

Page 1

User’s Guide
Basic
ML-331x Series
ML-371x Series
imagine the possibilities
This guide provides information concerning installation, basic operation and
troubleshooting on windows.
Page 2

Contents
2
1. Introduction
5 Key benefits
7 Features by models
8 Useful to know
9 About this user’s guide
10 Safety information
16 Machine overview
19 Control panel overview
22 Turning on the machine
23 Installing the driver locally
24 Reinstalling the driver
2. Menu overview and basic setup
3. Maintenance
48 Ordering supplies and accessories
49 Available supplies
50 Available accessories
51 Available maintenance parts
52 Redistributing toner
54 Replacing the toner cartridge
56 Upgrading a memory module
58 Monitoring the supplies life
59 Setting the toner low alert
60 Cleaning the machine
4. Troubleshooting
26 Menu overview
28 Printing a demo page
29 Changing the display language
30 Media and tray
41 Basic printing
65 Tips for avoiding paper jams
66 Clearing paper jams
72 Understanding the status LED
75 Understanding display messages
5. Appendix
81 Specifications
Page 3

Contents
91 Regulatory information
101 Copyright
3
Page 4

1. Introduction
This chapter provides information you need to know before using the
machine.
•Key benefits 5
•Features by models 7
•Useful to know 8
• About this user’s guide 9
• Safety information 10
• Machine overview 16
• Control panel overview 19
• Turning on the machine 22
• Installing the driver locally 23
• Reinstalling the driver 24
Page 5

Key benefits
Environmentally friendly
• To save toner and paper, this machine supports Eco feature.
• To save paper, you can print multiple pages on one single sheet of
paper (see Advanced Guide).
• To save paper, you can print on both sides of the paper (doublesided printing) (see Advanced Guide).
• To save electricity, this machine automatically conserves electricity
by substantially reducing power consumption when not in use.
Print with excellent quality and speed
- For duplex printing, 15 ppm (A4) or 16 ppm (Letter).
ML-371xD, ML-371xND, or ML-371xDW:
- For single-side printing, 35 ppm (A4) or 37 ppm (Letter).
- For duplex printing, 17 ppm (A4) or 18 ppm (Letter).
Convenience
• Samsung Easy Printer Manager and Samsung Printer Status (or Smart
Panel) are a program that monitors and informs you of the machine’s
status and allows you to customize the machine’s settings (see
Advanced Guide).
• AnyWeb Print helps you screen-capture, preview, scrap, and print
the screen of Windows Internet Explorer more easily, than when you
use the ordinary program (see Advanced Guide).
• You can print with a resolution of up to 1,200 x 1,200 dpi effective
output.
• Fast, on-demand printing.
ML-331xD or ML-331xND:
- For single-side printing, 31 ppm (A4) or 33 ppm (Letter).
Page 6

Key benefits
Wide range of functionality and application support
• Supports various paper sizes (see "Print media specifications" on page 83).
• Print watermark: You can customize your documents with words, such as “Confidential” (see Advanced Guide).
• Print posters: The text and pictures of each page of your document are magnified and printed across the multiple sheets of paper and can then
be taped together to form a poster (see Advanced Guide).
• You can print in various operating systems (see "System requirements" on page 86).
• Your machine is equipped with a USB interface and/or a network interface.
Expand your machine’s capacity
• This machine has an extra memory slot for adding more memory (see "Available accessories" on page 50).
• Zoran IPS Emulation compatible with PostScript 3 (PS) enables PS printing.
• Zoran IPS Emulation compatible with PostScript 3
• ©1995-2005, Zoran Corporation. All rights reserved. Zoran, the Zoran logo, IPS/PS3, and OneImage are trademarks of Zoran
Corporation.
• 136 PS3 fonts
• Contains UFST and MicroType from Monotype Imaging Inc.
Page 7

Features by models
Some features and optional goods may not be available depending on model or country.
Features ML-331xD ML-331xND ML-371xD ML-371xND ML-371xDW
Hi-Speed USB 2.0 ? ? ? ? ?
IEEE 1284 parallel connector ? ? ? ? ?
Network Interface Ethernet 10/100 Base TX
?
wired LAN
Network Interface Ethernet 10/100/1000 Base
? ?
TX wired LAN
Network Interface 802.11b/g/n wireless LAN ?
IPv6 ? ? ?
Eco printing ? ? ? ? ?
Wi-Fi Protected Setup™ (WPS) ?
Duplex (2-sided) printing ? ? ? ? ?
Samsung Easy Printer Manager ? ? ? ? ?
Memory ? ? ?
Tray 2 (520 sheets) ? ? ? ?
SyncThru™ Web Service ? ? ?
( ?: Included, ?: Optional, Blank: Not available)
Page 8

Useful to know
The machine does not print.
• Open the print queue list and remove the document from
the list (see "Canceling a print job" on page 42).
• Remove the driver and install it again (see "Installing the
driver locally" on page 23).
• Select your machine as your default machine in your
Windows.
Where can I purchase accessories or supplies?
• Inquire at a Samsung distributor or your retailer.
• Visit www.samsung.com/supplies. Select your country/
region to view product service information.
A paper jam has occurred.
• Open and close the front door.
• Check the instructions on removing jammed paper in this
manual and troubleshoot accordingly (see "Clearing
paper jams" on page 66).
Printouts are blurry.
• The toner level might be low or uneven. Shake the toner
cartridge.
• Try a different print resolution setting.
• Replace the toner cartridge.
Where can I download the machine’s driver?
The status LED flashes or remains constantly on.
• Turn the product off and on again.
• Check the meanings of LED indications in this manual
and troubleshoot accordingly (see "Understanding the
status LED" on page 72).
• Visit www.samsung.com/printer to download the latest
machine’s driver, and install it on your system.
Page 9

About this user’s guide
1. Introduction
9
This user's guide provides information for your basic understanding
of the machine as well as detailed steps to explain machine usage.
• Read the safety information before using the machine.
• If you have a problem using the machine, refer to the
troubleshooting chapter.
• Terms used in this user’s guide are explained in the glossary
chapter.
• All illustrations in this user’s guide may differ from your machine
depending on its options or model you purchased.
• The procedures in this user’s guide are mainly based on Windows
7.
1
Conventions
2
General icons
Icon Text Description
Gives users information to protect the
Caution
Note
machine from possible mechanical damage
or malfunction.
Provides additional information or detailed
specification of the machine function and
feature.
Some terms in this guide are used interchangeably, as below:
• Document is synonymous with original.
• Paper is synonymous with media, or print media.
• Machine refers to printer or MFP.
Page 10
Safety information
1. Introduction
10
These warnings and precautions are included to prevent injury to
you and others, and to prevent any potential damage to your
machine. Be sure to read and understand all of these instructions
before using the machine. After reading this section, keep it in a safe
place for future reference.
3
Important safety symbols
Explanation of all icons and signs used in this chapter
Warning
Caution
Do not attempt.
Hazards or unsafe practices that may result in
severe personal injury or death.
Hazards or unsafe practices that may result in
minor personal injury or property damage.
4
Warning
Operating environment
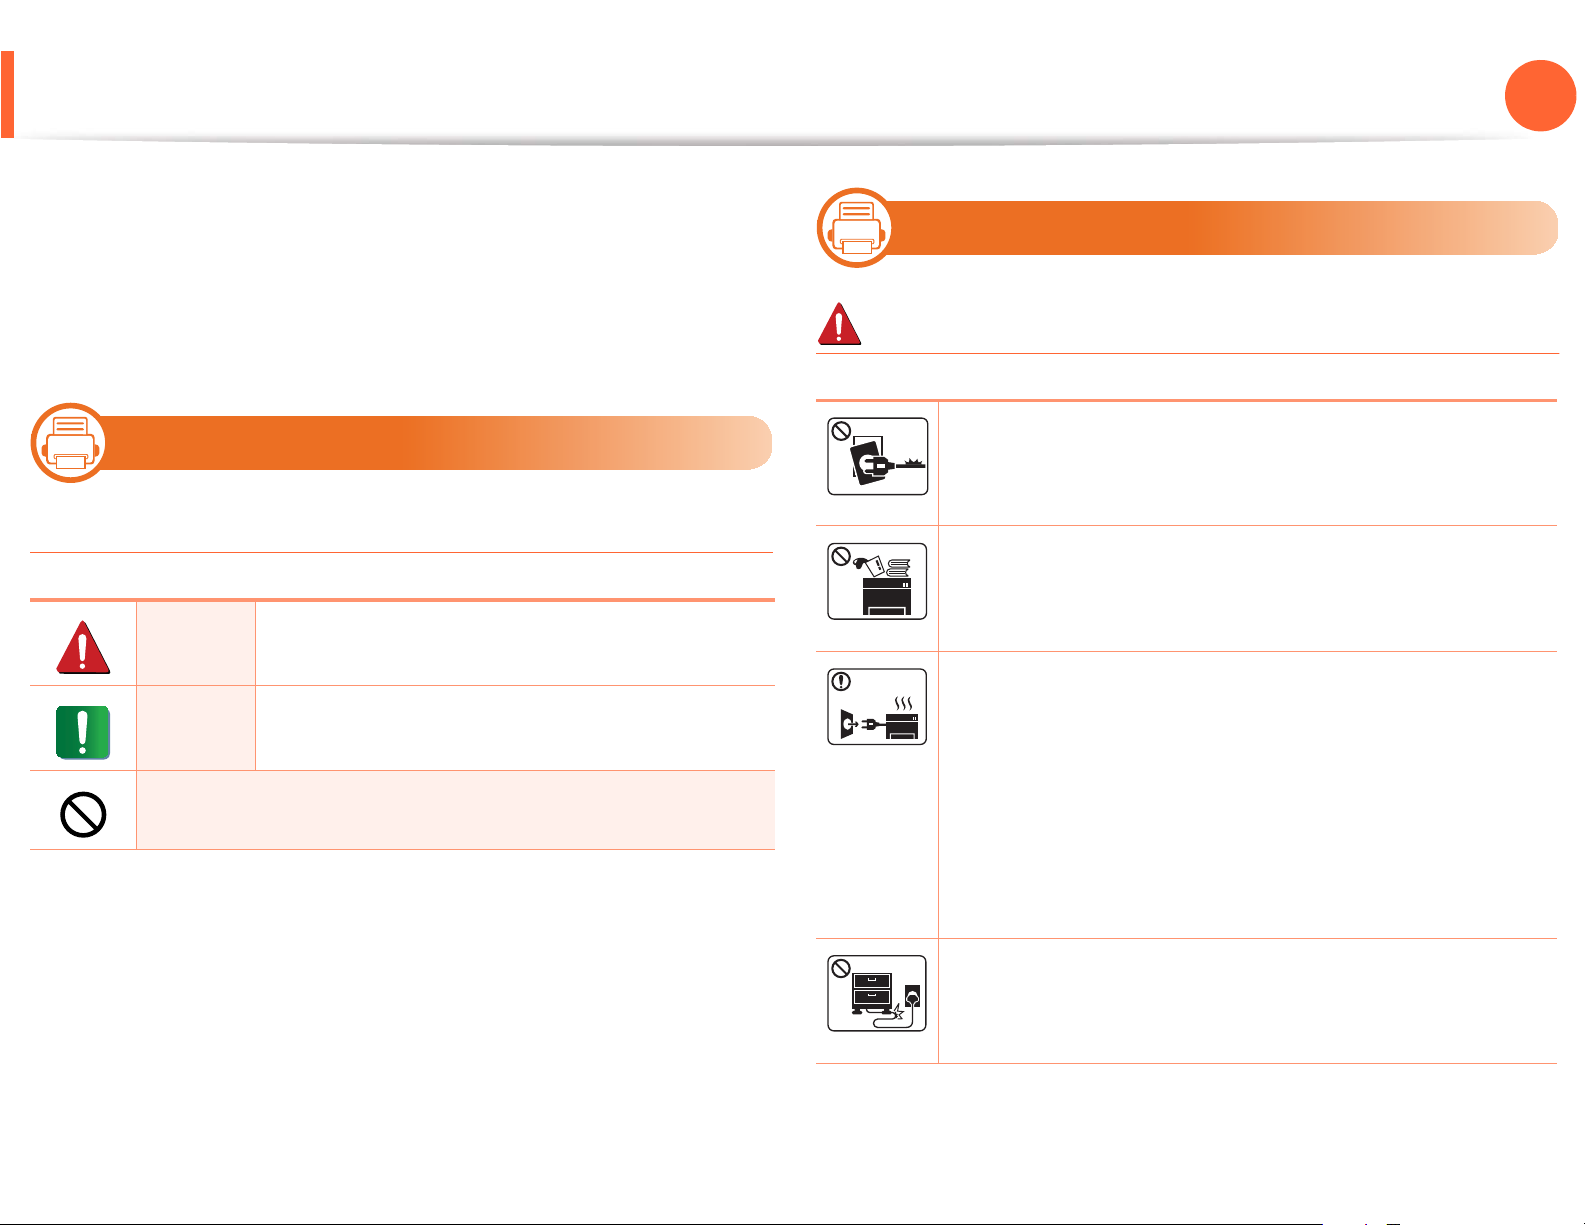
Do not use if the power cord is damaged or if the
electrical outlet is not grounded.
This could result in electric shock or fire.
Do not place anything on top of the machine (water,
small metal or heavy objects, candles, lit cigarettes, etc.).
This could result in electric shock or fire.
• If the machine gets overheated, it releases smoke,
makes strange noises, or generates an odd odor,
immediately turn off the power switch and unplug the
machine.
• The user should be able to access the power outlet in
case of emergencies that might require the user to pull
the plug out.
This could result in electric shock or fire.
Do not bend, or place heavy objects on the power cord.
Stepping on or allowing the power cord to be crushed by
a heavy object could result in electric shock or fire.
Page 11
Safety information
1. Introduction
11
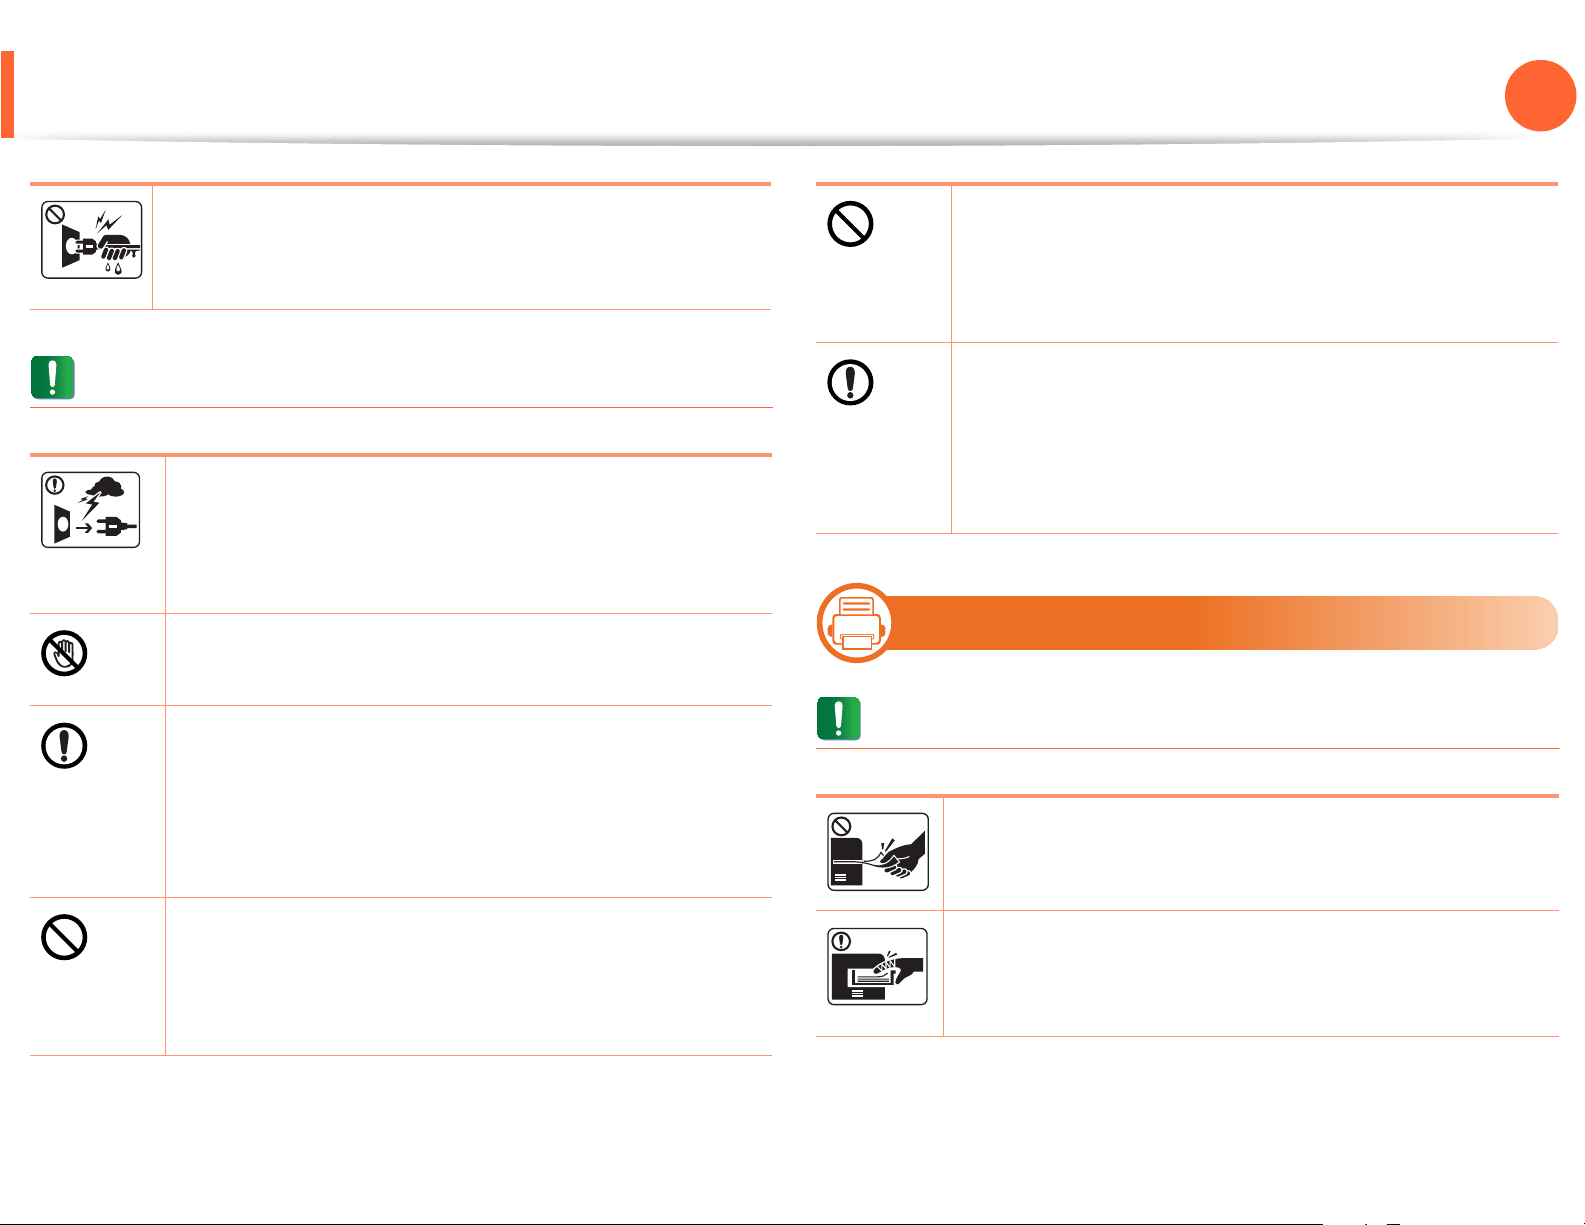
Do not remove the plug by pulling on the cord; do not
handle the plug with wet hands.
This could result in electric shock or fire.
Caution
During an electrical storm or for a period of nonoperation, remove the power plug from the electrical
outlet.
This could result in electric shock or fire.
Be careful, the paper output area is hot.
Burns could occur.
If the machine has been dropped, or if the cabinet
appears damaged, unplug the machine from all
interface connections and request assistance from
qualified service personnel.
Otherwise, this could result in electric shock or fire.
5
Caution
Do not allow pets to chew on the AC power, telephone
or PC interface cords.
This could result in electric shock or fire and/or injury to
your pet.
If the machine does not operate properly after these
instructions have been followed, unplug the machine
from all interface connections and request assistance
from qualified service personnel.
Otherwise, this could result in electric shock or fire.
Operating method
Do not forcefully pull the paper out during printing.
It can cause damage to the machine.
If the plug does not easily enter the electrical outlet, do
not attempt to force it in.
Call an electrician to change the electrical outlet, or this
could result in electric shock.
Be careful not to put your hand between the machine
and paper tray.
You may get injured.
Page 12
Safety information
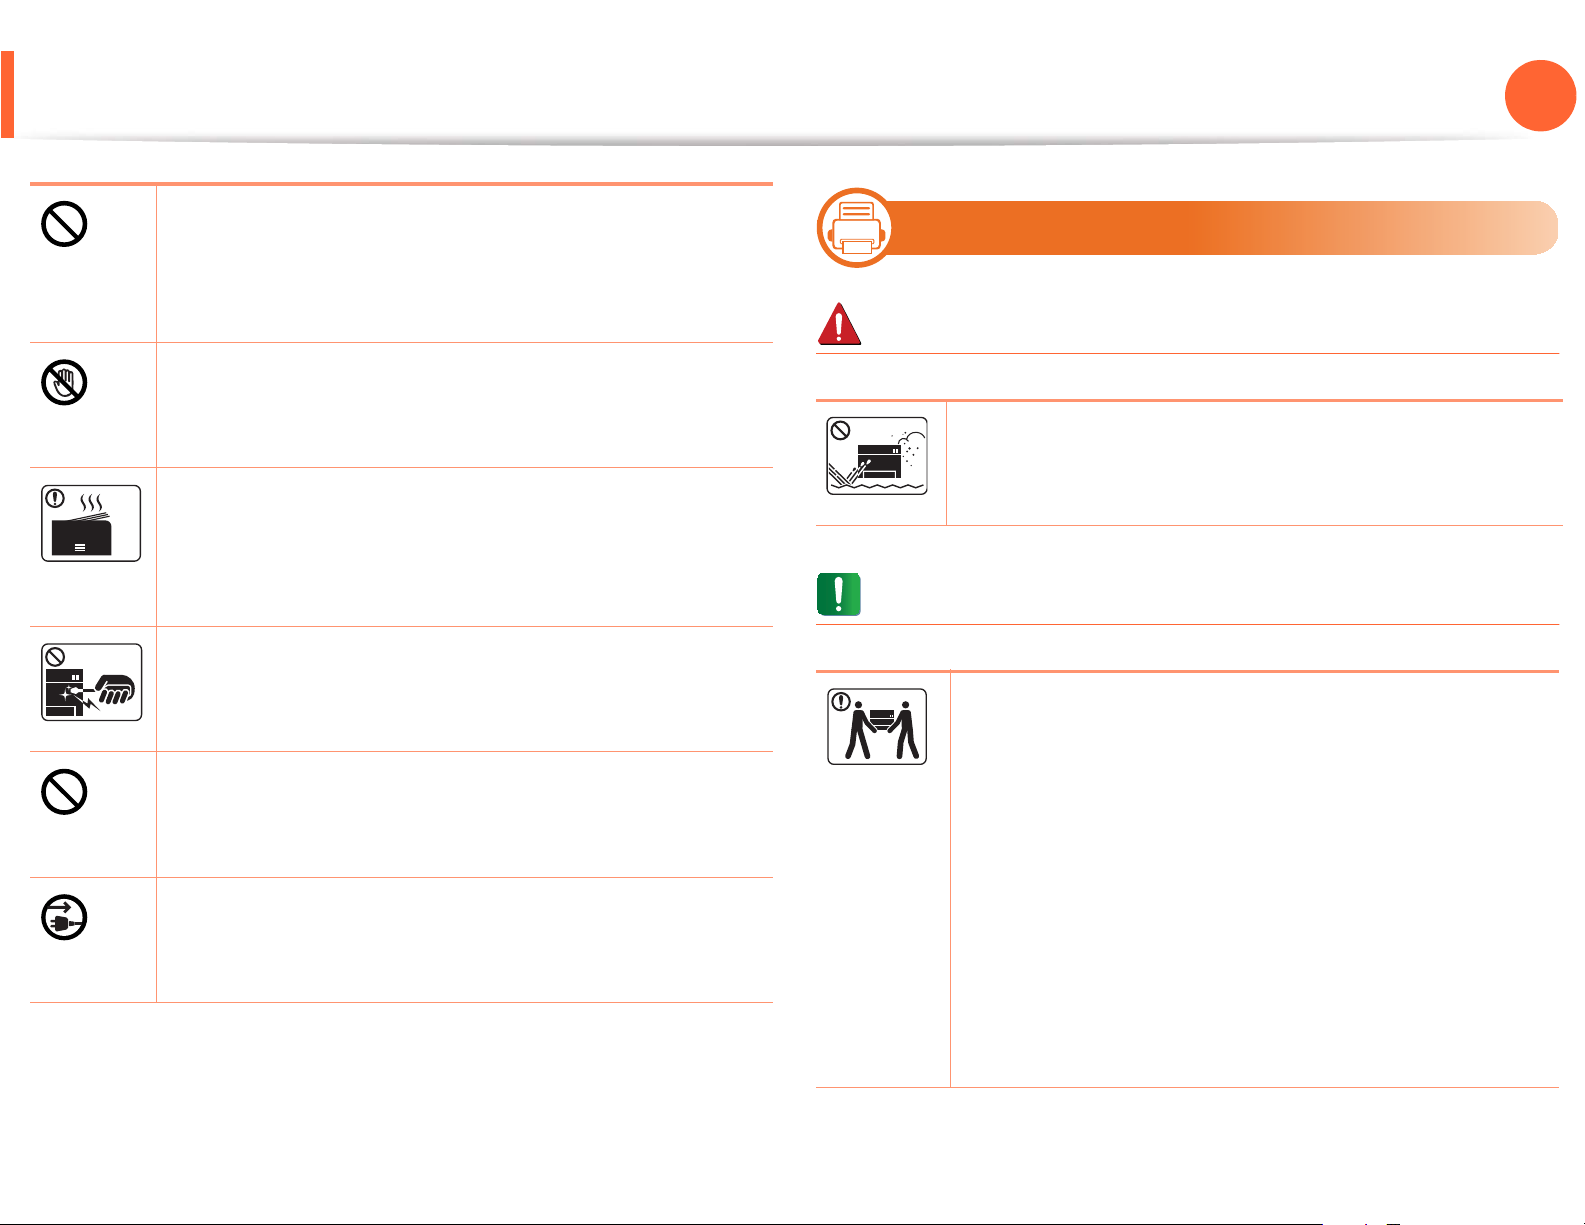
Do not block or push objects into the ventilation
opening.
This could result in elevated component temperatures
which can cause damage or fire.
Be care when replacing paper or removing jammed
paper.
New paper has sharp edges and can cause painful cuts.
6
Warning
1. Introduction
Installation / Moving
Do not place the machine in an area with dust, humidity,
or water leaks.
12
When printing large quantities, the bottom part of the
paper output area may get hot. Do not allow children to
touch.
Burns can occur.
When removing jammed paper, do not use tweezers or
sharp metal objects.
It can damage the machine.
Do not allow too many papers to stack up in the paper
output tray.
It can damage the machine.
This machine's power reception device is the power cord.
To switch off the power supply, remove the power cord
from the electrical outlet.
This could result in electric shock or fire.
Caution
Before moving the machine, turn the power off and
disconnect all cords.
Then lift the machine:
• If the machine weighs under 20 kg (44.09 lbs), lift with
1 person.
• If the machine weighs 20 kg (44.09 lbs) - 40kg (88.18
lbs), lift with 2 people.
• If the machine weighs more than 40 kg (88.18 lbs), lift
with 4 or more people.
The machine could fall, causing injury or machine
damage.
Page 13
Safety information
1. Introduction
13
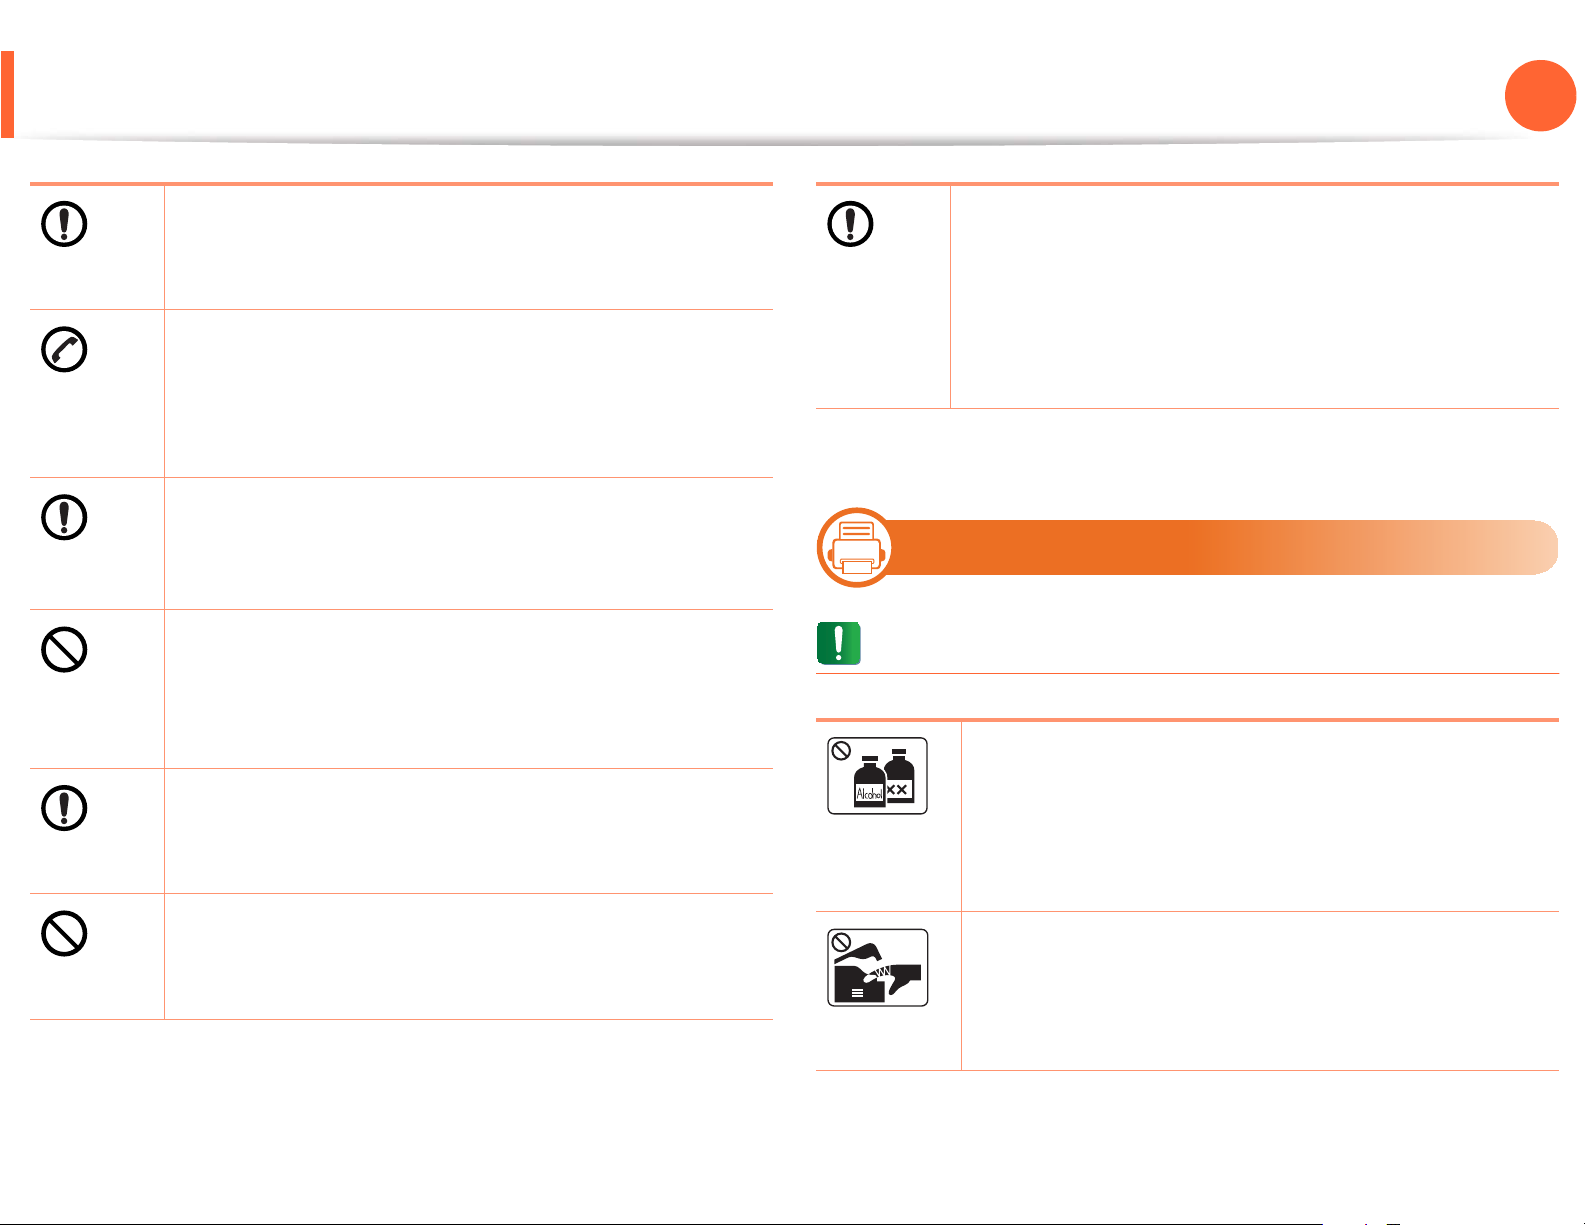
Do not place the machine on an unstable surface.
The machine could fall, causing injury or machine
damage.
The machine should be connected to
the power level which is specified on the label.
If you are unsure and want to check the power level you
are using, contact the electrical utility company.
a
Use only No.26 AWG
necessary.
Otherwise, it can cause damage to the machine.
Do not put a cover over the machine or place it in an
airtight location, such as a closet.
If the machine is not well-ventilated, this could result in
fire.
Make sure you plug the power cord into a grounded
electrical outlet.
Otherwise, this could result in electric shock or fire.
Do not overload wall outlets and extension cords.
This can diminish performance, and could result in
electric shock or fire.
or larger, telephone line cord, if
Use the power cord supplied with your machine for safe
operation. If you are using a cord which is longer than 2
meters (6 feet) with a 110 V machine, then the gauge
should be 16 AWG or larger.
Otherwise, it can cause damage to the machine, and
could result in electric shock or fire.
a. AWG: American Wire Gauge
7
Maintenance / Checking
Caution
Unplug this product from the wall outlet before
cleaning the inside of the machine. Do not clean the
machine with benzene, paint thinner or alcohol; do not
spray water directly into the machine.
This could result in electric shock or fire.
When you are working inside the machine replacing
supplies or cleaning the inside, do not operate the
machine.
You could get injured.
Page 14
Safety information
Keep the power cable and the contact surface of the
plug clean from dust or water.
Otherwise, this could result in electric shock or fire.
8
Supply usage
1. Introduction
14
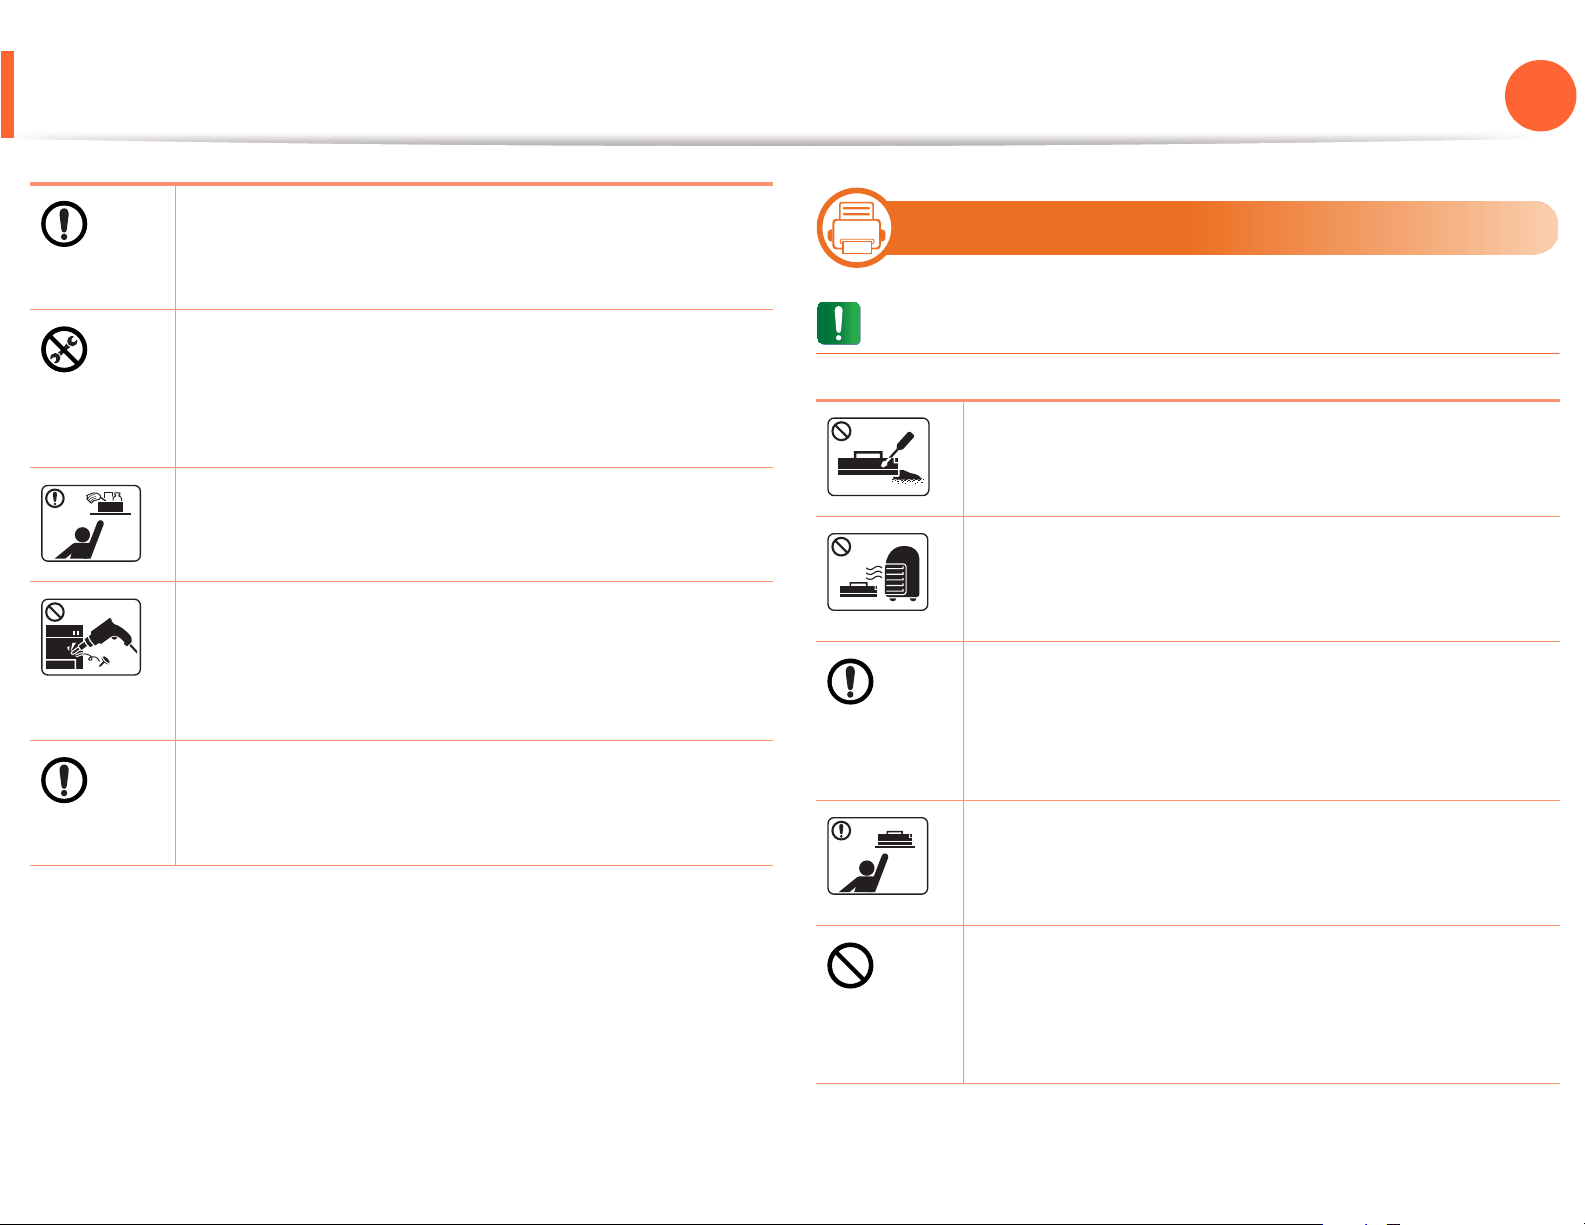
Do not remove any covers or guards that are fastened
with screws.
The machine should only be repaired by a Samsung
service technician.
Keep cleaning supplies away from children.
Children could get hurt.
Do not disassemble, repair or rebuild the machine by
yourself.
It can damage the machine. Call a certified technician
when the machine needs repairing.
To clean and operate the machine, strictly follow the
user's guide provided with the machine.
Otherwise, you could damage the machine.
Caution
Do not disassemble the toner cartridge.
Toner dust can be dangerous if inhaled or ingested.
Do not burn any of the supplies such as toner cartridge
or fuser unit.
This could cause an explosion or uncontrollable fire.
When changing the toner cartridge or removing
jammed paper, be careful not to let toner dust touch
your body or clothes.
Toner dust can be dangerous if inhaled or ingested.
When storing supplies such as toner cartridges, keep
them away from children.
Toner dust can be dangerous if inhaled or ingested.
Using recycled supplies, such as toner, can cause
damage to the machine.
In case of damage due to the use of recycled supplies, a
service fee will be charged.
Page 15

Safety information
When toner gets on your clothing, do not use hot water
to wash it.
Hot water sets toner into fabric. Use cold water.
1. Introduction
15
Page 16
Machine overview
9
1. Introduction
16
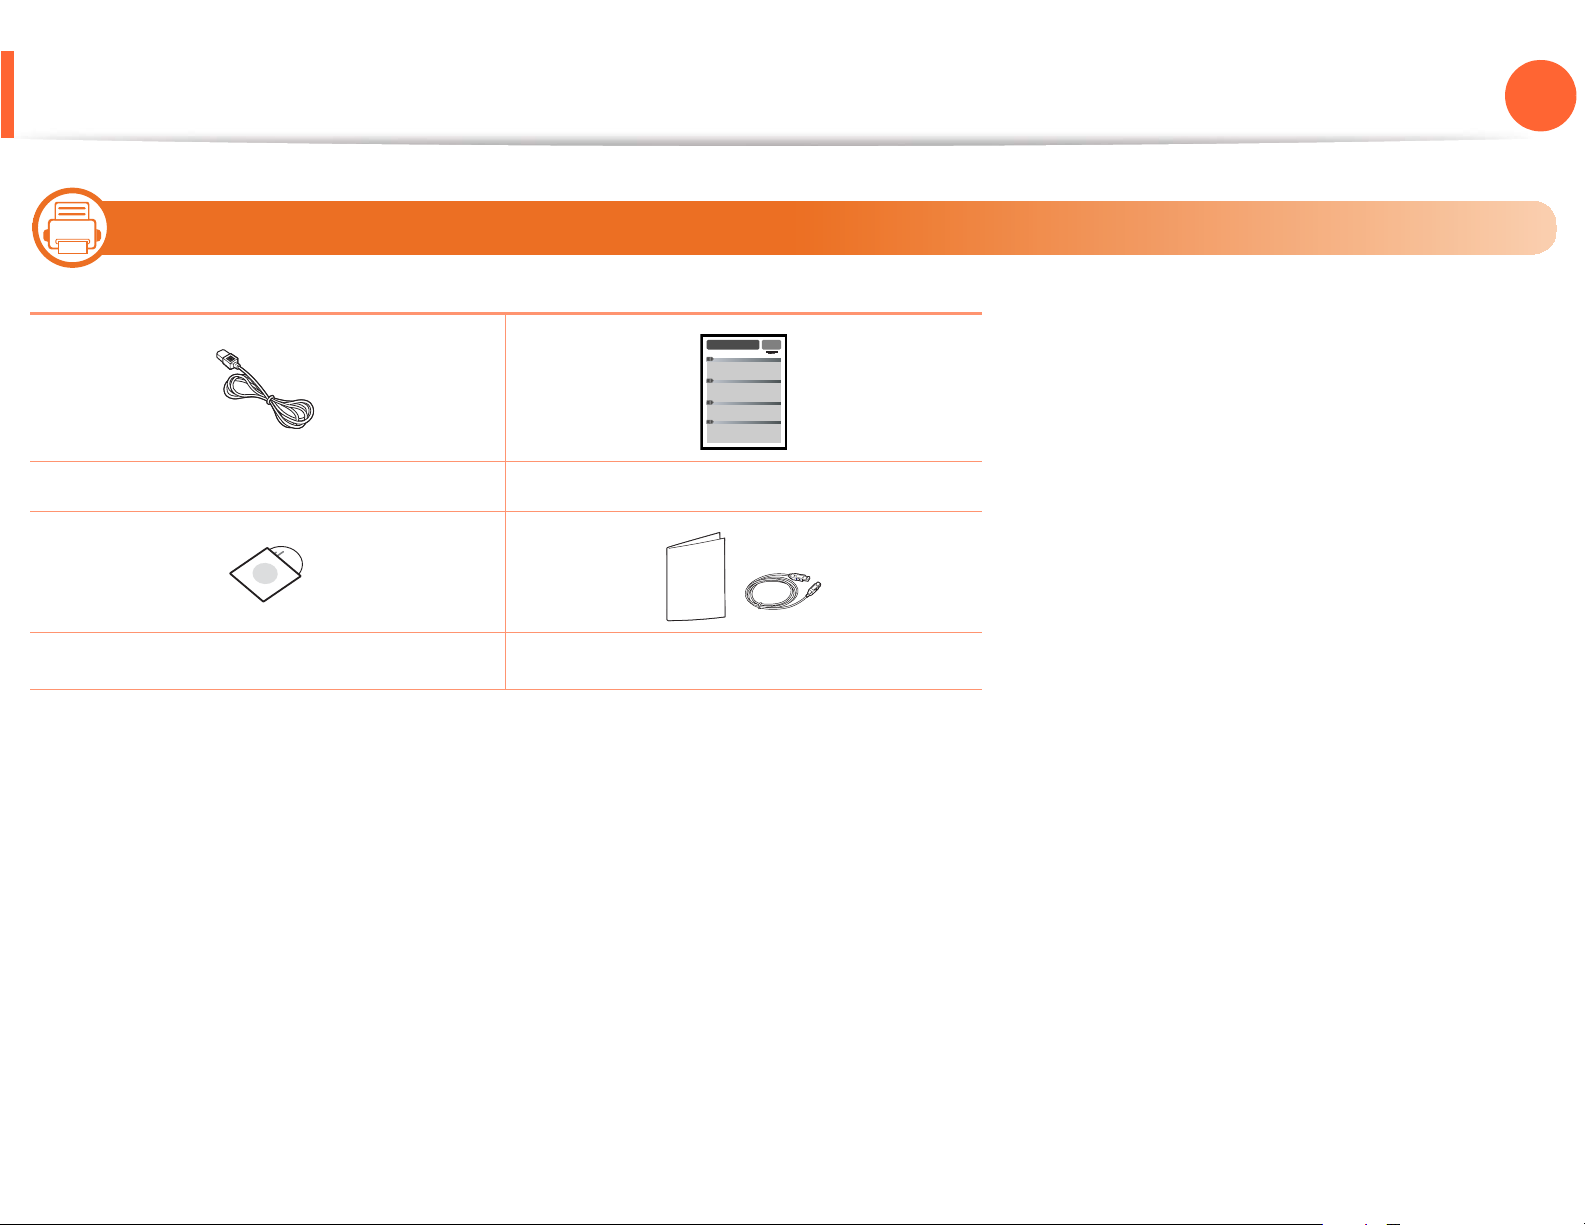
Accessories
Power cord Quick installation guide
Software CD
a. The software CD contains the printer driver and applications.
b. Miscellaneous accessories included with your machine may vary by country of purchase and specific
model.
a
Misc. accessories
b
Page 17
Machine overview
10
1. Introduction
17
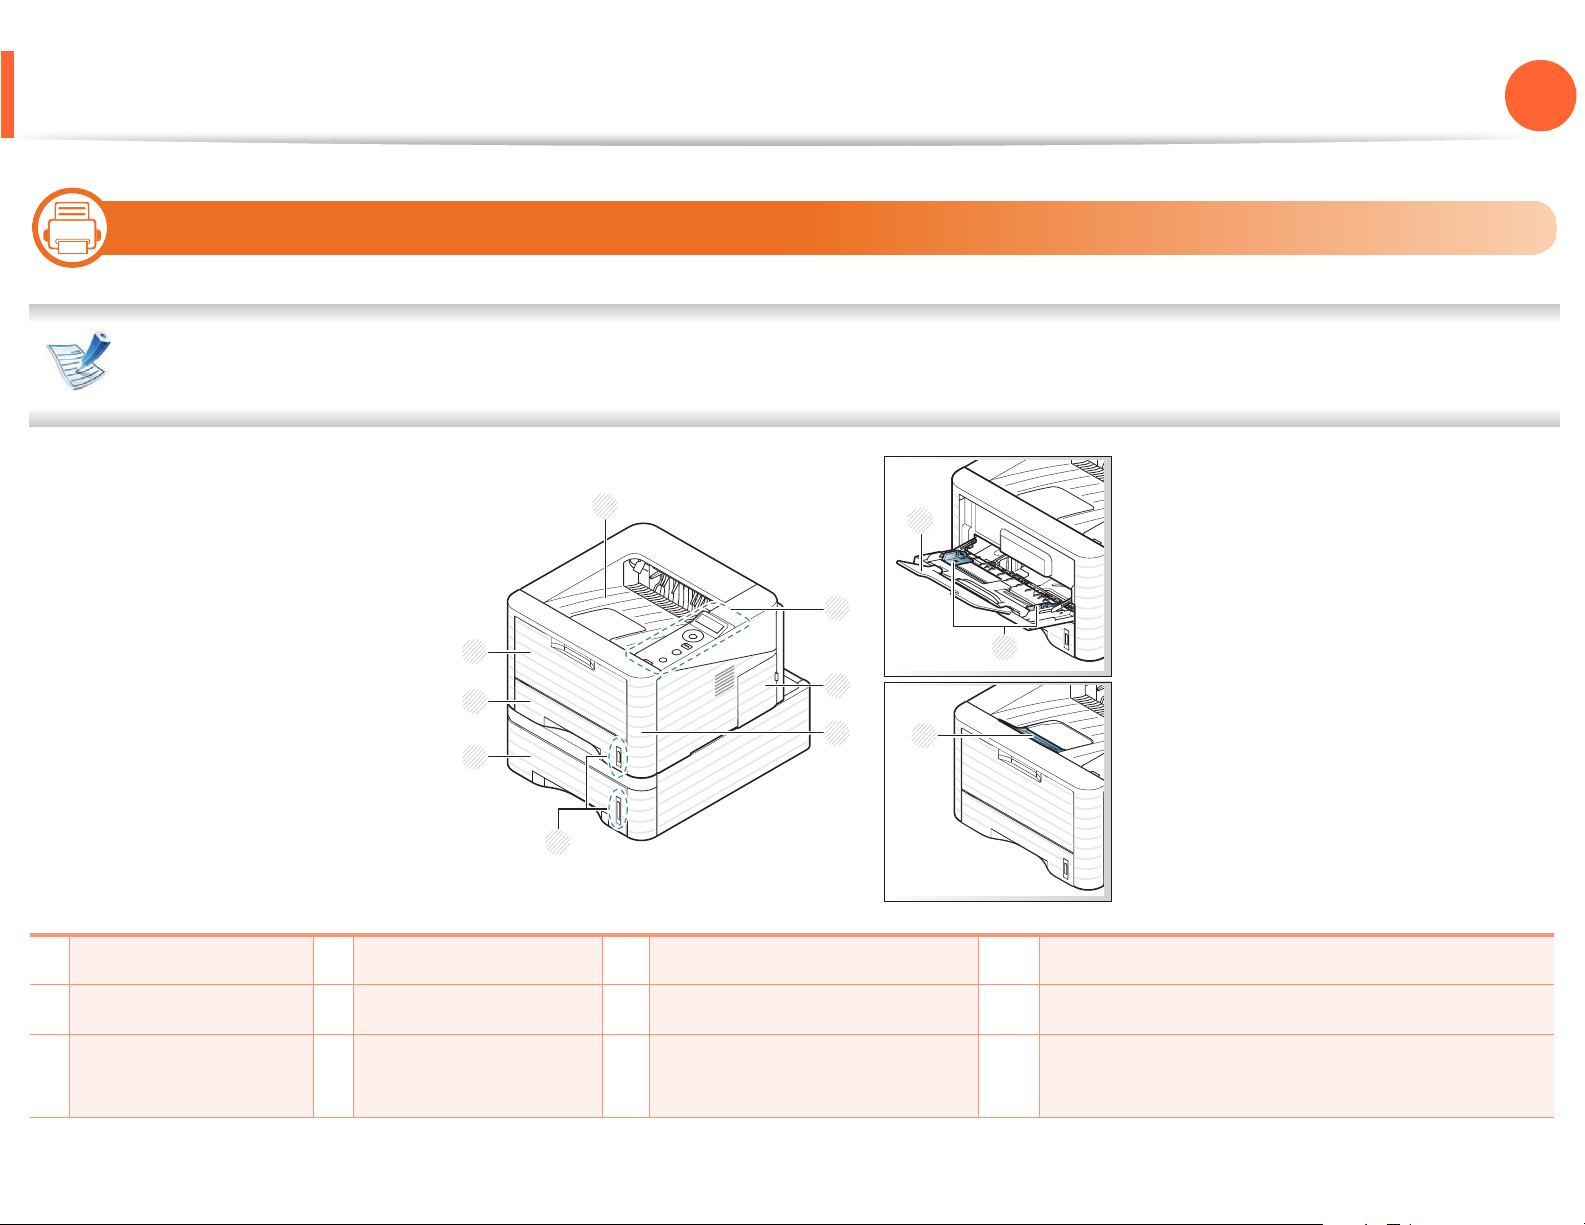
Front view
• This illustration may differ from your machine depending on its model.
• Some features and optional goods may not be available depending on model or country.
1
2
8
3
7
4
6
9
10
11
5
1 Output tray 4 Front cover 7 Tray 1 10 Paper width guides on a multi-purpose tray
2
Control panel 5 Paper level indicator 8 Multi-purpose tray 11 Output support
3
Control board cover
6
Tray 2
9
Multi-purpose tray paper
extension
Page 18
Machine overview
11
1. Introduction
18
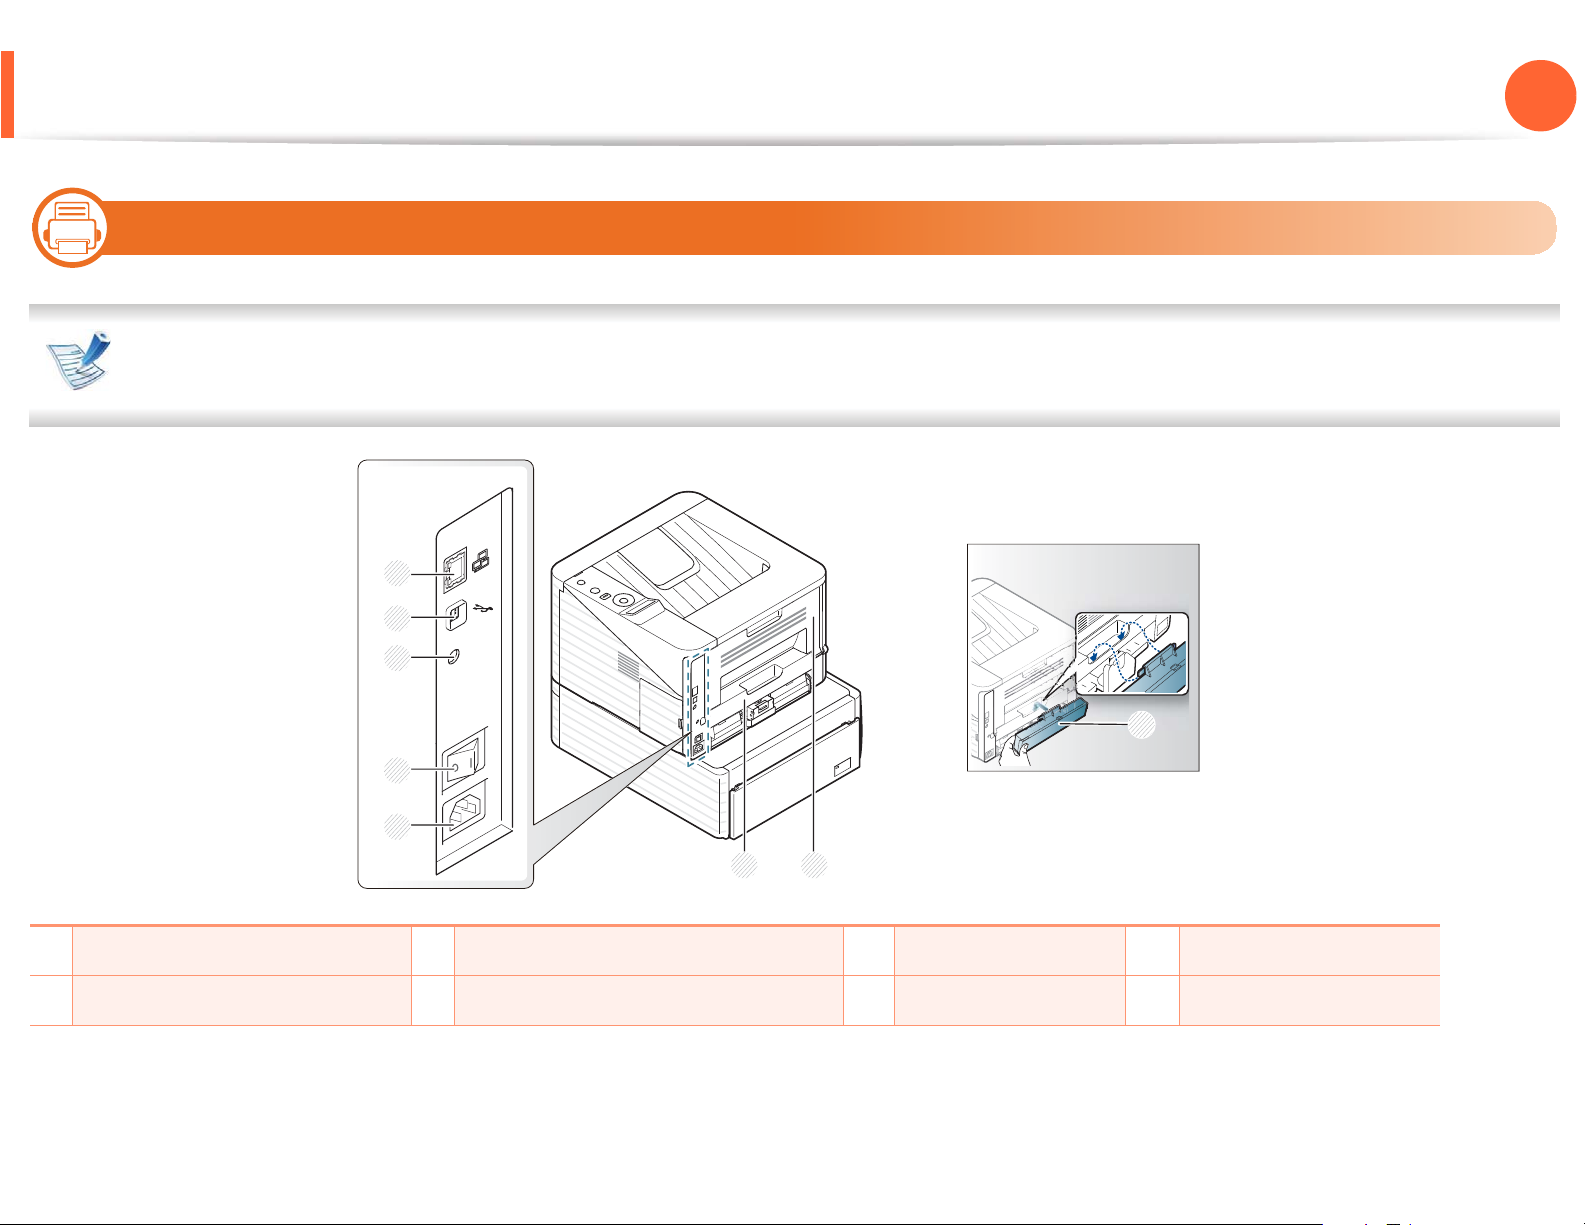
Rear view
• This illustration may differ from your machine depending on its model.
• Some features and optional goods may not be available depending on model or country.
1
2
3
8
4
5
6
7
1 Network port 3 IEEE 1284 parallel connector 5 Power receptacle 7 Rear cover
2
USB port 4 Power-switch 6 Duplex unit 8 Tray back cover
Page 19
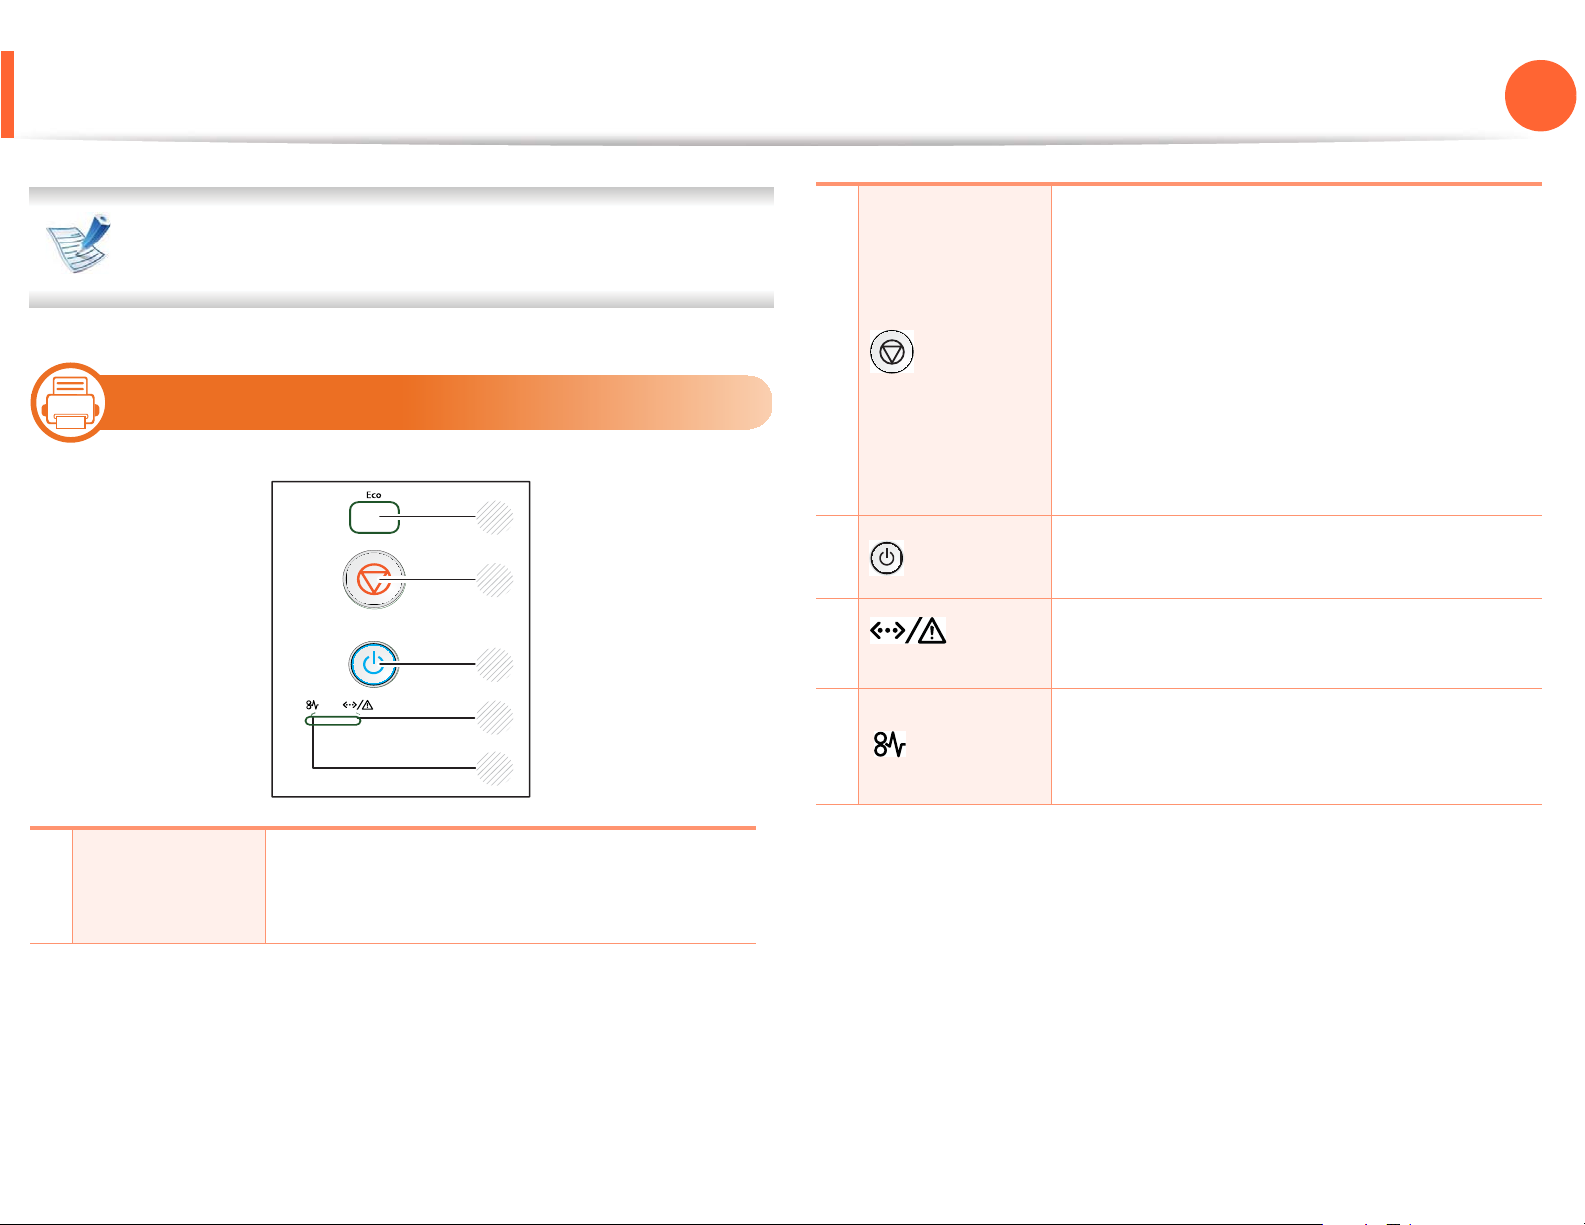
Control panel overview
This control panel may differ from your machine depending
on its model. There are various types of control panels.
12
Type A
1
2
1. Introduction
2
Stops an operation at any time and there are
19
more functions.
• Cancels the current job.
• Prints demo page: Press and hold this
(Cancel)
button for about 5 seconds until the status
LED blinks, and release.
• Prints configuration reports: Press and
hold this button for about 3 seconds until
the status LED blinks, and release.
3
(Power)
You can turn the power on and off with this
button.
4
3
4
LED)
5
(Status
(Jam LED)
5
1
Eco
Enters eco mode to reduce toner
consumption and paper usage (see "Eco
Shows the status of your machine (see
"Status LED" on page 73).
Shows the jam occurrance status of your
machine (see "Clearing paper jams" on page
66).
options" on page 45).
Page 20
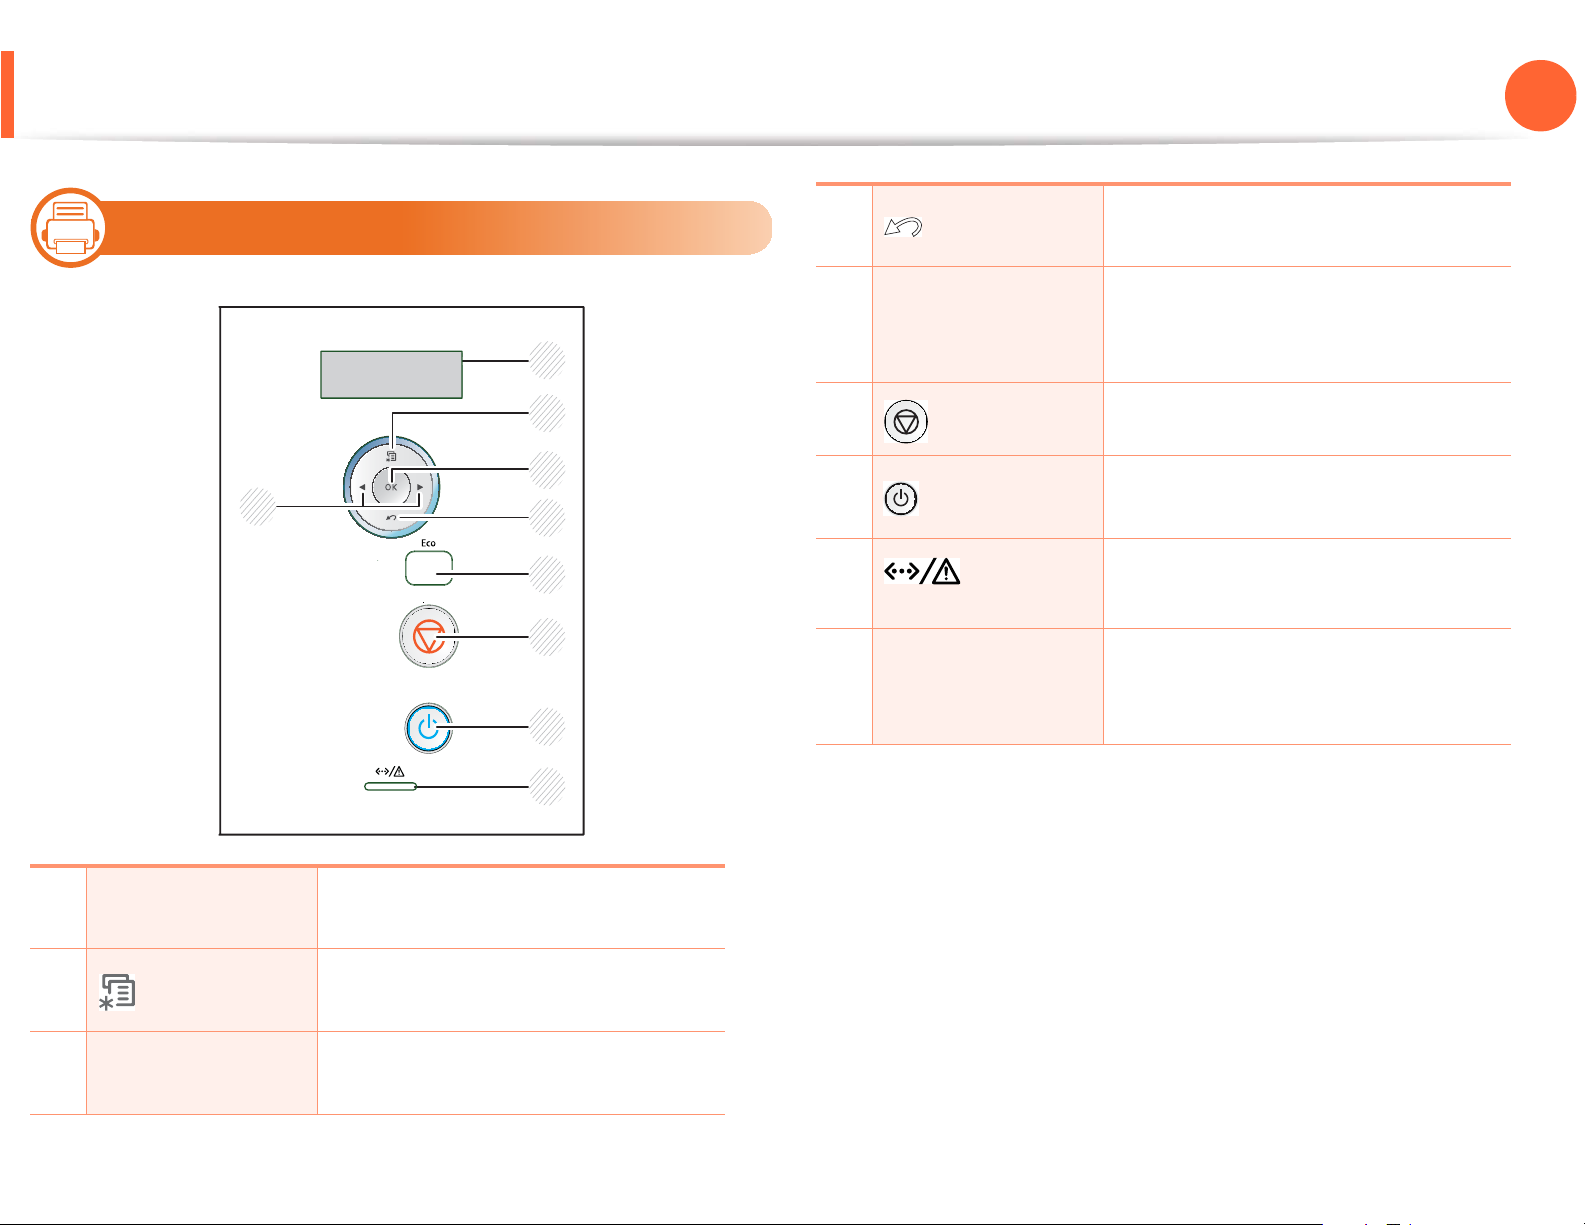
Control panel overview
13
Type B
1. Introduction
4
(Back)
Sends you back to the upper menu
level.
20
5
Eco
1
2
3
9
4
5
6
6
7
8
9
(Cancel)
(Power)
(Status
LED)
Arrows
7
Enters eco mode to reduce toner
consumption and paper usage (see
"Eco options" on page 45).
Stops an operation at any time.
You can turn the power on and off
with this button.
Shows the status of your machine
(see "Status LED" on page 73).
Navigates available values by
moving to the next or previous
options.
8
1
2
3
Display
(Menu)
OK
Shows the current status and
prompts during an operation.
Enters menu mode and scrolls
through the available menus.
Confirms the selection on the
display.
Page 21
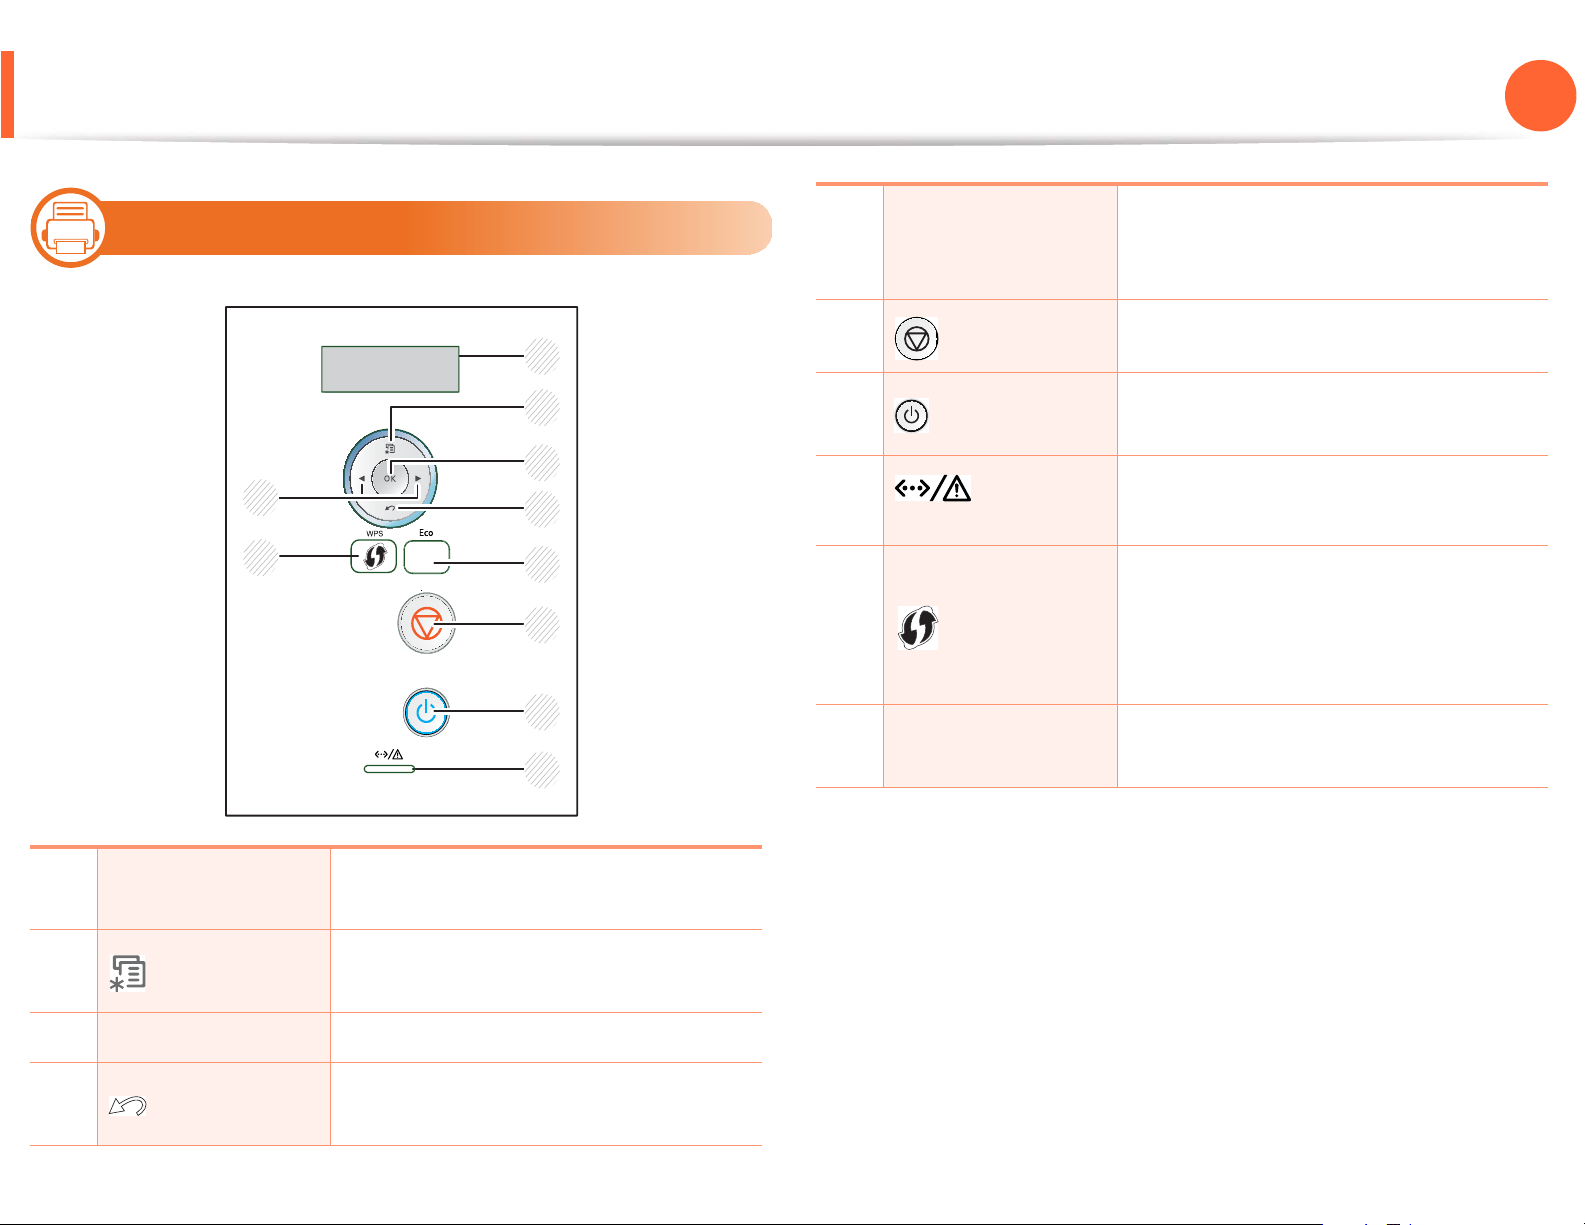
Control panel overview
14
Type C
1. Introduction
5
Eco
Enters eco mode to reduce toner
consumption and paper usage (see
"Eco options" on page 45).
21
1
Display
10
9
1
2
3
4
5
6
7
8
Shows the current status and prompts
during an operation.
6
7
8
9
10
(Cancel)
(Power)
LED)
(WPS)
Arrows
(Status
Stops an operation at any time.
You can turn the power on and off with
this button.
Shows the status of your machine (see
"Status LED" on page 73).
If your wireless access point supports
Wi-Fi Protected Setup™(WPS), you can
configure the machine easily without a
computer (see Advanced Guide).
Navigates available values by moving
to the next or previous options.
2
3
4
(Menu)
OK Confirms the selection on the display.
(Back)
Enters menu mode and scrolls through
the available menus.
Sends you back to the upper menu
level.
Page 22
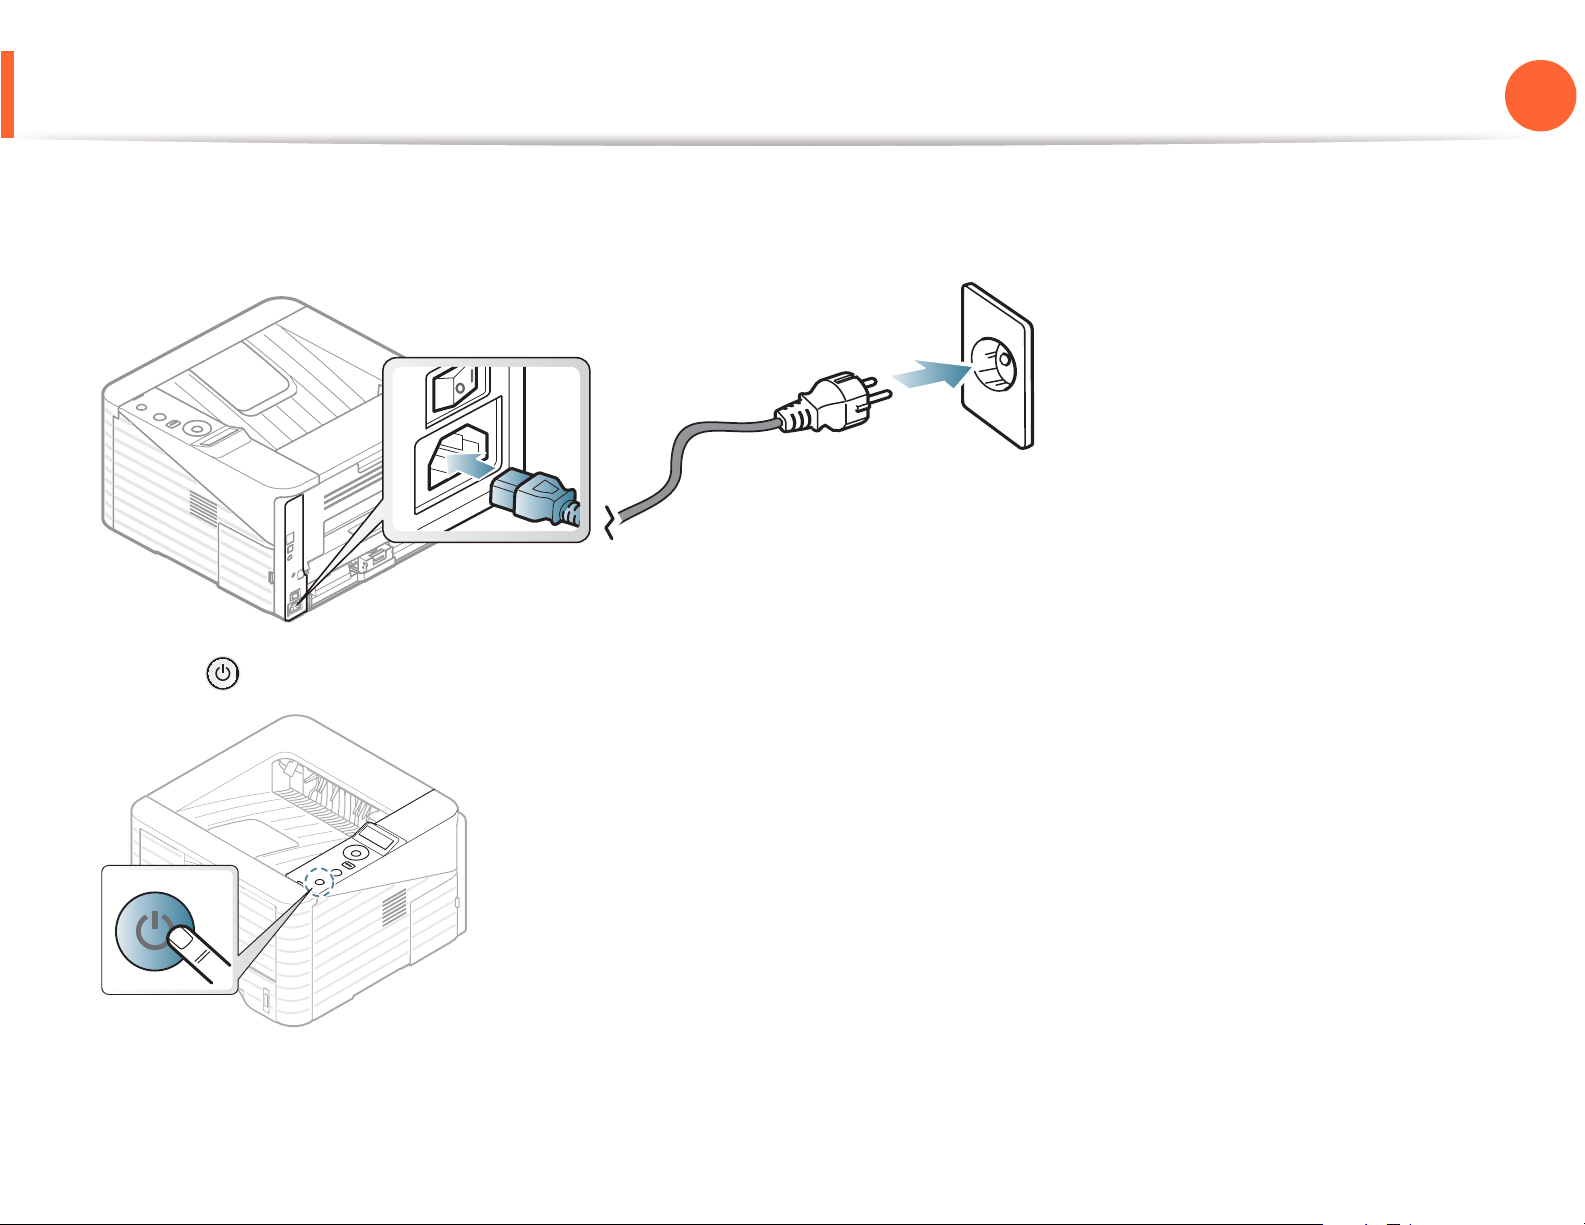
Turning on the machine
Connect the machine to the electricity supply first.
1
Turn the switch on if the machine has power switch.
1. Introduction
22
Press the (Power) button, then release.
2
Page 23
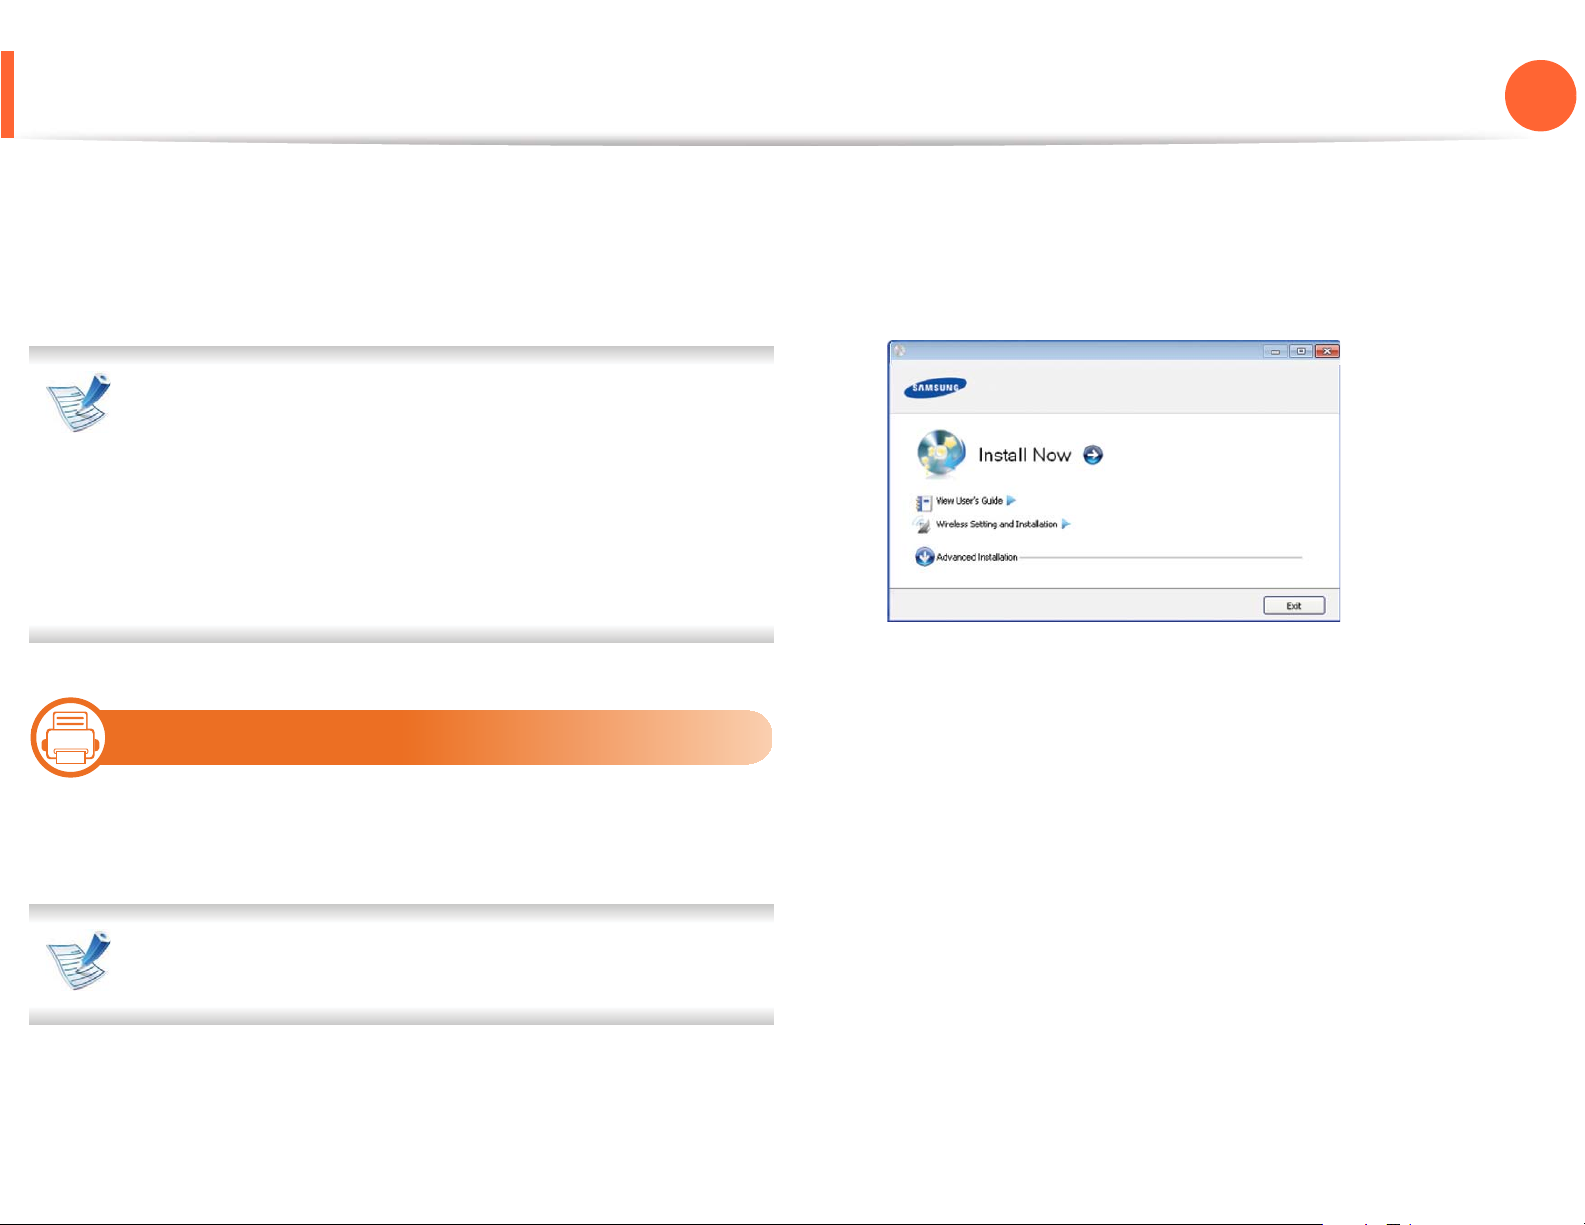
Installing the driver locally
1. Introduction
23
A locally connected machine is a machine directly attached to your
computer using the cable. If your machine is attached to a network,
skip the following steps below and go on to installing a network
connected machine’s driver (see Advanced Guide).
• If you are a Macintosh, Linux, or Unix OS user, refer to the
Advanced guide.
• The installation window in this User’s Guide may differ
depending on the machine and interface in use.
•Selecting Advanced Installation > Custom Installation
allows you to choose which programs to install.
• Only use a USB cable no longer than 3 meters (118 inches ).
15
Windows
The software CD should automatically run and an installation
window will appear.
Select Install Now.
3
Read License Agreement, and select I accept the terms of
4
the License Agreement. Then, click Next.
Follow the instructions in the installation window.
5
Make sure that the machine is connected to your computer
1
and powered on.
If the “Found New Hardware Wizard” appears during the
installation procedure, click Cancel to close the window.
Insert the supplied software CD into your CD-ROM drive.
2
Page 24

Reinstalling the driver
If the printer driver does not work properly, follow the steps below to
reinstall the driver.
16
1. Introduction
24
Windows
Make sure that the machine is connected to your computer
1
and powered on.
From the Start menu, select Programs or All Programs >
2
Samsung Printers > your printer driver name > Uninstall.
Follow the instructions in the installation window.
3
Insert the software CD into your CD-ROM drive and install the
4
driver again (see "Installing the driver locally" on page 23).
Page 25

2. Menu overview and basic
setup
After installation is complete, you may want to set the machine’s default
settings. Refer to the next section if you would like to set or change values.
This chapter provides information about the overall menu structure and
the basic setup options.
• Menu overview 26
•Printing a demo page 28
• Changing the display language 29
• Media and tray 30
• Basic printing 41
Page 26
Menu overview
The control panel provides access to various menus to set up the
machine or use the machine’s functions.
2. Menu overview and basic setup
Items Options
26
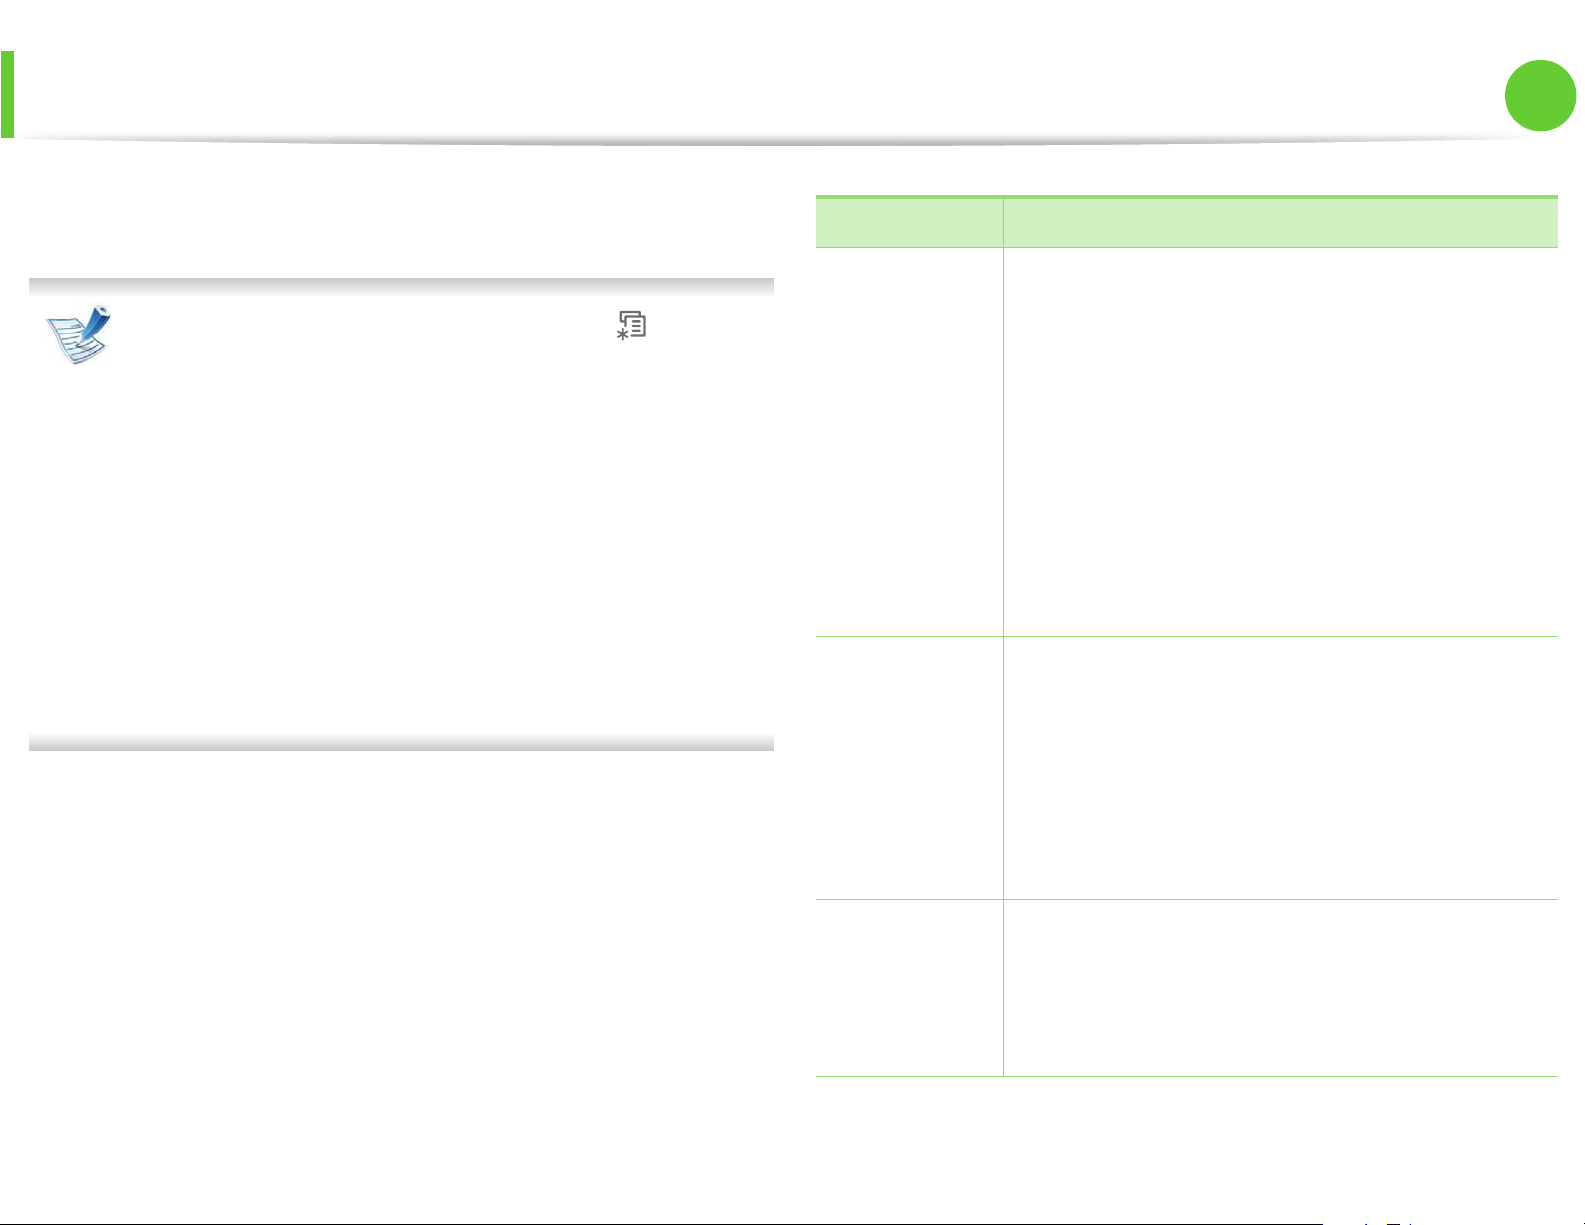
• These menus can be accessed by pressing (Menu)
button. Press the arrows until the needed menu item
appears and press OK.
• An asterisk (*) appears next to the currently selected
Information
Menu Map
Configuration
Supplies Info.
Demo Page
PCL Font
menu.
PS Font
• Some menus may not appear on the display depending on
options or models. If so, it is not applicable to your
machine.
• For models that do not have the display screen on the
EPSON Font
Usage Counter
Account Report
control panel, this feature is not applicable.
• Some menu names may differ from your machine
depending on its options or the models.
Orientation
Common Margin
MP Tray
Layout
Tray X
Emulation Mar.
Paper
Duplex
Copies
MP Tray/ [Tray <x>]
Paper Source
Tray Chaining
Page 27

Menu overview
2. Menu overview and basic setup
27
Items Options
Resolution
Graphic
Darken Text
Language
Power Save
Wakeup Event
Altitude Adj.
Auto CR
System Setup
Job Timeout
Maintenance
Toner Save
Eco Setup
Clear Setting
Emulation Type
Emulation
Setup
Items Options
TCP/IP (IPv4)
TCP/IP (IPv6)
Ethernet Speed
802.1x
Network
Custom
Job
Management
a. You can start applications. You need to register the application from the
SyncThru™ Web Service before you start the application.
a
Wireless
Clear Setting
Network Conf.
Net. Activate
Http Activate
Active Job
Store Job
File Policy
Page 28
Printing a demo page
Print a demo page to make sure that the machine is operating
correctly.
Press (Menu) button on the control panel.
1
Press Information > OK > Demo Page > OK.
2
Press Print? > YesG>GOKUG
3
A demo page prints out.
If your machine does not have a display screen, press and
hold (Cancel) button for about 5 seconds until the status
LED blinks, and release.
2. Menu overview and basic setup
28
Page 29
Changing the display language
To change the language that is displayed on the control panel,
follow these steps:
For models that do not have the display screen on the
control panel, this feature is not applicable.
Press (Menu) button on the control panel.
1
Press System Setup > OK > Language > OK.
2
Press OK to select the language you want.
3
2. Menu overview and basic setup
29
Page 30
Media and tray
A4
This chapter provides information on how to load print media into
your machine.
• Using print media that does not meet these specifications
may cause problems or require repairs. Such repairs are
not covered by Samsung’s warranty or service
agreements.
2
2. Menu overview and basic setup
1
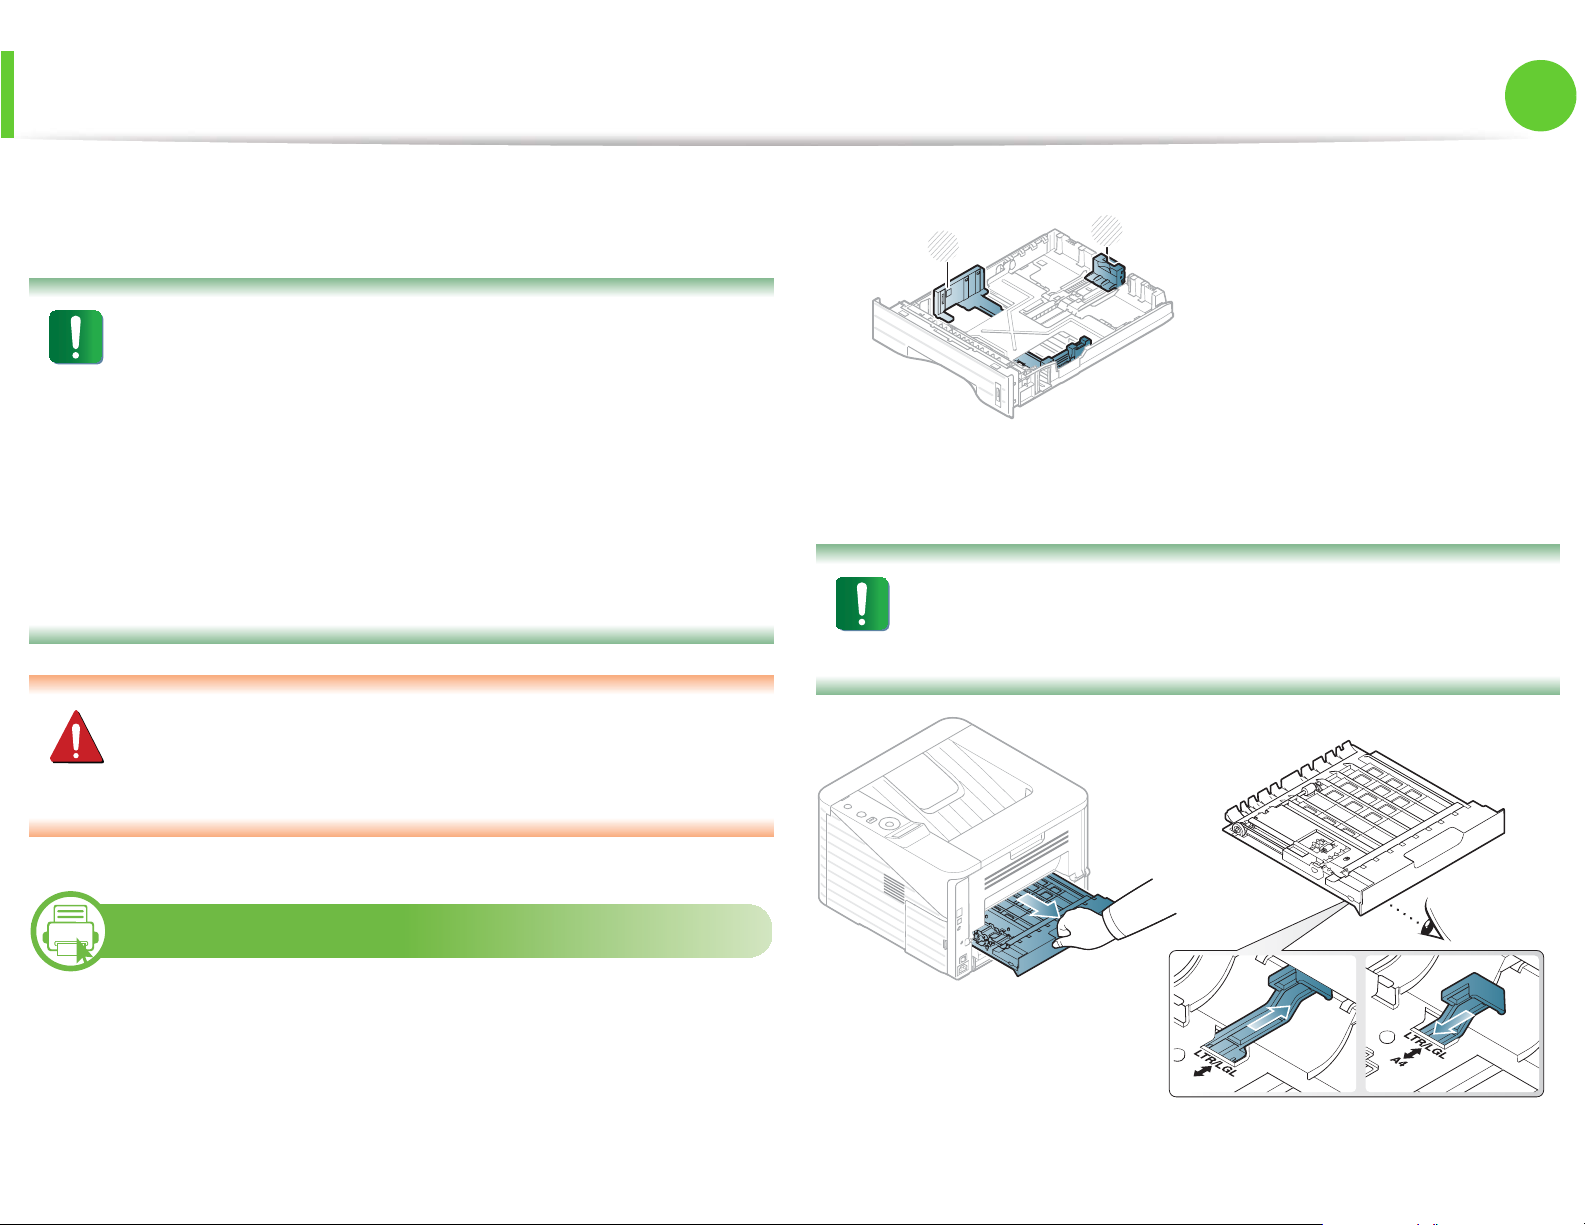
1 Paper length guide
2 Paper width guide
30
• Make sure not to use the inkjet photo paper with this
machine. It could cause damage to the machine.
• Using inflammable print media can cause a fire.
• Use designated print mediaG(see "Print media
specifications" on page 83).
The use of inflammable media or foreign materials left in the
printer may lead to overheating of the unit andS in rare cases
may cause a fire.
1
Tray overview
To change the size, you need to adjust the paper guides.
The duplex unit is preset to Letter/LGL or A4 size, depending on your
country. To change the paper size, adjust the guide as shown below.
If you do not adjust the guide, it may cause paper
registration, image skew, or jamming of the paper.
 Loading...