

Page 1
MD1200.fm Page 1 Monday, March 15, 2004 8:17 AM
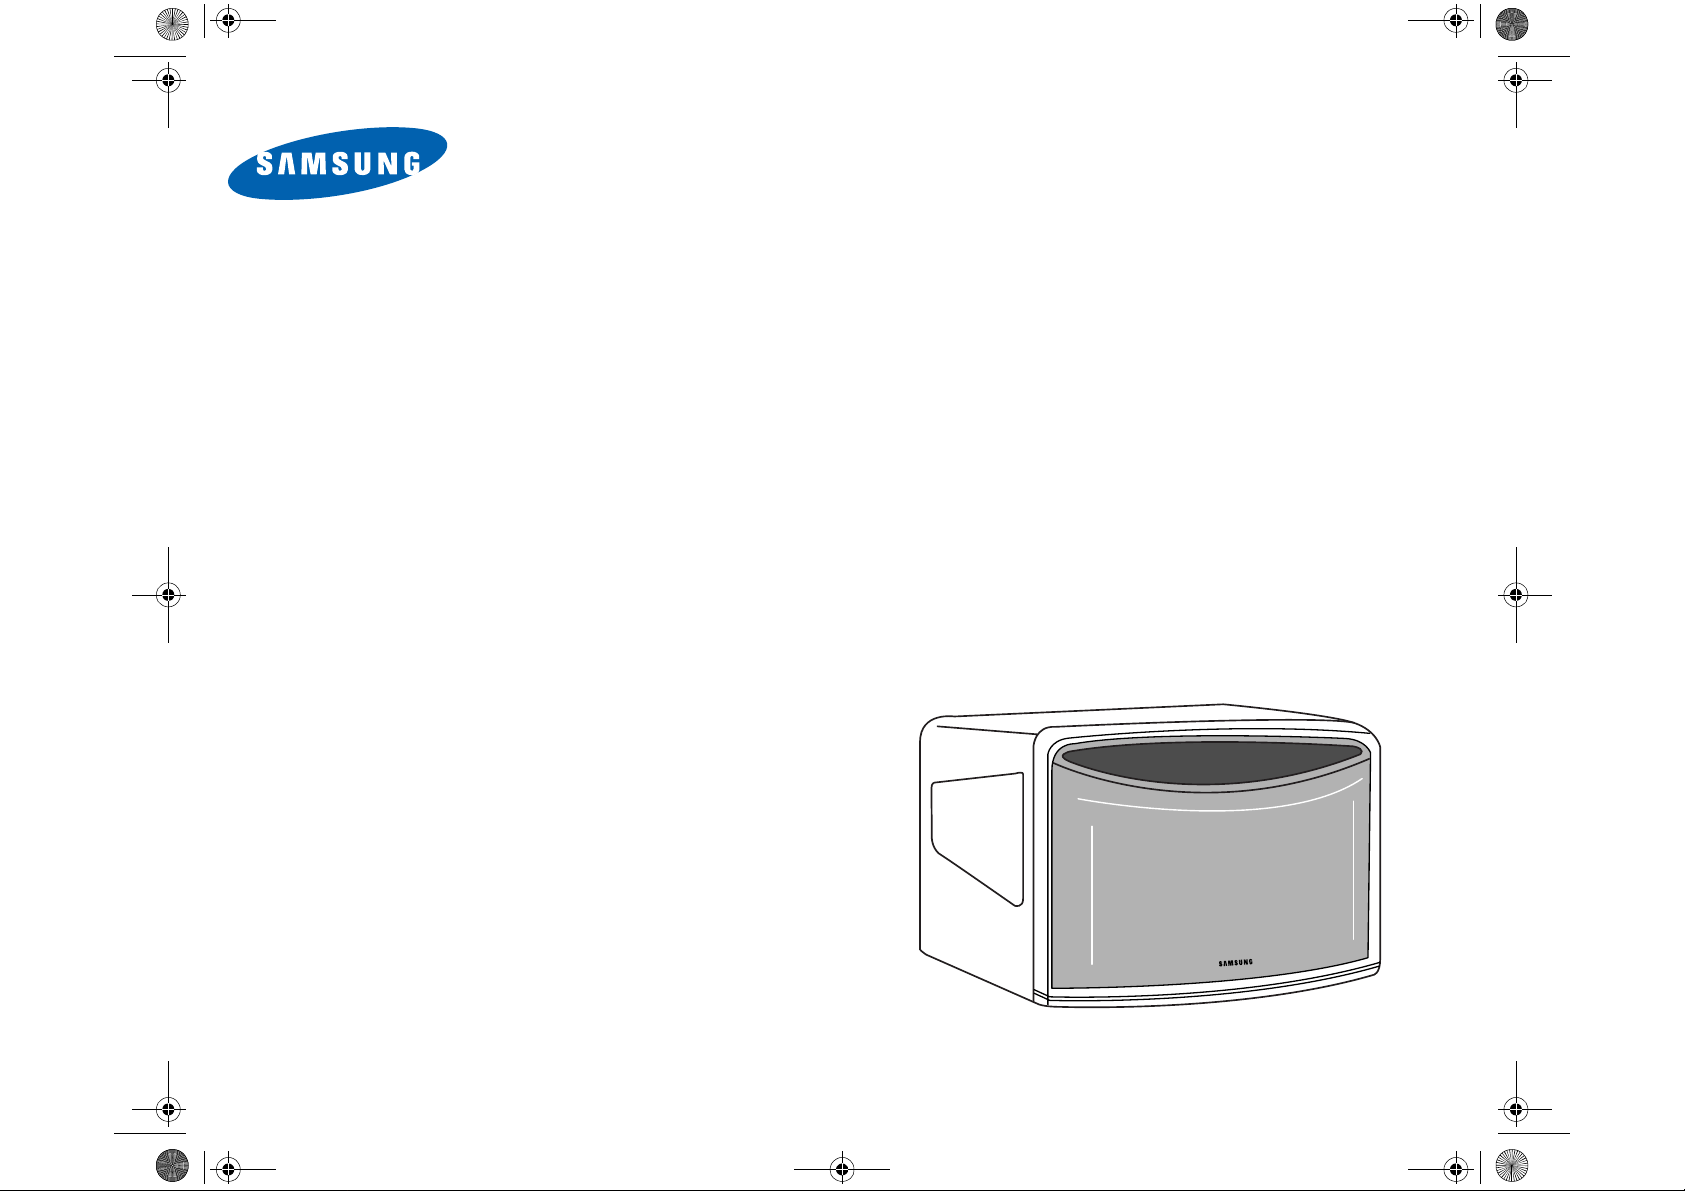
Microwave Oven
Owner’s Manual
MD1200
Code No.: DE68-02888A
Page 2
MD1200.fm Page 2 Monday, March 15, 2004 8:17 AM
Safety
P
RECAUTIONS TO
OSSIBLE
P
E
XPOSURE TO
A
VOID
I
MPORTANT
When using any electrical appliance, basic safety precautions
should be followed, including the fol lowing:
S
AFETY INSTRUCTIONS
XCESSIVE
E
NERGY
E
(a) Do not attempt to operate this oven with the door open
since open-door operation can result in harmful exposure to
microwave energy. It is important not to defeat or tamper
with the safety interlocks.
(b) Do not place any object between the oven front face and the
door or allow soil or cl eaner residue to accumula te on
sealing surfaces.
(c) Do not operate the oven if it is damaged. It is particularly
important that the oven door close properly and that there is
no damage to the
1) Door (bent or dented),
2) Hinges and latches (broken or loosened),
3) Door seals and seal ing surfaces.
(d) The oven should not be adjusted or repaired by anyone
except properly qualified service personnel.
:
M
ICROWAVE
WARNING
Always observe Safety Precautions when using your
oven. Never try to repair the oven on your own – there
is dangerous voltage inside. If the oven needs to be
repaired, call 1-800-SAMSUNG for the name of an
authorized service center near you.
WARNING
To reduce risk of burns, electric shock, fire, personal
injury or exposure to excessive microwave energy:
• Read all safety instructions before using the appliance.
• Read and follow th e specific “
EXPOSURE TO EXCESSIVE MICROWAVE ENERGY
• This appliance m ust be groun ded. Con nect only to properly g rounded
outlets. See “
3 of this manual.
• Install or place th is appliance only in accordance with the installation
instructions provided.
• Some items, like whol e eggs and food in sealed containers, may
explode if heated in this oven.
• Use this appliance only for its intended use as described in the
manual. Do not use corrosive chemicals or vapors in this appliance.
This type of ove n i s spe ci fic ally designed to heat, cook, or dry food. It
is not designed for industrial or laboratory use.
• As with any appliance, close supervision is necessary when used by
children.
• Do not operate this appliance if it has a damaged cord or plug, if it is
not working properly, or if it has been damaged.
• This appliance should be serviced only by qualified service
personnel. Contact the nearest authorized service facility for
examination, repair, or adjustment.
• Do not cover or block any of the openings on this appliance.
• Do not store this appliance outdoors. Do not use near water – for
example, near a kitchen sink, in a wet basement, or near a swimming
pool, etc.
IMPORTANT GROUNDING INSTRUCTIONS
PRECAUTIONS TO AVOID POSSIBLE
” on this page.
” on page
S
AVE
T
HESE INSTRUCTIONS
2
Page 3
MD1200.fm Page 3 Monday, March 15, 2004 8:17 AM
Safety
Important Safety Instructions, continued
• Keep the inside of the oven clean. Food particles or spattered oils
stuck to the oven walls or floor can cause paint damage and reduce
the efficiency of the oven.
• Do not immerse cord or plug in water.
• Keep cord away from heated surfaces.
• Do not let cord hang over edge of table or counter.
• When cleaning door and oven surfaces, use only mild, nonabrasive
soaps or detergents applied with a sponge or soft cloth.
• To reduce the risk of fire in the oven:
a. Do not overcook food. Watch appliance carefully if paper, plastic,
or other combustible materials are inside.
b. Remove wire twist-ties from plastic cooking bags before placing
bags in oven.
c. If materials inside the oven ignite, keep the oven door closed, turn
the oven off, disconnect the power cord, or shut off the power at
the fuse or circuit breaker panel.
d. Do not use the oven compartment for storage purposes. Do not
leave paper products, cooking utensils, or food in the oven when
not in use.
• Do not try to preheat oven or operate while empty.
• Do not cook without th e glass tray in place on the ove n floor. F ood wil l
not cook properly without the tray.
• Do not defrost frozen beverages in narrow-necked bottles. The
containers can break.
• Dishes and contai ners can bec om e hot. Handle with care.
• Carefully remove container coverings, directing steam away from
hands and face.
• Remove lids from baby food before heating. After heating baby food,
stir well and test temperature by tasting before serving.
• A short power-supply cord is pro vi ded to redu ce the ris k of bec om ing
entangled in or tripping over a longer cord. Longer cord sets or
extension cords are available and may be used with caution.
• Do not operate any other heating or cooking appliance beneath this
appliance.
• Do not mount unit over or near any portion of a heating or cooking
appliance.
• Do not mount over a sink.
• Do not store anything directly on top of the appliance when it is in
operation.
• If materials inside ov en should ign ite, keep the ov en door closed, turn
the oven off and disconnect the power cord, or shut off power at the
fuse or circuit breaker panel. If the door is opened, the fire may
spread.
• Pre-caution for safe use to avoid possible exposure to excessive
micro oven en ergy :
Do not attempt to pull any part of the door by hand to open the door.
Open the door only utilizing the push button located at front-rightbottom side.
I
MPORTANT GROUNDING
I
NSTRUCTIONS
This appliance must be grounded. In the event of an electrical
short circuit, grounding reduces the risk of electric shoc k by
providing an escape wire for the electrical current. This
appliance is equipped with a cord that includes a grounding wire
and a grounding plug. The plug must be plugged into an outlet
that is properly installed and grounded. Plug the three-pron g
power cord into a properly grounded outlet of standard 115-120
voltage, 60 Hz. Your oven should be the only appliance on this
circuit.
S
AVE
T
HESE INSTRUCTIONS
3
Page 4
MD1200.fm Page 4 Monday, March 15, 2004 8:17 AM
Safety
WARNING
Improper use of the grounding plug can result in a risk
of electric shock. Consult a qualified electrician or
servicer if you do not understand the grounding
instructions or if you are not sure if the appliance is
properly grounded.
Use of Extension Cords
A short power-supply cord is provided to reduce the risk of
becoming entangled in or tripping over a longer cord. Longer
cord sets or extension cords are available and may be used if
care is exercised in their use. If a long cord or extension cord is
used:
1. The marked electrical rating of the cord set or extension cord
should be at least as great as the electrical rating of the
appliance.
2. The extension cord must be a grounding-type 3-wire cord
and it must be plugged into a 3- slot outlet.
3. The longer cord should be arranged so that it will not drape
over the counter top or tabletop where it can be pulled on by
children or tripped over accidentally. If you use an extension
cord, the interior light may flicker and the bl ower may vary
when the microwave oven is on. Cooking times may be
longer, too.
WARNING
Do not cut or remove the third (ground) prong from the
power cord under any circumstances.
Note
Connect the oven to a 20A circuit.
When connecting the oven to a 15A circuit, make
sure that circuit breaker is operable.
Liquids, such as water, coffee, or tea are able to be overheated
beyond the boiling point without appearing to be boiling. Visible
bubbling or bo ilin g w he n the co n ta in er is rem o v ed from the
microwave oven is no t always present. THIS COULD RESULT
IN VERY HOT LIQUIDS SUDDENLY BOILING OVER WHEN
THE CONTAINER IS DISTURBED OR A SPOON OR OTHER
UTENSIL IS INSERTED INTO THE LIQUID.
To reduce the risk of injury to persons:
1. Do not overheat the liquid.
2. Stir the liquid bot h before and halfway through heating it.
3. Do not use straight-sided containers with narrow necks.
4. After heating, allow the container to stand in the microwave
oven for a short time before removing the container.
5. Use extreme care when inserting a spoon or other utensil
into the container.
S
AVE
T
HESE INSTRUCTIONS
4
Page 5
MD1200.fm Page 5 Monday, March 15, 2004 8:17 AM
Your New Microwave o ven
Table of Contents
Safety........................................................................................... 2
Your New Microwave oven......................................................... 5
Table of Contents .......................... ............................................5
Checking Parts ..........................................................................5
Warranty and Service Information .............................................5
Warranty and Service Information .............................................6
Setting Up Your Microwave Oven................... .......................... 6
Control Panel Buttons ...............................................................7
Operation.......................... ........................................................... 8
Turning on the Power and Selecting a Weight ..........................8
Setting the Clock .......................................................................8
Using the Pause/Cancel Button................................................ 8
Using the Instant Cook Buttons ................................................. 8
Using the Handy Helper Button .................................................9
Using the Kids Meals Button ...................................................10
Using the Snack Bar Button ....................................................10
Using the One Minute + Button ...............................................10
Defrosting Automatically ..........................................................11
Setting Cooking Times & Power Levels ..................................11
One-stage Cooking................................................................. 11
Reheating Automatically ..........................................................12
Multi-stage Cooking .................................................................13
Using the More/Less Buttons ..................................................13
Switching the Beeper On/Off................................................... 13
Using the Kitchen Timer ............................. .............................13
Demonstration Mode ...............................................................13
Setting the Child Protection Lock ............................................13
Cooking Instructions................................................................ 14
Cooking Utensils .....................................................................14
Testing Utensils .......................................................................14
Cooking Techniques ................................................................15
General Tips ............................................................................15
Cooking Guide .........................................................................16
Auto Defrosting Guide .............................................................18
Recipes ...................................................................................19
Appendix.................................................................................... 21
Troubleshooting Guide ................................................... .........21
Care and Cleaning ..................................................................22
Specifications.......................................................................... 22
Warranty .................................................................................... 23
Warranty Information ...............................................................23
Guía Rápida(Spanish)............................................................... 24
Quick Reference(English) .................. ......................................25
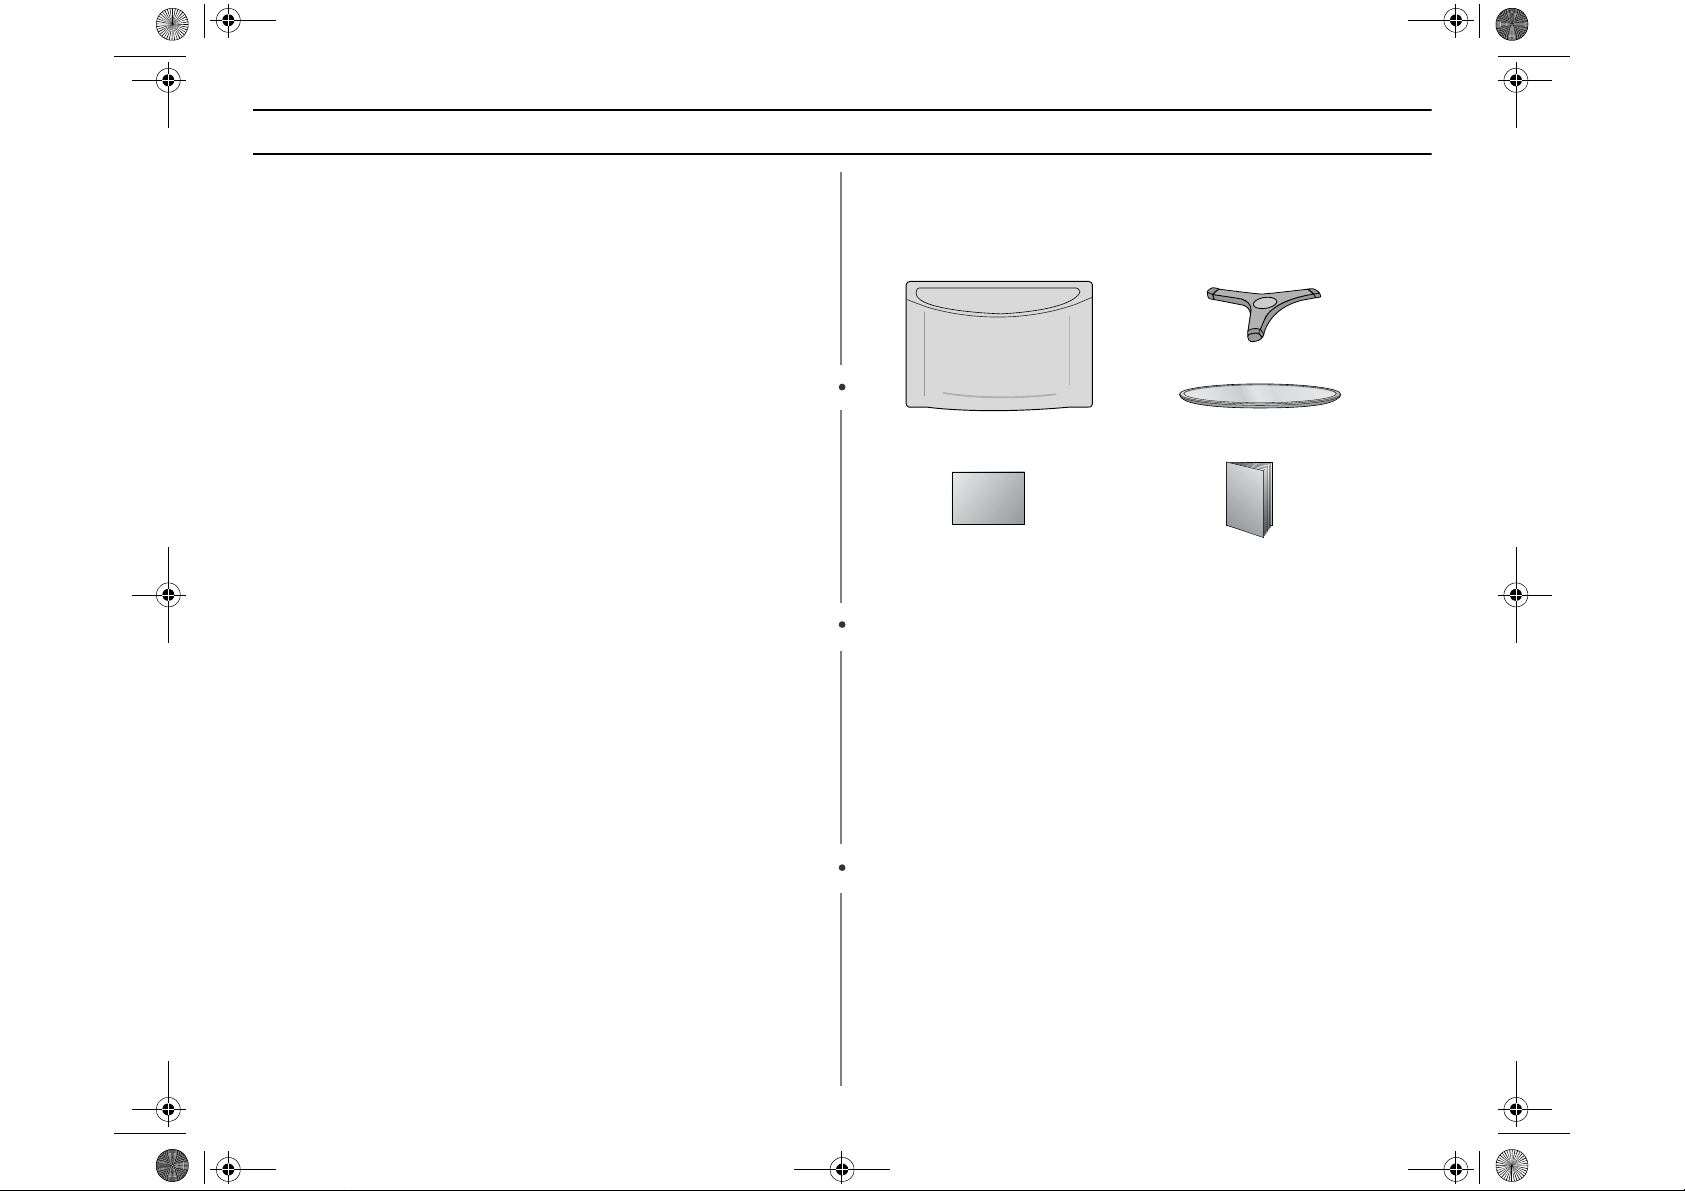
Checking Parts
Unpack your microwave oven and chec k to ma ke su re that y ou have all the
parts shown here. If any part is missing or broken , call you r deale r.
Roller guide ring
Microwave oven
Registration card
Glass tray
Instructi on manual
Warranty and Service Information
To help us better serve you, please complete th e enclo sed re gistratio n card
and promptly return it by mail. If the registration card is missing, you can call
Samsung Electronics America, Inc., at 1-800 - SAM SU NG ( 1-800 -726-7 864),
or register on-line at WWW.SAMSUNGUS A.COM
When contacting Samsung, please provide the sp ecific model and serial number information which is usually located on the ba ck or b ottom o f the pro duct.
Please record these numbers below, along with the other requested information. Keep this information in a safe place as a perm ane nt recor d of you r purchase to aid in identification in case of theft or loss , and a copy o f your s ales
receipt as a proof of purchase if warranty s ervice is neede d.
MODEL NUMBER ____________________
SERIAL NUMBER ____________________
DATE PURCHASED ____________________
PURCHASED FROM ____________________
Warranty service can only be performed by a Samsung Authorized
Service Center. If you should require warranty service, provide the
above information with a copy of your sales receipt to the Samsung
Authorized Service Center.
For service assistance and the location of the nea rest se rvice ce nter, please
call 1-800-SAMSUNG (1-800-726-786 4), or go on-line to WWW.SAMSUNGSUPPORT.COM
5
Page 6
MD1200.fm Page 6 Monday, March 15, 2004 8:17 AM
Your New Microwave o ven
Warranty and Service Information
To help us better serve you, please c omp lete the e nclos ed registration card
and promptly return it by mail. If the registration card is m issing, you can call
Samsung Electronics America, Inc., at 1- 800- S AMS UN G (1-8 00-72 6-
7864), or register on-line at WWW.SAM SU NG USA .CO M
When contacting Samsung, please provide the specific model and ser ial number information which is usually located on th e back or botto m of th e prod uct.
Please record these numbers below, along with the other requested information. Keep this information in a safe place as a perma nent re cord o f your purchase to aid in identification in case of theft or loss, and a copy of your sales
receipt as a proof of purchase if warranty service is needed.
MODEL NUMBER ____________________
SERIAL NUMBER ____________________
DATE PURCHASED ____________________
PURCHASED FROM ____________________
Warranty service can only be performed by a Samsung Authorized
Service Center. If you should require warranty service, provide the
above information with a copy of your sales receipt to the Samsung
Authorized Service Center.
For service assistance and the loca tion of the neare st serv ice center, please
call 1-800-SAMSUNG (1-800-726-7864 ), or go o n-line to W WW.SAM SUN GSUPPORT.COM
Setting Up Your Microwave Oven
1
Place the oven on a flat, sturdy surface and plug the cord into a
grounded outlet.
Make sure there is adequ ate v ent ila tio n for y our o ven by l eav in g at
least four inches of space behind, above, and to the side of the
oven.
2
Open the oven door by pressing the button below the control panel.
3
Wipe the inside of the oven with a damp cloth.
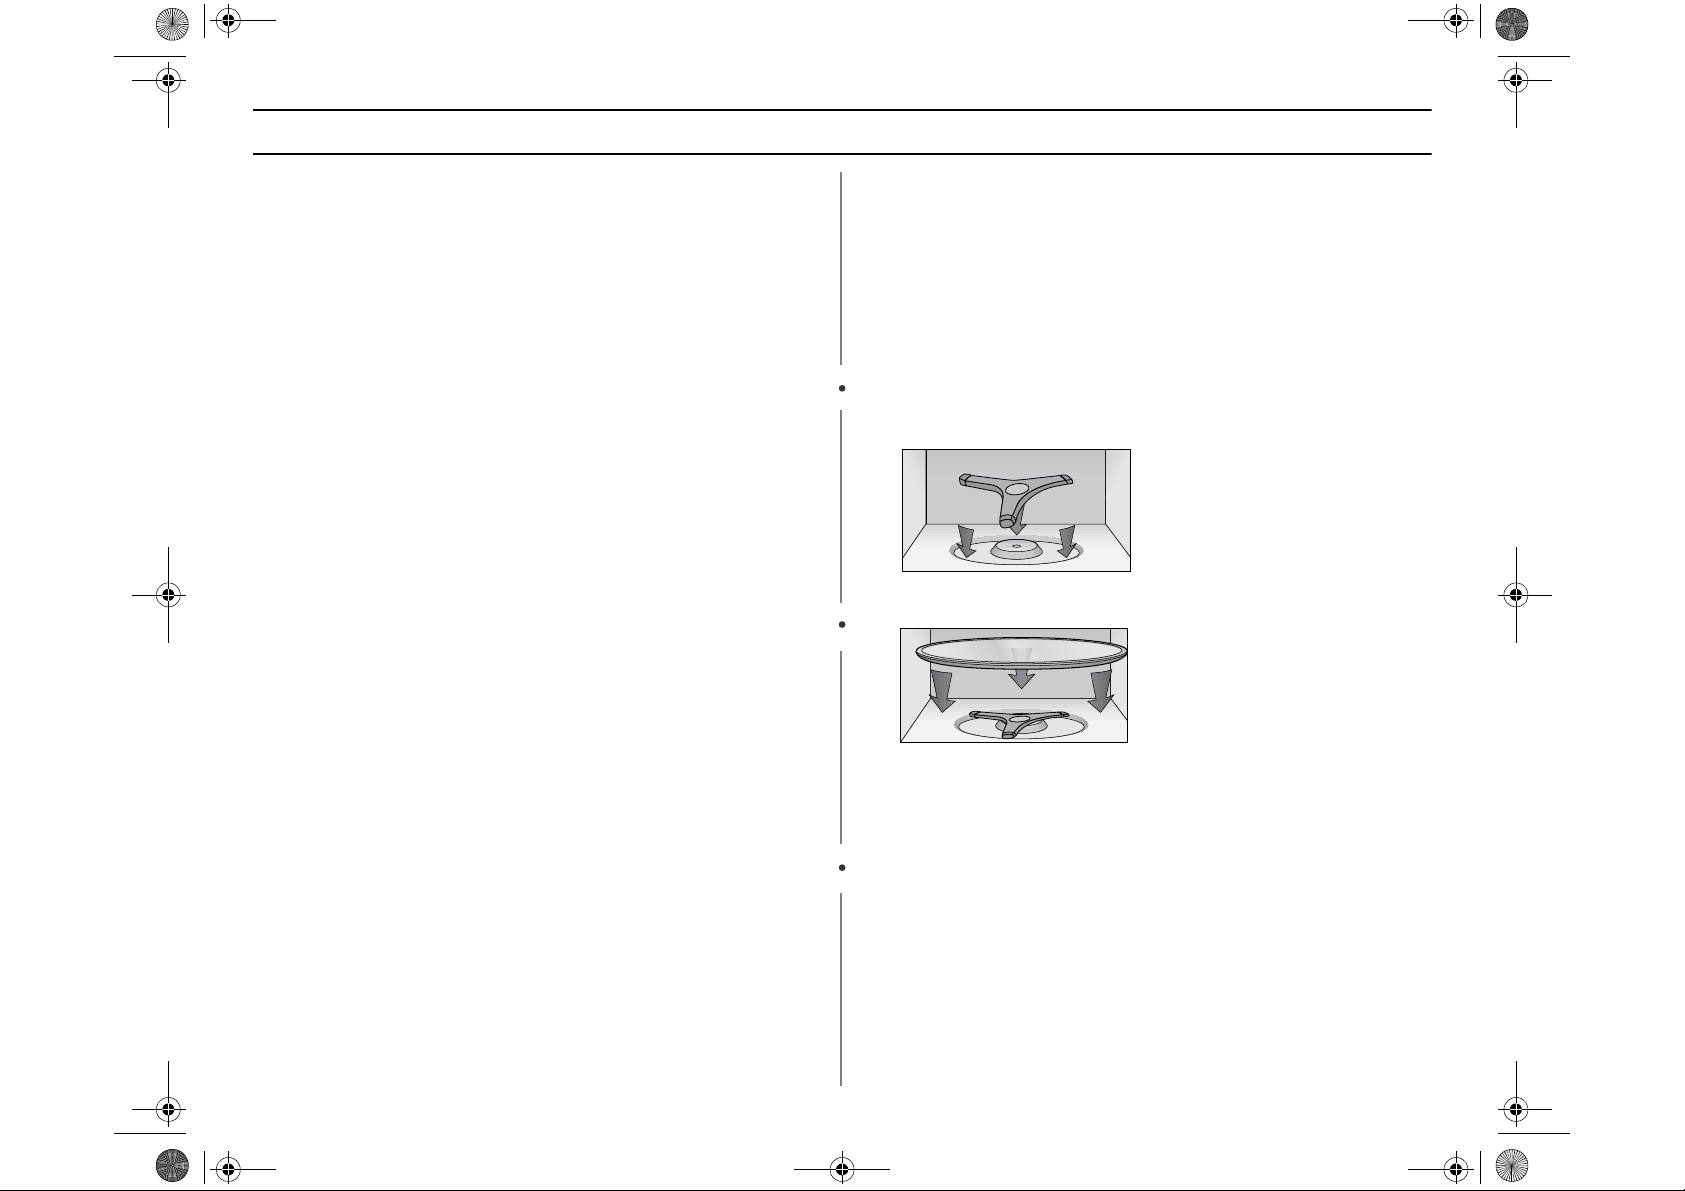
4
Place the pre-assembled ring in the indentation in the center of the
oven.
5
Place the glass tray secerely in the center of the pre-assembled roller
guide.
6
Page 7
MD1200.fm Page 7 Monday, March 15, 2004 8:17 AM
Your New Microwave o ven
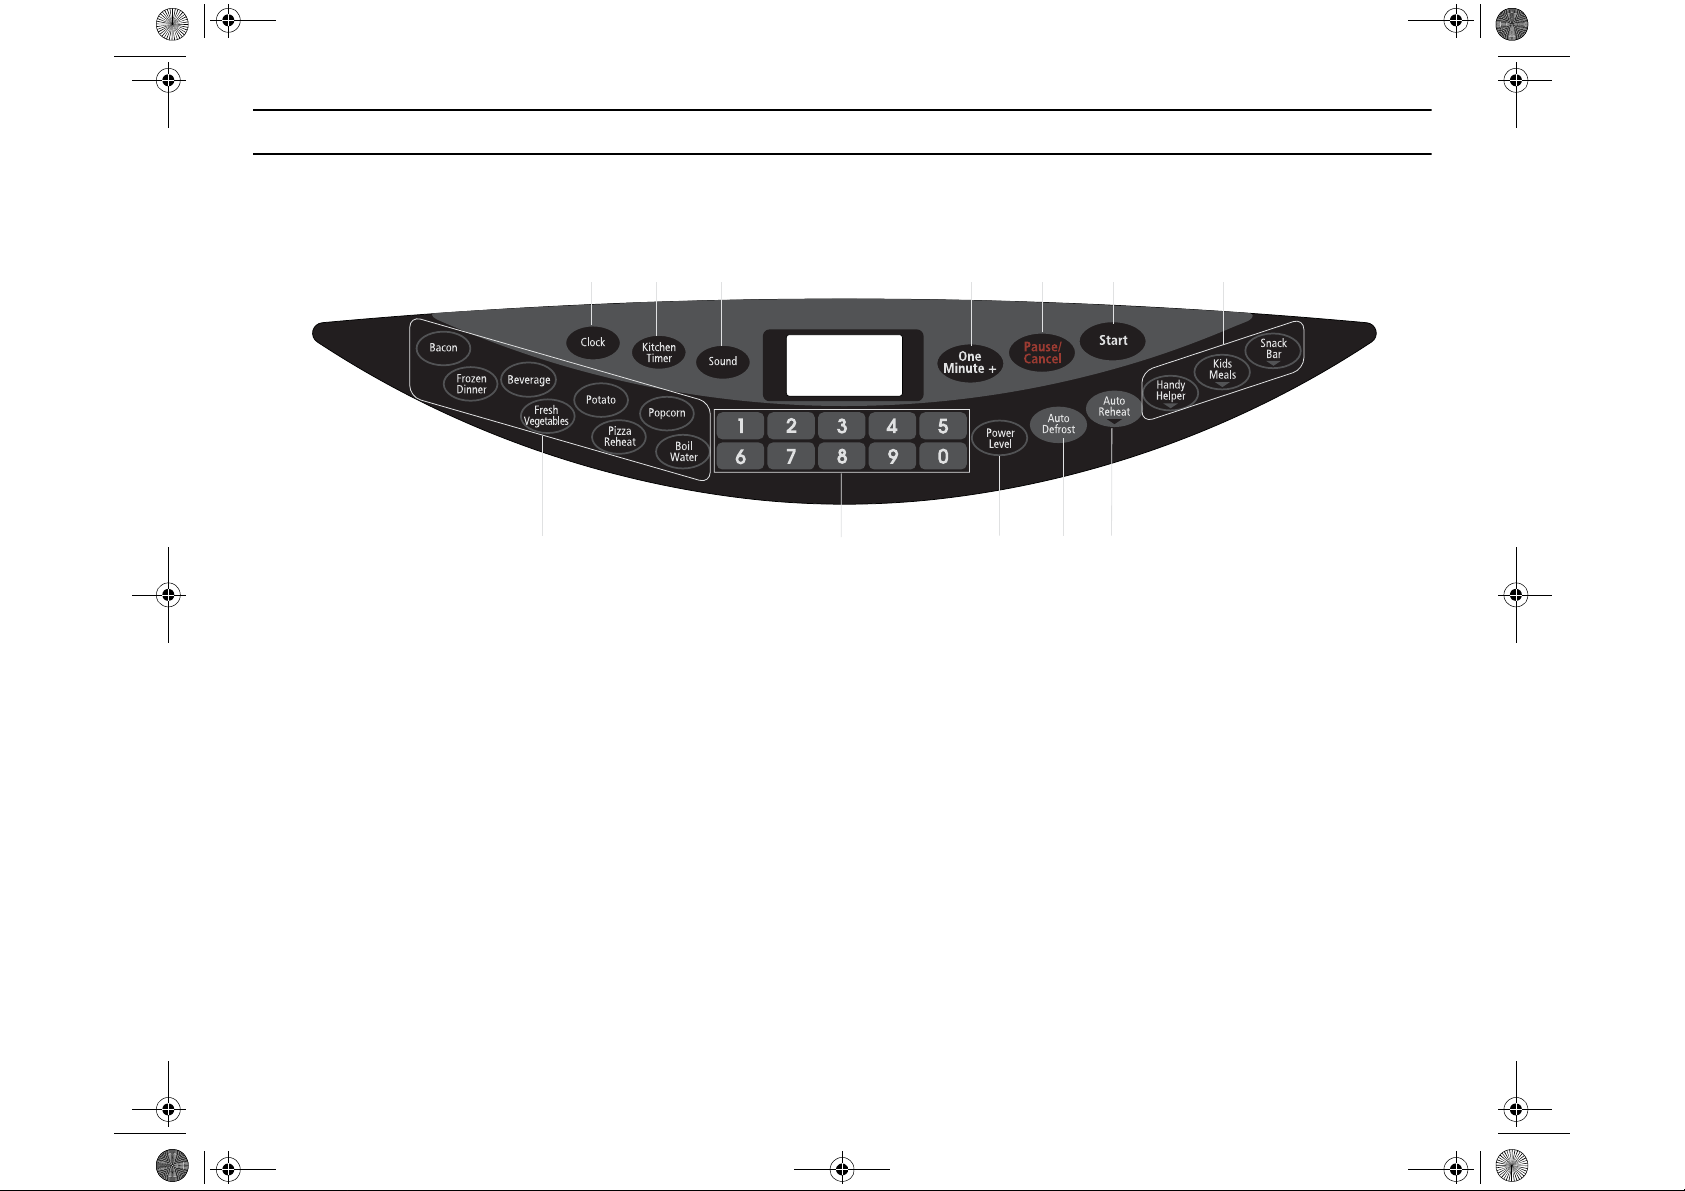
Control Panel Buttons
3
1. One Minute+ p.10
Press once for every minute of cook ing at H igh Po wer.
2. Auto Defrost p.11
Sets weight of food to be defrosted.
3. Instant Cook Buttons p.8
Instant settings to cook popular foods.
4. Number Buttons
Sets cooking times or amounts and power leve ls other th an high.
5. Power Level p.11
Press this pad to set a power level other than h ig h.
6. Kitchen Timer p.13
Sets kitchen or convenience timer.
7. Clock p.8
Sets current time.
8. Sound Button p.13
Sets sound on or off.
1
4
9 10 1167 8
2
135
9. Pause/Cancel p.8
Press to pause oven or correct a mistak e.
10. Start
Press to start cooking.
11. Handy Helper, Kids Meals, Snack Bar p.9
Selects type of dish to be reheated.
12. Auto Reheat p.12
Shows type and quantity of food to be reheated .
7
Page 8
MD1200.fm Page 8 Monday, March 15, 2004 8:17 AM
Operation
Turning on the Power and Selecting a Weight
The first time you plug the power cord into an outlet, or after there has been an
interruption in power, the display sh ows “ ” At this point, you can select
the weight system for the display. You can c hoose between pounds (LBS) or
kilograms (KG). To do so,
1
Press 0 immediately after plugging in your microwave. The display will
show “Kg”.
If the display does not shows “Kg”, you will need to unplug the
microwave and then plug it in again in order to change to the weight
selection.
2
Press 0 repeatedly to select the weight system you wish to use:
When you have sel ec ted the weight system you want to us e, pres s
the PAUSE/CANCEL button to end this procedure.
Setting the Clock
1
Press the
2
Use the number buttons to enter the current time. You must press at
least three numbers to set the clock. If the current time is 5:00 enter,
5,0,0.
3
When 5 seconds has elapsed, “ENTER” indicator flash and “Clock” will
be displayed.
4
Press
is set.
5
If there is a power interruption, you will need to reset the clock.
6
You can check the current time while cooking is in progress by pressing
the
Clock
Clock or Start
Clock
button.
button. The “ENTER” and “TIME” indicators flash.
again. A colon will blink, indicating that the time
Using the Pause/Cancel Button
The
Pause/Cancel
It also allows you to pause the oven’s cooking cycle, so that you can che ck the
food.
• To pause the oven during cooking: press Pause/Cancel once.
To restart, press
• To stop cooking, erase instructions, and return the oven display to the
time of day: press
• To correct a mistake you have just entered: press
then re-enter the instructions.
button allows you to clear instructions you have entered.
Start.
Pause/Cancel twice.
Pause/Cancel once,
Using the Instant Cook Buttons
Press the
1
cooking (
size. (“ENTER” and “QTY.” will flash)
2
Press the button repeatedly to select the serving size you want. The
display will cycle through all available serving sizes. Once you select
the correct serving size, the microwave will begin cooking automatically.
When the cooking times is over, the oven will beep. The oven will
then beep every minute.
Instant Cook
Popcorn
, for example). The display shows the first serving
button corresponding to the food you are
8
Page 9
MD1200.fm Page 9 Monday, March 15, 2004 8:17 AM
Operation
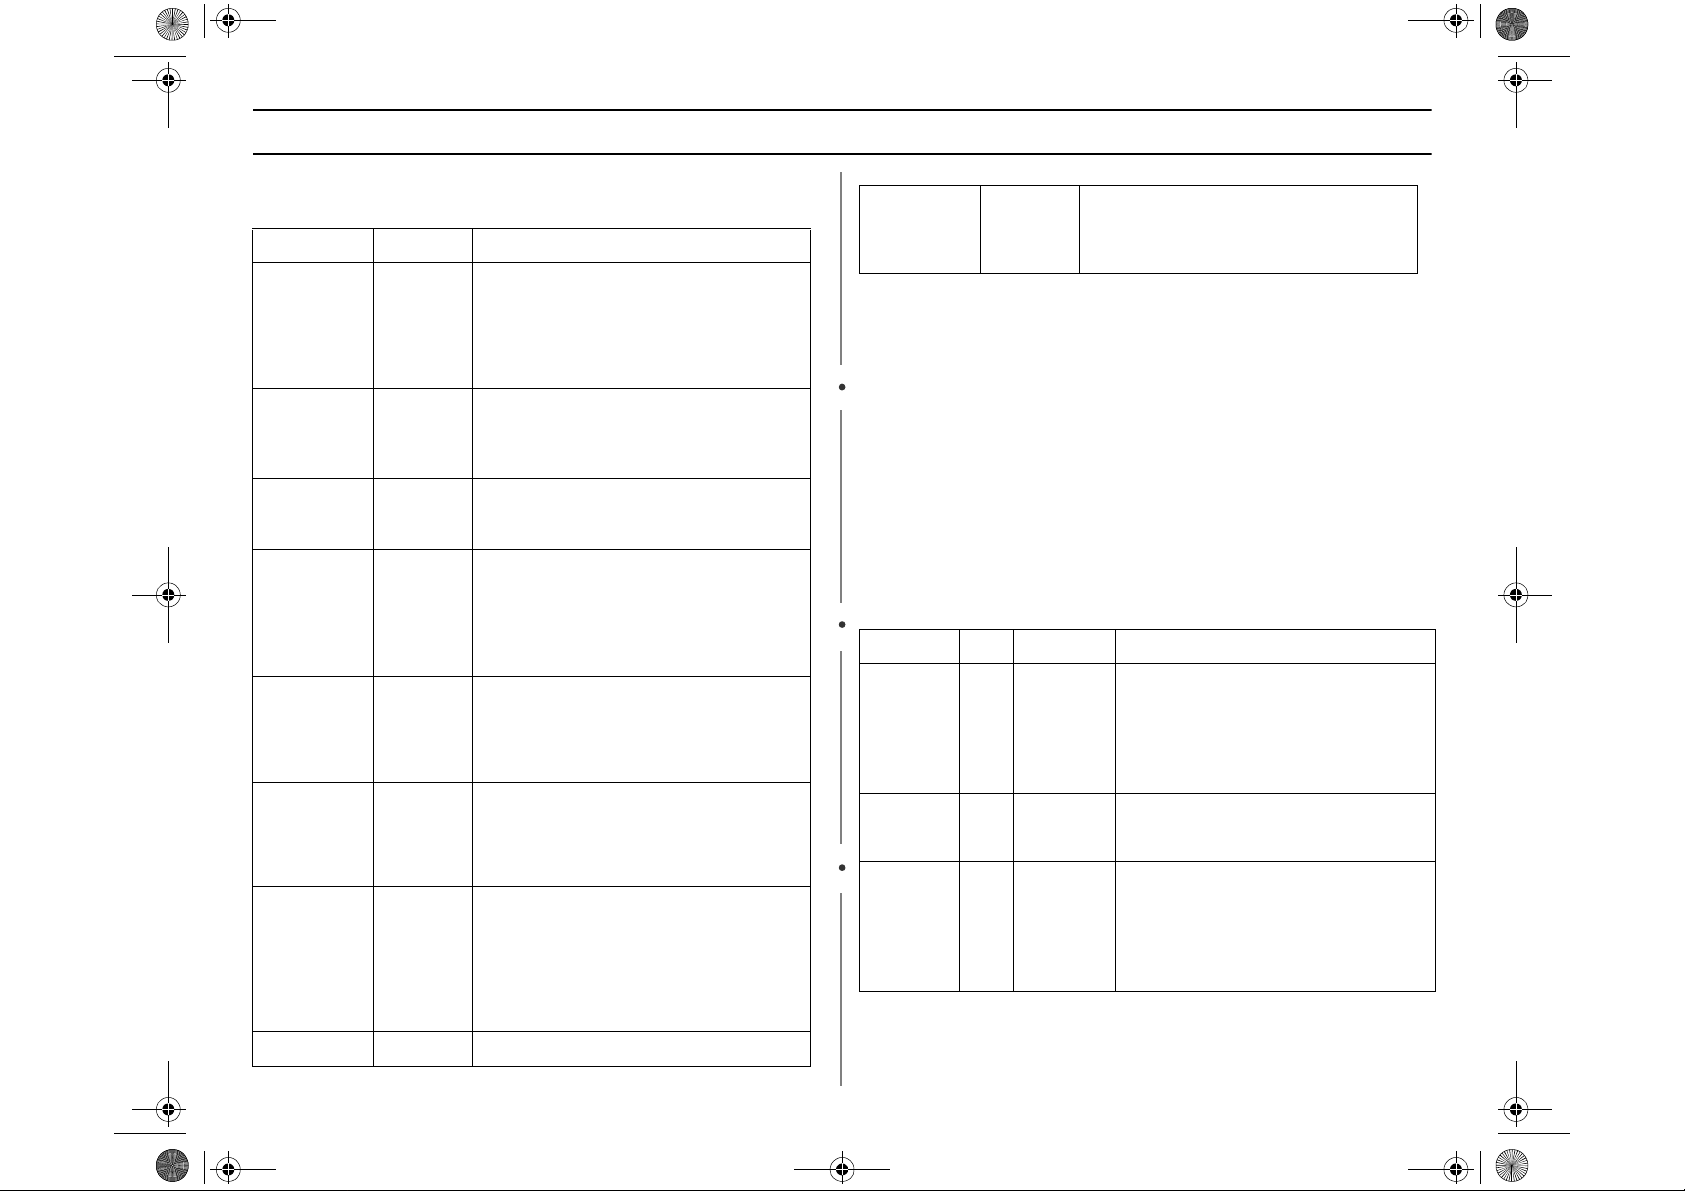
Instant Cook Chart
Item Weight Remarks
Popcorn Regular
Potato 1 EA, 2 EA
Beverage ½ cup
Boil water ½ cup
Fresh
vegetables
Pizza reheat 1 Slice
Bacon 2 Slices
Item Weight Remarks
(3.5 oz),
Light
Regular
(3.0-3.5
oz)
3 EA, 4 EA
5 EA, 6 EA
1 cup
2 cups
1 cup
2 cups
1 serving
2 servings
3 servings
4 servings
2 Slices
3 Slices
4 Slices
6 Slices
• Use one microwave-only bag of popcorn.
Pop only one bag at a time.
• Use caution when removing and opening
hot bag from ov en.
• Prick each potato several times with fork.
• Place on turntable in spoke-like f ashion.
• Remove from oven, wrap in foil and let
stand 3-5mi n.
• Use measuring cup or mug ; do not cover.
• Place the beverage in the oven.
• After heating, stir well.
• Measure liquid; po ur into micr owave-safe
container that is 2 times larger than
amount of liquid. Example: For 1 cup
liquid use a 2 cu p or larger dish.
• Stir well before and after heating to
prevent boil over.
• Place the vegetables into a casserole
bowl and add a small amount of water
(2-4Tbsp).
• Cover during cooking and stir before
standing.
• Put the pizza on a microwave-safe plate
with wide end of slice towards the
outside edge of the plate.
• Do not let slices overlap. Do not cover.
• Before serving, let stand 1-2 min.
• Place 2 paper towels on plate and
arrange bacon on towels, do not
overlap. Cover with additional paper
towel. Remove paper towel immediately
after cooking.
• Use More or Less button for desired
crispness.
Frozen dinner 8-10 oz
10-12 oz
12-18 oz
• Remove package from outer wrapping
and follow package instructions for
covering an d standing.
• After cooking, let stand 1-3 min.
Using the Handy Helper Button
Press the
1
cooking. The display show “A-1”.(code of item) Press the
Helper
Handy Helper Chart
2
Press the
press
Only
Melt Chocolate.(Refer to the
serving)
3
Press
Handy Helper
button repeatedly to select the item you want. (Refer to the
Number
“1”
or
“2”
“1”
Start
button for selecting serving size.
button(serving) is available for Sofetn Cream Cheese and
button to begin cooking.
button corresponding to the food you are
below)
button to select the serving size you want. You can
Handy Helper Chart
Handy Helper Chart
Item Code Weight Remarks
Melt
Chocolate
Soften
Cream
Cheese
Melt Butter A-3 1 stick
A-1 1 cup chips
A-2 1 package
(8 oz.)
(1/4 lb.)
2 sticks
(1/2 lb.)
• Place chocolate chips or square in a
microwave-safe dish.
• Stir well at half time when the oven
beeps, and re-s tar t the oven .
• Unless sti rred, the cho colate keeps its
shape even when heating time is over.
• Unwrap cream cheese and place on
microwave-safe dish.
• Let stand 1-2 min.
• Remove wrapping and cut butter in half
vertically.
• Place butter in dish, cover with wax
paper.
• Stir well after fini shi ng and l et s tan d 1-2
min.
Handy
below for the
9
Page 10
MD1200.fm Page 10 Monday, March 15, 2004 8:17 AM
Operation
Using the Kids Meals Button
1
Press the
cooking. The display shows “A-1”(Code of item). Press
the
the
2
Press the
Press
(Refer to the
3
Press
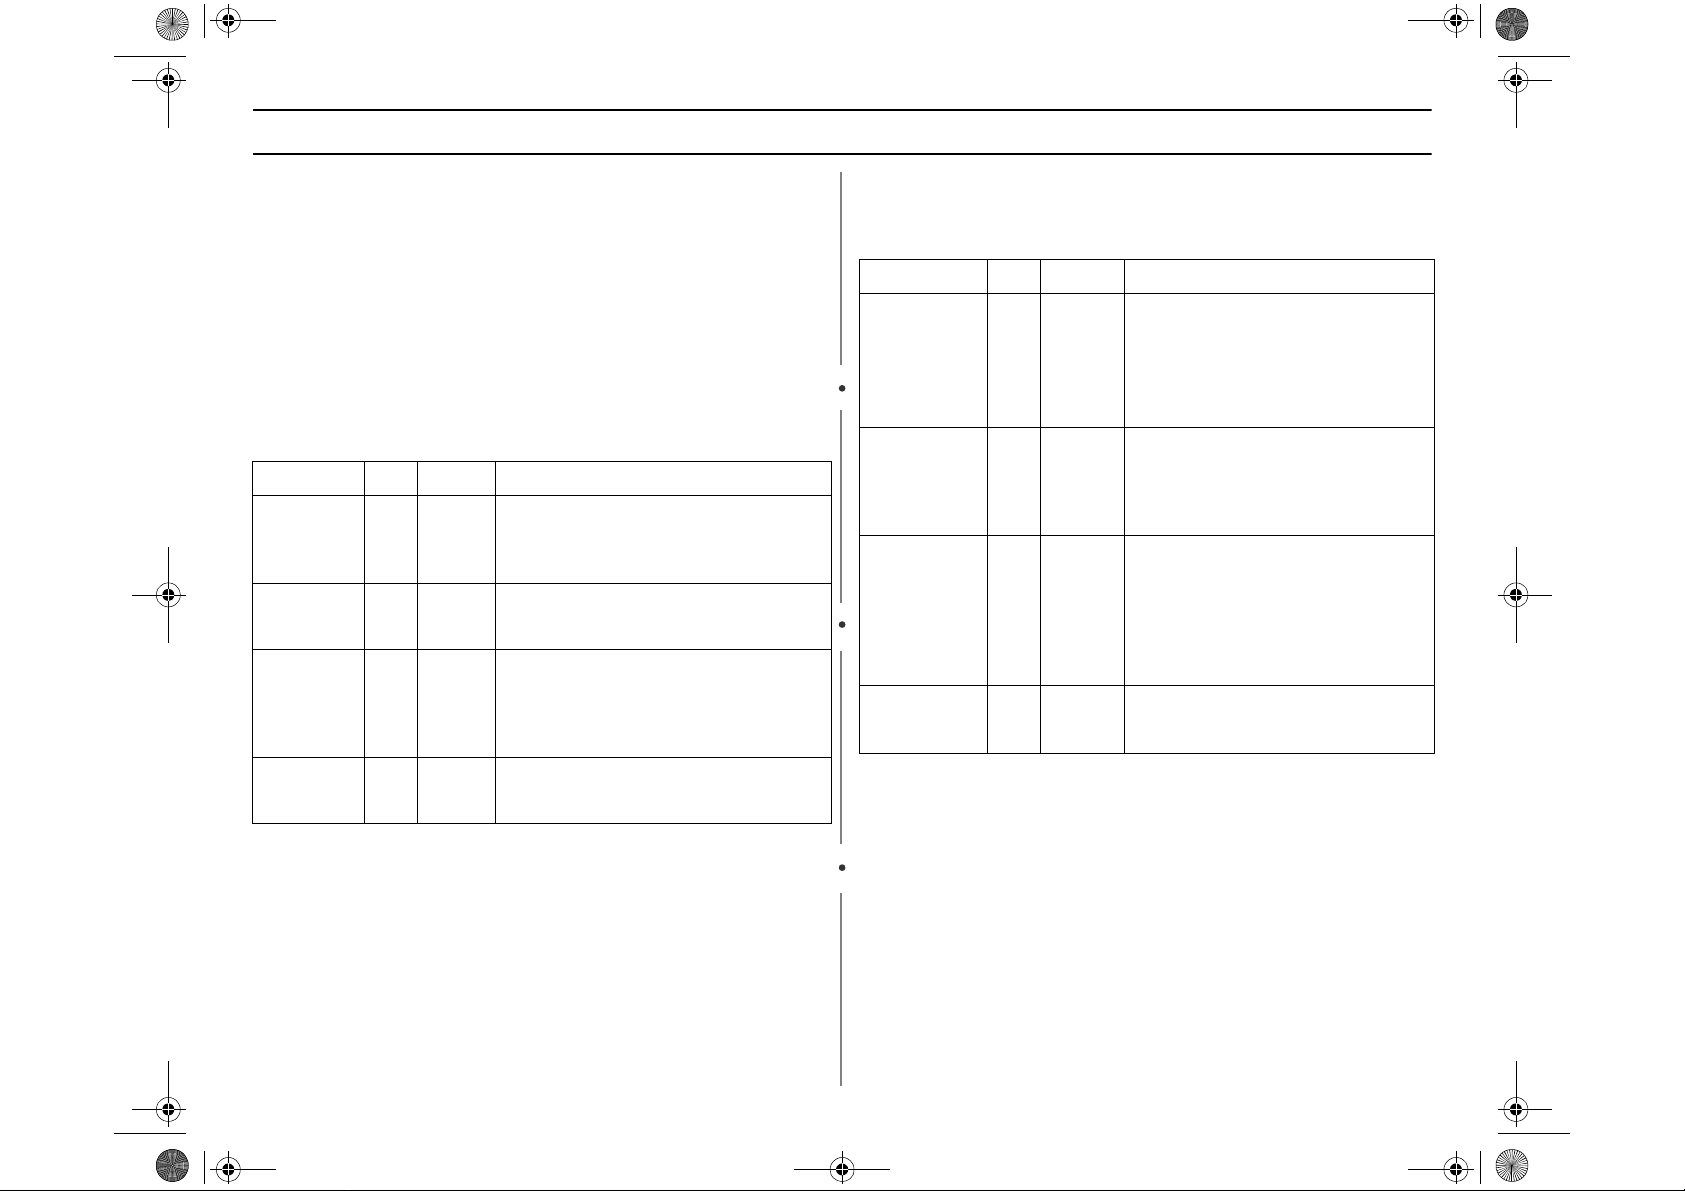
Kids Meals Chart
Item Code Weight Remarks
Chicken
Nuggets
Hot Dogs A-2 2 EA
French Fries A-3 4-5 oz
Frozen
Sandwich
Using the Snack Bar Button
Press the
1
cooking. The display shows “A-1”(Code of item).
Press the
want.(Refer to the
2
Press the
press 1 or 2 button for selecting serving size.
Only
(Refer to the
3
Press
Kids Meals
Kids Meals
Kids Meals Chart
Number
1
or 2 button for selecting serving size.
Kids Meals Chart
Start
button to begin cooking.
A-1 4-5 oz
A-4 1 EA
Snack Bar
Snack Bar
Number
1
button(serving) is available for Nachos.
Snack Bar Chart
Start
button to begin cooking.
button corresponding to the food you are
button repeatedly to select the item you want.(Refer to
below)
button to select the serving size you want. You can
below for the serving.)
• Put a paper towel on top of pl a te and
6-7 oz
4 EA
6-7 oz
2 EA
button corresponding to the food you are
button repeatedly to selcet the item you
Snack Bar Chart
button to select the serving size you want. You can
arrange nuggets in spoke fashion on
paper towel.
• Do not co ver. Let stan d 1 m in.
• Prick ho t dogs, place on plate. When the
oven beeps, add buns and re-start the
oven.
• Place 2 pa per towels on plate and
arrange french fries on towe ls, do not
overlap.
• Blot with additional paper towel after
removal from oven.
• Place frozen sandwi ch in susceptor
"sleeve" (which is in package) and put on
plate.
below)
below for the serving)
Snack Bar Chart
Item Code Weight Remarks
Nachos A-1 1 serving
Chicken Wings A-2 5-6 oz
7-8 oz
Potato Skins A-3 1 cooked
potato
2 cooked
potatoes
Cheese Sticks A-4 5-6 pcs
7-10 pcs
• Place tortilla chips on plate without
overl
apping.
• Sprinkle evenl y wi th ch eese.
Contents
•
- 2 cups tortilla chips
- 1/3 cup grated cheese
• Use pre-cooked, refrigerated chi cken
wings.
• Place chicken wings around plate in
spoke fashion and cover with wax
paper.
• Cut cooked potato into 4 even
wedges. Scoop or cut out potato fles h,
leaving about 1/4" of skin.
• Place skins in spoke fashion around
plate.
• Sprinkle with bacon, on i o ns and
cheese. Do not cover.
• Place cheese sticks on plate in spoke
fashion.
• Do not cover.
:
Using the One Minute + Button
This button offers a convenient way to heat food in one-minute increments at
the High power level.
1
Press the
the food.
will display, and the oven starts automatically.
Add minutes to a program in pro gres s by p res si ng the One Minute
+ button for each minute you want to add.
One Minut e +
For example, press it twice for two minutes.
button once for each minute you wish to cook
The time
10
Page 11
MD1200.fm Page 11 Monday, March 15, 2004 8:17 AM
Operation
Defrosting Automatically
To thaw frozen food, set the weight of the food and th e micr owav e automatically sets the defrosting time, power level and standin g time.
1
Press the
you have set your oven for metric measure).
(“ENTER” and “ Lbs.” will flash).
2
To set the weight of your food, press the
repeatedly. This increases the weight by 0.5 lb increments, up to 6.0 lbs
(The Auto Defrost button will increase the weight by 0.2Kg up to 2.6kg if
you are using metric measurement).
You can also use the number buttons to enter the weight of the food
directly.
The oven calculates the defrosting time and starts automatically.
Twice during defrosting , the oven will beep to let you know to turn the
food over.
3
Press the
over.
4
Press the
Auto Defrost
Pause/Cancel
Start
button to resume defrosting.
button. The display shows “0.5 lbs.” (0.2Kg if
button, open the oven door, and turn the food
Auto Defrost
button
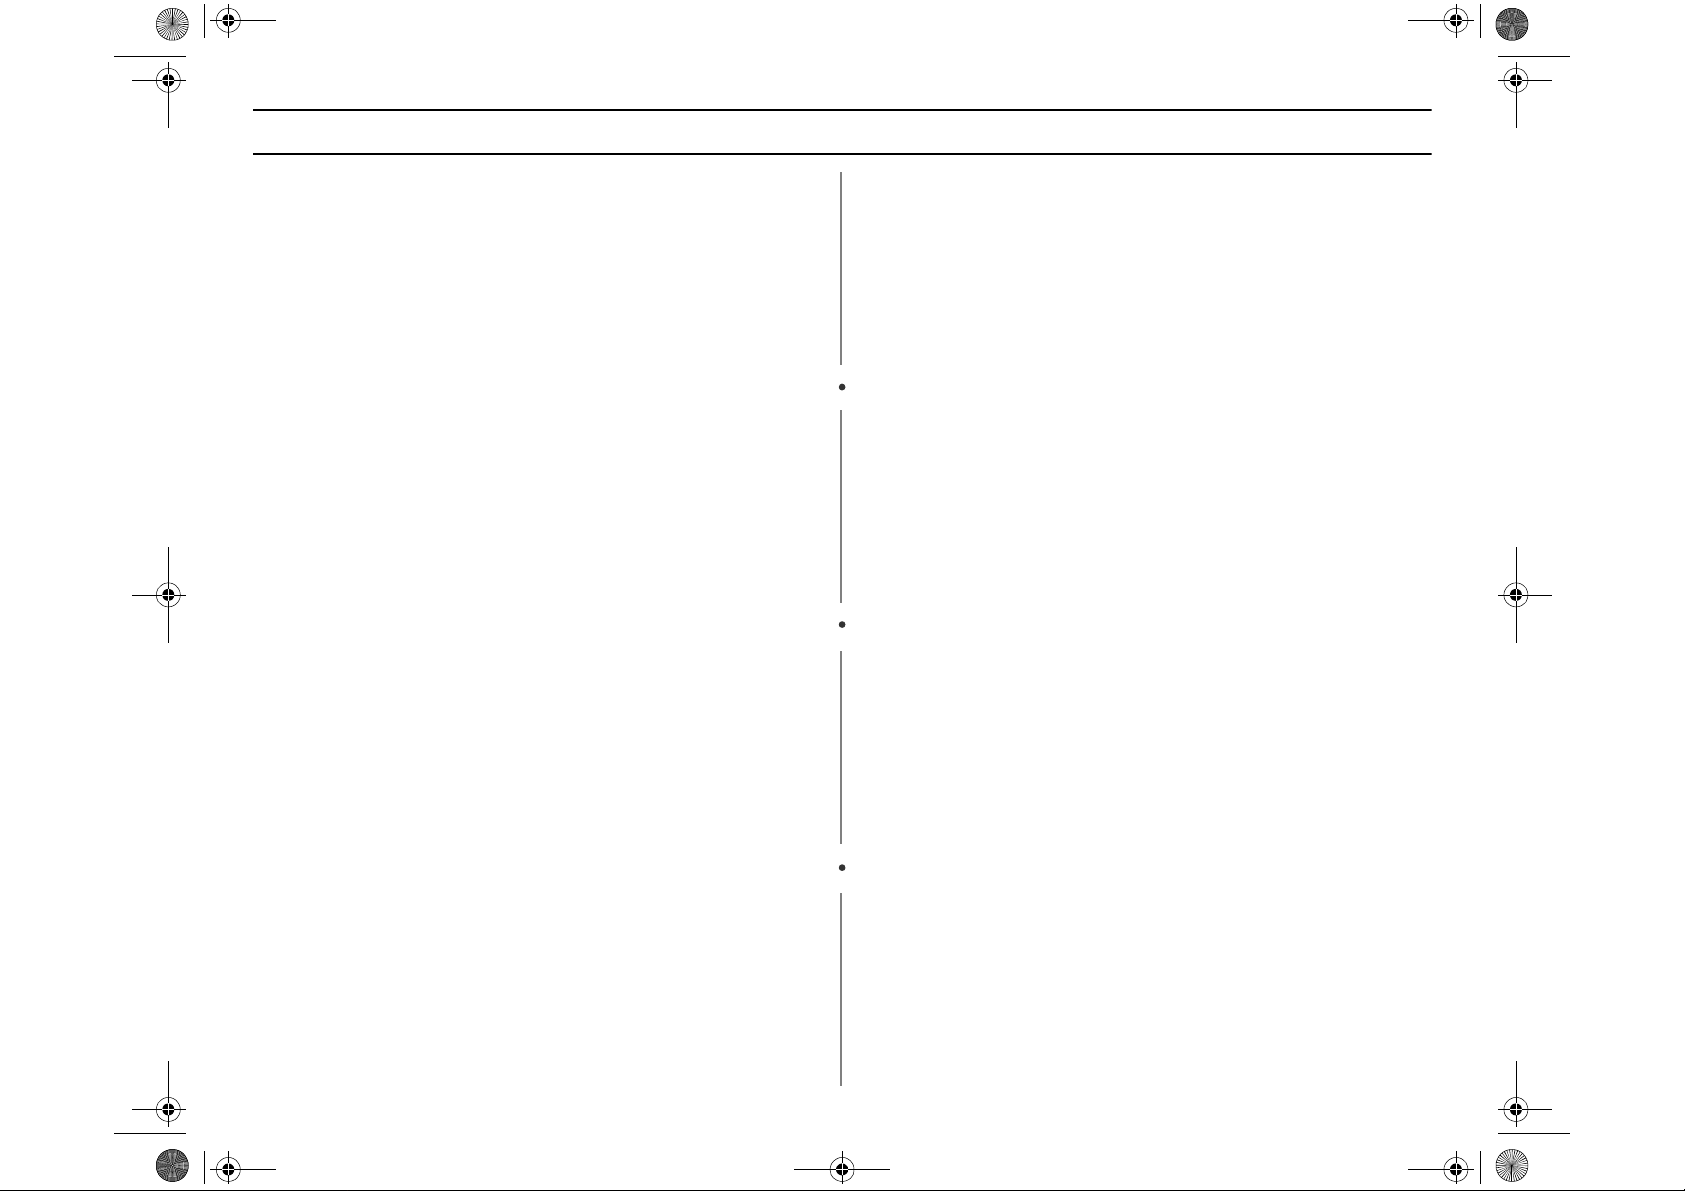
• See page 18 for the Auto Defrosting Guide.
Setting Cooking Times & Power Levels
Your microwave allows you to set up to tw o differe nt stag es of cooking, each
with its own time length and power level. Th e pow er leve l button le ts you control the heating intensity from Warm (1) to High (0).
One-stage Cooking
For simple one-stage cooking, you o nly need to set a co oking time. The power
level is automatically set to High. If you want to set the power to any other
level, you must set it using the
1
Use the number buttons to set a cooking time. You can set a time from
one second to 99 minutes, 99 seconds. To set a time over one minute,
enter the seconds too.
0, 0 .
2
If you want to set the power level to something other than High, press
Power Level
the
level.
Power Levels:
1 = PL:10 (Warm) 6 = PL:60 (Simmer)
2 = PL:20 (Low) 7 = PL:70 (Medium High)
3 = PL:30 (Defrost) 8 = PL:80 (Reheat)
4 = PL:40 (Medium Low) 9 = PL:90 (Sauté)
5 = PL:50 (Medium) 0 = PL:Hi (High)
3
Press the
power level, press
all of the instructions.
Some recipes require different stages of cooking at differe nt tem peratu res.
You can set multiple stages of cooking with you r micro wav e.
Start
button to begin cooking. If you want to change the
Power Level
For example, to set 20 minutes, enter 2, 0,
button, then use the number buttons to enter a power
Pause/Cancel
button.
before you press
Start
, and re-enter
11
Page 12
MD1200.fm Page 12 Monday, March 15, 2004 8:17 AM
Operation
Reheating Automatically
To reheat food, select the type of dish and the number of serving s you want to
reheat, then the oven will automatically set the reheatin g time.
1
Press the
The display shows :
SELECT ITEM WITH AUTO REHEAT BUTTON
2
Press the
to reheat. The initial serving size for each dish is one serving.
The display shows :
PLATE OF FOOD
CASSEROLE
PASTA REHEAT
SOUP REHEAT
You can select up to four servings for casseroles, pas ta reheat and Soup
Reheat . Only one serving is available for a plate of food.
3
Use the
For example, for three servings, press the 3 button(Refer to
the Auto Reheat Chart below for the servings).
The display shows the number of servings you h ave selected:
3 SERVINGS PRESS START
4
Press the
Auto Reheat
Auto Reheat
Number
Start
button and reheating will begin.
button.
repeatedly to select the type of dish you wish
buttons to increase the serving size.
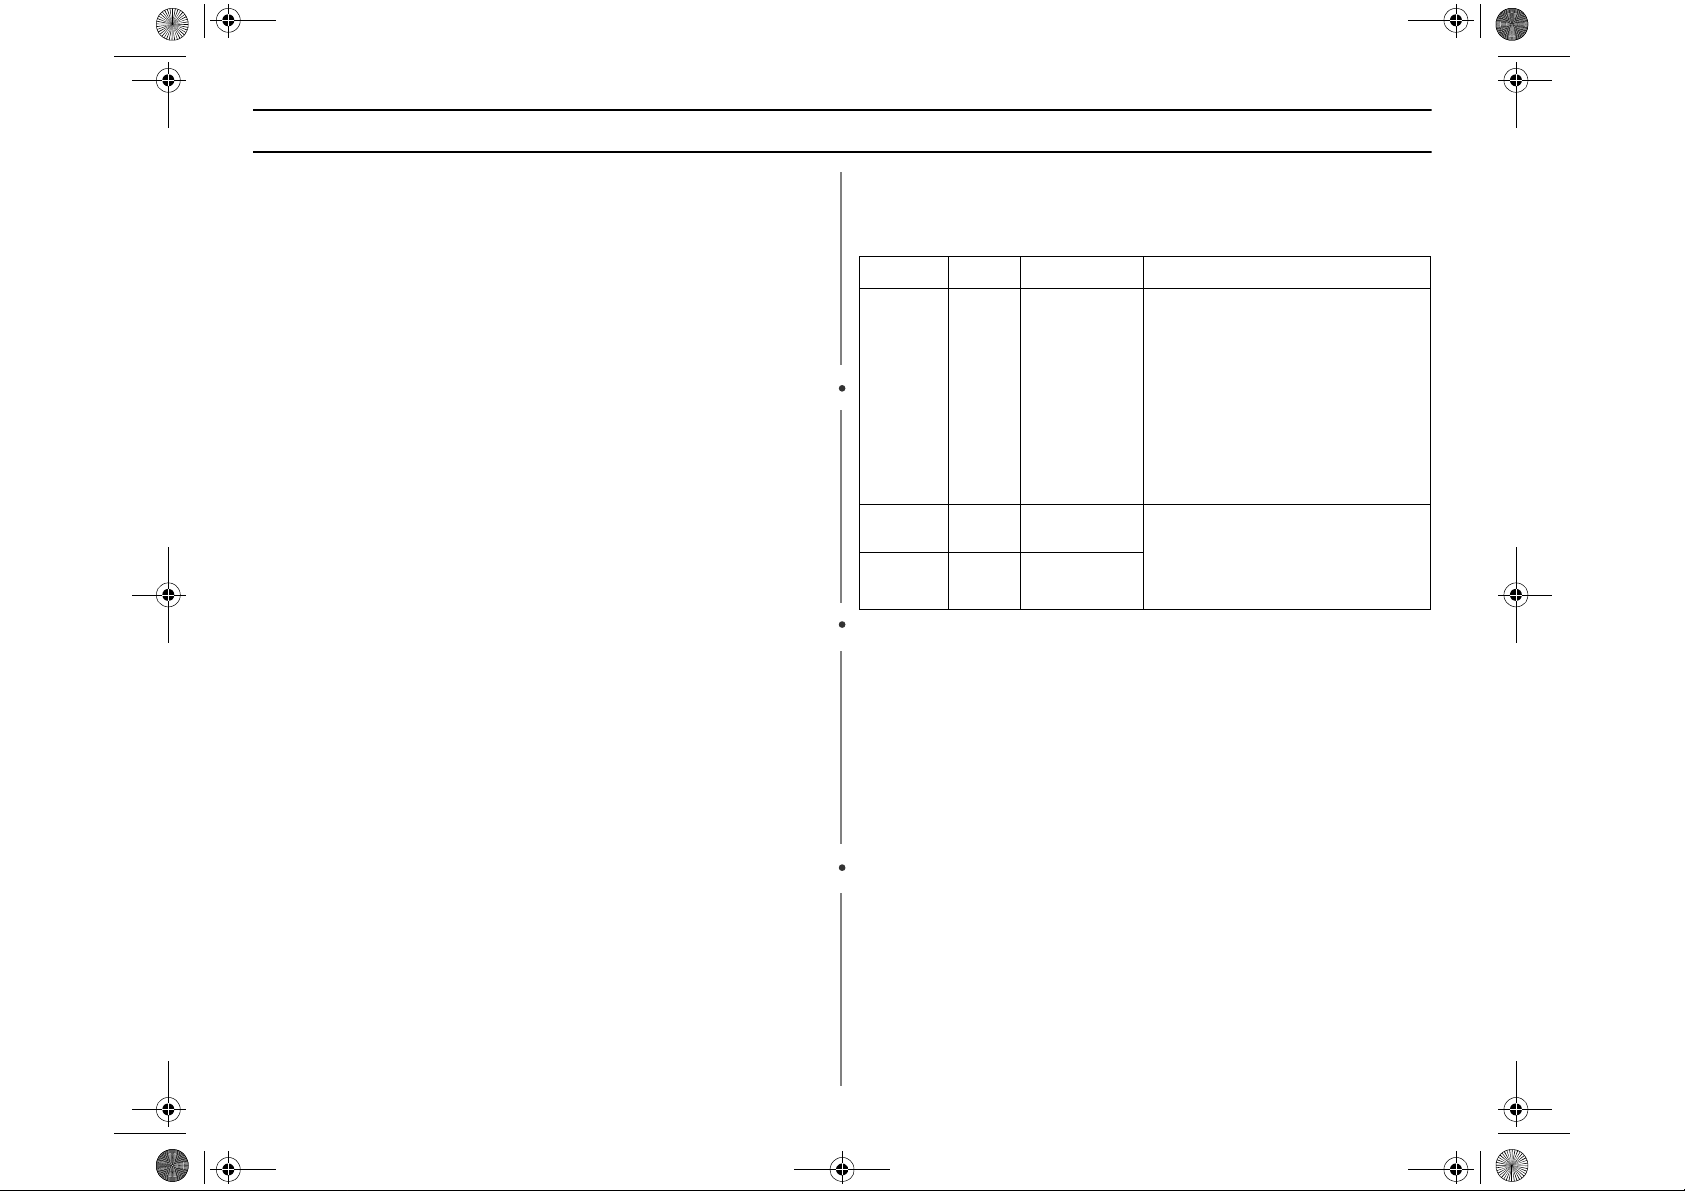
Auto Reheat Chart
• Follow the instructions below when Auto Reheating different types of
food.
Item Code Weight Remarks
Plate of
Food
Casserole
Pasta
Reheat
A-1
A-2
A-3
1 serving
1 to 4 servings
(8 oz./serving)
1 to 4 servings
(8 oz./serving)
• Use only pre-cooked, refrigerated
foods.
• Cover plate with vented plastic
wrap or wax paper.
• Contents
- 3-4 oz. meat, poultry or fish
( up to 6 oz. with bone)
- ½ cup starch (potatoes, pasta,
rice, etc.)
- ½ cup vegeta bles (about 3-4
oz.)
• Use only refrigerated foods.
• Cover with lid or vented plastic
wrap.
• Stir foods well before serving.
12
Page 13
MD1200.fm Page 13 Monday, March 15, 2004 8:17 AM
Operation
Multi-stage Cooking
1
Follow steps 1 and 2 in the “One-Stage Cooking” section on the
previous page.
When entering more than one cooking stage, the Power Level
button must be pressed before the second cooking stage can be
entered.
To set the power level at High for a stage of cooking, press the
Power Level button twice.
2
Use the number buttons to set a second cooking time.
3
Press the
power level of the second stage of cooking.
4
Press
You can check the Power Level while cooking is in progress by
pressing the Power Level but ton.
Power Level
Start
to begin cooking.
button, then use the number buttons to set the
Using the More/Less Buttons
The
More/Less
work in the
Cook modes
cooking with one of these procedu res.
1
To ADD more time to an automatic cooking procedure: Press the
More
2
To REDUCE the time of an automatic cooking procedure: Press the
Less
If you wish to increase/decrease in Time Cook
press the More(9) or Less(1) button.
buttons allow you to adjust pre-set coo king times. Th ey only
Instant, Handy Helper, Kids Meals, Snack Bar or Time
. Use the
(9) button.
(1) button.
More/Less
button only after you have already begu n
mode
by 10sec,
Switching the Beeper On/Off
You can switch the beeper off whenev er you want.
1
Press the
(“START” will flash)
2
Press the
“OFF”.(“START” will flash)
3
Press
The display returns to the time of day.
Sound
button. The display shows “ON”.
Sound
button to turn the volume off. The display shows:
Start.
Using the Kitchen Timer
1
Press the
2
Use the
run.
3
Press
4
The display counts down and beeps when the time has elapsed.
.
“Note: The microwave does not turn on when the Kitchen timer
Kitchen Timer
Number
Start
is used.
buttons to set the length of time you want the timer to
to begin Kitchen Timer.
”
button.
Demonstration Mode
You can use the Demonstration Mode to se e how your microwave oven operates without the oven heating.
1
Hold the 0 button and then press the 1 button.
To turn demo mode off, repeat step 1 above.
Setting the Child Protection Lock
You can lock your microwave oven so it can ’ t be use d by un supervised children.
1
Hold the 0 button and then press the 2 button.
At this point, the microwave oven cannot be used until it is
unlocked. To unlock it, repeat step 1 above.
13
Page 14
MD1200.fm Page 14 Monday, March 15, 2004 8:17 AM
Cooking Instructions
Cooking Utensils
Recommended Use
• Glass and glass-ceramic bowls and dishes — Use for heating or
cooking.
Microwavable browning dish — Use to brown the exterior of small
•
items such as steaks, chops, or pancakes. Follow the directions provided
with your browning dish.
Microwavable plastic wrap — Use to retain steam. Leave a small
•
opening for some steam to escape and avoid placing it directly on the
food.
Wax paper — Use as a cover to prevent spattering.
•
•
Paper towels and napki ns — Use for short-term heating and covering;
they absorb excess moisture and prevent spattering. Do not use recycled
paper towels, which may contain metal and can catch fire.
Paper plates and cups — Use for short-term heating at low
•
temperatures. Do not use recycled paper, which may contain metal and
can catch fire.
Thermometers — Use only those labeled “Microwave Safe” and follow
•
all directions. Check the food in several places. Conventional
thermometers may be used once the food has been removed from the
oven.
Limited Use
• Aluminum foil — Use narrow strips of foil to prevent overcooking of
exposed areas. Using too much foil can damage your oven, so be careful.
Ceramic, porcelain, and stoneware — Use these if they are labeled
•
“Microwave Safe”. If they are not labeled, test them to make sure they can
be used safely. Never use dishes with metallic trim.
Plastic — Use only if labeled “Microwave Safe”. Other plastics can melt.
•
•
Straw, wicker, and wood — Use only for short-term heating, as they
can be flammable.
Not Recommended
• Glass jars and bottles — Regular glass is too thin to be used in a
microwave, and can shatter.
Paper bags — These are a fire hazard, except for popcorn bags that are
•
designed for microwave use.
Styrofoam plates and cups — These can melt and leave an
•
unhealthy residue on food.
Plastic storage and food containers — Containers such as
•
margarine tubs can melt in the microwave.
Metal utensils — These can damage your oven. Remove all metal
•
before cooking.
Testing Utensils
If you are not sure whether a dish is microwave -safe o r not, you can p erform
this test:
1
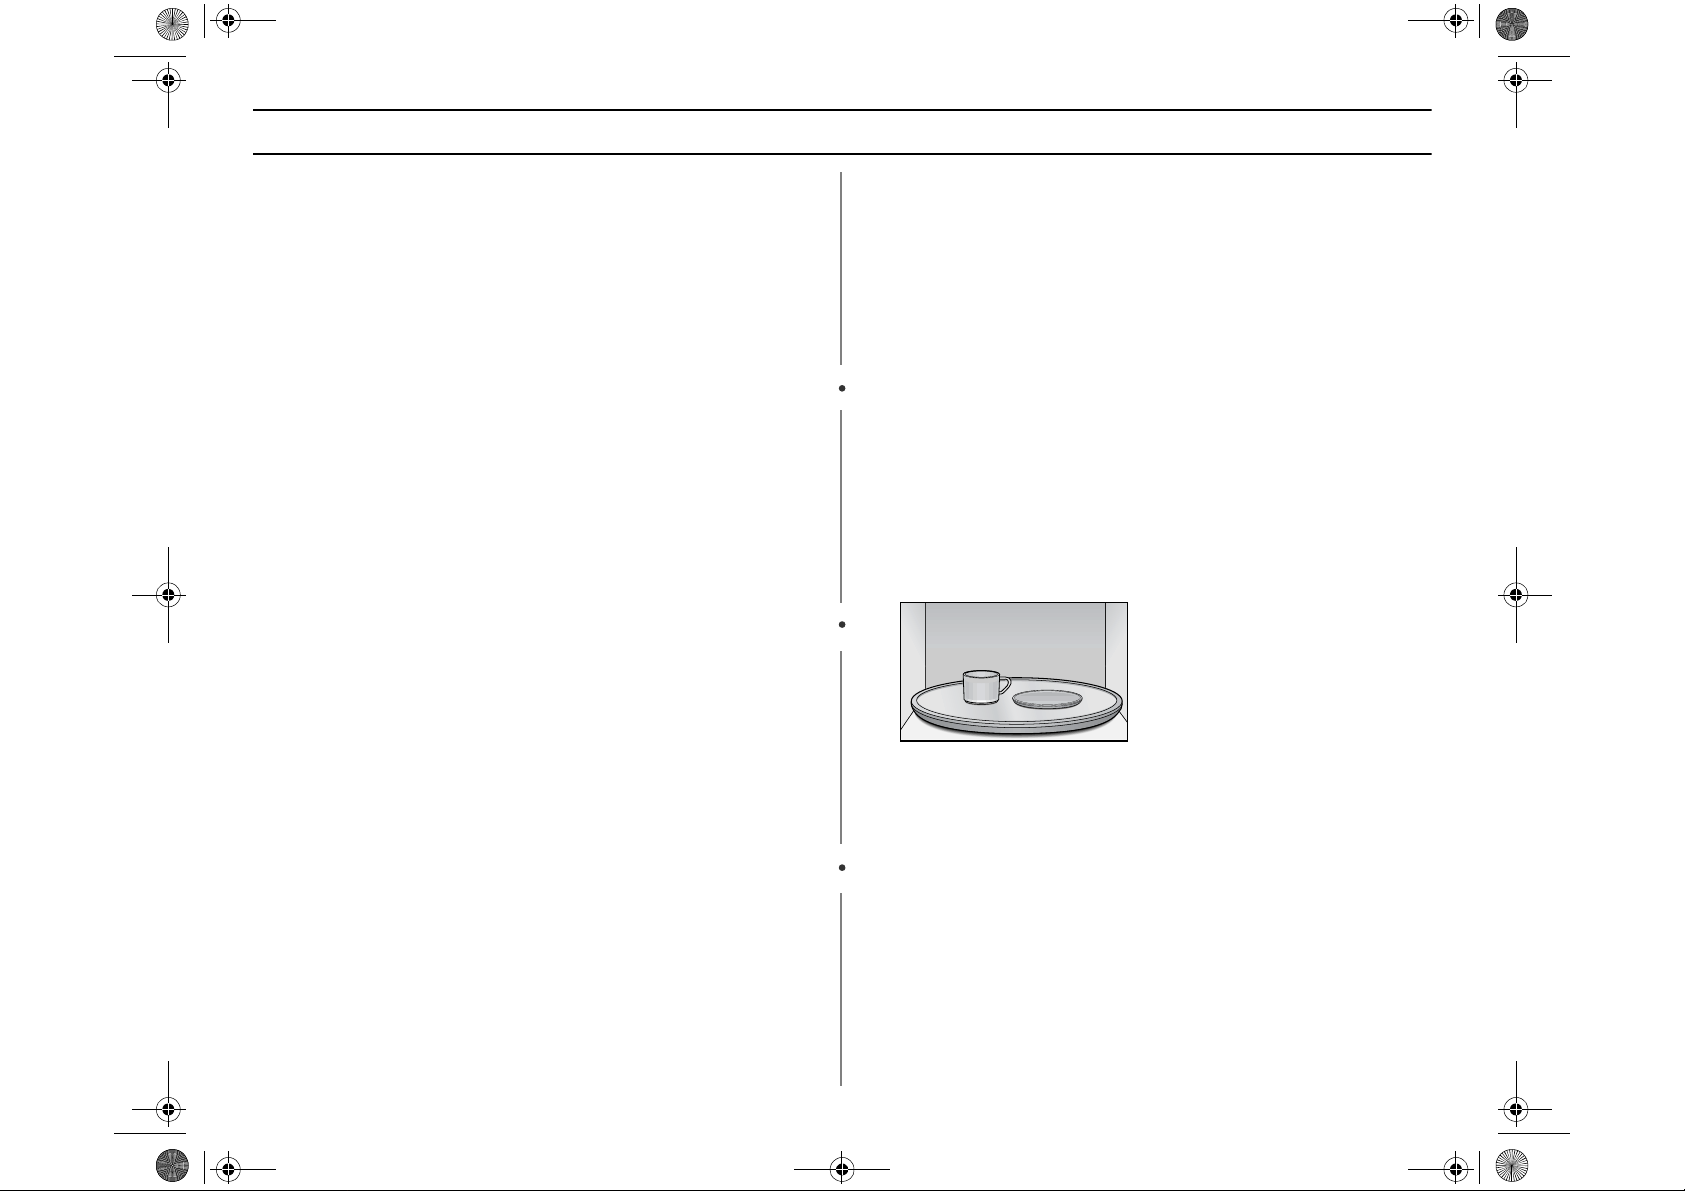
Fill a 1 cup glass measuring cup with water and put it inside your oven,
next to the dish you want to test.
2
Press the
High power.
The water should be warm and the di sh you are tes t ing sho uld be cool. If the
dish is warm, then it is absorbing microwave e nergy and is n ot acce ptable for
use in the microwave.
One Minute +
button once to heat them for one minute at
14
Page 15
MD1200.fm Page 15 Monday, March 15, 2004 8:17 AM
Cooking Instructions
Cooking Techniques
Stirring
Stir foods such as casseroles and v egetables w hile coo king to d istribute heat
evenly. Food at the outside of the dish a bsorb s mo re ene rgy an d heats more
quickly, so stir from the outside to the center. The oven will turn o ff when you
open the door to stir your food.
Arrangement
Arrange unevenly shaped foods , such a s chick en pie ces or chops, with the
thicker, meatier parts toward the outside of the turntable where they receive
more microwave energy. To prevent overco oking , place th in or delic ate pa rts
toward the center of the turntable.
Shielding
Shield food with narrow strips of aluminum foil to prevent overcooking. Areas
that need shielding include pou ltry wi ng-tips , the e nds of poultry legs, and corners of square baking dishes. U se only small amounts of alu minum foil. Larger
amounts can damage your oven.
Turning
Turn foods over midway through cook ing to ex pose a ll parts to micro wave
energy. This is especially important with large items such a s roasts.
Standing
Foods cooked in the micr owave build up inte rnal heat and c ontinue to cook for
a few minutes after the oven stops. L et foods stand to com plete co oking ,
especially foods such as roasts and whole vegetables. Roasts need this time
to complete cooking in the center without ov ercoo king the outer a reas. A ll liquids, such as soup or hot chocolate, sho uld be shaken or stirred when c ooking
is complete. Let liquids stand a moment before se rving. W hen heatin g baby
food, stir well and test the temperature before serving .
General Tips
• Dense foods, such as potatoes, take longer to heat than lighter foods.
Foods with a delicate texture should be heated at a low power level to
avoid becoming tough.
• Altitude and the type of cookware you are using can affect cooking time.
When using a new recipe, use the minimum cooking time and check the
food occasionally to prevent overcooking.
• Foods with a non-porous skin or shell, such as potatoes, eggs, or hot
dogs, should be pierced to prevent bursting.
• Frying with heating oil or fat is not recommended. Fat and oil can
suddenly boil over and cause severe burns.
• Some ingredients heat faster than others. For example, the jelly inside a
jelly doughnut will be hotter than the dough. Keep this in mind to avoid
burns.
• Home canning in the microwave oven is not recommended because all
harmful bacteria may not be destroyed by the microwave heating
process.
• Although microwaves do not heat the cookware, the heat is often
transferred to the cookware. Always use pot holders when removing food
from the microwave and instruct children to do the same.
Adding Moisture
Microwave energy is attracted to water molecu les. Fo od that is uneven in
moisture content should be covered or allowed to stand so that the heat disperses evenly. Add a small amount of water to d ry food to help it cook.
15
Page 16
MD1200.fm Page 16 Monday, March 15, 2004 8:17 AM
Cooking Instructions
Cooking Guide
Guide for Cooking Meat in Your Microwave
• Place meat on a microwave-safe roasting rack in a microwave-safe dish.
• Start meat fat-side down. Use narrow strips of aluminum foil to shield any
bone tips or thin meat areas.
• Check the temperature in several places before letting the meat stand the
recommended time.
• The following temperatures are removal temperatures. The temperature
of the food will rise during the standing time.
Food Cook Time/Power Level Directions
Roast
Beef
Boneless
Up to 4 lbs.
Pork
Boneless
or bone-in
Up to 4 lbs.
Cooking Time:
7-11 min. / lb. for 115° F Rare
8-12 min. / lb. for 120° F Medium
9-14 min. / lb. for 145° F Well Done
Power Level: High(Hi) for
first 5 min., then
Medium(50).
Cooking Time:
11-15 min. / lb. for 160° F
Well Done
Power Level: High(Hi) for
first 5 min., then
Medium(50).
Place roast fat-side down on
roasting rack. Cover with wa x
paper. Turn over when
cooking time is half up. Let
stand 10 min.
Place roast fat-side down on
roasting rack. Cover with
vented plastic wrap. Turn
over when cooking time is
half up. Let stand 10 min.
Guide for Cooking Poultry in Your Microwave
• Place poultry on a microwave-safe roasting rack in a microwave-safe
dish.
• Cover poultry with wax paper to prevent spattering.
• Use aluminum foil to shield bone tips, thin meat areas, or areas that start
to overcook.
• Check the temperature in several places before letting the poultry stand
the recommended time.
Food Cook Time/Power Level Directions
Whole
Chicken
Up to 4 lbs.
Chicken
Pieces
Up to 2 lbs.
Cooking Time:
6-9 min. / lb.180°F
Power Le vel: Medium
High(70).
Cooking Time:
6-9 min. / lb.
180°F dark meat
170°F light meat
Power Le vel: Medium
High(70).
Place chicken breast-side
down on roasting rack. Cover
with wax paper. Turn over
when the cooking time is half
up. Cook until juic es run clear
and meat near th e bone is no
longer pink. Let stand 5-10
min.
Place chicken bone-side
down on dish, with the
thickest portions towards the
outside of the dish. Cover
with wax paper. Turn over
when the cooking time is half
up. Cook until juic es run clear
and meat near th e bone is no
longer pink. Let stand 5-10
min.
16
Page 17
MD1200.fm Page 17 Monday, March 15, 2004 8:17 AM
Cooking Instructions
Guide for Cooking Seafood in Your Microwave
• Cook fish until it flakes easily with a fork.
• Place fish on a microwave-safe roasting rack in a microwave-safe dish.
• Use a tight cover to steam fish. A lighter cover of wax paper or paper
towel provides less steaming.
• Do not overcook fish; check it at minimum cooking time.
Food
Steaks
Up to 1.5 lbs.
Fillets
Up to 1.5 lbs.
Shrimp
Up to 1.5 lbs.
Cook Time/Power
Level
Cooking Time:
6-10 min. / lb.
Power Level: Medium-
High(70).
Cooking Time:
3-7 min. / lb
Power Level: Medium-
High(70).
Cooking Time:
3-5 ½ min. / lb.
Power Level: Medium-
High(70).
Directions
Arrange steaks on roasting
rack with meaty portions
towards the outside of rack.
Cover with wax paper. Turn
over and rearrange when
cooking time is half up. Cook
until fish flakes easily with a
fork. Let stand 3-5 min.
Arrange fillets in a baking
dish, turning any thin pieces
under Cover with wa x paper.
If over ½ inch thic k, turn over
and rearrange when c ooking
time is half up. Cook until
fish flakes easily with a fork.
Let stand 2-3 min.
Arrange shrimp in a baking
dish without overlapping or
layering. Cover with wax
paper. Cook until firm and
opaque, stirring 2 or 3 times.
Let stand 5 min.
Guide for Cooking Eggs in Your Microwave
• Never cook eggs in the shell, and never warm hard-cooked eggs in the
shell; they can explode.
• Always pierce whole eggs to keep them from bursting.
• Cook eggs just until set; they become tough if overcooked.
Guide for Cooking Vegetables in Your
Microwave
• Vegetables should be washed just before cooking. Often, no extra water
is needed. If dense vegetables such as potatoes, carrots and green
beans are being cooked, add about ¼ cup water.
• Small vegetables (sliced carrots, peas, lima beans, etc.) will cook faster
than larger ones.
• Whole vegetables, such as potatoes, acorn squash or corn on the cob,
should be arranged in a circle on the turntable before cooking. They will
cook more evenly if turned over after half the cooking time.
• Always place vegetables like asparagus and broccoli with the stem ends
pointing towards the edge of the dish and the tips toward the center.
• When cooking cut vegetables, always cover the dish with a lid or vented
microwavable plastic wrap.
• Whole, unpeeled vegetables such as potatoes, squash, eggplant, etc.,
should have their skin pricked in several spots before cooking to prevent
them from bursting.
• For more even cooking, stir or rearrange whole vegetables halfway
through the cooking time.
• Generally, the denser the food, the longer the standing time. (Standing
time refers to the time necessary for dense, large f oods and vegetables to
finish cooking after they come out of the oven.) A baked potato can stand
on the counter for five minutes before cooking is completed, while a dish
of peas can be served immediately.
17
Page 18
MD1200.fm Page 18 Monday, March 15, 2004 8:17 AM
Cooking Instructions
Auto Defrosting Guide
• Follow the instructions below when defrosting different types of food.
Food
Roast
Beef, Pork
Steaks,
Chops,
Fish
Ground
Meat
Whole
Chicken
Chicken
Pieces
Standard
Amount
2.5-6.0 lbs. Start with the food placed fat side down.
After each stage, turn the food over and
shield any warm portions with narrow
strips of aluminum foil.
0.5-3.0 lbs. After each stage, rearrange the food. If
there are any warm or thawed port ions of
food, shield them with narrow flat pieces
of aluminum foil. Remove any pieces of
food that are nearly defrosted . Let stan d,
covered, for 5-10 minutes.
0.5-3.0 lbs. After each stage, remove any pieces of
food that are nearly defrosted . Let stan d,
covered with foil, for 5–10 minutes.
2.5-6.0 lbs. Remove giblets before freezing poultry.
Start defrosting with the breast side
down. After the first stage, turn the
chicken over and shield any warm
portions with narrow strips of aluminum
foil. After the second stage, again shield
any warm portions with narrow strips of
aluminum foil. Let stand, covered, for
30–60 minutes in the refrigerator.
0.5-3.0 lbs. After each stage, rearrange or remove
any pieces of food that are nearly
defrosted. Let stand for 10-20 minutes.
Procedure
Notes
Check foods when the oven signals. A fter the fin al stage , sma ll section s may
still be icy; let them stand to continue thawing. Do not defrost u ntil all ice c rystals have thawed. Shielding roasts and steaks w ith sm all piec es of foil p r events the edges from cooking be fore the ce nter of the food has defrosted. Use
narrow, flat, smooth strips of alum inum fo il to cover the edges and thinner sections of the food.
18
Page 19
MD1200.fm Page 19 Monday, March 15, 2004 8:17 AM
Cooking Instructions
Recipes
Beef and Barley Stew
1½ lbs. beef stew cubes, cut into ½-inch piec es
½ cup chopped onion
2 Tbs. all-purpose flour
1 Tbs Worcestershire sauce
1 can (13.75-14.5 oz.) beef broth
2 medium carrots, cut into ½-inch slices (about 1 c up)
½ cup barley
1 bay leaf
¼ tsp. pepper
1 pkg. (9-10 oz.) frozen peas, thawe d
1. In a 2-quart casserole, combine beef, onion, flour, and
Worcestershire; mix well. Cover with lid. Cook at High for 6 to 8
minutes until beef is no longer pink, sti rrin g once.
2. Stir in beef broth, carrots, barley, bay leaf, and pepper. Cover with
lid. Cook at Medium for 1 to 1½ hours until carrots and beef are
tender, stirring 2 to 3 times.
3. Stir in peas. Cover with lid. Cook at Medium for 10 minutes. Let
stand for 10 minutes. Remove bay leaf before serving.
Makes 6 servings.
Broccoli and Cheese Casserole
¼ cup butter or margarine
¼ cup chopped onion
1½ Tbs. flour
½ tsp. salt
¼ tsp. dry mustard
1
/8 tsp. pepper
1½ cups milk
¼ cup chopped red pepper
8 oz. (2 cups) cheddar cheese, shredd ed
1 pkg. (9-10 oz.) frozen chopped brocco li, thawe d
4 cups cooked spiral shaped pasta (8 o z. dry)
1. In a 2-quart casserole, cook butter and onion at High for 1 to 2
minutes until onion is soft, stirring once.
2. Add flour, salt, mustard, and pepper; mix well. C ook at Hig h for 30 to
60 seconds until mixture boils. Stir in milk until smooth.
3. Stir in red pepper. Cook at High for 2 to 3 minutes until mixture boils
and thickens slightly, stirring twice. Stir in cheese until melted.
4. Add broccoli and pasta, mix well. Cover wi th lid. C ook at High f or 4 to
6 minutes until heated through, stirring once. Stir before serving.
Makes 6 servings.
19
Page 20
MD1200.fm Page 20 Monday, March 15, 2004 8:17 AM
Cooking Instructions
Warm Potato Salad
2 lbs. small red potatoes, cut into ½-inch pieces
4 slices bacon (uncooked), cut into ½-inch p ieces
¼ cup chopped onion
2 tsp. sugar
1 tsp. salt
1 tsp. flour
½ tsp. celery seed
1
/8 tsp. pepper
2½ Tbs. apple cider vinegar
1. In a 2-quart casserole, combine potatoes and ¼ cup water. Cover
with lid. Cook at High unti l potato es are te nder (7-10 min.); s tir twice .
Drain and set aside to cool slightly.
2. In a medium bowl, cook bacon at High until crisp (2½-3½ min.); stir
once. Place bacon on a paper towel. Reserve 1 Tbs. drippings.
3. Combine drippings and onion. Cover with plastic wrap; turn back a
corner to vent steam. Cook at High until tender (1½-2½ min.); stir
once.
4. Stir in sugar, salt, flour, celery seed, and pepper. Cook at High until
mixture boils (30-40 sec.). Stir in vinegar and ½ cup water. Cook at
High until liquid boils and thickens slightly (1-2 min.); stir once. Add
bacon to dressing. Pour dressing over potatoes. Stir well.
Makes 6 servings.
Black Bean Soup
1 cup chopped onion
1 clove garlic, minced
2 cans (15 oz. each) black beans, draine d
1 can (14-16 oz.) stewed tomatoes, chopped
1 can (13.75-14.5 oz.) chicken broth
1 can (7-8.5 oz.) corn
1 can (4 oz.) chopped green chilies
1-2 tsp. ground cumin, or to taste
1. Place onion and garlic in a 3-quart cassero le. Co ver with l id. Co ok at
High for 2 to 4 minutes until tender.
2. Add one can of beans, mash beans with a fork. Add remaining
ingredients; mix well.
3. Cook uncovered, at High for 10 minutes; stir. Reduce power to
Medium and cook for 5 minutes. Stir before serving.
Makes about 2 quarts.
20
Page 21
MD1200.fm Page 21 Monday, March 15, 2004 8:17 AM
Appendix
Troubleshooting Guide
Before you call a repair person for you r oven , check this list of p ossible problems and solutions.
Neither the oven’s display nor the oven operate.
• Properly insert the plug into a grounded outlet.
• If the outlet is controlled by a wall switch, make sure the wall switch is
turned on.
• Remove the plug from the outlet, wait ten seconds, then plug it in again.
• Reset the circuit breaker or replace any blown fuse.
• Plug another appliance into the outlet; if the other appliance doesn’t work,
have a qualified electrician repair the outlet.
• Plug the oven into a different outlet.
The oven’ s display works, but the power won’t come
on.
• Make sure the door is closed securely.
• Check to see if packing material or other material is stuck to the door
seal.
• Check for door damage.
• Press Cancel twice and re-enter all cooking instructions.
The power goes off before the set time has elapsed.
• If there has not been a power outage, remove the plug from the outlet,
wait ten seconds, then plug it in again. If there was a power outage, the
time indicator will display “ ” Reset the clock and any cooking
instructions.
• Reset the circuit breaker or replace any blown fuse.
The food is cooking too slowly.
• Make sure the oven is on its own 20 amp circuit line. Operating another
appliance on the same circuit can cause a voltage drop. If necessary,
move the oven to its own circuit.
You see sparks or arcing.
• Remove any metallic utensils, cookware, or metal ties. If using foil, use
only narrow strips and allow at least one inch between the f oil and inter ior
oven walls.
The turntable makes noises or sticks.
• Clean the turntable, roller ring and oven floor.
• Make sure the turntable and roller ring are positioned correctly.
Using your microwave causes TV or radio interference.
• This is similar to the interference caused by other small appliances, such
as hair dryers. Move your microwave further away from other appliances,
like your TV or radio.
Note :
If the oven is set m ore than 2 5 min utes at 80, 90 or 100 per ce nt
power level, after the first 25 minutes the power level will
automatically adjust itself to 70 percent power to avoid
overcooking.
21
Page 22
MD1200.fm Page 22 Monday, March 15, 2004 8:17 AM
Appendix
Care and Cleaning
Follow these instructions to clean and care fo r your o ven.
• Keep the inside of the oven clean. Food particles and spilled liquids can
stick to the oven walls, causing the oven to work less efficiently.
• Wipe up spills immediately. Use a damp cloth and mild soap. Do not use
harsh detergents or abrasives.
• To help loosen baked on food particles or liquids, heat two cups of water
(add the juice of one lemon if you desire to keep the oven fresh) in a fourcup measuring glass at
stand in the oven for one or two minutes.
• Remove the glass tray from the oven when cleaning the oven or tray. To
prevent the tray from breaking, handle it carefully and do not put it in
water immediately after cooking. Wash the tray carefully in warm sudsy
water or in the dishwasher.
• Clean the outside surface of the oven with soap and a damp cloth. Dry
with a soft cloth. To prevent damage to the operating parts of the oven,
don’t let water seep into the openings.
• Wash the door window with very mild soap and water. Be sure to use a
soft cloth to avoid scratching.
• If steam accumulates inside or outside the oven door, wipe with a soft
cloth. Steam can accumulate when operating the oven in high humidity
and in no way indicates microwave leakage.
• Never operate the oven without food in it; this can damage the magnetron
tube or glass tray. You may wish to leave a cup of water in the oven when
it is not in use to prevent damage if the oven is accidentally turned on.
If you have a problem you cannot solve,
please call our service line:
High power for five minutes or until boiling. Let
1-800-SAMSUNG
(1-800-726-7864)
Specifications
Model Number MD1200
Oven Cavity 1.2cuft
Controls 10 power levels, including defrost
Timer 99 minutes, 99 seconds
Power Source 120 VAC, 60 Hz
Power Output 1000 Watts
Power Consumption 1500 Watts
Outside Dimensions 18
Oven Cavity Dimensions 14
Shipping Dimensions 21
11/32
11/16
1/32
”(W) X 16
”(W) X 13
”(W) X 9
Net/Gross Weight 35.2/40.8 lbs
15/64
31/64
15/16
”(H) X 20
”(H) X 15
(H) X 22
3/32
7/16
1/8
”(D)
”(D)
”(D)
22
Page 23
MD1200.fm Page 23 Monday, March 15, 2004 8:17 AM
Warranty
Warranty Information
SAMSUNG MICROWA VE OVEN
LIMITED WARRANTY TO ORIGINAL PURCHASER
This SAMSUNG brand product, as supplied and distributed by
SAMSUNG ELECTRONICS AMERICA, INC. (SAMSUNG) and delivered
new, in the original carton to the original c onsum er pur chaser , is
warranted by SAMSUNG against manufacturing defects in materials and
workmanship for a limited warranty period of:
One (1) Year Parts and Labor, Eight (8) Years Parts Warranty for Magnetron
This limited warranty begins on the original date of purchase, and is valid
only on products purchased and used in the United States. To receive
warranty service, the purchaser must contact SAMSUNG for problem
determination and service procedures. Warranty service can only be
performed by a SAMSUNG authorized service center. The original dated
bill of sale must be presented upon request as proof of purchase to
SAMSUNG or SAMSUNG’s authorized service center. Transportation of
the product to and from the service center is the responsibility of the
purchaser.
SAMSUNG will repair or replace th is pr oduct, at our option and at no
charge as stipulated herein, with new or reconditioned parts or products if
found to be defective during the limited warranty period specified above.
All replaced parts and products become the prope rty of SA M SU NG and
must be returned to SAMSUNG. Replacement part s and pr oduct s
assume the remaining original warranty, or ninety (90) days, whichever is
longer.
This limited warranty covers manufacturing defects in m aterials and
workmanship encountered in normal, non-commercial use of this product
and shall not apply to the following, including, but not limited to: damage
which occurs in shipment; delivery and installation; applications and uses
for which this product was not intended; alt ere d pro duct or ser ia l
numbers; cosmetic damage or exterior finish; accidents, abuse, neglect,
fire, water, lightning or other acts of nature; use of products, equipment,
systems, utilities, services, parts, supplies, accessories, applications,
installations, repairs, external wiring or connectors not supplied or
authorized by SAMSUNG which damage this product or result in service
problems; incorrect electrical line voltage, fluctuations and surges;
customer adjustments and failure to follow operating instructions,
cleaning, maintenance and environmental instructions that are covered
and prescribed in the instruction book; product remo val and
reinstallation; problems caused by pest infest at ions, and overheating or
overcooking by user; glass tray or turntable; reduced magnetr on power
output related to normal aging. SAM SU NG does not warrant
uninterrupted or error-free operation of the product.
THERE ARE NO EXPRESS WARRANTIES OTHER THAN THOSE
LISTED AND DESCRIBED ABOVE, AND NO WARRANTIES
WHETHER EXPRESS OR IMPLIED, INCLUDING, BUT NOT LIMITED
TO, ANY IMPLIED WARRANTIES OF MERCHANTABILITY OR
FITNESS FOR A PARTICULAR PURPOSE, SHALL APPLY AFTER THE
EXPRESS WARRANTY PERIODS STATED ABOVE, AND NO OTHER
EXPRESS WARRA NTY OR GUARANTY GIV EN BY ANY PERSON,
FIRM OR CORPORATIO N WIT H RESPECT TO THIS PRODUCT
SHALL BE BINDING ON SAMSUNG. SAMSUNG SHALL NOT BE
LIABLE FOR LOSS OF RE VENUE OR PROFITS, FAILURE TO
REALIZE SAVINGS OR OTHER BENEFITS, OR ANY OTHER
SPECIAL, INCIDENTAL OR CONSEQUENTIAL DAMAGES CAUSED
BY THE USE, MISUSE OR INABILITY TO USE THIS PRODUCT,
REGARDLESS OF THE LEGAL THEORY ON WHICH THE CLAIM IS
BASED, AND EVEN IF SAMSUNG HAS BEEN ADVISED OF THE
POSSIBILITY OF SUCH DAMAGES. NOR SHALL RECOVERY OF
ANY KIND AGAINST SAMSUNG BE GREATER IN AMOUNT THAN
THE PURCHASE PRICE OF THE PRODUCT SOLD BY SAMSUNG
AND CAUSING THE ALLEGED DAMAGE. WITHOUT LIMITING THE
FOREGOING, PU RCHASER ASSUMES ALL RISK AND LIABILITY
FOR LOSS, DAMAGE OR INJURY TO PURCHASER AND
PURCHASER’S PROPERTY AND TO OTHERS AND THEIR
PROPERTY ARISING OUT OF THE USE, MISUSE OR INABILITY TO
USE THIS PRODUCT SOL D BY SAMSUNG NOT CAUSED DIRECTL Y
BY THE NEGLIGENCE OF SAMSUNG. THIS LIMITED WARRANTY
SHALL NOT EXTEND TO ANYONE OTHER THAN THE ORIGINAL
PURCHASER OF THIS PRODUCT, IS NONTRANSFERABLE AND
STATES YOUR EX CLUSIVE REMEDY.
Some states do not allow limitat ions on how long an implied warranty
lasts, or the exclusion or limitation of incidental or conse quential
damages, so the above limitations or exclusions may not apply to you.
This warranty gives you specific legal rights, and you may also have
other rights which vary from state to state.
To obtain warranty service, please contact:
AMERICA, INC. - WWW.SAMSUNGUSA.COM
SAMSUNG CUSTOMER SERVICE 400
VALLEY ROAD, SUITE 201, MT. ARLINGTON , NJ 07856
Tel: 973-601-6000, Fax: 973-601-6001
1-800-SAMSUNG (1-800-726-7864)
WWW.SAMSUNGSUPPORT.COM
SAMSUNG ELECTRONICS
23
Page 24
MD1200.fm Page 24 Monday, March 15, 2004 8:17 AM
Warranty
SAMSUNG ELECTRONICS
NORTH AMERICAN LIMITED WARRANTY ADDENDUM
Subject to the requirements, con ditions, exclu sions and limitations of the Original Limited Warranty supplied with Sam sung Electro nics (S AMSUN G) products, and the requirements, conditions, exclu sions a nd lim itations c ontained
herein, SAMSUNG will additionally provide Warranty Repair Se rvice in th e
United States on SAMSUNG products pu rchas ed in C anad a, and in Canada
on SAMSUNG products purchased in the United States, for the warranty
period originally specified, and to the Or iginal Pu rchaser only.
The above described warranty re pairs must be performed by a SAMSUNG
Authorized Service Center. Along with this Statement, the Original Limited
Warranty Statement and a dated Bill of Sale as Proof of P urcha se must be
presented to the Service Center. Tr ansportation to and from the Service Center is the responsibility of the purchaser.
Conditions covered are limited only to manufacturing defects in material or
workmanship, and only those encounte red in normal use of the product.
Excluded, but not limited to, are any original specified p rovision s for, in-h ome
or on-site services, minimum or maximum repair times, exchanges or replacements, accessories, options, upgra des, or consumables.
For the locations of a SAMSUNG Au thorized Serv ice Ce nter in the United
States and Canada, please conta ct SAM SU NG at:
1-800-SAMSUNG (1-800-726-7864)
Or on-line at:
WWW.SAMSUNGUSA.COM and WWW.SAMSUNGCANADA.COM
Guía Rápida( Spanish)
Función! Operación
Ajuste de Reloj 1. Presione CLOCK.
2. Use botones numéricos para seleccionar
hora.
3. Presiones CLOCK de nuevo.
Cocinado Fase
simple
Cocinado Un
Minuto +
Botones de Cocinado Instantáneo
Descongelado
Automático
Ajuste de Niveles
de Poder y Tiempo
de Cocinado
Handy Helper,
Kids Meals, Snack
Bar
1. Use botones numéricos para seleccionar
tiempo.
2. Seleccione nivel de poder o deje alto.
3. Presione START.
1. Presione el botón ONE MINUTE+ por cada
minuto de cocción.
2. El tiempo se vera en pantalla y el horno
comenzara.
1. Presione botón que corresponde al alimento
que esta cocinando.
2. Presione el botón para sel eccionar el tamaño
de la porción.
1. Presione AUTO DEFROST.
2. Ingrese el peso del alimento presionando el
botón de AUTO DEFROST repetidamente o
con los botones numéricos.
3. Después de medio tiempo, presione
CANCEL voltee el aliment o, y presiones
START para re iniciar.
1. Use botones numéricos para tiempo de
cocción.
2. Para seleccionar nivel de pode r, presion e los
botones numéricos.
3. Presione START para empezar a cocinar.
1. Presione HANDY HELPER(KIDS MEALS,
SNACK BAR) repetidamente pare seleccionar tipo de platillo.
2. Para incrementar tamaño de porción,
presione los botones numéricos.
3. Presione START para comenzar.
24
Page 25
MD1200.fm Page 25 Monday, March 15, 2004 8:17 AM
Quick Reference(English)
Feature Operation
Set Clock 1. Press CLOCK.
2. Use number buttons to enter the current
time.
3. Press CLOCK or START again.
One Stage
Cooking
One Minute+
Cooking
Instant Cook
Buttons
Auto Defrost 1. Press AUTO DEFROST.
Set Cooking Time
and Power Levels
Handy Helper,
kids Meals,
Snack Bar
1. Use number buttons to set cooking time.
2. Set power level or leave at high.
3. Press START.
1. Press the ONE MINUTE + button once for
each minute of cooking.
2. The time will display and the oven will start.
1. Press button that corresponds to the food
you are cooking (for example, POPCORN).
2. Press the butto n re pea tedl y to se lec t s erv ing
size.
2. Enter weight of food by pressing AUTO
DEFROST button repeatedly or using the
number buttons.
3. When the oven beeps, press PAUSE/
CANCEL but ton and turn f ood over. Press
START to resume defrosting cycle.
1. Use number buttons to set cooking time.
2. To set power level at other than HIGH, press
POWER LEVEL and use the number buttons
to enter the power level.
3. Press START to begin cooking.
1. Press HANDY HELPER(KIDS MELAS,
SNACK BAR) repeatedly to select type of
dish to reheat.
2. To increase serving size, press the
corresponding number button.
3. Press START to begin cooking.
ELECTRONICS
SAMSUNG ELECTRONICS AMERICA, INC.
HEADQUARTERS
105 CHALLENGER ROAD
RIDGEFIELD PARK, NEW JERSEY 07660-0511
Samsung Electronics Co., Ltd.
Printed in Malaysia
 Loading...