

Page 1

MAX-DG53
MAX-DG54
DVD MINI COMPONENT SYSTEM
WITH USB HOST
DVD/CD/MP3-CD/CD-R/RW PLAYBACK
user manual
imagine the possibilities
Thank you for purchasing a Samsung product.
To receive a more complete service,
please register your product at
AH68-02170K
www.samsung.com/global/register
Page 2
Safety Warnings Precautions
ENG
ENG
PREPARATION
CAUTION
RISK OF ELECTRIC SHOCK.
DO NOT OPEN
TO REDUCE THE RISK OF ELECTRIC SHOCK,
DO NOT REMOVE REAR COVER (or BACK).
NO USER SERVICEABLE PARTS INSIDE.
REFER SERVICING TO QUALIFIED SERVICE
PERSONNEL.
CLASS 1 LASER PRODUCT
CLASS 1 LASER PRODUCT
KLASSE 1 LASER PRODUKT
LUOKAN 1 LASER LAITE
KLASS 1 LASER APPARAT
PRODUCTO LASER CLASE 1
CAUTION :
WARNING : To reduce the risk of fire or electric shock, do not expose this appliance to rain or moisture.
CAUTION : TO PREVENT ELECTRIC SHOCK, MATCH WIDE BLADE OF PLUG TO WIDE SLOT, FULLY INSERT.
This apparatus shall always be connected to a AC outlet with a protective grounding connection.
•
To disconnect the apparatus from the mains, the plug must be pulled out from the mains socket, therefore the mains
•
plug shall be readily operable.
CAUTION
Apparatus shall not be exposed to dripping or splashing and no objects filled with liquids, such as vases,
•
shall be placed on the apparatus.
The Mains plug is used as a disconnect device and shall stay readily operable at any time.
•
This Compact Disc player is classified as a CLASS 1
LASER product.
Use of controls, adjustments or performance of procedures
other than those specified herein may result in hazardous
radiation exposure.
This symbol indicates “dangerous voltage” inside
the product that presents a risk of electric shock
or personal injury.
This symbol indicates important instructions
accompanying the product.
INVISIBLE LASER RADIATION WHEN OPEN AND
INTERLOCKS DEFEATED, AVOID EXPOSURE TO BEAM.
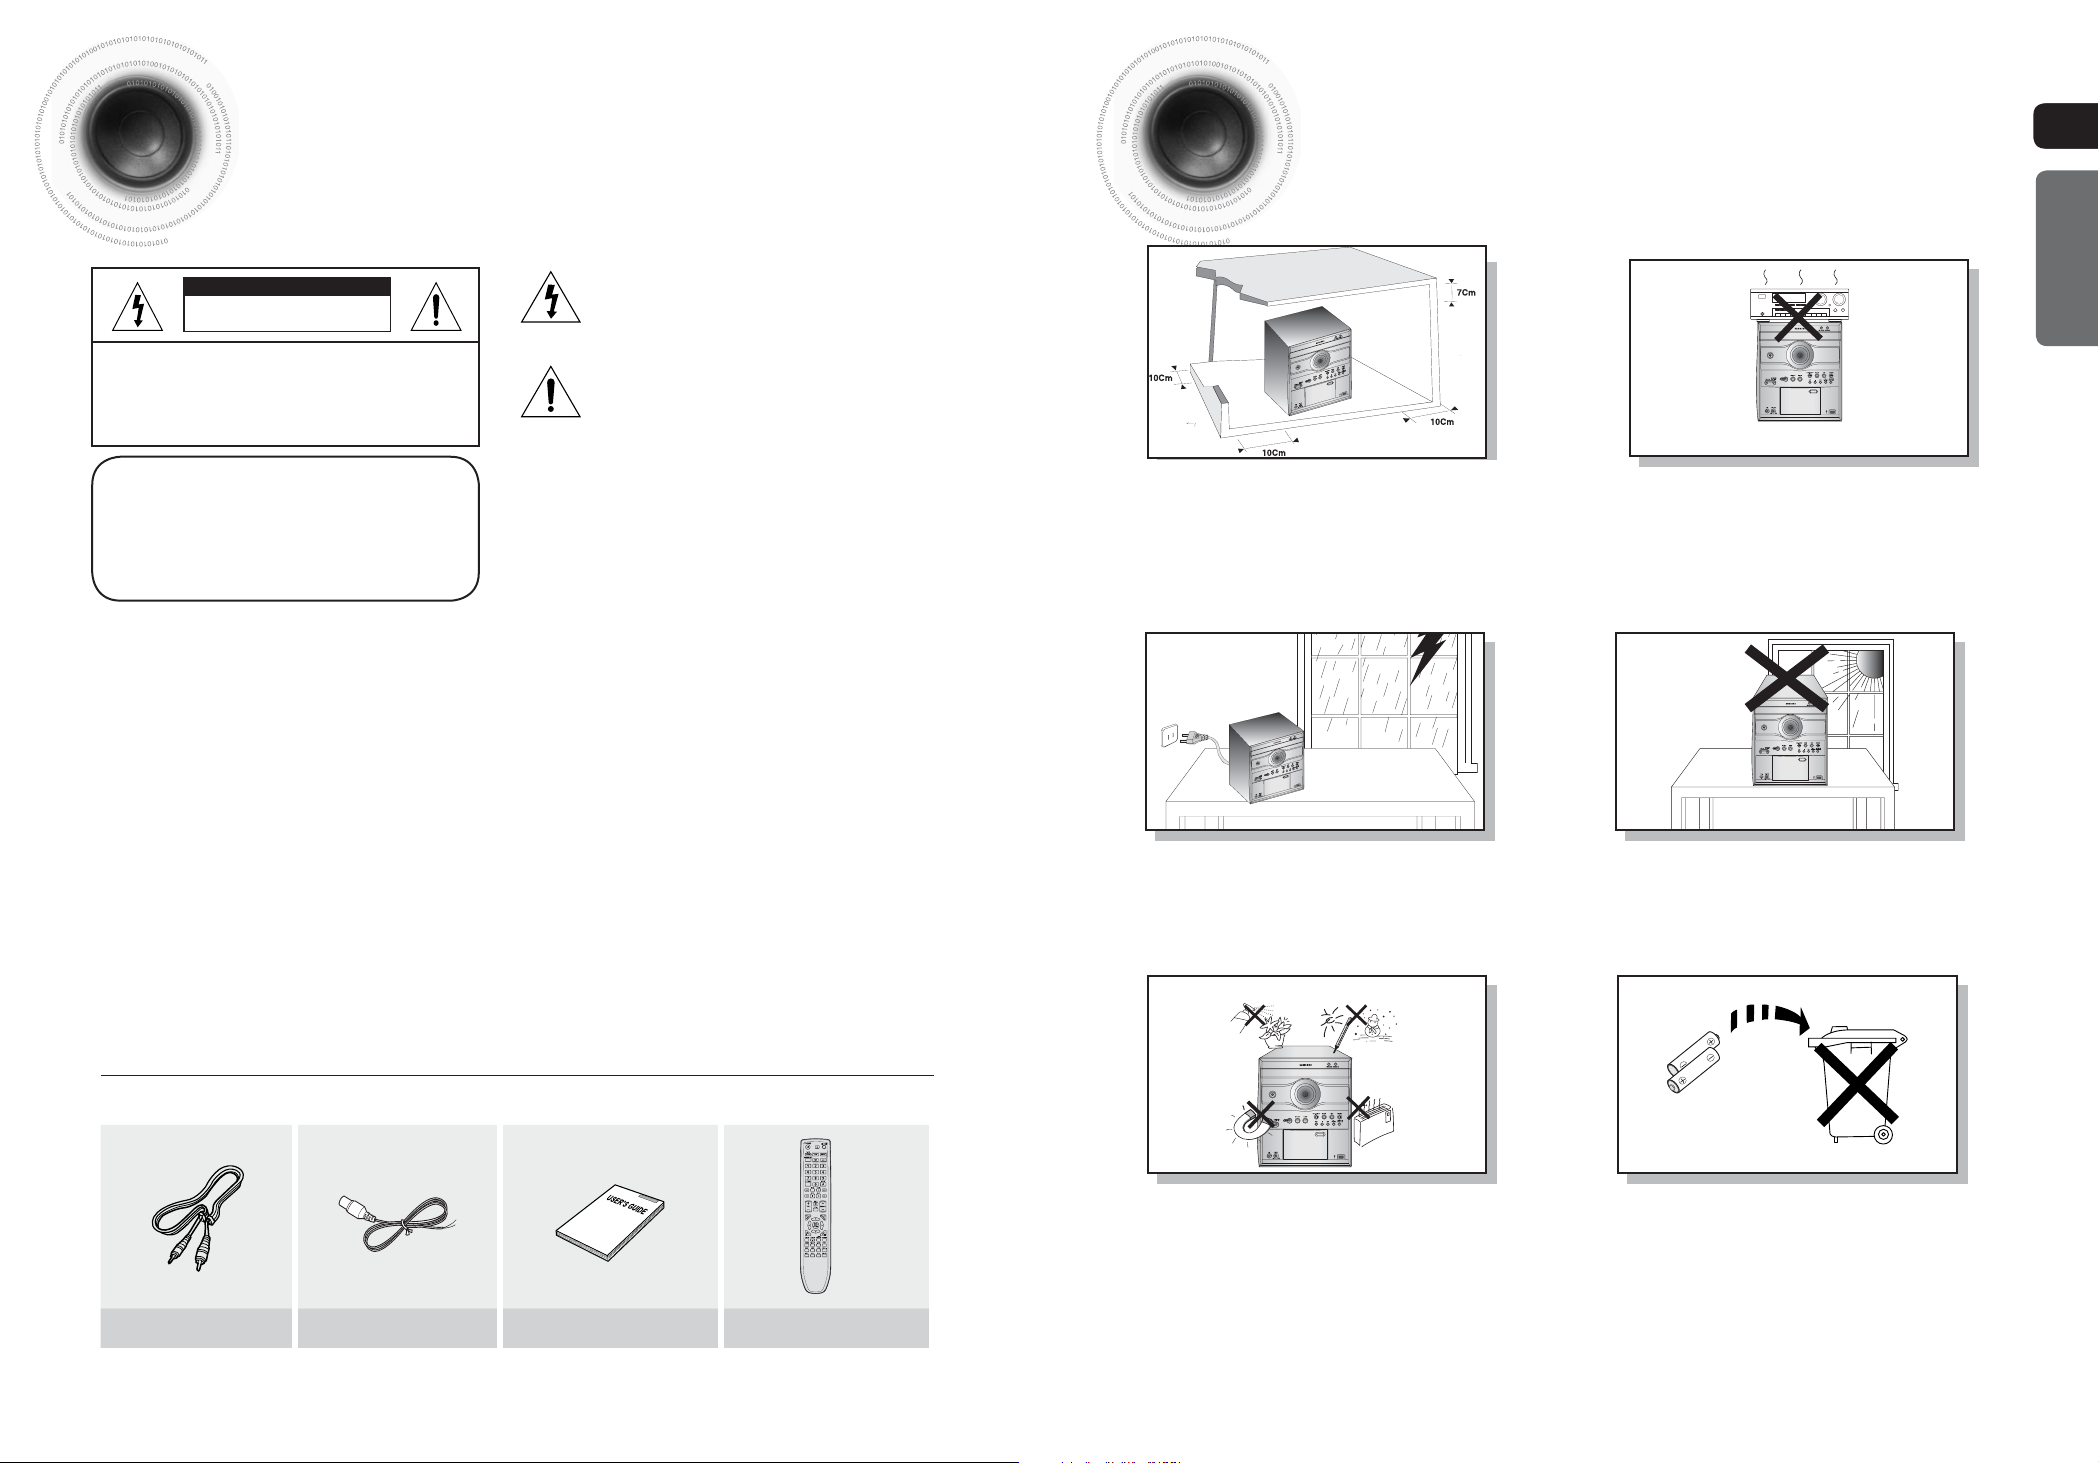
Ensure that the AC power supply in your house complies with the identification sticker located on the back of your player. Install your
player horizontally, on a suitable base (furniture), with enough space around it for ventilation (3~4inches). Make sure the ventilation slots
are not covered. Do not stack anything on top of the player. Do not place the player on amplifiers or other equipment which may become
hot. Before moving the player, ensure the disc tray is empty. This player is designed for continuous use. Switching off the DVD player to
the stand-by mode does not disconnect the electrical supply. In order to disconnect the player completely from the power supply,
remove the main plug from the wall outlet, especially when left unused for a long period of time.
During thunderstorms, disconnect AC main plug from the
wall outlet.
Voltage peaks due to lightning could damage the unit.
Do not expose the unit to direct sunlight or other heat
sources.
This could lead to overheating and malfunction of the unit.
[Saudi Arabian Standards Organisation only]
THIS APPLIANCE IS FITTED WITH 220V SASO APPROVED PLUG.THE CUSTOMER IS ENTITLED TO A FREE SASO
APPROVED 127V PLUG FROM THE LOCAL DEALER.
WHAT’S INCLUDED
Check for the supplied accessories below.
Video Cable FM Antenna
User's Manual
Remote Control
Protect the player from moisture(i.e. vases) , and excess heat(e.g.fireplace) or
equipment creating strong magnetic or electric fields (i.e.speakers...).
Disconnect the power cable from the AC supply if the player malfunctions.
Your player is not intended for industrial use.
Use of this product is for personal use only.
Condensation may occur if your player or disc have been stored in cold
temperatures.
If transporting the player during the winter, wait approximately 2 hours until the
unit has reached room temperature before using.
Phones
The battery used with this product contain chemicals that
are harmful to the environment.
Do not dispose of batteries in the general household trash.
1 2
Page 3
Features
Multi-Disc Playback & FM Tuner
The MAX-DG53/DG54 combines the convenience of multi-disc playback capability,
including DVD, CD, MP3-CD, CD-R, CD-RW, DivX,JPEG and DVD-R/RW, with a
sophisticated FM tuner, TAPE, USB HOST all in a single player.
TV Screen Saver Function
The MAX-DG53/DG54 automatically brightens and darkens the
brightness of the TV screen after 3 minutes in the stop mode.
The MAX-DG53/DG54 automatically switches itself into the power
saving mode after 20 minutes in the screen saver mode.
Power Saving Function
The MAX-DG53/DG54 automatically shuts itself off after 20 minutes in the stop mode(only for
USB, DVD).
DVD (Digital Versatile Disc) offers fantastic audio and video, thanks to Dolby Digital
V I D E O
~
1 6
•
•
surround sound and MPEG-2 video compression technology. Now you can enjoy these
realistic effects in the home, as if you were in a movie theater or concert hall.
DVD players and the discs are coded by region. These regional codes must match in order
for the disc to play. If the codes do not match, the disc will not play.
The Region Number for this player is given on the rear panel of the player.
(Your DVD player will only play DVDs that are labeled with identical region codes.)
Copy Protection
Many DVD discs are encoded with copy protection. Because of this, you should only connect your
DVD player directly to your TV, not to a VCR. Connecting to a VCR results in a distorted picture
from copy-protected DVD discs.
This product incorporates copyright protection technology that is protected by methods claims of certain
U.S. patents and other intellectual property rights owned by Macrovision Corporation and other rights
owners. Use of this copyright protection technology must be authorized by Macrovision Corporation, and
is intended for home and other limited viewing uses only unless otherwise authorized by Macrovision
Corporation. Reverse engineering or disassembly is prohibited.
Contents
PREPARATION
Safety Warnings .................................................................................................................................................................1
Precautions.........................................................................................................................................................................2
Features .............................................................................................................................................................................3
Description..........................................................................................................................................................................5
CONNECTIONS
Connecting the Speakers ...................................................................................................................................................9
Connecting to a TV .............................................................................................................................................................10
P.SCAN(Progressive Scan) Function .................................................................................................................................12
Connecting External Components ......................................................................................................................................13
Connecting the FM Antennas ............................................................................................................................................. 14
Setting the Clock ................................................................................................................................................................15
OPERATION
Disc Playback ..................................................................................................................................................................... 16
MP3/WMA-CD Playback ....................................................................................................................................................17
JPEG File Playback ............................................................................................................................................................18
DivX Playback ....................................................................................................................................................................19
Playing Media Files using the USB feature ........................................................................................................................ 21
Displaying Disc Information ................................................................................................................................................ 23
Fast/Slow Playback ............................................................................................................................................................ 24
Skipping Scenes/Songs......................................................................................................................................................25
Angle Function....................................................................................................................................................................26
Repeat Playback ................................................................................................................................................................27
A-B Repeat Playback ........................................................................................................................................................28
Zoom Function....................................................................................................................................................................29
Selecting Audio/Subtitle Language.....................................................................................................................................30
Moving Directly to a Scene/Song .......................................................................................................................................31
Using Disc Menu ................................................................................................................................................................32
Using the Title Menu...........................................................................................................................................................33
SETUP
Setting the Language .........................................................................................................................................................34
Setting TV Screen type.......................................................................................................................................................35
Setting Parental Controls (Rating Level) ............................................................................................................................ 37
Setting the Password..........................................................................................................................................................38
Setting the DRC (Dynamic Range Compression) ..............................................................................................................39
AV SYNC Setup .................................................................................................................................................................40
RADIO OPERATION
Listening to Radio ...............................................................................................................................................................41
Presetting Stations .............................................................................................................................................................42
TAPE
Listening to a Cassette ....................................................................................................................................................... 43
Recording a Radio Program ............................................................................................................................................... 44
Recording a Compact Disc .................................................................................................................................................45
MISCELLANEOUS
CD RIPPING Function ........................................................................................................................................................47
Timer Function....................................................................................................................................................................48
Canceling the Timer ...........................................................................................................................................................49
POWER SOUND/POWER BASS/PARTY Function .......................................................................................................... 50
DSP/EQ Function ..............................................................................................................................................................51
Sleep Timer Function / Mute Function................................................................................................................................52
DEMO Function / DIMMER Function / ECO Function ........................................................................................................ 53
Connecting Headphones/Microphone ................................................................................................................................54
Cautions on Handling and Storing Discs ............................................................................................................................ 55
Before Calling for Service ...................................................................................................................................................56
Notes on Discs ...................................................................................................................................................................58
Notes on Terminology ........................................................................................................................................................59
Specifications .....................................................................................................................................................................60
ENG
ENG
PREPARATION
3
4
Page 4
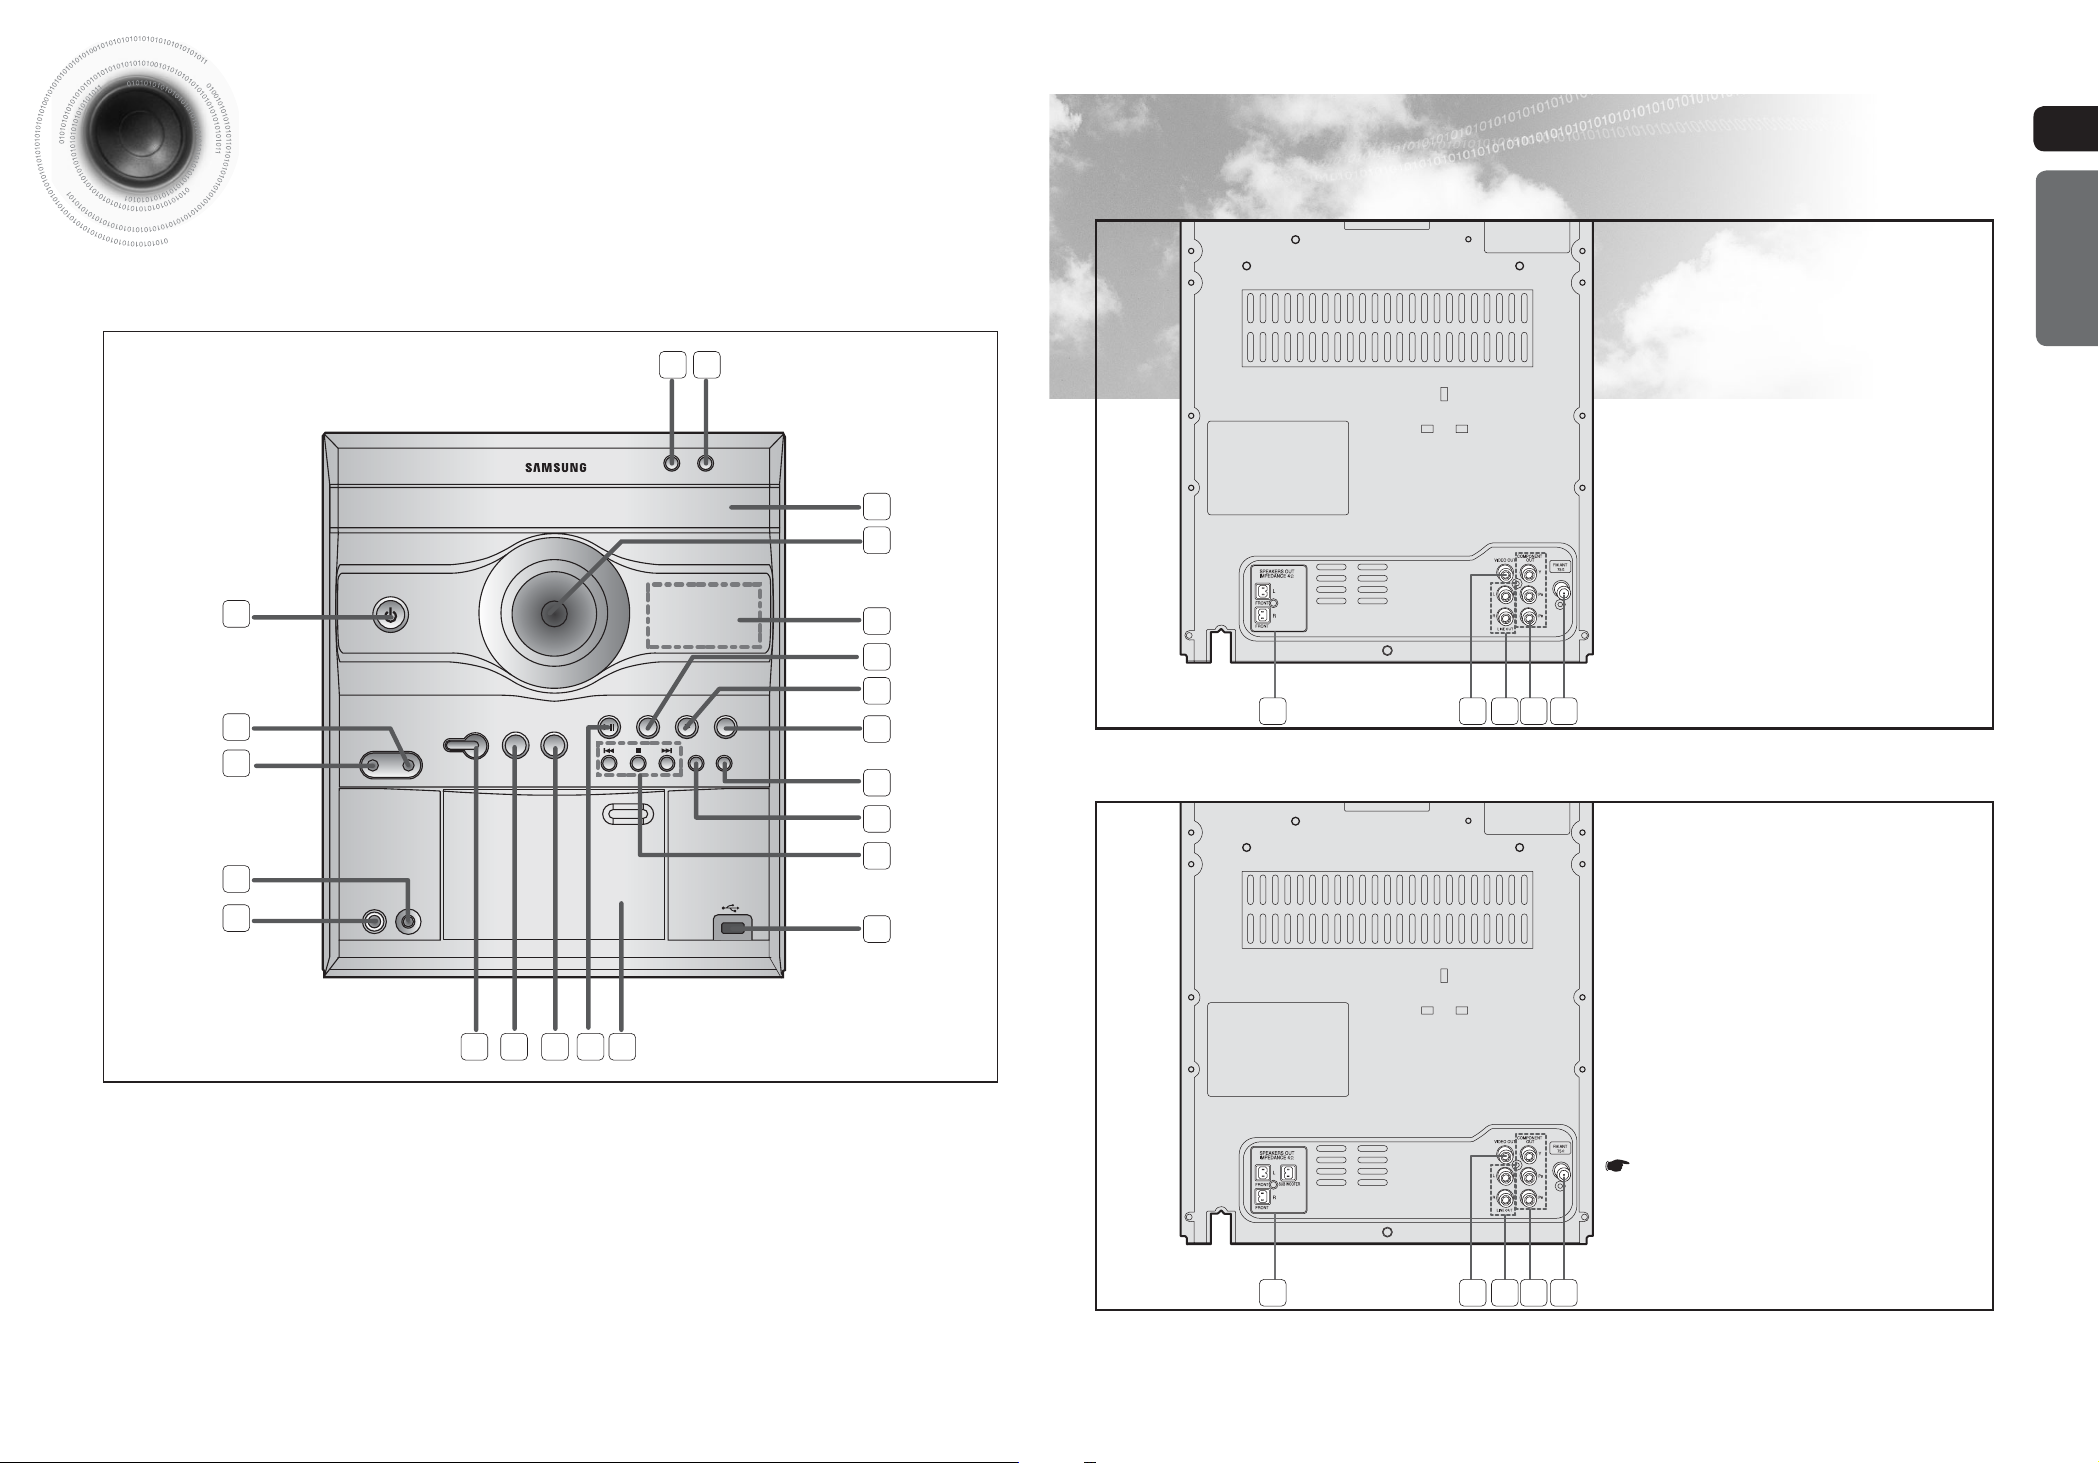
Description
—Front Panel—
DISC CHANGE
2122
OPEN/CLOSE
20
19
—Rear Panel—
MAX-DG53
1.
Speaker Connector Terminals
2.
Video Output Connector
Connect the TV's video input jacks (VIDEO
IN) to the VIDEO OUT connector.
3.
LINE OUT connector
4.
Component Output Connectors
Connect a TV with component video input
jacks to these jacks.
5.
FM Antenna Connector
ENG
PREPARATION
1
2
PHONES
PORTABLE
AUDIO IN
P. SOUND P. BASS
PART Y
3
4
5
MIC MIC VOL
MIN. .MAX
6 7 8 9
1. STANDBY/ON
2. PORTABLE AUDIO IN
3. HEADPHONE JACK
4. MIC VOLUME
5. MIC
6. PARTY
7. POWER SOUND
8. POWER BASS
9. MP3-CD/DVD FUNCTION
10. CASSETTE DECK DOOR
11. USB JACK
12. SEARCH FUNCTION BUTTONS, TUNING MODE
OR STOP BUTTON
18
17
MP3-CD/DVD TUNER TAPE
CD
RIPPING
AUX/USB
CD SYNC/
REC/PAUSE
16
15
14
13
12
11
10
13. CD RIPPING
14. CD SYNC/REC/PAUSE
15. AUX/USB FUNCTION
16. TAPE FUNCTION
17. TUNER FUNCTION
18. WINDOW DISPLAY
19. VOLUME
20. COMPACT DISC COMPARTMENT
21. OPEN/CLOSE
22. DISC CHANGE
MAX-DG54
1
1
2
2
4
3
5
1.
Speaker Connector Terminals
2.
Video Output Connector
Connect the TV's video input jacks (VIDEO
IN) to the VIDEO OUT connector.
3.
LINE OUT connector
4.
Component Output Connectors
Connect a TV with component video input
jacks to these jacks.
5.
FM Antenna Connector
All those pictures of Rear panel are
based on MODEL:MAX-DG54
4
3
5
5
6
Page 5
Description
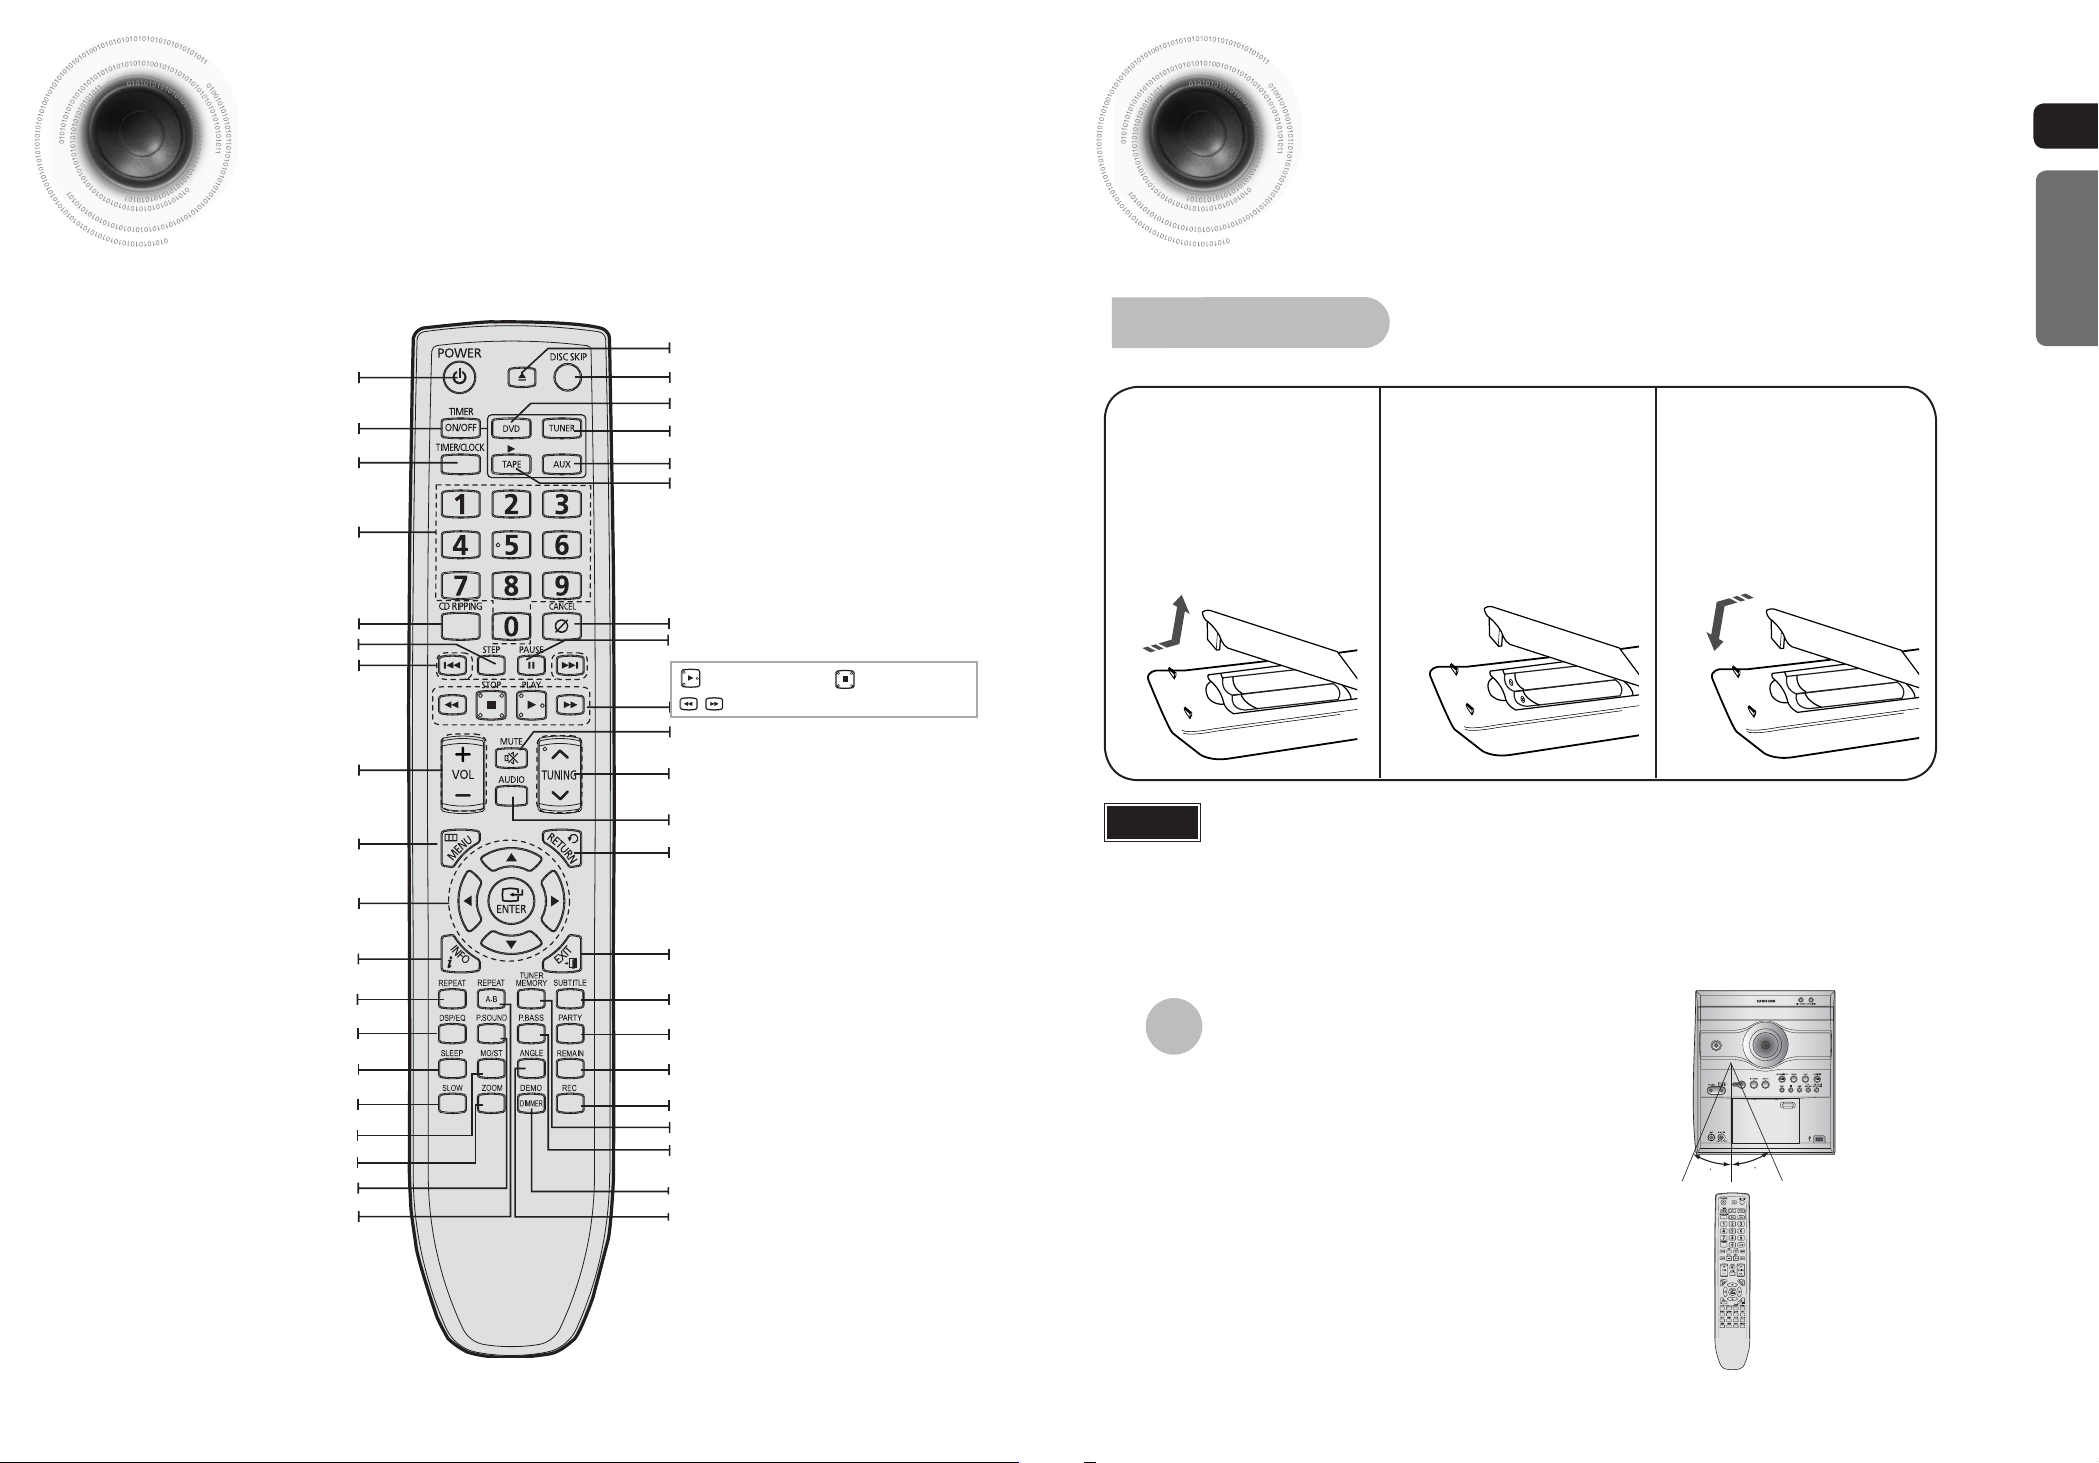
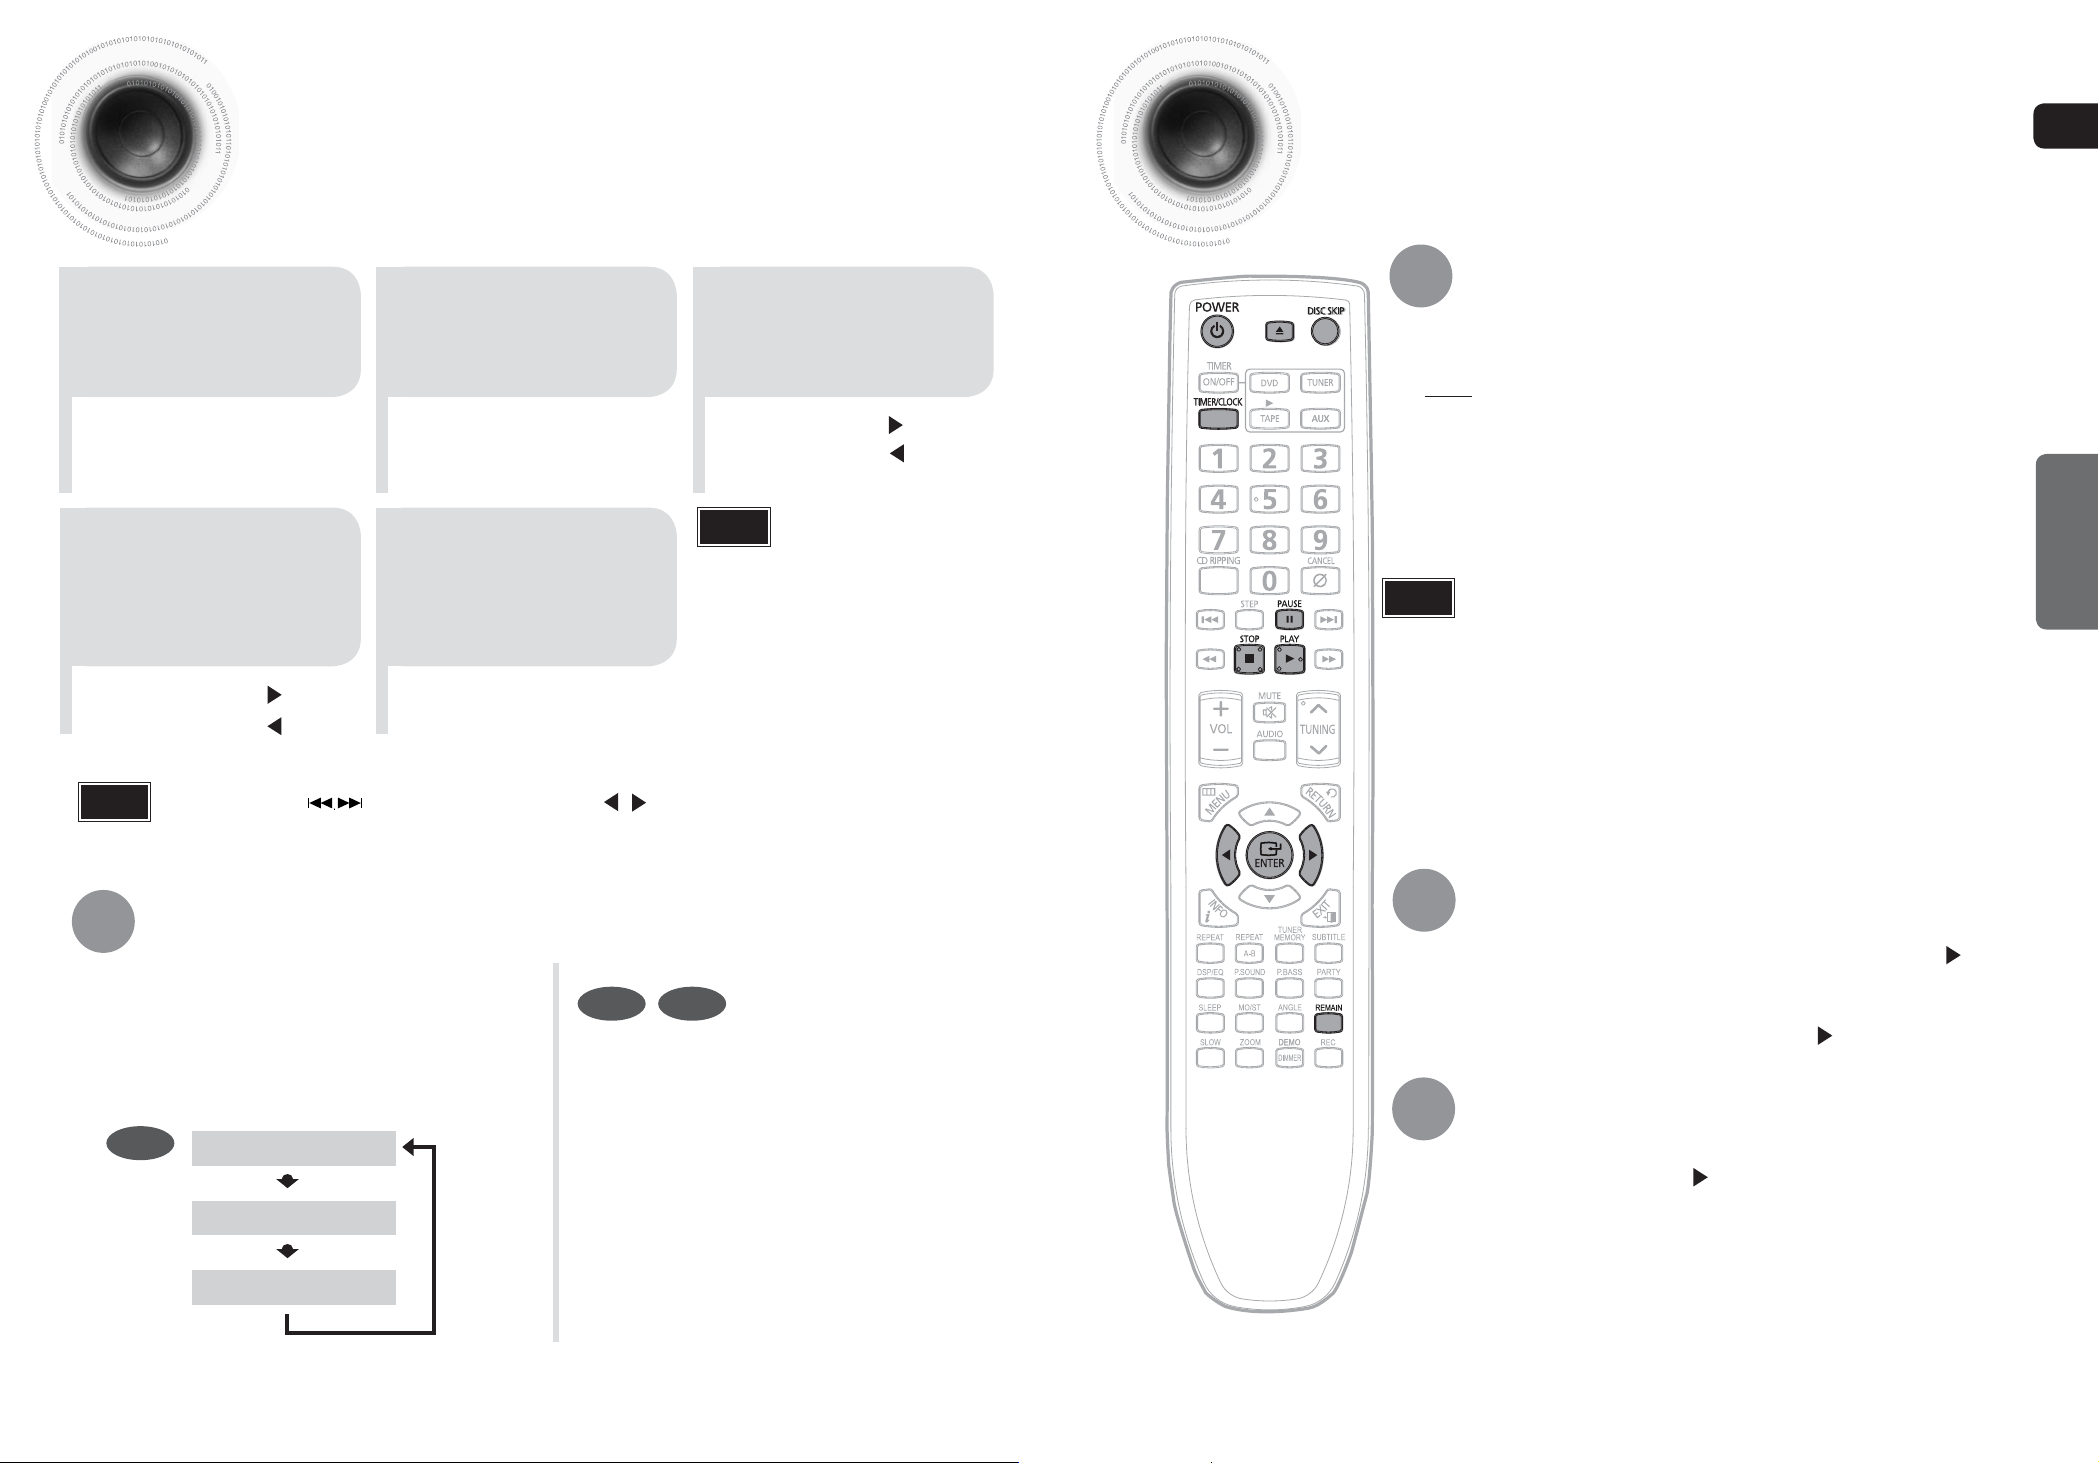
—Remote Control—
POWER button
TIMER ON/OFF button
TIMER/CLOCK button
Number(0~9) buttons
OPEN/CLOSE button
DISC SKIP button
DVD button
TUNER button
AUX/USB button
TAPE button
Insert Remote Batteries
Remove the battery
1
cover in the direction
of the arrow.
Insert two 1.5V AAA
2
batteries, paying
attention to the correct
polarities (+ and –).
Replace the battery
3
cover.
ENG
PREPARATION
CD RIPPING button
STEP button
CD Skip buttons
VOLUME button
MENU button
Cursor/ENTER button
INFO button
REPEAT button
DSP/EQ button
SLEEP button
SLOW button
MO/ST button
ZOOM button
POWER SOUND button
REPEAT A-B button
CANCEL button
PAUSE button
Play button
SEARCH buttons
MUTE button
TUNING button/Tuning Preset button
AUDIO button
RETURN button
EXIT button
SUBTITLE button
PARTY button
REMAIN button
REC button
TUNER MEMORY button
POWER BASS button
DEMO/DIMMER button
ANGLE button
Stop button
Caution
Follow these precautions to avoid leaking or cracking cells:
Place batteries in the remote control so they match the polarity:(+) to (+)and (–)to (–).
•
Use the correct type of batteries.Batteries that look similar may differ in voltage.
•
Always replace both batteries at the same time.
•
Do not expose batteries to heat or flame.
•
Range of Operation of the Remote Control
The remote control can be used up to approximately 23
feet/7 meters in a straight line. It can also be operated at
a horizontal angle of up to 30° from the remote control
sensor.
30
30
7
8
Page 6
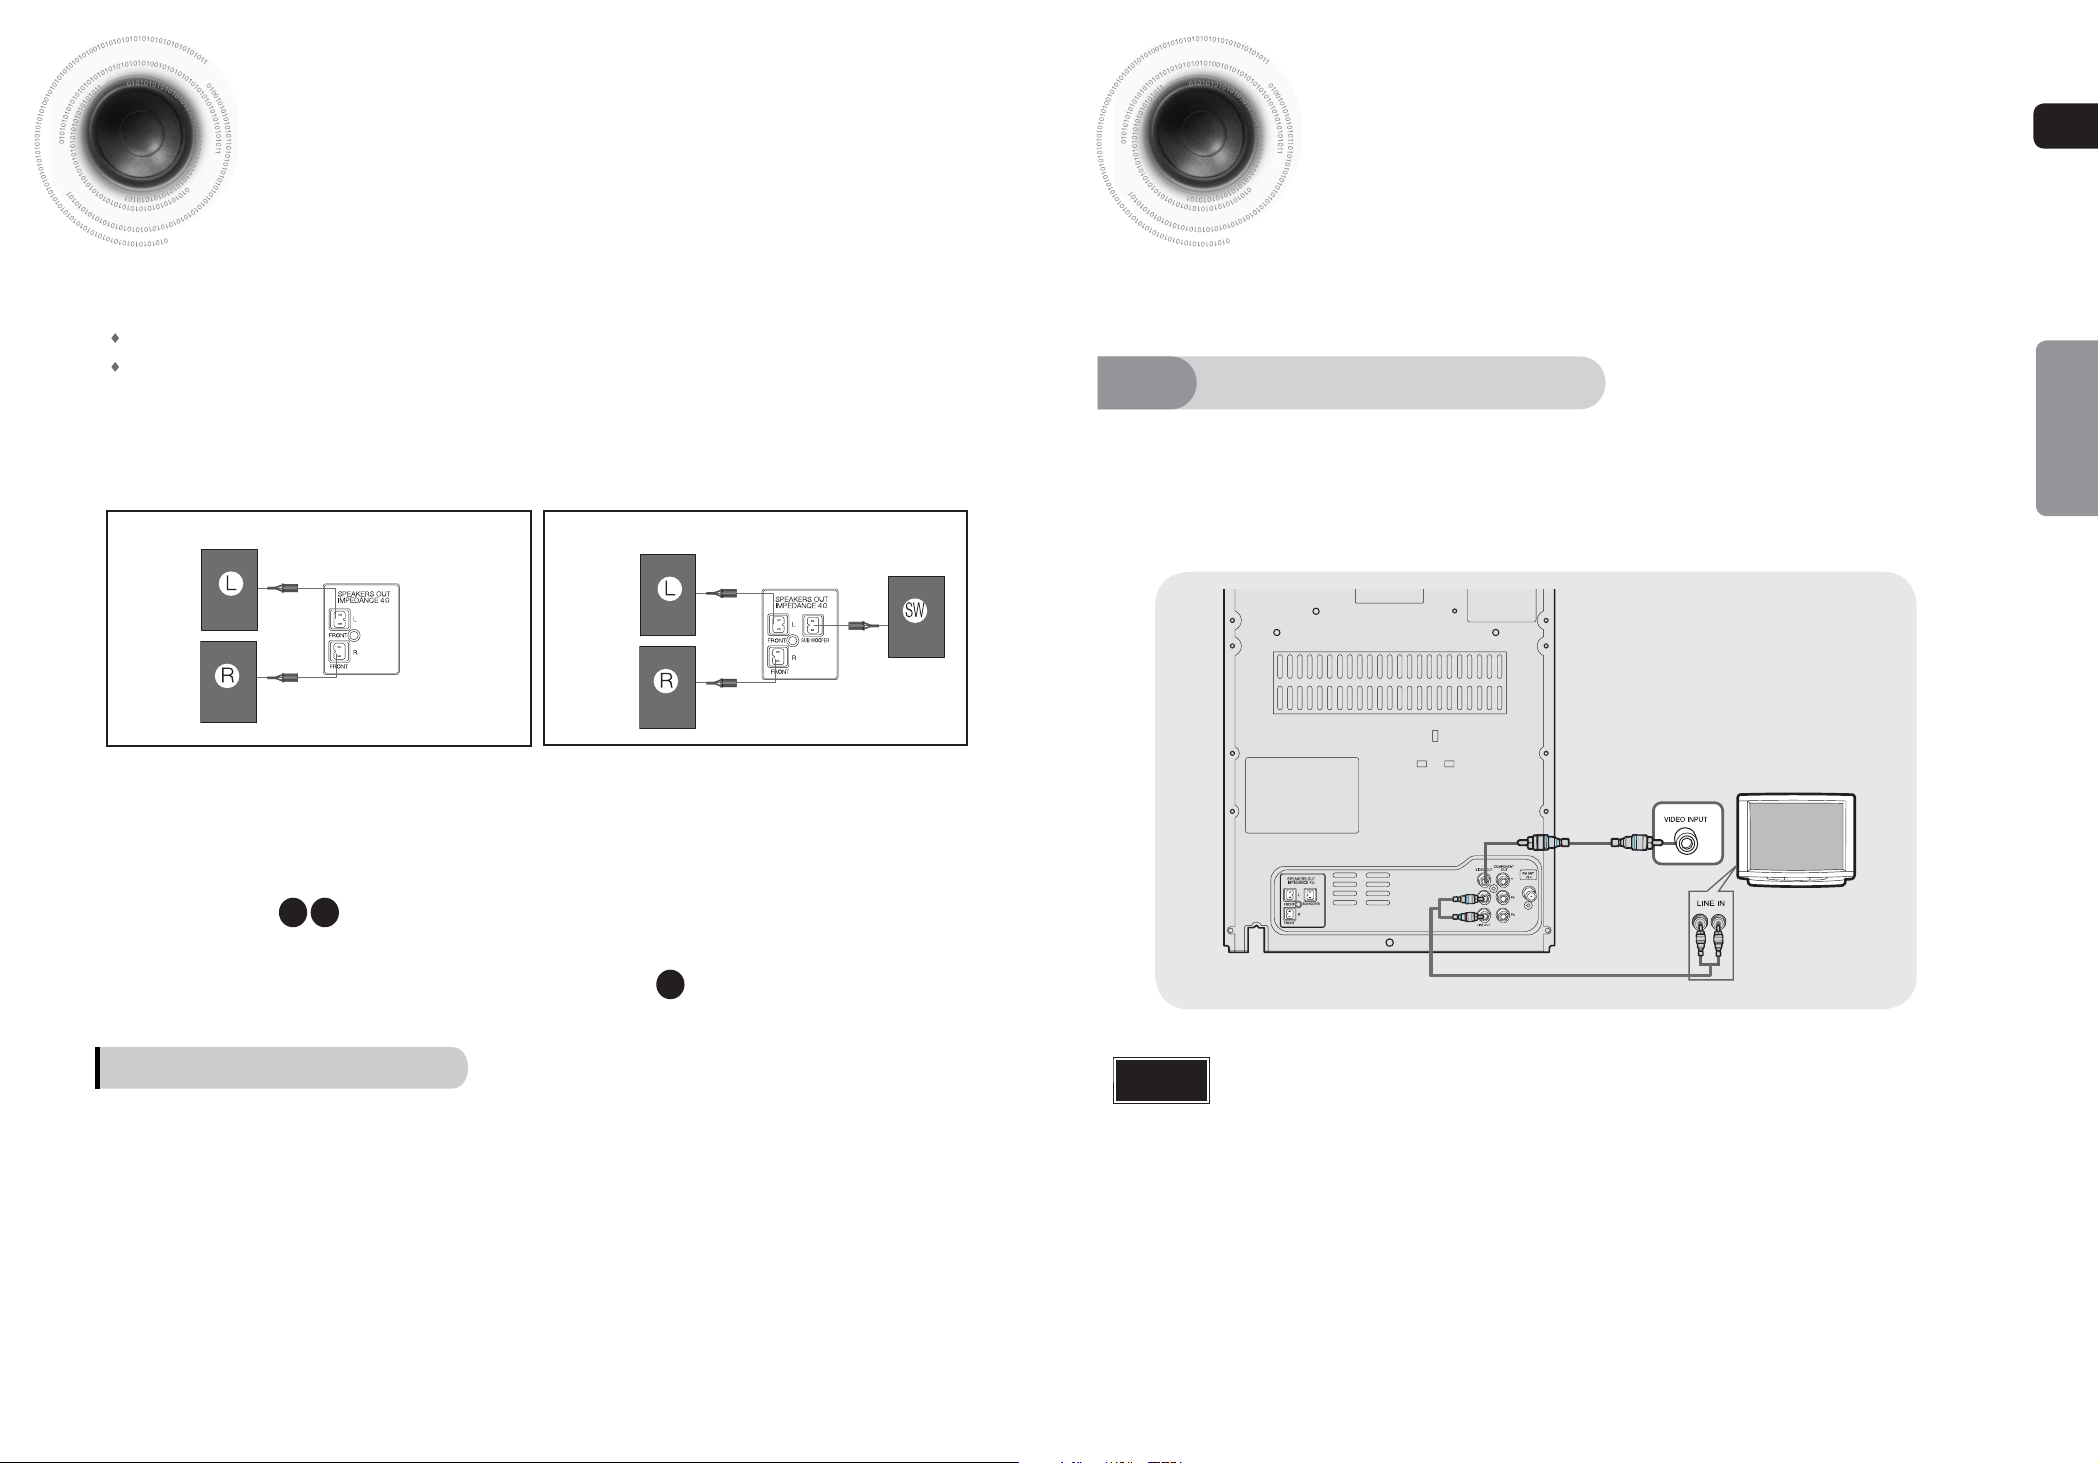
Connecting the Speakers
Connecting to a TV
ENG
Before moving or installing the product, be sure to turn off the power and
disconnect the power cord.
The loudspeaker connector terminals are located on the rear of the system.
There are two terminals on the system:
left speaker (marked L)
right speaker (marked R)
To achieve the correct sound quality,insert those speaker connector cables to
the speaker connector terminals of the system.
MAX-DG53 MAX-DG54
Please be sure to turn off the power and unplug the power cord before moving or
installing this unit.
Please choose one video connection method.
Method 1
Connect Video Out on the player to Video
1
In on your TV.
Using Video Out (Good Quality)
Press the TV/VIDEO button on the remote
2
of TV control to set the TV to "VIDEO".
CONNECTIONS
Position of the DVD Player
Place it on a stand or cabinet shelf,
•
or under the TV stand.
L
Front Speakers
Place these speakers in front of your listening
•
position, facing inwards (about 45°) toward you.
Place the speakers so that their tweeters will be
•
at the same height as your ear.
Directions in Installing Speaker
•
Installation in a place near heating apparatus, under direct lay of light or with high humidity may cause
performance degradation of the speaker.
•
Do not install on the wall or on a high place of pole or other unstable place to prevent any safety accident
caused by falling of the speaker.
•
Do not take the speaker near from TV or computer monitor.
The speaker near the TV or computer monitor may influence the quality of the screen display.
R
Selecting the Listening Position
The listening position should be located about 2.5 to 3
times the distance of the TV's screen size away from the
TV. Example: For 32" TVs 2~2.4m (6~8feet)
For 55" TVs 3.5~4m (11~13feet)
Subwoofer
•
The position of the subwoofer is not so critical.
Place it anywhere you like.
SW
Note
(supplied)
Composite Video: A single video signal that is a composite of the black-and-white
•
information (Y) and the color information (C).
9
10
Page 7
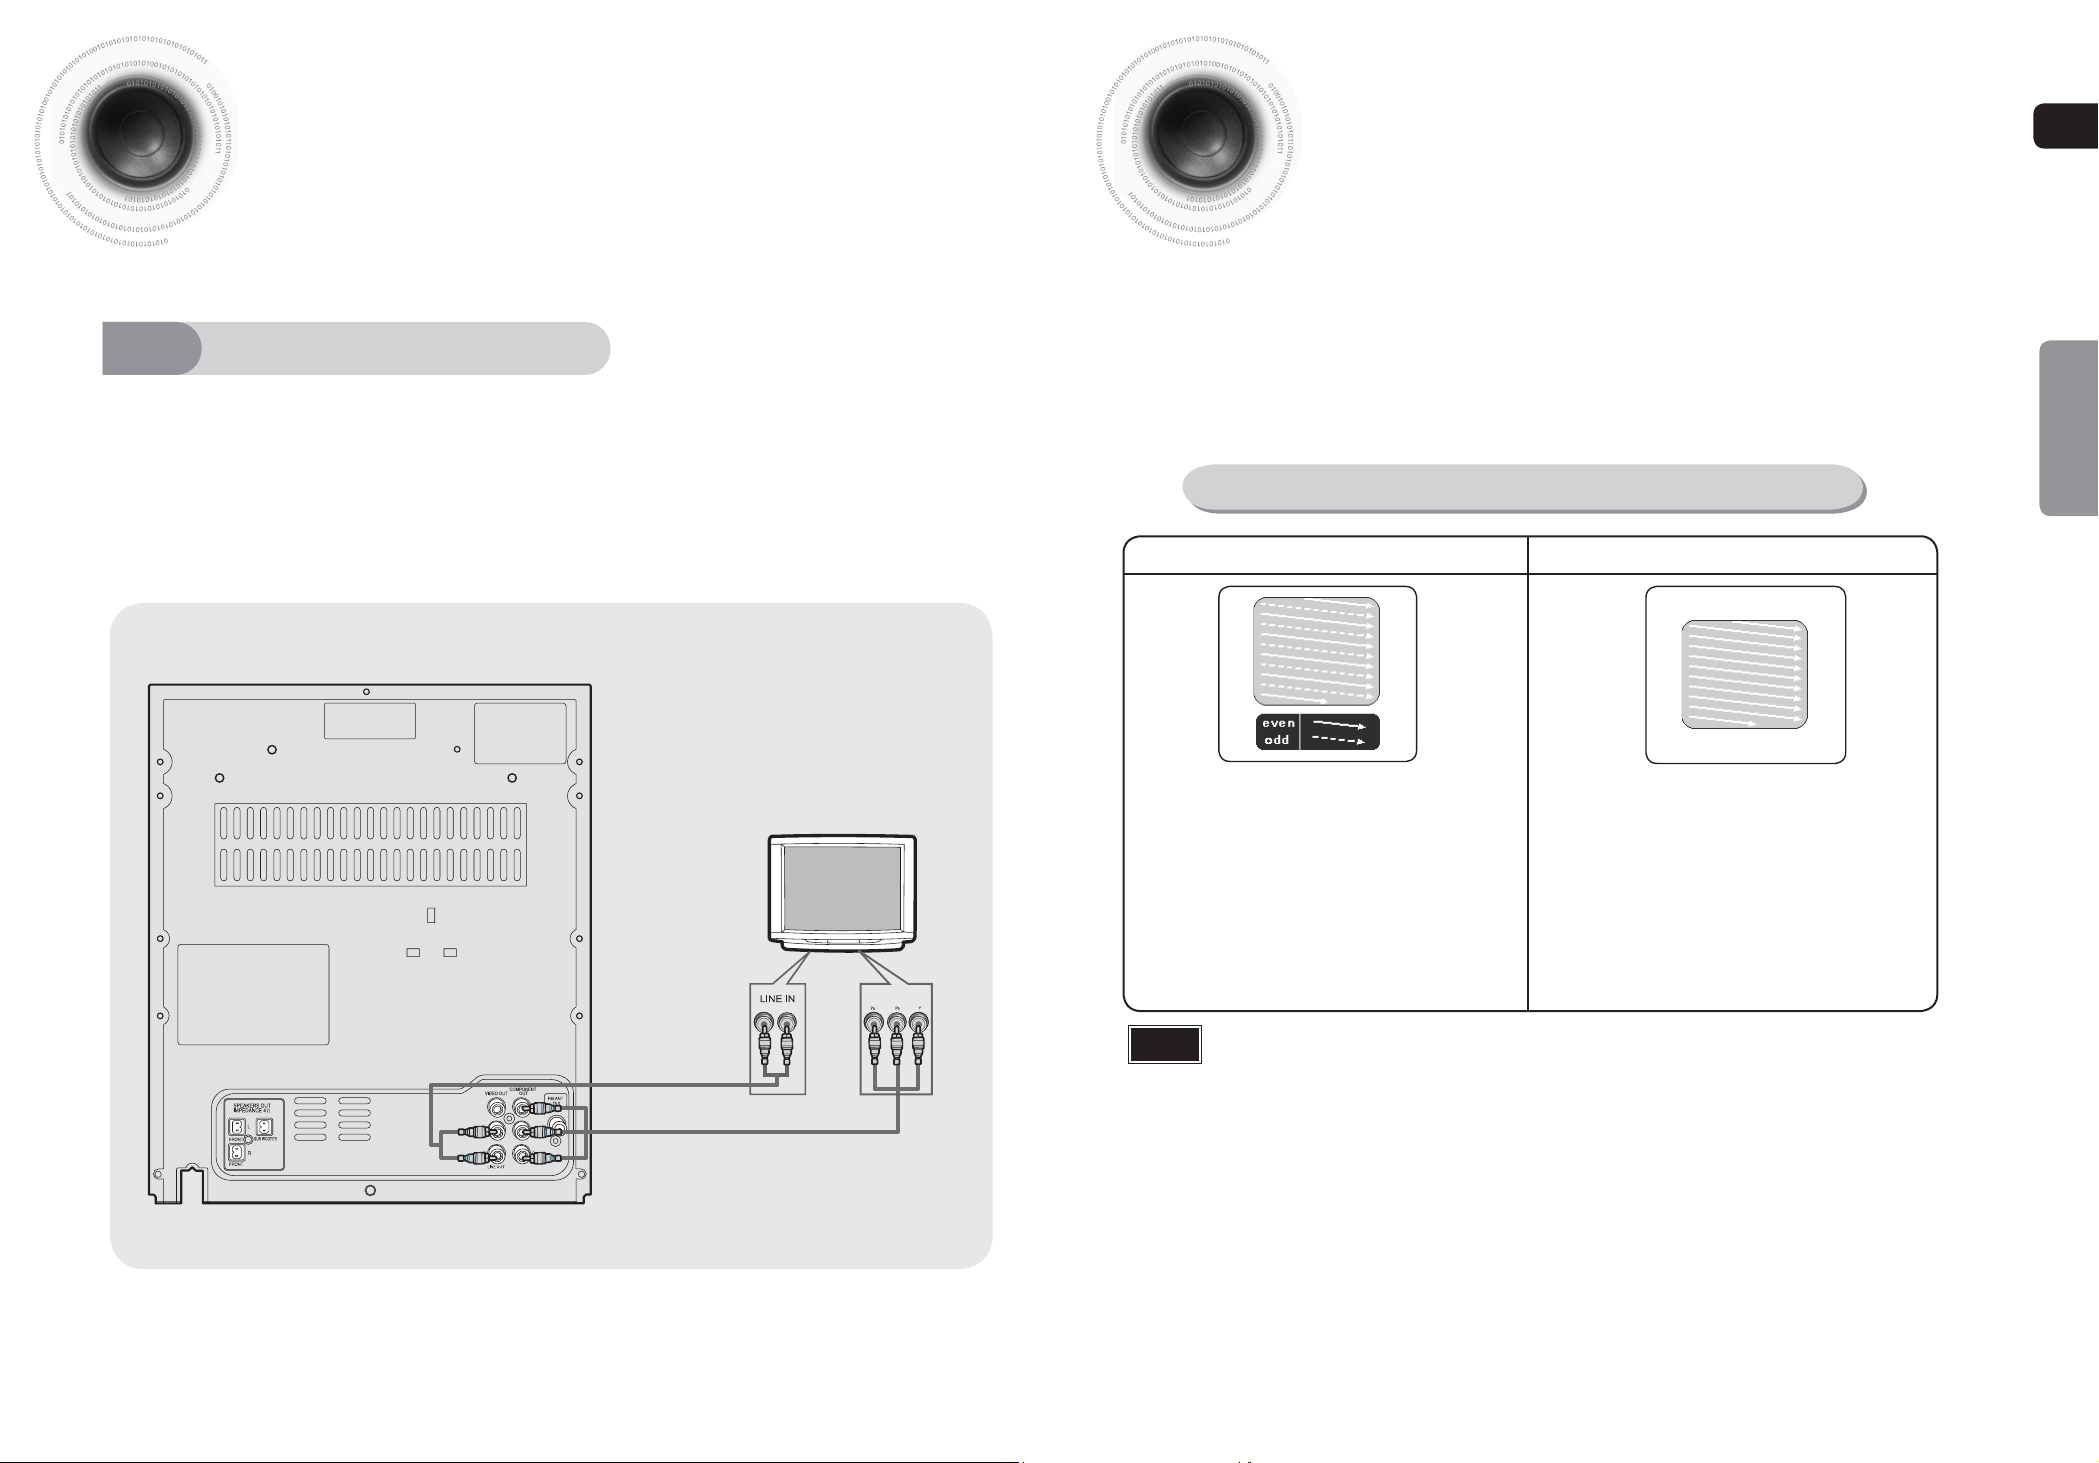
Connecting to a TV(Con’t)
Please be sure to turn off the power and unplug the power cord before moving
or installing this unit.
Please choose one video connection method.
P.SCAN (Progressive Scan) Function
Unlike regular Interlace Scan, in which two fields of picture information alternate to create the
entire picture (odd scan lines, then even scan lines), Progressive Scan uses one field of
information (all lines displayed in one pass) to create a clear and detailed picture without visible
scan lines.
ENG
Method 2
Component Video (Best Quality)
Use this method if your TV have Pr,Pb andY jacks.
If your television is equipped with Component Video inputs,connect a component
video cable from the Pr,Pb and Y jacks on the back panel of the system to the
corresponding jacks on your television.
COMPONENT
IN
You can select "Progressive Scan" or "Interlace Scan" for your TV.
Please go to <Setup><Display Setup><Video Output> and set I-SCAN or P-SCAN.
(see the page 35.)
What is Progressive (or Non-Interlaced) Scanning?
Interlaced Scan (1 FRAME = 2 FIELDS)
In interlaced-scan video, a frame consists of two
interlaced fields (odd and even), where each field
contains every other horizontal line in the frame.
The odd field of alternating lines is displayed first, and
then the even field is displayed to fill in the alternating
gaps left by the odd field to form a single frame.
One frame, displayed every 1/25th of a second, contains
two interfaced fields, thus a total of 50 fields are
displayed every 1/50th of a second.
The interlaced scanning method is intended for capturing
a still object.
Progressive Scan (FULL FRAME)
The progressive scanning method scans one full frame of
video consecutively down the screen, line by line.
An entire image is drawn at one time, as opposed to the
interlaced scanning process by which a video image is
drawn in a series of passes.
The progressive scanning method is desirable for dealing
with moving objects.
CONNECTIONS
11
(not supplied)
Note
This function works only on TVs equipped with component video inputs (Y, Pr, Pb) that support
•
Progressive Video. (It does not work on TVs with conventional component inputs, i.e., non-progressive
scan TVs.)
Depending on the brand and model of your TV, this function may not work.
•
12
Page 8

Connecting External Components
AUX : Connecting an External Component/MP3 player
Components such as an MP3 Player
AUX : Front Panel
Audio Cable
(not supplied)
Connecting the FM Antennas
FM Antenna (supplied)
ENG
CONNECTIONS
Connect PORTABLE AUDIO IN (Audio) on the MINI COMPACT front panel to the Audio Out of the
1
external component/MP3 player.
Press the AUX/USB button to select <AUX> input.
2
The mode switches as follows :
AUX USB.
13
Connect the FM antenna supplied to the FM 75Ω COAXIAL Jack.
1
Slowly move the antenna wire around until you find a location where reception is good, then fasten it
2
to a wall or other rigid surface.
Note
• This unit does not receive AM broadcasts.
14
Page 9
For each step, you have a few seconds to set the required options.
If you exceed this time, you must start again.
Switch the system on
by pressing POWER
1
button.
Press TIMER/CLOCK
twice.
2
Press ENTER.
3
The hour flashes.
Disc PlaybackSetting the Clock
ENG
Selecting a CD in the Disc changer
To select a specific disc, press the DISC CHANGE button on the front panel or DISC SKIP
on the remote control, until the required disc indicator flashes.
Result: All the discs will be played in turn, starting with the one selected.
"CLOCK" is displayed.
•
When the correct
hour is displayed,
press ENTER.
4
The minutes flash.
Increase the minutes :
•
Decrease the minutes :
•
You can also use on the panel front instead of buttons in step 3,4.
Note
•
5
When the correct
time is displayed,
press ENTER.
"TIMER" appears in the display.
•
The current time is now set.
•
Checking the Remaining Time
Press the REMAIN button.
For checking the remaining time of a title or chapter
•
being played.
Each time the REMAIN button is pressed ,
the time is displayed as below:
DVD
TITLE REMAIN TIME
CHAPTER REMAIN TIME
Increase the hours :
•
Decrease the hours :
•
Note
You can display the time, even
•
when you are using another
function, by pressing
TIMER/CLOCK once.
CD MP3
Press the REMAIN button.
If you press the REMAIN button, the
remaining time is displayed.
To cancel this function, press the
REMAIN button again.
If the disc selected is not loaded, the next disc is played automatically.
•
Note
For mixed discs, the play order is as below:MP3/WMA
•
Depending on the content of the disc, the initial screen may appear different.
•
Depending on the recording mode, some MP3-CDs cannot be played.
•
For CD discs, you can press the numeric buttons to select the track, when you
•
press the numeric buttons after 3 seconds, the p
Table of contents of a MP3-CD varies depending on the MP3 track format recorded
•
on the disc.
DTS Audio is not supported.
•
DVD Audio Disc is not supported.
•
DIVX
JPEG.
layback starts automatically.
To stop playback, press STOP button during playback.
If pressed once, the stop position will be stored in memory. If PLAY ( ) button
•
is pressed, playback resumes from the stop position. (This function works only with
DVDs.)
If pressed twice, “STOP” is displayed, and if PLAY ( ) button is pressed,
•
playback starts from the beginning.
To temporarily pause playback, press PAUSE button
during playback.
To resume playback, press PLAY( ) button again.
•
OPERATION
15
ELAPSED TIME
16
Page 10
MP3/WMA-CD Playback
JPEG
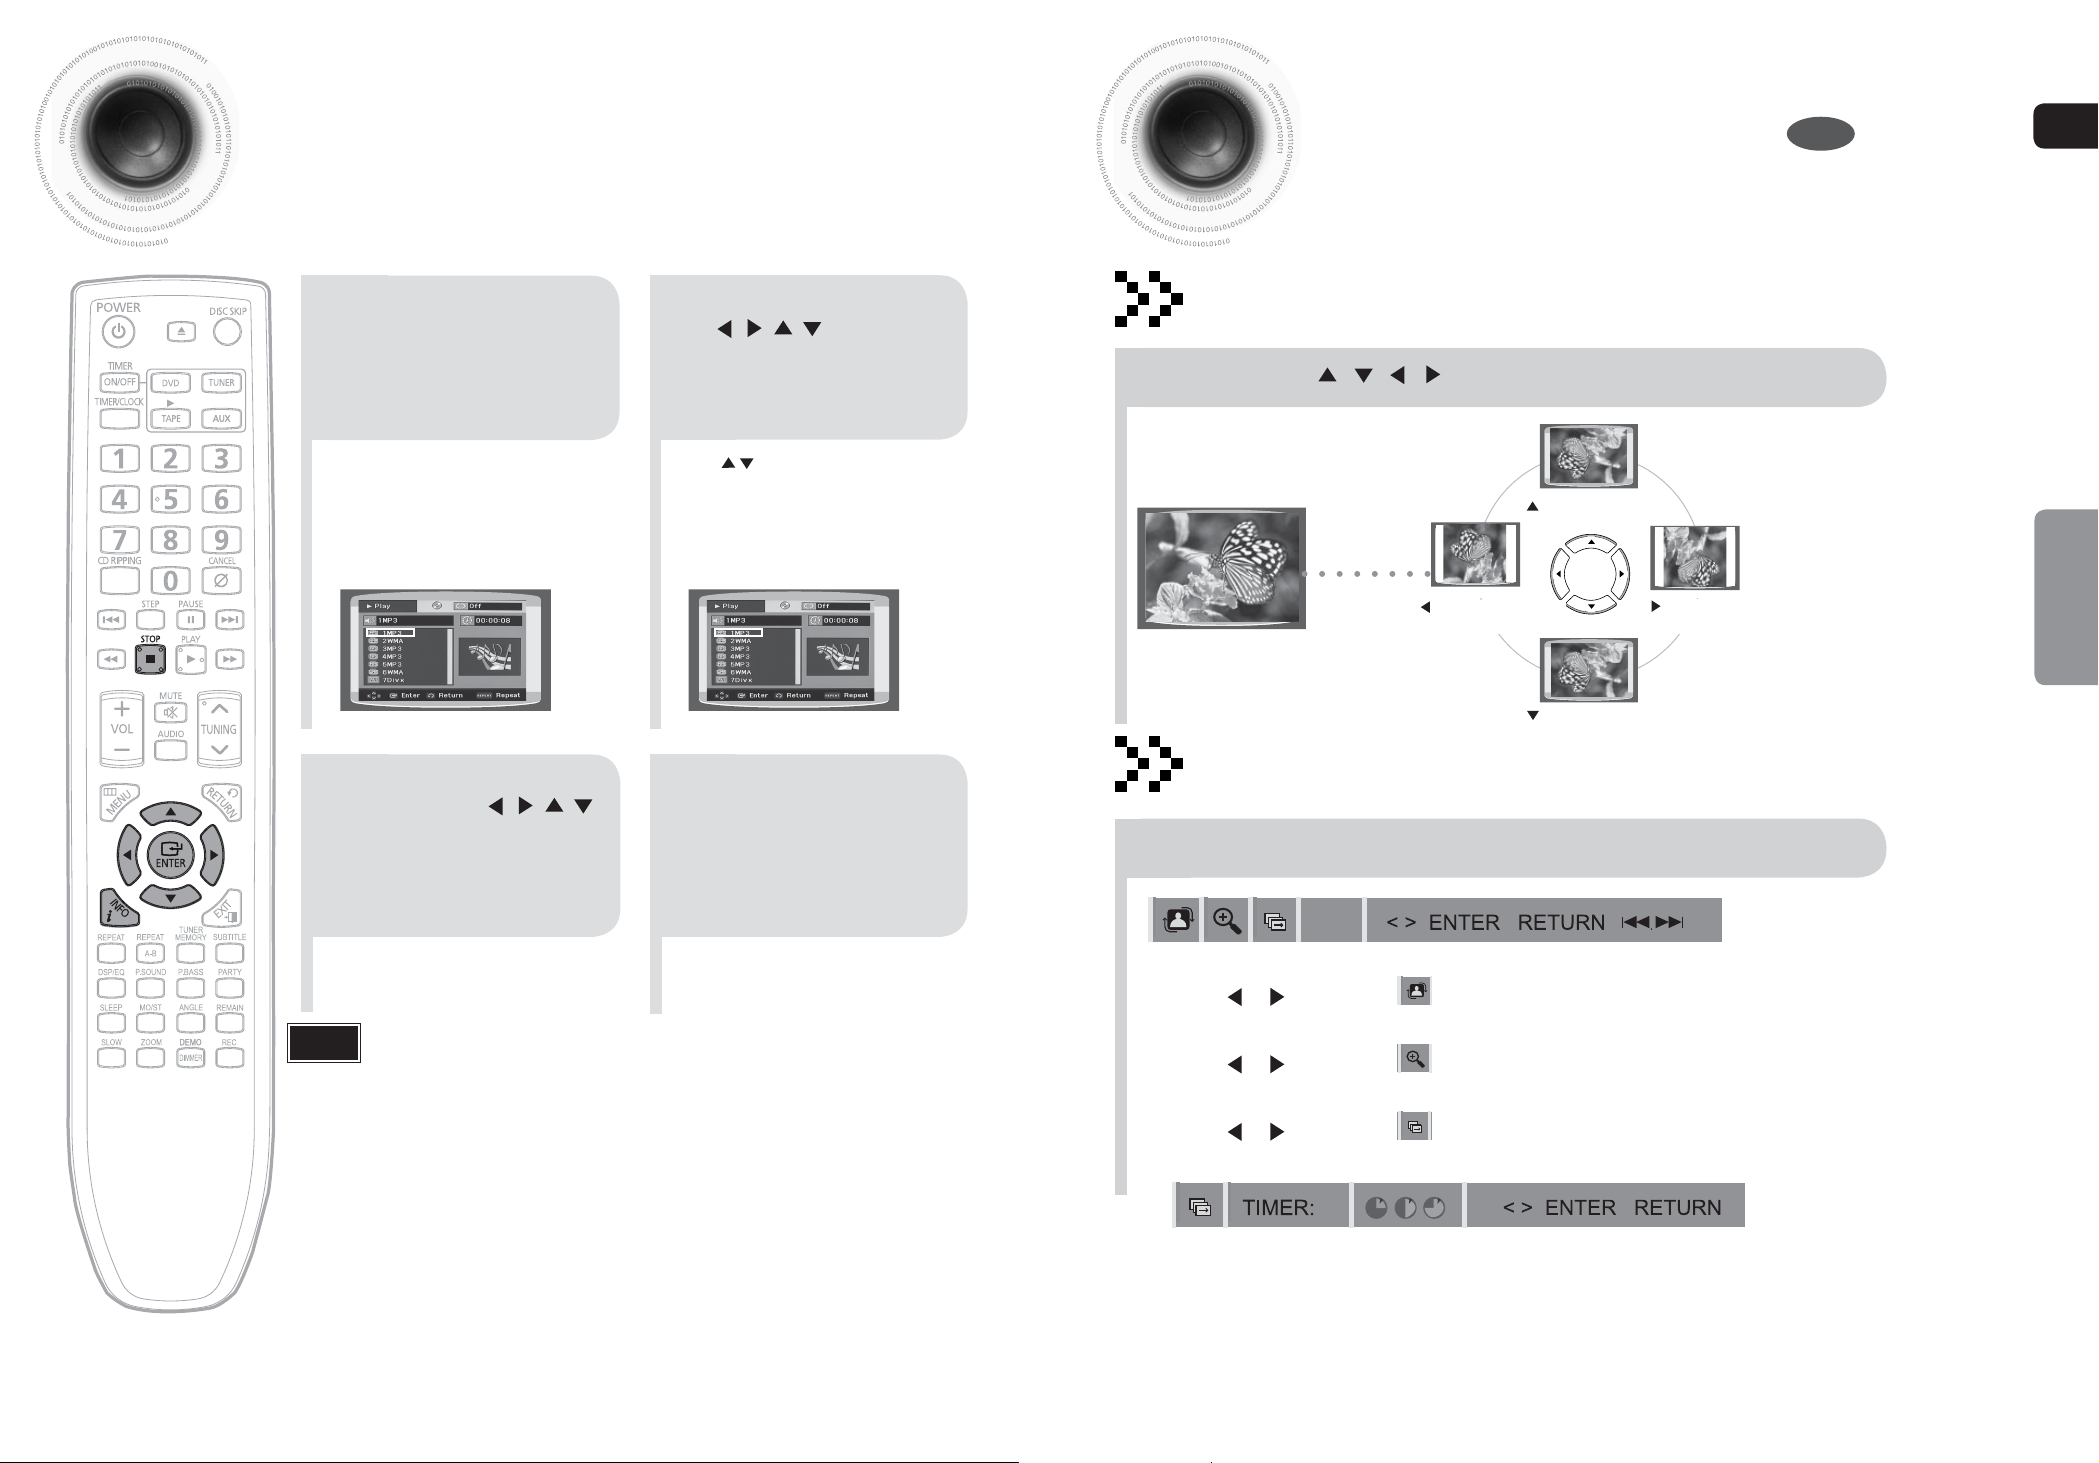
JPEG File Playback
Images captured with a digital camera or camcorder, or JPEG files on a PC can be
stored on a CD and then played back with this DVD player.
ENG
Load the MP3/WMA
disc.
1
The MP3/WMA menu screen will appear
•
and playback will start.
The appearance of the menu depends
•
on the MP3/WMA disc.
WMA-DRM files cannot be played.
•
To change the
album, use
to select another
album in Stop mode,
3
and then press the
ENTER button.
Use
to select the album,
and then press the
2
ENTER button.
Use to select the track.
•
Press the STOP
button to stop
4
playback.
Rotate/Flip Function
Press Cursor , , , buttons during playback.
button: Flip Vertically
button: Rotate 90°
Counterclockwise
Original Image
button: Flip Vertically
button: Rotate 90° Clockwise
Zoom/Auto play Function
Press INFO button during playback, TV displays as below:
OPERATION
17
To select another album and track,
•
repeat Steps 2 and 3 above.
Depending on the recording mode, some MP3/WMA-CDs may not be played.
•
Note
Table of contents of a MP3-CD varies depending on the MP3/WMA track
•
format recorded on the disc.
1. Use , to select
press the button, your selection will rotate as clockwise.
2. Use , to select
press the button, your selection will change as below: x2
3. Use , to select
below:
Press ENTER button to select the time space for
4. Press STOP button to cancel this function.
icon, and then press ENTER button, each time you
icon, and then press ENTER button, each time you
icon, and then press ENTER button, TV displays as
playing the pictures.
x4 x2 Off.
18
Page 11

DivX Playback
Skip Forward/Back
5 Minute Skip function
During playback, press the , button.
Go to the screen 5 minutes after whenever you press button.
•
Go to the screen 5 minutes earlier whenever you press button.
•
For MPG format files, 5 minute skip function is not supported.
•
Note
ENG
During playback, press the button.
Go to the next file whenever you press button, if there are over
•
2 files in the disk.
Go to the previous file whenever you press button, if there are over
•
2 files in the disk.
Fast playback
Press button.
Each time the button is pressed during playback,
•
the playback speed changes as follows:
To resume normal playback, press PLAY (
•
) button.
Audio Display
Press the AUDIO button.
If there are multiple audio tracks on a disc, you can toggle between them.
•
Each time you press the button, your selection will toggle between AUDIO(OFF, 1/1, 1/2 ...).
•
Subtitle Display
Press the SUBTITLE button.
Each time you press the button, your selection will changed as below:
•
SUBTITLEKOR SUBTITLEOff
If the disc has only one subtitle file, it will be played automatically.
•
Up to 8 subtitle languages are supported.
•
DivX Feature Table
DivX Supported
Avi files are used to contain the audio and video data; these must be stored on CD in the ISO 9660 format.
SPEC
VIDEO Compatibility DivX3.11 Up to the latest VERSION
AUDIO Compatibility MP3 CBR : 8kbps~320kbps
AC3 CBR : 32kbps~640kbps
WMA
CBR1:Stereo case:48kbps~384kbps
CBR2:Mono case:64kbps~192kbps
MPEGs containing DivX can be divided into Video and Audio.
Video compatibility : All versions of DivX later than 3.11 (including
•
the latest 5.1) are supported. In addition, XviD is supported.
Audio compatibility : MP3s encoded at bit rates from 8kbps to
•
320kbps, AC3s from 32kbps to 640kbps, and WMAs from 48kbps to
384kbps are supported.
In addition, for subtitles, this unit will support Text format (SMI).
•
OPERATION
19
Note
When playing the DivX disk, you can play the file with extension of AVI only.
•
Among the available DivX audio formats, DTS Audio is not supported.
•
When burning a subtitle file to a CD-ROM with your PC, be sure to burn it as an SMI file.
•
MPEG 1 Layer 1 (MP1) is not supported.
•
20
Page 12

Playing Media Files using the USB feature
You can connect and play files from external USB storage devices such as MP3 players,
USB flash memory, etc. using the player's USB function.
Connect the USB
1
cable.
To stop playback, press the STOP ( ) button.
Note
Video files (DivX, MPEG, etc.) are supported.
•
To prevent the loss of data saved in the USB device, please turn the unit off or
•
switch it to another mode before disconnecting the USB cable.
The play order is as follow: MP3/WMA DIVX JPEG.
•
Press the AUX button
to select the USB
2
mode.
USB” appears on the display screen
•
“
and then disappear.
USB SORTING screen appears on the
•
TV screen and the saved file is played.
USB Host Specifi cation
• Supports USB 1.1 or USB 2.0 compliant devices.
• Supports devices connected using the USB A type cable.
USB Host Specifi cation
Non-compliance
Operational Limitations
• Supports UMS (USB Mass Storage Device) V1.0 compliant devices.
• Supports the device of which the connected drive is formatted in the FAT(FAT, FAT16,
FAT32) fi le system.
Does not support a device that requires installing a separate driver on the PC (Windows).
•
• Does not support connection to a USB hub.
•
A USB device that is connected using the USB extension cable may not be recognized.
• A USB device requiring a separate power source needs to be connected to the player
with the separate power connection.
• If the connected device has multiple drives (or partitions) installed, only one drive
(or partition) can be connected.
• A device supporting USB 1.1 alone may cause a difference in the picture quality,
depending on the device.
USB Devices that can be used with the MINI COMPONENT
SYSTEM
USB Storage Device1.
MP3 Player2.
Digital Camera3.
Removable HDD4.
Removable HDDs equipped with less than 160 Gbytes are supported. Removable HDDs •
equipped with 160Gbytes or more may not be recognized, depending on the device.
If the connected device does not work due to insuffi cient power supply, you can use a separate •
power cable to supply power so that it can work properly. The connector of the USB cable may
differ, depending on the manufacturer of the USB device.
USB card Reader: One slot USB card reader and Multi slot USB card reader.5.
Depending on the manufacturer. the USB card reader may not be supported.•
If you install multiple memory devices into a multi card reader, you may experience problems.•
Compliant File Formats
ENG
OPERATION
Skip Forward/Back
During playback, press the or , button.
When there is more than a file, when you press the , button, the next file is selected.
•
When there is more than a file, when you press the , button, the previous file is selected.
•
Fast playback
To play back the disc at a faster speed, press or button
during playback.
Each time you press either button, the playback speed will change as follows:
•
x
To resume normal playback, press PLAY (
•
2
x
4
x
8 or
x
2
x
x
4
) button.
8
21
Format File name File extension Bit rate Version Pixel
Still Picture JPG JPG .JPEG – – 640x480 –
MP3 .MP3 8~320kbps – – 44.1kHz
Music
Movie DivX .AVI 4Mbps
CBI (Control/Bulk/Interrupt) is not supported.•
Digital Cameras that use PTP protocol or require additional program installation when connected to a •
PC are not supported.
A device using NTFS fi le system is not supported. (Only FAT 16/32 (File Allocation Table 16/32) fi le •
system is supported.)
Does not operate with Janus enabled MTP (Media Transfer Protocol) devices.•
MPEG 1 Layer 1 (MP1) is not supported.
•
WMA .WMA
Stereo:48~384kbps
Mono:64~192kbps
V8 – 44.1kHz
DivX3.11~
DivX5.1, XviD
720x480 44.1KHz~48KHz
Sampling
Frequency
22
Page 13

Displaying Disc Information
You can view playback information on the disc on the TV screen.
Fast/Slow Playback
ENG
Press INFO button.
•
Press Cursor , buttons select the desired item.
DVD
What is a Title?
•
A movie contained in a DVD disc.
What is a Chapter?
•
Each title on a DVD disc is divided into several smaller sections called "chapters".
appears on the TV screen!
•
If this symbol appears on the TV screen while buttons are being operated, that
operation is not possible with the disc currently being played.
What is a Track (File)?
•
A section of video or a music file recorded on a CD, or MP3-CD.
Display disappears
Fast Playback
DVD
CD
Press buttons.
Each time you press either button during playback,
•
the playback speed changes as follows:
DVD
CD
16
32
128
MP3
16
32
128
MP3
OPERATION
Note
Depending on the disc, the disc
•
information display may appear different.
23
To resume normal playback, press PLAY (
•
) button.
Slow Playback
Press SLOW button.
Each time the button is pressed during playback,
•
the playback speed changes as follows:
DVD
In Pause mode, Step mode or Slow mode, you
•
DivX
can use the button to select as below:
To resume normal playback, press PLAY (
•
During fast playback of a CD or MP3-CD, sound is not heard.
Note
•
No sound is heard during slow playback and step motion playback.
•
) button.
24
Page 14

Skipping Scenes/Songs
Angle Function
This function allows you to view the same scene in different angles.
ENG
DVD MP3
CD
Briefly press .
Each time the button is pressed briefly during playback, the previous or next chapter, track, or directory (file) will
•
be played.
But, you cannot skip chapters consecutively.
•
DVD MP3
Skip
Skip
CD
Track01
Track01
Track02
Track03
Track04
Track05
Track06
Track07
Track02
Track01
Track02
Track03
Track04
Track05
Track06
Track07
Track03
Track01
Track02
Track03
Track04
Track05
Track06
Track07
DVD
Press ANGLE
button.
1
1/3
Press Cursor ,
buttons or numeric
buttons to select the
2
desired angle.
Each time the button is pressed,
•
the angle changes as follows:
1/3
2/3
3/3
OPERATION
Playing Frame by Frame
DVD
Press STEP button.
The picture moves forward one frame each time
•
the button is pressed during playback.
25
DivX
Step
Note
The Angle function works only with discs on which multiple angles
•
have been recorded.
26
Page 15

Repeat Playback
Repeat playback allows you to repeatedly play a chapter, title, track (song), or directory (MP3 file).
AB Repeat Playback
ENG
DVD CD MP3 DIVX
Press REPEAT button.
Each time the button is pressed during playback, the repeat playback
•
mode changes as follow:
DVD
Press the REPEAT button or cursor , button to select one mode
•
then press ENTER button.
Select
•
Select
•
Select
•
Select
•
Folder
: Cancel Repeat playback.
: Repeat playback one Chapter.
: Repeat playback one Title.
: Repeat playback A-B.
Track
CDMP3DIVX
Track
Folder
Track
Disc
DVD CD MP3 DIVX
Press the REPEAT A-B
button at the point where you
1
want repeat play to start (A).
'RPT A-' is displayed.
To return to nomal play, press
the REPEAT A-B button again.
3
'RPT OFF-' is displayed.
2
'RPT A-B' is displayed.
Press the REPEAT A-B
button at the point where you
want repeat play to stop (B).
OPERATION
Off
Shuffle
Repeat Playback Options
Track
Repeatedly plays the selected track.
Folder
Repeatedly plays all tracks in the
selected folder.
Disc
Repeatedly plays the entire disc.
27
Disc
Off
Shuffle
Plays tracks in random order.
(Each track can be played one time.)
Off
Cancels Repeat Playback.
Shuffle
Off
• Point B cannot be set until 5 seconds of playback has elapsed from point A.
28
Page 16

Zoom Function
This function allows you to enlarge a particular area of the displayed image.
Selecting Audio/Subtitle Language
ENG
Zoom (Screen Enlarge) Function
DVD
Press ZOOM
button.
1
Press ENTER
button.
3
DivX
JPEG
Press Cursor , ,
, buttons to
move to the area
2
you want to enlarge.
Audio Language Selection Function
Press INFO button.
1
Depending on the number of languages on a DVD disc, a different audio language (ENGLISH, SPAIN,FRENCH, etc.) is selected each
Note
•
time the button is pressed.
Subtitle Language Selection Function
Press INFO button.
1
DVD
Press Cursor ,
buttons to select the
Audio and then press
2
ENTER button.
DVD
Press Cursor ,
buttons to select the
Subtitle and then press
2
ENTER button.
Press Cursor ,
or numeric buttons to select the
desired Audio language and then
3
press ENTER button.
OPERATION
Press Cursor ,
or numeric buttons to select the
desired Subtitle language and
3
then press ENTER button.
29
Each time the button is pressed, the
•
zoom level changes as follow:
DVD
DivX
2 x 4 x OFF.
JPEG
2 x 4 x 2 x OFF.
Note
You can use the AUDIO or SUBTITLE button on the remote control to select an audio or subtitle language.
•
Depending on the disc, the Subtitle and Audio Language functions may not work.
•
When you use AUDIO button to select "DTS", sound is not heard, and the TV displays as below:
•
CHI DOLBY DIGITAL 5.1 CH
AUDIO
30
Page 17

Moving Directly to a Scene/Song
Using Disc Menu
You can use the menus for the audio language, subtitle language, profile, etc.
DVD menu contents differ from disc to disc.
ENG
DVD
Press INFO button.
Moving to a Title/Chapter
1
Moving to a Title/Chapter
Press Cursor ,
or numeric buttons to
select the desired part and
3
then press ENTER button.
Moving to a Specific Time
4
Press Cursor ,
buttons to select the
Title/Chapter.
2
Press Cursor ,
buttons to select the
Time.
DVD
In stop mode, press
MENU button.
Disc Menu
Press Cursor ,
buttons to select the
desired item and then
press ENTER button.
Press Cursor , buttons
to move to ‘DISC MENU’
and then press ENTER
21
button.
Disc Menu
Press Cursor ,
, buttons to select
the desired item and
43
then press ENTER
button.
OPERATION
31
Moving to a Specific Time
Press the numeric
buttons to select the
desired time and then
5
press ENTER button.
Note
You can press on the
•
remote control to move directly to the
desired title, chapter.
Depending on the disc, you may not
•
be able to move to the selected title or
time.
Press RETURN button to return to the previous level.
Press MENU button to exit the setup screen.
Press EXIT button to exit the setup screen.
32
Page 18

Using the Title Menu
Setting the Language
ENG
For DVDs containing multiple titles, you can view the title of each movie.
Depending on the disc, this function may either not work at all or may work differently.
DVD
In stop mode, press
MENU button.
1
Disc Menu
Press Cursor ,
buttons to select the
desired item and then
press ENTER button.
Press Cursor ,
button to move to
‘Title Menu’ and
2
then press ENTER
button.
Press Cursor ,
, buttons to select
the desired item and
43
then press ENTER
button.
OSD language is set to English by default.
In stop mode, press
MENU button.
Disc Menu
Press Cursor ,
button to select the
desired language and then
4
press ENTER button.
Once the setup is complete, if the language
•
was set to English, OSD will be displayed in
English.
21
Press Cursor ,
button to move to
‘Setup’ and then
press ENTER button.
3
Press Cursor ,
button to select the
desired item and then
press ENTER button.
SETUP
Press RETURN button to return to the previous level.
Press MENU button to exit the setup screen.
Press EXIT button to exit the setup screen.
33
Selecting the
OSD Language
Selecting the Subtitle Language
(recorded on the disc)
Press MENU or EXIT button to exit the setup screen.
Press RETURN button to return to the previous level.
Language (recorded on the disc)
Selecting the
Disc Menu Language
(recorded on the disc)
Selecting the DivX Subtitle
(recorded on the disc)
If the language you selected is
*
not recorded on the disc, menu
language will not change even if
you set it to your desired
language.
Selecting the
Audio Language
34
Page 19

Setting TV Screen type
ENG
In stop mode, press
MENU button.
Disc Menu
Press Cursor ,
button to move to
‘Display Setup’ and
3
then press ENTER
button.
Press Cursor ,
button to move to
‘Setup’ and then
21
press ENTER button.
Press Cursor ,
button to 'Tv Aspect'
4
and then press
ENTER button.
• You can select '4:3 Letter Box', '4:3
Pan&Scan' or '16:9 Wide' mode for
your TV.
Adjusting the TV Aspect Ratio (Screen Size)
The horizontal to vertical screen size ratio of conventional TVs is 4:3, while that of wide screen and high
definition TVs is 16:9. This ratio is called the aspect ratio. When playing DVDs recorded in different
screen size, you should adjust the aspect ratio to fit your TV or monitor.
For a standard TV, select either "4:3LB" or "4:3PS" option according to
personal preference. Select "16:9" if you have a wide screen TV.
16:9 Wide
4:3LB
(4:3 Letter box)
4:3PS
(4:3 Pan&Scan)
: Select this to view a 16:9 picture in the full-screen
mode on your wide screen TV.
• You can enjoy the wide screen aspect.
: Select this to play a 16:9 picture in the letter box
mode on a conventional TV.
• Black bars will appear at the top and bottom of the screen.
SETUP
: Select this to play a 16:9 picture in the pan & scan
mode on a conventional TV.
• You can see the central portion of the screen only (with the
sides of the 16:9 picture cut off).
• If a DVD is in the 4:3 ratio, you cannot view it in wide screen.
• Since DVD discs are recorded in various image formats, they will look different depending on
the software, the type of TV, and the TV aspect ratio setting.
Press Cursor ,
button to move to
‘Screen Messages’
5
and then press
ENTER button.
• You can select 'On' or 'Off'.
On: you can see the screen messages.
Off: you can't see the screen messages.
6
• You can select 'I-SCAN' or 'P-SCAN'.
(see the page 12 about P-SCAN or
I-SCAN mode.)
Press Cursor ,
button to 'Video
Output' and then
press ENTER button.
Note
Press RETURN button to return to the previous level.
Press MENU button to exit the setup screen.
Press EXIT button to exit the setup screen.
35 36
Page 20

Setting Parental Controls (Rating Level)
Setting the Password
ENG
Use this to restrict playback of adult or violent DVDs you do not want children to view.
In stop mode, press
MENU button.
Disc Menu
Press Cursor , button
to select the 'Rating Level'
and then press ENTER
4
button.
Press Cursor
button to move to
‘Setup’ and then
21
press ENTER button.
Enter the password
and then press
5
ENTER button.
Press Cursor button
to move to ‘Parental
Setup’ and then press
3
ENTER button.
You can set the password for the Parental (rating level) setting.
In stop mode, press
MENU button.
Disc Menu
Press Cursor button to
move to
Setup’
3
ENTER button.
‘Parental
and then press
Press Cursor
button to move to
‘Setup’ and then
21
press ENTER button.
Press Cursor , button
to select the 'Change
Password' and then press
4
ENTER button.
SETUP
If you have selected Level 6, you
•
cannot view DVDs with Level 7 or
higher.
The higher the level, the closer the
•
content is to violent or adult material.
Press RETURN button to return to the previous level.
Press MENU button to exit the setup screen.
37 38
Press EXIT button to exit the setup screen.
The password is set to "7890" by default.
•
Once the setup is complete, you will be
•
taken to the previous screen.
Note
This function works only if a DVD disc
•
contains the rating level information.
Enter the password
and then press
5
ENTER button.
Enter the old password, a new
•
password, and confirm new password.
The setting is complete.
•
Page 21

Setting the DRC
(Dynamic Range Compression)
AV SYNC Setup
ENG
You can use this function to enjoy Dolby Digital sound when watching movies at
low volume at night.
Press Cursor ,
In stop mode, press
1
MENU button.
Disc Menu Disc Menu
Press Cursor , button
to select the 'DRC' and
3
then press ENTER button.
2
4
button to move to
‘Audio’ and then press
ENTER button.
Press Cursor , to
adjust the ‘DRC’.
Video may look slower than the audio if it is connected with digital TV.
In this case, adjust the delay time of audio to optimal status to fit the video.
In stop mode, press
MENU button.
Press Cursor , buttons
to move to ‘Audio’ and then
21
press ENTER button.
SETUP
You can set the DRC between 0 and 8.
•
Set it to the optimal status.
Press RETURN button to return to the previous level.
Press MENU button to exit the setup screen.
Press EXIT button to exit the setup screen.
3
Press Cursor , buttons
to move to ‘AV-SYNC’ and
then press ENTER button.
Press RETURN button to return to the previous level.
Press MENU button to exit the setup screen.
Press Cursor , buttons
to select the Delay Time of
AV-SYNC and then press
4
the ENTER button.
You can set the audio delay time between 0 ms
•
and 300 ms. Set it to the optimal status.
39 40
Page 22

Listening to Radio
You can listen to the chosen band (FM broadcast stations) by using either the
automatic or manual tuning operation.
Presetting Stations
You can store up to:
15 FM stations
ENG
Remote Control Unit
Press TUNER
button.
1
Main Unit
Press the TUNER
button to select the
FM band.
Tune in to the
2
Automatic Tuning 1
press
the preset station.
Automatic Tuning 2
TUNING or
search the band.
Manual Tuning
TUNING
higher frequency.
desired station.
Press the STOP ( ) button
to select PRESET and then
TUNING or
Press the STOP
select "AUTO " and then press
Press STOP
MANUAL and then briefly press
or
button to select
button to automatically
( )
to tune in to a lower or
Select a broadcast
station.
21
( )
button to
to select
Example: Presetting FM 89.1 in the memory
Press the TUNER
button and select
the FM band.
MHz
kHz
Press
TUNING
or
to select
preset number.
Press
TUNING
or to select
21 3
"89.10".
Refer to Step 2 on page 41
•
to automatically or manually
tune in to a station.
MHz
kHz
Press the TUNER
MEMORY button.
54
6
Press the TUNER
MEMORY button.
MHz
kHz
To preset another
station, repeat
steps 2 to 5.
RADIO OPERATION
Automatic Tuning 1
press button to select the preset
station.
Automatic Tuning 2
band.
Manual Tuning
press
higher frequency.
Press the STOP ( ) button
to select PRESET and then
Press the STOP
select "AUTO " and then press
button to automatically search the
Press STOP
MANUAL and then briefly
to tune in to a lower or
( )
( )
button to
to select
You can select between 1 and
•
15.
MHz
kHz
If you can’t press “TUNER MEMORY” in 5
•
seconds, the preset disappears and “FM”
displays.
MHz
kHz
Press MO/ST button to listen in Mono/Stereo.
(This applies only when listening to an FM station.)
Each time the button is pressed, the sound switches between "STEREO" and "MONO".
•
In a poor reception area, select MONO for a clear, interference-free broadcast.
•
41 42
Page 23

Listening to a Cassette
Recording a Radio Program
ENG
Always treat your cassettes with care; refer, if necessary, to the section entitled
“Precautions When Using Audio Cassettes” on page 55.
Switch the system
on by pressing
1
POWER.
Press the PUSH
EJECT of the
cassette deck to
open the cassette
3
door and insert a
cassette.
Insert a cassette with the
•
recording/playback side facing
the cassette holder, and then
push the cassette door shut.
Press TAPE button
on the remote control
to select the Tape
2
function.
ress the
P
button on the remote
control. The cassette
4
starts
playing.
You can record a radio program of your choice.
You do not need to adjust the volume, as it has no effect on the recording.
Switch the system
on by pressing
1 3
POWER.
Insert a blank
cassette in Deck.
2
Select the
TUNER function
by pressing
TUNER.
Press the
button if necessary.
5
Rewind the cassette button.
•
Fast-forward the cassette
•
button.
You can use the button
•
of the front panel instead of the
button.
43
6
When you have
finished playback,
press STOP button.
Select the radio
station that you wish
to record by pressing
button .
Press REC button or
CD SYNC/REC/PAUSE.
54
REC is displayed and recording
•
starts.
To stop recording,
press button.
6
44
Page 24

Recording a Compact Disc
You can record a compact disc on a cassette in two different ways:
ENG
Synchronized recording
This feature enables you to synchronize the start of the recording with the start of the disc or track of your choice.
Switch the system
on by pressing
1
POWER.
Press the
MP3-CD/DVD
) button.
(
Insert a blank
cassette in Deck.
2
Press the PUSH/EJECT button to
•
open the cassette door, insert a
cassette, and then close the
cassette door.
Insert the cassette with the safety
•
tabs.
Press and hold
RECREC button.
54
Load a compact
disc.
3
Press the OPEN/CLOSE button to
•
open the CD door.
Insert a CD and press the OPEN/
•
CLOSE button to close the CD door.
To stop recording,
press button.
6
Direct recording
The direct recording mode enables you to start recording with any track on the compact disc.
Switch the system
on by pressing
1
POWER.
Load a compact
disc.
3
Press the OPEN/CLOSE button to
•
open the CD door.
Insert a CD and press the OPEN/
•
CLOSE button to close the CD door.
Press
REC button.
5
Recording will begin.
•
To stop recording, press button.
•
Insert a blank
cassette in Deck.
2
Press the PUSH/EJECT button to
•
open the cassette door, insert a
cassette, and then close the
cassette door.
Insert the cassette with the safety
•
tabs.
Press the
MP3-CD/DVD
4
Use the CD selection ( )
•
buttons to select the desired song.
6
) button.
(
To stop recording,
press button.
Use the CD selection ( )
•
buttons to select the desired song.
45
"
CD SYNC" is displayed.
•
When stopped, press the button to
•
start the recording from the first
piece of music.
Press and hold
•
the playback of CD to start the
recording from the first part of the
music being played.
You can use the
•
PAUSE button instead of the REC
button.
REC button during
CD SYNC/REC/
Note
Synchronized recording
•
available for CD only.
Function is
Note
The cassette tape you want to record on must have the safety tabs intact.
•
46
Page 25

CD RIPPING Function
You can rip a compact disc as a MP3 file on the USB
This feature enables you to ripping with the start of the disc or track of your choice.
Timer Function
The timer enables you to switch the system on or off at specific times.
•
If you no longer want the system to be switched on or off automatically, you must cancel the timer.
•
Before setting the timer, check that the current time is correct.
•
For each step, you have a few seconds to set the required options.
•
If you exceed this time, you must start again.
ENG
Switch the system
on by pressing
1
POWER.
2
Press CD
RIPPING button
on remote control
4
to starting ripping.
If the system is playing state, turn the CD
¡
RIPPING dial down or press CD RIPPING button
on the remote control to start the ripping for the
current track.
Turn CD RIPPING dial up or press and hold CD
¡
RIPPING button on the remote control to start
ripping the all tracks of Disc.
Press this button, “TRACK RIPPING” is
¡
displayed and CD RIPPING starts.
Press and hold this button, “FULL CD RIPPING”
¡
is displayed and CD RIPPING starts.
During CD ripping, do not disconnect USB
¡
device.
Note
Don’t disconnected USB and AC Cord during CD-Ripping.This may cause
◆
the file damage.If you want to stop CD-Ripping during CD-Ripping,you must
press stop Key first and after the CD Stopped,then you can remove the USB
device.
If you disconnected USB device when CD Ripping, the main unit will be
◆
power off and you may not delete the ripped file, In this case, please connect
the USB on the PC and backup the USB data on the PC first and then
formate the USB device .
When the USB memory is not enough, it will be displayed “RIPPING
◆
ERROR”.
DTS-CD can’t for CD Ripping.
◆
With external HDD,FAT format the USB can be CD Ripping,but not NTFS.
◆
The CD Ripping function of this product does not support all USB devices.
When you use CD high speed search function or in the Pause or Stop mode,
◆
the CD Ripping can’t work.
During CD Ripping, do not deal impact.If is shocked while CD Ripping, CD
◆
Ripping maybe disengage.
Sometimes, some of USB devices, CD Ripping time is long.
◆
In program mode, you can't use CD RIPPING function.
◆
When CD Ripping completes or Stops, the CD will reload.
◆
5
After CD-Ripping,a directory named
“RIPPING FOLDER” will be created in your
device.The file name is same with the disc.
Connect the
USB.
To stop ripping, press
STOP(
)button.and
then automatically
create and save as
the MP3 file.
Load a compact
disc(Digital
3
the CD door.
button to close the CD door.
to select the desired song.
Audio).
Press the OPEN/CLOSE button to open
Insert a CD and press the OPEN/CLOSE
Use the CD selection (
) buttons
Example: You wish to wake up to music every morning.
Press TIMER/
Switch the system
on by pressing
1
POWER.
Set the timer
switch-on time.
a. Set the hour by pressing or
button.
b. Press ENTER .
The minutes flash.
•
c. Set the minutes by pressing or
button.
d. Press ENTER.
OFF TIME is displayed for a few
•
seconds, followed by any switchoff time already set; you can now
set the timer switch-off time.
CLOCK until
TIMER is
2
displayed.
Set the timer
switch-off time.
54
a. Set the hour by pressing or
button.
b. Press ENTER.
The minutes flash.
•
c. Set the minutes by pressing or
button.
d. Press ENTER.
VOL 10 is displayed, where 10
•
corresponds to the volume
already set.
Press or button
to select the source to
be played when the
system switches on.
TUNER (radio) : a Press ENTER.
•
DVD/CD (compact disc) :
•
Load on or more compact disc.
USB :Insert a USB.
•
TAPE (cassette) : Insert a cassettetape.
•
Note
b Select a preset station
by pressing or .
If the timer switch on and off times are identical, the word ERROR is displayed.
•
If there is no disc or usb, when you select the “DVD/CD, TAPE, USB, it will automatically change to
•
“TUNER”.
Press ENTER to
confirm the timer.
87
Press the ENTER
button.
3
ON TIME is displayed for a few
•
seconds, followed by any switchon time already set; you can set
the timer switch-on time.
Press or button
to adjust the volume
level and press
6
ENTER.
The source to be selected is
•
displayed.
Press POWER to
set the system to
standby mode.
9
is displayed to the top right of
•
the time, indicating that the timer
has been set.
The system will switch on and off
•
automatically at the required
times.
TAPE DECK
47
48
Page 26

Canceling the Timer
POWER SOUND/POWER
ENG
After having set the timer, it will start automatically as shown by the TIMER indication on the
display. If you no longer wish to use the timer, you must cancel it.
To cancel the timer, press TIMER
ON/OFF once.
•
is no longer displayed.
To resume the timer, press TIMER
ON/OFF again.
•
is displayed again.
BASS/PARTY Function
POWER SOUND Function
Your mini-compact system is equipped with the function of POWER SOUND
mode .
The function of POWER SOUND mode amplifies bass and improves high key or
bass twice as much for you to appreciate powerful real sound.
Press the P.SOUND button.
Result: “P.SOUND” is displayed.
To cancel this function, press P.SOUND again, “OFF”
is displayed for a few seconds.
POWER BASS Function
Your mini-compact system has a bass amplification function called Power Bass.
This function makes the sound more powerful and real.
Press the P.BASS button.
When CD Ripping,the P.SOUND function
can’t work and the P.SOUND automatically
covert to “OFF” mode.
When CD Ripping,the P.BASS function can’t
work and the P.BASS automatically covert to
“OFF” mode.
49
Note
You can cancel the timer while the power is on or while the player is in standby.
•
Result: “P,BASS” is displayed for a few seconds.
To cancel this function, press P.BASS again,
“OFF” is displayed for a few seconds.
PARTY Function
Your mini-compact system has a special effect
light. when you select PARTY mode, the light will
changed with the music playback.
Press the PARTY button.
MISCELLANEOUS
Each time you press the PARTY button, the party
mode will change as follows:
PARTY 1 PARTY 2 PARTY 3 PARTY 4
OFF
When CD Ripping,the PARTY function can’t work and the PARTY
mode automatically covert to “OFF” mode.
50
Page 27

DSP/EQ Function
Selecting DSP/EQ
Sleep Timer Function / Mute Function
ENG
Sleep Timer Function
You can set the time that the DVD player will shut itself off.
Your mini-compact system is equipped with a
preset equalizer that allows you to choose the
most appropriate balance between treble and
bass frequencies, according to the type of
music you are listening to.
Press DSP/EQ on the remote control until
the required option is selected.
To obtain a... Select...
Normal balance (linear) PASS
Balance suitable for pop music POP
Balance suitable for rock music ROCK
Balance suitable for class CLASSIC
Balance suitable for hall HALL
Balance suitable for live LIVE
Balance suitable for cinema CINEMA
When CD Ripping,the DSP/EQ function can’t work and the
DSP/EQ automatically covert to “PASS” mode.
Press SLEEP button.
Each time the button is pressed, the selection changes as follows:
•
90 MIN 60 MIN 45 MIN 30 MIN 15 MIN OFF.
To confirm the sleep timer setting, press SLEEP button.
The remaining time before the DVD player will shut itself off is displayed.
•
Pressing the button again changes the sleep time from what you have set
•
earlier.
To cancel the sleep timer, press SLEEP button until
OFF appears on the display.
Mute Function
This is useful when answering a doorbell or telephone call.
51
Press MUTE button.
MUTE ’ appears in the display.
•
‘
To turn off mute, press the button again.
•
MISCELLANEOUS
52
Page 28

DEMO Function / DIMMER Function / ECO Function
DEMO Function
You can view the various functions available on your system.
Press DEMO/DIMMER button.
The various functions available are listed in turn on the display.
•
All these functions are described in detail in this booklet.
•
For instructions on how to use them, refer to the appropriate sections.
DIMMER Function
You can adjust the brightness of the display on the main unit so it won't
interfere with your movie viewing.
Press DEMO/DIMMER button.
Each time the button is press, the brightness changes as follows:
•
DEMO ON DIMMER ON(Dim) DIMMER OFF(Bright).
ENG
Connecting Headphones/Microphone
You can connect a set of headphones to your mini component system so that you can listen to
music or radio programmers without disturbing other people in the room. The headphones must
have a 3.5ø jack or an appropriate adapter.
You can also insert microphone to sing along with your favorite Cds.
Note
Press any buttons to cancel DEMO function.
When you turn off the main unit, DEMO function will be auto start
after 10 senconds. if you want to cancel this DEMO function, press
DEMO/DIMMER button again.
ECO Function
You can save the power consumption while the unit is
turned off (on standby)
In Standby mode, press and
hold the POWER button for
longer than 3 seconds.
Result: ECO displays and the main set automatically switches itself into
•
the power saving mode.
Connect the headphones
to the PHONES jack on
Plug a microphone with a 6.3ø MIC
jack into the Mic terminal.
the front panel.
The loudspeakers are no longer used to
•
output the sound.
Note
Prolonged use of headphones at a high volume may damage your hearing.
•
Connect one Microphone.
•
Turn the MIC VOL knob to adjust the MIC Volume.
•
MISCELLANEOUS
53
54
Page 29

Cautions on Handling and Storing Discs
Before Calling for Service
ENG
Small scratches on the disc may reduce sound and picture quality or cause breaks in
playback. Be especially careful not to scratch discs when handling them.
Handling discs
Do not touch the playback side of the disc. Hold
the disc by the edges so that fingerprints will not
get on the surface.
Do not stick paper or tape on the disc.
Handling and Storing Discs
When you get fingerprints or dirt on the disc, clean it
with a mild detergent diluted in water and wipe with a
soft cloth.
When cleaning, wipe gently from the inside to the outside of the disc.
•
Note
Condensation may form if warm air comes into contact with cold parts
•
inside the player. When condensation forms inside the player, the player
may not operate correctly. If this occurs, remove the disc and let the
player stand for 1 or 2 hours with the power on.
Refer to the chart below when this unit does not function properly. If the problem you are experiencing is not
listed below or if the instruction below does not help, turn off the unit, disconnect the power cord, and contact
the nearest authorized dealer or Samsung Electronics Service Center.
Symptom Check/Remedy
Disc tray does not open.
Playback does not start.
The remote control does
not work.
Playback does not start
immediately when the Play/
Pause button is pressed.
Is the power cord plugged securely into the outlet?
•
Turn off the power and then turn it back on.
•
Check the region number of the DVD.
•
DVD discs purchased from abroad may not be playable.
CD-ROMs and DVD-ROMs cannot be played on this DVD
•
player.
Make sure that the rating level is correct.
•
Is the remote control being operated within its operation range of
•
angle and distance?
Are the batteries exhausted?
•
Are you using a deformed disc or a disc with scratches on
•
the surface?
Wipe the disc clean.
•
Precautions When Using Audio Cassettes
Check that the tape in the cassette is sufficiently taut.
•
To prevent erasing a cassette that you wish to keep, remove the safety tab on the upper edge of the
•
cassette. To record a cassette, where the tab has been broken, simply cover the opening with adhesive
tape.
When you have finished playing a cassette, always put it back in its case.
•
Store your cassettes in a clean place, out of direct sunlight, where they will not be exposed to high
•
temperatures.
Avoid using 120-minute cassettes as they place unnecessary strain on the tape mechanism.
•
Sound is not produced.
Picture does not appear, sound
is not produced, or the disc
tray opens 2 to 5 seconds later.
• Disc is rotating but no
picture is produced.
• Picture quality is poor and
No sound is heard during fast playback, slow playback, and step
•
motion playback.
Are the speakers connected properly? Is the speaker setup
•
correctly customized?
Is the disc severely damaged?
•
Was the DVD player suddenly moved from a cold place to a warm
•
one? When condensation forms inside the player, remove the disc
and let the player stand for 1 or 2 hours with the power on. (You
can use the player again after condensation disappears.)
Is the TV power on?
•
Are the video cables connected properly?
•
Is the disc dirty or damaged?
•
A poorly manufactured disc may not be playable.
•
picture is shaking.
MISCELLANEOUS
55
56
Page 30

Notes on Discs
ENG
Symptom Check/Remedy
Audio language and
subtitles do not work.
Audio language and subtitles will not work for DVDs not containing
•
them. And depending on the disc, they may work differently.
Menu screen does not appear even
Are you using a disc that does not contain menus?
•
when the menu function is selected.
You can play 16:9 DVDs in 16:9 WIDE mode, 4:3 LETTER BOX
Aspect ratio cannot be
changed.
The tape does not start
playing
The volume falls off
The cassette is not erased correctly
There is excessive wow and flutter
Can't receive radio
broadcast.
The main unit is not working.
•
(Example: The power goes out or
strange noise is heard.)
• The DVD player is not
working normally.
The password for rating
level has been forgotten.
•
mode, or 4:3 PAN SCAN mode, but 4:3 DVDs can be seen in 4:3
ratio only. Refer to the DVD disc jacket and then select the
appropriate function.
The TAPE function has not been selected.
•
The cassette has not been inserted correctly.
•
The cassette player has not been closed.
•
The tape is either slack or broken.
•
The audio heads are dirty.
•
The rollers or drive capstans are dirty.
•
The tape is worn.
•
Is the antenna connected properly?
•
If the antenna's input signal is weak, install an external FM
•
antenna in an area with good reception.
Turn off the power and hold the STOP button on the main unit
•
for longer than 5 seconds.
Using the RESET function will erase all stored settings.
Do not use this unless necessary.
While the player is in the No Disc mode, hold the main unit's STOP
•
button for longer than 5 seconds. “INITIAL” appears on the display and
all settings will return to the default values.
Press the POWER button.
•
Using the RESET function will erase all stored settings.
Do not use this unless necessary.
Disc Recording Format
CD-R Discs
• Some CD-R discs may not be playable depending on the disc recording device (CD-Recorder or PC) and the condition of
the disc.
• Use a 650MB/74 minute CD-R disc. Do not use CD-R discs over 700MB/80 minute as they may not be played back.
• Some CD-RW (Rewritable) media, may not be playable.
• Only CD-Rs that are properly "closed" can be fully played. If the session is closed but the disc is left open, you may not be
able to fully play the disc.
CD-R MP3 Discs
• Only CD-R discs with MP3 files in ISO 9660 or Joliet format can be played.
• MP3 file names should be 8 characters or less in length and contain no blank spaces or special characters (. / = +).
• Use discs recorded with a compression/decompression data rate greater than 128Kbps.
• Only files with the ".mp3" and ".MP3" extensions can be played.
• Only a consecutively written multisession disc can be played. If there is a blank segment in the Multisession disc, the disc
can be played only up to the blank segment.
• If the disc is not closed, it will take longer to begin playback and not all of the recorded files may be played.
• For files encoded in Variable Bit Rate (VBR) format, i.e. files encoded in both low bit rate and high bit rate (e.g., 32Kbps ~
320Kbps), the sound may skip during playback.
• A maximum of 500 tracks can be played per CD.
• A maximum of 300 folders can be played per CD.
CD-R JPEG Discs
• Only files with the "jpg" extensions can be played.
• If the disc is not closed, it will take longer to start playing and not all of the recorded files may be played.
• Only CD-R discs with JPEG files in ISO 9660 or Joliet format can be played.
• JPEG file names should be 8 characters or less in length and contain no blank spaces or special characters (. / = +).
• Only a consecutively written multisession disc can be played. If there is a blank segment in the multisession disc, the disc
can be played only up to the blank segment.
• A maximum of 9,999 images can be stored on a single CD.
• When playing a Kodak/Fuji Picture CD, only the JPEG files in the picture folder can be played.
• Picture discs other than Kodak/Fuji Picture CDs may take longer to start playing or may not play at all.
DVD R/RW, CD-R/RW DivX Discs
• Software updates for incompatible formats are not supported.
(Example : QPEL, GMC, resolution higher than 720 x 480 pixels, etc.)
• Sections with a high frame rate might not be played while playing a DivX file.
DivX® is a digital video format created by DivX, Inc. This is an official DivX Certified or DivX
Ultra Certified device that plays DivX video.
MISCELLANEOUS
57
58
Page 31

Notes on Terminology
Specifications
ENG
ANGLE
CHAPTER
NUMBER
DVD
PCM
PBC
(PLAYBACK
CONTROL)
REGION NUMBER
SUBTITLES
TITLE NUMBER
TRACK NUMBER
Recorded onto some DVD discs are scenes which have been simultaneously shot
from a number of different angles (the same scene is shot from the front, from the
left , from the right , etc.).
With such discs, the Angle button can be used to change the angle of view for
specific scenes.
These numbers are recorded on DVD discs. A Title is subdivided into many
sections, each of which is numbered, and specific parts of the video can be
searched quickly using these numbers.
A high-density optical disc on which high-quality pictures and sound have been
recorded by means of digital signals. Incorporating a new video compression
technology (MPEG-2) and high-density recording technology, a DVD disc
comprises two 0.6 mm thick discs bonded together.
An acronym for Pulse Code Modulation - another name for digital audio.
This is recorded on a video CD (version 2.0). Selected scenes or information can
be chosen from the menu displayed on the TV monitor.
Both the DVD player and DVD discs are encoded with a region number.
If the region number on the DVD disc does not correspond to the region number
of the DVD player, the player cannot play the disc.
Translated appearing at the bottom of the screen. A DVD disc can contain up to
32 subtitle languages.
These numbers are recorded on DVD discs. When a disc contains two or more
movies, these movies are numbered as Title 1, Title 2, etc.
These numbers are assigned to the tracks which are recorded on video and
audio CDs. They enable specific tracks to be located quickly.
RADIO
FM
FM Frequency Range 87.5~108.0MHz
Signal/noise ratio 55 dB
Usable sensitivity 12 dB
Total harmonic distortion 0.6 %
COMPACT DISC PLAYER
Capacity 3 discs
Frequency range 20 Hz - 20 KHz (± 1 dB)
Signal/noise ratio 85 dB (at 1 KHz) with filter
Distortion 0.1 % (at 1 KHz)
Channel separation 75 dB
Disc sizes Diameter: 120 or 80 mm. Thickness: 1.2 mm
TAPE
Frequency range 125 Hz ~ 8 KHz
Signal/noise ratio 40 dB
Channel separation 35 dB
Erasing effect 50 dB(without filter)
AMPLIFIER
Output power
Front Speaker(4 Ω) 90W/CH RMS,IEC (total harmonic distortion: 10 %)(MAX-DG53/DG54)
Subwoofer Speaker(4 Ω) 100W/CH RMS,IEC (total harmonic distortion: 10 %)(MAX-DG54)
Channel separation 45 dB
Signal/noise ratio 60 dB
VIDEO CD
59
Contains recordings of pictures and sound whose quality is roughly comparable
to that of video tape.
This player also supports video CDs with playback control (version 2.0).
5.1 (or 6) Channel Digital Surround sound reproduced from DVDs and LDs
recorded as a digital signals (with disc marking). With better sound quality,
dynamic range, and directionality than traditional Dolby surround technology, you
can enjoy dynamic, realistic sound.
GENERAL
Power consumption 50W
Dimensions 374(D) x 317 (H) x 270 (W) mm
Weight 4.3 Kg
MISCELLANEOUS
60
Page 32

Contact SAMSUNG WORLD WIDE
If you have any questions or comments relating to Samsung products, please contact the SAMSUNG customer
care centre.
Region Country Customer Care Center Web Site
61
 Loading...