

Page 1
MENU
EXIT
ON/OFF
VOLUME
MIN MAX
BASS
MIN MAX
TREBLE
MIN MAX
MIC
ON OFF
SyncMaster 320TFT/520TFT 4-1
4 Opearating Instructions
4-1 Control and Connectors
EXIT
MENU
ON/OFF
VOLUME BASS
TREBLE
MIC
MIN MAX MIN MAX MIN MAX
ON OFF
MIC
AUDIO
OUT IN
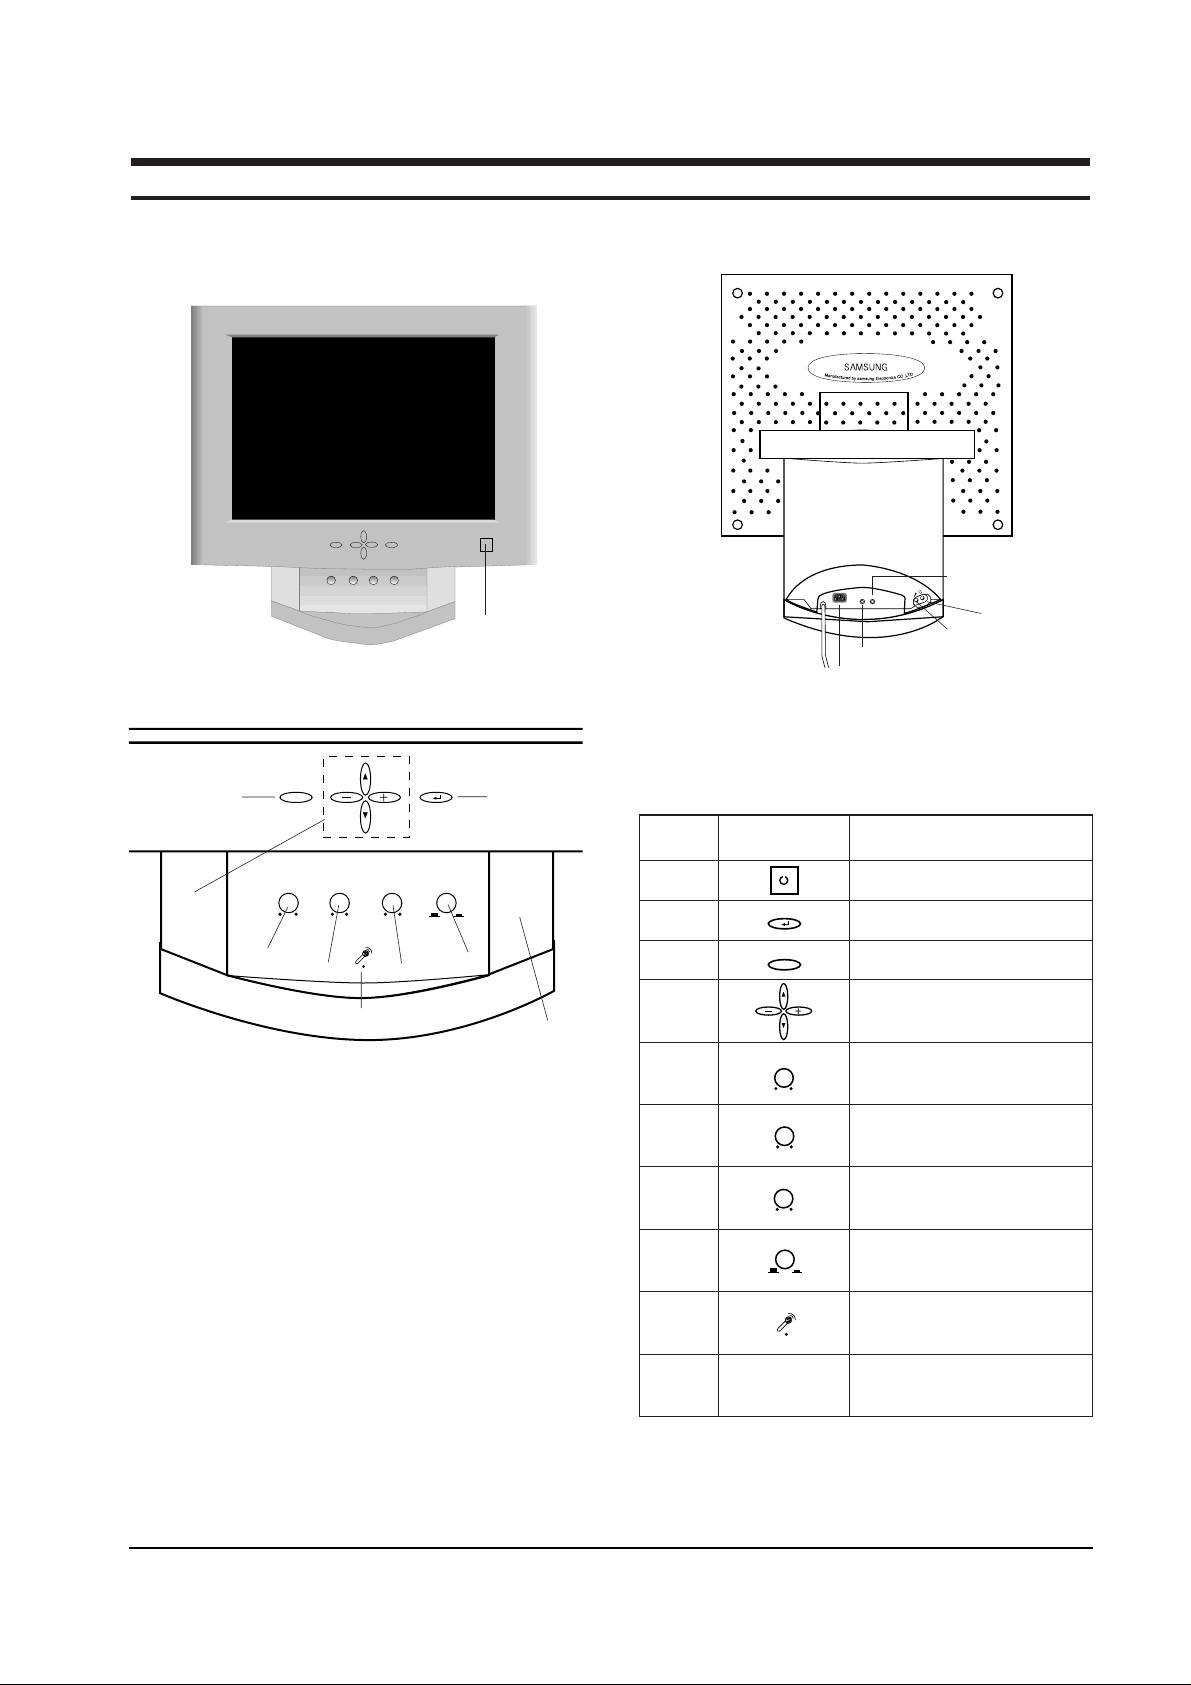
Figure 4-2. Rear View
Figure 4-1. Front View and Control
1
2
3
4
5
67
8
9
10
1 Power Button
Menu Button
Exit Button
Up / Down / + / – Buttons
Audio On / Off & Volume Buttons
Bass Button
Treble Button
Microphone On / Off Button
Microphone
Amplified Stereo Speakers
3
4
5
6
7
8
9
10
2
Location Symbol Description
Table 4-1. Front Panel Controls
Power port
Microphone out port
Audio in port
Headphone jack
External microphone jack
Page 2
This monitor has no Òservice onlyÓ micom
controls. Should there be a problem with the
microprocessor, replace the entire circuit board.
There are, however, user accessible adjustment
features that are described below.
This monitor has factory preset display settings
for each of the signals listed in the standard
display modes Timing Chart (see pages 3-3 and
3-4). As a result, when the monitor senses one of
the standard signal timings, it automatically
adjusts to an optimum size and position.
However, the user may wish to adjust the monitor
to their own preferred settings rather than use
those preset at the factory. The monitor saves up
to 16 user defined settings.
4-2-1 OSD Window
The adjustable features described below all use
the on-screen menu system.
1. Push the ↵ button to open the display the on-
screen menu.
2. Use the or button to change an
adjustment icon, use the ↵ button to highlight
an adjustment icon, then use the + or Ð
buttons to make the adjustments.
3. To select another adjustment on the same
screen, use the or button to move to the
next selection.
4. When you are done making adjustments on an
adjustment icon, push the EXIT button.
5. When you are done making all adjustments,
push the EXIT button.
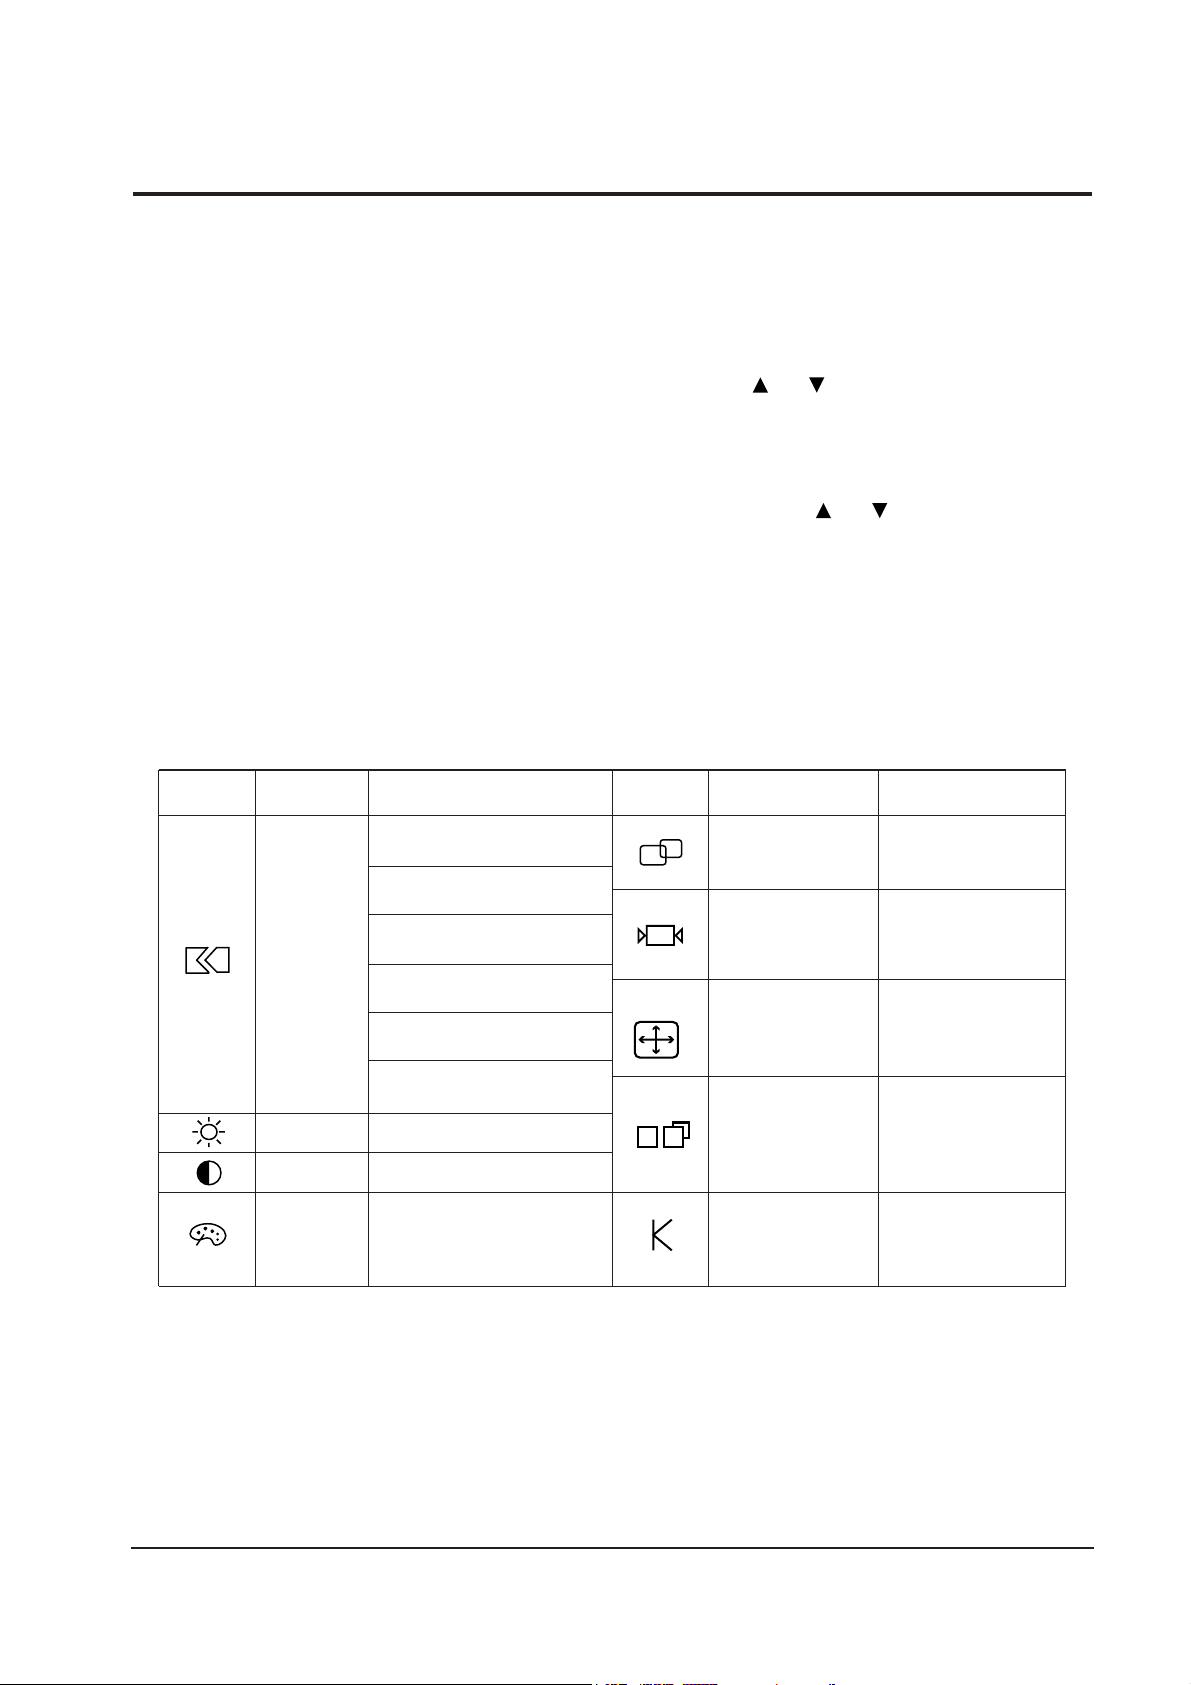
Table 4-2 shows the adjustment types and their
icons.
4 Operating Instructions
4-2 SyncMaster 320TFT/520TFT
4-2 Microprocessor Controls and Functions
Brightness
Contrast
Auto Reset
Auto Adjustment
Geometry
Color
Misc.
Language
Menu Position
Menu Display Time
Display Mode
0 ~ 100
0 ~ 100
No/Yes
No/Yes
No/Yes
x1, x2, x4, x8
Normal/Expand
Color Temperature
Mode1
Mode2
Mode3
0 ~ 100
0 ~ 100
0 ~ 100
Color Control
Red
Green
Blue
Image Size
Zoom
Display Size
0 ~ 100
0 ~ 100
0 ~ 100
0 ~ 100
Image Lock
Fine
Coarse
Position
Horizontal
Vertical
IBM VGA1/70 Hz 0-100
740-860
VGA2/70 Hz 0-100
840-960
VGA3/60 Hz 0-100
740-860
VESA SVGA/56 Hz 0-100
964-1084
SVGA/60 Hz 0-100
996-1116
XGA/60 Hz 0-100
1284-1404
Icon Description Adjustment Range Icon Description Adjustment Range
Table 4-2. Available adjustments
Page 3

4 Operating Instructions
SyncMaster 320TFT/520TFT 4-3
4-3 Audio Controls
Your LCD monitor provides four audio control buttons located on the front of the stand.
4-3-1 Audio Adjustments
To access the on/off, volume, bass and treble functions push the appropriate blue control button until it
pops out then turn it to the right or left to adjust the function.
Function
Name
Audio On/Off
and Volume
Effect of Control Movement
Left Right
Off
Decrease volume
Decrease Low sounds
Decrease high sounds
Bass
Treble
On
Increase volume
Increase low sounds
Increase High sounds
Function
Name
Audio On/Off
and Volume
Effect of Control Movement
In Out
Off On
Your LCD monitor includes an internal microphone which you can turn On or Off using the rightmost
control of the Audio controls.
Page 4

This monitor has a built-in power management
system called PowerSaver. This system saves
energy by switching your monitor into an off
mode when it has not been used for an certain
amount of time.
This system operates with a VESA DPMS
compliant video card installed in your computer.
You use a software utility installed on your
computer to set up this feature. See the table
below for details.
Note 1: This monitor automatically returns to
normal operation when horizontal and
vertical sync return. This occurs when you
move the computer's mouse or press a key
on the keyboard.
Note 2: This monitor is EPA ENERGY STAR
¨
compliant and NUTEK compliant when
used with a computer equipped with
VESA DPMS functionality. If your
computer system cannot support a display
power management function, you can
purchase an optional DPMS software
program to enable the power saving
function. Please contact Samsung or your
dealer for more information.
Note 3: For energy conservation, turn your
monitor OFF when it is not needed, or
when leaving it unattended for long
periods.
Note 4: Audio Part is operated separately by
control button.
4 Operating Instructions
4-4 SyncMaster 320TFT/520TFT
4-4 Power Management System
Table 4-3. Display Power Management Signaling (DPMS); 13.3”
State
Items
Normal
Operation
Horizontal Sync
Vertical Sync
Video
Power
Indicator
Power
Consumption/hr
Active
Active
Active
Green Amber
Amber
Blinking
(0.5 sec)
Amber
Blinking
(1 sec)
40 W (max.)
30 W
(nominal)
Less than
5 W
Less than
5 W
Less than
5 W
Inactive
Active
Blanked
Active
Inactive
Blanked
Power saving function EPA/NUTEK
Stand-By
Mode
Suspend Mode
Position A
Power Off Mode
Position B
Inactive
Inactive
Blanked
Table 4-4. Display Power Management Signaling (DPMS); 15”
State
Items
Normal
Operation
Horizontal Sync
Vertical Sync
Video
Power
Indicator
Power
Consumption/hr
Active
Active
Active
Green Amber
Amber
Blinking
(0.5 sec)
Amber
Blinking
(1 sec)
45 W (max.)
35 W
(nominal)
Less than
5 W
Less than
5 W
Less than
5 W
Inactive
Active
Blanked
Active
Inactive
Blanked
Power saving function EPA/NUTEK
Stand-By
Mode
Suspend Mode
Position A
Power Off Mode
Position B
Inactive
Inactive
Blanked
 Loading...