

Page 1

LCD TV
LW15E33C/LW17E34C
LCD TV
LW15E33C
LW17E34C
Owner’s Instructions
Before operating the unit,
please read this manual thoroughly,
and retain it for future reference.
ON-SCREEN MENUS
PC DISPLAY
PICTURE IN PICTURE (PIP)
TELETEXT
-
AFTER SALES SERVICE
-
Do not hesitate to contact your retailer or service agent if a
change in the performance of your product indicates that a
faulty condition may be present.
BN68-00438E-02
ELECTRONICS
BN68-00438E-02Cover 8/18/03 6:20 PM Page 1
Page 2

LCD TV
LW15E33C
LW17E34C
Owner’s Instructions
Before operating the unit,
please read this manual thoroughly,
and retain it for future reference.
ON-SCREEN MENUS
PC DISPLAY
PICTURE IN PICTURE (PIP)
TELETEXT
BN68-00438D-02_en 6/11/03 7:11 PM Page 1
Page 3
English-2
Caution
CAUTION:
TO PREVENT ELECTRICAL SHOCK,
DO NOT REMOVE REAR COVER, NO USER
SERVICEABLE PARTS INSIDE. REFER SERVICING TO
QUALIFIED SERVICE PERSONNEL.
RISK OF ELECTRIC
SHOCK DO NOT OPEN
CAUTION
The lightning flash and arrow head
within the triangle is a warning
sign alerting you of “dangerous
voltage” inside the product.
The exclamation point within the
triangle is a warning sign alerting
you of important instructions
accompanying the product.
WARNING:TO PREVENT DAMAGE WHICH MAY RESULT IN FIRE OR SHOCK HAZARD, DO NOT EXPOSE
THIS APPLIANCE TO RAIN OR MOISTURE.
☛
The main voltage is indicated on the rear of your set and the frequency is 50 or 60 Hz.
Information in this document is subject to change without notice.
© 2003 Samsung Electronics Co., Ltd. All rights reserved.
Reproduction in any manner whatsoever without the written permission of Samsung Electronics Co., Ltd. is strictly forbidden.
Samsung Electronics Co., Ltd. shall not be liable for errors contained herein or for incidental or consequential damages in
connection with the furnishing, performance, or use of this material.
The
Samsung logo is the registered trademarks of Samsung Electronics Co., Ltd.; Microsoft, Windows®and Windows®NT are
registered trademark of Microsoft Corporation; VESA, DPMS and DDC are registered trademarks of Video Electronics Standard
Association. All other product names mentioned herein may be the trademarks or registered trademarks of their respective owners.
European Notice (Europe Only)
Products with the CE marking comply with the EMC Directive(89/336/EEC), (92/31/EEC), (93/68/EEC) and the Low
Voltage Directive (73/23/EEC) issued by the Commission of the European Community.
Compliance with these directives implies conformity to the following European Norms:
■ EN55022:1998+A1:2000 - Radio Frequency Interference
■ EN55024:1998 - Electromagnetic Immunity
■ EN55013:1990+A12:1994+A13:1996+A14:1999 - Radio Frequency Interference
■ EN55020:1994+A11:1996+A12/A13/A14:1999 - Electromagnetic Immunity
■ EN61000-3-2:1995+A1/A2:1998 - Power Line Harmonics
■ EN61000-3-3:1995 - Voltage Fluctuations
■ EN60065:1997 or EN60095:1998 - Product Safety
Manufactured under license from Dolby Laboratories.
“Dolby”, “Pro Logic”, and the double-D symbol are trademarks of Dolby Laboratories.
TRADEMARK & LABEL LICENSE NOTICE
BN68-00438D-03eng 8/18/03 11:11 AM Page 2
Page 4
English-3
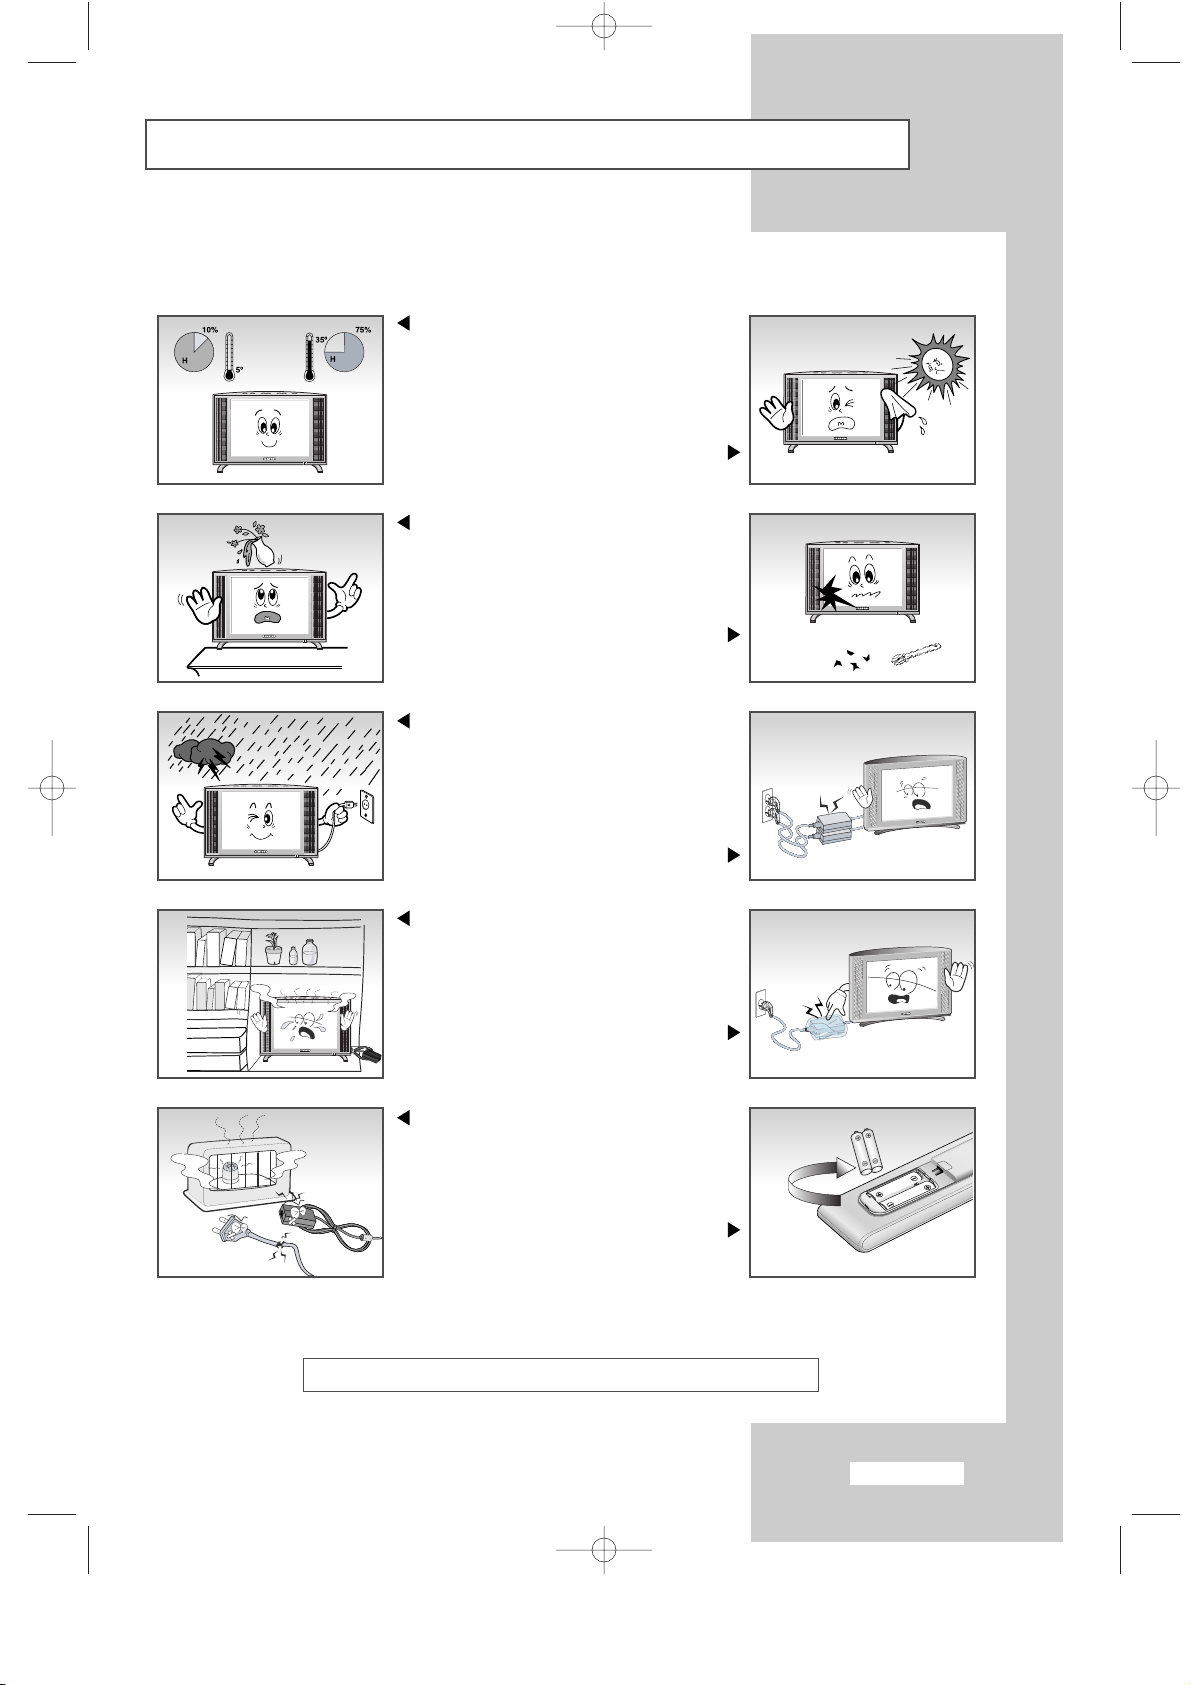
Safety Instructions
These illustrations represent precautions concerning your set.
THIS DEVICE IS NOT FOR USE IN INDUSTRIAL ENVIRONMENTS
Do NOT expose your set to extreme
temperature or humidity conditions.
Do NOT expose your set to
direct sunlight.
Do NOT expose your set to any liquids.
If your set is broken,
do not try to repair it yourself.
Contact qualified service personnel.
During storm conditions (especially when
there is lightning) unplug your set from
the mains socket and aerial.
Keep all power adaptors apart.
Possible fire hazard.
Always keep the power adaptor in a
well-ventilated area.
Remove and discard the plastic
cover from the power adaptor before use.
Possible fire hazard.
Keep the power adaptor away from
any other heater. Possible fire hazard.
If the remote control is not used for a long
period of time, remove the batteries and
store it in a cool, dry place.
BN68-00438D-02_en 6/11/03 7:11 PM Page 3
Page 5

English-4
Contents
◆ FOREWORD
■
Caution .......................................................................................................... 2
■
Safety Instructions .......................................................................................... 3
◆ CONNECTING AND PREPARING YOUR TV
■
Viewing the Control Panel ............................................................................. 6
■
Viewing the Connection Panel ....................................................................... 7
-
Connecting an Aerial or Cable Television Network .................................... 8
-
Connecting Set-Top Box, VCR, or DVD...................................................... 8
-
Connecting Computer ............................................................................... 8
-
Connecting External A/V Devices ............................................................... 9
-
Kensington Slot ........................................................................................... 9
■
Viewing Pictures From External Sources......................................................... 10
■
Inserting the Batteries in the Remote Control.................................................. 11
■
Viewing the Remote Control (All Functions Except Teletext) .......................... 12
■
Viewing the Remote Control (Teletext Functions)........................................... 13
■
Switching On and Off .................................................................................... 14
■
Placing in Standby Mode ............................................................................... 14
■
Becoming Familiar with the Remote Control.................................................. 15
■
Choosing Your Language................................................................................ 16
◆ SETTING THE CHANNELS
■
Storing Channels Automatically...................................................................... 17
■
Storing Channels Manually............................................................................. 18
■
Giving Channels Names................................................................................. 19
■
Skipping Unwanted Channels ........................................................................ 20
■
Fine Tuning Channel Reception ..................................................................... 20
■
Sorting the Stored Channels ........................................................................... 21
◆ USING THE VARIOUS FUNCTIONS
■
Changing the Picture Standard ....................................................................... 22
■
Adjusting the Picture Settings ......................................................................... 22
■
Selecting the Picture Format........................................................................... 23
■
Freezing the Current Picture........................................................................... 23
BN68-00438D-02_en 6/11/03 7:11 PM Page 4
Page 6

English-5
Contents
◆ USING THE VARIOUS FUNCTIONS
■
Changing the Sound Standard ........................................................................ 24
■
Adjusting the Sound Settings .......................................................................... 24
■
Enjoying the Dolby Sound.............................................................................. 25
■
Selecting the Sound Mode.............................................................................. 25
■
Viewing the Picture In Picture (PIP)................................................................ 26
■
Switching Off Automatically........................................................................... 27
■
Displaying Information................................................................................... 27
◆ USING THE PC FUNCTIONS
■
Setting up Your PC Softerware (Based on Windows 2000) ............................. 28
■
Adjusting the Brightness and Contrast ............................................................ 29
■
Adjusting the Image Quality........................................................................... 30
■
Changing the Image Position.......................................................................... 31
■
Adjusting the Color ........................................................................................ 32
■
Initializing the Image Settings......................................................................... 33
■
Adjusting the PC Screen Automatically .......................................................... 33
◆ USING THE TELETEXT FEATURE
■
Teletext Feature.............................................................................................. 34
■
Displaying the Teletext Information................................................................ 35
■
Selecting a Page by Number .......................................................................... 36
■
Using FLOF to Select a Page .......................................................................... 37
■
Storing Teletext Pages..................................................................................... 37
◆ RECOMMENDATIONS FOR USE
■
Troubleshooting: Before Contacting Service Personnel................................... 38
■
Power Saver ................................................................................................... 39
■
Technical and Environmental Specifications .................................................. 40
■
Display Modes ............................................................................................... 41
■
Maintenance of Your Telelvision.................................................................... 42
■
How to assemble the TV set and stand base................................................... 43
■
Installing the Wall Mount Kit.......................................................................... 44
■
Wiring the Mains Power Supply Plug (UK Only) ............................................ 46
☛
➢
Press Important Note
Symbols
BN68-00438D-02_en 6/11/03 7:11 PM Page 5
Page 7
English-6
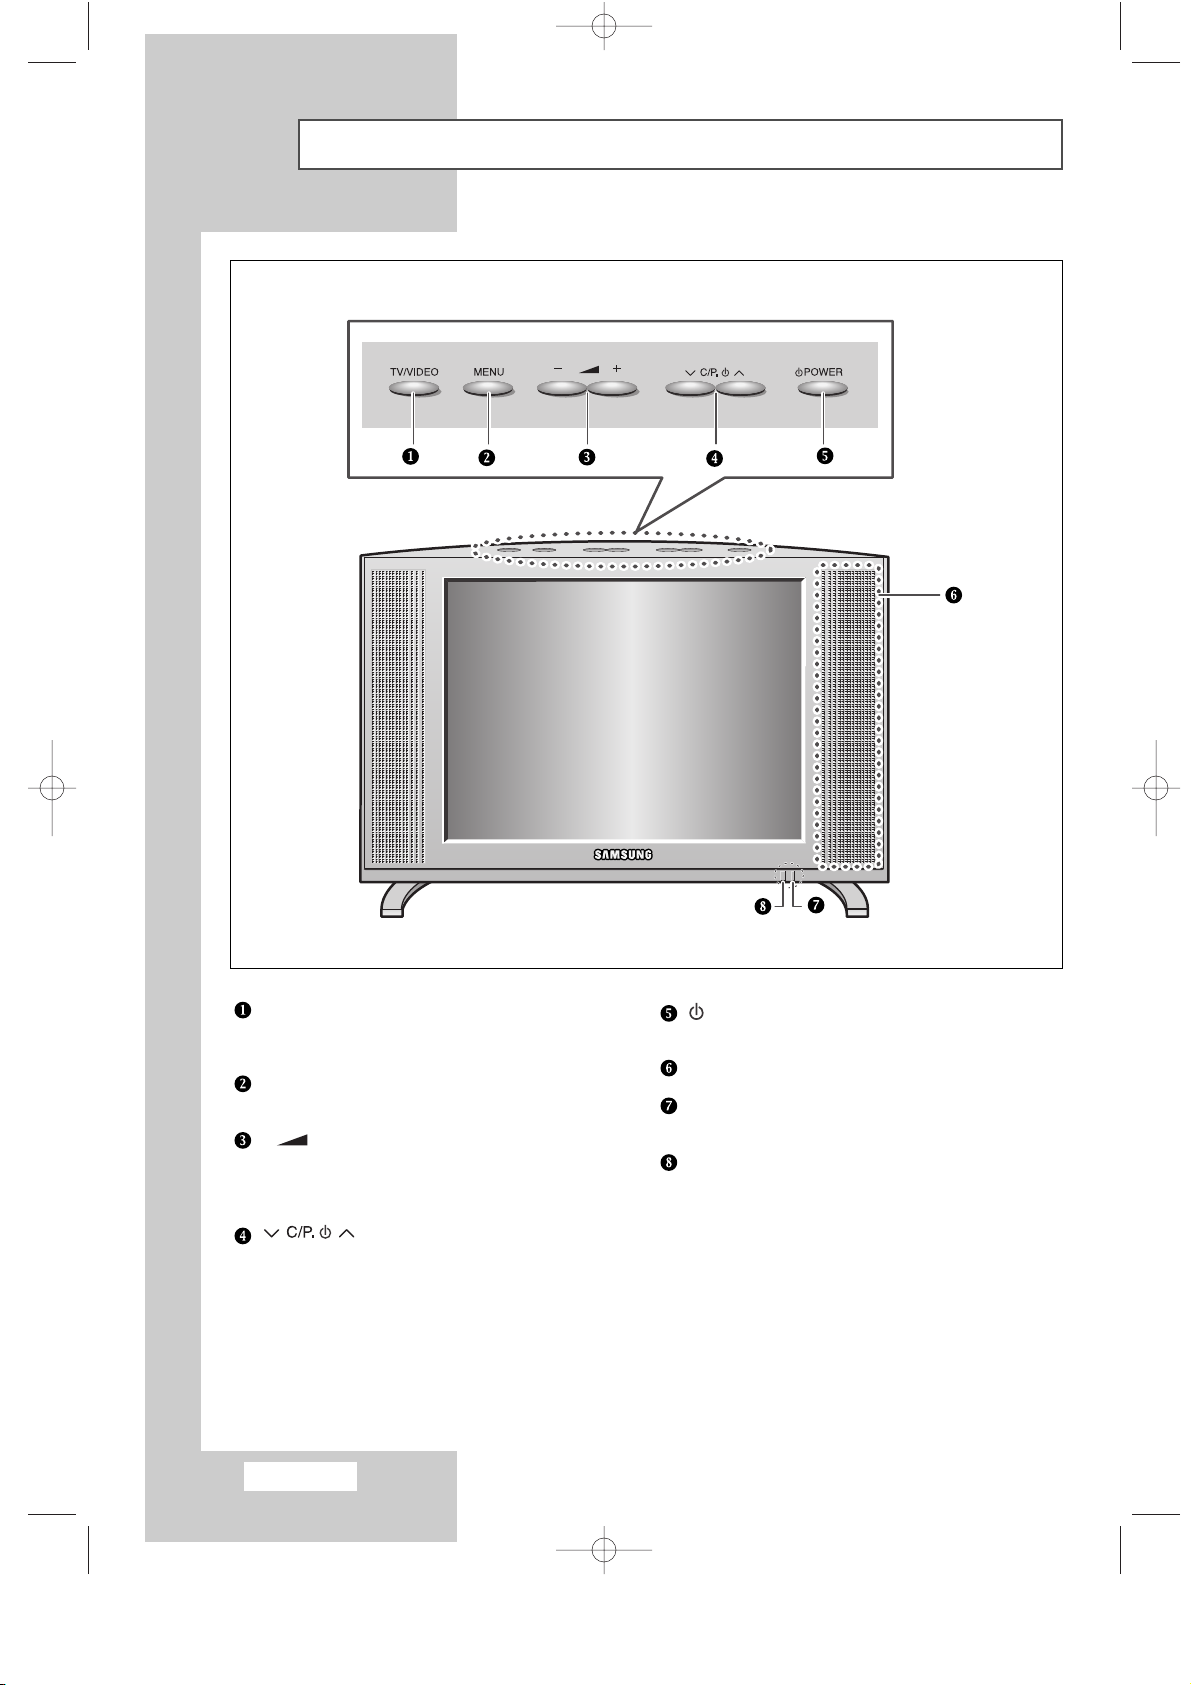
Viewing the Control Panel
TV/VIDEO
Displays a menu of all of the available input sources
(TV - Video1 - Video2 - S-Video - PC).
MENU
Opens the on-screen menu.
- +
Moves the selector left or right on the OSD.
Increases or decreases the level of audio
volume and the values of the selected function.
Moves the selector up or down on the OSD.
Increases or decreases the channel number.
POWER
Turns ON/OFF your set.
SPEAKER
Power Indicator
Lights up when you turn the power off.
REMOTE CONTROL SENSOR
BN68-00438D-02_en 6/11/03 7:11 PM Page 6
Page 8
English-7
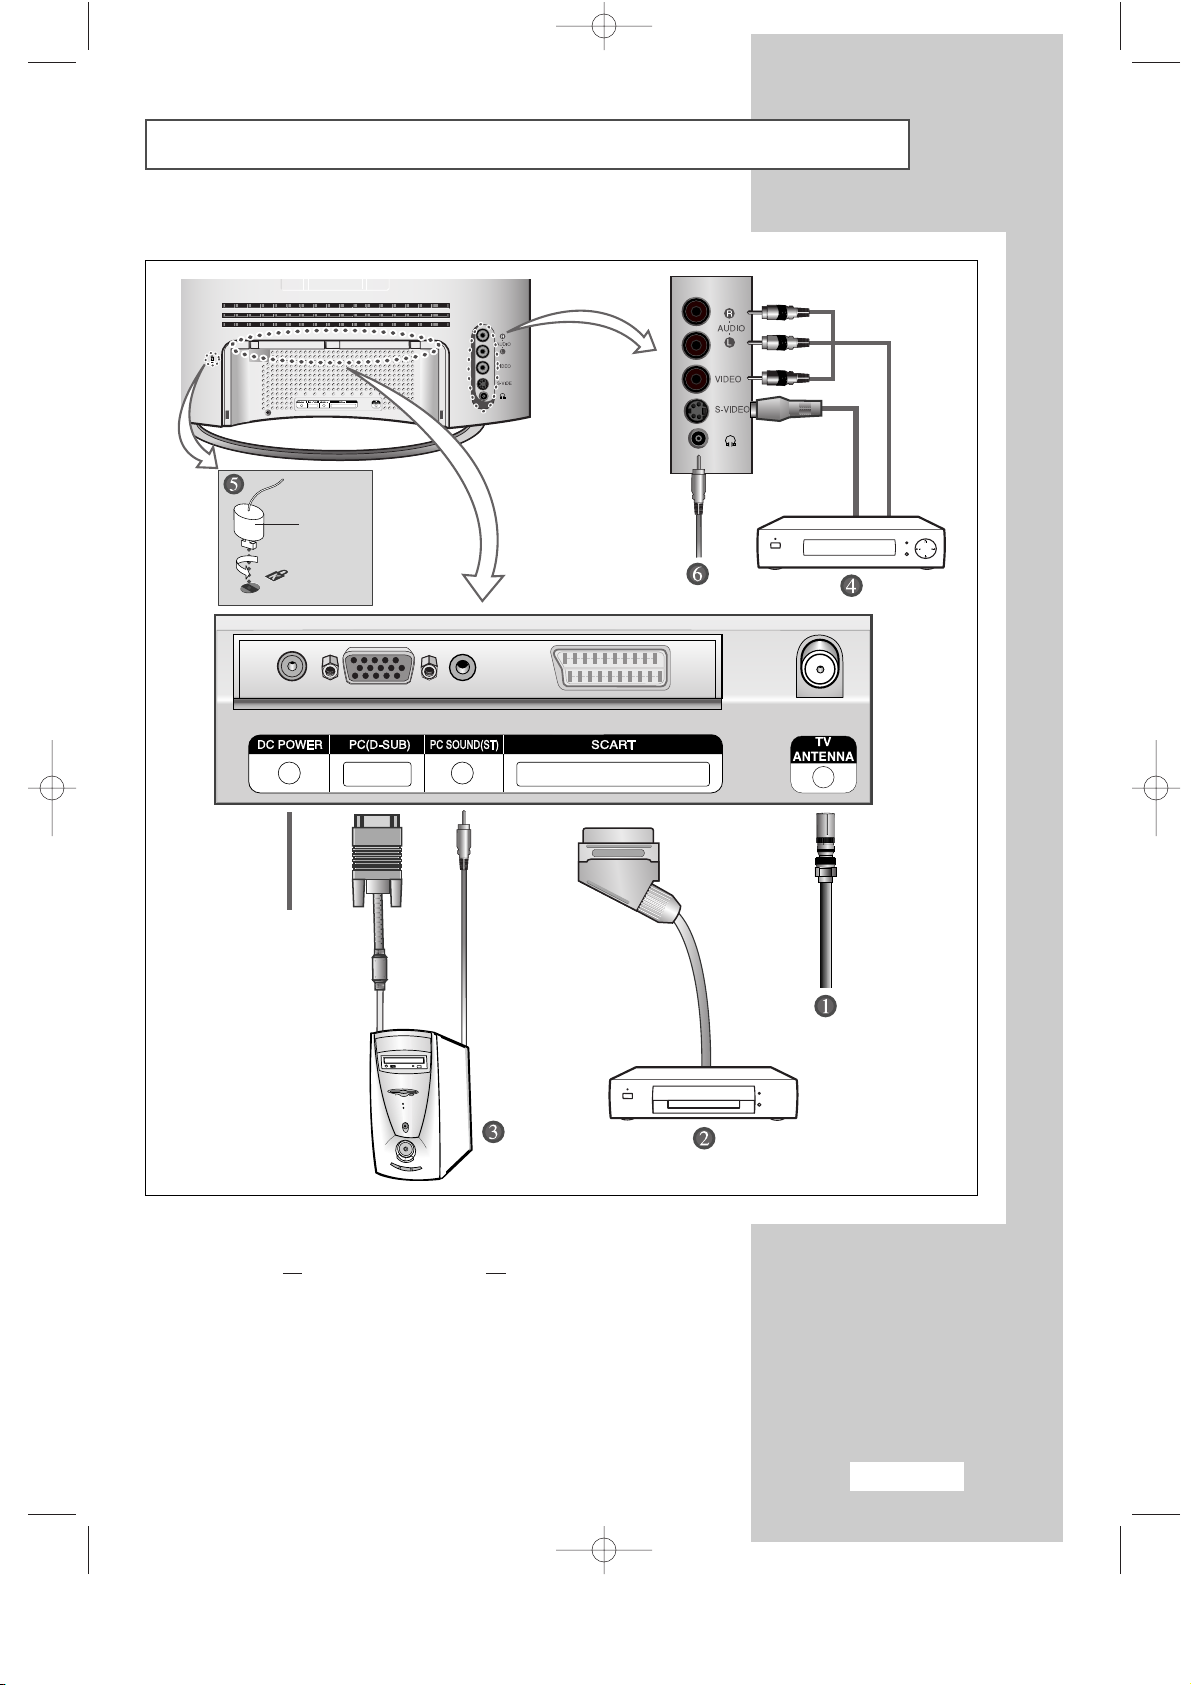
Viewing the Connection Panel
☛
Whenever you connect an audio or video system to your set,
ensure that all
elements are switched off. Refer to the
documentation supplied with your equipment for detailed
connection instructions and associated safety precautions.
Power Input
Option
BN68-00438D-02_en 6/11/03 7:11 PM Page 7
Page 9
English-8
Viewing the Connection Panel
Connecting an Aerial or Cable Television Network
(depending on the model)
To view television channels correctly, a signal must be received by the set from one of the following sources:
- An outdoor aerial
- A cable television network
- A satellite network
Connecting Set-Top Box, VCR, or DVD
- Connect the VCR, or DVD SCART cable to the SCART connector of the VCR, or DVD.
- If you wish to connect both the Set-Top Box and VCR (or DVD), you should connect the Set-Top Box
to the VCR (or DVD) and connect the VCR (or DVD) to your set.
Connecting Computer
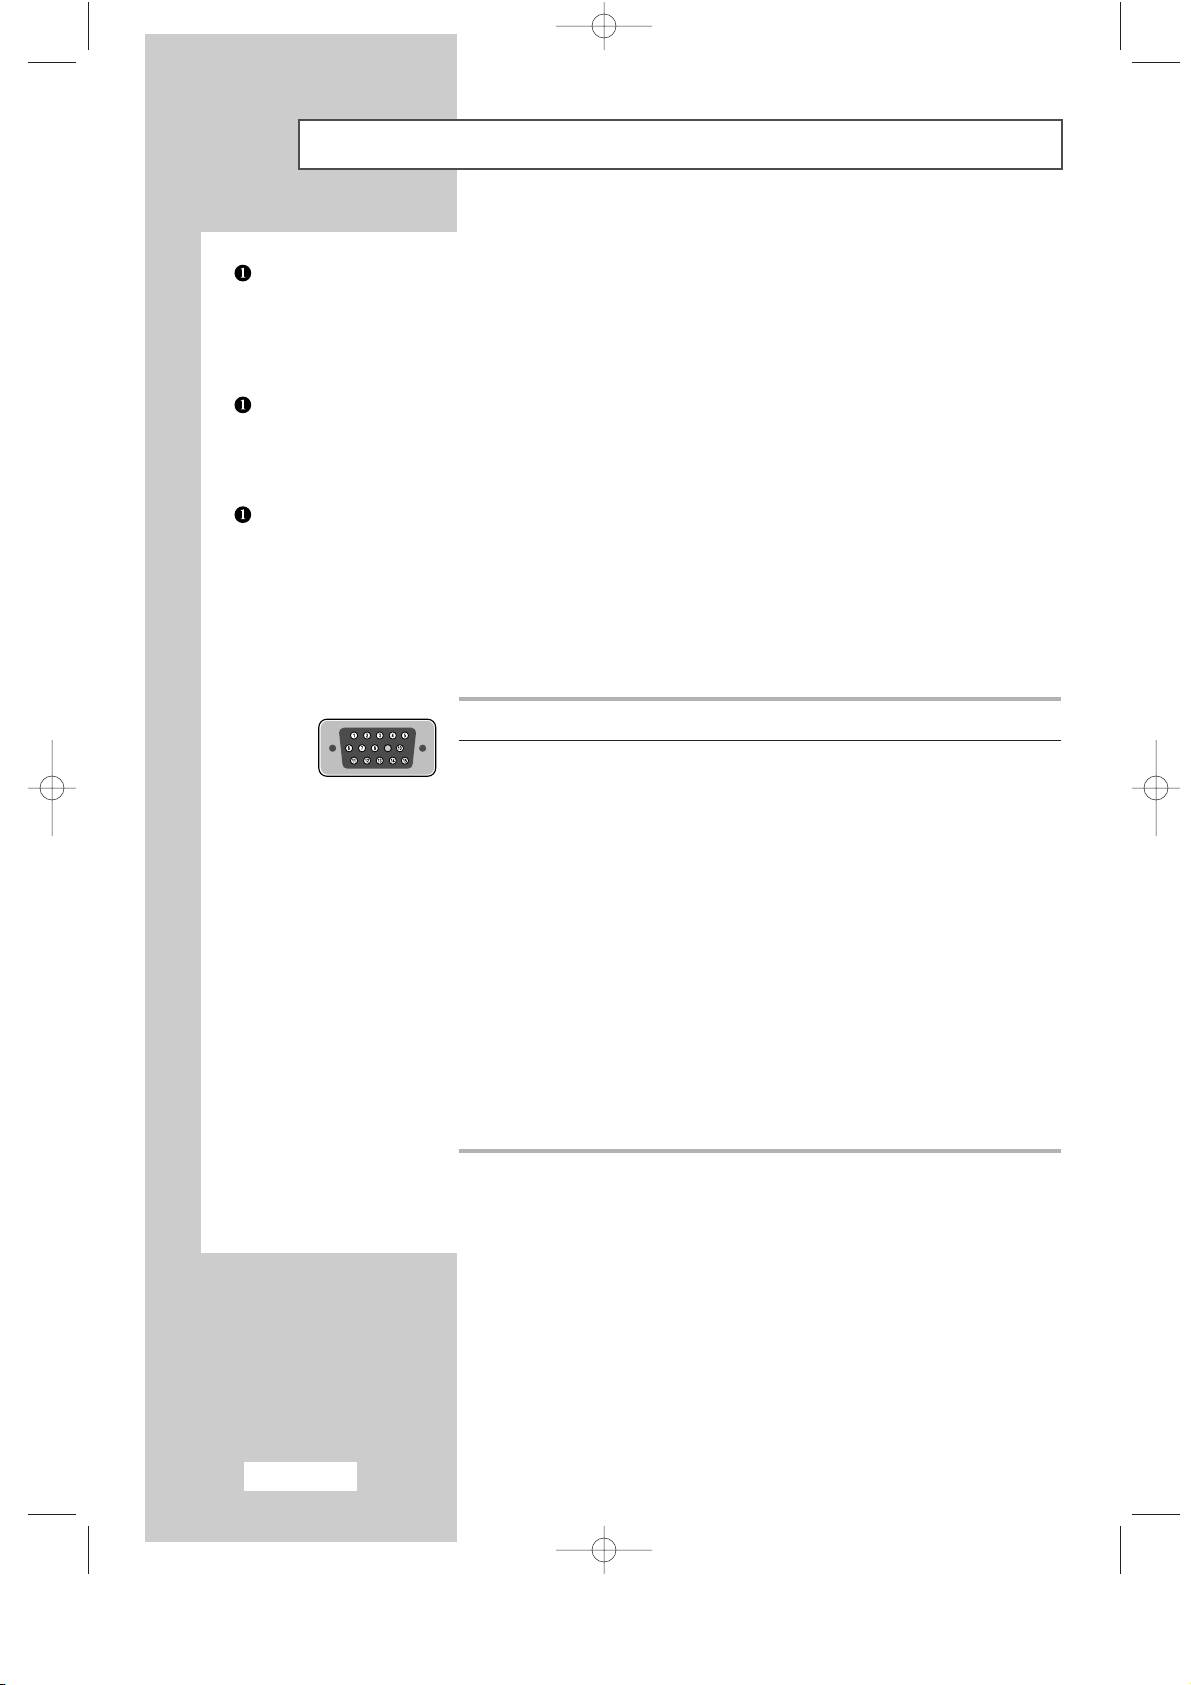
- Connect the 15 Pin D-SUB connector to the PC video connector.
- Connect the stereo audio cable to “Audio (ST)” on the rear of your set and the other end to “Audio Out” of
the sound card on your computer.
- If necessary, please install monitor driver contained on the accompanied CD. For more information, refer to
the driver installation instructions included with your CD package.
➣
15 Pin D-SUB connector
Pin Separate H/V Composite H/V
1 Red (R) Red (R)
2 Green (G) Green (G)
3 Blue (B) Blue (B)
4 Grounding Grounding
5 Grounding (DDC return) Grounding (DDC return)
6 Grounding - Red (R) Grounding - Red (R)
7 Grounding - Green (G) Grounding - Green (G)
8 Grounding - Blue (B) Grounding - Blue (B)
9 No connection No connection
10 Grounding - Sync. / Self test Grounding - Sync. / Self test
11 Grounding Grounding
12 DDC - SDA (Date) DDC - SDA (Date)
13 Horizontal Sync. Horizontal/Vertical Sync.
14 Vertical Sync. Not used
15 DDC - SCL (Clock) DDC - SCL (Clock)
BN68-00438D-02_en 6/11/03 7:11 PM Page 8
Page 10
English-9
Viewing the Connection Panel
Connecting External A/V Devices
- Connect RCA or S-VIDEO cable to an appropriate external A/V device such as VCR, DVD, or Camcorder.
- Connect RCA audio cables to “AUDIO (L)” and “AUDIO (R)” on the rear of your set and the other ends to
corresponding audio out connectors on the A/V device.
- Headphone may be connected to the headphone output (Ø) on the rear of your set.
While the headphone is connected, the sound from the built-in speakers will be disabled.
Kensington Slot
- This television has been designed to apply a burglarproof lock.
➢
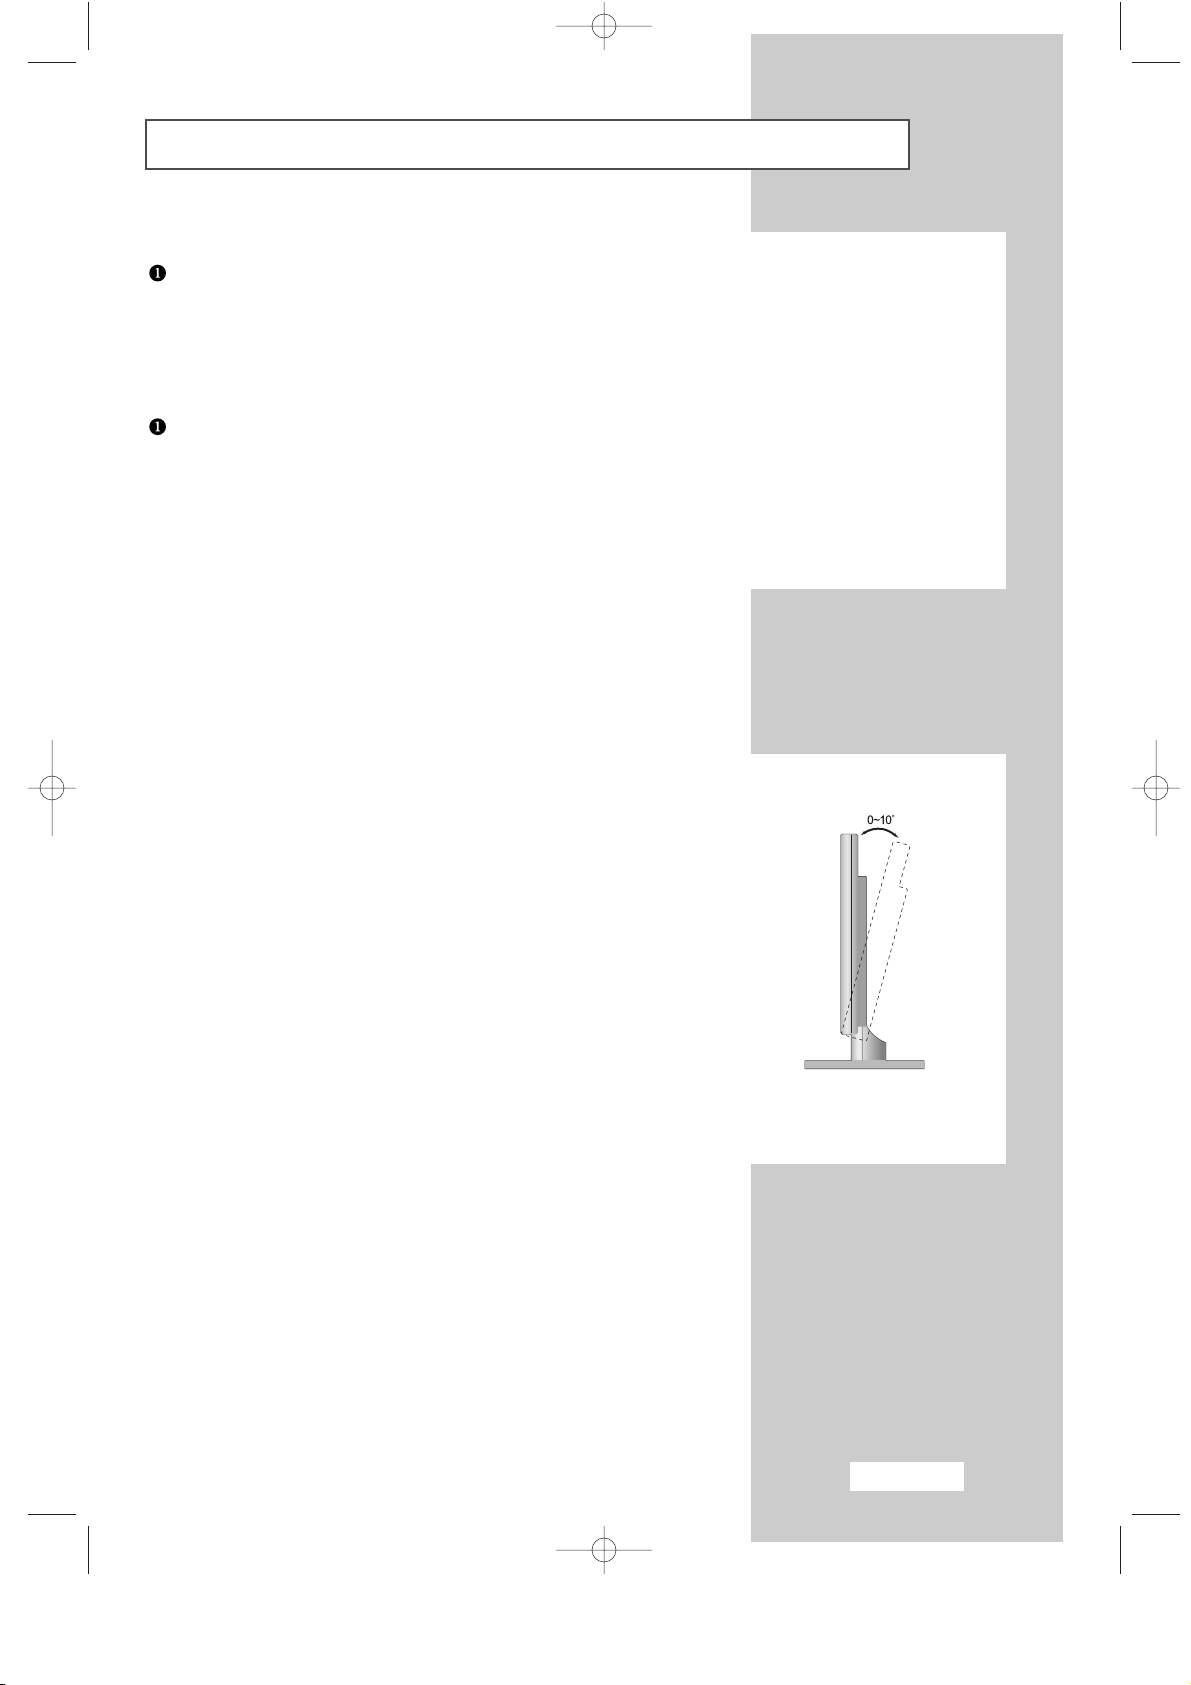
Retractable Stand
Tilt the screen until you feel comfortable.
The maximum tilt angle is 10 degree to the backward direction.
Please do not tilt the television other than specified range.
Excessive force to tilt the television other than specified
range may give permanent damage to the mechanical
part of the stand.
BN68-00438D-02_en 6/11/03 7:11 PM Page 9
Page 11

English-10
Viewing Pictures From External Sources
Once you have connected up your various audio and video systems,
you can view the different sources by selecting the appropriate
input.
1 Check that all the necessary connections have been made
(refer to pages 8 and 9 for further details).
2 Switch your set on and if necessary, press the TV/VIDEO button
repeatedly.
The input sources are displayed in the following order:
TV -VIDEO1 -VIDEO2 -S-VIDEO -PC.
TV/VIDEO PC DISPLAY STILL
P.STD S.STD
Power
BN68-00438D-02_en 6/11/03 7:11 PM Page 10
Page 12
English-11
Inserting the Batteries in the Remote Control
You must insert or replace the batteries in the remote control when you:
◆
Purchase your set
◆
Find that the remote control is no longer operating correctly
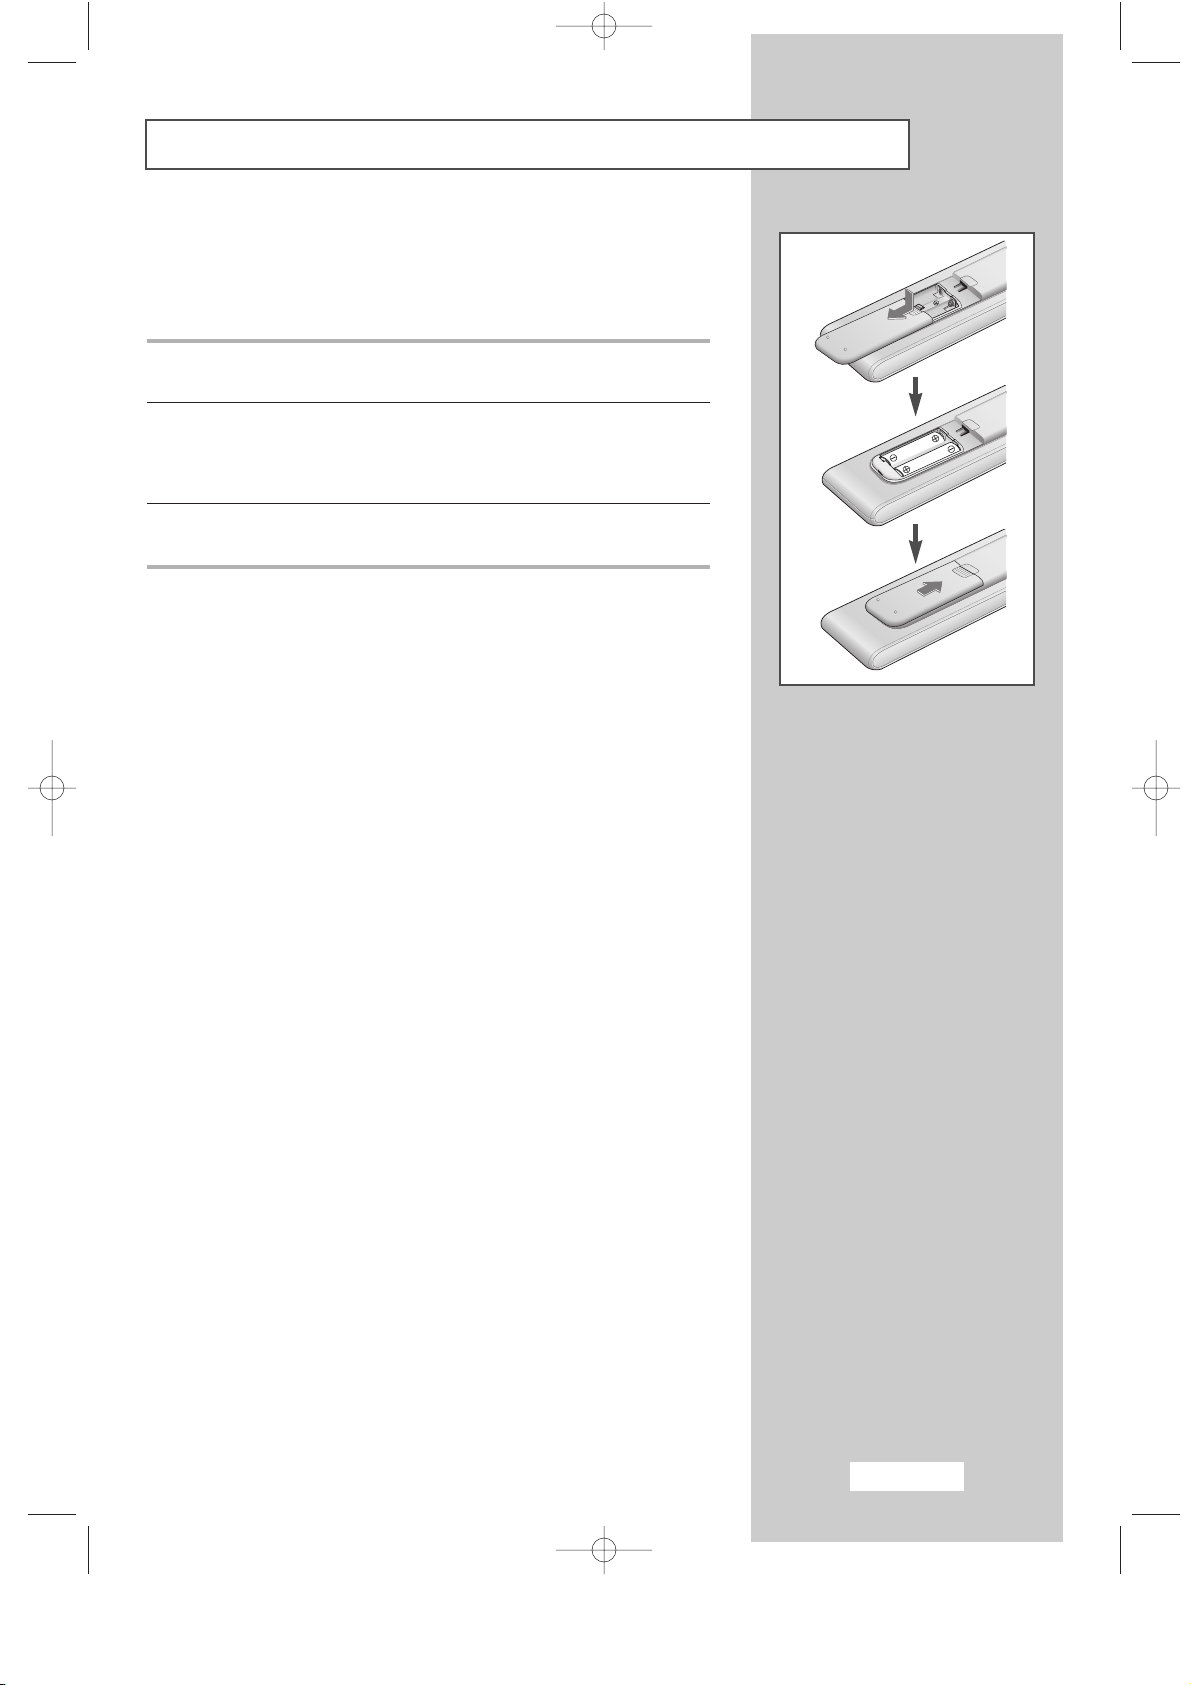
1 Remove the cover on the rear of the remote control by pressing the
symbol downwards and then pulling firmly to remove it.
2 Insert two R03, UM4, “AAA” 1.5V or equivalent batteries taking care
to respect the polarities:
◆
+
on the battery against +on the remote control
◆
-
on the battery against -on the remote control
3 Replace the cover by aligning it with the base of the remote control
and pressing it back into place.
➣
Do not mix battery types, i.e. alkaline and manganese.
BN68-00438D-02_en 6/11/03 7:11 PM Page 11
Page 13
English-12
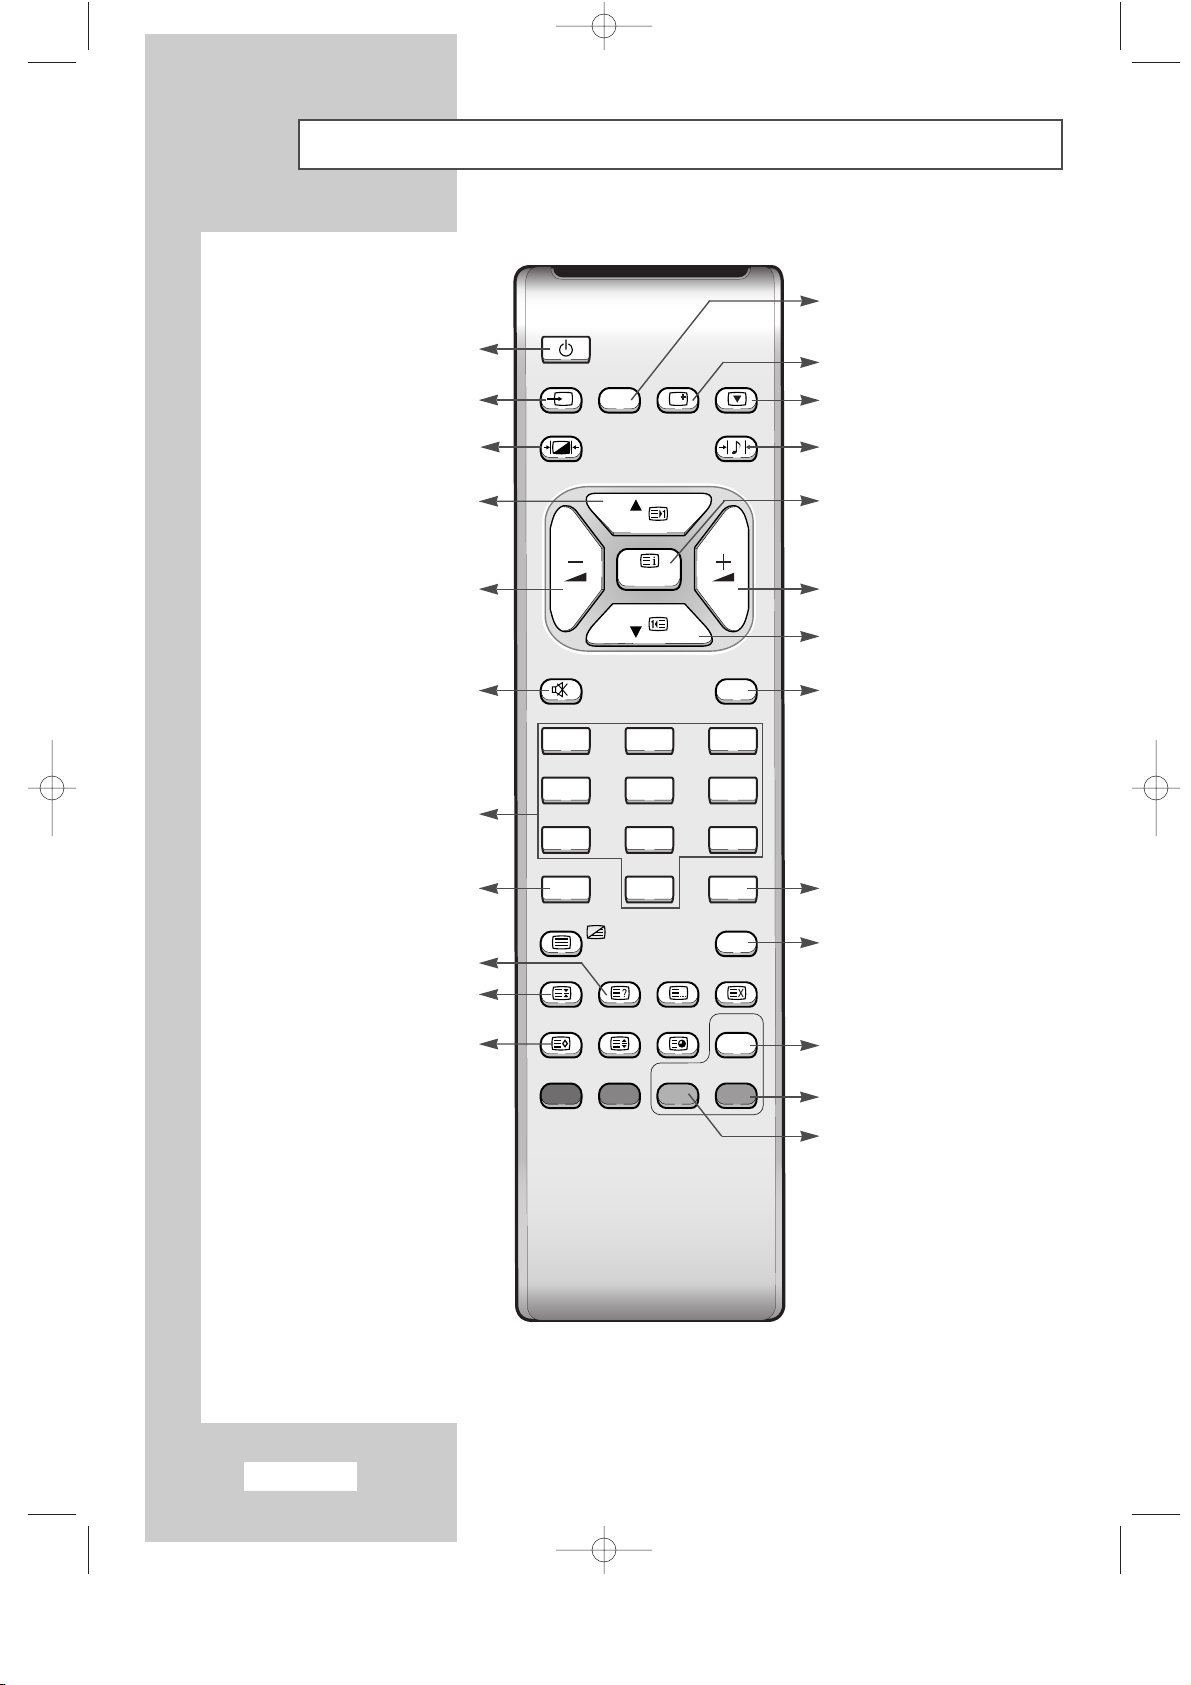
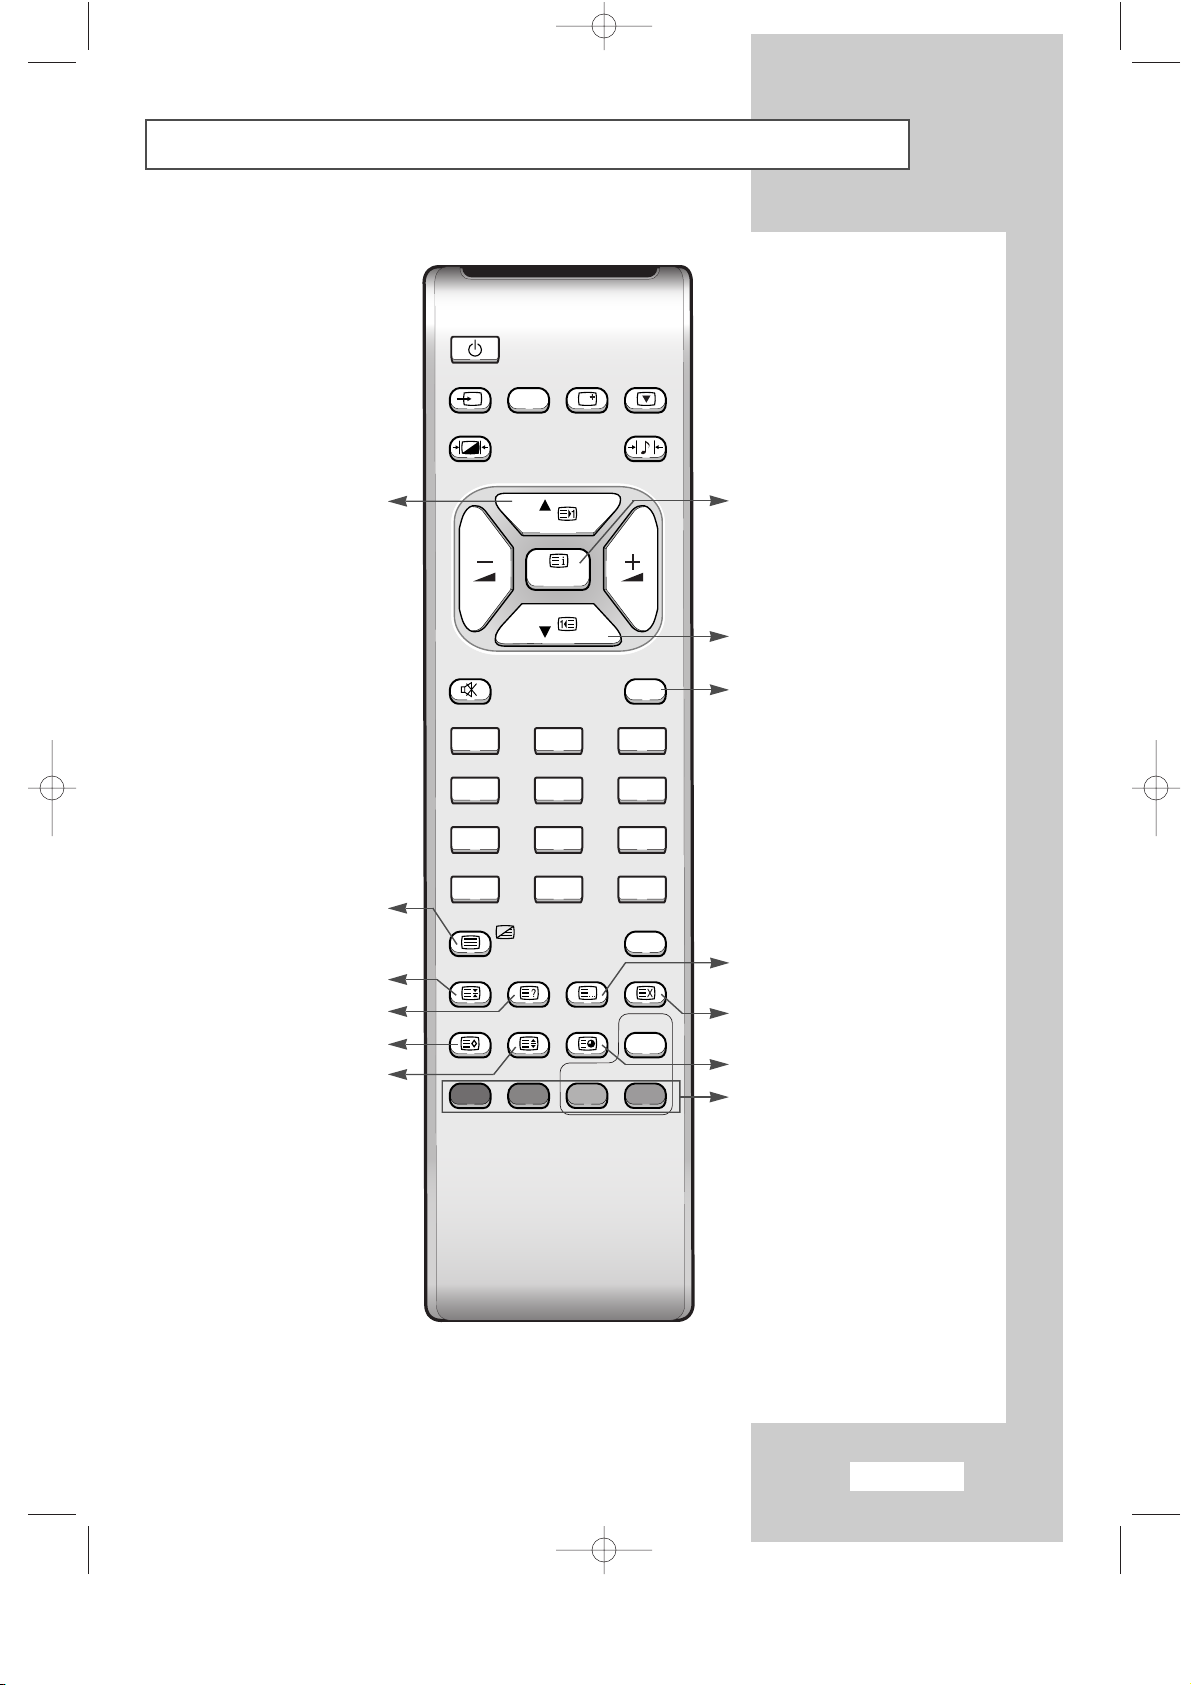
Viewing the Remote Control (All Functions Except Teletext)
Numeric buttons for
direct channel access
Sound mode selection
Picture freeze
Picture size selection
Automatic switch-off
Television On/Off
Available sources selection
One/Two-digit channel selection
Previous channel
Exit from the OSD/
Picture-In-Picture Off
Temporary sound switch-off
Picture effect selection
Sound effect selection
Picture-In-Picture On/
PIP source selection
Self-adjust to the incoming
video signal
Volume decrease
Next channel
Volume increase
➣
The performance of the remote control may be affected by bright light.
Display the setting information
Select to the PC mode directly
Menu display and
change confirmation
Previous channel
PIP size selection
PIP location selection
BN68-00438D-02_en 6/11/03 7:11 PM Page 12
Power
TV/VIDEO PC DISPLAY STILL
P.STD S.STD
P
MENU
P
EXITMUTE
1 2 3
4 5 6
7 8 9
-/--
0
TTX/MIX AUTO
PRE-CH
SLEEP DUAL I/II LIST/FLOF CANCEL
P.SIZE PIP
SUBPAGE
SIZE
ON
LOCATE
Page 14
English-13
Viewing the Remote Control (Teletext Functions)
Teletext hold
Teletext reveal
Teletext display/
mix both teletext information
and the normal broadcast
Teletext store
Teletext previous page
Teletext mode selection
(List or Flof)
Teletext cancel
Teletext next page
Programme selection by name
Teletext sub-page
Teletext size selection
Fastext topic selection
Exit from the Teletext display
BN68-00438D-02_en 6/11/03 7:11 PM Page 13
Power
TV/VIDEO PC DISPLAY STILL
P.STD S.STD
P
MENU
P
EXITMUTE
1 2 3
4 5 6
7 8 9
SIZE
PRE-CH
ON
LOCATE
-/--
0
TTX/MIX AUTO
SLEEP DUAL I/II LIST/FLOF CANCEL
P.SIZE PIP
SUBPAGE
Page 15
English-14
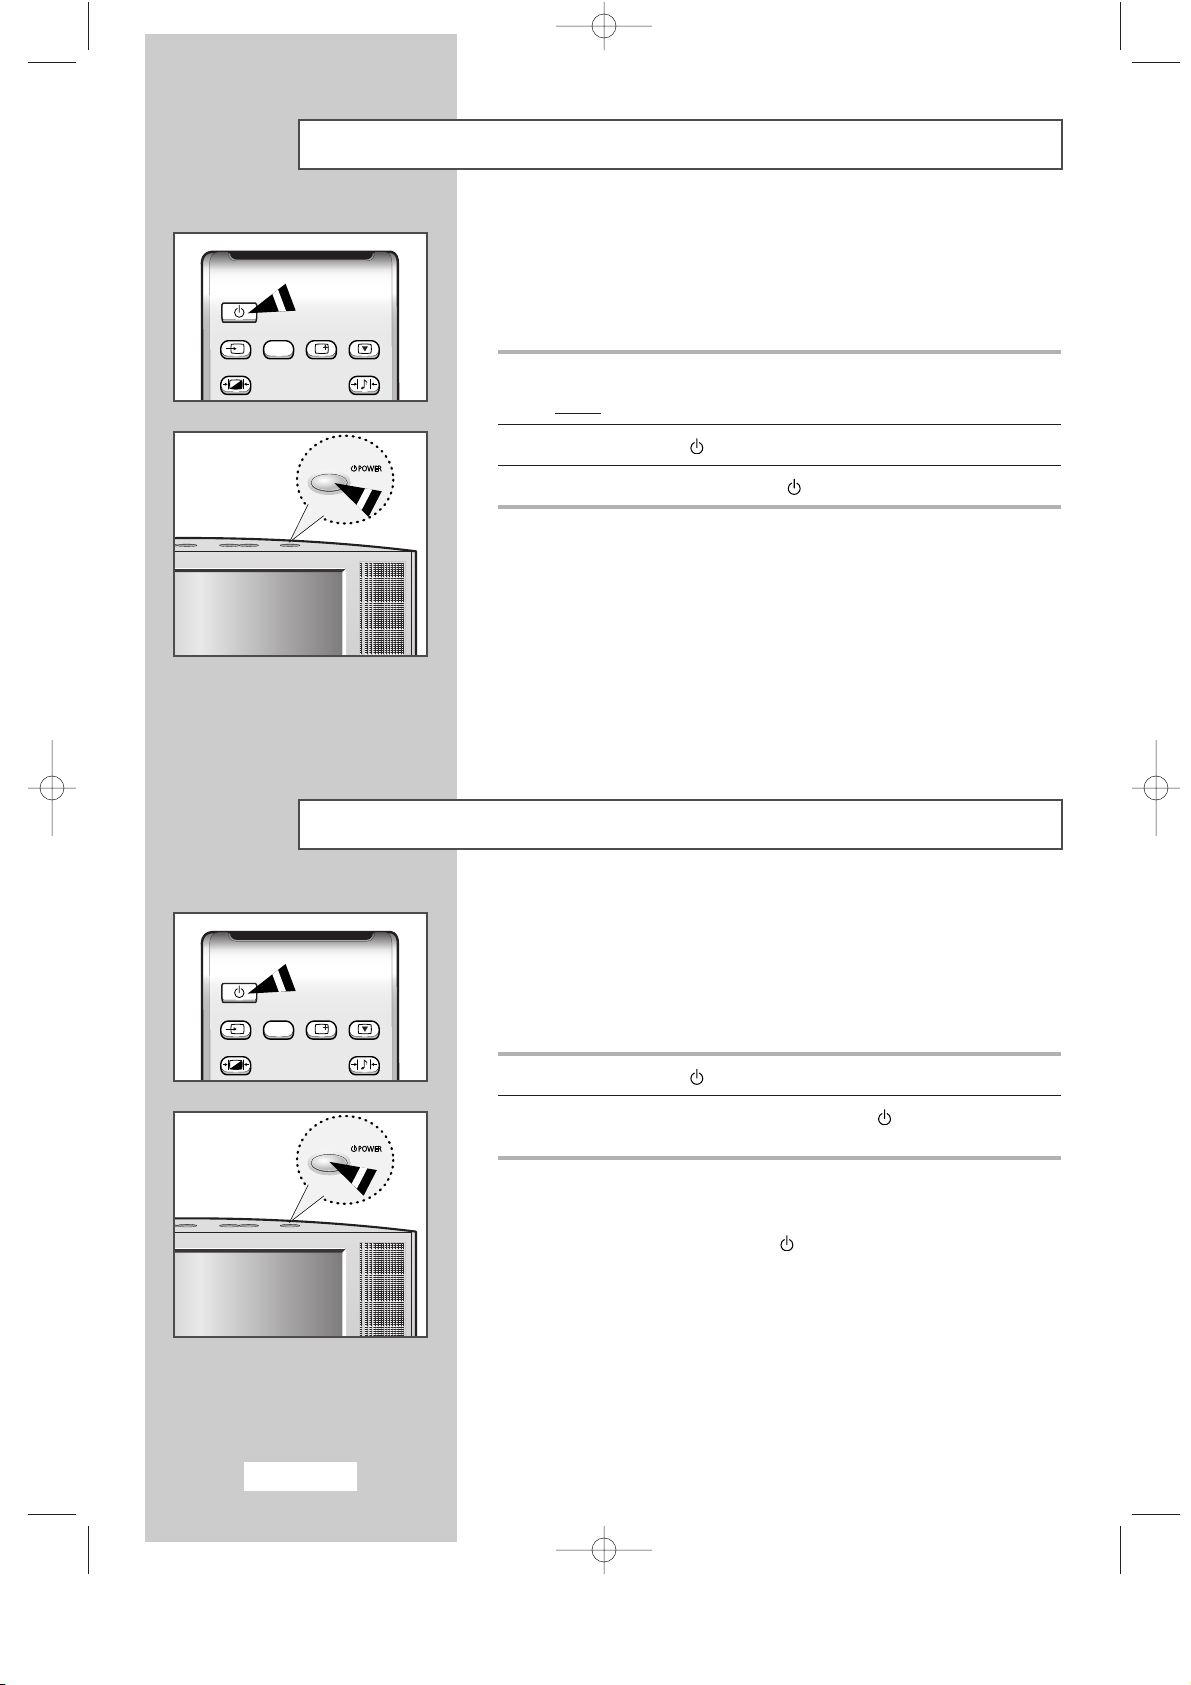
Switching On and Off
The mains lead is attached to the rear of your set.
☛
If you have purchased this set in the United Kingdom,
refer to page 42 for further instructions on plug wiring.
1 Plug the mains lead into an appropriate socket.
Result
:
A Standby indicator lights off on the front panel.
2 Press the Power ( ) button to switch on.
3 To switch off, press the Power ( ) button again.
Placing in Standby Mode
Your set can be placed in Standby mode, in order to reduce the
power consumption.
The Standby mode can be useful when you wish to interrupt viewing
temporarily (during a meal, for example).
1 Press the Power ( ) button.
2 To switch back on, simply press the Power ( ) button again
or a numeric button.
➣
Do not leave your set in Standby mode for long periods of
time (when you are away on holiday, for example).
Turn off by pressing the ( ) button. It is best to unplug the
set from the mains and aerial.
TV/VIDEO PC DISPLAY STILL
P.STD S.STD
Power
BN68-00438D-02_en 6/11/03 7:11 PM Page 14
Power
TV/VIDEO PC DISPLAY STILL
P.STD S.STD
Page 16

English-15
Becoming Familiar with the Remote Control
The remote control is used mainly to:
◆
Change channels and adjust the volume
◆
Set up your set using the on-screen menu system
The following table presents the most frequently used buttons and
their functions.
Button Viewing Function Menu Function
▲
Used to display the next Used to select the previous
P stored channel. menu option.
P Used to display the Used to select the next menu
▼
previous stored channel. option.
PRE-CH Used to switch repeatedly between the last two channels
displayed. (
PRE-CH; Previous Channel)
to Used to display the corresponding channels.
-/--
Used to select a channel numbered ten or over.
Press this button, and the “
--
” symbol is displayed.
Enter the two-digit channel number.
Used to decrease the Used to...
volume.
◆ Display a submenu containing
selections for the current
menu option.
◆ Search forwards manually
for channels
◆ Reduce a menu option value.
Used to increase the Used to...
volume.
◆ Display a submenu containing
selections for the current
menu option.
◆ Search backwards manually
for channels
◆ Increase a menu option value.
MUTE Used to switch the sound off temporarily.
➣
To turn the sound back on, press this button again, or
press the
-
or + button.
MENU Used to display the Used to return to the previous
on-screen menu system. menu or normal viewing.
EXIT Used to exit from the menu system and return to normal
viewing directly.
EXITMUTE
9
PRE-CH
EXITMUTE
0
SLEEP DUAL I/II LIST/FLOF CANCEL
P.SIZE PIP
ON
TTX/MIX AUTO
PRE-CH
EXITMUTE
TV/VIDEO PC DISPLAY STILL
P.STD S.STD
Power
MENU
1 2 3
4 5 6
7 8 9
0
LOCATE
-/--
P
P
SIZE
SUBPAGE
BN68-00438D-02_en 6/11/03 7:11 PM Page 15
Page 17

English-16
Choosing Your Language
When you start using your set for the first time, you must select the
language which will be used for displaying menus and indications.
1 Press the MENU button.
Result
:
The main menu is displayed.
2 Press the P▼ or P▲ button to select the Function.
Result:
The options available in the
Function
group are
displayed.
3 Press the
-
or + button
.
4 Press the P▼ or P▲ button
to
select the Language
.
5 Select a particular language by pressing the
-
or + button
repeatedly.
6 When you are satisfied with your choice, press the EXIT button to
return to normal viewing.
Function
Sleep timer Off
PIP
Size Normal
Language English
TV/VIDEO PC DISPLAY STILL
Power
BN68-00438D-02_en 6/11/03 7:11 PM Page 16
P.STD S.STD
P
MENU
P
EXITMUTE
Page 18

English-17
Storing Channels Automatically
You can scan for the frequency ranges available to you
(and availability depends on your country). Automatically allocated
programme numbers may not correspond to actual or desired
programme numbers. However you can sort numbers manually and
clear any channels you do not wish to watch.
1 Press the MENU button.
Result
:
The main menu is displayed.
2 Press the P▼ or P▲ button to select the Channel.
Result:
The options available in the
Channel
group are displayed.
3 Press the
-
or + button.
Result
:
The
Auto store
is selected.
4 Press the
-
or + button again.
Result
:
The options available in the
Auto store
group are
displayed with the
Country
is selected.
5 Select your country by pressing the
-
or + button repeatedly.
The following countries are available:
Belgie-Deutschland-Espania-France-Italia-Nederland
-
Schweiz-Sverige-UK-East Europe.
6 Press the P▼ or P▲ button to select the Search, and then
press the
-
or + button.
Result
:
The search will end automatically. Channels are sorted
and stored in an order which reflects their position in the
frequency range, (with lowest first and highest last).
The programme originally selected is then displayed.
➣
To stop the search before it has finished, press the EXIT button.
7 When the channels have been stored, you can:
◆ Change channels
◆ Assign a name to the stored channels (refer to page 19)
◆ Clear a channel (refer to page 20)
◆ Fine tune channel reception if necessary (refer to page 20)
◆ Sort them in the order required (refer to page 21)
Channel
Auto store
Manual store
Name
Add/Erase
Fine tune
Channel sort
BN68-00438D-02_en 6/11/03 7:11 PM Page 17
Channel
Country UK
Search
Channel
Country UK
Search
Search
Program P1
Frequency 43MHz
Band VHF-L
Page 19

English-18
Storing Channels Manually
You can store up to 100 channels, including those received via cable
networks. When storing channels manually, you can choose:
◆
Whether or not to store each of the channels found
◆
The programme number of each stored channel which
you wish to identify
1 Press the MENU button.
Result
:
The main menu is displayed.
2 Press the P▼ or P▲ button to select the Channel.
Result
:
The options available in the
Channel
group are displayed.
3 Press the
-
or + button
.
4 Press the P▼ or P▲ button
to
select the Manual store
.
Press the -or + button.
Result
:
The options available in the
Manual store
group are
displayed with the
Colour system
is selected.
5 If necessary, indicate the broadcasting standard required by
pressing the
-
or + button repeatedly.
Result
: The color standards are displayed in the following order:
AUTO-PAL-SECAM-NT4.43
6 Press the P▼ or P▲ button to select the Sound system. Indicate
the sound standard required by pressing the
-
or + button
repeatedly.
Result
: The sound standards are displayed in the following order:
BG-DK-I-L
7 If you know the channel number to be stored, press the P▼ or P▲
button to select the Channel. Indicate the required number by
pressing the
-
or + button.
If you do not know the channel numbers, press the
P▼ or P▲ button
to select the
Search. Start the search by pressing the -or +
button.
Result
: The tuner scans the frequency range until the first
channel or the channel that you selected is received on
your screen.
8 To assign a programme number to a channel, select the Program
by pressing the P▼ or P▲ button.
Press the
-
or + button to find the correct number.
9 Press the P▼ or P▲ button to select the Store
.
Select the OK by pressing the -or + button
.
Result: The channel and associated programme number are
stored.
10 Repeat Steps 7 to 9 for each channel to be stored.
Channel
Auto store
Manual store
Name
Add/Erase
Fine tune
Channel sort
BN68-00438D-02_en 6/11/03 7:11 PM Page 18
Channel
Colour system AUTO
Sound system BG
Search 471MHz
Channel C4
Program P1
Store ?
Channel
Colour system AUTO
Sound system BG
Search 471MHz
Channel C4
Program P1
Store ?
Channel
Colour system AUTO
Sound system BG
Search 471MHz
Channel C4
Program P1
Store ?
Channel
Colour system AUTO
Sound system BG
Search 471MHz
Channel C4
Program P1
Store ?
Channel
Colour system AUTO
Sound system BG
Search 471MHz
Channel C4
Program P1
Store ?
Channel
Colour system AUTO
Sound system BG
Search 471MHz
Channel C4
Program P1
Store OK
Page 20

English-19
Giving Channels Names
If channel name information is broadcast when you store the channels
either manually or automatically, the names are assigned to the
channels directly. You can however change these names or assign new
names as required.
1 Press the MENU button.
Result
:
The main menu is displayed.
2 Press the P▼ or P▲ button to select the Channel.
Result:
The options available in the
Channel
group are displayed.
3 Press the
-
or + button
.
4 Press the P▼ or P▲ button to select the Name
.
Press the -or + button.
Result
:
The current channels are displayed.
5 If necessary, select the channel to be assigned to a new name
by pressing the
P▼ or P▲ button.
6 Press the
-
or + button.
7 Press the P▼ or P▲ button to select a letter (A~Z), a number(0~9)
or a symbol (
-
, space). Move on the previous or next letter by
pressing the
-
or + button.
8 Repeat Steps 5 to 7 for each channel to be assigned to a new name.
Channel
Auto store
Manual store
Name
Add/Erase
Fine tune
Channel sort
BN68-00438D-02_en 6/11/03 7:11 PM Page 19
Channel
P1 -----
P2 ----P3 ----P4 -----
Channel
P1 A----
P2 ----P3 ----P4 -----
Page 21

English-20
Skipping Unwanted Channels
You can exclude the channels you chosen from the channels you
scanned. When you scan through the stored channels, those you have
chosen to skip are not displayed.
All channels that you do not specifically choose to skip are displayed
during scanning.
1 Press the MENU button.
Result
:
The main menu is displayed.
2 Press the P▼ or P▲ button to select the Channel.
Result:
The options available in the
Channel
group are displayed.
3 Press the
-
or + button.
4 Press the P▼ or P▲ button to select the Add/Erase
.
Press the -or + button.
Result
:
The stored channels are displayed.
5 Press the P▼ or P▲ button to select the channel to add or erase.
If necessary, select the
Added or Erased by pressing the
-
or + button.
6 Repeat Step 5 for each channel to be added or erased.
Fine Tuning Channel Reception
If the reception is clear, you do not have to fine-tune the channel,
as this is done automatically during the search and store operation.
If however the signal is weak or distorted, you may have to fine-tune
the channel manually.
1 Press the MENU button.
Result
:
The main menu is displayed.
2 Press the P▼ or P▲ button to select the Channel.
Result
:
The options available in the
Channel
group are displayed.
3 Press the
-
or + button
.
4 Press the P▼ or P▲ button to select the Fine tune.
5 Obtain a sharp and clear picture and good sound quality by
pressing the
-
or + button.
Channel
Auto store
Manual store
Name
Add/Erase
Fine tune
Channel sort
BN68-00438D-02_en 6/11/03 7:11 PM Page 20
Channel
Auto store
Manual store
Name
Add/Erase
Fine tune
Channel sort
P1 Added
P2 Added
P3 Added
P4 Added
P1 Erased
P2 Added
P3 Added
P4 Added
Channel
Channel
Fine tune
+ 1
Page 22

English-21
Sorting the Stored Channels
You can exchange the numbers of two channels, in order to:
◆
Modify the numeric order in which the channels have been
automatically stored.
◆
Give easily remembered numbers to the channels that you
watch most often.
1 Press the MENU button.
Result
:
The main menu is displayed.
2 Press the P▼ or P▲ button to select the Channel.
Result
:
The options available in the
Channel
group are displayed.
3 Press the
-
or + button
.
4 Press the P▼ or P▲ button to select the Channel sort
.
Press the -or + button.
Result
:
The options available in the
Channel sort
group are
displayed with the
From
is selected.
5 Select the channel number that you wish to change by
pressing the
-
or + button repeatedly.
6 Press the P▼ or P▲ button to select the To.
Select the new number by which you wish to identify the channel by
pressing the
-
or + button repeatedly.
7 Press the P▼ or P▲ button to select the Store.
Select the
OK to confirm the exchange of channel numbers by
pressing the
-
or + button.
Result
:
The selected channel is exchanged with the one
previously stored to the chosen number.
8 For all the channels to move to the required channel numbers,
repeat steps
5 to 7 after select the From by pressing the P▼ or P▲
button.
Channel
Auto store
Manual store
Name
Add/Erase
Fine tune
Channel sort
BN68-00438D-02_en 6/11/03 7:11 PM Page 21
Channel
From P1 -----
To P-Store ?
Channel
From P1 -----
To P3 -----
Store ?
Channel
From P3 ----To P1 -----
Store OK
Page 23

English-22
Changing the Picture Standard
You can select the type of picture which best corresponds to your
viewing requirements.
1 Press the MENU button.
Result
:
The main menu is displayed.
2 Press the P▼ or P▲ button to select the Picture.
Result
:
The options available in the
Picture
group are displayed.
3 Press the
-
or + button.
Result
:
The
Mode
is selected.
4 Select the required picture effect by pressing the
-
or +
button repeatedly. The following picture effects are available:
Dynamic-Standard-Movie-Custom.
➣
You can also set these options simply by pressing the
P.STD (Picture Standard) button.
➣
On the Picture menu, if you change the Brightness,
Contrast, Sharpness, Colour or Tint (NTSC only) settings,
the
Custom is selected automatically
.
Adjusting the Picture Settings
Your set has several settings which allow you to control picture quality.
1 Press the MENU button.
Result
:
The main menu is displayed.
2 Press the P▼ or P▲ button to select the Picture.
Result
:
The options available in the
Picture
group are displayed.
3 Press the
-
or + button.
4 Select the option (Brightness
,
Contrast, Sharpness, Colour or
Tint) to be adjusted by pressing the P▼ or P▲ button.
Press the
-
or + button.
Result
:
The horizontal bar is displayed.
5 Press the
-
or + button to reach the required setting.
6 Press the P▼ or P▲ button to select the Colour tone.
Select the required option by pressing the the
-
or + button
repeatedly. The following options are available:
Cool 2-Cool 1-Normal-Warm 1-Warm 2
➣
If you make any changes to these settings,
the picture standard is automatically switched to
Custom.
Picture
Mode Custom
Brightness
Contrast
Sharpness
Colour
Tint
Colour tone Standard
BN68-00438D-02_en 6/11/03 7:11 PM Page 22
Power
TV/VIDEO PC DISPLAY STILL
P.STD S.STD
P
Picture
Mode Custom
Brightness
Contrast
Sharpness
Colour
Tint
Colour tone Standard
Brightness
50
Picture
Mode Custom
Brightness
Contrast
Sharpness
Colour
Tint
Colour tone Standard
Page 24

English-23
Selecting the Picture Format
You can select the picture format which best corresponds to your
viewing requirements.
1 Press the MENU button.
Result
:
The main menu is displayed.
2 Press the P▼ or P▲ button to select the Function.
Result
:
The options available in the
Function
group are displayed.
3 Press the
-
or + button.
4 Press the P▼ or P▲ button to select the Size.
5 Select the required picture format by pressing the
-
or +
button repeatedly.
➣
You can also select these options simply by pressing the
P.SIZE (Picture Size) button.
Freezing the Current Picture
Press the “STILL” button on the remote control to freeze the picture
on a given frame. To return to normal viewing, press the “STILL”
button again.
Function
Sleep timer Off
PIP
Size Normal
Language English
TTX/MIX AUTO
PRE-CH
EXITMUTE
TV/VIDEO PC DISPLAY STILL
P.STD S.STD
Power
-/--
Wide
Wide
Sets the picture to 16:9 wide
mode.
Normal
Normal
Sets the picture to 4:3 normal
mode. This is a standard TV
screen size.
Zoom
Zoom
Magnifies the size of the
picture on screen.
➣
Not Available in PC mode.
BN68-00438D-02_en 6/11/03 7:11 PM Page 23
SLEEP DUAL I/II LIST/FLOF CANCEL
P.SIZE PIP
SUBPAGE
SIZE
ON
LOCATE
Power
TV/VIDEO PC DISPLAY STILL
P.STD S.STD
Page 25

English-24
Changing the Sound Standard
You can select the type of special sound effect to be used when
watching a given broadcast.
1 Press the MENU button.
Result
:
The main menu is displayed.
2 Press the P▼ or P▲ button to select the Sound.
Result:
The options available in the
Sound
group are displayed.
3 Press the
-
or + button.
Result
:
The
Mode
is selected.
4 Select the required sound effect by pressing the
-
or +
button repeatedly. The following sound effects are available:
Custom-Standard-Music-Movie-Speech.
➣
You can also set these options simply by pressing the
S.STD (Sound Standard) button.
Adjusting the Sound Settings
The sound settings can be adjusted to suit your personal preferences.
1 Press the MENU button.
Result
:
The main menu is displayed.
2 Press the P▼ or P▲ button to select the Sound.
Result
:
The options available in the
Sound
group are displayed.
3 Press the
-
or + button.
4 Select the option (Bass or Treble) to be adjusted by pressing
the
P▼ or P▲ button. Press the
-
or + button.
Result
:
The horizontal bar is displayed.
5 Press the
-
or + button to reach the required setting.
➣
If you make any changes to these settings,
the sound standard is automatically switched to
Custom.
Sound
Mode Custom
Bass
Treble
Dolby : Off
BN68-00438D-02_en 6/11/03 7:12 PM Page 24
Power
TV/VIDEO PC DISPLAY STILL
P.STD S.STD
P
Sound
Mode Custom
Bass
Treble
Dolby : Off
Bass
51
Page 26

English-25
Enjoying the Dolby Sound
This feature provides a home theater-like Dolby effect by mixing the
left and right speakers.
1 Press the MENU button.
Result
:
The main menu is displayed.
2 Press the P▼ or P▲ button to select the Sound.
Result:
The options available in the
Sound
group are displayed.
3 Press the
-
or + button.
4 Press the P▼ or P▲ button to select the Dolby.
5 For enjoying the Dolby sound effect, select the On by pressing the
-
or + button.
Sound
Mode Custom
Bass
Treble
Dolby : On
Selecting the Sound Mode
You can set the sound mode by pressing the “DUALI/II” button.
When you press it, current sound mode is displayed on the screen.
➣
◆ If the receiving conditions deteriorate, listening will
be easier if the mode is set to the
MONO.
◆ If the stereo signal is weak and an automatic switching
occurs, then switch to the
MONO.
SLEEP DUAL I/II LIST/FLOF CANCEL
P.SIZE PIP
ON
TTX/MIX AUTO
PRE-CH
EXITMUTE
TV/VIDEO PC DISPLAY STILL
P.STD S.STD
Power
LOCATE
-/--
SIZE
SUBPAGE
DUAL 1/2
MONO
STEREO
↔
MONO
DUAL 1
↔
DUAL 2
MONO
MONO
↔
STEREO
→
MONO →DUAL 1
DUAL 2
→
Default
Automatic
change
DUAL 1
Automatic
change
DUAL 1
Audio type
Mono
Stereo
Dual
Mono
Stereo
Dual
FM
Stereo
NICAM
Stereo
BN68-00438D-02_en 6/11/03 7:12 PM Page 25
Page 27

English-26
Viewing the Picture In Picture (PIP)
You can display a sub picture within the main picture of PC MODE.
In this way you can watch TV program or external A/V device such as
VCR or DVD (to video_1, video_2, S-video), while watching PC Mode.
1 Press the MENU button.
Result
:
The main menu is displayed.
2 Press the P▼ or P▲ button to select the Function.
Result:
The options available in the
Function
group are
displayed.
3 Press the
-
or + button
.
4 Press the P▼ or P▲ button
to
select the PIP
.
Press the -or + button.
Result
:
The options available in the
PIP
group are displayed.
5 Select the On by pressing the
-
or + button
.
➣
You can also activate the PIP simply by pressing the PIP ON
button.
6 Press the P▼ or P▲ button to select the TV/Video.
Select a source of the sub picture by pressing the
- or + button.
Result
: The sources are displayed in the following order:
TV-VIDEO1-VIDEO2-S-VIDEO
7 Press the P▼ or P▲ button to select the Size.
Select a size of the sub picture by pressing the
- or + button.
Result
: The sizes are displayed in the following order:
Small-Medium-Large
➣
◆ You can also select these options simply by pressing
the
SIZE button.
◆ Not Available in PC mode.
8 Press the P▼ or P▲ button to select the Locate.
Move the sub picture counterclockwise by pressing the
-
or + button.
➣
You can also move the sub picture simply by pressing the
LOCATE button.
Function
Sleep timer Off
PIP
Size Normal
Language English
TTX/MIX AUTO
PRE-CH
EXITMUTE
TV/VIDEO PC DISPLAY STILL
P.STD S.STD
Power
-/--
BN68-00438D-03eng 8/18/03 2:47 PM Page 26
Function
PIP : On
TV/Video TV
Size Small
Locate
Function
PIP : On
TV/Video TV
Size Small
Locate
Function
PIP : On
TV/Video TV
Size Small
Locate
Function
PIP : On
TV/Video TV
Size Small
Locate
SLEEP DUAL I/II LIST/FLOF CANCEL
P.SIZE PIP
SUBPAGE
SIZE
ON
LOCATE
Page 28

English-27
Switching Off Automatically
You can select a time period of between 10 and 240 minutes after
your set automatically switches off.
1 Press the MENU button.
Result
:
The main menu is displayed.
2 Press the P▼ or P▲ button to select the Function.
Result:
The options available in the
Function
group are
displayed.
3 Press the
-
or + button
.
Result:
The
Sleep timer
is selected.
4 Select the number of minutes after which your set switches off by
pressing the
-
or + button repeatedly.
◆ The preset time intervals: 10, 20, 30, 60, 90, 120, 150, 180, 210,
and 240 minutes.
➣
You can also select simply by pressing the “SLEEP” button.
If the sleep timer is already set, the screen displays the
remaining time and then your set will be switched off.
If the sleep timer is not yet set, displays
Off.
Displaying Information
You can view the setting status of selected source by pressing the
“DISPLAY” button on the remote control. The displayed information
are different depending on the selected source.
Function
Sleep timer Off
PIP
Size Normal
Language English
PRE-CH
EXITMUTE
TV/VIDEO PC DISPLAY STILL
P.STD S.STD
Power
-/--
BN68-00438D-02_en 6/11/03 7:12 PM Page 27
TTX/MIX AUTO
SLEEP DUAL I/II LIST/FLOF CANCEL
P.SIZE PIP
SUBPAGE
SIZE
ON
LOCATE
Power
TV/VIDEO PC DISPLAY STILL
P.STD S.STD
Page 29

English-28
Setting up Your PC Software (Based on Widows 2000)
The Windows display-settings for a typical computer are shown below. But the actual screens on your
PC will probably be different, depending upon your particular version of Windows and your particular
video card. But even if your actual screens look different, the same, basic set-up information will apply
in almost all cases. (If not, contact your computer manufacturer or Samsung Dealer.)
1 First, click on “Settings” on the Windows start menu.
While “
Settings” is highlighted, move the cursor
so that “
Control Panel” is highlighted.
3 Navigate to the “Settings” tab on the display dialog-box.
The correct setting of size (resolution)
- 15” : 1024 x 768 pixels
- 17” : 1280 x 1024 pixels
If a vertical-frequency option exists on your display
settings dialog box, the correct value is “
60” or “60 Hz”.
Otherwise, just click “
OK” and exit the dialog box.
2 When the control panel screen appears,
click on “
Display” and a display
dialog-box will appear.
BN68-00438D-02_en 6/11/03 7:12 PM Page 28
Page 30

English-29
Adjusting the Brightness and Contrast
1 Press the MENU button.
Result
:
The main menu is displayed.
2 Press the P▼ or P▲ button to select the PC.
Result
:
The options available in the PCgroup are displayed.
3 Press the
-
or + button.
Result
:
The
Image
is selected.
4 Press the
-
or + button again.
Result
:
The options available in the
Image
group are displayed.
5 Select the option (Brightness or Contrast) to be adjusted for the
color of your computer image by pressing the
P▼ or P▲ button.
Press the
-
or + button.
Result
:
The horizontal bar is displayed.
6 Press the
-
or + button to reach the required setting.
PC
Image
Image lock
Position
Colour adjust
Recall
Auto adjustment
1024x768 48.2kHz 59.8Hz
➣
Preset to the PC mode by pressing the PC button.
BN68-00438D-02_en 6/11/03 7:12 PM Page 29
PC
Image
Brightness
Contrast
Brightness
90
Page 31

English-30
Adjusting the Image Quality
This feature is used to fine tune and get the best image by removing
noises that create unstable images with jitters and shimmers.
1 Press the MENU button.
Result
:
The main menu is displayed.
2 Press the P▼ or P▲ button to select the PC.
Result:
The options available in the PCgroup are displayed.
3 Press the
-
or + button.
4 Press the P▼ or P▲ button to select the Image Lock.
Press the
-
or + button.
Result
:
The options available in the
Image Lock
group are
displayed.
5 Select the option (Coarse or Fine) to be adjusted for the quality of
your computer image by pressing the
P▼ or P▲ button.
Press the
-
or + button.
Result
:
The horizontal bar is displayed.
6 Press the
-
or + button to reach the required setting.
➣
This feature may change the width of the image.
If necessary, adjust the position to center.
➣
Preset to the PC mode by pressing the PC button.
PC
Image
Image lock
Position
Colour adjust
Recall
Auto adjustment
1024x768 48.2kHz 59.8Hz
BN68-00438D-02_en 6/11/03 7:12 PM Page 30
PC
Image lock
Coarse
Fine
Coarse
1344
Page 32

English-31
Changing the Image Position
1 Press the MENU button.
Result
:
The main menu is displayed.
2 Press the P▼ or P▲ button to select the PC.
Result
:
The options available in the PCgroup are displayed.
3 Press the
-
or + button.
4 Press the P▼ or P▲ button to select the Position..
Press the
-
or + button.
5 Select the position (H-Position or V-Position) to be adjusted by
pressing the
P▼ or P▲ button.
Press the
-
or + button.
Result
:
The horizontal bar is displayed.
6 Press the
-
or + button to reach the required setting.
➣
Preset to the PC mode by pressing the PC button.
PC
Image
Image lock
Position
Colour adjust
Recall
Auto adjustment
1024x768 48.2kHz 59.8Hz
BN68-00438D-02_en 6/11/03 7:12 PM Page 31
PC
Position
H-Position
V-Position
H-Position
50
Page 33

English-32
Adjusting the Color
1 Press the MENU button.
Result
:
The main menu is displayed.
2 Press the P▼ or P▲ button to select the PC.
Result
:
The options available in the PCgroup are displayed.
3 Press the
-
or + button.
4 Press the P▼ or P▲ button to select the Colour adjust.
Press the
-
or + button.
Result
:
The options available in the
Colour adjust
group are
displayed with the
Mode
is selected.
5 Select the required color mode by pressing the
-
or + button
repeatedly. The following color modes are available:
Custom-Colour 1-Colour 2-Colour 3.
6 If you wish adjust the color which best corresponds to your viewing
requirements, select the option (
Red, Green, or Blue) to be adjusted
by pressing the
P▼ or P▲ button.
Press the
-
or + button.
Result
:
The horizontal bar is displayed.
7 Press the
-
or + button to reach the required setting.
➣
If you change the Red, Green, or Blue settings, the Mode is
selected to
Custom automatically.
➣
Preset to the PC mode by pressing the PC button.
PC
Image
Image lock
Position
Colour adjust
Recall
Auto adjustment
1024x768 48.2kHz 59.8Hz
BN68-00438D-02_en 6/11/03 7:12 PM Page 32
PC
Mode Custom
Red
Green
Blue
PC
Mode Custom
Red
Green
Blue
Red
50
Page 34

English-33
Initializing the Image Settings
You can replace all image settings with the factory default values.
1 Press the MENU button.
Result
:
The main menu is displayed.
2 Press the P▼ or P▲ button to select the PC.
Result:
The options available in the PCgroup are displayed.
3 Press the
-
or + button.
4 Press the P▼ or P▲ button to select the Recall.
Press the
-
or + button.
Result
:
The options available in the
Recall
group are displayed.
5 Select the option (Image recall or Colour recall) to be replaced
by pressing the
P▼ or P▲ button.
Press the
-
or + button.
Result
:
The screen becomes black and return to original
view about a few seconds later.
➣
Preset to the PC mode by pressing the PC button.
PC
Image
Image lock
Position
Colour adjust
Recall
Auto adjustment
1024x768 48.2kHz 59.8Hz
Adjusting the PC Screen Automatically
1 Press the MENU button.
Result
:
The main menu is displayed.
2 Press the P▼ or P▲ button to select the PC.
Result
:
The options available in the PCgroup are displayed.
3 Press the
-
or + button.
4 Press the P▼ or P▲ button to select the Auto adjustment.
Press the
-
or + button.
Result
: The screen quality and position are automatically adjusted,
and
the screen returns to original view about a few seconds
later.
PC
Image
Image lock
Position
Colour adjust
Recall
Auto adjustment
1024x768 48.2kHz 59.9Hz
➣
Preset to the PC mode by pressing the PC button.
BN68-00438D-02_en 6/11/03 7:12 PM Page 33
PC
Recall
Image recall
Colour recall
Auto adjustment
Please wait
Page 35

English-34
Teletext Feature
Most television channels provide written information services
via teletext. Information provided includes:
◆
Television programme times
◆
News bulletins and weather forecasts
◆
Sports results
◆
Travel information
This information is divided into numbered pages (see diagram).
Part Contents
A Selected page number.
B Broadcasting channel identity.
C Current page number or search indications.
D Date and time.
E Text.
F Status information.
FASTEXT information.
➣
Teletext information is often divided between several pages
displayed in sequence, which can be accessed by:
◆ Entering the page number
◆ Selecting a title in a list
◆ Selecting a coloured heading (FASTEXT system)
BN68-00438D-02_en 6/11/03 7:12 PM Page 34
Page 36

English-35
Displaying the Teletext Information
You can display Teletext information at any time on your set.
☛
For Teletext information to be displayed correctly,
channel reception must be stable; otherwise:
◆ Information may be missing
◆ Some pages may not be displayed
1 Select the channel providing the Teletext service using the
P▼ or P▲ button.
2 Press the TTX/MIX button to activate the teletext mode.
Result
:
The contents page is displayed. It can be redisplayed
at any time by pressing the (index) button.
3 If you wish to display the actual broadcast at the same time as the
teletext page, press the
TTX/MIX button again.
4 To return to normal viewing, press the CANCEL ( ) button.
5 Press the EXIT button again to exit from the teletext display.
SLEEP DUAL I/II LIST/FLOF CANCEL
P.SIZE PIP
ON
TTX/MIX AUTO
PRE-CH
EXITMUTE
TV/VIDEO PC DISPLAY STILL
P.STD S.STD
Power
MENU
1 2 3
4 5 6
7 8 9
0
-/--
P
P
SUBPAGE
BN68-00438D-02_en 6/11/03 7:12 PM Page 35
Page 37

English-36
Selecting a Page by Number
You can enter the page number directly by pressing the numeric
buttons on the remote control.
1 Enter the three-digit page number given in the content by pressing
the corresponding numeric buttons.
Result
: The current page counter is incremented and the page
is then displayed.
2 If the selected page is linked with several secondary pages,
the secondary pages are displayed in sequence.
To freeze the display on a given page, press the (hold) button.
Press the (hold) button again to resume.
Using the various display options:
To display... Press the...
◆ Hidden text (reveal)
(answers to quiz games, for example)
◆ The normal screen (reveal) again
◆ A secondary page, SUBPAGE ()
by entering its 4-digit number
◆ The next page (page up)
◆ The previous page (page down)
◆ Double-size letters in the: (size)
• Upper half of the screen • Once
• Lower half of the screen • Twice
◆ Normal screen • Three times
SLEEP DUAL I/II LIST/FLOF CANCEL
P.SIZE PIP
ON
TTX/MIX AUTO
PRE-CH
EXITMUTE
TV/VIDEO PC DISPLAY STILL
P.STD S.STD
Power
MENU
1 2 3
4 5 6
7 8 9
0
LOCATE
-/--
P
P
SIZE
SUBPAGE
TTX/MIX AUTO
PRE-CH
EXITMUTE
TV/VIDEO PC DISPLAY STILL
P.STD S.STD
Power
-/--
BN68-00438D-02_en 6/11/03 7:12 PM Page 36
SLEEP DUAL I/II LIST/FLOF CANCEL
P.SIZE PIP
SUBPAGE
SIZE
ON
LOCATE
Page 38
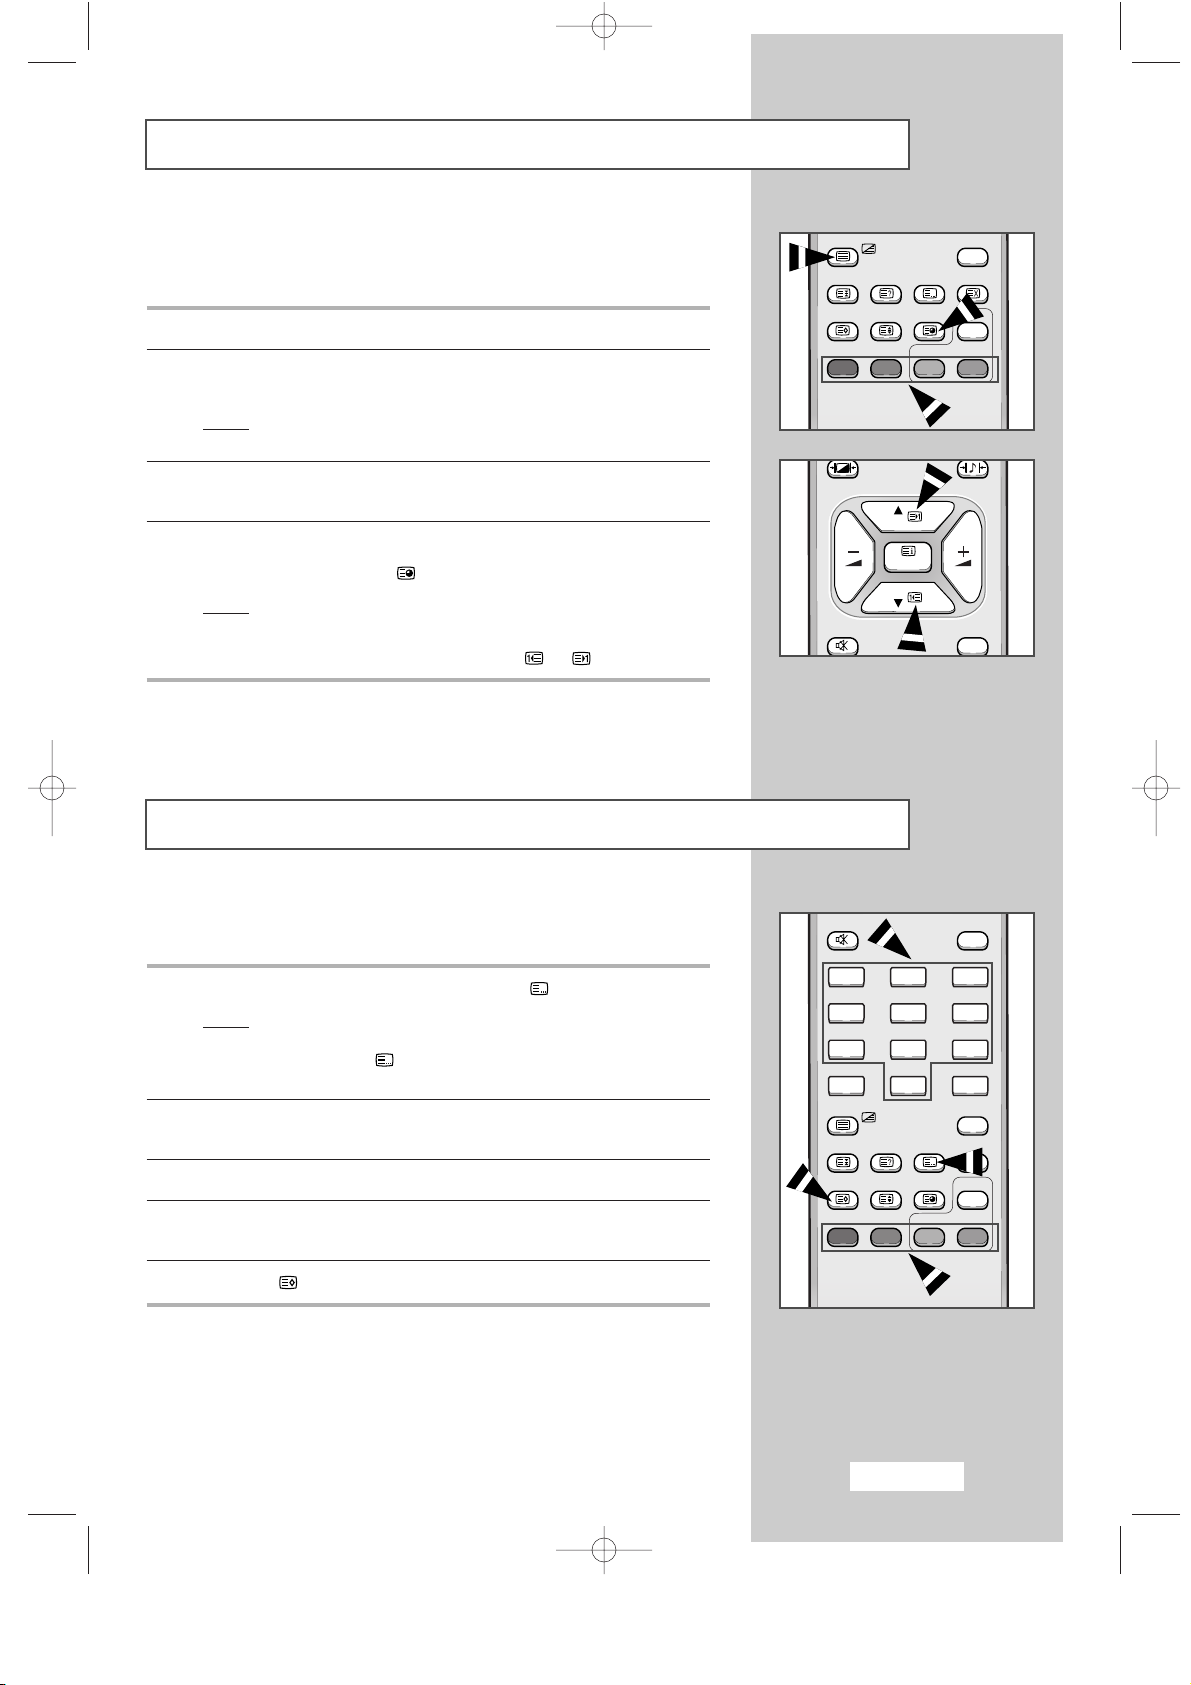
English-37
Storing Teletext Pages
Using FLOF to Select a Page
The various topics included in the teletext pages are color-coded, and
can be selected by pressing the colored buttons on the remote control.
1 Display the teletext contents page by pressing the TTX/MIX button.
2 Press the coloured button corresponding to the topic that you wish
to select; the available topics are given on the status line.
Result
:
The page is displayed with other coloured information
that can be selected in the same way.
3 To display the previous or next page, press the corresponding
coloured button.
4 To display the subpage, see the following steps.
◆
Press the SUBPAGE ( ) button.
Result
: The available subpages appear.
◆
Select the required sub-page.
Sub-pages can be scrolled by using the or button.
You can store up to four teletext pages to display them later at leisure.
1 Select the LIST mode using the LIST/FLOF ( ) button.
Result
: Four 3-digit numbers are displayed in different colors.
➣
The LIST/FLOF ( ) button is used to switch between
the LIST and FLOF modes.
2 Press the colored button corresponding to the page that will be
replaced.
3 Enter the new page number using the numeric buttons.
4 Repeat steps 2 and 3 for each page to be stored,
using a different colored button each time.
5 Press the (store) button until the corresponding blocks blink.
SLEEP DUAL I/II LIST/FLOF CANCEL
P.SIZE PIP
ON
TTX/MIX AUTO
PRE-CH
EXITMUTE
TV/VIDEO PC DISPLAY STILL
P.STD S.STD
Power
1 2 3
4 5 6
7 8 9
0
LOCATE
-/--
SIZE
SUBPAGE
TV/VIDEO PC DISPLAY STILL
P.STD S.STD
Power
PRE-CH
EXITMUTE
TV/VIDEO PC DISPLAY STILL
P.STD S.STD
Power
-/--
BN68-00438D-02_en 6/11/03 7:12 PM Page 37
TTX/MIX AUTO
SLEEP DUAL I/II LIST/FLOF CANCEL
P.SIZE PIP
P
MENU
P
SUBPAGE
SIZE
ON
LOCATE
EXITMUTE
Page 39

English-38
Troubleshooting: Before Contacting Service Personnel
Before contacting Samsung after-sales service, perform the following simple checks.
If you cannot solve the problem using the instructions below, note the model and serial number of
your set and contact your local dealer.
No sound or picture
Normal picture but no sound
No picture or black and white picture
Sound and picture interference
Blurred or snowy picture,
distorted sound
Remote control malfunctions
“Check Signal Cable” message is
displayed.
On PC mode, “Not Supported Mode”
message is displayed.
On PC mode, horizontal or vertical bars
appear to flicker, jitter or shimmer on the
image.
On PC mode, screen is black and power
indicator light is steady amber or blinks
every 0.5 or 1 seconds.
◆ Check that the mains lead has been connected to a wall socket.
◆ Check that you have pressed the Power ( ) button.
◆ Check the picture contrast and brightness settings.
◆ Check the volume.
◆ Check the volume.
◆ Check whether the MUTE button has been pressed on the
remote control.
◆ Adjust the color settings.
◆ Check that the broadcast system selected is correct.
◆ Try to identify the electrical appliance that is affecting the set
and move it further away.
◆ Plug your set into a different mains socket.
◆ Check the direction, location and connections of your aerial.
This interference is often due to the use of an indoor aerial.
◆ Replace the remote control batteries.
◆ Clean the upper edge of the remote control (transmission window).
◆ Check the battery terminals.
◆ Check that the signal cable is firmly connected to the
PC or video sources.
◆ Check that the PC or video sources are turned on.
◆ Check the maximum resolution and the frequency of the
video Adapter.
◆ Compare these values with the data in the Display Modes Timing
Chart.
◆ Adjust the Coarse or Fine function.
◆ The TV is using its power management system.
◆ Move the computer’s mouse or press a key on the keyboard.
BN68-00438D-02_en 6/11/03 7:12 PM Page 38
Page 40

English-39
Power Saver
This set has a built-in power management system called PowerSaver. This system saves energy by
switching your set into a low-power mode when it has not been used for a certain period of time.
The available modes are “On”, “Standby”, “Sleep”, and “Deep Sleep”. PowerSaver operates with a
VESA DPMS compliant video card installed in your computer. You use a software utility installed on
your computer to set up this feature.
State Normal Operation
Power-Saving Function mode
(EPA/NUTEK)
Horizontal Sync Active Inactive
Vertical Sync Active Inactive
Power Indicator Green Green, Blinking (1 sec interval)
Power Consumption
LW15E33C : 48W (Max.)
Less than 3W
LW17E34C : 58W (Max.)
➣
This set automatically returns to normal operation when horizontal and vertical sync return.
This occurs when you move the computer’s mouse or press a key on the keyboard.
Troubleshooting: Before Contacting Service Personnel
On PC mode, image is not stable and
may appear to vibrate.
On PC mode, image is not centered
on the screen.
◆ Check that the display resolution and frequency from your
computer or video board is an available mode for your set.
On your computer check: Control Panel, Display, Settings.
◆ If the setting is not correct, use your computer utility programme
to change the display settings.
➣
Your set supports multiscan display functions within the
following frequency domain:
Horizontal frequency - 15” : 30 ~ 69 kHz
17” : 30 ~ 81 kHz
Vertical frequency - 56 ~ 75 Hz
Maximum refresh rate - 15” : 1024 x 768 @ 75Hz
17” : 1280 x 1024 @ 75Hz
◆ Adjust the horizontal and vertical position.
BN68-00438D-02_en 6/11/03 7:12 PM Page 39
Page 41

English-40
Technical and Environmental Specifications
Model LW15E33C LW17E34C
Panel
Size 15” Diagonal 17” Diagonal
Display Size 304.1(H) x 228.1(V) mm 337.92(H) x 270.336(V) mm
Type a-si TFT active matrix
Pixel Pitch 0.297 (H) x 0.297 (V) mm 0.264 (H) x 0.264 (V) mm
Viewing Angle 140/125 (Horizontal/Vertical) 140/110 (Horizontal/Vertical)
Frequency
Horizontal 30 ~ 69 kHz 30 ~ 81 kHz
Vertical 56 ~ 75 Hz
Display Color 16,194,277 colors
Display Resolution
Optimum Mode 1024 x 768 @ 60 Hz 1280 x 1024 @ 60 Hz
Maximum Mode 1024 x 768 @ 75 Hz 1280 x 1024 @ 75 Hz
Input Signal
Sync. H/V Separate, TTL, P. or N.
Video Signal 0.7 Vp-p @ 75 ohm
Power Supply
Input AC 90 ~ 264V(50 Hz / 60 Hz)
Output DC 14V/3A DC 14V/3.5A
Power Consumption
Maximum 48 W 58 W
Power Saving < 3 W
Dimensions (W x D x H) / Weight
TV Body 461 x 87.6 x 305.5 mm / 3.9 kg 514.6 x 89.0 x 351.1 mm / 5.0 kg
With Stand 461 x 182.2 x 325.1 mm / 6.2 kg 514.6 x 180.9 x 371.3 mm / 7.7 kg
Environmental Considerations
Operating Temperature 50 °F to 104 °F (10 °C to 40 °C)
Operating Humidity 10% to 80%
Storage Temperature - 13 °F to 113 °F (-25 °C to 45 °C)
Storage Humidity 5% to 95%
Audio Characteristics
Audio Input 1 RCA Jack (L, R), 0.5Vrms (-9dB)
Audio Input 2 (PC) 3.5Ø Stereo Jack, 0.5Vrms (-9dB)
Headphone Output Max. 10mW Output (3.5Ø Stereo Jack, 32Ω)
Frequency RF: 80Hz ~ 15kHz (at- 3dB)
Response A/V: 80Hz ~ 20kHz (at- 3dB)
BN68-00438D-02_en 6/11/03 7:12 PM Page 40
Page 42

English-41
Display Modes
If the signal from the system equals to the standard signal mode, the screen is adjusted automatically.
If the signal from the system doesn’t equal to the standard signal mode, adjust the mode with referring
to the Video card user guide because the screen might not display or only the power LED might be on.
For the display modes listed below, the screen image has been optimized during manufacture.
Mode Resolution Horizontal Vertical Pixel Clock Sync Polarity
Frequency (kHz) Frequency (Hz) Frequency (MHz) (H/V)
VGA 720 x 400 31.469 70.087 28.322
-
/ +
640 x 480 31.469 59.940 25.175
-/ -
640 x 480 37.500 75.000 31.500
-/ -
SVGA 800 x 600 46.875 75.000 49.500
+ / +
XGA 1024 x 768 48.363 60.004 65.000
-/ -
1024 x 768 60.023 75.029 78.750
+ / +
SXGA 1280 x 1024 63.981 60.020 108.000
+ / -,
+ /
-
(LW17E34C) 1280 x 1024 79.976 75.025 135.000
+ / +
BN68-00438D-02_en 6/11/03 7:12 PM Page 41
Page 43

English-42
Maintenance of Your Television
To avoid risk of electric shock, do not disassemble the TV cabinet (except for gaining access to the
cable connectors as described on page 7).
Users cannot service the TV. User maintenance is restricted to cleaning as explained below:
Unplug the television from the power outlet before cleaning.
◆
When you clean the TFT-LCD and the panel outside, please apply the recommended small
amount of cleaner by using soft and dry cloth and polish it. Let your television screen not to be
forced but to be scrubbed out softly. If excessive force is applied, you can have a stain on it.
◆
Never use flammable cleaning material to clean your television or any other electrical
apparatus.
BN68-00438D-02_en 6/11/03 7:12 PM Page 42
Page 44

English-43
How to assemble the TV set and stand base
Note : The curved side of the stand base should be placed at the
back of the TV set as shown in the above figure.
BN68-00438D-02_en 6/11/03 7:12 PM Page 43
Page 45
English-44
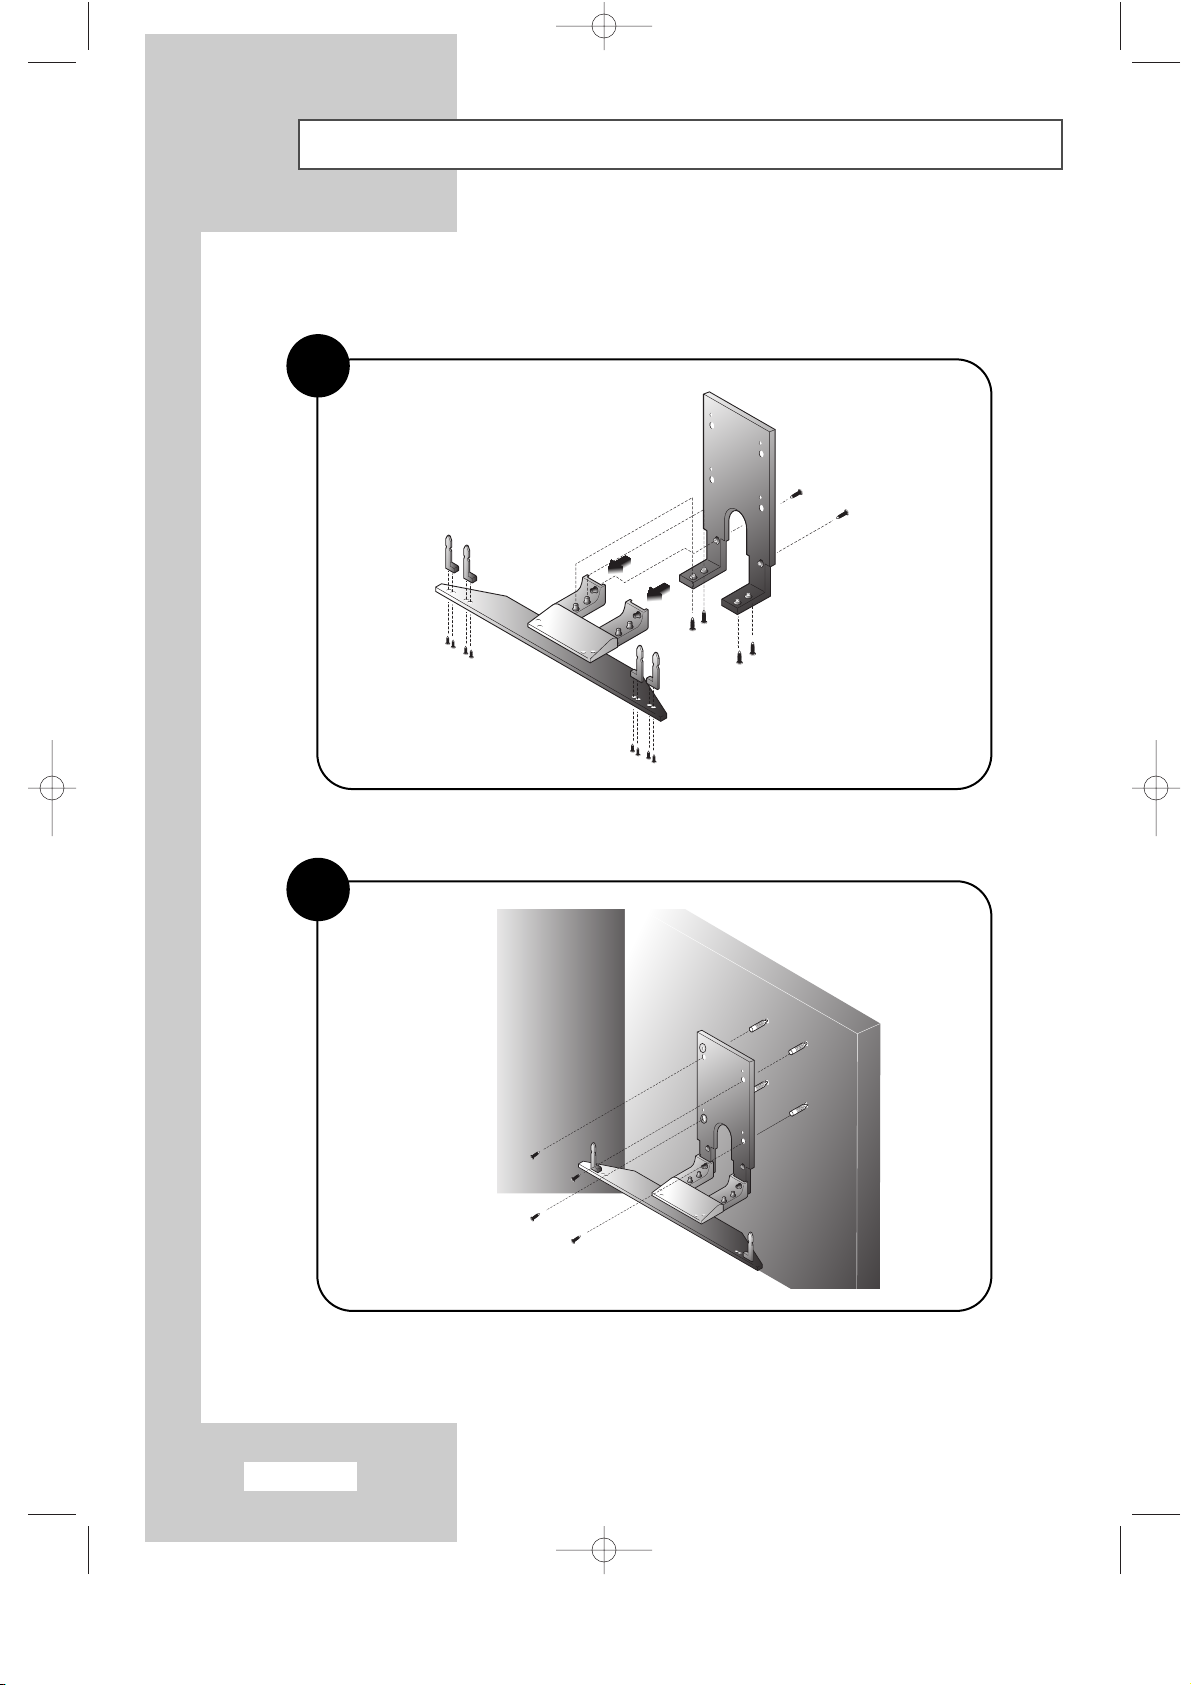
Installing the Wall Mount Kit (Sold separately)
1
2
BN68-00438D-02_en 6/11/03 7:12 PM Page 44
Page 46

English-45
Installing the Wall Mount Kit (Sold separately)
3
4
BN68-00438D-02_en 6/11/03 7:12 PM Page 45
Page 47

English-46
Wiring the Mains Power Supply Plug (UK Only)
◆ IMPORTANT NOTICE
The mains lead on this equipment is supplied with a moulded plug incorporating a fuse. The value of the fuse
is indicated on the pin face of the plug and, if it requires replacing, a fuse approved to BSI1362 of the same
rating must be used. Never use the plug with the fuse cover omitted if the cover is detachable.
If a replacement fuse cover is required, it must be of the same color as the pin face of the plug. Replacement
covers are available from your dealer. If the fitted plug is not suitable for the power points in your house or the
cable is not long enough to reach a power point, you should obtain a suitable safety approved extension lead
or consult your dealer for assistance. However, if there is no alternative to cutting off the plug, remove the fuse
and then safely dispose of the plug. Do NOT connect the plug to a mains socket as there is a risk of shock
hazard from the bared flexible cord.
◆ IMPORTANT
The wires in the mains lead are colored in accordance with the following code:
BLUE - NEUTRAL BROWN - LIVE
As these colors may not correspond to the colored markings identifying the terminals in your plug,
proceed as follows:
The wire colored BLUE must be connected to the terminal marked with the letter N or colored BLUE or BLACK.
The wire colored BROWN must be connected to the terminal marked with the letter L or colored BROWN or RED.
WARNING: DO NOT CONNECT EITHER WIRE TO THE EARTH TERMINAL, WHICH IS MARKED
WITH THE LETTER E OR BY THE EARTH SYMBOL , OR COLORED GREEN OR GREEN
AND YELLOW.
BN68-00438D-02_en 6/11/03 7:12 PM Page 46
Page 48

English-47
Memo
BN68-00438D-02_en 6/11/03 7:12 PM Page 47
Page 49

-
AFTER SALES SERVICE
-
Do not hesitate to contact your retailer or service agent if a
change in the performance of your product indicates that a
faulty condition may be present.
ELECTRONICS
BN68-00438D-02_en 6/11/03 7:12 PM Page 48
 Loading...