

Samsung LTP266WX-XAA User Manual
1-800-SAMSUNG(1-800-726-7864)
U.S.A
Samsung Electronics America
Service Division
400 Valley Road, Suite 201
Mount Arlington, NJ 07856
www.samsungusa.com
Canada
Samsung Electronics Canada Inc.
Samsung Customer Care
7037 Financial Drive
Mississauga, Ontario
L5N 6R3
www.samsung.ca
BN68-00656A-01

CONTENTS
Chapter 1: Your New TV
List of Features . . . . . . . . . . . . . . . . . . . . . . . . . . . . . . . . . . . . . . . . 1
List of Parts . . . . . . . . . . . . . . . . . . . . . . . . . . . . . . . . . . . . . . . . . . . 1
Familiarizing Yourself with Your New TV . . . . . . . . . . . . . . . . . . . . 2
Right-side Panel Buttons . . . . . . . . . . . . . . . . . . . . . . . . . . . . . . 2
Rear Panel Jacks . . . . . . . . . . . . . . . . . . . . . . . . . . . . . . . . . . . . 3
Remote Control . . . . . . . . . . . . . . . . . . . . . . . . . . . . . . . . . . . . . . . . 4
Installing Batteries in the Remote Control . . . . . . . . . . . . . . . . . . . . . 6
If remote control doesn’t work . . . . . . . . . . . . . . . . . . . . . . . . . . . . . 6
Chapter 2: Installation
Connecting VHF and UHF Antennas . . . . . . . . . . . . . . . . . . . . . . . . 7
Antennas with 300-ohm Flat Twin Leads . . . . . . . . . . . . . . . . . 7
Antennas with 75-ohm Round Leads . . . . . . . . . . . . . . . . . . . . 8
Separate VHF and UHF Antennas . . . . . . . . . . . . . . . . . . . . . . . 8
Connecting Cable TV . . . . . . . . . . . . . . . . . . . . . . . . . . . . . . . . . . . . 8
Connecting to a Cable Box that Descrambles All Channels . . . . 9
Connecting to a Cable Box that Descrambles Some Channels . . 9
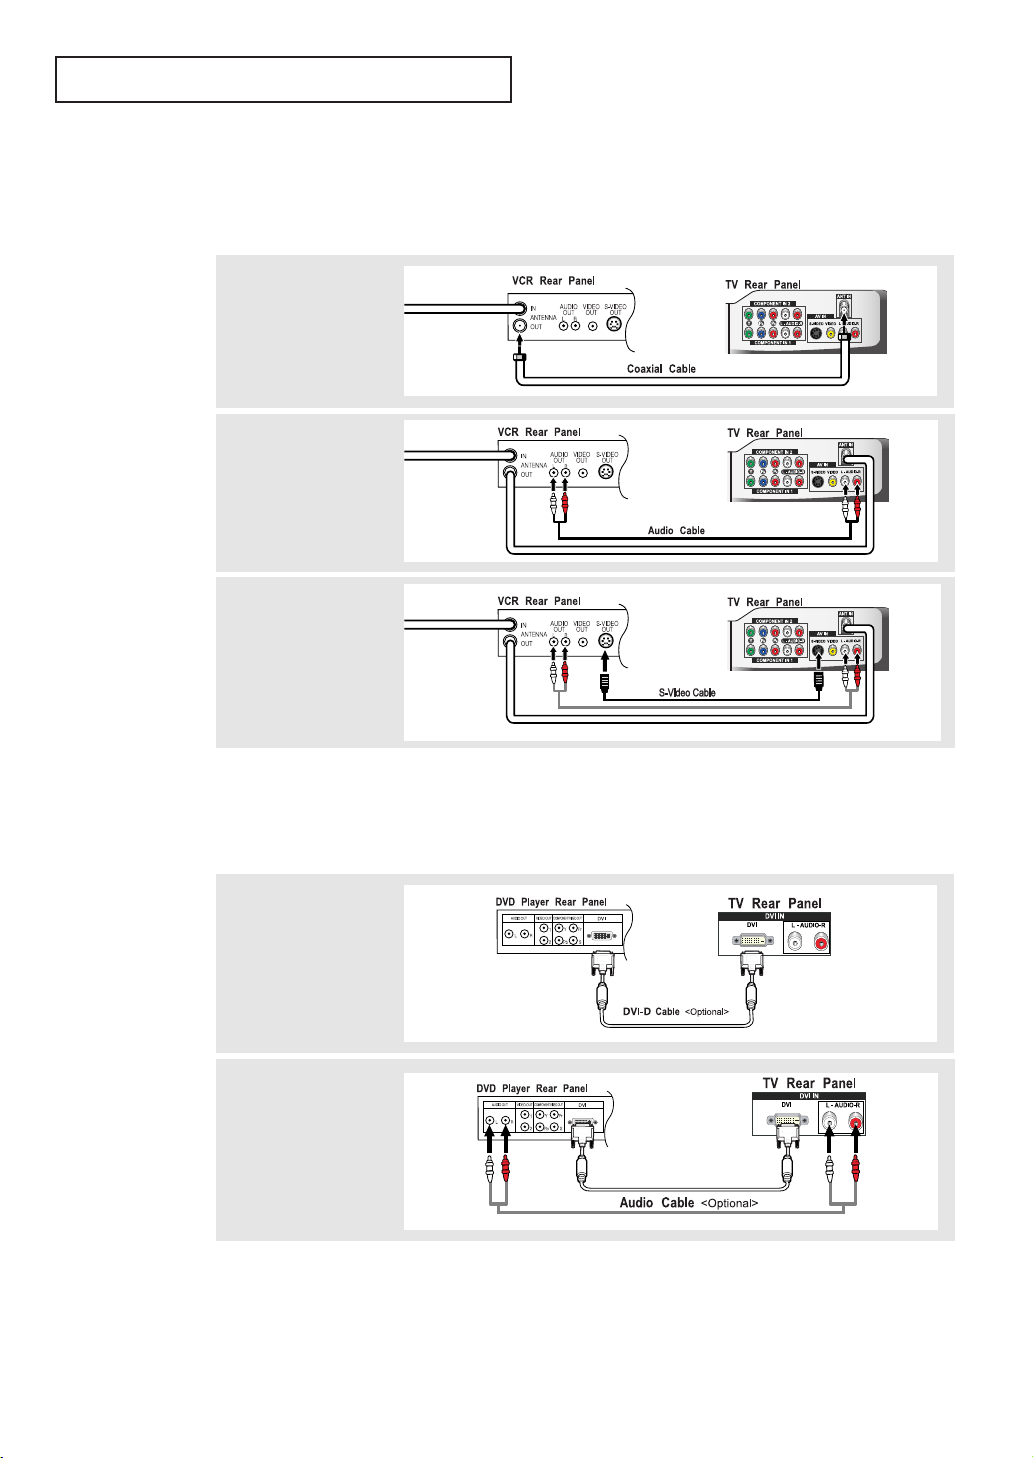
Connecting a VCR . . . . . . . . . . . . . . . . . . . . . . . . . . . . . . . . . . . . . 11
Connecting an S-VHS VCR . . . . . . . . . . . . . . . . . . . . . . . . . . . . . . 12
Connecting a DVI-D Cable . . . . . . . . . . . . . . . . . . . . . . . . . . . . . . . 12
Connecting a DVD Player . . . . . . . . . . . . . . . . . . . . . . . . . . . . . . . 13
Connecting a Digital TV Set-Top Box . . . . . . . . . . . . . . . . . . . . . . 13
Connecting a PC . . . . . . . . . . . . . . . . . . . . . . . . . . . . . . . . . . . . . . . 14
Chapter 3: Operation
Turning the TV On and Off . . . . . . . . . . . . . . . . . . . . . . . . . . . . . . . 15
Changing Channels . . . . . . . . . . . . . . . . . . . . . . . . . . . . . . . . . . . . . 15
Using the Channel Buttons . . . . . . . . . . . . . . . . . . . . . . . . . . . 15
Using the PRE-CH Button to select the Previous Channel . . . . 15
Adjusting the Volume . . . . . . . . . . . . . . . . . . . . . . . . . . . . . . . . . . . 15
Using Mute . . . . . . . . . . . . . . . . . . . . . . . . . . . . . . . . . . . . . . . 15
Viewing the Display . . . . . . . . . . . . . . . . . . . . . . . . . . . . . . . . . . . . 16
Viewing the Menus . . . . . . . . . . . . . . . . . . . . . . . . . . . . . . . . . . . . . 16
Setting Up Your Remote Control . . . . . . . . . . . . . . . . . . . . . . . . . . 17
Remote Control Codes . . . . . . . . . . . . . . . . . . . . . . . . . . . . . . . . . . 20
Chapter 4: Special Features
Plug & Play Feature . . . . . . . . . . . . . . . . . . . . . . . . . . . . . . . . . . . . 21
Memorizing the Channels . . . . . . . . . . . . . . . . . . . . . . . . . . . . . . . . 22
Selecting the Video Signal-source . . . . . . . . . . . . . . . . . . . . . . 22
Storing Channels in Memory (Automatic Method) . . . . . . . . . 23
Adding and Erasing Channels (Manual Method) . . . . . . . . . . . 24
Labeling Channels . . . . . . . . . . . . . . . . . . . . . . . . . . . . . . . . . . . . . 24
To Set-up Favorite Channels . . . . . . . . . . . . . . . . . . . . . . . . . . . . . . 25
To Select Source . . . . . . . . . . . . . . . . . . . . . . . . . . . . . . . . . . . . . . . 25
To Edit the Input Source Name . . . . . . . . . . . . . . . . . . . . . . . . . . . . 26
Using Automatic Picture Settings . . . . . . . . . . . . . . . . . . . . . . . . . . 27
Customizing the Picture . . . . . . . . . . . . . . . . . . . . . . . . . . . . . . . . . 28
Using Automatic Sound Settings . . . . . . . . . . . . . . . . . . . . . . . . . . 29
Customizing the Sound . . . . . . . . . . . . . . . . . . . . . . . . . . . . . . . . . . 30
Selecting a Menu Language . . . . . . . . . . . . . . . . . . . . . . . . . . . . . . 31
Setting the Blue Screen Mode . . . . . . . . . . . . . . . . . . . . . . . . . . . . . 32
Fine Tuning Channels . . . . . . . . . . . . . . . . . . . . . . . . . . . . . . . . . . . 33
Contents-1

CONTENTS
Viewing Picture-in-Picture . . . . . . . . . . . . . . . . . . . . . . . . . . . . . . . 34
Activating Picture-in-Picture . . . . . . . . . . . . . . . . . . . . . . . . . . 34
PIP Settings . . . . . . . . . . . . . . . . . . . . . . . . . . . . . . . . . . . . . . 34
Selecting a Signal Source (External A/V) for PIP . . . . . . . . . . 35
Swapping the Contents of the PIP and Main image . . . . . . . . . 35
Changing the PIP Channel . . . . . . . . . . . . . . . . . . . . . . . . . . . 35
Changing the Position of the PIP Window . . . . . . . . . . . . . . . . 35
Changing the Size of the PIP Window . . . . . . . . . . . . . . . . . . . 35
DNIe (Digital Natural Image engine) . . . . . . . . . . . . . . . . . . . . . . . 36
MCC (My Color Control) . . . . . . . . . . . . . . . . . . . . . . . . . . . . . . . . 37
Easy Control . . . . . . . . . . . . . . . . . . . . . . . . . . . . . . . . . . . . . . 37
Detail Control . . . . . . . . . . . . . . . . . . . . . . . . . . . . . . . . . . . . . 38
I2C (Intelligent Image Control) . . . . . . . . . . . . . . . . . . . . . . . . . . . 39
IBC (Intelligent Brightness Control) . . . . . . . . . . . . . . . . . . . . . . . . 40
Changing the Screen Size. . . . . . . . . . . . . . . . . . . . . . . . . . . . . . . . 41
Freezing the Picture . . . . . . . . . . . . . . . . . . . . . . . . . . . . . . . . . . . . 41
Adjusting the Color Tone . . . . . . . . . . . . . . . . . . . . . . . . . . . . . . . . 42
Automatic volume control . . . . . . . . . . . . . . . . . . . . . . . . . . . . . . . 43
To select the WOW option . . . . . . . . . . . . . . . . . . . . . . . . . . . . . . . 44
Special Sound Options . . . . . . . . . . . . . . . . . . . . . . . . . . . . . . . . . . 45
Selecting the Main or Sub Sound . . . . . . . . . . . . . . . . . . . . . . . . . . 46
Adjusting the Headphone Sound . . . . . . . . . . . . . . . . . . . . . . . . . . 47
Sub Woofer . . . . . . . . . . . . . . . . . . . . . . . . . . . . . . . . . . . . . . . . . . 48
Setting the Clock . . . . . . . . . . . . . . . . . . . . . . . . . . . . . . . . . . . . . 49
Setting the On/Off Timer . . . . . . . . . . . . . . . . . . . . . . . . . . . . . . . . 50
Setting the Sleep Timer . . . . . . . . . . . . . . . . . . . . . . . . . . . . . . . . . 52
Viewing Closed Captions . . . . . . . . . . . . . . . . . . . . . . . . . . . . . . . . 53
Using the V-Chip . . . . . . . . . . . . . . . . . . . . . . . . . . . . . . . . . . . . . . 55
Setting Up Your Personal ID Number (PIN) . . . . . . . . . . . . . . 55
How to Enable/Disable the V-Chip . . . . . . . . . . . . . . . . . . . . . . 56
How to Set up Restrictions Using
the ‘TV Parental Guidelines’ . . . . . . . . . . . . . . . . . . . . . . . . . . 57
How to Set up Restrictions Using the MPAA Ratings:
G, PG, PG-13, R, NC-17, X . . . . . . . . . . . . . . . . . . . . . . . . . . 59
How to Reset the TV after the V-Chip
Blocks a Channel (‘Emergency Escape’) . . . . . . . . . . . . . . . . . 60
Color Weakness . . . . . . . . . . . . . . . . . . . . . . . . . . . . . . . . . . . . . . . 61
Selecting the Melody . . . . . . . . . . . . . . . . . . . . . . . . . . . . . . . . . . . 62
Chapter 5: PC Display
Using Your TV as a Computer (PC) Display . . . . . . . . . . . . . . . . . . 63
How to Set up Your PC Software (Windows only) . . . . . . . . . 63
How to Auto Adjust . . . . . . . . . . . . . . . . . . . . . . . . . . . . . . . . 64
Adjusting the Screen Quality . . . . . . . . . . . . . . . . . . . . . . . . . 65
Changing the Screen Position . . . . . . . . . . . . . . . . . . . . . . . . . 66
To Initialize the Screen Position or Color Settings . . . . . . . . . . 67
Chapter 6: Troubleshooting
Identifying Problems . . . . . . . . . . . . . . . . . . . . . . . . . . . . . . . . . . . 68
Appendix
Installing the Stand . . . . . . . . . . . . . . . . . . . . . . . . . . . . . . . . . . . . . 70
Installing VESA compliant mounting devices(not supplied) . . . . . . 71
Cleaning and Maintaining Your TV . . . . . . . . . . . . . . . . . . . . . . . . 72
Using Your TV in Another Country . . . . . . . . . . . . . . . . . . . . . . . . 72
Specifications . . . . . . . . . . . . . . . . . . . . . . . . . . . . . . . . . . . . . . . . . 73
Display Modes . . . . . . . . . . . . . . . . . . . . . . . . . . . . . . . . . . . . . . . . 74
Contents-2
Chapter One
YOUR N EW TV
List of Features
MCC (My Color Control):
Users can adjust colors to their preference by adjusting skin, sky and grass
tones.
I2C (Intelligent Image Control):
Automatically detects the input visual signal and adjusts to create optimum
contrast.
IBC (Intelligent Brightness Control):
Adjusts the screen brightness automatically depending on the brightness of
the surrounding environment.
Color Weakness :
This feature enables those with a color weakness to view images as those
with normal vision.
JBL high performance built-in speakers:
Enables reproduction of broadband frequency sound.
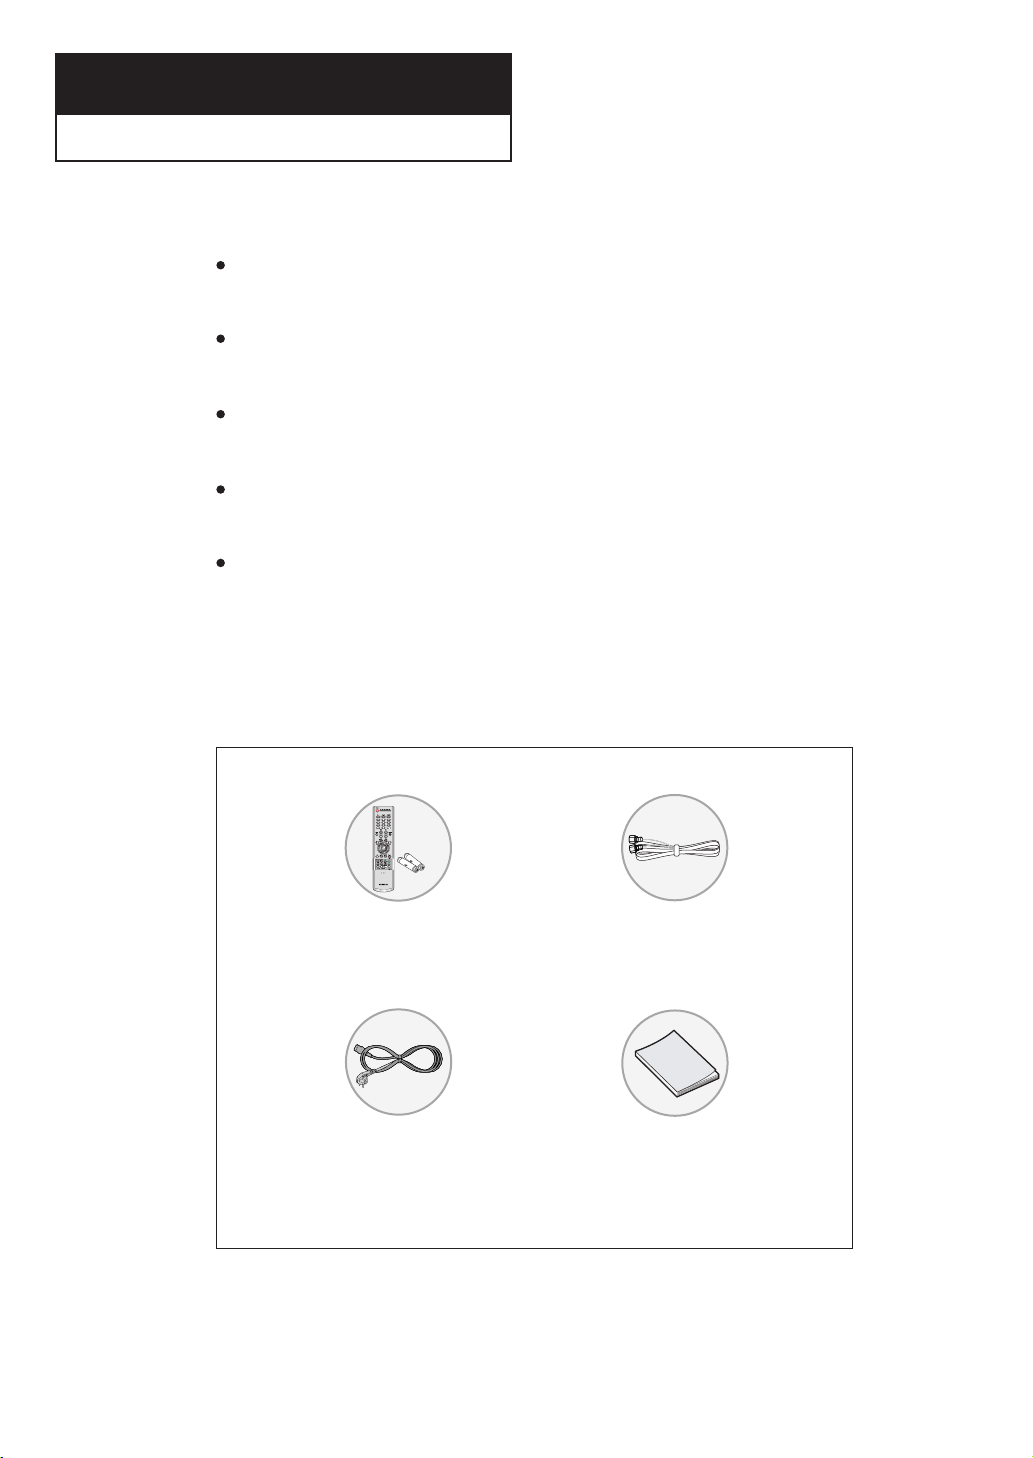
List of Parts
Please make sure the following items are included with your LCD TV.
If any items are missing, contact your dealer.
Remote Control(BN59-00409B)
& Batteries (AAA x 2)
Power Cord
(3903-000085)
RF Cable
(AA39-00039A)
Owner’s
Instructions
English-1
YOUR N EW TV
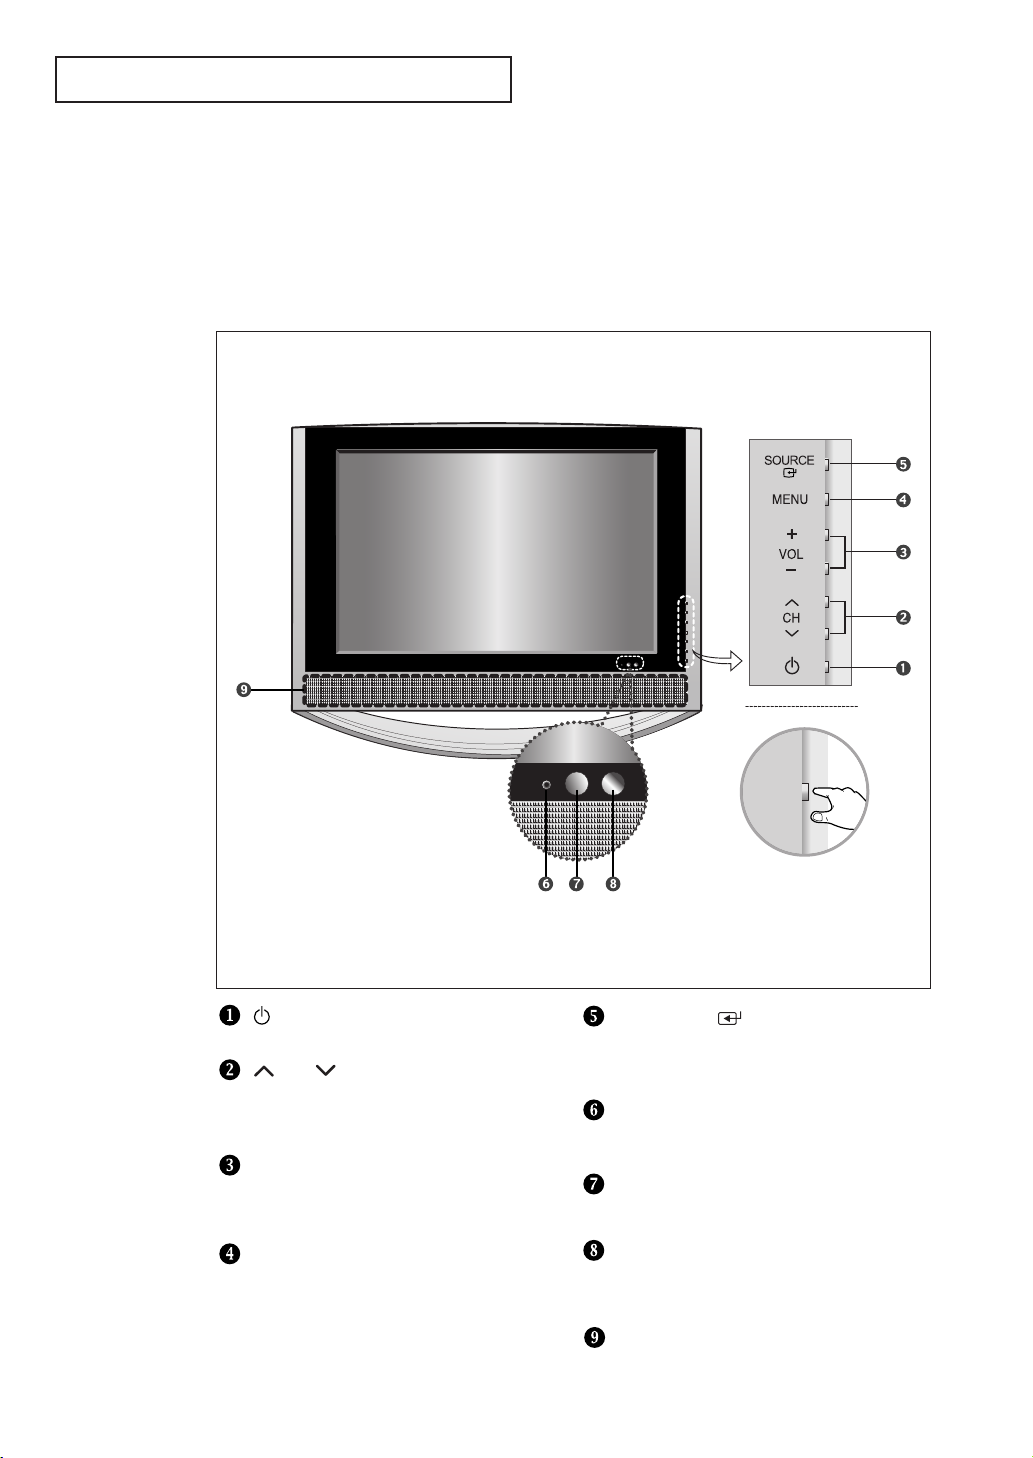
Familiarizing Yourself with Your New TV
Right-Side Panel Buttons
The buttons on the Right-side panel control your TV’s basic features, including the onscreen menu. To use the more advanced features, you must use the remote control.
POWER
Press to turn the TV on and off.
CH
Press to change channels.
Also press to highlight various items
on the on-screen menu.
+ VOL –
Press to increase or decrease the volume.
Also used to select items on the
on-screen menu.
MENU
Press to see an on-screen menu of
your TV’s features.
English-2
SOURCE
Displays a menu of all of the available
input sources (TV, AV, S-VIDEO, Component 1,
Component 2, DVI, PC).
POWER INDICATOR
Lights when unit is in standby mode.
Lights green after setting on/off timer.
REMOTE CONTROL SENSOR
Aim the remote control towards this spot
on the TV.
LIGHT DETECTING SENSOR
Adjusts brightness of screen automatically
by detecting brightness of surrounding
environment. This sensor works when IBC is on.
SPEAKER
YOUR N EW TV
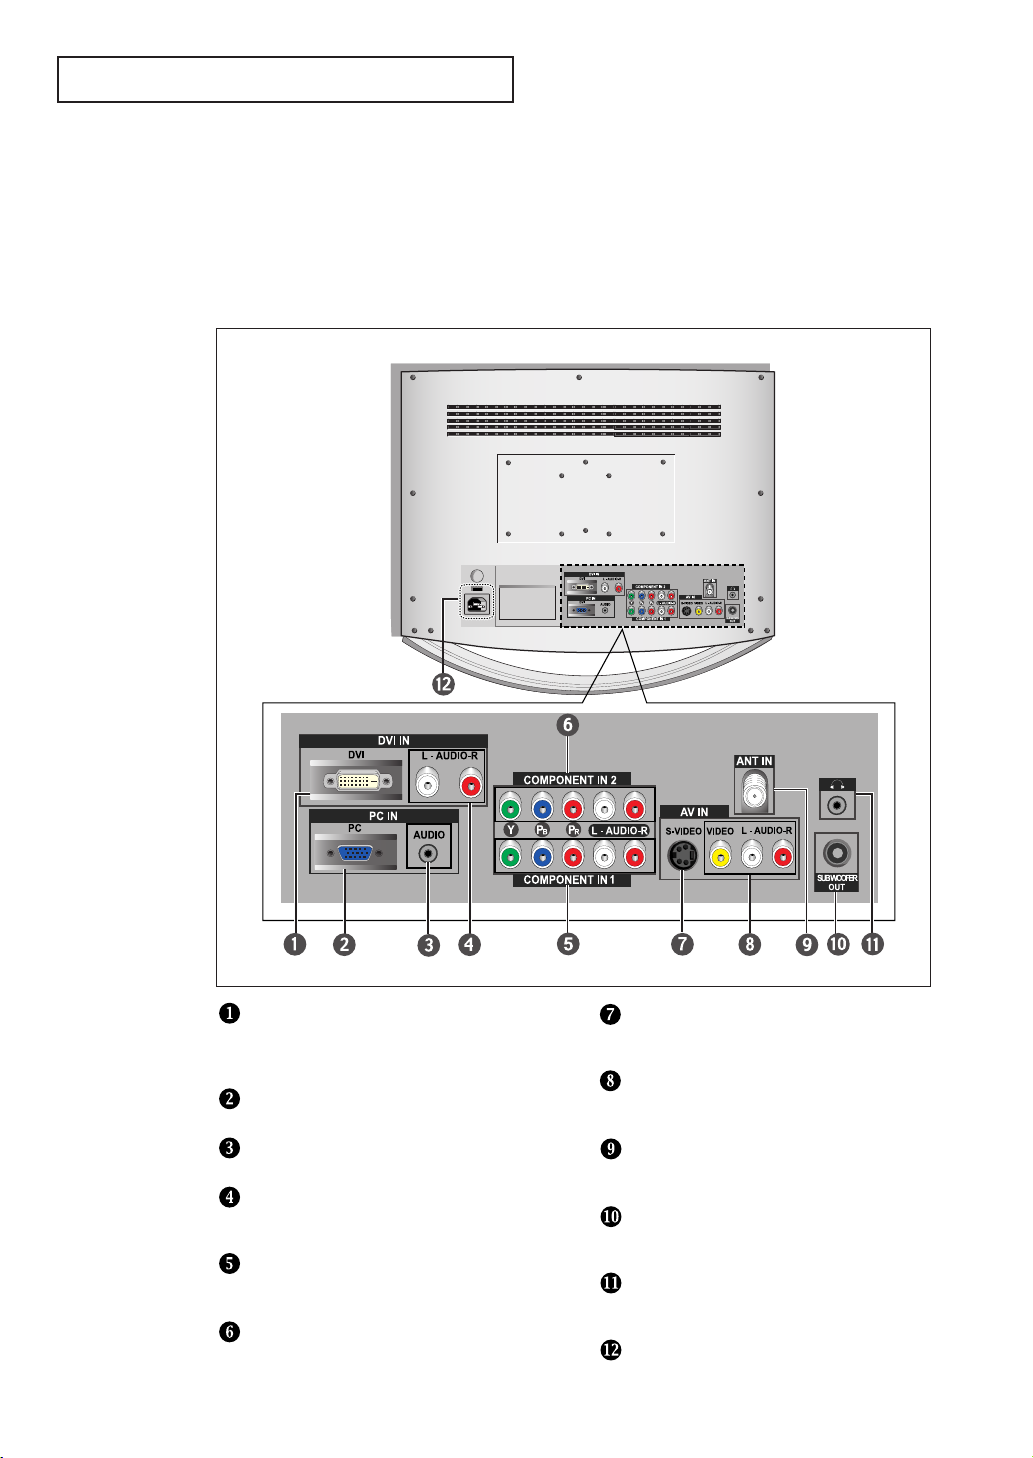
Rear Panel Jacks
Use the rear panel jacks to connect an A/V component that will be connected
continuously, such as a VCR or a DVD player.
For more information on connecting equipment, see pages 7-14.
DVI-D INPUT
Connect to the digital video output jack on your
DVD/Set-top Box.
(DVI-D terminal does not support PC.)
PC VIDEO (D-SUB) INPUT
Connect to the video output port on your PC.
PC AUDIO (D-SUB) INPUT
Connect to the audio output jack on your PC.
DVI-D AUDIO INPUT
Connect to the audio output jack on your
DVD/Set-top Box.
COMPONENT IN 1
Connect component video/audio from a
DVD/VCR/Set-top Box.
COMPONENT IN 2
Connect component video/audio from a
DVD/VCR/Set-top Box.
English-3
S-VIDEO
Connect an S-Video signal from
a camcorder or VCR
VIDEO/AUDIO INPUT
Connect a Video signal from
a camcorder or VCR.
ANT IN
Connect to an antenna or to a cable TV
system.
SUBWOOFER OUTPUT
Connect to an active (powered)
subwoofer.
HEADPHONE JACK
Connect a set of external headphones
for private listening.
POWER INPUT
YOUR N EW TV
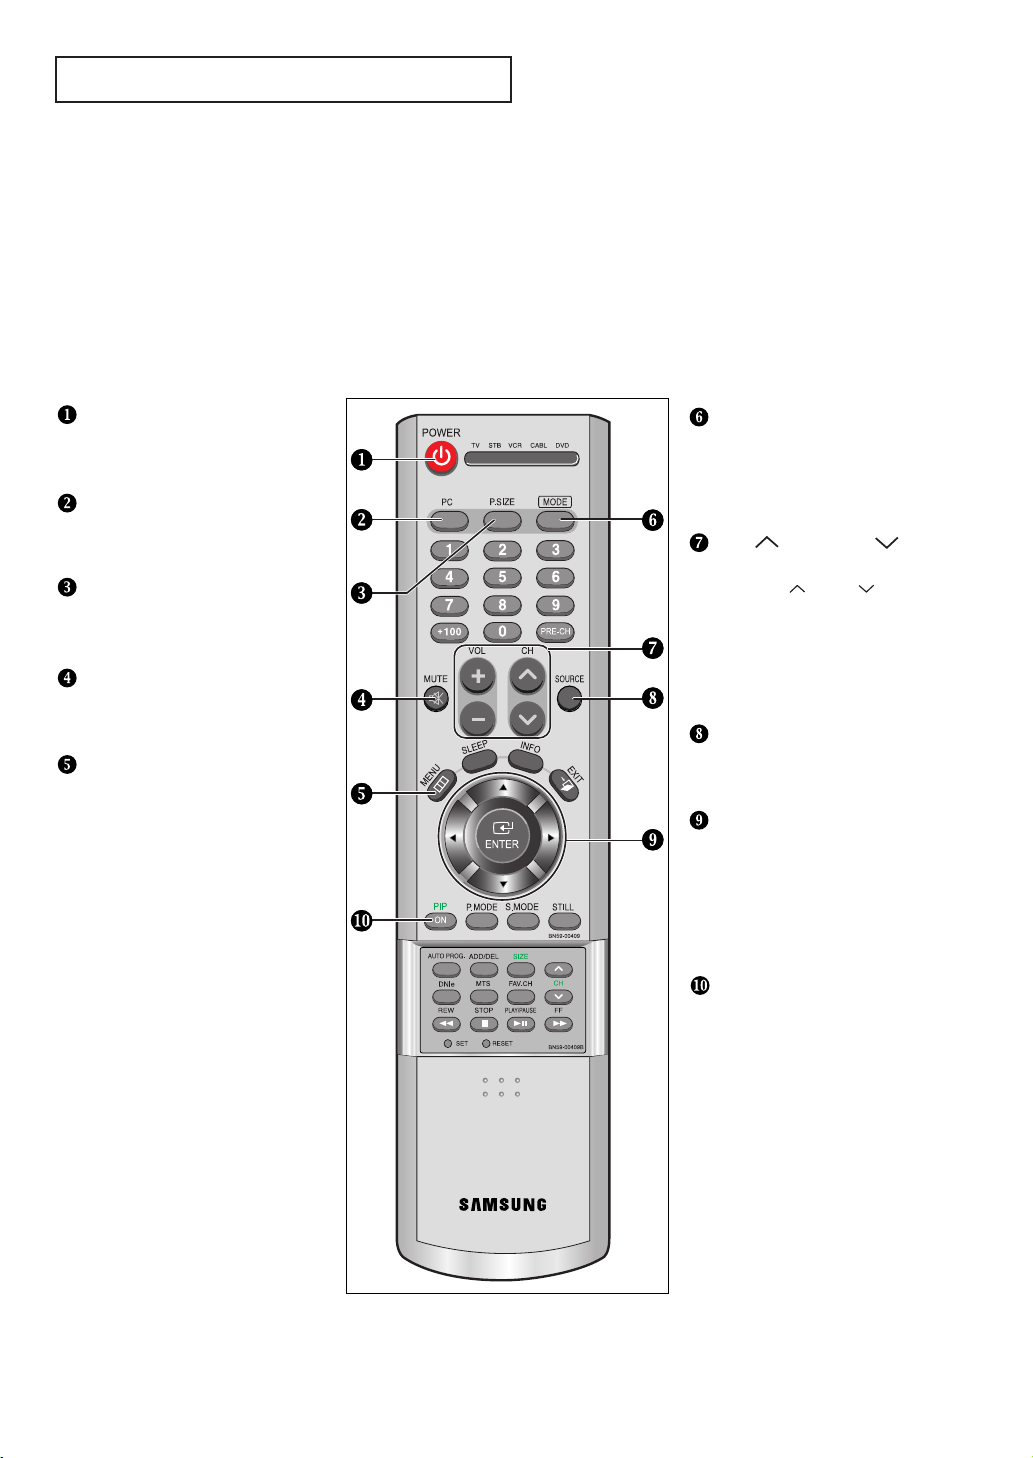
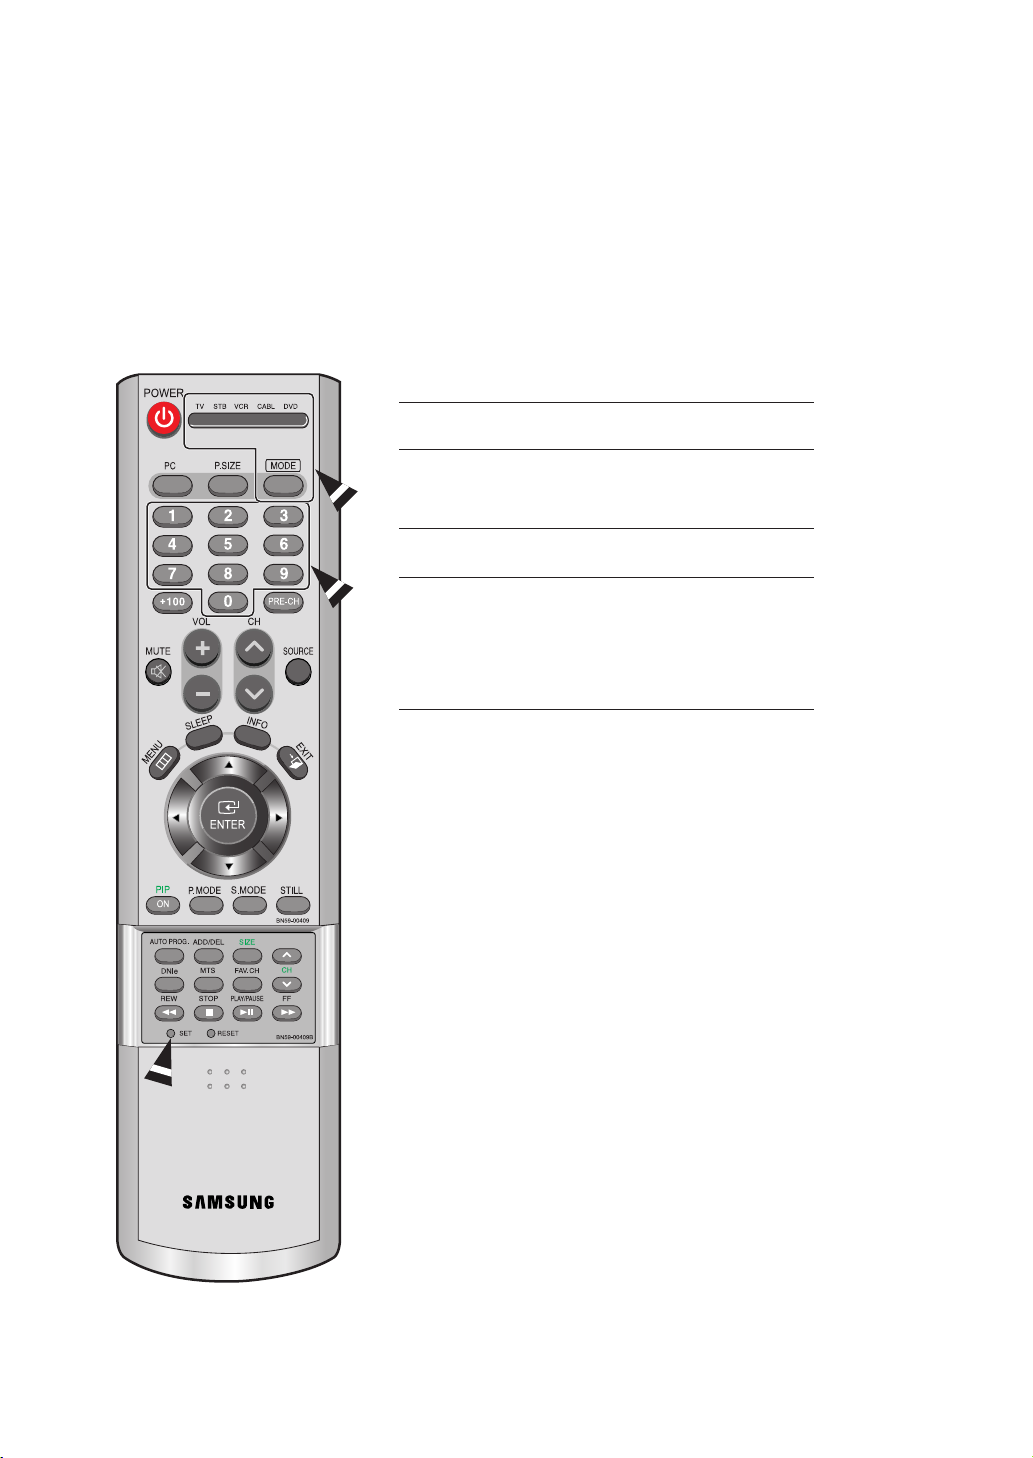
Remote Control
Frequently Used Buttons
You can use the remote control up to a distance of about 23 feet from the TV.
When using the remote, always point it directly at the TV.
POWER
Turns the TV on and off.
(See Page 15)
PC MODE
Press to switch to the PC mode.
(See Page 63)
P.SIZE
Press to change the screen size.
(See Page 41)
MUTE
Press to temporarily cut off
the sound. (See Page 15)
MENU
Displays the main on-screen
menu.(See Page 16)
MODE
Selects a target device to be controlled
by the Samsung remote control
(TV, VCR, Cable, DVD, Samsung STB)
(See pages 17~19)
CH and CH
(Channel UP/Down)
Press CH or CH to
change channels. (See Page 15)
VOL + and VOL -
Press to increase or decrease
the volume.(See Page 15)
SOURCE
Press to display all of the available
video sources.(See Page 25)
UP / DOWN / LEFT /
RIGHT / ENTER
Use to select on-screen menu
items and change menu values.
(The remote control will only
function with VCR or DVD units
that are compatible with the LCD TV.)
PIP FUNCTIONS
Picture-in-Picture ON/OFF
(See pages 34~35)
English-4
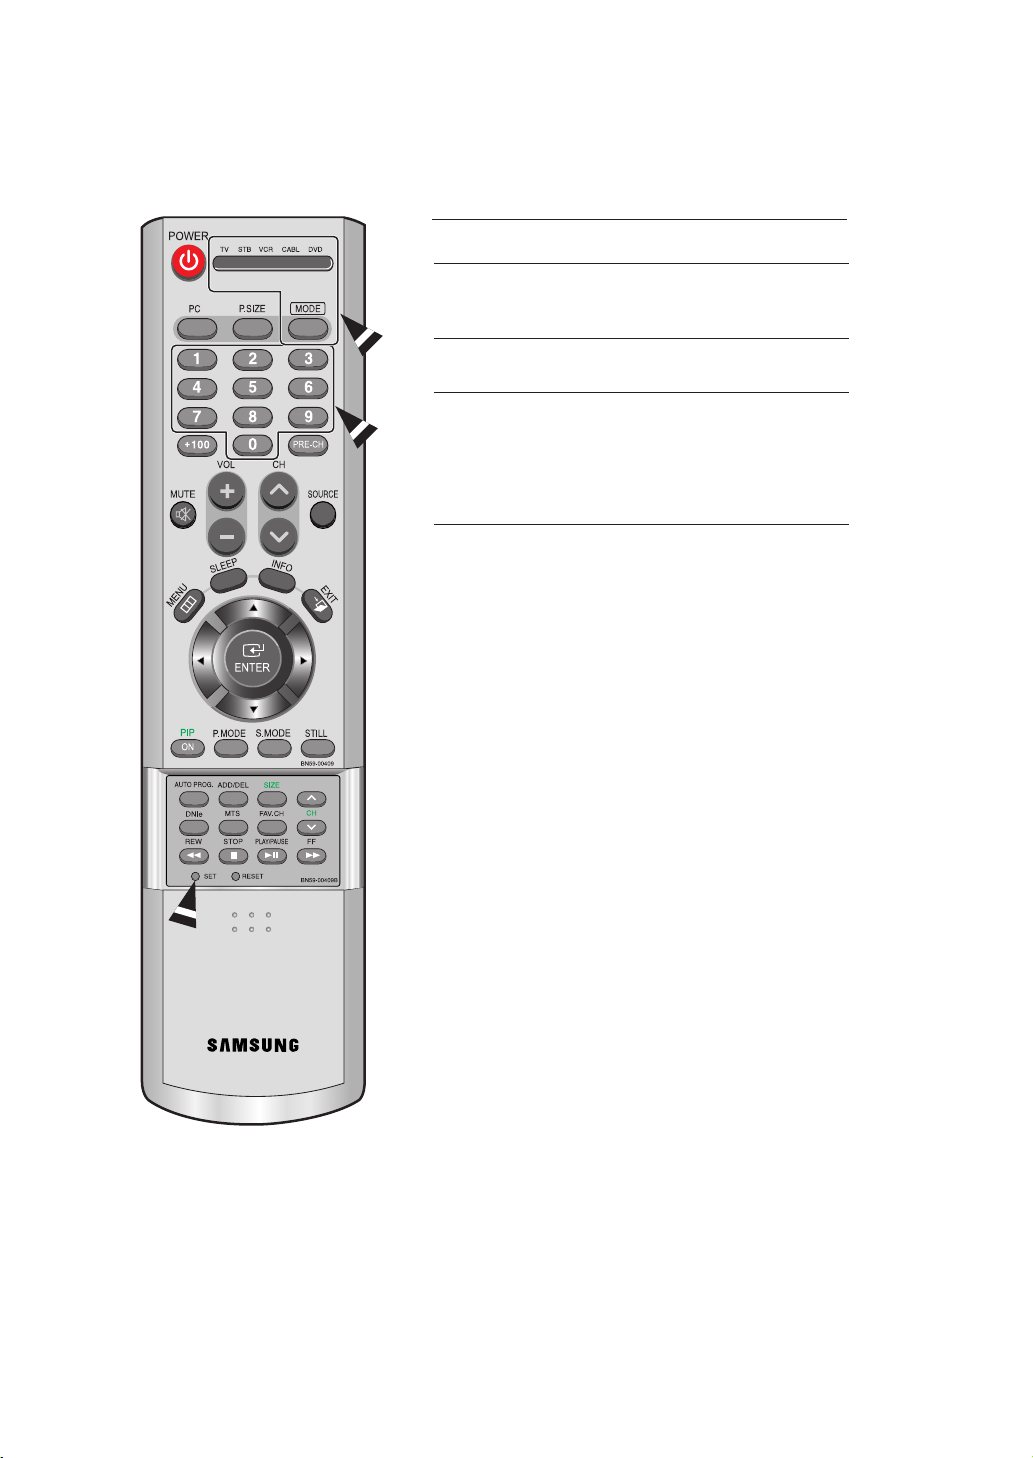
YOUR N EW TV
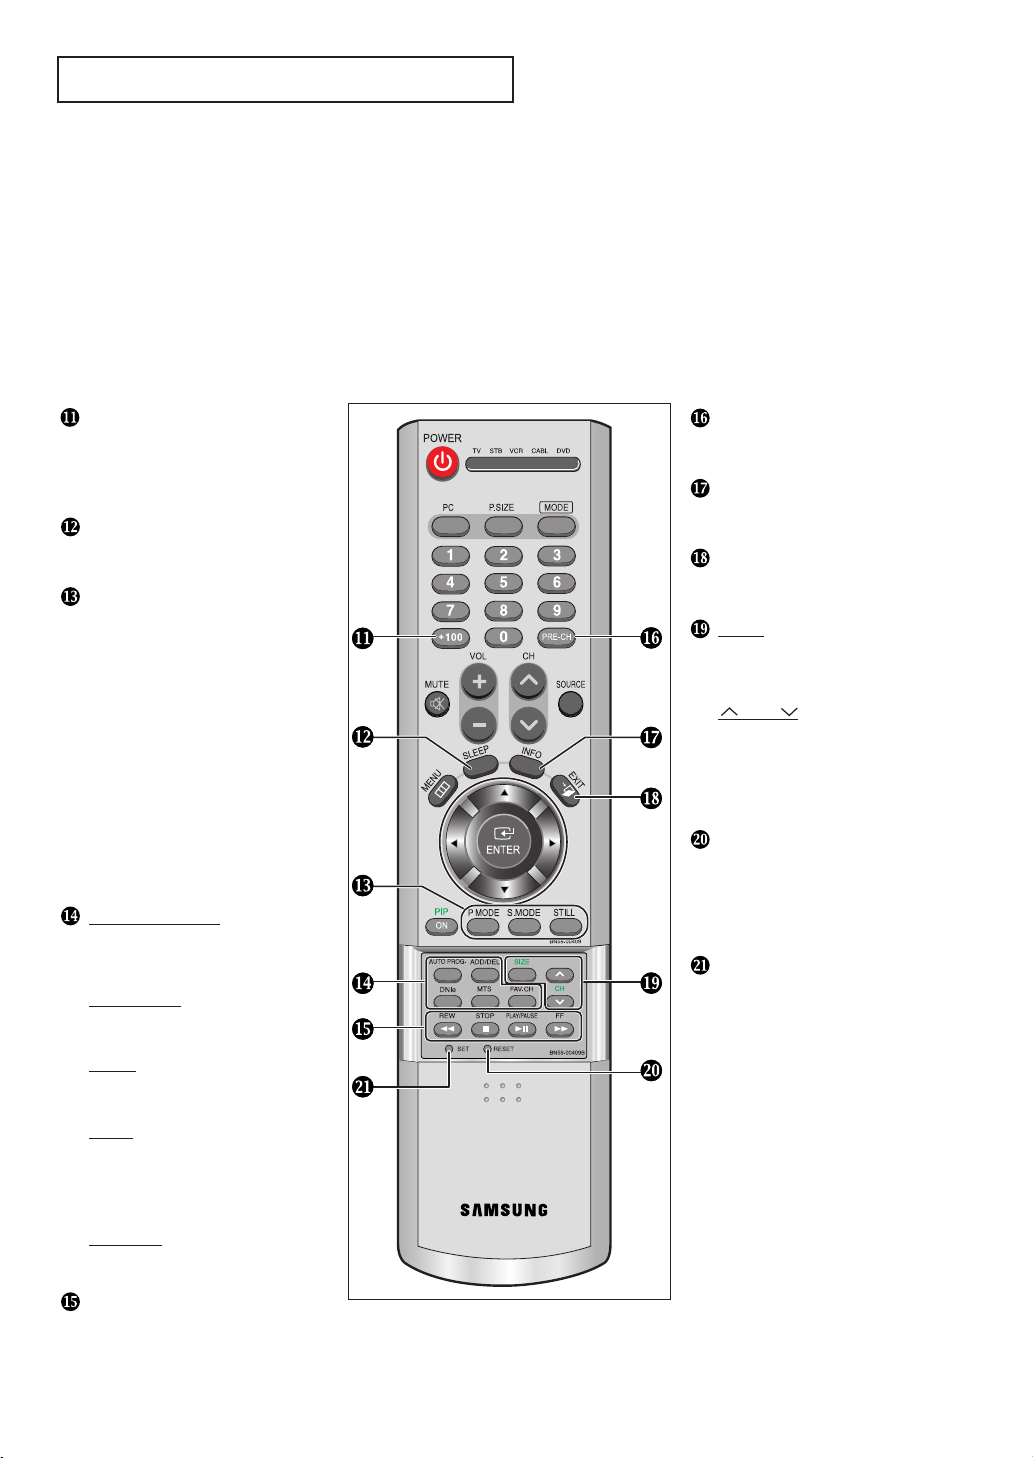
Convenient Buttons
You can use the remote control up to a distance of about 23 feet from the TV.
When using the remote, always point it directly at the TV.
+100
Press to select channels over 100.
For example, to select channel 121,
press “+100”, then press “2” and “1”.
(See Page 23)
SLEEP
Press to select a time for the TV to
turn off automatically.(See Page 52)
P.MODE
Adjusts the TV picture by selecting
one of the preset factory settings.
(See Page 27)
S.MODE
Adjust the TV sound by selecting
one of the preset factory settings
(or select your personal,
customized sound settings).
(See Page 29)
STILL
Press to stop the action during
a particular scene. Press again to
resume normal video.
(See Page 41)
AUTO PROG.
Press to automatically store
selected TV/cable channels.
(See Page 23)
ADD/DEL
Use to store and delete channels
to/from memory. (See Page 24)
DNIe
Press to improve the digital video
quality. (See Page 36)
MTS
(Multi channel Television Stereo)
Press to choose stereo, mono or
Separate Audio Program
(SAP broadcast). (See Page 45)
FAV.CH
Tunes to the channels in your
favorite channel list. (See Page 25)
VCR/DVD Functions
-
Rewind
-
Stop
-
Play/Pause
-
Fast/Forward
PRE-CH
Tunes to the previous channel.
(See Page 15)
INFO
Use to see information on the
current broadcast.(See Page 16)
EXIT
Press to exit the menu.
SIZE
Press to make the PIP window
double, large or small.
(See Page 35)
CH
Displays the available channels
in sequence.
(These buttons change channels
in the PIP window only.)
(See Page 35)
RESET
When your remote does not work,
change the batteries and press the
RESET button for 2-3 seconds
before use.
SET BUTTON
SET button on TV remote control
adjusts 5 separate devices - TV,
VCR, Cable, DVD, or Samsung
Set-top box.
(See pages 17~19)
English-5
YOUR N EW TV
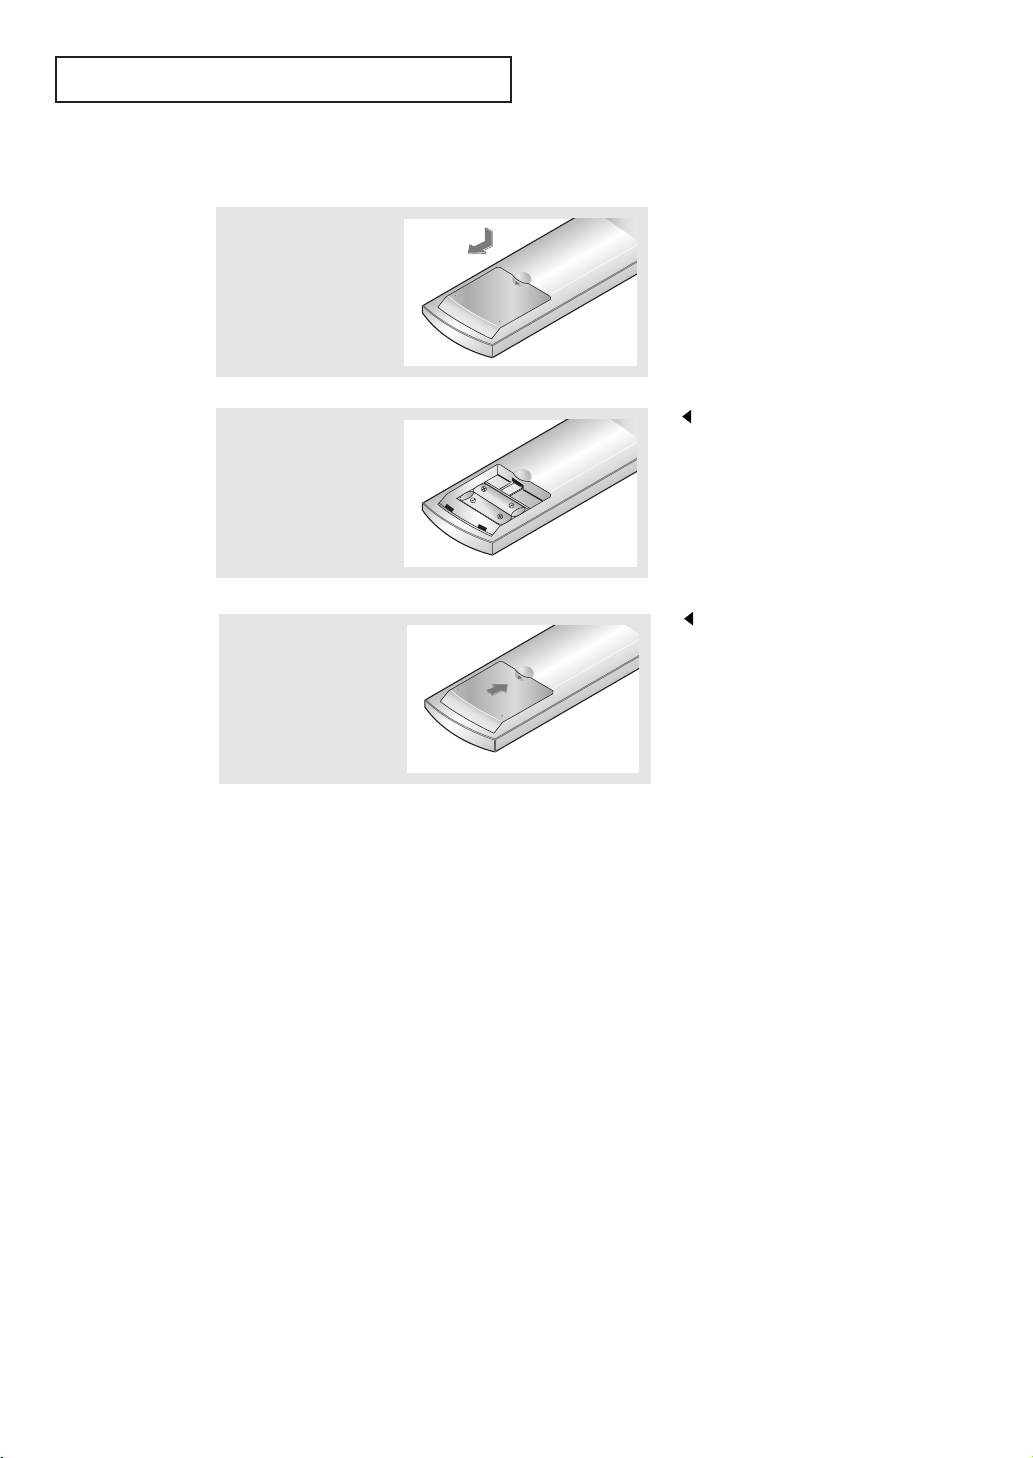
Installing Batteries in the Remote Control
1
Slide the cover out
completely.
2
Install two AAA size
batteries.
3
Replace the cover.
If remote control doesn’t work
Check the following:
1. Is the TV power switch on?
2. Are the plus and minus ends of the batteries reversed?
3. Are the batteries drained?
4. Is there a power outage, or is the power cord unplugged?
5. Is there a special fluorescent light or a neon sign nearby?
Make sure to match the “+” and
“
–” ends of the batteries with the
diagram inside the compartment.
Remove the batteries and store them
in a cool, dry place if you won’t be
using the remote control for a long
time.
The remote control can be used
up to about 23 feet from the TV.
(Assuming typical TV usage,
the batteries last for about one year.)
English-6
Chapter Two
I NSTALLATION
Connecting VHF and UHF Antennas
If your antenna has a set of leads that
look like this, see “Antennas with
300-ohm Flat Twin Leads” below.
If your antenna has one lead that looks
like this, see “Antennas with 75-ohm
Round Leads” on page 8.
If you have two antennas, see “Separate
VHF and UHF Antennas” on page 8.
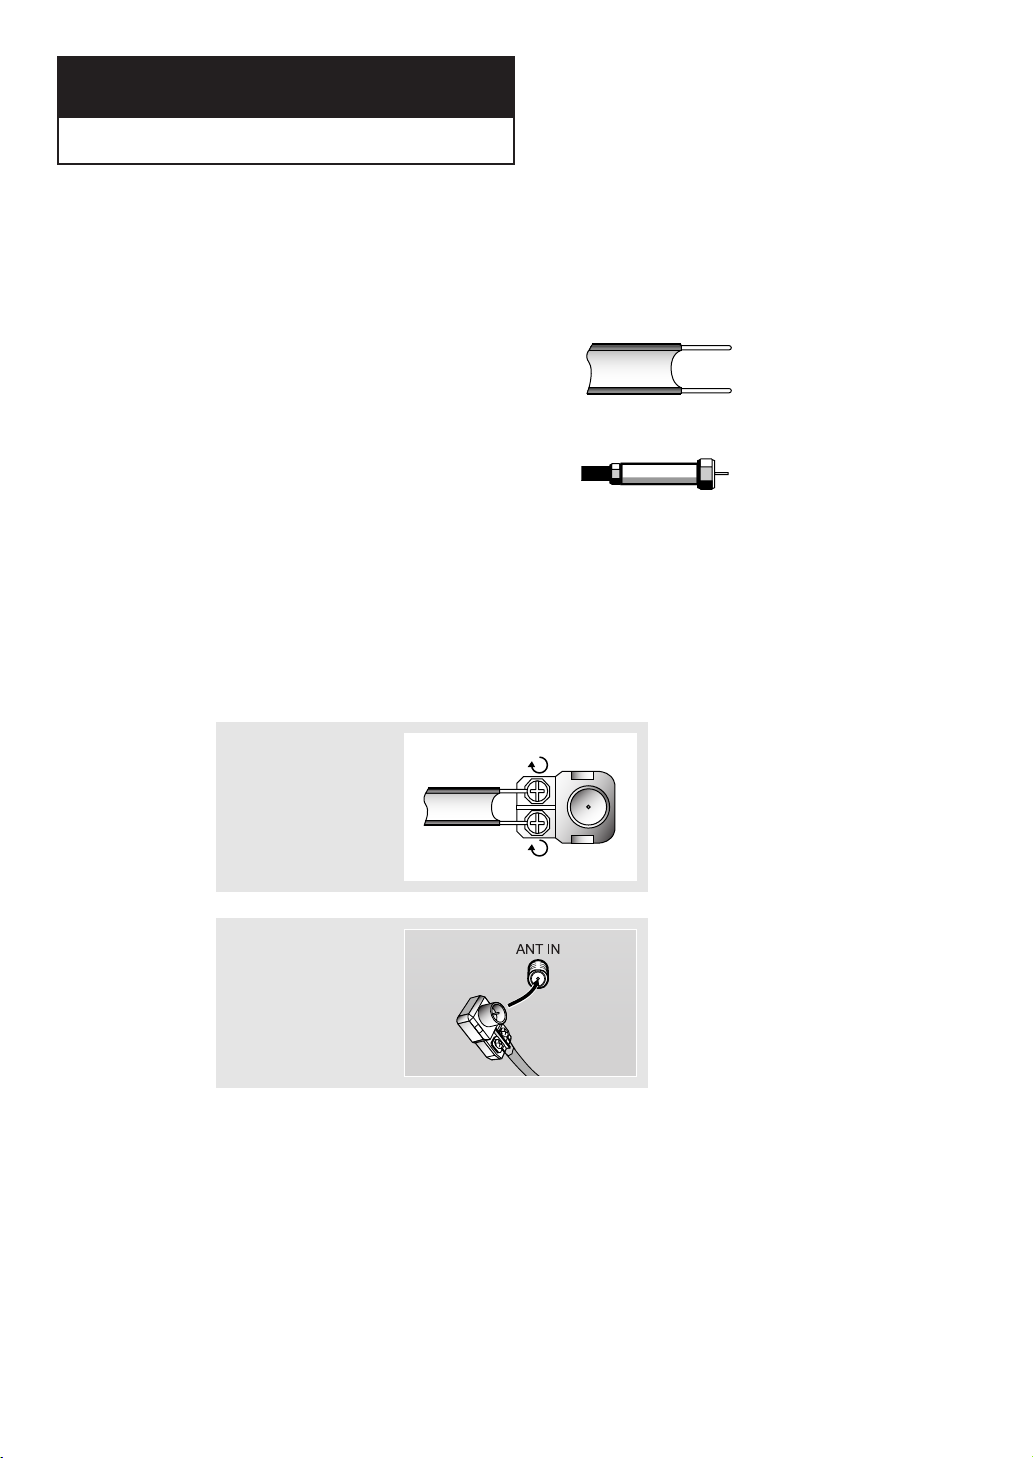
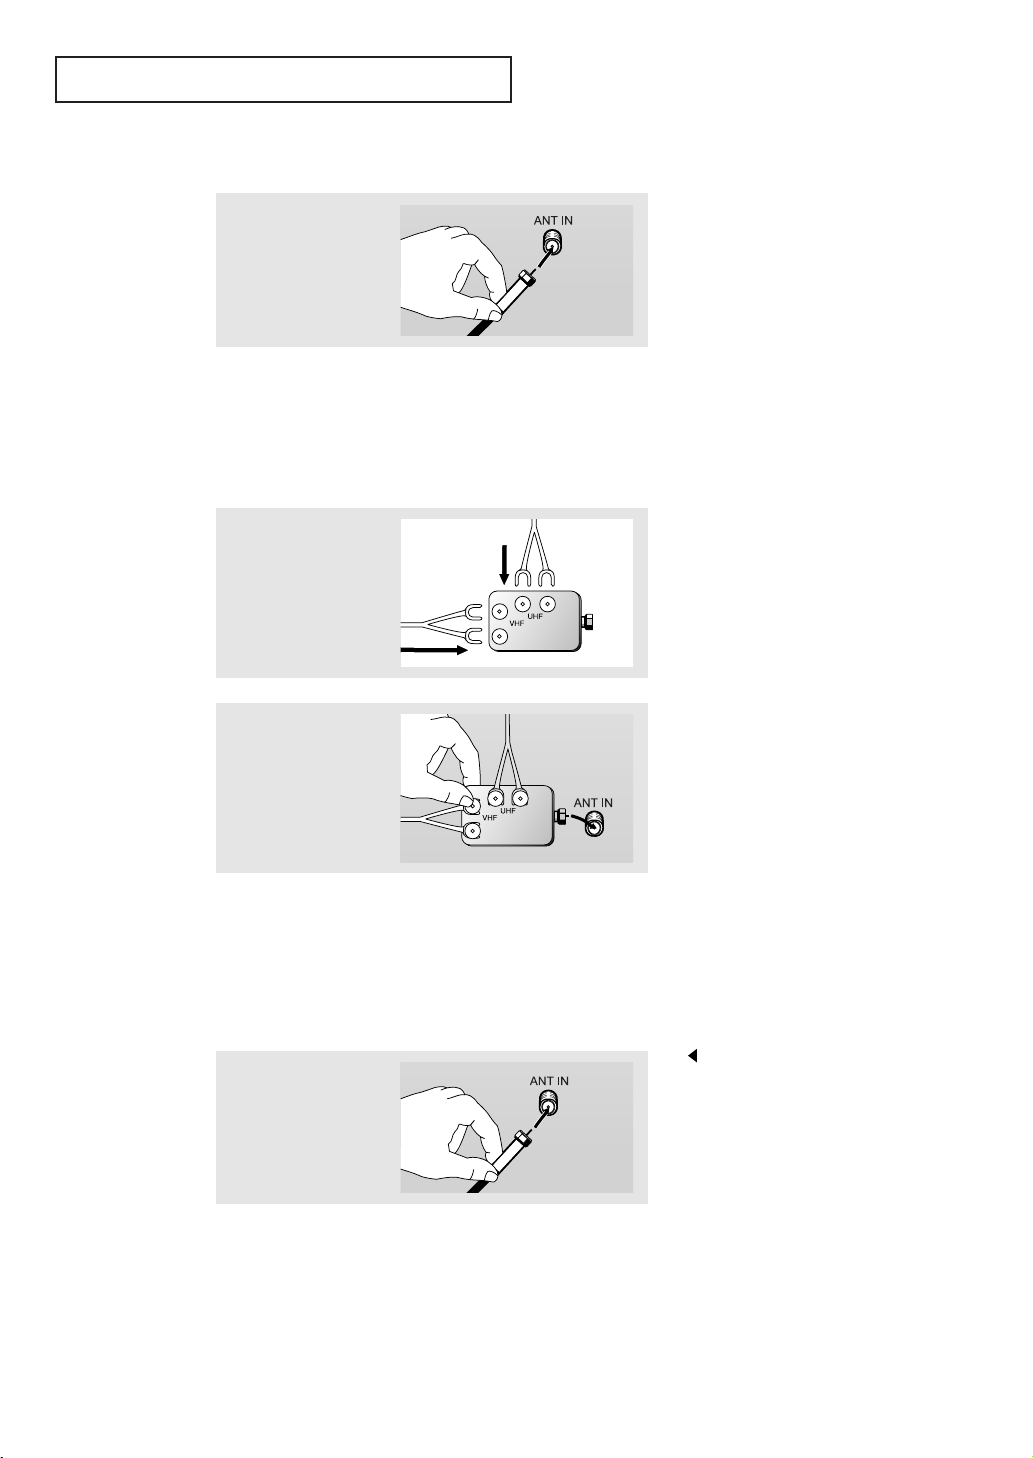
Antennas with 300-ohm Flat Twin Leads
If you are using an off-air antenna (such as a roof antenna or “rabbit ears”) that has
300-ohm twin flat leads, follow the directions below.
1
Place the wires from
the twin leads under
the screws on a 30075 ohm adaptor (not
supplied). Use a
screwdriver to tighten
the screws.
2
Plug the adaptor into
the ANT IN
terminal on the
bottom of the back
panel.
English-7
I NSTALLATION
Antennas with 75-ohm Round Leads
1
Plug the antenna
lead into the
ANT IN terminal
on the bottom of the
back panel.
Separate VHF and UHF Antennas
If you have two separate antennas for your TV (one VHF and one UHF), you must
combine the two antenna signals before connecting the antennas to the TV. This
procedure requires a an optional combiner-adaptor (available at most electronics shops).
1
Connect both antenna
leads to the combiner.
2
Plug the combiner
into the ANT IN
terminal on the
bottom of the
rear panel.
Connecting Cable TV
To connect to a cable TV system, follow the instructions below.
Cable without a Cable Box
Because this TV is cable-ready,
1
Plug the incoming
cable into the
ANT IN terminal
on back of the TV.
you do not need a cable box to
view unscrambled cable channels.
English-8
I NSTALLATION
Connecting to a Cable Box that Descrambles All Channels
1
Find the cable that is
connected to the
ANT OUT terminal
on your cable box.
This terminal might be labeled
“ANT OUT”, “VHF OUT”, or
simply, “OUT”.
2
Connect the other end
of this cable to the
ANT IN terminal on
the back of the TV.
Connecting to a Cable Box that Descrambles Some Channels
If your cable box descrambles only some channels (such as premium channels), follow the
instructions below. You will need a two-way splitter, an RF (A/B) switch, and four lengths
of coaxial cable. (These items are available at most electronics stores.)
1
Find and disconnect
the cable that is
connected to the
ANTENNA IN terminal
on your cable box.
This terminal might be labeled
“ANT IN”, “VHF IN”, or simply, “IN”.
2
Connect this cable
to a two-way splitter.
3
Connect a coaxial
cable between an
OUTPUT terminal on
the splitter and the IN
terminal on the cable
box.
English-9
I NSTALLATION
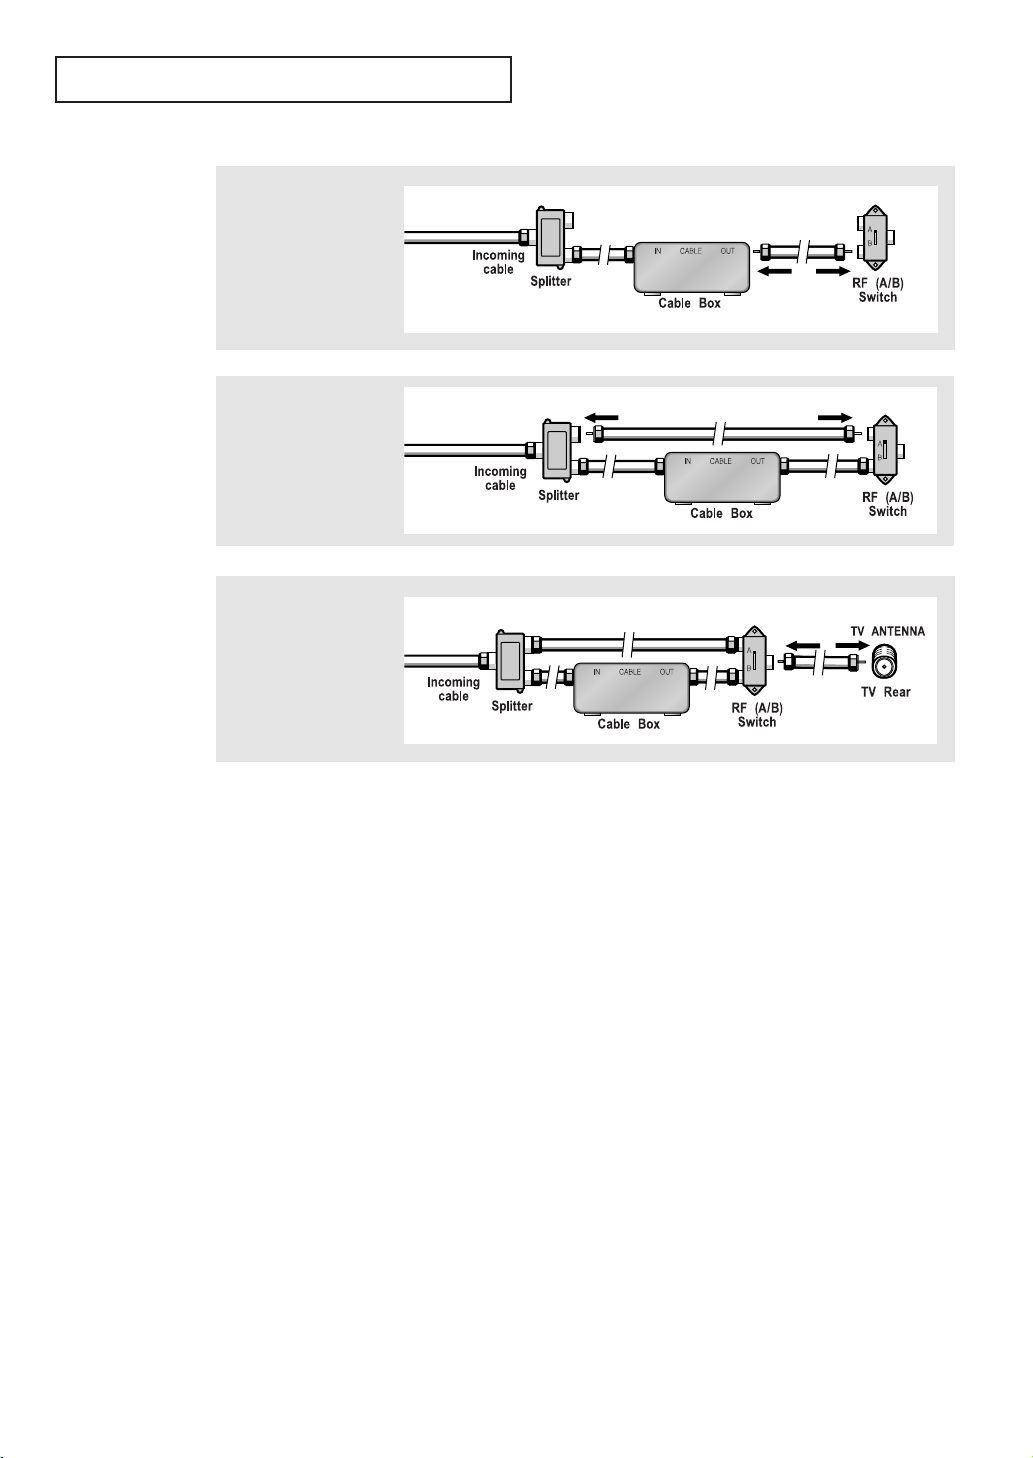
4
Connect a coaxial
cable between the
ANT OUT terminal
on the cable box
and the B–IN
terminal on the
A/B switch.
5
Connect another
cable between the
other OUT terminal
on the splitter and
the A–IN terminal on
the RF (A/B) switch.
6
Connect the last
coaxial cable
between the OUT
terminal on the RF
(A/B) switch and the
VHF/UHF terminal
on the rear of the TV.
After you’ve made this connection, set the A/B switch to the “A” position for normal
viewing. Set the A/B switch to the “B” position to view scrambled channels.
(When you set the A/B switch to “B”, you will need to tune your TV to the cable box’s
output channel, which is usually channel 3 or 4.)
English-10
I NSTALLATION
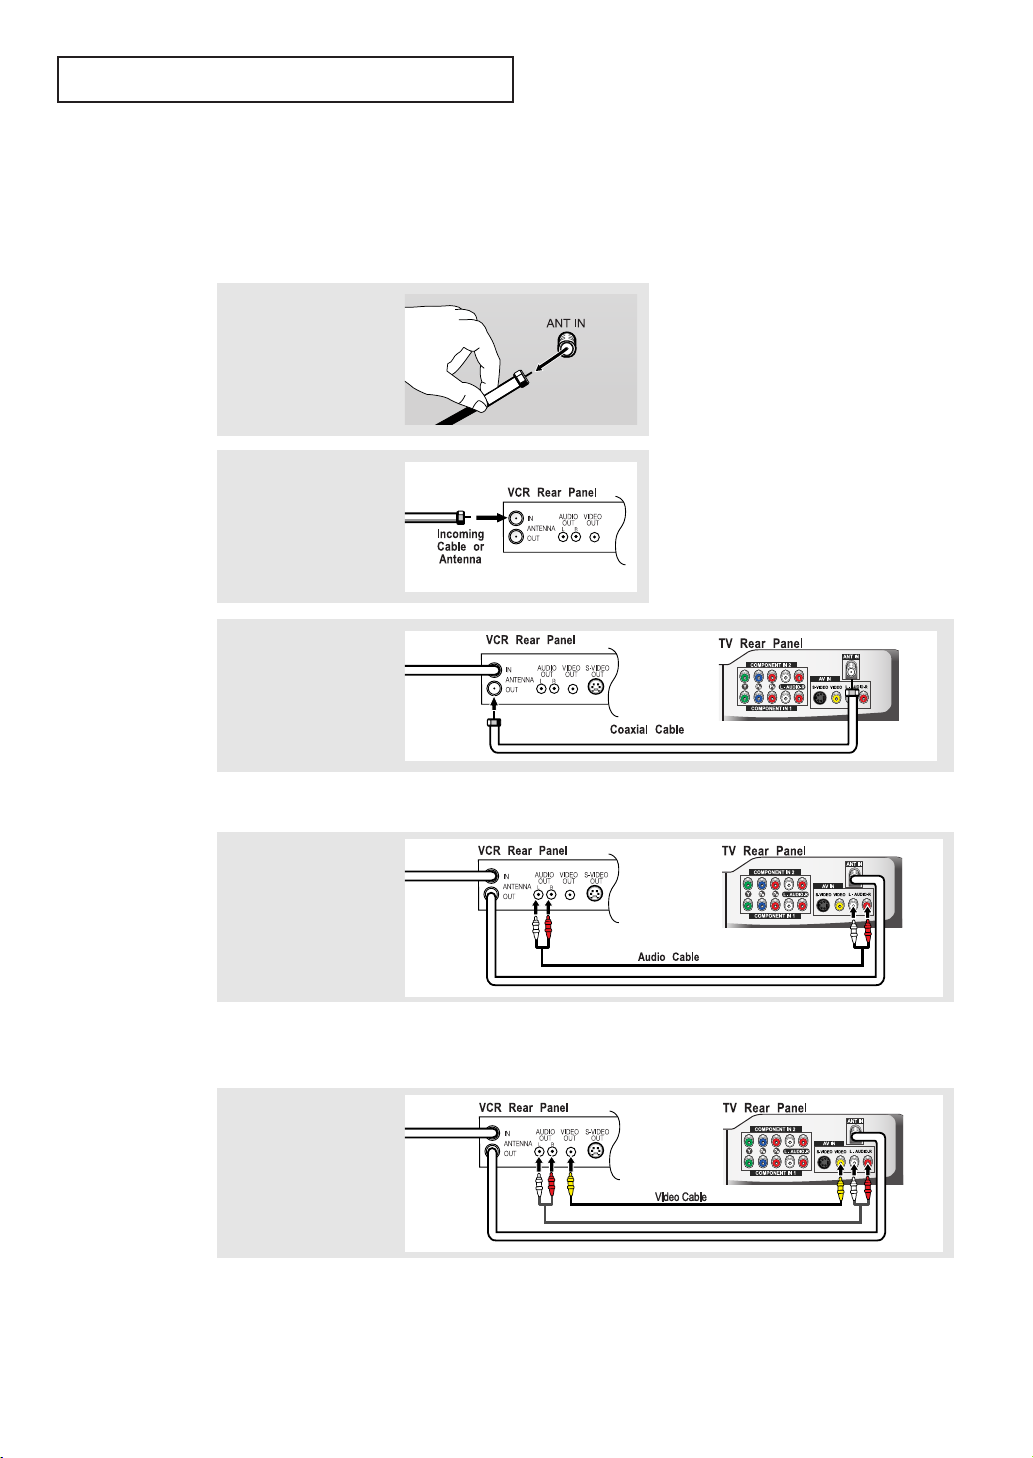
Connecting a VCR
These instructions assume that you have already connected your TV to an antenna or a
cable TV system (according to the instructions on pages 7-10).
Skip step 1 if you have not yet connected to an antenna or a cable system.
1
Unplug the cable or
antenna from the
back of the TV.
2
Connect the cable or
antenna to the
ANT IN terminal
on the back of the
VCR.
3
Connect a coaxial
cable between the
ANT OUT terminal
on the VCR and
the antenna terminal
on the TV.
A coaxial cable is usually included with a VCR. (If not, check your local electronics store).
4
Connect a set of
audio cables
between the AUDIO
OUT jacks on the
VCR and the AUDIO
jacks on the TV.
If you have a “mono” (non-stereo) VCR, use the Y-connector (not supplied) to hook
up to the left and right audio input jacks of the TV. If your VCR is stereo, you must
connect two cables.
5
Connect a video
cable between the
VIDEO OUT jack on
the VCR and the
VIDEO jack on the
TV.
Follow the instructions in “Viewing a VCR or Camcorder Tape” to view your VCR tape.
* Each external input source device has a different back panel configuration.
English-11
I NSTALLATION
Connecting an S-VHS VCR
Your Samsung TV can be connected to an S-Video signal from an S-VHS VCR.
(This connection delivers a better picture as compared to a standard VHS VCR.)
1
To begin, follow
steps 1–3 in the
previous section to
connect the antenna
or cable to your
VCR and your TV.
2
Connect a set of audio
cables between the
AUDIO OUT jacks on
the VCR and the
AUDIO INPUT jacks
on the TV.
3
Connect an S-video
cable between the
S-VIDEO OUT jack on
the VCR and the
S-VIDEO INPUT jack
on the TV.
An S-video cable is usually included with an S-VHS VCR.
(If not, check your local electronics store.)
* Each external input source device has a different back panel configuration.
Connecting a DVI-D Cable
1
Connect a DVI-D
cable between the
DVI-I INPUT
connector on the TV
and the DVI connector
on the DVD player/
Set-Top BOX.
2
Connect a set of audio
cables between the
PC AUDIO INPUT
jack on the TV and the
AUDIO OUTPUT jacks
on the DVD player/
Set-Top BOX.
Note:If you are using a DVI-D cable to connect
1.Be sure to connect the audio cable (sold separately)as shown above to get normal TV sound.
2.See Appendix “Display Modes ”for supported resolutions.
3.The screen may have shifted to the right or to the left after connecting the cable.
The screen must be adjusted on the source(Set-top box).
4.Each external input source device has a different back panel configuration.
English-12
I NSTALLATION
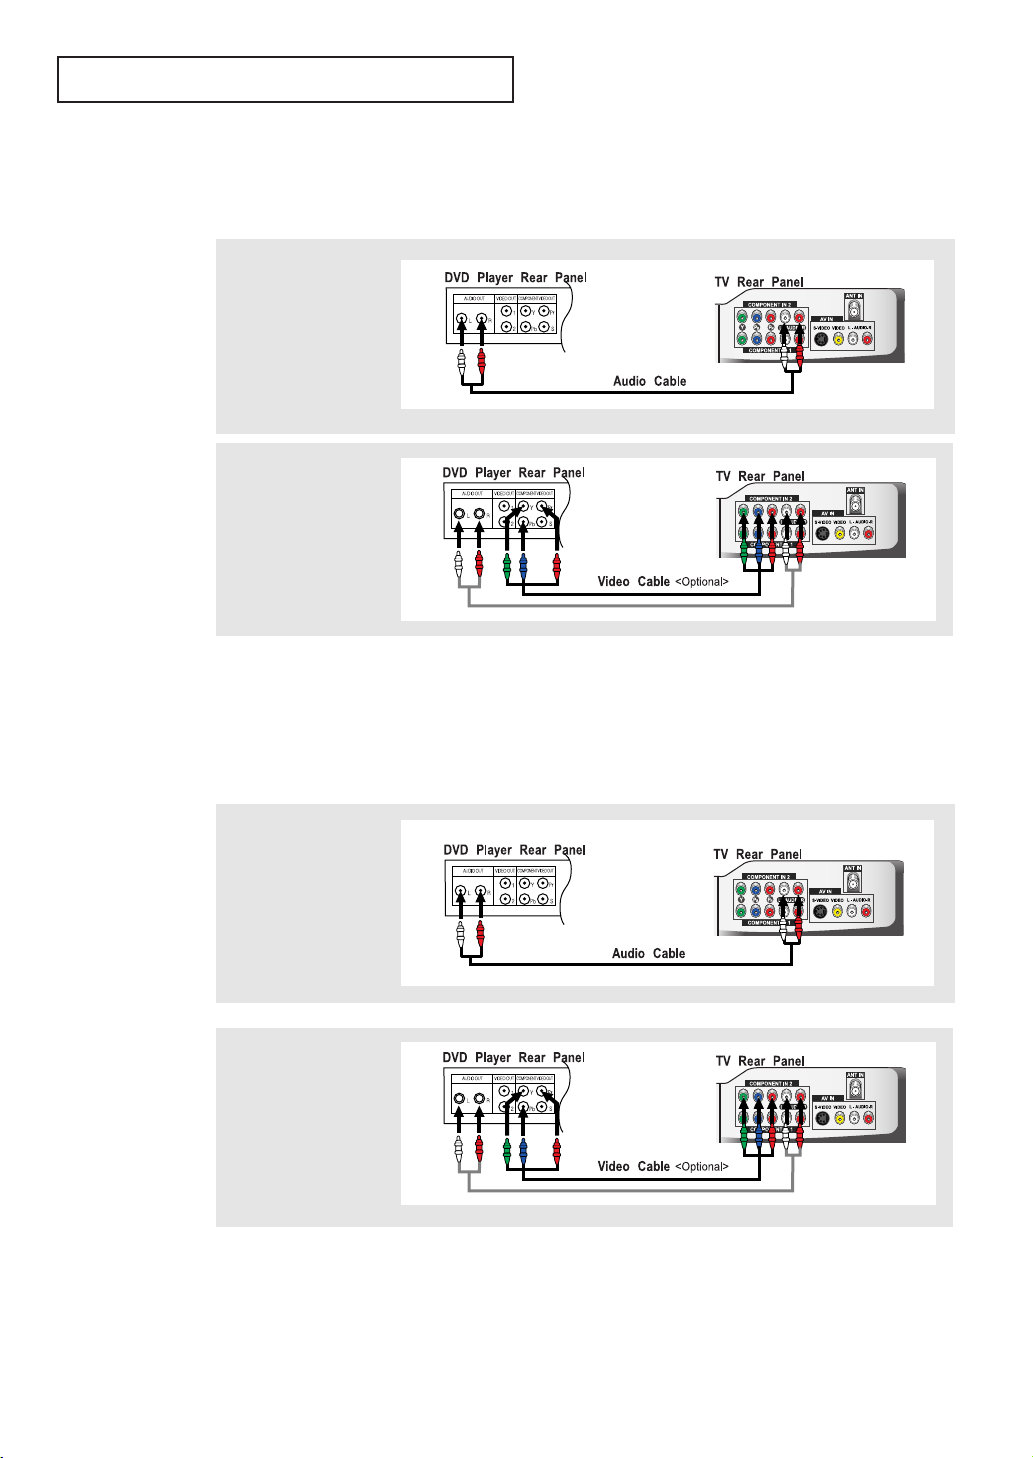
Connecting a DVD Player
The rear panel jacks on your TV make it easy to connect a DVD player to your TV.
1
Connect a set of audio
cables between the
COMPONENT1 or
COMPONENT2, L, R
AUDIO INPUT
jacks on the TV and
the AUDIO OUT jacks
on the DVD player.
2
Connect a video cable
between the
COMPONENT1 or
COMPONENT2
(Y, PB, PR) jacks on
the TV and the Y, PB,
PR jacks on the DVD
player.
Note: For an explanation of Component video, see your DVD player owner's manual.
* Each external input source device has a different back panel configuration.
Connecting a Digital TV Set-Top Box
The connections for a typical set-top box are shown below.
1
Connect a set of audio
cables between the
L, R COMPONENT1
or COMPONENT2
AUDIO INPUT jacks
on the TV and the
AUDIO OUT jacks on
the Set-Top Box.
2
Connect a video cable
between the
COMPONENT1 or
COMPONENT2
B, PR) jacks on
(Y, P
the TV and the Y, P
PR jacks on the
Set-Top Box.
Note: For an explanation of Component video, see your Set-Top Box owner's manual.
* Each external input source device has a different back panel configuration.
B,
English-13
I NSTALLATION
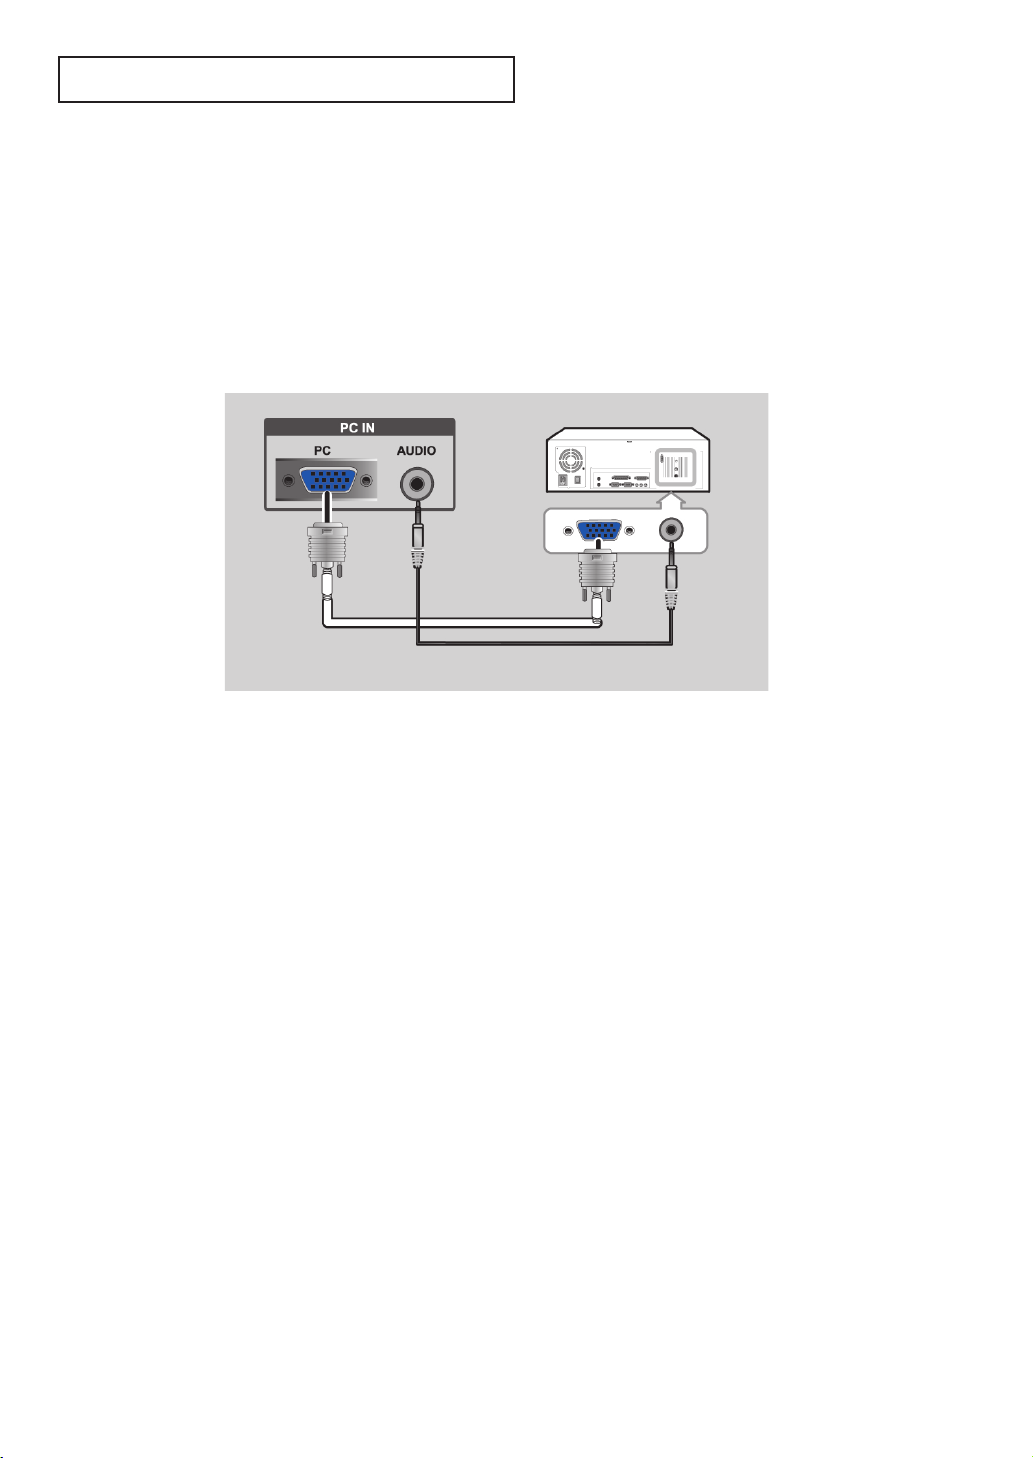
Connecting a PC
Note: This figure shows the Standard Connector-jack panel.
The actual configuration on your TV may be different, depending on the model.
- Connect the D- Sub cable to “PC (PC IN)” on the rear of your set.
- Connect the stereo audio cable to “
and the other end to “Audio Out” of the sound card on your computer.
TV Rear panel
PC VIDEO CABLE ( D-SUB )
AUDIO (PC IN)” on the rear of your set
<Not supplied>
PC AUDIO CABLE
<
Not supplied
>
English-14
Chapter Three
OPERATION
Turning the TV On and Off
Press the POWER button.
You can also use the Power button on the front panel.
Changing Channels
Using the Channel Buttons
1
Press the CH
buttons to change channels.
/
When you press the CH
You will see all the channels that the TV has memorized. (The TV must have
memorized at least three channels). You will not see channels that were either
erased or not memorized.
Using the PRE-CH Button to select the Previous Channel
buttons, the TV changes channels in sequence.
/
1
Press the PRE-CH button.
The TV will switch to the last channel viewed.
To quickly switch between two channels that are far apart, tune to one channel,
then use the number button to select the second channel. Then use the PRE-CH
button to quickly alternate between them.
Adjusting the Volume
1
Press the VOL +/– buttons to increase or decrease the volume.
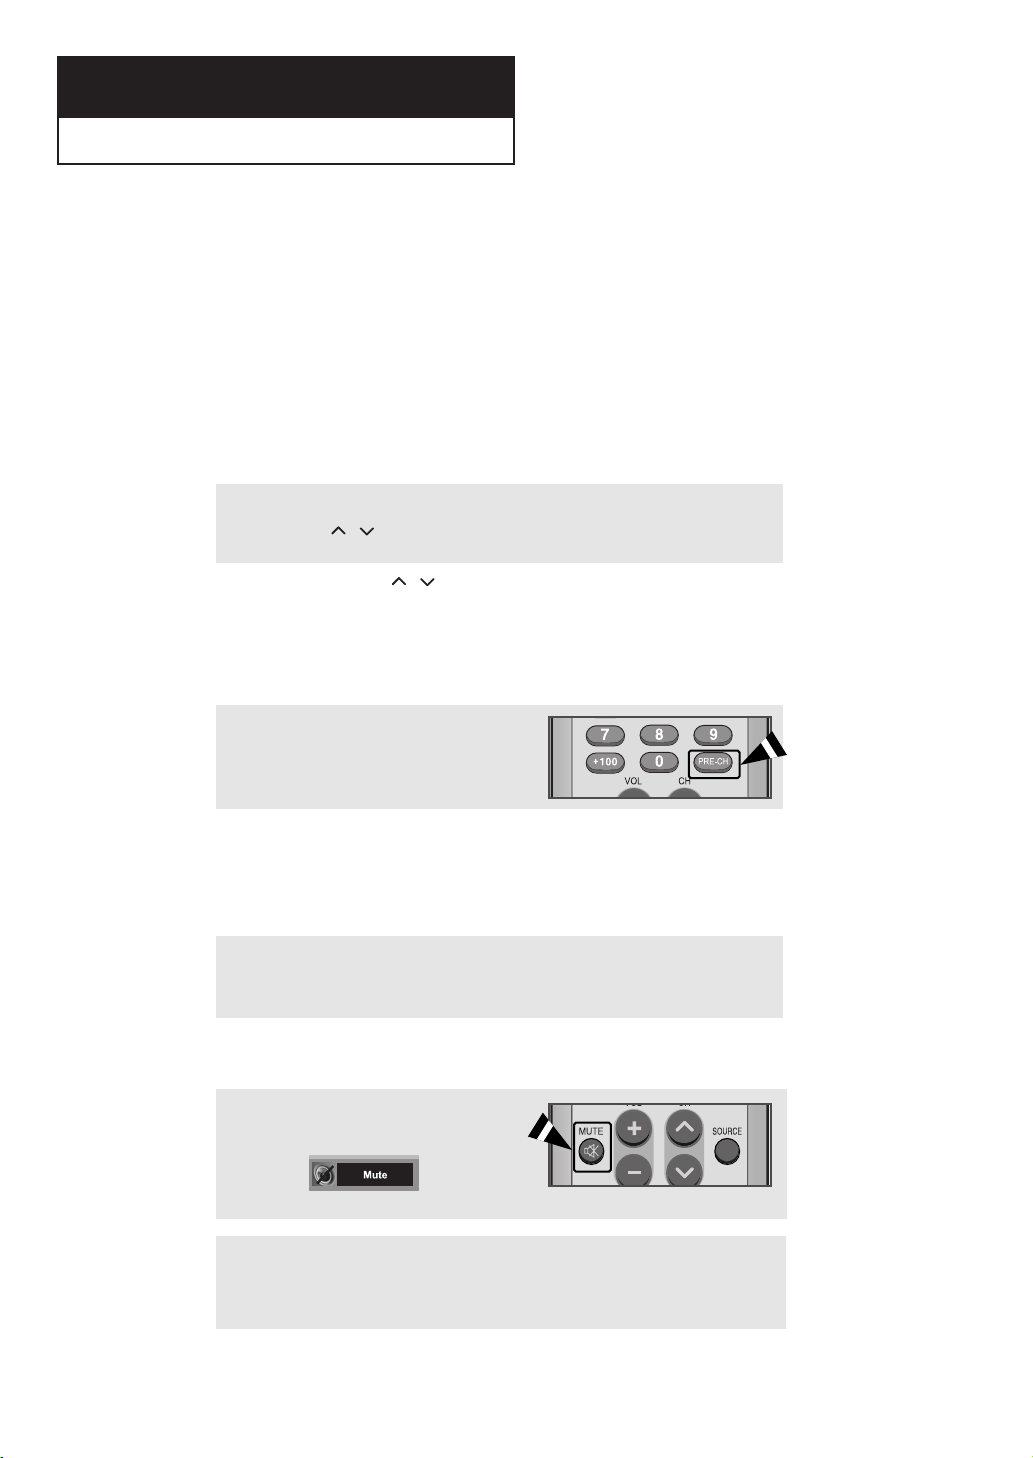
Using Mute
At any time, you can temporarily cut off the sound using the Mute button.
1
Press MUTE and the sound cuts off.
The word
the lower-left corner of the screen.
“”
will appear in
2
To turn mute off, press the MUTE button again, or simply
press the VOL +/- buttons.
English-15
SPECIAL FEATURES
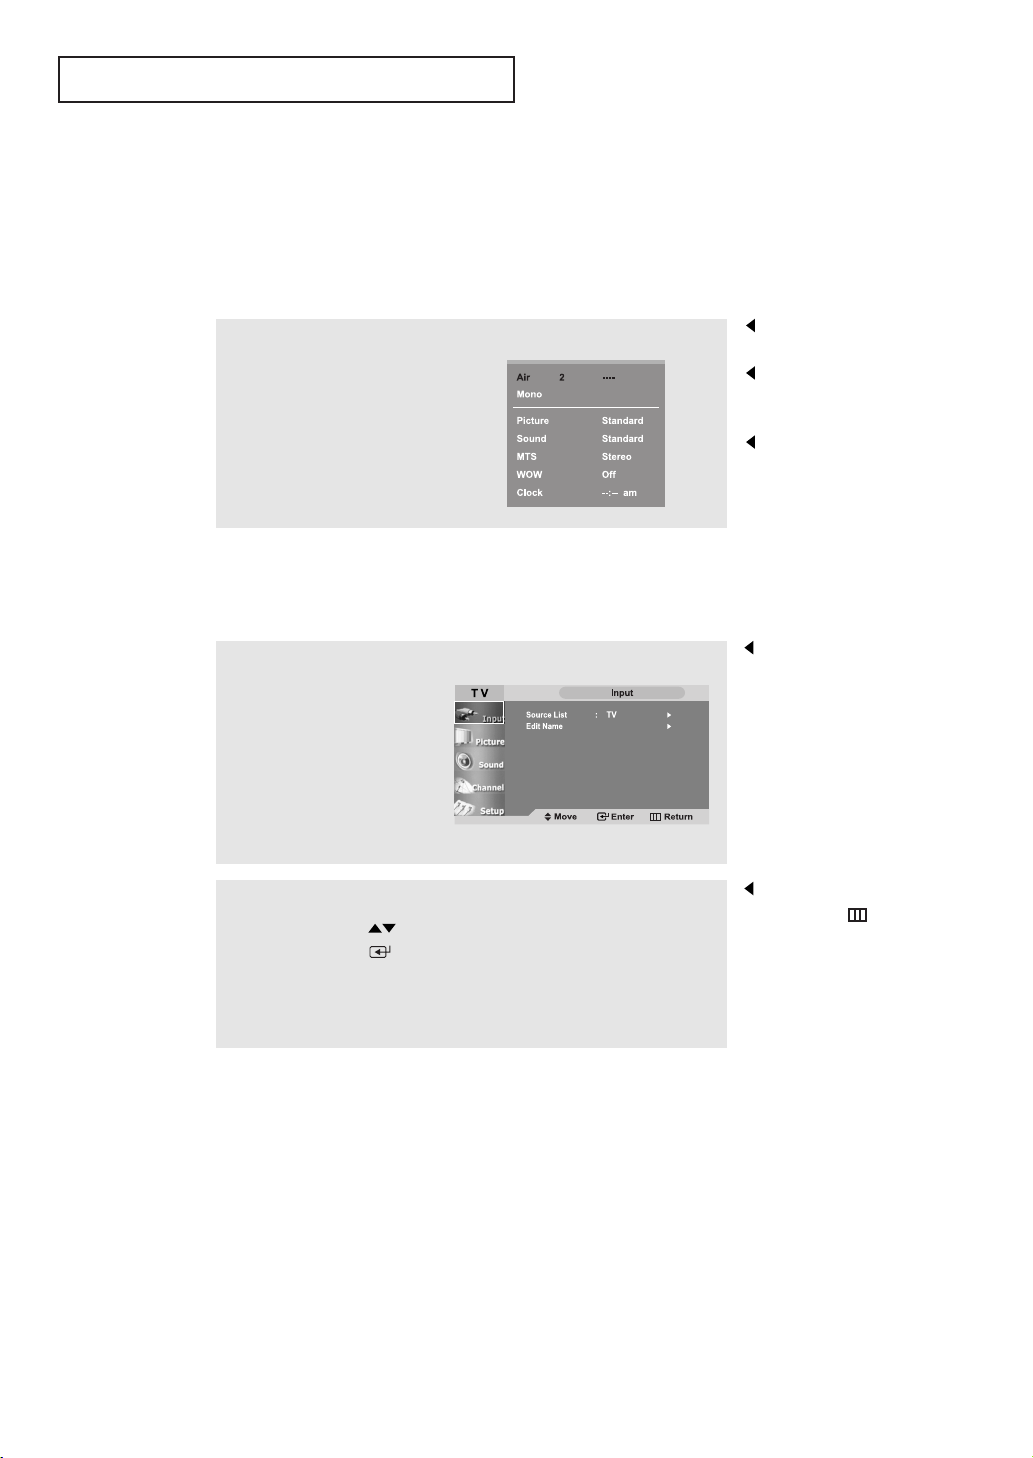
Viewing the Display
The display identifies the current channel and the status
of certain audio-video settings.
1
Press the INFO button on the
remote control.
The TV will display the
channel, the type of sound,
and the status of certain
picture and sound settings.
Viewing the Menus
1
With the power on, press
the MENU button.
The main menu appears
on the screen. It’s left
side has five icons:
Input, Picture, Sound,
Channel, Setup.
The on-screen displays
disappear after about ten seconds.
Press the INFO button once more
or wait approximately 10 seconds
and it disappears automatically.
Allows the user to adjust the
settings according to his/her
preference and shows the
current settings.
The on-screen menus
disappear from the screen after
about two minutes.
2
Use the UP/DOWN buttons to select one of the 5 icons.
Then press ENTER to access the icon’s sub-menu.
3
Press the MENU button to exit.
English-16
You can also use
the MENU( ), CH Up/Down,
Volume Up/Down and
SOURCE(ENTER) buttons on
the TV to make selections.
Setting Up Your Remote Control
After it has been set up properly, your remote control can operate in five different modes:
TV, VCR, Cable, DVD or Samsung Set-top box. Pressing the corresponding button on the
remote control allows you to switch between these modes, and control whichever piece of
equipment you choose.
Note
The remote control might not be compatible with all DVD Players, VCRs and Cable boxes.
This remote control is only compatible with Samsung Set-top boxes.
Setting Up the Remote to Operate Your VCR
1 Turn off your VCR.
2 Press the MODE button and make sure that the VCR LED
is illuminated.
3 Press the SET button on your TV’s remote control.
4 Using the number buttons on your remote control, enter
three digits of the VCR code listed on page 20 of this
manual for your brand of VCR. Make sure you enter three
digits of the code, even if the first digit is a “0”.
(If more than one code is listed, try the first one.)
5 Press the Power button on the remote control. Your VCR
should turn on if your remote is set up correctly.
If your VCR does not turn on after set up, repeat steps
2, 3, and 4, but try one of the other codes listed for your
brand of VCR. If no other codes are listed, try each VCR
code, 000 through 088.
Note on Using Remote Control Modes: VCR
When your remote control is in “VCR” mode, the volume buttons still control your TV’s volume.
English-17

Setting Up the Remote to Operate Your Cable Box
1 Turn off your cable box.
2 Press the MODE button and make sure that the Cable LED is
illuminated.
3 Press the SET button on your TV’s remote control.
4 Using the number buttons on your remote control, enter three
digits of the cable box code listed on page 20 of this manual
for your brand of cable box. Make sure you enter three digits
of the code, even if the first digit is a “0.”
If there is more than one code listed, try the first one.
5 Press the Power button on the remote control. Your cable box
should turn on if your remote is set up correctly.
If your cable box does not turn on after set up, repeat steps
2, 3, and 4, but try one of the other codes listed for your brand
of cable box. If no other codes are listed, try each code, 000
through 077.
Note on Using Remote Control Modes: Cable Box
When your remote control is in “Cable Box” mode, the volume buttons still control your TV’s volume.
English-18
Setting Up the Remote to Operate Your DVD
Setting Up the Remote to Operate Your DVD
1Turn off your DVD.
2 Press the MODE button and make sure that the DVD LED is
illuminated.
3 Press the SET button on your TV’s remote control.
4Using the number buttons on your remote control, enter three
digits of the DVD code listed on page 20 of this manual for
your brand of DVD. Make sure you enter three digits of the
code, even if the first digit is a “0.”
If there is more than one code listed, try the first one.
5 Press the Power button on the remote control. Your DVD should
turn on if your remote is set up correctly.
If your DVD does not turn on after set up, repeat steps 2, 3, and
4, but try one of the other codes listed for your brand of DVD.
If no other codes are listed, try each code, 000 through 009.
Note on Using Remote Control Modes: DVD
When your remote control is in “DVD” mode, the volume buttons still control your TV’s volume.
English-19
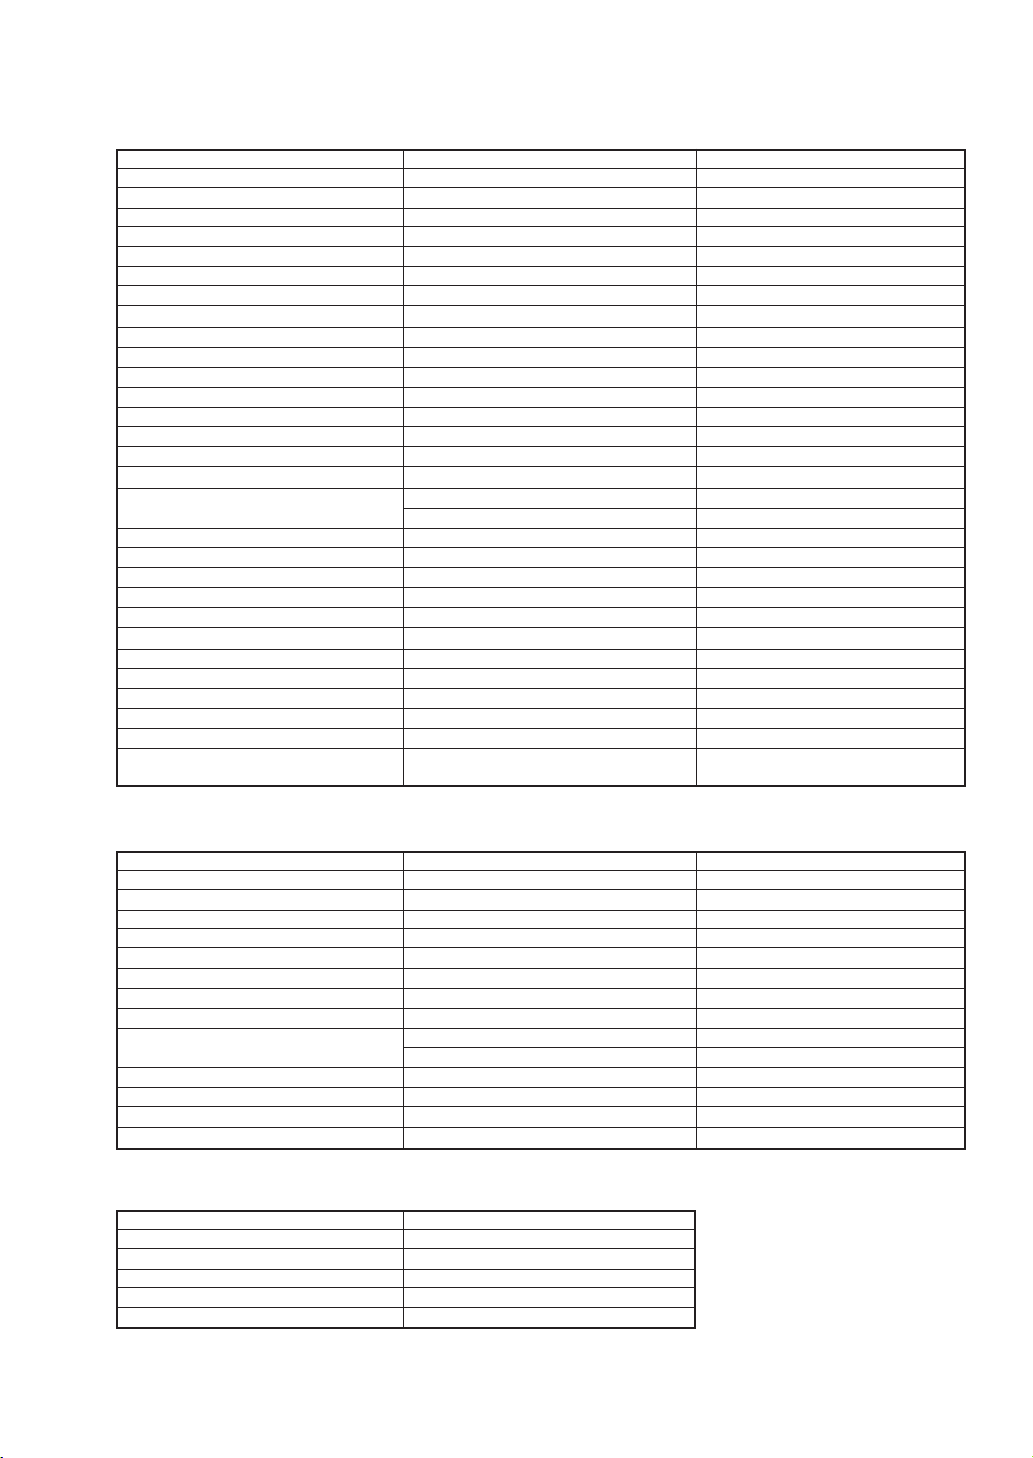
Remote Control Codes
VCR Codes
Admiral
Aiwa
Audio Dynamics
Akai
Bell&Howell
Broksonic
Candle
Canon
Citizen
Colortyme
Craig
Curtis-Mathes
Daewoo
DB
Dimensia
Dynatech
Electrohome
Emerson
Fisher
Funai
GE
Go Video
Goldstar
General Electric
Harman Kardon
Hitach
Instant Replay
JC Penny
JCL
JVC
009,016,017,023,024,055,062,073,076
003,004,005,006,007,008,022,054,085
017,018,019,022,024,029,032,036,043,
050,051,056,058,066,071,074,076,077,079
011,021,027,028,052,057,067
011,014,016,017,023,025,039,044,060,062
kenwood
015,088
KLH
024
LG
022,025
026,031,032
016,018,022,054,055,061
016,018,022,054,055,061
018,023,055,069
009,016,017,041,062
014,024,044,045
011,017,023,025,039,055
Lloyd
Logik
011
LXI
019
Magnavox
017,062
Marantz
Marta
023
MEI
016,021
Memorex
MGA
Midland
025,023
Minota
009
Mitsubishi
024
Montgomery ward
036
MTC
Multitech
NEC
Optimus
024
Panasonic
Pentax
016
Pentex Reserch+
Philco
Philips
023
Pioneer
Portland
017
ProScan
Quartz
Quasar
Radio Shack/Realistics
011,023,025,039,055
001,002,007
017,038,062,065
011,017,023,025,038,039,055,070
016,024,040,041
011,023,025,039,055,070,073
017,062,084,086
017,038,062,065
014,025,042,059
053,054,061
011,015,017,018,021,
024,028,036,052,062
082
024
040
024
016,024
015
014,044
055
017,038
009
011
017,053
RCA
Samsung
Sansui
Sanyo
Scott
Sears
Sharp
Shintom
Signature
Sony
Sylvania
Symphonic
Tandy
Tashiko
Tatung
Teac
Technics
Temika
Teknika
TMK
Toshiba
Toshiko
Totevision
Unitech
Vector Research
Victor
Video Concepts
Videosonic
Wards
Yamaha
Zenith
009,014,016,017,037,044,046,063,078
000,016,022,031,041,051
025
011,021
022,050,058,077
011,014,018,021,027,028,044,052,057
015,036,048,054
026,035,040,064
024
026,035,047
017,024,038,062,065
024
011,024
039
024,039,078
018,030
076
014,022,028,057,058
018
016,018
Cable Box Codes
Anvision
Cable star
DeaRyung
DongKuk
DaeHan
Eagle
Eastrm Int.
Eastern International
General Instrument
GI
Hamlin
Hitachi
012,013,023,031,032,033,038,044,054,070,073
Jerrold
LG
012,013,023,031,032,
033,038,044,075,076,077
011,012,020,021,042,056
DVD Codes
CurtisMathes
JVC
LG
Philips
Proscan
RCA
015,016
015,016
003
004
005
015,016
020
054
045,051,054
006
009
003
001
007
008
008
Macom
Magnavox
Nawoo
NSC
Oak
Osk Sigma
Panasonic
Philips
Pioneer
Randtek
RCA
Regal
Regency
SA
Samsung
Toshiba
Panasonic
Sony
Samsung
Sharp
015,016,027,029,034,036,037,040,041,048,049
011,035,047,069
015,016,027,029,034,036,037,040,041,048,049
000,011,030,052,071,072
English-20
045,051
001
017
024,046
024
026,028,052
015,016
008,035,074
011,020,021
010,041
002
006
004
000
005
SAEWOO
Signature
Sprucer
Starcom
Stargate 2000
Sylvania
TaePyungYang
Texscan
Tocom
Unika
Universal
Viewstar
015,016,027,029,034,036,037,040,041,048,049
Warner Amex
Zenith
025,029,057,058,063
039,040,049
022,050,065,069
007
054
035
054
066
019,067
002
019,067
059,060
052
Chapter Four
SPECIAL FEATURES
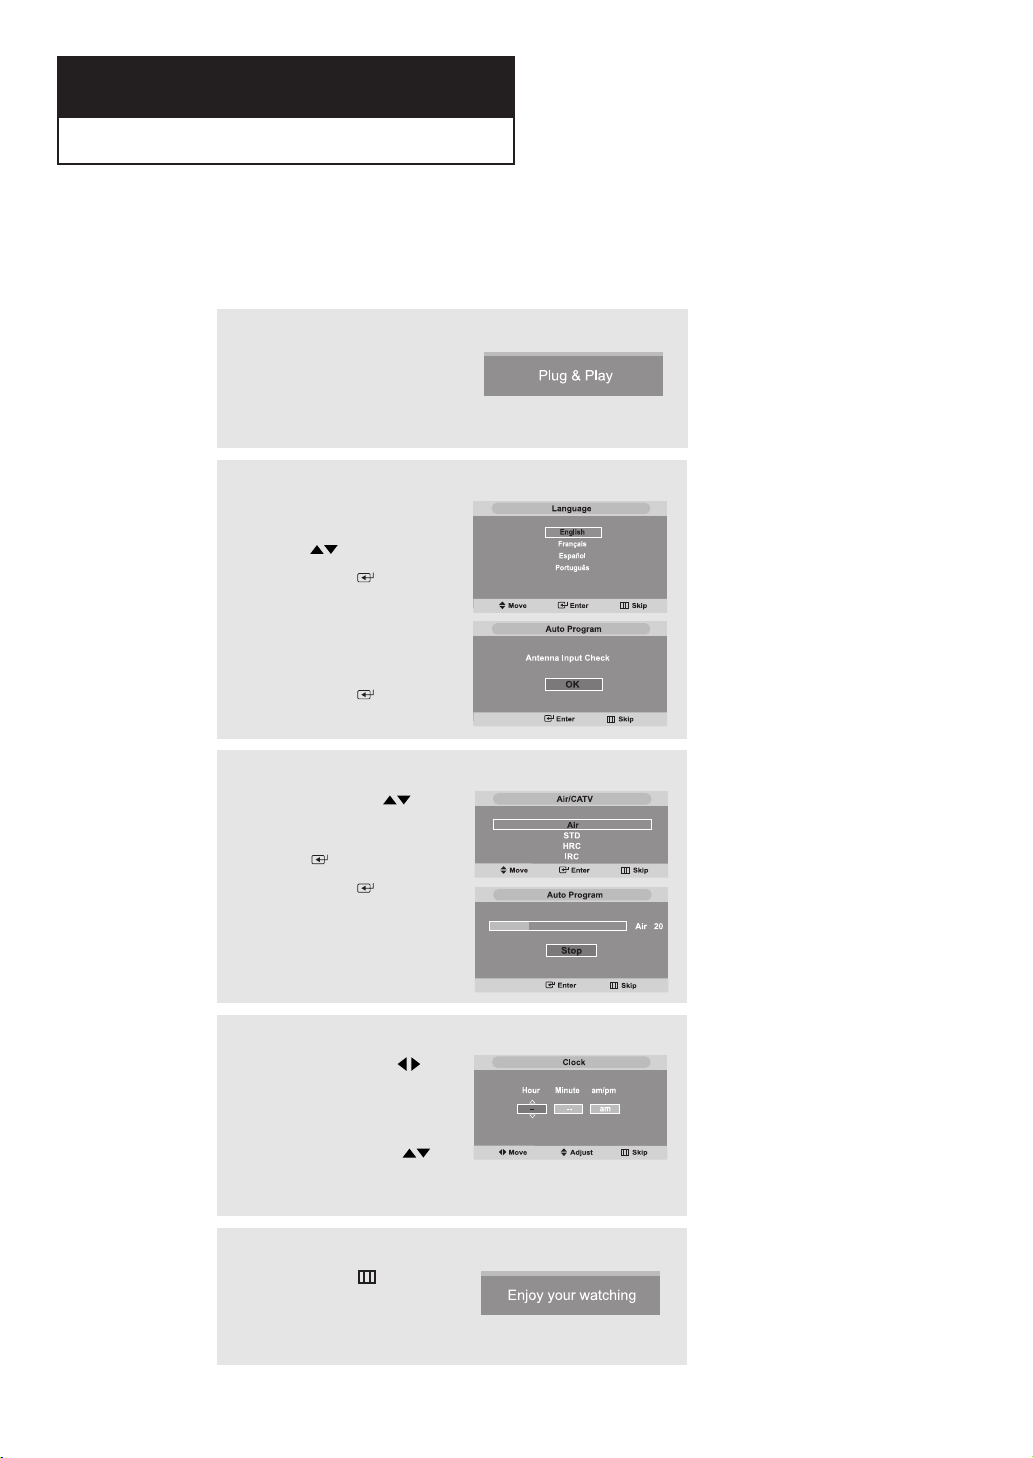
Plug & Play Feature
When the TV is initially powered On, two basic customer settings proceed
automatically and subsequently: Setting Auto program, Clock.
1
Press the POWER
button on the remote control.
The message “Plug & Play”
is displayed.
2
Select the appropriate
Language by pressing the
UP/DOWN buttons.
Press the
to confirm your choice.
The message “Antenna Input
Check,” is displayed with
“OK ” selected.
Press the
ENTER button
ENTER button.
3
Press the UP/DOWN
buttons to select “Air”, “STD”,
HRC”, or “IRC”, then press
the ENTER button.
Press the
button to stop.
ENTER
4
Press the LEFT/RIGHT
buttons to move to the “Hour”,
“Minute” or “am/pm”.
Set the hour or minute by
pressing the
buttons.(Refer to “Setting the
Clock” on page 49.)
UP/DOWN
5
Press the MENU()button
to confirm your setting.
The message “Enjoy your watching.”
is displayed.
English-21
 Loading...