

Page 1

Click
Digital Photo Frame
User manual
800W
1000W
The images and screen shots used in this manual are from the 800W.
Contents
Safety precautions
Get started
Play multimedia
Browse and manage
multimedia
Customize settings
Appendix
Index
Read this manual thoroughly for proper use
and maintenance instructions.
Page 2

Contents
Instructional icons
Before you start, familiarize yourself with the icons you will
see in this manual:
Caution - situations that could cause damage
to your device or other equipment
Note - notes, usage tips, or additional
information
©2010 SAMSUNG ELECTRONICS CO., LTD.
It is strictly forbidden to copy or distribute the contents of this •
manual without permission from SAMSUNG ELECTRONICS
CO., LTD
Product specifications or contents of this manual may be •
changed without prior notice due to upgrade of product
functions.
Safety precautions
Get started
What’s in the box
Get to know your frame
Set up your frame
Connect the adapter and
turn the power on
Customize basic settings
Get to know the Main menu
View the time and date
Connect external memory devices
Select a memory location
Connect to a PC
Transfer files from a PC
..........................................
Play multimedia
Play a slideshow
Play videos
Play music
.............................................
.............................
.....................................
...........................
..................................
..................................
.......................
...................
...........................
.........
.......................
....................................
..........................
................................
....................................
.............................................
Browse and manage multimedia
Browse files
Manage files
...........................................
...........................................
.....
10
10
11
12
13
14
15
16
17
19
19
24
27
29
29
30
3
Customize settings
6
6
7
Adjust slideshow effects
Set the time and date
Set and use alarms
Customize general settings
Update or reset the frame
Appendix
Use as a PC mini-monitor
Upgrade Firmware
Troubleshooting
Specifications
Correct disposal of the frame
Contact information of
Samsung Worldwide
Software License
Index
...........................
.........................
.............................
................................
....................
......................
...........................................
......................
.................................
.....................................
.........................................
.................
..............................
...................................
......................................................
33
33
33
34
36
38
39
39
40
41
43
44
45
46
47
Page 3

Safety precautions
WARNING:
TO PREVENT ELECTRIC SHOCK, DO NOT OPEN OR REMOVE THE COVER OR BACK OF THE FRAME. THERE ARE NO •
USER-SERVICEABLE PARTS INSIDE. ALLOW ONLY QUALIFIED PERSONNEL TO SERVICE THIS FRAME.
TO PREVENT FIRE, KEEP THIS FRAME AWAY FROM ALL OPEN FLAMES, SUCH AS CANDLES, AT ALL TIMES.•
The slots and openings in the frame provide needed •
ventilation. To ensure reliable operation and prevent
overheating, these openings must not be blocked or
covered:
Do not cover the slots or openings. Do not block the slots or openings by placing the frame on -
soft surfaces, such as beds, sofas, or rugs.
Do not place the frame in an enclosed space, such as a -
bookcase or cabinet, without proper ventilation.
Do not place the frame near or on sources of heat, such •
as radiators, or in direct sunlight.
Do not allow the frame to come in contact with water. •
Do not place the frame near sources of water, such
as bathtubs or sinks, or where water or other liquids
may splash or drip on the frame. If the frame gets wet,
unplug the frame immediately and contact the dealer or
an authorized service center.
Do not overload wall outlets, extension cords, or •
adaptors beyond their intended capacity, as this may
result in fire or electrical shock.
Route all power supply cords away from traffic areas •
and other objects so that they are not likely to be
stepped on or pinched by items placed on or against
them. Ensure that wires are not twisted or pinched at
plug ends or adapter connections.
During electrical storms or when the frame will be •
unattended and unused for extended periods of
time, unplug the frame from the wall. This will prevent
damage to the frame from electrical surges.
Before connecting the power cord, make sure that the •
voltage designation of the frame corresponds to the
local electrical supply.
3
Page 4

Safety precautions
Never insert any metal objects into the open parts of •
this frame, as this may result in electrical shock. Ensure
that the power cord is completely plugged in when
using this frame. Grasp the plug firmly when removing
the power cord and never touch the power cord with
wet hands.
If you notice any unusual operation, such as unusual •
sounds or burning smells coming from the frame,
unplug it immediately and contact the dealer or an
authorized service center.
It is not recommended to install the frame in a location •
where it will be exposed to heavy dust, high or low
temperatures, high humidity, or chemical substances or
where it operates continuously.
Use only properly grounded plugs and outlets when •
connecting this frame. Improper grounding may cause
electrical shock or damage to equipment.
Keep this frame and all accessories out of the reach of •
children.
Do not install the frame in unstable locations, such as •
improperly mounted shelves, angled surfaces, or where
the frame may be exposed to vibration.
Do not drop the frame or subject the frame to any •
strong impacts. If the frame is damaged, disconnect
the power cord and contact a dealer or an authorized
service center.
Always unplug the power cord when cleaning the frame. •
Use only a soft, dry cloth to wipe frame. Do not expose
the frame to any chemicals, such as waxes, benzene,
alcohol, thinners, insecticides, air fresheners, lubricants,
or detergents, as these may damage the frame’s finish
and void your warranty.
Clean the product with a soft dry cloth.•
Avoid cleaning the product with a flammable substance such as benzene or thinner or with a wet cloth. This may result in
damage to the product.
Avoid scratching the screen with your fingernails or a sharp object.
Avoid cleaning the product by spraying water onto it. If water enters the product, it may result in fire, electric shock or
malfunction.
Avoid using a supersonic humidifier near the product. It may result in a white stain on the surface of the product.
4
Page 5

Safety precautions
Correct disposal of this product
(Waste Electrical & Electronic Equipment)
(Applicable in the European Union and other
European countries with separate collection
systems)
This marking on the product, accessories or literature
indicates that the product and its electronic accessories
(e.g. charger, headset, USB cable) should not be
disposed of with other household waste at the end of
their working life.
To prevent possible harm to the environment or human
health from uncontrolled waste disposal, please separate
these items from other types of waste and recycle them
responsibly to promote the sustainable reuse of material
resources.
Household users should contact either the retailer where
they purchased this product, or their local government
office, for details of where and how they can take these
items for environmentally safe recycling.
Business users should contact their supplier and check
the terms and conditions of the purchase contract. This
product and its electronic accessories should not be
mixed with other commercial wastes for disposal.
Correct disposal of batteries in this
product
(Applicable in the European Union and other
European countries with separate battery
return systems.)
This marking on the battery, manual or packaging
indicates that the batteries in this product should not be
disposed of with other household waste at the end of
their working life. Where marked, the chemical symbols
Hg, Cd or Pb indicate that the battery contains mercury,
cadmium or lead above the reference levels in EC
Directive 2006/66. If batteries are not properly disposed
of, these substances can cause harm to human health or
the environment.
To protect natural resources and to promote material
reuse, please separate batteries from other types of
waste and recycle them through your local, free battery
return system.
5
Page 6
Get started
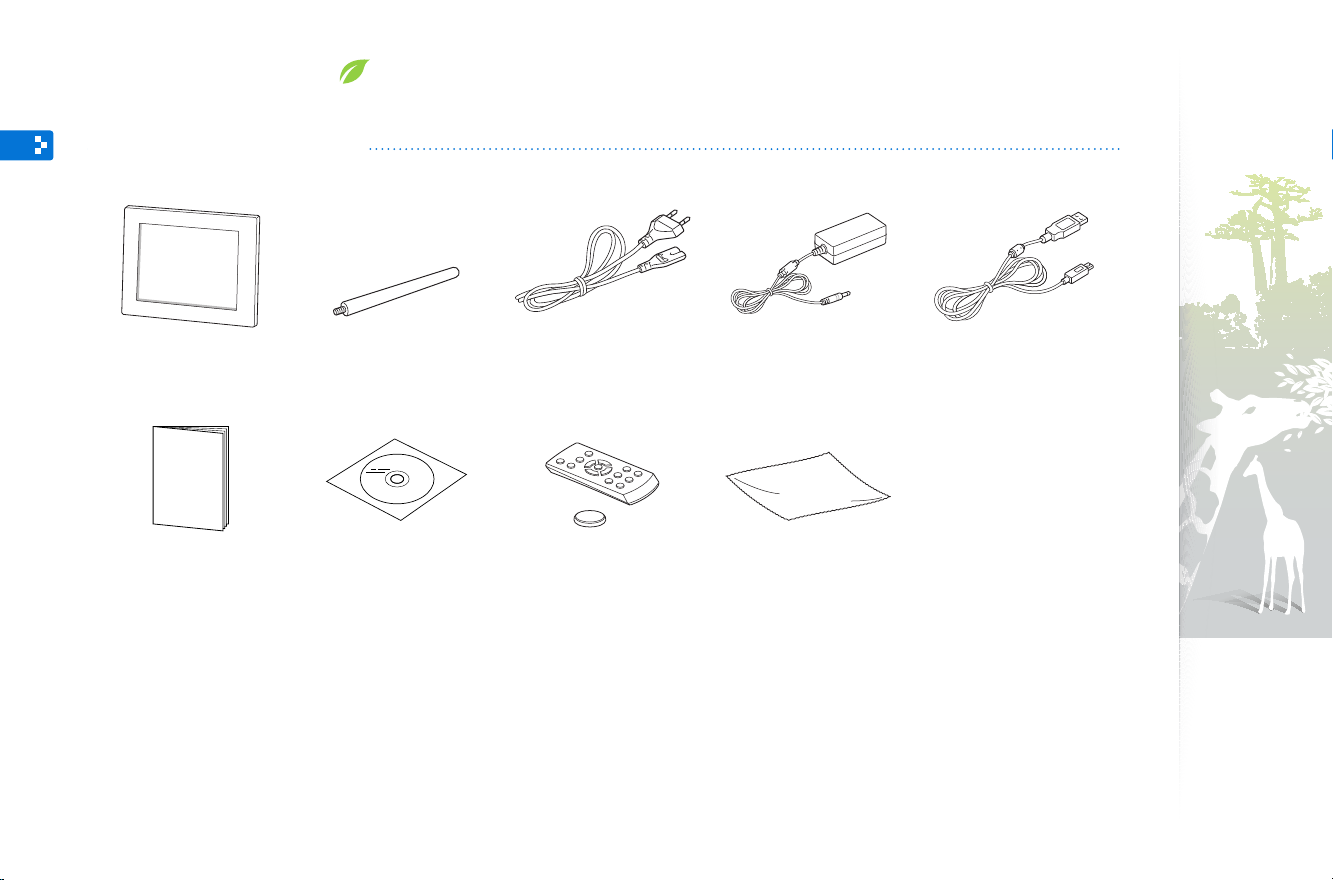
What’s in the box
Digital frame Frame stand Power cable* Adapter USB cable
Quick Start Guide
and Warranty**
* The shape of the plug may differ depending on your region.
** Warranty may be unavailable depending on your region.
*** The battery may be not included depending on your region.
CD-ROM
(User Manual)
Remote control/
Battery(CR2032)***
Cloth
6
Page 7

Get started
Get to know your frame
The front of your frame
Screen
Remote
control sensor
Touch button* Description
p
m
u/d/l/r
e
b
s
* The descriptions in this manual are based on the touch button. Please read
this manual carefully and use correctly.
When using the touch buttons
Operate the touch buttons only with your fingers. Make sure your •
hands are clean and dry when using the touch buttons.
Lightly touch the button that corresponds to the desired function.•
The touch sensor may not work properly when wet or in humid •
places.
When the touch buttons disappear, lightly touch the touch panel •
to make the buttons visible.
Do not cover the remote control sensor. It will block the signal •
from the remote control.
When the touch buttons are locked, you can operate the device •
only with the remote control. After turning the device off and on,
the device will remain locked. To unlock the device, touch and
hold m more than 5 seconds.
Turn the frame on; Turn the frame off (touch and
hold)
Access menus•
Lock or unlock the touch buttons (touch and •
hold)
Scroll through menus or items
(up/down/left/right)
Select menus or items; Perform selected functions
Return to the previous level
Play a slideshow in any screen; Change the view
mode during a slideshow
7
Page 8

Get started
Get to know your frame (continued)
The rear of your frame
Speaker
Wall-mount hole
SD memory card slot
Frame stand storage
Frame stand
Speaker
USB memory device port
USB cable port
Headset port
Power cable port
Wall-mount hole
8
Page 9

Get started
Get to know your frame (continued)
Remote control
Be sure to point the remote control to the remote control sensor on the frame (p. 7).
Button Description
Turn the frame on or off
Access the Main menu
Access menus
Return to the previous level
Scroll through menus or items (up/down/left/right)
Select menus or items
Play a slideshow in any screen; Change the view mode during
a slideshow
View the time and date
To change the remote control battery
Rotate a photo during a slideshow
Access the photo list screen
Access the music list screen
Access the video list screen
9
Page 10

Get started
Set up your frame
You can use the digital frame in both landscape and portrait view.
Store the frame stand inside the holder
when you are not using it.
Do not press down on the frame or apply excessive pressure to the frame stand, as this may cause damage.
Connect the adapter and turn the power on
The shape of the plug differs depending on your region.
To turn the frame on, touch p after connecting the power
adapter. The light will turn on for p and the Main menu
will appear. To turn the frame off, touch and hold p.
The light on • p will be turned off automatically after
some time.
10
Page 11

Get started
Customize basic settings
When you turn the frame on for the first time, the Quick setup screen appears.
Select a language and customize the basic settings of your frame.
Start Quick Setup
Quick Setup helps you setup several
settings to use your photo frame. This
includes View Mode, Slideshow Transition,
Clock Set, and Startup Mode settings. Do
you want to start?
Yes
ENTER BACK EXIT
No
Scroll to your language and touch 1 e
Select
2
Follow the on-screen instructions to customize your frame
3
Yes
to start the setup wizard.
.
according to your preferences.
Setting Description
View Mode
Slideshow
Transition
Clock Set
Startup Mode
When you complete the setup, select 4 Yes
Select a view mode for a slideshow (p. 20)
Select a transition effect for a slideshow (p. 22)
Set the current time and date (p. 13)
Select a mode to activate when the frame turns on
(p. 36)
to view the
product guide.
Review the basic usage instructions for your frame, and
5
then select
Done
.
11
Page 12

Get started
Get to know the Main menu
From the Main menu screen, you can access the following menus.
Menu Description
Photos
Music
Videos
Frame Memory
Photos
Music
Videos
Clock
Mini Monitor
Settings
Clock
Mini Monitor
Settings
You can set other functions to be activated instead of the Main menu •
when you turn the frame on (Startup Mode p. 36).
Press •
Browse photos stored in the internal memory or on an
external memory device and change options (p. 29)
Listen to music stored in the internal memory or on an
external memory device and change options (p. 27)
View videos stored in the internal memory or on an external
memory device and change options (p. 24)
View the current time and date (p. 13)
Use the frame as a supplementary monitor for your PC (p. 39)
Customize settings (p. 33)
s
from the menu list to start a slide show.
12
Page 13
Get started
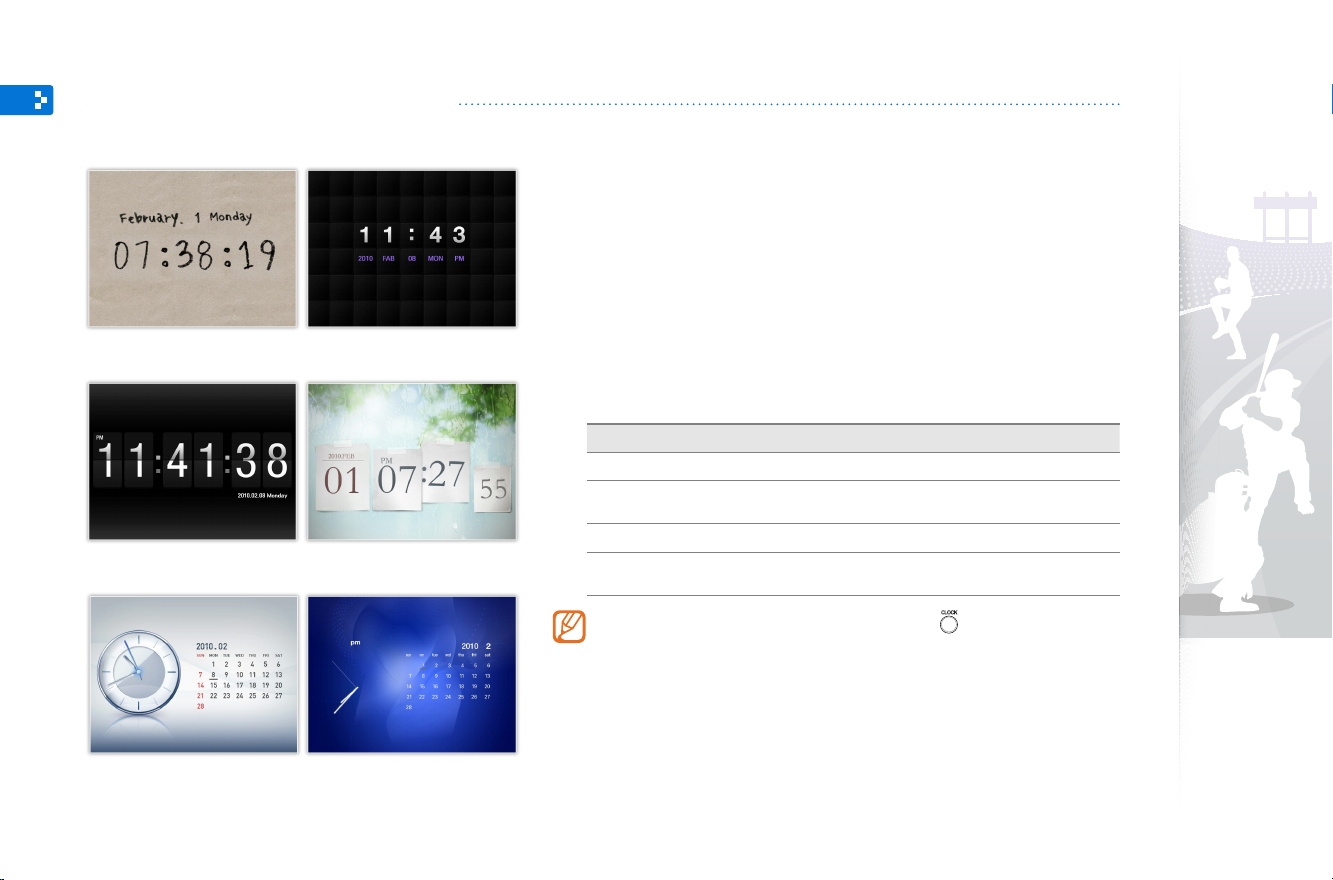
View the time and date
Check the current time and date or customize clock settings.
▲ Clock 1
▲ Clock 3
▲ Clock 2
▲ Clock 4
From the Main menu screen, scroll to 1 Clock
The current time and date will display.•
Touch 2 m
Scroll to
3
Scroll to one of the following options and touch
4
For • Clock Set, touch l or r to select the option you want and
touch
Option Description
Clock Set
Date Format
Time Format
Clock Type
You can also change the clock type by pressing button on the remote
control.
and select
Clock
u
or d to set the value.
Settings
and touch e.
Set the current time and date
Select how dates display (YYYY.MM.DD, MM.DD.
YYYY, DD.MM.YYYY)
Select how time displays (12 Hours, 24 Hours)
Select the clock type (Clock 1~4, Clock & Calendar
1~2)
.
and touch e.
e
.
▲ Clock & Calendar 2▲ Clock & Calendar 1
13
Page 14

Get started
Connect external memory devices
You can connect USB memory devices or SD memory cards to the frame. The frame supports FAT16 and FAT32 file format
systems for external memory devices.
Some USB memory devices may not be compatible with the •
frame due to their size and shape.
If you connect an external memory device while the power •
is on, a pop-up window will appear. To start a slideshow
of photos stored in the external memory device, select
Slideshow.
Maximum capacities of memory cards**•
SD Up to 2 GB
microSD* Up to 2 GB
miniSD* Up to 2 GB
SDHC Up to 32 GB
microSDHC* Up to 8 GB
Insert an SD memory card with the metal contacts
facing toward the frame. Push the card in until it
locks in place.
To remove the SD memory
card, push it gently until it
disengages from the frame.
miniSDHC* Up to 4 GB
USB Up to 32 GB
* An adapter is required to use a micro or mini type SD card.
** The capacity of an external memory device may differ depending on the
manufacturers as it is based on the test result of SAMSUNG when the
device is released.
14
Page 15

Get started
Select a memory location
When there is an external memory device (SD memory card or USB memory device) connected, you can select the source of
files.
From the Main menu screen, scroll to the memory location
1
list.
Scroll to one of the following memory locations and touch
2
e
.
Memory location Description
Frame Memory
Photos
Music
Videos
Clock
Mini Monitor
Settings
Frame Memory
SD Card
USB
You can also change the memory location while browsing photos,
music files or videos, by touching
Device (p. 30).
Internal memory
SD memory card (external)
USB memory device (external)
m
and selecting Select Storage
15
Page 16

Get started
Connect to a PC
You can transfer files (p. 17) or use the frame as a mini-monitor by connecting it to a PC (p. 39).
Connect the smaller end of the USB cable to the frame and the larger end to the USB port of a PC.
USB connector
16
Page 17

Get started
Transfer les from a PC
Mass Storage
Connected to PC USB port.
Do not insert or remove storage devices to/
from the Photo Frame while they are
connected to the PC.
You can switch to Mini Monitor mode by
using Frame Manager.
Some files are embedded on the frame by default. •
When there is not enough memory, delete these
stock files.
If your photos are large, they will consume more •
memory and the preview will play slowly. Change
the photo resolution to 800 X 600 (for ‘800W’)
or 1024 X 768 (for ‘1000W’). Or set the frame to
copy and automatically resize your photos (Frame
Memory Copy p. 36).
To transfer files from a PC
Connect the frame to a PC with the supplied USB cable
1
(p. 16).
When the frame is turned off, connect it to the PC first, and then •
turn it on.
Select 2 Mass Storage
When connected, ‘• Mass Storage’ will appear on the screen and
a pop-up window will appear on the PC.
If you connect the frame to a PC while using it as a mini-monitor •
(p. 39), you need to switch to Mass Storage mode by using the
Frame Manager program. For more information, refer to the Frame
Manager program’s User Manual.
The removable disk drive will appear as ‘• 800W’ or ‘1000W’ on the
PC. Open the drive for the corresponding model in My Computer
and copy your photos.
.
17
Page 18

Get started
Transfer les from a PC (continued)
To disconnect the frame from a PC
Make sure to end the connection properly to prevent damage to the frame or your data.
Click 1 on the Windows Taskbar.
Click the pop-up message.
2
Safely remove USB Mass Storage Device - Drive(G:)
Disconnect the USB cable only when the message says that it is safe to remove the hardware.
3
Do not disconnect the USB cable while the files are being copied, as this could result in loss of data or damage to the frame.•
The connection will not end if you have frame files open on the PC. Close all frame files and try again.•
18
Page 19

Play multimedia
Play a slideshow
From the Main menu screen, select a memory location
1
(
Frame Memory, SD Card
, or
USB
).
Scroll to
2
Scroll to a file and touch
3
Control playback using the following buttons:
4
Touch buttons Description
Photos
To play a slideshow with specific photos, touch m and select
Select Multiple Files (p. 30).
m
d/u
l/r
e
b
s
and touch e.
e
or s to play a slideshow.
Access the slideshow menu
Adjust the volume of the background music
View the previous or next photo
Pause or resume the slideshow
Return to the previous level
Change the view mode
19
Page 20

Play multimedia
Play a slideshow (continued)
▲ Photo Only
▲ Photo & Clock
Change the view mode
Display a clock or calendar during a slideshow or multiple photos on
one screen during a slideshow.
Touch s repeatedly during a slideshow to change the view
mode.
Each time you touch • s, the view mode changes (Photo Only →
Photo & Clock → Photo & Calendar → Multiview 1 →
Multiview 2 → Multiview 3).
Set the current time and date before displaying the clock or calendar •
(p. 33).
You can view the previous or next photo by touching •
slide show.
With • Multiview 1~3, the displayed photos on the screen will all change
at once when you change the view mode.
l
or r during a
▲ Photo & Calendar
▲ Multiview 2
▲ Multiview 1
▲ Multiview 3
20
Page 21

Play multimedia
Play a slideshow (continued)
Use slideshow menus
Control a slideshow and adjust the slideshow settings.
Home
Rotate
Zoom
Background Music
Settings
On
O
Select Music
Touch 1 m
Scroll to one of the following menus and touch
2
Option Description
Home
Rotate
Zoom
Background
Music
Settings
When you are finished, touch 3 e
When you touch •
appears. To play the slideshow, touch
during a slideshow.
View the main menu
Rotate a photo (Original, 90°, -90°, 180°)
Enlarge in a photo (x1, x2, x4)
Turn the background music on or off
Access the Settings menu (p. 22)
You can rotate or zoom a photo only in • Photo Only and Photo &
Clock modes.
When you zoom a photo, you can move around the photo by •
touching
Select the background music to enjoy music and photos same •
time.
All music files inside the selected music folder will play •
automatically when you select the slideshow.
u, d, l
, or r. To exit the zoom mode, touch b.
.
b
in the Settings menu, the Main menu
s
e
.
.
21
Page 22

Play multimedia
Play a slideshow (continued)
Category
Photos
Clock
Alarm
General
Support
Settings
Option
Slideshow Transition
Slideshow Speed
Slideshow Mode
Slideshow Order
View Mode
Slideshow Aspect Ratio
Auto Rotation
Display Photo Info
: On
Fast
Normal
Slow
Select slideshow effects
Adjust the transition effect, speed, play mode, or order of photos for
a slideshow.
Touch 1 m
Select
2
Scroll to
3
Scroll to one of the following options and touch 4 e
Option Description
Slideshow
Transition
Slideshow
Speed
Slideshow
Mode
Slideshow
Order
View Mode
during a slideshow.
Settings
Photos
You can also select slideshow effects by accessing Photos in
Settings.
.
and touch e.
.
Select a transition effect (No Effect, Fade, Blinds, Cross
Comb, Checkerboard, Slide, Wipe, Silk, Wheel, Circle,
Box In/Out, Diamond, Plus, Uncover, Push, Stairs,
Random)
Select a slideshow speed (Fast, Normal, Slow)
All photos• : Play all photos in the order of file names
Photos in folder• : Play all photos in the selected folder in
the order of file names
One photo• : Repeat the selected photo
Normal• : Play photos in the order of file names
Shuffle• : Play photos in a random order
Change the view mode (p. 20)
22
Page 23

Play multimedia
Play a slideshow (continued)
Category
Photos
Clock
Alarm
General
Support
Settings
Option
Slideshow Transition
Slideshow Speed
Slideshow Mode
Slideshow Order
View Mode
Slideshow Aspect Ratio
Auto Rotation
Display Photo Info
Original Fit
Auto Fit
Fit to Width
Fit to Screen
Slide Fit
Option Description
Original Fit• : Display photos in the original size. When a
photo is larger than the screen, it will be adjusted to fit
the screen in the same ratio
Auto Fit• : Resize photos to fit the screen in the same
Slideshow
Aspect Ratio
ratio (some parts of the photo may not appear)
Fit to Width• : Resize photos to fit the screen width
Fit to Screen• : Resize photos to fill the screen
Slide Fit• *: Resize photos to fit the longest edge to
the screen. The frame will automatically scroll through
the remainder of the photos from left to right or top to
bottom (for example, panorama or portrait photos)
Automatically rotate photos to fit the screen during a
Auto Rotation
slideshow (for example, a panorama photo will shrink in
width to fit the screen in portrait view)
Display Photo
Info
* In Slide Fit mode, if you attempt to view photos with resolutions below 184 ppi, over
2600 pixels in width, or 2000 pixels in height, they may appear distorted.
Touch 5 s
Set the slideshow to display details of each photo
to play the slideshow.
23
Page 24

Play multimedia
Play videos
From the Main menu screen, select a memory location
1
(
Frame Memory, SD Card
, or
USB
).
Pause Volume Prev/Next
Optimal video resolution or codec
Video
Audio
Codec
Bit rate
Resolution
Frame rate
Codec
Bit rate
Sample
rate
Channel
A/V Sync
MPEG4 (*.avi)
2000 Kbps
800W• : 720 X 540
1000W• : 720 X 540
30fps, CBR
MP3 (MPEG1-layer3)
320kbps
48 KHz
2
Basic
Scroll to
2
Scroll to a file and touch
3
Control playback using the following buttons:
4
Touch button Description
Videos
m
d/u
l/r
e
b
If the frame is not in use for some time while pausing a video, the
screensaver will appear. To return to the video player screen, touch
any button except for
and touch e.
e
to play a video.
Access the video menu
Adjust the volume
Skip backward or forward; Scan backward or forward in a
file (touch and hold)
Pause or resume the playback
Return to the previous level
p
.
24
Page 25

Play multimedia
Play videos (continued)
Use video menus
Home
Play Mode
Play Order
Repeat
Video Aspect Ratio
Subtitle Encoding
Subtitle Sync
Subtitle Sync Reset
Settings
: All videos
: Normal
: On
Original Fit
Default
Touch 1 m
Scroll to one of the following options and touch
2
Option Description
Home
Play Mode
Play Order
Repeat
Video Aspect
Ratio
Subtitle
Encoding*
during playback.
View the main menu
All videos• : Play all videos in file name order
Videos in folder• : Play all videos in the selected folder in
file name order
One video• : Repeat the selected video
Normal• : Play videos in file name order
Shuffle• : Play videos in random order
Set to play repeatedly
Original Fit• : Display photos in the original size. When a
photo is larger than the screen, it will be adjusted to fit
the screen in the same ratio
Fit to Width• : Resize photos to fit the screen width
Fit to Screen• : Resize photos to fit the screen
Select an encoding option
Default• : Encodes subtitles in the same language as set
on the General Settings of the frame.
Various Languages: Encodes subtitles in the designated •
language of a file
UTF-8• : Encodes subtitles in Unicode format (UTF-8)
If a subtitles file supports more than one language, •
the frame will display only the first language listed.
The subtitle may not display properly if the •
language setting is incorrect.
e
.
25
Page 26

Play multimedia
Play videos (continued)
Home
Play Mode
Play Order
Repeat
Video Aspect Ratio
Subtitle Encoding
Subtitle Sync
Subtitle Sync Reset
Settings
: All videos
: Normal
: On
Original Fit
Default
Option Description
Set a sync rate of the subtitles
Select• : Save selected sync rate (The selected sync rate
will apply to other videos. Please reset the sync rate by
Subtitle Sync*
Subtitle Sync
Reset *
Settings
* This menu only appears when a subtitles file is available.
The name of subtitles file and the video file should be identical, and the frame only
supports *.smi or *.srt file format. The frame supports up to 18 font size.
A defected subtitle file could cause problems on the playing video.
The sync rate also resets when you restart the frame.
selecting the Subtitle Sync Reset before playing another
video)
Back• : Return to the video menu
Volume• : Adjust the volume level
±0.5 sec• : Adjust the sync rate
Reset the sync rate to the default
Access the Settings menu
When you are finished, touch 3 b
When you touch •
b
in the Settings menu, the Main menu
.
appears. To play the video, refer to steps
1~3 in “Play videos.”
26
Page 27

Play multimedia
Play music
From the Main menu screen, select a memory location
1
(
Frame Memory, SD Card
, or
USB
).
Pause Volume Prev/Next
Scroll to
2
Scroll to a file and touch
3
Control playback using the following buttons:
4
Touch button Description
Music
and touch e.
e
to play music.
m
d/u
l/r
e
b
If the frame is not in use for some time while not playing music, a clock •
will appear as a screensaver. To return to the music player screen,
touch any button except for
When you play music files encoded in a variable bit rate (VBR), the •
playback time shown on the screen may differ from the actual playback
time.
Select the background music on the slideshow mode to enjoy music •
and photos same time.
Access the music menu
Adjust the volume
Skip backward or forward; Scan backward or forward in a
file (touch and hold)
Pause or resume the playback
Return to the previous level
p
.
27
Page 28

Play multimedia
Play music (continued)
Use music menus
Home
Play Mode
Play Order
Repeat
Settings
: All music
: Normal
: On
Pause Volume Prev/Next
Touch 1 m
Scroll to one of the following options and touch
2
Option Description
Home
Play Mode
Play Order
Repeat
Settings
When you are finished, touch 3 b
When you touch •
appears. To play the music, refer to steps
during playback.
View the main menu
All music• : Play all music files in file name order
Music in folder• : Play all music files in the selected folder
in file name order
One music• : Repeat the selected music file
Normal• : Play music files in file name order
Shuffle• : Play music files in random order
Set to play repeatedly
Access the Settings menu
.
b
in the Settings menu, the Main menu
1~3 in “Play music.”
e
.
28
Page 29

Browse and manage multimedia
Browse les
Access the Photos, Videos, or Music menus and browse files.
Memory location/
Folder name/File name
Photos
Frame Memory • 2009 • Summer.jpg
Music
Frame Memory • 2009 • Music
Title Artist
Current file number/
total number of files
From the Main menu screen, select a memory location
1
(
Frame Memory, SD Card
Scroll to
2
Touch
3
If the frame is not in use for some time, the screensaver will appear.
On the music and video play mode, only Clock mode appears as a
screensaver. To wake up the frame, touch any buttons except the power
(refer to Screensaver settings → p. 37).
Photos, Videos
d, u, l
To view files in a folder, scroll to the folder and touch •
, or r to browse files.
, or
, or
USB
Music
and touch e.
).
e
.
29
Page 30

Browse and manage multimedia
Manage les
Copy or delete files stored in internal memory or external memory devices.
Photos
Frame Memory • 2009 • Summer.jpg
Home
Copy
Delete
Select Multiple Files
Select Storage Device
Settings
Photo Size
File Size
Date
While browsing files, touch 1 m
Scroll to one of the following options and touch
2
Option Description
Home
Copy
Delete
Select Multiple
Files
Select Storage
Device
Settings
View the main menu
Copy the selected folder or file to another memory
location (p. 31)
Delete the selected folder or file (p. 32)
Select multiple files to view as a slideshow, copy, or
delete
Change the memory location (p. 15)
Access the Settings menu (p. 33)
.
e
.
30
Page 31

Browse and manage multimedia
Manage les (continued)
Photos
Frame Memory • 2009 • Summer.jpg
Copy
Choose a device to copy a photo to.
SD Card
USB
Photos copied to the frame will maintain their •
original size. To copy the photos in optimal sizes,
from the Main menu screen, select Settings →
General → Frame Memory Copy → Resized
(p. 36).
If you copy high resolution photos using the •
Resized option, the photos will be resized to the
lower resolution and result in smaller sizes. This will
allow you to store more photos on the frame.
Copy files
Connect an external memory device (SD memory card or USB
memory device) to the frame and copy files from the external memory
device to the frame or vice versa.
From the Main menu screen, select a memory location
1
(
Frame Memory, SD Card
Scroll to
2
Scroll to the file you want to copy and touch
3
Scroll to 4 Copy
Select a destination for the files.
5
Photos, Videos
To copy all files in the selected folder, select the folder.•
and touch e.
To copy multiple files, select • Select Multiple Files.
The selected files will be copied.•
, or
, or
USB
Music
and touch e.
).
m
.
31
Page 32

Browse and manage multimedia
Manage les (continued)
Photos
Frame Memory • 2009 • Summer.jpg
Yes No
Delete
Do you want to delete the
photo?
Delete files
From the Main menu screen, select a memory location
1
(
Frame Memory, SD Card
Scroll to
2
Scroll to the file you want to delete and touch
3
Scroll to 4 Delete
Select 5 Yes
Photos, Videos
To delete all files in the selected folder, select the folder.•
and touch e.
To delete multiple files, select • Select Multiple Files.
to confirm.
The selected file will be deleted.•
, or
, or
USB
Music
and touch e.
).
m
.
32
Page 33

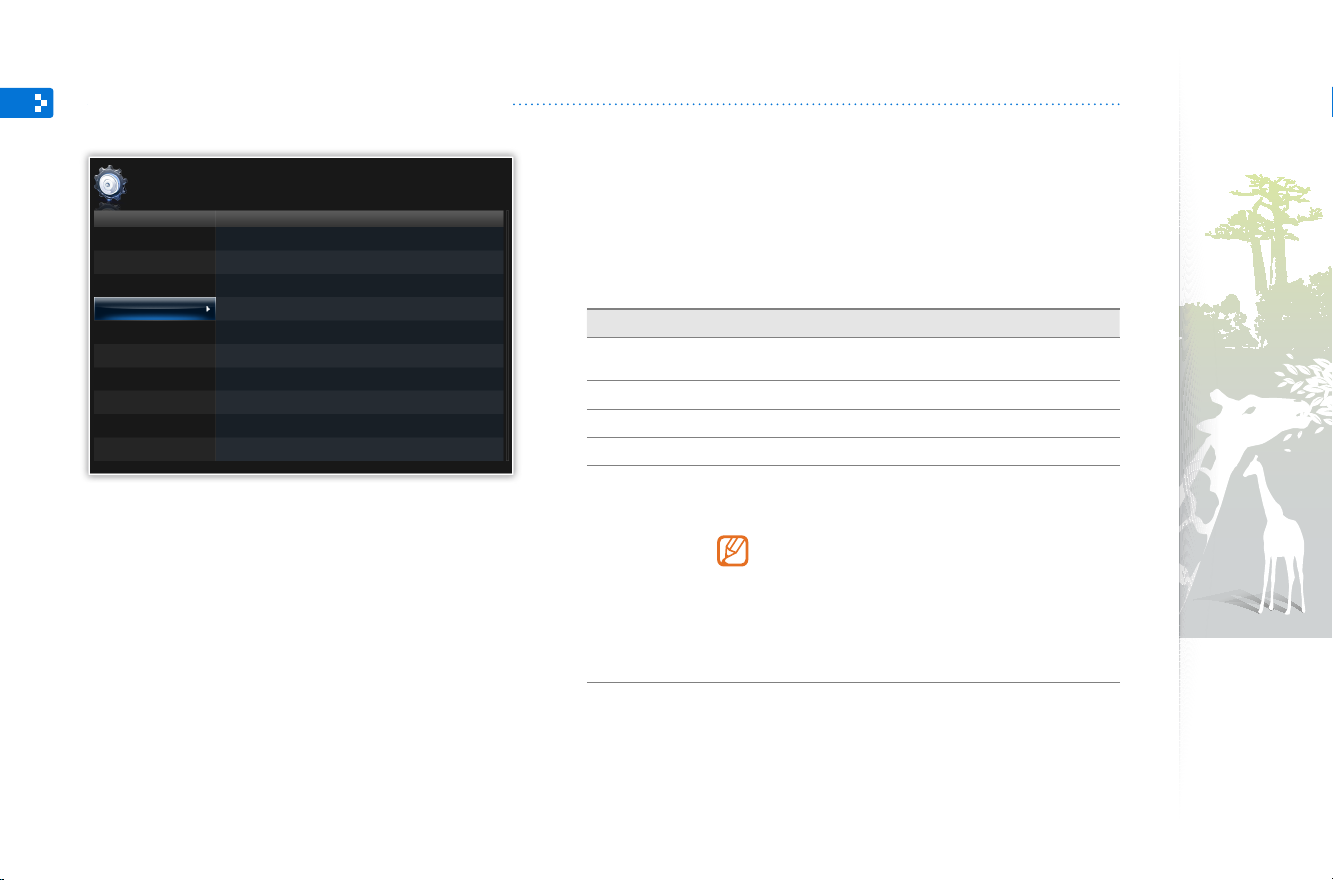
Customize settings
Define frame settings according to your preferences.
Adjust slideshow eects
Settings
Category
Photos
Clock
Alarm
General
Support
Option
Slideshow Transition
Slideshow Speed
Slideshow Mode
Slideshow Order
View Mode
Slideshow Aspect Ratio
Auto Rotation
Display Photo Info
: Fade
: Fast
: All photos
: Normal
: Photo Only
: Auto Fit
: On
: On
Set the time and date
Settings
Category
Photos
Clock
Alarm
General
Support
Option
Clock Set
Date Format
Time Format
Clock Type
: DD.MM.YYYY
: 12 Hours
: Clock 1
From the Main menu screen, scroll to 1 Settings
e
.
Scroll to
2
Select and adjust slideshow effects (p.
3
From the Main menu screen, scroll to
1
e
Scroll to
2
Set the time and date and customize the clock settings
3
.
Photos
Clock
and touch e.
and touch e.
22).
Settings
and touch
and touch
(p. 13).
33
Page 34

Customize settings
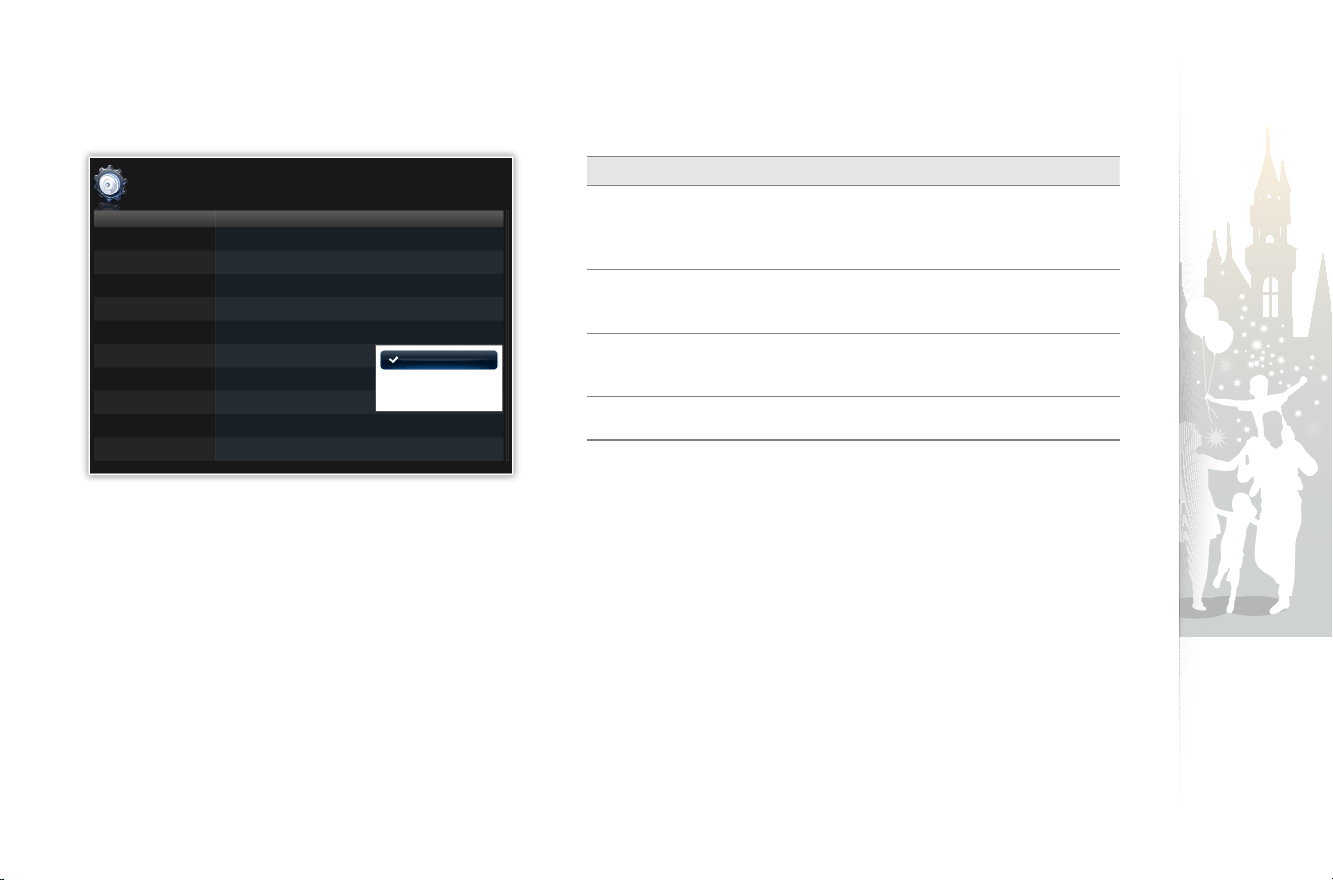
Set and use alarms
Set and control alarms for important events.
Category
Photos
Clock
Alarm
General
Support
Settings
Option
Alarm1
Alarm2
Alarm3
Alarm4
Alarm5
: Inactivated
: Inactivated
: Inactivated
: Inactivated
: Inactivated
Set a new alarm
From the Main menu screen, scroll to 1 Settings
e
.
Scroll to
2
Scroll to an inactivated alarm and touch
3
Touch
4
When you are finished, select 5 OK
• will appear at the top right corner of the screen.
You can only have an alarm for a specified time. Duplicate alarms will be
ignored.
d, u, l
Activation
On
AM/PM
AM
Alarm
and touch e.
Set time
Manual
Repeat
Once
OK Cancel
, or r to set alarm details.
Hour
Sound
Sound 1
Minute
12
00
Volume
70
.
e
and touch
.
34
Page 35

Customize settings
Set and use alarms (continued)
Category
Photos
Clock
Alarm
General
Support
Settings
Option
Alarm1
Alarm1
Current
Alarm
OK
Stop an alarm
When the alarm sounds, touch any button except for p to stop the
PM
PM
PM
alarm. If you do not stop the alarm, it will sound for 1 minute.
Deactivate an alarm
From the Main menu screen, scroll to 1 Settings
e
.
Scroll to
2
Scroll to the alarm you want to deactivated and touch
3
Scroll to
4
Alarm
and touch e.
Off
and select e.
and touch
e
.
35
Page 36
Customize settings
Customize general settings
Category
Photos
Clock
Alarm
General
Support
Settings
Option
Quick Setup
Language
Brightness
Button Sound
Auto Picture On/O
Startup Mode
Frame Memory Copy
Screen Saver
Logo
: English
: 70
: O
: Home
: Original size
: Slideshow
: On
From the Main menu screen, scroll to 1 Settings
e
.
Scroll to
2
Scroll to one of the following options and touch
3
Option Description
Quick Setup
Language
Brightness
Button Sound
Auto Picture
On/Off
General
and touch e.
Set up basic settings, including the language for your
frame (p. 11)
Select a language to display
Adjust the brightness of the screen
Set the button sound
Set the time for the screen to turn on or off automatically
(for example, you can set the screen to turn off when you
go to sleep or turn on when you wake up in the morning)
When you set this options and the screen is off, •
touch any button except for
on again.
If you turn off the frame by pressing •
frame will not turn on automatically. The Auto
Picture only works when the frame is turned off
scheduled.
and touch
e
.
p
to turn it back
p
, the
36
Page 37
Customize settings
Customize general settings (continued)
Category
Photos
Clock
Alarm
General
Support
Settings
Option
Quick Setup
Language
Brightness
Button Sound
Auto Picture On/O
Startup Mode
Frame Memory Copy
Screen Saver
Logo
: English
: 70
: O
Home
Last Mode
Slideshow
: On
Option Description
Select a mode to activate when the frame turns on
Startup Mode
Home• : Start with the Main menu
Last Mode• : Start with the mode you used last
Slideshow• : Start with a slideshow
Frame Memory
Copy
Original size• : Copy photos in their original size
Resized• : Copy photos in reduced sizes for optimal
resolution on the screen
Select a screensaver (Slideshow or Clock)
Screen Saver
On the music and video play mode, only Clock mode •
appears as a screensaver.
Logo
Set the backlight of Samsung logo to on or off
(The backlight will not turn on in portrait view)
37
Page 38

Customize settings
Update or reset the frame
Category
Photos
Clock
Alarm
General
Support
Settings
Option
Upgrade Software
Reset
Product Guide
Product Information
Open Source License
From the Main menu screen, scroll to 1 Settings
e
.
Scroll to
2
Scroll to one of the following options and touch
3
Option Description
Upgrade
Software
Reset
Product Guide
Product
Information
Open Source
License
Support
and touch e.
Update the frame with the latest firmware (p. 40)
Reset all settings and options to their factory defaults
(except for the time and language settings)
View basic instructions for using your frame
View product information, such as model name, firmware
version, memory usage, or copyright
View Open Source License information
and touch
e
.
38
Page 39

Appendix
Use as a PC mini-monitor
You can use the frame as a mini-monitor (supplementary monitor) for a PC. Install the Frame Manager program on your
PC and connect the frame to the PC with the USB cable. For more information, visit the Samsung Electronics webpage
(http://www.samsung.com) and search for “800W” or “1000W”.
Before use
Read the Frame Manager User Manual to install the program properly.
•
Use the USB cable provided with the frame.
•
Do not use the frame as a primary monitor. The screen may not work
•
properly.
d
System requirements for using the frame
as a mini-monitor
OS: Windows XP (SP2/SP3), Vista (32bit/64bit)
•
USB: Extended Host Controller (EHCT) for USB 2.0
•
RAM: 512 MB or more
•
CPU: 2.4 GHz or more
•
Touch
•
mini-monitor.
The display blinks when there is not enough available memory.
•
If you have moved a program icon or window to the secondary monitor,
•
move it back to the primary monitor after use.
The frame may not function properly with some video cards. In this case,
•
try setting the hardware acceleration to None.
For Windows Vista, the Aero 3D effect may not function while using the
•
frame as a mini-monitor and some videos may not play.
The frame does not function as a Windows Presentation Foundation
•
application.
If you encounter a problem after the installation, uninstall the program.
•
After uninstallation, reboot the computer and reinstall the program. The
frame must stay disconnected during the installation.
or u to adjust the brightness when you use the frame as a
To set the hardware acceleration to None (for Windows XP),
1. Right-click on the Windows desktop, and select Properties.
2. When the Display Properties window appears, select Settings → Advanced →
Troubleshoot → Hardware acceleration and drag the indicator to None.
39
Page 40

Appendix
Upgrade Firmware
Download and install the latest firmware from the Samsung Electronics web page (http://www.samsung.com).
Connect the external memory device (SD memory card or
1
USB memory device) to the PC (p. 14).
Copy the latest firmware you have downloaded to the
2
external memory device.
Copy the firmware to the root folder on the memory device.•
Disconnect the external memory device from the PC, and
3
then connect it to the frame.
Category
Photos
Clock
Alarm
General
Support
Settings
Option
Upgrade Software
Reset
Upgrade Software
Getting upgrade les now.
Do not remove the storage device.
Upgrading…
Back up your files (photos, videos, or music) •
before upgrading the firmware to prevent losing
them.
While the upgrading is in progress, •
Do not disconnect the external device (SD memory card or USB memory device) from the frame.
Do not touch any buttons. Do not insert any other memory cards. Do not turn the frame off . -
You can verify that the firmware is upgraded to the •
latest version by accessing Product Information
in Settings → Upgrade Software.
From the Main menu screen, scroll to
4
e
.
Scroll to
5
Scroll to
6
Select the external memory device and touch
7
When the upgrade is complete, the frame will restart
8
automatically.
Support
Upgrade Software
The firmware will be upgraded.•
Remove the external memory device.•
and touch e.
and touch e.
Settings
and touch
e
.
40
Page 41

Appendix
Troubleshooting
Try the following if you have trouble using the frame.
Issue Resolution
The frame will not turn on. Verify that the power cable is connected properly.
When connecting the frame to a PC with
the USB connector, the screen blinks and
the frame turns off automatically.
There is light leaking along the border of
the clock screen.
The time setting is not correct.
It takes time for a photo to display when
the frame turns on or during a slideshow.
Even though there is free space left on the
internal memory, photos will not copy.
External devices (USB memory device or
SD memory card) do not function properly.
JPEG photos do not play.
Some photos will not display in a
slideshow.
The proportion of a photo is not correct.
The preview plays slowly. When there are many photos or large file sizes, the preview may be slow.
There may be a problem with the USB port of the PC.
If the screen is black, there may be light showing through due to the characteristics of the LCD
panel. This is normal.
When the power adapter is disconnected for a long period of time, the current time settings may
be lost. Connect the power adapter at all times.
If the resolution of a photo is high or the file size is large, it may take longer to display.
If the FAT section of the internal memory is damaged, photos may not copy there.•
Make a folder inside the internal memory to copy photos.•
Verify that the devices are connected properly.•
Verify that the photos stored in the external memory devices are in JPEG format. Corrupted or •
damaged files will not display.
The device may not be supported by the frame. Try another device.•
JPEG photos saved in CMYK modes will not display.•
JPEG photos edited by image editors (e.g., Photoshop or Paintshop) may not display properly. •
Save photos in JPEG format after editing on a PC and play the slideshow again.
Your frame can read up to 10,000 photos. Photos exceeding this limit will not display in a
slideshow.
From the Main menu screen, select Settings → Photos → Slideshow Aspect Ratio →
Original Fit.
41
Page 42

Appendix
Troubleshooting (continued)
Issue Resolution
Even when there is only one photo on the
memory card or Slideshow Mode is set to
One photo, the slideshow effect is applied
to the photo.
In what order are the photos displayed on a
memory card?
The slideshow will not start automatically. Verify that Startup Mode is set to Slideshow in Settings → General (p. 36).
I cannot play a video file.
I activated the Auto Picture On/Off
feature, but the screen does not turn on
automatically.
I want to reset the frame.
The effect is applied to protect the panel.
The photos are arranged by file name, in the order of number – upper case letter – lower case
letter.
Verify that the frame supports the video codec (p.• 41).
If the codec is not supported, convert it with a video codec converter (Optimal video resolution •
or codec → p. 44)
Verify that the current time is set correctly.•
p
If you have touched •
activated, the screen does not turn on automatically. The screen turns on automatically only
when the screen was turned off automatically via the Off Time setting.
Select Reset in Settings →Support to their factory default, but the time and language settings
will not be reset.
to turn the frame off when the Auto Picture On/Off feature is
42
Page 43

Appendix
Specications
Digital frame
Model name 800W 1000W
Panel
File formats
Built-in memory
USB
Power
Type
Resolution
Photo
Music
Video
Rating
Consumption
8” TFT LCD 10” TFT LCD
800 X 600 1024 X 768
BMP
JPEG (CMYK formats not supported)
Supports a maximum resolution of 16,000 X 16,000•
Supports a maximum ratio from 1:6 to 6:1•
MP3 (Frequency: 8 - 48 Khz, Bit Rates : 8 - 320 Kbps)
Video Codec Format Combination Capability
Container Video Audio
M-JPEG(*.MOV, *.AVI)
MPEG-1(*.MPG)
MPEG-4(*.AVI, *.MP4)
1GB
Host (USB 2.0) / Device (USB 2.0)
External DC 12V
On: 10 W / Off: less than 1 W On: 11 W / Off: less than 1 W
MOV
AVI
* PCM : PCM, ADPCM, ALAW, MULAW
Container Video Audio
MPG MPEG-1 MP2
* MP2 : MPEG-1 Layer II
Container Video Audio
AVI
MP4
* MPEG-4 : MPEG-4 ASP
* AAC: AAC-LC
JPEG
MJPG
MPEG-4
mp4v
PCM
PCM
MP3/PCM/AC-3
AAC
VGA(640 X 480),
30 Fps, 15000 Kbps
D1(720 X 480), 30 Fps,
2000 Kbps CBR
D1(720 X 540), 30 Fps,
2000 Kbps CBR
43
Page 44

Appendix
Specications (continued)
With the frame stand : 8.9 X 6.9 X 4.6 inches •
General
* The design of the product may vary according to the model. Specifications are subject to change without notice.
* This device is a class B digital apparatus.
Dimension (W x H x D)
Weight
(225.4 mm X 175.4 mm X 116.1 mm)
Without the frame stand : 8.9 X 6.9 X 1 inches •
(225.4 mm X 175.4 mm X 27.0 mm)
20.1 oz (570 g) 26.3 oz (745 g)
With the frame stand : 10.5 X 8.5 X 4.6 inches •
(266.9 mm X 217.0 mm X 116.1 mm)
Without the frame stand : 10.5 X 8.5 X 1 inches •
(266.9 mm X 217.0 mm X 27.0 mm)
Optimal video resolution or codec
Video options Audio options
Codec
Bit rate
Resolution
Frame Rate
* Above explained video codec is based on AVI Movie file.
* Above values are based on AVC(Any Video Converter), and the values may differ in other video converters.
MPEG4 (*.avi)
2000kbps
800W(720x540), 1000W(720x540)
30fps, CBR
Codec
Bit Rate
Sample Rate
Channel
A/V Sync
Correct disposal of the frame
Dispose of the product according to local regulations and applicable laws.
MP3 (MPEG1-layer3)
320kbps
48kHz
2
Basic
44
Page 45

Appendix
Contact information of Samsung Worldwide
If you have any questions or comments relating to Samsung products, please contact.
Region Contact Center Web Site
CANADA 1-800-SAMSUNG (726-7864) www.samsung.com
North America
Latin America
Europe
MEXICO 01-800-SAMSUNG (726-7864) www.samsung.com
U.S.A 1-800-SAMSUNG (726-7864) www.samsung.com
ARGENTINE 0800-333-3733 www.samsung.com
BRAZIL
CHILE 800-SAMSUNG (726-7864) www.samsung.com
COLOMBIA 01-8000112112 www.samsung.com
COSTA RICA 0-800-507-7267 www.samsung.com
ECUADOR 1-800-10-7267 www.samsung.com
EL SALVADOR 800-6225 www.samsung.com
GUATEMALA 1-800-299-0013 www.samsung.com
HONDURAS 800-7919267 www.samsung.com
JAMAICA 1-800-234-7267 www.samsung.com
NICARAGUA 00-1800-5077267 www.samsung.com
PANAMA 800-7267 www.samsung.com
PUERTO RICO 1-800-682-3180 www.samsung.com
REP. DOMINICA 1-800-751-2676 www.samsung.com
TRINIDAD &
TOBAGO
VENEZUELA 0-800-100-5303 www.samsung.com
AUSTRIA
BELGIUM 02-201-24-18
CZECH
DENMARK 70 70 19 70 www.samsung.com
EIRE 0818 717100 www.samsung.com
ESTONIA 800-7267 www.samsung.com
FINLAND 030 - 6227 515 www.samsung.com
0800-124-421
4004-0000
1-800-SAMSUNG (726-7864) www.samsung.com
0810 - SAMSUNG
(7267864, € 0.07/min)
800 - SAMSUNG
(800-726786)
SamsungZrt.,českáorganizačnísložka,OasisFlorenc,
Sokolovská394/17,18000,Praha8
www.samsung.com
www.samsung.com
www.samsung.com/be
(Dutch)
www.samsung.com/be_fr
(French)
www.samsung.com
Region Contact Center Web Site
FRANCE 01 48 63 00 00 www.samsung.com
GERMANY
HUNGARY 06-80-SAMSUNG (726-7864) www.samsung.com
ITALIA 800-SAMSUNG (726-7864) www.samsung.com
LATVIA 8000-7267 www.samsung.com
LITHUANIA 8-800-77777 www.samsung.com
LUXEMBURG 261 03 710 www.samsung.com
Europe
(continued)
CIS
NETHERLANDS
NORWAY 815-56 480 www.samsung.com
POLAND
PORTUGAL 80820-SAMSUNG (726-7864) www.samsung.com
SLOVAKIA 0800-SAMSUNG (726-7864) www.samsung.com
SPAIN
SWEDEN 0771 726 7864 (SAMSUNG) www.samsung.com
SWITZERLAND
U.K 0845 SAMSUNG (7267864) www.samsung.com
RUSSIA 8-800-555-55-55 www.samsung.com
ARMENIA 0-800-05-555
AZERBAIJAN 088-55-55-555
BELARUS 810-800-500-55-500
GEORGIA 8-800-555-555
KAZAKHSTAN 8-10-800-500-55-500
KYRGYZSTAN 00-800-500-55-500 www.samsung.com
MOLDOVA 00-800-500-55-500
TADJIKISTAN 8-10-800-500-55-500 www.samsung.com
UKRAINE 0-800-502-000
UZBEKISTAN 8-10-800-500-55-500 www.samsung.com
01805 - SAMSUNG
(726-7864 € 0,14/Min)
0900-SAMSUNG
(0900-7267864) (€ 0,10/Min)
0 801 1SAMSUNG (172678)
022-607-93-33
902 - 1 - SAMSUNG
(902 172 678)
0848 - SAMSUNG
(7267864, CHF 0.08/min)
www.samsung.com
www.samsung.com
www.samsung.com
www.samsung.com
www.samsung.com/ch
www.samsung.com/ch_fr/
(French)
www.samsung.ua
www.samsung.com/ua_ru
45
Page 46

Appendix
Contact information of Samsung Worldwide (continued)
Region Contact Center Web Site
Asia Pacific
AUSTRALIA 1300 362 603 www.samsung.com
CHINA
HONG KONG (852) 3698-4698
INDIA
INDONESIA
JAPAN 0120-327-527 www.samsung.com
MALAYSIA 1800-88-9999 www.samsung.com
NEW ZEALAND
PHILIPPINES
400-810-5858
010-6475 1880
3030 8282
1800 110011
1800 3000 8282
1800 266 8282
0800-112-8888
021-5699-7777
0800 SAMSUNG
(0800 726 786)
1-800-10-SAMSUNG
(726-7864)
1-800-3-SAMSUNG
(726-7864)
1-800-8-SAMSUNG
(726-7864)
02-5805777
www.samsung.com
www.samsung.com/hk
www.samsung.com/hk_en/
www.samsung.com
www.samsung.com
www.samsung.com
www.samsung.com
Region Contact Center Web Site
SINGAPORE 1800-SAMSUNG (726-7864) www.samsung.com
Asia Pacific
(continued)
Middle East &
Africa
TAIWAN 0800-329-999 www.samsung.com
THAILAND
VIETNAM 1 800 588 889 www.samsung.com
BAHRAIN 8000-4726
JORDAN 800-22273
SOUTH AFRICA 0860-SAMSUNG (726-7864 ) www.samsung.com
TURKEY 444 77 11 www.samsung.com
U.A.E 800-SAMSUNG (726-7864) www.samsung.com
1800-29-3232
02-689-3232
Soware License
To send inquiries and requests for questions regarding open sources, contact Samsung via Email (vdswmanager@samsung.com).
This product uses some software programs which are distributed under the Independent JPEG Group.•
This product uses some software programs which are distributed under the Freetype Project.•
This product uses some software programs which are distributed under the OpenSSL Project.•
This product uses some software programs which are distributed under the MPL.•
This product uses some software programs which are distributed under the GPL/LGPL license. •
GPL software: Linux Kernel, Busybox, Binutils, U-boot, wireless_tools, pump / LGPL software: Glibc, ffmpeg, smpeg, libgphoto2, libusb, libptp, SDL, libiconv
To see more details, click Software License on the main screen of the CD-ROM.
www.samsung.com
46
Page 47

Appendix
Index
A
alarm
set, 34
stop, 35
aspect ratio, 23
B
basic settings, 11
brightness, 36
C
clock
clock type, 13
date format, 13
time and date, 13
time format, 13
connect
external memory devices, 14
PC, 16
F
file
browse files, 29
copy files, 31
delete files, 32
manage files, 30
transfer files, 17
firmware upgrade, 40
Frame Manager, 39
L
language, 11, 36
M
main menu, 12
mass storage, 17
memory location, 15
mini monitor, 39
music
mode, 28
order, 28
play music, 27
repeat, 28
settings, 28
P
PC requirements, 39
product disposal, 44
Q
quick setup, 11
R
remote control, 9
reset settings, 38
rotate, 21
47
Page 48

Appendix
Index (continued)
S
screensaver, 37
slideshow
aspect ratio, 23
background music, 21
display photo info, 23
mode, 22
order, 22
play slideshow, 19
rotate, 21
settings, 21
speed, 22
transition, 22
view mode, 20, 22
zoom, 21
specifications, 43
startup mode, 37
subtitle
subtitle encoding, 25
subtitle sync, 26
subtitle sync reset, 26
supplementary monitor, 39
T
touch buttons, 7
troubleshooting, 41
U
USB connector, 16
V
video
mode, 25
order, 25
play video, 24
repeat, 25
settings, 26
view mode, 20
Z
zoom, 21
48
Page 49

 Loading...