

Page 1

Digital Photo Frame
User Manual
700T
The color and the appearance may differ depending on the product,
and the specications are subject to change
without prior notice to improve the performance.
Page 2
Safety Instructions
경고 주의
경고
주의
주의
경고 주의
경고
주의
These safety instructions must be followed to ensure your safety and prevent property
damage. Make sure to read the instructions carefully and use the product in the correct
manner.
Warning
Failing to follow the precautions marked with this sign, may
result in a serious injury or even a fatality.
1
English
Caution
Power Related
Warning
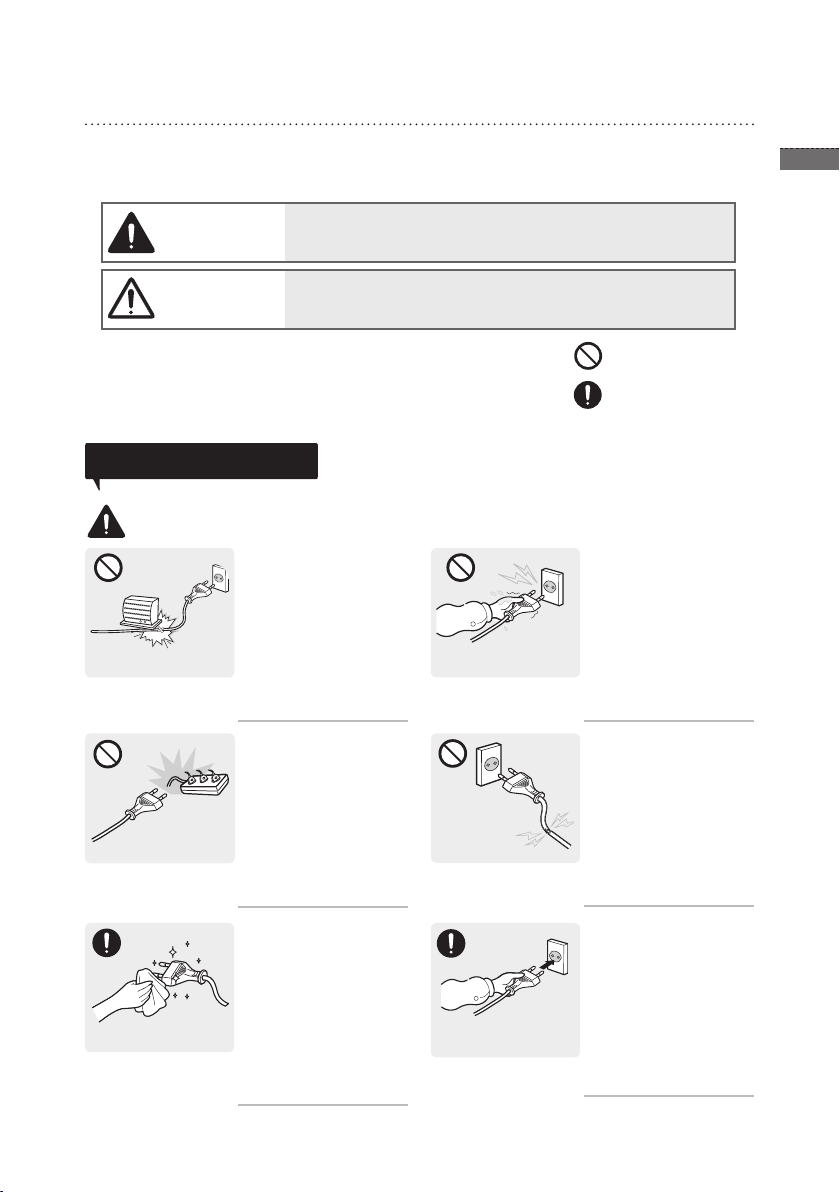
Avoid bending or twisting
the power cord excessively
and avoid placing heavy
objects on the cord.
Otherwise, it may result in •
electric shock or re due to
a damaged power cord.
Avoid connecting multiple
electric appliances to a
single wall outlet.
Otherwise, it may result in •
re due to overheating of
the wall outlet.
Failing to follow the precautions marked with this sign, may
result in a personal injury or property damage.
Do not perform.
Must be followed.
Avoid plugging in or
unplugging the power
supply with wet hands.
Otherwise, it may result in •
electric shock.
Avoid using a damaged
power cord or plug or a
loose power outlet.
Otherwise, it may result in •
electric shock or re.
If the pins of the power
plug or the wall outlet are
covered in dust, clean it
using a dry cloth.
Otherwise, it may result •
in re.
Plug the power plug in
rmly.
Otherwise, it may result •
in re.
Page 3
English
2
주의
경고 주의
경고
주의
Caution
When unplugging the
power plug from the wall
outlet, make sure to hold
it by the plug and not by
the cord.
Otherwise, it may result in •
electric shock or re.
Installation Related
Warning
Make sure to use only the
power cord supplied by
our company. In addition,
do not use the power
cord of another electric
appliance.
Otherwise, it may result in •
electric shock or re.
Avoid installing the product
at an easily reachable
height where children
may reach it.
Make sure to turn the power
off and disconnect the power
plug from the outlet before
moving the product. Make sure
to disconnect the connection
cables from other devices as
well.
Avoid installing the product in
a location that is unstable or
exposed to excessive vibrations
such as on an unstable or
slanted shelf.
If a child touches the •
product, the product may
fall and this may result in
injury.
Otherwise, it may result in •
electric shock or re due to
a damaged power cord.
The product may fall and •
this may result in damage
to the product or injury.
If you use the product •
in a location exposed to
excessive vibrations, it
may result in a problem
with the product or re.
Keep the power cord and
the product away from a
heater.
Otherwise, it may result in •
electric shock or re.
Keep the plastic bags
used to pack the product
away from children.
If children place the plastic •
bags over their heads,
they may suffocate.
If the product is installed in a
location where the operating
conditions vary considerably,
a serious quality problem may
occur due to the surrounding
environment. In this case,
install the product only after
consulting one of our service
engineers about the matter.
Places exposed to microscopic •
dust, chemicals, too high or low
temperature, high humidity, such
as airports or stations where the
product is continuously used for a
long time and so on.
Page 4
3
English
주의
Caution
경고 주의
경고
주의
When installing the product
on a console or shelf,
make sure that the front
of the product does not
protrude out of the console
or shelf.
Otherwise, this may cause •
the product to fall off and
result in a malfunction or
injury.
Make sure to use a cabinet •
or shelf suitable to the size
of the product.
Usage Related
Warning
Do not place the product
face down on the oor.
This may damage the •
panel of the product.
If the product generates a
strange noise, a burning
smell, or smoke, unplug
the power plug immediately
and contact a service
center.
Otherwise, it may result in •
electric shock or re.
Do not let the product drop
while moving it.
If you drop the product or
the case is damaged, turn
the power off and unplug
the power cord. Contact a
service center.
Otherwise, it may result in •
re or electric shock.
Avoid lifting up or move the
product by holding only the
power cord or signal cable.
Otherwise, it may result •
in electric shock, re or a
problem with the product
due to damage to the
cable.
Avoid using a humidier or
cooker near the product.
Otherwise, it may result in •
electric shock or re.
Since a high voltage
runs through the product,
never disassemble, repair
or modify the product
yourself.
Otherwise, it may result in •
re or electric shock.
If the product needs to be •
xed, contact a service
center.
Disconnect the power plug
when there is thunder or
lightning.
Otherwise, it may result in •
electric shock or re.
Page 5

English
4
100
주의
Avoid turning the product
upside down or move the
product holding only the
stand.
This may cause the •
product to fall resulting in
damage to the product or
injury.
When a gas leak occurs,
do not touch the product
or the power plug and
ventilate immediately.
A spark may result in an •
explosion or re.
Caution
Avoid dropping an object
over the product or cause
impact to the product.
Otherwise, it may result in •
electric shock or re.
Keep the product away
from places exposed to oil,
smoke or moisture; do not
install inside a vehicle.
Otherwise, it may result •
in electric shock or re. In
particular, avoid operating
the monitor near water or
outdoors where it could be
exposed to snow or rain.
Keep the small
accessories in a location
out of the reach of
children.
Avoid inserting metal
objects such as a
chopsticks, coins or
hairpins, or inammable
objects into the product
(the vents, ports, etc).
If water or an alien •
substance enters the
product, turn the power
off, unplug the power cord
and contact a service
center. Otherwise, it may
result in a problem with
the product, electric shock
or re.
When not using the
product for a long time
such as leaving your
home, unplug the power
cord from the wall outlet.
Otherwise, it may cause •
dust accumulation and
result in re caused by
overheating or short circuit
or result in an electric
shock.
Page 6

5
English
Watching the product
from too close a distance
continuously may damage
your eyesight.
It is important to give your •
eyes some rest (5 minutes
every hour) when viewing
the product screen for long
periods of time. This will
alleviate any eye strain.
Cleaning Related
When cleaning the product,
do not spray water directly
over the product parts.
Avoid spraying cleansing
agent directly onto the
product.
Make sure that water does •
not enter the product.
Otherwise, it may result
in re, electric shock or a
problem with the product.
This may result in the •
exterior being deformed or
the print being removed.
When cleaning the product,
disconnect the power cord
and clean the product with
the supplied cleaning cloth.
This may result in the •
exterior being deformed or
the print being removed.
Since using a surfactant,
which contains a large
amount of alcohol, solvent
or other strong chemicals,
may result in the
discoloration or cracking
of the product exterior or
the panel surface coming
off, be sure to use the
recommended cleansing
agent only.
Otherwise, this may result •
in the discoloration and
distortion of the structure
and the screen surface
may peel off.
Since the exterior of the
product is easily scratched,
be sure to use the supplied
cleansing cloth.
However, if the cloth is •
contaminated by alien
substances, it may result
in scratches to the exterior;
therefore shake off any
alien substances from the
cloth before using it.
Page 7

English
6
Product and Components
Components
Please check to make sure that all of the following items are included in
your delivered package before using the product.
Digital photo
frame
* Not available in all locations
Power cable
/adaptor
USB cable
Digital frame
stand
Name and function of each part
Touch button
Caution: While the photo frame is booting, do not press and hold the touch buttons. Touch buttons pressed
while the photo frame is booting will not operate.
Quick Start Guide
/ Warranty
Touch one of the operating
buttons lightly.
Turn the frame on;
Turn the frame off (touch and hold)
Access menus
Navigates or changes options on the menu.
Selects an option on the menu.
Returns to the previous menu.
(Moves to the main screen if pressed for 2
seconds.)
Starts a slide show.
Power cable connection
Connect the power cable.
Cleaning
Cloth
Description
USB memory
device
connection
Connect a USB
storage device.
User
Manual
SD memory card slot
Insert the SD memory to
view saved pictures.
USB cable connection
(PC connection)
Connect to a PC to copy pictures
to the internal memory or use as a
Mini Monitor.
Page 8

7
English
!
700T can be used by connecting to a PC via
the USB cable (along with the auxiliary power
cable).
However, it may not operate properly if the
power supply in your PC is unstable. In this
case, connect the power adapter.
USB Cable
Set up your digital frame
Auxiliary power
cable
Screw the digital frame stand until it is xed
completely to the frame.
Using the Digital Frame
Viewing pictures
Press [ ].
If you press the [ ] button during a slide show, the <Home>, <Rotate>, <Zoom> and <Settings> menus will appear.
• To use <Rotate>, <View Mode> must be set as <Photo Only>, <Photo & Clock> or <Photo & Calendar>.
• To use <Zoom>, <View Mode> must be set as <Photo Only> or <Photo & Clock>.
Pictures saved in the product’s internal memory or an external
memory device can be viewed in a wide range of options. Only
an SD memory card or USB memory device can be used as an
external memory device. Refer to the following page for menu
options.
Use [▲,▼,◄,►] to
move to the picture you
A slide show begins from
the picture you selected.
want and press [ ].
Using as a Mini Monitor
Connect the digital frame to a PC with the USB cable to use as a Mini
Monitor.
Connect the digital frame to a PC with the USB cable to use as a Mini
Monitor (aux. monitor). You must install Frame Manager on your
PC in order to use the product as a Mini Monitor.
Log on to http://samsung.com/ to download Frame Manager and for
instructions on using the product as a Mini Monitor.
Only one auxiliary monitor can be used at a time.
* The buttons on the digital photo frame are disabled (in Mass
Storage or Mini Monitor mode) when connected to a PC.
!
PC requirements for use as a
• OS: Windows XP SP2, Vista
• USB: Extended Host Controller(EHCT)
USB 2.0 supported
• RAM: 256MB or higher
• CPU: 2.4GHz or higher
Mini Monitor
Page 9

English
8
1
2
3
4
Firmware update
!
Preparations for rmware
update
• Digital photo frame
• Firmware le for update
• USB memory or SD card
Menu Description
Download and install the latest rmware from the Samsung
Electronics homepage.
Log on to http://samsung.com/ and enter the model name
in the search eld. (700T)
Download and decompress the appropriate rmware.
Copy the decompressed ***.isp le to the SD card or USB
memory device and connect to the digital frame.
Select <Settings> - <Support> - < Upgrade Software> with
the buttons on the product. The rmware is updated.
When the update is nished, turn the digital frame off,
remove the external memory device (SD card/USB
memory device), and turn the digital frame on again.
You can check if the rmware version has been updated in
<Settings> - <Support> - <Product Information>.
You can set various functions using buttons.
<Home>
<Copy>
<Delete>
<Select Multiple
Files>
<Select Storage
Device>
<Settings>
* If you use the MENU, select the picture and then, press the [ ] button.
Moves to the main screen.
If an external memory device (SD memory card/ USB
memory device) is connected to the product,
• Copies pictures in an external memory device to the
internal memory.
• Copies pictures in the internal memory to an external
memory device.
Deletes pictures in the internal memory or an external
memory device.
Selects multiple les to run functions like slide show, copy,
delete, etc.
If an external memory device (SD memory card/USB
memory device) is connected to the product,
• Select the internal memory or an external memory
device (SD memory card/USB memory device).
Moves to the Settings screen.
The current time congured in <Settings> - <Clock> is displayed. The
current time setting can be erased if the power adaptor is disconnected for a
prolonged period of time. Please keep the power adapter connected.
Connect the digital frame to a PC with the USB cable to use as a Mini Monitor.
Page 10

9
English
Photos
Clock
General
Support
< Slideshow Transition>
<Slideshow Speed>
<Slideshow Mode>
<Slideshow Order>
<View Mode>
<Aspect Ratio>
<Display Photo Info>
<Clock Set>
<Date Format>
<Time Format>
<Clock Type>
<Quick Setup>
<Language>
<Brightness>
< Auto Picture On/Off >
<Startup Mode>
<Screen Saver>
< Frame Memory Copy>
< Activate USB
Communication>
<Upgrade Software>
<Reset>
<Product Guide>
< Product Information>
Sets the slide show effects.
• <No Effect / Fade / Blinds / Cross Comb / Mosaic / Checkerboard /
Dissolve / Wipe / Extend / Silk / Corner Transition / Wheel / Ellipse /
Random>
Sets the slide show speed.
• <Fast / Normal / Slow>
Images of large le sizes may not be displayed at the currently congured
slideshow speed.
• <All Photos / Photos in folder / One photo>
Sets the slide show order.
• <Normal / Shufe>
Sets the slide show display mode.
• <Photo Only / Photo & Clock / Photo & Calendar / Multiview 1 / Multiview
2>
• <Original Fit>:A picture smaller than the screen is displayed in its original
size and a picture bigger than the screen size is reduced in direct
proportion to the screen size.
• <Auto Fit>: Fits the picture in direct proportion to the screen size.
• <Fit to Width>: Fits the picture to the screen’s horizontal width.
Displays a picture’s le name and date of creation.
Sets the current time.
Select the month, year, day display mode.
(YYYY/MM/DD, MM/DD/YYYY, DD/MM/YYYY)
Selects the time display mode (12 hours, 24 hours).
Selects the clock display mode (<Clock Only>, <Clock & Calendar>).
Easy settings for frequently used functions.
(<View Mode>, <Slideshow Transition>, <Clock Set>, and <Startup Mode>)
Selects the OSD (on-screen display) language.
Adjusts the screen brightness.
Sets the screen to automatically turn on and off at certain times.
Selects the screen to be displayed when the digital frame is switched on.
• <Home> / <Last Mode> / <Slideshow>
If there is no button operation for 10 minutes, the currently congured
screensaver will appear.
• <Slideshow> / <Clock>
• <Original Size>: Copies an original le as is.
• <Resized>: Matches the screen’s optimal resolution by reducing the le
size and then copies.
Selects the recognition mode to be used when the digital frame is
connected to a PC with a USB cable.
Use as a removable disk or Mini Monitor.
Use as a digital photo frame.
Updates the rmware.
You can reset various settings to the factory default settings.
(Time setting and screen language setting excluded).
Product functions guide
Displays product model name, rmware version, internal memory and
copyrights.
Page 11

English
10
Troubleshooting
Check the below table rst when a malfunction is suspected.
Symptoms and questions Causes and corrections
The power won’t switch on. Ensure that the power cable is correctly connected.
Spots which look like light leaking can be
seen on the edges of the clock screen.
The time setting is wrong.
It takes a long time for images to be
displayed after the power has been turned
on.
It takes a long time to move from one image
to the next.
I can’t copy more les even when there
is excess capacity to use in the internal
memory.
I’ve connected an external memory device
(USB memory device or SD memory card)
but it doesn’t work.
JPEG les are not displayed.
Some pictures are not displayed as a
slideshow.
The picture size changes when I rotate it.
The picture looks stretched horizontally or
vertically.
Previews are too slow. Previews may be slow for large-sized images and multiple images.
Slide show effects are displayed when I
have saved only one picture I want in the
memory card or when I pause the slide
show with multiple pictures saved in the
memory card.
In what order are the pictures, which are
saved in the memory card, displayed?
The slide show doesn’t start automatically.
I have set <Auto Picture On/Off> but the
screen doesn’t switch on automatically.
The pictures I copied from a USB memory
or SD card onto the internal memory have
changed in resolution and le size.
Black LCD panel screens by nature can have this effect, which is not
a defect.
The current time setting can be erased if the power adaptor is
disconnected for a prolonged period of time. Keep the power adaptor
connected.
It is recommended to reduce the picture resolution.
You may be unable to copy les if the FAT section of the internal
memory is damaged. Try again after formatting the internal memory.
• 700T can be used by connecting the power adapter instead of the
USB cable.
• Ensure that the external memory device has been connected
properly or try formatting it.
• Ensure that JPEG les are saved in the external memory device.
• Abnormal picture les (0 Kbyte, broken JPEG) will not be displayed
on the screen.
• The connected external memory device is not supported. Try another
storage device.
• Progressively saved JPEG les or JPEG les saved as CMYK color
coordinates will not be displayed.
• Images edited by a JPEG image editor (Photoshop, Paintshop, etc.)
may not be displayed normally. Edit the image on a PC, convert back
to JPEG format, save, and try again.
This product can accommodate a maximum of 4,000 pictures. Any
excess pictures will not be recognized and will not be displayed as a
slide show.
The picture size changes automatically depending on the rotation
angle (90°, -90°) in order to display the entire image on the screen.
] on the slide show screen. Go to <Settings> - <Photos> -
Press [
<Aspect Ratio> and change the setting to <Original Fit> and check
again.
The slide show effects will be displayed automatically in order to
protect the panel. This is not an error.
They are arranged according to the le names. The slide show display
order is determined in the order of number, upper-case letter, and
lower-case letter. Please note that a le name can have up to 255
characters in languages that use the roman alphabet and up to 127 in
other languages.
Ensure that the <Startup Mode> is set to <Slideshow> in <Settings>
- <General>.
• Ensure that the current time has been set correctly.
• The screen will not switch on automatically if you have turned the
digital frame off by pressing [
been set. The screen switches on automatically only if the power has
been switched off automatically at the Auto Picture Off time.
This product is designed to reduce the le size of high-resolution
pictures to t the screen’s ideal resolution when they are copied onto
the internal memory.
If you want to disable the settings, you can change to the original size
by selecting <Settings> - <General> - <Frame Memory Copy>.
] when <Auto Picture On/Off> has
Page 12

11
English
The digital frame is not recognized as a
removable disk when I connect it to a PC
with the USB cable.
The 700T has 2 USB connectors. You must connect the USB
connector [
as a removable disk if only the auxiliary power (DC 5V) connector is
connected to a PC.
] because the digital frame will not be recognized
Product Specications
Classication Details
Model name 700T
Panel Type 7” TFT LCD
Resolution 800 x 600
Supported format JPEG (Progressive or CMYK type pictures are not supported.)
Internal memory 1 GB
USB Host (USB 2.0) / Device (USB 2.0)
Power
supply
General Size (Width x height x depth) 200.7 x165.3 x 30.0 mm
The product design may differ according to the model, and specications are subject to change without prior
notice for product performance enhancement.
This device is a Class B digital apparatus.
N Recommended memory capacities for different types of memory cards:
Rating External DC power supply device (12 V)
Power consumption General: 5.3 W / Power off: Under 1 W
Weight 350 g
(The recommended memory capacities indicated below are based on our factory test and may differ depending on the
manufacturer.)
SD Up to 2 GB
microSD Up to 2 GB
miniSD Up to 256 MB
SDHC Up to 16 GB
microSDHC Up to 8 GB
USB Up to 32 GB
Page 13

Contact SAMSUNG WORLD-WIDE
If you have any questions or comments relating to Samsung products, please contact the SAMSUNG customer
care center.
North America
U.S.A 1-800-SAMSUNG (726-7864) http://www.samsung.com
CANADA 1-800-SAMSUNG (726-7864) http://www.samsung.com
MEXICO
ARGENTINA 0800-333-3733 http://www.samsung.com
BRAZIL 0800-124-421, 4004-0000 http://www.samsung.com
CHILE
COLOMBIA 01-8000112112 http://www.samsung.com
COSTA RICA 0-800-507-7267 http://www.samsung.com
ECUADOR 1-800-10-7267 http://www.samsung.com
EL SALVADOR 800-6225 http://www.samsung.com
GUATEMALA 1-800-299-0013 http://www.samsung.com
HONDURAS 800-7919267 http://www.samsung.com
JAMAICA 1-800-234-7267 http://www.samsung.com
NICARAGUA 00-1800-5077267 http://www.samsung.com
PANAMA 800-7267 http://www.samsung.com
PUERTO RICO 1-800-682-3180 http://www.samsung.com
REP. DOMINICA 1-800-751-2676 http://www.samsung.com
TRINIDAD &
TOBAGO
VENEZUELA
AUSTRIA
BELGIUM 02-201-24-18 http://www.samsung.com/
CZECH 800 - SAMSUNG (800-726786) http://www.samsung.com
DENMARK 70 70 19 70 http://www.samsung.com
EIRE 0818 717100 http://www.samsung.com
ESTONIA 800-7267 http://www.samsung.com
FINLAND 030 - 6227 515 http://www.samsung.com
FRANCE 01 48 63 00 00 http://www.samsung.com
GERMANY
HUNGARY 06-80-SAMSUNG (726-7864) http://www.samsung.com
ITALIA 800-SAMSUNG (726-7864) http://www.samsung.com
LATVIA 8000-7267 http://www.samsung.com
LITHUANIA 8-800-77777 http://www.samsung.com
LUXEMBURG 261 03 710 http://www.samsung.com
NETHERLANDS
NORWAY 815-56 480 http://www.samsung.com
POLAND
PORTUGAL 80820-SAMSUNG (726-7864) http://www.samsung.com
SLOVAKIA 0800-SAMSUNG (726-7864) http://www.samsung.com
SPAIN
01-800-SAMSUNG (726-7864) http://www.samsung.com
Latin America
800-SAMSUNG (726-7864) http://www.samsung.com
1-800-SAMSUNG (726-7864) http://www.samsung.com
0-800-100-5303 http://www.samsung.com
Europe
0810 - SAMSUNG (7267864, €
0.07/min)
Samsung Zrt., česká organizační složka, Oasis Florenc,
Sokolovská394/17, 180 00, Praha 8
01805 - SAMSUNG (726-7864
€ 0,14/Min)
0900-SAMSUNG
(0900-7267864) (€ 0,10/Min)
0 801 1SAMSUNG (172678),
022-607-93-33
902 - 1 - SAMSUNG
(902 172 678)
http://www.samsung.com
be (Dutch)
http://www.samsung.com/
be_fr (French)
http://www.samsung.com
http://www.samsung.com
http://www.samsung.com
http://www.samsung.com
SWEDEN 0771 726 7864 (SAMSUNG) http://www.samsung.com
SWITZERLAND 0848 - SAMSUNG
U.K 0845 SAMSUNG (7267864) http://www.samsung.com
ARMENIA 0-800-05-555 -
AZERBAIJAN 088-55-55-555 -
BELARUS 810-800-500-55-500 -
GEORGIA 8-800-555-555 -
KAZAKHSTAN 8-10-800-500-55-500 -
KYRGYZSTAN 00-800-500-55-500 http://www.samsung.com
MOLDOVA 00-800-500-55-500 -
RUSSIA 8-800-555-55-55 http://www.samsung.com
TADJIKISTAN 8-10-800-500-55-500 http://www.samsung.com
UKRAINE 8-800-502-0000 http://www.samsung.com/
UZBEKISTAN 8-10-800-500-55-500 http://www.samsung.com
AUSTRALIA 1300 362 603 http://www.samsung.com
CHINA
HONG KONG (852) 3698 - 4698
INDIA
INDONESIA 0800-112-8888 http://www.samsung.com
JAPAN 0120-327-527 http://www.samsung.com
MALAYSIA 1800-88-9999 http://www.samsung.com
NEW ZEALAND 0800 SAMSUNG (0800 726 786) http://www.samsung.com
PHILIPPINES
SINGAPORE 1800-SAMSUNG(726-7864) http://www.samsung.com
TAIWAN 0800-329-999 http://www.samsung.com
THAILAND
VIETNAM 1 800 588 889 http://www.samsung.com
BAHRAIN 8000-4726 -
JORDAN 800-22273 -
SOUTH AFRICA 0860-SAMSUNG(726-7864) http://www.samsung.com
TURKEY 444 77 11 http://www.samsung.com
U.A.E 800-SAMSUNG(726-7864) http://www.samsung.com
(7267864, CHF 0.08/min)
CIS
Asia Pacic
400-810-5858
010-6475 1880
3030 8282
1800 110011
1800 3000 8282
1800 266 8282
1-800-10-SAMSUNG (726-7864)
1-800-3-SAMSUNG (726-7864)
1-800-8-SAMSUNG (726-7864)
02-5805777
1800-29-3232
02-689-3232
Middle East & Africa
http://www.samsung.com/
ch, http://www.samsung.
com/ch_fr (French)
ua, http://www.samsung.
com/ua_ru
http://www.samsung.com
http://www.samsung.
com/hk
http://www.samsung.
com/hk_en/
http://www.samsung.com
http://www.samsung.com
http://www.samsung.com
 Loading...