

Samsung LN40A530, LN46A503P1F, LN37A530P1F, LN40A530P1F, LN46A530P1F User Manual
...
Contact SAMSUNG WORLDWIDE
If you have any questions or comments relating to Samsung products, please contact the SAMSUNG
customer care center.
Contacte con SAMSUNG WORLDWIDE
Si tiene alguna pregunta o comentario referente a nuestros productos, por favor contacte con nuestro Servicio de Atenci6n al
CIiente.
Samsung Electronics Canada Inc., Customer
Service 55 Standish Court Mississauga,
Ontario LSR 4B2 Canada
CANADA 1-800-SAMSUNG(726-7864) www.samsung.com/ca
Samsung EIectronique Canada Inc.,
Service a la Clientele 55 Standish Court
Mississauga, Ontario L5R 4B2 Canada
Samsung Electronics America, Inc.
U.S.A 1-800-SAMSUNG(726-7864) www.samsung.com 105 Challenger Road
Ridgefield Park, NJ 07660-0511
BN68-01392D-01
imagine the possibilities
Thank you for purchasJnc this Samsung procluct.
To receive more complete service, please reg ster
your procluct a_:
www.samsung.comiglobaliregister
Model_ Serial No.
important Warranty Regarding Viewing
information Television Format
Wide screenformatLCD Displays(16:9, the aspectratioofthe screenwidth to height)are primarilydesignedtoview widescreenformat
full-motion video.The images displayed on them shouldprimarily be inthe wide screen 16:9ratio format, or expandedto fill thescreenif
your modeloffers this feature andthe images areconstantly moving.Displayingstationarygraphics andimages on screen,such as the dark
sidebars on nonexpandedstandard formattelevisionvideoand programming,shouldbe limitedto no morethan 5% of the total television
viewing perweek
Additionally,viewing otherstationary imagesand text suchasstock market reports,video gamedisplays, station legos, websitesor computer
graphics and patterns, shouldbe limited asdescribed abovefor all televisions. Displayingstationaryimagesthatexceed the above guidelines
can cause unevenaging of LCDDisplaysthatleave subtle, butpermanentburned-inghost images inthe LCD picture. Toavoidthis,vary the
programmingand images,and primarilydisplay full screen moving images,notstationarypatterns or dark bars.
On LCDmodelsthatofferpicture sizingfeatures,usethesecontrolsto viewdifferentformats as a fullscreen picture.
Becarefut in the selectionandduration oftelevisionformatsused for viewing.Uneven LCD agingas aresult of format selection anduse, as
well as burned-in images,are not covered by your Samsunglimited warranty.
U.S.A Only
The product unit accompanyingthis user manual is licensed under certain intellectualproperty rights of certain third parties.In particular,
this product is licensedunderthe following USpatents:5,991,715,5,740,317,4_972,484_5,214_678_5,323,396,5,539,829,5,806,618,
5,530,655,5,777,992,6,289,308,5_610_985_5,481_643_5,544,247,5,980,037,6,023,490,5,878,080,and under US PublishedPatent
Application No 2001-44713-A1.
This licenseis limited to private non-commercialuseby end-userconsumersfor licensedcontents. No rights are grantedfor commercial
use.The license does not coverany product unitother than this productunit andthe license doesnot extendto anyunlicensed product unit
or processconforming to ISO/tEC11172-3or ISO/IEC13818-3usedor sold incombinationwith this productunit The license only covers
the use ofthis product unitto encodeand/ordecodeaudiofiles conformingto the ISO/IEC11172-3or tSO/IEC13818-3 Norights are
grantedunderthislicensefor productfeaturesor functionsthatdo not conform tothe tSO/IEC 11172-3or ISO/IEC13818-3.
Other countries
The product unit accompanyingthis user manual is licensed under certain intellectualproperty rights of certain third parties.This license is
limitedto privatenon-commercialuse by end-user consumersfor licensedcontents No rightsare grantedfor commercialuse The license
doesnot coveranyproduct unitotherthan thisproduct unit andthe license does not extend to any unlicensed productunit or process
conformingto tBO/IEC 11172-3or ISO/IEC13818-3usedor sold in combinationwiththis product unit.The licenseonlycovers the useof
this product unitto encodeand/or decodeaudiofiles conformingto the ISO/IEC11172-3ortSO/tEC 13818-3.Norights are granted under
this licensefor productfeaturesor functionsthatdo not conformto the ISO/IEC 11172-3or IBO/tEC 13818-3.
8AMSUNG ELECTRONICSNORTHAMERICANLIMITEDWARRANTYSTATEMENT
Subject to me requirements,oona_uons,exclusionsand limitationsoftheoriginal LimitedWarrantysuppliedwith SamsungElectronics
SAMSUNG;uroaucts,andtne reouiremems,conal[ions exclusionsandlimitationscontained hereir SAMSUNGwill additionallyprovide
Warranty RepairServicein the UnitedStatesonSAMSUNG products purchased in Canada and in Canadaon SAMSUNGprouucts
purchasedin the UnitedStates,for the warrantyperiodoriginally specified,andto theOriginal Purchaseron!
The abovedescribedwarrantyrepairs mustbeperformedbya SAMSUNGAuthorizedService CentenAlong withthis Statement the
Original LimitedWarrant; Statement and aaatea Billof Saleas Proofo"Uurcnasemustee presentedtothe ServiceCenter.Transporrauon
[o and fromthe ServiceCenter isthe responsiDHl[yofthe purchaser.
Conditionscoveredare limitedon y to manufacturingdefectsin materialo[workmanship,and only mose encoumerecin normal use ofthe
product.
Excluded but not limitedto. are anyoriginally specified provisionsfoL in-nomeor on-siteservices minimumor maximumrepairt_mes.
exchangesor replacemenl:s,accessories opuons,upgrades,or consumables.
For the locationof aSAMSUNGAuthorized ServiceCenter, please cal toll-free:
In the United States : 1-800-SAMSUNG(1-800-726-7864} InCanada : !-800-BAMSUNG
See the warranty card for more information on warranty terms.
Precautions When Displaying a Still image
A stJl}image may Cause permanent damage to the TV Screen
• Do not display a still image on the LCD panel for more than 2 hours as it can cause screen image retention. This image
retention is also known as !'screen burn" To arc d such image retention, reduc e the degree of brightness and contrast of the
screen when displaying a st!i! image.
Watching the LCD TV in 4:3 format for a !ong period of time may leave traces of borders disp!ayed on the !eft,
right and center of the screen caused by the difference of light emission on the screen.
Playing a DVD or a game Console may Cause a similar effect to the Screen.
bore effect ate not covered by the Warranty.
• Displaying stil! images from Video games and PC for longer than a certain period of time may produce partial after-images.
To prevent this effect, reduce the 'brightness! and !contrast' when displaying still images.
© 2008 Samsung Electronics Co., Ltd. All rights reserved.
Contents
m Listof Features................................................................ 2 s Managing Channels ......................................... 34
m Accessories ........................................................ 2 m Clearing ScramDlea Channels- Digital............................40
m viewing the Control Panel ............................................... 3 u Fine Tuning Analog _,hanneIs..................................... 40
m viewing the Connection Panel................................. 4 • Checkingthe Digital-Signal Strength ............................... 41
Remote Control ................................................................. 5
m Installing Batteries in the Remote Control .........................6
m Using YourTV asa Computer (PC) Display ................. 42
s Display Modes................................................................ 42
Connecung VHF and uHF Antennas ................................ 6 • Setting up the TV with your PC ............................. 43
Connecting Cable TV .............................................. 7
m Connecting a DVD Player or Cable Box/Satellite receiver
Set-TeDBox wa HDMI..................................................... 8
m Connecting a DVD Player or Cable Box/Satellite recewer
_Set-TODBox via DVt 8
u Connecting a DVD Player or Cable Box/Bateltite receiver
Set-TeDBox_via Component cables .................. 9
m Connecting a Camcorder ........................ 9
m Connecting a VCR ...................................................... 10
m Connecung a Digital Audio System .................................!1
u Connecting an Amptifier/DVD Home Theater ............. 11
m Connecting a PC ............................................................ 1!
m Turning the TV On and O_ ............................................ 12
Plug & Play Feature......................................................... 12
m Changing Channels ...................................................... 13
m Adjusting me Volume................................................... 14
! Viewing the Display ......................................................... !4
wewlng _neMenus .......................
u Usingthe TOOLS Button ............... I5
m Memonzlng the Channels ............................................ 15
m To Select the Source ................................. 17
m To Edit the Inout Source Name....................................... 17
Changing the Picture Stanaara .................. 18
m Customizing the Picture Settings .......... 18
u Adjusting the Detailec Settings .................. 19
u Resetting the Picture Settings to the Factory Defaults....22
m Configunng Picture Options ..................................... 23
m Setting the Clock ...................................................... 45
Selecting a Menu Language............................... 49
using the V-Chip.............................................................. 49
i viewing Closed Captions (On-Screen Text Messages_
-Analog ........................................................................... 56
[] Viewing Closed Captions (On-Screen TextMessages}
- Digl[al ............................................................................ 57
B A(]jusung the TV On/Off Metod_ Sound......................... 58
Setting the Entertainment mode ........ 58
Using the Energy Saving Feature.............. 59
Upgrading the Software ..........60
[] What isAnynet+? ................................................ 61
Connecting An_ _et"_Devices .................... 61
Setting Up Anyne[ _ 62
Scanning and Switching between Anynet+ Devices........62
Recording ....................................................................... 63
Listening [nrough a Receiver •_ome [nea_e[_..................64
R TroubleshootingforAnyne[ _ ......................................... 64
m Troubleshooting ............................................................... 65
Instailing the Stand ......................................................... 67
Disconnecting the Stand....... 67
m Viewing Picture-in-Picture ................................................27 • Auto Walt-MountAdjustment Sotd separa[ely,, ............. 68
m Changing the Sound Standard .............................. 29
m Customizing the Sound ................................................... 29
m Setting the TruSurround XT ............................................ 30
m Choosing Preferred Language ...................................... 31
m Choosing a Multi-Channel Sound (MTS_[rack ................31
u Automatic Volume Control .............................................32
n Setting the TV Speakers OnlOff ...................................... 32 A
us_enlng _othe Sound of the Sub (PIP/Picture ............ 33
Resetting the Sound Settings to the Factory Defaults.....33
Connecting _eaclpnones tSotd seoarately_.....................33 Symbol Press
_iatl Mount Kit Specifications/VESA ........................... 69
[] Uslng theAnti-Theft Kensing[on LOCK............................ 70
Specifications ................................................................ 71
Dimensions.................................... 72
Note One-Touch Button
List of Features
• Adjustable picture settings that can be stored in the TV's memory.
• Automatic timer to turn the TV on and off.
• A special sleep timer.
• Excellent Digital interface & Networking :
With a buitt-in HD digital tuner, non-subscription HD broadcasts can be viewed with no Cable Box/Satellite receiver
(Set-Top Box) needed.
• HDMI/DVI connection of your PC to this TV.
• Excellent Picture Quality
- DNle technology provides life-like clear images.
• SRS TruSurround XT
- SRS TruSurround XT provides a virtual surround system.
Accessories
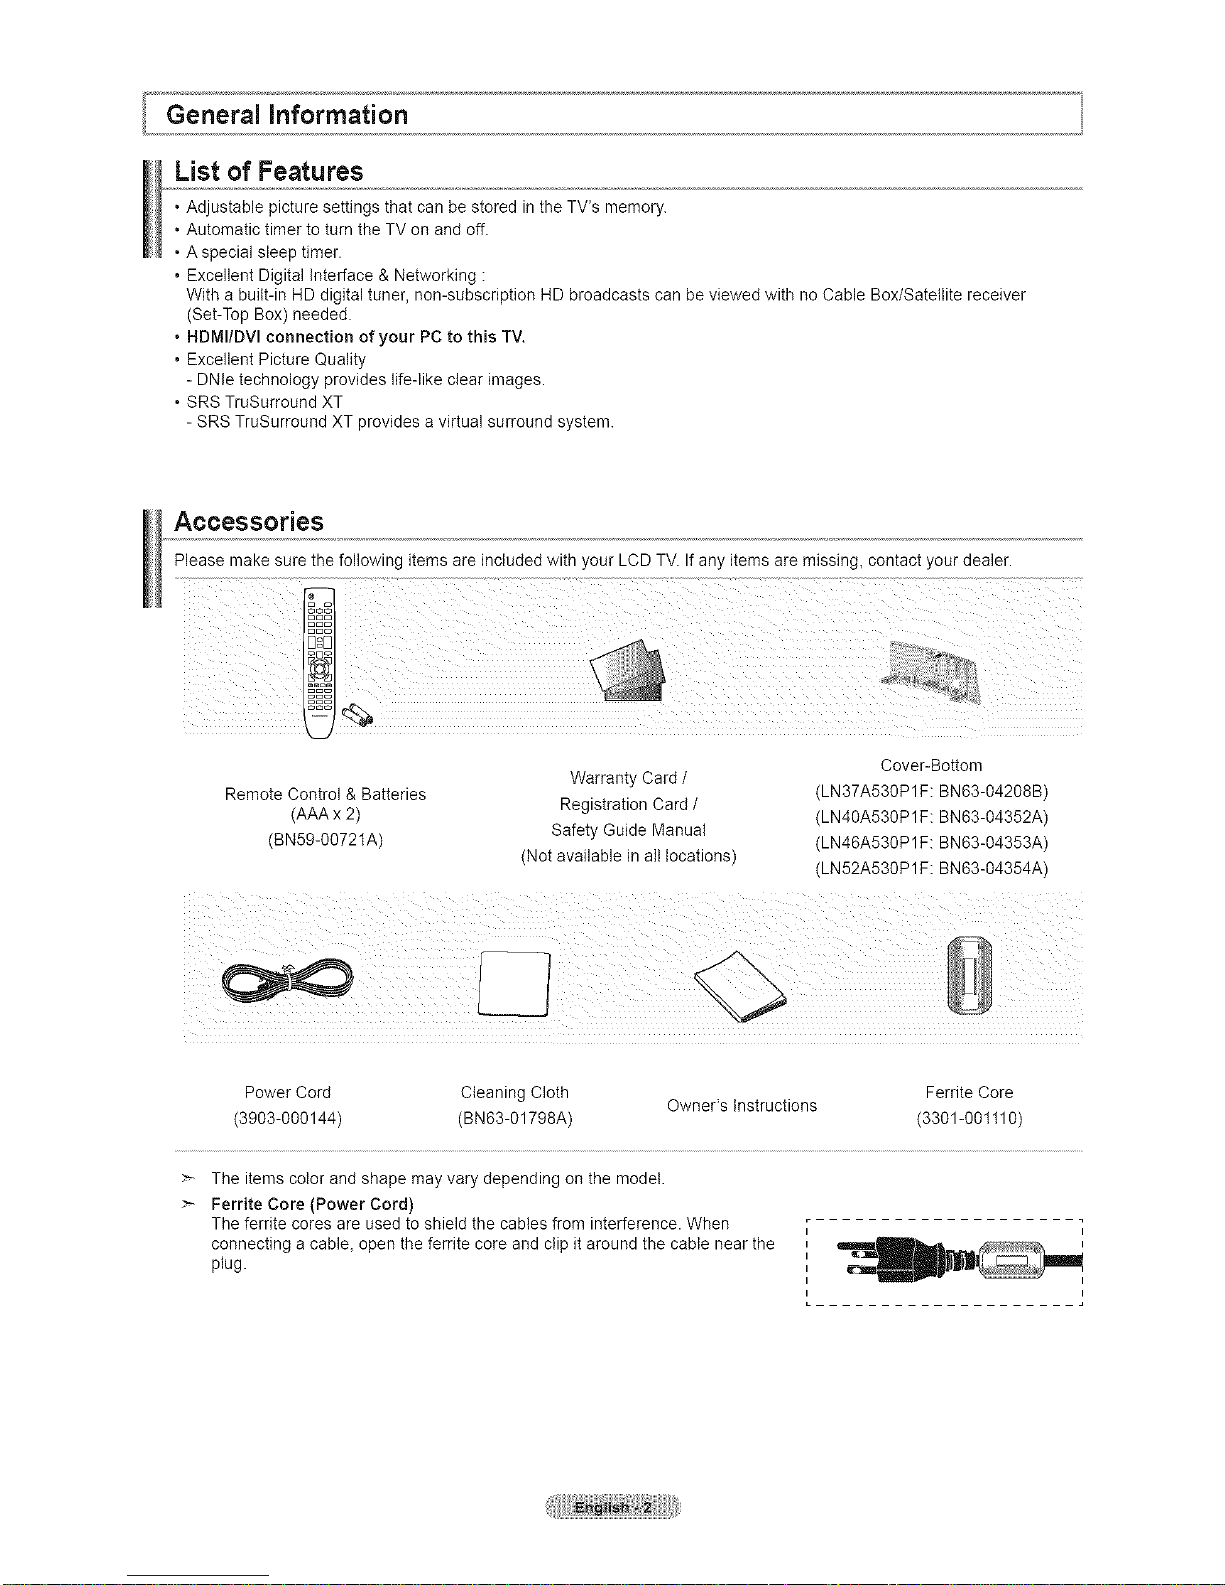
Please make sure the following items are included with your LCD TV. If any items are missing, contact your dealer.
Do_
k_J
Remote Control & Batteries
(AAA x 2)
(BN59-OO721A)
Warranty Card /
Registration Card /
Safety Guide Manual
(Not available in all locations)
Cover-Bottom
(LN37A530P1F: BN63-04208B)
(LN40A530P1F: BN63-04352A)
(LN46A53OP1F: BN63-04353A)
(LN52A53OP1F: BN63-O4354A)
Power Cord Cleaning Cloth Ferrite Core
Owner's Instructions
(3903-000144) (BN63-01798A) (3301-001110)
The items color and shape may vary depending on the model.
Ferrite Core (Power Cord)
The ferrite cores are used to shield the cables from interference. When
connecting a cable, open the ferrite core and clip it around the cable near the
plug.

Viewing the Control Panel
Buttons on the Lower-Right Part of the Panel
The buttons on the lower-right panel controt your TV's basic features, including the on-screen menu.
To use the more advanced features, you must usa the remote control.
SA_SUNG
y y
©U_
MENU _?*#*_ w/_7,¢7/O
+
VOL _/_v/_
A
Front Panel buttons
Touch each button to
The product color and shape may vary depending on the model, operate.
= ....................................................................................................... =
O SOURCE
Toggles between all the available input sources
(TV, AV1, AV2, S-Video, Component1, Component2, PC,
HDMI1, HDMI2/DVt, HDMI3). In the on-screen menu,
use this button as you would use the ENTER _ button
on the remote control,
O MENU
Press to see an on-screen menu of your TV's features.
O - VOL +
Press to increase or decrease the volume.
In the on-screen menu, use the - VOL + buttons as you
would use the _ and _ buttons on the remote control.
O vCH^
Press to change channels.
In the on-screen menu, use the v CH ^ buttons as
you would use the • and _, buttons on the remote
control.
O POWER INDICATOR
Blinks and turns off when the power is on and lights up
in stand-by mode.
O _ (Power)
Press to turn the TV on and off.
O REMOTE CONTROL SENSOR
Aim the remote control towards this spot on the TV.
Q SPEAKERS
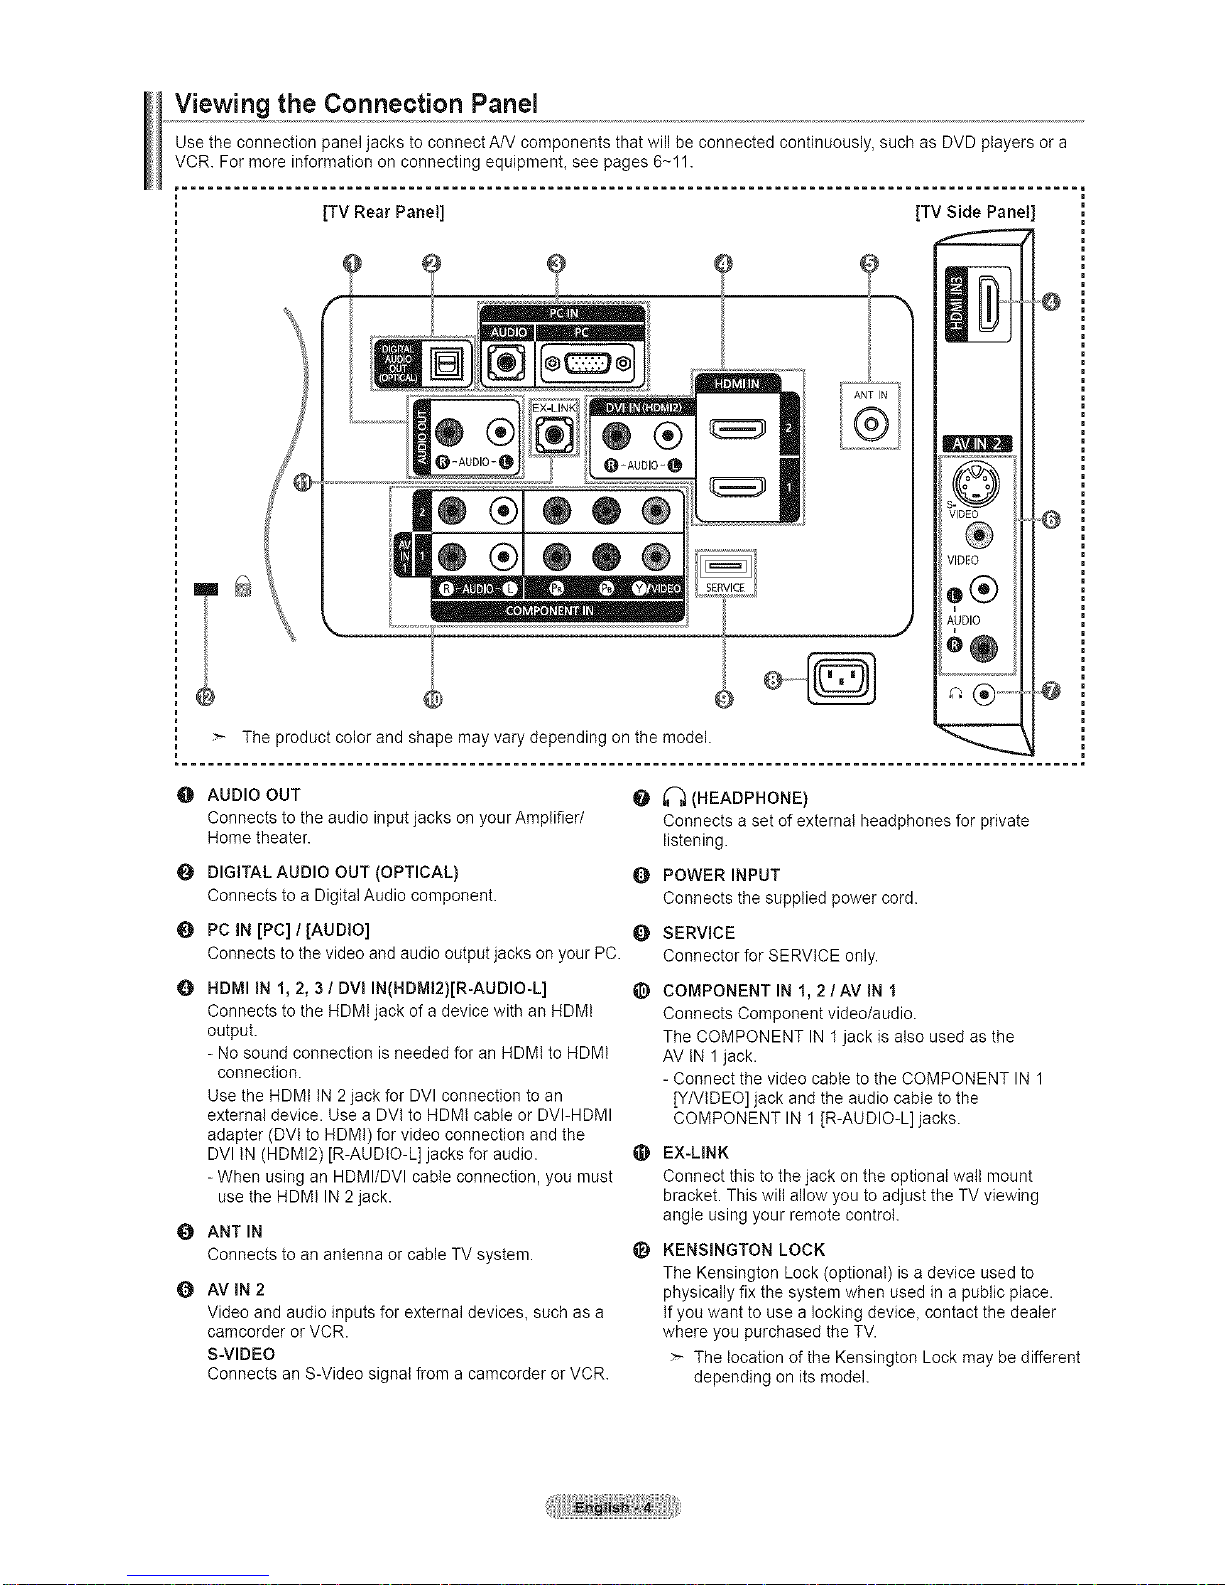
Viewing the Connection Panel
Use the connection panel jacks to connect A/V components that will be connected continuously, such as DVD players or a
VCR. For more information on connecting equipment, see pages 6-11.
[TV Rear Panel] [TV Side Panel
The product color and shape may vary depending on the model.
O AUDIO OUT
Connects to the audio input jacks an your Amplifier/
Home theater.
O
O DIGITAL AUDIO OUT (OPTICAL) Q
Connects to a Digital Audio component.
O PC IN [PC] / [AUDIO] Q
Connects to the video and audio output jacks on your PC.
O HDMI IN 1, 2, 3 / DVl IN(HDMI2)[R-AUDIO-L] _)
Connects to the HDMI jack of a device with an HDMI
output.
- No sound connection is needed for an HDMt to HDMI
connection.
Use the HDMt tN 2 jack for DVl connection to an
external device. Use a DVt to HDMt cable or DVI-HDMI
adapter (DVt to HDMt) for video connection and the
DVI IN (HDMI2) [R-AUDIO-L] jacks for audio. _)
- When using an HDMI/DVl cable connection, you must
use the HDMI IN 2 jack.
ANT IN
Connects to an antenna or cable TV system. _)
O AVIN2
Video and audio inputs for extemaJ devices, such as a
camcorder or VCR.
S-VIDEO
Connects an S-Video signal from a camcorder or VCR.
(HEADPHONE)
Connects a set of external headphones for private
listening.
POWER INPUT
Connects the supplied power cord.
SERVICE
Connector for SERVICE only.
COMPONENT IN 1, 2/AV IN 1
Connects Component video/audio.
The COMPONENT IN f jack is also used as the
AV tN 1 jack.
- Connect the video cable to the COMPONENT IN 1
[Y/VIDEO] jack and the audio cable to the
COMPONENT IN 1 [R-AUDIO-L] jacks.
EX-LINK
Connect this to the jack on the optional wall mount
bracket. This wilt allow you to adjust the TV viewing
angle using your remote control.
KENSINGTON LOCK
The Kensington Lock (optional) is a device used to
physically fix the system when used in a public place.
If you want to use a locking device, contact the dealer
where you purchased the TV.
The location of the Kensington Lock may be different
depending on its model.
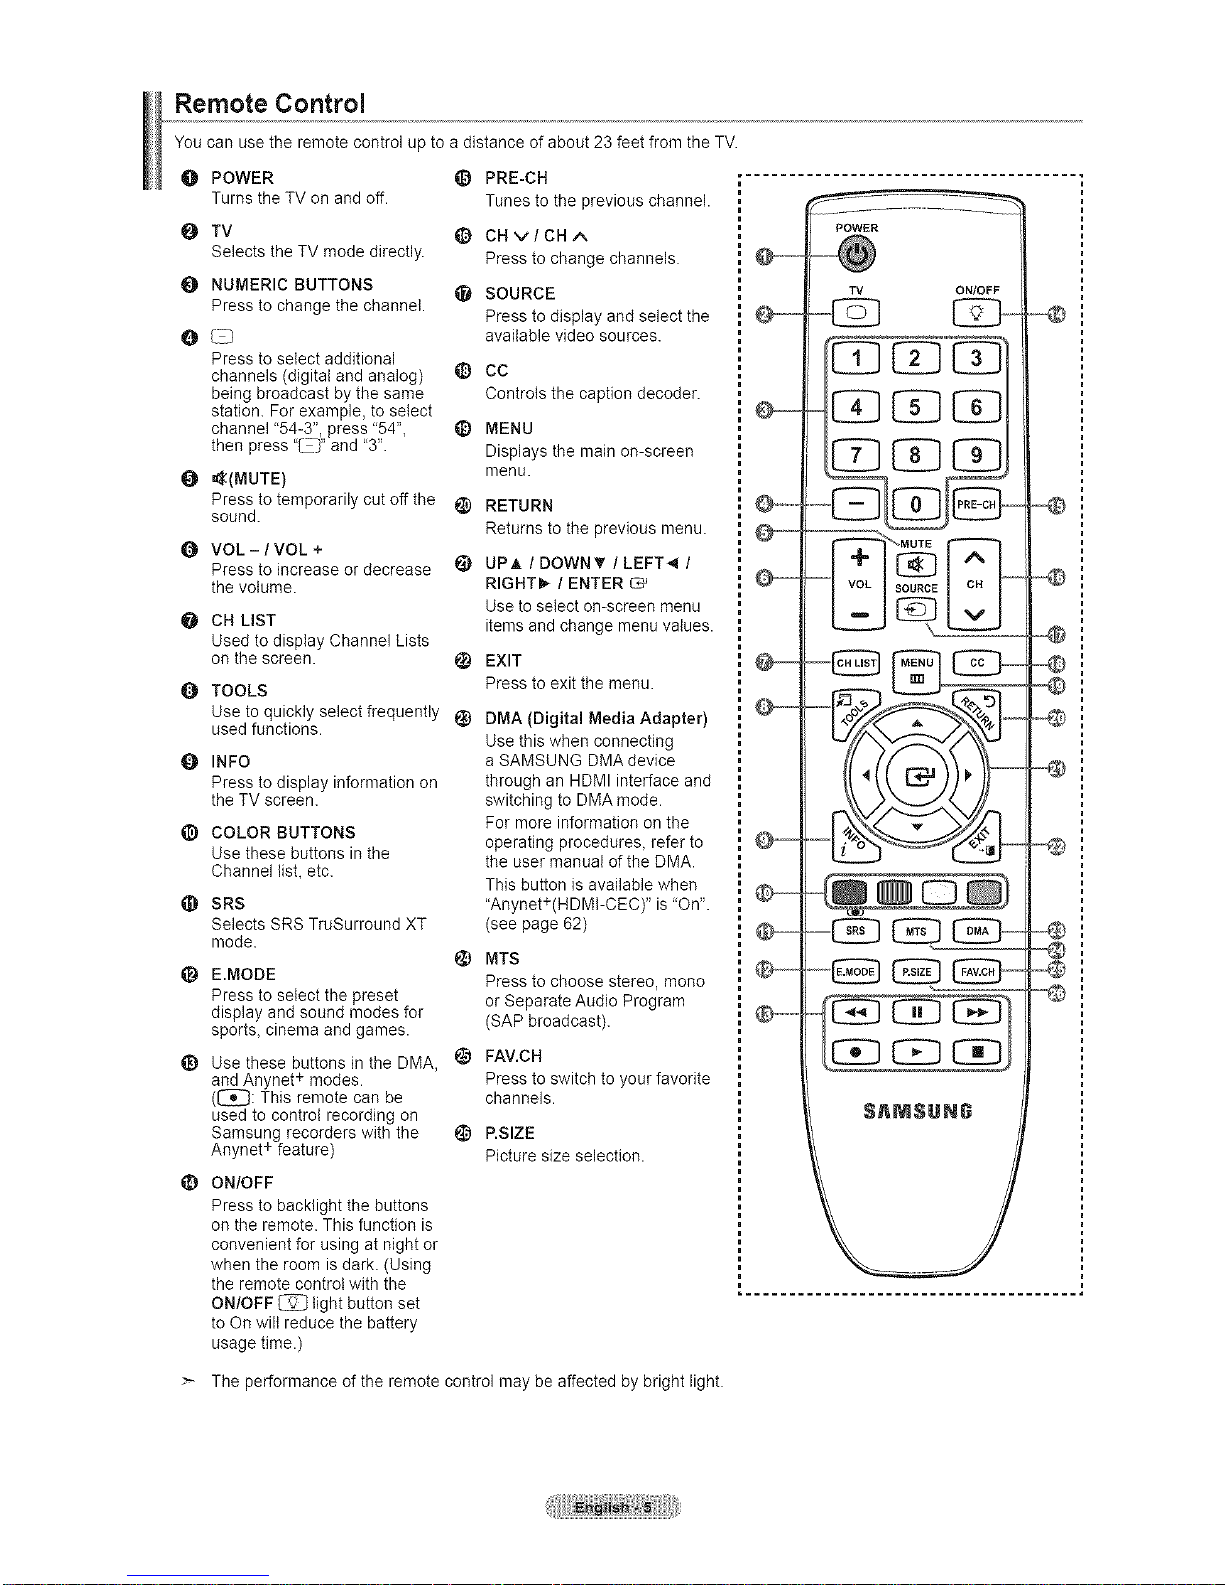
Remote Control
You can use the remote control up to a distance of about 23 feet from the TV.
O POWER (1) PRE-CH ........................................
Turns the TV on and off.
O TV
Selects the TV mode directly.
NUMERIC BUTTONS
Press to change the channel.
Press to select additional
channels (digital and analog)
being broadcast by the same
station. For example, to setect
channel "54-3", press '54",
then press "[_-7'and "3".
O =_(MUTE)
Press to temporarily cut off the i_)
sound.
Q VOL-/VOL+
Press to increase or decrease _)
the volume.
O CH LiST
Used to display Channel Lists
on the screen. _)
TOOLS
Use to quickly select frequently (_)
used functions.
INFO
Press to display information on
the TV screen.
_) COLOR BUTTONS
Use these buttons in the
Channel list, etc.
@ SRS
Selects SRS TruSurround XT
mode.
_) E.MODE
Press to select the preset
display and sound modes for
sports, cinema and games.
_) Use these buttons in the DMA,
and Anynet + modes.
([_: This remote can be
used to control recording on
Samsung recorders with the
Anynet + feature)
ON/OFF
Press to backlight the buttons
on the remote. This function is
convenient for using at night or
when the room is dark. (Using
the remote control with the
ON/OFF _ tightbutton set
to On wilt reduce the battery
usage time.)
Tunes to the previous channel.
O CHv/CH^
Press to change channels.
SOURCE
Press to display and select the
available video sources.
@ CC
Controts the caption decoder.
@ MENU
Displays the main on-screen
menu.
RETURN
Returns to the previous menu.
UPA / DOWN_' / LEFT_ /
RIGHT_,- / ENTER
Use to select on-screen menu
items and change menu values.
EXIT
Press to exit the menu.
DMA (Digital Media Adapter)
Use this when connecting
a SAMSUNG DMA device
through an HDMI interface and
switching to DMA mode.
For more information on the
operating procedures, refer to
the user manual of the DMA.
This button is available when
"Anynet+(HDMFCEC) '' is 'On".
(see page 62)
MTS
Press to choose stereo, mono
or Separate Audio Program
(SAP broadcast).
FAV.CH
Press to switch to your favorite
channels.
@ P.SEE
Picture size selection.
O .........
O o-
POWER
TV ONIOFF
.... t:3D-
EE]EE]
-N
_©
o_
$AIVISUNG
> The performance of the remote control may be affected by bright light.
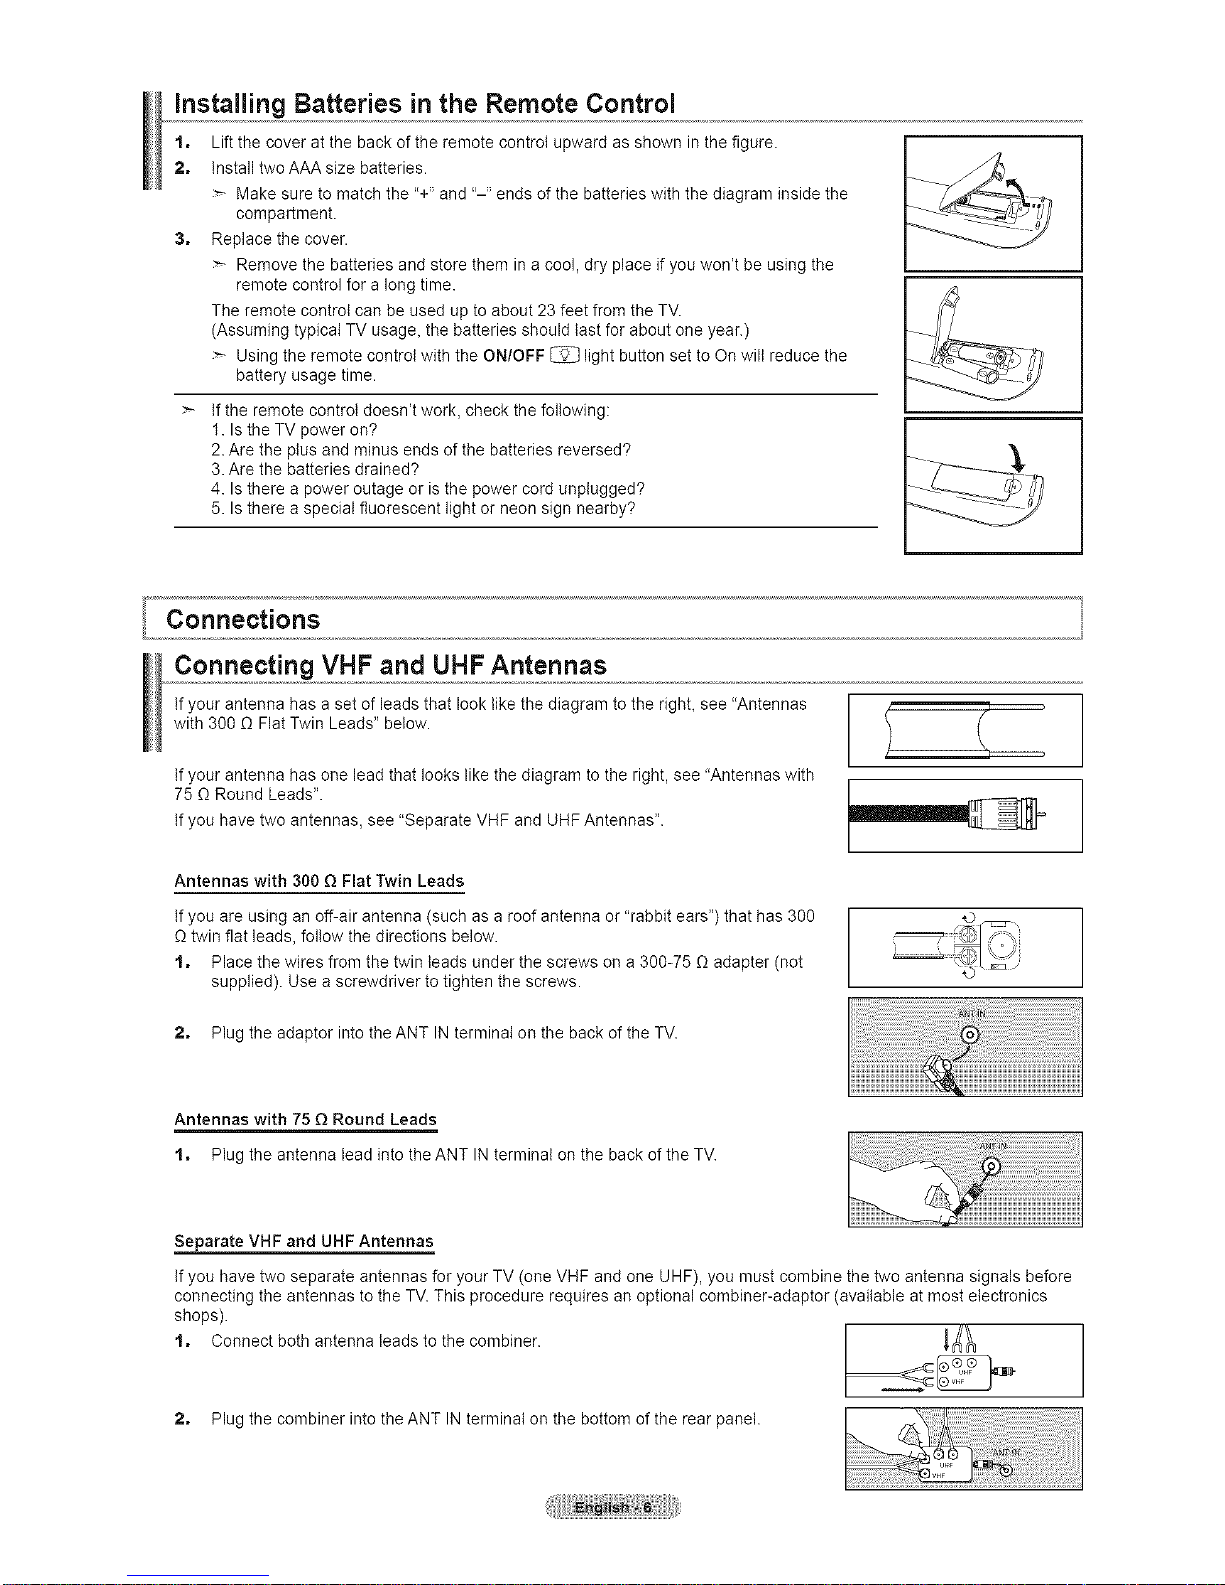
Installing Batteries in the Remote Control
t,
2,
3,
Lift the cover at the back of the remote control upward as shown in the figure.
Install two AAA size batteries.
Make sure to match the "+" and "-" ends of the batteries with the diagram inside the
compartment.
Replace the cover.
Remove the batteries and store them in a cool, dry place if you won't be using the
remote control for a long time.
The remote control can be used up to about 23 feet from the TV.
(Assuming typical TV usage, the batteries should last for about one year.)
Using the remote control with the ON/OFF _ light button set to On wilt reduce the
battery usage time.
If the remote control doesn't work, check the following:
1. Is the TV power on?
2.Are the plus and minus ends of the batteries reversed?
3.Are the batteries drained?
4. Is there a power outage or is the power cord unplugged?
5. Is there a special fluorescent light or neon sign nearby?
Connecting VHF and UHF Antennas
If your antenna has a set of leads that look like the diagram to the right, see "Antennas
with 300 [3 Flat Twin Leads" below.
If your antenna has one lead that looks like the diagram to the right, see 'Antennas with
75 [3 Round Leads".
If you have two antennas, see "Separate VHF and UHF Antennas".
Antennas with 300 _ Fiat Twin Leads
If you are using an off-air antenna (such as a roof antenna or "rabbit ears") that has 300
[3twin flat leads, follow the directions below.
t, Place the wires from the twin leads under the screws on a 300-75 [3 adapter (not
supplied). Use a screwdriver to tighten the screws.
2, Plug the adaptor into the ANT IN terminal on the back of the TV.
Antennas with 75 _ Round Leads
t, Plug the antenna lead into the ANT IN terminal on the back of the TV.
Separate VHF and UHF Antennas
If you have two separate antennas for your TV (one VHF and one UHF), you must combine the two antenna signals before
connecting the antennas to the TV.This procedure requires an optional combiner-adaptor (available at most electronics
shops).
t, Connect both antenna leads to the combiner.
2, Plug the combiner into the ANT IN terminal on the bottom of the rear panel.
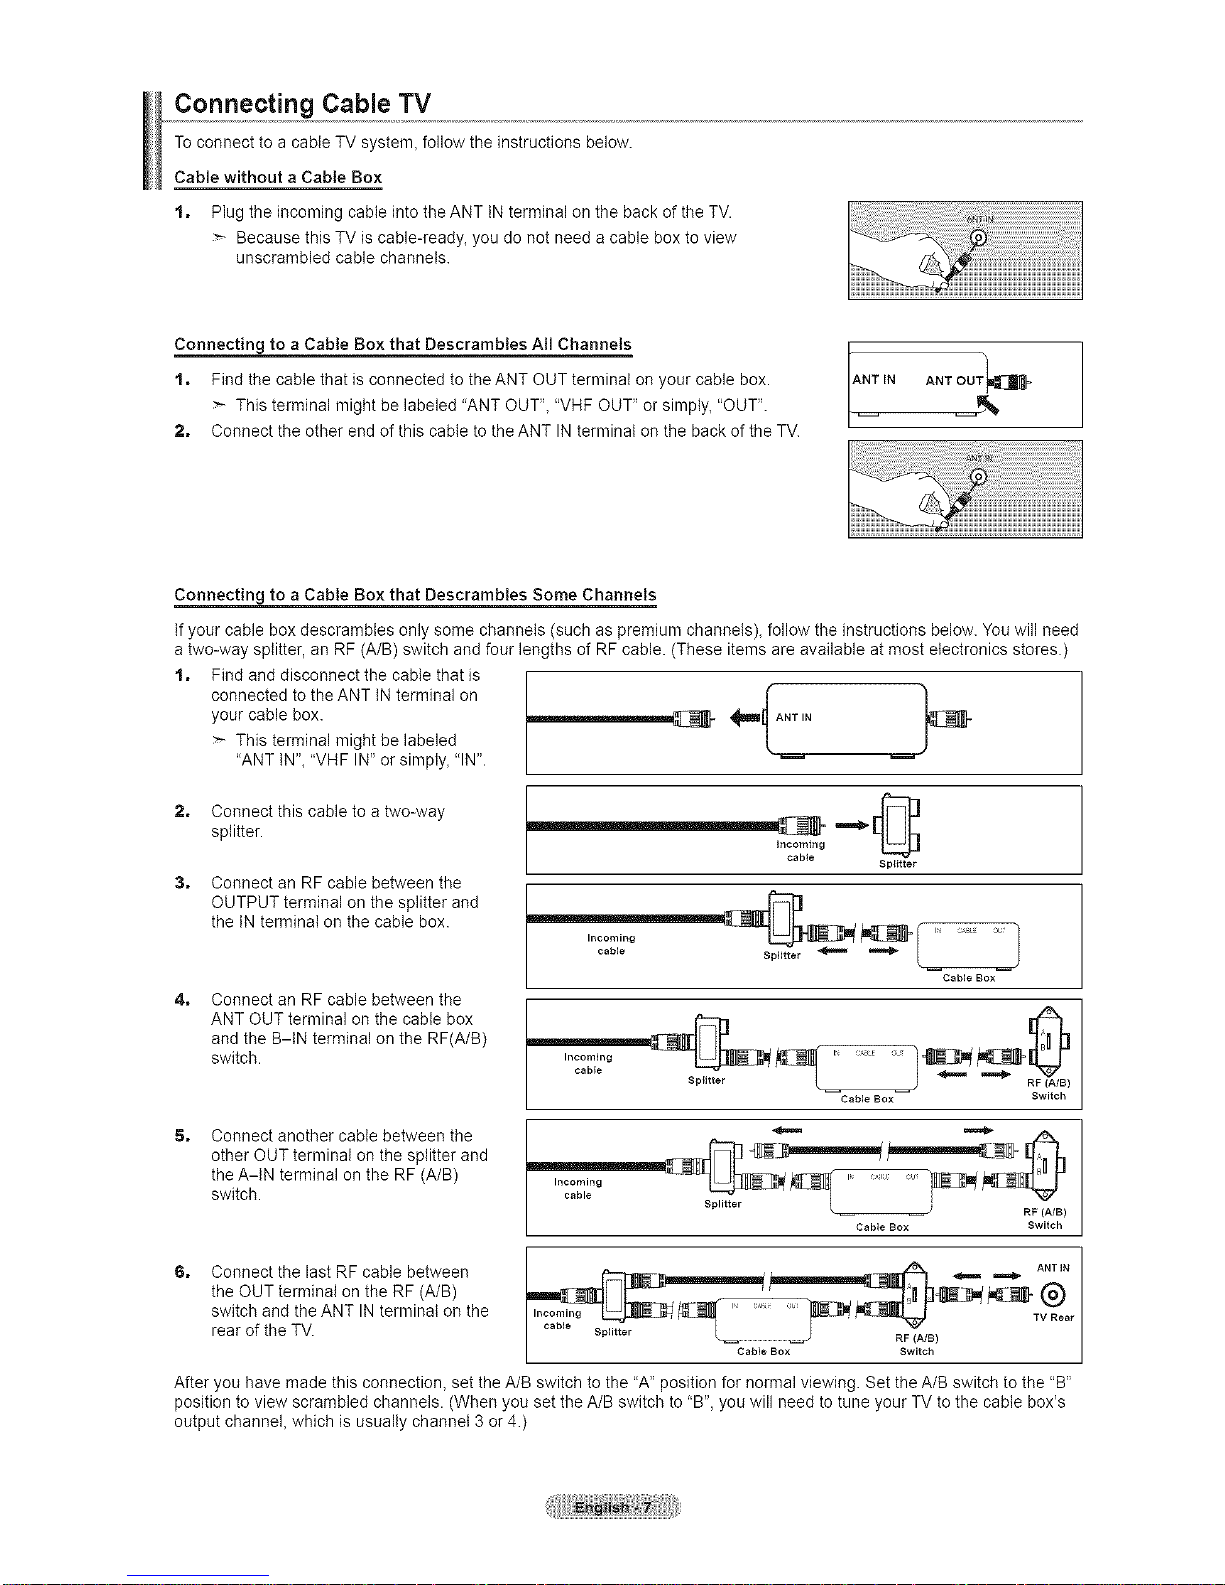
Connecting Cable TV
To connect to a cable TV system_ follow the instructions below.
Cable without a Cabte Box
t. Plug the incoming cable into the ANT IN terminal on the back of the TV.
Because this TV is cable-ready_ you do not need a cable box to view
unscrambled cable channels.
Connecting to a Cable Box that Descrambtes All Channels ANTIN T_
t, Find the cable that is connected to the ANT OUT terminal on your cable box. ANTOU
This terminal might be labeled "ANT OUT", "VHF OUT" or simply_ "OUT". -- ___
2. Connect the other end of this cable to the ANT IN terminal on the back of the TV.
Connecting to a Cable Box that Descrambtes Some Channels
If your cable box descrambles only some channels (such as premium channels), follow the instructions below. You will need
a two-way splitter, an RF (A/B) switch and four lengths of RF cable. (These items are available at most electronics stores.)
t. Find and disconnect the cable that is
connected to the ANT IN terminal on [" ]
your cable box. __ _I.ANT IN b
This terminal might be labeled
"ANT IN", "VHF IN" or simply, "IN". w
2. Connect this cable to a two-way
splitter.
3,
4,
Connect an RF cable between the
OUTPUT terminal on the splitter and
the IN terminal on the cable box.
Connect an RF cable between the
ANT OUT terminal on the cable box
and the B-IN terminal on the RF(A/B)
switch.
incoming
cabie
Splitter
Incoming
cable
J
Cable BOX
Switch
5, Connect another cable between the
other OUT terminal on the splitter and
the A-tN terminal on the RF (A/B)
switch.
Incoming J
Cable Box Switch
6, Connect the last RF cable between
the OUT terminal on the RF (A/B)
switch and the ANT IN terminal on the
rear of the TV.
_ ANT iN
ca e Splitter L_ _J RF (A/B)
Cable Box Switch
After you have made this connection, set the A/B switch to the "A" position for normal viewing. Set the A/B switch to the "B"
position to view scrambled channels. (When you set the A/B switch to "B", you will need to tune your TV to the cable box's
output channel which is usually channel 3 or 4.)
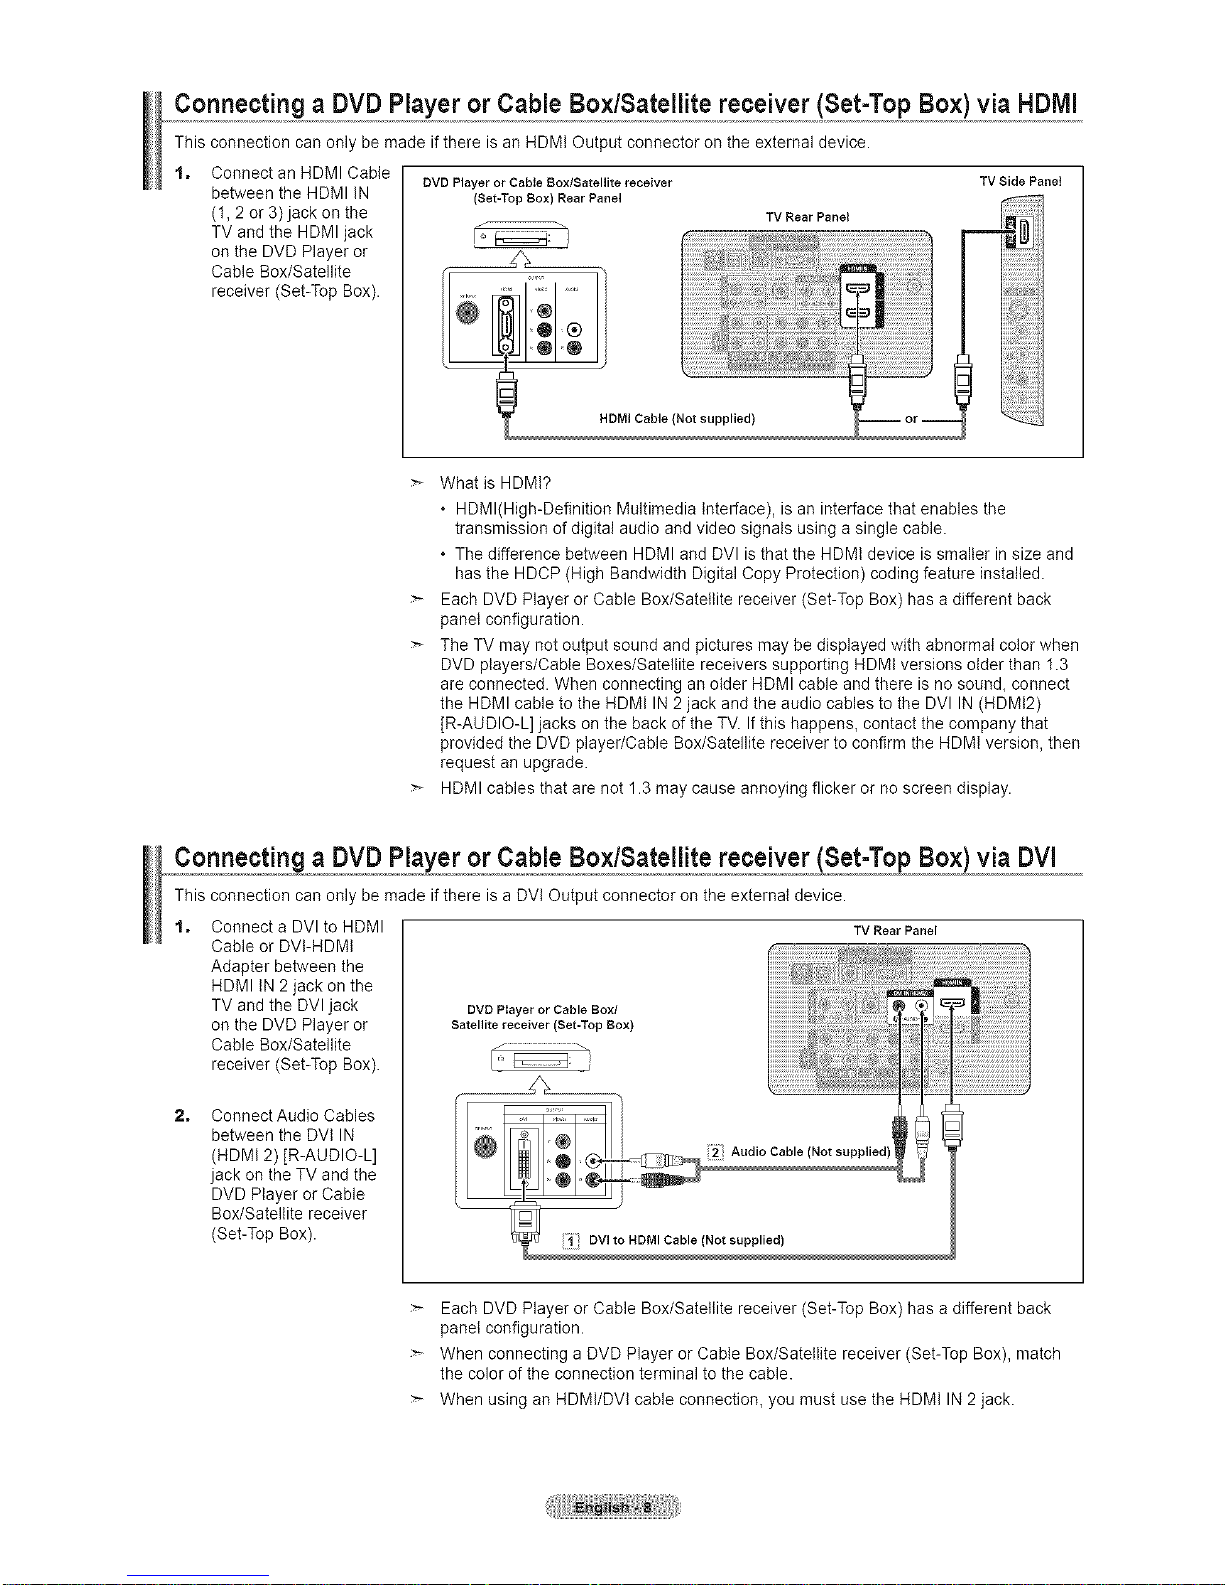
Connecting a DVD Player or Cable Box/Satellite receiver (Set-Top Box)via HDlVil
This connection can only be made if there is an HDMI Output connector on the external device.
t, Connect an HDMI Cable
between the HDMI IN
(1, 2 or 3) jack on the
TV and the HDMI jack
on the DVD Player or
Cable Box/Satellite
receiver (Set-Top Box).
DVD Player or Cable Box/Satellite receiver
(Set-Top Box) Rear Panel
TV Rear Panel
TV Side Panei
What is HDMt?
• HDMl(High-Definition Multimedia interface), is an interface that enables the
transmission of digital audio and video signals using a single cable.
• The difference between HDMI and DVl is that the HDMI device is smaller in size and
has the HDCP (High Bandwidth Digital Copy Protection) coding feature installed.
Each DVD Player or Cable Box/Satellite receiver (Set-Top Box) has a different back
panel configuration.
The TV may not output sound and pictures may be displayed with abnormal color when
DVD players/Cable Boxes/Satellite receivers supporting HDMI versions older than 1.3
are connected. When connecting an older HDMI cable and there is no sound_connect
the HDMI cable to the HDMI IN 2 jack and the audio cables to the DVl IN (HDMt2)
[R-AUDIO-L] jacks on the back of the TV. If this happens, contact the company that
provided the DVD player/Cable Box/Satellite receiver to confirm the HDMI version, then
request an upgrade.
HDMI cables that are not 1.3 may cause annoying flicker or no screen display.
Connecting a DVD Player or Cable Box/Satellite receiver (Set-Top Box) via DVl
This connection can only be made if there is a DVl Output connector on the external device.
t, Connect a DVl to HDMI
Cable or DVI-HDMI
Adapter between the
HDMI tN 2 jack on the
TV and the DVI jack
on the DVD Player or
Cable Box/Satellite
receiver (Set-Top Box).
2, ConnectAudio Cables
between the DVt IN
(HDMI 2) [R-AUDIO-L]
jack on the TV and the
DVD Player or Cable
Box/Satellite receiver
(Set-Top Box).
TV Rear Panel
DVD PIayer or Cable Box/
Satellite receiver (Set-Top Box)
Each DVD Player or Cable Box/Satellite receiver (Set-Top Box) has a different back
panel configuration.
When connecting a DVD Player or Cable Box/Satellite receiver (Set-Top Box), match
the color of the connection terminal to the cable.
When using an HDMI/DVI cable connection, you must use the HDMI IN 2 jack.
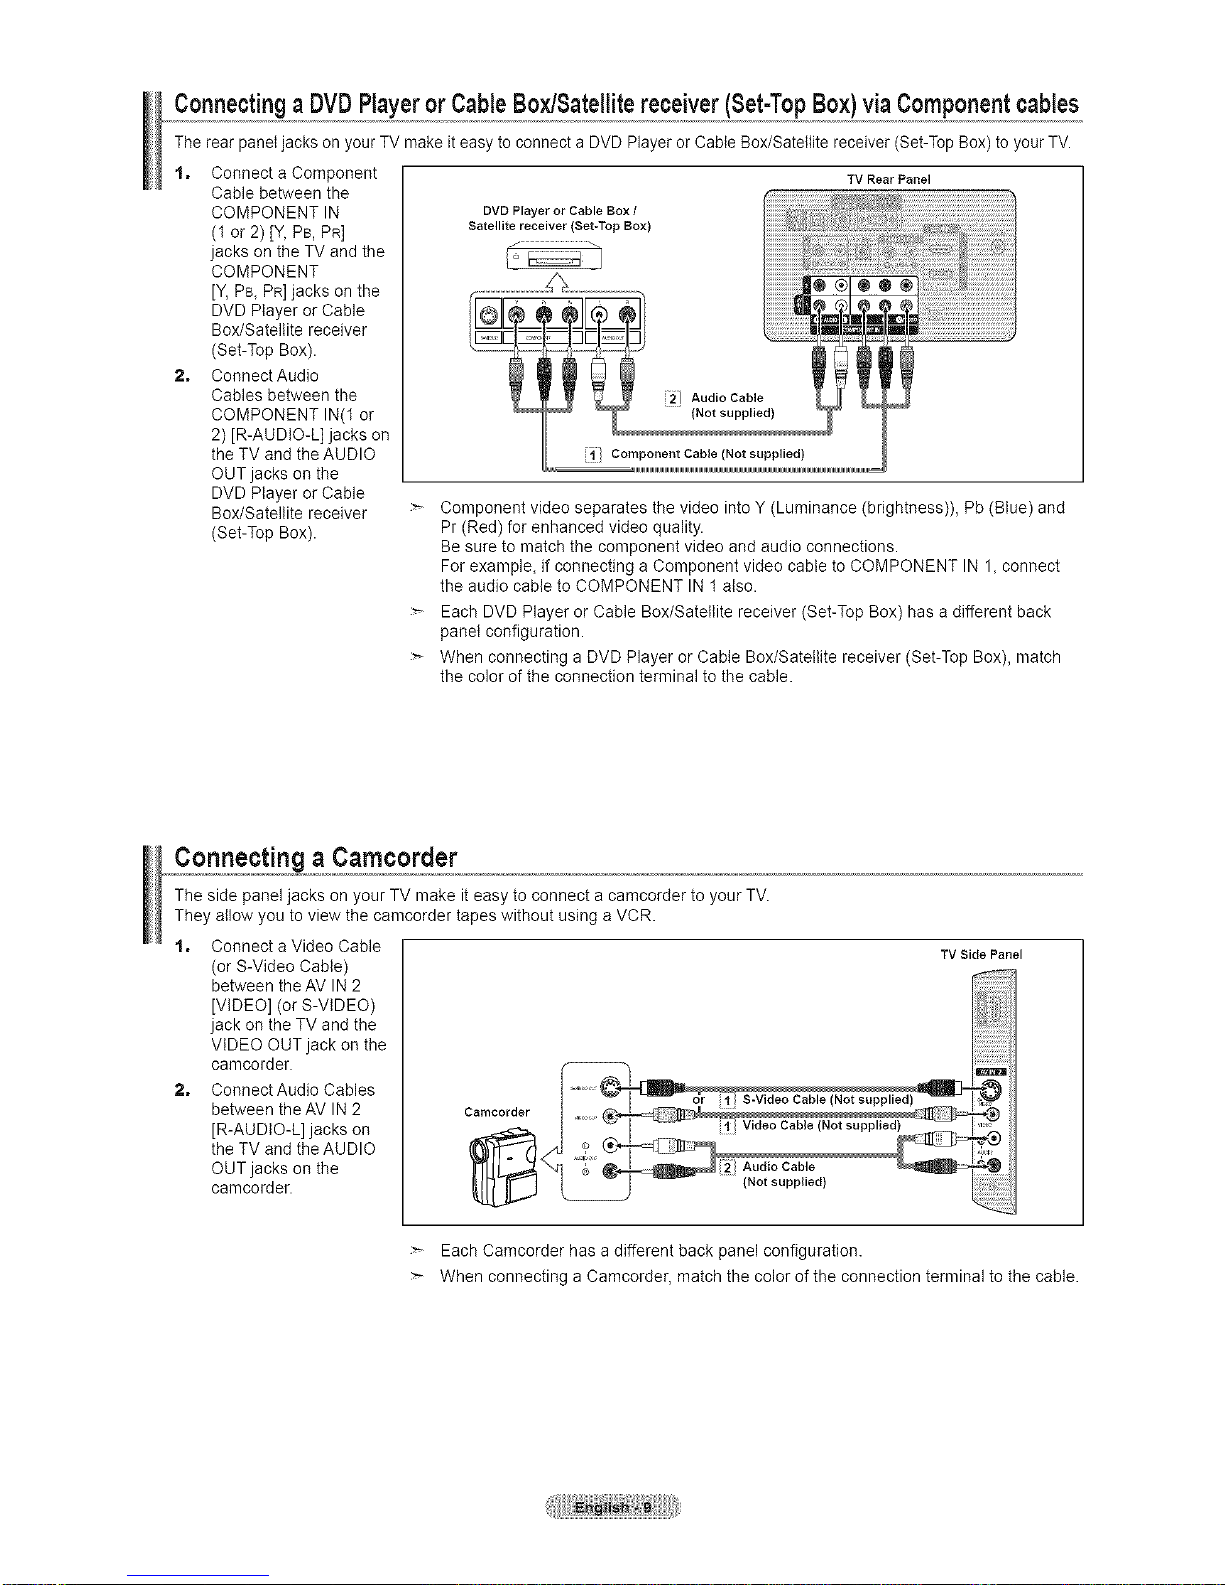
ConnectingaDVDPlayerorCableBox/Satellitereceiver(Set=TopBox)viaComponentcables
The rear panel jacks on your TV make it easy to connect a DVD Player or Cable Box/Satellite receiver (Set-Top Box) to your TV.
t, Connect a Component
Cable between the
COMPONENT IN
(1 or 2) [Y, PB, PR]
jacks on the TV and the
COMPONENT
[Y,PB_PR]jacks on the
DVD Player or Cable
Box/Satellite receiver
(Set-Top Box).
2, Connect Audio
Cables between the
COMPONENT IN(1 or
2) [R-AUDIO-L] jacks on
the TV and the AUDIO
OUT jacks on the
DVD Player or Cable
Box/Satellite receiver
(Set-Top Box).
DVD Player or Cable Box /
Satellite receiver {Set*Top Box)
TV Rear Panel
(Not supplied}
Component Cable (Not supplied}
Component video separates the video into Y (Luminance (brightness)), Pb (Blue) and
Pr (Red) for enhanced video quality.
Be sure to match the component video and audio connections.
For example, if connecting a Component video cable to COMPONENT IN 1, connect
the audio cable to COMPONENT IN 1 also.
Each DVD Player or Cable Box/Satellite receiver (Set-Top Box) has a different back
panel configuration.
When connecting a DVD Player or Cable Box/Satellite receiver (Set-Top Box), match
the color of the connection terminal to the cable.
Connecting a Camcorder
The side panel jacks on your TV make it easy to connect a camcorder to your TV.
They allow you to view the camcorder tapes without using a VCR.
t, Connect a Video Cable
(or S-Video Cable)
between theAV IN 2
[VIDEO] (or S-VIDEO)
jack on the TV and the
VIDEO OUT jack on the
camcorder.
2, ConnectAudio Cables
between theAV IN 2
[R-AUDIO-L] jacks on
the TV and the AUDIO
OUT jacks on the
camcorder.
eamcorder
2} Audio Cable
(Not supplied)
TV Side Panel
Each Camcorder has a different back panel configuration.
When connecting a Camcorder, match the color of the connection terminal to the cable.

Connecting a VCR
Video Connection
These instructions assume that you have already connected your TV to an antenna or a cable TV system (according to the
instructions on pages 6~7). Skip step 1 if you have not yet connected to an antenna or a cable system.
t, Unplug the cable or
2,
3,
4,
5,
antenna from the back
of the TV.
Connect the cable or
antenna to the ANT IN
terminal on the back of
the VCR.
Connect an RF Cable
between the ANT OUT
terminal on the VCR
and the ANT iN terminal
on the TV.
Connect a Video Cable
between the VIDEO
OUT jack on the
VCR and theAV IN 1
[Y/ViDEO] orAV iN 2
[VIDEO] jack on the TV.
Connect Audio Cables
between the AUDIO
OUT jacks on the VCR
and theAV IN 1 (orAV
iN 2) [R-AUDIO-L] jacks
on the TV.
If you have a 'mono"
(non-stereo) VCR,
use a Y-connector
(not supplied) to
connect to the
right and left audio
input jacks of the
TV.Alternatively,
connect the cable to
the "R" jack. if your
VCR is stereo, you
must connect two
cables.
TV Side Panel
TV Rear Panel
i3 RF Cable (Not supplied)
Follow the instructions in "Viewing a VCR or Camcorder Tape" to view your VCR tape.
Each VCR has a different back panel configuration.
When connecting a VCR, match the color of the connection terminal to the cable.
When connecting to AV iN 1, the color of the AV iN 1 [Y/VIDEO] jack (Green) does not
match the color of the video cable (Yellow).
S-VideoConnection
Your Samsung TV can be connected to an S-Video jack on a VCR. (This connection delivers a better picture as compared
to a standard VCR.)
t, To begin, follow steps
1-3 in the previous
section to connect the
antenna or cable to your
VCR and your TV.
2, Connect an S-Video
Cable between the
S-VIDEO OUT jack on
the VCR and the
AV iN 2 [S-VIDEO] jack
on the TV.
3, ConnectAudio Cables
between the AUDIO
OUT jacks on the VCR
and theAV IN 2
[R-AUDIO-L] jacks on
the TV.
VCR Rear Panel
TV Rear Panel
TV Side Panel
An S-Video cable may be included with a VCR. (if not, check your local electronics store.)
Each VCR has a different back panel configuration.
When connecting a VCR, match the color of the connection terminal to the cable.
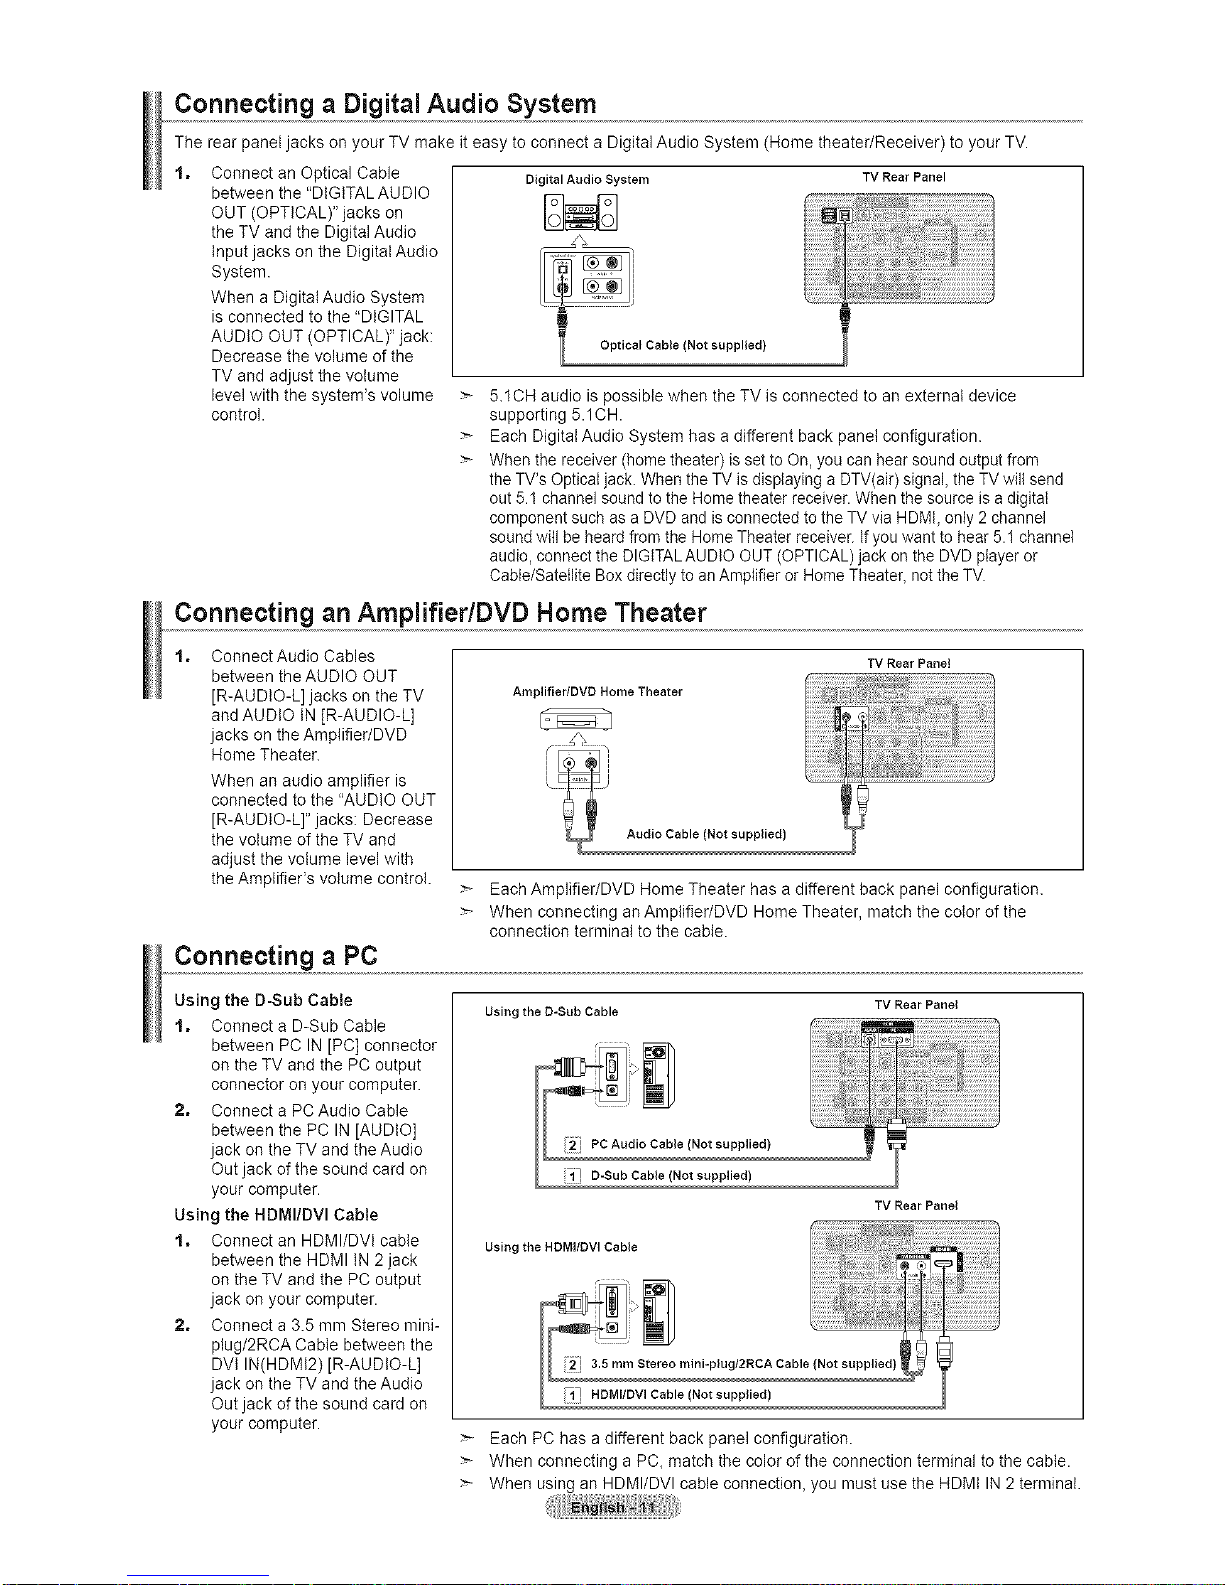
Connecting a Digital Audio System
The rear panel jacks on your TV make iteasy to connect a Digital Audio System (Home theater/Receiver) to your TV.
'_" Digital Audio System TV Rear Panel
Connect an Optical Cable
between the "DIGITAL AUDIO
OUT (OPTICAL)" jacks on
the TV and the Digital Audio
input jacks on the Digital Audio
System.
When a Digital Audio System
is connected to the "DIGITAL
AUDIO OUT (OPTICAL)" jack:
Decrease the volume of the
TV and adjust the volume
level with the system's volume
control.
5.1CH audio is possible when the TV is connected to an external device
supporting 5.1CH.
Each Digital Audio System has a different back panel configuration.
When the receiver (home theater) is set to On, you can hear sound output from
the TV's Optical jack. When the TV isdisplaying a DTV(aJr)signal, the TV will send
out 5.1 channel sound to the Home theater receiver. When the source is adigital
component such as a DVD and is connected to the TV via HDMI, only 2 channel
sound will be heard from the Home Theater receiver. If you want to hear 5.1 channel
audio, connect the DIGITALAUDIO OUT (OPTICAL) jack on the DVD player or
Cable/Satellite Box directly to anAmplifier or Home Theater_notthe TV.
Connecting an Amplifier/DVD Home Theater
t, Connect Audio Cables
between the AUDIO OUT
[R-AUDIO-L] jacks on the TV
and AUDIO tN [R-AUDIO-L]
jacks on the Amplifier/DVD
Home Theater.
When an audio amplifier is
connected to the "AUDIO OUT
[R-AUDIO-L]" jacks: Decrease
the volume of the TV and
adjust the volume level with
the Amplifier's volume control.
Connecting a PC
Amplifier/DVD Home Theater
TV Rear Pane!
Audio Cable (Not supplied)
Each Amplifier/DVD Home Theater has a different back panel configuration.
When connecting an Amplifier/DVD Home Theater, match the color of the
connection terminal to the cable.
Using the D-Sub Cable
t, Connect a D-Sub Cable
between PC IN [PC] connector
on the TV and the PC output
connector on your computer.
2, Connect a PCAudio Cable
between the PC IN [AUDIO]
jack on the TV and the Audio
Out jack of the sound card on
your computer.
Using the HDMI/DVI Cable
t, Connect an HDMI/DVt cable
between the HDMI IN 2 jack
on the TV and the PC output
jack on your computer.
2, Connect a 3.5 mm Stereo mini-
plug/2RCA Cable between the
DVt IN(HDMt2) JR-AUDIO-L]
jack on the TV and the Audio
Out jack of the sound card on
your computer.
Using the D-Sub Cable
TV Rear Panel
!2" PC Audio Cable (Not supplied}
;1" D-Sub Cable (Not supplied)
TV Rear Panel
Using the HDMI/DVl Cable
!2" 3.5 rnm Stereo mini-plug/2RCA Cable (Not supplied}
!;if! HDMI/DVl Cable (Not supplied)
Each PC has a different back panel configuration.
When connecting a PC, match the color of the connection terminal to the cable.
When using an HDMI/DVl cable connection, you must use the HDMI IN 2 terminal.

Turning the TV On and Off
Press the POWER d) button on the remote control.
You can also use the POWER_ button on the TV.
Plug & Play Feature
I POWER I
TV ON/OFF
When the TV is initially powered on, basic settings proceed automatically and subsequently.
t, Press the POWER button on the remote control.
The message "Menu Language_ Store Demo, Channels and Time will be set."
is displayed.
Press the ENTER _ button, then "Select language of the OSD." menu
is automatically displayed. Press the ENTER _ button.
2, Press the A or 'V button to select language, then press the ENTER
button. The message "Select 'Home Use' when installing this TV in your
home." is displayed.
3, Press the _ or l,- button to select 'Store Demo" or "Home Use", then
press the ENTER _ button. The message "Select the Antenna source to
memorize." is displayed.
We recommend setting the TV to "Home Use" mode for the best picture in
your home environment.
"Store Demo" mode is only intended for use in retail environments.
If the unit is accidentally set to "Store Demo" mode and you want to return
to "Home Use" (Standard): Press the Volume button on the TV. When the
volume OSD is displayed, press and hold the MENU button on the TV for
5 seconds.
4, Press the _, or ,It button to memorize the channels of the selected
connection. Press the ENTER _ button to select "Start".
Air: "Air" antenna signal.
Cable: 'Cable" antenna signal.
Auto: "Air" and "Cable" antenna signals.
In Cable mode, you can select the correct signal source among STD,
HRC, and IRC by pressing the A, _r, 41or _ button, then press the
ENTER C*' button. If you have Digital cable, select the cable system
signal source for both Analog and Digital. Contact your local cable
company to identify the type of cable system that exists in your particular
area.
5, The TV will begin memorizing all of the available channels.
To stop the search before it has finished_ press the ENTER _ button with
"Stop" selected.
After all the available channels are stored, it starts to remove scrambled
channels (see page 40). And then, the Auto program menu reappears.
Press the ENTER _ button when channel memorization is complete.
The message "Set the Clock Mode." is displayed.
6, Press the ENTER _ button.
Press the A or 'I' button to select "Auto", then Press the ENTER _ button.
The message "Set to daylight saving time." is displayed.
If you select "Manual", 'Set current date and time" is displayed.
(See page 45)
7, Press the A or 'V button to select 'Oft" or "On", then press the ENTER
button. The message "Select the time zone inwhich you live." is displayed.
I
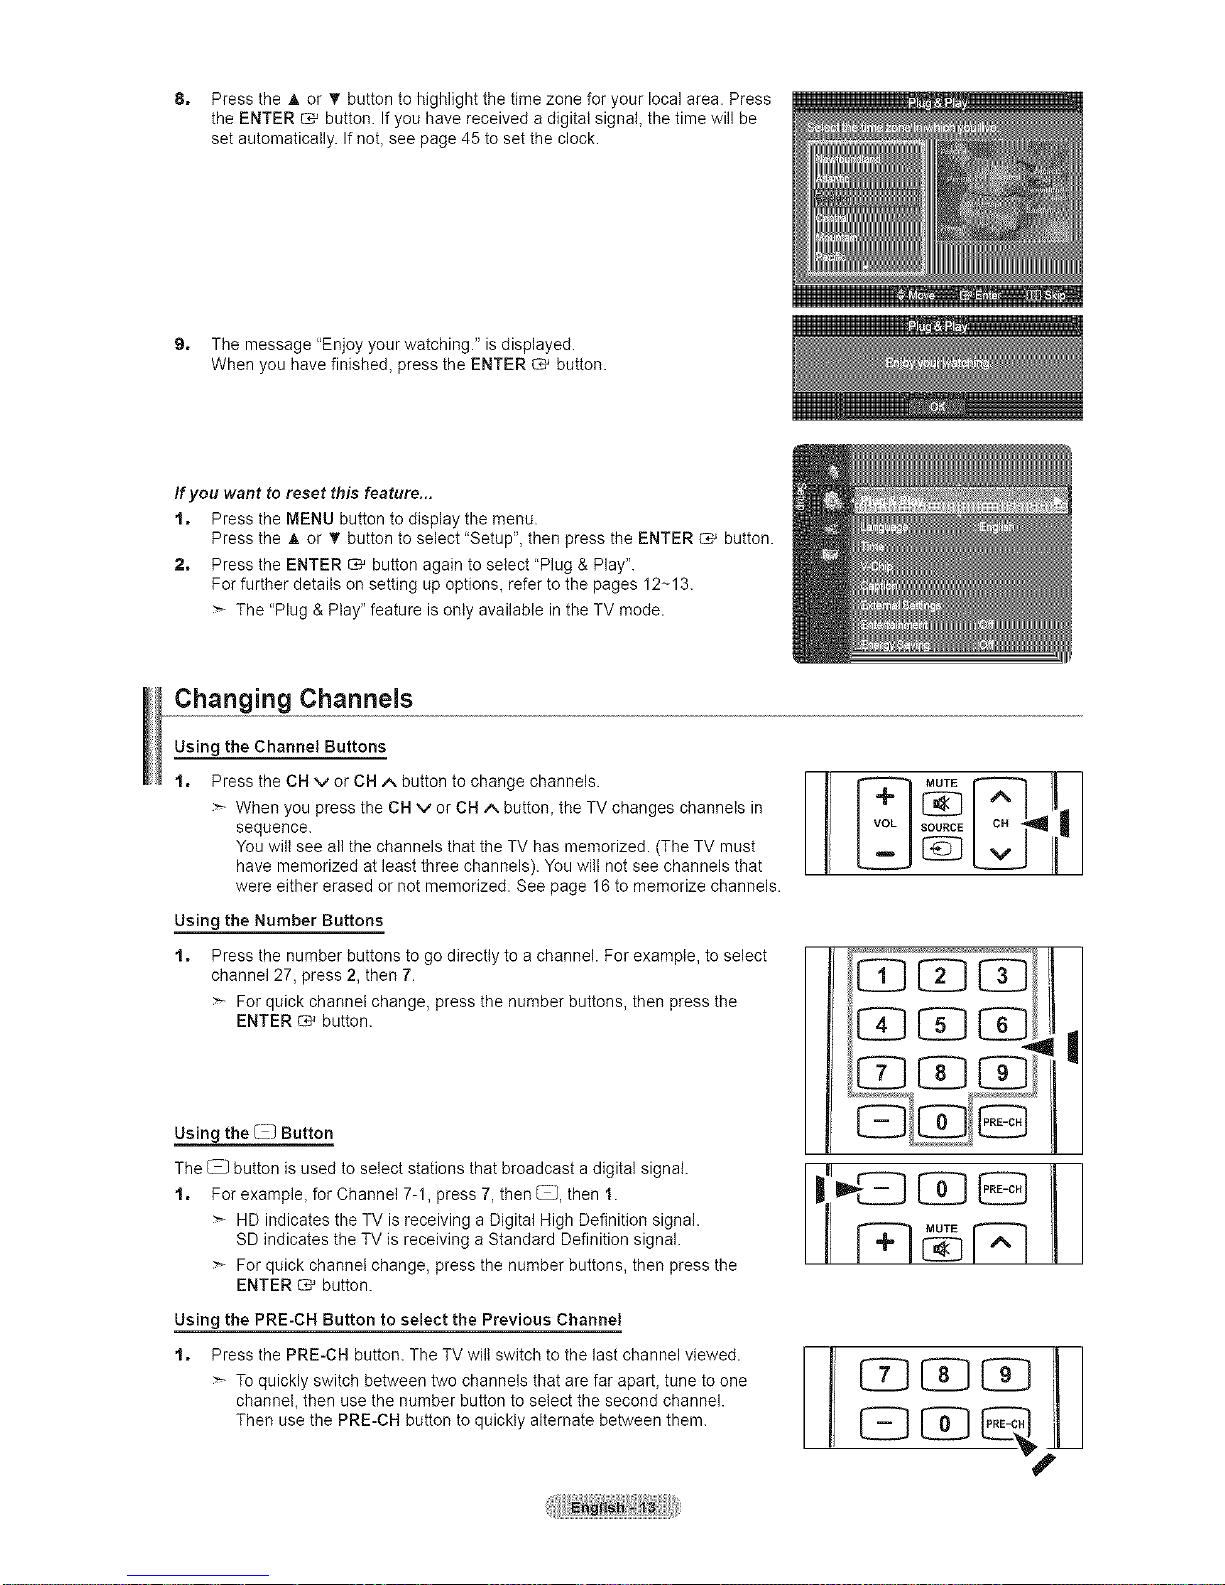
8, Press the A or _' button to highlight the time zone for your local area. Press
the ENTER _ button. If you have received a digital signal, the time will be
set automatically. If not, see page 45 to set the clock.
9, The message "Enjoy your watching." is displayed.
When you have finished, press the ENTER _ button.
if you want to reset this feature...
t, Press the MENU button to display the menu.
Press the _, or _" button to select "Setup", then press the ENTER _ button.
2, Press the ENTER _ button again to select "Plug & Play".
For further details on setting up options, refer to the pages 12-13.
The "Plug & Play" feature is only available in the TV mode.
Changing Channels
Using the Channel Buttons
t,
Press the CH v or CH ^ button to change channels.
> When you press the CH v or CH ^ button, the TV changes channels in
sequence.
You will see all the channels that the TV has memorized. (The TV must
have memorized at least three channels). You will not see channels that
were either erased or not memorized. See page 16to memorize channels.
Using the Number Buttons
t,
Press the number buttons to go directly to a channel. For example, to select
channel 27, press 2, then 7.
For quick channel change, press the number buttons, then press the
ENTER O,_ button.
Using the [_-] Button
The (_-}button is used to select stations that broadcast a digital signal.
t, For example, for Channel 7-1, press 7, then {-}, then I.
HD indicates the TV is receiving a Digital High Definition signal.
SD indicates the TV is receiving a Standard Definition signal.
For quick channel change, press the number buttons, then press the
ENTER _ button.
Using the PRE-CH Button to select the Previous Channel
t, Press the PRE-CH button. The TV will switch to the last channel viewed.
To quickly switch between two channels that are far apart, tune to one
channel, then use the number button to select the second channel.
Then use the PRE-CH button to quickly alternate between them.
I
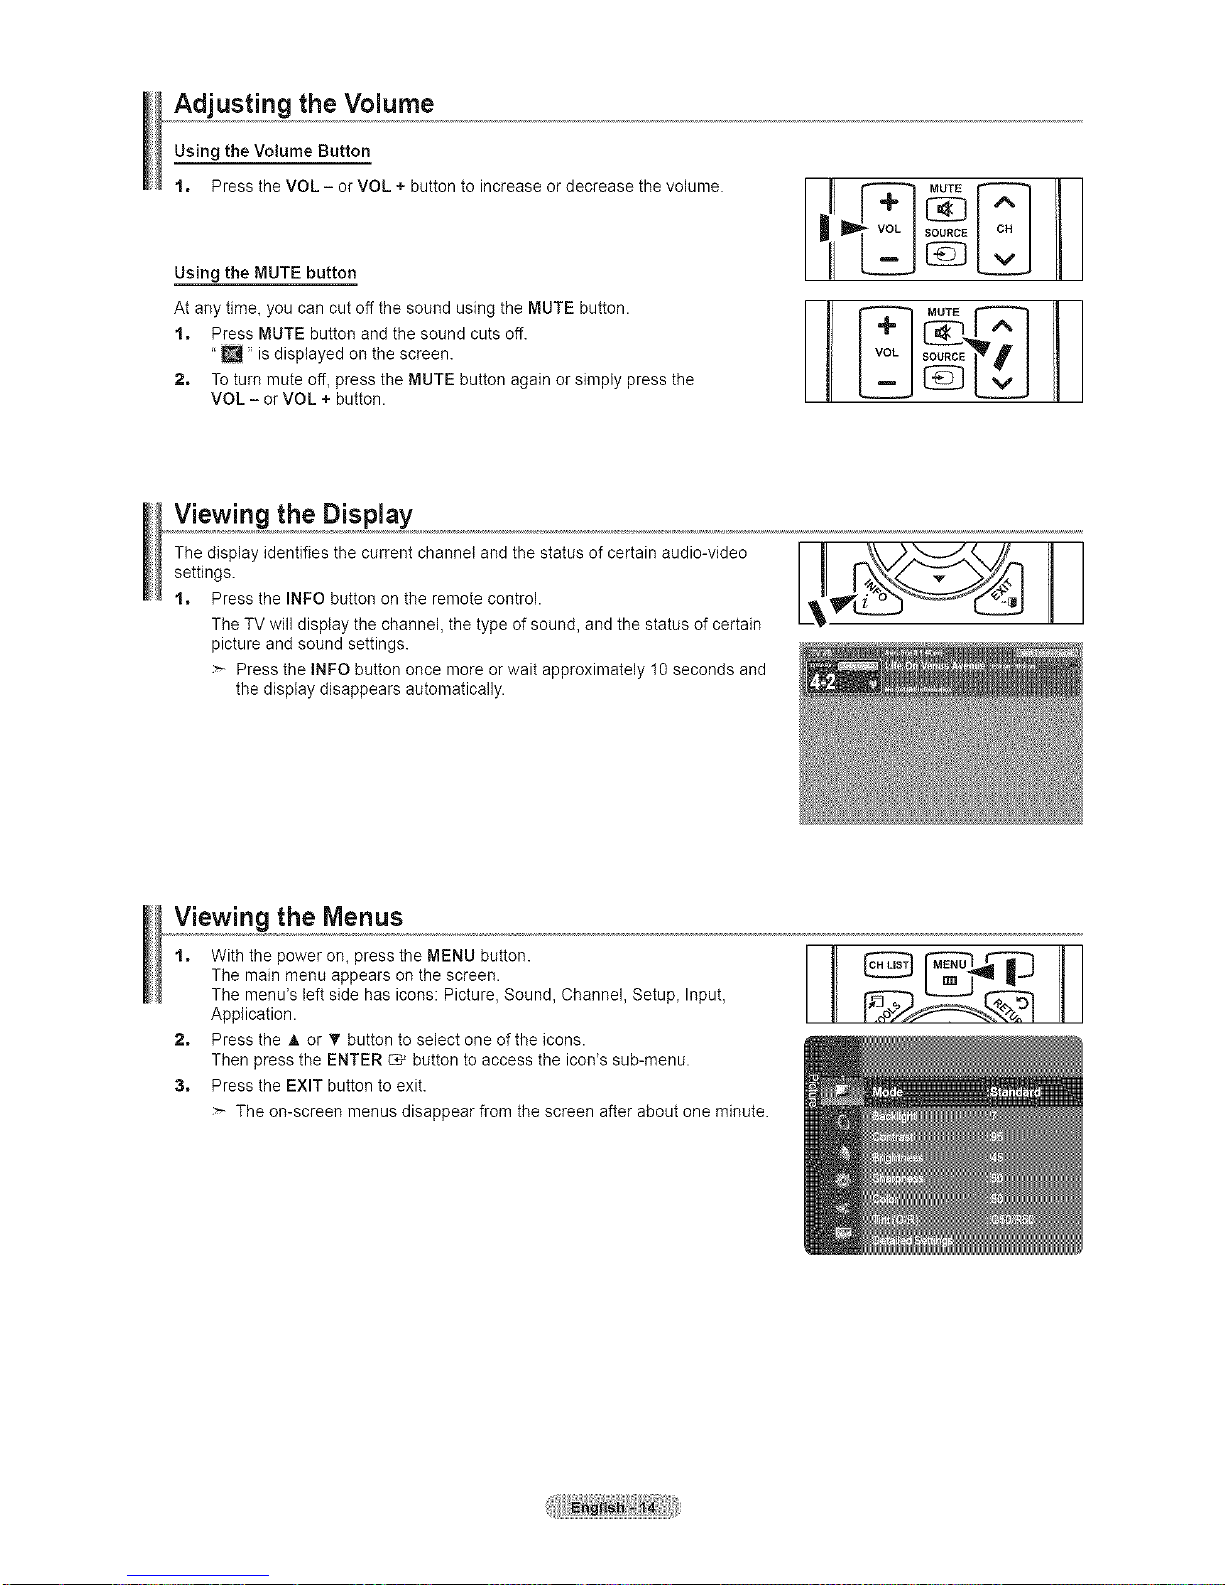
Adjusting the Volume
Using the Volume Button
t, Press the VOL - or VOL + button to increase or decrease the volume.
Using the MUTE button
At any time, you can cut off the sound using the MUTE button.
t, Press MUTE button and the sound cuts off.
"[]" is displayed on the screen.
2, To turn mute off, press the MUTE button again or simply press the
VOL - or VOL + button.
Viewing the Display
The display identifies the current channel and the status of certain audio-video
settings.
t, Press the INFO button on the remote control.
The TV will display the channel, the type of sound, and the status of certain
picture and sound settings.
Press the INFO button once more or wait approximately 10 seconds and
the display disappears automatically.
Viewing the Menus
t, With the power on, press the MENU button.
The main menu appears on the screen.
The menu's left side has icons: Picture, Sound, Channel, Setup, Input,
Application.
2, Press the A or T button to select one of the icons.
Then press the ENTER _ button to access the icon's sub-menu.
3, Press the EXIT button to exit.
The on-screen menus disappear from the screen after about one minute.
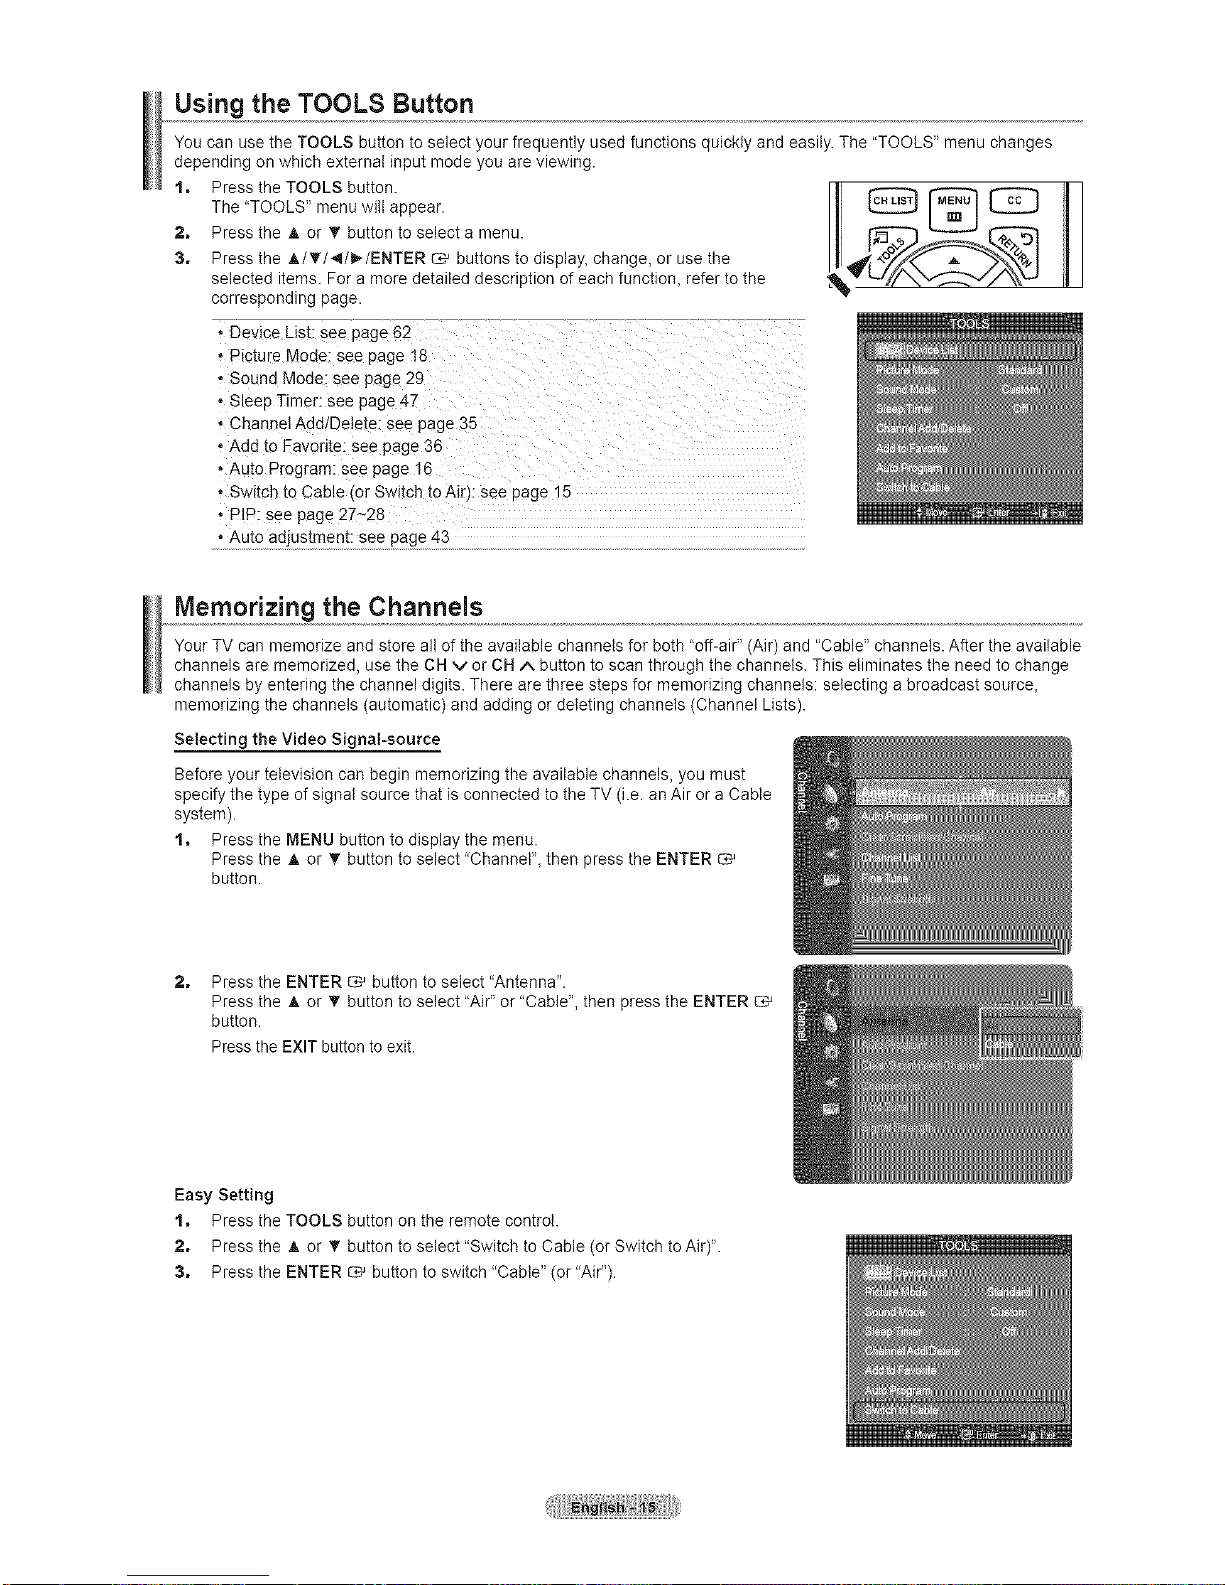
Using the TOOLS Button
You can use the TOOLS button to select your frequently used functions quickly and easily. The "TOOLS" menu changes
depending on which external input mode you are viewing.
t, Press the TOOLS button.
The "TOOLS" menu will appear.
2, Press the A or T button to select a menu.
3, Press the _./'_/_/_,-/ENTER _ buttons to display, change, or use the
selected items. For a more detailed description of each function, refer to the
corresponding page.
• Device List: see page 62
• Picture Moue: see page t8
• Sound Mode see page 29
• Sleep Timer: see page 47
• Channel Add/Delete: see page 35
• Add to Favorite: see page 36
• Auto Program: see page 16
• Switch to Cable 'or Switch to .Air):see page 15
• PIP: see page 27~28
" Au]t0 ad)usfmen_: see page 43
Memorizing the Channels
Your TV can memorize and store all of the available channels for both "off-air" (Air) and "Cable" channels. After the available
channels are memorized, use the CH v or CH ^ button to scan through the channels. This eliminates the need to change
channels by entering the channel digits. There are three steps for memorizing channels: selecting a broadcast source,
memorizing the channels (automatic) and adding or deleting channels (Channel Lists).
Selecting the Video Signal-source
Before your television can begin memorizing the available channels, you must
specify the type of signal source that is connected to the TV (i.e. an Air or a Cable
system).
t, Press the MENU button to display the menu.
Press the _, or _' button to select 'Channet"_ then press the ENTER
button.
2, Press the ENTER _ button to select "Antenna".
Press the A or • button to select "Air" or "Cable", then press the ENTER
button.
Press the EXIT button to exit.
Easy Setting
t, Press the TOOLS button on the remote control.
2, Press the A or T button to select "Switch to Cable (or Switch to Air)".
3, Press the ENTER _ button to switch "Cable" (or 'Air').
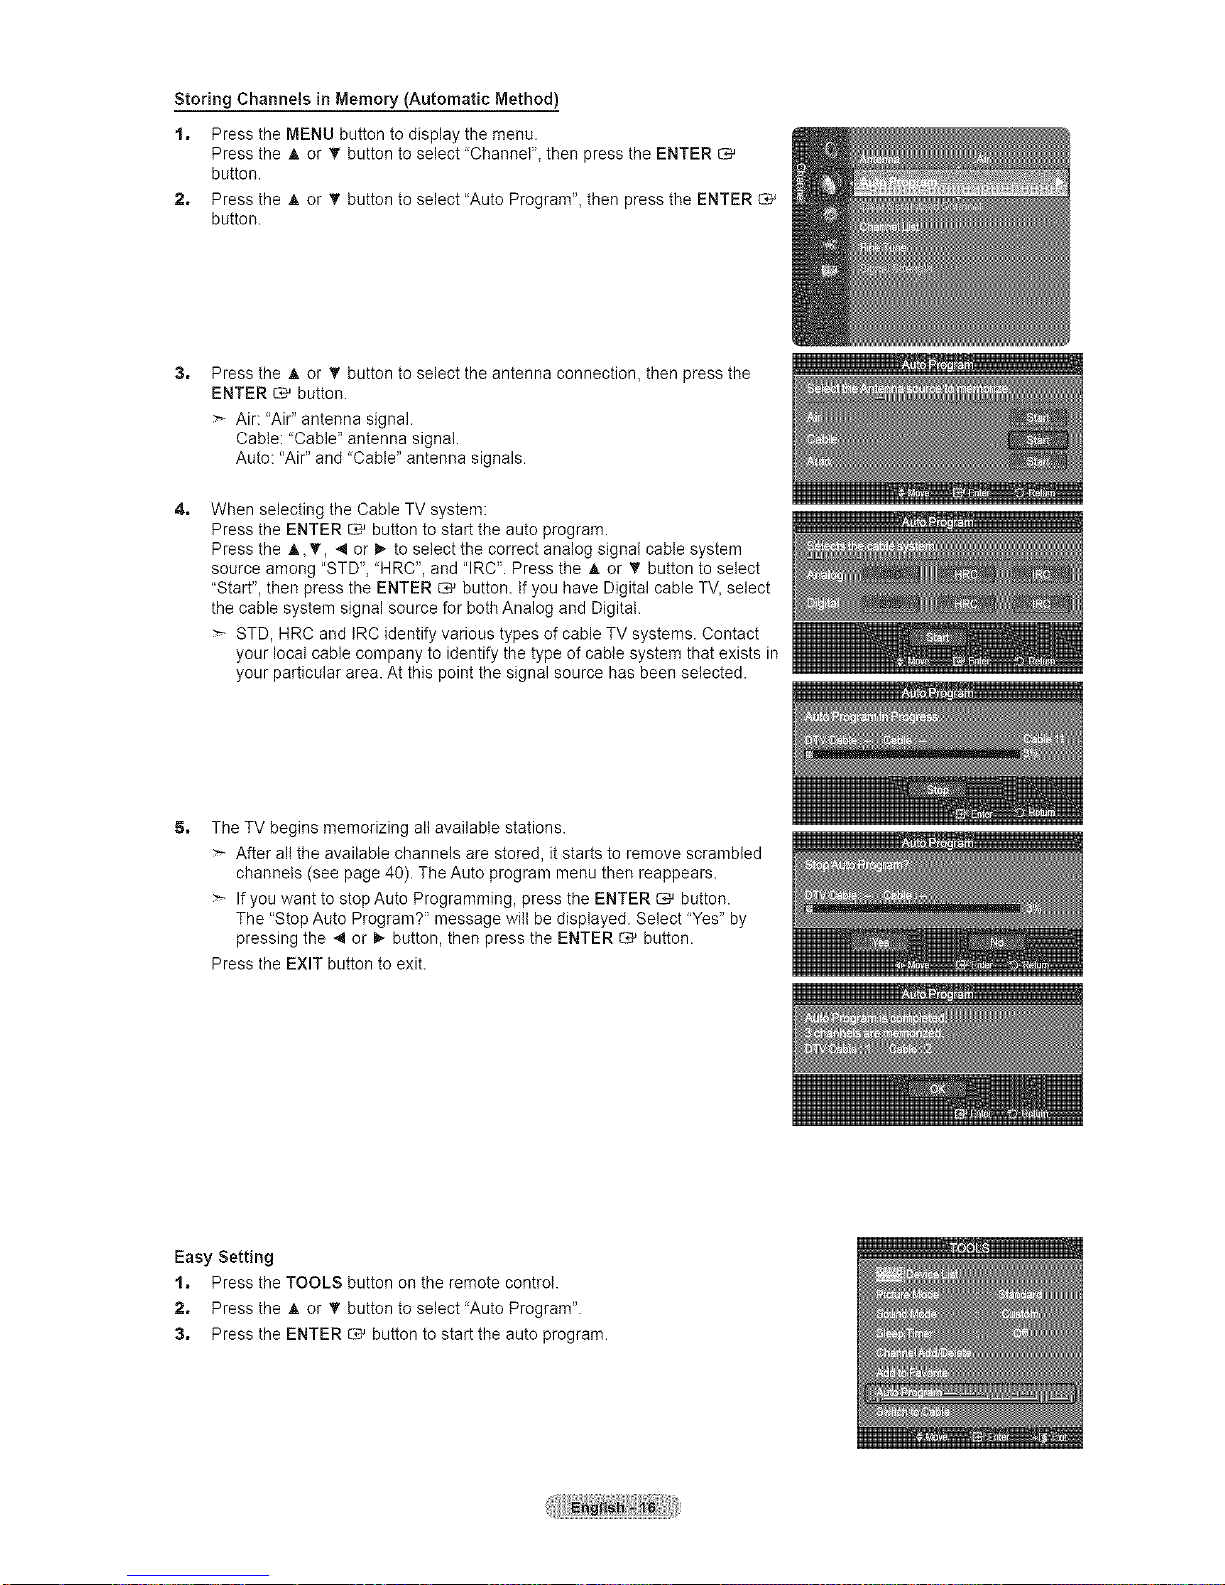
Storing Channels in Memory (Automatic Method)
to Press the MENU button to display the menu.
Press the A or 'I' button to select "Channel", then press the ENTER
button.
2, Press the A or _" button to select "Auto Program", then press the ENTER C_'
button.
3,
4,
Press the _, or T button to select the antenna connection, then press the
ENTER _ button.
Air: "Air" antenna signal.
Cable: 'Cable" antenna signal.
Auto: "Air" and "Cable" antenna signals.
When selecting the Cable TV system:
Press the ENTER _ button to start the auto program.
Press the A, T, 4 or _ to select the correct analog signal cable system
source among "STD", "HRC", and "IRC". Press the A or _' button to select
"Start", then press the ENTER _ button, if you have Digital cable TV, select
the cable system signal source for both Analog and Digital.
STD, HRC and IRC identify various types of cable TV systems. Contact
your local cable company to identify the type of cable system that exists in
your particular area. At this point the signal source has been selected.
5,
The TV begins memorizing all available stations.
After alt the available channels are stored, it starts to remove scrambled
channels (see page 40). The Auto program menu then reappears.
If you want to stop Auto Programming, press the ENTER _ button.
The "Stop Auto Program?" message will be displayed. Select "Yes" by
pressing the ,,I or _ button, then press the ENTER _ button.
Press the EXIT button to exit.
Easy Setting
t, Press the TOOLS button on the remote control.
2, Press the A or 'I' button to select 'Auto Program".
3, Press the ENTER _ button to start the auto program.
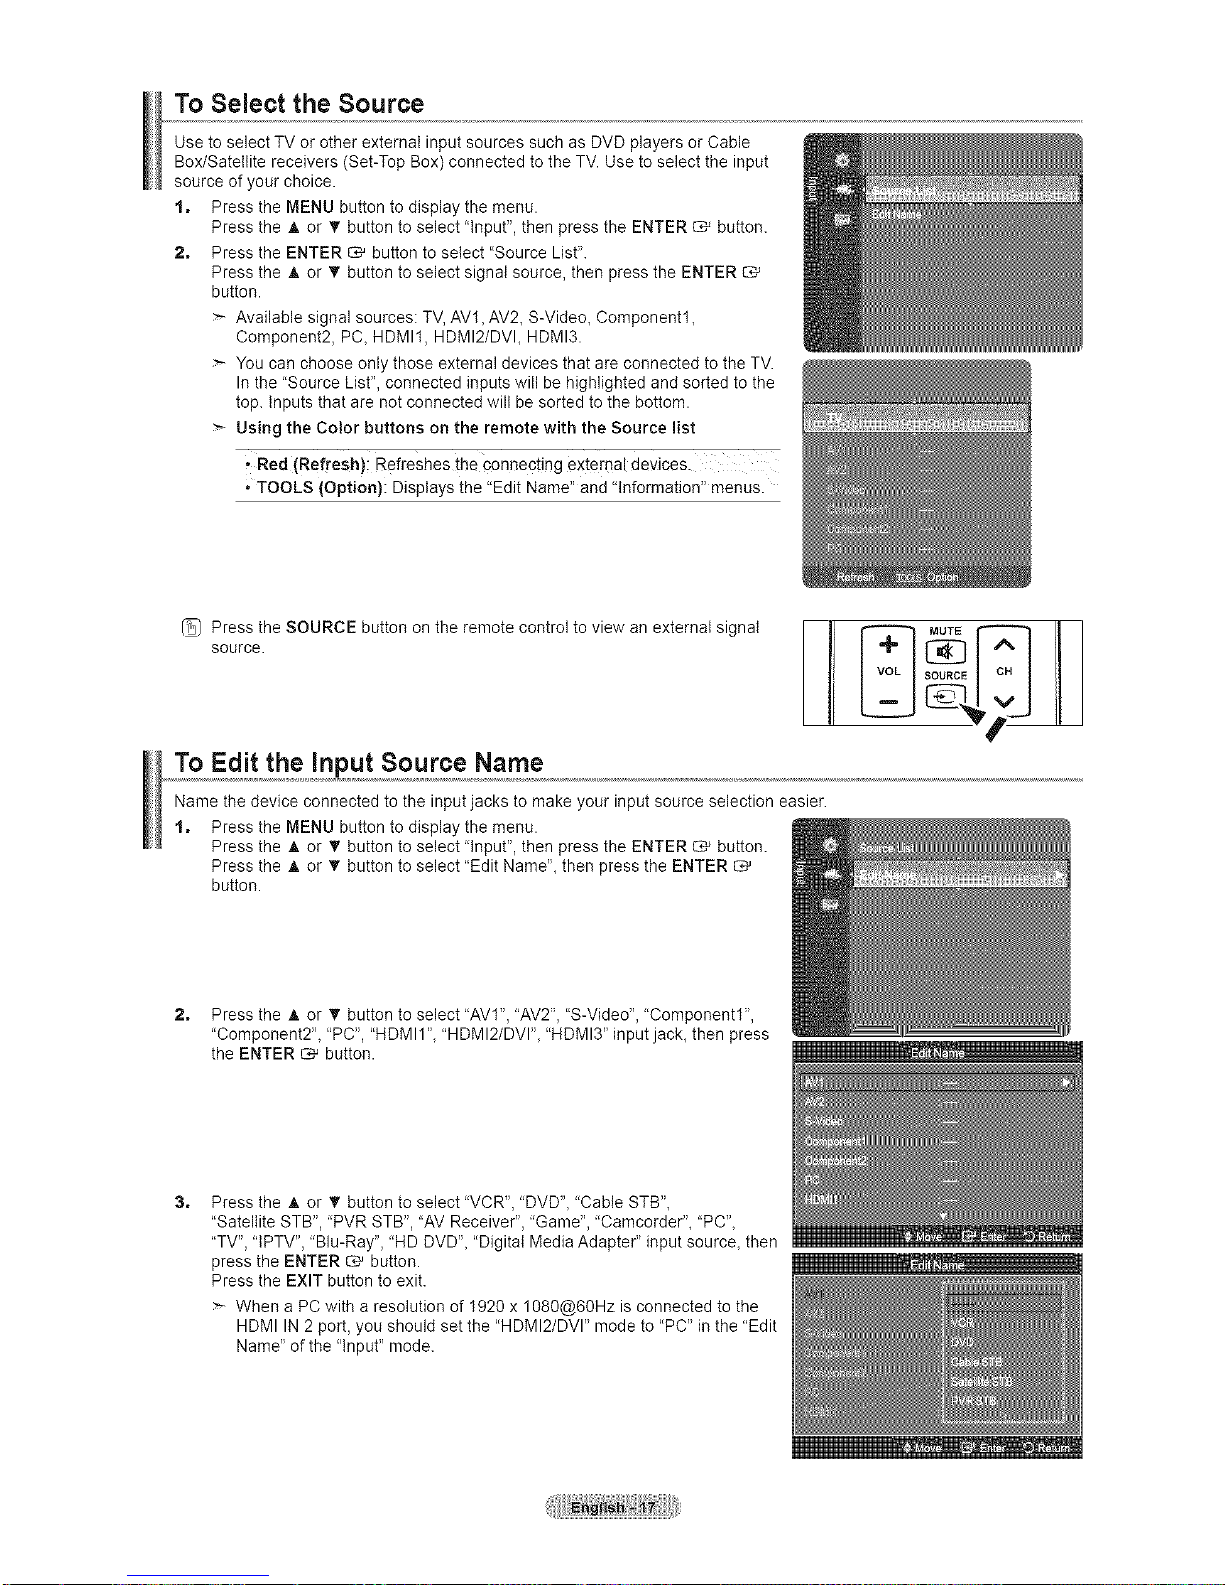
To Select the Source
Use to select TV or other external input sources such as DVD players or Cable
Box/Satellite receivers (Set-Top Box) connected to the TV. Use to select the input
source of your choice.
t, Press the MENU button to display the menu.
Press the A or 'I' button to select "Input", then press the ENTER _ button.
2, Press the ENTER _ button to select "Source List".
Press the A or • button to select signal source, then press the ENTER
button.
Available signal sources: TV, AVl, AV2, S-Video, Component1,
Component2, PC, HDMI1, HDMI2/DVL HDMI3.
You can choose only those external devices that are connected to the TV.
In the "Source List", connected inputs will be highlighted and sorted to the
top. Inputs that are not connected wilt be sorted to the bottom.
Using the Color buttons on the remote with the Source list
Red (Refresh)i Refreshes the €onnecting external devices.
• TOOLS (Option): Displays the "Edit Name" and "Information" menus.
(_ Press the SOURCE button on the remote control to view an external signal
source.
To Edit the input Source Name
Name the device connected to the input jacks to make your input source selection easier.
t, Press the MENU button to display the menu.
Press the A or _' button to select 'Input", then press the ENTER _ button.
Press the A or T button to select "Edit Name"_ then press the ENTER
button.
2, Press the A or _r button to select "AVI", "AV2", "S-Video", "Component1",
"Component2", "PC", "HDMI1 ","HDMI2/DVI", "HDMI3" input jack, then press
the ENTER _ button.
3,
Press the A or _' button to select "VCR", "DVD", "Cable STB",
"Satellite STB", "PVR STB", "AV Receiver", "Game", "Camcorder", "PC",
"TV", 'IPTV", "Blu-Ray", "HD DVD", "Digital Media Adapter" input source, then
press the ENTER _ button.
Press the EXIT button to exit.
When a PC with a resolution of 1920 x 1080@60Hz is connected to the
HDMI IN 2 port, you should set the "HDMI2/DVI" mode to "PC" in the "Edit
Name" of the "Input" mode.
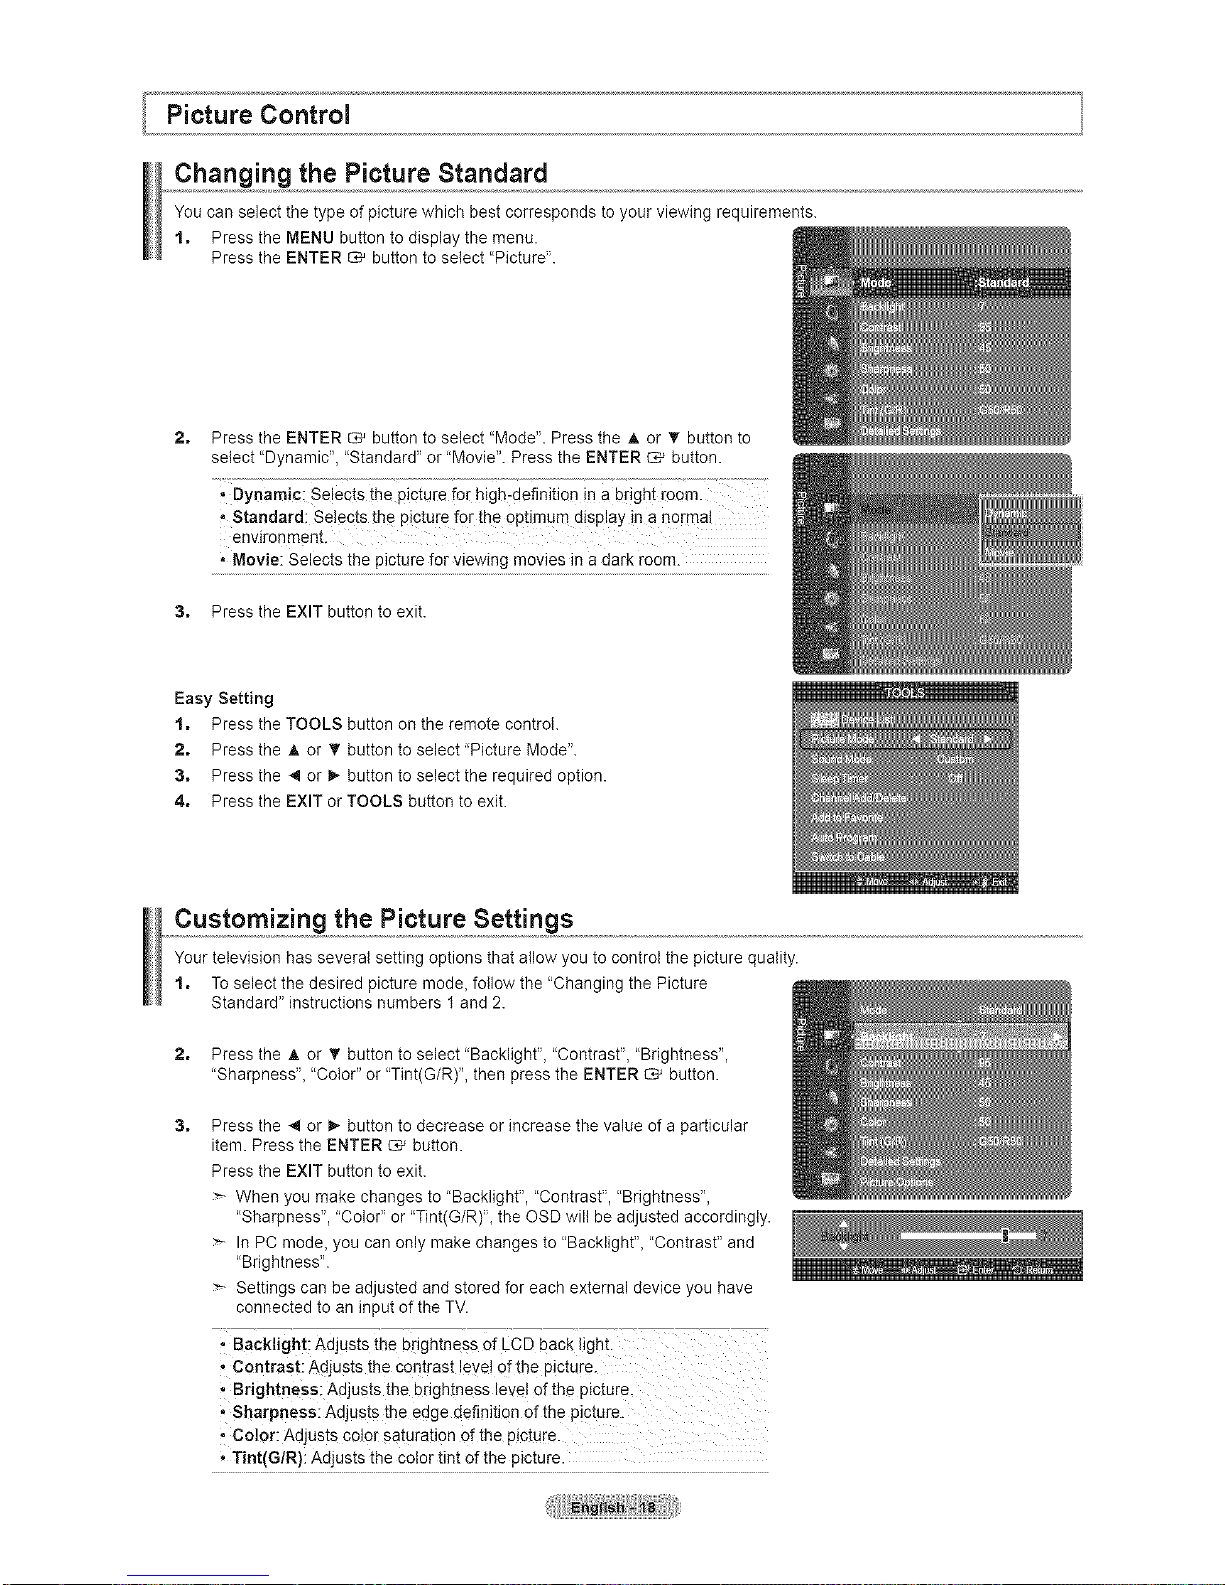
Changing the Picture Standard
You can select the type of picture which best corresponds to your viewing requirements.
t. Press the MENU button to display the menu.
Press the ENTER _ button to select "Picture".
2, Press the ENTER _ button to select "Mode". Press the A or T button to
select "Dynamic", "Standard" or "Movie". Press the ENTER C,_ button.
Dynamic: Selects the picture for high-definition in a bright room.
Standard; Selects the picture for the optimum display in a normal
environment.
• Movie: Selects the picture for viewing movies in a dark room.
3, Press the EXIT button to exit.
Easy Setting
t. Press the TOOLS button on the remote control.
2. Press the A or _r button to select 'Picture Mode".
3. Press the _ or _ button to select the required option.
4. Press the EXIT or TOOLS button to exit.
Customizing the Picture Settings
Your television has several setting options that allow you to controt the picture quality.
t. To select the desired picture mode. follow the "Changing the Picture
Standard" instructions numbers 1 and 2.
2, Press the A or T button to select "Backlight", "Contrast", "Brightness",
"Sharpness"_ "Color" or "Tint(G/R)", then press the ENTER _ button.
3,
Press the _ or _ button to decrease or increase the value of a particular
item. Press the ENTER C,= button.
Press the EXIT button to exit.
When you make changes to "Backlight", "Contrast", "Brightness",
"Sharpness", "Color" or "Tint(G/R)"_ the OSD will be adjusted accordingly.
In PC mode. you can only make changes to "Backlight". "Contrast" and
"Brightness".
Settings can be adjusted and stored for each external device you have
connected to an input of the TV.
.. Backlight; Adjusts the brightness Of LCD hack light. .................................................................
• Contrast:Adjusts the contrast leye! of the picture.
.' Brightness: Adjusts the brightness level of the picture.
, Sharpness: Adjusts the edge definition of the picture.
, Color: Adjusts color saturation of the picture.
• Tint(G/R): Adjusts the color tint of the picture.
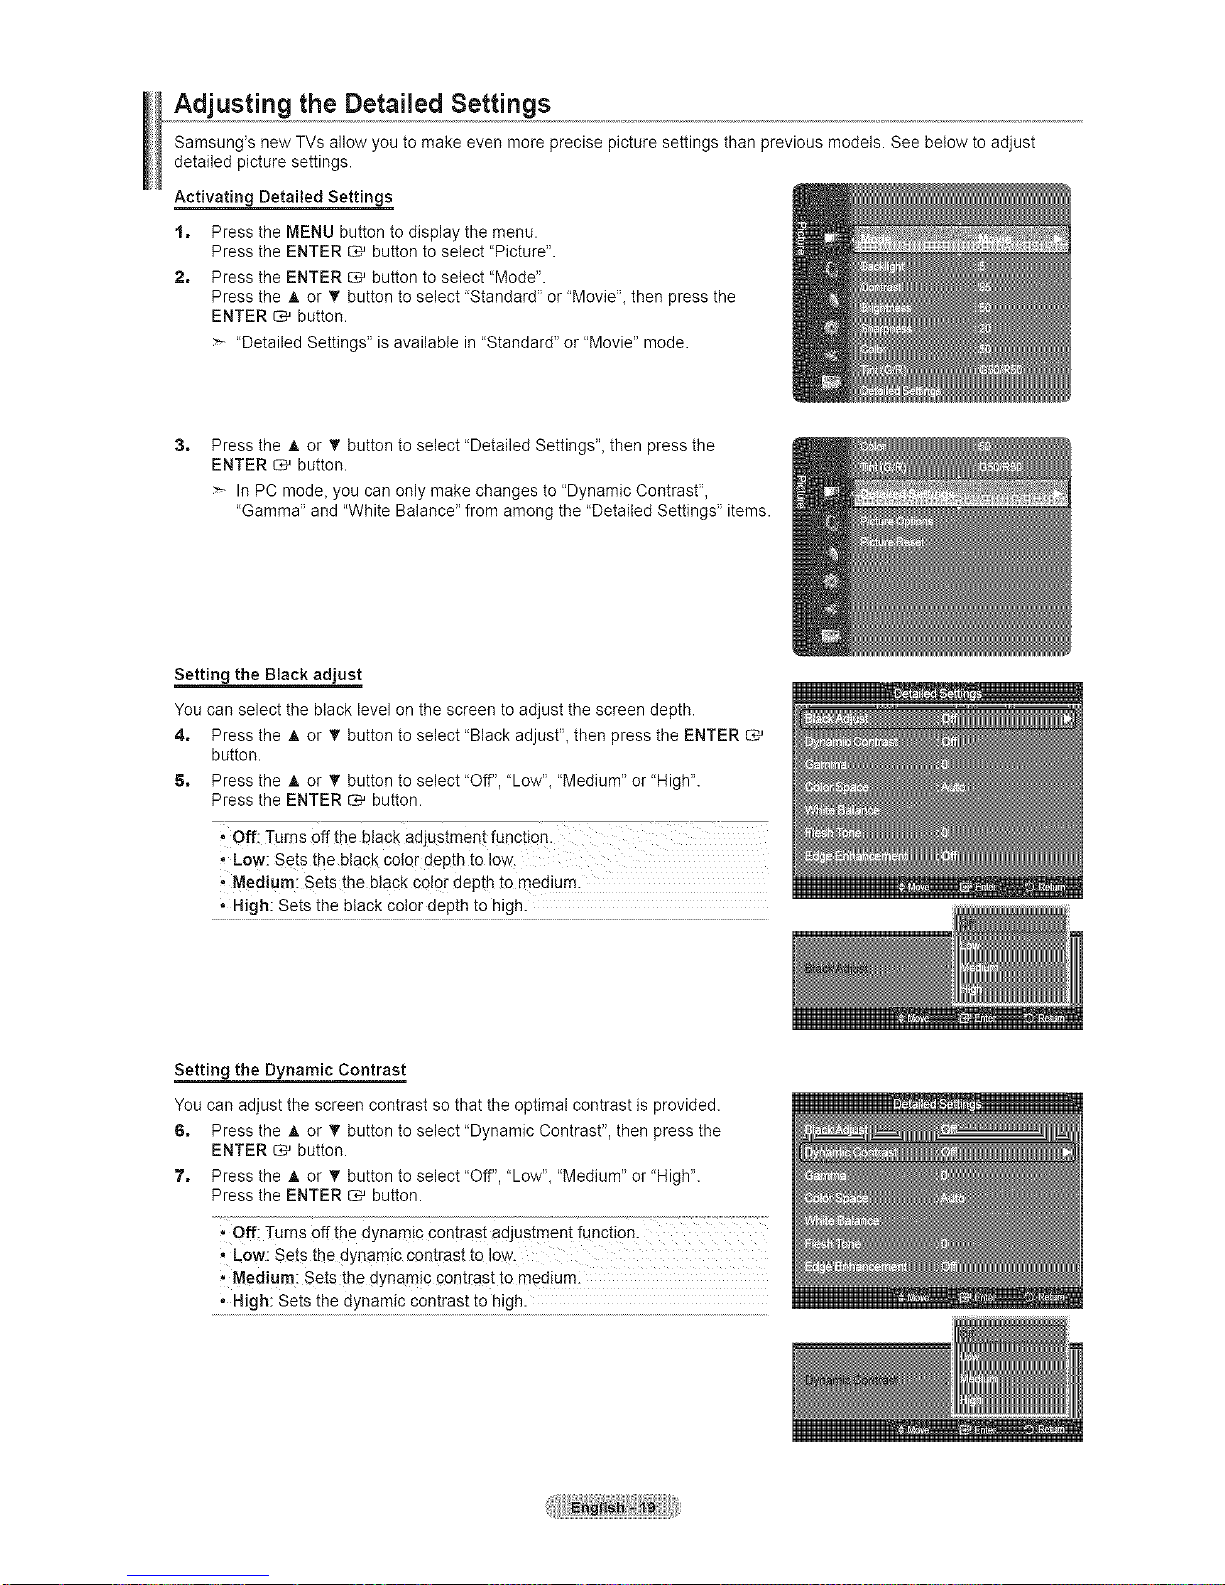
Adjusting the Detailed Settings
Samsung's new TVs allow you to make even more precise picture settings than previous models. See below to adjust
detailed picture settings.
Activating Detailed Settings
t, Press the MENU button to display the menu.
Press the ENTER _ button to select "Picture".
2, Press the ENTER _ button to select "Mode".
Press the A or _' button to select 'Standard" or "Movie"_then press the
ENTER _ button.
"Detailed Settings" is available in "Standard" or "Movie" mode.
3,
Press the A or T button to select "Detailed Settings"_ then press the
ENTER _ button.
In PC mode, you can only make changes to "Dynamic Contrast",
"Gamma" and "White Balance" from among the "Detailed Settings" items.
Setting the Black adjust
You can select the black level on the screen to adjust the screen depth.
4, Press the A or 'I' button to select "Black adjust"_ then press the ENTER
button.
5, Press the _, or _/' button to select "Off", "Low", "Medium" or "High".
Press the ENTER _ button.
; Off: Turns Off the black adjustment function.
, Low: Sets the black color depth to low.
, Medium: Sets the black color depth to medium.
• High: Sets the black color depth to high.
Setting the Dynamic Contrast
You can adjust the screen contrast so that the optimal contrast is provided.
6, Press the A or T button to select "Dynamic Contrast", then press the
ENTER _ button.
7, Press the _, or _' button to select "Off", "Low"_ "Medium" or "High".
Press the ENTER _ button.
Off: ]-urns Off the dynamic contrast adjustment function.
• Low: Sets the dynamic contrast to !ow.
Medium: Sets the dynamic contrast to medium:
• High: Sets the dynamic contrast to high.
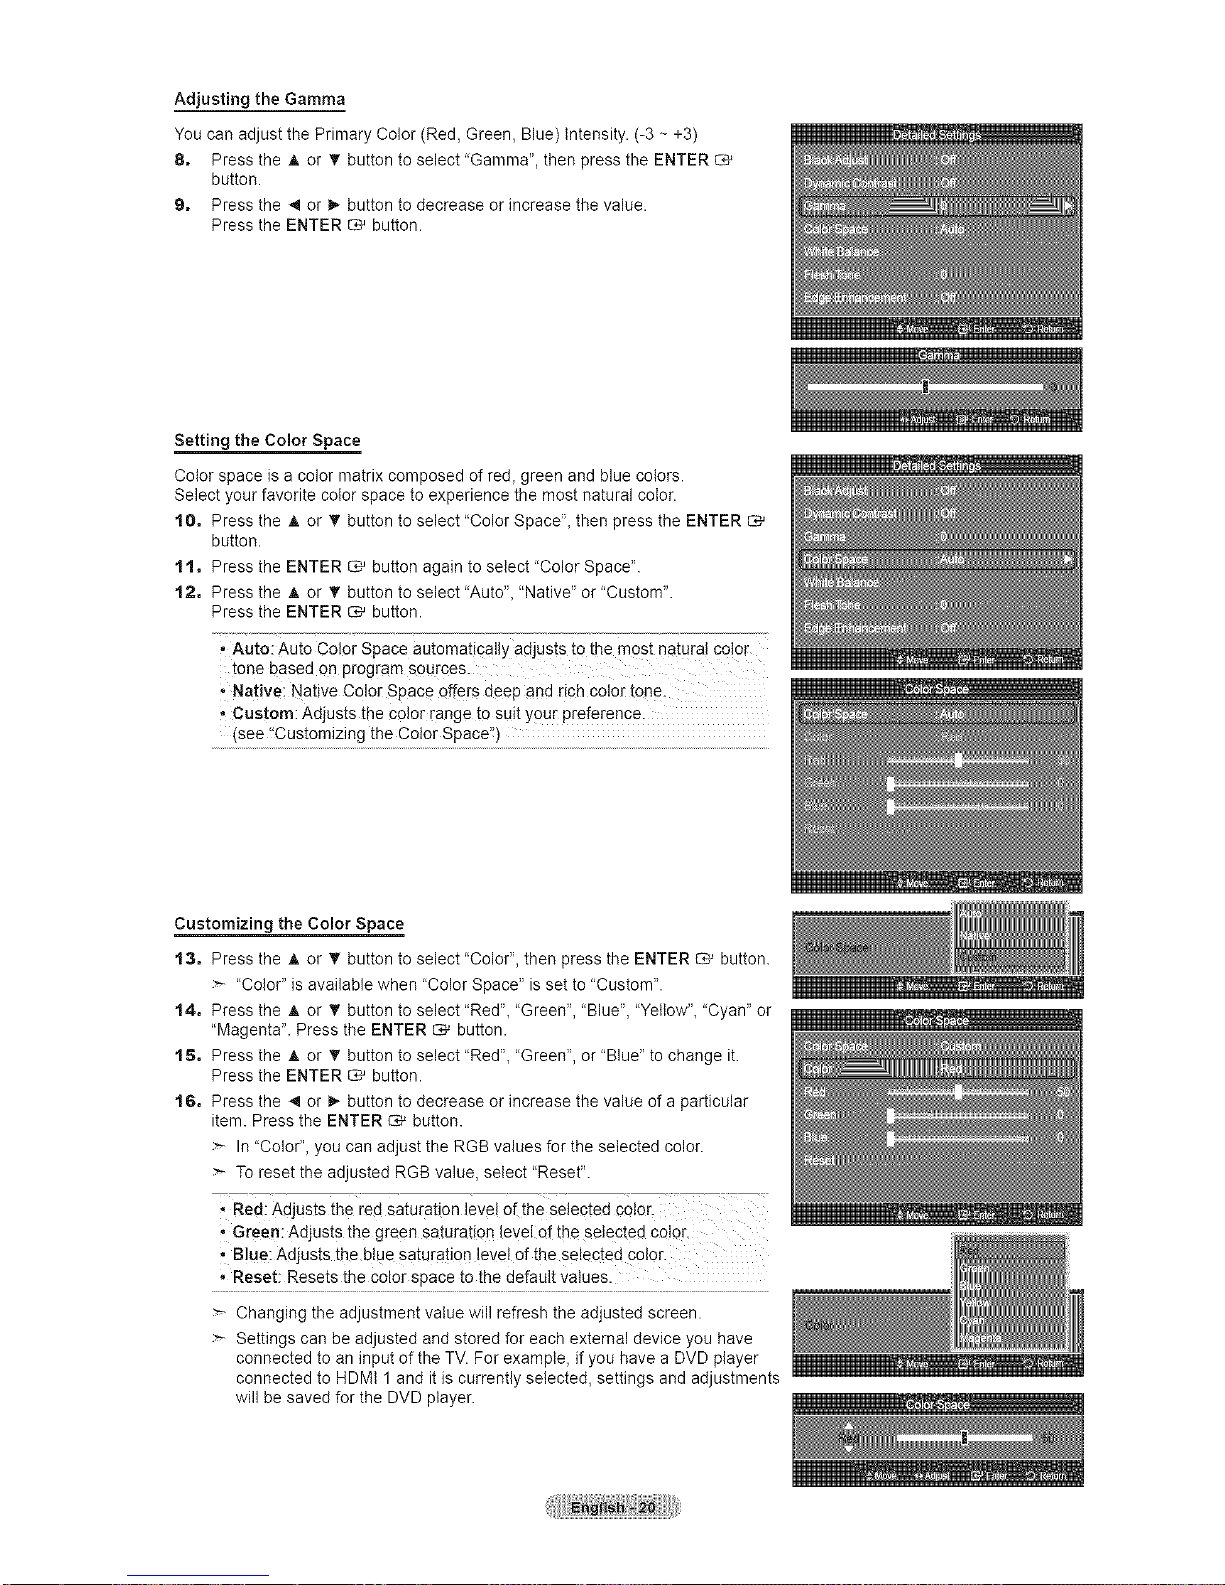
Adjusting the Gamma
You can adjust the Primary Color (Red, Green, Blue) intensity. (-3 ~ +3)
8, Press the A or _/' button to select 'Gamma", then press the ENTER
button.
9, Press the _ or _- button to decrease or increase the value.
Press the ENTER _ button.
Setting the Color Space
Color space is a color matrix composed of red, green and blue colors.
Select your favorite color space to experience the most natural color.
t0, Press the _. or _" button to select "Color Space", then press the ENTER
button.
tl, Press the ENTER _ button again to select "Color SpaceL
t2, Press the _, or _' button to select "Auto", "Native" or "Custom".
Press the ENTER _ button.
, Auto: Auto Color Space automatically ad usts to the most natural color
tone based on program sources.
, Native; Native Color Space offers deep and rich colonton e.
• Custom: Adjusts the color range to suit your preference.
(see !'Customizing the Color Space'!)
Customizing the Color Space
t3, Press the _, or T button to select "Color", then press the ENTER _ button.
"Color" is available when "Color Space" is set to "Custom".
t4, Press the A or 'V button to select "Red", "Green", "Blue", "Yellow", "Cyan" or
"Magenta". Press the ENTER _ button.
t_, Press the _, or _' button to select "Red", "Green", or "Blue" to change it.
Press the ENTER _ button.
t6, Press the _ or _,-button to decrease or increase the value of a particular
item. Press the ENTER C_' button.
In "Color", you can adjust the RGB values for the selected color.
To reset the adjusted RGB value, select "Reset".
• Red: Adjusts the red saturation level or the Selected color.
, Green: Adjust s the green saturation level of the selected cotQr,
, B!ue: Adjusts the blue satura!ion level of the selected COlOr.
• Reset: Resets the color space to the default values.
Changing the adjustment value will refresh the adjusted screen.
Settings can be adjusted and stored for each external device you have
connected to an input of the TV. For example, if you have a DVD player
connected to HDMt 1and it is currently selected, settings and adjustments
will be saved for the DVD player.
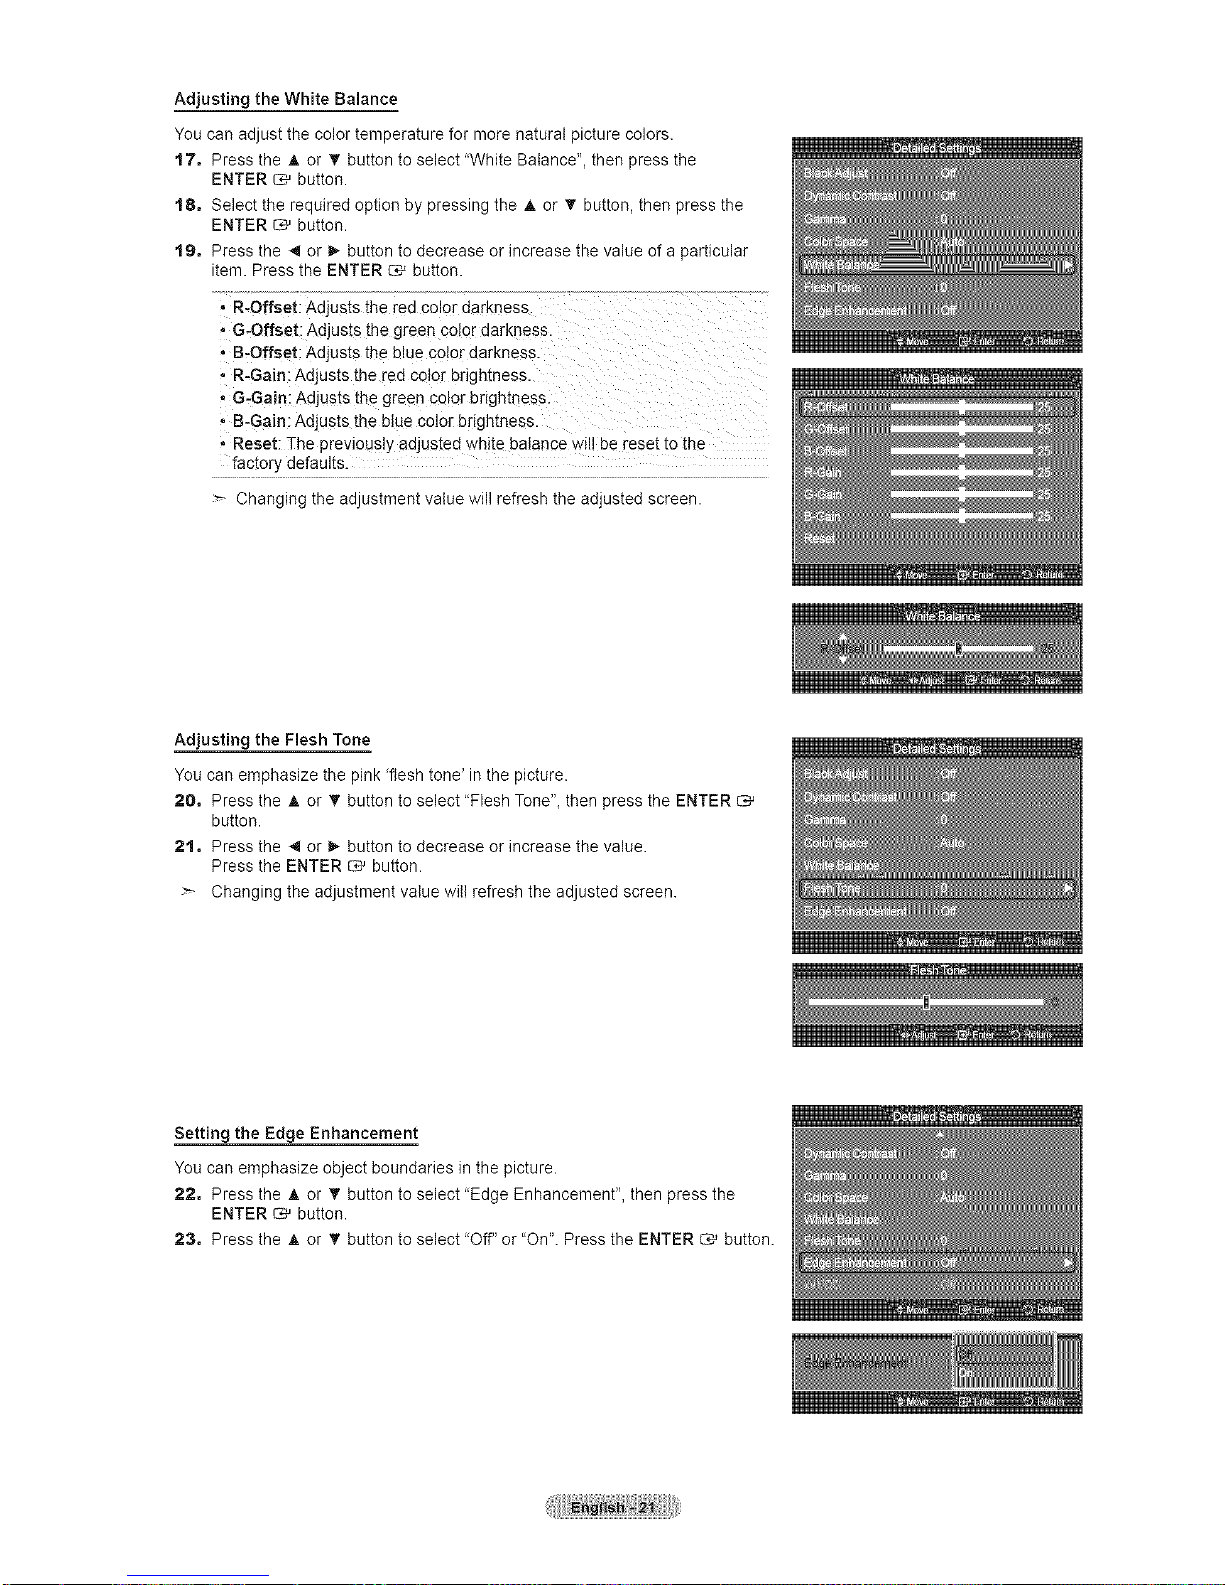
Adjusting the White Balance
You can adjust the color temperature for more natural picture colors.
t7, Press the A or T button to select 'White Balance", then press the
ENTER _ button.
t8, Select the required option by pressing the A or T button, then press the
ENTER _ button.
t9, Press the _ or _- button to decrease or increase the value of a particular
item. Press the ENTER C,_ button.
• R-Offset: Adjusts the red color darkness.
• G-Offset: Adjusts the green color darkness.
• B-Offset: Aajusts the blue color darkness.
• R-Gain: Adjusts the red color brightness.
, G-Gain: Adjusts the green color brightness.
• B-Gain: Adjusts the blue color brightness.
• Reset: The previously adjusted white oalance will Dereset to the
factory defaults
_'- Changing the adjustment value will refresh the adjusted screen.
Adjusting the Flesh Tone
You can emphasize the pink 'flesh tone' in the picture.
20, Press the A or _" button to select "Flesh Tone"_then press the ENTER
button.
2t, Press the _ or _- button to decrease or increase the value.
Press the ENTER _ button.
Changing the adjustment value will refresh the adjusted screen.
Setting the Edge Enhancement
You can emphasize object boundaries in the picture.
22, Press the A or T button to select 'Edge Enhancement", then press the
ENTER _ button.
23, Press the A or _" button to select 'Off" or "On". Press the ENTER _ button.
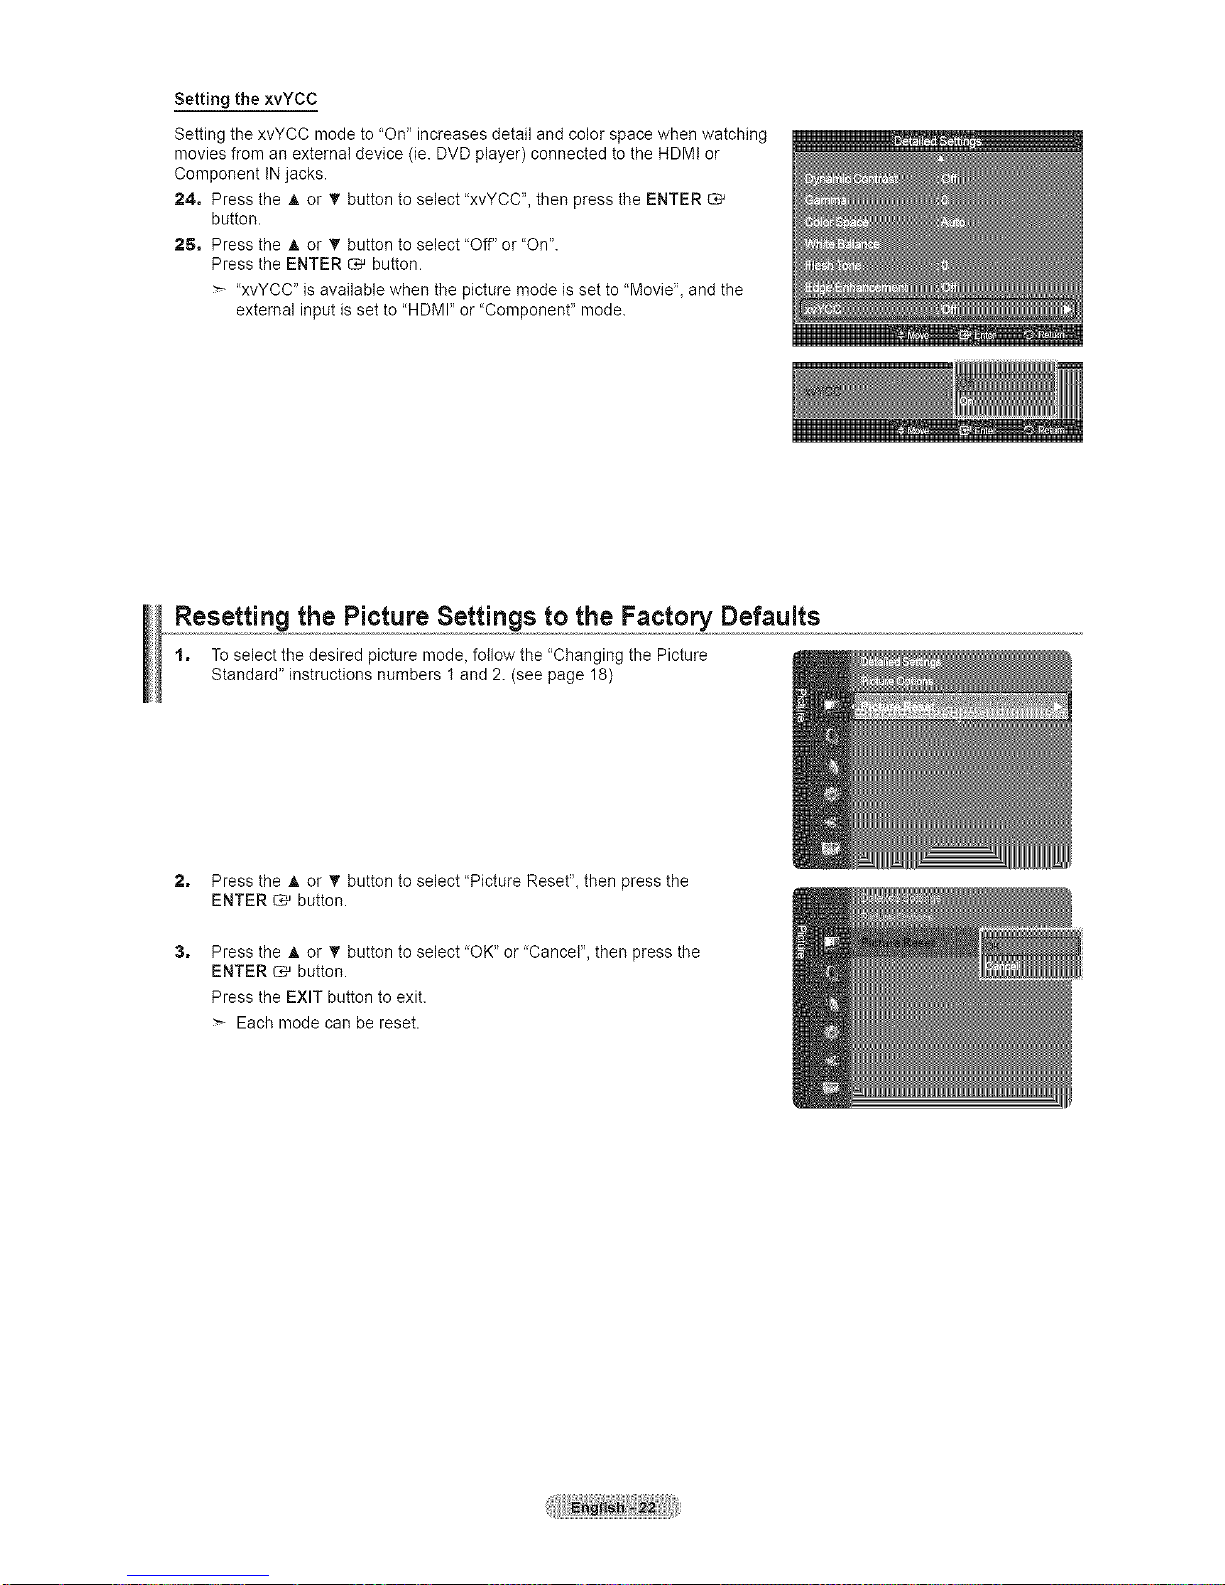
Setting the xvYCC
Setting the xvYCC mode to "On" increases detail and color space when watching
movies from an external device (ie. DVD player) connected to the HDMI or
Component IN jacks.
24, Press the A or 'I' button to select "xvYCC", then press the ENTER
button.
25, Press the A or _' button to select "Off" or "On".
Press the ENTER _ button.
"xvYCC" is available when the picture mode is set to "Movie", and the
external input is set to "HDMI" or "Component" mode.
Resetting the Picture Settings to the Factory Defaults
1, To select the desired picture mode_follow the "Changing the Picture
Standard" instructions numbers 1 and 2. (see page 18)
2,
3,
Press the _, or T button to select "Picture Reset", then press the
ENTER _ button.
Press the A or _' button to select "OK" or "Cancel", then press the
ENTER _ button.
Press the EXIT button to exit.
Each mode can be reset.
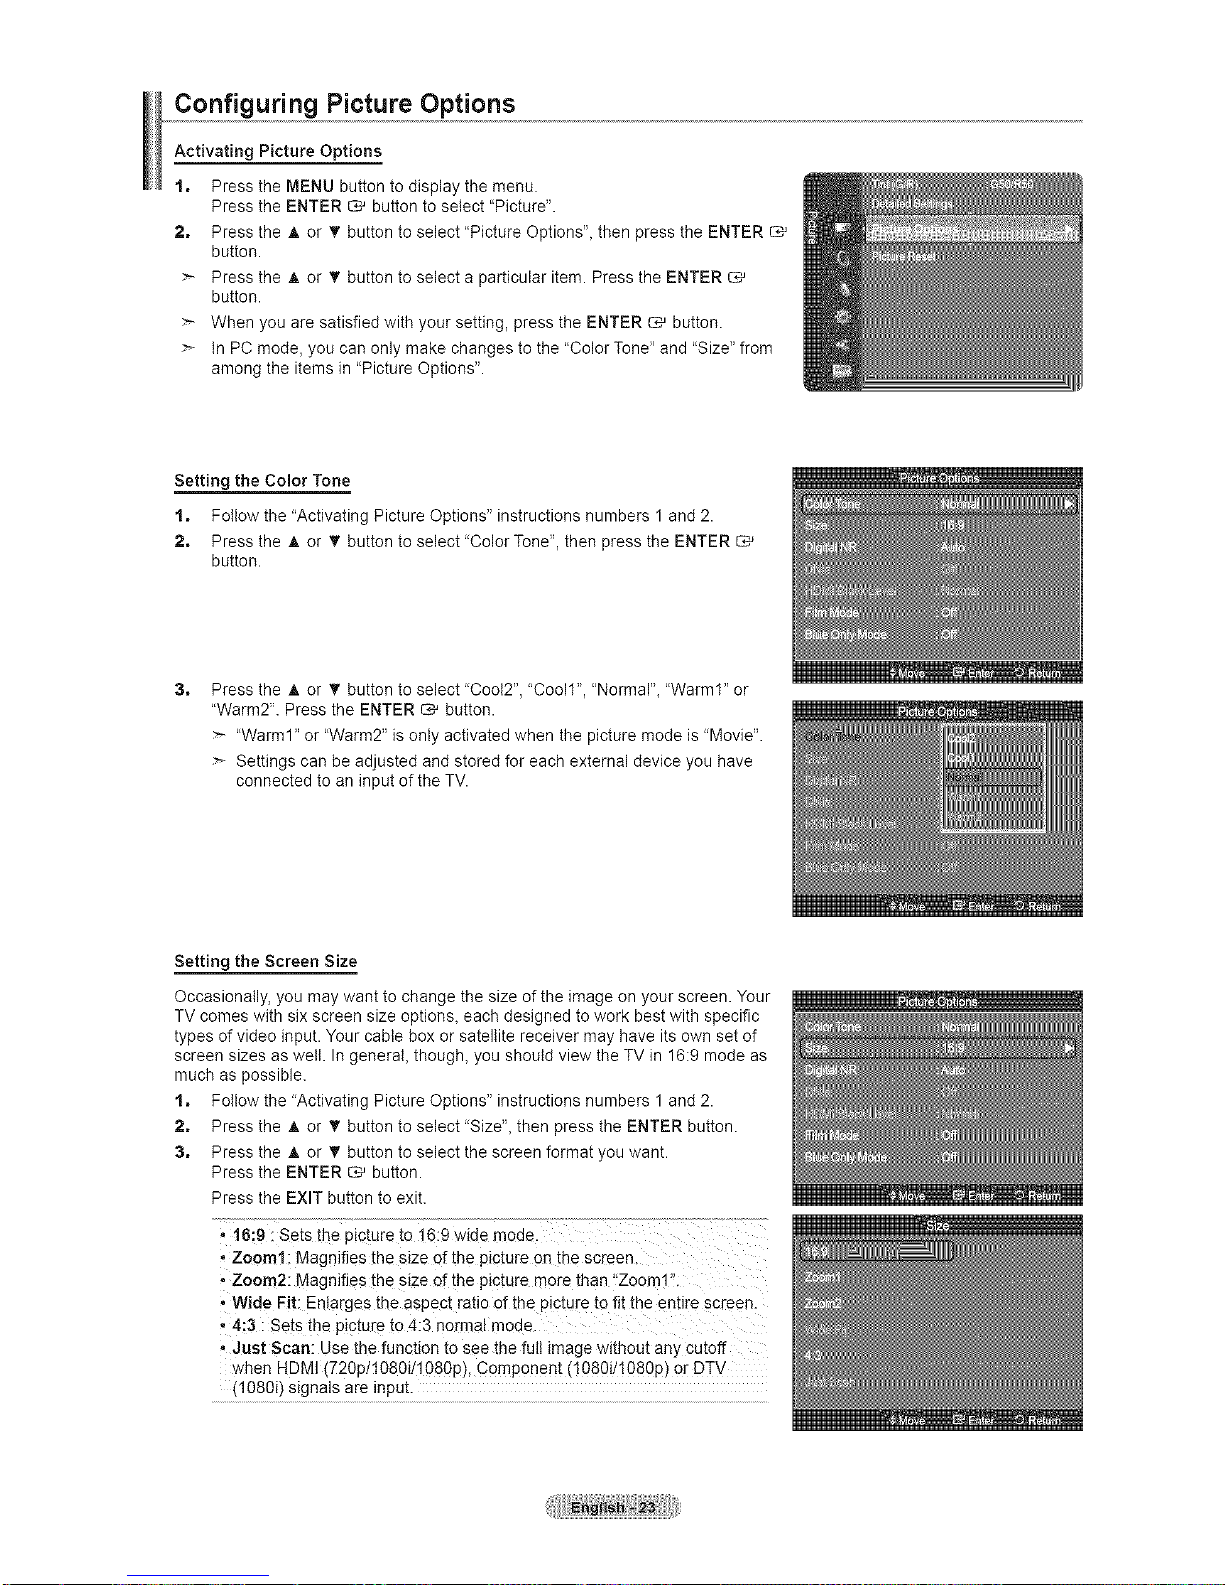
Configuring Picture Options
Activating Picture Options
•t, Press the MENU button to dispJay the menu.
Press the ENTER _ button to select "Picture".
2, Press the _, or _" button to select "Picture Options", then press the ENTER
button.
Press the _, or _" button to select a particular item. Press the ENTER
button.
When you are satisfied with your setting, press the ENTER _ button.
in PC mode, you can only make changes to the "Color Tone" and "Size" from
among the items in "Picture Options".
Setting the Color Tone
t, Fotlow the "Activating Picture Options" instructions numbers 1 and 2.
2, Press the _, or _" button to select 'Color Tone", then press the ENTER
button.
3,
Press the A or T button to select 'Coot2", "Cool1", "Normal", "Warm1" or
"Warm2". Press the ENTER _ button.
"Warm1" or "Warm2" is only activated when the picture mode is "Movie".
Settings can be adjusted and stored for each external device you have
connected to an input of the TV.
Setting the Screen Size
Occasionally, you may want to change the size of the image on your screen. Your
TV comes with six screen size options, each designed to work best with specific
types of video input. Your cable box or satellite receiver may have its own set of
screen sizes as well. In general, though, you should view the TV in 16:9 mode as
much as possible.
t, Follow the "Activating Picture Options" instructions numbers 1 and 2.
2, Press the A or _r button to select 'Size", then press the ENTER button.
3, Press the _, or T button to select the screen format you want.
Press the ENTER _ button.
Press the EXIT button to exit.
,16:9 : Sets the D_ctureto t6:9 wide mode.
• Zoom1: Magnifies the size of the p_cture on me screen.
• Zoom2: Magnifies the size of the p_cture more than "Zoom1
• Wide Fit: Enlarges the aspect ratio of the picture to fit the entire screen.
,4:3 : Sets the picture to 4:3 normal moue
• Just Scan: Use the function to see the full _magew_thout any cutoff
,vhen HDIV (720D/108Oi/1080p), Component (108Oi/108Op)or DTV
(t080i) signals are input.
WhenDouble([_, _ )modehasbeensetinPIP,thePictureSizecannotbeset.
Temporaryimageretentionmayoccurwhenviewingastaticimageonthesetformorethantwohours.
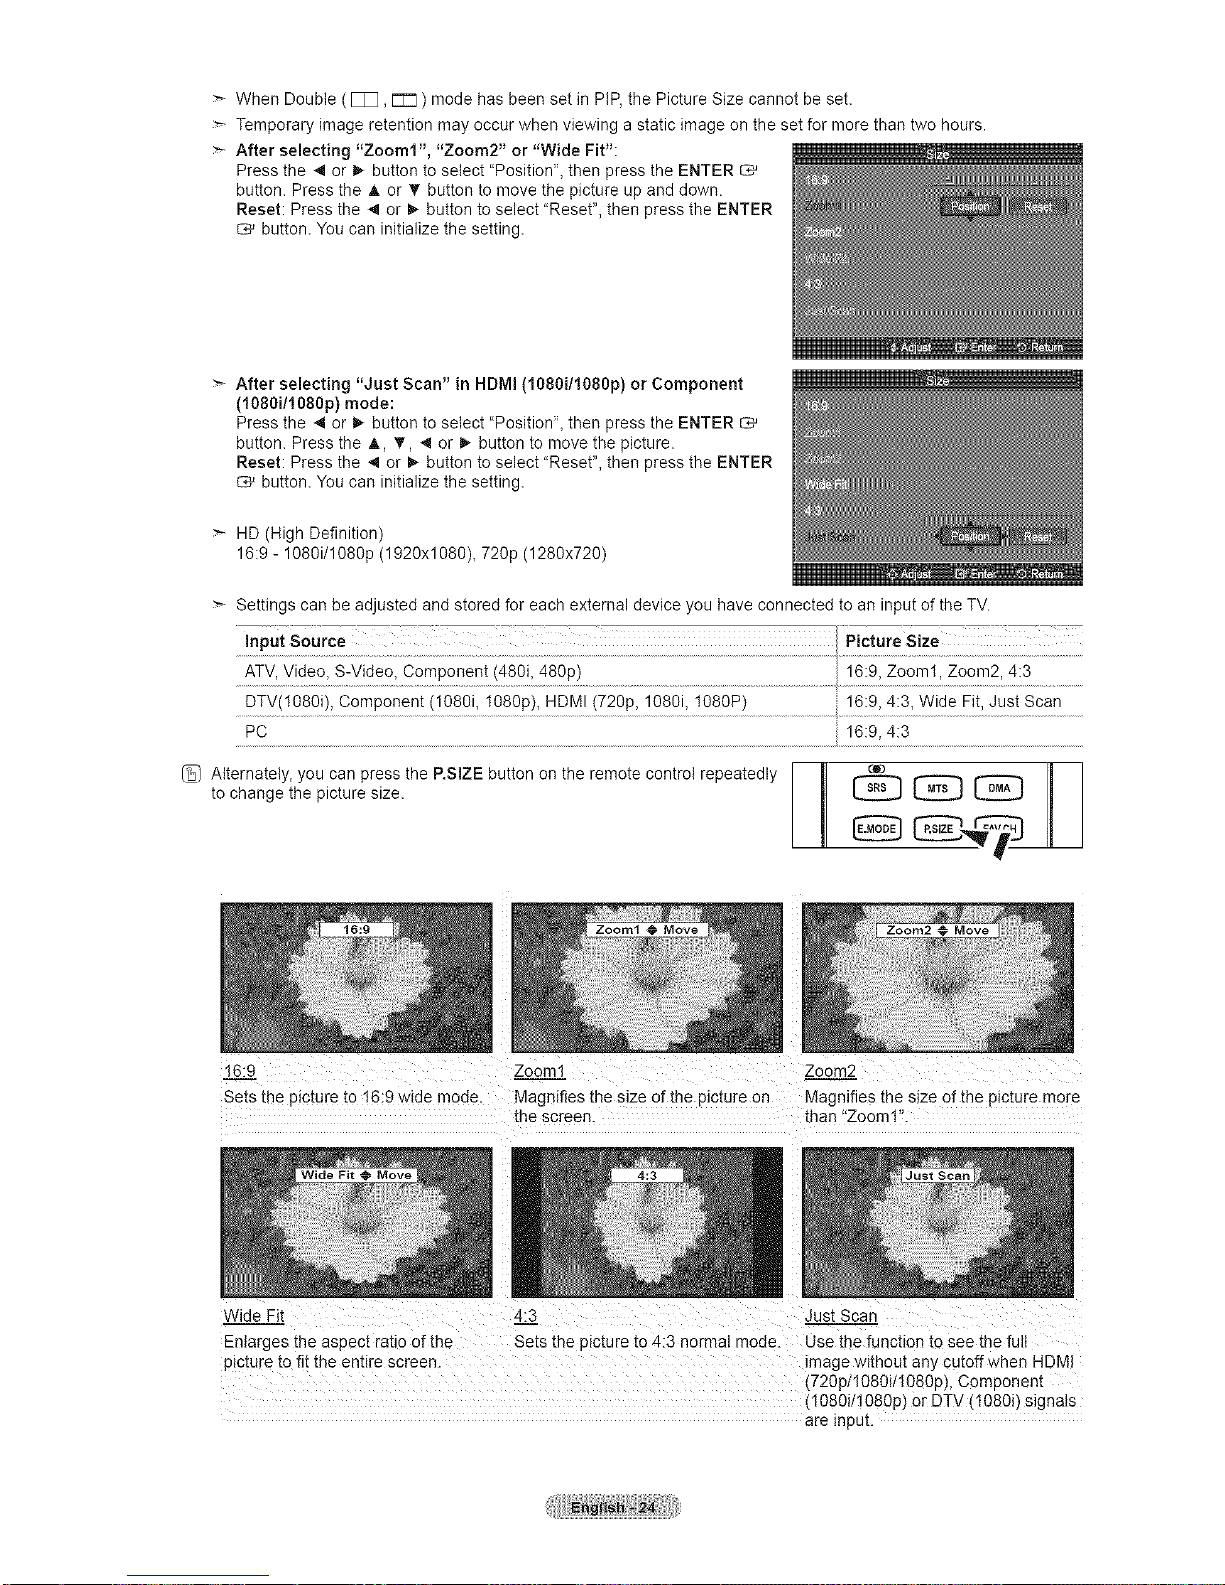
Afterselecting"Zoom1","Zoom2"or"WideFit":
Pressthe4orI_buttontoselect"Position",thenpresstheENTER
button.Pressthe_, or _' button to move the picture up and down.
Reset: Press the _1or _ button to select "Reset", then press the ENTER
button. You can initialize the setting.
After selecting "Just Scan" in HDMI (1080i/1080p) or Component
(I080ili080p)mode:
Press the 4 or _,-button to select "Position", then press the ENTER
button. Press the A, _', 4 or _ button to move the picture.
Reset: Press the ,q or _ button to select "Reset", then press the ENTER
button. You can initialize the setting.
HD (High Definition)
16:9 - 1080i/1080p (1920x1080), 720p (1280x720)
Settings can be adjusted and stored for each external device you have connected to an input of the TV.
Input Source Picture Size
ATV,Video, S-Video, Component (48% 480p) 16:9, Zoom1, Zoom2, 4:3
DTV(1080i), Component (108% 1080p), HDMI (720p, 108% 1080P) 16:9, 4:3, Wide Fit, Just Scan
PC 16:9, 4:3
_ Alternately' Y°U can press the P'SIZE butt°n °n the rem°te c°ntr°l repeatedly IrJI)tochange the picture size. _ _"_ /__
Zoom2 @ Move
i6:9 Z0oml Zo0m2
Sets the picture to 16:9 wide mode. Magnifies the size of the picture on Magnifies the size of the picture more
the screen than !'Zoom1'!
Wide Fit O Move
Just ScanW_de Fit 4:3_
Enlarges the aspect ratio of the Sets the oicture to 4:3 normal mode. Use the function to see the ful
picture [o fit the entire screen, image without an_ cutoffwhen HDMI
(729pt1080i/108Ou_. Comuonem
(1080i11080p) or DTV (1080i) signals
are lnpu[.

Setting the Digital Noise Reduction
if the broadcast signal received by your TV is weak, you can activate the Digital
Noise Reduction feature to help reduce any static and ghosting that may appear
on the screen.
t, Follow the "Activating Picture Options" instructions numbers 1 and 2.
(Refer to page 23)
2, Press the A or _" button to select "Digital NR", then press the ENTER
button.
3, Press the _. or T button to select "Off", "Low", "Medium", "High" or "Auto".
Press the ENTER _ button.
. Off: Turns the screen noise reduction function 0ff.
. Low: Reduces Screen noise at a low level.
• Medium: Reduces screen noise at a medium teveL
• High: Reduces screen noise at a high level.
• Auto: Automatically recognizes and reduces screen noise.
Press the EXIT button to exit.
Setting the DNle (Digital Natural image engine)
This TV includes the DNle function to provide high visual quality. If you set DNle
to on, you can view the screen with the DNle feature activated.
t, Follow the "Activating Picture Options" instructions numbers 1 and 2.
(Refer to page 23)
2, Press the A or _" button to select "DNle', then press the ENTER
button.
3, Press the A or _r button to select "Off" or "On", then press the ENTER
button.
, Off: switches off the DNle mode.
On: Switches on the DNle mode.
Press the EXIT button to exit.
DNle TM (Digital Natural image engine)
This feature brings you a more detailed image with 3D noise reduction
and detail, contrast and white enhancement.
"DNle" is only available in "Dynamic" mode.
Setting the HDMI Black Level
You can select the black level on the screen to adjust the screen depth.
to Follow the "Activating Picture Options" instructions numbers 1 and 2.
(Refer to page 23)
2, Press the A or _f button to select "HDMI Black Level", then press the
ENTER _ button.
3, Press the A or T button to select 'Normal" or "Low", then press the
ENTER _ button.
• Normal: The screen gets brighter.
• Low: The screen gets darken
This function is active only when an external device is connected to the
TV via HDMI. "HDMI Black Level" function may not be compatible with
all external devices.
Press the EXIT button to exit.
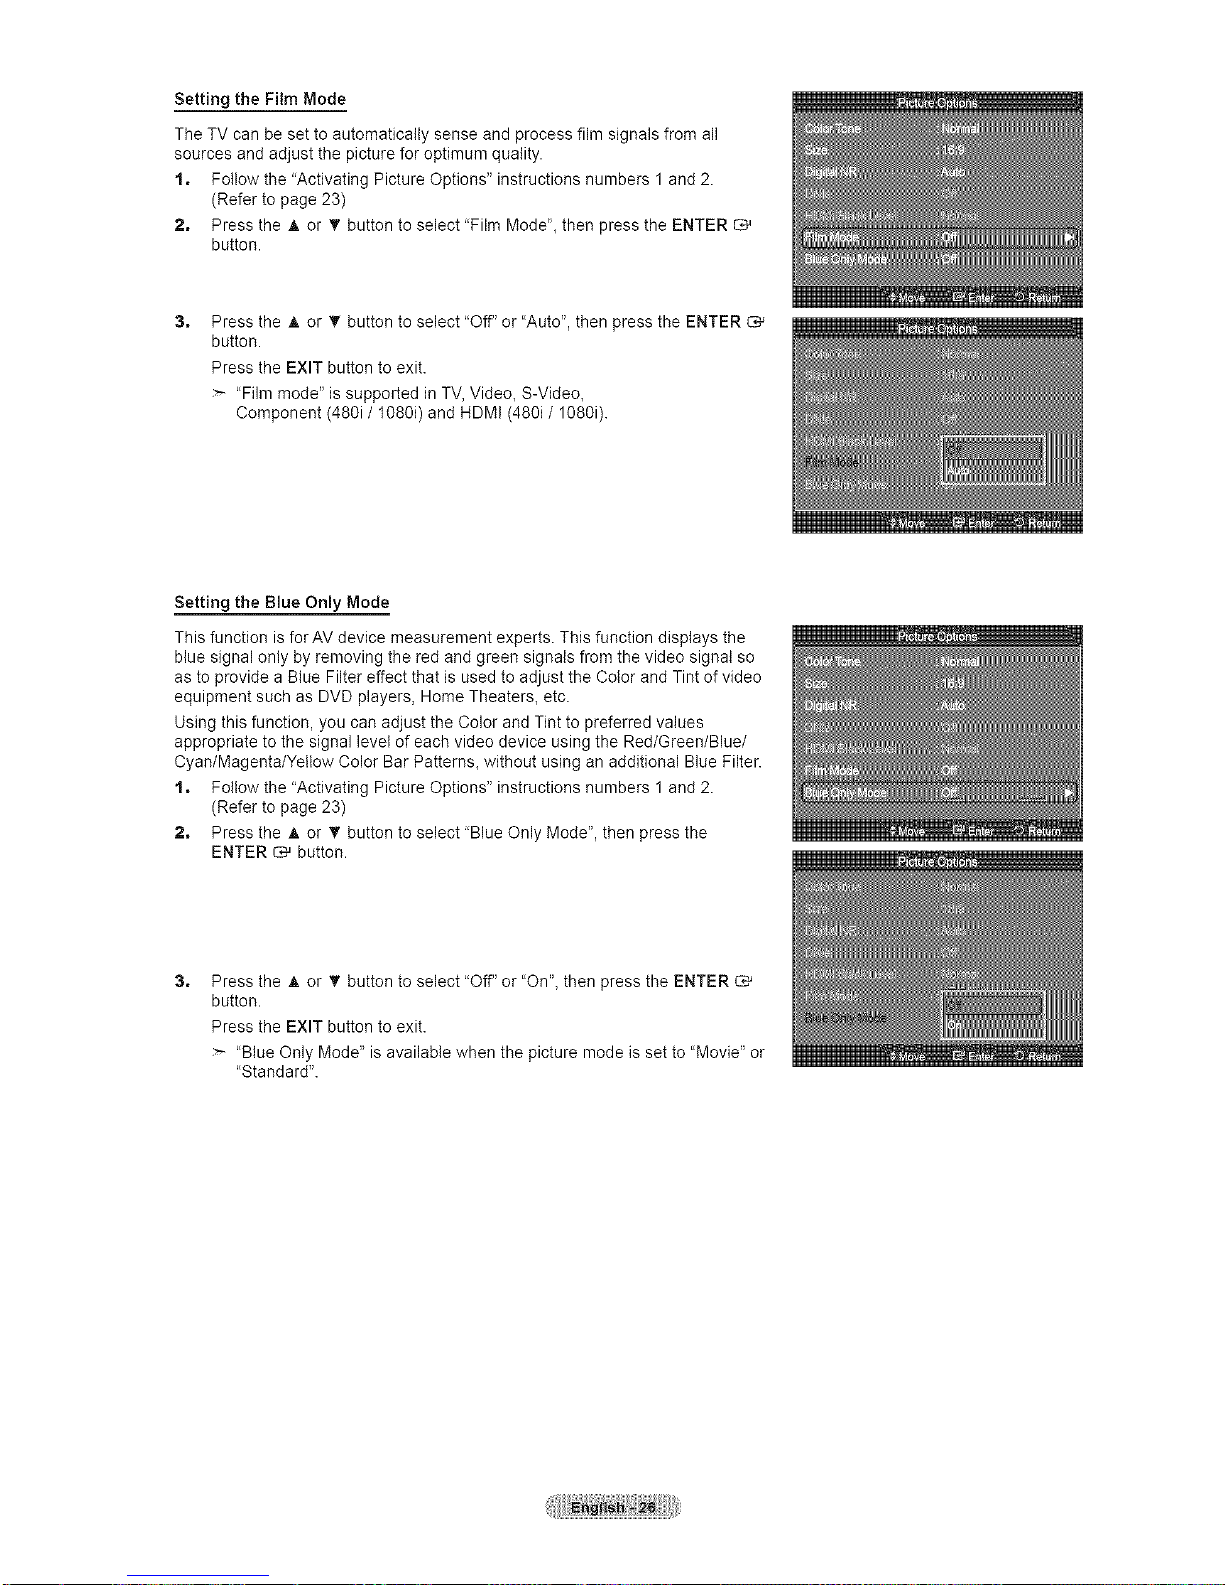
Setting the Film Mode
The TV can be set to automatically sense and process film signals from all
sources and adjust the picture for optimum quality.
t, Follow the "Activating Picture Options" instructions numbers 1 and 2.
(Refer to page 23)
2, Press the A or _" button to select 'Film Mode"_then press the ENTER
button.
3_
Press the A or 'I' button to select "Off" or "Auto", then press the ENTER C,_
button.
Press the EXIT button to exit.
"Film mode" is supported in TV, Video, S-Video,
Component (480i / 1080i) and HDMI (480i / 1080i).
Setting the Blue Only Mode
This function is for AV device measurement experts. This function displays the
blue signal only by removing the red and green signals from the video signal so
as to provide a Blue Filter effect that is used to adjust the Color and Tint of video
equipment such as DVD players, Home Theaters, etc.
Using this function, you can adjust the Color and Tint to preferred values
appropriate to the signal level of each video device using the Red/Green/Blue/
Cyan/Magenta/Yellow Color Bar Patterns, without using an additional Blue Filter.
t, Follow the "Activating Picture Options" instructions numbers 1 and 2.
(Refer to page 23)
2, Press the A or T button to select 'Blue Only Mode", then press the
ENTER _ button.
3_
Press the A or _" button to select "Off" or "On", then press the ENTER
button.
Press the EXIT button to exit.
"Blue Only Mode" is available when the picture mode is set to "Movie" or
"Standard".
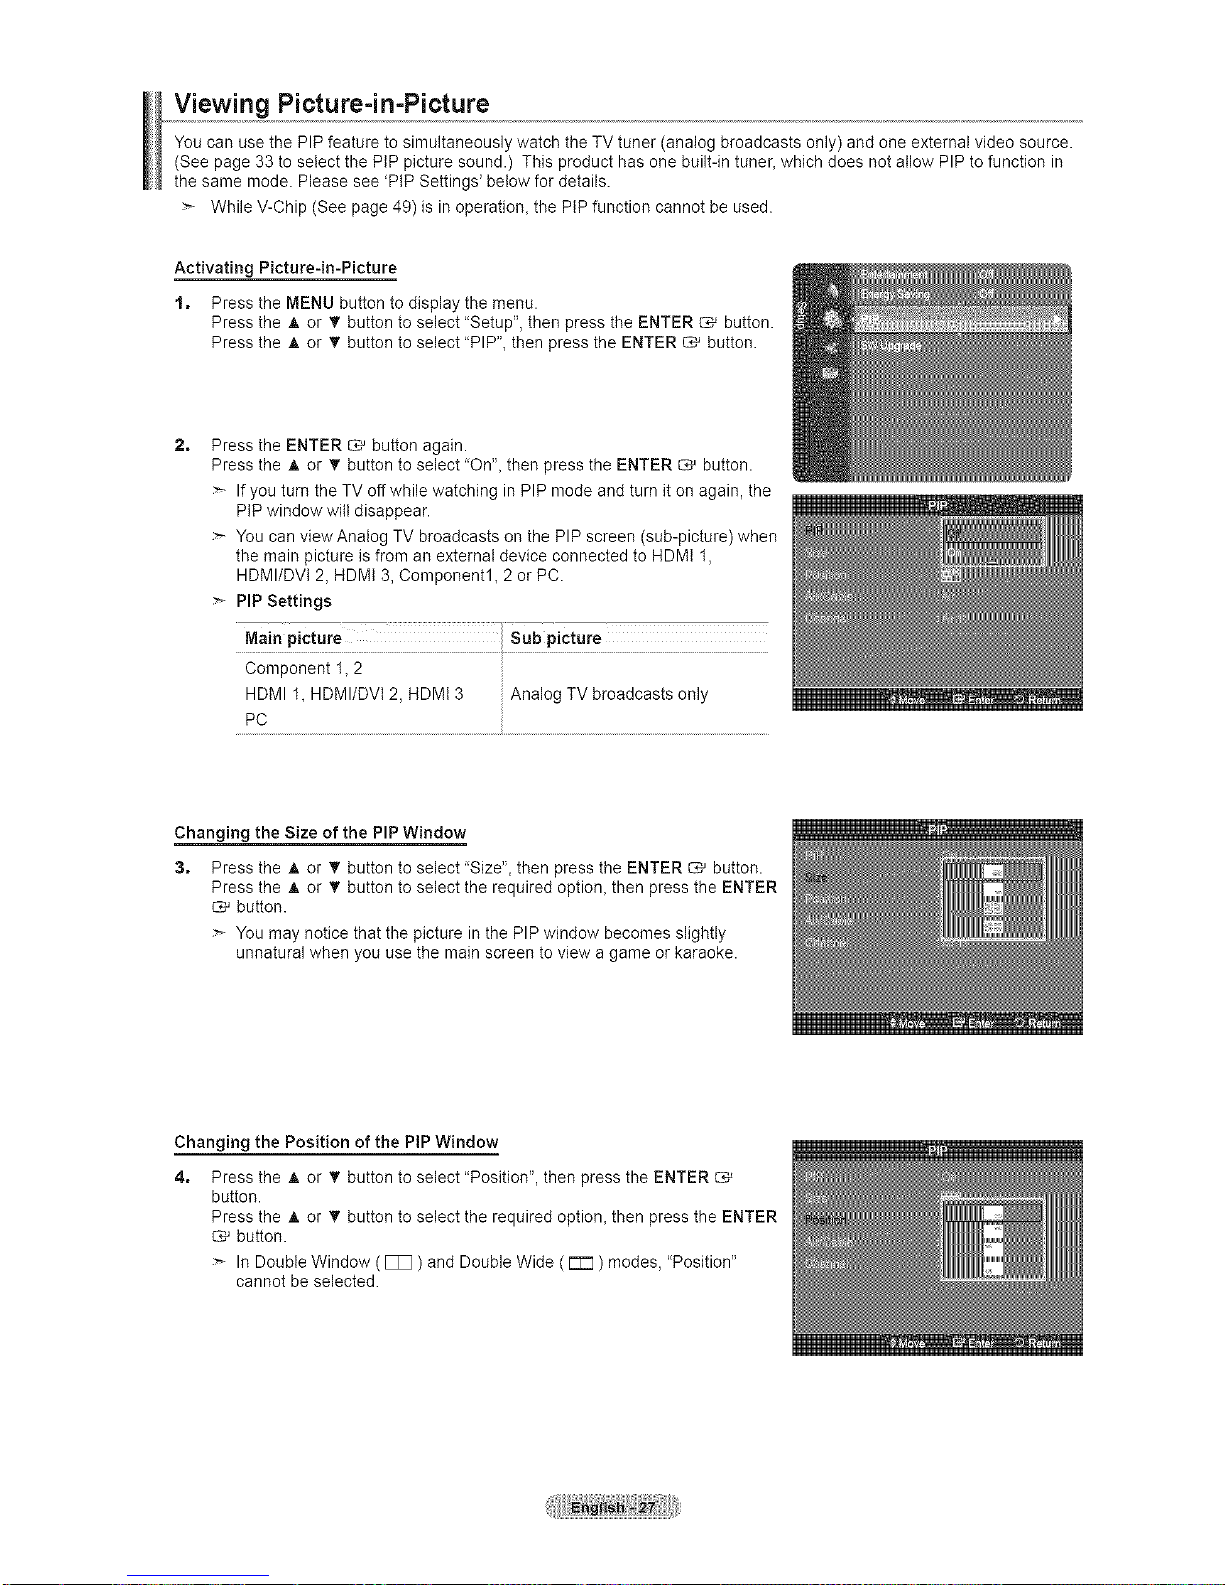
Viewing Picture=in-Picture
You can use the PIP feature to simultaneously watch the TV tuner (analog broadcasts only) and one external video source.
(See page 33 to select the PiP picture sound.) This product has one built-in tuner_which does not allow PIP to function in
the same mode. Please see 'PiP Settings' below for details.
While V-Chip (See page 49) is in operation_ the PiP function cannot be used.
Activating Picture-in-Picture
t, Press the MENU button to display the menu.
Press the A or _' button to select "Setup", then press the ENTER _ button.
Press the A or _" button to select "PIP"_then press the ENTER _ button.
2,
Press the ENTER _ button again.
Press the A or _' button to select 'On", then press the ENTER _ button.
If you turn the TV off while watching in PIP mode and turn it on again, the
PiP window will disappear.
You can viewAnalog TV broadcasts on the PIP screen (sub-picture) when
the main picture is from an external device connected to HDMt 1,
HDMI/DVt 2, HDMt 3, Component1, 2 or PC.
PIP Settings
HDMI 1_HDMI/DVt 2, HDMt 3 Analog TV broadcasts only
PC
Changing the Size of the PIP Window
3,
Press the A or _' button to select 'Size '', then press the ENTER _ button.
Press the A or _" button to select the required option, then press the ENTER
button.
You may notice that the picture in the PIP window becomes slightly
unnatural when you use the main screen to view a game or karaoke.
Changing the Position of the PiP Window
4,
Press the A or _" button to select "Position", then press the ENTER
button.
Press the A or _" button to select the required option, then press the ENTER
button.
In Double Window ( [_ ) and Double Wide ( r=T=l) modes, "Position"
cannot be selected.

Changing the PiP Channel
5, Press the A or _" button to select "Air/Cable", then press the ENTER
button.
6, Press the A or _" button to select "Air" or"Cable", then press the ENTER
button.
7,
8,
Press the A or _" button to select "Channel", then press the ENTER
button.
Press the A or T button to select the desired channel in the PiP window.
Press the ENTER _ button.
You can select only analog TV broadcasts on the PiP screen
(sub-picture).
Press the EXIT button to exit.
Easy Setting
t, Press the TOOLS button on the remote control.
2, Press the A or _r button to select 'PIP", then press the ENTER _ button.
3, Press the A or 'I' button to select a particular item.
4, Press the _ or _ button to select the required option.
5, Press the EXIT or TOOLS button to exit.
 Loading...