

Samsung LN32C550J1FXZA, LN37C550J1FXZA, LN46C550J1FXZA, LN32C550, LN37C550 User Manual
...
LCD TV
user manual
imagine the possibilities
Thank you for purchasing this Samsung product.
To receive more complete service, please register
your product at
www.samsung.com/register
Model Serial No.
Contact SAMSUNG WORLDWIDE
If you have any questions or comments relating to Samsung products, please contact the SAMSUNG customer care center.
Comuníquese con SAMSUNG WORLDWIDE
Si desea formular alguna pregunta o comentario en relación con los productos de Samsung, comuníquese con el centro de
atención al cliente de SAMSUNG.
Country Customer Care Center
Web Site Address
CANADA 1-800-SAMSUNG(726-7864) www.samsung.com
Samsung Electronics Canada Inc., Customer
Service 55 Standish Court Mississauga,
Ontario L5R 4B2 Canada
Samsung Electronique Canada Inc.,
Service à la Clientèle 55 Standish Court
Mississauga, Ontario L5R 4B2 Canada
U.S.A 1-800-SAMSUNG(726-7864) www.samsung.com
Samsung Electronics America, Inc.
105 Challenger Road
Ridgefield Park, NJ 07660-0511
BN68-02604A-02
BN68-02604A_Eng.indb 1 2010-02-10 �� 8:19:05

2
English
Figures and illustrations in this User Manual are provided for reference only and may differ from actual product appearance.
Product design and specifications may be changed without notice.
Important Warranty Information Regarding Television Format Viewing
See the warranty card for more information on warranty terms.
✎
Wide screen format LCD Displays (16:9, the aspect ratio of the screen width to height) are primarily designed to view wide screen format fullmotion video. The images displayed on them should primarily be in the wide screen 16:9 ratio format, or expanded to fill the screen if your model
offers this feature and the images are constantly moving. Displaying stationary graphics and images on screen, such as the dark sidebars on
nonexpanded standard format television video and programming, should be limited to no more than 5% of the total television viewing per week.
Additionally, viewing other stationary images and text such as stock market reports, video game displays, station logos, web sites or computer
graphics and patterns, should be limited as described above for all televisions. Displaying stationary images that exceed the above guidelines
can cause uneven aging of LCD Displays that leave subtle, but permanent burned-in ghost images in the LCD picture. To avoid this, vary the
programming and images, and primarily display full screen moving images, not stationary patterns or dark bars. On LCD models that offer picture
sizing features, use these controls to view different formats as a full screen picture.
Be careful in the selection and duration of television formats used for viewing. Uneven LCD aging as a result of format selection and use, as well as
burned-in images, are not covered by your Samsung limited warranty.
SAMSUNG ELECTRONICS NORTH AMERICAN LIMITED WARRANTY STATEMENT•
Subject to the requirements, conditions, exclusions and limitations of the original Limited Warranty supplied with Samsung Electronics
(SAMSUNG) products, and the requirements, conditions, exclusions and limitations contained herein, SAMSUNG will additionally provide
Warranty Repair Service in the United States on SAMSUNG products purchased in Canada, and in Canada on SAMSUNG products
purchased in the United States, for the warranty period originally specified, and to the Original Purchaser only.
The above described warranty repairs must be performed by a SAMSUNG Authorized Service Center. Along with this Statement, the Original
Limited Warranty Statement and a dated Bill of Sale as Proof of Purchase must be presented to the Service Center. Transportation to and
from the Service Center is the responsibility of the purchaser. Conditions covered are limited only to manufacturing defects in material or
workmanship, and only those encountered in normal use of the product.
Excluded, but not limited to, are any originally specified provisions for, in-home or on-site services, minimum or maximum repair times,
exchanges or replacements, accessories, options, upgrades, or consumables.
For the location of a SAMSUNG Authorized Service Center, please call toll-free:
In the United States : 1-800-SAMSUNG (1-800-726-7864) –
In Canada : 1-800-SAMSUNG –
Still image warning
Avoid displaying still images (such as jpeg picture files) or still image elements (such as TV channel logos, panorama or 4:3 image format, stock
or news bars at screen bottom etc.) on the screen. Constant displaying of still pictures can cause uneven wear of the screen phosphor, which will
affect image quality. To reduce risk of this effect, please follow below recommendations:
Avoid displaying the same TV channel for long periods.•
Always try to display any image on full screen, use TV set picture format menu for best possible match.•
Reduce brightness and contrast values to minimum required to achieve desired picture quality, exceeded values may speed up the burnout •
process.
Frequently use all TV features designed to reduce image retention and screen burnout, refer to proper user manual section for details.•
Securing the Installation Space
Keep the required distances between the product and other objects (e.g. walls) to ensure proper ventilation.
Failing to do so may result in fire or a problem with the product due to an increase in the internal temperature of the product.
When using a stand or wall-mount, use parts provided by Samsung Electronics only.
✎
If you use parts provided by another manufacturer, it may result in a problem with the product or an injury due to the product falling.
x
The appearance may differ depending on the product.
✎
Installation with a stand. Installation with a wall-mount.
4inches
4inches
4inches
4inches
4inches
4inches
4inches
© 2010 Samsung Electronics Co., Ltd. All rights reserved.
BN68-02604A_Eng.indb 2 2010-02-10 �� 8:19:05

3
Contents
English
ENGLISH
Getting Started
List of Features y ......................................................... 4
Accessories y .............................................................. 4
Installing the LCD TV Stand y ...................................... 4
Viewing the Control Panel y ......................................... 5
Viewing the Remote Control y ...................................... 6
Connecting to an Antenna y ........................................ 7
Plug & Play (Initial Setup) y ........................................... 7
Connections
Connecting to an AV Device y ...................................... 8
Connecting to an Audio Device y ................................. 9
Connecting to a PC y .................................................. 9
Changing the Input source y ...................................... 11
Basic Features
How to Navigate Menus y .......................................... 11
Channel Menu y ........................................................ 12
Seeing Channels 12
Using Favorite Channels 12
Memorizing channels 12
Editing channels 13
Other Features 13
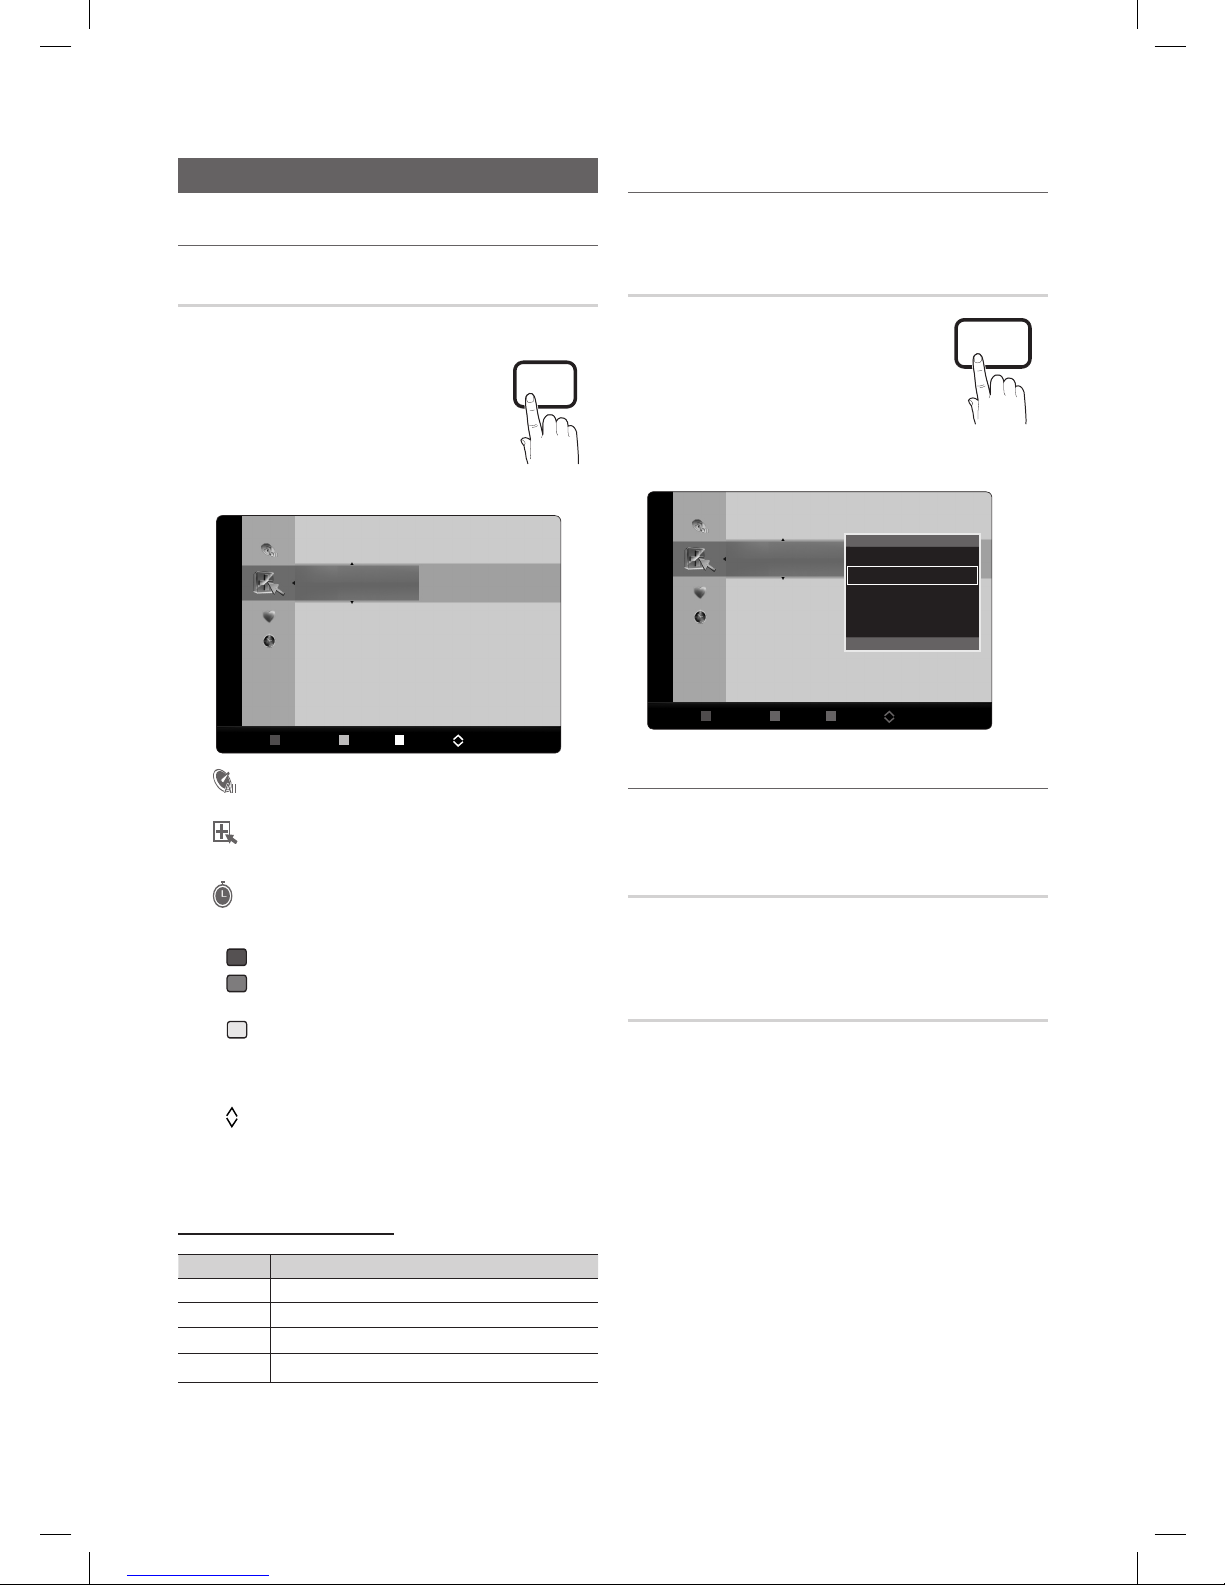
Picture Menu y .......................................................... 14
Changing the Preset Picture Mode 14
Adjusting picture settings 14
Economical Solutions 14
Setting up the TV with your PC 14
Changing the Picture Options 15
Sound Menu y ........................................................... 16
Changing the Preset Sound Mode 16
Adjusting sound settings 16
Sound Settings 16
Setup Menu y ............................................................ 17
Setting the Time 17
Using the Sleep Timer 18
Setting the On/Off Timer 18
Locking Programs 18
Other Features 20
Picture In Picture (PIP) 21
Support Menu y ......................................................... 21
Advanced Features
Network Connection y ............................................... 23
Connecting to a Wired Network 23
Connecting Wireless Network 25
Media Play y .............................................................. 28
Connecting a USB Device 28
Connecting to the PC through network 28
Screen Display 30
Playing Multiple Files 33
Media Play - Additional Functions 33
Anynet+ y ................................................................. 35
Setting Up Anynet+ 36
Switching between Anynet+ Devices 36
Recording 36
Listening through a Receiver 37
Troubleshooting for Anynet+ 37
AllShare y ..................................................................38
About AllShare 38
Setting Up AllShare 38
Other Information
Assembling the Cables y ........................................... 40
Anti-theft Kensington Lock y ...................................... 40
Installing the Wall Mount y ......................................... 40
Securing the TV to the Wall y ..................................... 42
Troubleshooting y ......................................................43
Specifications y ......................................................... 46
License 46
Dimensions y ............................................................. 47
Index y ...................................................................... 48
Check the Symbol!
t
✎
O
This function can be used by pressing the
TOOLS button on the remote control.
Note :
Important information
Step by step guide :
Informs you how to access
the menu.
P
POWER
CHLIST
P . MODE
P . SIZE
INFO
TO OLS
BN68-02604A_Eng.indb 3 2010-02-10 �� 8:19:06
4
Getting Started
English
List of Features
Excellent Digital Interface & Networking: With a built-in HD digital tuner, nonsubscription HD broadcasts can be viewed y
without a cable box / STB (Set-Top-Box) satellite receiver.
Media Play y : Allows you to play music files, pictures, and movies saved on a USB device. (P. 28)
AllShare y : Allows you to configure a mobile message server media render. (P. 38)
Self Diagnosis y :You can check picture and sound operation. (P. 21)
Accessories
Please make sure the following items are included with your LCD TV. If any items are missing, contact your dealer.
✎
The items' colors and shapes may vary depending on the models.
✎
Remote Control y (BN59-01041A) & Batteries (AAA x 2)
Owner’s Instructions y
Warranty Card / Safety Guide / Quick Setup Guide y
Cleaning Cloth (BN63-01798B) y
Power Cord y
Blanking Bracket (BN63-06339A) y
(LN32C550: BN63-06389A)
TV-Holder & Screw y
(M8: BN96-10788B / M6: BN96-10788C)
Cable Tie y
(BN61-05596A)
Holder-Ring (4ea) y
(BN61-04529A )
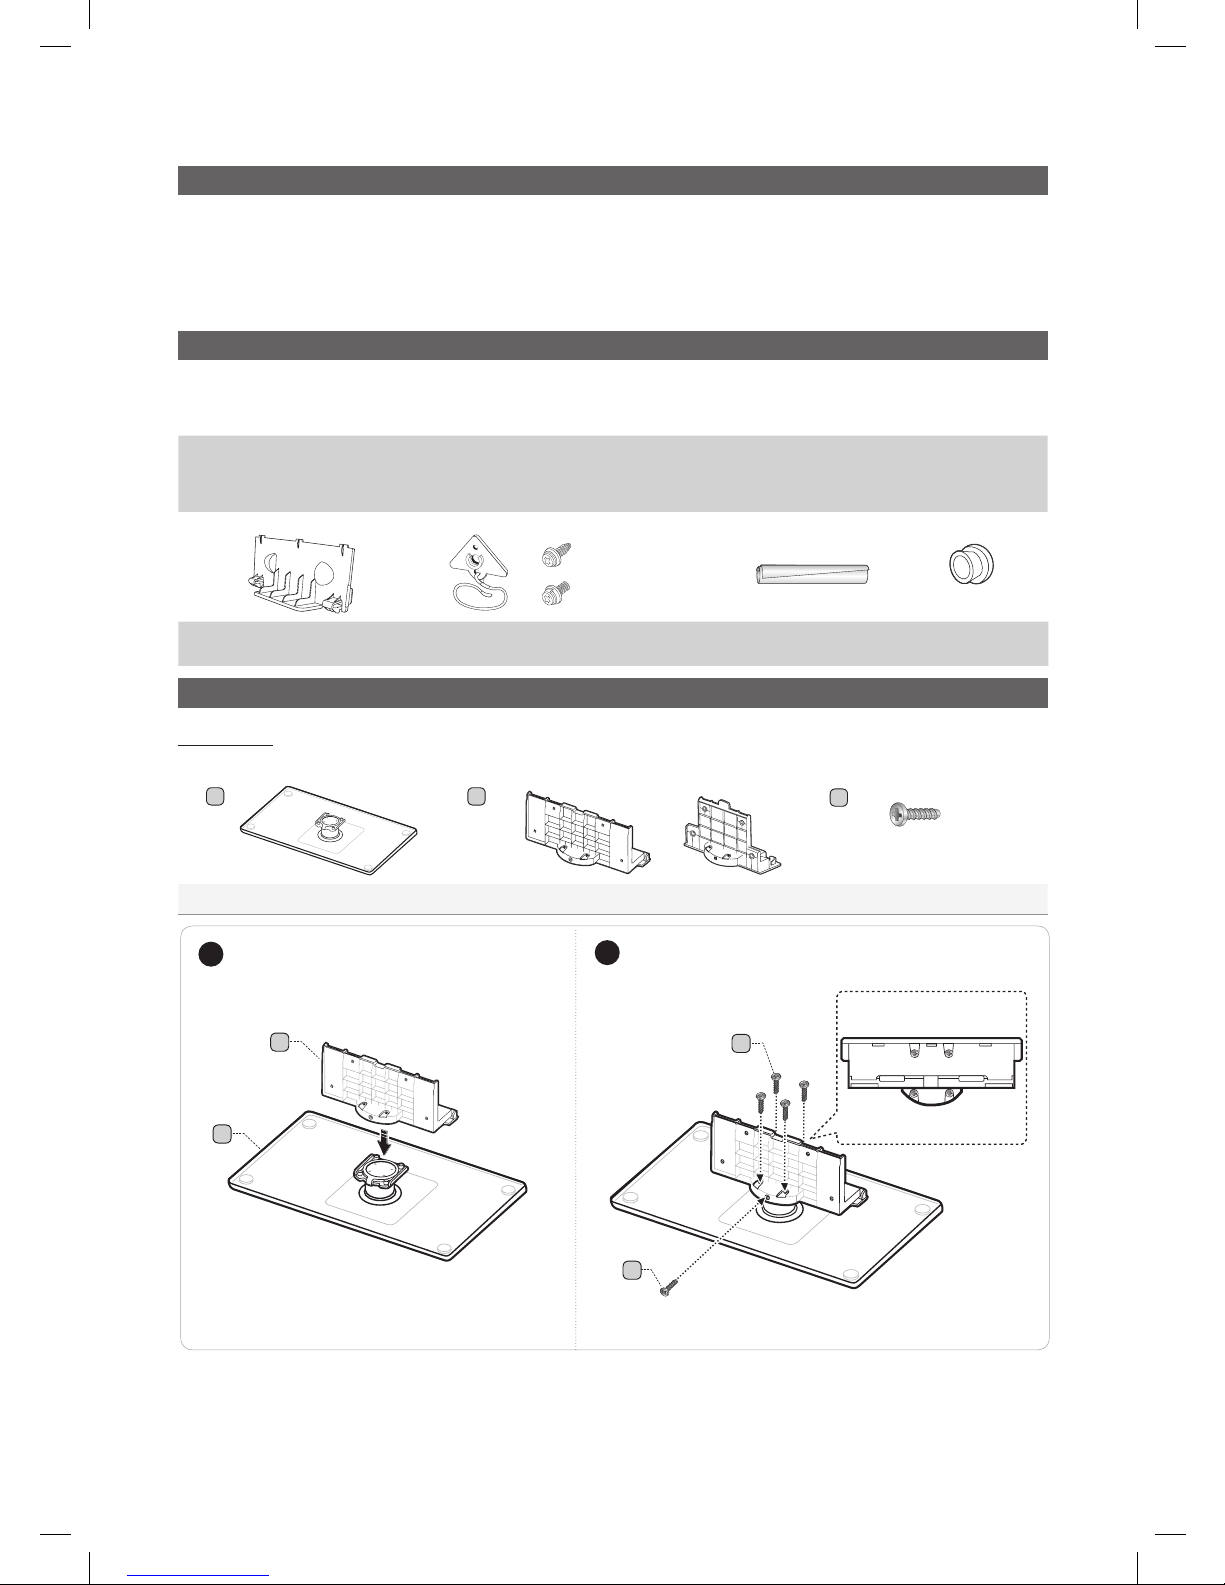
Installing the LCD TV Stand
Components
When installing the stand, use the provided components and parts.
Stand Guide Stand Screws
(M6 X 16: 32 ~ 40inch TVs)
(M8 X 19: 46inch TV)
A B
C
9EA (M4 X L12)
1 EA 1 EA
or
1
2
C
Top View
C
4EA
1EA
B
Front
Rear
A
(46inch TV)
BN68-02604A_Eng.indb 4 2010-02-10 �� 8:19:07
5
01 Getting Started
English
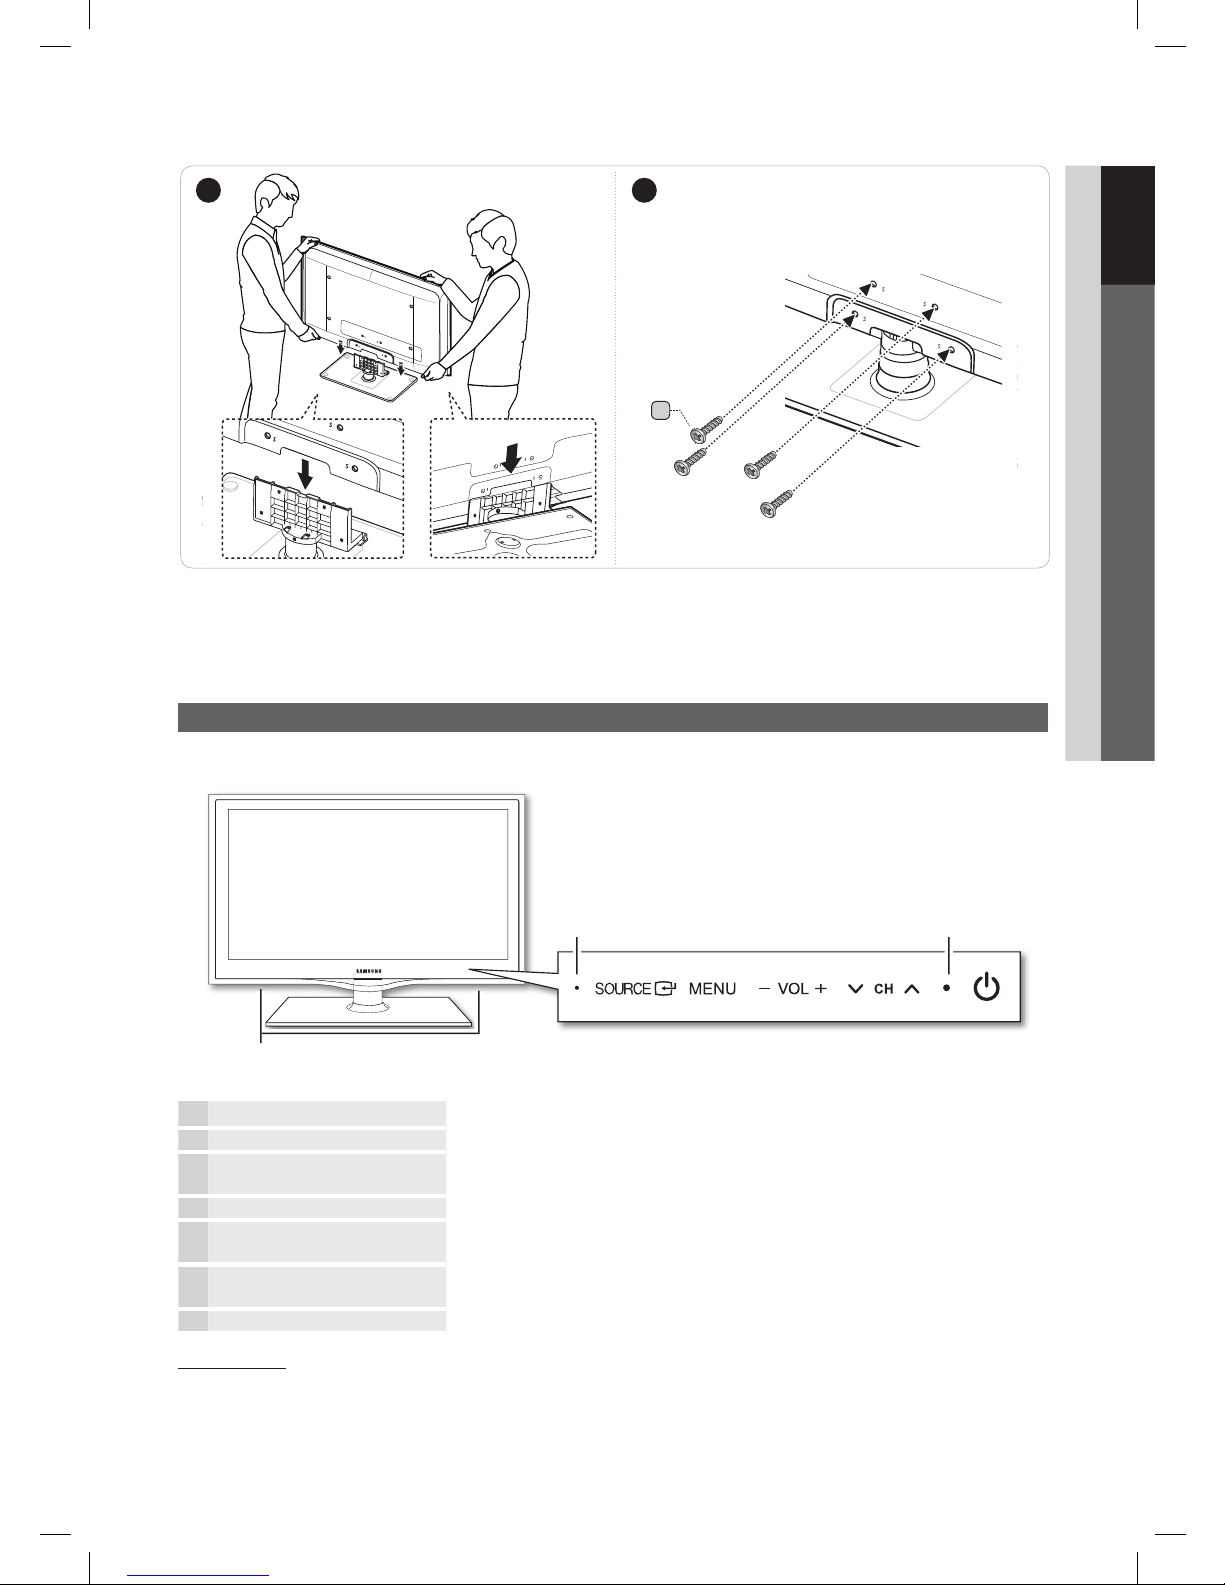
Make sure to distinguish between the front and back of the Stand and Guide Stand when assembling them.
✎
Make sure that at least two persons lift and move the LCD TV.
✎
Stand the product up and fasten the screws. If you fasten the screws with the LCD TV placed down, it may lean to one
✎
side.
Viewing the Control Panel
The product color and shape may vary depending on the model.
✎
P
(Power)
Turns the TV on or off.
Remote control sensor Aim the remote control towards this spot on the TV.
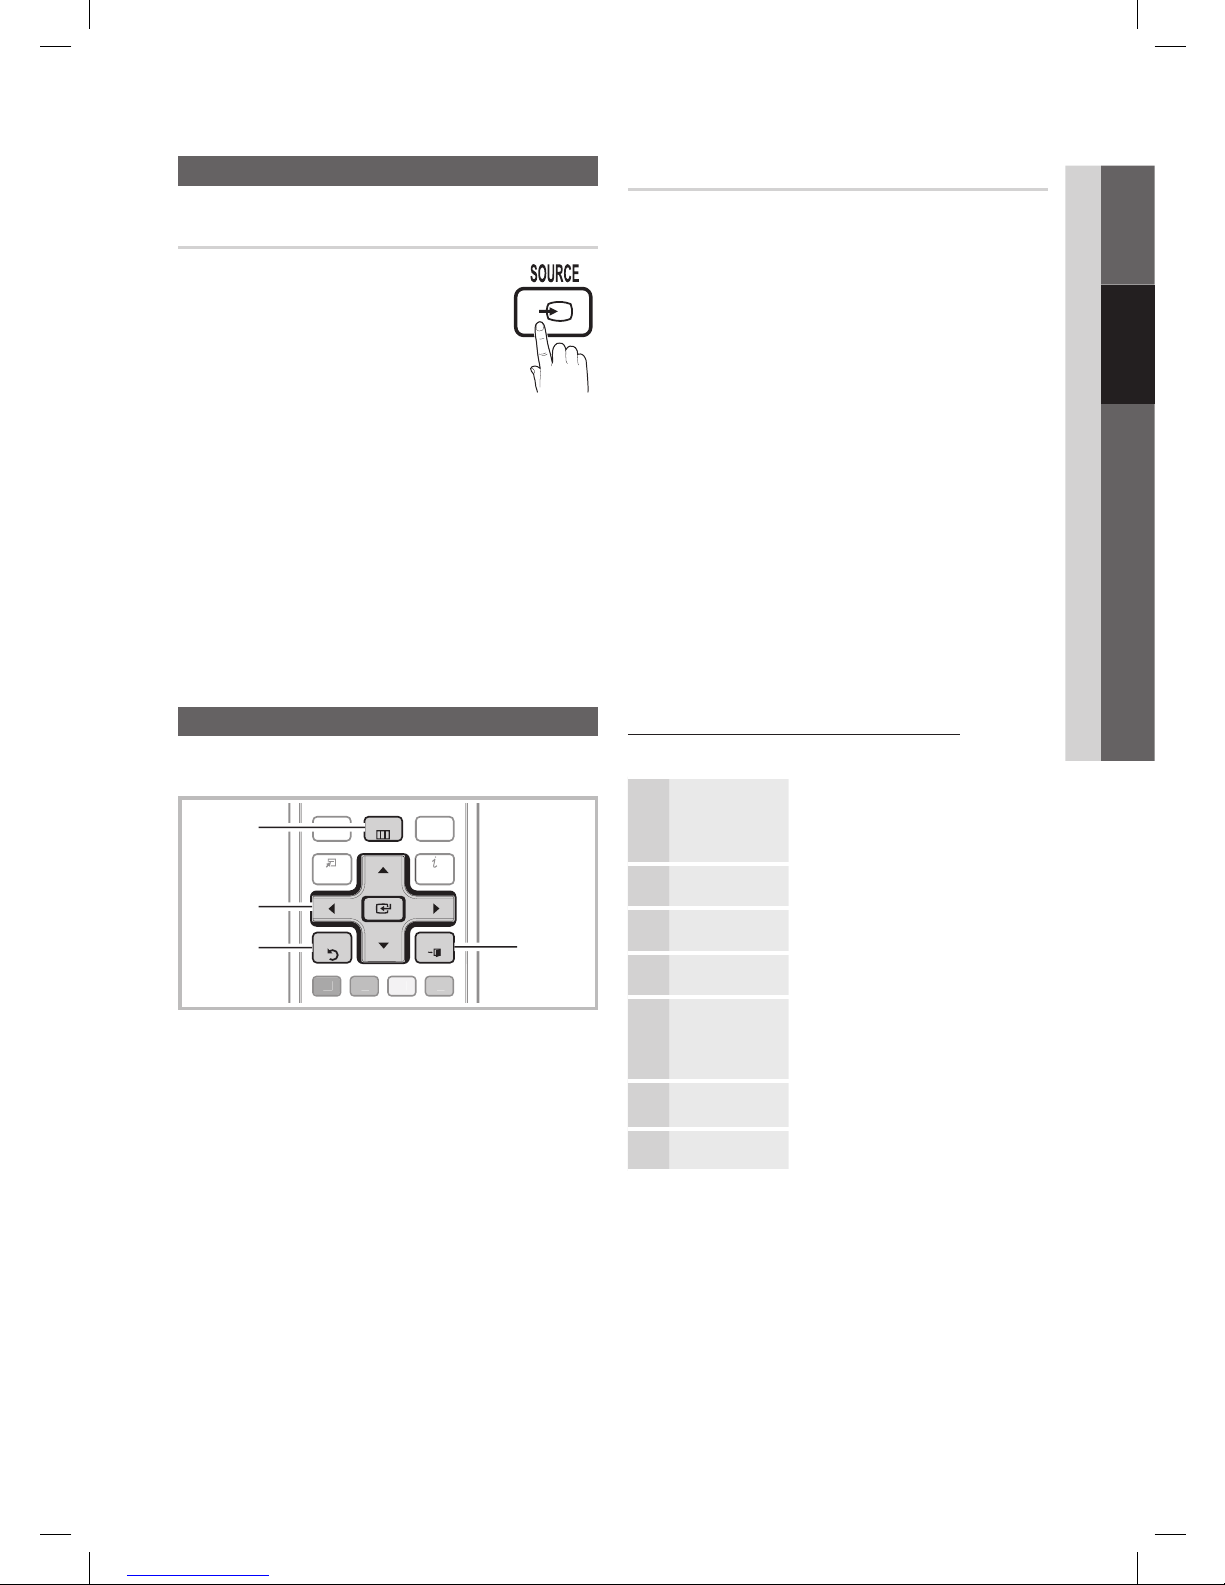
SOURCE
E
Toggles between all the available input sources. In the on-screen menu, use this
button as you would use the ENTERE button on the remote control.
MENU Displays an on-screen menu, the OSD (on screen display), of your TV’s features.
y
Adjusts the volume. In the OSD, use the
y
buttons as you would use the ◄
and ► buttons on the remote control.
z
Changes the channels. In the OSD, use the
z
buttons as you would use the
▼ and ▲ buttons on the remote control.
Power Indicator Blinks and turns off when the power is on and lights up in standby mode.
Standby mode
Do not leave your TV in standby mode for long periods of time (when you are away on a holiday, for example). A small amount
of electric power is still consumed even when the power button is turned off. It is best to unplug the power cord.
Speakers
Power IndicatorRemote control sensor
43
C
4EA
Bottom View
BN68-02604A_Eng.indb 5 2010-02-10 �� 8:19:08
6
Getting Started
English
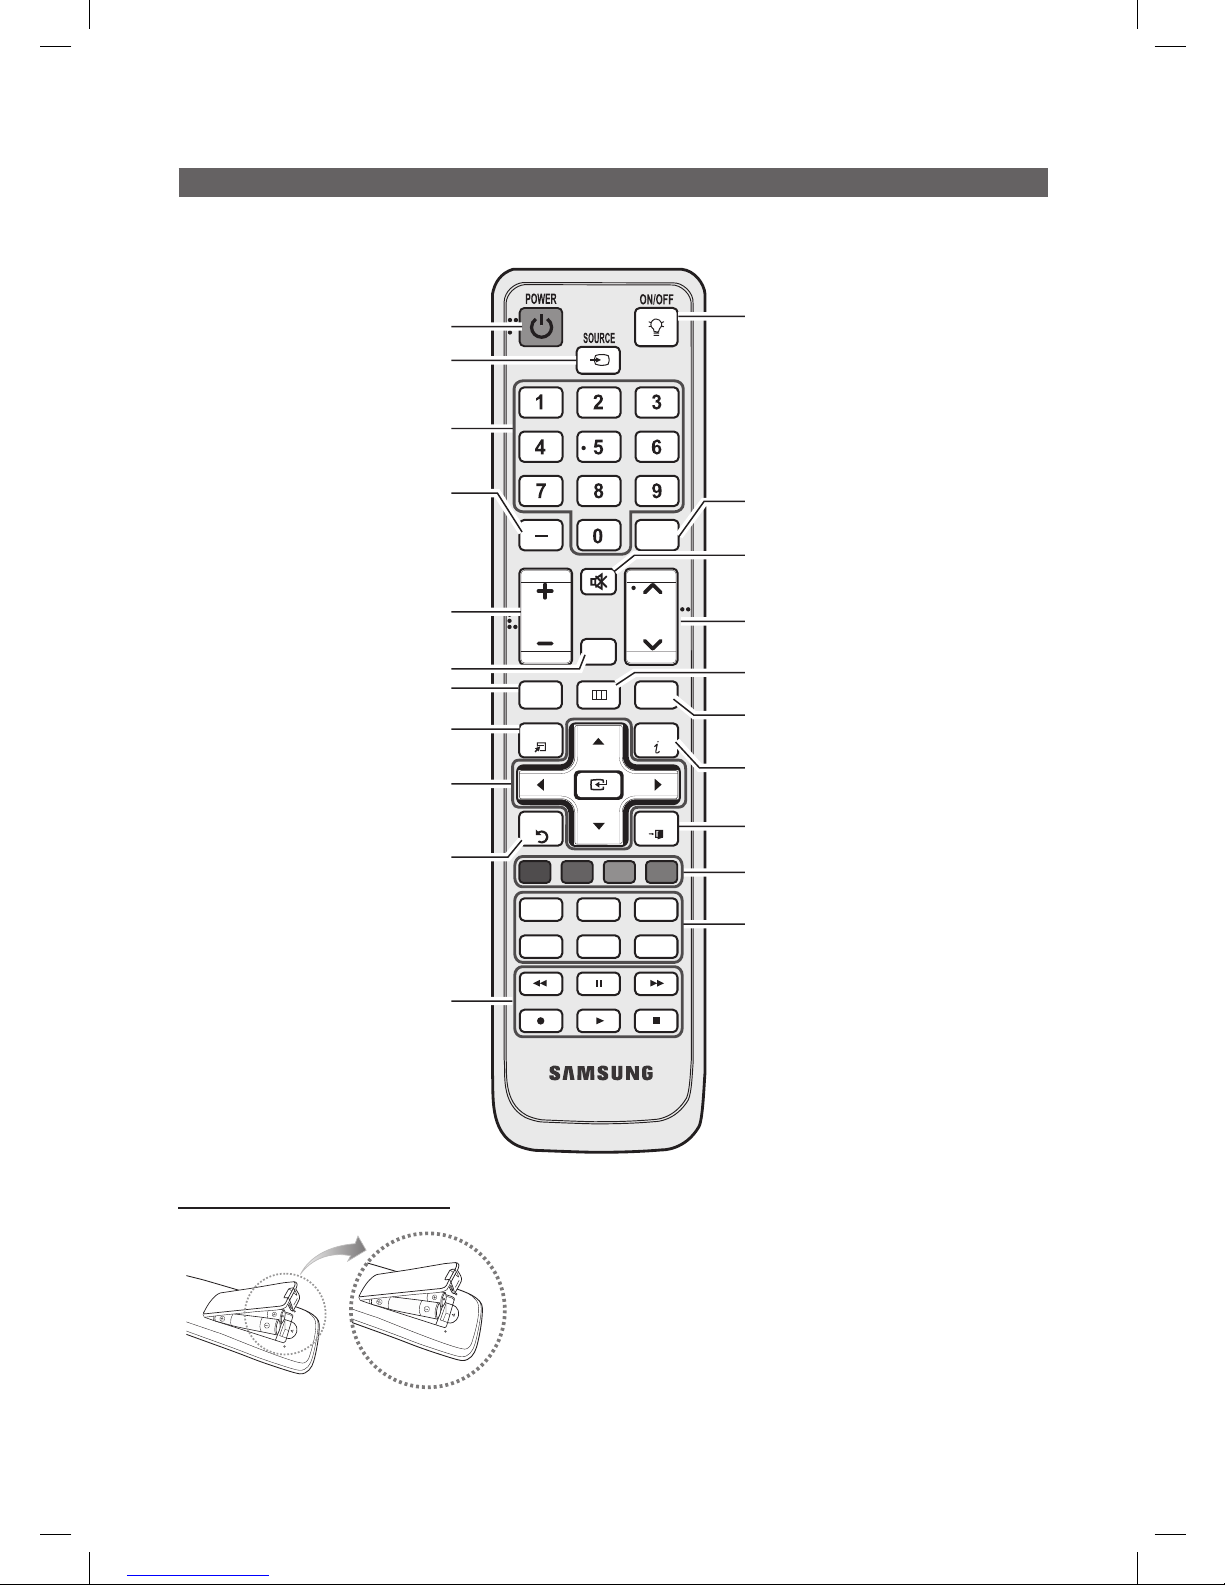
Viewing the Remote Control
This is a special remote control for the visually impaired persons and has Braille points on the Power, Channel, Volume
✎
buttons.
Installing batteries (Battery size: AAA)
NOTE
✎
Use the remote control within 23 feet from the TV.
x
Bright light may affect the performance of the remote
x
control. Avoid use when nearby fluorescent lights or neon
signs.
The color and shape may vary depending on the model.
x
Press to display information on the TV screen.
(P. 17)
Changes channels.
Returns to the previous channel.
Turns the remote control light on and off.
When on, the buttons become illuminated for a
moment when pressed.
(Using the remote control with this button set to
off will reduce the battery usage time.)
Cut off the sound temporarily.
Displays the main on-screen menu.
Exit the menu.
Buttons used in the Channel list, Media Play
menu, etc.
S.MODE: Selects the sound mode. (P. 16)
SLEEP: Automatically shuts off the TV at a
preset time. (P. 18)
MTS: Press to choose stereo, mono or Separate
Audio Program (SAP broadcast). (P. 17)
P.MODE: Selects picture mode. (P. 14)
P.SIZE: Choose the picture size. (P. 15)
CC: Controls the caption decoder. (P. 20)
Displays Favorite Channel Lists on the screen.
(P. 12)
Returns to the previous menu.
Quickly select frequently used functions.
Selects the on-screen menu items and
changes the values seen on the menu.
Views Media Play.
(P. 28)
Displays the channel list on the screen.
(P. 12)
Press to select additional channels (digital)
being broadcast by the same station. For
example, to select channel ‘54-3’, press
‘54’, then press ‘-’ and ‘3’.
Adjusts the volume.
Displays and selects the available video
sources. (P. 11)
Turns the TV on and off.
Use these buttons in Media Play and
Anynet+ modes.
(: controls recording on Samsung
recorders with the Anynet+ feature)
Press to directly access to channels.
PRE-CH
CH
VOL
MENU
MUTE
RETURN
CH LIST
EXIT
ABCD
MEDIA.P F AV . CH
P . MODE
S.MODE
CC
SLEEP
P.SIZE
MTS
TOOLS
INFO
BN68-02604A_Eng.indb 6 2010-02-10 �� 8:19:09
7
01 Getting Started
English
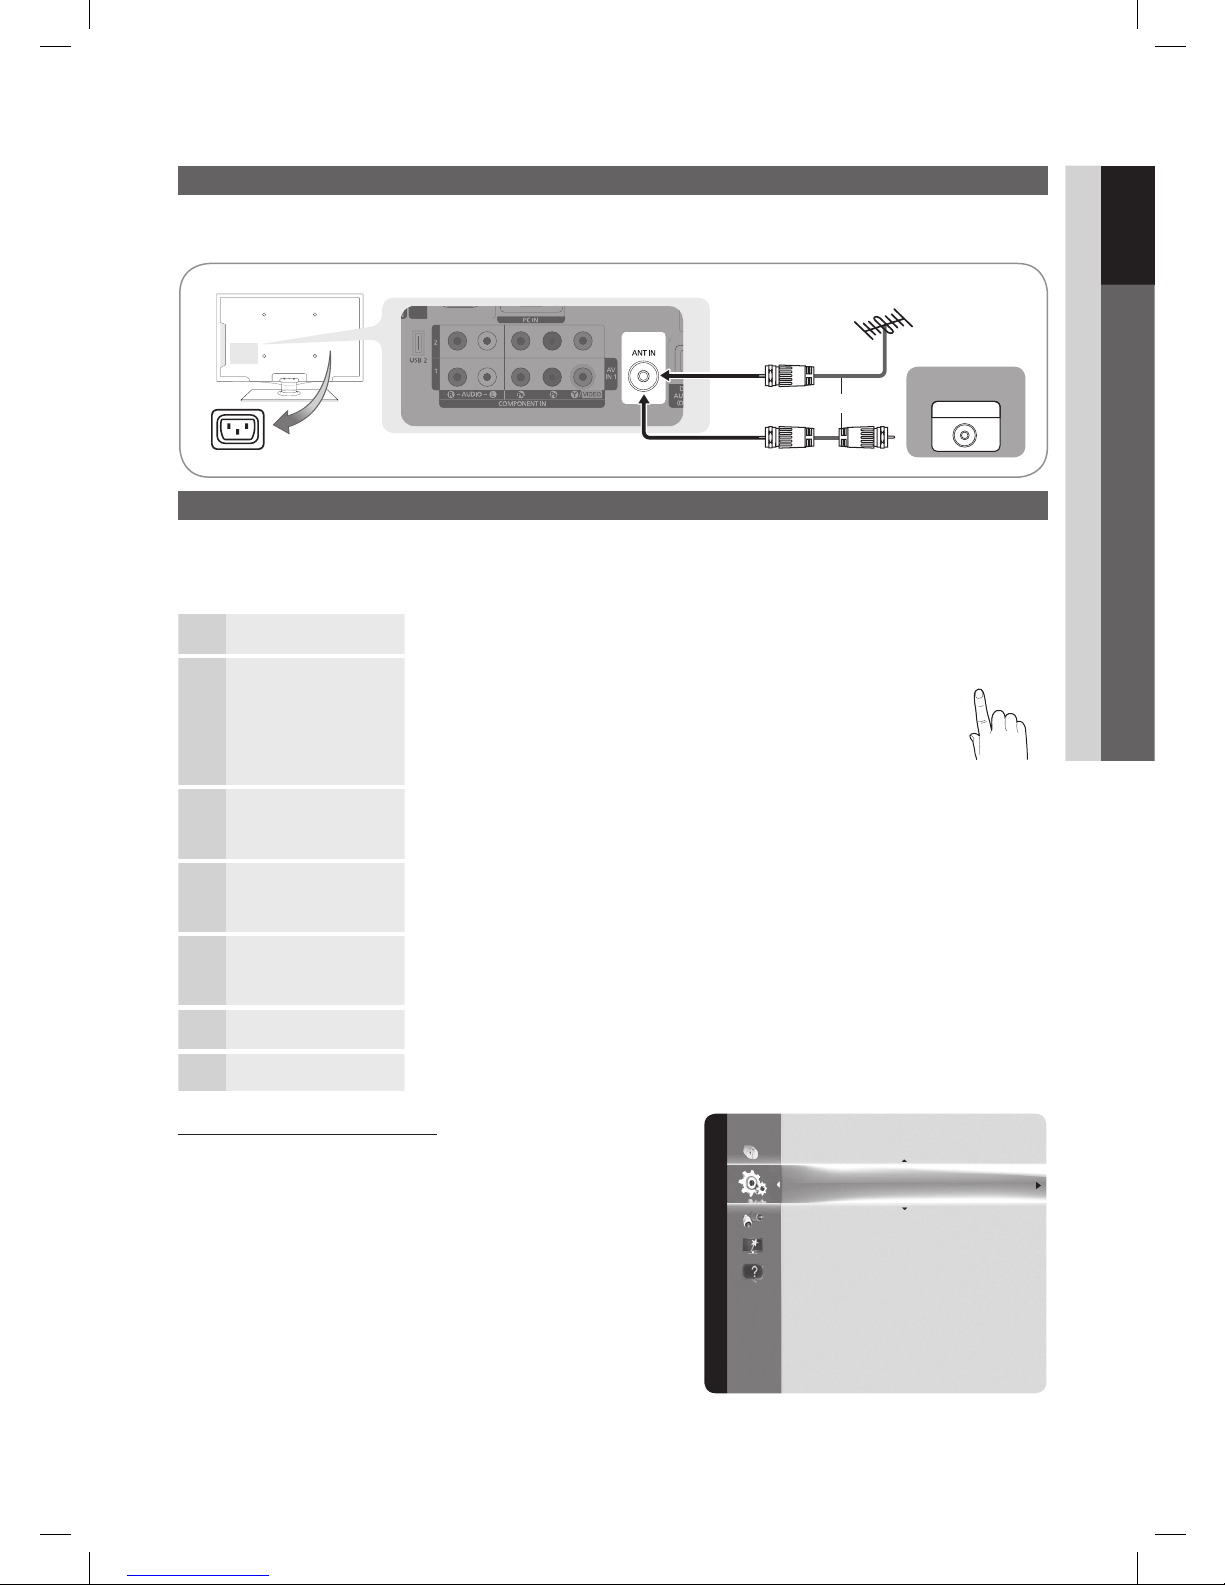
Connecting to an Antenna
When the TV is initially powered on, basic settings proceed automatically.
Connecting the power cord and antenna.
✎
Plug & Play (Initial Setup)
When the TV is initially powered on, a sequence of on-screen prompts will assist in configuring basic settings. Press the
POWERP button. Plug & Play is available only when the Input source is set to TV.
To return to the previous step, press the red button.
✎
1
Selecting a language
Press the ▲ or ▼ button, then press the ENTERE button.
Select the desired OSD (On Screen Display) language.
P
POWER
CHLIST
INFO
2
Selecting Store Demo
or Home Use
Press the ◄ or ► button, then press the ENTERE button.
Select the y Home Use mode. Store Demo Mode is for retail
environments.
To return the unit’s settings from y Store Demo to Home Use
(standard): Press the volume button on the TV. When you see the
volume in the OSD, press and hold MENU for 5 sec.
3
Selecting an antenna
Press the ▲ or ▼ button, then press the ENTERE button. Select Air, Cable or Auto.
In ✎Cable mode, you can select the correct signal source among STD, HRC, and IRC
by pressing the ▲, ▼, ◄ or ► button, then press the ENTERE button.
4
Selecting a channel The channel search will start automatically.
For more information, refer to Channel → Auto Program. (P. 12)
Press the ✎ENTERE button at any time to interrupt the memorization process.
5
Setting the Clock
Mode
Set the Clock Mode automatically or manually.
If you select the ✎Auto, set the daylight saving time.
Select the time zone where you live.
6
Viewing the HD
Connection Guide.
The connection method for the best HD screen quality is displayed.
7
Enjoy your TV.
Press the ENTERE button.
If You Want to Reset This Feature...
MENU
O m
→ Setup → Plug & Play → ENTER
E
or
Cable
ANT OUT
VHF/UHF Antenna
Power Input
Plug & Play
Time
Menu Language : English
Caption : On
Security
Network
General
PIP : Off
Setup
BN68-02604A_Eng.indb 7 2010-02-10 �� 8:19:10
8
English
Connections
Connections
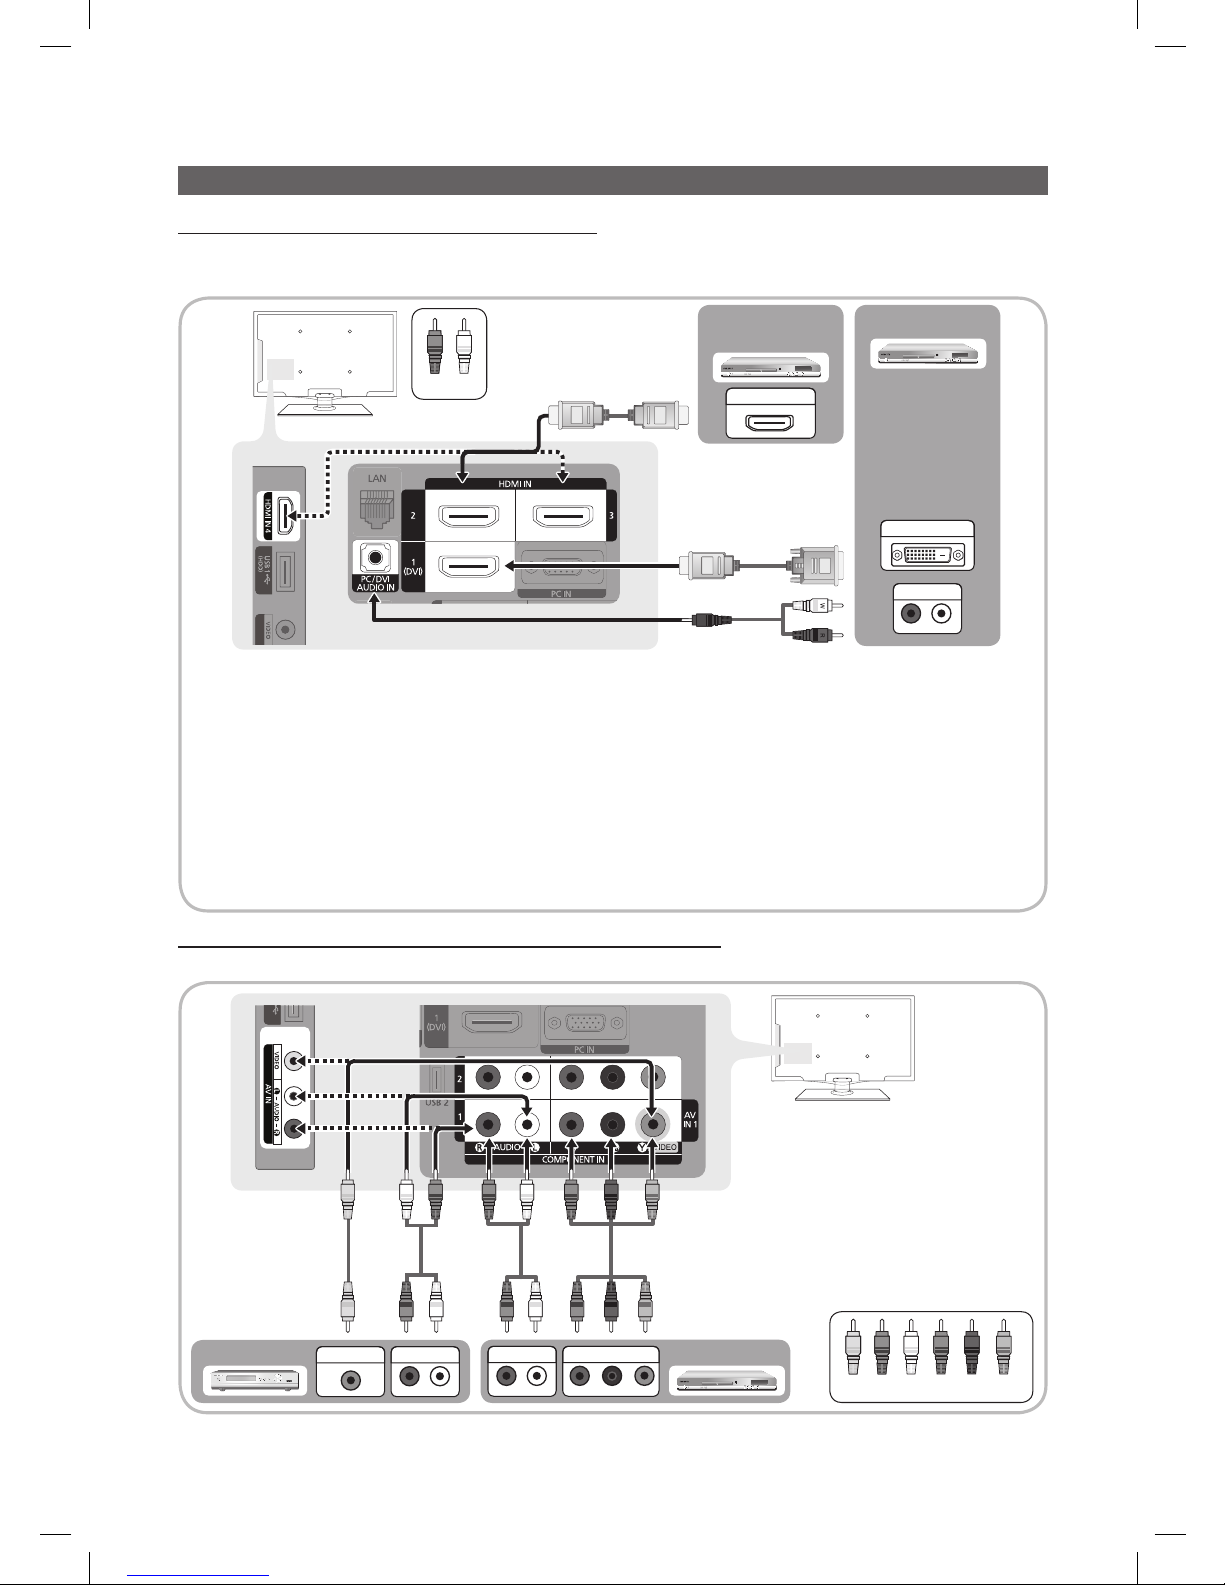
Connecting to an AV Device
Using an HDMI / DVI Cable: HD connection (up to 1080p)
We recommend using the HDMI connection for the best quality HD picture. Available devices: DVD, Blu-ray player, HD cable
box, HD satellite receiver (STB).
HDMI IN 1(DVI) ✎, 2, 3, 4 / PC/DVI AUDIO IN
When using an HDMI/DVI cable connection, you must use the xHDMI IN 1(DVI) jack for video. A DVD, Blu-ray
player, HD cable box, HD STB satellite receiver, cable box, or STB satellite receiver may require a DVI-HDMI (DVI
to HDMI) cable or DVI-HDMI (DVI to HDMI) adapter. The PC/DVI AUDIO IN jack is required for audio.
If an external device such as a DVD / Blu-ray player / cable box / satellite receiver (Set-Top Box) supporting
x
HDMI versions older than 1.3 is connected, the TV may operate abnormally (e.g. no screen display / no sound /
annoying flicker abnormal Color).
If there is no sound after connecting an HDMI cable, check the HDMI version of the external device. If you
x
suspect the version is older than 1.3, contact the provider of the device to confirm the HDMI version and request
an upgrade.
It is recommended you purchase an HDMI-certified cable. Otherwise, the screen may appear blank or a
x
connection error may occur.
Using a Component (up to 1080p), Using an Audio/Video Cable (480i only)
Available devices: DVD, Blu-ray player, cable box, STB satellite receiver, VCR
Device
DVI OUT
BD/DVD player/
HD cable/Sat. box
HDMI OUT
R-AUDIO-L
P
R PB Y
AUDIO OUT
P
R PB Y
COMPONENT OUT
R-AUDIO-L
P
R PB Y
AUDIO OUT
Blu-ray player
WY
W Y
BGR
W
W
B
G
R
R
R
R
R
VIDEO OUT
VCR
R-AUDIO-L
P
R PB Y
AUDIO OUT
COMPONENT IN1 ✎, 2 / AV IN 1, 2:
When connecting to AV IN 1, the
color of the AV IN 1 [Y/VIDEO] jack
(Green) does not match the color of
the video cable (Yellow).
For better picture quality,
✎
the Component connection
is recommended over the A/V
connection.
W W
BGRRWY
Yellow Red White Red Blue Green
Red White
W W
BGRR
BN68-02604A_Eng.indb 8 2010-02-10 �� 8:19:12
9
English
02 Connections
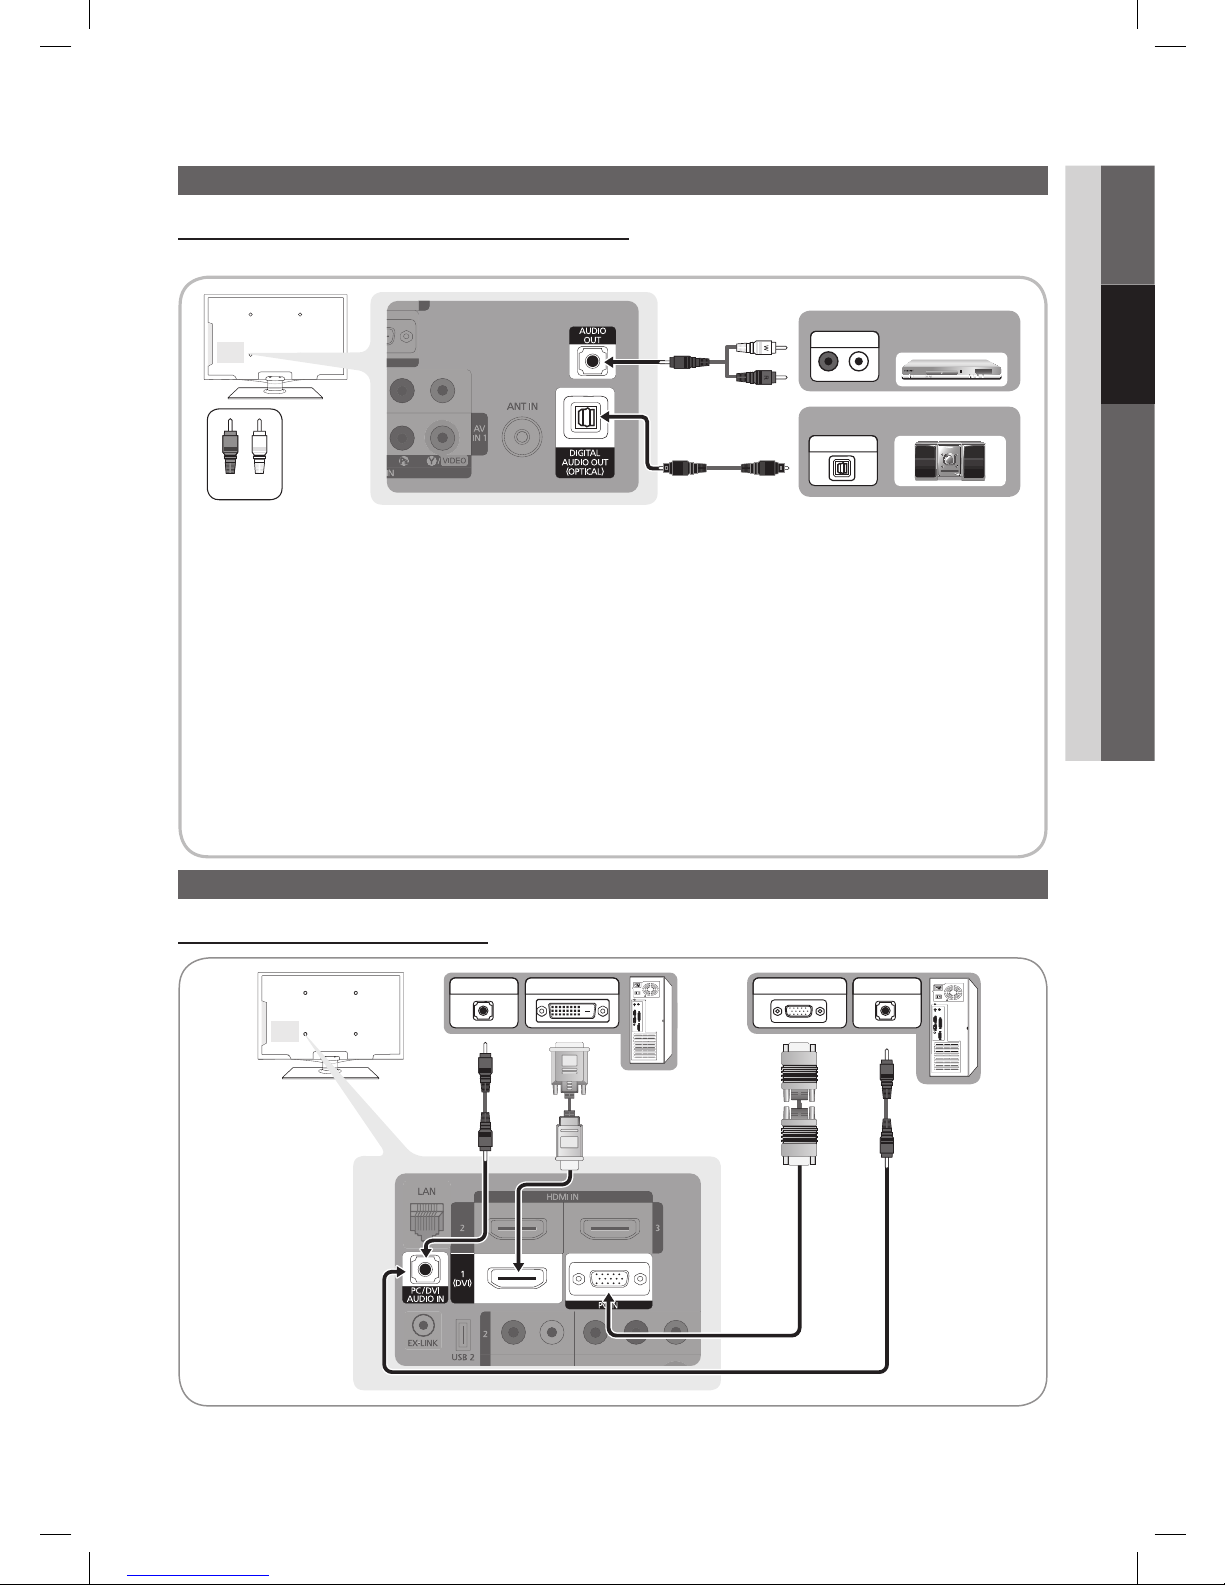
Connecting to an Audio Device
Using an Optical (Digital) or Audio (Analog) Cable Connection
Available devices: Digital Audio System, Amplifier, Home Theater
DIGITAL AUDIO OUT (OPTICAL)
✎
When a Digital Audio System is connected to the xDIGITAL AUDIO OUT (OPTICAL) jack, decrease the volume
of both the TV and the system.
5.1 CH (channel) audio is available when the T V is connected to an external device supporting 5.1 CH.
x
When the receiver (home theater) is set to on, you can hear sound output from the TV’s optical jack. When the
x
TV is receiving a DTV signal, the TV will send 5.1 CH sound to the home theater receiver. When the source is
a digital component such as a DVD / Blu-ray player / cable box / STB (Set-Top-Box) satellite receiver and is
connected to the TV via HDMI, only 2 CH audio will be heard from the home theater receiver. If you want to
hear 5.1 CH audio, connect the digital audio out jack from your DVD / Blu-ray player / cable box / STB satellite
receiver directly to an amplifier or home theater.
AUDIO OUT ✎: Connects to the audio input jacks on your amplifier/home theater.
When connecting, use the appropriate connector (sold separately).
x
When an audio amplifier is connected to the xAUDIO OUT jacks: Decrease the volume of the TV and adjust the
volume level with the amplifier’s volume control.
Connecting to a PC
Using an HDMI/DVI Cable / a D-sub Cable
AUDIO OUT
AUDIO OUT
DVD
Home Theater
OPTICAL
R-AUDIO-L
P
R PB Y
AUDIO IN
Red White
W W
BGRR
Digital audio system
DVI OUT
PC OUT
BN68-02604A_Eng.indb 9 2010-02-10 �� 8:19:14

10
English
Connections
Display Modes (D-Sub and HDMI/DVI Input)
Optimal resolution is 1920X1080@60Hz.
Mode Resolution Horizontal Frequency (KHz) Vertical Frequency (Hz) Pixel Clock Frequency (MHz) Sync Polarity (H / V)
IBM
640 x 350 31.469 70.086 25.175 +/720 x 400 31.469 70.087 28.322 -/+
MAC
640 x 480 35.000 66.667 30.240 -/832 x 624 49.726 74.551 57.284 -/-
1152 x 870 68.681 75.062 100.000 -/-
VESA CVT
720 x 576 35.910 59.950 32.750 -/+
1152 x 864 53.783 59.959 81.750 -/+
1280 x 720 56.456 74.777 95.750 -/+
1280 x 960 75.231 74.857 130.000 -/+
VESA DMT
640 x 480 31.469 59.940 25.175 -/-
640 x 480 37.861 72.809 31.500 -/-
640 x 480 37.500 75.000 31.500 -/-
800 x 600 37.879 60.317 40.000 +/+
800 x 600 48.077 72.188 50.000 +/+
800 x 600 46.875 75.000 49.500 +/+
1024 x 768 48.363 60.004 65.000 -/1024 x 768 56.476 70.069 75.000 -/1024 x 768 60.023 75.029 78.750 +/+
1152 x 864 67.500 75.000 108.000 +/+
1280 x 1024 63.981 60.020 108.000 +/+
1280 x 1024 79.976 75.025 135.000 +/+
1280 x 800 49.702 59.810 83.500 -/+
1280 x 800 62.795 74.934 106.500 -/+
1280 x 960 60.000 60.000 108.000 +/+
1280 x 720 45.000 60.000 74.250 +/+
1360 x 768 47.712 60.015 85.500 +/+
1440 x 900 55.935 59.887 106.500 -/+
1440 x 900 70.635 74.984 136.750 -/+
1680 x 1050 65.290 59.954 146.250 -/+
VESA GTF
1280 x 720 52.500 70.000 89.040 -/+
1280 x 1024 74.620 70.000 128.943 -/-
VESA DMT / DTV CEA 1920 x 1080p 67.500 60.000 148.500 +/+
NOTE
✎✎
For HDMI/DVI cable connection, you must use the xHDMI IN 1(DVI) jack.
The interlace mode is not supported.
x
The set might operate abnormally if a non-standard video format is selected.
x
Separate and Composite modes are supported. SOG(Sync On Green) is not supported.
x
EX-LINK
Connector for service only.
Input Cables (Sold Separately)
HDMI HDMI-DVI Component Composite (AV) Coaxial (RF) VGA
BN68-02604A_Eng.indb 10 2010-02-10 �� 8:19:15
11
English
02 Connections
How to Navigate Menus
Before using the TV, follow the steps below to learn how to
navigate the menu and select and adjust different functions.
PRE-CH
TOOL
S
MENU
F
AV.CH
INFO
RETURN
C
HLI
ST
EXIT
MEDIA.PABCD
1
2
3
4
1 MENU button: Displays the main on-screen menu.
2 ENTERE / Direction button: Move the cursor and
select an item. Confirm the setting.
3 RETURN button: Returns to the previous menu.
4 EXIT button: Exits the on-screen menu.
How to Operate the OSD (On Screen Display)
The access step may differ depending on the selected menu.
1
MENU
m
The main menu options appear on
the screen:
Picture, Sound, Channel, Setup,
Input, Application, Support.
2
▲ / ▼ Select an icon with the ▲ or ▼
button.
3
ENTER
E
Press ENTERE to access the
sub-menu
4
▲ / ▼
Select the desired submenu with
the ▲ or ▼ button.
5
◄ / ►
Adjust the value of an item with the
◄ or ► button. The adjustment in
the OSD may differ depending on
the selected menu.
6
ENTER
E
Press ENTERE to confi rm the
selection.
7
EXIT
e
Press EXIT.
Basic Features
Changing the Input source
Source List
MENU
O m
→ Input → Source List →
ENTER
E
Use to select TV or an external input sources
such as a DVD / Blu-ray player / cable box /
STB satellite receiver.
TV / AV1 / AV2 / Component1 / ■
Component2 / PC / HDMI1/DVI /
HDMI2 / HDMI3 / HDMI4 / USB
You can only choose external devices that
✎
are connected to the TV. In the Source List,
connected inputs will be highlighted.
PC ✎ always stay activated.
Edit Name
MENU
O m
→ Input → Edit Name → ENTER
E
VCR / DVD / Cable STB / Satellite STB / PVR STB / ■
AV Receiver / Game / Camcorder / PC / DVI PC /
DVI Devices / TV / IPTV / Blu-ray / HD DVD / DMA:
Name the device connected to the input jacks to make
your input source selection easier.
When a PC with a resolution of 1920 x 1080 @
✎
60Hz is connected to the HDMI IN 1(DVI) port,
you should set to DVI PC mode under Edit Name.
When connecting an HDMI/DVI cable to the
✎
HDMI IN 1(DVI) port, you should set to DVI PC or
DVI Devices mode under Edit Name.
CHLIST
P . SIZE
BN68-02604A_Eng.indb 11 2010-02-10 �� 8:19:16
12
English
Basic Features
Channel Menu
Seeing Channels ¦
Channel List
MENU
O m
→ Channel → Channel List → ENTER
E
Add, delete or set Favorite channels and use
the program guide for digital broadcasts.
Select a channel in the All Channels, Added
Channels, Favorite or Programmed screen
by pressing the ▲ / ▼ buttons, and pressing
the ENTERE button. Then you can watch
the selected channel.
■ All Channels: Shows all currently available
channels.
■ Added Channels: Shows all added channels.
■
*
Favorite: Shows all favorite channels.
■ Programmed: Shows all currently reserved programs.
Using the color buttons with the ✎Channel List
ABCD
x
Red (Antenna): Switches
to Air or Cable.
x
Green (Zoom): Enlarges or shrinks a channel
number.
x
Yellow (Select): Selects multiple channel lists.
Select desired channels and press the Yellow button
to set all the selected channels at the same time. The
c
mark appears to the left of the selected channels.
x
(Page): Move to next or previous page.
T x (To o ls): Displays the Channel List option menu.
(The Options menus may differ depending on the
situation.)
Channel Status Display Icons
Icons Operations
c
A channel selected.
*
A channel set as a Favorite.
)
A reserved program.
(
A program currently being broadcast.
Using Favorite Channels ¦
MENU
O m
→ Channel → Channel List → ENTER
E
*
Add to Favorite / Delete from Favorite
t
Set channels you watch frequently as
Favorites.
1. Select a channel and press the TOOLS
button.
2. Add or delete a channel using the Add to
Favorite or Delete from Favorite menu
respectively.
Memorizing channels ¦
MENU
O m
→ Channel → ENTER
E
Antenna (Air / Cable)
t
Before your television can begin memorizing the available
channels, you must specify the type of signal source that is
connected to the TV (i.e. an Air or a Cable system).
Auto Program
Air ■ : Air antenna signal.
Cable ■ : Cable antenna signal.
Auto ■ : Air and Cable antenna.
NOTE ✎
When selecting the Cable T V system: Selects the
x
cable system. STD, HRC and IRC identify various
types of cable TV systems. Contact your local cable
company to identify the type of cable system that
exists in your particular area. At this point, the signal
source has been selected.
After all the available channels are stored, it starts
x
to remove scrambled channels. The Auto program
menu then reappears.
Added Channels
6 Air
6-1 ♥ TV #6
7 Air
8 Air
9 Air
9-1 ♥ TV #9
10 Air
10-1 ♥ TV #10
11-1 ♥ TV #11
Air A Antenna B Zoom C Select Page T Tools
Delete
Add to Favorite
Timer Viewing
Channel Name Edit
Select All
P
POWER
FAV . CH
CHLIST
P . MODE
P . SIZE
MTS
INFO
SLEEP
CHLIST
Added Channels
6 Air
6-1 ♥ TV #6
7 Air
8 Air
9 Air
9-1 ♥ TV #9
10 Air
10-1 ♥ TV #10
11-1 ♥ TV #11
Air A Antenna B Zoom C Select Page T Tools
BN68-02604A_Eng.indb 12 2010-02-10 �� 8:19:17

13
English
03 Basic Features
How to Stop Auto Programming
1. Press the ENTERE button.
2. A message will ask Stop Auto Program? Select Yes by
pressing the ◄ or ► button.
3. Press the ENTERE button.
Editing channels ¦
MENU
O m
→ Channel → Channel List → ENTER
E
Channel Name Edit
t
1. Select a channel and press the TOOLS button.
2. Edit the channel name using the Channel Name Edit
menu.
Channel Name Edit ■ (analog channels only): Assign your
own channel name.
Other Features ¦
MENU
O m
→ Channel → ENTER
E
Clear Scrambled Channel
This function is used to filter out scrambled channels after
Auto Program is completed. This process may take up to
20~30 minutes.
How to Stop Searching Scrambled Channels
1. Press the ENTERE button to select Stop.
2. Press the ◄ button to select Yes .
3. Press the ENTERE button.
This function is only available in ✎Cable mode.
Channel List
MENU
O m
→ Channel → Channel List → ENTER
E
Channel List Option Menu
t
Set each channel using the Channel List menu options (Add/
Delete, Timer Viewing, Select All/ Deselect All). Option
menu items may differ depending on the channel status.
1. Select a channel and press the TOOLS button.
2. Select a function and change its settings.
Add / Delete ■ : Delete or add a channel to display the
channels you want.
NOTE
✎
All deleted channels will be shown on the xAll
Channels menu.
A gray-colored channel indicates the channel
x
has been deleted.
The xAdd menu only appears for deleted
channels.
Delete a channel from the xAdded Channels or
Favorite menu in the same manner.
Timer Viewing ■ : You can set a desired channel to be
displayed automatically at the set time; even when you
are watching another channel. Set the current time first
to use this function. (P. 17)
1. Press the ◄ / ► /▲ / ▼ buttons to select the
desired channel in Channel List.
2. Press the TOOLS button, then select Timer Viewing.
3. Scroll up or down to adjust the settings in the box,
or use the numeric buttons on your remote for
entering the date and time.
If you selected ✎Once, Every Week or Every Day
in Repeat, you can enter the date you want.
4.
Select OK, then press the ENTERE button when done.
NOTE
✎
Only memorized channels can be reserved.
x
Reserved programs will be displayed in the
x
Programmed menu.
When a digital channel is selected, press the x►
button to view the digital program.
Select All ■ : Select all the channels in the channel list.
Deselect All ■ : Deselect all the selected channels.
You can only select ✎Deselect All when one or
more channels are selected.
Programmed
(in Channel List)
You can view, modify or delete a a show you have reserved
to watch.
1. Press the
ENTERE
button to select Channel List.
2. Press the ◄ and ▼ button move to the Programmed
menu.
Change Info ■ : Change a show you have reserved to
watch.
Cancel Schedules ■ : Cancel a show you have reserved
to watch.
Information ■ : Display a show you have reserved
to watch. (You can also change the reservation
Information.)
Select All / Deselect All: ■ You can select or deselect all
channels in the channel list.
Fine Tune
(analog channels only)
If the reception is clear, you do not have to fine tune the
channel, as this is done automatically during the search and
store operation. If the signal is weak or distorted, fine tune
the channel manually.
Select y Fine Tune in the Channel menu.
Fine tuned channels that have been saved are marked
✎
with an asterisk “*” on the right-hand side of the
channel number in the channel banner.
To reset the fine-tuning, select ✎Reset.
BN68-02604A_Eng.indb 13 2010-02-10 �� 8:19:17
14
English
Basic Features
Picture Menu
Changing the Preset Picture Mode ¦
MENU
O m
→ Picture → Mode → ENTER
E
Mode
t
Select your preferred picture type by
pressing the P.MODE button.
Dynamic ■ : Suitable for a bright room.
Standard ■ : Suitable for a normal
environment.
Natural ■ : Suitable for an eye comfortable display.
Natural ✎ is not available in PC mode.
Movie ■ : Suitable for watching movies in a dark room.
Adjusting picture settings ¦
MENU
O m
→ Picture → Backlight → ENTER
E
Backlight / Contrast / Brightness /
Sharpness / Color / Tint (G/R)
Your television has several setting options for picture quality
control.
NOTE
✎
When you make changes to xBacklight, Contrast,
Brightness, Sharpness, Color or Tint (G/R), the
OSD will be adjusted accordingly.
In PC mode, you can only make changes to
x
Backlight, Contrast and Brightness.
Settings can be adjusted and stored for each
x
external device connected to the TV.
Lowering picture brightness reduces power
x
consumption.
Economical Solutions ¦
ECO Solution
MENU
O m
→ Picture → ECO Solution → ENTER
E
Energy Saving (Off / Low / Medium / High / Picture ■
Off / Auto): This adjust the brightness of the TV in order
to reduce power consumption. If you select Picture
Off, the screen is turned off , but the sound remains on.
Press any button to turn on the screen again.
Eco Sensor (Off / On) ■ : To enhance your power savings;
the picture settings will automatically adapt to the light
in the room.
If you adjust the ✎Backlight, the Eco Sensor will
be set to Off.
Min Backlight: When ECO sensor is On, the minimum
screen brightness can be adjusted manually.
If ✎Eco Sensor is On, the display brightness may
change (become slightly darker in most cases)
depending on the surrounding light intensity.
No Signal Power Off (Off / 15 min. / 30 min. / 60 min.) ■
Sets how quickly the TV switches to standby mode, if no
picture is being received.
Disabled when the PC is in power saving mode.
✎
Setting up the TV with your PC ¦
Set the input source to PC.
Auto Adjustment
t
MENU
O m
→Picture → Auto Adjustment →
ENTER
E
Adjust frequency values/positions and fine tune the settings
automatically.
Not available when connecting through HDMI/DVI
✎
cable.
Screen
Coarse / Fine ■ : Removes or reduces picture noise. If the
noise is not removed by Fine-tuning alone, then adjust
the frequency as best as possible (Coarse) and Finetune again. After the noise has been reduced, readjust
the picture so that it is aligned to the center of screen.
Position ■ : Adjust the PC’s screen positioning if it does
not fit the TV screen. Press the ▲ or ▼ button to adjust
the Vertical-Position. Press the ◄ or ► button to adjust
the Horizontal-Position.
Image Reset ■ : Resets the image to default settings.
Using Your TV as a Computer (PC) Display
Setting Up Your PC Software (Based on Windows XP)
Depending on the version of Windows and the video card,
the actual screens on your PC will probably look different, but
the same basic set-up information will apply in most cases.
(If not, contact your computer manufacturer or Samsung
Dealer.)
1. Click on “Control Panel” on the Windows start menu.
2. Click on “Appearance and Themes” in the “Control
Panel” window and a display dialog-box will appear.
3. Click on “Display” and a display dialog box will appear.
CHLIST
P . MODE
P . SIZE
INFO
BN68-02604A_Eng.indb 14 2010-02-10 �� 8:19:17
15
English
03 Basic Features
4. Navigate to the “Settings” tab on the display dialog-box.
The correct size setting (resolution) y
[Optimum: 1920 X 1080 pixels]
If a vertical-frequency option exists on your display y
settings dialog box, the correct value is ‘60’ or ‘60 Hz’.
Otherwise, just click ‘OK’ and exit the dialog box.
Changing the Picture Options ¦
Advanced Settings
MENU
O m
→ Picture → Advanced Settings →
ENTER
E
(available in Standard / Movie mode)
Compared to previous models, new Samsung TVs have
more precise pictures.
In PC mode, you can only make changes to ✎Dynamic
Contrast, Gamma and White Balance.
Bla ■ ck Tone (Off / Dark / Darker / Darkest): Select the
black level to adjust the screen depth.
Dynamic Contrast (Off / Low / Medium / High) ■ :
Adjust the screen contrast.
Shadow Detail ■ : Increase the brightness of dark images.
Disabled under PC mode.
✎
G ■ amma: Adjust the primary color intensity.
RGB Only Mode (Off / Red / Green / Blue) ■ : Displays
the Red, Green and Blue color for making fine
adjustments to the hue and saturation.
Color Space (Auto / Native) ■ : Adjust the range of colors
available to create the image.
White Balance ■ : Adjust the color temperature for a more
natural picture.
R-Offset / G-Offset / B-Offset: Adjust each color's
(red, green, blue) darkness.
R-Gain / G-Gain / B-Gain : Adjust each color's (red,
green, blue) brightness.
Reset: Resets the White Balance to it's default
settings.
Flesh Tone ■ : Emphasize pink "flesh tone".
Edge Enhancement (Off / On) ■ : Emphasize object
boundaries.
Picture Options
MENU
O m
→ Picture → Picture Options →
ENTER
E
In PC mode, you can only make changes to the ✎Color
Tone , Size and Digital Noise Filter.
Color Tone (Cool / Normal / Warm1 / Warm2) ■
Warm1 ✎ or Warm2 will be deactivated when the
picture mode is Dynamic.
Settings can be adjusted and stored for each
✎
external device connected to an input on the TV.
Size ■ : Your cable box/satellite receiver
may have its own set of screen sizes as
well. However, we highly recommend
you use 16:9 mode most of the time.
16:9: Sets the picture to 16:9 wide mode.
Zoom1: Use for moderate magnification.
Zoom2: Use for a stronger magnification.
Wide Fit: Enlarges the aspect ratio of the picture to fit
the entire screen.
4:3: Sets the picture to basic (4:3) mode.
Do not watch in 4:3 format for a long time. Traces
✎
of borders displayed on the left, right and center
of the screen may cause image retention (screen
burn) which are not covered by the warranty.
Screen Fit: Displays the full image without any cut-off
when HDMI (720p / 1080i / 1080p) or Component
(1080i / 1080p) signals are inputted.
NOTE
✎
After selecting xZoom1, Zoom2 or Wide Fit:
1. Press the ► button to select Position.
2. Press the ENTERE button.
3. Press the ▲ or ▼ button to move the picture up
or down.
4. Press the ENTERE button.
5. Press the ► button to select Reset.
6. Press the ENTERE button to reset the picture
to its default position.
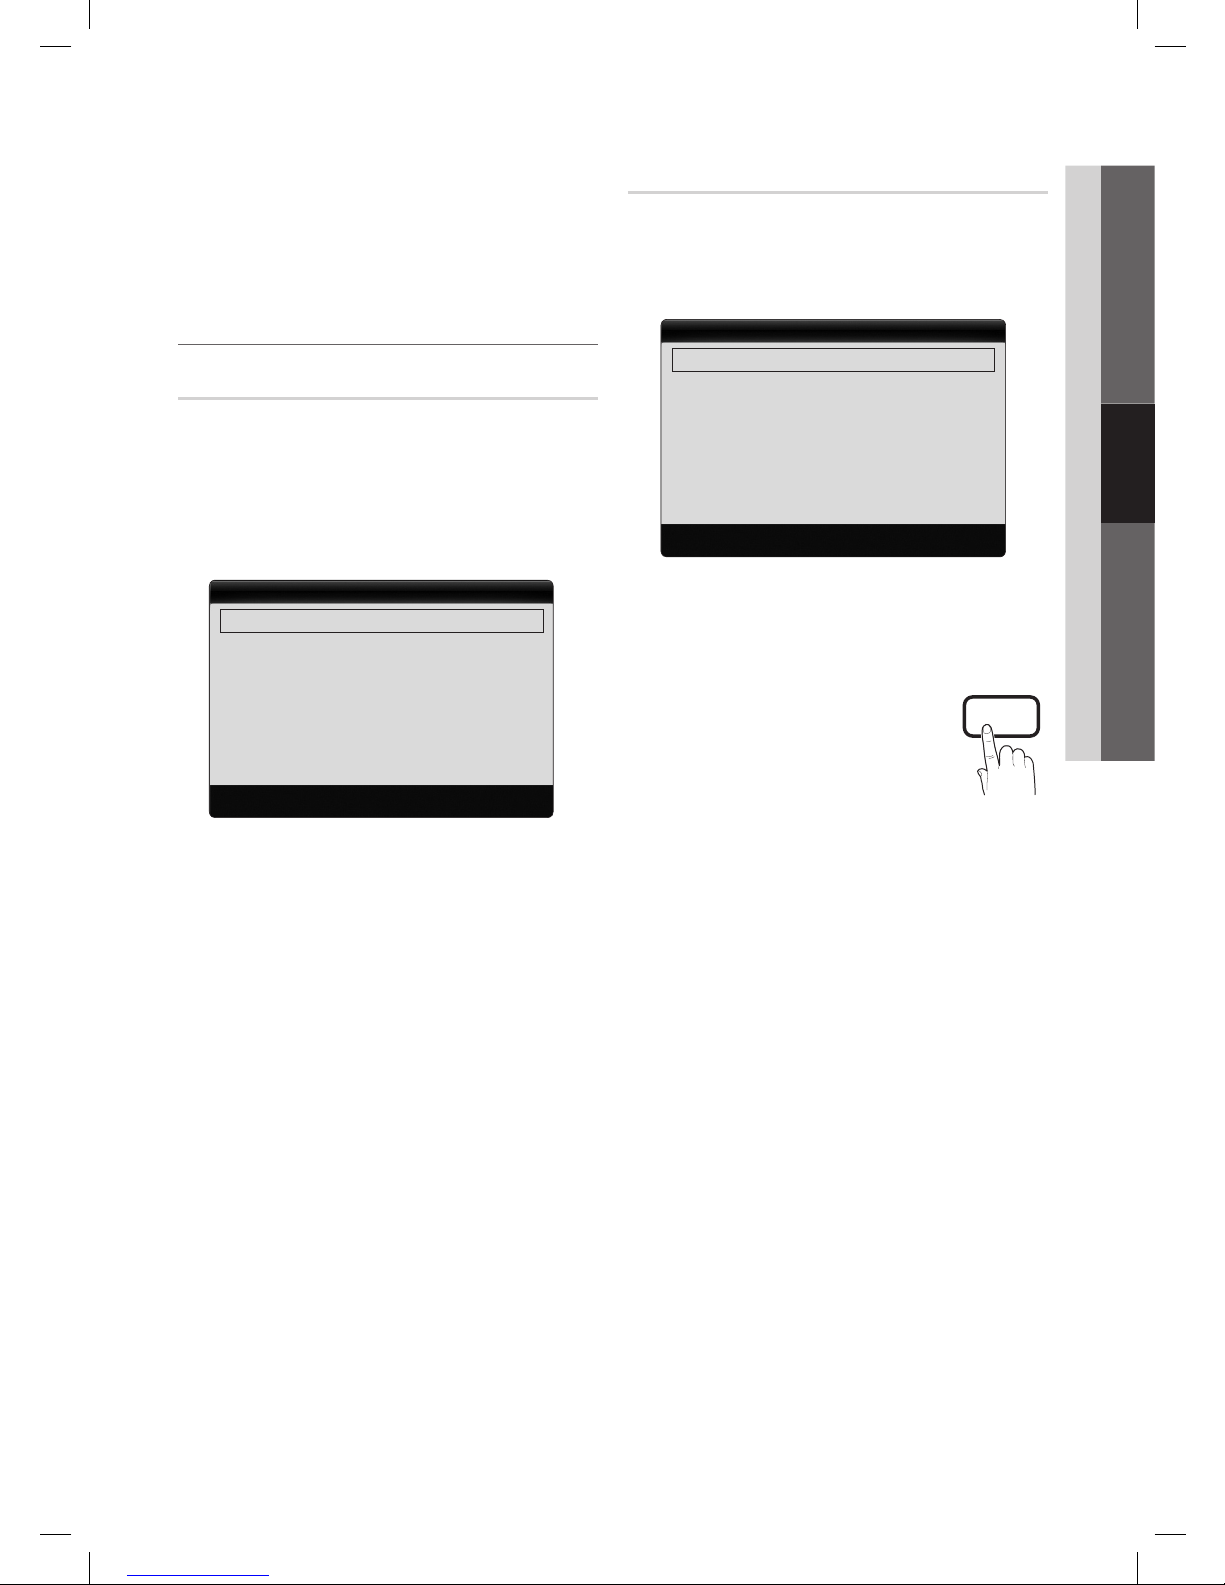
Advanced Settings
Black Tone : Off ►
Dynamic Contrast : Medium
Shadow Detail : 0
Gamma : 0
RGB Only Mode : Off
Color Space : Native
White Balance
▼
U Move E Enter R Return
Picture Options
Color Tone : Normal ►
Size : 16:9
Digital Noise Filter : Auto
MPEG Noise Filter : Auto
HDMI Black Level : Normal
Film Mode : Off
Auto Protection Time : 2 hours
U Move E Enter R Return
CHLIST
P . SIZE
BN68-02604A_Eng.indb 15 2010-02-10 �� 8:19:18
 Loading...