

Samsung LE46D550 User Manual

E-MANUAL
Contact SAMSUNG WORLDWIDE
If you have any questions or comments relating to Samsung products, please contact the SAMSUNG customer care centre.
Country
ALBANIA 42 27 5755 AUSTRIA 0810 - SAMSUNG (7267864, € 0.07/min) www.samsung.com
BELGIUM 02-201-24-18 www.samsung.com/be (Dutch)
BOSNIA 05 133 1999 BULGARIA 07001 33 11 www.samsung.com
CROATIA 062 SAMSUNG (062 726 7864) www.samsung.com
CZECH 800 - SAMSUNG (800-726786) www.samsung.com
DENMARK 70 70 19 70 www.samsung.com
FINLAND 030 - 6227 515 www.samsung.com
FRANCE 01 48 63 00 00 www.samsung.com
GERMANY 01805 - SAMSUNG(726-7864 € 0,14/Min) www.samsung.com
GREECE
HUNGARY 06-80-SAMSUNG(726-7864) www.samsung.com
ITALIA 800-SAMSUNG(726-7864) www.samsung.com
KOSOVO +381 0113216899 LUXEMBURG 261 03 710 www.samsung.com
MACEDONIA 023 207 777 MONTENEGRO 020 405 888 NETHERLANDS 0900-SAMSUNG (0900-7267864) (€ 0,10/Min) www.samsung.com
NORWAY 815-56 480 www.samsung.com
POLAND 0 801 1SAMSUNG(172678) / 022-607-93-33 www.samsung.com
PORTUGAL 80820-SAMSUNG(726-7864) www.samsung.com
RUMANIA "1. 08010 SAMSUNG (72678) – doar din reţeaua Romtelecom, tarif local;
SERBIA 0700 Samsung (0700 726 7864) www.samsung.com
SLOVAKIA 0800 - SAMSUNG(0800-726 786) www.samsung.com/sk
SPAIN 902 - 1 - SAMSUNG (902 172 678) www.samsung.com
SWEDEN 0771 726 7864 (SAMSUNG) www.samsung.com
SWITZERLAND 0848 - SAMSUNG(7267864, CHF 0.08/min) www.samsung.com/ch
U.K 0330 SAMSUNG (7267864) www.samsung.com
EIRE 0818 717100 www.samsung.com
LITHUANIA 8-800-77777 www.samsung.com
LATVIA 8000-7267 www.samsung.com
ESTONIA 800-7267 www.samsung.com
Customer Care Centre
Samsung Zrt., česká organizační složka, Oasis Florenc, Sokolovská394/17,
180 00, Praha 8
"1. Για προϊόντα πληροφορικής και κινητής τηλεφωνίας
Από σταθερό 80111-SAMSUNG (80111 7267864), αστική χρέωση
Από κινητό 210 6897691
2. Για φωτογραφικές μηχανές, βιντεοκάμερες, τηλεοράσεις & οικιακές
συσκευές
Από κινητό και σταθερό 2106293100"
2. 021.206.01.10 – din orice reţea, tarif normal "
Web Site
www.samsung.com/be_fr (French)
www.samsung.com
www.samsung.com
www.samsung.com/ch_fr/(French)
LCD TV
User Manual
imagine the possibilities
© 2011 Samsung Electronics Co., Ltd. All rights reserved.
Thank you for purchasing this Samsung product.
To receive more complete service, please register
your product at
www.samsung.com/register
Model _____________ Serial No. _____________
BN68-03397D-00
For more information on how to use e-Manual (P.12)
Figures and illustrations in this User Manual are provided for reference only and may differ from actual product appearance.
Product design and specifications may be changed without notice.
Important Warranty Information Regarding Television Format Viewing
1. Functionalities related to Digital TV (DVB) are only available in countries/areas where DVB-T (MPEG2 and MPEG4 AVC) digital terrestrial
signals are broadcasted or where you are able to access to a compatible DVB-C (MPEG2 and MPEG4 AAC) cable-TV service. Please check
with your local dealer the possibility to receive DVB-T or DVB-C signal.
2. DVB-T is the DVB European consortium standard for the broadcast transmission of digital terrestrial television and DVB-C is that for the broadcast
transmission of digital TV over cable. However, some differentiated features like EPG (Electric Programme Guide), VOD (Video On Demand) and so
on, are not included in this specification. So, they cannot be workable at this moment.
3. Although this TV set meets the latest DVB-T and DVB-C standards, as of [August, 2008], the compatibility with future DVB-T digital terrestrial
and DVB-C digital cable broadcasts cannot be guaranteed.
4. Depending on the countries/areas where this TV set is used some cable-TV providers may charge an additional fee for such a service and
you may be required to agree to terms and conditions of their business.
5. Some Digital TV functions might be unavailable in some countries or regions and DVB-C might not work correctly with some cable service
providers.
6. For more information, please contact your local Samsung customer care centre.
The reception quality of TV may be affected due to differences in broadcasting method between the countries. Please check the TV
✎
performance in the local SAMSUNG Authorized Dealer, or the Samsung Call Centre whether it can be improved by reconfiguring TV
setting or not.
Still image warning
Avoid displaying still images (like jpeg picture files) or still image element (like TV programme logo, panorama or 4:3 image format, stock or news
bar at screen bottom etc.) on the screen. Constant displaying of still picture can cause ghosting of LCD screen, which will affect image quality. To
reduce risk of this effect, please follow below recommendations:
• Avoid displaying the same TV channel for long periods.
• Always try do display any image on full screen, use TV set picture format menu for best possible match.
• Reduce brightness and contrast values to minimum required to achieve desired picture quality, exceeded values may speed up the burnout
process.
• Frequently use all TV features designed to reduce image retention and screen burnout, refer to proper user manual section for details.
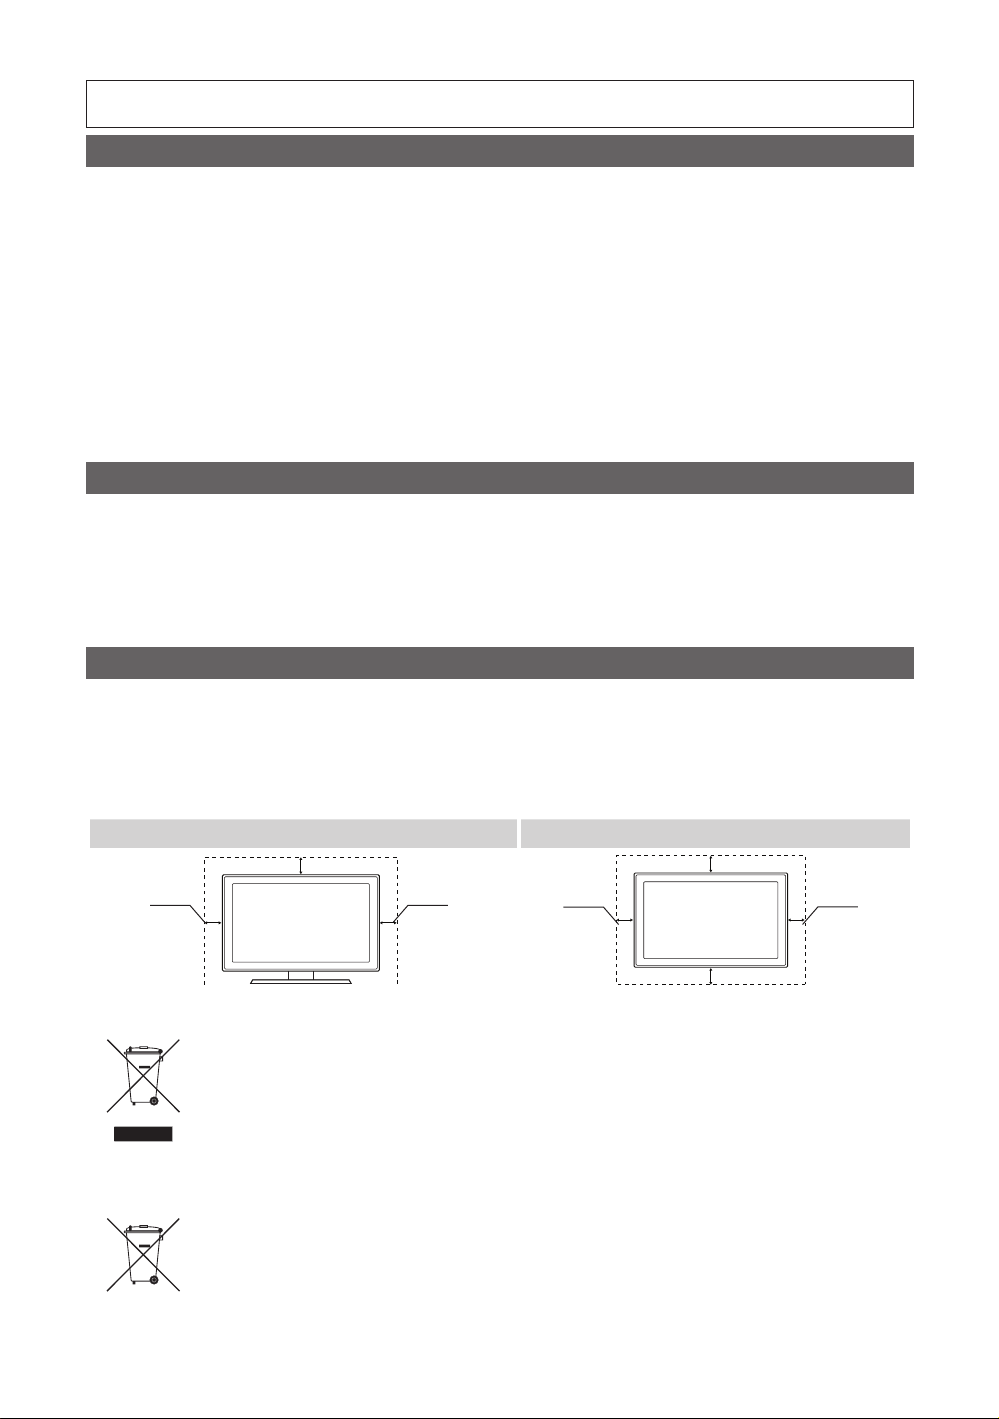
Securing the Installation Space
Keep the required distances between the product and other objects (e.g. walls) to ensure proper ventilation.
Failing to do so may result in fire or a problem with the product due to an increase in the internal temperature of the product.
When using a stand or wall-mount, use parts provided by Samsung Electronics only.
✎
• If you use parts provided by another manufacturer, it may result in a problem with the product or an injury due to the product falling.
The appearance may differ depending on the product.
✎
Be careful when you contact the TV because some parts can be somewhat hot.
✎
Installation with a stand. Installation with a wall-mount.
10 cm
10 cm10 cm
Correct Disposal of This Product (Waste Electrical & Electronic Equipment)
(Applicable in the European Union and other European countries with separate collection systems)
This marking on the product, accessories or literature indicates that the product and its electronic accessories (e.g. charger,
headset, USB cable) should not be disposed of with other household waste at the end of their working life. To prevent
possible harm to the environment or human health from uncontrolled waste disposal, please separate these items from
other types of waste and recycle them responsibly to promote the sustainable reuse of material resources. Household users
should contact either the retailer where they purchased this product, or their local government office, for details of where and
how they can take these items for environmentally safe recycling. Business users should contact their supplier and check
the terms and conditions of the purchase contract. This product and its electronic accessories should not be mixed with
other commercial wastes for disposal.
Correct disposal of batteries in this product
(Applicable in the European Union and other European countries with separate battery return systems)
This marking on the battery, manual or packaging indicates that the batteries in this product should not be disposed of with
other household waste at the end of their working life. Where marked, the chemical symbols Hg, Cd or Pb indicate that the
battery contains mercury, cadmium or lead above the reference levels in EC Directive 2006/66. If batteries are not properly
disposed of, these substances can cause harm to human health or the environment. To protect natural resources and
to promote material reuse, please separate batteries from other types of waste and recycle them through your local, free
battery return system.
10 cm
10 cm
10 cm
10 cm

Accessories
✎
Please make sure the following items are included with your TV. If any items are missing, contact your dealer.
✎
The items’ colours and shapes may vary depending on the models.
y Remote Control & Batteries (AAA x 2)
y Owner’s Instructions
y Warranty Card / Safety Guide (Not available in some locations)
See separate guide for installing the stand.
M4 x L12
y Screws (8EA)
✎
An administration fee may be charged if either
(a) an engineer is called out at your request and there is no defect in the product
(i.e. where you have failed to read this user manual)
(b) you bring the unit to a repair centre and there is no defect in the product
(i.e. where you have failed to read this user manual).
✎
The amount of such administration charge will be advised to you before any work or home visit is carried out.
y Power Cord
y Cleaning Cloth
Viewing the Control Panel
✎
The product colour and shape may vary depending on the model.
Control Panel
Speakers
Remote control sensor Aim the remote control towards this spot on the TV.
Power Indicator Blinks and turns off when the power is on and lights up in standby mode.
SOURCE
MENU Displays an on-screen menu, the OSD (on screen display) of your TV’s features.
Y
z
P
Standby mode
Do not leave your TV in standby mode for long periods of time (when you are away on a holiday, for example). A small amount
of electric power is still consumed even when the power button is turned off. It is best to unplug the power cord.
E
(Power)
Toggles between all the available input sources. In the on-screen menu, use this
button as you would use the ENTERE button on the remote control.
Adjusts the volume. In the OSD, use the
and ► buttons on the remote control.
Changes the channels. In the OSD, use the
▼ and ▲ buttons on the remote control.
Turns the TV on or off.
Y
buttons as you would use the ◄
z
buttons as you would use the
English - 3

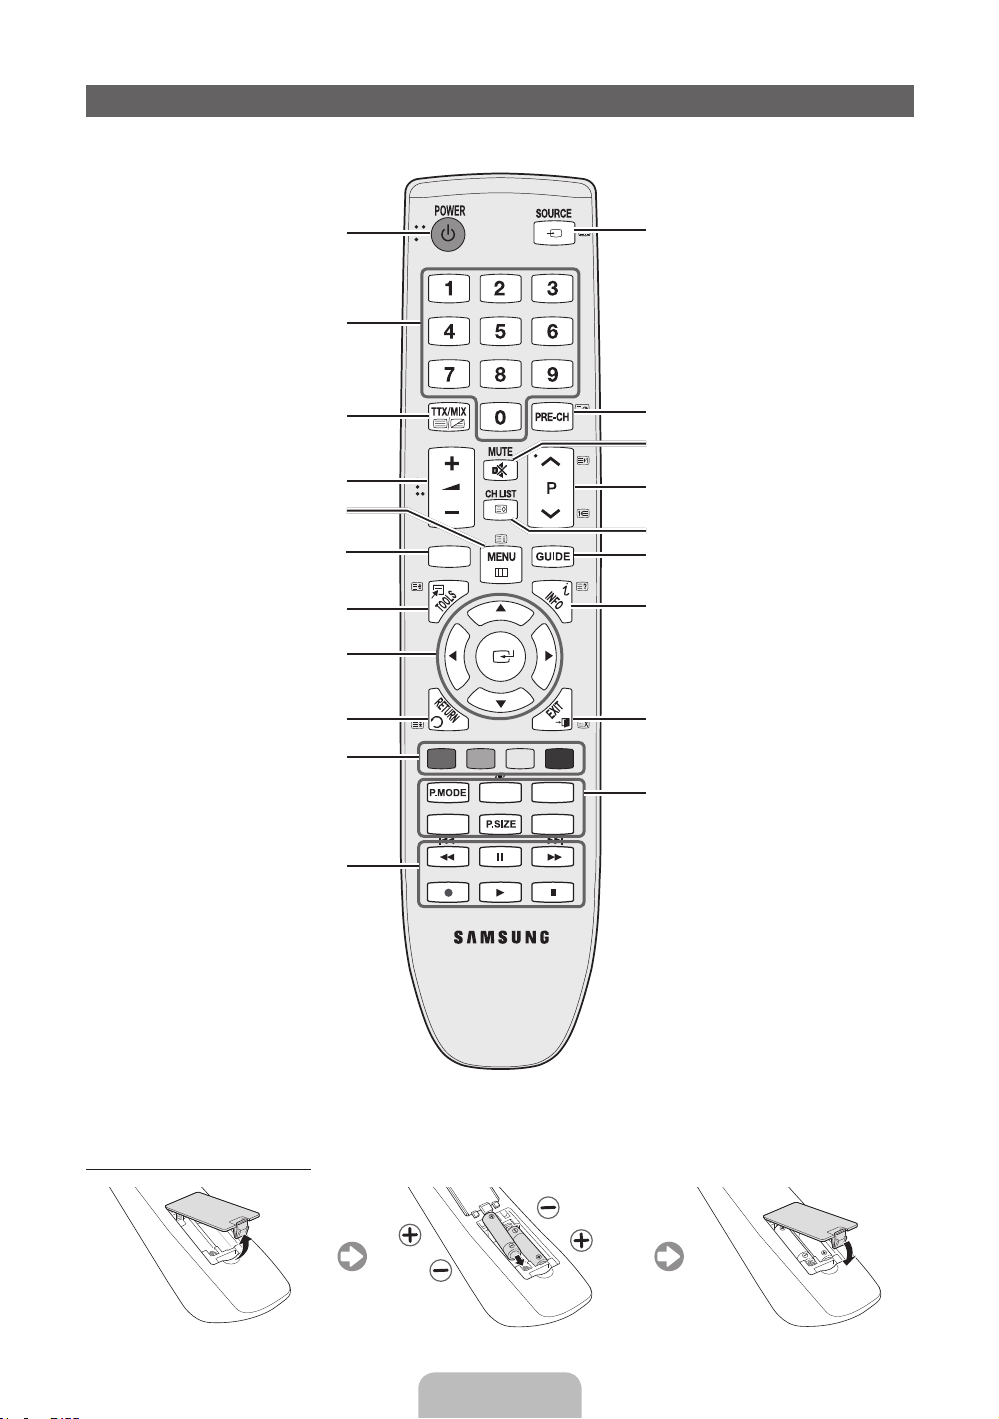
Viewing the Remote Control
✎
This is a special remote control for the visually impaired persons and has Braille points on the Power, Channel, and Volume buttons.
Turns the TV on and off.
Press to directly access to channels
Alternately select Teletext ON,
Double, Mix or OFF.
Adjusts the volume.
Displays the main on-screen menu.
Displays the My Downloads, Watch
TV and Source.
Quickly select frequently used
functions.
Selects the on-screen menu items
and changes the values seen on the
menu.
Returns to the previous menu.
Buttons used in the Channel List,
Channel Manager, My Downloads,
Network, AllShare™ menu, etc.
Use these buttons in My
Downloads and Anynet+ modes.
CONTENT
A B C D
SRS
E-MANUAL
DUAL I-II
AD/SUBT.
Displays and selects the available
video sources.
Returns to the previous channel.
Cuts off the sound temporarily.
Changes channels.
Displays channel lists on the screen.
Displays the EPG (Electronic
Programme Guide).
Displays information on the TV
screen.
Exits the menu.
P.MODE: Selects picture mode.
SRS: Selects the SRS TruSurround
HD mode.
DUAL I-II: Select Dual sound mode.
E-MANUAL: Displays the e-Manual
guide.
P.SIZE: Selects the picture size.
AD: Audio Description selection.
(Not available in some locations)
SUBT.: Displays digital subtitles.
Installing batteries (Battery size: AAA)
English - 4

Connecting to an Antenna
When the TV is initially powered on, basic settings proceed automatically.
✎
Preset: Connecting the mains and antenna.
Power Input
TV Rear Panel
or
VHF/UHF AntennaCable
Plug & Play (Initial Setup)
When the TV is initially powered on, a sequence of on-screen prompts will assist in configuring basic settings. Press the
POWERP button. Plug & Play is available only when the Input source is set to TV.
✎
To return to the previous step, press the Red button.
Selecting a language
1
Selecting Store Demo
2
or Home Use
Selecting a country
3
Setting the Clock
4
Mode
Selecting an antenna
5
Selecting a channel
6
Enjoy your TV.
7
If You Want to Reset This Feature...
Select System - Plug & Play (Initial Setup). Enter your 4 digit PIN number. The default PIN number is “0-0-0-0.” If you want to
change the PIN number, use the Change PIN function.
You should do Plug & Play (MENU → System) again at home although you did in shop.
✎
If you forget the PIN code, press the remote control buttons in the following sequence in Standby mode, which resets
the PIN to “0-0-0-0” : MUTE → 8 → 2 → 4 → POWER (on)
Press the ▲ or ▼ button, then press the ENTERE button.
Select the desired OSD (On Screen Display) language.
Press the ◄ or ► button, then press the ENTERE button.
Select the Home Use mode. Store Demo mode is for retail
environments.
To return the unit’s settings from Store Demo to Home Use (standard):
Press the volume button on the TV. When the OSD volume is displayed,
press and hold MENU for 5 sec.
Store Demo is only for shop display. If you select it, several functions
are not able to use. Please select Home Use when you watch at home.
Press the ▲ or ▼ button, then press the ENTERE button.
Select the appropriate country.
✎
After selecting the country in the Country menu, some models may proceed with an
additional option to setup the pin number.
✎
When you input the PIN number, 0-0-0-0 is not available.
Set the Clock Mode automatically or manually.
Press the ▲ or ▼ button, then press the ENTERE button.
Select Air (Digital & Analogue/Digital/Analogue) or Cable (Digital & Analogue/Digital/
Analogue).
Press the ▲ or ▼ button, then press the ENTERE button.
Select the channel source to memorise. When setting the antenna source to Cable, a step
appears allowing you to assign numerical values (channel frequencies) to the channels. For
more information, refer to Channel → Auto Tuning.
Press the ENTERE button at any time to interrupt the memorisation process.
Select the Watch TV. Press the ENTERE button.
✎
If you select the Network Settings, set the network. For more information, refer to
“Network menu” in the e-Manual.
POWER
P
English - 5
Connecting to an AV devices
¦ Available devices: DVD, Blu-ray player, HD cable box, HD STB (Set-Top-Box) satellite
receiver, VCR, Digital Audio System, Amplifier, DVD Home Theatre, PC
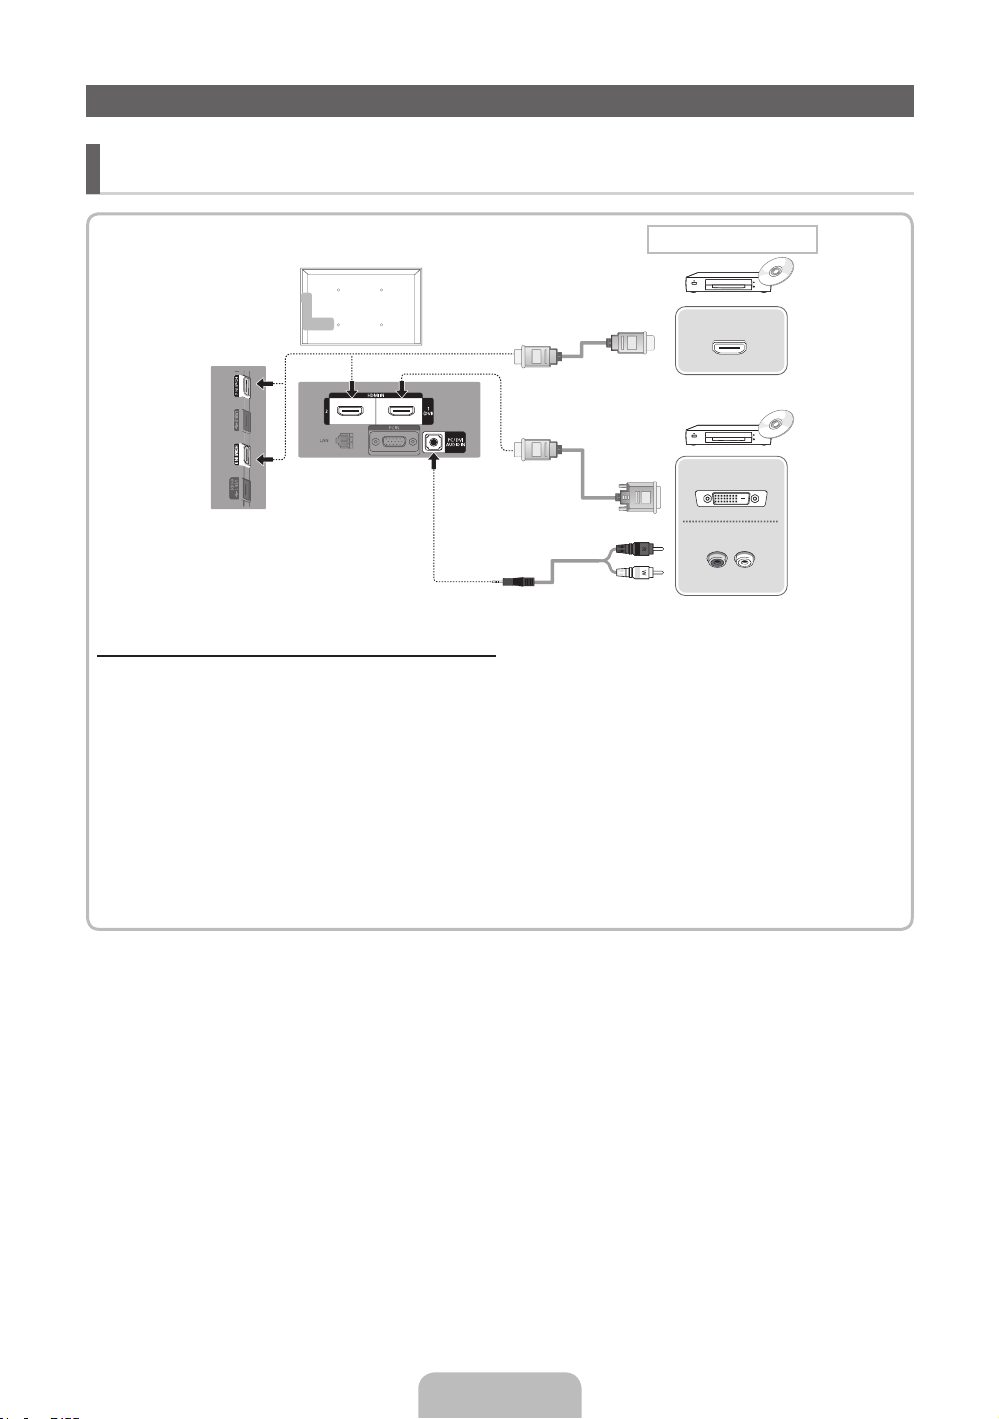
HDMI connection
HDMI OUT
DVI OUT
AUDIO OUT
R-AUDIO-L
Using an HDMI cable or HDMI to DVI Cable (up to 1080p)
✎
HDMI IN 1(DVI), 2, 3, 4, PC/DVI AUDIO IN
For better picture and audio quality, connect to a digital device using an HDMI cable.
x
An HDMI cable supports digital video and audio signals, and does not require an audio cable.
x
– To connect the TV to a digital device that does not support HDMI output, use an HDMI/DVI and audio cables.
The picture may not display normally (if at all) or the audio may not work if an external device that uses an older
x
version of HDMI mode is connected to the TV. If such a problem occurs, ask the manufacturer of the external
device about the HDMI version and, if out of date, request an upgrade.
Be sure to purchase a certified HDMI cable. Otherwise, the picture may not display or a connection error may
x
occur.
A basic high-speed HDMI cable or one with ethernet is recommended. This product does not support the
x
ethernet function via HDMI.
English - 6
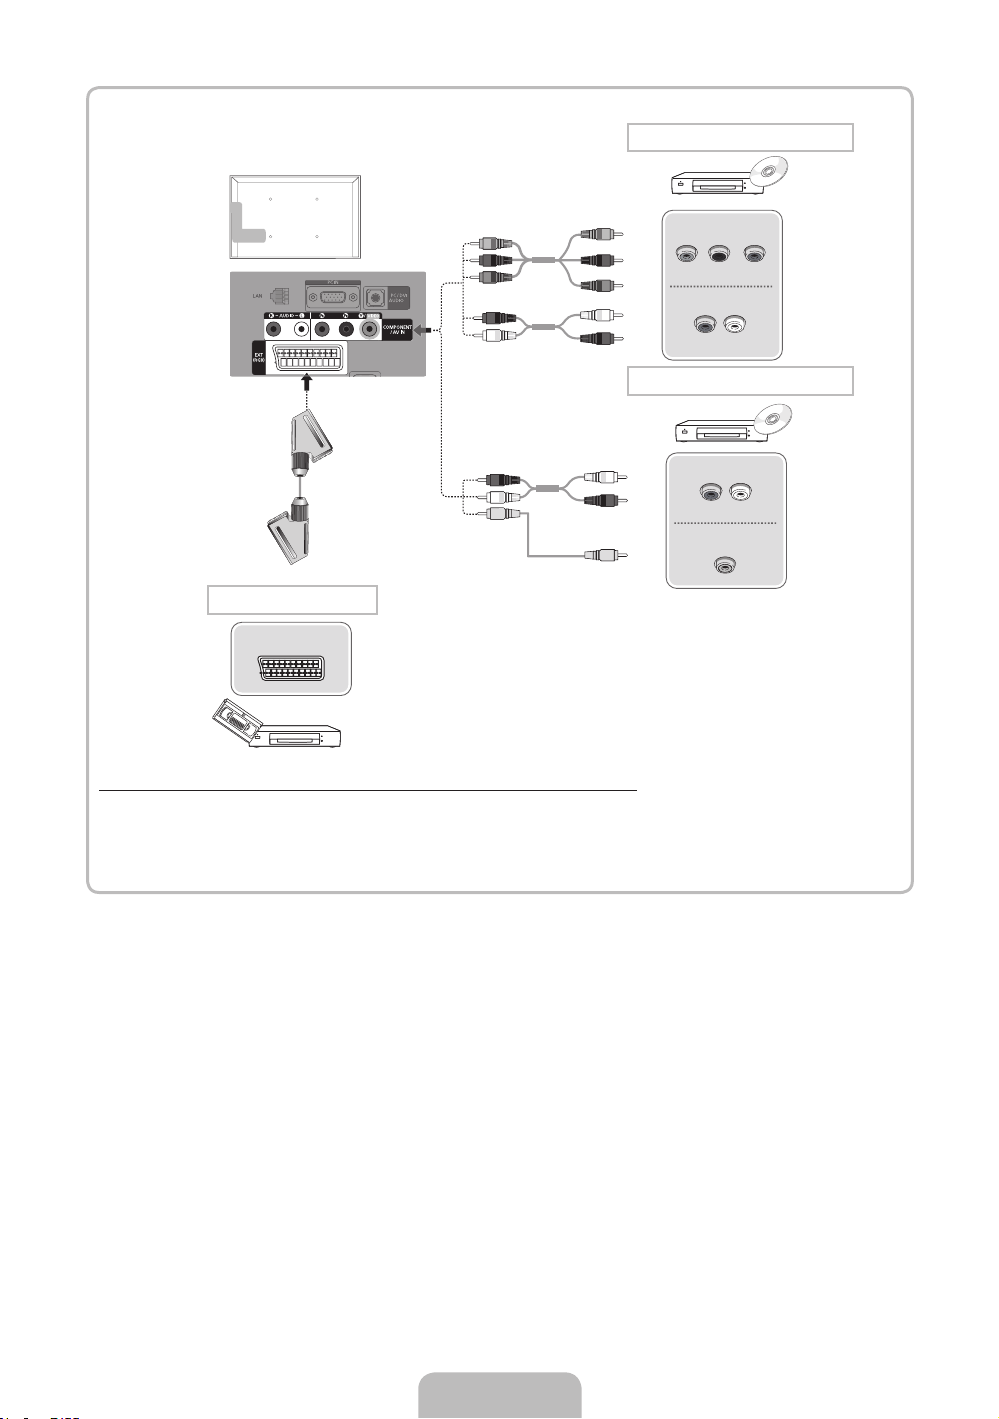
Component connection
G
B
R
R
W
G
B
R
W
R
COMPONENT OUT
PRPBY
AUDIO OUT
R-AUDIO-L
AV connection
R
W
Y
W
R
Y
AUDIO OUT
R-AUDIO-L
VIDEO OUT
SCART connection
EXT
Using a Component (up to 1080p) or Audio/Video (480i only) and Scart Cable
✎
In Ext. mode, DTV Out supports MPEG SD Video and Audio only.
✎
To obtain the best picture quality, the Component connection is recommended over the A/V connection.
English - 7

Connecting to a PC and Audio device
¦ Available devices: Digital Audio System, Amplifier, DVD Home Theatre
Audio connection
OPTICAL
Using an Optical (Digital) cable or Headphone Connection
✎
DIGITAL AUDIO OUT (OPTICAL)
When a digital audio system is connected to the DIGITAL AUDIO OUT (OPTICAL) jack, decrease the volume of
x
both the TV and the system.
5.1 CH (channel) audio is available when the TV is connected to an external device supporting 5.1 CH.
x
When the receiver (home theatre) is set to on, you can hear sound output from the TV’s optical jack. When the TV
x
is receiving a DTV signal, the TV will send 5.1 CH sound to the home theatre receiver. When the source is a digital
component such as a DVD / Blu-ray player / cable box / STB (Set-Top-Box) satellite receiver and is connected to
the TV via HDMI, only 2 CH audio will be heard from the home theatre receiver. If you want to hear 5.1 CH audio,
connect the digital audio out jack from your DVD / Blu-ray player / cable box / STB satellite receiver directly to an
amplifier or home theatre.
✎
Headphones H: You can connect your headphones to the headphones output on your set. While the headphones
are connected, the sound from the built-in speakers will be disabled.
Sound function may be restricted when connecting headphones to the TV.
x
Headphone volume and TV volume are adjusted separately.
x
English - 8

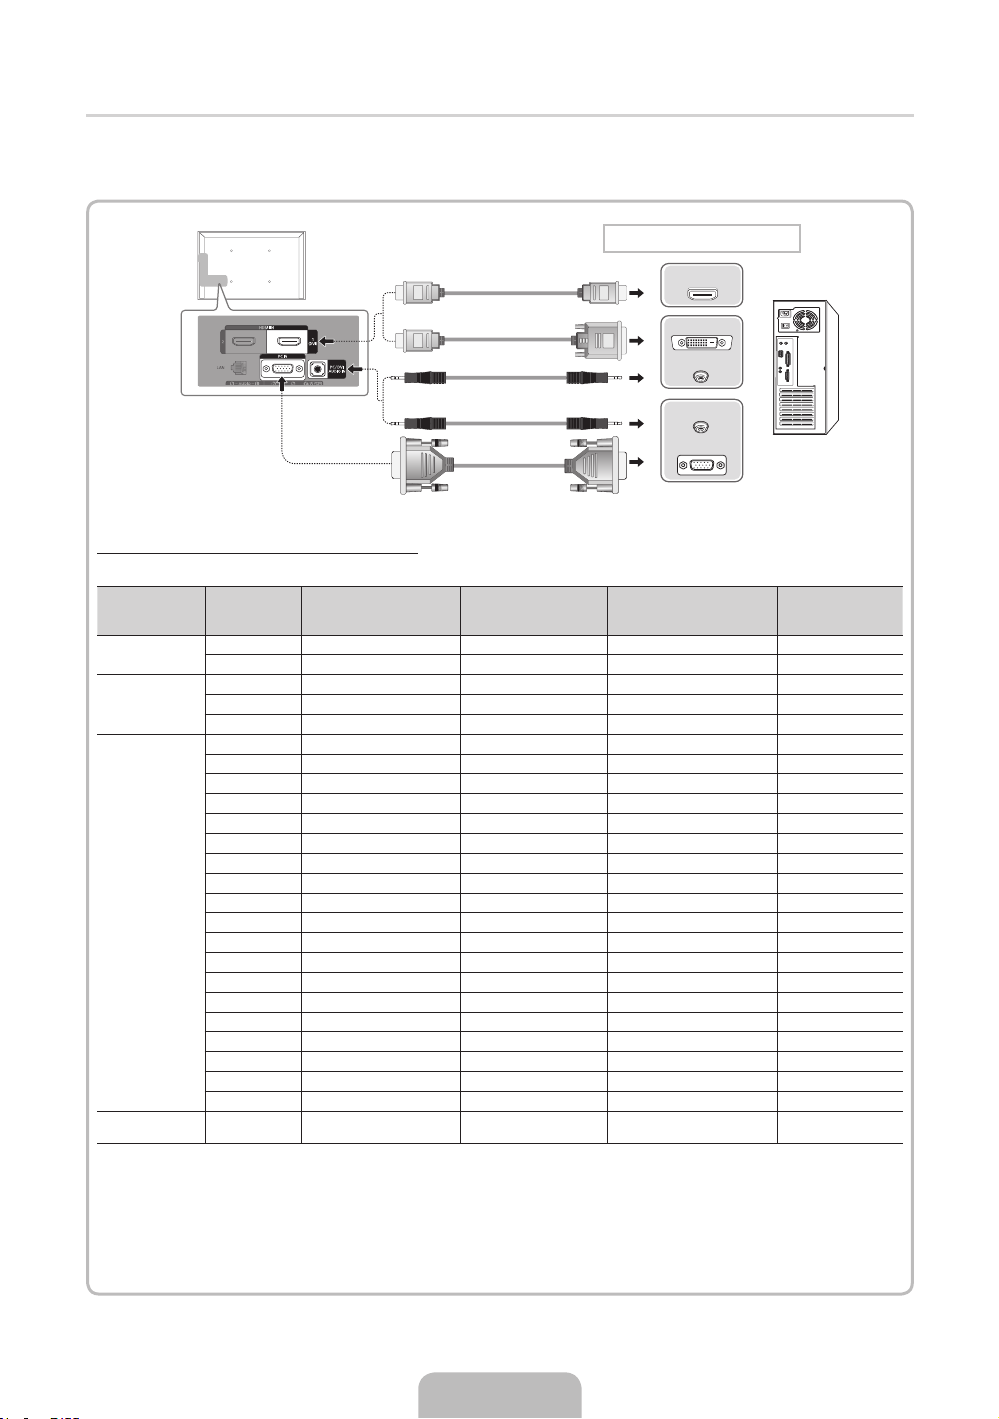
¦ Using an HDMI cable or HDMI to DVI Cable / a D-sub Cable
✎
Connecting through the HDMI cable may not be supported depending on the PC.
✎
An HDMI cable supports digital video and audio signals, and does not require an audio cable.
PC connection
HDMI OUT
DVI OUT
AUDIO OUT
AUDIO OUT
PC OUT
Display Modes (D-Sub and HDMI/DVI Input)
Optimal resolution is 1920 X 1080 @ 60 Hz.
Mode Resolution
IBM
MAC
VESA DMT
VESA DMT / DTV
CEA
✎✎
NOTE
For HDMI/DVI cable connection, you must use the HDMI IN 1(DVI) jack.
x
The interlace mode is not supported.
x
The set might operate abnormally if a non-standard video format is selected.
x
Separate and Composite modes are supported. SOG(Sync On Green) is not supported.
x
640 x 350 31.469 70.086 25.175 +/720 x 400 31.469 70.087 28.322 -/+
640 x 480 35.000 66.667 30.240 -/832 x 624 49.726 74.551 57.284 -/-
1152 x 870 68.681 75.062 100.000 -/-
640 x 480 31.469 59.940 25.175 -/640 x 480 37.861 72.809 31.500 -/640 x 480 37.500 75.000 31.500 -/800 x 600 37.879 60.317 40.000 +/+
800 x 600 48.077 72.188 50.000 +/+
800 x 600 46.875 75.000 49.500 +/+
1024 x 768 48.363 60.004 65.000 -/1024 x 768 56.476 70.069 75.000 -/1024 x 768 60.023 75.029 78.750 +/+
1152 x 864 67.500 75.000 108.000 +/+
1280 x 1024 63.981 60.020 108.000 +/+
1280 x 1024 79.976 75.025 135.000 +/+
1280 x 800 49.702 59.810 83.500 -/+
1280 x 800 62.795 74.934 106.500 -/+
1280 x 960 60.000 60.000 108.000 +/+
1360 x 768 47.712 60.015 85.500 +/+
1440 x 900 55.935 59.887 106.500 -/+
1440 x 900 70.635 74.984 136.750 -/+
1680 x 1050 65.290 59.954 146.250 -/+
1920 x 1080p 67.500 60.000 148.500 +/+
Horizontal Frequency
(KHz)
Vertical Frequency (Hz) Pixel Clock Frequency (MHz) Sync Polarity (H / V)
English - 9
Changing the Input Source
¦ Source List
Use to select TV or other external input sources such as DVD / Blu-ray players / cable box / STB
satellite receiver connected to the TV.
■ TV / Ext. / PC / AV / Component / HDMI1/DVI / HDMI2 / HDMI3 / HDMI4 / USB / AllShare
✎
In the Source List, connected inputs will be highlighted.
✎
If you want to see connected devices only, move to Connected using ◄ or ► button.
✎
Ext. and PC always stay activated.
✎
If the connected external devices are not highlighted, press the red button. The TV will
search for connected devices.
¦ Edit Name
How to use Edit Name
In the Source, press the TOOLS button, and then you can set an external input sources name you want.
■ VCR / DVD / Cable STB / Satellite STB / PVR STB / AV Receiver / Game / Camcorder / PC / DVI PC / DVI Devices /
TV / IPTV / Blu-ray / HD DVD / DMA: Name the device connected to the input jacks to make your input source selection
easier.
✎
When connecting a PC to the HDMI IN 1(DVI) port with HDMI cable, you should set the TV to PC mode under Edit
Name.
✎
When connecting a PC to the HDMI IN 1(DVI) port with HDMI to DVI cable, you should set the TV to DVI PC mode
under Edit Name.
✎
When connecting an AV devices to the HDMI IN 1(DVI) port with HDMI to DVI cable, you should set the TV to DVI
Devices mode under Edit Name.
Information
You can see detailed information about the selected external device.
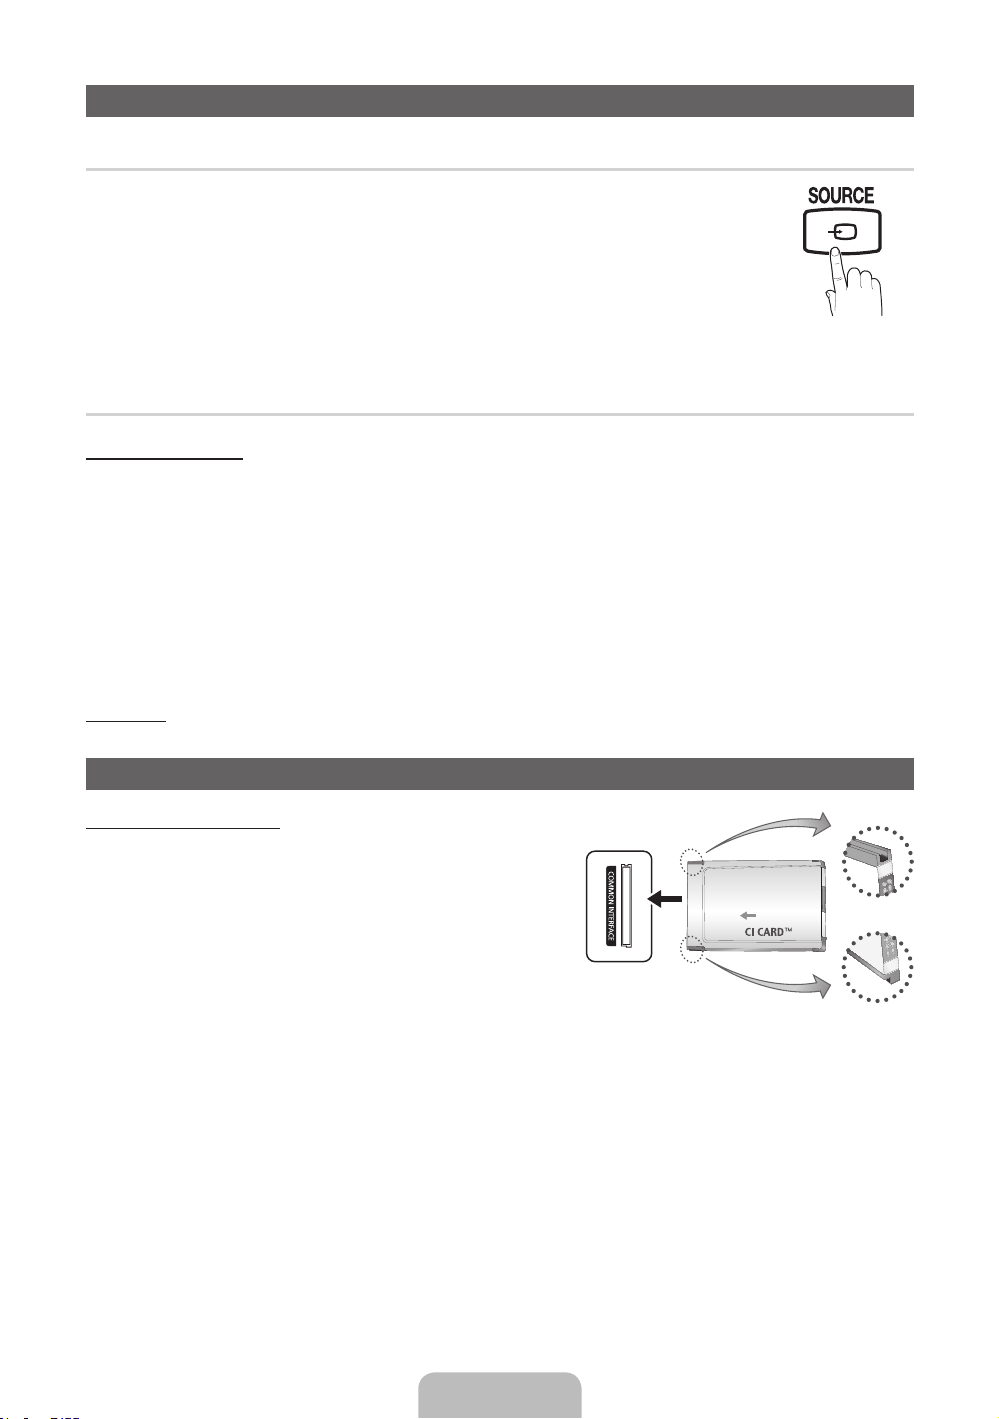
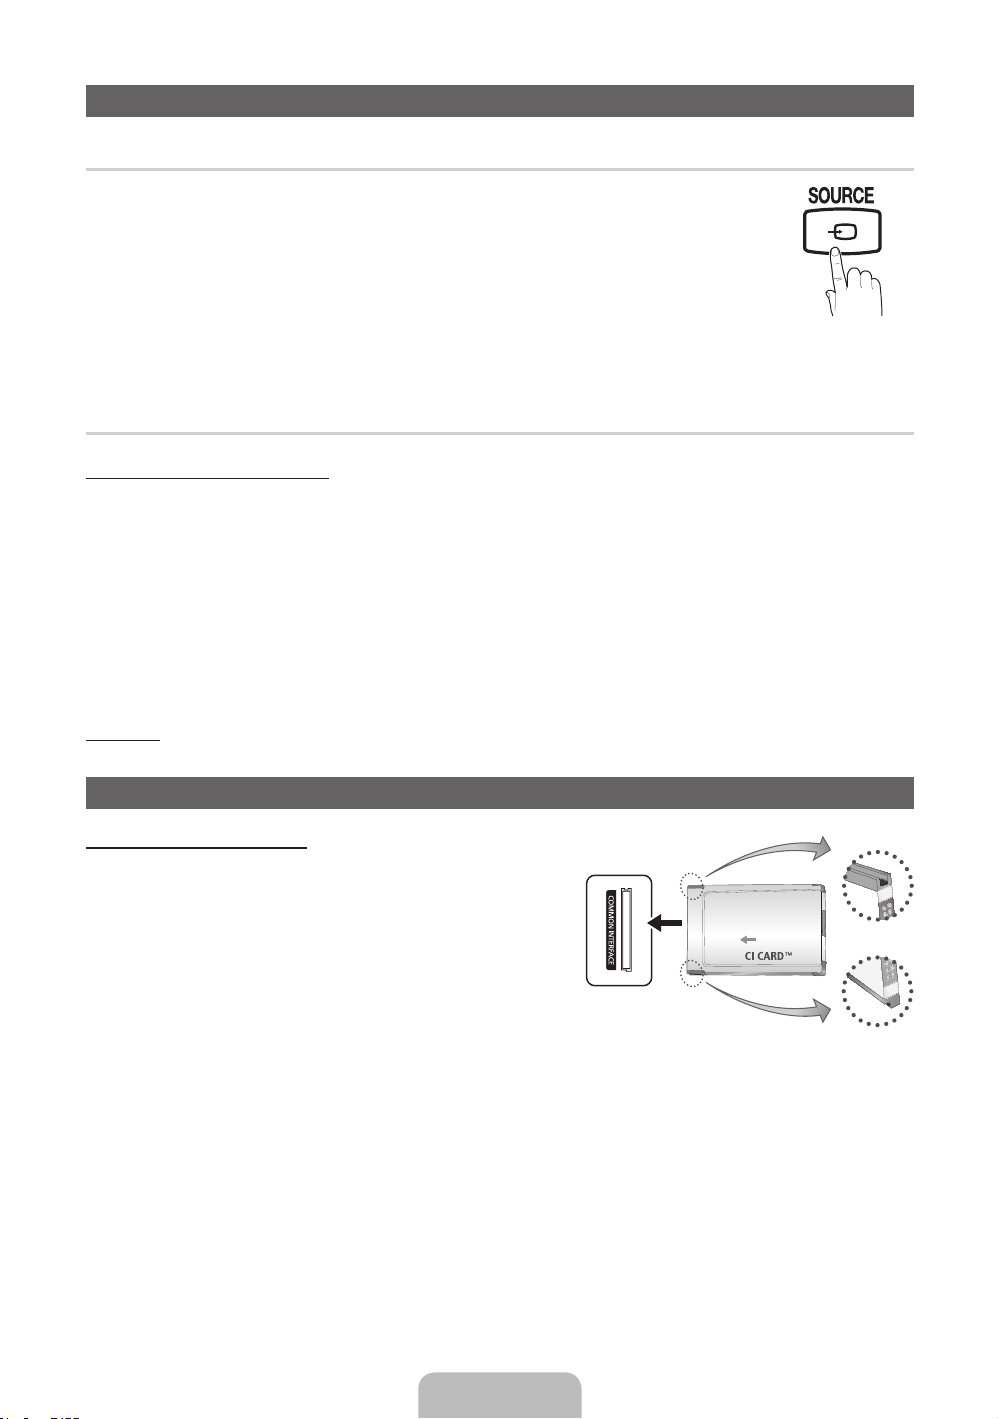
Connecting to a COMMON INTERFACE slot
Using the “CI or CI+ CARD”
To watch paid channels, the “CI or CI+ CARD” must be inserted.
y If you do not insert the “CI or CI+ CARD,” some channels will display
the message “Scrambled Signal”.
y The pairing information containing a telephone number, the “CI or
CI+ CARD” ID the Host ID and other information will be displayed in
about 2~3 minutes. If an error message is displayed, please contact
your service provider.
y When the configuration of channel information has finished, the
message “Updating Completed” is displayed, indicating the channel
list is updated.
✎
NOTE
You must obtain a “CI or CI+ CARD” from a local cable service provider.
x
When removing the “CI or CI+ CARD”, carefully pull it out with your hands since dropping the “CI or CI+ CARD” may
x
cause damage to it.
Insert the “CI or CI+ CARD” in the direction marked on the card.
x
The location of the COMMON INTERFACE slot may be different depending on the model.
x
“CI or CI+ CARD” is not supported in some countries and regions; check with your authorized dealer.
x
If you have any problems, please contact a service provider.
x
Insert the “CI or CI+ CARD” that supports the current antenna settings. The screen will be distorted or will not be seen.
x
English - 10

Network Connection
You can set up your TV so that it can access the Internet through your local area network (LAN) using a wired or wireless
connection.
Network Connection - Wireless
You can connect your TV to your LAN through a standard wireless router or modem. To connect wirelessly, you must first
attach a “Samsung Wireless LAN Adapter” (WIS09ABGN, WIS09ABGN2, WIS10ABGN - sold separately) to either the USB or
USB1 (HDD), USB 2 port on the back of your TV. See the illustration below.
Wireless IP sharer
The LAN Port on the Wall
Samsung’s Wireless LAN adapter is sold separately and is offered by select retailers, Ecommerce sites and Samsungparts.
com. Samsung’s Wireless LAN adapter supports the IEEE 802.11a/b/g and n communication protocols. Samsung
recommends using IEEE 802.11n. When you play the video over a IEEE 802.11b/g connection, the video may not play
smoothly.
Most wireless network systems incorporate a security system that requires devices that access the network through an access
point or wireless router (typically a wireless IP Sharer) to transmit an encrypted security code called an access key.
If Pure High-throughput (Greenfield) 802.11n mode is selected and the Encryption type is set to WEP, TKIP or TKIP AES
(WPS2Mixed) for your wireless router, Samsung TVs will not support a connection in compliance with new Wi-Fi certification
specifications.
Network Connection - Wired
There are two main ways to connect your TV to your network using cable, depending on your network setup. They are
illustrated below:
The Modem Port on the Wall
(wireless router having DHCP
LAN Cable
server)
External Modem
(ADSL / VDSL / Cable TV)
Samsung Wireless
LAN Adapter
TV Rear Panel
TV Side Panel
The LAN Port on the Wall
✎
A network speed of lower than 10 Mbps is not supported.
English - 11
LAN CableModem Cable
TV Rear Panel
LAN Cable

How to view the e-Manual
E-MANUAL
Screen Display
1
You can find instructions about your TV’s features in the e-Manual in your TV. To
use, press the E-MANUAL button on your remote. Move the cursor using the up/
down/right/left buttons to highlight a category, then a topic, and then press the
ENTERE button. The e-Manual displays the page you want to see.
You can also access it through the menu:
MENUm → Support → e-Manual → ENTER
O
✎
To return to the e-Manual main menu, press the E-MANUAL button on the remote.
✎
You cannot use Try now directly if the TV is set to an external input source.
1 Currently displayed video, TV programme, etc.
2 The category list. Press ◄ or ► button to select
Basic Features
Picture Menu
Sound Menu
2
3
the category you want.
3 Displays the sub-menu list. Use the arrow buttons
on your remote to move the cursor. Press the
ENTERE button to select the sub-menu you
want.
4 } Blue (Index): Displays the index screen.
5 E Enter: Selects a category or sub-menu.
}
Index E Enter e Exit
4 5 6
6 e Exit: Exit the e-Manual.
E
How to toggle between an e-Manual topic and the corresponding OSD menu(s).
Basic Features > Picture Menu (3/17)
ATry Now
E-MANUAL
a
Try Now b Home { Zoom } Index L Page e Exit
✎
This function is not enabled in some menus
Method 1 Method 2
1. If you want to use the menu that corresponds to an e-Manual
topic, press the red button to select Try Now.
2. To return to the e-Manual screen, press the E-MANUAL button.
1. Press the ENTERE button when a topic is displayed. “Are
you sure?” appears. Select Yes, and then press the ENTERE
button. The OSD window appears.
2. To return to the e-Manual screen, press the E-MANUAL button.
Picture
Picture Mode : Standard ►
Backlight : 7
Contrast : 95
Brightness : 45
Sharpness : 50
Colour : 50
Tint (G/R) : G50/R50
Advanced Settings
English - 12

Viewing the Contents
Basic Features > Picture Menu (3/17)
a
Try Now b Home { Zoom } Index L Page e Exit
2 3 4 5
Using the Zoom mode
U
Move
R
Return
1 Contents Area: Contains the topic contents, if you selected
a sub-menu. To move previous or next page, press the ◄ /
► button.
2 Try Now: Displays the OSD menu that corresponds to
1
the topic. To return to the e-Manual screen, press the
E-MANUAL button.
3 Home: Moves to the e-Manual home screen.
4 Zoom: Magnifies a screen. You can scroll through the
magnified screen by using ▲ / ▼ buttons.
5 L (Page): Moves to previous or next page.
Select the Zoom, and then press ENTERE to magnify the
screen. You can scroll through the magnified screen by using
the ▲ or ▼ buttons.
✎
To return to the screen to normal size, press the RETURN
button.
How to search for a topic on the index page
1. To search for a topic, press the left or right arrow button to select a letter, and then press ENTERE. The Index displays
a list of topics and keywords that begin with the letter you selected.
2. Press the up or down arrow button to select a topic or keyword, and then press the ENTERE button.
3. The e-Manual page with the topic appears.
✎
To close the Index screen, press the RETURN button.
English - 13

Installing the Wall Mount
The wall mount kit (sold separately) allows you to mount the TV on the wall.
For detailed information on installing the wall mount, see the instructions provided with the wall mount. Contact a technician for
assistance when installing the wall mount bracket.
Samsung Electronics is not responsible for any damage to the product or injury to yourself or others if you elect to install the
TV on your own.
Wall Mount Kit Specifications (VESA)
✎
Wall mount kit is not supplied but sold separately.
Install your wall mount on a solid wall perpendicular to the floor. When attaching to other building materials, please contact
your nearest dealer. If installed on a ceiling or slanted wall, it may fall and result in severe personal injury.
✎
NOTE
Standard dimensions for wall mount kits are shown in the table below.
x
When purchasing our wall mount kit, a detailed installation manual and all parts necessary for assembly are provided.
x
Do not use screws that do not comply with the VESA standard screw specifications.
x
Do not use screws longer than the standard dimension, as they may cause damage to the inside of the TV set.
x
For wall mounts that do not comply with the VESA standard screw specifications, the length of the screws may differ
x
depending on their specifications.
Do not fasten the screws too strongly, this may damage the product or cause the product to fall, leading to personal
x
injury. Samsung is not liable for these kinds of accidents.
Samsung is not liable for product damage or personal injury when a non-VESA or non-specified wall mount is used or
x
the consumer fails to follow the product installation instructions.
Do not exceed 15 degrees tilt when mounting this TV.
x
Product
Family
inches VESA Spec. (A * B) Standard Screw Quantity
19~22 75 X 75
26 200 X 100
M4
LCD-TV
32~40 200 X 200 M6
46 400 X 400 M8
Do not install your Wall Mount Kit while your TV is turned on. It may result in personal injury due to electric
shock.
4
English - 14
Troubleshooting
If the TV seems to have a problem, first try this list of possible problems and solutions. If none of these troubleshooting tips
apply, visit “www.samsung.com,” then click on Support, or call Samsung customer service.
Issues Solutions and Explanations
The TV will not turn on. • Make sure the AC power cord is securely plugged in to the wall outlet and the TV.
There is no picture/video. • Check cable connections (remove and reconnect all cables connected to the TV and
The remote control does not work. • Replace the remote control batteries with the poles (+/–) in the right direction.
The cable/set top box remote control
doesn’t turn the TV on or off, or
adjust the volume.
✎
You can keep your TV as optimum condition to upgrade the latest firmware on web site (samsung.com -> Support ->
Downloads) by USB.
✎
This TFT LCD panel uses a panel consisting of sub pixels which require sophisticated technology to produce. However,
there may be a few bright or dark pixels on the screen. These pixels will have no impact on the performance of the
product.
• Make sure the wall outlet is working.
• Try pressing the POWER button on the TV to make sure the problem is not the remote. If
the TV turns on, refer to “Remote control does not work” below.
external devices).
• Set your external device’s (Cable/Set top box, DVD, Blu-ray etc) video outputs to match
the connections to the TV input. For example, if an external device’s output is HDMI, it
should be connected to an HDMI input on the TV.
• Make sure your connected devices are powered on.
• Be sure to select the TV’s correct source by pressing the SOURCE button on the remote
control.
• Reboot the connected device by reconnecting the device’s power cable.
• Clean the sensor’s transmission window on the remote.
• Try pointing the remote directly at the TV from 5~6 feet away.
• Programme the Cable/Set top box remote control to operate the TV. Refer to the Cable/
Set top box user manual for the SAMSUNG TV code.
Licence
List of Features
Excellent Digital Interface & Networking: With a built-in HD digital tuner, nonsubscription HD broadcasts can be viewed without
a cable box / STB (Set-Top-Box) satellite receiver.
My Downloads
Allows you to play music files, pictures, and movies saved on a USB device.
AllShare™
AllShare™ connects your TV and compatible Samsung mobile phones/devices through a network.
Anynet+(HDMI-CEC)
Allows you to control all connected Samsung devices that support Anynet+ with your Samsung TV’s remote.
English - 15
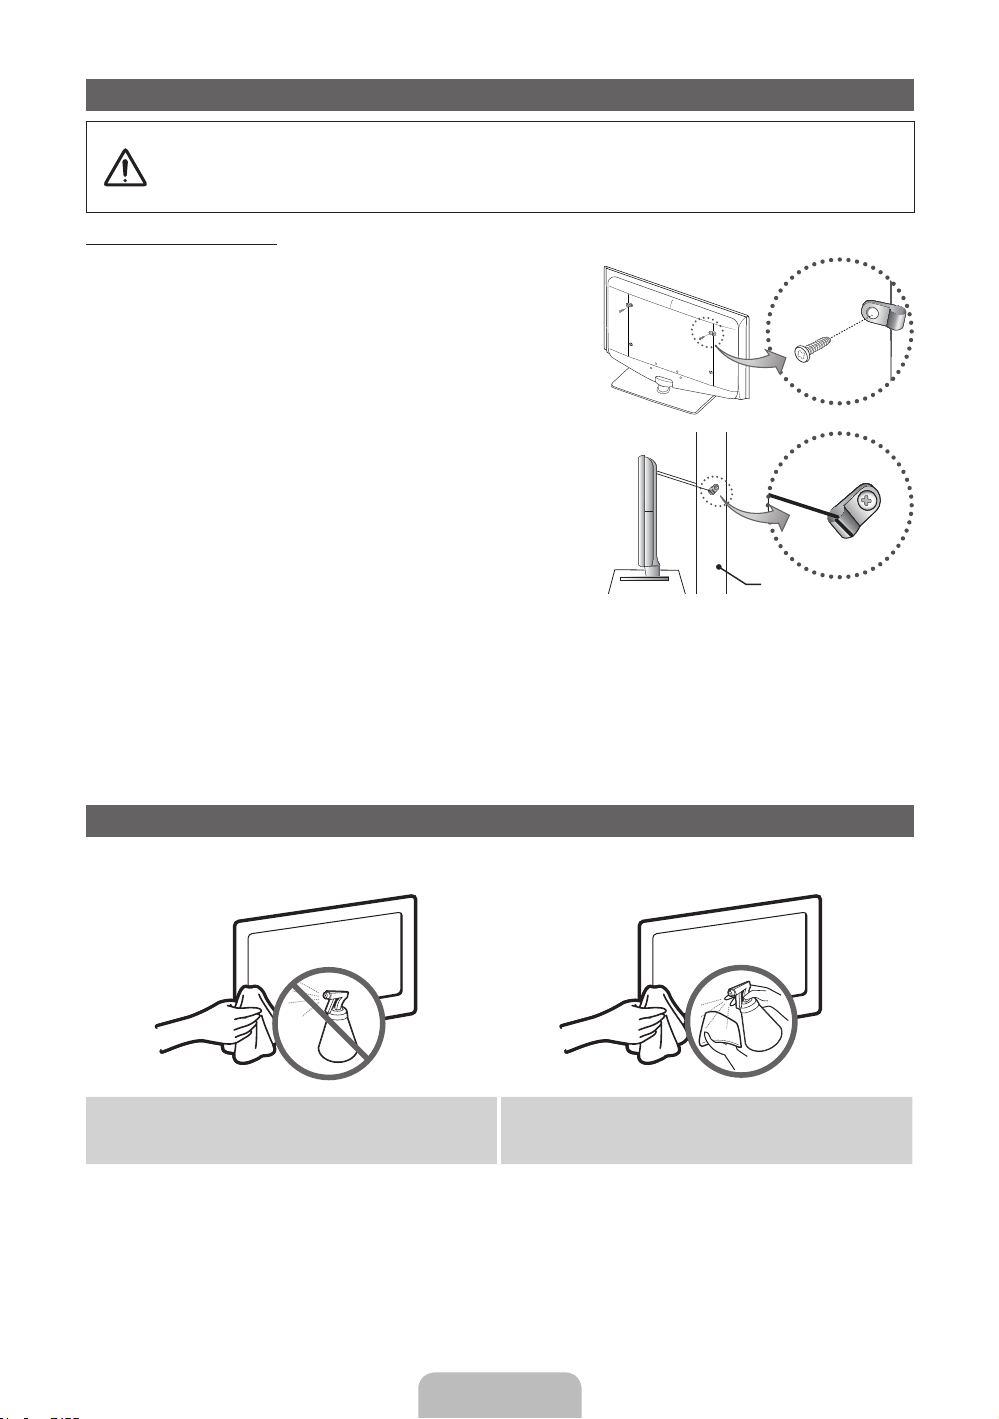
Securing the TV to the Wall
Caution: Pulling, pushing, or climbing onto the TV may cause the TV to fall. In particular, ensure that your
children do not hang over or destabilize the TV; doing so may cause the TV to tip over, resulting in serious
injuries or death. Follow all safety precautions provided on the included Safety Flyer. For added stability, install
the anti-fall device for safety purposes, as follows.
To avoid the TV from falling
1. Put the screws into the clamps and firmly fasten them onto the
wall. Confirm that the screws have been firmly installed onto the
wall.
✎
You may need additional material such as an anchor
depending on the type of wall.
✎
Since the necessary clamps, screws, and string are not
supplied, please purchase these additionally.
2. Remove the screws from the centre back of the TV, put the
screws into the clamps, and then fasten the screws onto the TV
again.
✎
Screws may not be supplied with the product. In this case,
please purchase the screws of the following specifications.
✎
Screw Specifications
For a 32 ~ 40 Inch LCD TV: M6
x
For a 46 ~ 55 inch LCD TV: M8
x
3. Connect the clamps fixed onto the TV and the clamps fixed onto
the wall with a strong string and then tie the string tightly.
✎
NOTE
Install the TV near to the wall so that it does not fall backwards.
x
It is safe to connect the string so that the clamps fixed on the wall are equal to or lower than the clamps fixed on
x
the TV.
Untie the string before moving the TV.
x
4. Verify all connections are properly secured. Periodically check connections for any sign of fatigue for failure. If you have any
doubt about the security of your connections, contact a professional installer.
Wall
Storage and Maintenance
✎
If you remove the attached sticker on the TV screen, clean the residues and then watch TV.
Do not spray water or a cleaning agent directly onto the
product. Any liquid that goes into the product may cause a
failure, fire, or electric shock.
Clean the product with a soft cloth dapped in a small amount
of water.
English - 16

Specifications
Display Resolution 1920 x 1080
Environmental Considerations
Operating Temperature
Operating Humidity
Storage Temperature
Storage Humidity
TV System Analogue: B/G, D/K, L, I (Depending on your country selection)
Colour/Video System Analogue: PAL, SECAM, NTSC-4.43, NTSC-3.58, PAL60
Sound System BG, DK, L, NICAM, MPEG1, DD, DD+, HEAAC
HDMI IN Video: 1080 24p, 1080p, 1080i, 720p, 576p, 576i, 480p, 480i
Stand Swivel (Left / Right) -20˚ ~ 20˚
Model Name LE32D550 / LE32D551 LE37D550 / LE37D551 LE40D550 / LE40D551 LE46D550 / LE46D551
Screen Size 32 inches 37 inches 40 inches 46 inches
Sound
(Output) 10 W X 2
Dimensions (WxDxH)
Body
With stand
Weight
Without Stand
With Stand
Model Name LE32D580 LE37D580 LE40D580 LE46D580
Screen Size 32 inches 37 inches 40 inches 46 inches
TV System Analogue: B/G, D/K, L, I (Depending on your country selection)
Sound
(Output) 10 W X 2
Dimensions (WxDxH)
Body
With stand
Weight
Without Stand
With Stand
804.7 X 77.8 X 507.4 (mm)
804.7 X 240.0 X 563.7 (mm)
804.7 X 77.8 X 507.4 (mm)
804.7 X 240.0 X 563.7 (mm)
Digital: MPEG-2 MP@ML, MPEG-4, H.264/AVC MP@L3, MP@L4.0, HP@L4.0
Audio: 2Ch Linear PCM 32/44.1/48kHz, 16/20/24bits.
923.5 X 78.5 X 573.2 (mm)
923.5 X 255.0 X 629.2 (mm)
9.3 kg
12.0 kg
923.5 X 78.5 X 573.2 (mm)
923.5 X 255.0 X 629.2 (mm)
9.3 kg
12.0 kg
10°C to 40°C (50°F to 104°F)
10% to 80%, non-condensing
-20°C to 45°C (-4°F to 113°F)
5% to 95%, non-condensing
Digital: DVB-T/DVB-C
992.1 X 80.4 X 611.0 (mm)
992.1 X 255.0 X 667.2 (mm)
12.6 kg
15.8 kg
Digital: DVB-T/DVB-C/DVB-T2
992.1 X 80.4 X 611.0 (mm)
992.1 X 255.0 X 667.2 (mm)
12.6 kg
15.8 kg
14.3 kg
17.5 kg
14.3 kg
17.5 kg
1124.1 X 80.4 X 686.1 (mm)
1124.1 X 275.0 X 742.8 (mm)
19.4 kg
23.0 kg
1124.1 X 80.4 X 686.1 (mm)
1124.1 X 275.0 X 742.8 (mm)
19.4 kg
23.0 kg
✎
Design and specifications are subject to change without prior notice.
✎
For information about power supply, and more about power consumption, refer to the label attached to the product.
English - 17

Aby uzyskać więcej informacji o sposobie obsługi instrukcji elektronicznej (str. 12)
Rysunki i ilustracje w niniejszej Instrukcji użytkownika służą wyłącznie jako przykład i mogą się różnić od faktycznego
wyglądu urządzenia. Wygląd produktu i specyfikacja mogą się zmienić bez uprzedzenia.
Ważne informacje gwarancyjne związane z formatem obrazu telewizyjnego
1. Funkcje telewizji cyfrowej (DVB) są dostępne tylko w krajach/regionach, gdzie emitowane są sygnały naziemnej telewizji cyfrowej DVB-T
(MPEG2 i MPEG4 AVC) lub gdzie obsługiwana jest kompatybilna cyfrowa telewizja kablowa DVB-C (MPEG2 i MPEG4 AAC). Aby dowiedzieć
się, czy sygnał DVB-T lub DVB-C jest odbierany na danym obszarze, należy zapytać sprzedawcę.
2. DVB-T to europejski standard emisji sygnału naziemnej telewizji cyfrowej, DVB-C jest standardem emisji sygnału kablowej telewizji cyfrowej. Standard
ten nie zawiera jednak niektórych zróżnicowanych funkcji, takich jak EPG (Electronic Program Guide – Elektroniczny przewodnik po programach),
VOD (Video on Demand – Wideo na żądanie) itp. Funkcje z tego powodu mogą nie być obecnie obsługiwane.
3. Chociaż telewizor jest zgodny ze standardami telewizji DVB-T i DVB-C według stanu na miesiąc sierpień 2008 r., nie jest możliwe
zagwarantowanie obsługi przyszłych standardów emisji naziemnej telewizji cyfrowej DVB-T i kablowej telewizji cyfrowej DVB-C.
4. W zależności od kraju/obszaru, w którym telewizor funkcjonuje, niektórzy dostawcy telewizji kablowych mogą żądać dodatkowej opłaty za
taką usługę lub zaakceptowania ich regulaminu świadczenia usług.
5. Niektóre funkcje telewizji cyfrowej mogą być niedostępne w niektórych krajach lub regionach. Cyfrowa telewizja kablowa może nie działać
poprawnie u niektórych dostawców.
6. Aby uzyskać więcej informacji, skontaktuj się z lokalnym działem obsługi klienta Samsung.
Jakość odbioru telewizji może zależeć od różnych sposobów nadawania w różnych krajach. Aby sprawdzić, czy jest możliwa poprawa
✎
jakości odbieranego odbioru przez ponowne skonfigurowanie telewizora, skontaktuj się z autoryzowanym sprzedawcą Samsung lub z
biurem pomocy telefonicznej firmy Samsung.
Ostrzeżenie dotyczące nieruchomych obrazów
Należy unikać wyświetlania na ekranie nieruchomych obrazów (np. plików JPEG) lub ich elementów (np. logo programu telewizyjnego, panorama,
obraz w formacie 4:3, czy dolny pasek z informacjami lub notowaniami giełdowymi). Może to spowodować odbicia na ekranie LCD i pogorszyć
jakość obrazu. Aby zmniejszyć ryzyko wystąpienia tego efektu, postępuj zgodnie z poniższymi zaleceniami.
• Nie wolno wyświetlać jednego kanału telewizyjnego przez dłuższy czas.
• Staraj się wyświetlać każdy obraz na pełnym ekranie. Aby optymalnie ustawić obraz, użyj menu ustawiania formatu obrazu.
• Zmniejsz wartości jasności i kontrastu tak nisko, jak się da, przy zachowaniu pożądanej jakości obrazu. Za wysokie wartości mogą
przyspieszyć proces zużywania się ekranu.
• Często używaj tych funkcji telewizora, które służą do redukcji efektu utrwalania obrazu na ekranie i wypalania obrazu. Aby uzyskać
szczegółowe informacje, przejdź do odpowiedniej części instrukcji obsługi.
Zabezpieczanie przestrzeni instalacyjnej
Należy zachować wymaganą odległość pomiędzy produktem a innymi obiektami (np. ściany). Pozwoli to zapewnić odpowiednią wentylację.
Niezastosowanie się do zalecenia może spowodować pożar lub problemy z produktem związane z wyższą temperaturą w jego wnętrzu.
Korzystając z podstawy lub wspornika naściennego, należy używać wyłącznie części oferowanych przez firmę Samsung Electronics.
✎
• Użycie części innego producenta może spowodować problemy z produktem lub obrażenia spowodowane spadkiem produktu.
Wygląd urządzenia może się różnić w zależności od modelu.
✎
Należy uważać przy dotykaniu telewizora na gorące elementy.
✎
Instalacja na podstawie. Instalacja na wsporniku naściennym.
10 cm
10 cm10 cm
Prawidłowe usuwanie produktu (przepisy dot. zużytego sprzętu elektrycznego i elektronicznego)
Dotyczy Unii Europejskiej i innych europejskich krajów korzystających z oddzielnych systemów segregacji
odpadów.
Oznaczenie umieszczone na produkcie, akcesoriach lub w instrukcji wskazuje, że produktu i jego elektronicznych
akcesoriów (np. ładowarki, zestawu słuchawkowego, kabla USB itd.) po upływie okresu użytkowania nie należy usuwać z
innymi odpadami pochodzącymi z gospodarstw domowych. W celu uniknięcia skażenia środowiska lub narażenia na utratę
zdrowia z powodu nieprawidłowej utylizacji, należy oddzielić te odpady od innych i pozbyć się ich w sposób odpowiedzialny
i umożliwiający wtórne wykorzystanie surowców. Użytkownicy domowi powinni skontaktować się ze sprzedawcą, u którego
zakupili produkt, lub z organizacjami samorządowymi w celu uzyskania informacji na temat miejsca i sposobu bezpiecznej
utylizacji tych produktów. Użytkownicy w firmach powinni skontaktować się ze swoim dostawcą i sprawdzić warunki umowy
zakupu. Produktu nie należy usuwać razem z innymi odpadami komercyjnymi.
Prawidłowe usuwanie baterii używanych z produktem
(Dotyczy Unii Europejskiej i innych europejskich krajów korzystających z oddzielnych systemów segregacji
odpadów.)
Oznaczenie umieszczone na baterii, instrukcji lub opakowaniu wskazuje, że baterii produktu po upływie okresu użytkowania
nie należy usuwać z innymi odpadami pochodzącymi z gospodarstw domowych. Chemiczne symbole Hg, Cd lub Pb
wskazują, że bateria zawiera rtęć, kadm lub ołów w ilościach przekraczających poziom ustalony w dyrektywie Komisji
Europejskiej 2006/66. W przypadku nieprawidłowej utylizacji tych baterii te substancje mogą być zagrożeniem dla zdrowia
człowieka lub dla środowiska. Aby chronić zasoby naturalne oraz promować ponowne wykorzystywanie materiałów, należy
oddzielić baterie od innych odpadów i utylizować je, korzystając z lokalnego, darmowego systemu zwrotu baterii.
10 cm
10 cm
10 cm
10 cm

Akcesoria
✎
Należy sprawdzić, czy poniższe części zostały dostarczone wraz z telewizorem. W przypadku braku którejkolwiek części należy
skontaktować się ze sprzedawcą.
✎
Kolor i kształt elementów mogą się różnić w zależności od modelu.
y Pilot z 2 bateriami AAA
y Instrukcja obsługi
y Karta gwarancyjna / Podręcznik zasad bezpieczeństwa (nie są dostępne w
niektórych krajach)
Informacje o instalacji na podstawie znajdują się w oddzielnym
podręczniku.
M4 x L12
y Śruby (8 szt.)
✎
Za poniższe czynności może zostać naliczona opłata manipulacyjna:
(a) po zgłoszeniu żądania technik przybyły na miejsce nie stwierdzi defektu produktu.
(tzn. gdy usterka wystąpi na skutek nieprzeczytania przez użytkownika instrukcji obsługi).
(b) użytkownik przekaże urządzenie do centrum napraw i nie zostanie stwierdzony defekt urządzenia.
(tzn. gdy usterka wystąpi na skutek nieprzeczytania przez użytkownika instrukcji obsługi).
✎
Informacja o wysokości opłaty manipulacyjnej zostanie przekazana przed rozpoczęciem pracy lub wizytą u klienta.
y Kabel zasilania
y Szmatka do czyszczenia
Opis panelu sterowania
✎
Kolor i kształt produktu mogą się różnić w zależności od modelu.
Panel sterowania
Głośniki
Czujnik pilota Miejsce na telewizorze, na które należy skierować pilot.
Wskaźnik zasilania Miga i wyłącza się, gdy telewizor jest włączony, a zapala się w trybie gotowości.
SOURCE
MENU Wyświetlenie menu ekranowego z funkcjami telewizora.
Y
z
P
Tryb gotowości
Nie jest wskazane pozostawianie telewizora w trybie gotowości przez dłuższy czas (np. na czas wyjazdu na urlop). Pewna
ilość zasilania jest zużywana nawet po wyłączeniu urządzenia za pomocą przycisku zasilania. Najlepszym rozwiązaniem jest
odłączenie kabla zasilającego.
E
(Zasilanie)
Przełączanie pomiędzy dostępnymi źródłami sygnału wejściowego. Podczas
poruszania się po menu przycisk ten pełni taką samą funkcję jak przycisk ENTERE na
pilocie.
Pozwala na regulację głośności dźwięku. W menu ekranowym przycisku
tak, jak przycisków ◄ i ► na pilocie sterowania.
Zmiana kanałów. W menu ekranowym przycisku
▲ na pilocie sterowania.
Włączenie lub wyłączenie produktu.
z
używa się tak, jak przycisków ▼ i
Y
używa się
Polski - 3
Opis pilota
✎
Pilot może być obsługiwany przez osoby niedowidzące, ponieważ umieszczono na nim wypukłości w kodzie Braille’a na przyciskach
Power, Channel i Volume.
Włączanie i wyłączanie telewizora.
Zapewnia bezpośredni dostęp do
kanałów
Umożliwia wybór opcji Telegazeta
włączona, Podwójny ekran, Mix (Telegazeta
i obraz) lub Telegazeta wyłączona.
Pozwala na regulację głośności dźwięku.
Wyświetla główne menu ekranowe.
Wyświetlenie ekranów Moje treści,
Oglądaj TV i Źródło.
Szybki wybór często używanych
funkcji.
Wyświetla pozycje menu
ekranowego i zmienia wyświetlone w
nim wartości.
Powrót do poprzedniego menu.
Przyciski używane w menu Lista
kanałów, Menedżer kanałów, Moje
treści, Sieć, AllShare™ itd.
Przyciski działają w trybach Moje
treści i Anynet+.
CONTENT
A B C D
SRS
E-MANUAL
DUAL I-II
AD/SUBT.
Wyświetla listę w celu wybrania
źródła sygnału wideo.
Umożliwia powrót do poprzedniego kanału.
Tymczasowo wycisza dźwięk.
Zmienia kanał.
Wyświetla listę kanałów na ekranie.
Wyświetla informacje elektronicznego
przewodnika po programach (Electronic
Programme Guide, EPG).
Wyświetla informacje na ekranie telewizora.
Zamyka menu.
P.MODE: Wybór trybu obrazu.
SRS: Wybór trybu SRS TruSurround
HD.
DUAL I-II: Wybór dwusystemowego
trybu dźwięku.
Elektroniczna instrukcja:
Wyświetlenie instrukcji elektronicznej.
P.SIZE: Wybór rozmiaru obrazu.
AD: Wybór Opisu audio. (nie jest
dostępny w niektórych krajach)
SUBT.: Wyświetla napisy w formacie
cyfrowym.
Wkładanie baterii (rozmiar: AAA)
Polski - 4

Podłączanie anteny
Gdy zasilanie telewizora jest włączane po raz pierwszy, podstawowe ustawienia są wyświetlane automatycznie.
✎
Ustawienie fabryczne: Podłączanie zasilania i anteny.
Panel tylny telewizora
Zlacze Zasilania
lub
Antena VHF/UHFKablowe
Plug & Play (Konfiguracja wstępna)
Po włączeniu telewizora pojawi się szereg komunikatów ekranowych, które pomogą w konfiguracji podstawowych ustawień.
Naciśnij przycisk POWERP. Funkcja Plug & Play jest dostępna tylko wtedy, gdy dla opcji wejście wybrano ustawienie TV.
✎
Aby wrócić do poprzedniego menu, naciśnij czerwony przycisk.
Wybieranie języka
1
Wybieranie opcji Tryb
2
sklepowy lub Tryb
domowy.
Wybieranie kraju
3
Ustawianie opcji Tryb
4
zegara
Wybieranie anteny
5
Wybór kanału
6
Miłego oglądania.
7
Przywrócenie ustawień fabrycznych funkcji...
Wybierz opcję System - Plug & Play (Konfiguracja początkowa). Wprowadź czterocyfrowy kod PIN. Domyślny kod PIN to
0-0-0-0. Aby zmienić kod PIN, należy skorzystać z funkcji Zmień kod PIN.
W domu należy ponownie wybrać kolejno opcje Plug & Play (MENU → System), mimo że wybrano je już w sklepie.
✎
Jeśli nie pamiętasz kodu PIN, w celu wyzerowania kodu PIN w trybie gotowości do wartości „0-0-0-0” naciśnij przyciski
na pilocie w następującej kolejności: MUTE → 8 → 2 → 4 → POWER (wł.).
Naciśnij przycisk ▲ lub ▼, a następnie naciśnij przycisk ENTERE.
Wybierz żądany język menu ekranowego.
Naciśnij przycisk ◄ lub ►, a następnie naciśnij przycisk ENTERE.
Wybierz opcję Tryb domowy. Opcja Tryb sklepowy jest przeznaczona
dla sklepów.
Przełączanie ustawienia telewizora z opcji Tryb sklepowy na Tryb
domowy: Naciśnij przycisk głośności na telewizorze. Kiedy pojawi się
menu ekranowe OSD, naciśnij i przytrzymaj przez 5 sekund przycisk
MENU.
Tryb sklepowy jest przeznaczony tylko na wystawy sklepowe. Po
wybraniu go kilka funkcji będzie niedostępnych. Do użytku domowego
przeznaczony jest Tryb domowy.
Naciśnij przycisk ▲ lub ▼, a następnie naciśnij przycisk ENTERE.
Wybierz odpowiedni kraj.
✎
Po wybraniu odpowiedniego kraju zamieszkania w menu Kraj, niektóre modele mogą
wymagać dalszych działań w celu ustaleniu numeru PIN.
✎
Wprowadzony kod PIN nie może mieć postaci 0-0-0-0.
Wybór w opcji Tryb zegara ustawienia automatycznego lub ręcznego.
Naciśnij przycisk ▲ lub ▼, a następnie naciśnij przycisk ENTERE.
Wybierz opcję Naziemne (Cyfrowe i Analogowe/Cyfrowe/Analogowe) lub Kablowe
(Cyfrowe i Analogowe/Cyfrowe/Analogowe).
Naciśnij przycisk ▲ lub ▼, a następnie naciśnij przycisk ENTERE.
Wybierz źródło sygnału kanału do zapamiętania. Po ustawieniu źródła sygnału antenowego
na opcję Kablowe pojawi się krok umożliwiający przypisanie numerów (częstotliwości
kanałów) do poszczególnych kanałów. Aby uzyskać więcej informacji, należy zapoznać się z
sekcją Kanał → Automatyczne strojenie.
Aby przerwać proces zapamiętywania, naciśnij przycisk ENTERE.
Wybierz opcję Oglądaj TV. Naciśnij przycisk E.
✎
Jeśli została wybrana opcja Ustawienia sieci, skonfiguruj sieć. Więcej informacji
znajduje się w sekcji „Menu Sieć” w instrukcji elektronicznej.
POWER
P
Polski - 5

Podłączanie do urządzenia AV
¦ Dostępne urządzenia: odtwarzacz DVD, odtwarzacz Blu-ray, odbiornik telewizji kablowej
HD, dekoder telewizji satelitarnej HD (STB), magnetowid, cyfrowy system audio,
amplituner, zestaw kina domowego, komputer PC
Połączenie HDMI
HDMI OUT
DVI OUT
AUDIO OUT
R-AUDIO-L
Używanie kabla HDMI lub HDMI–DVI (do 1080i)
✎
HDMI IN 1(DVI), 2, 3, 4, PC/DVI AUDIO IN
Aby uzyskać wyższą jakość obrazu i dźwięku, podłącz urządzenie cyfrowe przy użyciu kabla HDMI.
x
Kabel HDMI pozwala na przesyłanie jednocześnie obrazu i audio. Nie jest wymagane podłączenie kabla audio.
x
– Aby podłączyć telewizor do urządzenia cyfrowego, które nie obsługuje wyjścia HDMI, użyj kabla HDMI/DVI i kabla
audio.
Jeśli do telewizora zostanie podłączone urządzenie zewnętrzne, które używa starszej wersji trybu HDMI, obraz
x
może być wyświetlany niepoprawnie lub nie być w ogóle wyświetlany oraz mogą występować problemy z
dźwiękiem. W takim przypadku spytaj producenta urządzenia zewnętrznego o wersję HDMI i jeśli jest starsza,
poproś o aktualizację.
Upewnij się, czy kupiony kabel HDMI ma odpowiedni certyfikat. W przeciwnym razie może być wyświetlany pusty
x
ekran lub wystąpić błąd połączenia.
Zalecamy użycie podstawowego kabla HDMI o wysokiej szybkości lub kabla z wbudowaną obsługą interfejsu
x
Ethernet. To urządzenie nie obsługuje interfejsu Ethernet w kablu HDMI.
Polski - 6

Połączenie komponentowe
G
B
R
R
W
R
W
Y
G
B
R
W
R
W
R
Y
COMPONENT OUT
Połączenie SCART
EXT
Za pomocą kabla komponentowego (do 1080p) lub A/V (tylko 480i) oraz kabla SCART
✎
W trybie Złącze wyjście DTV obsługuje tylko standard MPEG SD (obraz i dźwięk).
✎
Aby uzyskać najlepszą jakość obrazu, zalecamy użycie złącza Component zamiast złącza A/V.
PRPBY
AUDIO OUT
R-AUDIO-L
Połączenie AV
AUDIO OUT
R-AUDIO-L
VIDEO OUT
Polski - 7

Łączenie z komputerem i urządzeniem audio
¦ Dostępne urządzenia: cyfrowy system audio, wzmacniacz, zestaw kina domowego
Złącze Audio
OPTICAL
Przy użyciu kabla optycznego (cyfrowego) lub zvącza Słuchawek
✎
DIGITAL AUDIO OUT (OPTICAL)
Po podłączeniu cyfrowego systemu audio do gniazda DIGITAL AUDIO OUT (OPTICAL), zmniejsz poziom
x
głośności w telewizorze i systemie.
Dźwięk 5.1 jest dostępny, gdy telewizor jest podłączony do urządzenia obsługującego ten standard.
x
Kiedy odbiornik (kino domowe) jest włączony, emitowany będzie dźwięk przesyłany przez złącze optyczne
x
telewizora. Gdy w telewizorze odbierany jest cyfrowy obraz antenowy, do zestawu kina domowego będzie
przesyłany dźwięk 5.1-kanałowy. Gdy źródłem jest urządzenie cyfrowe podłączone przez HDMI, takie jak
odtwarzacz DVD / Blu-ray / odbiornik telewizji kablowej / dekoder telewizji satelitarnej (STB), odbiornik kina
domowego będzie emitował jedynie dwukanałowy dźwięk. Jeśli chcesz korzystać z dźwięku 5.1-kanałowego,
podłącz cyfrowe wyjście dźwięku z odtwarzacza DVD / Blu-ray / odbiornika telewizji kablowej / dekodera telewizji
satelitarnej (STB) bezpośrednio do wzmacniacza lub zestawu kina domowego.
✎
Słuchawki H: Jeśli chcesz używać słuchawek, podłącz je do wyjścia na słuchawki w urządzeniu. Podłączenie
słuchawek powoduje odłączenie głośników.
Przy słuchawkach podłączonych do telewizora korzystanie z funkcji dźwięku może być ograniczone.
x
Głośność słuchawek i głośność telewizora są regulowane osobno.
x
Polski - 8
¦ Za pomocą kabla HDMI albo HDMI-DVI/D-sub
✎
Połączenie nawiązane przy użyciu kabla HDMI może nie być obsługiwane na wszystkich komputerach.
✎
Kabel HDMI pozwala na przesyłanie jednocześnie obrazu i audio. Nie jest wymagane podłączenie kabla audio.
Połączenie z komputerem
HDMI OUT
DVI OUT
AUDIO OUT
AUDIO OUT
PC OUT
Tryby wyświetlania (sygnał D-Sub i HDMI/DVI)
Optymalna rozdzielczość wynosi 1920x1080 pikseli przy częstotliwości 60Hz.
Tryb Rozdzielczość
IBM
MAC
VESA DMT
VESA DMT / DTV
CEA
✎✎
UWAGA
Gdy chcesz podłączyć kabel HDMI/DVI, należy użyć gniazda HDMI IN 1(DVI).
x
Tryb z przeplotem nie jest obsługiwany.
x
Telewizor może nie działać poprawnie, jeśli zostanie wybrany niestandardowy format wideo.
x
Obsługiwane są tryby sygnału rozdzielonego oraz złożonego (kompozytowego). Funkcja synchronizacja na
x
640 x 350 31.469 70.086 25.175 +/720 x 400 31.469 70.087 28.322 -/+
640 x 480 35.000 66.667 30.240 -/832 x 624 49.726 74.551 57.284 -/-
1152 x 870 68.681 75.062 100.000 -/-
640 x 480 31.469 59.940 25.175 -/640 x 480 37.861 72.809 31.500 -/640 x 480 37.500 75.000 31.500 -/800 x 600 37.879 60.317 40.000 +/+
800 x 600 48.077 72.188 50.000 +/+
800 x 600 46.875 75.000 49.500 +/+
1024 x 768 48.363 60.004 65.000 -/1024 x 768 56.476 70.069 75.000 -/1024 x 768 60.023 75.029 78.750 +/+
1152 x 864 67.500 75.000 108.000 +/+
1280 x 1024 63.981 60.020 108.000 +/+
1280 x 1024 79.976 75.025 135.000 +/+
1280 x 800 49.702 59.810 83.500 -/+
1280 x 800 62.795 74.934 106.500 -/+
1280 x 960 60.000 60.000 108.000 +/+
1360 x 768 47.712 60.015 85.500 +/+
1440 x 900 55.935 59.887 106.500 -/+
1440 x 900 70.635 74.984 136.750 -/+
1680 x 1050 65.290 59.954 146.250 -/+
1920 x 1080p 67.500 60.000 148.500 +/+
Częstotliwość pozioma
(kHz)
Częstotliwość pionowa
(Hz)
Częstotliwość taktowania
pikseli (MHz)
sygnale zieleni nie jest obsługiwana.
Polaryzacja
synchronizacji
(pozioma/pionowa)
Polski - 9
Zmiana źródła sygnału
¦ Lista wyboru źródła
Lista służy do wyboru telewizora lub innych podłączonych do telewizora zewnętrznych źródeł sygnału,
takich jak odtwarzacz DVD, Blu-ray lub dekoder telewizji satelitarnej (STB).
■ TV / Złącze / PC / AV / Component / HDMI1/DVI / HDMI2 / HDMI3 / HDMI4 / USB / AllShare
✎
Na ekranie Wybierz źródło podłączone źródła zostaną zaznaczone.
✎
Aby wyświetlić tylko podłączone urządzenia, przejdź do sekcji Połączono, używając
przycisku◄ lub ►
✎
Opcje Złącze i PC są zawsze aktywne.
✎
Jeśli podłączone urządzenia nie znajdują się na liście, naciśnij czerwony przycisk. Telewizor
przeprowadzi wyszukiwanie podłaczonych urządzeń.
¦ Edytuj nazwę
Korzystanie z funkcji Edytuj nazwę
W oknie Źródło naciśnij przycisk TOOLS, a następnie ustaw żądaną nazwę zewnętrznego źródła sygnału.
■ VCR / DVD / Dekoder kabl. / Dekoder sat. / Przys. PVR / Odbiornik AV / Gra / Kamera / PC / DVI PC / Urządzenia
DVI / TV / IPTV / Blu- ray / HD DVD / DMA: Nazwanie urządzeń podłączonych do gniazd wejściowych ułatwia
wybieranie właściwego źródła sygnału.
✎
Podłączając komputer PC do portu HDMI IN 1(DVI) za pomocą kabla HDMI, należy ustawić telewizor w trybie PC w
sekcji Edytuj nazwę.
✎
Podłączając komputer PC do portu HDMI IN 1(DVI) za pomocą kabla HDMI-DVI, należy ustawić telewizor w trybie
DVI PC w sekcji Edytuj nazwę.
✎
Podłączając urządzenia AV do portu HDMI IN 1(DVI) za pomocą kabla HDMI-DVI, należy ustawić telewizor w trybie
Urządzenia DVI w sekcji Edytuj nazwę.
Informacja
Funkcja pozwalająca wyświetlić szczegółowe informacje o wybranym urządzeniu zewnętrznym.
Podłączanie do gniazda COMMON INTERFACE
Korzystanie z karty „CI lub CI+”
Jeśli chcesz oglądać kanały płatne, włóż kartę „CI lub CI+”.
y Jeśli karta „CI lub CI+” nie zostanie włożona, dla niektórych kanałów
zostanie wyświetlony komunikat „Scrambled Signal”.
y Przez około 2–3 minuty wyświetlany będzie komunikat o parowaniu
urządzeń, zawierający numer telefonu, identyfikator karty CI lub
CI+, identyfikator hosta i inne informacje. W przypadku wyświetlenia
komunikatu o błędzie należy skontaktować się z dostawcą usługi.
y Po zakończeniu konfiguracji informacji dotyczących kanału
wyświetlany jest komunikat „Updating Completed”, który oznacza,
że lista kanałów została zaktualizowana.
✎
UWAGA
Kartę CI lub CI+ należy zakupić u lokalnego operatora sieci kablowej.
x
Kartę CI lub CI+ należy wyjmować bardzo ostrożnie, ponieważ jej upuszczenie może spowodować uszkodzenie.
x
Włóż kartę CI lub CI+ zgodnie ze wskazanym na niej kierunkiem.
x
Umiejscowienie gniazda COMMON INTERFACE zależy od modelu.
x
Karta „CI lub CI+” nie jest dostępna w niektórych krajach, informacji na ten temat udziela autoryzowany sprzedawca.
x
W przypadku problemów należy skontaktować się z usługodawcą.
x
Włóż kartę „CI lub CI+”, która obsługuje bieżące ustawienia anteny. Obraz będzie zakłócony lub niewidoczny.
x
Polski - 1010

Połączenie sieciowe
Możesz tak skonfigurować telewizor, aby korzystał z Internetu za pomocą przewodowej lub bezprzewodowej sieci lokalnej.
Połączenie sieciowe – Bezprzewodowe
Telewizor możesz połączyć z siecią LAN przy użyciu standardowego routera lub modemu bezprzewodowego. Aby połączyć
się bezprzewodowo, należy najpierw podłączyć „Adapter bezprzewodowej sieci LAN firmy Samsung” (WIS09ABGN,
WIS09ABGN2, WIS10ABGN - sprzedawane osobno) do portu USB, USB 1 (HDD) lub USB 2 z tyłu telewizora. Zapoznaj się z
poniższą ilustracją.
Gniazdo sieci LAN na
ścianie
Urządzenie do bezprzewodowego
współdzielenia połączenia sieciowego
(w routerze bezprzewodowym jest
skonfigurowany serwer DHCP)
Adapter
bezprzewodowej sieci
LAN
firmy Samsung
Panel boczny telewizora
Kabel sieci LAN
Adapter bezprzewodowej sieci LAN Samsung jest sprzedawany oddzielnie przez wybranych sprzedawców, sklepy internetowe
i na stronie Samsungparts.com. Adapter sieci bezprzewodowej sieci LAN Samsung obsługuje protokoły IEEE 802.11 a/b/g i n.
Firma Samsung zaleca stosowanie protokołu IEEE 802.11n. Filmy odtwarzane za pomocą połączenia IEEE 802.11 b/g mogą
nie być płynnie wyświetlane.
Większość sieci bezprzewodowych dysponuje systemami zabezpieczeń, które w celu uzyskania dostępu do sieci przez
punkt dostępu lub router bezprzewodowy (zazwyczaj bezprzewodowy router IP) wymuszają przesłanie przez urządzenie
zaszyfrowanego kodu zabezpieczającego, nazywającego się kodem dostępu lub kluczem bezpieczeństwa.
W przypadku wybrania trybu o wysokiej przepustowości (Greenfield) 802.11n i ustawionym w routerze bezprzewodowym typie
szyfrowania WEP, TKIP, TKIP-AES (WPS2Mixed), telewizor Samsung nie będzie obsługiwać połączenia w nowym standardzie
Wi-Fi.
Połączenie sieciowe – Kablowa
W zależności od konfiguracji sieci istnieją dwa sposoby podłączenia telewizora do sieci. Zostały one przedstawione poniżej:
Port modemu w ścianie
Modem zewnętrzny
(ADSL/VDSL/Telewizja kablowa)
Panel tylny telewizora
Gniazdo sieci LAN na ścianie
✎
Sieć wolniejsza niż 10 Mbps nie jest obsługiwana.
Kabel sieci LANKabel ze złączem modemu
Panel tylny telewizora
Kabel sieci LAN
Polski - 1111

Sposób obsługi e-Manual
E-MANUAL
Elementy ekranu
1
Informacje o funkcjach telewizora możną znaleźć w e-Manual dla telewizora.
Naciśnij przycisk E-MANUAL na pilocie, aby z niej skorzystać. Używając
przycisków góra/dół/prawo/lewo, przesuń kursor w celu wyróżnienia kategorii i
tematu, a następnie naciśnij przycisk ENTERE. Zostanie wyświetlona żądana
strona instrukcji elektronicznej.
Dostęp do instrukcji umożliwia także menu:
MENUm → Pomoc techniczna → e-Manual → ENTER
O
✎
Aby powrócić do menu głównego elektronicznej instrukcji, na pilocie zdalnego sterowania naciśnij przycisk
E-MANUAL.
✎
Opcji Spróbuj nie można użyć bezpośrednio, jeśli telewizor jest ustawiony na odbieranie sygnału z
zewnętrznego źródła.
1 Obecnie wyświetlany film, program TV itd.
2 Lista kategorii. Naciśnij przycisk ◄ or ►, aby
Funkcje podstawowe
Menu Obraz
Menu Dźwięk
2
3
wybrać żądaną kategorię.
3 Wyświetla listę podmenu. Do przesuwania kursora
służą przyciski ze strzałkami na pilocie. Naciśnij
przycisk ENTERE, aby wybrać żądane podmenu.
4 } Niebieski (Indeks): Wyświetla ekran indeksu.
5 E Wejdź: Wybór kategorii lub podmenu.
6 e Wyjdź: Zamknięcie instrukcji elektronicznej.
}
Indeks E Wejdź e Wyjdź
4 5 6
E
Przełączanie między instrukcją elektroniczną i odpowiednimi menu ekranowymi OSD.
Funkcje podstawowe > Menu Obraz (3/17)
Obraz
A Spróbuj
E-MANUAL
a
Spróbuj b Str. gł. { Powiększenie } Indeks L Strona e Wyjdź
✎
Ta funkcja nie jest włączona w niektórych menu.
Sposób 1 Sposób 2
1. Aby użyć menu odpowiadającego tematowi e-Manual, naciśnij
czerwony przycisk w celu wybrania opcji Spróbuj.
2. Aby powrócić do ekranu instrukcji elektronicznej, naciśnij przycisk
E-MANUAL.
1. Po wyświetleniu tematu naciśnij przycisk ENTERE. Pojawi się
monit Czy chcesz wykonać?. Wybierz opcję Tak, a następnie
naciśnij przycisk ENTERE. Pojawi się okno ekranowe.
2. Aby powrócić do ekranu e-Manual, naciśnij przycisk
E-MANUAL.
Tryb obrazu : Standardowe
Podświetlenie : 7 ►
Kontrast : 95
Jasność : 45
Ostrość : 50
Kolor : 50
Odcień (Z/C) : G50 / R50
Regulacja ekranu
Polski - 1212

Wyświetlanie zawartości
Funkcje podstawowe > Menu Obraz (3/17)
a
Spróbuj b Str. gł. { Powiększenie } Indeks L Strona e Wyjdź
2 3 4 5
Korzystanie z trybu Powiększanie
U
Przen.
R
Wróć
1 Obszar zawartości: Po wybraniu podmenu zostanie
wyświetlona zawartość tematu. Aby przejść do poprzedniej
lub następnej strony, naciśnij przycisk ◄ / ►.
2 Spróbuj: Wyświetlenie menu ekranowego OSD
1
odpowiadającego tematowi. Aby powrócić do ekranu
e-Manual, naciśnij przycisk E-MANUAL.
3 Str. gł.: Przejście do ekranu głównego opcji e-Manual.
4 Powiększenie: Powiększenie ekranu. Po ekranie
powiększonym można poruszać się przy pomocy
przycisków ▲ / ▼.
5 L (Strona): Przejście do poprzedniej lub następnej strony.
Wybierz opcję Powiększenie, a następnie naciśnij przycisk
ENTERE, aby powiększyć ekran. Po ekranie powiększonym
można poruszać się przy pomocy przycisków ▲ or ▼.
✎
Aby powrócić do normalnego rozmiaru ekranu, naciśnij
przycisk RETURN.
Wyszukiwanie tematu na stronie indeksu
1. Aby wyszukać temat, naciśnij przycisk ze strzałką w lewo lub w prawo w celu wybrania litery, a następnie
naciśnij przycisk ENTERE. Zostanie wyświetlona strona indeksu zawierająca listę tematów i słów kluczowych
rozpoczynających się na wybraną literę.
2. Naciśnij przycisk ze strzałką w górę lub w dół, aby wybrać temat lub słowo kluczowe, a następnie naciśnij przycisk
ENTERE.
3. Pojawi się strona instrukcji elektronicznej z tematem.
✎
Aby zamknąć ekran Indeks, naciśnij przycisk RETURN .
Polski - 1313

Montaż wspornika ściennego
Elementy wspornika (sprzedawane oddzielnie) umożliwiają zamontowanie telewizora na ścianie.
Szczegółowe informacje dotyczące instalacji wspornika znajdują się w instrukcji dołączonej do zestawu do montażu
naściennego. Zamontowanie telewizora na ścianie przy użyciu wspornika należy zlecić technikowi.
Firma Samsung Electronics nie ponosi odpowiedzialności za uszkodzenia produktu lub obrażenia ciała powstałe w wyniku
samodzielnego montażu telewizora.
Dane techniczne zestawu do montażu naściennego (VESA)
✎
Zestaw do montażu naściennego jest sprzedawany oddzielnie.
Zainstaluj wspornik na solidnej ścianie, prostopadle do podłogi. W przypadku montażu na innych elementach i materiałach
należy skontaktować się z najbliższym punktem sprzedaży. Montaż na dziurawej lub pochyłej ścianie może doprowadzić do
spadku urządzenia i spowodowania obrażeń ciała.
✎
UWAGA
W poniższej tabeli przedstawiono standardowe rozmiary zestawów do montażu naściennego.
x
W przypadku zakupienia zestawu do montażu naściennego naszej firmy dołączona jest do niego szczegółowa
x
instrukcja obsługi i wszystkie części niezbędne do montażu.
Nie używać śrub, które nie spełniają standardów VESA dla śrub.
x
Nie należy używać wkrętów dłuższych niż standardowe, ponieważ mogą one spowodować uszkodzenie telewizora.
x
W przypadku wkrętów, które nie spełniają standardowych wymagań VESA dotyczących śrub, długość wkrętów może
x
się różnić w zależności od ich parametrów.
Nie należy dokręcać śrub zbyt mocno, gdyż może to uszkodzić produkt lub doprowadzić do jego upadku i
x
spowodowania obrażeń ciała. Firma Samsung nie ponosi odpowiedzialności za tego typu wypadki.
Firma Samsung nie ponosi odpowiedzialności za uszkodzenia produktu lub obrażenia ciała powstałe w wyniku
x
korzystania z mocowania niespełniającego standardów VESA lub nieokreślonego w specyfikacjach, a także w wyniku
niezastosowania się użytkownika do instrukcji montażu produktu.
Nie odchylać telewizora w tył o więcej niż 15 stopni.
x
Rodzina
produktów
cale Dane VESA (A * B)
19~22 75 X 75
26 200 X 100
Standardowy
wkręt
M4
Liczba
Telewizory
LCD
32~40 200 X 200 M6
46 400 X 400 M8
Nie należy instalować zestawu do montażu naściennego, kiedy telewizor jest włączony. Może to
spowodować obrażenia ciała powstałe w wyniku porażenia prądem.
4
Polski - 1414
 Loading...