

Page 1

Contact SAMSUNG WORLDWIDE
If you have any questions or comments relating to Samsung products, please contact the SAMSUNG customer care centre.
Country
ARMENIA 0-800-05-555 AUSTRIA 0810 - SAMSUNG (7267864, € 0.07/min) www.samsung.com/at
AZERBAIJAN 088-55-55-555 BELARUS 810-800-500-55-500 -
BELGIUM 02-201-24-18
CZECH
DENMARK
800-7267 www.samsung.com
FINLAND
FRANCE www.samsung.com/fr
GERMANY 01805 - SAMSUNG(726-7864 € 0,14/Min) www.samsung.com/de
8-800-555-555 HUNGARY 06-80-SAMSUNG(726-7864) www.samsung.com/hu
EIRE 0818 717100 www.samsung.com/ie
ITALIA 800-SAMSUNG(726-7864) www.samsung.com/it
KAZAKHSTAN 8-10-800-500-55-500 KYRGYZSTAN 00-800-500-55-500 www.samsung.com
LATVIA 8000-7267 www.samsung.com
LITHUANIA 8-800-77777 www.samsung.com
LUXEMBURG www.samsung.com/lu
00-800-500-55-500 NETHERLANDS www.samsung.com/nl
815-56 480 www.samsung.com/no
80820-SAMSUNG(726-7864) www.samsung.com/pt
RUSSIA 8-800-555-55-55 www.samsung.com
0800-SAMSUNG(726-7864)
www.samsung.com/es
0771 726 7864 (SAMSUNG) www.samsung.com/se
0848 - SAMSUNG(7267864, CHF 0.08/min)
TADJIKISTAN 8-10-800-500-55-500 www.samsung.com
U.K 0845 SAMSUNG (7267864)
UKRAINE 0-800-502-000
UZBEKISTAN 8-10-800-500-55-500 www.samsung.com
Customer Care Centre
800 - SAMSUNG (800-726786) www.samsung.com/cz
0 801 1SAMSUNG(172678)
Web Site
www.samsung.com/be (Dutch)
www.samsung.com/be_fr (French)
www.samsung.com/pl
www.samsung.com/ch
www.samsung.com/ch_fr/(French)
www.samsung.ua
www.samsung.com/ua_ru
LCD TV user manual
LCD TV
user manual
imagine the possibilities
© 2010 Samsung Electronics Co., Ltd. All rights reserved.
Thank you for purchasing this Samsung product.
To receive more complete service, please register
your product at
www.samsung.com/register
Model _____________ Serial No. _____________
BN68-02808H-00
Page 2
Figures and illustrations in this User Manual are provided for reference only and may differ from actual product appearance.
Product design and specifications may be changed without notice.
Digital TV notice
1. Functionalities related to Digital TV (DVB) are only available in countries/areas where DVB-T (MPEG2 and MPEG4 AVC) digital terrestrial signals are
broadcasted or where you are able to access to a compatible DVB-C (MPEG2 and MPEG4 AAC) cable-TV service. Please check with your local
dealer the possibility to receive DVB-T or DVB-C signal.
2. DVB-T is the DVB European consortium standard for the broadcast transmission of digital terrestrial television and DVB-C is that for the broadcast
transmission of digital TV over cable. However, some differentiated features like EPG (Electric Programme Guide), VOD (Video On Demand) and so
on, are not included in this specification. So, they cannot be workable at this moment.
3. Although this TV set meets the latest DVB-T and DVB-C standards, as of [August, 2008], the compatibility with future DVB-T digital terrestrial and
DVB-C digital cable broadcasts cannot be guaranteed.
4. Depending on the countries/areas where this TV set is used some cable-TV providers may charge an additional fee for such a service and you may
be required to agree to terms and conditions of their business.
5. Some Digital TV functions might be unavailable in some countries or regions and DVB-C might not work correctly with some cable service providers.
6. For more information, please contact your local Samsung customer care centre.
The reception quality of TV may be affected due to differences in broadcasting method between the countries. Please check the TV
✎
performance in the local SAMSUNG Authorized Dealer, or the Samsung Call Centre whether it can be improved by reconfiguring TV setting or
not.
Still image warning
Avoid displaying still images (like jpeg picture files) or still image element (like TV programme logo, panorama or 4:3 image format, stock or news bar at
screen bottom etc.) on the screen. Constant displaying of still picture can cause ghosting of LCD screen, which will affect image quality. To reduce risk of
this effect, please follow below recommendations:
Avoid displaying the same TV channel for long periods.•
Always try do display any image on full screen, use TV set picture format menu for best possible match.•
Reduce brightness and contrast values to minimum required to achieve desired picture quality, exceeded values may speed up the burnout process.•
Frequently use all TV features designed to reduce image retention and screen burnout, refer to proper user manual section for details.•
Securing the Installation Space
Keep the required distances between the product and other objects (e.g. walls) to ensure proper ventilation.
Failing to do so may result in fire or a problem with the product due to an increase in the internal temperature of the product.
When using a stand or wall-mount, use parts provided by Samsung Electronics only.
✎
If you use parts provided by another manufacturer, it may result in a problem with the product or an injury due to the product falling.
x
The appearance may differ depending on the product.
✎
Installation with a stand. Installation with a wall-mount.
2
10 cm
English
10 cm
10 cm
Correct Disposal of This Product (Waste Electrical & Electronic Equipment)
(Applicable in the European Union and other European countries with separate collection systems)
This marking on the product, accessories or literature indicates that the product and its electronic accessories (e.g. charger,
headset, USB cable) should not be disposed of with other household waste at the end of their working life. To prevent possible
harm to the environment or human health from uncontrolled waste disposal, please separate these items from other types of waste
and recycle them responsibly to promote the sustainable reuse of material resources. Household users should contact either the
retailer where they purchased this product, or their local government office, for details of where and how they can take these items
for environmentally safe recycling. Business users should contact their supplier and check the terms and conditions of the purchase
contract. This product and its electronic accessories should not be mixed with other commercial wastes for disposal.
Correct disposal of batteries in this product
(Applicable in the European Union and other European countries with separate battery return systems)
This marking on the battery, manual or packaging indicates that the batteries in this product should not be disposed of with other
household waste at the end of their working life. Where marked, the chemical symbols Hg, Cd or Pb indicate that the battery
contains mercury, cadmium or lead above the reference levels in EC Directive 2006/66. If batteries are not properly disposed of,
these substances can cause harm to human health or the environment. To protect natural resources and to promote material
reuse, please separate batteries from other types of waste and recycle them through your local, free battery return system.
10 cm
10 cm
10 cm
10 cm
Page 3

3
English
Contents
Getting Started
4
Connections
8
Basic Features
12
Advanced Features
27
4 Accessories
5 Viewing the Control Panel
6 Viewing the Remote Control
7 Connecting to an Antenna
7 Plug & Play (Initial Setup)
8 Connecting to an AV Device
10 Connecting to an Audio Device
11 Changing the Input Source
12 How to Navigate Menus
12 Using the INFO button (Now & Next guide)
12 Planning Your Viewing
14 Channel Menu
16 Picture Menu
21 Sound Menu
23 Setup Menu
25 Support Menu
27 Connecting to a PC
28 Network Connection
35 Media Play
44
Anynet+
48
Internet@TV
51
AllShare
Other Information
t
This function can be used by
pressing the TOOLS button on the
remote control.
53 Analogue Channel Teletext Feature
54
Installing the Wall Mount
55
Assembling the Cables
56 Anti-theft Kensington Lock
56
Securing the TV to the wall
57
Troubleshooting
60
Specifications
61
Index
Check the Symbol!
Note One-Touch Button
Page 4

Getting Started
Accessories
Please make sure the following items are included with your LCD TV. If any items are missing, contact your dealer.
✎
The items’ colours and shapes may vary depending on the models.
✎
Remote Control & Batteries (AAA x 2) y
Owner’s Instructions
y
Warranty Card / Safety Guide (Not available in some locations)
y
Blanking Bracket y Cable tie y Holder-Ring (4ea) y
See separate guide for installing the stand.
Stand (1EA) y Guide Stand (1EA) y Screws y
y
Cleaning Cloth
Power Cord
y
(46 ~ 55 inch TVs)
(4EA) M4 X L12
(4EA) M4 X L8
4
English
Page 5

5
01 Getting Started
English
Viewing the Control Panel
The product colour and shape may vary depending on the model.
✎
Contact with objects or particles other than your finger may switch on the LCD light.
✎
Speakers
Remote control sensor Aim the remote control towards this spot on the TV.
SOURCE
MENU
Y
z
Power Indicator Blinks and turns off when the power is on and lights up in standby mode.
P
E
m
(Power)
Toggles between all the available input sources. In the on-screen menu, use this
button as you would use the ENTERE button on the remote control.
Displays an on-screen menu, the OSD (on screen display), of your TV’s features.
Adjusts the volume. In the OSD, use the
and ► buttons on the remote control.
Changes the channels. In the OSD, use the
and buttons on the remote control.
Turns the TV on or off.
Y
buttons as you would use the
z
buttons as you would use the
Power IndicatorRemote control sensor
Standby mode
Do not leave your TV in standby mode for long periods of time (when you are away on a holiday, for example). A small amount
of electric power is still consumed even when the power button is turned off. It is best to unplug the power cord.
Page 6
Getting Started
ABCD
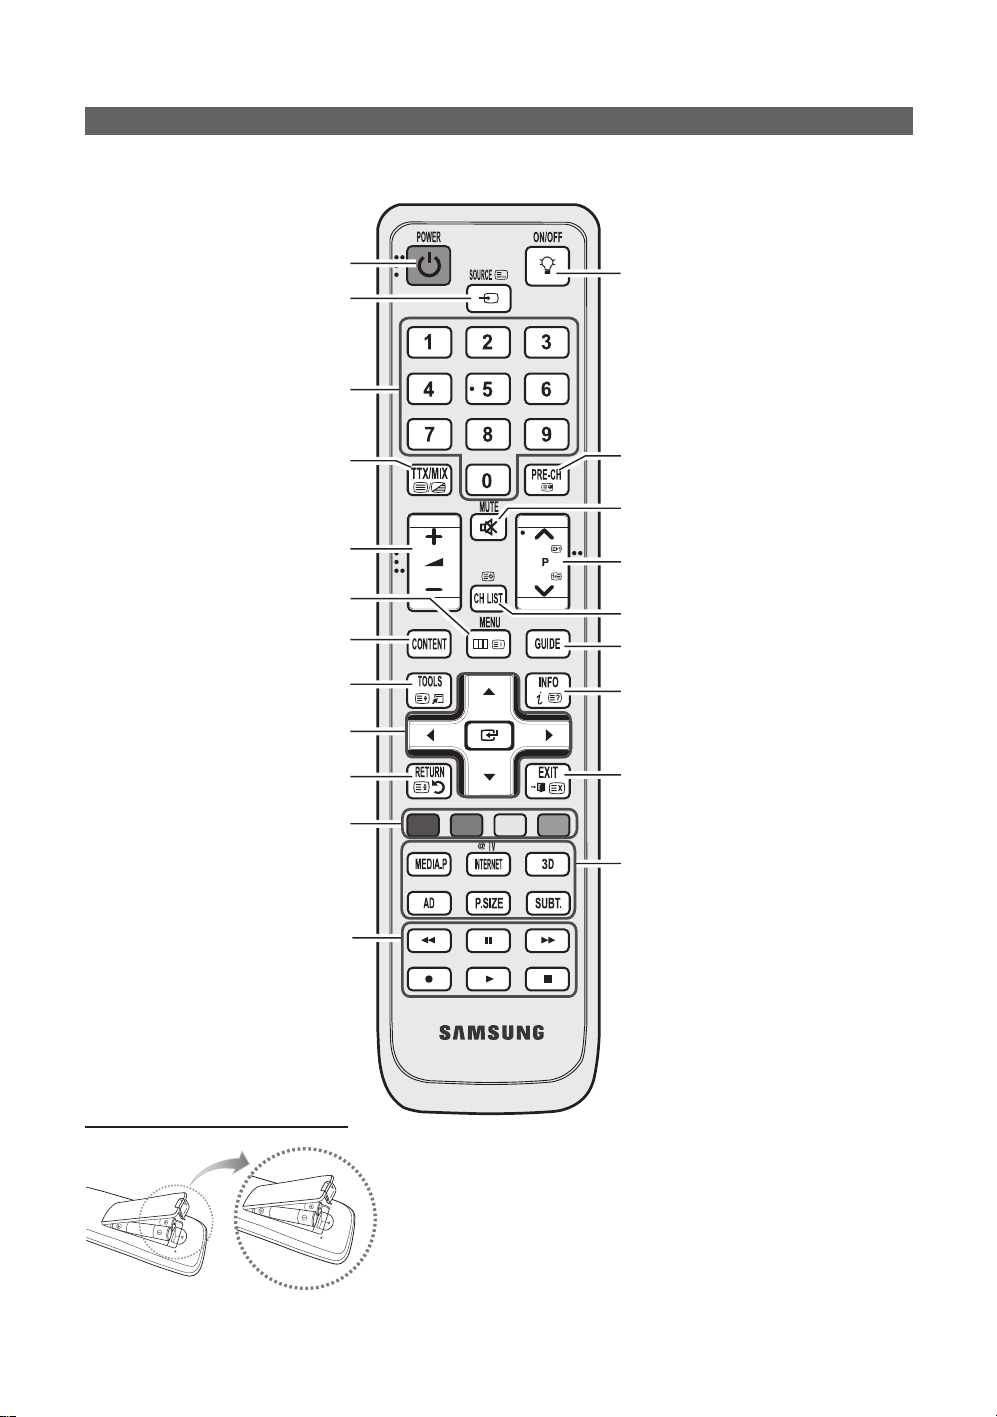
Viewing the Remote Control
This is a special remote control for the visually impaired persons and has Braille points on the Power, Channel, and
✎
Volume buttons.
Turns the TV on and off. (P. 7)
Displays and selects the available video
sources. (P. 11)
Press to directly access to channels.
Alternately select Teletext ON, Double,
Mix or OFF.
Adjusts the volume.
Displays the main on-screen menu.
(P. 12)
Displays the Content View, which includes Guide,
3D, Internet@TV, Media Play, and AllShare.
Quickly selects frequently used functions.
Selects the on-screen menu items and changes
the values seen on the menu.
Returns to the previous menu.
Buttons in the Channel Manager, Internet@TV,
Media Play menu, etc.
Use these buttons in the Media Play and
Anynet+ modes. (P. 35, 44)
(�: controls recording on Samsung recorders
with the Anynet+ feature)
When the ON/OFF light button is set to ON and a
certain button is pressed, the remote control buttons
will be lit for a moment.
(Using the remote control with this button set to On
will reduce the battery usage time.)
Returns to the previous channel.
Cuts off the sound temporarily.
Changes channels.
Displays channel list on the screen. (P. 14)
Displays the EPG (Electronic Programme Guide).
(P. 12)
Displays information on the TV screen. (P. 12)
Exits the menu.
MEDIA.P: Views the Media play. (P. 35)
INTERNET
3D: Sets the video, which provided with 3D signal.
AD: Audio Description selection. (Not available in
P.SIZE: Choose the picture size. (P. 17)
SUBT.: Digital subtitle display (P. 24)
: Links to various internet services.
(P. 48)
(P. 19)
some locations) (P. 22)
Installing batteries (Battery size: AAA)
English
6
NOTE
✎
Use the remote control within 23 feet from the TV.
x
Bright light may affect the performance of the remote
x
control. Avoid using nearby special fluorescent light or neon
signs.
The colour and shape may vary depending on the model.
x
Page 7

7
01 Getting Started
English
Connecting to an Antenna
P
POWER
When the TV is initially powered on, basic settings proceed automatically.
✎
Preset: Connecting the mains and antenna.
VHF/UHF Antenna
or
Plug & Play (Initial Setup)
When the TV is initially powered on, a sequence of on-screen prompts will assist in configuring basic settings. Press the
POWERP button. Plug & Play is available only when the Input source is set to TV.
To return to the previous step, press the Red button.
✎
Selecting a language
1
Selecting Store Demo
2
or Home Use
Selecting a country
3
Selecting an antenna
4
Selecting a channel
5
Setting the Clock
6
Mode
Time Zone
7
Viewing the HD
8
Connection Guide.
Enjoy your TV.
Press the or button, then press the ENTERE button.
Select the desired OSD (On Screen Display) language.
Press the or button, then press the ENTER
Select the
y Home Use mode. Store Demo Mode is for retail
environments.
Return the unit’s settings from
y Store Demo to Home Use
(standard): Press the volume button on the TV. When the OSD
volume is displayed, press and hold MENU for 5 sec.
Press the or button, then press the ENTER
Select the appropriate country. If the desired country does not exist on the menu, select
Others.
✎
After selecting the country in the
additional option to setup the pin number.
✎
When you input the PIN number, 0-0-0-0 is not available.
Press the or button, then press the ENTER
Select Air or Cable.
Press the or button, then press the ENTER
Select the channel source to memorise. When setting the antenna source to Cable, a step
appears allowing you to assign numerical values (channel frequencies) to the channels. For
more information, refer to Channel Auto Store (p. 14).
✎
Press the
Set the Clock Mode automatically or manually.
✎
If you select the
Press the or button to select the your time zone, then press the ENTER
(depending on the country)
The connection method for the best HD screen quality is displayed.
Press the ENTER
ENTERE button at any time to interrupt the memorization process.
Auto, select the time zone which you live.
E
button.
Country menu, some models may proceed with an
E
E
E
E
button.
button.
button.
button.
Cable
ANT OUT
E
button.
9
If You Want to Reset This Feature...
Select Setup - Plug & Play (Initial Setup). Enter your 4 digit PIN number. The default PIN number is “0-0-0-0.” If you want to
change the PIN number, use the Change PIN function.
Page 8
Connections
W R
W
G
RR
R-AUDIO-L
P
R PB Y
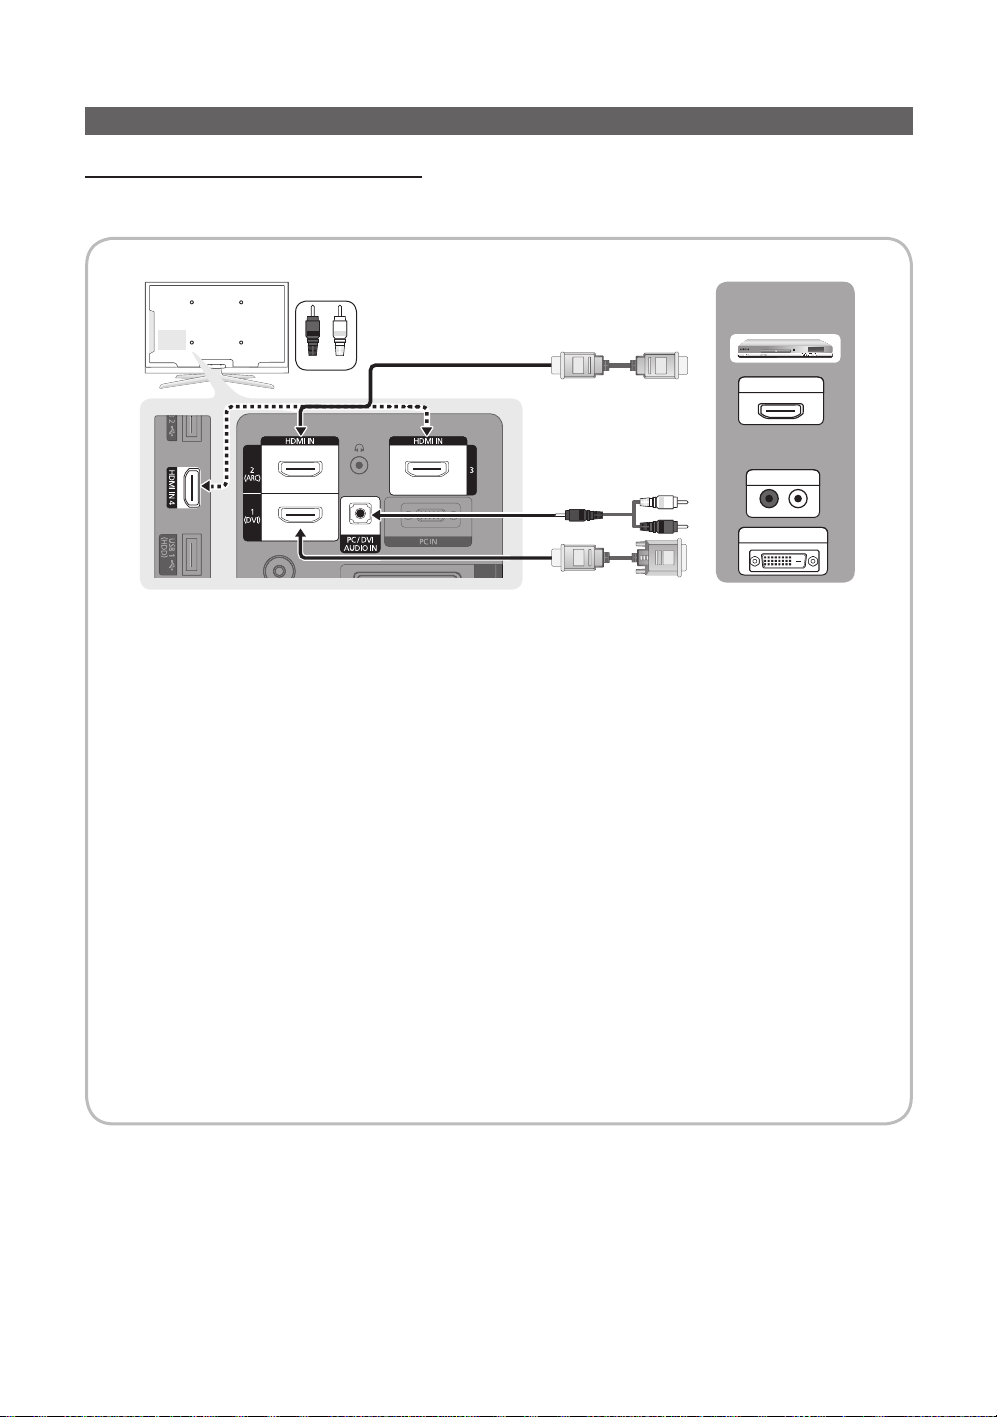
Connecting to an AV Device
Using an HDMI or HDMI/DVI cable (up to 1080p)
Available devices: DVD, Blu-ray player, HD cable box, HD STB (Set-Top-Box) satellite receiver, cable box, STB satellite receiver
DVD / Blu-ray
player
Red White
HDMI OUT
AUDIO OUT
DVI OUT
HDMI IN 1(DVI)
✎
When using an HDMI/DVI cable connection, you must use the
x
player, HD cable box, HD STB satellite receiver, cable box, or STB satellite receiver may require a DVI-HDMI
(DVI to HDMI) cable or DVI-HDMI (DVI to HDMI) adapter. The PC/DVI AUDIO IN jack is required for audio.
If an external device such as a DVD / Blu-ray player / cable box / STB satellite receiver supporting a HDMI
x
versions older than 1.4 is connected, the TV may operate abnormally (e.g. no screen display / no sound /
annoying flicker / abnormal colour).
If there is no sound after connecting an HDMI cable, check the HDMI version of the external device. If you
x
suspect the version is older than 1.4, contact the provider of the device to confirm the HDMI version and
request an upgrade.
Samsung TVs support the HDMI 1.4 (with 3D and Audio Return Channel). However, the ARC(Audio Return
x
Channel) function is only supported on HDMI IN 2(ARC)
If
– 3D Auto View is On, some functions, such as Internet@TV, are disabled. If this is a problem, set 3D Auto
View or 3D Mode to Off.
The ARC function enables digital output of sound using the
x
when the TV is connected to an audio receiver that supports the ARC function.
The ARC Single mode is only enabled when the TV is connected to the device when using HDMI Standard
–
cable, HDMI High Speed cable, Hdmi Standard with Ethernet cable, HDMI High Speed with Ethernet cable.
When the Input Source is the TV, the ARC function allows audio to be heard from a receiver. The audio is sent
–
to a receiver from the TV via an HDMI cable without the need for a separate optical cable.
It is recommended you purchase an HDMI-certified cable. Otherwise, the screen may appear blank or a
x
connection error may occur.
, 2(ARC), 3, 4 / PC/DVI AUDIO IN
HDMI IN 1(DVI) jack for video. A DVD, Blu-ray
HDMI IN 2(ARC) port and can only be operated
English
8
Page 9
9
English
02 Connections
Using a Component (up to 1080p) or Audio/Video (480i only) and Scart Cable
RGB W R
W
R G
R
W R
B
R W
Y
Y
P
R PB Y
R-AUDIO-L
P
R PB Y
R-AUDIO-L
P
R PB Y
W
G
RRWY B
G
RR
Available devices: VCR, DVD, Blu-ray player, cable box, STB satellite receiver
Yellow Red White
AUDIO OUT
✎
Ext. mode, DTV Out supports MPEG SD Video and Audio only.
In
✎
To obtain the best picture quality, the Component connection is recommended over the A/V connection.
VIDEO OUT
Blu-ray player DVDVCR
AUDIO OUT
COMPONENT OUT
Red Blue Green
EXT
Page 10
Connections
Connecting to an Audio Device
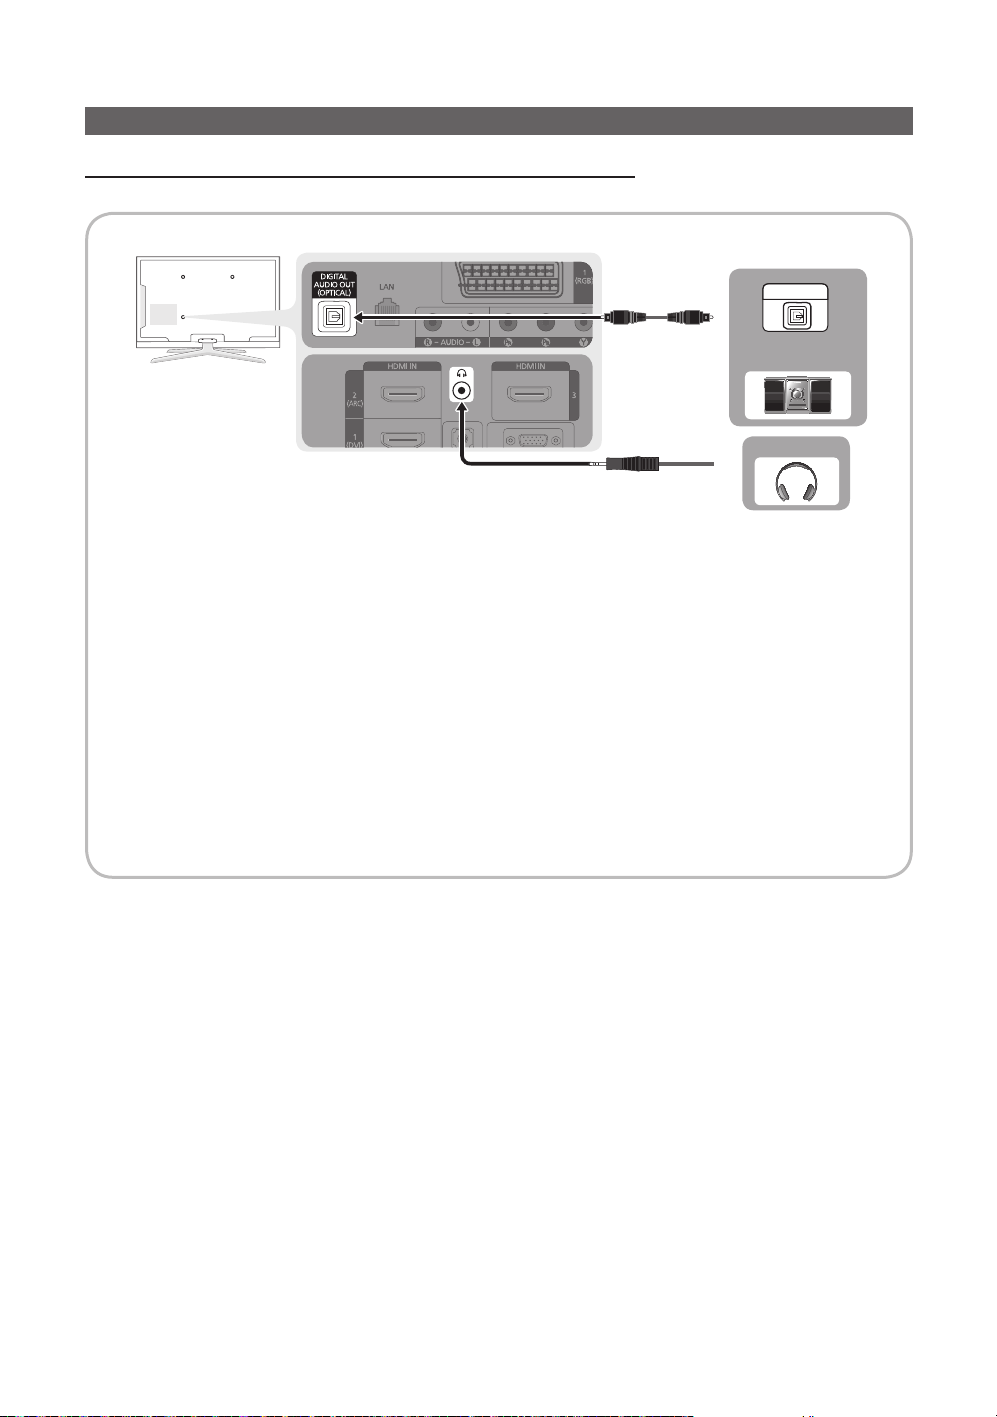
Using an Optical (Digital) or Audio (Analogue) Cable or Headphone Connection
Available devices: digital audio system, amplifier, DVD home theatre
✎
DIGITAL AUDIO OUT (OPTICAL)
When a digital audio system is connected to the xDIGITAL AUDIO OUT (OPTICAL) jack, decrease the volume
of both the TV and the system.
5.1 CH (channel) audio is available when the TV is connected to an external device supporting 5.1 CH.
x
When the receiver (home theatre) is set to on, you can hear sound output from the TV’s xoptical jack. When the
TV is receiving a DTV signal, the TV will send 5.1 CH sound to the home theatre receiver. When the source is
a digital component such as a DVD / Blu-ray player / cable box / STB (Set-Top-Box) satellite receiver and is
connected to the TV via HDMI, only 2 CH audio will be heard from the home theatre receiver. If you want to
hear 5.1 CH audio, connect the digital audio out jack from your DVD / Blu-ray player / cable box / STB satellite
receiver directly to an amplifier or home theatre.
✎
Headphones H: You can connect your headphones to the headphones output on your set. While the
headphones are connected, the sound from the built-in speakers will be disabled.
Sound function may be restricted when connecting headphones to the TV.
x
Headphone volume and TV volume are adjusted separately.
x
OPTICAL
Digital Audio
System
Headphone
10
English
Page 11

11
English
02 Connections
CONNECTIONS COMMON INTERFACE Slot
To watch paid channels, the “CI or CI+ CARD” must be inserted.
If you don’t insert the “CI or CI+ CARD,” some channels will
y
display the message “Scrambled Signal”.
The pairing information containing a telephone number, the “CI or
y
CI+ CARD” ID the Host ID and other information will be displayed
in about 2~3 minutes. If an error message is displayed, please
contact your service provider.
When the configuration of channel information has finished, the
y
message “Updating Completed” is displayed, indicating the
channel list is updated.
NOTE
✎
You must obtain a “CI or CI+ CARD” from a local cable service provider.
x
When removing the “CI or CI+ CARD”, carefully pull it out with your hands since dropping the “CI or CI+ CARD” may
x
cause damage to it.
Insert the “CI or CI+ CARD” in the direction marked on the card.
x
The location of the xCOMMON INTERFACE slot may be different depending on the model.
“CI or CI+ CARD” is not supported in some countries and regions; check with your authorized dealer.
x
If you have any problems, please contact a service provider.
x
Changing the Input Source
Source List
Use to select TV or other external input
sources such as DVD / Blu-ray players /
cable box / STB satellite receiver connected
to the TV.
TV / Ext.1 / Ext.2 / PC / AV /
■
Component / HDMI1/DVI / HDMI2 /
HDMI3 / HDMI4 / USB
In the
✎
Source List, connected
inputs will be highlighted.
Ext.1, Ext.2
✎
and PC always stay activated.
Edit Name
VCR / DVD / Cable STB / Satellite STB / PVR STB / ■
AV Receiver / Game / Camcorder / PC / DVI PC / DVI
Devices / TV / IPTV / Blu-ray / HD DVD / DMA: Name
the device connected to the input jacks to make your
input source selection easier.
When a PC with a resolution of 1920 x 1080 @
✎
60Hz is connected to the HDMI IN 1(DVI) port,
you should set to DVI PC mode under Edit Name.
When connecting an HDMI/DVI cable to the
✎
IN 1(DVI) port, you should set to DVI PC or DVI
Devices mode under Edit Name.
HDMI
Page 12

Basic Features
DTV Air
15
DEF
18:00 ~ 6:00
18:11 Thu 6 Jan
Life On Venus Avenue
Unclassified
No Detaild Information
Information
E
Watch
DTV Air 800 five
Home and Away
18:00 - 18:30
Drama
Dani is devastated when scott makes clear his views on marriage...
27
28
800
24
16
6
Discovery
DiscoveryH&L
five
price-drop.tv
QVC
R4DTT
American Chopper
Programmes resume at 06:00
Home and...
No Information
QVC Selection
No Information
Tine Team
Fiv...
18:00 - 19:00 19:00 - 20:00
)
Family Affairs
)
Dark Angel
800 five
How to Navigate Menus
Before using the TV, follow the steps below to learn how to
navigate the menu and select and adjust different functions.
1
2
3
4
1 MENU button: Displays the main on-screen menu.
2 ENTERE / Direction button: Move the cursor and
select an item. Confirm the setting.
3 RETURN button: Returns to the previous menu.
4 EXIT button: Exits the on-screen menu.
How to Operate the OSD (On Screen Display)
The access step may differ depending on the selected menu.
1
MENU
m
The main menu options appear on
the screen:
Picture, Sound, Channel, Setup,
Input, Application, Support.
/ Select an icon with the or
2
ENTER
3
/
4
/
5
button.
E
Press ENTERE to access the
sub-menu.
Select the desired submenu with
the or button.
Adjust the value of an item with the
or button. The adjustment in
the OSD may differ depending on
the selected menu.
ENTER
E
6
EXIT
e
Press ENTERE to complete the
configuration.
Press EXIT.
7
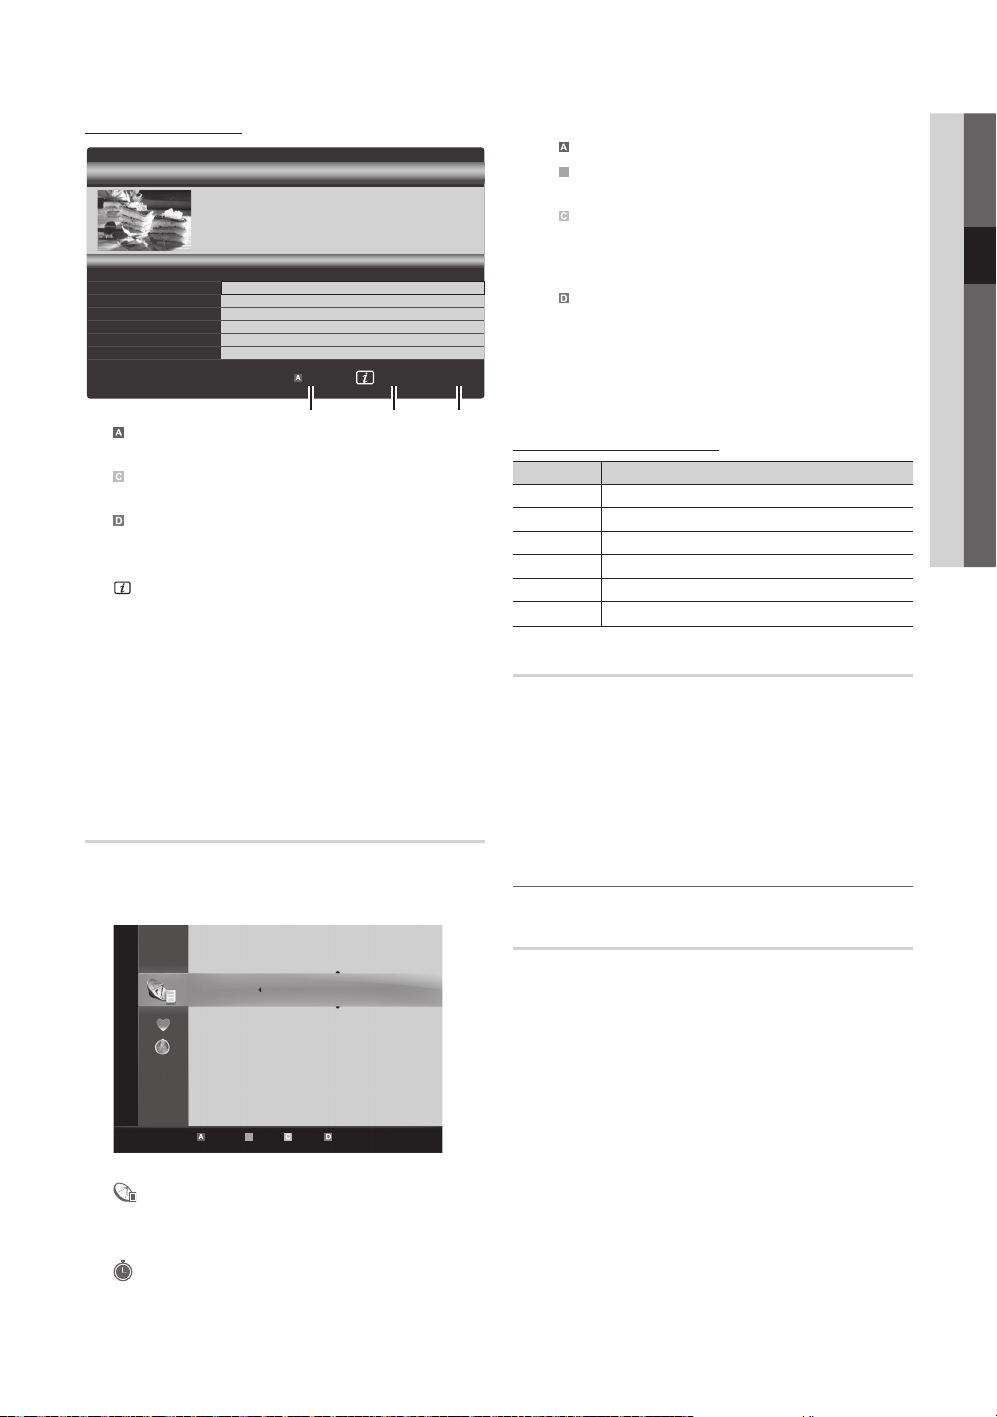
Using the INFO button (Now & Next guide)
The display identifies the current channel
and the status of certain audio-video
settings.
The Now & Next guide shows daily TV
programme information for each channel
according to the broadcasting time.
Scroll
y , to view information for a
desired programme while watching the
current channel.
Scroll
y , to view information for other channels. If you
want to move to the currently selected channel, press
the ENTERE button.
Planning Your Viewing
Guide
The EPG (Electronic Programme Guide)
information is provided by broadcasters.
Using programme schedules provided
by broadcasters, you can specify
programmes you want to watch in
advance so that the channel automatically
changes to the selected programme
channel at the specified time. Programme
entries may appear blank or out of date depending on a
channel status.
Using Channel View
Guide
Channel View - TV
Today
2:10 Tue 1 Jun
12
English
View Mode +24 Hours Ch. Mode Information k E
1 2 3 4 5 6
Page 13
13
English
03 Basic Features
Using Scheduled View
B
c 1 1futech
2 * 24ore.tv
15 abc1
3 BBC World
23 bid-up.tv
33 Boonerang
32 Cartoon Nwk
5 Class News
4 \ Coming Soon
27 Discovery
All
TV
Radio
Data/Other
Analogue
r
DTV Air 800 five
Family Affairs
18:00 - 18:30
Drama
Tanya confesses all to a stunned Babs. Conrad is anxious to hear...
18:30
19:15
)
Family Affairs
)
Dark Angel
800
800
five
five
800 five
Guide
Scheduled View
Today
Today
View Mode Information
1 Red (View Mode): View the list of programmes that
1 4 6
2:10 Tue 1 Jun
E
Cancel
are playing now or coming up.
2 Yellow (+24 Hours): Viewing the list of programmes to
be broadcasted after 24 hours.
3 Blue (Ch. Mode): Select the type of channels you
want to display on the Channel View window.
–– The Ch. Mode differs according to the antenna source.
4 (Information): Displays details of the selected
programme.
5 k (Page): Move to next or previous page.
6 ENTERE button
– When selecting the current programme, you can
watch the selected programme.
When selecting the future programme, you can
–
reserve to watch the selected programme. To cancel
E
the schedule, press the ENTER
button again and
select Cancel Schedules.
Channel Manager
Delete or set favourites channels and use the programme
guide for digital broadcasts. Select a channel in the
Channels, My Channels or Scheduled screen.
Using the colour buttons with the ✎Channel Manager
Red (Antenna): Toggle among Air or Cable.
x
Green (Zoom): Enlarges or shrinks a channel
x
number.
Yellow (Select): Select desired channels and press
x
the Yellow button to set all the selected channels at
the same time. The c mark appears to the left of
the selected channels.
Blue (Sort): Change the list ordered by channel
x
name or channel number.
k x(Page): Move to next or previous page.
T x (Tools): Displays the Channel Manager option
menu. (The options menus may differ depending on
the situation.)
Channel Status Display Icons
Icons Operations
An analogue channel.
A
A channel selected.
c
A channel set as a Favourite.
*
A programme currently being broadcast.
(
A locked channel.
\
A reserved programme.
)
Guide Type (Samsung / Guide Plus+)
(depending on the country)
You can select a different type of Guide.
Samsung
■ : Uses the guide programme by provided
samsung.
Guide Plus+
■ : Uses the guide programme provided by
Rovi International Solutions. For more information, refer
to “www.europe.guideplus.com.”
Using Favourite Channels ¦
*
Channels
My Channels
(in Channel Manager)
Shows all favourite channels.
Edit My Channels
■
t
: You can set the selected
channels to desired my channels group.
✎ *
” symbol will be displayed and the channel will
The “
be set as a my channel.
1. Select a channel and press the TOOLS button.
Air Antenna B Zoom Select Sort kT Tools
■ Channels: Shows the channel list according to
■
■ Scheduled: Shows all the currently reserved
channel type.
*
programmes.
My Channels: Shows the group of the channel.
2. Add or delete a channel in the my channel groups
you want among 1, 2, 3 and 4.
One or more groups can be selected.
x
Page 14

Basic Features
c 1 1futech
2 * 24ore.tv
15 abc1
3 BBC World
23 bid-up.tv
33 Boonerang
32 Cartoon Nwk
5 Class News
4 \ Coming Soon
27 Discovery
All
TV
Radio
Data/Other
Analogue
r
3. After you have changed the settings, the channel list
for each group can be viewed in My channels.
Channels
Edit My Channels
Delete
Deselect All
Select All
d
Air Antenna B Zoom Select Sort kT Tools
Channel Menu
Retuning Channels ¦
Antenna (Air / Cable)
Before your television can begin memorizing the available
channels, you must specify the type of signal source that is
connected to the TV (i.e. an Air or a Cable system).
Country
The PIN input screen appears. Enter your 4 digit PIN number.
Digital Channel
■ : Change the country for digital
channels.
■ : Change the country for analogue
Analogue Channel
channels.
Auto Store
Scans for a channel automatically and stores in the TV.
✎
Automatically allocated programme numbers may not
correspond to actual or desired programme numbers. If
a channel is locked using the Child Lock function, the
PIN input window appears.
Antenna Source (Air / Cable)
■
antenna source to memorise.
t
: Select the
Channel Source (Digital & Analogue / Digital / ■
Analogue): Select the channel source to memorise.
When selecting Cable Digital & Analogue or Digital:
Provide a value to scan for cable channels.
Search Mode (Full / Network / Quick): Scans for all
channels with active broadcast stations and stores them
in the TV.
If you select
✎
Network ID, Frequency, Modulation and
Symbol Rate manually by pressing the button on
the remote control.
Network (Auto / Manual): Selects the Network ID
setting mode among Auto or Manual.
Network ID: When Network is Manual, you can set up
Network ID using the numeric buttons.
Frequency: Displays the frequency for the channel.
(differs in each country)
Modulation: Displays available modulation values.
Symbol Rate: Displays available symbol rates.
Quick, you can set up the Network,
Manual Store
Scans for a channel manually and stores in the TV.
✎
If a channel is locked using the
the PIN input window appears.
Digital Channel
■ : When scanning has finished, channels
are updated in the channel list.
When selecting
✎
Frequency, Bandwidth
When selecting
✎
Modulation, Symbol Rate
■
Analogue Channel (Programme, Colour System,
Sound System, Channel, Search, Store): If there
is abnormal sound or no sound, reselect the sound
standard required.
✎
Channel mode
P x (programme mode): When tuning is complete,
the broadcasting stations in your area have been
assigned to position numbers from P0 to P99. You
can select a channel by entering the position number
in this mode.
C
(aerial channel mode) / S (cable channel mode):
x
These two modes allow you to select a channel
by entering the assigned number for each aerial
broadcasting station or cable channel.
Antenna Air: Channel,
Antenna Cable: Frequency,
Child Lock function,
English
14
Page 15

15
English
03 Basic Features
Editing Channels ¦
Channel Manager Option Menu
(in Channel Manager)
1. Select a channel and press the TOOLS button.
2. Edit the channel name or number using the Edit
Channel Name or Edit Channel Number menu.
■ (analogue channels only): Assign
Edit Channel Name
your own channel name.
■ (digital channels only): Edit the
Edit Channel Number
number by pressing the number buttons desired.
Other Features ¦
Cable Search Option
(depending on the country)
Sets additional search options such as the frequency and
symbol rate for a cable network search.
Freq.Start / Freq.Stop
■ : Set the start or stop frequency
(differs in each country).
■ : Displays available modulation values.
Modulation
■ : Displays available symbol rates.
Symbol Rate
Channel Manager
Delete ■ : You can delete a channel to display the channels
you want.
■ : Select all the channels
Select All / Deselect All
or deselect all the selected channels in the channel
manager.
Scheduled
(in Channel Manager)
You can view, modify or delete a show you have reserved to
watch.
Change Info
■ : Change a show you have reserved to
watch.
■ : Cancel a show you have reserved
Cancel Schedules
to watch.
■ : Display a show you have reserved
Information
to watch. (You can also change the reservation
information.)
Select All / Deselect All
■ : Select or deselect all reserved
programmes.
Channel List
You can see all the channels searched.
Channel Manager Option Menu
(in Channel Manager)
Set each channel using the Channel Manager menu options
(Lock / Unlock, Timer Recording, Timer Viewing, Sort,
Delete, Select All / Deselect All). Option menu items may
differ depending on the channel status.
1. Select a channel and press the TOOLS button.
2. Select a function and change its settings.
■ : Lock a channel so that the channel
Lock / Unlock
cannot be selected and viewed.
✎
NOTE
This function is available only when the xChild Lock
is set to On.
The PIN input screen appears. Enter your 4-digit PIN,
x
the default of which is “0-0-0-0”. Change the PIN
using the Change PIN option.
Timer Viewing
■ : You can set a desired channel to be
displayed automatically at the intended time. Set the
current time first to use this function.
When a digital channel is selected, press the
✎
button to view the digital Programme.
■ (analogue channels only): This operation allows
Sort
you to change the programme numbers of the stored
channels. This operation may be necessary after using
the auto store.
Channel List Transfer
Imports or exports the channel map. You should connect a
USB storage to use this function.
✎
The PIN number input screen appears. Enter your 4
digit PIN number.
✎
The default PIN number of a new TV set is ‘0-0-0-0’.
Import from USB ■ : Import channel list from USB.
■ : Export channel list to USB.
Export to USB
Fine Tune
(analogue channels only)
If the signal is weak or distorted, fine tune the channel
manually.
✎
Fine tuned channels are marked with an asterisk “*”.
To reset the fine-tuning, select ✎Reset.
Page 16

Basic Features
Picture Menu
Changing the Preset Picture Mode ¦
Mode
Select your preferred picture type.
t
Dynamic
■ : Suitable for a bright room.
■ : Suitable for a normal environment.
Standard
Natural
■ : Suitable for reducing eye strain.
Natural
✎
■ : Suitable for watching movies in a dark room.
Movie
is not available in PC mode.
Adjusting Picture Settings ¦
Backlight / Contrast / Brightness /
Sharpness / Colour / Tint (G/R)
Your television has several setting options for picture quality
control.
✎
NOTE
In analogue xTV, Ext., AV modes of the PAL system,
the Tint (G/R) function is not available.
In PC mode, you can only make changes to
x
Backlight, Contrast and Brightness.
Settings can be adjusted and stored for each
x
external device connected to the TV.
Lowering picture brightness reduces power
x
consumption.
Economical Solutions ¦
Eco Solution
Energy Saving (Off / Low / Medium / High / Picture ■
Off / Auto)
TV in order to reduce power consumption. If you select
Picture Off, the screen is turned off, but the sound
remains on. Press any button except volume button to
turn on the screen.
■ : To enhance your power savings;
Eco Sensor (Off / On)
the picture settings will automatically adapt to the light
in the room.
Min Backlight: When Eco sensor is On, the minimum
screen brightness can be adjusted manually.
t
If you adjust the
✎
be set to Off.
If
✎
Eco Sensor is On, the display brightness
may change (become slightly darker or brighter)
depending on the surrounding light intensity.
: This adjusts the brightness of the
Backlight, the Eco Sensor will
No-Signal Power Off (Off / 15 min / 30 min / 60 min) ■ :
Activates the Stand-by mode, in the case of “No Signal”
or “Check Signal Cable” status for a certain period of
time defined by the user.
Disabled when the PC is in power saving mode.
✎
Changing the Picture Options ¦
Advanced Settings
(available in Standard / Movie mode)
You can adjust the detailed setting for the screen including
colour and contrast.
✎
In PC mode, you can only make changes to
Contrast, Gamma and White Balance.
Advanced Settings
Dynamic Contrast : Medium
Shadow Detail : -2
Gamma : 0
Colour Space : Native
Black Tone (Off / Dark / Darker / Darkest)
■ : Select the
black level to adjust the screen depth.
■ : Adjust
Dynamic Contrast (Off / Low / Medium / High)
the screen contrast.
■ : Increase the brightness of dark
Shadow Detail (-2~+2)
images.
Disabled under
✎
Gamma
■ : Adjust the primary colour intensity.
■ : By running
Expert Pattern (Off / Pattern1 / Pattern2)
the Expert Pattern function, the picture can be
calibrated without a generator or filter. If the OSD menu
disappears or a menu other than the Picture menu is
opened, the calibration is saved and the Expert Pattern
window disappears.
While the
✎
outputted.
Only enabled on DTV, Component / HDMI models.
✎
RGB Only Mode (Off / Red / Green / Blue) ■ : You can
adjust Colour or Tint (G/R) of Red, Green or Blue for
the picture from an external device (DVD player, home
theatre, etc.).
Colour Space (Auto / Native / Custom)
■ : Adjust the
range of colours available to create the image. To adjust
Colour, Red, Green, Blue and Reset, set Colour
Space to Custom.
Expert Pattern is running, sound is not
U
PC mode.
Move E Enter R Return
Dynamic
16
English
Page 17

17
English
03 Basic Features
White Balance ■ : Adjust the colour temperature for a
more natural picture.
R-Offset / G-Offset / B-Offset: Adjust each colour’s
(red, green, blue) darkness.
R-Gain / G-Gain / B-Gain: Adjust each colour’s (red,
green, blue) brightness.
Reset: Resets the White Balance to it’s default settings.
10p White Balance (Off / On)
■ : Controls the white
balance in 10 point interval by adjusting the red, green,
and blue brightness.
Available when the picture mode is set to
✎
and when the external inputs are connected.
Some external devices may not support this
✎
function.
Interval: Select interval to adjust.
Red: Adjust the red level.
Green: Adjust the green level.
Blue: Adjust the blue level.
Reset: Resets the 10p White Balance to its default
settings.
Flesh Tone
■ : Emphasize pink Flesh Tone.
Edge Enhancement (Off / On)
■ : Emphasize object
boundaries.
■ : Setting the xvYCC mode on
xvYCC (Off / On)
increases detail and colour space when watching movies
from an external device (e.g. DVD player) connected to
the HDMI or Component IN jacks.
Available when the picture mode is set to
✎
and when the external input is set to HDMI or
Component.
Some external devices may not support this
✎
function.
Picture Options
In PC mode, you can only make changes to the ✎Colour
Tone, Size and Auto Protection Time.
Picture Options
Digital Noise Filter : Auto
U
Move E Enter R Return
Movie
Movie
■
Colour Tone (Cool / Normal / Warm1 / Warm2)
Warm1
✎
✎
■ : Your cable box/satellite receiver
Size
may have its own set of screen sizes as
well. However, we highly recommend
you use 16:9 mode most of the time.
Auto Wide: Automatically adjusts the
picture size to the 16:9 aspect ratio.
16:9: Adjusts the picture size to 16:9 for DVDs or wide
broadcasting.
Wide Zoom: Magnifies the picture size more than 4:3.
✎
Zoom: Magnifies the 16:9 wide pictures vertically to fit
the screen size.
✎
4:3: The default setting for a movie or normal
broadcasting.
✎
Screen Fit: Displays the full image without any cut-off
when HDMI (720p / 1080i / 1080p) or Component
(1080i / 1080p) signals are inputted.
✎
NOTE
After selecting xScreen Fit in HDMI (1080i / 1080p) or
Component (1080i / 1080p) mode, you may need to
center the picture:
1. Press the or button to select Position.
2. Press the ENTERE button.
3.
Depending on the input source, the picture size
x
options may vary.
The available items may differ depending on the
x
selected mode.
In PC mode, only
x
adjusted.
Settings can be adjusted and stored for each
x
external device connected to an input on the TV.
If you use the
x
input, 1 line will be cut at the top, bottom, left and
right as in the overscan function.
Screen Mode (16:9 / Wide Zoom / Zoom / 4:3)
■ :
Available only when picture size is set to Auto Wide. You
can determine the desired picture size at the 4:3 WSS
(Wide Screen Service) size or the original size. Each
European country requires different picture size.
✎
or Warm2 will be deactivated when the
picture mode is Dynamic.
Settings can be adjusted and stored for each
external device connected to an input on the TV.
Adjusts the
Adjusts the
button.
Do not watch in 4:3 format for a long time. Traces
of borders displayed on the left, right and centre
of the screen may cause image retention(screen
burn) which are not covered by the warranty.
Press the , , or button to move the picture.
Not available in PC, Component or HDMI mode.
Position by using , buttons.
Position or Size by using ,
16:9 and 4:3 modes can be
Screen Fit function with HDMI 720p
Page 18

Basic Features
Digital Noise Filter (Off / Low / Medium / High / Auto ■
/ Auto Visualisation): When the broadcast signal is
weak, some static and ghosting may appear. Select one
of the options until the best picture is displayed.
Auto Visualisation: When changing analogue channels,
displays signal strength.
Only available for analogue channels.
✎
When bar is green, you are receiving the best
✎
possible signal.
■
MPEG Noise Filter (Off / Low / Medium / High /
Auto): Reduces MPEG noise to provide improved
picture quality.
Disabled under PC mode.
✎
HDMI Black Level (Normal / Low) ■ : Selects the black
level on the screen to adjust the screen depth.
Available only in HDMI mode (RGB signals).
✎
Film Mode (Off / Auto1 / Auto2) ■ : Sets the TV to
automatically sense and process film signals from all
sources and adjust the picture for optimum quality.
Available in AV, COMPONENT (480i / 1080i) and
✎
HDMI (480i / 1080i).
■
Motion Plus (Off / Clear / Standard / Smooth /
Custom / Demo) : Removes drag from fast scenes with
a lot of movement to provide a clearer picture.
If you enable
✎
the screen. If this occurs, set Motion Plus to Off.
Blur Reduction: Adjusts the blur reduction level from
video sources.
Judder Reduction: Adjusts the judder reduction level
from video sources when playing films.
Reset: Reset the custom settings.
Auto Protection Time (2 hours / 4 hours / 8 hours
■
/ 10 hours / Off): If the same image remains on the
screen, Auto Screen Burn Protector will work.
Motion Plus, noise may appear on
Viewing TV using the 3D function ¦
IMPORTANT SAFETY INFORMATION. READ THE
FOLLOWING WARNINGS BEFORE YOU OR YOUR
CHILD USE THE 3D FUNCTION
[
WARING
As the TV turns on, the left and right sides of 3D
x
pictures may overlap more than usual. It may take
time until the picture quality is optimized.
The 3D effect may be experienced differently
x
depending on the viewer. You may not notice the 3D
effect at all if you have a prescription for one eye that
is very different from the other eye.
Parents’ careful supervision is required particularly
x
when children or teenagers view 3D images.
Photosensitive Seizure Warning and Other Health
x
Risks
Some viewers may experience an epileptic seizure
–
or stroke when exposed to certain flashing images
or lights contained in certain television pictures or
video games. If you or any of your relatives has a
history of epilepsy or strokes, please consult with a
medical specialist before using the 3D function.
Even those without a personal or family history
–
of epilepsy or stroke may have an undiagnosed
condition that can cause “photosensitive epileptic
seizures.”
If you experience any of the following symptoms
–
immediately stop watching 3D pictures and
consult a medical specialist : (1) altered vision; (2)
lightheadedness; (3) dizziness; (4) involuntary
movements such as eye or muscle twitching;
(5) confusion; (6) nausea; (7) loss of awareness;
(8) convulsions; (9) cramps; and/or (10)
disorientation. Parents should monitor and ask
their children about the above symptoms-children
and teenagers may be more likely than adults to
experience these symptoms.
Note that watching TV while sitting too close to the
x
screen for an extended period of time may weaken
your eyesight.
Note that watching TV while wearing 3D Active
x
Glasses for an extended period of time may cause a
headache or fatigue. If you feel headache, fatigue or
dizziness, stop watching TV and rest.
Some 3D pictures may startle viewers. The pregnant,
x
elderly, epileptic and those suffering from serious
physical conditions are advised to avoid utilizing the
unit’s 3D functionality.
We don’t recommend 3D pictures to those who are
x
in bad physical condition, who are sleep-deprived or
who drank liquor.
Please take care to be aware of the world around
x
you. This product is designed to be immersive. DO
NOT use this product near open stairwells, cables,
balconies, or other objects that can be tripped over,
run into, knocked down, broken or fallen over. Being
startled or deluding yourself into thinking that the 3D
images are real may cause you to crush a nearby
object or get injured trying to move your body.
Do not use the 3D Active Glasses for any other
x
purpose than for which it was designed. Wearing the
3D Active Glasses for any other purpose (as general
spectacles, sunglasses, protective goggles, etc.)
may physically harm you or weaken your eyesight.
When watching 3D images, turn on 3D Active
x
Glasses.
Turn off 3D glasses while not using. If you leave 3D
x
glasses on, battery lifespan is shortened.
Be careful that children do not place the batteries
x
in their mouths when removed from the 3D glasses.
Place the battery in a location that children or infants
cannot reach.
Immersive video can potentially have adverse effects
x
on the user including motion sickness, perceptual
after effects, disorientation, eye strain, and
decreased postural stability. Take frequent breaks to
lessen the potential of these effects, as is commonly
18
English
Page 19

19
English
03 Basic Features
suggested for other items, such as keyboards and
computer monitors, that you may tend to fixate or
concentrate on. If your eyes show signs of fatigue or
dryness or if you have any of the above symptoms,
immediately discontinue use of this device and do
not resume using it for at least thirty minutes after
the symptoms have subsided.
The ideal viewing distance should be three times
x
or more the height of the screen. We recommend
sitting with viewer’s eyes on a level with the screen.
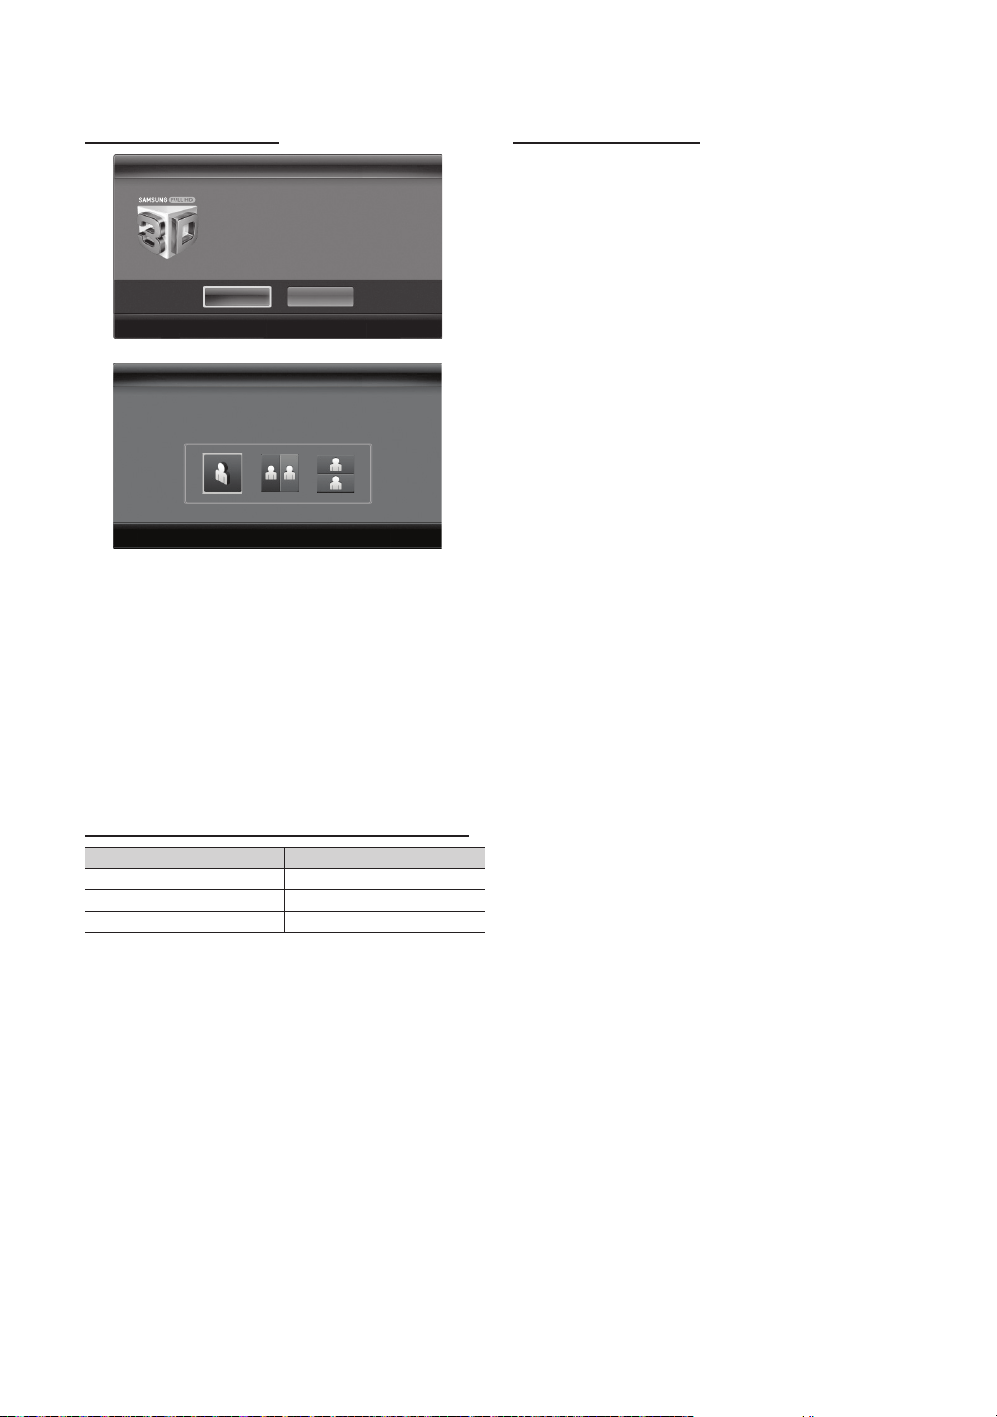
3D
This exciting new feature enables you to
view 3D content. In order to fully enjoy
this feature, you must purchase a pair
of Samsung 3D Active Glasses (SSG2100AB, SSG-2200AR, SSG- 2200KR) to
view 3D video.
Samsung 3D Active Glasses are sold
separately. For more detailed purchasing information, contact
the retailer where you purchased this TV.
3D emitter
If there is any obstacle between the emitter and 3D
✎
Active Glasses, the proper 3D effect may not be
obtained.
3D Mode
■ : Select the 3D input format.
If you want to feel the 3D effect fully, please wear
✎
the 3D Active Glasses first, and then select 3D
mode from the list as below.
Frequency
✎
Side by Side” and “Top & Bottom” are available
“
when the resolution is 720p, 1080i and 1080p in
(DTV, HDMI and USB modes) or set to PC (HDMI
mode).
“Vertical Strip”, “Line by Line” and “Checker
✎
Board” are available when the resolution is set to
PC (HDMI mode).
“Frequency” displays the frequency (60Hz only)
✎
when the resolution is set to PC.
3D ■ 2D (Off / On): Displays the image for the left eye only.
This function is deactivated when ✎3D Mode is set
to “2D 3D” or Off.
3D View point: ■ The overall adjustment of 3D perspective.
This function is deactivated when ✎3D Mode is set
to “2D 3D” or Off.
■ : Adjusts focus / depth in “2D 3D” mode.
Depth
This function is only activated when the
✎
is “2D 3D ”.
■ : Adjusts the images for the left and
Picture Correction
right eye.
■ : If 3D Auto View is set to On,
3D Auto View (Off / On)
a “Side-By-Side” format HDMI signal with one of the
resolutions below is automatically switched to 3D. Here,
correct 3D information must be sent from the HDMI 1.3
transmitter.
If a 3D failure occurs due to a 3D information error,
✎
set 3D Auto View to Off and manually select a
3D Mode using the 3D button or corresponding
menu.
Support resolution (16:9 only)
✎
Resolution Frequency (Hz)
1280 x 720p 50 / 60 Hz
1920 x 1080i 50 / 60 Hz
1920 x 1080p 24 / 30 / 50 / 60 Hz
Displays the images for the
left and right eye alternately in
frames.
3D Mode
3D Mode Operation
Off Turns the 3D function off.
2D 3D
Side by Side
Top & Bottom
Line by Line
Vertical Stripe
Checker
Board
Changes a 2D image to 3D.
Displays two images next to
each other.
Displays one image above
another.
Displays the images for the left
and right eye alternately in rows.
Displays the images for the
left and right eye alternately in
columns.
Displays the images for the
left and right eye alternately in
pixels.
Resolution supported for HDMI PC mode
The resolution for HDMI PC mode is optimized to 1920 x
1080 input.
An input resolution other than 1920 x 1080 may not be
displayed properly in 3D display or full screen mode.
Page 20
Basic Features
How to watch the 3D image
Before using 3D function...
3D
press the power button on the glasses.
periods may cause eye fatigue and/or
dizziness
Cancel
U
Move E Enter R Exit
3D
select the icon suitable for the picture on screen.
select the icon suitable for the picture on screen.
U
Move E Enter R Exit
1. Press the CONTENT button, then the Content View
menu will appear.
2. Press the or button, then select 3D.
To watch in 3D, wear glasses and press the power
button on the glasses. Viewing 3D TV motion pictures
for long periods may cause eye fatigue and/or dizziness.
3. Select OK, then press the ENTERE button.
4. Using the or buttons on your remote control,
selects the 3D Mode of the image you want to view.
Some 3D modes may not be available depending
✎
on the format of the image source.
Supported formats and operating specifications for HDMI 1.4
Source signal format Standard HDMI 1.4 3D
1920x1080p@24Hz x 2 1920x2205p@24Hz
1280x720p@60Hz x 2 1280x1470p@60Hz
1280x720p@50Hz x 2 1280x1470p@50Hz
The mode is automatically switched to 3D mode for the 3D
video input in one of the formats above.
For the HDMI 1.4@24Hz format, the TV is optimized as
follows:
Resolution First Display Mode
– : If Auto Motion Plus
is set to Off, Clear or Standard, you can watch the
video at a high resolution optimized to the resolution
of the source video.
Judder Reduction Display Mode
– : When Auto
Motion Plus is set to Smooth or Custom, you can
watch a smooth picture without judder.
NOTE
✎
You may notice a small amount of screen flickering
x
when watching 3D images in poor light conditions
(from a strobe light, etc.), or under a fluorescent lamp
(50Hz ~ 60Hz) or 3 wavelength lamp. If so, dim the
light or turn the lamp off.
3D mode is automatically disabled in following cases:
x
when changing a channel or the input source, or
accessing Media Play or Internet@TV.
Some Picture functions are disabled in
x
PIP and data broadcast is not supported in 3D
x
mode.
Data broadcasts (MHEG / MHP) are not supported
x
in 3D mode.
3D Active Glasses from other manufacturers may not
x
be supported.
When the TV is initially powered on, may take some
x
time until the 3D display is optimized.
The 3D Active Glasses may not work properly if there
x
is any other 3D product or electronic devices turned
on near the glasses or TV. If there is a problem, keep
other electronic devices as far away as possible from
the 3D Active Glasses.
When watching pictures from a 50Hz 3D source with
x
its Game mode On, visually-sensitive viewers may
see some flicker on bright images.
Photos of Media Play are shown in “2D 3D”
x
mode only.
If lying on your side, the 3D-effects may not be
x
displayed.
Be sure to stay within the viewing angle and optimum
x
TV viewing distance when watching 3D pictures.
Otherwise, you may not be able to enjoy proper 3D
–
effects.
If the TV Emitter becomes disconnected due to
x
either a change in the viewing angle or distance,
the 3D Active Glasses turn off automatically after
30 seconds. If this occurs, the red LED blinks three
times.
3D mode.
20
English
Page 21

21
English
03 Basic Features
Picture Reset (OK / Cancel)
Resets your current picture mode to its default settings.
Setting up the TV with Your PC ¦
Sound Menu
Changing the Preset Sound Mode ¦
Set the input source to PC.
Auto Adjustment
Adjust frequency values/positions and fine tune the settings
automatically.
✎
Not available when connecting with an HDMI/DVI cable.
t
Screen
Coarse / Fine ■ : Removes or reduces picture noise. If the
noise is not removed by Fine-tuning alone, then adjust
the frequency as best as possible (Coarse) and Finetune again. After the noise has been reduced, readjust
the picture so that it is aligned to the centre of screen.
■ : Adjust the PC screen position with direction
Position
button ( / / / ).
■ : Resets the image to default settings.
Image Reset
Using Your TV as a Computer (PC) Display
Setting Up Your PC Software (Based on Windows XP)
Depending on the version of Windows and the video card,
the actual screens on your PC may differ in which case the
same basic set-up information will almost always be applied.
(If not, contact your computer manufacturer or Samsung
Dealer.)
1. Click on “Control Panel” on the Windows start menu.
2. Click on “Appearance and Themes” in the “Control
Panel” window and a display dialog-box will appear.
3. Click on “Display” and a display dialog box will appear.
4. Navigate to the “Settings” tab on the display dialog-box.
The correct size setting (resolution) [Optimum: 1920 X
y
1080 pixels]
If a vertical-frequency option exists on your display
y
settings dialog box, the correct value is “60” or “60 Hz”.
Otherwise, just click “OK” and exit the dialog box.
SRS TheaterSound
Standard ■ : Selects the normal sound mode.
■ : Emphasizes music over voices.
Music
■ : Provides the best sound for movies.
Movie
■ : Emphasizes voices over other sounds.
Clear Voice
Amplify
■ : Increase the intensity of high-frequency sound
to allow a better listening experience for the hearing
impaired.
t
Adjusting Sound Settings ¦
Equalizer
Adjusts the sound mode (standard sound mode only).
Balance L/R
■ : Adjusts the balance between the right and
left speaker.
■ (Bandwidth
100Hz / 300Hz / 1kHz / 3kHz / 10kHz
Adjustment): Adjusts the level of specific bandwidth
frequencies.
Reset
■ : Resets the equalizer to its default settings.
Sound Systems, Etc. ¦
SRS TruSurround HD (Off / On)
(standard sound mode only)
This function provides a virtual 5.1 channel surround sound
experience through a pair of speakers or headphones using
HRTF (Head Related Transfer Function) technology.
t
SRS TruDialog (Off / On)
(standard sound mode only)
This function allows you to increase the intensity of a voice
over background music or sound effects so that dialog can
be heard more clearly when viewing a show.
Page 22

Basic Features
Audio Language
(digital channels only)
Change the default value for audio languages.
The available language may differ depending on the
✎
broadcast.
Audio Format
(digital channels only)
When sound is emitted from both the main speaker and the
audio receiver, a sound echo may occur due to the decoding
speed difference between the main speaker and the audio
receiver. In this case, use the TV Speaker function.
✎
Audio Format
broadcast. 5.1ch Dolby digital sound is only available
when connecting an external speaker through an
optical cable.
(MPEG / Dolby Digital 5.1)
option may differ depending on the
Audio Description
(not available in all locations)
(digital channels only)
This function handles the Audio Stream
for the AD (Audio Description) which is
sent along with the Main audio from the
broadcaster.
Audio Description (Off / On)
■ : Turn the audio description
function on or off.
■ : Adjust the audio description volume.
Volume
Auto Volume (Off / Normal / Night)
To equalize the volume level on each channel, set to Normal.
Night
■ : This mode provides an improved sound
experience compared to Normal mode, making almost
no noise. It is useful at night.
Speaker Select
(External Speaker / TV Speaker)
A sound echo may occur due to a difference in decoding
speed between the main speaker and the audio receiver. In
this case, set the TV to External Speaker.
✎
Speaker Select is set to External Speaker, you
When
should use these settings.
TV speaker: Off , External speaker: On
x
When ✎Speaker Select is set to TV Speaker, you
should use these settings
TV Speaker: On, External Speaker: On
x
If there is no video signal, both speakers will be mute.
✎
Additional Setting
(digital channels only)
DTV Audio Level (MPEG / HE-AAC)
■ : This function
allows you to reduce the disparity of a voice signal
(which is one of the signals received during a digital TV
broadcast) to a desired level.
According to the type of broadcast signal,
✎
/ HE-AAC can be adjusted between -10dB and
0dB.
To increase or decrease the volume, adjust
✎
between the range 0 and -10 respectively.
■ : SPDIF (Sony Philips Digital InterFace)
SPDIF Output
is used to provide digital sound, reducing interference
going to speakers and various digital devices such as a
DVD player.
Audio Format: During the reception of a digital TV
broadcast, you can select the Digital Audio output
(SPDIF) format from the options PCM or Dolby Digital.
By connecting to 5.1ch speakers in a Dolby
✎
Digital setup, maximize your interactive 3D sound
experience.
Audio Delay: Correct audio-video sync problems, when
watching TV or video, and when listening to digital audio
output using an external device such as an AV receiver
(0ms ~ 250ms).
Dolby Digital Comp (Line / RF)
■ : This function minimizes
signal disparity between a dolby digital signal and a
voice signal (i.e. MPEG Audio, HE-AAC, ATV Sound).
Select
✎
Line to obtain dynamic sound, and RF
to reduce the difference between loud and soft
sounds at night time.
Line: Set the output level for signals greater or less than
-31dB (reference) to either -20dB or -31dB.
RF: Set the output level for signals greater or less than
-20dB (reference) to either -10dB or -20dB.
MPEG
Sound Reset (OK / Cancel)
Reset all sound settings to the factory defaults.
Selecting the Sound Mode ¦
When you set to Dual I-II, the current sound mode is
displayed on the screen.
A2
Stereo
NICAM
Stereo
Audio
Type
Mono Mono
Stereo
Dual
Mono Mono
Stereo
Dual
Dual I-II Default
Stereo Mono
Dual I Dual II
Mono Stereo
Mono Dual I
Dual II
t
Automatic
change
Dual I
Automatic
change
Dual I
22
English
Page 23

23
English
03 Basic Features
If the stereo signal is weak and an automatic switching,
10 TV AT V1
00 00
▲
▼
00 00
▲
▼
✎
occurs, then switch to the mono.
✎
Only activated in stereo sound signal.
Only available when the ✎Input source is set to TV.
Setup Menu
Setting the Time ¦
Time
Clock ■ : Setting the clock is for using various timer
features of the TV.
O
The current time will appear every time you press
the INFO button.
✎
If you disconnect the power cord, you have to set
the clock again.
Clock Mode (Auto / Manual)
Depending on the broadcast station and signal,
✎
the auto time set up may not be correct. In this
case, set the time manually.
The antenna must be connected in order to set
✎
the time automatically.
Clock Set: Set the Day, Month, Year, Hour and Minute
manually.
Available only when
✎
Manual.
Time Zone: You can select your time zone.
This function is only available when Clock Mode is
✎
set to Auto.
Depending on the broadcast station and signal,
✎
the auto time may not be set correctly. If this
occurs, set the time manually.
Using the Sleep Timer ¦
To cancel
t
Sleep Timer, select Off.
Sleep Timer ■
after a preset period of time. (30, 60, 90, 120, 150 and
180 minutes).
✎
Clock Mode is set to
: Automatically shuts off the TV
Setting the On / Off Timer ¦
Timer 1 / Timer 2 / Timer 3 ■ : Three different on / off
timer settings can be made. You must set the clock first.
Inactivate
Inactivate
Volume
Repeat
On Time / Off Time: Set the hour, minute, and activate
/ inactivate. (To activate timer with the setting you’ve
chosen, set to Activate.)
Volume: Set the desired volume level.
Source: Select TV or USB content to be played when
the TV is turned on automatically. (USB can be selected
only when a USB device is connected to the TV)
Antenna (when the Source is set to TV): Select ATV or
DTV.
Channel (when the Source is set to TV): Select the
desired channel.
Contents (when the Source is set to USB): Select a
folder in the USB device containing music or photo files
to be played when the TV is turned on automatically.
NOTE
✎
If there is no music file on the USB device or the
x
folder containing a music file is not selected, the
Timer function does not operate correctly.
When there is only one photo file in the USB
x
device, the Slide Show will not play.
If a folder name is too long, the folder cannot be
x
selected.
Each USB you use is assigned its own folder.
x
When using more than one of the same type of
USB, make sure the folders assigned to each
USB have different names.
Repeat: Select Once, Everyday, Mon~Fri, Mon~Sat,
Sat~Sun or Manual to set at you convenience. If you
select Manual, you can set up the day you want to
activate the timer.
The
✎ c
✎
Auto Power Off (available only when the TV is turned on
by Timer): The TV will be automatically turned off after 3
hours of being left idle to prevent overheating.
Timer 1
Source Antenna Channel
Sun Mon Tue Thu Fri Sat
L
Move
U Adjust E
mark indicates the day is selected.
Enter R Return
Page 24

Basic Features
Locking Programme ¦
Security
The PIN input screen appears before the setup screen.
✎
Enter your 4-digit PIN, the default of which is “0-0-0-0”.
✎
Change the PIN using the Change PIN option.
Child Lock (Off / On)
■ : Lock channels in Channel
Manager, to prevent unauthorized users, such as
children, from watching unsuitable programme.
Available only when the
✎
■ (Parental Rating):Prevent unauthorized
Parental Lock
users, such as children, from watching unsuitable
programme with a user-defined 4-digit PIN code.
Allow All: Unlock all TV ratings.
The items of
✎
the country.
■ : Change your personal ID number required
Change PIN
to set up the TV.
If you forget the PIN code, press the remote
✎
control buttons in the following sequence, which
resets the PIN to “0-0-0-0”: POWER (off)
MUTE 8 2 4 POWER (on).
Parental Lock differs depending on
Input source is set to TV.
Other Features ¦
Language
Menu Language ■ : Set the menu language.
Teletext Language
■ : Set a desired language for teletext.
English is the default in cases where the selected
✎
language is unavailable in the broadcast.
Preference (Primary Audio Language / Secondary
■
Audio Language / Primary Subtitle Language /
Secondary Subtitle Language / Primary Teletext
Language / Secondary Teletext Language): Select
a language, which will be the default language when a
channel is selected.
Subtitle
Use this menu to set the Subtitle mode.
Subtitle feature does not work in
✎
Component and HDMI.
Subtitle (Off / On)
■ : Switches subtitles
on or off.
Mode (Normal / Hearing Impaired)
■ :
Sets the subtitle mode.
Subtitle Language
■ : Sets the subtitle language.
If the programme you are watching does not
✎
support the Hearing Impaired function, Normal
automatically activates even if the Hearing
Impaired mode is selected.
English is the default in cases where the selected
✎
language is unavailable in the broadcast.
Digital Text (Disable / Enable)
(UK only)
If the programme broadcasts with digital text, this feature is
enabled.
Network (Network Type / Network Setup
/ Network Test / Samsung Wireless Link /
SWL connect)
For details on setting up options, refer to the “Network
Connection” instructions (p. 28).
General
Game Mode (Off / On) ■ : When connecting to a game
console such as PlayStation™ or Xbox™, you can enjoy
a more realistic gaming experience by selecting game
mode.
✎
NOTE
Precautions and limitations for x game mode
To disconnect the game console and connect
–
another external device, set Game Mode to Off in
the setup menu.
If you display the TV menu in
– Game Mode, the
screen shakes slightly.
Game Mode
x
After connecting the game console, set
x
to On to prevent poor picture quality.
If
Game Mode is On: Picture mode is set to
x
Standard and Sound mode is set to Movie.
is not available in PC and TV mode.
Game Mode
24
English
Page 25

25
English
03 Basic Features
BD Wise (Off / On) ■ : Provides the optimal picture quality
for Samsung DVD, Blu-ray and Home Theatre products
which support BD Wise. When BD Wise is turned On,
the picture mode is automatically changed to the optimal
resolution.
Available when connecting Samsung products
✎
that support BD Wise through a HDMI cable.
■ : Set the
Menu Transparency (Bright / Dark)
Transparency of the menu.
■ : Set so that a
Melody (Off / Low / Medium / High)
melody plays when the TV is turned on or off.
■ : When the TV is powered on, the
FastStart (Off / On)
screen will come on quickly with this feature.
Melody
✎
is disabled when FastStart is On.
Common Interface
CI Menu ■ : This enables the user to select from the CAM-
provided menu. Select the CI Menu based on the menu
PC Card.
■ : View information on the CAM inserted
Application Info
into the CI slot and on the “CI or CI+ CARD” which is
inserted into the CAM. You can install the CAM anytime
whether the TV is on or off.
1. Purchase a CI CAM module at your nearest dealer or by
phone.
2. Firmly insert the “CI or CI+ CARD” into the CAM in the
direction of the arrow.
3. Insert the CAM with the “CI or CI+ CARD” into the
common interface slot, in the direction of the arrow so
that it aligns parallel with the slot.
4. Check if you can see a picture on a scrambled signal
channel.
Wireless Remote Control (Off/On)
Turn wireless remote controls on or off or give permission to
wireless remote controls.
Picture In Picture (PIP) ¦
t
PIP
You can watch the TV tuner and one external video source
simultaneously. PIP (Picture-in-Picture) does not function in
the same mode.
NOTE
✎
If you turn the TV off while watching in xPIP mode, the
PIP window will disappear.
You may notice that the picture in the PIP window
x
becomes slightly unnatural when you use the main
screen to view a game or karaoke.
While
Internet@TV is in operation, the PIP function
x
cannot be used.
PIP settings
x
Main picture Sub picture
Component, HDMI1/DVI,
HDMI2, HDMI3, HDMI4, PCTV
PIP (Off / On)
■ : Activate or deactivate the PIP function.
■ : Select the channel for the sub-screen.
Channel
Size (
■
Õ
/ Ã /
picture.
■
Position (
sub-picture.
■ : You can choose the
Sound Select (Main / Sub)
desired sound (Main / Sub) in PIP mode.
À / Œ
Ã
/ – / — / œ): Select a position for the
): Select a size for the sub-
Support Menu
Self Diagnosis
Picture Test (Yes / No) ■ : Use to check for picture
problems and if the problem continues to occur check
the colour pattern.
Sound Test (Yes / No)
■ : Use the built-in melody sound to
check for sound problems.
If you hear no sound from the TV’s speakers,
✎
before performing the sound test, make sure
Speaker Select is set to TV Speaker in the
Sound menu.
The melody will be heard during the test even if
✎
Speaker Select is set to External Speaker or the
sound is muted by pressing the MUTE button.
■ : (digital channels only) HDTV
Signal Information
channel’s reception quality is either perfect or the
channels are unavailable. Adjust your antenna to
increase signal strength.
■ : If the TV seems to have a problem,
Troubleshooting
refer to this description.
If none of these troubleshooting tips apply, contact
✎
the Samsung customer service centre.
Page 26
Basic Features
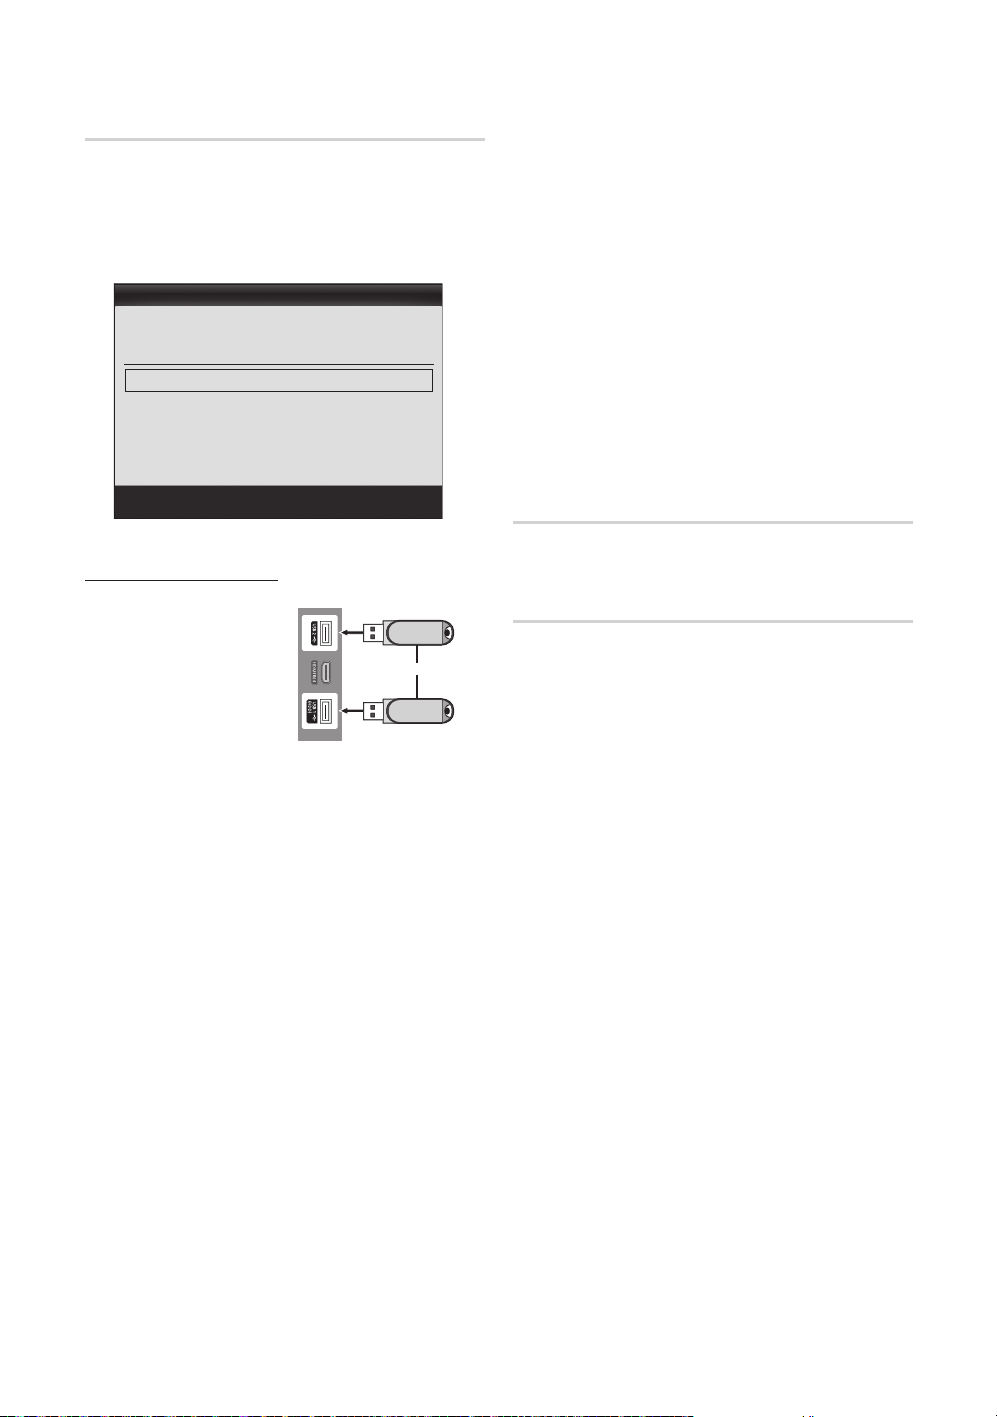
Software Upgrade
Software Upgrade can be performed via a broadcasting
signal or by network connection or downloading the latest
firmware from “www.samsung.com,” to a USB memory
device.
Current Version the software already installed in the TV.
Software is represented as “Year/Month/Day_Version”.
✎
Software Upgrade
Current Version 2010/01/18_000001
By Channel
Alternative Software ----/--/--_-----
U
Move E Enter R Return
Installing the Latest Version
■ : Insert a USB
By USB
drive containing the
firmware upgrade file,
downloaded from
“www.samsung.com,”
into the TV. Please
be careful not to
disconnect the power
or remove the USB
drive until upgrades are complete. The TV will be turned
off and on automatically after completing the firmware
upgrade. When software is upgraded, video and audio
settings you have made will return to their default
settings. We advise you to to write down your settings
so that you can easily reset them after the upgrade.
■ : Upgrade the software using the Internet.
By Online
First, configure your network. For detailed
✎
procedures on using the Network Setup, refer to
the “Network Connection” instructions.
If the internet connection doesn’t operate properly,
✎
the connection may be broken. Please retry
downloading. If the problem persists, download by
USB and upgrade.
TV Side Panel
or
USB Drive
By Channel ■ : Upgrade the software using the
broadcasting signal.
If the function is selected during the software
✎
transmission period, software will be automatically
searched and downloaded.
The time required to download the software is
✎
determined by the signal status.
■ : A manual upgrade will be
Standby Mode Upgrade
automatically performed at selected time. Since the
power of the unit is turned on internally, the screen
may be turned on slightly for the LCD product. This
phenomenon may continue for more than 1 hour until
the software upgrade is complete.
■ (backup): Displays the software
Alternative Software
version downloaded through By Online. During the
software upgrading, When the Upgrade will discontinue
from last step, this function be activated.
HD Connection Guide
Refer to this information when connecting external devices
to the TV.
Contact Samsung
View this information when your TV does not work properly
or when you want to upgrade the software. You can find
information regarding our call centres, and how to download
products and software.
26
English
Page 27

27
English
Advanced Features
Using an HDMI/DVI Cable / a D-sub Cable
Connecting to a PC
04 Advanced Features
DVI OUT
AUDIO OUT
Display Modes (D-Sub and HDMI/DVI Input)
Optimal resolution is 1920 X 1080 @ 60 Hz.
Mode Resolution
IBM
MAC
VESA CVT
VESA DMT
VESA GTF
VESA DMT / DTV CEA
NOTE
✎
Horizontal Frequency
(KHz)
640 x 350
720 x 400
640 x 480
832 x 624
1152 x 870
720 x 576
1152 x 864
1280 x 720
1280 x 960
640 x 480
640 x 480
640 x 480
800 x 600
800 x 600
800 x 600
1024 x 768
1024 x 768
1024 x 768
1152 x 864
1280 x 1024
1280 x 1024
1280 x 720
1280 x 800
1280 x 800
1280 x 960
1360 x 768
1440 x 900
1440 x 900
1600 x 1200
1680 x 1050
1280 x 720
1280 x 1024
1920 x 1080p 67.500 60.000 148.500 +/+
31.469
31.469
35.000
49.726
68.681
35.910
53.783
56.456
75.231
31.469
37.861
37.500
37.879
48.077
46.875
48.363
56.476
60.023
67.500
63.981
79.976
45.000
49.702
62.795
60.000
47.712
55.935
70.635
75.000
65.290
52.500
74.620
Vertical Frequency
(Hz)
70.086
70.087
66.667
74.551
75.062
59.950
59.959
74.777
74.857
59.940
72.809
75.000
60.317
72.188
75.000
60.004
70.069
75.029
75.000
60.020
75.025
60.000
59.810
74.934
60.000
60.015
59.887
74.984
60.000
59.954
70.000
70.000
For HDMI/DVI cable connection, you must use the xHDMI IN 1(DVI) jack.
The interlace mode is not supported.
x
The set might operate abnormally if a non-standard video format is selected.
x
Separate and Composite modes are supported. SOG(Sync On Green) is not supported.
x
AUDIO OUT
Pixel Clock Frequency
PC OUT
(MHz)
25.175
28.322
30.240
57.284
100.000
32.750
81.750
95.750
130.000
25.175
31.500
31.500
40.000
50.000
49.500
65.000
75.000
78.750
108.000
108.000
135.000
74.250
83.500
106.500
108.000
85.500
106.500
136.750
162.000
146.250
89.040
128.943
Sync Polarity
(H / V)
+/-
-/+
-/-
-/-
-/-
-/+
-/+
-/+
-/+
-/-
-/-
-/+/+
+/+
+/+
-/-
-/+/+
+/+
+/+
+/+
+/+
-/+
-/+
+/+
+/+
-/+
-/+
+/+
-/+
-/+
-/-
Page 28
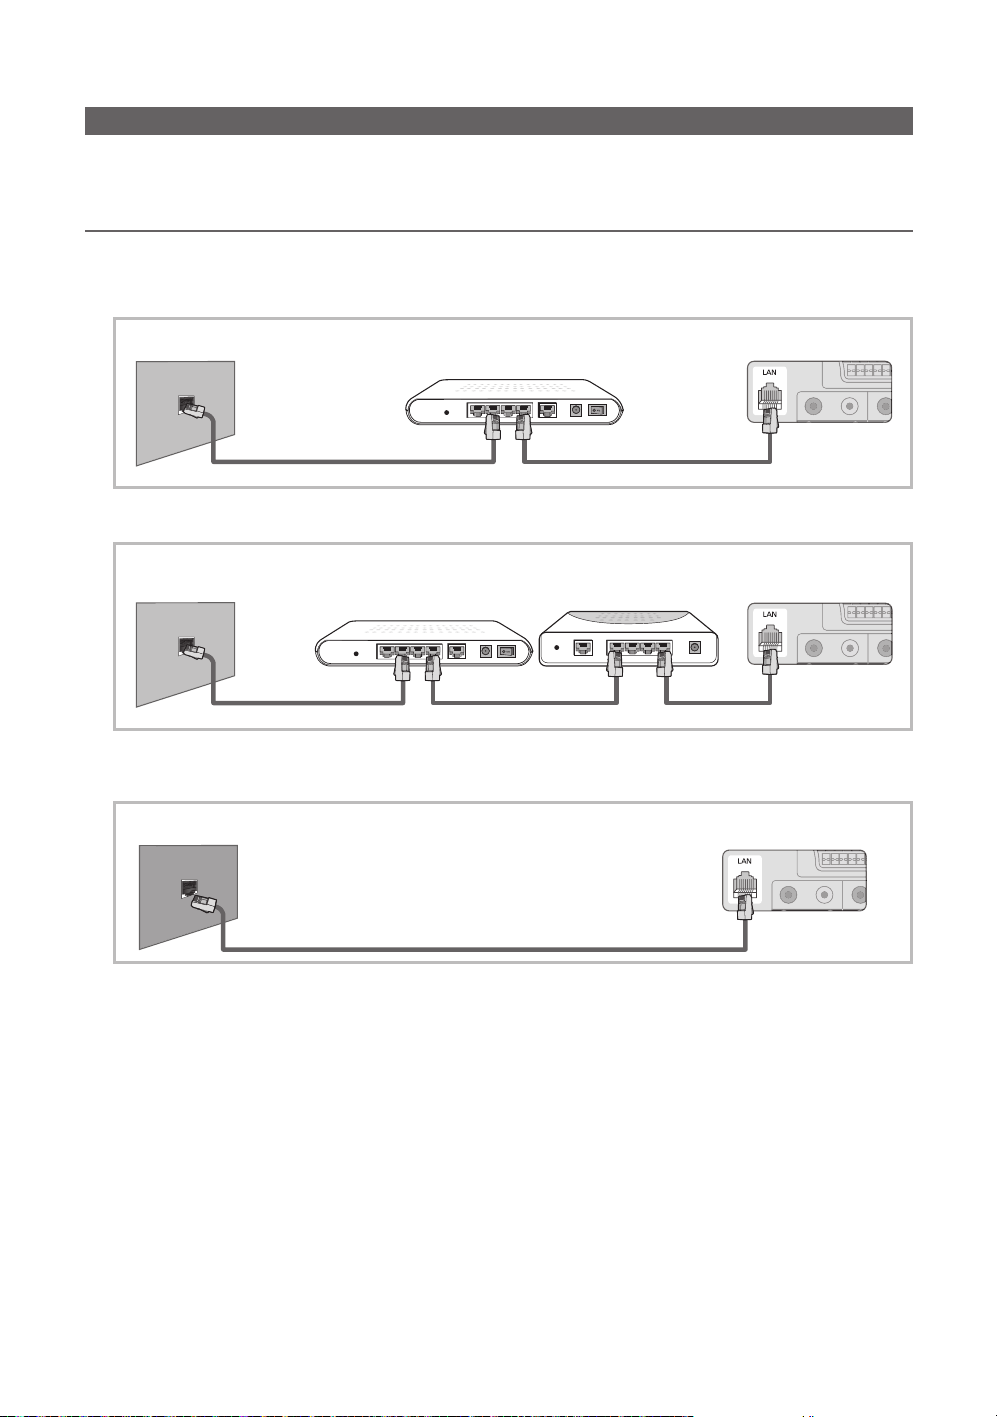
Advanced Features
Network Connection
You can set up your TV so that it can access the Internet through your local area network (LAN) using a wired or wireless
connection.
Connecting to a Wired Network ¦
You can attach your TV to your LAN using cable in three ways:
You can attach your TV to your LAN by connecting the LAN port on the back of your TV to an external modem using a Cat
y
5 cable. See the diagram below.
The Modem Port on the Wall
You can attach your TV to your LAN by connecting the LAN port on the back of your TV to a IP Sharer which is connected y
to an external modem. Use Cat 5 cable for the connection. See the diagram below.
The Modem Port on the Wall
Modem Cable
Depending on how your network is configured, you may be able to attach your TV to your LAN by connecting the LAN y
port on the back of your TV directly to a network wall outlet using a Cat 5 cable. See the diagram below. Note that the wall
outlet is attached to a modem or router elsewhere in your house.
The LAN Port on the Wall
External Modem
(ADSL / VDSL / Cable TV)
External Modem
(ADSL / VDSL / Cable TV)
LAN CableModem Cable
IP Sharer
(having DHCP server)
LAN Cable LAN Cable
TV Rear Panel
TV Rear Panel
TV Rear Panel
LAN Cable
If you have a Dynamic Network, you should use an ADSL modem or router that supports Dynamic Host Configuration
Protocol (DHCP). Modems and routers that support DHCP automatically provide the IP address, subnet mask, gateway,
and DNS values your TV needs to access the Internet so you don’t have to enter them manually. Most home networks are
Dynamic Networks.
Some networks require a Static IP address. If your network requires a Static IP address, you must enter the IP address,
subnet mask, gateway, and DNS values manually on your TV’s Cable Setup Screen when you set up the network
connection. To get the IP address, subnet mask, gateway, and DNS values, contact your Internet Service Provider (ISP). If
you have a Windows computer, you can also get these values through your computer.
You can use ADSL modems that support DHCP if your network requires a Static IP address. ADSL modems that
✎
support DHCP also let you use Static IP addresses.
English
28
Page 29

29
English
04 Advanced Features
Network Setup (Auto)
Use the Automatic Network Setup when connecting your
TV to a network that supports DHCP. To set up your TV’s
cable network connection automatically, follow these steps:
How to set up automatically
1. Connect your TV to your LAN as described in the
previous section.
2. Turn on your TV, press the MENU button on your
remote, use the or button to select Setup, and
then press the ENTERE button.
3. Use the or button to select Network in the Setup
menu, and then press the ENTERE button. The
Network screen appears.
Network
U
Move E Enter R Return
4. On the Network screen, select Network Type.
5. Set Network Type to Wired.
6. Select Network Setup. The Network Setup screen
appears.
Network Setup
Gateway :
DNS : Auto
DNS Server :
Network Setup (Manual)
Use the Manual Network Setup when connecting your TV to
a network that requires a Static IP address.
Getting the Network Connection Values
To get the Network connection values on most Windows
computers, follow these steps:
1. Right click the Network icon on the bottom right of the
screen.
2. In the pop-up menu that appears, click Status.
3. On the dialog that appears, click the Support tab.
4. On the Support Tab, click the Details button. The
Network connection values are displayed.
How to set up manually
To set up your TV’s cable network connection manually,
follow these steps:
1. Follow Steps 1 through 6 in the “How to set up
automatically” procedure.
2. Set Internet Protocol Setup to Manual.
3. Press the button on your remote to go to the first
entry field.
4. Enter the IP Address, Subnet Mask, Gateway, and
DNS Server values. Use the number buttons on your
remote to enter numbers and the arrow buttons to move
from one entry field to another.
5. When done, press the RETURN button on your remote.
6. Select Network Test to check the Internet connectivity.
U
Move E Enter R Return
7. Set Internet Protocol Setup to Auto.
8. Auto acquires and enters the needed Internet values
automatically.
9. When done, press the RETURN button on your remote.
10. Select Network Test to check the Internet connectivity.
11. If the Network Function has not acquired the network
connection values, go to the directions for Manual.
Page 30

Advanced Features
Connecting to a Wireless Network ¦
To connect your TV to your network wirelessly, you need a wireless router or modem and a Samsung Wireless LAN Adapter
(WIS09ABGN, WIS09ABGN2, WIS10ABGN), which you connect to your TV’s back or side panel USB jack. See the illustration below.
To use the
✎
SWL(Samsung Wireless Link) function, connect to the USB 1 (HDD) port.
The LAN Port on
the Wall
Wireless IP sharer
(AP having DHCP server)
TV Side Panel
Samsung Wireless
LAN Adapter
LAN Cable
Samsung’s Wireless LAN adapter is sold separately and is offered by select retailers, Ecommerce sites and Samsungparts.
com. Samsung’s Wireless LAN adapter supports the IEEE 802.11A/B/G and N communication protocols. Samsung
recommends using IEEE 802.11N. When you play the video over a IEEE 802.11B/G connection, the video may not play
smoothly.
✎
NOTE
You must use the “Samsung Wireless LAN Adapter” (WIS09ABGN) to use a wireless network.
x
Samsung’s Wireless LAN adapter is sold separately. The WIS09ABGN Wireless LAN adapter is offered by select
x
retailers, Ecommerce sites and Samsungparts.com.
To use a wireless network, your TV must be connected to a wireless IP sharer. If the wireless IP sharer supports
x
DHCP, your TV can use a DHCP or static IP address to connect to the wireless network.
Select a channel for the wireless IP sharer that is not currently being used. If the channel set for the wireless IP sharer
x
is currently being used by another device nearby, this will result in interference and communication failure.
If you apply a security system other than the systems listed below, it will not work with the TV.
x
If Pure High-throughput (Greenfield) 802.11n mode is selected and the Encryption type is set to WEP, TKIP or TKIP-
x
AES (WPS2Mixed) for your AP, Samsung TVs will not support a connection in compliance with new Wi-Fi certification
specifications.
If your AP supports WPS (Wi-Fi Protected Setup), you can connect to the network via PBC (Push Button
x
Configuration) or PIN (Personal Identification Number). WPS will automatically configure the SSID and WPA key in
either mode.
If your router, modem, or device isn’t certified, it may not connect to the TV via the “Samsung Wireless LAN Adapter.”
x
Connection Methods: You can setup the wireless network connection six ways.
x
Samsung Auto Configuration
–
– PBC (WPS)
Auto Setup (Using the Auto Network Search function)
–
Manual Setup
–
– SWL(Samsung Wireless Link)
– Ad-Hoc
All of Samsung Wireless LAN Adapter should be connected directly to the TV's USB port. USB HUB are not
x
supported.
or
30
English
Page 31

31
English
04 Advanced Features
Notice
The picture may appear corrupted for some channels when the TV is connected to the Samsung Wireless LAN Adapter. In
such case, establish a connection using one of the following methods:
Method 1 Method 2
Connect using the USB right angle adapter
Connect via an extension cable
Network Setup
(Samsung Auto Configuration)
This function is available in APs (Access Points) that support
Samsung Auto Configuration. If your AP does not, you can
connect through PBC (WPS), auto, or manually.
✎
This function is available when
Wireless Link) is set to Off.
You can check for equipment that supports Samsung
✎
Auto Configuration on www.samsung.com.
How to set up using Samsung Auto Configuration
1. Place the AP and TV next to each other and turn them
on.
Because the booting times of applications differ,
✎
you may have to wait for approximately 2 minutes.
If the LAN cable connected the WAN port of AP
✎
during Samsung Auto Configuration, you are able
to complete until internet connection test. If you
do not connect, Samsung Auto Configuration will
check only device connecting of AP (Not check
internet).
2. After 2 minutes, connect the Samsung Wireless LAN
Adapter to the TV. When the Samsung Wireless LAN
Adapter is established, the pop-up window appears.
3. As soon as a connection is established, place the AP in
parallel with the Samsung Wireless LAN Adapter giving a
gap no larger than 25cm.
SWL(Samsung
4. Wait until the connection is automatically established.
If the connection fails, reset the AP and then try
✎
again.
If Samsung Auto Configuration does not connect
✎
your TV to your AP, a pop-up window appears
on the screen notifying you of the failure. Reset
the AP, and then try again. If the connection fails
again, choose one of the other connection setup
methods, PBC (WPS), auto, or manual.
5. After the connection is established, locate the sharer at
the desired location.
If the AP settings have been changed or it is the
✎
first time you use the new AP after purchase, you
need to set up again beginning from Step 1.
Network Setup (PBC (WPS))
How to set up using PBC (WPS)
If your router has a PBC (WPS) button, follow these steps:
1. Connect your TV to your LAN as described in the
previous section.
2. Turn on your TV, press the MENU button on your
remote, use the or button to select Setup, and
then press the ENTERE button.
3. Use the or button to select Network in the Setup
menu, and then press the ENTERE button.
4. On the Network screen, select Network Type.
5. Set Network Type to Wireless.
6. Select Network Setup. The Network Setup screen
appears.
Page 32

Advanced Features
A B C D E F G
H I J K L M N
O P Q R S T U
V W X Y Z
0~9
Network Setup
Gateway :
DNS : Auto
DNS Server :
U Move E Enter R Return
7. Press the Red button on your remote.
8. Press the PBC (WPS) button on your router within 2
minutes. Your TV player automatically acquires all the
network setting values it needs and connects to your
network.
9. After the network connection is set up, press the
RETURN button to exit the Network Setup screen.
Network Setup (Auto)
Most wireless networks have an optional security system
that requires devices that access the network to transmit
an encrypted security code called an Access or Security
Key. The Security Key is based on a Pass Phrase, typically
a word or a series of letters and numbers of a specified
length you were asked to enter when you set up security for
your wireless network. If you use this method of setting up
the network connection, and have a Security Key for your
wireless network, you will have to enter the Pass Phrase
during the setup process.
How to set up automatically
To set up the wireless connection automatically, follow these
steps:
1. Follow Steps 1 through 6 in the “How to set up using
PBC (WPS)” (p. 31).
2. Press the button to select Internet Protocol Setup,
and then press the ENTERE button. Press the or
button to select Auto, and then press the ENTER
button.
3. Press the button to go to Select a Network, and
then press the ENTERE button. The Network function
searches for available wireless networks. When done, it
displays a list of the available networks.
4. In the list of networks, press the or button to select
a network, and then press the ENTERE button.
If the AP is set to Hidden (Invisible), you have
✎
to select Add Network and enter the correct
Network Name (SSID) and Security Key to
establish the connection.
E
5. If the Security/PIN pop-up appears, go to Step 6. If the
Network Connecting Screen appears, go to Step 10.
6. Press the or button to select Security or PIN. For
most home networks, you would select Security (for
Security Key). The Security Screen appears.
Select a network
Security Key
0 entered
Number
Lower case
B Delete
Space
n
Move E Enter R Return
7. On the Security screen, enter your network’s Pass
Phrase.
You should be able to find the Pass Phrase on
✎
one of the set up screens you used to set up your
router or modem.
8. To enter the Pass Phrase, follow these general
directions:
Press the number buttons on your remote to enter
–
numbers.
Use the direction buttons on your remote to move
–
from button to button on the Security Key screen.
Press the Red button to change case or display
–
symbols/characters.
To a enter letter or symbol, move to the letter or
–
symbol, and then press the ENTERE button.
To delete the last letter or number you entered, press
–
the Green button on your remote.
9. When done, press the Blue button on your remote. The
Network Connecting screen appears.
10. Wait until the connection confirmation message is
displayed, and then press the ENTERE button. The
Network Setup screen re-appears.
11. To test the connection, press the RETURN button to
select Network Test, and then press the ENTERE
button.
32
English
Page 33

33
English
04 Advanced Features
Network Setup (Ad-Hoc)
You can connect to a mobile device without an access point
through the “Samsung Wireless LAN Adapter” by using a
peer to peer network.
✎
This function is available when
Wireless Link) is set to Off.
How to connect to new Ad-hoc device
1. Follow Steps 1 through 6 in the “How to set up using
PBC (WPS)” (p. 31).
2. Choose Select a network. A list of devices/networks
appears.
3. While in the device list, press the Blue button on the
remote.
The message
✎
connection with cellphone or PC. The existing
network system may have limited functionality.
Do you want to change the network
connection? is displayed.
4. Input the generated Network Name (SSID) and
Security Key into the device you want to connect.
How to connect an existing Ad-hoc device
1. Follow Steps 1 through 6 in the “How to set up using
PBC (WPS)” (p. 31).
2. Choose Select a network. The Device/Network list
appears.
3. Select the device you want in the Device list.
4. If security key is required, input the security key.
If network doesn’t operate normally, check
✎
the Network Name (SSID) and Security Key
again. An incorrect Security Key may cause a
malfunction.
Ad-hoc is a direct WI-Fi
SWL(Samsung
Network Setup (Manual)
If the other methods do not work, you need to enter the
Network setting values manually.
Getting the Network Connection Values
To get the Network connection values on most Windows
computers, follow these steps:
1. Right click the Network icon on the bottom right of the
screen.
2. In the pop-up menu, click Status.
3. On the dialog that appears, click the Support tab.
4. On the Support tab, click the Details button. The
Network settings are displayed.
How to set up manually
To enter the Network connection values manually, follow
these steps:
1. Follow Steps 1 through 6 in the “How to set up using
PBC (WPS)” (p. 31).
2. Press the button to select Internet Protocol Setup,
and then press the ENTERE button. Press the
or button to select Manual, and then press the
ENTERE button.
3. Press the button to go to the first entry field
(IP Address).
4. Use the number buttons to enter numbers.
5. When done with each field, use the button to move
successively to the next field. You can also use the other
arrow buttons to move up, down, and back.
6. Enter the IP Address, Subnet Mask, and Gateway
values.
7. Press the or button to go to DNS.
8. Press the button to go to the first DNS entry field.
Enter the numbers as above.
9. When done, press the button to go to Select a
Network. Select your network, and then press the
ENTERE button.
10. Go to Step 4 in the “How to set up automatically”
(p. 32), and follow the directions from that point on.
Page 34

Advanced Features
SWL(Samsung Wireless Link)
This function lets you connect a Samsung device that
supports the PBC (WPS) to your TV. You can connect
devices to the TV even if a sharer is not connected to the TV.
To use the Internet@TV, the AP (access point) must be
✎
connected to the wireless network.
✎
If a Samsung Wireless
USB 2 port, the network may not operate normally. We
recommend to connecting it to the USB 1 (HDD) port.
✎
Only sharers using the 2.4 Ghz band are supported.
Sharers using the 5 Ghz band are not supported.
LAN Adapter is connected to the
SWL connect
You can directly connect a device that supports the PBC
(WPS) to the TV.
This function is available when
✎
Wireless Link) is set to On.
How to connect Samsung Wireless Link
For the procedures to establish a connection, refer to the
following:
1. Follow Steps 1 through 5 in the “How to set up using
PBC (WPS)” (p. 31).
2. Select SWL(Samsung Wireless Link) by using the
button and press the ENTER
3. Select SWL connect by using the button and press
the ENTERE button.
4. If the “
5. If the device is connected properly to the TV after
Press the PBC button on the PBC(WPS)
supported device to connect within 120 seconds.
message appears, press the PBC button on the device
to connect.
For more information, refer to the wireless network
✎
setup manual of the device to be connected.
starting count on message box then message box will
be disappeared automatically.
If the connection fails, please retry after 2 minutes.
✎
SWL(Samsung
E
button to turn it On.
If Your TV Fails to Connect to the Internet
Your TV may not be able to connect to the Internet
because your ISP has permanently registered the
MAC address (a unique identifying number) of your
PC or modem, which it then authenticates each time
you connect to the Internet as a way of preventing
unauthorized access. As your TV has a different MAC
address, your ISP can not authenticate its MAC address,
and your TV can not connect.
To resolve this problem, ask your ISP about the
procedures required to connect devices other than a PC
(such as your TV) to the Internet.
If your Internet service provider requires an ID or password
to connect to the Internet, your TV may not be able to
connect to the Internet. If this is the case, you must enter
your ID or password when connecting to the Internet.
The internet connection may fail because of a firewall
problem. If this is the case, contact your Internet service
provider.
If you cannot connect to the Internet even after you have
followed the procedures of your Internet service provider,
please contact Samsung Electronics
”
34
English
Page 35

35
English
04 Advanced Features
Media Play
SUM
Enjoy recorded tv, photos, music and/or movie
files saved on a USB Mass Storage Class (MSC)
device and/or your PC.
Recorded TV
Change Device
Device Mode E Enter R Return
Connecting a USB Device ¦
1. Turn on your TV.
2. Connect a USB device containing recorded tv, photo, music and/or movie files to
the USB 1 (HDD) or USB 2 jack on the side of the TV.
3. When USB is connected to the TV, popup window appears. Then you can select
Media Play.
USB Drive
TV Side Panel
or
Connecting to the PC through network ¦
You can play pictures, music and videos saved on your PC through a network connection in the Media Play mode.
✎
If you use
“www.samsung.com.”
Media Play through saved file on your PC, you should download “PC Share Manager” and users manual from
LAN
PC
External Modem
(ADSL/VDSL/Cable TV)
TV Side Panel
or
Samsung
Wireless
LAN
Adapter
Wireless IP
sharer
LAN Cable
1. For more information on how to configure your network, refer to “Network Connection” (p. 28).
You are recommended to locate both TV and PC in same subnet. The first 3 parts of the subnet address of the TV and
–
the PC IP addresses should be the same and only the last part (the host address) should be changed. (e.g. IP Address:
123.456.789.**)
2. Using a LAN cable, connect between the external modem and the PC onto which the Samsung PC Share Manager
programme will be installed.
You can connect the TV to the PC directly without connecting it through a Sharer (Router).
–
Page 36

Advanced Features
No supported functions when connecting to the PC through network:
✎
The xBackground Music and Background Music Setting functions.
Sorting files by preference in the
x
The
x
The Divx DRM, Multi-audio, embedded caption does not supported.
✎
Samsung PC Share manager should be permitted by the firewall programme on your PC.
✎
When you use ✎Media Play mode through a network connection, According to functions of the provided server:
x
x
x
x
✎
It might not work properly with unlicenced multimedia files.
Need-to-Know List before using ✎Media Play
x
x
x
x
x
x
x
x
x
x
x
x
x
x
x
x
x
x
x
x
(REW) or µ (FF) button while a movie is playing.
The sorting method may vary.
The scene search function may not be supported.
The xPlay Continuously function, which resumes playing of a video, may not be supported.
The
– Play Continuously function does not support multiple users. (It will have only memorised the point where the
most recent user stopped playing.)
The
or button may not work depending on the content information.
If you experience any file stuttering issue while playing a video over a wireless network, we recommend using a wired
network.
MTP (Media Transfer Protocol) is not supported.
The file system supports FAT16, FAT32 and NTFS.
Certain types of USB Digital camera and audio devices may not be compatible with this TV.
Media Play only supports USB Mass Storage Class (MSC) devices. MSC is a Mass Storage Class Bulk-Only
Transport device. Examples of MSC are Thumb drives, Flash Card Readers and USB HDD (USB HUB are not
supported). Devices should be connected directly to the TV’s USB port.
Before connecting your device to the TV, please back up your files to prevent them from damage or loss of data.
SAMSUNG is not responsible for any data file damage or data loss.
Connect a USB HDD to the dedicated port,
Do not disconnect the USB device while it is loading.
The higher the resolution of the image, the longer it takes to display on the screen.
The maximum supported JPEG resolution is 15360X8640 pixels.
For unsupported or corrupted files, the “Not Supported File Format” message is displayed.
If the files are sorted by Basic View, up to 1000 files can be displayed in each folder.
MP3 files with DRM that have been downloaded from a non-free site cannot be played. Digital Rights Management
(DRM) is a technology that supports the creation of content, the distribution and management of the content in an
integrated and comprehensive way, including the protection of the rights and interests of the content providers, the
prevention of the illegal copying of contents, as well as managing billings and settlements.
If more than 2 PTP devices are connected, you can only use one at a time.
If more than two MSC devices are connected, some of them may not be recognized. A USB device that requires high
power (more than 500mA or 5V) may not be supported.
If an over-power warning message is displayed while you are connecting or using a USB device, the device may not
be recognized or may malfunction.
If the TV has been no input during time set in
The power-saving mode of some external hard disk drives may be released automatically when connected to the TV.
If a USB extension cable is used, the USB device may not be recognized or the files on the device may not be read.
If a USB device connected to the TV is not recognized, the list of files on the device is corrupted or a file in the list is
not played, connect the USB device to the PC, format the device and check the connection.
If a file deleted from the PC is still found when Media Play is run, use the “Empty the Recycle Bin” function on the PC
to permanently delete the file.
Photos, Music, and Videos folders.
USB 1 (HDD) port.
Auto Protection Time, the Screensaver will run.
36
English
Page 37

37
English
04 Advanced Features
Screen Display ¦
Jan.10.2010
Jan.10.2010
Jan.10.2010
Jan.10.2010
Jan.10.2010
Jan.10.2010
Jan.10.2010
Jan.10.2010
Jan.10.2010
Jan.10.2010
/Movie 01.avi 1/1
Movie 01.avi
SUM
Movie 03.avi
Movie 05.avi
Movie 07.avi
Movie 09.avi
Movie 02.avi
Movie 04.avi
Movie 06.avi
Movie 08.avi
Movie 10.avi
B
Move to the file you desired using the up/down/right/left buttons and then press the ENTERE or (Play) button. The file is
played.
✎
Supports the
You can ascertain the selected
file name and the number of files
Displays sorting standard.
Sorting standard is
✎
different depending on the
contents.
View Devices and Contents Mode in Media Play homepage.
Information:
and page.
Sort List Section:
Videos
Change Device
Operation Buttons
Red (Change Device): Selects a connected device.
Green (Preference): Sets the file preference. (not supported in Basic view)
Yellow (Select): Selects multiple files from file list. Selected files are marked with a symbol.
Blue (Sorting): Selects the sort list.
T
Tools: Displays the option menu.
Using the
✎
(REW) or µ (FF) button, file list can move to next or previous page.
Page
Select Sorting T Tools
File List Section:
You can confirm the files
and groups that is sorted by
each category.
Recorded TV
To use the recording or Timeshift Mode function, the connected USB device must be available for recording. Device format is
recommended to use USB HDD.
✎
During the Device formatting, do not disconnect the device while formatting is in progress. If you format the device, all
files will be deleted.
Playing Recorded TV Programme
1. Press the or button to select Recorded TV, then press
the ENTERE button in the Media Play menu.
2. Press the /// button to select the desired file in the file
Recorded TV / .../ American Chopper
04/2010
list.
3. Press the ENTERE button or (Play) button.
The selected file is displayed on the top with its playing
–
time.
During playing the recorded TV programme, you can search
–
using the and button.
Using the Timeshift Mode function
t
Select Sorting T Tools
If you missed a live broadcast, you can see from the recorded broadcast using this feature.
When the Timeshift Mode is set to Auto, the TV stores the channel you watch currently to record automatically.
When the Timeshift Mode is set to Manual, if you press the
view you want to record.
(Play) button, the TV stores the channel from the point of
Page 38

Advanced Features
✎
NOTE
Recorded videos are DRM (digital rights management) protected and cannot be played on a PC or other TVs, nor can
x
they be played when the main board of the TV is changed.
Data broadcasts cannot be recorded.
x
The availability of both recording and the xTimeshift Mode function may differ depending on picture quality and the
free space on the hard disk drive.
If you press the
x
broadcast.
The
Timeshift Mode operates for a maximum of 90 minutes.
x
After the
x
Note that if you have paused the recording the TV will automatically resume playback.
If the 5% free memory space limit of the USB storage device is reached, the current recording process will be closed.
x
When recording is performed by both the PVR (Personal Video Recorder) function and a device that supports the
x
HDMI-CEC feature, recording by the PVR function takes precedence.
During a playback or the
x
If you change the input source during recording, the screen will go blank until the change is completed.
x
An application which supports neither the recording nor the xTimeshift Mode function will close automatically if you
try to use it during either function.
A message may appear in front of the application window indicating that the recording or the
x
function is closed.
Timeshift Mode
x
The recording and the
x
If the USB device has failed the
x
Device Performance Test again before you record with the Guide or Channel Manager.
The recording and
x
Device Performance Test.
If you attempt the recording or
x
Test , the function will not start.
If a USB device dedicated to recording is connected, existing
x
abnormally will automatically be deleted.
If you switch to external input mode during recording, the recording will continue but the
x
disabled.
If any function that turns off the TV (
x
will be turned off once the recording is complete.
or button, you can see the current channel being on air, or can see the start point the recorded
Timeshift Mode function has run for the maximum time, the time information will be fixed to “00:00:00.”
Timeshift Mode, the picture will be displayed according to the display settings of the TV.
Timeshift Mode
function is not supported for radio channels.
Timeshift Mode functions are disabled for channels locked with Child Lock.
Device Performance Test, the USB device must go through the Device Format and
Timeshift Mode functions can only be used with a USB storage device that completed the
Timeshift Mode function with a device that did not have the Device Performance
Timeshift Mode or recording files that were saved
�
(REC) button will be
Sleep Timer, Off timer, etc.) is set for a time that conflicts with recording, the TV
38
English
Page 39

39
English
04 Advanced Features
Videos
Movie 01.avi
00:04:03 / 00:07:38 1/1
SUM
Playing Video
1. Press the or button to select Videos, then press the ENTERE button in the Media Play menu.
2. Press the /// button to select the desired file in the file list.
3. Press the ENTERE button or (Play) button.
The selected file is displayed on the top with its playing time.
–
If video time information is unknown, play time and progress bar are not displayed.
–
During playing the video, you can search using the
– and button.
✎
In this mode, you can enjoy movie clips contained on a Game,
but you cannot play the Game itself.
Supported Subtitle Formats
y
Name File extension Format
MPEG-4 time-based text .ttxt XML
SAMI .smi HTML
SubRip .srt string-based
SubViewer .sub string-based
Micro DVD .sub or .txt string-based
Supported Video Formats y
File Extension Container Video Codec Resolution
*.avi
*.mkv
*.asf ASF
*.wmv ASF Window Media Video v9 1920x1080 6 ~ 30 25 WMA
*.mp4 MP4
*.3gp 3GPP
*.vro
*.mpg
*.mpeg
*.ts
*.tp
*.trp
AVI
MKV
VRO
VOB
PS
TS
Frame rate
(fps)
Divx 3.11 / 4.x / 5.1 / 6.0 1920x1080 6 ~ 30 8
XviD 1920x1080 6 ~ 30 8
H.264 BP / MP / HP 1920x1080 6 ~ 30 25
MPEG4 SP / ASP 1920x1080 6 ~ 30 8
Motion JPEG 800x600 6 ~ 30 8
Divx 3.11 / 4.x / 5.1 / 6.0 1920x1080 6 ~ 30 8
XviD 1920x1080 6 ~ 30 8
H.264 BP / MP / HP 1920x1080 6 ~ 30 25
MPEG4 SP / ASP 1920x1080 6 ~ 30 8
Motion JPEG 800x600 6 ~ 30 8
H.264 BP / MP / HP 1920x1080 6 ~ 30 25
XVID 1920x1080 6 ~ 30 8
H.264 BP / MP / HP 1920x1080 6 ~ 30 25
MPEG4 SP / ASP 1920x1080 6 ~ 30 8
MPEG1 1920x1080 24 / 25 / 30 30
MPEG2 1920x1080 24 / 25 / 30 30
MPEG1 1920x1080 24 / 25 / 30 30
H.264 1920x1080 6 ~ 30 25
MPEG2 1920x1080 24 / 25 / 30 30
H.264 1920x1080 6 ~ 30
VC1 1920x1080 6 ~ 30 25
Bit rate
(Mbps)
E
Chaptering
MP3 / AC3 / LPCM /
ADPCM / DTS Core
MP3 / AC3 / LPCM /
MP3 / ADPCM / AACMPEG4 SP / ASP 1920x1080 6 ~ 30 8
ADPCM / AAC / HE-AAC
AC3 / MPEG / LPCM
AC3 / MPEG / LPCM / AACMPEG2 1920x1080 24 / 25 / 30 30
AC3 / AAC / MP3 / DD+ /
25
L
Jump T Tools R Return
Audio Codec
ADPCM / WMA
HE-AAC
Page 40

Advanced Features
Movie 01.avi
00:04:03 / 00:07:38 1/1
SUM
B
Other Restrictions
NOTE
✎
If there are problems with the contents of a codec, the codec will not be supported.
x
If the information for a Container is incorrect and the file is in error, the Container will not be able to play
x
correctly.
Sound or video may not work if the contents have a standard bitrate/frame rate above the compatible Frame/sec
x
listed in the table above.
Video Decoder Audio Decoder
Supports up to H.264, Level 4.1•
H.264 FMO / ASO / RS, VC1 SP / MP / AP L4 and AVCHD are not •
supported.
XVID, MPEG4 SP, ASP:•
Below 1280 x 720: 60 frame max –
Above 1280 x 720: 30 frame max
–
GMC 2 over is not supported.•
H.263 is not supported.•
Only Samsung Techwin MJEPG is supported. •
Playing recorded TV or movie file continuously (Resume Play)
If you exit the playing Recorded TV or Videos function, it can be played later from the point where it was stopped.
✎
If you press the
ENTERE button (Chaptering) during playing the file, you can explore scene divided into 5 chapters
you want.
✎
If the index information is damaged or unsupported, you will not be able to use the
1. Select the movie file you want to play continuously by pressing
the or button to select it from the file list section.
2. Press the (Play) / ENTERE button.
3. Select Play Continuously (Resume Play) by pressing the Blue
button. The Movie will begin to play from where it was stopped.
The Blue button is available when resuming play.
✎
If the ✎Cont. movie play help function is set to On in the
Settings menu, a pop-up message will appear when you
resume play a movie file.
Supports up to WMA 7, 8, 9, STD•
WMA 9 PRO does not support 2 channel excess multi channel or •
lossless audio.
WMA sampling rate 22050Hz mono is not supported.•
Chaptering function.
Resumes playing from the last
viewed scene.
Section Repeat Play continuously E Chaptering
English
40
L
Jump T Tools
Page 41

41
English
04 Advanced Features
Music
Image1024.jpg 1024x768 2010/2/1 3/15
SUM
3/15
I Love you
Jhon
Music 1
No Singer
Music 2
No Singer
Music 3
No Singer
Music 4
No Singer
Music 5
No Singer
I Love You
Jhon
1st Album
Pop
2010
4.2MB
01:10 / 04:02
SUM
Playing Music
1. Press the or button to select Music, then press the
ENTERE button in the Media Play menu.
2. Press the /// button to select the desired file in the file
list.
3. Press the ENTERE button or (Play) button.
– During playing the music, you can search using the and
button.
– (REW) and µ (FF) buttons do not function during play.
Only displays the files with MP3 and PCM file extension. Other
✎
file extensions are not displayed, even if they are saved on the
same USB device.
If the sound is strange when playing MP3 files, adjust the
✎
Equalizer in the Sound menu. (An over-modulated MP3 file
may cause a sound problem.)
✎
You can create
My Playlist selecting the desired music in the file, and can play My Playlist.
Photos
Viewing a Photo (or Slide Show)
1. Press the or button to select Photos, then press the
ENTERE button in the Media Play menu.
2. Press the /// button to select the desired file in the file
list.
3. Press the ENTERE button or (Play) button.
While a photo list is displayed, press the
–
ENTERE button on the remote control to start slide show.
All files in the file list section will be displayed in the slide show.
–
During the slide show, files are displayed in order from
–
currently being shown.
✎
Music files can be automatically played during the Slide Show if
the Background Music is set to On.
✎
BGM Mode cannot be changed until the BGM has finished
The
loading.
(Play) /
Normal
E
Pause L Jump T Tools R Return
E
Pause L Previous/Next T Tools R Return
Page 42

Advanced Features
1/1
/Movie 01.avi
SUM
Movie 01.avi
Jan.10.2010
Jan.10.2010
Jan.10.2010
Jan.10.2010
Jan.10.2010
Jan.10.2010
Jan.10.2010
Jan.10.2010
Jan.10.2010
Jan.10.2010
Movie 03.avi
Movie 05.avi
Movie 07.avi
Movie 09.avi
Movie 02.avi
Movie 04.avi
Movie 06.avi
Movie 08.avi
Movie 10.avi
Playing the Multiple Files ¦
Playing the selected recorded TV/video/music/photo files
1. Press the Yellow button in the file list to select the desired file.
Videos
2. Repeat the above operation to select multiple files.
NOTE
✎
The xc
mark appears to the left of the selected files.
To cancel a selection, press the Yellow button again.
x
To deselect all selected files, press the xTOOLS button
and select Deselect All.
3. Press the TOOLS button and select Play Selected Contents.
Change Device
Select Sorting T Tools
Playing the recorded TV/video/music/photo file group
1. While a file list is displayed, move to the any file in desired group.
2. Press the TOOLS button and select Play Current Group.
Media Play Additional Function ¦
Sorting the file list
Press the Blue button in the file list to sort the files.
Category Operations Recorded TV Videos Music Photos
Basic View
Title
Preference
Latest Date
Earliest Date
Artist
Album
Genre
Mood
Monthly
Weekly
Channel
It shows whole folder. You can view the photo by selecting the folder.
It sorts and displays the file title in Symbol/Number/Alphabet/Special order.
It sorts and displays the file by preference. You can change the file preference
in the file list section using the Green button.
It sorts and shows files by latest date.
It sorts and shows files by earliest date.
It sorts the music file by artist in alphabetical.
It sorts the music file by album in alphabetical order.
It sorts music files by the genre.
It sorts music files by the mood. You can change the music mood information.
It sorts and shows photo files by month. It sorts only by month (from January
to December) regardless of year.
It sorts and shows photo files by week. It sorts only by week (from Monday
to Sunday).
It sorts the recorded files by channel name.
c c c c
c c c c
c c c
c c c
c
c
c c c
c
c
c
c
c
42
English
Page 43

43
English
04 Advanced Features
Recorded TV/Videos/Music/Photos Play Option menu
During playing a file, press the TOOLS button.
Category Operations Recorded TV Videos Music Photos
Title You can move the other file directly.
Repeat Mode You can play recorded tv, movie and music files repeatedly.
Picture Size You can adjust the picture size for preference.
Picture Setting You can adjust the picture setting. (p. 16~21)
Sound Setting You can adjust the sound setting. (p. 21, 22)
Subtitle Setting You can play the video file with Subtitle. This function only works if the
Audio You can enjoy video in one of supported languages as required. The function
Audio Description You can adjust the audio description (p. 22).
Stop Slide Show /
Start Slide Show
Slide Show Speed You can select the slide show speed during the slide show.
Slide Show Effect You can set variously the slide show effect.
Background Music You can set and select background music when watching a slide show.
Zoom You can zoom into images in full screen mode.
Rotate You can rotate images in full screen mode.
Home Background You can move the file to the Media Play desktop.
Information You can see detailed information about the played file.
subtitles are the same file name as the video file.
is only enabled when stream-type files which support multiple audio formats
are played.
You can start or stop a slide show.
c c
c c c
c
c c c
c c c c
c c
c c
c
c c c c
c
c
c
c
c
c
c
c
Settings
Using the Setup Menu
Background Setting
■ : Select to display the background you want.
■ : Select to display the help pop-up message for continuous movie
Cont. movie play help (Resume Play) (On / Off)
playback.
■ : Shows the registration code authorized for the TV. If you connect to the DivX web
Get the DivX® VOD registration code
site and register the registration code with a personal account, you can download VOD registration file. If you play the VOD
registration using Media Play, the registration is completed.
For more information on DivX® VOD, visit “www.DivX.com.”
✎
Get the DivX® VOD deactivation code ■ : When DivX® VOD is not registered, the registration deactivation code is
displayed. If you execute this function when DivX® VOD is registered, the current DivX® VOD registration is deactivated.
■ : Select to view information about the connected device.
Information
Page 44

Advanced Features
Anynet+
What is Anynet+?
Anynet+ is a function that enables you to control all connected Samsung devices that support Anynet+ with your Samsung
TV’s remote. The Anynet+ system can be used only with Samsung devices that have the Anynet+ feature. To be sure your
Samsung device has this feature, check if there is an Anynet+ logo on it.
To connect to a Samsung Home Theatre
1. Connect the HDMI IN (1(DVI), 2(ARC), 3 or 4) jack on the TV and the HDMI OUT jack of the corresponding Anynet+
device using an HDMI cable.
2. Connect the HDMI IN jack of the home theatre and the HDMI OUT jack of the corresponding Anynet+ device using an
HDMI cable.
✎
NOTE
Connect the Optical cable between the
x
on the Home Theatre.
The ARC function enables digital output of sound using the
x
the TV is connected to an audio receiver that supports the ARC function.
When following the connection above, the Optical jack only outputs 2 channel audio. You will only hear sound from
x
the Home Theatre’s Front, Left and Right speakers and the subwoofer. If you want to hear 5.1 channel audio, connect
the DIGITAL AUDIO OUT (OPTICAL) jack on the DVD / Satellite Box (i.e. Anynet Device 1 or 2) directly to the
Amplifier or Home Theatre, not the TV.
You can connect only one Home Theatre.
x
You can connect an Anynet+ device using the HDMI cable. Some HDMI cables may not support Anynet+ functions.
x
Anynet+ works when the AV device supporting Anynet+ is in the standby or on status.
x
Anynet+ supports up to 12 AV devices in total. Note that you can connect up to 3 devices of the same type.
x
t
TV
Home Theatre
Optical Cable
DIGITAL AUDIO OUT (OPTICAL) jack on your TV and the Digital Audio Input
HDMI IN 2(ARC) port and can only be operated when
Anynet+ Device 1
HDMI Cable
HDMI Cable
Anynet
+
Device 2, 3, 4
44
English
Page 45

45
English
04 Advanced Features
Anynet+ Menu
The Anynet+ menu changes depending on the type and status of the Anynet+ devices connected to the TV.
Anynet+ Menu Description
View TV Changes Anynet+ mode to TV broadcast mode.
Device List Shows the Anynet+ device list.
(device_name) MENU Shows the connected device menus. E.g. If a DVD recorder is connected, the disc menu of
(device_name) INFO Shows the play menu of the connected device. E.g. If a DVD recorder is connected, the
Recording: (*recorder) Starts recording immediately using the recorder. (This is only available for devices that
Stop Recording: (*recorder) Stops recording.
Receiver Sound is played through the receiver.
If more than one recording device is connected, they are displayed as (*recorder) and if only one recording device is
connected, it will be represented as (*device_name).
the DVD recorder will appear.
play menu of the DVD recorder will appear.
support the recording function.)
Setting Up Anynet+ ¦
Setup ■
Anynet+ (HDMI-CEC) (Off / On): To use the Anynet+ Function, Anynet+ (HDMI-CEC) must be set to On.
When the
✎
Auto Turn Off (No / Yes): Setting an Anynet+ Device to turn off automatically when the TV is turned off.
The active source on the TV must be set to TV to use the Anynet+ function.
✎
Even if an external device is still recording, it may turn off.
✎
Anynet+ (HDMI-CEC) function is disabled, all the Anynet+ related operations are deactivated.
Switching between Anynet+ Devices ¦
1. Anynet+ devices connected to the TV are listed.
If you cannot find a device you want, press the Red button to refresh the list.
✎
2. Select a device and press the ENTERE button. You can switch to the selected device.
Only when you set
✎
Switching to the selected device may take up to 2 minutes. You cannot cancel the operation during the switching
x
operation.
If you have selected external input mode by pressing the
x
Make sure to switch to an Anynet+ device by using the Device List.
Anynet+ (HDMI-CEC) to On in the Application menu, the Device List menu appears.
SOURCE button, you cannot use the Anynet+ function.
Recording ¦
You can make a recording of a TV Programme using a Samsung recorder.
1. Select Recording.
When there are more than two recording devices
✎
When multiple recording devices are connected, the recording devices are listed. Select one recording device in
x
the Device List.
When the recording device is not displayed, select
✎
2. Press the EXIT button to exit.
You can record the source streams by selecting
✎
Pressing the
✎
another device, the video from the device is recorded.
Before recording, check whether the antenna jack is properly connected to the recording device. To properly
✎
connect an antenna to a recording device, refer to the recording device’s users manual.
(REC) button will record whatever you are currently watching. If you are watching video from
Device List and press the Red button to search devices.
Recording: (device_name).
Page 46

Advanced Features
Listening through a Receiver ¦
You can listen to sound through a receiver (i.e Home Theatre) instead of the TV Speaker.
1. Select Receiver and set to On.
2. Press the EXIT button to exit.
If your receiver supports audio only, it may not appear in the device list.
✎
The receiver will work when you have properly connected the optical in jack of the receiver to the ✎DIGITAL AUDIO
OUT (OPTICAL) jack of the TV.
When the receiver (i.e Home Theatre) is set to On, you can hear sound output from the TV’s Optical jack. When the
✎
TV is displaying a DTV (aerial) signal, the TV will send out 5.1 channel sound to the receiver. When the source is a
digital component such as a DVD and is connected to the TV via HDMI, only 2 channel sound will be heard from
the receiver.
✎
NOTE
You can only control Anynet+ devices using the TV remote control, not the buttons on the TV.
x
The TV remote control may not work under certain conditions. If this occurs, reselect the Anynet+ device.
x
The Anynet+ functions do not operate with other manufacturers’ products.
x
Using the ARC function
You can listen to sound through a receiver connected HDMI cable without the need for a separate optical cable.
1. Select Receiver and set to On.
2. Press the EXIT button to exit.
✎
To use the ARC function, a receiver which supports the HDMI-CEC and ARC features must be connected to the
IN 2 (ARC) port.
✎
To disable the ARC function, set the
will be blocked from receiving the signal.
Receiver to Off. Even if the TV transmits the ARC signal continuously, the receiver
HDMI
46
English
Page 47

47
English
04 Advanced Features
Troubleshooting for Anynet+ ¦
Problem Possible Solution
Anynet+ does not work. Check if the device is an Anynet+ device. The Anynet+ system supports Anynet+ devices only.•
I want to start Anynet+. Check if the Anynet+ device is properly connected to the TV and check if the • Anynet+ (HDMI-CEC) is set to
I want to exit Anynet+. Select • View TV in the Anynet+ menu.
The message “Connecting to
Anynet+ device...” appears on the
screen.
The Anynet+ device does not play. You cannot use the play function when • Plug & Play (initial setup) is in progress.
Only one receiver (home theatre) can be connected.•
Check if the Anynet+ device power cord is properly connected.•
Check the Anynet+ device’s Video/Audio/HDMI cable connections.•
Check whether • Anynet+ (HDMI-CEC) is set to On in the Anynet+ setup menu.
Check whether the TV remote control is in TV mode.•
Check whether the remote control is Anynet+ compatible.•
Anynet+ doesn’t work in certain situations. (Searching channels, operating • Media Play or Plug & Play (initial
setup), etc.)
When connecting or removing the HDMI cable, please make sure to search devices again or turn your TV off •
and on again.
Check if the Anynet+ Function of Anynet+ device is set on.•
On in the Anynet+ Setup menu.
Press the • TOOLS button to display the Anynet+ menu and select a menu you want.
Press the • SOURCE button on the TV remote control and select a non- Anynet+ device.
>/<
Press• P
tuner-embedded Anynet+ device is not connected.)
You cannot use the remote control when you are configuring Anynet+ or switching to a view mode.•
Use the remote control when the Anynet+ setting or switching to view mode is complete.•
, and PRE-CH to change the TV mode. (Note that the channel button operates only when a
The connected device is not
displayed.
The TV Programme cannot be
recorded.
The TV sound is not output
through the receiver.
Check whether or not the device supports Anynet+ functions.•
Check whether or not the HDMI cable is properly connected.•
Check whether • Anynet+ (HDMI-CEC) is set to On in the Anynet+ setup menu.
Search Anynet+ devices again.•
You can connect an Anynet+ device using the HDMI cable only. Some HDMI cables may not support Anynet+ •
functions.
If connection is terminated because there has been a power interruption or the HDMI cable has been •
disconnected, please repeat the device scan.
Check whether the antenna jack on the recording device is properly connected.•
Connect the optical cable between TV and the receiver.•
The ARC function enables digital output of sound using the • HDMI IN 2(ARC) port and can only be operated
when the TV is connected to an audio receiver that supports the ARC function.
Page 48

Advanced Features
B
Getting Started with Internet@TV ¦
Internet@TV
Internet@TV brings useful and entertaining
Recommended
contents and services directly from the web to
NOTE
✎
your TV.
Samsung Apps
My Applications
Settings
Login B Sort by R Return
Configure the network settings before using xInternet@TV. For more information, refer to “Network Connection”
(p. 28).
Unsupported fonts within the provider’s content will not display normally.
x
Slow responses and/or interruptions may occur, depending on your network conditions.
x
English may be only supported in application service depending on region.
x
This feature is not available in some locations.
x
If you experience a problem using a application, please contact the content provider.
x
According to circumstances of the contents provider, an application’s updates or the application itself may be
x
discontinued.
Depending on your country’s regulations, some applications may have limited service or not be supported.
x
Screen Display
Settings
Recommended
My Applications
Login B
Sort by R Return
Controls:
• Red (Login): To log in to to Internet@TV.
• Green (Mark as favourite): To mark the applications as a favourite.
• Blue (Sort by): To sort the applications.
•R Return: To return to the previous menu.
The colour buttons may work differently depending on the application.
✎
by Date 1/1
Recommended Applications:
Displays the recommended service by
Samsung. You are not able to add or
delete a service in this list.
Downloaded Applications:
Displays the downloaded applications
through the Samsung Apps.
Displays the current channel.
TV Screen:
Information:
Displays notices, new
applications, and
advertisemevnts brought to
you by Samsung product
introductions.
Application service:
You can experience
various service by provided
samsung.
Samsung Apps
Internet@TV Settings:
Edit and configure applications
and Internet@TV settings.
by Date 1/1
English
48
Page 49

49
English
04 Advanced Features
Account Login
admin
For a application with multiple account, use and to
access the different account.
Login
User account:
Password:
R Cancel
✎
For a more enjoyable application experience, register
and log in to your account.
For instructions on creating an account, refer to
✎
up Settings Internet@TV ID Create.
1. Press the Red button in Internet@TV home page.
2. Select desired User account, then press the ENTERE
button.
If you want create account, press Red button:
✎
then create account OSD window appear.
3. Enter the Password.
When login succeeds,
✎
displayed on the screen.
User account will be
Setting
Setting up Internet@TV ¦
Settings
Create IDs and configure Internet@TV settings from this
screen. Highlight Settings using and buttons and press
the ENTER
E
button.
Settings
R Return
System Setup
■
Ticker Autorun (Off / On): Enable/disable ticker autorun
upon powering on the TV.
The
✎
Ticker application provides useful News,
Weather, and Stock Market information. The
Ticker application on Internet@TV must be
downloaded to use this feature.
Depending on your country,
✎
may have different service or not be supported.
Channel Bound Service (Off / On): Some channels
support applications as an Internet data service, allowing
you to access the Internet service while watching TV.
Only available if supported by the broadcaster.
✎
Reset: Resets Internet@TV settings to factory default
settings.
Change the Service Lock password
The default password set is “0-0-0-0.”
✎
If you forget the password, press the following
✎
sequence of remote control buttons to reset the
password to “0-0-0-0”: POWER (off) MUTE
8 2 4 POWER (on).
■
Internet@TV ID
You can use this menu when creating, deleting the
account. You can control your account including
contents site’s account information.
Account is only for internet@TV.
✎
Create: Create an account and link it with desired
service applications.
NOTE
✎
Account will be made less than 10.
x
Maximum number of characters is 8.
x
Manager
Service Site
– : Register login information for service
sites.
Change Password
– : Change account password.
Delete
– : Delete the account.
Service Manager
■ : Delete and lock applications installed
to Internet@TV.
Lock: Lock the application.
Accessing a locked application requires the
✎
password.
Delete: Delete the application.
Properties
■ : Display information about Internet@TV. Use
the Check the speed of your internet connection
option to test your network connection.
Ticker application
Page 50

Advanced Features
B
You Tu be
Using the Internet@TV service ¦
Samsung Apps
Samsung Apps is a store for downloading applications to be
used on Samsung TV/AV equipment.
Users can enjoy a variety of contents like videos, music,
photos, games, useful information etc. using the downloaded
applications.
Additional applications will be available hereafter.
Samsung Apps
Video
Sports
Game
Lifestyle
Information
Help
Using the colour buttons with the
✎
Red (Login): To log in to the internet service.
x
Green (Thumbnail View): To change the view
x
mode.
Blue (Sort by): To sort the applications by
x
Featured, Most downloaded, Most recent or
Name.
R
Return: Moves to previous menu.
x
Featured Most downloaded Most recent Name
YouTube
TV store Test User002
Login B Thumbnail View Sort by R Return
Free
Samsung Apps.
Using the Samsung Apps by category
The following categories are available:
y What’s New?: Displays newly registered applications.
y Video: Displays various video media such as movies, TV
shows and short length videos.
y Sports: Displays various sports media such as match
information, images and short length video.
y Game: Displays various games such as sudoku and
chess.
y Lifestyle: Includes various lifestyle media services such
as music, personal photo management tools and social
networking such as Facebook and Twitter.
y Information: Includes various information services such
as news, stocks and weather.
y Other: Includes other miscellaneous services.
y My Page: My Page offers information about already
installed applications on the TV like detailed information,
download contents etc.. It can allows delete or lock the
applications.
y Help: If you have questions about Internet@TV, check
this section first.
English
50
Page 51

51
English
04 Advanced Features
AllShare
AllShare™
3/7
About AllShare ¦
AllShare connects your TV, mobile phones and other
devices which are compatible through a network. On your
TV, you can view call arrivals, SMS messages and schedules
set on your mobile phones. In addition, you can play media
contents including videos, photos and music saved on your
mobile phones or the other devices (such as your PC) by
controlling them on the TV via the network. Additionally, you
can use your TV as a monitor for your mobile when browsing
a web page.
For more information, visit “www.samsung.com” or
✎
contact the Samsung call centre. Mobile devices may
need additional software installation. For details, refer to
each device’s user’s guide.
Setting Up AllShare ¦
Setup
Message (On / Off) ■ : Enables or disables the message
function (for call arrivals, SMS messages and schedules
set on your mobile phones).
Media (On / Off)
■ : Enables or disables the media
function. When the media function is on, it plays videos,
photos and music from a mobile phone or other device
that supports AllShare.
■ : Enables or disables the
ScreenShare (On / Off)
ScreenShare function for using mobile phone as a
remote control.
■ : Sets the TV name so you can find it easily on
TV name
a mobile device.
If you select
✎
using the OSK (On Screen Keyboard).
User Input, you can type on the TV
Setup
Setup
Message
Media
TV name : Home TV
ScreenShare
Message / Media / ScreenShare
Shows a list of mobile phones or connected devices which
have been set up with this TV for using the Message,
Media, or ScreenShare function.
✎
Media function is available in all mobile devices
The
which support AllShare.
Allowed / Denied
■ : Allows/Blocks the mobile phone.
■ : Deletes the mobile phone from the list.
Delete
This function only deletes the name of the mobile
✎
from the list. If the deleted mobile device is turned
on or trys to connect to the TV, it may appear on
the list again.
Using the Message Function
Using this function, you view call arrivals, SMS messages
and schedules set on the mobile phone through the alarm
window while watching TV.
✎
NOTE
To disable the alarm window, set xMessage to Off in
Setup of AllShare.
If
OK is selected, or if OK is not selected after the
x
message has appeared three times, the message
will be deleted. The message is not deleted from the
mobile phone.
The alarm window can be displayed while using
x
some applications such as Media Play etc. To view
the contents of a message, switch to TV viewing
mode.
When a message from an unknown mobile phone is
x
displayed, select the mobile phone on the message
menu in AllShare and select Denied to block the
phone.
Message View
If a new SMS message arrives while you are
watching TV, the alarm window appears. If you click
the OK button, the contents of the message are
displayed.
You can configure the viewing settings for SMS
✎
messages on your mobile phones. For the
procedures, refer to the mobile phone manual.
Some types of characters may be displayed as
✎
blank or broken characters.
E
Select R Return e Exit
Setup R Return
Page 52

Advanced Features
Call Arrival Alarm
If a call arrives while you are watching TV, the alarm
window appears.
Schedule Alarm
While you are watching TV, the alarm window
appears to display the registered event.
You can configure viewing settings for schedule
✎
contents on your mobile phones. For the
procedures, refer to the mobile phone manual.
Some special characters may be displayed as
✎
blank or broken characters.
Using the Media Function
An alarm window appears informing the user that the media
contents (videos, photos, music) sent from a mobile phone
will be displayed on your TV. The contents are played
automatically 3 seconds after the alarm window appears.
If you press the RETURN or EXIT button when the alarm
window appears, the media contents are not played.
NOTE
✎
If the media function executes for the first time,
x
the warning popup windows appears. Press the
ENTERE button to select Allow, then you can use
Media function on that device.
You can also change the setting (or resetting) of this feature at “AllShare
DenyAllow
To turn off the media contents transmission from
x
the mobile phone, set Media to Off in the AllShare
setup.
Contents may not be played on your TV depending
x
on their resolution and format.
The
ENTERE and / buttons may not work
x
depending on the type of media content.
Using the mobile device, you can control the media
x
playing. For details, refer to each mobile’s user’s
guide.
When you want to play media contents from
x
your PC, select the PC icon on the main display
of AllShare. Then the TV’s Media Play menu
automatically changes. For more detail information,
refer to “Media Play” (p. 35).
Using ScreenShare Function
Screenshare displays the same web page as provide in
mobile. Using ScreenShare, you can open the various
contents saved in a mobile phone. For example, the image
below displays an access page for contents from a mobile.
You can read the mobile’s various files and view the phone
book and calender on the TV. Also, in phone book, you can
make a call to other person, or can send to SMS.
✎
NOTE
In Samsung mobile, ScreenShare must be installed
x
and the supporting application must be executed;
then you can use the ScreenShare function.
Available buttons on your remote control may vary
x
for each page.
Doc Viewer can read files in doc format, but cannot
x
modify them.
The screen display may differ depending on the
x
connected device.
My Mobile
Contacts Calendar Doc Viewer
E
Select Return
Using your Samsung phone to control your TV Simply
Before you can use this feature, you must connect to
a Samsung mobile phone that supports ScreenShare
functions. When operating the TV with your mobile phone,
only the POWER,
supported.
Even if you keep pressing down on a control button
✎
(channel or volume) on the mobile phone, the value will
only go up or down by one unit.
Y
, P</> and MUTE buttons are
52
English
Page 53

53
English
Other Information
ABC D
Analogue Channel Teletext Feature
The index page of the Teletext service gives you information on how to use the service. For Teletext information to be displayed
correctly, channel reception must be stable. Otherwise, information may be missing or some pages may not be displayed.
✎
You can change Teletext pages by pressing the numeric buttons on the remote control.
05 Other Information
1
/ (Teletext on/mix/off):
Activate the Teletext mode after
selecting the channel providing the
Teletext service. Press it twice to
overlap the Teletext mode with the
current broadcasting screen. Press
it one more time to exit teletext.
2
8 (store): Store the Teletext
pages.
3
4 (size): Display the double-
size letters on the upper half of the
screen. For the lower half of the
screen, press it again. To display
the normal screen, press it once
again.
4
9 (hold): Hold the display
on a given page if the selected
page is linked with several
secondary pages which follow on
automatically. To resume, press it
again
5
0 (mode): Select the Teletext
mode (LIST/ FLOF).
If you press this button in the LIST
mode, the mode is switched into
the List save mode. In the List save
mode, you can save a Teletext
page into list using the 8(store)
button.
1
2
3
4
2 (page up): Display the next
Teletext page.
5
3 (page down): Display the
previous Teletext page.
6 (index): Display the index
(contents) page at any time while
you are viewing Teletext.
5 (reveal): Display the hidden
text (answers to quiz games, for
6
example). To display the normal
7
7 (cancel): Display the current
broadcast when searching for a
8
9
system is used by a broadcasting
0
colour-coded and can be selected
by pressing the coloured buttons.
Press one of them corresponding
!
@
information that can be selected
in the same way. To display the
previous or next page, press the
corresponding coloured button.
screen, press it again.
Colour buttons (red/green/
yellow/blue): If the FASTEXT
company, the different topics
covered on a Teletext page are
to the required. The page is
displayed with other coloured
7
8
9
0
!
page.
@
6
1 (sub-page): Display the
available sub-page.
The Teletext pages are organized according to six categories:
Part Contents Part Contents
A Selected page number. D Date and time.
B Broadcasting channel identity. E Text.
Current page number or
C
search indications.
F
Status information. FASTEXT
information.
Page 54

Other Information
Installing the Wall Mount
Assembling the Blanking Bracket
When installing the TV onto a wall, attach the Blanking Bracket as shown.
Blanking Bracket
Preparing before installing Wall-Mount (46 ~ 55 inch TVs)
To install a wall-mount from another manufacturer, use the Holder-Ring.
Installing the Wall Mount Kit ¦
Wall mount items (sold separately) allow you to mount the TV on the wall.
For detailed information on installing the wall mount, see the instructions provided with the Wall Mount items. Contact a
technician for assistance when installing the wall mount bracket.
Samsung Electronics is not responsible for any damage to the product or injury to yourself or others if you elect to install the
TV on your own.
54
English
Page 55

55
English
05 Other Information
Wall Mount Kit Specifications (VESA)
The wall mount kit ✎ is not supplied, but sold separately.
Install your wall mount on a solid wall perpendicular to the floor. When attaching to other building materials, please contact
your nearest dealer. If installed on a ceiling or slanted wall, it may fall and result in severe personal injury.
✎
NOTE
Standard dimensions for wall mount kits are shown in the table below.
x
When purchasing our wall mount kit, a detailed installation manual and all parts necessary for assembly are provided.
x
Do not use screws that do not comply with the VESA standard screw specifications.
x
Do not use screws that are longer than the standard dimension or do not comply with the VESA standard screw
x
specifications. Screws that are too long may cause damage to the inside of the TV set.
For wall mounts that do not comply with the VESA standard screw specifications, the length of the screws may differ
x
depending on the wall mount specifications.
Do not fasten the screws that are too
x
personal injury. Samsung is not liable for these kinds of accidents.
Samsung is not liable for product damage or personal injury when a non-VESA or non-specified wall mount is used or
x
the consumer fails to follow the product installation instructions.
Do not mount the TV at more than a 15 degree tilt.
x
Product
Family
LCD-TV
inches VESA Spec. (A * B) Standard Screw Quantity
19~22
23~29 200 X 100
30~40 200 X 200 M6
46~55 400 X 400
57~65 600 X 400
70~80 800 X 400
80~ 1400 X 800
strongly, this may damage the product or cause the product to fall, leading to
75 X 75
100 X 100
M4
4
M8
Do not install your Wall Mount Kit while your TV is turned on. It may result in personal injury due to
electric shock.
Assembling the Cables
Enclose the cables in the Cable tie so that the cables are not visible through the
stand.
Cable tie
Page 56

Other Information
1
2
3
Anti-theft Kensington Lock
The Kensington Lock is not supplied by Samsung. It is a device used to
physically fix the system when using it in a public place. The appearance and
locking method may differ from the illustration depending on the manufacturer.
Refer to the manual provided with the Kensington Lock for additional
information on proper use.
Please find a “
✎ K
the “
K
” icon.
1. Insert the locking device into the Kensington slot 1 on the LCD TV and
turn it as shown 2.
2. Connect the Kensington Lock cable 3.
3. Fix the Kensington Lock to a desk or a heavy stationary object.
✎
The locking device has to be purchased separately.
The location of the Kensington slot may be different depending on the TV model.
✎
To Avoid the TV from Falling ¦
1. Put the screws into the clamps and firmly fasten them onto the wall.
Confirm that the screws have been firmly installed onto the wall.
You may need additional material such as an anchor depending on
✎
the type of wall.
Since the necessary clamps, screws, and string are not supplied,
✎
please purchase these additionally.
2. Remove the screws from the back centre of the TV, put the screws into
the clamps, and then fasten the screws onto the TV again.
Screws may not be supplied with the product. In this case, please
✎
purchase the screws of the following specifications.
Screw Specifications
✎
x
x
3. Connect the clamps fixed onto the TV and the clamps fixed onto the wall
with a strong cable and then tie the string tightly.
NOTE
✎
x
x
x
4. Verify all connections are properly secured. Periodically check
connections for any sign of fatigue for failure. If you have any doubt about
the security of your connections, contact a professional installer.
” icon on the rear of the TV. A kensington slot is beside
Securing the TV to the wall
Caution: Pulling, pushing, or climbing onto the TV may cause the TV to fall. In particular, ensure that your
children do not hang over or destabilize the TV; doing so may cause the TV to tip over, resulting in serious
injuries or death. Follow all safety precautions provided in the included Safety Flyer. For added stability and
safety, install the anti-fall device as follows.
For a 30 ~ 40 inch: M6
For a 46 ~ 55 inch: M8
Install the TV near to the wall so that it does not fall backwards.
It is safe to connect the string so that the clamps fixed on the
wall are equal to or lower than the clamps fixed on the TV.
Untie the string before moving the TV.
<Optional>
Wall
56
English
Page 57

57
English
05 Other Information
Troubleshooting
If you have any questions about the TV, first refer to this list. If none of these troubleshooting tips apply, please visit “www.
samsung.com,” then click on Support, or contact the call centre listed on the back-cover of this manual.
Issues Solutions and Explanations
Picture Quality First of all, please perform the Picture Test and confirm that your TV is properly displaying test image.
The TV image does not look as good as it
did in the store.
The picture is distorted: macro block error,
small block, dots, pixelization
Colour is wrong or missing. If you’re using a component connection, make sure the component cables are connected to the •
There is poor colour or brightness. Adjust the • Picture options in the TV menu. (go to Picture mode / Colour / Brightness / Sharpness)
There is a dotted line on the edge of the
screen.
The picture is black and white. If you are using an AV composite input, connect the video cable (yellow) to the Green jack of •
When changing channels, the picture
freezes or is distorted or delayed.
Sound Quality First of all, please perform the Sound Test to confirm that your TV audio is properly operating.
There is no sound or the sound is too low
at maximum volume.
The picture is good but there is no sound. Set the • Speaker Select option to TV Speaker in the sound menu (p. 22).
The speakers are making an inappropriate
noise.
The TV won’t turn on. Make sure the AC power cord is securely plugged in to the wall outlet and the TV.•
The TV turns off automatically. Ensure the • Sleep Timer is set to Off in the Setup menu (p. 23).
(go to MENU - Support - Self Diagnosis - Picture Test) (p. 25)
If the test image is properly displayed, the poor picture may caused by the source or signal.
If you have an analogue cable/set top box, upgrade to a digital set top box. Use HDMI or Component •
cables to deliver HD (high definition) picture quality.
Cable/Satellite subscribers: Try HD stations from the channel line up.•
Antenna connection: Try HD stations after performing Auto programme.•
Many HD channels are up scaled from SD(Standard Definition) contents.
✎
Adjust the Cable/Set top box video output resolution to 1080i or 720p.•
Make sure you are watching the TV at the minimum recommended distance based on the size and •
definition of the signal.
Compression of video contents may cause picture distortion especially in fast moving pictures such •
as sports and action movies.
Low signal level or bad quality can cause picture distortion. This is not a TV issue.•
Mobile phones used close to the TV (cca up to 1m) may cause noise in picture on analog and digital TV.•
correct jacks. Incorrect or loose connections may cause colour problems or a blank screen.
(p. 16)
Adjust • Energy Saving option in the TV menu. (go to MENU - Picture - Eco Solution - Energy
Saving) (p. 16)
Try resetting the picture to view the default picture settings. (go to • MENU - Picture - Picture Reset)
(p. 21).
If the picture size is set to • Screen Fit, change it to 16:9 (p. 17).
Change cable/set top box resolution.•
component input 1 on the TV.
If connected with a cable box, please try to reset the cable box. Reconnect the AC cord and wait until •
the cable box reboots. It may take up to 20 minutes.
Set the output resolution of the cable box to 1080i or 720p.•
(go to MENU - Support - Self Diagnosis - Sound Test) (p. 25)
If the audio is OK, the sound problem may caused by the source or signal.
Please check the volume the of external device connected to your TV.•
If you are using an external device, make sure the audio cables are connected to the correct audio •
input jacks on the TV.
If you are using an external device, check the device’s audio output option (ex. you may need to •
change your cable box’s audio option to HDMI when you have a HDMI connected to your TV).
If you are using a DVI to HDMI cable, a separate audio cable is required.•
If your TV has a headphone jack, make sure there is nothing plugged into it.•
Check the cable connections. Make sure a video cable is not connected to an audio input.•
For antenna or cable connections, check the signal strength. Low signal level may cause sound •
distortion.
Make sure the wall outlet is working.•
Try pressing the • POWER button on the TV to make sure the problem is not the remote. If the TV turns
on, refer to “The remote control does not work” below.
If your PC is connected to the TV, check your PC power settings.•
Make sure the AC power cord is plugged in securely to the wall outlet and the TV.•
When watching TV from an antenna or cable connection, the TV will turn off after 10 ~ 15 minutes if •
there is no signal.
Page 58

Other Information
Issues Solutions and Explanations
No Picture, No Video
There is picture/Video. Check cable connections (remove and reconnect all cables connected to the TV and external •
RF(Cable/Antenna) Connection
The TV is not receiving all channels. Make sure the Antenna cable is connected securely.•
The picture is distorted: macro block error
small block, dots, pixelization
PC Connection
A “Mode Not Supported” message
appears.
“PC” is always shown on the source list,
even if a PC is not connected.
The video is OK but there is no audio. If you are using a HDMI connection, check the audio output setting on your PC.•
Network Connection (Depending on Models)
Wireless network connection failed. Samsung Wireless USB dongle is required to use a wireless network.•
Others
The picture won’t display in full screen. HD channels will have black bars on either side of the screen when displaying up scaled SD (4:3) •
The remote control does not work. Replace the remote control batteries with the poles (+/–) in the right direction.•
The cable/set top box remote control
doesn’t turn the TV on or off, or adjust the
volume.
A “Mode Not Supported” message
appears.
There is a plastic smell from the TV. This smell is normal and will dissipate over time.•
The TV Signal Information is unavailable
in the Self Diagnostic Test menu.
The TV is tilted to the side. Remove the base stand from the TV and reassemble it.•
The channel menu is greyed out.
(unavailable)
Your settings are lost after 30 minutes or
every time the TV is turned off.
You have intermittent loss of audio or
video.
devices).
Set your external devices’ (Cable/Set top Box, DVD, Blu-ray etc) video outputs to match the •
connections to the TV input. For example, if an external device’s output is HDMI, it should be connect
to an HDMI input on the TV.
Make sure your connected devices are powered on.•
Be sure to select the TV’s correct source by pressing the • SOURCE button on the TV remote.
Please try • Plug & Play (Initial setup) to add available channels to the channel list. Go to MENU -
Setup - Plug & Play (Initial setup) and wait for all available channels to be stored (p. 7).
Verify the Antenna is positioned correctly.•
Compression of video contents may cause picture distortion, especially with fast moving pictures •
such as sports and action movies.
A low signal can cause picture distortion. This is not a TV issue.•
Set your PC’s output resolution and frequency so they match the resolutions supported by the TV (p. •
27).
This is normal; “PC” is always shown on the source list, regardless of whether a PC is connected.•
Make sure the Network Connection is set to • Wireless (p. 30).
Make sure the TV is be connected to a wireless IP sharer (router).•
contents.
Black bars on the top and bottom will appear during movies that have aspect ratios different from •
your TV.
Adjust the picture size options on your external device or TV to full screen.•
Clean the sensor’s transmission window on the remote.•
Try pointing the remote directly at the TV from 5~6 feet away.•
Programme the Cable/Set top box remote control to operate the TV. Refer to the Cable/Set user •
manual for the SAMSUNG TV code.
Check the supported resolution of the TV, and adjust the external device’s output resolution •
accordingly. Refer to the resolution settings on page 26 of this manual.
This function is only available with digital channels from an Antenna / RF/Coax connection (p. 25). •
The • Channel menu is only available when the TV source is selected.
If the TV is in the • Store Demo mode, it will reset audio and picture settings every 30 minutes. Change
the settings from Store Demo mode to Home Use mode in the Plug & Play (Initial setup) procedure.
Press the SOURCE button to select TV mode, and go to MENU Setup Plug & Play (Initial
ENTERE (p. 7).
setup)
Check the cable connections and reconnect them. •
Loss of audio or video can be caused by using overly rigid or thick cables. Make sure the cables are •
flexible enough for long term use. If mounting the TV to the wall, we recommend using cables with 90
degree connectors.
58
English
Page 59

59
English
05 Other Information
Issues Solutions and Explanations
You see small particles when you look
closely at the edge of the frame of the TV.
The PIP menu is not available. PIP• functionality is only available when you are using a HDMI, PC or components source (p. 25).
The message “Scramble signal” or “Weak
Signal/No Signal” appears.
You turned the TV off 45 minutes ago, and
it turned on again.
There are recurrent picture/sound issues. Check and change the signal/source.•
A reaction may occur between the rubber
cushion pads on the base stand and the
top finish of some furniture.
This TFT LCD panel uses a panel consisting of sub pixels which require sophisticated technology to produce. However,
✎
This is part of the product’s design and is not a defect.•
If you are using a CAM CARD (CI/CI+), check that it is installed into the common interface slot.•
If there is still a problem, pull the CAM CARD out of the TV and insert it into the slot again.•
It is normal. The TV operates the OTA (Over The Aerial) function itself to upgrade firmware •
downloaded whilst your watching TV.
To prevent this, use felt pads on any surface of the TV that comes in direct contact with furniture.•
there may be a few bright or dark pixels on the screen. These pixels will have no impact on the performance of the
product.
Licence ¦
Manufactured under licence from Dolby Laboratories. Dolby and the double-D symbol are
trademarks of Dolby Laboratories.
Manufactured under license under U.S. Patent #’s: 5,451,942; 5,956,674; 5,974,380; 5,978,762;
6,487,535 & other U.S. and worldwide patents issued & pending. DTS and the Symbol are
registered trademarks. & DTS 2.0+ Digital Out and the DTS logos are trademarks of DTS, Inc.
Product Includes software. © DTS, Inc. All Rights Reserved.
DivX Certified to play DivX video up to HD 1080p, including premium content.
ABOUT DIVX VIDEO: DivX® is a digital video format created by DivX,Inc. This is an official DivX Certified device that
plays DivX video. Visit www.divx.com for more information and software tools to convert your files into DivX video.
ABOUT DIVX VIDEO-ON-DEMAND: This DivX Certified® device must be registered in order to play DivX Video-onDemand (VOD) content. To generate the registration code, locate the DivX VOD section in the device setup menu. Go
to vod.divx.com with this code to complete the registration process and learn more about DivX VOD.
Pat. 7,295,673; 7,460,688; 7,519,274
TheaterSound, SRS and the symbol are trademarks of SRS Labs, Inc.
TheaterSound technology is incorporated under license form SRS Lab, Inc.
Open source licence notice
In the case of using open source software, Open Source Licences are available on the product menu.
Page 60

Other Information
Specifications
Panel native 1920 x 1080 @ 60 Hz
Environmental Considerations
Operating Temperature
Operating Humidity
Storage Temperature
Storage Humidity
TV System Analogue: B/G, D/K, L, I (Depending on your country selection)
Colour/Video System Analogue: PAL, SECAM, NTSC-4.43, NTSC-3.58, PAL60
Sound System BG. OK NICAM. MPEGl
HDMI IN 1 ~ 4 Video: 1080/24p, 1080p, 1080i, 720p, 576p, 576i, 480p, 480i
Stand Swivel (Left / Right) -20˚ ~ 20˚
Model Name LE40C750 LE46C750
Screen Size 40 inches 46 inches
Sound
(Output) 10 W X 2
Dimensions (WxDxH)
Body
With stand
Weight
Without Stand
With Stand
Digital: MPEG-2 MP@ML, MPEG-4, H.264/AVC MP@L3, MP@L4.0, HP@L4.0
Audio: 2Ch Linear PCM 32/44.1/48kHz, 16/20/24bits.
986.7 X 80.4 X 603.9 mm
986.7 X 255.0 X 665.5 mm
13.9 kg
16.2 kg
10°C to 40°C (50°F to 104°F)
10% to 80%, non-condensing
-20°C to 45°C (-4°F to 113°F)
5% to 95%, non-condensing
Digital: DVB-T/DVB-C
Analogue audio input (HDMI IN1 only)
PC input (HDMI IN1 only)
1119.1 X 80.3 X 679.4 mm
1119.1 X 275.0 X 679.4 mm
17.6 kg
20.1 kg
Design and specifications are subject to change without prior notice.
✎
For information about power supply, and more about power consumption, refer to the label attached to the product.
✎
60
English
Page 61

61
English
05 Other Information
Index
A
AllShare 51
Amplify 21
Antenna 23
Anynet+ 44
AUDIO OUT 10
Auto Adjustment 21
Auto Volume 22
B
Background Music 43
Balance L/R 21
Basic View 42
Batteries 6
Black Tone 16
Blanking Bracket 54
Brightness 14
C
Cable Tie 4, 55
Change PIN 24
Channel Manager 13
Channel Menu 14
Clock 23
Colour Tone 17
Component 9
Connecting to a PC 27
Connecting to an Audio Device 10
D
DIGITAL AUDIO OUT 10, 44
DivX® VOD 43
D-sub 27
Dynamic 16
Dynamic Contrast 16
E
Eco Sensor 16
Edit Name 11
Editing Channels 15
Energy Saving 16
EPG (Electronic Programme Guide) 12
Equalizer 21
External Speaker 22
F
Fine Tune 15
Flesh Tone 17
Frequency 14
H
HDMI 8, 44
Headphones 10
Home Theater 10, 44
I
Installation Space 2
Internet@TV 48
L
Language 24
Licence 59
Lock 15
M
Media Play 35
Melody 25
Menu Transparency 25
Music 41
N
Navigate 12
Network Connection 28
Network Setup 29
Now & Next guide 12
O
ON/OFF button 6
Optimal resolution 27
P
Password 49
Photos 41
Picture Size 17, 43
PIP (Picture in Picture) 25
Plug & Play 7
Power Indicator 5
R
Receiver 46
Recording 45
Remote Control 6
Repeat Mode 43
RGB Only Mode 16
Rotate 43
S
Select All 15
Self Diagnosis 25
Sharpness 16
Signal Information 25
Sleep Timer 23
Slide Show 41
Software Upgrade 26
Source List 11
Speaker Select 22
Specifications 60
Standby mode 5
Subtitle 24
Symbol 3
T
Timer 23
Title 42
Tools 3
Troubleshooting 57
TV Speaker 22
U
USB Drive 26, 35
Using Channel View 12
Using Scheduled View 13
Using Favourite Channels 13
V
VCR 9
Video Formats 39
Videos 39
Volume 5
W
Wall Mount 55
Warm 17
White Balance 17
Page 62

This page is intentionally
left blank.
Page 63

2
Deutsch
Die Abbildungen und Illustrationen in diesem Handbuch dienen nur zur Information und können vom tatsächlichen Aussehen
des Geräts abweichen. Änderungen an Ausführung und technischen Daten vorbehalten.
Hinweis zu Digitalfernsehen
1. Die Funktionalitäten für Digitalfernsehen (DVB) stehen nur in Ländern/Regionen zur Verfügung, in denen digitale terrestrische DVB-T-Signale (MPEG2 und
MPEG4 AVC) gesendet werden oder in denen Sie Zugang zu einem kompatiblen Kabelfernsehdienst mit DVB-C (MPEG2 und MPEG4 AAC) haben können.
Fragen Sie Ihren örtlichen Händler, wenn Sie Informationen über die Verfügbarkeit von DVB-T oder DVB-C in Ihrer Gegend benötigen.
2. DVB-T ist der Standard des europäischen DVB-Konsortiums für die terrestrische Versorgung mit digitalem terrestrischem Fernsehen, und DVB-C ist das
Konsortium für die Versorgung mit digitalem Kabelfernsehen. Allerdings werden manche Unterscheidungsmerkmale wie EPG (elektrische Programmzeitschrift),
VOD (Video on Demand) usw. in dieser Spezifikation nicht berücksichtigt. Deshalb können sie zum jetzigen Zeitpunkt noch nicht eingesetzt werden.
3. Zwar hält dieses Fernsehgerät die aktuellen Standards der DVB-T- und DVB-C-Spezifikationen [Version August 2008] ein, aber es kann nicht garantiert
werden, dass die Kompatibilität mit zukünftigen digitalen terrestrischen DVB-T und DBV-C-Signalen gewahrt bleibt.
4. In Abhängigkeit von den Ländern/Regionen, in denen dieses Fernsehgerät eingesetzt wird, verlangen manche Kabelfernsehanbieter zusätzliche Gebühren für
solch einen Dienst, und möglicherweise wird verlangt, dass Sie den Vertragsbedingungen des Unternehmens zustimmen.
5. Manche Digitalfernsehfunktionen sind in einigen Ländern oder Regionen möglicherweise nicht verfügbar, und DVB-C-Signale kann das Gerät bei manchen
Kabelfernsehanbietern möglicherweise nicht fehlerfrei verarbeiten.
6. Für weitere Informationen setzen Sie sich bitte mit dem Samsung-Kundendienstzentrum in Verbindung.
Die Empfangsqualität des Fernsehgeräts kann durch Unterschiede bei den Sendeverfahren in verschiedenen Ländern beeinträchtigt werden. Kontrollieren
✎
Sie die Leistung des Fernsehgeräts bei Ihrem örtlichen SAMSUNG-Händler oder wenden Sie sich an das Samsung-Callcenter um festzustellen, ob sich die
Empfangsqualität durch Ändern der Fernseheinstellungen verbessern lässt.
Warnung bei Standbildern
Vermeiden Sie die Anzeige von Standbildern (wie z. B. JPEG-Bilddateien) oder Standbildelementen (wie z. B. Senderlogos, Panorama- oder 4:3-Bilder, Aktienoder Laufschriften mit Nachrichten am unteren Bildschirmrand usw.) auf dem Bildschirm. Durch lang anhaltende Anzeige von Standbildern kann es zu einem
ungleichmäßigen Verbrauch des Phosphors im Bildschirm kommen, wodurch die Bildqualität beeinträchtigt wird. Um die Gefahr dieses Effekts zu vermindern,
befolgen Sie bitte die nachfolgenden Empfehlungen:
Vermeiden Sie es, für lange Zeit denselben Fernsehsender anzuzeigen.•
Versuchen Sie immer, Abbildung als Vollbild anzuzeigen. Verwenden Sie das Bildformatmenü des Fernsehgeräts um die beste Anzeigemöglichkeit zu finden.•
Reduzieren Sie die Helligkeits- und Kontrastwerte soweit wie möglich, um immer noch die gewünschte Bildqualität zu erreichen. Zu hohe Werte können das •
Ausbrennen beschleunigen.
Verwenden Sie häufiger alle Funktionen Ihres Fernsehgeräts, die dazu dienen, das Einbrennen von Bildern und das Ausbrennen des Bildschirms zu reduzieren. •
Weitere Informationen hierzu finden Sie in den entsprechenden Abschnitten des Benutzerhandbuchs.
Absichern des Aufstellbereichs
Halten Sie die erforderlichen Abstände zwischen dem Gerät und anderen Objekten (z.B. Wänden) ein, um ausreichende Lüftung sicherzustellen.
Wenn Sie dies nicht tun, besteht die Gefahr, dass aufgrund eines Anstiegs der Temperatur im Innern des Geräts ein Brand ausbricht oder andere Probleme mit dem
Gerät auftreten.
Wenn Sie einen Standfuß oder eine Wandhalterung einsetzen, verwenden Sie ausschließlich Teile von Samsung Electronics.
✎
Wenn Sie Teile eines anderen Herstellers verwenden, kann es zu Problemen mit dem Gerät oder zu Verletzungen kommen, weil das Gerät herunterfällt.
x
Das Aussehen kann sich je nach Gerät unterscheiden.
✎
Aufstellen des Geräts mit dem Standfuß Installation des Geräts mit der Wandhalterung
10 cm
10 cm
10 cm
10 cm
10 cm
10 cm
Ordnungsgemäße Entsorgung dieses Geräts (Elektro- und Elektronik-Altgeräte)
(Anzuwenden in den Ländern der Europäischen Union und anderen europäischen Ländern mit einem separaten Sammelsystem)
Diese Kennzeichnung auf dem Gerät, dem Zubehör oder der Dokumentation bedeutet, dass das Gerät sowie das elektronische Zubehör
(z. B. Ladegerät, Headset, USB-Kabel) am Ende ihrer Lebensdauer nicht im normalen Hausmüll entsorgt werden dürfen. Entsorgen
Sie diese Geräte bitte getrennt von anderen Abfällen, um der Umwelt bzw. der menschlichen Gesundheit nicht durch unkontrollierte
Müllbeseitigung zu schaden. Recyceln Sie das Gerät, um die nachhaltige Wiederverwertung von stofflichen Ressourcen zu fördern. Private
Nutzer sollten den Händler, bei dem das Produkt gekauft wurde, oder die zuständigen Behörden kontaktieren, um in Erfahrung zu bringen,
wie sie das Gerät auf umweltfreundliche Weise recyceln können. Gewerbliche Benutzer wenden sich an ihren Lieferanten und überprüfen
die Konditionen Ihres Kaufvertrags. Dieses Gerät und seine elektronischen Zubehörteile dürfen nicht zusammen mit anderem Gewerbemüll
entsorgt werden.
Ordnungsgemäße Entsorgung der Batterien dieses Produkts
(Anwendbar in der Europäischen Union und anderen europäischen Staaten mit Systemen zur getrennten Sammlung von Batterien.)
Diese Kennzeichnung auf der Batterie, dem Handbuch oder der Verpackung bedeutet, dass die Batterie am Ende ihrer Lebensdauer nicht
im normalen Hausmüll entsorgt werden darf. Die Kennzeichnung mit den chemischen Symbolen für Hg, Cd oder Pb bedeutet, dass die
Batterie Quecksilber, Cadmium oder Blei in Mengen enthält, die die Grenzwerte der EU-Direktive 2006/66 übersteigen. Wenn Batterien
nicht ordnungsgemäß entsorgt werden, können diese Substanzen die Gesundheit von Menschen oder die Umwelt gefährden. Zum Schutz
der natürlichen Ressourcen und zur Förderung der Wiederverwertung von Materialien trennen Sie die Batterien von anderem Müll und
führen Sie sie Ihrem örtlichen Recyclingsystem zu.
10 cm
Page 64

3
Deutsch
Inhalt
Erste Schritte
4
Anschlüsse
8
Grundfunktionen
12
Erweiterte Funktionen
27
4 Zubehör
5 Bedienfeld
6 Fernbedienung
7 Verbinden mit einer Antenne
7 Plug & Play (Anfangseinstellung)
8 Anschließen an ein AV-Gerät
10 Anschließen an ein Audiogerät
11 Signalquellen wählen
12 Navigieren in den Menüs
12 Verwenden der INFO-Taste
(Elektronische Programmzeitschrift)
12 Fernsehplanung
14 Kanalmenü
16 Bildmenü
21 Tonmenü
23 Einstellungsmenü
25 Unterstützungsmenü
27 Anschließen an einen PC
28 Netzwerkverbindung
35 Media Play
44 Anynet
48 Internet@TV
51 AllShare
+
Weitere Informationen
53
t
Diese Funktion können Sie durch
Drücken der Taste TOOLS auf der
Fernbedienung aufrufen.
53 Teletext für Analogkanäle
54 Anbringen der Wandhalterung
55 Verlegen der Kabel
56 Kensington-Schloss als Diebstahlsicherung
56 Befestigen des Fernsehgeräts an der Wand
57 Fehlerbehebung
60 Technische Daten
61 Index
Achten Sie auf das Symbol!
Hinweis Schrittweise Darstellung der
Vorgehensweisen
Page 65

4
Deutsch
Erste Schritte
Zubehör
Überprüfen Sie die Verpackung Ihres LCD-Fernsehgeräts auf Vollständigkeit. Falls Komponenten fehlen sollten, setzen
✎
Sie sich bitte mit Ihrem Händler in Verbindung.
✎
Die Farbe und die Form der Teile können sich je nach Modell unterscheiden.
Fernbedienung und 2 Batterien (Typ AAA) y
Bedienungsanleitung y
Garantiekarte / Sicherheitshinweise (nicht überall verfügbar) y
Montagehalterung y Kabelbinder y Haltering (4 Stück) y
Weitere Informationen finden Sie im Installationshandbuch für den Standfuß.
Reinigungstuch y
Netzkabel y
(46 ~ 55 Zoll TVs)
des
Standfuß (1 Stück) y Leitschiene (1 Stück) y Schrauben y
(4 Stück) M4 X L12
(4 Stück) M4 X L8
Page 66

5
01 Erste Schritte
Deutsch
Bedienfeld
Form und Farbe des Geräts können sich je nach Modell unterscheiden.
✎
Die LCD-Leuchte kann durch Kontakt mit Objekten oder Partikeln angeschaltet werden, nicht aber mit Ihren Fingern.
✎
Fernbedienungssensor
Lautsprecher
Fernbedienungssensor Richten Sie die Fernbedienung auf diesen Sensor am Fernsehgerät.
SOURCE
MENU
Y
z
Fernbedienungssensor Richten Sie die Fernbedienung auf diesen Sensor am Fernsehgerät.
P
Standby-Modus
Der Standby-Modus ist nicht für längere Phasen der Abwesenheit gedacht (z. B. wenn Sie verreist sind). Eine kleine Menge
Strom wird auch dann noch verbraucht, wenn das Gerät mit dem Netzschalter ausgeschaltet wurde. Es ist am besten, das
Netzkabel aus der Steckdose zu ziehen.
E
m
(Netz)
Schaltet zwischen allen verfügbaren Signalquellen um. Im Bildschirmmenü können Sie
diese Taste wie die ENTER
Drücken Sie diese Taste, um die Funktionen des Fernsehgeräts in einem
Bildschirmmenü anzuzeigen.
Hiermit stellen Sie die Lautstärke ein. Im Bildschirmmenü können Sie die
Y-Schaltflächen wie die Tasten ◄ und ► auf der Fernbedienung verwenden.
Wechseln des Kanals. Im Bildschirmmenü können Sie die z-Schaltflächen
wie die Tasten ▼ und ▲ auf der Fernbedienung verwenden.
Ein- und Ausschalten des Fernsehgeräts.
E
auf der Fernbedienung verwenden.
Netzanzeige
Page 67

6
Erste Schritte
Deutsch
ABCD
Fernbedienung
Dies ist eine spezielle Fernbedienung für Personen mit eingeschränktem Sehvermögen. Die Netztaste sowie die Tasten
✎
zum Einstellen des Senders und der Lautstärke sind in Braille beschriftet.
Ein- und Ausschalten des Fernsehgeräts.
Anzeigen und Auswählen aller verfügbaren
Hiermit wechseln Sie direkt zu einem Kanal.
Alternativ wählen Sie „Videotext ein“, „Doppel“,
Anzeigen von Inhalte anzeigen mit Kanal-Manager,
3D, Internet@TV, Media Play und AllShare.
Auswählen von Optionen im Bildschirmmenü
Verwenden Sie diese Tasten im Media Play-
(�: Steuern von Aufnahmen auf Samsung-
Rekordern, die mit der Anynet+-Funktion
Videosignalquellen. (Seite 11)
Lautstärke einstellen
Bildschirmmenü anzeigen.
Hiermit können Sie häufig verwendete
Funktionen schnell auswählen.
und Ändern von Menüwerten.
Zurück zum vorherigen Menü.
Tasten in den Menüs Kanal-Manager,
Internet@TV, Media Play usw.
und Anynet
+
-Modus. (Seite 35, 44)
(Seite 7)
„Mix“ oder „Aus“
(Seite 12)
ausgerüstet sind.)
Wenn die Beleuchtungstaste ON/OFF angeschaltet
ist und Sie drücken eine Taste, leuchten alle Tasten
auf der Fernbedienung für einen kurzen Moment auf.
(Wenn Sie die Fernbedienung mit angeschalteter
Hintergrundbeleuchtung verwenden, verkürzt dies
die Lebensdauer der Batterie.)
Zurück zum vorherigen Kanal.
Drücken Sie diese Taste, um den Ton
vorübergehend auszuschalten.
Wechseln des Kanals
Anzeige der Senderliste auf dem Bildschirm.
(Seite 14)
Anzeigen des elektronischen Programmführers
(Seite 12)
Anzeigen von Informationen auf dem Bildschirm
(Seite 12)
Schließen des Menüs
MEDIA.P: Anzeigen von Media Play. (Seite 35)
INTERNET: Verbindung zu verschiedenen Internet
diensten. (Seite 48)
3D: Einstellen des Videos, das mit dem 3D-Signal
zur Verfügung gestellt wird. (Seite. 19)
AD: Auswahl der Audio-Beschreibung.
(nicht überall verfügbar) (Seite 22)
P.SIZE: Wählen des Bildformats. (Seite 17)
SUBT.: Anzeigen der digitalen Untertitel (Seite 24)
Einlegen von Batterien (Batteriegröße: AAA)
HINWEIS
✎
Setzen Sie die Fernbedienung bis zu einer Entfernung von
x
maximal 7 m ein.
Helles Licht kann die Leistung der Fernbedienung
x
verschlechtern. Vermeiden Sie Leuchtstoffröhren oder ein
Neonschild in der Nähe der Fernbedienung.
Form und Farbe können sich je nach Modell unterscheiden.
x
Page 68

7
01 Erste Schritte
Deutsch
P
POWER
Verbinden mit einer Antenne
Wenn das Fernsehgerät zum ersten Mal eingeschaltet wird, werden automatisch die Grundeinstellungen vorgenommen.
✎
Voreinstellung: Anschließen ans Stromnetz und an die Fernsehantenne.
VHF/UHF Antenna
Kabel
oder
Plug & Play (Anfangseinstellung)
Wenn das Fernsehgerät erstmals eingeschaltet wird, helfen eine Reihe aufeinanderfolgender Abfragen beim Durchführen der
Grundeinstellungen. Drücken Sie die POWERP. Plug & Play ist nur verfügbar, wenn die Eingangsquelle auf TV eingestellt ist.
✎
Um zum vorherigen Schritt zurückzukehren, drücken Sie die rote Taste.
Auswählen der Sprache
1
Auswählen von
2
Shop-Demo oder
Privatgebrauch
Wählen eines Landes
3
Auswählen einer
4
Antenne
Auswählen eines
5
Senders
Einstellen des
6
Uhr-Modus
Zeitzone
7
Anzeigen des HD-
8
Anschlussplans.
Gute
9
Fernsehunterhaltung!
So setzen Sie diese Funktion zurück...
Wählen Sie Einstell. - Plug & Play (Anfangseinstellung). Geben Sie nun Ihre vierstellige PIN ein. Die Standard-PIN lautet
„0-0-0-0“. Wenn Sie die PIN ändern möchten, verwenden Sie die Funktion PIN ändern.
Drücken Sie die Taste ▲ oder ▼, und drücken Sie dann auf die
ENTER
E
.
Drücken Sie die Taste ◄ oder ►, und drücken Sie dann auf die
ENTER
E
.
Wählen Sie den Modus y Privatgebrauch. Der Modus Shop-Demo
ist für den Betrieb in Einzelhandelsgeschäften bestimmt.
Zurückstellen des Geräts von y Shop-Demo auf Privatgebrauch
(Standard): Drücken Sie die Lautstärketaste am Fernsehgerät.
Wenn das Menü Lautstärke angezeigt wird, halten Sie die Taste
MENU 5 Sekunden lang gedrückt.
Drücken Sie die Taste ▲ oder ▼, und drücken Sie dann auf die ENTER
Wählen Sie das gewünschte Land. Wenn es das gewünschte Land im Menü nicht gibt,
wählen Sie Sonstiges.
✎
Nachdem Sie im Menü
Modellen anschließend aufgefordert, die PIN-Nummer einzurichten.
✎
Die Ziffernkombination 0-0-0-0 dürfen Sie als PIN-Nummer nicht eingeben.
Drücken Sie die Taste ▲ oder ▼, und drücken Sie dann auf die ENTERE.
Wählen Sie Terrestrisch oder Kabel.
Drücken Sie die Taste ▲ oder ▼, und drücken Sie dann auf die ENTER
Wählen Sie den Sendertyp zum Speichern aus. Wenn Sie den Sendertyp auf
Kabel einstellen, können Sie den Sendern im nächsten Schritt einen Zahlenwert
(Senderfrequenzen) zuweisen. Weitere Informationen hierzu finden Sie unter
Kanal → Autom. Senderspeich. (Seite 14)
Zum Unterbrechen des Speichervorgangs zu einem beliebigen Zeitpunkt drücken Sie
✎
die ENTERE.
Stellen Sie den Uhr-Modus automatisch oder manuell ein.
✎
Wenn Sie
Wählen Sie Ihre Zeitzone durch Drücken der Tasten ▲ oder ▼ , und drücken Sie dann die
Taste ENTER
Die Verbindungsmethode für optimale HD-Bildqualität wird angezeigt.
Drücken Sie die Taste ENTER
Auto wählen, müssen Sie Ihre Zeitzone auswählen.
E
(je nach Land).
Land das Land eingestellt haben, werden Sie bei manchen
E
.
E
E
ANT OUT
.
.
Page 69

8
Deutsch
Anschlüsse
R-AUDIO-L
P
R PB Y
W R
W
G
RR
Anschlüsse
Anschließen an ein AV-Gerät
Mit Hilfe eines HDMI/DVI-Kabels: HD-Anschluss (max. 1080p)
Verfügbare Geräte: DVD, Blu-ray-Player, HD-Kabelreceiver, HD-Satellitenreceiver, Kabelreceiver, Satellitenreceiver
DVD / Blu-ray
player
Rot Weiß
HDMI IN 1(DVI)
✎
Eine Verbindung über HDMI/DVI-Kabel kann nur über
x
Kabel oder einen DVI/HDMI-Adapter (DVI auf HDMI) für den DVI-Kabelanschluss und die PC/DVI AUDIO IN
-Anschlüsse für die Audioverbindung.
Wenn ein externes Gerät wie ein DVD-/Blu-Ray-Player/Kabelreceiver/
x
HDMI-Versionen älter als 1.4 angeschlossen wird, funktioniert das Fernsehgerät möglicherweise nicht wie
erwartet (z. B. kein Bild/kein Ton/störendes Flackern/falsche Farben).
Wenn es nach dem Anschließen eines HDMI-Kabels keinen Ton gibt, überprüfen Sie die HDMI-Version des
x
externen Geräts. Wenn Sie vermuten, dass die Version älter als 1.4 ist, wenden Sie sich an den Lieferanten
des Geräts, um die HDMI-Version zu bestätigen und ein Upgrade anzufordern.
Samsung-Fwernsehgeräte unterstützen HDMI 1.4 (mit 3D und Audio-Rückkanal). Allerdings wird ARC (Audio
x
Return Channel) nur von HDMI IN 2(ARC) unterstützt.
Wenn – 3D-Autoansicht aktiviert Ein ist, werden manche Funktionen, wie z. B. Internet@TV deaktiviert. Wenn
dies ein Problem darstellt, deaktivieren Aus Sie 3D-Autoansicht oder 3D-Modus).
Der ARC Single-Modus ist nur aktiviert, wenn das Fernsehgerät mit einem HDMI-Standardkabel,
x
HDMI-Hochgeschwindigkeitskabel, HDMI-Standardkabel mit Netzwerkanschluss oder einem HDMIHochgeschwindigkeitskabel mit Netzwerkanschluss an das Gerät angeschlossen ist.
Die ARC-Funktion ermöglicht digitale Tonausgabe mit Hilfe des – HDMI IN 2(ARC) Anschlusses und sie kann
nur genutzt werden, wenn das Fernsehgerät an einen Audioempfänger angeschlossen ist, der die ARCFunktion unterstützt.
Wenn als Signalquelle TV eingestellt ist, ermöglicht die ARC-Funktion die Tonausgabe über einen Receiver. –
Die Tonsignale werden vom Fernseher über ein HDMI-Kabel an den Receiver übertragen, ohne dass ein
gesondertes optisches Kabel benötigt wird.
Es wird empfohlen, ein zertifiziertes HDMI-Kabel zu erwerben. Andernfalls kann es passieren, dass der
x
Bildschirm leer bleibt oder ein Verbindungsfehler auftritt.
, 2(ARC), 3, 4 / PC/DVI AUDIO IN
HDMI IN 1(DVI) erfolgen. Verwenden Sie ein DVI/HDMI-
Satellitenreceiver mit Untertsützung für
HDMI OUT
AUDIO OUT
DVI OUT
Page 70

9
Deutsch
02 Anschlüsse
Mit Hilfe eines Komponentenkabels (bix 1080p) oder eines Audio/Video-Kabels (nur 480i) und eines Scartkabels
P
R PB Y
R-AUDIO-L
P
R PB Y
R-AUDIO-L
P
R PB Y
W
G
RRWY B
G
RR
RGB W R
W
R G
R
W R
B
R W
Y
Y
Verfügbare Geräte: Videorekorder, DVD-Player, Blu-ray-Player, Kabelreceiver, Satellitenreceiver
Gelb Rot Weiß
AUDIO OUT
Im
✎
Ext.-Modus unterstützt DTV Out nur MPEG SD-Video und -Audio.
Um die beste Bildqualität zu erhalten, wird eine Komponentenverbindung über den A/V-Anschluss empfohlen.
✎
VIDEO OUT
Blu-ray-Player DVDVideorekorder
AUDIO OUT
COMPONENT OUT
Rot Blau Grün
EXT
Page 71

10
Deutsch
Anschlüsse
Anschließen an ein Audiogerät
Mit Hilfe eines Glasfaserkabels oder eines Audiokabels
Verfügbare Geräte: Digital-Audiosystem, Verstärker, DVD-Heimkino
DIGITAL AUDIO OUT (OPTICAL)
✎
Wenn ein Digital Audio-System mit dem xDIGITAL AUDIO OUT (OPTICAL)-Anschluss verbunden ist, reduzieren Sie die
Lautstärke von Fernsehgerät und System.
5.1-Kanalton ist möglich, wenn das Fernsehgerät an ein externes Gerät angeschlossen ist, das 5.1-Kanalton
x
unterstützt.
Wenn der Receiver (Heimkinosystem) angeschaltet ist, können Sie den Ton hören, der vom
x
der Fernsehgeräts zur Verfügung gestellt wird. Wenn das Fernsehgerät ein (terrestrisches) DTV-Signal empfängt,
überträgt das Fernsehgerät 5.1-Kanalton an den Receiver des Heimkinosystems. Wenn es sich bei der Signalquelle
um eine digitale Komponente wie beispielsweise einen DVD-Player/Blu-Ray-Player/Kabel- / Satellitenreceiver (Set-TopBox) handelt, der über HDMI an das Fernsehgerät angeschlossen ist, kann der Receiver des Heimkinosystems nur
Zweikanalton wiedergeben. Wenn Sie 5.1-Kanalton wünschen, müssen Sie den digitalen Ausdioausgang am DVD-/BluRay-Player / Kabel- / Satellitenreceiver (Set-Top-Box) direkt an einen Verstärker oder ein Heimkinosystem anschließen.
Kopfhörer
✎
angeschlossen sind, ist die Tonwiedergabe über die eingebauten Lautsprecher abgeschaltet.
H: Sie können Ihre Kopfhörer an den Kopfhörer-Ausgang Ihres Fernsehgeräts anschließen. Wenn Kopfhörer
Wenn Sie Kopfhörer an das Fernsehgerät anschließen, ist die Tonfunktion eingeschränkt.
x
Die Lautstärke der Kopfhörer und des Fernsehgeräts werden getrennt geregelt.
x
OPTICAL
Digital-
Audiosystem
Kopfhörer
optischen Ausgang
Page 72

11
Deutsch
02 Anschlüsse
ANSCHLÜSSE COMMON INTERFACE-STECKPLATZ
Um Bezahlsender zu sehen, müssen Sie eine „CI“ oder „CI+“-Karte
einsetzen.
Wenn Sie keine „CI“ oder „CI+“-Karte einsetzen, wird bei einigen y
Kanäle die Meldung „Gestörtes Signal“ angezeigt.
Die Verbindungsinformationen mit Telefonnummer, Kennung der y
„CI“ oder „CI+“-Karte, Hostkennung und anderen Angaben wird
nach ungefähr 2 bis 3 Minuten angezeigt. Wenn eine Fehlermeldung
angezeigt wird, wenden Sie sich bitte an Ihren Dienstanbieter.
Wenn das Konfigurieren der Kanalinformationen abgeschlossen ist, y
wird die Meldung „Aktualisierung abgeschlossen“ angezeigt. Dies
bedeutet, dass die Kanalliste aktualisiert ist.
HINWEIS
✎
Sie können die „CI“ oder „CI+“-Karte bei einem der örtlichen Kabelnetzbetreiber erwerben.
x
Ziehen Sie die „CI“ oder „CI+“-Karte vorsichtig mit den Händen heraus. Sie könnte beim Herunterfallen ansonsten
x
beschädigt werden.
Die Richtung, in der Sie die „CI“ oder „CI+“-Karte einsetzen müssen, ist auf der Karte markiert.
x
Die Position des xCOMMON INTERFACE-Steckplatzes ist modellabhängig.
„CI“ oder „CI+“-Karten werden in einigen Ländern und Regionen nicht unterstützt. Fragen Sie diesbezüglich Ihren offiziellen
x
Hä ndler.
Bei Problemen wenden Sie sich an den Dienstanbieter.
x
Signalquellen wählen
Quellen
Hiermit wählen Sie, ob das Fernsehgerät
mit einem Fernsehsignal versorgt wird oder
an andere externe Signaleingänge wie
z. B. DVD- / Blu-Ray-Player / Kabelreceiver
/ Satellitenreceiver (Set-Top Box)
angeschlossen ist.
TV / Ext.1 / Ext.2 / PC / AV / ■
Komponenten / HDMI1/DVI / HDMI2
/ HDMI3 / HDMI4 / USB
Bei
✎
Liste der Signalquellen werden die
angeschlossenen Signalquellen hervorgehoben.
Ext.1, Ext.2
✎
und PC bleiben immer aktiviert.
Name bearbeiten
Videorekorder / DVD / Kabelreceiver / ■
Satellitenreceiver / PVR-Receiver / AV-Receiver /
Spiel / Camcorder / PC / DVI PC / DVI-Geräte / TV /
IPTV / Blu-Ray / HD DVD / DMA: Vergeben Sie Namen
für die an die Eingangsbuchsen angeschlossenen
Geräte, um die Auswahl der Signalquelle zu
vereinfachen.
Wenn ein PC mit einer Auflösung von 1920 x 1080
✎
bei 60 Hz mit dem HDMI IN 1(DVI)-Anschluss
verbunden wird, stellen Sie den Anschluss unter
Name bearb. auf den DIV PC-Modus ein.
Wenn Sie ein HDMI/DVI-Kabel mit dem
✎
IN 1(DVI)-Anschluss verbinden, stellen Sie den
Anschluss unter Name bearb. auf den Modus DVI
PC oder DVI-Geräte ein.
HDMI
Page 73

12
Deutsch
Grundfunktionen
DTV Air 800 five
Home and Away
18:00 - 18:30
Drama
Dani is devastated when scott makes clear his views on marriage...
27
28
800
24
16
6
Discovery
DiscoveryH&L
five
price-drop.tv
QVC
R4DTT
American Chopper
Programmes resume at 06:00
Home and...
No Information
QVC Selection
No Information
Tine Team
Fiv...
Today 18:00 - 19:00 19:00 - 20:00
)
Family Affairs
)
Dark Angel
800 five
Navigieren in den Menüs
Vor dem ersten Einsatz des Fernsehgeräts führen Sie die
folgenden Schritte aus, um zu erfahren, wie Sie im Menü
navigieren und verschiedene Funktionen auswählen und
einstellen.
1
2
3
1 Taste MENU: Erste Ebene des Bildschirmmenüs
anzeigen.
2 Taste ENTER
und Elemente auswählen. Einstellungen bestätigen.
3 Taste RETURN: Zurück zum vorherigen Menü.
4 Taste EXIT: Bildschirmmenü schließen.
Bedienung des Bildschirmmenüs (OSD)
Die Zugriffsmethoden können in Abhängigkeit vom jeweiligen
Menü variieren.
MENU
1
▲ / ▼
2
ENTER
3
▲ / ▼
4
◄ / ►
5
ENTER
6
EXIT
7
E
/ Navigationstasten: Cursor bewegen
m
Das Hauptmenü mit seinen
Optionen wird auf dem Bildschirm
angezeigt:
Bild, Ton, Kanal, Einstell.,
Eingang, Anwendung,
Unterstützung
Wählen Sie durch Drücken der
Tasten ▲ oder ▼ ein Symbol.
E
Drücken Sie die Taste ENTERE,
um das Untermenü zu einem
Symbol anzuzeigen.
Wählen Sie durch Drücken der
Tasten ▲ oder ▼ das gewünschte
Untermenü.
Wählen Sie durch Drücken der
Tasten ◄ oder ► den Wert für
ein bestimmtes Element. Die
Methoden zum Anpassen der
Werte im Bildschirmmenü können in
Abhängigkeit vom jeweiligen Menü
variieren.
E
Drücken Sie die Taste ENTERE,
um die Konfiguraton abzuschließen.
e
Drücken Sie die Taste EXIT zum
Beenden.
4
Verwenden der INFO-Taste (Elektronische
Programmzeitschrift)
Auf dem Bildschirm werden der aktuelle Kanal
und bestimmte Audio/Video-Einstellungen
angezeigt.
Die elektronische Programmführer zeigt
entsprechend der Sendezeit für jeden Kanal
tagesaktuelle Fernsehprogramminformation an.
Blättern Sie mit y ◄, ►, um
Informationen zu einem gewünschten Programm
anzuzeigen, während Sie einen anderen Sender
anzeigen.
Blättern Sie mit y ▲, ▼, um Informationen für andere
Kanäle anzuzeigen. Wenn Sie zum ausgewählten Sender
wechseln möchten, drücken Sie auf die ENTER
abc1
DTV Air
15
Life On Venus Avenue
Unclassified
No Detaild In formation
18:00 ~ 6:00
E
.
18:11 Thu 6 Jan
E Watch
Informationen
Fernsehplanung
Programmführer
Die Informationen des elektronischen
Programmführers werden von den Sendern
zur Verfügung gestellt. Mit Hilfe der von
den Sendern zur Verfügung gestellten
Programmpläne können Sie im Voraus
Programme angeben, die Sie sehen
möchten, so dass das Fernsehgerät zur
angegebenen Zeit automatisch zum Kanal
des gewählten Programms wechselt. Je nach Aktualität
der Senderinformationen können Programmplätze leer oder
veraltet sein.
Verwenden der Kanalansicht
TV-Programm
Kanalansicht - TV
Ansichts.
1 2 3 4 5 6
+24 Std. CH-Modus
Informationen k Seite
2:10 Tue 1 Jun
E
Ansehen
Page 74

13
Deutsch
03 Grundfunktionen
Verwenden der Programmieransicht
DTV Air 800 five
Family Affairs
18:00 - 18:30
Drama
Tanya confesses all to a stunned Babs. Conrad is anxious to hear...
18:30
19:15
Today
Today
)
Family Affairs
)
Dark Angel
800
800
five
five
800 five
B
c 1 1futech
c 2 * 24ore.tv
15 abc1
3 BBC World
23 bid-up.tv
33 Boonerang
32 Cartoon Nwk
5 Class News
4 \ Coming Soon
27 Discovery
All
TV
Radio
Data/Other
Analogue
r
Verwenden der Farbtasten in Verbindung mit dem
✎
Kanal-Manager
Rot (TV-Empfang): Wählen Sie abwechselnd
TV-Programm
2:10 Tue 1 Jun
x
Terrestrisch oder Kabel.
Grün (Zoom): Hiermit vergrößern oder verkleinern
x
Sie die Sendernummer.
Gelb (Auswählen): Markieren Sie die gewünschten
Programmieransicht
x
Kanäle und drücken Sie die gelbe Taste, um alle
markierten Kanäle zugleich einzustellen. Links neben
dem Namen der gewählten Kanäle wird das Zeichen
c
angezeigt.
Blau (Sortieren): Ändern der Sortierung in der Kanalliste (nach
x
Ansichts.
Informationen
E
Abbrechen
1 4 6
1
Rot (Ansichts.): Anzeigen der Programme, die gerade
laufen oder demnächst anfangen.
2
Gelb (+24 Std.): Anzeigen der Programme, die nach
24 Stunden gesendet werden.
3
Blau (CH-Modus): Wählen Sie die Art der Kanäle aus,
die Sie im Fenster Kanalansicht anzeigen möchten.
Der Kanalmodus unterscheidet sich je nach –
Antennensignal.
4
(Informationen): Anzeigen von Details zum
ausgewählten Programm.
5
(Seite): Wechseln zur vorherigen/nächsten Seite.
6 Taste ENTER
E
Wenn Sie ein laufendes Programm auswählen, –
können Sie es ansehen.
Wenn Sie ein zukünftiges Programm auswählen, –
können Sie es vormerken. Um die Programmierung
abzubrechen, drücken Sie erneut auf die ENTER
und wählen Sie Programmierung abbrechen.
Kanal-Manager
Mit diesem Menü können Sie Favoriten löschen oder
E
Kanalnamen oder Kanalnummer).
(Seite): Weiter zur nächsten oder vorherigen Seite.
x
T x (Extras): Hiermit zeigen Sie das Optionsmenü
Kanal-Manager an. (Der Inhalt des Menüs
„Optionen“ hängt von der jeweiligen Situation ab.)
Symbole zur Anzeige des Kanalstatus
Symbole Vorgang
Ein analoger Kanal.
A
Ein ausgewählter Sender.
c
Ein Kanal, der als Favorit eingestellt ist.
*
Ein Programm, das gerade gesendet wird.
(
Ein gesperrter Kanal.
\
Ein vorgemerktes Programm.
)
Programmführer-Typ (Samsung / Guide Plus+)
(je nach Land)
Sie können den gewünschten Programmführer auswählen.
Samsung: ■ Hiermit stellen Sie den von Samsung
angebotenen Programmführer ein.
Guide Plus+: ■ Hiermit stellen Sie den von Rovi
International Solutions angebotenen Programmführer
ein. Weitere Informationen
einstellen und den Programmführer für digitale Sendungen
verwenden. Wählen Sie im Fenster Sender, Eigene Kanäle
Verwenden von Favoriten ¦
oder Vorgemerkt einen Sender.
*
Eigene Kanäle
Sender
(im Kanal-Manager)
Hiermit zeigen Sie alle Favoritenkanäle an.
Eigene Kanäle bearbeiten ■
t
: Sie können die
gewählten Sender zu der gewünschten Gruppe eigener
Sender hinzufügen.
✎ *
Das Symbol „
“ wird angezeigt, und der Sender wird
als eigener Kanal festgelegt.
1. Wählen Sie einen Kanal und drücken Sie die Taste
Terrestrisch TV-Empfang B Zoom Auswählen Schwarz k Seite T Extras
TOOLS.
2. Sie können einen Kanal der Gruppen 1, 2, 3 und 4
■ Sender: Anzeigen der Senderliste anhand des
*
■ Eigene Kanäle: Anzeigen der Gruppe des Senders.
■ Vorgemerkt: Anzeigen aller vorgemerkten
Sendertyps.
Programme.
der eigenen Kanäle hinzufügen oder löschen.
Sie können eine oder mehrere Gruppen
x
auswählen.
Page 75

14
Deutsch
Grundfunktionen
c 1 1futech
2 * 24ore.tv
15 abc1
3 BBC World
23 bid-up.tv
33 Boonerang
32 Cartoon Nwk
5 Class News
4 \ Coming Soon
27 Discovery
All
TV
Radio
Data/Other
Analogue
r
3. Nachdem Sie die Einstellungen geändert haben,
kann die Senderliste für jede Gruppe in Eigene
Kanäle angezeigt werden.
Sender
Eigene Kanäle bearbeiten
Sperren
Entfernen
Alle abwählen
Alle wählen
d
Air
TV-Empfang
B Zoom
Auswählen
Schwarz
k Seite T Extras
Kanalmenü
Kanäle neu einstellen ¦
Antennentyp (Terrestrisch / Kabel)
Ehe Ihr Fernseher beginnen kann, die verfügbaren Kanäle zu
speichern, müssen Sie die Art der Signalquelle angeben, die
an das Fernsehgerät angeschlossen ist (z. B.: Terrestrisch
oder Kabel).
Antennentyp (Terrestrisch/Kabel) ■
Sie einen Antennentyp zum Speichern aus.
Sendertyp (Digital und Analog / Digital / Analog) ■ :
Wählen Sie den Sendertyp zum Speichern aus.
Bei Auswahl von Kabel → Digital und Analog oder
Digital: Wert für die Suche nach Kabelkanälen eingeben.
Suchlaufmodus (Voll / Netzwerk / Schnell): Das
Fernsehgerät durchsucht automatisch alle Kanäle mit
aktiven Sendern und speichert sie im Fernsehgerät.
✎
Wenn Sie
Netzwerk-ID, Frequenz, Modulation,
Symbolrate durch Drücken der Taste auf der auf
der Fernbedienung manuell einstellen.
Netzwerk (Auto / Manuell): Auswählen der
Einstellmethode für die Netzwerk-ID zwischen Auto
oder Manuell.
Netzwerk-ID: Wenn das Netzwerk auf Manuell
eingestellt ist, können Sie die Netzwerk-ID mit den
Zifferntasten eingeben.
Frequenz: Hiermit zeigen Sie die Frequenz des Kanals
an. (Je nach Land unterschiedlich)
Modulation: Hiermit zeigen Sie die verfügbaren
Modulationswerte an.
Symbolrate: Hiermit zeigen Sie die verfügbaren
Symbolraten an.
Schnell wählen, können Sie Netzwerk,
t
: Wählen
Land
Der Eingabefenster für die PIN wird geöffnet. Geben Sie nun
Ihre vierstellige PIN ein.
Digitaler Sender ■ : Sie können das Land für die digitalen
Sender ändern.
Analogsender ■ : Sie können das Land für die analogen
Sender ändern.
Automatisch speichern
Automatisches Suchen nach einem Kanal und Speichern im
Fernsehgerät.
✎
Die automatisch zugewiesenen Programmplätze
entsprechen unter Umständen nicht den
gewünschten Programmplätzen. Wenn ein Kanal
mit der Kindersicherung gesperrt wurde, wird das
Eingabefenster für die PIN geöffnet.
Sender manuell speichern
Manuelle Suche nach einem Kanal und Speichern im
Fernsehgerät.
✎
Wenn ein Kanal mit der
wurde, wird das Eingabefenster für die PIN geöffnet.
Digitaler Sender ■ : Nach Abschluss des Suchlaufs
werden die Kanäle in der Kanalliste aktualisiert.
✎
Bei Auswahl von
Kanal, Frequenz, Bandbreite
✎
Bei Auswahl von
Frequenz, Modulation, Symbolrate
Analoger Sender (Programm, Fernsehnorm, ■
Tonsystem, Kanal, Suchen, Speichern): Falls kein oder
nur schlechter Ton zu hören sein sollte, wählen Sie einen
anderen Audiostandard aus.
✎
Kanalmodus
P x (Programm-Modus): Nach Abschluss der
Einstellungen sind die Sender lhrer Region auf den
Programmplätzen P0 bis maximal P99 gespeichert.
In diesem Modus können Sie Sender durch Eingabe
des Programmplatzes auswählen.
C
(Terrestrische Kanäle) / S (Kabelkanäle): In diesen
x
beiden Modi können Sie Sender durch Eingabe der
Nummer anwählen, die dem terrestischen Sender
oder dem Kabelkanal zugeordnet ist.
Kindersicherung gesperrt
TV-Empfang → Terrestrisch
TV-Empfang → Kabel:
Page 76

15
Deutsch
03 Grundfunktionen
Bearbeiten von Sendern ¦
Optionsmenü Kanal-Manager
(im Kanal-Manager)
1. Wählen Sie einen Kanal und drücken Sie die Taste
TOOLS.
2. Bearbeiten Sie den Namen oder die Nummer des Kanals
mit den Menübefehlen Kanalnamen bearbeiten oder
Kanalnr. bearbeiten.
Kanalnamen bearbeiten ■ (nur Analogkanäle): Weisen
Sie einen Kanalnamen nach Ihrer Wahl zu.
Kanalnr. bearbeiten ■ (nur Digitalkanäle): Bearbeiten
Sie die Nummer durch Drücken der gewünschten
Zifferntasten.
Weitere Funktionen ¦
Kabelsuchoption
(je nach Land)
Einstellen weiterer Suchoptionen für die Kanalsuche im
Kabelnetz (z. B. Frequenz oder Symbolrate).
Startfrequenz/Stoppfrequenz ■ : Einstellen der Start- und
Stoppfrequenz (je nach Land unterschiedlich)
Modulation ■ : Hiermit zeigen Sie die verfügbaren
Modulationswerte an.
Symbolrate ■ : Hiermit zeigen Sie die verfügbaren
Symbolraten an.
Sortieren ■ (nur Analogkanäle): Mit diesem Vorgang
können Sie die Programmnummern gespeicherter
Sender ändern. Das ist möglicherweise nach dem
automatischen Speichern von Sendern erforderlich.
Entfernen: ■ Sie können Kanäle löschen, damit nur die
gewünschten Kanäle angezeigt werden.
Alle wählen / Alle abwählen ■ : Wählen Sie alle Kanäle
aus oder deaktivieren Sie alle im Kanal-Manager
ausgewählten Kanäle.
Vorgemerkt
(im Kanal-Manager)
Mit dieser Menüoption können Sie eine vorgemerkte
Sendung anzeigen, ändern oder löschen.
Info ändern ■ : Mit dieser Menüoption können Sie eine
vorgemerkte Sendung ändern.
Programmierung abbrechen ■ : Mit dieser Menüoption
können Sie die Vormerkrung einer Sendung stornieren.
Informationen ■ : Anzeigen einer vorgemerkten Sendung.
(Sie können auch die Vormerkinformationen auswählen).
Alle wählen / Alle abwählen ■ : Wählen oder Abwählen
aller vorgemerkten Programme.
Senderliste
Sie können alle gesuchten Kanäle anzeigen.
Kanal-Manager
Optionsmenü Kanal-Manager
(im Kanal-Manager)
Stellen Sie den Kanal mit den Menübefehlen im Kanal-
Manager ein (Sperren / Freigabe / Timer-Wiedergabe /
Sortieren, Entfernen / Alle wählen / Alle abwählen). Der
Inhalt des Optionsmenüs hängt vom jeweiligen Kanalstatus ab.
1. Wählen Sie einen Kanal und drücken Sie die Taste
TOOLS.
2. Wählen Sie eine Funktion aus, und ändern Sie deren
Einstellungen.
Sperren / Freigabe ■ : Sie können einen Kanal sperren,
sodass er nicht ausgewählt und angezeigt werden kann.
✎
HINWEIS
Diese Funktion ist nur verfügbar, wenn die
x
Kindersicherung aktiviert ist Ein.
Der Eingabefenster für die PIN wird geöffnet. Geben
x
Sie die vierstellige Standard-PIN ein: „0-0-0-0“.
Ändern Sie die PIN mit der Option PIN ändern.
Timer-Wiedergabe ■ : Sie können einen Kanal einstellen,
der bei Erreichen einer bestimmten Zeit automatisch
angezeigt wird. Um diese Funktion verwenden zu
können, müssen Sie zuerst die aktuelle Uhrzeit
einstellen.
Wenn Sie einen digitalen Kanal gewählt haben und
✎
die Taste ► drücken, wird das digitale Programm
angezeigt.
Senderliste übertragen
Importieren oder Exportieren der Kanaltabelle. Schließen
Sie einen USB-Speicher an, um diese Funktion zu
verwenden.
Der Eingabebildschirm für die PIN wird geöffnet.
✎
Geben Sie nun Ihre vierstellige PIN ein.
Der Standard-PIN-Code eines neuen Fernsehgeräts
✎
lautet “0-0-0-0”.
Von USB importieren ■ : Importieren der Kanalliste vom
USB-Speicher.
Auf USB exportieren ■ : Exportieren der Kanalliste auf den
USB-Speicher
Feinabstimmung
(nur analoge Kanäle)
Wenn das Signal schwach oder gestört ist, können Sie die
Feinabstimmung manuell vornehmen.
Fein abgestimmte Kanäle sind mit einem Sternchen
✎
markiert “*”.
Wählen Zurückset., wenn Sie die Feinabstimmung
✎
zurücksetzen möchten.
Page 77

16
Deutsch
Grundfunktionen
Bildmenü
Ändern des voreingestellten Bildmodus ¦
Modus
Wählen Sie Ihren bevorzugten Bildtyp aus.
t
Dynamisch ■ : Für helle Zimmer geeignet.
Standard ■ : Für normale Umgebungen geeignet.
Natürlich ■ : Für geringe Augenbelastung geeignet.
Natürlich
✎
Film ■ : Geeignet für das Anzeigen von Filmen in einem
abgedunkelten Zimmer.
ist im PC-Modus nicht verfügbar.
Anpassen der Bildeinstellungen ¦
Hintergrundbeleuchtung / Kontrast /
Helligkeit / Schärfe / Farbe / Farbton
(G/R)
Das Gerät verfügt über mehrere Einstellmöglichkeiten für die
Bildqualität.
✎
HINWEIS
Im Modus xTV, Ext., AV des PAL-Systems steht die
Funktion Farbton (G/R) nicht zur Verfügung.
Im PC-Modus können Sie nur
x
Kontrast und Helligkeit einstellen.
Sie können die Einstellungen für jedes an das
x
Fernsehgerät angeschlossene externe Gerät
festlegen und speichern.
Durch geringere Bildhelligkeit reduzieren Sie den
x
Stromverbrauch.
Hintergrundbel.,
Möglichkeiten zum Sparen ¦
Öko-Lösung
Energiesparmod. (Aus / Gering / Mittel / Hoch / Bild ■
aus / Auto)
Helligkeit des Fernsehgeräts ein, um den Stromverbrauch
zu senken. Wenn Sie Bild aus wählen, wird der Bildschirm
abgeschaltet, aber der Ton bleibt an. Drücken Sie eine
beliebige Taste außer der Lautstärketaste, um den
Bildschirm wieder anzuschalten.
Öko-Sensor (Aus / Ein) ■ : Um noch mehr Energie zu
sparen; werden die Bildeinstellungen automatisch an die
Lichtverhältnisse im Zimmer angepasst.
Minimale Hintergrundbeleuchtung: Wenn der ÖkoSensor aktiviert (Ein) ist, können Sie die minimale
Bildhelligkeit manuell einstellen.
t
Wenn Sie die
✎
wird der Öko-Sensor deaktiviert.
Wenn
✎
Öko-Sensor aktiviert ist Ein, kann sich
die Helligkeit der Anzeige je nach Helligkeit der
Umgebung ändern (etwas heller oder dunkler
werden).
: Mit dieser Funktion stellen Sie die
Hintergrundbeleuchtung einstellen,
Kein Signal Standby (Aus / 15 min / 30 min / 60 min) ■ :
Löst den Standbymodus aus, wenn für einen gewissen,
benutzerdefinierten Zeitraum der Status „Kein Signal“
oder „Signalkabel prüfen“ ansteht.
Deaktiviert, wenn der PC im Stromsparmodus läuft.
✎
Ändern der Bildoptionen ¦
Erweiterte Einstellungen
(verfügbar nur im Modus Standard / Film)
Sie können verschiedene Detaileinstellungen für Ihren Fernseher
vornehmen, unter anderem für Farbe und Kontrast.
An Im PC-Modus können Sie nur ✎Optimalkontrast.,
Gamma und Weißabgleich einstellen.
Erweiterte Einstellungen
Schwarzton : Aus ►
Optimalkontrast : Mittel
Schattendurchzei. : -2
Gamma : 0
Expertenmuster : Aus
Nur RGB-Modus : Aus
Farbraum : Nativ
U Verschieben E Eingabe R Zurück
Schwarzton (Aus / Dunkel / Dunkler / Max. dunkel) ■ :
Wählen Sie den Schwarzwert aus, um die Bildschirmtiefe
einzustellen.
Optimalkontrast (Aus / Gering / Mittel / Hoch) ■ :
Stellen Sie den Bildkontrast ein.
Detailtreue bei Schatten (-2~+2) ■ : Erhöhen Sie die
Helligkeit dunkler Bilder.
Im
✎
PC-Modus deaktiviert.
Gamma ■ : Einstellen der Intensität der Primärfarbe.
Expertenmuster (Aus, Muster 1, Muster 2) ■ : Durch
Ausführen der Funktion Expertenmuster kann das Bild
ohne einen Generator oder Filter kalibriert werden.
Wenn das Bildschirmmenü verschwindet oder ein anderes
Menü als Menü Bild geöffnet wird, ist die Kalibrierung
gespeichert und das Fenster Expertenmuster wird
geschlossen.
Solange ✎Expertenmuster ausgeführt wird, erfolgt
keine Tonausgabe.
Nur verfügbar im Modus DTV, Component und HDMI.
✎
Nur RGB-Modus (Aus / Rot / Grün / Blau) ■ : Sie können
die Farbe oder den Farbton der Bildanteile Rot, Grün
oder Blau von einem externen Gerät (DVD-Player,
Heimkinosystem usw.) einstellen.
Farbraum (Auto / Nativ / Benutzerdefiniert) ■ : Stellen
Sie den Bereich der Farben ein, aus denen das Bild
erstellt wird. Wenn Sie Farbe, Rot, Grün, Blau und
Zurückset. anpassen möchten, stellen Sie Farbraum auf
Benutzerdefiniert ein.
▼
Page 78

17
Deutsch
03 Grundfunktionen
Weißabgleich ■ : Einstellen der Farbtemperatur für ein
natürlicheres Bild.
R-Offset / G-Offset / B-Offset: Sie können die
Dunkelheit jeder Farbe (Rot, Grün und Blau) einstellen.
R-Gain/G-Gain/B-Gain: Sie können die Helligkeit jeder
Farbe (Rot, Grün und Blau) einstellen.
Zurücksetzen: Hiermit setzen Sie den Weißabgleich
auf die Standardwerte zurück.
10 P Weißabgleich (Aus / Ein): ■ Steuern des
Weißabgleichs in 10-Punkt-Schritten durch Einstellen der
Helligkeit des roten, grünen und blauen Signals.
Diese Funktion ist verfügbar, wenn der Bildmodus
✎
auf Film und der externe Eingang auf HDMI oder
Komponente eingestellt ist.
Manche USB-Geräte unterstützen diese Funktion
✎
möglicherweise nicht.
Intervall: Wählen Sie das Intervall zum Einstellen.
Rot: Einstellen des Rotpegels.
Grün: Einstellen des Grünpegels.
Blau: Einstellen des Blaupegels.
Zurücksetzen: Zurücksetzen von 10 P Weißabgleich
Hautton ■ : Betonen des Rosaanteils im „Hautton“.
Kantenglättung (Aus / Ein) ■ : Hervorheben von
Objektbegrenzungen.
xvYCC (Aus / Ein) ■ : Durch Aktivieren des xvYCC-Modus
vergrößern Sie die Detailtreue und den Farbraum beim
Abspielen von Filmen auf einem externen Gerät (z. B.
DVD-Player), das an den HDMI- oder Component INEingang angeschlossen ist.
Diese Funktion ist verfügbar, wenn der Bildmodus
✎
auf Film und der externe Eingang auf HDMI oder
Komponente eingestellt ist.
Manche USB-Geräte unterstützen diese Funktion
✎
möglicherweise nicht.
auf die Standardwerte.
Bildoptionen
Im PC-Modus können Sie nur ✎Farbtemp., Größe und
Aktivierung des Einbrennschutzes nach einstellen.
Bildoptionen
Farbtemp. : Normal ►
Größe : Autom. Breit
Bildschirmmodus : 16:9
Digit. Rauschlter : Auto
MPEG-Rauschlter : Auto
HDMI-Schwarzp. : Normal
Filmmodus : Aus
▼
U Verschieben E Eingabe R Zurück
Farbtemperatur (Kalt / Normal / Warm1 / Warm2) ■
✎
✎
Größe ■ : Möglicherweise verfügt auch Ihr
Kabel-/Satellitenreceiver über eigene
Bildschirmformate. Allerdings empfehlen
wir dringend, dass Sie die meiste Zeit den
16:9-Modus verwenden.
Automatische Breite: Mit dieser Option
stellen Sie das Bildformat automatisch auf das
Seitenverhältnis 16:9 ein.
16:9 : Wählen Sie diese Option aus, um als Bildformat das
Seitenverhältnis 16:9 für DVDs oder Breitbildsendungen
einzustellen.
Breitenzoom: Diese Option vergrößert das Bild auf mehr als
4:3.
✎
Zoom: Wählen Sie diese Option aus, um das 16:9-Breitbild auf
die volle Bildschirmhöhe zu vergrößern.
✎
4:3 : Dies ist die Standardeinstellung zum Anzeigen von Filmen
und herkömmlichen Fernsehsendungen.
✎
Bildanpassung: Mit dieser Funktion wird das ganze Bild
auch bei Versorgung mit HDMI- (720p / 1080i / 1080p) oder
Komponentensignalen (1080i / 1080p) vollständig und ohne
Beschneidung angezeigt.
HINWEIS
✎
Nach Auswahl von xBildschirmanpassung im Modus HDMI
(1080i / 1080p) oder Component (1080i / 1080p):
1. Drücken Sie die Taste ◄ oder ►, um die Option
2. Drücken Sie die ENTERE.
3. Positionieren Sie das Bild mit den Tasten
Je nach Signalquelle können die Bildgrößenoptionen
x
variieren.
Die verfügbaren Elemente können in Abhängigkeit vom
x
ausgewählten Modus variieren.
Im PC-Modus können nur die Modi
x
eingestellt werden.
Sie können die Einstellungen für jedes externe Gerät
x
einstellen und speichern, das Sie an einen Eingang des
Fernsehgeräts angeschlossen haben.
Wenn Sie die Funktion xBildschirmanpassung zusammen
mit einem HDMI 720p-Signal verwenden, wird eine Zeile wie
bei Overscan oben, unten, links und rechts abgeschnitten.
Bildschirmmodus (16:9 / Breitenzoom / Zoom / 4:3) ■ :
Verfügbar nur, wenn die Bildgröße auf Autom. Breit
eingestellt ist. Sie können die gewünschte Bildgröße beim
4:3-Breitbilddienst oder der Originalgröße bestimmen. Für jedes
Europäische Land ist eine andere Bildgröße erforderlich.
✎
oder Warm2 werden nur aktiviert, wenn der
Warm1
Bildmodus auf Dynamisch eingestellt ist.
Sie können die Einstellungen für jedes externe Gerät
einstellen und speichern, das Sie an das Fernsehgerät
angeschlossen haben.
Einstellen der Position mit den Tasten
Einstellen der Position oder Größe mit den Tasten
Verwenden Sie nicht über längere Zeit hinweg das
4:3-Format. Spuren der links, rechts und in der Mitte
angezeigten Rahmen können zum Einbrennen von
Bildern (Einbrennen) führen, was nicht von der Garantie
abgedeckt ist.
Position auszuwählen.
▲, ▼, ◄ oder ►.
Diese Funktion ist im PC-, Komponenten- oder HDMIModus nicht verfügbar.
▲, ▼.
▲, ▼.
16:9 und 4:3
Page 79

18
Deutsch
Grundfunktionen
Digit. Rauschfilter (Aus / Gering / Mittel / Hoch / Auto / ■
Auto-Anzeige): Wenn das Sendesignal schwach ist, können
statisches Rauschen und Geisterbilder erscheinen. Wählen Sie
diejenige der Optionen, bei der das beste Bild angezeigt wird.
Auto-Anzeige: Anzeige der Signalstärke beim Wechseln
zwischen Analogkanälen.
Nur für Analogkanäle verfügbar.
✎
Wenn die Säule grün ist, empfangen Sie das
✎
bestmögliche Signal.
MPEG-Rauschfilter (Aus / Gering / Mittel / Hoch / Auto) ■ :
Reduziert das MPEG-Rauschen, um besserte Bildqualität
zu ermöglichen.
Im PC-Modus deaktiviert.
✎
HDMI-Schwarzpegel (Normal / Gering) ■ : Sie können den
Schwarzwert direkt auf dem Bildschirm auswählen, um die
Bildschirmtiefe anzupassen.
Nur im HDMI-Modus (RGB-Signale) verfügbar.
✎
Filmmodus (Aus / Auto1 / Auto2) ■ : Sie können das
Fernsehgerät so einstellen, dass eine Filmsignal aus allen
Quellen automatisch empfangen und verarbeitet und das
Bild auf die optimale Qualität eingestellt werden kann.
Verfügbar bei TV, AV, COMPONENT (480i / 1080i)
✎
und HDMI (480i / 1080i).
Motion Plus (Aus / Klar / Standard / Glätten / ■
Benutzerdefiniert / Demo): Beseitigt das Verschwimmen
schneller Szenen mit viel Bewegung und sorgt für ein
klareres Bild.
Wenn Sie ✎Motion Plus wählen, kann es zu
Bildrauschen auf dem Bildschirm kommen. In diesem
Fall sollten Sie Motion Plus deaktivieren (Aus).
Unschärfeminderung: Hiermit passen Sie die
Unschärfeminderung bei Videosignalen an.
Judder-Minderung: Hiermit passen Sie die Minderung
stockender Bewegungen beim Abspielen von Filmen an.
Zurücksetzen: Hiermit setzen Sie die benutzerdefinierten
Einstellungen zurück.
Aktivierung des Einbrennschutzes nach (2 Std. / 4 Std. ■
/ 8 Std. / 10 Std. / Aus) Wenn längere Zeit das gleiche Bild
angezeigt wird, greift der Einbrennschutz.
Fernsehen mit der 3D-Funktion ¦
WICHTIGE SICHERHEITSINFORMATIONEN LESEN SIE
DIE FOLGENDEN WARNHINWEISE EHE SIE ODER IHR
KIND DIE 3D-FUNKTION VERWENDEN
[
Achtung
Beim Anschalten des Fernsehgeräts können sich
x
die linke und rechte Seite von 3D-Bildern stärker als
üblich überlagern. Es kann eine Weile dauern, bis die
Bildqualität optimiert ist.
Der 3D-Effekt wird von unterschiedlichen Betrachtern
x
verschieden wahrgenommen. Möglicherweise können
Sie den 3D-Effekt überhaupt nicht wahrnehmen,
wenn die Stärken des linken und des rechten Glases
Ihrer Brille deutlich voneinander abweichen.
Die Eltern müssen ihre Kinder im Teenageralter oder
x
jünger beim 3D-Fernsehen genau beobachten.
Warnung bezüglich Lichtepilepsie und anderer
x
Gesundheitsrisiken
Manche Zuschauer bekommen einen epileptischen –
Anfall oder einen Schlag, wenn Sie blinkende
Bilder oder Blinklichter sehen, wie sie in manchen
Fernsehfilmen oder Videospielen vorkommen.
Konsultieren Sie Ihren Arzt, ehe Sie die 3D-Funktion
nutzen, wenn es bei Ihnen oder Verwandten von Ihnen
eine Vorgeschichte mit Epilepsie oder Schlägen gibt.
Auch Personen ohne eigene oder familiäre –
Vorgeschichte mit Epilepsie oder Herzschlag
können, ohne es zu wissen, eine undiagnostizierte
Veranlagung für Lichtepilepsie haben.“
Wenn bei Ihnen irgendwelche der folgenden –
Symptome auftreten, hören Sie sofort auf, 3D-Bilder
anzusehen und wenden Sie sich an einen Facharzt: (1)
Sehstörungen, (2) Benommenheit, (3) Schwindel,
(4) Unwillkürliche Bewegungen des Auges oder
der Muskeln, (5) Verwirrung, (6) Übelkeit, (7)
Bewusstseinseintrübungen, (8) Konvulsionen,
(9) Krämpfe und/oder (10) Orientierungslosigkeit.
Eltern sollten ihre Kinder beobachten und nachfragen,
ob irgendwelche der obigen Symptome aufgetreten
sind. Bei Kindern und Teenagern können solche
Symptome eher als bei Erwachsenen auftreten.
Beachten Sie, dass längeres Fernsehen in zu großer
x
Nähe zum Bildschirm die Augen schädigen kann.
Beachten Sie, dass längeres Fernsehen mit der
x
3D-Aktivbrille Kopfschmerzen und Erschöpfung
verursachen kann. Wenn Sie Kopfschmerzen, Müdigkeit
oder Benommenheit verspüren, hören Sie sofort auf
und machen Sie eine Pause.
Manche 3D-Bilder können den Zuschauer erschrecken.
x
Schwangere, ältere Menschen, Personen mit Epilepsie
oder einer schweren Erkrankung sollten es vermeiden,
die 3D-Funktion des Geräts zu verwenden.
Wir raten vom Genuss der 3D-Bilder ab, wenn Sie
x
sich in schlechter körperlicher Verfasung befinden,
übermüdet sind oder Alkohol getrunken haben.
Denken Sie weiterhin an Ihre Umgebung. Dieses Gerät
x
soll Sie umfassend gefangen nehmen. Verwenden Sie
es als NICHT in der Nähe von ungesicherten Treppen
und Trppenhäusern, Kabeln, Brüstungen oder anderen
Objekten, bei denen die Möglichkeit besteht, dass Sie
darüber stolpern, dagegenstoßen oder darüber hinweg
stürzen bzw. dass sie einstürzen oder zerbrechen. Sie
können sich erschrecken oder werden dazu verführt,
die 3D-Bilder für real zu halten und deshalb in der Nähe
stehende Gegenstände zu zerschlagen und sich zu
verletzen, weil Sie sich bewegen.
Verwenden Sie die 3D-Aktivbrille nur
x
bestimmungsgemäß. Wenn Sie die 3D-Aktivbrille
mit HDMI/DVI für andere Zwecke (z. B. als Brille,
Sonnenbrille oder Schutzschutzbrille usw.) tragen,
können Sie sich körperliche Schäden zufügen und Ihre
Sehkraft schwächen.
Schalten Sie die 3D-Aktivbrille ein, wenn Sie
x
3D-Bilder sehen.
Schalten Sie die 3D-Brille aus, wenn Sie sie nicht
x
verwenden. Wenn Sie die 3D-Brille eingeschaltet
lassen, wird die Lebensdauer der Batterie verkürzt.
Achten Sie darauf, dass Kinder die Batterien nicht in
x
den Mund nehmen, nachdem diese aus der 3D-Brille
entfernt wurden. Bewahren Sie Batterien an Stellen auf,
die für Kinder und Kleinkinder nicht erreichbar sind.
Durch das Eintauchen in die Bilder können sich
x
negative Effekte wie Reisekrankheit, nachwirkende
Wahrnehmunsstörungen, Orientierungslosigkeit,
Augenbelastung und schlechtere Körperhaltung
herausbilden. Legen Sie deshalb häufig Pausen ein, da
Page 80

19
Deutsch
03 Grundfunktionen
Sie auf diese Weise die Gefahr solcher Effekte reduzieren.
Dies wird auch bei anderen Geräten wie Keyboards und
Computermonitoren empfohlen, bei man dazu neigt, sie
zu fixieren oder sich darauf zu konzentrieren. Wenn an
Ihren Augen Anzeigen von Ermüdung oder Trockenheit
auftreten, oder wenn bei Ihnen eines oder mehrere der
obigen Symptome auftreten, verwenden Sie das Gerät
nicht mehr. Erst 30 Minuten nachdem alle Symptome
verschwunden sind, dürfen Sie es wieder nutzen.
Der ideale Betrachtungsabstand beträgt mindestens
x
das Dreifache der Bildschirmhöhe. Wir empfehlen,
sich so hinzusetzen, dass die Augen des Betrachters
auf einer Höhe mit dem Bildschirm liegen.
3D
Mit dieser aufregenden neuen Funktion können
Sie Inhalte räumlich anzeigen. Damit Sie diese
Funktion volll genießen können, müssen Sie
eine Samsung-3D-Aktivbrille (SSG-2100AB,
SSG-2200AR, SSG-2200KR) erwerben.
Die 3D-Aktivbrille von Samsung wird
gesondert vertrieben. Weitere Informationen
erhalten Sie bei dem Händler, bei dem Sie das Fernsehgerät
gekauft haben.
3D emitter
Wenn sich ein Hindernis zwischen dem Sender und der
✎
3D-Aktivbrille befindet, tritt möglicherweise nicht der
richtige 3D-Effekt ein.
3D-Modus ■ : Wählen Sie das 3D-Eingangsformat.
Wenn Sie den 3D-Effekt voll erfahren möchten,
✎
setzen Sie zuerst die 3D-Aktivbrille auf und wählen
Sie dann den 3D-Modus aus der nachfolgenden
Liste aus, mit dem Sie das beste 3D-Erlebnis
erzielen.
3D Modus Funktion
Aus Deaktiviert die 3D-Funktion.
2D → 3D
Nebeneinander
Oben und
Unten.
Horizontal
getrennt
Vertikale
Streifen
Ändern eines 2D Bilds in 3D.
Anzeigen von zwei Bildern
neben einander.
Anzeigen von zwei Bildern über
einander.
Zeigt die Bilder für das linke
und rechte Auge abwechselnd
in Reihen an.
Zeigt die Bilder für das linke
und rechte Auge abwechselnd
in Spalten an.
Schachbrett
Frequenz
✎
Nebeneinander“ und „Übereinander“ stehen nur
“
bei den Auflösungen 720p, 1080i und 1080p in
den Modi DTV, HDMI und USB zur Verfügung,
oder wenn das Gerät bei Anschluss mit einem
HDMI/DVI-Kabel auf PC eingestellt ist.
„Vertikale Streifen“, „Line by Line (Horizontal
✎
getrennt)“ und „Schachbrett“ sind nur verfügbar,
wenn die Auflösung auf PC-Modus (mit Anschluss
über HDMI/DVI-Kabel) eingestellt ist.
„Frequenz“ zeigt die Frequenz (nur 60 Hz) an,
✎
wenn die Auflösung auf PC eingestellt ist.
3D ■ → 2D (Aus / Ein): Anzeigen nur des Bilds für das
linke Auge.
Diese Funktion ist deaktiviert, wenn der
✎
3D-Modus auf „2D → 3D“ oder Aus eingestellt ist.
3D View point ■ : The overall adjustment of 3D
perspective.
Diese Funktion ist deaktiviert, wenn der
✎
3D-Modus auf „2D → 3D“ oder Aus eingestellt ist.
Farbtiefe ■ : Einstellen von Fokus / Tiefe im Modus
„2D → 3D“.
Diese Funktion ist nur aktiviert, wenn der
✎
3D-Modus auf „2D → 3D“ eingestellt ist.
Bildkorrektur ■ : Anpassen des Bilds an das linke und
rechte Auge.
3D-Autoansicht (Aus / Ein) ■ : Wenn 3D-Autoansicht
aktiviert Ein ist, wird ein HDMI-Signal im Format
„Nebeneinander“ mit einer der nachfolgenden
Aufösungen automatisch auf 3D umgeschaltet. In
diesem Fall müssen vom HDMI 1.4-Sender die richtigen
3D-Informationen gesendet werden.
Wenn ein 3D-Fehler auftritt, weil die
✎
3D-Informationen fehlerhaft sind, deaktivieren
(Aus) Sie 3D-Autoansicht und wählen Sie einen
3D-Modus manuell mit Hilfe der 3D-Taste oder
dem entsprechenden Menübefehl.
Unterstützte Auflösungen (nur 16:9)
✎
Auflösung Frequenz (Hz)
1280 x 720p 50 / 60 Hz
1920 x 1080i 50 / 60 Hz
1920 x 1080p 24 / 30 / 50 / 60 Hz
Untersützte Auflösungen im HDMI PC-Modus
Die Auflösung für den HDMI PC-Modus ist für
Eingangssignale mit 1920 x 1080 optimiert.
Eine andere Eingabeauflösung als 1920 x 1080 kann in 3D
oder im Vollbildmodus nicht richtig angezeigt werden.
Zeigt die Bilder für das linke
und rechte Auge abwechselnd
in Pixeln an.
Zeigt die Bilder für das linke
und rechte Auge abwechselnd
in Rahmen an.
Page 81

20
Deutsch
Grundfunktionen
(je nach Modell) So zeigen Sie ein 3D-Bild an
3D
Um 3D-Bilder sehen zu können, tragen Sie
eine Brille und schalten Sie sie ein. Wenn
Sie für längere Zeit 3D-Fernsehsendungen
anschauen, können Ihre Augen ermüden
und/oder es kann Ihnen schwindlig werden.
OK
Abbr.
U
Verschieben E Eingabe R Beenden
3D
Wählen Sie mit den Tasten LINKS / RECHTS der
Fernbedienung das passende Symbol zum Bild auf
dem Bildschirm.
U
Verschieben E Eingabe R Beenden
1. Drücken Sie auf die Taste CONTENT, damit das Menü
Inhalte anzeigen angezeigt wird.
2. Drücken Sie dann auf ◄ oder ►, und wählen Sie 3D.
Um 3D-Bilder sehen zu können, tragen Sie eine Brille
und schalten Sie sie ein. Wenn Sie für längere Zeit
3D-Fernsehsendungen anschauen, können Ihre Augen
ermüden und/oder es kann Ihnen schwindlig werden.
3. Wählen Sie OK, und drücken Sie dann auf die
ENTER
E
.
4. Mit den Tasten ◄ oder ► auf Ihrer Fernbedienung
wählen Sie den gewünschten 3D-Modus des Bilds.
Einige 3D-Modi werden nicht unterstützt
✎
(abhängig von Format und der Signalquelle)
Unterstützte Formate und technische Betriebsdaten für
HDMI 1.4
Quellsignalformat Standard HDMI 1.4 3D
1920x1080p@24Hz x 2 1920x2205p@24Hz
1280x720p@60Hz x 2 1280x1470p@60Hz
1280x720p@50Hz x 2 1280x1470p@50Hz
Bei 3D-Videosignalen in einem der obigen Formate wird der
Modus automatisch auf 3D-Modus umgeschaltet.
Für HDMI 1.4 bei 24 Hz wird das Fernsehbild wie folgt
optimiert:
Auösung im ersten Anzeigemodus – : Wenn
Auto Motion Plus deaktiviert Aus oder auf Clear
(Klar) bzw. Standard eingestellt ist, können Sie das
Video bei einer für die Auflösung des Quellsignals
optimierten hohen Auflösung anzeigen.
Anzeigemodus für Judder-Minderung – : Wenn Auto
Motion Plus auf Glätten oder Benutzrdef. eingestellt
ist, sehen Sie ein geglättetes Bild ohne Judder.
Vor dem ersten Verwenden der 3D-Funktion...
✎
HINWEIS
Wenn Sie 3D-Bilder unter einer Leuchtstoffröhre
x
(50 Hz – 60 Hz) oder einer 3-Bandleuchte sehen,
bemerken Sie möglicherweise ein leichtes Flackern.
Dimmen Sie in diesem Fall das Licht oder schalten
Sie es aus.
Der 3D-Modus wird in den folgenden Situationen
x
automatisch deaktiviert: Wechseln des Kanals oder
der Signalquelle und beim Zugriff auf Media Play
oder Internet@TV.
Manche Bildfunktionen werden im
x
deaktiviert.
PIP
und Übertragungen von Datendiensten stehen
x
im 3D-Modus nicht zur Verfügung.
Datendienste (MHEG / MHP) stehen im 3D-Modus
x
nicht zur Verfügung.
3D-Aktivbrillen anderer Hersteller werden
x
möglicherweise nicht unterstützt.
Wenn das Fernsehgerät erstmals angeschaltet
x
wird, kann es eine Weile dauern, bis die 3D-Anzeige
optimiert ist.
Die 3D-Aktivbrille funktioniert möglicherweise
x
nicht korrekt, wenn in der Nähe der Brille oder des
Fernsehgeräts andere 3D-Geräte oder elektronische
Apparate eingeschaltet sind. Wenn ein solches
Problem auftritt, halten Sie andere elektronische
Geräte so weit wie möglich von der 3D-Aktivbrille
entfernt.
Wenn Sie Bilder aus einer 3D-Quelle mit 50 Hz
x
und aktiviertem Spielemodus ansehen, nehmen
optisch sensible Seher bei hellen Abbildungen
möglicherweise ein Flimmern wahr.
Die
Fotos aus Media Play werden nur im Modus
x
„2D → 3D“ angezeigt.
Wenn Sie auf der Seite liegen, werden die 3D-Effekte
x
möglicherweise nicht angezeigt.
Wenn Sie 3D-Filme anschauen, achten Sie darauf,
x
innerhalb des Betrachtungswinkels und der
optimalen Fernsehdistanz zu bleiben.
Andernfalls können Sie die 3D-Effekte –
möglicherweise nicht richtig genießen.
Wenn der Sender am Fernsehgerät wegen eines
x
geänderten Betrachtungswinkels oder einer zu
großen Distanz getrennt wird, schaltet sich die
3D-Aktivbrille nach 30 Sekunden automatisch aus. In
diesem Fall blinkt die rote LED drei Mal.
3D-Modus
Page 82

21
Deutsch
03 Grundfunktionen
Bild zurücksetzen (OK / Abbrechen)
Zurücksetzeb Ihres aktuellen Bildmodus auf ihre
Standardeinstellungen.
Tonmenü
Ändern des Tonmodus ¦
Einstellen des Fernsehgeräts mithilfe Ihres PCs ¦
Stellen Sie die Signalquelle auf PC ein.
Autom. Einstellung
Stellen Sie die Frequenzen/Positionen ein und lassen Sie die
Feinstellung automatisch durchführen.
Nicht verfügbar bei Anschluss mit einem HDMI/DVI-Kabel.
✎
t
Bildschirm
Grob / Fein ■ : Entferneb oder Reduzieren von Bildrauschen.
Falls sich das Bildrauschen durch die Feinabstimmung
allein nicht beheben lässt, stellen Sie zunächst die Frequenz
möglichst genau ein Grob. Führen Sie dann erneut eine
Feinabstimmung durch. Nachdem Sie das Bildrauschen
durch die Grob- und Feinabstimmung des Bildes verringert
haben, stellen Sie die Position des Bildes so ein, dass es
auf dem Bildschirm zentriert ist.
Position ■ : Einstellen der Position des PC-Fensters mit den
Richtungstasten (▲ / ▼ / ◄ / ►).
Bild zurücksetzen ■ : Zurücksetzen des Bilds auf die
Standardwerte.
Verwenden Ihres Computers als Computerbildschirm (PC)
Konfigurieren Ihrer PC-Software (unter Windows XP)
Je nach der Version von Windows und der Grafikkarte können
die tatsäch angezeigten Dialogfelder auf Ihrem PC abweichen.
In fast jedem Fall aber werden die gleichen grundlegenden
Einstellungen vorgenommen. (Wenden Sie sich andernfalls an
den Computerhersteller oder Samsung-Händler.)
1. Klicken Sie im Startmenü von Windows auf „Systemsteuerung”.
2.
Wenn das Fenster der Systemsteuerung angezeigt wird,
klicken Sie auf „Darstellung und Designs”. Ein Dialogfeld
wird geöffnet.
3. Klicken Sie auf „Anzeige“. Anschließend wird ein Dialogfeld
angezeigt.
4. Klicken Sie im Dialogfeld Anzeige auf die Registerkarte
„Einstellungen”.
Stellen Sie die richtige Größe (Bildschirmauflösung) ein y
[Optimal: 1920 x 1080 Pixel]
Wenn das Dialogfeld eine Option für die Bildschirmfrequenz y
enthält, muss als Einstellung “60” oder “60 Hz” ausgewählt
werden. Andernfalls klicken Sie einfach auf OK, um das
Dialogfeld zu schließen.
SRS TheaterSound
Standard ■ : Auswahl des normalen Tonmodus.
Musik ■ : Betont die Musik im Verhältnis zu Stimmen.
Film ■ : Ermöglicht optimale Tonwiedergabe für Filme.
Klare Stimme ■ : Betont Stimmen im Verhältnis zu anderen
Geräuschen.
Verstärken ■ : Erhöht die Lautstärke hochfrequenter
Töne, damit hörgeschädigte Personen den Ton besser
verstehen können.
t
Anpassen der Toneinstellungen ¦
Equalizer
Anpassen des Tonmodus (nur im Standardtonmodus)
Balance L/R ■ : Anpassen der Balance zwischen dem
linken und dem rechten Lautsprecher.
100Hz / 300Hz / 1kHz / 3kHz / 10kHz ■ (Einstellung
der Frequenzbänder): Einstellen der Lautstärke für die
unterschiedlichen Frequenzbänder.
Zurücksetzen ■ : Zurücksetzen der Equalizereinstellungen
auf die Standardwerte.
Tonsystem, usw. ¦
SRS TheaterSound (Aus / Ein)
(nur im Standardtonmodus)
Diese Funktion ermöglicht durch HRTF-Technologie (Head
Related Trasfer Function) virtuellen 5.1 Kanalton bei einem
einzigen Lautsprecherpaar oder Kopfhörer.
t
SRS TruDialog (Aus / Ein)
(nur im Standardtonmodus)
Mitr dieser Funktion können SIe die Lautstärke einer Stimme
gegenüber der Hintergrundmusik oder den Toneffekten erhöhen,
so dass Dialoge während einer Show besser zu verstehen sind.
Page 83

22
Deutsch
Grundfunktionen
Wiedergabesprache
(nur digitale Sender)
Sie können die Standardsprache für Audio ändern.
✎
Welche Sprache verfügbar ist, hängt von der jeweiligen
Sendung ab.
Audioformat (MPEG / Dolby Digital 5.1)
(nur digitale Sender)
Wenn Sie für die Tonausgabe sowohl den Hauptlautsprecher
als auch den Audioreceiver verwenden, kann es aufgrund der
Geschwindigkeitsunterschiede beim Dekodieren durch die
beiden Systeme zu einem Echoeffekt kommen. Verwenden
Sie in diesen Fall die TV-Lautsprecher.
Die Audioformat-
✎
jeweiligen Sendung. Dolby Digital-5.1-Kanalton
steht nur zur Verfügung, wenn Sie einen externer
Lautsprecher über ein optisches Kabel anschließen.
Option richtet sich nach der
Audio für Sehgeschädigte
(nicht überall verfügbar) (nur Digitalkanäle)
Diese Funktion verarbeitet den Audiostream
für den Audiokommentar (Audio für
Sehgeschädigte), der vom Sender zusammen
mit dem Vordergrundton übertragen wird.
Audio für Sehgeschädigte (Aus / Ein) ■ :
Hiermit wird der Audiokommentar für Sehbehinderte einund ausgeschaltet.
Lautstärke ■ : Hiermit regeln Sie die Lautstärke des
Audiokommentars für Sehgeschädigte.
Automatische Lautstärke (Aus / Normal /
Nacht)
Wählen Sie Normal, um die verschiedenen Kanäle auf die
gleiche Lautstärke einzustellen.
Nacht ■ : Dieser Modus ermöglicht besseren Ton als im
Modus Normal, denn er ist fast rauschfrei. Das ist
beispielsweise bei Nacht nützlich.
Lautsprecherauswahl (Ext. Lautsprecher /
Lautsprecher auswählen)
Es kann aufgrund unterschiedlicher
Decodierungsgeschwindigkeiten des Hauptlautsprechers
und des Audioreceivers zu Echoeffekten kommen. Stellen Sie
das Fernsehgerät in diesem Fall auf Ext. Lautsprecher ein.
Prüfen Sie, ob
✎
Lautsprecher eingestellt ist.
TV-Lautsprecher: Aus, Ext. Lautsprecher: Ein
x
Wenn ✎Lautsprecher auswählen auf Ext.
Lautsprecher eingestellt ist, verwenden Sie die
folgenden Einstellungen.
TV-Lautsprecher: Ein, Ext. Lautsprecher: Ein
x
Ohne Videosignal werden beide Lautsprecher
✎
stummgeschaltet.
Lautsprecher auswählen auf Ext.
Zusätzliche Einstellung
(nur digitale Sender)
DTV-Audiolautstärke (MPEG / HE-AAC) ■ : Mit
dieser Funktion können Sie die Ungleichheit eines
Stimmensignals (dies ist eines der bei einer digitalen
Fernsehsendung empfangenen Signale) auf die
gewünschte Höhe reduzieren.
Entsprechend dem Typ des Sendesignals kann
✎
MPEG / HE-AAC im Bereich von -10 dB bis 0 dB
eingestellt werden.
Um die Lautstärke zu erhöhen oder zu vermindern,
✎
stellen Sie den Bereich zwischen 0 bzw. -10 ein.
SPDIF-Ausgabe ■ : SPDIF (Sony Philips Digital
InterFace) ermöglicht digitalen To n und reduziert die an
Lautsprecher und verschiedene andere digitale Geräte
(z. B. DVD-Player) übertragenen Störungen.
Audioformat: Während des Empfangs einer digitalen
Fernsehsendung können Sie bei den Optionen PCM
oder Dolby Digital das digitale Audioausgabeformat
(SPDIF) auswählen.
Durch Anschließen von 5.1-Kanallautsprechern in
✎
einer Dolby Digital-Konfiguration maximieren Sie
Ihre interaktive 3D-Raumerfahrung.
Audioverzögerung: Korrektur von Audio/VideoFehlsynchronisierungen, wenn Sie Fernsehsendungen
oder Videos ansehen und die digitalen Audiosignale mit
einem externen Gerät (z, B. einem AV-Receiver) ausgeben
(0ms ~ 250ms).
Dolby Digital-Komp. (Line / RF) ■ : Diese Funktion
minimiert die Lautstärkeunterschiede zwischen einem
Dolby Digital-Signal und einem Sprachsignal (d.h.
MPEG-Audio, HE-AAC, ATV-Ton).
Wählen Sie
✎
erzielen, und RF, um beispielsweise bei Nacht
die Lautstärkeunterschiede zwischen lauten und
leisen Tönen zu reduzieren.
Line: Hiermit stellen Sie die Lautstärke von Signalen
mit mehr oder weniger als -31 dB (Bezugswert) auf
entweder -20 dB oder -31 dB ein.
RF: Hiermit stellen Sie die Lautstärke von Signalen
mit mehr oder weniger als -20 dB (Bezugswert) auf
entweder -10 dB oder -20 dB ein.
Line, um Ton mit großer Dynamik zu
Ton zurücksetzen (OK / Abbr.)
Hiermit setzen Sie alle Toneinstellungen auf die
Standardwerte zurück.
Stereo
Dual I
Mono
Mono
t
Mono
↔
Mono
↔
Dual II
Mono
↔
Stereo
→
Dual I
Dual II
Standard
Automatischer
Wechsel
Dual-I
Automatischer
Wechsel
Dual-I
Tonmodus auswählen ¦
Wenn Sie Dual I-II einstellen, wird der aktuelle
Tonwiedergabemodus auf dem Bildschirm angezeigt.
Audiosystem Dual I-II
A2-
Stereo
NICAM
Stereo
Mono
Stereo
Dual
Mono
Stereo
Dual
Page 84

23
Deutsch
03 Grundfunktionen
Falls das Stereosignal schwach ist und automatisch
10 TV AT V1
00 00
▲
▼
00 00
▲
▼
✎
umgeschaltet wird, sollten Sie zu mono wechseln.
✎
Diese Funktion ist nur bei einem Stereosignal aktiviert.
Nur verfügbar, wenn die ✎Eingang squelle auf TV
eingestellt ist.
Einstellungsmenü
Einstellen der Uhrzeit ¦
Zeit
Uhr ■ : Die Uhr muss eingestellt werden, damit Sie die
verschiedenen Timerfunktionen des Fernsehgeräts verwenden
können.
O
edes Mal, wenn Sie die Taste INFO drücken, wird die
J
aktuelle Zeit angezeigt.
Wenn Sie das Netzkabel ziehen, müssen Sie die Uhr
✎
erneut einstellen.
Uhr-Modus (Auto / Manuell)
Je nach Sendestation und Signal ist die automatisch
✎
eingestellte Zeit möglicherweise nicht korrekt. In diesem
Fall müssen Sie die Zeit manuell einstellen.
Die Antenne muss angeschlossen sein, damit die Zeit
✎
automatisch eingestellt werden kann.
Uhrzeit einstellen: Manuelles Einstellen von Tag, Monat, Jahr,
Stunde und Minute.
✎
Verfügbar nur, wenn der
eingestellt ist.
Zeitzone: Sie können Ihre Zeitzone auswählen.
Diese Funktion ist nur verfügbar, wenn Sie
✎
Uhrmodus auf Auto eingestellt haben.
Je nach Sendestation und Signal erfolgt die
✎
automatische Zeiteinstellung möglicherweise nicht
korrekt. In diesem Fall müssen Sie die Zeit manuell
einstellen
.
Verwenden des Sleep-Timers ¦
Sleep-Timer ■
Fernsehgerät nach Ablauf einer vorher eingestellten Zeit
automatisch abgeschaltet. (30, 60, 90, 120, 150 und 180
Minuten).
t
Um den
✎
Sleep-Timer abzubrechen, wählen Sie Aus.
Uhr-Modus auf Manuell
: Mit dieser Funktion wird das
Einstellen des Ein-/Ausschalttimers ¦
Timer 1 / Timer 2 / Timer 3 ■ : Sie können drei verschiedene
Einstellungen für den Ein-/Ausschalttimer vornehmen.
Voraussetzung dafür ist, dass Sie die Uhr gestellt haben.
Timer 1
Anschaltzeit
Deaktiv.
Ausschaltzeit
Deaktiv.
Lautstärke
Wiederh.
Anschaltzeit / Ausschaltzeit:Stellen Sie Stunde und Minute
ein und aktivieren bzw. deaktivieren Sie die Funktion. (Wenn Sie
mit den Einstellungen fertig sind, aktivieren Sie den Timer mit
Aktivieren).
Lautstärke: Stellen Sie die gewünschte Lautstärke ein.
Source: Sie können den TV oder USB-Inhalt einstellen,
der beim automatischen Einschalten des Fernsehers
wiedergegeben wird. (USB kann nur dann ausgewählt werden,
wenn ein USB-Gerät an den Fernseher angeschlossen ist)
TV-Empfang (wenn die Quelle auf TV eingestellt ist): Wählen
Sie ATV oder DTV.
Kanal (wenn die Quelle auf TV eingestellt ist): Wählen Sie den
gewünschten Kanal.
Inhalt (wenn die Quelle auf USB eingestellt ist): Wählen Sie auf
dem USB-Gerät einen Ordner mit Musik- oder Fotodateien, die
beim automatischen Anschalten des Fernsehgeräts angezeigt
werden.
HINWEIS
✎
Die xTimerfunktion arbeitet nicht fehlerfrei, wenn es
auf dem USB-Gerät keine Musikdatei gibt oder der
Ordner mit der Musikdatei nicht markiert ist.
Wenn auf dem USB-
x
gespeichert ist, wird keine Diashow gestartet.
Wenn der Ordnername zu lang ist, kann der Ordner
x
nicht ausgewählt werden.
Jedem USB-Gerät, das Sie verwenden, wird ein
x
eigener Ordner zugewiesen. Wenn Sie mehr als
eine SUB-Gerät den selben Typs verwenden,
vergewissern Sie sich, dass die den einzelnen USBGeräten zugewiesenen Ordner unterschiedliche
Namen tragen.
Wiederholen: Wählen Sie Einmal, Täglich, Mo - Fr, Mo Sa, Sa - So, oder Manuell, um den Wert Ihren Wünschen
entsprechend einzustellen. Wenn Sie Manuell wählen, können
Sie den Tag einstellen, an dem der Timer aktiviert werden soll.
Das Symbol
✎
Automatische Ausschaltung (nur dann verfügbar, wenn
✎
das Fernsehgerät von Timer eingeschaltet wurde): Um eine
eventuelle Überhitzung zu verhindern, wird das Fernsehgerät
nach 3 Stunden im Leerlauf automatisch ausgeschaltet.
Quelle TV-Empfang Kanal
Einmal
So Mo. Di. Mi. Do. Fr. Sa
L
Verschieben
U
c zeigt an, dass der Tag gewählt ist.
Einstellen
E
Eingabe R Zurück
Gerät nur eine Fotodatei
Page 85

24
Deutsch
Grundfunktionen
Sperren von Programmen ¦
Sicherheit
Der Eingabefenster für die PIN wird angezeigt, ehe das
✎
Einstellungsfenster geöffnet wird.
✎
Geben Sie die vierstellige Standard-PIN ein: „0-0-0-0“. Ändern
Sie die PIN mit der Option PIN ändern.
Kindersicherung (Aus / Ein) ■ : Sie können Kanäle im Kanal-
Manager sperren, damit unberechtigte Benutzer, z. B. Kinder,
für sie nicht geeignete Sendungen sehen.
Nur verfügbar, wenn die
✎
eingestellt ist.
Sicherungsstufe (Alterseinstellung) ■ : Mit einem
benutzerdefinierten 4-stelligen PIN-Code verhindern Sie, dass
unbefugte Benutzer (z. B. Kinder), ungeeignete Sendungen
sehen.
Alle zulassen: Hiermit können Sie alle Altersbeschränkungen
aufheben.
✎
Die Optionen für die
Abhängigkeit vom jeweiligen Land variieren.
PIN ändern ■ : Sie können Ihre zum Einrichten des
Fernsehgeräts benötigte persönliche Kennnummer
ändern.
Wenn Sie den PIN-Code vergessen haben,
✎
drücken Sie die Fernbedienungstasten in der
angegebenen Reihenfolge, um die PIN auf
„0-0-0-0“ zurückzusetzen: POWER (Aus) →
MUTE → 8 → 2 → 4 → POWER (Ein).
Eingang squelle auf TV
Sicherungsstufe können in
Weitere Funktionen ¦
Sprache
Menüsprache ■ : Stellen Sie die Menüsprache ein.
Teletextsprache ■ : Einstellen der gewünschten
Teletextsprache.
Englisch ist der Standardwert in Fällen, wo die
✎
ausgewählte Sprache für die Sendung nicht
verfügbar ist.
Voreinstellung (Primäre Wiedergabesprache ■
/ Sekundäre Wiedergabesprache / Primäre
Untertitelsprache / Sekundäre Untertitelsprache
/ Primäre Teletextsprache / Sekundäre
Teletextsprache): Wählen Sie eine Sprache aus, die als
Standardsprache verwendet wird, wenn Sie einen Kanal
auswählen.
Untertitel
Mit diesem Menü legen Sie den Untertitel
modus fest.
Die Untertitelfunktion kann nicht
✎
verwendet werden, wenn sich die
Quelle im Modus Component oder
HDMI befindet.
Untertitel (Aus / Ein) ■ : Untertitel aktivieren oder
deaktivieren.
Modus (Normal / Schwerhörig) ■ : Hiermit können Sie
den Modus der Untertitelfunktion einstellen.
Untertitelsprache ■ : Hiermit können Sie die
Untertitelsprache festlegen.
Wenn das Programm, das Sie gerade sehen, die
✎
Funktion Schwerhörig nicht unterstützt, wird
selbst bei der Einstellung Normal automatisch die
Einstellung Scshwerhörig aktiviert.
Englisch ist der Standardwert in Fällen, wo die
✎
ausgewählte Sprache für die Sendung nicht
verfügbar ist.
Digitaltext (Deaktivieren / Aktivieren)
(nur Großbritannien)
Wenn das Programm mit Digitaltext gesendet wird, ist diese
Funktion aktiviert.
Netzwerk (Netzwerktyp / Netzwerk
einrichten / Netzwerktest / SWL (Samsung
Wireless Link) / SWL verbinden)
Genaue Beschreibungen zum Einstellen der Optionen finden
Sie bei den Anweisungen zum „Netzwerkanschluss“. (Seite 28)
Allgemein
Spielemodus (Aus / Ein) ■ : Wenn Sie eine Spielekonsole
wie PlayStation™ oder Xbox™ anschließen, können Sie
durch Auswählen des Spielemodus ein realitätsnaheres
Spielerlebnis genießen.
HINWEIS
✎
Vorsichtsmaßnahmen und Einschränkungen im x
Spielemodus
Wenn Sie die Spielekonsole wieder vom Gerät trennen –
und ein anderes externes Gerät anschließen möchten,
deaktivieren (Aus) Sie den Spielemodus mit Hilfe des
Einrichtmenüs.
Wenn Sie im – Spielemodus das TV-Menü anzeigen,
zittert das Bild leicht.
Spielemodus
x
Nach dem Anschließen der
x
(Ein) Sie den Spielemodus, um schlechte Bildqualität zu
verhindern.
Bei aktiviertem (
x
ist eingestellt auf Standard und der Tonmodus auf
Benutzerdefiniert.
ist im TV und PC nicht verfügbar.
Spielekonsole aktivieren
Ein) Spielemodus: Der Bildmodus
Page 86

25
Deutsch
03 Grundfunktionen
BD Wise (Aus / Ein) ■ : Ermöglicht optimale Bildqualität für
Samsung DVD, Blu-Ray und Heimkinoprodukte, die BD
Wise unterstützen. Wenn BD Wise aktiviert (Ein) ist, wird
der Bildmodus automatisch auf die optimale Auflösung
eingestellt.
Verfügbar nur, wenn Sie über ein HDMI-Kabel
✎
Geräte von Samsung anschließen, die über BD Wise
verfügen.
Menütransparenz (Hell / Dunkel) ■ : Stellen Sie die
Transparenz des Menüs ein.
Melodie (Aus / Gering / Mittel / Hoch) ■ : Verwenden Sie
diese Funktion, wenn Sie möchten, dass beim Ein- oder
Ausschalten des Fernsehgeräts eine Melodie abgespielt wird.
FastStart (Aus / Ein) ■ : Mit dieser Funktion wird das Bild
beim Einschalten des Fernsehgeräts schnell angezeigt.
✎
Melodie wird deaktiviert, wenn Sie FastStart aktivieren
(Ein).
Common Interface
CI-Menü ■ : Hiermit kann der Benutzer seine Auswahl in dem
vom CAM-Modul bereitgestellten Menü treffen. Wählen Sie
das CI-Menü ausgehend vom Menü „PC Card“ (PC-Karte).
Anwendungsinformationen ■ : Anzeigen von Informationen
zu dem in den CI Steckplatz eingesetzen CAM und zur „CI“
oder „CI+“-Karte, die in das CAM eingesetzt wurde. Sie
können das CAM-Modul unabhängig davon anschließen,
ob das Fernsehgerät angeschaltet ist oder nicht.
1. Sie können das CI-CAM-Modul bei Ihrem nächsten Händler
oder durch telefonische Bestellung erwerben.
2. Schieben Sie die „CI“ oder „CI+“-Karte in Richtung des
Pfeils in das CAM-Modul ein, bis sie fest sitzt.
3. Setzen Sie das CAM mit der „CI“ oder „CI+“-Karte in
Richtung des Pfeils so in den Common Interface-Steckplatz
ein, dass es parallel zum Steckplatz ausgerichtet ist.
4. Kontrollieren Sie, ob Sie ein Bild sehen oder ein gestörtes
Signal.
Drahtlose Fernbedienung
Schalten Sie die drahtlose Fernbedienung ein oder aus, bzw.
lassen Sie drahtlose Fernbedienungen zu.
Bild-im-Bild (PIP) ¦
t
PIP
Gleichzeitige Anzeige des Fernsehbilds und des Bilds von
einer externen Videoquelle. PIP (Bild-im-Bild) funktioniert
nicht, für zwei gleiche Signalquellen.
(Aus / Ein)
HINWEIS
✎
Wenn Sie das Fernsehgerät im xPIP-Modus
ausschalten und wieder einschalten, wird das PIPFenster nicht mehr angezeigt.
Möglicherweise wirkt das Bild im PIP-Fenster leicht
x
unnatürlich, wenn Sie den Hauptbildschirm zum
Anzeigen von Spielen oder für Karaoke verwenden.
Solange Sie
x
PIP-Funktion nicht verwenden.
PIP-Einstellungen
x
Hauptbild Nebenbild
Komponenten, HDMI1/
DVI, HDMI2, HDMI3,
HDMI4, PC
PIP (Aus / Ein) ■ : Aktivieren oder deaktivieren Sie die
PIP-Funktion.
Kanal ■ : Hiermit wählen Sie den Kanal für das Teilbild.
Größe ( ■
für das PIP-Bild.
Position ( ■
Position für das PIP-Bild.
Ton wählen (Erster Tuner / Zweiter Tuner) ■ : Sie können
die gewünschte Tonquelle (Erster Tuner / Zweiter
Tuner) für den PIP-Modus auswählen.
Internet@TV einsetzen, können Sie die
TV
Õ
/ Ã /
À / Œ
Ã
/ – / — / œ): Wählen Sie eine
): Wählen Sie eine Position
Unterstützungsmenü
Eigendiagnose
Bildtest (Ja / Nein) ■ : Verwenden Sie diese Funktion, um
Bildprobleme zu analysieren, und kontrollieren Sie das
Farbmuster, wenn das Problem fortbesteht.
Audiotest (Ja / Nein) ■ : Verwenden Sie die integrierte
Melodie, um Tonprobleme zu ermitteln.
Wenn die Fernsehlautsprecher keinen Ton
✎
ausgeben, müssen Sie vor dem Audiotest
sicherstellen, dass Lautsprecher auswählen im
Ton menü auf TV-Lautsprecher eingestellt ist.
Die Melodie ist im Test auch dann zu hören, wenn
✎
Lautsprecher auswählen auf Ext. Lautsprecher
eingestellt ist, oder wenn der Ton mit der Taste
MUTE stumm geschaltet wurde.
Signalinformation ■ : (Nur digitale Kanäle nur) Die
Empfangsqualität des HDTV-Kanals ist entweder perfekt,
oder die Kanäle sind nicht verfügbar. Stellen Sie Ihre
Antenne so ein, dass die Signalstärke zunimmt.
Fehlerbehebung ■ : Wenn das Fernsehgerät scheinbar
ein Problem hat, schlagen Sie zuerst bei diesen
Beschreibungen nach.
Wenn keiner dieser Tipps zur Fehlerbehebung
✎
hilft, wenden Sie sich an das SamsungKundendienstzentrum.
Page 87

26
Deutsch
Grundfunktionen
Software-Update
Das Software-Update kann über das Fernsehsignal
durchgeführt werden, oder durch Herunterladen der
neuesten Firmware von samsung.com auf ein USBSpeichergerät.
Aktuelle Version gibt die Version der Software an, die bereits
im Fernsehgerät installiert ist.
Die Software wird angegeben als „Jahr/Monat/Tag_
✎
Version“.
Software-Update
Aktuelle Version 2010/01/18_000001
PER USB ►
PER Online
PER Channel
Update im Standby : Aus
Alternative Software ----/--/--/--_------
U Verschieben E Eingabe R Zurück
Installieren der aktuellsten Version
Über USB ■ : Legen Sie
ein USB-Laufwerk mit der
Datei des gespeicherten
Firmwareupgrades
(heruntergeladen von
www.samsung.com,) in
das Fernsehgerät ein.
Achten Sie beim Einspielen
des Updates darauf, die
Stromversorgung nicht
zu unterbrechen und das
USB-Laufwerk nicht zu entfernen, bis das Update
abgeschlossen ist. Das Fernsehgerät wird automatisch
ab- und wieder angeschaltet, wenn das Firmwareupdate
abgeschlossen ist. Nachdem die Software aktualisiert
wurde, sind die Video- und Audioeinstellungen wieder
auf die Standardwerte zurückgesetzt. Wir empfehlen,
Ihre Einstellungen aufzuschreiben, damit Sie sie nach
dem Update einfach wieder einstellen können.
Seitenverkleidung des
Fernsehgeräts
oder
USB-Laufwerk
Online ■ : Aktualisierung der Software über das Internet.
Konfigurieren Sie zuerst Ihr Netzwerk. Detaillierte
✎
Verfahrensbeschreibungen zum Einrichten des Netzwerks
finden Sie unter „Netzwerkverbindung“.
Wenn die Internetverbindung nicht richtig funktioniert,
✎
kann es sein, dass die Verbindung unterbrochen ist.
Wiederholen Sie den Download-Versuch. Wenn das
Problem fortbesteht, laden Sie per USB herunter und
aktuilisieren Sie dann.
Über Sendesignal ■ : Aktualisierung der Software über das
Sendesignal.
✎
Wenn Sie diese Funktion während des
Übertragungszeitraums für Software wählen, sucht die
Funktion automatisch nach neuer Software und lädt sie
herunter.
Die zum Herunterladen der Software erforderliche Zeit
✎
hängt vom Signalstatus ab.
Update im Standby ■ : Zur gewählten Zeit erfolgt das manuelle
Update automatisch. Da die Stromversorgung des Geräts
intern eingeschaltet wird, kann der LCD-Bildschirm ein
wenig beleuchtet sein. Dieser Zustand kann etwas mehr
als eine Stunde andauern, bis die Softwareaktualisierung
abgeschlossen ist.
Alternative ■ Software (Backup): Anzeigen der Softwareversion,
die mit Online heruntergeladen wurde. Wenn das Update im
letzten Schritt unterbrochen wird, wird diese Funktion aktiviert.
HD-Anschlussplan
Beachten Sie diese Informationen, wenn Sie externe Geräte an den
Fernseher anschließen.
Samsung kontaktieren
Zeigen Sie diese Informationen an, wenn Ihr Fernseher nicht
ordnungsgemäß arbeitet oder wenn Sie die Software aktualisieren
möchten. Sie können Informationen zu unseren Callcentern und
zum Herunterladen von Produkten und Software finden.
Page 88

27
Deutsch
Erweiterte Funktionen
Anschließen an einen PC
Mit Hilfe eines HDMI/DVI-Kabels oder eines D-Sub-Kabels
04 Erweiterte Funktionen
DVI OUT
AUDIO OUT
AUDIO OUT
PC OUT
Anzeigemodi (D-Sub- und HDMI/DVI-Eingang)
Die optimale Auflösung beträgt 1920 X 1080 bei 60 Hz.
Modus Auflösung Horizontalfrequenz (kHz) Vertikalfrequenz (Hz) Pixeltakt (MHz)
IBM
MAC
VESA CVT
VESA DMT
VESA GTF
VESA DMT / DTV CEA 1920 x 1080p 67.500 60.000 148.500 +/+
HINWEIS
✎✎
640 x 350 31.469 70.086 25.175 +/720 x 400 31.469 70.087 28.322 -/+
640 x 480 35.000 66.667 30.240 -/-
832 x 624 49.726 74.551 57.284 -/-
1152 x 870 68.681 75.062 100.000 -/-
720 x 576 35.910 59.950 32.750 -/+
1152 x 864 53.783 59.959 81.750 -/+
1280 x 720 56.456 74.777 95.750 -/+
1280 x 960 75.231 74.857 130.000 -/+
640 x 480 31.469 59.940 25.175 -/-
640 x 480 37.861 72.809 31.500 -/-
640 x 480 37.500 75.000 31.500 -/-
800 x 600 37.879 60.317 40.000 +/+
800 x 600 48.077 72.188 50.000 +/+
800 x 600 46.875 75.000 49.500 +/+
1024 x 768 48.363 60.004 65.000 -/1024 x 768 56.476 70.069 75.000 -/1024 x 768 60.023 75.029 78.750 +/+
1152 x 864 67.500 75.000 108.000 +/+
1280 x 1024 63.981 60.020 108.000 +/+
1280 x 1024 79.976 75.025 135.000 +/+
1280 x 800 49.702 59.810 83.500 -/+
1280 x 800 62.795 74.934 106.500 -/+
1280 x 960 60.000 60.000 108.000 +/+
1280 x 720 45.000 60.000 74.250 +/+
1360 x 768 47.712 60.015 85.500 +/+
1440 x 900 55.935 59.887 106.500 -/+
1440 x 900
1600 X 1200
1680 x 1050 65.290 59.954 146.250 -/+
1280 x 720 52.500 70.000 89.040 -/+
1280 x 1024 74.620 70.000 128.943 -/-
70.635
75.000
74.984
60.000
136.750
162.000
Synchronisationspolarität
Bei einem Anschluss über HDMI/DVI-Kabel müssen Sie den xHDMI IN 1(DVI)-Anschluss verwenden.
Das Zeilensprungverfahren wird nicht unterstützt.
x
Das Fernsehgerät funktioniert möglicherweise nicht ordnungsgemäß, wenn kein Standardmodus ausgewählt wird.
x
Separate- und Composite-Modus werden unterstützt. SOG (Sync On Green) wird nicht unterstützt.
x
(H/V)
-/+
+/+
Page 89

28
Deutsch
Erweiterte Funktionen
Netzwerkverbindung
Sie können Ihr Fernsehgerät so einrichten, dass es über Ihr lokales Netzwerk (LAN) und eine Kabel- oder WLAN-Verbindung
auf das Internet zugreifen kann.
Verbindung mit einem Kabelnetzwerk herstellen ¦
Sie können Ihr Fernsehgerät auf dreierlei Weise an Ihr LAN anschließen:
Sie können Ihr Fernsehgerät über den LAN-Anschluss auf der Rückseite des Geräts direkt über ein CAT5-Kabel an ein y
externes Modem und Ihr LAN anschließen. Siehe nachfolgende Abbildung.
Modemanschluss an der Wand
Sie können Ihr Fernsehgerät über den LAN-Anschluss auf der Rückseite des Geräts mit einem IP-Sharer verbinden, der y
an ein externes Modem angeschlossen ist, und so die Verbindung zum LAN herstellen. Verwenden Sie ein CAT5-Kabel für
den Anschluss. Siehe nachfolgende Abbildung.
Modemanschluss an der Wand
Modem-Kabel
Je nachdem, wie Ihr Netzwerk aufgebaut ist, können Sie Ihr Fernsehgerät möglicherweise auch an Ihr LAN anschließen, y
indem Sie den LAN-Anschluss auf der Rückseite des Geräts direkt über ein CAT5-Kabel mit einer Netzwerkdose
verbinden. Siehe nachfolgende Abbildung. Beachten Sie, dass die Netzwerkdose mit einem Modem oder Router irgendwo
in Ihrem Haus verbunden sein muss.
LAN-anschluss an der Wand
Externes Modem
(ADSL / VDSL / Kabelfernsehen)
Externes Modem
(ADSL / VDSL / Kabelfernsehen)
LAN-KabelModem-Kabel
IP-Sharer
(mit DHCP-Server)
Rückseite des Fernsehgeräts
Rückseite des Fernsehgeräts
LAN-KabelLAN-Kabel
Rückseite des Fernsehgeräts
LAN-Kabel
Wenn Sie ein dynamisches Netzwerk verwenden, sollten Sie ein ADSL-Modem oder einen Router verwenden, der DHCP
(Dynamic Host Configuration Protocol) unterstützt. Modems und Router, die DHCP unterstützen, stellen für IP-Adresse,
Teilnetzmaske, Gateway und DNS automatisch die Werte zur Verfügung, die Ihr Fernsehgerät benötigt, um auf das Internet
zuzugreifen. Sie brauchen sie also nicht mehr manuell einzugeben. Die meisten Privatnetzwerk nutzen DHCP.
Manche Netzwerk erfordern jedoch eine statische IP-Adresse. Wenn Ihr Netzwerk eine statische IP-Adresse benötigt,
müssen Sie die Werte für IP-Adresse, Teilnetzmaske, Gateway und DNS manuell über das Konfigurationsfenster Ihres
Fernsehgeräts eingeben, wenn Sie die Netzwerkverbindung einrichten. Um die Werte für IP-Adresse, Teilnetzmaske,
Gateway und DNS zu erhalten, wenden Sie sich an Ihren Internet Service Provider (ISP). Wenn Sie einen WindowsComputer einsetzen, können Sie diese Werte über Ihren Computer beziehen.
Sie können ADSL-Modems verwenden, die DHCP unterstützen, wenn Ihr Netzwerk eine statische IP-Adresse
✎
benötigt. Auch ADSL-Modems, die DHCP unterstützen, ermöglichen die Verwendung von statischen IP-Adressen.
Page 90

29
Deutsch
04 Erweiterte Funktionen
Netzwerkkonfiguration (Auto)
Verwenden Sie Eingang einrichten - automatisch, wenn
Sie Ihr Fernsehgerät an ein Netzwerk anschließen, das
DHCP unterstützt. Um die Kabelnetzwerkverbindung
Ihres Fernsehgeräts automatisch einzurichten, gehen Sie
folgendermaßen vor:
So konfigurieren Sie automatisch
1. Schließen Sie Ihr Fernsehgerät wie im vorherigen Abschnitt
beschrieben an Ihr LAN an.
2. Schalten Sie das Fernsehgerät ein, drücken Sie die
MENU-Taste auf Ihrer Fernbedienung und dann
▲ oder ▼, um Einstell. zu wählen. Drücken Sie dann auf
die ENTERE.
3. Verwenden Sie die Tasten ▲ oder ▼, um Netzwerk im
Menü Einstell. auszuwählen, und drücken Sie dann die
ENTERE. Das Fenster Netzwerk wird geöffnet.
Netzwerk
Netzwerktyp : Kabel ►
Eingang einrichten
Netzwerktest
SWL(Samsung Wireless Link)
SWL verbinden
U
4. Wählen Sie im Fenster Netzwerk den Netzwerktyp.
5. Stellen Sie Netzwerktyp auf Kabel ein.
6. Wählen Sie Eingang einrichten. Das Fenster Eingang
einrichten wird geöffnet.
Eingang einrichten
IP-Konguration : Auto ►
IP-Adresse :
Teilnetzmaske :
Gateway :
DNS : Auto
DNS Server :
:
Verschieben
E
Aus
Eingabe
R
Zurück
Netzwerk einrichten (Manuell)
Verwenden Sie Eingang einrichten - manuell, wenn Sie
Ihr Fernsehgerät an ein Netzwerk anschließen, das eine
statische IP-Adresse erfordert.
Beziehen der Werte für die Netzwerkverbindung
Um die Werte für die Netzwerkverbindung der meisten
Windows-Computer abzurufen, gehen Sie folgendermaßen
vor:
1. Klicken Sie mit der rechten Maustaste auf das
Netzwerksymbol in der unteren rechte Ecke des
Bildschirms.
2. Klicken Sie im angezeigten Kontextmenü auf Status.
3. Klicken Sie im angezeigten Dialogfeld auf die
Registerkarte Unterstützung.
4. Klicken Sie auf der Registerkarte Unterstützung auf
Details. Die Paremeter der Netzwerkverbindung werden
angezeigt.
Manuelle Konfiguration
Um die Kabelnetzwerkverbindung Ihres Fernsehgeräts
manuell einzurichten, gehen Sie folgendermaßen vor:
1. Befolgen Sie die Anweisungen der Schritte 1 bis 6 im
Abschnitt „So konfigurieren Sie automatisch“.
2. Stellen Sie IP-Konfiguration auf Manuell.
3. Drücken Sie die Taste ▼ Ihrer Fernbedienung, um in das
erste Eingabefeld zu wechseln.
4. Geben Sie die Werte für IP-Adresse, Teilnetzmaske,
Gateway und DNS-Server ein. Verwenden Sie die
Zifferntasten auf Ihrer Fernbedienung, um Zahlen
einzugeben, und die Pfeiltasten, um von einem
Eingabefeld zum nächsten zu wechseln.
5. Wenn Sie fertig sind, drücken Sie auf der Fernbedienung
die Taste RETURN.
6. Wählen Sie Netzwerktest, um die Internetverbindung zu
überprüfen.
U Verschieben E Eingabe R Zurück
7. Stellen Sie IP-Konfiguration auf Auto.
8. Mit Auto werden die erforderlichen Internetparameter
automatisch bezogen und eingegeben.
9. Warten Sie zwei Minuten und drücken Sie dann die Taste
RETURN auf der Fernbedienung.
10. Wählen Sie Netzwerktest, um die Internetverbindung zu
überprüfen.
11. Wenn die Funktion Netzwerk die Parameter für die
Netzwerkverbindung nicht beziehen konnte, fahren Sie
mit den Anweisungen für Manuell fort.
Page 91

30
Deutsch
Erweiterte Funktionen
Anschließen des WLAN ¦
Um Ihr Fernsehgerät drahtlos an Ihr Netzwerk anzuschließen, benötigen Sie einen Funkrouter oder ein Funkmodem sowie
einen Samsung WLAN-Adapter (WIS09ABGN, WIS09ABGN2, WIS10ABGN), den Sie mit dem hinteren oder seitlichen USBAnschluss verbinden. Siehe nachfolgende Abbildung.
Um die ✎SWL-Funktion (Samsung Wireless Link) verwenden zu können, müssen Sie den Anschluss über den
Anschluss USB 1 (HDD) herstellen.
Seitenverkleidung des
Fernsehgeräts
LAN-Anschluss an der
Wand
Der Samsung WLAN-Adapter wird bei ausgewählten Einzelhändlern, E-Commerce-Sites und unter samsungparts.com
angeboten. Der Samsung WLAN-Adapter unterstützt die Kommunikationsprotokolle IEEE 802.11 A/B/G und N. Samsung
empfiehlt, IEEE 802.11 N zu verwenden. Wenn Sie Video über die IEEE 802.11B/G-Verbindung anzeigen, wird das Videobild
möglicherweise nicht ohne Unterbrechungen angezeigt.
✎
HINWEIS
Sie müssen den „Samsung Wireless LAN Adapter“ (WIS09ABGN) verwenden, wenn Sie mit einem Drahtlosnetzwerk
x
arbeiten möchten.
Der WLAN-Adapter von Samsung ist gesondert erhältlich. Der WLAN-Adapter WIS09ABGN wird bei
x
Spezialanbietern, Internetshops und bei Samsungparts.com angeboten.
Wenn Sie mit einem Drahtlosnetzwerk arbeiten möchten, müssen Sie Ihr Fernsehgerät an einen drahtlosen IP-Sharer
x
anschließen. Wenn der drahtlose IP-Sharer DHCP unterstützt, kann Ihr Fernsehgerät über DHCP oder über eine
statische IP-Adresse mit dem Drahtlosnetzwerk verbunden werden.
Wählen Sie einen zurzeit unbenutzten Kanal für den drahtlosen IP-Sharer. Wenn der für den drahtlosen IP-Sharer
x
eingestellte Kanal von einem anderen Gerät in der Nähe belegt ist, führt dies zu Störungen und die Datenübertragung
scheitert.
Wenn Sie ein anderes Sicherheitssystem als die nachfolgend angeführten verwenden, so kann es zusammen mit
x
dem Fernsehgerät nicht eingesetzt werden.
Wenn Sie im 802.11n-Modus Pure High-throughput (Greenfield) wählen und als Verschlüsselungstyp ist für Ihren
x
Zugangspunkt WEP, TKIP oder TKIPAES (WPS2Mixed) eingestellt, so unterstützt das Samsung-Fernsehgerät eine
Verbindung gemäß der Spezifikation für die neue Wi-Fi-Zertifizierung nicht.
Wenn Ihr Zugangspunkt WPS (Wi-Fi Protected Setup) unterstützt, können Sie die Netzwerkverbindung mittels PBC
x
(Push Button Configuration) oder PIN (Persönliche IdentifikationsNummer) herstellen. WPS konfiguriert den SSIDund WPA-Schlüssel in jedem Modus automatisch.
Wenn Ihr Router, Modem oder Gerät nicht zertifiziert ist, kann es die Verbindung zum Fernseher möglicherweise nicht
x
über den „Samsung WLAN Adapter“ herstellen.
Verbindungsmethoden
x
Samsung Auto-Konfiguration –
PBC (WPS) –
Automatisches Setup (mit der automatischen Netzwerksuche) –
Manuelles Setup –
Samsung Wireless –
Ad-hoc –
Alle Samsung WLAN-Adapter müssen direkt mit dem USB-Anschluss des Fernsehers verbunden werden. USB-Hubs
x
werden nicht unterstützt.
Sie können die WLAN-Verbindung auf sechs Arten einrichten.
Drahtloser IP-Sharer
LAN-Kabel
WLAN-Adapter von
Samsung
oder
Page 92

31
Deutsch
04 Erweiterte Funktionen
Hinweis
Das Bild kann bei manchen Kanälen gestört sein, wenn das Fernsehgerät an den WLAN-Adapter von Samsung angeschlossen
ist. Stellen Sie die Verbindung in solch einem Fall mit einer der folgenden Methoden her:
Methode 1 Methode 2
Verbinden mit Hilfe des USB-90°-Adapters
Verbinden mit Hilfe eines Verlängerungskabels
Netzwerkkonfiguration
(Samsung Auto-Konfiguration)
Diese Funktion steht für Zugangspunkte zur Verfügung, die
Samsung Auto Configuration unterstützen. Wenn es einen
solchen Zugangspunkt nicht gibt, können Sie die Verbindung
über PBC (WPS) oder manuell herstellen.
Diese Funktion ist verfügbar, wenn
✎
Wireless Link) deaktiviert ist (Aus).
✎
Sie können unter www.samsung.com nach Geräten
suchen, die Samsung Auto Configuration unterstützen.
Konfigurieren mit Samsung Auto Configuration
1. Stellen Sie den Zugangspunkt und das Fernsehgerät neben
einander und schalten Sie sie ein.
✎
Da sich die Startzeiten der jeweiligen Anwendungen
unterscheiden, kann es sein, dass Sie etwa 2
Minuten warten müssen.
Wenn das LAN-Kabel bei Samsung-
✎
Autokonfiguration an den WAN-Anschluss des
Zugangspunkts angeschlossen wird, können Sie
den Vorgang bis zum Internetverbindungstest
durchführen. Wenn Sie es nicht anschließen,
überprüft Samsung-Autokonfiguration nur den
Anschluss des Geräts an den Zugangspunkt (nicht
aber die Internetverbindung) .
2. Schließen Sie den Samsung WLAN-Adapter nach 2
Minuten an das Fernsehgerät an. Wenn der Samsung
WLAN-Adapter eingerichtet ist, wird ein Popup-Fenster
geöffnet.
3. Sobald die Verbindung hergestellt ist, stellen Sie den
Zugangspunkt parallel in einem Abstand von maximal
25 cm neben den Samsung WLAN-Adapter.
SWL(Samsung
4. Warten Sie, bis die Verbindung automatisch hergestellt
wurde.
Wenn der Verbindungsversuch fehlschlägt, setzen
✎
Sie den Zugangspunkt zurück und wiederholen Sie
den Versuch.
Wenn Sie Ihr Fernsehgerät über Samsung-
✎
Autokonfiguration nicht mit Ihrem Zugangspunkt
verbinden können, wird ein Popupfenster geöffent,
mit dem Sie über den Fehlschlag informiert
werden. Setzen Sie den Zugangspunkt zurück, und
wiederholen Sie den Versuch. Wenn die Verbindung
wieder nicht aufgebaut wird, wählen Sie eine der
anderen Verbindungsmethoden (PBC (WPS), Auto
oder Manuell).
5. Nachdem die Verbindung steht, stellen Sie den Sharer am
gewünschten Standort auf.
✎
Wenn sich die Einstellungen des Zugangspunkts
geändert haben oder wenn Sie den neuen
Zugangspunkt nach dem Kauf erstmals verwenden,
müssen Sie den Vorgang ab dem ersten Schritt
wiederholen.
Netzwerkkonfiguration PBC (WPS)
Einrichten mit PBC (WPS)
Wenn Ihr Router eine PBC (WPS)-Taste aufweist, gehen Sie
folgendermaßen vor:
1. Schließen Sie Ihr Fernsehgerät wie im vorherigen Abschnitt
beschrieben an Ihr LAN an.
2.
Schalten Sie das Fernsehgerät ein, drücken Sie die
MENU-Taste auf Ihrer Fernbedienung und dann
▲ oder ▼, um Einstell. zu wählen. Drücken Sie dann
auf die ENTERE.
3. Verwenden Sie die Tasten ▲ oder ▼, um Netzwerk im
Menü Einstell. auszuwählen, und drücken Sie dann die
ENTERE
4. Wählen Sie im Fenster Netzwerk den Netzwerktyp.
5. Stellen Sie Netzwerktyp auf Drahtlos.
6. Wählen Sie Eingang einrichten. Das Fenster Eingang
einrichten wird geöffnet.
.
Page 93

32
Deutsch
Erweiterte Funktionen
A B C D E F G
H I J K L M N
O P Q R S T U
V W X Y Z
0~9
B
Eingang einrichten
Wählen Sie ein Netzwerk : Nicht gewählt ►
IP-Konguration : Auto
IP-Adresse :
Teilnetzmaske :
Gateway :
DNS : Auto
DNS Server :
PBC(WPS)
U
Verschieben
E
Eingabe
R
Zurück
5. Wenn das Sicherheitsfenster zur Eingabe der PIN geöffnet
7. Drücken Sie die rote Taste Ihrer Fernbedienung .
8. Drücken Sie innerhalb von 2 Minuten die PBC (WPS)-
Taste am Router. Ihr Fernsehgerät bezieht automatisch alle
benötigten Netzwerkeinstellungen und stellt die Verbindung
zu Ihrem Netzwerk her.
9. Nachdem die Netzwerkverbindung eingerichtet ist, drücken
Sie auf die RETURN-Taste, um das Fenster Eingang
einrichten zu schließen.
7. Geben Sie im Fenster Sicherheit das Kennwort Ihres
Netzwerkkonfiguration (Auto)
Die meisten Funknetzwerke verfügen über ein optionales
Sicherheitssystem, mit dem alle Geräte, die auf das Netzwerk
zugreifen wollen, einen verschlüsselten Sicherheitscode (den
so genannten Zugriffs- oder Sicherheitsschlüssel) übertragen
müssen. Als Sicherheitsschlüssel dient ein Kennwort
(normalerweise ein Wort bestimmmter Länge oder einer
definierte Anzahl von Buchstaben und Zahlen), das Sie eingeben
mussten, als Sie die Sicherheitsmerkmale Ihres Funknetzwerks
konfigurierten. Wenn Sie diese Methode verwenden, um die
Netzwerkverbindung einzurichten und Sie verwenden einen
Sicherheitsschlüssel für Ihr Funknetzwerk, müssen Sie bei der
Konfiguration das Kennwort eingeben.
So konfigurieren Sie automatisch
Um die Funknetzwerkverbindung automatisch einzurichten,
gehen Sie folgendermaßen vor:
1. Befolgen Sie die Anweisungen der Schritte 1 bis 6 im
Abschnitt „Einrichten mit PBC (WPS)“ (Seite. 31).
2. Wählen Sie durch Drücken der Taste ▼ die Option IP-
Konfiguration, und drücken Sie dann die
ENTERE
.
Wählen Sie durch Drücken der Tasten ▲ oder▼ die Option
Auto, und drücken Sie dann die
ENTERE
.
3. Wählen Sie Wählen Sie ein Netzwerk durch Drücken der
Taste ▲, und drücken Sie dann die ENTERE. Die Netzwerk
funktion sucht nach verfügbaren Funknetzwerken. Nach
Abschluss der Suche wird eine Liste der verfügbaren Netzwerke
angezeigt.
4. Markieren Sie durch Drücken der Tasten ▲ oder ▼ ein
Netzwerk in der Netzwerkliste, und drücken Sie dann die
ENTERE.
Wenn der Zugangspunkt ausgeblendet (versteckt) ist,
✎
müssen Sie Netzwerk hinzufügen wählen und den
Netzwerknamen (SSID) sowie den Sicherheitsschlüssel
richtig eingeben, um die Verbindung aufzubauen.
8. Bei der Eingabe des Kennworts beachten Sie diese allgemeinen
9. Wenn Sie fertig sind, drücken Sie die blaue Taste Ihrer
10. Warten Sie, bis die Verbindungsbestätigung angezeigt wird,
11. Um die Verbindung zu testen, drücken Sie die Taste RETURN,
wird, fahren Sie mit Schritt 6 fort. Wenn das Fenster für die
Netzwerkverbindung geöffnet wird, fahren Sie mit Schritt 10 fort.
6. Wählen Sie mit den Tasten ▲ oder ▼ die Option Sicherheit
oder PIN. In den meisten Privatnetzwerken verwenden Sie
Sicherheit (für Sicherheitsschlüssel). Das Fenster Sicherheit
wird geöffnet.
Wählen Sie ein Netzwerk
Sicherheitsschlüssel
n
Verschieben E Eingabe R Zurück
0 einge.
Zahl
Klein
Entfernen
Leertaste
Netzwerks ein.
Sie können das Kennwort wahrscheinlich in einem der
✎
Konfigurationsfenster finden, die Sie beim Einrichten des
Routers oder Modems verwendet hatten.
Hinweise:
Drücken Sie auf die Zifferntasten Ihrer Fernbedienung, um –
Zahlen einzugeben.
Verwenden Sie die Navigationstasten Ihrer auf der –
Fernbedienung, um im Fenster Sicherheitsschlüssel
zwischen den Schaltflächen zu wechseln.
Drücken Sie die rote Taste, um zwischen Groß- und –
Kleinschreibung umzuschalten oder um Zeichen/Symbole
anzuzeigen.
Wenn Sie einen Buchstaben oder ein Symbol eingeben –
möchten, navigieren Sie zu dem Buchstaben oder Symbol
und drücken Sie dann die ENTERE.
Um den letzten Buchstaben oder die letzte Zahl zu löschen, –
drücken Sie auf die grüne Taste Ihrer Fernbedienung.
Fernbedienung. Das Fenster Netzwerkverbindung wird
geöffnet.
und drücken Sie dann die ENTERE. Das Fenster Netzwerk
einrichten wird wieder angezeigt.
um Netzwerktest zu wählen, und drücken Sie dann die
ENTERE.
Page 94

33
Deutsch
04 Erweiterte Funktionen
Netzwerk einrichten (Ad-Hoc)
Mit dem „Samsung Wireless LAN Adapter“ können Sie die
Verbindung zu einem Mobilgerät mit Hilfe eines Peer-to-PeerNetzwerks auch ohne Zugriffspunkt herstellen.
Diese Funktion ist verfügbar, wenn
✎
SWL(Samsung Wireless Link) deaktiviert ist (Aus).
So stellen Sie eine Verbindung mit einem neuen Ad-hocNetzwerk her:
1. Befolgen Sie die Anweisungen der Schritte 1 bis 6 im
Abschnitt „Einrichten mit PBC (WPS)“. (Seite 31)
2. Wählen Sie Wählen Sie ein Netzwerk. Eine Liste der
Geräte / Netzwerke wird angezeigt.
3. In der Geräteliste drücken Sie die blaue Taste auf der
Fernbedienung.
Die Meldung
✎
eine direkte WI-Fi-Verbindung zu einem
Mobiltelefon oder PC. Möglicherweise
ist das vorhandene Netzwerk funktional
eingeschränkt. Möchten Sie die
Netzwerkverbindung wechseln? wird angezeigt.
4. Geben Sie den generierten Namen des Netzwerks
(SSID) und den Sicherheitsschlüssel in das Gerät ein,
mit dem Sie sich verbinden möchten.
So stellen Sie eine Verbindung mit einem vorhandenen
Ad-hoc-Gerät her:
1. Befolgen Sie die Anweisungen der Schritte 1 bis 6 im
Abschnitt „Einrichten mit PBC (WPS)“. (Seite 31)
2. Wählen Sie Wählen Sie ein Netzwerk. Anschließend
wird die Geräteliste angezeigt.
3. Wählen Sie ein Gerät aus der Geräteliste.
4. Wenn ein Sicherheitsschlüssel erforderlich ist, geben Sie
diesen ein.
Wenn das Netzwerk nicht fehlerfrei
✎
arbeitet, kontrollieren Sie noch einmal
Name des Netzwerks (SSID) und den
Sicherheitsschlüssel. Ein falscher
Sicherheitsschlüssel kann Störungen
verursachen.
Ein Ad-hoc-Netzwerk ist
Netzwerk einrichten (Manuell)
Wenn keine andere Methode funktioniert, müssen Sie die
Werte für die Netzwerkkonfiguration manuell eingeben.
Beziehen der Werte für die Netzwerkverbindung
Um die Werte für die Netzwerkeinstellungen der meisten
Windows-Computer abzurufen, gehen Sie folgendermaßen
vor:
1. Klicken Sie mit der rechten Maustaste auf das
Netzwerksymbol in der unteren rechte Ecke des
Bildschirms.
2. Klicken Sie im angezeigten Kontextmenü auf Status.
3. Klicken Sie im angezeigten Dialogfeld auf die
Registerkarte Unterstützung.
4. Klicken Sie auf der Registerkarte Unterstützung auf
Details. Die Netzwerkeinstellungen werden angezeigt.
Manuelle Konfiguration
Um die Netzwerkeinstellungen in Ihr Fernsehgerät
einzugeben, gehen Sie folgendermaßen vor:
1. Befolgen Sie die Anweisungen der Schritte 1 bis 6 im
Abschnitt „Einrichten mit PBC (WPS)“. (Seite 31)
2. Wählen Sie durch Drücken der Taste ▼ die Option
IP-Konfiguration, und drücken Sie dann die
Wählen Sie Manuell durch Drücken der Tasten
▲ oder ▼, und drücken Sie dann die
3. Drücken Sie die Taste ▼, um in das erste Eingabefeld
(für die IP-Adresse) zu wechseln.
4. Geben Sie Zahlen mit den Zifferntasten ein.
5. Wenn Sie die Eingabe in einem Feld abgeschlossen
haben, wecheln Sie mit der Taste ► zum jeweils
nächsten Feld. Sie können auch die anderen Pfeiltasten
verwenden, um sich nach oben, unten oder zurück zu
navigieren.
6. Geben Sie die Werte für IP-Adresse, Teilnetzmaske
und Gateway ein.
7. Wechseln Sie mit der Taste ▲ oder ▼ nach DNS.
8. Drücken Sie die ▼-Taste, um zum ersten Feld für die
DNS-Eingabe zu wechseln. Geben Sie die Ziffern wie
oben beschrieben ein.
9. Wenn Sie damit fertig sind, drücken Sie die ▲-Taste, um
zu Wählen Sie ein Netzwerk zu wechseln. Wählen Sie
Ihr Netzwerk und drücken Sie die
10. Fahren Sie nun mit Schritt 4 der Beschreibung unter „So
konfigurieren Sie automatisch“ (Seite 32) und befolgen
Sie die Anweisungen ab diesem Punkt.
ENTERE .
ENTERE
ENTERE
.
.
Page 95

34
Deutsch
Erweiterte Funktionen
Netzwerk einrichten
(DWL (Samsung Wireless Link (SWL))
Mit dieser Funktion können Sie ein Samsung-Gerät
anschließen, dass PBC (WPS) mit Ihrem Fernsehgerät
unterstützt. Sie können auch dann Geräte an Ihren Fernseher
anschließen, wenn kein Sharer an das Fernsehgerät
angeschlossen ist.
Um
✎
das Internet mit Ihrem Fernsehgerät zu
verwenden, muss der Zugriffspunkt mit dem
Funknetzwerk verbunden sein.
✎
Wenn der Samsung WLAN-Adapter an
angeschlossen ist, funktioniert das Netzwerk
möglicherweise nicht richtig. Wir empfehlen, diesen an
USB 1 (HDD) anzuschließen.
✎
Nur Sharer im 2,4 Ghz-Band werden unterstützt.
Sharer im 5 Ghz-Band werden nicht unterstützt.
USB 2
SWL verbinden
Sie können Geräte, die PBC (WPS) unterstützen, direkt an
Ihren Fernseher anschließen.
✎
Diese Funktion ist verfügbar, wenn
Wireless Link) aktiviert ist (Ein).
Verbinden mit Samsung Wireless Link
Das Verfahren zum Aufbauen einer Verbindung ist
nachfolgend beschrieben.
1. Befolgen Sie die Anweisungen der Schritte 1 bis 5 im
Abschnitt „Einrichten mit PBC (WPS)“. (Seite 31)
2. Wählen Sie Samsung Wireless Link mit der ▼-Taste,
und drücken Sie die
aktivieren.
3. Wählen Sie SWL verbinden mit der ▼-Taste, und
drücken Sie die
4. Wenn die Meldung „Drücken Sie die PBC-Taste auf
dem Gerät, das durch den PBC(WPS) unterst. wird,
um sich innerh. von 120 Sek. zu verb.” angezeigt
wird, drücken Sie die PBC-Taste, um die Verbindung
herzustellen.
Weitere Informationen erhalten Sie im Handbuch
✎
zur WLAN-Konfiguration des Geräts, das Sie
anschließen möchten.
5. Wenn das Gerät nach Beginn mit Zählung im
Meldungsfenster richtig mit dem Fernsehgerät
verbunden wird, wird das Meldungsfenster automatisch
geschlossen.
Wenn die Verbindung fehlschlägt, wiederholen Sie
✎
den Versuch nach 2 Minuten.
ENTERE
ENTERE
.
SWL(Samsung
, um die Funktion zu
Ihr Fernsehgerät bekommt keine Verbindung mit dem
Internet
Es kann sein, dass Ihr Fernseher keine Internetverbindung
aufbauen kann, weil Ihr ISP die MAC-Adresse (eine
eindeutige Kennnummer) Ihres PCs oder Modems
registriert hat, und anhand dieser die Authentifizierung
vornimmt, wenn Sie sich mit dem Internet verbinden.
Auf diese Weise soll unbefugter Zugriff verhindert werden.
Da Ihr Fernsehgerät eine andere Mac-Adresse besitzt,
kann Ihr ISP diese Adresse bei der Authentifizierung nicht
verifizieren und Ihr Fernsehgerät kann sich nicht mit dem
Internet verbinden.
Fragen Sie in diesem Fall Ihren Internetprovider, auf
welche Weise die Verbindung durch andere Geräte als
Ihren PC (z. B. Ihr Fernsehgerät) hergestellt werden kann.
Wenn Ihr Internet-Provider eine Kennung oder ein
Kennwort erfordert, um die Verbindung zum Internet
herzustellen, kann Ihr Fernsehgerät möglicherweise keine
Internetverbindung aufbauen. Wenn dies der Fall ist,
müssen Sie Ihre ID oder Ihr Kennwort eingeben,
wenn Sie eine Internetverbindung herstellen möchten.
Die Internetverbindung kann auch aufgrund von
Problemen mit der Firewall fehlschlagen. Setzen Sie sich
in diesem Fall mit Ihrem Internetprovider in Verbindung.
Wenn Sie selbst dann noch keine Internetverbindung
aufbauen können, nachdem Sie die Anweisungen Ihres
Internet-Providers eingehalten haben, setzen Sie sich
unter mit Samsung Electronics in Verbindung.
Page 96

35
Deutsch
Media Play
SUM
Mit dieser Funktion können Sie auf einem
USB-Speichermedium (MSC) oder Ihrem PC
gespeicherte Foto-, Musik und/oder Filmdateien
anzeigen bzw. wiedergeben.
04 Erweiterte Funktionen
TV-Aufzeichnung
Gerät wechs.
Gerätemodus E Eingabe R Zurück
Anschließen eines USB-Geräts ¦
1. Schalten Sie den Fernseher ein.
2. Schließen Sie ein USB-Gerät mit Foto-, Musik und/oder Filmdateien an die USB 1
(HDD)- oder USB 2-Buchse seitlich am Fernsehgerät an.
3. Wenn ein USB-Gerät an den Fernseher angeschlossen ist, wird ein Fenster
geöffnet. Nun können Sie Media Play wählen.
Rückseite des Fernsehgeräts
oder
USB-Laufwerk
Herstellen der Verbindung zum PC über das Netzwerk ¦
Sie können die auf Ihrem PC oder Fernsehgerät gespeicherten Videos, Bilder und Musikstücke im Media Play-Modus über
eine Netzwerkverbindung wiedergeben.
✎
Wenn Sie
Benutzerhandbuch von www.samsung.com herunterladen.
Media Play für eine auf Ihrem PC gespeicherte Datei verwenden, sollten Sie „PC Share Manager“ und das
LAN
PC
Externes Modem
(ADSL / VDSL / Kabelfernsehen)
Rückseite des Fernsehgeräts
oder
WLAN-
Adapter von
Samsung
Drahtloser
IP-Sharer
LAN-Kabel
1. Weitere Informationen zum Konfigurieren Ihres Netzwerks finden Sie unter „Netzwerkverbindung“ (Seite 28).
Wir empfehlen Ihnen, sowohl das Fernsehgerät als auch den PC in gleichem Teilnetz anzuordnen. Die ersten 3 Teile der –
Teilnetzadresse des Fernsehgeräts und der IP-Adressen des PCs müssen übereinstimmen und nur der letzte Teil darf
geändert werden. (z.B.: IP-Adresse: 123.456.789.**)
2. Schließen Sie den PC, auf dem das Programm Samsung PC Share Manager installiert wird, über ein Netzwerkkabel an
das externe Modem an.
Sie können das Fernsehgerät direkt an den PC anschließen, ohne vorher einen Sharer (Router) dazwischen zu schalten. –
Page 97

36
Deutsch
Erweiterte Funktionen
Die folgenden Funktionen werden beim Anschluss an einen PC über das Netzwerk nicht unterstützt:
✎
Die Funktionen für die xHintergrundmusik und die Einstellungen für Hintergrundmusik.
Benutzerdefinierte Sortierung von Dateien in den Ordnern
x
Die Tasten
x
✎
Divx DRM, Multi-Audio und eingebettete Beschriftung werden nicht unterstützt.
Sie müssen Samsung PC Share Manager in der Firewall Ihres PCs freigeben.
✎
Bei Verwendung von ✎Media Play über eine Netzwerkverbindung, wirken die folgenden Funktionen entsprechend der
Konfiguration des Servers:
Die Sortiermethode kann variieren.
x
Möglicherweise wird die Funktion zur Suche von Szenen nicht unterstützt.
x
Möglicherweise wird die Funktion xUnunterbrochen abspielen nicht unterstützt, mit der die Widergabe eines Videos
foertgesetzt wird.
Die Tasten ◄ oder ► arbeiten je nach Inhalt möglicherweise nicht.
x
Wenn Sie bei der Wiedergabe eines Videos über WLAN Bildunterbrechungen bemerken, sollten Sie besser auf das
x
Kabelnetzwerk zurückgreifen.
Möglicherweise treten bei lizenzfreien Multimediadateien weniger Probleme auf.
✎
Das sollten Sie vor dem Einsatz von ✎Media Play unbedingt wissen
MTP (Media Transfer Protocol) wird nicht unterstützt.
x
Als Dateisystem wird ausschließlich FAT16, FAT32 und NTFS unterstützt.
x
Einige Typen von USB-Digitalkameras und -Audiogeräten sind eventuell nicht mit diesem Fernseher kompatibel.
x
Media Play unterstützt ausschließlich USB-Massenspeichergeräte vom Typ MSC (Mass Storage Class). MSC-Geräte
x
sind Massenspeicher zur Übertragung von Daten. Beispiele für MSC sind Thumb-Laufwerke und Flash CardLesegeräte sowie USB HDD (USB-HUB wird nicht unterstützt). Die Geräte müssen direkt mit dem USB-Anschluss
des Fernsehers verbunden werden.
Ehe Sie Ihr Gerät an das Fernsehgerät anschließen, sichern Sie Ihre Dateien, um eventuellem Datenverlust
x
vorzubeugen. SAMSUNG haftet nicht für Verlust und Beschädigung von Daten.
Schließen Sie eine USB-Festplatte an den dafür reservierten
x
Trennen Sie das USB-Gerät nicht, solange Daten geladen werden.
x
Je höher die Auflösung des Bilds, desto länger dauert es, um es auf dem Bildschirm anzuzeigen.
x
Die maximal unterstützte JPEG-Auflösung beträgt 15360x8640 Pixel.
x
Bei nicht unterstützten oder beschädigten Dateien wird die Meldung „Dateiformat wird nicht unterstützt“ angezeigt.
x
Wenn der Sortierschlüssel auf Basisansicht eingestellt ist, können bis zu 1000 Dateien in einem Ordner angezeigt
x
werden.
MP3-Dateien mit DRM, die von einer nicht-lizenzfreien Site heruntergeladen worden sind, können nicht abgespielt
x
werden. Digital Rights Management (DRM) ist eine Technologie, die das Erstellen von Inhalten und die Distribution
und das Management der Inhalte integriert und umfassend unterstützt. Dies beinhaltet den Schutz der Rechte und
der Interessen der Content-Provider, die Verhütung von unerlaubtem Kopieren der Inhalte sowie das Management
von Abrechnung und Bezahlung.
Wenn mehr als 2 PTP Geräte angeschlossen sind, können Sie nur jeweils eines verwenden.
x
Wenn mehr als zwei MSC-Geräte angeschlossen sind, werden einige davon möglicherweise nicht anerkannt.
x
Ein USB-Gerät, das hohe elektrische Leistung (mehr als 500 mA oder 5 V) abfordert, wird möglicherweise nicht
unterstützt.
Wenn eine Überstrom-Warnung angezeigt wird, während Sie ein USB-Gerät anschließen oder verwenden, wird das
x
Gerät möglicherweise nicht erkannt oder weist eine Störung auf.
Wenn während der in
x
aktiviert.
Der Stromsparmodus mancher externer Festplattenlaufwerke kann automatisch ausgelöst werden, wenn sie an das
x
Fernsehgerät angeschlossen sind.
Bei Verwendung eines USB-Verlängerungskabels wird das USB-Gerät möglicherweise nicht erkannt, oder die auf
x
dem Gerät gespeicherten Dateien können nicht gelesen werden.
Wenn das an das Fernsehgerät angeschlossene USB-Gerät nicht erkannt wird, die Liste der Dateien auf dem Gerät
x
beschädigt aussieht oder eine Datei in der Liste nicht abgespielt wird, schließen Sie das USB-Gerät an den PC an,
formatieren Sie das Gerät und überprüfen Sie die Verbindung.
Wenn eine mit dem PC gelöschte Datei unter Media Play weiterhin gefunden wird, verwenden Sie die Funktion
x
„Papierkorb leeren“ des PCs, um die Datei dauerhaft zu löschen.
(REW) oder µ (FF), während ein Film abgespielt wird.
Die Funktion – Ununterbrochen abspielen unterstützt maximal einen Benutzer. (Gespeichert wird nur die Stelle, an der
der letzte Benutzer die Wiedergabe unterbrochen hat.)
Autom. Schutzzeit eingestellten Zeit kein Fernsehsignal ansteht, wird der Bildschirmschoner
Foto, Musik und Film.
USB 1 (HDD)-Anschluss an.
Page 98

37
Deutsch
04 Erweiterte Funktionen
Bildschirmanzeige ¦
Jan.10.2010
Jan.10.2010
Jan.10.2010
Jan.10.2010
Jan.10.2010
Jan.10.2010
Jan.10.2010
Jan.10.2010
Jan.10.2010
Jan.10.2010
/Movie 01.avi 1/1
Movie 01.avi
SUM
Movie 03.avi
Movie 05.avi
Movie 07.avi
Movie 09.avi
Movie 02.avi
Movie 04.avi
Movie 06.avi
Movie 08.avi
Movie 10.avi
Navigieren Sie mit den Pfeiltasten (Auf / Ab / Rechts / Links) zu der gewünschten Datei und drücken Sie dann die ENTERE
oder die Taste (Wiedergabe). Die Datei wird wiedergegeben.
Unterstützt den
✎
Gerätemodus und den Inhaltsmodus auf der Startseite von Media Play.
Hier können Sie den Namen der
gewählten Datei sowie die Anzahl
der Dateien und Seiten überprüfen.
Abschnitt mit der Sortierliste:
Anzeige der Sortierreihenfolge.
Die Sortierreihenfolge
✎
unterscheidet sich je nach
Inhalt.
Informationen :
TV-Aufzeichnung
Videos
A
Gerät wechseln
Bedienung
A
Rote (Gerät wechseln) : Dient zur Auswahl eines angeschlossenen Geräts.
B
Grüne (Voreinstellungen) : Festlegen der Voreinstellungen für Dateien (in der
C
Gelbe (Auswählen): Auswählen mehrerer Dateien aus der Dateiliste. Die ausgewählten
D
Blaue (Sortieren): Auswählen der Sortierliste
T
Schaltfläche Extras Anzeigen des Optionsmenüs.
Mit Hilfe der Tasten
✎
nächsten Seite wechseln.
Auswählen Sortieren T Extras
Basisansicht nicht unterstützt)
Dateien werden mit einem Symbol gekennzeichnet.
oder µ können Sie in der Dateiliste zur vorigen oder
Page
Abschnitt mit der
Dateiliste :
Sie können die nach
den verschiedenen
Kategorien sortierten
Dateien und Gruppen
bestätigen.
Um die Aufnahme- oder Timeshift-Modus-Funktion zu verwenden, muss das angeschlossene USB-Gerät für die Aufnahme zur
Verfügung stehen. Gerät formatieren wird empfohlen, wenn Sie eine USB-Festplatte verwenden möchten.
✎
Trennen Sie nicht die Verbindung, während das Gerät formatiert wird. Beim Formatieren des Geräts werden alle Dateien
gelöscht.
Wiedergabe aufgenommener Fernsehsendungen
1. Wählen Sie durch Drücken der Tasten ◄ oder ► die Option
E
TV-Aufzeichnung, und drücken Sie dann im ENTER
Media
Play-Menü auf die.
Recorded TV / .../ American Chopper
04/2010
2. Wählen Sie die gewünschte Datei mit den Tasten ◄/►/▲/▼
aus der Dateiliste aus.
3. Drücken Sie auf die ENTER
E
oder die
(Wiedergabetaste).
Die ausgewählte Datei wird zusammen mit der –
Abspieldauer oben angezeigt.
Auswählen Sortieren
Während der Wiedergabe des aufgezeichneten –
Fernsehprogramms können Sie mit den Tasten ◄ und ►
suchen.
Verwenden des Timeshift-Modus
t
Wenn Sie eine Sendung verpassen, können Sie sie mit dieser Funktion später ansehen.
Wenn der Timeshift-Modus auf Auto eingestellt ist, speichert das Fernsehgerät automatisch den Kanal, den Sie gerade
sehen.
Wenn der Timeshift-Modus auf Manuell eingestellt ist und Sie drücken die Taste
Fernsehgerät den Kanal ab der von Ihnen gewünschten Stelle.
(Wiedergabe), speichert das
T
1/8 Seite
Extras
Page 99

38
Deutsch
Erweiterte Funktionen
✎
HINWEIS
Videoaufnahmen werden durch das DRM-System (DRM, Digitaler Urheberschutz) geschützt und können werden auf
x
einem PC noch auf anderen Fernsehgeräten abgespielt werden. Dies gilt auch nach einem eventuellen Tausch der
Hauptplatine des Fernsehgeräts.
Übertragungen von Datendiensten können nicht aufgezeichnet werden.
x
Die Aufnahme- wie auch xTimeshift-Modus-Funktion sind je nach Bildqualität und freiem Speicherplatz auf der
Festplatte möglicherweise nicht verfügbar.
Wenn Sie die Taste
x
aufgenommenen Sendung.
Die
Timeshift-Modus-Funktion kann einen Zeitbereich von max. 90 Minuten abdecken.
x
Nachdem die
x
„00:00:00“ eingefroren. Hinweis: Wenn Sie die Aufnahme angehalten haben, setzt das Fernsehgerät die Wiedergabe
automatisch wieder fort.
Wenn die Grenze von 5 % freiem Speicherplatz auf dem USB-Gerät erreicht ist, wird die aktuelle Aufnahme
x
abgebrochen.
Wenn die Aufnahme zugleich durch den PVR (Persönlicher VideoRekorder) und ein Gerät erfolgt, das die HDMI-CEC-
x
Funktion unterstützt, hat die Aufnahme mit der PVR-Funktion Vorrang.
Bei der Wiedergabe oder bei Einsatz der
x
Einstellungen des Fernsehgeräts.
Wenn Sie während der Aufnahme die Signalquelle ändern, wird auf dem Bildschirm solange kein Bild angezeigt, bis
x
die Umschaltung durchgeführt ist.
Anwendungen, die weder Aufnahmen noch die
x
beendet, wenn Sie versuchen, sie bei Einsatz einer der beiden Funktionen zu verwenden.
In diesem Fall erscheint möglicherweise über dem Anwendungsfenster eine Meldung, dass die Aufnahme bzw. die
x
Timeshift-Modus-Funktion beendet wurden.
Timeshift-Modus
x
Aufnahmen und die
x
nicht möglich.
Wenn das USB-Gerät den Geräte-Leistungstest nicht besteht, müssen Sie zuerst das USB-Gerät formatieren und
x
dann noch einmal den Geräte-Leistungstest durchlaufen, ehe Sie mit TV-Programm oder Kanal-Manager Aufnahmen
durchführen können.
Die Funktionen für
x
werden, das den Geräte-Leistungstest bestanden hat.
Die Funktion wird nicht aktiviert, Aufnahmen oder
x
Geräte-Leistungstest nicht bestanden hat.
Wenn ein USB-Gerät speziell für Aufnahmen angeschlossen ist, werden
x
die fehlerhaft gespeichert wurden, automatisch gelöscht.
Wenn Sie beim Aufnehmen zum Modus für externen Signaleingang wechseln, läuft die Aufnahme zwar weiter, aber
x
die Aufnahmetaste (REC) wird deaktiviert.
Wenn Sie eine Funktion zum Abschalten des Fernsehers (
x
haben, die im Konflikt mit einer Aufnahme steht, so wird das Fernsehgerät erst ausgeschaltet, wenn die Aufnahme
beendet ist.
▲ oder ▼ drücken, sehen Sie den gerade gesendeten Kanal oder Sie sehen den Startpunkt der
Timeshift-Modus-Funktion ihre maximale Dauer erreicht hat, werden die Zeitinformationen bei
Timeshift-Modus-Funktion gelten für die Anzeige des Bilds die
Timeshift-Modus-Funktion unterstützen, werden automatisch
wird bei Radiokanälen nicht unterstützt.
Timeshift-Modus-Funktion sind bei Kanälen, die mit der Kindersicherung gesperrt wurden,
Aufnahmen und Timeshift-Modus können nur mit einem USB-Speichergerät durchgeführt
Timeshift-Modus mit einem Gerät durchführen möchten, das den
Timeshift-Modus- oder Aufnahmedateien,
Sleep-Timer, Abschalttimer usw.) auf eine Zeit eingestellt
Page 100

39
Deutsch
04 Erweiterte Funktionen
Videos
Movie 01.avi
00:04:03 / 00:07:38 1/1
Wiedergeben von Videos
1. Wählen Sie durch Drücken der Tasten ◄ oder ► die Option Videos, und drücken Sie dann im Media Play-Menü auf die
ENTERE.
2. Wählen Sie das gewünschte Video mit den Tasten ◄/►/▲/▼ aus der Dateiliste aus.
3. Drücken Sie die ENTERE oder die Taste (Wiedergabetaste).
Die ausgewählte Datei wird zusammen mit der Abspieldauer oben angezeigt. –
Wenn die Zeitinformationen für das Video nicht vorhanden sind, werden Wiedergabezeit und Fortschrittsbalken nicht angezeigt. –
Bei der Wiedergabe eines Videos können Sie mit den Tasten – ◄
In diesem Modus können Sie zwar die Filme aus einem Spiel
✎
wiedergeben, nicht aber das eigentliche Spiel spielen.
Unterstützte Formate für Untertitel y
Name
MPEG-4 Text mit Zeitverlauf .ttxt XML
SAMI .smi HTML
SubRip .srt Stringbasiert
SubViewer .sub Stringbasiert
Micro DVD .sub oder .txt Stringbasiert
Unterstützte Videoformate y
Dateinamenserweiterung
*.avi
*.mkv
*.asf ASF
*.wmv ASF Window Media Video v9 1920 x 1080 6 ~ 30 25 WMA
*.mp4 MP4
*.3gp 3GPP
*.vro
*.mpg
*.mpeg
*.ts
*.tp
*.trp
Dateinamenserweiterung
Container Video-Codec Auflösung
Divx 3.11 / 4.x / 5.1 / 6.0 1920 x 1080 6 ~ 30 8
AVI
MKV
VRO
VOB
PS
TS
XviD 1920 x 1080 6 ~ 30 8
H.264 BP / MP / HP 1920 x 1080 6 ~ 30 25
MPEG4 SP / ASP 1920 x 1080 6 ~ 30 8
Motion JPEG 800 x 600 6 ~ 30 8
Divx 3.11 / 4.x / 5.1 / 6.0 1920 x 1080 6 ~ 30 8
XviD 1920 x 1080 6 ~ 30 8
H.264 BP / MP / HP 1920 x 1080 6 ~ 30 25
MPEG4 SP / ASP 1920 x 1080 6 ~ 30 8
Motion JPEG 800 x 600 6 ~ 30 8
H.264 BP / MP / HP 1920 x 1080 6 ~ 30 25
XVID 1920 x 1080 6 ~ 30 8
H.264 BP / MP / HP 1920 x 1080 6 ~ 30 25
MPEG4 SP / ASP 1920 x 1080 6 ~ 30 8
MPEG1 1920 x 1080 24 / 25 / 30 30
MPEG2 1920 x 1080 24 / 25 / 30 30
MPEG1 1920 x 1080 24 / 25 / 30 30
H.264 1920 x 1080 6 ~ 30 25
MPEG2 1920 x 1080 24 / 25 / 30 30
H.264 1920 x 1080 6 ~ 30 25
VC1 1920 x 1080 6 ~ 30 25
Format
und
► suchen
Gerätename
Framerate
(fps)
.
E
Kap. festl.
Bitrate
(Mbps)
AC3 / MPEG / LPCM / AACMPEG2 1920 x 1080 24 / 25 / 30 30
L
Wechseln T Extras R Zurück
Audio-Codec
MP3 / AC3 / LPCM /
ADPCM /DTS Core
MP3 / AC3 / LPCM /
ADPCM / WMA
MP3 / ADPCM / AACMPEG4 SP / ASP 1920 x 1080 6 ~ 30 8
ADPCM / AAC / HE-AAC
AC3 / MPEG / LPCM
AC3 / AAC / MP3 / DD+ /
HE-AAC
 Loading...