

Page 1

Связывайтесь с SAMSUNG по всему миру
Если у вас есть предложения или вопросы по продуктам Samsung, связывайтесь с информационным центром Samsung.
Страна
ESTONIA 800-7267 www.samsung.ee
LATVIA 8000-7267 www.samsung.com/lv
LITHUANIA 8-800-77777 www.samsung.lt
KAZAHSTAN 8-10-800-500-55-500 www.samsung.com/kz_ru
KYRGYZSTAN 00-800-500-55-500 -
RUSSIA 8-800-555-55-55 www.samsung.ru
TADJIKISTAN 8-10-800-500-55-500 -
UKRAINE 8-800-502-0000 www.samsung.ua
UZBEKISTAN 8-10-800-500-55-500 www.samsung.com/kz_ru
Центр поддержки покупателей
Веб-узел
LE40A756R
LE46A756R
LE52A756R
ЖК-ТЕЛЕВИЗОР
руководство пользователя
BN68-01700F-01
удивительные возможности
Благодарим за приобретение продукции компании
Samsung. Для получения полного обслуживания
зарегистрируйте свое устройство по адресу
www.samsung.com/global/register
Модель Серийный номер
Page 2

Digital TV (DVB-T) Notice
1. FUNCTIONALITIES RELATED TO DIGITAL TV (DVB) ARE ONLY AVAILABLE IN COUNTRIES OR AREAS WHERE DVB-T
(MPEG2 AND MPEG4 AVC) DIGITAL TERRESTRIAL SIGNALS ARE BROADCAST. DVB-T is the European consortium
standard for the broadcast transmission of digital terrestrial television. Please check with your local dealer about the availability
of DVB-T service in your area.
2. Although this TV set meets the current DVB-T standards as of [August, 2008], compatibility with future DVB-T digital terrestrial
broadcast cannot be guaranteed.
3. Some Digital TV functions may not be available or operate correctly in some countries or regions.
4. For more information, please contact your local SAMSUNG customer care centre.
Contact SAMSUNG WORLDWIDE
If you have any questions or comments relating to Samsung products, please contact the SAMSUNG customer care centre. (See back
cover for more information.)
Precautions When Displaying a Still Image
A still image may cause permanent damage to the TV screen
Do not display a still image on the LCD panel for more than 2 hours as it can cause screen image retention.
is also known as “screen burn”. To avoid such image retention, reduce the degree of brightness and contrast of the screen when
displaying a still image.
Watching the LCD TV in 4:3 format for a long period of time may leave traces of borders displayed on the left, right
and center of the screen caused by the difference of light emission on the screen. Playing a DVD or a game console
may cause a similar effect to the screen. Damages caused by the above effect are not covered by the Warranty.
Displaying still images from Video games and PC for longer than a certain period of time may produce partial afterimages. To prevent this effect, reduce the ‘brightness’ and ‘contrast’ when displaying still images.
This image retention
© 2008 Samsung Electronics Co., Ltd. All rights reserved.
Page 3

Contents
English
Connecting and Preparing Your TV
List of Parts .........................................................................2
■
Installing the Wall Mount Kit ................................................2
■
Viewing the Control Panel ...................................................3
■
Viewing the Connection Panel.............................................4
■
Remote Control ...................................................................6
■
Installing Batteries in the Remote Control ...........................7
■
Switching On and Off...........................................................7
■
Placing Your Television in Standby Mode ............................7
■
Viewing the Menus ..............................................................8
■
Using the TOOLS Button .....................................................8
■
Using the Wheel button .......................................................8
■
Plug & Play Feature ............................................................9
■
Channel Control
Storing Channels and channel ...........................................9
■
Managing Channels ..........................................................12
■
Picture Control
Changing and Resetting the Picture Settings ....................13
■
Viewing Picture-in-Picture .................................................16
■
PC Display .........................................................................17
■
Setting up the TV with your PC .........................................18
■
Sound Control
Changing the Sound Standard ..........................................18
■
Selecting the Sound Mode ................................................20
■
Function Description
Conguring the Setup Menu ..............................................20
■
Setting the Time ................................................................23
■
Network Connection ..........................................................24
■
Network Setup ...................................................................26
■
Source List / Edit Name .....................................................27
■
Product Guide ...................................................................28
■
WISELINK Pro
Connecting a USB Device .................................................28
■
Using the WISELINK Pro Function ....................................29
■
Using and Sorting Photo List .............................................31
■
Viewing a Photo or Slide Show ........................................32
■
Using and Sorting the Music List .......................................34
■
Playing a Music ................................................................35
■
Using and Sorting the Movie List .......................................36
■
Playing a Movie File .........................................................37
■
Deleting the Photo/Music/Movie File ................................38
■
Picture/Music Settings Using WISELINK Pro ....................39
■
Using the Setup Menu .......................................................39
■
WISELINK Pro-DLNA
Setting the DLNA Network .................................................40
■
Installing the DLNA Application .........................................40
■
Using the DLNA Application ..............................................42
■
Using the DLNA Function ..................................................45
■
Content Library
Activating the Content Library ...........................................46
■
Using the Content Library ..................................................47
■
Using Additional Content Using External USB Memory
■
Storage ..............................................................................48
About Anynet
Connecting Anynet+ Devices ............................................49
■
Setting Up Anynet+ ...........................................................50
■
Scanning and Switching between Anynet+ Devices..........50
■
Recording ..........................................................................51
■
Listening through a Receiver (Home theater) ...................52
■
Troubleshooting for Anynet+ ............................................52
■
+
InfoLive
Using InfoLive ....................................................................53
■
Using the Weather Service ................................................54
■
Using the News Service ....................................................54
■
Using the Stock Service ....................................................55
■
InfoLive Setup ...................................................................56
■
Recommendations for Use
Teletext Feature .................................................................57
■
Auto Wall-Mount Adjustment (Sold separately)
■
(depending on the model) .................................................58
Using the Anti-Theft Kensington Lock (depending on the
■
model) ...............................................................................59
Securing the TV to the Wall ...............................................60
■
Troubleshooting: Before Contacting Service Personnel ....61
■
Specications ....................................................................62
■
Additional Terms of Service ...............................................63
■
N O T
Symbol Press Note One-Touch Button TOOL Button
English -
Page 4

Connecting and Preparing Your TV
List of Parts
Please make sure the following items are included with your LCD TV. If any items are missing, contact your dealer.
Remote Control & Batteries
(AAA x 2)
Owner’s Instructions
•
Warranty card / Safety Guide (Not available in all locations)
N
Power Cord Cover-Bottom Program CD Cleaning Cloth
Warranty card
•
Installing the Wall Mount Kit
Wall mount items (sold separately) allow you to mount the TV on the wall. For
detailed information on installing the wall mount, see the instructions provided with
the Wall Mount items. Contact a technician for assistance when installing the wall
mounted bracket. Samsung Electronics is not responsible for any damage to the
product or injury to yourself or others if you elect to install the TV on your own.
Do not install your Wall Mount Kit while your TV is turned on. It may result in
personal injury due to electric shock.
Remove the stand and cover the bottom hole with a cap and fasten with two
N
screws.
Safety Guide
•
English - 2
Page 5

English -
Viewing the Control Panel
88
4
1
2
3
6
5
7
The product colour and shape may vary depending on the model.
N
Front Panel buttons
Touch each button to operate.
1
SOURCE
Toggles between all the available input sources. In the
on-screen menu, use this button as you would use the
ENTERE button on the remote control.
2
MENU
Press to see an on-screen menu of your TV’s features.
3
– = +
Press to increase or decrease the volume.
In the on-screen menu, use the –
would use the ◄ and ► buttons on the remote control.
E
=
+ buttons as you
4
> C/P.P
Press to change channels. In the on-screen menu, use
the > C/P.P < buttons as you would use the ▼ and ▲
buttons on the remote control.
5
POWER INDICATOR
Blinks and turns off when the power is on and lights up in
stand-by mode.
6
P POWER
Press to turn the TV on and off.
7
REMOTE CONTROL SENSOR
Aim the remote control towards this spot on the TV.
8
SPEAKERS
<
Page 6

Viewing the Connection Panel
2 3 4 5
6
7
3
8
9
$
1
0!@#
[TV Rear Panel]
[TV Side Panel]
Power Input
The product colour and shape may vary depending on the model.
N
Whenever you connect an external device to your TV, make sure that power on the unit is turned off.
N
When connecting an external device, match the colour of the connection terminal to the cable.
N
1
PC IN [PC] / [AUDIO]
Connect to the video and audio output jack on your PC.
-
2
COMPONENT IN
Connect component video cables (optional) to component connector (‘PR’, ‘PB’, ‘Y’) on the rear of your set and the other
-
ends to corresponding component video out connectors on the DTV or DVD.
If you wish to connect both the Set-Top Box and DTV (or DVD), you should connect the Set-Top Box to the DTV (or DVD)
-
and connect the DTV (or DVD) to component connector (‘P
The P
-
R, PB and Y connectors on your component devices (DTV or DVD) are sometimes labeled Y, B-Y and R-Y or Y, Cb and
R’, ‘PB’, ‘Y’) on your set.
Cr.
-
Connect RCA audio cables (optional) to [R-AUDIO-L] on the rear of your set and the other ends to corresponding audio out
connectors on the DTV or DVD.
3
HDMI IN , HDMI IN 2, HDMI IN , HDMI IN 4
-
Supports connections between HDMI-connection-enabled AV devices (Set-Top Boxes, DVD players)
-
No additional Audio connection is needed for an HDMI to HDMI connection.
-
When using an HDMI / DVI cable connection, you must use the HDMI IN 2 jack.
N
What is HDMI?
-
‘High Denition Multimedia interface’ allows the transmission of high denition digital video data and multiple channels
of digital audio.
-
The HDMI / DVI terminal supports DVI connection to an extended device with the appropriate cable (not supplied).
The difference between HDMI and DVI is that the HDMI device is smaller in size, has the HDCP (High Bandwidth Digital
Copy Protection) coding feature installed, and supports multi - channel digital audio.
N
The TV may not output sound and pictures may be displayed with abnormal colour when DVD players / Cable Boxes /
Satellite receivers supporting HDMI versions older than 1.3 are connected. When connecting an older HDMI cable and
there is no sound, connect the HDMI cable to the HDMI IN 2 jack and the audio cables to the DVI IN (HDMI2) [R-AUDIO-
L] jacks on the back of the TV. If this happens, contact the company that provided the DVD player / Cable Box / Satellite
receiver to conrm the HDMI version, then request a rmware update. HDMI cables that are not 1.3 may cause annoying
icker or no screen display.
DVI IN(HDMI2) [R-AUDIO-L]
-
DVI audio outputs for external devices.
English - 4
Page 7

English -
Supported modes for HDMI / DVI and Component.
N
480i 480p 576i 576p 720p 1080i 1080p
HDMI / DVI 50Hz X X X O O O O
HDMI / DVI 60Hz X O X X O O O
Component O O O O O O O
4
ANT IN
-
To view television channels correctly, a signal must be received by the set from one of the following sources: An outdoor
aerial / A cable television network / A satellite network
5
SERVICE
Connector for Service only.
-
Connect this to the jack on the optional wall mount bracket. This will allow you to adjust the TV viewing angle using your
-
remote control.
6
COMMON INTERFACE SLOT
When not inserting ‘CI CARD’ in some channels, ‘Scrambled Signal’ is displayed on the screen.
-
The pairing information containing a telephone number, CI CARD ID, Host ID and other information will be displayed in about
-
2~3 minutes. If an error message is displayed, please contact your service provider.
When the channel information conguration has nished, the message ‘Updating Completed’ is displayed, indicating that the
-
channel list is now updated.
You must obtain a CI CARD from a local cable service provider. Remove the CI CARD by carefully pulling it out with your
N
hands since dropping the CI CARD may cause damage to it.
Insert the CI-Card in the direction marked on it.
N
The place of the COMMON INTERFACE Slot may be different depending on its model.
N
7
WISELINK
Connect a USB mass storage device to view movies and photos and listen to music les.
-
You can connect to Samsung’s network wirelessly using the ‘Samsung Wireless LAN Adapter’ (Sold separately).
-
8
S-VIDEO / VIDEO / R-AUDIO-L
Connect RCA or S-VIDEO cable to an appropriate external A/V device such as VCR, DVD or Camcorder.
-
Connect RCA audio cables to [R-AUDIO-L] on your set and the other ends to corresponding audio out connectors on the
-
A/V device.
9
HEADPHONES JACK
Headphone may be connected to the headphone output on your set. While the head phone is connected, the sound from the
-
built-in speakers will be disabled.
Using the sound function is restricted when connecting headphones to the TV
N
Prolonged use of headphones at a high volume may damage your hearing.
N
You will not hear sound from the speakers when you connect headphones to the TV.
N
The headphone volume and TV volume are adjusted separately.
N
0
AUDIO OUT [R-AUDIO-L]
Connect RCA audio cables to AUDIO OUT [R-AUDIO-L] on the rear of your set and the other ends to corresponding audio
-
.
in connectors on the Amplier or DVD Home Theatre.
!
DIGITAL AUDIO OUT (OPTICAL)
Connect to a Digital Audio Component.
-
When the HDMI IN jacks are connected, the DIGITAL AUDIO OUT (OPTICAL) jack on the TV outputs 2 channel audio
N
only. If you want to hear 5.1 channel audio, connect the Optical jack on the DVD player or Cable / Satellite Box directly to
an Amplier or Home Theater, not the TV.
@
EXT , EXT 2
Connector
Video Audio (L / R) RGB Video + Audio (L / R)
Input Output
EXT 1 O O O Only TV or DTV output is available.
EXT 2 O O Output you can choose.
Inputs or outputs for external devices, such as VCR, DVD, video game device or video disc players.
-
#
LAN
Connect a LAN cable to this port to connect to the Network.
-
$
KENSINGTON LOCK (depending on the model)
The Kensington Lock (optional) is a device used to physically x the system when used in a public place.
-
If you want to use a locking device, contact the dealer where you purchased the TV.
-
The location of the Kensington Lock may be different depending on its model.
-
Page 8
Remote Control
You can use the remote control up to a distance of about 23 feet from the TV.
The performance of the remote control may be affected by bright light.
N
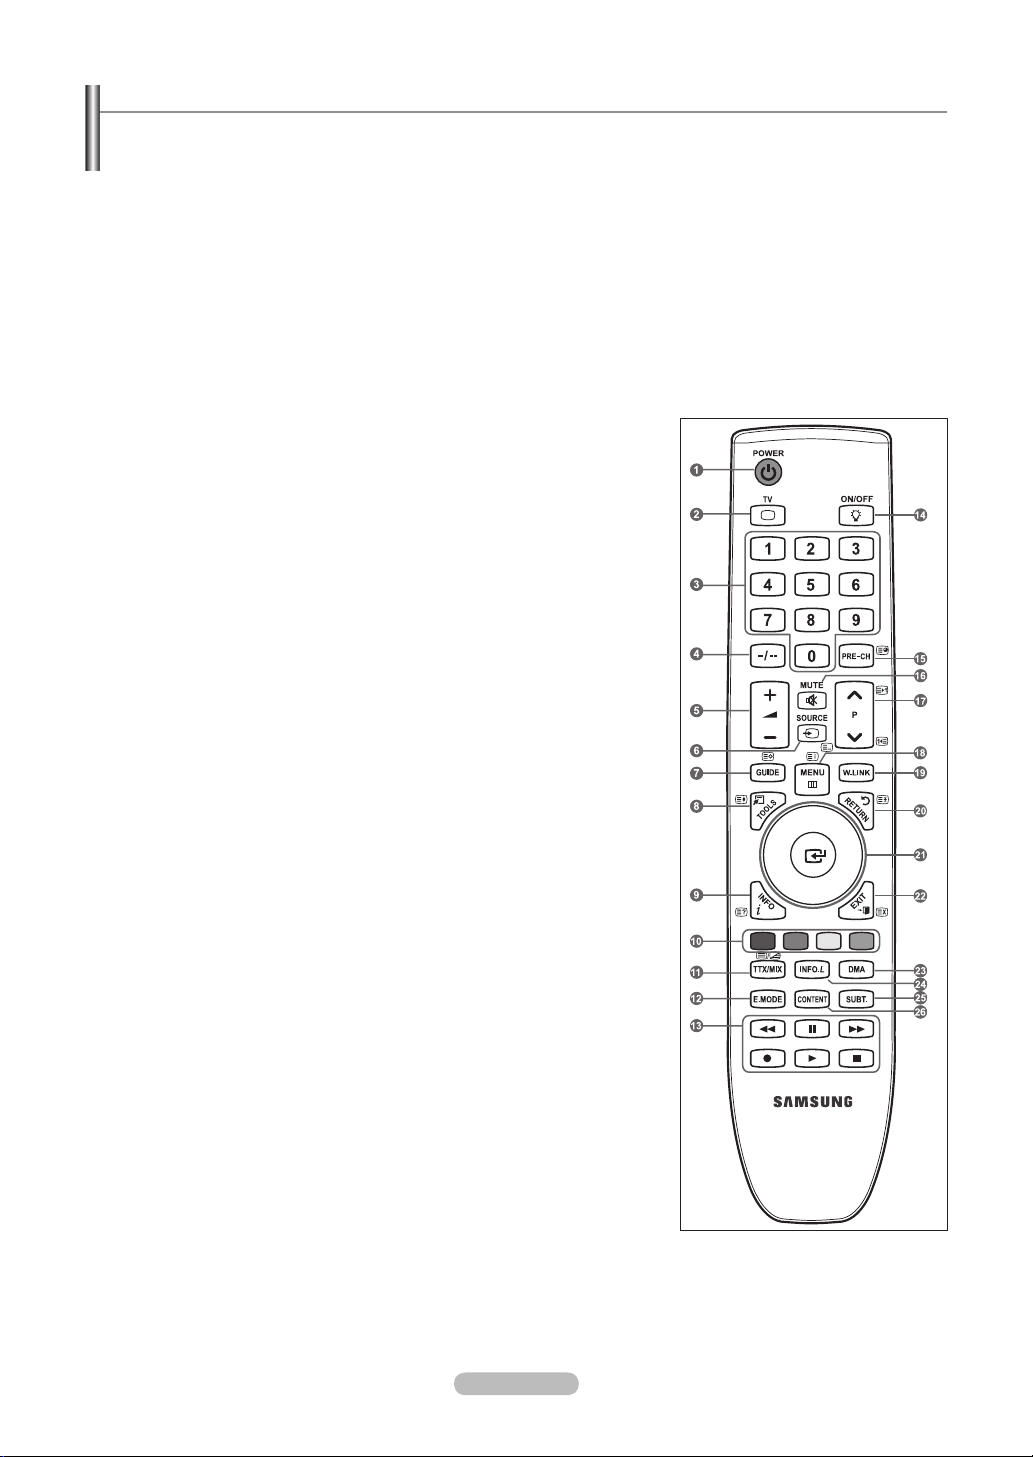
1
POWER
Television Standby button.
2
TV
Selects the TV mode directly.
3
NUMERIC BUTTONS
Number buttons for direct channel
access
4
−
One or more digit channel selection
5
VOLUME BUTTONS
+ : Volume increase
– : Volume decrease
6
SOURCE
Available source selection
7
GUIDE
Electronic Programme Guide (EPG)
display
8
TOOLS
Use to quickly select frequently used
functions.
9
INFO
Use to see information on the current
broadcast
0
COLOURS BUTTONS
Use these buttons in the Channel list
and WISELINK Pro, etc.
@
E.MODE
Press to select the optional display
and sound modes for sports, cinema
and games.
#
Use these buttons in the DMA,
WISELINK Pro and Anynet+. (∏:
This remote can be used to control
recording on Samsung recorders with
the Anynet+ feature)
$
Pressing the ON/OFF @ light button
toggles between on and off. When
the remote control is on, and a key
is pressed on the remote control, the
remote control buttons will be lit for a
moment.
% PRE-CH
Previous channel
^ MUTE
Temporary sound switch-off
&
CHANNEL BUTTONS
P < : Next channel
P > : Previous channel
* MENU
Displays the main on-screen menu
( W.LINK
This function enables you to view and
play photo and music les from an
external device.
) RETURN
Returns to the previous menu
a
UP▲ / DOWN▼ / LEFT◄ /
RIGHT► / ENTER
Press the Up / Down / Left / Right
sections of the wheel button and
Enter to select on-screen menu items
and change menu values. You can
navigate up and down the menu,
switch channels and adjust the
volume by turning the wheel button.
b
EXIT
Exit the on-screen menu
c DMA
Use this when connecting a
SAMSUNG DMA (Digital Media
Adapter) device through an HDMI
interface and switching to DMA mode.
(The DMA button is optional.) For
more information on the operating
procedures, refer to the user manual
of the DMA. This button is available
when “Anynet+(HDMI-CEC)” is “On”
(see page 50)
d
INFO.L
Press to use the News, Stock Market
and Weather Forecast information
services available over the network.
e
SUBT.
Digital subtitle display
f CONTENT
This function enables you to view
“Content Library”. (see page 46)
Teletext Functions
2
:: Exit from the teletext display
6
0: Teletext mode selection (LIST /
FLOF)
7
8: Teletext store
8
4: Teletext size selection
9
5: Teletext reveal
0
Fastext topic selection
E
!
/: Alternately select Teletext,
Double, or Mix.
%
1: Teletext sub page
&
2: Teletext next page
3: Teletext previous page
*
6: Teletext index
)
9: Teletext hold
b
7: Teletext cancel
English -
Page 9

English -
Installing Batteries in the Remote Control
1. Lift the cover at the back of the remote control upward as shown in the gure.
2. Install two AAA size batteries.
Make sure to match the ‘+’ and ‘–’ ends of the batteries with the diagram
N
inside the compartment.
3. Replace the cover.
Remove the batteries and store them in a cool, dry place if you won’t be
N
using the remote control for a long time.
Using the remote control with the ON / OFF @ light button set to on will
N
reduce the battery usage time.
If the remote control doesn’t work, check the following:
N
1. Is the TV power on?
2. Are the plus and minus ends of the batteries reversed?
3. Are the batteries drained?
4. Is there a power outage or is the power cord unplugged?
5. Is there a special uorescent light or neon sign nearby?
Switching On and Off
The mains lead is attached to the rear of your set.
1. Plug the mains lead into an appropriate socket.
The standby indicator lights up on your set.
N
2. Press the
N
N
3. Press the numeric button (0~9) or channel up / down (< / >) button on the remote control or >C/P.
set.
N
4. To switch your set off, press the POWER
P
button on your set.
You also can press the POWER
The programme that you were watching last is reselected automatically.
When you switch the set on for the very rst time, you will be asked to choose language in which the menus are to be
displayed.
P
button or the TV button on the remote control to turn the TV on.
P
button again.
P
< button on your
Placing Your Television in Standby Mode
Your set can be placed in standby mode in order to reduce the power consumption. The standby mode can be useful when you
wish to interrupt viewing temporarily (during a meal, for example).
1. Press the POWER
The screen is turned off and a red standby indicator appears on your set.
N
2. To switch your set back on, simply press the POWER
button again.
Do not leave your set in standby mode for long periods of time (when you are away on holiday
N
unplug the set from the mains and aerial.
P
button on the remote control.
P
, numeric buttons (0~9), TV button or channel up / down (< / >)
, for example). It is best to
Page 10

Viewing the Menus
1. With the power on, press the MENU button. The main menu appears on the
screen. The menu’s left side has icons: Picture, Sound, Channel, Setup, Input,
Application.
2. Press the ▲ or ▼ button to select one of the icons. Then press the ENTER
E
button to access the icon’s sub-menu.
3. Press the EXIT button to exit.
N
The on-screen menus disappear from the screen after about one minute.
Using the TOOLS Button
You can use the TOOLS button to select your frequently used functions quickly and
easily. The “Tools” menu changes depending on which external input mode you are
viewing.
1. Press the TOOLS button. The “Tools” menu will appear.
2. Press the ▲ or ▼ button to select a menu.
3. Press the ▲ / ▼ / ◄ / ► / ENTER
selected items. For a more detailed description of each function, refer to the
corresponding page.
Anynet+ (HDMI-CEC): see page 50
•
Picture Size: see page 15
•
Picture Mode: see page 13
•
Sound Mode: see page 18
•
Sleep Timer: see page 23
•
SRS TS XT: see page 18
•
Energy Saving: see page 22
•
Dual l ll: see page 20
•
PIP: see page 16
•
Auto Adjustment: see page 18
•
E
buttons to display, change, or use the
Picture
Mode
:
Backlight : 7
Contrast : 95
Brightness : 45
Sharpness : 50
Colour : 50
Tint (G / R) : G50 / R50
Detailed Settings
Tools
Anynet+ (HDMI-CEC)
Picture Size : Auto Wide
Picture Mode : Standard
Sound Mode : Custom
Sleep Timer : Off
SRS TS XT : Off
Energy Saving : Off
Dual l ll : Mono
U
Move E Enter e Exit
Standard
Using the Wheel button
To increase the channel number, turn the wheel clockwise when the
Channel Display is displayed. To decrease the channel number, turn the
wheel counterclockwise.
To turn the volume up, turn the wheel clockwise when the Volume
Control window is displayed. To turn the volume down, turn the wheel
counterclockwise.
To move to a lower menu, turn the wheel clockwise when the menu Display
is displayed. To move to a higher menu, turn the wheel counterclockwise.
English -
Page 11

English -
Plug & Play Feature
When the TV is initially powered on, basic settings proceed automatically and subsequently.
1. Press the POWER button on the remote control. The message “Будут
установлены параметры “Язык меню”, “Демонстрация”, “Каналы” и
“Время”.” is displayed.
E
2. Press the ENTER
automatically displayed. Press the ENTER
button, then “Выбор языка экранного меню.” menu is
E
button.
Будут установлены параметры “Язык меню”,
“Демонстрация”, “Каналы” и “Время”.
3. Select the appropriate language by pressing the ▲ or ▼ button. Press the
E
ENTER
4. Press the ◄ or ► button to select “Store Demo” or “Home Use”, then the ENTER
N
N
N
button to conrm your choice.
E
button.
We recommend setting the TV to “Home Use” mode for the best picture in your home environment.
“Store Demo” mode is only intended for use in retail environments.
If the unit is accidentally set to “Store Demo” mode and you want to return to “Home Use” (Standard): Press the Volume
button on the TV. When the volume OSD is displayed, press and hold the MENU button on the TV for 5 seconds.
5. Press the ENTER
E
button. Select the appropriate country by pressing the ▲ or ▼ button. Press the ENTERE button to
conrm your choice.
E
6. Press the ▲ or ▼ button to select the channel source to memorize. Press the ENTER
Digital & Analogue: Digital and Analogue channels.
N
button to select “Start”.
Digital: Digital channels.
Analogue: Analogue channels.
The channel search will start and end automatically.
N
Press the ENTER
N
After all the available channels are stored, the message “Set the Clock Mode.” is displayed.
N
7. Press the ENTER
N
If you select “Manual”, “Set current date and time” is displayed. (See page 23)
N
If you have received a digital signal, the time will be set automatically. If not, see page 23 to set the clock.
8. The message “Enjoy your viewing” is displayed. When you have nished, press the ENTER
E
button at any time to interrupt the memorization process.
E
button. Press the ▲ or ▼ button to select “Auto”, then Press the ENTERE button.
E
button.
Plug & Play
OK
E Вход
If you want to reset this feature...
1. Press the MENU button to display the menu. Press the ▲ or ▼ button to select
“Setup”, then press the ENTER
E
2. Press the ENTER
E
button.
button again to select “Plug & Play”.
3. Enter your 4 digit PIN number. The default PIN number of a new TV set is ‘0-00-0’.
If you want to change PIN number, refer to page 20.
N
The “Plug & Play” feature is only available in the TV mode.
N
Channel Control
Storing Channels and channel
Country
❑
Analogue Channel: You can change the country for analogue channels.
Digital Channel: You can change the country for digital channels.
The PIN number input screen appears. Enter your 4 digit PIN number.
N
Setup
Plug & Play
Language : English
Time
Network
Wireless Network Setup
Cable Network Setup
Child
Change PIN
Channel
Country
Auto Store
Manual Store
Full Guide
Mini Guide
Default
Channel List
Channel
►
Selection : Cable
Lock : On
Guide : Mini Guide
Mode : Added Ch.
►
Page 12

Auto Store
❑
You can scan for the frequency ranges available to you (and availability
depends on your country). Automatically allocated programme numbers may
not correspond to actual or desired programme numbers.
Digital & Analogue: Digital and Analogue channels.
•
Digital: Digital channels.
•
Analogue: Analogue channels.
•
Scans for all channels with active broadcast stations and stores them in the
N
Channel
Fine Tune
Signal Information
LNA : On
TV’s memory.
E
If you want to stop Auto Store, press the ENTER
N
N
The “Stop Auto Store?” message will be displayed.
N
Select “Yes” by pressing the ◄ or ► button, then press the ENTER
button.
E
button.
N
If a channel is locked using the “Child Lock” function, the PIN input window appears.
Manual Store
❑
Scans for a channel manually and stores it in the TV’s memory.
N
If a channel is locked using the “Child Lock” function, the PIN input window appears.
N
Digital Channel
Manual store for digital channels.
Channel: Set the Channel number using the ▲, ▼ or number (0~) buttons.
•
Frequency: Set the frequency using the number buttons.
•
Bandwidth: Set the bandwidth using the ▲, ▼ or number (0~) buttons.
•
When it has nished, channels are updated in the channel list.
N
Analogue Channel
Manual store for analogue channel.
Programme (Programme number to be assigned to a channel): Sets the programme number using the ▲, ▼
•
(0~9) buttons.
Colour System → Auto / PAL / SECAM / NTSC4.43: Sets the colour system value using the ▲ or ▼ button.
•
Sound System → BG / DK / I / L: Sets the sound system value using the ▲ or ▼ button.
•
Channel (When you know the number of the channel to be stored): Press the ▲ or ▼ button to select “C” (Air channel) or
•
“S” (Cable channel). Press the ► button, then press the ▲, ▼ or number (0~) buttons to select the required number.
You can also select the channel number directly by pressing the number (0~) buttons.
N
If there is abnormal sound or no sound, reselect the sound standard required.
N
Search (When you do not know the channel numbers): Press the ▲ or ▼ button to start the search. The tuner scans the
•
frequency range until the rst channel or the channel that you selected is received on the screen.
Store (When you store the channel and associated programme number): Set to “OK” by pressing the ENTER
•
N
Channel mode
-
P (Programme mode): When completing tuning, the broadcasting stations in your area have been assigned to position
numbers from P00 to P99. You can select a channel by entering the position number in this mode.
-
C (Air channel mode): You can select a channel by entering the assigned number to each air broadcasting station in
this mode.
-
S (Cable channel mode): You can select a channel by entering the assigned number for each cable channel in this
mode.
or number
E
button.
►
Full Guide / Mini Guide
❑
The EPG (Electronic Programme Guide) information is provided by the broadcasters. Programme entries may appear blank
or out of date as a result of the information broadcast on a given channel. The display will dynamically update as soon as new
information becomes available.
For the detailed procedures on using “Full Guide” and “Mini Guide”, refer to the descriptions on page 11.
N
You can also display the guide menu simply by pressing the GUIDE button.
O
(To congure the “Default Guide”, refer to the descriptions.)
Full Guide:
Displays the programme information as time ordered One hour segments. Two hours of programme information
is displayed which may be scrolled forwards or backwards in time.
Mini Guide:
The information of each programme is displayed by each line on the current channel Mini Guide screen from the
current programme onwards according to the programme starting time order.
English - 0
Page 13

English -
Default Guide
❑
Mini Guide / Full Guide:
You can decide whether to display either the “Mini Guide” or the “Full Guide” when the GUIDE
button on the remote control is pressed.
Channel List
❑
For the detailed procedures on using the “Channel List”, refer to the descriptions on pages 12~13.
❑
Channel Mode
When press the P >/< button, Channels will be switched within the selected channel list.
Added Ch: Channels will be switched within the memorized channel list.
Favourite Ch.: Channels will be switched within the favourite channel list.
Fine Tune
❑
If the reception is clear, you do not have to ne tune the channel, as this is done automatically during the search and store
operation. If the signal is weak or distorted, you may have to ne tune the channel manually.
Fine tuned channels that have been saved are marked with an asterisk “*” on the right-hand side of the channel number in
N
the channel banner.
E
To reset the ne-tuning, select “Reset” by pressing the ▲ or ▼ button and then press the ENTER
N
N
Only Analogue TV channels can be ne tuned.
Signal Information
❑
button.
You can get information about the signal status.
If the signal status is poor, the “Weak or No Signal” message is displayed.
N
While viewing a Digital channel, this function can be selected.
N
LNA → On / Off
❑
If the TV is operating in a weak-signal area, the LNA (Low Noise Amplier) function can improve the reception (a low-noise
preamplier boosts the incoming signal).
While viewing an Analogue channel, this function can be selected.
N
Using the Full / Mini Guide
Full Guide
900 f tn
901 ITV Play
902 Kerrang!
903 Kiss
903 oneword
903 Smash Hits!
▼
Watch
DTV Cable 900 f tn 2:10 Tue 1 Jun
Freshmen On Campus
2:00 - 2:30
No Detailed Information
Today 2:00 - 3:00 3:00 - 4:00
Freshmen O..
Street Hypn..
Mint Extra
Loaded
Fresh 40 with Dynamite MC
The Distillery
Smash Hits! Sunday
Information
No Information
No Information
Kisstory
No Information
Mini Guide +24 Hours Exit
To... Then...
Watch a programme in the EPG list Select a programme by pressing the ▲, ▼, ◄, ► button.
Exit the guide Press the blue button
If the next programme is selected, it is scheduled with the clock icon displayed. If the ENTER
► button to select Cancel Schedules, the scheduling is canceled with the clock icon gone.
View programme information Select a programme of your choice by pressing the ▲, ▼, ◄, ► button.
Please click on INFO button for the detailed information. Channel Number, Running Time, Status Bar, Parental Level, Video Quality
Information (HD / SD), Sound Modes, Subtitle or Teletext, languages of Subtitle or Teletext and brief summary of the highlighted
programme are included on the detailed information. “...” will be appeared if the summary is long.
Toggle between the “Mini Guide” or “Full Guide” Press the red button repeatedly.
In Full Guide
Scrolls backwards quickly (24 hours).
Scrolls forwards quickly (24 hours).
In Mini Guide
Display next page quickly.
Display previous page quickly.
Mini Guide DTV Cable 900 f tn
▼
2:00
2:30
5:00
Watch
Freshmen On Campus
Street Hypnosis
Booze Britain
Information
Then press the INFO button when the programme of your choice is highlighted.
The programme title is on the upper part of the screen center.
Press the green button repeatedly.
Press the yellow button repeatedly.
Press the green button.
Press the yellow button.
Full Guide Next Page Exit
E
button is pressed again, press the ◄,
Page 14

Managing Channels
Using this menu, you can Add / Delete or set Favourite channels and use the
programme guide for digital broadcasts.
N
Select a channel in the “All Channels”, “Added Channels” or “Favourite” screen
by pressing the ▲ / ▼ buttons, and pressing the ENTER
can watch the selected channel.
All Channels:
Added Channels:
Favourites:
Programmed:
Shows all currently available channels.
Shows all added channels.
Shows all favourite channels.
Shows all current reserved programmes.
E
button. Then you
Mini Guide
Default Guide : Mini Guide
Channel
Channel List
Channel Mode : Added Ch.
Fine Tune
Signal Information
LNA :
On
N
Using the Colour buttons with the Channel List
-
Red (Channel Type): Toggle between your “TV”, “Radio”, “Data / Other” and
“All”.
-
Green (Zoom): Enlarges or shrinks a channel number.
-
Yellow (Select): Selects multiple channel lists.
-
TOOLS (Option): Displays the “Delete” (or “Add”), “Add to Favourite” (or
“Delete from Favourite”), “Lock” (or “Unlock”), “Timer Viewing”, “Edit Channel
Name”, “Sort”, “Edit Channel Number”, “Select All”, “Deselect All” or “Auto
Store” menu. (The Options menus may differ depending on the situation.)
N
Channel Status Display Icons
An analogue channel.
A
A channel set as a Favourite.
♥
\
A locked channel.
c
A channel selected by pressing the yellow button.
(
A programme currently being broadcast.
)
A reserved programme
Added Channels
824 UKTV Gold
825 UKTV style
A
C --
A
2 C
A 3 ♥ C
A 4 C
A 5 C
A 6 C
A 7 C
A 8 C
All
Channel Type Zoom Select
--
--
--
--
--
--
--
Option
Channel List Option Menu (in All Channels / Added Channels / Favourites)
N
Press the TOOLS button to use the option menu.
N
Option menu items may differ depending on the channel status.
Add / Delete
You can delete or add a channel to display the channels you want.
All deleted channels will be shown on “All Channels” menu.
N
A gray-coloured channel indicates the channel has been deleted.
N
The “Add” menu only appears for deleted channels.
N
You can also delete a channel to the “Added Channels” or “Favourite” menu
N
in the same manner.
Add to Favourite / Delete from Favourite
You can set channels you watch frequently as favourites.
The “♥” symbol will be displayed and the channel will be set as a favourite.
N
All favourite channels will be shown on “Favourite” menu.
N
Lock / Unlock
You can lock a channel so that the channel cannot be selected and viewed. This function is available only when the “Child
Lock” is set to “on”. (see page 20)
The PIN number input screen appears. Enter your 4 digit PIN number.
N
The default PIN number of a new TV set is “0-0-0-0”. You can change the PIN, by selecting “Change PIN” from the menu.
N
The “\” symbol will be displayed and the channel will be locked.
N
Timer Viewing
If you reserve a programme you want to watch, the channel is automatically switched to the reserved channel in the Channel
List; even when you are watching another channel. To reserve a programme , set the current time rst. (See page 23.)
Only memorized channels can be reserved.
N
You can set the channel, day, month, year, hour and minute directly by pressing the number buttons on the remote
N
control.
Reserving a programme will be shown on “Programmed” menu.
N
Digital Programme Guide and Viewing Reservation
N
When a digital channel is selected, and you press the ► button, the Programme Guide for the channel appears.
reserve a programme according to the procedures described above.
824 UKTV Gold
All Channels
825 UKTV style
A
C --
A
2 C
A 3 C
A 4 C
A 5 C
A 6 C
A 7 C
A 8 C
All
Channel Type Zoom Select
--
--
--
--
--
--
--
Delete
Add to Favourite
Lock
Timer Viewing
Edit Channel Name
Sort
▼
Option
You can
English - 2
Page 15

English -
Edit Channel Name (only analogue channel)
Channels can labeled so that their call letters appear whenever the channel is selected.
The names of digital broadcasting channels are automatically assigned and cannot be labeled.
N
Edit Channel Number (only digital channel)
You can also edit the channel number by pressing the number buttons on the remote control.
Sort (only analogue channel)
This operation allows you to change the programme numbers of the stored channels. This operation may be necessary after
using the auto store.
Select All / Deselect All
Select All: You can select all the channels in the channel list.
•
Deselect All: You can deselect all the selected channels by pressing the yellow button.
•
You can perform the add / delete, add to Favourites / delete from Favourites, or lock / unlock function for multiple
N
channels at the same time. Select the required channels and press the yellow button to set all the selected channels at
the same time.
The c mark appears to the left of the selected channels.
N
You can only select “Deselect All” when there is a selected channel.
N
Auto Store
For further details on setting up options, refer to page 10.
N
If a channel is locked using the “Child Lock” function, the PIN input window appears.
N
Channel List Option Menu (in Programmed )
You can view, modify or delete a reservation.
Press the TOOLS button to use the option menu.
N
Change Info: Select to change a viewing reservation.
Cancel Schedules: Select to cancel a viewing reservation.
Information: Select to view a viewing reservation. (You can also change the
reservation information.)
Select All: Select all reserved programmes.
Picture Control
Changing and Resetting the Picture Settings
Mode
❑
You can select the type of picture which best corresponds to your viewing
requirements.
Dynamic: Selects the picture for high-definition in a bright room.
Standard: Selects the picture for the optimum display in a normal
environment.
Movie: Selects the picture for viewing movies in a dark room.
Press the TOOLS button to display “Tools” menu. You can also set the
T
picture mode by selecting “Tools → Picture Mode”.
Backlight / Contrast / Brightness / Sharpness / Colour / Tint(G/
❑
R)
Your television has several setting options that allow you to control the picture
quality.
Backlight: Adjusts the brightness of LCD back light.
Contrast: Adjusts the contrast level of the picture.
Brightness: Adjusts the brightness level of the picture.
Programmed
1 / 1 / 2008
13:59 5 TV1 Quincy, M.E
18:59 2 TV3 The Equalizer
20:59 2 TV3 McMillan & Wife
21:59 2 TV3 M.Spillane’s mike Hammer
All
Channel Type Zoom Select
Picture
Mode : Standard
Backlight : 5
Contrast : 95
Brightness : 45
Sharpness : 50
Colour : 50
Tint(G/R) : G50 / R50
Detailed Settings
Colour : 50
Tint (G / R) : G50 / R50
Picture
Detailed Settings ►
Picture Options
Picture Reset
Change Info
Cancel Schedules
Information
Select All
Option Information
►
Page 16

Sharpness: Adjusts the edge definition of the picture.
Colour: Adjusts colour saturation of the picture.
Tint(G/R): Adjusts the colour tint of the picture.
Select a picture mode to be adjusted rst. The adjusted values are saved for each picture mode.
N
When you make changes to “Backlight”, “Contrast”, “Brightness”, “Sharpness”, “Colour” or “Tint(G/R)”, the OSD will be
N
adjusted accordingly.
In Analogue TV, Ext., AV, S-Video modes of the PAL system, you cannot use the “Tint” Function.
N
In PC mode, you can only make changes to “Backlight”, “Contrast” and “Brightness”.
N
Settings can be adjusted and stored for each external device you have connected to an input of the
N
N
The energy consumed during use can be signicantly reduced if the level of brightness of the picture is reduced, and then this
TV.
will reduce the overall running cost.
Detailed Settings
❑
Samsung’s new TVs allow you to make even more precise picture settings than previous models. See below to adjust detailed
picture settings.
“Detailed Settings” is available in “Standard” or “Movie” mode.
N
In PC mode, you can only make changes to “Dynamic Contrast”, “Gamma” and “White Balance” from among the “Detailed
N
Settings” items.
Black adjust → Off / Low / Medium / High
You can select the black level on the screen to adjust the screen depth.
Dynamic Contrast → Off / Low / Medium / High
You can adjust the screen contrast so that the optimal contrast is provided.
Gamma
You can adjust the Primary Colour (Red, Green, Blue) Intensity.
Colour Space
Colour Space is a colour matrix composed of red, green and blue colours. Select your favourite Colour Space to experience
the most natural colour.
Auto: Auto Colour Space automatically adjusts to the most natural colour tone based on programme sources.
•
Native: Native Colour Space offers deep and rich colour tone.
•
Custom: Adjusts the colour range to suit your preference.
•
Customizing the Colour Space
N
Colour → Red / Green / Blue / Yellow / Cyan / Magenta
-
Adjusts the Colour range to suit your preference. “Colour” is available when “Colour Space” is set to “Custom”.
-
Red / Green / Blue: In “Colour”, you can adjust the RGB values for the selected colour.
-
Reset: Resets the colour space to the default values.
-
White Balance
You can adjust the colour temperature for more natural picture colours.
R-Offset / G-Offset / B-Offset / R-Gain / G-Gain / B-Gain: Changing the adjustment value will refresh the adjusted screen.
•
Reset: The previously adjusted white balance will be reset to the factory defaults.
•
Flesh Tone
You can emphasize the pink ‘esh tone’ in the picture.
Changing the adjustment value will refresh the adjusted screen.
N
Edge Enhancement → Off / On
You can emphasize object boundaries in the picture.
xvYCC → Off / On
Setting the xvYCC mode to on increases detail and colour space when watching movies from an external device (i.e. DVD
player).
“xvYCC” is available when the picture mode is set to “Movie”, and the external input is set to “HDMI” or “Component”
N
mode.
If “xvYCC” function is active, PIP cannot be selected.
N
English - 4
Page 17

English -
Picture Options
❑
In PC mode, you can only make changes to the “Colour Tone” and “Size” from among the items in “Picture Options”.
N
Colour Tone → Cool2 / Cool1 / Normal / Warm1 / Warm2
You can select the most comfortable colour tone to your eyes.
The adjusted values are stored according to the selected “Picture” mode.
N
“Warm1” or “Warm2” is only activated when the picture mode is “Movie”.
N
Size
You can select the picture size which best corresponds to your viewing requirements.
Press the TOOLS button to display “Tools” menu. You can also set the size by selecting “Tools → Picture Size”.
T
Auto Wide: Automatically adjusts the picture size to the “16:9” aspect ratio.
•
16:9: Adjusts the picture size to 16:9 appropriate for DVDs or wide broadcasting.
•
Wide Zoom: Magnify the size of the picture more than 4:3.
•
Zoom: Magnies the 16:9 wide picture (in the vertical direction) to t the screen size.
•
4:3: This is the default setting for a video movie or normal broadcasting.
•
Just Scan: Use the function to see the full image without any cutoff when HDMI (720p / 1080i / 1080p) or Component (1080i
•
/ 1080p) signals are input.
Depending on the input source, the picture size options may vary.
N
The items available may differ depending on the selected mode.
N
In PC Mode, only “16:9” and “4:3” mode can be adjusted.
N
Settings can be adjusted and stored for each external device you have connected to an input of the
N
N
Temporary image retention may occur when viewing a static image on the set for more than two hours.
E
N
“Wide Zoom”: Press the ► button to Select “Position”, then press the ENTER
move the screen up / down. Then press the ENTER
N
“Zoom”: Press the ► button to Select “Position”, then press the ENTER
the picture up and down. Then press the ENTER
E
ENTER
the ENTER
N
After selecting “Just Scan” in HDMI (1080i / 1080p) or Component (1080i / 1080p) mode: Select “Position” by pressing
button. Press the ▲ or ▼ button to magnify or reduce the picture size in the vertical direction. Then press
E
button.
E
button.
E
button. Press the ► button to Select “Size”, then press the
button. Press the ▲ or ▼ button to
E
button. Press the ▲ or ▼ button to move
TV.
the ◄ or ►button. Use the ▲, ▼, ◄ or ► button to move the picture.
E
Reset: Press the ◄ or ► button to select “Reset”, then press the ENTER
N
If you use the “Just Scan” function with HDMI 720p input, 1 line will be cut at the top, bottom, left and right as in the
button. You can initialize the setting.
overscan function.
N
When Double (
Screen Mode → 16:9 / Wide Zoom / Zoom / 4:3
, ) mode has been set in PIP, the Picture Size cannot be set.
When setting the picture size to “Auto Wide” in a 16:9 wide TV, you can determine the picture size you want to see the 4:3
WSS (Wide Screen Service) image or nothing. Each individual European country requires different picture size so this function
is intended for users to select it.
16:9: Sets the picture to 16:9 wide mode.
•
Wide Zoom: Magnify the size of the picture more than 4:3.
•
Zoom: Magnify the size of the picture vertically on screen.
•
4:3: Sets the picture to 4:3 normal mode.
•
This function is available in “Auto Wide” mode.
N
This function is not available in “PC”, “Component” or “HDMI” mode.
N
Digital NR → Off / Low / Medium / High / Auto
If the broadcast signal received by your TV is weak, you can activate the Digital Noise Reduction feature to help reduce any
static and ghosting that may appear on the screen.
When the signal is weak, select one of the other options until the best picture is displayed.
N
DNIe → Off / Demo / On
This TV includes the DNIe function so as to provide a high visual quality. If you set DNIe to on, you can view the screen with
the DNIe feature activated. If you set the DNIe to Demo, you can view the applied DNIe and normal pictures on the screen, for
demonstration purposes. Using this function, you can view the difference in the visual quality.
DNIe™ (Digital Natural Image engine)
N
DNIe™
This feature brings you more detailed image with 3D noise reduction, detail enhancement, contrast enhancement and
white enhancement. New image compensation Algorithm gives brighter, clearer, more detailed image to you. DNIe™
technology will t every signal into your eyes.
N
This function is not available in “Movie” and “Standard” mode.
Page 18

HDMI Black Level → Normal / Low
You can directly select the black level on the screen to adjust the screen depth.
This function is active only when the external input connects to HDMI (RGB signals).
N
100Hz Motion Plus → Off / Low / Medium / High / Demo
Removes drag from fast scenes with a lot of movement to provide a clearer picture.
This function is not available in PC mode.
N
If you enable “100 Hz Motion Plus”, noise may appear on the screen. If this occurs, set “100Hz Motion Plus” to “off” or
N
select one of the other options.
Blue Only Mode → Off / On
This function is for AV device measurement experts. This function displays the blue signal only by removing the red and
green signals from the video signal so as to provide a Blue Filter effect that is used to adjust the Colour and Tint of video
equipment such as DVD players, Home Theaters, etc. Using this function, you can adjust the Colour and Tint to preferred
values appropriate to the signal level of each video device using the Red / Green / Blue / Cyan / Magenta / Yellow Colour Bar
Patterns, without using an additional Blue Filter.
“Blue Only Mode” is available when the picture mode is set to “Movie” or “Standard”.
N
Picture Reset → Reset Picture Mode / Cancel
❑
Resets all picture settings to the default values.
Select a picture mode to be reset. The reset is performed for each picture mode.
N
Viewing Picture-in-Picture
You can display a sub picture within the main picture of set programme or video
input. In this way, you can watch the picture of set programme or video input from
any connected equipment while watching the main picture.
You may notice that the picture in the PIP window becomes slightly unnatural
N
when you use the main screen to view a game or karaoke.
Press the TOOLS button to display “Tools” menu. You can also congure PIP
T
related settings by selecting “Tools → PIP”.
Entertainment : Off
Energy Saving : Off
Setup
PIP ►
Software Upgrade
Common Interface
PIP → On / Off
❑
You can activate or deactivate the PIP function.
Main picture Sub picture
Component
HDMI 1, HDMI / DVI 2, HDMI 3, HDMI 4
TV, Ext.1, Ext.2, AV
PC
Source
You can select a source of the sub-picture.
Size → / /
You can select a size of the sub-picture.
If main picture is in “HDMI” mode, “Size” is available.
N
Position → / / /
You can select a position of the sub-picture.
In Double (
N
Channel
, ) mode, “Position” cannot be selected.
You can select a channel of the sub-picture only when the “Source” is set to “TV”.
PIP
PIP : On
Source : TV
Size :
Position :
Channel : ATV 11
L
Move E Enter R Return
English -
Page 19

English -
PC Display
Setting Up Your PC Software (Based on Windows XP)
The Windows display-settings for a typical computer are shown below. The actual
screens on your PC will probably be different, depending upon your particular
version of Windows and your particular video card. However, even if your actual
screens look different, the same basic set-up information will apply in almost all
cases. (If not, contact your computer manufacturer or Samsung Dealer.)
1. First, click on ‘Control Panel’ on the Windows start menu.
2. When the control panel window appears, click on ‘Appearance and Themes’
and a display dialog-box will appear.
3. When the control panel window appears, click on ‘Display’ and a display dialogbox will appear.
4. Navigate to the ‘Settings’ tab on the display dialog-box.
The correct size setting (resolution)
Optimum: 1920 X 1080 pixels
If a vertical-frequency option exists on your display settings dialog box, the
correct value is ‘60’ or ‘60 Hz’. Otherwise, just click ‘OK’ and exit the dialog box.
Display Modes
Both screen position and size will vary depending on the type of PC monitor and its resolution.
The resolutions in the table are recommended.
D-Sub Input
Mode Resolution
IBM
VESA
CVT 1920 x 1080RB 66.587 59.934 138.500 + / -
640 x 350
720 x 400
640 x 480
640 x 480
640 x 480
800 x 600
800 x 600
800 x 600
1024 x 768
1024 x 768
1024 x 768
1280 x 1024
1280 x 1024
1360 x 768
1600 x 1200
Horizontal
Frequency (kHz)
31.469
31.469
31.469
37.861
37.500
37.879
48.077
46.875
48.363
56.476
60.023
63.981
79.976
47.712
75.000
Vertical Frequency
(Hz)
70.086
70.087
59.940
72.809
75.000
60.317
72.188
75.000
60.004
70.069
75.029
60.020
75.025
60.015
60.000
Frequency (MHz)
Pixel Clock
25.175
28.322
25.175
31.500
31.500
40.000
50.000
49.500
65.000
75.000
78.750
108.000
135.000
85.500
162.000
Sync Polarity
(H / V)
+ / -
- / +
- / -
- / -
- / + / +
+ / +
+ / +
- / -
- / + / +
+ / +
+ / +
+ / +
+ / +
HDMI / DVI Input
Mode Resolution
640 x 480
800 x 600
VESA
CEA 1920 x 1080p 67.500 60.000 148.500 + / +
When using an HDMI / DVI cable connection, you must use the HDMI IN 2 jack.
N
The interlace mode is not supported.
N
The set might operate abnormally if a non-standard video format is selected.
N
Separate and Composite modes are supported. SOG is not supported.
N
Too long or low quality VGA cable can cause picture noise at high resolution modes (1920x1080 or 1600x1200).
N
1024 x 768
1280 x 1024
1360 x 768
1600 x 1200
Horizontal
Frequency (kHz)
31.469
37.879
48.363
63.981
47.712
75.000
Vertical Frequency
(Hz)
59.940
60.317
60.004
60.020
60.015
60.000
Pixel Clock
Frequency (MHz)
25.175
40.000
65.000
108.000
85.500
162.000
Sync Polarity
(H / V)
- / + / +
- / + / +
+ / +
+ / +
Page 20

Setting up the TV with your PC
Preset: Press the SOURCE button to select PC mode.
N
Auto Adjustment
❑
Auto Adjustment allows the PC screen of set to self-adjust to the incoming PC
video signal. The values of ne, coarse and position are adjusted automatically.
This function does not work in DVI-HDMI mode.
N
Press the TOOLS button to display “Tools” menu. You can also set the Auto
T
Picture
Brightness : 45
Sharpness : 50
Auto Adjustment
Screen
Detailed Settings
Picture Options
Picture Reset
Adjustment by selecting “Tools → Auto Adjustment”.
Screen
❑
Coarse / Fine:
The purpose of picture quality adjustment is to remove or reduce picture noise. If the noise is not removed
by Fine-tuning alone, then adjust the frequency as best as possible (Coarse) and Fine-tune again. After the noise has been
reduced, readjust the picture so that it is aligned on the center of screen.
PC Position:
Adjust the PC’s screen positioning if it does not t the TV screen.
Press the ▲ or ▼ button to adjusting the
Vertical-Position. Press the ◄ or ► button to adjust the Horizontal-Position.
Image Reset:
You can replace all image settings with the factory default values.
Sound Control
Changing the Sound Standard
►
Mode → Standard / Music / Movie / Speech / Custom
❑
You can select the type of special sound effect to be used when watching a
given broadcast.
Press the TOOLS button to display “Tools” menu. You can also congure
T
the sound mode by selecting “Tools → Sound Mode”.
Equalizer
❑
The sound settings can be adjusted to suit your personal preferences.
Mode: You can select a sound mode to suit your personal preferences.
Balance: Controls the balance between the right and left speakers.
100Hz / 300Hz / 1kHz / 2kHz / 3kHz / 10kHz (Bandwidth Adjustment): To
adjust the level of different bandwidth frequencies
Reset: Resets the equalizer settings to the default values.
SRS TruSurround XT → Off / On
❑
Mode : Custom
Equalizer
Sound
SRS TruSurround XT
Audio Language : ---Audio Format : ---Audio Description
Volume : Off
Auto
Select Speaker : TV Speaker
Sound Select : Main
Sound Reset
Select Speaker : TV Speaker
Sound Select : Main
Sound
Sound Reset ►
TruSurround XT is a patented SRS technology that solves the problem of
playing 5.1 multichannel content over two speakers. TruSurround delivers
a compelling, virtual surround sound experience through any two-speaker
playback system, including internal television speakers. It is fully compatible
with all multichannel formats.
Press the TOOLS button to display “Tools” menu. You can also set the SRS TruSurround XT by selecting “Tools → SRS
T
TS XT”.
TruSurround XT, SRS and Symbol are trademarks of SRS Labs, Inc. TruSurround XT
technology is incorporated under license from SRS Labs, Inc.
: Off ►
English -
Page 21

English -
Audio Language
❑
You can change the default value for audio languages. Displays the language information for the incoming stream.
While viewing a digital channel, this function can be selected.
N
You can only select the language among the actual languages being broadcast.
N
Audio Format → MPEG / Dolby Digital
❑
When sound is emitted from both the main speaker and the audio receiver, a sound echo may occur due to the decoding
speed difference between the main speaker and the audio receiver. In this case, use the TV Speaker function.
While viewing a digital channel, this function can be selected.
N
The “Audio Format” appears according to the broadcasting signal.
N
Manufactured under license from Dolby Laboratories. Dolby and the double-D symbol are
trademarks of Dolby Laboratories.
Audio Description
❑
This is an auxiliary audio function that provides an additional audio track for visually challenged persons. This function handles
the Audio Stream for the AD (Audio Description), when it is sent along with the Main audio from the broadcaster. Users can
turn the Audio Description On or Off and control the volume.
Audio Description → Off / On: Turn the audio description function on or off.
Volume: You can adjust the audio description volume.
“Volume” is active when “Audio Description” is set to “On”.
N
While viewing a Digital channel, this function can be selected.
N
Auto Volume → Off / On
❑
Each broadcasting station has its own signal conditions, and so it is not easy to adjust the volume every time the channel is
changed. This feature lets you automatically adjust the volume of the desired channel by lowering the sound output when the
modulation signal is high or by raising the sound output when the modulation signal is low.
❑
Select Speaker → External Speaker / TV Speaker
If you want to hear the sound through separate speakers, cancel the internal amplier.
The volume buttons and MUTE buttons do not operate when the “Select Speaker” is set to “External Speaker”.
N
If you select “External Speaker” in the “Select Speaker” menu, the sound settings will be limited.
N
TV's Internal Speakers Audio Out (Optical, L / R Out) to Sound System
RF / AV / S-Video / Component / PC / HDMI RF / AV / S-Video / Component / PC / HDMI
TV Speaker Speaker Output Sound Output
External Speaker Mute Sound Output
Video No Signal Mute Mute
Sound Select
❑
When the PIP feature is activated, you can listen to the sound of the sub (PIP) picture.
Main: Used to listen to the sound of the main picture.
Sub: Used to listen to the sound of the sub picture.
Press the TOOLS button to display “Tools” menu. You can also set the sound of the sub picture by selecting “Tools → PIP
T
→ Sound Select”.
Sound Reset
❑
Reset All / Reset Sound Mode / Cancel:
You can restore the Sound settings to the factory defaults.
Page 22

Selecting the Sound Mode
You can set the sound mode in the “Tools” menu. When you set to “Dual l ll”, the
current sound mode is displayed on the screen.
Audio Type Dual / 2 Default
A2 Stereo
Mono MONO
Stereo STEREO ↔ MONO
Automatic change
Dual DUAL 1 ↔ DUAL 2 DUAL 1
Mono MONO
NICAM Stereo
If the stereo signal is weak and an automatic switching occurs, then switch to the mono.
N
This function is only activated in stereo sound signal. It is deactivated in mono sound signal.
N
This function is only available in TV mode.
N
Stereo MONO ↔ STEREO
Dual
MONO ↔ DUAL 1
DUAL 2
Automatic change
DUAL 1
Function Description
Conguring the Setup Menu
Language
❑
You can set the menu language.
❑
Child Lock → On / Off
This feature allows you to prevent unauthorized users, such as children, from
watching unsuitable programme by muting out video and audio.
Before the setup screen appears, the PIN number input screen appears.
N
Enter your 4 digit PIN number.
The default PIN number of a new TV set is “0-0-0-0”. You can change the
N
PIN by selecting “Change PIN” from the menu.
You can lock some channels in Channel List. (refer to page 12)
N
“Child Lock” is available only in TV mode.
N
Change PIN
❑
You can change your personal ID number that is required to set up the TV.
Before the setup screen appears, the PIN number input screen appears.
N
Enter your 4 digit PIN number.
The default PIN number of a new TV set is “0-0-0-0”.
N
If you forget the PIN code, press the remote control buttons in the following
N
sequence, which resets the PIN to 0-0-0-0: POWER (Off), MUTE, 8, 2, 4,
POWER (On).
Tools
Anynet+ (HDMI-CEC)
Picture Size : Auto Wide
Picture Mode : Standard
Sound Mode : Custom
Sleep Timer : Off
SRS TS XT : Off
Energy Saving : Off
Dual l ll ◄ Mono ►
U
Move L Adjust e Exit
Plug & Play
Language : English
Setup
Time ►
Network Selection : Cable
Wireless Network Setup
Cable Network Setup
Child
Lock : On
Change PIN
Parental Lock
Subtitle
Teletext Language : ----
Preference
Setup
Digital Text : Enable ►
Wall-Mount Adjustment
Melody : Off
Entertainment : Off
Energy Saving : Off
PIP
Software
Upgrade
Common Interface
Parental Lock → Parental Rating
❑
This feature allows you to prevent unauthorized users, such as children, from watching unsuitable programme by a 4-digit PIN
(Personal Identication Number) code that is dened by the user.
In the ‘Parental Rating’ screen, congure the parental ratings.
-
Before the setup screen appears, the PIN number input screen appears. Enter your 4 digit PIN number
N
The default PIN number of a new TV set is “0-0-0-0”. You can change the PIN by selecting “Change PIN” from the menu.
N
When the parental ratings are set, the “
N
Allow All: Press to unlock all TV ratings.
N
\
” symbol is displayed.
.
Block All: Press to lock all TV ratings.
English - 20
Page 23

English - 2
Subtitle
❑
You can activate and deactivate the subtitles. Use this menu to set the Subtitle Mode. “Normal” under the menu is the basic
subtitle and “Hard of hearing” is the subtitle for a hearing-impaired person.
Subtitle → On / Off: Switches subtitles on or off.
Mode → Normal / Hard of hearing: Sets the subtitle mode.
Subtitle Language: Set the subtitle language.
If the programme you are watching does not support the “Hard of hearing” function, “Normal” automatically activates even
N
though “Hard of hearing” mode is selected.
English is the default in cases where the selected language is unavailable in the broadcast.
N
You can select these options simply by pressing the SUBT. button on the
O
remote control.
Teletext Language
❑
You can set the Teletext language by selecting the language type.
English is the default in cases where the selected language is unavailable in the broadcast.
N
Preference
❑
Primary Audio Language / Secondary Audio Language / Primary Subtitle Language / Secondary Subtitle Language /
Primary Teletext Language / Secondary Teletext Language
Using this feature, users can select one of the languages. The language selected here is the default when the user selects a
channel.
If you change the language setting, the Subtitle Language, Audio Language, and the Teletext Language of the Language
menu are automatically changed to the selected language.
The Subtitle Language, Audio Language, and the Teletext Language of the Language menu show a list of languages
supported by the current channel and the selection is highlighted. If you change this language setting, the new selection is
only valid for the current channel. The changed setting does not change the setting of the Primary Subtitle Language, Primary
Audio Language, or the Primary Teletext Language of the Preference menu.
Digital Text → Disable / Enable (UK only)
❑
If the programme is broadcast with digital text, this feature is enabled.
MHEG (Multimedia and Hypermedia Information Coding Experts Group)
N
An International standard for data encoding systems used in multimedia and hypermedia.
the MPEG system which includes data-linking hypermedia such as still images, character service, animation, graphic and
video les as well as multimedia data. MHEG is user runtime interaction technology and is being applied to various elds
including VOD (Video-On-Demand), ITV (Interactive TV), EC (Electronic Commerce), tele-education, tele-conferencing,
digital libraries and network games.
Melody
❑
Off / Low / Medium / High
The TV power on / off melody sound can be adjusted.
The Melody does not play
N
When no sound is output from the TV because the MUTE button has been pressed.
-
When no sound is output from the TV because the (–) Volume button has been pressed.
-
When the TV is turned off by Sleep Timer function.
-
Entertainment
❑
The “Entertainment” mode enables you to select the optimal display and sound for sports, cinema and games.
Off: Switches the “Entertainment” function off.
Sports: Provides the optimal picture and sound quality for sports.
Cinema: Provides the optimal picture and sound quality for movie watching. You can experience a richer picture and
enhanced sound.
Game: Provides the optimal picture and sound quality for games. This mode accelerates the playing speed when using
an external game console connected to the TV.
This is at a higher level than
Page 24

If you set any of the three “Entertainment” modes to On, the settings will be locked and can not be adjusted. In addition,
N
Picture and Sound mode settings are not allowed. If you want to make Picture and Sound mode adjustments, the
“Entertainment” mode must be turned off.
If you set any of the three “Entertainment” modes to On, the sound and picture functions will be limited.
N
The “Entertainment” settings are saved for each input source.
N
You can press the E.MODE button on the remote control repeatedly to change
O
the “Entertainment” setting.
Energy Saving
❑
This feature adjusts the brightness of the TV in order to reduce power consumption. When watching TV at night, set the
“Energy Saving” mode option to “High” to reduce eye fatigue as well as power consumption.
Off: Turns off the energy saving function.
Low: Sets the TV to low energy saving mode.
Medium: Sets the TV to medium energy saving mode.
High: Sets the TV to high energy saving mode.
Auto: Automatically adjusts the brightness of the TV screen in accordance with the scenes.
Press the TOOLS button to display “Tools” menu. You can also set the Energy Saving option by selecting “Tools → Energy
T
Saving”.
Software Upgrade
❑
To keep your product up-to-date with new Digital Television features then
TV Side Panel
software upgrades are periodically broadcast as part of the normal Television
signal. It will automatically detect these signals and display the software
upgrade banner. You are given the option to install the upgrade.
BY USB
USB Drive
Insert a USB drive containing the rmware upgrade into TV. Please be careful
to not disconnect the power or remove the USB drive while upgrades are being
applied. The TV will turn off and turn on automatically after completing the
rmware upgrade. Please check the rmware version after the upgrades are complete. When software is upgraded, video and
audio settings you have made will return to their default (factory) settings. We recommend you write down your settings so that
you can easily reset them after the upgrade.
BY Channel
Upgrades the software using the broadcasting signal.
Standby Mode Upgrade
To continue software upgrade with master power on, Select On by pressing the ▲ or ▼ button. 45 minutes after entering
standby mode, a manual upgrade is automatically conducted. Since the power of the unit is turned on internally, the screen
may be on slightly for the LCD product. This phenomenon may continue for more than 1 hour until the software upgrade is
completed.
Alternative Software
To display the software version information.
Common Interface
❑
CI Menu
This enables the user to select from the CAM-provided menu.
Select the CI Menu based on the menu PC Card.
Application Info.
This contains information on CAM inserted in the CI slot and displays it.
The Application Info inserting is about the CI CARD. You can install the CAM
anytime whether the TV is ON or OFF.
1.
Purchase the CI CAM module by visiting your nearest dealer or by phone.
2. Insert the CI CARD into the CAM in the direction of the arrow until it ts.
3. Insert the CAM with the CI CARD installed into the common interface slot.
(Insert the CAM in the direction of the arrow, right up to the end so that it is
parallel with the slot.)
4.
Check if you can see a picture on a scrambled signal channel.
English - 22
Page 25

English - 2
Setting the Time
Clock
❑
Setting the clock is necessary in order to use the various timer features of the
TV.
The current time will appear every time you press the INFO button.
N
If you disconnect the power cord, you have to set the clock again.
N
Clock Mode
You can set up the current time manually or automatically.
Auto: Set the current time automatically using the time from the digital
•
broadcast.
Manual: Set the current time to a manually specied time.
•
Clock Set
You can set the current time manually.
Set up this item when you have set “Clock Mode” to “Manual”.
N
You can set the day, month, year, hour and minute directly by pressing the
N
number buttons on the remote control.
Sleep Timer → Off / 0 / 0 / 0 / 20 / 0 / 0
❑
The sleep timer automatically shuts off the TV after a preset time (30, 60, 90,
120, 150 and 180 minutes).
The TV automatically switches to standby mode when the timer reaches 0.
N
To cancel the “Sleep Timer” function, select “Off”.
N
Press the TOOLS button to display “Tools” menu. You can also set the sleep timer by selecting “Tools → Sleep Timer”.
T
Timer / Timer 2 / Timer
❑
Three different on / off timer settings can be made.
On Time:
(To activate timer with the setting you’ve chosen, set to “Activate”.)
Off Time:
(To activate timer with the setting you’ve chosen, set to “Activate”.)
Volume:
Contents:
les.
•
•
•
•
•
Repeat:
N
N
Set the hour, minute, and activate / inactivate.
Set the hour, minute, and activate / inactivate.
Set the required volume level.
When the “On Time” is active, you can turn on a specic channel or play back contents such as photo or audio
TV / USB: Select TV or USB. (Make sure that an USB device is connected to your TV.)
Antenna: Select ATV or DTV.
Channel: Select the desired channel.
Music: Select the folder containing MP3 les on the USB device.
Photo: Select the folder containing JPEG les on the USB device.
Select “Once”, “Everyday”, “Mon~Fri”, “Mon~Sat”, “Sat~Sun”, or “Manual”.
When “Manual” is selected, press the ► button to select the desired day of the week. Press the ENTER
the desired day and the c mark will appear.
You must set the clock rst.
Plug & Play
Language : English
Setup
Time ►
Network Selection : Cable
Wireless Network Setup
Cable Network Setup
Child
Lock : On
Change PIN
Parental Lock
Subtitle
Clock : -- : -- ►
Sleep
Timer : Off
Timer 1 : Inactivated
Timer 2 : Inactivated
Timer 3 : Inactivated
U
Time
Move E Enter R Return
E
button over
You can set the hour, minute and channel by pressing the number buttons on the remote control.
N
Auto Power Off
N
When you set the timer On, the television will eventually turn off, if no controls are operated for 3 hours after the
TV was
turned on by the timer. This function is only available in timer On mode and prevents overheating, which may occur if a TV is
on for too long time.
Page 26

Network Connection
Network Connection - Cable
Cable Connection for a DHCP Environment
The procedures to set up the network using Dynamic Host Conguration Protocol (DHCP) are described below. Since an IP
address, subnet mask, gateway, and DNS are automatically allocated when DHCP is selected, you do not have to enter them
manually.
TV Rear Panel
The Modem Port
on the Wall
2
Modem Cable
1. Connect the [LAN] port on the rear panel of the TV and the external modem with a LAN Cable.
2. Connect the LAN port on the wall and the external modem with a Modem Cable.
You can connect the LAN via a Sharer (Router).
The Modem
Port on the Wall
External Modem
(ADSL / VDSL / Cable TV)
External Modem
(ADSL / VDSL / Cable TV)
IP Sharer
LAN Cable
LAN Cable
LAN Cable
TV Rear Panel
Modem Cable
You can connect the LAN port and the TV directly depending on your network status.
TV Rear Panel
The LAN Port
on the Wall
LAN Cable
The terminals (the position of the port and the type) of the external device may differ depending on the manufacturer.
N
If the IP address allocation by the DHCP server has failed, turn the external modem off, turn it on again after at least 10
N
seconds and then try again.
For the connections between the external modem and the Sharer (Router), refer to the owner
N
’s manual of the corresponding
product.
N
You can connect the TV to the LAN directly without connecting it through a Sharer (Router).
N
You cannot use a manual-connection-type ADSL modem becaus;e it does not support DHCP. You have to use an automaticconnection-type ADSL modem.
English - 24
Page 27

English - 2
LAN Connection for Static IP Environment
The procedures to set up the network using a static IP address are described below. You have to manually enter the IP
address, subnet mask, gateway, and DNS that are provided by your Internet Service Provider (ISP).
TV Rear Panel
The LAN Port
on the Wall
LAN Cable
1. Connect the [LAN] port on the rear panel of the TV and the LAN port on the wall using the LAN cable.
You can connect the LAN via a Sharer (Router).
The LAN Port
on the Wall
IP Sharer
TV Rear Panel
LAN Cable
The terminals (the position of the port and the type) of the external device may differ depending on the manufacturer.
N
If you are using a static IP address, your ISP will inform you of the IP address, subnet mask, gateway, and DNS. You must
N
enter these values to complete the network settings. If you do not know the values, ask your network administrator
N
For the information on how to congure and connect a Sharer (Router), refer to the owner
LAN Cable
.
’s manual for the corresponding
product.
N
You can connect the TV to the LAN directly without connecting it through a Sharer (Router).
N
If you use an IP Sharer (IP Router) that supports DHCP, you can set up the device as either DHCP or static IP.
N
For the procedures to use a static IP address, ask your Internet Service Provider.
Network Connection - Wireless
You can connect to the network wirelessly through a wireless IP sharer.
TV Side Panel
The LAN Port on
the Wall
LAN
Cable
Wireless IP sharer
1. Connect the ‘Samsung Wireless LAN Adapter’ into the Wiselink terminal of the TV.
N
You must use the ‘Samsung Wireless LAN Adapter’(WIS-08BG) to use a wireless network.
N
The ‘Samsung Wireless LAN Adapter’ is sold separately. Contact a Samsung Electronics agent or service center for
purchasing.
N
To use a wireless network, your TV must be connected to a wireless IP sharer.
N
If the wireless IP sharer supports DHCP, you TV can use a DHCP or static IP address to connect to the wireless network.
N
You must use a wireless IP sharer that supports IEEE 802.11 B or IEEE 802.11G.
N
If the wireless IP sharer allows you to turn on / off the Ping connection function, turn it on.
N
Set the wireless IP sharer to Infrastructure mode. Ad-hoc mode is not supported.
N
Select a channel for the wireless IP sharer that is not currently being used. If the channel set for the wireless IP sharer is
currently being used by another device nearby, this will result in interference and communications may fail.
N
When applying the security key for the AP (wireless IP sharer), only the following is supported.
1) Authentication Mode : WEP, WPAPSK, WPA2PSK
2) Encryption Type : WEP, TKIP, AES
If you apply a security system other than the systems listed above, it will not work with the
Samsung Wireless
LAN Adapter
TV.
Page 28

Network Setup
Network Selection
❑
Select Cable or Wireless as the method to connect to the network.
The menu is activated only if the ‘Samsung Wireless LAN Adapter’ is
N
connected. (See page 25)
Cable:
❑
❑
Connect to network using a cable.
Wireless:
Connect to network wirelessly.
Cable Network Setup
Internet Protocol Setup → Auto / Manual
Network Test:
When unable to connect to a wired network
N
You can test or conrm the network connection status after setting up the network.
If your Internet service provider has registered the MAC address of the device used to connect to the Internet for the rst
time and authenticates the MAC address each time you connect to the Internet, your
the Internet as the MAC address differs from that of the device (PC) used to connect to the Internet the rst time. In this
case, ask your Internet service provider about the procedures to connect devices other than your PC (such as your TV) to
the Internet. If your Internet service provider requires an ID or password to connect to the Internet (network), your TV may
not be able to connect to the Internet. In this case, you have to enter your ID or password when connecting to the Internet
using an Internet Sharer (Router).
The internet connection may fail due to a rewall problem. In this case, contact your Internet service provider
cannot connect to the Internet even if you have followed the procedures of your Internet service provider, please contact a
Samsung Electronics Service Center.
Wireless Network Setup
Internet Protocol Setup → Auto / Manual
Network Test: You can test or confirm the network connection status after setting up the network.
When unable to connect to a wireless network
N
Your TV may fail to locate an AP that is congured as a private SSID type. In this case, please change the AP settings and
try again. If your Internet service provider has registered the MAC address of the device used to connect to the Internet
for the rst time and authenticates the MAC address each time you connect to the Internet, your
connect to the Internet as the MAC address differs from that of the device (PC) used to connect to the Internet the rst
time. In this case, ask your Internet service provider about the procedures to connect devices other than your PC (such
as your TV) to the Internet. If you cannot connect to the Internet even if you have followed the procedures of your Internet
service provider, please contact a Samsung Electronics Service Center.
Select Access Point:
If a wireless Access Point is not in the Access Point list, press the Red button.
N
When the connection is made, you will be returned to the screen automatically.
N
If you selected an Access Point that requires security authentication, enter the security key.
N
If you have selected an Access Point with a security authentication:
N
The Security Key input screen appears.
-
Enter the security key and press the ENTERE button.
-
Using the Remote Control Buttons on the Security Key Input Screen.
-
You can select the IP sharer to use when using a wireless network.
Language : English
Time
Setup
Network Selection : Cable ►
Wireless Network Setup
Cable Network Setup
Child
Lock : On
Change PIN
Parental Lock
Subtitle
T
eletext Language : - - - -
TV may not be able to connect to
TV may not be able to
. If you
Cable Network Setup-Auto
If you connect the LAN cable and it supports DHCP, the Internet Protocol (IP) Settings are automatically congured. Please check
if the LAN cable is connected. (See page 24)
1. Set “Network Selection” to “Cable”.
2. Select “Cable Network Setup”.
3. Set “Internet Protocol Setup” to “Auto”.
4. Select “Network Test” to check the network connectivity.
English - 2
Page 29

English - 2
Cable Network Setup-Manual
To connect the TV to the LAN using a static IP address, you must set up the Internet Protocol (IP). Please check if the LAN cable is
connected. (See page 25)
1. Set “Network Selection” to “Cable”.
2. Select “Cable Network Setup”.
3. Set “Internet Protocol Setup” to “Manual”.
4. Set up “IP Address”, “Subnet Mask”, “Gateway” and “DNS Server”.
Press the number buttons on the remote control when you set the Network manually
N
5. Select “Network Test” to check the network connectivity.
.
Wireless Network Setup-Auto
The menu is activated only if the ‘Samsung Wireless LAN Adapter’ is connected. (See page 25)
If you connect the LAN cable and it supports DHCP, the Internet Protocol (IP) Settings are automatically congured. The wireless
IP sharer to be connected to this product must support DHCP.
1. Set “Network Selection” to “Wireless”.
2. Select “Wireless Network Setup”.
3. Set “Internet Protocol Setup” to “Auto”.
4. Select an AP through “Select Access Point”.
5. Select “Network Test” to check the network connectivity.
Wireless Network Setup-Manual
The menu is activated only if the ‘Samsung Wireless LAN Adapter’ is connected. (See page 25)
1. Set “Network Selection” to “Wireless”.
2. Select “Wireless Network Setup”.
3. Set “Internet Protocol Setup” to “Manual”.
4. Select an AP through “Select Access Point”.
5. Select “Network Test” to check the network connectivity.
Source List / Edit Name
Source List
❑
Use to select TV or other external input sources such as DVD players or Cable
Box / Satellite receivers (Set-Top Box) connected to the TV. Use to select the
input source of your choice.
TV, Ext.1, Ext.2, AV, S-Video, Component, PC, HDMI1, HDMI2 / DVI,
HDMI3, HDMI4, USB, DLNA.
You can choose only those external devices that are connected to the TV.
N
In the “Source List”, connected inputs will be highlighted and sorted to the
top. Inputs that are not connected will be sorted to the bottom.
Using the Colour buttons on the remote with the Source list
N
Red (Refresh): Refreshes the connecting external devices.
-
TOOLS (Option): Displays the “Edit Name” and “Information” menus.
-
Press the SOURCE button on the remote control to view an external signal
O
source. TV mode can be selected by pressing the TV button, number
buttons (0~), and the P < / > button on the remote control.
Edit Name
❑
VCR / DVD / Cable STB / Satellite STB / PVR STB / AV Receiver / Game / Camcorder / PC / TV / IPTV / Blu-ray / HD
DVD / DMA
Name the device connected to the input jacks to make your input source selection easier.
When a PC with a resolution of 1920 x 1080@60Hz is connected to the HDMI IN 2 port, you should set the “HDMI2 / DVI”
N
mode to “PC” in the “Edit Name” of the “Input” mode.
Input
Source List
Edit Name
Page 30

Product Guide
The Product Guide gives you information on the most important features of this TV.
1. Press the MENU button to display the menu. Press the ▲ or ▼ button to select
“Application”, then press the ENTER
2. Press the ▲ or ▼ button to select “Product Guide”, then press the ENTER
button.
3. Press the ◄ or ► button to select a Guide (“Picture Quality”, “Entertainment” or
“Connectivity”) and press the ENTER
4. You can navigate the Product Guide screen by using the ◄ and ► buttons.
Picture Quality Full HD 1080p
Entertainment InfoLive
Connectivity WISELINK Pro
5. Press the EXIT button to exit.
Using the Remote Control Button in Product Guide Menu
Button Operations
Yellow Button Shows the contents of the Product Guide sequentially. (AutoPlay)
Wheel (◄/►) Move the cursor and select an item.
E
ENTER
RETURN Return to the previous menu.
EXIT Stop the current function and return to the “Product Guide” main menu.
Select the currently selected item.
E
button.
E
button.
100Hz Motion Plus
Content Library
Entertainment Mode
DLNA
4HDMI
Anynet+
E
Content Library
Application
InfoLive
Product Guide ►
WISELINK Pro
Connecting a USB Device
1. Press the POWER button to turn the TV on.
2. Connect a USB device containing photo, music and/or movie les to the
WISELINK jack (USB jack) on the side of the TV.
If you enter the WISELINK Pro mode with no USB device connected the
N
message ‘No external storage device found. Check the connection status.’
will appear. In this case, insert the USB device, exit the screen by pressing
the W.LINK button on the remote control and enter the WISELINK Pro screen
again.
MTP (Media Transfer Protocol) is not supported.
N
The le system only supports FAT16/32 (The NTFS le system is not supported).
N
Certain types of USB Digital camera and audio devices may not be compatible with this
N
N
WISELINK Pro only supports USB Mass Storage Class devices (MSC). MSC is a Mass Storage Class Bulk-Only
TV.
device. Examples of MSC are Thumb drives and Flash Card Readers (Both USB HDD and HUB are not supported.)
N
Please connect directly to the USB port of your TV. If you are using a separate cable connection, there may be a USB
compatibility problem.
English - 2
TV Side Panel
USB Drive
Transport
Page 31

English - 2
Before connecting your device to the TV, please back up your les to prevent them from damage or loss of data. SAMSUNG is
N
not responsible for any data le damage or data loss.
Do not disconnect the USB device while it is loading.
N
MSC supports MP3 and JPEG les, while a PTP device supports JPEG les only.
N
The sequential JPEG format is supported.
N
The higher the resolution of the image, the longer it takes to display on the screen.
N
The maximum supported JPEG resolution is 15360X8640 pixels.
N
For unsupported or corrupted les, the ‘Not Supported File Format’ message is displayed.
N
If the number of photo les exceeds 4000 (or the number of music les exceeds 3000), any les exceeding the 4000 limit may
N
not be displayed in the Photo List (or Music List).
MP3 les with DRM that have been downloaded from a non-free site cannot be played. Digital Rights Management (DRM)
N
is a technology that supports the creation of content, the distribution and management of the content in an integrated and
comprehensive way, including the protection of the rights and interests of the content providers, the prevention of the illegal
copying of contents, as well as managing billings and settlements.
When moving to a photo, loading may take a few seconds. At this point, the loading icon will appear at the screen.
N
Using the WISELINK Pro Function
This function enables you to view and listen to photo, music and/or movie les saved on a USB Mass Storage Class (MSC) device.
Entering the WISELINK Pro Menu
1. Press the MENU button. Press the ▲ or ▼ button to select “Application”, then
press the ENTERE button.
2. Press the ▲ or ▼ button to select “WISELINK Pro”, then press the ENTER
E
button.
The “WISELINK Pro” menu is displayed.
N
WISELINK Pro
PHOTO
SUM
851.98MB/995.00MB Free
Press the W.LINK button on the remote control to display the “WISELINK Pro”
O
Photo
SUM
Music Setup
Movie
Device Return
menu.
Press the SOURCE button on the remote control repeatedly to select “USB”,
O
then press the ENTER
3. Press the Red button, then press the ▲ or ▼ button to select the corresponding USB Memory Device (i.e. if connected
through a hub). Press the ENTER
This function differs depending on the USB Memory Device / DLNA device connected to TV.
N
The selected USB device name appears at the bottom left of the screen.
N
4. Press the ◄ or ► button to select an icon (Photo, Music, Movie, Setup), then press the ENTER
E
button.
E
button.
E
button. To exit “WISELINK
Pro” mode, press the W.LINK button on the remote control.
Removing a USB Memory Device Safely
You can remove the device safely from the TV.
Photo
1. Press the TOOLS button in the WISELINK Pro le list screen, or while a Slide
Show, music or movie is being played.
2. Press the ▲ or ▼ button to select “Remove Safely”, then press the ENTER
E
button.
3. Remove the USB device from the TV.
SUM
Preference
Monthly
Timeline
image_1.jpg
Month : Jan
Date :
Jan.01.2008
Color : Gray
Composition :
Folder : P-other
Favourites :
★ ★ ★
Jan Nov
Device
Favourites Setting
▲
Play Current Group
Delete
Information
Remove Safely
▲
Select
Jump
Option
Page 32

Screen Display
Photo
image_1.jpg
Month : Jan
Date :
Color : Gray
Composition :
Folder : P-other
Favourites :
Jan.01.2008
★ ★ ★
2
1File(s) Selected
SUM
Preference
Monthly
Timeline
4
Jan Nov
Device
Favourites Setting
▲
Select
Jump
Option
1. Currently selected le: The currently selected le is highlighted. Photo and movie les are displayed as thumbnail images.
2. Information Window: Shows information about the currently selected le. There is a separate information window for photo and
movie les only. For music les, the le information is also displayed in the location where the le is displayed.
3. Current Sort Standard: This eld shows the current standard for sorting les. Press the ▲ or ▼ button to change the standard
for sorting les.
4. View Groups: Shows the sorting groups. The sorting group including the currently selected photo is highlighted.
5. Current Device: Shows the currently selected device name. Press the Red button to select a device.
6. Item Selection Information: Shows the number of photos that are selected by pressing the
Yellow button.
7. Help Items
Red (Device) button: Selects a connected device.
•
Green (Favourites Setting) button: Changes the favourites setting for the selected le. Press this button repeatedly until
•
the desired value appears.
Yellow (Select) button: Selects le from the le list. Selected les are marked with a symbol c. Press the yellow button
•
again to cancel a le selection.
πµ (Jump) button: Jumps to the previous sorting group/Jumps to the next sorting group.
•
TOOLS (Option) button: Displays the option menus. (The option menu changes according to the current status.)
•
Using the Remote Control Button in WISELINK Pro Menu
Button Operations
▲/▼/◄/►/wheel Move the cursor and select an item.
Select the currently selected item.
E
ENTER
∂/∑
RETURN Return to the previous menu.
TOOLS Run various functions from the Photo, Music and Movie menus.
∫
π/µ
INFO Show le information.
W.LINK Exit WISELINK Pro mode.
>/<
P
, PRE-CH
EXIT Stop the current function and return to the WISELINK Pro main menu.
While playing a slide show, movie, or music le:
- Pressing the ENTER
- Pressing the ENTER
E
button during play pauses the play.
E
button during pause resumes the play.
Play or pause the Slide Show, music or movie.
Stop the current slide show, Music or Movie le.
Jump to previous group/Jump to next group.
Stop WISELINK Pro mode and Returns to TV mode.
English - 0
Page 33

English -
Using and Sorting Photo List
You can sort photos in the Photo List by a particular standard.
1. Press the ▲ or ▼ button to select a sorting standard in the Photo list.
The photos are sorted according to the newly selected sorting standard.
N
To move to the previous/next group, press the
N
π
(REW) or µ (FF)
Photo
button.
2. Press the
∂
(Play)/ENTERE button to start the Slide Show in the order
selected by the user.
N
The information of a photo le is automatically set.
N
The “Color” and “Composition” information extracted from a photo le
may be different from the user’s expectations.
N
Photo information is automatically set. You can change the “Color”,
SUM
Preference
Monthly
Timeline
“Composition”, and “Favourites”.
N
Photos for which information cannot be displayed are set as
“Unclassied”.
N
PTP does not support folder sort mode.
Sorting Standard for the Photo List
Monthly
It sorts and shows photos in the le by month. It sorts only by month (from January to December) regardless of year.
Timeline
It sorts and shows photos by date. It sorts by year and month from the earliest photo.
Color
It Sorts photos by color. You can change the photo color information.
“Color” options: Red, Yellow, Green, Blue, Magenta, Black, Gray, Unclassied.
N
Composition
It Sorts photos by composition. You can change the compositional information of photos.
“Composition” options:
N
Folder
It Sorts photos by folder. If there are many folders in USB, the photos les are shown in order in each folder. The photo le in
the Root folder is shown rst and the others are shown in alphabetical order by name.
Preference
It Sorts photos by preference (Favourites). You can change the photo preferences.
Changing the Favourites setting
N
Select the desired photo in the Photo list, then press the Green button repeatedly until the desired setting appears.
“Favourites” options:
N
(horizontal), (vertical), (object), (perspective), (pattern), Unclassied.
★ ★ ★, ★ ★ ★, ★ ★ ★, ★ ★ ★
image_1.jpg
Month : Jan
Date :
Jan.01.2008
Color : Gray
Composition :
Folder : P-other
Favourites :
★ ★ ★
Jan Nov
Device
Favourites Setting
▲
Select
Jump
Option
Photo List Option Menu
Slide Show
Using this menu, you can play a SlideShow using the photo les on the USB
memory device.
Play Current Group
Using this menu, you can play a SlideShow using only the photo les in the
currently selected sorting group.
Delete
Using this menu, you can delete the selected photo les.
Change Group
You can change the “Color” and “Composition” information of photo les.
The group information of the current le is updated and the le is moved to the new group.
N
To change the information of multiple les, select the les you want by pressing the yellow button.
N
Photo
SUM
image_1.jpg
Month : Jan
Date :
Jan.01.2008
Color : Gray
Composition :
Folder : P-other
Favourites :
★ ★ ★
Preference
Jan Nov
Monthly
Timeline
Device
Favourites Setting
Slide Show
Play Current Group
Delete
Information
▼
▲
Select
Jump
Option
Page 34

Information
The photo le information including the name, the size, the resolution, the date modied and the path is displayed.
You can view the information of photo les during a SlideShow using the same procedures.
N
Alternatively, select a photo from the photo list and press the INFO button
O
to view the information.
Remove Safely
You can remove the device safely from the TV.
Viewing a Photo or Slide Show
Viewing a Slide Show
1. Press the ◄ or ► button to select the desired photo in the Photo list.
2. Press the TOOLS button.
3. Press the ▲ or ▼ button to select “Slide Show”, then press the ENTER
E
button.
All les in the photo list will be used for the Slide Show.
N
During the slide show, les are displayed in order from the currently shown
N
le.
The Slide Show progresses in the order sorted in the Photo list.
N
Music les can be automatically played during the Slide Show if the
N
“Background Music” is set to “On”. (Refer to page 33).
►
Normal20/22 image_1.jpg 440x440 2.0KB 2008/1/1
SUM
E Pause Previous Next Option Return
While a photo list is displayed, press the
O
∂
(Play)/ENTERE button on the
remote control to start slide show.
N
SlideShow Control Buttons
ENTER
∂
∑
E
Play/Pauses the Slide Show.
Play the Slide Show. TOOLS Run various functions from the Photo menus.
Pause the Slide Show.
∫
π/µ
Exit Slide Show and return to the photo list.
Change the SlideShow playing speed.
Playing current group
1. Press the ▲ or ▼ button to select a sorting standard. (“Monthly”, “Timeline”, “Color”, “Composition”, “Folder”, “Preference”)
2. Press the
π
(REW) or µ (FF) button to select the desired group.
3. Press the TOOLS button.
4. Press the ▲ or ▼ button to select “Play Current Group”, then press the ENTER
Only the photos in the sorting group including the selected les will be used for the Slide Show
N
E
button.
.
To perform a SlideShow with only the selected les
1. Press the ◄ or ► button to select the desired photo in the Photo list.
2. Press the yellow button. Repeat the above operation to select multiple photos.
c
The
N
N
N
3. Press the
N
mark appears to the left of the selected photo.
If you select one le, the SlideShow will not be performed.
To deselect all selected les, press the TOOLS button and select “Deselect All”.
∂
(Play)/ENTERE button.
The selected les will be used for the Slide Show.
English - 2
Page 35

English -
Slide Show Option Menu
Stop Slide Show/Start Slide Show
You can start or stop a SlideShow.
Rotate
You can rotate photos saved on a USB memory device.
Whenever you press the ◄ button, it rotates by 270˚, 180˚, 90˚, and 0˚.
N
Whenever you press the ► button, it rotates by 90˚, 180˚, 270˚, and 0˚.
N
If you have select “Zoom”, the “Rotate” deactivated.
N
Zoom
You can magnify photos saved on a USB memory device. (x1 → x2 → x4)
To move the enlarged photo image, press the ENTER
N
E
button, then
press the ▲/▼/◄/► buttons. Note that when the enlarged picture
is smaller than the original screen size, the location change function
doesn’t work.
The enlarged le is not saved.
N
Slide Show Speed
You can select the slide show speed.
You can select the Slide Show speed only during a slide show.
N
You can also change the speed of the Slide Show by pressing the
N
Background Music → On/Off
π
(REW) or µ (FF) button during the Slide Show.
If you set “Background Music” to On, the background music will be played when viewing photos one by one or in a Slide Show.
If you set “Background Music” to On, a screen appears immediately where you can set the Background Music.
To use this feature, there must be music and photo les stored on the USB device.
Background Music Setting
You can select background music when watching a SlideShow.
If you turn off the “Background Music”, even if the “Background Music Settings” have been set up, the background music
N
will not be played.
Loading music les is needed to change BGM mode. Play music les in music category to load.
N
BGM Mode → Mood/Selected File/Shufe
•
BGM Mood → Energetic/Rhythmical/Sad/Exciting/Calm
•
If you set “BGM Mode” to “Mood”, you can select a mood.
N
You cannot select a mood not part of the music les on the USB memory device.
N
Select Music File
•
If you set “BGM Mode” to “Selected File”, you can select a music le.
N
Picture Setting/Sound Setting
Refer to page 39.
Information
The photo le information is displayed.
Remove Safely
You can remove the device safely from the TV.
Tools
Stop Slide Show
Rotate
Zoom
Slide Show Speed : Normal
Background Music : Off
Background Music Setting
Picture Setting
Sound Setting
Information
U
Move E Enter e Exit
Page 36

Using and Sorting the Music List
You can sort music les in the Music List by a particular standard.
1. Press the ▲ or ▼ button to select a sorting standard in the Music list.
Music les are sorted according to the newly selected sorting standard.
N
To move to the previous/next group, press the
N
π
(REW) or µ (FF)
button.
2. Press the ENTER
E
button to start playing music in the order selected by
the user.
The information of the music les is automatically set.
N
The “Mood” information extracted from a music le may differ from the
N
expectations of the user.
Music information is automatically set. You can change the “Mood” and
N
“Favourites”.
Music les for which information cannot be displayed are set to “Unclassied”.
N
If there is no title information for a music le, the lename is displayed.
N
If no information is available for the Genre, Artist, Album, or Year, the corresponding item is displayed as blank.
N
Sorting Standard for the Music List
Title: It sorts the Music titles in symbol/Number/alphabet/special order, and shows the music file.
Artist: It sorts the music file by artist in symbol/Number/alphabet/special order.
Mood: It sorts music files by the mood. You can change the music mood information.
“Mood” options: Energetic, Rhythmical, Sad, Exciting, Calm, Unclassied
N
Genre: It sorts music files by the genre.
Folder: It sorts music files by the folder. If there are many folders in USB, the files are shown in order in each folder.
The music file in the Root folder is shown first and the others are shown in alphabetical order by name.
Preference: It sorts music files by preference (Favourites). You can change the music files preferences.
Changing the Favourites setting
N
Select the desired music le in the Music list, then press the Green button repeatedly until the desired setting appears.
To change the information of multiple les, select les by pressing the yellow button.
N
“Favourites” options:
N
★ ★ ★, ★ ★ ★, ★ ★ ★, ★ ★ ★
Music
Thanks
Jee
Album 1
2005
Pop
Energetic ★ ★ ★
Preference
Title
Artist
SUM
I Love You
Darby
Album 2
2005
Pop
Sad ★ ★ ★
F G H I J L P S T V
▲
Device
Favorites Setting
Select
Better than yesterday
Catherine
Album 3
2005
Pop
Calm ★ ★ ★
Jump
Option
Music List Option Menu
Play Current Group: Using this menu, you can only play music files in
the currently selected sorting group.
Delete: Using this menu, you can delete the selected music files.
Change Group: You can change the mood information of music files.
The group information of the current file is updated and the file is
moved to the new group.
To change the information of multiple les, select les by pressing the
N
yellow button.
Information: The music file information including the name, the size, the
date modified and the path is displayed.
You can view the information of music les during a SlideShow using
N
the same procedures.
Alternatively, select a music le from the music list and press the INFO
O
button to view the information.
Remove Safely: You can remove the device safely from the TV.
Music
Thanks
Jee
Album 1
2005
Pop
Sad ★ ★ ★
Artist
Mood
Genre
Device
SUM
I Love You
Darby
Album 2
2005
Pop
Sad ★ ★ ★
Rhythmical Sad Exciting Calm ...
▲
Favorites Setting
Play Current Group
Delete
Change Group
Information
Exciting ★ ★ ★
Select
Jump
Better than yesterday
Catherine
Album 3
2005
Pop
▼
Option
English - 4
Page 37

English -
Playing a Music
Playing a music le
1. Pressing the ◄ or ► button to select a music le to be played,
2. Press the
N
∂
(Play)/ENTERE button.
This menu only shows les with the MP3 le extension. Files with other
le extensions are not displayed, even if they are saved on the same
USB device.
N
π
(REW) or µ (FF) buttons do not function during play.
N
The selected le is displayed at the top with its playing time.
N
To adjust the music volume, press the volume button on the remote
control. To mute the sound, press the MUTE button on the remote
control.
N
The playing duration of a music le may be displayed as ‘00:00:00’ if its playing time information is not found at the start of
the le.
N
Music Play Control Buttons
E
ENTER
∂
∑
N
Music function information icon
Play/Pauses the music le.
Play the music le TOOLS Run various functions from the Music menus.
Pause the music le
∫
Exit play mode and return to the music list.
When all music les in the folder (or the selected le) are repeated. “Repeat Mode” is “On”.
When all music les in the folder (or the selected le) are played once. “Repeat Mode” is “Off”.
Playing the music group
1. Press the ▲ or ▼ button to select a sorting standard.
(“Title”, “Artist”, “Mood”, “Genre”, “Folder”, “Preference”)
2. Press the
3. Press the TOOLS button.
4. Press the ▲ or ▼ button to select “Play Current Group”, then press the ENTER
N
π
(REW) or µ (FF) button to select the desired group.
E
The music les in the sorting group including the selected le are played.
7/14 00:01:15 00:05:41
I Love You
SUM
Pause Previous Next Option Return
button.
Playing the selected music les
1. Press the ◄ or ► button to select the desired music le in the music list.
2. Press the yellow button. Repeat the above operation to select multiple music les.
c
N
The
mark appears to the left of the selected music le.
3. Press the
N
∂
(Play)/ENTERE button.
Only the selected le is played.
Music Play Option Menu
Repeat Mode → On/Off
You can play music les repeatedly.
Picture Setting/Sound Setting
Refer to page 39.
Information
The music le information is displayed.
Remove Safely
You can remove the device safely from the TV.
Tools
Repeat Mode
◄ On ►
Picture Setting
Sound Setting
Information
Remove Safely
U
Move L Adjust e Exit
Page 38

Using and Sorting the Movie List
You can sort movies in the Movie List by a particular standard.
1. Press the ▲ or ▼ button to select a sorting standard in the Movie list.
N
The movie les are sorted according to the newly selected sorting
Movie
standard.
N
To move to the previous/next group, press the
π
(REW) or µ (FF)
button.
2. Press the
selected by the user.
N
N
∂
(Play)/ENTERE button to play the movie in the order
The movies are sorted according to the newly selected sorting standard.
Movie information is automatically set. You can change the “Favourites”.
SUM
Preference
Title
Timeline
Sorting Standard for the Movie List
Title
It sorts and displays the Movie titles in symbol/Number/alphabet/special order.
Timeline
It sorts and shows movies by date. It sorts by year and month from the earliest movie.
Folder
If there are many folders in USB, the movies les are shown in order in each folder. The movie le in the Root folder is shown
rst and the others are shown in alphabetical order by name.
Preference
It sorts movies by preference. (Favourites) You can change the movie preferences.
Changing the Favourites setting
N
Select the desired movie le in the movie list, then press the Green button repeatedly until the desired setting appears.
“Favourites” options:
N
★ ★ ★, ★ ★ ★, ★ ★ ★, ★ ★ ★
movie_1.jpg
Date : Jan.01.2008
Folder : movie-folder
Favourites :
★ ★ ★
SYMBOL
A M
□
Device
ENG
▲
Favourites Setting
Select
Jump
Option
Movie List Option Menu
Play Current Group
Using this menu, you can only play movie les in the currently selected
sorting group.
Delete
Using this menu, you can delete the selected movie les.
Information
The movie le information including the name, the size, the date modied
and the path is displayed.
Alternatively, select a movie le from the movie list and press the INFO
N
button to view the information.
Remove Safely
You can remove the device safely from the TV.
Movie
Preference
SUM
movie_1.jpg
Date : Jan.01.2008
Folder : movie-folder
Favourites :
★ ★ ★
SYMBOL
A M
Title
Timeline
□
Device
ENG
▲
Favourites Setting
Play Current Group
Delete
Information
Remove Safely
Select
Jump
Option
English -
Page 39

English -
Playing a Movie File
Playing a movie le
1. Pressing the ◄ or ► button to select a movie to be played,
2. Press the
N
N
N
N
N
N
N
∂
(Play)/ENTERE button.
The selected le is played.
The selected le is displayed at the top with its playing time.
The playing duration of a movie le may be displayed as ‘00:00:00’ if its
playing time information is not found at the start of the le.
You can watch exciting gaming multimedia les, but the gaming function
is not supported.
Movie doesn’t support subtitles. (for example, not support smi, srt and
sub les, etc and not support subtitles included in movie les)
Supported Video Formats
Container Type
Video Codec Type Resolution (Max) Frame Rate
Video Codec
XviD 720 x 576
avi
MPEG2 720 x 576
H.264 HP 1920 x 1088
MPEG-4 ASP 720 x 576
mp4
H.264 HP 1920 x 1088 24/25/30
MPEG-4 ASP 720 x 576 24/25/30
PS MPEG2 1920 x 1088 24/25/30
TS MPEG2 1920 x 1088 24/25/30
Video Play Control Buttons
ENTER
∂
∑
∫
E
Play/Pause the movie le
Play the movie le
Pause the movie le
Exit play mode and return to the movie list.
TOOLS Run various functions from the movie menus.
◄/► Skip forwards or backwards through the movie le in 20 second intervals.
1/5 00:00:48 00:23:05
ABC.avi
E
SUM
Pause -20sec +20sec Option
24/25/30
Return
Audio codec
AC3, MPEG1 (Layer
1, 2, 3), PCM
ADPCM (MS, IMA),
AAC LC
AC3, MPEG1 (Layer
1, 2, 3), LPCM
AC3, MPEG1 (Layer
1, 2, 3), LPCM
N
Movie function information icon
When all movie les in the folder (or the selected le) are repeated.
“Repeat Mode” is “On”.
When all movie les in the folder (or the selected le) are played once.
“Repeat Mode” is “Off”.
Playing the movie group
1. Press the ▲ or ▼ button to select a sorting standard. (“Title”, “Timeline”, “Folder”, “Preference”)
2. Press the π (REW) or µ (FF) button to select the desired group.
3. Press the TOOLS button.
4. Press the ▲ or ▼ button to select “Play Current Group”, then press the ENTER
E
button.
Page 40

Playing the selected movie les
1. Press the ◄ or ► button to select the desired movie le in the movie list.
2. Press the yellow button. Repeat the above operation to select multiple movie les.
The cmark appears to the left of the selected movie le.
N
3. Press the ∂ (Play)/ENTER
N
Only the selected le is played.
E
button.
Playing movie continuously
If you exit playing movie, playing it continuously later is possible.
With “Play continuously” function, you can watch movie without watching again from beginning or bothering searching.
1. Select movie le you want to Play continuously by pressing ◄ or ► button from the Movie List.
2. Press the ∂ (Play)/ENTER
E
button.
3. Select play continuously by pressing Blue button.
Movie will begin to play from where it was stopped being played.
N
If “Cont. movie play help” function was set “On”, a pop-up message will appear when you play movie le you want to Play
N
continuously. (Refer to page 39)
4. To exit “WISELINK Pro” mode, press the W.LINK button on the remote control.
Movie Play Option Menu
Repeat Mode
You can play the movie repeatedly.
Picture Setting/Sound Setting
Refer to page 39.
Picture Size
Fit: Play video at the TV screen size.
•
Original: Play video at the original size.
•
Information
The movie le information is displayed.
Remove Safely
You can remove the device safely from the TV.
Tools
Repeat Mode ◄ On ►
Picture Setting
Sound Setting
Picture Size : Fit
Information
Safe Remove
U
Move L Adjust e Exit
Deleting the Photo/Music/Movie File
1. Press the ◄ or ► button to select the desired le in the Photo/Music/Movie
list.
To delete multiple les, select les by pressing the yellow button.
N
2. Press the TOOLS button.
3. Press the ▲ or ▼ button to select “Delete” (or “Delete selected File”), then
press the ENTER
4. Press the ◄ or ► button to select “OK”, then press the ENTER
The le is deleted.
N
When a read-only le is deleted, the “This File is read-only le. Delete
N
it?” message appear.
Read-only les among multiple les cannot be deleted.
N
If you select “Cancel”, the deletion is cancelled.
N
While removing les, don’t remove the USB memory device.
N
You cannot remove the PTP-connected digital camera picture les.
N
You cannot recover deleted Photo/music/movie les.
N
E
button.
English -
E
button.
Photo
Preference
Monthly
SUM
image_1.jpg
Month : Jan
Date :
Jan.01.2008
Color : Gray
Composition :
Folder : P-other
Favourites :
★ ★ ★
Jan Nov
Timeline
Device
Favourites Setting
Slide Show
Play Current Group
Delete
Information
▼
▲
Select
Jump
Option
Page 41

English -
Picture/Music Settings Using WISELINK Pro
While a slideshow, music or movie is being played, you can set the picture and sound.
Picture Setting
1. Press the TOOLS button while a slideshow, music or movie is being played.
2. Press the ▲ or ▼ button to select “Picture Setting”.
3. Press the ◄ or ► button to select the “Picture Mode” (“Dynamic”,
“Standard”, or “Movie”).
4. Press the ▲ or ▼ button to move to an item. (“Contrast”, “Brightness”,
“Color”, “Dynamic Contrast”, “Black Adjust”, or “Reset”)
Select “Reset” to initialize the picture settings.
N
5. Press the ◄ or ► button to adjust the settings.
For more information on the picture settings, refer to pages 13~16.
N
Sound Setting
1. Press the TOOLS button while a slideshow, music or movie is being played.
2. Press the ▲ or ▼ button to select “Sound Setting”.
3. Press the ◄ or ► button to select the “Sound Mode”. (“Standard”, “Music”,
“Movie”, “Speech”, or “Custom”)
4. Press the ▲ or ▼ button to move to an item.
Select “Reset” to initialize the sound settings.
N
5. Press the ◄ or ► button to adjust the settings.
For more information on the sound settings, refer to page 18.
N
Picture Setting
Picture Mode ◄ Standard ►
Contrast : 95
Brightness : 40
Color : 50
Dynamic Contrast : Low
Black Adjust : Low
Reset
U
Move L Adjust E Enter R Return
Sound Setting
Sound Mode ◄ Custom ►
Balance : L50 R50
100Hz : 0
300Hz : 0
1KHz : 0
3KHz : 0
10KHz : 0
Reset
U
Move L Adjust E Enter R Return
Using the Setup Menu
Setup displays the user settings of the WISELINK Pro menu.
1. Press the W.LINK button on the remote control to display the WISELINK Pro
menu.
2. Press the ◄ or ► button to select “Setup”, then press the ENTER
button.
3. Press the ▲ or ▼ button to select the desired option.
4.
Press the ◄ or ► button to select the option, then press the ENTER
button.
To exit WISELINK Pro mode, press the W.LINK button on the remote
N
control.
Slide Show Speed → Fast/Slow/Normal
Select to control the slide show speed.
Music Repeat Mode → On/Off
Select to repeatedly play music les.
Movie Repeat Mode → On/Off
Select to repeatedly play movie les.
Cont. movie play help → On/Off
Select to display the help pop-up message for continuous movie playback.
Screen Saver Run Time → 1 min/3 min/5 min
Select to set the waiting time before the screen saver appears.
Information
Select to viewing the information of the connected device.
Remove Safely
You can remove the device safely from the TV.
E
E
WISELINK Pro
Photo
SUM
Setup
SUM
Music Setup
Slide Show Speed ◄ Normal ►
Music Repeat Mode : On
Movie Repeat Mode : On
Cont. movie play help : On
Screen Saver Run Time : 3 min
Information
Remove Safely
SUM
SETUP
Movie
Device Move Adjust Return
851.98MB/995.00MB Free
Device e Exit
Page 42

WISELINK Pro-DLNA
Setting the DLNA Network
DLNA allows you to watch videos and pictures saved on your PC on your TV through a network connection in Wiselink Pro mode.
This removes the need to copy them to a USB storage device and then connect the device to your TV. To use DLNA, the TV must
be connected to the network and the DLNA application must be installed on your PC.
Network Connections Diagram
PC
LAN
LAN
TV
External Modem
(ADSL/VDSL/Cable TV)
2
1. Connect the [LAN] port on the rear panel of the TV to the external modem with a LAN Cable.
2. Connect the PC to which the “DLNA PC Share Manager” programme will be installed and the external modem using a LAN
cable.
3. Connect the LAN port on the wall and the external modem with a Modem Cable.
You can connect the TV to the PC directly without connecting it through a Sharer(Router).
N
Connecting to the Network
1. When connecting to the network is complete, set up the network on the TV.
The rst 3 parts of the subnet address of the TV and the PC IP addresses should be the same and only the last part (the
N
host address) should be changed. (e.g. IP Address: 123.456.789.**)
2. Run a “Network Test” to check the network settings.
Installing the DLNA Application
To play content on the PC on the TV, you have to rst install the application.
System Requirements
1. Insert the Programme CD supplied with this TV into your PC.
2. 20MB of free hard disk space is needed for the programme installation.
If you share les, up to 20MB of hard disk drive space is required for each 100 les.
N
If you cancel le sharing, the hard disk drive space used for the thumbnail information is also freed.
N
Supported Formats
1. Image: JPEG (jpg, jpeg)
2. Audio: MP3 (mp3)
3. Video: MPEG1(mpg, mpeg), MPEG2 PS/TS(mpg, mpeg, trp, ts, tp), divx(mpg, mpeg, avi), MPEG4/H.264 (mpg, mpeg)
English - 40
Page 43

English - 4
Install the application
1. Run the Setup.exe le on the Programme CD supplied with the product.
Alternatively, you can download the le from www.samsung.com.
N
2. Install the SAMSUNG PC Share Manager as shown in the gures below.
► ►
► ►
►
3. When the installation is complete, the PC Share Manager icon appears on your Desktop.
N
Double-click the icon to run the programme.
Page 44

Using the DLNA Application
The Programme Screen Layout
2 4
1. Menus: The following application menus are provided : “File”, “Share”, “Server”, and “Help”.
2. Click to share the selected PC server folder.
3. Click to cancel sharing.
4. Click to refresh the PC folder and les.
5. Click to synchronize the share status.
6. The folders and les of the PC to be shared are listed.
7. Folders shared by the user are listed.
File
❑
Property: Shows information on the selected file or folder.
Method : Select a le or folder and select the “File” menu and then select the “Property” sub-menu.
-
Method 2: Select a le or folder, right-click over the selected le or folder and then select “Property” from the pop-up menu.
-
<Method
Exit: Exits the DLNA application.
> <Method 2>
Name Modied
Name
Name
If you select “Exit” without applying the changes after changing the shared status, a message will appear asking if you want to
apply the changed settings to the PC. Select “Yes” to apply the changes and exit the application.
Name
Yes No
English - 42
Page 45

English - 4
Share
❑
Sharing a Folder
You can share a folder from your PC to the TV. The maximum number of folders that can be shared is 32.
Your PC will operate as a server to the TV.
N
Method
-
-
: Select a folder in “My Computer”, select the “Share” menu and then select the “Share Folder” sub-menu.
Method 2: Select a folder in “My Computer”, right-click over the selected folder and then select “Share Folder” from the pop-
up menu.
: Locate the mouse pointer over a folder in the “My Computer” folder list in the left pane and drag&drop the folder
Method
-
into the Shared Folders pane. If a message appears asking you to conrm the shared folder
<Method > <Method 2> <Method
, select “Yes”.
>
Name Modied
Cancelling a Shared Folder
Name Modied
Name Modied
Yes No
You can cancel a shared folder on your PC. Select a folder from the “Shared Folder” pane and select “Unshare Folder”.
Method : Select a folder from the “Shared Folder” pane, select the “Share” menu and then select “Unshare Folder”.
-
Method 2: Select a folder from the “Shared Folder” pane, right-click over the selected folder and then select “Unshare
-
Folder” from the pop-up menu.
Method
-
: Locate the mouse pointer over a folder in the “Shared Folder” pane and drag&drop the folder into the “My
Computer” pane. If a message appears asking you to conrm the cancelation, select “Yes”.
<Method
Applying the Current Settings
> <Method 2> <Method
Name Modied
Name Modied
>
Name Modied
Yes No
Perform this when synchronization is necessary due to a new shared folder or canceling a shared folder. The “Set Changed
State” menu applies changes to shared folders to the data saved with the PC share programme.
Since applying changes to the internal data is a time-consuming process, this function enables users to apply changes to the
data only when required.
Until the “Set Changed State” menu is selected, the changed state of the shared folder is not applied to the server
.
Changes to the shared folders are not applied to your PC until you select the “Set Changed State” menu.
Method
-
-
: Select the “Share” menu and select the “Refresh DB” sub-menu.
Method 2: Click the “Set Changed State” icon.
<Method
> <Method 2>
Name Modied
Name
Page 46

Setting the Access Permission
To enable the TV to nd your PC, the TV must be set to “Set Device Policy” in the Access Permission Settings window. In
addition, the PC server and the TV must be on the same subnet.
Method: Select the “Share” menu and select “Set Device Policy”. Rejected items are represented in gray. You can change
-
the access permissions by using the Allow “Accept” / “Deny” button. To delete an item, select the item and select “Delete
Item”.
Server
❑
Server
You can run or stop using your PC as a server.
Run DLNA Digital Media Server when Windows Starts
You can determine whether to start the PC server automatically when Windows starts.
Change server name
You can rename the PC server. Enter a new name and click “OK”. The new name will appear at the top right of the window
and will appear on the TV.
Name Modied
Name Modied
Help
❑
Version
The programme version information message box appears.
Name Modied
Name
English - 44
Page 47

English - 4
Using the DLNA Function
Using the DLNA Menu
DLNA (Digital Living Network Alliance) enables content saved on a DLNA server
(usually your PC) connected to your TV or over a network to be played.
Wiselink Pro enables playing content saved on a USB memory device connected
to the TV, while DLNA enables playing content saved on a DLNA server (your
PC) connected to your TV or over the network. The procedures to use the
content are the same as those for WISELINK Pro.
If you install the PC share manager programme supplied with the TV onto a PC,
you can have the PC perform the role of a DLNA server over the network.
1. Press the W.LINK button on the remote control to display the “DLNA” menu.
Press the SOURCE button on the remote control repeatedly to select
O
“DLNA”, then press the ENTER
2. Press the ◄ or ►button to select an icon (Photo, Music, Movie, Setup), then
press the ENTER
To exit “DLNA” mode, press the W.LINK button on the remote control.
N
Photo
❑
Photo List option menu
E
button.
E
button.
Sorting Photo List/Viewing the Information/Rotating the Photo le/Viewing a Slide Show
During a Slide Show option menu
Play & Pause/Slide Show Speed/Zoom/Rotate
Music
❑
Music List option menu
Sorting Music List/Viewing the Information/Playing a music le
Music Play Option Menu
Play & Pause/Repeat Mode
WISELINK Pro
SUM
Photo
PHOTO
Music Setup
Movie
Device e Exit
DLNA : Server
Movie
❑
Movie List option menu
Sorting Movie List/Viewing the Information/Playing a Movie le
Movie Play Option Menu
Play & Pause/Repeat Mode
Setup
❑
Slide Show Speed/Music Repeat Mode/Movie Repeat Mode/Screen Saver Run Time/Information
DLNA does not support the following functions.
N
The Background Music and Background Music Setting functions.
-
Sorting les by preference in the Photo, Music, and Movie folders.
-
The Change Group Info function.
-
The Delete function.
-
The Safe Remove function.
-
The π (REW)/µ (FF) button functions while a movie is playing.
-
Function to watch continuously when playing movie.
-
The Skip (◄/► button) or Pause function may not work while a movie is playing for the DLNA
N
depending on the corresponding content information.
N
The playing time may not be displayed while a movie is playing.
of other manufacturers,
Page 48

Content Library
Activating the Content Library
The “Content Library” enables you to view or play the built-in contents on the TV
or stored on your USB device. The Delete, Move and Update functions will not
work with the built-in content on the TV.
1. Press the MENU button. Press the ▲ or ▼ button to select “Application”,
then press the ENTER
2. Press the ▲ or ▼ button to select “Content Library”, then press the
E
ENTER
N
Press the CONTENT button on the remote control to display the “Content
O
button.
The “Content Library” main menu is displayed.
Library” main menu.
E
button.
WISELINK Pro
Application
Anynet+ (HDMI-CEC)
Content Library ►
InfoLive
Product Guide
3. Press the ◄ or ► button to select an icon (Gallery, Cooking, Game,
Children, Fitness), then press the ENTER
The selected item will be run.
N
Refer to the explanation for the button in the display when the user uses
N
E
button.
the button while content is running.
Content Library
Gallery
Cooking
Setup
Gallery
Game Children Fitness
R
USB
Returne
Exit
Button Operations
Wheel (▲/▼/◄/►) Move the cursor and select an item.
ENTER
E
Select the currently selected item.
RETURN Return to the previous menu.
EXIT Stop the current function and return to the “Content Library” main menu.
>/<
P
, PRE-CH
Stop Content Library mode and Returns to TV mode.
Colour button Button that provide functions are described on the corresponding page.
– = +
You can control the volume of the played content.
CONTENT Exit Content Library mode.
N
If you press the Volume or MUTE button, no OSD is displayed, but the function operates accordingly.
Content Library contains text, graphics, images, multimedia, and other materials for informational and promotional purposes
only. Materials in Content Library has been modied and keeps being revised and updated. The Materials in the Content Library
may not be suitable for all audiences.
Information in the Content Library is provided “as is.” Although the information provided to you in the Content Library is obtained
or complied from sources we believe to be reliable, Samsung cannot and does not guarantee the accuracy
, validity, timeliness
or completeness of any information or data made available to you for any particular purpose. Under no circumstances, including
negligence, shall Samsung be held liable, whether in contract or tort, for any direct, indirect, incidental, special or consequential
damages, attorney fees, expenses, or any other damages whatsoever arising out of, or in connection with, any information
contained in, or the use of, the Content Library, even if advised of the possibility of such damages.
English - 4
Page 49

English - 4
Using the Content Library
Gallery
❑
Art/Relaxation/Party:
various atmospheres. Using the Gallery function of the TV, you can change your home atmosphere.
Press the yellow button to playback all imageries.
N
There is default music for each for the “Art”, “Relaxation”, and “Party” options.
N
Press INFO button to see the credit and detail information in English for the imagery. Press INFO button again or press ►
N
button for the credit information to go away (currently, the credit supports English only.)
The copyrights of the “Gallery” contents and all issues related to them are reserved by Gallery Player, Inc.
N
For additional “Gallery” contents, check for information through www.samsung.com. Please refer to the “Using Additional
N
Content Using External USB Memory Storage” section (page 48) to see how to play additional imagery
Cooking
❑
Starters/Main Courses/Desserts:
contents which give you great ideas for meals.
The recipes introduced in the “Cooking” contents on the Samsung TV are based on recipes published by Anness
N
Publishing.
The copyrights of the “Cooking” contents and all issues related to them are reserved by Practical Pictures.
N
Game
❑
Dynamic Bowling/Minimini Cook:
For the buttons used in the games, refer to the directions on the screen.
N
For the 2 embedded games, the copyrights are reserved by each of the corresponding game providers and all issues
N
related to copyrights are reserved by the corresponding game providers.
More detail instruction on how to play a game is given at the beginning of each game page.
N
Children
❑
Story/Song/Play:
and games with the Boowa and Kwala characters.
The copyrights of the “Children” contents and issues related to them are reserved by UpToTen.
N
This function plays a SlideShow with high resolution images and background music and produces
.
You can view various recipes that you can then easily follow step by step. Enjoy these
This category provides entertainment games for the whole family.
This is educational and interactive content that children can watch repeatedly. Enjoy existing stories, songs
Fitness
❑
Basic Stretches/Massage:
that can be enjoyed by the whole family.
This is benecial health management content that provides stretching and massage exercises that can be enjoyed by the
N
whole family. The “Basic Stretches” contents for the Samsung TV are based on the book Stretching by Suzanne Martin
which is published by DK and the “Massage” contents are based on the books published by Anness Publishing.
The copyrights to “Basic Stretches” are reserved by the DK Publishing Company. The copyrights to the “Massage” content
N
are reserved by Practical Pictures. All issues related to copyrights are reserved by the corresponding company.
Using the Remote Control Button in Fitness menu
Button Operations
Wheel (◄/►) View to previous step/View to next step
E
ENTER
Screen Saver Run Time → Off / 4 hour / hour / 0 hour
❑
Select to set the waiting time before the screen saver appears.
Press the yellow button to select “Setup” in the “Content Library” main menu.
This is benecial health management content that provides stretching and massage exercises
Play or pause (in Basic and Advanced Stretches)
Page 50

Using Additional Content Using External USB Memory Storage
You can download contents onto a USB memory device and play them on your TV. (The contents on the external USB device are
played directly without being copied to the built-in Flash memory of the TV.)
Playing and Exiting New Content
1. Press the Red button in the “Content Library” main menu.
The USB Browser main screen is displayed.
N
A list of les saved on the USB device is displayed.
N
2. Press the ▲ or ▼ button to move to the le (or folder) you want to play.
Press the ENTER
The selected content is played.
N
Not support game program.
N
The use of contents is the same as in using the TV memory contents.
N
To return to the USB browser main screen, press the EXIT button.
N
To exit “Content Library” mode, press the P>/< button on the remote
N
E
button.
control.
“Content Library” only supports USB Mass Storage Class devices
N
(MSC). MSC is a Mass Storage Class Bulk-Only Transport device.
Examples of MSC are Thumb drives and Flash Card Readers (Both
USB HDD and HUB are not supported.)
Content Library
Gallery
Cooking
Content Library
Cooking
Game Children Fitness
Setup
USB
USB
Cooking
Gallery
Fitness
Children
Gallery
R
Returne
Exit
1/1 >>
<<
Downloading New Contents
New content other than the built-in contents will be provided via the Samsung.
com website with or without charge.
Downloading Content
1. Visit the www.samsung.com website and open the Content Library page.
2. Enter the product number (UDN, Unique Device Number) when it is asked.
3. Select a content item in the Contents Download page.
4. Download the contents onto the USB memory device.
“Content Library” only supports USB Mass Storage Class devices (MSC). MSC is a Mass Storage Class Bulk-Only
N
Transport device. Examples of MSC are Thumb drives and Flash Card Readers (Both USB HDD and HUB are not
supported.)
5. Go to “Content Library” main menu by pressing CONTENT button or choosing “Content Library”
6. Plug the USB memory into USB port on the side of the TV.
Finding a product number (Unique Device Number, UDN)
1. Insert the USB memory into the USB port on the side of the TV.
2. In the USB Browser main screen, press the Green button (Show UDN).
3. The 18-digit number on the screen is the product code.
Provided Content
Additional contents are available on www.samsung.com.
TV Memory
Show UDNR
▼ ▲
Return
English - 4
Page 51

About Anynet
+
Connecting Anynet+ Devices
Anynet+ is a function that enables you to control all connected Samsung devices that support Anynet+ with your Samsung TV’s
remote.
The Anynet+ system can be used only with Samsung devices that have the Anynet+ feature. To be sure your Samsung device has
this feature, check if there is an Anynet+ logo on it.
To connect to a TV
TV
Anynet+ Device
HDMI .
Cable
Anynet+ Device 2 Anynet+ Device Anynet+ Device 4
HDMI .
Cable
HDMI .
Cable
HDMI .
Cable
1. Connect the [HDMI 1], [HDMI 2], [HDMI 3] or [HDMI 4] jack on the TV and the HDMI OUT jack of the corresponding Anynet+
device using an HDMI cable.
To connect to Home Theater
TV
Home Theater
Optical
Cable
HDMI . Cable
Anynet+ Device 2 Anynet+ Device Anynet+ Device 4
HDMI .
Cable
HDMI .
Cable
HDMI .
Cable
Anynet+ Device
HDMI .
Cable
1. Connect the [HDMI 1], [HDMI 2], [HDMI 3] or [HDMI 4] jack on the TV and the HDMI OUT jack of the corresponding Anynet+
device using an HDMI cable.
2. Connect the HDMI IN jack of the home theater and the HDMI OUT jack of the corresponding Anynet+ device using an HDMI
cable.
Connect the Optical cable between the Digital Audio Out (Optical) jack on your TV and the Digital Audio Input on the Home
N
Theater.
When following the connection above, the Optical jack only outputs 2 channel audio.
N
You will only hear sound from the Home
Theater’s Front Left and Right speakers and the subwoofer. If you want to hear 5.1 channel audio, connect the Digital Audio
Out (Optical) jack on the DVD player or Cable/Satellite Box (ie Anynet Device 1 or 2) directly to the Ampli er or Home Theater,
not the TV.
N
Connect only one Home Theater.
N
You can connect an Anynet+ device using the HDMI 1.3 cable. Some HDMI cables may not support Anynet+ functions.
N
Anynet+ works when the AV device supporting Anynet+ is in the Standby or On status.
N
Anynet+ supports up to 12 AV devices in total. Note that you can connect up to 3 devices of the same type.
English - 4
Page 52

Setting Up Anynet+
Anynet+(HDMI-CEC)
❑
“Tools → Anynet+(HDMI-CEC)” performs the same function.
Setup
Anynet+(HDMI-CEC) → Off / On: To use the Anynet+ Function, Anynet+
•
(HDMI-CEC) must be set to On.
When the “Anynet+ (HDMI-CEC)” function is disabled, all the Anynet+
N
related operations are deactivated.
Auto Turn Off → No / Yes: Setting an Anynet+ Device to turn Off
•
Automatically when the TV is Turned Off
The active source on the TV remote must be set to TV to use the
N
Anynet+ function.
If you set “Auto Turn Off” to “Yes”, connected external devices are also
N
turned off when the TV is turned off. If an external device is still recording,
it may or may not turn off.
Application
WISELINK Pro
Anynet+ (HDMI-CEC) ►
Content Library
InfoLive
Product Guide
Device List
Setup
U
Move E Enter R Return
Set up
Anynet+ (HDMI-CEC) : ON
Auto Turn Off : Yes
U
Move E Enter R Return
Off
On
Scanning and Switching between Anynet+ Devices
1. Press the TOOLS button. Press the ENTERE button to select “Anynet+
(HDMI-CEC)”.
2. Press the ▲ or ▼ button to select “Device List”, then press the ENTER
E
button
Anynet+ devices connected to the TV are listed. If you cannot nd a device
N
you want, press the red button to scan for devices.
Only when you set “Anynet+ (HDMI-CEC)” to On in the “Setup” menu, the
N
“Device List” menu appears.
3. Press the ▲ or ▼ button to select to a particular device and press the
E
ENTER
Switching to the selected devices may take up to 2 minutes. You cannot cancel the operation during the switching operation.
N
The time required to scan for devices is determined by the number of connected devices.
N
When the device scan is complete, the number of devices found are not displayed.
N
Although the TV automatically searches the device list when the TV is turned on via the power button, devices connected to
N
button. It is switched to the selected device.
the TV when the TV is on or under some conditions are not automatically displayed in the device list. Press the red button to
search for the connected device.
If you have selected external input mode by pressing the SOURCE button, you cannot use the Anynet+ function. Make sure to
N
switch to an Anynet+ device by using the “Device List”.
View TV
Device List
Recording
: DVDR
DVDR Operation
Receiver :
Setup
On
U
Move E Enter R Return
English - 0
Page 53

English -
Anynet+ Menu
The Anynet+ menu changes depending on the type and status of the Anynet+ devices connected to the TV.
Anynet+ Menu Description
View TV Anynet+ mode changes to TV broadcast mode.
Device List Shows the Anynet+ device list.
(device_name) Menu Shows the connected device menus. E.g. If a DVD recorder is connected, the disc menu of
the DVD recorder will appear.
(device_name) Operation Shows the play menu of the connected device. E.g. If a DVD recorder is connected, the play
menu of the DVD recorder will appear.
Record: (*recorder) Starts recording immediately using the recorder. (This is only available for devices that
support the recording function.)
Stop Recording: (*recorder) Stops recording.
Receiver Sound is played through the receiver.
N
If more than one recording device is connected, they are displayed as (*recorder) and if only one recording device is
connected, it will be represented as (*device_name).
TV Remote Control Buttons Available in Anynet+ Mode
Device Type Operating Status Available Buttons
After switching to the device, when
the menu of the corresponding
Anynet+ Device
device is displayed on the screen.
After switching to the device, while
playing a le
Device with builtin Tuner
After switching to the device, when
you are watching a TV programme
Audio Device When Receiver is activated Volume / MUTE button
The Anynet+ function only works when the active source on the TV remote control is set to TV.
N
The
N
∏
button works only while in the recordable state.
N
You cannot control Anynet+ devices using the buttons on the TV. You can control Anynet+ devices only using the TV remote
control.
N
The TV remote control may not work under certain conditions. In this case, reselect the Anynet+ device.
N
The Anynet+ functions do not operate with other manufacturers’ products.
N
The
π, µ
operations may differ depending on the device.
Numeric buttons
E
▲/▼/◄/►/wheel/ ENTER
buttons
Colour buttons / EXIT button
π
(Backward search) / µ(Forward search) ∫(Stop) / ∂(Play) /
∑
(Pause)
>
/ P < button
P
Recording
You can make a recording of a TV programme using a Samsung recorder.
1. Press the TOOLS button. Press the ENTER
(HDMI-CEC)”.
2. Press the ▲ or ▼ button to select “Recording: (device_name)”, then press the
E
ENTER
N
button. Recording begins.
When there is more than one recording device
When multiple recording devices are connected, the recording devices are
listed. Press the ▲ or ▼ button to select a recording device and press the
E
ENTER
N
When the recording device is not displayed
button. Recording begins.
Select “Device List” and press the red button to search devices.
3. Press the EXIT button to exit.
N
You can record the source streams by selecting “Recording: (device_name)”.
N
Pressing the
∏
button will record whatever you are currently watching. If you are watching video from another device, the
video from the device is recorded.
N
Before recording, check whether the antenna jack is properly connected to the recording device.
antenna to a recording device, refer to the recording device’s users manual.
E
button to select “Anynet+
View TV
Device List
Recording
DVDR Operation
Receiver :
Setup
: DVDR
On
U
Move E Enter R Return
To properly connect an
Page 54

Listening through a Receiver (Home theater)
You can listen to sound through a receiver instead of the TV speaker.
E
1. Press the TOOLS button. Press the ENTER
(HDMI-CEC)”.
2. Press the ▲ or ▼ button to select “Receiver”. Press the ◄ or ► button to select
“On” or “Off”.
3. Press the EXIT button to exit.
If your receiver supports audio only, it may not appear in the device list.
N
The receiver will work when you have properly connected the Optical IN jack of
N
button to select “Anynet+
View TV
Device List
Recording
: DVDR
DVDR Operation
Receiver ◄
Setup
U
On ►
Move L Adjust R Return
the receiver to the Optical Out jack of the TV.
When the receiver (home theater) is set to On, you can hear sound output from the
N
TV’s Optical jack. When the TV is
displaying a DTV(air) signal, the TV will send out 5.1 channel sound to the Home theater receiver. When the source is a digital
component such as a DVD and is connected to the TV via HDMI, only 2 channel sound will be heard from the Home Theater
receiver.
N
When using the WISELINK Pro feature, sound may not output properly through the receiver
N
When listening through the receiver, there are restrictions for using the PIP and audio-related menus.
N
If there is a power interruption to the TV when the “Receiver” is set to “On” (by disconnecting the power cord or a power
.
failure), the “Select Speaker” may be set to “External Speaker” when you turn the TV on again. (see page 19)
Troubleshooting for Anynet+
Symptom Solution
Anynet+ does not work. Check if the device is an Anynet+ device. The Anynet+ system supports Anynet+ devices only.
I want to start Anynet+. Check if the Anynet+ device is properly connected to the TV and check if the Anynet+ (HDMI-
I want to exit Anynet+. Select View TV in the Anynet+ menu.
The message ‘Connecting
to Anynet+ device...’
appears on the screen.
The Anynet+ device does
not play.
The connected device is
not displayed.
The TV programme cannot
be recorded.
The TV sound is not output
through the receiver.
•
•
Connect only one receiver (home theater).
•
Check if the Anynet+ device power cord is properly connected.
•
Check the Anynet+ device’s Video/Audio/HDMI 1.3 cable connections.
•
Check whether Anynet+ (HDMI-CEC) is set to On in the Anynet+ setup menu.
•
Check whether the TV remote control is in TV mode.
•
Check whether it is Anynet+ exclusive remote control.
•
Anynet+ doesn’t work in certain situations. (Searching channels, Operating WISELINK Pro, Plug
& Play, etc.)
•
When connecting or removing the HDMI 1.3 cable, please make sure to search devices again or
turn your TV off and on again.
•
Check if the Anynet+ Function of Anynet+ device is set on.
•
CEC) is set to On in the Anynet+ Setup menu.
Press the TV button on the TV remote control to switch to TV. Then press the TOOLS button to
•
show the Anynet+ menu and select a menu you want.
•
Press the SOURCE button on the TV remote control and select a device other than Anynet+
•
devices.
>/<
Press P
•
and PRE-CH to change the TV mode. (Note that the channel button operates
only when a tuner-embedded Anynet+ device is not connected.)
You cannot use the remote control when you are conguring Anynet+ or switching to a view
•
mode.
Use the remote control when the Anynet+ setting or switching to view mode is complete.
•
You cannot use the play function when Plug & Play is in progress.
Check whether or not the device supports Anynet+ functions.
•
Check whether or not the HDMI 1.3 cable is properly connected.
•
Check whether Anynet+ (HDMI-CEC) is set to On in the Anynet+ setup menu.
•
Search Anynet+ devices again.
•
You can connect an Anynet+ device using the HDMI 1.3 cable only. Some HDMI cables may not
•
support Anynet+ functions.
•
If it is terminated by an abnormal situation such as disconnecting the HDMI cable or power cord
or a power failure, please repeat the device scan.
Check whether the antenna jack on the recording device is properly connected.
Connect the optical cable between TV and the receiver.
English - 2
Page 55

English -
InfoLive
Using InfoLive
You can view news, stock market and weather information services using SAMSUNG’s InfoLive service.
Set up the network. (Refer to pages 24~25)
N
The InfoLive service is only provided for England, France, Germany, Italy
N
Spain, Norway, Sweden, Denmark, Finland and Russia. The countries are
determined by the “Country” setting congured during Plug & Play.
,
Anynet+ (HDMI-CEC)
Application
Content Library
InfoLive ►
Product Guide
1. Press the MENU button to display the menu. Press the ▲ or ▼ button to select
“Application”, then press the ENTER
2. Press the ▲ or ▼ button to select “InfoLive”, then press the ENTER
E
button.
E
button.
Weather L Move R Return
3. Press the ◄ or ► button to select a service (“Weather”, “News”, “Stocks” or
“Setup”) and press the ENTERE button.
You can select and view more than one service at the same time only for
N
‘News (without detailed information)’, ‘Weather-Today’s Weather’, and
‘Stocks-Favorite Stocks, Market Summary’.
Press the INFO.L button on the remote control to display the “InfoLive” menu.
O
ALL THE MATERIALS AVAILABLE THROUGH InfoLive [‘InfoLive CONTENT’] ARE THE PROPERTY OF THE ORIGINATOR OF THE CONTENT
[‘CONTENT OWNER’] AND/OR ITS AFFILIATES OR LICENSORS, AND ARE PROTECTED BY COPYRIGHT, TRADEMARK, AND OTHER
INTELLECTUAL PROPERTY LAWS. ALL InfoLive CONTENT IS PROVIDED SOLELY FOR YOUR PERSONAL NONCOMMERCIAL USE. YOU
MAY NOT USE ANY InfoLive CONTENT IN A MANNER THAT CONSTITUTES AN INFRINGEMENT OF THE CONTENT OWNERS’ RIGHTS
OR THAT HAS NOT BEEN AUTHORIZED BY THE CONTENT OWNER. MORE SPECIFICALLY, UNLESS EXPLICITLY AUTHORIZED IN THIS
DISCLAIMER OR BY THE CONTENT OWNER, YOU MAY NOT MODIFY, COPY, REPRODUCE, REPUBLISH, UPLOAD, POST, TRANSMIT,
TRANSLATE, SELL, CREATE DERIVATIVE WORKS, EXPLOIT, OR DISTRIBUTE IN ANY MANNER OR MEDIUM (INCLUDING BY EMAIL OR
OTHER ELECTRONIC MEANS) ANY InfoLive CONTENT OR ANY OTHER MATERIAL FROM THE InfoLive SERVICE. CONTENT PROVIDED
CONTENT OWNERS IN CONNECTION WITH THE InfoLive SERVICE MAY BE TIME-DELAYED AS SPECIFIED BY THE CONTENT OWNER
AND/OR ITS AFFILIATES.
InfoLive IS PROVIDED THROUGH AGREEMENT BETWEEN SAMSUNG AND THE CONTENT OWNER. InfoLive MAY BE TERMINATED OR
INTERUPTED AT ANY TIME BY EITHER SAMSUNG OR THE CONTENT PROVIDER OR THROUGH TERMINATION OF THE AGREEMENT
BETWEEN THEM. UNDER NO CIRCUMSTANCES, INCLUDING NEGLIGENCE, SHALL SAMSUNG OR THE CONTENT PROVIDER
BE HELD LIABLE, WHETHER IN CONTRACT OR TORT, FOR ANY DIRECT, INDIRECT, INCIDENTAL, SPECIAL OR CONSEQUENTIAL
DAMAGES, ATTORNEY FEES, EXPENSES, OR ANY OTHER DAMAGES WHATSOEVER ARISING OUT OF, OR IN CONNECTION WITH,
SUCH TERMINATION OR INTERUPTION. SINCE CONTENT TRANSMITTED VIA InfoLive IS RECEIVED BY MEANS OF NETWORKS AND
TRANSMISSION FACILITIES OVER WHICH SAMSUNG HAS NO CONTROL, SAMSUNG EXPRESSLY DISCLAIMS ANY RESPONSIBILITY
OR LIABILITY FOR ANY INTERRUPTION OR SUSPENSION OF INTERLINK SERVICE OR FOR THE ABSENCE OF CONTENT RESULTING
THEREFROM.
INFORMATION IN THE InfoLive IS PROVIDED “AS IS,” AND CONSEQUENTLY, SAMSUNG DOES NOT WARRANT THE INFORMATION SO
PROVIDED, EITHER EXPRESSLY OR IMPLIEDLY, FOR ANY PARTICULAR PURPOSE; AND SAMSUNG EXPRESSLY DISCLAIMS ANY
IMPLIED WARRANTIES, INCLUDING BUT NOT LIMITED TO, WARRANTIES OF MERCHANTABILITY OR FITNESS FOR A PARTICULAR
PURPOSE. SAMSUNG DOES NOT GUARANTEE THE ACCURACY, VALIDITY, TIMELINESS, LEGALITY, OR COMPLETENESS OF ANY
INFORMATION OR DATA MADE AVAILABLE THROUGH InfoLive FOR ANY PARTICULAR PURPOSE AND UNDER NO CIRCUMSTANCES,
INCLUDING NEGLIGENCE, SHALL SAMSUNG BE HELD LIABLE, WHETHER IN CONTRACT OR TORT, FOR ANY DIRECT, INDIRECT,
INCIDENTAL, SPECIAL OR CONSEQUENTIAL DAMAGES, ATTORNEY FEES, EXPENSES, OR ANY OTHER DAMAGES WHATSOEVER
ARISING OUT OF, OR IN CONNECTION WITH, ANY INFORMATION CONTAINED IN, OR AS A RESULT OF THE USE OF InfoLive BY YOU OR
ANY THIRD PARTY, EVEN IF ADVISED OF THE POSSIBILITY OF SUCH DAMAGES.
Page 56

Using the Weather Service
1. Press the INFO.L button on the remote control.
2. Press the ◄ or ► button to move to the “Weather” service and press the
Set up the Region
3. Press the Yellow button. Press the ▲ or ▼ button to select the initial letter
4. Press the ► button to move to the Category. Press the ▲ or ▼ button to select
Set up Weather Option
5. Press the Red button while using the service to change the “Weather” service
6. Press ▲ or ▼ button and select “Weather” option.
N
N
E
ENTER
button.
(A~Z) of the location you want, then press the ENTERE button.
the location you want and press the ENTER
You can check the weather of the selected region.
N
E
button.
option.
To exit the ”Weather” service, press the Blue button.
To exit the “InfoLive” service, press the EXIT button.
Weather L Move R Return
London
59°F
Options Location Close
Weather L Move R Return
Options
Today’s Weather
Weekly Forecast
ESelect RReturn
London
59°F
Using the News Service
The news provider may be changed in the future.
1. Press the INFO.L button on the remote control.
2. Press the ◄ or ► button to move to the “News” service and press the
3. Press the Red button while using the service to change the “News” service
4. Press ▲ or ▼ button and select “News” service option.
N
N
N
E
ENTER
N
N
button.
Press the ENTER
E
button to view the detailed article.
Press the ◄ or ► button to view the previous or next article.
Option.
The News service option changes depending on the provided web service.
To exit the ”News” service, press the Blue button.
To exit the “InfoLive” service, press the EXIT button.
News L Move R Return
News L Move R Return
GM turns 100 with focus on future
E Enter
Options
Options
Politics
Business
News
Entertainment
Sports
ESelect RReturn
GM turns 100 with focus on future
Close
English - 4
Page 57

English -
Using the Stock Service
1. Press the INFO.L button on the remote control.
2. Press the ◄ or ► button to move to the “Stocks” service and press the
E
ENTER
button.
3. Press the Red button while using the service to change the “Stocks” service
option.
4. Press ▲ or ▼ button and select “Stocks” service option, then press the
E
ENTER
Stock quotes delayed at least 20 minutes. The time delay differs according to
N
button.
the region.
To exit the “Stocks” service, press the Blue button.
N
To exit the “InfoLive” service, press the EXIT button.
N
Favorite Stocks: The Favorite stock information is displayed. You can set
up the Favorite Stocks by pressing the Yellow button.
Market Summary: Major indices are toggled and the entire index, amount
of up or down, and % are displayed.
Stocks & News: The Favorite stock information and major indices and
Financial news are displayed.
Setting Favorite Stocks Items
1. Press the Yellow button when “Favorite Stocks” or “Stocks & News” is selected.
2. Press the ▲ or ▼ button to select the exchange market you want and press the
3. Press the ◄, ►, ▲ or ▼ button to enter stock symbol. Then press the
4. Press the ENTER
E
ENTER
N
ENTER
N
N
button.
The Set “Favorite Stocks” screen appears.
E
button.
The search result appears.
Select the symbol input after checking the symbol contents of the
newspaper or website.
E
button to set a favourite stock.
The selected stock is set as a Favorite Stock.
N
To delete your favourite stocks
N
Press the Green button when “Favorite Stocks” or “Stocks & News” is
selected. Press the ▲ or ▼ button to select a stocks, then press the
E
ENTER
button. The c mark will disappear to the left of the stock
name. Press the RETURN button.
Stocks L Move R Return
Stocks L Move R Return
Stocks L Move R Return
Favorite Stocks
Market Summary
Stocks & News
ESelect RReturn
Favorite Stocks
Market Summary
Stocks & News
ESelect RReturn
Set Favorite Stocks
Select the exchange market.
O London Stock Exchange
Options
Options
12/24 Mon 15:00 updated
AAA $ 0.000,00 ▲ $ 0.000,00 +00,00%
BBB $ 0.000,00
CCC $ 0.000,00
DDD $ 0.000,00
12/24 Mon 15:00 updated
AAA $ 0.000,00 ▲ $ 0.000,00 +00,00%
BBB $ 0.000,00
CCC $ 0.000,00
DDD $ 0.000,00
12/24 Mon 15:00 updated
AAA $ 0.000,00 ▲ $ 0.000,00 +00,00%
BBB $ 0.000,00
CCC $ 0.000,00
DDD $ 0.000,00
▼
$ 0.000,00 - 00,00%
▲
$ 0.000,00 +00,00%
▲
$ 0.000,00 +00,00%
Quotes delayed at least 20 minutes.
Brought to you by Yahoo! France.
Options Favorite Close
▼
$ 0.000,00 - 00,00%
▲
$ 0.000,00 +00,00%
▲
$ 0.000,00 +00,00%
Quotes delayed at least 20 minutes.
Brought to you by Yahoo! France.
▼
$ 0.000,00 - 00,00%
▲
$ 0.000,00 +00,00%
▲
$ 0.000,00 +00,00%
Quotes delayed at least 20 minutes.
Brought to you by Yahoo! France.
U
U
U
1/2
1/2
1/2
▲
▼
E Select R Return
Set Favorite Stocks
Enter stock symbol.
U Adjust L Move E Select R Return
Page 58

InfoLive Setup
1. Press the INFO.L button on the remote control.
2. Press the ◄ or ► button to select “Setup”, then press the ENTER
3. Press the ▲ or ▼ button to select the desired option. (“Auto Launch”, “Display
Time”, “Font Size”, “Background Colour”, “InfoLive’s Position”)
4. Press the ▲ or ▼ button to select an option, then press the ENTER
Auto Launch: Determines whether to launch InfoLive automatically when the
•
TV is turned on. You can select either “Off” or “On”.
Display Time: Determines the time to display the news service on the TV
•
screen. You can select “4 hours”, “8 hours”, “10 hours”, or “Always”.
Font Size: You can select letter size “Standard” or “Large” through InfoLive
•
service.
Background Colour: You can select the Background Colour of InfoLive
•
service. The colour is applied to each service, option and setup window.
InfoLive’s Position: You can set the position of each InfoLive service on
•
the screen. You can select from six preset InfoLive positions (“Position
1”~“Position 6”).
To exit the “Setup” service, press the RETURN button.
N
To exit the “InfoLive” service, press the EXIT button.
N
InfoLive’s Position
E
E
button.
button.
Setup L Move R Return
InfoLive’s Setup
Auto Launch : Off
Display Time : 4 hours
Font Size : Standard
Background Colour : Black
InfoLive’s Position
U
Move E Select R Return
Stocks
Weather News
Position 1 Position 2 Position 3
Stocks
Weather News
Position 4 Position 5 Position 6
News
News
Weather
Stocks
Weather
Stocks
Stocks
Stocks
News
Weather
News
Weather
English -
Page 59

English -
Recommendations for Use
Teletext Feature
Most television stations provide written information services via Teletext. The index page of the teletext service gives you
information on how to use the service. In addition, you can select various options to suit your requirements by using the remote
control buttons.
For teletext information to be displayed correctly, channel reception must be stable. Otherwise, information may be missing or
N
some pages may not be displayed.
1
: (exit)
Exit from the teletext display.
2
6 (index)
Used to display the index (contents) page at any time while you are viewing
teletext.
3
8 (store)
Used to store the teletext pages.
4
4 (size)
Press to display the double-size letters in the upper half of the screen. For lower
half of the screen, press it again. To display normal screen, press it once again.
5
5 (reveal)
Used to display the hidden text (answers to quiz games, for example). To display
normal screen, press it again.
6
/ (teletext on/mix)
Press to activate teletext mode after selecting the channel providing the teletext
service. Press it twice to overlap the teletext with the current broadcasting screen.
7
1 (sub-page)
Used to display the available sub-page.
8
2 (page up)
Used to display the next teletext page.
9
3 (page down)
Used to display the previous teletext page.
0
0 (mode)
Press to select the teletext mode (LIST/FLOF). If you press it in the LIST mode,
it switches into the List save mode. In the List save mode, you can save teletext
page into list using the 8(store) button.
!
9 (hold)
Used to hold the display on a given page if the selected page is linked with several
secondary pages which follow on automatically. To resume, press it again.
@
7 (cancel)
Used to display the broadcast when searching for a page.
#
Colour buttons (red/green/yellow/blue)
If the FASTEXT system is used by a broadcasting company, the different topics
covered on a teletext page are colour-coded and can be selected by pressing the
coloured buttons. Press one of them corresponding to the required. The page is
displayed with other coloured information that can be selected in the same way. To
display the previous or next page, press the corresponding coloured button.
You can change teletext pages by pressing the numeric buttons on the remote
N
control.
1
2
3
4
5
6
7
8
9
0
!
@
#
Page 60

The teletext pages are organized according to six categories:
Part Contents
A Selected page number.
B Broadcasting channel identity.
C Current page number or search indications.
D Date and time.
E Text.
F Status information.
FASTEXT information.
N
Teletext information is often divided between several pages displayed in sequence,
which can be accessed by:
-
Entering the page number
-
Selecting a title in a list
-
Selecting a coloured heading (FASTEXT system)
O
Press the TV button to exit from the teletext display.
Auto Wall-Mount Adjustment (Sold separately) (depending on the model)
Once the auto wall mount is installed, your TV’s position can be easily adjusted.
TV Rear Panel
SERVICE Cable (Not supplied)
Entering the menu
1. Press the ▲, ▼, ◄ or ► button on your remote control.
The Wall Mount Adjustment screen is displayed.
N
If the Auto Wall-Mount screen is not displayed when clicking on a direction
N
button while watching your TV, use the menu to display that screen.
Press the MENU button to display the menu. Press the ▲ or ▼ button to
-
select “Setup”, then press the ENTER
-
Press the ▲ or ▼ button to select “Wall-Mount Adjustment”, then press
the ENTER
E
button.
E
button.
Auto Wall-Mount
Preference
Digital Text : Enable
Setup
Wall-Mount Adjustment
Melody : Off
Entertainment : Off
Energy Saving : Off
PIP
Software Upgrade
Common Interface
►
English -
Page 61

English -
Remembering the Position
2. Adjust to the desired position using the ▲,▼,◄,► buttons.
If you press an arrow button when no OSD is displayed on the TV screen,
N
the Adjustment screen appears.
Press the INFO button to reset. Press the ◄ or ► button to select “Yes”,
N
then press the ENTER
E
button. The position is initialized to the default
setting.
3. Press the blue button. Press the ▲ and ▼ buttons to select a save mode from
either Position 1, Position 2 or Position 3 in order to save the current position.
To not save the current position, press the RETURN button.
N
When selecting a save mode, you cannot use the Colour buttons.
O
4. Press the ENTER
N
When Position1 is selected, the message “Current position saved as Position1” is displayed.
5. Press the ENTER
The saved Position appears on the left side of the OSD.
N
E
button to save.
E
button.
Position 2
Wall-Mount Adjustment
Adjust Save Centre
Moving to the remembered position
1. Complete Step 1 of “Entering the menu”.
2. Pressing a Colour (Red, Green, Yellow) button moves the auto wall mount to
the saved position.
You can move the wall mount to one of the 3 pre-set positions by pressing
N
the Red (Position 1), Green (Position 2) or Yellow (Position 3) buttons.
If you adjust the Position after moving to a pre-set position, the position
N
display will disappear.
For installation, refer to the Installation Manual provided with the wall mount.
N
For product installation and the installation and moving of the wall mount, make sure to consult a specialized installation
N
company.
This installation manual is to be used when attaching the wall mount to a wall. When attaching to other building materials,
N
please contact your nearest dealer.
The auto wall mount will not work when Anynet+ or WISELINK Pro is operating.
N
37, 40 and 46 models are not compatible with the older wall mount model (WMN5090A).
N
Save
Select a mode to save.
Position
Position2
Position
Move Enter Return
Using the Anti-Theft Kensington Lock (depending on the model)
The Kensington Lock is a device used to physically x the system when using it in
a public place. The appearance and locking method may differ from the illustration
depending on the manufacturer. Refer to the manual provided with the Kensington
Lock for proper use. The locking device has to be purchased separately.
Insert the locking device into the Kensington slot on the LCD TV (Figure 1)
1.
and turn it in the locking direction (Figure 2).
2. Connect the Kensington Lock cable.
3. Fix the Kensington Lock to a desk or a heavy stationary object.
The location of the Kensington Lock may be different depending on its model.
N
<Optional>
Cable
Figure 2
Figure
Page 62

Securing the TV to the Wall
Caution: Pulling, pushing, or climbing on the TV may cause the TV to fall. In particular, ensure your children do not
hang over or destabilize the TV; doing so may cause the TV to tip over, causing serious injuries or death. Follow
all safety precautions provided on the included Safety Flyer. For added stability, install the anti-fall device for safety
purposes, as follows.
Wall
To avoid the TV from falling:
1.
Put the screws into the clamps and rmly fasten them onto the wall. Conrm that the screws have been rmly installed
onto the wall.
You may need additional material such as an anchor depending on the type of wall.
N
Since the necessary clamps, screws, and string are not supplied, please purchase these additionally
N
2.
Remove the screws from the center back of the TV, put the screws into the clamps, and then fasten the screws onto the
TV again.
Screws may not be supplied with the product. In this case, please purchase the screws of the following specications.
N
Screw Specications
N
For a 17 ~ 29 Inch LCD TV: M4 X 15 / For a 32 ~ 40 Inch LCD TV: M6 X 15
-
3.
Connect the clamps xed onto the TV and the clamps xed onto the wall with a strong string and then tie the string tightly.
Install the TV near to the wall so that it does not fall backwards.
N
It is safe to connect the string so that the clamps xed on the wall are equal to or lower than the clamps xed on the
N
Untie the string before moving the TV.
N
4.
Verify all connections are properly secured. Periodically check connections for any sign of fatigue for failure. If you have
any doubt about the security of your connections, contact a professional installer.
.
Wall
TV.
English - 0
Page 63

English -
Troubleshooting: Before Contacting Service Personnel
No sound or picture Check that the mains lead has been connected to a wall socket.
Normal picture but no sound Check the volume.
Screen is black and power
indicator light blinks steadily
No picture or black and white
picture
Sound and picture interference Try to identify the electrical appliance that is affecting the set and move it further away.
Blurred or snowy picture,
distorted sound
Remote control malfunctions Replace the remote control batteries.
‘Check signal cable.’ message is
displayed
On PC mode, ‘Not Supported
Mode.’ message is displayed
The damaged picture appears in
the corner of the screen
The ‘Resets all settings to
the default values.’ message
appears.
You may see small particles if
you look closely at the edge of
the bezel surrounding the TV
screen.
The TFT LCD panel uses a panel consisting of sub pixels (6 220 800) which require sophisticated technology to produce.
However, there may be few bright or dark pixels on the screen. These pixels will have no impact on the performance of the
product.
•
Check that you have pressed the button on your set.
•
Check the picture contrast and brightness settings.
•
Check the volume.
•
•
Check whether the MUTEM button has been pressed on the remote control.
•
Check the “Select Speaker” settings.
•
On your computer check; Power, Signal Cable.
•
The TV is using its power management system.
•
Move the computer’s mouse or press any key on the keyboard.
•
Adjust the colour settings.
•
Check that the broadcast system selected is correct.
•
•
Plug your set into a different mains socket.
•
Check the direction, location and connections of your aerial.
•
This interference is often due to the use of an indoor aerial.
•
•
Clean the upper edge of the remote control (transmission window).
•
Check the battery terminals.
•
Check that the signal cable is rmly connected to the PC or video sources.
•
Check that the PC or video sources are turned on.
•
Check the maximum resolution and the frequency of the video adaptor.
•
Compare these values with the data in the Display Modes.
•
If “Just Scan” is selected in some external devices, the damaged picture may appear in the
corner of the screen. This symptom is caused by external devices, not TV.
This appears when you press and hold the EXIT button for a while. The product settings are
reset to the factory defaults.
This is part of the product’s design and is not a defect.
Page 64

Specications
Model Name LE40AR LE4AR LE2AR
Screen Size
(Diagonal) 40 inches 46 inches 52 inches
PC Resolution
(Optimum) 1920 x 1080 @ 60 Hz 1920 x 1080 @ 60 Hz 1920 x 1080 @ 60 Hz
Sound
Output 10W x 2 10W x 2 10W x 2
Dimensions (WxDxH)
Body
With stand
Weight
With Stand 19 kg 29 kg 37 kg
Environmental
Considerations
Operating Temperature
Operating Humidity
Storage Temperature
Storage Humidity
Stand Swivel
(Left / Right) 0˚
Design and specications are subject to change without prior notice.
N
This device is a Class B digital apparatus.
N
For the power supply and Power Consumption, refer to the label attached to the product.
N
1040 x 85 x 638 mm
1040 x 272 x 686 mm
1172 x 98 x 712 mm
1172 x 300 x 766 mm
10°C to 40°C (50°F to 104°F)
10% to 80%, non-condensing
-20°C to 45°C (-4°F to 113°F)
5% to 95%, non-condensing
1321 x 107 x 805 mm
1321 x 338 x 861 mm
English - 2
Page 65

This page is intentionally left
blank.
Page 66

Цифровое телевещание (DVB-T). Примечание
1. ФУНКЦИИ ЦИФРОВОГО ТЕЛЕВИДЕНИЯ (DVB) ДОСТУПНЫ ТОЛЬКО В ТЕХ СТРАНАХ И РЕГИОНАХ, ГДЕ
ПЕРЕДАЮТСЯ ЦИФРОВЫЕ НАЗЕМНЫЕ СИГНАЛЫ DVB-T (MPEG2 AND MPEG4 AVC). DVB-T – это стандарт
цифрового наземного ТВ-вещания, принятый консорциумом европейских организаций. Узнайте у местного
представителя о наличии услуги DVB-T в вашей местности.
2. Несмотря на то, что данный телевизор поддерживает стандарты DVB-T с [августа 2008 года], компания не гарантирует
совместимость с последующими стандартами цифрового наземного ТВ-вещания DVB-T.
3. Некоторые функции цифрового ТВ могут быть недоступны или работать неправильно в некоторых странах или
регионах.
4. Для получения более подробной информации обратитесь в местный центр по обслуживанию клиентов SAMSUNG.
Связывайтесь с SAMSUNG по всему миру
Если у вас есть предложения или вопросы по продуктам Samsung, связывайтесь с информационным центром Samsung.
(Дополнительные сведения см. на обороте.)
Меры предосторожности при воспроизведении неподвижного изображения.
Неподвижное изображение может серьезно повредить экран телевизора.
Не следует просматривать неподвижное изображение на ЖК экране более двух часов, чтобы не вызвать эффект остаточного
изображения на экране. Подобное остаточное изображение также известно как “выгорание экрана”. Во избежание такого
эффекта уменьшите уровень яркости и контрастности экрана при отображении неподвижных изображений.
Вследствие эксплуатации телевизора с ЖК экраном в формате 4:3 на протяжении долгого времени, слева,
справа и в центре экрана могут появиться следы границ формата, вызванные разницей излучения света в
разных областях экрана. Использование телевизора для воспроизведения DVD-дисков или подключение
игровой приставки может оказать подобное воздействие на экран. Повреждения, вызванные вышеуказанным
эффектом, не подлежат гарантийному ремонту.
Длительное отображение неподвижных изображений, например, при подключении экрана к видеоигре и компьютеру,
может вызвать появление остаточных изображений. Во избежание возникновения подобного эффекта, при отображении
неподвижных изображений уменьшите уровень параметров “яркости” и “контрастности”.
© 2008 Samsung Electronics Co., Ltd. All rights reserved.
Page 67

Содержание
ПОДКЛЮЧЕНИЕ И ПОДГОТОВКА ТЕЛЕВИЗОРА К РАБОТЕ
Список принадлежностей ..................................................2
■
Установка набора для настенного монтажа ....................2
■
Панель управления ...........................................................3
■
Соединительная панель ....................................................4
■
Пульт дистанционного управления ..................................6
■
Установка батарей в пульт дистанционного управления
■
Включение и выключение .................................................7
■
Перевод телевизора в режим ожидания ..........................7
■
Просмотр меню ..................................................................8
■
Использование кнопки TOOLS ..........................................8
■
Использование кнопки-колесика ......................................8
■
Функция Plug & Play ...........................................................9
■
...7
Управление каналами
Сохранение каналов ........................................................9
■
Управление каналами .....................................................12
■
Управление изображением
Изменение и сброс настроек изображения ...................13
■
Просмотр изображений в режиме Изображение в
■
изображении ...................................................................16
Экран компьютера ...........................................................17
■
Настройка подключения телевизора к компьютеру ......18
■
Управление звуком
Изменение стандарта звука ............................................18
■
Выбор режима звука ........................................................20
■
Описание функций
Меню настройки ...............................................................20
■
Установка времени ..........................................................23
■
Сетевое соединение ........................................................24
■
Настройка сети ................................................................26
■
Список источн./Редактир. назв. ......................................27
■
Руководство .....................................................................28
■
WISELINK Pro
Подключение устройства USB ........................................28
■
Использование функции WISELINK Pro .........................29
■
Использование и сортировка списка фотографий ........31
■
Просмотр фотографий или слайд-шоу .........................32
■
Использование и сортировка списка музыки ................34
■
Воспроизведение музыки ...............................................35
■
Использование и сортировка списка видео ..................36
■
Воспроизведение видеофайла ......................................37
■
Удаление музыкальных/фото-/видеофайлов ...............38
■
Настройка изображений/музыки с помощью
■
WISELINK Pro ...................................................................39
Использование меню настройки.....................................39
■
WISELINK Pro-DLNA
Настройка сети DLNA ......................................................40
■
Установка приложения DLNA ..........................................40
■
Использование приложения DLNA .................................42
■
Использование функций DLNA .......................................45
■
Библиотека содержимого
Включение библиотеки содержимого .............................46
■
Использование библиотеки содержимого......................47
■
Использование дополнительных материалов с
■
помощью внешнего носителя USB .................................48
О системе Anynet+
Подключение устройств Anynet+ ....................................49
■
Настройка Anynet+ ..........................................................50
■
Сканирование и переключение между устройствами
■
Anynet+ .............................................................................50
Запись ...............................................................................51
■
Прослушивание через ресивер (домашний кинотеатр)
■
Поиск и устранение неисправностей Anynet+ ..............52
■
InfoLive
Использование InfoLive ...................................................53
■
Использование службы Погода ......................................54
■
Использование службы Новости ....................................54
■
Использование службы Акции ........................................55
■
Настройка InfoLive ...........................................................56
■
Рекомендации по эксплуатации
Функция телетекста .........................................................57
■
Регулировка автоматического настенного крепления
■
(продается отдельно) (в зависимости от модели) .........58
Использование замка Kensington для предотвращения
■
кражи (в зависимости от модели) ...................................59
Крепление телевизора на стене .....................................60
■
Поиск и устранение неисправностей: перед
■
обращением в службу технической поддержки ............61
Характеристики ................................................................62
■
Технические характеристики ..........................................63
■
Русский
..52
Символ Нажмите кнопку Примечание Кнопка одного нажатия Кнопка TOOL
N O T
Русский -
Page 68

ПОДКЛЮЧЕНИЕ И ПОДГОТОВКА ТЕЛЕВИЗОРА К РАБОТЕ
Список принадлежностей
Убедитесь, что следующие принадлежности прилагаются к телевизору с ЖК-дисплеем.
Если какой-либо элемент комплекта отсутствует, обратитесь к торговому представителю.
Пульт дистанционного
управления и батареи
(AAA x 2)
Руководство пользователя
•
N
Гарантийный талон / Инструкция по технике безопасности (прилагается не во всех странах)
Кабель питания Крышка-нижняя
Гарантийный талон
•
Компакт-диск с
программой
•
Установка набора для настенного монтажа
С помощью деталей для настенного крепления (продаются отдельно) можно
крепить телевизор на стене.
Для получения дополнительной информации относительно установки
настенного крепления см. инструкции, прилагаемые к деталям для настенного
крепления. Для получения помощи при установке настенного кронштейна
обратитесь к специалисту технической поддержки. Samsung Electronics не
несет ответственности за любые повреждения изделия или травмы, возникшие
в случае самостоятельной установки телевизора покупателем.
Не выполняйте установку набора для настенного монтажа, когда
телевизор включен. Это может привести к травме вследствие поражения
электрическим током.
N
Снимите подставку, закройте отверстие в нижней части заглушкой и закрепите два винта.
Ткань для чистки
Инструкция по технике безопаснос
Русский - 2
Page 69

Русский -
Панель управления
88
4
1
2
3
6
5
7
Цвет и форма устройства могут различаться в зависимости от модели.
N
Кнопки на передней панели
Нажмите каждую из кнопок для
управления.
1
SOURCE
Переключение между всеми доступными источниками
входа. Эта кнопка в экранном меню выполняет
те же функции, что и кнопка ENTERE на пульте
дистанционного управления.
2
MENU
Нажмите для просмотра экранного меню функций
телевизора.
3
– = +
Используется для увеличения или уменьшения
громкости.
Кнопки –
функции, что и кнопки ◄ и ► на пульте дистанционного
управления.
E
=
+ в экранном меню выполняют те же
4
> C/P.P
Используется для смены каналов.
Кнопки
те же функции, что и кнопк ▲ и ▼ на пульте
дистанционного управления.
5
Индикатор питания
Мигает и отключается при включенном питании и горит
в режиме ожидания.
6
P POWER
Используется для включения и выключения питания.
7
Датчик приема сигнала пульта дистанционного
управления
Направляйте пульт дистанционного управления на эту
точку на панели управления телевизора.
8
Громкоговорители
<
>
C/P.P < в экранном меню выполняют
Page 70

Соединительная панель
2 3 4 5
6
7
3
8
9
$
1
0!@#
[Задняя панель телевизора]
Разъем для
шнура питания
Цвет и форма устройства могут различаться в зависимости от модели.
N
При подключении внешнего устройства к телевизору убедитесь, что питание данного устройства выключено.
N
Подключая внешнее устройство, проследите, чтобы цвет соединительного разъема совпадал с цветом кабеля.
N
1
PC IN [PC] / [AUDIO]
-
Подсоединение к разъему видео- и аудиовыхода ПК.
2
COMPONENT IN
-
Подсоедините один конец компонентного видеокабеля (поставляется дополнительно) к компонентному разъему
(‘PR’, ‘PB’, ‘Y’) на задней панели телевизора, а другой конец - к соответствующему компонентному разъему видео
выхода устройства DTV или проигрывателя DVD-дисков.
-
Если требуется подключить к телевизору одновременно видеоприставку и устройство DTV (или проигрыватель
DVD), необходимо подключить видеоприставку к устройству DTV (или проигрывателю DVD), после чего подключить
устройство DTV (или проигрыватель DVD) к компонентному разъему (‘P
-
Разъемы P
-
Соедините с помощью аудиокабелей RCA (поставляется дополнительно) разъемы [R - AUDIO - L], расположенные на
задней панели телевизора, с соответствующими разъемами аудиовыхода устройства DTV или проигрывателю DVD.
3
HDMI IN , HDMI IN 2, HDMI IN , HDMI IN 4
-
Поддерживает AV-устройства с возможностью подключения через интерфейс HDMI (приставки, проигрыватели DVD)
-
При соединении двух устройств с помощью разъема HDMI дополнительный аудиокабель не требуется.
-
При использовании кабеля HDMI/DVI необходимо выполнить подключение к гнезду HDMI IN 2.
N
N
DVI IN(HDMI2) [R-AUDIO-L]
-
DVI и аудиовыходы для подключения внешних устройств.
R
, PB и Y компонентных устройств (DTV или DVD) иногда имеют маркировку Y, B-Y и R-Y или Y, Cb и Cr.
Что такое HDMI?
-
‘High Denition Multimedia interface’ позволяет передавать цифровые видеоданные высокого разрешения и
многоканальные цифровые аудиосигналы.
-
Разъем HDMI/DVI обеспечивает DVI-соединение с дополнительным устройством с помощью соответствующего
кабеля (в комплект не входит). Различие между HDMI и DVI состоит в том, что устройство HDMI меньше
по размеру, оснащено технологией защиты от незаконного копирования HDCP (High Bandwidth Digital Copy
Protection), а также поддерживает многоканальные цифровые аудиосигналы.
На телевизоре может отсутствовать звук, а изображения отображаться с необычными цветами, если к нему
подключены проигрыватели DVD, декодеры кабельного телевидения ил спутниковые ресиверы, поддерживающие
версии HDMI, более ранние, чем 1.3. Если отсутствует звук, когда используется старый кабель HDMI, подключите
кабель HDMI к гнезду HDMI IN 2, а аудиокабели к гнездам DVI IN (HDMI2) [R-AUDIO-L] на задней панели
телевизора. В этом случае обратитесь в компанию, предоставившую DVD-проигрыватель/приемник кабельного
или спутникового телевидения, чтобы узнать версию HDMI, а затем запросите обновление. Кабели HDMI,
отличные от 1.3, могут вызывать дрожание изображения на экране.
R
[Разъемы на боковой панели]
’, ‘PB’, ‘Y’) телевизора.
Русский - 4
Page 71

Русский -
Поддерживаемые режимы для выхода HDMI/DVI или компонентного выхода
N
480i 480p 576i 576p 720p 1080i 1080p
HDMI / DVI 50Гц X X X O O O O
HDMI / DVI 60Гц X O X X O O O
Компонентный O O O O O O O
4
ANT IN
-
Для просмотра телевизионных каналов необходимо, чтобы сигнал поступал от одного из следующих источников:
внешняя антенна, кабельная телевизионная сеть или спутниковая сеть
5
SERVICE
Разъем используется только для ТЕХОБСЛУЖИВАНИЯ.
-
Подсоедините к гнезду на дополнительном настенном кронштейне. Это позволит регулировать угол просмотра
-
телевизора с помощью пульта дистанционного управления.
6
Слот COMMON INTERFACE
-
Если в слот стандартного интерфейса не вставлена карта, при приёме некоторых каналов может появиться надпись
“Зашифрованный сигнал”.
-
Сопровождающая информация, содержащая телефонный номер, идентификационный номер стандартного
интерфейса, идентификационный номер хоста будет выведена на экран через 2-3 минуты после подключения
модуля. Если появится сообщение об ошибке обратитесь к Вашему провайдеру услуг цифрового телевидения.
После завершения конфигурирования информации о каналах на экране отобразится сообщение: “Обновление
-
завершено”, означающее, что список каналов обновлён.
Карту стандартного интерфейса необходимо получить у местного поставщика услуг цифрового телевидения.
N
Извлеките карту стандартного интерфейса, аккуратно придерживая ее, поскольку падение карты может привести к
ее повреждению.
N
Вставьте карту CI-Card в направлении, указанном на ней.
N
Размещение гнезда COMMON INTERFACE может отличаться в зависимости от его модели.
7
WISELINK
Подсоедините запоминающее устройство USB для просмотра фильмов и фотографий, а также для прослушивания музыки.
-
Можно подключиться к беспроводной сети Samsung с помощью адаптера беспроводной локальной сети Samsung (продается отдельно).
-
8
S-VIDEO / VIDEO / R-AUDIO-L
Подключите кабель RCA или S-VIDEO к соответствующему внешнему аудио/видео устройству, например,
-
видеомагнитофону, проигрывателю DVD или видеокамере.
Соедините с помощью аудио кабелей RCA разъемы [R-AUDIO-L] на телевизоре с соответствующими разъемами
-
аудио выхода аудио/видео устройства.
9
гнездо наушников
Можно подключить наушники к выходу наушников на телевизоре. При подключении наушников звук через
-
встроенные громкоговорители выводиться не будет
При подключении к телевизору наушников использование функций звука ограничено.
N
Продолжительное использование наушников с высоким уровнем громкости может привести к нарушениям слуха.
N
При подключении наушников к телевизору звук в динамиках отключается.
N
Громкость наушников и громкость телевизора регулируются отдельно.
N
0
AUDIO OUT [R-AUDIO-L]
Соедините с помощью аудиокабелей RCA разъемы AUDIO OUT [R-AUDIO-L] расположенные на задней панели
-
телевизора, с соответствующими разъемами аудиовыхода усилителя или домашнего кинотеатра с проигрывателем DVD.
!
DIGITAL AUDIO OUT (OPTICAL)
Выполните подключение к цифровому аудиоустройству.
-
При подключении гнезд HDMI IN через гнездо
N
DIGITAL AUDIO OUT (OPTICAL)
на телевизоре выполняется вывод только
двухканального звука. Если требуется 5.1- канальный звук, подключите оптическое гнездо на DVD-проигрывателе или дек одере
кабельного/спутникового телевидения непосредственно к усилителю или с истеме домашнего кинотеатра, а не к телевизору.
@
EXT , EXT 2
Разъем
Видео Аудио (Л/П) RGB Видео + аудио (Л/П)
Вход Выход
EXT 1 O O O Доступен только выход телевизионного сигнала или сигнала DTV.
EXT 2 O O Выходной сигнал, который можно выбрать.
Входные и выходные разъемы для внешних устройств, таких как видеомагнитофон, DVD-проигрыватель, игровая
-
приставка или проигрыватели видеодисков.
#
LAN
Для подключения к сети подсоедините кабель LAN к этому порту.
-
$
Замок Kensington (в зависимости от модели)
Замок Kensington (поставляется дополнительно) - это устройство, используемое для физического закрепления
-
системы, когда оно используется в общественных местах.
Если необходимо использовать блокировочное устройство, обратитесь к продавцу телевизора.
-
Размещение замка Kensington может отличаться в зависимости от его модели.
-
Page 72

Пульт дистанционного управления
Пульт дистанционного управления можно использовать на расстоянии не более 7 метров от телевизора.
N
На работу пульта ДУ может влиять яркий свет.
1
POWER
Кнопка режима ожидания
телевизора.
2
TV
Используется для
непосредственного выбора режима
просмотра телепрограмм.
3
ЦИФРОВЫЕ КНОПКИ
Цифровые кнопки для
непосредственного выбора канала
4
−
Выбор номера канала, состоящего
из одной или нескольких цифр
5 КНОПКИ РЕГУЛИРОВКИ ГРОМКОСТИ
+ : увеличение громкости
– : уменьшение громкости
6
SOURCE
Выбор доступных источников сигнала
7
GUIDE
Отображение электронного
справочника по программам (EPG)
8
TOOLS
Используется для быстрого выбора
часто используемых функций
9
INFO
Просмотр информации о текущей
станции вещания
0
ЦВЕТНЫЕ КНОПКИ
Используйте эти кнопки в списке
каналов и WISELINK Pro и т.д.
@
E.MODE
Нажмите эту кнопку для выбора
дополнительных режимов
отображения и звука для просмотра
спортивных передач, кино и игр.
#
Используйте эти кнопки в режимах
DMA, WISELINK Pro и Anynet+.
(∏: данный пульт дистанционного
управления можно использовать
для управления записью с
помощью устройств записи
Samsung с функцией Anynet+)
$
При каждом нажатии кнопки
ON/OFF @ индикатор
переключается между Вкл. и
Выкл. Когда пульт дистанционного
управления включен, при нажатии
кнопки пульта дистанционного
управления будут подсвечиваться.
% PRE-CH
Предыдущий канал
^ MUTE
Временное выключение звука
&
КНОПКИ КАНАЛОВ
P < : следующий канал
P > : предыдущий канал
* MENU
Отображение главного экранного
меню
(
W.LINK
Данная функция позволяет
просматривать и воспроизводить
фото- и аудиофайлы с внешнего
устройства.
)
RETURN
Возврат к предыдущему меню
a
верхнюю▲/нижнюю▼/левую◄/
правую►/ENTER
Для выбора элементов меню и
изменения значений параметров
нажмите на верхнюю/нижнюю/
левую/правую части кнопкиколесика, а затем Вход. Можно
перемещаться вверх и вниз
по меню, переключать каналы
и регулировать громкость,
поворачивая кнопку-колесико.
b
EXIT
Выход из экранного меню
c DMA
Используется при подключении
устройства SAMSUNG DMA (Digital
Media Adapter) через интерфейс
HDMI и при переключении в
режим DMA (Кнопка DMA является
дополнительной.) Для получения
дополнительной информации об
эксплуатации см. руководство
пользователя DMA. Эта кнопка
доступна, когда для параметра
“Anynet+(HDMI-CEC)” установлено
значение “Вкл.” (см. стр. 50)
d
INFO.L
Нажмите эту кнопку для просмотра
новостей, информации с фондовой
биржи и о прогнозе погоды,
доступных через сеть.
e
SUBT.
Отображение субтитров
f CONTENT
Данная функция позволяет
просматривать “Content Library”.
(см. стр. 46)
Функции телетекста
2
:: выход из режима телетекста
6
0: выбор режима телетекста
(LIST/FLOF)
7
8: сохранение телетекста
8
4: выбор размера телетекста
9
5: открытие телетекста
0
выбор темы Fastext
E
!
/: или выберите Teletext,
Double или Mix.
%
1: дополнительная страница
телетекста
&
2: следующая страница
телетекста
3: предыдущая страница
телетекста
*
6: указатель телетекста
)
9: удержание страницы
телетекста
b
7: отмена телетекста
Русский -
Page 73

Русский -
Установка батарей в пульт дистанционного управления
1. Снимите крышку сзади пульта дистанционного управления вверх, как
показано на рисунке.
2. Установите две батареи размера AAA.
Убедитесь, что полюсы ‘+’ и ‘–’ батареи соответствуют полюсам на
N
рисунке внутри отделения.
3. Закройте крышку.
Если пульт дистанционного управления не используется в течение
N
долгого времени, извлеките батареи и храните их в прохладном сухом
месте.
Если кнопку ON / OFF @ на пульте дистанционного управления
N
установить в положение Вкл., время использования батареи
сократится.
Если пульт дистанционного управления не работает, проверьте
N
следующее:
1. Включен ли телевизор?
2. Правильно ли установлены положительный и отрицательный полюсы
батареи?
3. Не разряжены ли батареи?
4. Возможно, отключено питание или отсоединен кабель питания?
5. Нет ли поблизости люминесцентного излучения или неоновой вывески?
Включение и выключение
Шнур питания подсоединен к соответствующему гнезду на задней панели телевизора.
1. Подключите кабель питания к соответствующему разъему.
На телевизоре загорается индикатор режима ожидания.
N
2. Нажмите кнопку P на телевизоре.
Можно также нажать кнопк POWER
N
телевизор.
Программа, просматриваемая последней, будет выбрана автоматически.
N
3. Нажмите цифровую кнопку (0~9) или кнопку переключения канала (< / >) на пульте дистанционного управления или
4. Чтобы выключить телевизор, еще раз нажмите кнопку POWER
P
>C/P.
N
< телевизоре.
При первом включении телевизора появится меню выбора языка, который будет использоваться для отображения
информации на экране телевизора.
P
или кнопку TV на пульте дистанционного управления, чтобы включить
P
.
Перевод телевизора в режим ожидания
Чтобы уменьшить количество энергии, потребляемой телевизором, можно перевести его в режим ожидания. Режим
ожидания удобно использовать, если необходимо временно прервать просмотр (например, на время обеда).
P
1. Нажмите кнопку POWER
Экран погаснет, и на телевизоре загорится красный индикатор режима ожидания.
N
2. Чтобы снова включить телевизор, повторно нажмите кнопку POWER
увеличения/уменьшения номера канала (< / >).
Не оставляйте телевизор в режиме ожидания надолго (например, уезжая в отпуск). Лучше всего отсоединить
N
кабель питания телевизора и антенну.
на пульте дистанционного управления.
P
, цифровые кнопки (0~9), кнопку TV или кнопку
Page 74

Просмотр меню
1. При включенном питании нажмите кнопку MENU. На экране появится
главное меню. В левой части меню расположены значки: Изображение,
Звук, Канал, Установка, Вход, Приложение.
2. Нажмите кнопку ▲ или ▼ для выбора одного из значков. Чтобы получить
доступ в подменю выбранной пиктограммы, нажмите кнопку ENTER
E
.
3. Чтобы выйти, нажмите кнопку EXIT.
N
Экранные меню закроются приблизительно через минуту.
Использование кнопки TOOLS
С помощью кнопки TOOLS можно быстро и без труда выбрать часто
используемые функции. Меню “Инструменты” изменяется в зависимости от
того, какой режим входящего внешнего сигнала используется при просмотре.
1. Нажмите кнопку TOOLS. Откроется меню “Инструменты”.
2. Нажмите кнопку ▲ или ▼ для выбора меню.
3. Нажмите кнопку ▲ / ▼ / ◄ / ► / ENTER
использовать выбранные элементы. Более подробное описание каждой
функции см. на соответствующей странице.
Anynet+ (HDMI-CEC): см. стр. 50
•
Размер изображения: см. стр. 15
•
Режим иэображения: см. стр. 13
•
Режим звука: см. стр. 18
•
Таймер сна : см. стр. 23
•
SRS TS XT: см. стр. 18
•
Энергосбережение: см. стр. 22
•
Двойной l ll: см. стр. 20
•
PIP : см. стр. 16
•
Автоподстройка: см. стр. 18
•
E
чтобы отобразить, изменить или
Изображение
Режим
:
Подсветка : 7
Контраст : 95
Яркость : 45
Четкость : 50
Цвет : 50
Тон (З / К) : З50 / К50
Установки детализац.
Инструменты
Anynet+ (HDMI-CEC)
Размер изображения
Режим иэображения
Режим звука : Польз.
Таймер сна : Выкл.
SRS TS XT : Выкл.
Энергосбережение : Выкл.
Двойной l ll : Mono
: Шир. aвто
: Стандартный
U
Перем. E Вход e Exit
Стандартный
Использование кнопки-колесика
Для увеличения номера канала поверните колесико по часовой
стрелке во время отображения окна Channel Display. Для уменьшения
номера канала поверните колесико против часовой стрелки.
Для увеличения громкости поверните колесико по часовой стрелке во
время отображения окна управления громкостью. Для уменьшения
громкости поверните колесико против часовой стрелки.
Для перемещения в меню более низкого уровня поверните колесико
по часовой стрелке во время отображения меню Display. Для
перемещения в меню более высокого уровня поверните колесико
против часовой стрелки.
Русский -
Page 75

Русский -
Функция Plug & Play
При первом включении телевизора автоматически и поочередно восстанавливаются основные параметры.
1. Нажмите кнопку POWER на пульте дистанционного управления. На экране
отобразится сообщение “Будут установлены параметры “Язык меню”,
“Демонстрация”, “Каналы” и “Время”.”.
E
2. Нажмите кнопку ENTER
, чтобы на экране отобразилось меню “Выбор
Будут установлены параметры “Язык меню”,
“Демонстрация”, “Каналы” и “Время”.
языка экранного меню.”. Нажмите кнопку ENTERE.
E
3. Выберите язык, нажав кнопку ▲ или ▼. Нажмите кнопку ENTER
для
подтверждения выбора.
4. Нажмите кнопку ◄ или ► для выбора пункта “Демонстрация” или “Домашний”, затем нажмите копку ENTER
Для получения наилучшего изображения в домашних условиях рекомендуется перевести телевизор в режим
N
“Домашний”.
Режим “Демонстрация” предназначен только для точек розничной торговли.
N
Если для устройства случайно выбран режим “Демонстрация” и нужно вернуться в режим “Домашний”
N
(Стандартный): нажмите кнопку регулировки громкости на телевизоре. При отображении экранного меню
громкости нажмите на телевизоре кнопку MENU и удерживайте ее в течение 5 секунд.
5. Нажмите кнопку ENTER
E
. Выберите страну, нажав кнопку ▲ или ▼. Нажмите кнопку ENTERE для подтверждения
вызова.
6. Нажмите кнопку ▲ или ▼ для выбора источника канала для сохранения. Нажмите кнопку ENTER
пункта “Пуск”.
Цифровые и Аналоговые: Цифровые и аналоговые каналы.
N
Цифр.: Цифровые каналы.
Аналоговая: аналоговые каналы.
Поиск каналов начнется и закончится автоматически.
N
Нажмите кнопку ENTER
N
После сохранения всех доступных каналов на экране отобразится меню “Устан. режима Часы”.
N
7. Нажмите кнопку ENTER
N
При выборе пункта “Ручной”, отобразится сообщение “Установка текущей даты и времени.”. (См. стр. 23)
N
При приеме цифрового канала время будет установлено автоматически. Если канал не цифровой, см. стр. 23 для
E
в любой момент времени, чтобы прервать процесс сохранения.
E
. С помощью кнопки ▲ или ▼ выберите пункт “Авто”, затем нажмите кнопку ENTERE.
настройки часов.
8. Отобразится сообщение “Приятного просмотра”. После завершения процедуры нажмите кнопку ENTER
Plug & Play
OK
E
для выбора
E
E Вход
E
.
.
Сброс настроек этой функции...
1. Для отображения меню нажмите кнопку MENU. С помощью кнопки ▲ или ▼
выберите пункт “Установка”, затем нажмите кнопку ENTER
E
2. Нажмите кнопку ENTER
еще раз, чтобы выбрать пункт “Plug & Play”.
E
.
3. Введите 4-значный PIN-код. По умолчанию для телевизора используется
PIN-код ‘0-0-0-0’.
Для получения сведений об изменении PIN-кода см. стр. 20.
N
Функция “Plug & Play” доступна только в режиме TV.
N
Управление каналами
Сохранение каналов
Страна
❑
Аналоговые каналы: Изменение страны для приема аналоговых
каналов.
Цифровые каналы: Изменение страны для цифровых каналов.
Отобразится окно ввода PIN-кода. Введите 4-значный PIN-код.
N
Установка
Plug & Play
Язык : Русский
Время
Выбор
Настр.беспровод.сети
Настройка кабельной сети
Замок
Ввод PIN
Канал
Страна
Автонастройка
Ручная настр.
Полн. руков.
Мини гид
Г
ид по умолч. : Мини гид
Список каналов
ежим каналов : Добавл.каналы
Р
►
сети : Кабель
: Вкл.
►
Page 76

Автонастройка
❑
Можно произвести поиск каналов в доступных частотных диапазонах
(диапазоны частот зависят от страны). Автоматически присвоенные
номера программ могут не соответствовать реальным или желаемым
номерам программ.
Цифровые и Аналоговые: Цифровые и аналоговые каналы.
•
Цифр.: Цифровые каналы.
•
Аналоговая: аналоговые каналы.
•
Сканирование всех каналов действующих телевизионных станций и
N
Точн. настр.
Информ. о сигнале
Channel
УСС : Вкл.
сохранение их в памяти телевизора.
При необходимости остановки выполнения функции Автонастройка
N
нажмите кнопку ENTER
N
Отобразится сообщение “Остановить автонастройку?”.
N
Выберите “Да”, нажав кнопку ◄ или ►, затем нажмите кнопку ENTER
N
При блокировке каналов с помощью функции “Замок” отобразится окно ввода PIN-кода.
Ручная настр.
❑
Сканирование каналов вручную и сохранение их в памяти телевизора.
N
При блокировке каналов с помощью функции “Замок” отобразится окно ввода PIN-кода.
N
Цифровые каналы
E
.
E
.
Сохранение каналов вручную.
Канал: Установка номеров каналов с помощью кнопок ▲, ▼ или цифровых кнопок (0~).
•
Интервал: Установка частоты с помощью цифровых кнопок.
•
Полоса пропуск: Установка полосы пропускания с помощью кнопок ▲, ▼ или цифровых кнопок (0~).
•
После завершения этой процедуры список каналов обновляется.
N
Аналоговые каналы
Сохранение аналоговых каналов вручную.
Прог. (номер программы, присвоенный каналу): Установка номера программы с помощью кнопок ▲, ▼ или
•
цифровых кнопок (0~9).
Сист. цвета → Авто/PAL/SECAM/NTSC4.43: Установка значений цветовой системы помощью кнопки ▲ или ▼.
•
Система звука → BG/DK/I/L: Установка значений звуковой системы с помощью кнопки ▲ или ▼.
•
Канал (если номер сохраняемого канала известен): Нажмите кнопку ▲ или ▼ для выбора “C” (канал с антенны)
•
или “S” (кабельный канал). Нажмите кнопку ►, затем с помощью кнопки ▲, ▼ или цифровых кнопок (0~) выберите
желаемый номер.
Также можно выбрать номер канала непосредственно, нажимая цифровые кнопки (0~).
N
Если слышен странный звук или звук не слышен вообще, еще раз выберите стандарт звука.
N
Поиск (если номера каналов неизвестны): Чтобы начать поиск, нажмите кнопку ▲ или ▼. Тюнер будет вести поиск в
•
диапазоне частот, пока изображение первого канала или выбранного канала не отобразится на экране.
Сохранение (при сохранении канала и соответствующего номера программы): Выберите “ОК”, нажав кнопку
•
E
ENTER
N
.
Режимы каналов
-
P (Режим программы): По окончании настройки всем станциям телевещания в регионе присваиваются номера
программ от P00 до P99: В этом режиме можно выбрать канал, введя присвоенный ему номер программы.
-
C (Режим радиоканалов): В этом режиме можно выбрать канал посредством ввода номера, присвоенного для
конкретной станции.
-
S (Режим кабельных каналов): В этом режиме можно выбрать канал, введя номер, присвоенный каналу
кабельного телевидения.
►
Полн. руков./Мини гид
❑
Данные справочника по программам (EPG) представляются вещательными компаниями. В зависимости от
передаваемой информации по определенному каналу могут отображаться устаревшие сведения по программам или
совсем не отображаться. Данные на экране обновляются автоматически при появлении новой информации.
Для получения подробных сведений об использовании “Полн. руков.” и “Мини гид” см. описание на стр. 11.
N
Для отображения меню гида можно также нажать кнопку GUIDE.
O
(Чтобы настроить “Гид по умолч.”, см. описание.)
Полн. руков:
Отображение информации о программах передач в
ближайший час. Можно настроить отображение сведений о программах в
ближайшие два часа. Для просмотра информации можно выполнять прокрутку вперед и назад.
Мини гид:
Информация о каждой программе отображается на экране Мини гид для текущего канала, начиная с
текущей программы и далее, в соответствии с очередностью по времени начала программ.
Русский - 0
Page 77

Русский -
Гид по умолч.
❑
Мини гид/Полн. руков:
Можно установить отображение “
Мини гид
” или “Полн. руков.” при нажатии кнопки GUIDE на
пульте дистанционного управления.
Список каналов
❑
Для получения подробных сведений об использовании “Список каналов” см. описание на стр. 12~13.
❑
Режим каналов
С помощью кнопок P >/< можно переключать каналы, сохраненные в выбранном списке каналов.
Добавл.каналы: Переключение каналов, сохраненных в списке каналов.
Любимые каналы: Переключение каналов, сохраненных в списке избранных каналов.
Точн. настр.
❑
Если принимается четкий сигнал без помех, то нет необходимости производить точную настройку, т.к. это уже было
выполнено автоматически во время поиска и сохранения каналов. Если сигнал слабый или искаженный, то можно
выполнить точную настройку на принимаемый сигнал канала вручную.
В строке канала справа от номера сохраненного канала, настроенного с помощью функции точной настройки,
N
появится звездочка “*”.
Чтобы сбросить точную настройку, выберите пункт “Сброс”, нажав кнопку ▲ или ▼, а затем кнопку ENTER
N
N
Точную настройку можно производить только для аналоговых каналов.
Информ. о сигнале
❑
Можно получить информацию о состоянии сигнала.
Если сигнал слабый, то появится сообщение “Нет сигнала”.
N
Эту функцию можно выбрать во время просмотра цифрового канала.
N
E
.
УСС → Вкл./Выкл.
❑
Если телевизор работает в области со слабым приемом, с помощью функции УСС (усиление слабого сигнала)
усиливается входящий сигнал.
Эту функцию можно выбрать при просмотре аналоговых каналов.
N
Использование полного руководства/мини-руководства
Полн. руков.
900 f tn
901 ITV Play
902 Kerrang!
903 Kiss
903 oneword
903 Smash Hits!
▼
Часы
DTV Cable 900 f tn 2:10 Tue 1 Jun
Freshmen On Campus
2:00 - 2:30
No Detailed Information
Today 2:00 - 3:00 3:00 - 4:00
Freshmen O..
Street Hypn..
Mint Extra
Loaded
Fresh 40 with Dynamite MC
The Distillery
Smash Hits! Sunday
ИнФормация
No Information
No Information
Kisstory
No Information
Мини гид +24 часа Выход
Требуемая операция... Необходимые действия...
Просмотр программы из списка EPG Выберите программу, нажав кнопку ▲, ▼, ◄, ►.
Закрытие окна гида Нажмите синюю кнопку
Если выбрать следующую программу, она будет включена в расписание, и появится значок часов. При повторном нажатии
кнопки ENTER
E
нажмите кнопку ◄, ► для выбора расписаний каналов; расписание будет отключено, значок часов исчезнет.
Просмотр информации о программе Выберите нужную программу, нажав кнопку ▲, ▼, ◄, ►.
Нажмите кнопку INFO для получения подробной информации. Доступна подробная информация о следующих функциях:
номер канала, время работы, строка состояния, уровень родительского ограничения, качество видео (HD/SD), режимы
звука, субтитры или телетекст, языки субтитров или телетекста, краткое описание выделенной программы. “...”
отображается, если описание слишком длинное.
Переключение между “Мини гид” и “Полн. руков.” Несколько раз нажмите красную кнопку.
В режиме Полн. руков.
быстрая прокрутка назад (24 часа)
быстрая прокрутка вперед (24 часа)
В режиме Мини гид
быстрое отображение следующей страницы.
быстрое отображение предыдущей страницы.
Мини гид DTV Cable 900 f tn
2:00
2:30
▼
5:00
Часы
Freshmen On Campus
Street Hypnosis
Booze Britain
ИнФормация
Выделив нужную программу, нажмите кнопку INFO.
Название программы отображается в верхней части экрана по центру.
Несколько раз нажмите зеленую кнопку.
Несколько раз нажмите желтую кнопку.
Нажмите зеленую кнопку.
Нажмите желтую кнопку.
Полн. руков. След. стр. Выход
Page 78

Управление каналами
С помощью данного меню можно добавлять/удалять или выбирать избранные
каналы, а также использовать руководство по программам цифрового телевещания.
Выберите канал в списке “Все каналы”, “Добавл.каналы” или “Избранное”,
N
нажав кнопку ▲ / ▼, затем нажмите кнопку ENTERE. После этого можно
смотреть выбранный канал.
Все каналы:
Добавл.каналы:
Избранное:
Запрограммированный:
Использование цветных кнопок со списком каналов
N
Красная (Тип канала): Переключение между “ТВ”, “Радио”, “Данн./другое”
-
Отображение всех доступных каналов.
Отображение всех добавленных каналов.
Отображение всех избранных каналов.
Отображение всех сохраненных программ.
Добавл.каналы
и “Bce”.
Зеленая (Увел.): Увеличение или уменьшение номера канала.
-
Желтая (Выбрать): Выбор нескольких списков каналов.
-
TOOLS (Параметр): Отображение меню “Удалить” (или “Добавить”),
-
“Добавить к избранному” (или “Удалить из избранного”), “Блокировка”
(или “Разблокировка”), “Просмотр таймера”, “Изменить название канала”,
“Сортировка”, “Изменение номера канала”, “Выбрать все”, “Отменить
все” или “Автонастройка”. (Меню параметров может отличаться, в
зависимости от ситуации.)
Отображаемые значки состояния каналов
N
Аналоговый канал.
A
Избранный канал.
♥
\
Заблокированный канал.
c
Канал, выбранный с помощью нажатия желтой кнопки.
(
Принимаемая в текущий момент программа.
)
Сохраненная программа.
Меню параметров списка каналов (в меню Все каналы / Добавл.каналы / Избранное)
N
Нажмите кнопку TOOLS, чтобы открыть меню параметров.
N
Элементы меню параметров могут отличаться в зависимости от состояния каналов.
Добавить/Удалить
Можно удалять или добавлять каналы в список для отображения
желаемых каналов.
Все удаленные каналы можно найти в списке “Все каналы”.
N
Каналы, выделенные серым цветом, удалены.
N
Меню “Добавить” отображается только для удаленных каналов.
N
Также можно удалять каналы из списка “Добавл.каналы” или
N
“Избранное”, выполняя описанные выше процедуры.
Добавить к избранному/Удалить из избранного
Часто просматриваемые каналы можно обозначить как избранные.
Для канала, добавленного в список избранного, будет отображаться символ “♥”.
N
Все избранные каналы будут добавлены в список “Избранное”.
N
Блокировка/Разблокировка
Можно заблокировать канал, при этом его нельзя будет выбрать и смотреть. Эта функция доступна, только если для
параметра “Замок” установлено значение “Вкл.”. (см. стр. 20)
Отобразится окно ввода PIN-кода. Введите 4-значный PIN-код.
N
По умолчанию на новом телевизоре установлен PIN-код “0-0-0-0”. Можно изменить PIN-код, выбрав в меню пункт
N
“Изменение PIN”.
Для заблокированного канала будет отображаться символ “\”.
N
Просмотр таймера
Если вы сохранили программу, которую хотите посмотреть, телевизор автоматически переключится на канал
сохраненной программы, содержащийся в списке каналов, даже если вы в текущий момент смотрите другой канал.
Для сохранения программы сначала необходимо установить текущее время. (см. стр. 23)
Можно сохранять программы, транслируемые только на сохраненных в памяти телевизора каналах.
N
Можно установить канал, день, месяц, год, часы и минуты непосредственно с помощью цифровых кнопок на
N
пульте дистанционного управления.
Сохраненные программы будут отображаться в меню “Запрограммированный”.
N
Гид для программ цифровых каналов и сохранение программ для просмотра
N
При просмотре цифрового канала нажмите кнопку ►, чтобы на экране отобразилось окно гида по программам
канала. Можно сохранить программу в соответствии с процедурами, описанными выше.
Русский - 2
Все каналы
Мини гид
Гид по умолч. : Мини гид
Канал
Список каналов
Режим каналов : Добавл.каналы
Точн. настр.
Информ. о сигнале
УСС
: Вкл.
824 UKTV Gold
825 UKTV style
A
C --
A
2 C
A 3 ♥ C
A 4 C
A 5 C
A 6 C
A 7 C
A 8 C
Bce
Тип канала Увел. Выбрать
824 UKTV Gold
825 UKTV style
A
C --
A
2 C
A 3 C
A 4 C
A 5 C
A 6 C
A 7 C
A 8 C
Bce
Тип канала Увел. Выбрать
--
--
--
--
--
--
--
Удалить
Добавить к избранному
--
Блокировка
--
Просмотр таймера
--
Изменить название канала
--
Сортировка
--
--
--
Параметр
▼
Параметр
Page 79

Русский -
Изменить название канала (только для аналоговых каналов)
Можно присваивать каналам имена, которые отображаются на экране при каждом выборе канала.
Имена для цифровых каналов присваиваются автоматически, их нельзя изменять.
N
Изменение номера канала (только для цифровых каналов)
Также можно изменять номера каналов с помощью цифровых кнопок на пульте дистанционного управления.
Сортировка (только для аналоговых каналов)
Эта функция позволяет изменять номера программ сохраненных каналов. Использование этой функции может быть
необходимым после выполнения процедуры автоматического сохранения каналов.
Выбрать все/Отменить все
Выбрать все: Выбор всех каналов в списке каналов.
•
Отменить все: Отмена выбора всех каналов с помощью нажатия желтой кнопки.
•
Можно добавлять / удалять, добавлять / удалять из списка избранного, блокировать / разблокировать несколько
N
каналов одновременно. Выберите нужные каналы и нажмите желтую кнопку, чтобы настроить выбранные каналы
одновременно.
Слева от выбранных каналов отобразится метка c.
N
Для выбранного канала доступна только функция “Отменить все”.
N
Автонастройка
Для получения дополнительной информации о настройке параметров см. стр. 10.
N
При блокировке каналов с помощью функции “Замок” отобразится окно ввода PIN-кода.
N
Меню параметров списка каналов (в меню “Запрограммированный”)
Можно просматривать, изменять или удалять сохраненные программы.
Нажмите кнопку TOOLS, чтобы открыть меню параметров.
N
Изменение инфо: Изменение сохраненных для просмотра программ.
Отмена расписаний: Отмена выбранных для просмотра программ.
ИнФормация: Просмотр выбранных программ. (Также можно изменить
сведения о сохраненной для просмотра программы.)
Выбрать все: Выбор всех сохраненных для просмотра программ.
Запрограммированный
1 / 1 / 2008
13:59 5 TV1 Quincy, M.E
18:59 2 TV3 The Equalizer
20:59 2 TV3 McMillan & Wife
21:59 2 TV3 M.Spillane’s mike Hammer
Bce
Тип канала Увел. Выбрать
Изменение инфо
Отмена расписаний
ИнФормация
Выбрать все
Параметр
ИнФормация
Управление изображением
Изменение и сброс настроек изображения
Режим
❑
Можно выбрать тип изображения для просмотра каналов, который
максимально соответствует вкусам пользователя.
Динам.: Выбор изображения высокой четкости для просмотра в
комнате с ярким освещением.
Стандартный: Выбор оптимального отображения в нормальных
условиях.
Кино: Выбор изображения для просмотра фильмов в темной комнате.
Нажмите кнопку TOOLS для отображения меню “Инструменты”. Также
T
можно выбрать режим отображения, выбрав пункт “Инструменты →
Picture Mode”.
Подсветка/Контраст/Яркость/Четкость/Цвет/Тон(З/К)
❑
Несколько регулируемых параметров телевизора позволяют пользователю
настроить качество изображения.
Подсветка: Регулировка яркости подсветки ЖК-дисплея.
Контраст: Регулировка контрастности изображения.
Яркость: Регулировка яркости изображения.
Изображение
Режим :
Подсветка : 5
Контраст : 95
Яркость : 45
Четкость : 50
Цвет : 50
Тон(З/К) : З50 / К50
Установки детализац.
Цвет : 50
Тон(З/К) : З50 / К50
Изображение
Установки детализац. ►
Параметры изображения
Сброс настроек изображения
Стандартный ►
Page 80

Четкость: Регулировка резкости края изображения.
Цвет: Регулировка насыщенности цвета изображения.
Тон(З/К): Регулировка оттенков изображения.
С начала нужно выбрать режим отображения для регулировки. Отрегулированные значения будут сохранены для
N
каждого режима изображения.
При изменении параметров “Подсветка”, “Контраст”, “Яркость”, “Четкость”, “Цвет” или “Тон(З/К)” экранное меню будет
N
регулироваться в соответствии с выполненными регулировками.
В режимах “Аналог. TV”, “Ext., AV”, “S-Video” в системе PAL функция “Tint” не доступна.
N
В режиме “PC” можно изменять только значения параметров “Подсветка”, “Контраст” и “Яркость”.
N
Можно изменять и сохранять настройки для каждого внешнего устройства, подключенного к входу телевизора.
N
Потребление энергии можно существенно уменьшить, если уменьшить уровень яркости изображения. Это приведет к
N
уменьшению общих расходов.
Установки детализац.
❑
Новые телевизоры Samsung позволяют делать более точные настройки, чем в моделях, выпускавшихся ранее. Для
выполнения более точных настроек см. описание ниже.
Функция “Установки детализац.” доступна в режиме “Стандартный” или “Кино”.
N
В режиме PC можно изменять только параметры “Автоконтраст”, “Гамма” и “Баланс белого” в меню “Установки
N
детализац.”.
Настройка черного → Выкл./Низкий/Средний/Высокий
Для настройки глубины экрана можно выбрать желаемый уровень черного.
Автоконтраст → Выкл./Низкий/Средний/Высокий
Можно настроить оптимальную контрастность экрана.
Гамма
Можно отрегулировать интенсивность главных цветов (красный, зеленый, синий).
Цвет. интревал
Цветовое пространство – это цветовая матрица, состоящая из красного, зеленого и синего цветов. Выберите
предпочитаемое цветовое пространство, чтобы цвета отображались наиболее естественно.
Авто: Автоматическая настройка цветового пространства позволяет установить наиболее естественное
•
отображение цветовых оттенков на основе источников программы.
Исходный: В режиме исходного цветового интервала обеспечивается глубина и насыщенность цветов.
•
Польз.: Настройка цветового диапазона в соответствии с предпочтениями пользователя.
•
Настройка цветового интервала
N
Цвет → Красный/Зеленый /Синий/Желтый/Голубой/Пурпурный
-
Настройка цветового диапазона в соответствии с предпочтениями пользователя. Меню “Цвет” доступно, когда
-
для параметра “Цвет. интревал” установлено значение “Польз.”.
Красный/Зеленый/Синий: В меню “Цвет” можно отрегулировать значения RGB для выбранного цвета.
-
Сброс: Восстановление значений параметров цветового интервала по умолчанию.
-
Баланс белого
Можно отрегулировать цветовую температуру для более естественного отображения цветов.
К: смещ. / З: смещ. / С: смещ. / К: усил. / З: усил. / С: усил.: При изменении значения регулировки изображение на
•
экране будет обновлено.
Сброс. Ранее настроенные установки баланса белого будут заменены на установки по умолчанию.
•
Телесн. оттенок
Можно выделить розовый оттенок изображения.
При изменении значения регулировки изображение на экране будет обновлено.
N
Улучшение кромок → Выкл./Вкл.
Можно выделить границы объекта на изображении.
Сигнал xvYCC → Выкл./Вкл.
При установке параметра “
Вкл.
” для режима xvYCC детализация и цветовое пространство увеличиваются, когда
просмотр фильмов осуществляется из внешнего источника (например, проигрыватель DVD).
Режим “Сигнал xvYCC” доступен, когда для режима изображения выбрано значение “Кино”, а для внешнего
N
источника установлен режим “HDMI” или “Компонентный”.
Если функция “Сигнал xvYCC” включена, режим PIP недоступен.
N
Русский - 4
Page 81

Русский -
Параметры изображения
❑
В режиме PC можно изменять только параметры “Оттенок” и “Разм.” в меню “Параметры изображения”.
N
Оттенок →Хол. 2/Хол. 1/Норм./Теплый1/Теплый2
Можно выбрать оттенок, наилучшим образом отвечающий предпочтениям пользователя.
Установленные значения сохраняются в соответствии с выбранным режимом “Изображение”.
N
“Параметр “Теплый1” или “Теплый2” активен, только если в качестве режима изображения выбран режим “Кино”.
N
Разм.
Можно выбрать размер изображения, который максимально соответствует предпочтениям просмотра.
Нажмите кнопку TOOLS для отображения меню “Инструменты”.
T
Также можно установить размер, выбрав пункт
Инструменты → Размер изображения.
Шир. aвто: Автоматическая настройка размера изображения в формат “16:9”.
•
16:9: Настройка размера изображения в формат 16:9, походит для DVD или широковещательной трансляции.
•
Широк. увел.: Увеличение формата изображения более чем 4:3.
•
Увел.: Увеличение изображения в формате 16:9 (в вертикальном направлении) по размеру экрана.
•
4:3: Это настройка по умолчанию для режима видео или обычного телевещания.
•
Точное отображение: Функция для просмотра полноразмерного изображения без обрезки при вводе сигналов HDMI
•
(720p/1080i/1080p), или компонентного сигнала (1080i/1080p).
В зависимости от источника входного сигнала размер изображения может отличаться.
N
Набор доступных элементов зависит от того, какой режим выбран.
N
В режиме PC можно настраивать только режим “16:9” и “4:3”.
N
Можно изменять и сохранять настройки для каждого внешнего устройства, подключенного к входу телевизора.
N
N
При просмотре статического изображения более двух часов может появляться временное остаточное изображение.
N
“Широк. увел.: Нажмите кнопку ► для выбора пункта “Позиция”, затем нажмите кнопку ENTERE. Нажмите
кнопку ▲ или ▼ для перемещения экрана вверх/вниз. Затем нажмите кнопку ENTERE.
N
“Увел.: Нажмите кнопку ► для выбора пункта “Позиция”, затем нажмите кнопку ENTER
E
. Нажмите кнопку
▲ или ▼ для перемещения изображения вверх и вниз. Затем нажмите кнопку ENTERE. Нажмите кнопку ►
для выбора пункта “Разм.”, затем нажмите кнопку ENTERE. Нажмите кнопку ▲ или ▼ для увеличения или
уменьшения размера изображения по вертикали. Затем нажмите кнопку ENTERE.
N
Выбрав пункт “Точное отображение” в режиме HDMI (1080i/1080p) или Component (1080i/1080p), выполните
следующее. Выберите пункт “Позиция”, нажав кнопку ◄ или ►. С помощью кнопок ▲, ▼, ◄ или ► переместите
изображение.
Сброс: Нажмите кнопку ◄ или ► для выбора пункта “Сброс”, затем нажмите кнопку ENTER
E
. Также можно
установить исходные значения.
N
При использовании функции “Точное отображение” с входом HDMI 720p 1 строка будет обрезана сверху, снизу,
слева и справа, как при использовании функции нерабочей области.
N
Если в для PIP выбран режим Double (
Режим экрана → 16:9 / Широк. увел. / Увел. / 4:3
, ) настройка параметра Picture Size невозможна.
При установке для размера изображения значения “Шир. aвто” в широкоэкранном режиме 16:9 можно задать размер
изображения, если необходим просмотр широкоформатного изображения 4:3, или не задавать его. Во всех странах
Европы требуются различные размеры изображений, поэтому предусмотрен выбор этой функции пользователем.
16:9: Установка формата изображения 16:9.
•
Широк. увел.. Увеличение формата изображения более чем 4:3.
•
Увел.. Используется для увеличения размера изображения в вертикальном направлении.
•
4:3: Установка изображения в обычном формате 4:3.
•
Эта функция доступна в режиме “Шир. aвто”.
N
Эта функция недоступна в режиме “ПК”, “Компонентный” или “HDMI”.
N
Цифр. ш/под → Выкл./Низкий/Средний/Высокий/Авто
Если телевизор принимает слабый сигнал, можно включить функцию цифрового подавления шумов, которая
позволяет снизить уровень радиопомех и устранить двоение изображения.
Если сигнал слабый, выберите другой параметр, чтобы улучшить изображение.
N
DNIe → Выкл./Демо/Вкл.
Этот телевизор оснащен функцией DNIe, предназначенной для обеспечения высокого качества изображения. При включении режима
DNIe можно просматривать изображение с активированной функцией DNIe. Если для режима DNIe установлено значение Demo,
на экране в демонстрационных целях отобразится одновременно обычное изображение и изображение с использованием функции
DNIe. Использование этой функции позволит увидеть разницу в качестве изображения.
DNIe™ (механизм цифровой обработки сигнала для получения естественного изображения)
N
DNIe™
Благодаря трехмерному подавлению шума эта функция позволяет достичь более четкого изображения, подчеркивания деталей,
улучшения контрастности и яркости. Новый алгоритм компенсации обеспечивает яркое, чистое и намного более четкое
изображение. Технология DNIe™ позволяет обрабатывать все сигналы для их оптимального восприятия глазами человека.
N
Эта функция недоступна в режиме “Кино” и “Стандартный”.
Page 82

ЧерныйHDMI → Норм./Низкий
Можно непосредственно выбрать уровень черного на экране, чтобы настроить глубину экрана.
Эта функция активна, только если источник внешнего сигнала подключается к HDMI (сигналы RGB).
N
100Гц Motion Plus → Выкл./Низкий/Средний/Высокий/Демо
Устранение эффекта торможения в динамичных сценах с большим количество движений для получения более четкого
изображения.
Эта функция недоступна в режиме ПК.
N
При использовании функции “100Гц Motion Plus” на экране могут появиться помехи. В этом случае для параметра
N
“100Гц Motion Plus” установите значение “Выкл.” или выберите другой параметр.
Только синий экран → Выкл./Вкл.
Эта функция предназначена для специалистов по настройке AV-устройств. При использовании этой функции отображается
сигнал синего цвета только благодаря исключению сигналов красного и зеленого цвета из видеосигнала, чтобы обеспечить
эффект синего фильтра, который используется для настройки цвета и тона такого видеооборудования, как проигрыватели DVD,
домашние кинотеатры и т.д. Эта функция позволяет настроить необходимый цвет и тон, соответствующий уровню сигнала каждого
видеоустройства, с помощью испытательных таблиц красного/зеленого/синего/голубого/пурпурного/желтого цветов без использования
дополнительного синего фильтра.
Параметр “Только синий экран” доступен, только если в качестве режима изображения выбран режим “Кино” или
N
“Стандартный”.
Сброс настроек изображения → Сброс режима изображения/Отмена
❑
Сброс всех параметров изображения до значений по умолчанию.
Выберите режим изображения для сброса. Функция сброса будет выполнена для каждого режима изображения.
N
Просмотр изображений в режиме Изображение в изображении
На фоне основного изображения может отображаться дополнительное
изображение с изображением заданной программы или от источника
видеосигнала. Таким образом, одновременно с просмотром основного
изображения можно смотреть телевизионную программу или изображение,
сигнал которого поступает с видеовхода от любого подключенного устройства.
N
Можно заметить, что при использовании основного экрана для
просмотра игр или караоке изображение в окне PIP становится несколько
ненатуральным.
T
Нажмите кнопку TOOLS для отображения меню “Инструменты”. Можно
также настроить параметры функции PIP, выбрав “Инструменты → PIP”.
Развлечения : Выкл.
Энергосбережение : Выкл.
Установка
PIP ►
Обновл. ПО
Стандартный интерфейс
PIP → Вкл./Выкл.
❑
Функцию PIP можно включить или выключить.
Основное изображение Дополнительное изображение
Компонентный
HDMI 1, HDMI/DVI 2, HDMI 3, HDMI 4ПКТВ, Внешн.1, Внешний 2, AV
Источн.
PIP : Вкл.
Источн. : ТВ
Разм. :
Позиция :
Канал : ATV 11
PIP
L
Перем. E Вход R Возврат
Можно выбрать источник дополнительного изображения.
Разм. → / /
Можно выбрать размер дополнительного изображения.
Если для основного изображения используется режим “HDMI”, доступен параметр “Разм.”.
N
Позиция → / / /
Можно выбрать позиции дополнительного изображения.
В режиме “Double” (
N
Канал
, ) нельзя выбрать параметр “Позиция”.
Канал дополнительного изображения можно выбрать только в том случае, если для параметра “Источн.” установлено
значение “ТВ”.
Русский -
Page 83

Русский -
Экран компьютера
Установка программного обеспечения компьютера (на основе Windows XP)
Параметры экрана Windows для обычного компьютера приведены ниже. В
зависимости от установленной версии Windows и видеокарты изображение на
экране компьютера может выглядеть иначе. Однако даже если экран выглядит
иначе, основные инструкции по настройке параметров экрана применимы
почти во всех случаях. (В противном случае, обратитесь к производителю
компьютера или торговому представителю компании Samsung).
1. Сначала выберите ‘Панель управления’ в меню ‘Пуск’ Windows.
2. В открывшемся окне ‘Панель управления’ выберите ‘Оформление и темы’,
чтобы открыть диалоговое окно.
3. В открывшемся окне ‘Панель управления’ выберите ‘Экран’, чтобы открыть
диалоговое окно.
4. В диалоговом окне ‘Экран’ перейдите на вкладку ‘Параметры’.
Настройка размера (разрешение)
Оптимальное: 1920 X 1080 пикселей
Если в диалоговом окне параметров экрана есть параметр частоты кадров,
то правильное значение ‘60’ или ‘60 Гц’. В противном случае закройте
диалоговое окно, нажав кнопку ‘OK’.
Режимы экрана
Положение изображения и его размер могут изменяться в зависимости от выбранного типа монитора компьютера и его
разрешения.
Рекомендуются разрешения, указанные в таблице.
Вход D-Sub
Режим Разрешение
IBM
VESA
CVT 1920 x 1080RB 66,587 59,934 138,500 + / -
640 x 350
720 x 400
640 x 480
640 x 480
640 x 480
800 x 600
800 x 600
800 x 600
1024 x 768
1024 x 768
1024 x 768
1280 x 1024
1280 x 1024
1360 x 768
1600 x 1200
Частота
горизонтальной
развертки (кГц)
31,469
31,469
31,469
37,861
37,500
37,879
48,077
46,875
48,363
56,476
60,023
63,981
79,976
47,712
75,000
Частота
вертикальной
развертки (Гц)
70,086
70,087
59,940
72,809
75,000
60,317
72,188
75,000
60,004
70,069
75,029
60,020
75,025
60,015
60,000
Частота
синхронизации
пикселей (МГц)
25,175
28,322
25,175
31,500
31,500
40,000
50,000
49,500
65,000
75,000
78,750
108,000
135,000
85,500
162,000
Полярность
синхронизации
(Г/В)
+ / -
- / +
- / -
- / -
- / + / +
+ / +
+ / +
- / -
- / + / +
+ / +
+ / +
+ / +
+ / +
Вход HDMI/DVI
Режим Разрешение
640 x 480
800 x 600
VESA
CEA 1920 x 1080p 67,500 60,000 148,500 + / +
При использовании кабеля HDMI/DVI необходимо выполнить подключение к гнезду HDMI IN 2.
N
Режим чересстрочной развертки не поддерживается.
N
При выборе нестандартного видеоформата устройство может работать неправильно.
N
Поддерживаются режимы раздельной и композитной синхронизации. Режим SOG не поддерживается.
N
Кабель VGA низкого качества или слишком большой длины может стать причиной помех на изображении в
N
режимах с высоким разрешением (1920x1080 или 1600x1200).
1024 x 768
1280 x 1024
1360 x 768
1600 x 1200
Частота
горизонтальной
развертки (кГц)
31,469
37,879
48,363
63,981
47,712
75,000
Частота
вертикальной
развертки (Гц)
59,940
60,317
60,004
60,020
60,015
60,000
Частота
синхронизации
пикселей (МГц)
25,175
40,000
65,000
108,000
85,500
162,000
Полярность
синхронизации
(Г/В)
- / -
+ / +
- / + / +
+ / +
+ / +
Page 84

Настройка подключения телевизора к компьютеру
Предварительная настройка: для выбора режима ПК нажмите кнопку
N
SOURCE.
Автоподстройка
❑
Функция автоподстройки обеспечивает выполнение экраном телевизора
самостоятельной регулировки входящего видеосигнала с компьютера.
Настройка параметров грубой и точной настройки, а также настройка
положения изображения производится автоматически.
Эта функция не работает в режиме DVI-HDMI.
N
Нажмите кнопку TOOLS для отображения меню “Инструменты”. Можно
T
Яркость : 45
Четкость : 50
Изображение
Автоподстройка
Экран
Установки детализац.
Параметры изображения
Сброс настроек изображения
также установить функцию автоподстройки, выбрав “Инструменты →
Автоподстройка”.
Экран
❑
Грубо/Точно:
С помощью функции настройки качества изображения можно снизить уровень помех в изображении
или избавиться от них полностью. Если уровень помех не удалось снизить с помощью функции точной настройки,
настройте частоты как можно лучше в грубом режиме, а затем повторите точную настройку. После того, как уровень
помех был снижен, настройте изображение таким образом, чтобы оно располагалось по центру экрана.
Положение ПК:
Настройте положение экрана компьютера, если оно не умещается на экране телевизора.
настройки вертикального положения используйте кнопку ▲ или ▼. Для настройки горизонтального положения
используйте кнопку ◄ или ►.
Сброс настр.:
Можно восстановить значения параметров изображения, установленные изготовителем.
Управление звуком
►
Для
Изменение стандарта звука
Режим → Стандартный/Муз./Кино/Речь/Польз.
❑
Можно выбрать один из перечисленных ниже специальных звуковых
эффектов, который будет использоваться во время просмотра.
Нажмите кнопку TOOLS для отображения меню “Инструменты”. Можно
T
также выполнить настройку режима звука, выбрав “Инструменты →
Режим звука”.
Эквалайзер
❑
Можно настроить параметры звука в соответствии со своими
предпочтениями.
Режим: Можно выбрать режим звука в соответствии со своими
предпочтениями.
Баланс: Регулировка баланса между правым и левым
громкоговорителями.
100Гц/300Гц/1кГц/2кГц/3кГц/10кГц (регулировка диапазонов): Служит
для регулировки уровня звука в разных частотных диапазонах.
Сброс: Сброс настроек эквалайзера до значений по умолчанию.
SRS TruSurround XT → Выкл./Вкл.
❑
TruSurround XT является запатентованной технологией SRS, которая
позволяет воспроизводить звук многоканального (5.1) телевидения через два громкоговорителя. Функция TruSurround
обеспечивает воспроизведение захватывающего виртуального объемного звучания через систему с двумя
динамиками, включая встроенные динамики телевизора. Функция работает со всеми многоканальными форматами.
Нажмите кнопку TOOLS для отображения меню “Инструменты”. Можно также установить функцию SRS
T
TruSurround XT, выбрав “Инструменты → SRS TS XT”.
Режим : Польз.
Эквалайзер
Звук
SRS TruSurround XT
Язык аудио : ---Аудиоформат : ---Описание аудио
ромк. авто : Выкл.
Г
Выбрать громкогов. :
Выбор звука : Осн.
Сброс звука
Выбрать громкогов. : Динамик ТВ
Выбор звука : Осн.
Звук
Сброс звука ►
: Выкл. ►
Динамик ТВ
TruSurround XT, SRS и Symbol являются товарными знаками корпорации SRS Labs,
Inc. Технология TruSurround XT использована по лицензии корпорации SRS Labs, Inc.
Русский -
Page 85

Русский -
Язык аудио
❑
Можно изменить установленный по умолчанию язык аудио. Отображение сведений о языке входящего потока.
Эту функцию можно выбрать во время просмотра цифрового канала.
N
Можно выбрать язык только среди языков, на которых транслируются программы.
N
Аудиоформат → MPEG/Dolby Digital
❑
При выводе звука через главный громкоговоритель и аудиоресивер может возникать эффект эха из-за различий в
скорости декодирования этих устройств. В этом случае используйте функцию громкоговорителя телевизора.
Эту функцию можно выбрать во время просмотра цифрового канала.
N
Появится аудиоформат в соответствии с транслируемым сигналом.
N
Произведено по лицензии Dolby Laboratories. Dolby и символ двойного D являются
торговыми знаками Dolby Laboratories.
Описание аудио
❑
Это вспомогательная функция аудио, которая обеспечивает дополнительную аудиодорожку для людей с ослабленным
зрением. Эта функция обрабатывает аудиопоток для AD (описание аудио), когда он отправляется вещательной
компанией вместе с основным аудио. Пользователи могут включить или выключить описание аудио и регулировать
громкость.
Описание аудио → Выкл./Вкл.: Используется для включения/выключения функции описания аудио.
Громкость: Можно настроить громкость описания аудио.
Параметр “Громкость” активен, если для параметра “Описание аудио” установлено значение “Вкл.”.
N
Эту функцию можно выбрать во время просмотра цифрового канала.
N
Громк. авто → Выкл./Вкл.
❑
Звук, транслируемый разными телевизионными станциями, имеет различные характеристики. По этой причине при
каждом переключении канала приходится регулировать громкость, что не очень удобно. Данная функция позволяет
выполнять автоматическое регулирование громкости звука канала, уменьшая ее в случае сильного модуляционного
сигнала и увеличивая, если модуляционный сигнал слишком слабый.
❑
Выбрать громкогов. → Внешний громкогов./Динамик ТВ
В случае необходимости прослушивать звук через внешние громкоговорители отключите внутренний усилитель.
Кнопки регулировки громкости и кнопка MUTE не работают, если для параметра “Выбрать громкогов.” установлено
N
значение “Внешний громкогов.”.
Если выбран параметр “Внешний громкогов.” в меню “Выбрать громкогов.”, настройки звука будут ограничены.
N
Внутренние громкоговорители телевизора
RF/AV/S-Video/Компонентный/ПК/HDMI RF/AV/S-Video/Компонентный/ПК/HDMI
Динамик ТВ Выход громкоговорителя Вывод звука
Внешний громкогов. Отключение звука Вывод звука
Отсутствие видеосигнала
Выбор звука
❑
При работе функции PIP можно прослушивать звуковое сопровождение дополнительного изображения (PIP).
Осн.: Используется для прослушивания звуков основного изображения.
Доп.: Используется для прослушивания звуков дополнительного изображения.
Нажмите кнопку TOOLS для отображения меню “Инструменты”. Можно также установить звук дополнительного
T
изображения, выбрав “Инструменты → PIP → Выбор звука”.
Сброс звука
❑
Сбросить все/Сброс реж. звука/Отмена:
звука.
Отключение звука Отключение звука
Можно восстановить заводские настройки по умолчанию для параметров
Аудиовыход (оптический, выход Л/П) звуковой системы
Page 86

Выбор режима звука
Режим звука можно настроить в меню “Инструменты”. При выборе параметра
“Двойной l ll” на экране отобразится текущий режим звука.
Тип звука Двойной /2 По умолчанию
A2 стерео
Моно Моно
Стерео Стерео ↔ Моно
Автоматическое
изменение
Двойной Двойной 1 ↔ Двойной 2 Двойной 1
Моно Моно
NICAM
стерео
Если стереосигнал слишком слабый и происходит автоматическое переключение режимов, выберите режим “Моно”.
N
Эта функция активизируется только для стереосигнала. При монофоническом сигнале она отключается.
N
Эта функция доступна только в режиме телевизора.
N
Стерео Моно ↔ Стерео
Двойной
Моно ↔ Двойной 1
Двойной 2
Автоматическое
изменение
Двойной 1
Инструменты
Anynet+ (HDMI-CEC)
Размер изображения
Режим иэображения
Режим звука : Польз.
Таймер сна : Выкл.
SRS TS XT : Выкл.
Энергосбережение : Выкл.
Двойной l ll ◄ Mono ►
U
: Шир. aвто
: Стандартный
Перем. L Настр. e Выход
Описание функций
Меню настройки
Язык
❑
Можно установить язык меню.
❑
Замок → Вкл./Выкл.
С помощью этой функции можно ограничить доступ определенных
пользователей (например, детей) к неподходящим программам
посредством отключение звука и изображения.
Перед отображением экрана настройки появится экран для ввода PIN-
N
кода. Введите 4-значный PIN-код.
По умолчанию на новом телевизоре установлен PIN-код “0-0-0-0”. PIN-
N
код можно изменить, выбрав в меню пункт “Изменение PIN”.
N
Некоторые каналы из списка каналов можно заблокировать. (См. стр. 12)
N
Функция “Замок” доступна только в режиме телевизора.
Изменение PIN
❑
Можно изменить персональный идентификационный номер, необходимый
для установки телевизора.
Перед отображением экрана настройки появится экран для ввода PIN-
N
кода. Введите 4-значный PIN-код.
По умолчанию на новом телевизоре установлен PIN-код “0-0-0-0”.
N
Если вы забыли PIN-код, нажимайте кнопки пульта дистанционного управления в следующей последовательности
N
Plug & Play
Язык : Русский
Установка
Время ►
Выбор сети : Кабель
Настр.беспровод.сети
Настройка кабельной сети
Замок
: Вкл.
Изменение PIN
Родит. блокировка
Субтитры
Язык телетекста : ----
Предпочтение
Установка
Цифровой текст : Включить ►
Регулировка настенного крепления
Мелодия : Выкл.
Развлечения : Выкл.
Энергосбережение : Выкл.
PIP
Обновл. ПО
Стандартный интерфейс
для возвращения значения по умолчанию – 0-0-0-0: POWER (Выкл.), MUTE, 8, 2, 4, POWER (Вкл.).
Родит. блокировка → Родит. ограничения
❑
С помощью этой функции можно ограничить доступ определенных пользователей (например, детей) к неподходящим
программам с помощью 4-значного PIN-кода, определенного пользователем.
На экране “Parental Rating” выполните настройки родительских оценок.
-
Перед отображением экрана настройки появится экран для ввода PIN-кода. Введите 4-значный PIN-код.
N
По умолчанию на новом телевизоре установлен PIN-код “0-0-0-0”. PIN-код можно изменить, выбрав в меню пункт
N
“Изменение PIN”.
\
После установки родительских оценок отобразится символ “
N
Разр. все: Нажмите, чтобы снять блокировку всех оценок ТВ.
N
”.
Блок.все: Нажмите, чтобы заблокировать все оценки ТВ.
Русский - 20
Page 87

Русский - 2
Субтитры
❑
Субтитры можно включать и отключать. Это меню используется для настройки режима субтитров. Значение “Норм.” в
этом меню соответствуют обычным субтитрам, а “Расстр. слуха” – субтитрам для людей с ослабленным слухом.
Субтитры → Вкл./Выкл.: Используется для включения или выключения субтитров.
Режим → Норм./Расстр. слуха: Используется для установки режима субтитров.
Язык субтитров: Используется для установки языка субтитров.
Если просматриваемая программа не поддерживает функцию “Расстр. слуха”, автоматически будет выбран режим
N
“Норм.”, даже если ранее был выбран режим “Расстр. слуха”.
Если выбранный язык не транслируется, по умолчанию устанавливается английский язык.
N
Эти параметры можно также установить, нажав кнопку SUBT. на пульте
O
дистанционного управления.
Язык телетекста
❑
Можно установить язык телетекста, выбрав тип языка.
Если выбранный язык не транслируется, по умолчанию устанавливается английский язык.
N
Предпочтение
❑
Основной язык аудио / Язык дополнительного аудио / Первичный язык субтитров / Вторичный язык субтитров /
Основной язык телетекста / Дополнительный язык телетекста
Используя эту функцию, пользователи могут выбрать один из языков. Выбранный язык используется по умолчанию,
когда пользователь выбирает канал.
Если изменить настройку языка, то параметры “Subtitle Language”, “Audio Language” и “Teletext Language” меню
“Language” автоматически изменятся на выбранный язык.
В подменю “Subtitle Language”, “Audio Language” и “Teletext Language” в меню “Language” отображается список языков,
которые поддерживаются на текущем канале, а выбранные языки выделены цветом. При изменении этого параметра
языка новый вариант действителен только для текущего канала. Измененный параметр не используется в подменю
“Primary Subtitle Language”, “Primary Audio Language” или “Primary Teletext Language” меню “Preference”.
Цифровой текст → Отключить / Включить (Только Великобритания)
❑
Эта функция включается, если программа передается с цифровым текстом.
MHEG (Multimedia and Hypermedia Information Coding Experts Group) –
N
международный стандарт для систем кодирования данных, который используется для мультимедиа и
гипермедиа. Это система более высокого уровня, чем MPEG и включает гипермедиа связанных данных,
например неподвижные изображения, службу символов, анимацию, графические и видеофайлы, а также данные
мультимедиа. MHEG – это технология интерактивной работы пользователя в реальном времени. Она применяется
в различных областях, включая функции VOD (видео по запросу), ITV (интерактивное ТВ), EC (электронная
коммерция), телеобучение, телеконференции, цифровые библиотеки и сетевые игры.
Мелодия
❑
Выкл./Низкий/Средний/Высокий
Можно настроить звук мелодии включения/выключения питания телевизора.
Мелодия не воспроизводится
N
Когда звук не воспроизводится на телевизоре, поскольку нажата кнопка MUTE.
-
Когда звук не воспроизводится на телевизоре, поскольку нажата кнопка (–) регулировки громкости.
-
Когда телевизор выключается с помощью функции таймера.
-
Развлечения
❑
Режим “Развлечения” позволяет выбирать оптимальное изображение и звук для спорта, кино и игр.
Выкл.: Выключение функции “Развлечения”.
Спорт: Обеспечивается оптимальное качество изображения и звука для просмотра спортивных передач.
Кино: Обеспечивается оптимальное качество изображения и звука для просмотра фильмов. Можно
просматривать передачи с более богатым изображением и улучшенным звуком.
Игра: Обеспечивается оптимальное качество изображения и звука для игр. Этот режим позволяет ускорить
воспроизведение игры при использовании внешней игровой консоли, подключенной к телевизору.
Page 88

При установке для любого из трех режимов “Развлечения” значения Вкл параметры будут заблокированы, и их будет
N
невозможно настроить. Кроме того, параметры режимов Изображение и Звук недоступны. Если необходимо настроить
режим “Изображение” и “Звук”, выключите режим “Развлечения”.
При установке для любого из трех режимов “Развлечения” значения Вкл использование функций звука и изображения
N
будет ограничено.
Параметры режима “Развлечения” сохраняются для каждого источника
N
входного сигнала.
Для изменения параметров режима “Развлечения” можно повторно
O
нажимать кнопку E.MODE на пульте дистанционного управления.
Энергосбережение
❑
С помощью этой функции настраивается яркость телевизора для снижения потребления энергии. При просмотре
телевизора в ночное время установите для параметра “Энергосбережение” значение “Высокий”, чтобы снизить
утомляемость глаз, а также уменьшить потребление энергии.
Выкл.: Выключение функции экономии энергии.
Низкий: Выбор низкого значения для функции экономии энергии.
Средний: Выбор среднего значения для функции экономии энергии.
Высокий: Выбор высокого значения для функции экономии энергии.
Авто: Автоматическая настройка яркости экрана в соответствии с отображаемыми сценами.
Нажмите кнопку TOOLS для отображения меню “Инструменты”. Можно также установить параметр
T
“Энергосбережение”, выбрав “Инструменты → Энергосбережение”.
Обновл. ПО
❑
Для обновления устройства и поддержки функций нового цифрового
телевидения, вместе с обычным телевизионным сигналом периодически
Боковая панель
телевизора
передается обновление для программного обеспечения. Устройство
автоматически обнаружит эти сигналы и отобразит баннер обновления
Диск USB
программного обеспечения. При этом можно установить обновление.
По USB
Вставьте диск USB с обновлением микропрограммы в гнездо телевизора.
Не отсоединяйте питание и не извлекайте диск USB, когда выполняется
обновление. После завершения обновления микропрограммы телевизор
автоматически выключится и снова включится. После выполнения обновления проверьте версию микропрограммы. По
завершении обновления для всех настроек видео и аудио будут восстановлены значения по умолчанию (заводские).
Рекомендуется записывать свои настройки, чтобы их можно было легко восстановить после обновления.
По каналу
Обновление программного обеспечения через транслируемый сигнал.
Обновление в режиме ожидания
Чтобы продолжить обновление программного обеспечения при включении основного питания, выберите пункт Вкл,
нажав кнопку ▲ или ▼. Через 45 мин. после перехода в режим ожидания автоматически будет запущен мастер
обновления вручную. Поскольку питание устройства включается автоматически, экран может слегка мигать. Этот
эффект может продолжаться более 1 часа до тех пор, пока не будет завершено обновление программного обеспечения.
Др.ПО
Отображение информации о версии программного обеспечения.
Стандартный интерфейс
❑
Меню CI
Эта функция позволяет пользователям выбрать параметры в меню модуля
CAM. Выберите пункт “CI Menu” в меню платы PC Card.
Информация о приложении
Здесь приведены сведения о модуле CAM, подключенном к гнезду CI.
Приложение отображает сведения о карте CI CARD. Можно установить CAM
независимо от того, включен телевизор или нет.
1.
Можно приобрести модуль CI CAM, посетив ближайшего официального
дилера, или по телефону.
2.
Вставьте карту CI CARD в модуль CAM в направлении, указанном стрелкой.
3. Вставьте модуль CAM с установленной картой CI CARD в гнездо общего
интерфейса. (Вставьте модуль CAM в направлении, указанном стрелкой,
до упора, так, чтобы модуль был параллелен гнезду.)
4. Убедитесь, что на канале с зашифрованным сигналом можно видеть
изображение.
Русский - 22
Page 89

Русский - 2
Установка времени
Часы
❑
Для использования различных функций таймера в телевизоре необходима
установка часов.
Текущее время будет отображаться каждый раз при нажатии кнопки
N
INFO.
После отключения кабеля питания часы потребуется установить
N
заново.
Реж. часов
Можно установить текущее время вручную или автоматически.
Авто: Установка текущего времени автоматически с использованием
•
значения времени в цифровом вещании.
Ручной: Установка текущего времени вручную.
•
Уст. часов
Можно установить текущее время вручную.
Установив для параметра “Реж. часов” значение “Ручной”, выполните
N
Plug & Play
Язык : Русский
Установка
Время ►
Выбор сети : Кабель
Настр.беспровод.сети
Настройка кабельной сети
Замок
: Вкл.
Изменение PIN
Родит. блокировка
Субтитры
Время
Часы : -- : -- ►
Т
аймер сна : Выкл.
Таймер 1 : Неактивный
Таймер 2 : Неактивный
Таймер 3 : Неактивный
настройку данной функции.
Можно установить день, месяц, год, час и минуту с помощью номерных
N
кнопок на пульте дистанционного управления.
Таймер сна → Выкл./0/0/0/20/0/0
❑
U
Перем. E Вход R Возврат
Таймер сна автоматически выключает телевизор после определенного времени (30, 60, 90, 120, 150 и 180 минут).
Телевизор автоматически переключится в режим ожидания, как только выбранный интервал времени истечет.
N
Для отмены функции “Таймер сна ” выберите значение “Выкл.”.
N
Нажмите кнопку TOOLS для отображения меню “Инструменты”. Можно также установить функцию таймера сна,
T
выбрав “Инструменты → Таймер сна ”.
Таймер /Таймер 2/Таймер
❑
Можно сделать три различные настройки параметра
Таймер вкл.:
Установка часов, минут и включение/отключение.
вкл/Таймер выкл.
.
(Чтобы включить таймер с выбранными параметрами, задайте значение “Включить”).
Таймер выкл.:
Установка часов, минут и включение/отключение.
(Чтобы включить таймер с выбранными параметрами, задайте значение “Включить”).
Громкость:
Содержание:
Установка необходимого уровня громкости.
Когда включена функция “Таймер вкл.”, можно настроить включение на определенном канале или при
воспроизведении файлов фотографий или аудиофайлов.
TV/USB: Выбор параметра “TV” или “USB”. (Убедитесь, что устройство USB подключено к телевизору).
•
Антенна: Выбор параметра “ATV” или “DTV”.
•
Канал: Выбор необходимого канала.
•
Музыка: Выбор папки с файлами MP3 на устройстве USB.
•
Фото: Выбор папки с файлами JPEG на устройстве USB.
•
Повтор:
N
Выберите “Один раз”, “Ежедневно”, “Пн~Пт”, “Пн~Сб”, “Сб~Вс” или “Ручной”.
При выборе параметра “Ручной” нажмите кнопку ► для выбора необходимого дня недели. Нажмите кнопку
N
N
E
ENTER
, наведя курсор на нужный день, после чего отобразится значок c.
Сначала необходимо установить часы.
Можно также установить значение времени (часы и минуты) и канал с помощью номерных кнопок на пульте
дистанционного управления.
Автоматическое выключение питания
N
Когда включен таймер, телевизор выключится автоматически, если в течение 3 часов с момента включения
телевизора таймером не было выполнено ни одной команды. Данная функция применяется, только когда таймер
включен. Она предотвращает возможный перегрев телевизора при его продолжительной работе.
Page 90

Сетевое соединение
Сетевое соединение – кабель
Соединение кабеля в среде DHCP
Процедуры настройки сети с использованием протокола DHCP (Dynamic Host Conguration Protocol) описаны ниже.
Поскольку IP-адрес, маска подсети, номер шлюза и DNS назначаются автоматически при выборе протокола DHCP,
необязательно вводить эти данные вручную.
Задняя панель телевизора
Порт модема на
стене
2
1. С помощью кабеля LAN подсоедините порт [LAN] на задней панели телевизора к внешнему модему.
2. С помощью модемного кабеля подсоедините порт LAN, расположенный на стенке, к внешнему модему.
Можно выполнить подключение локальной сети через устройство совместного доступа (маршрутизатор).
Внешний модем
(ADSL/VDSL/Кабель TV)
Кабель модема
IP-устройство совместного доступа
Кабель LAN
Задняя панель телевизора
Порт модема
на стене
Можно подсоединить телевизор к порту LAN напрямую. Это зависит от состояния сети.
Порт LAN на
стене
N
Разъемы (положение порта и типа) на внешнем устройстве могут различаться в зависимости от производителя.
N
Если произошел сбой процесса назначения IP-адреса на сервере DHCP, отключите внешний модем, затем через 10
Внешний модем
(ADSL/VDSL/Кабель TV)
Кабель модема
Кабель LAN
Кабель LAN
Кабель LAN
Задняя панель телевизора
секунд включите его еще раз и повторите попытку.
N
Инструкции по подключению внешнего модема и устройства совместного доступа (маршрутизатора) см. в руководстве
пользователя соответствующего устройства.
N
Можно подсоединить телевизор к локальной сети напрямую без подключения его к устройству совместного доступа
(маршрутизатору).
N
Нельзя использовать тип модема ADSL, подключаемого вручную, поскольку он не поддерживает DHCP. Необходимо
использовать тип модема ADSL, подключаемого автоматически.
Русский - 24
Page 91

Русский - 2
Соединение кабеля LAN в среде статического IP-адреса
Процедуры настройки сети с использованием статического IP-адреса описаны ниже. Необходимо вручную ввести IPадрес, данные о маске подсети, шлюзе и DNS, которые предоставляются поставщиком услуг Интернета.
Задняя панель телевизора
Порт LAN на
стене
Кабель LAN
1. С помощью кабеля LAN подсоедините порт [LAN] на задней панели телевизора к порту LAN на стене.
Можно выполнить подключение локальной сети через устройство совместного доступа (маршрутизатор).
Порт LAN на
стене
IP-устройство совместного доступа
Задняя панель телевизора
Кабель LAN
Разъемы (положение порта и типа) на внешнем устройстве могут различаться в зависимости от производителя.
N
При использовании статического IP-адреса ваш поставщик услуг Интернета предоставит IP-адрес, данные о маске подсети, шлюзе и DNS. Для
N
Кабель LAN
завершения процедуры настройки сети необходимо ввести эти значения. Если значения неизвестны, обратитесь к сетевому администратору.
N
Информацию о настройке и подключении устройства совместного доступа (маршрутизатора) см. в руководстве пользователя соответствующего устройства.
N
Можно подсоединить телевизор к локальной сети напрямую без подключения его к устройству совместного доступа (маршрутизатору).
N
При использовании IP-устройства совместного доступа (IP-маршрутизатора) с поддержкой DHCP можно настроить устройство с помощью
протокола DHCP или статического IP-адреса.
N
За информацией о процедурах использования статического IP-адреса обратитесь к поставщику услуг Интернета.
Сетевое соединение – беспроводное
Подключение к сети можно выполнить беспроводным путем с помощью беспроводного IP-устройства совместного доступа.
Боковая панель телевизора
Порт LAN на
стене
Беспроводное IP-устройство
совместного доступа
Кабель
LAN
1. Подсоедините адаптер беспроводной локальной сети Samsung к разъему Wiselink на телевизоре.
N
Чтобы воспользоваться беспроводной сетью, необходимо установить адаптер беспроводной локальной сети Samsung (WIS-08BG).
N
Адаптер беспроводной локальной сети Samsung продается отдельно. Для приобретения данного устройства обратитесь к сотруднику сервисного
центра Samsung Electronics.
N
Для использования беспроводной сети телевизор должен быть подсоединен к беспроводному IP-устройству совместного доступа.
N
Если беспроводное IP-устройство совместного доступа поддерживает протокол DHCP, то для подсоединения телевизора к беспроводной сети
можно использовать DHCP или статический IP-адрес.
N
Рекомендуется использовать беспроводное IP-устройство совместного доступа с поддержкой IEEE 802.11 B или IEEE 802.11G.
N
Если с помощью беспроводного IP-устройства совместного доступа можно включить/выключить функцию подсоединения Ping, включите ее.
N
Установите для беспроводного IP-устройства совместного доступа режим инфраструктуры. Одноранговый режим не поддерживается.
N
Выберите канал для беспроводного IP-устройства совместного доступа, который не используется в данный момент. Если заданный для
беспроводного IP-устройства совместного доступа канал используется в данный момент другим устройством, установленным рядом, это может
привести к возникновению помех и сбою связи.
N
При применении ключа безопасности к точке доступа (беспроводному IP-устройству совместного доступа) поддерживаются только следующие
параметры.
1) Режим проверки подлинности: WEP, WPAPSK, WPA2PSK
2) Тип шифрования: WEP, TKIP, AES
При использовании системы безопасности, отличной от перечисленных выше, она не будет работать на телевизоре.
Адаптер беспроводной
локальной сети Samsung
Page 92

Настройка сети
❑
Выбор сети
В качестве метода подключения к сети выберите параметр Кабель или
Беспроводная.
Меню активируется только в случае подключения адаптера
N
беспроводной локальной сети Samsung. (См. стр. 25)
Кабель:
Подключение к сети с помощью кабеля.
Беспроводная:
❑
Настройка кабельной сети
Настр.проток. Интернета → Авто / Ручной
Проверка сети:
соединения.
Если не удается подключиться к проводной сети
N
Если поставщик услуг Интернета зарегистрировал MAC-адрес устройства, используемого для подключения к
Интернету в первый раз, и выполняет проверку подлинности MAC-адреса при каждом подключении к Интернету,
возможно, не удастся выполнить подключение телевизора к Интернету, так как MAC-адрес отличается от
MAC-адреса устройства (ПК), используемого для подключения к Интернету в первый раз. В этом случае
обратитесь к поставщику услуг Интернета за информацией о процедурах подключения устройств, отличных
от ПК (например, телевизора), к Интернету. Если поставщик услуг Интернета запрашивает идентификатор или
пароль для подключения к Интернету (сети), возможно, не удастся подключить телевизор к Интернету. В этом
случае необходимо ввести ваш идентификатор или пароль при подключении к Интернету с помощью устройства
совместного доступа в Интернет (маршрутизатора).
Может произойти сбой Интернет-подключения из-за неполадок брандмауэра. В этом случае обратитесь к
поставщику услуг Интернета. Если не удается подключиться к Интернету даже при выполнении инструкций,
полученных от поставщика услуг Интернета, обратитесь в сервисный центр Samsung Electronics.
Беспроводное подключение к сети.
После выполнения настройки сети можно проверить или подтвердить состояние сетевого
Язык : Русский
Время
Установка
Выбор сети : Кабель ►
Настр.беспровод.сети
Настройка кабельной сети
Замок
: Вкл.
Изменение PIN
Родит. блокировка
Субтитры
Язык
телетекста : - - - -
❑
Настр.беспровод.сети
Настр.проток. Интернета → Авто / Ручной
Проверка сети: После выполнения настройки сети можно проверить или подтвердить состояние сетевого
соединения.
N
Если не удается подключиться к беспроводной сети
Возможно, не удастся найти точку доступа, для которой задан отдельный SSID. В этом случае измените настройки
точки доступа и повторите попытку. Если поставщик услуг Интернета зарегистрировал MAC-адрес устройства,
используемого для подключения к Интернету в первый раз, и выполняет проверку подлинности MAC-адреса
при каждом подключении к Интернету, возможно, не удастся выполнить подключение телевизора к Интернету,
так как MAC-адрес отличается от MAC-адреса устройства (ПК), используемого для подключения к Интернету в
первый раз. В этом случае обратитесь к поставщику услуг Интернета за информацией о процедурах подключения
устройств, отличных от ПК (например, телевизора), к Интернету. Если не удается подключиться к Интернету даже
при выполнении инструкций, полученных от поставщика услуг Интернета, обратитесь в сервисный центр Samsung
Electronics.
Выбор точки доступа:
Если беспроводной точки доступа нет в списке точек доступа, нажмите красную кнопку.
N
После того, как соединение будет установлено, произойдет возврат к экрану автоматически.
N
Если выбрана точка доступа, для которой необходима проверка безопасности, введите ключ безопасности.
N
Если выбрана точка доступа, для которой необходима проверка безопасности
N
Отобразится окно ввода ключа безопасности.
-
Введите ключ безопасности и нажмите кнопку ENTERE.
-
Для ввода ключа используйте кнопки на пульте дистанционного управления.
-
При использовании беспроводной сети можно выбрать IP-устройство совместного доступа.
Настройка кабельной сети – Авто
При подключении кабеля LAN, который поддерживает DHCP, параметры протокола Интернета (IP) будут установлены
автоматически. Проверьте, подсоединен ли кабель LAN. (См. стр. 24)
1. Для параметра “Выбор сети” установите значение “Кабель”.
2. Выберите параметр “Настройка кабельной сети”.
3. Для параметра “Настр.проток. Интернета” установите значение “Авто”.
4. Выберите параметр “Проверка сети” для проверки сетевого подключения.
Русский - 2
Page 93

Русский - 2
Настройка кабельной сети – Ручной
Для подключения телевизора к локальной сети с использованием статического IP-адреса необходимо настроить протокол
Интернета (IP). Проверьте, подсоединен ли кабель LAN. (См. стр. 25)
1. Для параметра “Выбор сети” установите значение “Кабель”.
2. Выберите параметр “Настройка кабельной сети”.
3. Для параметра “Настр.проток. Интернета” установите значение “Ручной”.
4. Выполните настройку следующих параметров: “IP-адрес”, “Маска подсети”, “Шлюз” и “DNS Server”.
Во время настройки сети вручную используйте цифровые кнопки на пульте дистанционного управления.
N
5. Выберите параметр “Проверка сети” для проверки сетевого подключения.
Настройка беспроводной сети – Авто
Меню активируется только в случае подключения адаптера беспроводной локальной сети Samsung. (См. стр. 25)
При подключении кабеля LAN, который поддерживает DHCP, параметры протокола Интернета (IP) будут установлены
автоматически. Беспроводное IP-устройство совместного доступа для подключения к телевизору должно поддерживать
протокол DHCP.
1. Для параметра “Выбор сети” установите значение “Беспроводная”.
2. Выберите параметр “Настр.беспровод.сети”.
3. Для параметра “Настр.проток. Интернета” установите значение “Авто”.
4. Выберите точку доступа в меню “Выбор точки доступа”.
5. Выберите параметр “Проверка сети” для проверки сетевого подключения.
Настройка беспроводной сети – Ручной
Меню активируется только в случае подключения адаптера беспроводной локальной сети Samsung. (См. стр. 25)
1. Для параметра “Выбор сети” установите значение “Беспроводная”.
2. Выберите параметр “Настр.беспровод.сети”.
3. Для параметра “Настр.проток. Интернета” установите значение “Ручной”.
4. Выберите точку доступа в меню “Выбор точки доступа”.
5. Выберите параметр “Проверка сети” для проверки сетевого подключения.
Список источн./Редактир. назв.
Список источн.
❑
Используется для выбора телевизора или других внешних источников
ввода, например, DVD-проигрывателей или декодеров кабельного
телевидения/спутниковых приемников (видеоприставки), подключенных к
телевизору. Используется для выбора нужного источника входного сигнала.
ТВ, Внешн.1, Внешн.2, AV, S-Video, Компонентный, ПК, HDMI1,
HDMI2 / DVI, HDMI3, HDMI4, USB, DLNA.
Можно выбрать только те внешние устройства, которые подключены
N
к телевизору. В меню “Список источн.” подключенные устройства
входных сигналов будут выделены и будут отображаться вверху
списка. Устройства входных сигналов, которые не подключены, будут
отображаться внизу списка.
Использование цветных кнопок на пульте дистанционного
N
управления со списком источников.
-
Красная (Обновить). Обновление списка подключенных внешних устройств.
-
TOOLS (Параметр). Отображение меню “Редактир. назв.” и
“ИнФормация”.
O
Нажмите кнопку SOURCE на пульте дистанционного управления для
просмотра сигнала от внешнего источника. Режим телевизора можно
выбрать с помощью кнопки TV, номерных кнопок (0~) и кнопки
P < / > на пульте дистанционного управления.
Редактир. назв.
❑
VCR/DVD/Кабельное ТВ/Спутниковая приставка/PVR/АV ресивер/Игра/Камера/ПК/ТВ/Сброс реж. звука/Blu-ray/
HD DVD/Цифровой адаптер
Укажите название устройства, подключенного к входным разъемам, для упрощения процедуры выбора источника.
Если к порту HDMI IN 2 подключен компьютер с разрешением 1920 x 1080 при частоте 60 Гц, необходимо выбрать
N
для режима “HDMI2/DVI” значение “ПК” в поле “Редактир. назв.” режима “Вход”.
Вход
Список источн.
Редактир. назв.
Page 94

Руководство
В настоящем руководстве содержатся сведения о наиболее важных функциях
данного телевизора.
1. Для отображения меню нажмите кнопку MENU. С помощью кнопки
▲ или ▼ выберите пункт “Приложение”, затем нажмите кнопку ENTER
E
.
2. С помощью кнопки ▲ или ▼ выберите пункт “Руководство”, затем нажмите
кнопку ENTER
E
.
3. С помощью кнопки ◄ или ► выберите руководство (“Picture Quality”,
“Entertainment” или “Connectivity”) и нажмите кнопку ENTER
E
.
4. С помощью кнопок ◄ и ► можно перемещаться по экранам руководства.
Picture Quality Full HD 1080p
100Hz Motion Plus
Entertainment InfoLive
Content Library
Entertainment Mode
Connectivity WISELINK Pro
DLNA
4HDMI
Anynet+
5. Чтобы выйти, нажмите кнопку EXIT.
Использование кнопок пульта дистанционного управления в меню руководства
Кнопка Функция
Желтая кнопка Последовательное отображение содержания руководства. (Автоматическое воспроизведение)
Прокрутка (◄/►) Перемещение курсора для выбора пункта меню.
E
ENTER
RETURN Возврат к предыдущему меню.
EXIT Завершение текущей функции и возврат в главное меню “Руководство”.
Выбор пункта меню, на который наведен курсор.
Content Library
Приложение
InfoLive
Руководство ►
WISELINK Pro
Подключение устройства USB
1. Нажмите кнопку POWER, чтобы включить телевизор.
2. Подключите устройство USB, содержащее музыкальные, фото- и/или
видеофайлы, к гнезду WISELINK (USB) на боковой панели телевизора.
Если выбрать режим WISELINK Pro, когда устройство USB не подключено,
N
отобразится сообщение “Нет подключенного устройства. Проверьте
состояние соединения”. В этом случае вставьте устройство USB и
отключите текущий экран, нажав кнопку W.LINK на пульте дистанционного
управления, а затем снова вернитесь к экрану WISELINK Pro.
Протокол MTP (Media Transfer Protocol) не поддерживается.
N
Поддерживается только файловая система FAT16/32 (NTFS не поддерживается).
N
Определенные типы цифровых камер USB и аудиоустройств могут быть несовместимыми с этим телевизором.
N
WISELINK Pro поддерживает только устройства USB MSC (Mass Storage Class). MSC – это устройства Mass Storage
N
Class с возможностью передачи единым целым. Примерами устройств MSC являются флэш-диски и устройства
чтения флэш-карт (не поддерживаются как жесткие диски USB, так и концентраторы).
Подсоедините непосредственно к порту USB телевизора. Если используется отдельное кабельное подключение,
N
может возникнуть проблема совместимости USB.
Русский - 28
Боковая панель
телевизора
Диск USB
Page 95

Русский - 2
Перед подключением к телевизору создайте резервные копии файлов, чтобы предотвратить повреждение или потерю
N
данных. Компания SAMSUNG не несет ответственности за любые повреждения файлов и потерю данных.
Не отключайте устройство USB во время загрузки.
N
Устройства MSC поддерживают файлы в формате MP3 и JPEG, устройства PTP – только JPEG.
N
Поддерживается последовательный формат JPEG.
N
Чем больше разрешение изображения, тем больше времени требуется для его отображения на экране.
N
Максимально возможное разрешение JPEG – 15360X8640 пикселей.
N
Если файл поврежден или имеет несовместимый формат, отображается сообщение ‘Формат не поддерживается’.
N
Если количество фотофайлов превышает 4000 (или музыкальных – 3000), то, возможно, что лишние файлы не будут
N
отображаться в списке фото (или музыки).
Файлы MP3 с технологией DRM, которые были загружены с платного узла, невозможно воспроизвести. Digital
N
Rights Management (DRM) – это технология, которая поддерживает создание содержимого, распространение и
полное интегрированное управление содержимым, включая защиту прав и интересов поставщиков содержимого,
предотвращение незаконного копирования содержимого, а также управление выставлением счетов и платежами.
При переходе к фотографии может потребоваться несколько секунд для загрузки. В этом случае на экране появляется
N
значок загрузки.
Использование функции WISELINK Pro
Данная функция позволяет просматривать и воспроизводить музыкальные, фото- и/или видеофайлы, хранящиеся на
устройстве USB MSC (Mass Storage Class).
Вход в меню WISELINK Pro
1. Нажмите кнопку MENU. С помощью кнопки ▲ или ▼ выберите пункт
“Приложение”, затем нажмите кнопку ENTERE .
2. С помощью кнопки ▲ или ▼ выберите пункт “WISELINK Pro”, затем
нажмите кнопку ENTER
Отобразится меню “WISELINK Pro”.
N
E
.
WISELINK Pro
PHOTO
851.98MB/995.00MB Своб.
SUM
Нажмите кнопку W.LINK на пульте дистанционного управления, чтобы
O
Photo
SUM
Music Setup
Movie
открыть меню “WISELINK Pro”.
С помощью кнопки SOURCE на пульте дистанционного управления
O
выберите “USB” и нажмите кнопку ENTER
E
.
3. Нажмите красную кнопку, затем с помощью кнопки ▲ или ▼ выберите
соответствующее запоминающее устройство USB (если подсоединено через концентратор). Нажмите кнопку
E
ENTER
N
N
.
Эта функция изменяется в зависимости от устройства памяти USB/DLNA, подключенного к телевизору.
В левой нижней части экрана отобразится имя выбранного устройства USB.
4. С помощью кнопки ◄ или ► выберите значок (Photo, Music, Movie, Setup), затем нажмите кнопку ENTER
выйти из режима “WISELINK Pro”, нажмите кнопку W.LINK на пульте дистанционного управления.
Безопасное отключение запоминающего устройства USB
Безопасное извлечение устройства из телевизора.
1. Нажмите кнопку TOOLS на экране списка файлов WISELINK Pro или во
время воспроизведения слайд-шоу, музыки или фильма.
2. С помощью кнопки ▲ или ▼ выберите пункт “Безопасное отключен.”,
затем нажмите кнопку ENTER
E
.
3. Удалите устройство USB из телевизора.
Photo
Ежемес.
SUM
Предпоч.
Дата
image_1.jpg
Месяц : Янв
Число :
Цвет : Серый
Композиция :
Папка : P-other
Избранное :
Янв Ноя
Устройс. пар.изб. Выбрать Переход Параметр
Воспр. текущ. гр.
Янв.01.2008
Удалить
ИнФормация
★ ★ ★
Безопасное отключен.
▲
Устройс. Возврат
E
. Чтобы
▲
Page 96

Отображение на экране
Photo
Месяц : Янв
Число :
Цвет : Серый
Композиция :
Папка : P-other
Избранное :
image_1.jpg
Янв.01.2008
★ ★ ★
2
1Выбр.файлы
SUM
Предпоч.
Ежемес.
Дата
4
Янв Ноя
▲
Устройс. пар.изб. Выбрать Переход Параметр
1. Файл, выбранный в настоящий момент, выделен. Фото- и видеофайлы отображаются в виде эскизов.
2. Информационное окно содержит сведения о файле, выбранном в настоящий момент. Только для фото- и
видеофайлов отображаются разные информационные окна. Информация о музыкальных файлах отображается там,
где расположен файл.
3. Поле текущего критерия сортировки содержит указание на текущие критерий сортировки файлов. С помощью кнопки
▲ или ▼ можно изменить текущий критерий.
4. Просмотр групп указывает на отсортированную группу. Также как и фотография, выбранная в настоящий момент,
отсортированная группа выделяется.
5. Текущее устройство содержит имя устройства, выбранного в настоящий момент. Выбрать устройство можно с
помощью красной кнопки.
6. Сведения о выборе элементов содержат количество фотографий, выбранных с помощью желтой кнопки.
7. Вспомогательные элементы
Красная кнопка (Устройс.): выбор подсоединенного устройства.
•
Зеленая кнопка (пар.изб.): изменение избранных настроек для выбранного файла. Нажимайте кнопку до тех пор,
•
пока не появится нужное значение.
Желтая кнопка (Выбрать): выбор файла из списка. Выбранный файл отмечается значком c. Чтобы отменить
•
выбор, еще раз нажмите желтую кнопку.
πµ (Переход): переход к предыдущей отсортированной группе/переход к следующей отсортированной группе.
•
Кнопка TOOLS (Параметр): отображение меню параметров (вид меню параметров зависит от текущего
•
состояния).
Использование кнопок пульта дистанционного управления в меню WISELINK Pro
Кнопка Функция
▲/▼/◄/►/колесико Перемещение курсора для выбора пункта меню.
Выбор пункта меню, на который наведен курсор.
E
ENTER
∂/∑
RETURN Возврат к предыдущему меню.
TOOLS Запуск различных функций из меню “Фото”, “Музыка”, “Видео”.
∫
π/
µ
INFO Отображение сведений о файле.
W.LINK Выход из режима WISELINK Pro.
>/<
P
, PRE-CH
EXIT Завершение текущей функции и возврат в главное меню WISELINK Pro.
При воспроизведении слайд-шоу, видео или музыки:
- с помощью кнопки ENTER
- с помощью кнопки ENTER
E
можно приостановить воспроизведение.
E
можно возобновить воспроизведение после паузы.
Воспроизведение или приостановка показа слайдов, музыки или фильмов.
Завершение текущего показа слайдов, воспроизведения музыки или видео.
Переход к предыдущей группе/переход к следующей группе.
Выключение режима WISELINK Pro и возвращение в режим ТВ.
Русский - 0
Page 97

Русский -
Использование и сортировка списка фотографий
Фотографии из списка фотографий можно отсортировать по определенному критерию.
1. С помощью кнопки ▲ или ▼ выберите критерий сортировки в списке
фотографий.
N
Фотографии будут отсортированы в соответствии с выбранным
Photo
критерием.
N
Для перехода к предыдущей/следующей группе используйте кнопку
π
(REW) или µ (FF).
2. С помощью кнопки
слайдов в выбранном порядке.
Сведения о фотофайле устанавливаются автоматически.
N
Сведения “Цвет” и “Композиция”, извлеченные из фотофайла, могут
N
∂
(Воспроизведение)/ENTERE запустите показ
SUM
Предпоч.
Ежемес.
Дата
не совпадать с ожидаемыми.
Сведения о фотофайле устанавливаются автоматически. Можно
N
изменить параметры “Цвет”, “Композиция” и “Избранное”.
Фотографии, сведения о которых отсутствуют, обозначены как
N
“Неклассиф.”.
Устройство PTP не поддерживает режим сортировки папок.
N
Критерии сортировки в списке фотографий
Ежемес.
Сортировка и отображение фотографий из файла по месяцу. Сортировка выполняется только по месяцу (январьдекабрь) без учета года.
Дата
Сортировка и отображение фотографий по дате. Сортировка выполняется по году и месяцу, фотографии
располагаются по возрастанию.
Цвет
Сортировка фотографий по цвету. Цветовую информацию фотографии можно изменить.
“Цвет”, возможные значения: красный, желтый, зеленый, синий, пурпурный, черный, серый, Неклассиф..
N
Композиция
Сортировка фотографий по композиции. Композиционную информацию фотографии можно изменить.
“Композиция”, возможные значения:
N
(по горизонтали), (по вертикали), (объект), (перспектива),
(схема), Неклассиф..
Папка
Сортировка фотографий по папке. Если на устройстве USB слишком много папок, фотофайлы из каждой папки
отображаются по очереди. Фотофайлы из корневой папки отображаются в первую очередь, из всех остальных папок
– в алфавитном порядке.
Предпоч.
Сортировка фотографий по предпочтениям (Избранное). Предпочтения можно менять.
Изменение избранных настроек
N
Выделите нужную фотографию в списке фотографий, а затем нажимайте зеленую кнопку до тех пор, пока не
появится нужная настройка.
“Избранное”, возможные значения:
N
★ ★ ★, ★ ★ ★, ★ ★ ★, ★ ★ ★
Меню параметров списка фотографий
image_1.jpg
Месяц : Янв
Число :
Янв.01.2008
Цвет : Серый
Композиция :
Папка : P-other
★ ★ ★
Избранное :
Янв Ноя
Устройс. пар.изб. Выбрать Переход Параметр
▲
Слайд-шоу
Воспроизведение слайд-шоу, составленного из фотофайлов
запоминающего устройства USB.
Воспр. текущ. гр.
Photo
image_1.jpg
Месяц : Янв
Число :
Цвет : Серый
Композиция :
Папка : P-other
Избранное :
Воспроизведение слайд-шоу, составленного из фотофайлов текущей
отсортированной группы.
Предпоч.
Янв Ноя
SUM
Ежемес.
Дата
Устройс. пар.изб. Выбрать Переход Параметр
Удалить
Удаление выбранных фотофайлов.
Изм. группу
Изменение параметров “Цвет” и “Композиция” фотофайлов.
Групповая информация текущего файла обновляется и он перемещается в новую группу.
N
Чтобы изменить информацию сразу нескольких файлов, выберите нужные файлы с помощью желтой кнопки.
N
Янв.01.2008
★ ★ ★
▲
Слайд-шоу
Воспр. текущ. гр.
Удалить
ИнФормация
▼
Page 98

ИнФормация
Отображение сведений о файлах фотографий: номер файла в текущем каталоге, имя, размер, разрешение, дата
изменения и путь.
Во время показа слайдов можно просматривать информацию о фотофайлах с помощью аналогичной процедуры.
N
Просмотреть информацию можно также, выбрав фотографию из
O
списка и нажав кнопку INFO.
Безопасное отключен.
Безопасное извлечение устройства из телевизора.
Просмотр фотографий или слайд-шоу
Просмотр слайд-шоу
1. С помощью кнопки ◄ или ► выберите нужную фотографию в списке
фотографий.
2. Нажмите кнопку TOOLS.
3. С помощью кнопки ▲ или ▼ выберите пункт “Слайд-шоу”, затем
нажмите кнопку ENTER
Все файлы из списка фотографий будут включены в слайд-шоу.
N
Во время показа слайдов будут отображаться файлы из текущей папки
N
E
.
по порядку.
Слайды будут отображаться в том порядке, в каком они перечислены в
N
списке фотографий.
Музыкальные файлы будут автоматически воспроизводиться во время показа слайдов, если для параметра “Фоновая
N
музыка” установлено значение “Вкл.”. (См. стр. 33).
►
Обычная20/22 image_1.jpg 440x440 2.0KB 2008/1/1
SUM
E Пауза Предыд. Следующая Параметр Возврат
Когда отображается список фотографий, нажмите кнопку
O
∂
(Воспроизведение)/ENTERE на пульте дистанционного
управления, чтобы начать показ слайдов.
N
Кнопки управления показом слайдов
ENTER
∂
∑
E
Запуск/приостановка слайд-шоу.
∫
Запуск слайд-шоу. TOOLS Запуск различных функций в меню Фото.
Остановка слайд-шоу.
π/µ
Выход из режима воспроизведения слайд-шоу
и возврат к списку фотографий.
Изменение скорости показа слайдов.
Воспроизведение текущей группы
1. С помощью кнопки ▲ или ▼ выберите критерий сортировки (“Ежемес. ”, “Дата”, “Цвет”, “Композиция”, “Папка”,
“Предпоч.”)
2. С помощью кнопки
π
(REW) или µ (FF) выберите нужную группу.
3. Нажмите кнопку TOOLS.
4. С помощью кнопки ▲ или ▼ выберите пункт “Воспр. текущ. гр.”, затем нажмите кнопку ENTER
N
В слайд-шоу будут включены только фотографии из отсортированной группы, включая выделенные файлы.
E
.
Показ слайд-шоу, состоящего только из выбранных файлов
1. С помощью кнопки ◄ или ► выберите нужную фотографию в списке фотографий.
2. Нажмите желтую кнопку. Повторите описанную выше операцию, чтобы выбрать несколько фотографий.
Слева от выбранной фотографии появится значок
N
N
Если выбрать только один файл, слад-шоу воспроизводиться не будет.
N
Чтобы отменить выбор всех файлов, нажмите кнопку TOOLS и выберите пункт “Отменить все”.
3. Нажмите кнопку
O
Выбранные файлы будут включены в слайд-шоу.
∂
(Воспроизведение)/ENTERE .
c
.
Русский - 2
Page 99

Русский -
Меню параметров слайд-шоу
Остановка показа/Запустить показ слайдов
Остановка показа слайдов/запуск показа слайдов
Поворот
Поворот фотографий, хранящихся на запоминающем устройстве USB.
При каждом нажатии кнопки ◄ фотография поворачивается на
N
270°, 180°, 90° или 0°.
При каждом нажатии кнопки ► фотография поворачивается на 90°,
N
180°, 270° или 0°.
При выборе функции “Увелич.” параметр “Поворот” недоступен.
N
Увелич.
Увеличение фотографий, хранящихся на запоминающем устройстве
USB. (x1 → x2 → x4)
Чтобы переместить увеличенное изображение, нажмите кнопку ENTER
N
E
, а потом одну из кнопок ▲/▼/◄/►.
Обратите внимание, что если увеличенная фотография не превышает размер экрана, то функция перемещения
недоступна.
Увеличенное изображение не сохраняется.
N
Скорость слайд-шоу
Выбор скорости слайд-шоу.
Скорость можно менять только во время показа слайдов.
N
Можно изменить скорость показа слайдов, нажав кнопку
N
Фоновая музыка → Вкл./Выкл.
π
(REW) или µ (FF) во время показа слайдов.
Если для параметра “Фоновая музыка” установить значение “Вкл.”, то при просмотре фотографий или показе слайдов
будет звучать фоновая музыка.
Если для параметра “Фоновая музыка” установить значение “Вкл.”, то немедленно отобразиться экран установки
фоновой музыки.
Этой функцией можно воспользоваться, только если на устройстве USB хранятся музыкальные и фотофайлы .
Настройка фоновой музыки
Выбор фоновой музыки для показа слайдов.
Если отключить параметр “Фоновая музыка”, воспроизведение прекратится, даже если для параметра “Настройка
N
фоновой музыки” выбрано какое-либо значение.
Для изменения режима BGM необходимо загрузить музыкальные файлы. Для загрузки воспроизведите
N
музыкальные файлы в музыкальной категории.
Режим BGM → Настр./Выбр. Файл/Случайно
•
Настроение BGM → Энергичный/Ритмичный/Печальный/Веселый/Спокойный
•
Если для параметра “Режим BGM” установлено значение “Настр.”, то можно настроить тональность фоновой
N
музыки.
Тональность, не входящую в музыкальные файлы запоминающего устройства USB, установить нельзя.
N
Выбор файла музыки
•
Если для параметра “Режим BGM” установлено значение “Выбр. Файл”, то в качестве фона можно выбрать
N
музыкальный файл.
Настройка изображения/Настройка звука
См. стр. 39.
ИнФормация
Отображение сведений о фотофайле.
Безопасное отключен.
Безопасное извлечение устройства из телевизора.
Инструменты
Остановка показа
Поворот
Увелич.
Скорость слайд-шоу
Фоновая музыка : Выкл.
Настройка фоновой музыки
Настройка изображения
Настройка звука
ИнФормация
U
Перем. E Вход e Выход
: Обычная
Page 100

Использование и сортировка списка музыки
Фотографии из списка музыки можно отсортировать по определенному критерию.
1. С помощью кнопки ▲ или ▼ выберите критерий сортировки в списке
музыки.
Музыкальные файлы будут отсортированы в соответствии с
N
выбранным критерием.
Для перехода к предыдущей/следующей группе используйте кнопку
N
π
(REW) или µ (FF).
2. С помощью кнопки ENTER
E
запустите воспроизведение музыки в
выбранном порядке.
Сведения о музыкальном файле устанавливаются автоматически.
N
Сведения “Настр.”, извлеченные из музыкального файла, могут не
N
совпадать с ожидаемыми.
Сведения о музыкальном файле устанавливаются автоматически. Можно изменить параметры “Настр.” и
N
“Избранное”.
Музыкальные файлы, сведения о которых отсутствуют, обозначены как “Неклассиф.”.
N
Если отсутствует название композиции, отображается имя файла.
N
Если отсутствуют сведения о жанре, исполнителе, альбоме или годе выпуска, то соответствующие поля остаются
N
пустыми.
Критерии сортировки в списке музыки
Название: Сортировка названий музыкальных файлов по символу/номеру/алфавиту/по другому признаку и
отображение музыкального файла.
Артист: Сортировка музыкальных файлов по артисту в порядке по символу/номеру/алфавиту/другому признаку.
Настр.: сортировка музыкальных файлов по тональности. Информацию о тональности композиции можно
изменить.
“Настр.”, возможные значения: Энергичный, Ритмичный, Печальный, Веселый, Спокойный, Неклассиф.
N
Жанр: сортировка музыкальных файлов по жанру.
Папка: сортировка музыкальных файлов по папке. Если на устройстве USB много папок, файлы из каждой
папки отображаются по очереди. Музыкальные файлы из корневой папки отображаются в первую очередь, из
всех остальных папок – в алфавитном порядке.
Предпоч.: сортировка музыкальных файлов по предпочтениям (“Избранное”). Предпочтения можно менять.
Изменение избранных настроек
N
Выделите нужный музыкальный файл в списке музыки, а затем нажимайте зеленую кнопку до тех пор, пока не
появится нужная настройка.
Чтобы изменить информацию сразу нескольких файлов, выберите нужные файлы с помощью желтой кнопки.
N
“Избранное”, возможные значения:
N
★ ★ ★, ★ ★ ★, ★ ★ ★, ★ ★ ★
Music
Thanks
Jee
Album 1
2005
Pop
Энергичный ★ ★ ★
Предпоч.
Название
Артист
SUM
I Love You
Darby
Album 2
2005
Pop
Печальный ★ ★ ★
F G H I J L P S T V
▲
Устройс. пар.изб. Выбрать
Better than yesterday
Спокойный ★ ★ ★
Переход
Catherine
Album 3
2005
Pop
Параметр
Меню параметров списка музыки
Воспр. текущ. гр.: воспроизведение музыкальных файлов только из
текущей отсортированной группы.
Удалить: удаление выбранных музыкальных файлов.
Изм. группу: изменение информации о тональности композиции.
Групповая информация текущего файла обновляется и он
перемещается в новую группу.
Чтобы изменить информацию сразу нескольких файлов, выберите
N
нужные файлы с помощью желтой кнопки.
ИнФормация: В сведениях о музыкальном файле указывается имя,
размер, дата изменения и путь к файлу.
Во время показа слайдов можно просматривать информацию о
N
музыкальных файлах с помощью аналогичной процедуры.
Просмотреть информацию можно также, выбрав музыкальный
O
файл из списка и нажав кнопку INFO.
Безопасное отключен.: безопасное извлечение устройства из
телевизора.
Русский - 4
Music
Thanks
Jee
Album 1
2005
Pop
Печальный ★ ★ ★
Артист
Настр.
Жанр
SUM
I Love You
Darby
Album 2
2005
Pop
Печальный ★ ★ ★
Ритмичный Печальный Веселый Спокойный ...
▲
Устройс. пар.изб. Выбрать
Better than yesterday
Воспр. текущ. гр.
Удалить
Catherine
Изм. группу
Album 3
2005
ИнФормация
Pop
▼
Веселый ★ ★ ★
Переход
Параметр
 Loading...