

Page 1
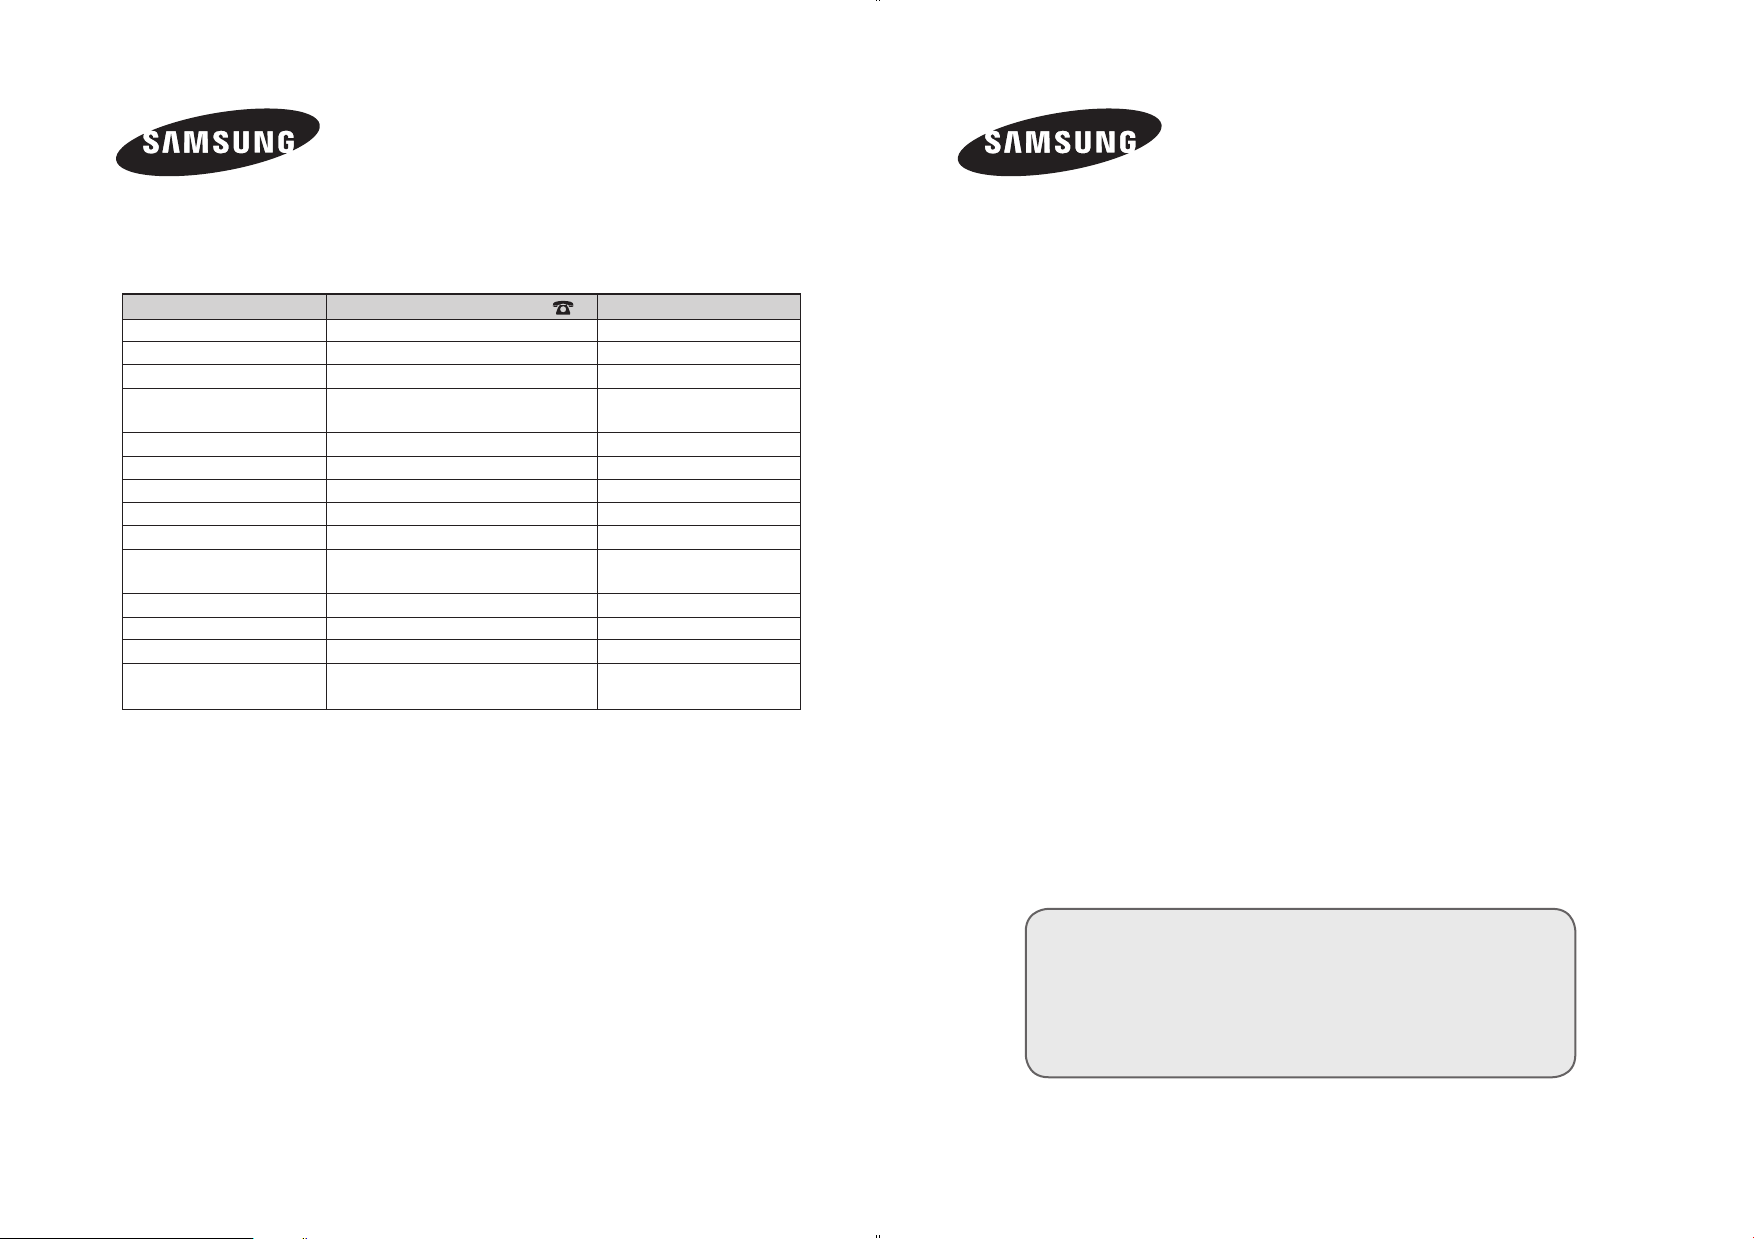
Contact SAMSUNG WORLDWIDE
If you have any questions or comments relating to Samsung products,
please contact the SAMSUNG customer care centre.
LCD TV
LA40F81BD
LA46F81BD
LA52F81BD
Country
AUSTRALIA
CHINA
HONG KONG
INDIA
INDONESIA
JAPAN
MALAYSIA
PHILIPPINES
SINGAPORE
THAILAND
TAIWAN
VIETNAM
SOUTH AFRICA
U.A.E
Customer Care Centre
1300 362 603
800-810-5858 , 010- 6475 1880
3698 - 4698
3030 8282
1800 1100 11
0800-112-8888
0120-327-527
1800-88-9999
1800-10-SAMSUNG (7267864)
1800-SAMSUNG (7267864)
1800-29-3232
02-689-3232
0800-329-999
1 800 588 889
0860 7267864 (SAMSUNG)
800SAMSUNG (7267864)
8000-4726
Web Site
www.samsung.com/au
www.samsung.com.cn
www.samsung.com/hk
www.samsung.com/in
www.samsung.com/id
www.samsung.com/jp
www.samsung.com/my
www.samsung.com/ph
www.samsung.com/sg
www.samsung.com/th
www.samsung.com/tw
www.samsung.vn
www.samsung.com/za
www.samsung.com/mea
Owner’s Instructions
Before operating the unit,
please read this manual thoroughly,
and retain it for future reference.
BN68-01324A-02
ON-SCREEN MENUS
PC DISPLAY
PICTURE IN PICTURE (PIP)
TELETEXT
Register your product at www.samsung.com/global/register
Record your Model and Serial number here for future reference.
▪ Model _______________ ▪ Serial No. _______________
Page 2

Precautions When Displaying a Still Image
A still image may cause permanent damage to the TV screen.
• Do not display a still image on the LCD panel for more than 2 hours as it can cause screen image retention.
This image retention is also known as "screen burn".
To avoid such image retention, reduce the degree of brightness and contrast of the screen when displaying a still image.
• Watching the LCD TV in 4:3 format for a long period of time may leave traces of borders displayed on the left, right and center
• Displaying still images from Video games and PC for longer than a certain period of time may produce partial after-images.
To prevent this effect, reduce the ‘brightness’ and ‘contrast’ when displaying still images.
of the screen caused by the difference of light emission on the screen.
Playing a DVD or a game console may cause a similar effect to the screen.
Damages caused by the above effect are not covered by the Warranty.
© 2007 Samsung Electronics Co., Ltd. All rights reserved.
Page 3

Contents
General Information
User Instructions .............................................2
List of checking Parts ......................................4
Installing the Wall Mount Kit ...........................4
Viewing the Control Panel ............................. 5
Viewing the Connection Panel........................ 6
Viewing the Remote Control ........................... 8
Installing Batteries in the Remote control.......... 9
Operation
Switching On and Off 9
Placing Your Television in Standby Mode........ 9
Plug & Play Feature ......................................10
Viewing the Display ....................................... 11
Viewing the Menus ........................................12
Using the TOOLS Button .............................. 12
Viewing External Signal Sources ..................13
Editing Device Names ...................................14
................................... ..
Using the DTV Feature
Setting the Guide .......................................... 15
Setting the Default Guide .............................. 15
Checking the Digital-Signal Strength - Digital ...
16
Channel Control
Storing Channels Automatically ....................16
Storing Channels Manually ...........................17
Managing Channels ......................................18
Fine Tuning Channel Reception ....................24
LNA (Low Noise Amplifier) ............................25
Picture Control
Changing the Picture Standard ..................... 26
Customizing the Picture Settings ..................27
Configuring Detailed Settings on the Picture
Selecting the Picture Size ............................. 29
Digital NR / Active Colour /
Auto Motion Plus 100Hz / DNIe ....................30
Freezing the Current Picture ......................... 30
Viewing Picture-in-Picture ............................. 31
...28
Sound Control
Sound Features ............................................33
Selecting the Sound Mode
(depending on the model) .............................34
Function Description
Setting the Time ............................................ 35
Menu Transparency / Energy Saving /
HDMI Black Level / Film Mode /
Light Effect / Blue Screen /
Melody / Function Help....................... ........... 37
Activating the Child Lock ............................... 38
Setting the Subtitle .......................................39
Using the Game Mode ..................................40
Setting up the Parental Lock ......................... 41
Wall- mount adjustment
(Sold separately)........................................... 43
Upgrading the Software ................................ 44
Over the Air Download................................. 45
PC Display
Setting up Your PC Software
(Based on Windows XP) ...............................46
Display Modes ..............................................47
Setting the PC ............................................... 48
Changing the Picture Size (PC Mode) ..........49
Setting the Home theatre PC ........................49
WISELINK
Using the WISELINK Function ...................... 50
Using the WISELINK Mode ........................... 51
Using the Photo (JPEG) List .........................52
Using the Music (MP3) List ...........................60
About Anynet+
What is Anynet+? .......................................... 63
Connecting Anynet+ Devices ........................ 63
Setting Up Anynet+ ....................................... 64
Scanning and Switching between Anynet+
Devices ......................................................... 65
Recording ......................................................66
Listening through a Home theatre ................. 67
Troubleshooting for Anynet+ ......................... 67
Appendix
Teletext Feature (depending on the model) ..68
Setting Up Your Remote Control ................... 70
Using the Anti-Theft Kensington Lock
(depending on the model) .............................75
Troubleshooting ............................................ 75
Technical and Environmental Specifications. 76
Symbols
Press
English - 3
☛ ➢
Important
Note
Page 4
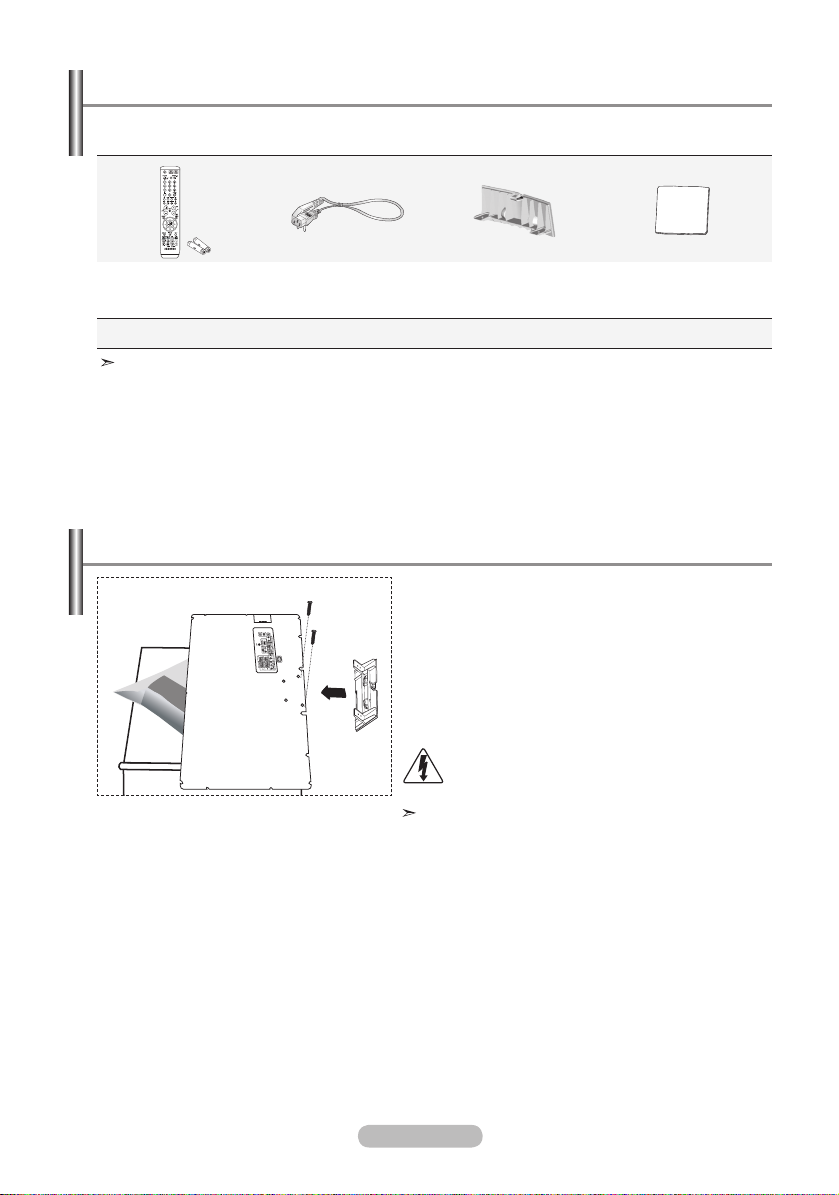
List of Parts
Please make sure the following items are included with your LCD TV.
If any items are missing, contact your dealer.
Remote Control &
Batteries
(AAA x 2)
Owner’s Instructions
Warranty card / Safety Guide /
Power Cord Cover-Bottom Cleaning Cloth
Warranty card
Registration Cards (Not available in all locations)
Safety Guide
Installing the Wall Mount Kit
Wall mount items (sold separately) allow you to mount
the TV on the wall.
For detailed information on installing the wall mount,
see the instructions provided with the Wall Mount items.
Contact a technician for assistance when installing the
wall mounted bracket.
Samsung Electronics is not responsible for any damage
to the product or injury to yourself or others
if you elect to install the TV on your own.
Do not install your Wall Mount Kit while your TV
is turned on. It may result in personal injury due
to electric shock
Remove the stand and cover the bottom hole with a
cap and fasten with two screws.
Registration Cards
English - 4
Page 5
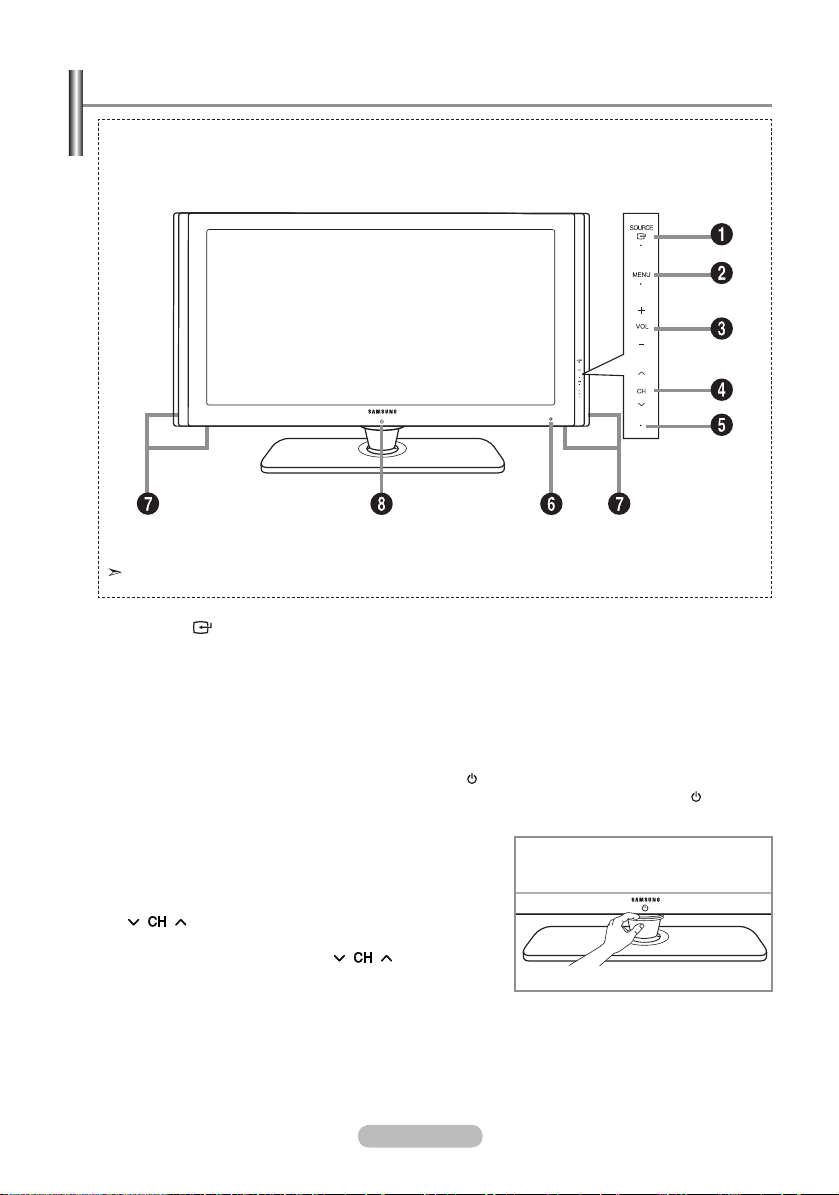
Viewing the Control Panel
The product colour and shape may vary depending on the model.
Front Panel buttons
Touch the each button to
operate.
1 SOURCE
Toggles between all the available input
sources (TV, AV1, AV2, S-Video, Component1,AV2, S-Video, Component1,S-Video, Component1,
Component2,
PC, HDMI1, HDMI2/DVI, HDMI3
PC, HDMI1
USB).In the on-screen menu, use this button
as you use the ENTER/OK button on the
remote control.
2 MENU
Press to see an on-screen menu of your TV’s
features.
3 - VOL +
Press to decrease or increase the volume.
In the on-screen menu, use the - VOL +
buttons as you use the and buttons on
◄ ►
the remote control.
4
Press to change channels.
In the on-screen menu, use the
buttons as you use the and buttons on
the remote control.
▼
▲
(Without the Remote Control, you can turn on
the TV by using the Channel buttons.)
English - 5
5 Power Indicator
Blinks and turns off when the power is on and
lights up in stand-by mode.
6 Remote Control Sensor
Aim the remote control towards this spot on
the TV.
7 Speakers
8 (Power)
Touch the silver sensor below the ( ) mark to
turn the TV on and off.
Silver sensor
Page 6
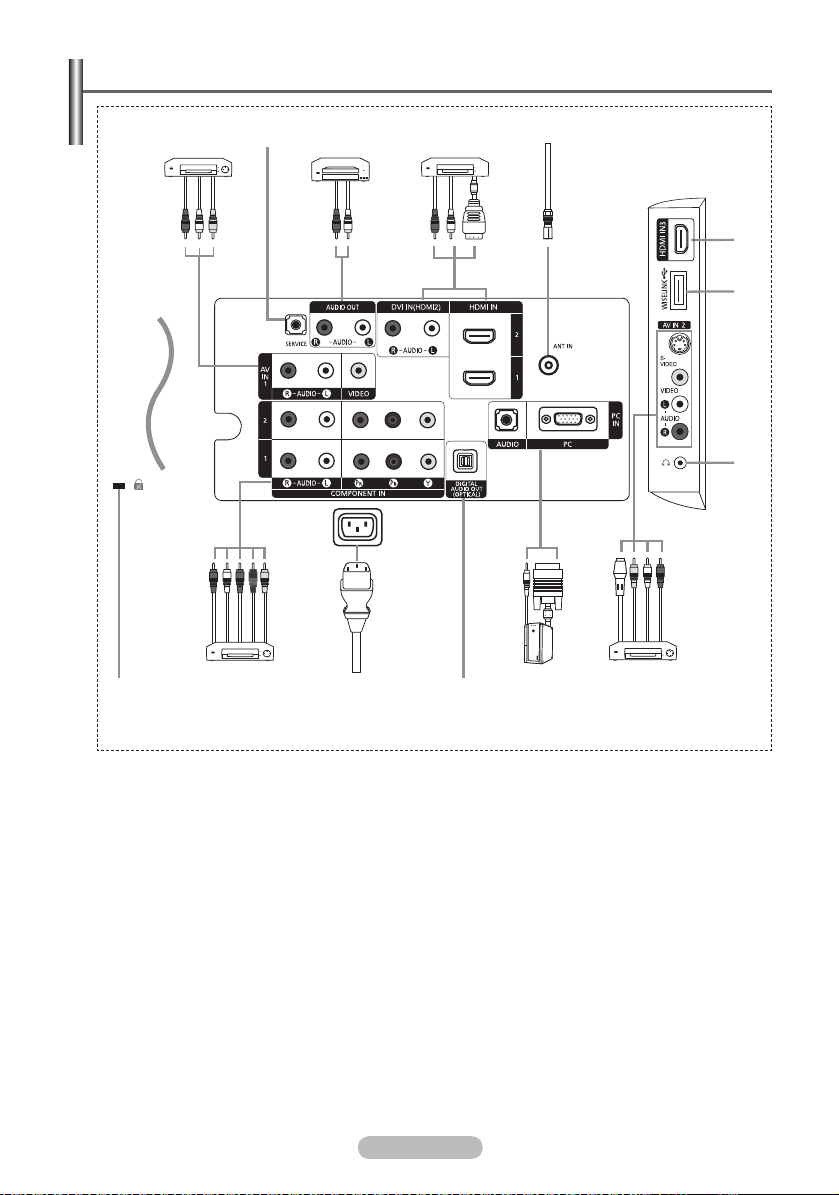
Viewing the Connection Panel
@
1 2 3 4
Power Input
5
[Side Panel Jacks]
3
6
7
90!
8
The product colour and shape may vary depending on the model.
➢
Whenever you connect an external device to your TV, make sure that power on the unit is turned off.
➢
The product colour and shape may vary depending on the model.
➢
1
VIDEO / AUDIO L/R
Video and audio inputs for external devices, such as a camcorder or VCR.
2
SERVICE
− Connector for service.
− Connect the serial jack between the electro-motion wall mount bracket and your TV when you
want to adjust the TV viewing angle using your remote control.
3
Connecting external Audio Devices
Connect RCA audio signals from the TV to an external source, such as Audio equipment.
4
HDMI IN 1, HDMI IN 2, HDMI IN 3
− Connect to the HDMI jack of a device with HDMI output. These inputs can also be used as a DVI
connection with separate analog audio inputs. An optional HDMI/DVI cable will be necessary to
make this connection. When using the optional HDMI/DVI adapter, the DVI analog audio inputs on
your TV allow you to receive left and right audio from your DVI device. (Not compatible with PC)
− When connecting this product via HDMI or DVI to a Set Top Box, DVD Player or Games Console
etc, make sure that it has been set to a compatible video output mode as shown in the table below.
Failure to observe this may result in picture distortion, image breakup or no picture.
− Do not attempt to connect the HDMI/DVI connector to a PC or Laptop Graphics Card.
(This will result in a blank screen being displayed)
English -6
Page 7

DVI IN (HDMI 2) AUDIO L/R
DVI audio outputs for external devices.
The external devices that support lower version HDMI mode may not implement sound ouput for
theTV with the latest HDMI version (HDMI 1.3.) In this case, connect to HDMI IN2 and DVI IN (HDMI
2) “ R-AUDIO-L” on the back panel of the TV.
Part of lower version HDMI cables may cause annoying flickers or no screen display in this case use
the cable that supports the latest HDMI version(HDMI 1.3)
Supported modes for HDMI and Component
480i 480p 576i 576p 720p 1080i 1080p
HDMI/DVI 50Hz X X X O O O O
HDMI/DVI 60Hz X O X X O O O
Component O O O O O O O
5
ANT IN
75Ω Coaxial connector for Aerial/Cable Network.
6
WISELINK
- Connect a USB mass storage device to view photo files (JPEG) and play audio files (MP3)
7
Headphones jack
You can connect a set of headphones if you wish to watch a television programme without disturbing
the other people in the room.
Prolonged use of headphones at a high volume may damage your hearing.
➢
8
S-VIDEO or VIDEO / AUDIO L/R
- Video (S-Video or Video) and audio inputs for external devices, such as a camcorder or VCR.
9
PC IN / AUDIO
Connect to the video and audio output jack on your PC.
0
DIGITAL AUDIO OUT (OPTICAL)
Connect to a Digital Audio Component. According to the received audio signal, optical output is
selectcted by Dobly or PCM signal. The level of sound can change according to received signal
and sound level’s difference can be.
!
COMPONENT IN 1, COMPONENT IN 2
Audio (AUDIO L/R) and video (Y/PB/PR) inputs for Component.
@
Kensington Lock (depending on the model)
- The Kensington lock (optional) is a device used to physically fix the system when used in a public
place.
- If you want to use a locking device, contact the dealer where you purchased the TV.
- The place of the Kensington Lock may be different depending on its model.
English -7
Page 8
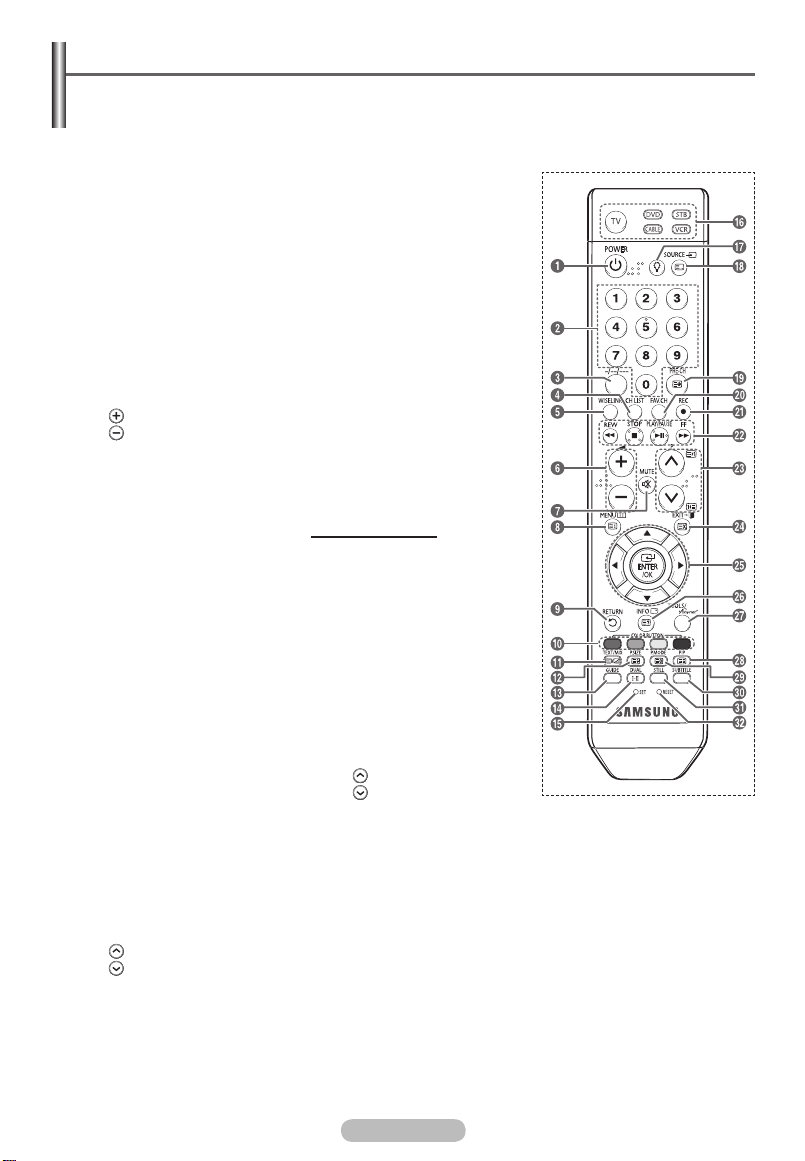
Viewing the Remote Control
This is a special remote control for the visually impaired persons, and has Braille points on the
➢
Power, Channel, Volume, STOP, and PLAY/PAUSE buttons.
The performance of the remote control may be affected by bright light.
1
POWER button
(turns the TV on and off)
2
Number buttons for direct
channel access
3
One/Two/Three-digit channel
selection
4
Channel control button
(Refer to page 16)
5
This function enables you to
view and play photo (JPEG)
and audio files (MP3) from
an external device. (See
page 52(JPEG), 60 (MP3))
6
Volume increase
Volume decrease
7
Temporary sound switch-off
8
Displays the main on-screen
menu
9
Returns to the previous
menu
@
Picture size selection
#
Electronic Program Guide
(EPG) display
$
Sound mode selection
%
Remote control setup
^
Selects a target device to be
controlled by the Samsung
remote control (TV, DVD,
STB, CABLE, VCR)
&
Press to backlight the VOL,
CH, and the active source
button (TV, DVD, CABLE,
STB, VCR) on the remote.
*
Available source selection
(
Previous channel
)
Press to switch to your
favourite channels.
a
Records for Live
Broadcasting
b
VCR/DVD Function (Rewind,
Stop, Play/Pause, Fast/
Forward)
c
Next channel
Previous channel
d
Exit the on-screen menu
e
Control the cursor in the
menu
f
Use to see information on
the current broadcast
g
TOOLS : Use to quickly
select frequently used
functions.
Anynet+ : Runs the Anynet+
view functions and sets up
Anynet+ devices.
h
Picture-In-Picture On/Off
i
Picture effect selection
(Refer to page 26)
j
Digital subtitle display
k
Picture freeze
l
If your remote control is not
functioning properly, take out
the batteries and press the
reset button for about 2~3
seconds.
Reinsert the batteries and
try using the remote control
again.
Teletext Functions
(Refer to page 68)
8
Teletext index
9
Exit from the teletext display
(depending on the model)
0
Fastext topic selection
!
Teletext display/mix both
teletext information and the
normal broadcast
@
Teletext size
*
Teletext mode selection
(LIST/FLOF)
(
Teletext sub page
c
P :Teletext next page
P
:Teletext previous page
d
Teletext cancel
f
Teletext reveal
h
Teletext hold
i
Teletext store
English - 8
Page 9
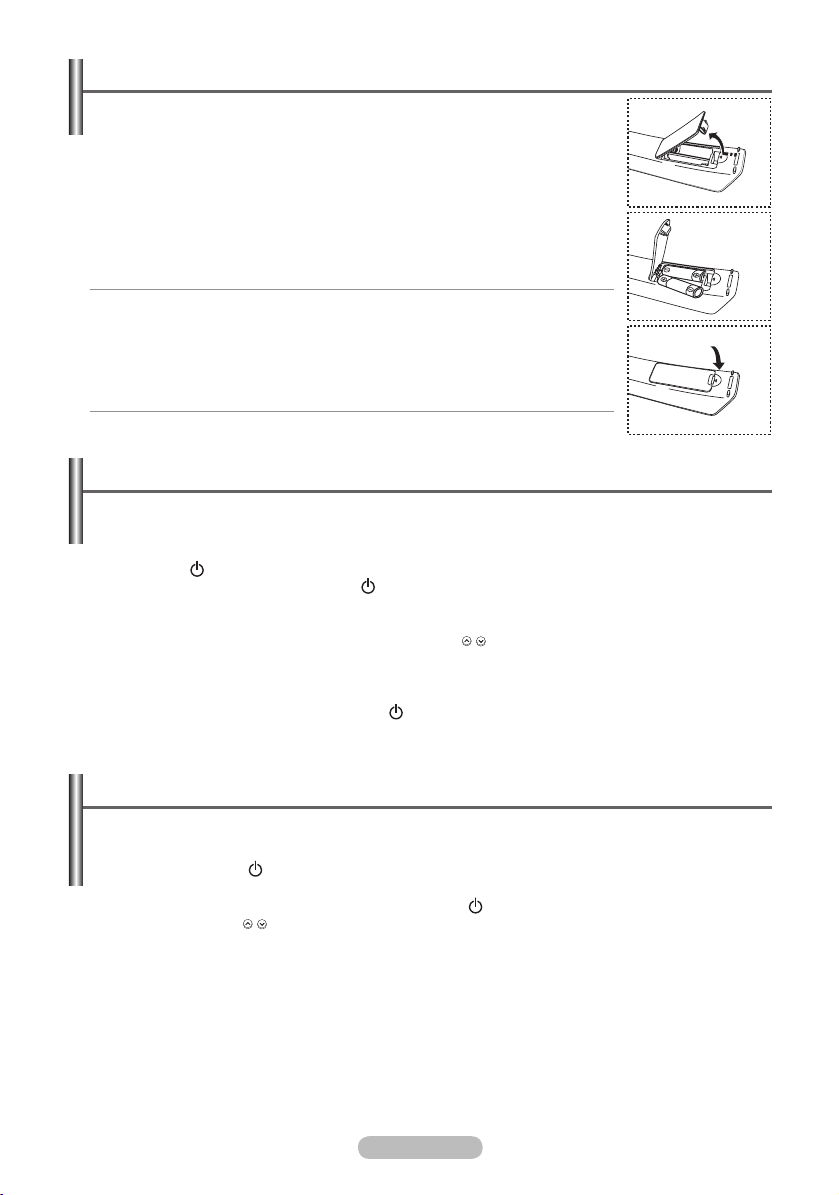
Installing Batteries in the Remote Control
1 Lift the cover at the back of the remote control upward as shown in the
figure.
2 Install two AAA size batteries.
Make sure to match the “+” and “–” ends of the batteries with the
➢
diagram inside the compartment.
3 Replace the cover.
Remove the batteries and store them in a cool, dry place if you won’t be
➢
using the remote control for a long time. The remote control can be used
up to about 23 feet from the TV.
(Assuming typical TV usage, the batteries last for about one year.)
If the remote control doesn’t work, check the following:
➢
1. Is the TV power on?
2. Are the plus and minus ends of the batteries reversed?
3. Are the batteries drained?
4. Is there a power outage, or is the power cord unplugged?
5. Is there a special fluorescent light or neon sign nearby?
Switching On and Off
The main lead is attached to the rear of your set.
1 Plug the mains lead into an appropriate socket.
The standby indicator lights up on the front of the set.
➢
2 Press the button on the front of the set.
You also can press the POWER button or the TV button on the remote control to turn the TV
➢
on.
The programme that you were watching last is reselected automatically.
➢
3 Press the numeric button (0~9) or channel up/down ( / ) button on the remote control or button on
the right side of the set.
When you switch the set on for the very first time, you will be asked to choose language in which
➢
the menus are to be displayed.
4 To switch your set off, press the POWER button again.
Placing Your Television in Standby Mode
Your set can be placed in standby mode in order to reduce the power consumption. The standby
mode can be useful when you wish to interrupt viewing temporarily (during a meal, for example).
1 Press the POWER button on the remote control.
The screen is turned off and a red standby indicator appears on the front of your set.
➢
2 To switch your set back on, simply press the POWER , numeric buttons (0~9), TV button or
channel up/down ( / ) button again.
Do not leave your set in standby mode for long periods of time (when you are away on holiday,
➢
for example). It is best to unplug the set from the mains and aerial.
English - 9
Page 10

Plug & Play Feature
When the TV is initially powered on, basic settings
proceed automatically:
1 Press the POWER button on the remote control.
The message Runs the Plug & Play function when
setting the TV up for the first time or when resetting it.
Sets the channels, the clocks, as well as other
functions.is automatically displayed.
2 The message Select Home Mode when installing this
TV at home. is automatically displayed.
3 Press the ◄ or ► button to select Shop or Home, then
press the ENTER/OK button.
The default selection is Home.
➢
We recommend setting the TV to Home mode for the
➢
best picture in your home environment.
Shop mode is only intended for use in retail
➢
environments.
If the unit is accidentally set to Shop mode, and you
➢
want to return to Dynamic (Home) mode, press the
Volume button and then hold down the
MENU button
for five seconds on the TV panel.
4 The TV will begin memorizing all of the available
channels.
After all the available channels are stored, the Auto
program menu reappears.
Press the ENTER/OK button when channel memorization
is complete.
The Clock Mode menu is displayed.
To stop the search before it has finished, press the
➢
ENTER/OK button with stop selected.
5 Press the ENTER/OK button.
Press the ▲ or ▼ button to select Manual for setting the
current time manually, then press the
ENTER/OK button.
The message Set current date and time. is displayed.
If you select Auto. Select the time zone in which
➢
you live. is displayed, then go to step 8.
6 Press the ◄ or ► button to move to Month, Day, Year,
Hour, Minute or am/pm.Set the date and time you want
bypressing the ▲ or ▼ button, then press the ENTER/OK
button.
You can set the month, day, year, hour, and minute
➢
directly by pressing the number buttons on the
remote control.
7 The message Enjoy your watching. is displayed.
When you have finished, press the ENTER/OK button.
Even if the ENTER/OK button is not pressed, the
➢
message will automatically disappear after several
seconds.
Plug & Play
Runs the Plug & Play function when setting the TV up
for the first time or when resetting it. Sets the
channels,clocks, as well as other functions.
OK
Enter
Return
Plug & Play
Select Home Mode when installing this TV at home.
Shop
Press Enter to start channel memory.
Auto Store in Progress.
6
Digital Channels are added on the favourite
channel list.
Auto Store is completed.
3 channels are memorized.
Digital:1 Analog:2
Set the Clock Mode.
Clock Mode : Auto
Set the Clock Mode.
Clock Mode : Auto
Set current date and time
Month
01
Hour
00
Move
Home
Move
Plug & Play
Start
Plug & Play
Digital Channel found: 0
Stop
Plug & Play
OK
Plug & Play
Plug & Play
Auto
Manual
Move
Plug & Play
Day
01
Minute
04
Enter
Adjust
SkipEnter
0%
SkipEnterf
3%
SkipEnter
SkipEnter
SkipEnter
SkipEnter
Year
2007
am/pm
am
Skip
English - 10
Continued...
Page 11
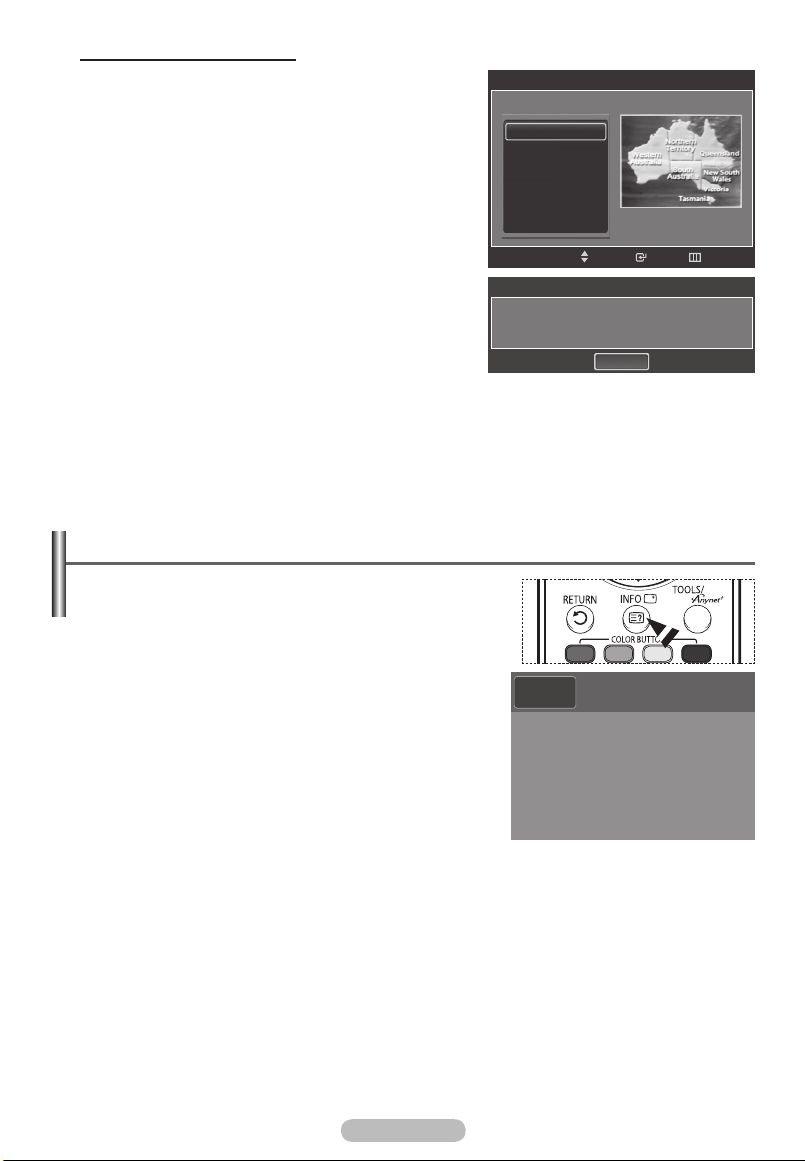
Setting the Clock Automatically
8 Press the ENTER/OK button.
Press the ▲ or ▼ button to select Off or On, then the
ENTER/OK button.
The message Select the time zone in which you live.
is displayed.
9 Press the ▲ or ▼ button to highlight the time zone
for your local area (and to move the highlight to the
appropriate time zone on the map of the United States).
Press the ENTER/OK button.
If clock is not automatically set, see pages 35~36. to set
Select the time zone in which you live.
New South Wales/ACT
Victoria
QueenSland
South Australia
West Australia
Tasmania
the clock.
10 The message Enjoy your watching. is displayed.
When you have finished, press the ENTER/OK button.
Even if the ENTER/OK button is not pressed, the
➢
message will automatically disappear after several
seconds.
Viewing the Display
The display identifies the current channel and the status of
certain audio-video settings.
Press the INFO button on the remote control.
Plug & Play
Move
Plug & Play
Enjoy your watching.
OK
SkipEnter
English - 11
ATV
3
No Time Information
Page 12

Viewing the Menus
1 With the power on, press the MENU button.
The main menu will appear at the bottom of the screen.
There are seven menu groups: Picture, Sound, Channel,
Setup, Input, Guide, and PIP.
2 Press the ▲ or ▼ button, then press the ENTER/OK
button to select an item you want in the menu. Press the
▲/▼/◄/►/ENTER/OK button to display, change, or use
the selected items.
3 Press the EXIT button to exit.
Using the TOOLS Button
Picture
Mode
Contrast : 100
Brightness : 45
Sharpness : 75
Colour : 55
Tint (G/R) : G50/R50
Colour Tone : Cool1
Backlight :10
:
Dynamic
The Tools button allows you to display frequently used Menu
and Connection items with a Single button press.
1 Press the TOOLS button.
The TOOLS menu will appear.
2 Press the ▲/▼ button to select a menu, then press the
ENTER/OK button.
3 Press the ▲/▼/◄/►/ENTER/OK buttons to display, change,
or use the selected items.
For a more detailed description of each function, refer to the
corresponding page.
Device List, see page 63
Picture Setting, see page 26
Sound Setting, see page 33
Sleep Timer, see page 36
Delete Favourite Channel, see page 20
Auto Store, see page 16
TOOLS
Device List
Picture Size : 16:9
Picture Mode : Dynamic
Sound Mode : Standard
Sleep Timer : Off
Delete from Favourite
Auto Store
Move
Enter
English - 12
Page 13
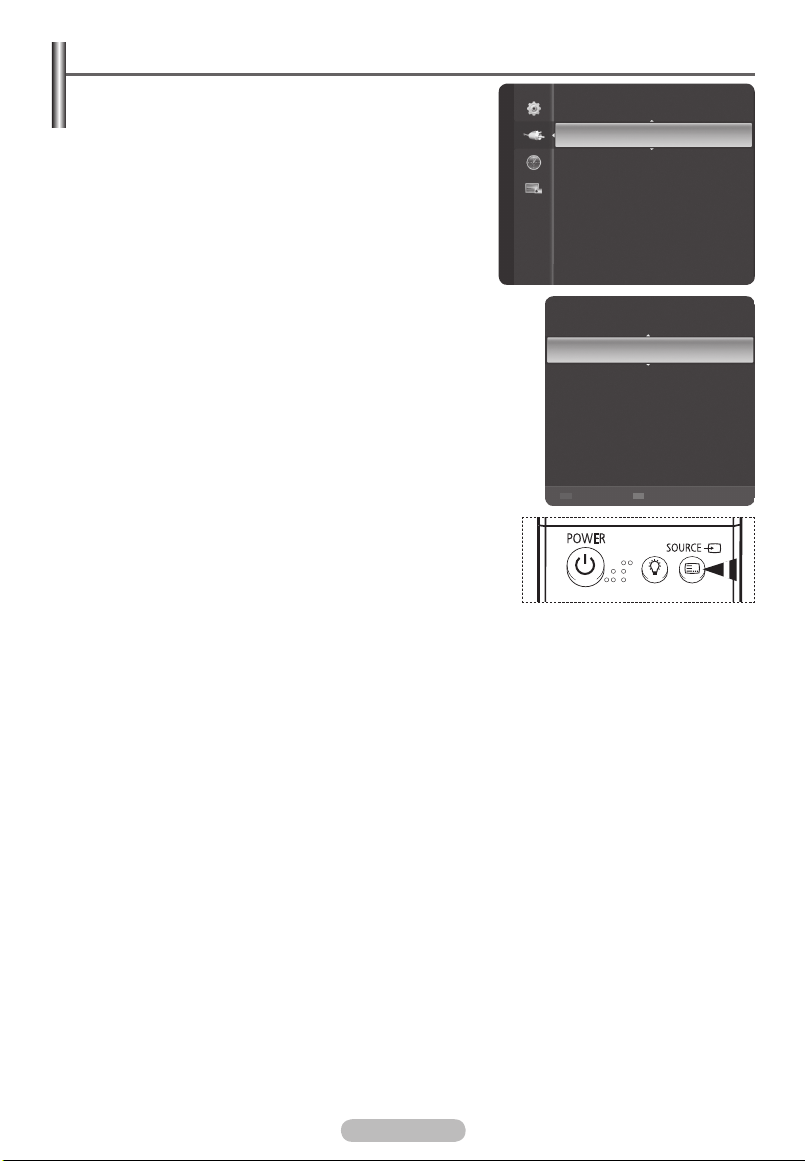
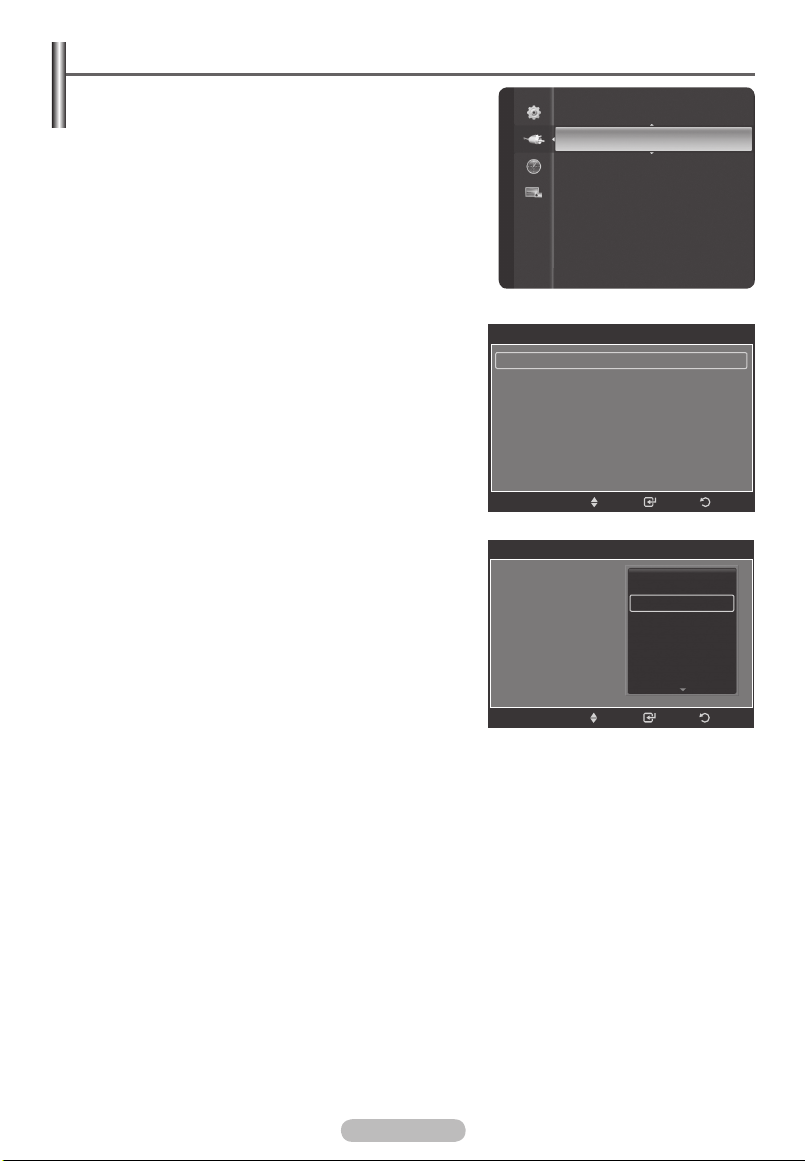
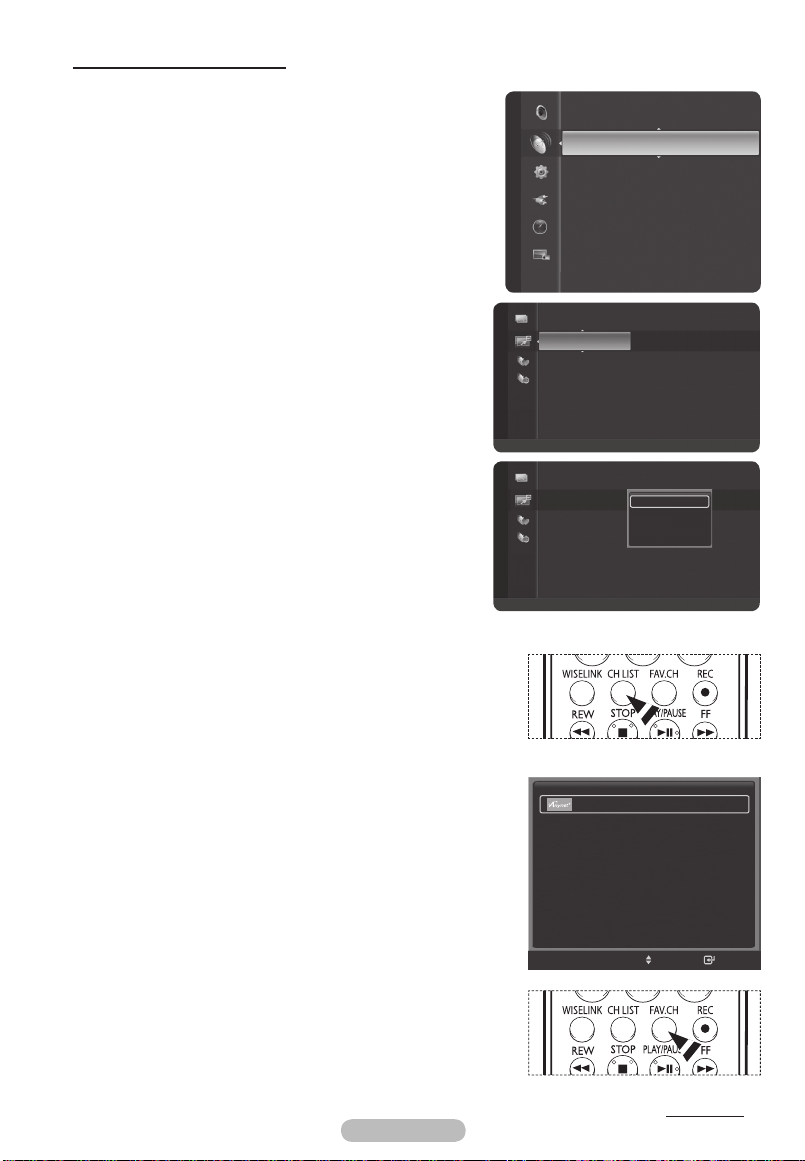
Viewing External Signal Sources
You can switch between viewing signals from connected
equipment, such as a VCR, DVD, Set-Top Box, and the TV
source (broadcast or cable).
1 Press the MENU button to display the menu.
2 Press the ▲ or ▼ button to select Input, then press the
ENTER/OK button.
3 Press the ENTER/OK button again to select Source List.
4 Press the ▲ or ▼ button to select the signal source, then
press the ENTER/OK button.
Available signal sources:
Component1, Component2, PC, HDMI1, HDMI2/DVI,
HDMI3, USB
You can select these options simply by pressing the SOURCE
➢
button on the remote control.
TV, AV1, AV2, S-Video,
Input
Source List
Edit Name
TV
AV1
AV2
S-Video
Component1
Component2
PC
Refresh Option
----
----
----
----
----
----
English - 13
Page 14
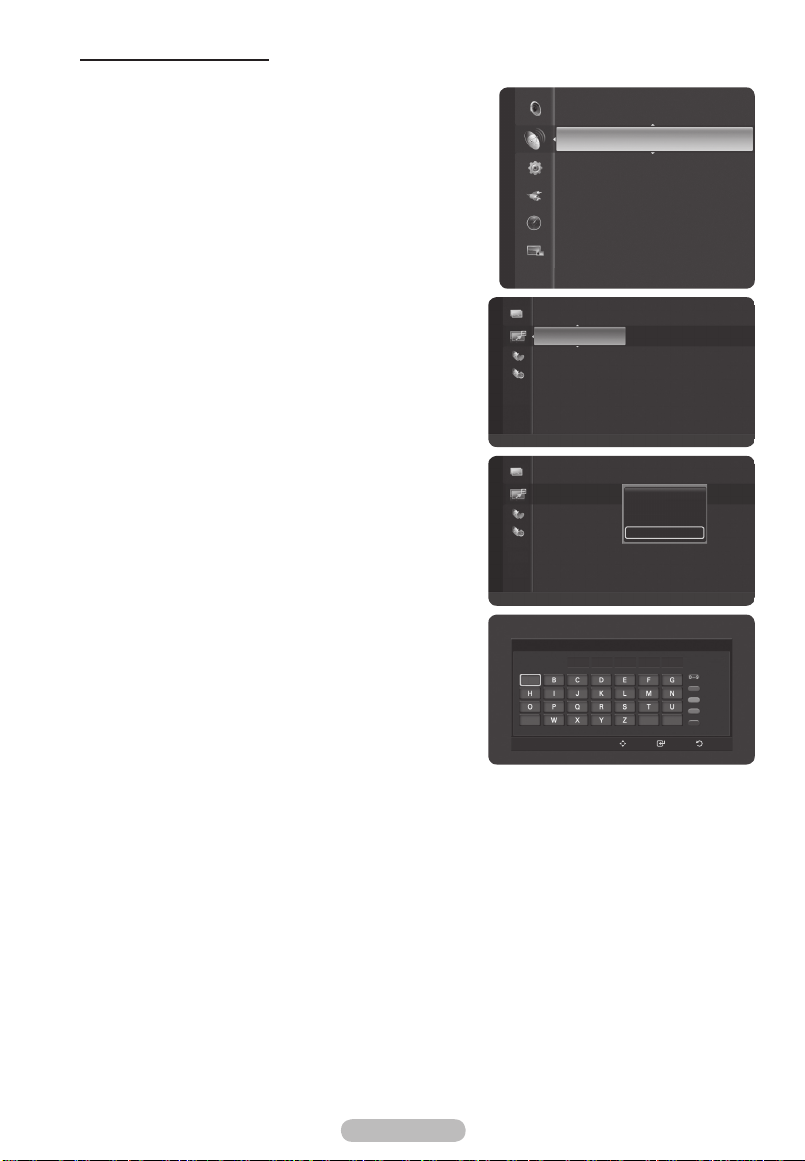
Editing Device Names
You can give a name to the external source.
1 Press the MENU button to display the menu.
2 Press the ▲ or ▼ button to select Input, then press the
Input
ENTER/OK button.
3 Press the ▲ or ▼ button to select Edit Name, then press
the ENTER/OK button.
4 Press the ▲ or ▼ button to select the external source to
be edited, then press the ENTER/OK button.
5 Select the required device by pressing ▲ or ▼, then press
the ENTER/OK button.
Available device names:
VCR, DVD, D-VHS, Cable STB,
HD STB, Satellite STB, PVR STB, AV Receiver, DVD
Receiver, Game, Camcorder, DVD Combo, DVD HDD
Recorder, PC, Internet TV Recv., Interactive TV Recv.,
VOD STB, TV.
6 Press the EXIT button to exit.
When a PC with a resolution of 1920 x 1080@60Hz
➢
is connected to the HDMI IN 1 port, you should set
the HDMI1 mode to PC in the Source List of the
Input mode. If the HDMI1 mode is not PC, it works
depending on the TV setting.
AV1 :
AV2 :
S-Video :
Component1 :
Component2 :
PC :
HDMI1 :
AV1 :
AV2 :
S-Video :
Component1 :
Component2 :
PC :
HDMI1 :
Source List
Edit Name
Edit Name
----
----
----
----
----
----
----
Return
Enter
Move
Edit Name
----
----
----
VCR
----
DVD
----
D-VHS
----
Cable STB
----
HD STB
----
Enter
Move
Return
English - 14
Page 15
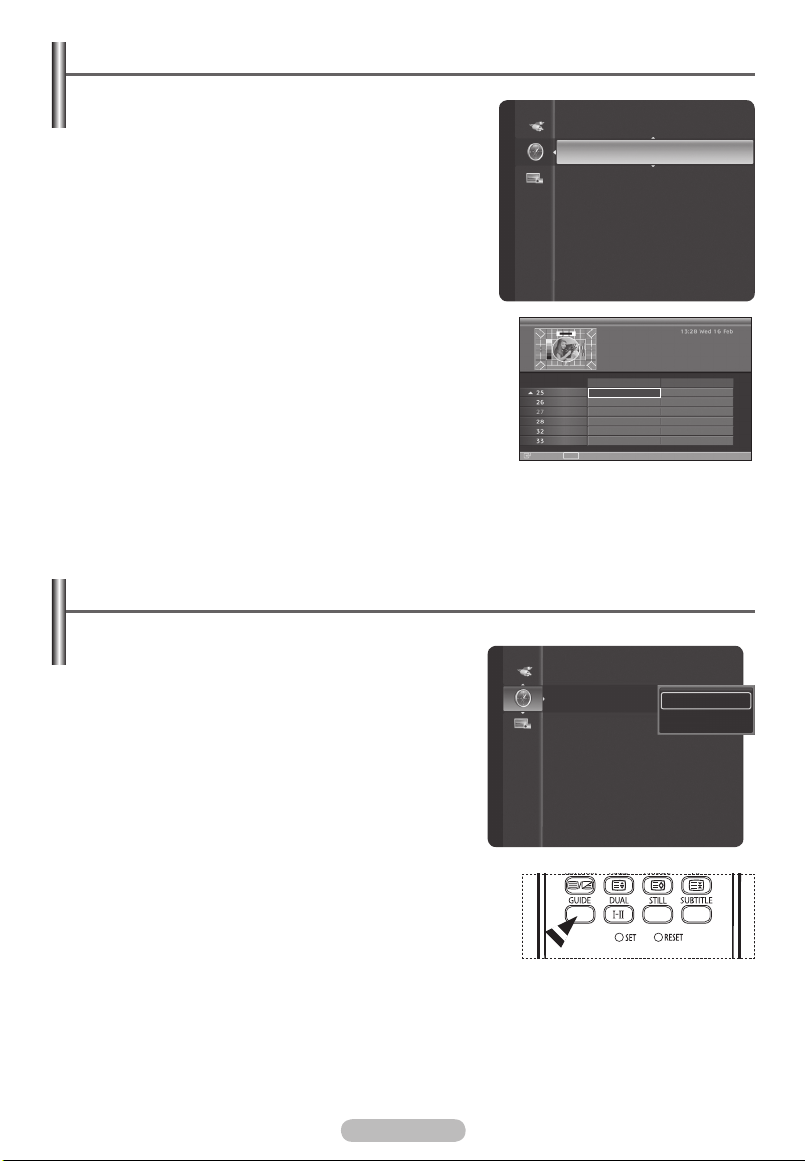
Setting the Guide
You can set the guide as your preference.
1 Press the MENU button to display the menu.
2 Press the ▲ or ▼button to select Guide. Press the
Guide
ENTER/OK button.
3 Select your required guide (Now & Next Guide or Full
Guide) by pressing the ▲ or ▼ button.
4 Press the ENTER/OK button.
5 Select a programme of your choice by pressing the ▲, ▼,
◄, or ► button.
6 Press the INFO button to display information about the
highlighted programme.
7 Press the red button to exchange Now & Next Guide or
Full Guide.
8 Press the EXIT button or blue button to exit.
Setting the Default Guide
You can preset the default guide style.
1 Press the MENU button to display the menu.
2 Press the ▲ or ▼button to select Guide. Press the
ENTER/OK button.
3 Press the ▲ or ▼ button to select Default Guide, then
press the ENTER/OK button.
4 Select Now/Next or Full Guide using the ▲ or ▼ button,
and press the ENTER/OK button.
5 Press the EXIT button to exit.
Guide
WISELINK
Full Guide
Now&Next Guide
Default Guide : Full Guide
Full Guide
77 Digital
Watch
DTV 77 Digital
NBC TODAY
AM 4:00 - AM 6:00
International news and weather. Including interviews with ne..
AM6:00-AM7:00 AM7:00-AM8:00
Today
7 Digital
NBC TODAY
7 HD Digital
NBC TODAY
7 Digital 1
NBC TODAY
7 Digital 2
NBC TODAY
7 Digital 3
NBC TODAY
7 Guide
NBC TODAY
INFO
Info
Now&Next
-2Hours
Full Guide
Now&Next Guide
Default Guide : Now&Next
SUNRISE
SUNRISE
SUNRISE
SUNRISE
SUNRISE
SUNRISE
+2Hours
Now&Next
Full Guide
Exit
You can select these options by simply pressing the
➢
GUIDE button on the remote control.
English - 15
Page 16
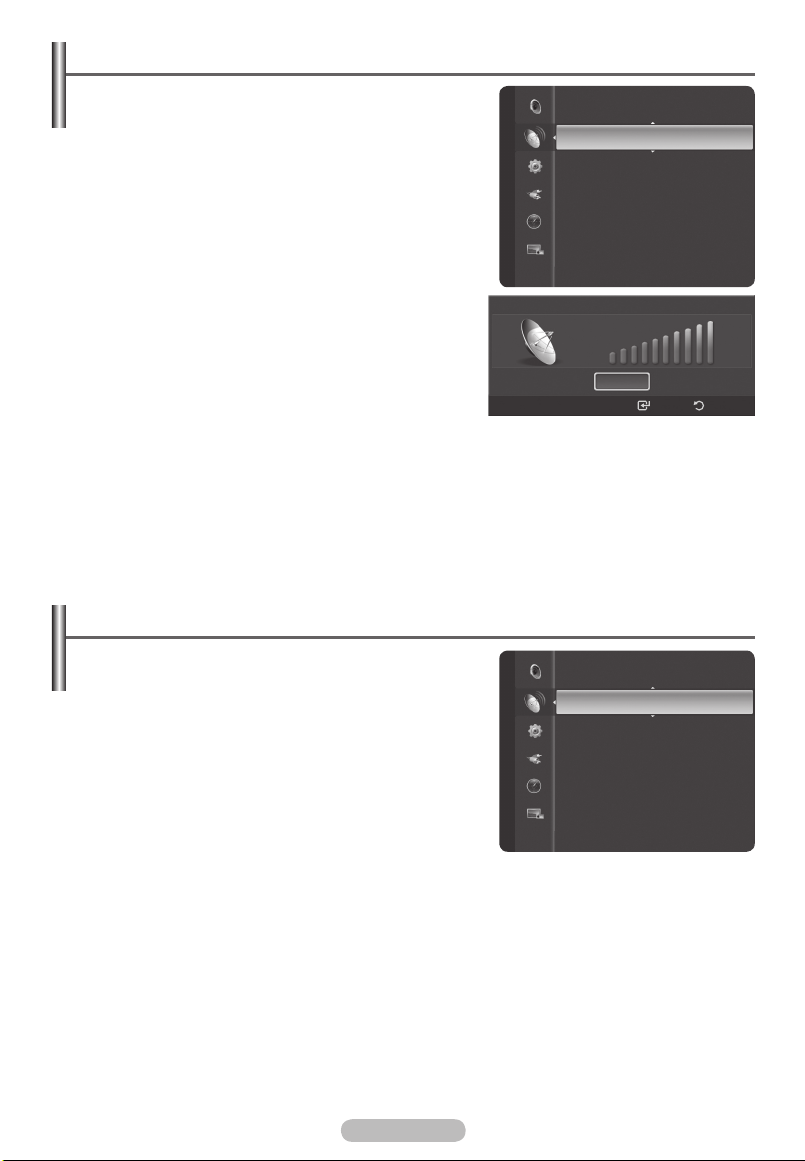
Checking the Digital-Signal Strength - Digital
Unlike analog channels, which can vary in reception quality
from “snowy” to clear, digital (HDTV) channels have either
perfect reception quality or you will not receive them at all.
Channel
So, unlike analog channels, you cannot fine tune a digital
channel.
You can, however, adjust your antenna to improve the
reception of available digital channels.
1 Press the MENU button to display the menu.
2 Press the ▲ or ▼ button to select Channel, then press the
ENTER/OK button.
3 Press the ▲ or ▼ button to select Signal Strength, then
press the ENTER/OK button.
4 If the signal strength meter indicates that the signal is
weak, physically adjust your antenna to increase the
signal strength.
Continue to adjust the antenna until you find the best
position with the strongest signal.
5 Press the EXIT button to exit.
Storing Channels Automatically
You can scan for the frequency ranges available to you
(availability depends on your country).
Automatically allocated programme numbers may not
correspond to actual or desired programme numbers.
However you can sort numbers manually and clear any
channels you do not wish to watch.
1 Press the MENU button to display the menu.
2 Press the ▲ or ▼ button to select Channel, then press the
ENTER/OK button.
3 Press the ▲ or ▼ button to select Auto Store, then press
the ENTER/OK button.
4 Press the ENTER/OK button again to start the search.
The search will end automatically.
To stop the search before it has finished, press the MENU or the ENTER/OK button.
➢
Channel
Manual Store
Fine Tune
Signal Strength
LNA : On
Signal Strength
OK
Return
Enter
Channel List
Auto Store
Manual Store
Fine Tune
Signal Strength
LNA : On
English - 16
Page 17

Storing Channels Manually
You can store television channels, including those
received via cable networks.
When storing channels manually, you can choose:
Whether or not to store each of the channels found.
The programme number of each stored channel which you
wish to identify.
1 Press the MENU button to display the menu.
Channel List
Auto Store
Channel
Manual Store
Fine Tune
Signal Strength
LNA : On
2 Press the ▲ or ▼ button to select Channel, then press
the ENTER/OK button.
3 Press the ▲ or ▼ button to select Manual Store, then
press the ENTER/OK button.
4 Select the required option by pressing the ▲ or ▼ button,
then press the ENTER/OK button.
On digital mode, you can choose Digital Channel, on
➢
analog mode ,you can choose Digital Channel and
Analog Channel.
5 When you are satisfied with your setting, press the
ENTER/OK button.
6 Press the EXIT button to exit.
Channel List
Auto Store
Channel
Manual Store : On
Fine Tune
Signal Strength
LNA : On
Digital Channel
Analog Channel
Programme (Programme number to be assigned to a
channel)
− Press the ▲ or ▼ button until you find the correct
number.
You can also select the channel number directly by
➢
pressing the numeric buttons (0~9).
Colour System: Auto/PAL
− Press the ▲ or ▼ button to select the required colour
standard.
Channel
Manual Store
Frequency
43
6345 00 KHz
Bandwidth
7 M Hz
Sound System: DK/BG/I
− Press the ▲ or ▼ button to select the required sound
standard.
Channel (When you know the number of the channel to
be stored)
− Press the ▲ or ▼ button to select
C (Air channel) or S
(Cable channel).
− Press the ► button, then press the ▲ or ▼ button to
select the required number.
You can also select the channel number directly by
➢
pressing the numeric buttons (0~9).
If there is abnormal sound or no sound, reselect the
➢
sound standard required.
Search (When you do not know the channel numbers)
Adjust
Programme
1
Channel
C 2
Adjust
Start
Move
Enter
Return
Manual Store
Colour SystemBGSound System
Auto
Search
62 M Hz
Move
Enter
Store
?
Return
− Press the ▲ or ▼ button to start the search.
− The tuner scans the frequency range until the first channel or the channel that you selected is
received on the screen.
Store (When you store the channel and associated programme number)
− Set to
Channel mode
☛
P (Programme mode): When completing tuning, the broadcasting stations in your area have
OK by pressing the ENTER/OK button.
been assigned to position numbers from P00 to P99. You can select a channel by entering the
position number in this mode.
C (Air channel mode): You can select a channel by entering the assigned number to each air
broadcasting station in this mode.
S (Cable channel mode): You can select a channel by entering the assigned number for each
cable channel in this mode.
English - 17
Page 18
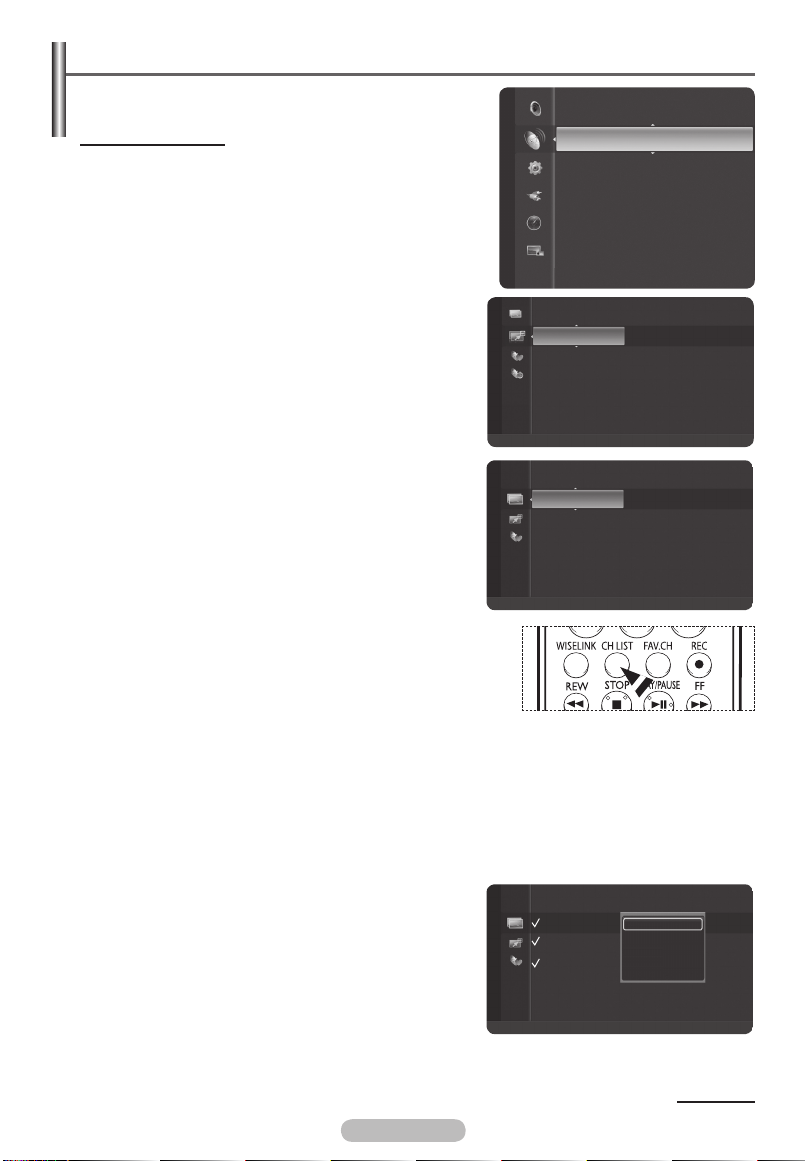
Managing Channels
Using this menu, you can Add/Delete or set Favourite
channels and use the program guide for digital broadcasts.
Viewing All Channels
Show all currently available channels.
To use the Channel List function, first run Auto Program.
1 Press the MENU button to display the menu.
2 Press the ▲ or ▼ button to select Channel, then press the
ENTER/OK button.
3 Press the ▲ or ▼ button to select Channel List, then
press the ENTER/OK button.
4 Press the ◄ button to select Added Channels.
5 Press the ▲ or ▼ button to select All Channels, then
press the ENTER/OK button.
Shows all currently available channels.
6 Press the ▲ or ▼ button to select a channel to view, then
press the ENTER/OK button.
You can watch the selected channel.
You can press Number buttons on Remote control for
➢
direct channel access,press the same Number button
again to switch between digital channel and ATV channel.
You can select these options simply by pressing the CH LIST
➢
button on the remote control.
Channel
Added Channels
All Channels
Channel List
Auto Store
Manual Store
Fine Tune
Signal Strength
LNA : On
1 ♥ 7HD Digital
2 ♥ 7Digital 1
3 ♥ 7Digital 2
4 ♥ 7Digital 3
ATV0 C1
ATV1 C2
ATV2 C3
ATV3 C4
ATV4 C5
Zoom
1 ♥ 7HD Digital
2 ♥ 7Digital 1
3 ♥ 7Digital 2
4 ♥ 7Digital 3
ATV0 C1
ATV1 C2
ATV2 C3
ATV3 C4
ATV4 C5
Zoom
Select
Option
Select
Option
Using the Colour buttons on the Remote with the Channel List
Green (Zoom): Enlarges or shrinks a channel number.
Yellow (Select): Selects multiple channel lists.
Blue (Option): Displays the Add (or Delete), Add Favourite (or Delete Favourite), Timer Viewing, and
Channel Name Edit menus.
A gray-coloured channel refers to a deleted channel. The Add menu only appears for deleted
➢
channels.
If you select multiple channel include “favourite
➢
channels”,“delete channel etc. channels”and other
channels, you can choose “Add to Favourite or Delete from
Favourite or Add or Deselect All”etc.
All Channels
1 ♥ 7HD Digital
2 7Digital 1
3 ♥ 7Digital 2
4 ♥ 7Digital 3
ATV0 C1
ATV1 C2
ATV2 C3
ATV3 C4
ATV4 C5
Zoom
Select
Add
Delete
Add to Favourite
Delete from Favourite
Deselect All
Option
Continued...
English - 18
Page 19

Adding and Erasing Channels
1 ♥ 7HD Digital
2 ♥ 7Digital 1
3 ♥ 7Digital 2
4 ♥ 7Digital 3
ATV0 C1
ATV1 C2
ATV2 C3
ATV3 C4
ATV4 C5
All Channels
Zoom
Select
Option
1 ♥ 7HD Digital
2 ♥ 7Digital 1
3 ♥ 7Digital 2
4 ♥ 7Digital 3
ATV0 C1
ATV1 C2
ATV2 C3
ATV3 C4
ATV4 C5
Delete
Delete from Favourite
Timer Viewing
Channel Name Edit
All Channels
Zoom
Select
Option
You can add or delete a channel to display the channels you want.
1 Press the MENU button to display the menu.
2 Press the ▲ or ▼ button to select Channel, then press the
ENTER/OK button.
3 Press the ▲ or ▼ button to select Channel List, then
press the ENTER/OK button.
4 Press the ◄ button to select Added Channels.
5 Press the ▲ or ▼ button to select All Channels, then
press the ENTER/OK button.
Shows all currently available channels.
Channel
Channel List
Auto Store
Manual Store
Fine Tune
Signal Strength
LNA : On
6 Press the ▲ or ▼ button to select a channel to add, then
press the blue button.
7 Press the ENTER/OK button to select Add.
All added channels will be shown on Added
➢
Channels menu.
8 Press the ▲ or ▼ button to select a channel to delete,
then press the blue button.
Press the ENTER/OK button to select Delete.
9 Press the EXIT button to exit.
You can also delete a channel in the Added Channels
➢
menu in the same manner.
You can select these options simply by pressing the CH LIST
➢
button on the remote control.
English - 19
Continued...
Page 20
Setting Your Favourite Channels
You can set channels you watch frequently as favourites.
1 Press the MENU button to display the menu.
2 Press the ▲ or ▼ button to select Channel, then press
the ENTER/OK button.
3 Press the ▲ or ▼ button to select Channel List, then
press the ENTER/OK button.
4 Press the button to select Added Channels.
5 Press the button to select Favourite,then press the
◄
▲ or ▼
ENTER/OK button. You can view all favourite channels.
6 Press the button to select Added Channels,
▲ or ▼
then press the ENTER/OK Button.
7 Press the ▲ or ▼ button to select a channel as a favourite
channel, then press the blue button.
8 Press the ▲ or ▼ button to select
Add to Favourite, then
press the ENTER/OK button.
The “♥” symbol will be displayed and the channel will be
set as a favourite.
9 To cancel your favourite channel selection, press the blue
button when a favourite channel is selected. Press the ▲
or ▼ button to select
Delete from Favourite, then press
the ENTER/OK button. The channel is deleted from
Favourites and the “♥” mark also disappears.
10 Press the EXIT button to exit.
You can also Add or Delete a channel from Favourites in
➢
the All Channels menu in the same manner.
Only memorized channels can be set as favourite
➢
channels.
All favourite channels will be shown on Favourite menu.
➢
Channel
Added Channels
Added Channels
Channel List
Auto Store
Manual Store
Fine Tune
Signal Strength
LNA : On
1 ♥ 7HD Digital
2 ♥ 7Digital 1
3 ♥ 7Digital 2
4 ♥ 7Digital 3
ATV0 C1
ATV1 C2
ATV2 C3
ATV3 C4
ATV4 C5
Select
Select
Option
Delete
Delete from Favourite
Timer Viewing
Channel Name Edit
Option
Zoom
1 ♥ 7HD Digital
2 ♥ 7Digital 1
3 ♥ 7Digital 2
4 ♥ 7Digital 3
ATV0 C1
ATV1 C2
ATV2 C3
ATV3 C4
ATV4 C5
Zoom
You can select these options simply by pressing the CH
➢
LIST button on the remote control.
TOOLS
Device List
Easy Setting
1 Press the TOOLS button on the remote control.
2 Press the ▲/▼ button to select
Delete from Favourite
Add to Favourite or
, then press the ENTER/OK
button. The current channel is added to or deleted from
Favourites.
To select the favourite channels you have set up, press the
➢
FAV.CH
Continued...
button on the remote control.
Picture Size : 16:9
Picture Mode : Dynamic
Sound Mode : Standard
Sleep Timer : Off
Delete from Favourite
Auto Store
Move
Enter
English - 20
Page 21

Reserving a Program (Time Viewing)
If you reserve a program you want to watch, the channel is automatically switched to the reserved
channel in the Channel List even when you are watching another channel.
To reserve a program set the current time first. See pages 35~36. Reserved channels can only be
set if they are in the Channel List (See page 18).
1 Press the MENU button to display the menu.
2 Press the ▲ or ▼ button to select Channel, then press
the ENTER/OK button.
3 Press the ▲ or ▼ button to select Channel List, then
press the ENTER/OK button.
4 Press the ▲ or ▼ button to select a channel, then press
the Blue (Options) button.
5 Press the ▲ or ▼ button to select Timer Viewing, then
press the ENTER/OK button.
Channel
Channel List
Auto Store
Manual Store
Fine Tune
Signal Strength
LNA : On
The Reserve a Program (Timer Viewing) screen appears.
6 Press the ▲/▼/◄/► buttons to reserve a program and
then press the ENTER/OK button.
Reserving a program has been completed.
7 Press the EXIT button to exit.
You can also reserve a program in the All Channels or
➢
Favourite menus using the same procedures.
For information on how to confirm a viewing reservation,
➢
refer to page 22.
Added Channels
1 ♥ 7HD Digital
♥ 7Digital 1
2
3 ♥ 7Digital 2
4 ♥ 7Digital 3
ATV0 C1
ATV1 C2
ATV2 C3
ATV3 C4
ATV4 C5
Select
Zoom
Delete
Delete from Favourite
Timer Viewing
Channel Name Edit
Option
You can select these options simply by pressing the CH
➢
LIST button on the remote control.
Digital Program Guide and Viewing Reservation
When a digital channel is selected, and you press the ►
button, the Program Guide for the channel appears. You can
reserve a program according to the procedures described
above.
: A program currently being broadcast.
: A reserved program
Antenna
DTV
2007 - 01 - 10
Added Channels
1 ♥ 7HD Digital
2
3 ♥ 7Digital 2 2:27 am
4 ♥ 7Digital 3 2:35 am
ATV0 C1 3:21 am
ATV1 C2 4:33 am
ATV2 C3 6:00 am
ATV3 C4 6:36 am
ATV4 C5
Zoom
Timer Viewing
Channel
2
Date
Adjust
Move
♥ 7Digital 1 1:30 am
Watch
Option
Start Time
Enter
2007/2/3
10:09 am
Repeat
once
Return
Continued...
English - 21
Page 22

Confirming a Viewing Reservation
2007/2/3
3:15 am 6-1 No Program Name
4:15 am 6-1 No Program Name
2007/2/4
2:14 am 6-1 No Program Name
2007/2/5
2:15 am 6-1 No Program Name
Programed
You can view, modify or delete a reservation.
1 Press the MENU button to display the menu.
2 Press the ▲ or ▼ button to select Channel, then press the
ENTER/OK button.
3 Press the ▲ or ▼ button to select Channel List, then
press the ENTER/OK button.
4 Press the ◄ button to select Added Channels.
5 Press the ▲ or ▼ button to select Programed, then press
the ENTER/OK button.
You can view reservations.
Channel
Added Channels
Channel List
Auto Store
Manual Store
Fine Tune
Signal Strength
LNA : On
1 ♥ 7HD Digital
2 ♥ 7Digital 1
3 ♥ 7Digital 2
4 ♥ 7Digital 3
ATV0 C1
ATV1 C2
ATV2 C3
ATV3 C4
ATV4 C5
Select
Option
Zoom
Modifying a viewing reservation
6 To select a reservation item to be modified, press the ▲
or ▼ button and then press the blue button.
7 Press the ENTER/OK button to select Change Info.
8 Press the ▲/▼/◄/► buttons to change a reservation
setting and then press the ENTER/OK button.
The reservation modification is applied.
Cancelling a reservation
6 To select a reservation item to be cancelled, press the ▲
or ▼ button, and then press the blue button.
7 Press the ▲ or ▼ button to select Cancel schedules, then press the ENTER/OK button.
8 Press the ◄ or ► button to select OK, then press the ENTER/OK button.
The viewing reservation has been cancelled.
9 Press the EXIT button to exit.
Programed Menu
Change Info: Select to change a viewing reservation.
Cancel schedules: Select to cancel a viewing reservation.
Information: Select to view a viewing reservation.
You can select these options simply by pressing the CH LIST
➢
button on the remote control.
English - 22
Zoom
Programed
2007/2/3
3:15 am 6-1 No Program Name
4:15 am 6-1 No Program Name
2007/2/4
2:14 am 6-1 No Program Name
2007/2/5
2:15 am 6-1 No Program Name
Zoom
Select
Select
Information
Option
Change Info
Cancel schedules
Information
Information
Option
Continued...
Page 23
Labeling Channels - Analog
Channels can labeled so that their call letters appear whenever the channel is selected.
1 Press the MENU button to display the menu.
2 Press the ▲ or ▼ button to select Channel, then press
the ENTER/OK button.
3 Press the ▲ or ▼ button to select Channel List, then
press the ENTER/OK button.
4 Press the ▲ or ▼ button to select the channel to be
assigned a new name, then press the blue button.
5 Press the ▲ or ▼ button to select Channel Name Edit,
then press the ENTER/OK button.
Channel
Channel List
Auto Store
Manual Store
Fine Tune
Signal Strength
LNA : On
6 Press the ▲/▼/◄/► button to select a letter, then press
the ENTER/OK button.
Numeric buttons: You can enter numbers.
Red button: You can switch between English and
Characters.
Green button: You can delete an already entered
character.
Yellow button: You can enter a blank space.
Blue button: Press this button to finish renaming a
channel.
7 When you have finished, press the blue button to assign
the new name.
8 Press the EXIT button to exit.
The names of digital broadcasting channels are
➢
automatically assigned and thus cannot be assigned by
users.
Added Channels
Added Channels
3 ♥ 7Digital 2
4 ♥ 7Digital 3
ATV0 C1
ATV1 C2
ATV2 C3
ATV3 C4
ATV4 C5
ATV5 C6
ATV6 C7
Zoom
Select
3 ♥ 7Digital 2
4 ♥ 7Digital 3
ATV0 C1
ATV1 C2
ATV2 C3
ATV3 C4
ATV4 C5
ATV5 C6
ATV6 C7
Zoom
Select
Option
Delete
Add to Favourite
Timer Viewing
Channel Name Edit
Option
English - 23
6
A
V
Number
Character
Delete
Blank
Done
Enter ReturnMove
Channel Name Edit
_
Page 24
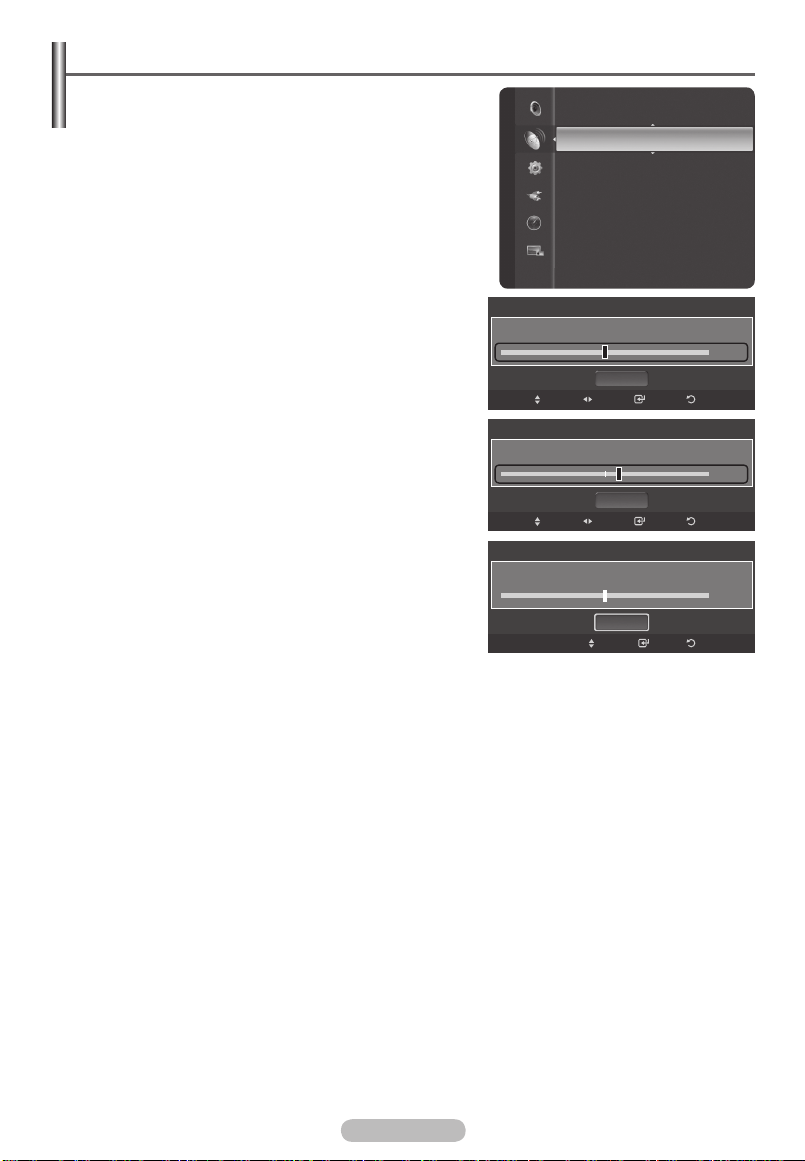
Fine Tuning Channel Reception
If the reception is clear, you do not have to fine tune the
channel, as this is done automatically during the search
and store operation.
If the signal is weak or distorted, you may have to fine
tune the channel manually.
1 Press the MENU button to display the menu.
2 Press the ▲ or ▼ button to select Channel, then press
the ENTER/OK button.
3 Press the ▲ or ▼ button to select Fine Tune, then press
the ENTER/OK button.
4 To obtain a sharp, and clear picture and good sound
quality, press the ◄ or ► button until you reach the
optimal setting. Press the ENTER/OK button.
To reset the fine tuning to 0, select Reset by pressing
➢
the ▲ or ▼ button. Press the ENTER/OK button.
5 Press the EXIT button to exit.
Fine tuned channels that have been saved are
➢
marked with an asterisk “*” on the right-hand side of
the channel number in the channel banner.
Channel
ATV 6
ATV 6*
ATV 6
Auto Store
Manual Store
Fine Tune
Signal Strength
LNA : On
Fine Tune
Reset
Move
Adjust
Fine Tune
Reset
Move
Adjust
Fine Tune
Reset
Move
Save
Fine Tuned
Save
Enter
0
Return
+3
Return
0
Return
English - 24
Page 25

LNA (Low Noise Amplifier)
This function is very useful in the situation that the TV is
used in weak signal.
LNA amplifies the TV signal in the weak signal area, a
Channel
low-noise preamplifier boosts the incoming signal.
1 Press the MENU button to display the menu.
2 Press the ▲ or ▼ button to select Channel, then press
the ENTER/OK button.
3 Press the ▲ or ▼ button to select LNA, then press the
ENTER/OK button.
4 Select Off or On by pressing the ▲ or ▼ button, then
press the ENTER/OK button.
5 Press the EXIT button to exit.
Depending on areas, factory mode of LNA, will be
➢
set up as On or Off.
Channel
Fine Tune
Signal Strength
LNA : On
Fine Tune
Signal Strength
LNA : On
Off
On
English - 25
Page 26

Changing the Picture Standard
You can select the type of picture which best
corresponds to your viewing requirements.
1 Press the MENU button to display the menu.
2 Press the ENTER/OK button to select Picture.
3 Press the ENTER/OK button again to select Mode.
4 Select the required mode by pressing the ▲ or ▼ button,
then press the ENTER/OK button.
Available modes:
The settings values may vary depending on the input
➢
source. (ex. RF, Video, Component, PC, or HDMI)
Dynamic, Standard, Movie
5 Press the EXIT button to exit.
You can select these options simply by pressing the P.MODE
➢
button on the remote control.
Choose Dynamic for viewing the TV during the day or
➢
when there is bright light in the room.
Choose Standard for general TV watching mode.
Choose Movie when viewing the movie.
Picture Picture
Mode
:
Contrast : 100
Brightness : 45
Sharpness : 75
Colour : 55
Tint (G/R) : G50/R50
Colour Tone : Cool1
Backlight :10
Mode
:
Contrast : 100
Brightness : 45
Sharpness : 75
Colour : 55
Tint (G/R) : G50/R50
Colour Tone : Cool1
Backlight :10
Dynamic
Dynamic
Dynamic
Standard
Movie
English - 26
Page 27

Customizing the Picture Settings
Adjust
Your television has several setting options that allow you
to control the picture quality.
1 To select the desired picture effect, follow the “Changing
the Picture Standard” instructions number 1 to 3 on page
26.
erutciP
2 Press the ▲ or ▼ button to select a particular item. Press
the ENTER/OK button.
3 Press the ◄ or ► button to decrease or increase the
value of a particular item. Press the ENTER/OK button.
4 Press the EXIT button to exit.
Contrast: Adjusts the lightness and darkness between
objects and the background.
Brightness: Adjusts the brightness of the whole screen.
Sharpness: Adjusts the outline of objects to either
Picture
sharpen them or make them more dull.
Colour: Adjusts the colours, making them lighter or darker.
Tint: Use this function to adjust the colour of
objects,making them more red or green for a more natural
look when RF(60Hz),AV(60Hz),S-Video(60Hz),compone
nt,HDMI signals are input.
Colour Tone: Cool2/Cool1/Normal/Warm1/Warm2
When the picture mode is set to Dynamic or
➢
Standard, Warm1 and Warm2 cannot be selected.
Picture Reset: Reset All/Reset Picture Mode
Reset All: All the picture values return to default settings.
Reset Picture Mode: Current picture values return to
default settings.
Backlight: you can adjust the screen brightness by chang ing the LCD backlight brightness.(0-10)
Colour : 55
Tint (G/R)
:
Colour Tone : Cool1
Backlight : 10
Detailed Settings
Size : 16:9
Digital NR : Auto
Active Colour : On
Auto Motion Plus 100Hz : Low
DNIe : On
Colour : 55
Tint (G/R)
:
Colour Tone
Backlight
Detailed Settings
Size
Digital NR
Active Colour
Auto Motion Plus 100Hz : Low
DNIe : On
Backlight
G50/R50
G50/R50
Cool2
Cool1
Normal
Warm1
Warm2
Enter
10
Return
English - 27
Page 28

Configuring Detailed Settings on the Picture
You can set detailed picture settings.
1 Press the MENU button to display the menu.
2 Press the ENTER/OK button to select Picture.
Picture
3 Press the ▲ or ▼ button to select Detailed Settings,
then press the ENTER/OK button.
4 Select the required option by pressing the ▲ or ▼ button,
then press the ENTER/OK button.
Available options: Black Adjust, Dynamic Contrast,
Gamma, Colour Space, White Balance, My Colour
Control, Edge Enhancement, xvYCC
Colour Tone
Backlight : 10
Detailed Settings
Size : 16:9
Digital NR : Auto
Active Colour : On
Auto Motion Plus 100Hz :Low
DNIe : On
Picture Reset
Cool1
:
5 When you are satisfied with your setting, press the
ENTER/OK button.
6 Press the EXIT button to exit.
When the picture mode is set to Standard or Movie,
➢
Detailed Settings can be selected.
If DNIe is set to Off and the picture mode is in Dynamic
➢
or Standard mode, the Detailed Settings cannot be
selected.
Black
Adjust: Off/Low/Medium/High
You can directly select the black level on the screen to
adjust the screen depth.
Black Adjust : Medium
Dynamic Contrast : Medium
Gamma : +1
Colour Space : Wide
White Balance
My Colo
Edge Enhancement : On
Detailed Settings
ur Control
Move
Dynamic Contrast: Off/Low/Medium/High
You can adjust the screen contrast so that the optimal contrast is provided.
Gamma: -3 ~ +3
You can adjust the middle brightness of pictures.
Press the ◄ or ► button until you reach the optimal setting.
Colour Space
You can set the colour reproduction space for the input signal to Auto or Wide.
White Balance: R-Offset/G-Offset/B-Offset/R-Gain/G-Gain/B-Gain/Reset
You can adjust the colour temperature for more natural picture colours.
R-Offset/G-Offset/B-Offset/R-Gain/G-Gain/B-Gain: Changing the adjustment value will refresh the
adjusted screen.
Select the required option by pressing the ▲ or ▼ button, then press the ENTER/OK button.
Press the ◄ or ► button until you reach the optimal setting.
Reset
: The previously adjusted white balance will be reset to the factory defaults.
My Colour Control: Pink/Green/Blue/White/Reset
This setting can be adjusted to suit your personal preferences.
Select the Pink, Green, Blue or White by pressing the ▲ or ▼ button, then press the ENTER/OK
button.
Press the ◄ or ► button until you reach the optimal setting.
Reset
: The previously adjusted colours will be reset to the factory defaults.
Edge Enhancement: Off/On
You can emphasize object boundaries.
xvYCC: Off/ On
Setting the xvYCC mode to “ On ” increases detail and colour space when watching movies from an
external devices(ie. DVD player) connected to HDMI or Component IN jacks. You must set the
Picture Mode to Movie to enjoy this feature.
Only available in “ HDMI1.3(Y Pb Pr format)” and “Component ” on Movie mode.
➢
If xvYCC function is active, PIP can not be selected.
➢
ReturnEnter
English - 28
Page 29

Selecting the Picture Size
You can select the picture size which best corresponds to
your viewing requirements.
1 Press the MENU button to display the menu.
2 Press the ENTER/OK button to select Picture.
3 Press the ▲ or ▼ button to select Size, then press the
ENTER/OK button.
4 Select the required option by pressing the ▲ or ▼ button,
then press the ENTER/OK button.
Available options:
16:9, Zoom1, Zoom2, 4:3, Just Scan
Backlight :1
Detailed Settings
Size : 16:9
erutciP
Digital NR : Auto
Active Colour : On
Auto Motion Plus 100Hz : Low
DNIe : On
Picture Reset
16:9: Sets the picture to 16:9 wide mode.
Zoom1: Magnifies the size of the picture on the
screen.
Zoom2: Expands the Zoom1 format picture.
4:3: Sets the picture to 4:3 normal mode.
Just Scan: Use this function to see the full
image without cutting off the picture when HDMI
(1080i/1080p/720p) or Component (1080i/1080p/
720p) or DTV(1080i/1080p) signals are input.
5 Press the EXIT button to exit.
You can change the picture size simply by pressing the
➢
P.SIZE
button on the remote control.
16:9 and 4:3 are available in all modes. Zoom1 and Zoom2 are available in ATV, DTV,
➢
Component (480i,480p, 576i, 576p), HDMI (480p, 576p), AV and S-Video modes.
In Zoom1, Zoom2 modes, you can move the picture on the screen by pressing the ▲ or ▼
button.
Each adjusted setting will be stored separately according to its input mode.
16:9
Zoom1
Zoom2
4:3
Just Scan
Size
Move
0
ReturnEnter
English - 29
Page 30

Digital NR / Active Colourr /Auto Motion Plus 100Hz / DNIe
1 Press the MENU button to display the menu.
2 Press the ENTER/OK button to select Picture.
3 Select the required option by pressing the ▲ or ▼ button,
then press the ENTER/OK button.Available options: Digital
NR, Active Colour, Auto Motion Plus 100Hz, DNIe
4 When you are satisfied with your setting, press the ENTER/
OK button.
5 Press the EXIT button to exit.
Detailed Settings
Size : 16:9
P
i
c
t
u
Digital NR : Auto
re
Active Colour : On
Auto Motion Plus 100Hz : Low
DNIe
Picture Reset
: On
Digital NR: Off/Low/Medium/High/Auto
If the signal received by the television is weak, you can
activate this feature to reduce any static and ghosting that
may appear on the screen.
Active Colou
r: Off/On
If you turn on this option, the colours of the sky and grass will be stronger and clearer for a more vivid
on-screen picture.
When you select Standard or Movie in Picture Mode, the Active Colour automatically changes
➢
to Off and it is deactivated. When the Picture Mode is set to Dynamic, the Active Colour is
activated regardless of the Picture Mode setting.
Auto Motion Plus 100Hz: Off / Low / Medium/ High/ Demo
You can view more natural skin and text even in fast moving scenes.This function is not available in
PC mode and Game mode.
If you enable “ Auto Motion Plus 100Hz” noise may appear on the screen. If this occurs,
➢
please set “Auto Motion Plus 100Hz” to “Off”
DNIe: Off/On
This TV includes the DNIe function so as to provide a high visual quality. If you set DNIe to on, you
can view the screen with the DNIe feature activated. Using this function, you can view the difference
in the visual quality.
TM
DNIe
➢
(Digital Natural Image engine)
This feature brings you more detailed image with 3D noise reduction, detail enhancement,
contrast enhancement and white enhancement. New image compensation Algorithm gives
brighter, clearer, more detailed image to you. DNIe
TM
technology will fit every signal into your
eyes.
This function is not available in PC mode.
➢
Freezing the Current Picture
You can freeze the picture when watching a television
programme simply by pressing the “STILL” button. To return to
normal viewing, press it again.
This function will automatically cancel five minutes later.
➢
You can use this function on main picture.When viewing
➢
Picture in Picture, only main picture will be freezed.
English - 30
Page 31

Viewing Picture-in-Picture
This product has one built-in tuner, which does not allow PIP to function in the same mode. For
example, you cannot watch one TV channel in the main screen, and a different one in the PIP
screen. Please see ‘PIP Settings’ below for details. You can use the PIP feature to simultaneously
watch two video sources.
While Parental Lock is in operation, the PIP function cannot be used. (Refer to page 41)
➢
Activating Picture-in-Picture
1 Press the MENU button to display the menu.
2 Press the ▲ or ▼ button to select PIP, then press the
ENTER/OK button.
3 Press the ENTER/OK button again.
Press the ▲ or ▼ button to select On, then press the
ENTER/OK button.
If you turn the TV off while watching in PIP mode and
➢
turn it on again, the PIP window will disappear.
You can view Analog TV broadcasts on the PIP
➢
screen (sub-picture) when the main picture is
from an external device connected to HDMI1,2,3
Component1,2 PC, or AV1,2, S-Video.
Main picture Sub picture
Component 1,2
Analog TV broadcasts only
HDMI 1,2,3
PC
AV1,2
S-Video
PIP
PIP : Off
Size :
Position :
Channel : ATV3
PIP
PIP : Off
Size :
Position :
Channel : ATV3
Off
On
You can select these options simply by pressing the PIP button
➢
on the remote control.
If the main picture is 60Hzexcept PC), the PIP function cannot
➢
be used. When you see DVD,please choose 50HZ signal
Changing the Size of the PIP Window
4 Press the ▲ or ▼ button to select Size, then press the
ENTER/OK button.
Press the ▲ or ▼ button to select the desired size of the
PIP window, then press the
You may notice that the picture in the PIP window
➢
becomes slightly unnatural when you use the main
ENTER/OK button.
picture to view a game or karaoke.
The Double Window and Double Wide cannot be use
➢
when the main picture is PC model.
English - 31
PIP : On
PIP
Size :
Position :
Channel : Cable 3
Continued...
Page 32

Changing the Position of the PIP Window
5 Press the ▲ or ▼ button to select Position, then press
the ENTER/OK button.
Press the ▲ or ▼ button to select the desired PIP window
position, then press the ENTER/OK button.
In Double Window (
➢
modes, Position cannot be selected.
If the PIP window is set to Double Window (
➢
) or Double Wide (
) and Double Wide (
)
) mode, the screen size or
alignment may slightly differ depending on the signal
type.
PIP : On
Size :
PIP
Position :
Channel : Cable 3
Changing the PIP Channel
6 Press the ▲ or ▼ button to select Channel, then press
the ENTER/OK button.
Press the ▲ or ▼ button at the bottom of the remote to
select the desired channel in the PIP window, then press
the ENTER/OK button.
The channel can be active when the sub picture is
➢
set to TV.
7 Press the EXIT button to exit.
Size :
Position :
PIP
Channel : Cable 3
ATV3
English - 32
Page 33

Sound Features
1 Press the MENU button to display the menu.
2 Press the ▲ or ▼ button to select Sound, then press the
ENTER/OK button.
3 Select the required option by pressing the ▲ or ▼ button,
then press the ENTER/OK button.
Available options:
Mode, Equalizer, SRS TruSurround
XT, Audio Language, Auto Volume, Internal Mute,
Sound Select, Digital Format, Sound Reset
4 When you are satisfied with your setting, press the
ENTER/OK button.
5 Press the EXIT button to exit.
Mode: Standard/Music/Movie/Speech/Custom
You can select the type of special sound effect to be used
when watching a given broadcast.
Equalizer: Balance/100Hz/500Hz/1kHz/2kHz/4kHz/
8kHz/15kHz/Reset
SRS TruSurround XT: Off/On
TruSurround XT is a patented SRS technology that solves
the problem of playing 5.1 multichannel content over
two speakers. TruSurround delivers a compelling, virtual
surround sound experience through any two-speaker
playback system, including internal television speakers. It
is fully compatible with all multichannel formats.
TruSurround XT, SRS and Symbol are
➢
trademarks of SRS Labs, Inc. TruSurround XT technology is incorporated under license from
SRS Labs, Inc.
Audio Language
You can change the default value for audio languages. Displays the language
information for the incoming stream.
While viewing a Digital channel, the Audio Language function can be selected.
➢
Auto Volume: Off/On
Each broadcasting station has its own signal conditions, and so it is not easy to adjust the volume
every time the channel is changed. This feature lets you automatically adjust the volume of the
desired channel by lowering the sound output when the modulation signal is high or by raising the
sound output when the modulation signal is low.
Internal Mute: Off/On
If you want to hear the sound through separate speakers, cancel the internal amplifier.
The +, - and MUTE buttons do not operate when the Internal Mute is set to On.
➢
When Internal Mute is set to On, the Sound menus except for Sound Select and Sound Reset
➢
(in PIP mode) cannot be adjusted.
Sound Select: Main/Sub
When the PIP feature is activated, you can listen to the sound of the sub (PIP) picture.
− Main: Used to listen to the sound of the main picture.
− Sub: Used to listen to the sound of the sub picture.
Digital Format
The Digital Format appears according to the broadcasting signal.
While viewing a Digital channel , the Digital Format function can be selected.
➢
Sound Reset: Reset All/Reset Sound Mode
Reset All: All the picture values return to default settings.
Reset Sound Mode: Current sound values return to default settings.
Sound
Mode
:
Equalizer
SRS TruSurround XT : Off
Audio Language : English
Auto Volume : Off
Internal Mute : Off
Sound Select : Main
Digital Format : MPEG
Mode : Custom
Balance L R
100Hz - +
500Hz - +
1kHz - +
2kHz - +
4kHz - +
Move
Equalizer
▼
Adjust
Custom
Enter
Return
TRADEMARK & LABEL LICENSE NOTICE
Manufactured under license from Dolby Laboratories.
“Dolby” and the double-D symbol are trademarks of Dolby Laboratories.
English - 33
Page 34

Selecting the Sound Mode (depending on the model)
The DUAL I-II button displays/controls the processing and
output of the audio signal. When power is switched on, the
mode is automatically preset to either “DUAL-I” or “Stereo”,
depending on the current transmission.
Type of broadcast On-screen indication
Regular broadcast
(Standard audio)
Regular + NICAM Mono NICAM
NICAM
Stereo
NICAM Stereo
Mono (Normal use)
NICAM
stereo
Mono
(Normal)
Mono
(Normal)
NICAM DUAL-I/II
Regular broadcast
A2
Stereo
➢
(Standard audio)
Bilingual or DUAL-I/II Dual I
Stereo Stereo
If the receiving conditions deteriorate, listening will be easier if the mode is set to Mono.
If the stereo signal is weak and automatic switching occurs, switch to Mono.
When receiving a mono sound in the AV mode, connect to the “AUDIO-L” input connector on the
panel (front or side). If the mono sound comes out only from the left speaker, press the DUAL I-II
NICAM
dual-1
NICAM
dual-2
Mono (Normal use)
Mono
(Normal)
Dual II
Mono
(Forced mono)
button.
English - 34
Page 35

Setting the Time
Setting the clock is necessary in order to use the various
timer features of the TV.
Also, you can check the time while watching the TV. (Just
press the INFO button.)
Option 1: Setting the Clock Automatically
The Clock can be set automatically if you are receiving a
digital signal.
1 Press the MENU button to display the menu.
2 Press the ▲ or ▼ button to select Setup, then press the
ENTER/OK button.
3 Press the ▲ or ▼ button to select Clock, then press the
ENTER/OK button.
4 Press the ENTER/OK button to select Clock Mode.
5 Press the ▲ or ▼ button to select Auto, then press the
ENTER/OK button.
6 Press the ▲ or ▼ button to select Time Zone, then press
the ENTER/OK button.
Press the ▲ or ▼ button to highlight the time zone
for your local area (and to move the highlight to the
appropriate time zone on the map of the United States),
then press the ENTER/OK button.
7 Press the EXIT button to exit.
Option 2: Setting the Clock Manually
1 Press the MENU button to display the menu.
2 Press the ▲ or ▼ button to select Setup, then press the
ENTER/OK button.
3 Press the ▲ or ▼ button to select Clock, then press the
ENTER/OK button.
4 Press the ENTER/OK button to select Clock Mode.
5 Press the ▲ or ▼ button to select Manual, then press the
ENTER/OK button.
6 Press the ▲ or ▼ button to select Clock Set, then press
the ENTER/OK button.
7 Press the ◄ or ► button to move to Month, Day, Year,
Hour, or Minute, am/pm.
Set the date and time you want by pressing the ▲ or ▼
button, then press the ENTER/OK button.
8 Press the EXIT button to exit.
The current time will appear every time you press the
➢
INFO button.
You can set the Month, Day, Year, Hour, and Minute
➢
directly by pressing the number buttons on the remote
control.
Setup
Clock Mode : Auto
Clock Set
Time zone
Clock Mode : Auto
Clock Set
Time zone
Plug & Play
Clock
: -- : -- --
Sleep Timer : Off
Timer 1 : Inactivated
Timer 2 : Inactivated
Timer 3 : Inactivated
Child Lock
Subtitle
Game Mode : Off
Clock
Move
Time Zone
New South Wales /ACT
Victoria
QueenSland
South Australia
West Australia
Tasmania
Move
Clock
Move
Clock Set
Month
1
Hour
00
Move
Day
Minute
Adjust
Auto
Manual
Auto
Manual
1
04
Enter
Enter
ReturnEnter
Return
ReturnEnter
Year
2007
am/pm
am
Return
English - 35
Continued...
Page 36

Setting the On/Off Timer
Use this feature to set the TV to turn on or off at a desired time.
1 Press the MENU button to display the menu.
2 Press the ▲ or ▼ button to select Setup, then press the
ENTER/OK button.
Setup
3 Press the ▲ or ▼ button to select Timer 1, then press
the ENTER/OK button.
The Timer 1 menu is displayed.
4 Press the ◄ or ► button to select the required item
below.
Press the ▲ or ▼ button to adjust to the setting satisfied.
5 Press the EXIT button to exit.
On Timer: Select Hour, Minute, am/pm, and No/Yes.
(To activate timer with the setting satisfied, set to Yes
.)
Off Timer: Select Hour, Minute, am/pm, and No/Yes.
(To activate timer with the setting satisfied, set to Yes
Repeat: Select Once, Everyday, Mon~Fri, Mon~Sat, or
Sat~Sun.
Volume: Select the required volume level.
Contents: When the On Time is active, you can turn on
a specific channel or play back contents such as photo or
audio files. (Make sure that a USB device is connected to
your TV.)
Auto Power Off
➢
When you set the timer On, the TV will eventually turn off
.)
On Timer
Hour
12
Off Timer
Hour
12
Repeat
Once
if no controls are operated for 3 hours after the TV was
turned on by timer. This function is only available in timer
On mode and prevents overheating, which may occur if a
TV is on for too long time.
TV/USB
TV
Clock : 12 : 00 am
Sleep Timer
:
Timer 1 : Inactivated
Timer 2 : Inactivated
Timer 3 : Inactivated
Child Lock
Subtitle
Game Mode : Off
Parental Lock
Menu Transparency : Medium
Move
Timer 1
Minuteamam/pmNoActivation
00
Minuteamam/pmNoActivation
00
Volume
10
TV ATV 3
Adjust
Contents
ATV/DTV
ATV
Music
None
Photo
None
Off
Contents
Enter
Return
Channel
3
Adjust
Move
Enter
Return
Setting the Sleep Timer
The sleep timer automatically shuts off the TV after a preset time (30, 60, 90, 120, 150 and 180
minutes).
1 Press the MENU button to display the menu.
2 Press the ▲ or ▼ button to select Setup, then press the
ENTER/OK button.
3 Press the ▲ or ▼ button to select Sleep Timer, then
press the ENTER/OK button.
4 Press the ▲ or ▼ button to select the minute, then press
the ENTER/OK button.
To cancel the set sleep timer:
Press the ▲ or ▼ button to select Off, then press the
ENTER/OK button.
Plug & Play
Clock
Setup
: --
Sleep Timer : Off
Timer 1 : Inactivated
Timer 2 : Inactivated
Timer 3 : Inactivated
Child Lock
Subtitle
Game Mode : Off
Parental Lock
: --
--
Off
30min.
60min.
90min.
120min.
150min.
180min.
5 Press the EXIT button to exit.
English - 36
Page 37

Menu Transparency / Energy Saving / HDMI Black Level /
Film Mode / Light Effect / Blue Screen / Melody /
Function Help
1 Press the MENU button to display the menu.
2 Press the ▲ or ▼ button to select Setup, then press the
ENTER/OK button.
3 Select the required option by pressing the ▲ or ▼ button,
then press the ENTER/OK button.
Available options: Menu Transparency, Energy Saving,
HDMI Black Level, Film Mode, Light Effect, Blue
Screen, Melody, Function Help
4 When you are satisfied with your setting, press the ENTER/
OK button.
5 Press the EXIT button to exit.
Menu Transparency: High/Medium/Low
Adjusts the transparency of the menu screen.
Energy Saving: Off/Low/Medium/High
This feature adjusts the screen brightness depending on the surrounding lighting conditions.
− Off: Switches off the Energy Saving mode.
− Low: Operates in standard mode regardless of the surrounding illumination.
− Medium: Enters Medium power saving mode regardless of the surrounding illumination.
− High: Enters maximum power saving mode regardless of the surrounding illumination.
HDMI Black Level: Normal/Low
Use this function to adjust the Black Level of the picture while in HDMI mode.
− Normal: The screen gets brighter.
− Low: The screen gets darker.
This function is active only when the externel input connects to HDMI(RGB signals).
➢
Film Mode: On/Off
You can automatically sense and process film signals and adjust the picture for optimum quality.
Film Mode is only available in the TV mode and the External Input modes ( AV, S-Video,
➢
Composite and Component) which support SD level signals (480i, 576i).
Light Effect : Off/In Standby/In Watching TV/Always
You can turn on/off the blue LED on the front of TV according to the situation. Use it for saving power
or when the LED dazzles your eyes.
− Off: The blue LED is always off.
− In Standby: The blue LED lights while in Standby mode and it turns off when your TV is turned on.
− In Watching TV: The blue LED lights when watching TV and it turns off when your TV is turned off.
− Always: The blue LED always lights.
Set the Light Effect to Off to reduce the power consumption.
➢
Blue Screen: On/Off
If no signal is being received or the signal is very weak, a blue screen automatically replaces the
noisy picture background. If you wish to continue viewing the poor picture, you must set the Blue
Screen to Off.
Melody: Off/Low/Medium/High
The TV power on/off melody sound can be adjusted.
Function Help: On/Off
Displays help on the menu functions.
The Function Help default setting is On.
➢
Game Mode : Off
Parental Lock
Setup
Menu Transparency : Medium
Energy Saving : Off
PC
Home theatre PC : Off
HDMI Black Level : Normal
Film Mode : Off
Wall-Mount Adjustment
Light Effect : Always
English - 37
Page 38

Activating the Child Lock
This feature allows you to prevent unauthorized users,
such as children, from watching unsuitable programmes
by muting out video and audio. Child Lock cannot be
released using the buttons on the side.Only the remote
control can release the Child Lock setting, so keep the
remote control away from children.
1 Press the MENU button to display the menu.
2 Press the ▲ or ▼ button to select Setup, then press the
ENTER/OK button.
3 Press the ▲ or ▼ button to select Child Lock.
4 Press the ENTER/OK button to select On or Off. Press the
ENTER/OK button.
5 Press the ▲ or ▼ button to select Channel, then press
the ENTER/OK button and select the channels you want
to lock, then press the ENTER/OK button.
6 Press the ▲ or ▼ button to select Lock, then press the
ENTER/OK button to select Unlocked or Locked.
7 Repeat steps for each channel to be locked or unlocked.
8 Press the EXIT button to exit.
While viewing a Analog channel , the Child Lock
➢
function can be selected.
Child Lock : On
Channel : Air 1
Lock : Unlocked
Child Lock : On
Channel : Air 1
Lock : Unlocked
Timer 2 : Inactivated
Timer 3 : Inactivated
Setup
Child Lock
Subtitle
Game Mode : Off
Parental Lock
Menu Transparency : Medium
Energy Saving : Off
PC
Home theatre PC : Off
Child Lock
Child Lock : On
Channel : Air 1
Lock : Unlocked
Off
On
Move
Child Lock
ATV1
Move
Child Lock
Unlocked
Locked
ReturnEnter
ReturnEnter
English - 38
Move
ReturnEnter
Page 39

Setting the Subtitle
1 Press the MENU button to display the menu.
2 Press the ▲ or ▼ button to select Setup, then press the
ENTER/OK button.
3 Press the ▲ or ▼ button to select Subtitle, then press the
ENTER/OK button.
4 Select On by pressing the ENTER/OK button.
5 Press the ▲ or ▼ button to select required menu (Subtitle,
Subtitle Mode, Subtitle Language) then press the
ENTER/OK button. The options of the selected menu
are displayed.
6 Press the EXIT button to exit.
The Subtitle Language availability depends on your
➢
country,if the signal does not include subtitle language,
the function is not active.
Timer 3 : Inactivated
Child Lock
Setup
Subtitle
Game Mode : Off
Parental Lock
Menu Transparency : Medium
Energy Saving : Off
PC
Home theatre PC : Off
HDMI Black Level : Normal
Subtitle
Subtitle : On
Subtitle Mode : Normal
Subtitle Language
Subtitle : On
Subtitle Mode : Normal
Subtitle Language
Subtitle : On
Subtitle Mode : Normal
Subtitle Language
Off
On
Move
Subtitle
Normal
Hard of Hearing
Move
Subtitle
ReturnEnter
ReturnEnter
►
English - 39
Move
ReturnEnter
Page 40

Using the Game Mode
When connecting to a game console such as
PlayStationTM or XboxTM, you can enjoy a more realistic
gaming experience by selecting game menu.
1 Press the MENU button to display the menu.
2 Press the ▲ or ▼ button to select Setup, then press the
ENTER/OK button.
3 Press the ▲ or ▼ button to select Game Mode, then
press the ENTER/OK button.
4 Select On by pressing the ▲ or ▼ button, then press the
ENTER/OK button.
5 Press the EXIT button to exit.
Restrictions on Game Mode (Caution)
➢
To disconnect the game console and connect
another external device, set Game Mode to Off
in the Setup menu.
If you display the TV menu in Game Mode, the
screen shakes slightly.
The mark ( ) appears on the screen which
means that Game Mode is On with the selected
source.
If Game Mode is On
➢
Picture Mode is automatically changed to
Standard and users cannot change the mode.
Child Lock
Subtitle
Setup
Game Mode : Off
Parental Lock
Menu Transparency : Medium
Energy Saving : Off
PC
Home theatre PC : Off
HDMI Black Level : Normal
Film Mode
Child Lock
Subtitle
Setup
Game Mode : Off
Parental Lock
Menu Transparency : Medium
Energy Saving : Off
PC
Home theatre PC : Off
HDMI Black Level : Normal
Film Mode
: Off
Off
On
: Off
Sound Mode is automatically changed to
Custom and user can not chang the mode.
Adjust the sound using the equalizer.
The Reset in the Sound menu is activated. Reset function initializes the Equalizer settings to
the factory default setting.
The Channel menu is deactivated.
Game Mode is not available in TV mode.
➢
If the picture is poor when external device is connected to TV, check if Game Mode is On.
➢
Set Game Mode to Off and connect external devices.
English - 40
Page 41

Setting up the Parental Lock
This feature allows you to prevent unauthorized users,
such as children, from watching unsuitable programmes
by a 4-digit PIN (Personal Identification Number) code that
Setup
is defined by the user. The on-screen menu will instruct
you to assign a PIN code (you can change it later, if
necessary).
1 Press the MENU button to display the menu.
2 Press the ▲ or ▼ button to select Setup, then press the
ENTER/OK button.
3 Press the ▲ or ▼ button to select Parental Lock, then
press the ENTER/OK button.
4 Press the number buttons to enter your current 4-digit PIN.
The default PIN for a new TV set is “0-0-0-0”.
➢
5 The Parental Lock screen will appear.
Press the ▲ or ▼ button to select Change PIN, then
press the ENTER/OK button.
6 The Change PIN screen will appear.
Enter PIN
Press the number buttons to enter your new 4-digit PIN.
Re-enter the same 4 digits. The message
changed sucessfully.
is displayed, then your PIN has
PIN is
been memorized.
7 Press the EXIT button to exit.
If you forget the PIN, press the remote-control
➢
buttons in the following sequence, which resets the
pin to 0-0-0-0 : Power Off. → Mute → 8 → 2 → 4 →
Power On.
Parental Rating
Change PIN
Subtitle
Game Mode : Off
Parental Lock
Menu Transparency : Medium
Energy Saving : Off
PC
Home theatre PC : Off
HDMI Black Level : Normal
0~9
Enter PIN
: Off
Film Mode
Wall-Mount Adjustment
*
Parental Lock
* *
Parental Lock
Return
English - 41
Enter new PIN.
Confirm new PIN.
PIN is changed successfully.
Move
Change PIN
0~9
Change PIN
OK
0~9
Enter PIN
Enter PIN
ReturnEnter
Return
Return
Continued...
Page 42

How to Set up Restrictions Using “Parental Rating”
First, set up a personal identification number (PIN), and enable the V-Chip. (See previous section.)
1 Press the MENU button to display the menu.
2 Press the ▲ or ▼ button to select Setup, then press the
ENTER/OK button.
3 Press the ▲ or ▼ button to select Parental Lock, then
press the ENTER/OK button.
4 Press the number buttons to enter your current 4-digit PIN.
The default PIN for a new TV set is “0-0-0-0”.
➢
5 The Parental Lock screen will appear.
Press the ENTER/OK button to select Parental Rating.
The Austraila screen for age rating (G/PG/M/MA/AV/R) will
appear.
Subtitle
Game Mode : Off
Setup
Parental Lock
Menu Transparency : Medium
Energy Saving : Off
PC
Home theatre PC : Off
HDMI Black Level : Normal
Film Mode
Wall-Mount Adjustment
: Off
6 Press the ▲ or ▼ button to select an appropriate
restriction.
7 Press the ENTER/OK button to activate the restriction
selected. The “
Allow All: Press to unlock all TV ratings.
➢
Block All: Press to lock all TV ratings.
” symbol is indicated.
8 Press the EXIT button to exit.
While viewing a DTV channel, the Parental Lock function
➢
can be selected.
Enter PIN
Parental Rating
Change PIN
Parental Lock
* *
*
Enter PIN
0~9
Parental Lock
Return
English - 42
G
PG
M
MA
AV
R
Move
Austraila
Move
ReturnEnter
Allow All
Block All
ReturnEnter
Page 43

Wall- mount adjustment (Sold separately)
Once the wall mount is installed, the position of your TV can be easily adjustable.
Rear Panel
Serial Cable(1P to 1P)(Not supplied)
Auto Wall-Mount
Entering the menu
1 Press the MENU button to display the menu.
Press the ▲ or ▼ button to select Setup, then press the
ENTER/OK button.
2 Press the ▲ or ▼ button to select Wall-Mount
Adjustment, then press the ENTER/OK button.
3 Adjust to the desired position using the ▲/▼/◄/► buttons.
Press the EXIT button to exit.
If you press an arrow button when no OSD is displayed on
➢
the TV screen, the Adjustment screen appears.
When you turn the power off, your TV moves to the initial
➢
installation position.When you turn the power on, your TV
HDMI Black Level : Normal
Setup
Film Mode : Off
Wall-Mount Adjustmen
Light Effect
Blue Screen
Melody : Medium
Anynet+(HDMI-CEC) Setup
SW Upgrade
Function Help : Off
: Always
: On
moves to the last remembered position you adjusted.
Using the remote Control Buttons
Button Operations
Wall-mount
angle
adjustment
Reset
Remembering
the position and
(Red) (Green) (Yellow)
moving to the
remembered
position
For installation, refer to the Installation Manual provided.
➢
For product installation and the installation and moving of the wall mount, make sure to consult a
➢
specialized installation company.
This installation manual is to be used when attaching the wall mount to a wall. When attaching to
➢
other building materials, please contact your nearest dealer.
Tilt Up, Tilt Down, Move
right, Move left
Moves to the initial
installation position
Remembers 3 positions
with the Red, Green and
Yellow buttons.
Moves to the remembered
position using these 3
colour buttons.
Wall-Mount Adjustment
Position1
Position
Adjust Centre
1 2 3
INFO
Exit
English - 43
Page 44

Upgrading the Software
Samsung may offer upgrades for your TV’s firmware in the future. There are two methods to
upgrade the software. Please contact the Samsung call center at 1-800-SAMSUNG to receive
information about downloading upgrades and using the USB device and Over the Air Download.
Upgrades will be possible by connecting a USB drive to the USB port located on the back of your
TV and using Over the Air Download.
Using a USB
TV Side Panel
USB Drive
1 Insert a USB drive containing the firmware upgrade into
the USB Upgrade Port on the side of the TV.
2 Press the MENU button to display the menu.
3 Press the ▲ or ▼ button to select Setup, then press the
ENTER/OK button.
4 Press the ▲ or ▼ button to select SW Upgrade, then
Scanning for USB.
It may take up to 30 seconds.
Melody : Medium
Anynet+ (HDMI-CEC) Setup
Setup
SW Upgrade
Function Help : On
Software Upgrade
press the ENTER/OK button and select USB Download.
The message Scanning for USB. It may take up to 30
seconds. is displayed.
5 If the firmware on the USB is properly recognized, the
message Upgrade version xxxx to version xxxx? The
system would be reset after upgrade. is displayed.
Upgrade version XXXX to version XXXX ? The
system would be reset after upgrade.
Software Upgrade
Press the ◄ or ► button to select OK, then press the
ENTER/OK button. The upgrade starts.
OK Cancel
Please be careful not to disconnect the power or remove
the USB drive while upgrades are being applied.
The TV will shut off and turn on automatically after completing the firmware upgrade.
Please check the firmware version after the upgrades are complete.
When software is upgraded, video and audio settings you have made will return to their default
➢
(factory) settings. We recommend you write down your settings so that you can easily reset them
after the upgrade.
English - 44
Page 45

Over the Air Download
1 Press the MENU button to display the menu.
2 Press the ▲ or ▼ button to select Setup, then press the
ENTER/OK button.
3 Press the ▲ or ▼ button to select SW Upgrade, then
press the ENTER/OK button.
4 press the ENTER/OK button to select the Over the Air
Download.
5 Press the ▲ or ▼ button to select Software Information,
Manual Upgrade or Standby Mode Upgrade.
Press the ENTER/OK button.
Software Information
➢
Press the
ENTER/OK button, then the current software
version appears. Then you can upgrade the software as
the pictures.
Manual Upgrade
➢
Press the
ENTER/OK button to search for new software
from the currently broadcasting channels. The operations
are same as you enter the software information.
Standby Mode Upgrade : On / Off
➢
When you turn off your TV, software upgrade will be
conducted automatically, after 45 minutes. During this
upgrade, the screen can be illuminatedslightly, in case of
plasma. This phenomenon may continue for 3~5 minutes
if there is no upgrade signal. But this phenomenon may
continue for more than 1 hour if there is new software
version. After upgrade is completed, your TV will be
turned off automatically. If you don’t want this process,
select Off by pressing the ▲ or ▼ button. Press the
ENTER/OK button.
Melody :Medium
Anynet+ (HDMI-CEC) Setup
Setup
SW Upgrade
Function Help : On
Software Upgrade
Software Information
Manual Upgrade
Standby Mode Upgrade : On
Move
Software Information
Current Software: T-PENYDAU0-XXXX
Default
Alternative Software: X-PENYDAU0-XXXX
(Old Version)
Switch Default Software
Software Information
Current Software: T-PENYDAU0-XXXX
Alternative Software: X-PENYDAU0-XXXX
(Old Version) New Default
Software Upgrade
Software Information
Manual Upgrade
Standby Mode Upgrade : On
Move
Over the Air Download
USB Download
Return
Enter
Enter
Off
On
Return
ReturnConfirm
English - 45
Enter
Move
SWUpgrade Scan
Searching for Upgrade...
Stop
Return
3%
Page 46

Setting up Your PC Software (Based on Windows XP)
The Windows display-settings for a typical computer are shown below. The
actual screens on your PC may be different depending upon your particular
version of Windows and your particular video card.
screens look different, the same, basic set-up information will apply in almost
all cases. (If not, contact your computer manufacturer or Samsung Dealer.)
1. First, click on "Control Panel" on the Windows start menu.
2. When the control panel window appears, click on "Appearance and Themes"
and a display dialog-box will appear.
3. When the control panel window appears, click on "Display" and a display
dialog-box will appear.
4. Navigate to the "Settings" tab on the display dialog-box.
The correct size setting (resolution): Optimum- 1920 X 1080
If a vertical-frequency option exists on your display settings dialog box, the correct value is
"60" or "60 Hz". Otherwise, just click "OK" and exit the dialog box.
Even if your actual
English - 46
Page 47

Display Modes
Both screen position and size will vary depending on the type of PC monitor and its resolution.
The resolutions in the table are recommended. (All resolutions between the supported limits are
supported)
D-Sub Input
Mode Resolution
IBM
VESA
HDMI/DVI Input
Mode Resolution
IBM
VESA
The interlace mode is not supported.
The set might operate abnormally if a non-standard video format is selected.
Separate and Composite modes are supported. SOG is not supported.
640 x 350
640 x 480
720 x 400
640 x 480
640 x 480
640 x 480
800 x 600
800 x 600
800 x 600
800 x 600
1024 x 768
1024 x 768
1024 x 768
1024 x 768
1152 x 864
1280 x 960
1280 x 1024
1280 x 1024
1280 x 1024
1600 x 1200
1920 x 1080
640 x 350
640 x 480
720 x 400
800 x 600
1024 x 768
1280 x 1024
1920 x 1080
Horizontal
Frequency (kHz)
31.469
31.469
31.469
35.000
37.861
37.500
43.750
37.879
48.077
46.875
57.672
48.364
56.476
60.023
67.500
60.000
63.981
74.620
79.976
75.000
66.587
Horizontal
Frequency (kHz)
31.469
31.469
31.469
37.879
48.364
63.981
66.587
Vertical
Frequency (Hz)
70.086
59.940
70.087
70.000
72.809
75.000
70.000
60.317
72.188
75.000
72.000
60.000
70.069
75.029
75.000
60.000
60.020
70.000
75.025
60.000
59.934
Vertical
Frequency (Hz)
70.086
59.940
70.087
60.317
60.000
60.020
59.934
Pixel Clock
Frequency (MHz)
25.175
25.175
28.322
28.560
31.500
31.500
45.500
40.000
50.000
49.500
78.434
65.000
75.000
78.750
108.000
108.000
108.000
1 28.943
135.000
162.000
138.500
Pixel Clock
Frequency (MHz)
25.175
25.175
28.322
40.000
65.000
108.000
138.500
Sync Polarity
(H/V)
+ / -
- / -
- / +
- / +
- / -
- / -
- / +
+ / +
+ / +
+ / +
- / -
- / -
- / + / +
+ / +
+ / +
+ / +
- / -
+ /+
+ /+
+ / -
Sync Polarity
(H/V)
+ / -
- / -
- / +
+ / +
- / -
+ /+
+ / -
English - 47
Page 48

Setting the PC
Preset to the PC mode by pressing the SOURCE button.
➢
1 Press the MENU button to display the menu.
2 Press the ▲ or ▼ button to select Setup, then press the
ENTER/OK button.
3 Press the ▲ or ▼ button to select PC, then press the
ENTER/OK button.
4 Select the required option by pressing the ▲ or ▼
button, then press the ENTER/OK button.
Available options:
Image Lock, Position, Auto
Adjustment, Image Reset
5 When you are satisfied with your setting, press the
ENTER/OK button.
6 Press the EXIT button to exit.
Image Lock: Coarse/Fine
The purpose of picture quality adjustment is to remove
or reduce picture noise.
If the noise is not removed by Fine-tuning alone, then
adjust the frequency as best as possible (coarse) and
Fine-tune again.
After the noise has been reduced, readjust the picture so
that it is aligned on the centre of screen.
1 Press the ▲ or ▼ button to select Coarse or Fine,
then press the ENTER/OK button.
2 Press the ◄ or ► button to adjust the screen
quality, vertical stripes may appear or the picture
may be blurry. Press the
ENTER/OK button.
Position
Adjust the PC’s screen positioning if it does not fit the
TV screen.
1 Adjust the position by pressing the ▲/▼/◄/►
button.
2 Press the ENTER/OK button.
Auto Adjustment
Auto adjustment allows the PC screen of set to selfadjust to the incoming PC video signal.
The values of fine, coarse and position are adjusted
automatically.
Image Reset
You can replace all image settings with the factory
default values.
Menu Transparency : Medium
Energy Saving : Off
Setup
PC
Home theatre PC : Off
HDMI Black Level : Normal
Film Mode
Wall-Mount Adjustment
Light Effect
Blue Screen
Melody
Menu Transparency : Medium
Energy Saving : Off
Setup
PC
Home theatre PC : Off
HDMI Black Level : Normal
Film Mode
Wall-Mount Adjustment
Light Effect
Blue Screen
Melody
Image Lock
Coarse
Fine
Move
Adjust
Position
Adjust
: Off
: Always
: On
: Medium
Image Lock
Position
Auto Adjustment
Image Rese
: Off
: Always
: On
: Medium
Enter
t
50
0
Return
ReturnEnter
English - 48
Auto Adjustment in Progress. Please Wait.
Image Reset is completed.
Page 49

Changing the Picture Size (PC Mode)
You can select the picture size which best corresponds to
your viewing requirements.
1 Press the MENU button to display the menu.
2 Press the ENTER/OK button to select Picture.
3 Press the ▲ or ▼ button to select Size, then press the
ENTER/OK button.
4 Press the ▲ or ▼ button to select the screen format you
want, then press the ENTER/OK button.
5 Press the EXIT button to exit.
16:9: Sets the picture to 16:9 wide mode.
4:3: Set the picture in 4:3 format.
You can change the picture size simply by pressing the P.SIZE
➢
button on the remote control.
erutciP
16:9
Zoom 1
Zoom 2
4:3
Just Scan
Backlight : 10
Detailed Settings
Size : 16:9
Digital NR : Off
Active Colour : Off
Auto Motion Plus 100Hz : Low
DNIe : Off
Picture Reset
Size
Move
ReturnEnter
Setting the Home theatre PC
You can view higher quality pictures by configuring the
screen settings in PC Mode.
If you set the Home Theatre PC function to On, you can
configure the Detailed Settings (when Picture Mode is set
to Standard or Movie) as in PC Mode.
1 Press the MENU button to display the menu.
2 Press the ▲ or ▼ button to select Setup, then press the
ENTER/OK button.
3 Press the ▲ or ▼ button to select Home theatre PC,
then press the ENTER/OK button.
4 Select Off or On by pressing the ▲ or ▼ button, then
press the ENTER/OK button.
5 Press the EXIT button to exit.
This function is available only in PC mode.
➢
English - 49
Setup
Setup
Energy Saving : Off
PC
Home theatre PC : Off
HDMI Black Level : Normal
Film Mode
Wall-Mount Adjustment
Light Effect
Blue Screen
Melody : Medium
Anynet + (HDMI-CEC) Setup
Energy Saving : Off
PC
Home theatre PC : Off
HDMI Black Level : Normal
Film Mode
Wall-Mount Adjustment
Light Effect
Blue Screen
Melody : Medium
Anynet + (HDMI-CEC) Setup
: Off
: Always
: On
Off
On
: Off
: Always
: On
Page 50

Using the WISELINK Function
This function enables you to view and listen to photo (JPEG) and audio files (MP3) saved on a
USB Mass Storage Class (MSC) device.
1 Press the POWER button on the remote control or front
panel.
2 Connect a USB device containing JPEG and/or MP3
files to the WISELINK jack (USB jack) on the side of the
TV.
TV Side Panel
Removing a USB Device
1 Press the MENU button to display the menu.
2 Press the ▲ or ▼ button to select Guide, then press the
ENTER/OK button.
3 Press the ENTER/OK button to select WISELINK.
The photo or music files saved on the memory device are
listed.
4 Press the blue button and press the ▲ or ▼ button to
select Safe Remove and press the ENTER/OK button. The
Removing the device safe
...
message appears and then
the USB could be removed safe message appears.
5 Remove the USB device from the TV.
If you enter the WISELINK mode with no USB device
➢
connected. “No external storage device found. Check
the connection status.” message will appear. In
this case, insert the USB device, exit the screen by
pressing the WISELINK button on the remote control
and enter the WISELINK screen again.
Photo and audio files must be named in English.
If not, the files can not be played. Change the file
names to English, French, or Spanish if necessary.
Folder or file names can not exceed 128 characters.
If exceeded, they won’t function. When the files stored in
the USB is over 440MB, if you select Delete All,
the TV will be abnormal. You can delete it in the computer.
The file system only supports the FAT16/32.
Certain types of USB Digital camera and audio
WISELINK supports USB Mass Storage Class (MSC) devices only.
MSC is the device for mass storage class bulk-only transport. (e.g. thumb device, flash card
WISELINK only supports the USB Mass Storage Class device (MSC). MSC is a Mass Storage
Before connecting your device to the TV, please back up your files to prevent them from damage
The USB hub is not supported and you cannot use a digital camera (PTP: Picture Transfer
To remove a USB storage device from the TV or to turn it off (if available), exit WISELINK first for
Guide
WISELINK
Full Guide
Now&Next Guide
Default Guide : Full Guide
Photo
Folder 1 2007/1/2
File 1.jpg 2007/1/2
Information
Safe Remove
File 2.jpg 2007/1/2
File 3.jpg 2007/1/2
File 4.jpg 2007/1/2
USB
Device
Zoom
Removing the device safe
Option
USB Drive
...
English - 50
Continued...
Page 51

Using the Remote Control Button in WISELINK Menu
Button Operations
Move the cursor and select an item.
Select the currently selected item.
Play or pause the Slide Show or MP3 file.
Return to the previous menu.
Run various functions from the Photo and Music menus.
Stop the current slide show or MP3 file.
Page Up or Down (file list item).
Using the WISELINK Mode
button to display the menu.
1 Press the
2 Press the ▲ or ▼ button to select
ENTER/OK
3 Press the
4 Press the ▲ or ▼ button to select
press the
The photo or music files saved on the storage device are
listed.
5 To exit WISELINK mode, press the
remote control.
MENU
button.
ENTER/OK
ENTER/OK
Guide
button to select
Photo
button.
EXIT
, then press the
or Music
.
, then
WISELINK
button on the
Guide
WISELINK
Full Guide
Now&Next Guide
Default Guide : Full Guide
Press the
➢
the WISELINK mode.
WISELINK
Photo
Flash Disk
button on the remote control to turn on
English - 51
Folder 1 2007/1/2
File 1.jpg 2007/1/2
File 2.jpg 2007/1/2
File 3.jpg 2007/1/2
File 4.jpg 2007/1/2
Device
Zoom
Option
Page 52

Using the Photo (JPEG) List
You can play back the JPEG files saved on a memory device in various ways.
1 After switching the mode to WISELINK, select a memory
device that you have installed. (Refer to page 50~51)
2 Press the ENTER/OK button to select Photo.
JPEG files and existing folders are displayed.
3 Press the ▲ or ▼ button to select a photo, then press the
ENTER/OK button.
Pressing the button over a photo icon shows the
➢
currently selected photo in full screen.
Pressing the button over a folder icon shows the JPEG
➢
files included in the folder.
While a full screen is displayed, ◄ or ► button will let
➢
you see another photo image in the same folder.
Press the PLAY/PAUSE button when a photo icon is
➢
selected to start a Slide Show.
4 To exit WISELINK mode, press the EXIT button on the
remote control.
Moving to a photo may take a few seconds because the
➢
file needs to be loaded. At this point, the icon will appear.
This menu shows only the files whose extension is jpeg
➢
(or jpg). Files with other formats such as gif or tif will not
be displayed.
Folders are displayed first and they are followed by all
➢
JPEG files in the current folder.
The folders and JPEG files are sorted in alphabetical
order.
If the photo is displayed in full screen, you can zoom in
➢
and out or rotate the photo on the screen. (Refer to pages
55~57)
If the size of a photo file is too big, the playing of the
➢
background music may be interrupted intermittently.
(When Background Music is On) See page 58.
Press the WISELINK button on the remote control to turn on
➢
the WISELINK mode.
Guide
WISELINK
Full Guide
Now&Next Guide
Default Guide : Full Guide
Photo
Folder 1 2007/1/2
File 1.jpg 2007/1/2
File 2.jpg 2007/1/2
File 3.jpg 2007/1/2
File 4.jpg 2007/1/2
USB
Device
II
1/4 File 1.jpg 800x600 103.1KB 2007/1/2
II Slide Show
Zoom
◀ Previous
Option
▶ Next
TOOL
S
WISELINK
Option
List
Using the Options Menu
Start Slide Show (or Stop Slide Show):
You can start or stop a Slide Show.
(Refer to “Viewing a Slide Show” on pages 54~55)
Slide Show Speed::
when you choose Start Slide Show, you can select Slide
Show Speed (Refer to Slide Show Speed on page 55)
English - 52
Normal
1/4 File 1.jpg 800x600 103.1KB 2007/1/2
II Pause
◀ Previous
▶ Next
TOOL
S
WISELINK
Option
List
Continued...
Page 53

Zoom:
You can zoom into images in full screen mode.
Images are zoomed in, in the order of x1 (original size), x2
and x4.
(Refer to “Zooming-In” on page 55)
Rotate:
You can rotate images in full screen mode.
Images are rotated in the order of 0° (original state), 180°,
270° and 90°.
(Refer to “Rotating” on page 57)
Background Music:
You can determine whether to play the configured background
music.
(Refer to “Background Music On/Off” on page 58)
x2
Zoom Out Zoom In
90°
Rotate
Start Slide Show
Zoom
Rotate
Background Music
Background Music Setting
Delete
Picture Mode :Dynamic
Sound Mode :Custom
Information
Move
Adjust
On
Enter
Background Music Setting:
You can set the background music.
(Refer to “Background Music Setting” on page 58)
Delete:
You can delete a photo (JPEG) file.
(Refer to “Deleting the Photo files” on page 59)
English - 53
Background Music Setting
Flash Disk/ 5File(s) Selected
Folder 1
Steve-Love.mp3
Tomas-Feel So Good.mp3
Jane-Holiday.mp3
Rachel-Happy day.mp3
Maritha-Rain.mp3
Select
Move
Save
Return
Do you want to delete file File 1.jpg?
NoYesS
Continued...
Page 54

Picture Setting:
You can set the Picture mode.
(Refer to on page 27)
Sound Setting:
You can set the Sound mode.
(Refer to on page 33)
TOOLS
Stop Slide Show
Slide Show Speed
Zoom
Rotate
Background Music : On
Background Music Setting
Delete
Picture Mode
Dynamic
Sound Mode : Custom
Move
Adjust
TOOLS
Stop Slide Show
Slide Show Speed
Zoom
Rotate
Background Music : On
Background Music Setting
Delete
Picture Mode : Dynamic
Sound Mode
Custom
Move
Adjust
Enter
Enter
Information:
The photo file information including the order of the file in the
current directory, the name, the size, the resolution, and the
date modified is displayed.
Screen Saver:
Select to set the waiting time before the screen saver is run
Position : / dtv/usb/sda/Folder 1/File 1.jpg
Name : File 1.jpg
Size : 103.1KB
Resolution : 800x600
Date : Jan 1, 2007
OK
when no button is pressed.
You can select from
To prevent a residual image on the screen, the time to
➢
run the Screen Saver is set to 5min by default. Users can
change the setting to Off, 5min or 10min according to
user requirements.
Safe Remove:
1min, 5min or 10min.
Photo
Folder 1 2007/1/2
File 1.jpg 2007/1/2
File 2.jpg 2007/1/2
File 3.jpg 2007/1/2
File 4.jpg 2007/1/2
You can remove from the WISELINK.
Viewing a Slide Show
Flash Disk
Device
Zoom
Select
Option
II Slide Show
1 After switching the mode to WISELINK, select a memory
device that you have installed. (Refer to page 50~51)
2 Press the ENTER/OK button to select Photo.
JPEG files and existing folders are displayed.
3 Press the ▲ or ▼ button to select a photo, then press
the blue button to display the option (View, Start Slide
Show, Delete, Delete All, Select All, Information, Safe
Photo
Folder 1
File 1.jpg 2007/1/2
File 2.jpg 2007/1/2
File 3.jpg 2007/1/2
File 3.jpg 2007/1/2
View
Start Slide Show
Delete
Delete All
Select All
Information
Safe Remove
Remove).
Press the ▲ or ▼ button to select Start Slide Show,
Flash Disk
Device
Zoom
Select
Option
II Slide Show
then press the ENTER/OK button.
Slide show displays all JPEG files in the selected folder at a pre-set speed.
➢
During the slide show, files are displayed in order from the currently shown file.
➢
MP3 files can be automatically played during the slide show if the Background Music is set to
➢
On. To enable this function, MP3 files and other photo files must be located in the same folder on
the memory device.
Press the PLAY/PAUSE button when a photo icon is selected to start a Slide Show.
➢
Continued...
English - 54
Page 55

4 Press the TOOLS button during slide show to set the
option.
5 To exit WISELINK mode, press the EXIT button on the
remote control.
Press the WISELINK button on the remote control to turn on
➢
the WISELINK mode.
TOOLS
Start Slide Show
Zoom
Rotate
Background Music : On
Background Music Setting
Delete
Picture Mode : Dynamic
Sound Mode : Standard
Information
Move
Enter
Slide Show Speed:
Select to control the slide show speed.
Each time the ◄ or ► button is pressed, the speed changes
repeatedly.
(Fast → Slow → Normal)
Zooming-In
1 After switching the mode to WISELINK, select a memory
device that you have installed. (Refer to page 50~51)
Photo
2 Press the ENTER/OK button to select Photo.
JPEG files and existing folders are displayed.
3 Press the ▲ or ▼ button to select a photo, then press the
ENTER/OK button.
Pressing the button over a photo icon shows the
➢
currently selected photo in full screen.
4 Press the TOOLS button.
Press the ▲ or ▼ button to select Zoom, then press the
ENTER/OK button.
Each time the ◄ or ► button is pressed, the photo size
decreases or increases.
(x1 → x2 → x4)
x1: Restore the photo to its original size.
x2: Zoom-in to the photo x2.
x4: Zoom-in to the photo x4.
Folder 1 2007/1/2
File 1.jpg 2007/1/2
File 2.jpg 2007/1/2
File 3.jpg 2007/1/2
File 4.jpg 2007/1/2
USB
Device
TOOLS
Start Slide Show
Start Slide Speed : Normal
Zoom
Rotate
Background Music : On
Background Music Setting
Delete
Picture Mode : Dynamic
Sound Mode : Standard
Move
Adjust
Enter
Zoom
Option
TOOLS
Start Slide Show
Zoom
Rotate
Background Music : On
Background Music Setting
Delete
Picture Mode : Dynamic
Sound Mode : Standard
Information
Move
Enter
English - 55
Continued...
Page 56

5 To move the enlarged photo image up/down/left/right, press
the ENTER/OK button, then press the ▲/▼/◄/► buttons.
Note that when the enlarged picture is smaller than
➢
the original screen size, the location change function
x1
doesn’t work.
6 To exit WISELINK mode, press the EXIT button on the
remote control.
The enlarged file is not saved.
➢
Press the WISELINK button on the remote control to turn on
➢
the WISELINK mode.
x2
Zoom Out Zoom In
Move
Zoom function information icon (Displayed at the top left of the screen).
Icon Current OSD Function
Zoom (x 1) Restore a photo to its original size.
Zoom (x 2) Zoom-in to a photo x2.
Zoom (x 4) Zoom-in to a photo x4.
Pan Up Pan up to view the upper part of a zoomed-in photo.
Pan Down Pan down to view the lower part of a zoomed-in photo.
Pan Left Pan left to view the left side of a zoomed-in photo.
Pan Right Pan right to view the right side of a zoomed-in photo.
Enter
TOOLS
Option
WISELINK
List
English - 56
Continued...
Page 57

Rotating
1 After switching the mode to WISELINK, select a memory
device that you have installed. (Refer to page 50~51)
Photo
2 Press the ENTER/OK button to select Photo.
JPEG files and existing folders are displayed.
3 Press the ▲ or ▼ button to select a photo, then press the
ENTER/OK button.
Pressing the button over a photo icon shows the
➢
currently selected photo in full screen.
4 Press the TOOLS button.
Press the ▲ or ▼ button to select Rotate, then press the
ENTER/OK button.
Press the ◄ or ► button to rotate the photo by the
required amount.
Whenever you press the ◄ button, it rotates by 270˚,
➢
180˚, 90˚, and 0˚.
Whenever you press the ► button, it rotates by 90˚,
➢
180˚, 270˚, and 0˚.
Rotating directly from 90 degrees to 270 degrees is
➢
not allowed.
5 To exit WISELINK mode, press the EXIT button on the
remote control.
The rotated file is not saved.
➢
If you have select ZOOM, the Rotate function is
➢
deactivate
Folder 1 2007/1/2
File 1.jpg 2007/1/2
File 2.jpg 2007/1/2
File 3.jpg 2007/1/2
File 4.jpg 2007/1/2
USB
Device
90°
Zoom
Option
TOOLS
Start Slide Show
Zoom
Rotate
Background Music : On
Background Music Setting
Delete
Picture Mode : Dynamic
Sound Mode : Standard
Information
Move
Enter
Rotate
Press the WISELINK button on the remote control to turn on
➢
the WISELINK mode.
The Rotating function information icon (Displayed at the top left of the screen).
Icon Current OSD Function
Rotating (270°) To rotate a photo by 270 degrees
Rotating (180°) To rotate a photo by 180 degrees
Rotating (90°) To rotate a photo by 90 degrees
Rotating (0°) To rotate a photo to its original state
English - 57
Continued...
Page 58

Background Music On/Off
If you set Background Music On, the background music
will be played when viewing photos one by one or in a
Slide Show.
Photo
1 After switching the mode to WISELINK, select a memory
device that you have installed. (Refer to page 50~51)
2 Press the ENTER/OK button to select Photo.
JPEG files and existing folders are displayed.
3 Press the ▲ or ▼ button to select a photo, then press the
ENTER/OK button.
Pressing the button over a photo icon shows the
➢
currently selected photo in full screen.
4 Press the TOOLS button.
Press the ▲ or ▼ button to select Background Music,
then press the ◄ or ► button to select On or Off.
On: When the background music is available, if you
➢
select On, the music is played back.
Off: Background music is not played.
➢
5 To exit WISELINK mode, press the EXIT button on the
remote control.
Press the WISELINK button on the remote control to turn on
➢
the WISELINK mode.
Background Music Setting
1 After switching the mode to WISELINK, select a memory
Photo
device that you have installed. (Refer to page 50~51)
2 Press the ENTER/OK button to select Photo.
JPEG files and existing folders are displayed.
3 Press the ▲ or ▼ button to select a photo, then press the
ENTER/OK button.
Pressing the button over a photo icon shows the
➢
currently selected photo in full screen.
4 Press the TOOLS button.
Press the ▲ or ▼ button to select Background Music
Setting, then press the ENTER/OK button.
The music (MP3) files are listed.
5 Press the ▲ or ▼ button to select a particular music file
and press the yellow button.
The <✔> mark appears to the left of the selected
➢
music (MP3).
Repeat the above operation to select multiple music
➢
files.
6 Press the ENTER/OK button to save the current
selections.
Flash Disk/ 5File(s) Selected
7 To exit WISELINK mode, press the EXIT button on the
remote control.
If you turn Off the Background Music, even if the
➢
Background Music Settings have been set up, the
background music will not be played.
Folder 1 2007/1/2
File 1.jpg 2007/1/2
File 2.jpg 2007/1/2
File 3.jpg 2007/1/2
File 4.jpg 2007/1/2
Flash Disk
Flash Disk
Device
Zoom
Folder 1 2007/1/2
File 1.jpg 2007/1/2
File 2.jpg 2007/1/2
File 3.jpg 2007/1/2
File 4.jpg 2007/1/2
Device
Zoom
Background Music Setting
Folder 1
Steve-Love.mp3
Tomas-Feel So Good.mp3
Jane-Holiday.mp3
Rachel-Happy day.mp3
Maritha-Rain.mp3
Select
Move
Select
Option
II Slide Show
Start Slide Show
Zoom
Rotate
Background Music : On
Background Music Setting
Delete
Picture Mode : Dynamic
Sound Mode : Standard
Information
Move
Select
Option
II Slide Show
Start Slide Show
Zoom
Rotate
Background Music : On
Background Music Setting
Delete
Picture Mode : Dynamic
Sound Mode : Standard
Information
Save
TOOLS
TOOLS
Adjust
Move
Enter
Enter
Return
English - 58
Continued...
Page 59

Press the WISELINK button on the remote control to turn on
➢
the WISELINK mode.
Deleting the Photo files
You can delete photo (JPEG) files saved on a USB storage device.
1 After switching the mode to WISELINK, select a memory
device that you have installed. (Refer to page 50~51)
2 Press the ENTER/OK button to select Photo.
JPEG files and existing folders are displayed.
3 Press the ▲ or ▼ button to select a photo you want to
delete and then press the blue button.
Photo
Folder 1 2007/1/2
File 1.jpg 2007/1/2
File 2.jpg 2007/1/2
File 3.jpg 2007/1/2
File 4.jpg 2007/1/2
4 Press the ▲ or ▼ button to select Delete or Delete All
and then press the ENTER/OK button.
If you select Delete, only the selected photo will be
➢
deleted.
If you select Delete All, all photos in the folder will be
➢
deleted.
5 Press the ◄ or ► button to select Yes and press the
ENTER/OK button.
The photo will be deleted.
➢
If you select No, the deletion is cancelled.
➢
6 To exit WISELINK mode, press the EXIT button on the
remote control.
You cannot remove the following files:
➢
PTP-connected digital camera picture files
Read-only files
While removing files, don’t remove the USB memory
➢
device.
You cannot recover a deleted photo file.
➢
Flash Disk
Device
Photo
Folder 1 2007/1/2
File 1.jpg 2007/1/2
File 2.jpg 2007/1/2
File 3.jpg 2007/1/2
File 3.jpg 2007/1/2
Flash Disk
Device
Do you want to delete file File 1.jpg?
Removing read-only files
When removing any read-only files, the screen to the right
appears.
Press the ◄ or ► button to select Yes, then press the
File 1.jpg is read-only file. Delete it?
ENTER/OK button.
If you select No, the removing operation is cancelled.
➢
Zoom
Option
View
Start Slide Show
Delete
Delete All
Select All
Information
Safe Remove
Select
Option
II Slide Show
NoYes
NoYes
Zoom
Press the WISELINK button on the remote control to turn on
➢
the WISELINK mode.
English - 59
Continued...
Page 60

Deleting Multiple Photos
1 In the Photo list, press the ▲ or ▼ button to select a
photo to be deleted and press the yellow button.
The <✔> mark appears to the left of the selected
➢
photo.
Repeat the above operation to select multiple photos.
➢
2 Press the blue button, press the ▲ or ▼ button to select
Photo
Folder 1 2007/1/2
File 1.jpg 2007/1/2
File 2.jpg 2007/1/2
File 3.jpg 2007/1/2
File 3.jpg 2007/1/2
Start Slide Show
Delete selected File
Select All
Deselect All
Safe Remove
Delete selected File and press the ENTER/OK button.
3 Press the ◄ or ► button to select Yes and press the
ENTER/OK button.
The selected photos are deleted.
➢
If you select No, the deletion will be cancelled.
➢
4 To exit WISELINK mode, press the EXIT button on the
remote control.
You cannot remove the read-only files from the selected
➢
ones.
You cannot restore the removed pictures.
➢
Press the WISELINK button on the remote control to turn on
➢
the WISELINK mode.
Flash Disk
Device
Zoom
Do you want to delete the 2 files including
File 1.jpg?
Select
Option
NoYes
Using the Music (MP3) List
You can play back the MP3 files saved on a memory device in various ways.
1 After switching the mode to WISELINK, select a memory
device that you have installed. (Refer to page 50~51)
2 Press the ▲ or ▼ button to select Music, then press the
ENTER/OK button.
MP3 files and existing folders are displayed.
3 Press the ▲ or ▼ button to select a music to be played,
then press the ENTER/OK button.
Pressing the ENTER/OK button while a music file is
➢
highlighted immediately plays the music file.
Pressing the ENTER/OK button while a folder is
➢
highlighted shows the music files in the folder.
To select a file on the next page, press the REW or
➢
FF button.
Pressing the ◄ or ► button while playing a music file
➢
will let you play another music file in the same folder.
To play back the files repeatedly, change the setting
➢
by referring to page 61.
4 Press the PLAY/PAUSE button while playing an MP3 file
to pause the file.
Press the STOP button to stop playback.
5 To exit WISELINK mode, press the EXIT button on the
remote control.
This menu shows only the files whose extension is mp3. Files with other extensions are not
➢
displayed, even if they have been saved on the same memory device.
The selected file is displayed on the top of the screen with its playing time.
➢
To adjust the music volume, press the VOL+ or VOL- button on the remote control.
➢
To mute the sound, press the MUTE button on the remote control.
To move to the music list while playing a music file, press the WISELINK button.
➢
Press the WISELINK button on the remote control to turn on
➢
the WISELINK mode.
Music
Folder 1 2007/1/2
Tomas-Feel So Good.mp3
Steve-Love.mp3 2007/1/2
Jane-Holiday.mp3 2007/1/2
Flash Disk
Device
1/4 00:01:53 00:04:10
Tomas-Feel So Good.mp3
II Pause
Zoom
Option
◀ Previous
2007/1/2
▶ Next
II Slide Show
TOOL
S
Option
WISELINK
List
English - 60
Continued...
Page 61

Playing a Selected Music File
1 In the Music list, press the ▲ or ▼ button to select a
music file and then press the yellow button.
The <✔> mark appears to the left of the selected
➢
music.
Repeat the above operation to select multiple music
➢
files.
Music
Folder 1 2007/1/2
Tomas-Feel So Good.mp3
Steve-Love.mp3 2007/1/2
Jane-Holiday.mp3 2007/1/2
2 Press the blue button, then press the ENTER/OK button
to select Play selected File.
3 To exit WISELINK mode, press the EXIT button on the
remote control.
The selected music files are played.
➢
Music
Flash Disk
Flash Disk
Device
Device
Zoom
Folder 1 2007/1/2
Tomas-Feel So Good.mp3
Steve-Love.mp3 2007/1/2
Jane-Holiday.mp3 2007/1/2
Zoom
Music function information icon (Displayed at the top left of the screen).
Icon Current OSD Function
(Music) One Repeat When a music file is repeated.
(Music) One When a music file is played once.
2007/1/2
Select
Option
II Play
2007/1/2
Play selected File
Repeat mode On
Delete selected File
Select All
Deselect All
Safe Remove
Select
Option
II Play
(Music) Play/Pause
while music is playing. The music stops and the ‘Play’ text
appears at the top of the screen.
When pressing the PLAY/PAUSE button on the remote control
Press the WISELINK button on the remote control to turn on
➢
the WISELINK mode.
Repeating Music Play
You can play music repeatedly.
1 After switching the mode to WISELINK, select a memory
device that you have installed. (Refer to page 50~51)
Music
2 Press the ▲ or ▼ button to select Music, then press the
ENTER/OK button.
MP3 files and existing folders are displayed.
Folder 1 2007/1/2
Tomas-Feel So Good.mp3
Steve-Love.mp3 2007/1/2
Jane-Holiday.mp3 2007/1/2
3 Press the ▲ or ▼ button to select a music, then press the
blue button.
Press the ▲ or ▼ button to select Repeat mode, then
press the ◄ or ► button to select On.
To cancel
Repeat mode, select Off.
USB
Device
4 To exit WISELINK mode, press the EXIT button on the remote control.
Press the WISELINK button on the remote control to turn on
➢
the WISELINK mode.
Zoom
2007/1/2
Play
Repeat mode ◄ On ►
Delete
Delete All
Select All
Information
Safe Remove
Select
Option
II Play
Continued...
English - 61
Page 62

Deleting the Music files
You can delete music (MP3) files saved on the USB storage device.
1 After switching the mode to WISELINK, select a memory
device that you have installed. (Refer to page 50~51)
Music
2 Press the ▲ or ▼ button to select Music, then press the
ENTER/OK button.
MP3 files and existing folders are displayed.
Folder 1 2007/1/2
Tomas-Feel So Good.mp3
Steve-Love.mp3 2007/1/2
Jane-Holiday.mp3 2007/1/2
3 Press the ▲ or ▼ button to select a music file to be
deleted and then press the blue button.
4 Press the ▲ or ▼ button to select Delete or Delete All
and then press the ENTER/OK button.
If you select Delete, only the selected music will be
➢
deleted.
If you select Delete All, all music files in the selected
➢
folder are deleted.
USB
Device
Do you want to delete file Tomas-Feel So Good.mp3?
5 Press the ◄ or ► button to select Yes and press the
ENTER/OK button.
The music will be deleted.
➢
If you select No, the deletion will be cancelled.
➢
You cannot remove the following files:
➢
Read-only files
While removing any files, don’t remove the USB memory device.
➢
You cannot restore a deleted music file.
➢
Removing read-only files
When removing read-only files, the screen to the right
appears.
Press the ◄ or ► button to select Yes, then press the
z_break_away.mp3 is read-only file. Delete it ?
ENTER/OK button.
The music files are removed.
If you select No, the removing operation is cancelled.
➢
To exit WISELINK mode, press the
EXIT button on the remote
control.
Press the WISELINK button on the remote control to turn on
➢
the WISELINK mode.
Deleting Multiple Music Files
1 In the Music list, press the ▲ or ▼ button to select a
music file to be deleted and press the yellow button.
The <✔> mark appears to the left of the selected
➢
music file.
Repeat the above operation to select multiple music
➢
files.
Music
Folder 1 2007/1/2
Tomas-Feel So Good.mp3
Steve-Love.mp3 2007/1/2
Jane-Holiday.mp3 2007/1/2
2 Press the blue button, press the ▲ or ▼ button to select
Delete selected File and press the ENTER/OK button.
3 Press the ◄ or ► button to select Yes and press the
ENTER/OK button.
The selected music files will be deleted.
➢
If you select No, the deletion will be cancelled.
➢
4 To exit WISELINK mode, press the EXIT button on the
USB
Device
Do you want to delete the 2 files including
Tomas-Feel So Good.mp3?
remote control.
You cannot remove the read-only files from the selected ones.
➢
You cannot restore the removed pictures.
➢
Press the WISELINK button on the remote control to turn on
➢
the WISELINK mode.
Zoom
Zoom
2007/1/2
Play
Repeat mode On
Delete
Delete All
Select All
Information
Safe Remove
Select
Option
NoYes
NoYes
2007/1/2
Play selected File
Repeat mode On
Delete selected File
Select All
Deselect All
Safe Remove
Select
Option
NoYes
II Play
II Play
English - 62
Page 63

What is Anynet+?
Anynet+ is an AV network system that enables you to control all connected Samsung AV devices
with your Samsung TV’s remote.
Connecting Anynet+ Devices
The Anynet+ system can be used only with Samsung AV devices that have the Anynet+ feature. To
be sure your Samsung AV device has this feature, check if there is an Anynet+ mark on it.
To directly connect to TV
TV
Anynet+ Device 1 Anynet+ Device 2 Anynet+ Device 3
Connect the [HDMI 1], [HDMI
2] or [HDMI 3] jack on the TV
and the HDMI OUT jack of the
corresponding Anynet+ device
using the HDMI cable.
HDMI 1.3 Cable
TV
HDMI 1.3 Cable
HDMI 1.3 Cable
Connect the Optical cable between [Digital Audio Out (Optical)] on your TV and Digital Audio Input on
➢
the Home Theatre.
Connect only one Home Theatre.
➢
When following the connection above, the Optical jack only outputs 2 channel audio. You will only
➢
hear sound from the Home Theatre’s Front Left and Right speakers and the subwoofer. If you want
to hear 5.1 channel audio, connect the DIGITAL AUDIO OUT (OPTICAL) jack on the DVD player or
Cable/Satellite Box (ie Anynet Device 1 or 2) directly to the Amplifier or Home Theatre, not the TV.
Please see the home theatre’s user manual for more information.
You can connect an Anynet+ device using the HDMI 1.3 cable. Some HDMI cables may not support
➢
Anynet+ functions.
Anynet+ works when the AV device supporting Anynet+ is in the Standby or On status.
➢
Anynet+ supports up to 8 AV devices in total.
➢
HDMI 1.3 Cable
Anynet+ Device 1 Anynet+ Device 2
Home Theatre
HDMI 1.3 Cable
HDMI 1.3 Cable
Anynet+ Device 3
HDMI 1.3 Cable
To connect to Home Theatre
1 Connect the [HDMI 1],
[HDMI 2] or [HDMI 3]
jack on the TV and the
HDMI OUT jack of the
corresponding Anynet+
device using the HDMI
cable.
2 Connect the HDMI IN jack
of the home theatre and
the HDMI OUT jack of the
corresponding Anynet+
device using the HDMI
cable.
English - 63
Page 64

Setting Up Anynet+
The following settings help set the Anynet+ functions.
To use the Anynet+ Function, Anynet+ (HDMI-CEC) must be set to On
1 Press the MENU button to display the menu.
Press the ▲ or ▼ button to select Setup, then press the
ENTER/OK button.
2 Press the ▲ or ▼ button to select Anynet+ (HDMI-CEC)
Setup, then press the ENTER/OK button.
3 Press the ENTER/OK button to select Anynet+ (HDMI-
CEC) Setup, then press the ENTER/OK button.
4 Press the ▲ or ▼ button to select On, then press the
ENTER/OK button.
The Anynet+ function is enabled.
➢
If you select Off, Anynet+ is disabled.
➢
When the Anynet+ (HDMI-CEC) function is disabled, all
➢
the Anynet+ related operations are deactivated.
Anynet+ (HDMI-CEC) : ON
Auto Turn Off :
Setting an Anynet+ Device to turn Off Automatically when the TV is Turned Off
3 Press the ▲ or ▼ button to select Auto Turn Off, then
press the ENTER/OK button.
4 Press the ▲ or ▼ button to select On, then press the
ENTER/OK button.
The Auto Turn Off function is enabled.
➢
If you select Off, the Auto Turn Off function is
➢
cancelled.
Anynet+ (HDMI-CEC) : On
Auto Turn Off :
Press the EXIT button to exit.
The active source on the TV remote must be set to TV to use the Anynet+ function.
➢
If you set the Anynet+ (HDMI-CEC) to On, the Device List menu appears when you press the TOOLS
➢
button on the remote control.
If you set Auto Turn Off to On, connected external devices are also turned off when the TV is turned
➢
off. However, if the device is recording, it may not be turned off.
Blue Screen :Off
Melody :Medium
Setup
Anynet+ (HDMI-CEC) Setup
SW Upgrade
Function Help : On
Anynet+ (HDMI-CEC) Setup
Move
Anynet+ (HDMI-CEC) Setup
Move
Off
On
Enter
Off
On
Enter
Return
Return
English - 64
Page 65

Scanning and Switching between Anynet+ Devices
1 Press the Anynet+ button.
Press the ENTER/OK button to select Device List.
Anynet+ devices connected to the TV are listed.
➢
If you cannot find a device you want, press the red button
➢
to scan for devices.
2 Press the ▲ or ▼ button to select to a particular device and
press the ENTER/OK button. It is switched to the selected
device.
Only when you set Anynet+ (HDMI-CEC) to On in the Setup
➢
menu, the Device List menu appears.
Switching to the selected devices may take up to 2 minutes.
➢
You cannot cancel the operation during the switching
Picture Size : 16:9
Picture Mode : Dynamic
Sound Mode : Standard
Sleep Timer : Off
operation.
The time required to scan for devices is determined by the
➢
number of connected devices.
When the device scan is complete, the number of devices
➢
found is not displayed.
Although the TV automatically scans devices when it is turned
➢
on using the POWER button, devices connected when the TV
is already on are not displayed in the device list. Therefore
press the red button to re-scan devices if necessary.
If you have selected an external device by pressing the
➢
SOURCE button, you cannot use the Anynet+ function. Make
sure to switch to an external Anynet+ device by using the
Anynet+ button.
Anynet+ Menu
The Anynet+ menu changes depending on the type and status of the Anynet+ devices connected
to the TV.
Anynet+ Menu Description
View TV Switches from Anynet+ to TV broadcast mode.
Device List Displays the Anynet+ device list.
Shows the menu of the connected device.
Menu on Device
Device Operation
Record
Timer Recording
Example. When a DVD Recorder is connected, the DVD Recorder’s
title menu appears.
Shows the play control menu of the connected device.
Example. When a DVD Recorder is connected, the play control
menu of the DVD Recorder appears.
Starts a recording immediately. (This menu works only for a device
supporting recording.)
Allows reserving a recording.
(This menu works only for a device supporting recording
reservations.)
Stop Recording Stops recording.
Receiver Sound is output through the receiver (home theatre).
.
TOOLS
View TV
Device List
Recording : DVDR
DVDR Menu
DVDR Operation
BD Player
DVDR
Refresh
Move
Move
Enter
Enter
Return
English - 65
Continued...
Page 66

TV Remote Control Buttons Available in Anynet+ Mode
Device Type Operating Status Available Buttons
Anynet+ Device
Device with built-in Tuner
Audio Device When Receiver is activated
The Anynet+ function only works when the remote control is set to TV.
➢
The REC button works only in View TV status.
➢
You cannot control Anynet+ devices using the buttons on the side of the TV. You can control Anynet+
➢
devices only using the TV remote control.
The TV remote control may not work under certain conditions. In this case, re-select the Anynet+ device.
➢
The Anynet+ functions don’t operate for the products from other manufacturers.
➢
The Anynet+ functions do not work with other manufacturers’ products.
➢
The ◄◄, ►► operations may differ depending on the device.
➢
After switching to the
device, when the menu of
the corresponding device is
displayed on the screen.
After switching to the device,
while playing a file
After switching to the device,
when you are watching a TV
program
Numeric buttons
▲/▼/◄/►/ENTER buttons
Colour buttons
EXIT button
◄◄(Backward search)
►►(Forward search)
(Stop)
►
(Play/Pause)
CH ▲/▼ button
VOL +/-
button
MUTE button
Recording
You can make a recording of a TV program using a recorder.
1 Press the Anynet+ button.
2 Press the ▲ or ▼ button to select to Record Immediately and
press the ENTER/OK button.
Recording begins.
When there are more than one recording device
When multiple recording devices are connected, the recording
devices are listed. Press the ▲ or ▼ button to select to a
recording device and press the ENTER/OK button. Recording
begins.
When the recording device is not displayed
Select Device List and press the red button to search devices.
Press the EXIT button to exit.
You can record instantly using the REC button of the TV remote control.
➢
The current TV program is recorded in the Watching TV status. If you are watching video from
➢
another device, the video from the device is recorded.
Before recording, check whether the antenna jack is properly connected to the recording device.
➢
For the antenna connection to the recording device, refer to its user manual.
Picture Size : 16:9
Picture Mode : Dynamic
Sound Mode : Standard
Sleep Timer : Off
TOOLS
View TV
Device List
Recording : DVDR
DVDR Menu
DVDR Operation
Move
Enter
English - 66
Page 67

Listening through a Home theatre
You can listen to sound through a receiver (home theatre) instead of the TV’s speakers.
1 Press the Anynet+ button.
2 Press the ▲ or ▼ button to select Receiver, press the ◄ or ► button to select to On. Now you can
listen to sound through the Home theatre receiver.
Press the
When the receiver (home theatre) is set to On, you can hear sound output from the TV’s Optical jack.
➢
When the TV is displaying a DTV(air) signal, the TV will send out 5.1 channel sound to the Home theatre
receiver. When the source is a digital component such as a DVD and is connected to the TV via HDMI, only
2 channel sound will be heard from the Home Theatre receiver.
If your Home Theatre receiver supports audio only, it may not appear in the device list.
➢
The receiver will work when you have properly connected the Optical IN jack of the receiver to the
➢
Optical Out jack of the TV.
When using the WISELINK feature, sound may not output properly through the receiver.
➢
When listening through the receiver, there are restrictions for using the PIP and audio-related(MTS,
➢
Preferred language) menus.
EXIT button to exit.
Troubleshooting for Anynet+
Symptom Solution
Anynet+ does not work. ■ Check if the device is an Anynet+ device. The Anynet+ system
I want to start Anynet+.
I want to exit Anynet+. ■ Select View TV in Anynet+ menu.
The Connecting to Anynet+
device…message appears
on the screen.
The Anynet+ device does
not play.
The connected device is
not displayed.
The TV program cannot be
recorded.
The TV sound is not output
through the receiver.
supports Anynet+ devices only.
■ Connect only one receiver (home theatre).
■ Check if the Anynet+ device power cord is properly connected.
■
Check the Anynet+ device’s Video/Audio/HDMI cable connections.
■ Check whether the TV remote control is in TV mode.
■ Check whether it is Anynet+ exclusive remote control.
■ Anynet+ doesn’t work at a certain condition. (Searching channels,
operating WISELINK)
■ When connecting or removing the HDMI cable, please make sure to
search devices again or restart your TV.
■ Check if the Anynet+ Function of Anynet+ device is set on.
■
Check if the Anynet+ device is properly connected to the TV and check
if the Anynet+ (HDMI-CEC) is set to On in the Anynet+ Setup menu.
■ Press the TV button on the TV remote control to switch to TV. Then
press the Anynet+ button to show the Anynet+ menu and select a
menu you want.
■ Press the
device other than Anynet+ devices.
■ Press any of
mode. (Note that the channel button operates only when an Anynet+
device with a built-in tuner is not connected.)
■ You cannot use the remote control when you are configuring Anynet+
or switching to a view mode.
■ Use the remote control when the Anynet+ setting or switching to view
mode is complete.
■ You cannot use the play function when Plug & Play is in progress.
■ Check whether or not the device supports Anynet+ functions.
■ Check whether or not the HDMI cable is properly connected.
■ Check whether <Anynet+ (HDMI-CEC) Setup> is set to <On> in the
Anynet+ setup menu.
■ Search Anynet+ devices again.
■ You can connect an Anynet+ device using the HDMI cable only. Some
HDMI cables may not support Anynet+ functions.
■ Check whether the antenna jack on the recording device is properly
connected.
■ Connect the optical cable between TV and the receiver.
SOURCE button on the TV remote control and select a
CH, CH LIST, PRE-CH, and FAV.CH to change to the TV
English - 67
Page 68

Teletext Feature (depending on the model)
Most television stations provide written information services
via teletext. The index page of the teletext service gives you
information on how to use the service. In addition, you can select
various options to suit your requirements by using the remote
control buttons.
For teletext information to be displayed correctly, channel reception
☛
must be stable. Otherwise, information may be missing or some
pages may not be displayed.
1
RETURN
Exit from the teletext display (depending on the model)
2
(index)
Used to display the index (contents) page at any time while you
are viewing teletext.
3
(teletext on/mix)
Press to activate teletext mode after selecting the channel
providing the teletext service. Press it twice to overlap the teletext
with the current broadcasting screen.
4
(size)
Press to display the double-size letters in the upper half of the
screen. For lower half of the screen, press it again.
To display normal screen, press it once again.
5
(mode)
Press to select the teletext mode (LIST/FLOF).
If you press it in the LIST mode, it switches into the List save
mode.
In the List save mode, you can save teletext page into list using the
(store) button.
6
(sub-page)
Used to display the available sub-page.
7
(page up)
Used to display the next teletext page.
8
(page down)
Used to display the previous teletext page.
9
(cancel)
Used to display the broadcast when searching for a page.
0
(reveal)
Used to display the hidden text (answers to quiz games, for example). To display normal screen,
press it again.
!
Coloured buttons (red/green/yellow/blue)
If the FASTEXT system is used by a broadcasting company, the different topics covered on a teletext
page are colour-coded and can be selected by pressing the coloured buttons. Press one of them
corresponding to the required. The page is displayed with other coloured information that can be
selected in the same way.
To display the previous or next page, press the corresponding coloured button.
@
(hold)
Used to hold the display on a given page if the selected page is linked with several secondary pages
which follow on automatically. To resume, press it again.
#
(store)
Used to store the teletext pages.
You can change teletext pages by pressing the numeric buttons on
➢
the remote control.
English - 68
Continued...
Page 69

The teletext pages are organized according to six categories:
Part Contents
A
B
C
D
E
F
Teletext information is often divided between several pages
➢
displayed in sequence, which can be accessed by:
Entering the page number
Selecting a title in a list
Selecting a coloured heading (FASTEXT system)
Press the RETURN button to exit from the teletext display.
➢
Selected page number.
Broadcasting channel identity.
Current page number or search indications.
Date and time.
Text.
Status information.
FASTEXT information.
English - 69
Page 70

Setting Up Your Remote Control
After it has been set up properly, your remote control can operate in five different modes: TV, VCR,
Cable, DVD, or Set-Top Box. Pressing the corresponding button on the remote control allows you
to switch between these modes, and control whichever piece of equipment you choose.
The remote control might not be compatible with all DVD Players, VCRs, Cable boxes, and Set-Top
➢
Boxes.
Setting Up the Remote to Operate Your VCR
1 Turn off your VCR.
2 Press the
3 Press the
4 Using the number buttons on your remote control, enter three digits
of the VCR code listed on page 72 of this manual for your brand of
VCR. Make sure you enter three digits of the code, even if the first
digit is a “0”. (If more than one code is listed, try the first one.)
5 Press the
turn on if your remote is set up correctly.
If your VCR does not turn on after set-up, repeat steps 2, 3 and 4,
but try one of the other codes listed for your brand of VCR. If no
other codes are listed, try each VCR code, 000 through 080.
Note on Using Remote Control Modes: VCR
When your remote control is in
control your TV’s volume.
VCR button on your TV’s remote control.
SET button on your TV’s remote control.
POWER button on the remote control. Your VCR should
VCR
mode, the volume buttons still
Setting Up the Remote to Operate
1
Turn o
2
3
4
5
Note on Using Remote Control Modes: Cable Box
When your remote control is in
control your TV’s volume.
ff your cable box.
Press the CABLE button on your
Press the SET button on your
Using the number buttons on your remote control, enter three digits
of the cable box code listed on page 73 of this manual for your
brand of cable box.
Make sure you enter three digits of the code, even if the first digit is
a “0”. (If more than one code is listed, try the first one.)
Press the POWER button on the remote control.
Your cable box should turn on if your remote is set up correctl
If your cable box does not turn on after set-up, repeat steps 2, 3
and 4, but try one of the other codes listed for your brand of cable
box. If no other codes are listed, try each code, 000 through 046.
English - 70
Your Cable Box
TV
’s remote control.
TV
’s remote control.
CABLE
mode, the volume buttons still
y
.
Continued...
Page 71

Setting Up the Remote to Operate Your DVD
1 Turn off your DVD.
2 Press the
3 Press the
DVD button on your TV’s remote control.
SET button on your TV’s remote control.
4 Using the number buttons on your remote control, enter three digits
of the DVD code listed on page 74 of this manual for your brand of
DVD. Make sure you enter three digits of the code, even if the first
digit is a “0”. (If more than one code is listed, try the first one.)
5 Press the
POWER
button on the remote control.
Your DVD should turn on if your remote is set up correctly.
If your DVD does not turn on after set-up, repeat steps 2, 3 and 4,
but try one of the other codes listed for your brand of DVD. If no
other codes are listed, try each code, 000 through 141.
Note on Using Remote Control Modes: DVD
When your remote control is in
DVD
mode, the volume buttons still
control your TV’s volume.
Setting Up the Remote to Operate
1
Turn o
2
3
4
ff your STB.
Press the STB button on your
Press the SET button on your
Using the number buttons on your remote control, enter three digits
Your Set
TV
TV
Top Box
’s remote control.
’s remote control.
of the STB code listed on page 73 of this manual for your brand of
STB. Make sure you enter three digits of the code, even if the first
digit is a “0”. (If more than one code is listed, try the first one.)
5
Press the POWER button on the remote control.
Your STB should turn on if your remote is set up correctl
y
.
If your STB does not turn on after set-up, repeat steps 2, 3 and 4,
but try one of the other codes listed for your brand of STB. If no
other codes are listed, try each code, 000 through 074.
Note on Using Remote Control Modes: STB
When your remote control is in
STB
mode, the volume buttons still
control your TV’s volume.
English - 71
Continued...
Page 72

Remote Control Codes
VCR
Brand
SAMSUNG
ADMIRAL
AIWA
AKAI
AUDIO DYNAMICS
BELL&HOWELL
BROKSONIC
CANDLE
CANON
CITIZEN
ColorTYME
CRAIG
CURTIS MATHES
DAEWOO
DB
DIMENSIA
DYNATECH
ELECTROHOME
EMERSON
FISHER
FUNAI
GENERAL ELECTRIC
GO VIDEO
LG(Goldstar)
HARMAN KARDON
HITACHI
INSTANT REPLAY
JC PENNEY
JCL
KENWOOD
KLH
LIOYD
LOGIK
LXI
JVC
MAGNAVOX
MARANTZ
MARTA
KONIA
ORION
MEI
MEMOREX
MGA
MIDLAND
MINOLTA
Code
000 001 002 003 004 005 077 078 079
020
025
004 027 032
007 026
018
022
002 003 006 008 015 055
021 056
002 003 006 008 015 055
007
002 024
002 007 008 017 021 025 056 064 066
003 010 011 012 013 014 015 016
007 026
017
025
034
001 003 006 021 022 025 030 032 034
040 047 050 052 060 063 065 066 067
069 073
018 024 028 029 048 051 061
025
002 005 017 021 056
002
006 007 008 009 010
007
019 025 041 042 074
021
002 007 018 019 021 026 037 041
054 056
007 008 018 021 026 037
007 008 018 026 037
070
025
038
025
081 082 083
021 056 059
007 008 018 021 026 037 062
006
036
073 074 075 076
021
006 021 024 025
034
005
019 041 075
Brand
MITSUBISHI
MONTGOMERY WARD
MTC
MULTITECH
NEC
OPTIMUS
PANASONIC
PENTAX
PENTEX RESEARCH+
PHILCO
PHILIPS
PIONEER
PORTLAND
PROSCAN
QUARTZ
QUASAR
RADIO SHACK/
REALISTIC
RCA
SANSUI
SANYO
SCOTT
SEARS
SHARP
SHIMTOM
SIGNATURE
SONY
SYLVANIA
SYMPHONIC
TANDY
TASHIKA
TATUNG
TEAC
TECHNICS
TEKNIKA
TMK
TOSHIBA
TOTEVISION
UNITECH
VECTOR RESEARCH
VICTOR
VIDEO CONCEPTS
VIDEOSONIC
WARDS
YAMAHA
ZENITH
Code
019 034 041 046
020
002 025
002 005 025 038
007 008 018 026 037 062 064
020
021 056 071 072
019 041 075
008
021 056 059
021 080
019 026 039 053
015 049 055
017
018
021 056
006 018 020 021 024 025 029 034
048 056
002 017 019 021 035 041 043 057
068 076
026
018 024
003 047 052 067
006 018 019 024 028 029 041 048 051
020 034 045 015
027 033 038 058
025
027 033 044
021 025 056 059
025
018 025
006
037
025 037 068
021
006 021 025 031
066
003 019 029 051 052
002 006
002
007 026
026
007 026
002
002 003 006 019 020 021 024 025 034
038 041
007 008 018 026 037
023 027 033
English - 72
Continued...
Page 73

CABLE BOX
Brand
SAMSUNG
GI
HAMLIN
HITACHI
JERROLD
MACOM
MAGNAVOX
OAK
PANASONIC
PHILIPS
PIONEER
RCA
REGAL
Code
000 001 002 003 004 005 006 007
041
003 024 031
025 030
038 039
025 030
019 023 028
026
003 022 027 037 044
019 021 023 028
004 018 020 044
014 022 040
003
SAMSUNG SET-TOP BOX
Product
Ground wave STB
CABLE STB
Satellite STB
Code
000 001 002 008 013
000 004 008 013
000 003 008 013
SET-TOP BOX
Brand
ALPHASTAR
ANAM
CHANNEL MASTER
CROSSDIGITAL
CHAPARRAL
DIRECT TV
DAEWOO
DISH NETWORK SYSTEM
DISHPRO
DRAKE
DX ANTENNA
ECHOSTAR
EXPRESSVU
GOI
GE
GENERAL INSTRUMENT
HTS
HOME CABLE
HITACHI
HUGHES NETWORK
IQ
IQ PRISM
JANEIL
JERROID
JVC
Code
023
043
018 034
019
035
015 016 017 019 022 045 060
061 062 065 066 067 068
074
069 070
069
018 024 032
027
025 069 070 071
069
069
065
046 047 048 063 064
069
056
022
015 017
020
020
059
063
069 070
Brand
REGENCY
SA
SCIENTIFIC ATLAN
SPRUCER
STARGATE 2000
SYLVANIA
TEXSCAN
TOCOM
UNIVERSAL
VIEWSTAR
WARNER AMEX
ZENITH
Brand
LG(Goldstar)
MAGNAVOX
MEMOREX
MOTOROLA
MACOM
MITSUBISHI
NEXT LEVEL
PHILIPS
PRIMESTAR
PANASONIC
PAYSAT
PROSCAN
RCA
RADIOSHACK
REALISTIC
STS
STAR TRAK
SKY
SKY LIFE
SHACK
STAR CHOICE
SONY
TOSHIBA
ULTIMATE TV
UNIDEN
ZENITH
Code
015 023
042 043
042 043
022
036
016
016
032
033 034
019 021 023 028
046
017 029 035 037 045
Code
044 073
016 021 036 038 039 040 041 042
016
064
018
015
047 048 064
015 016 017 021 033 036 038 039
040 041 042 067
046 049 050 063
058 059 061 062
016
065 066
051 052 053 065 066
064
057
020 027
026
031
005 006 007
064
064
054 060
015 017 028 029 030 072
060 066
016 021 037 055 056 057
024 031 068
English - 73
Continued...
Page 74

SAMSUNG DVD
Product
DVD
DVDR
BD Record
VCR COMBO
VCR Record
DHR COMBO
DVD
Brand
ANAM
AUDIOVOX
AUDIOLOGIC
ANABA
APEX DIGITAL
AIWA
BROKSONIC
BLAUPUNKT
B&K
CURTIS MATHES
CYBER HOME
CLARION
CIRRUS
CINEVISION
DAEWOO
DENON
FARENHEIT
FISHER
GPX
GO VIDEO
GE
GREENHILL
HITACHI
HITEKER
HOYO
HARMAN / KARDON
IRT
INTEGRA
JBL
JVC
JATON
KENWOOD
KISS
KONKA
KLH
LG(Goldstar)
LOEWE
LASONIC
MOBILE AUTHORITY
MEMOREX
MALATA
MAGNAVOX
MINTEK
MONYKA
Code
000 001 002
003 004
005 006
007 008 009 010 011
012
013
Code
030
075
085
072
070 071 074 086 083 084 088
111 112
114
062
074
122 123
027
065 077 078 079 082
080 125
081
095
066
146
067 068
090
060
061 089 133 135
069 074
074
064 113
071
073
091 110
089
092
091
022 033 115 116
073
051 108 109
073
059 100 106 107
074 075
025 031
057
058
054
055
056
076 093
074 094
073
Product
Home theater VCR COMBO
HDD Record COMBO
TWIN TRAY COMBO
STB DVD COMBO
DVD Receiver
AV Receiver
Brand
NORCENT
NEXT BASE
NEC
NANTAUS
NESA
OPTOMEDIA ELECTRONICS
OPTIVIEW
ONKYO
PHILCO
PRINCETON
PROSCAN
PANASONIC
PHILIPS
ROTEL
RIO
RCA
RAITE
ROWA
SAMPO
SONY
SHERWOOD
SVA
SYLVANIA
SHARP
SANSUI
SANYO
SHINSONIC
SANYO
THOMSON
TOSHIBA
TECHNICS
TVIEW
TOKAI
TEAC
TECHWOOD
TREDEX
URBAN CONCEPTS
VENTURER
VOCOPRO
YAMAHA
YAMAKAWA
XWAVE
ZENITH
Code
014 015 016
017
018
019
020
021
Code
048 049 050
052
053
144
074
105
072
076 092 119
044 045
046 047
023
024 034 124 134 136 137 138
036 076
117 118
120
023 035 074 075 131 132
073
038
104
026 029 126 127 128 129
130 141
039 041
042
043 093
140
062
062
094
090
145
028 062 076
139
072
073
096
097
098 099 101
076
075
102
032 063
040 073
103
076 121
English - 74
Page 75

Using the Anti-Theft Kensington Lock (depending on the model)
The Kensington lock is a device used to physically fix the system when using it in a public place.
The locking device has to be purchased separately. The appearance and locking method may
differ from the illustration depending on the manufacturer. Please refer to the manual provided
with the Kensington lock for proper use.
1 Insert the locking device into
the Kensington slot on the LCD
TV (Figure 1), and turn it in the
locking direction (Figure 2).
2 Connect the Kensington lock
cable.
3 Fix the Kensington lock to a
desk or a heavy stationary
object.
Cable
Figure 2
Figure 1
<Optional>
The place of the Kensington Lock may be
➢
different depending on its model.
Troubleshooting
No sound or picture
Normal picture but no sound
Screen is black and power
indicator light blinks steadily
No picture or black and
white picture
Sound and picture
interference
Blurred or snowy picture,
distorted sound
Remote control malfunctions
"Check signal cable."
message is displayed.
On PC mode, "Not Supported
Mode." message is displayed.
The damaged picture appears
in the corner of the screen.
The TFT LCD panel uses a panel consisting of sub pixels (6 220 800) which require sophisticated
technology to produce. However, there may be few bright or dark pixels on the screen. These pixels will
have no impact on the performance of the product.
Check that the mains lead has been connected to a wall socket.
Check that you have pressed the button on the front of the set.
Check the picture contrast and brightness settings.
Check the volume.
Check the volume.
Check whether the MUTE button has been pressed on the remote
control.
Check if "Internal Mute" is off
On your computer check; Power, Signal Cable.
The TV is using its power management system.
Move the computer’s mouse or press any key on the keyboard.
Adjust the colour settings.
Check that the broadcast system selected is correct.
Try to identify the electrical appliance that is affecting the set and move it
further away.
Plug your set into a different mains socket.
Check the direction, location and connections of your aerial.
This interference is often due to the use of an indoor aerial.
Replace the remote control batteries.
Clean the upper edge of the remote control (transmission window).
Check the battery terminals.
Check that the signal cable is firmly connected to the PC or video sources.
Check that the PC or video sources are turned on.
Check the maximum resolution and the frequency of the video adaptor.
Compare these values with the data in the Display Modes.
If "Just Scan" is selected in some external devices, the damaged picture
may appear in the corner of the screen. This symptom is caused by external
devices, not TV.
English - 75
Page 76

Technical and Environmental Specifications
Model Name
Screen Size (Diagonal)
PC Resolution
Sound
Output
Dimensions (WxDxH)
Body
With stand
Weight
With stand
Environmental
Considerations
Operating Temperature
Operating Humidity
Storage Temperature
Storage Humidity
LA40F81BD LA46F81BD LA52F81BD
40 inch 46 inch 52 inch
1920 x 1080 @ 60 Hz 1920 x 1080 @ 60 Hz 1920 x 1080 @ 60 Hz
10 W X 2 10 W X 2 10 W X 2
1094 x 103 x 607 mm
1094 x 290 x 675 mm
24 kg 33 kg 37 kg
10 °C to 40 °C (50 °F to 104 °F)
10 % to 80 %, non-condensing
-20 °C to 45 °C (-4 °F to 113 °F)
5 % to 95 %, non-condensing
1222 x 111 x 687 mm
1222 x 320 x 752 mm
10 °C to 40 °C (50 °F to 104 °F)
10 % to 80 %, non-condensing
-20 °C to 45 °C (-4 °F to 113 °F)
5 % to 95 %, non-condensing
1366 x 120 x 780 mm
1366 x 320 x 845 mm
10 °C to 40 °C (50 °F to 104 °F)
10 % to 80 %, non-condensing
-20 °C to 45 °C (-4 °F to 113 °F)
5 % to 95 %, non-condensing
Stand Swivel (Left / Right)
-20˚ ~ 20˚
Design and specifications are subject to change without prior notice.
➢
This device is a Class B digital apparatus.
➢
For the power supply and Power Consumption, refer to the label attached to the product.
➢
English - 76
Page 77

Page 78

This page is intentionally
left blank.
 Loading...