

Page 1
Contact SAMSUNG WORLDWIDE
If you have any questions or comments relating to Samsung products, please contact the SAMSUNG customer care centre.
Country
AUSTRALIA 1300 362 603 www.samsung.com/au
CHINA
INDIA
INDONESIA 0800-112-8888 www.samsung.com/id
JAPAN 0120-327-527 www.samsung.com/jp
MALAYSIA 1800-88-9999 www.samsung.com/my
NEW ZEALAND 0800 SAMSUNG (0800 726 786) www.samsung.com/nz
PHILIPPINES 1-800-10-SAMSUNG(726-7864)
SINGAPORE 1800-SAMSUNG(726-7864) www.samsung.com/sg
THAILAND
TAIWAN 0800-329-999 www.samsung.com/tw
VIETNAM 1 800 588 889 www.samsung.com/vn
SOUTH AFRICA 0860-SAMSUNG(726-7864 ) www.samsung.com/za
U.A.E 800-SAMSUNG (726-7864)
Customer Care Centre
800-810-5858
400-810-5858
010-6475 1880
HONG KONG:3698 - 4698 www.samsung.com/hk
3030 8282
1-800-3000-8282
1800 110011
1-800-3-SAMSUNG(726-7864)
02-5805777
1800-29-3232
02-689-3232
8000-4726
Web Site
www.samsung.com/cn
www.samsung.com/in
www.samsung.com/ph
www.samsung.com/th
www.samsung.com/ae
LCD TV
user manual
BN68-02101G-01
imagine the possibilities
Thank you for purchasing this Samsung product.
To receive more complete service, please register
your product at
www.samsung.com/global/register
Model Serial No.
Page 2
License
❑
TruSurround HD, SRS and symbol are trademarks of SRS Labs, Inc. TruSurround HD technology is
incorporated under license from SRS Labs, Inc.
Precautions When Displaying a Still Image
❑
A still image may cause permanent damage to the TV screen
Do not display still image and partially still on the LCD panel for more than 2 hours as it can cause screen image retention.
●
This image retention is also known as screen burn. To avoid such image retention, reduce the degree of brightness and
contrast of the screen when displaying a still image.
●
Displaying still images from Video games and PC for longer than a certain period of time may produce partial after-images. To
●
prevent this effect, reduce the ‘brightness’ and ‘contrast’ when displaying still images.
© 2009 Samsung Electronics Co., Ltd. All rights reserved.
Watching the LCD TV in 4:3 format for a long period of time may leave traces of borders displayed on the
left, right and centre of the screen caused by the difference of light emission on the screen. Playing a DVD or
a game console may cause a similar effect to the screen. Damages caused by the above effect are not
covered by the Warranty.
Page 3

CONTENTS
SETTING UP YOUR TV
Viewing the Control Panel ................................................................. 2
■
Accessories ....................................................................................... 3
■
Viewing the Connection Panel ........................................................... 4
■
Viewing the Remote Control .............................................................. 6
■
Installing Batteries in the Remote Control ......................................... 7
■
OPERATION
Viewing the menus ............................................................................ 7
■
Placing Your Television in Standby Mode .......................................... 8
■
Plug & Play Feature ........................................................................... 8
■
CHANNEL
Channel Menu ................................................................................... 9
■
PICTURE
Conguring the Picture Menu ...........................................................11
■
Viewing Picture-in-Picture................................................................ 14
■
Using Your TV as a Computer (PC) Display .................................... 15
■
Setting up the TV with your PC........................................................ 16
■
SOUND
Conguring the Sound Menu ........................................................... 16
■
Selecting the Sound Mode .............................................................. 17
■
SETUP
Conguring the Setup Menu ............................................................ 18
■
Symbol
❑
N O
Note One-Touch Button TOOL Button
INPUT
Input Menu ....................................................................................... 20
■
RECOMMENDATIONS
Teletext Feature ............................................................................... 21
■
Installing the Stand .......................................................................... 22
■
Disconnecting the Stand .................................................................. 23
■
Installing the Wall Mount Kit ............................................................ 23
■
Anti-Theft Kensington Lock ............................................................. 24
■
Securing the TV to the Wall ............................................................. 24
■
Troubleshooting: Before Contacting Service Personnel .................. 25
■
Specications .................................................................................. 26
■
English - 1
Page 4
SETTING UP YOUR TV
Figures and illustrations in this User Manual are provided for reference only and may differ from actual product appearance.
N
Product design and specifications may be changed without notice in order to enhance product performance.
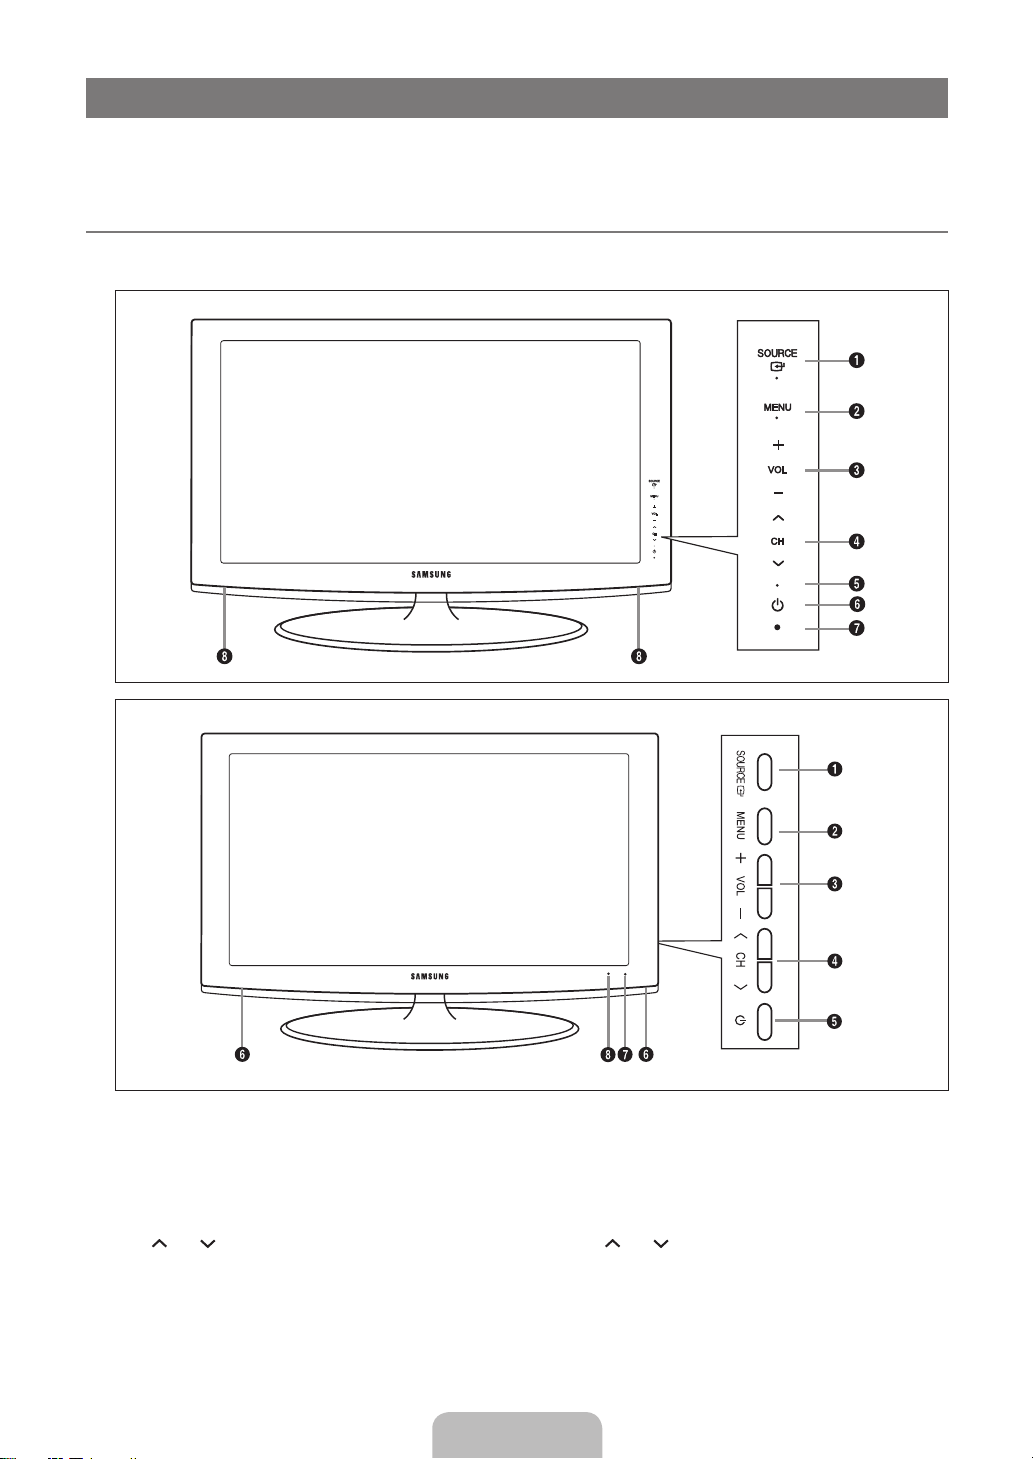
Viewing the Control Panel
M
The product colour and shape may vary depending on the model.
N
The front panel buttons can be activated by touching them with your finger.
N
[LA26B350, LA32B350]
[LA22B360, LA26B360, LA32B360]
1
SOURCE E: Toggles between all the available input sources. In the on-screen menu, use this button as you would use the
ENTERE button on the remote control.
2
MENU: Press to see an on-screen menu of your TV’s features.
3
+ VOL –: Press to increase or decrease the volume.
In the on-screen menu, use the+ VOL – buttons as you would use the ◄ and ► buttons on the remote control.
4
CH : Press to change channels. In the on-screen menu, use the CH buttons as you would use the ▼ and ▲
buttons on the remote control.
5
POWER INDICATOR: Blinks and turns off when the power is on and lights up in stand-by mode.
6 P
(POWER): Press to turn the TV on and off.
7
REMOTE CONTROL SENSOR: Aim the remote control towards this spot on the TV.
8
SPEAKERS
English - 2
Page 5
English - 3
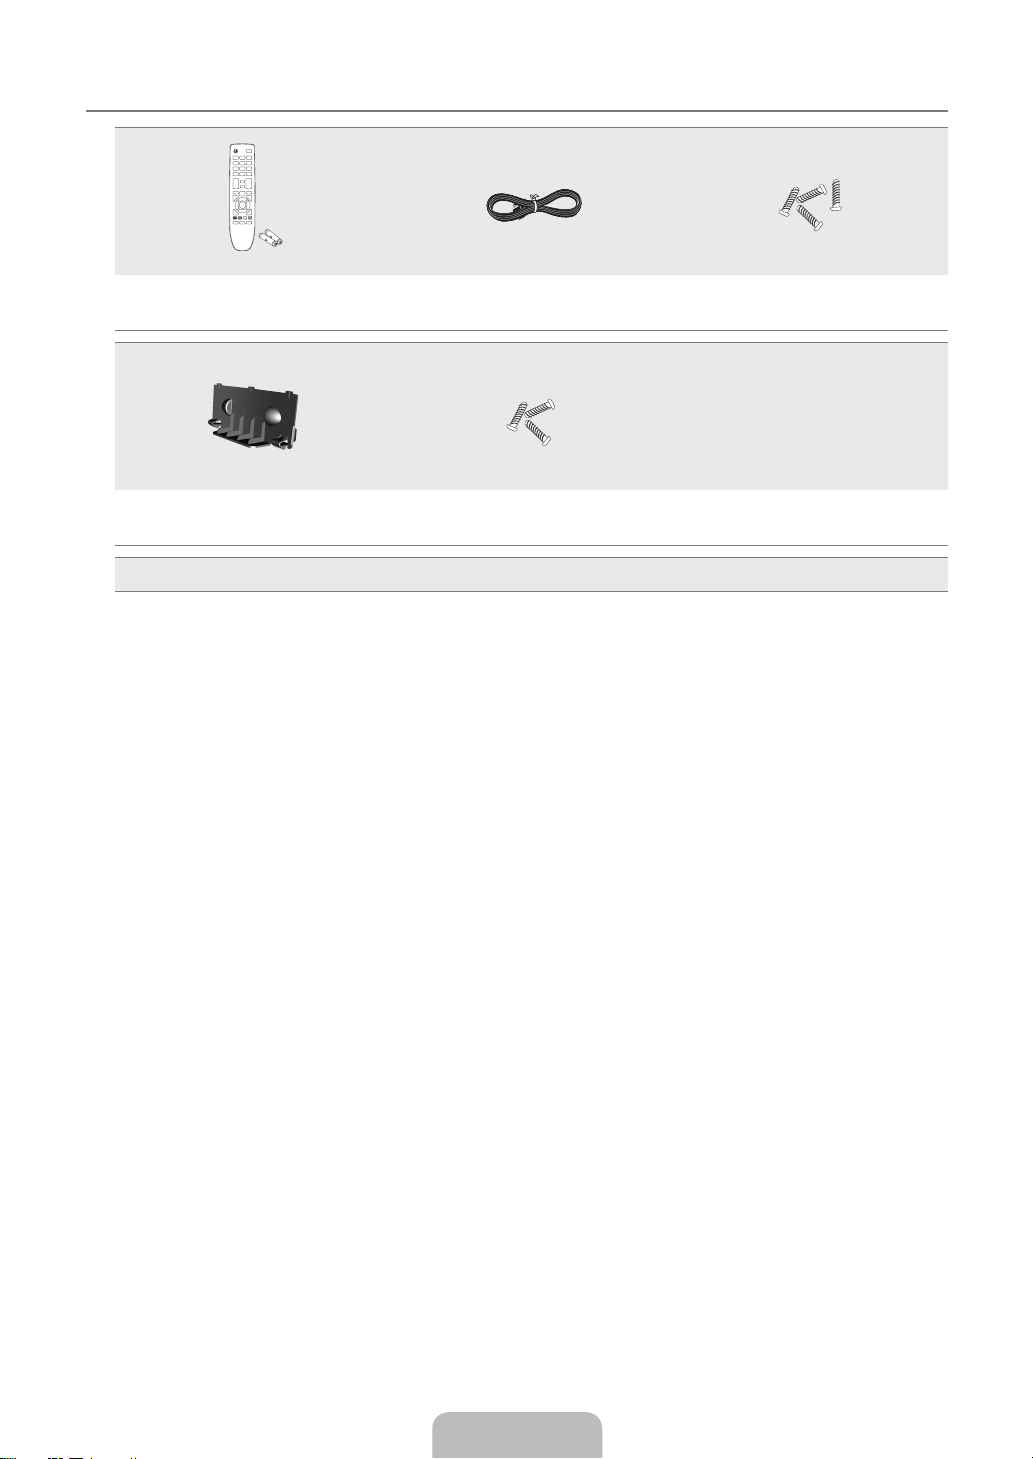
Accessories
M
Remote Control & Batteries (AAA x 2) Power Cord Stand Screw (4EA) (M4 X L16)
Cover-Bottom
Owner’s Instructions
●
Please make sure the following items are included with your LCD TV. If any items are missing, contact your dealer.
N
Warranty card / Safety Guide / Registration Cards (Not available in all locations)
N
The items colour and shape may vary depending on the model.
N
Stand Screw (3EA) (M4 X L14)
(Depending on the model)
Warranty card
●
Safety Guide
●
●
Registration Cards
Page 6
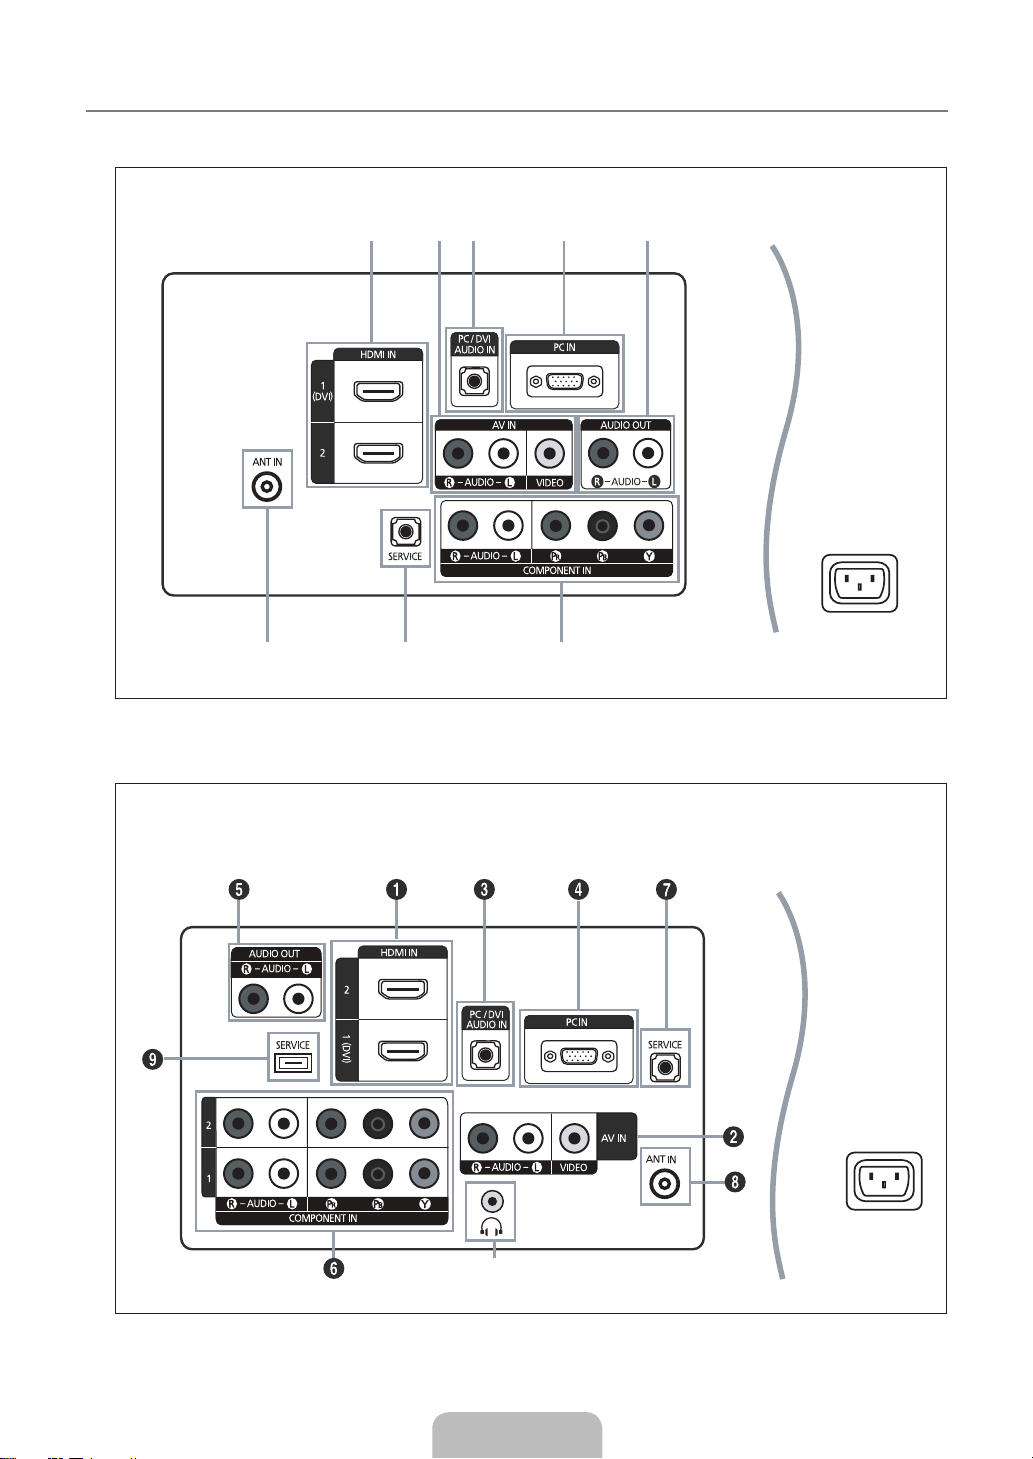
Viewing the Connection Panel
1 2 3
678
4 5
1 2 3
678
4 5
0
M
[ LA26B350, LA32B350,LA26B360, LA32B360]
[TV Rear Panel]
[ LA22B360]
Power Input
[TV Rear Panel]
English - 4
Power Input
Page 7

English - 5
The product colour and shape may vary depending on the model.
N
1
HDMI IN 1(DVI), 2
Connects to the HDMI jack of a device with an HDMI output.
No additional Audio connection is needed for an HDMI to HDMI connection.
N
What is HDMI?
N
HDMI(High-Denition Multimedia Interface), is an interface that enables the transmission of digital audio and video signals
●
using a single cable.
The difference between HDMI and DVI is that the HDMI device is smaller in size and has the HDCP (High Bandwidth
●
Digital Copy Protection) coding feature installed.
Use the HDMI IN 1(DVI) jack for DVI connection to an external device. Use a DVI to HDMI cable or DVI-HDMI adapter
N
(DVI to HDMI) for video connection and the PC/DVI AUDIO IN jacks for audio. When using an HDMI / DVI cable
connection, you must use the HDMI IN 1(DVI) jack.
2
AV IN [VIDEO] / [R-AUDIO-L]
Connect RCA cable to an appropriate external A/V device such as VCR, DVD or Camcorder.
–
Connect RCA audio cables to [R-AUDIO-L] on your set and the other ends to corresponding audio out connectors on the
–
A/V device.
3
PC/DVI AUDIO IN
Connect to the audio output jack on your PC.
–
DVI audio outputs for external devices.
–
4
PC IN
Connect to the video output jack on your PC.
–
If your PC supports an HDMI connection, you can connect this to the HDMI IN 1 (DVI), 2 terminal.
N
If your PC supports a DVI connection, you can connect this to the HDMI IN 1 (DVI) / PC/DVI AUDIO IN terminal.
N
5
AUDIO OUT [R-AUDIO-L]
Connect RCA audio cables to AUDIO OUT [R-AUDIO-L] on the rear of your set and the other ends to corresponding
–
audio in connectors on the Amplier or DVD Home Theatre.
6
COMPONENT IN
Connect component video cables (optional) to component connector (PR, PB, Y) on the rear of your set and the other ends
–
to corresponding component video out connectors on the DVD.
If you wish to connect both the Set-Top Box and DVD, you should connect the Set-Top Box to the DVD and connect the
–
DVD to component connector (PR, PB, Y) on your set.
The PR, PB and Y connectors on your component devices DVD are sometimes labeled Y, B-Y and R-Y or Y, Cb and Cr.
–
Connect RCA audio cables (optional) to [R-AUDIO-L] on the rear of your set and the other ends to corresponding audio
–
out connectors on the DVD.
7
SERVICE
Connector for service only.
–
8
ANT IN
Connects to an antenna or cable TV system.
–
9
SERVICE
Connector for service only.
–
0 H
(HEADPHONE)
Headphone may be connected to the headphone output on your set. While the head phone is connected, the sound from
–
the built-in speakers will be disabled.
–
Using the sound function is restricted when connecting headphones to the TV.
N
Prolonged use of headphones at a high volume may damage your hearing.
N
You will not hear sound from the speakers when you connect headphones to the TV.
N
The headphone volume and TV volume are adjusted separately.
N
Page 8
1
2
3
4
5
6
7
8
9
0
!
@
#
$
&
*
(
)
a
%
^
M
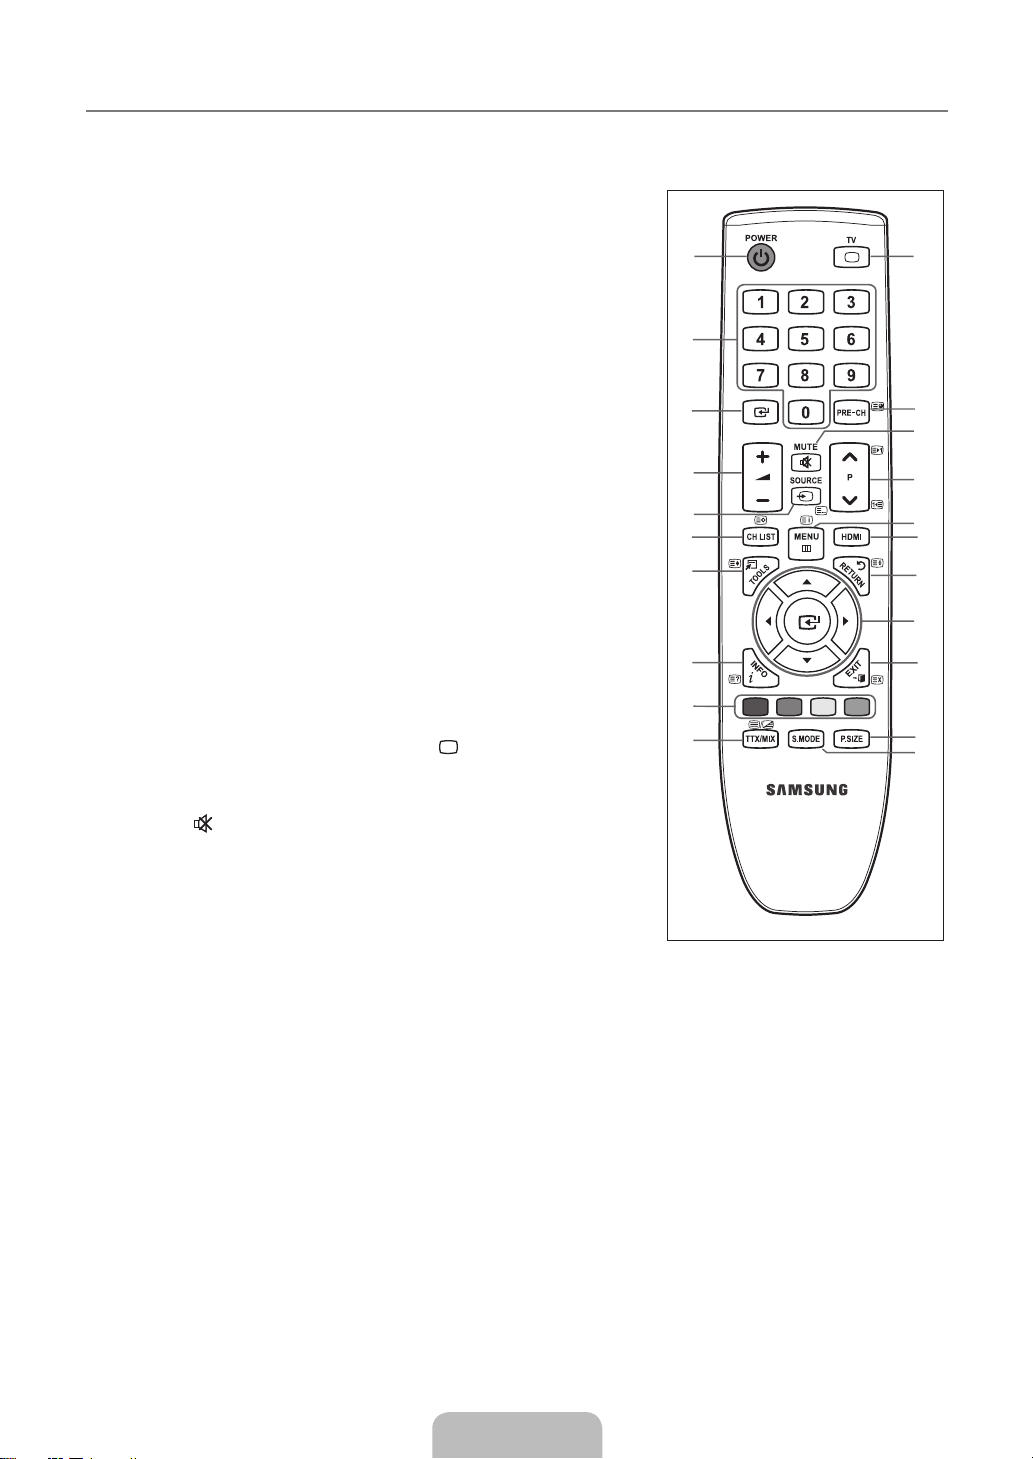
Viewing the Remote Control
You can use the remote control up to a distance of about 23 feet from the TV.
N
The performance of the remote control may be affected by bright light.
N
The product colour and shape may vary depending on the model.
N
%
1
POWER : Turns the TV on and
off.
2
NUMERIC BUTTONS : Press to
change the channel.
3 E
: Performs the same function
as the ENTERE button of
the directional buttons. When
switching channels with the
numeric buttons, and you press
the channel number and then the
ENTERE button, the channel is
immediately switched.
4 -=+
5
6
7
8
9
!
@
#
$ > P <
: Press to increase or
decrease the volume.
SOURCE : Press to display
and select the available video
sources.
CH LIST : Displays the Channel
List on screen.
TOOLS : Use to quickly select
frequently used functions.
INFO : Press to display
information on the TV screen.
COLOUR BUTTONS : Use these
buttons in the Fastext menu, etc.
TV : Selects the TV mode
directly.
PRE-CH : Enables you to return
to the previous channel you were
watching.
MUTE : Press to temporarily
cut off the sound.
channels.
: Press to change
MENU : Displays the main on-
screen menu.
^
HDMI : Selects the HDMI mode
directly.
&
RETURN : Returns to the
previous menu
*
UP▲/DOWN▼/LEFT◄/
RIGHT►/ENTERE : Use to
select on-screen menu items and
change menu values.
(
EXIT : Press to exit the menu.
)
P.SIZE : Picture size selection
a
S.MODE : Sound mode
selection.
Teletext Functions
5 0
: Teletext mode selection
(LIST / FLOF)
6 8
: Teletext store
7 4
: Teletext size selection
8 5
: Teletext reveal
9
Fastext topic selection
0 /
!
@ 1
$ 2
% 6
& 9
( 7
: Alternately select
Teletext, Double, or Mix.
: Exit from the Teletext
display
: Teletext sub page
: Teletext next page
3
: Teletext previous page
: Teletext index
: Teletext hold
: Teletext cancel
English - 6
Page 9

English - 7
Installing Batteries in the Remote Control
M
1. Lift the cover at the back of the remote control upward as shown in the figure.
2. Install two AAA size batteries.
Make sure to match the ‘+’ and ‘–’ ends of the batteries with the diagram inside the
N
compartment.
3. Replace the cover.
Remove the batteries and store them in a cool, dry place if you won’t be using the
N
remote control for a long time.
If the remote control doesn’t work, check the following:
N
Is the TV power on?
•
Are the plus and minus ends of the batteries reversed?
•
Are the batteries drained?
•
Is there a power outage or is the power cord unplugged?
•
Is there a special fluorescent light or neon sign nearby?
•
OPERATION
OPERATION
Viewing the menus
M
Before using the TV, follow the steps below to learn how to navigate the menu in order to select and adjust different functions.
Display the main on-screen menu.
ENTERE / DIRECTION Buttons
Move the cursor and select an
item. Select the currently selected
item. Confirm the setting.
MENU Button
RETURN Button
Return to the previous menu.
EXIT
Exit the on-screen menu.
Operation the OSD (On Screen Display)
❑
The access step may differ depending on the selected menu.
1. Press the MENU button.
2. The main menu appears on the screen. The menu’s left side has icons : Picture, Sound,
Channel, Setup, Input.
3. Press the ▲ or ▼ button to select one of the icons.
4. Then press the ENTERE button to access the icon’s sub-menu.
5. Press the ▲ or ▼ button to select the icon’s submenu.
6. Press the ◄ or ► button to decrease or increase the value of a particular item. The
adjustment OSD may differ depending on the selected menu.
7. Press the ENTERE button to complete the configuration. Press the EXIT button to exit.
TV Picture
Mode : Dynamic
Backlight 10
Contrast 100
Brightness 45
Sharpness 75
Colour 55
Tint (G/R) G 50 R 50
Advanced Settings
Picture Options
Reset : OK
U
Move E Enter R Return
TV Picture
Mode : Dynamic
Backlight 10
Contrast 100
Brightness 45
Sharpness 75
Colour 55
Tint (G/R) G 50 R 50
Advanced Settings
Picture Options
Reset : OK
U
Move E Enter R Return
▲
Backlight
▼
U
Move L Adjust R Return
Help Icon
10
Page 10
M
Placing Your Television in Standby Mode
Your set can be placed in standby mode in order to reduce the power consumption. The standby mode can be useful when you
wish to interrupt viewing temporarily (during a meal, for example).
1. Press the POWERP button on the remote control.
N
The screen is turned off and a red standby indicator appears on your set.
2. To switch your set back on, simply press the POWERP button again.
N
Do not leave your set in standby mode for long periods of time (when you are away on holiday, for example). It is best to
unplug the set from the mains and aerial.
M
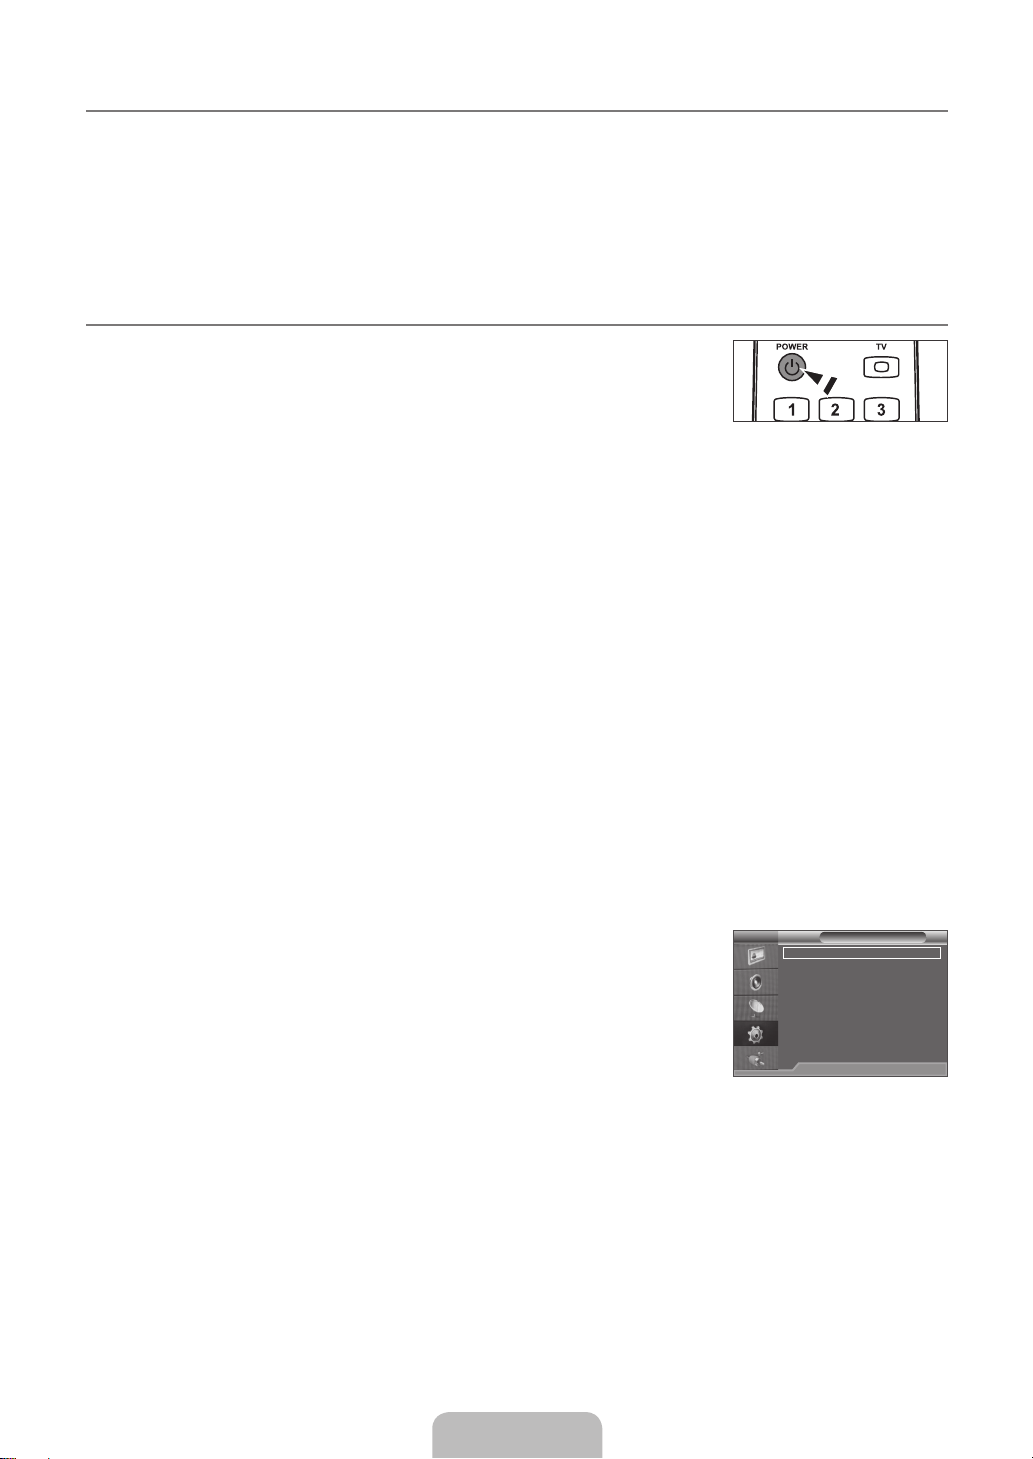
Plug & Play Feature
When the TV is initially powered on, basic settings proceed automatically and subsequently.
1. Press the POWERP button on the remote control.
N
You can also use the POWERP button on the TV.
2. Press the ▲ or ▼ button to select the language, then press the ENTERE button.
3. Press the ◄ or ► button to select Store Demo or Home Use, then the ENTERE button.
N
We recommend setting the TV to Home Use mode for the best picture in your home environment.
N
Store Demo mode is only intended for use in retail environments.
N
If the unit is accidentally set to Store Demo mode and you want to return to Home Use (Standard): Press the volume
button on the TV. When the volume OSD is displayed, press and hold the MENU button on the TV for 5 seconds.
4. The message Check antenna input. is displayed with OK selected.
Press the ENTERE button.
N
Please check that the antenna cable is connected correctly.
5. Select the appropriate area by pressing the▲ or ▼ button.
Press the ENTERE button to confirm your choice.
6. The Auto Store menu is displayed with the Start selected. Press the ENTERE button.
N
The channel search will start and end automatically.
N
Press the ENTERE button at any time to interrupt the memorization process.
N
After all the available channels are stored, the Clock Set menu appears.
7. Press the ENTERE button.
Select the Month, Day, Year, Hour, Minute, or am/pm by pressing the ◄ or ► button.
Set the Month, Day, Year, Hour, Minute, or am/pm by pressing the ▲ or ▼ button.
N
You can also set the Month, Day, Year, Hour and Minute by pressing the number buttons on the remote control.
8. Press the ENTERE button to confirm your setting. The message Enjoy your TV. is displayed.
When you have finished, press the ENTERE button.
N
Even if the ENTERE button is not pressed, the message will automatically disappear after several seconds.
If you want to reset this feature...
1. Press the MENU button to display the menu. Press the ▲ or ▼ button to select Setup,
then press the ENTERE button.
2. Press the ENTERE button again to select Plug & Play.
N
The Plug & Play feature is only available in the TV mode.
English - 8
TV Setup
Plug & Play
Language : English
Time
Child Lock : On
Change PIN
Game Mode : Off
Melody : Off
Energy Saving : Off
PIP
U
Move E Enter R Return
Page 11

English - 9
CHANNEL
Channel Menu
M
Area
❑
You can change the area for channels.
Auto Store
❑
You can scan for the frequency ranges available to you (and availability depends on your
TV Channel
Area : Asia/Europe
Auto Store
Manual Store
Channel List
Sort
Name
Fine Tune
area). Automatically allocated programme numbers may not correspond to actual or desired
programme numbers.
Scans for all channels with active broadcast stations and stores them in the TV’s memory.
N
If you want to stop Auto Store, press the ENTERE button.
N
Manual Store
❑
Scans for a channel manually and stores it in the TV’s memory.
N
Programme (Programme number to be assigned to a channel): Sets the programme number using the ▲, ▼ or number (0~9)
●
U
Move E Enter R Return
buttons.
ColourSystem→Auto/PAL/SECAM/NTSC4.43/NTSC3.58: Sets the colour system value using the ▲ or ▼ button.
●
SoundSystem→BG/DK/I/M: Sets the sound system value using the ▲ or ▼ button.
●
Channel (When you know the number of the channel to be stored): Press the ▲ or ▼ button to select C (Air channel) or S
●
(Cable channel). Press the ► button, then press the ▲, ▼ or number (0~9) buttons to select the required number.
You can also select the channel number directly by pressing the number (0~9) buttons.
N
If there is abnormal sound or no sound, reselect the sound standard required.
N
Search (When you do not know the channel numbers): Press the ▲ or ▼ button to start the search. The tuner scans the
●
frequency range until the first channel or the channel that you selected is received on the screen.
Store (When you store the channel and associated programme number): Set to OK by pressing the ENTERE button.
●
Channel mode
N
P (Programme mode): When completing tuning, the broadcasting stations in your area have been assigned to position
–
numbers from P00 to P99. You can select a channel by entering the position number in this mode.
C (Air channel mode): You can select a channel by entering the assigned number to each air broadcasting station in this
–
mode.
S (Cable channel mode): You can select a channel by entering the assigned number for each cable channel in this mode.
–
Channel List
❑
Using the Channel List, you can conveniently lock or add channels.
Adding channels
Using the Channel List, you can add channels.
Move to the (#) field by pressing the ▲, ▼, ◄ or ► button, select a channel to be added, and press the ENTERE button to
–
add the channel.
If you press the ENTERE button again, the c symbol next to the channel disappears and the channel is not added.
–
Locking channels
This feature allows you to prevent unauthorized users, such as children, from watching unsuitable programmes by muting out
video and audio.
\
is active when Child Lock is selected to On. (refer to page 18)
N
Move to the \ field by pressing the ▲, ▼, ◄ or ► button, select a channel to be locked, and press the ENTERE button.
–
The PIN number input screen appears. Enter your 4 digit PIN number.
N
If you press the ENTERE button again, the c symbol next to the channel disappears and the channel lock is cancelled.
N
A blue screen is displayed when Child Lock is activated.
N
Select On or Off in Child Lock to easily turn the channels which selected on \ to be active or inactive.
N
You can select these options by simply pressing the CH LIST button on the remote control.
O
Page 12

Sort
❑
This operation allows you to change the programme numbers of the stored channels.
This operation may be necessary after using the auto store.
The channel is moved to its new position and all other channels are shifted accordingly.
N
Name
❑
Channel names will be assigned automatically when channel information is broadcast. These names can be changed, allowing you
to assign new names.
The following characters are available: Letters of the alphabet (A~Z) / Numbers (0~9) / Special characters (+, -, *, /, space)
N
Fine Tune
❑
If the reception is clear, you do not have to fine tune the channel, as this is done automatically during the search and store
operation. If the signal is weak or distorted, you may have to fine tune the channel manually.
Fine tuned channels that have been saved are marked with an asterisk “*” on the right-hand side of the channel number in the
N
channel banner.
To reset the fine-tuning, select Reset by pressing the ▲ or ▼ button and then press the ENTERE button.
N
Only TV channels can be fine tuned.
N
English - 10
Page 13
English - 11
PICTURE
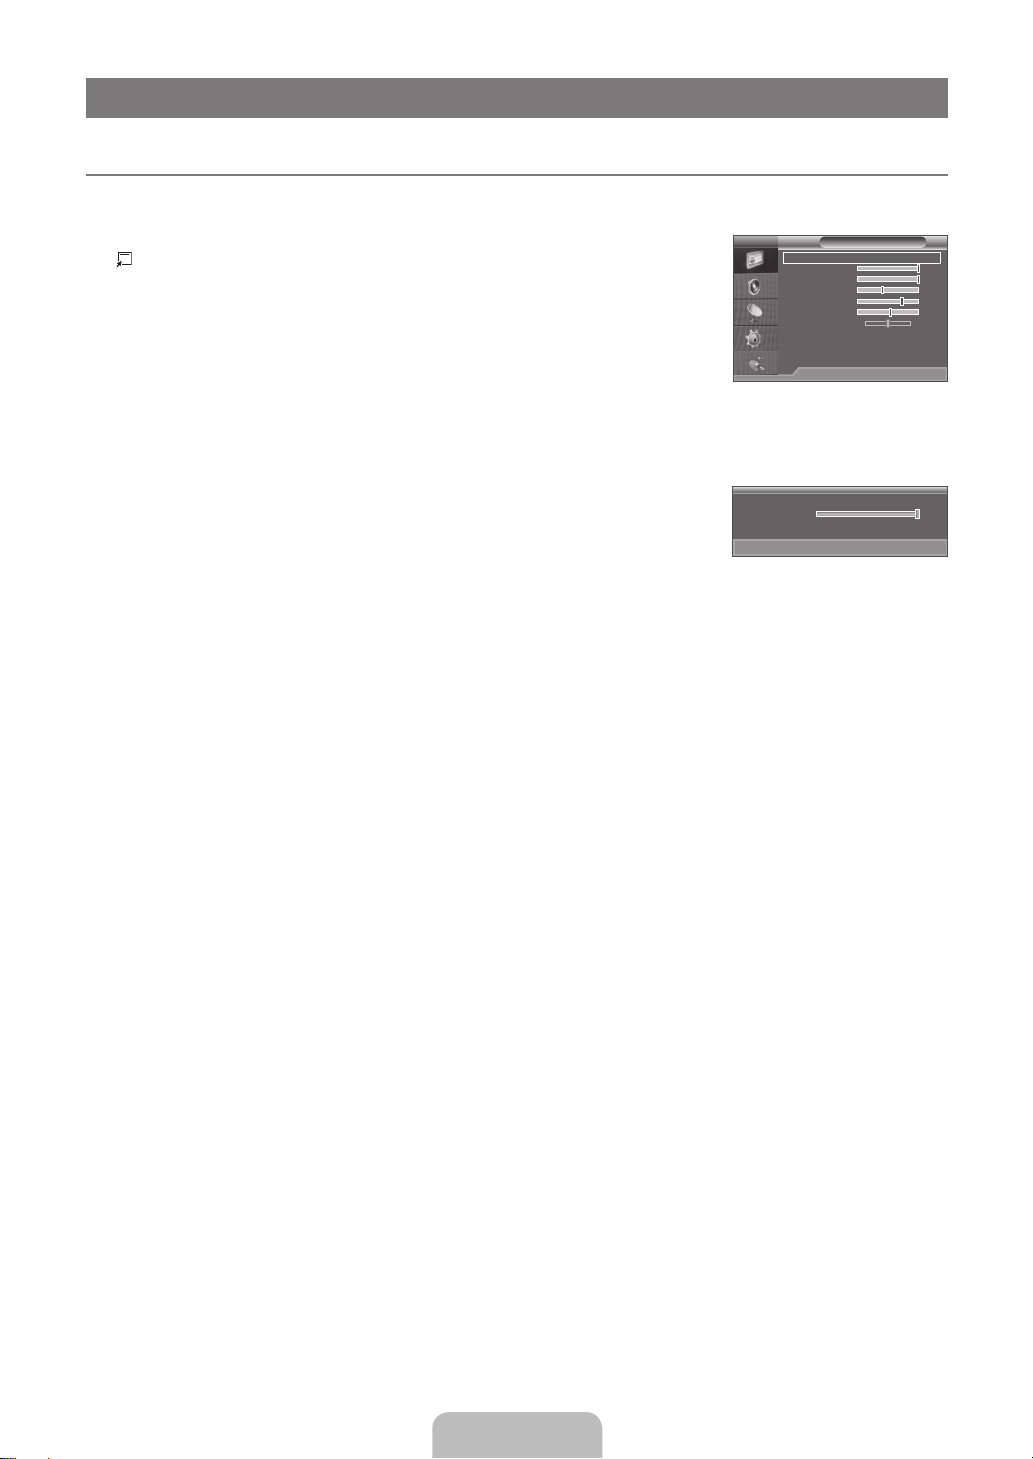
Configuring the Picture Menu
M
Mode
❑
You can select the type of picture which best corresponds to your viewing requirements.
Press the TOOLS button to display the Tools menu. You can also set the picture mode by
selecting Tools→PictureMode.
The Picture mode must be adjusted separately for each input source.
N
Dynamic
■
Selects the picture for increased definition in a bright room.
Standard
■
Selects the picture for the optimum display in a normal environment.
Movie
■
Selects the picture for viewing movies in a dark room.
Backlight / Contrast / Brightness / Sharpness / Colour / Tint (G/R)
❑
Your television has several setting options that allow you to control the picture quality.
Backlight
■
Adjusts the brightness of LCD back light.
Contrast
■
Adjusts the contrast level of the picture.
Brightness
■
Adjusts the brightness level of the picture
Sharpness
■
Adjusts the edge definition of the picture.
Colour
■
Adjusts colour saturation of the picture.
Tint (G/R)
■
Adjusts the colour tint of the picture.
In TV, AV modes of the PAL system, you cannot use the Tint (G/R) Function.
N
When you make changes to Backlight, Contrast, Brightness, Sharpness, Colour or Tint (G/R), the OSD will be adjusted
N
accordingly.
In PC mode, you can only make changes to Backlight, Contrast and Brightness.
N
Settings can be adjusted and stored for each external device you have connected to an input of the TV.
N
The energy consumed during use can be signicantly reduced if the brightness level of the picture is lowered, which will
N
reduce the overall running cost.
TV Picture
Mode : Dynamic
Backlight 10
Contrast 100
Brightness 45
Sharpness 75
Colour 55
Tint (G/R) G 50 R 50
Advanced Settings
Picture Options
Reset : OK
▲
Backlight
▼
U
Move L Adjust R Return
U
Move E Enter R Return
10
Page 14

Advanced Settings
❑
Samsung’s new TVs allow you to make even more precise picture settings than previous
models.
Advanced Settings is available in Standard or Movie mode.
N
In PC mode, you can only make changes to Gamma and White Balance from among the
N
TV Advanced Settings
Black Tone : Off
Dynamic Contrast : Medium
Gamma : 0
Colour Space : Native
White Balance
Flesh Tone : 0
Edge Enhancement : On
Advanced Settings items.
U
BlackTone→Off/Dark/Darker/Darkest
■
Move E Enter R Return
You can select the black level on the screen to adjust the screen depth.
DynamicContrast→Off/Low/Medium/High
■
You can adjust the screen contrast so that the optimal contrast is provided.
Gamma
■
You can adjust the primary colour (red, green, blue) Intensity.
Colour Space
■
Colour Space is a colour matrix composed of red, green and blue colours. Select your favourite colour space to experience the
most natural colour.
Auto: Auto Colour Space automatically adjusts to the most natural colour tone based on programme sources.
●
Native: Native Colour Space offers deep and rich colour tone.
●
White Balance
■
You can adjust the colour temperature for more natural picture colours.
R-Offset: Adjusts the red colour darkness.
●
G-Offset: Adjusts the green colour darkness.
●
B-Offset: Adjusts the blue colour darkness.
●
R-Gain: Adjusts the red colour brightness.
●
G-Gain: Adjusts the green colour brightness.
●
B-Gain: Adjusts the blue colour brightness.
●
Reset: The previously adjusted white balance will be reset to the factory defaults.
●
Flesh Tone
■
You can emphasize the pink ‘flesh tone’ in the picture.
Changing the adjustment value will refresh the adjusted screen.
N
EdgeEnhancement→Off/On
■
You can emphasize object boundaries in the picture.
English - 12
Page 15

English - 13
Picture Options
❑
In PC mode, you can only make changes to the Colour Tone and Size from among the
N
items in Picture Options.
ColourTone→Cool/Normal/Warm1/Warm2
■
Warm1 or Warm2 is only activated when the picture mode is Movie.
N
Settings can be adjusted and stored for each external device you have connected to an
N
input of the TV.
Size
■
TV Picture Options
Colour Tone : Cool
Size : 16:9
Digital NR : Auto
HDMI Black Level : Normal
Film Mode : Off
U
Move E Enter R Return
Occasionally, you may want to change the size of the image on your screen. Your TV comes with several screen size options, each
designed to work best with specific types of video input. Your cable box/satellite receiver may have its own set of screen sizes as
well. In general, though, you should view the TV in 16:9 mode as much as possible.
Alternately, you can press the P.SIZE button on the remote control repeatedly to change the picture size.
O
16:9: Adjusts the picture size to 16:9 appropriate for DVDs or wide broadcasting.
●
Wide Zoom: Magnify the size of the picture more than 4:3.
●
Zoom: Magnifies the 16:9 wide picture (in the vertical direction) to fit the screen size.
●
4:3: This is the default setting for a video movie or normal broadcasting.
●
Screen Fit: Use the function to see the full image without any cut-off when HDMI (720p / 1080i) or Component (1080i) signals
●
are input.
Depending on the input source, the picture size options may vary.
N
The items available may differ depending on the selected mode.
N
In PC Mode, only 16:9 and 4:3 mode can be adjusted.
N
Settings can be adjusted and stored for each external device you have connected to an input of the TV.
N
Temporary image retention may occur when viewing a static image on the set for more than two hours.
N
Wide Zoom: Move the screen up/down using the ▲ or ▼ button after selecting the by pressing the ► or ENTERE
N
button.
Zoom: Select by pressing the ◄ or ►button. Use the ▲ or ▼ button to move the picture up and down. After selecting
N
, use the ▲ or ▼ button to magnify or reduce the picture size in the vertical direction.
After selecting Screen Fit in HDMI (1080i) or Component (1080i) mode:
N
Select by pressing the ◄ or ►button. Use the ▲, ▼, ◄ or ► button to move the picture.
Reset: Press the ◄ or ► button to select Reset, then press the ENTERE button.
You can initialize the setting.
If you use the Screen Fit function with HDMI 720p input, 1 line will be cut at the top, bottom, left and right as in the
N
overscan function.
When Double ( , ) mode has been set in PIP, the Picture Size cannot be set.
N
DigitalNR→Off/Low/Medium/High/Auto
■
If the broadcast signal received by your TV is weak, you can activate the Digital Noise Reduction feature to help reduce any static
and ghosting that may appear on the screen.
When the signal is weak, select one of the other options until the best picture is displayed.
N
HDMIBlackLevel→Normal/Low
■
You can directly select the black level on the screen to adjust the screen depth.
This function is active only when the external input connects to HDMI (RGB signals).
N
FilmMode→Off/Auto
■
The TV can be set to automatically sense and process film signals from all sources and adjust the picture for optimum quality.
Film Mode is supported in TV, AV, COMPONENT(480i / 1080i) and HDMI(480i / 1080i).
N
PictureReset→OK/Cancel
❑
Resets all picture settings to the default values.
Page 16
Viewing Picture-in-Picture
M
You can use the PIP feature to simultaneously watch the TV tuner and one external video
source. This product has one built-in tuner, which does not allow PIP to function in the same
mode. Please see ‘PIP Settings’ below for details.
Press the TOOLS button to display the Tools menu. You can also configure PIP related
settings by selecting Tools→PIP.
PIP Settings
N
Main picture Sub picture
Component
HDMI1/DVI, HDMI2
TV, AV
PC
If you turn the TV off while watching in PIP mode and turn it on again, the PIP window will
N
disappear.
You may notice that the picture in the PIP window becomes slightly unnatural when you
N
use the main screen to view a game or karaoke.
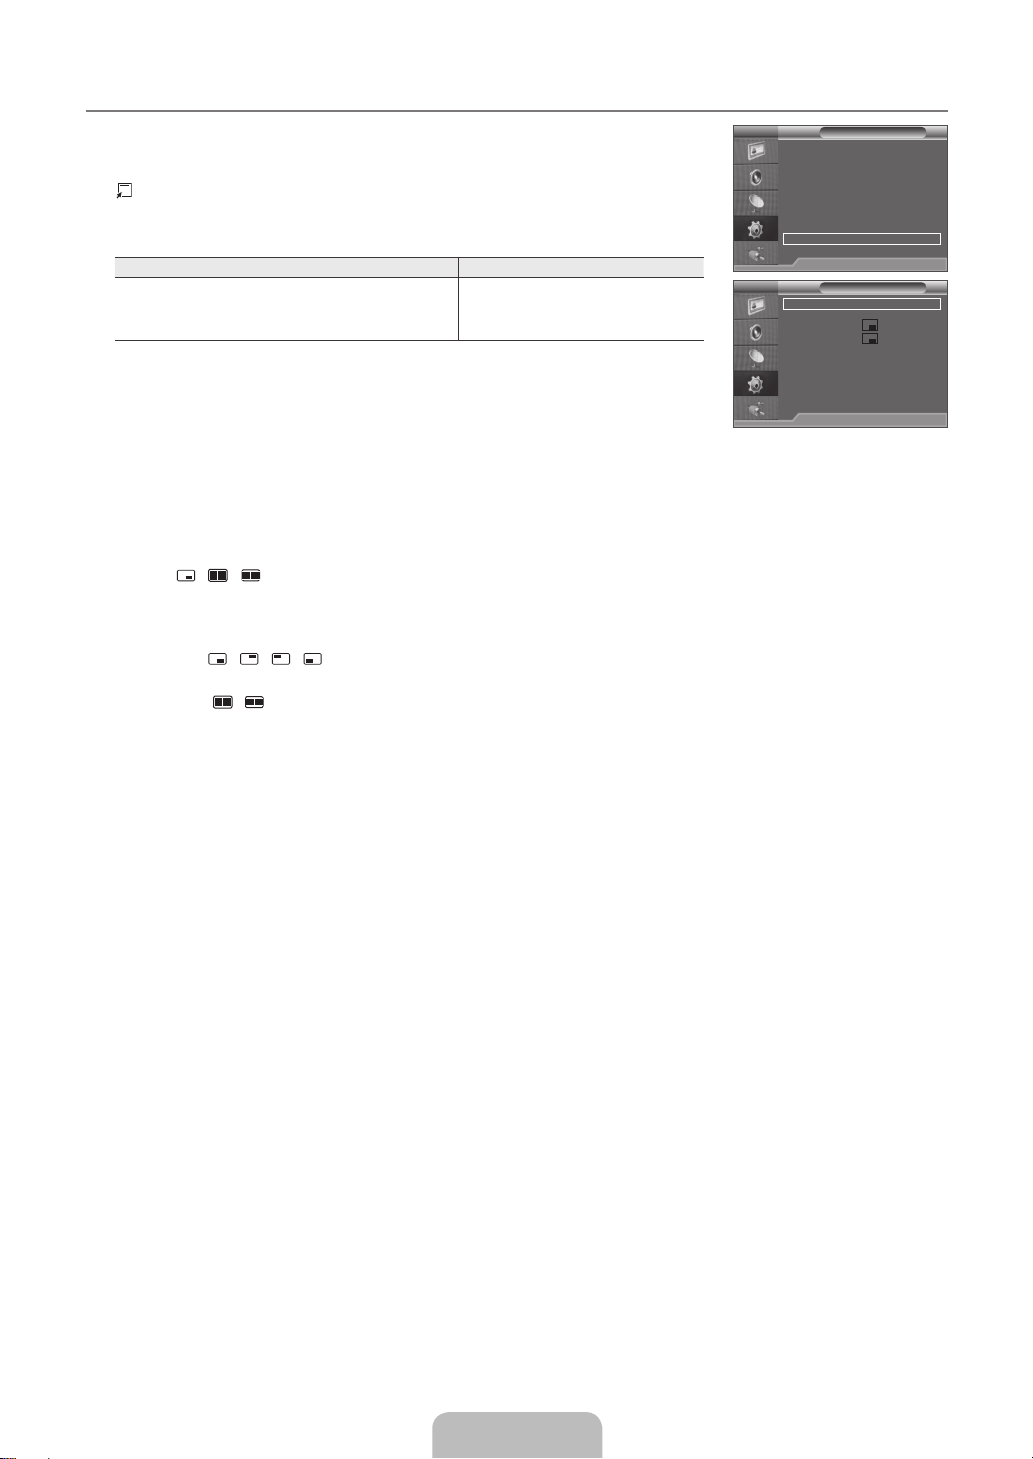
PIP→Off/On
❑
You can activate or deactivate the PIP function.
Source
❑
You can select a source of the sub-picture.
Size→ / /
❑
You can select a size of the sub-picture.
If main picture is in HDMI mode, Size is available.
N
Position→ / / /
❑
You can select a position of the sub-picture.
In Double ( / ) mode, Position cannot be selected.
N
TV Setup
Plug & Play
Language : English
Time
Child Lock : On
Change PIN
Game Mode : Off
Melody : Off
Energy Saving : Off
PIP
U
Move E Enter R Return
TV PIP
PIP : Off
Source : TV
Size :
Position :
Programme : P 1
E
Enter R Return
Programme
❑
You can select the channel for the sub-screen.
Programme is available when the Source is set to TV.
N
When you set the sub picture as TV,you can use the number button and channel up/down button to change the sub picture
N
channel.
English - 14
Page 17

English - 15
Using Your TV as a Computer (PC) Display
M
Setting Up Your PC Software (Based on Windows XP)
The Windows display-settings for a typical computer are shown below. The actual screens on
your PC will probably be different, depending upon your particular version of Windows and
your particular video card. However, even if your actual screens look different, the same basic
set-up information will apply in almost all cases. (If not, contact your computer manufacturer or
Samsung Dealer.)
1. First, click on ‘Control Panel’ on the Windows start menu.
2. When the control panel window appears, click on ‘Appearance and Themes’ and a display
dialog-box will appear.
3. When the control panel window appears, click on ‘Display’ and a display dialogbox will
appear.
4. Navigate to the ‘Settings’ tab on the display dialog-box.
The correct size setting (resolution) - Optimum: 1360 X 768 pixels
•
If a vertical-frequency option exists on your display settings dialog box, the correct
•
value is ‘60’ or ‘60 Hz’. Otherwise, just click ‘OK’ and exit the dialog box.
Display Modes
Both screen position and size will vary depending on the type of PC monitor and its resolution. The resolutions in the table are
recommended.
D-Sub and HDMI/DVI Input
■
Mode Resolution
IBM 640 x 350 31.469 70.086 25.175 +/-
MAC 640 x 480 35.000 66.667 30.240 -/-
VESA CVT 720 x 576 35.910 59.950 32.750 -/+
VESA DMT 640 x 480 31.469 59.940 25.175 -/-
VESA GTF 1280 x 720 52.500 70.000 89.040 -/+
When using an HDMI / DVI cable connection, you must use the HDMI IN 1 (DVI) jack.
N
The interlace mode is not supported.
N
N
The set might operate abnormally if a non-standard video format is selected.
Separate and Composite modes are supported. SOG is not supported.
N
720 x 400 31.469 70.087 28.322 -/+
832 x 624 49.726 74.551 57.284 -/-
1280 x 720 44.772 59.855 74.500 -/+
1280 x 720 56.456 74.777 95.750 -/+
640 x 480 37.500 75.000 31.500 -/640 x 480 37.861 72.809 31.500 -/800 x 600 37.879 60.317 40.000 +/+
800 x 600 46.875 75.000 49.500 +/+
800 x 600 48.077 72.188 50.000 +/+
1024 x 768 48.363 60.004 65.000 -/1024 x 768 56.476 70.069 75.000 -/1024 x 768 60.023 75.029 78.750 +/+
1360 x 768 47.712 60.015 85.500 +/+
Horizontal Frequency
(KHz)
Vertical Frequency
(Hz)
Pixel Clock Frequency
(MHz)
Sync Polarity
(H / V)
Page 18
Setting up the TV with your PC
M
Preset: Press the SOURCE button to select PC mode.
N
Auto Adjustment
❑
Use the Auto Adjust function to have the TV automatically adjust the video signals it receives.
The function also automatically fine-tunes the settings and adjusts the frequency values and
positions.
Press the TOOLS button to display the Tools menu. You can also set the Auto Adjustment
by selecting Tools→AutoAdjustment.
This function does not work in DVI-HDMI mode.
N
Screen
❑
Coarse / Fine
■
The purpose of picture quality adjustment is to remove or reduce picture noise. If the noise is
TV Picture
Mode : Dynamic
Backlight 10
Contrast 100
Brightness 45
Sharpness 50
Auto Adjustment
Screen
Advanced Settings
Picture Options
Reset : OK
TV Screen
Coarse 50
Fine 26
PC Position
Image Reset
not removed by Fine-tuning alone, then adjust the frequency as best as possible (Coarse) and
Fine-tune again. After the noise has been reduced, readjust the picture so that it is aligned on
the centre of screen.
PC Position
■
Adjust the PC’s screen positioning if it does not fit the TV screen.
Press the ▲ or ▼ button to adjusting the Vertical-Position. Press the ◄ or ► button to adjust the Horizontal-Position.
Image Reset
■
You can replace all image settings with the factory default values.
SOUND
U
Move E Enter R Return
U
Move E Enter R Return
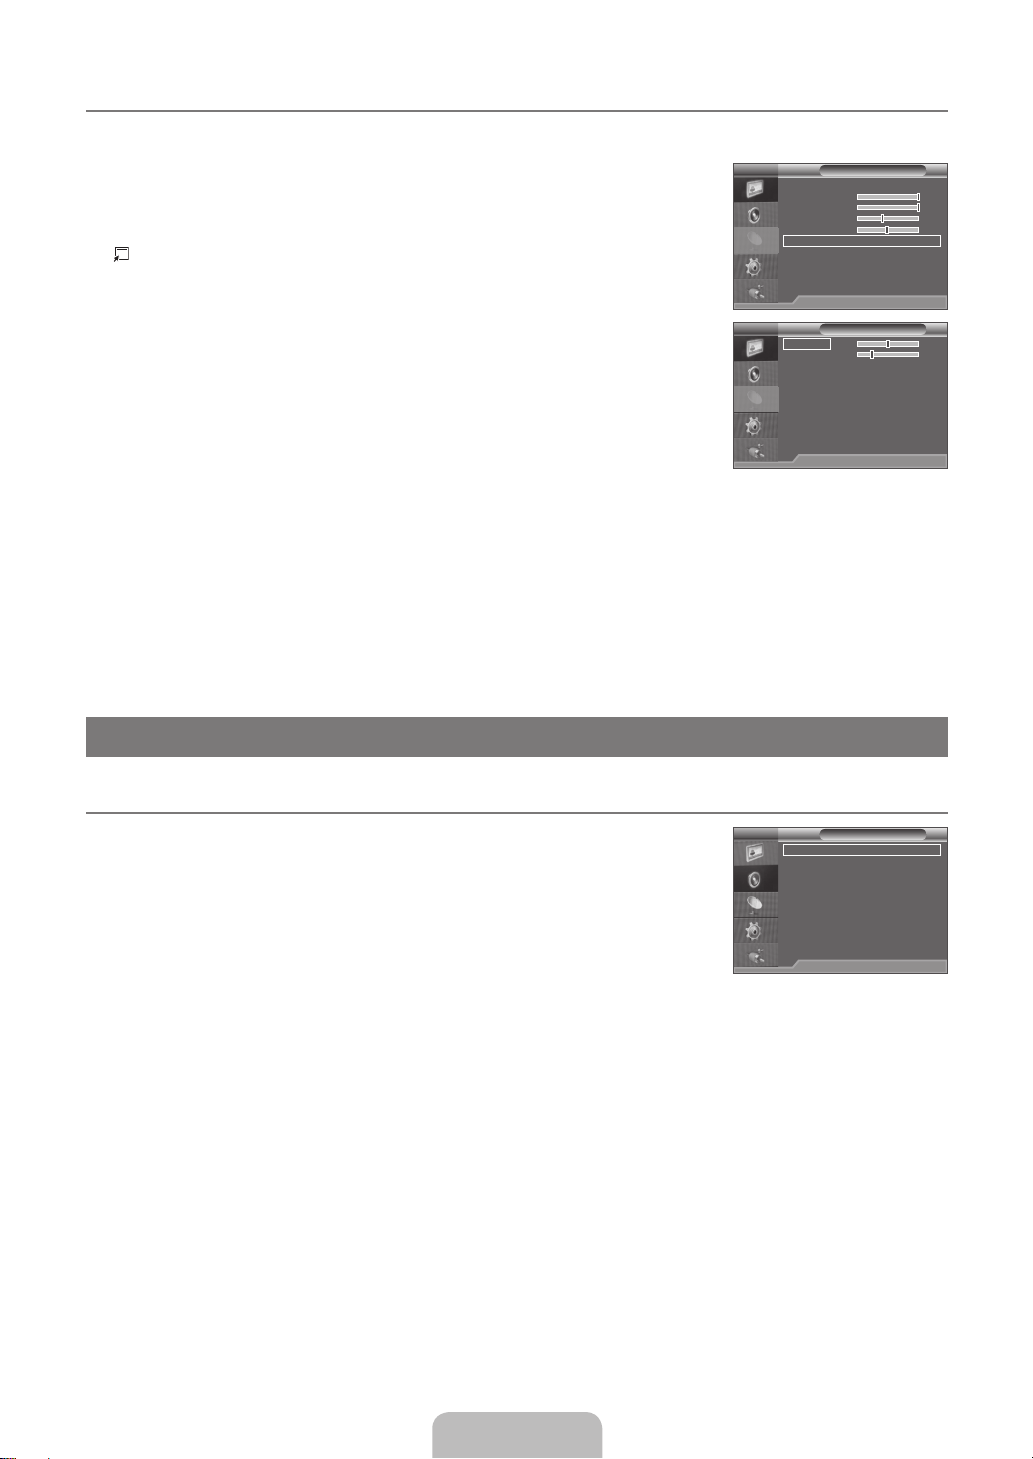
Configuring the Sound Menu
M
TV Sound
Mode→Standard/Music/Movie/ClearVoice/Custom
❑
You can select these options by simply pressing the S.MODE button on the remote control.
O
Standard: Selects the normal sound mode.
●
Music: Emphasizes music over voices.
●
Movie: Provides the best sound for movies.
●
Clear Voice: Emphasizes voice over other sounds.
●
Custom: Recalls your customized sound settings.
●
Equalizer
❑
Mode : Standard
Equalizer
SRS Trusurround HD : Off
Auto Volume : Off
Speaker Select : TV Speaker
Sound Select : Main
U
Move E Enter R Return
The sound settings can be adjusted to suit your personal preferences.
Balance L/R: Adjusts the balance between the right and left speaker.
●
100Hz / 300Hz / 1KHz / 3KHz / 10KHz (Bandwidth Adjustment): To adjust the level of different bandwidth frequencies.
●
If you make any changes to these settings, the sound mode is automatically switched to Custom.
N
SRSTruSurroundHD→Off/On
❑
SRS TruSurround HD is a patented SRS technology that solves the problem of playing 5.1 multichannel content over two
speakers. TruSurround delivers a compelling, virtual surround sound experience through any two-speaker playback system,
including internal television speakers. It is fully compatible with all multichannel formats.
English - 16
Page 19

English - 17
AutoVolume→Off/On
❑
Each broadcasting station has its own signal conditions, and so it is not easy to adjust the volume every time the channel is
changed. This feature lets you automatically adjust the volume of the desired channel by lowering the sound output when the
modulation signal is high or by raising the sound output when the modulation signal is low.
Auto Volume is not available in Component and HDMI mode.
N
Speaker Select
❑
When you watch TV with it connecting to a Home theatre, turn the TV speakers off so you can listen to sound from the Home
theatre’s (external) speakers.
External Speaker: Used to listen to the sound of the External (Home Theatre) Speakers.
●
TV Speaker: Used to listen to the sound of the TV Speakers.
●
The volume and MUTE buttons do not operate when the Speaker Select is set to External Speaker.
N
If you select External Speaker in the Sound Select menu, the sound settings will be limited.
N
TV’s Internal Speakers Audio Out (L/R Out) to Sound System
RF / AV / Component / PC / HDMI RF / AV / Component / PC / HDMI
TV Speaker Sound Output Sound Output
External Speaker Mute Sound Output
Video No Signal Mute Mute
SoundSelect→Main/Sub
❑
When the PIP feature is activated, you can listen to the sound of the sub (PIP) picture.
You can select this option when PIP is set to On.
N
Press the TOOLS button to display the Tools menu. You can also set the sound of the sub picture by selecting Tools→PIP→
Sound Select.
Selecting the Sound Mode
M
You can set the sound mode in the Tools menu. When you set to Dual l ll, the current sound mode is displayed on the screen.
Audio Type Dual 1 / 2 Default
Mono MONO
A2 Stereo
NICAM
Stereo
If the stereo signal is weak and an automatic switching occurs, then switch to the mono.
N
This function is only activated in stereo sound signal. It is deactivated in mono sound signal.
N
This function is only available in TV mode.
N
Stereo STEREO ↔ MONO
Dual DUAL 1 ↔ DUAL 2 DUAL 1
Mono MONO
Stereo MONO ↔ STEREO
Dual
MONO ↔ DUAL 1
DUAL 2
Automatic change
Automatic change
DUAL 1
Page 20

SETUP
Configuring the Setup Menu
M
Language
❑
You can set the menu language.
Time
❑
Clock
■
TV Setup
Plug & Play
Language : English
Time
Child Lock : On
Change PIN
Game Mode : Off
Melody : Off
Energy Saving : Off
PIP
Setting the clock is necessary in order to use the various timer features of the TV.
The current time will appear every time you press the INFO button.
O
If you disconnect the power cord, you have to set the clock again.
N
You can set the day, month, year, hour and minute directly by pressing the number buttons on the remote control.
Sleep Timer
■
The sleep timer automatically shuts off the TV after a preset time (30, 60, 90, 120, 150 and 180 minutes).
Press the TOOLS button to display the Tools menu. You can also set the sleep timer by selecting Tools→SleepTimer.
To cancel the Sleep Timer function, select Off.
N
Timer 1 / Timer 2 / Timer 3
■
Three different on / off timer settings can be made.
You must set the clock first.
On Time
●
Set the hour, minute, am/pm and activate / inactivate.
(To activate timer with the setting you’ve chosen, set to Activated.)
Off Time
●
Set the hour, minute, am/pm and activate / inactivate.
(To activate timer with the setting you’ve chosen, set to Activated.)
Repeat
●
Select Once, Everyday, Mon~Fri, Mon~Sat or Sat~Sun.
Volume
●
Select the desired turn on volume level.
Programme
●
When the On Timer is active, you can turn on a specific channel.
You can set the hour, minute and channel by pressing the number buttons on the remote control.
N
Auto Power Off
N
When you set the timer On, the television will eventually turn off, if no controls are operated for 3 hours after the TV was
turned on by the timer. This function is only available in timer On mode and prevents overheating, which may occur if a TV
is on for too long time.
U
Move E Enter R Return
ChildLock→Off/On
❑
This feature allows you to prevent unauthorized users, such as children, from watching unsuitable programme by muting out video
and audio.
Before the setup screen appears, the PIN number input screen appears. Enter your 4 digit PIN number.
N
The default PIN number of a new TV set is 0-0-0-0. You can change the PIN by selecting Change PIN from the menu.
N
You can lock some channels in Channel List. (refer to page 9)
N
Child Lock is available only in TV mode.
N
With Child Lock on,you can use number key to change channel,only can use channel up/down button.
N
English - 18
Page 21

English - 19
Change PIN
❑
You can change your personal ID number that is required to set up the TV.
Before the setup screen appears, the PIN number input screen appears. Enter your 4 digit PIN number.
N
The default PIN number of a new TV set is 0-0-0-0.
N
If you forget the PIN code, press the remote control buttons in the following sequence, which resets the PIN to 0-0-0-0:
N
POWER (Off) → MUTE → 8 → 2 → 4 → POWER (On).
GameMode→Off/On
❑
When connecting to a game console such as PlayStation™ or Xbox™, you can enjoy a more realistic gaming experience by
selecting game menu.
Restrictions on game mode (Caution)
N
To disconnect the game console and connect another external device, set Game Mode to Off in the setup menu.
–
If you display the TV menu in Game Mode, the screen shakes slightly.
–
Game Mode is not available in regular TV and PC mode.
N
While PIP is in operation, the Game Mode function cannot be used.
N
If the picture is poor when external device is connected to TV, check if Game Mode is On. Set Game Mode to Off and
N
connect external devices.
If Game Mode is On:
N
Picture mode is automatically changed to Standard and cannot be changed.
–
Sound mode is automatically changed to Custom and cannot be changed. Adjust the sound using the equalizer.
–
Melody→Off/Low/Medium/High
❑
A melody sound can be set to come on when the TV is powered On or Off.
The Melody does not play
N
When no sound is output from the TV because the MUTE button has been pressed.
–
When no sound is output from the TV because the volume has been reduced to minimum with the VOL – button.
–
When the TV is turned off by Sleep Timer function.
–
Energy Saving →Off/Low/Medium/High/Auto
❑
This feature adjusts the brightness of the TV in order to reduce power consumption. When watching TV at night, set the Energy
Saving mode option to High to reduce eye fatigue as well as power consumption.
Press the TOOLS button to display the Tools menu. You can also set the Energy Saving option by selecting Tools→Energy
Saving.
PIP
❑
For detailed procedures on setting up options, refer to page 14.
Page 22

INPUT
Input Menu
M
Source List
❑
Use to select TV or other external input sources such as DVD / Blu-ray players / Cable Box /
TV Input
Source List : TV
Edit Name
Satellite receivers (Set-Top Box) connected to the TV. Use to select the input source of your
choice.
Press the SOURCE button on the remote control to view an external signal source. TV
O
mode can be selected by pressing the TV button, number buttons (0~9), and the P < /
>
button on the remote control.
You can also watch HDMI mode simply by pressing the HDMI button on the remote control
O
TV / AV / Component / PC / HDMI1/DVI / HDMI2
■
Edit Name
❑
VCR / DVD / Cable STB / Satellite STB / PVR STB / AV Receiver / Game / Camcorder / PC / DVI / DVI PC / TV / IPTV / Blu-ray
■
TV Source List
U
Move E Enter R Return
TV
AV : ---Component : ---PC : ---HDMI1/DVI : ---HDMI2 : ----
U
Move E Enter R Return
/ HD DVD / DMA
Name the device connected to the input jacks to make your input source selection easier.
When connecting an HDMI/DVI cable to the HDMI IN 1(DVI) port, you should set the HDMI1/DVI mode to DVI or DVI PC in
N
the Edit Name of the Input mode. In this case, a separate sound connection is required.
When you edit the HDMI/DVI name as PC,DVI PC,the Game Mode cannot be activated.
N
When connecting the PC with resolution 1920*1080@60Hz to HDMI1/DVI port,you should edit HDMI1/DVI name as DVI PC.
N
English - 20
Page 23

English - 21
RECOMMENDATIONS
2
1
7
8
9
0
!
@
#
3
4
5
6
Teletext Feature
M
Most television stations provide written information services via Teletext. The index page of the Teletext service gives you
information on how to use the service. In addition, you can select various options to suit your requirements by using the remote
control buttons.
For Teletext information to be displayed correctly, channel reception must be stable. Otherwise, information may be missing or
N
some pages may not be displayed.
1 0 (mode)
Press to select the Teletext mode (LIST/ FLOF). If you press it in the LIST mode, it
switches into the List save mode. In the List save mode, you can save Teletext page
into list using the 8(store) button.
2 8 (store)
Used to store the Teletext pages.
3 4 (size)
Press to display the double-size letters in the upper half of the screen. For lower half
of the screen, press it again. To display normal screen, press it once again.
4 5 (reveal)
Used to display the hidden text (answers to quiz games, for example). To display
normal screen, press it again.
5 Colour buttons (red/green/yellow/blue)
If the FASTEXT system is used by a broadcasting company, the different topics
covered on a Teletext page are colour-coded and can be selected by pressing
the coloured buttons. Press one of them corresponding to the required. The page
is displayed with other coloured information that can be selected in the same
way. To display the previous or next page, press the corresponding coloured
button.
6
/
(Teletext on/mix)
Press to activate Teletext mode after selecting the channel providing the Teletext
service. Press it twice to overlap the Teletext with the current broadcasting screen.
7 (exit)
Exit from the Teletext display.
8 1 (sub-page)
Used to display the available sub-page.
9 2 (page up)
Used to display the next Teletext page.
0 3 (page down)
Used to display the previous Teletext page.
! 9 (hold)
Used to hold the display on a given page if the selected page is linked with several
secondary pages which follow on automatically. To resume, press it again.
@ 6 (index)
Used to display the index (contents) page at any time while you are viewing Teletext.
# 7 (cancel)
Used to display the broadcast when searching for a page.
You can change Teletext pages by pressing the numeric buttons on the remote control.
N
Page 24

The Teletext pages are organized according to six categories:
Part Contents
A Selected page number.
B Broadcasting channel identity.
C Current page number or search indications.
D Date and time.
E Text.
F Status information.
FASTEXT information.
Teletext information is often divided between several pages displayed in sequence, which can be accessed by:
N
Entering the page number
–
Selecting a title in a list
–
Selecting a coloured heading (FASTEXT system)
–
Press the TV button to exit from the Teletext display.
O
Installing the Stand
M
Preset: Place the Guide Stand and Cover Neck onto the stand and fasten it using the
N
screws. Applicable to 32inch models only.
Back
1. Attach your LCD TV to the stand.
Two or more people should carry the TV.
N
Make sure to distinguish between the front and back of the stand when assembling
N
them.
To make sure the TV is installed on the stand at a proper level, do not apply excess
N
downward pressure to the upper left of right sides of the TV.
2. Fasten screws at position 1 and then fasten screws at position 2.
Stand the product up and fasten the screws. If you fasten the screws with the LCD TV
N
placed down, it may lean to one side.
The stand is installed for models with the screen size of 37 inch and above.
N
Front
English - 22
Page 25

English - 23
Disconnecting the Stand
M
1. Remove four screws from the back of the TV.
2. Separate the stand from the TV.
Two or more people should carry the TV.
N
3. Cover the bottom hole with the cover.
Installing the Wall Mount Kit
M
Wall mount items (sold separately) allow you to mount the TV on the wall.
For detailed information on installing the wall mount, see the instructions provided with the
Wall Mount items. Contact a technician for assistance when installing the wall mounted
bracket.
Samsung Electronics is not responsible for any damage to the product or injury to yourself or
others if you elect to install the TV on your own.
Do not install your Wall Mount Kit while your TV is turned on. It may result in personal
injury due to electric shock.
Remove the stand and cover the bottom hole with a cap and fasten with two screws.
N
Page 26

Anti-Theft Kensington Lock
M
The Kensington Lock is a device used to physically fix the system when using it in a public
place. The appearance and locking method may differ from the illustration depending on the
manufacturer.
Refer to the manual provided with the Kensington Lock for proper use.
The locking device has to be purchased separately.
N
The location of the Kensington Lock may be different depending on its model.
N
1. Insert the locking device into the Kensington slot on the LCD TV (1) and turn it in the
locking direction (2).
2. Connect the Kensington Lock cable (3).
3. Fix the Kensington Lock to a desk or a heavy stationary object.
Securing the TV to the Wall
M
Caution: Pulling, pushing, or climbing on the TV may cause the TV to fall. In particular, ensure your
children do not hang over or destabilize the TV; doing so may cause the TV to tip over, causing serious
injuries or death. Follow all safety precautions provided on the included Safety Flyer. For added stability,
install the anti-fall device for safety purposes, as follows.
To avoid the TV from falling:
■
1. Put the screws into the clamps and firmly fasten them onto the wall. Confirm that the
screws have been firmly installed onto the wall.
You may need additional material such as an anchor depending on the type of
N
wall.
Since the necessary clamps, screws, and string are not supplied, please
N
purchase these additionally.
3
2
1
Wall
2. Remove the screws from the centre back of the TV, put the screws into the clamps,
and then fasten the screws onto the TV again.
Screws may not be supplied with the product. In this case, please purchase the
N
screws of the following specifications.
Screw Specifications
N
For a 17 ~ 29 Inch LCD TV: M4 X 15 / For a 32 ~ 40 Inch LCD TV: M6 X 15
–
3. Connect the clamps fixed onto the TV and the clamps fixed onto the wall with a strong
string and then tie the string tightly.
Install the TV near to the wall so that it does not fall backwards.
N
It is safe to connect the string so that the clamps fixed on the wall are equal to or
N
lower than the clamps fixed on the TV.
Untie the string before moving the TV.
N
4. Verify all connections are properly secured. Periodically check connections for any
sign of fatigue for failure. If you have any doubt about the security of your connections,
contact a professional installer.
Wall
English - 24
Page 27

English - 25
Troubleshooting: Before Contacting Service Personnel
M
Before contacting service personnel
N
Problem
No sound or picture
Normal picture but no sound
Screen is black and power
indicator light blinks steadily
No picture or black and white
picture
Sound and picture interference
Blurred or snowy picture,
distorted sound
Remote control malfunctions
‘Check signal cable.’ message is
displayed
On PC mode, ‘Not Supported
Mode.’ message is displayed
The damaged picture appears in
the corner of the screen
The ‘Resets all settings to
the default values.’ message
Possible Solution
Check that the mains lead has been connected to a wall socket.
Check that you have pressed the button on your set.
Check the picture contrast and brightness settings.
Check the volume.
Check the volume.
Check whether the MUTEM button has been pressed on the remote control.
Check the Speaker Select settings.
On your computer check; Power, Signal Cable.
The TV is using its power management system.
Move the computer’s mouse or press any key on the keyboard.
Adjust the colour settings.
Check that the broadcast system selected is correct.
Try to identify the electrical appliance that is affecting the set and move it further away.
Plug your set into a different mains socket.
Check the direction, location and connections of your aerial.
This interference is often due to the use of an indoor aerial.
Replace the remote control batteries.
Clean the upper edge of the remote control (transmission window).
Check the battery terminals.
Check that the signal cable is rmly connected to the PC or video sources.
Check that the PC or video sources are turned on.
Check the maximum resolution and the frequency of the video adaptor.
Compare these values with the data in the Display Modes.
If Screen Fit is selected in some external devices, the damaged picture may appear in the corner of the
screen. This symptom is caused by external devices, not TV.
This appears when you press and hold the EXIT button for a while. The product settings are reset to the
factory defaults.
appears.
You may see small particles if
This is part of the product’s design and is not a defect.
you look closely at the edge of
the bezel surrounding the TV
screen.
This TFT LCD panel uses a panel consisting of sub pixels (3 133 440) which require sophisticated technology to produce.
N
However, there may be few bright or dark pixels on the screen. These pixels will have no impact on the performance of the
product.
Page 28

Specifications
M
Model Name LA22B360 LA26B360 LA32B360
Screen Size
(Diagonal) 22inch 26 inch 32 inch
PC Resolution
(Optimum) 1360 x 768 @ 60Hz 1360 x 768 @ 60Hz 1360 x 768 @ 60Hz
Sound
(Output) 3W X 2 5W X 2 10W X 2
Dimensions (WxDxH)
Without Stand
With stand
Weight
With Stand 7 kg 8 kg 11 kg
Environmental Considerations
Operating Temperature
Operating Humidity
Storage Temperature
Storage Humidity
Stand Swivel
(Left / Right) 0˚ -20˚ ~ 20˚
Model Name LA26B350 LA32B350
Screen Size
(Diagonal) 26 inch 32 inch
PC Resolution
(Optimum) 1360 x 768 @ 60Hz 1360 x 768 @ 60Hz
Sound
(Output) 5W X 2 10W X 2
Dimensions (WxDxH)
Without Stand
With stand
Weight
With Stand 8 kg 11 kg
Environmental Considerations
Operating Temperature
Operating Humidity
Storage Temperature
Storage Humidity
Stand Swivel
(Left / Right) 0˚ -20˚ ~ 20˚
558 x 75 x 384 mm
558 x 216 x 437 mm
670 x 75 x 455 mm
670 x 216 x 495 mm
670 x 75 x 455 mm
670 x 216 x 495 mm
10°C to 40°C (50°F to 104°F)
10% to 80%, non-condensing
-20°C to 45°C (-4°F to 113°F)
5% to 95%, non-condensing
798 x 81 x 531 mm
798 x 252 x 577 mm
10°C to 40°C (50°F to 104°F)
10% to 80%, non-condensing
-20°C to 45°C (-4°F to 113°F)
5% to 95%, non-condensing
798 x 81 x 531 mm
798 x 252 x 577 mm
Design and specifications are subject to change without prior notice.
N
This device is a Class B digital apparatus.
N
For the power supply and Power Consumption, refer to the label attached to the product.
N
English - 26
Page 29

LCD-彩色电视机
使用说明书
请在www.samsung.com/global/register注册您的产品
在此处记下型号和序列号,以供今后参考之用。
型号 序列号
Page 30

许可
❑
TruSurround HD、SRS 和标志都是 SRS Labs, (●) Inc 的商标。
TruSurround HD 技术由 SRS Labs, Inc 授权使用。
显示静止图像时的注意事项
❑
静止图像可能会导致电视屏幕永久性损坏。
不要在电视屏幕上示静止图像(如电子游戏或将PC连接到此LCD上时)超过2小时,因为这会导致出现屏幕图像残影。此图像
●
残影也称为荧光屏灼伤。
●
显示电子游戏和PC的静止图像的时间超过某段时间后可能会导致局部余像。为避免出现此效果,请在显示静止图像时降低亮度
●
和对比度。
© 2009三星电子有限公司。保留所有权利。
长时间观看4:3格式的电视节目时,在屏幕的左侧、右侧和中央显示的边缘会由于屏幕上光发射的不同而留下
痕迹。播放DVD或连接游戏控制台也会对屏幕产生类似的影响。 上述原因导致的损坏不在保修范围之内。
Page 31

目录
安装电视机
控制面板 ............................................................................................ 2
■
附件.................................................................................................... 3
■
连接后面板 ......................................................................................... 4
■
查看遥控器 ......................................................................................... 6
■
安装遥控器电池.................................................................................. 7
■
操作
查看菜单 ............................................................................................ 7
■
将电视机置于待机模式 ....................................................................... 8
■
即插即用功能 ..................................................................................... 8
■
频道
频道项目 ............................................................................................ 9
■
图像
配置图像菜单 ....................................................................................11
■
观看画中画 ....................................................................................... 14
■
将电视机作为计算机(PC)显示器使用 ............................................... 15
■
将电视机设置为更适合计算机(PC)使用 ........................................... 16
■
伴音
更改伴音设置 ................................................................................... 16
■
选择伴音模式 ................................................................................... 17
■
设置
配置设置菜单 ................................................................................... 18
■
符号
❑
N O
注意事项 单触式按钮 工具按钮
输入
输入项目 .......................................................................................... 20
■
使用建议
图文电视功能 (视型号而定) ............................................................. 21
■
安装支架 .......................................................................................... 22
■
拆除支架 .......................................................................................... 22
■
安装墙托架套件................................................................................ 23
■
Kensington 防盗锁 ......................................................................... 23
■
将电视固定到墙上 ............................................................................ 24
■
故障诊断: 与维修人员联系之前 ........................................................ 25
■
技术规格 .......................................................................................... 26
■
中文 - 1
Page 32

安装电视机
本用户手册中的图示可能与实物外观有所差别,仅供参考。
N
为增强产品性能,其设计和规格可能会有所更改,对此恕不另行通知。
控制面板
^
产品颜色和外形可能随型号的不同而异。
N
前面板按钮通过手指触碰即可激活。
N
[LA26B350, LA32B350]
[LA22B360, LA26B360, LA32B360]
1
SOURCE (节目源) E: 切换所有可用输入节目源。屏幕菜单中此按钮的功能与遥控器上ENTER (确认) E 按钮的功能相同。
2
MENU (项目) : 按此按钮可查看电视机功能的屏幕菜单。 : 按此按钮可查看电视机功能的屏幕菜单。按此按钮可查看电视机功能的屏幕菜单。
3
+ VOL – : 按这两个按钮可提高或降低音量。屏幕菜单中+ VOL– 按钮的功能与遥控器上l 和 r 按钮的功能相同。
4
P : 按这两个按钮可更改频道。屏幕菜单中, P 按钮的功能与遥控器上 ▲ 和 ▼ 按钮的功能相同。
5 P
(POWER / 电源)按钮: 按此按钮可打开和关闭电视机。
6
SPEAKERS (扬声器)
7
REMOTE CONTROL SENSOR (遥控传感器): 将遥控器对准电视机上的这一位置。
8
POWER INDICATOR (电源指示灯): 在打开电源时不停闪烁,然后熄灭,处于待机模式时则亮起。
中文 - 2
Page 33

中文 - 3
附件
^
遥控器/ AAA电池(2个) 电源线 底座螺钉(4个) (M4 X L16)
底盖-按钮
使用说明书
●
请确保随液晶电视机一起提供了下列部件。如果缺少任何一项,请与您的经销商联系。
N
保修卡 / 维修网络卡/安全指南/注册卡(国家不同,电视配件也有所不同)
N
各附件的颜色和外形可能随型号的不同而异。
N
底座装配螺钉(3个) (M4 X L14)
(取决于型号)
保修卡
●
●
安全指南
●
注册卡
Page 34

连接后面板后面板面板
1 2 3
678
4 5
1 2 3
678
4 5
0
^
[ LA26B350, LA32B350,LA26B360, LA32B360]
后面板
[ LA22B360]
电源输入
后面板
电源输入
中文 - 4
Page 35

中文 - 5
产品颜色和外形可能随型号的不同而异。
N
1
HDMI IN(输入) 1(DVI), 2
连接到带有 HDMI 输出的设备的 HDMI 插孔。
任何额外的音频连接所需的 HDMI 的 HDMI 连接。
N
什么是 HDMI?
N
HDMI(高清晰多媒体接口), 是一种可使用单一缆线实现音频和视频数字信号传输的接口。
●
与 DVI 不同的是,HDMI 接口的尺寸较小,且内置 HDCP(高带宽数字拷贝保护)编码功能。
●
可通过 HDMI IN (输入) 1 (DVI) 插孔与外部设备进行 DVI 连接。 视频连接可使用 DVI 至 HDMI 缆线或 DVI-HDMI 适配
N
器(DVI 至 HDMI),音频连接则可使用 PC/DVI AUDIO IN(音频输入) 插孔。 采用 HDMI / DVI 缆线连接时,必须使用
HDMI IN(输入) (DVI) 插孔。
2
AV IN(输入) [VIDEO] (视频) / [R-AUDIO-L] (右-音频-左)
将 RCA(可选)连接到适当的外部 A/V(视听)设备(如录像机、DVD或摄像机)。
–
将 RCA音频电缆(可选)连接到电视机背面的 [R-AUDIO-L] (右-音频-左),并将另一端连接到 A/V(视听)设备上对应的音频输
–
出连接器。
3
PC/DVI AUDIO IN (音频输入)
连接到 PC 上的 AUDIO OUT(音频输出)插孔。
–
用于外部设备的 DVI 音频输出。
–
4
PC IN (输入)
连接到 PC 上的视频输出插孔。
–
如果您的 PC 支持 HDMI 连接,您可将此插孔连接到 HDMI IN (输入)1(DVI) 或 2 端子。
N
如果您的PC支持DVI连接,您可将视频接口连接到HDMI IN (输入)1(DVI),音频接口连接到PC/DVI音频接口。
N
5
AUDIO OUT(音频输出) [R-AUDIO-L] (右-音频-左)
将电视机的 RCA 音频信号连接到外部源,如音频设备。
–
6
COMPONENT IN (分量输入)
将分量视频电缆(可选)连接到电视机背面的分量连接器 (PR, PB, Y) 并将另一端连接到电视或DVD的对应分量视频输出连接电
–
视或DVD的对应分量视频输出连接器。
如果您希望同时连接机顶盒和电视或DVD,应将机顶盒连接到电视或DVD,并将电视或DVD连接到电视机的分量连接器
–
(PR, PB, Y) 。
分量设备(DTV或DVD)背面的 PR, PB 和 Y 连接器有时也标为 Y、B-Y 和 R-Y 或 Y、Cb 和 Cr。
–
将RCA音频电缆(可选)连接到电视机背面的[右-音频-左],并将另一端连接到DTV或DVD 上对应的音频输出连接器。
–
7
SERVICE (服务)
仅用于维修的连接器。
–
8
ANT IN (输入)
连接到天线或有线电视系统。
–
9
SERVICE (服务) (LA22B360 具备此功能)
仅用于维修的连接器。
–
0 H
HEADPHONE (耳机插孔) (LA22B360 具备此功能)
可以将耳机连接到电视机耳机输出端。连接耳机后,内置喇叭就不会发出伴音了。
–
将耳机连接到电视机后,音效功能将受到限制。
N
如果音量开得很大,长时间听耳机会损害您的听觉。
N
将耳机连接到电视机后,扬声器将无声音输出。
N
耳机的音量和电视机的音量是分开调节的。
N
Page 36

1
2
3
4
5
6
7
8
9
0
!
@
#
$
&
*
(
)
a
%
^
^
查看遥控器
N
遥控器的最大工作距离约是 23 英尺。
N
遥控器的性能可能会受强光影响。
产品颜色和外形可能随型号的不同而异。
N
1 POWER(电源按钮) : 打开和关闭电视。
2 数字按钮 : 按这些按钮可更改频道。
3 E : 与方向按钮中 确认E 按钮的作用相同。
通过数字按钮切换频道时,先按下频道编号,
然后按 确认E按钮,可立即切换到该频道。
-=+ : 音量提高或音量减低。
4
5 SOURCE (节目源) : 按此按钮可切换可用的视
频源。
6 CH LIST (频道列表) : 在屏幕上显示频道列表。
7 TOOLS (工具) : 显示工具菜单。
8 INFO (显示) : 按此按钮可在电视屏幕上显示信息
9 COLOUR BUTTONS (彩色按钮) : Fastext
等中使用。
! TV (电视) : 直接选择电视模式。
@ PRE- CH (回看) : 按此按钮可返回到您观看的
上一个频道。
# MUTE(静音) : 按此按钮可暂时关闭声音。
$ P : 按此按钮可更改频道。
% MENU (项目) : 显示屏幕主菜单。
^ HDMI :选择进入HDMI模式。
& RETURN (返回) : 返回到上一菜单。
* 上▲ / 下▼ / 左 / 右 / 确认E :
用于选择屏幕菜单项和更改菜单的设置。
( EXIT (退出) : 按此按钮可退出菜单。
) P.SIZE (图像大小) : 图像大小选择。
a S.MODE : 声音模式选择。
图文电视功能
5 0 图文电视模式选择
(LIST(列表)/
FLOF)。
6 8 图文电视存储
7 4 图文电视尺寸
8 5 图文电视显示
9 Fastext主题选择
0
/
选择图文电视、
Double(双重)、或Mix
(混合)。
。
! 退出图文电视显示
@ 1 图文电视子页面。
$
2
图文电视下一页
3
图文电视上一页
% 6 图文电视索引
& 9 图文电视保持
( 7 图文电视取消
中文 - 6
Page 37

中文 - 7
安装遥控器电池
^
1. 如图所示、向上抬起遥控器后盖。
2. 安装两节 AAA 规格的电池。
确保电池的正极‘+’和负极‘–’如电池盒内的示意图所示。
N
3. 装回后盖。
如果长时间不用遥控器,请取出电池并将电池放在凉爽干燥的地方保存。
N
如果遥控器不工作,检查以下各项 :
N
是否打开了电视机?
•
电池的正极和负极是否倒转?
•
电池电量是否耗尽?
•
电视是否断电或者未插入电源线?
•
附近是否有特殊的荧光或氖光信号?
•
操作
查看菜单菜单
^
使用本电视机前,请按以下说明进行操作,以了解项目导航的方法,学习如何选择和调节不同的功能。项目导航的方法,学习如何选择和调节不同的功能。导航的方法,学习如何选择和调节不同的功能。
ENTER (确认)E / 方向按钮
进入当前选定项。确认设置。
MENU (项目)按钮
显示屏幕主项目。。
RETURN (返回)按钮
返回上一级菜单。菜单。。
移动光标并选择项目。项目。。
EXIT (退出)按钮
退出屏幕菜单。菜单。。
屏幕菜单操作
❑
根据所选菜单的不同,访问步骤也会不同。
1. 按下MENU (项目)按钮。
2. 在屏幕上显示主菜单。
其左侧有五个图标: PICTURE (图像)、SOUND (伴音)、CHANNEL (频道)、
SETUP (设置)和 INPUT(输入)。
3. 按 ▲ 或 ▼ 按钮选择其中一个图标。
4. 按 ENTER (确认)E 按钮进入图标的子菜单。
5. 按 ▲ 或 ▼ 按钮选择图标的子菜单。
6. 按 l 或 r 按钮减少或增加某一项的值。根据所选项目的不同,调节屏幕显示项也会不
同。
7. 按 ENTER (确认)E 按钮完成配置。按EXIT(退出)按钮,退出该菜单。
TV Picture
Mode : Dynamic
Backlight 10
Contrast 100
Brightness 45
Sharpness 75
Colour 55
Tint (G/R) G 50 R 50
Advanced Settings
Picture Options
Reset : OK
U
Move E Enter R Return
TV Picture
Mode : Dynamic
Backlight 10
Contrast 100
Brightness 45
Sharpness 75
Colour 55
Tint (G/R) G 50 R 50
Advanced Settings
Picture Options
Reset : OK
U
Move E Enter R Return
▲
Backlight
▼
U
Move L Adjust R Return
Help Icon (帮助图标)
10
Page 38

将电视机置于待机模式
^
为减少功耗, 可将您的电视机置于待机模式。您想暂时中断观看(如吃饭)时, 待机模式就很有用。
1. 按遥控器上的电源 按钮。
屏幕关闭, 电视机前端亮红色待机指示灯。
N
2. 要重新打开电视, 只需再按电源 。
切勿长时间将电视机置于待机模式(如您外出度假)。最好拔下电视机的电源和天线。
N
即插即用功能
^
电视机第一次打开时,会先后自动出现几个需要用户设置的基本设定。可以进行以下设置。
1. 按遥控器上的POWER (电源) P 按钮。
也可使用电视机上的POWER (电源) P 按钮。
N
2. 按 ▲ 或 ▼ 按钮选择Language,然后按ENTER (确认)E 按钮。
3. 按 l 或 r 按钮选择Store Demo (商场展示)或Home Use(家庭使用),然后按ENTER (确
认)E 按钮。
我们建议将电视机设置为Home Use (家庭使用)模式,以便在家庭使用环境中获得最佳效果。
N
Store Demo (商场展示)模式仅适用于零售环境。
N
如果电视机意外设置为Store Demo (商场展示)模式,而您想返回到Home Use (家庭使用)模式,请按Volume (声音)按钮,
N
然后按住前面板上的MENU (项目)按钮持续 5 秒钟。
4. 选择确定后显示消息Check antenna input (检查天线输入)。
按下ENTER (确认)E 按钮。
请检查天线电缆是否连接正确。
N
5. 按▲ 或 ▼ 按钮选择合适的地区。
按ENTER (确认)E 按钮确认您的选择。
6. Auto Store (自动存储)项目显示的Start (启动)选择。按下ENTER (确认)E 按钮。
频道搜索将自动开始并结束。
N
可随时按ENTER (确认)E 按钮来中断记忆过程。
N
存储所有可用的频道后,将出现Clock Set (时钟设置)菜单。
N
7. 按下ENTER (确认)E 按钮。
按 l 或 r 按钮可选择 month (月)、Day (日期)、Year (年)、Hour (小时)、Minute (分钟) 或 am/pm (上午/下午)。
按 ▲ 或 ▼ 按钮进行设置,month (月)、Day (日期)、Year (年)、Hour (小时)、Minute (分钟) 或 am/pm (上午/下午)。
您还可以通过按遥控器上的数字按钮来设置 month (月)、Day (日期)、Year (年)、Hour (小时)、Minute (分钟) 或 am/pm (上
午/下午)。
8. 按ENTER (确认)E 按钮以确认您的设置,屏幕将显示信息:Enjoy your TV(欣赏节目_。按下ENTER (确认)E 按钮。
即使没有按下ENTER (确认)E按钮,该消息也会在几秒钟后自动消失。
N
如果您想重设该功能...
1. 按下 MENU (项目)按钮显示菜单。按 ▲ 或 ▼ 按钮选择Set up (设置)菜单, 然后
按ENTER (确认)E 按钮。
2. 再次按ENTER (确认)E 按钮,选择Plug&Play (即插即用)。
仅在TV (电视)模式下,Plug&Play (即插即用)功能才可用。
N
中文 - 8
TV Setup
Plug & Play
Language : English
Time
Child Lock : On
Change PIN
Game Mode : Off
Melody : Off
Energy Saving : Off
PIP
U
Move E Enter R Return
Page 39

中文 - 9
频道
频道项目项目
^
Area (地区)
❑
您可以更改所需地区。
Auto Store (自动选台)
❑
您可搜索可用的频率范围 (频道数量取决于您所在的地区)。
自动分配的节目号不一定与实际或所需的节目号相对应。
扫描所有活动广播电台频道,并存储在电视内存中。
N
如果您想停止“Auto Store (自动选台)”, 按下ENTER (确认)E 按钮。
N
Manual Store (手动选台)
❑
手动扫描频道并存储在电视内存中。
N
Programme (节目) : 为频道指定的台号按 ▲或▼ 按钮, 直到找到正确的数字。通过按数字按钮 (0~9) 可以直接选择频道。
●
Colour System (彩色制式) → Auto (自动) / PAL / SECAM / NTSC4.43 / NTSC 3.58: 按 ▲ 或 ▼ 按钮,选择所需的彩色制式。
●
Sound System (伴音制式) → BG / DK / I / M: 按 ▲ 或 ▼ 按钮, 选择所需的伴音标准。
●
Channel (频道) (当您知道要存储的频道号时): 按 ▲ 或 ▼ 按钮, 选择 C(无线频道)或 S(有线频道)。按ENTER (确认)E按钮,然
●
后按 ▲ 或▼ 按钮选择所需的号码。
通过按数字按钮 (0~9) 可以直接选择频道。
N
如果伴音异常或没有伴音,重新选择需要的伴音标准。
N
Search (搜索) (当您不知道频道号时): 按 ▲ 或 ▼ 按钮开始搜索。调谐器会扫描频率范围,直到电视屏幕接收到第一个频道或者
●
您选定的频道为止。
Store (存储) (当您存储频道及相关的台号时): 通过按 ENTER (确认)E 按钮设置确定。
●
频道模式
N
P (节目模式): 调节完成后,您所在地区内的电视台将被指定一个从 P00 至 P99 的位置编号。
–
C (无线频道模式): 在此模式中,可以通过输入每个无线电视台的指定编号选择频道。
–
S (有线频道模式): 在此模式中,可以通过输入每个有线频道的指定编号选择频道。
–
Channel List (频道列表)
❑
使用Channel List (频道列表),您可以方便地锁定或添加频道。
TV Channel
Area : Asia/Europe
Auto Store
Manual Store
Channel List
Sort
Name
Fine Tune
U
Move E Enter R Return
Adding Channels (添加频道)
使用频道列表,您可以添加频道。
移动到 (#) 领域,按 ▲, ▼, l 或 r 按钮,选择的频道将增加,并按下ENTER (确认)E按钮添加频道。
–
如果你再次按下ENTER (确认)E的则该频道旁边的c 符号将会消失,而且该频道没有被添加。
–
Locking Channels (锁定频道)
此功能让您可以防止未经授权的用户(如儿童)看不适宜的节目。
开启时,此功能会被激活。(请参阅第18 页)
N
通过按 ▲, ▼, l 或 r 按钮,移动到\字段选择要锁定的频道,然后按ENTER (确认)E 按钮。
–
将显示输入密码画面。输入 4 位密码。
N
如果您再次按下ENTER (确认)E按钮,则该频道旁边的c符号将会消失,而且频道锁定会被取消。
N
Child Lock (频道童锁)被激活时,将会显示蓝背景。
N
将童锁设定为On (开启)或Off (关闭),即可改变带有\ 图标的频道的状态(活动或非活动)。图标的频道的状态(活动或非活动)。
N
只需按遥控器上的频道列表按钮,即可选择这些选项。
O
Page 40

Sort (变更台号)
❑
此操作可以改变存储频道的台号。使用自动选台后,可能需要使用此操作。
该频道被移动到新位置,所有其他频道也会相应移动。
N
Name (名称)
❑
发送频道信息时,将自动指定频道名称。这些名称可以变更,您可以指定新的名称。名称。。
可以选择的字符有:字母表上的字母(A~Z)/数字(0~9)/特殊字符(+、-、*、/、空格)
N
Fine Tune (微调)
❑
如果接收画面清晰,则您无需对频道进行微调,因为这是在搜索和存储操作中自动进行的。如果信号较弱或失真,
则您可能需要手动对频道进行微调。
经过微调的频道保存后,在频道标志上的频道号右侧用星号“*” 标记。
N
要复位微调, 按 ▲ 或 ▼ 按钮选择Reset (复位),然后按ENTER (确认)E 按钮。
N
只有电视频道才可进行微调。
N
中文 - 10
Page 41

中文 - 11
图像
配置图像菜单菜单
^
Mode (模式)
❑
您可以选择最符合您观看要求的图像类型。
您还可选择TOOLS (工具)→Picture Mode (图像模式),设置Picture Mode (图像模式)。
必须针对每个输入源单独调整图像效果。
N
Dynamic (动态)
■
选择在明亮的房间中进行高清晰显示的图像。
Standard (标准)
■
选择在正常环境中进行最佳显示的图像。
Movie (电影)
■
选择在黑暗的房间中进行舒适显示的图像。
Backlight (背光) / Contrast (对比度) / Brightness (亮度) /
❑
Sharpness (清晰度) /Colour (色度) / Tint (色调)
您的电视机有几项可供您控制图像质量的设置。
Backlight (背光)
■
可通过调节 LCD 背光亮度来调节屏幕亮度。
Contrast (对比度)
■
调整对象和背景之间的亮度和暗度。
Brightness (亮度)
■
调整整个屏幕的亮度。
Sharpness (清晰度)
■
将对象轮廓调整为更加锐化或钝化。
Colour (色度)
■
调整颜色,使颜色更亮或更暗。
Tint (色调)
■
调整对象的颜色,使对象更红或更绿,从而使其外观更加自然。
在 PAL 系统的 TV (电视)、AV模式下,无法使用Tint (色调)功能。
N
调整Backlight (背光)、Contrast (对比度)、Brightness (亮度)、Sharpness (清晰度)、Colour (色度)和Tint (色调)后,屏幕显示项
N
也会发生相应变化。
在PC模式下,只能调整Backlight (背光),Contrast (对比度)和Brightness (亮度)。
N
可以调整和存储已连接到电视输入端口的每台外部设备的设置。
N
降低显示屏亮度能显著降低电视机在使用过程中的能耗,也能为您降低电视机的运行成本。
N
TV Picture
Mode : Dynamic
Backlight 10
Contrast 100
Brightness 45
Sharpness 75
Colour 55
Tint (G/R) G 50 R 50
Advanced Settings
Picture Options
Reset : OK
▲
Backlight
▼
U
Move L Adjust R Return
U
Move E Enter R Return
10
Page 42

Advanced Settings (高级设置)
❑
TV Advanced Settings
与之前的机型相比,三星新款电视机可进行更为精确的图像设置。
Picture Mode (图像模式)设置为Movie (电影)或 Standard (标准)时,可以选择
N
Advanced Settings (高级设置)。
在PC模式的Advanced Settings (高级设置)中,您仅可调整动Dynamic Contrast
N
(动态对比度) 、Gamma (伽玛) white Balance (白平衡)。
Black Tone (黑色色调) → Off (关闭) / Dark (暗色) / Darker (较暗) / Darkest (最暗)
■
可在屏幕上直接选择黑色等级来调整屏幕深度。
Dynamic Contrast (动态对比度) → Off (关闭) / Low (低) / Medium (中) / High (高)
■
可对屏幕对比度加以调整,以获得最佳对比度。
Gamma (伽玛)
■
可调整图像的中级亮度。
Colour Space (色彩空间)
■
色彩空间是一个由红、绿和蓝三色组成的色彩矩阵。您可选择自己最喜爱的色彩空间以体验最自然的色彩。
Auto (自动): 自动色彩空间将根据节目源自动将画面调整到最自然的色温。
●
Native (原始): 自然色彩空间可提供更深沉,丰富的色温。
●
White Balance (白平衡)
■
可对色温加以调整, 以获得更为自然的图像色彩。
R-Offset (红截止): 调节红色深度。
●
G-Offset (绿截止): 调节绿色深度。
●
B-Offset (蓝截止): 调节蓝色深度。
●
R-Gain (红增益): 调节红色亮度。
●
G-Gain (绿增益): 调节绿色亮度。
●
B-Gain (蓝增益): 调节蓝色亮度。
●
Reset (复位): 先前调整过的白平衡将复位为出厂默认值。
●
Flesh Tone (肤色)
■
你可以增强图像中粉红色调。
更改调整值将刷新调整的屏幕。
N
Edge Enhancement (边缘增强) → Off (关闭) / On(开启)
■
可以突出对象的边缘。
Black Tone : Off
Dynamic Contrast : Medium
Gamma : 0
Colour Space : Native
White Balance
Flesh Tone : 0
Edge Enhancement : On
U
Move E Enter R Return
中文 - 12
Page 43

中文 - 13
Picture Option (图像选项)
❑
在 PC 模式下,只可更改Picture Option (图像选项)下的Colour Tone (色温)和 Size
N
(尺寸)项。
Colour Tone (色温) → Cool (冷) / Nomal (正常) / Warm 1 (暖 1) / Warm 2 (暖 2)
■
图像模式设置为动态和标准时, 无法选择Warm 1 (暖 1)、Warm 2 (暖 2)。
N
可调节和存储已连接到电视机输入端口的所有外部设备的设置。
N
Size (尺寸)
■
您有时可能会想更改屏幕上的图像大小。本电视机提供多种画面大小选项,可完美播放
TV Picture Options
Colour Tone : Cool
Size : 16:9
Digital NR : Auto
HDMI Black Level : Normal
Film Mode : Off
U
各种特定视频输入。您的有线电视盒/卫星接收器可能也有各自的画面大小设置。尽管有
多种选项可供选择,但一般情况下,应尽量使用 16:9 的模式观看电视。
如要以其他模式观看,可重复按遥控器上的P.SIZE (图像尺寸)按钮更改画面大小。
O
16:9: 将图像尺寸调整为 16:9 ,这种尺寸适用于 DVD 或宽广播。
●
Wide Zoom (宽度放大): 将图像的尺寸放大超过 4:3。
●
Zoom (放大): 放大16:9宽图片(在垂直方向),以适应屏幕大小。
●
4:3: 这是视频电影或正常广播所使用的默认设置。
●
Screen Fit (全屏显示):当输入 HDMI(720p、1080i或1080p)或者分量输入(1080i或1080p)信号时使用此功能可查看完整图像,
●
不会被截断。
根据输入源的不同,画面大小的选项也会有差别。
N
根据所选模式的不同 ,可用项也会不同。
N
在 PC 模式下 , 只能调整 16:9 和 4:3 模式。
N
可以调整和存储已连接到电视输入端口的每台外部设备的设置。
N
如果在装置上观看静态图像超过两个小时 ,可能会出现暂时的残影现象。
N
Wide Zoom (宽度放大): 按放大按钮。或确认 按钮选择,然后用上r或下ENTER (确认)E按钮设置屏幕的上下位置。
N
Zoom (放大): 按上下按钮选择 ,使用上下按钮移动画面。选择 。使用 ▲ 或 ▼ 按钮放大或缩小画面的垂直大小。
N
在 HDMI (1080i / 1080p) 或分量输入模式下选择全屏显示后:
N
选择 按 l 或 r 按钮选择位置。使用 ▲, ▼, l 或 r 按钮移动画面。
Reset (复位): 按 l 或 r 按钮选择Reset (复位),然后按ENTER (确认)E 按钮。您可以将设置初始化。
如果您在输入源为 HDMI 720p 时使用Screen Fit (全屏显示)功能,则和使用全屏显示 功能时一样,屏幕顶部、底部、左侧
N
和右侧将各去掉 1 行。
如果在画中画中设置了双屏幕 ( , ) 模式,则无法设置画面大小。
N
Digital NR (数字降噪) → Off (关闭) / Low (低) / Medium (中) / High (高) / Auto (自动)
■
如果电视接收到的信号较弱,您可激活此功能来帮助减少任何静电和屏幕上出现的重影。
信号弱时,请调整以上选项,直到屏幕显示最佳图像。
N
HDMI Black Level (黑色等级) → Normal (正常) / Low (低)
■
可在屏幕上直接选择黑色等级来调整屏幕深度。
此功能仅在 HDMI 外部连接 RGB 信号输入时才可使用。
N
Film Mode (电影模式) → Off (关闭) / Auto (自动)
■
可将电视机设置为自动检测和处理各种视频源的电影信号并调节画面大小以实现最佳显示效果。
TV (电视)、AV (视频)、COMPONENT (分量输入) (480i / 1080i) 和 HDMI (1080i) 都支持Film Mode (电影模式) 。
N
Move E Enter R Return
Reset (复位)→ OK (确定) / Cancel (取消)
❑
将所有画面设置复位为默认值。
Page 44

观看画中画
^
可利用画中画功能同时观看电视和一个外部视频。本产品内置的调谐器不支持同一模式
中的画中画功能。请查看下方的“画中画设置”,了解详细信息。
TV Setup
您还可选择TOOLS (工具)→PIP (画中画), 配置画中画的相关设置。
PIP (画中画)设置
N
主画面 副画面
Component (分量输入)
HDMI1/DVI, HDMI2
TV, AV
PC
如果在画中画模式下观看时关闭了电视,重新开启电视后画中画窗口将会消失。
N
将主屏幕用于播放游戏或卡拉画中画面时,您可能会发现画中画窗口中的图像有 点
N
TV PIP
不自然。
PIP (画中画) → OFF (关闭) / ON (开启)
❑
您可以激活或取消画中画功能。
Source (节目源)
❑
您可以为副画面选择Source (节目源)。
Size (尺寸) → / /
❑
可选择副画面的尺寸。
仅在主画面为HDMI模式下,Size (尺寸)选项可用。
N
Position (画面位置) → / / /
❑
您可以选择副画面的位置。
在双画面 ( / ) 模式中,您不能设置屏幕的位置。
N
Programme (节目)
❑
可为副画面选择频道。
副画面设置为TV(电视)时,可选择频道。
N
当您将副画面选择为 TV(电视)时,您可以方便的使用遥控器上的数字按键和频道切换键来切换副画面的频道。
N
Plug & Play
Language : English
Time
Child Lock : On
Change PIN
Game Mode : Off
Melody : Off
Energy Saving : Off
PIP
U
Move E Enter R Return
PIP : Off
Source : TV
Size :
Position :
Programme : P 1
E
Enter R Return
中文 - 14
Page 45

中文 - 15
将电视机作为计算机(PC)显示器使用
^
电脑的 Windows 显示设置一般如右所示
视 Windows 的具体版本和视频卡的不同,每个人的实际 PC 屏幕显示可能不同。即使实际屏幕
看起来有所不同,相同的基本设置信息几乎可应用于所有情况。(如这里介绍的设置方法对您的
电脑不适用,请与您的电脑制造商或者三星经销商联系。)
1. 首先,单击 Windows 开始菜单上的控制面板。
2. 出现控制面板窗口时,单击外观和主题,然后出现一个显示对话框。
3. 出现控制面板窗口时,单击显示,然后出现一个显示对话框。
4. 找到显示对话框上的设置选项卡。
正确的尺寸设置应为(分辨率) - 最优 : 1360 X 768 像素
•
如果您的显示设置对话框还有场频选项、正确的数值为 60 或 60Hz。
•
否则,只需单击确定,退出对话框。
显示模式
屏幕位置和尺寸都视PC显示器的类型和分辨率而定。建议使用表中提供的分辨率。
D-Sub 和 HDMI/DVI IN (输入)
■
模式 分辨率 行频 (KHz) 场频 (Hz) 像素时钟频率 (MHz) 同步极性(水平/垂直)
IBM 640 x 350 31.469 70.086 25.175 +/-
MAC 640 x 480 35.000 66.667 30.240 -/-
VESA CVT 720 x 576 35.910 59.950 32.750 -/+
VESA DMT 640 x 480 31.469 59.940 25.175 -/-
VESA GTF 1280 x 720 52.500 70.000 89.040 -/+
使用HDMI/DVI时,必须连接HDMI IN (输入)1(DVI)接口。
N
N
不支持逐行模式。
N
如果选择非标准的视频格式,则电视机可能出现异常操作。
N
支持独立模式和复合模式。不支持 SOG。
720 x 400 31.469 70.087 28.322 -/+
832 x 624 49.726 74.551 57.284 -/-
1280 x 720 44.772 59.855 74.500 -/+
1280 x 720 56.456 74.777 95.750 -/+
640 x 480 37.500 75.000 31.500 -/640 x 480 37.861 72.809 31.500 -/800 x 600 37.879 60.317 40.000 +/+
800 x 600 46.875 75.000 49.500 +/+
800 x 600 48.077 72.188 50.000 +/+
1024 x 768 48.363 60.004 65.000 -/1024 x 768 56.476 70.069 75.000 -/1024 x 768 60.023 75.029 78.750 +/+
1360 x 768 47.712 60.015 85.500 +/+
Page 46

将电视机设置为更适合计算机(PC)使用
^
预设: 按节目源按钮选择PC模式。
N
Auto Adjustment (自动调整)
❑
自动调整使电视机的PC屏幕可以根据输入的PC视频信号进行自动调节。
微调,粗调和位置的值是自动调节的。
您还可选择TOOLS (工具)→Auto Adjustment (自动调整),设置 Adjustment (自动
调整) 。
此功能在 DVI/HDMI 模式中无效。
N
Screen (屏幕)
❑
Coarse (粗调) / Fine (微调)
■
调整图像质量的目的是为了消除或减少图像噪声。如果微调后仍无法消除噪声,则尽
可能进行频率调整(Coarse (粗调)),然后再进行微调。在噪声减少以后,请重新调整图
像,使之与屏幕中心对齐。
PC Position (位置)
■
如果 PC 屏幕位置与TV (电视)屏幕不合适,请进行调整。
按 ▲ 或 ▼ 按钮调整垂直位置。按 l 或 r 按钮调整水平位置。
Image Reset (图像复位)
■
您可以将所有图像设置替换为出厂默认值。
TV Picture
Mode : Dynamic
Backlight 10
Contrast 100
Brightness 45
Sharpness 50
Auto Adjustment
Screen
Advanced Settings
Picture Options
Reset : OK
U
Move E Enter R Return
TV Screen
Coarse 50
Fine 26
PC Position
Image Reset
U
Move E Enter R Return
伴音
更改伴音设置
^
Mode (模式) → Standard (标准) / Music (音乐) / Movie (电影) /
❑
Clear Voice (清晰语音) / Custom (个人设定)
您还可以直接按遥控器上的S.MODE 按钮进行设置。
N
Standard (标准) 标准: 用于获得电视机的标准出厂设置。
●
Music (音乐): 用于观看音乐视频或音乐会。
●
Movie (电影): 用于观看电影。
●
Clear Voice (清晰语音): 用于观看以对话为主的节目。
●
Custom (个人设定): 用于调出您的个人设置。
●
Equalizer (均衡器)
❑
您的电视机有几项可供控制伴音质量的设置。
Balance L/R (左/右伴音平衡调整): 调整左/右扬声器的伴音平衡。
●
100Hz / 300Hz / 1KHz / 3KHz / 10KHz (带宽调整): 调整不同带宽频率的级别。
●
如果您进行任何更改这些设置,声音模式自动切换到Custom (个人设定)。
N
SRS TruSurround HD → OFF (关闭) / ON (开启)
❑
SRS TruSurround HD 是一种专利 SRS 技术,可解决通过两个扬声器播放 5.1 多声道内容的问题。TruSurround 通过任意双扬声器
回放系统(包括内部的电视扬声器)使您可以 体验强有力的虚拟环绕音响。它与所有多声道格式完全兼容。
TV Sound
Mode : Standard
Equalizer
SRS Trusurround HD : Off
Auto Volume : Off
Speaker Select : TV Speaker
Sound Select : Main
U
Move E Enter R Return
中文 - 16
Page 47

中文 - 17
Auto Volume (伴音自动控制) → OFF (关闭) / ON (开启)
❑
每个电视台都有自己的信号条件,如果每次更改频道都要调整音量,那就很麻烦。使用此功能,您可以自动调整所需频道的音量、
在调制信号强时,降低伴音输出,而在调制信号弱时,提高伴音输出。
Auto Volume (伴音自动控制)再分量和HDMI模式下无法启动。
N
Speaker Select (选择扬声器)
❑
当将它连接到家庭影院观看电视时,请关闭电视的扬声器,以便可以享受家庭影院(外置)扬声器的声音。
External Speaker (外部扬声器): 当选择扬声器设置为外部扬声器时,音量和Mute (静音)按钮将不起作用。
●
TV Speaker (电视扬声器): 用于启用内置电视扬声器。
●
当Speaker Select (选择扬声器)设置为External Speaker (外部扬声器)时,音量和静音按钮将不起作用。
N
如果您在Sound Select (伴音选择)菜单中选择External Speaker (外部扬声器),则声音设置将被限制。
N
电视内置扬声器 音频输出(左/右输出)至声音系统
RF / AV / Component (分量输入) / PC / HDMI RF / AV /Component (分量输入) / PC / HDMI
TV Speaker (电视扬声器) Sound Output (扬声器输出) Sound Output (伴音输出)
External Speaker
( 外部扬声器)
Sound Select (伴音选择) → Main (主画面) / Sub (副画面)
❑
PIP (画中画)功能启动时,您可以听到副画面(画中画)的伴音。
PIP (画中画)设置为 On (开启)时,可选择此选项。
N
按TOOLS (工具)按钮,显示Tools (工具)菜单。您也可通过选择Tools (工具)→PIP (画中画)→Sound Select (伴音选择)来设置副
画面的音效。
Mute (静音) Sound Output (伴音输出)
选择伴音模式
^
通过按立体声切换按钮可设置声 音模式。按立体声切换按钮后,屏幕上将显示当前的声音模式。
音频类型 双语 1 / 2 默认
A2 Stereo
(立体声)
NICAM
Stereo
(立体声)
如果立体声信号较弱,而且发生自动切换,请切换到Mono (单声道)模式。
N
本功能只在立体声模式下可以切换。Mono (单声道)模式不支持此功能。
N
此功能在电视模式中可用。
N
Mono (单声道) Mono (单声道)
Stereo (立体声)
Dual (双语)
Mono (单声道) Mono (单声道)
Stereo (立体声)
Dual (双语)
Stereo (立体声)
Dual 1 (双语 1)
Mono (单声道)
Mono (单声道)
Dual 2 (双语 2)
Mono (单声道)
Dual 2 (双语 2)
Stereo (立体声)
Dual 1 (双语 1)
自动更改
Dual 1 (双语 1)
自动更改
Dual 1 (双语 1)
Page 48

设置
配置设置菜单菜单
^
Language (语言)
❑
您可设置菜单语言。
Time (时间)
❑
Clock (时钟设定)
■
为使用电视机的各种定时功能,您需要先设置时钟。
每次按INFO (显示)按钮时,都会显示当前时间。
O
如果电源线连接断开,您必须重新设置时钟。
N
TV Setup
Plug & Play
Language : English
Time
Child Lock : On
Change PIN
Game Mode : Off
Melody : Off
Energy Saving : Off
PIP
U
Move E Enter R Return
按遥控器上的数字按钮来设置 month (月)、Day (日期)、Year (年)、Hour (小时)、
Minute (分钟)。
Sleep Timer (睡眠定时器)
■
预设时间过后,睡眠定时器将自动关闭电视机。→Off (关闭) / 30Minute (分钟) / 60Minute (分钟) / 90Minute (分钟) / 120Minute (分
钟)/150Minute (分钟)/ 180Minute (分钟)
按工具按钮显示TOOLS (工具)菜单。您还可选择Tools (工具)→Sleep Timer (睡眠定时器)→设置Sleep Timer (睡眠定时器)。
选择Off (关闭)可取消Sleep Timer (睡眠定时器)功能。
N
Timer 1 (定时器 1) / Timer 2 (定时器 2) / Timer 3 (定时器 3)
■
三个不同的定时器,可分别ON (开启) / Off (关闭)。
您必须先设置时钟。
On Time (定时开机时间)
●
选择 Hour (小时)、Minute (分钟)、am/pm (上午/下午)以及Activate (启用) / Inactivate (禁用) 。
(要以您满意的设置来激活定时器、请设置为启用。)
Off Time (定期关机时间)
●
选择Hour (小时)、Minute (分钟)、am/pm (上午/下午)以及Activate (启用) / Inactivate (禁用)。
(要以您满意的设置来激活定时器,请设置为启用。)
Reset (重复)
●
选择 Once (一次) 、Everyday (每天)、Mon~Fri(周一~周五)、Mon~Sat (周一~周六) 或 Sat~ Sun(周六~周日)。
Volume (音量)
●
选择所需的音量。
Programme (节目)
●
选择所需的频道。
您可以通过按遥控器上的数字按钮来设置日期、月份、年份、小时数和分钟数。
N
Auto Power off (自动关机)
N
将定时器设置为启动时,如果在开机后3小时内没有进行任何控制操作,电视机将关机。此功能只在定时器处于启动模式时
可用。此功能用于防止由于电视机开机时间过长(例如您外出度假时)可能出现的过热或漏电。
Child Lock (频道童锁) → OFF (关闭) / ON (开启)
❑
该功能可关闭视频和音频,防止未经授权的用户例如儿童观看不适宜的节目。
设置屏幕出现前,先出现密码输入屏幕。输入 4 位密码。
N
新电视机的默认密码为0-0-0-0。您可以选择项目中的Change PIN (更改密码)来修改密码。
N
您可以锁定频道列表中的一些频道。(请参阅第9页)
N
Child Lock (频道童锁)只在电视模式下可用。
N
Child Lock (频道童锁)打开后,当切换到童锁频道时,按数字键不能更换频道,只能按频道上下键或通过频道列表更换频道。
N
中文 - 18
Page 49

中文 - 19
Change PIN (改变密码)
❑
您可以修改对电视进行设置时所需的个人 ID 号码。
设置屏幕出现前,先出现密码输入屏幕。输入 4 位密码。
N
新电视机的默认密码为 0-0-0-0。
N
如果您忘记了密码,请按如下顺序按下遥控器按钮,将密码复位为 0-0-0-0: POWER (电源) (Off) (关闭), 静音→ 8 → 2 → 4
N
→ POWER (电源) On(开启)。
Game Mode (游戏模式) → OFF (关闭) / ON (开启)
❑
连接 PlayStation™ 或 Xbox™ 等游戏控制台时,您可以选择游戏菜单菜单,享受更真实的游戏体验。
游戏模式限制(注意)
N
如要断开游戏控制台并连接其他外部设备,需在设置项目中将Game Mode (游戏模式)设置为 off (关闭)。
–
在Game Mode (游戏模式)下显示电视项目时,画面会轻微摇晃。
–
Game Mode (游戏模式)在常规TV (电视)和 PC 模式下不可用。
N
打开 PIP (画中画)时,不能使用Game Mode (游戏模式)功能。
N
如果外部设备连接到电视时,画面质量很差,请检查Game Mode (游戏模式)是否设置为 On (开启)。Game Mode (游戏模式)设
N
置为 Off (关闭),再连接外部设备。
如果Game Mode (游戏模式)设置为开启:
N
图像模式自动变成Standard (标准),用户无法更改。
–
声音模式自动变成 Custom (个人设定),用户无法更改。使用均衡器调节声音。
–
声音复位功能将被激活。设置均衡器后,选择复位功能可将均衡器设置复位为出厂默认值。
N
Melody (开关机旋律) → Off (关闭) / Low (低) / Medium (中) / High (高)
❑
可设置电视机开机或关机时的音乐旋律。
不播放开关机旋律
N
按下Mute (静音)按钮后,TV(电视)将不会播开关机旋律。
–
如果已通过VOL(音量)– 按钮将音量调至最小,电视机将不会播放开关机旋律。
–
定时器将电视关闭时,TV(电视)机将不会播放开关机旋律。
–
Energy Saving (省电) → Off (关闭) / Low (低) / Medium (中) / High (高) / Auto (自动)
❑
本功能用于调节电视亮度以减少能耗。夜间看电视时,可将 Energy Saving (省电) 模式选项设置为High (高),以缓解眼部疲劳并减
少能耗。
按工具按钮显示TOOLS (工具)菜单。您还可选择Tools (工具)→Energy Saving (省电),设置Energy Saving (省电)选项。
PIP (画中画)
❑
有关设置选项的详细步骤, 请参阅第14页。
Page 50

输入
输入项目项目
^
Source List (节目源)
❑
用于选择TV (电视)或其他外部输入源, 如 DVD 蓝光播放器或连接到电视的有线电视盒 /
卫星接收器(机顶盒)等。用于选择您想要的输入源。
通过按遥控器上的Source (节目源)按钮,可以选择外部节目源。通过按遥控器上的
O
TV (电视)、数字(0~9)或P (频道) / 按钮可选择TV (电视)模式。
节目源包括: TV (电视) / AV / Component (分量输入) / PC / HDMI1(DVI) / HDMI2
■
Edit Name (名称编辑)
❑
VCD (录像机) / DVD / Cable STB (有线机顶盒) / Satellite STB (卫星机顶盒) / PVR
■
STB (机顶盒) / AV Receiver (接收器) / Game (游戏机) / Camcorder (摄像机) / PC / DVI
/ DVI PC / TV (电视) / IPTV (网络电视) / Blue-ray (蓝光) / HD (高清) DVD / DMA
您可以为连接到输入插孔的设备命名, 以便选择输入源。
当分辨率为 1920 x 1080@60Hz 的 PC 连接到 HDMI IN (输入)1(DVI) 端口时,您
N
应当在输入模式的Edit Name (名称编辑)中将HDMI1/DVI名称设置为 DVI PC。
在HDMI1/DVI模式下,当将HDMI1/DVI的Edit Name (名称编辑)为 DVI PC,
N
DVI时,扬声器将不会输出声音。
如果您将HDMI1/DVI的Edit Name (名称编辑)为PC,DVI PC,则此时Game Mode (游戏模式)将不能激活。
N
TV Input
Source List : TV
Edit Name
U
Move E Enter R Return
TV Source List
TV
AV : ---Component : ---PC : ---HDMI1/DVI : ---HDMI2 : ----
U
Move E Enter R Return
中文 - 20
Page 51

中文 - 21
使用建议
图文电视功能 (视型号而定)
^
大多数电视台通过图文电视提供文字信息服务。图文电视服务的索引页将为您提供有关如何使用该服务的信息。此外,您也可使用
遥控器按钮,根据自己的需要选择各种选项。
为了正确显示图文电视信息,频道接收必须稳定。否则,信息可能会丢失或有些页面可能无法显示。
N
1
0 (mode)(模式)
按此按钮可选择图文电视模式(LIST/FLOF(列表/FLOF))。如果在“列表
保存”模式下按此按钮,则会切换为 List(列表)保存模式。在“列表保
存”模式下,可使用8按钮将图文电视页面保存到列表中。
2
8 (store)(存储)
用于存储图文电视页面。
3
4 (size)(尺寸)
按此按钮可在屏幕的上半部显示放大字母。再次按此按钮,则可在屏幕的
下半部显示放大字母。
4
5 (reveal)(显示)
用于显示隐藏文本(例如问答比赛的答案)。要显示正常屏幕,请再次按
此按钮。
5
彩色按钮(红色/绿色/黄色/蓝色)
如果广播公司使用了 FASTEXT 系统,则图文电视页面所包含的不同主题
都标了颜色,按这些彩色按钮,便可选择主题。按与所需主题相对应的按
钮中的一个按钮。该页面与其他彩色信息一起显示,可以用同样方法选择
这些信息。要显示前一个或后一个页面,请按相应的彩色按钮。
6
/ (teletext on/mix)(图文电视打开/混合)
按此按钮,可在选择提供图文电视服务的频道后激活图文电视模式。再次
按此按钮,可将图文电视与当前播放节目的屏幕相重叠。
7
(exit)
图文电视退出(视型号而定)。
8
1 (sub-page)(子页面)
用于显示可用的子页面。
9
2 (page up)(向上翻页)
用于显示下一个图文电视页面。
0
3 (page down)(向下翻页)
用于显示上一个图文电视页面。
!
9 (hold)(保持)
用于在所选页面与多个在其后自动出现的二级页面相链接时,保持所给出
页面上的显示内容。要恢复,请再次按此按钮。
@
6 (index)(索引)
用于在查看图文电视时,随时显示索引(内容)页面。
#
7 (cancel)(取消)
用于在搜索页面时显示播放的节目。
可通过按遥控器上的数字按钮,更改图文电视页面。
N
用于显示上一个图文电视页面。
Page 52

图文电视页面按照六大类组织:
N
类别 目录
A
B
C
D
E
F
图文电视信息经常被分为多个按顺序显示的页面、
N
可以通过下列方法访问这些页面:
输入页码
–
选择列表中的一个标题
–
选择一个彩色标头(FASTEXT 系统)
–
按 TV 按钮、退出图文电视显示。
N
安装支架
^
安装前: 将引导支架和连接架安装到支架上并用螺钉进行固定。仅适用于 32 英寸机型。
N
选定的页码。
电视台名称。
当前页码或搜索指示。
日期和时间。
文本。
状态信息。
FASTEXT 信息
后面
前面
1. 将液晶电视安装到支架上。
应至少由两人搬动电视。
N
组装时,请确保分清支架的前后方向。
N
为确保电视安装在支架上的高度适合,请勿在电视右侧的左上角用力向下压。
N
2. 拧紧 1 处的两颗螺钉,再拧紧 2 处的两颗螺钉。
使产品竖立并拧紧螺钉。如果在液晶电视平放时拧紧螺钉,可能导致电视向一边倾斜。
N
安装的支架适用于屏幕尺寸为 37 英寸或以上的型号。
N
拆除支架
^
1. 拧下电视机背面的四个螺钉。
2. 拆下电视机上的支架。
应至少由两人搬动电视。
N
3. 用盖子盖住底孔。
中文 - 22
Page 53

中文 - 23
安装墙托架套件
^
视产品型号而定,可能不会随附支架和支架螺钉。墙托架套件(单独销售)让您可以将电视机安装
在墙壁上。有关进行墙托架套件的详细信息,请参阅随墙托架套件提供的说明。安装墙托架时请与
技术人员联系,请求其协助。如果您选择自行安装电视机,并因此对产品造成任何损害或对您本人
或他人造成任何人身伤害,三星电子概不承担任何责任。
请勿在电视启动状态下安装墙托架套件。否则可能会引发触电造成人身伤害。
卸下支架,并用座盖盖住底部的孔并用螺钉固定。
N
Kensington 防盗锁
^
Kensington 防盗锁是一种公共场合固定电视设备的工具。装置的外形和锁定方法可能与图中
所示不同。请参阅 Kensinton 防盗锁随附的手册,以便正确使用该产品。
请参阅 Kensington 防盗锁说明书,以便正确使用。
N
Kensington 锁的位置可能随其型号而有所不同。
N
1. 将锁定装置插入液晶电视的 Kensington 锁孔 (1) 然后朝锁定方向旋转 (2)。
2. 连接 Kensington 防盗锁的钢缆 (3)。
3. 将 Kensington 防盗锁与一张桌子或固定 重物固定在一起。
3
2
1
Page 54

将电视固定到墙上
^
注意:推拉电视或爬到电视上可能导致电视坠落。请特别注意不要让儿童爬到电视上或摇晃电视,否则电视可能翻
倒,造成严重人身伤害,甚至死亡。请遵循随附的“安全单”中的安全注意事项。为增加电视的稳定性,使电视更
加安全,请按以下方法安装防坠落装置。
要避免电视坠落 :
■
1. 将螺丝钉穿过固定夹,然后将其牢牢地固定到墙上。确保将螺丝钉紧紧地拧进墙中。
根据墙的类型,您可能需要使用其他材料(例如固定物)。
N
所需的固定夹、螺丝钉和绳子都不是随附物品,请另行购买。
N
2. 将螺丝钉从电视背面的中央部位取出,放进固定夹,然后重新拧到电视上。
产品可能未随附螺丝钉。在这种情况下,请另行购买以下规格的螺丝钉。
N
螺钉规格。
N
M4 X 15:适用于17英寸到29英寸LCD TVX 15:适用于17英寸到29英寸LCD TV15:适用于17英寸到29英寸LCD TV
–
M6 X 15:适用于32英寸到40英寸LCD TV
–
3. 通过牢固的绳子将安装在电视上的固定夹与安装在墙上的固定夹连接起来,并系紧。
请将电视安装在靠近墙的位置,这样电视不会向后翻倒。
N
连接绳子时,安装在墙上的固定夹应与安装在电视上的固定夹同高或略低,以确
N
保安全。
移动电视时,请先解开绳子。
N
4. 确保所有连接都足够牢固。请定期检查各处连接是否存在老化迹象。如果对连接的牢固
性存在疑虑,请联系专业安装人员。
墙壁
墙壁
中文 - 24
Page 55

中文 - 25
故障诊断: 与维修人员联系之前
^
与维修人员联系之前
N
故障现象 可能解决方案
检查电视机的电源线是否与墙壁电源插座连接。
无伴音或图像
图像正常,但无伴音
出现黑屏,电源指示灯不断闪烁
无图像,或者是黑白图像
伴音和图像干扰
图像模糊或者出现雪花点,
伴音失真
遥控器发生故障
出现"Check Signal Cable (检测信
号)"菜单信息
在 PC 模式中,屏幕会显示
"Not Supported Mode(设置无
效)" 消息
受损的画面将显示在屏幕一角
出现"Resets all settings to the
default values(所有设置恢复为默
认值)"的消息
当您在近处观察电视屏幕外框的
边缘时,可能会看到一些小微粒
检查是否按下了电视机侧面板上的电源按钮。
检查图像的对比度和亮度设置。
检查音量。
检查音量。
检查是否按了遥控器上的MUTE (静音) 按钮。
检查Speaker Select (选择扬声器)的设置。
在电脑上检查电源、信号线。
TV (电视)正在使用其电源管理系统。电视)正在使用其电源管理系统。
将电脑鼠标移动一下或者在键盘上按任意键。
调整色度设置。
检查所选的广播系统是否正确。
看看有什么电器对电视造成了干扰,将该电器挪开。
换一个电源插座来插电视机的电源线。
检查天线的方向、位置和连接。
这种干扰经常是由于使用室内天线引起的。
给遥控器更换电池。
擦拭遥控器的上端(发送窗口)。
检查电池的接线端。
检查信号电缆与 PC 或视频信号源的连接是否稳固。
检查 PC 或视频信号源是否已经打开。
检查视频适配器的最大分辨率和频率。
将这些数值与显示模式中的数据进行对比。
如果连接某些外部设备时选择了适合屏幕,则受损的画面可能会显示在屏幕的一角。
此故障现象为外部设备而非TV (电视)所致。
长按EXIT (退出)按钮一段时间后会出现此消息。产品设置会恢复为出厂默认值。
这是由产品设计原因造成的,并非产品瑕疵。
TFT 液晶显示面板所使用的面板由 (3,133,440) 个子像素组成,需要先进的技术才能生产出来。
N
但屏幕上可能会有一些过于明亮或黑暗的像素。这些像素不会影响产品的性能。
Page 56

^
技术规格
型号名称 LA22B360 LA26B360 LA32B360
可视图像尺寸
(对角线) 22 英寸 对角线 26 英寸 对角线 32 英寸 对角线
PC 分辨率
(最优) 1360 x 768 @ 60Hz 1360 x 768 @ 60Hz 1360 x 768 @ 60Hz
伴音最大输出
(输出) 3W X 2 5W X 2 10W X 2
尺寸(宽x高x深)
不带支架
带支座
质量
带支座 7 kg 8 kg 11 kg
环境条件
运行温度
运行湿度
贮存温度
贮存湿度
支架旋转
(左 / 右) 0˚ -20˚ ~ 20˚
型号名称 LA26B350 LA32B350
可视图像尺寸
(对角线) 26 英寸 对角线 32 英寸 对角线
PC 分辨率
(最优) 1360 x 768 @ 60Hz 1360 x 768 @ 60Hz
伴音最大输出
(输出) 5W X 2 10W X 2
尺寸(宽x高x深)
不带支架
带支座
质量
带支座 8 kg 11 kg
环境条件
运行温度
运行湿度
贮存温度
贮存湿度
支架旋转
(左 / 右) 0˚ -20˚ ~ 20˚
558 x 384 x 75 mm
558 x 437 x 216 mm
670 x 455 x 75 mm
670 x 495 x 216 mm
670 x 455 x 75 mm
670 x 495 x 216 mm
10°C 到 40°C (50°F 到 104°F)
10% 到 80%, 非凝结
-20°C 到 45°C (-4°F 到 113°F)
5% 到 95%, 非凝结
10°C 到 40°C (50°F 到 104°F)
10% 到 80%, 非凝结
-20°C 到 45°C (-4°F 到 113°F)
5% 到 95%, 非凝结
798 x 531 x 81 mm
798 x 577 x 252 mm
798 x 531 x 81 mm
798 x 577 x 252 mm
设计及规格如有改变,恕不另行通知。
N
本设备为 B 类数字仪器。
N
有关电源信息,请参阅产品上所附的标签。
N
中文 - 26
Page 57

三星全球服务网
如果您对三星产品有任何咨询或建议 , 请联系三星客服中心。
400-810-5858( 收费 ), 010-6475 1880
www.samsung.com/cn
天津通广三星电子有限公司
地址 : 天津市西青区微电子工业区
电话 : 022-23961234
邮政编码 : 300385
BN68-02101G-01
 Loading...