

Samsung LA22D400E User Manual

LCD TV
user manual
imagine the possibilities
Thank you for purchasing this Samsung
product. To receive more complete service,
please register your product at
www.samsung.com/register
Model Serial No.
Contact SAMSUNG WORLDWIDE
If you have any questions or comments relating to Samsung products, please contact the SAMSUNG customer care centre.
Country Customer Care Centre Web Site
AUSTRALIA 1300 362 603 www.samsung.com
NEW ZEALAND 0800 SAMSUNG (0800 726 786) www.samsung.com
CHINA 400-810-5858 www.samsung.com
HONG KONG (852) 3698-4698 www.samsung.com/hk
INDIA
3030 8282
1800 3000 8282
www.samsung.com
INDONESIA
0800-112-8888
021-5699-7777
www.samsung.com
JAPAN 0120-327-527 www.samsung.com
MALAYSIA 1800-88-9999 www.samsung.com
PHILIPPINES
1-800-10-SAMSUNG(726-7864)
1-800-3-SAMSUNG(726-7864)
1-800-8-SAMSUNG(726-7864)
02-5805777
www.samsung.com
SINGAPORE 1800-SAMSUNG(726-7864) www.samsung.com
THAILAND
1800-29-3232
02-689-3232
www.samsung.com
TAIWAN 0800-329-999 www.samsung.com
VIETNAM 1 800 588 889 www.samsung.com
LCD TV
user manual
© 2011 Samsung Electronics Co., Ltd. All rights reserved.
BN68-03417A-00
[LD400-ASIA]BN68-03417A-Eng.indb 1 2011-03-04 �� 6:13:45

2
English
Figures and illustrations in this User Manual are provided for reference only and may differ from actual product appearance.
Product design and specifications may be changed without notice.
Still image warning
Avoid displaying still images (like jpeg picture files) or still image element (like TV programme logo, panorama or 4:3 image format, stock or news bar at
screen bottom etc.) on the screen. Constant displaying of still picture can cause ghosting of LCD screen, which will affect image quality. To reduce risk of
this effect, please follow below recommendations:
• Avoid displaying the same TV channel for long periods.
• Always try to display any image on full screen, use TV set picture format menu for best possible match.
• Reduce brightness and contrast values to minimum required to achieve desired picture quality, exceeded values may speed up the burnout process.
• Frequently use all TV features designed to reduce image retention and screen burnout, refer to proper user manual section for details.
Securing the Installation Space
Keep the required distances between the product and other objects (e.g. walls) to ensure proper ventilation.
Failing to do so may result in fire or a problem with the product due to an increase in the internal temperature of the product.
✎
When using a stand or wall-mount, use parts provided by Samsung Electronics only.
x
If you use parts provided by another manufacturer, it may result in a problem with the product or an injury due to the product falling.
✎
The appearance may differ depending on the product.
✎
Be careful when you contact the TV because some parts can be somewhat hot.
Installation with a stand. Installation with a wall-mount.
10 cm
10 cm
10 cm
10 cm
10 cm
10 cm
10 cm

3
English
Contents
Getting Started
4
4 Accessories
4 Viewing the Control Panel
5 Viewing the Remote Control
6 Connecting to an Antenna
6 Plug & Play (Initial Setup)
Connections
7
7 Connecting to an AV Device
8 Connecting to an Audio Device
9 Changing the Input Source
Basic Features
9
9 How to Navigate Menus
9 Channel Menu
10 Picture Menu
12 Sound Menu
12 Setup Menu
Advanced Features
14
14 Connecting to a PC
16 Media Play
Other Information
20
20 Analogue Channel Teletext Feature
21 Installing the Wall Mount
22 Anti-Theft Kensington Lock
22 Securing the TV to the Wall
23 Troubleshooting
26 Specifications
27 Index
Check the Symbol!
t
This function can be used by
pressing the TOOLS button on the
remote control.
Note One-touch button
P.SIZE

4
Getting Started
English
Accessories
✎
Please make sure the following items are included with your LCD TV. If any items are missing, contact your dealer.
✎
The items’ colours and shapes may vary depending on the models.
y Remote Control & Batteries (AAA x 2)
y Owner’s Instructions
y Warranty Card / Safety Guide (Not available in some locations)
y Cleaning Cloth
y Power Cord
✎
For more detailed information, please refer to stand guide.
M4 X L16
▪
Stand Screws
(3EA)
Viewing the Control Panel
✎
The product colour and shape may vary depending on the model.
P
(Power)
Turns the TV on or off.
Power Indicator Blinks and turns off when the power is on and lights up in standby mode.
SOURCE
E
Toggles between all the available input sources. In the on-screen menu, use this
button as you would use the ENTERE button on the remote control.
MENU Displays an on-screen menu, the OSD (on screen display), of your TV’s features.
- VOL +
Adjusts the volume. In the OSD, use the - VOL + buttons as you would use the
◄ and ► buttons on the remote control.
z
Changes the channels. In the OSD, use the
z
buttons as you would use the
▼ and ▲ buttons on the remote control.
Remote control sensor Aim the remote control towards this spot on the TV.
Standby mode
Do not leave your TV in standby mode for long periods of time (when you are away on a holiday, for example). A small amount
of electric power is still consumed even when the power button is turned off. It is best to unplug the power cord.
Getting Started
Speakers
Control Panel
5
01 Getting Started
English
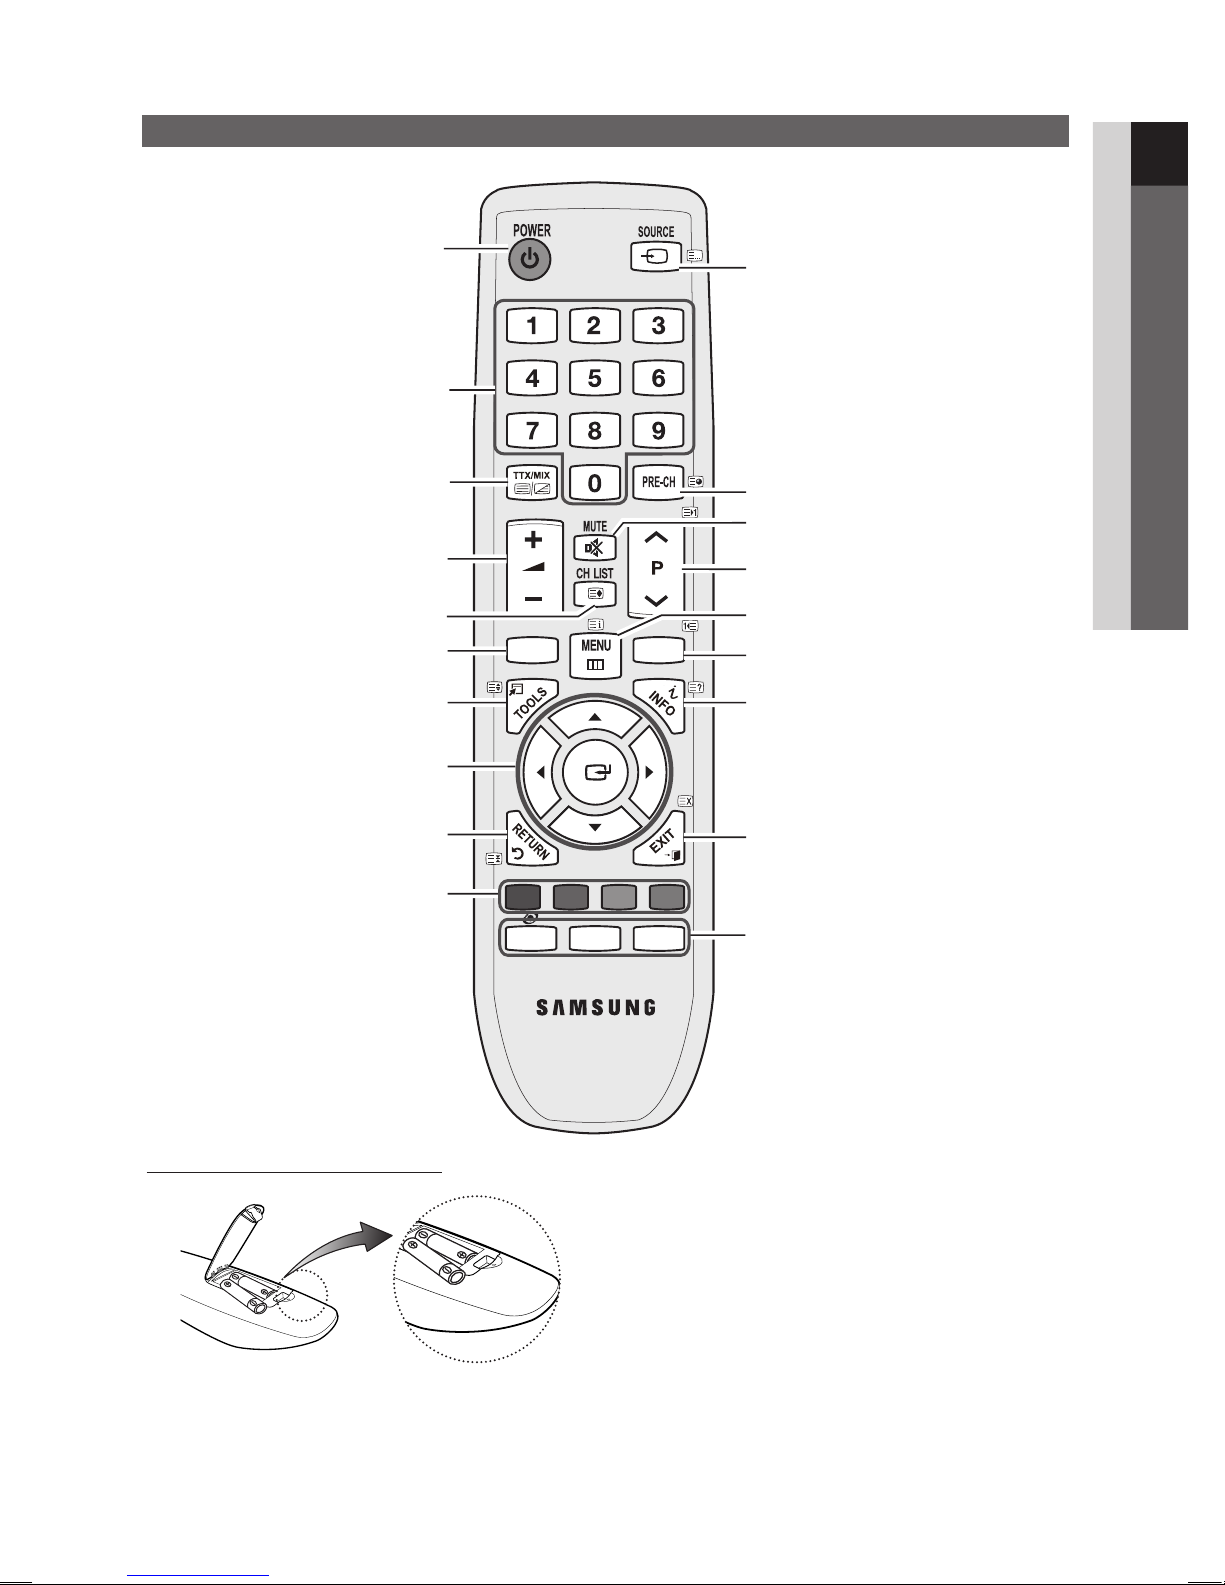
Viewing the Remote Control
Installing batteries (Battery size: AAA)
✎
NOTE
x
Use the remote control within 23 feet from the TV.
x
Bright light may affect the performance of the remote
control. Avoid using nearby special fluorescent light or
neon signs.
x
The colour and shape may vary depending on the
model.
MEDIA.P
HDMI
A B C D
SRS P.SIZE P.MODE
Displays and selects the available video sources.
(P. 9)
Turns the TV on and off.
Have direct access to channels.
Alternately select Teletext ON / Double / Mix
/ OFF.
Selects the HDMI mode directly.
Changes channels.
Quickly selects frequently used functions.
Displays information on the TV screen.
Displays the main on-screen menu. (P. 9)
Adjusts the volume.
Returns to the previous channel.
Buttons in the Media Play menu, etc.
Cut off the sound temporarily.
Returns to the previous menu. (P. 9)
Selects on-screen menu items and changes
menu values.
Exit the menu. (P. 9)
SRS : Turns the SRS TruSurround on and off. (P. 12)
P.SIZE : Choose the picture size. (P. 11)
P.MODE : Selects the Picture Mode. (P. 10)
Views the Media Play. (P. 16)
Displays channel list on the screen. (P. 9)

6
Getting Started
English
Connecting to an Antenna
When the TV is initially powered on, basic settings proceed automatically.
✎
Preset: Connecting the mains and antenna.
Plug & Play (Initial Setup)
When the TV is initially powered on, a sequence of on-screen prompts will assist in configuring basic settings.
Press the POWERP button. Plug & Play is available only when the Source is set to TV.
1
Selecting a language
Press the ▲ or ▼ button, then press the ENTERE button.
Select the desired OSD (On Screen Display) language.
HDMI
P
POWER
2
Selecting Store Demo
or Home Use
Press the ◄ or ► button, then press the ENTERE button.
y Select the Home Use mode. Store Demo Mode is for retail
environments.
y Return the unit’s settings from Store Demo to Home Use
(standard): Press the volume button on the TV. When the OSD
volume is displayed, press and hold MENU for 5 sec.
3
Selecting an area.
Press the ▲ or ▼ button, then press the ENTERE button.
Select the appropriate area.
4
Selecting a channel
Press the ENTERE button, then the channel search will start automatically.
For more information, refer to Channel → Auto Store. (P. 10)
✎
Press the ENTERE button at any time to interrupt the memorisation process.
5
Setting the clock
Press the ◄ or ► button to select Month, Day, Year, Hour, Minute or am/pm.
Set these by pressing the ▲ or ▼ button.
Cable
ANT OUT
VHF/UHF Antenna
or
TV Rear Panel
or
Power Input

7
English
02 Connections
Connecting to an AV Device
Using an HDMI / DVI Cable: HD connection (up to 1080p)
Available devices: DVD / Blu-ray player / HD Cable Box / HD Satellite receiver (STB) / Cable Box / Satellite receiver (STB)
Using a Component Cable: (up to 1080p) / Using an Audio/Video: (480i only)
Available devices: VCR / DVD / Blu-ray player / Cable Box / Satellite receiver
✎
HDMI (DVI) IN / PC/DVI AUDIO IN
x
For better picture and audio quality, connect to a digital device using an HDMI cable.
x
An HDMI cable supports digital video and audio signals, and does not require an audio cable.
– To connect the TV to a digital device that does not support HDMI output, use an HDMI/DVI and audio cables.
x
The picture may not display normally (if at all) or the audio may not work if an external device that uses an older
version of HDMI mode is connected to the TV. If such a problem occurs, ask the manufacturer of the external
device about the HDMI version and, if out of date, request an upgrade.
x
Be sure to purchase a certified HDMI cable. Otherwise, the picture may not display or a connection error may occur.
x
A basic high-speed HDMI cable or one with ethernet is recommended. This product does not support the
ethernet function via HDMI.
W
R
DVD
R-AUDIO-L
P
R PB Y
AUDIO OUT
DVI OUT
HDMI OUT
W W
BGRR
Red White
W
R
W
B
Y
Y
Y
R
R
G W R
WR
B
R
G
B
P
R PB Y
COMPONENT OUT
R-AUDIO-L
P
R PB Y
AUDIO OUT
Blu-ray player
VIDEO OUT
VCR
R-AUDIO-L
P
R PB Y
AUDIO OUT
✎
When connecting to AV IN, the colour of
the AV IN [Y/VIDEO] jack (Green) does not
match the colour of the video cable (Yellow).
✎
To obtain the best picture quality, the
Component connection is recommended
over the A/V connection.
W W
BGRRWY
Yellow Red White Red Blue Green
Connections
8
English
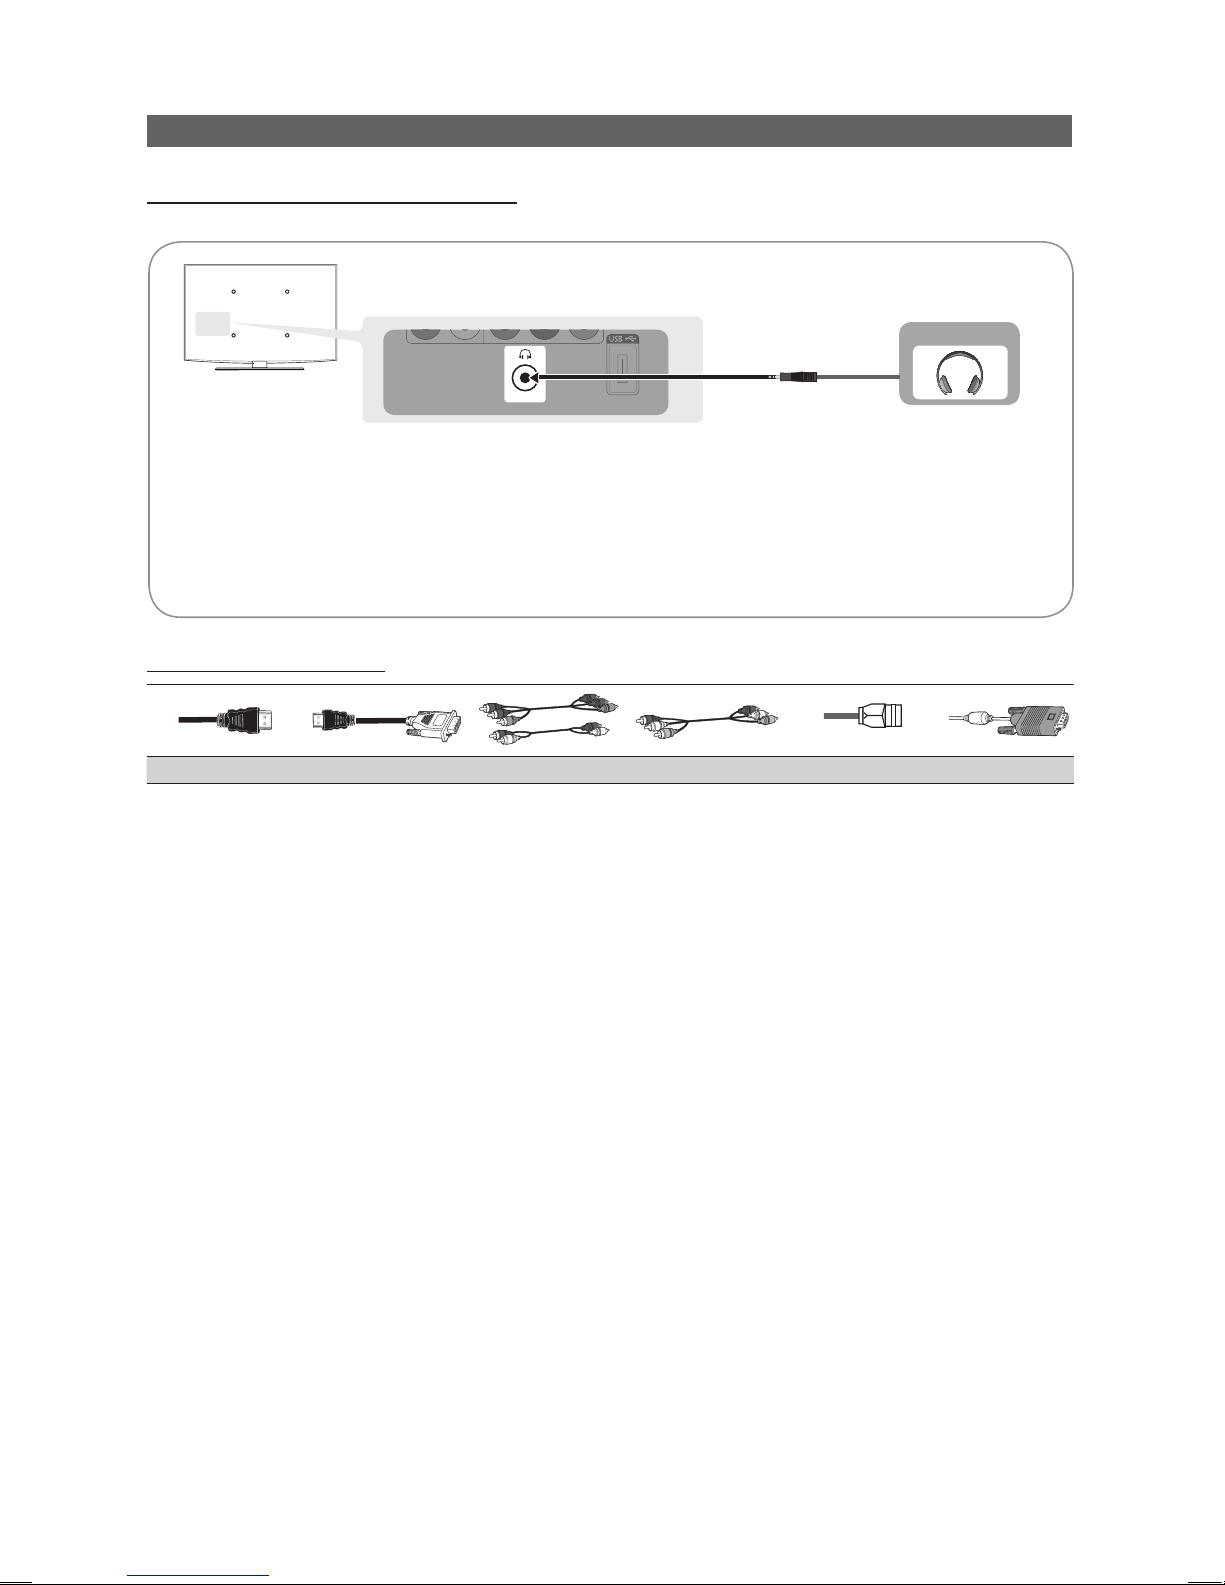
Connections
Connecting to an Audio Device
Using Audio Cable (Analogue) Connection
Available devices: amplifier, DVD home theatre.
Input Cables (Sold Separately)
HDMI HDMI-DVI Component Composite (AV) Coaxial (RF) VGA
Headphone
✎
Headphones H: You can connect your headphones to the headphones output on your set. While the
headphones are connected, the sound from the built-in speakers will be disabled.
x
Sound function may be restricted when connecting headphones to the TV.
x
Headphone volume and TV volume are adjusted separately.

9
English
03 Basic Features
How to Navigate Menus
Before using the TV, follow the steps below to learn how to
navigate the menu and select and adjust different functions.
1 MENU button: Displays the main on-screen menu.
2 E(Enter) / Direction button: Move the cursor and select
an item. Confirm the setting.
3 RETURN button: Returns to the previous menu.
4 EXIT button: Exits the on-screen menu.
How to Operate the OSD (On Screen Display)
The access step may differ depending on the selected menu.
1
MENU
m
The main menu options appears on the
screen:
Picture, Sound, Channel, Setup, Input
.
2
▲ / ▼
Select an icon with the ▲ or ▼ button.
3
ENTER
E
Press ENTERE to access the submenu.
4
▲ / ▼
Select the desired submenu with the ▲
or ▼ button.
5
ENTER
E
Press ENTERE to access the submenu.
6
▲ / ▼
Adjust the value of an item with the ▲
or ▼ button. The adjustment in the OSD
tmenu.
7
ENTER
E
Press ENTERE to complete the
configuration.
8
EXIT
e
Press EXIT.
Channel Menu
Channel List
O
MENUm → Channel → Channel List → ENTER
E
Using the Channel List, you can conveniently
add/delete or lock/unlock channels.
Channel List
P 2 C 46
1 / 10
0 C45
1 C46
2 C47
3 C48
4 C49
5 C50
6 C51
7 C52
8 C53
9 C54
\ Lock
# \
c
c
c \
c
c
c
# Add
Move
E Enter
P
Page
R Return
Prog.
Adding / Deleting channels
You can add or delete channels.
Move to the (#) field by pressing the ▲ / ▼ buttons, select
a channel to be added, and press the ENTERE button to
add the channel.
✎
If you press the ENTERE button again, the (c)
symbol next to the channel disappears and the
channel is not added.
Locking / Unlocking channels
This feature allows you to prevent unauthorized users, such
as children, from watching. unsuitable programmes by
muting out video and audio.
Move to the (\) field by pressing the ▲ / ▼ buttons, select a
channel to be locked, and press the
ENTERE button.
✎
This function is available only when the Child Lock is
set to On.
✎
The PIN number input screen appears. Enter your 4
digit PIN number.
P.SIZE
HDMI
P.MODE
CH LIST
SLEEP
Connections
Changing the Input Source
Source List
O
MENUm → Input → Source List → ENTER
E
Use to select TV or other external input sources
such as DVD / Blu-ray players / cable box /
STB satellite receiver connected to the TV.
■ TV / AV / Component / PC / HDMI/
DVI
✎
In the Source List, connected
inputs will be highlighted.
✎
PC always stay activated.
Edit Name
O
MENUm → Input → Edit Name → ENTER
E
■ VCR / DVD / Cable STB / Satellite STB / PVR STB
/ AV Receiver / Game / Camcorder / PC / DVI PC /
DVI / TV / IPTV / Blu-ray / HD DVD / DMA: Name the
device connected to the input jacks to make your input
source selection easier.
✎
When connecting an HDMI/DVI cable to the HDMI
(DVI) IN port, you should set to DVI PC or DVI
mode under Edit Name.
Basic Features
EDIA.
HDMI
4
1
2
3
P.SIZE
HDMI
 Loading...