

Page 1

SAMSUNG
Enterprise IP Solutions
OfficeServ
User Guide
for
5000D Series Phones
ITP-5021D
ITP-5014D
DS-5021D
DS-5014D
Page 2

Publication Information
Samsung Telecoms reserves the right without prior notice to revise information in this publication for any reason.
Samsung Telecoms also reserves the right without prior notice to
make changes in design or components of equi pment as engineering and manufacturing may warrant.
Disclaimer
Samsung Telecoms is not responsible for errors or problems
arising from customers not installing, programming or operating
their Samsung systems as described in this manual.
Copyright 2004
Samsung Telecoms (UK) Limited
All rights reserved. No part of this manual may be reproduced in
any form or by any means – graphic, electronic or mechanical,
including recording, taping, photocopy or information retrieval
system – without express written permission of the publisher of
this mat erial.
Part No.: 18933 Version 1.0
Page 3

EU Declaration of Conformity (RTTE)
Samsung Electronics Co., Ltd.
259 Gongdan-Dong, Gumi-City Kyungbuk, Korea, 730-030
(factory name, address)
declare under our sole responsibility that the product
Digital Keyphone System "iDCS500 / OfficeServ500"
to which this declaration relates is in conformity with
RTTE Directive 1999/5/EC ( Annex II )
Low Voltage Directive 73/23/EEC
EMC Directive 89/336/EEC:92/31/EEC
By application of the following standards
.........................................................................................
RTTE : TBR4: November 1995 incorporating TBR4/A1: December 1997
.........................................................................................
LVD: EN60950: 2000 (IEC 60950, Third Edition, 1999)
.........................................................................................
EMC: EN55022 : 1998, EN61000-3-2:1995 Inc A1/A2:1998 + A14:2000*,
.........................................................................................
.........................................................................................
EN61000-3-3:1995, EN61000-4-2:1995 98, EN61000-4-3:1996,
.........................................................................................
EN61000-4-4:1995, EN61000-4-5:1995, EN61000-4-6:1996,
.........................................................................................
EN61000-4-11:1994, AS/NZS3548:1995
(Manufacturer)
Samsung Electronics Co., Ltd
259, Gongdan-Dong, Gumi-City
Kyungbuk, Korea, 730-030
2003-05-19
................................................. .................................................................................
(place and date of issue) (name and signature of authorized person)
(Representative in the EU)
Samsung Electronics Euro QA Lab.
Blackbushe Business Park
Saxony Way, Yateley, Hampshire
GU46 6GG, UK
TE Jang
Tae-eok Jang / General Manager
2003-05-18
................................................. ...............................................................................
(place and date of issue) (name and signature of authorized person)
IS Lee
In-Seop Lee / Manager
Page 4

ABOUT THIS GUIDE
This User Guide provides instructions for installing and operating the following
Samsung telephones with the Samsung Enterprise IP Solutions OfficeServ system.
• ITP-5000D Series IP phones (ITP-5021D and ITP-5014D 2-line LCD IP
phones)
• DS-5000D Series phones (DS-5021D and DS-5014D 2-line LCD digital
phones)
Please take the time to read this guide to familiarise yourself with the features of
your phone. Keep the guide handy: you may need to look up instructions for
infrequently used features.
SAFETY PRECAUTIONS
i
For your safety and to ensure correct operation of your phone, note carefully the
following important precautions before you begin the installation.
Avoid placing objects containing water near the phone.
Do not put objects that contain water such as vases, cups, cosmetics, and medicines near the
phone. Moisture in the phone may cause fire and electric shocks.
Do not install the phone in the following locations:
- Direct sunlight or near a heater
- Humid areas or where water flows
- Areas of extreme or volatile changes in temperature.
- Dusty or dirty areas
Use a soft dry cloth to clean the phone.
Do not use chemical solvents such as wax, benzene, alcohol, thinner, aerosol, lubricant, or
detergent to clean your phone.
Page 5

ii
Introduction
Do not disassemble or attempt to repair the phone yourself.
If a repair is needed, please contact your authorised Samsung dealer.
Also, if installing an ITP-5000D Series phone:
Take care not to connect the network LAN cable to the PC connection jack.
If the LAN cable connected to the network is connected to the PC connection jack, both telephone
and PC communications will be disabled.
Use the AC power adapter supplied with the phone.
If an alternative power adapter is used, this may result in serious damage and voids the warranty.
Do not turn off power to the phone while upgrading the Bootrom.
If you turn off power to the phone during the upgrade process, the phone will not function correctly.
If any items are missing or damaged when you open the phone packaging, contact your
authorised Samsung dealer for advice.
.
Page 6

iii
Contents
Chapter 1 Installing Your ITP- or DS-5000D Series Phone ................................. 1-1
ITP-5000D Series IP Phone ................................................................................................. 1-1
Checking the Supplied Components..............................................................................1-1
Connectors on the IP Phone.......................................................................................... 1-2
Installing the IP Phone ...................................................................................................1-2
DS-5000D Series Digital Phone .......................................................................................... 1-6
Checking the Supplied Components..............................................................................1-6
Installing the Phone........................................................................................................1-7
Chapter 2 Setting the Working Environment for ITP-5000D
Series IP Phones .................................................................................. 2-1
Overview of Environment Settings Mode .........................................................................2-1
Starting the Phone............................................................................................................... 2-2
Setting Parameters..............................................................................................................2-3
Verifying Settings and Rebooting......................................................................................2-7
Chapter 3 Things You Should Know ..................................................................... 3-1
Front Panel of Phone...........................................................................................................3-1
Dial (Keypad) Buttons .....................................................................................................3-3
Programmable Buttons ...................................................................................................3-3
Volume Buttons ............................................................................................................ 3-4
Redial Button ..................................................................................................................3-4
Conference Button ..........................................................................................................3-4
Transfer Button ...............................................................................................................3-4
Hold Button .....................................................................................................................3-4
Speaker Button ...............................................................................................................3-4
Navigation Buttons..........................................................................................................3-5
LCD Panel.......................................................................................................................3-6
Scroll Button....................................................................................................................3-6
Soft Buttons.....................................................................................................................3-6
Microphone .....................................................................................................................3-7
Phone Status Indicator ...................................................................................................3-7
Page 7

iv
Contents
Chapter 4 Basic Features .......................................................................................4-1
Button LEDs ..........................................................................................................................4-1
Phone Status Indicator.........................................................................................................4-1
Using Feature Codes............................................................................................................4-2
Selecting Programmed Functions ......................................................................................4-2
Assigning Button Values (Extenders) ................................................................................4-3
Controlling Volume Levels...................................................................................................4-4
Handset Volume..............................................................................................................4-5
Speakerphone Volume....................................................................................................4-5
Ringer Volume ................................................................................................................4-6
Selecting the Ring Tone .......................................................................................................4-6
Changing the Phone Passcode...........................................................................................4-7
Setting the Answering Mode for Intercom Calls................................................................4-8
Switching Headset/Handset Mode....................................................................................4-10
Enabling/Disabling Key Confirmation Tone.....................................................................4-11
Hot Keypad..........................................................................................................................4-12
Dialling by Directory Name................................................................................................4-13
Assigning/Changing Your Extension Name.....................................................................4-14
Making Intercom Calls .......................................................................................................4-15
Calling an Extension Number .......................................................................................4-15
Busy Extension Callback ..............................................................................................4-16
Busy Extension Camp-On.............................................................................................4-17
Calling Your System Operator.......................................................................................4-17
Answering Intercom Calls .................................................................................................4-18
Answering Intercom Calls in Ring Mode.......................................................................4-18
Answering Intercom Calls in Voice Announce Mode ....................................................4-18
Answering Intercom Calls in Automatic Answer Mode .................................................4-19
Making Outside Calls .........................................................................................................4-20
Calling Outside Lines (Overview)..................................................................................4-20
Authorisation Codes and Account Codes .....................................................................4-20
Calling Outside Lines Using the Handset .....................................................................4-21
Calling Outside Lines Using the Speakerphone ...........................................................4-22
Making a New Call Without Releasing the Line (Recall Dial Tone) ..............................4-22
Busy Line Queuing With Callback ................................................................................4-23
Cancelling a Callback ...................................................................................................4-24
Answering Outside Calls ...................................................................................................4-25
Universal Answer ..........................................................................................................4-25
Page 8

v
Holding a Call......................................................................................................................4-25
System Hold..................................................................................................................4-26
Automatic Hold..............................................................................................................4-26
Exclusive Hold ..............................................................................................................4-28
Consultation Hold..........................................................................................................4-29
Hold Recall....................................................................................................................4-30
Retrieving Calls Held at Another Extension..................................................................4-30
Parking Calls .......................................................................................................................4-31
Transferring Calls...............................................................................................................4-32
Transfer With Camp-On................................................................................................4-33
Transfer To Voice Mail...................................................................................................4-33
Call Waiting...................................................................................................................4-34
Chapter 5 Program Menus...................................................................................... 5-1
Navigation Buttons...............................................................................................................5-1
Menu Button....................................................................................................................5-1
Send Button ....................................................................................................................5-1
End Button ......................................................................................................................5-2
Cancel Button .................................................................................................................5-2
Enter Button ....................................................................................................................5-2
Direction (Arrow) Buttons................................................................................................5-2
Main Menu .............................................................................................................................5-3
How to Select Menu Items..............................................................................................5-3
Viewing and Redialling Recently Called Numbers............................................................5-4
Viewing and Calling Recently Received Numbers............................................................5-5
Viewing and Calling Personal Speed Dial Numbers .........................................................5-5
Viewing and Calling System Speed Dial Numbers............................................................5-6
Viewing and Calling Personal Speed Dial Numbers By Name.........................................5-7
Viewing and Calling System Speed Dial Numbers By Name ...........................................5-8
Viewing and Calling Extension Numbers by Name...........................................................5-9
Setting Call Forward Type and Destination .....................................................................5-10
Setting Reminder Alarms...................................................................................................5-12
Page 9

vi
Contents
Chapter 6 Dialling Features .................................................................................... 6-1
Speed Dialling .......................................................................................................................6-1
Redial an Outside Number...................................................................................................6-7
Automatic Redial/Retry ........................................................................................................6-8
Pulse to Tone Changeover ..................................................................................................6-8
Conference Calls ..................................................................................................................6-9
Chapter 7 Call Pickup.............................................................................................. 7-1
Station Call Pickup ...............................................................................................................7-1
Group Call Pickup.................................................................................................................7-2
Chapter
Forwarding All Calls.............................................................................................................8-2
Forward Busy........................................................................................................................8-3
Forward No Answer..............................................................................................................8-3
Forward Busy/No Answer....................................................................................................8-4
Forward DND.........................................................................................................................8-4
Forward Follow Me ...............................................................................................................8-5
Viewing and Changing Forward Options ...........................................................................8-6
8 Call Forwarding...................................................................................... 8-1
Chapter 9 Paging and Messaging .......................................................................... 9-1
Internal Page .........................................................................................................................9-1
External Page ........................................................................................................................9-2
All Page..................................................................................................................................9-3
Meet Me Page: MMPG...........................................................................................................9-4
Call Park and Page ...............................................................................................................9-5
Rejoining a Page...................................................................................................................9-6
Setting a Message Waiting Indication ................................................................................9-7
Replying to Message Waiting Indications..........................................................................9-8
Cancelling Messages .........................................................................................................9-10
Programmed Messages .....................................................................................................9-10
Page 10

vii
Chapter 10 Special Features...............................................................................10-1
Do Not Disturb ....................................................................................................................10-1
Muting Your Phone .............................................................................................................10-3
Background Music..............................................................................................................10-3
Alarm Features....................................................................................................................10-4
Using the Door Phone........................................................................................................10-8
Executive/Secretary Hot Line............................................................................................10-9
Group Listening ................................................................................................................10-10
Locking and Unlocking Your Phone ...............................................................................10-11
Off-Hook Voice Announcements (OHVA) .......................................................................10-12
In Group / Out of Group ...................................................................................................10-14
Call Duration Timer...........................................................................................................10-15
Ring Preference ................................................................................................................10-17
Chapter 11 Caller Identification (CLIP) .............................................................. 11-1
Viewing Number or Name of Caller...................................................................................11-1
Viewing Next Caller CLIP ...................................................................................................11-2
Storing a Caller Number.....................................................................................................11-2
Calling a Stored Number.................................................................................................... 11-3
Storing a Caller Number as a Speed Dial Number. .........................................................11-3
Viewing CLIP for Calls on Hold or Parked .......................................................................11-3
Viewing CLIP for Previous Calls .......................................................................................11-4
Appendix: Additional Information ............................................................................ A-1
System Feature Codes........................................................................................................ A-1
Programmed Messages ...................................................................................................... A-2
Entering Characters on the LCD Panel .............................................................................A-3
Page 11

viii
Contents
List of Figures
Figure 1.1 Contents of ITP-5000D Series IP Phone Package ................................... 1-1
Figure 1.2 Base of ITP-5000D Series IP Phone......................................................... 1-2
Figure 1.3 Contents of DS-5000D Series Phone Package ........................................ 1-6
Figure 1.4 Base of DS-5000D Series Phone.............................................................. 1-7
Figure 3.1 Front Panel of the ITP- and DS-5014D Phone ......................................... 3-1
Figure 3.2 Front Panel of the ITP- and DS-5021D Phone ......................................... 3-2
Figure 5.1 Navigation Buttons .................................................................................... 5-1
Figure 6.1 Buttons A–F............................................................................................... 6-1
Page 12

Chapter 1 Installing Your ITP- or DS-5000D Series
Phone
This chapter explains how to install your phone. Refer to the appropriate section
for ITP-5000D Series IP Phone or DS-5000D Series Digital Phone in this
chapter for the phone you are installing.
ITP-5000D Series IP Phone
Checking the Supplied Components
First, open and check the package you have received. If any of the parts is
missing or damaged, contact your dealer immediately.
The package supplied with the IP phone includes the following items:
IP phone
IP phone stand
Handset
LAN cable (for PC connection)
Power adapter (Input: AC 240V 50Hz, Output : DC 24V 0.4A)
1-1
IP Phone
Handset
IP Phone Stand
User Guide
LAN Cable
Power Adapter
Figure 1.1 Contents of ITP-5000D Series IP Phone Package
Page 13

1-2
Chapter 1 Installing Your ITP- or DS-5000D Series Phone
Connectors on the IP Phone
The base of the phone contains a handset connection jack, power connection jack,
LAN connection jack, and a PC connection jack.
Power Connection Jack
PC Connection Jack
Figure 1.2 Base of ITP-5000D Series IP Phone
Installing the IP Phone
1. Plug the handset cord into the jack marked with the symbol and push the
cord inside the recess to secure it.
LAN Connection Jack
Handset Connection Jack
POWER
PC24V
PC
LAN
Page 14

1-3
2. Connect the LAN cable from the network to the LAN connection jack.
POWER
PC24V
PC
LAN
3. Connect the LAN cable from the PC’s network card to the PC connection jack.
POWER
PC24V
PC
LAN
Take care not to connect the LAN cable from the network to the PC
connection jack on the phone.
Otherwise, neither the phone nor the PC connection will function.
Page 15
1-4
Chapter 1 Installing Your ITP- or DS-5000D Series Phone
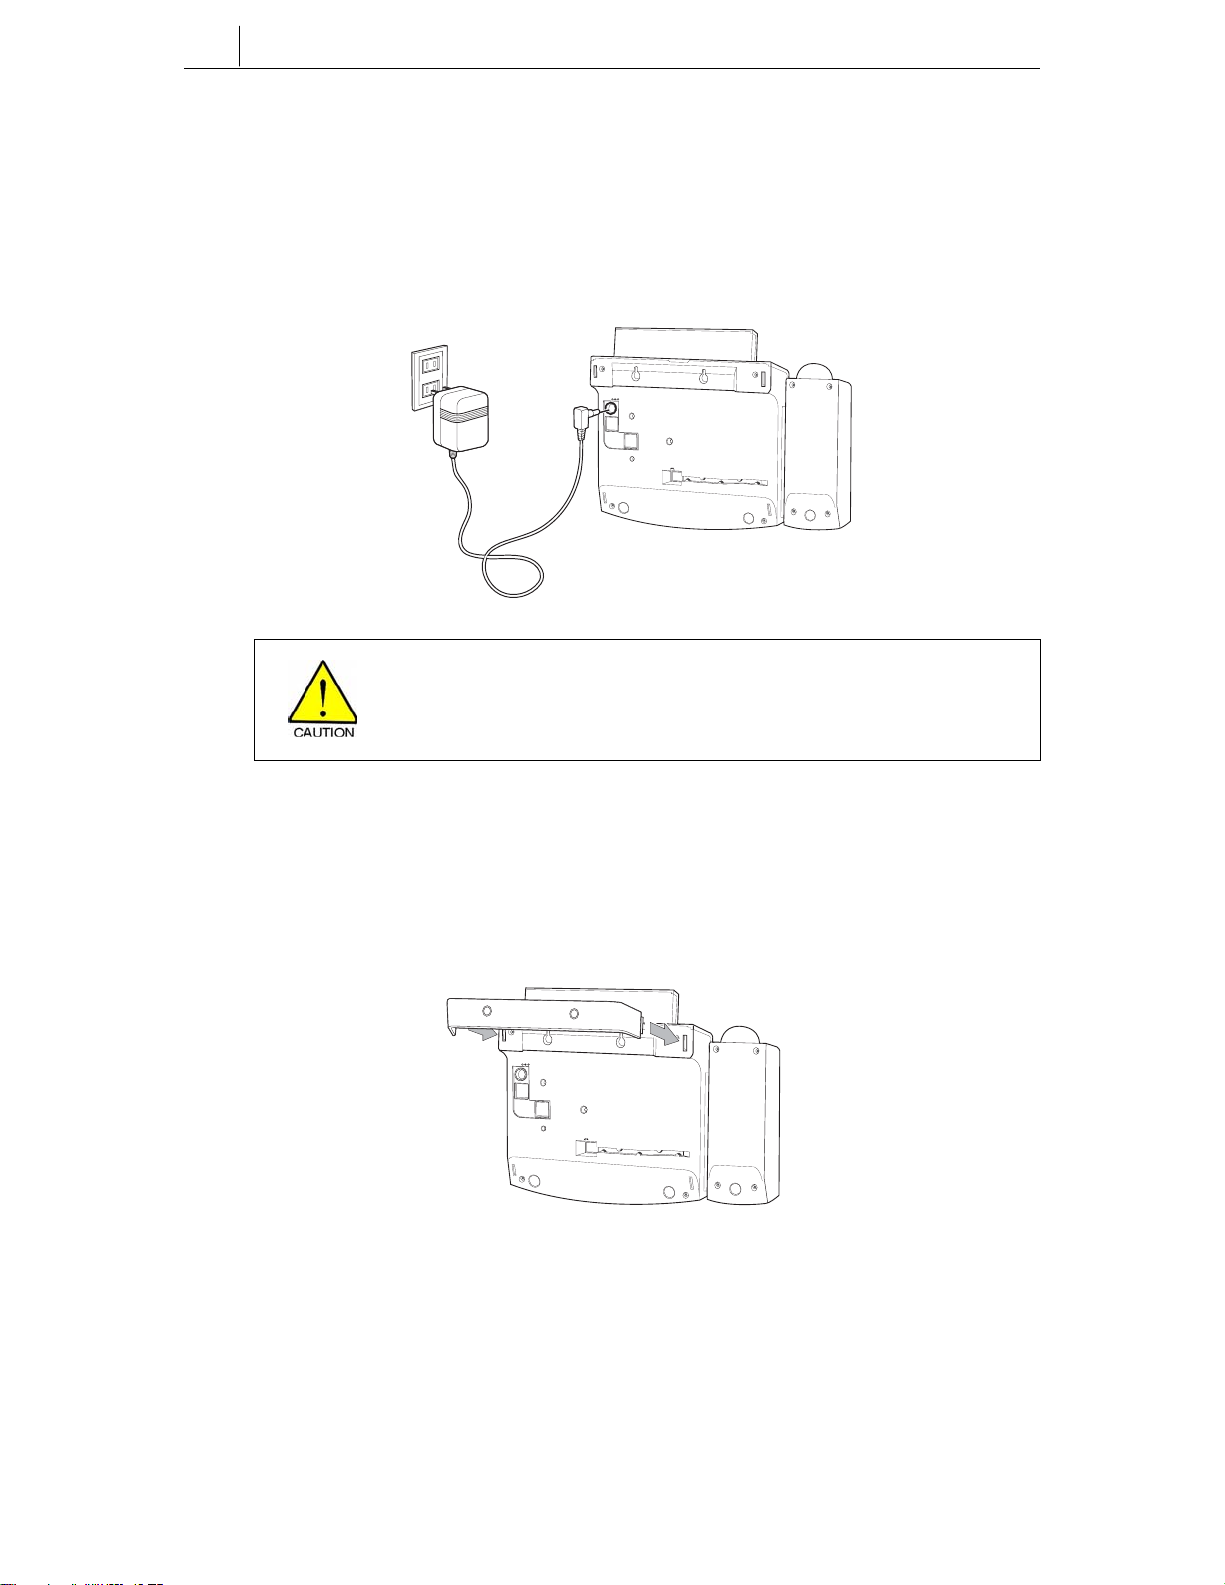
4. Connect the power adapter cable to the power connection jack. Do not connect
the cable to the power outlet yet.
The power specification is as follows.
Input : AC 240V 50Hz
Output : DC 24V 0.4A
POWER
PC24V
PC
LAN
Use only the supplied adapter cable. Using any other cable may cause
serious damage and will void the warranty.
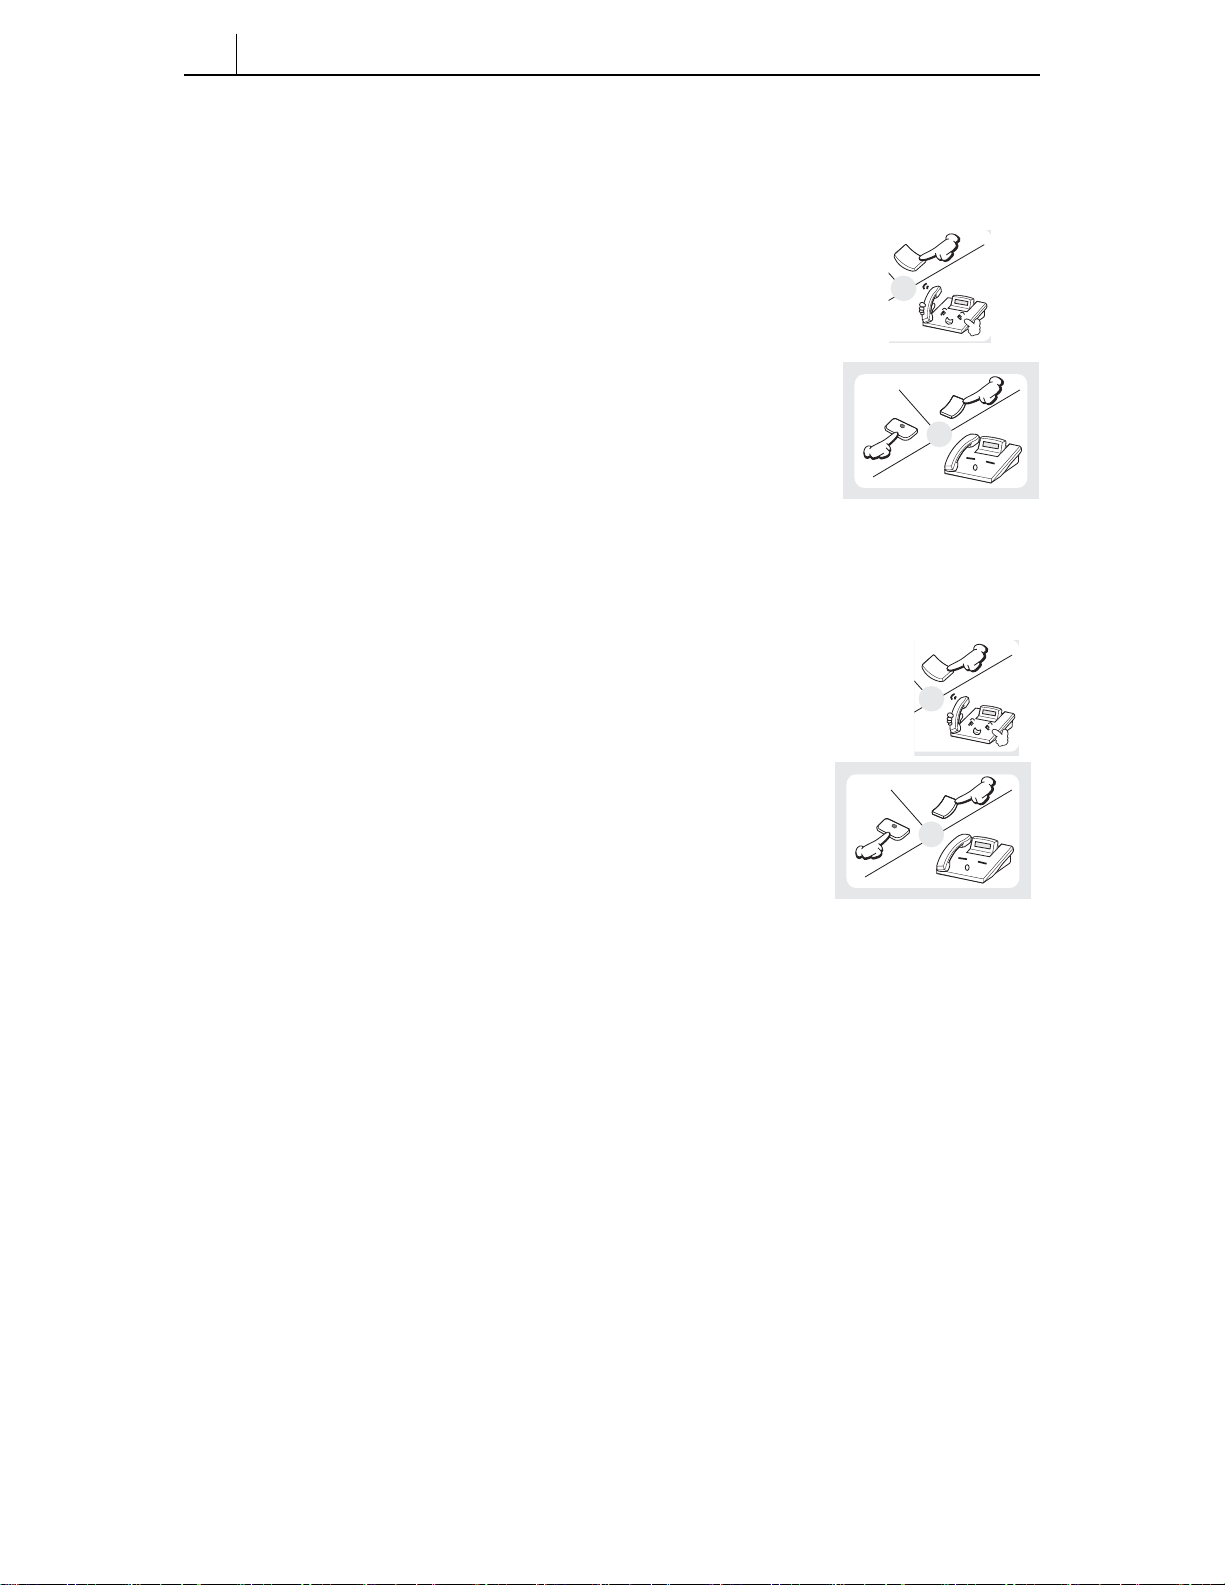
5. Insert the phone stand.
• If using as a desk-phone, insert the phone stand into the slots located
in the upper section of the base.
POWER
PC24V
PC
LAN
Page 16
1-5
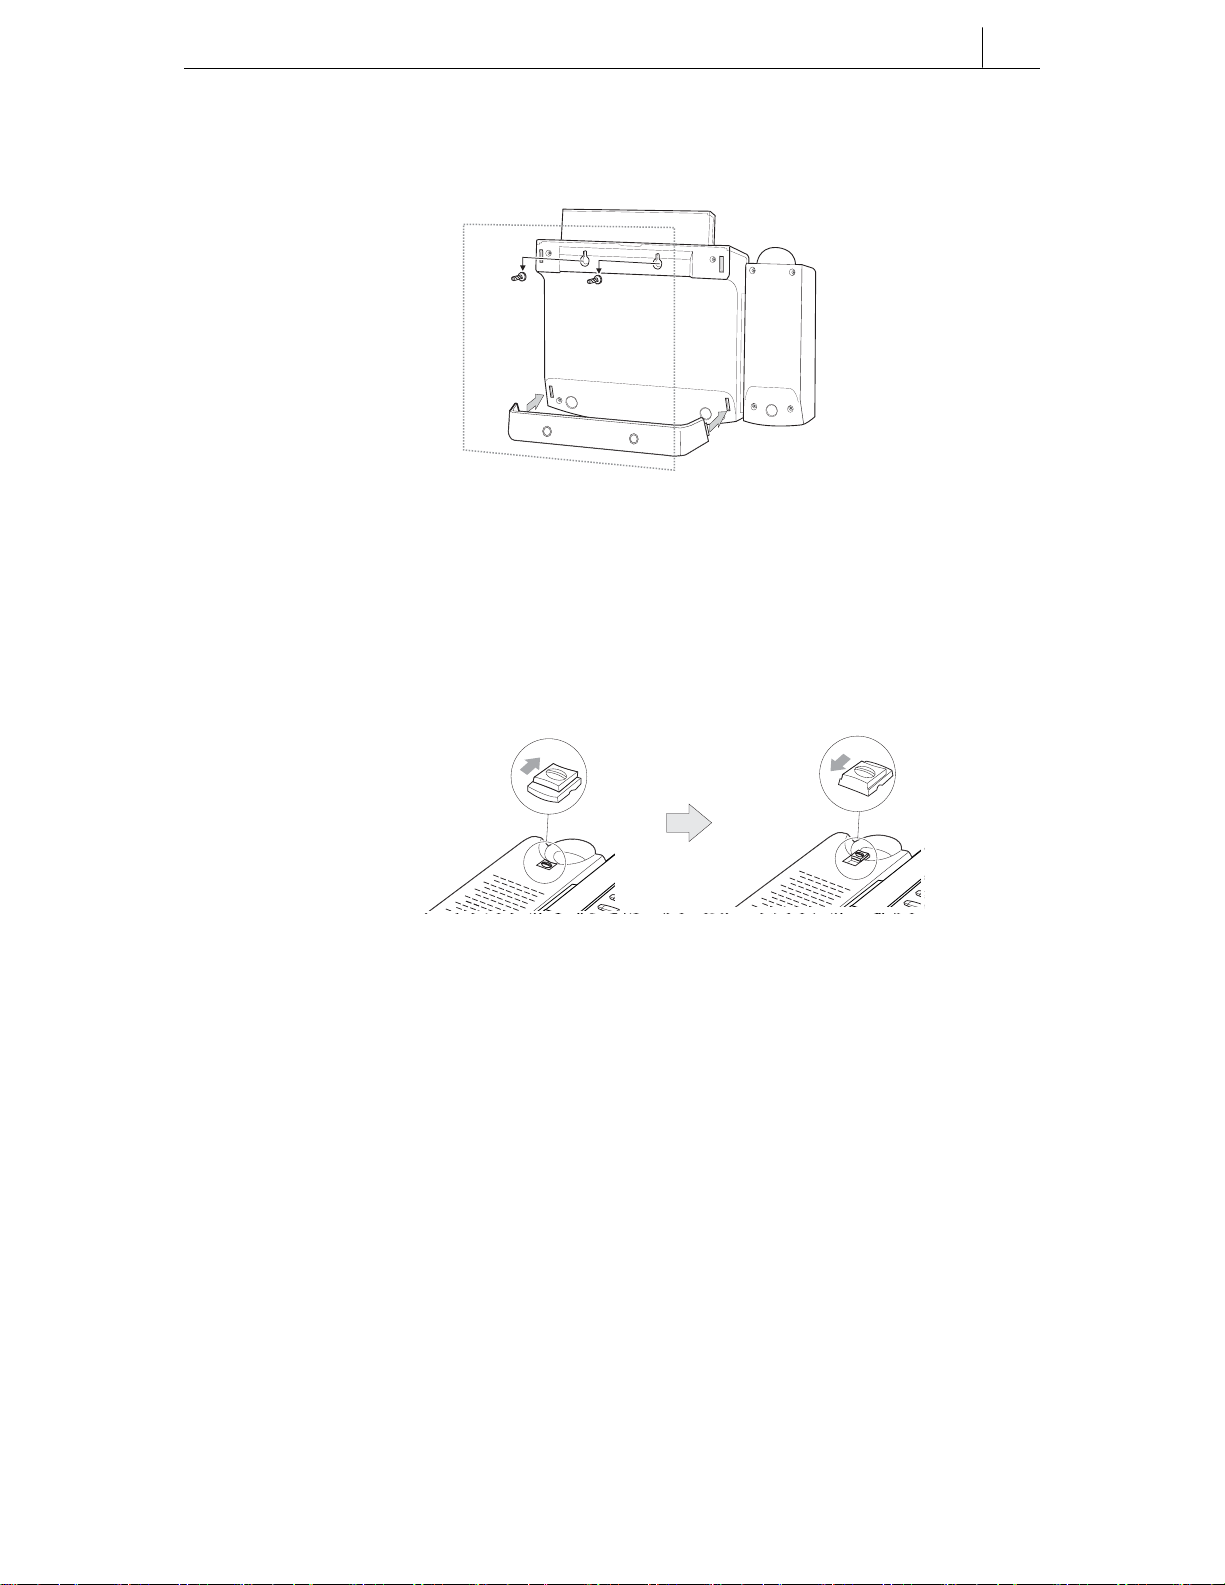
• If using as a wall-mounted phone, insert the support into the slots
located in the lower section of the base.
– Use the two mounting holes in the upper section of the phone body for
wall mounting the phone on screws inserted into the wall.
– The handset hook should also be changed so that the handset is secure
when mounted on the wall. Push out the handset hook from the holder,
turn it through 180o and push it back into the holder.
Installation is complete. Now set up the ‘working environment’ for the phone as
described in Chapter 2.
Page 17

1-6
Chapter 1 Installing Your ITP- or DS-5000D Series Phone
DS-5000D Series Digital Phone
Checking the Supplied Components
First, open and check the package you have received. If any of the parts is
missing or damaged, contact your dealer immediately.
The package supplied with the phone includes the following items:
Digital phone
Phone stand
Handset
Line cord
Handset
Line Cord
DS-5000D Series Phone
Phone Stand
User Guide
Figure 1.3 Contents of DS-5000D Series Digital Phone Package
Page 18
Installing the Phone
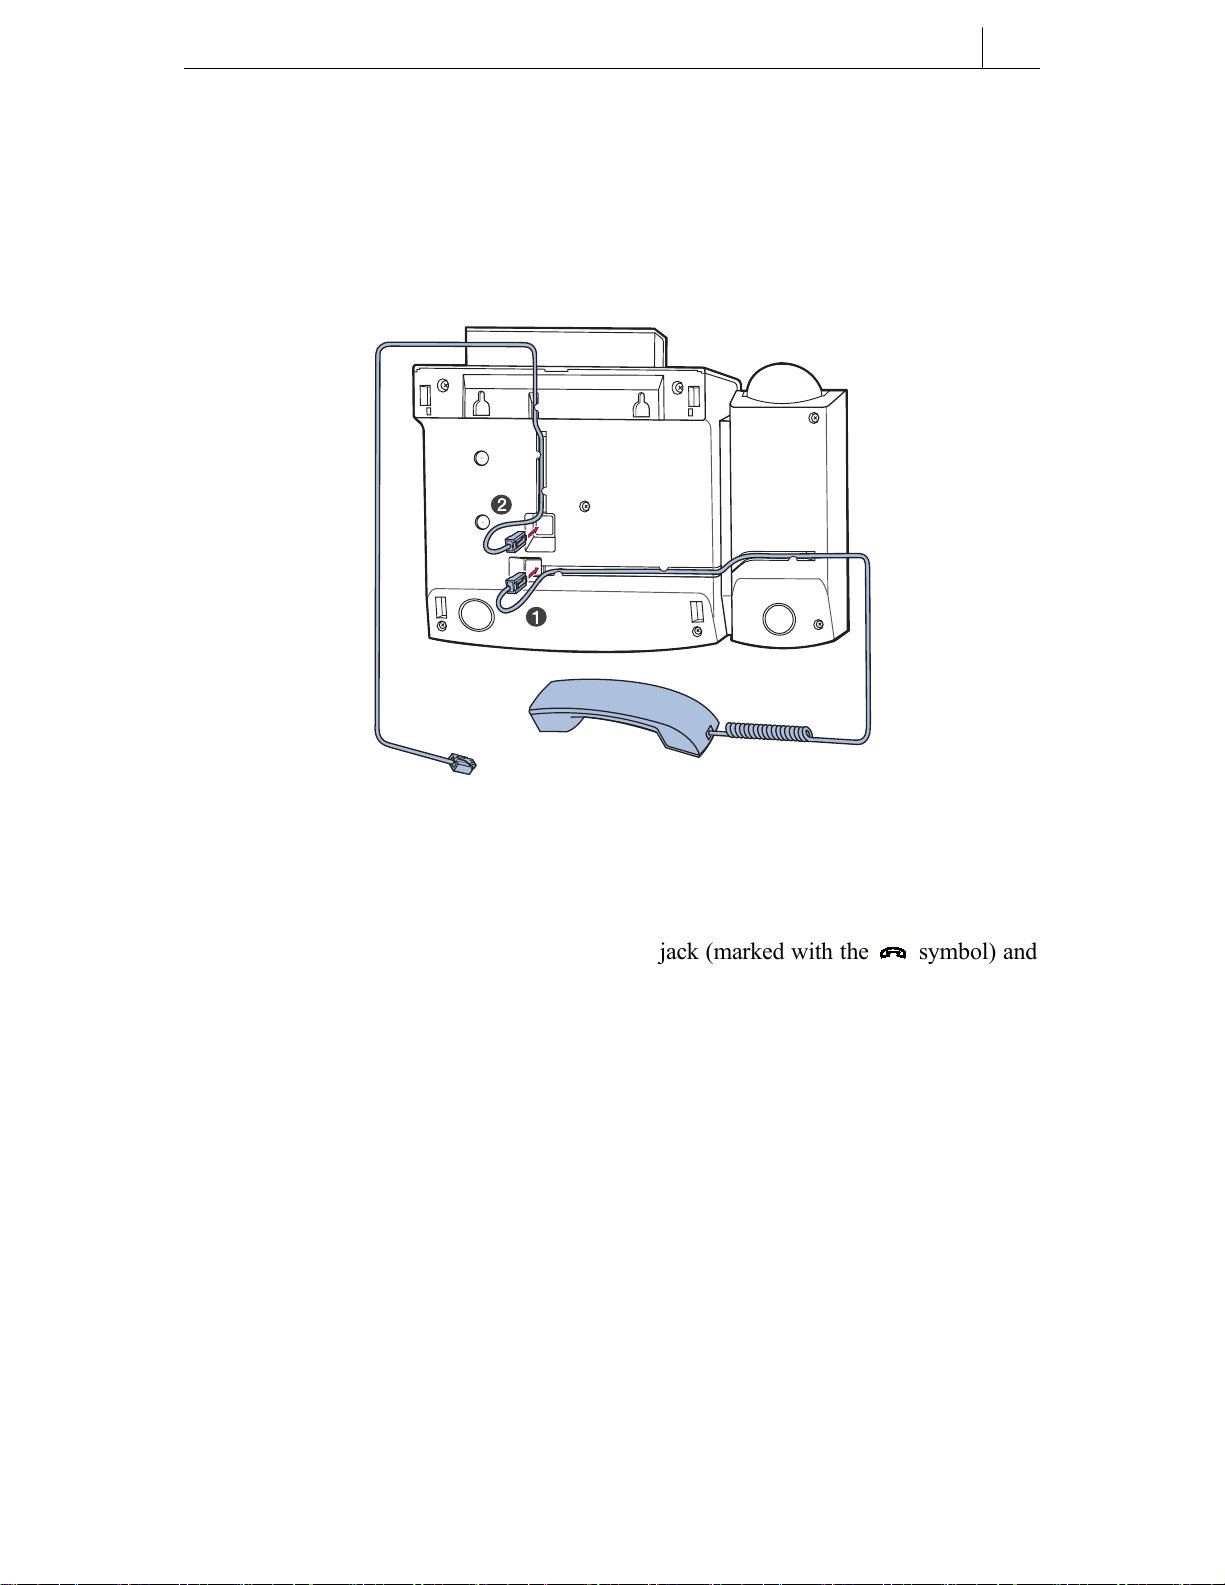
The base of the phone contains a handset connection jack and a line cord
connection jack.
1-7
Figure 1.4 Base of DS-5000D Series Digital Phone
1. Plug the handset cord into the handset jack (marked with the symbol) and
push the cord inside the recess to secure it.
2. Plug the line cord into the line cord jack and push the cord inside the recess to
secure it. Plug the other end of the line cord into the phone socket.
Page 19
1-8
Chapter 1 Installing Your ITP- or DS-5000D Series Phone
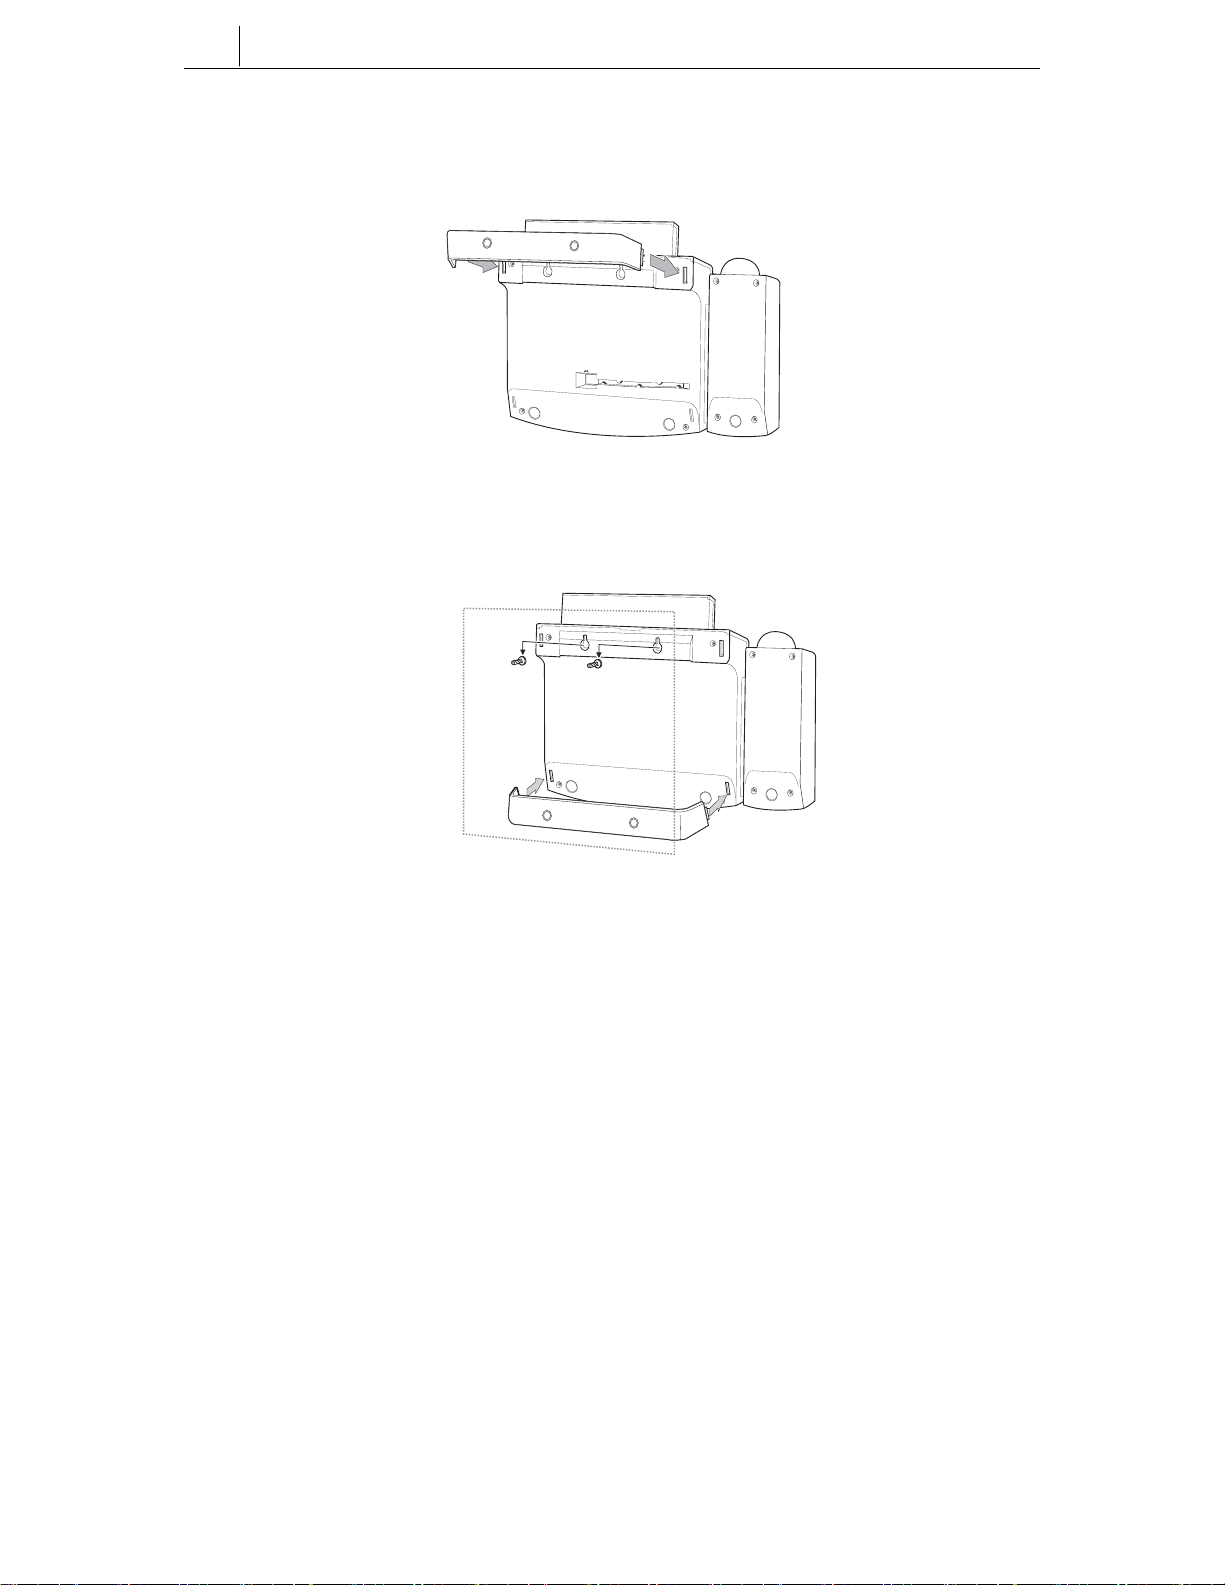
• If using as a desk-phone, insert the phone stand into the slots located
in the upper section of the base.
POWER
PC24V
PC
LAN
• If using as a wall-mounted phone, insert the support into the slots
located in the lower section of the base.
– Use the two mounting holes in the upper section of the phone body for
wall mounting the phone on screws inserted into the wall.
Page 20

1-9
– The handset hook should also be changed so that the handset is secure
when mounted on the wall. Push out the handset hook from the holder,
turn it through 180o and push it back into the holder.
Installation is complete. Now find out what features your phone supports by going
to Chapter 3.
Page 21

Chapter 2 Setting the Working Environment for ITP 5000D Series IP Phones
This chapter describes the procedure for starting (“booting”) an IP phone and
setting the phone’s operating parameters.
Overview of Environment Settings Mode
Menu Items
The menu structure for setting the phone’s environment is as shown below.
TOP LEVEL SUB-LEVEL
1.Information 1.Version
2.Network
3.Load Option
4.MAC address
2.Network 1.Mode
2.IP*
3.Netmask
4.Gateway*
(* Items 2 to 4 are only displayed when setting Manual IP)
3.Load & Upgrade 1.Load Option
2.Upgrade Program
3.Upgrade Bootrom
4.Format
4.System 1.Password
(Not used)
5.Server 1.Server IP
2.ID
3.Password
6.Exit
2-1
Page 22
2-2
Chapter 2
Setting the Working Environment for ITP-5000D Series IP Phones
Using the Buttons in Edit Mode
When entering the edit mode for any menu option, the cursor flashes and you can
enter digits using the dial buttons [0] – [9] and [*].
Button functions are listed in the table.
Table 3.1 Using the Buttons in Edit Mode
Button Function
Left/Right arrow buttons on Navigation buttons Erase contents or move cursor
Up/Down arrow buttons on Navigation buttons Move between menu options
[Enter] button on Navigation buttons Select menu or save current settings and exit
[End] button on Navigation buttons Cancel entered settings and exit
Dial button [*] Enter full-stop (.)
Dial button [0] – [9] Select menu or enter numbers
Starting the Phone
Connect the power adapter plug from the phone to the power outlet. The phone
starts automatically.
The power connection jack must be connected to a power outlet using the
power adapter supplied with the phone.
Using a different adapter may result in serious damage and voids the
warranty.
Press the [Menu] button on the Navigation buttons. The phone enters the
environment settings menu and displays the first two top level menus:
>1.Information
2.Network
Page 23

Setting Parameters
The procedure for setting parameters takes you through the top level menus for
Network, Load & Upgrade, System and Server.
Network Menu
• Select ‘2.Network’. You see:
>1.Mode
2.IP
• Select ‘1.Mode’. You see:
>1.Manual IP
2.DHCP
• Select ‘1.Manual IP’ to manually enter the IP, Subnet Mask, and Gateway IP
addresses and continue with this section.
OR
Select ‘2.DHCP’ to have the IP, Subnet Mask, and Gateway IP addresses
automatically entered for you (and then go to the section Load & Upgrade
Menu to continue).
If you selected ‘1.Manual IP’ you see:
2-3
Manual IP
Selected
followed by:
>1.Mode
2.IP
Page 24

2-4
Chapter 2
Setting the Working Environment for ITP-5000D Series IP Phones
• Select ‘2.IP’. You see:
Input IP Address
xxx.xxx.xxx.xxx
If the IP address is set, you can confirm the address displayed by pressing the
[Enter] button. (If it is incorrect, use the left arrow button to delete the set address
and use the dial buttons [0] to [9], and [*] to enter the correct address, and press
the [Enter] button to save and exit.)
OR
If the IP address is blank, use the dial buttons [0] to [9], and [*] to set the address
and press the [Enter] button to save and exit.
• Select ‘3.Netmask’. You see:
Input Netmask
xxx.xxx.xxx.xxx
If the subnet mask address is set, you can confirm the address displayed by
pressing the [Enter] button. (If it is incorrect, use the left arrow button to delete the
set address and use the dial buttons [0] to [9], and [*] to enter the correct address,
and press the [Enter] button to save and exit.)
OR
If the subnet mask address blank, use the dial buttons [0] to [9], and [*] to set the
address and press the [Enter] button to save and exit.
• Select ‘4.Gateway’. You see:
Input Def. Gateway
xxx.xxx.xxx.xxx
If the gateway address is set, you can confirm the address displayed by pressing
the [Enter] button. (If it is incorrect, use the left arrow button to delete the set
address and use the dial buttons [0] to [9], and [*] to enter the correct address, and
press the [Enter] button to save and exit.)
Page 25

OR
If the gateway address is blank, use the dial buttons [0] to [9], and [*] to set the
address and press the [Enter] button to save and exit.
You have now completed the network parameter setup. Press the [End] button to
return to the top level menu.
Load & Upgrade Menu
The menu ‘3.Load & Upgrade’ sets or modifies the phone’s upgrade environment.
• Select ‘3.Load & Upgrade’. You see:
1.Load Option
2.Upgrade Program
• To designate where the phone’s program is to be downloaded from, select
‘1.Load Option’, then:
select ‘1.File System’ to operate programs saved in the phone’s flash memory,
or
select ‘2.TFTP down run’ to download programs saved in the designated
TFTP server to the RAM memory of the phone.
• To upgrade the program, select ‘2.Upgrade Program’ then ‘1.TFTP server’.
2-5
Input TFTP Server
xxx.xxx.xxx.xxx
Enter the IP address of the TFTP server from which the program should be
downloaded. Press the [Enter] button to start the download.
Page 26

2-6
Chapter 2
Setting the Working Environment for ITP-5000D Series IP Phones
• To upgrade the phone’s bootrom select ‘3.Upgrade Bootrom’ then ‘1.TFTP
server’.
Input TFTP Server
xxx.xxx.xxx.xxx
Enter the IP address of the TFTP server from which the program should be
downloaded. Press the [Enter] button to start the download.
The phone is rebooted after downloading the Bootrom program and the
environment setup main menu appears.
• The ‘[4. Format]’ option is used to delete previously saved programs. Check
if the program needs to be deleted before using this function.
Server Menu (Setting System Authentication Information)
Select the ‘5.Server’ option on the main menu to set the IP address of the
OfficeServ system connected to the IP phone and the authentication ID and
password of the phone. (The ID and password are required if the OfficeServ
system is set to request this information.) The following screen is displayed.
1.Server IP
2.ID
• To set/modify the IP address of the OfficeServ system, select ‘1.Server IP’.
The following screen is displayed.
Input Server IP
xxx.xxx.xxx.xxx
The address is left blank if it is not set. Use the dial buttons [0] to [9], and [*] to
set the address and press the [Enter] button to save and exit.
Page 27

• To set/modify the ID of the phone, select ‘2.ID’. The following screen is
displayed.
*Input ID
Enter the ID as a maximum of 16 digits/characters.
• To set/modify the password of the phone, select ‘3.Password’. The following
screen is displayed.
Enter the password as a maximum of 8 digits (displays as ‘*’).
Verifying Settings and Rebooting
The top level menu ‘1.Information’ allows you to view and verify all your
parameter settings.
• When you are satisfied that the settings are valid, select the menu ‘6.Exit’ to
save all settings and reboot your phone.
2-7
Page 28

Chapter 3 Things You Should Know
The ITP- and DS-5000D Series of phones comprise the ITP/DS-5021D and
ITP/DS-5014D phones. These are 2-line LCD phones that can be used with the
Samsung Enterprise IP Solutions OfficeServ System. They are described in detail
in this chapter.
ITP and DS phones are operated in the same way. However, IP phones enjoy the
added benefits of Internet technology to make and receive calls.
Front Panel of Phone
Programmable Buttons (14)
LCD Panel
3-1
Soft Buttons (3)
Scroll Button
Speaker
Volume Button
Redial Button
Dial Buttons
Speaker Button
Status Indicator
Navigation Buttons
Conference Button
Hold button
Figure 3.1 Front Panel of the ITP- and DS-5014D Phone
Transfer Button
Phone Support
Microphone
Page 29

3-2
Chapter 3 Things You Should Know
Programmable Buttons (21)
Speaker
Volume Button
Redial Button
Dial Buttons
Speaker Button
Hold button
Figure 3.2 Front Panel of the ITP- and DS-5021D Phone
LCD Panel
Soft Buttons (3)
Scroll Button
Status Indicator
Phone Support
Navigation Buttons
Microphone
Conference Button
Transfer Button
• The 14 or 21 programmable buttons can be programmed with desired
functions.
• Dial keypad buttons for dialling numbers.
• Volume buttons to control volume levels for handset, speaker, ring etc.
• Redial button redials the last number dialled from the dial keypad.
• Conference button used for conference calls (a number of phones connected
simultaneously).
• Transfer button transfers current call to another phone.
• Hold button puts your calls on hold.
• Speaker button turns the speakerphone on/off.
• Navigation buttons guide you easily through phone functions.
• The LCD panel shows call status, functions and other useful information.
Page 30

• The status indicator displays the status of the phone using red, green, and
amber colours.
Dial (Keypad) Buttons
The dial buttons are used to dial digits [0]-[9], [*] and [#].
Programmable Buttons
ITP- and DS-5021D have 21 programmable buttons; ITP- and DS-5014D have 14
programmable buttons. You can program these buttons with frequently used
functions, such as dialling a specific telephone number when pressed. Your system
administrator will normally do this for you using system programming (MMCs).
Programmable functions are described in Chapter 4. Ask the system administrator
how your phone is set up if you’re not sure.
Buttons are assigned a number from 1 to 21 (or 1 to 14) beginning with the top
row left-hand button and ending with the bottom row right-hand button. Each
button also has an LED which can display one of three colours, red, amber or
green, if the button is being used. (See Chapter 4 for a description of possible
LED displays.)
Three buttons are pre-set to perform the following functions. They may be
changed in programming but it is not recommended.
Message Button:
If a message waiting indication is left for you, this button’s LED flashes.
Call 1 and Call 2 Buttons:
These are essential in order to allow your phone to make and receive calls. Up to
six Call buttons can be set on your phone. Your phone should have at least one
Call key, but two are recommended. While the hold or conference functions are in
use, the corresponding button’s LED flashes.
3-3
Page 31

3-4
Chapter 3 Things You Should Know
Volume Buttons [t and u]
The Volume buttons are used to control the volume levels for the handset,
speakerphone, ringing bell and background music. The [u] button decreases the
volume and the [t] button increases the volume.
They are also used to move between menus and features on the LCD panel. Press
the [u] button to move to the previous menu or feature, and the [t] button to
move to the next menu or feature.
Redial Button
The most recent phone number you dialled is held in memory. Press the Redial
button to redial the number.
Conference Button
This button can set up a conference call for up to five people, including you.
Transfer Button
This has two main functions:
Transfers a call at your phone to another extension (and toggles between the
other extension and the external caller).
Enters programming (MMC) mode.
Hold Button
The Hold button is used to temporarily put your current call on hold (without
hanging-up) while you do something else, such as dial another number for
consultation.
Speaker Button
This is used to make a call through the speakerphone rather than the handset. To
change from the handset to the speakerphone while on a call, press the [Speaker]
button and put the handset down.
Page 32

Navigation Buttons
These are used to “navigate” through menus and features displayed on the LCD.
Menu Button
This button is used to display menus of information, such as outgoing and
incoming call logs, speed dial numbers, and directory dial numbers. It also allows
you to set and display features such as call forwarding and alarm reminder types.
Send Button
This button is used to answer calls through the speakerphone. If pressed when the
phone is idle, the button displays the most recent received number or recent called
number saved in memory. If pressed and held down, the last called outside number
is redialled.
3-5
End Button
This button terminates the current call or exits the menu mode display (see Menu
Button.).
Cancel Button
This button is used:
When moving to the previous step in the menu mode display.
To cancel the last character/digit while entering data in the display.
Enter Button
This button is used when selecting or saving a corresponding entry on the menu
mode display. It can also be used as the [NND (Name/Number Display)] button
when receiving calls. The [NND] button displays ‘caller number’, ‘caller name’,
and ‘received time’ in turn, as you press the button, for outside calls (if caller ID
information is available).
Page 33

3-6
Chapter 3 Things You Should Know
Arrow Buttons
The left and right arrow buttons are used to move the cursor left and
right on the LCD panel for editing contents. The up and down arrow
buttons are used to move up and down through menus.
LCD Panel
Up to 48 alphabetic characters and numbers can be displayed on the LCD panel on
two 24-character lines. The panel shows the processing status and progress of
calls, and displays various functions and menus. Below the panel are three soft
buttons and a Scroll button.
Scroll Button
This button is used to scroll through menu options on the LCD panel. The menu
options displayed depend on the status of the phone (e.g. whether it is idle or busy
on a call).
For example, if the button is pressed while the phone is idle, the following menu
options are shown:
A menu option may be selected using the appropriate soft button below it (see Soft
Buttons, below).
If the arrow symbol (→) displays, this indicates that other menu options are
available. Press the Scroll button to display the new options. Whenever the Scroll
button is pressed, different menu options appear on the LCD panel.
201: SAMSUNG
CALL OTHER ANS
→
Soft Buttons
Soft buttons are used to select the desired menu option from the LCD panel
display (see Scroll Button).
Page 34

For example, when selecting the CALL menu, use the left soft button; when
selecting the OTHER menu, use the centre soft button; and when selecting the
ANS menu, press the right soft button.
Microphone
The small opening below the Navigation buttons is a microphone. You can speak
through the microphone without lifting the handset when making a call. To do this,
press the [Speaker] button.
Phone Status Indicator
The phone status indicator is located on the upper right-hand edge of the LCD
panel. The indicator lights red, green or amber to show the phone’s status. See
Chapter 4 for more details.
3-7
Page 35

4-1
Chapter 4 Basic Features
This chapter describes the basic features of the ITP- and DS-5000D Series phones.
It is recommended that you familiarise yourself with these features before using
your phone so that operating it will be easier and problem free. If you haven’t
already done so, take time to read Chapter 3 which explains the functions of the
various buttons on your phone.
Button LEDs
The programmable buttons, [Transfer] button, [Hold] button, and [Speaker] button
have LEDs that light red, green or amber when it is being used. The following
table summarises the functions of LEDs.
Table 4.1 Button LED Status
Function Button LED Status
Central office line or function is in use LED is steady green.
New incoming call is ringing LED is a fast flashing green
A call is on hold LED is a slow flashing green or red
A held or transferred call is recalling to the
phone
Phone Status Indicator
The status indicator is located on the upper right section of the LCD panel. It
shows the status of the phone as described in the table.
LED is a slow flashing amber
Page 36

4-2
Chapter 4 Basic Features
Status of Phone Status Indicator
Busy on call / Off-hook Steady red
Internal extension ring Flashing red
External (C.O.) line ring Flashing green
Transferred / held call recalling Flashing amber
Message waiting Flashing red
Calling denied Fast flashing red
Using Feature Codes
System features are programmed with default codes that you can dial to access the
features. These are described in the relevant parts of the guide. However, these
codes may have been changed in programming; if so, you may find that a feature
does not work as described. In such cases, refer to your system administrator for
the correct codes (or ask them to check with the installation technician if they
don’t know what they are).
Default system feature codes are listed in the Appendix.
Table 4.2 Status Indicator
Selecting Programmed Functions
The most convenient way to select functions on your phone is to have them
registered on the programmable buttons, so that you simply press the required
button. If a function is not programmed on a button, it can be selected on the LCD
panel using the Scroll button and soft buttons. The use of the Scroll button and
soft buttons is described in Chapter 3.
An advantage of using the soft buttons for functions is that the programmable
buttons can be used to assign more buttons for direct extension selection and
speed dialling.
Page 37

4-3
Assigning Button Values (Extenders)
You can add an “extender” to some programmed buttons to make their functions
more specific. For example, you could add the extender “4” to the [PAGE] button.
Normally, when you press the [PAGE] button, you are asked to enter the page
zone to page. With the new extender, pressing the button will automatically page
zone 4. The following table lists the extenders that can be assigned to
programmable buttons.
Table 4.3 Extenders Assignable for Programmable Buttons
Button Description Extender
AB Absence Extension number
ACC Account 000-999
BOSS Director/Secretary 1-4
DIR Directory 1 (PERS), 2 (SYS), 3 (STN)
DP Direct Call Pick-up Extension or extension group number
DS Direct Extension Select Station number
0 = FWD Cancel, 1 = FWD All, 2 = FWD Busy,
FWRD Call Forwarding
GPIK Group Call Pick-up 01-20
IG In / Out Of Group Extension group number 5xx(x)
MMPG Meet Me Page 0-9, *
PMSG Programmed Message 01-20
PAGE Paging 0-9, *
PARK Park orbit 0-9
RP Ring Plan 1-6
SG Extension Group Selection Extension group number 5xx(x)
SP UCD Supervise UCD group number
SPD Speed Dial 00-49, 500-999
VT Voice Mailbox Voice Mailbox Group (5xx)
3 = FWD No Answer, 4 FWD Busy/No Answer,
5 = FWD DND and-6 = Follow Me
Page 38

4-4
Chapter 4 Basic Features
How to Add Extenders
1. Press the [Transfer] button.
2. Press [1][0][7].
3. Select the button for adding the extender.
Use the [uVo l u m e t] buttons to scroll through
the display of programmable buttons and press the
right soft button to select the button (OR you can
press the programmable button or enter the number
if you know it)
4. Enter the extender using the dial buttons.
5. Save the new key value by pressing the [Transfer]
button.
Transfer
4
7
PQRS
*
0
Transfer
1
0
7
MNO
Volume
1
2
ABC
GHI
3
DEF
5
JKL
6
MNO
8
TUV
9
WXYZ
Controlling Volume Levels
Volume levels for the speakerphone, ringer and handset can be adjusted using the
[uVo l u m e t] buttons. The levels you set will be saved in memory. If background
music is set, the volume levels of music and page announcements can also be
adjusted using the [uVo l u m e t] buttons. There are 16 volume levels.
Note: The Volume of off-hook ringing can only be adjusted in programming.
Page 39

4-5
Handset Volume
1. Pick up the handset and listen to the tone.
2. To increase handset volume, press the
[Volumet] button.
3. To decrease handset volume, press the
[uVolume] button.
Speakerphone Volume
1. Press the [Speaker] button.
Speaker
2. To increase speakerphone volume, press the
[Volumet] button.
3. To decrease speakerphone volume, press the
[uVolume] button.
Page 40

4-6
Chapter 4 Basic Features
Ringer Volume
1. To increase ringer volume, press the [Volumet]
button while the phone is ringing.
2. To decrease ringer volume, press the [uVo l u m e ]
button while the phone is ringing.
Selecting the Ring Tone
One of eight ring tones can be selected.
1. Press the [Transfer] button.
2. Press [1][1][1].
3. Press button [1]-[8] in order, or press the
[uVo l u m e t] button, to listen to each ring tone.
4. When you hear the desired dial tone, press the
[Transfer] button to save the setting.
Transfer
1
1
Volume
Transfer
1
Page 41

4-7
Changing the Phone Passcode
Your pre-assigned extension passcode is 1234. You can change the passcode if
needed.
1. Press the [Transfer] button.
2. Press [1][0][1].
3. Enter the current passcode (e.g. 1234).
4. Enter the new passcode. The passcode must be a 4-digit
number (0-9).
5. Reenter the new passcode for confirmation. If the
passcode is entered correctly, a beep will be
heard twice. If four beeps are heard, the passcode
entry is incorrect.
Reenter the new passcode.
6. Save the new passcode by pressing the [Transfer] button.
Transfer
4
7
PQRS
*
0
4
7
PQRS
*
0
4
7
PQRS
*
0
1
0
1
1
2
ABC
GHI
3
DEF
5
JKL
6
MNO
8
TUV
9
WXYZ
1
2
ABC
GHI
3
DEF
5
JKL
6
MNO
8
TUV
9
WXYZ
1
2
ABC
GHI
3
DEF
5
JKL
6
MNO
8
TUV
9
WXYZ
Page 42

4-8
Chapter 4 Basic Features
Setting the Answering Mode for Intercom Calls
Intercom calls can be answered in one of three modes. You can select whichever
mode suits your working preferences:
RING MODE: The phone rings and you answer using either the handset or the
speakerphone. This is the normal answering mode.
AUTO ANSWER MODE: The phone gives a brief tone and automatically
answers the call. The speakerphone is switched on. (Lift the handset for privacy if
you prefer.)
VOICE ANNOUNCE MODE: The phone gives a brief tone and the caller makes
an announcement. Answer the call by pressing the [Send] button (for the
speakerphone) or using the handset.
If your phone is set as a “Secretary” or “Executive” extension using a hotline, you
also need to tell the system whether the answering mode is for executive
answering rather than normal answering (EXEC ANS or ANS MODE).
If you set voice announce mode on your phone and also set the Call Forwarding
on No Answer function, you must ensure that you press the [Send] button to
answer a call before the ‘no answer’ timer expires. Otherwise, the call will be
forwarded.
Page 43

4-9
1. Press the [Transfer] button.
Transfer
2. Press [1][0][3].
1
0
3
DEF
3. Select ANS MODE or EXEC ANS using
the [uVo l u m e t] buttons.
Volume
4. Move the cursor by pressing the right soft button.
5. Press [0] (Ring mode), or [1] (Auto Answer mode),
or [2] (Voice Announce mode)
OR
Select the mode using the [uVo l u m e t] buttons.
Transfer
6. Press the [Transfer] button to save the setting.
Page 44

4-10
Chapter 4 Basic Features
Switching Headset/Handset Mode
You can switch between handset mode and headset mode if you have a headset
connected to your phone. In headset mode, you answer or end a call by pressing
the [Send] or [End] button.
1. Press the [Transfer] button.
2. Press [1][1][0].
3. To use the handset, press [0][2][0]
To use the headset, press [0][2][1]
4. Save the selected entry by pressing the [Transfer]
button.
<Headset>
Transfer
1
1
1
0
1
2
ABC
0
1
PQRS
Transfer
0
<Handset>
0
1
1
2
ABC
0
0
PQRS
If your phone has a headset mode on/off button, press this button. The button’s
LED will light when headset mode is set. Press again to return to handset mode.
The LED goes off.
Page 45

4-11
Enabling/Disabling Key Confirmation Tone
When you press a dial button, you may hear a short confirmation tone, depending
on whether this feature is enabled or disabled.
1. Press the [Transfer] button.
2. Press [1][1][0].
3. To enable the key confirmation tone, press [0][4][1];
to disable, press [0][4][0].
4. Save the selected entry by pressing the [Transfer]
button.
Enable
O
Transfer
1
1
1
1
1
0
1
4
GHI
0
1
PQRS
Transfer
0
1
0
0
PQRS
Disable
X
1
4
GHI
0
0
PQRS
Page 46

4-12
Chapter 4 Basic Features
Hot Keypad
The hot keypad feature allows you to make a call or activate feature codes by
pressing the dial buttons directly, without having to pick up the handset or press
the [Speaker] button.
To turn this feature on or off:
1. Press the [Transfer] button.
2. Press [1][1][0].
3. To enable the hot keypad, press [0][3][1]; to disable
press [0][3][0].
4. Save the selected entry by pressing the [Transfer]
button.
While using a hot keypad, the [Speaker] button LED lights when you dial a number
and the speakerphone is enabled. Lift the handset when the call is answered if you
want a private conversation.
Enable
O
Transfer
1
1
1
1
1
0
1
3
DEF
0
1
PQRS
Transfer
0
1
0
0
PQRS
Disable
1
3
DEF
X
0
0
PQRS
Page 47

4-13
Dialling by Directory Name
The online directory of names allows you to find any extension or speed dial
number very quickly. Normally, every extension number or speed dial number in
the system has a directory name assigned to it (for example, John Smith on
extension 201, or Ann Jones on 203). You can select an extension number or speed
dial number using the list of directory names by scrolling through the list, which
displays in alphabetical order.
1. Press the programmed [DIR] button, or use the Scroll
button and soft buttons to select the DIR option in the
CALL menu on the LCD panel.
1
2. Press the soft button to select the directory you wish to
use: PERS (Personal), SYS (System) or STN (Extension)
OR
Press [1] (PERS), or [2] (SYS), or [3] (STN)
3. Press the dial button that matches the first letter
of the name that you wish to find (e.g. J for John).
4. Find the name by using the [uVo l u m e t] buttons to
scroll through the list.
5. To dial the number, press the soft button corresponding
to the DIAL option in the LCD panel.
*
*
2
ABC
4
GHI
3
DEF
5
JKL
7
PQRS
6
MNO
8
TUV
9
WXYZ
0
1
2
ABC
4
GHI
3
DEF
5
JKL
7
PQRS
6
MNO
8
TUV
9
WXYZ
0
Volume
Page 48

4-14
Chapter 4 Basic Features
If you program a [DIR] button, you can add the extender 1, 2 or 3, e.g. DIR2, to go
straight to the directory you most often use (PERS, SYS or STN).
Assigning/Changing Your Extension Name
Up 11 alphabetic characters can be assigned as a name to your phone. The name is
entered in the online directory to enable others to call you using the ‘dialling by
directory name’ feature (see above). The name also displays in your LCD panel
and in the LCD panels of phones you call.
1. Press the [Transfer] button.
2. Press [1][0][4].
3. Enter the name. (Refer to the Appendix in this guide
for the procedure for entering characters.)
4. Save the name by pressing the [Transfer] button.
Transfer
4
7
PQRS
*
0
Transfer
1
1
1
0
0
4
PQRS
GHI
1
2
ABC
GHI
3
DEF
5
JKL
6
MNO
8
TUV
9
WXYZ
Page 49

4-15
Making Intercom Calls
Calling an Extension Number
1. Pick up the handset and listen for dial tone or press
the [Speaker] button.
(Remember: you don’t need to do this if the hot
keypad feature is switched on.)
1
2
2. Dial the extension number (or group number to which
the extension belongs).
3. Wait until the called party answers. If you hear a short
signal tone (not a ringing tone), the called extension
has set up the Voice Announce or Automatic Answer
function and you are connected automatically.
4. To finish the call, replace the handset or press the
[Speaker] or [End] button.
*
7
PQRS
0
Speaker
ABC
4
GHI
3
DEF
5
JKL
6
MNO
8
TUV
9
WXYZ
End
z
O
r
z
Z
If there is a [DS] button assigned to the extension, press this button instead of
dialling the number.
Page 50

4-16
Chapter 4 Basic Features
Busy Extension Callback
If a called extension is busy, you can set a busy extension callback. When the busy
extension becomes free, your phone will ring. When you pick up the handset, the
other extension will ring for the user to answer your call.
1. When you hear a busy signal, press the programmed
[CBK] button, or dial [4][4] or press the soft button
corresponding to the CBK option on the LCD
panel.
2. When you hear the confirmation tone, replace the
handset.
3. When the called extension becomes free, your phone
rings. The ‘CALL BACK’ message will appear
on the LCD panel.
Lift the handset to ring the free extension and wait for it
to answer.
4. To end the call, replace the handset or press either
the [Speaker] or [End] button.
Speaker
O
r
4
GHI
4
GHI
z
z
Z
CALL BACK
End
z
r
O
z
Z
If you don’t answer a callback within 30 seconds, it will be cancelled.
You can have a maximum of five callbacks set on extensions at any one time.
Page 51

4-17
Busy Extension Camp-On
If a called extension is busy and you don’t want to wait for a callback, you can
give the called extension off-hook ring tone and wait for them to answer.
Press the [CAMP] button or dial [4][5] or press the
soft button corresponding to the CAMP option
r
on the LCD panel.
O
4
GHI
5
JKL
The called extension will receive off-hook ring tone
repeated every few seconds and its first available
Call button will flash to indicate your call is waiting.
The extension must release its first call or place it on
hold before answering your camp-on.
Calling Your System Operator
Dial [0] to call your system operator or group operator.
If you want to call a specific operator, dial that person’s
extension number.
0
Page 52
4-18
Chapter 4 Basic Features
Answering Intercom Calls
Answering Intercom Calls in Ring Mode
1. When the phone rings, pick up the handset or press
the [Send] button.
2. To end the call, replace the handset or press the
[Speaker] or [End] button
Answering Intercom Calls in Voice Announce Mode
The phone issues a brief tone and you hear the caller’s message.
1. Pick up the handset or press the [Send] button to use
the speakerphone.
2. To end the call, replace the handset or press
either the [End] or [Speaker] button.
Send
O
r
Speaker
Speaker
End
z
O
r
Send
O
r
End
O
r
z
Z
z
z
Z
Page 53

4-19
Answering Intercom Calls in Automatic Answer Mode
The phone issues a brief tone and automatically answers the call.
1. Use the speakerphone to talk.
For a private conversation, use the handset.
2. To end the call, replace the handset or press
either the [End] or [Speaker] button.
B
A
F
D
Speaker
C
E
End
z
O
r
z
Z
Page 54

4-20
Chapter 4 Basic Features
Making Outside (External) Calls
Calling Outside Lines—an Overview
Outside calls are made via central office (C.O.) lines. To call an outside number
you first need to press a programmed line button or line group button or dial the
C.O. line access code (‘9’ for example). If you have an LCR button (for least cost
routing) you should press that. Ask your system administrator what is set up for
your phone.
You may also be asked to enter an account and/or authorisation code in order to be
able to make a call (or you may choose to enter a code voluntarily). These are
described next.
If you try to make a call if there are no available Call buttons, you will hear No
More Calls tone instead of ringing tone and you cannot complete the call.
Authorisation Codes and Account Codes
Account codes ensure your call is charged to the proper account or department.
Authorisation codes ensure you are authorised to make outside calls. You may be
required to enter a code before a call can be made (these are referred to as “forced”
codes), or you may voluntarily enter a code before or during a call.
Entering Account Codes
If you are asked to enter an account code when you select an outside line, press the
programmed [ACC] button or the soft button for the ACCT option on the LCD
panel. Enter the code using the dial keys. To voluntarily enter a code before making
a call or during a call, press the [ACC] button or dial [4] [7] and enter a valid code,
press the [ACCT] button again.
Page 55

4-21
Entering Authorisation Codes
If you are asked to enter an authorisation code when you select an outside line,
press the programmed [AUTH] button or the soft button for the AUTH option on
the LCD panel. Enter the code using the dial keys. To voluntarily enter a code
before making a call, press the [AUTH] button or the [#] button and enter a valid
code.
Ask the system administrator for more information on authorisation and account
codes.
Calling Outside Lines Using the Handset
1. Pick up the handset.
1
2
2. Press the outside line access button or dial the access
code (e.g., 9).
(Enter an account or authorisation code if requested.)
3. Dial the outside number you want to call.
4. To end your call, replace the handset.
*
*
ABC
4
GHI
3
DEF
5
JKL
7
PQRS
6
MNO
8
TUV
9
WXYZ
0
1
2
ABC
4
GHI
3
DEF
5
JKL
7
PQRS
6
MNO
8
TUV
9
WXYZ
0
z
z
Z
Page 56

4-22
Chapter 4 Basic Features
Calling Outside Lines Using the Speakerphone
1. Press the [Speaker] button.
(Remember: you don’t need to do this if the hot
keypad feature is switched on.)
2. Press the outside line access button or dial the access
code (e.g., 9).
(Enter an account or authorisation code if requested.)
*
3. Dial the outside number you want to call.
*
4. To end your call, press the [Speaker] button.
Making a New Call Without Releasing the Line (Recall Dial Tone)
Speaker
1
2
ABC
4
GHI
3
DEF
5
JKL
7
PQRS
6
MNO
8
TUV
9
WXYZ
0
1
2
ABC
4
GHI
3
DEF
5
JKL
7
PQRS
6
MNO
8
TUV
9
WXYZ
0
Speaker
It is possible to complete your current call and make a new call without hanging
up the phone. Press the programmed [NEW] button to disconnect your existing
call, wait for dial tone and then make a new call on the same line. If this [NEW]
button does not appear on your phone, press the soft button corresponding to the
NEW option on the LCD panel.
Page 57

4-23
Busy Line Queuing With Callback
If there is no available C.O. line to make your call, you can set a callback to
reserve a line. When a line becomes free, your phone will ring.
1. If you receive a busy tone when you select a C.O. line,
press the programmed [CBK] button or dial [4][4].
Or, press the soft button corresponding to the
CBK option on the LCD panel.
2. When confirmation tone is heard, replace the handset.
3. When the line becomes free, the system will call you
back.
4. Lift the handset or press the [Send] button, wait for
dial tone and dial the number you require.
r
O
4
GHI
4
GHI
z
z
Z
Send
r
O
If you don’t answer a callback within 30 seconds, it will be cancelled.
You can have a maximum of five callbacks set on C.O. lines at any one time.
Page 58

4-24
Chapter 4 Basic Features
Cancelling a Callback
1. Press the [CBK] button or dial [4][4]. You will hear
confirmation tone.
2. Press the [Hold] button. This will cancel the oldest
callback you have set. Do this for each callback you
wish to cancel.
r
O
4
GHI
4
GHI
Hold
Page 59

4-25
Answering Outside Calls
For an incoming outside call, lift the handset or press the [Send] button to answer on
the speakerphone.
(Also refer to Ring Preference in Chapter 10.)
If a call is flashing on a button but not ringing, you must press the flashing button
to answer the call.
Universal Answer
If a call is ringing in the Night mode, it may be programmed to ring through an
external speaker. In this case, press [6][7] or the programmed [UA] button to
answer the call.
Holding a Call
There may be occasions when you need to temporarily interrupt your current call
and keep the other party on hold (for example, to get more information or to
answer an important incoming second call). The types of hold function available
are:
System hold Puts the current call on hold. Other phone users can take it
Exclusive hold Puts the current call on hold. Other phone users cannot take
Automatic hold Puts the current call on hold and automatically connects you
Consultation hold Puts the current call on hold and allows you to consult with
off hold.
it off hold.
to the new incoming call. Automatic hold is a feature that
must be programmed for your phone.
another phone user.
Page 60

4-26
Chapter 4 Basic Features
System Hold
1. While on a call, press the [Hold] button.
The call on hold will flash green on a Call button
on your phone, and will flash red on the line button
on other phones. (Another user can press the flashing
red button to take the call off hold if necessary. See
Retrieving Calls Held at Another Extension, below.)
2. To take the call off hold, press the flashing Call button.
3. Resume your conversation.
Automatic Hold
Hold
1
2
ABC
4
GHI
3
DEF
5
JKL
7
PQRS
6
MNO
8
TUV
*
9
WXYZ
0
B
A
C
F
E
D
If a second call arrives while you are busy on an outside call, it will flash at a Call
button on your phone. If the Auto Hold feature is enabled at your phone (see
below), pressing the flashing button will automatically put your current call on
hold and connect you to the new call.
Page 61

4-27
To enable the Auto Hold feature:
1. Press the [Transfer] button.
Transfer
2. Dial [1][1][0].
1
1
1
1
0
0
PQRS
3. Dial [0][0][1] to enable, or [0][0][0] to disable, the
Auto Hold feature.
O
1
0
1
0
X
0
1
1
0
0
0
PQRS
0
1
PQRS
4. Press the [Transfer] button to save the setting.
Transfer
You cannot use this feature for holding intercom calls. Intercom calls will be
disconnected.
Page 62

4-28
Chapter 4 Basic Features
Exclusive Hold
To place an outside call on hold so that other users cannot access it :
1. Press the [Hold] button twice.
2. The call will flash green on a Call button on your
phone and will show a steady red light on other phones.
3. To retrieve the call on hold, press the flashing
green button or press the [Hold] button three times.
Hold
O
r
Hold
Intercom calls will always be set on exclusive hold.
Page 63

4-29
Consultation Hold
You can place an outside call on hold and make a call to another extension for
consultation.
1. Press the [Transfer] button; you will hear transfer
dial tone. Your call is placed on transfer hold.
2. Dial the extension number.
3. Consult with the internal party. The outside party
cannot hear your conversation.
4. Press the [Transfer] button to return to the outside
party.
Transfer
4
7
PQRS
*
0
B
A
C
F
D
Transfer
1
2
ABC
GHI
3
DEF
5
JKL
6
MNO
8
TUV
9
WXYZ
E
Repeatedly pressing the [Transfer] button will toggle between the outside party
and internal extension. Neither party can hear your conversation with the other.
Page 64

4-30
Chapter 4 Basic Features
Hold Recall
If you leave a call on hold longer than the hold timer set in the system, it will
recall your phone. The Call button will show a slow flashing amber light. If you
do not answer the recall within a set time, it will go to the system operator.
Lift the handset or press the [Send] button to answer the recall.
Retrieving Calls Held at Another Extension
When a call is on hold at another extension, the appropriate line button on your
phone (if it is programmed) will have a flashing red light. To retrieve the call on
hold, press the line button.
When a call is on hold at another extension but you do not have a line key, dial
[1][2] followed by the line number or the extension number of the extension that
placed the call on hold.
Page 65

4-31
Parking Calls
You can park an outside call in one of 10 “parking orbits” (0-9) to be picked up by
another user.
1. Press the programmed [PARK] button.
Or, press the soft button corresponding to the
PARK option on the LCD panel.
(If you press a dedicated [PARK] button with an
extender for a parking orbit, skip step 2.)
2. Press the orbit number required, [0]-[9]
(the [PARK] button will flash.)
3. To have the parked call picked up by another user,
notify them of the parking orbit number.
To Retrieve a Parked Call
To pick up a parked call, press the [PARK]
button followed by the required orbit number,
or press the flashing [PARK] button.
1
2
ABC
4
GHI
3
DEF
5
JKL
7
PQRS
6
MNO
8
TUV
*
9
WXYZ
0
Refer also to “Call Park and Page” in Chapter 9.
Page 66

4-32
Chapter 4 Basic Features
Transferring Calls
You can quickly and easily transfer your current call to another extension. A
‘blind’ transfer means you don’t announce the call, unlike a ‘screened’ transfer
where you do.
1. While on a call, press the [Transfer] button.
2. Dial the extension or group number, or press the
programmed [DS] button. Your current call
is automatically put on transfer hold. (See Note, below.)
3. For a ‘blind’ transfer, hang up when you hear ringing.
For a ‘screened’ transfer, wait for the called party to
answer and advise them of the call, then hang up.
Transfer
4
7
PQRS
*
0
1
2
ABC
GHI
3
DEF
5
JKL
6
MNO
8
TUV
9
WXYZ
z
z
Z
Reconnecting with the Outside Party
If the transfer is refused and the called extension hangs up, you will be
reconnected to the outside line. Alternatively, you can press the [Transfer] button
to return to the outside party.
Transferring to Another Extension
If you wish to send the call to another extension without waiting for the first
extension to hang up, simply press another [DS] button. Alternatively, press the
Call button or C.O. line button to return to the outside party and begin the transfer
process again.
Page 67

4-33
- When the extension answers, you may toggle between the parties by pressing
the [Transfer] button. Neither party can hear the other until the transfer is
complete.
- If you receive No More Calls tone, the extension has no button available to
receive another call or is in Do Not Disturb mode. Press the [Transfer] button to
return to the outside party.
- You cannot transfer an intercom call by pressing the [DS] button. Dial the
destination extension number.
- When you are transferring a call to a phone set for Voice Announce or Auto
Answer, the transferred call will always ring the phone.
Transfer With Camp-On
When you are transferring a call to another extension and you receive a busy
signal, you may “camp on” the call to this extension. The extension will be alerted
that a call is waiting (see Call Waiting, below).
To camp on when transferring, simply hang up when you hear a busy signal.
Transfer To Voice Mail
This feature is used to send a call directly to a voice mailbox. Your phone must
have a programmed [VT] button to accomplish this.
1. Press the [VT] button while you are
on a call. Or, press the soft button corresponding
to the [VT] entry on the LCD panel.
2. Dial the mailbox number.
1
2
ABC
4
GHI
3
DEF
5
JKL
7
PQRS
6
MNO
8
TUV
*
9
WXYZ
0
3. Hang up.
z
z
Z
Page 68

4-34
Chapter 4 Basic Features
Call Waiting
If an outside call or other extension has camped-on to you, your phone will ring
and the waiting call’s button will flash green.
1. Press the flashing button to answer the waiting call.
2. If your phone has the Auto Hold feature set,
your current call will go on hold automatically and
you are connected to the new call.
If this feature is not set, press the [Hold]
button and then press the flashing button to answer
the new call.
(Or, finish the current call and hang up. The waiting
call will ring. Lift the handset or press the [Send]
button to answer the new call.)
Hold
Page 69

5-1
Chapter 5 Program Menus
ITP- and DS-5000D Series phones are equipped with Navigation buttons for easy
use of features and menus. This chapter describes the functions of each Navigation
button and the procedures for using the various applications that are implemented
by the menu buttons.
Navigation Buttons
Menu Button
The [Menu] button displays the main menu (see Main Menu, below).
Send Button
If you press [Send] while the phone is idle, you enter the [OUTGOING LOGS]
function.
If you press [Send] in dial mode, you enter the [OUTGOING LOGS] status
regardless of the numbers previously pressed.
If you press [Send] while an incoming call is ringing at your phone, the
speakerphone is turned on.
If you press [Send] while using the [OUTGOING LOGS], [INCOMING LOGS],
[SPEED DIAL] or [DIRECTORY DIAL] function to select a number, the selected
number will be dialled.
Cancel
Menu Send
Figure 5.1 Navigation Buttons
Enter
End
Arrow Button
Page 70

5-2
Chapter 5 Program Menus
End Button
This button is used to disconnect calls or to exit the menu mode.
Cancel Button
The [Cancel] button is used in menu mode to move to the previous menu level. If
you press [Cancel] when at the first menu level, you exit menu mode.
[Cancel] is also used to erase numbers or characters you enter on the LCD panel.
Enter Button
This button is used in menu mode to select or save the item the cursor is indicating.
This button may also be used as the [NND] (Name/Number Display) button when
receiving calls.
The [NND] button displays ‘caller number’, ‘caller name’, and ‘received time’ in
sequence as you press the button, if caller information is available.
Direction (Arrow) Buttons
These buttons are used for scrolling through menu items and when editing (such
as entering or cancelling contents in the LCD panel).
button
Move to the previous menu.
button
Move to the next menu.
button
If a phone number too long for the LCD panel is displayed, move left to
display beginning digits not showing on the LCD.
button
If a phone number too long for the LCD panel is displayed, move right to
display following digits not showing on the LCD.
Page 71

5-3
Main Menu
Press the [Menu] button to see the main menu:
Press the up and down arrow button to scroll through the options 1-6.
SELECT MENU
1. OUTGOING LOGS
2. INCOMING LOGS
3. SPEED DIAL
4. DIRECTORY DIAL
5. FORWARD SET
6. ALARM REMINDER
Calls are not interrupted if the [Menu] button is pressed while you talking. If you
press the [End] button, you will automatically exit from the menu mode.
How to Select Menu Items
Use the direction buttons or the [uVo l u m e t] buttons to move to the
item or press the dial button corresponding to the item (e.g. 3 for Speed Dial).
Press the [Enter] button to select the item.
Press the [End] button to exit menu mode.
If you press any button other than the Navigation buttons, you will exit menu
mode.
If someone calls you while you are in menu mode, they will hear busy tone.
Page 72

5-4
Chapter 5 Program Menus
Viewing and Redialling Recently Called Numbers
Up to 50 of your most recently called numbers can be saved in the system’s
memory (your system administrator can tell you what number is set). You can
view these numbers and call them again using the menu.
1. Press the [Menu] button to display the main menu.
2. Select [1.OUTGOING LOGS].
3. The list of recently called numbers is displayed. You can verify each number
on the list in turn using the buttons or the [uVo l u m e t] buttons.
Use the buttons to view long numbers that do not fully appear on the
LCD.
4. To redial a number, move to the number you require and press the [Send]
button.
Page 73

5-5
Viewing and Calling Recently Received Numbers
Up to 50 of your most recently received numbers can be saved in the system’s
memory (your system administrator can tell you what number is set). You can
view these numbers and call them using the menu..
1. Press the [Menu] button to display the main menu.
2. Select [2.INCOMING LOGS].
3. The list of recently received numbers is displayed. You can verify each
number on the list in turn using the direction buttons or the
[uVo l u m e t] buttons. Use the direction buttons to view long
numbers that do not fully appear on the LCD.
4. To dial a number, move to the number you require and press the [Send] button.
Viewing and Calling Personal Speed Dial Numbers
Using the menu, you can view and call the personal speed dial numbers you have
created.
1. Press the [Menu] button to display the main menu.
2. Select [3.SPEED DIAL]. The submenu below is displayed.
1. PERSONAL SPEED
2. SYSTEM SPEED
Select [1.PERSONAL SPEED].
3. The saved personal speed dial list appears. You can verify each number on the
list in turn using the direction buttons or [uVo l u m e t] buttons. Use
the direction buttons to view long numbers that do not fully appear
on the LCD.
Page 74

5-6
Chapter 5 Program Menus
4. To call a speed dial number, move to the number you require and press the
[Send] button to make.
Viewing and Calling System Speed Dial Numbers
You can view and call system speed dial numbers designated by the system
administrator.
1. Press the [Menu] button to display the main menu.
2. Select [3.SPEED DIAL]. The submenu below is displayed.
1. PERSONAL SPEED
2. SYSTEM SPEED
Select [2.SYSTEM SPEED].
3. The system speed dial list appears. You can verify each number on the list in
turn using the direction buttons or [uVo l u m e t] buttons. Use the
direction buttons to view long numbers that do not fully appear on
the LCD.
4. To call a system speed dial number, move to the number you require and press
the [Send] button.
Page 75

5-7
Viewing and Calling Personal Speed Dial Numbers by Name
You can view and call a personal speed dial number using the name associated
with it.
1. Press the [Menu] button to display the main menu .
2. Select [4.DIRECTORY DIAL]. The submenu below is displayed.
1. PERSONAL SPEED
2. SYSTEM SPEED
3. STATION NUMBER
Select [1.PERSONAL SPEED].
3. Use the dial buttons to enter the first letter of the name you want to find (e.g.
M for Matthew) and press the [Enter] button.
Enter 1st letter
M
The first personal speed dial number found for names starting with the
entered letter is displayed, e.g.
00:MARTIN
9-1234563224
If there are no names starting with the letter entered, an error message is
displayed and you can enter another letter or press [End] to exit menu mode.
Page 76

5-8
Chapter 5 Program Menus
4. Scroll through names on the list using the direction buttons or the
[uVo l u m e t] buttons. Use the direction buttons to view long numbers
that do not fully appear on the LCD.
Press the [Cancel] button to return to the previous menu.
5. To dial a number, scroll to it in the list and press the [Send] button.
Viewing and Calling System Speed Dial Numbers by Name
You can view and call a system speed dial number using the associated name
designated by the system administrator.
1. Press the [Menu] button to display the main menu.
2. Select [4.DIRECTORY DIAL]. The submenu below is displayed.
1. PERSONAL SPEED
2. SYSTEM SPEED
3. STATION NUMBER
Select [2.SYSTEM SPEED].
3. Use the dial buttons to enter the first letter of the name you want to find (e.g.
M for Matthew) and press the [Enter] button.
Enter 1st letter
M
Page 77

5-9
The first system speed dial number found for names starting with the entered
letter is displayed, e.g.
00:MARTIN
9-4323456662
If there are no names starting with the letter entered, an error message is
displayed and you can enter another letter or press [End] to exit menu mode.
4. Scroll through numbers on the list using the direction buttons or
[uVo l u m e t] buttons. Use the direction buttons to view long numbers
that do not fully appear on the LCD.
5. To dial a number, scroll to it in the list and press the [Send] button.
Viewing and Calling Extension Numbers by Name
You can view extensions by name or call an extension directly from the menu.
1. Press the [Menu] button to display the main menu.
2. Select [4. DIRECTORY DIAL]. The submenu below is displayed.
1. PERSONAL SPEED
2. SYSTEM SPEED
3. STATION NUMBER
Select [3.STATION NUMBER].
3. Use the dial buttons to enter the first letter of the name you want to find (e.g.
M for Matthew) and press the [Enter] button.
Page 78

5-10
Chapter 5 Program Menus
Enter 1st letter
M
The first extension number found for names starting with the entered letter is
displayed, e.g.
3645:
MARTIN
If there are no names starting with the letter entered, an error message is
displayed and you can enter another letter or press [End] to exit menu mode.
4. Scroll through the numbers on the list using the direction buttons or
[uVo l u m e t] buttons. Use the direction buttons to view long numbers
that do not fully appear on the LCD.
5. To dial a number, scroll to it in the list and press the [Send] button.
Setting Call Forward Type and Destination
You can set forwarding options on your phone to send your incoming calls to
another phone (or to voice mail if this is set up for you). The Forward Type
determines which calls are forwarded: all calls to your phone (ALL); all calls
arriving when you are already busy on a call (BUSY); calls not answered within a
specific time for any reason (NO ANS); or calls arriving when you have set Do
Not Disturb (DND) on your phone.
1. Press the [Menu] button to display the main menu.
2. Select [5.FORWARD SET]. The submenu below is displayed.
Page 79

5-11
0. FORWARD TYPE
1. FORWARD ALL
2. FORWARD BUSY
3. FORWARD NO ANS
4. FORWARD DND
3. Select [0.FORWARD TYPE]. The submenu of the available forward types is
displayed.
0. FORWARD CANCEL
1. FORWARD ALL
2. FORWARD BUSY
3. FORWARD NO ANS
4. FWD BUSY/NOANS
4. Select the intended forward type by using the direction buttons, the
[uVo l u m e t] buttons, or by pressing the dial button corresponding to the
forward type, then press the [Enter] button.
5. The forward type is selected and you move to the upper menu displaying the
submenu shown below.
1. FORWARD TYPE
2. ALL FWD NO.
3. BUSY FWD NO.
4. NOANS FWD NO.
5. DND FWD NO.
6. Use the direction button or the [uVo l u m e t] button, or select the
number of the forward type you have selected using the dial button, and press
the [Enter] button.
7. Enter the number to be forwarded using the dial buttons. For example, if you
selected [1. ALL FORWARD], enter the numbers in the LCD panel as shown
below.
Page 80

5-12
Chapter 5 Program Menus
ALL FWD NO.
9 1234567
Use the direction button to move the cursor in the number input
screen. Use the [Cancel] button to erase all entered numbers and re-enter
numbers.
8. Press the [Enter] button to save the number entered and to move to the upper menu.
9. Press the [End] button and end the menu mode.
Setting Reminder Alarms
You can set the time and type of reminder alarms. When set, you will hear a series
of short rings at the set time(s) and “Alarm Reminder” is displayed on the LCD
panel. You can set up to three different alarms (1-3) and each can be set to ring
TODAY only at the set time or DAILY (every day) at the set time. An alarm can
also be set to NOTSET, in which case it does not ring.
1. Press the [Menu] button to display the main menu.
2. Select [6.ALARM REMINDER]. The submenu below is displayed.
1. ALARM 1
2. ALARM 2
3. ALARM 3
3. Use the direction buttons or the [uVo l u m e t] buttons, or press the
dial button corresponding to the alarm number, and press the [Enter] button.
The submenu for setting the alarm type and time appears.
Page 81

5-13
1. ALARM TYPE
2. ALARM TIME
4. Select [1. ALARM TYPE], and press the [Enter] button.
The submenu for the alarm type is displayed.
0. NOT SET
1. TODAY
2. DAILY
5. Use the direction buttons, or the [uVo l u m e t] buttons, or the
relevant dial button to select the alarm type (e.g. TODAY), and press the
[Enter] button. The selected alarm type is saved and you move to the previous
menu.
1. ALARM TYPE
2. ALARM TIME
6. Select [2. ALARM TIME] and press the [Enter] button. The alarm time screen
is displayed.
ALARM TIME
H H:mm
7. Use the dial buttons to enter the alarm time in 24-hour clock format (e.g.
13:30 for 1.30 pm).
Use the direction buttons to move the cursor on the LCD. Use the
[Cancel] button to delete a set time and re-enter it.
8. Press the [Enter] button to save the entered time and to move to the previous
menu.
9. Press the [End] button to exit menu mode.
Page 82

5-14
Chapter 5 Program Menus
To Answer an Alarm
Answer an alarm by lifting the handset. If you do not answer, the alarm will ring
up to four times at short intervals before cancelling.
To Cancel an Alarm
Select the alarm number as described in the procedure above. Then either select
the alarm type as NOT SET or set the alarm time to 0000. Then press the [End]
button to exit menu mode.
Page 83

6-1
Chapter 6 Dialling Features
Dialling features comprise:
• Speed dial numbers and names (including one-touch speed dial buttons)
• Chain dialling
• Redialling numbers
• Pulse to Tone dialling changeover
• Conference calls
Speed Dialling
Your system may already have a system list of speed dial numbers for frequently
used phone numbers. You may also assign numbers to a personal speed dial
number list. This way you don’t have to dial the whole number but simply dial the
2- or 3-digit speed number instead. You can also assign a speed dial number to a
programmed [SPD] button for even faster one-touch speed dialling. This is
particularly useful for long phone numbers. Names can also be assigned to each
speed dial.
Buttons “A” to “F”
When programming speed dial numbers, the programmable buttons designated as
A, B, C, D, E, and F can be used.
A B C D E F
Figure 6.1 Buttons A-F (5021D)
Page 84

6-2
Chapter 6 Dialling Features
A,B,C,D,E, and F buttons are the first six buttons on the bottom line of
programmable buttons on both types of phone (ITP-5021D and 5014D).
Button Description
A
B Insert “FLASH” (F)
C Insert “PAUSE” (P)
D Convert from the pulse dialling (mechanical) to tone dialling (electronic). If your
E
F
Hold Clear a speed dial number
Toggle between uppercase and lowercase characters when entering speed dial
names.
system uses pulse dialling C.O. lines, pressing D while entering a speed dial
number causes all subsequent digits to be sent as DTMF tones.
Insert “[“, character to prevent the actual phone number, or some of the digits,
from showing on the LCD panel when the speed dial number is used. Any digits
entered after the “[“ symbol are displayed as “*” only. Pressing E again inserts
the “]” character so any digits entered after the “]” character will display on the
LCD.
For example: 1234[567890 will display as 1234******, and 1234[5678]90 will
display as 1234****90
Input a name for a speed dial number while programming the numbers (F button
toggles between number entry and name entry during programming)
Page 85

6-3
Programming Personal Speed Dial Numbers
Your station can be assigned up to fifty speed dial numbers (00-49). Ask the
system administrator how many are assigned for you.
To program personal speed dial numbers:
1. Press the [Transfer] button and dial [1][0][5].
1
Transfer
O
r
0
5
JKL
2. Dial the speed dial number (00-49), or use the
1
2
[uVo l u m e t] buttons to select and press the right
soft button.
*
ABC
4
GHI
3
DEF
5
JKL
7
PQRS
6
MNO
8
TUV
9
WXYZ
0
3. If programming an outside number, enter the outside line
access code or line number (e.g. ‘9’, ‘702’, etc). A hyphen
(“-“) is automatically entered after the number.
1
2
ABC
4
GHI
3
DEF
5
JKL
7
PQRS
6
MNO
8
TUV
*
9
WXYZ
0
1
2
4. Enter the phone number to be saved (maximum of 24
digits) (see table above for special characters A-F)
*
ABC
4
GHI
3
DEF
5
JKL
7
PQRS
6
MNO
8
TUV
9
WXYZ
0
Tip: To enter a name for this speed dial number, press the
F button to go to step 4 of the procedure below.
5. Press the [Transfer] button to save the number.
Transfer
Page 86

6-4
Chapter 6 Dialling Features
Assigning a Name to a Speed Dial Number
A name up to 11 characters can be assigned for each speed dial number. This
name is used to dial numbers using the Dialling by Directory Name feature (see
Chapter 4). Names can be assigned while programming speed dial numbers
(above) or using a different program, as described here.
1. Press the [Transfer] button.
2. Dial [1][0][6].
3. Enter the speed dial number to be assigned a name
(00-49).
4. Enter a name. (Refer to the Appendix in this manual
for how to enter characters.)
Tip: If you used the F button in order to enter a name while
programming a speed dial number (see previous procedure),
press the F button again to return to step 4 of that procedure.
5. Press the [Transfer] button to save the speed dial name.
Transfer
7
PQRS
*
0
7
PQRS
*
0
Transfer
1
0
6
MNO
1
2
ABC
4
GHI
3
DEF
5
JKL
6
MNO
8
TUV
9
WXYZ
1
2
ABC
4
GHI
3
DEF
5
JKL
6
MNO
8
TUV
9
WXYZ
Page 87

6-5
Dialling Using Speed Dial Numbers
You can dial speed dial numbers from the list of system numbers (500-999)
created by the system administrator or from the personal list of numbers (00-49)
you have created.
1. Press the programmed [SPD] button or dial [1][6].
1
6
MNO
2. Dial the speed dial number programmed for the
1
2
number you want to call (e.g. 00)
*
ABC
4
GHI
3
DEF
5
JKL
7
PQRS
6
MNO
8
TUV
9
WXYZ
0
The number is dialled automatically.
HELLOW
Alternatively, to dial one of your first 10 personal speed dial numbers:
Without lifting the handset, hold down a dial pad button 0–9
corresponding to the speed dial number (00–09) for approximately two
seconds. The telephone number programmed in the personal speed dial
location will be dialled automatically.
Page 88

6-6
Chapter 6 Dialling Features
Programming One-touch Speed Dial Buttons
You can assign frequently used speed dial numbers to one-touch speed dial
buttons for even more convenience. To do this, you must have a programmed
[SPD] button for each speed dial you require.
1. Press the [Transfer] button.
2. Dial [1][0][7].
3. Press a [SPD] button.
4. Enter the speed dial number (00-49 or 500-999)
to be assigned to this button.
5. Press the [Transfer] button to save the selected number.
Now, to make a call to the number, simply press this
speed dial button.
Transfer
4
7
PQRS
*
0
Transfer
1
0
7
PQRS
1
2
ABC
GHI
3
DEF
5
JKL
6
MNO
8
TUV
9
WXYZ
Page 89

6-7
Chain Dialling
After the speed dial number is pressed, additional number or desired speed dial
number can be dialed manually.
After the first speed dial number, press the programmed [SPD] button or dial
[1][6] and then dial another speed dial number. Alternatively, after the speed dial
number, dial the additional numbers manually.
Redial an Outside Number
To redial the last outside number you called, press the [Redial] button, or press
and hold down the [Send] button, or dial [1][9].
Redial does not apply to intercom calls.
Save Number with Redial
To save the number you just dialled in memory, select the [SAVE] option on the
LCD panel before hanging up. (Use the Scroll and relevant soft button to select.)
The saved number can be redialled at any time by selecting the [SNR] option on
the LCD panel or dialling [1][7].
- The saved number will be kept in memory only until you save another number.
- Redial does not apply to intercom calls.
Page 90

6-8
Chapter 6 Dialling Features
Automatic Redial/Retry
When you make an outside call and receive a busy signal, the system can
automatically redial the number for you. It will automatically redial at a preprogrammed interval for up to 99 attempts.
1. When you hear a busy signal, press the
programmed [RETRY] button or press the soft
button corresponding to the [RETRY]
option on the LCD panel.
2. The system will reserve the line and automatically
redial the same number for you. You will hear the call
being made through the speaker. The microphone is
muted.
3. When the called party answers, pick up the
handset or press the [Speaker] or [Send] button
before you begin speaking.
You must answer within 10 seconds.
Speaker
Send
O
r
- If you make another call in the meantime, auto-redial is cancelled.
- To cancel a retry, lift and replace the handset.
Pulse to Tone Changeover
When making an outside call on a pulse dial (mechanical or
rotary) line, press the [#] button. All digits dialled
subsequently will be sent as tones.
Page 91

6-9
Conference Calls
You can make a conference call with a group of up to five parties, including
yourself. These can be other extensions and outside lines in any combination.
The OfficeServ system allows some stations to pre-assign up to five conference
groups so you can set up a conference call by simply pressing a programmable
[Group Conference] button. (See Programming Conference Groups, below.)
1. Call the first number to be included in the conference
(Press Twice)
1
2
5
JKL
TUV
9
WXYZ
Conference
Conference
Conference
ABC
3
DEF
6
MNO
Conference
Conference
and press the [Conference] button when answered.
You will hear conference tone.
2. Make another call, either intercom or outside.
3. When answered, press the [Conference] button.
You will hear conference tone again.
4. Repeat steps 2-3 for each party you wish to connect.
When the final party answers, press the [Conference]
button twice to connect all callers.
To drop a party from your conference call
Press the [Conference] button and dial the extension or
outside line number to be dropped.
Press the [Conference] button again to reestablish the
conference.
4
GHI
7
PQRS
8
*
0
Page 92

6-10
Chapter 6 Dialling Features
When attempting to add a party to the conference and you are not able to reach
them, simply press the [Conference] button again.
Programming Conference Groups
(Refer to your system administrator to confirm that this option is available to you.)
1. Press the [Transfer] button.
2. Dial [1][1][8].
3. Select the required Conference Group number
using the [uVo l u m e t] buttons and press the right
soft button.
4. Select ‘Name’ and press the right soft button to
enter the Conference Group name. (Refer to the
Appendix for how to enter characters.) Press the right
soft button to save the name.
5. Using the [uVo l u m e t] buttons, select [MBR1–4]
and press the right soft button
6. Dial the extension number or outside telephone number,
remembering to dial the trunk access code first, and
press the right soft button.
7. Repeat steps 5 and 6 to add conference group members
8. Save the settings by pressing the [Transfer] button.
Transfer
4
7
PQRS
*
0
4
7
PQRS
*
0
4
7
PQRS
*
0
Transfer
1
2
ABC
GHI
3
DEF
5
JKL
6
MNO
8
TUV
9
WXYZ
Volume
1
2
ABC
GHI
3
DEF
5
JKL
6
MNO
8
TUV
9
WXYZ
Volume
1
2
ABC
GHI
3
DEF
5
JKL
6
MNO
8
TUV
9
WXYZ
Page 93

6-11
Making a Group Conference Call
Press the programmed [GCONF] button followed by the group number (1–5). The
conference will be set up automatically.
You can set up a [GCONF] button for each group by adding extenders (1–5) if
preferred.
Page 94

7-1
Chapter 7 Call Pickup
This chapter explains how to intercept (pick up) a call that is ringing at another
extension.
Station Call Pickup
If a call rings at another extension and you know the extension number:
1. If the hot keypad feature is switched off, pick up the
handset or press the [Speaker] button.
2. Dial [6][5].
3. Dial the number of the ringing extension.
1
6
MNO
1
5
JKL
1
2
ABC
4
GHI
3
DEF
5
JKL
7
PQRS
6
MNO
8
TUV
*
9
WXYZ
0
Page 95

7-2
Chapter 7 Call Pickup
Group Call Pickup
Extensions may be assigned to call pickup groups. If this is the case, when a call
rings at another extension, and you know the pickup group number:
1. If the hot keypad feature is switched off, pick up the
handset or press the [Speaker] button.
2. Dial [6][6] and dial the pickup group number.
Or
Press the flashing [GROUP PICKUP] button, if
programmed,.
1
6
MNO
1
6
MNO
- A station number (extender) can be assigned to the [GROUP PICKUP] button.
- Station Call Pickup and Group Call Pickup cannot answer the recalls arriving on
stations, and are only used for newly incoming calls (external/internal) and
operator recalls.
Page 96

8-1
Chapter 8 Call Forwarding
This chapter explains how you can forward calls sent to you. The main reasons for
doing this are to allow someone else to answer your calls—or to record the calls if
you have voice mail set up for you—if you are unable to answer calls for any
reason, or to redirect calls to another phone you are temporarily using.
Refer to Setting Call Forward Type and Destination in Chapter 5 for a
description of forwarding types, and how to use the menus to set forwarding. This
chapter tells you how to set forwarding using the special dial codes programmed
in the system.
If your phone has the FWD ALL, FWD BUSY, and FWD NO ANSWER buttons
programmed, you can set the type of forwarding required by pressing one of the
buttons. In this case, the button LED lights to indicate which forward option is
enabled. Otherwise, use the dialling codes as described below.
Cancelling Call Forwarding
To cancel any forwarding options you set (except Forward DND), dial [6][0][0].
Page 97

8-2
Chapter 8 Call Forwarding
Forwarding All Calls
To forward all calls sent to your phone:
1. Dial [6][0][1].
2. Enter the extension number, group number, or external
number where your calls are to be sent
3. Hang up after the attention tone.
6
MNO
0
1
1
2
ABC
4
GHI
3
DEF
5
JKL
7
PQRS
6
MNO
8
TUV
*
9
WXYZ
0
z
z
Z
- The extension receiving the forwarded calls can transfer the call back to your
extension. This feature is useful when you are expecting an important call and
do not want to be disturbed by other calls.
- If you set Forward All Calls and there is no [FORWARD ALL] button, the
[Transfer] button lights.
Page 98

8-3
Forward Busy
To forward calls arriving when you are busy on another call:
1. Dial [6][0][2].
6
2. Enter the extension number, group number, or external
number where your calls are to be sent.
3. Hang up after the confirmation tone.
MNO
0
2
ABC
1
2
ABC
4
GHI
3
DEF
5
JKL
7
PQRS
6
MNO
8
TUV
*
9
WXYZ
0
z
z
Z
Forward No Answer
To forward calls arriving when you are away from your desk (calls will ring and
then be forwarded after a set time):
1. Dial [6][0][3].
2. Dial the extension number, group number, or external
number where your calls are to be sent.
3. Hang up after the confirmation tone.
6
MNO
0
3
DEF
1
2
ABC
4
GHI
3
DEF
5
JKL
7
PQRS
6
MNO
8
TUV
*
9
WXYZ
0
z
z
Z
Page 99

8-4
Chapter 8 Call Forwarding
Forward Busy/No Answer
If the Forward Busy and Forward No Answer options are both already set, calls
are forwarded to the numbers specified for each of the options. You can select to
have both options enabled at the same time.
1. Dial [6][0][4].
2. Hang up after the confirmation tone.
Forward DND
6
MNO
0
4
GHI
z
z
Z
Normally, when you set your phone in Do Not Disturb (DND) mode, incoming
callers hear busy tone. If you select Forward DND, calls are forwarded to another
destination when you put your phone in DND mode. Forward DND is cancelled
when you cancel DND mode.
1. Dial [6][0][5].
6
MNO
0
5
JKL
2. Dial the extension number, group number, or external
number where your calls are to be sent.
1
2
ABC
4
GHI
3
DEF
5
JKL
7
PQRS
6
MNO
8
TUV
*
9
WXYZ
0
3. Hang up after the confirmation tone.
z
z
Z
Page 100

8-5
Forward Follow Me
This feature has two purposes. The first is to allow you to transfer calls ringing at
your normal extension to the extension you are currently using. The second is to
allow you to transfer calls from another extension to your own (called Remote
Forwarding).
To transfer all calls ringing at your phone to the phone you are
currently using:
1. Dial [6][0][6] on the phone you are currently using.
2. Dial your normal extension number.
3. Hang up after the confirmation tone.
6
MNO
0
6
MNO
1
2
ABC
4
GHI
3
DEF
5
JKL
7
PQRS
6
MNO
8
TUV
*
9
WXYZ
0
z
z
Z
 Loading...