


SAMSUNG I110 ILLUSION
Users ManUal
Front
Key Functions - Front
1. Proximity and Light Sensors: Detects the presence of nearby
objects to control screen display, such as when you hold the
phone to your ear during a phone call. Detects ambient light to
determine screen brightness when the Automatic brightness
setting is enabled, and when taking pictures.
2. Menu Key: Press to display options for the current screen.
3. Home Key: Press to display the Home screen. Press and hold to
display recent applications or launch Task Manager.
4. Back Key: Press to return to the previous screen or option.
5. Search Key: Press to launch Google Search, to search your
device or the web.
6. Earpiece: Use during calls to listen to callers.
Key Functions - Side
1. Volume Key: From the Home screen, press to adjust Master
Volume. During calls or music playback, press to adjust volume.
Press to mute the ringtone of an incoming call.
2. Memory Card Slot: Open to insert a memory card for storage
of pictures, music, and other les.
3. Power/Lock Key: Press and hold to turn the phone on or o.
Press to lock the phone, or to wake the screen for unlocking.
Side
Back
Key Functions - Back
1. 3 Megapixel Camera Lens: Used when taking photos or
recording videos.
2. USB/Power/Accessory Port: Connect a USB cable for charging
or to sync music and les.
3. Microphone: Use during calls to allow callers to hear your voice,
and when recording.
4. External Speaker: Plays ringtones, call audio when in
Speakerphone mode, music and other sounds.
5. 3.5mm Headset Jack: Plug in an optional headset or
TTY equipment.
Getting started
Install the battery
1. Pull on the indentation on the top of the battery cover to remove it.
2. Insert the battery into the phone, aligning the gold contacts on the
battery with the gold contacts in the phone. Push down on the bottom of
the battery until it snaps into place.
3. Align the cover at the bottom and press it rmly into place, making sure
it snaps into place at the sides and top.
Remove the battery
1. Remove the battery cover.
2. Lift the battery up and out of the phone, using the slot provided.
3. Replace the battery cover.
Charge the battery
1. Insert the charger cable into the port.
2. Plug the charging head into a standard AC power outlet.
3. When charging is complete, unplug the charging head from the power
outlet and remove the cable from the phone.
Turning Your Phone On/O
Press and hold Power/Lock key for 3 seconds to turn phone on or o.
CONTINUED ON BACK
Unlocking The Screen
By default, the phone locks automatically when the
screen times out, or you can lock it manually. You
can unlock the phone using one of the default Unlock
screens, or for increased security, use a personal
screen unlock pattern.
Locking the Phone Manually:
• Press the Power/Lock Key on the side of the
phone while the screen is on.
Unlocking the Phone Manually:
• Press the Power/Lock Key to wake the
screen.
• Touch and drag a puzzle piece to t it into the
empty space. Special puzzle pieces display for
missed calls or new messages. Drag a missed call
or message puzzle piece to the empty space to
view the message or call log.
Setting Increased Security:
• Press the Menu Key > Settings > Location
& Security > Set Screen Lock/Change Screen Lock.
• Choose Options: None, Pattern, PIN or Password.
• Follow the onscreen instructions to set a new
Screen Lock.
Making Calls
1. From a Home screen, touch Phone.
2. Touch the digits of the telephone or speed dial
number on the Dialer keypad. While dialing, use
these options:
• Touch Menu > Add to Contacts to add
the number you entered to a new contact, or to
update an existing contact.
• Touch Menu > Speed Dial Setting to dial
or set Speed Dials.
• Touch Menu > Add 2 Sec Pause to insert
a 2-second pause in the telephone number.
• Touch Menu > Add Wait to insert a Wait
pause in the telephone number, to pause dialing
to wait for input from you.
3. Touch to place the call.
Making Calls from Contacts:
A contact is an entry that you have created to store
the name, numbers, and other information for people/
groups of interest.
1. From Home screen, touch Contacts.
2. Find the contact and touch it to open the
Contact entry.
3. Touch to dial the default number for
the Contact.
Answering Calls
You can answer incoming calls when phone is locked
or unlocked.
With the phone unlocked, touch Answer.
– or –
With the phone locked, touch and drag the Answer
puzzle piece to the empty space.
Ending a Call:
• Touch .
Voicemail
Setting Up Voicemail:
1. From the homescreen, touch .
2. Touch and hold 1 (the number 1)to call or
dial *86.
3. Follow the automated instructions to set up your
new password and record a greeting.
Checking Voicemail:
1. From the homescreen, touch .
2. Touch and hold 1 (the number 1)to call or
dial *86.
3. Enter your password.
4. Follow voice prompts.
- or -
When you receive a voicemail, an icon will
appearinyournotications.
1. Pull down the notications bar.
2. Touch the new voicemail. Phone will
automatically call.
3. Enter your password.
4. Follow voice prompts.
Text Messaging
1. From the Home screen, touch Messaging
> New message.
2. Tap the To eld and enter the recipient’s name,
phone number or email address.
3. Touch the Type to compose eld and compose
your message. While composing a message,
touch Menu for these options:
- Add subject: Add a subject eld to the
message and enter a subject. (This option also
converts the message to MMS.)
- Attach: Add content to the message to convert
it to MMS.
• Pictures: Add a picture.
• Capture picture: Take a new picture.
• Videos: Add a video.
• Capture video: Record a new video.
• Audio: Add a sound clip.
• Record audio: Create a new audio clip.
• Slideshow: Add a slideshow of pictures to
this message.
- Add text: Select text from Contacts, Calendar
or Memo to add to the message or just add
text/message.
- Insert smiley: Add a text emoticon to the
message.
- Discard: Cancel the message.
(Options may vary depending on which keyboard is
selected.)
4. Touch to send the message.
Turning Wi-Fi On/O
1. From the Home screen, sweep your nger
downward to display the Notication Panel.
2. Touch Wi-Fi to turn Wi-Fi On/O.
Accessing Internet
Your phone is equipped with a full HTML Browser,
which allows you to access the internet.
• From the Home screen, click on Applications,
select Browser.
Turning Bluetooth On/O
1. From the Home screen, sweep your nger
downward to display the Notication Panel.
2. Touch Bluetooth to turn Bluetooth On/O.
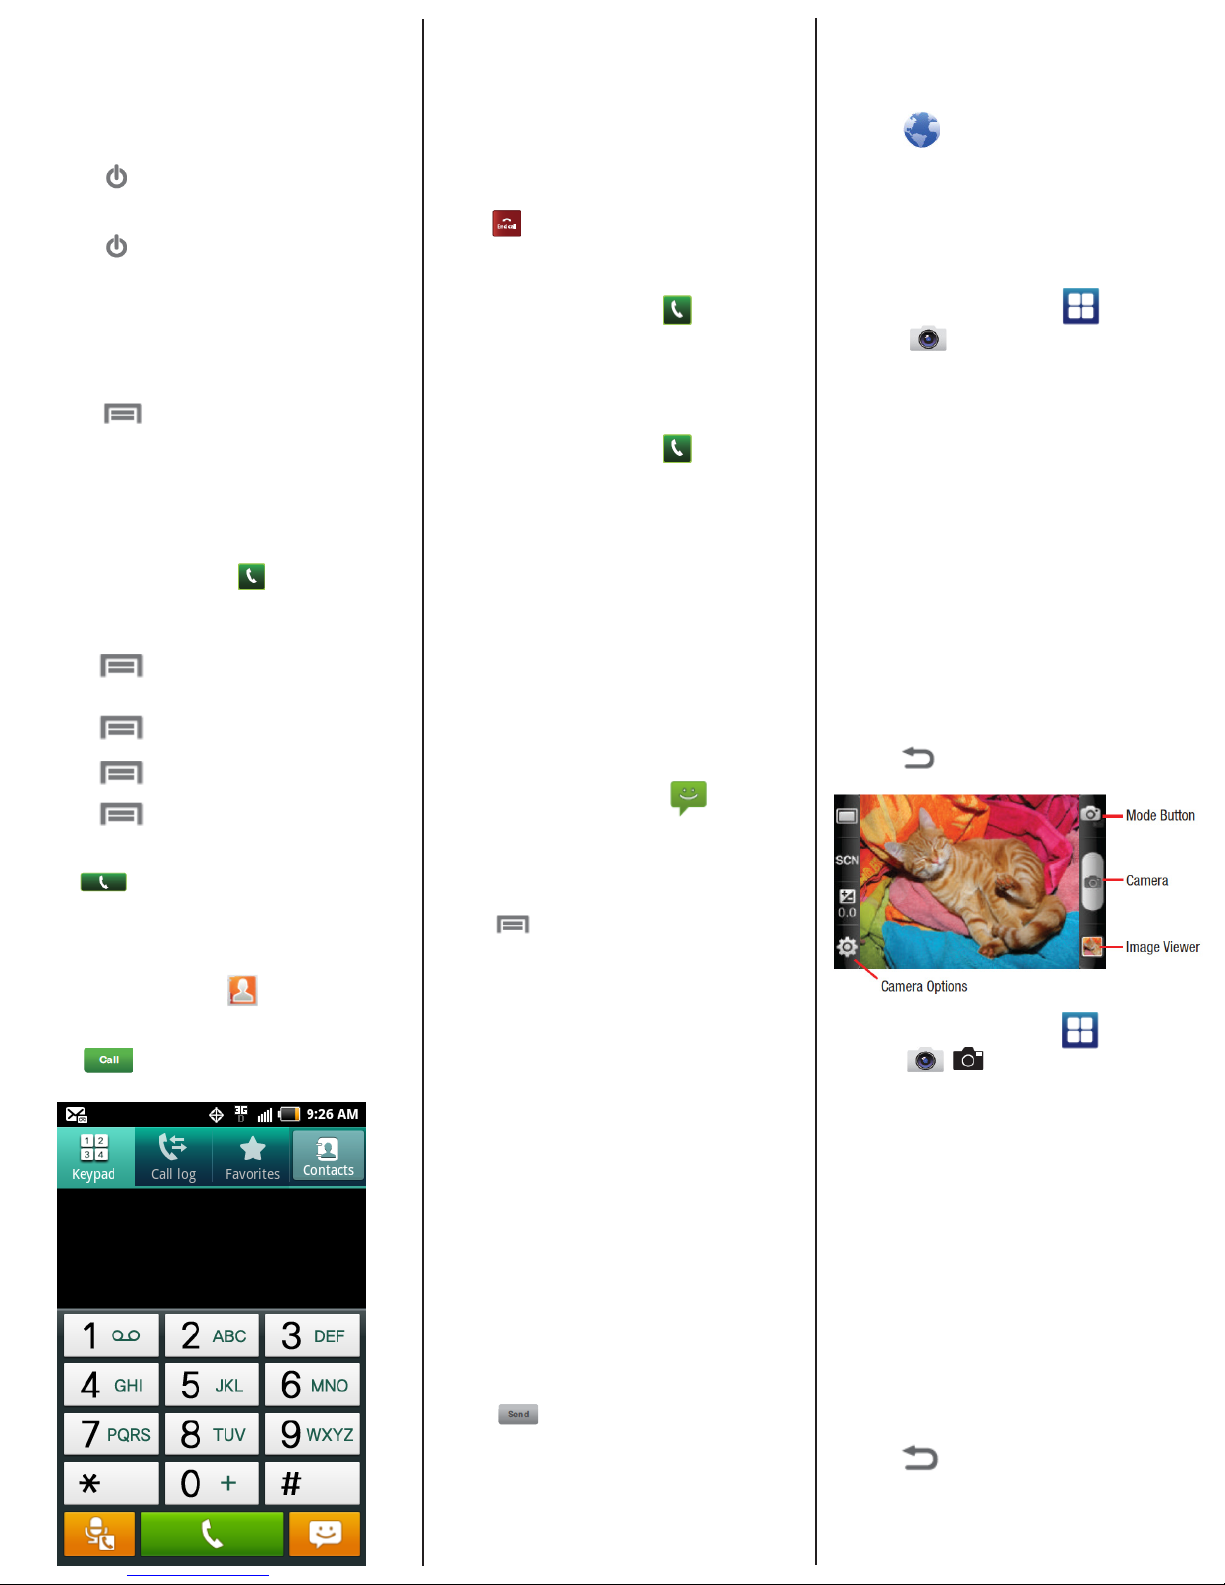
Taking Pictures
1. From the Home screen, touch Applications >
Camera .
2. Using the display as a viewnder, compose your
picture by aiming the lens at the subject.
• Touch the screen to focus on the area you
touched.
• Press the Volume Key to zoom in or out.
3. To take the picture, touch the Camera button.
4. After taking a picture, touch Image Viewer to
view the picture. While viewing the picture, use
these options:
NOTE: If options don’t appear, tap on the picture.
• Touch the zoom icons to zoom incrementally, or
double-tap on the picture to zoom all the way in
or out.
• Touch Delete to erase the picture.
• Touch Share to send the picture via AllShare,
Bluetooth, Email, Gmail, Messaging, or Picasa.
• Touch Set as to assign the picture as a contact
icon, or as wallpaper.
• Touch Back to return to the Camera to take
more pictures.
Taking Video
1. From the Home screen, touch Applications >
Camera > Mode .
2. Using the display as a viewnder, compose your
shot by aiming the lens at the subject.
• Press the Volume Key to zoom in or out.
3. To start recording, touch the Record button.
During recording, the button changes to Pause;
touch Pause to temporarily stop recording.
To resume recording, touch Record again.
4. To stop recording, touch the Stop button.
5. After recording, touch Image Viewer to view the
video. While viewing the video, use these options:
• Double-tap on the video to zoom all the way in or
out.
• Touch Share to send the video via AllShare,
Bluetooth, Email, Gmail, Messaging, or
YouTube.
• Touch Play to review the video.
• Touch Delete to erase the video.
• Touch Back to return to the Camcorder to
record more videos.
NOTE: Pictures and videos can use large amounts
of available space. If you plan to store these on your
phone we recommend purchasing a large capacity
SD card.
 Loading...