

Page 1

User Manual
HW-KM45
For further information, refer to the Web Manual.
Web manual : www.Samsung.com → Support →
Product name search
→ HW-KM45
* Design and specifications are subject to change without prior notice.
Page 2
SAFETY INFORMATION
SAFETY WARNINGS
TO REDUCE THE RISK OF ELECTRIC SHOCK, DO NOT REMOVE THE COVER (OR BACK).
NO USER-SERVICEABLE PARTS ARE INSIDE. REFER SERVICING TO QUALIFIED SERVICE PERSONNEL.
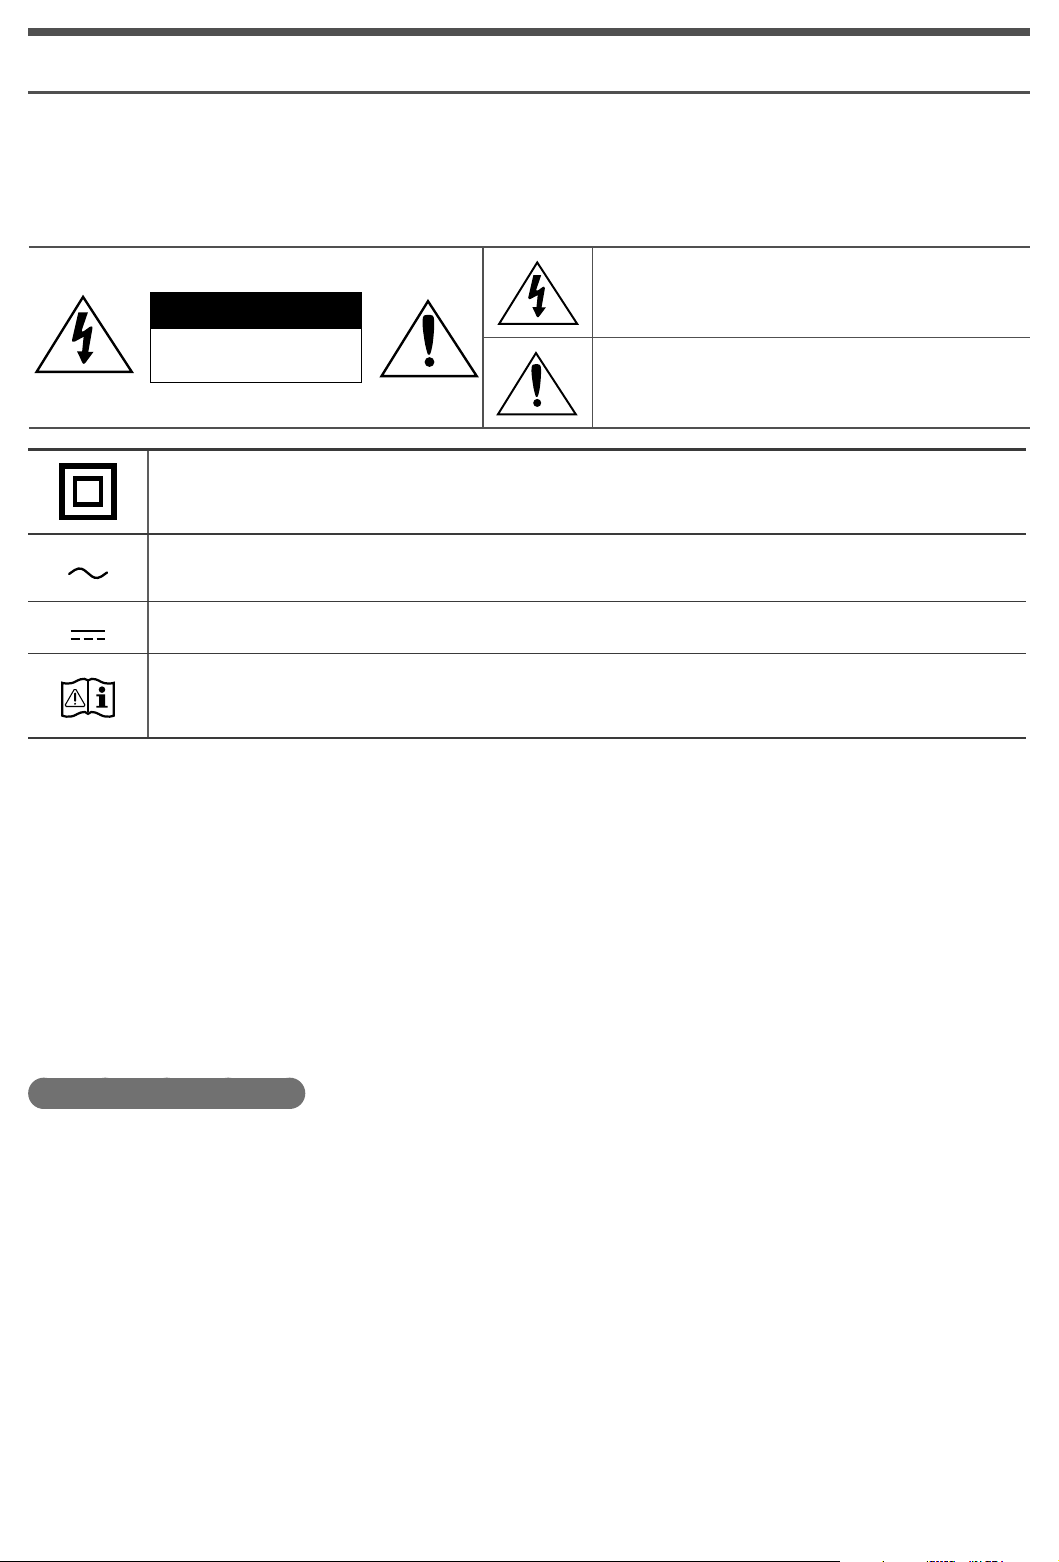
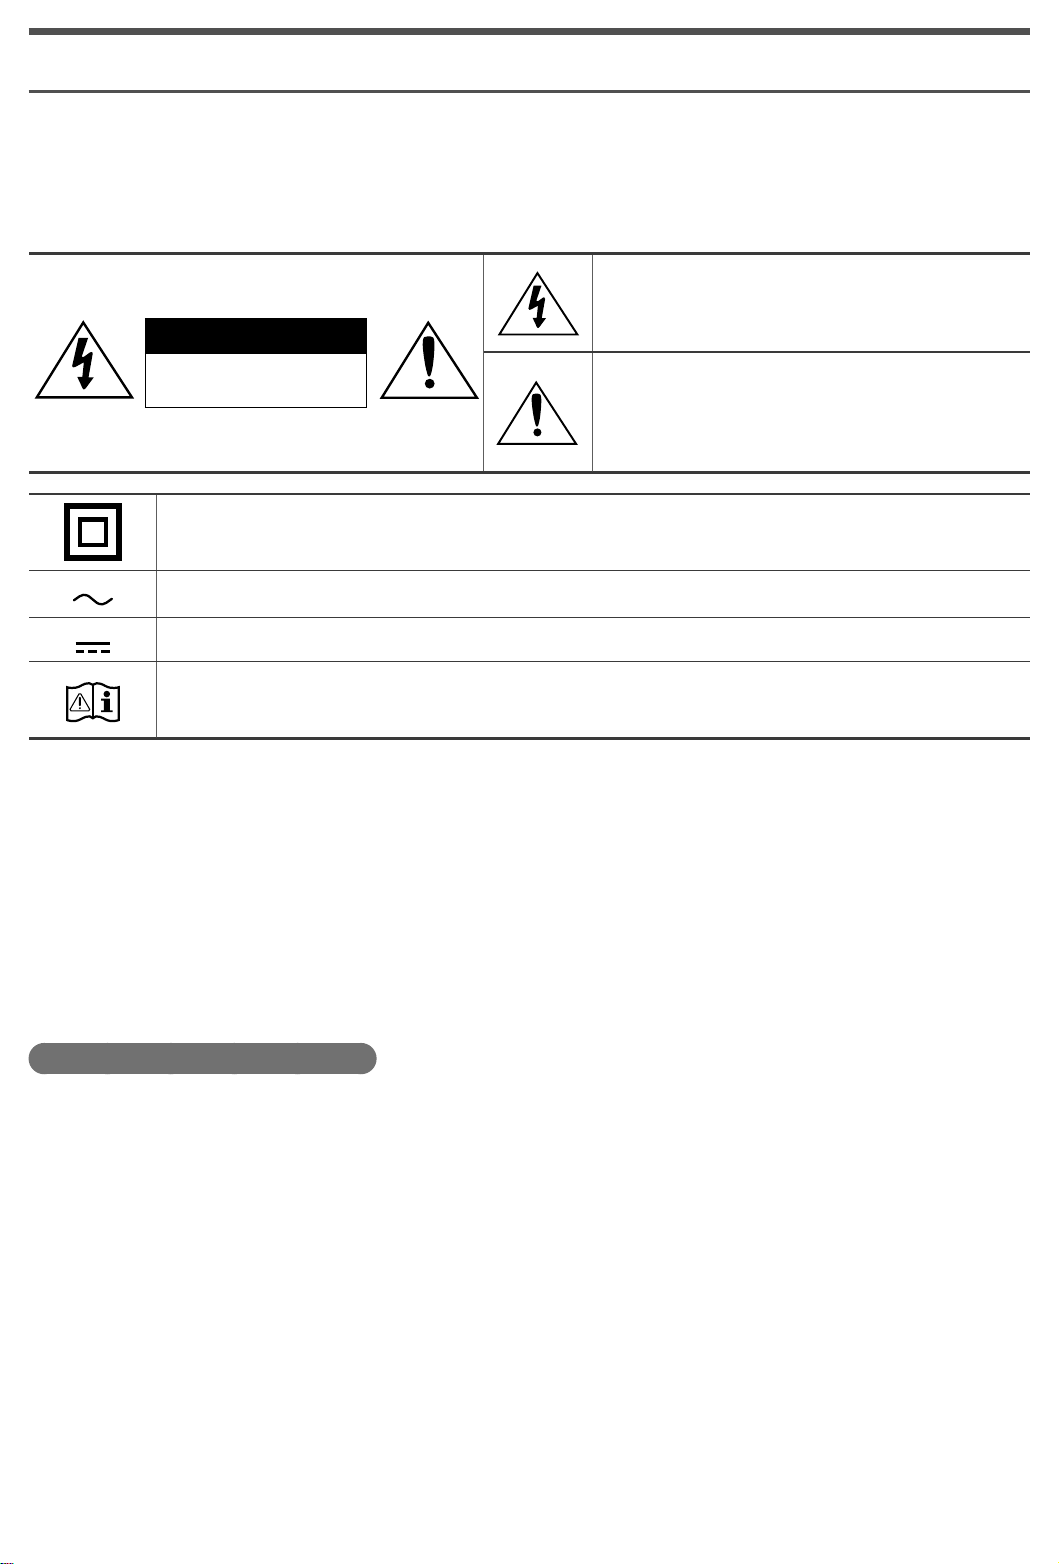
This symbol indicates that high voltage is
present inside. It is dangerous to make any kind
CAUTION
RISK OF ELECTRIC SHOCK
DO NOT OPEN
Class II product : This symbol indicates that it does not require a safety connection to electrical
earth (ground).
AC voltage : This symbol indicates that the rated voltage marked with the symbol is AC
voltage.
DC voltage : This symbol indicates that the rated voltage marked with the symbol is DC voltage.
of contact with any internal part of this product.
This symbol indicates that this product has
included important literature concerning
operation and maintenance.
Caution, Consult instructions for use : This symbol instructs the user to consult the user
manual for further safety related information.
WARNING
• To reduce the risk of fire or electric shock, do not expose this appliance to rain or moisture.
• To prevent injury, this apparatus must be securely attached to the floor/wall in accordance with the installation
instructions.
CAUTION
• Do not expose this apparatus to dripping or splashing. Do not put objects filled with liquids, such as vases on
the apparatus.
• To turn this apparatus off completely, you must pull the power plug out of the wall socket. Consequently, the
power plug must be easily and readily accessible at all times.
CAUTION (for Canada)
This equipment complies with Industry Canada licence-exempt RSS standard(s). Operation is subject to the
following two conditions: (1) this device may not cause interference, and (2) this device must accept any
interference, including interference that may cause undesired operation of the device.
This device and its antenna(s) must not be co-located or operation in conjunction with any other antenna or
transmitter.
This device may automatically discontinue transmission if there is no information to transmit, or an operational
failure. Note that this is not intended to prohibit the transmission of control or signaling information or the use of
repetitive codes where required by the technology.
This Class B digital apparatus complies with Canadian ICES-003.
FCC Radiation Exposure Statement
This equipment complies with IC RSS-102 radiation exposure limits set forth for an uncontrolled environment.
This equipment should be installed and operated with minimum distance 20cm between the radiator & your body.
· 1 · English
Page 3
Important Safety Instructions
Read these operating instructions carefully before
using the unit. Follow all the safety instructions listed
below. Keep these operating instructions handy for
future reference.
1) Read these instructions.
2) Keep these Instructions.
3) Heed all warnings.
4) Follow all instructions.
5) Do not use this apparatus near water.
6) Clean only with dry cloth.
7) Do not block any ventilation openings. Install in
accordance with the manufacturer's instructions.
8) Do not install near any heat sources such as
radiators, heat registers, stoves, or other
apparatus (including amplifiers) that produce
heat.
9) Do not defeat the safety purpose of the polarized
or grounding-type plug. A polarized plug has two
blades with one wider than the other.
A grounding type plug has two blades and a third
grounding prong. The wide blade or the third
prong are provided for your safety. If the provided
plug does not fit into your outlet, consult an
electrician for replacement of the obsolete outlet.
10) Protect the power cord from being walked on or
pinched particularly at plugs, convenience
receptacles, and the point where they exit from
the apparatus.
11) Only use attachment/accessories specified by the
manufacturer.
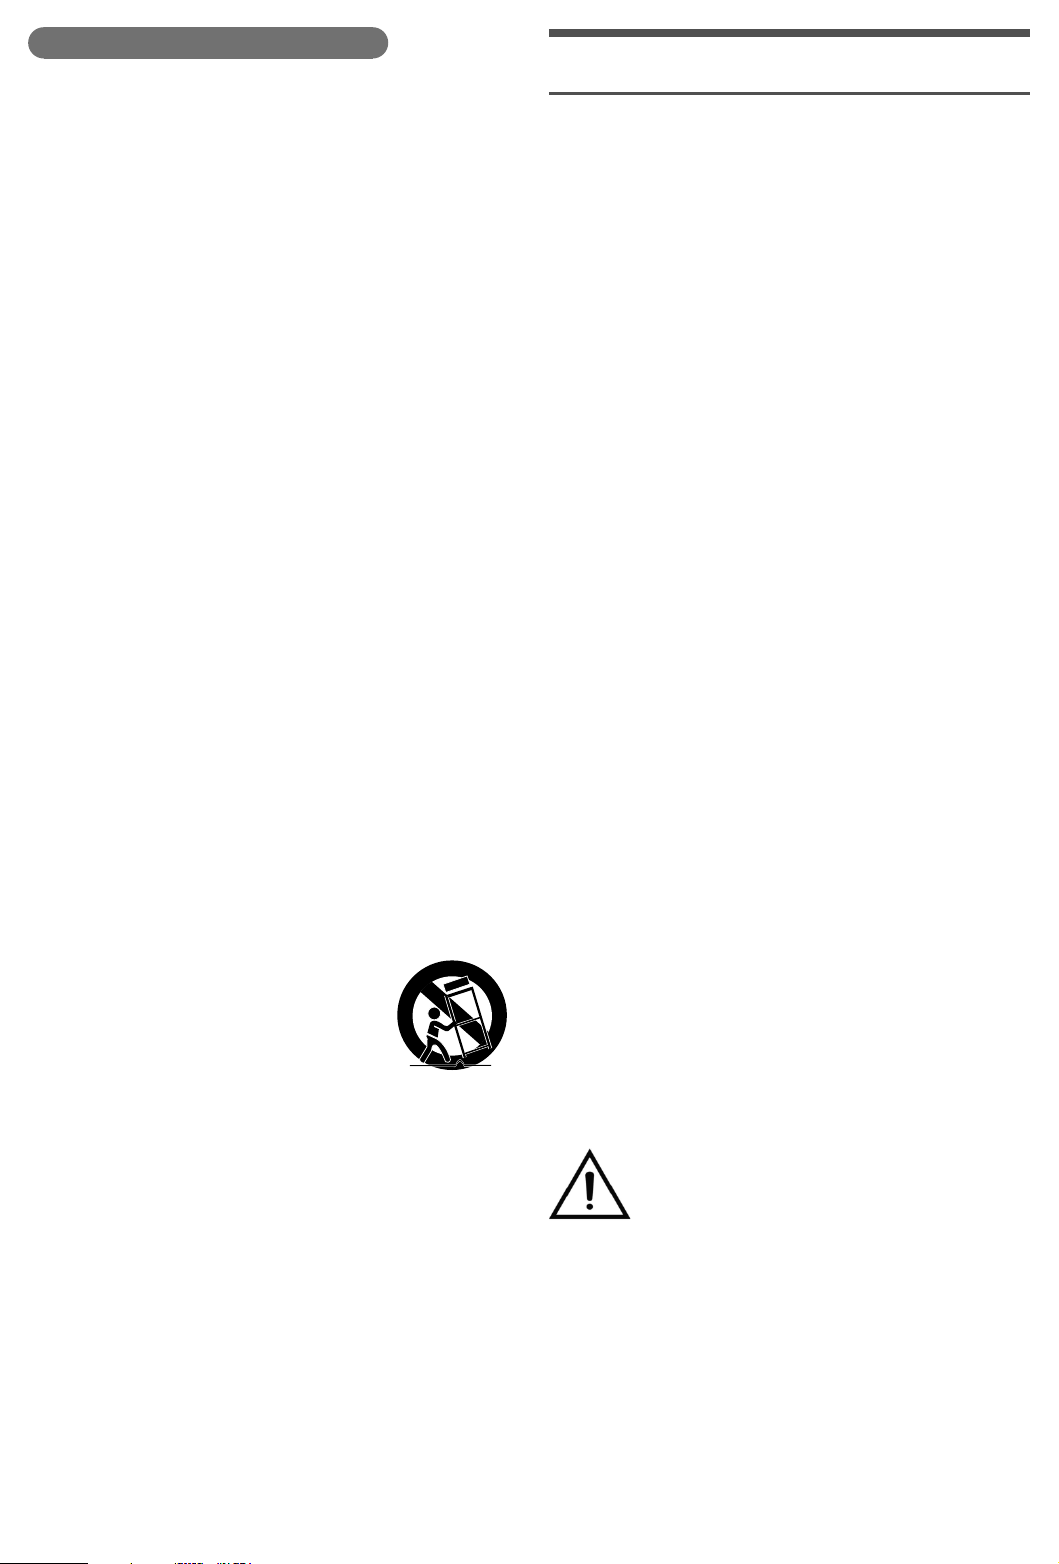
12) Use only with the cart, stand,
tripod, bracket, or table specified
by the manufacturer, or sold with
the apparatus. When a cart is
used, use caution when moving
the cart/apparatus combination to avoid injury
from tip-over.
13) Unplug this apparatus during lightning storms or
when unused for long periods of time.
PRECAUTIONS
1. Ensure that the AC power supply in your house
complies with the power requirements listed on the
identification sticker located on the back of your
product. Install your product horizontally, on a
suitable base (furniture), with enough space around it
for ventilation (3~4 inches). Make sure the ventilation
slots are not covered.
Do not place the unit on amplifiers or other
equipment which may become hot. This unit is
designed for continuous use. To fully turn off the unit,
disconnect the AC plug from the wall outlet. Unplug
the unit if you intend to leave it unused for a long
period of time.
2. During thunderstorms, disconnect the AC plug from
the wall outlet. Voltage peaks due to lightning could
damage the unit.
3. Do not expose the unit to direct sunlight or other
heat sources. This could lead to overheating and
cause the unit to malfunction.
4. Protect the product from moisture (i.e. vases), and
excess heat (e.g. a fireplace) or equipment creating
strong magnetic or electric fields. Unplug the power
cable from the AC wall socket if the unit
malfunctions. Your product is not intended for
industrial use. It is for personal use only.
Condensation may occur if your product has been
stored in cold temperatures. If transporting the unit
during the winter, wait approximately 2 hours until the
unit has reached room temperature before using.
5. The battery used with this product contains
chemicals that are harmful to the environment.
Do not dispose of the battery in the general
household trash. Do not expose the battery to
excess heat, direct sunlight, or fire. Do not short
circuit, disassemble, or overheat the battery.
Danger of explosion if the battery is replaced
incorrectly. Replace only with the same or equivalent
type.
WARNING: DO NOT INGEST BATTERY.
CHEMICAL BURN HAZARD.
14) Refer all servicing to qualified service personnel.
Servicing is required when the apparatus has
been damaged in any way, such as power-supply
cord or plug is damaged, liquid has been spilled
or objects have fallen into the apparatus, the
apparatus has been exposed to rain or moisture,
does not operate normally, or has been dropped.
· 2 · English
The remote control supplied withthis product contains a
coin/button cell battery. If the coin/button cell battery is
swallowed, it can cause severe internal burns in just 2
hours and can lead to death. Keep new and used
batteries away from children. If the battery compartment
does not close securely, stop using the product and
keep it away from children. If you think batteries might
have been swallowed or placed inside any part of the
body, seek immediate medical attention.
Page 4
CHECKING THE COMPONENTS
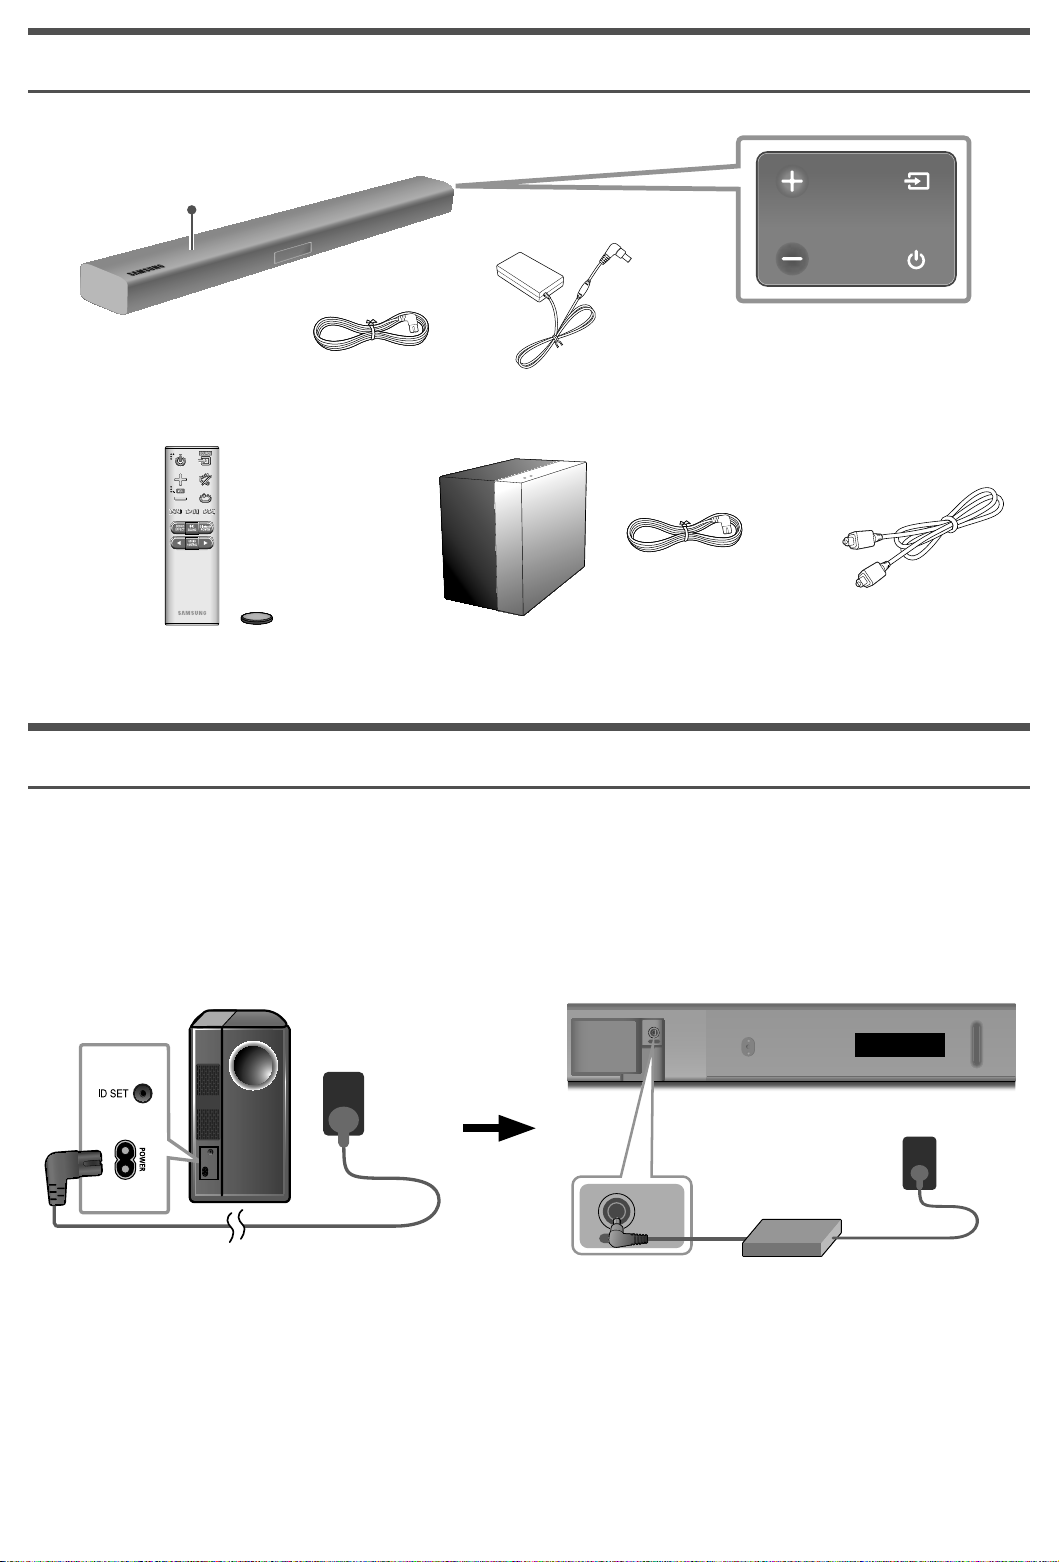
244VV
Soundbar Main Unit
To p
2 AC/DC Adapter
3 Power Cord
Right Side of the Soundbar
Remote Control / Battery Subwoofer Optical Cable
1 Power Cord
c The Micro USB to USB adapter and HDMI cables are sold separately. To purchase, contact a Samsung
Service Center or Samsung Customer Care. The package also includes wall mounting hardware. See page 8.
CONNECTING ELECTRICAL POWER
Use the power components (1, 2, 3) to connect the power supplies in the following order:
Subwoofer Soundbar Main Unit
c For mor
product. (Label : Bottom of the Soundbar Main Unit)
POWER
(Power Jack)
e information about the power supply and power consumption, refer to the label attached to the
Rear of Subwoofer Bottom of the Soundbar Main Unit
1 Power Cord
Connecting
electrical power
(Power Jack)
DC 24V
DC 24V
DC 24V
3 Power Cord
2 AC/DC
Adapter
Connecting
electrical power
c Make sure to rest the AC/DC Adapter flat on a table or the floor. If you place the AC/DC Adapter so that it is
hanging with the AC cord input facing upwards, water or other foreign substances could enter the Adapter
and cause the Adapter to malfunction.
· 3 · English
Page 5
CONNECTING THE SUBWOOFER TO THE MAIN UNIT
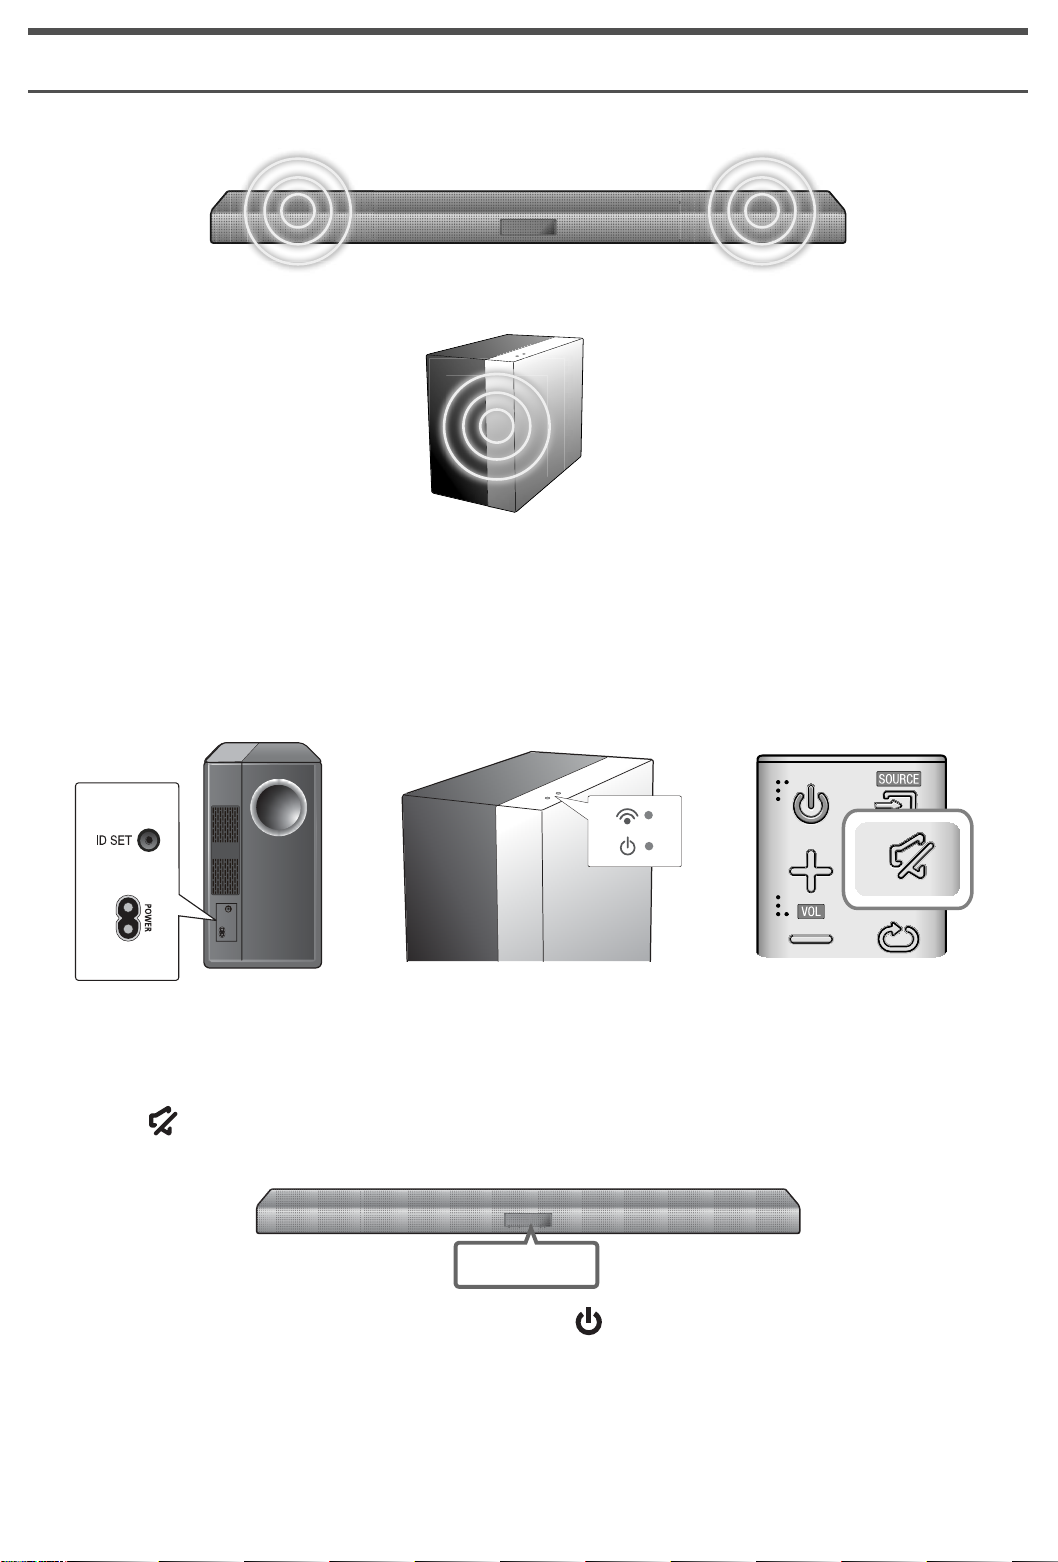
You can enjoy rich bass tones and better sound quality by linking the subwoofer to the main unit.
Soundbar Main Unit
Subwoofer
The main unit and subwoofer should link (connect wirelessly) automatically when the main unit and subwoofer
are turned on. When auto-connection is complete, the blue indicator on the top of the subwoofer stops blinking
and glows blue continuously.
c If the indicator on the top of the subwoofer displays in red or flashes in blue, the subwoofer has not
automatically connected. If this occurs, follow the directions below to connect the subwoofer manually.
c Important: Before you begin, put the battery into the remote. See page 12 for instructions.
1. Plug the power cords of the main unit and subwoofer into an AC wall outlet.
2. Press the ID SET button on the rear of the subwoofer with a small, pointed object for 5 seconds.
c The STANDBY indicator turns off and the LINK indicator (Blue LED) blinks quickly.
3. Press the button on your remote control for 5 seconds while the main unit is turned OFF.
4. The ID SET message appears on the display of the main unit for a short period of time, and then disappears.
ID SET
5. While the subwoofer's indicator is flashing blue, press the button on your remote control or on the right
side of the main unit to turn on the main unit.
6. The connection is complete if the indicator on the top of the subwoofer stops flashing and glows continuously.
c If the connection process fails, the blue indicator will flash continuously. Go back to Step 2 and start again.
· 4 · English
Page 6
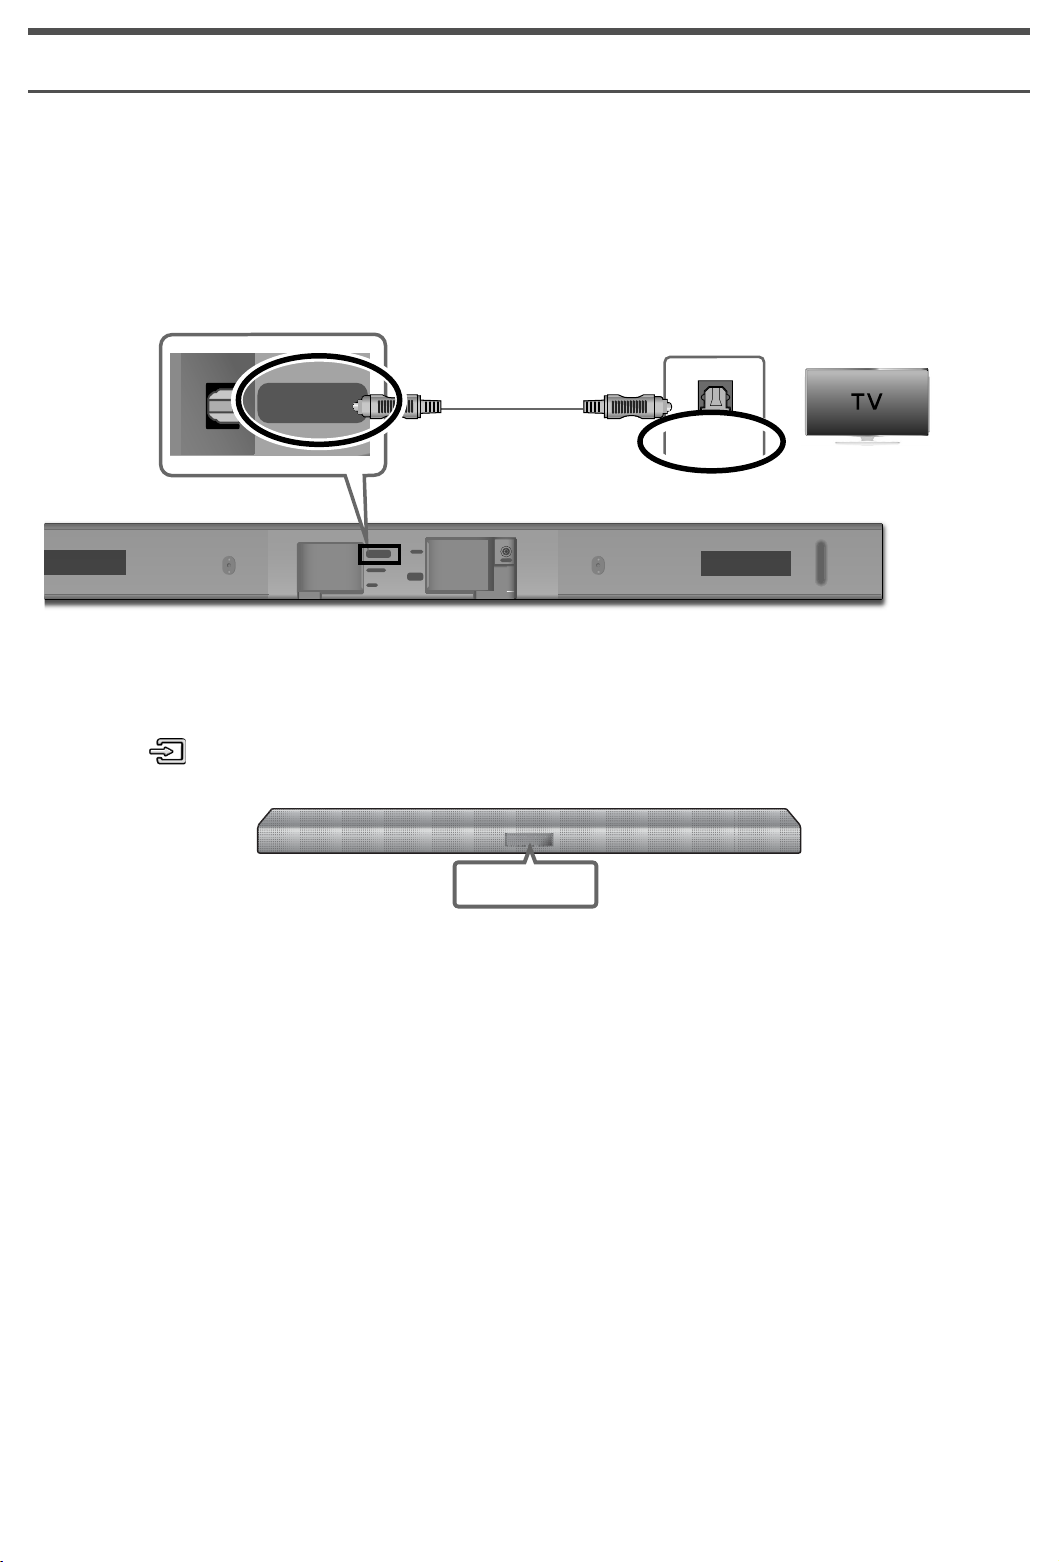
CONNECTING TO YOUR TV
24
4VV
You can enjoy TV sound after connecting the Soundbar to your TV with or without a cable.
c Important: Before you begin, put the battery into the remote. See page 12 for instructions.
Method 1. Connecting with a Cable
Check the DIGITAL AUDIO IN (OPTICAL)
port of the main unit.
Check the OPTICAL OUT
port of your TV.
Optical Cable
DIGITAL AUDIO IN
(OPTICAL )
OPTICAL OUT
HDMI IN
DIGITAL AUDIO IN
(OPTICAL)
USB (5V 0.5A)
AUX IN
HDMI OUT
(TV-ARC)
DC 24V
Bottom of main unit
1. Connect the DIGITAL AUDIO IN (OPTICAL) jack on the Soundbar to the OPTICAL OUT jack of the TV with
a digital optical cable.
2. Press the
button on the right side panel of the Soundbar or the SOURCE button on the remote control
to select the D.IN mode.
D.IN
c If you have connected the main unit to a TV with a digital optical cable, you can set Auto Power Link to ON
and have the Soundbar turn on automatically when you turn the TV on.
c This function is only available when the Soundbar is in the D.IN mode.
· 5 · English
Page 7
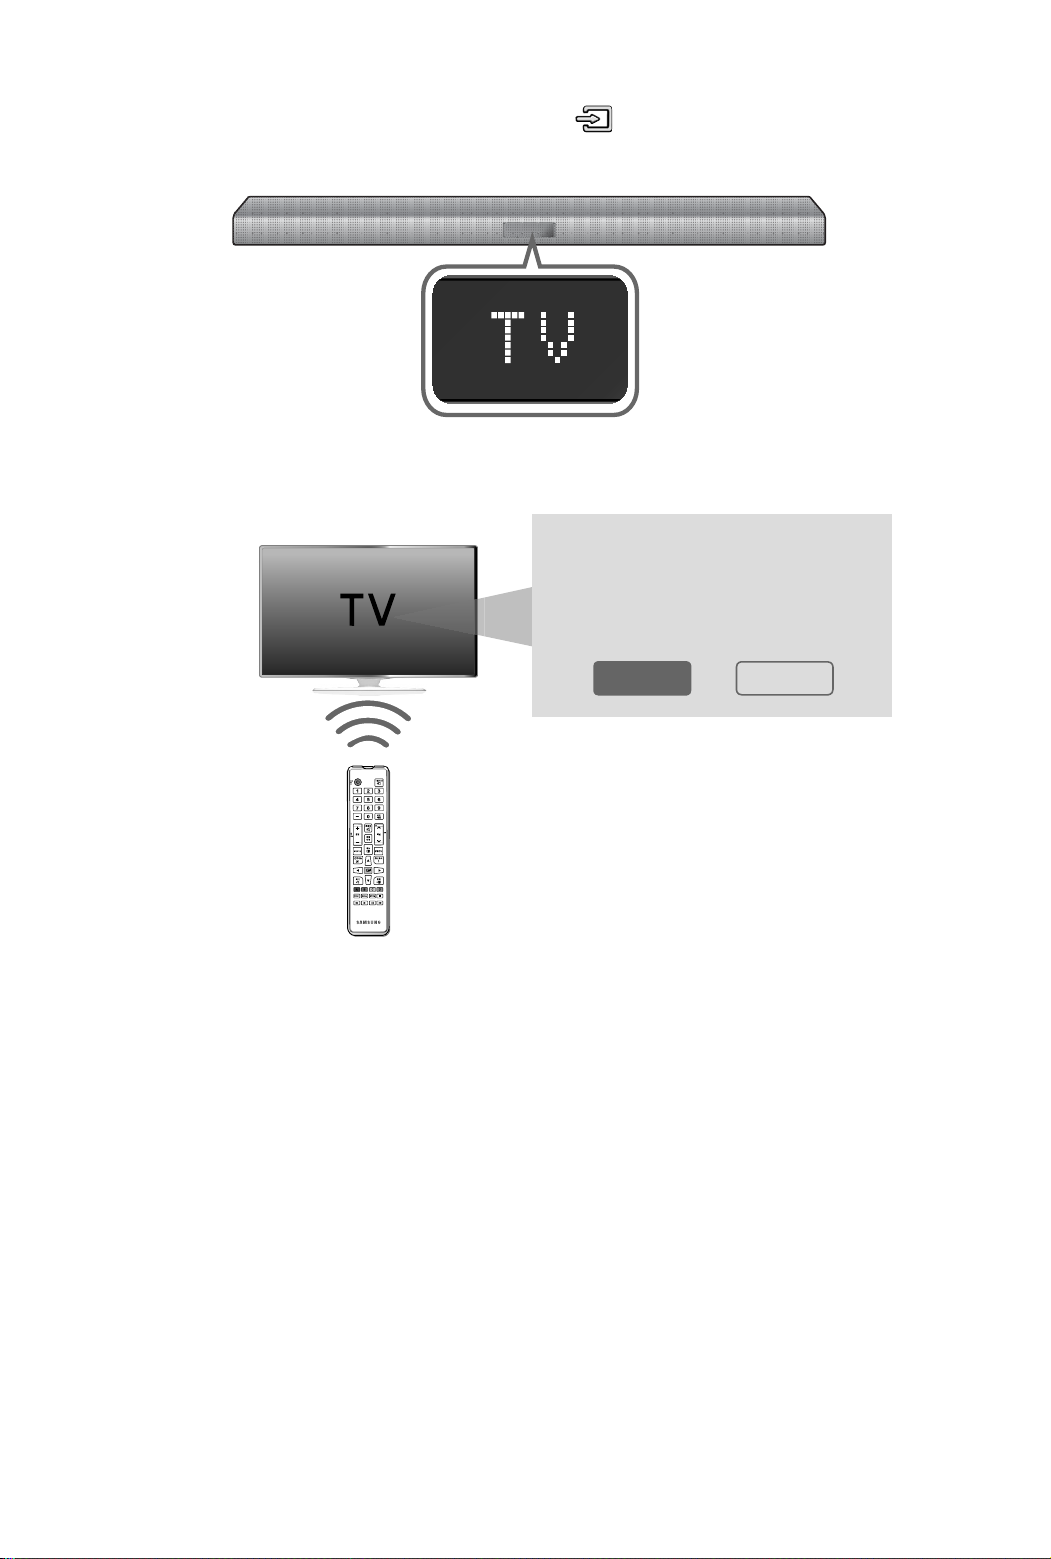
Method 2. TV SoundConnect (Linking to a Samsung TV with Bluetooth)
1. Turn on your Samsung TV and the Soundbar.
2. Select TV mode in your Soundbar display by pressing the button on the right side of the Soundbar or
the SOURCE button on your remote control. (Modes are displayed in the following order: D.IN → AUX →
HDMI → BT → TV → USB.)
3. When the connection message shown below appears on the TV screen, select <Yes> with your TV remote
control.
Samsung Audio Device detected.
Do you want to hear TV sound
through this device?
Yes No
Select <Yes> with your TV remote control.
4. The Soundbar outputs TV sound.
c If the TV SoundConnect linking process fails, navigate to SoundConnect in the TV's Sound menu, select
Add New Device, and set Add New Device to ON. Then, try again.
c If your Soundbar is connected to your TV through TV SoundConnect, you can conveniently control the
volume with the Soundbar's remote or the TV's remote. You can also have the Soundbar turn on and off
automatically when you turn the TV on or off by setting the Bluetooth POWER On function to On.
See page 12.
c TV SoundConnect (Soundshare) is only available in some Samsung TV products released since 2012.
c If you want to disconnect the existing connection to your TV and establish a new connection to another TV,
press the & button on your remote control for more than 5 seconds.
c In the TV SoundConnect mode, the Soundbar cannot be paired or connected to another Bluetooth device.
c Do not place electronic devices or metallic objects on top of the product.
e.g., Wired/wireless router, set-top box, or modem.
c Placing the product on the floor may degrade wireless network performance, depending on the floor
material.
· 6 · English
Page 8
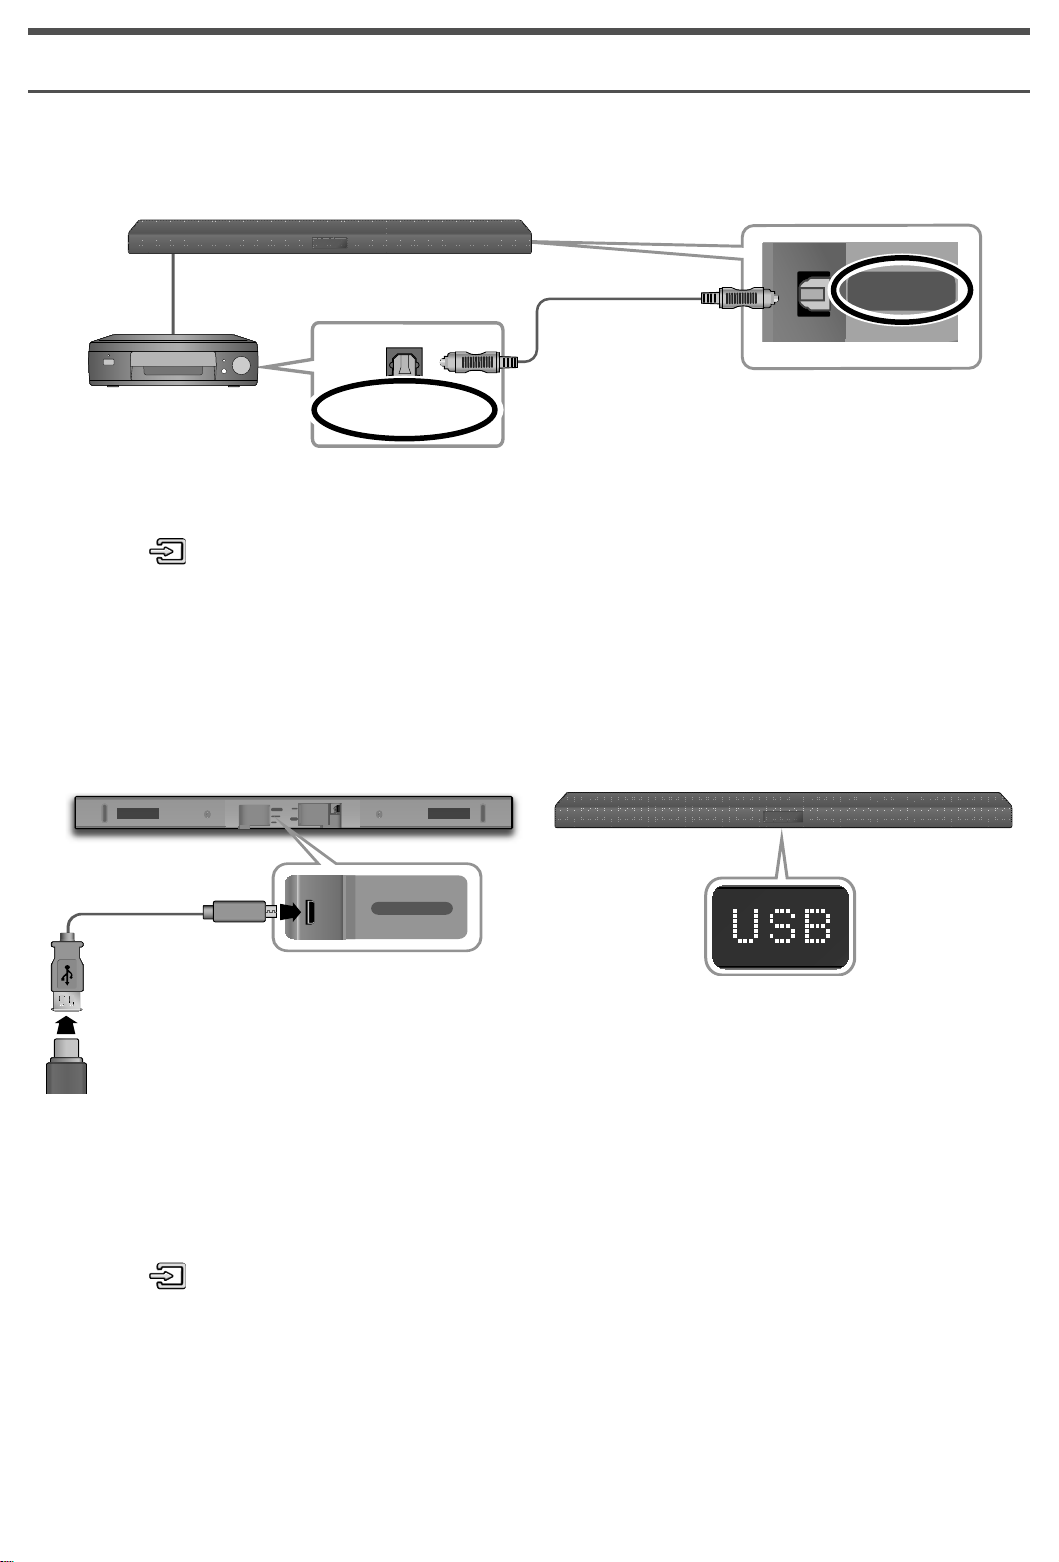
CONNECTING TO AN EXTERNAL DEVICE
244VV
USB (5V 0.5A)
Optical Cable
You can enjoy sound from separate external devices such as a BD player/game console/set-top box, etc. by
connecting them to your Soundbar.
Soundbar
Optical Cable
External Device
OPTICAL OUT
Bottom of Soundbar
1. Connect an Optical Cable as shown in the picture above.
2. Press the
button on the right side of your Soundbar or the SOURCE button on your remote control to
select D.IN mode.
3. The Soundbar shows D.IN on its display and outputs sound from the connected device.
USB
You can play music files located on USB storage devices through the Soundbar.
USB port Display
HDMI IN
DIGITAL AUDIO IN
(OPTICAL)
USB (5V 0.5A)
AUX IN
DC 24V
HDMI OUT
(TV-ARC)
DIGITAL AUDIO IN
(OPTICAL)
Micro USB to
USB adapter Cable
(not supplied)
1. Connect a Micro USB to USB adapter with a male USB 2.0 Micro USB plug (Type B) on one end and a
standard female 2.0 USB jack (Type A) on the other end to the micro USB jack on your Soundbar.
c The Micro USB to USB adapter is sold separately. To purchase, contact a Samsung Service Centre or
Samsung Customer Care.
2. Connect your USB device to the female end of the adapter cable.
3. Press the
button on the main unit’s right side or the SOURCE button on the remote control to select the
USB mode.
4. USB appears on the display screen.
•
The Soundbar connection to the USB device is complete.
•
The Soundbar automatically turns off (Auto Power Off) if no USB device has been connected for more
than 5 minutes.
· 7 · English
Page 9
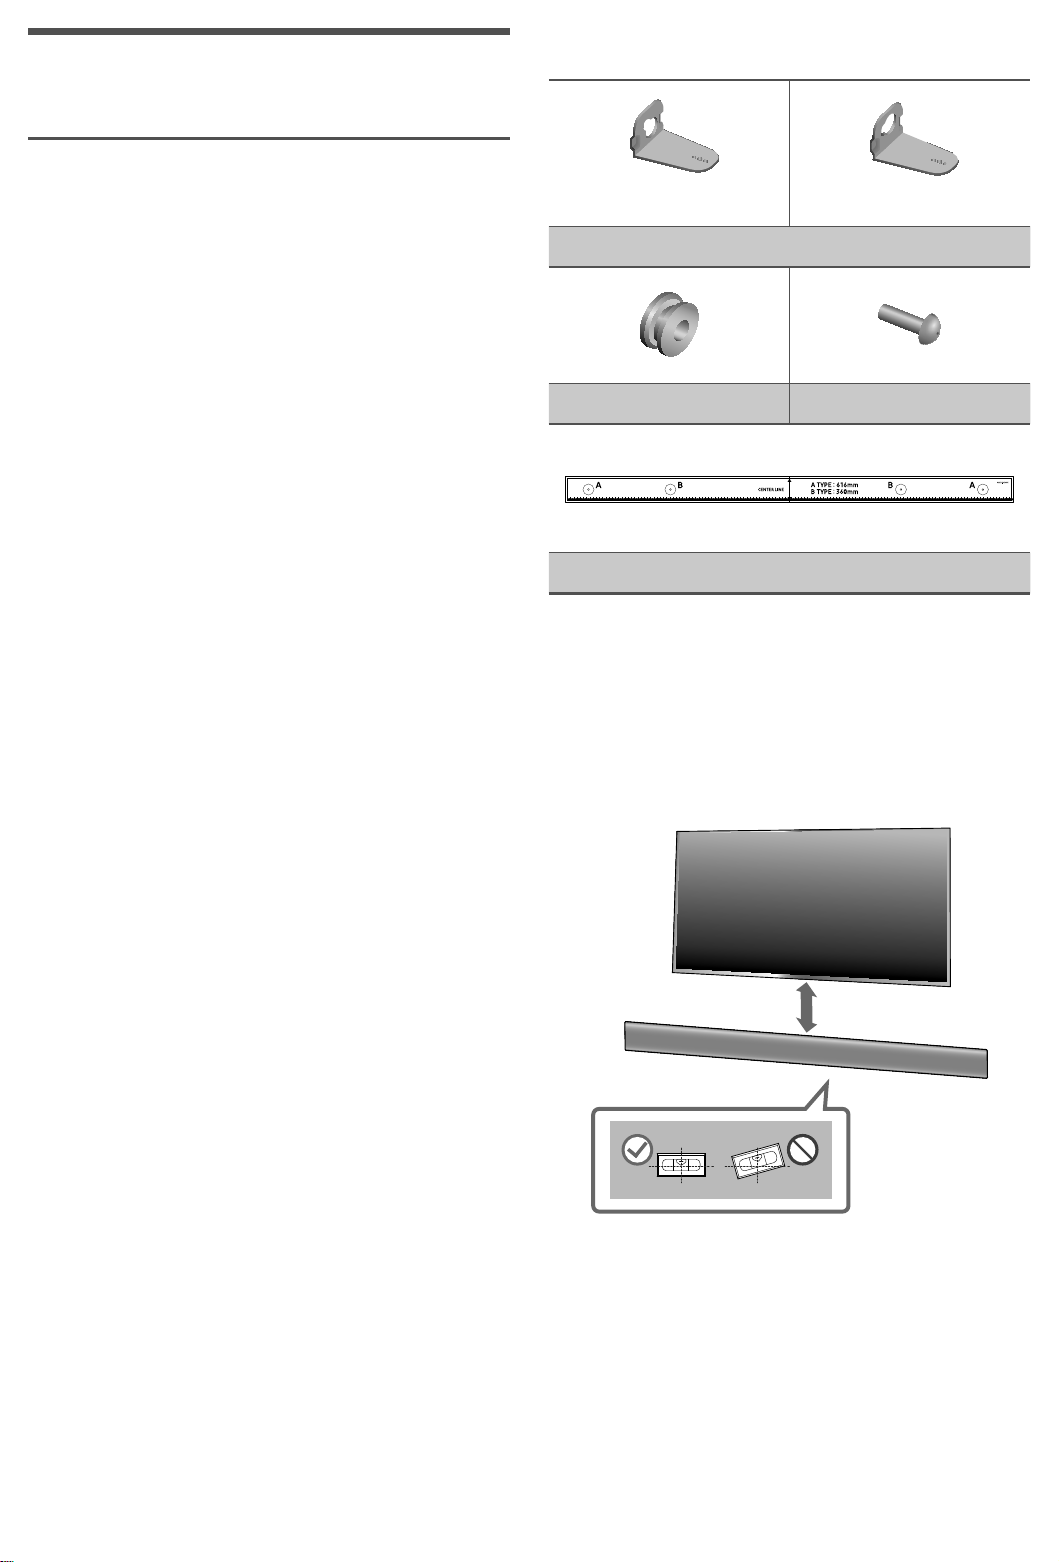
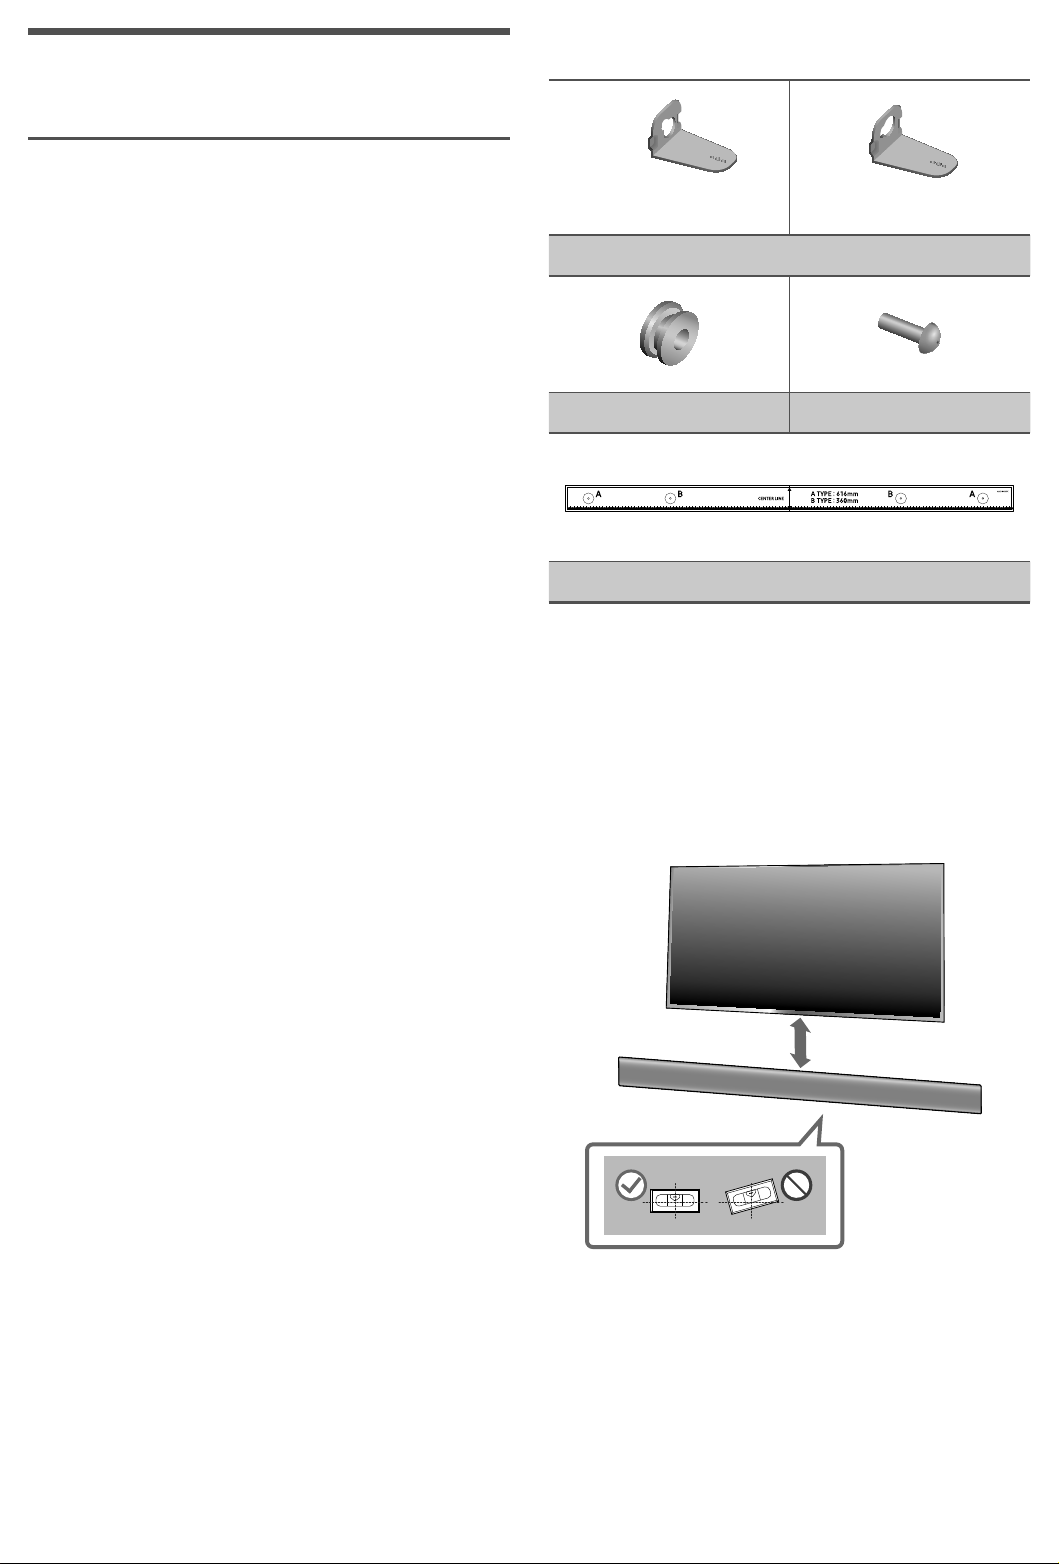
INSTALLING THE WALL
MOUNT
You can use the wall mount bracket to mount this unit
on a wall.
Accessories for Wall-mounting
(Wall Mount L) (Wall Mount R)
I nstallation Precautions
• Install on a vertical wall only.
• For the installation, avoid a location with high
temperature or humidity, or a wall that cannot
sustain the weight of the set.
• Check the strength of the wall. If the wall is not
strong enough to support the unit, reinforce the
wall or install the unit on a different wall that can
support the unit's weight.
• Purchase and use the fixing screws or anchors
appropriate for the kind of wall you have (plaster
board, iron board, wood, etc.). If possible, fix the
support screws into wall studs.
• Purchase wall mounting screws according to the
type and thickness of the wall you will mount the
Soundbar on.
- Diameter: M5
- Length: 1 3/8 inches or longer recommended.
• Connect cables from the unit to external devices
before you install it on the wall.
Bracket-Wall Mount (2 EA)
Holder-Screw (2 EA) Screw (2 EA)
Wall Mount Guide
1. Place the Wall Mount Guide against the wall
surface.
•
The Wall Mount Guide must be level.
•
If your TV is mounted on the wall, install the
Soundbar at least 2 inches (5 cm) below the
TV.
• Make sure the unit is turned off and unplugged
before you install it. Otherwise, it may cause an
electric shock.
2 inches or more
· 8 · English
Page 10
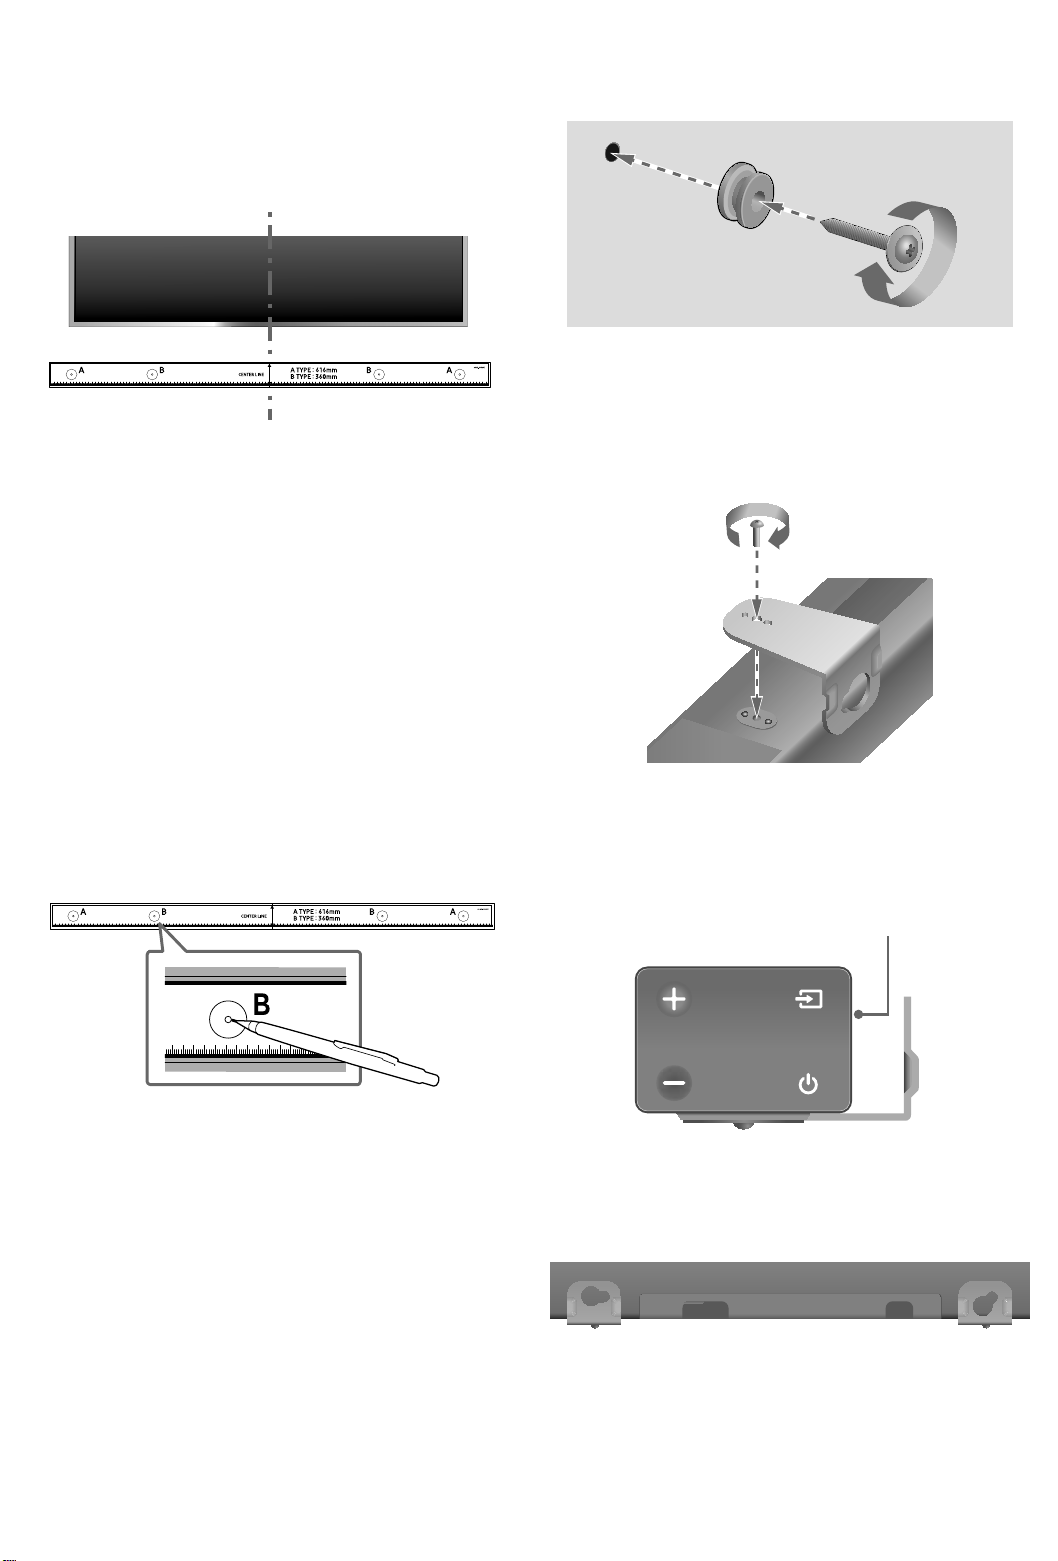
2. Align the Wall Mount Guide's Center Line with the
center of your TV (if you are mounting the
Soundbar below your TV), and then fix the Wall
Mount Guide to the wall using tape.
c If you are not mounting below a TV, place the
Center Line in the center of the installation area.
Center Line
3. Push a pen tip or sharpened pencil tip through the
center of the B-TYPE images on each end of the
Guide to mark the holes for the supporting
screws, and then remove the Wall Mount Guide.
5. Push a screw (not supplied) through each
Holder-Screw, and then screw each screw
firmly into a support screw hole.
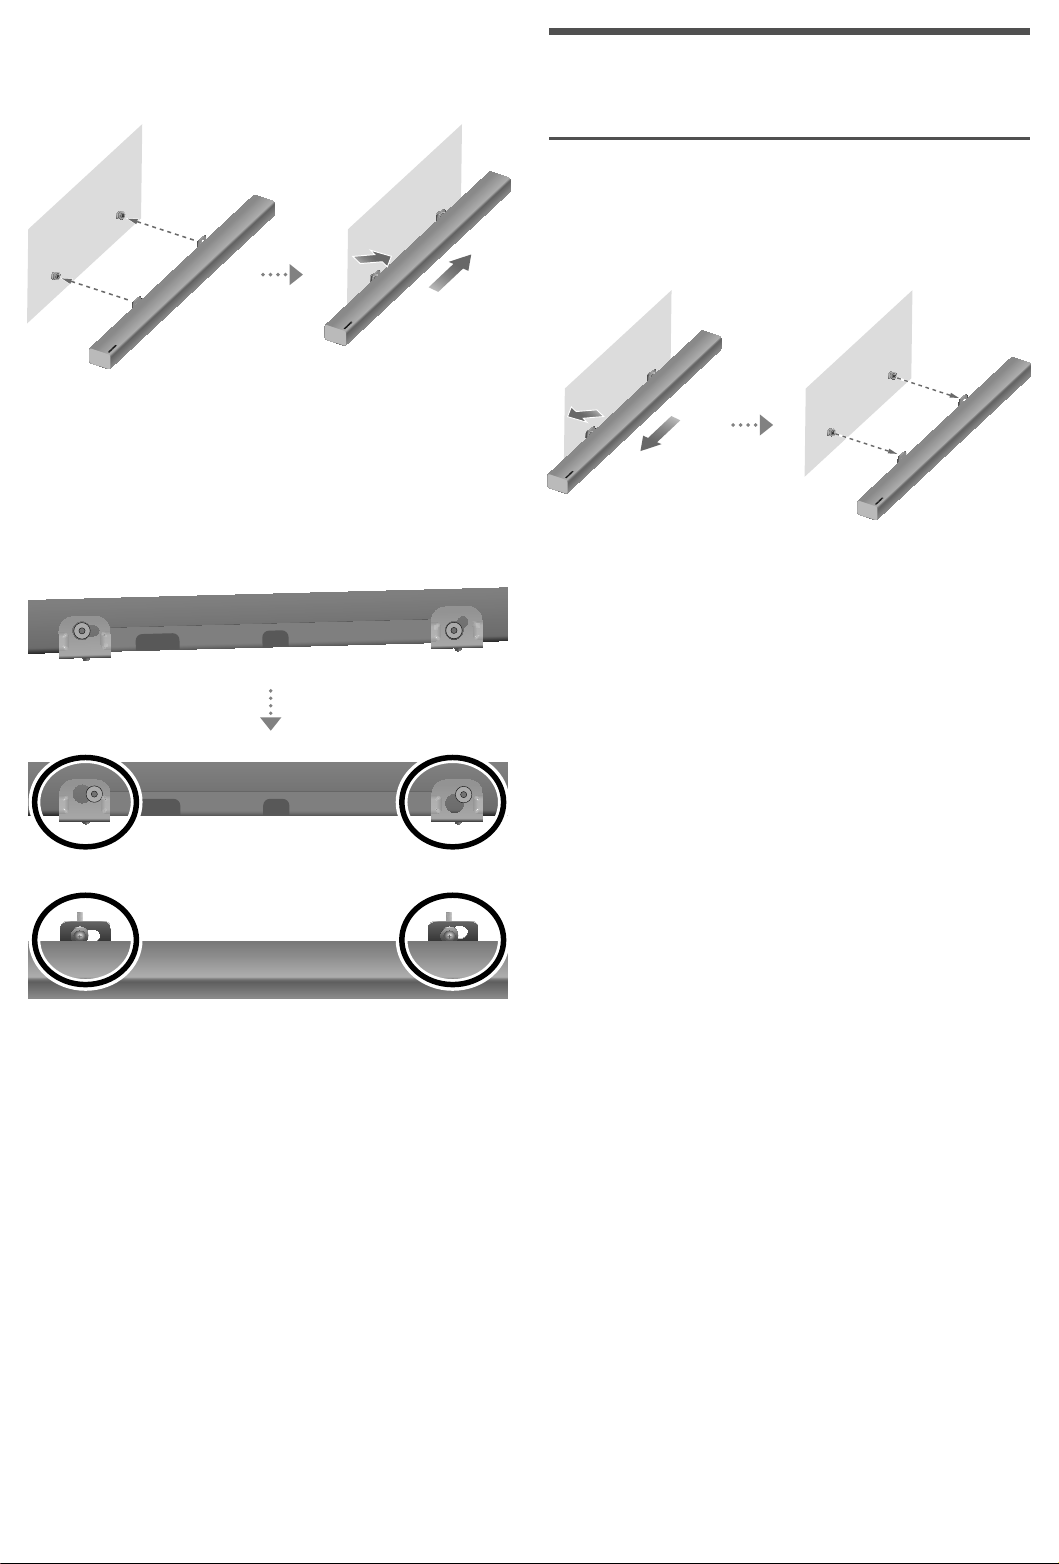
6. Use the two Screws (M4 x L14) to attach both
Bracket-Wall Mount L and R to the Soundbar's
bottom. For a proper fit, make sure to align the
bumps on the Soundbar to the holes on the
brackets.
4. Using an appropriately sized drill bit, drill a hole in
the wall at each marking.
c If the markings do not correspond to the
positions of studs, make sure you insert
appropriate anchors or mollies into the holes
before you insert the support screws. If you use
anchors or mollies, make sure the holes you drill
are large enough for the anchors or mollies you
use.
•
When assembling, make sure the hanger of
the Bracket-Wall Mounts are located behind
the rear of the Soundbar. See the illustration
below.
Rear of Soundbar
Right end of Soundbar
•
The left and right mounts are different shapes.
Make sure to position them correctly.
· 9 · English
Wall Mount LWall Mount R
Page 11
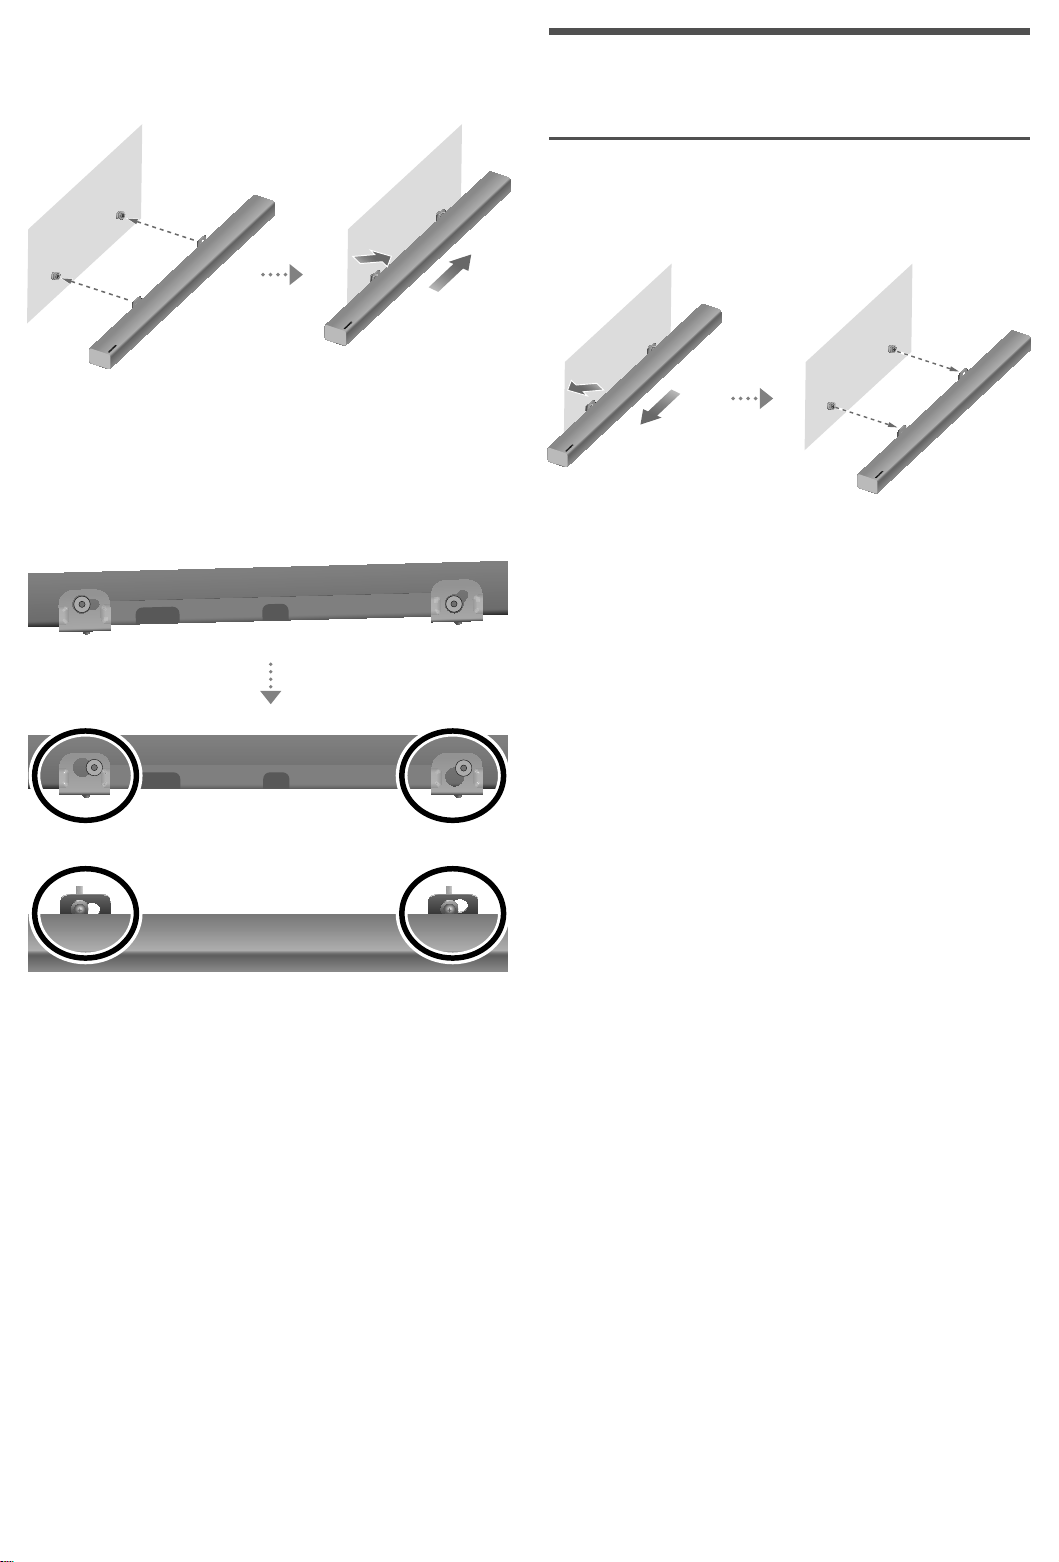
7. Install the Soundbar with the attached BracketWall Mount by hanging the Bracket-Wall Mount
on the Holder-Screws on the wall.
• Slightly tilt the Soundbar to insert both
Holder-Screw heads into Bracket-Wall
Mount holes. Push the Soundbar in the
direction of the arrow to make sure both sides
are firmly fixed.
D ETACHING THE SOUNDBAR
FROM THE WALL
1. To separate the Soundbar from the wall , push it in
the direction of the arrow, tilt it up slightly, and
then pull it away from the wall as shown.
c Do not hang onto the installed unit and avoid
striking or dropping the unit.
c Secure the unit firmly to the wall so that it does
not fall off. If the unit falls off, it may cause an
injury or damage the product.
c When the unit is installed on a wall, please make
sure that children do not pull any of the
connecting cables, as this may cause it to fall.
c For the optimal performance of a wall mount
installation, install the speaker system at least
2 inches (5 cm) below the TV, if the TV is
mounted on the wall.
c For your safety, if you do not mount the unit on
the wall, install it on a secure, flat surface where it
is unlikely to fall.
· 10 · English
Page 12

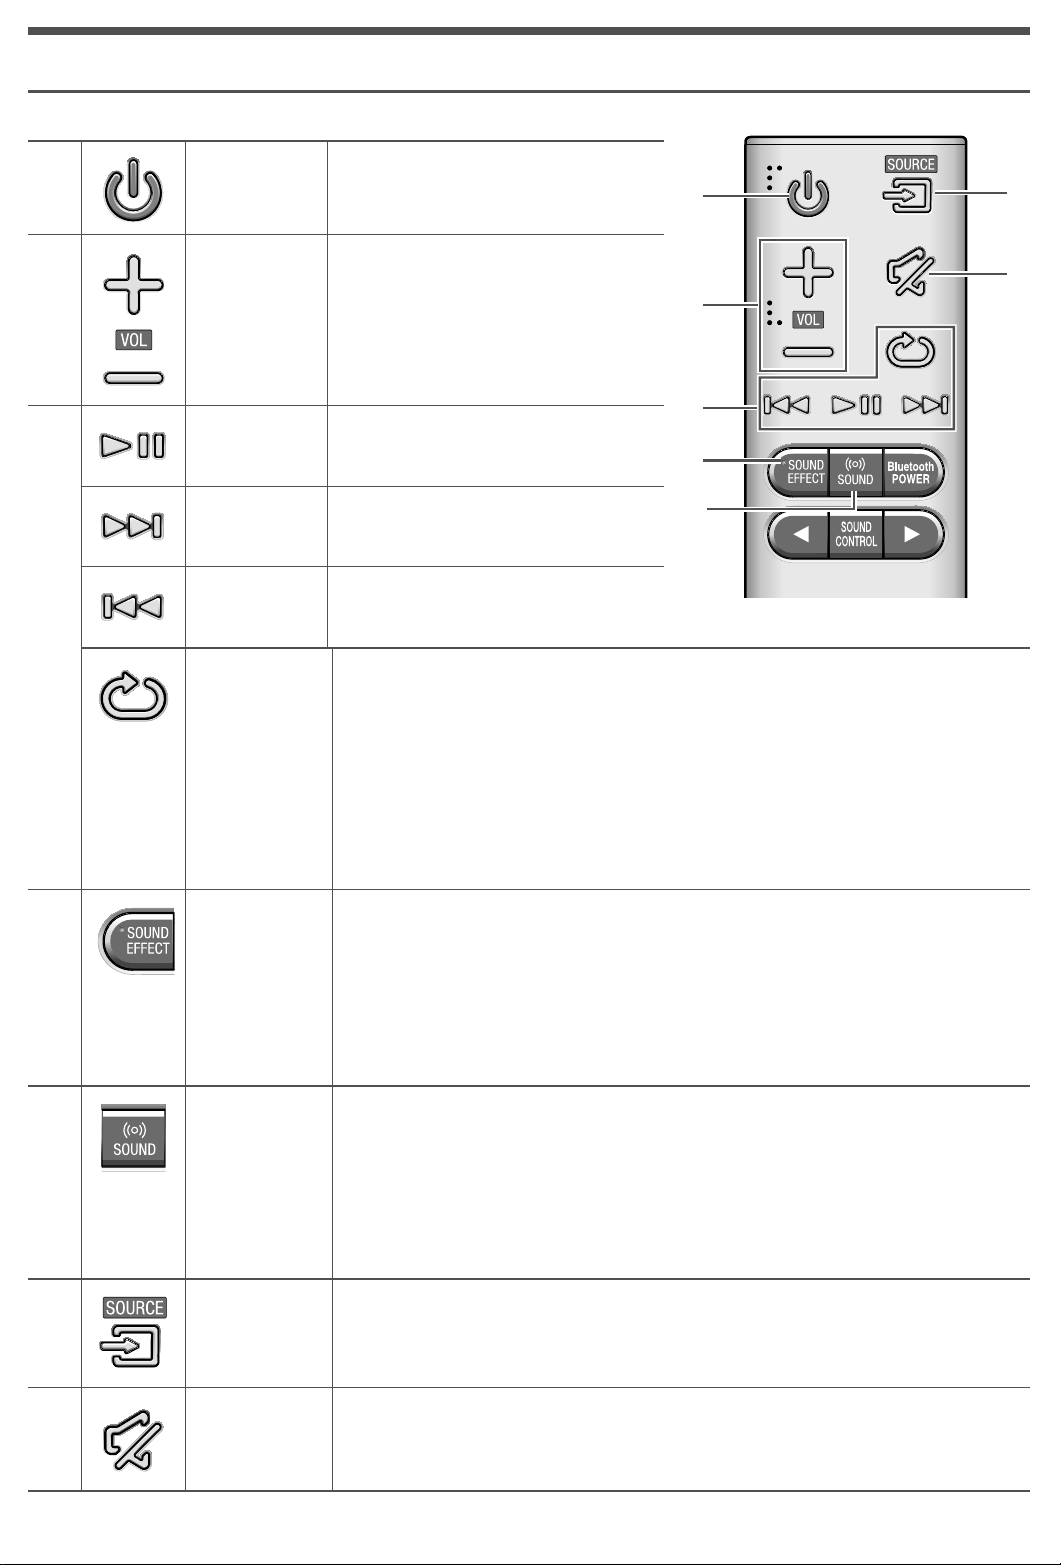
REMOTE CONTROL
Power
Volume
Play /
Pause
Skip
Forward
Skip
Back
Repeat
Turns the Soundbar on and off.
Adjusts the volume level of the unit.
Plays and pauses a file.
Selects the next file.
Selects the previous file.
Press to set the Repeat function during music playback from a USB device.
• OFF-REPEAT : Cancels Repeat Playback.
• TRACK-REPEAT : Plays a track repeatedly.
• ALL-REPEAT : Plays all tracks repeatedly.
• RANDOM-REPEAT : Plays tracks in random order repeatedly.
(A track that has already been played may be played again.)
SOUND
EFFECT
SURROUND
SOUND
SOURCE
Mute
You can select from 6 sound modes: STANDARD, MUSIC, CLEAR VOICE,
SPORTS, MOVIE, and NIGHT MODE.
The Surround Sound function adds depth and a sense of space to sound.
Each time you press this button, ON-SURROUND SOUND and OFFSURROUND SOUND alternate.
Each time you press and hold this button for 5 seconds, ON-TV REMOTE and
OFF-TV REMOTE alternate.
Press to select a source connected to the Soundbar.
Sets the volume temporarily to 0.
Press again to cancel.
c NIGHT MODE
When changing a channel or music source, the volume difference between
different music input sources is automatically adjusted to be suitable for listening.
· 11 · English
Page 13
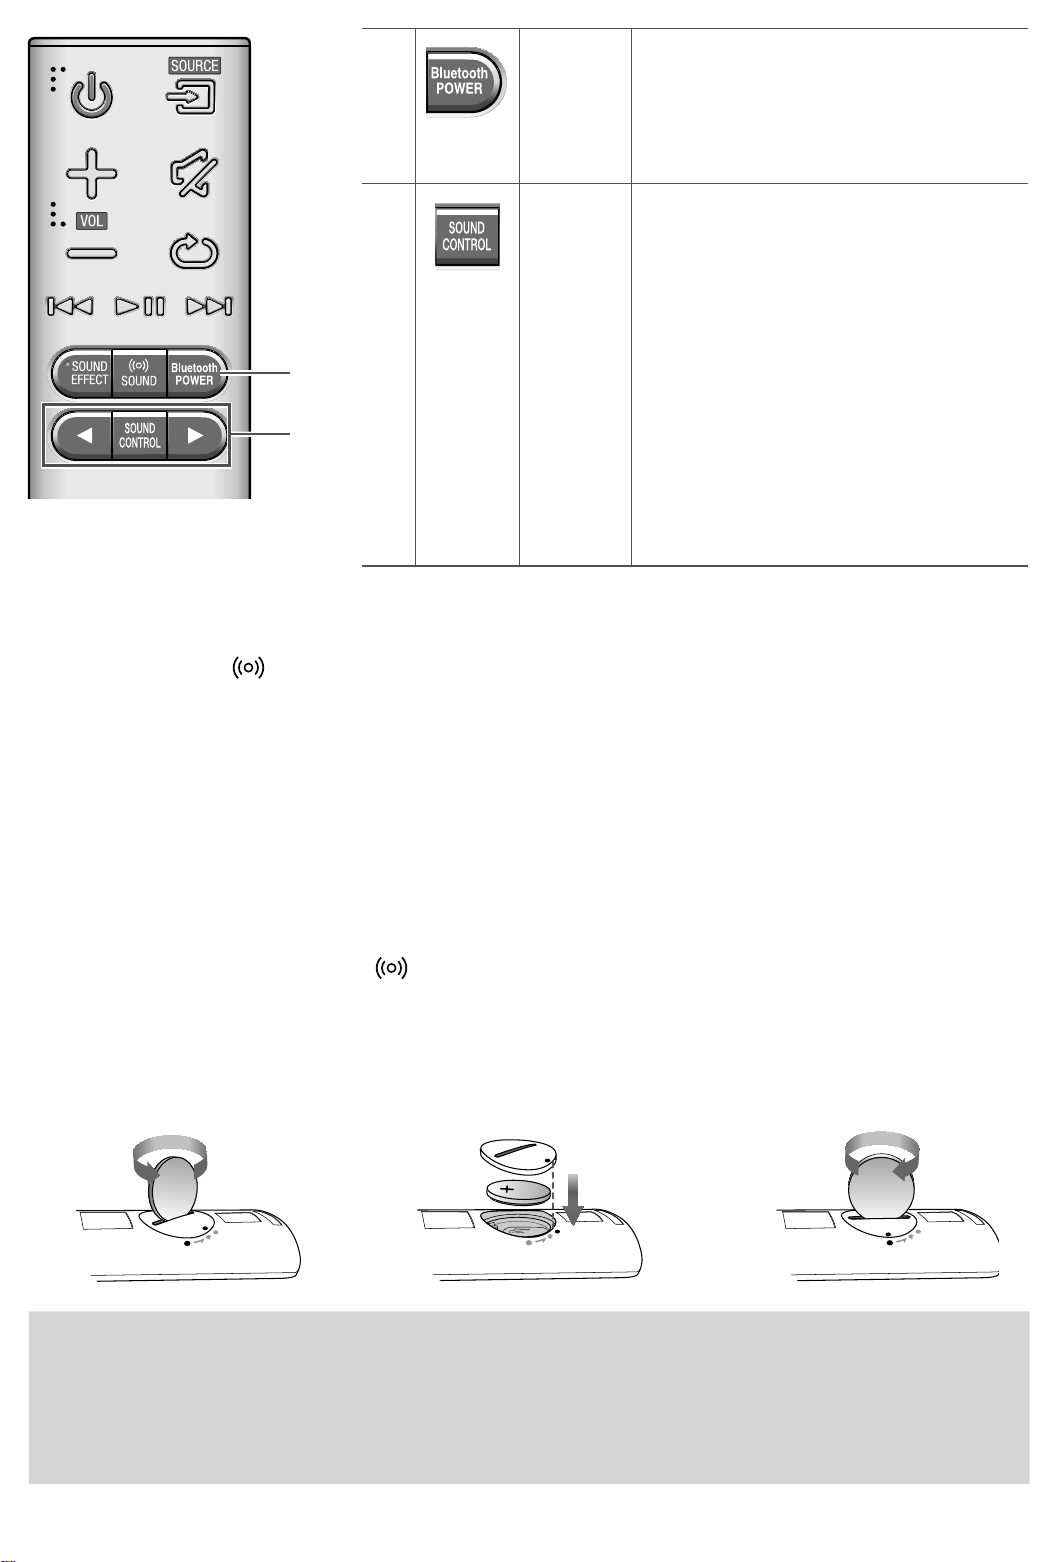
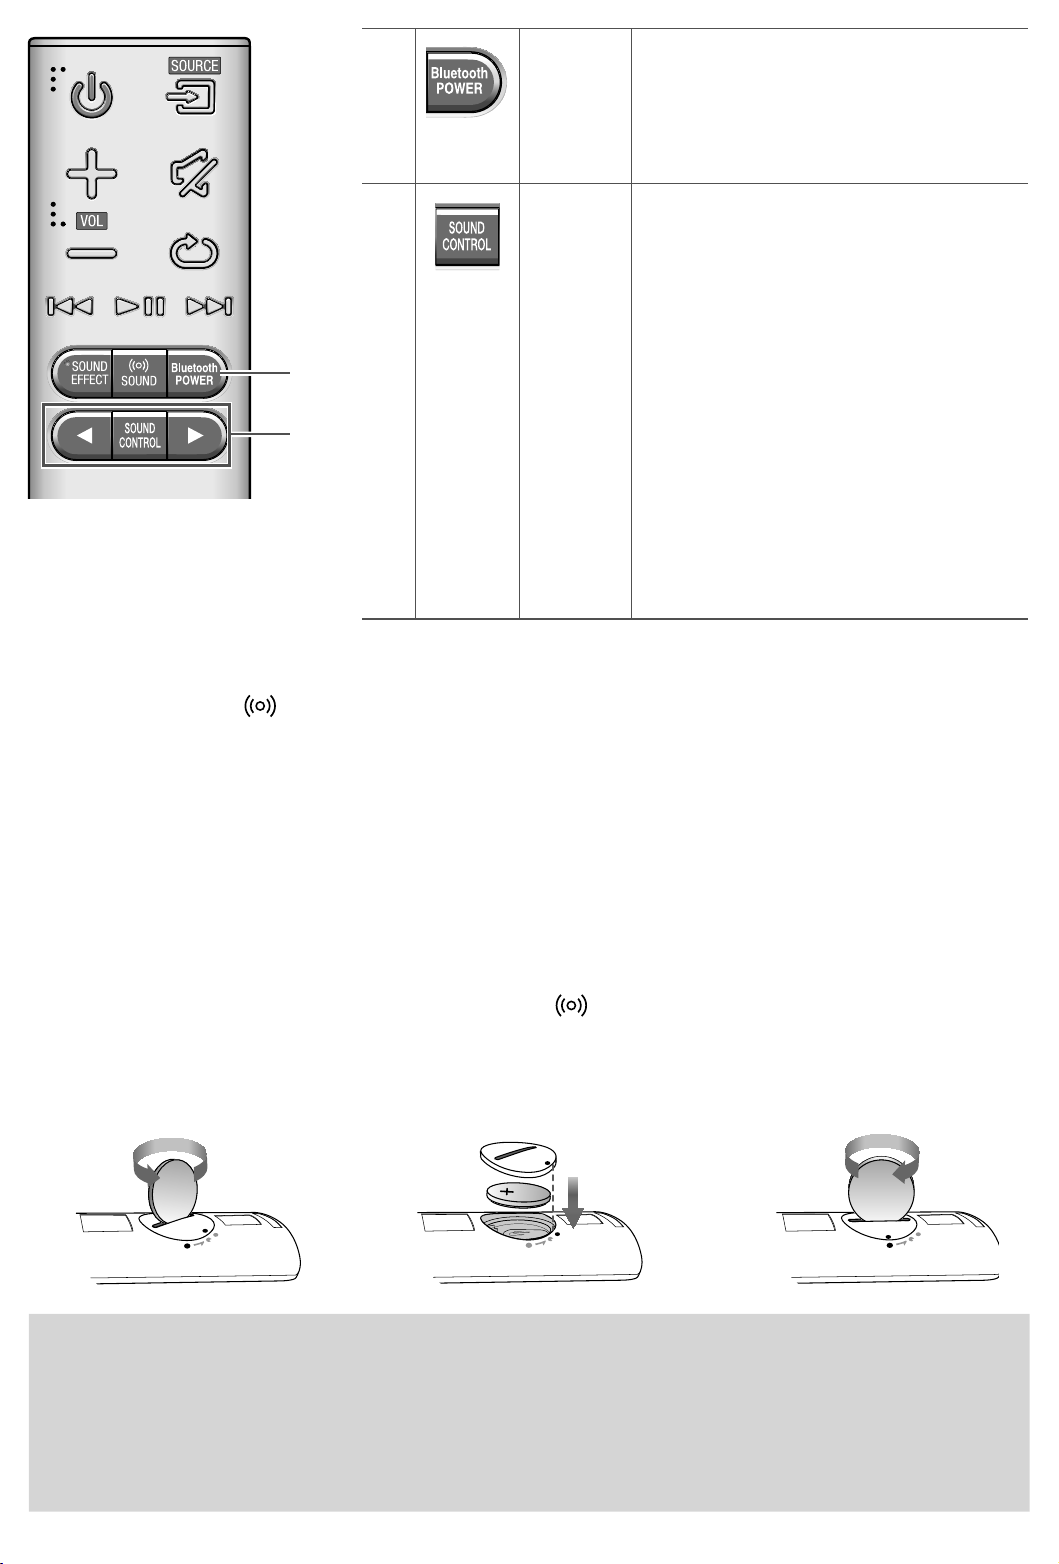
Bluetooth
POWER
Press to turn the Bluetooth POWER On
function on and off. When the Bluetooth
POWER On function is on,
ON - BLUETOOTH POWER appears in
the Soundbar’s display.
SOUND
CONTROL
You can select from TREBLE, BASS, SUB
WOOFER LEVEL, and AUDIO SYNC.
• Press to select TREBLE, BASS,
SUBWOOFER LEVEL, or AUDIO SYNC.
Then, use the , buttons to adjust the
Treble or Bass volume from -6 ~ +6, SUB
WOOFER LEVEL volume from -12, -6 ~ +6.
• If the video and audio between the
TV and your Soundbar are not
synchronized, select AUDIO SYNC in
Sound Control, and then set audio
delay between 0~300 milliseconds by
using the , buttons.
Controlling the Soundbar using Your TV Remote Control
1. Press and hold the SOUND button for more than 5 seconds while the Soundbar is turned on.
2. "ON - TV REMOTE" appears on the Soundbar's display.
3. In the TV's menu, set the TV speaker to external speaker.
c TV menus differ by manufacturer and model. Refer to the TV's user manual for further information.
c Only the
c This function is not available when the Soundbar is in the TV SoundConnect, TV ARC, or HDMI mode.
c Manufacturers supporting this function:
•
•
c To turn off this function, press the
"OFF - TV REMOTE" appears on the Soundbar's display.
VOL +/-
VIZIO, LG, Sony, Sharp, PHILIPS, PANASONIC, TOSHIBA, GRUNDIG, Hisense, RCA
This function may not be compatible with your TV's remote depending on the remote control's
manufacturer.
and MUTE buttons will be available to control the Soundbar.
SOUND button for 5 seconds.
Installing the Battery in the Remote Control
1. Use a suitable coin to turn
the remote control's battery
cover counterclockwise to
remove it as shown in the
figure above.
2. Insert a 3V lithium battery. Keep the
positive (+) pole facing up when
inserting the battery. Put the battery
cover on, and then align the '●'
marks side by side as shown in the
figure above.
· 12 · English
3. Use a suitable coin to turn
the remote control battery
cover clockwise as far as it
will go to fix it in place.
Page 14
TROUBLESHOOTING
Before seeking assistance, check the following.
The unit will not turn on.
Is the power cord plugged into the outlet?
➮ Connect the power plug to the outlet.
A function does not work when the button is
pressed.
LICENSE
Manufactured under license from Dolby
Laboratories. Dolby, Dolby Audio, Pro Logic, and
the double-D symbol are trademarks of Dolby
Laboratories.
Is there static electricity in the air?
➮ Disconnect the power plug and connect it again.
Sound is not produced.
Is the Mute function on?
➮
Press the (Mute) button to cancel the function.
Is the volume set to minimum?
➮ Adjust the Volume.
The remote control does not work.
Are the batteries drained?
➮ Replace with new batteries.
Is the distance between the remote control and main
unit too far?
➮ Move closer to the unit.
The TV SoundConnect (TV pairing) failed.
Does your TV support TV SoundConnect?
➮ TV SoundConnect is supported by some
Samsung TVs released from 2012 on. Check
your TV to see if it supports TV SoundConnect.
Is your TV firmware the latest version?
➮ Update your TV with the latest firmware.
Does an error occur when connecting?
➮ Contact the Samsung Call Center.
Reset the TV mode and connect again.
➮ Press and hold the & button for 5 seconds to
reset the TV SoundConnect connection.
For DTS patents, see http://patents.dts.com.
Manufactured under license from DTS Licensing
Limited. DTS, the Symbol, DTS in combination with
the Symbol, and DTS 2.0 Channel are registered
trademarks or trademarks of DTS, Inc. in the United
States and/or other countries. © DTS, Inc. All Rights
Reserved.
The terms HDMI and HDMI High-Definition
Multimedia Interface, and the HDMI Logo are
trademarks or registered trademarks of HDMI
Licensing LLC in the United States and other
countries.
OPEN SOURCE LICENSE
NOTICE
To send inquiries and requests regarding open
sources, contact Samsung via Email
([email protected]).
The red LED on the subwoofer blinks and the
subwoofer is not producing sound.
Your subwoofer may not be connected to the main
unit of the product.
➮ Try to connect your subwoofer again.
See page 4.
· 13 · English
Page 15
IMPORTANT NOTE ABOUT SERVICE
• Figures and illustrations in this User Manual are provided for reference only and may differ from actual product
appearance.
SPECIFICATIONS
Model Name HW-KM45
USB 5V / 0.5A
Weight 4.4 lbs (2.0Kg)
Dimensions (W x H x D) 35.8 x 2.1 x 2.8 inches (908.5 x 53.5 x 70.5 mm)
Operating Temperature Range +41°F to +95°F (+5°C to +35°C)
Operating Humidity Range 10 % ~ 75 %
AMPLIFIER
Rated Output power
40W/CH x 4, 6ohm
Supported play formats
(DTS 2.0 sound is played in DTS format.)
Subwoofer Name PS-WK450
Weight 10.1 lbs (4.6Kg)
Dimensions (W x H x D)
AMPLIFIER
Rated Output power 140W, 3ohm
• Nominal specification
– Samsung Electronics Co., Ltd reserves the right to change the specifications without notice.
– Weight and dimensions are approximate.
– For more information about the power supply and power consumption, refer to the label attached to the
product. (Label : Bottom of main unit)
LPCM 2ch, Dolby Audio™
(supporting Dolby® Digital), DTS
7.0 x 14.2 x 11.8 inches (179.0 x 361.0 x 299.5 mm)
· 14 · English
Page 16
LIMITED WARRANTY TO ORIGINAL PURCHASER
Samsung Electronics Canada Inc.(SECA), warrants that this product is free from defective material
and workmanship.
SECA further warrants that if this product falls to operate properly within the specified warranty
period and the failure is due to improper workmanship or defective materials, SECA will repair or
replace the product at its option.
All warranty repairs must be performed by a SECA Authorized Service Center. (The name and
address of the location nearest you can be obtained by calling toll free: 1- 800- SAMSUNG)
LABOR
One year (Carry- in)
On carry-in models, transportation to and from the service center is the customer’s responsibility.
The original dated sales receipt must be retained by the customer and is the only acceptable proof
of purchase. It must be presented to the authorized service center at the time service is requested.
PARTS
One year
EXCLUSIONS (WHAT IS NOT COVERED)
This warranty does not cover damage due to accident, fire, flood and/ or other acts of God;
misuse,incorrect line voltage, improper installation, improper or unauthorized repairs, commercial
use or damage that occurs in shipping. Exterior and interior finish, lamps, glass are not covered
under this warranty. Customer adjustments which are explained in the instruction manual are not
covered under the terms of this warranty. This warranty will automatically be voided for any unit
found with a missing or altered serial number. This warranty is valid only on products purchased
and used in Canada.
Samsung Electronics Canada Inc
2050 Derry Rd West
Mississauga, On. L5N 0B9
Tel: 1-800-SAMSUNG (726-7864)
Fax: (905) 542- 1199
Website: www.samsung.com/ca
Page 17
© 2018 Samsung Electronics Co., Ltd. All rights reserved.
Contact SAMSUNG WORLD WIDE
If you have any questions or comments relating to Samsung products, please contact the SAMSUNG customer
care Centre.
HEADQUARTERS
Samsung Electronics Canada Inc. 2050 Derry Road
West, Mississauga, Ontario L5N 0B9 Canada
TEL: 1-800-SAMSUNG (1-800-726-7864)
www.samsung.com/ca/support
Country Contact Center
`
North America
CANADA 1-800-SAMSUNG (726-7864)
U.S.A 1-800-SAMSUNG (726-7864)
Web Site
www.samsung.com/ca/support (English)
www.samsung.com/ca_fr/support (French)
www.samsung.com/us/support
Page 18

Guide d'utilisation
HW-KM45
Pour de plus amples renseignements, consultez le guide de l’utilisateur en ligne.
Guide Web : www.Samsung.com → Assistance →
Recherche du nom de produit → HW-KM45
* Cette conception et ces spécifications techniques sont susceptibles d'être modifiées sans préavis.
Page 19
INFORMATIONS RELATIVES À LA SÉCURITÉ
AVERTISSEMENTS
POUR ÉVITER LES RISQUES DE CHOC ÉLECTRIQUE, NE DÉMONTEZ PAS LE CAPOT.
L’APPAREIL NE CONTIENT PAS DE PIÈCES RÉPARABLES PAR L’UTILISATEUR. S’ADRESSER À UN SERVICE
APRÈS-VENTE QUALIFIÉ.
Ce symbole indique la présence d'une haute
tension à l'intérieur. Tout contact avec une
MISE EN GARDE
RISQUE DE CHOC
ÉLECTRIQUE NE PAS OUVRIR
Produit de catégorie II : Ce symbole indique qu'il ne nécessite pas une connextion de sécurité
à la terre (masse).
Tension CA : Ce symbole indique que la tension nominale est la tension CA.
Tension CC : Ce symbole indique que la tension nominale est la tension CC.
pièce interne de l'appareil présente un danger.
Ce symbole vous informe qu'une
documentation importante relative au
fonctionnement et à l'entretien est fournie avec
le produit.
Attention, consultez les instructions aux fins d'utilisation : Ce symbole indique à l'utilisateur
qu'il doit consulter le guide d'utilisation pour avoir de l'information au sujet de la sécurité.
AVERTISSEMENT
• Afin de diminuer les risques d’incendie ou de choc électrique, n’exposez pas cet appareil à la pluie ou à
l’humidité.
• Pour éviter des blessures, cet appareil doit être solidement fixé au plancher/au mur conformément aux
directives d’installation.
MISE EN GARDE
• Veillez à éviter toute projection sur l'appareil. Ne placez jamais de récipients contenant un liquide (ex. : vase)
dessus.
• La prise d’alimentation fait office de système de déconnexion. Elle doit donc rester disponible en permanence.
ATTENTION (Pour le Canada)
Le présent appareil est conforme aux CNR d’Industrie Canada applicables aux appareils radio exempts de
licence. L’exploitation est autorisée aux deux conditions suivantes : (1) l’appareil ne doit pas produire de
brouillage, et (2) l’utilisateur de l’appareil doit accepter tout brouillage radioélectrique subi, même si le brouillage
est susceptible d’en compromettre le fonctionnement.
Cet appareil et son ou ses antennes ne doivent pas etre installés a proximité ou etre utilisés conjointement avec
une autre antenne ou un autre émetteur..
Le dispositif pourrait automatiquement cesser d’émettre en cas d’absence d’informations à transmettre, ou une
défaillance opérationnelle. Notez que ce n’est pas l’intention d’interdire la transmission des informations de
contrôle ou de signalisation ou l’utilisation de codes répétitifs lorsque requis par la technologie.
Cet appareil numerique de la classe B est conforme a la norme NMB-003 du Canada.
Declaration d’exposition aux radiations:
Cet equipement est conforme aux limites d’exposition aux rayonnements IC RSS-102 etablies pour un
environnement non controle. Cet equipement doit etre installe et utilise avec un minimum de 20 cm de distance
entre la source de rayonnement et votre corps.
· 1 · Français
Page 20
Consignes de sécurité importantes
Lisez attentivement ces consignes avant d'utiliser
l'appareil. Veillez à respecter toutes les consignes
répertoriées ci-après. Conservez ces instructions à
portée de main pour vous y référer ultérieurement.
1) Lisez attentivement ces consignes.
2) Conservez-les précieusement.
3) Tenez compte de tous les avertissements
mentionnés.
4) Respectez toutes les instructions sans exception.
5) N'utilisez pas cet appareil à proximité de l'eau.
6) Nettoyez-le à l'aide d'un tissu sec.
7) Ne bloquez pas les ouvertures de ventilation.
Installez l'appareil conformément aux instructions
du fabricant.
8) N'installez pas le lecteur à proximité d’une source
de chaleur de type radiateur, registre de chaleur,
cuisinière ou tout autre appareil (y compris les
récepteurs AV) générateur de chaleur.
9) Ne désactivez pas le dispositif de sécurité de la
fiche de mise à la terre ou de la fiche polarisée.
Une fiche polarisée comporte deux lames dont
l’une est plus large que l’autre. Une fiche de mise
à la terre comporte deux lames et une troisième
broche de mise à la terre. La lame la plus large et
la troisième broche sont destinées à assurer votre
sécurité. Si la fiche fournie ne s'insère pas dans
la prise utilisée, faites appel à un électricien pour
faire remplacer celle-ci.
10) Placez le cordon d'alimentation de sorte qu'il ne
puisse être ni piétiné ni pincé, particulièrement au
niveau de la fiche, de la prise de courant et du
point de sortie de l'appareil.
11) Utilisez exclusivement les fixations/ accessoires
spécifiés par le fabricant.
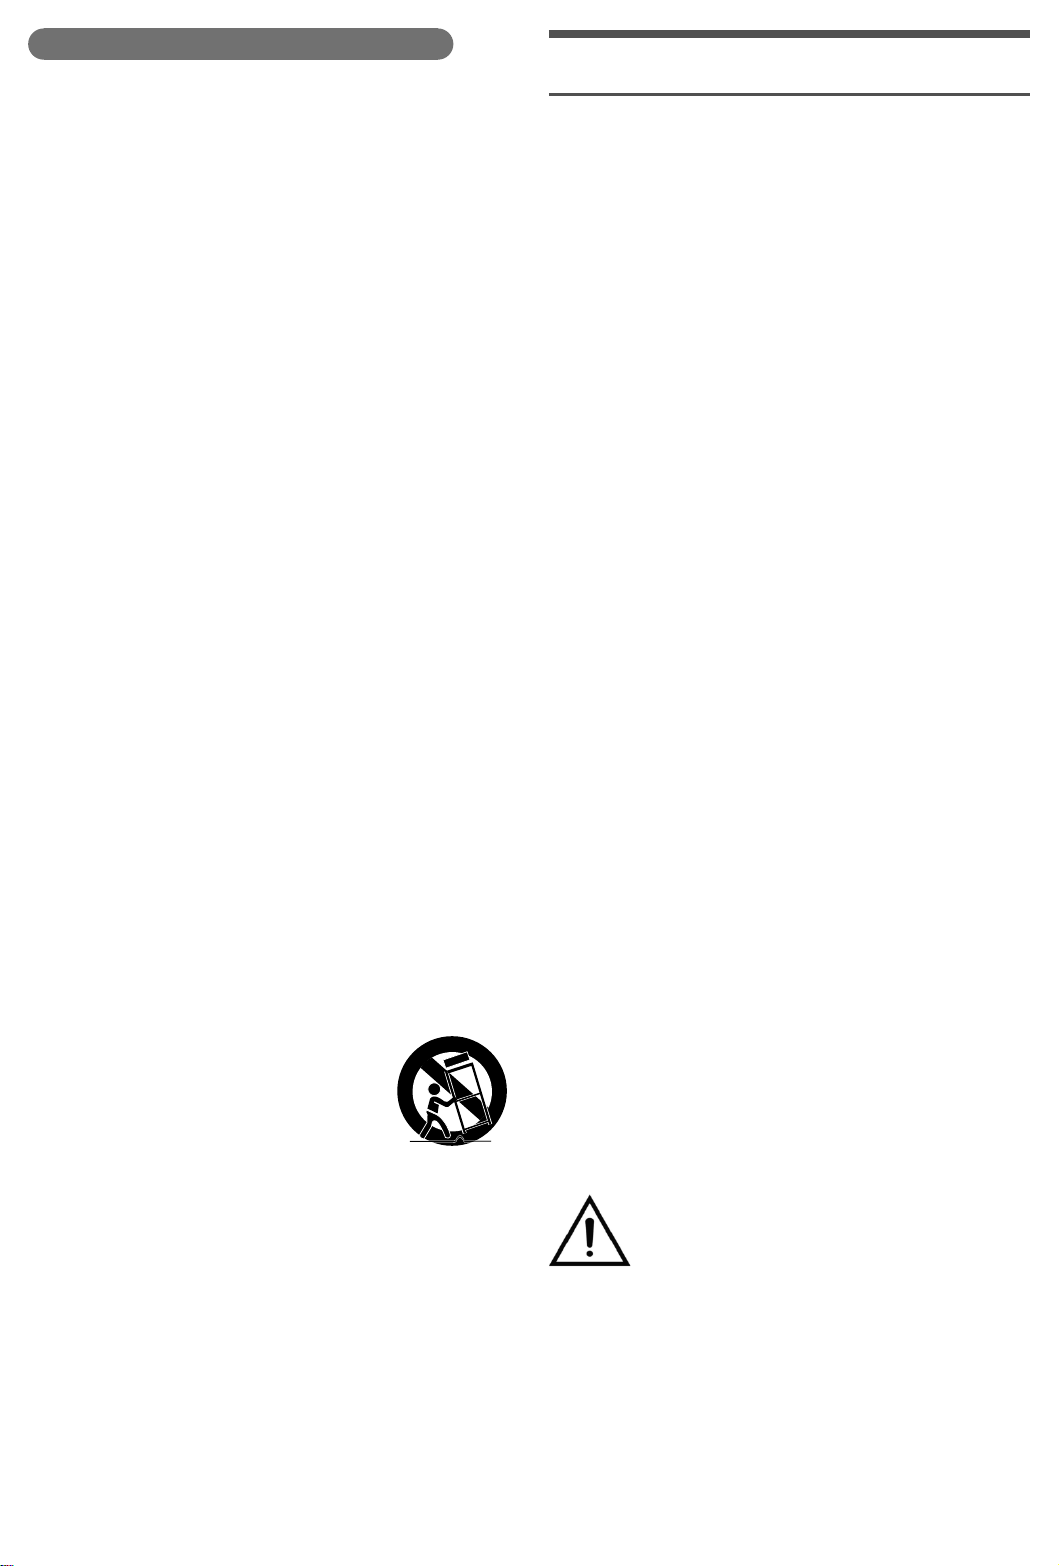
12) Utilisez exclusivement le meuble à
roulettes, le socle, le trépied, le
support ou la table recommandés
par le fabricant ou vendus avec
l’appareil. Si l’appareil est posé sur
un meuble à roulettes, déplacez
l’ensemble avec précaution pour éviter de faire
tomber le lecteur et de vous blesser.
13) Débranchez l’appareil en cas d'orage ou lorsqu’il
est inutilisé pendant une période prolongée.
14) Confiez toutes les réparations à un technicien
qualifié. Votre appareil doit impérativement être
réparé lorsqu’il a été endommagé de quelque
manière que ce soit : détérioration du cordon ou
de la fiche d’alimentation, projection de liquide
sur l’appareil, chute d’objets à l’intérieur de
l’appareil, exposition à la pluie ou à l’humidité,
dysfonctionnement, chute.
PRÉCAUTIONS
1. Assurez-vous que l'alimentation c.a. de votre
domicile satisfait aux normes inscrites sur l'étiquette
d'identification située à l'arrière du produit. Installez
votre produit horizontalement, sur un socle approprié
(meuble), en laissant un espace suffisant pour la
ventilation sur le pourtour 3~4 po. Faites attention à
ne pas obstruer les orifices de ventilation. Ne posez
pas l'ensemble sur un amplificateur ou un autre
appareil susceptible de chauffer. Cet ensemble est
conçu pour une utilisation en continu. Pour éteindre
totalement l'appareil, débranchez la fiche c.a. de la
prise murale. Débranchez l'appareil si vous prévoyez
une longue période d'inactivité.
2. En cas d'orage, débranchez la fiche de l'appareil de
la prise murale. Les surtensions occasionnées par
l'orage pourraient endommager votre appareil.
3. N'exposez pas l'ensemble aux rayons directs du
soleil ou à toute autre source de chaleur. Cela
pourrait causer une surchauffe du fil et causer un
dysfonctionnement de l’unité.
4. Protégez le produit de l'humidité (comme les vases) et
d'une chaleur excessive (comme une cheminée) ou de
tout équipement capable de créer des champs
magnétiques ou électriques. Débranchez le câble
d'alimentation en cas de dysfonctionnement. Votre
produit n'est pas prévu pour un usage industriel. Ce
produit ne peut être utilisé qu'à des fins personnelles.
Une condensation peut se former si le produit ou un
disque a été stocké à basse température. Si vous
devez transporter l'ensemble pendant l'hiver, attendez
environ 2 heures que l'appareil ait atteint la
température de la pièce avant de l'utiliser.
5. Les piles utilisées dans ce produit peuvent contenir des
produits chimiques dangereux pour l'environnement.
Ne jetez pas les piles dans votre poubelle habituelle. Ne
vous débarrassez pas des piles en les faisant brûler.
Les piles ne doivent pas être court-circuitées,
démontées ou subir de surchauffe.
Le remplacement incorrect des piles peut entraîner un
danger d'explosion. Remplacez-les uniquement par
des produits similaires ou équivalents.
AVERTISSEMENT, NE PAS INGÉRER LA
PILE, RISQUE DE BRÛLURE CHIMIQUE
[La télécommande fournie avec] Ce produit contient une
pile bouton. Si la pile bouton est avalée, elle risque de
causer, en quelques heures seulement, des brûlures
internes graves pouvant entraîner la mort. Conservez les
piles neuves et usées hors de portée des enfants. Si le
compartiment des piles ne se ferme pas correctement,
arrêtez d'utiliser le produit et tenez-le à l’écart des
enfants. Si vous pensez que des piles ont été ingérées
ou insérées à l’intérieur d’une partie du corps, consultez
immédiatement un médecin.
· 2 · Français
Page 21
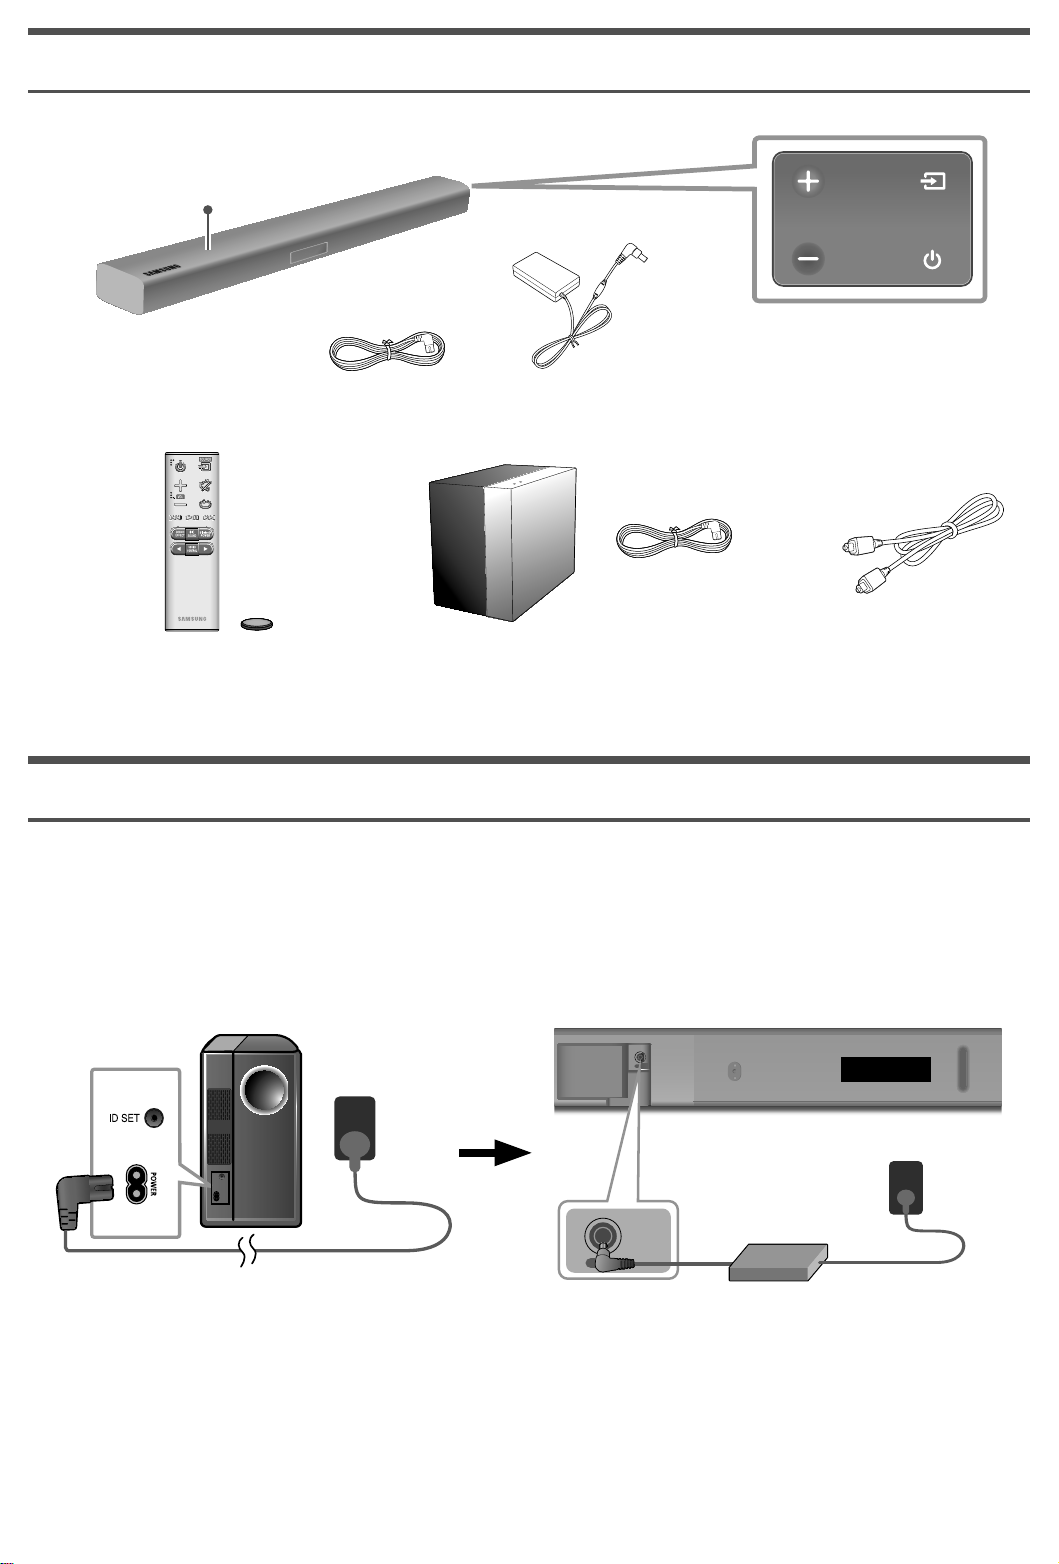
VÉRIFICATION DES COMPOSANTES
244VV
Unité principale du Soundbar
Haut
2 Adaptateur CA/CC
3 Cordon
d’alimentation
Télécommande / Pile Caisson des basses Câble optique
1 Cordon
d’alimentation
Côté droit du Soundbar
c Le câble HDMI et le câble adaptateur Micro USB USB sont vendus séparément. Pour les acheter, contactez
un Centre de service Samsung ou le service clientèle Samsung. L'emballage contient également la
quincaillerie de montage sur le mur. Voir page 8.
BRANCHEMENT À LA SOURCE D’ALIMENTATION ÉLECTRIQUE
Utilisez les composantes de puissance (1, 2, 3) afin de connecter l'alimentation dans l'ordre suivant :
Caisson des basses Unité principale du Soundbar
c Pour obtenir de l'information sur la source d'alimentation et la consommation électrique, veuillez vous
reporter à l'étiquette apposée sur le produit. (Étiquette : Dessous d’une unité principale)
Arrière du caisson de basses
1 Cordon
d’alimentation
Arrière de l'Unité Principale du Soundbar
DC 24V
3 Cordon d’alimentation
2 Adaptateur
CA/CC
DC 24V
ALIMENTATION
(prise électrique)
c Assurez-vous de poser les adaptateurs C.A./C.C. à plat sur une table ou le plancher. Si vous placez un
adaptateur C.A./C.C. en position suspendue avec le connecteur du cordon C.A. orienté vers le dessus, de
l'eau ou d'autres substances étrangères pourraient pénétrer dans l’adaptateur et causer son
dysfonctionnement.
Branchement à la
source d'alimentation
électrique
DC 24V
(prise électrique)
· 3 · Français
Branchement à la
source d'alimentation
électrique
Page 22
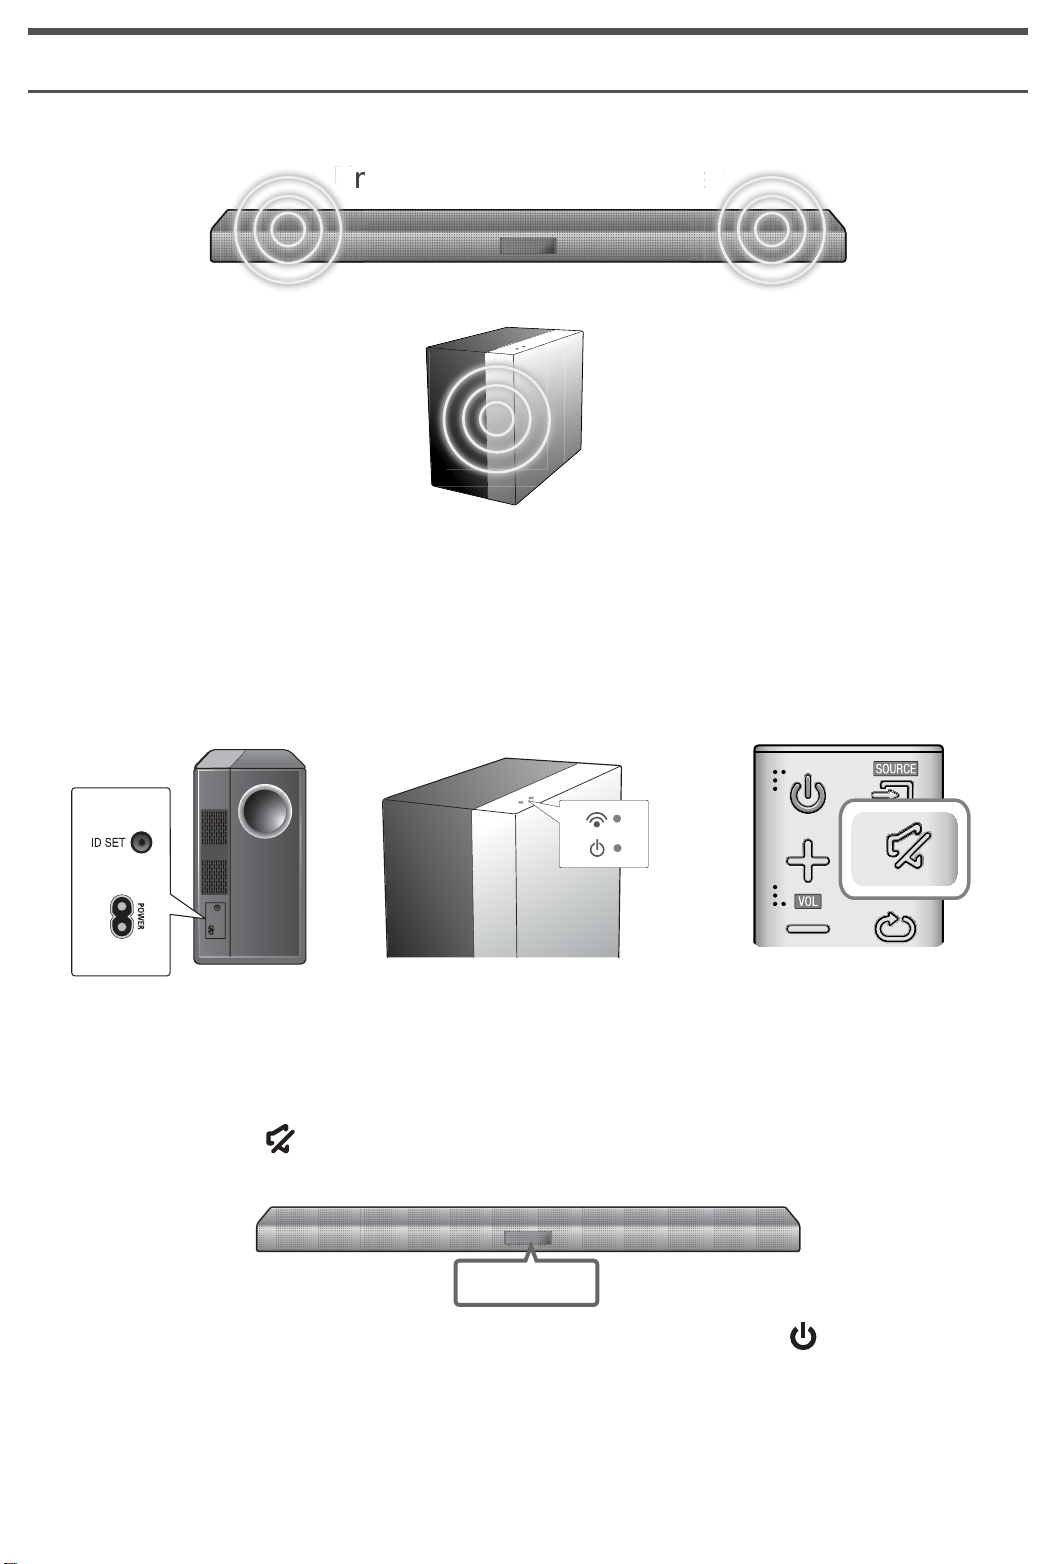
BRANCHEMENT DU CAISSON DES BASSES À L’UNITÉ PRINCIPALE
a
Vous pouvez profiter d’une sonorité de basses riche et d’une meilleure qualité sonore en connectant le caisson
des basses à l’unité principale.
Unité principale du Soundbar
Caisson des basses
L’unité principale et le caisson des basses devraient communiquer automatiquement (par une connexion sans
fil) lorsque l’unité principale et le caisson des basses sont allumés. Une fois la connexion automatique réalisée, le
voyant bleu sur le dessus du caisson des basses cesse de clignoter et s’allume continuellement.
c Si le voyant sur le dessus du caisson des basses s’illumine en rouge ou clignote en bleu, le caisson des
basses n’est pas automatiquement connecté. Si cela se produit, suivez les directives ci-dessous pour
brancher le caisson des basses manuellement.
c Important : Avant de commencer, insérez la pile dans la télécommande. Voir la page 12 pour des directives.
1. Branchez les cordons d’alimentation de l’unité principale et du caisson des basses dans une prise murale C.A.
2. Appuyez sur le bouton ID SET à l’arrière du caisson des basses à l’aide d’un petit objet pointu pendant
5 secondes.
c Le voyant VEILLE s’éteint et le voyant DEL bleu LIEN clignote rapidement.
3. Appuyez sur le bouton
4. Le message DÉFINIR ID apparaît sur l’écran de l’unité principale pendant un court moment, puis disparaît.
de la télécommande pendant 5 secondes lorsque l’unité principale est ÉTEINTE.
ID SET
5. Lorsque le voyant du caisson des basses clignote en bleu, appuyez sur le bouton
ou sur le côté droit de l’unité principale pour allumer l’unité principale.
6. La connexion est établie si le voyant sur le dessus du caisson des basses cesse de clignoter et s’allume en continu.
c Si la connexion n’aboutit pas, le voyant bleu clignote continuellement. Retournez à l'étape 2 et
recommencez.
· 4 · Français
de la télécommande
Page 23
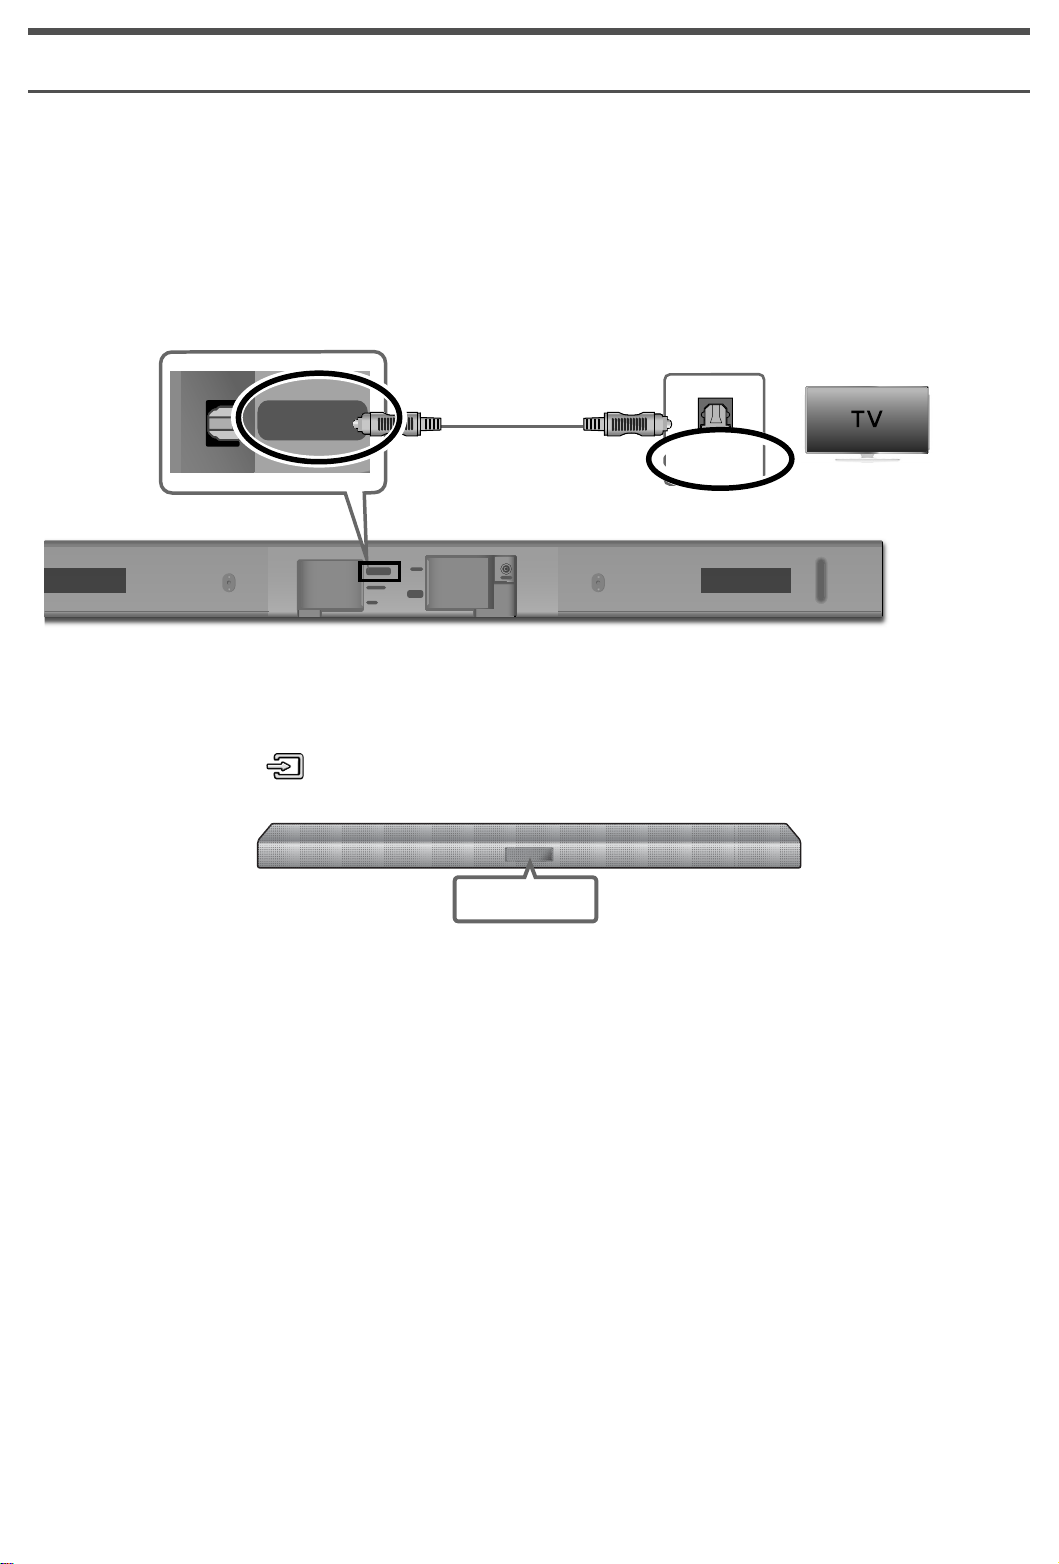
CONNEXION À VOTRE TÉLÉVISEUR
24
Vous permet de restituer le son par le téléviseur après l’avoir branché au Soundbar avec ou sans un câble.
c Important : Avant de commencer, insérez la pile dans la télécommande. Voir la page 12 pour des directives.
Méthode 1. Branchement à l'aide d'un câble
Vérifiez le port DIGITAL AUDIO IN
(ENTRÉE AUDIO NUMÉRIQUE) de l'unité
principale.
Câble optique
DIGITAL AUDIO IN
(OPTICAL )
HDMI IN
DIGITAL AUDIO IN
(OPTICAL)
USB (5V 0.5A)
HDMI OUT
(TV-ARC)
AUX IN
Dessous d’une unité principale
OPTICAL OUT
DC 24V
Vérifiez le port OPTICAL
OUT (SORTIE OPTIQUE) de
votre téléviseur.
1. Connectez l’entrée DIGITAL AUDIO IN (OPTICAL) du Soundbar à la prise OPTICAL OUT du téléviseur à
l’aide d’un câble optique numérique.
2. Appuyez sur le bouton
du côté droit du Soundbar ou le bouton SOURCE de la télécommande pour
sélectionner le mode D.IN.
D.IN
c Si vous avez connecté l’unité principale à un téléviseur à l'aide d'un câble optique numérique, vous pouvez
régler la fonction Auto Power Link (Lien de mise en fonction automatique) à ACTIVÉE pour que le
Soundbar se mette automatiquement en fonction lorsque vous allumez le téléviseur.
c Cette fonction est uniquement accessible si le Soundbar est en mode D.IN.
· 5 · Français
Page 24

Méthode 2. TV SoundConnect (connexion à un téléviseur Samsung par Bluetooth)
1. Allumez le téléviseur Samsung et le Soundbar.
2. Sélectionnez le mode TV dans l’affichage du Soundbar en appuyant sur le bouton
le bouton SOURCE de la télécommande. (Les modes s'affichent dans l'ordre suivant : D.IN → AUX → HDMI
→ BT → TV → USB.)
3. Lorsqu’un message de connexion montré ci-dessous s’affiche sur l’écran du téléviseur, sélectionnez <Oui>
à l’aide de la télécommande du téléviseur.
Un appareil audio Samsung a été
détecté.
Voulez-vous que le son du téléviseur
soit restitué par cet appareil?
situé du côté droit ou
Oui Non
Sélectionnez <Oui> à l’aide de la
télécommande du téléviseur.
4. Le Soundbar restitue le son du téléviseur.
c Si le processus de liaison TV SoundConnect échoue, accédez à SoundConnect dans le menu Son du
téléviseur, sélectionnez Ajouter un nouvel appareil et définissez Ajouter un nouvel appareil sur ACTIVÉ.
Faites ensuite une nouvelle tentative.
c Si votre Soundbar est branché à un téléviseur par l'entremise de TV SoundConnect, vous pouvez régler le
volume en toute commodité à l’aide de la télécommande du Soundbar ou du téléviseur. Vous pouvez aussi
régler la mise en fonction et hors fonction automatique du Soundbar lorsque vous allumez ou éteignez le
téléviseur en activant la fonction de MISE EN FONCTION Bluetooth. Voir page 12.
c La fonction TV SoundConnect (SoundShare) est seulement disponible sur certains téléviseurs Samsung
commercialisés depuis 2012.
c Si vous voulez couper la connexion existante à votre téléviseur et vous brancher à un autre téléviseur,
appuyez sur le bouton & de votre télécommande pendant plus de 5 secondes.
c En mode TV Sound Connect, le Soundbar ne peut pas être apparié ou connecté à un autre appareil Bluetooth.
c Ne posez pas d'appareils électroniques ou d'objets métalliques sur le produit.Par exemple, routeur câblé ou
sans fil, décodeur STB ou modem.
c Selon le revêtement, le fait de placer le produit au sol peut réduire les performances du réseau sans fil.
· 6 · Français
Page 25
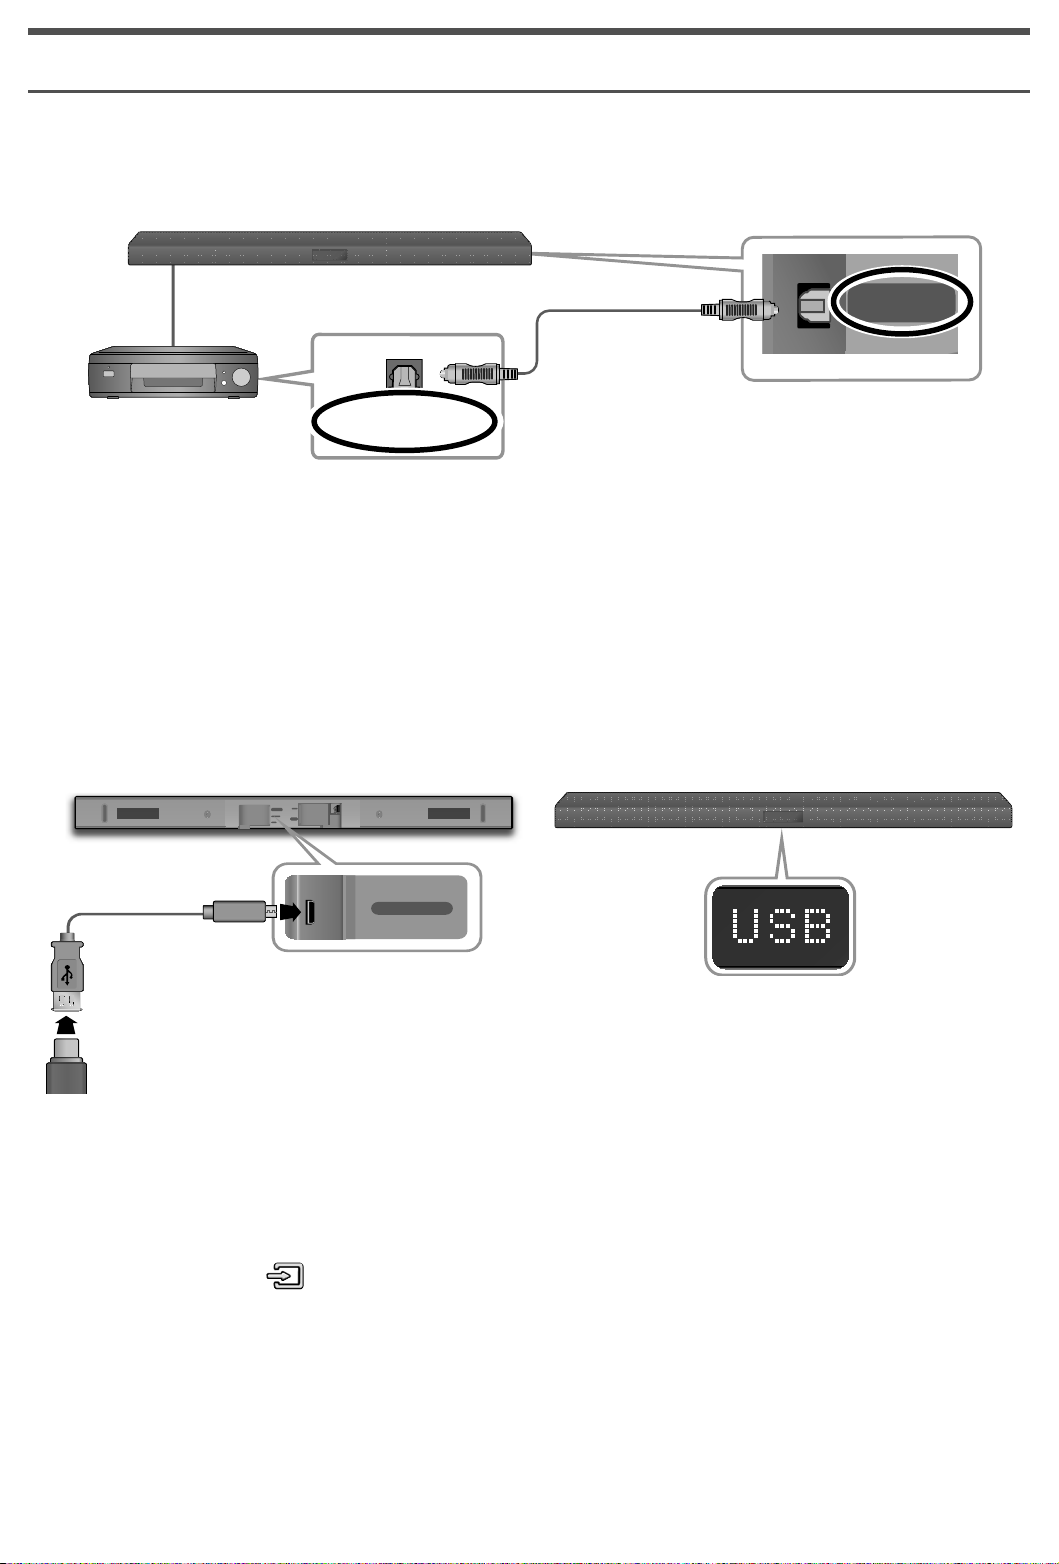
BRANCHEMENT À UN PÉRIPHÉRIQUE EXTERNE
24
4V
USB (5V 0.5A)
Câble optique
Vous pouvez restituer le son sur des appareils externes séparés comme un lecteur BD, une console de jeu, un
décodeur, etc. en les connectant à votre Soundbar.
Soundbar
DIGITAL AUDIO IN
(OPTICAL)
Câble optique
Périphérique
OPTICAL OUT
Dessous du Soundbar
externe
1. Branchez un câble optique comme l’illustre l’image ci-dessus.
2. Appuyez sur le bouton du côté droit du Soundbar ou le bouton SOURCE de votre télécommande pour
sélectionner le mode D.IN.
3. Le Soundbar affiche la mention D.IN sur son écran et restitue le son de l’appareil connecté.
USB
Vous pouvez lire des fichiers musicaux présents sur des périphériques de stockage USB par l’entremise du Soundbar.
Port USB Écran d’affichage
HDMI IN
DIGITAL AUDIO IN
(OPTICAL)
USB (5V 0.5A)
AUX IN
DC 24V
HDMI OUT
(TV-ARC)
Câble adaptateur
Micro USB-USB
(non fourni)
1. Connectez un câble adaptateur USB doté d'un connecteur Micro USB USB 2.0 (type B) à une extrémité et
d'un connecteur USB 2.0 femelle standard (type A) à l'autre sur le connecteur micro USB de votre Soundbar.
c Le câble adaptateur USB est vendu séparément. Pour l'acheter, contactez un Centre de service Samsung
ou le service clientèle Samsung.
2. Connectez votre périphérique USB à l'extrémité femelle du câble adaptateur.
3. Appuyez sur le bouton
sur le côté droit de l'appareil ou sur le bouton SOURCE de la télécommande
pour sélectionner le mode USB.
4. USB apparaît à l’écran.
•
La connexion Soundbar à un périphérique USB est établie.
•
Il s'éteint automatiquement (Auto Power Off) si aucun périphérique USB n'est connecté pendant plus de
5 minutes.
· 7 · Français
Page 26
INSTALLATION DE LA
FIXATION MURALE
Vous pouvez utiliser le support de fixation murale pour
monter cette unité sur un mur.
Accessoires pour la fixation murale
(Fixation murale de
gauche)
(Fixation murale de
droite)
Précautions à prendre lors de l’installation
• Ne peut être installé que sur un mur vertical.
• Pour l’installation, évitez les pièces où la
température ou l’humidité est élevée ou sur un mur
qui ne peut pas supporter le poids de l’appareil.
• Vérifiez la solidité du mur. Si le mur n’est pas
suffisamment solide pour supporter l’unité,
renforcez-le ou installez l’unité sur un autre mur qui
peut supporter son poids.
• Achetez et utilisez des vis de fixation ou des
ancrages convenant au type de mur que vous avez
(plaque de plâtre ou en fer, bois, etc.) Si cela est
possible, fixez les vis de fixation dans les poteaux
muraux.
• Des vis pour un montage mural doivent être
achetées en fonction du type et de l’épaisseur du
mur sur lequel le Soundbar sera posé.
- Diamètre : M5
- Longueur : une longueur de 3,5 cm (1 3/8 po) ou
plus est recommandée.
• Connectez les câbles de l’unité à des
périphériques externes avant de l’installer sur le
mur.
Support-fixation murale (2 de chaque)
Porte-vis (2 de chaque) Vis (2 de chaque)
Guide de fixation murale
1. Placez le Guide de fixation murale contre la
surface murale.
•
Le Guide de fixation murale doit être de
niveau.
•
Si votre téléviseur est monté sur le mur,
installez le Soundbar à une distance d’au
moins 5 cm (2 po) sous le téléviseur.
• Assurez-vous que l’unité est éteinte et débranchée
avant de l’installer. Autrement, il y a risque de
décharge électrique.
5 cm (2 po) ou plus
· 8 · Français
Page 27

2. Alignez la Ligne centrale du guide de fixation
murale avec le centre du téléviseur (si vous
montez le Soundbar sous le téléviseur), puis fixez
le Guide de fixation murale au mur à l'aide d'un
ruban adhésif.
c Si vous ne le montez pas sous un téléviseur,
placez la Ligne centrale au centre de la zone
d’installation.
Ligne centrale
3. Poussez la pointe d’un stylo ou la pointe taillée
d’un crayon dans le centre des images B-TYPE
(TYPE B) sur chaque extrémité du guide pour
marquer les orifices de passage des vis de
fixation, puis retirez le Guide de fixation murale.
5. Enfoncez une vis (non fournie) dans chaque
Porte-vis, puis serrez fermement chacune
d’entre elles.
6. Utilisez deux Vis (M4 x L14) pour fixer les deux
Supports-fixations murales de gauche et de
droite. Pour assurer un ajustement adéquat,
assurez-vous d’aligner les bourrelets du Soundbar
avec les orifices des supports.
4. À l’aide d'un foret de dimension appropriée,
percez un orifice dans le mur sur chaque point de
marquage.
c Si les points de marquage ne correspondent pas
aux positions des goujons, assurez-vous
d'insérer les ancrages ou les gaines d’expansion
dans les orifices avant d’utiliser les vis de fixation.
Si vous utilisez des ancrages ou des gaines
d’expansion, assurez-vous que les orifices que
vous percez sont suffisamment grands pour les
loger.
•
Lors de l’assemblage, assurez-vous que la
partie suspendue des supports-fixations
murales se trouve à l’arrière du Soundbar.
Consultez l’illustration ci-dessous.
Arrière du Soundbar
Extrémité droite du Soundbar
•
Les supports gauche et droit ont des formes
différentes.Assurez-vous de les placer
correctement.
Fixation murale de
droite
· 9 · Français
Fixation murale de
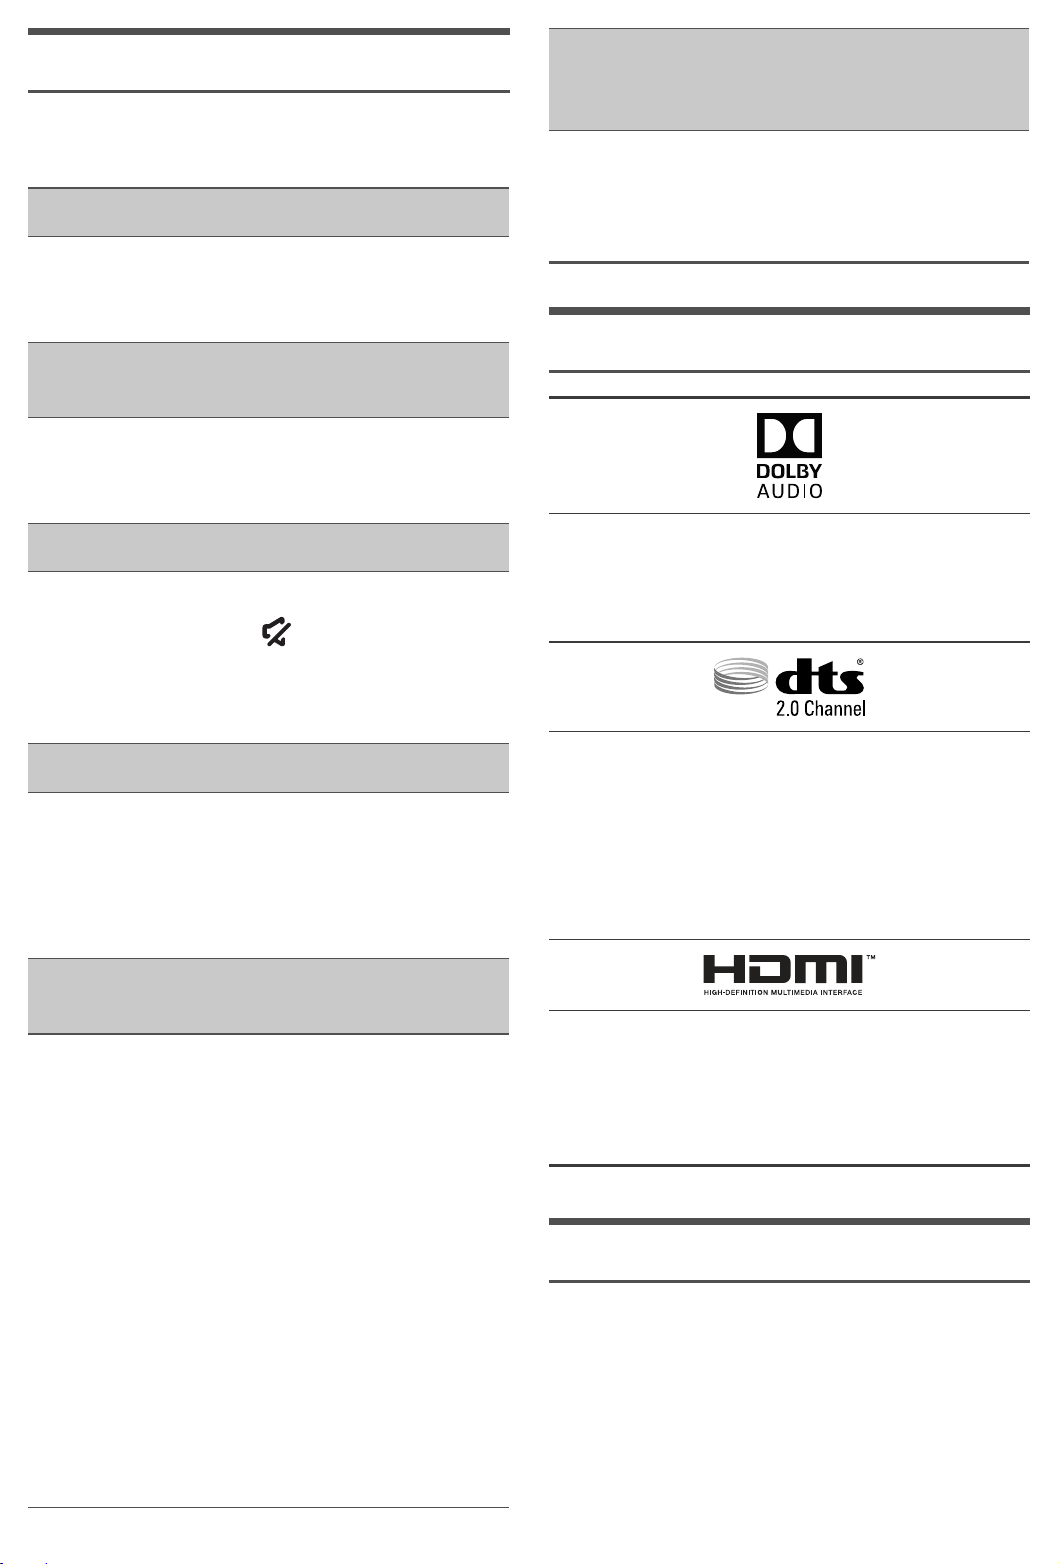
gauche
Page 28
7. Installez le Soundbar à l’aide du Support-fixation
murale en suspendant le Support-fixation
murale sur les Porte-vis du mur.
• Inclinez légèrement le Soundbar pour insérer
les deux têtes des Porte-vis dans les orifices
du Support-fixation murale. Poussez le
Soundbar dans la direction des flèches pour
vous assurer que les deux côtés sont
fermement fixés.
DÉMONTAGE DU SOUNDBAR
DU MUR
1. Pour démonter le Soundbar du mur, poussez-le
dans la direction de la flèche, inclinez-le
légèrement, puis dégagez-le du mur de la manière
illustrée.
c Ne le suspendez pas à l’unité installée et évitez
de le heurter ou de l’échapper.
c Fixez solidement l’appareil au mur de sorte qu’il
ne tombe pas. Si l’unité tombe, elle pourrait
causer des blessures ou endommager le produit.
c Si vous installez l'unité sur un mur, veuillez vous
assurer que des enfants ne tireront pas sur un ou
plusieurs câbles de connexion, car cela pourrait
entraîner la chute du produit.
c Pour une performance optimale d’une installation
murale d’un support, installez le système
d’enceintes à une distance d’au moins 5 cm (2
po) sous le téléviseur, si le téléviseur est monté
sur le mur.
c Pour votre sécurité, ne montez pas l’unité sur le
mur. Installez-la sur une surface plane et sûre où
elle est peu susceptible de tomber.
· 10 · Français
Page 29
TÉLÉCOMMANDE
Alimentation
Volume
Lecture/
pause
Saut vers
l’avant
Saut vers
l’arrière
Répéter
Permet d’allumer et d’éteindre le
Soundbar.
Règle le niveau sonore de l’unité.
Permet de lire ou d’interrompre la
lecture d’un fichier.
Sélectionne le prochain fichier.
Sélectionne le fichier précédent.
Appuyez sur cette touche pour régler la fonction Répéter lorsque vous écoutez des
fichiers musicaux sur un périphérique USB.
• OFF-REPEAT : Annule la lecture répétée.
• TRACK-REPEAT : Lit toutes les pistes de manière répétée.
• ALL-REPEAT : Lit toutes les pistes plusieurs fois.
• RANDOM-REPEAT : Lit les pistes plusieurs fois de manière aléatoire.
(Une piste déjà lue peut être lue de nouveau.)
SOUND
EFFECT
SON
AMBIOPHONIQUE
SOURCE
Vous pouvez sélectionner jusqu’à six modes sonores : STANDARD, MUSIC, CLEAR
VOICE, SPORTS, MOVIE et NIGHT MODE.
La fonction Son ambiophonique ajoute de la profondeur et une notion d’espace à
votre expérience sonore.
Chaque fois que vous appuyez sur cette touche, ON-SURROUND SOUND et
OFF-SURROUND SOUND se succèdent.
Chaque fois que vous appuyez sur cette touche pendant 5 secondes, ON-TV
REMOTE et OFF-TV REMOTE se succèdent.
Appuyez pour sélectionner une source branchée au Soundbar.
c NIGHT MODE
Lors de la modification des canaux ou de la source musicale, la différence de
volume entre des sources musicales différentes est automatiquement réglée pour
convenir à l’écoute.
Mise en
sourdine
Règle temporairement le volume à 0.
Appuyez de nouveau pour annuler.
· 11 · Français
Page 30
Bluetooth
POWER
Appuyez pour activer et désactiver la fonction
de Bluetooth POWER On. La fonction de
Bluetooth POWER On est activée, la mention
ON - BLUETOOTH POWER
l’écran du Soundbar.
apparaît sur
SOUND
CONTROL
Vous pouvez faire un choix parmi les options
suivantes : TREBLE, BASS, SUBWOOFER
LEVEL, et AUDIO SYNC.
• Appuyez pour sélectionner TREBLE,
BASS, SUBWOOFER LEVEL, ou
AUDIO SYNC. Utilisez ensuite les
boutons , pour régler le volume
des aigus et des basses de -6 à +6, le
SUB WOOFER LEVEL de -12, -6 à +6.
• Si la vidéo et le son entre le téléviseur et
votre Soundbar ne sont pas synchronisés,
sélectionnez AUDIO SYNC dans les
réglages sonores puis réglez le son entre 0
et 300 millisecondes en utilisant les boutons
, .
Commande du Soundbar à l'aide de la télécommande
1. Appuyez sur le bouton SOUND pendant plus de 5 secondes pendant que le Soundbar est allumé.
2. La fonction « ON - TV REMOTE » apparaît sur l’écran du Soundbar.
3. Dans le menu du téléviseur, réglez l’enceinte du téléviseur sur enceinte externe.
c Les menus du téléviseur diffèrent en fonction du fabricant et du modèle. Reportez-vous au guide d’utilisation
du téléviseur pour obtenir de plus amples renseignements.
c Seuls les boutons VOL +/- et MISE EN SOURDINE pourront être utilisés pour commander le Soundbar.
c Cette fonction n'est pas disponible lorsque le Soundbar est en mode TV SoundConnect, TV ARC ou HDMI.
c Fabricants prenant en charge cette fonction :
•
VIZIO, LG, Sony, Sharp, PHILIPS, PANASONIC, TOSHIBA, GRUNDIG, Hisense, RCA
•
Cette fonction pourrait ne pas être compatible avec la télécommande du téléviseur en fonction du
fabricant de la télécommande.
c Pour désactiver cette fonction, appuyez sur le bouton
« OFF - TV REMOTE » apparaît sur l'écran du Soundbar.
SOUND pendant cinq secondes.
Installation de la pile dans la télécommande
1. Utilisez une pièce de monnaie
appropriée pour faire tourner le
couvercle du logement des piles
de la télécommande dans le
sens antihoraire et le retirer
comme cela est illustré dans la
figure ci-dessus.
2. Insérez une pile au lithium de 3 V.
Assurez-vous que la polarité positive (+)
est orientée vers le haut lors de l’insertion
de la pile. Replacez le couvercle du
compartiment des piles et alignez les
marques '●' côte à côte comme cela est
illustré dans la figure ci-dessus.
· 12 · Français
3. Utilisez une pièce de monnaie
appropriée pour faire tourner
complètement le couvercle
du logement des piles de la
télécommande dans le sens
horaire et le remettre en
place.
Page 31
DÉPANNAGE
Avant de demander de l’aide, effectuez les
vérifications élémentaires suivantes :
L’unité ne s’allume pas.
Le cordon d'alimentation est-il branché dans la
prise?
Branchez le cordon d’alimentation dans la prise.
Une fonction ne marche pas quand la touche
est enfoncée.
Y-a-t-il de l'électricité statique dans l'air?
Débranchez le cordon d’alimentation et essayez
de nouveau.
Le voyant DEL sur le caisson des basses
clignote et le caisson des basses ne produit
aucun son.
Votre caisson des basses pourrait ne pas être
connecté à l’unité principale du produit.
Essayez de connecter de nouveau votre caisson
des basses.Voir page 4.
LICENCE
Aucun son n'est produit.
La fonction de mise en sourdine est-elle activée?
Appuyez sur la touche (Mute/Sourdine) pour
désactiver la fonction.
L’intensité sonore est-elle réglée à minimum?
Réglez le volume.
La télécommande ne fonctionne pas.
Les piles sont-elles à plat?
Remplacez les piles par des piles neuves.
La télécommande et l'unité principale sont-elles trop
éloignées l'une de l'autre?
Rapprochez-vous de l’unité.
L’appariement TV Sound Connect (téléviseur)
n’a pas abouti.
Votre téléviseur prend-il en charge la fonction TV
SoundConnect?
TV SoundConnect est pris en charge par
certains téléviseurs Samsung commercialisés à
partir de 2012. Vérifiez si téléviseur prend en
charge TV SoundConnect.
Le micrologiciel de votre téléviseur est-il à jour?
Mettez votre téléviseur à jour en utilisant le
micrologiciel le plus récent.
Une erreur se produit-elle lors de la connexion?
Communiquez avec le centre d’appels
Samsung.
Réglez le mode du téléviseur, puis rétablissez la
connexion.
Appuyez sur le bouton & pendant 5 secondes
pour réinitialiser la connexion TV SoundConnect.
Manufactured under license from Dolby
Laboratories. Dolby, Dolby Audio, Pro Logic, and
the double-D symbol are trademarks of Dolby
Laboratories.
For DTS patents, see http://patents.dts.com.
Manufactured under license from DTS Licensing
Limited. DTS, the Symbol, DTS in combination with
the Symbol, and DTS 2.0 Channel are registered
trademarks or trademarks of DTS, Inc. in the United
States and/or other countries. © DTS, Inc. All Rights
Reserved.
The terms HDMI and HDMI High-Definition
Multimedia Interface, and the HDMI Logo are
trademarks or registered trademarks of HDMI
Licensing LLC in the United States and other
countries.
AVIS DE LICENCE LIBRE
Pour transmettre des demandes et des questions
portant sur les sources ouvertes, communiquez avec
Samsung par courriel ([email protected]).
· 13 · Français
Page 32
REMARQUE IMPORTANTE CONCERNANT LE SERVICE
• Les figures et les illustrations de ce guide d’utilisation sont fournies à titre de référence seulement. Elles
peuvent différer de l'apparence réelle du produit.
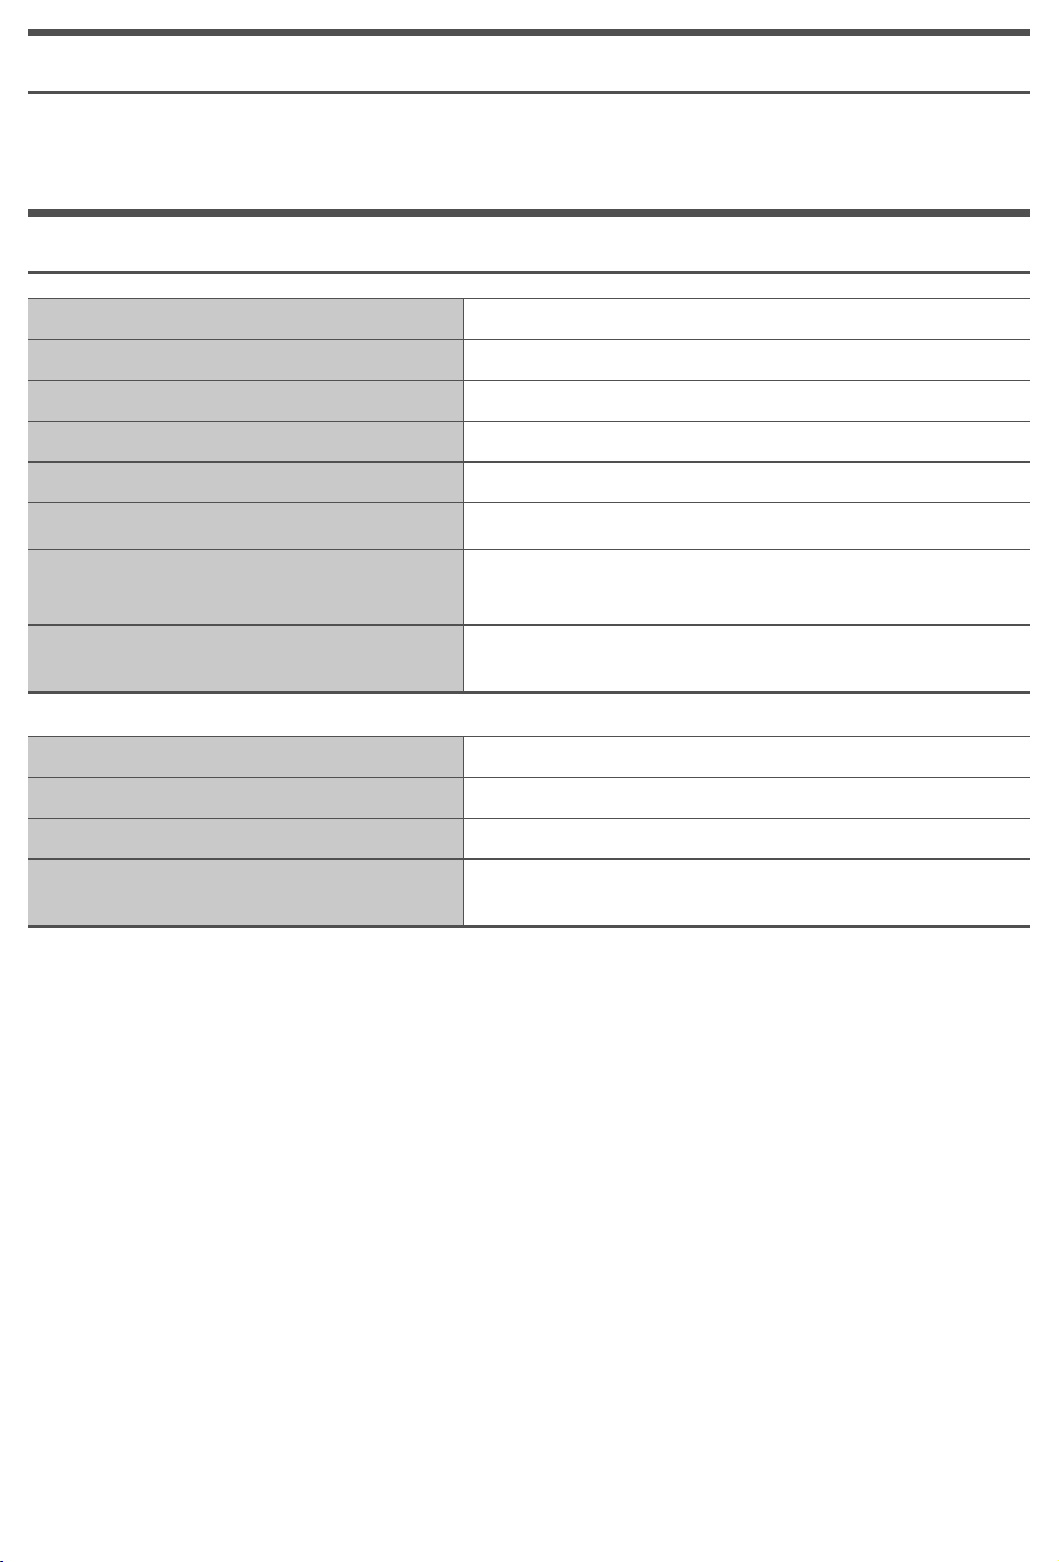
CARACTÉRISTIQUES TECHNIQUES
Nom de modèle HW-KM45
USB 5 V/0,5 A
Poids 4,4 lb (2,0Kg)
Dimensions (L x H x P)
Plage de températures en fonctionnement +41 °F à +95 °F
Plage d’humidité en fonctionnement 10 % à 75 %
AMPLIFICATEUR
Puissance de sortie nominale
Formats de lecture pris en charge
(Le son DTS 2.0 est lu au format DTS.)
Nom du caisson de basses PS-WK450
Poids 10,1 lb (4,6Kg)
Dimensions (L x H x P)
AMPLIFICATEUR
Puissance de sortie nominale 140W, 3ohm
• Spécification nominale
– Samsung Electronics Co., Ltd se réserve le droit d'apporter des modifications aux spécifications ans
préavis.
35,8 po x 2,1 po x 2,8 po (908,5 mm x 53,5 mm x 70,5 mm)
40W/CH x 4, 6ohm
LPCM 2ch, Dolby Audio™
(prise en charge de Dolby® Digital), DTS
7,0 po x 14,2 po x 11,8 po (179,0 mm x 361,0 mm x 299,5 mm)
– Les poids et les dimensions sont approximatifs.
– Pour obtenir de l'information sur la source d'alimentation et la consommation électrique, veuillez vous
reporter à l'étiquette apposée sur le produit. (Étiquette : Dessous d’une unité principale)
· 14 · Français
Page 33
GARANTIE LIMITÉE À L’ACHETEUR INITIAL
Samsung Electronics Canada Inc. (SECA) garantit ce produit contre tout défaut de fabrication.
SECA garantit aussi que si cet appareil ne fonctionne pas convenablement durant la période
de garantie SECA se réservera le droit de réparer ou de remplacer l’appareil défectueux.
Toutes les réparations sous garantie doivent être effectuées par un Centre de service
autorisé SECA.
Le nom et l’adresse du Centre de service le plus près de chez vous peut être obtenu en
composant sans frais le 1-800-268-1620 ou en visitant notre site web au www.samsung.ca
Main-d’oeuvre
un (1) an (au comptoir)
Pour tous les modèles portatifs, le transport de l’appareil sera la responsabilité du client.
Le reçu de vente original doit être conservé par le client car cela constitue la seule preuve d’achat
acceptée. Le client doit le présenter au Centre de service agréé au moment où il fait la demande d’une
réparation sous garantie.
Pièces
un (1) an
EXCLUSIONS (CE QUI N’EST PAS COUVERT)
Cette garantie ne couvre pas les dommages causés par un accident, un incendie, une inondation, un
cas de force majeure, un mauvais usage ou une tension incorrecte. La garantie ne couvre pas une
mauvaise installation, une mauvaise réparation, une réparation non autorisée et tout usage commercial
ou dommages survenus durant le transport. Le fini extérieur et intérieur de même que les lampes ne
sont pas couverts par cette garantie. Les ajustements par le client qui sont expliqués dans le guide
de l’utilisateur ne sont pas couverts en vertu de cette garantie. Cette garantie sera automatiquement
annulée pour tout appareil qui aurait un numéro de série manquant ou modifié. Cette garantie est
valable seulement sur les appareils achetés et utilisés au Canada.
Samsung Electronics Canada Inc
2050 Derry Rd West
Mississauga, On. L5N 0B9
Tel: 1-800-SAMSUNG (726-7864)
Fax: (905) 542- 1199
Website: http://www.samsung.com/ca_fr
Page 34
© 2018 Samsung Electronics Co., Ltd. Tous droits réservés.
Comment contacter Samsung dans le monde
Si vous avez des suggestions ou des questions concernant les produits Samsung, veuillez contacter le Service
Consommateurs Samsung.
SIÈGE SOCIAL
Samsung Electronics Canada Inc. 2050 Derry Road
West, Mississauga, Ontario L5N 0B9 Canada
TEL: 1-800-SAMSUNG (1-800-726-7864)
www.samsung.com/ca_fr/support
Country Contact Center
`
North America
CANADA 1-800-SAMSUNG (726-7864)
U.S.A 1-800-SAMSUNG (726-7864)
Web Site
www.samsung.com/ca/support (English)
www.samsung.com/ca_fr/support (French)
www.samsung.com/us/support
AH68-03054A-00
AH68-03054A-00
 Loading...