

Page 1

HW-F450
Crystal Surround Air Track
(Active Speaker System)
user manual
imagine the possibilities
Thank you for purchasing this Samsung product.
To receive more complete service,
please register your product at
www.samsung.com/register
Page 2
features
2.0 Channel
2.0 Channel
SoundShare
SoundShare produces TV sound on your SAT via a Bluetooth connection and controls the sound.
HDMI
HDMI transmits video and audio signals simultaneously, and provides a clearer picture.
The unit is also equipped with the ARC function which lets you listen to sound from your TV via an HDMI cable through the Crystal
Surround Air Track. This function is only available if you connect the unit to an ARC compliant TV.
3D SOUND PLUS
The 3D SOUND PLUS feature adds depth and spaciousness to your listening experience.
Wireless Subwoofer
Samsung’s wireless module does away with cables running between the main unit and the subwoofer.
Instead, the subwoofer connects to a compact wireless module that communicates with the main unit.
Special Sound mode
You can select from 7 different sound modes - MUSIC, NEWS, DRAMA, CINEMA, SPORTS, GAME, and OFF (Original Sound) depending on the type of content you want to enjoy.
Multi-function Remote Control
The supplied remote control can be used to control the TV connected to this unit. (Works only for Samsung TVs)
The remote control has a TV hotkey that enables you to perform various operations with the simple press of a button.
Active Speaker System
This unit features an Active Speaker System that provides high sound quality in a single slim unit.
This unit does not require any satellite loudspeakers or speaker cabling, which are normally associated with conventional surround
sound systems.
USB Host support
You can connect and play music files from external USB storage devices such as MP3 players,
USB flash memory, etc. using the Air Track's USB HOST function.
Bluetooth Function
You can use connect a Bluetooth device to the SAT and enjoy music with high quality stereo sound, all without wires!
LICENSE
Manufactured under license from Dolby Laboratories. Dolby and the double-D symbol are trademarks of Dolby
Laboratories.
Manufactured under license under U.S. Patent Nos: 5,956,674; 5,974,380; 6,487,535 & other U.S. and worldwide patents
issued & pending. DTS, the Symbol, & DTS and the Symbol together are registered trademarks & DTS 2.0 Channel is a
trademark of DTS, Inc. Product includes software. © DTS, Inc. All Rights Reserved.
The terms HDMI and HDMI High-Definition Multimedia Interface, and the HDMI Logo are trademarks or
registered trademarks of HDMI Licensing LLC in the United States and other countries.
- To send inquiries and requests regarding open sources, contact Samsung via Email (oss.request@samsung.com).
2
Page 3
EnG
safety information
SAFETY WARNINGS
TO REDUCE THE RISK OF ELECTRIC SHOCK, DO NOT REMOVE THE COVER(OR BACK).
NO USER-SERVICEABLE PARTS ARE INSIDE. REFER SERVICING TO QUALIFIED SERVICE PERSONNEL.
This symbol indicates “dangerous voltage”
CAUTION
RISK OF ELECTRIC SHOCK
DO NOT OPEN
WARNING : To reduce the risk of fire or electric shock, do not expose this appliance to rain or moisture.
CAUTION : TO PREVENT ELECTRIC SHOCK, MATCH WIDE BLADE OF PLUG TO WIDE SLOT, FULLY INSERT.
This apparatus shall always be connected to a AC outlet with a protective grounding connection.
•
To disconnect the apparatus from the mains, the plug must be pulled out from the mains socket, therefore the mains plug shall be readily operable.
•
CAUTION
• Do not expose this apparatus to dripping or splashing. Do not put objects filled with liquids, such as vases on the apparatus.
To turn this apparatus off completely, you must pull the power plug out of the wall socket. Consequently, the power plug must be
•
easily and readily accessible at all times.
inside the product that presents a risk of
electric shock or personal injury.
This symbol indicates important instructions
accompanying the product.
3
Page 4
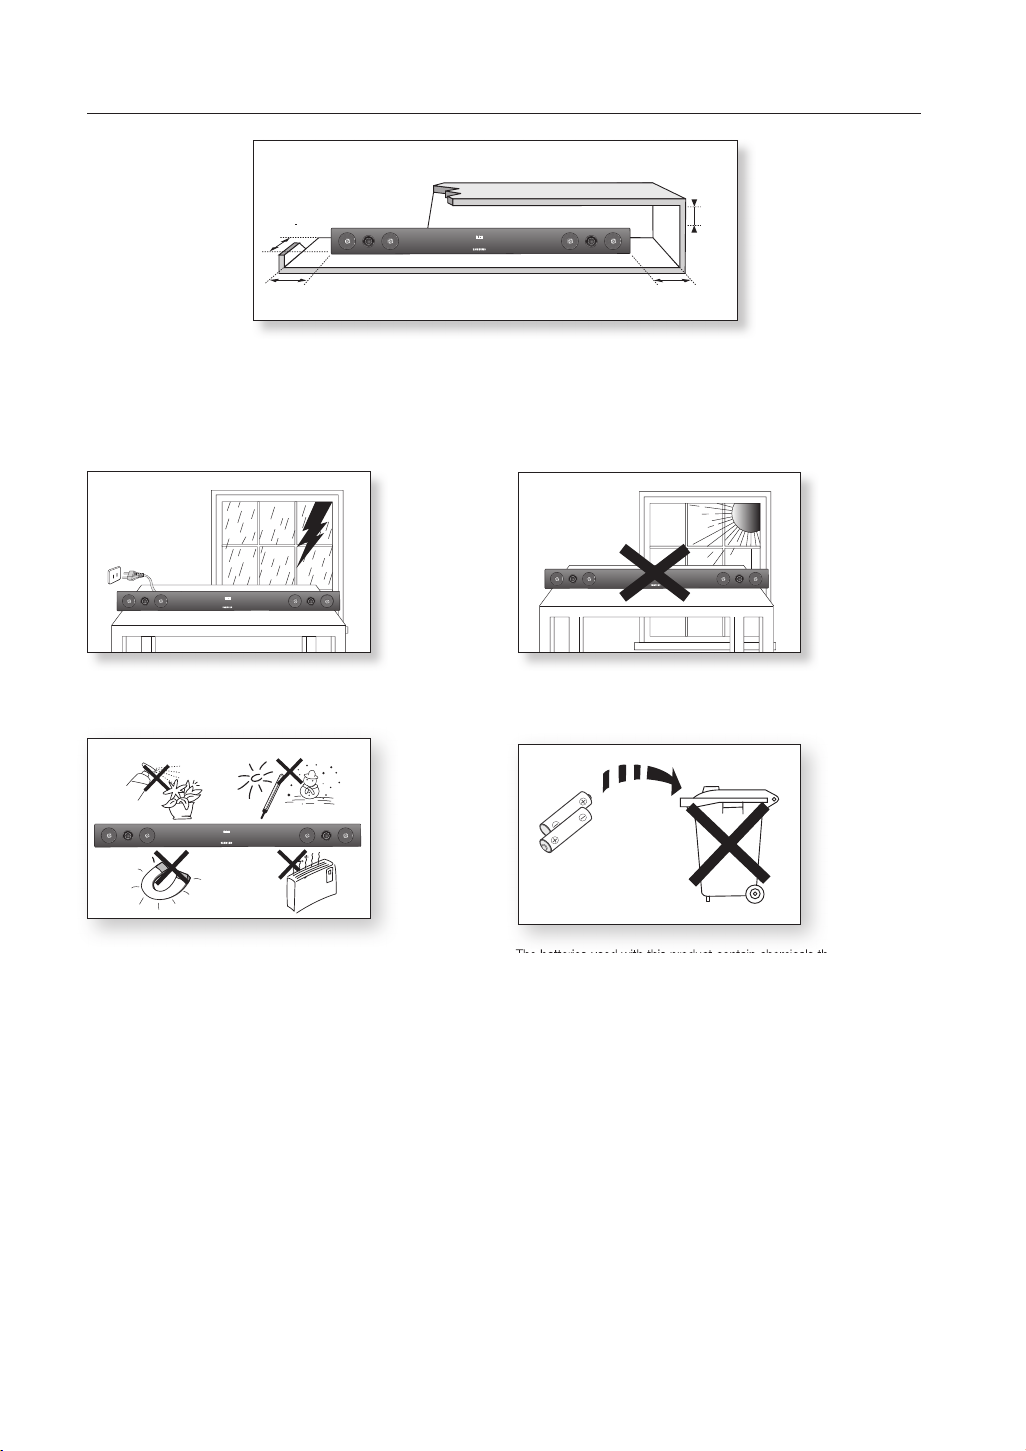
PRECAUTIONS
3.9 inch 3.9 inch
2.7 inc
h
3.9 inch
Ensure that the AC power supply in your house complies with the power requirements listed on the identification sticker located on the
back of your product. Install your product horizontally, on a suitable base (furniture), with enough space around it for ventilation (3~4 inches). Make sure the ventilation slots are not covered. Do not place the
unit
is designed for continuous use. To fully turn off the unit, disconnect the AC plug from the wall outlet. Unplug the unit if you intend to
leave it unused for a long period of time.
unit
on amplifiers or other equipment which may become hot. This
During thunderstorms, disconnect the AC plug from the
wall outlet. Voltage peaks due to lightning could damage the unit.
Phones
product
Protect the
from moisture (i.e. vases) , and excess heat (e.g.
a fireplace) or equipment creating strong magnetic or electric fields
Disconnect the power cable from the AC supply if the unit malfunctions.
product
Your
is not intended for industrial use. This product is for per-
sonal use only.
Condensation may occur if your
peratures. If transporting the
product
unit
has been stored in cold tem-
during the winter, wait approxi
mately 2
hours until the unit has reached room temperature before using.
Do not expose the unit to direct sunlight or other heat sources.
This could lead to overheating and cause the unit to malfunction.
The batteries used with this product contain chemicals that are harmful to
the environment.
Do not dispose of batteries in the general household trash.
4
Page 5

EnG
contents
FEATURES
2
SAFETY INFORMATION
3
GETTING STARTED
6
DESCRIPTIONS
7
REMOTE CONTROL
8
CONNECTIONS
9
FUNCTIONS
14
2 Features
2 License
3 Safety warnings
4 Precautions
6 Before reading the User’s manual
6 What’s included
7 Front/Rear Panel
8 Tour of the remote control
9 Installing the wall mount
10 Connecting the Wireless Subwoofer
11 Attaching the Toroidal Ferrite Core to the
Power Cord of the Subwoofer
11 Looping the Power Cable around the
Toroidal Core
12 Connecting an external device using HDMI
cable
13 Connecting an external device using Audio
(Analog) cable or Optical (Digital) cable
14 Input mode
14 Bluetooth
16 SoundShare
17 USB
18 Using the remote control
21 Software Upgrade
TROUBLESHOOTING
22
APPENDIX
23
22 Troubleshooting
23 Specifications
5
Page 6
getting started
BEFORE READING THE USER’S MANUAL
Note the following terms before reading the user manual.
Icons used in this manual
Icon Term Definition
Caution
Note
Indicates a situation where a function does not operate or settings may be
canceled.
Indicates tips or instructions on the page that help you operate a function.
Safety Instructions and Troubleshooting
1) Be sure to familiarize yourself with the Safety Instructions before using this product. (See page 3)
2) If a problem occurs, check Troubleshooting. (See page 22)
Copyright
©2013 Samsung Electronics Co.,Ltd.
All rights reserved; no part or whole of this user’s manual may be reproduced or copied without the prior
written permission of Samsung Electronics Co.,Ltd.
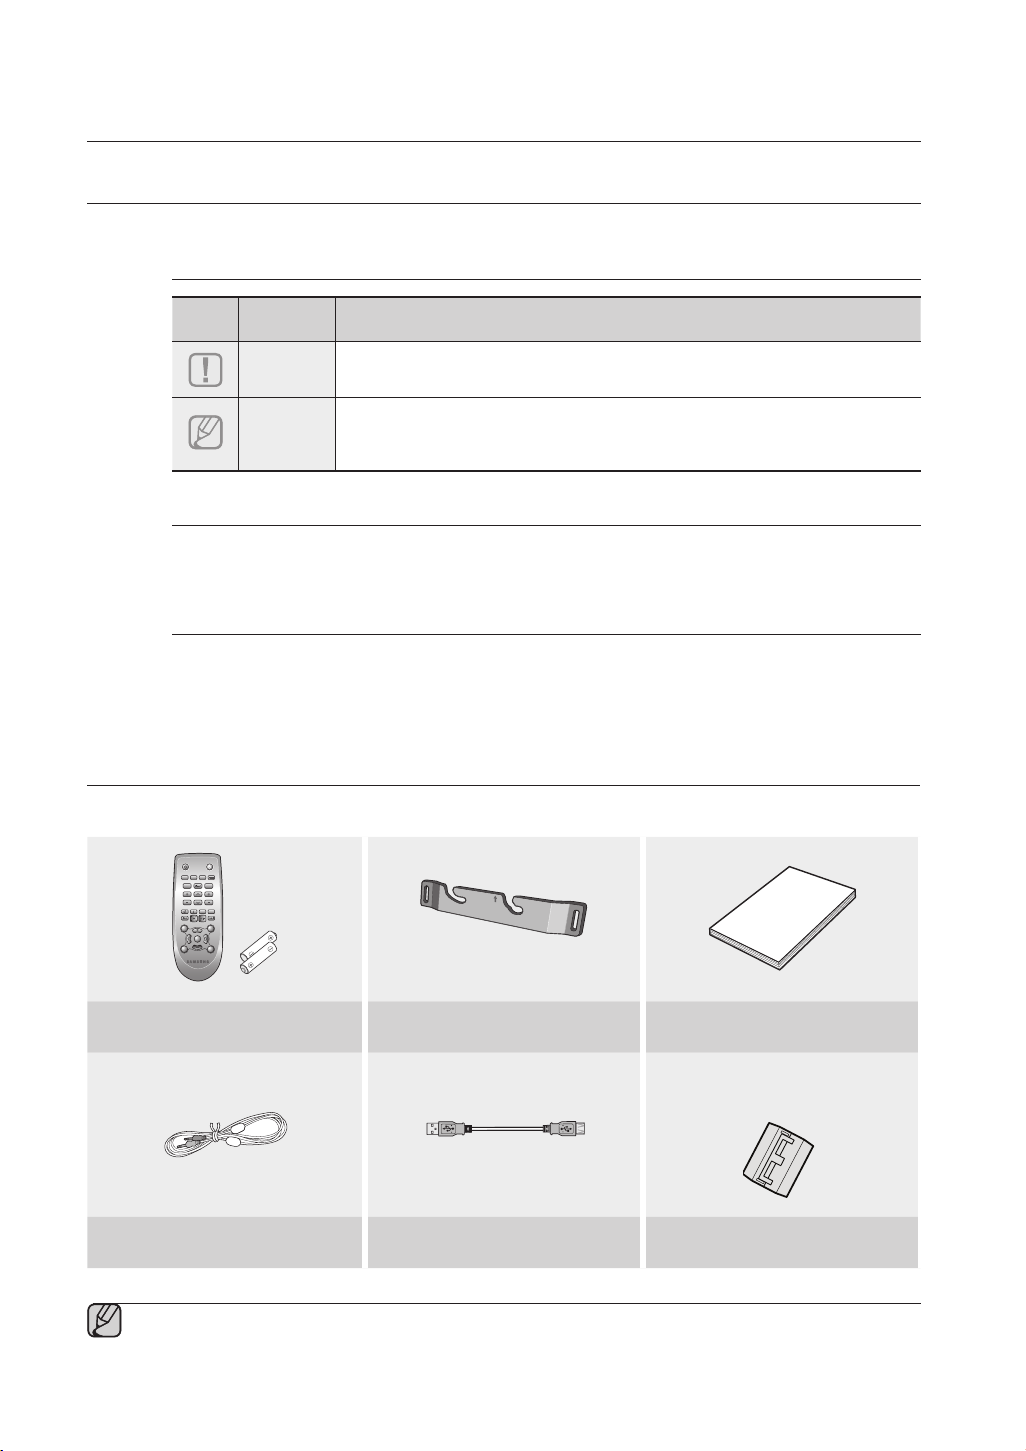
WHAT’S INCLUDED
Check for the supplied accessories shown below.
POWER
TV POWER
AUTO
SPEAKER
TV SOURCE
POWER
SOURCE
SoundShare
REPEAT
TV VOL TV CH
AUDIO SYNC
DIMMER
TV INFOTV MUTE
TV PRE-CH
SMART VOLUMESOUND EFFECT
VOL
S/W
S/W
MUTE
LEVEL
LEVEL
VOL
3D SOUND
DRC
PLUS
AH59-02547B
Remote Control / Batteries (AAA size)
Aux Cable USB Cable Toroidal ferrite core
▪ The appearance of the accessories may differ slightly from the illustrations above.
▪ Use the dedicated USB cable to connect external USB devices to the unit.
6
Bracket-Wall Mount User Manual
(For Subwoofer power cable 1EA)
Page 7
EnG
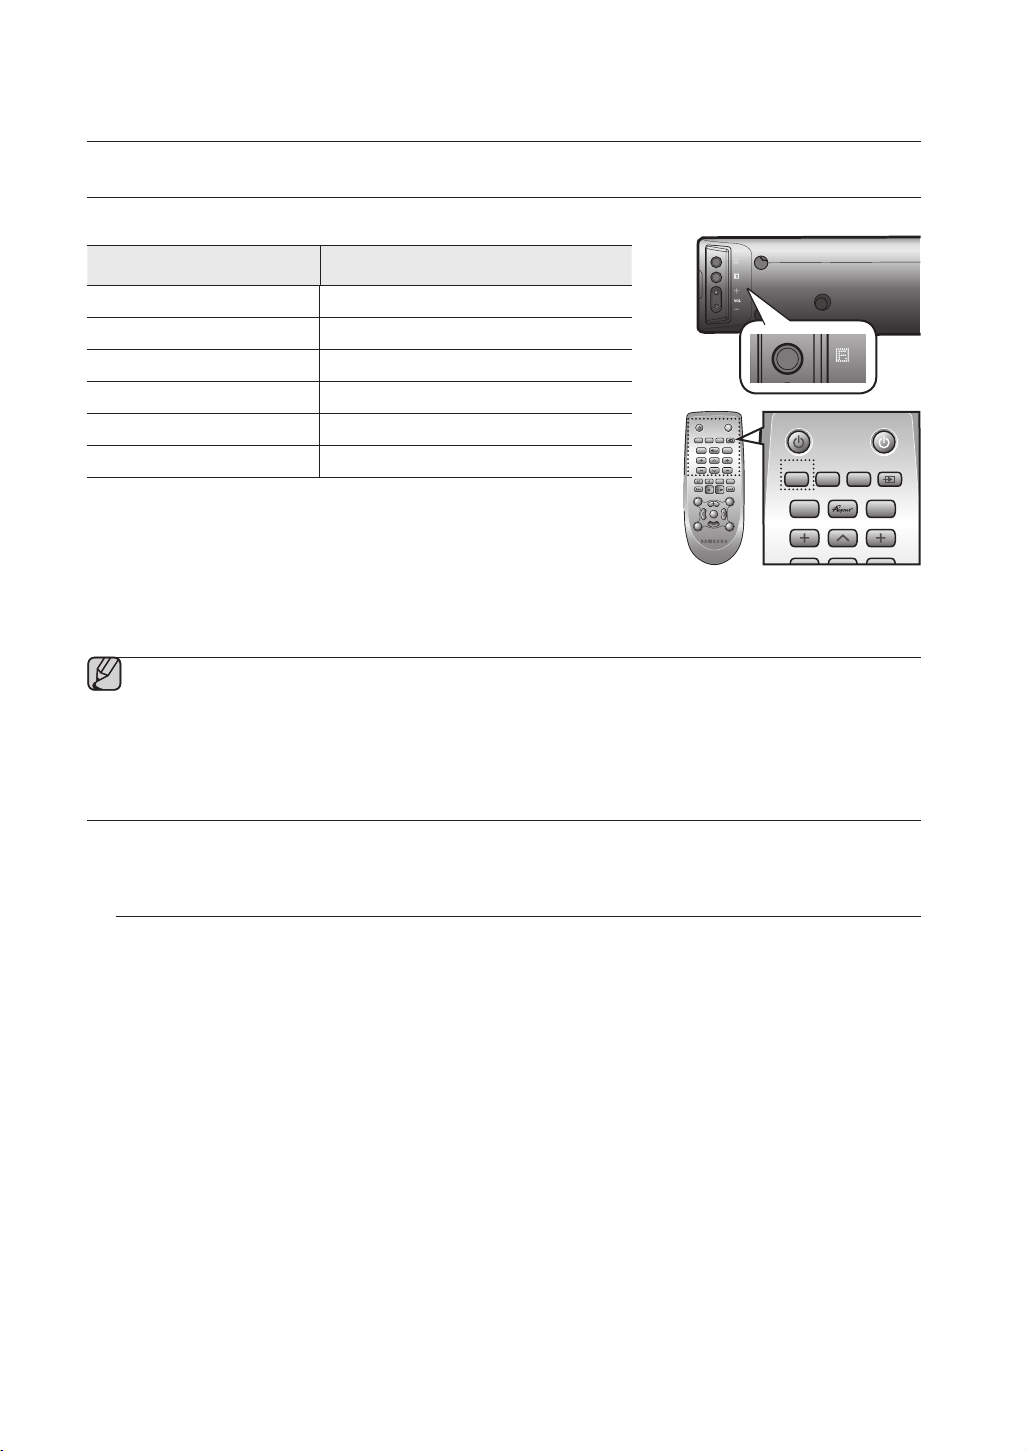
● DEscription
descriptions
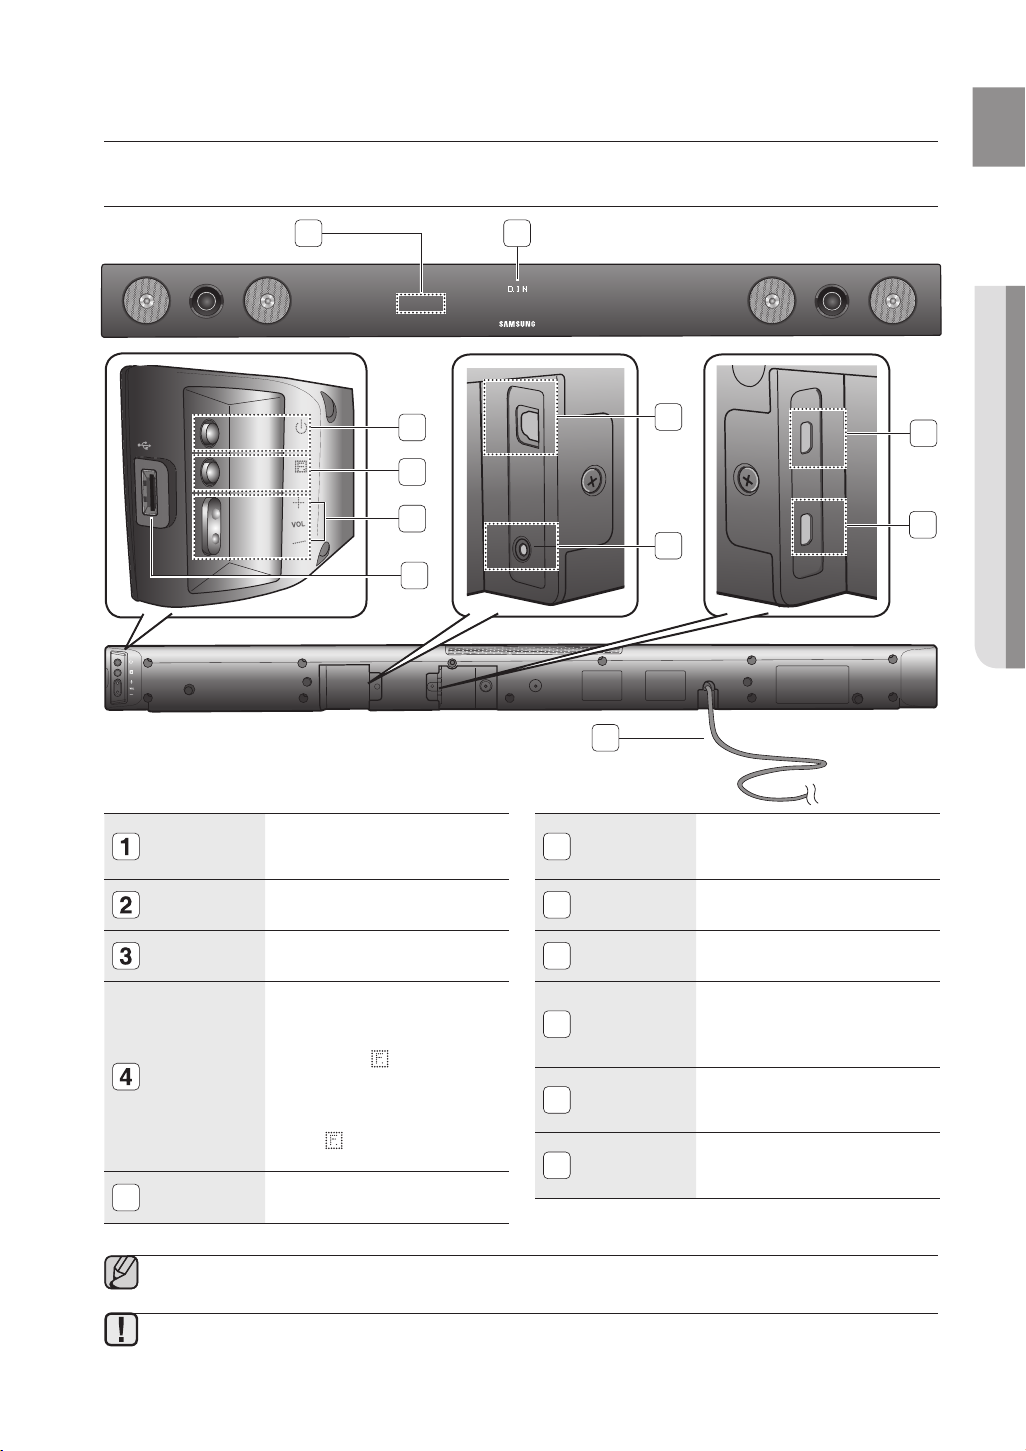
FRONT/REAR PANEL
1 2
3
5v 500mA
4
OPTICAL IN
7
HDMI IN
9
5
REMOTE
CONTROL
SENSOR
DISPLAY
POWER
BUTTON
FUNCTION
BUTTON
VOLUME
( +/- )
5
6
The remote control can operate
Air Tracks made by SAMSUNG
only.
Displays the current mode.
Turns the Crystal Surround Air
Track on and off.
Selects the D.IN, AUX, HDMI,
BT, TV, USB input.
While the unit is powered,
pressing the button for more
than 3 seconds sets the button
to act as MUTE button. To
cancel MUTE button setup,
press button for more than 3
seconds again.
Controls the volume level.
AUX IN
6
7
8
9
10
11
8
11
USB PORT
OPTICAL IN
AUX IN
HDMI IN
JACK
HDMI OUT
JACK
POWER
SUPPLY
CABLE
HDMI OUT
Connect USB devices such as
MP3 players here to the play
files on the devices.
Connect to the digital (optical)
output of an external device.
Connect to the Analog output
of an external device.
Receives digital video and
audio signals simultaneously
from an external source using
an HDMI cable.
Outputs digital video and audio
signals simultaneously using an
HDMI cable.
Plug the power supply cable
into the AC wall outlet.
10
▪ When you turn on this unit, there will be a 4 to 5 second delay before it produces sound.
▪ When disconnecting the power cable from the wall outlet, pull the plug. Do not pull the cable.
▪ Do not connect this unit or other components to an AC outlet until all connections between components are
complete.
7
Page 8

remote control
POWER
TV POWER
AH59-02547B
REPEAT
TV VOL TV CH
AUDIO SYNC
SOURCE
AUTO
POWER
SPEAKER
TV SOURCE
TV PRE-CH
DIMMER
SMART VOLUMESOUND EFFECT
S/W
LEVEL
S/W
LEVEL
VOL
VOL
3D SOUND
PLUS
DRC
TV INFOTV MUTE
SoundShare
MUTE
TOUR OF THE REMOTE CONTROL
POWER BUTTON
Turns the Crystal Surround Air Track
on and off.
SOURCE
Press to select a connected SAT
source. (SAT:Surround Air Track)
AUTO POWER
Synchronizes the Air Track to a
connected Optical source via the
Optical jack so it turns on automatically
when you turn on your TV.
REPEAT
Select Repeat File, All, Random.
TV VOLUME
Adjusts the TV volume level.
TV MUTE
Mutes the sound from the TV. Press
again to restore the sound to the
previous volume level.
TV INFO, TV PRE-CH
Display current TV status.
Moves to the previous TV channel.
CONTROL BUTTON
Play, pause, or stop playing
a music file, or search forwards or
backwards for a music file.
SOUND EFFECT
Selects the Sound Effect:
(MUSIC, NEWS, DRAMA, CINEMA,
SPORTS, GAME, OFF (Original Sound))
3D SOUND PLUS
This feature adds depth and
spaciousness to the sound.
▪ SAT stands for Surround Air Track, which is a Samsung’s proprietary name.
▪ The remote control can operate TVs made by SAMSUNG only.
▪ Depending on the TV you are using, you may not be able to operate your TV with this remote control. If you can't,
operate the TV using the TV's remote control.
Installing batteries in the Remote Control
TV POWER BUTTON
Turns your Samsung TV on and off.
SPEAKER
This button allows you to choose to listen
to audio from the Air track or your TV.
TV SOURCE
Press to select a connected TV's video
source.
Anynet+,
SoundShare
Anynet+ is a function that enables you
to control other Samsung Devices
with your Samsung TV's remote
control.
This produces TV sound on your SAT
via a Bluetooth connection and
controls the sound.
TV CHANNEL, AUDIO SYNC
Switches between the available TV
channels.
Used to help sync video to audio
when connected to a digital TV.
DIMMER
You can control the brightness of the
Display.
SMART VOLUME
Regulates and stabilizes the volume
level against a drastic volume change.
VOLUME, S/W LEVEL
Adjusts the volume level of the unit.
Adjusts the Subwoofer level.
DRC
You can use this function to enjoy Dolby
Digital sound when watching movies at
low volume at night (Standard, MAX, MIN).
MUTE
Mutes the sound from the unit. Press
again to restore the sound to the
previous volume level.
1. Lift the cover at the back of
the remote control upward as
shown.
Operational Range of the Remote Control
You can use the remote control up to 23 feet (7 meters) in a straight line from the unit. You can also operate the
Install two AAA size batteries.
2.
Make sure to match the “+” and “–” ends
of the batteries with the diagram inside the
compartment.
Replace the cover.
3.
Assuming typical TV usage,
the batteries last for about
one year.
remote at a horizontal angle of up to 30° from the remote control sensor.
8
Page 9
EnG
● connEctions
connections
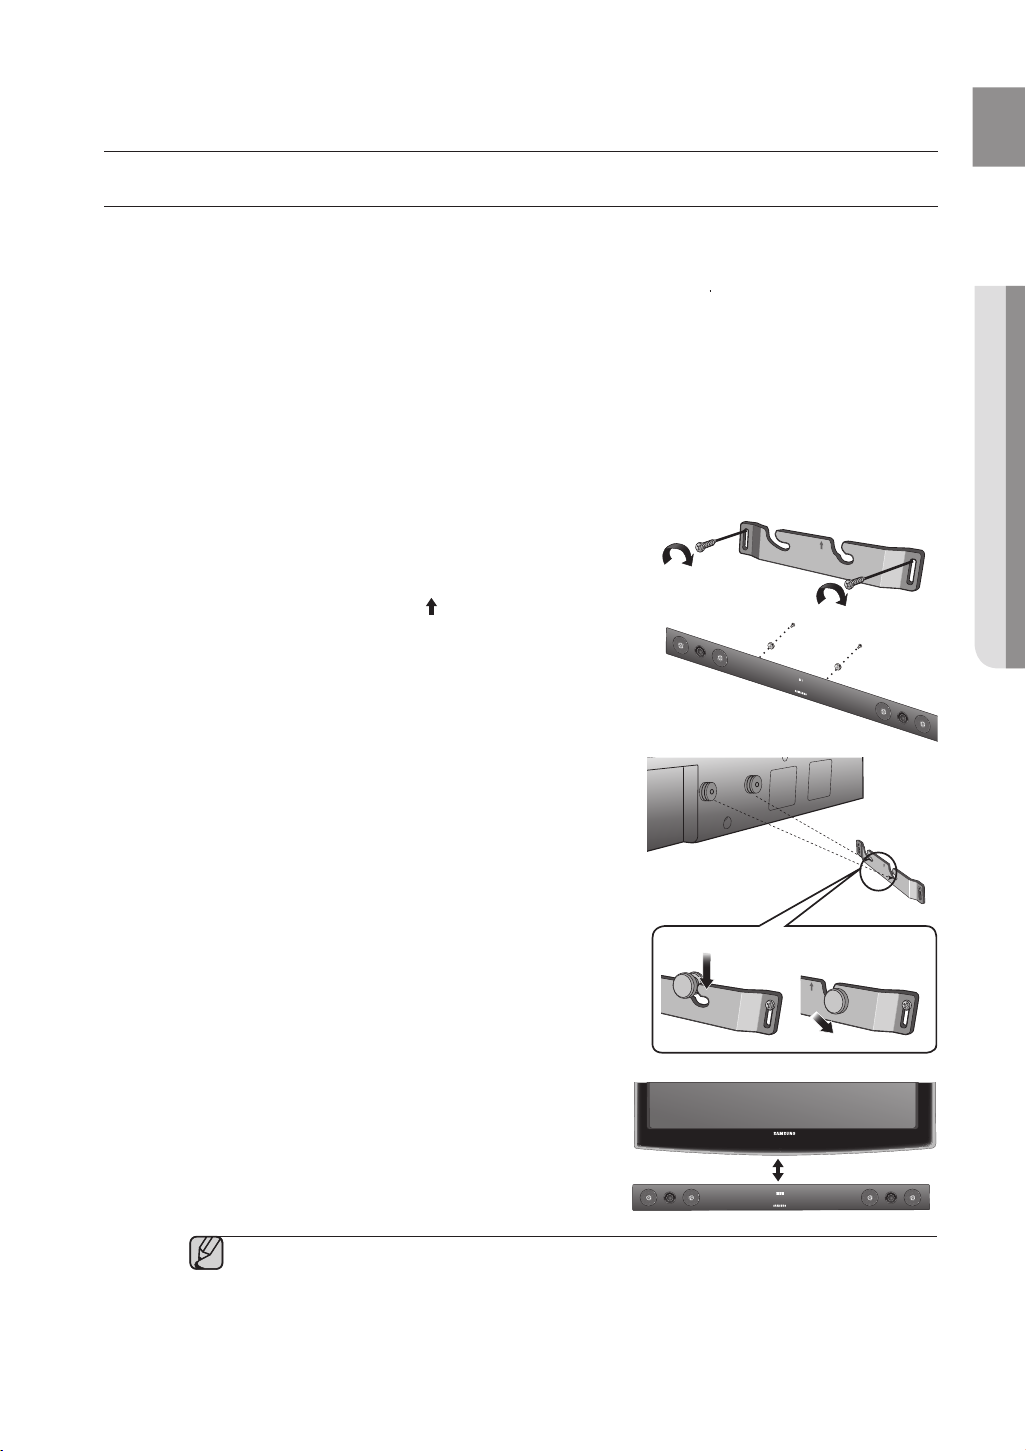
INSTALLING THE WALL MOUNT
You can use the wall mount bracket to mount this unit on a wall.
Installation Precautions
• Install on a vertical wall only.
• For the installation, avoid a location with high temperature or humidity, or a wall that cannot sustain the
weight of the set.
• Check the strength of the wall. If the wall is not strong enough to support the unit, reinforce the wall or
install the unit on different wall that can support the unit's weight.
• Purchase and use the flxing screws or mollys appropriate for the kind of wall you have (plaster board, iron
board, wood, etc.). If possible, fix the support screws into wall studs.
• Connect cables from the unit to external devices before you install it on the wall.
• Make sure the unit is turned off and unplugged before you install it. Otherwise, it may cause an electric shock.
1. Place the wall mount bracket on a wall surface
secure it with two screws (not supplied).
If you are hanging the unit below a TV, be
wall mount bracket so that the arrow (
center of the TV.
Also make sure the unit is at least two inches (5 cm)
below the TV.
2. Align the two HOLDER-SCREWs with the screw holes
on the left and right sides of the MAIN UNIT, and then fix
them to the main unit with the supplied screws.
3. Fit the unit into the corresponding slots of the wall mount
bracket. For secure installation, make sure the mounting
studs slide firmly down into the bottom of the slots.
4. The installation is complete.
sure to install the
) is placed in the
and then
1
21
2 inches (5 cm) or more
▪ Do not hang onto the installed unit and avoid any impact to the unit.
▪ Secure the unit firmly to the wall so that it does not fall off. If the unit falls off, it may cause an
injury or damage the product.
▪ When the unit is installed on a wall, please make sure that children do not pull any of the
connecting cables, as it may cause it to fall.
▪ For the optimal performance of a wall mount installation, install the speaker system at least 2
inches (5 cm) below the TV.
9
Page 10
connections
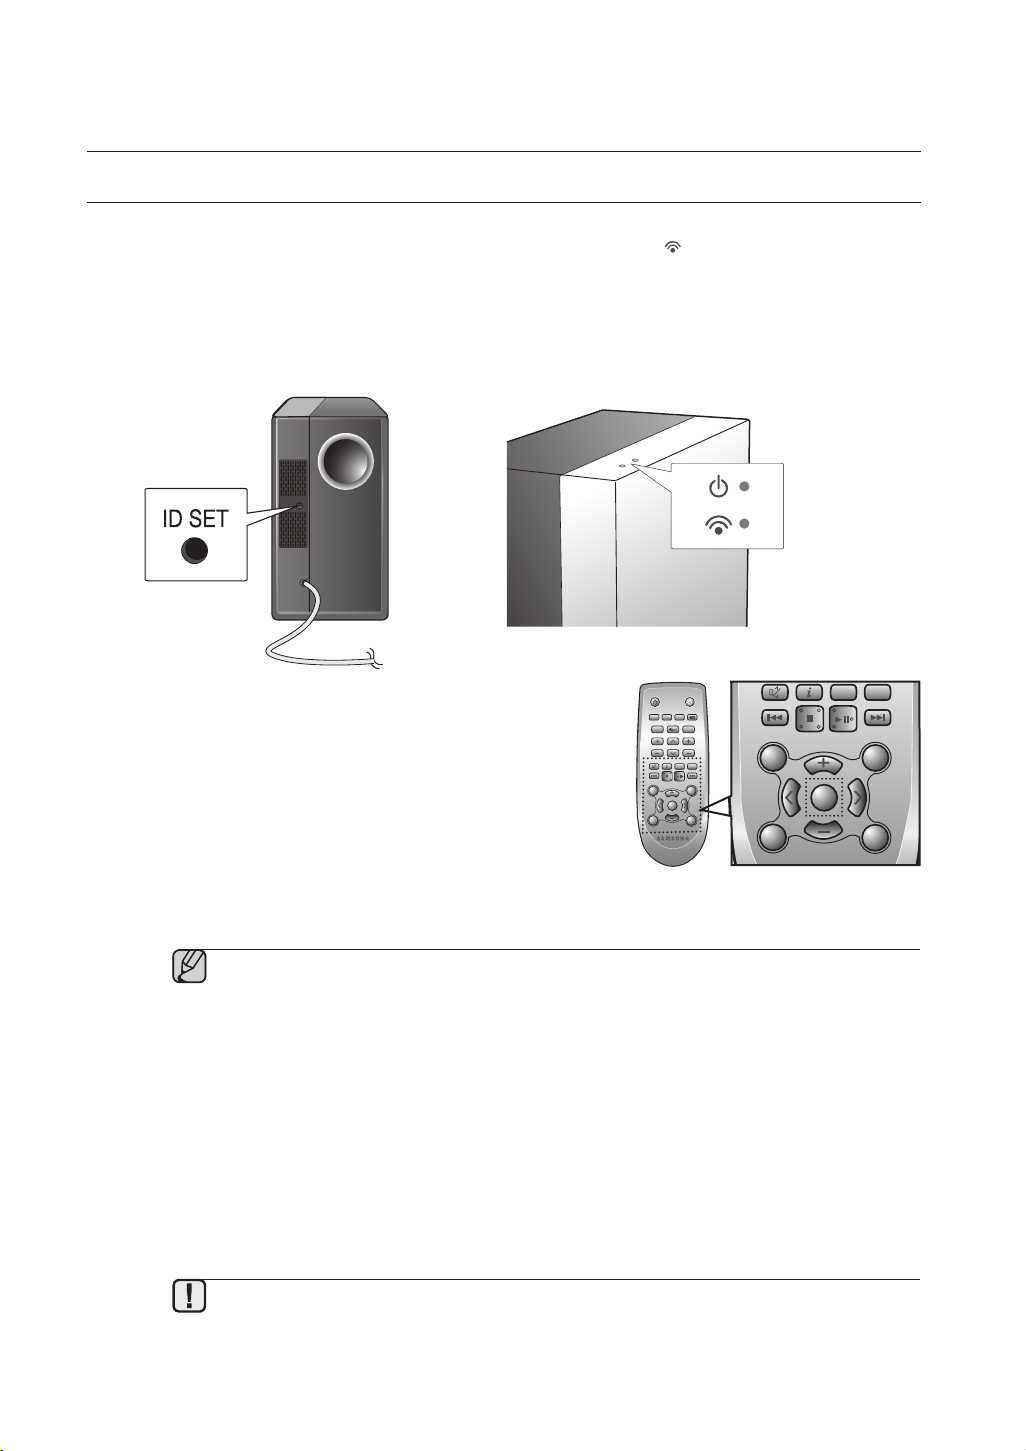
CONNECTING THE WIRELESS SUBWOOFER
STANDBY
LINK
STANDBY
LINK
POWER
TV POWER
REPEAT
TV VOL TV CH
AUDIO SYNC
SOURCE
AUTO
POWER
SPEAKER
TV SOURCE
TV PRE-CH
DIMMER
SMART VOLUMESOUND EFFECT
S/W
LEVEL
S/W
LEVEL
VOL
VOL
3D SOUND
DRC
TV INFOTV MUTE
SoundShare
MUTE
The Subwoofer's linking ID is preset at the factory and the main unit and subwoofer should link (connect
wirelessly) automatically when the main unit is turned on. If the link indicator (
unit and subwoofer are turned on, please set the ID by following the procedure below.
1. Plug the power cords of the main unit and subwoofer into an AC wall outlet.
2. Press the ID SET button on the back of the subwoofer with a small, pointed object for 5 seconds.
• The STANDBY indicator is turned off and the LINK indicator (Blue LED) blinks quickly.
3. While the main unit is powered off (
press MUTE on the remote control for 5 seconds.
4. The ID SET message appears on the main unit’s VFD display.
5. To finalize the link, turn the main unit’s power on while the
subwoofer’s Blue LED blinks.
• The main unit and the subwoofer are now linked (connected).
• The Link indicator (blue LED) on the subwoofer is turned on.
• You can enjoy better sound from the wireless subwoofer by
selecting the sound effect. (See page 19)
▪ Before moving or installing the product, be sure to turn off the power and disconnect the power
cord.
▪ If the main unit is powered off, the wireless subwoofer will be in the standby mode and the
STANDBY LED on the upper side will come on after the Link indicator (Blue LED) blinks for 30
10
seconds.
▪ If you use a device that uses the same frequency (2.4GHz) near the system, interference may
cause some sound interruption.
▪ The transmission distance of the wireless signal between the main unit and sub is about 33 ft.,
but may vary depending on your operating environment. If a steel-concrete or metallic wall is
between the main unit and the wireless subwoofer, the system may not operate at all, because
the wireless signal cannot penetrate metal.
▪ If the main unit doesn't make a wireless connection, follow steps 1-5 above to retry the
connection between the main unit and wireless subwoofer.
▪ The wireless receiving antenna is built into the wireless subwoofer. Keep the unit away from
water and moisture.
▪ For optimal listening performance, make sure that the area around the wireless subwoofer
location is clear of any obstructions.
STANDBY
mode),
) does not light when the main
POWER
TV POWER
AUTO
SPEAKER
TV SOURCE
POWER
SOURCE
SoundShare
REPEAT
TV VOL TV CH
AUDIO SYNC
DIMMER
TV INFOTV MUTE
TV PRE-CH
SMART VOLUMESOUND EFFECT
VOL
S/W
S/W
MUTE
LEVEL
LEVEL
VOL
3D SOUND
DRC
PLUS
AH59-02547B
Page 11
EnG
● connEctions
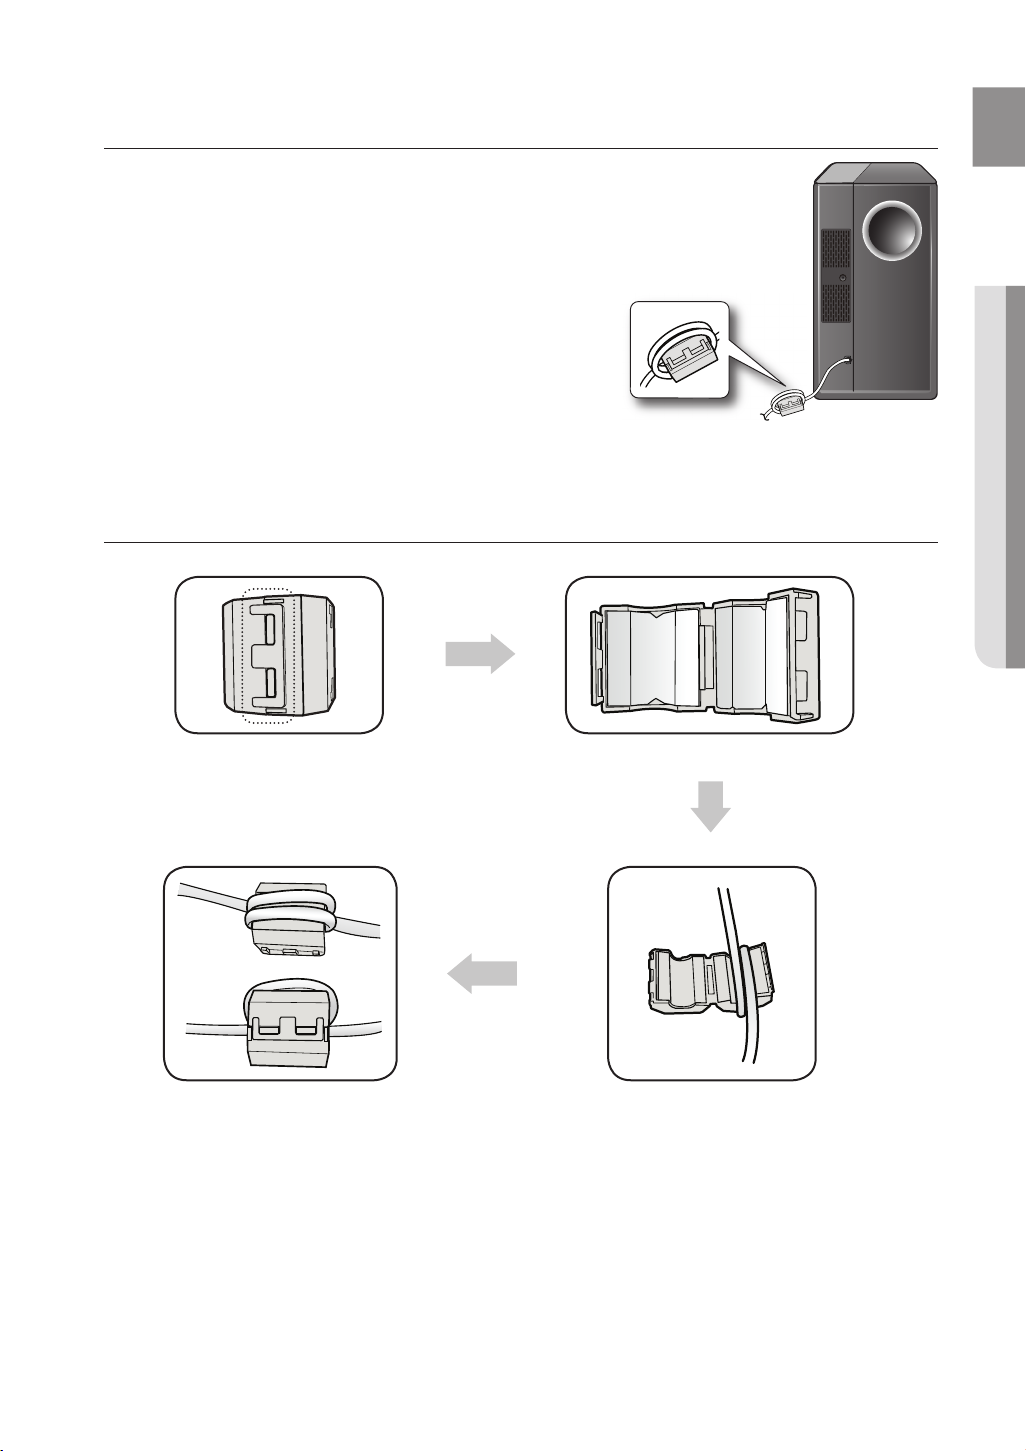
ATTACHING THE TOROIDAL FERRITE CORE TO THE POWER CORD
OF THE SUBWOOFER
Attaching the Toroidal ferrite core to the power cord of the subwoofer
helps prevent RF interference from radio signals.
1.
Pull the fixing tab of the Toroidal ferrite core to open it.
2. Make two loops around the core with the power cable of the
subwoofer.
3. Attach the Toroidal ferrite core to the Subwoofer power cord as the figure
shows and press it until it clicks.
LOOPING THE POWER CABLE AROUND THE TOROIDAL CORE
Lift up to release the lock and open the core.
Close the lock.
Make two loops around the core with the power cable.
(Start winding 5-10cm (12.75 - 25.5 in.)
away from the core).
11
Page 12
connections
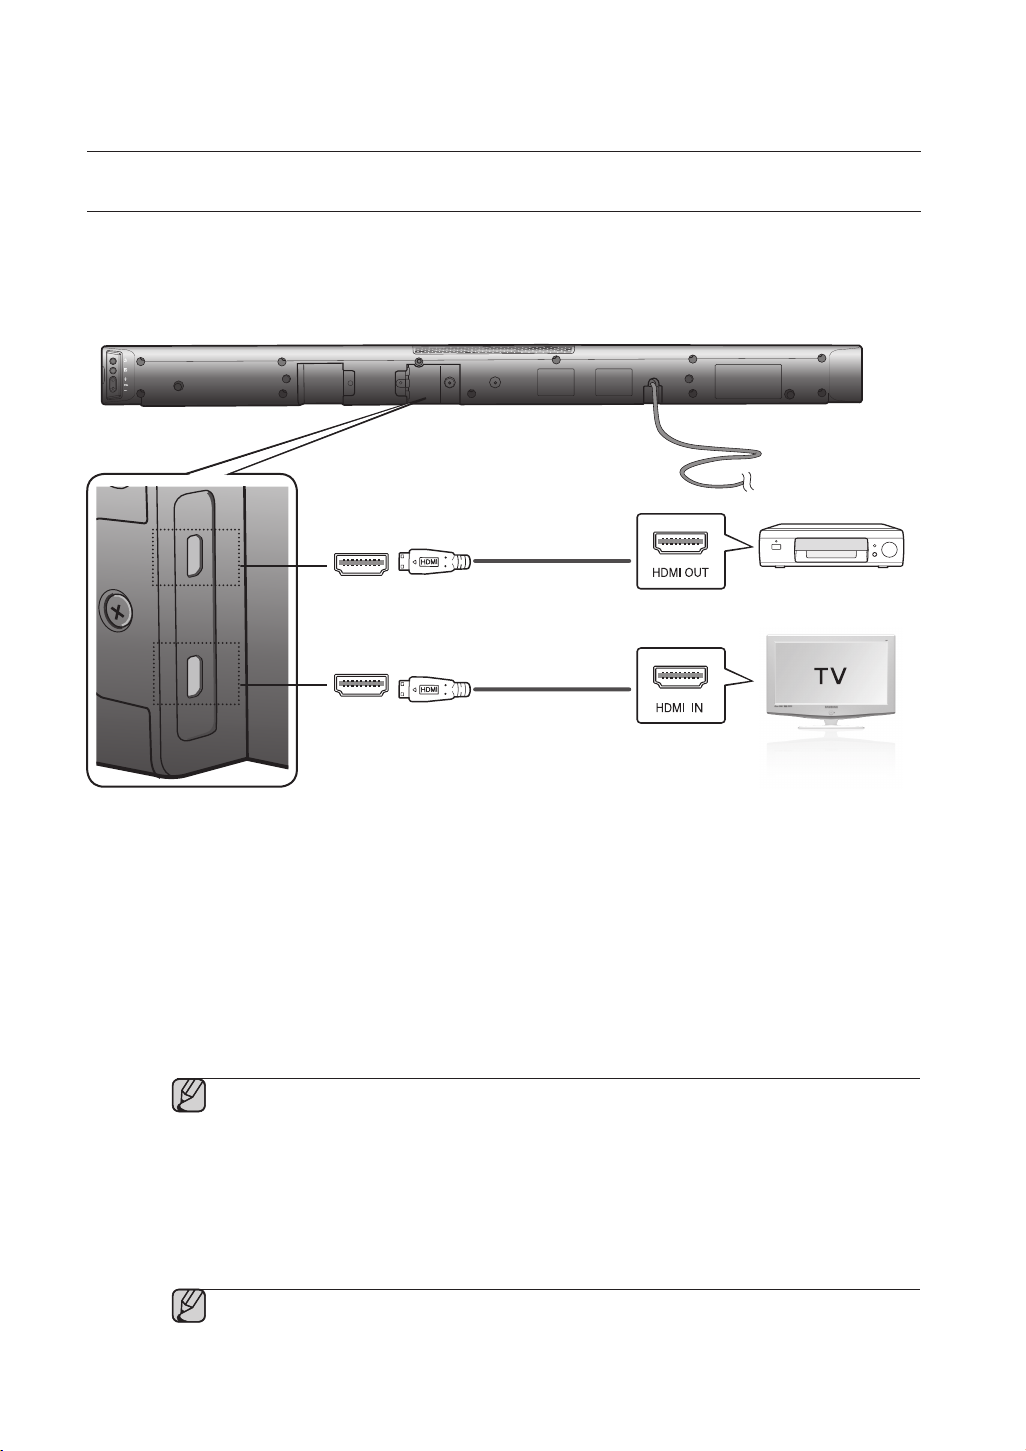
CONNECTING AN EXTERNAL DEVICE USING HDMI CABLE
HDMI OUT
HDMI IN
HDMI is the standard digital interface for connecting to such devices as a TVs, projectors, DVD players,
Blu-ray players, set top boxes, and more.
HDMI removes any loss of signal from analog conversion, enabling you to enjoy video and audio sound quality
as it was originally created in the digital source.
HDMI IN
HDMI OUT
HDMI IN
Connect an HDMI cable (not supplied) from the HDMI IN jack on the back of the product to the HDMI OUT
jack on your digital devices.
and,
HDMI OUT (HDMI)
• Connect an HDMI cable from the HDMI OUT jack on the back of the product to the HDMI IN jack on your TV.
HDMI Cable
Digital Devices
HDMI Cable
▪ HDMI is an interface that enables the digital transmission of video and audio data with just
a single connector.
HDMI OUT (ARC)
• The ARC function allows digital audio to output via the HDMI OUT (ARC) port.
It can be enabled only when the Air Track is connected to a TV that supports the ARC function.
• Anynet+ must be turned on.
▪ This function is not available if the HDMI cable does not support ARC.
12
Page 13
EnG
● connEctions
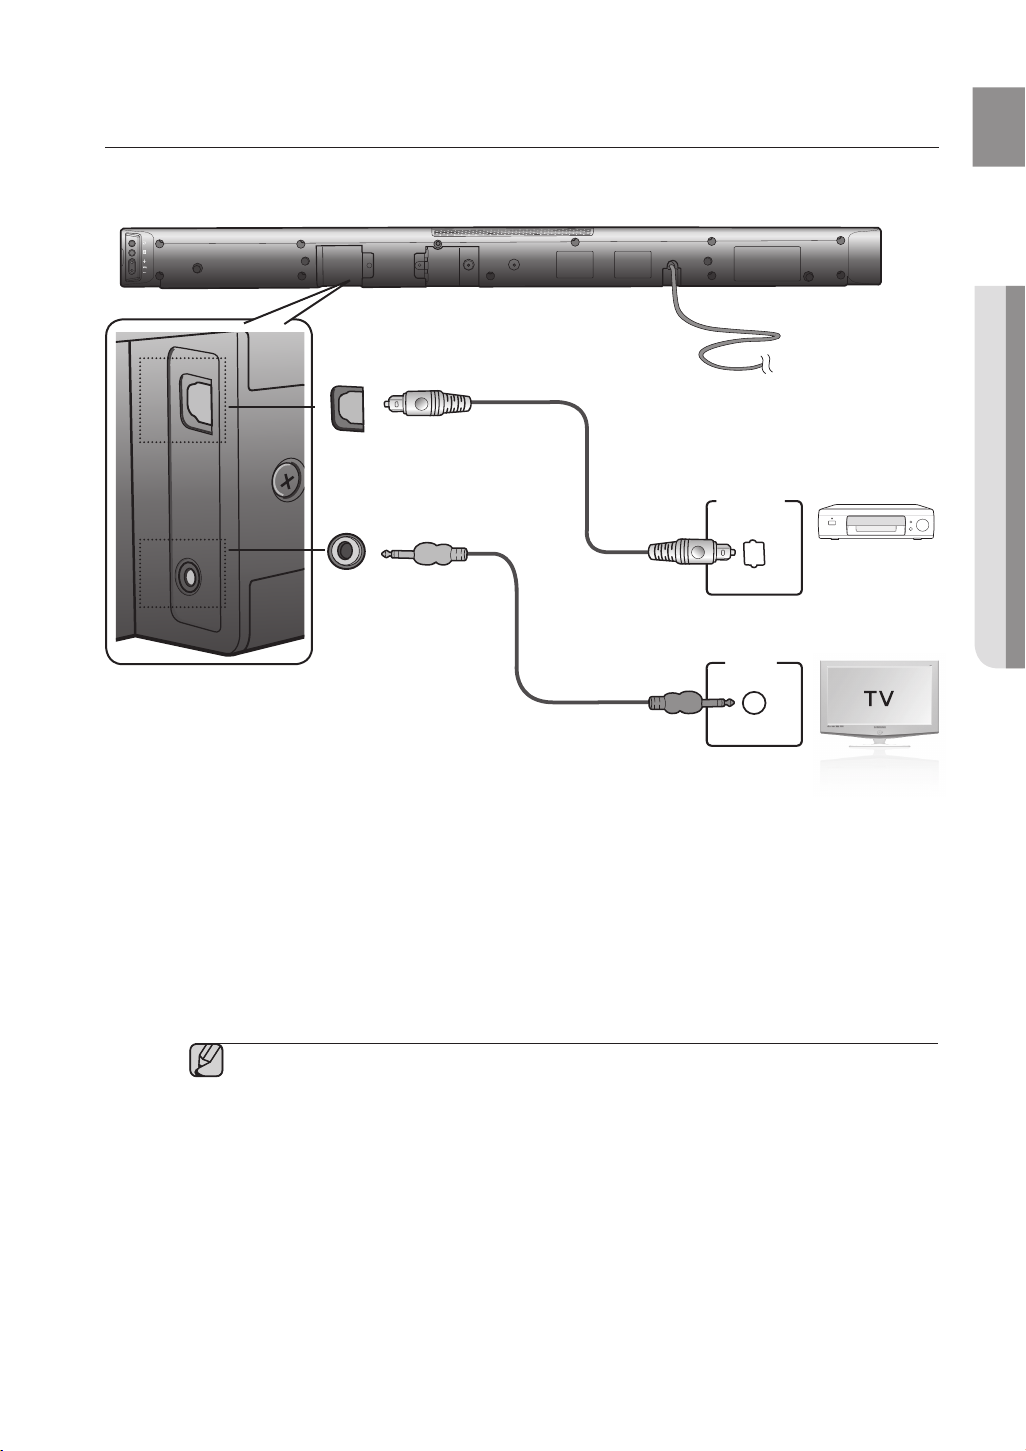
CONNECTING AN EXTERNAL DEVICE USING AUDIO (ANALOG)
AUX IN
AUDIO
OUT
OPTICAL IN
OPTICAL
OUT
CABLE OR OPTICAL (DIGITAL) CABLE
This unit comes equipped with one optical in digital jack and one audio analog in jack, giving you two ways to
connect it to a TV.
OPTICAL IN
Optical Cable (not supplied)
AUX IN
or
Audio Cable
OPTICAL IN
Connect the Digital Input on the main unit to the OPTICAL OUT of
or,
AUX IN
Connect AUX IN (Audio) on the main unit to the AUDIO OUT of
Be sure to match connector colors.
▪ Do not connect the power cord of this product or your TV to the wall outlet until all
connections between components are
complete.
▪ Before moving or installing this product, be sure to turn off the power and disconnect the power
cord.
the TV or Source Device
the TV or Source Device.
BD/DVD player/
Set-top box/
Game console
or
.
13
Page 14
functions
INPUT MODE
POWER
TV POWER
REPEAT
TV VOL TV CH
AUDIO SYNC
SOURCE
AUTO
POWER
SPEAKER
TV SOURCE
SoundShare
You can select D.IN, AUX, HDMI, BT, TV input or USB input.
Input mode Display
Optical Digital input
AUX input
HDMI input
BLUETOOTH mode
TV mode
USB mode
The unit turns off automatically in the following situations:
• BT/TV/USB/HDMI/ARC/D.IN MODE
- If there is no audio signal for 20 minutes.
D.IN
AUX
HDMI
BT
TV
USB
S/W
LEVEL
3D SOUND
POWER
SOURCE
PLUS
REPEAT
TV VOL TV CH
TV POWER
AUTO
SPEAKER
TV SOURCE
POWER
SoundShare
AUDIO SYNC
DIMMER
TV INFOTV MUTE
TV PRE-CH
SMART VOLUMESOUND EFFECT
VOL
S/W
MUTE
LEVEL
VOL
DRC
AH59-02547B
• AUX Mode
- If no KEY input is entered for 8 hours when the cable is connected.
- If the AUX cable is disconnected for 20 minutes.
▪ The ARC function is activated in D.IN mode if the unit is connected to an ARC supporting TV.
▪ To turn off the ARC function, turn Anynet off.
▪ Use the provided cable if a USB flash memory device cannot be connected directly to the unit.
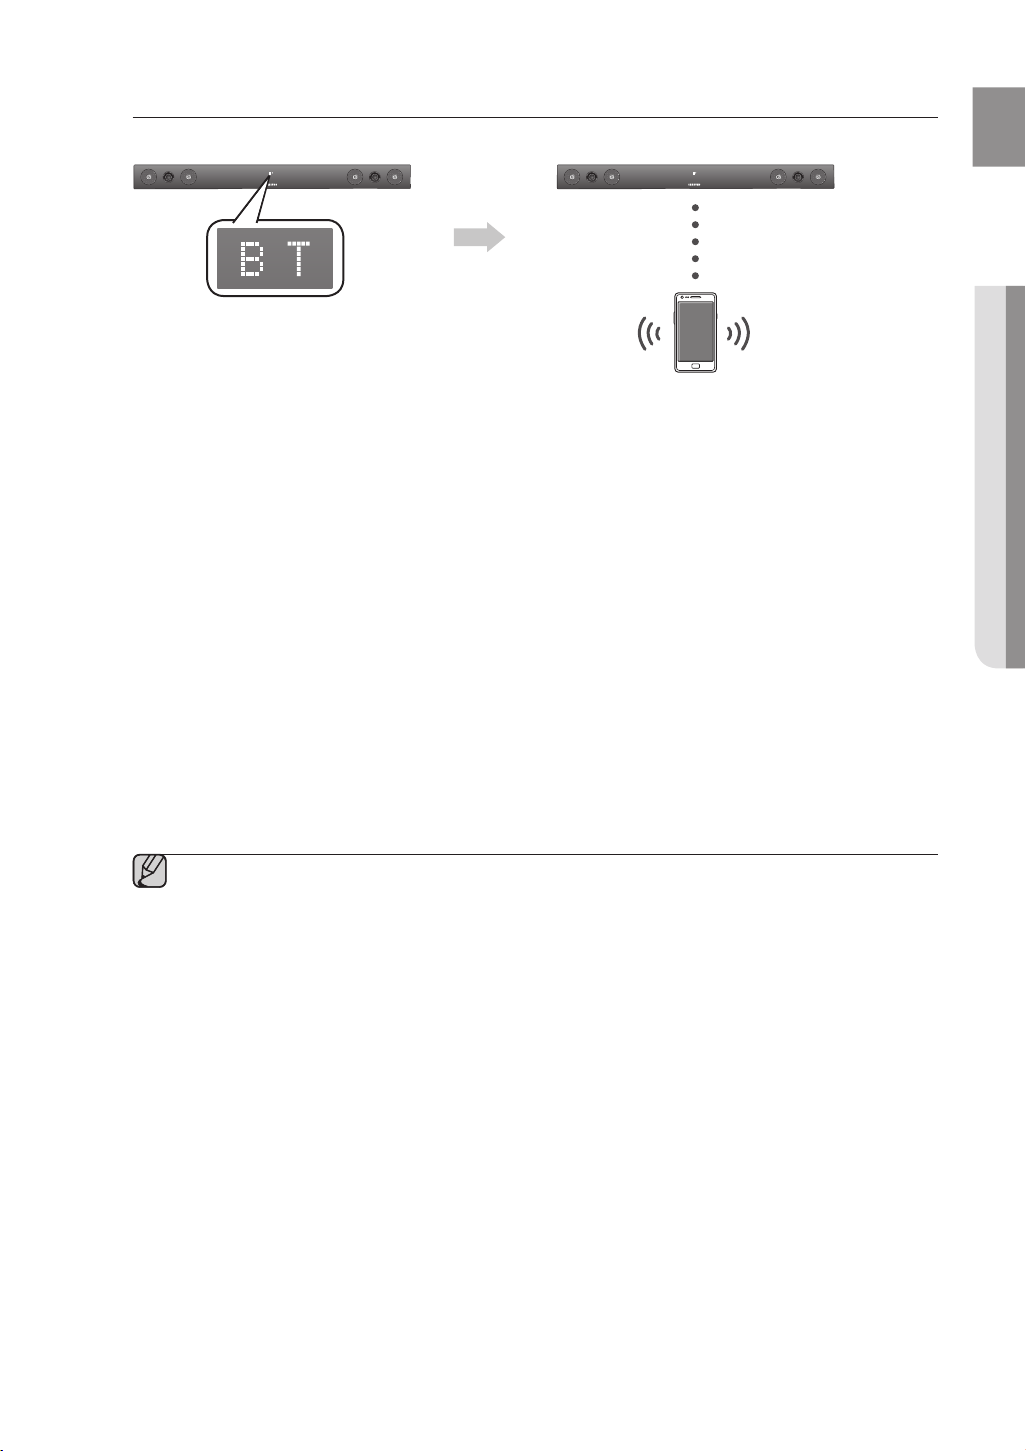
BLUETOOTH
You can use a Bluetooth device to enjoy music with high quality stereo sound, all without wires!
What is Bluetooth?
Bluetooth is a technology that enables Bluetooth-compliant devices to interconnect easily with each other using
a short wireless connection.
• A Bluetooth device may cause noise or malfunction, depending on usage, when:
- A part of your body is in contact with the receiving/transmitting system of the Bluetooth device or the Air
Track.
- It is subject to electrical variation from obstructions caused by a wall, corner, or office partition.
- It is exposed to electrical interference from same frequency-band devices including medical equipment,
microwave ovens, and wireless LANs.
• Pair the Air Track with the Bluetooth device while they are close together.
• The further the distance is between Air Track and Bluetooth device, the worse the quality is.
If the distance exceeds the Bluetooth operational range, the connection is lost.
• In poor r
• The Bluetooth connection only works when it is close to the set. The connection will be automatically cut off if
the Bluetooth device is out of range. Even within range, the sound quality may be degraded by obstacles
such as walls or doors.
• This wireless device may cause electric interference during its operation.
14
eception-sensitivity areas, the Bluetooth connection may not work properly.
Page 15
EnG
● functions
To connect the Air Track to a Bluetooth device
Check if the Bluetooth device supports the Bluetooth compliant stereo headset function.
Connect
Bluetooth device
1.
Press the SOURCE button on the remote control of the AirTrack to display the BT message.
• You will see WAIT for 4 seconds and then BT READY on the front display of the Air Track.
2.
Select the Bluetooth menu on the Bluetooth device you want to connect. (Refer to the Bluetooth
device's user manual.)
3.
Select the Stereo headset menu on the Bluetooth device.
• You will see a list of scanned devices.
4. Select "[Samsung] AirTrack" from the list.
• When the Air Track is connected to the Bluetooth device, it will display BT CONNECTED
display.
• If the Bluetooth device has failed to pair with the Air Track, delete the previous “[Samsung] AirTrack” found
by the Bluetooth device and have it search for the Air Track again.
5. Play music on the connected device.
• You can listen to the music playing on the connected Bluetooth device over the Crystal Surround Air Track
system.
• In BT mode, Play/Repeat/Stop/Next/Prev functions are not available.
▪ You may be required to enter a PIN code (password) when connecting the Bluetooth device to
the Air Track. If the PIN code input window appears, enter <0000>.
▪ The Air Track supports SBC data (44.1kHz, 48kHz).
▪ The AVRCP feature is not supported.
▪ Connect only to a Bluetooth device that supports the A2DP (AV) function.
▪ You cannot connect to a Bluetooth device that supports only the HF (Hands Free) function.
▪ Only one Bluetooth device can be paired at a time.
▪ Once you have turned off Air Track and the pairing is disconnected, the pairing will not be
restored automatically. To reconnect, you must pair the device again.
▪ Search or connection may not be performed properly by Air Track in the following cases:
- If there is a strong electrical field around Air Track.
- If several Bluetooth devices are simultaneously paired with AirTrack
- If the Bluetooth device is turned off, not in place, or malfunctions
- Note that such devices as microwave ovens, wireless LAN adaptors, fluorescent lights, and gas
stoves use the same frequency range as the Bluetooth device, which can cause electric
interference.
➡
BT on the front
15
Page 16

functions
To disc
You can disconnect the Bluetooth device from the Air Track.
For instructions, see the Bluetooth device's user manual.
•
The Air Track will be disconnected.
• When the Air Track is disconnected from the Bluetooth device the Air
Track will display BT DISCONNECTED on the front display.
onnect the Bluetooth device from the Air Track
To disconnect the Air Track from the Bluetooth device
Press the button on the front panel of the Air Track to switch from BT to another mode or turn off the Air
Track.
• The connected Bluetooth device will wait a certain amount of time for a response from the Air Track before
terminating the connection.
(Disconnection time may differ, depending on the Bluetooth device)
•
The currently connected device will be disconnected.
▪ In Bluetooth connection mode, the Bluetooth connection will be lost if the distance between the Air
Track and the Bluetooth device exceeds 16.25 ft. (5m).
▪ If the Bluetooth device comes back into the effective range after disconnecting, you can restart the Air
Track to restore the pairing with the Bluetooth device.
▪ The Air Track automatically turns off after 20 minutes in the Ready state.
SOUNDSHARE
This section explains how to connect the Crystal Surround Air Track to a Bluetooth compatible SAMSUNG TV.
To connect the Crystal Surround Air Track to a Bluetooth compatible
Samsung TV
Connect
Press the button to select the TV mode, and then connect the TV to the Crystal Surround Air Track.
• The unit will play the TV's audio when it is connected to the TV.
• If you change to another mode, except the TV SoundShare mode, or turn off the Air Track, you will hear audio
from the TV again.
16
Page 17

EnG
● functions
<To pair to your TV>
To produce TV sound on your Air Track via a Bluetooth connection, you need to pair your system to the Bluetooth
compliant TV first. Once the pairing is established, the pairing information is recorded and kept and no further
Bluetooth connection message will appear. Bring the Air Track and the TV close together before pairing.
1. Turn on the Samsung TV and Air Track.
• Set Add New Device in the TV's SoundShare Setting menu to On.
- The SoundShare function is supported by some Samsung TVs released after 2012. Check whether your TV
supports SoundShare before you begin.
(For more information, refer to the user's guide of your TV)
When you change the mode of the Air Track to TV, a message asking whether to proceed with
2.
Bluetooth pairing is displayed. "[Samsung] AirTrack" appears on the TV screen.
3. Select <Yes > on the TV screen. The pairing with the Air Track will be completed.
• Once the pairing is established, when you change the Air Track to the TV mode from other input modes, it will
automatically connect to the TV.
• Changing the Air Track from TV mode to any other mode will cancel the SoundShare connection.
• If you want to cancel the existing pairing of the SAT to a TV and pair your SAT to a different TV.
- Press the PLAY/PAUSE button on the SAT for 5 seconds in the TV input mode to cancel the existing pairing.
You can now pair it to a different TV.
• In the SoundShare mode, you can control the volume and mute using either the TV remote or the SAT remote.
▪ TV SoundShare operation range
- recommended pairing range: within 20 inches (within 50cm.)
- recommended operation range: within 16.25 ft. (5m)
▪ If the distance between the Air Track and Samsung TV is over 16.25 ft. (5m), the connection or the
sound can be cut off. If this occurs, connect to the Bluetooth device again within the operational range.
▪ Make sure the Samsung TV's SoundShare mode is on before you use this function.
▪ The PLAY, NEXT, PREV, STOP buttons will not work in the SoundShare mode.
▪ Bluetooth Standby On function
- Air Track will be powered on automatically when you turn the TV on if you connected TV and Air Track with
SoundShare function.
- You can toggle this fucntion On/Off by pressing SOURCE button over 5 seconds when AirTrack is
powered off. If set to Off, the product turns off automatically when the TV turns off, but it does not turn on
automatically.
- This function is supported by Samsung TVs released from 2013.
USB
1.
2. Press the (
3.
Connect the USB device to the USB port on the side of the unit.
) button on the front panel of the Air Track repeatedly until USB appears.
USB appears on the display screen and then disappears.
• The Crystal Surround Air Track connection is complete.
• The SAT automatically turns off (Auto Power Off) if no USB device has been connected for more than 20
minutes.
Before you connect a USB device
Be aware of the following:
• If the file name of a folder on a USB device exceeds 10 characters, it is
not displayed on the VFD.
• This product may not be compatible with certain types of USB storage
media.
• The Air Track supports the FAT16 and FAT32 file systems.
- The NTFS file system is not supported.
17
Page 18

functions
• Connect USB devices directly to the USB port of the product. Otherwise, you may encounter a USB
POWER
TV POWER
REPEAT
TV VOL TV CH
AUDIO SYNC
SOURCE
AUTO
POWER
SPEAKER
TV SOURCE
TV PRE-CH
DIMMER
TV INFOTV MUTE
SoundShare
PO
WER
TV POWER
R
EPEAT
T
V VOLTV CH
AUDIO SYN
C
SOURCE
AUT
O
POWER
S
PEAKERTV SOURCE
T
V PRE-CH
D
IMMER
TV INF
O
T
V MUT
E
SoundShare
POWER
TV POWER
REPEAT
TV VOL TV CH
AUDIO SYNC
SOURCE
AUTO
POWER
SPEAKER
TV SOURCE
TV PRE-CH
DIMMER
TV INFOTV MUTE
SoundShare
PO
WER
TV POWER
R
EPEAT
T
V VOLTV CH
AUDIO SYN
C
S
OURC
E
AUT
O
POWER
S
PEAKERTV SOURCE
T
V PRE-CH
TV INF
O
TV MUTE
SoundShare
POWER
TV POWER
REPEAT
TV VOL TV CH
AUDIO SYNC
SOURCE
AUTO
POWER
SPEAKER
TV SOURCE
SoundShare
compatibility problem.
• Do not connect multiple storage devices to the product via a multi-card reader. It may not operate
properly.
• Digital camera PTP protocols are not supported.
• Do not remove the USB device while it is being read.
• DRM-protected music files (MP3, WMA) from a commercial web site will not be played.
• External HDDs are not supported.
• Mobile phone devices are not supported.
• File Format Type Compatibility list:
Format Codec
MPEG 1 Layer2
*.mp3
MPEG 1 Layer3
MPEG 2 Layer3
*.wma
Wave_Format_MSAudio1
Wave_Format_MSAudio2
AAC
*.aac
AAC-LC
HE-AAC
*.wav
*.Ogg
*.Flac
FLAC 1.1.0, FLAC 1.2.1
-
OGG 1.1.0
※ Supporting Sampling Rate above 16KHz
USING THE REMOTE CONTROL
POWER
TV POWER
AUTO
SPEAKER
TV SOURCE
POWER
SOURCE
SoundShare
REPEAT
AUDIO SYNC
TV VOL TV CH
DIMMER
TV INFOTV MUTE
TV PRE-CH
SMART VOLUMESOUND EFFECT
VOL
S/W
S/W
MUTE
LEVEL
LEVEL
VOL
3D SOUND
DRC
PLUS
AH59-02547B
POWER
TV POWER
AUTO
SPEAKER
TV SOURCE
POWER
SOURCE
SoundShare
REPEAT
AUDIO SYNC
TV VOL TV CH
DIMMER
TV INFOTV MUTE
TV PRE-CH
SMART VOLUMESOUND EFFECT
VOL
S/W
S/W
MUTE
LEVEL
LEVEL
VOL
3D SOUND
DRC
PLUS
AH59-02547B
POWER
TV POWER
AUTO
SPEAKER
TV SOURCE
POWER
SOURCE
SoundShare
REPEAT
AUDIO SYNC
TV VOL TV CH
DIMMER
TV INFOTV MUTE
TV PRE-CH
SMART VOLUMESOUND EFFECT
VOL
S/W
S/W
MUTE
LEVEL
LEVEL
VOL
3D SOUND
DRC
PLUS
18
AH59-02547B
Play/Pause/Stop
During playback, press the +#,@ button.
• Press the +# button again to stop playing the file temporarily.
Press the +# button to play the selected file.
• To stop playback, press the Stop (
@
) button during playback.
Skip Forward/Back
During playback, press the [,] button.
• When there is more than one file and you press the ] button, the next file
is selected.
• When there is more than one file and you press the [ button, the
previous file is selected.
Using the REPEAT function
Repeat playback allows you to repeatedly play a file, repeat all, randomly play
files, or turn Repeat off.
Press the REPEAT button.
• REPEAT OFF : Cancels Repeat Playback.
• REPEAT FILE : Repeat playing a track.
• REPEAT ALL : Repeat playing all tracks.
• REPEAT RANDOM : Plays tracks in random order. (A track that has
already been played may be played again.)
▪ You can set the REPEAT function during the playback of music from
a USB drive.
Page 19

EnG
● functions
POWER
POWER
TV POWER
REPEAT
TV VOL TV CH
AUDIO SYNC
SOURCE
AUTO
POWER
SPEAKER
TV SOURCE
TV PRE-CH
DIMMER
SMART VOLUMESOUND EFFECT
S/W
LEVEL
S/W
LEVEL
VOL
VOL
3D SOUND
PLUS
DRC
TV INFOTV MUTE
SoundShare
MUTE
POWER
TV POWER
REPEAT
TV VOL TV CH
AUDIO SYNC
SOURCE
AUTO
POWER
SPEAKER
TV SOURCE
TV PRE-CH
DIMMER
SMART VOLUMESOUND EFFECT
S/W
LEVEL
S/W
LEVEL
VOL
VOL
3D SOUND
PLUS
DRC
TV INFOTV MUTE
SoundShare
MUTE
POWER
TV POWER
REPEAT
TV VOL TV CH
AUDIO SYNC
SOURCE
AUTO
POWER
SPEAKER
TV SOURCE
TV PRE-CH
DIMMER
SMART VOLUMESOUND EFFECT
S/W
LEVEL
S/W
LEVEL
VOL
VOL
3D SOUND
PLUS
DRC
TV INFOTV MUTE
SoundShare
MUTE
POWER
TV POWER
REPEAT
TV VOL TV CH
AUDIO SYNC
SOURCE
AUTO
POWER
SPEAKER
TV SOURCE
TV PRE-CH
DIMMER
SMART VOLUMESOUND EFFECT
S/W
LEVEL
S/W
LEVEL
VOL
VOL
3D SOUND
PLUS
DRC
TV INFOTV MUTE
SoundShare
MUTE
POWER
TV POWER
REPEAT
TV VOL TV CH
AUDIO SYNC
SOURCE
AUTO
POWER
SPEAKER
TV SOURCE
TV PRE-CH
DIMMER
SMART VOLUMESOUND EFFECT
S/W
LEVEL
S/W
LEVEL
VOL
VOL
3D SOUND
PLUS
DRC
TV INFOTV MUTE
SoundShare
MUTE
TV POWER
AUTO
SPEAKER
TV SOURCE
POWER
SOURCE
SoundShare
REPEAT
AUDIO SYNC
TV VOL TV CH
DIMMER
TV INFOTV MUTE
TV PRE-CH
SMART VOLUMESOUND EFFECT
VOL
S/W
S/W
MUTE
LEVEL
LEVEL
VOL
3D SOUND
DRC
PLUS
AH59-02547B
Muting the sound
This is useful when answering a doorbell or telephone call.
1.
To mute the sound of this unit, press the MUTE button on the remote
control.
2.
To mute the TV, press the
control.
TV MUTE ( )
button on the remote
3. Press MUTE/ TV MUTE ( ) on the remote control again (or press
VOLUME +/–) to restore the sound.
POWER
TV POWER
AUTO
SPEAKER
TV SOURCE
POWER
SOURCE
SoundShare
REPEAT
TV VOL TV CH
AUDIO SYNC
DIMMER
TV INFOTV MUTE
TV PRE-CH
SMART VOLUMESOUND EFFECT
VOL
S/W
S/W
MUTE
LEVEL
LEVEL
VOL
3D SOUND
DRC
PLUS
AH59-02547B
Using the 3D SOUND PLUS function
The 3D Sound Plus feature adds depth and spaciousness to the sound.
Press 3D SOUND PLUS on the remote control.
• Each time the button is pressed, the selection changes as follows :
3D SOUND PLUS OFF ➡ 3D SOUND PLUS MUSIC ➡ 3D SOUND
PLUS MOVIE
▪ When you turn on 3D Sound Plus, the Sound Effect function will
automatically change to OFF.
POWER
TV POWER
AUTO
SPEAKER
TV SOURCE
POWER
SOURCE
SoundShare
REPEAT
AUDIO SYNC
TV VOL TV CH
DIMMER
TV INFOTV MUTE
TV PRE-CH
SMART VOLUMESOUND EFFECT
VOL
S/W
S/W
MUTE
LEVEL
LEVEL
VOL
3D SOUND
DRC
PLUS
AH59-02547B
Using the SMART VOLUME function
This will regulate and stabilize the volume level against a drastic volume
change caused by a channel change or scene transition.
Press SMART VOLUME on the remote control.
• Each time the button is pressed, the selection changes as follows :
SMART VOLUME ON ➡ SMART VOLUME OFF
POWER
SOURCE
REPEAT
TV VOL TV CH
S/W
LEVEL
3D SOUND
PLUS
POWER
SOURCE
REPEAT
TV VOL TV CH
S/W
LEVEL
3D SOUND
PLUS
TV POWER
AUTO
SPEAKER
TV SOURCE
POWER
SoundShare
AUDIO SYNC
DIMMER
TV INFOTV MUTE
TV PRE-CH
SMART VOLUMESOUND EFFECT
VOL
S/W
MUTE
LEVEL
VOL
DRC
AH59-02547B
TV POWER
AUTO
SPEAKER
TV SOURCE
POWER
SoundShare
AUDIO SYNC
DIMMER
TV INFOTV MUTE
TV PRE-CH
SMART VOLUMESOUND EFFECT
VOL
S/W
MUTE
LEVEL
VOL
DRC
AH59-02547B
Using the Sound effect function
You can select from 7 different sound modes - MUSIC, NEWS, DRAMA,
CINEMA, SPORTS, GAME, and OFF (Original Sound) - depending on the
type of sources you want to enjoy.
Press SOUND EFFECT on the remote control.
• Select the OFF mode if you want to enjoy the original sound.
▪ We recommend that you select a Sound Effect based on the
source material and your personal taste.
▪ When you choose a Sound Effect mode (except OFF), 3D Sound
Plus will automatically be turned OFF.
Using the S/W LEVEL function
You can control the base volume with the S/W Level button on the remote
control.
Press the S/W LEVEL button on the remote control.
1.
2.
“SW 0” appears on the display.
3. Press or button on the LEVEL key if you want to increase or decrease
the subwoofer volume. You can set it from SW -6 to SW +6.
19
Page 20

functions
POWER
POWER
TV POWER
REPEAT
TV VOL TV CH
AUDIO SYNC
SOURCE
AUTO
POWER
SPEAKER
TV SOURCE
SoundShare
POWER
TV POWER
REPEAT
TV VOL TV CH
AUDIO SYNC
SOURCE
AUTO
POWER
SPEAKER
TV SOURCE
TV PRE-CH
DIMMER
SMART VOLUMESOUND EFFECT
TV INFOTV MUTE
SoundShare
POWER
TV POWER
REPEAT
TV VOL TV CH
AUDIO SYNC
SOURCE
AUTO
POWER
SPEAKER
TV SOURCE
TV PRE-CH
DIMMER
SMART VOLUMESOUND EFFECT
S/W
LEVEL
S/W
LEVEL
VOL
VOL
3D SOUND
PLUS
DRC
TV INFOTV MUTE
SoundShare
MUTE
POWER
TV POWER
REPEAT
TV VOL TV CH
AUDIO SYNC
SOURCE
AUTO
POWER
SPEAKER
TV SOURCE
TV PRE-CH
DIMMER
SMART VOLUMESOUND EFFECT
TV INFOTV MUTE
SoundShare
POWER
TV POWER
REPEAT
TV VOL TV CH
AUDIO SYNC
SOURCE
AUTO
POWER
SPEAKER
TV SOURCE
SoundShare
TV POWER
AUTO
SPEAKER
TV SOURCE
POWER
SOURCE
SoundShare
REPEAT
AUDIO SYNC
TV VOL TV CH
DIMMER
TV INFOTV MUTE
TV PRE-CH
SMART VOLUMESOUND EFFECT
VOL
S/W
S/W
MUTE
LEVEL
LEVEL
VOL
3D SOUND
DRC
PLUS
AH59-02547B
POWER
TV POWER
AUTO
SPEAKER
TV SOURCE
POWER
SOURCE
SoundShare
REPEAT
AUDIO SYNC
TV VOL TV CH
DIMMER
TV INFOTV MUTE
TV PRE-CH
SMART VOLUMESOUND EFFECT
VOL
S/W
S/W
MUTE
LEVEL
LEVEL
VOL
3D SOUND
DRC
PLUS
AH59-02547B
POWER
TV POWER
AUTO
SPEAKER
TV SOURCE
POWER
SOURCE
SoundShare
REPEAT
AUDIO SYNC
TV VOL TV CH
DIMMER
TV INFOTV MUTE
TV PRE-CH
SMART VOLUMESOUND EFFECT
VOL
S/W
S/W
MUTE
LEVEL
LEVEL
VOL
3D SOUND
DRC
PLUS
AH59-02547B
POWER
TV POWER
AUTO
SPEAKER
TV SOURCE
POWER
SOURCE
SoundShare
REPEAT
AUDIO SYNC
TV VOL TV CH
DIMMER
TV INFOTV MUTE
TV PRE-CH
SMART VOLUMESOUND EFFECT
VOL
S/W
S/W
MUTE
LEVEL
LEVEL
VOL
3D SOUND
DRC
PLUS
POWER
SOURCE
REPEAT
S/W
LEVEL
3D SOUND
PLUS
20
AH59-02547B
AUTO
SPEAKER
POWER
TV VOL TV CH
TV INFOTV MUTE
TV PRE-CH
VOL
MUTE
VOL
AH59-02547B
TV POWER
TV SOURCE
SoundShare
AUDIO SYNC
DIMMER
SMART VOLUMESOUND EFFECT
S/W
LEVEL
DRC
Using the AUTO POWER LINK function
The Crystal Surround Air Track is automatically turned on when you turn on the
TV or any device connected to the Air Track with the optical cable.
Press AUTO POWER on the remote control of this unit.
• The Auto power link function turns on and off each time you press AUTO
POWER.
AUTO POWER LINK Display
ON
OFF
POWER LINK ON
POWER LINK OFF
▪ If a TV or any device connected to Air Track with the optical cable is
off and there is no digital input, the Air Track is turned off after 20
minutes.
▪ These functions are available only when Anynet+ (HDMI-CEC) is
turned off.
Using the AUDIO SYNC function
Video may appear out of synch with the audio if the Air Track is connected to a
digital TV. If this occurs, adjust the audio delay time to match the video.
Press AUDIO SYNC +/–. on the remote control of this unit.
• You can use the + , - buttons to set the audio delay time between 0 ms
and 300 ms.
▪ In USB mode, TV mode or BT mode, the Audio Sync function may
not work.
Using the DRC function
This feature balances the range between the loudest and quietest sounds.
You can use this function to enjoy Dolby Digital sound when watching movies
at low volume at night.
Press DRC on the remote control of this unit.
• Each time the button is pressed, the selection changes as follows :
DRC STANDARD ➡ DRC MAX ➡ DRC MIN
Using the DIMMER function
This feature controls the brightness of the Display.
Press DIMMER on the remote control of this unit.
• Each time the button is pressed, the selection changes as follows :
DIMMER ON ➡ DIMMER OFF
SPEAKER button
If the TV and Air Track are connected via HDMI, this button lets you select
between listening to audio through your TV or through the Air Track.
Press SPEAKER on the remote control of this unit.
AUDIO MODE SPEAKER Scroll Display Display
HDMI IN
ARC
TV
ir Track
A
TV
ir Track
A
TV SPEAKER TV SPK
AVR SPEAKER HDMI
TV SPEAKER S MUTE
AVR SPEAKER TV ARC
Page 21

EnG
● functions
POWER
POWER
TV POWER
REPEAT
TV VOL TV CH
AUDIO SYNC
SOURCE
AUTO
POWER
SPEAKER
TV SOURCE
SoundShare
POWER
TV POWER
REPEAT
TV VOL TV CH
AUDIO SYNC
SOURCE
AUTO
POWER
SPEAKER
TV SOURCE
TV PRE-CH
DIMMER
TV INFOTV MUTE
SoundShare
5v 500mA
5v 500mA
TV POWER
AUTO
SPEAKER
TV SOURCE
POWER
SOURCE
SoundShare
REPEAT
TV VOL TV CH
AUDIO SYNC
DIMMER
TV INFOTV MUTE
TV PRE-CH
SMART VOLUMESOUND EFFECT
VOL
S/W
S/W
MUTE
LEVEL
LEVEL
VOL
3D SOUND
DRC
PLUS
AH59-02547B
Using the Anynet+(HDMI-CEC) function
Anynet+ is a function that enables you to control other Samsung Devices
with your Samsung TV's remote control.
The Anynet+ function turns on and off each time you press Anynet+.
Connect the product to a Samsung TV with an the HDMI cable.
1.
(See page 12)
2.
Set the Anynet+ function on your TV and the SAT to ON. (See the
TV instruction manual for more information.)
▪ Depending on your TV, certain HDMI output resolutions may not
work.
▪ Please refer to the user’s manual of your TV and check for the
logo (If your TV has an
Anynet+ function.)
logo, then it supports the
SOFTWARE UPGRADE
Samsung may offer upgrades for the Crystal
Surround Air Track's system firmware in the future.
If an upgrade is offered, you can upgrade the
firmware by connecting a USB drive with the
firmware upgrade stored on it to the USB port on
your Air Track.
Note that if there are multiple upgrade files, you must
load them onto the USB drive singly and use them to
upgrade the firmware one at a time.
Please visit Samsung.com or contact the Samsung
call center to receive more information about
downloading upgrades files.
POWER
TV POWER
AUTO
SPEAKER
TV SOURCE
POWER
SOURCE
SoundShare
REPEAT
AUDIO SYNC
TV VOL TV CH
DIMMER
TV INFOTV MUTE
TV PRE-CH
SMART VOLUMESOUND EFFECT
VOL
S/W
S/W
MUTE
LEVEL
LEVEL
VOL
3D SOUND
DRC
PLUS
AH59-02547B
Using the TV functions (with Samsung TVs only)
• Press TV SOURCE on the remote control to change the TV's input source.
• Press TV INFO on the remote control to display the TV channel
information.
• Press TV CH on the remote control to select the TV channel.
• Press TV VOL on the remote control to increase or decrease the volume
level.
• Use TV PRE-CH button to move to the previous TV channel in TV mode.
▪ When you press the SoundShare button, the TV's sound is
transmitted through the Air Track system via a Bluetooth
connection. The Air Track also controls the sound volume,
sound quality, etc.
▪ The remote control can operate TVs made by SAMSUNG only.
▪ Insert a USB drive containing the firmware upgrade into the USB port on the main unit.
▪ Do not disconnect the power or remove the USB drive while upgrades are being applied. The main unit will turn
off automatically after completing the firmware upgrade.
When software is upgraded, settings you have made will return to their default (factory) settings.
We recommend you write down your settings so that you can easily reset them after the upgrade.
▪ Once upgrading the product software is completed, turn off the product and then press and hold
to reset the product.
▪ If the firmware fails to upgrade, we recommend formatting the USB device in FAT16 and trying again.
▪ For upgrading purposes, do not format the USB drive in NTFS format because it is not a supported file system.
▪ Depending on the manufacturer, some USB devices may not be supported.
(@)
button for a while
21
Page 22

troubleshooting
Before requesting service, please check the following.
Symptom Check Remedy
The unit will not turn on.
A function does not work when the
button is pressed.
Sound is not produced.
The Picture does not appear on a TV
when the function is selected.
The remote control does not work.
• Is the power cord plugged into
the outlet?
• Is there static electricity in the
air?
• Is the unit properly connected
to your TV?
• Is the Mute function on?
• Is the volume set to minimum?
• Is the TV connected properly? • Connect it correctly.
• Are the batteries drained?
• Is the distance between remote
control and main unit too far?
• Connect the power plug to the
outlet.
• Disconnect the power plug and
connect it again.
• Connect it correctly.
• Press the Mute button to
cancel the function.
• Adjust the volume.
• Replace with new batteries.
• Move closer to the unit.
The sound from the left/right
channels are reversed.
The SoundShare (TV pairing) failed.
22
• Are the left/right audio output
cables from the TV connected
properly?
• Does your TV support
SoundShare?
• Is your TV firmware the latest
version?
• Does an error occur when
connecting?
• Reset the BT/TV MODE and
connect again.
• Check the left/right channel and
connect it/them correctly.
• SoundShare is supported by
some Samsung TVs released
after 2012. Check your TV to
see if it supports SoundShare.
• Update your TV with the latest
firmware.
• Contact the call center.
• Press
to reset the product.
button for 5 seconds
Page 23

EnG
● appEndix
appendix
SPECIFICATIONS
Model name
GENERAL
AMPLIFIER
HW-F450
USB 5V/0.5A
Main unit 4.28 Ibs
Weight
Dimensions
(W x H x D)
Operating temperature range +41°F to +95°F
Operating humidity range 10 % to 75 %
Rated output
power
S/N ratio (analog
Separation(1kHz) 65 dB
Subwoofer
(PS-WF450)
Main unit 35.67 x 1.77 x 2.76 inches
Subwoofer
(PS-WF450)
Main unit 80W/CH, 4O
Subwoofer
(PS-WF450)
input)
12.01 Ibs
6.89 x 13.78 x 11.61 inches
HM,
120W, 4O
65 dB
HM,
THD = 10%, 1kHz
THD = 10%, 70Hz
* S/N ratio, distortion, separation and usable sensitivity are based on measurement using AES (Audio
Engineering Society) guidelines.
*: Nominal specification
- Samsung Electronics Co., Ltd reserves the right to change the specifications without notice.
- Weight and dimensions are approximate.
As an ENERGY STAR Partner, Samsung
has determined that this product or product
models meets the ENERGY STAR guidelines
for energy efficiency.
23
Page 24

LIMITED WARRANTY TO ORIGINAL PURCHASER
Samsung Electronics Canada Inc.(SECA), warrants that this product is free from defective
material and workmanship.
SECA further warrants that if this product falls to operate properly within the specified warranty
period and the failure is due to improper workmanship or defective materials, SECA will repair
or replace the product at its option.
All warranty repairs must be performed by a SECA Authorized Service Center. (The name and
address of the location nearest you can be obtained by calling toll free: 1- 800- SAMSUNG)
LABOR
One year (Carry- in)
PARTS
One year
On carry-in models, transportation to and from the service center is the customer’s responsibility.
The original dated sales receipt must be retained by the customer and is the only acceptable
proof of purchase. It must be presented to the authorized service center at the time service is
requested.
EXCLUSIONS (WHAT IS NOT COVERED)
This warranty does not cover damage due to accident, fire, flood and/ or other acts of God; misuse,
incorrect line voltage, improper installation, improper or unauthorized repairs, commercial use or
damage that occurs in shipping. Exterior and interior finish, lamps, glass are not covered under this
warranty. Customer adjustments which are explained in the instruction manual are not covered
under the terms of this warranty. This warranty will automatically be voided for any unit found with a
missing or altered serial number. This warranty is valid only on products purchased and used in
Canada.
HEADQUARTERS
SAMSUNG ELECTRONICS CANADA INC.,
CUSTOMER SERVICE
55 STANDISH COURT MISSISSAUGA, ONTARIO L5R 4B2 CANADA
FABRIQUE EN CORÉE
1-800-SAMSUNG (1-800-7267864)
www.SAMSUNG.COM/CA
Page 25

Contact SAMSUNG WORLD WIDE
If you have any questions or comments relating to Samsung products, please contact the SAMSUNG customer
care center.
Area Contact Center
`
North America
CANADA 1-800-SAMSUNG(726-7864)
MEXICO 01-800-SAMSUNG(726-7864)
`
Latin America
ARGENTINE 0800-333-3733 www.samsung.com
BRAZIL
CHILE
Bolivia 800-10-7260 www.samsung.com
COLOMBIA 01-8000112112 www.samsung.com
COSTA RICA 0-800-507-7267 www.samsung.com
DOMINICA 1-800-751-2676 www.samsung.com
ECUADOR 1-800-10-7267 www.samsung.com
EL SALVADOR 800-6225 www.samsung.com
GUATEMALA 1-800-299-0013 www.samsung.com
HONDURAS 800-27919267 www.samsung.com
JAMAICA 1-800-234-7267 www.samsung.com
NICARAGUA 00-1800-5077267 www.samsung.com
PANAMA 800-7267 www.samsung.com
PERU 0-800-777-08 www.samsung.com
PUERTO RICO 1-800-682-3180 www.samsung.com
TRINIDAD & TOBAGO 1-800-SAMSUNG(726-7864) www.samsung.com
VENEZUELA 0-800-100-5303 www.samsung.com
0800-124-421
4004-0000
800-SAMSUNG(726-7864)
From mobile 02-482 82 00
www.samsung.com/ca
www
www.samsung.com
www
www.samsung.com
Web Site
.samsung.com/ca_fr (French)
.samsung.com
AH68-02644G-00
Page 26

HW-F450
Ensemble Home Cinéma
(Système Avec Enceintes Actives)
manuel d'utilisation
imaginez les possibilités
Merci d’avoir choisi un appareil Samsung.
Pour recevoir une assistance plus complète,
veuillez enregistrer votre produit sur
www.samsung.com/register
Page 27

caractéristiques
2.0 Channel
2.0 Channel
SoundShare
SoundShare permet d’écouter votre téléviseur sur votre SAT par votre connexion Bluetooth et commande le son.
HDMI
Le protocole HDMI transmet des signaux vidéo et audio numériques simultanément et procure une image plus nette.
L'appareil est aussi doté de la fonction ARC qui permet d'écouter le son de votre téléviseur via un câble HDMI par l'intermédiaire du
système Crystal Surround Air Track. La fonction n'est disponible que si vous connectez l'appareil à un téléviseur compatible ARC.
3D SOUND PLUS
La fonction 3D SOUND PLUS ajoute de la profondeur et de l’amplitude à votre expérience sonore.
Caisson de basses sans fil
Le module sans fil de Samsung s'affranchit des câbles qui reliaient l'unité principale au caisson de basses.
En remplacement du câblage, le caisson de basses se connecte à un module sans fil compact qui communique avec l'unité
principale.
Mode sonore spécial
Selon le type de contenu que vous souhaitez utiliser, vous pouvez choisir entre sept modes de champ sonore différents - MUSIC,
NEWS, DRAMA, CINEMA, SPORTS, GAME, et OFF (Son Original)).
Télécommande multifonction
La télécommande fournie peut également être utilisée pour commander le téléviseur connecté à cet ensemble. (Fonctionne
seulement sur les téléviseurs Samsung)
Elle est pourvue d'une touche d'accès rapide au téléviseur permettant d'activer plusieurs options d'une simple pression sur les
touches.
Système avec enceintes actives
Cet ensemble est doté d'un système avec enceintes actives qui offre une haute qualité sonore dans une seule unité
peu encombrante.
Cet ensemble ne nécessite aucun haut-parleur satellite ni câbles, généralement présents dans les Home Cinémas classiques.
Prise en charge de l'hôte USB
Vous pouvez lire des fichiers musicaux à partir de supports de stockage USB externes tels que lecteurs MP3, mémoire flash USB,
etc., à l'aide de la fonction HÔTE USB de Air Track.
Fonction Bluetooth
Vous pouvez utiliser un périphérique Bluetooth pour écouter de la musique en stéréo haute qualité, et ce sans fil !
LICENCE
Vous pouvez utiliser un dispositif BlueBooth connecté au SAT pour écouter de la musique en son stéréo de haute qualité,
tout cela sans fil!
Fabriqué sous licence sous les brevets américains suivants : 5,956,674; 5,974,380; 6,487,535 et autres brevets déposés
ou en attente aux États-Unis ou dans d'autres pays. DTS, le Symbole, ainsi que DTS et le Symbole ensemble sont des
marques déposées et DTS 2.0 Channel est une marque de commerce de DTS, Inc. Le produit inclut le logiciel. © DTS, Inc.
Tous droits réservés.
Les termes HDMI, High-Definition Multimedia Interface et le logo HDMI sont des marques de commerce
ou des marques déposées de HDMI Licensing LLC aux États-Unis ou dans d'autres pays.
- Pour toute requête et demande concernant les questions sur les sources ouvertes, contactez Samsung via e-mail
(oss.request@ samsung.com).
2
Page 28

FRA
informations relatives à la sécurité
AVERTISSEMENTS
POUR ÉVITER LES RISQUES DE CHOC ÉLECTRIQUE, NE DÉMONTEZ PAS LE CAPOT. L’APPAREIL NE CONTIENT PAS DE
PIÈCES RÉPARABLES PAR L’UTILISATEUR ; S’ADRESSER À UN SERVICE APRÈS-VENTE QUALIFIÉ.
Ce symbole avertit l’utilisateur de la
ATTENTION
RISQUE DE CHOC ÉLECTRIQUE.
NE PAS OUVRIR
AVERTISSEMENT : afin de diminuer les risques d’incendie ou de choc électrique, n’exposez pas cet appareil à la pluie ou à l’
humidité.
présence d’une tension dangereuse à
l’intérieur de l’appareil.
Ce symbole avertit l’utilisateur de la
présence de directives importantes dans la
documentation accompagnant cet appareil.
MISE EN GARDE : pour prévenir les chocs électriques, branchez la fiche au fond, en prenant soin d'insérer la tige large dans la fente
Cet appareil doit toujours être branché à une prise terre.
•
• Pour déconnecter l’appareil du circuit principal, la prise doit être débranchée de la prise principale ; il est de ce fait nécessaire que
la prise principale soit facile d'accès.
MISE EN GARDE
• Veillez à éviter toute projection sur l'appareil et ne placez jamais de récipients contenant un liquide (ex. : vase) dessus.
• La prise d’alimentation fait office de système de déconnexion ; elle doit donc rester disponible en permanence.
large.
3
Page 29

PRÉCAUTIONS
3.9 inch 3.9 inch
2.7 inc
h
3.9 inch
Assurez-vous que l'alimentation c.a. de votre domicile satisfait aux normes inscrites sur l'étiquette d'identification située à l'arrière du
produit. Installez votre produit horizontalement, sur un socle approprié (meuble), en laissant un espace suffisant pour la ventilation sur le
pourtour (3~4 inches). Faites attention à ne pas obstruer les orifices de ventilation. Ne posez pas l'ensemble sur un amplificateur
ou un autre appareil susceptible de chauffer. Cet ensemble est conçu pour une utilisation en continu.
Pour éteindre totalement l'appareil, débranchez la fiche c.a. de la prise murale. Débranchez l'appareil si vous prévoyez une longue période d'inactivité.
En cas d'orage, débranchez la fiche de l'appareil de la prise murale.
Les surtensions occasionnées par l'orage pourraient endommager votre
appareil.
Phones
Protégez le produit de l'humidité (comme les vases) et d'une chaleur
excessive (comme une cheminée) ou de tout équipement capable de
créer des champs magnétiques ou électriques. Débranchez le câble
d'alimentation en cas de dysfonctionnement.
Votre produit n'est pas prévu pour un usage industriel. Ce produit ne peut
être utilisé qu'à des fins personnelles.
Une condensation peut se former si le produit ou un disque a été stocké
à basse température. Si vous devez transporter l'ensemble pendant
l'hiver, attendez environ 2 heures que l'appareil ait atteint la température
de la pièce avant de l'utiliser.
N'exposez pas l'ensemble aux rayons directs du soleil ou à toute autre
source de chaleur. Cela pourrait causer une surchauffe du fil et causer un
dysfonctionnement de l’unité.
Les piles utilisées dans ce produit peuvent contenir des produits chimiques dangereux pour l'environnement.
Ne jetez pas les piles dans votre poubelle habituelle.
4
Page 30

FRA
sommaire
CARACTÉRISTIQUES
2
INFORMATIONS RELATIVES À LA
SÉCURITÉ
3
DÉMARRAGE
6
DESCRIPTIONS
7
TÉLÉCOMMANDE
8
BRANCHEMENTS
9
2 Caractéristiques
2 Licence
3 Avertissements
4 Précautions
6 Avant de lire le manuel d'utilisation
6 Contenu
7 Panneau Avant/Arrière
8 Présentation de la télécommande
9 Installation de la fixation murale
10
Branchement d’un caisson de graves sans fil
11 Fixation du noyau torique en ferrite au
cordon d'alimentation du caisson de graves
11 Installation du noyau torique en ferrite sur le
caisson de graves
12 Branchement à un périphérique externe en
utilisant le câble HDMI
13 Branchement d’un périphérique externe
en utilisant un câble audio (analogique) ou
optique (numérique)
FONCTIONS
14
DÉPANNAGE
22
ANNEXE
23
14 Mode input (entrée)
14 Bluetooth
16 SoundShare
17 USB
18 Utilisation de la télécommande
21 Mise à jour du logiciel
22 Dépannage
23 Spécifications
5
Page 31

démarrage
AVANT DE LIRE LE MANUEL D'UTILISATION
Lisez attentivement la signification des termes suivants avant de commencer la lecture du manuel d'utilisation.
Icônes utilisées dans le présent manuel
Icône Terme Définition
Attention
Remarque
Indique qu'une fonction ne fonctionne pas ou que des paramètres peuvent être
annulés.
Donne des conseils ou des instructions permettant d'améliorer l'utilisation de
chaque fonction.
Consignes de sécurité et dépannage
1) Familiarisez-vous avec les Consignes de sécurité avant d'utiliser ce produit. (Reportez-vous à la page 3)
2) En cas de problème, consultez la section Dépannage. (Reportez-vous à la page 22)
Copyright
©2013 Samsung Electronics Co.,Ltd.
Tous droits réservés. Le présent manuel d'utilisation ne peut être reproduit ou copié, en partie ou dans
son intégralité, sans l'autorisation écrite préalable de Samsung Electronics Co., Ltd.
CONTENU
Vérifiez que vous disposez bien des accessoires ci-dessous.
POWER
TV POWER
AUTO
SPEAKER
TV SOURCE
POWER
SOURCE
SoundShare
REPEAT
TV VOL TV CH
AUDIO SYNC
DIMMER
TV INFOTV MUTE
TV PRE-CH
SMART VOLUMESOUND EFFECT
VOL
S/W
S/W
MUTE
LEVEL
LEVEL
VOL
3D SOUND
DRC
PLUS
AH59-02547B
Télécommande / Piles (type AAA)
Câble auxiliaire Câble USB Noyau torique en ferrite
▪ Les accessoires pourraient légèrement différer de ceux figurant sur la photo ci-dessus.
▪ Le câble USB dédié est fourni pour permettre la communication avec le périphérique USB.
6
Fixation de Support Mural Manuel D'utilisation
(Pour le câble d'alimentation
du caisson de graves 1 unité)
Page 32

FRA
● DescRiption
descriptions
PREDNJA/STRAŽNJA STRANICA
1 2
3
5v 500mA
4
OPTICAL IN
7
HDMI IN
9
5
AUX IN
8
6
11
DÉTECTEUR
DE TÉLÉCOMMANDE
ÉCRAN
D’AFFICHAGE
BOUTON
POWER
TOUCHE DE
FONCTIONS
VOLUME +/-
5
▪ Lorsque vous mettez cet appareil sous tension, un délai de 4 à 5 secondes précède l'émission du son.
▪ Lorsque vous voulez débrancher le câble d'alimentation de la prise murale, saisissez bien la fiche.
Ne tirez pas sur le câble.
▪ Ne branchez pas cet appareil ni les autres composants dans une prise c.a. tant que tous les composants
ne sont pas interconnectés.
La télécommande peut seulement
faire fonctionner le système Air
Tracks de marque SAMSUNG.
fichent le mode actuel.
Af
Permet d'allumer/d'éteindre
l'ensemble Home Cinéma.
Sélection des entrées D.IN
(NUMÉRIQUE), AUX, HDMI, BT, TV USB.
-
Pendant que l’unité est alimentée en
tension, si vous appuyez sur la
touche (
secondes celle-ci pourrait être utilisée
pour la MISE EN SOURDINE.
annuler le réglage de MISE EN
SOURDINE, appuyez encore sur le
bouton
secondes.
Permet de régler le volume.
) pendant plus de 3
( )
pendant plus de 3
Pour
6
7
8
9
10
11
PORT USB
ENTRÉE
OPTIQUE
ENTRÉE
AUXILIAIRE
PRISES HDMI
IN
PRISE HDMI
OUT
CÂBLE
ME-
D'ALI
NTATION
Branchez les périphériques USB
comme les lecteurs MP3 ici pour
lire les fichiers des périphériques.
Connexion jusqu'à la sortie
numérique (optique) d'un
périphérique externe.
Connexion jusqu'à la sortie
analogique d'un périphérique
externe.
Reçoit les signaux vidéo et audio
numériques simultanément d’une
source externe utilisant un câble
HDMI.
Transmet les signaux vidéo et
audio numériques simultanément
au moyen d’un câble HDMI.
Branchez le câble d'alimentation
dans la prise murale.
HDMI OUT
10
7
Page 33

POWER
TV POWER
AH59-02547B
REPEAT
TV VOL TV CH
AUDIO SYNC
SOURCE
AUTO
POWER
SPEAKER
TV SOURCE
TV PRE-CH
DIMMER
SMART VOLUMESOUND EFFECT
S/W
LEVEL
S/W
LEVEL
VOL
VOL
3D SOUND
PLUS
DRC
TV INFOTV MUTE
SoundShare
MUTE
télécommande
PRÉSENTATION DE LA TÉLÉCOMMANDE
TOUCHE POWER
Permet d'allumer/d'éteindre
l'ensemble Home Cinéma.
SOURCE
Sélection d'une source SAT. (SAT : Surround Air Track)
AUTO POWER
Synchronise le système Air Track par la
connexion Optique au moyen de la prise
Optique de façon à ce qu’il s’active
automatiquement lorsque vous allumez
votre téléviseur.
REPEAT
Sélection des fonctions Répétition
fichier, Tout, Aléatoire.
TV VOLUME
Réglage du niveau sonore du téléviseur.
TV MUTE
Coupure du son du téléviseur.
Appuyez de nouveau sur cette touche
pour restaurer le volume initial.
TV INFO, TV PRE-CH
Affichage de l'état actuel du téléviseur.
Déplacement sur la chaîne de
télévision précédente.
TOUCHE CONTRÔLE
Permet de démarrer, de faire une
pause ou d'arrêter la lecture d'un fichier
musical, ou encore de rechercher un tel
fichier vers l'avant ou l'arrière.
SOUND EFFECT
Sélection des fonctions Effet Sonore:
(MUSIC, NEWS, DRAMA, CINEMA,
SPORTS, GAME, OFF (Son Original))
3D SOUND PLUS
Cette fonction ajoute de la
profondeur et de l’espace au son.
▪ SAT est l'acronyme de Surround Air Track, une dénomination propriété de Samsung.
▪ La télécommande n'est opérationnelle que sur les téléviseurs Samsung.
▪ Il se peut que cette télécommande ne soit pas compatible avec le type de téléviseur que vous utilisez. Si c'est le
cas, utilisez la télécommande du téléviseur.
TOUCHE TV POWER
Permet d'allumer/d'éteindre le
téléviseur Samsung.
SPEAKER
Ce bouton permet d'écouter un contenu
audio à partir du système Air Track ou de
votre téléviseur. (Cette fonction prend en
charge via un câble HDMI.)
TV SOURCE
Sélection d'une source vidéo sur un
téléviseur connecté.
Anynet+, SoundShare
Anynet+ est une fonction qui vous permet de
commander les autres appareils Samsung à l’aide de
la télécommande de votre téléviseur Samsung.
Le son du téléviseur est émis sur votre enceinte satellite
(SAT) via une connexion Bluetooth et le son est contrôlé.
TV CHANNEL , AUDIO SYNC
Permet de basculer entre les
différentes chaînes disponibles.
Pour synchroniser la vidéo avec
l’audio lorsque l’unité est connectée à
un téléviseur numérique.
DIMMER
Vous pouvez régler la luminosité de
l'affichage.
SMART VOLUME
Pour régler et stabiliser le volume afin de le
protéger contre les variations importantes.
VOLUME, S/W LEVEL
Pour régler le volume de l’unité.
Pour régler le volume du caisson d’extrêmes graves.
DRC
Vous pouvez utiliser cette fonction pour bénéficier
du son Dolby Digital lorsque vous visionnez un film
selon un faible volume la nuit (Standard, MAX, MIN).
MUTE
Permet de mettre l'appareil en sourdine.
Appuyez de nouveau sur cette touche
pour restaurer le volume initial
Installation des piles dans la télécommande
1. Soulevez le couvercle situé à
Portée de la télécommande
l'arrière de la télécommande
comme indiqué.
Insérez deux piles de type AAA.
2.
Vérifiez bien que les pôles + et - des piles
sont placés comme indiqué sur le diagramme
représenté à l'intérieur du compartiment.
Repositionnez le couvercle.
3.
Dans un schéma d'utilisation
classique, les piles durent
environ un an.
La portée de la télécommande en ligne droite est d'environ 7 mètres. Elle fonctionne également inclinée selon un angle
horizontal de 30° maximum par rapport au capteur de la télécommande.
8
Page 34

FRA
● bRAnchements
branchements
INSTALLATION DE LA FIXATION MURALE
Vous pouvez utiliser le support de fixation mural pour fixer l’unité au mur.
Précautions d’installation
• Ne procédez pas à l'installation sur un autre emplacement qu’un mur vertical.
• Pour l’installation, évitez les températures extrêmes et l’humidité ou encore un mur pas assez solide pour
supporter le poids de l’appareil.
• Vérifiez la solidité du mur. Si le mur n’est pas suffisamment solide pour supporter l’unité, renforcez-le ou
installez l’unité sur un autre mur qui peut supporter son poids.
• Achetez et utilisez des vis de fixation ou des chevilles convenant au type de mur que vous avez (plaque
de plâtre ou en fer, bois, etc.) Si cela est possible, fixez les vis de fixation dans les poteaux muraux.
• Connectez les câbles de l'appareil aux périphériques externes avant de l'installer au mur.
• Assurez-vous d’éteindre et de débrancher l’unité avant l’installation afin d’éviter tout choc électrique.
1. Placez le support de fixation sur la surface du mur puis
fixez-le à l’aide de deux vis (non fournies).
Si vous installer l'appareil derrière le téléviseur, assurez-vous
de monter le support mural de façon que la flèche
placée au centre du téléviseur.
Assurez-vous aussi que l'appareil se trouve à 5 cm ou
plus sous le téléviseur.
( ) soit
2. Vérifiez les trous des vis et alignez-les à l’arrière de
3. Introduisez l’unité dans les fentes correspondantes
4. L’installation suggérée pour le support mural est ainsi
L'UNITÉ PRINCIPALE, puis fixez les vis de fixation.
du support de fixation mural. - Pour une sécurité
d’ installation optimale, veillez à ce que les goujons
descendent jusqu’en butée à l’intérieur des fentes.
terminée.
▪ Ne vous appuyez sur l’unité montée et protégez celle-ci de tout risque d’impact.
▪ Fixez fermement l’unité au mur afin qu’elle ne tombe pas. La chute de l’appareil peut provoquer
des blessures ou endommager le produit.
▪ Lorsque l’unité est fixée au mur, veillez à ce qu’un enfant ne tire pas sur les câbles de connexion
au risque de faire tomber l’appareil.
▪ Pour qu'une installation avec fixation murale fonctionne de manière optimale, veillez à ce que le
système d'enceintes et le téléviseur soient séparés d'au moins 5 cm.
1
1
5 cm (2 po) ou plus
2
9
Page 35

branchements
BRANCHEMENT D’UN CAISSON DE GRAVES SANS FIL
STANDBY
LINK
STANDBY
LINK
POWER
TV POWER
REPEAT
TV VOL TV CH
AUDIO SYNC
SOURCE
AUTO
POWER
SPEAKER
TV SOURCE
TV PRE-CH
DIMMER
SMART VOLUMESOUND EFFECT
S/W
LEVEL
S/W
LEVEL
VOL
VOL
3D SOUND
DRC
TV INFOTV MUTE
SoundShare
MUTE
L'ID de lien du caisson de graves est préréglé en usine et l’unité principale et le caisson doivent se connecter
automatiquement (connexion sans fil) à la mise sous tension. Si le témoin de lien (
sous tension de l'unité principale et du caisson de graves, vous devrez régler l'ID tel qu'indiqué dans la
procédure suivante.
1. Branchez les cordons d’alimentation de l’unité principale et du caisson des basses dans une prise
murale C.A.
2. Appuyez pendant 5 secondes sur le bouton ID SET situé à l’arrière du caisson de graves à l’aide d’un
petit objet pointu.
• Le témoin STANDBY s’éteint et le témoin LINK (DEL Bleue) clignote rapidement.
3. Alors que l’unité principale est hors tension (mode VEILLE),
appuyez sur la touche MUTE de la télécommande pendant 5
secondes.
4.
Le message ID SET apparaît sur l'écran (VFD) de l'unité principale.
5. Pour établir la liaison, mettre l'unité principale sous tension
pendant que le témoin DEL du caisson de graves clignote.
• L’unité principale et le caisson de graves sont à présent liés (connectés).
• Le témoin de liaison (DEL Bleue) du caisson de braves est allumé.
• Vous pouvez profiter d'une meilleure qualité de son en provenance du
caisson de graves sans fil en sélectionnant un effet sonore. (Reportezvous en page 19)
▪ Avant de déplacer ou d'installer l'appareil, éteignez-le et débranchez son cordon d'alimentation.
▪ Si l’unité principale est hors tension, le caisson d’extrêmes graves sans fil se met en mode de
10
veille et le témoin DEL de VEILLE s’affiche sur la partie supérieure de l’écran. Après 30
secondes, le témoin Link (DEL bleue) commence à clignoter.
▪ Si un appareil qui utilise la même fréquence (2.4GHz) se trouve à proximité du système, des
interruptions de son peuvent se produire en raison de l’interférence.
▪ Le champ d’action de la transmission depuis l’unité centrale vers le module syntoniseur sans fil
est d’environ 10 m (33 pi) ; il peut varier en raison de votre environnement. Un mur en béton
armé ou de métal situé entre l’unité centrale et le module syntoniseur sans fil peut provoquer
une défaillance du système puisque les ondes radio ne peuvent pas pénétrer le métal.
▪ Si l’unité principale n’effectue pas de connexion sans fil, suivez les étapes 1 à 5 ci-dessus pour
réessayer la connexion entre l'unité principale et le caisson de graves sans fil.
▪ L’antenne de réception sans fil est intégrée au caisson de graves sans fil. Maintenez l’appareil
à l’abri de l’eau et de l’humidité.
▪ Pour un résultat d’écoute optimal, assurez-vous que la zone autour du caisson de graves
sans fil est bien dégagée.
LEVEL
3D SOUND
S/W
POWER
SOURCE
REPEAT
TV VOL TV CH
PLUS
) ne s’allume pas à la mise
TV POWER
AUTO
SPEAKER
TV SOURCE
POWER
SoundShare
AUDIO SYNC
DIMMER
TV INFOTV MUTE
TV PRE-CH
SMART VOLUMESOUND EFFECT
VOL
S/W
MUTE
LEVEL
VOL
DRC
AH59-02547B
Page 36

FRA
● bRAnchements
FIXATION DU NOYAU TORIQUE EN FERRITE AU CORDON
D'ALIMENTATION DU CAISSON DE GRAVES
Si vous fixez le noyau torique en ferrite au cordon d'alimentation du
caisson de graves, cela pourra empêcher les interférences RF des
signaux radioélectriques.
1.
Tirez la languette de fixation du noyau torique en ferrite pour ouvrir
celui-ci.
2. Enroulez deux fois le câble d'alimentation du caisson de graves.
3. Fixez le noyau torique en ferrite au cordon d'alimentation du caisson de
graves, tel qu'indiqué dans l'illustration, et appuyez dessus jusqu’à ce
qu’il s’encliquette.
INSTALLATION DU NOYAU TORIQUE EN FERRITE SUR LE CAISSON
DE GRAVES
Soulevez le dispositif de verrouillage pour le
libérer et ouvrez le noyau.
Remettez le dispositif de
verrouillage en place.
Enroulez deux fois le câble d'alimentation autour de
la bobine. (Commencez l'enroulement à une distance
de 5 à 10 cm du commutateur.)
11
Page 37

branchements
BRANCHEMENT À UN PÉRIPHÉRIQUE EXTERNE EN UTILISANT LE
HDMI OUT
HDMI IN
CÂBLE HDMI
HDMI est une interface numérique standard qui permet de connecter des appareils tels qu’un téléviseur, un
projecteur, un lecteur de DVD, un lecteur Blu-ray, un décodeur et bien plus encore.
HDMI élimine les pertes de signal découlant de la conversion analogique et vous assure la même qualité
sonore vidéo et audio que celle d’un son créé à l’origine dans la source numérique.
Câble HDMI
HDMI IN
Appareils numériques
Câble HDMI
HDMI OUT
HDMI IN
Branchez un câble HDMI (non fournies) de la prise HDMI IN située à l’arrière du produit à la prise HDMI OUT
de vos appareils numériques.
ensuite,
SORTIE HDMI (HDMI)
• Branchez un câble HDMI de la prise HDMI OUT située à l’arrière du produit à la prise HDMI IN de votre téléviseur.
▪ HDMI est une interface qui permet la transmission numérique de données vidéo et audio à
partir d'un seul connecteur.
HDMI OUT (ARC)
• La fonction ARC permet à l’audio numérique d’être transmise par le port HDMI OUT (ARC).
Elle ne peut être activée que lorsque le système Air Track est connecté à un téléviseur qui prend en charge la
fonction ARC.
• La fonction Anynet+ doit être activée.
▪ Cette fonction n'est pas disponible si le câble HDMI ne prend pas en charge la
fonctionnalité ARC (Consumer Electronics Control).
12
Page 38

FRA
● bRAnchements
BRANCHEMENT D’UN PÉRIPHÉRIQUE EXTERNE EN UTILISANT UN
AUX IN
AUDIO
OUT
OPTICAL IN
OPTICAL
OUT
CÂBLE AUDIO (ANALOGIQUE) OU OPTIQUE (NUMÉRIQUE)
Cette section présente les deux méthodes (numérique et analogique) de connexion de l’unité au téléviseur.
Cet appareil est doté d'une prise numérique optique et d'une prise analogique audio pour connecter un
téléviseur.
OPTICAL IN
Câble Optique (non fournies)
ENTRÉE OPTIQUE
Pour connecter l’entrée numérique de l’unité principale à la sortie OPTICAL OUT du téléviseur ou du
périphérique source.
ou,
ENTRÉE AUXILIAIRE
Permet de connecter la prise AUX IN (Audio) (ENTRÉE AUXILIAIRE - Audio) de l'unité principale à la prise
AUDIO OUT (SORTIE AUDIO) du téléviseur ou du périphérique source.
Veillez à respecter les codes couleur.
AUX IN
ou
Lecteur BD/DVD/
boîtier décodeur/
console de jeu
ou
Câble Audio
▪ Ne branchez pas le cordon d’alimentation de ce produit ou de votre téléviseur dans la
prise murale avant que toutes les connexions entre les différents composants n’aient été
effectuées.
▪ Avant de déplacer ou d'installer ce produit, éteignez-le et débranchez le cordon
d'alimentation.
13
Page 39

fonctions
fonctions
POWER
TV POWER
REPEAT
TV VOL TV CH
AUDIO SYNC
SOURCE
AUTO
POWER
SPEAKER
TV SOURCE
SoundShare
MODE INPUT (ENTRÉE)
Vous pouvez sélectionner l'une des entrées suivantes : D.IN, AUX, HDMI, BT, TV ou encore une entrée USB.
Mode d'entrée Écran d’affichage
Entrée Optique Numérique
Entrée AUXILIAIRE
Entrée HDMI
Mode BLUETOOTH
Mode TV
Mode USB
L'appareil s'éteint automatiquement dans les conditions suivantes :
• MODE BT/TV/USB/HDMI/ARC/D.IN
- Si aucun signal audio n’est reçu pendant 20 minutes.
D.IN
AUX
HDMI
BT
TV
USB
S/W
LEVEL
3D SOUND
POWER
SOURCE
PLUS
REPEAT
TV VOL TV CH
TV POWER
AUTO
SPEAKER
TV SOURCE
POWER
SoundShare
AUDIO SYNC
DIMMER
TV INFOTV MUTE
TV PRE-CH
SMART VOLUMESOUND EFFECT
VOL
S/W
MUTE
LEVEL
VOL
DRC
AH59-02547B
• Mode AUX
- Si aucune CLÉ n’est entrée pendant 8 heures lorsque la prise est branchée.
- Si le câble AUX audio n’est pas branché pendant 20 minutes.
▪ La fonction ARC est activée dans le mode D.IN si la connexion est établie sur un téléviseur
compatible ARC.
▪ Pour désactiver la fonction ARC, désactivez Anynet.
▪ Utilisez le câble fourni si la mémoire Flash USB ne peut pas être directement connectée dans l’unité.
BLUETOOTH
Vous pouvez utiliser un périphérique Bluetooth pour écouter de la musique en stéréo haute qualité, et ce sans fil !
Qu'est-ce que Bluetooth?
Bluetooth est une technologie facilitant l'interconnexion d'appareils compatibles Bluetooth via une connexion
sans fil à faible distance.
• Un appareil Bluetooth peut engendrer des bruits ou un dysfonctionnement selon les conditions d’utilisation.
- Si une partie du corps est en contact avec le système de réception/transmission du périphérique
Bluetooth ou du système Air Track.
- Variations électriques dues à un brouillage du signal par un mur, un coin ou une cloison de bureau.
- Interférences électriques causées par des appareils fonctionnant sur la même bande de fréquence,
notamment équipements médicaux, fours à micro-ondes et réseaux locaux sans fil.
• Maintenez la distance la plus courte possible lorsque vous jumelez le système Air Track avec le périphérique
Bluetooth.
• La qualité diminue parallèlement à la distance entre le système Air Track et le périphérique Bluetooth. Si la
distance excède la portée opérationnelle du périphérique Bluetooth, la connexion est perdue.
• La connexion Bluetooth peut s'avérer déficiente dans les zones à faible réception.
• La portée de réception efficace du système Air Track atteint 10 mètres dans toutes les directions en
absence d'obstacles. La connexion sera automatiquement interrompue si la distance excède la portée.
Même dans les limites de cette portée, des obstacles tels que des murs ou des portes peuvent dégrader la
qualité sonore.
• Le fonctionnement de ce périphérique sans fil peut engendrer un brouillage électrique.
14
Page 40

FRA
● Fonctions
Connexion du système Air Track au périphérique Bluetooth
Vérifiez si le périphérique Bluetooth prend en charge la fonction de casque d'écoute stéréo compatible
Bluetooth.
Connexion
Périphérique Bluetooth
1.
Appuyez sur la touche SOURCE de la télécommande du système Air Track pour afficher le message
BT.
• Vous apercevrez le message WAIT pendant 4 secondes puis BT READY sur le panneau avant du système
Air Track.
2.
Sélectionnez le menu Bluetooth sur le périphérique Bluetooth que vous souhaitez connecter.
(Reportez-vous au manuel d'utilisation du périphérique Bluetooth)
3.
Sélectionnez le menu du casque d'écoute Stéréo sur le périphérique Bluetooth.
• Une liste produite par le balayage des appareils apparaîtra.
4. Sélectionnez "[Samsung] AirTrack" dans la liste.
• Lorsque le système Air Track est branché à un dispositif Bluetooth, il affiche la mention BT CONNECTED
➡
BT sur l’écran avant.
• Si l'appariement du périphérique Bluetooth avec le système Air Track a échoué, supprimez l'appareil
"[Samsung] AirTrack" précédent qui a été trouvé par le périphérique Bluetooth et, à partir de ce dernier,
relancez la recherche du système Air Track.
5. Écoutez de la musique sur le périphérique connecté.
• Vous pouvez écouter de la musique provenant du périphérique Bluetooth sur le système Crystal Surround
Air Track.
• En mode BT, les fonctions Lire/Répéter/Arrêter/Suivant/Précédent ne sont pas accessibles.
▪ Un code PIN (mot de passe) peut vous être demandé lors de la connexion du périphérique Bluetooth
au système Air Track. Si la fenêtre de saisie du code PIN apparaît, tapez <0000>.
▪ Le système Air Track prend en charge les données SBC (44,1 kHz, 48 kHz).
▪ La fonctionnalité AVRCP n'est pas prise en charge.
▪ La connexion est possible uniquement sur un périphérique Bluetooth compatible avec la fonction
A2DP (AV).
▪ Vous ne pouvez pas vous connecter à un périphérique Bluetooth qui ne prend en charge que la
fonction HF (Mains libres).
▪ On ne peut apparier qu'un seul périphérique Bluetooth à la fois.
▪ Une paire déconnectée suite à l'extinction du système Air Track ne sera pas reconnectée
automatiquement. Dans ce cas, rétablissez l'appariement.
▪ La recherche ou la connexion via Air Track peut s'avérer défectueuse dans les cas suivants:
- Si un puissant champ électrique est émis autour du système Air Track.
- Si plusieurs périphériques Bluetooth sont appariés simultanément avec le système Air Track.
- Si le périphérique Bluetooth est éteint, situé au mauvais endroit ou ne fonctionne pas bien.
- Prenez note que certains appareils tels que fours à micro-ondes, adaptateurs de réseau sans fil, lampes
fluorescentes et cuisinières à gaz utilisent la même bande de fréquences que le périphérique Bluetooth,
d'où un risque de brouillage.
15
Page 41

fonctions
Déconnexion du périphérique Bluetooth à partir du système Air Track
Vous pouvez déconnecter le périphérique Bluetooth à partir du système
Air Track. Pour des directives, consultez le manuel d'utilisation du
périphérique Bluetooth.
• Le système Air Track sera déconnecté.
• Lorsque le système Air Track est déconnecté du périphérique
Bluetooth, Air Track affiche le message BT DISCONNECTED sur le
panneau avant.
Déconnexion du système Air Track à partir du périphérique Bluetooth
Appuyez sur le bouton (
mode ou pour éteindre Air Track.
• Le périphérique Bluetooth connecté attendra pendant un certain temps une réponse du système Air Track
avant de mettre fin à la connexion.
(Le temps de déconnexion peut varier selon le périphérique Bluetooth.)
•
Le périphérique en cours sera déconnecté.
▪ En mode de connexion Bluetooth, la connexion Bluetooth sera perdue si la distance entre Air Track et
l'appareil dépasse (5 mètres).
▪ Si le dispositif Bluetooth se retrouve de nouveau dans la portée effective et se reconnecte après une
déconnexion, vous pouvez redémarrer pour réinitialiser l’appariement avec le dispositif Bluetooth.
▪ Le périphérique s'éteint automatiquement (Auto Power Off) au bout de 20 minutes dans l'état
Prêt (Ready).
) sur le panneau avant du système Air Track pour passer du mode BT à un autre
SOUNDSHARE
Cette section explique comment brancher le système Crystal Surround Air Track aux téléviseurs SAMSUNG
compatibles Bluetooth.
Pour connecter l'Ensemble Home cinéma à un téléviseur Samsung
compatible avec le Bluetooth.
Appuyez sur le bouton ( ) pour sélectionner le mode TV, puis branchez le téléviseur sur l'Ensemble Home cinéma.
• L’appareil lit le son du téléviseur lorsqu’il est connecté à celui-ci.
• Si vous passez à un mode autre que TV SoundShare ou si vous le désactivez, le son recommencera à être
restitué par le téléviseur.
<Appariement avec votre téléviseur>
Afin que le son du téléviseur soit émis sur le Home cinéma via une connexion Bluetooth, vous devez
commencer par apparier votre station avec le téléviseur compatible avec le Bluetooth. Une fois l’appariement
terminé, les informations correspondantes sont enregistrées et conservées, et plus aucun message de
connexion Bluetooth ne s’affiche. Maintenez le Home cinéma et le téléviseur à proximité avant l’appariement.
16
Connexion
Page 42

FRA
● Fonctions
1. Allumez le lecteur Samsung et le système Air Track.
• Réglez le menu "Ajouter un nouveau périphérique" du téléviseur à "Activé".
- La fonction SoundShare est prise en charge par les modèles de téléviseurs Samsung mis sur le marché
après 2012. Assurez-vous que votre téléviseur prend cette fonction en charge.
(Pour plus d'informations, reportez-vous au manuel d'utilisation du téléviseur.)
Lorsque vous remplacez le mode du Home cinéma par TV, un message vous demandant si vous souhaitez poursuivre
2.
l’appariement Bluetooth s'affiche. Le message " [Samsung] AirTrack " apparaît à l'écran du téléviseur.
3. Sélectionnez <Yes> (Oui) sur l’écran du téléviseur. L’appariement avec l'Ensemble Home cinéma est alors terminé.
• Une fois que l'appariement est établi, lorsque vous remplacez le mode d'entrée par le mode TV, la connexion au
téléviseur est établie automatiquement.
• Le fait de passer du mode Air Track au mode TV ou à un autre mode annulera la connexion SoundShare.
• Si vous voulez annuler l'appariement existant dans l'enceinte satellite (SAT) et apparier votre enceinte satellite à
un nouveau téléviseur,
- Appuyez sur la touche PLAY/PAUSE (LIRE/PAUSE) sur le SAT pendant 5 secondes en mode d’entrée TV
pour annuler l’appariement existant. Vous pouvez maintenant l’apparier à un téléviseur différent.
• Vous pouvez contrôler le volume et le mode silencieux en utilisant la télécommande du téléviseur et celle de
l'enceinte satellite en mode SoundShare.
▪ Portée de fonctionnement de la fonction SoundShare du téléviseur
- Portée d’appariement recommandée : moins de 50 cm
- Portée de fonctionnement recommandée : moins de 5 m
▪ Si la distance entre le SAT et le téléviseur Samsung est supérieure à 5 mètres, la connexion ou le son
pourrait être coupé. Si cela se produit, branchez de nouveau le dispositif Bluetooth dans la portée de
fonctionnement.
▪ Assurez-vous que le mode SoundShare du téléviseur Samsung est activé avant d’utiliser cette fonction.
▪ La touche PLAY (LIRE), NEXT (SUIVANT), PREV (PRÉCÉDENT), STOP (ARRÊTER) ne fonctionnera pas en
mode SoundShare.
▪ Fonction de mise en marche de la fonction de veille Bluetooth
- Le système sera automatiquement alimenté en tension lors de la mise en marche du téléviseur si vous
avez branché le téléviseur et le système Air Track à l’aide de la function Air Track
- Vous pouvez activer et désactiver cette fonction en appuyant sur la clé source pendant plus de 5
secondes lorsque le système AirTrack est éteint. Si vous désactivez cette fonction le produit s’éteindra
automatiquement, mais ne se mettra pas automatiquement en fonction.
- Cette fonction est prise en charge par les téléviseurs Samsung commercialisés après 2013.
USB
1.
Connectez le périphérique USB au port USB sur le côté de l'appareil.
2.
Appuyez à plusieurs reprises sur la touche
apparaisse.
USB apparaît à l'écran puis disparaît.
3.
• La connexion du système Crystal Surround Air Track est terminée.
• Il s'éteint automatiquement (Auto Power Off) si aucun périphérique USB n'est connecté pendant plus de 20 minutes.
Avant de connecter un périphérique USB
Il importe de tenir compte des points suivants :
• Si le dossier du fichier dans un périphérique USB excède 10 caractères, il n'est pas
affiché sur l'écran VFD.
• Il se peut que ce produit ne soit pas compatible avec certains types de supports de
stockage USB.
• Les systèmes de fichiers FAT16 et FAT32 sont pris en charge.
- Le système NTFS ne l'est pas.
za pohranu.
( ) du panneau avant d'Air Track jusqu'à ce que la mention USB
17
Page 43

fonctions
• Connectez le périphérique USB directement dans le port USB de l'appareil. Autrement, un problème de
POWER
TV POWER
REPEAT
TV VOL TV CH
AUDIO SYNC
SOURCE
AUTO
POWER
SPEAKER
TV SOURCE
TV PRE-CH
DIMMER
TV INFOTV MUTE
SoundShare
PO
WER
TV POWER
R
EPEAT
T
V VOLTV CH
AUDIO SYN
C
SOURCE
AUT
O
POWER
S
PEAKERTV SOURCE
T
V PRE-CH
IMMER
TV INF
O
T
V MUT
E
SoundShare
POWER
TV POWER
REPEAT
TV VOL TV CH
AUDIO SYNC
SOURCE
AUTO
POWER
SPEAKER
TV SOURCE
TV PRE-CH
DIMMER
TV INFOTV MUTE
SoundShare
PO
WER
TV POWER
EPEAT
T
V VOLTV CH
AUDIO SYN
C
S
OURC
E
AUT
O
POWER
S
PEAKERTV SOURCE
T
V PRE-CH
DIMMER
TV INF
O
TV MUTE
SoundShare
POWER
TV POWER
REPEAT
TV VOL TV CH
AUDIO SYNC
SOURCE
AUTO
POWER
SPEAKER
TV SOURCE
SoundShare
compatibilité USB pourrait survenir.
• Ne connectez pas plusieurs périphériques de stockage au produit via un lecteur multicarte. Un
dysfonctionnement pourrait en résulter.
• Les protocoles PTP de la caméra numérique ne sont pas pris en charge.
• Ne retirez pas le périphérique USB pendant sa lecture.
• Les fichiers musicaux à protection DRM (MP3, WMA) d'un site Web commercial ne seront pas lus.
• Les disque durs externes ne sont pas pris en charge.
• Les périphériques de téléphones cellulaires ne sont pas pris en charge.
• Liste de compatibilité
Format Codec
MPEG 1 2 couches
*.
mp3
MPEG 1 3 couches
MPEG 2 3 couches
*.wma
Wave_Format_MSAudio1
Wave_Format_MSAudio2
AAC
*.aac
AAC-LC
HE-AAC
*.wav
*.Ogg
*.Flac
FLAC 1.1.0, FLAC 1.2.1
-
OGG 1.1.0
※ Prend en charge les taux d’échantillonnage supérieurs à 16 KHz
UTILISATION DE LA TÉLÉCOMMANDE
POWER
TV POWER
AUTO
SPEAKER
TV SOURCE
POWER
SOURCE
SoundShare
REPEAT
AUDIO SYNC
TV VOL TV CH
DIMMER
TV INFOTV MUTE
TV PRE-CH
SMART VOLUMESOUND EFFECT
VOL
S/W
S/W
MUTE
LEVEL
LEVEL
VOL
3D SOUND
DRC
PLUS
AH59-02547B
Lecture/Pause/Arrêt
Pendant la lecture, appuyez sur la touche +#,@.
• Appuyez sur la touche +# à nouveau pour arrêter temporairement la
• Pour arrêter la lecture, appuyez sur la touche Arrêt (
lecture
du fichier
.
Appuyez sur la touche +
#
pour lire le fichier sélectionné.
@
) pendant la lecture.
POWER
TV POWER
AUTO
SPEAKER
TV SOURCE
POWER
SOURCE
SoundShare
REPEAT
AUDIO SYNC
TV VOL TV CH
DIMMER
TV INFOTV MUTE
TV PRE-CH
SMART VOLUMESOUND EFFECT
VOL
S/W
S/W
MUTE
LEVEL
LEVEL
VOL
3D SOUND
DRC
PLUS
AH59-02547B
POWER
TV POWER
AUTO
SPEAKER
TV SOURCE
POWER
SOURCE
SoundShare
REPEAT
AUDIO SYNC
TV VOL TV CH
DIMMER
TV INFOTV MUTE
TV PRE-CH
SMART VOLUMESOUND EFFECT
VOL
S/W
S/W
MUTE
LEVEL
LEVEL
VOL
3D SOUND
DRC
PLUS
18
AH59-02547B
Saut Avant/Arrière
Pendant la lecture, appuyez sur la touche [,].
• Si la liste contient plus d'un fichier et que vous appuyez sur la touche ],
le fichier suivant est sélectionné.
• Si la liste contient plus d'un fichier et que vous appuyez sur la touche [,
le fichier précédent est sélectionné.
Utilisation de la fonction RÉPÉTER
Cette fonction permet de répéter la lecture d'un fichier ou de tous les fichiers,
de répéter d'une façon aléatoire ou de faire cesser la répétition.
Appuyez sur la touche RÉPÉTER.
• ARRÊT DE LA RÉPÉTITION : Annule la lecture à répétition.
• RÉPÉTER LA LECTURE DU FICHIER : Répète la lecture d'une piste.
• RÉPÉTER LA LECTURE DE TOUS LES FICHIERS : Répète la
lecture de toutes les pistes.
• RÉPÉTER ALÉATOIREMENT : Lit les pistes dans un ordre aléatoire.
(Une piste qui a été lue peut l'être à nouveau.)
▪ Vous pouvez activer la fonction REPEAT pendant la lecture de fichiers
musicaux d'un lecteur USB.
Page 44

FRA
● Fonctions
POWER
POWER
TV POWER
REPEAT
TV VOL TV CH
AUDIO SYNC
SOURCE
AUTO
POWER
SPEAKER
TV SOURCE
TV PRE-CH
DIMMER
SMART VOLUMESOUND EFFECT
S/W
LEVEL
S/W
LEVEL
VOL
VOL
3D SOUND
PLUS
DRC
TV INFOTV MUTE
SoundShare
MUTE
POWER
TV POWER
REPEAT
TV VOL TV CH
AUDIO SYNC
SOURCE
AUTO
POWER
SPEAKER
TV SOURCE
TV PRE-CH
DIMMER
SMART VOLUMESOUND EFFECT
S/W
LEVEL
S/W
LEVEL
VOL
VOL
3D SOUND
PLUS
DRC
TV INFOTV MUTE
SoundShare
MUTE
POWER
TV POWER
REPEAT
TV VOL TV CH
AUDIO SYNC
SOURCE
AUTO
POWER
SPEAKER
TV SOURCE
TV PRE-CH
DIMMER
SMART VOLUMESOUND EFFECT
S/W
LEVEL
S/W
LEVEL
VOL
VOL
3D SOUND
PLUS
DRC
TV INFOTV MUTE
SoundShare
MUTE
POWER
TV POWER
REPEAT
TV VOL TV CH
AUDIO SYNC
SOURCE
AUTO
POWER
SPEAKER
TV SOURCE
TV PRE-CH
DIMMER
SMART VOLUMESOUND EFFECT
S/W
LEVEL
S/W
LEVEL
VOL
VOL
3D SOUND
PLUS
DRC
TV INFOTV MUTE
SoundShare
MUTE
POWER
TV POWER
REPEAT
TV VOL TV CH
AUDIO SYNC
SOURCE
AUTO
POWER
SPEAKER
TV SOURCE
TV PRE-CH
DIMMER
SMART VOLUMESOUND EFFECT
S/W
LEVEL
S/W
LEVEL
VOL
VOL
3D SOUND
PLUS
DRC
TV INFOTV MUTE
SoundShare
MUTE
TV POWER
AUTO
SPEAKER
TV SOURCE
POWER
SOURCE
SoundShare
REPEAT
TV VOL TV CH
AUDIO SYNC
DIMMER
TV INFOTV MUTE
TV PRE-CH
SMART VOLUMESOUND EFFECT
VOL
S/W
S/W
MUTE
LEVEL
LEVEL
VOL
3D SOUND
DRC
PLUS
AH59-02547B
Mise en sourdine
Cette fonction se révèle particulièrement utile lorsqu’il vous faut aller ouvrir
votre porte d’entrée ou répondre à un appel téléphonique.
Pour couper le son de cet appareil, appuyez sur la touche MUTE de la
1.
télécommande.
Pour couper le son du téléviseur, appuyez sur la touche
2.
( )
de la télécommande.
TV MUTE
3. Appuyez à nouveau sur MUTE / TV MUTE ( ) de la télécommande (ou
appuyez sur VOLUME +/–) pour restaurer le son.
POWER
TV POWER
AUTO
SPEAKER
TV SOURCE
POWER
SOURCE
SoundShare
REPEAT
AUDIO SYNC
TV VOL TV CH
DIMMER
TV INFOTV MUTE
TV PRE-CH
SMART VOLUMESOUND EFFECT
VOL
S/W
S/W
MUTE
LEVEL
LEVEL
VOL
3D SOUND
DRC
PLUS
AH59-02547B
Utilisation de la fonction 3D SOUND PLUS
La fonction 3D Sound Plus ajoute de la profondeur et de l’amplitude à votre
expérience sonore.
Appuyez sur la touche 3D SOUND PLUS de la télécommande.
• Chaque fois que vous appuyez sur cette touche, la sélection change dans
l’ordre suivant :
3D SOUND PLUS OFF ➡ 3D SOUND PLUS MUSIC ➡ 3D SOUND
PLUS MOVIE
▪ Lorsque vous activez la fonction 3D Sound Plus, l’effet sonore
passe automatiquement à OFF (DÉSACTIVÉ).
POWER
TV POWER
AUTO
SPEAKER
TV SOURCE
POWER
SOURCE
SoundShare
REPEAT
AUDIO SYNC
TV VOL TV CH
DIMMER
TV INFOTV MUTE
TV PRE-CH
SMART VOLUMESOUND EFFECT
VOL
S/W
S/W
MUTE
LEVEL
LEVEL
VOL
3D SOUND
DRC
PLUS
AH59-02547B
Utilisation de la fonction SMART VOLUME
Cette fonction permet de régler et de stabiliser le niveau du volume afin
d’éviter les variations de niveau importantes lorsque vous changez de chaîne
ou pendant un changement de scène.
Appuyez sur la touche SMART VOLUME de la télécommande de cette unité.
• Chaque fois que vous appuyez sur cette touche, la sélection change
dans l’ordre suivant :
SMART VOLUME ON ➡ SMART VOLUME OFF
POWER
SOURCE
REPEAT
TV VOL TV CH
S/W
LEVEL
3D SOUND
PLUS
POWER
SOURCE
REPEAT
TV VOL TV CH
S/W
LEVEL
3D SOUND
PLUS
TV POWER
AUTO
SPEAKER
TV SOURCE
POWER
SoundShare
AUDIO SYNC
DIMMER
TV INFOTV MUTE
TV PRE-CH
SMART VOLUMESOUND EFFECT
VOL
S/W
MUTE
LEVEL
VOL
DRC
AH59-02547B
TV POWER
AUTO
SPEAKER
TV SOURCE
POWER
SoundShare
AUDIO SYNC
DIMMER
TV INFOTV MUTE
TV PRE-CH
SMART VOLUMESOUND EFFECT
VOL
S/W
MUTE
LEVEL
VOL
DRC
AH59-02547B
Utilisation de la fonction Sound Effect
Selon le type de source que vous souhaitez utiliser, vous pouvez choisir entre
sept modes de champ sonore différents - MUSIC, NEWS, DRAMA, CINEMA,
SPORTS, GAME, OFF (Son Original).
Appuyez sur la touche SOUND EFFECT de la télécommande.
• Sélectionnez le mode OFF si vous souhaitez bénéficier du son original.
▪ Nous vous recommandons de sélectionner la fonction Effet sonore
selon l'appareil de la source et vos préférences.
▪ Lorsque vous choisissez Sound Effect (Effet sonore) (sauf OFF
[DÉSACTIVÉ]), la fonction 3D Sound Plus passe automatiquement
à OFF (DÉSACTIVÉ).
Utilisation de la fonction S/W LEVEL
Vous pouvez régler le volume de base à l’aide de la touche S/W de la
télécommande.
Appuyez sur la touche S/W LEVEL de la télécommande.
1.
2.
“SW 0” s’affiche à l’écran.
3.
Appuyez sur le bouton < ou > de la clé LEVEL si vous souhaitez
augmenter ou diminuer le volume du caisson de graves. Vous pouvez
le régler de SW -6 à SW +6.
19
Page 45

fonctions
POWER
POWER
TV POWER
REPEAT
TV VOL TV CH
AUDIO SYNC
SOURCE
AUTO
POWER
SPEAKER
TV SOURCE
SoundShare
POWER
TV POWER
REPEAT
TV VOL TV CH
AUDIO SYNC
SOURCE
AUTO
POWER
SPEAKER
TV SOURCE
TV PRE-CH
DIMMER
SMART VOLUMESOUND EFFECT
TV INFOTV MUTE
SoundShare
POWER
TV POWER
REPEAT
TV VOL TV CH
AUDIO SYNC
SOURCE
AUTO
POWER
SPEAKER
TV SOURCE
TV PRE-CH
DIMMER
SMART VOLUMESOUND EFFECT
S/W
LEVEL
S/W
LEVEL
VOL
VOL
3D SOUND
PLUS
DRC
TV INFOTV MUTE
SoundShare
MUTE
POWER
TV POWER
REPEAT
TV VOL TV CH
AUDIO SYNC
SOURCE
AUTO
POWER
SPEAKER
TV SOURCE
TV PRE-CH
DIMMER
SMART VOLUMESOUND EFFECT
TV INFOTV MUTE
SoundShare
POWER
TV POWER
REPEAT
TV VOL TV CH
AUDIO SYNC
SOURCE
AUTO
POWER
SPEAKER
TV SOURCE
SoundShare
TV POWER
AUTO
SPEAKER
TV SOURCE
POWER
SOURCE
SoundShare
REPEAT
TV VOL TV CH
AUDIO SYNC
DIMMER
TV INFOTV MUTE
TV PRE-CH
SMART VOLUMESOUND EFFECT
VOL
S/W
S/W
MUTE
LEVEL
LEVEL
VOL
3D SOUND
DRC
PLUS
AH59-02547B
Utilisation de la fonction AUTO POWER LINK
Le système Crystal Surround Air Track est automatiquement mis sous
tension lorsque vous allumez le téléviseur ou tout autre appareil connecté
au système Air Track à l'aide du câble optique.
Appuyez sur la touche AUTO POWER de la télécommande de cet ensemble.
• La fonction Auto Power Link s’active ou se désactive à chaque fois que
vous appuyez sur AUTO POWER.
AUTO POWER LINK Écran d’affichage
ACTIVÉ
DÉSACTIVÉ
POWER LINK ON
POWER LINK OFF
▪ Si le téléviseur ou autre périphérique connecté au Air Track au
moyen du câble optique est éteint, il n’y a pas d’entrée numérique
et le Air Track se désactive après 20 minutes.
▪ Ces fonctions sont seulement disponibles si Anynet+ (HDMI-
CEC) est désactivé.
POWER
TV POWER
AUTO
SPEAKER
TV SOURCE
POWER
SOURCE
SoundShare
REPEAT
AUDIO SYNC
TV VOL TV CH
DIMMER
TV INFOTV MUTE
TV PRE-CH
SMART VOLUMESOUND EFFECT
VOL
S/W
S/W
MUTE
LEVEL
LEVEL
VOL
3D SOUND
DRC
PLUS
AH59-02547B
Utilisation de la fonction AUDIO SYNC
La vidéo peut sembler plus lente que l'audio si le système Air Track est
connecté à un téléviseur numérique. Si c’est le cas, corrigez ce décalage
pour les synchroniser.
Appuyez sur la touche AUDIO SYNC +/–. de la télécommande de cette
unité.
• Vous pouvez utiliser la touche + , - pour régler le retard audio sur une
valeur comprise entre 0 ms et 300 ms.
▪ En mode USB, TV ou BT, la fonction Audio Sync pourrait ne pas
fonctionner.
POWER
TV POWER
AUTO
SPEAKER
TV SOURCE
POWER
SOURCE
SoundShare
REPEAT
AUDIO SYNC
TV VOL TV CH
DIMMER
TV INFOTV MUTE
TV PRE-CH
SMART VOLUMESOUND EFFECT
VOL
S/W
S/W
MUTE
LEVEL
LEVEL
VOL
3D SOUND
DRC
PLUS
AH59-02547B
POWER
TV POWER
AUTO
SPEAKER
TV SOURCE
POWER
SOURCE
SoundShare
REPEAT
AUDIO SYNC
TV VOL TV CH
DIMMER
TV INFOTV MUTE
TV PRE-CH
SMART VOLUMESOUND EFFECT
VOL
S/W
S/W
MUTE
LEVEL
LEVEL
VOL
3D SOUND
DRC
PLUS
POWER
SOURCE
REPEAT
S/W
LEVEL
3D SOUND
PLUS
20
AH59-02547B
AUTO
SPEAKER
POWER
TV VOL TV CH
TV INFOTV MUTE
TV PRE-CH
VOL
MUTE
VOL
AH59-02547B
TV POWER
TV SOURCE
SoundShare
AUDIO SYNC
DIMMER
SMART VOLUMESOUND EFFECT
S/W
LEVEL
DRC
Utilisation de la fonction DRC
Cette fonction permet d’effectuer la balance entre les sons les plus forts et
les plus bas. Vous pouvez utiliser cette fonction pour bénéficier du son
Dolby Digital lorsque vous visionnez un film à faible volume (ex. : la nuit).
Appuyez sur la touche DRC de la télécommande de cette unité.
• Chaque fois que vous appuyez sur cette touche, la sélection change
dans l’ordre suivant :
DRC STANDARD ➡ DRC MAX ➡ DRC MIN
Utilisation de la fonction DIMMER
Appuyez sur Dimmer (Gradateur) pour régler la luminosité de l'écran d’affichage.
Appuyez sur la touche DIMMER de la télécommande de cette unité.
• Chaque fois que vous appuyez sur cette touche, la sélection change
dans l’ordre suivant :
DIMMER ON ➡ DIMMER OFF
Touche SPEAKER (HAUT-PARLEUR)
Cette touche permet de choisir entre une écoute de contenus audio provenant
du téléviseur ou du système Air Track lors d'une connexion via HDMI.
Appuyez sur la touche SPEAKER sur la télécommande de cet appareil.
MODE AUDIO
ENTRÉE
HDMI
ARC
HAUT-PARLEUR
TÉLÉVISEUR
ir Track
A
TÉLÉVISEUR
ir Track
A
Affichage Défilant Affichage
TV SPEAKER TV SPK
AVR SPEAKER HDMI
TV SPEAKER S MUTE
AVR SPEAKER TV ARC
Page 46

FRA
● Fonctions
POWER
POWER
TV POWER
REPEAT
TV VOL TV CH
AUDIO SYNC
SOURCE
AUTO
POWER
SPEAKER
TV SOURCE
SoundShare
POWER
TV POWER
REPEAT
TV VOL TV CH
AUDIO SYNC
SOURCE
AUTO
POWER
SPEAKER
TV SOURCE
TV PRE-CH
DIMMER
TV INFOTV MUTE
SoundShare
5v 500mA
5v 500mA
TV POWER
AUTO
SPEAKER
TV SOURCE
POWER
SOURCE
SoundShare
REPEAT
TV VOL TV CH
AUDIO SYNC
DIMMER
TV INFOTV MUTE
TV PRE-CH
SMART VOLUMESOUND EFFECT
VOL
S/W
S/W
MUTE
LEVEL
LEVEL
VOL
3D SOUND
DRC
PLUS
AH59-02547B
Utilisation de la fonction Anynet+(HDMI-CEC)
Anynet+ est une fonction qui vous permet de commander les autres appareils
Samsung à l’aide de la télécommande de votre téléviseur Samsung.
La fonction Anynet+ s’active et se désactive chaque fois que vous appuyez sur Anynet+.
1.
Connectez le produit à un téléviseur Samsung à l'aide du câble.
(voir page 12)
2.
Réglez la fonction Anynet+ de votre téléviseur et le SAT à ON (ACTIVÉ).
(Pour de plus amples renseignements, reportez-vous au manuel
d’instructions du téléviseur.)
▪ Certaines résolutions de sortie HDMI ne sont pas compatibles avec
certains téléviseurs.
▪ Veuillez vous reporter au guide d’utilisation de votre téléviseur. Veuillez
vérifier le logo
signifie qu’il prend en charge la fonction Anynet+.)
(si votre téléviseur est pourvu du logo
, cela
POWER
TV POWER
AUTO
SPEAKER
TV SOURCE
POWER
SOURCE
SoundShare
REPEAT
AUDIO SYNC
TV VOL TV CH
DIMMER
TV INFOTV MUTE
TV PRE-CH
SMART VOLUMESOUND EFFECT
VOL
S/W
S/W
MUTE
LEVEL
LEVEL
VOL
3D SOUND
DRC
PLUS
AH59-02547B
Utilisation des fonctions du TV
(seulement avec les téléviseurs Samsung)
• Appuyez sur la TV SOURCE de la télécommande pour changer la source
d’entrée du téléviseur.
• Appuyez sur la touche TV INFO de la télécommande pour visionner
l’information sur la chaîne du téléviseur.
• Appuyez sur la touche
TV CH de la télécommande pour sélectionner la
chaîne du téléviseur.
• Appuyez sur la touche
TV VOL de la télécommande pour augmenter ou
diminuer le niveau sonore.
• Utilisez la touche TV PRE-CH (CHAÎNE DE TÉLÉVISION PRÉCÉDENTE)
pour revenir à la chaîne de télévision précédente en mode TV.
▪ Lorsque vous appuyez sur le bouton SoundShare, le son du
téléviseur est transmis au système Air Track par une connexion
Bluetooth. Le système Air Track commande le volume sonore, la
qualité sonore, etc.
▪ La télécommande n'est opérationnelle que sur les téléviseurs Samsung.
MISE À JOUR DU LOGICIEL
Samsung peut offrir des mises à niveau du micrologiciel du
système Crystal Surround Air Track dans le futur.
Si la mise à niveau du micrologiciel est offerte, il s'agit de la
télécharger dans une clé USB qui sera insérée dans un port USB
du système Air Track.
Prenez note qu'en présence de plusieurs fichiers de mise à jour,
vous devez les télécharger séparément dans la clé USB puis les
utiliser un à un pour la mise à niveau du micrologiciel.
Veuillez visiter Samsung.com ou communiquer avec le Centre
d'appels Samsung pour obtenir de plus amples renseignements
sur le téléchargement des fichiers de mise à niveau.
▪ Insérez un périphérique USB contenant la mise à niveau du micrologiciel dans le port USB de l’unité principale.
▪ Veillez à ne pas débrancher le cordon d'alimentation ni à retirer le lecteur USB lorsque les mises à niveau sont en
cours d'exécution. L’unité principale s’éteint automatiquement une fois que la mise à niveau du firmware est
terminée.
Une fois le logiciel mis à niveau, les paramètres sont réinitialisés sur leur réglage par défaut. Nous vous
conseillons de consigner vos réglages par écrit afin de pouvoir facilement les spécifier à nouveau après la mise à
niveau.
▪ Lorsque la mise à niveau du logiciel du produit est terminée, éteignez le produit, puis appuyez sur la
touche (@) et maintenez-la enfoncée pendant un certain temps pour réinitialiser le produit.
▪ Si le micrologiciel ne réussit pas à faire la mise à jour, nous vous recommandons de formater le périphérique USB
au format FAT16 et d’essayer de nouveau.
▪ À des fins de mise à niveau, ne formatez pas la clé USB au format NTFS puisque ce système de fichiers n'est
pas pris en charge.
▪ Tout dépendant du fabricant, le USB pourrait ne pas être compatible.
21
Page 47

dépannage
Avant de contacter l'assistance, veuillez lire ce qui suit.
Problème Vérification Solution
L'ensemble ne s'allume pas.
La fonction ne s'active pas lorsque
vous appuyez sur le bouton
correspondant.
Aucun son n'est émis.
Aucune image n'apparaît sur le
téléviseur lorsque la fonction est
sélectionnée.
La télécommande ne fonctionne pas.
• Le cordon d'alimentation est-il
branché dans la prise ?
• L'air est-il chargé en électricité
statique ?
• L’unité est-elle correctement
reliée au téléviseur ?
• La fonction Mute est-elle
activée ?
• Le volume est-il réglé au
minimum ?
• Le téléviseur est-il correctement
branché ?
• Les piles sont-elles usées ?
• La distance entre la
télécommande et l'unité
principale est-elle trop
importante ?
• Branchez la fiche d'alimentation
électrique dans la prise murale.
• Débranchez la fiche
d'alimentation électrique et
rebranchez-la.
• Branchez-les correctement.
• Appuyez sur la touche Mute
pour annuler cette fonction.
• Réglez le volume.
• Branchez-le correctement.
• Remplacez-les.
• Rapprochez-vous de l’unité.
Le son provenant des canaux
gauche/droit est inversé.
La fonction SoundShare
(appariement du téléviseur) a
échoué.
22
• L’émission se fait-elle
correctement sur les câbles audio
de sortie gauche/droit en
provenance du téléviseur ?
• Votre téléviseur prend-il en
charge la fonction SoundShare?
• La version du micrologiciel du
téléviseur est-elle la plus récente ?
• Une erreur se produit-elle lors
de la connexion?
• Réglez le MODE BT/TV MODE,
puis rétablissez la connexion.
• Vérifiez le canal gauche/droit et
connectez-le correctement.
• La fonction SoundShare est prise
en charge par les modèles de
téléviseurs Samsung mis sur le
marché après 2012. Assurezvous que votre téléviseur prend
cette fonction en charge.
• Mettez votre téléviseur à jour
avec la version du micrologiciel la
plus récente.
• Communiquez avec le centre
d’appels.
• Appuyez sur la touche
pendant 5 secondes pour
réinitialiser le produit.
Page 48

FRA
● Appendix
annexe
SPÉCIFICATIONS
Nom du modèle
GÉNÉRAL
AMPLIFICATEUR
HW-F450
USB 5 V / 0,5 A
Unité principale 4,28 Ibs
Poids
Dimensions
(W x H x D)
Plage de températures en
fonctionnement
Plage d'humidité en
fonctionnement
Puissance de
sortie nominale
Rapport signal/bruit
(entrée analogique)
Caisson de basses
(PS-WF450)
Unité principale 35,67 x 1,77 x 2,76 inches
Caisson de basses
(PS-WF450)
Unité principale 80W/CN, 4OHM, THD = 10%, 1kHz
Caisson de basses
(PS-WF450)
12,01 Ibs
6,89 x 13,78 x 11,61 inches
de +41°F à +95°F
de 10 % à 75 %
120W, 4OHM, THD = 10%, 70Hz
65 dB
Séparation (1 kHz)
* Le rapport signal/bruit, la distorsion, la séparation et la sensibilité utilisable sont basés sur des mesures
effectuées à l'aide des directives AES (Audio Engineering Society).
*: Caractéristiques nominales
- Samsung Electronics Co., Ltd se réserve le droit de modifier les caractéristiques sans préavis.
- Le poids et les dimensions sont approximatifs.
65 dB
23
Page 49

GARANTIE LIMITÉE À L’ACHETEUR INITIAL
Samsung Electronics Canada Inc. (SECA) garantit ce produit contre tout défaut de fabrication.
SECA garantit aussi que si cet appareil ne fonctionne pas convenablement durant la période
de garantie SECA se réservera le droit de réparer ou de remplacer l’appareil défectueux.
Toutes les réparations sous garantie doivent être effectuées par un Centre de service
autorisé SECA.
Le nom et l’adresse du Centre de service le plus près de chez vous peut être obtenu en
composant sans frais le 1-800-268-1620 ou en visitant notre site web au www.samsung.ca
Main-d’oeuvre
un (1) an (au comptoir)
Pièces
un (1) an
Pour tous les modèles portatifs, le transport de l’appareil sera la responsabilité du client.
Le reçu de vente original doit être conservé par le client car cela constitue la seule preuve
d’achat acceptée.
Le client doit le présenter au Centre de service agréé au moment où il fait la demande d’une
réparation sous garantie.
EXCLUSIONS (CE QUI N’EST PAS COUVERT)
Cette garantie ne couvre pas les dommages causés par un accident, un incendie, une
inondation, un cas de force majeure, un mauvais usage ou une tension incorrecte. La
garantie ne couvre pas une mauvaise installation, une mauvaise réparation, une réparation
non autorisée et tout usage commercial ou dommages survenus durant le transport. Le fini
extérieur et intérieur de même que les lampes ne sont pas couverts par cette garantie. Les
ajustements par le client qui sont expliqués dans le guide de l’utilisateur ne sont pas couverts
en vertu de cette garantie. Cette garantie sera automatiquement annulée pour tout appareil qui
aurait un numéro de série manquant ou modifié. Cette garantie est valable seulement sur les
appareils achetés et utilisés au Canada.
SIÈGE SOCIAL
SAMSUNG ELECTRONIQUE CANADA INC.,
SERVICE À LA CLIENTÈLE
55 STANDISH COURT MISSISSAUGA, ONTARIO L5R 4B2 CANADA
FABRIQUE EN CORÉE
1-800-SAMSUNG (1-800-7267864)
www.SAMSUNG.COM/CA
Page 50

Communiquez avec SAMSUNG DANS LE MONDE ENTIER
Pour toutes questions ou observations concernant les produits Samsung, veuillez consulter le Centre de
service à la clientèle SAMSUNG.
Pays Centre de contact
`
North America
CANADA 1-800-SAMSUNG(726-7864)
MEXICO 01-800-SAMSUNG(726-7864)
`
Latin America
ARGENTINE 0800-333-3733 www.samsung.com
BRAZIL
CHILE
Bolivia 800-10-7260 www.samsung.com
COLOMBIA 01-8000112112 www.samsung.com
COSTA RICA 0-800-507-7267 www.samsung.com
DOMINICA 1-800-751-2676 www.samsung.com
ECUADOR 1-800-10-7267 www.samsung.com
EL SALVADOR 800-6225 www.samsung.com
GUATEMALA 1-800-299-0013 www.samsung.com
HONDURAS 800-27919267 www.samsung.com
JAMAICA 1-800-234-7267 www.samsung.com
NICARAGUA 00-1800-5077267 www.samsung.com
PANAMA 800-7267 www.samsung.com
PERU 0-800-777-08 www.samsung.com
PUERTO RICO 1-800-682-3180 www.samsung.com
TRINIDAD & TOBAGO 1-800-SAMSUNG(726-7864) www.samsung.com
VENEZUELA 0-800-100-5303 www.samsung.com
0800-124-421
4004-0000
800-SAMSUNG(726-7864)
From mobile 02-482 82 00
www.samsung.com/ca
www
www.samsung.com
www
www.samsung.com
Site Web
.samsung.com/ca_fr (French)
.samsung.com
En tant que partenaire ENERGY STAR, Samsung
a déterminé que ce produit ou les modèles de
produit répondent aux exigences d’ENERGY
STAR en matière d’efficacité énergétique.
AH68-02644G-00
 Loading...