

Samsung HR44 Users Manual

P.O. Box 1079
DRAFT
El Segundo, CA 90245
USER GUIDE
DIRECTV® HD DVR RECEIVERS

When you see the ENERGY STAR label on your set-top box, it means that your set-top box is ENERGY STAR
DRAFT
qualified, giving you the benefit of saving energy and helping our environment.
However, ENERGY STAR labeled HD DVR set-top boxes qualify for ENERGY STAR only when configured
with the DIRECTV Whole-Home DVR service. All other ENERGY STAR labeled set-top boxes, when used in
conjunction with a DIRECTV subscription, meet ENERGY STAR criteria without requiring the consumer to take
any additional steps.

WELCOME TO THE DIRECTV FAMILY!
DRAFT
Welcome! Now that you’re plugged in, it’s time to start enjoying over 280 (including 170 Full-time HD channels) channels of live and
On Demand TV programming, satellite music and a huge selection of box office hits from DIRECTV CINEMA™. We’ll take you step by
step through everything, from pushing the POWER button to searching for your favorite programs.
This User Guide applies to the DIRECTV® HD DVR and the Genie™ HD DVR and Mini Clients. Because this User Guide was designed
to accommodate several models, your Receiver and its user interface may vary slightly from what is shown here.
Online Manuals and Other Resources
To view the most up-to-date manuals for DIRECTV Receivers and other equipment, please visit www.directv.com/manuals or
go to www.directv.com and search for keyword “manuals”.
You can also visit www.directv.com to manage your account, and find information about DIRECTV service, programming
packages, special promotions, and much more.
Getting Connected
If a professional installed your DIRECTV® HD DVR and any Clients, you are ready to start watching TV. If your equipment was
not professionally installed, or you just added a surround sound system or other equipment, please see Appendix 1, “Setup and
Activation”.
IMPORTANT:
• You must subscribe to DIRECTV Advanced Receiver HD (ARHD) to view the HD channels included in your programming
package.
• DIRECTV hardware and programming and HD fees available separately. For information and pricing regarding programming
and ARHD, please visit directv.com.
3
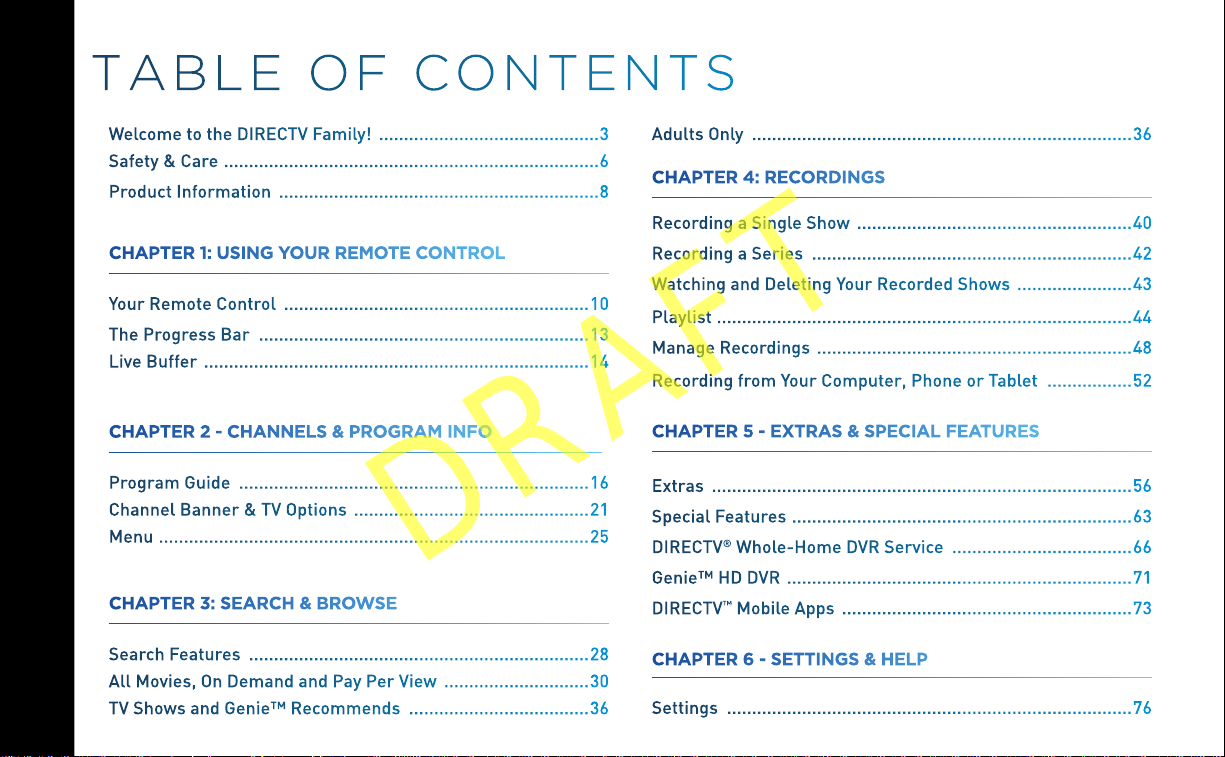
TABLE OF CONTENTS
DRAFT
Welcome to the DIRECTV Family! ............................................3
Safety & Care ...........................................................................6
Product Information ................................................................8
CHAPTER 1: USING YOUR REMOTE CONTROL
Your Remote Control ............................................................. 10
The Progress Bar ..................................................................13
Live Buffer ............................................................................. 14
CHAPTER 2 - CHANNELS & PROGRAM INFO
Program Guide ......................................................................16
Channel Banner & TV Options ............................................... 21
Menu ...................................................................................... 25
HD DVR RECEIVER USER GUIDE
®
CHAPTER 3: SEARCH & BROWSE
Search Features ....................................................................28
DIRECTV
4
All Movies, On Demand and Pay Per View ............................. 30
TV Shows and Genie™ Recommends ....................................36
Adults Only ............................................................................36
CHAPTER 4: RECORDINGS
Recording a Single Show ....................................................... 40
Recording a Series ................................................................42
Watching and Deleting Your Recorded Shows ....................... 43
Playlist ...................................................................................44
Manage Recordings ............................................................... 48
Recording from Your Computer, Phone or Tablet .................52
CHAPTER 5 - EXTRAS & SPECIAL FEATURES
Extras .................................................................................... 56
Special Features .................................................................... 63
DIRECTV® Whole-Home DVR Service ....................................66
Genie™ HD DVR ..................................................................... 71
DIRECTV™ Mobile Apps .......................................................... 73
CHAPTER 6 - SETTINGS & HELP
Settings .................................................................................76

Parental Controls .................................................................. 85
DRAFT
Favorite Channels ..................................................................90
Help ....................................................................................... 91
CHAPTER 7 - GENIE™ HD DVR
Genie™ HD DVR ..................................................................... 94
Special Features .................................................................... 98
Back Panel Example .............................................................. 99
CHAPTER 8 - TROUBLESHOOTING & FAQS
Troubleshooting Tips ........................................................... 102
Frequently Asked Questions ................................................105
(“TERMS”) ...........................................................................129
APPENDICES
Appendix 1: Setup and Activation ........................................ 140
Appendix 2: Connections to TV & Equipment ...................... 141
Appendix 3: Receiver Front and Back Panels ...................... 151
Appendix 4: How to Network Your HD DVR ..........................155
Appendix 5: About High-Definition ...................................... 162
Index .................................................................................... 168
Icon Reference .....................................................................174
CHAPTER 9: WARRANTY AND OTHER INFO
Limited 90-Day Warranty ....................................................122
DIRECTV PROTECTION PLAN ..............................................125
FCC Customer Information .................................................126
TERMS AND CONDITIONS FOR USE OF SOFTWARE
5
SAFETY & CARE
DRAFT
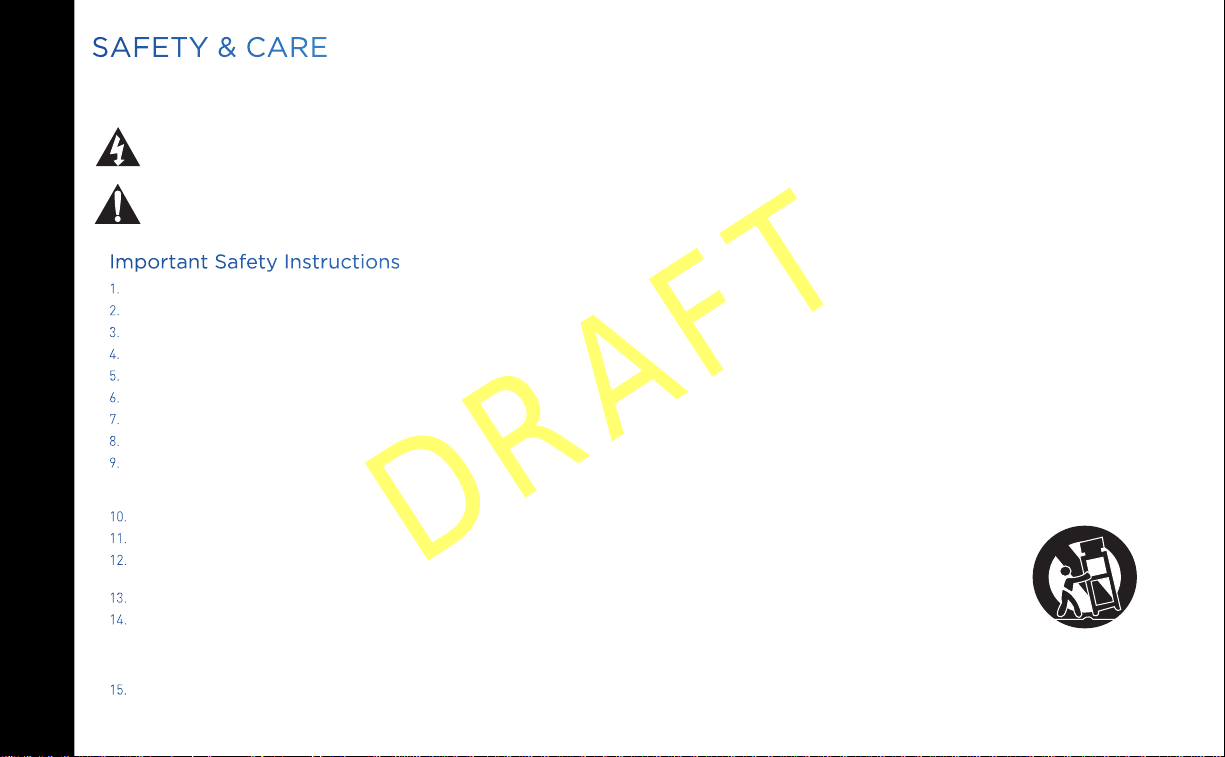
Your DIRECTV® Receiver has been designed and manufactured to stringent quality and safety standards. You should, however, be aware of the
following important precautions for safe and optimal use of the equipment. Meaning of symbols printed on the rear panel of the product:
This symbol indicates that dangerous voltage with a risk of electric shock is present within this unit.
This symbol indicates that there are important operating and maintenance instructions in the literature accompanying this unit.
Important Safety Instructions
1. Read these instructions.
2. Keep these instructions.
3. Heed all warnings.
4. Follow all instructions.
5. Do not use this apparatus near water.
6. Clean only with dry cloth.
7. Do not block any ventilation openings. Install in accordance with the manufacturer’s instructions.
8. Do not install near any heat sources such as radiators, heat registers, stoves or other apparatus (including amplifiers) that produce heat.
9. Do not defeat the safety purpose of the polarized or grounding-type plug. A polarized plug has two blades with one wider than the other. A grounding type plug has
two blades and a third grounding prong. The wide blade or the third prong are provided for your safety. If the provided plug does not fit into your outlet, consult an
electrician for replacement of the obsolete outlet.
10. Protect the power cord from being walked on or pinched particularly at plugs, convenience receptacles and the point where they exit the apparatus.
11. Use only attachments/accessories specified by the manufacturer.
HD DVR RECEIVER USER GUIDE
®
DIRECTV
6
12. Use only with the cart, stand, tripod, bracket or table specified by the manufacturer, or sold with the apparatus. When a cart is used, use caution
when moving the cart/apparatus combination to avoid injury from tip-over.
13. Unplug this apparatus during lightning storms or when unused for long periods of time.
14. Refer all servicing to qualified service personnel. Servicing is required when the apparatus has been damaged in any way, such as power-supply
cord or plug is damaged, liquid has been spilled or objects have fallen into the apparatus, the apparatus has been exposed to rain or moisture,
does not operate normally, or has been dropped.• Ensure proper ventilation — the vent slots on the DIRECTV® Receiver must be left uncovered to allow proper airflow
to the unit. Blocking the airflow to the unit could impair performance or damage your Receiver and other components.
15. Use only the power supply (power cord) that came with your DIRECTV Receiver. Failure to use the authorized power supply (power cord) may cause electric shock,
fire, bodily injury and/or property damage. If the power supply (power cord) becomes damaged or needs to be replaced, please contact DIRECTV Customer Service to
obtain an authorized replacement.
WARNING: Use only the power supply (power cord) that
DRAFT
came with your DIRECTV Receiver. Failure to use the
authorized power supply (power cord) may cause electric
shock, fire, bodily injury and/or property damage. If the
power supply (power cord) becomes damaged or needs to be
replaced, please contact DIRECTV Customer Service to obtain
an authorized replacement.
WARNING: To reduce the risk of fire or electric shock, do not
expose this product to rain or moisture. The apparatus shall
not be exposed to dripping or splashing and no objects filled
with liquids, such as vases, shall be placed on the apparatus.
CAUTION
RISK OF ELECTRIC SHOCK
DO NOT OPEN!
CAUTION: To reduce the risk of electric shock, do not
remove cover (or back).
No user-serviceable parts inside.
Refer servicing to qualified service personnel.
IMPORTANT: Be sure not to place your DIRECTV
near anything WET or HOT!
If this product is rated at 240VAC, a suitable attachment
plug should be used.
®
CAUTION: Avoid moisture to reduce the risk of fire or electric
shock. The DIRECTV® Receiver should not be used near water
(for example, kitchen sink, bathtub, pool, damp basement).
Also, never spill liquid on the Receiver. Do not place vases or
other vessels containing liquid on top of it.
TIP: We highly recommend plugging the DIRECTV
into a surge protector to prevent damage from fluctuations in
your power supply.
®
• Do not stack electronic components or other objects on top of the DIRECTV® Receiver. Also, do not stack the Receiver on top
of a “hot component” such as an audio power amplifier.
• Protect your components from power surges by connecting all the components before plugging any power cords into the wall
outlet. Use of a surge protector is also recommended.
• Don’t overload power outlets or extension cords, which can result in the risk of fire or shock. It’s also important to use only the
type of power source indicated on the marking label or in this manual.
• Avoid audio hum or interference by inserting all cable plugs firmly into their jacks. Also, place Audio/Video (A/V) cables to the
sides of the TV back panel rather than down the middle once connected. Try not to coil any twin-lead cables and keep them
away from A/V cables as much as possible.
• Never insert objects of any kind into any openings in the DIRECTV
detailed in this manual).
• Place it on a flat, hard surface — do not operate the DIRECTV
• Always unplug your DIRECTV
• Always unplug the DIRECTV
• The only way to disconnect the DIRECTV
Receiver unit must therefore be installed next to the power point which must be easily accessible.
• CAUTION: Electric Shock — never attempt to disassemble the DIRECTV
service person when repair is required. Opening or removing covers may expose dangerous voltage or other risks. Incorrect
reassembly can cause shock when Receiver is subsequently used. Attempted self-repair may also void your warranty. Changes
or modifications not expressly approved by the party responsible for compliance (by the warranty or by the manufacturer) could
void the user’s authority to operate the equipment.
• Do not drop your DIRECTV
• Have your DIRECTV
• Any changes or modifications in construction of this device which are not expressly approved by the party responsible for
compliance could void the user’s authority to operate the equipment.
Receiver
• If you move your DIRECTV
you apply power to it.
• Do not pick up or otherwise move your DIRECTV
your set-top box, first disconnect it, then wait at least 30 seconds before continuing.
• CAUTION: To reduce the risk of fire, use only No. 26 AWG or better telecommunications line cord.
• CAUTION: Replace remote control batteries with same or equivalent type. There is danger of explosion if batteries are
incorrectly replaced.
• “For your information: The identification sticker for your Receiver is located behind the small door on its front panel. For your
Mini Client, the sticker can be found on the bottom or base of the unit.”
• The telecommunication network voltage used is the category number 3.
Note to Satellite Dish Installer: This reminder is provided to call your attention to articles 810 and 820 of the 2005 National
Electrical Code. Refer to article 810, in particular 810-1 and 810-15, for required grounding of the metal structure of the dish
Receiver
antenna. Refer also to the 810-2 which, by reference to article 820, requires that the satellite dish coaxial cable shield be
connected to the grounding system of the building as close to the point of cable entry as practical.
®
Receiver before moving it.
®
Receiver, TV and other equipment before you connect or disconnect any cables.
®
Receiver and always move it with care.
®
Receiver professionally serviced (do not attempt to service it yourself).
®
Receiver between locations at different temperatures, allow it to reach room temperature before
SAFETY & CARE
®
Receiver (other than the DIRECTV® Access Card as
®
Receiver on a carpet or other padded surface.
®
Receiver from the power supply is to remove the power cord. The DIRECTV®
®
Receiver yourself; always take it to a qualified
®
Receiver while it is connected to the AC power supply. If you want to move
7
HD DVR RECEIVER USER GUIDE
DRAFT
®
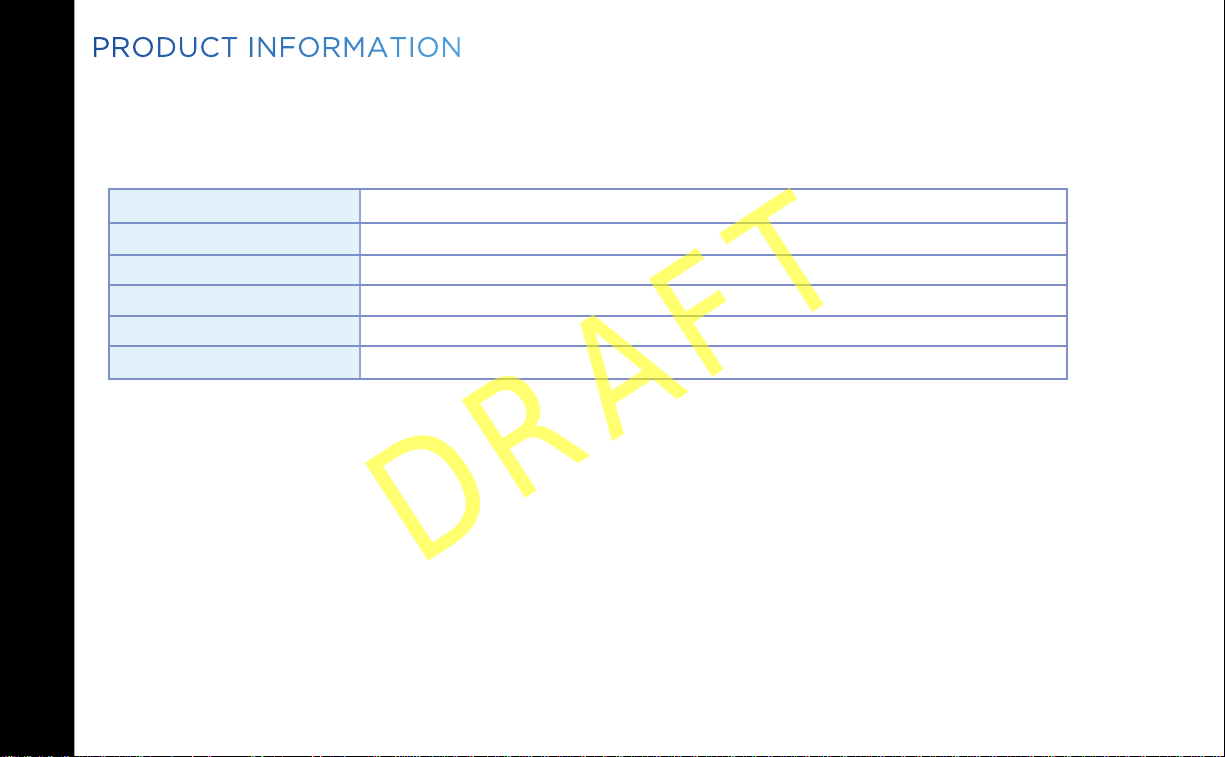
PRODUCT INFORMATION
Keep your receipt to obtain warranty parts and service and for proof of acquisition. Attach it here and record the serial and model
numbers in case you need them. *These numbers are typically located behind the card door on the front panel of your Receiver.
Model No. *
Serial No.
Acquisition Date
Dealer/Address/Phone
Access Card *
Receiver ID *
DIRECTV
8
CHAPTER 1: USING YOUR REMOTE CONTROL
DRAFT
Your Remote Control ................................................................ 10
DIRECTV Genie® Remote Control ............................................... 10
DIRECTV White Remote Control (RC65 and Earlier) ...............12
Power Button & Mode Switch .................................................... 12
Basic Button Controls on DIRECTV Remote .............................13
Screen Hints Buttons .................................................................13
DVR Buttons ............................................................................... 14
Checking Remote Control Status for All Remotes ..............14
The Progress Bar ..................................................................... 13
Live Buffer ................................................................................ 14
CHAPTER 1 - USING YOUR REMOTE CONTROL
9
YOUR REMOTE CONTROL
DRAFT
DIRECTV GENIE® REMOTE CONTROL
Introducing the DIRECTV Genie® Remote Control
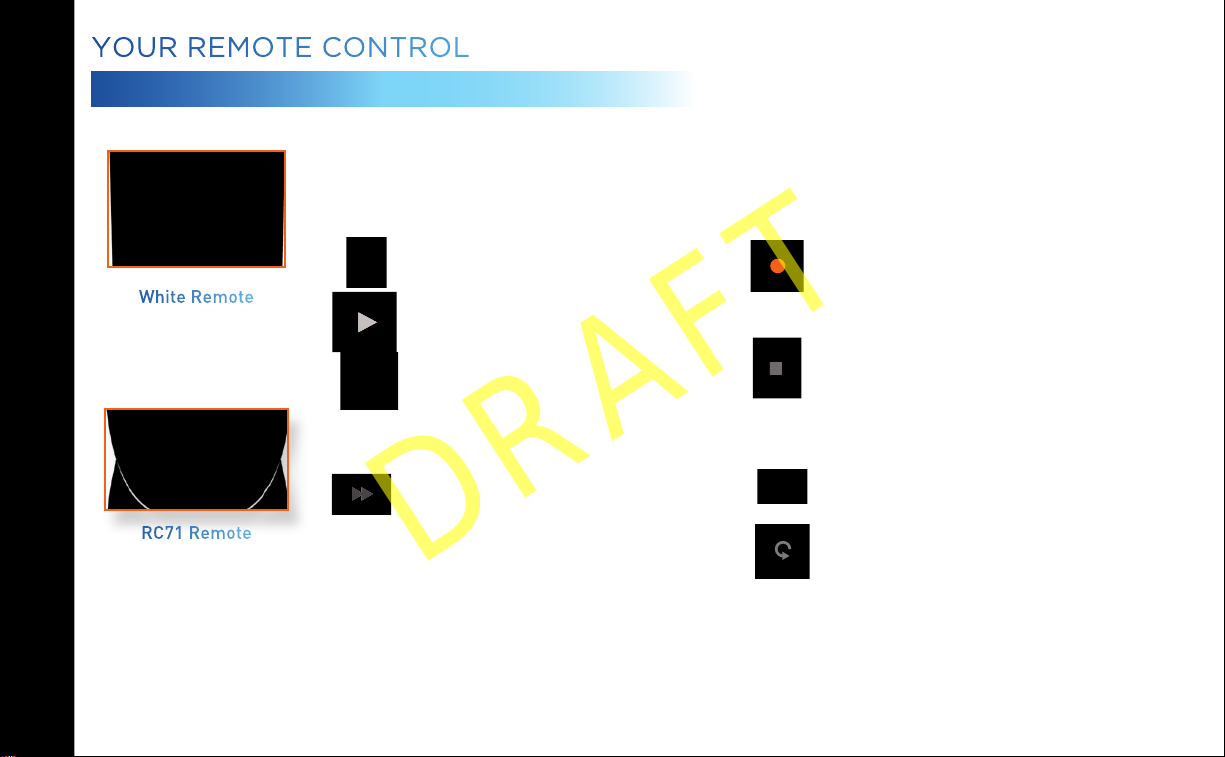
Most remote controls send an Infra Red (IR) signal to your Receiver, and
must be pointed directly at the box in order to work properly. Now DIRECTV
offers an improved remote control device, the Genie model series (RC71 and
above, Black & White design), which uses Radio Frequency (RF) technology to
control your entertainment experience. Please see back cover for the Genie
Remote button layout and functions.
Genie Remote Works with Previous DIRECTV Receivers, too
The Genie Remote is “backwards compatible”, and comes factory-set to
work in Infra Red (IR) mode. This means you can use it with your pre-Genie
non-RF equipped HD Receivers and Client devices. You can also change the
factory settings to take advantage of the benefits of RF mode, which include
improved command transmission speed, extended battery life (up to a year),
reduced interference, and more. (see next page for RF Mode instructions).
During the programming process, the Genie Remote Control becomes paired
with the DIRECTV Receiver you want it to work with. However, you can pair it
later with a different DIRECTV Receiver, if you wish. See the following page
HD DVR RECEIVER USER GUIDE
®
DIRECTV
10
for programming instructions.
NOTE: If you have upgraded to the latest DIRECTV Genie Receiver (HR44
and above) and Mini Client (C41, C41W and above), the Genie Remote is not
required – you can still use the previous generation (RC6x series) DIRECTV
Remote Controls to operate your devices.

Programming Your Genie Remote
DRAFT
For your TV:
1. Make sure your TV is turned on.
2. Press and hold the MUTE & SELECT buttons until green light at the top
of the remote flashes twice.
3. Enter the following TV code (5) (4) (0) (0) (0).
For Radio Frequency (RF) Mode:
1. Make sure the Receiver and TV to which you want to program your
Genie Remote are turned on.
2. Press MENU on the Remote, then select “Settings & Help” from the left
menu.
3. Select “Settings” from the Settings & Help screen.
4. Select “Remote Control” from the left menu
5. Select “IR/RF Setup”.
6. Use the arrow keys to select “IR” or “RF”, depending on which Receiver
you wish to pair the remote with, then arrow to select “Continue”.
7. Follow the onscreen instructions from this screen.
Resetting to IR Mode
If you have set your Genie Remote to RF mode, and wish to reset it to Infra
Red (IR) mode, repeat the above steps to #6, choose ”IR”, and follow the
onscreen instructions.
YOUR REMOTE CONTROL
CHAPTER 1 - USING YOUR REMOTE CONTROL
11

YOUR REMOTE CONTROL
DRAFT
DIRECTV WHITE REMOTE CONTROL (RC65 AND
EARLIER)
The DIRECTV White Remote works with your pre-Genie Receivers, RVU-enabled
clients, and the latest Genie Receivers and Mini Clients, as long as they are
programmed to operate in IR Mode.
If your DIRECTV® System was installed professionally, your Remote is already
programmed to operate your TV. To reprogram the Remote for a new TV or other
audio-visual equipment, press MENU, select “Settings & Help”, “Settings”, then
“Remote Control”and follow the instructions.
POWER BUTTON & MODE SWITCH
Use the POWER (PWR) button and Mode Switch to turn a single component on
or off (a DVD player or surround sound system, etc.). The Mode Switch to the
position that matches the component you want to control and use the POWER
button to turn it off or on. The mode switch must always be in the far left position
to control your DIRECTV® Receiver. If the Mode Switch is in a position that has
not been programmed, or if you press a button that is not supported by that
HD DVR RECEIVER USER GUIDE
®
DIRECTV
12
particular piece of equipment, an onscreen message will pop up to alert you.
NOTE: DIRECTV White/RC65 and Earlier Remote Controls - If you are already a
DIRECTV HD customer with Advanced Receiver HD (ARHD), you may have one
or more of DIRECTV’s previous model Remote Controls (Model RC65 or earlier).
You can continue using this Remote Control device with your existing Receivers
(HR34 and earlier) and orRVU-enabled Clients (C31 and earlier, and nonDIRECTV RVU-enabled Clients/TVs).

BASIC BUTTON CONTROLS ON DIRECTV REMOTES
DRAFT
These navigation and destination keys are common to both DIRECTV
Remotes:
MENU button takes you to the main menu where you go to access all
of the features available in your system. Press INFO on any show to see
information about that show.
GUIDE – accesses the Program Guide.
LIST – accesses the Playlist screen.
EXIT – Dismisses any menu screen/box and returns you to your current
programming.
ARROW Keys & SELECT - Navigate through any menu screen or dialog box.
BACK/ Left ARROW Key – Returns you to your previous location
SCREEN HINTS BUTTONS
Both Remotes feature special buttons that offer shortcuts within the
DIRECTV interface. These buttons coincide with graphical “screen hint”
icons that display at the bottom left of your screen. The buttons include the
DASH, ENTER, and RED buttons on both the Genie and White Remotes, and
the ACTIVE, GREEN, YELLOW and BLUE buttons on the White Remote only.
Examples of the screen hints and their functionality are included in
this chapter and throughout this User Guide.
YOUR REMOTE CONTROL
CHAPTER 1 - USING YOUR REMOTE CONTROL
13
YOUR REMOTE CONTROL
DRAFT
DVR CONTROL BUTTONS
Below are the DVR control buttons (Rewind, Fast Forward, etc.) common to both types of Remotes with
exceptions as noted.* They can also be used along with the Mode switch to control a DVD player or other
auxiliary equipment.
PLAY / SLOW MOTION
Starts the recorded video or paused live TV
currently on screen. Hold this button down
for slow motion.
PAUSE / FRAME BY FRAME STOP**
Freezes the action of any live or
prerecorded television program. While
paused, press FFWD or REW to move
forward or backward frame by frame.
FFWD / JUMP TO TICKMARK REPLAY / JUMP TO BEGINNING OF PROGRAM
Fast-forwards recorded or live-stored
video. Press up to four times to fastforward at increasing speeds. Press
ADVANCE while fast-forwarding to go to
the next 15-minute tickmark. Pressing
PLAY returns to normal play.
HD DVR RECEIVER USER GUIDE
®
White Remote
II
RC71 Remote
DIRECTV
14
R
RECORD
One press allows you to record programs
in the Guide and live TV. Press twice to
record a series.
While watching recorded TV, pressing
this stops playback, displays the recorded
program info screen, and inserts live TV in
the top right.
Jumps the program you’re watching
backwards 6 seconds and starts playing
from that point. Holding down REPLAY
jumps to the beginning of the program.

REW / JUMP TO TICKMARK ADVANCE / JUMP TO END OF PROGRAM
DRAFT
Rewinds recorded or live-stored video.
Press up to four times to rewind at
increasing speeds. Press REPLAY while
rewinding to go to the previous 15-minute
tickmark. Pressing play returns to normal
play.
*For White Remote Only: The DVR buttons can also be used along
with the Mode Switch to control a DVD player or other auxiliary
equipment.
Jumps ahead in recorded or live-stored
video by 30 seconds. Press multiple times
to skip multiples of 30 seconds. Hold down
to continue to the end of the program.
CHAPTER 1 - USING YOUR REMOTE CONTROL
** The STOP button is not available on the RC71 Remote.
NOTE: For White Remote only: Each time you press a button, the
green light at the top of the White Remote flashes. If it flashes several
times with a single press, this indicates the batteries (size AA) need to
be replaced.
15

HD DVR RECEIVER USER GUIDE
DRAFT
®
YOUR REMOTE CONTROL
CHECKING REMOTE CONTROL STATUS FOR
ALL REMOTES
You can access the “More System Info” screen to see the status
of any Remote on a given Receiver or Client, such as battery
condition and signal mode. Press MENU, select “Settings &
Help”, select “Info & Test” from the left menu, then arrow over to
“More System Info”. Using the ARROW keys, scroll down the list
of information to “Remote Control” to view its status. If more than
one Genie remote is paired with the Genie HR44 or other Receiver,
it will display in the listing “Other Paired Remotes”.
DIRECTV
16

When you use the DVR control buttons, this indicator bar appears
DRAFT
at the bottom of the screen to show where you are in the program
and how far you can go forward or back. For live programs, the
progress bar is green and the time shown is the time of day.
The current time
The left end of the
green bar shows
how far back in time
you can go.
If you press the RECORD button during a live show, the progress
bar turns orange and the orange record icon appears next to the
title of the show.
shows where you
are in the program
you are viewing.
The right end of the green
bar shows how far ahead
you can go.
THE PROGRESS BAR
CHAPTER 1 - USING YOUR REMOTE CONTROL
17

HD DVR RECEIVER USER GUIDE
DRAFT
®
LIVE BUFFER
Your DVR saves programs to the hard drive instantly and
continuously, while you watch. This “live buffer” lets you pause,
rewind fast forward or instant replay (jump back 6 seconds). If
you start watching a program late, even if it is not set to record,
you can back up to the beginning (up to 90 minutes) using REW,
as long as you haven’t changed channels since the program
started. Simply press PLAY during a show to display the progress
bar and see how far back in time you can go.
NOTE: You cannot fast forward during live TV until you pause or
rewind a program.
Progress Bar
DIRECTV
18
CHAPTER 2 - CHANNELS & PROGRAM INFO
DRAFT
Program Guide ......................................................................... 16
Program Info .............................................................................. 16
Local Channels .......................................................................... 17
HD and SD Channels ................................................................. 17
Unsubscribed Channels ............................................................ 17
3D Channels ...............................................................................18
Interactive Channels .................................................................. 18
Filtering the Guide ..................................................................... 19
Guide Options .............................................................................19
Mini Guide .................................................................................. 20
Channel Banner & TV Options .................................................. 21
Messages ................................................................................... 21
Info ..............................................................................................21
Last 4 .......................................................................................... 22
Favorite Channels ...................................................................... 22
Closed Captioning ......................................................................22
Audio/Video Options ...................................................................23
Parental Controls ......................................................................23
Picture-in-Picture ......................................................................24
Menu ......................................................................................... 25
My DIRECTV ...............................................................................25
Search & Browse ....................................................................... 25
Recordings ................................................................................. 25
Extras ......................................................................................... 26
Settings & Help ..........................................................................26
CHAPTER 2 - CHANNELS & PROGRAM INFO
19

PROGRAM GUIDE
DRAFT
Press the GUIDE button to display the onscreen Program
Guide, with up to 14 days of programming information.
Navigate in the Guide as follows:
Use the ARROW buttons to move one cell at a time up/
down/left/right;
Use the CHAN/PAGE button to scroll up or down by page;
Input a channel number to tune directly to it.
Press the right ARROW button to scroll programming that’s
playing up to 14 days in the future on a particular channel.
PROGRAM INFO
Press INFO on any program to see its associated info screen,
which screen displays the program’s description and provides
other information and functionality:
Watch or record the program, view a list of other showings
or episodes, and more.
“Rotten Tomatoes™” - This popular film/TV Critic ratings
system uses fresh or rotten tomato icons to represent critic
scores.
HD DVR RECEIVER USER GUIDE
®
DIRECTV
20
“Flixster” – This audience ratings service uses upright or
spilled popcorn icons to represent audience scores.
(A 60%+ awards the fresh tomato and upright popcorn,
respectively.)
“Cast & Crew” – see info on actors, directors, producers,
etc. who worked on the show or movie. Select a name
to view the “Filmography”, which is the actor or crew
member’s entertainment resume.

“You Might Like” - displays shows similar to the current
DRAFT
program.
“Parental Info” - shows info from Common Sense Media, a
non-profit, independent organization that provides ratings
and reviews for TV shows and movies. You can decide
appropriate programs for your children based on program
description; details on a program’s language, violence and
sexual content; and age-appropriate indicator.
LOCAL CHANNELS
Your DIRECTV-provided local channels can be found in the
Guide from channel numbers 2 through 69.
HD AND SD CHANNELS
DIRECTV has a tremendous offering of HD channels and they
are spread throughout the Guide. They are identified by an
“HD”, look for HD after the program title in the Guide. If you
want to see only the HD version of a channel in the Guide go to
Chapter 6, “Settings:Display:Preferences”, for instructions on
how to make that setting.
PROGRAM GUIDE
CHAPTER 2 - CHANNELS & PROGRAM INFO
HD
Channel
UNSUBSCRIBED CHANNELS
Channels in the Guide that are not part of your subscription
package are shown grayed out. You can customize your Guide
to hide these channels. See Chapter 6, “Settings & Help:
Favorite Channels” for details.
Unsubscribed
Channel
21
PROGRAM GUIDE
DRAFT
3D CHANNELS
3D channels are in the 100s series in the Guide, starting on
channel 103. For a list of 3D programs, press GUIDE, press the
DASH (—) key* and then select “Sort programs by category”.
Select “3D” and a list of 3D programs will display.
NOTE: *If you are using the older DIRECTV White Remote,
press GUIDE, the YELLOW button, and follow the same
instructions as above for 3D channel list.
INTERACTIVE CHANNELS
Interactive Channels allow you to interact with what you see on
screen. When accessing these channels, you will have to wait a
few seconds for the software to download.
Tune to Channel 9999* to get weather, horoscopes, lottery
results, games and more. The channel is ready to interact
when the yellow highlight box appears.
HD DVR RECEIVER USER GUIDE
®
DIRECTV
22
To exit an interactive channel, press GUIDE and select
another channel, or just directly input the numbers of
the destination channel on your Remote while still on the
ACTIVE Channel.
Other interactive channels, such as Sports Mix let
customers with a qualifying programming package see up
NOTE: There is no separate 3D fee, but DIRECTV
3D programming is broadcast in HD and requires
HD Access, HD Receiver (HR44, HR34, HR21, H21 or
later) compatible 3D HDTV and 3D glasses. CHOICE™
package or higher required for ESPN 3D. For more
information, visit directv.com/3D.

to eight of the hottest channels on one screen. These channels
DRAFT
are distributed among your regular channels; see the Program
Guide. Move the yellow highlight box using the direction arrows
on your remote to hear the audio associated with each channel.
If you want to see a channel full-screen, move the yellow
highlight box over it and press SELECT.
NOTE: *Press the ACTIVE button on the older, DIRECTV White
Remote to tune to the ACTIVE Channel.
FILTERING THE GUIDE
There may be times when you want to temporarily trim down the
channels that are shown in the Guide, filtering them by program
type. For example, you may want to see just sports or movies or
news.
Press GUIDE twice to display the Guide Filter.
Highlight your desired category and press SELECT.
The Guide will display only channels in your desired category, which
is labeled at the bottom right of the Guide.
NOTE: Since the filtering is temporary, it only lasts as long as
you keep the Program Guide on the screen.
PROGRAM GUIDE
CHAPTER 2 - CHANNELS & PROGRAM INFO
Look to the
right to
see how the
Guide is
being
filtered.
23

HD DVR RECEIVER USER GUIDE
DRAFT
®
PROGRAM GUIDE
GUIDE OPTIONS
From the Program Guide, press the DASH key [—] on the Genie
Remote or press the button on the older DIRECTV White remote
to display “Guide Options”.
Sort Programs by Category:
Select “Sort programs by category”, then select a category to
see a list of shows in chronological order that match your sort
criterion.
Jump to a Date & Time:
Select “Jump to a date & time” to quickly go to a future date
and time in the Guide.
Change Favorites List:
By default, your Program Guide displays all channels offered
by DIRECTV, some of which may not be in your programming
package. “Change favorites list” allows you to toggle the
channels displayed in your Guide among the following: “All
Channels”, “Channels I Get” (channels you subscribe to) or a
custom list of channels you have defined. The “Edit Settings”
option allows you to modify the channels in your custom list.
See Chapter 6, “Settings & Help: Favorite Channels” for details.
Pay Per View:
DIRECTV
24
Select “Pay Per View” then select a program type. The Receiver
will search for featured movies, sports or events that are
available for “rent” from DIRECTV ’s vast Pay Per View offerings.

More programs are available using All Movies, On Demand TV
DRAFT
Shows and Adults Only destinations (See Chapter 3.)
PROGRAM GUIDE
MINI GUIDE
If you are watching a show and want a quick look at what’s on next,
press ENTER to display a one-line mini Program Guide. Use it for
the channel you’re currently watching or type in a new channel
number to see what’s airing next there. Look for the channel or
time you want using the UP, DOWN, LEFT and RIGHT arrows.
Press SELECT on the new show to go to that channel.
CHAPTER 2 - CHANNELS & PROGRAM INFO
online
miniGuide
25

CHANNEL BANNER & TV OPTIONS
DRAFT
When you find a current ly airing show in the Guide you want to
watch, press SELECT and the Receiver changes to that channel.
The Channel Banner briefly displays at the top of the screen with
program title, channel number, date, time and other information.
Select “More Info” for detailed program information and other
options.
You can also press INFO to display the Channel Banner while
watching a program.
The Channel Banner also provides easy access to Messages,
the last four channels you watched, Favorite Channels, Closed
Captioning, Audio and Video options, and Parental Controls. Use
the ARROW keys to highlight an option, then press SELECT.
MESSAGES
Select “Messages”, to see your messages. DIRECTV sends
messages to you for important news items or special promotions.
When you have new mail, an “envelope” icon appears in the
Channel Banner.
HD DVR RECEIVER USER GUIDE
®
DIRECTV
26
INFO
Select “Info” to read a brief description of the program. For
detailed program information and other options select “More Info”.

LAST 4
DRAFT
Select “Last 4” to see a list of previous channels you’ve watched
(up to 4). When you select a channel from this list, the Receiver
will tune to that channel. This is an easy way to toggle among the
channels you watch most often.
FAVORITE CHANNELS
Select “Favorites” to update the Program Guide to show only
the channels you want to see. You have four options to choose
from such as, “All Channels”, “Channels I Get”, “Custom 1”
and “Custom 2”. Channels I Get displays only the channels
you subscribe to. Custom 1 and 2 are self-created lists of your
favorite channels. If one of your self-created lists is active, select
the “Add...” or “Remove...” option to add or remove the current
channel from that list.
CLOSED CAPTIONING
Select the “CC” option, then select either “DIRECTV Subtitles” or
“Closed Captioning”. Both options display the same text so only
one or the other can be “ON” at a time. The display format is the
only difference so check out both to determine your preference.
Select OFF to turn the display of subtitles or closed captioning off.
CHANNEL BANNER & TV OPTIONS
CHAPTER 2 - CHANNELS & PROGRAM INFO
27

HD DVR RECEIVER USER GUIDE
DRAFT
®
CHANNEL BANNER & TV OPTIONS
AUDIO/VIDEO OPTIONS
Select “Audio/Video” to change the resolution and format of your
display and to change audio to an alternate language, when
available. Select “Change Resolution & Format” to change
the display settings; each press of SELECT toggles to the next
available option. The current settings are shown in gray text. (See
“Appendix 5: About High Definition” for more information about
screen resolution and format.)
You may also select a language from the options listed. Not all
programs have alternate languages.
PARENTAL CONTROLS
Select “Parental” to quickly lock or unlock your Receiver. You
can also customize your Parental Controls settings by selecting
“Parental Controls”. For more information on Parental Controls
settings, see the “Parental Controls” section in Chapter 6.
DIRECTV
28

PICTURE-IN-PICTURE
DRAFT
Watch two programs, live or recorded, at the same time. While
watching one program, press the INFO button on your remote.
Select “PIP”. The program you’re currently watching moves
into a smaller window on your screen. The larger video is the
active program and can be controlled by your remote. To switch
between programs, press the DOWN ARROW.
To change the position of the smaller window, press INFO on
your remote. Select “PIP” and choose a position from the
options provided.
NOTE: The Picture in Picture feature is only available on the TV
connected directly to a Genie HD DVR (models HR44, HR34 and
above).
CHANNEL BANNER & TV OPTIONS
CHAPTER 2 - CHANNELS & PROGRAM INFO
29

HD DVR RECEIVER USER GUIDE
DRAFT
®
MENU
The DIRECTV Menu is your main point of access to My DIRECTV,
Search & Browse, Recordings, Extras, and Settings & Help. Press
MENU on your remote to see your options.
MY DIRECTV
My DIRECTV gives you quick access to programs/channels you
watch frequently, as well as recommended programs based on
your past viewing history. Use the ARROW keys to highlight a title
you are interested in, then press SELECT for program information.
If you have a DIRECTV Genie® HD DVR (HR44, HR34 and above),
and have the “Genie Recommends” feature enabled, you can also
access the your Genie Recommends programming from the My
DIRECTV screen. For more information, please see Chapter 3,
“Genie Recommends”.
SEARCH & BROWSE
The Search & Browse option lets you access Smart Search, All
Movies, On Demand and TV Shows. See Chapter 3 “Search &
Browse” for more information.
RECORDINGS
Recordings option provides access to the Playlist and Manage
DIRECTV
30
Recordings features. For additional information, see
Chapter 4, “Recordings”.
 Loading...