

Page 1
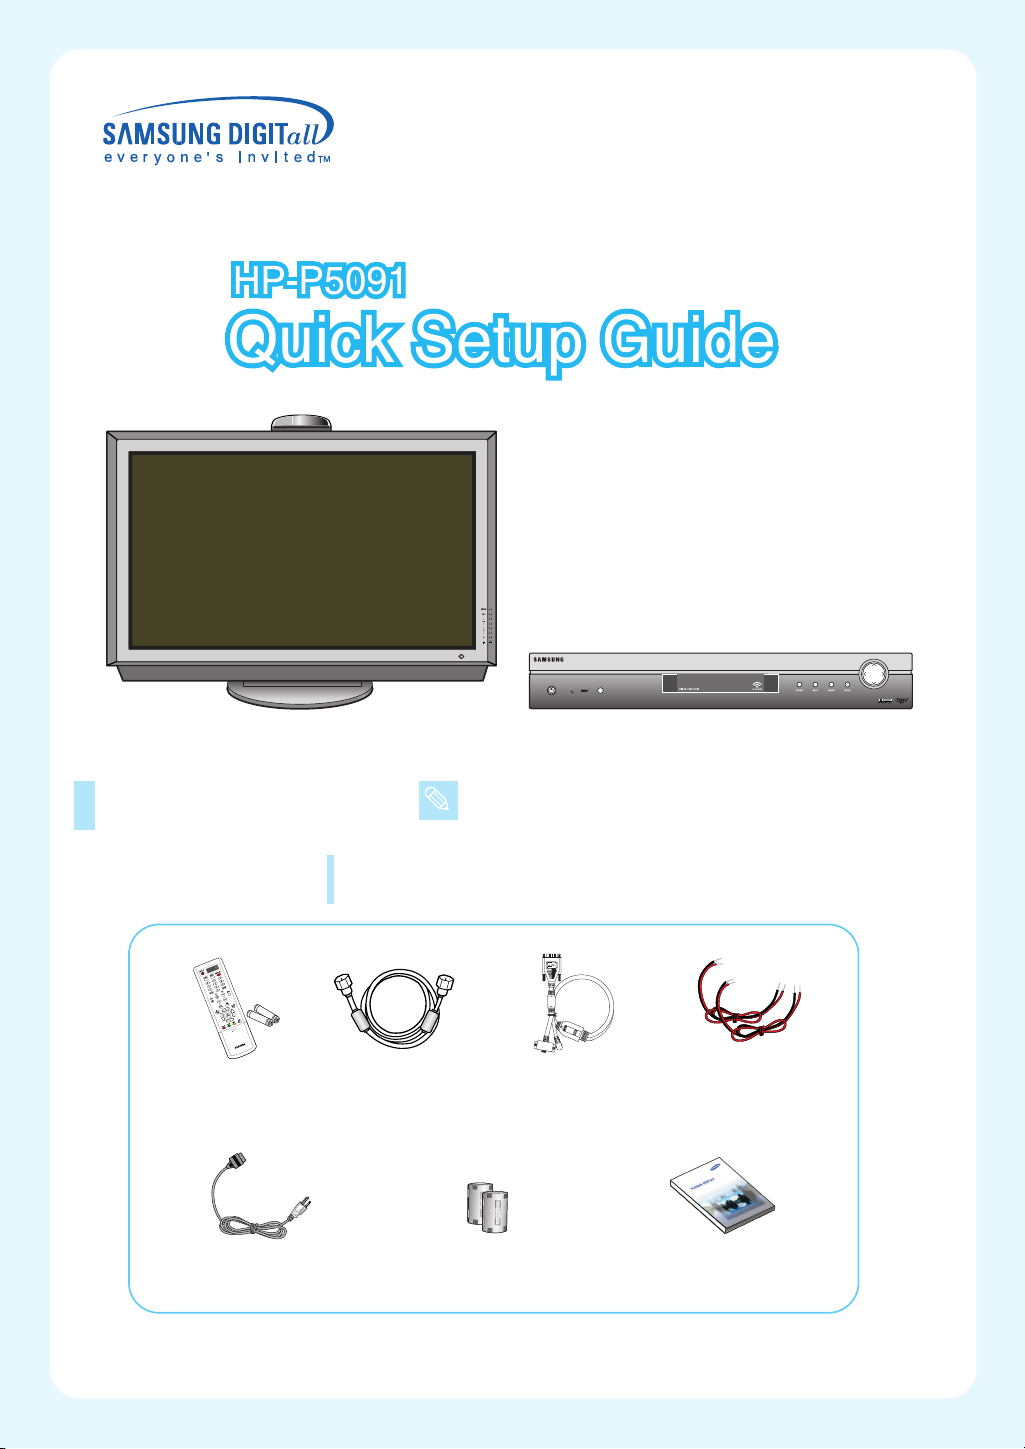
List of Parts
Note
●
External speakers(PSN5042) and stand(SMN5040) are sold
separately.
Accessories
Remote Control/
AAA Batteries
(MD59-00355A)
Power Cord
(3903-000085)
Once you have unpacked your PDP with WIRELESS HOME AV CENTER,
check to make sure that you have all the parts shown here. If any piece is
missing or broken, call your dealer.
Antenna Cable
(BN39-00333A)
Wireless signal cable
(MD39-00108A)
Ferrite Cores :
2EA (3301-001201)
Speaker Cables
(BN39-00530A)
Owner’s Instructions
BN68-00766B-00
Page 2
Turning the PDP On and Off
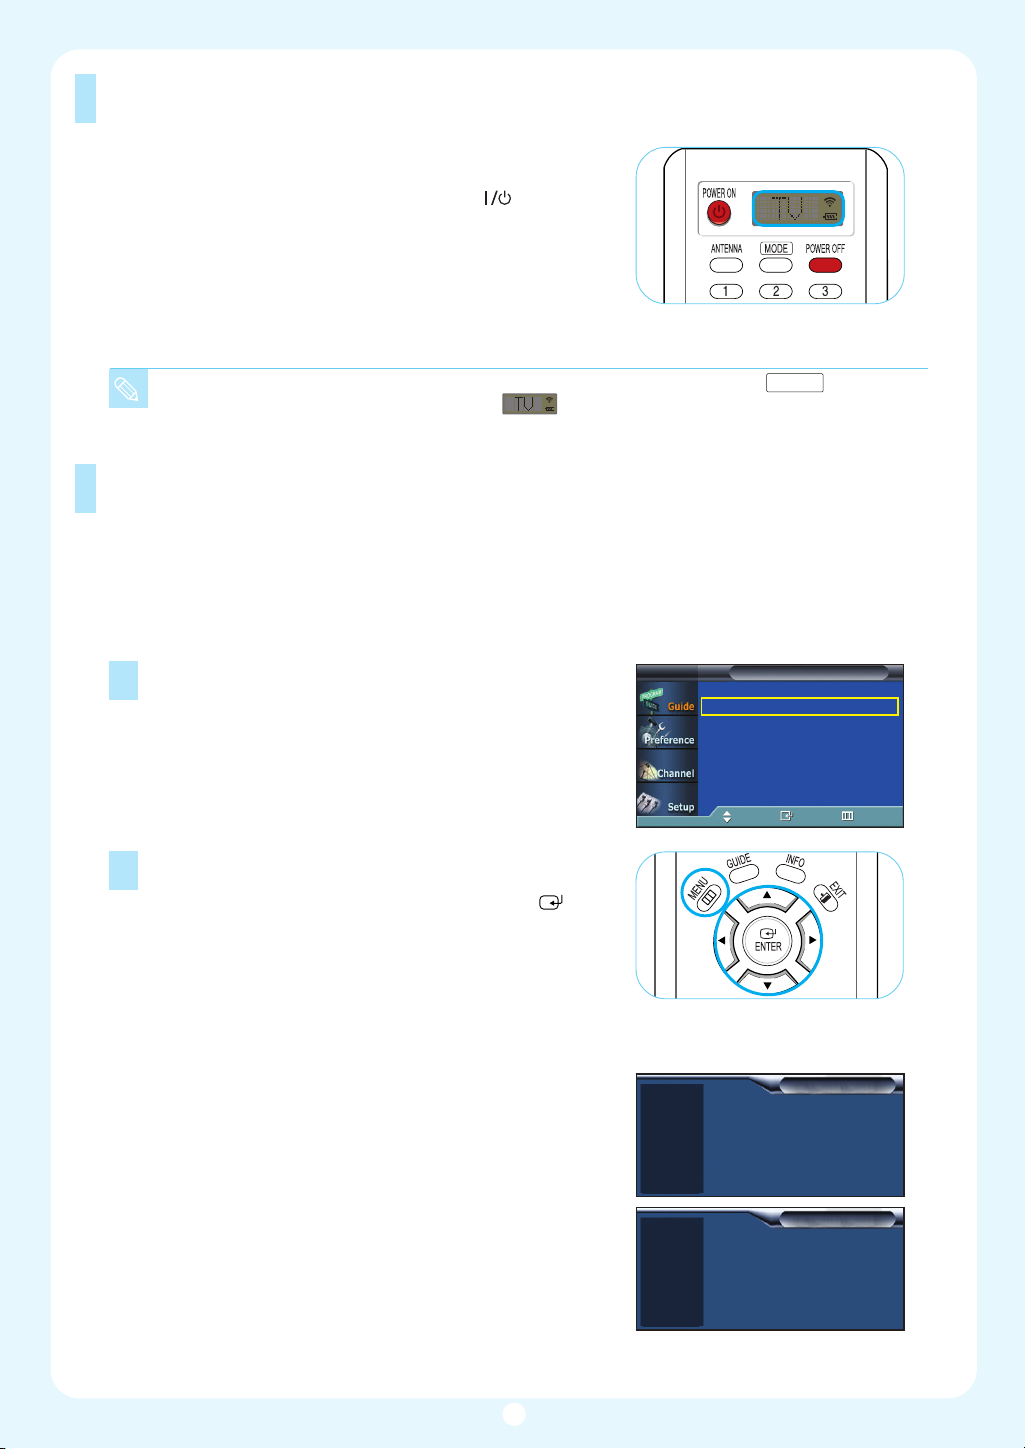
Press the POWER ON button on the remote control.
The PDP will be turned on and you will be ready to use
its features. You can also use the POWER ( ) button
on the front of the PDP. You can use the POWER ON
button to turn on the WIRELESS HOME AV CENTER.
The WIRELESS HOME AV CENTER and the PDP each
have their own respective POWER ON/OFF button, but
when you turn off the PDP, the WIRELESS HOME AV
CENTER will turn off also.
If your PDP isn’t turned on when the power ON button is pressed: Press the MODE button
to check if the TV mode has been chosen ( ).
Viewing the Menus and Displays
Your PDP has a simple, easy-to-use menu system that appears on the PDP screen.
This system makes it convenient and fast to use features on the PDP. Your PDP also lets you
display the status of many of your PDP’s features.
Viewing the Menus
With power on, press the MENU button on the remote
1
control. The main menu appears on the screen.
The Guide menu is selected.
TV
Mini Guide
Full Guide
Remind List
Default Guide : Mini Guide
Guide
√
√
√
√
Press the ▲ or ▼ button to move items in the menu.
2
Press the œ/√/ENTER buttons to display, change,
or use the selected items. Press the ENTER ( )
button to enter items in the menu. On screen menus
disappear from the screen automatically after about
2 minutes, or you can press the MENU or EXIT
button on your remote control to exit the menu.
Displaying Status Information
Press the INFO button on the remote control.
The PDP will display the channel, MTS, rating, and
caption information.
Air 10
SD
Mono
DTV Air
13-1
TV #1
SD
English
Move Enter Return
8:15 PM Fri Nov 09
No title
No Detail Information
10:44 AM Wed Sep 02
Life on Venus Avenue
10:00 am - 11:00 am
No Detail Information
2
Page 3
Connecting the PDP to the WIRELESS HOME AV CENTER
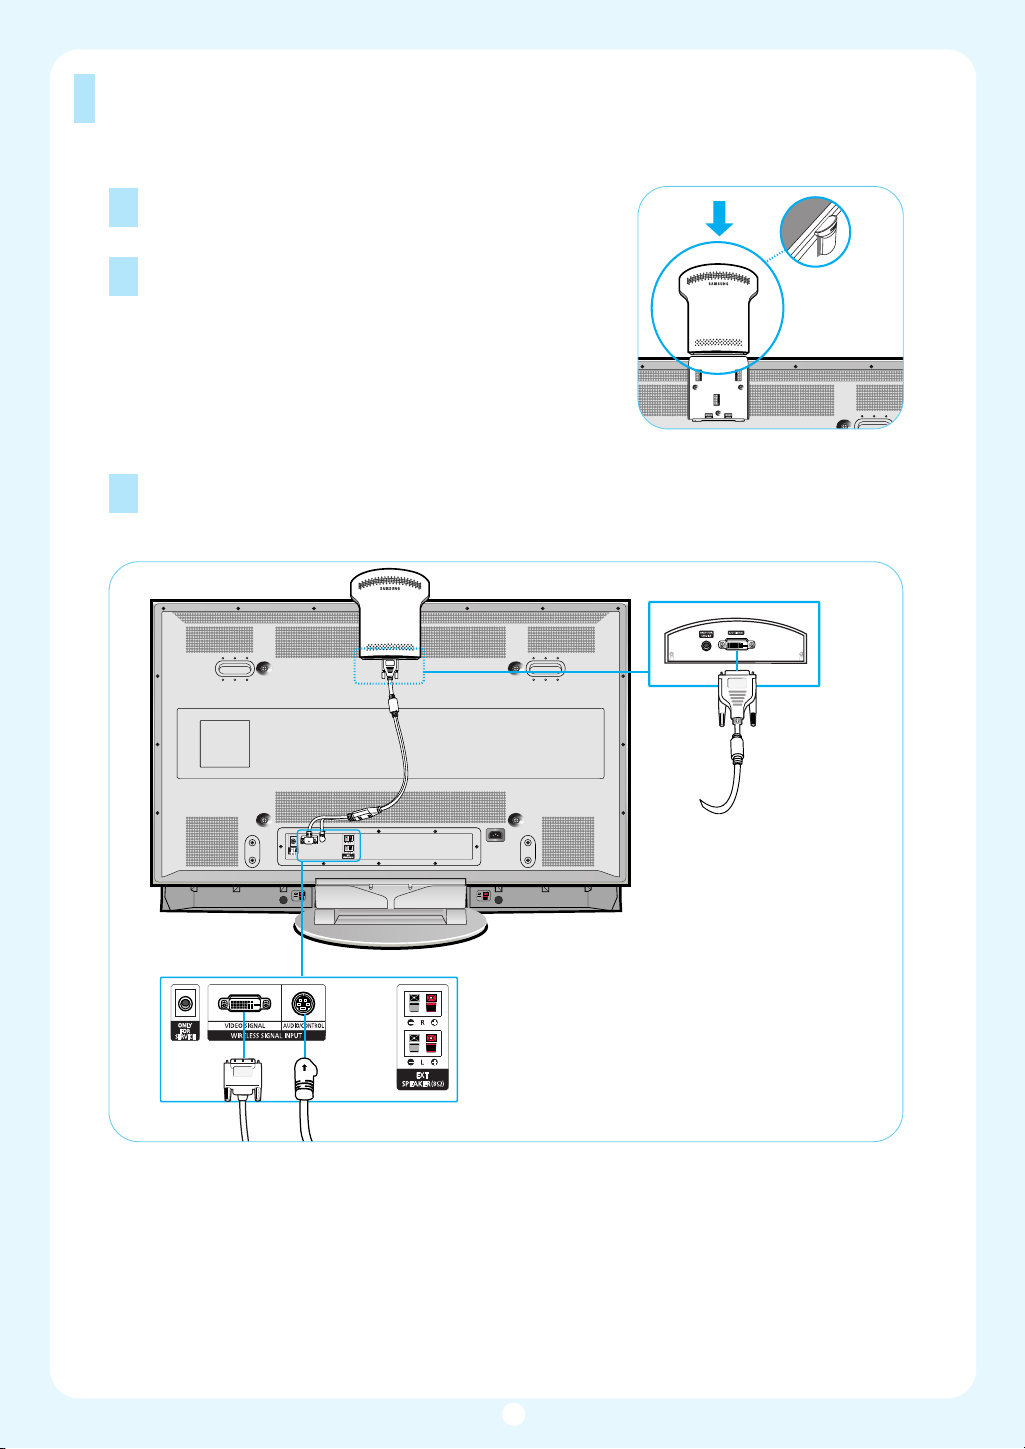
Connecting the PDP to the WIRELESS HOME AV CENTER
Make sure your PDP, A/V receiver and WIRELESS
1
HOME AV CENTER are turned off and unplugged.
Install the WIRELESS HOME AV RECEIVER onto
2
the bracket located at the top of the PDP’s rear
panel, in the direction of the arrow (as illustrated).
Connect the Wireless Signal cable from the WIRELESS SIGNAL INPUT Video Signal
3
and Audio/Control ports on the rear of the PDP to the A/V SIGNAL Port on the bottom
of the WIRELESS AV RECEIVER.
3
Page 4
Connecting VHF and UHF Antennas
Antennas with 75-ohm Round Leads
If your antenna looks like this: it has
75-ohm round leads.
Plug the antenna lead into the AIR terminal on the
1
WIRELESS HOME AV CENTER.
Use the antenna cable included in the product
package.
Connecting Cable TV
You can connect different cable systems to your WIRELESS HOME AV CENTER, including cable without
a Cable box, and cable with a Cable box that descrambles some or all channels.
Cable without a Cable Box
Plug the incoming cable into the cable terminal
1
on the WIRELESS HOME AV CENTER.
Use the antenna cable included in the product
package.
Cable with a Cable Box that Descrambles All Channels
Find the cable connected to the ANTENNA
1
OUT terminal on your Cable box. This terminal
might be labeled “ANT OUT”, “VHF OUT” or
simply “OUT”.
Connect the cable to the cable terminal on the
2
WIRELESS HOME AV CENTER.
Use the antenna cable included in the product
package.
Connecting a VCR
WIRELESS HOME AV CENTER VCR
Audio cable
S-Video cable
Video cable
Connect the Video/Audio cables between the VIDEO or S-VIDEO / L - AUDIO - R jacks to the
WIRELESS HOME AV CENTER and VIDEO or S-VIDEO / L - AUDIO - R output jacks on the VCR.
(Note: For better video, use an S-Video cable.)
Please be sure to match the color coded input terminals and cable jacks.
4
Page 5

Connecting a Camcorder
WIRELESS HOME AV CENTER Camcorder
Audio cable
S-Video cable
Video cable
Connect a Video/Audio cable between the VIDEO or S-VIDEO / L - AUDIO - R jacks to the WIRELESS
HOME AV CENTER and the VIDEO or S-VIDEO / AUDIO output jacks on the camcorder.
(Note: For better video, use an S-VIDEO cable.)
Please be sure to match the color coded input terminals and cable jacks.
Connecting a DVD Player (480i, 480p)
WIRELESS HOME AV CENTER DVD Player
Optical cable
Component cable
Audio cable
Connect the Y, Pb, Pr (COMPONENT) input jacks on the WIRELESS HOME AV CENTER to the
1
Y, P
b, Pr output jacks on the DVD player using a component cable.
Connect the AUDIO L/R(COMPONENT) input jacks on the WIRELESS HOME AV CENTER to the
2-1
AUDIO output jacks on the DVD player using an audio cable.
or
Connect the optical input jack on the WIRELESS HOME AV CENTER to the optical output jack on
2-2
the DVD player using an optical cable.
Please be sure to match the color coded input terminals and cable jacks.
The WIRELESS HOME AV CENTER only takes Dolby Digital (AC-3) as a digital audio input.
5or6
Page 6

Connecting a DTV Receiver (480i, 480p)
WIRELESS HOME AV CENTER DTV Receiver
Component cable
Audio cable
Connect the cable or antenna to the antenna input jack on the DTV receiver.
1
Connect the Y, P
2
to Y, P
B, PR output jacks on the DTV receiver using a component cable.
Connect the AUDIO L/R(COMPONENT) input jacks on the WIRELESS HOME AV CENTER to the
3
AUDIO output jacks on the DTV receiver using an audio cable.
●
Please be sure to match the color coded input terminals and cable jacks.
●
When you want to connect DTV satellite receiver or DTV cable receiver to the component jack
on the WIRELESS HOME AV CENTER, please use Lt and Rt jacks for audio input instead of
using DIGITAL AUDIO INPUT (OPTICAL).
b, Pr (COMPONENT) input jacks on the WIRELESS HOME AV CENTER
Connecting a Digital Audio System
WIRELESS HOME AV CENTER
or
Coaxial cable
Optical cable
If your audio system has a coaxial digital audio input, connect to the “COAXIAL” output jack
1
on the WIRELESS HOME AV CENTER.
If your audio system has an optical digital audio input, connect to the “OPTICAL“ output jack
2
on the WIRELESS HOME AV CENTER. Be certain to remove the black cover from the optical
output before inserting the cable.
If your system has both coaxial and optical digital audio inputs, SAMSUNG recommends you
3
use the optical digital output on the WIRELESS HOME AV CENTER.
Do not connect both optical and coaxial cables. This may damage your audio system.
●
OPTICAL: Converts the electric signal into an optical light signal, and transmits it through glass fibers.
●
COAXIAL: The digital audio signal is received through a coaxial copper cable.
Digital Audio System
Page 7

Connecting to a second TV
WIRELESS HOME AV CENTER
Audio cable
Video cable
TV
Connect the Video/Audio cables between TV out / L - AUDIO - R jacks on the WIRELESS HOME AV
CENTER to VIDEO / L - AUDIO - R input jacks on the second TV.
●
Please be sure to match the color coded input terminals and cable jacks.
●
TV OUT works only for the AIR and Cable input sources. It does not work for the external input
sources because of content protection.
Connecting Speakers
Speaker Cable
✱ External speakers MUST have a power handling
capability of 12 watts minimum (impedance 8 ohm).
Connect the speaker audio cable to the external speaker output jack on the PDP matching the “+”
and “-” ends of the cable with the diagram on the PDP.
7
Page 8

Operation
Selecting the Video Signal-source
Before your television can begin memorizing the available channels, you must specify the
type of signal source that is connected to the WIRELESS HOME AV CENTER (i.e., an
antenna or a cable system).
TV
Channel
Select Antenna : Air √
Auto Program √
Add/Delete √
Fine Tune √
Signal Strength √
Move Enter Return
1
Press the MENU button. Press the ▲ or ▼ button to select “Channel”, then press
the ENTER button.
TV
TV
Channel
Select Antenna : Air
Auto Program
Add/Delete
Fine Tune
Signal Strength
Move Enter Return
Select Antenna : Air
Auto Program
Add/Delete
Fine Tune
Signal Strength
Move Enter Return
Channel
Cable
Cable
Air
Air
2
Press the ▲ or ▼ button to select “Select Antenna”, then press the ENTER button.
3
Press the ▲ or ▼ button to select “Air” or “Cable”, then press the ENTER button.
4
Press the MENU button to exit.
Storing Channels in Memory (Automatic Method)
TV
TV
Channel
Select Antenna : Air √
Auto Program √
Add/Delete √
Fine Tune √
Signal Strength √
Move Enter Return
Channel
Select Antenna : Air √
Auto Program √
Add/Delete √
Fine Tune √
Signal Strength √
Move Enter Return
1
First, select the correct antenna (Air and Cable). See steps on previous page.
Press the MENU button. Press the ▲ or ▼ button to select “Channel”, then press
the ENTER button.
2
Press the ▲ or ▼ button to select “Auto Program”, then press the ENTER button.
➤
Quick way to access the Automatic Channel Setting:
➤
Just press the “AUTO PROG.” button on the remote control.
TV
Auto Program
Air
STD
HRC
IRC
Move Enter Return
Auto Program
It will take about several minutes.
Would you like to continue?
Start
Enter Return
Auto Program
Air Ch 23
Stop
Enter Return
3
Press the ▲ or ▼ button to select the correct signal (Air, STD, HRC, and IRC).
Select an option and then press the Enter button.
If you are connected to an antenna (Air), leave “Air” displayed. If you are connected to a
cable, press the ▲ or ▼ button to display the type of cable system “STD”, “HRC” or “IRC”.
(If you are not sure which type of cable system you have, contact your cable company).
4
Press the ENTER button. The PDP will begin memorizing all of the available
channels. After all the available channels are stored, the Auto program menu
reappears. Press the MENU button to stop.
Note
●
Auto Program may take a few minutes to process.
8
Page 9

Remote Control Buttons
Œ
POWER ON button
Turns the PDP and WIRELESS
HOME AV CENTER on.
You have to turn on the PDP and
the WIRELESS HOME AV CENTER
respectively.
´
ANTENNA button
Alternates the input between Air
and Cable.
ˇ
Number buttons
Select the channel directly.
¨
+100 button
Selects channels over 100.
For example, to select channel 121,
press “+100”, then press “2” and “1”.
ˆ
MUTE button
Mutes the PDP sound.
Ø
VOL / buttons
Adjusts volume.
∏
GUIDE button
Displays the on-screen Program
Guide.
”
MENU button
Displays the on-screen menus or to
switch back to the previous menu
screen that was displayed.
’
ENTER button
Confirms a selection.
˝
FAV. CH button
Switches among your favorite
channels.
Ô
ASPECT button
Changes the screen size.
LCD Display
When you press any button, ‘ ’
appears along with the selected
mode (TV, VCR, CATV, DVD, or
STB) and battery status on LCD.
Ò
MODE button
Selects a target device to be
controlled by the Samsung remote
control (i.e., VCR, Cable Box, DVD
player, Samsung Set-Top Box, or
other devices).
Ú
POWER OFF button
Turns the PDP and WIRELESS
HOME AV CENTER off.
When you turn off the PDP, the
WIRELESS HOME AV CENTER
turns off also.
Æ
PRE-CH button
Tunes to the previous channel.
ı
Source button
Toggles between all the external
input sources (ie., Component, AV1,
AV2, and S-Video).
˜
CH (Channel) / buttons
Changes channels.
¯
INFO button
Displays information on the PDP
screen.
˘
EXIT button
Exits the menu.
¿ UP/DOWN/LEFT/RIGHT buttons
Controls the cursor in the menu.
¸
SRS button
Selects TruSurround XT mode.
˛
MTS button
Chooses stereo, mono or Separate
Audio Program (SAP broadcast).
◊
AUTO PROG. button
Automatically cycles through all of
the available channels and stores
them in memory.
±
ADD/DEL button
Adds or deletes channels in the TV’s
memory.
≠
DNIe button
Activates DNIe (Digital Natural
Image engine).
–
SLEEP button
Selects a preset time interval for
automatic shutoff.
—
SET button
Sets up the Samsung remote control
to work with other devices (VCR,
Cable Box and DVD).
÷
S.MODE button
Selects the sound mode.
®
P.MODE button
Adjust the PDP picture by selecting
one of the preset factory settings (or
select your personal, customized
picture settings.)
∑
CAPTION button
Controls the caption decoder.
µ
VCR, DVD control buttons
Controls VCR tape or DVD disc
functions: Stop, Rewind, Play/Pause,
and Fast Forward.
¥
RESET button
If your remote control is not
functioning properly, take out the
batteries and press the reset button
for about 2~3 seconds. Re-insert
the batteries and try using the
remote control again.
9
Page 10

Troubleshooting
If the TV seems to have a problem, first try this list of possible problems and solutions. If none of
these troubleshooting tips apply, then call your nearest Samsung authorized service center.
WIRELESS HOME AV CENTER
Problem Possible Solution
Poor picture quality
Poor sound quality or no sound.
No picture or sound.
No color or wrong colors.
Remote control failure.
A/V Center won’t turn on.
No output from the TV OUT
Video and audio breakups
Try another channel. Adjust the antenna. Check all wire connections.
Try another channel. Adjust the antenna. Make sure the “MUTE” button is off.
Try another channel. Make sure the Set-Top Box is plugged in. Check the
antenna connections.
Make sure the program is broadcast in color.
Press the STB button to enter the DTV mode. Check for batteries.
Make sure the wall outlet is working. Make sure the remote has batteries.
Check if the power plug is connected.
No Video output from the external input source is available on this terminal.
Available input sources are AIR and Cable. Audio output for all input sources is
available.
This product adopts 5GHz wireless LAN technology. Since wave length of signal
is very short, signal cannot go through concrete wall. This causes video and
audio breakups. For a better reception, PDP needs a line of sight to the
WIRELESS HOME AV CENTER.
PDP
Problem Possible Solution
Poor picture.
Check all wire connections.
Your remote control does not
operate the PDP.
The PDP won’t turn on.
There is no screen image.
The image is too light or too dark.
The image is too large or too small.
If the message “No Wireless Signal
or Please Check WIRELESS HOME
AV CENTER Power” appears:
This message is displayed when the
communication between the PDP
and the WIRELESS HOME AV
CENTER fails.
Press the “MODE” button to put your remote control in the “TV” mode.
Check if the power plug is connected.
Check to see that both the PDP and the source are plugged in and turned on.
Adjust the Brightness or Contrast settings.
Adjust the Size settings.
Check whether the WIRELESS HOME AV CENTER’s Power is turned ON.
Check whether the Wireless LED on the front panel is lit Green (If not, move the
WIRELESS HOME AV CENTER to a location where the Green LED lights up).
10
Page 11

Troubleshooting
PDP (Continued)
Problem Possible Solution
PDP set is turned on and the
message “No Wireless Signal or
Please Check WIRELESS HOME
AV CENTER Power” appears.
Cause 1: The WIRELESS HOME
AV CENTER is turned off.
Cause 2: The message still appears
despite the AV Center is on.
The picture continuously breaks
up and the message “No Wireless
Signal or Please Check WIRELESS
HOME AV CENTER Power”
appears.
Cause: The product utilizes 5GHz
band for wireless signal transmission.
Other wireless devices may cause
picture noise or communication
errors. These problems may be
caused by Wireless PC networks
or wireless TV sets using the same
band.
The message “Please check
resolution, AV Center can’t support
720p/1080i component signal.”
appears in the Component Mode.
Cause: AV Center only handles of
480i and 480p input. 720p and 1080i
input cannot be processed.
Solution 1: Turn on the PDP set and then turn on the AV Center as they have
separate power supplies.
Solution 2: Check if AV Receiver’s LED at the top of PDP set and the AV
Center’s wireless LED are ON and green.
If both are OFF, change both devices’ positions so that they face each other for
better communication. If the message appears again, turn both PDP and AV
Center OFF and then turn them back ON. If the problem persists, contact the
nearest service center.
Solution: During watching, another wireless device that uses a single fixed
frequency of the same band may interfere and cause this problem. In this case,
turn the PDP and AV Center off and then back on. The WIRELESS HOME AV
CENTER has the function of frequency search in the 5GHz band for clear data
communication to avoid signal interference.
Solution: Switch the input source to 480i or 480p.
There is no signal in a digital
channel, and messages “Searching
for Signals” followed by “No Signal”
appear.
Cause: Channels have been stored
using Auto Memorize but the
broadcasting companies are not
sending the corresponding signals.
Or External Input has been selected
but there is no signal.
Solution: Select an alternative channel or switch the external input source.
11
Page 12

Troubleshooting
PDP (Continued)
Problem Possible Solution
The message “Not supported sound
format” appears.
Cause: Digital Audio rather than
AC-3 (such as DTS, MPEG-1 or
MPEG-2) was entered for Audio
when SPDIF Input is selected in the
Component Mode resulting in
displaying this message with no
picture.
The picture quality is poor in the
Component Mode despite setting
480p.
Cause: To enable the wireless signal
transmission for 480p input, it is
converted to 480i before MPEG
Encoding.
After selecting the STB Mode of the
Remote Control, AV Center does not
respond to the Remote Control.
Cause: The Remote Control of AV
Center only turns power ON and
OFF, but cannot respond to other
Remote Control keys.
The message “Not available in the
current mode.” appears.
Cause: Input of unavailable function
keys (e.g. trying to switch a channel
in External Input mode) may cause
the message to appear.
Solution: AV Center cannot handle the Audio Mode except AC-3. Switch the input
to AC-3, or alternatively select Set-Up in the Menu, move to Sound In/Out then
switch Digital Input to Lt/Rt.
Note: Digital Audio inputs except AC-3 might cause a severe damage to the
system. Please use Dolby Digital as a digital audio input.
Solution: MPEG Encoding of 480p is not possible in the current consumer
electronics technology as it is, so viewing the original 480p picture quality is
limited.
Solution: Set the Remote Control to the TV Mode and perform all controls on
the PDP.
Solution: Please try to use other menu keys that are available.
12
 Loading...