


Remote Control Buttons
Remote Control
ŒPOWER button
Turns the PDP on and off.
´ASPECT button
Press to change the screen size.
ˇNumber buttons
¨+100 button
Press to select channels over 100. For example, to select
channel 121, press “+100”, then press “2” and “1.”
ˆMUTE button
Press to mute the PDP sound.
ØVOL (Volume) buttons
Use it to adjust volume.
∏Anynet button
Runs the Anynet view functions and sets up the Anynet
devices.
”MENU button
Displays the main on-screen menu.
’ENTER button
Confirms a selection.
˝PIP button
Activates picture in picture.
ÔSTILL button
Press to pause the current screen.
LCD Display
When you press a button, ‘ ‘ appears along with
selected mode (TV, VCR, CATV, DVD or STB) and
the remote's battery charge status.
ÒP.MODE button
Adjust the PDP picture by selecting one of the preset
factory settings (or select your personal, customized
picture settings.)
ÚMODE button
Selects a target device to be controlled by the Samsung
remote control (i.e., VCR, Cable, DVD players or Samsung
STB). If you change modes, the new mode is momentarily
displayed on LCD.
ÆPRE-CH button
Tunes to the previous channel.
ıSOURCE button
Press to display all of the available video sources
(TV, AV1, AV2, AV3, S-VIDEO1, S-VIDEO2, COMPONENT1,
COMPONENT2, PC, DVI).
˜CH (Channel) buttons
Use it to switch channels.
¯INFO button
Press to display information on the PDP screen.
˘EXIT button
Press to exit the menu.
¿Up/Down Left/Right buttons
Control the cursor in the menu.

¸SRS TSXT button
Selects Trusurround XT mode.
˛ MTS button
Press to choose stereo, mono or Separate Audio Program (SAP broadcast).
◊AUTO PROG. button
The TV automatically cycles through all of the available channels and stores them in memory.
±ADD/DEL button
Press to add or delete channels in the TV’s memory.
≠DNIe button
Activates DNIe (Digital Natural Image engine).
–CAPTION button
Controls the caption decoder.
—SET button
Used during set up of this Samsung remote control,
so that it will work compatibly with other devices
(VCR, Cable Box, DVD)
÷PIP control buttons
SIZE : Press to make the PIP window Large,
Small or Double.
SWAP : Exchanges the video signal that is
currently displayed on the main screen
with the signal in the PIP window.
,
CH
: Displays the available channels in
sequence. (These buttons change channels
in the PIP window only).
®VCR, DVD control buttons
Controls VCR tape or DVD disc functions: Stop,
Rewind, Play/Pause, Fast Forward.
∑RESET button
If your remote control is not functioning properly, take
out the batteries and press the reset button for about
2~3 seconds. Re-insert the batteries and try using the
remote control again.
Installing the Batteries in Your Remote Control
Slide the back cover
1
to open the battery
compartment of the
remote control.
Install two AAA size batter-
2
ies. Make sure to match the
“+” and “-” ends of the batteries with the diagram
inside the compartment.
Slide the cover back into
3
place.
Remote Control Operation Range.
You can use your remote control within a distance of 23 feet and an angle of 30 degrees
from the left and right sides of the PDP’s remote control receiver.
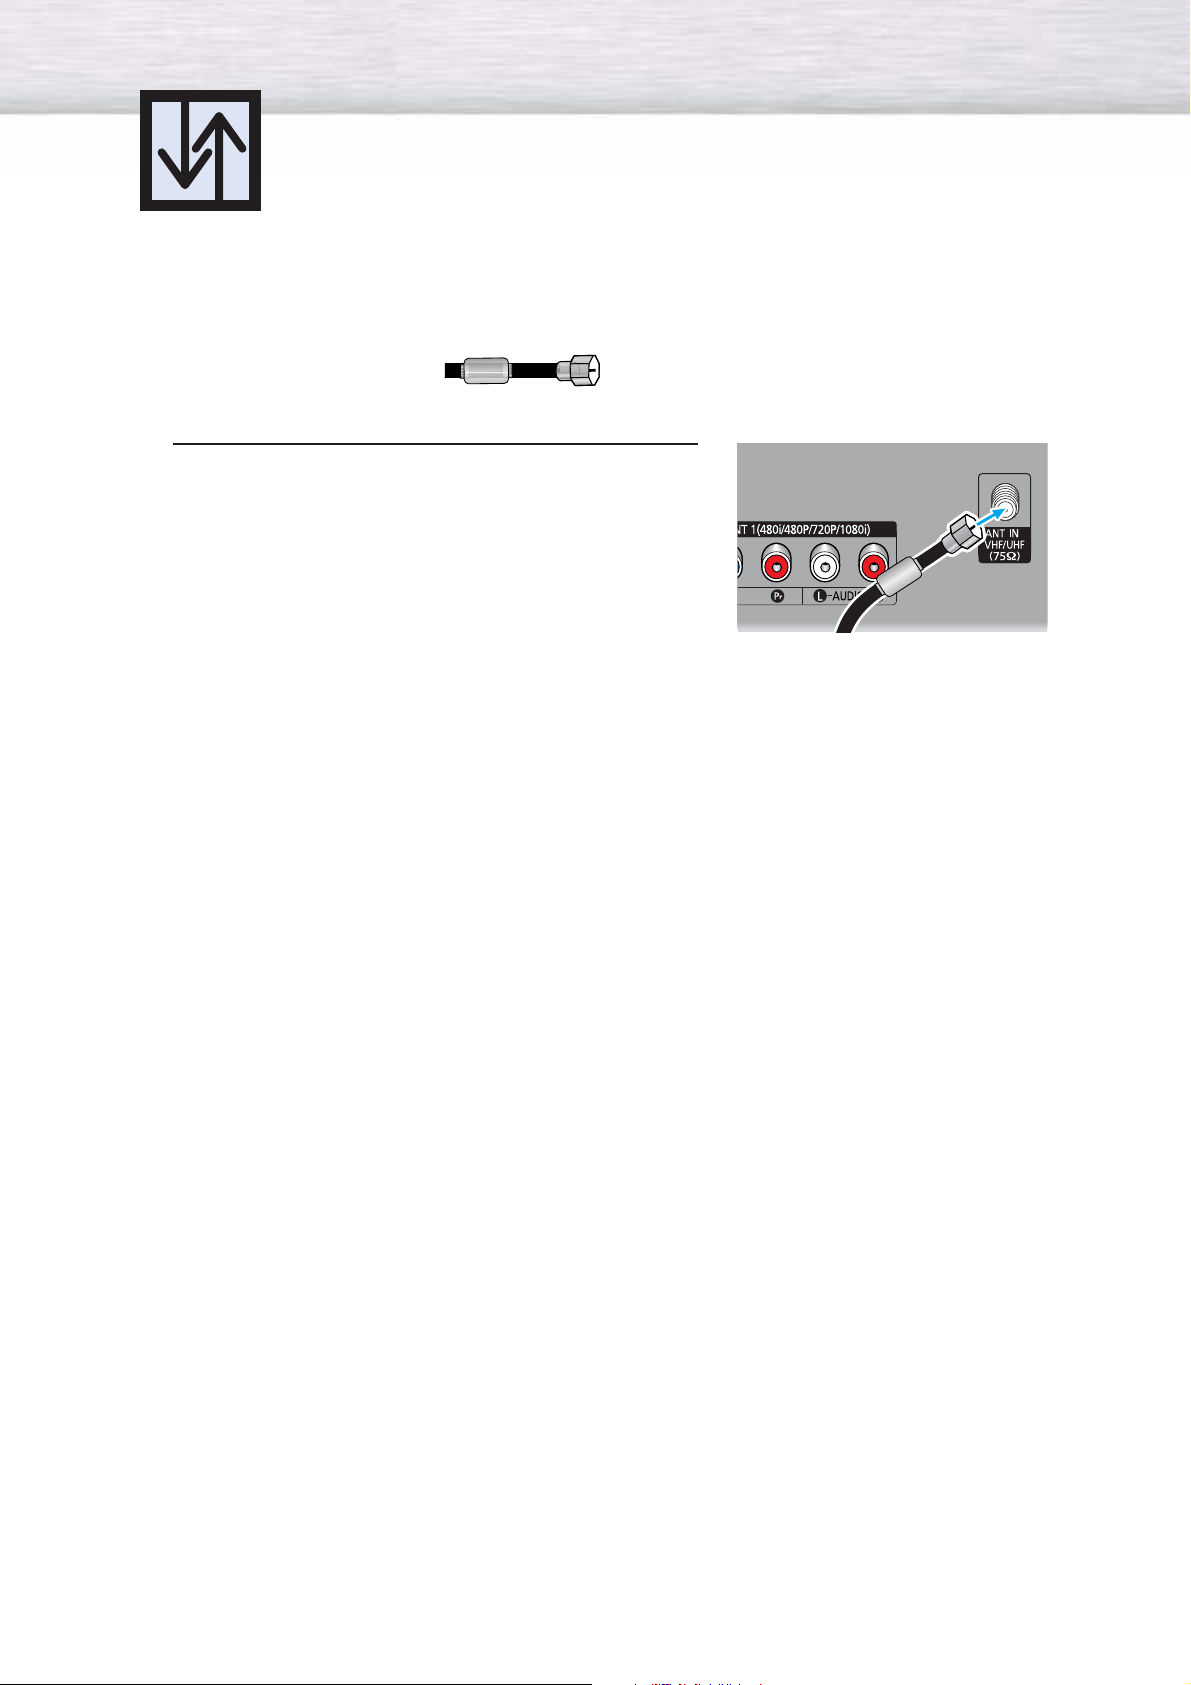
Antennas with 75-ohm Round Leads
If your antenna looks like this: it has 75-ohm round leads.
Plug the antenna lead into the VHF/UHF terminal
on the PDP.
1
Use the Antenna Cable, an accessory included
in the product package.

Connecting Cable TV
You can connect different cable systems to your PDP, including cable without a cable box,
and cable with a cable box that descrambles some or all channels.
Cable without a Cable Box
Plug the incoming cable into the VHF/UHF terminal on
the PDP.
1
Use the Antenna Cable, an accessory included
in the product package.
Cable with a Cable Box that Descrambles All Channels
Find the cable connected to the ANTENNA OUT
terminal on your cable box. This terminal might be
1
labeled "ANT OUT", "VHF OUT" or simply "OUT".
Connect the cable to the VHF/UHF terminal on the
PDP.
2
Use the Antenna Cable, an accessory included
in the product package.

Cable with a Cable Box that Descrambles Some (But Not All) Channels
To complete this connection you will need a two-way splitter, an RF (A/B) switch, and four coaxial
cables (which you can buy from your Samsung dealer or any electronics store).
Find and disconnect the cable that is
connected to the ANTENNA IN terminal of
1
your cable box.
This terminal might be labeled "ANT IN",
"VHF IN" or simply, "IN". Connect this
cable to a two-way splitter.
Connect a coaxial cable between an
OUTPUT terminal of the splitter and the
2
IN terminal of the cable box.
Connect a coaxial cable between the
ANTENNA OUT terminal of the cable box
3
and the B-IN terminal of the A/B switch.
Connect a coaxial cable between the
ANTENNA OUT terminal of the cable box
4
and the B-IN terminal of the A/B switch.
Connect the last coaxial cable between the
OUT terminal of the RF (A/B) switch and
5
the VHF/UHF terminal on the PDP.
After you've made this connection, set the A/B switch to the "A" position for normal viewing.
Set the A/B switch to the "B" position to view scrambled channels. (When you set the A/B switch
to "B", you will need to tune your Set-Top Box to the cable box's output channel, which is usually
channel 3 or 4.)

Connecting a VCR
Connecting a VCR to the Video or S-Video/Audio jack
PDP VCR
Power Cord
Audio Cable
Video Cable
or
S-Video Cable
How to Connect
Connect the Video/Audio cables between the VIDEO or S-VIDEO / L - AUDIO - R jacks on the PDP
and VIDEO or S-VIDEO / L - AUDIO - R output jacks on the VCR. (Note: For better video, you can use
an S-Video cable.)
Note
• Please be sure to match the color coded input terminals and cable jacks.
Videotape Playback:
1. Turn on your PDP.
2. Press the SOURCE button to select “Video(AV1, AV2 or AV3)” or “S-Video(S-VIDEO1 or
S-VIDEO2)”.
3. Turn on your VCR, insert a videotape and press the play button.

Connecting a Camcorder
Viewing camcorder tapes
PDP(SIDE AV3)
PDP
REAR PANEL
S-Video Cable
Camcorder
Audio Cable
Power Cord
Video Cable
How to Connect
Connect a Video/Audio cable between the VIDEO or S-VIDEO / L - AUDIO - R jacks on the PDP
and the VIDEO or S-VIDEO /AUDIO output jacks on the camcorder. (Note: For better video, you
can use an S-VIDEO cable)
Note
• Please be sure to match the color coded input terminals and cable jacks.
Viewing Tapes
1. Turn on your PDP.
2. Press the SOURCE button to select “Video(AV1, AV2 or AV3)” or “S-VIDEO(S-VIDEO1 or
S-VIDEO2)”.
3. Turn on your camcorder and set it to Video Mode. (For details, refer to your camcorder
Owner’s instructions.)
4. Set the IN/OUT switch on your camcorder to OUT.
5. Insert the tape into the camcorder and press the Play button.

Connecting a DVD Player
This PDP displays the optimum picture in 720p mode.
(480i, 480p)
Playing DVD
PDP DVD Player
Power Cord
Component Cable
Audio Cable
How to Connect
Connect the Y, PB, PR (COMPONENT) input jacks on the PDP with Y, PB, PR output jacks on
1
the DVD player using a component cable.
Connect a Audio Cable between the AUDIO L/R(COMPONENT1, 2) input jacks on the PDP
2
and the AUDIO output jacks on the DVD player.
Note
• Please be sure to match the color coded input terminals and cable jacks.
To Play DVD:
1. Turn on your PDP.
2. Press the SOURCE button to select “COMPONENT1” or “COMPONENT2”.
3. Turn on your DVD player, insert a DVD disc and press the Play button.
• For an explanation of Component video, see your DVD owner’s instructions.
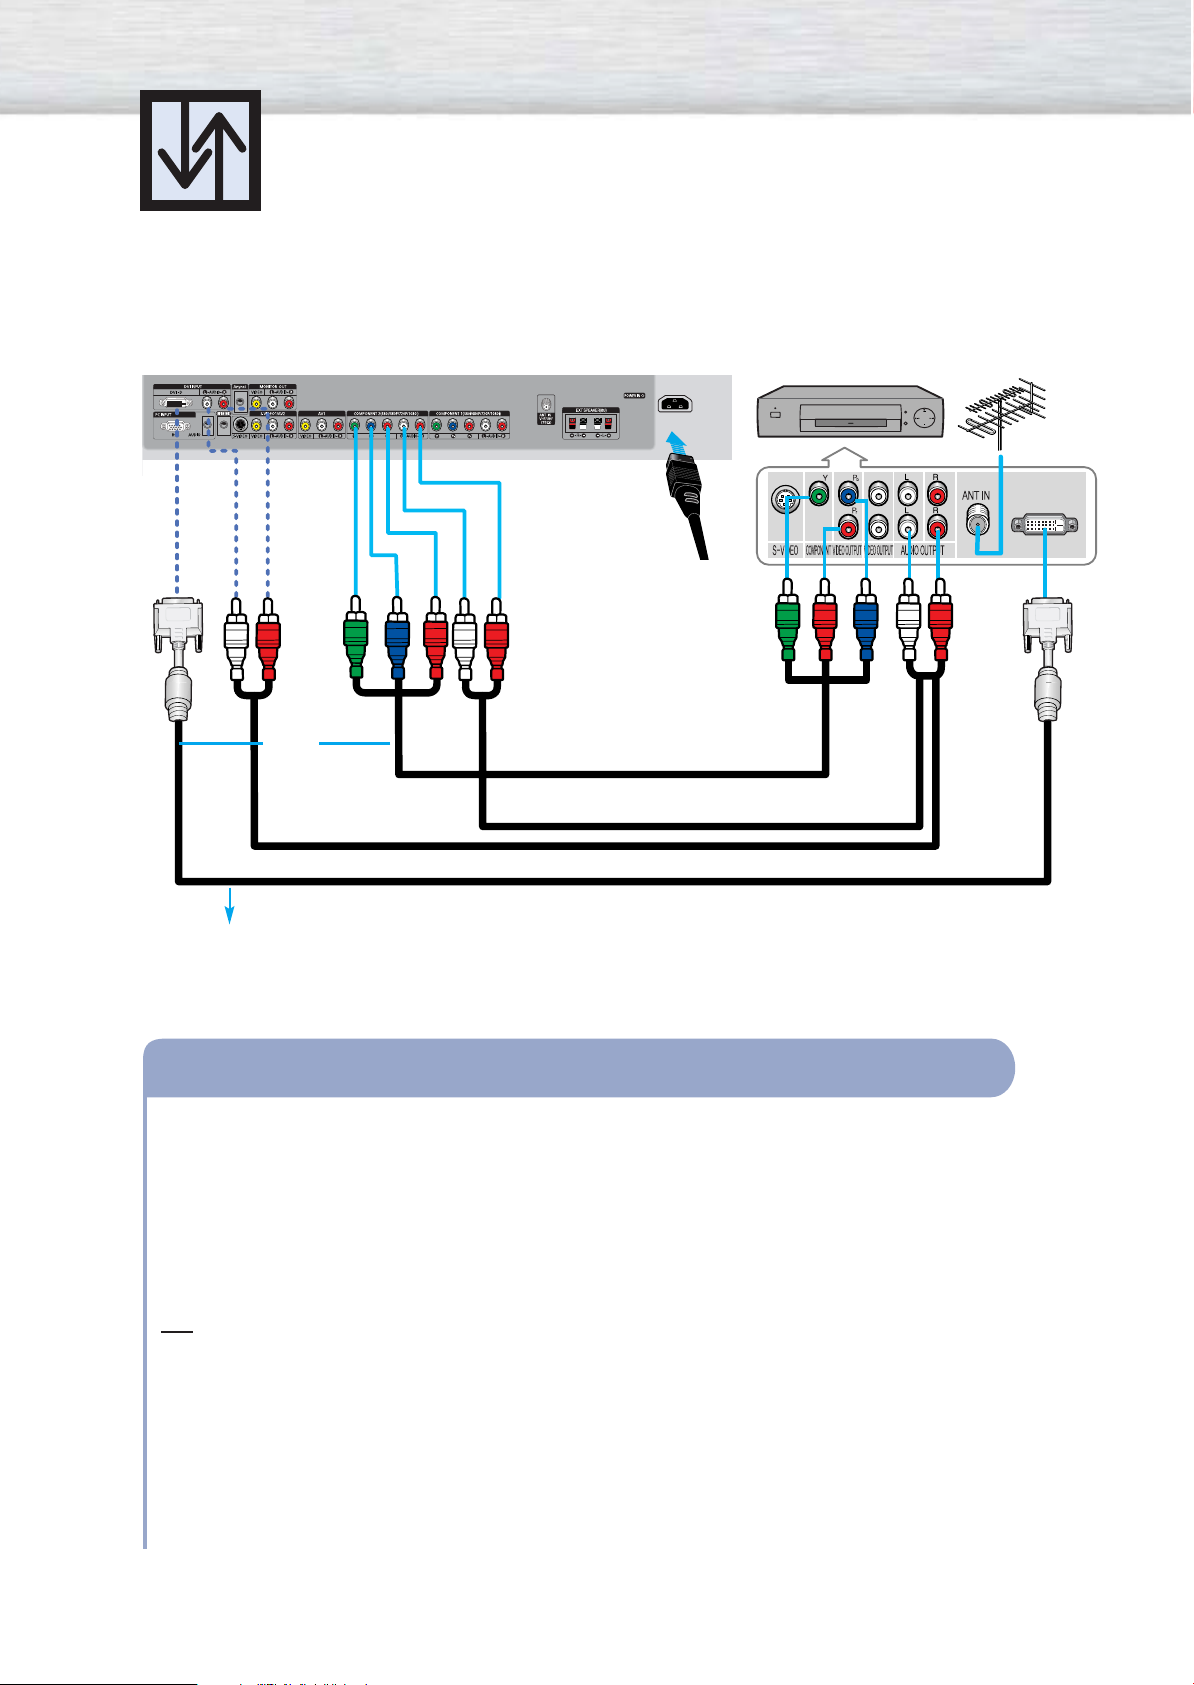
Watching DTV
PDP
or
Use a DVI-D connection cable. (sold separately)
DTV Receiver
Power
Cord
Component Cable
Audio Cable
DVI Cable
How to Connect
Connect the cable or antenna to the antenna input jack on the DTV.
1
Connect the Y, Pb, Pr (COMPONENT) input jacks on the PDP with Y, Pb, Pr output jacks on
2
the DTV receiver using a component cable.
Connect the AUDIO L/R(COMPONENT) input jacks on the PDP with the AUDIO output jacks
3
on the DTV receiver using a audio cable
Note
• Please be sure to match the color coded input terminals and cable jacks.
To Watch DTV:
1. Turn on your PDP.
2. Press the SOURCE button to select “COMPONENT1”, “COMPONENT2” or “DVI”.
3. Turn on your DTV receiver.
• For an explanation of Component video, see your DTV receiver owner’s instructions.
 Loading...