

IMPORTER
Samsung Eledronics Mexico SA de CV
Satumo No 44, Col Nuevu ladustlial '_llleio
Gusiavo A Madero CR 07700, Mexico
TEL)52-5-747-5100
EXPORTER
Samsuno Fl_ctronic__ JtJ
HPL5025

CAUTION
Thank you for choosing Samsung! Your new Samsung product represents the latest in television technol-
ogy, VVe designed it with easy-to-use on-screen menus and closed captioning capabilities, making it
one of the best products in its class, We. are proud to offer you a product that will provide convenient,
dependable service and enjoyment for years to come,
CAUTION: TO REDUCE THE RISK OF ELECTRIC SHOCK, DO NOT REMOVE COVER (OR BACK), NO USER
SERVICEABLE PARTS INSIDE, REFERSERVICING TO QUALIFIED SERVICE PERSONNEL,
[his symbol indicates high voltage is present inside, It is dangerous to make any kind of contact
with any inside part of this product,
This symbol alerts you that ir_portant literature concerning operation and maintenance has been
included with this product,
Note to CATV system lnstalmer: This reminder is provided to call CATV system installer's attention to Arti-
cle $20-40 of the National Electrical Code (Section 54 of Canadian Electrical Code, Part I), that provides
guidelines for proper grounding and, in particular, specifies that the cable ground shall be connected to the
grounding system of the building as close to the point of cable entry as practical,
Caution: FCC/CSA regulations state that any unauthorized changes or modifications to this equipment may
void the user's authority to operate it,
Caution: ]o prevent electric shock, match the wide blade of plug to the wide slot, and fully insert the plug,
Attention: pour eviter les chocs electdques, introduire la lame le plus large de la fiche clans la borne corre-
spondante de la prise et pousserLusqu'au fond,
Important: One Federal Court has held that unauthorized recording of copyrighted TV programs is an
infringement of U,B, copyright laws,
Certain Canadian programs may also be copyrighted and any unauthorized recording in whole or in part
may be in violation of these rights,
TO PREVENT DAMAGE WHICHMAY RESULTIN FIREOR ELECTRICSHOCK HAZARD, DO NOT EXPOSETHiS
APPLIANCETO HAHN OR MOISTURE.
Important Safety Information
Always be careful when using your Monitor, To reduce the risk of fire, electrical shock, and other
injuries, keep these safety precautions in mind when installing, using, and
maintaining your machine,
Read all safety and operating instructions before operating your Monitor,
Keep the safety and operating instructions for future reference,
Heed all warnings on the Monitor and in the operating instructions,
Follow all operating and use instructions,
Unplug the Monitor from the wall outlet before cleaning, Use a damp cloth; do not use liquid or
aerosol cJeaners
Never add any attachments and/or equipment without approval of the manufacturer, Such additions
can increase the risk of fire, electric shock, or other personal ff_jury,
Do not use the Monitor where contact with or immersion in water is a possibility, such as near bath
tubs, sinks, washing machines, s\_vimming pools, etc,
Do not place the Monitor on an unstable cart, stand, tripod, bracket,
table, or floor where it can fall, A frilling Monitor can cause serious
ir_jury to a child or adult, and serious damage to the appliance, Use
only with a cart, stand, tripod, bracket, or table recommended by the
manufacturer or sold with the Monitor, Follow the manuR_cturer's
instructions when mounting the unit, and use a mounting accessory
recommended by the manufacturer, Move the Monitor and cart with
care, ¢}uick stops, excessive force, and uneven surfaces can make the
unk and cart unsteady and likely to overturn,
Provide ventilation for the Monitor, The unit is designed with slots in the cabinet for ventilation to pro-
ted it from overheating, Do not block these openings with any object, and do not place the Monitor
on a bed, sofa, rug, or other similar surface, Do not place it near a radiator or heat register, If you
place the Monitor on a rack or bookcase, ensure that there is adequate ventilation and that you've
followed the manufacturer's instructions for mounting,
Operate your Monitor only from the type of power source indicated on the marking label, If you are
not sure of the type of power supplied to your home, consult your appliance dealer or local power
company,
Use only a grounded or polarized outlet, For your safety, this Monitor is equipped with a polarized
alternating current line plug having one blade wider than the other, This plug will fit into the power
outlet only one way, If you are unable to insert the plug fully into the outlet, try reversing the plug If
the plug still does not fit, contact your electrician to replace your outlet,
2 3

Protect the power cord, Power supply cords should be routed so that they won't be walked on or pinched
by objects placed on or against them, Pay particular atlention to cords at plugs, convenience recepta-
cles, and the point where they exit From the unit,
Unplug the Monitor From the wall outlet and disconnect the antenna or cable system during a lightning
storm or when left unattended and unused For long periods of time, This will prevent damage to the unit
due to Iightrfing and power-line surges,
Avoid overhead power lines, An outside antenna system should not be placed in the vicinity of overhead
power lines or other electric light or power circuits or where it can fall into such power lines or circuits,
When installing an outside antenna system, be extremely careful to keep From touching the power lines
or circuits Contact with such lines can be Fatal,
Do not overload the wall outlet or extension cords Overloading can result in fire or electric shock,
Do not insert anything through the openings in the unit, where they can touch dangerous voltage points
or damage parts, Never spill liquid of any kind on the Monitor,
Ground outdoor antennas, If an outside antenna or cable system is connected to the Monitor, be sure the
antenna or cable system is grounded so as to provide some protection against voltage surges and built-
up static charges, Section 810 of the National Electrical Code, ANSI/NFPA No,70-1984, provides infor-
mation about proper grounding of the mast and supporting structure, grounding of the lead-in wire to an
antenna discharge unit, size of grounding conductors, location of antenna discharge unit, connection to
grounding electrodes, and requftements For the grounding electrode,
Do not attempt to service the Monitor yourself, Refer all servicing to qualified service personnel, Unplug
the unit from the wall outlet and refer servicing to qualified service personnel under the Following condi-
tions:
when the power-supply cord or plug is damaged
if liquid has been spilled on the unit or if objects have fallen into the unit
if the Monitor has been exposed to rain or water
if the Monitor does not operate normally by following the operating instructions
if the Monitor has been dropped or the cabinet has been damaged
when the Monitor exhibits a distinct change in performance
If you make adjustri/ents yourself, adiust only those controls that are covered by the operating instruc-
tions, Adjusting other controls may result in damage and will often require extensive work by a qualified
technician to restore the Monitor to normal,
When replacement parts are required, be sure the service technician uses replacement parts specified by
the manufacturer or those that have the same characteristics as the original part, Unauthorized substitu-
tions may result in additional damage to the unit,
Upon completion of any service or repairs to this Monitor, ask the service technician to perform safety
checks to determine that the Monitor is in a safe operating condition,
The PDP can properly operate in less than temperature O-4OC and humidky 80%,
Do not use in a hot and humid place,
User Jnstruct_on_
The Federal Communications Commission Radio
Frequency Interference Statement includes the Fol-
lowing warning:
NOTE: This equipment has been tested and Found
to comply with the limits For a Class B digital
device, pursuant to part 15 of the FCC Rules,
These limits are designed to provide reasonable
protection against harmful interference in a resi-
dential installation,
This equipment generates, uses and can radiate
radio frequency energy and, if not installed
and used in accordance with the instructions, may
cause harmful interference to radio communica-
tions However, there is no guarantee that interfer-
ence will not occur in a particular installation, IF
this equipn_ent does cause harmful interference to
radio or television reception, which can be deter-
mined by turning the equipment off and on, the
user is encouraged to try to correct the interfer-
ence by one or more of the Following measures,
User information
Changes or modifications not expressly approved
by the party responsible for compliance could
void the user's authorky to operate the equipment
If necessary, consult your dealer or an experi-
enced raclio/television technician For additional
suggestions, You may Find the booklet called How
to Identify and Resolve Radio/TV Interference
Problems helpful, [his booklet was prepared by
the Federal Communications Commission, It is
available from the U,S. Government Printing
Office, _A/ashington, DC 20402, Stock Number
604-000-00345-4 ,
Warr_ing
This is a Class B product, In a domestic environ-
ment this product may cause radio interference in
which case the user may be required to take ade-
quate measures,
User must use shielded signal interface cables to
maintain FCC compliance For the product,
Declaration of conformity For products marked
with FCC Logo, This device complies with Part 15
of the FCC Rules, Operation is subiect to the Fol-
lowing two conditions:
(1) this device may not cause harmful interference,
and
(2) this device must accept any interference
received, including interference that may
cause undesired operation,
The party responsible For product compliance:
SAMSUNG ELECTRONICS CO,, LTD
America QA Lab of Samsung
3351 Michelson Drive, Suite #290,
Irvine, CA 92612, U,S,A
]el) 949-975-7310
Fax} 949-975-7328
Provided with this monitor is a detachable power
supply cord wkh IEC320 style terminations,
It may be suitable for connection to any U[ Listed
personal computer with similar configuration
Before making the connection, make sure the volt-
age rating of the computer convenience outlet is
the same as the monitor and that the ampere rat-
ing of the computer convenience outlet is equal to
or exceeds the monitor voltage rating,
For 110 \/ok applications, use only U[ Listed
detachable power cord with NEMA configuration
5-15P type (parallel blades) plug cap, For 230
Volt applications use only U[ Listed Detachable
power supply cord with NEMA con%uration
6015P type ([andem blades) plug cap,
JC Compmiance Notice
This Class B digital apparatus meets all require-
ments of the Canadian Interference-Causing
Equipment Regulations of ICES-O03,
Notice de Confor_ite iC
Cet appareil nume}rique de Classe B respecte
routes les exigences du Reglement ICES-O03 sur
les equipements produisant des interferences au
Canada,
European Notice
Products with the CE Marking comply wkh both
the EMC Directive (89/336/EEC), (92/31/EEC),
(93/68/EEC} and the Low Voltage Directive
(73/23/EEC) issued by the Commission of the
European Community, Compliance with these
directives implies conformity to the following Euro-
pean Norms:
EN55022 : 1998 Class B
EN55024 : 1998
EN61000-3-2 : 1995
EN61000-3-3 : 1995
4 5
Rq TeJevisionFormat
Table0f Contents
Wide screen format PDP Displays (16:9,the aspect ratio of the screen width to height) are primarily
designed to view wide screen format fulbmotion video,The images displayed on them should primarily be
in the wide screen 16:9 ratio format,or expanded to fill the screen if your model offers this feature,and con-
stantly moving,Displaying stationary graphics and images on screen,such as the dark side-bars on non-
expanded standard format tebvision video and programming,should be limited to no more than 5%of the
total television viewing per week,
Additionally, viewing other stationary images and text such as stock market reports, video game
displays,station Iogos,web sites or computer graphics and palerns,should be limited as described above
for all televisions, Disptaying any stationary images that exceed the above guidetines can
cause uneven aging of PDP Displays that leave subtle, but permanent burned-in gbost
images in the PDP picture=To avoid this, vary the programming and images, and primari-
ly disptay ful! screen moving images, not sta_onary pa_erns or dark bars.
On PDP models that offer picture sizing features,use these controls to view the different formats as a fuji
screen picture,
Be careful in the selection and duration of television formats used for viewing, Uneven PDP aging as a
result of format selection and use,as well as other burneddn images,is not covered by your Sanlsung limited
warranty,
User Jnstructi0ns
@
Screen imageretention
Do not display a still image (such as on a video game or when hooking up a PC to this Monitor) on the
plasma monitor panel for more than several minutes as it can cause screen image retention, [his image
retention is also known as "screen burn", To avoid such image retention, refer to page 26 of this manual to
reduce the degree of brightness and contrast of this screen when displaying a still image,
eel Defect
@
the plasma display panel consists of fine cells, Akhough the paneB are produced with nlore than 99,9
percent active cells, there may be some cells that do not produce light or remain lit,
Ybur New Plasma Display Panel ........................ 10
Remote Control Bulons .................................... 12
VVall hlstallation Instructions .............................. 14
Turning the PDP Qn and OFF.............................. 18
Connecting Speakers ...................................... 22
Connecting a VCR/Cabb Box .......................... 23
Connecting a DVD/Set-Top Box ........................ 24
Piet_[÷C;e_tt*el
Custorlfizh_g the Picture .................................... 26
Ushlg Automatic Picture Selings ........................ 27
Viewing the Picture-in-Picture ............................ 28
Changing the Screen Size ................................ 31
Freezhlg the Picture .......................................... 32
Seum_CeltreH
Customizing the Sound .................................... 34
Ushlg ALItomatJc SOLIBd Se_h-lgs ........................ 35
Ushlg the Surround ........................................ 36
Ser:ing the Clock ............................................ 38
Seling the Sleep Timer .................................... 39
Seling the Timers ............................................ 40
Io_÷_ti_g PCa_t Operatb_
Connectlrlg to a PC .......................................... 44
Aqjusting the PC; Screen .................................. 48
Changing the Position of the Image .................... 49
Changhlg the Size of the Image ........................ 50
Ertarge of the image (Zoom) ............................ 51
Move Expand d Picture .................................... _2
Picture ©uatty Adiustment ................................ 53
Information .................................................... 56
Power Saver (PC mode only) ............................ 57
Selecting a Menu Language .............................. 60
Setting the Mull Control .................................. 61
Using the Key Lock .......................................... 62
Setting up _ur Remote Control ........................ 63
Troubleshooting .............................................. 66
Care and Maintenance .................................... 67
Specifications .................................................. 68
@
._tmosphericPressureC0nditi0n: 0,8_1,1 atmosphericpressure
This condition is concerned with the height in which the PDP can normaly operate, Be sure of this condition
when you use the PDP,
@
Warranty
Warranty Period: One year starting from the purchase of your Monitor,
Warranty does not cover any damage caused by image retention,
6 7

? L _ S M _ D _ S ? k A Y ? A H E k
Your New Plasma Display P_nel .................................................... 10
Remote Control Buttons ................................................................ 12
\A/_III hlstallation Instructions .......................................................... 14
T_lrning the PDP On and Off .......................................................... 18
YourNew PlasmaDis
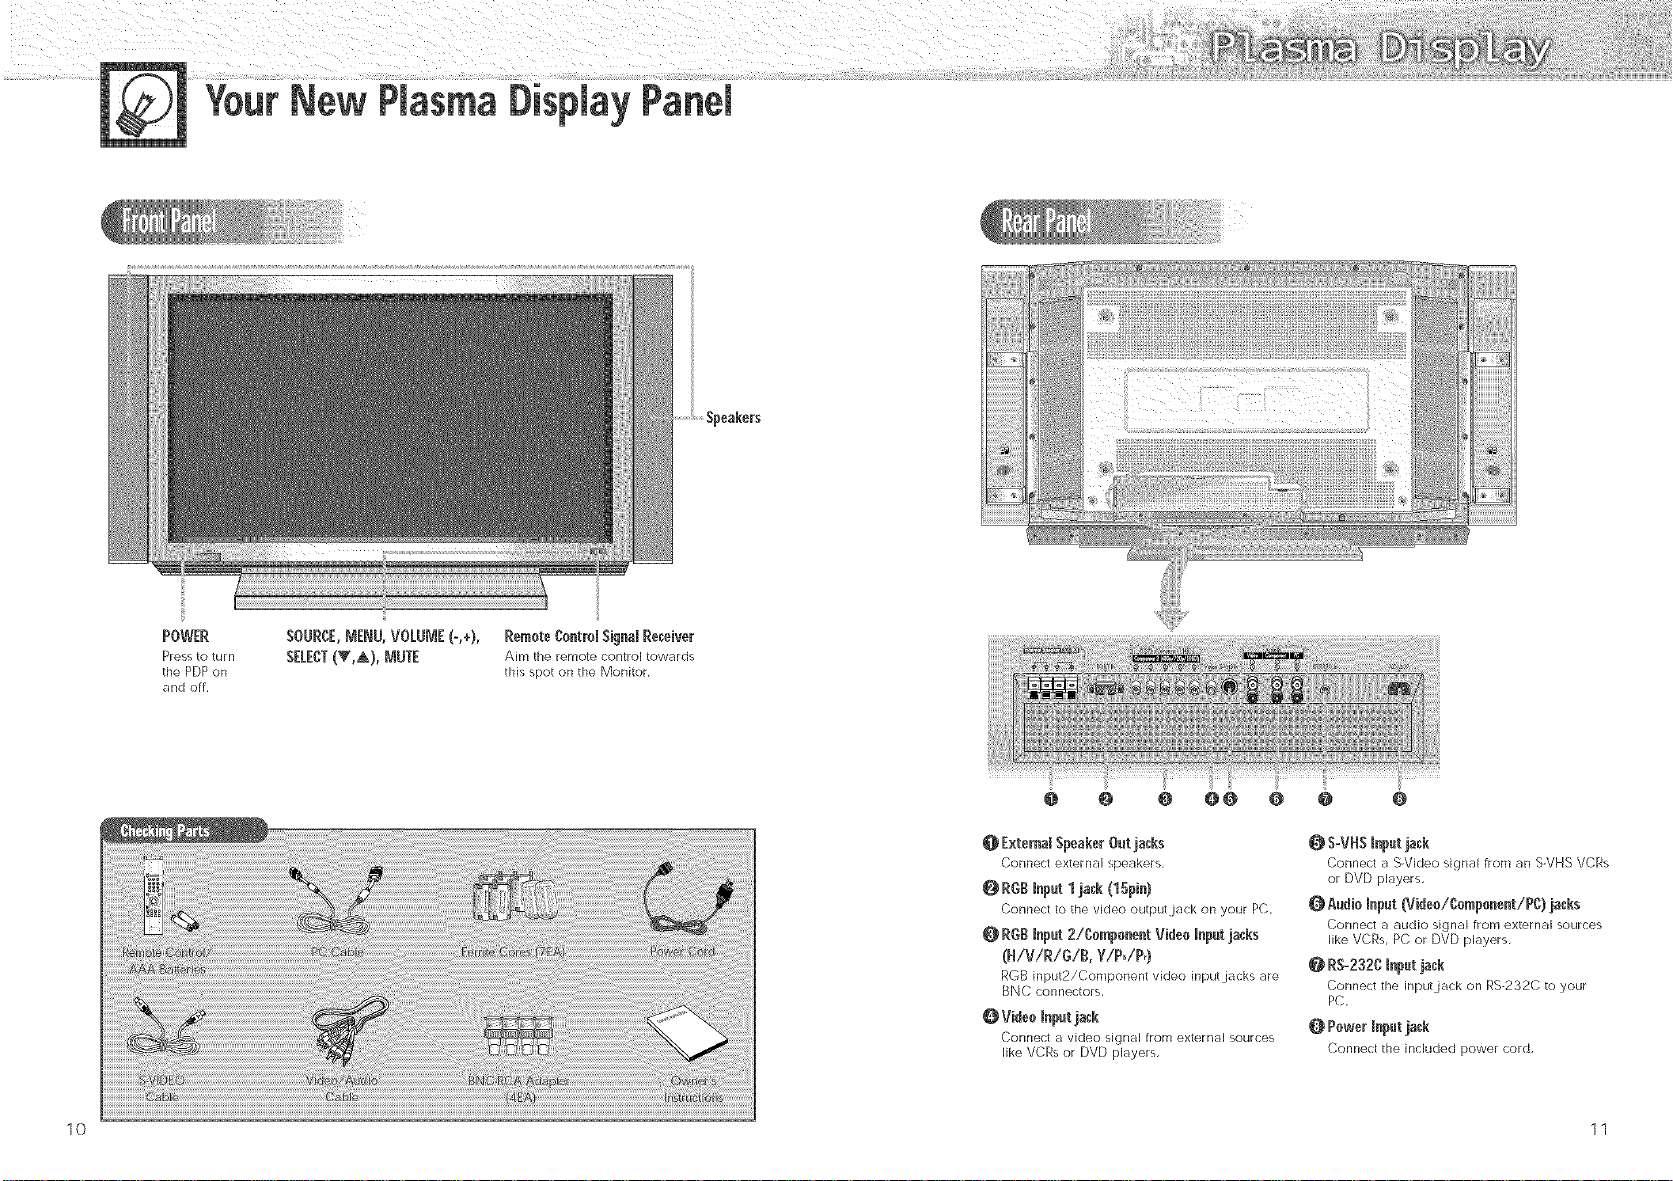
POWER
Press to tUFn
the PDP on
and off,
SOURCE,_'_ENU,VOLUME(-,+),
SELECT(V,A), MUTE
RemoteControl SignalReceiver
Aim the remote control towards
this spot on the Monitor,
@ ExtemalSpeakerOutjacks
Connect external speakers,
RGBmnput1jack (1Spin)
Connect to the video output.jack on your PC,
RGBinput2!Cnmp0nent Video Inputjacks
(H!V!R/¢!B, Y!P0/P_)
RGB input2/Component video input.jacks are
BNC connectors,
Videnmnputjack
Connect a video signal from external sources
like VCRs or DVD players,
S-VHSmnputjack
Connect a S-Video signal from an S-VHS VCRs
or DVD players,
Q AudioInput(Viden!Component!PC)jacks
Connect a audio signal from external sources
like VCRs, PC or DVD players,
@ R$-232Cinputjack
Connect the input jack on RS-232C to your
PC,
O Power Input jack
Connect the included power cord,
10 11
RemoteContromButtons
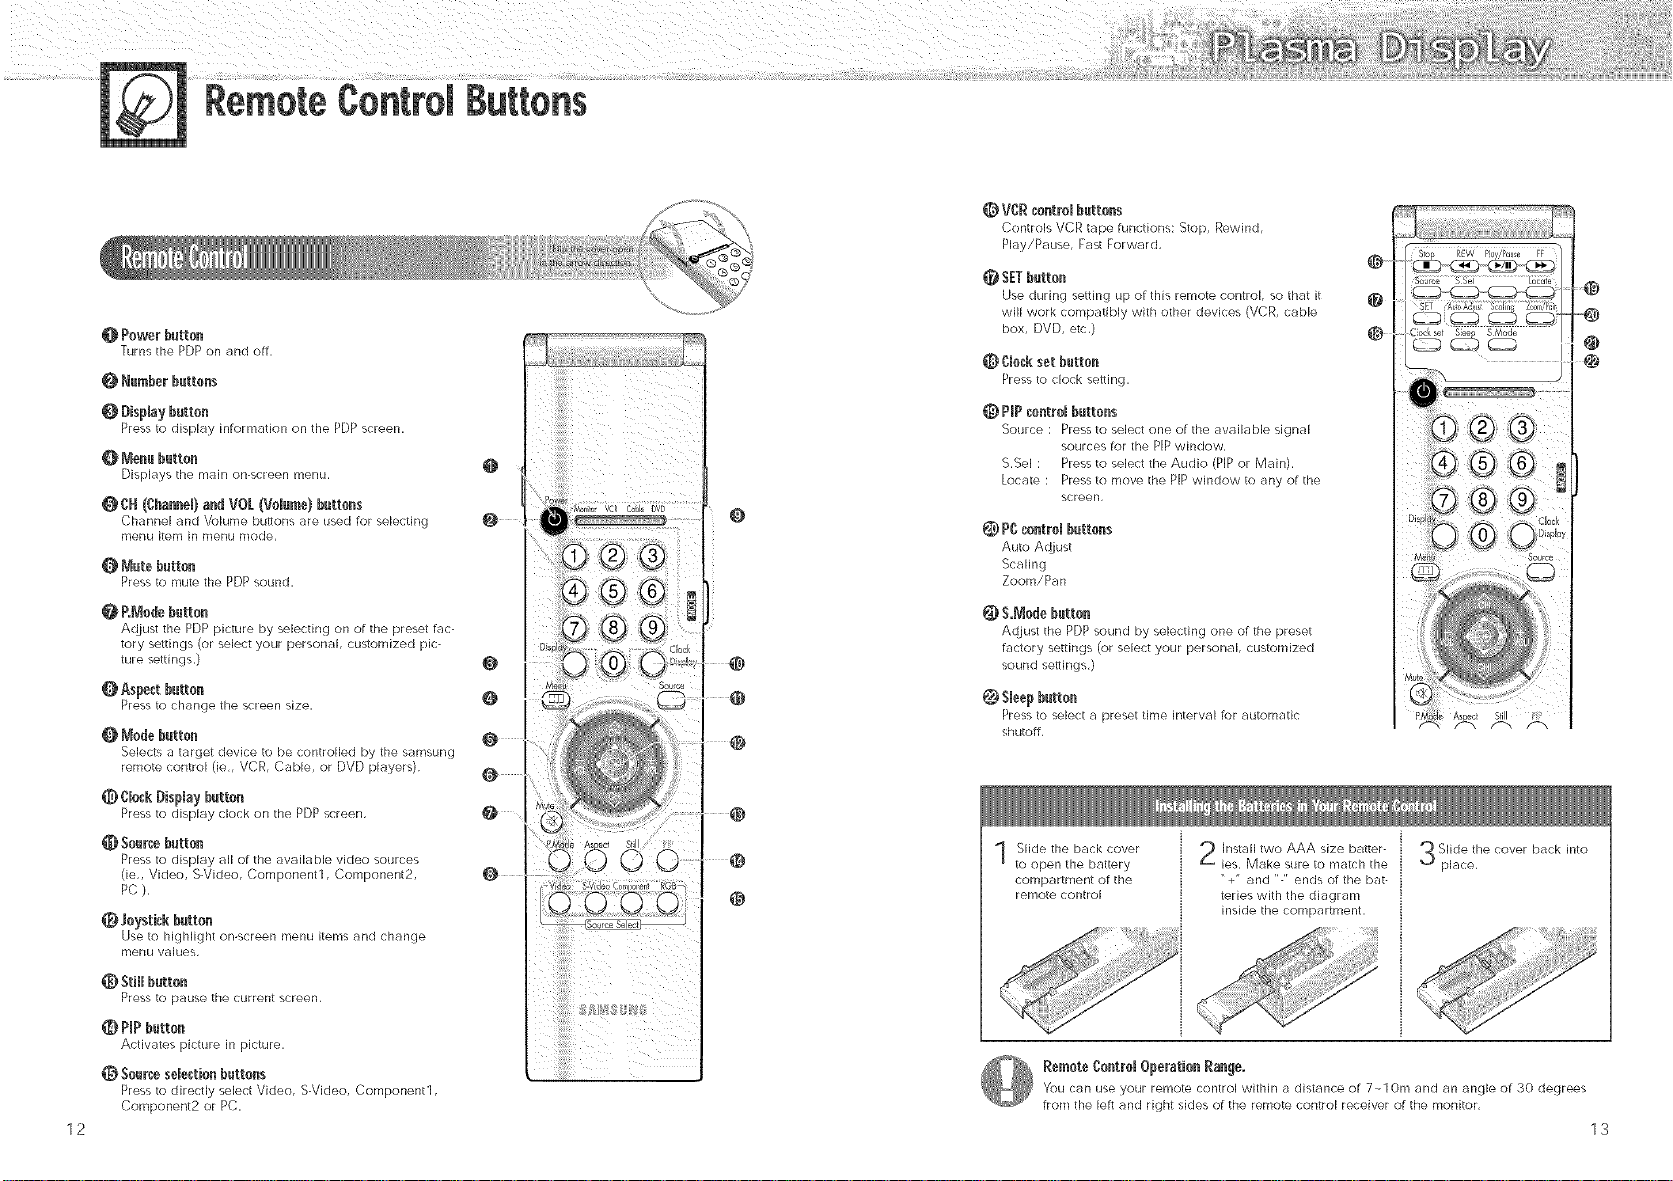
@ Powerbatten
Turns the PDP on and off,
O Nar_berbattens
0 Displaybatten
Press to display information on the PDP screen,
Menu batten
Displays the main on-screen menu,
CH(Channel)and VOL(Volume)battens
Channel and Volume buEons are used for selecting
menu ite[Yi in r[lenu r[lod@,
O Mnte batten
Press to mute the PDP sound,
RMedn batten
Adjust the PDPpicture by selecting on of the preset fac-
tory settings (or select your personal, customized pic-
ture settings,)
Aspect batten
Press to change the screen size,
Me@ batten
Selects a target device to be controlled by the samsung
remote control tie,, VCR, Cable, or DVD players)
ClockDisplay batten
Press to display clock on the PDP screen,
Searchbatten
Press to displa,>_allof the availabb video sources
(in,,Video, S-Video, Componentl, Component2,
PC),
_[_ Joystick batten
Use to highlight on-screen menu items and change
menu values,
Still batten
Press to pause the current sc[een,
0 PmPbatten
Activates picture in pidure,
_}t Search selection battens
Press to directly select Video, S-Video, Component1,
Component2 or PC,
12
@
@
@
@
@ VCR cent_Bbattens
Controls VCR tape functions: Stop, Rewind,
Play/Pause, Fast Forward,
SETbatten
Use during setting up of this remote control, so that it
will work compatibly with other devices (VCR, cable
box, DVD, etc,)
_} Cleck set batten
Press to clock seeing,
@ P!Pcontrolbattens
Source : Press to select one of the available signal
sources for the PiP window,
S,Sel : Press to select the Audio (PiPor Main),
Locate : Press to move the PiP window to any of the
screen,
(_) PC_ntrel battens
Auto Adiust
Scaling
Zoom/Pan
_) $.Medn batten
Adjust the PDP sound by selecting one of the preset
factory settings (or select your personal, customized
sound seeings,)
Sleep batten
Press to select a preset time interval for automatic
shutoff,
Slide the back cover
to open the battery
compartment of the
remote control
Install two AAA size batter-
ies, Make sure to match the
"+" and "-" ends of the bat-
teries with the diagram
inside the compartment.
RemoteContrel Operation Range.
You can use your remote control within a distance of 7_10m and an angle of 30 degrees
from the left and right sides of the remote control receiver of the monitor,
@
@
....
Slide the cover back into
place,
Slill ¸¸ Fii_
13
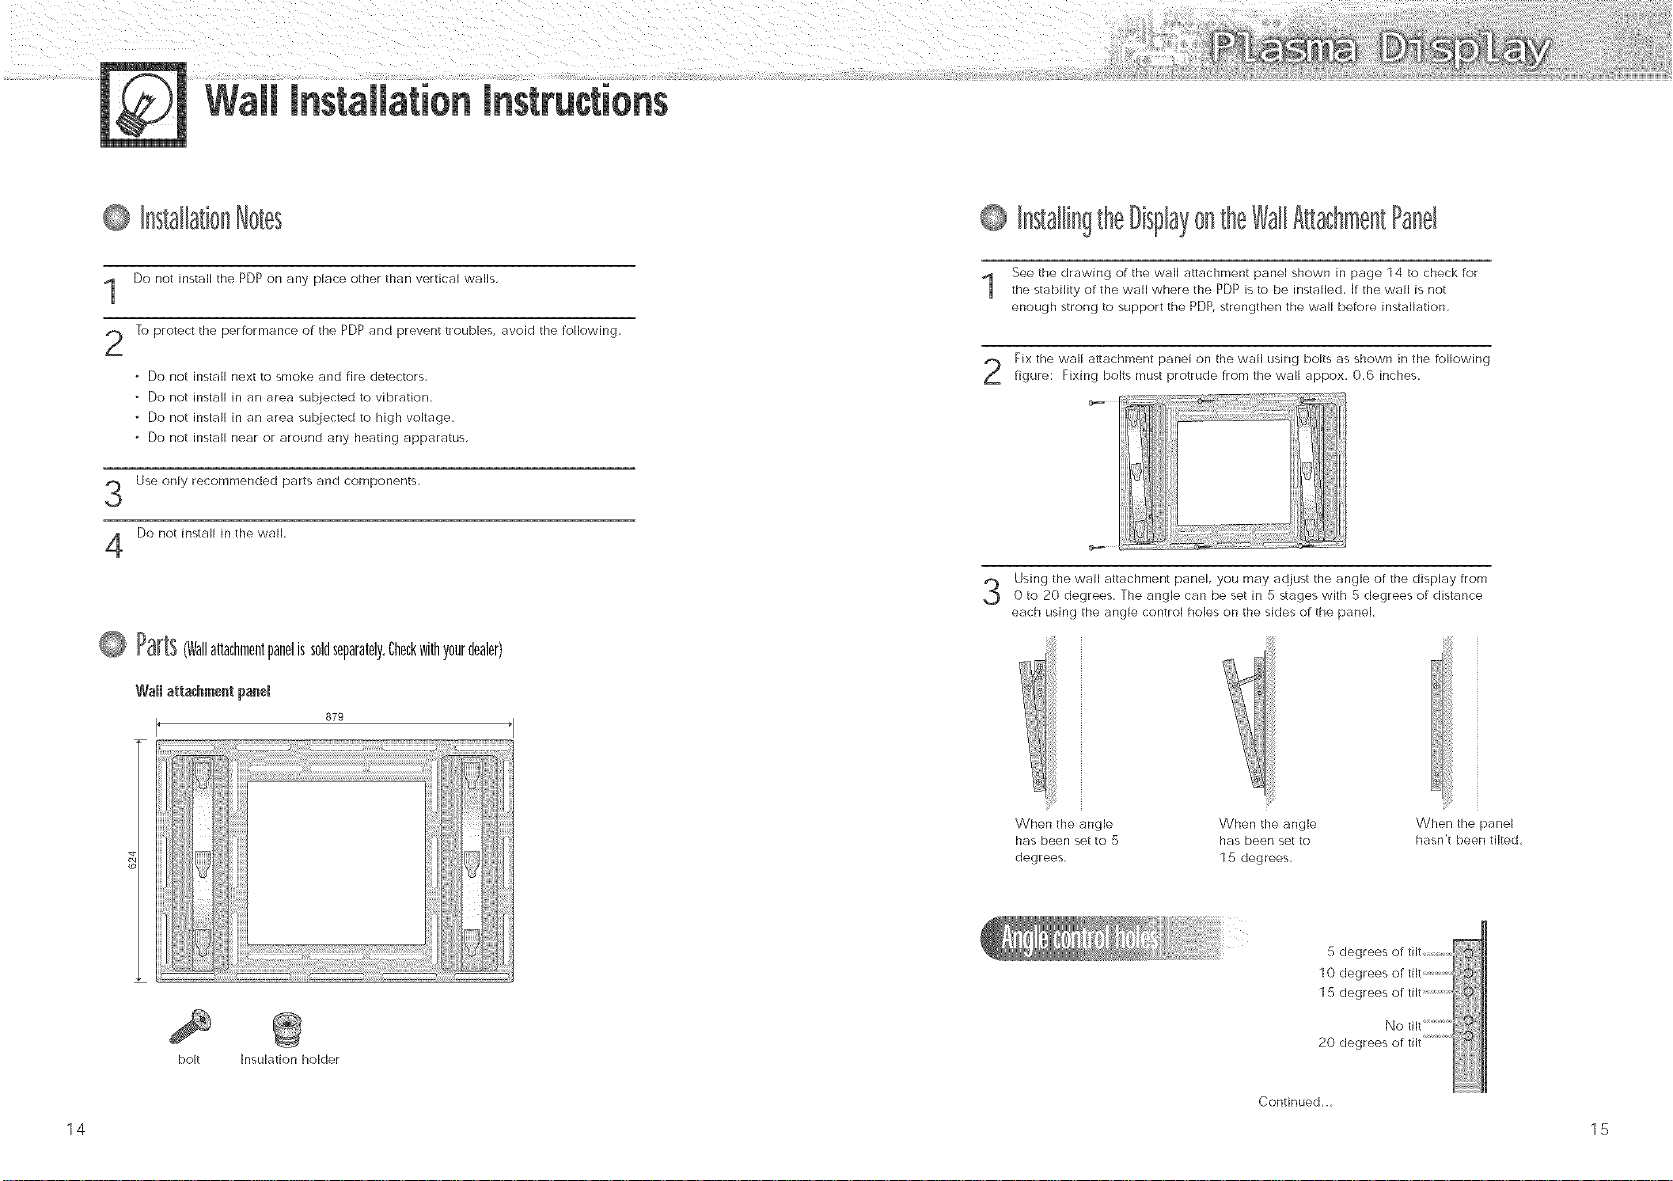
Wall installation instructions
@ InstallationNotes
Do not install the PDP on any place other than vertical walls,
To protect the performance of the PDP and prevent troubles, avoid the following,
* Do not install next to smoke and fire detectors,
* Do not install in an area subjected to vibration,
* Do not install in an area subiected to high voltage,
* Do not install near or around any heating apparatus,
Use only recommended parts and components,
Do not install in the wall,
Q Parts(Wallattachmentpanelissoldseparately.Checkwithyourdealer)
Wall attachmentpaneR
879
@ InstallingtheBisplayontheWallAttachmentPanel
See the drawing of the wall attachment panel shown in page 1 4 to check for
the stabilit_t of the w_:lll where the PDP is to be installed, If the wall is not
enough stlong to support the PDP, strengthen the wall before installation,
Fix the wall a_achment panel on the wall using bolts as shown in the following
figure: Fixing bolts must protrude from the wall appox, 0,6 inches,
c_ ....
Using the wall attachment panel, you may adjust the angle of the display from
0 to 20 degrees, The angle can be set in 5 stages with 5 degrees of distance
each using the angle control holes on the sides of the panel,
ili!iiii!ili
iii!_'
When the angle When the single When the panel
has been set to 5 has been set to hasn't been tilted,
degrees, 1 5 degrees,
5 degl
10 degl
1 5 degl
bolt Insuhtion holder
20 clegl
Continued,,
14 15
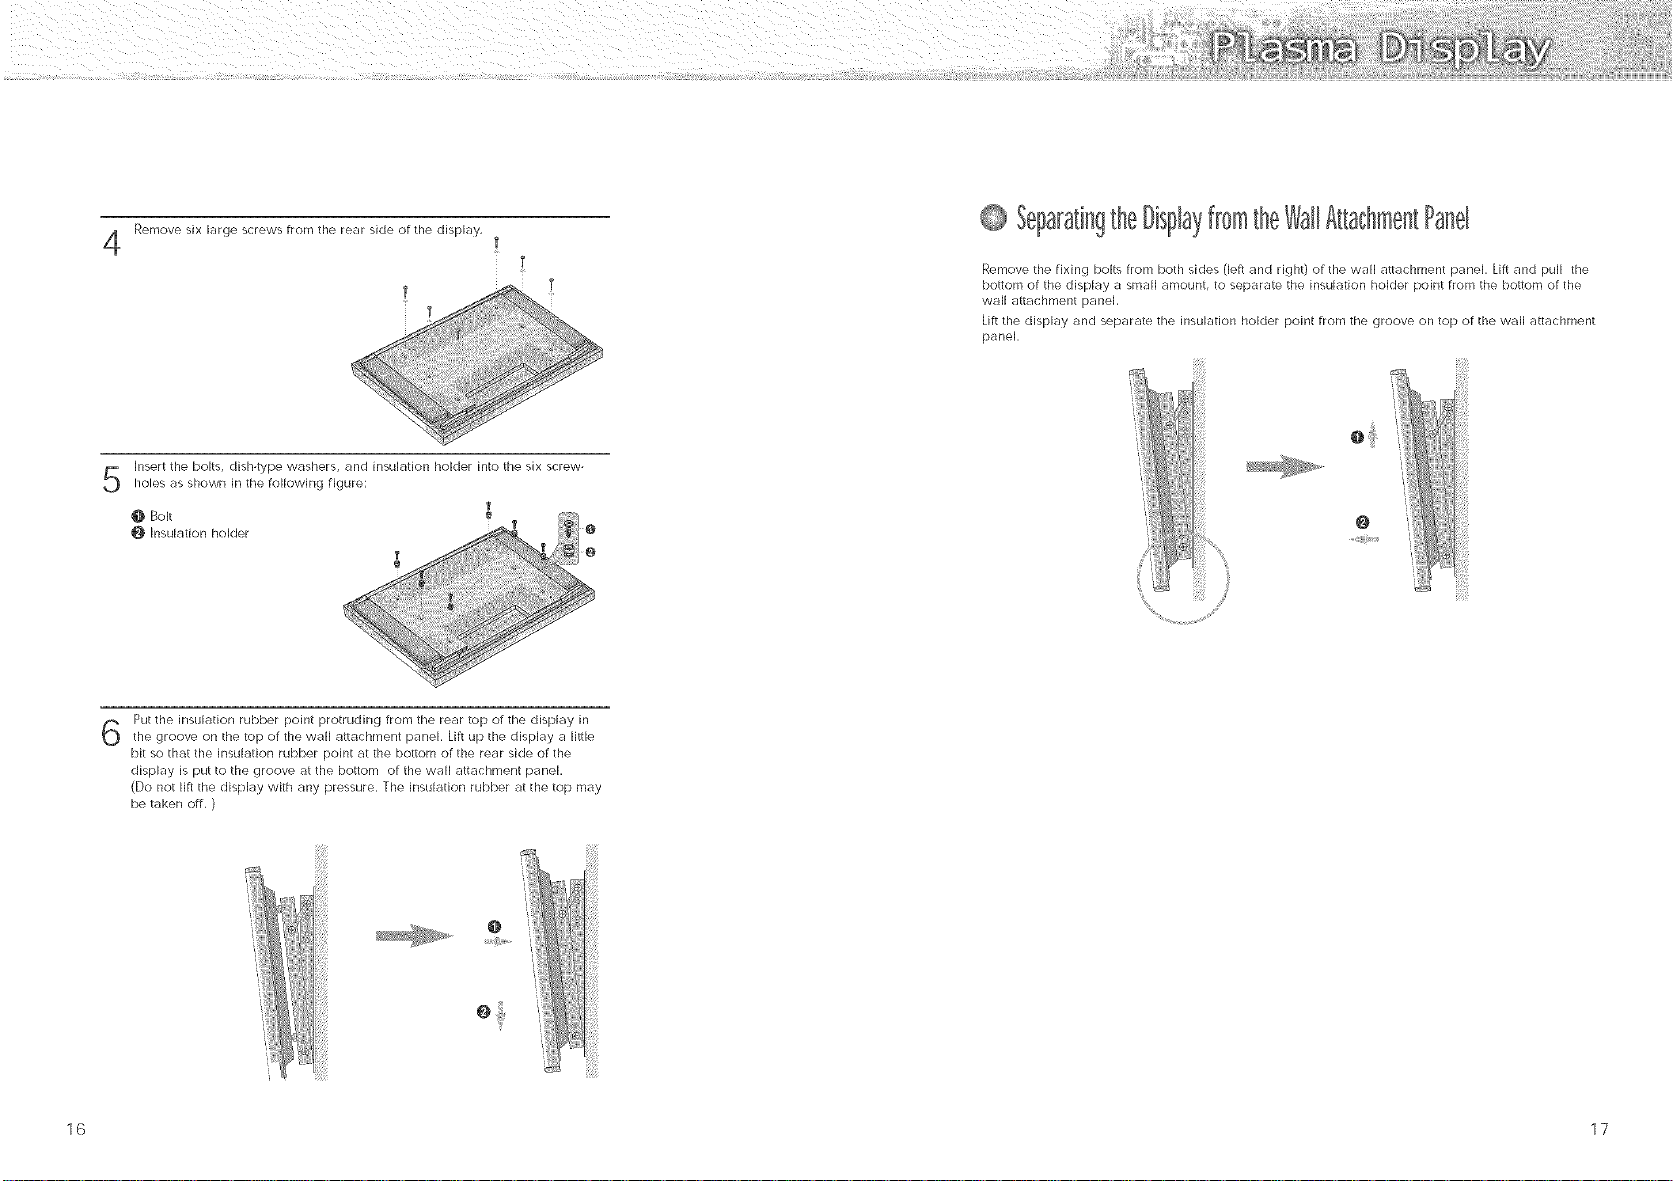
Remove six large screws from the rear side of the display,
iii!iiiii i
Insert the bolts, dish-type washers, and insulation holder into the six screw-
holes as shown in the Following figure:
0 Bolt
@ Insulation holder
Put the insulation rubber point protruding From the rear top of the display in
the gloove on the top of the wall attachment panel, lift up the display a Ii_le
bk so that the insulation rubber point at the bottom of the rear side of the
display is put to the groove at the bottom (if the wall attachment panel,
(Do not lift the display with any pressure, the insulation rubber at the top may
be taken off, )
0 SeparatingtheDisplayfromtheWallAttachmentPanel
Remove the fixing bolts from both sides (left and right) of the wall attachn/ent panel, lift and pull the
bottom of the display a small amount, to separate the insulation holder point from the botlom of the
wall attachment panel,
lift the display and separate the insulation holder point from the groove on top of the wall attachment
panel,
0
@
16 17
theMonitor(PDP)OnandOff
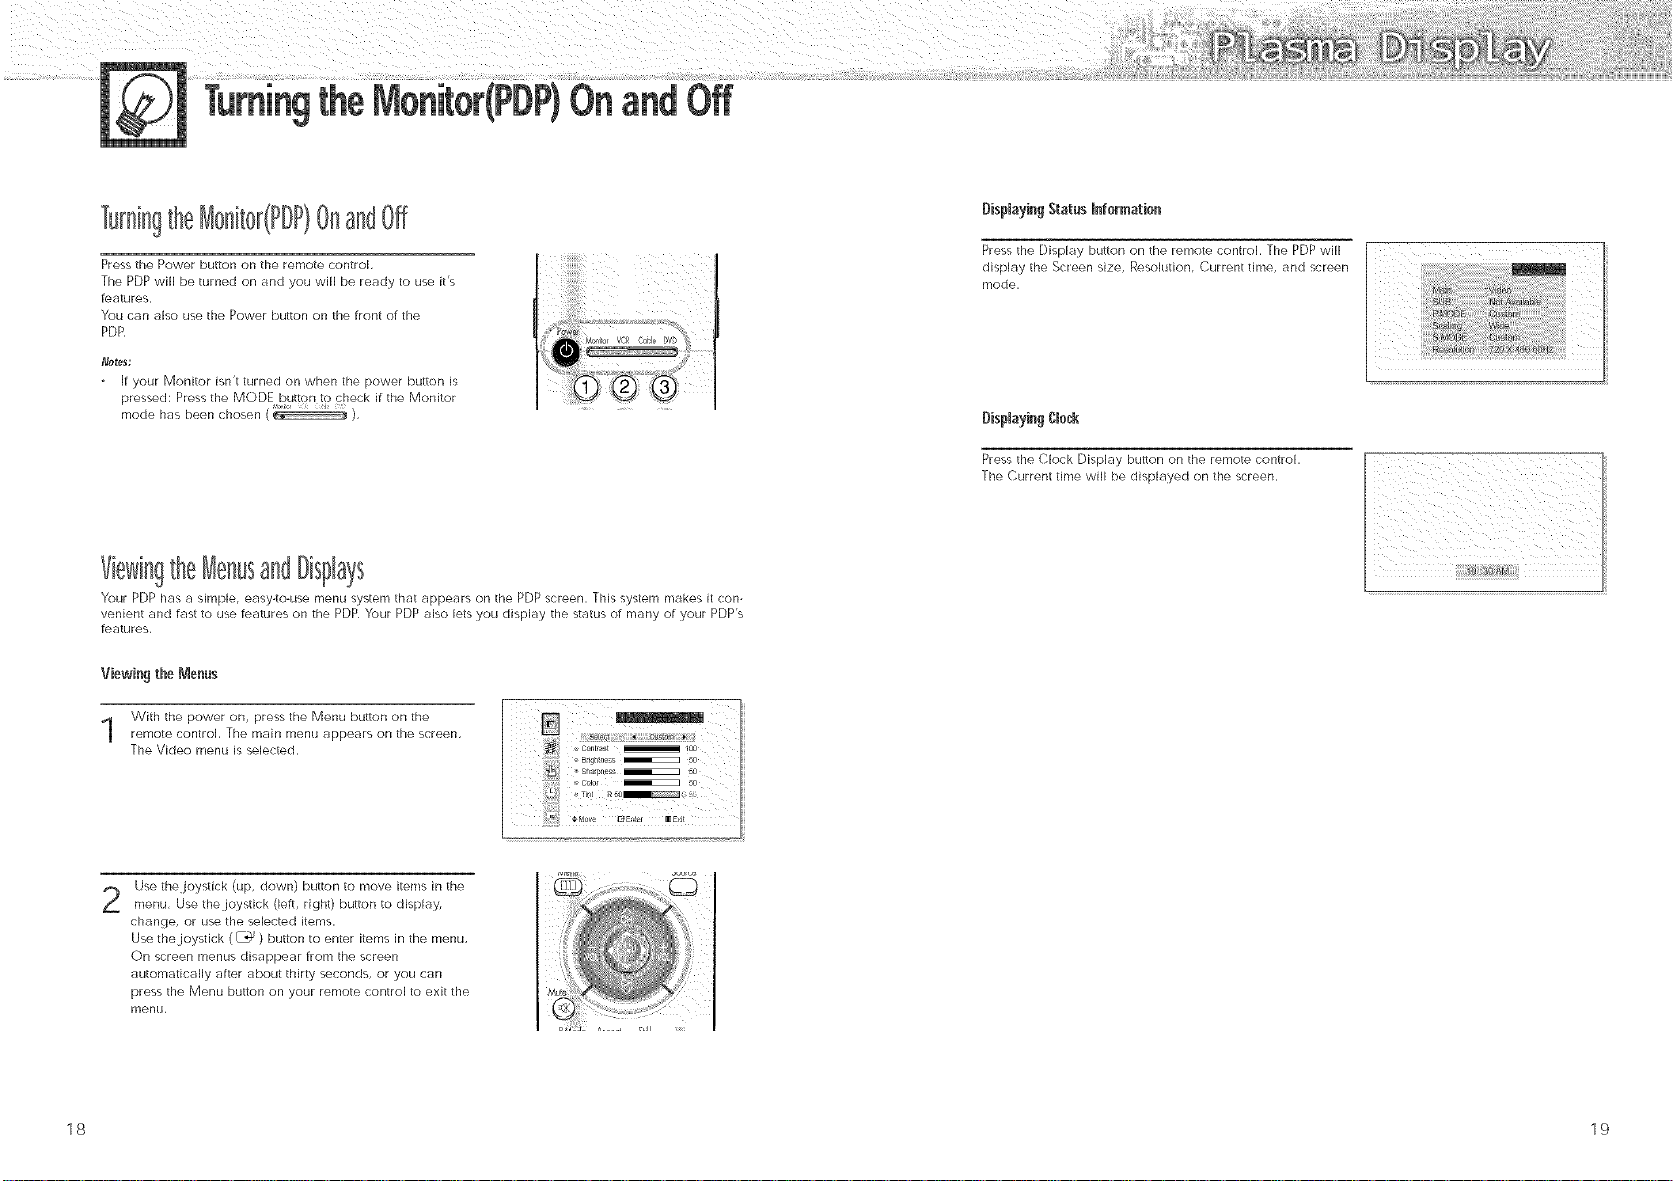
Turn[n9theMonRor(PDP)OnandOff
Press the Power button on the remote control,
The PDP will be turned on and you will be ready to use it's
features,
You can aBo use the Power button on the front of the
PDR
if your Monitor isn't turned on when the power button is
pressed: Press the MODE button to check if the Monitor
mode has been chosen ( ),
ViewingtheMenusandDisplays
Your PDP has a simple, easy-to-use menu system that appears on the PDP screen, This system makes it con-
venient and fast to use features on the PDP Your PDP also Jets you display the status of many of your PDP's
festures,
Viewingthe Menus
With the power on, press the Menu button on the
remote control The main menu appears on the screen,
The Video menu is selected,
Bisp[aying Statns Information
Press the Display button on the remote control, The PDP will
display the Screen size, Resolution, Current time, and screen
mode,
Disp[ayin9 CJncR
Press the Clock Display buRon on the remote control,
The Current time will be displayed on the screen,
Use the joysdck (up, clown} button to move items in the
2
menu, Use the.joystick (left, right) button to display,
change, or use the selected items,
Use the joystick (_) button to enter items in the menu,
On screen menus disappear from the screen
automatically after about thirty seconds, or you can
press the Menu button on your remote control to exit the
menu,
18 19

_ i _ _ _ _ _ i _ F'¸ i _ ? _ _ _ _: i
(Connecting Speakers / Receiver)
Connecting Speakers .................................................................... 22
Connecting a VCR/Cable Box ...................................................... 23
Connecting a DVD/Set-_p Box .................................................... 24

PDP
a VCR/Cab eBox
ThespeakersMUSThavemorethan7wa_srating(impedance8ohm),
Connect the speaker audio cable to the external speaker output jack on the rear or the PDP
matching the "+" and "-" ends or the cable with the diagram on the PDP,
Fix the bracket onto the guide pole located on the rear
of speaker and fasten the screws,
After removing the three screes on the PDP, clamp the
speaker and the PDP together and fasten the screws,
Stand and speakers
pole°....... ii!iii!ii
_i_Iiiiiiiiiii_
poleGUide _l
22
Guk_e
po_e
Video Cable
Connect Video/S-Video cable between the Video/S-Video Output jack on the VCR/Cable
box and the Video Input jack on the PDP,
o For better video, you can use a S-Video cable,
o You can attach the Ferrite Cores(supplied) to the both.jacks of the Video cable,
Simply set the Ferrite Cores right under the.jacks,
Connect an Audio cable between the Audio Output iack on the VCR/Cable box and the
Audio Input.jack (Video) on the PDP,
Vide0tapePBayback:
1, Turn on PDP and press the Video or S-Video(it S-Video.jack is connected,) button on your
reri/ote control,
2, [urn on your VCR, insert a videotape and press the Play bu_on,
, For an explanation or Component video, see your VCR/Cable Box owner's instruction,
23

PDP DVDiDTV receiver
ANTIN
Power Plug
Video (Y, P,,, Pr) Cable
1 Connect a Video cable between the DVD/Set-lop Box (Y,Pb,Pr) Output jacks on the DVD/Set-
Top Box and the Component1/2 Video Input (Y,P,,,P,) Input jacks on the PDP,
, You can art lch the Ferrite Cores(supplied) to the both jacks of the Video cable,
Simply set the Ferrite Cores right under the iacks
siiiiiiiiiiiiiiiiiiiiiiill .............................
PMureControl
Connect an Audio cable between the Audio Output jack on the DVD/Set-Top Box and the
Audio Input jack (Component) on the PDP,
ToPlay DVD:
1, Turn on PDP and press the Component button to select the Component1 mode,
2, Turn on your DVD, insert a Video CD and press the Play button,
ToWatch DTV:
1, Turn on PDPand press the Component button to select the Component2 mode,
2, Turn on your DTV receiver,
• For an explanation of Component video, see your DVD/DTV receiver owner's instructions,
24
Customizing the Picture ................................................................ 26
Using Automatic Picture Settings .................................................... 27
Viewhlg the Picture-in-Picture .......................................................... 28
Changing the Screen Size ............................................................ 31
Freezing the Picture ...................................................................... 32

Aut0mati¢Picture s
Tint settings of your PDP,
Press the Menu button, then press the.joystick toenter,
Move thejoystick [eft or right to select the "Custom",
You will also see the items "Contrast", "Brightness",
"Sharpness", "Color" and "Tint",
Move the joystick up or clown to select the item you
wish to change,
Your PDP has automatic picture settings that allow you to adjust the video display easily,
Press the Menu button, then press thejoystick toe[lteh
Move the.joystick [eft or right to select the "Custom"
"Standard", or "Mild" picture setting,
. You can select "High," "Middle," "Low," or
"Custom" in PC mode,
Press the Menu button to exit,
Move the joysdck [eft or right to change the wl[ue ofthe item,
Press the Menu button to exit,
. In the PC mode, you can't adjust the sharpness, color and tint,
26 27

the Pidure°in°Pidure
Sde@9thePIPScreen
Press the Menu button, Move the joystick up or down to
select the "PIP", then press the joystick to enter,
Move the joystick left or right to select the "On",
The PiP image will appear in the corner of the screen,
Press the Menu button to exit,
The PiP function operates in only PC mode or Component2 mode,
G [
SelectinganExternalSignal
You can use PiP to view a signal from an external source, such as a VCR,
Press the Menu button Move the]oystick up or
down to select the "PIP', then press the joystick to
enter,
Move the.joystick up or down to select the
"Source", then move the joystick left or right to
enter,
Move thejoystick up or down to select an external
3
signal then move the.joystick left or right,
the signal from these inputs will not appear if you
have not connected any equipment to the PDP's
input jacks,
Press the Menu button to exit,
28 29

Changingthe ScreenSize
(WhenenteringtheVideomode)
ChangingtheLocationofthePIPImage
Press the Menu button, Move the ioystick up or
down to select the PIP", then press the joystick to
enter,
Move the joystick up or down to select the "Locate",
Move the joystick to move the PIP screen where you
want,
When you press the Aspect button on the remote control, the PDP's screen mode should appear in
sequence, [he screen displays in this order: Wide, Panorama, Zoom1, Zoom2, Stretch, 4:3
o [f you watch a still image or the 4:3 mode for a long time, image may be burned onto the screen,
view the monitor in wide mode or panorama mode as possible,
Wide
Sets the picture to 16:9 wide mode,
Zoom2
Magnify the size of the picture more than
Zooml.
o0o
Panorama
Use this mode for the wide aspect ratio of a
pa norar',lic picture.
Stretch
Moves the Zoom2 picture up a tittle to fully
show the bottom, Use this picture size [f you
want to view Zoom2 picture along with cap-
tions when watching movies,
lkoool
Press the Menu button to exit,
Zooml
Magnify the size of the picture vertic_llly on
screen,
4:3
Sets the picture to 4:3 normal mode, This is a
standard PDP screen size,
0
oOoj
o In VIDEO, S-VIDEO, Component1 mode, all screen modes can be selected,
(Wide -_ Panorama _" Zoom1 _" Zoom2 -_ Stretch _" 4:3),
30 31

St)((
Press the Still button or) the remote control to freeze a mov-
(rig p(cture (nto a sti)[ one, Press again to cancel
_iiiiiiiiiiiiiiiiiiiiiiiill
S
SoundOontro(
CListOfh]Z(llg the _oLind ................................................................ _Z(
U',[ng ALItom_)t]C SOL_)ld Sort[rigs .................................................... )_
L),,in9 the Surround ...................................................................... 36
32

Press the Menu button, Move thejoystick up or
down to select the "AUDKZ)'r, then press the.joystick
to enter,
; g _ 5
#Move _Adjusi _ E×Lt
AutomaticSound s
Press the Menu button Move the joystick up or
down to select the "AUDIO", then press the joystick
to enter,
Move thejo,/stick left or right to select the "Custom",
You will also see the items "Treble", "Bass",
"Balance" and "Surround"
Move the joystick up or clown to select the item you
wish to change,
Move the joystick left or right to change the wllue ofthe item,
Press the Menu bu_(on to exk,
[]
,,Su 0ud _ Or
[]
Bass _ 50 [
,,Ba.... _ o I
Move thejoystick left or right to select the "Custom"
"Standard", "Music", "Movie" or "Speech" sound
setting,
Press the Menu bu_(on to exit,
o The Automatic Sound Setting Function doesn't operate in PC mode,
34 35

Press the Menu button, Move the joystick up or
down to select the "AUDK)", then press the.joystick
to enter,
Move the joystick up or clown to select the
"Surround", then move the joystick left or right
to select the "Concert", "Hall" or "Stadium",
Press the Menu button to exit,
JJ
it ,, sur_0usd _ o_
diiiiiiiiiiiiiiiiiiiiiiill .............................
:_i_!_!_!_!_!_!_!_!_!_!_!_!_!_!_!_!_!_!_!_!_!_!_!_!_!_!_!_{_!I _li_i_i_i_i_i_i_i_i_i_i_i_i_i_i_i_i_i_i_i_i_i_i_i_i_i_i_i_i_i_i_i_i_i_i_ill_il_.....
P ii ii !i ill!i! ii ii]i i ii P i ii i¸ i¸;¸ ii ill i i
Setthlg the Clock ..................................... 38
Setting the Sleep ]-imer ................................. 39
Setting the Timers .................................... 40
36

i¸i /!/! ! i/ / i i
the $ pTimer
This PDP has a built-in clock that will appear on screen when you press the Clock Display button on the
remote contlol Se_ing this clock also allows you to use it to automatically turn the PDP On or Off,
Press the Menu button, Move the joystick up or
down to select the "TIME", then press the.joystick to
enter,
Move the joystick left or right to select hour, then
move the joystick up or down to select the correct
hour,
Move the joystick left or right to select minute, then
move the joystick up or down to select the correct
minute,
Move the joystick left or right to select "AM, then
Move the joystick up or down to select AM" or
"PM",
• [f you want to display the Clock on screen, move
the joystick down to select "Clock Display", then
move the joystick right,
IL
You can set your PDP to automatically turn off after a preset interval,
Press the Menu button, Move the joystick up or
down to select "TIME", then press the joystick to
enter,
Move the joystick up or down to select the "Sleep",
then move the joystick left or right
Move the joystick up or down to select the time inter-
wil for the PDP to stay on, The interval ranges from
10 to 360 minutes,
Press the Menu button to exit,
_, O_Jme 12:0_ AM O_
,_o tL_ev_Ju'ne /g
s',:::_,_s:y'o ,
* a_iust _ I_ov_ __×it
i
l
Press the Menu button to exit
38 39

This PDP can be set to turn on or off automatically at specific times that you choose, Before using the
timers, you must set the PDP's clock, as described previousby,
Setting the On!Off Timer
Press the Menu button, Move the joystick up or
down to select the "rIME", then press the.joystick to
enter,
Move the joystick up or clown to select '<Off", then
move the joystick left or right to select '<On"
Move the joystick up or down to select the "On
time", then move the joystick left or right,
Move the joystick left or right to select hour, then
move the joystick up or down to select the correct
hour,
Move thejoystick left or right to select minute, then
move the joystick up or clown to select the correct
minute,
Move the.joystick left or right to select "AM", then
move the.joystick up or down to select "AM" or
"PM",
ii_¸' ;_,_ _ : iili
s::,::v0u._02:°°,t°°° I
:_i;%0u.,02°°,t_'°° I;
[] o,>
If you want to set the Off Time, move the joystick
down to select the Offrime",
Set the '<Off Time" just as you set the '<On rime"
If you want to set the volume level when the PDP
turns on, move thejoystick down to select "On
time volume", Move the joystick right to set the
volume level you want when the PDP turns on,
Press the Menu button to exit,
It
40 41

; ; !,i ; il ; i ; i¸¸ ; Ji ;
PCandOperation
Connectillg to a PC ...................................................................... 44
Aqi/_sting the PC Screen ................................................................ 48
Changhlg the Position of the hi,age ................................................ 49
Changhlg the Size of the hi,age .................................................... 50
Enlarge or the Image (Zoom) .......................................................... 51
Move Expanded Picture ................................................................ 52
PictL_re Quality A_ustrnent ............................................................ 53
Inforraation .................................................................................. 56
Power Saver (PC mode only) .......................................................... 57

PDP
PC (15pin)
Cable
to a PC
This PDP set is not compatible with Macintosh PC.
Audio Cable
Power Plug
PinConfiguration
• 15Pin Signal (;able (based on protruded pin)
Pr_No PCIN PCOUT
I Red(R) RedIR)
2 Greeq (O) Green (GJ
3 Blue (B} Blue (B)
4 @0undng Grouading
5 Glound _g DDC} Grauqding(DDq
6 R_d (k) Grounding Red{R} Grounding
7 Green (G}G_cunding GreenGI @cunning
8 _lue B} Groundin_ Blue (B)Grounding
9 Reserved Reserved
I 0 Syno @ound ng SyncGrounding
13 H_riz0n al sync. Horz0ntal sync
14 Ve fical sync. Verticalsync
15 Clock [DOC) Clock (DDq
@oun_ng Grv_ndJng
Data (I)DC) Daa D()C_
Settingup'fourMonitor£hgandPlay
Our adoption of the new VESA _ Plug and Play solution eliminates complicated and time consuming
setup. It allows you to install your monitor in a Plug and Play compatible system without the usual
hassles and confusion, Your PC system can easily identify and configure itself for use with your display,
This monitor automaticafly tells the PC system its Extended Display Identification data (EDID) using
Display Data Channel (DDC) protocols so the PC system can automatically configure itself to use the Flat
panel display
PC
Connect a PC (15pin) or BNC cable between the Video Output jack on the PC and
the RGB1 (15p D-SUB) or RGB2 on the PDP,
, You can attach the Ferrite Cores to each jack of the BNC cable,
For an explanation of Component video, see your PC owner's instruction,
Connect a Audio cable be_._veen the Audio Output jack on the PC and the Audio Input (PC)
on the PDP,
TOwatch the PC screen:
1, Turn on PDP and press the RGB button to select the PC mode,
2, Turn on PC and check for PC system requirements,
(Refer to pages 46 and 47 for PC system requirements,)
3, Adjust the PC screen, (Refer to page 48)
44
45

i?: 7 i:/:){: } }{: : }(} !://{(: { ::
HowtoSetupYourDisplaySetting(Windowsonly)
The plasma panel of this monitor is composed 1366 pixels & 768 lines. That is, the best resolution of
this monitor is 1366 X 768.
Thus, select 1366 X 768 resolution ill same way as below when you corttrol the display setting, It your
video card does not support 1366 X 768 resoution, the resolution of 1024 X 768 is recommended, If
you select one of resolutions above, you can use this morfitor in best condition.
rhe Windows display-settings for a typical computer are shown below, But the actual screens on your
PC will probably be different, depending upon your particular version of Windows and your particular
video card, But even if your actual screens look different, the same, basic set-up information will apply
in almost all cases, (If not, contact your computer manufacturer or Samsung Dealer,
On the windows screen, select in the following
sequence : Start -_ Settings _ Control Panel
When the control panel screen appears, click on
"Display" and a display dialog-box will appear,
@ _
Select the "Settings" tab in the display dido@box,
The two key variables that apply the PDP-PC inter-
face are "resolution" and "colors," [he correct set-
tings for these b47o variables are:
, Size (sometimes called "resolution"):
1024 x 768 pixels,
, Color: "24-bk" color (might also be expressed
as" 16 million colors')Shown at left is a typical
screen for "Display" dialog box
if a vertical-frequency option exists on your dis-
play settings dialog box, the correct value is "60"
or "60 Hz," Otherwise, just click "OK" and exit
the dialog box,
46
Conqnued ,,
Ne_es;
Both screen position and size will vary, depending on the type of PC monitor and its resolution,
the table below shows all of the display modes that
Video sign tl Dot X line
640 X 350
640 X 400
720 X 400
640 X 480
IBM PC / AT
Con/patib]e_
848 X 480
800 X 600
1024 X 768
1152 X 864
1280 X 768
/WXGA)
1280 X 1024
1366 X 768 _
Vertica_
Frequency(HzJ
70086
85080
85080
70¸087
85¸039
59¸940
72¸809
75¸000
85¸008
60¸000
72¸000
75¸000
88¸000
56¸250
60¸317
72¸188
75¸000
85¸O61
60¸004
70¸069
75¸029
84¸997
75¸000
60¸000
75¸000
60¸020
75¸025
60¸000
Frequency (kHzJ polarity polar _y
are supported:
Horizontal V_r_ical Horizonta_
31469 N P
37861 N P
37861 P N
31469 P N
37927 P N
31469 N N
37861 N N
37500 N N
43269 N N
29838 P N
35186 P N
36072 P N
37650 P N
42925 N/P N/P
37879 P P
48077 P P
46875 P P
53674 P P
48363 N N
56476 N N
60023 P P
68677 P P
67500 P P
47700 P N
60150 P N
63981 P P
79976 P P
48200 N N
(N: Negative / P: Positive)
The PDP might operate abnormally if a non-standard video format is selected,
When this PDP is used as a PC display, 24-bk color is supported (over 16 milfion colors),
Your PC display screen might appear different depending on the manufacturer (and your particular
version of Windows),
Check your PC instruction book for information about connecting your PC to a PDR
If a vertical and horizontal frequency-select mode exists, select 60Hz (vertical) and 31 ,SkHz
(horizontal),
In some cases, abnormal signals (such as stripes) might appear on the screen when the PC power is
turned off (or if the PC is disconnected), If so, press the Source button to enter the VIDEO mode,
Also, make sure that the PC is connected,
Connect only a PC monitor to the monitor output port while viewing the PC scleen,
(Otherwise, random signaB might appear),
This mode is only supported by a particular video card(PI}fEL PERFECTmade t_y IMAGINE
GRAPHICS Ltd)
47

the PCScreen
ChangingthePositionofthe
A@stingtheR,G,B
PF@s@t:
. Press the RGB button to select the PC mode
Press the Menu button, then press the.joystick to
enter,
Move the joystick up or down to select the "Color
Control", then move the.joystick left or right to enter,
Move thejoystick up or down to select the item you
want to change,
After connectingthe PDPto your PC,adjustthe positionof screenif it is not weH-a(igned,
Preset:
, Press the RGB button to select the PC mode
Press the Menu button, Move the.joystick up or
down to select the "SETUP", then press the joystick
tO enter,
Move thejoystick left or right to select the "Posi-
tion'r, then adjust the position of screen by using the
joystick button,
Press the Menu button to exit,
Move the joystick right or left to change the wHue of
the item, using the on-screen gauge as your guide,
Press the Menu button to exit,
48 49

e of the image (Zoom)
Preset:
, Pressthe RGBbutton to select the PC mode
Press the Menu button, Move the joystick up or
down to select the SETUP, then press thejoystick to
enter,
Move the joystick up or down to select the "Scal-
ing", then move the joystick left or right to select the
"Wide" or "4:3",
Press the Menu button to exit,
PPes¢t:
, Press the RGB bu_ton to select _he PC mode
Press the Menu button Move the joystick up or
down to select the SETUP, then press the joystick to
enter,
Move the joystick up or down to select the
'<Zoom/Panning'r, then move the.joystick left or right
to enter<
Move the joystick left or right to enlarge the image,
. [he picture can be expanded 1 to 10 in Zoom
nlode,
Press the Menu button to exit,
50 51

MoveExpandedPicture
Pr@s@t:
, Press the RGB button to select the PC mode
Press the Menu u[ion Move the OVSflCK u[) OI
.lows ro select me SFIUF rne .)tess _nejox/suc_: _o
en[er
Quick wa) To access the Zoom: Just Dress
Zoom/Part'* on the remote co_ltro
sca_ng • a_
Langua_P _ Eog[Ish
z00mlPanmng
_Tag_ L&_K
,s_mne_us
PictureQ aJity Adjustment
Press _l_eRGB butfon to select tl_e PC mode
• ........ Menu button, Move the joystick up or
:]own to select the SFTU[ me press the joystick to
Move the joystick u r or down to selec_/ne
Zoom/Pannir -1 th_ mow th_ jo_tstick I_ft - [qn_
ro _n_er
Move the joystick u[ or down to select the 'Pan-
...... (nen move me oystick left or ....... ro enier
/_r_l_q[ [np r )_JtJon of scr_(_r Jsln¢] [n(_ I_ qflc_
Jr[or
- Jhe Pannir q feature ooerates only when the
rHr# _vr _nd_(
Press the Menu button to exit,
r
_i Languag_ _ FJ_g'<h
] , sra]ng _ w_4e
JragtL_
_s£eJJaaeou_
, Panm_9
L
r, B_miJmJmu_
Move the joystid up or -)wn to select the "Image
Loci then move the )_,rid left or right to enter
Move the joystick up or aovvn to select "Auto
Ad < h_,, move thejo _tick left or right
The r]essQ _e /_u(( -1[)ro(lresf" shows on the
_cieen 8n r_ Dl(_[IJr@ zl ,rm_nm ar_ automatically
"_c[IvFd_d
• A j
52 53

i)):¸U7::i ((Z)iLZLI ])! ¸¸£(h! 71)¸Z(ii! )Fk
FrequencyAdjustment
_r@s@t:
, Press the RGB button to select the PC mode
Press the Menu button, Move thejoystick up or
down to select the SETUP, then press the joystick to
enter,
Move thejoystick up or down to select the "linage
Lock", then move the.joystick left or right to enter,
Move the joystick up or clown to select the "Frequen-
cy",
Remove picture noise (vertical stripes) on the screen
by moving thejoystick left or right,
(if frequency is not set properly, the vertical stripes
will appear on the screen,)
h ii_ii:::iLl: iii
A Aj s_ [
_:Lj-'!=0 °
FineTuninI (Phase)
' Press the RGB button to select the PC mode
Press the Menu button, Move thejoystick up or
down to select the SETUP, then press the.joystick to
enter,
Move the.joystick up or down to select the "Image
Lock", then move the joystick left or right to enter,
Move the.joystick up or down to select the "Phase",
3
Remove picture noise (vertical stripes) on the screen
by moving the joystick left or right,
(If phase is not set properly, the picture may be
blurry,)
i¸¸¸
Press the Menu button to exit,
54 55
Press the Menu button to exit,

PowerSaver(PCmodeonly)
Pr@s@t:
, Press the RGB button to select the PC mode
Press the Menu button, Move the joystick up or
down to select the SETUP, then press the joystick to
enter,
Move the joystick up or down to select the "Miscel-
laneous", then move the.joystick left or right to
enter,
Move the joystick up or down to select the "Informa-
tion", then move the.joystick left or right to enter,
This monitor has a built-in power management system called Power Saver, [his power management
system saves energy by switching your monitor into a low-power mode when it has not been used for a
certain amount of time, This power management system operates wkh a VESA DPMS compliant video
card installed in your computer, You use a software utility installed on your computer to set up this fea-
ture, See the table below for details,
T_ble 1. Po_uer-s_vi_g mode_
State Suspend Mode Power-off Mode
Horizontal Sync Inactive Active Inactive
Vertical Sync Active Inactive Inactive
Video Blanked Blanked Blanked
Power Amber Blinking Amber Blinking Amber Blinking
hdicator (1 sec Interval) (1 sec Interval) (1 sec Interval)
Note_;
• This monitor automatically returns to normal operation when horizontal and vertical sync return,
• This occurs when moving the computer's mouse or pressing a key on the keyboard,
o For energy conservation, turn your monitor OFF when it is not needed, or when leaving it unattend-
ed for long periods,
Operation
Active
Active
Active
Green
Standby Mode Position A1 Position A2
Normal
Power-saving Function Mode
Press the Menu button to exit,
56 57

!i? I !_i_ !:J i%_il !_i_ IX!i ! !!}i !i? I !_i_ _i¸¸ !_ !_i_ i_ii £ I
FunctionDescription
Selecting a Menu language ............................. 60
Setting the M@ti Control ................................ 61
Using the Key lock ................................... 62
Setting up _ur Remote Control ........................... 63

PresstheMenubutton,Movethejoystickupor
downtoselecttheSETUP",thenpressthe.joystick
toenter,
the Multi O0ntr0J
Press the Menu button, Move the joystick up or
down to select the "SETUP", then press the.joystick
to enter,
Movethejoystickleftorrighttoselecttheappropd-
atelanguage:English,Spanish,orFrench,
PresstheMenubuttontoexit,
Move the.joystick up or down to select the "Multi
Control", then move the.joystick left or right to enter,
Enter ID setup number The ID Setup operates by
using only the.joystick or channel up/down buttons,
Move thejoystick up or down to select the "ID
Input", The ID Input operates by using only the
numeric buttons,
Enter ID Input and the screen with the set ID number
will be switched to the Menu screen,
Nete
° To operate the muki control function, PDP1 and PDP2 should be set in the ID Setup mode, When
entering the ID Input number of PDP1 while the PDP is set in the ID Input mode, only PDP1 is
switched to the Menu screen and you can operate the remocon, At this time, PDP2 doesn't operate
with the remocon and displays the standby mode of ID Input, (See the figure of step 4,)
:!i i ,!i!;i¸¸ i!i? iiii
6O 61

up YourRemoteControl
When setting Key Lock ON, the buttons (SOURCE, MENU, VOLUME, SELECT, MUTE, POWER) on the
front of the PDP don't operate, But those buttons will operate when setting Key Lock OFF
Press the Menu button, Move thejoystick up or
down to select the SETUP", then press the.joystick
to enter,
Move the joystick up or down to select the "Key
Lock", then move the.joystick left or right to select
"On" or "OFF',
[] I
ii_i ii
Press the Menu button to exit,
This PDP's remote control can operate almost any VCR, cable box, or DVD, After it has been set up
properly, your remote control can operate in four different modes: VCR, Cable, or DVD, Pressing the
corresponding button on the remote control allows you to switch between these modes, and control
whichever piece of equipment you choose,
/% t :7 , _ _, / t : , :k w OY} _: y> V(R (:,,1 , x <
f c ,_< >y ¢< _* CO E:, y
Press the MODE button and make sure that the VCR
(or Cable box, DVD) LED is illuminated,
Press the Set button on your PDP's remote control,
Using the number buttons on your remote control,
4
enter three digits of the VCR (or Cable box, DVD)
code listed on page 64 of this manual for your
brand of VCR (or Cable box, DVD pla,>_ers), Make
sure you enter three digits of the code, even if the
first digit is a "0",
(If more than one code is listed, try the first one,)
_dc_i_c_VCR :/sbi! [}',B
62
Press the Power bur(on on the remote control,
5
Your VCR (or Cable box, DVD players) should turn
on if your remote is set up correctly, If your VCR (or
Cable box, DVD players) does not turn on after set
up, repeat steps 2, 3, and 4, but try one of the other
codes listed for your brand of VCR (or Cable box,
DVD players),
If no other codes are listed, try each code, 000
thlough 089 (or Cable box: 0000 through 077,
DVD players: 000 through 008),
Nete_
o When your remote control is in "VCR" mode, the VCR control buttons (Stop, REW, Play/Pause, FF)
still operate your VCR,
• When your remote control is in "Cabb box" or "DVD'r mode, the VCR control buttons (Stop, REW,
Play/Pause, FF) still operate your VCR,
63

VCR Codes
A_/ nJr _1 006,079
Aiv, a 0] 5
Aka 017 022 023 027 030
At_dio D_amics 0]_/01_
gel1 @ I lowell 002
B_oksontc 010
Ca_dle 007 009 0!3 0% 046 052
Camion 008 053
Ciliz_n 007 009 0!3, 045 046 052
Color_me 014
Craig 007 012
Curlis-Mathes 000,007, 008, 01_,,
Daewoo 0/3 0'15 076
DBX 0/_ 01_
l)imensia 000
/_nalech 01_
Electro}!ome 027
0_ 0_i 0_2 _7 _ 057 0_ 0_5 0_7 0_ 070
Fisher 002, 0_2 018 019 0_3, 0-_8 058
Funai 01
GE 000,007, 008 032 0_3
Go Video (}(/7
Ha_man Kardon 014
Hi_achi 005 015 035 03{_
Ins!ant Replay 008
JC Penney 002 005 007, 008, 014
]CL 008 002 0!4, 016 030 046
JVC 002,01"/088 089
Kenwood (}02¸ 0!4, 016 03(}¸ 046
Cable Box Codes
Anvision 007 008
Cab/:s_ar 007 008
Eagle 007 008
Easlenl In_ 002
Gene/a//ns!r_me_t 0_
GI 004, 00_, 0[5,023, 024
_amlin 003 012, 013,034 048
_ilachi 037, 0_3 046
ierm{d 004, 005 015, (}23, 02_,
Macom 037 043
Mag,'_avox 007 008, 0/9 021
0]_,046 0_3 064 06?
01_ 030,035 05! 053
02_ 030 03_,067 068 069
025 030 036, 046, 062 065
02_ 028 02!t¸ 032 033 040 04_
KLH 073
IG 009 0]'} 046, 060
[.loyal 015
Lop,lk 03/
/2q! 015
Mafgnavo× 008 029 053, 056
Mar,,ntz 002 008, 014 0! 6,
Maria 009
MEI 008
Memore× 008 009, 0! 2, 0_5
MGA 027
Mid!and 032
Mmola 005, 03_
Mils_ishi 005 027 035 040
Monlgome_ warcl 006
MIC 007, 015
M_ltilech 007 015 031 032
Op_mus 006
Panasonic 008 (}53¸075 07;
I_n!ax 005, 033
I_n_ex R_s*g_h + 046
l_i/c_ 008 029 0_3, 0_6
P_ni/i]_s 008 029
P_oneer 005 01_ 033 0_50
Port/arid 044 0_5 052
ProScan 000
Quar!z 002
Quasa_ 008, 0_3
Radio S_acl,d[_alist 002,006 008,
NSC 009
Oak 016 038
Osk Sigma 016
Panasoaic 00302703906],
Philips 007,00801902!,026,
Pk_lee_ 018¸020,044¸074¸077
I_mdlek 007,008
R(A 000,027¸066
Re_l 003,012¸013
R_'_ncy 002¸033
5A 070,07] 072
5ams_ng 04_00302206306#
029 030,046, 061
009 012,0!5, 019 027 0_15 053
07307_
028¸029¸032¸033¸040¸04¸[
RCA 000 00_1,007 008,028,
S imsung 0070130220320}2077
5a_s_i 0/6
Salvo 002 0/2
Scotl 013 04_ 049 0_8
Sears 002 005, 009 012 018,
5harp 006 027 039 045
Shintom 0l; 02d 031 055
Signa_ (!_3
Sony 0] 7,026, 038
Sylvania 008, 0/5 029 053 0_6
Symphonic 0/5
Tandy 002 0/5
Iashiko 009
Fatun_, 030
leac 015 030 0(_9
?ethnics 008
_ernika 008 009 015,021
FMK 0_
Ios_b_ 005, 0_3 019 048, i)_19
[olevisio_ 007 009
Unitl:c}! 007
Vector _sean_n 014 016
x,'3clo_ 0/6
Video Concepts 0/4 0/6
Videos.mic 007
Wa_ds _5 006, 007,008 009,
Yanlaha 002, 01'÷¸ 01d 030 046
_mth 0ll 017 026 079
Signamre 0%
Spm, cer 027
5anom 046
5 argale 2000 058
5_v,lnia 0! ] 059
Texscan 011 0_9
Eocom 0!7,021 049 0_0 055 073
Unika 031,032 04[
_/ilive_sal 061 052
Viewslet _)7, 008, 019,021, 02(5,
Wanler Amex 0_4
Zenilh 0/4 042,057 0d_,
035 037 05¢ 069
019 035 043 048
012 0!3, 015 02? 03] 03_
028, 029 032,033,040 041
075 076
ii_ ii i_ _!i ii_! i_ ii_ i i_ ii_ i i_ i! i¸_¸ i_ i_i i i
Troubleshooting ............................................................................ 66
Care and Maintenance ................................................................ 67
Specifications .............................................................................. 68
DVD Codes
P}fflips 001
Pmscap 002
RCA 002
]_ shiba 003
Panaso_ic 004
5ony 008
5ams_ng 000
64

Careand Maintenance
Before you call a service technician, please scan [his list of problems and possible solutions. It may save you
time and r',loney.
Possible$omuti0n
£,nec_ all Wife ;onReolloRs
The monllor IS us g Its power n arlagemen[ s;,,s[em
Check _Fle power ma[lageme[l[ Utility o[I your com Eu[e[
:_ress the "Mode" button to put your le note contrc In [ne
Monitor" mode
/l_-lke sure the wa :_uue[ IS worK,-g
Check to see thal ]o[I [ne monitor and [ne source are pluggeu
n an , [urnea or
_ujds[ In÷ B[i_ htness or Contras_ seeings
_djust the Size settings
The PDP s overheated. P_wer off the PDP and cool it fob J
wnue
With proper care, your PDP will give you many years of service, Please follow these guidelines to get
the maximum performance from your PDP,
Identifying ProMems
r)< no( but _-_ PDP rle_r extremely hot, cold, humid or dusty places,
[)o "_--" _u[ _ne P[)P n_ar QDDIIQnces /l/a( create magnetic fields
" I*_@el fn@ ven(ll_l/ion openlrl s cle_
r)o ---- _r_c_ rn_ Pr)pon r_ rough and shnted surface, such as cloth or paper
Liquids
Do ---" _,........ -_J_asn_r or on_n_PDP
Cabinet
\lever o rs_r_ (rle CSDIRe| or rc_Hcn the parts inside
WiDe v ir PDP wit_ a cle_ y cloth Never use water, cleaning fluids, wax, or chemicals
[)o ----" [_ur n_avv ODl@Crfl ...... "1Of the cabinet
Temperatare
_ur PDP is sudder hove from _l cold to a warm place, unplug the power cord for at least two
hour _>qo ma molslure rna/ ma' have formed inside the unit can dry completely
]he CUOllng fan of the PDP rll_ly nave a F 3Dlem. _on[ac[ an
ylu[norlzea service cen[el
66 67

Exterior design and product specifications are subject to change without prior notice to improve the
performance of this product,
This PDP applies to Class B digital device,
(Note: Class B system is for home use,)
This PDP has been accepted as a device with proper electrowave and you can use this PDP not only in
a residential area but other areas
HPL5025
12085 (W) X 89 (D)X724 (H) mm ; 4758 (W) X 350 (D) X 2850 (H) inches
54 (W) X31 5 (D)X 220 (H)ram; 213 (W) X124 (D)X866 (H)inches
42kg ; 92 591bs
15% (including balleries) ; 0 331bs
1OO-240V-,60 Hz
540 Wa_tts
1106 5(H) x 622(V) mm; 4356 x 2449
RGB1: MINI D-SUB15P
Rc_2:%Jc(RJGJ_,_csuv_
VIDEO : ANALOG O714V,1 / 75_ (Terminated)
i i i i i i i i i i i i i i i i i i SYNC(H,V)
VIDEO: 1O%,/75£_ (BNC)
S-VIDEO: Y _ 10V., / 75£S
C -_ O 28VH,/ 75_
COMPONENT (Y/P,,/P,): Y-* 1O%,/75£_
P,-* O7V.,/75_
P,_O 7V., / 75_
68 69
 Loading...