

Page 1
CONTENTS
SAFETY WARNING SIGNS...............................................................2
OPERATING INSTRUCTIONS........................................................ 4
SETTING UP THE REFRIGERATOR ........................................................4
MAJOR FEATURES.....................................................................................5
CONTROL PANEL.......................................................................................6
DIGITAL PANEL..........................................................................................7
TEMPERATURE CONTROL ......................................................................8
ICE and COLD WATER DISPENSER.........................................................8
SHELVES and BINS.....................................................................................9
FOOD STORAGE GUIDE ........................................................................10
CoolSelect Zone
TM
Drawer GUIDE.............................................................12
REMOVING THE FREEZER ACCESSORIES.........................................14
REMOVING THE REFRIGERATOR ACCESSORIES............................14
CLEANING THE ACCESSORIES.............................................................15
CHANGING THE INTERIOR LIGHT.........................................................16
WATER FILTER..........................................................................................17
DOORS.......................................................................................................17
INSTALLATION INSTRUCTIONS................................................18
INSTALLATION OF THE REFRIGERATOR ............................................18
REMOVING THE REFRIGERATOR DOORS .........................................19
REATTACHING THE REFRIGERATOR DOORS....................................22
ADJUSTING THE CLEARANCE BETWEEN THE DOORS....................25
CHECKING THE WATER DISPENSER LINE..........................................27
INSTALLING THE WATER DISPENSER LINE ........................................28
OPERATING INSTRUCTIONS (HomePADTM)..........................30
VIEWS OF HomePADTM.............................................................................30
USER INTER FACE ...................................................................................31
REMOTE OPERATION..............................................................................49
HOW TO USE VIRTUALKEYBOARD......................................................52
TURNING THE HomePAD
TM
OFF..............................................................53
AUTO UPGRADE PROCESS...................................................................53
BATTER YMANAGEMENT.........................................................................53
INSTALLATION INSTRUCTIONS (HomePADTM)...................54
INSTALLING AND ST ARTING THE HomePADTM.....................................54
HOW TO PUT HOMEPADTMON THE DOCKING STATION OF THE REFRIGERATOR
.........................55
HOW TO INSTALL HOME STATION.........................................................56
CABLE CONNECTION...............................................................................57
TROUBLESHOOTING...............................................................................58
CONSUMER SUPPORT....................................................................59
WARRANTY...............................................................................................59
HomePAD
TM
REFRIGERATOR
RH2777AT
HP2777AT
OWNER’S MANUAL AND INSTALLATION
DA68-01174A REV(0.1)
In the U.S.for questions about features,
operation/performance, parts, accesories or service, call:
1-800-726-7864 (1-800-SAMSUNG)
www.samsungusa.com
Write the model and serial number here:
Model #
Serial #
These numbers can be found on the left side
of the refrigerator cabinet.
DA68-01174A 12/13/02 12:57 PM Page 1
Page 2
2
SAFETY WARNING SIGNS
Because these warning signs are to prevent injury from users or other persons, please follow
safety warning signs. After reading the warning signs, keep them in a safe place for future reference.
CAUTION/WARNING SIGNS USED OTHER SIGNS USED
Indicates that a danger of
death or serious injury exists.
Indicates that a risk of
personal injury or material
damage exists.
WARNING
CAUTION
Represents
something you must NOT
touch.
Represents
something you must
follow.
Indicates that you must disconnect the
power plug from the socket.
Represents a ground is needed to prevent
electric shock.
Represents something you must NOT
disassemble.
Represents something you must NOT do.
WARNING
•
Before operating the appliance, please read this manual thoroughly and retain it for your reference.
•
Because these following operating instructions cover various models, the characteristics of your
refrigerator may differ slightly from those described in this manual
• The appliance is not intended for use by children or infirm persons without adult supervision.
• Children should be supervised to ensure that they do not play with the appliance.
You should use only the power adaptor which is
provided with the HomePAD
TM
.
• Otherwise,it may cause malfunction and the risk of fire.
Do not heat the HomePAD
TM
.
And do not keep it in the refrigerator.
• It may cause damage such as explosion fire or electric
shock.
When you use your HomePAD
TM
, it should be used in the
open area for proper ventilation.
• Also it may cause fire if you leave it on a blanket or linen
or pillow for the long time.
When you use your HomePAD
TM
, keep your body
in a comfortable and relaxed position.
Do not connect between charging terminals of
HomePAD
TM
bottom side.
• This can cause reduced battery life, malfunctions, explo-
sion and electric shock.
Pull the power plug out before installing, removing, and
disassembling the Home Station.
Plug in after installing.
• Otherwise, It may cause a risk of electric shock
Do not disassemble or repair the HomePADTMby yourself.
• This can cause malfunction
Do not plug several appliances into the same multiple
receptacle.
• This could cause overheating and the risk of fire.
Make sure that the power plug is not squashed or
damaged by the back of the refrigerator .
• Adamaged power plug may overheat and cause fire.
Do not directly spray water inside or outside the
refrigerator
/ freezer. .
• There is a risk of electric shock.
Do not use aerosols near the refrigerator .
• There is a risk of explosion or fire.
Do not bend the power cord excessively or place
heavey articles on it .
• This constitutes a fire hazard. If the power cord is damaged, have it replaced immediately by the manufacturer
or its service agent.
Do not insert the power plug with wet hands.
• You may receive an electric shock.
Do not put a container filled with water on the refrigerator.
• If spilled, there is a risk of fire or electric shock.
Do not install the refrigerator in a damp or wet place.
• Deteriorated insulation of the electrical parts may cause
electric shock or fire.
Do not store volatile or flammable substances in the
refrigerator.
• The storage of benzene, thinner, alcohol, ether, LP gas
and other such products may cause explosions.
WARNING SIGNS
DA68-01174A 12/13/02 12:57 PM Page 2
Page 3
3
SAFETY WARNING SIGNS
Pull the power plug out of the socket before
changing the interior light of the refrigerator.
• Otherwise, there is a risk of electric shock.
If you wish to dispose of the
refrigerator / freezer
throw it away after first removing the doors and
seals.
• Do so in a way that it is not possible for a child to
remain trapped inside.
Do not disassemble or repair the
refrigerator
by your-
self.
• You run the risk of causing a fire, malfunctions
and/or personal injury.
If the refrigerator is not to be used for a long period of
time, pull out the power plug.
• Deterioration in the insulation may cause fire.
When the water dispenser tray is overflowed, it may
result in a slippery floor.
Do not use a wet or damp cloth when cleaning the
plug. Remove any foreign matter or dust from the
power plug pins.
• Otherwise there is a risk of fire.
• If the refrigerator is disconnected from the power supply,
you should wait for at least five minutes before plugging it
back.
and cause personal injury and/or material damage.
Do not store pharmaceutical products, scientific materials and temperature-sensitive products in the refrigerator.
• Products with require strict temperature controls must not
be stored in the refrigerator.
Do not let children hang on the door, a serious injury
may occur.
If you sense a strange smell or smoke, pull out the
power plug immediately and contact your SAMSUNG
Electronics service center.
Do not touch the inside walls of the freezer or products stored in the freezer with wet hands.
• It may cause frostbite.
Do not insert your hands into the bottom area under
the appliance.
• Any sharp edges may cause personal injury.
Never put fingers or other objects into the
dispenser hole and ice chute. It may cause personal
injury or material damage
CAUTION SIGNS
HomePADTMis designed only for use in the house.
• Do not operate outside
• If you use outside, the wireless communication between
HomePAD
TM
and Home Station may fail.
Do not drop the HomePAD
TM
.
• Adult supervision should be maintained when children
are operating the unit.
• It may cause malfunction and personal injury.
Do not try to remove or reattach the HomePAD
TM
without first reading the owner’s manual.
• You need to connect to the A/C adapter or put the
HomePAD
TM
on the docking station of the refrigerator
door when the low battery signal comes on.
Otherwise, you may lose data that is not saved.
Do not use the sharp material(Pencil, nail, etc.) to
touch the LCD, it may easily damage to touch screen.
Y ou should use the stylus pen which is provided with the
HomePAD
TM
product
To clean HomePAD
TM
screen, wipe with a smooth,
dry cloth.
• Do not spray water or detergent directly on the monitor.
The LCD screen may appear different.
• It is not a malfunction but due to viewing the screen
from different angles, different amounts of light, and
ambient temperatures.
• These factors can also effect the quality of the image
on the screen
Do not overfill the refrigerator with food.
• When you open the door, an item may fall out and
cause personal injury or material damage.
Do not put bottles or glass containers in the
freezer
• When the contents freeze, the glass may break and
cause personal injury.
If the wall socket is loose, do not insert the power
plug.
• There is a risk of electric shock or fire.
Do not disconnect the power cord by pulling on it.
• Damage to the cord may cause a short-circuit, fire
and/or electric shock.
• If the power cord is damaged, it must be replaced by
the manufacturer, a certified service agent or qualified
service personnel.
Do not store articles on the top of the appliance .
• When you open or close the door, the articles may fall
The refrigerator must be grounded.
•
You must ground the refrigerator to prevent any power
leakages or electric shocks caused by current leakage
from the refrigerator.
Never use gas pipes, telephone lines or other
potential lightening rods as ground.
•
Improper use of the ground plug can result in a risk of
electric shock. If it is necessary to use an extension cord,
use only a 3-wire extension cord that has a 3-blade ground
plug and a 3-slot receptacle that will accept the plug on the
appliance. The marked rating of the extension cord should
be AC 115V~120V, 10A, or more. if a grounding adapter
used, make sure the receptacle box is fully grounded.
DA68-01174A 12/13/02 12:57 PM Page 3
Page 4
4
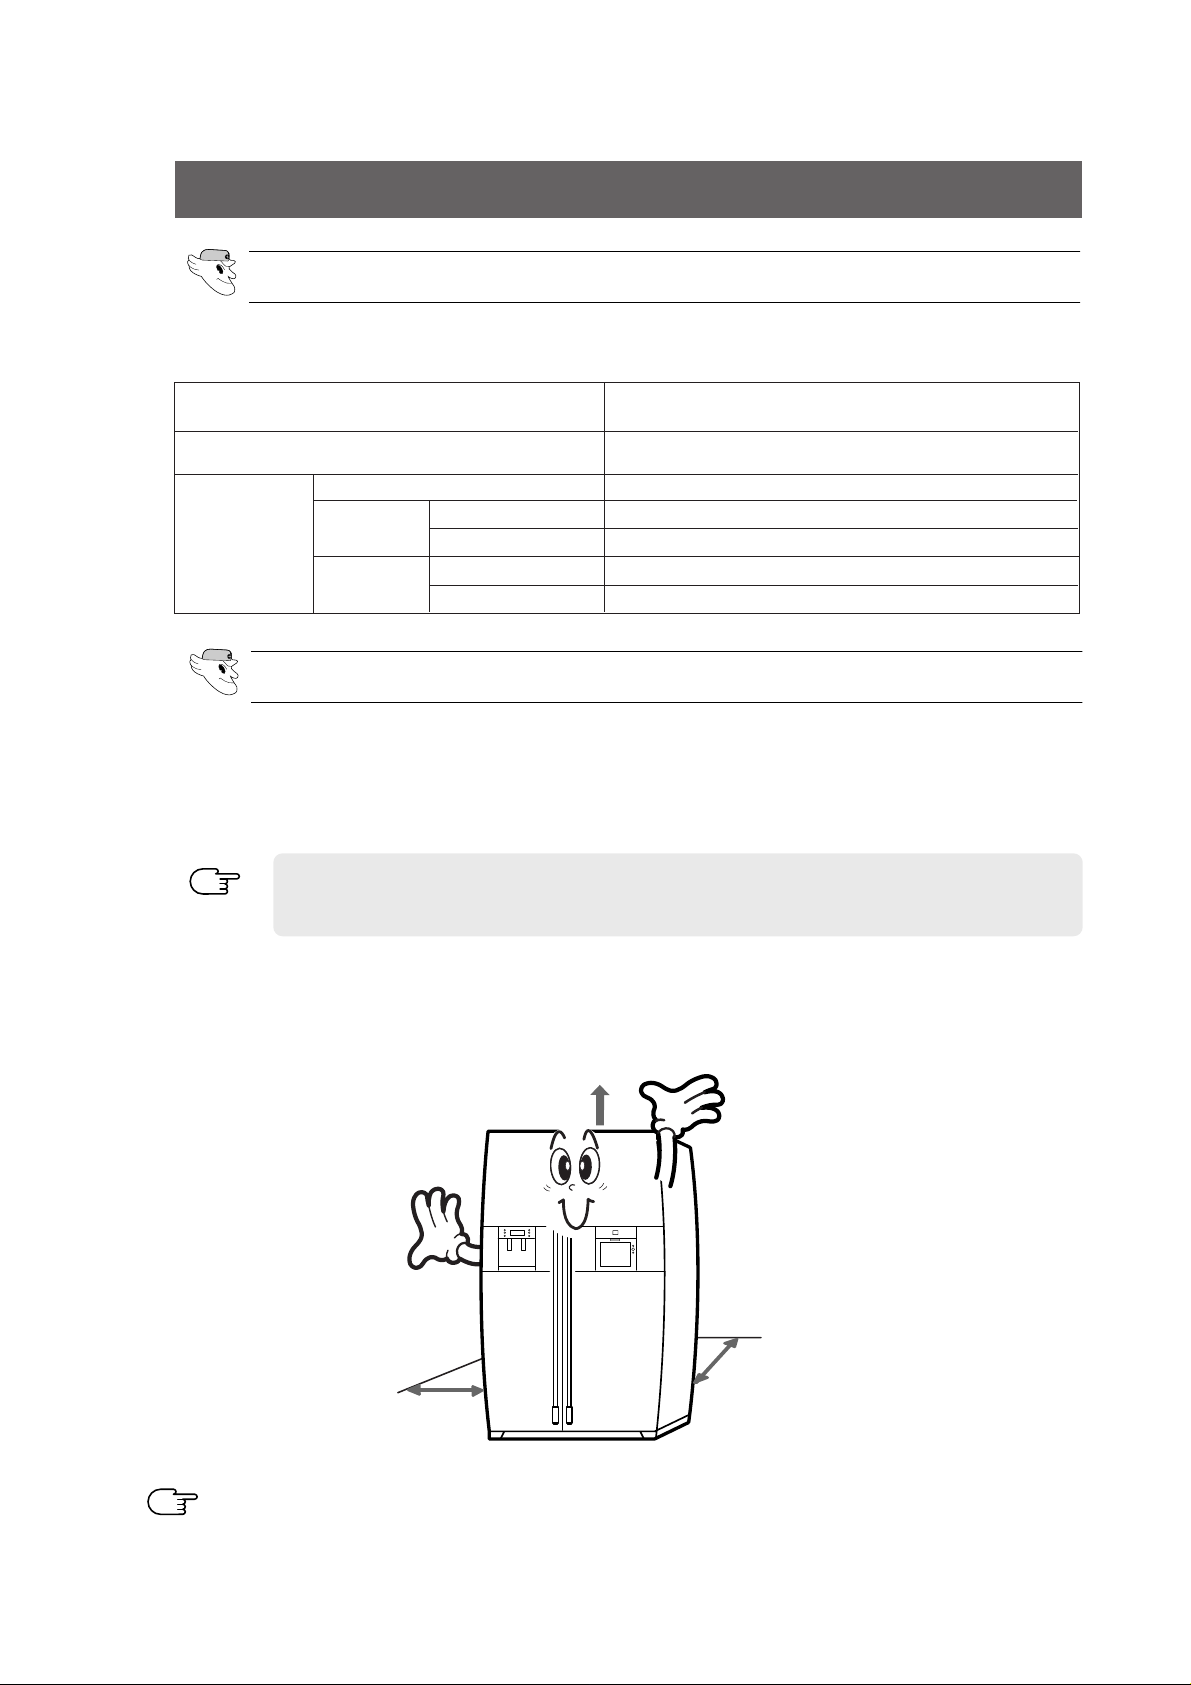
SETTING UP THE
REFRIGERATOR
Once you have performed the following steps, your refrigerator should be fully operational. If not, check
the power supply and electricity source. If you have any questions, contact your SAMSUNG
service center.
Place the refigerator in an appropriate location with reasonable clearance between the
wall and the refigerator.
(refer to installation instructions in this mannal)
Set the temperature control to the coldest
temperature and wait for an hour. The
freezer should get slightly chilled and the
motor should run smoothly.
Once the refrigerator temperature is sufficiently low, you can store food in the
refrigerator. After starting the refrigerator, it
takes a few hours to reach the appropriate
temperature.
When the refrigerator is plugged in,
the interior light should come on when
you open the doors.
DA68-01174A 12/13/02 12:57 PM Page 4
Page 5
5
MAJOR FEATURES
CPU X86 Family Width 11.378 inches
RAM 128 MB, SDRAM Length 9.055 inches
ROM 64 MB Flash Height 0.819 inches
OS
WindowsCE.net
Room
Recommended
space
LCD
10.4 (800x600)
4~45°C(39.2~1 13°F)
Recommended
operating temperature
Connecting
port
Wireless LAN(802.11b),1 USB port,
AC Adapter cable, Headphone port
Microphone Port.
8~80% - Recommend
0~90% - Suitable Adapter
Humidity
Ac power
adapter
input
100~240V AC / 50~60Hz
12V dc 3.2A
Ac adapter
output
Graphic User Interface (GUI) is an easy access interface for HomePAD
TM
users. It is designed for
HomePAD
TM
users to easily comprehend the functions supplied with visual pages.
Touch Screen allows access to all HomePAD
TM
functions of the built-in screen keyboards and a character
recognition program without using a keyboard
Wireless LAN (IEEE 802.11b) access any screens by using the diverse network HomePAD
TM
functions
If there is not an obstacle, wireless network is possible to 1,181 inches.
If there is an obstacle, an actual communication distance may decrease
Twin Cooling System
•
The refrigerator and the freezer have two evaporators. Given this
independent system, the freezer and the refrigerator are cooled
individually as required and are, therefore, more efficient. Food odor
from the refrigerator does not affect food in the freezer due to separate air flow circulation.
Multi-Flow System
•
Cool air circulates through multiple vents on every shelf level. This
provides even distribution of cooling inside cabinets to keep your
food fresh longer.
Xtra Space
TM
• Vertical room next to the ice maker in the freezer provides space
for pizza etc.
Door Alarm
•
Beeper reminds you that the door is open.
Xtra Fresh
TM
• Optimized humidity control keeps vegetables & fruits fresh.
Deodorizer
• Reusable twin deodorizers keep the refrigerator air fresh and
odor free.
CoolSelect Zone
TM
Drawer(RS2555, RS2577, RH2777)
•
User can select Quick Cool, Thaw, and Select for quickly soft
freeze, chill and cool items. Select Soft Freeze, Cool or Chill to control the temperature of drawer.
DA68-01174A 12/13/02 12:57 PM Page 5
Page 6
6
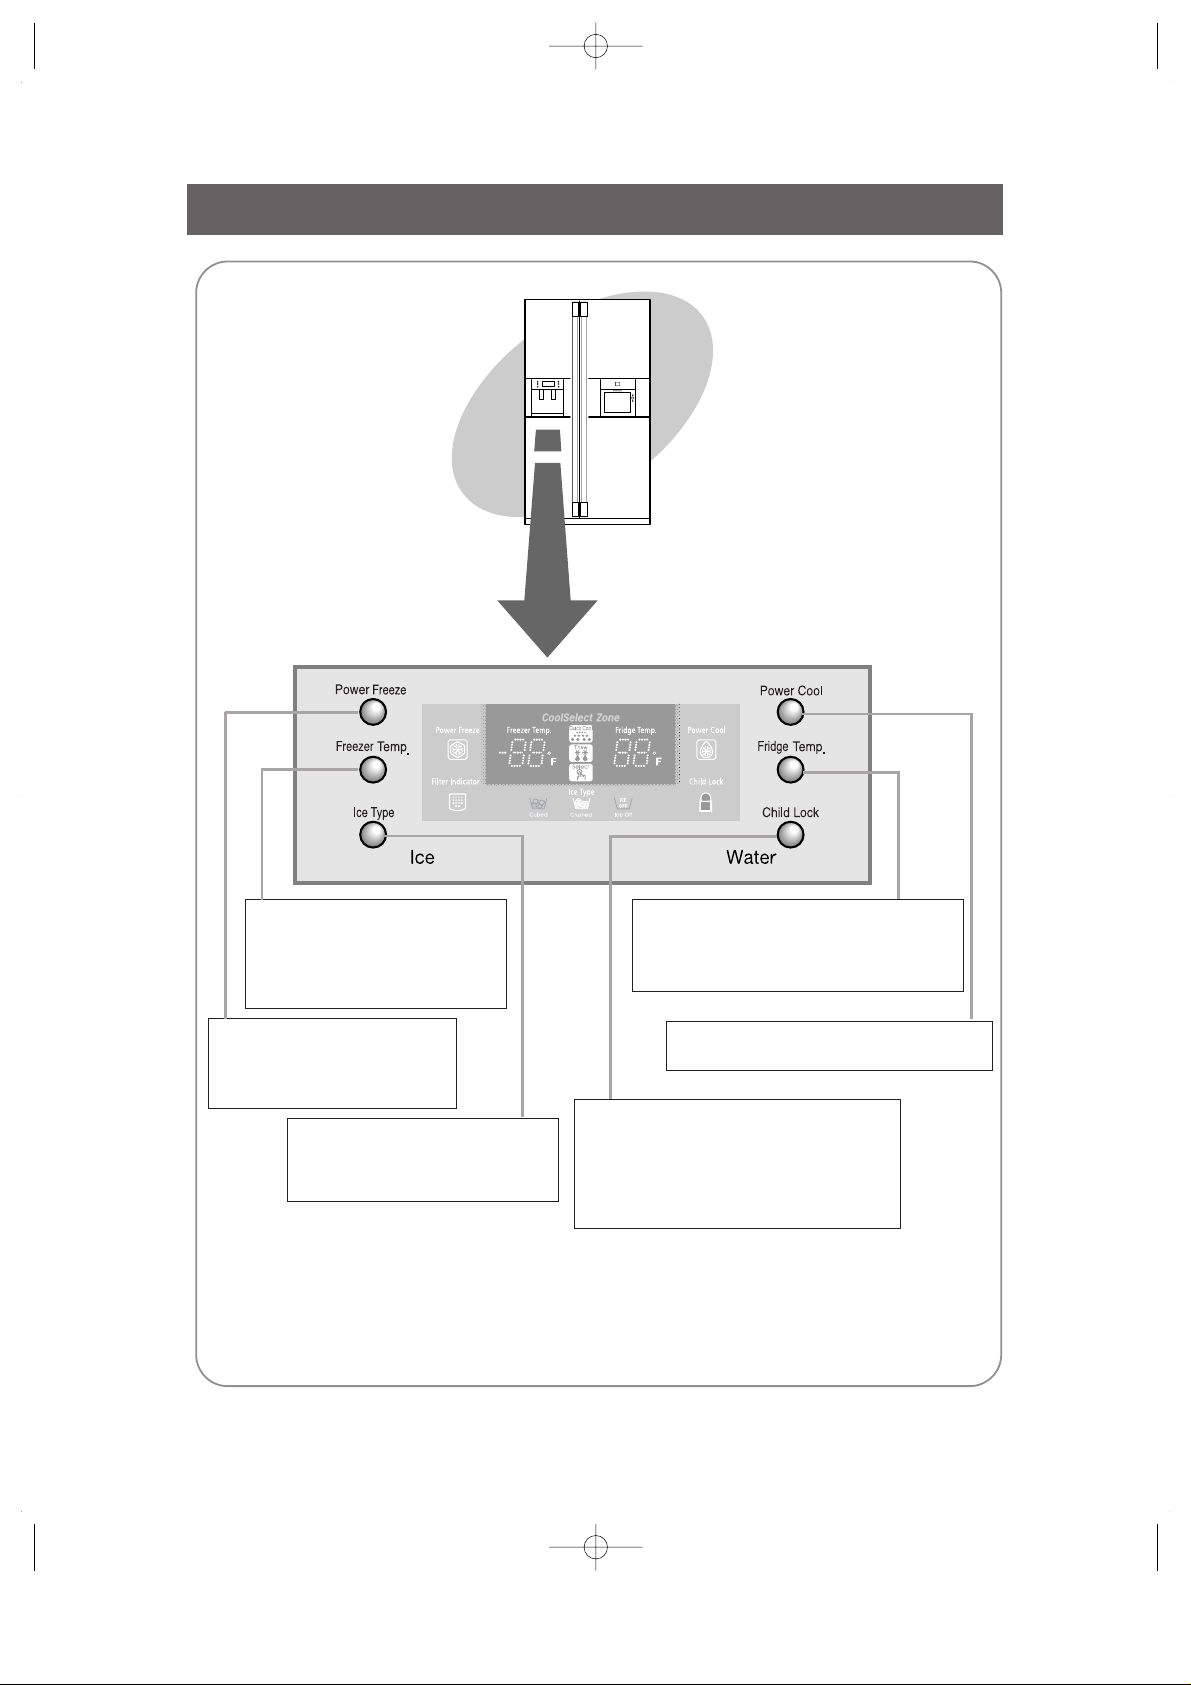
CONTROL PANEL
FREEZER TEMP. BUTTON
To set the freezer temperature, press
the button repeatedly to change the set
temperature in sequence between
8°F and -14°F.
FRIDGE TEMP. BUTTON
To set the fridge temperature, press the button
repeatedly to change the set temperature in
sequence between 34°F and 46°F.
POWER COOL BUTTON
Speeds up the cooling process in the
refrigerator
POWER FREEZE BUTTON
Speeds up the freezing process in
the freeze.
CHILD LOCK BUTTON
When this button is pressed for 3 sec., the Power
Freeze, Power Cool, Freezer Temp. and Fridge
Temp. are locked and can not be modified. The
Water and Ice dispensers are not locked they can
still be used.
ICE TYPE BUTTON
Use this button to choose Cubed or
Crushed Ice or Ice off.
DA68-01174A 1/4/03 12:17 PM Page 6
Page 7
7
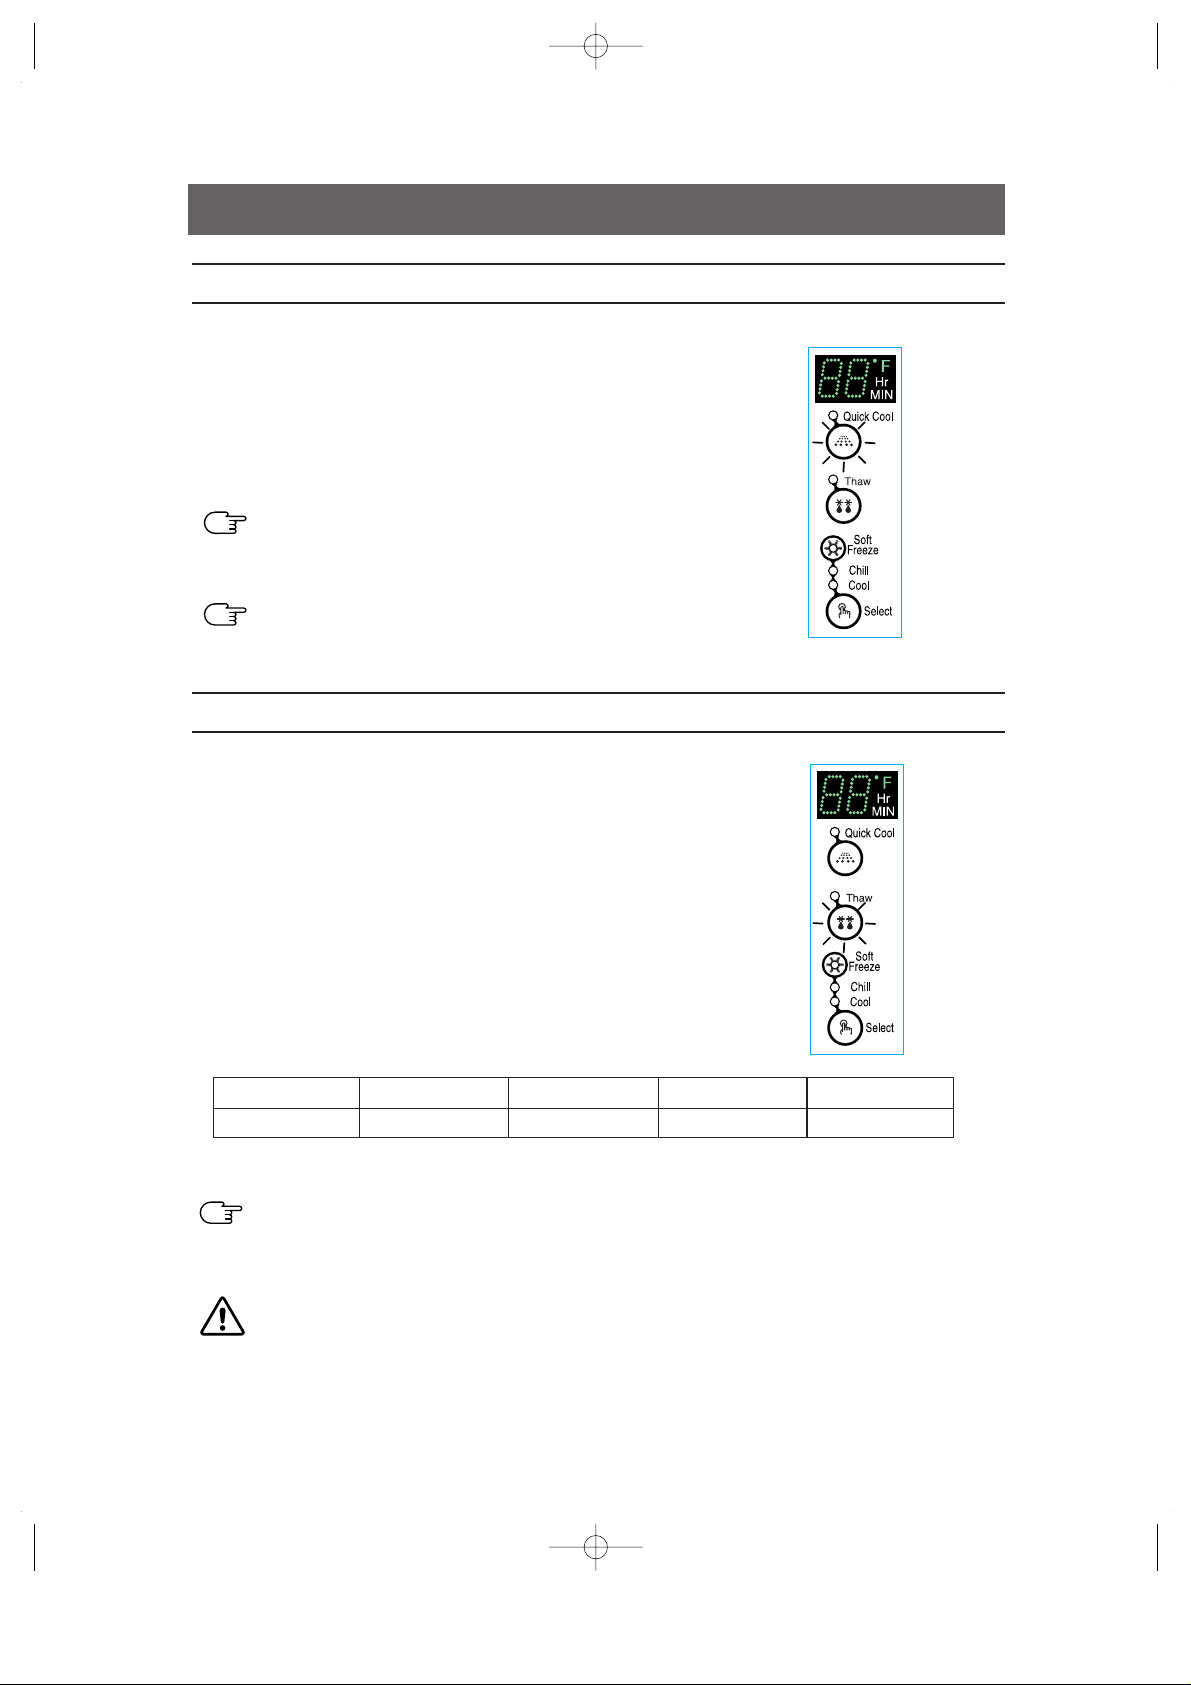
DIGITAL P ANEL
Freezer Temp. indicates the current freezer temperature.
Fridge Temp. indicates the current
refrigerator
temperature.
Quick Cool, Thaw, and Select show the status of the CoolSelect Zone
TM
Drawer
•
This light indicates the recyclable twin deodorizers are in operation.
•
Recycle the honeycomb cartridge once or twice a year (see “Cleaning the
Accessories” section)
•
This light is on when you press the Power Cool button.
Press the button to quickly return the refrigerator to the set temperature.
•
Press the button again to cancel the Power Cool mode.
•
This light is on when you press the Power Freeze button.
Press this button to quickly return the freezer to the set temperature.
•
You can get ice much faster.
•
Press the button again to cancel the Power Freezer mode.
•
Press the Ice Type button in sequence to choose
Cubed Ice, Crushed Ice or Ice Off to stop making ice.
•
Bright icon indicates the ice type is currently chosen.
Cubed Ice, Crushed Ice and Ice Off
•
When the green light changes to orange, it is time to replace the water filter.
If indicator is red, quick replacement is strongly recommended.
•
When the water filer is replaced, reset the indicator by pressing the Ice Type
button and the Child Lock buttons simultaneously for 3 seconds.
•
To turn off this indicator off, press the Ice Type and Child Lock buttons simultaneously for 5 seconds.
Filter Indicator
Power Freeze
Power Cool
Deodorizer
DA68-01174A 1/4/03 12:17 PM Page 7
Page 8
8
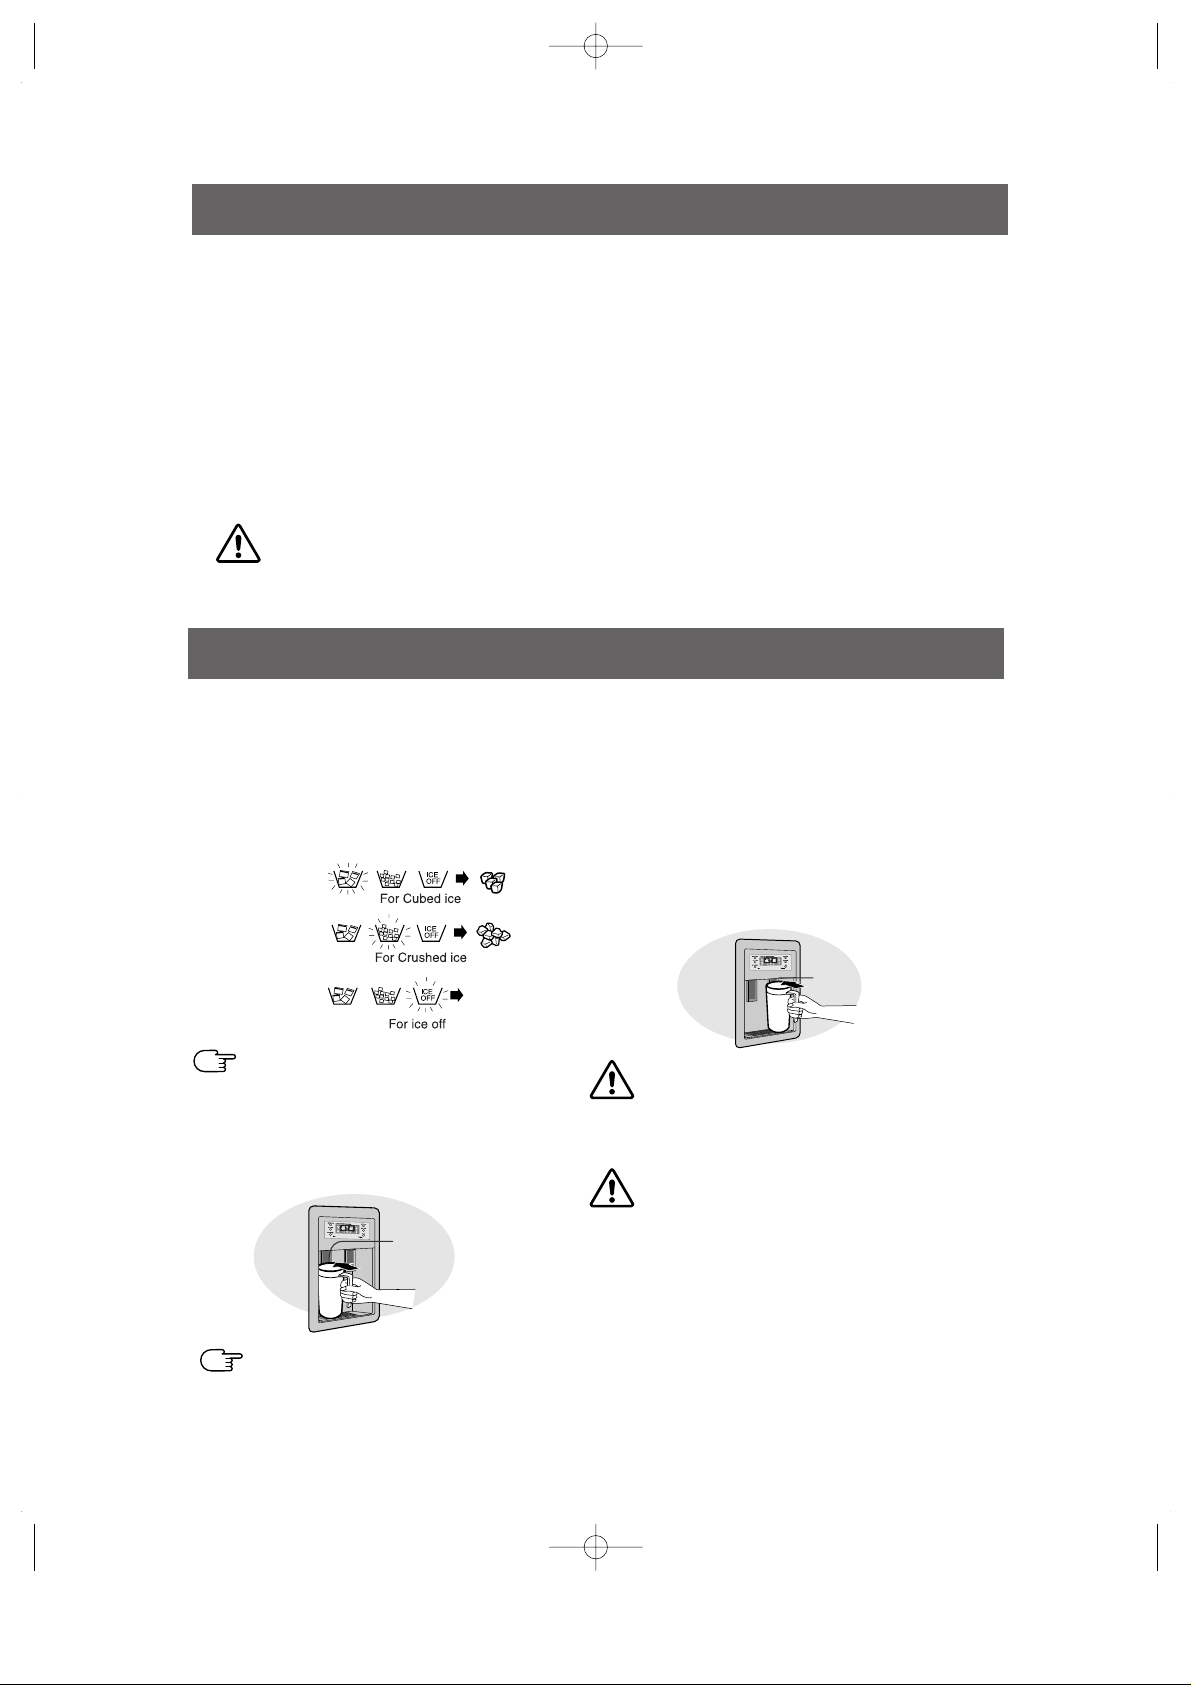
Press the Ice Type button to select the type of ice:
•
Cubed ice
•
Crushed ice
•
No ice
If the Ice remains in the Ice bucket, the
cubed ice is obtained.
Push the ice dispenser lever with a cup.
•
Place a cup to the dispenser lever line to prevent the ice from jumping out.
ICE and COLD WATER DISPENSER
Ice Dispenser
The ice maker produces 10 cubes at once and about
120 cubes a day automatically.
This quantity may be influenced by factors such as the freezer temperature, Power
Freeze function and the number of door openings. When
your
refrigerator
is plugged in, the Cubed ice mode is
automatically selected .
Water Dispenser
The capacity of the water tank is approximely 0.3 gal.
Cold Water
•
Push the water dispenser lever with a cup.
•
If you have just installed the
refrigerator
, throw
away the first six glassfuls of water to flush out
impurities in the water supply system.
Never put fingers or any other objects in the
dispenser opening. It may cause injury.
If you have a long vacation or business trip
and won’t use the water or ice dispensers,
close the water valve. Otherwise, leakage
of water may occur.
Push
Push
CAUTION
When the water dispenser tray is overflowed, it may result in a slippery floor.
CAUTION
TEMPERATURE CONTROL
Freezer
•
The freezer temperature can be set between
8°F and -14°F.
•
Press the Freezer Temp. button repeatedly until the
desired set temperature is shown in the temperature
display.
•
The temperature display changes in sequence
between 8°F and -14°F. When the display reaches
8°F, it returns to -14°F.
•
After five seconds, the display reverts to the actual
freezer temperature. The unit will then work to adjust
to the new desired temperature.
Refrigerator
•
The refrigerator temperature can be set between
46°F and 34°F.
•
Press the Fridge Temp. button repeatedly until the
desired temperature is shown in the temperature display .
•
The temperature display changes in sequence and
reverts in the same way as the freezer.
•
When ice cream is stored above 4°F in freezer, it may melt.
•
The temperature of the freezer or the refrigerator rises from frequent openings, when sweeping
and from warm food. This may cause the digital display to blink . The digital display will stop
blinking when the freezer and refrigerator return to the normal temperature.
WARNING
No ice
NOTE
NOTE
DA68-01174A 12/13/02 12:57 PM Page 8
Page 9
9
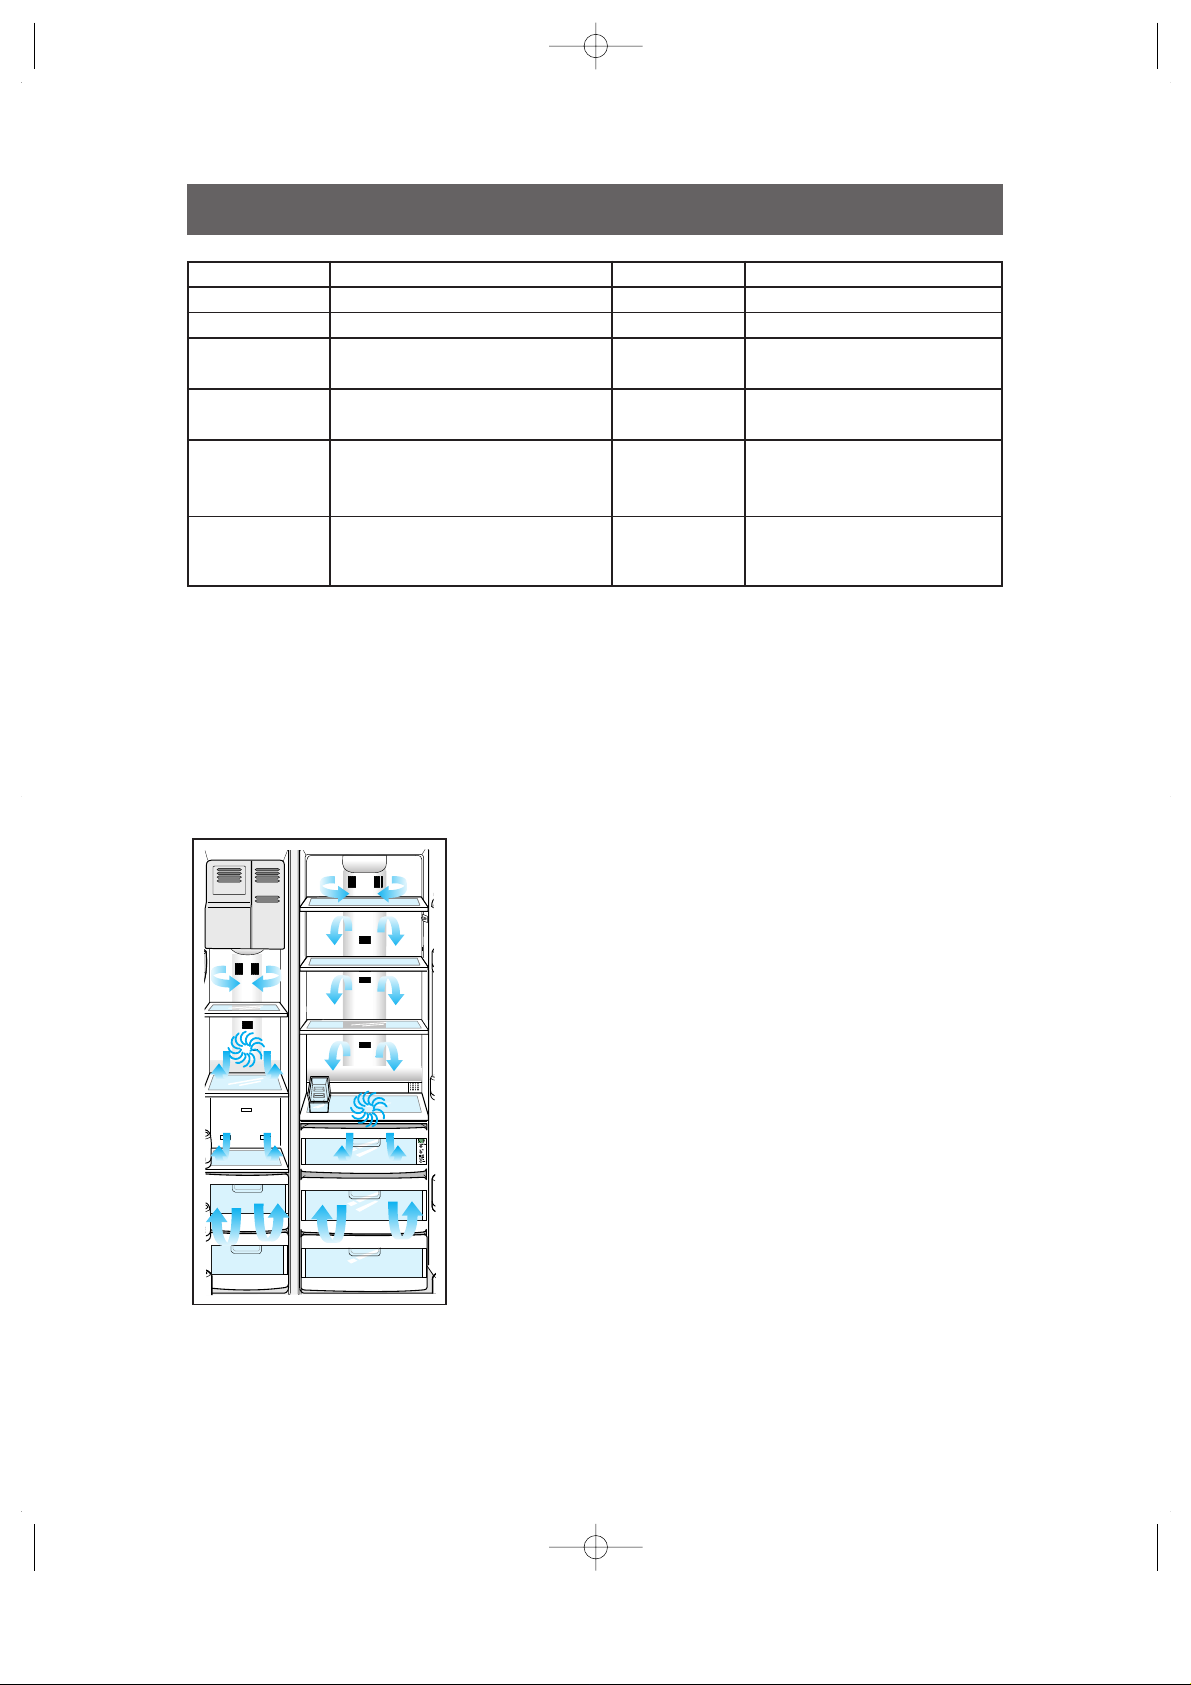
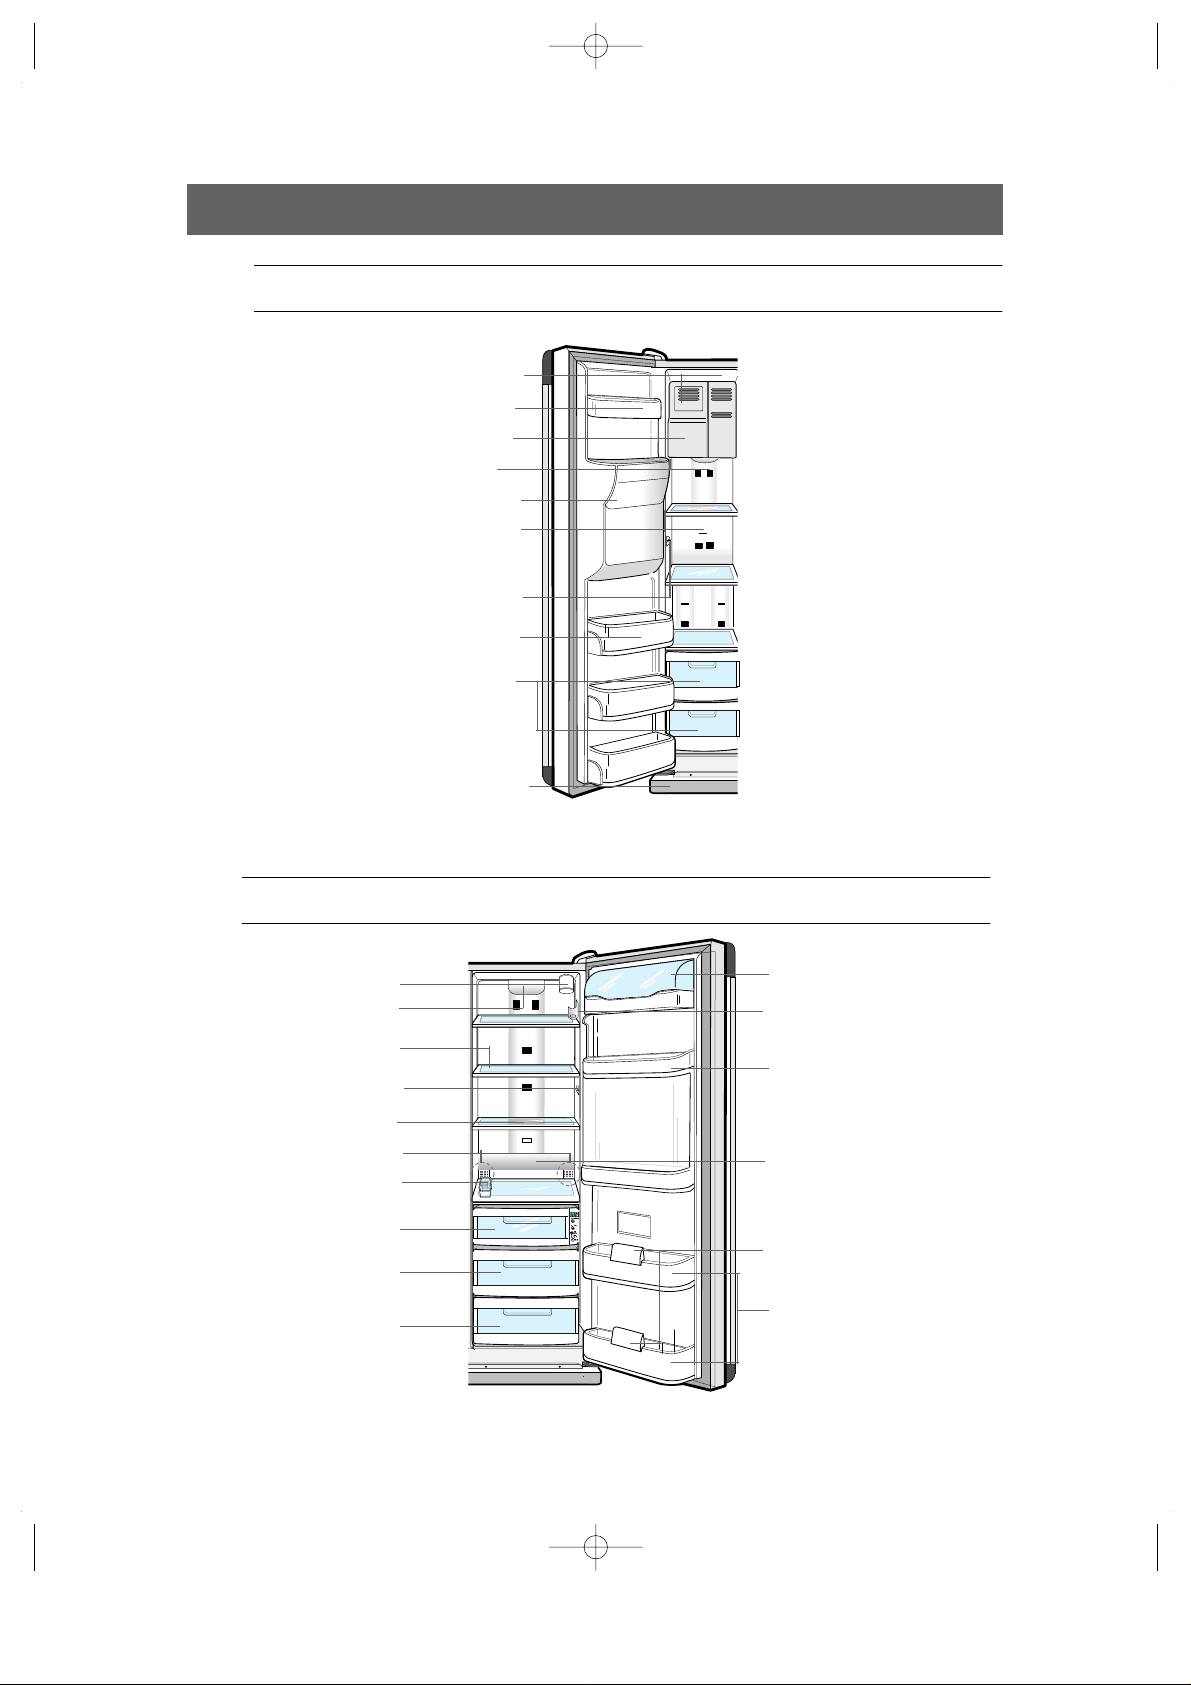
SHELVES and BINS
Door Bin
Xtra Space
TM
Ice Maker
Light
Ice Chute
Glass Shelf
Light Switch
Light Switch
Twin Deodorizers
Plastic Drawers
Front Leg Cover
Tilt Pockets
Freezer
Egg Container
Foldable Shelf
Light (upper)
Water Filter
Spill-proof glass Shelf
Dairy Compartment
Wine Rack
Gallon Door Bin
Lights (lower)
Gallon Door Bins
Door Bin Top Lips
CoolSelect Zone
TM
Drawer
Vegetable & Fruit Drawer (upper)
Refrigerator
Vegetable & Fruit Drawer (lower)
DA68-01174A 12/13/02 12:57 PM Page 9
Page 10
10
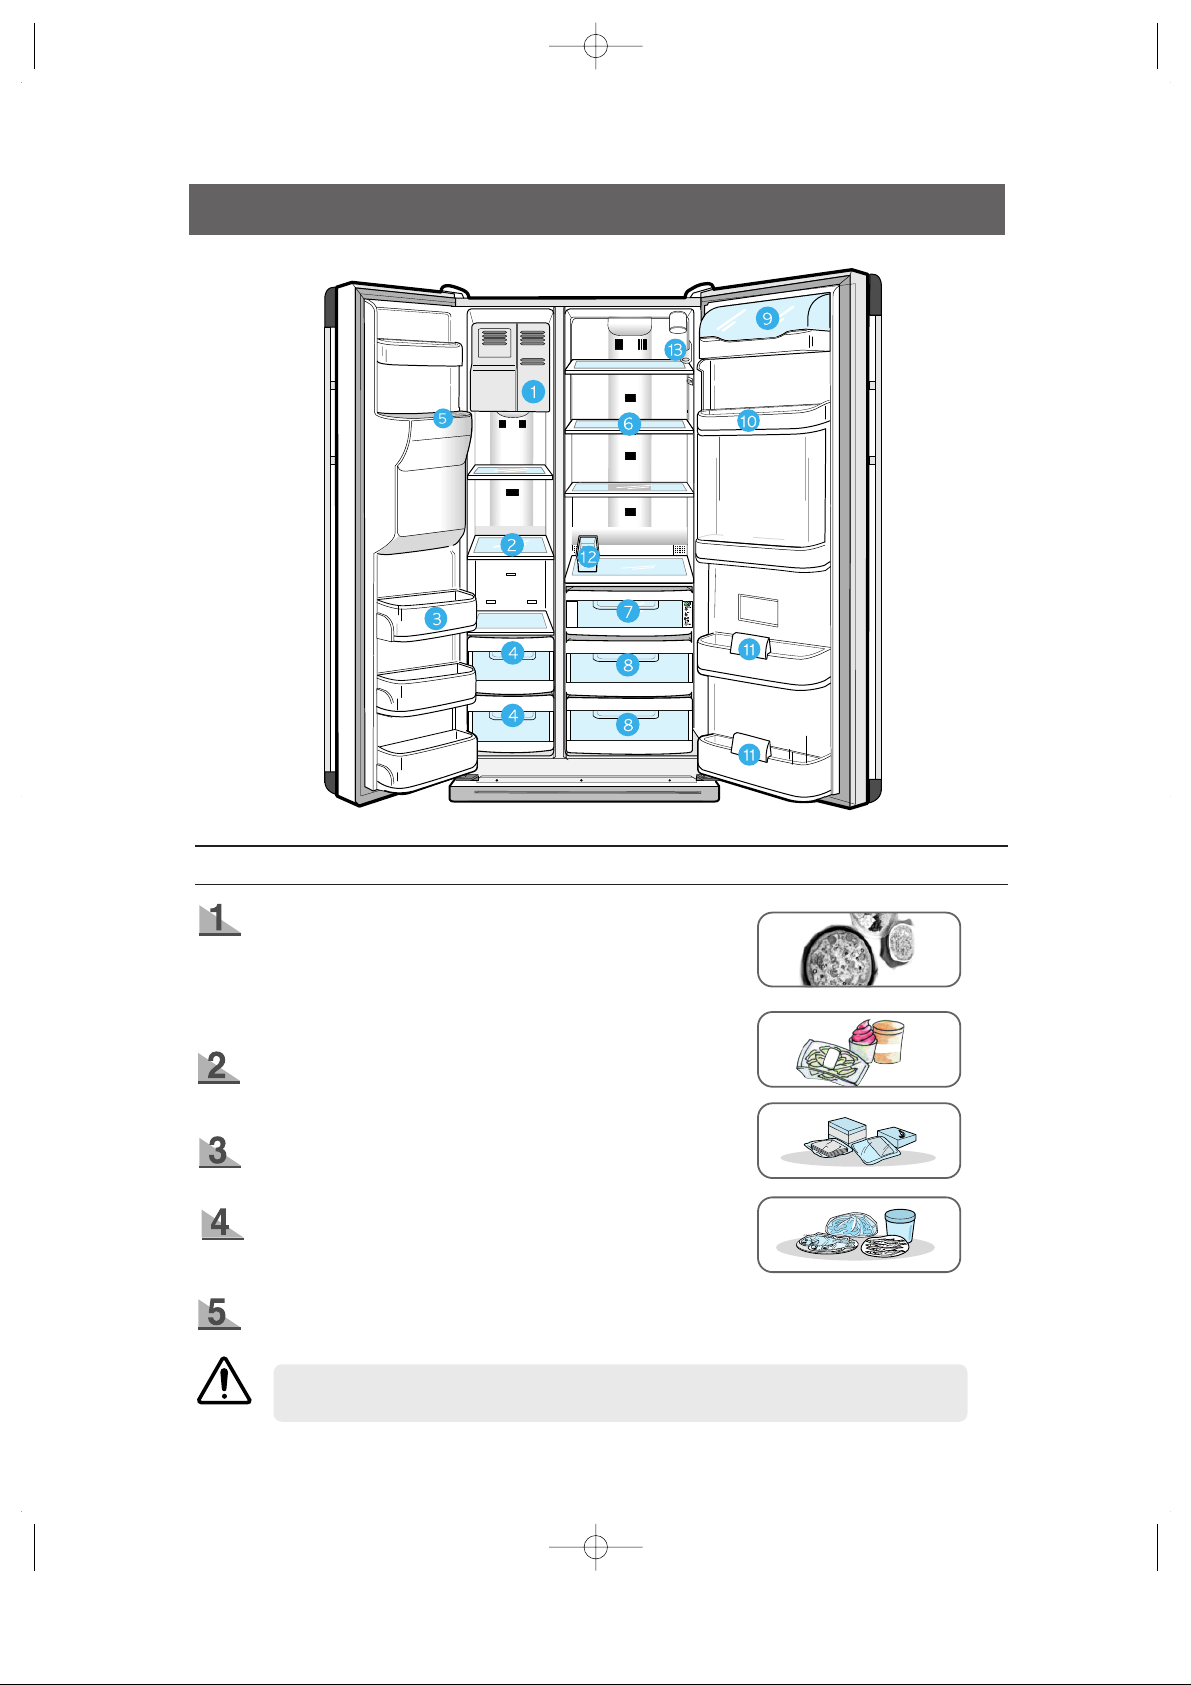
FOOD STORAGE GUIDE
FROZEN FOOD STORAGE IN FREEZER
Xtra Space
TM
•
Can be used for frozen foods such as pizza, pasta, burritos,
and fajitas.
•
In order to prevent odor penetration to the ice, stored food
should be wrapped securely.
Tempered Glass Shelf
•
Can be used to store all types of frozen food.
Door Bin (Tilt Pocket)
•
Can be used for small packages of frozen food.
Plastic Drawer
•
Can be used to store meat and dry foods. Stored food should
be wrapped securely using foil or other suitable wrapping
materials or containers.
Ice chute
WARNING
Do not put your fingers, hands or any other insuitable objects in the chute or ice-maker bucket.
This may result in personal injury or material damage.
DA68-01174A 12/13/02 12:57 PM Page 10
Page 11
11
FOOD STORAGE GUIDE
Tempered Spill Proof Glass Shelf
•
Can be used to store all types of chilled food.
•
Safe and hard to break resistant.
•
Circular marks on the glass surface are a normal phenomenon.
Chilled Bin or CoolSelect Zone
TM
Drawer
•
Helps to preserve the taste of food and prolongs its freshness. Use
to store cheese, meat, poultry, fish or any other foods used quickly.
Fruit & Vegetable Drawer (Upper and Lower)
•
Is used to store fruits and vegetables.
•
This drawer is airtight. Optimized humidity control design helps to
preserve the freshness of stored vegetables and fruits.
Dairy Compartment
•
Can be used to store butter, margarine and cheese.
Gallon Door Bins
•
Can be used to store foods in small packages, such as milk and
yogurt.
Beverage Station
•
Can be used to store the frequently used items, such as canned
beverages and snacks and allows access to these items without
opening the refrigerator door.
Wine Rack
CHILLED FOOD STORAGE IN REFRIGERATOR
Bottles should be stored tightly together so that they do not
fall out.
CAUTION
DA68-01174A 12/13/02 12:57 PM Page 11
Page 12
12
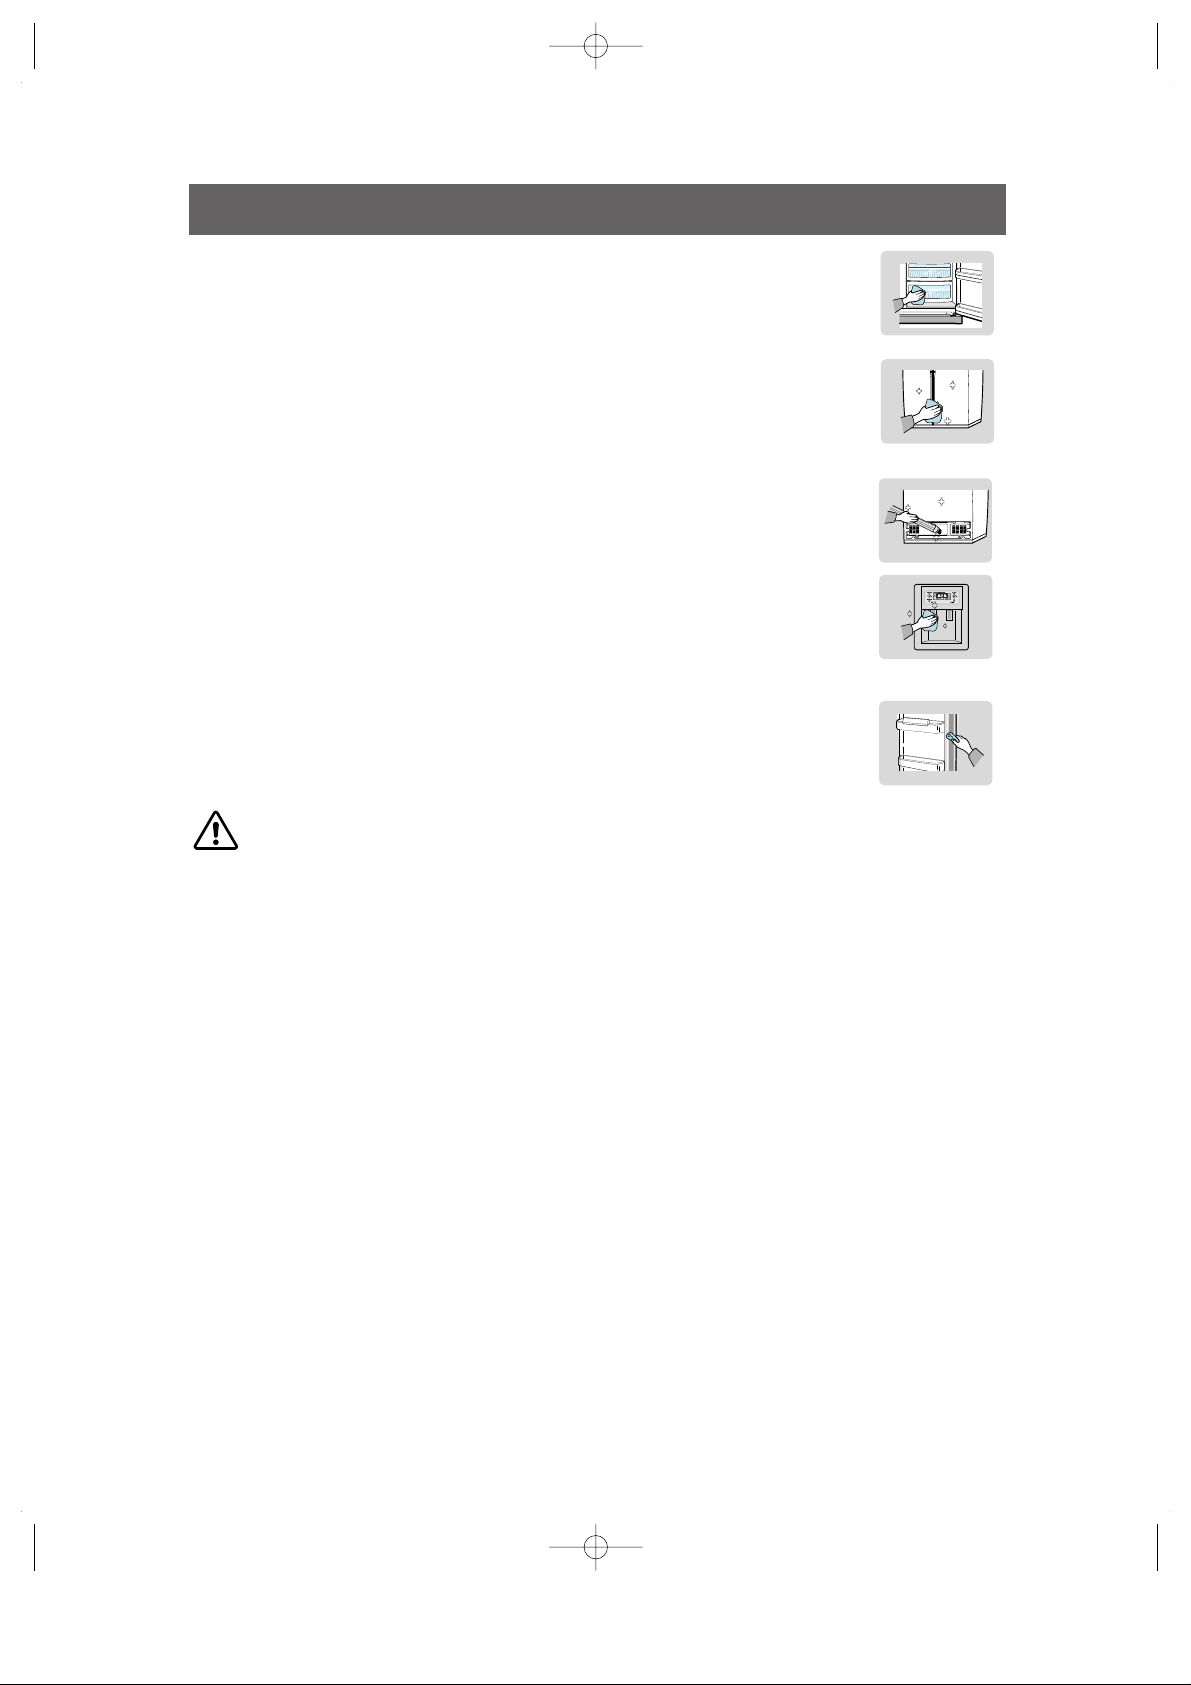
CoolSelect Zone
TM
Drawer GUIDE
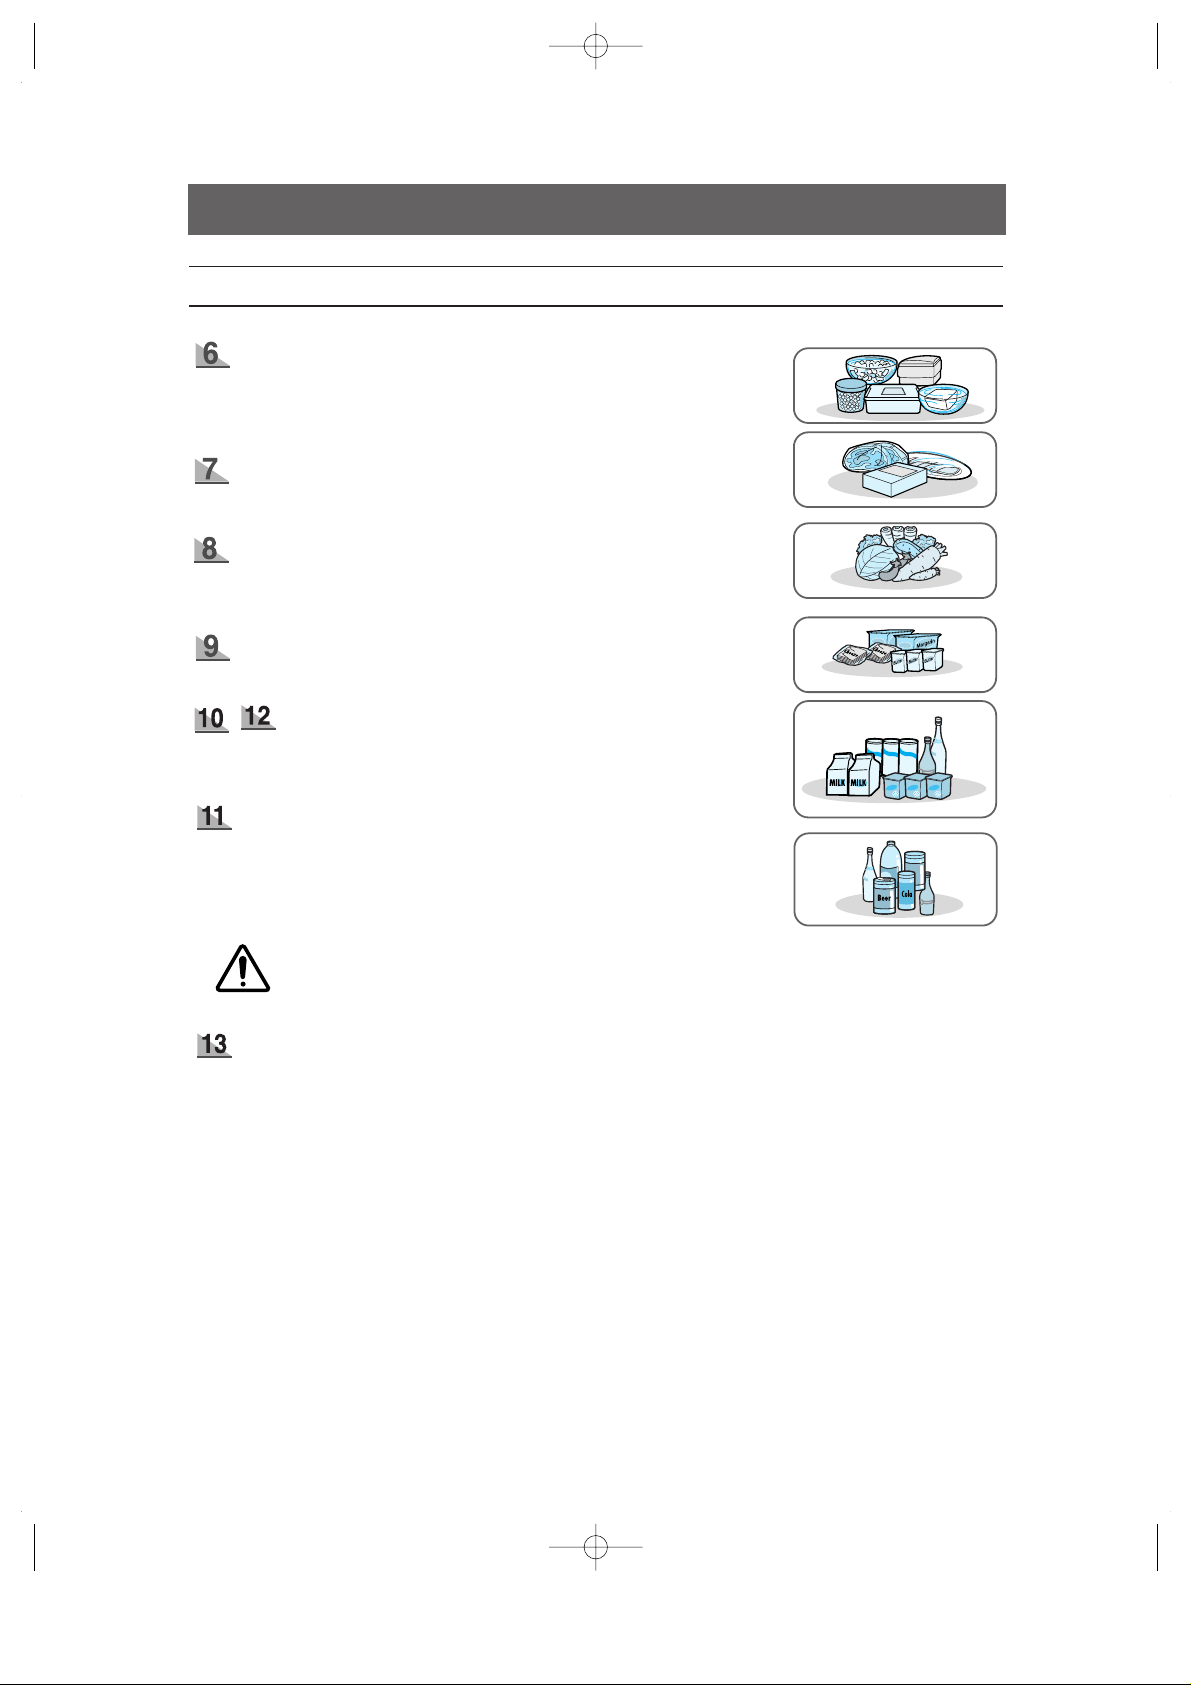
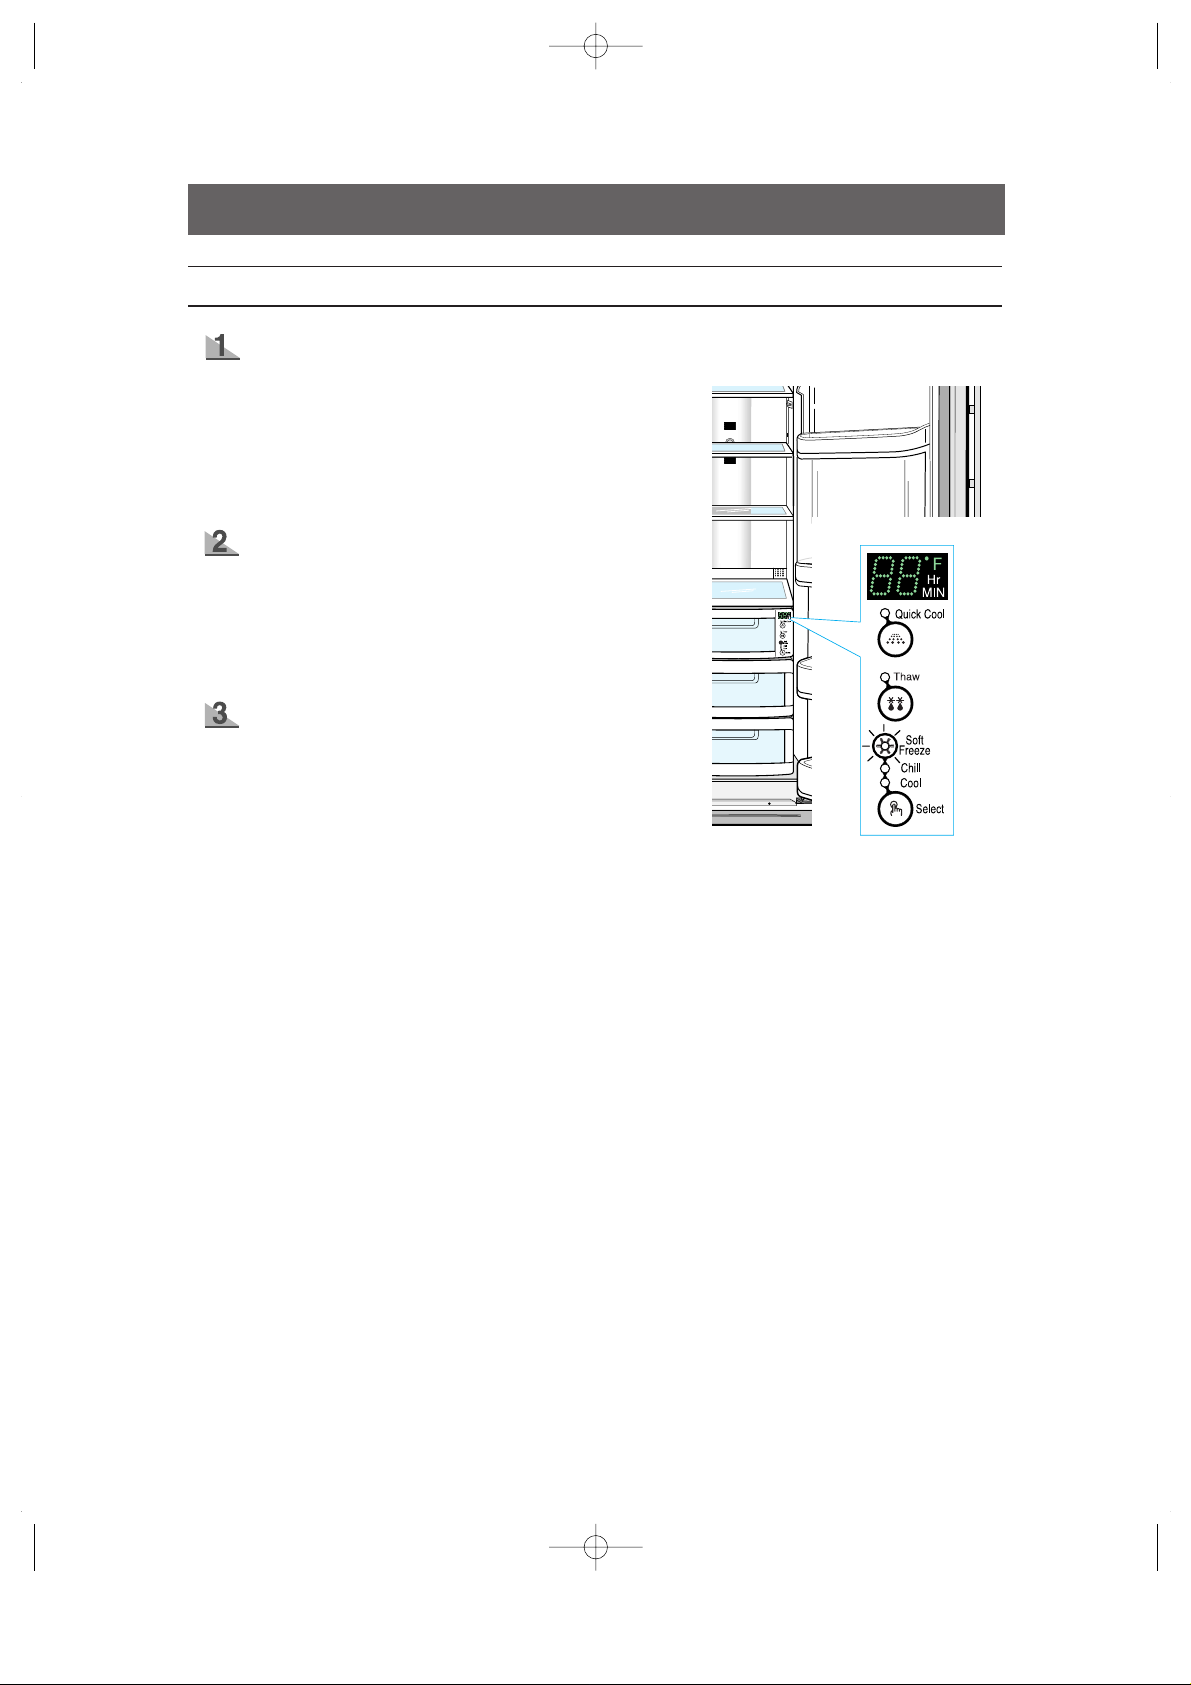
“Select” Button
Soft Freeze
•
When “Soft Freeze” is chosen, the temperature on the
digtal panel displays 23°F(-5oC) regardless of the set
temperature of the refrigerator.
•
“Soft-Freeze” temperature helps keep meat and fish
fresh longer.
•
Can cut meat easily without drips.
Chill
•
When “Chill” is chosen, the temperature of the
CoolSe-
lect Zone
TM
Drawer is kept at 30°F(-1oC) regardless of
the set refrigerator temperature.
•
“Chill” temperature helps keep meat and fish fresh
longer.
Cool
•
When “Cool” is chosen, the temperature will be the
same as the set temperature of the refrigerator. The digital panel shows the same temperature as the display
panel.
•
For “Cool,” the CoolSelect ZoneTMDrawer allows extra
refrigerator space.
DA68-01174A 12/13/02 12:57 PM Page 12
Page 13
13
CoolSelect Zone
TM
Drawer GUIDE
“Quick Cool” Button
“Thaw” Button
•
You can use the Quick Cool feature with the CoolSelect ZoneTM.
•
“Quick Cool” allows 1~3 canned beverages to cool within 60 min.
•
To cancel this option, press the “Quick Cool” button again.
CoolSelect Zone
TM
returns to the previous temperature.
•
When “Quick Cool” ends, it returns to the “Cool” temperature setting.
Depending on the beverages, the cool-down time may vary.
•
After “Thaw” is selected, warm and cold air is alternately supplied into the
CoolSelect ZoneTMDrawer
.
•
Depending on the weight of meat, thawing time can be selected
for 4 hrs, 6 hrs, 10 hrs, and 12 hrs sequentially.
•
When “Thaw” ends,
CoolSelect Zone
TM
displayreturns to “chill”
condition.
•
To cancel this option, press any button except “Thaw”.
•
The approximate thawing time of meat and fish are shown
below. (Based on 1inch thickness)
Thaw
Time 4 hours 6 hours 10 hours 12 hours
Weight 0.8 lb 1.3 lb 1.7 lb 2.2 lb
•
For “Quick Cool” option, food stored in the CoolSelect Zone
TM
Drawer should be removed.
NOTE
NOTE
NOTE
WARNING
Depending on the size and thickness of meat and fish, the thawing time may vary.
The above weight represents the total weight of food in the CoolSelect Zone
TM
Drawer.
Ex) The total thawing time for 1.3 lb frozen beef and 0.8 lb frozen chicken will be 10 hours.
•
When using the "Thaw" feature, food stored in the CoolSelect ZoneTMDrawer should be
removed.
DA68-01174A 12/13/02 12:57 PM Page 13
Page 14

14
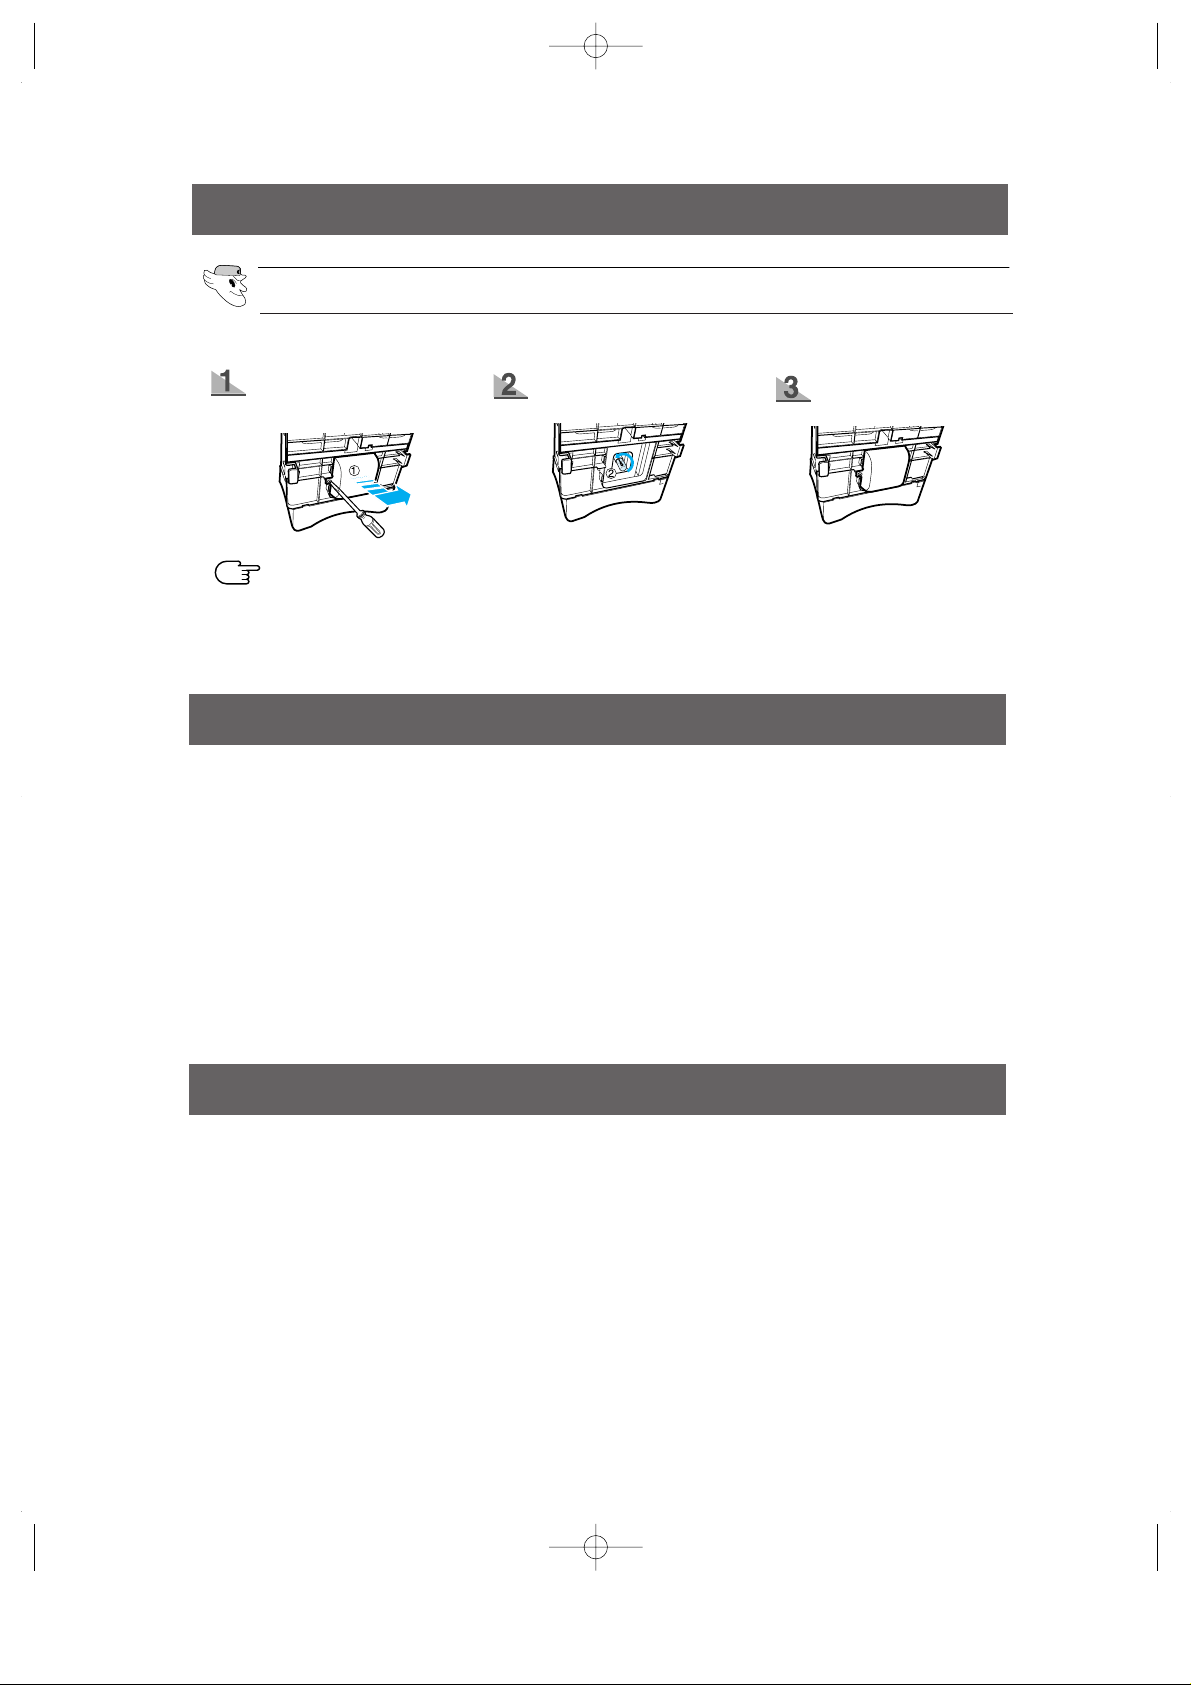
REMOVING THE FREEZER ACCESSORIES
•
Do not use excessive force when
removing the cover. It may cause an
injury .
Glass Shelf
•
Pull the shelf out as far as
it goes. Then lift it up and
remove it.
Door Bin
•
Hold the door bin with both
hands and then lift it up.
Plastic Drawer
•
Remove the drawer by
pulling it out and lifting it up
slightly .
Ice Maker Bucket
•
Remove the bucket by lifting up and pulling out.
Front Leg Cover
•
Open the freezer and refrigerator doors, remove three
screws and detach the cover.
•
To reassemble the cover leg
front, put it back to original
position and tighten the three screws.
NOTE
REMOVING THE REFRIGERATOR ACCESSORIES
Spill Proof Glass Shelf
•
Pull the shelf out as far as it will go. Then lift it up and remove it softly.
Vegetable & Fruit Drawer
•
Remove the drawer by holding the handle, pulling the drawer out and lifting it up smoothly.
•
Remove the optimized humidity control cover by pulling it towards you.
Gallon Door Bin
•
Hold the bin with both hands and remove it by lifting it up.
Wine Rack
•
It is attached to the cabinet wall. To remove wine rack, slide the
wine rack in the direction of the arrow as shown.
•
Simply take the rack out of the tabs.
NOTE
•
Before
removing the freezer and refrigerator accessories, please move the stored foods to other space.
DA68-01174A 12/13/02 12:57 PM Page 14
Page 15
15
CLEANING THE ACCESSORIES
•
Do not spray the refrigerator with water. It may cause an electric shock.
•
Do not clean it with benzene, thinner or car detergent. It may cause a fire.
Rubber door seals
•
If the rubber door seals are dirty, the door will not close properly, The refrigerator will not be
able to function efficiently. Clean the doors with a mild detergent and damp cloth. Then wipe
with a dry cloth.
Ice and water dispenser
•
Use a damp cloth to clean the ice and water dispenser. Then wipe it out with a dry cloth.
•
To keep drainage grid dry, do not touch ice and water dispenser.
Interior
•
Clean the accessories with a mild detergent, then wipe out with a dry cloth.
•
After washing the accessories, make sure that they are dry before using them again.
Exterior
•
Wipe the digital panel and display panel with a clean cloth.
•
The surface of doors, handles and cabinet should be cleaned with a mild detergent and soft
cloth, then wipe off the surface with a dry cloth.
- Do not use Benzene, Thinner and clorox for cleaning
- Do not spray water directly on the surface of refrigerator while cleaning.
•
The exterior part of refrigerator should be polished once or twice a year.
Rear
•
Use a vacuum cleaner to remove dust once or twice a year.
WARNING
DA68-01174A 12/13/02 12:57 PM Page 15
Page 16
16
CLEANING THE ACCESSORIES
CHANGING THE INTERIOR LIGHT
INTERIOR LIGHT IN THE REFRIGERATOR .
Before changing the interior light, unplug the
refrigerator
from the power supply. If you
have difficulty in changing the light, contact your service center.
WARNING
Pull out the screw cap ➀ and
remove the screw.
Push the lamp cover in the
direction of the arrows.
After changing the bulb,
reattach the light cover
and screw it in again.
Pull out the screw cap and
remove the screw.
Take the lamp cover out in
the dircotion of the arrows.
After changing the bulb,
reattach the light cover
and screw it again.
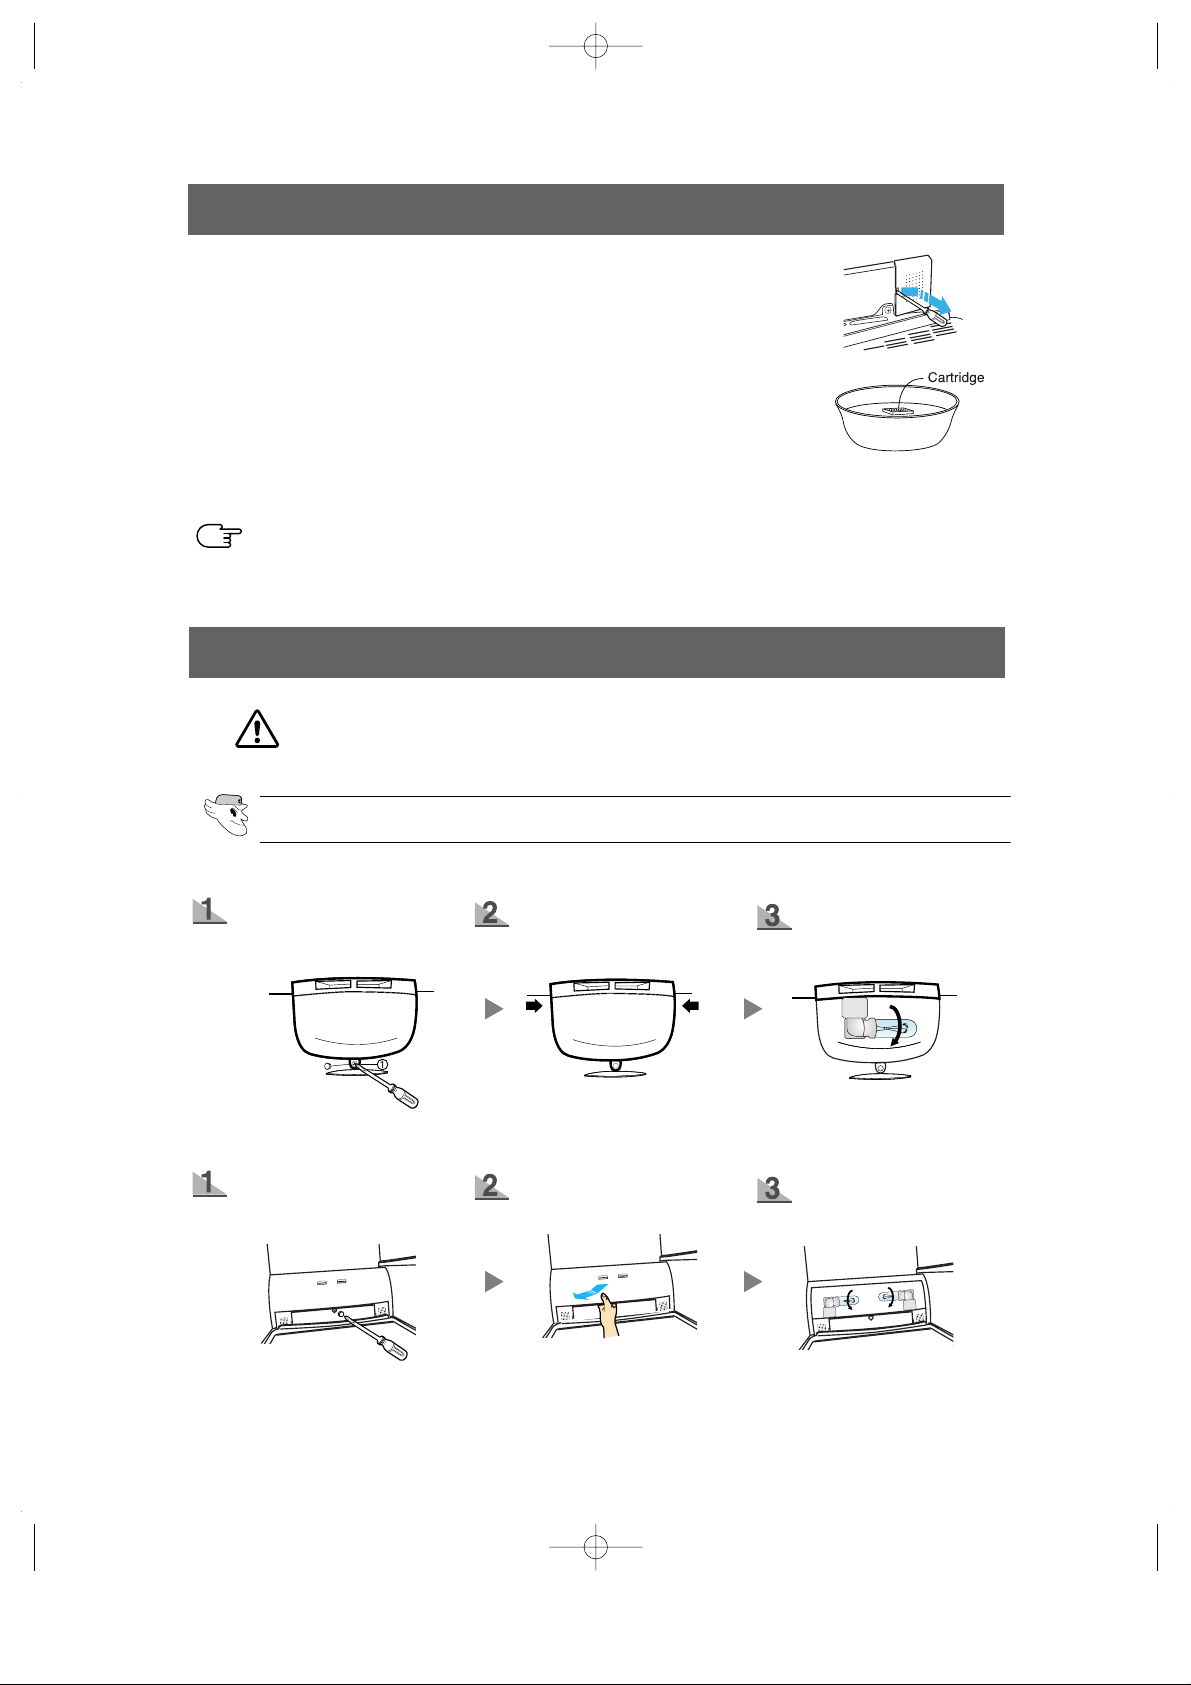
Twin Deodorizers
•
Remove the cover with a flat blade screw driver as shown.
•
Take out the cartridge from the cover and soak it in clean and warm water for
at least 4 hrs. Completely dry out the cartridge with sunlight for at least 8 hrs
in an open area.
•
Repeat this process once or twice a year.
•
If it is dried in a confined area, odor may be spread to that area.
NOTE
Upper
Lower (RS2555,RS2577,RH2777)
DA68-01174A 12/13/02 12:57 PM Page 16
Page 17
17
CHANGING THE INTERIOR LIGHT
INTERIOR LIGHT IN THE FREEZER
.
NOTE
Use a screwdriver to remove
the light cover (➀).
Change the bulb with a new
one (➁)
Reattach the light cover.
To replace freezer and refrigerator light bulbs (Bulb size E14, 30 watts), please contact
ADDRESS : SAMSUNG ELECTRONICS AMERICA, INC.
SERVICE DIVISION
400 VALLEY ROAD, SUITE 201, MT. ARLINGTON, NJ 07856
TELEPHONE : 1-800-SAMSUNG FAX : 1-973-601-6001
Light bulb part no: 4713-001145
WATER FILTER
The water “Filter Indicator” light
•
“Filter Indicator” light lets you know when it is time change your water filter cartridge. The light
will change from green to orange. This tells you that it is almost time to change the current cartridge.
It is recommended that you replace the cartridge when the light changes to red.
(see “Install the water filter” section for more informmation)
Using the dispenser without the water filter
•
You can not use the water and ice dispenser without a water filter cartridge because the water line
blocks at water supply.
Ordering replacement filters
•
To order more water filter cartridges, call 1-800-SAMSUNG and ask for accessory Part # DA2900003A or contact your authorized Samsung dealer.
DOORS
The refrigerator doors have a special door opening and closing feature to make sure they close all the
way and are securely sealed.
When opening the door, it will only open so far. After reaching a certain point, it will remain open.
When the door is partially open, it will close automatically.
The freezer light is located in the bottom of the auger motor case.
DA68-01174A 12/13/02 12:57 PM Page 17
Page 18
18
INSTALLATION OF THE REFRIGERATOR
Check the dimensions of your entrance door to determine whether the refrigerator can pass
through it.
Dimension
(inch)
Width
Capacity (Cu. Ft)
Model
RH2777AT
27.2
with Home Station
Case Height
without Home Station
with door
Depth
without door
36"
70.7"
68.6"
36.5"
30"
Checking the Dimensions of your Entrance Door
Allow clearance to the right, left, back and top when installing the refrigerator.
This has the advantage of reducing power consumption.
NOTE
inches
4
2 inches
inches
2
• Select a location with easy access to the water supply.
• Select a location with enough space for the refrigerator.
• Select a location without direct exposure to sunlight.
• Before disassembling the freezer door, the water supply line needs to be disconnected.
(If not, the water supply line can be damaged.)
• See “Separating the water supply line from the refrigerator” on the next page.
Selecting the Location for the Refrigerator
Allow sufficient space to circulate the air at the internal cooling system.
•
When refrigerator has not enough space, the internal cooling system may not work correctly.
NOTE
Page 19
19
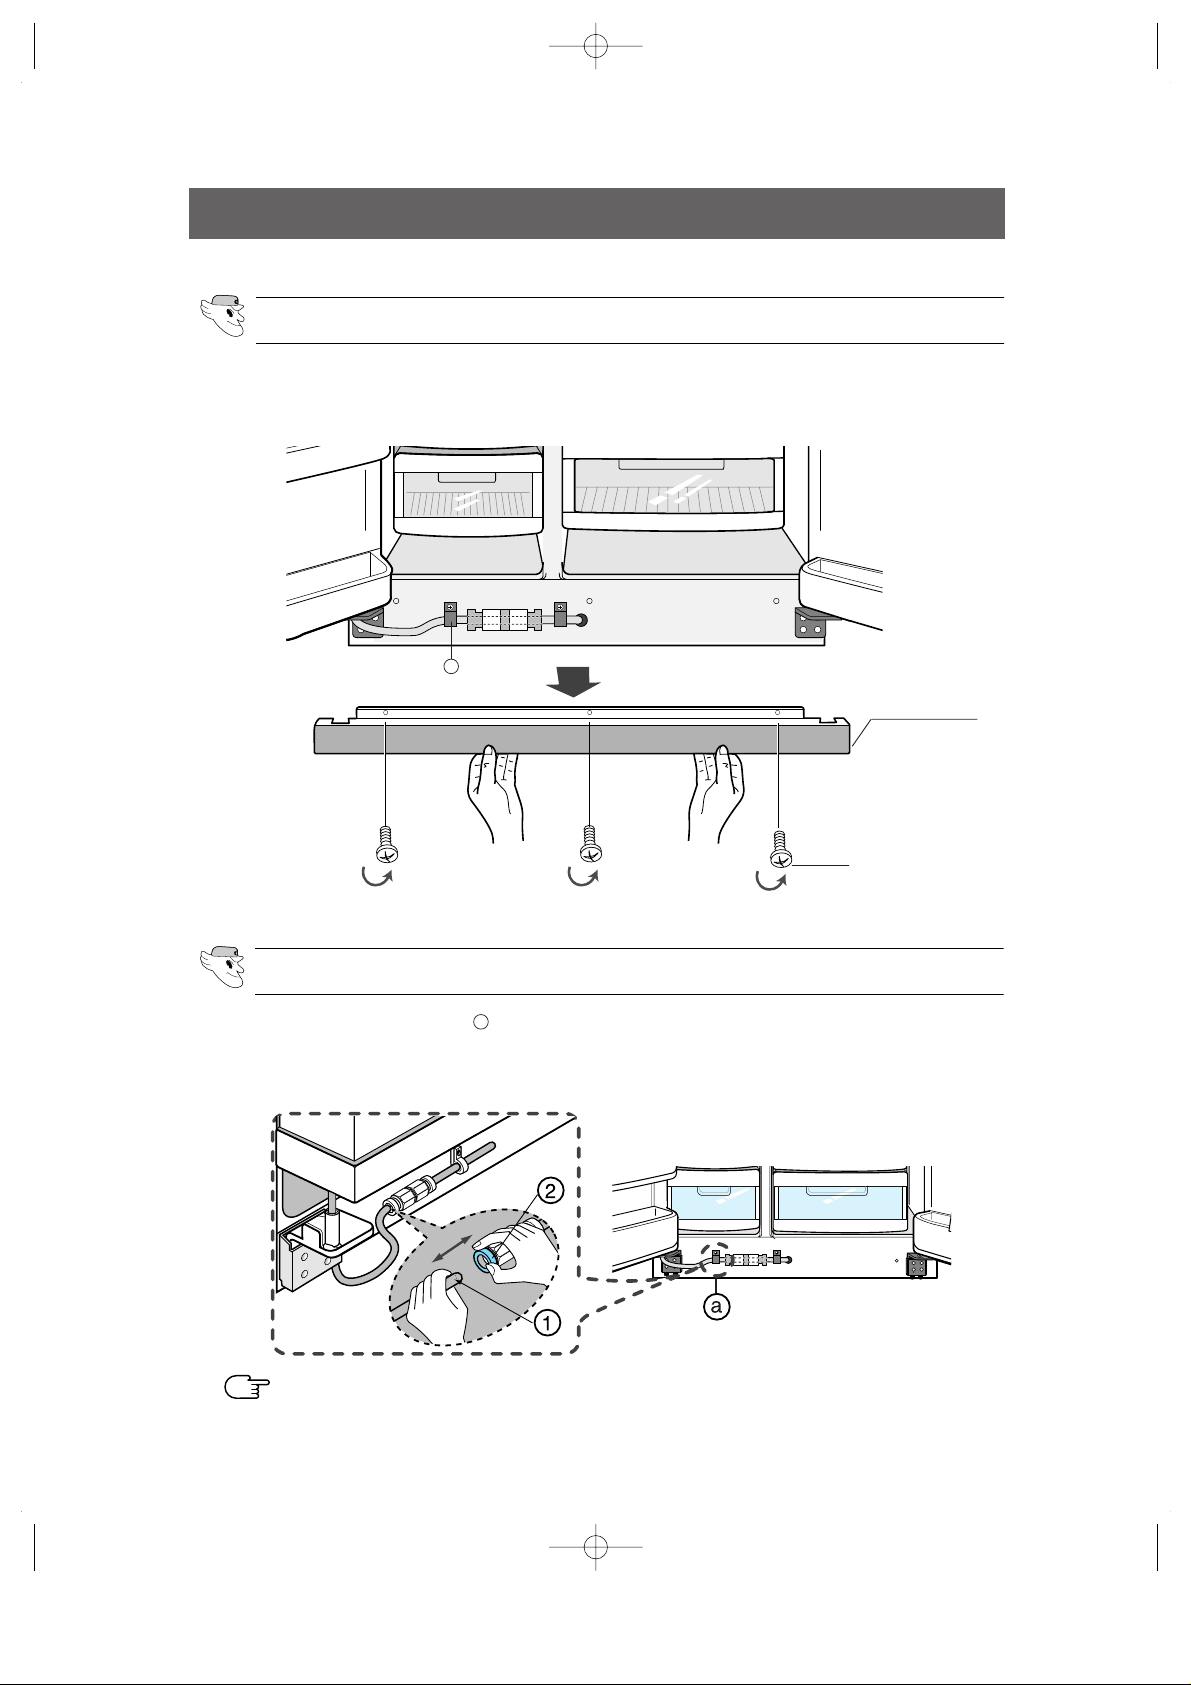
REMOVING THE REFRIGERATOR DOORS
1) Remove the screw from clamp ( ).
2) Remove the water tube by pressing the coupler (➁) and pulling the water tube (➀) away.
Open the freezer and refrigerator doors, and then take off the front leg cover by turning the
three screws counter-clockwise.
a
a
FRONT LEG COVER
SCREW
Removing the Front Leg Cover
Separating the Water Supply Line from the Refrigerator
Do not cut the water tube but separate it from the coupler.
NOTE
DA68-01174A 12/13/02 12:57 PM Page 19
Page 20

20
REMOVING THE REFRIGERATOR DOORS
1) With the door closed, remove the upper hinge cover (➀) using a screwdriver, and then disconnect
the wires (➁).
2) Remove hinge screws (➂) and ground screw (➃) counter-clockwise, and take off the upper hinge (➄)
along the arrow (➅). Take care when removing the door to ensure that it does not fall on you.
3) Remove
the door from the lower hinge
(➆)
by
carefully lifting the door (➇).
4) Remove the lower hinge (➈) from the bracket
lower hinge (➉) by lifting the lower hinge (➈) in
the direction of the arrow.
Removing the Freezer Door
•
Lift the door straight up.
•
Be careful not to pinch the water tubing and wire harness on the door.
•
Place doors on a protected surface.
NOTE
DA68-01174A 12/13/02 12:57 PM Page 20
Page 21

21
REMOVING THE REFRIGERATOR DOORS
3) Remove
the door from the lower hinge
(➆)
by
lifting the door (➇).
4) Remove the lower hinge (➈) from the bracket
lower hinge (➉) by lifting the lower hinge (➈) in
the direction of the arrow.
1) With the door closed, remove the upper hinge cover (➀) using a screwdriver, and then disconnect
the wires (➁).
2) Remove hinge screws (➂) and ground screw (➃) counter-clockwise, and take off the upper hinge
(➄) in the direction of the arrow (➅). Take care when removing the door to ensure that it does not fall
on you.
Removing the Refrigerator Door
DA68-01174A 12/13/02 12:57 PM Page 21
Page 22

22
Reattaching the Freezer Door
REATTACHING THE REFRIGERATOR DOORS
1) Insert the lower hinge (➀) in the bracket lower
hinge (➁).
2) Reattach the freezer door by inserting the hose
(➂) in the lower side of the door into the hole in
the lower hinge (➃) and pull the hose down.
3) Insert the upper hinge shaft (➄) into the hole (➅). After leveling between the upper hinge hole (➆) and
the hole of the cabinet
(➇).
Reattach hinge screws (➈) and gound screw (➉) in a clockwise direction.
4) Connect the wires.
5)
Put the front part of the upper hinge cover ( ) on
the front part of the upper hinge ( ) and reattach
from the front part of the upper hinge cover first.
11
12
DA68-01174A 12/13/02 12:57 PM Page 22
Page 23

23
REATTACHING THE REFRIGERATOR DOORS
Reattaching the Refrigerator Door
1) Insert the lower hinge (➀) in the bracket lower
hinge (➁).
2) Place the hole in the refrigerator door (➂) over
the lower hinge (➃).
3) Insert the upper hinge shaft (➄) into the hole (➅). After leveling between the upper hinge hole (➆) and
the hole of the cabinet
(➇). Reattach
hinge screws (➈) and gound screw (➉) in the clockwise direction.
4) Connect the wires.
5)
Put the front part of the upper hinge cover ( ) on
the front part of the upper hinge ( ) and reattach
it from the front part of the upper hinge cover
first.
11
12
DA68-01174A 12/13/02 12:57 PM Page 23
Page 24

2424
REATTACHING THE REFRIGERATOR DOORS
FRONT LEG COVER
SCREW
1) While pressing the front face of coupler (➁), insert the water line (➀) in the coupler.
2) Tighten the screw on the clamp ( ).
a
a
Put on the front leg cover by turning the three screws clockwise, as shown in the figure.
Reattaching the Water Supply Line
Reattaching the Front Leg Cover
DA68-01174A 12/13/02 12:57 PM Page 24
Page 25

25
ADJUSTING THE CLEARANCE BETWEEN THE DOORS
The doors will be uneven if the refrigerator is not level.
Case 1) Freezer door is lower than
that of the refrigerator
Insert a flat-blade screwdriver (-) (➀) into a slot of
the control lever (➁), turn it clockwise and level the
refrigerator.
Case 2) Freezer door is higher than
that of the refrigerator
Insert a flat-blade screwdriver (-) (➀) into a slot of
the control lever (➁), turn it clockwise and level
the refrigerator.
Do not make small adjustments with the control lever, Please refer to the next page.
DIFFERANCE OF HEIGHT
DIFFERANCE OF HEIGHT
➀
DRIVER(-)
➀
DRIVER(-)
➁ CONTROL LEVER
➁ CONTROL LEVER
Please level the refrigerator first.
NOTE
DA68-01174A 12/13/02 12:57 PM Page 25
Page 26

26
ADJUST THE CLEARANCE BETWEEN THE DOORS
Making small level adjustments between doors.
If the door of the freezer is lower than that of the
refrigerator.
If the door of freezer is higher than that of the
refrigerator.
3) After adjusting the doors, turn the nut (①) clockwise( ) until the lower end of the bolt, then tighten the
bolt again with the wrench (➂) to fix the nut(①).
If you do not fix the nut (①)firmly, the bolt (➁) may be released.
2) Please adjust the height difference between the doors turning the bolt (➁) clockwise( ) or
counter
clockwise
( ).
When you turn clockwise ( ), the door goes up.
➂ WRENCH
Adjustment location
➀ NUT
➁ BOLT
Adjustment location
➂ WRENCH
➀ NUT
➁ BOLT
➀ NUT
➁ BOLT
➂ WRENCH
➂ WRENCH
➂ WRENCH
➁ BOLT
➁ BOLT
Please open the doors and adjust the doors as follows:
1) Release the nut (①) on the lower hinge until the upper end of the bolt (➁).
When you release the nut(①), use enclosed hex wrench (➂) to turn the bolt(➁) a little counter-
clockwise.
Loosen the nut(①) with your finger.
➁ BOLT
➂ WRENCH
➀ NUT
NOTE
NOTE
NOTE
DA68-01174A 12/13/02 12:57 PM Page 26
Page 27

27
CHECKING THE WATER DISPENSER LINE
1) In order to operate the ice maker properly, water pressure of 20 ~125 psi is required.
In this range, a 170 cc paper cup can be filled in 10 secs.
2) The water filter removes particles. It does not sterilize or destroy any micro-organisms.
3) If the refrigerator is installed in area with low water pressure (below 20psi), you should install a booster pump to compensate for the low pressure.
4) Ensure the water storage tank inside the refrigerator is filled. push the water dis
penser lever until the water runs from the outlet.
NOTE
A universal water supply kit is available at extra cost from your dealer. The refrigerator manufacturer recommends using a water supply kit containing copper tubing.
DA68-01174A 12/13/02 12:57 PM Page 27
Page 28

28
INSTALLATION OF THE WATER DISPENSER LINE
SEPARATION
OF RED CAP
STICKER
(MONTH INDICATION)
COVER FILTER
ALIGN THE INDICATION MARK
WITH LOCK POSITION.
1) As shown, the fixed cap separates from the refrigerator by rotating it counterclockwise.
Remove the water filter from the box and put a month indicator
sticker on the filter as shown.
2) If the water filter was installed in March, put on the "SEP" sticker.
3) Remove the protective cap then position and insert the
filter as shown.
4) Slowly turn the water filter clockwise 90º to align
the indication mark on the cover, locking the filter in position. Do not overtighten.
Please check that the indication line aligns with the lock position.
Install the water filter.
NOTE
1) Slip the compression nut and plastic ferrule
through the plastic tube.
2) After inserting the sleeve, tighten the compression nut onto 1/4” compression fitting(union).
Connect the water tube to the refrigerator.
Water line must be connected to
drinkable water only.
NOTE
Do not overtighten the compression
nut.
NOTE
Keep the cap(A) in a safe place for recapping,
when you will not use the filter.
NOTE
3) Slip the compression ferrule and nut on copper (or plastic) tubing as shown.
Tighten the compression nut onto the compression fitting(union).
4) Turn water on and check for any leakege.
Compression Nut
Compression fitting
Sleeve
Compression Nut
Ferrule
Ferrule
(A)
DA68-01174A 12/13/02 12:57 PM Page 28
Page 29

29
2) When you press the test button, the ice cube container is
filled with water from the water supply tap.
Check the amount of water (see the illustration below).
If the water level is too low,
the ice cubes will be small.
This is not a problem with the ice maker
but of the water pressure in
the pipe, and occurs frequently.
When this problem occurs, contact the
service center to check the
amount of water supplied.
INSTALLATION OF THE WATER DISPENSER LINE
Remove any residual matter inside the water supply line after installing filter.
Check the amount of water supplied to the ice tray.
CHECK THE WATER LEVEL
TEST BUTTON
TOO HIGH
OPTIMUM
LEVEL
1) Lift up (①) and pull out (➁) the ice maker bucket in the freezer.
ICE MAKER
TOO LOW
1) Turn on the main water supply & shut-off valve of the water
supply line.
2) Run water through the dispenser until the water runs clear
(6~7 minutes). This will clean the water supply system and
clear air from the lines.
3) Additional flushing may be required in some households.
4) Open the refrigerator door and check if water leaks around
the water filter.
WATER
ICE
•
A newly-installed water filter cartridge may cause water to briefly spurt from the dispenser.
•
Before reinstalling the water filter, remove the wine rack.
NOTE
DA68-01174A 12/13/02 12:57 PM Page 29
Page 30

30
Front view
Camera: Photo picture album function for photos and images
Display Lamp: Displays system power and network status
Network Display Lamp: Displays system status of wireless network.
If this lamp blinks, the wireless network is not working properly. You
should recheck the settings of both the HomePADTMand Access
Station evices.
Power Button: Turns the system power on and off
Scroll Button: Moves the cursor on the preferred screen display.
The scroll button is located on front right of the HomePADTM.
You can scroll a screen on the lnternet and control the volume & the
channel of the TV
Home Button: Quits the current function, and returns to default
screen.
Speaker: Built-in Speaker
Microphone: Built-in Microphone
LCD: Display Touch Screens.
Back view
Battery Case: Built-in battery
Stand: Secures HomePADTMon a desk
Slip Pad: Prevents HomePADTMfrom slipping on a desk and in the
docking station
Stylus pen:Use to touch the screen.
Bottom view
Docking Connection Port: To charge the HomePADTM, mount the
connection port of HomePAD
TM
in the door of the refrigerator (docking
station)
Right view
Head Phone Connection Port: Connects to commonly used PC
headphones
Microphone Connection Port: Connects to external microphones.
Use standard PC microphones
Left view
USB Connection Port: To connect to commonly used USB key-
board USB mouse. If you wish to use an external key board please
make sure that it is compatible with USB.
The USB Keyboard is similar to a desktop keyboard and some keys
might not work properly.
VIEWS OF HomePAD
TM
Slip pad
Stylus pen
Headphone port
Microphone port
Stand
Battery
case
Camera
Docking connection port
Speaker
AC adaptor port
USB port
Microphone
Network display lamp
Power button
Scroll button
Home button
Power display lamp
DA68-01174A 12/13/02 12:57 PM Page 30
Page 31

31
USER INTERFACE
• This is the first page for starting to set up your system
and register user information.
• When you touch any screen, the next page comes up
Logging-in is only necessary the first time you set up the system.
Welcome Message
Network Setup - ESSID
Logging-In
Input the ESSID to use HomePADTMfunctions.
The following message will appear if you
don’t input ESSID.
The ESSID number is listed on the Home
station label.
Select the “MAIN” button to quit this
process.
If the ESSID was input, the HomePAD
TM
will restart.
ESSID (Extended Service Set Identificaton): It divides one wireless LAN from another
wireless LAN.
The Home station ESSID (represent by label) must match the HomePAD™ESSID
(input data).
• The first process starts with the ESSID
setting.
You can modify this input data in the “HomePAD
TM
Properties”
Insufficient information
You have to the ESS ID Number.
please check your input
NOTE
WARNING
DA68-01174A 12/13/02 12:57 PM Page 31
Page 32

32
• This is a user registration page for Tech Support and
remote diagnosis service .
Input the “Refrigerator serial NO”,“user ID” and
“password” in order to perform remote operation.
Y ou can obtain the serial number from the label on
the bottom left side of the refrigerator. The User ID
and password are user specified .
Remember your user ID and password for
remote operation.
Network Setup - Remote control setup
USER INTERFACE
Network Setup - Internet Setup
Choose one of the connection systems, according to the network environment.
(LAN / ADSL/Cable Modem)
1) LAN
- Select LAN, when external network is LAN
using static IP.
- Input IP address/Subnet mask/ Gateway
/DNS1 DNS2 obtained from network man
ager
2) ADSL
- Choose ADSL, when you use ADSL
Modem
- Contact your ADSL service provider to
input sub data.
3) Cable Modem(CM)
- Choose Cable Modem, when you use
Cable Modem or LAN using DHCP
- Contact your Cable Modem service
provider to input sub data
- Server Name and Clone Mac Address
are optional data.
The following error message will appear
when your input is invalid.
How to setup Internet System
• This is the setup page for using the internet and communicating with external system.
Insufficient information
You have entered an invalid IP address.
Please check your input.
WARNING
DA68-01174A 12/13/02 12:57 PM Page 32
Page 33

33
USER INTERFACE
• This page is about permission message for the customer
information survey.
Permission
Permission
This is the permission message informing you that
you will get a free warranty extension by completing
a customer information survey.
For data security, you can check the “PRIVACY
POLICY” by choosing the link on the last line. The
window will pop up and display the complete details.
If you don’t want to complete the customer survey
and receive free warranty extension, choose the
“MAIN” or “Register Later” button.
If you want to complete the customer survey and
receive free warrancy extension, choose the
“Register Now” button.
• This page is for permission to get customer information.
Customer Information Survey
Customer Registration and Information
You will get a free warranty extension by
completing customer the information survey.
All *asterisk items must be input. The
following message will appear if there is
any missing item.
The survey consists of two parts;
one is for user information and the other
for household information.
If you don’t want to complete the customer survey and receive free warranty
extension, choose the “MAIN” button.
For the data security, you can check the
“PRIVACY POLICY” on the upper blue
box.
Insufficient information
Please enter a Marital status.
DA68-01174A 12/13/02 12:57 PM Page 33
Page 34

34
Closing and Re-register
Closing Process
The closing page is displayed when you complete the entire
logging-in process.
If you want to transmit the data, choose "Submit" button.
Re-register
You can re-register when you are already
registered but you want to change your
information and properties or want to log
out.
Choose the “HomePADTMProperties”
menu, then find the “Edit Customer
Profile” button on the left bottom and
press it. Screen will change the registration page.
If you want to modify the data, choose
“Register profile” button. The log-in
process will start. Press the “CANCEL”
button to go back without any change.
If you press the “Clear Profile” button, the
following message will appear. Press “OK”
to clear profile
Clear profile
Your old registration data is deleted. you
can re-register anytime after.
System will restart.
MAIN
Task Bar Indicates present time, date, battery level
( ), network connection status.( )
Message Board Each family member can leave text or
video messages.
Home Datebook Manage your daily and monthly
schedule including events, appointments and wishlists.
Photo Album Take pictures with this built-in camera
and save them in the photo album.
Timer Set alarm to sound as a timer.
USER INTERFACE
DA68-01174A 12/13/02 12:57 PM Page 34
Page 35

35
USER INTERFACE
Internet Access connects you to the internet
directory page which offers links to useful web
sites.
In the case that Internet is not connected, the following message will be displayed.
TV go to TV mode.
Refrigerator Manager offers refrigerator control
panel, access control, storage functions and
cleaning functions.
Phone Directory offers phone number
input/erase and memory functions. Directory
organized alphabetically.
HomePADTMProperties offers optional sound,
touch screen, present time/date and network
property functions.
SYSTEM UPDATE Notification that new online
software upgrades are available. If you choose
the “OK” button, your system will be upgraded
automatically.
System Update
An updated version for your system
has been found.
Do you want to update now?
Internet Access
Internet connection is lost.
please check your network properties.
MESSAGE BORDER (TEXT MESSAGE)
Message Board featuring text messaging. Default screen will display recent saved messages.
[Saved Message Display Mode] [No Message Mode]
[Inpt Mode]
How to leave new messages
Press the “New” button ( ) for Input mode. If
there are over 40 messages stored, a warning
message will be displayed to indicate that the oldest message will be deleted due to memory shortage.
Text message
The text message memory is full.
The oldest text message(s) will be deleted
to save your new message.
-If the HomePADTMstarts to heat up due to
overuse, the following message window
appears.
"The temperature is too high!
The system may be shut down after a few seconds."
-.If message above appears, change to the main
screen.
-.After that, the message window disappears on the
main screen and you can return to using the unit.
NOTE
DA68-01174A 12/13/02 12:57 PM Page 35
Page 36

36
Choose the desired message ( ) to
change or delete.
To change it, press “MODIFY”.( ) It will
then change to Input Mode.
After changing your message, press
“Save” ( ) or “CANCEL” .( )
To delete a message press “DELETE”.
( ) Anew window will then be displayed
to confirm. Choose “OK” to delete.
How to change and delete text messages
Text Message
Are you sure you want to delete this
message?
Input title and message using the newly displayed keyboard below the message panel.
Choose “SAVE” ( ) when you are finished. The
following message will be displayed if no messages are input.
* To cancel a message, press “CANCEL”. ( )
Text message
No data in message box.
Please enter a message, then click save
MESSAGE BORDER (VIDEO MESSAGE)
USER INTERFACE
How to check text messages
In the Saved Message Display Mode, choose the desired message. ( ) The message will then be
displayed with title.
* The Default screen will display the newest message automatically.
How to leave new Video Messages
Choose “CAMERA MODE”( ) to record
video. Video images from the camera will
be displayed in the window. If you have
more than 4 saved video messages, a
warning will be displayed indicating that
the oldest message(s) will be deleted due
to memory shortage.
Press “RECORD” ( ) when you want to
begin recording.
Recording will automatically stop after 15
seconds. If you want to stop before 15 seconds has passed, press “STOP”. ( )
Input photo title in the input mode
Press “SAVE” button to save
[No Message Mode] [Input Mode]
DA68-01174A 12/13/02 12:57 PM Page 36
Page 37

37
USER INTERFACE
HOME DATEBOOK(1)
How to delete Video Messages
Choose the message you want to delete.
If you choose “DELETE”, ( ) the following mes
sage will be displayed automatically to confirm. Press
“OK” to delete.
Video message
Are you sure you want to delete this
video message?
[Saved Message Display Mode]
How to check Video Messages
In Saved Message Display Mode, choose the desired
message.
The title will appear on the top bar and the first video
image will be displayed in the view window.
Press “PLAY” ( ) to view the entire video message.
You can control the volume using the volume
controller. ( )
* In the default window, the newest video message will be
displayed.
[Daily Mode] [Input Mode]
The Home Datebook menu features a memo pad with schedule management functions to record
important daily events. Each event is displayed with a category icon on the monthly calendar. By clicking on the date, you can see event details as well as create new events.
DA68-01174A 12/13/02 12:57 PM Page 37
Page 38

38
HOME DATEBOOK(2)
[Monthly Mode] [Daily Mode]
How to check your schedule
Click the desired date in the monthly calendar
The entire schedule and all memos for that
date will be displayed as icons on the bottom.( )
How to change and delete your schedule
Choose the desired schedule icon( ) to
change or delete.
To change, choose “MODIFY”. ( )
It will then change to Input Mode with the
original text.
USER INTERFACE
* Alarm Message Window
The alarm window will be displayed along with the alarm
sound at the set time. If you press the “OK” button, the
window will disappear.If you press “DELETE”, the related
schedule will disappear along with the pop up window.
Choose the “NEW” button ( ) located on
the lower right. If there are more than 5
events scheduled in one day, the following
memory warning will be displayed.
It will then change to Input Mode with a
keyboard on the bottom.
Type your new schedule using the keyboard
and choose the type of schedule from the
choices on the upper left. Your selection will
be shown as an initial icon on the chosen
date in the monthly calendar.
( )
Indicate what time the schedule starts and
check the “Alarm Me” option if you want to be
notified.
Choose the interval time between the
alarms. (5 minutes/ 10 minutes/ 15 minutes/
20 minutes/ 30 minutes/ 45 minutes/ 1
hour/1hour 30 minutes/ 2 hours/ 3 hours/ 4
hours/ 5 hours/ 6 hours)
How to input your schedule and set the alarm
Scheduler
The home datebook memory is full.
The oldest item(s) will be deleted
to save your new item.
Scheduler
Father’s birthday party
03/22/2002 7:30 AM
Icon
-.Select the Anniversary icon (Aicon)
to save a message you want to
come up on the same day every year.
This is useful to remember anniversaries,
birthdays, etc.
NOTE
DA68-01174A 12/13/02 12:57 PM Page 38
Page 39

39
USER INTERFACE
How to add new photos
Choose the “CAMERA MODE” button ( ) on the
lower right. If there are over 30 photos already
saved, the following memory warning message will
pop up.
In “CAMERA MODE”, you will see what the camera
view finder sees.
When you are ready to take the photo, press the
“Take a picture!” button ( ) on the bottom.
It will then change to Input Mode with a keyboard on
the bottom.
Type the title of photo using the keyboard and
choose “SAVE” .( ) If you no longer want to add
the photo you have taken to the list, press
“CANCEL”. ( )
If you want to use a photo as a screen saver, press
“TO SCREENSAVER” button after choosing photo.
PHOTO ALBUM (1)
[Saved Photo Display Mode]
[Camera Mode]
[Input Mode]
Photo Album
The photo album memory is full.
Please delete old data to take a
new picture.
Scheduler
Are you sure you want to delete this item?
If you choose a desired schedule icon,
details and alarm settings will be displayed
on the top.
To delete a schedule, press “DELETE”.
( ) Amessage will automatically be displayed to confirm. Press “OK” to delete.
After you change the contents, press
“SA VE”( ) to save the changes. If you no
longer want to make changes, press “CANCEL”. ( )
DA68-01174A 12/13/02 12:57 PM Page 39
Page 40

40
Take pictures and save them in your Photo Album using the built-in camera.
How to check and delete photos
Choose the desired photo from the photo album
image list on the right.
The chosen photo will be displayed in its original size in the left window.
To delete the chosen photo, press the “DELETE”
button ( ) on the bottom. The following message window will be displayed to confirm. Press
“OK” to delete.
Photo Album
Are you sure you want to delete this item?
USER INTERFACE
PHOTO ALBUM (2)
ALBUM MANAGER Guidelines
This function is valid when an external storage device
is connected to the HomePADTM. You can save photo
album to external storage device or import image file
(from external Storage device) to the photo album.
How to save photo album to an external
storage device
-. Press “To Disk Storage” after choosing
photo album list
How to import image file(from external stor-
age device) to the photo album
will be displayed.
-. Press “To Photo Album” after choosing
Disk Storage image file.
-. Images files must be JPG to be imported.
Deleting files-choose the desired file in
Disk Storage, then press “Delete File”. The
following message will pop up to confirm.
External storage must be USB
compatible
External storage may not operate in
the following instances.
-.Driver installation is required
-.Power capacity is insufficient
[Album Manager Function Window Display Mode]
Album Manager
Are you sure you want to delete this file?
NOTE
WARNING
DA68-01174A 12/13/02 12:57 PM Page 40
Page 41

41
USER INTERFACE
If you want to cancel timer progress, press
“CANCEL”
When the timer is in progress, the screen
does not convert to the screen saver mode
Checking or stopping the Alarm
When the timer ends, the alarm will sound. If you press “OK”, the alarm will stop.
If you do not press "OK" ,six times of alarms ring in an interval for 30 seconds
TIMER / ALARM
Choose the “SET” button. The Alarm time
shows the interval between the current
time and the set time.
Remaining time counts down the seconds
to the alarm.
The Timer/Alarm menu allows you to set the timer and
alarm. The TIMER MESSAGE window shows the current time, alarm set time and the alarm remaining time.
If you do not use the timer, the Alarm time and
Remaining time will say ‘not available’
How to set the TIMER
Enter the desired time in minutes/
seconds using the keyboard on the bottom.
-. Maximum set time is 59 minutes, 59 seconds.
INTERNET ACCESS (1)
This Internet browser uses the samsungusa
Internet directory page,which provides links
to diverse websites about lifestyle, culture,
cooking and much more.
NEW WINDOW opens new windows.
BACK/FORWARD/STOP/RELOAD/HOME/
SEARCH/MINIMIZE/CLOSE
are basic
functions of the web browser.
TEXT SIZE controls the font type and font
size of the web browser. Options include XLARGE /LARGE / MEDIUM / SMALL / XSMALL.
How to surf the web
The keyboard will be displayed if you choose
the “KEYBOARD” button
( ) in the Task Bar.
If you choose the URL input bar, the cursor will
pop up and the keyboard will be displayed automatically
Enter the URL using the keyboard, then press
“GO”. It will then take you to your desired web
site.
If there are already 3 windows open, the
following message will pop up asking you to
close some windows in order to open the new
one.
Internet Access
The maximum number of browser windows
you can have opened is 3. Please close a
window to open a new one.
DA68-01174A 12/13/02 12:57 PM Page 41
Page 42

42
ADD Current Page bookmarks the current web
page. After choosing this, the following message
will ask you to name the bookmark.
INTERNET ACCESS (2)
To make the current page as a bookmark,
please input a title and press OK
Internet Access
USER INTERFACE
DELETE Bookmark(s) deletes bookmarks. A separate
window will pop up to select the desired book mark to
delete. Press “Delete” or “Cancel”.
SET Default Page sets your Default Page. The setting
window will pop up as the following. If you press “Current
Page”, the current window will be your default page or
you can choose “system default page(samsungusa.com)”
by pressing Default Page. You can also input a specific
address using keyboard and choose “OK” to set as your
default page. Press “CANCEL” to keep your original
default page.
SET Search page sets your search page. The setting
window will pop up
CLOSE closes any Bookmark-related windows.
TV
[Main Mode]
If you choose the 'TV' button, the default TV mode
will be shown as Main Mode. In the default TV mode, the
Task Bar and VIRTUAL REMOTE CONTROL will be displayed. The Lower Task Bar offers basic TV functions
including volume control/ channel control/ input selection/
controller.
If you press a small TV screen, the full TV screen will be
displayed. Press screen to change to main mode.
[ TASK BAR BUTTONS ]
Volume Controller controls the volume using the -/+ but-
ton.“CH”changes the channel using the -/+ button. ( )
LINE IN( ) connects external devices such as
DVD players and VCRs. If you select the “CH” button in
LINE IN Mode, you will see the following message: "You
cannot change channels in LINE IN Mode."
DA68-01174A 12/13/02 12:57 PM Page 42
Page 43

43
USER INTERFACE
REFRIGERATOR MANAGER
[ VIRTUAL REMOTE CONTROLLER BUTTONS ]
BRIGHTNESS/CONTRAST/COLOR( )
functions are located at the bottom of the remote control.
SAVE/DELETE( )function saves or deletes the
current channel. The message 'Saving current channel' or
'Erasing current channel' will pop up to confirm your
decision.
AUTO/CANCEL( ) offers a channel scanning function.
If you choose “AUTO/CANCEL”, the message 'channel' as
it processes. To cancel channel scanning, press
“AUTO/CANCEL” during channel scanning
CH Display ( ) shows the current channel.
Mute( ) offers a mute option.
Press power button( ) to close virtual remote control.
Press “VIRTUAL REMOTE CONTROL” to display virtual
remote control.
CONTROL PANEL
The refrigerator control panel menu displays the
condition of the refrigerator and controls each
function by communicating through the GATEWAY.
Freezer Temp. Setting ( ) controls the tem-
perature of the freezer within the -14°F~8°F parameters.
Power Freeze ( ) If you select this function,
the light will go on and it will begin working. To
cancel, press this button again.
Fridge Temp. Setting ( ) controls the tem-
perature of the fridge within the 34°F~46°F
parameters.
Power Cool ( ) If you select this function,
the Power Cool lamp will turn on and it will
begin
working. To cancel, press this button again.
Ice Cubes ( ) If you select this function, the
lamp will turn on and you will get ice cubes.
Crushed Ice ( ) If you select this function,
the lamp will turn on and you will get crushed
ice.
Ice Off ( ) If you select this, the lamp will
turn on and ice production will stop. If you press
the ice dispenser the remaining ice will come
out.
Child Lock ( ) If you select this function,
the lamp will turn on and the Freezer/Fridge
Temp control buttons will not work. If you press
If the TV cable is connected
through external equipment
(such as a set-top box), you
cannot change channels.
In this situation, change channels with the external equipment's remote control.
NOTE
DA68-01174A 12/13/02 12:57 PM Page 43
Page 44

44
this button again, the control buttons will be
unlocked.
Select Soft Freeze/Chill/Cool ( )
controls the temperature of the special compartment. The temperature is controlled to -5/-1/2°C
(23/30/38°F) regardless of the refrigerator temperature.
Quick Cool ( ) provides very cool air for an
hour. We recommend removing foods from the
special
compartment during this time. The temperature
will automatically return to normal after one
hour, or if you press the button again before an
hour has passed.
Thaw 4/6/10/12 hours ( ) sets
the melting duration time of the special compartment to make the melting process fresher
than thawing in a microwave or at room temperature. You can set the melting time according to
food type. we recommend remaining other
foods from the special compartment during this
time
Filter Indicator ( )Filter lamp will
turn on when you need to change the filter.
Thaw Time 4hours 6hours 10hours 12hours
Weight 0.8lb 1.3lb 1.7lb 2.2lb
USER INTERFACE
This menu describes the cleaning method for each part of
the refrigerator. If you choose the number in the diagram,
the related cleaning method will be displayed.
1 Dry Storage Area : Open the cover with both hands, and
remove it by pushing to the left. Remove storage shelf by
lifting up with both hands.
2 Freezer/Fridge Storage Box : Hold the box with both
hands and remove by lifting up.
3 Freezer/Fridge Shelf : Pull the shelf to remove.
4 Freezer/Fridge Drawer : Pull the drawer with one hand
and remove by lifting up.
CLEANING
STORAGE
This menu provides a description of each part of
the refrigerator. If you select a number, the
corresponding storage method will be displayed.
Figure may be different from refrigerator products
1 Freezer Shelf : Store frozen foods such as
meat, fish and ice cream.
2 Freezer Storage Area : Store small packaged
frozen food.
3 Dry Storage Area : Store dairy products such
as butter and cheese.
4 Fridge Shelf : Store small packaged food or
beverages such as milk, juice and beer.
5 Fridge Storage Box : Store frequently used
food items in the Fridge Storage Box.
6 Chilled Drawer : Store food that requires a
cooler temperature or food for immediate cooking.
7 Vegetable Drawer : Store all your vegetables.
8 Fruit Drawer : Store all your fruits.
9 Meat Storage Drawer : Store packaged meat
and chicken.
10 Dry Storage Drawer : Store dried foods to be
kept long-term.
DA68-01174A 12/13/02 12:58 PM Page 44
Page 45

45
USER INTERFACE
It is a screen for remote operation setting.(refer to remote operation (p49~51) in manual)
[Main] [Login Data Registration Mode]
PHONE DIRECTORY
[ No Item Mode ] [ Input Mode ]
How to enter new numbers
Press the “NEW” button( ) and it will change
to Input Mode. If there are already over 1000
numbers entered, the following memory error
message will appear.
Enter names and phone numbers using the
keyboard below. Enter related information in the
notes section.
Press “SAVE” ( ) after entering all the infor-
mation or press “CANCEL”. ( ) If you press
“SAVE” without entering a name, the following
error message will pop up.
Phone directory
The phone directory memory is full.
Please delete old data in order to add
a new item.
Phone directory
There is no name in this phone directory item.
Please enter a name, then click save.
ACCESS CONTROL
DA68-01174A 12/13/02 12:58 PM Page 45
Page 46

46
USER INTERFACE
The Phone Directory menu allows you to enter, modify and delete phone numbers.
The phone book manager is organized alphabetically. If there is no data saved, the input bars will not be
activated. You must press “NEW” to activate them.
[ List Display Mode ] [ Input Mode ]
How to search for phone numbers
Choose the first letter of the person’s first
name from the bottom line of letters.
Choose the name on the display list. The
person’s information will then be displayed
on top.
How to change or delete numbers
Choose the number you want to change or
delete.
To change, press “MODIFY”. ( ) It will
then change to Input Mode with the original
information.
Change the information using the keyboard
below. To save changes, press “SAVE”.
( ) To cancel the changes, press “CANCEL”. ( )
To delete a selected item, press “DELETE”.
The following message will appear to confirm. Press “OK” to delete.
Phone directory
Are you sure you want to delete
this phone directory item?
Home PADTMPROPERTIES
The HomePAD
TM,
Sound menu features volume controller
and sound enable functions.
VOLUME CONTROLLER( ) offers a 0~100 sound
control function.
Events ( ) makes a sound when message
SOUND
DA68-01174A 12/13/02 12:58 PM Page 46
Page 47

47
USER INTERFACE
[Main]
[ TOUCH POINT RESET Mode ]
SCREEN
This menu displays the HomeP ADTMuser’s screen
properties including brightness, touch point settings and screen saver time settings.
“After finishing touch point setting, touch a screen
within the 30 seconds in order to apply setting
(refer to screen)
How to control screen brightness
Brightness can be controlled from -50 to 50.
If you choose the “DEFAULT SETTING”
button ( ) on the bottom, a medium
brightness(0) will be chosen automatically.
How to control touch point
Touch point offers reset options when the
touch screen is not working well.
Press “RESET” ( ) and a screen will
appear with pointer instructions on the top.
Display Mouse Cursor: If a USB mouse
was connected with HomPADTM, Check the
activate box to display mouse point.
How to set the screen saver time
and choose a file
The default setting is 2 minutes. You can
change the time in minutes using the
button.( )
If set to 0 minutes, the screen saver will
not work.
To select a screen saver
-. To use the default screen saver, select
"Use System Default"
-. To use image setting at photo album,
select "Use Your Media File"
Hold the pen softly and press down lightly
on the center of the “+” mark.
Repeat as the “+” mark moves on the
screen.
2 5
1
3 4
DEFAULT
SETTING
windows appear, or a button is pressed, or system
is restarted. Check the activate box to use
this function.
Keyboard ( ) activates the keyboard sound.
You also can choose a Loud/Soft sound
level. Check the activate box to use this function.
Touch ( )activates a touch sound when you
touch the screen. You also can choose a
Loud/Soft sound level. Check the activate box to
use this function.
SAVE( ) is a function to save new properties.
CANCEL( ) is a function to cancel new prop-
erties.
* Edit Customer Profiles
a linked function that manages user information.
If the Events activation box is checked, the
Touch activation box is not checked automatically.
NOTE
DA68-01174A 12/13/02 12:58 PM Page 47
Page 48

48
TIME / DATE
TIME Choose the desired hour, minute and
AM/PM. The new time will be displayed below.
DATE Choose the desired month, date and year.
The new date will be displayed below.
Get Current Time sets the current time from the
task bar.
Set Time applies the new time settings to your system.
* Edit Customer Profile is
a linked function to manage customer profiles.
NETWORK
This menu displays the HomePADTMnetwork property settings.
Network Setup - ESSID Setup
You can modify HomePAD
TM
ESSID here , if the
ESSID is different from the Home Station ESSID.
USER INTERFACE
The HomePADTMpowers off after 20 minutes in screensaver mode.
After resetting the screen saver, press
“PREVIEW” ( ) to view it.
How to save or delete new settings
T o activate your new settings, press“SAVE”. ( )
To cancel, press “CANCEL”. ( )
* Edit Customer Profile
is a linked function to manage user profiles.
If a screen saver is not set,the HomePAD™
will not power off.
NOTE
The Home Station ESSID (represent
by label) must be the same as the
HomePADTMESSID(input data).
This menu displays the HomePAD
TM
user’s time and date settings.
WARNING
DA68-01174A 12/13/02 12:58 PM Page 48
Page 49

49
USER INTERFACE
REMOTE OPERATION
Network Setup - Internet Setup
-.You can set up internet here, if you did not set up Internet in
LOGGING IN process.
-.Y ou can refer to "LOGGING IN - Internet Setup" for inputting or
modifying data.
WEP (Wired Equivalent Privacy): This encrips data to ensure
Wireless LAN security.
Registration of Remote Control Setup
After registering refrigerator serial NO., user ID and Password,
you can control your refrigerator from a remote PC.
1. During initial start, you can register serial NO, your ID and
Password when Logging-in
2. If you miss this procedure, you can also register in
HomePAD™properties>Edit customer profile>register profile.
3. Click "Main" button to reboot or "Next" button system to continue customer registration process. HomePAD™may reboot
to save data. after reboot, you can see following message
and registration is done.
4. If the following error appears "sending information to server
has failed", check your internet status or turn the HomePAD
TM
off and on .
Please confirm whether ESSID is set up correctly. If
this page is not displayed, ESSID was not set up
cor-rectly.
Use WEP: You can select whether it is to use a WEP feature
and to use an encoding way of several bit(64bit,128bit)
Key1~4: You must set up four items for encoding all
Key Selection: Select key to actually use for encod
ing of WEP among four items.
1.You must set up HomePAD
TM
Encryption after set
ting Home Station Encryption.
2.If you set up HomePADTMand Home Station
Encryption must match for proper communication.
WARNING
WARNING
DA68-01174A 12/13/02 12:58 PM Page 49
Page 50

50
REMOTE OPERATION
This registration screen will not display again, after completing
remote control setup.
When information is duplicated
1.If you register user ID or serial NO. and somebody registered
before you, you may get an error message.
-.Click "OK" button and screen will change to the Refrigerator
Manager>Access control page.
2. You have to modify your information in Refrigerator
Manager>Access control page.
How to use remote operation
1. Access to http://www.samsunghomepad.com or http://(your
ID).samsunghomepad.com by using web browser
(only Iexplores of Microsoft is acceptable)
2. Input User ID and Password and type "enter" or click the
"Log-In" button for admission.
3. When the dialog box for downloading remote control pro
gram appears, please click "yes". The download takes about
30 seconds
4. After completing the download, control panel page will
appear
5. You can control your refrigerator in real time.
(refer to Refrigerator Manager > CONTROL PANEL)
6. Close the Web browser window, if you want to finish
remote operation
DA68-01174A 12/13/02 12:58 PM Page 50
Page 51

51
REMOTE OPERATION
Modify Remote control Setup
1. Once you register remote control setup, you can modify
your password in Refrigerator Manager>Access control.
2. After modifying, press "OK" button to save input data.
3. You will see following message and modification has been
completed.
Clear Remote control Setup and re-registration
1. Choose "Clear Profile" button in HomePADTMproperties>Edit
customer profile. This procedure will delete Serial NO. and ID
while other customer information.
2. HomePADTMwill reboot. The following message appears
and modification has been completed.
3. You can re-register your information anytime you want to in
HomePADTMproperties>Edit customer profile.
(refer to re-registration procedure)
You can not modify serial NO. and User ID
NOTE
DA68-01174A 12/13/02 12:58 PM Page 51
Page 52

52
HOW TO USE THE VIRTUAL KEYBOARD
You can use the screen keyboard or the external USB keyboard
Screen keyboard: The screen keyboard is a program to input handwritten text on the touch screen
or to type directly when you don’t have an external USB keyboard.
DioPen Options
1.Delay Time(mSec)
-.When a letter is input, the letter that was input is recognized after an input waiting time has passed.
-.If you have to input many letters quickly, you may want to set a coordinating
delay Time
-.Setting range is 100 ~ 5000(mSec) and a default setting is 400mSec.
2.Ink Width(pixels)
-.When you input a character, you can set up a width of a letter displayed in a screen.
-.Setting range is 1~5 (pixels)and a default setting is 2 pixels.
3.Keyboard Recognition
-.If you check this item, writing recognition is possible in basic screen keyboard.
DioPen Help
You can see how to write each letter.
Basic screen keyboard
writing recognition Mode
Screen keyboard with CAPS LOCK or Shift Key pressed
Activates the
basic Keyboard
Initiate writing recognition Mode
Input large English
characters.
Recognizes small
English characters.
Recognizes
numbers.
Recognizes special
characters
DioPen Help
DioPen options
DA68-01174A 12/13/02 12:58 PM Page 52
Page 53

53
TURNING THE HomePADTMOFF
AUTO UPGRADE PROCESS
1. When a new version of the
HomePADTMsystem application
program is launched, will be alerted.
2. You can start the upgrade
process now or postpone it next
time.(HomePADTMalerts you everyday until you accept)
3. When the upgrade is accepted,
the auto upgrade system downloads the new software from the
upgrade server and installs it.
4. After completing the installation,
you can finish the upgrade process.
BATTERY MANAGEMENT
How to use the HomePADTMbattery efficiently.
• The amount of battery power remaining will
be displayed with an icon( )in the
upper part of the screen
*Full(four battery bars): You can use
HomePADTMfor about 1 hour on main menu.
*High(three battery bars): about 40 minutes
on main menu.
*Low(two battery bars): about 20 minutes
on main menu.
*Critical(one battery bar): about 10 minutes
on main menu. Awarning message will
appear at three minute intervals.
*Very low(no battery bars): The HomePAD
TM
power will turns off within 10 minutes.
Save your data and recharge a battery on AC
adapter or refrigerator cabinet.
• The following warning message will appear
at one minute in this state.
" If the battery power is insufficient. Please
save your data and recharge the battery
immediately"
• If the battery supply is insufficient, you
should return it to the retail center or customer service center.
The battery is an expendable resource. If
you repeatedly recharge and discharge it,
the lifetime of the battery will be shortened.
If the battery life is too short to use, you
have to change with a new one.
Battery Warnings
• Do not drop the battery.
• Do not leave the battery under a direct
ray of light for a long time.
• Do not open the battery.
• Do not heat-up the battery. It may cause
an explosion.
• The battery may be affected by moving
from a cold to hot location and vice versa.
The charging performance of the battery
may be affected by charging in high tem-
Power Off Mode: This is the standard way to turn
off the system. Unsaved data will be lost and all
windows will be closed when the power is shut
down. Before turning off, you must save. In Power
Off Mode, the power LED lamp will blink. Press the
power button to restart the system. It should start
within 10 seconds
Do not turn off the
HomPAD
TM
and the
Home Station power
during installation ation
-.Otherwise the HomePAD
TM
sys-
tem may be halted.
NOTE
WARNING
WARNING
DA68-01174A 12/13/02 12:58 PM Page 53
Page 54

54
INSTALLING AND STARTING THE HomePAD
TM
Unfold your HomePADTMon the
stretch stand (When not using
HomePADTMon the refrigerator cabinet) and pull out its stand.
Connect the power cables
• Connect AC adapter to the HomePADTM.
• Connect AC plug to wall outlet
Lamp On
Lamp On On System and network are working properly
Lamp off
Off
Adapter power is off and the battery is discharged
Lamp blinking fast Blinking Fast Rebooting after power off
Lamp On
Blinking
System working normally but wireless network
not working
Lamp Blinking
Fast
Off
System is in power off mode
-
Adapter Power is on and the battery is fully
recharged.
Power Display Lamp
Network Display
Lamp
Remark
Please follow the Touch Screen instructions to correct its response system.
• This option screen appears only for initial
start-up.
• Press the screen point in sequence: 1->2>3->4->5(refer to UI Manual Screen setting),
This option only appears during initial startup.
• This process corrects the touch screen when
it is not responding to your screen input.
• Press each point on the LCD screen lightly
with the input pen to correct the Touch
Screen.
After Screen setting, Logging_In Process
will start.(refer to UI Manual Logging_In
process)
• This option only appears during initial start-up
Stand
Outlet
• When power is on, power and network display lamp will blink. System will initialize in 20
seconds. Touch Screen to correct touch point will display.
Press the power button of HomePAD
TM
The Display lamp status according to system conditions
DA68-01174A 12/13/02 12:58 PM Page 54
Page 55

HOW TO PUT HomePADTMON THE DOCKING STATION OF THE REFRIGERATOR
55
docking station
-.When you put HomePADTMon the docking station of the refrigerator, make sure the
HomeP ADTMscreen faces front.
Do not drop the HomeP ADTM.
It may cause malfunction and personal injury .
NOTE
CAUTION
DA68-01174A 12/26/02 2:46 PM Page 55
Page 56

56
HOW TO INSTALL HOME STATION
Step4: Remove the upper hinge
cover using a cross screwdriver
Step1: Put the home station on
the top of refrigerator
Step7: Connect the home station ground wire to the upper
hinge hole
Step3: Attach the home station
to the top of refrigerator
CAUTION
1. Pull the power plug out,
before installing the home station.
-. Otherwise, there is a risk of
electric shock.
Step6: Connect the door side
charging connector to the home
station charging connector.
Step5: Take off the upper hinge
cover
Step8:
Close the upper hinge
cover and replace the upper hinge
cover using a cross screwdriver
Home station
Step2: Connect the refrigerator
power cable to the home station
port
Home station rear panel
Refrigerator power cable
Fridge door
upper hinge cover
Step9: Remove the tape of
cover-wire base
Step10: Insert wires into the coverwire base and attach cover-wire
base to the refrigerator
Step11: Close the cover-wire
base with the cover-wire harness
connector
charging
cover-wire base
tape
cover-wire base
cover-wire base
cover-wire harness
upper hinge hole
ground wire
upper hinge
Home station
rear panel
refrigerator
back side
*Insert the home station
boss into the boss hole
boss hole
home station boss
DA68-01174A 12/13/02 12:58 PM Page 56
Page 57

57
CABLE CONNECTION
TV Cable
PC,Notebook
Internet
ASL/CABLE MODEM
Pull out
How to connect TV,DVD
How to connect network Cable
Audio
Cable
Video
Cable
DA68-01174A 12/13/02 12:58 PM Page 57
Page 58

58
TROUBLESHOOTING
The refrigerator does not work at all or it does not chill
sufficiently
• Check that the power plug is properly connected.
• Is the temperature control on the display panel set to the
correct temperature? Try setting it to a lower temperature.
• Is the refrigerator in direct sunlight or located near a heat
source?
• Is the back of the refrigerator too close to the wall?
The food in the refrigerator is frozen
• Is the temperature control on the display panel set to the
correct temperature? Try setting it to a warmer temperature.
• Is the temperature in the room too low?
• Did you store the food with a high water content in the coldest part of the refrigerator.
You can hear unusual noise or sounds
• Check that the floor is levelled and stable.
• Is the back of the refrigerator too near to the wall?
• Was anything dropped behind or under the refrigerator?
• A“ticking” sound may be heard from inside the refrigerator,
This is normal and occurs because various accessories
contract or expand.
The front corners and sides of the cabinet are hot; condensation occurs.
• Anti-condensation are installed in the front corners of the
refrigerator to prevent condensation.
• Condensation can occur when you leave the door open for
a long time.
Ice is not dispensed
• Did you stop the ice making function?
• Is there any ice in the ice storage unit?
• Is the water pipe connected and the shut-off valve open?
• Is the freezer temperature too warm?
(Set the temperature lower .)
• Did you wait for 12 hours after installation of the water supply line before making ice?
You can hear water bubbling in the refrigerator
• The bubbling comes from the refrigerant circulating in the
refrigerator and is normal.
There is a bad smell in the refrigerator
• Wrap strong smelling food so that it is airtight.
Throw away any rotten food.
Frost forms on the wall of the freezer
• Is the air vent blocked?
• Allow sufficient space between the foods stored for efficient
air circulation.
• Is the door closed properly?
No water is supplied
• Is the water pipe connected and the shut-off valve open?
• Is the water supply pipe crushed?
• Is the water tank frozen because the refrigerator temperature is too low? Select a warmer setting on the display
panel.
When HomePAD
TM
does not Power On
• If the HomePAD
TM
does not power on,it's because the
battery is discharged or its power button has not been
pressed.
• Connect an adaptor to the HomePAD
TM
or set it in the dock-
ing station.
• The power LED lights up. If the power
LED does not light, check the power connection of the
adaptor the setting of the HomePAD
TM
in the docking sta-
tion.
• Press the power button.
• If the unit still doesn't come on, press and hold the Power
button for at least 6 seconds.
When the wireless communication between HomePAD
TM
and Home Station fails.
• ESSID may not match or WEP is set incorrectly.
• Press HomePAD
TM
properties Icon when HomePADTMinitial-
ization screen appears.
• Select NETWORK button. Press "Go" button in ESSID
Setup
within the Network Setup .
• Check ESSID number.
• The HomePAD
TM
ESSID must match the ESSID number
on the Home Station label. If the numbers do not match,
go to HomePAD
TM
Properties, then select NETWORK.
Next, go to ESSID Setup and enter the correct ESSID number.
• Restart the HomePAD
TM
.
• If the ESSID numbers match, press "Return to Network
Main" button.
• Press "Go" button in the HomePAD
TM
Encryption setup.
-.Check WEP to see if it is enabled
-.If WEP is Enabled, select Disable.
• Press "Go" button in the Home station Encryption setup
-.Check WEP to see if it is enabled
-.WEP is Enabled, select Disable.
-.If WEP setting screen of Home Station does not appear,
consult a service center.
When HomePAD
TM
UI (User Interface) functions do not
run
• Turn the power on after turning HomePAD
TM
off.
• If UI functions do not run, contact a Samsung service center.
DA68-01174A 12/14/02 11:06 AM Page 58
Page 59

59
LIMITED WARRANTY TO ORIGINAL PURCHASER
SAMSUNG HomePADTMREFRIGERATOR
This SAMSUNG brand product, as supplied and distributed by Samsung Electronics America, Inc. (SAMSUNG) and delivered new, in the original carton
to the original consumer purchaser, is warranted by SAMSUNG against manufacturing defects in materials and workmanship for a limited warranty period of:
One (1) Year Parts and Labor on Refrigerator and Homepad Terminal
Five (5) Years Parts and Labor on Sealed Refrigeration System Only*
(*Compressor, evaporator, condenser, drier, connecting tubing)
This limited warranty begins on the original date of purchase, and is valid only on products purchased and used in the United States. To receive warranty
service, the purchaser must contact SAMSUNG for problem determination and service procedures. Warranty service can only be performed by a SAM-
SUNG authorized service center. The original dated bill of sale must be presented upon request as proof of purchase to SAMSUNG or SAMSUNG's
authorized service center.
SAMSUNG will repair or replace any part found to be defective, at our option and at no charge as stipulated herein, with new or reconditioned parts dur-
ing the limited warranty period specified above. All replaced parts and products become the property of SAMSUNG and must be returned to SAMSUNG.
Replacement parts and products assume the remaining original warranty, or ninety (90) days, whichever is longer.
In-home service will be provided during the warranty labor period subject to availability within the contiguous United States. In-home service is not avail-
able in all areas. To receive in-home service, the product must be unobstructed and accessible from floor level to service personnel. If during in-home
service repair cannot be completed, it may be necessary to remove, repair and return the product. If in-home service is unavailable, SAMSUNG may
elect, at our option, to provide for transportation of our choice to and from a SAMSUNG authorized service center. Otherwise, transportation to and from
the SAMSUNG authorized service center is the responsibility of the purchaser.
SAMSUNG does not warrant uninterrupted or error-free operation of the product, and shall not be liable for the loss or destruction of data or media result-
ing from the use or service of this product. It is the purchaser’s responsibility to secure all programs and data contained in or affected by the product. The
purchaser is cautioned that product performance may be affected by installation, system configuration, software, applications, equipment compatibility,
purchaser data and operator control of the system, among other factors, and it is the purchaser’s responsibility to determine the functional implementation.
SAMSUNG’s obligations with respect to software products distributed by SAMSUNG under the SAMSUNG brand name are set forth in the applicable
end user license agreement. Non-SAMSUNG hardware and software products, if provided, are on an "AS IS" basis. Non-SAMSUNG manufacturers,
suppliers, publishers, and service providers may provide their own warranties.
This limited warranty covers manufacturing defects in materials and workmanship encountered in normal, noncommercial use of this product, and shall
not apply to the following, including, but not limited to: damage which occurs in shipment; delivery and installation; applications and uses for which this
product was not intended; altered product or serial numbers; cosmetic damage or exterior finish; accidents, abuse, neglect, fire, water, lightning or other
acts of nature; use of products, equipment, systems, utilities, services, parts, supplies, accessories, applications, installations, repairs, external plumbing
and leaks, external wiring, circuit breakers, fuses or connectors not supplied and authorized by SAMSUNG, or which damage this product or result in service problems; incorrect electrical line voltage, fluctuations and surges; customer adjustments and failure to follow operating instructions, cleaning, mainte-
nance and environmental instructions that are covered and prescribed in the instruction book; reception or display problems and distortion related to
noise, echo, interference or other signal transmission and delivery problems; reduced screen brightness related to normal tube and lamp aging, or
burned-in images; loss of food due to spoilage; consumable items including filters and light bulbs.
THERE ARE NO EXPRESS W ARRANTIES OTHER THAN THOSE LISTED AND DESCRIBED ABOVE, AND NO WARRANTIES WHETHER
EXPRESS OR IMPLIED, INCLUDING, BUT NOT LIMITED TO, ANYIMPLIED WARRANTIES OF MERCHANTABILITYOR FITNESS FOR A PAR TIC-
ULAR PURPOSE, SHALLAPPLYAFTER THE EXPRESS WARRANTY PERIODS STATED ABOVE, AND NO OTHER EXPRESS WARRANTY OR
GUARANTY GIVEN BY ANY PERSON, FIRM OR CORPORATION WITH RESPECTTO THIS PRODUCT SHALL BE BINDING ON SAMSUNG.
SAMSUNG SHALL NOT BE LIABLE FOR LOSS OF REVENUE OR PROFITS, FAILURE TO REALIZE SAVINGS OR OTHER BENEFITS, OR ANY
OTHER SPECIAL, INCIDENTALOR CONSEQUENTIAL DAMAGES CAUSED BY THE USE, MISUSE OR INABILITY TO USE THIS PRODUCT,
REGARDLESS OF THE LEGALTHEORY ON WHICH THE CLAIM IS BASED, AND EVEN IF SAMSUNG HAS BEEN ADVISED OF THE POSSIBILI-
TY OF SUCH DAMAGES. NOR SHALL RECOVERY OF ANY KIND AGAINSTSAMSUNG BE GREATER IN AMOUNTTHAN THE PURCHASE
PRICE OF THE PRODUCT SOLD BY SAMSUNG AND CAUSING THE ALLEGED DAMAGE. WITHOUT LIMITING THE FOREGOING, PURCHAS-
ER ASSUMES ALL RISK AND LIABILITYFOR LOSS, DAMAGE OR INJURY TO PURCHASER AND PURCHASER’S PROPER TYAND TO OTHERS
AND THEIR PROPERTYARISING OUT OF THE USE, MISUSE OR INABILITY TO USE THIS PRODUCT SOLD BY SAMSUNG NOT CAUSED
DIRECTLYBY THE NEGLIGENCE OF SAMSUNG. THIS LIMITED WARRANTY SHALL NOT EXTEND TO ANYONE OTHER THAN THE ORIGINAL
PURCHASER OF THIS PRODUCT, IS NONTRANSFERABLE AND STATES YOUR EXCLUSIVE REMEDY.
Some states do not allow limitations on how long an implied warranty lasts, or the exclusion or limitation of incidental or consequential damages, so the
above limitations or exclusions may not apply to you. This warranty gives you specific legal rights, and you may also have other rights, which vary from
state to state.
To obtain warranty service, please contact SAMSUNG at:
SAMSUNG CUSTOMER CARE CENTER
400 Valley Road, Suite 201, Mt. Arlington, NJ 07856, Tel: 973-601-6000, Fax: 973-601-6001
1-800-SAMSUNG (1-800-726-7864) and www.SAMSUNGUSA.com
061002
DA68-01174A 12/13/02 12:58 PM Page 59
Page 60

MEMO
DA68-01174A 12/13/02 12:58 PM Page 60
Page 61

ADDRESS : SAMSUNG ELECTRONICS AMERICA, INC.
SERVICE DIVISION
400 VALLEY ROAD, SUITE 201, MT. ARLINGTON, NJ 07856
TELEPHONE : 1-800-SAMSUNG(1-800-726-7864) FAX : 1-973-601-6001
DA68-01174A 12/13/02 12:58 PM Page 61
 Loading...