

Page 1
Your easy to use
installation guide
Read me first
UPC. The Fibre Power Network™
Page 2
Watch TV anywhere in your home
on multiple devices with 100Mb broadband
Page 3
Record 4 programmes and watch a 5th
Page 4
19+ HD channels as standard
Page 5
UPC. The Fibre Power Network™
Help is at hand if you need it
If you need a helping hand our Customer
Care team is here to help.
If you have any queries, or would like to nd out more information about your Horizon products, our website can help. Check out www.upc.ie/horizontv
for more information on features and benets. Alternatively, visit www.upc.ie/horizontv/gettingstarted for support.
Version IE.N1450694.NA V2
Self-Install Help Desk
Freephone 1800 941 969
Monday – Friday 9am to 9pm
Saturday 9am to 6pm
Premium PC Support
*
1550 924 124 (Calls cost €1.20 per minute
from a UPC landline, other networks many vary)
Monday – Friday 9am to 9pm
Saturday 9am to 6pm
*Deal with computer problems that are not directly related to our broadband service such as setting up a new computer, rewalls and virus protection.
Experienced technicians are available for any non UPC related technical issues such as Windows/Mac/Android/iOS.
Page 6
Let’s get started
Welcome to your easy to use installation guide. Please follow these instructions carefully to ensure
successful installation, otherwise you may see some screens that are not highlighted in this guide.
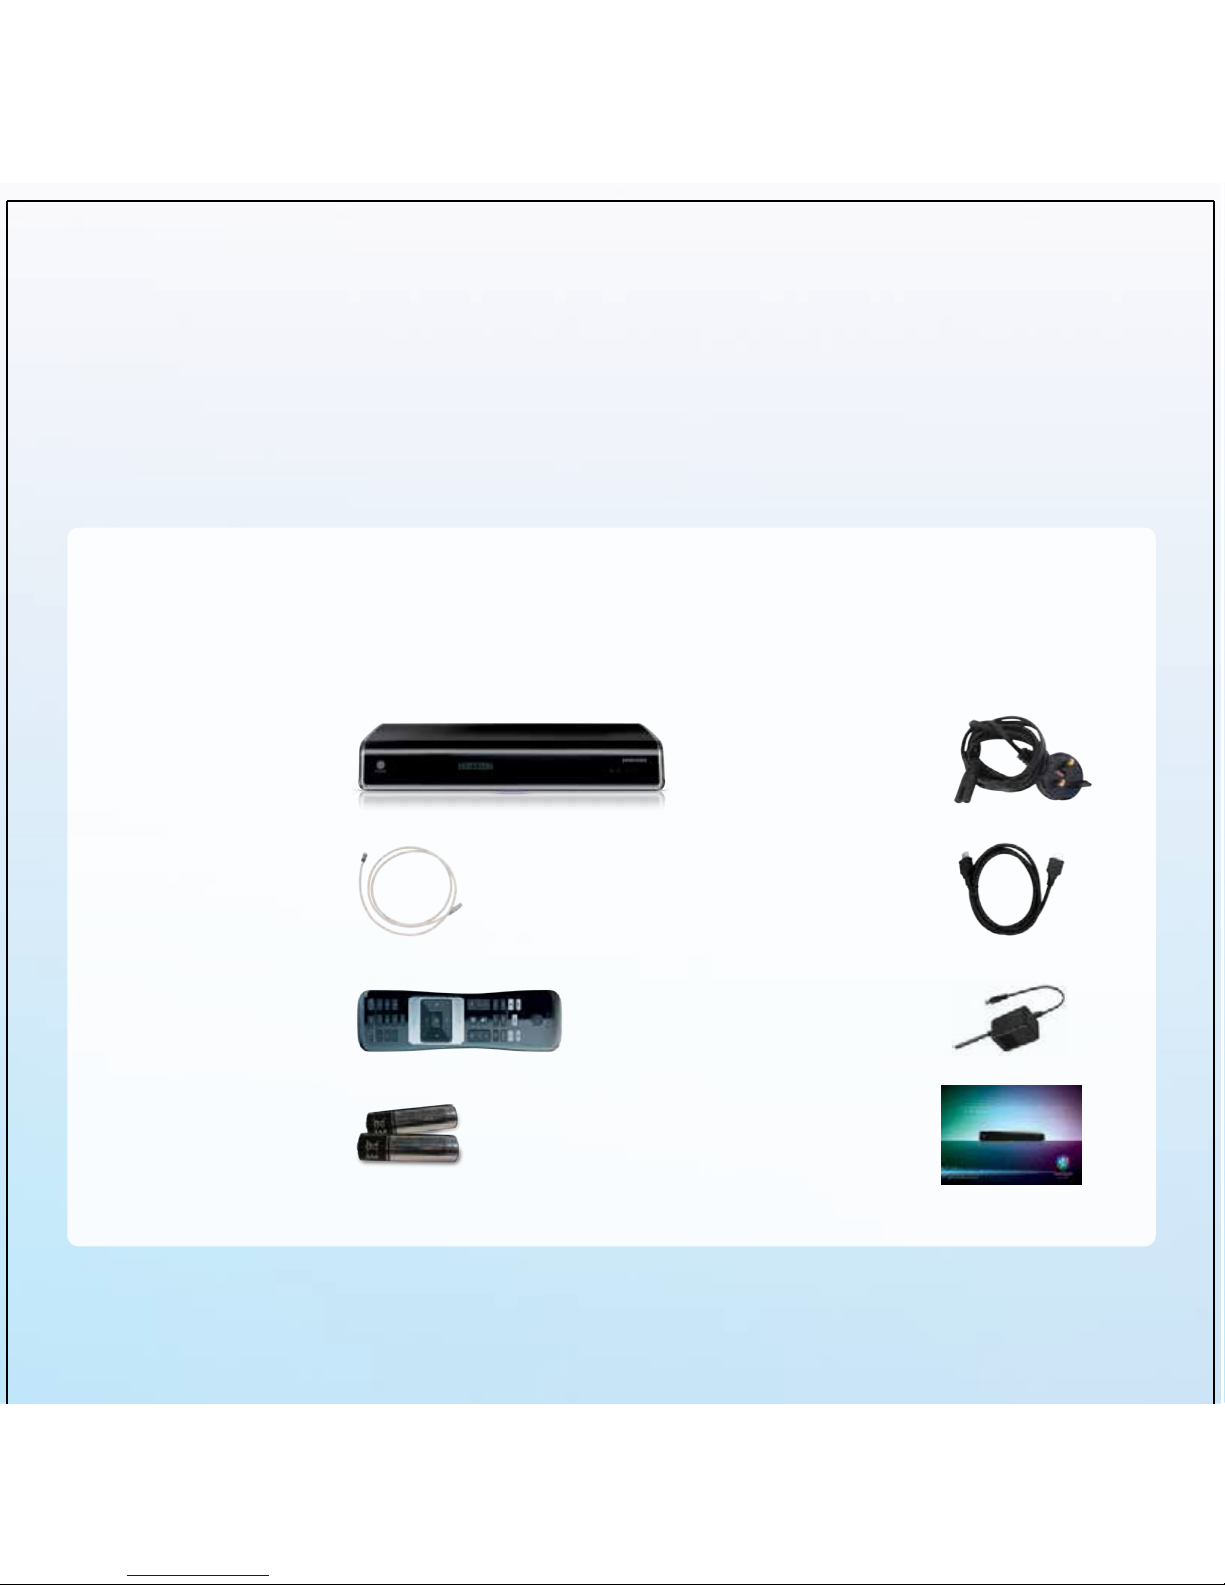
Your contents
Horizon TV HD + box Power cable
Coax cable HDMI cable
Remote control
Power supply
AAA batteries
Horizon
Product Guide
Notes:
Images used throughout this guide are for illustration purposes.
Please make yourself familiar with the full that terms and conditions that apply to your contract with UPC, they can be found at
http://www.upc.ie/termsandconditions/ or contact us on 1908 and we can send you a copy.
Do not remove the yellow tab
until instructed later in your
installation process.
Page 7
AAA batteries
Horizon
Product Guide
Notes:
Images used throughout this guide are for illustration purposes.
Please make yourself familiar with the full that terms and conditions that apply to your contract with UPC, they can be found at
http://www.upc.ie/termsandconditions/ or contact us on 1908 and we can send you a copy.
installation process.
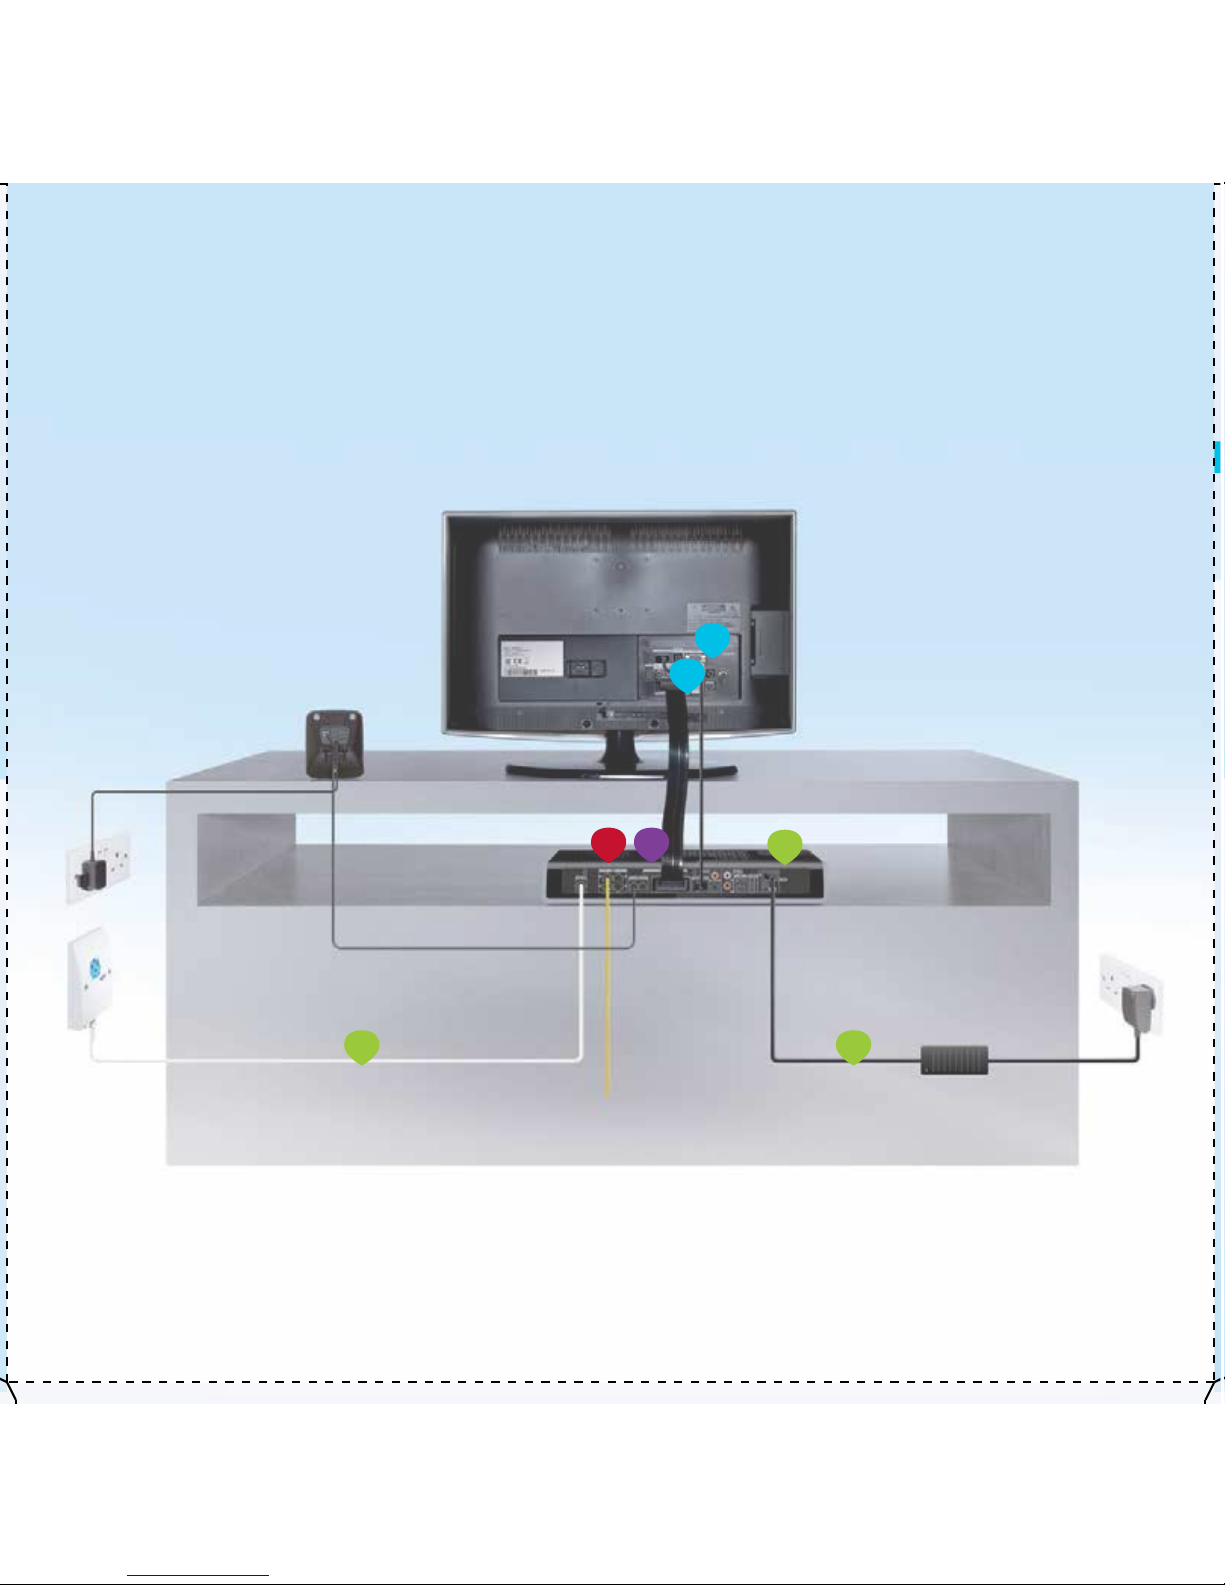
UPC connection box
TV & data port
Coax cable
To computer/console/smart tv via ethernet cable
through wired device
(not applicable for wireless connection)
Power cable
UPC Horizon
HD+ box
(back)
Scart cable HDMI cable
Home phone (base)
4
Installation diagram
2a
2b
3a
3b
2c
56a
Note: In this image 3a and 3b show the Scart and HDMI both connected, this is for illustration purposes only, you will only use one of these.
Page 8
Before you start
Step 2
Step 1
Connecting your Horizon TV HD+ box and hardware
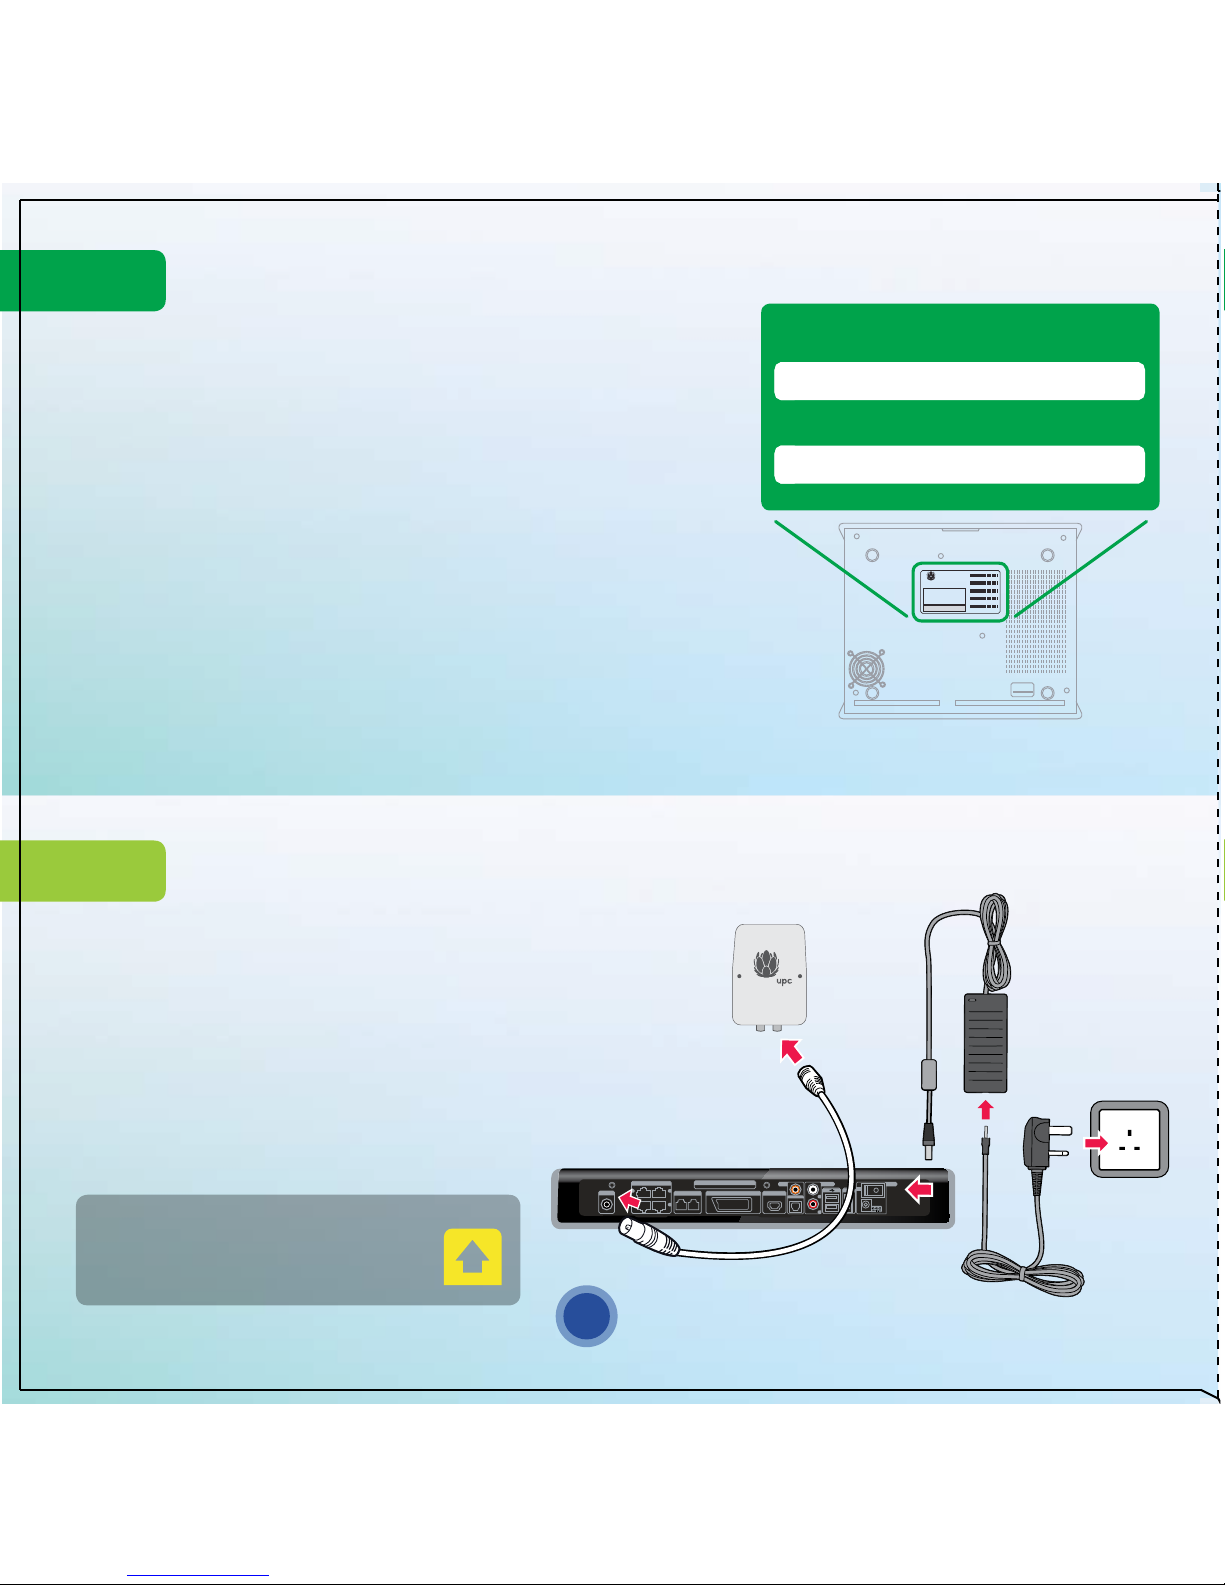
a) If all your services are through your Horizon TV HD+ box disconnect your
current equipment – ie your set-top box, your modem and all of the cables.*
b) Note your SSID details in the space provided, ie your network name and
8 character password. This is located on the bottom of your Horizon TV
HD+ box, or on the sticker provided.
*If you have requested that you keep your existing modem only disconnect your set-top box.
Notes:
No smart card, splitter or cable modem is needed as your Horizon TV HD+ box is a one box,
one cable solution.
When you are noting your SSID details (network name and password), make sure it is the
‘Wi-Fi 2.4Ghz’ that you select.
If your TV doesn’t have a HDMI connection, keep your Scart cable at hand as you will need
this in a later step.
For more information on wireless, go to page 6 of your Horizon Product Guide.
COAX IN
LAN
132
4
L
R
1 TEL 2 HDMI OUTSCART OUT
SMART CARD
HDMI OUT
SPDIF
AUDIO OUT
POWER
e-SATA
IN
Use
connection
on the right
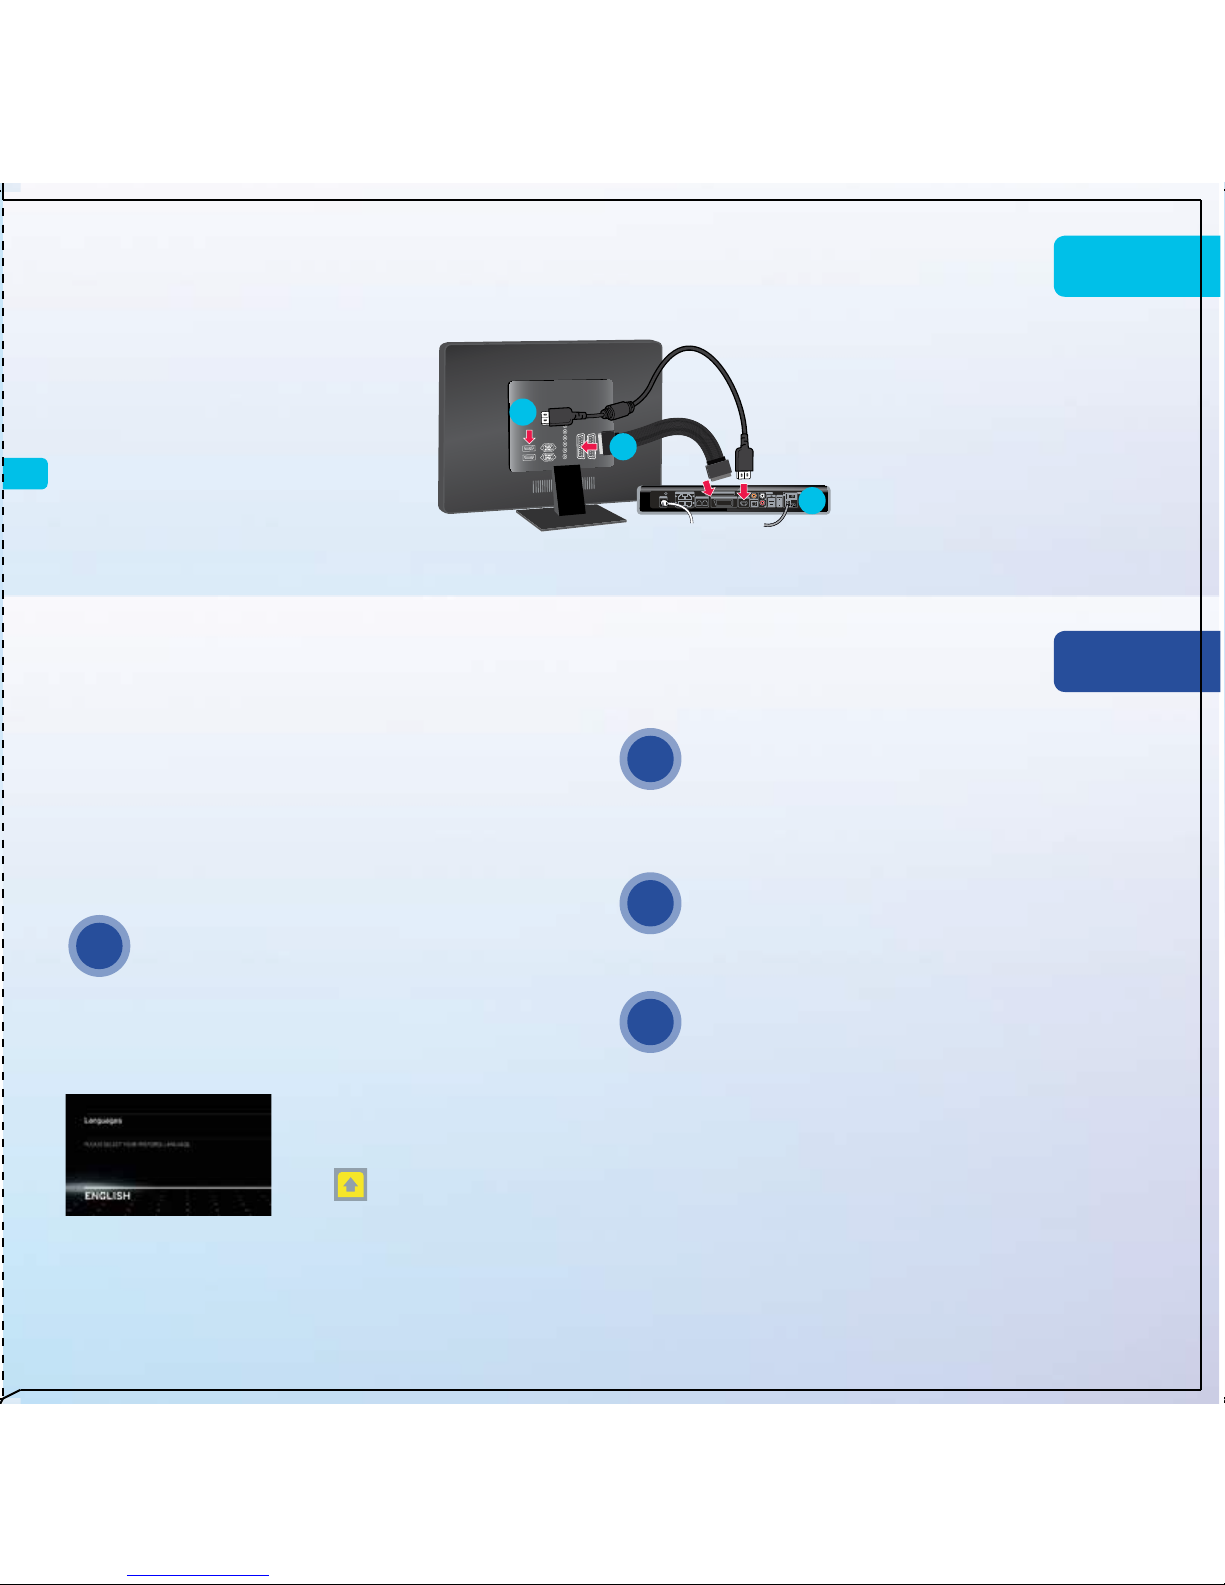
a) Connect the white coax cable to the TV port on your
wall and then to the ‘COAX IN’ socket on your Horizon
TV HD+ box, making sure that both ends are secure.
b) Take the black power cable and connect this to the
power adapter. Then place the plug end of the cable
into the power socket and the opposite end into the
slot at the back of your Horizon TV HD+ box, just
below the power button.
CA ID : 00 0000 0000 00
Model:AAA-A0000/AAA
Samsung Part No.: 0000000
Wifi 2.4 Ghz:
Wifi 5 Ghz:
SSID : A A A 0 0 0 0 0 0 0 0 0 0
SSID : AAA000000000
Password : AAAAAAAA
Password : A A A A A A A A
WPA2-PSK
Made in Indonesia
CA ID : 00 0000 0000 00
00 0000 0000 00
CA ID : 00 0000 0000 00
CA ID : 00 0000 0000 00
CA ID : 00 0000 0000 00
SSID (network name)
Password
Note: Image shows the bottom of your Horizon TV HD+ box
Write your details in here so you have them close to hand when you need them later.
Please do not remove the yellow plastic strip
from your Horizon Remote Control yet, as
the best time to do this is during step 4.
Don’t forget to remove the plastic from
the front of your Horizon TV HD+ box.
TIP 1
Page 9
When you see the screen that
displays the word ‘English’ it’s now
time to remove the yellow plastic
strip from your remote
control which will automatically pair
to your Horizon TV HD+ box. All you have to do now is press OK,
then sit back and relax, allow the installation to complete and
then enjoy everything Horizon TV has to oer. This process can
take up to 15 minutes.
Connecting your TV to your Horizon TV HD+ box
Final TV set-up and pairing your remote control
Step 3
Step 4
a) To make the most of the HD channels
that you have as standard from Horizon,
connect your Horizon TV HD+ box to
your TV using the HDMI cable provided.
c) Switch your Horizon TV HD+ box
on, this switch is located at the
back of the box.
d) Now you have connected your Horizon
TV HD+box, it is time to turn on your
TV by pressing the power switch. Make
sure that your TV is set to the correct
source i.e. HDMI or Scart.
Your Horizon TV HD+ box will now attempt to connect to the UPC
network. During this time you may see a number of messages on
your TV displaying codes 1010 and 1030, don’t worry these are
part of the normal installation process. This may take up to 30
minutes so please be patient and do not switch your Horizon TV
HD+ box o at this stage as it will disrupt installation.
b) If you do not have a HDMI connection
on your TV, you can connect through a
Scart lead (not included).
If you do not see the ‘English’ screen appear on your TV
after 30 minutes, we recommend that you unplug your
Horizon TV HD+ box power source, leave it o for 15
seconds and plug it back in. The installation process will
now restart.
If you see an on-screen message advising of Code 1090
at any stage during the process, we recommend that you
unplug your Horizon TV HD+ box power source, leave it
o for 15 seconds and plug it back in. If the message
remains on screen, please call our Self-Install Helpdesk on
1800 941 969 and a member of our team will be able to help.
If you have removed the yellow strip from your remote
control and it does not respond you can manually
pair it with your Horizon TV HD+ box by following the
instructions on page4 of your Horizon Product Guide.
When the personalisation screen appears select your
preferred response by using the up and down keys on
your remote control and press OK to conrm.
COAX IN
LAN
132
4
L
R
1 TEL 2 HDMI OUTSCART OUT
SMART CARD
HDMI OUT
SPDIF
AUDIO OUT
POWER
e-SATA
IN
a
b
c
TIP 2
TIP 1
TIP 3
TIP 4
OR
Home Network
After a short period of time an onscreen message will appear to
help you set up your home network. If you select ‘later’ you can set
this up at a later date and continue to enjoy your current viewing.
We are continually improving our home networking service so you
can do more with it in the future. For more information on home
networking see: http://www.upc.ie/customer_support/horizontv/
Page 10
Connecting your home phone
Connecting your devices through Broadband
Step 5
Step 6
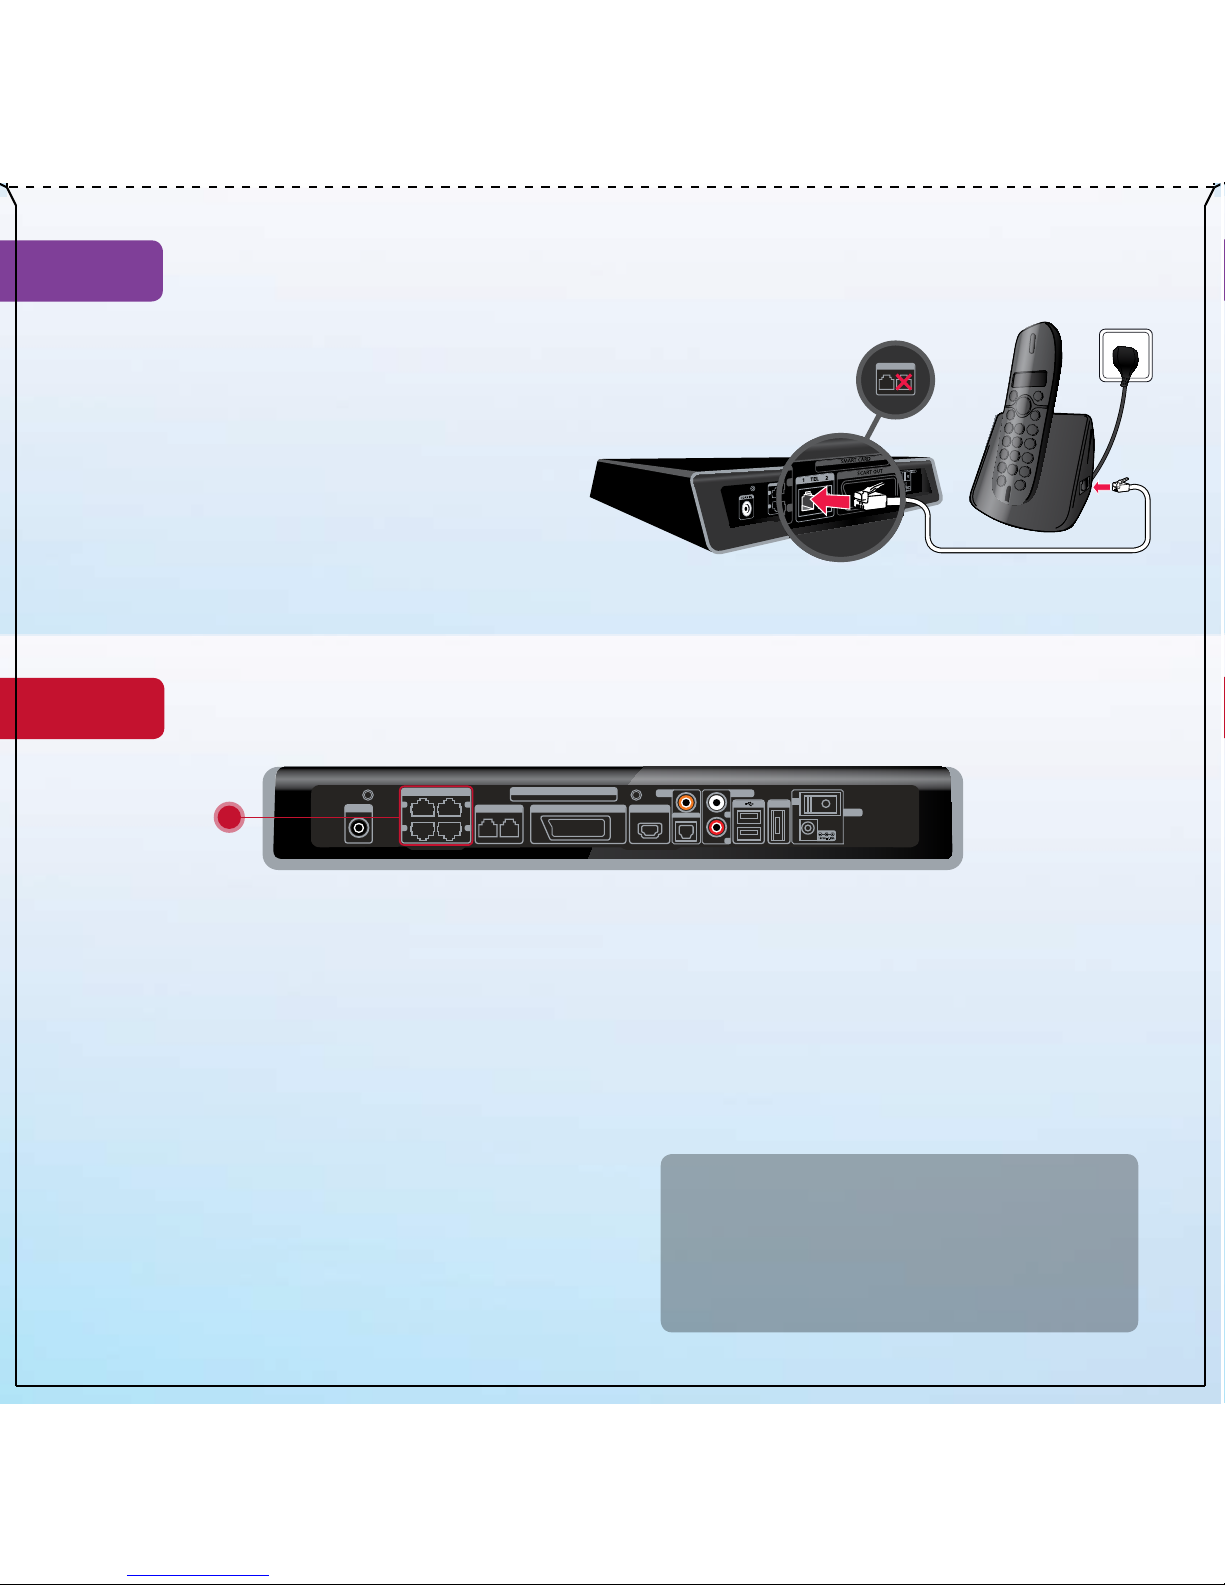
Connect your telephone cable from the base of the docking unit to the Tel 1 socket
on the back of your Horizon TV HD+ box. Once this is complete you can connect
your phone base to its power supply, ensuring that it is correctly plugged in.
Page 26 of your Horizon Product Guide explains some
of the useful functions of your home phone.
Notes:
Telephone and telephone cables are not provided.
If you did not request a handset from us and would like one, simply visit www.upc.ie/phone/
handsets to order one now. An additional one o charge applies.
1
2
3
2
2
2
1 TEL 2
COAX IN
LAN
1
3
2
4
L
R
1 TEL 2 HDMI OUTSCART OUT
SMART CARD
OPTICAL
SPDIF
AUDIO OUT
POWER
e-SATA
ON
a
TV & data port
Coax cable
To computer/console/smart tv via ethernet cable
through wired device
(not applicable for wireless connection)
Power cable
2a
2b
Note: In this image 3a and 3b show the Scart and HDMI both connected, this is for illustration purposes only, you will only use one of these.
a) Wired Devices
This includes: Desktop, PC, Laptop, Games Consoles.
Connect your Ethernet cable (not supplied) to any of the 4 LAN
ports on the back of your Horizon TV HD+ box and connect the
other end to your device.
Note: We would recommend that you use Cat5e Ethernet cable to ensure
that you get the best possible experience.
b) Wireless Devices
To connect any wireless device you will need to have the SSID
details, ie your network name and password, that you gathered
in step 1 of this process. When entering your password make
sure you enter this in uppercase.
Please note that wireless speeds may vary depending on your
surroundings. UPC has no control over these surroundings and
cannot guarantee wireless speeds.
For more information on setting up wirelessly see your Horizon
Product Guide page 6.
Note: To ensure you get the best possible speeds we recommend
connecting to your Horizon HD+ box using an Ethernet cable rather
than by Wi-Fi.
Congratulations! You have now completed your
Horizon TV HD+ box installation. Your next step is
to learn about the features and benets of Horizon.
For more details, please refer to the Horizon
Product Guide included in your box.
 Loading...