


3 Installation Guide
SAMSUNG
HARD DISK DRIVE
INSTALLATION GUIDE
Thank you for selecting the Samsung hard disk drive.
This manual will guide you through the installation process.

3 Installation Guide
Before You Start 2
Setting the jumper pin 3
Installing the hard disk drive 5
Setting the system BIOS 7
Partitioning and formatting 8
Installing the operating system(OS) 8
Thank you for selecting the Samsung hard disk drive.
This manual will guide you through the installation process.
English 1

Before You Start
2 English
A_Handling precautions
This hard disk drive is a highly precisioned electro-mechanical device and is very sensitive to shock and electrostatic discharge (ESD).
Please avoid exposure to high temperatures and humidity. Use the original ESD protection package in which the product was
originally shipped. Please handle the product with care. Damaged or detached label on any of the components may directly
cause product malfunction and will void the warranty.
- Leave the hard disk drive in the static shield package until ready for use
- Handle multiple the hard disk drives one at a time
- Do not bump or drop the hard disk drive
C_Backing up your data
Make a backup copy of your files before installing the new hard disk drive.
Please refer to your computer and/or OS user's manual for more information.
B_Kit components
- Hard disk drive
- ATA interface cable
- Mounting screws
- Installation guide book

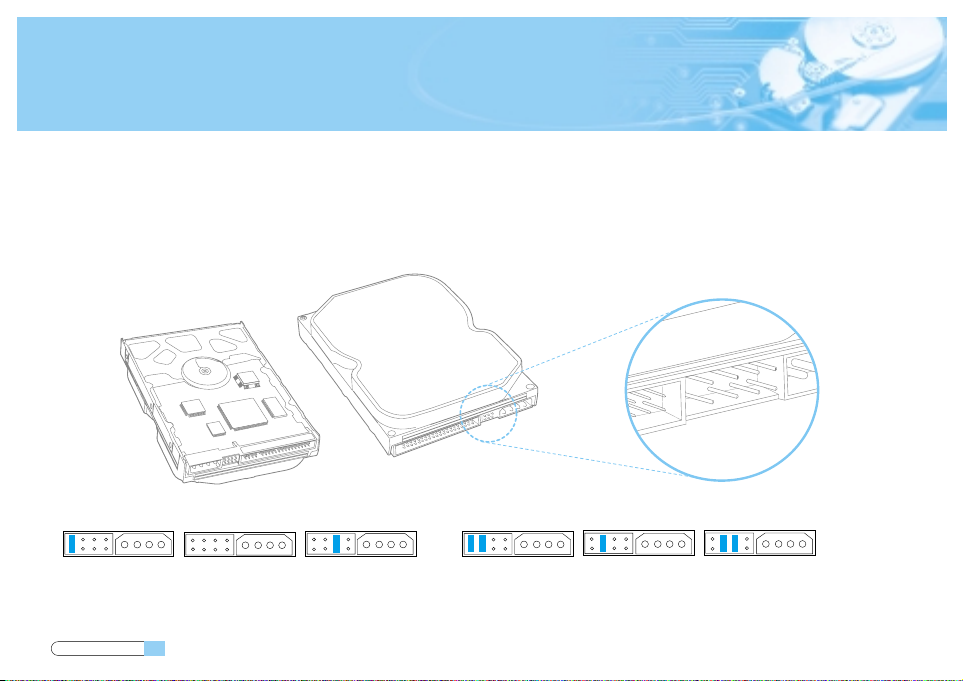
Setting the jumper pin
Setting the jumper pin
Before installing the Samsung hard disk drive, the jumpers must be set to match the configuration of your computer system.
Refer to the following diagram for instructions on setting the jumper pins.
English 3
Master Slave Cable Select Master Slave Cable Select
32GB Clip ConfigurationGeneral Configuration
*General configuration setting as "Slave" is "Remove the jumper" *32GB Clip Configuration "Slave" is set as above

Setting the jumper pin
4 English
NOTE: A system hang condition occurs when the installation of a hard disk drive larger than 32GB is attempted into a
PC that incorporates certain older Basic Input-Output Systems (BIOS).
To remedy this problem:
First, upgrade the BIOS by contacting your PC or main board manufacturer.
Second, set the drive jumpers to the 32GB clip configuration and install the disk manager software available from our website
www.samsunghdd.com which can be downloaded free of charge.
Microsoft recommends that the Windows95 user who wants to use an HDD capacity of 32GB or higher should upgrade
to Windows98/NT/2000 or higher.
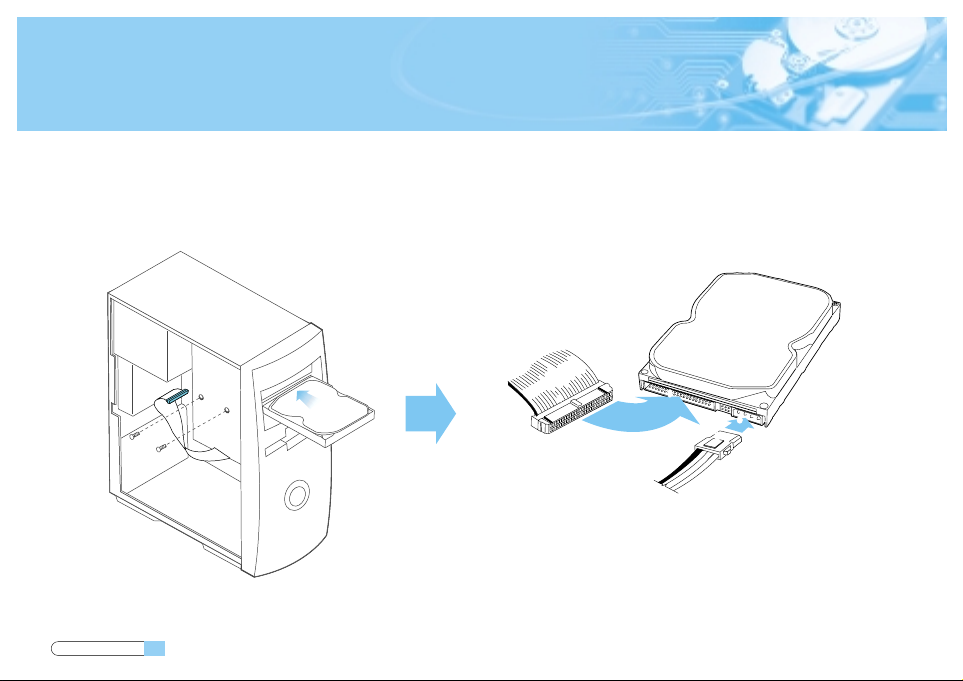
Installing the hard disk drive
English 5
Installing the hard disk drive
The followings are of typical computer systems and hard disk drive mounting styles.
❸
❶
❷
❹
Red
Red
❶ Key Slot
❷ DC Power Receptor
❸ ATA Interface Connector
❹ Power Supply Cable from computer power supply (3-Pin or 4-Pin)

Installing the hard disk drive
6 English
a_Turn off the power of your computer
b_Unplug the external power cables to the computer.
c_Open the cover of your Computer
Cover opening mechanism and the location of the hard disk drive may vary from
one computer to another. (Consult your computer manual)
d_Insert the HDD into an available 3.5" bay in your computer and secure it to the chassis using the provided screws.
e_Connect Cables.
1.Attach the ATA interface cable to the interface connector on the hard disk drive.
2.Attach the power cable to the power receptor on the hard disk drive. The connector is keyed and will fit in only one way.
3.Check all other cable connections before turning on your computer.
CAUTION!: Do not force or rock the connectors into their sockets on the hard disk drive. Push them in straight
until they are seated.

Setting the system BIOS
Setting the system BIOS
A_Turn on your computer system. During the startup sequence, run the CMOS(BIOS) setup program. Newer systems will
typically display a message similar to "press DEL to enter SETUP", showing how to access the CMOS(BIOS) program.
(What is the CMOS Setup?)
It's a program that controls the computer's basic details such as Date and Time, memory capacity, and disk drive status.
Because this information gets recorded into the CMOS IC, these recorded details are not lost when
the computer is turned off.
B_Choose a device position within the BIOS where the hard disk drive will be installed.
C_To make the computer detect the hard disk drive, select the "auto-detect" option then save and exit the BIOS set up.
If your computer supports IDE HDD auto detection, the hard disk drive will automatically be detected. If you select the
type from the IDE Adapter Primary Master Slave section, "Autotype Fixed Disk: [Press Enter]" will appear on the screen.
If you press Enter, the hard disk drive will automatically be detected.
English 7
Partitioning and formatting
8 English
Partitioning and formatting
The newly installed hard disk drive must be partitioned and formatted before it is ready for use. If your operating system(OS)
is Windows 2000, XP, or higher, your OS will automatically recognize the hard drive. Follow the on screen directions when
installing your OS. Please refer to your OS and/or computer user's manual for more information.
If your OS is windows ME or earlier, take the following steps.
A_When the CMOS setup is completed, reboot the system with a booting diskette that has FDISK and FORMAT programs.
B_Run the FDISK program to set up the partitions.
If you only want to use a single partition, select all the disk space available by the hard disk drive. In order to use 2 or
more partitions, divide the disk space.
C_Reboot with a booting diskette.
D_Run the FORMAT program and format the hard disk drive. If you divided the drive into multiple partitions (D:, E:, etc.) ,
you must format all the drives.
CAUTION!: FDISK and FORMAT programs erase all the data on the hard disk drive.
To avoid inadvertent erasure, backup your data before running FDISK or FORMAT programs.
Installing the operating system(OS)
Refer to the operating system user's manual to install the operating system.
Installing the operating system(OS)

3 Installation Guide
Avant de commencer 2
Réglage des cavaliers 4
Installation du disque dur 5
Réglage du BIOS de l’ordinateur 7
Partitionnement et formatage 8
Installation du système d’exploitation 8
Merci d’avoir choisi un disque dur Samsung.
Ce manuel vous présente les différentes étapes de la procédure d’installation.
French 1

Avant de commencer
2 French
A_Précautions de manipulation
Ce produit intègre un mécanisme de haute précision et est très sensible aux chocs et aux décharges électrostatiques. Evitez de
l’exposer à des températures extrêmes et à l’humidité. Utilisez l’emballage de protection antistatique d’origine dans lequel le produit
vous a été fourni. Veuillez manipuler ce produit avec précaution. Toute étiquette abîmée ou détachée sur l’un de ses composants peut
directement entraîner un dysfonctionnement du produit et annuler sa garantie.
- Laissez le disque dur dans son emballage antistatique jusqu’à sa mise en place.
- Manipulez un disque dur à la fois.
- Ne heurtez pas le disque dur contre un objet et ne le laissez pas tomber à terre.
C_Sauvegarde de vos données
Réalisez une copie de sauvegarde de vos fichiers avant d’installer le nouveau disque dur.
Pour plus de précisions, consultez le manuel d’utilisation de votre ordinateur et/ou du système d’exploitation.
B_Composition du kit
- disque dur
- câble d’interface ATA
- vis de montage
- guide d’installation
Réglage des cavaliers
Réglage des cavaliers
Avant d’installer votre disque dur Samsung, vous devez régler les cavaliers pour respecter la configuration de votre système informatique.
Reportez-vous aux instructions du diagramme suivant pour régler les cavaliers.
French 3
Master Slave Cable Select Master Slave Cable Select
32GB Clip ConfigurationGeneral Configuration
*General configuration setting as "Slave" is "Remove the jumper" *32GB Clip Configuration "Slave" is set as above

Réglage des cavaliers
4 French
NOTE: Sur certains PC fonctionnant sous des BIOS plus anciens, l’ordinateur risque de se retrouver paralysé si l’on tente de procéder à
l’installation d’un disque dur de plus de 32 Go. Dans ce cas, ce problème peut être résolu de deux façons. La première solution
consiste à mettre à niveau le BIOS en contactant le fabricant de votre PC ou de votre carte mère. La deuxième solution préconise de
régler les cavaliers du disque dur en configuration 32 Go et d’installer le logiciel de gestion de disque ( disk manager ) disponible et
téléchargeable gratuitement sur notre site web www.samsunghdd.com.
Microsoft recommande aux utilisateurs de Windows 95 souhaitant utiliser un disque dur de 32 Go ou plus de procéder à une mise à
niveau vers Windows 98/NT/2000 ou au-delà.

Installation du disque dur
French 5
Installation du disque dur
Les instructions suivantes concernent des ordinateurs classiques dotés de supports de montage de disque dur
classiques.
❸
❶
❷
❹
Red
Red
❶ Key Slot
❷ DC Power Receptor
❸ ATA Interface Connector
❹ Power Supply Cable from computer power supply (3-Pin or 4-Pin)

Installation du disque dur
6 French
a_Mettez votre ordinateur hors tension.
b_Débranchez les câbles d’alimentation externes.
c_Ouvrez le boîtier de votre ordinateur.
Le mécanisme d’ouverture du boîtier et l’emplacement du disque dur peuvent varier d’un ordinateur à l’autre.
d_Introduisez le disque dur dans un logement de 3,5” et fixez-le avec les vis fournies.
e_Branchez les câbles du disque dur.
1.Reliez le câble d’interface ATA au connecteur d’interface sur le disque dur.
2.Reliez le câble d’alimentation au connecteur d’alimentation sur le disque dur. Ces deux connecteurs sont munis d’un détrompeur
et ne peuvent s’engager que dans un sens.
3.Vérifiez tous les autres branchements de câbles avant de rallumer votre ordinateur.
ATTENTION !: Ne tentez pas de forcer ou de basculer les connecteurs dans leur prise sur le disque dur. Enfoncez-les en ligne droite
jusqu’à leur emboîtement.

Réglage du BIOS de l’ordinateur
Réglage du BIOS de l’ordinateur
A_Allumez votre ordinateur. Pendant la séquence de démarrage, exécutez le programme de configuration du CMOS (BIOS). Les
ordinateurs récents affichent habituellement un message tel que “press DEL to enter SETUP”, vous indiquant comment accéder au
programme du CMOS (BIOS).
(Qu’est-ce que le programme de configuration du CMOS ?)
Il s’agit d’un programme qui gère les paramètres de base de l’ordinateur tels que la date et l’heure, la capacité de mémoire et le statut
des disques durs. Comme ces informations sont enregistrées dans la puce CMOS, ces paramètres ne sont pas perdus lorsque
l’ordinateur est éteint.
B_Sélectionnez dans le BIOS une position de périphérique où le disque dur sera installé.
C_Faites détecter le disque dur par l’ordinateur. Choisissez l’option “auto-detect”, puis sauvegardez et quittez la configuration du BIOS.
Si votre ordinateur prend en charge la détection automatique des disques durs IDE, votre disque dur sera détecté automatiquement.
Si vous sélectionnez le type dans la section IDE Adapter Primary Master Slave, le message “Autotype Fixed Disk : [Press Enter]” doit
apparaître à l’écran. Appuyez sur Entrée pour que le disque dur soit détecté automatiquement.
French 7

Partitionnement et formatage
8 French
Partitionnement et formatage
Le disque dur que vous venez d’installer doit encore être partitionné et formaté avant de pouvoir être utilisé. Si votre système
d’exploitation est Windows 2000, XP ou au-delà, celui-ci doit reconnaître automatiquement le disque dur. Suivez les instructions à l’écran
pendant l’installation du système d’exploitation. Pour plus de précisions, consultez le manuel d’utilisation de votre ordinateur et/ou du
système d’exploitation. Si votre système d’exploitation est Windows ME ou une version antérieure, suivez les instructions ci-après :
A_Une fois la configuration du CMOS terminée, redémarrez le système avec une disquette de démarrage contenant les programmes
FDISK et FORMAT.
B_Exécutez le programme FDISK pour créer les partitions.
Si vous souhaitez n’utiliser qu’une seule partition, sélectionnez tout l’espace disque disponible pour le disque dur. Pour utiliser 2
partitions ou plus, scindez l’espace disque en conséquence.
C_Redémarrez l’ordinateur avec une disquette de démarrage.
D_Exécutez le programme FORMAT et formatez le disque dur. Si vous avez scindé le disque dur en plusieurs partitions (D:, E:, etc.), vous
devez formater chaque partition.
ATTENTION !: Les programmes FDISK et FORMAT effacent toutes les données sur le disque dur. Pour éviter tout incident, sauvegardez vos
données avant d’exécuter FDISK ou FORMAT.
Installation du système d’exploitation
Consultez le manuel d’utilisation du système d’exploitation pour installer votre système d’exploitation.
Installation du système d’exploitation

3 Installation Guide
Bevor Sie beginnen 2
Setzen der Brückenstecker 4
Die Installation der Festplatte 5
Einstellung des BIOS 7
Partitionieren und Formatieren 8
Installation des Betriebssystems 8
Vielen Dank, dass Sie sich für ein Festplattenlaufwerk von Samsung entschieden haben.
Diese Anleitung wird Sie durch den Installationsprozess führen.
German 1

Bevor Sie beginnen
2 German
A_Warnhinweise
Dieses Produkt ist ein Präzisionsgerät und sehr empfindlich gegenüber Erschütterung und elektrostatischer Entladung. Vermeiden Sie
bitte hohe Temperaturen und Feuchtigkeit. Verwenden Sie die Originalverpackung, in der das Produkt verkauft worden ist Gehen Sie
bitte sorgfältig mit dem Produkt um. Ein beschädigter oder entfernter Aufkleber an einer der Komponenten kann direkt zu
Funktionsstörungen und zu Garantieverlust führen .
- Belassen Sie das Laufwerk bis zur Verwendung in der Schutzverpackung.
- Falls sie mehrere Laufwerke installieren, tun Sie dieses nacheinander
- Setzen Sie das Laufwerk keinen Stößen aus und lassen Sie es nicht fallen.
C_Sicherung Ihrer Daten
Fertigen Sie ein Backup Ihrer Dateien an bevor Sie eine neue Festplatte installieren.
Bitte lesen Sie weitere Informationen hierzu im Handbuch Ihres PC und/oder Benutzerhandbuch zum Betriebssystem nach.
B_Lieferumfang
- Festplattenlaufwerk
- ATA -Schnittstellenkabel
- Montageschrauben
- Installationshandbuch

Setzen der Brückenstecker
Setzen der Brückenstecker
Bevor Sie die Samsung Festplatte installieren müssen die Brückenstecker zur Konfiguration gemäß Ihrem PC-Systems gesetzt werden.
Setzen Sie die Brückenstecker entsprechend dem folgenden Diagramm.
German 3
Master Slave Cable Select Master Slave Cable Select
32GB Clip ConfigurationGeneral Configuration
*General configuration setting as "Slave" is "Remove the jumper" *32GB Clip Configuration "Slave" is set as above

Setzen der Brückenstecker
4 German
ANMERKUNG: Das System reagiert nicht mehr, wenn versucht wird, eine Festplatte mit mehr als 32GB in einen PC mit einer älteren BIOS-
Version zu installieren. Für dieses Problem gibt es zwei Lösungen: Erstens, aktualisieren Sie das BIOS. Kontaktieren Sie
hierzu den Hersteller Ihres PC oder Mainboards. Zweitens, setzen Sie die Brückenstecker für das Laufwerk auf die 32GB
Clipkonfiguration und installieren Sie die DiskManager - Software von unserer Website www.samsunghdd.com, die Sie sich
kostenlos herunterladen können.
Microsoft empfiehlt Benutzern von Windows95, die eine Festplatte mit 32GB oder mehr verwenden wollen, Ihr
Betriebssystem zu Windows98/NT/2000 oder höher aufzurüsten.

Die Installation der Festplatte
German 5
Die Installation der Festplatte
Nachfolgend wird die Installation einer Festplatte in einem typischen Computersystem beschrieben.
❸
❶
❷
❹
Red
Red
❶ Key Slot
❷ DC Power Receptor
❸ ATA Interface Connector
❹ Power Supply Cable from computer power supply (3-Pin or 4-Pin)

Die Installation der Festplatte
6 German
a_Schalten Sie die Stromversorung Ihres Computers aus
b_Ziehen Sie das Netzkabel heraus.
c_Öffnen Sie das Gehäuse Ihres Computers
Der Öffnungsmechanismus des Gehäuses und der Montageplatz für die Festplatte können von PC zu PC unterschiedlich sein.
d_Stecken Sie die Festplatte in einen 3.5” -Laufwerksschacht und befestigen Sie diese mit den mitgelieferten Schrauben.
e_Verbinden Sie die Kabel.
1.Stecken Sie das ATA Schnittstellenkabel in den Verbindungsbuchse am Festplattenlaufwerk.
2.Stecken Sie das Stromkabel in die entsprechende Buchse am Festplattenlaufwerk. Beide Buchsen sind kodiert, so dass die Kabel nur
in einer Richtung passen.
3.Überprüfen Sie alle anderen Kabelverbindungen, bevor Sie Ihren Computer einschalten.
VORSICHT!: Stecken Sie die Stecker nicht gewaltsam in die Buchsen am Festplattenlaufwerk.
Drücken Sie die Stecker gerade herein bis sie richtig sitzen.

Einstellung des BIOS
Einstellung des BIOS
A_Schalten Sie Ihren Computer ein. Aktivieren Sie in der Startphase das CMOS(BIOS) Setup-Programm. Neuere Systeme zeigen in der
Regel eine Nachricht wie “drücken Sie ENTF, um SETUP zu starten”, die Ihnen sagt, wie Sie auf das CMOS(BIOS) Programm zugreifen
können.
(Was ist das CMOS Setup?)
Das ist ein Programm, dass die grundlegenden Einstellungen des Computers, wie beispielsweise Datum und Zeit, Speicherkapazität
und Diskettenlaufwerksstatus, steuert. Da diese Informationen im CMOS IC gespeichert werden, gehen diese Daten beim Ausschalten
des Computers nicht verloren.
B_Wählen Sie den zugehörigen Eintrag gemäß Ihrer Installation im BIOS aus.
C_Lassen Sie den Computer das Festplattenlaufwerk erkennen. Wählen Sie die Option “Autodetect” (Automatische Erkennung),
speichern Sie dann und beenden Sie das BIOS Setup. Falls Ihr Computer die IDE HDD Selbsterkennung unterstützt, wird das
Festplattenlaufwerk automatisch erkannt. Wenn Sie im Bereich IDE Adapter Primary Master / Slave den Typ auswählen, erscheint die
Nachricht “Autotype Fixed Disk: [Press Enter]” auf dem Bildschirm. Wenn Sie die Eingabetaste (Enter) drücken, wird das
Festplattenlaufwerk automatisch erkannt.
German 7

Partitionieren und Formatieren
8 German
Partitionieren und Formatieren
Das neu installierte Festplattenlaufwerk muss partitioniert und formatiert werden, bevor es benutzt werden kann. Ist Ihr Betriebssystem
Windows 2000, XP, oder höher, erkennt es das Festplattenlaufwerk automatisch. Folgen Sie bei der Installation Ihres Betriebssystems
einfach den Anweisungen auf dem Bildschirm. Weitere Informationen entnehmen Sie bitte dem Handbuch zu ihrem Betriebssystem oder
dem Benutzerhandbuch Ihres Computers.
Ist Ihr Betriebssystem Windows ME oder eine ältere Version, folgenden Sie bitte dieser Anleitung:
A_Wenn das CMOS Setup abgeschlossen ist, starten Sie das System mit Hilfe einer Startdiskette, auf welcher sich die Programme FDISK
und FORMAT befinden, neu.
B_Starten Sie das Programm FDISK, um die Partitionierung vorzunehmen.
Falls Sie nur eine Partition verwenden wollen, wählen Sie den gesamten für das Festplattenlaufwerk verfügbaren Speicherplatz.
Möchten Sie 2 oder mehr Partitionen nutzen, teilen Sie den Speicherplatz entsprechend auf.
C_Starten Sie Ihren PC mit Hilfe der Startdiskette neu.
D_Starten Sie das Programm FORMAT und formatieren Sie das Festplattenlaufwerk. Wenn Sie das Laufwerk in mehrere Partitionen
aufgeteilt haben (D:, E:, usw.), müssen Siee alle Laufwerke formatieren.
ACHTUNG!: Die Programme FDISK und FORMAT löschen alle Daten auf dem Festplattenlaufwerk. Um solche Probleme zu vermeiden,
fertigen Sie ein Backup Ihrer Daten an, bevor Sie die Programme FDISK oder FORMAT starten.
Installation des Betriebssystems
Lesen Sie hierzu bitte im Benutzerhandbuch zum Betriebssystem nach.
Installation des Betriebssystems

3 Installation Guide
Antes de comenzar 2
Cómo configurar los puentes (jumpers) 4
Cómo instalar la unidad de disco duro 5
Cómo ajustar la BIOS del sistema 7
Cómo particionar y formatear 8
Cómo instalar el sistema operativo 8
Gracias por elegir una unidad de disco duro Samsung.
Este manual le guiará durante el proceso de instalación.
Spanish 1

Antes de comenzar
2 Spanish
A_Precauciones de manejo
Este producto es un mecanismo diseñado con gran precisión y resulta muy sensible ante golpes y descargas electrostáticas (ESD).
Evite la humedad y las altas temperaturas. Utilice el paquete original de protección contra descargas eléctricas en el que
originariamente se adquirió este producto. Manéjelo con cuidado. Una etiqueta dañada o despegada de cualquiera de los
componentes podría provocar un mal funcionamiento del producto e invalidar la garantía.
- Mantenga la unidad en el paquete de protección estática hasta que esté lista para su uso.
- Maneje una unidad cada vez.
- Evite golpear o dejar caer la unidad.
C_Copias de seguridad de sus datos
Antes de instalar la nueva unidad de disco duro, haga una copia de seguridad de sus archivos. Para más información,
consulte el manual de usuario de su ordenador y del sistema operativo.
B_Componentes del equipo
- unidad de disco duro
- cable de conexión ATA
- tornillos de montaje
- manual de instalación

Cómo configurar los puentes (jumpers)
Cómo configurar los puentes (jumpers)
Antes de instalar la unidad de disco duro Samsung, hay que ajustar los puentes para que coincidan con la configuración de su sistema
informático. Consulte el diagrama siguiente para obtener las instrucciones sobre la configuración de los puentes.
Spanish 3
Master Slave Cable Select Master Slave Cable Select
32GB Clip ConfigurationGeneral Configuration
*General configuration setting as "Slave" is "Remove the jumper" *32GB Clip Configuration "Slave" is set as above

Cómo configurar los puentes (jumpers)
4 Spanish
NOTA: Cuando se intenta instalar una unidad de disco duro de más de 32GB en un PC que incorpore ciertos sistemas básicos de entrada-
salida (BIOS) antiguos, el sistema se cuelga. Existen dos soluciones a este problema: Primera, actualice la BIOS poniéndose en
contacto con el fabricante de su PC o de la placa base. Segunda, instale los puentes de la unidad a la configuración de 32GB e
instale el software de administración del disco que está disponible en nuestra página web www.samsunghdd.com y que puede
descargarse de forma gratuita.
Microsoft recomienda que el usuario de Windows95 que desee utilizar una unidad de disco duro con una capacidad de 32GB o más,
actualice a Windows98/NT/2000 o superior.

Cómo instalar la unidad de disco duro
Spanish 5
Cómo instalar la unidad de disco duro
A continuación, encontrará los sistemas informáticos y estilos de montaje de disco duro habituales.
❸
❶
❷
❹
Red
Red
❶ Key Slot
❷ DC Power Receptor
❸ ATA Interface Connector
❹ Power Supply Cable from computer power supply (3-Pin or 4-Pin)

Cómo instalar la unidad de disco duro
6 Spanish
a_Apague el ordenador
b_Desenchufe los cables de alimentación externos.
c_Abra la carcasa del ordenador
El mecanismo de apertura de la carcasa y la ubicación de la unidad de disco duro pueden variar de un ordenador a otro.
d_Introduzca la unidad de disco duro en una plataforma de 3,5” y fíjela con los tornillos suministrados.
e_Conecte los cables.
1.Acople el cable de conexión ATA al conector de la unidad de disco duro.
2.Acople el cable de alimentación al conector de corriente de la unidad de disco duro. Ambos conectores están bien identificados y se
ajustarán de una sola forma.
3.Compruebe el resto de conexiones del cable antes de encender el ordenador.
¡PRECAUCIÓN!: No apriete o sacuda con fuerza los conectores en las clavijas de la unidad de disco duro. Empújelos en dirección recta
hasta que se asienten.

Cómo ajustar la BIOS del sistema
Cómo ajustar la BIOS del sistema
A_Encienda el sistema del ordenador. Durante la secuencia de inicio, ejecute el programa CMOS(BIOS) Setup. Los sistemas nuevos
normalmente muestran en la pantalla un mensaje similar a “press DEL to enter SETUP” (pulse DEL para entrar en la
CONFIGURACIÓN), que muestra cómo acceder al programa CMOS(BIOS).
(¿Qué es el CMOS Setup?)
Se trata de un programa que controla los detalles básicos del ordenador como la fecha y la hora, la capacidad de memoria y el
estado de la unidad de disco. Puesto que la información se graba en la CMOS IC, estos datos grabados no se pierden al apagar el
ordenador.
B_Elija una posición del dispositivo dentro de la BIOS en la que se instalará la unidad de disco duro.
C_Haga que el ordenador detecte la unidad de disco duro. Seleccione la opción “auto-detect” (autodetectar), a continuación guarde y
salga de la configuración de la BIOS. Si su ordenador soporta la opción IDE HDD auto detection (Autodetección del disco duro), la
unidad de disco duro se detectará automáticamente. Si selecciona el tipo de la sección IDE Adapter Primary Master Slave, se
mostrará en la pantalla, “Autotype Fixed Disk (Disco duro Auto)”: [Pulse Intro]”. Si pulsa Intro, la unidad de disco duro se
detectará automáticamente.
Spanish 7

Cómo particionar y formatear
8 Spanish
Cómo particionar y formatear
Se debe particionar y formatear la unidad de disco duro recién instalada antes de que esté lista para su uso. Si su sistema operativo es
Windows 2000, XP, o superior, éste reconocerá la unidad de disco duro automáticamente. Siga las instrucciones que aparecen en pantalla
al instalar su sistema operativo. Para más información, consulte el manual de usuario del sistema operativo o del ordenador.
Si su sistema operativo es Windows ME o una versión inferior, siga los pasos siguientes:
A_Cuando haya finalizado la configuración de la CMOS, reinicie el sistema con un disquete de inicio que disponga de los programas
FDISK y FORMAT.
B_Ejecute el programa FDISK para configurar las particiones.
Si desea solamente una partición sencilla, seleccione todo el espacio disponible en la unidad de disco duro. Con el fin de utilizar 2 o más
particiones, divida el espacio del disco.
C_Reinicie con el disquete de inicio.
D_Ejecute el programa FORMAT, y formatee la unidad de disco duro. Si dividió la unidad en particiones múltiples (D:, E:, etc.), tendrá
que formatear todas las unidades.
¡PRECAUCIÓN!: Los programas FDISK y FORMAT borran todos los datos de la unidad de disco duro. Para evitar estos problemas, haga
una copia de seguridad de sus datos antes de ejecutar los programas FDISK o FORMAT.
Cómo instalar el sistema operativo
Para instalar el sistema operativo, consulte el manual de usuario de dicho sistema.
Cómo instalar el sistema operativo

3 Installation Guide
Voordat u begint 2
Instellen jumperschakelaars 4
Installatie van de hard disk drive 5
BIOS instellen 7
Partitioneren en formatteren 8
Het besturing systeem (OS) installeren 8
Dank u voor het kiezen van een Samsung hard disk drive.
Deze handleiding leidt u door het installatieproces.
Dutch 1

Voordat u begint
2 Dutch
A_Voorzorgsmaatregelen
Dit product is fijn mechanisch en is bijzonder gevoelig voor schokken en elektrostatische ontladingen (ESD). Vermijd hoge
temperaturen en vocht. Gebruik de originele tegen ESD beschermende verpakking waarin het product werd gekocht. Ga voorzichtig
met het product om. Een beschadigd of los etiket op een van de componenten kan directe aanleiding zijn voor defecten aan het product
en de garantie vervallen.
- Neem de drive tot het moment van gebruik niet uit de tegen ESD beschermende verpakking.
- Werk steeds aan één drive tegelijk.
- De drive niet stoten of laten vallen.
C_Een back-up maken van uw gegevens
Maak een back-up van uw bestanden voordat u de nieuwe hard disk drive installeert.
Zie de handleiding van uw computer en/of OS voor meer informatie.
B_Onderdelen
- hard disk drive
- ATA interfacekabel
- bevestigingsschroeven
- installatiehandleiding

Instellen jumperschakelaars
Instellen jumperschakelaars
Voordat de Samsung hard disk drive wordt geïnstalleerd, moeten de jumpers worden ingesteld zodat deze passen bij de configuratie van
uw computersysteem. Zie het volgende schema voor instructies over het instellen van de jumperschakelaars.
Dutch 3
Master Slave Cable Select Master Slave Cable Select
32GB Clip ConfigurationGeneral Configuration
*General configuration setting as "Slave" is "Remove the jumper" *32GB Clip Configuration "Slave" is set as above

Instellen jumperschakelaars
4 Dutch
N.b.: Het systeem kan vastlopen als wordt geprobeerd een hard disk drive groter dan 32 Gb te installeren in een PC waarop bepaalde
oudere BIOS (Basic Input-Output Systems) zijn geïnstalleerd. Dit probleem kan op twee manieren worden opgelost: 1: neem contact
op met de fabrikant van uw PC of moederbord voor het uitvoeren van een upgrade van het BIOS. 2: stel de jumpers van de drive in op
de 32 Gb configuratie en installeer de disk manager software die via een gratis download verkrijgbaar is op onze website
www.samsunghdd.com.
Microsoft adviseert Windows95 gebruikers, die een HDD met een capaciteit van 32 Gb of meer willen gebruiken, te upgraden naar
Windows98/NT/2000 of een hogere versie.

Installatie van de hard disk drive
Dutch 5
Installatie van de hard disk drive
Ga als volgt te werk bij de meeste computersystemen en hard disk drive inbouwtypes.
❸
❶
❷
❹
Red
Red
❶ Key Slot
❷ DC Power Receptor
❸ ATA Interface Connector
❹ Power Supply Cable from computer power supply (3-Pin or 4-Pin)

Installatie van de hard disk drive
6 Dutch
a_Schakel uw computer uit
b_Neem de stekers uit het stopcontact.
c_Open de behuizing van uw computer.
Het mechanisme voor openen van de computer en de plaats van de hard disk drive kan van computer tot computer verschillen.
d_Plaats de HDD in een 3,5 inch bay en zet de HDD vast met de bijgeleverde schroeven.
e_Sluit de kabels aan.
1.Bevestig de ATA interfacekabel in de interfaceaansluiting op de hard disk drive.
2.Bevestig de stroomkabel aan de stroomaansluiting op de hard disk drive. Beide aansluitingen zijn zodanig gevormd dat ze op
slechts één manier passen.
3.Controleer alle ander kabelaansluitingen alvorens uw computer in te schakelen.
LET OP!: De stekers niet met kracht in de aansluitingen, niet hard duwen of heen en weer bewegen. Duw de stekers voorzichtig en
recht in de aansluitingen tot ze vastzitten.

BIOS instellen
(deze procedure kan verschillen per model computer of BIOS)
BIOS instellen (deze procedure kan verschillen per model computer of BIOS)
A_Schakel uw computersysteem in. Voer tijdens het opstarten het SMOS(BIOS) setup-programma uit. Nieuwere systemen geven
meestal een melding zoals “press DEL to enter SETUP” weer, waarmee wordt aangegeven hoe toegang tot het CMOS(BIOS)
programma kan worden verkregen.
(Wat is CMOS Setup?)
Het is een programma dat de basisgegevens van de computer instelt, zoals datum en tijd, geheugencapaciteit en disk drive status.
Aangezien er informatie in de CMOS IC wordt opgeslagen, gaan deze opgeslagen gegevens niet verloren wanneer de computer wordt
uitgeschakeld.
B_Kies een apparaatpositie in het BIOS waar de hard disk drive moet worden geïnstalleerd.
C_Laat de computer de hard disk drive zoeken. Kies de optie “auto-detect”, vervolgens save en exit de BIOS setup. Indien uw computer
IDE HDD auto detection ondersteunt, wordt de hard disk drive automatisch gezocht. Indien u het type selecteert vanuit de sectie IDE
Adapter Primary Master Slave, wordt op het scherm “Autotype Fixed Disk: [Press Enter]” weergegeven. Als u op Enter drukt, wordt
de hard disk drive automatisch gezocht.
Dutch 7

Partitioneren en formatteren
8 Dutch
Partitioneren en formatteren
De nieuw geïnstalleerde hard disk drive moet worden gepartitioneerd en geformatteerd voordat deze kan worden gebruikt. Indien uw
besturing systeem (OS) Windows 2000, XP of een hogere versie is, zal uw OS de hard drive automatisch herkennen. Volg de aanwijzingen
op het scherm tijdens het installeren van uw OS. Zie de handleiding van uw OS en/of computer voor meer informatie.
Indien uw OS Windows ME of een lagere versie is, de volgende stappen uitvoeren.
A_Na het voltooien van de CMOS setup het systeem opnieuw starten met behulp van een opstartdiskette met de programma’s FDISK en
FORMAT.
B_Het FDISK programma uitvoeren op de partities aan te brengen.
Indien u slechts een enkele partitie wilt gebruiken, selecteert u alle beschikbare diskruimte op de hard disk drive. Om 2 of meer partities
aan te brengen, verdeelt u de diskruimte.
C_Opnieuw starten met een opstartdiskette.
D_Het FORMAT programma uitvoeren en de hard disk drive formatteren. Indien u op de drive meerdere partities heeft aangebracht
(D:, E:, enz.), moet u alle drives formatteren.
LET OP!: De programma’s FDISK en FORMAT wissen alle op de hard disk drive opgeslagen gegevens. Om dergelijke problemen te
voorkomen, dient u een back-up te maken van uw gegevens voordat de programma’s FDISK en FORMAT worden uitgevoerd.
Het besturing systeem (OS) installeren
Zie de handleiding van het besturing systeem voor het installeren van het besturing systeem.
Het besturing systeem (OS) installeren

3 Installation Guide
1. Prima di iniziare 2
2. Impostazione del pin del ponticello 4
3. Installazione del disco rigido 5
4. Impostazione del BIOS 7
5. Partizione e formattazione 8
6.
Installazione del sistema operativo (OS)
8
Grazie per aver scelto un drive per disco rigido Samsung.
Questo manuale vi guiderà durante la procedura d’installazione.
Italian 1

Prima di iniziare
2 Italian
A_Precauzioni d’impiego
Questo prodotto è un meccanismo di precisione ed è molto sensibile agli shock e alle scariche elettrostatiche (ESD).
Tenere al riparo da temperature elevate e dall’umidità. Utilizzare la confezione originale di protezione contro le cariche elettrostatiche
in cui il prodotto è stato acquistato. Maneggiare il prodotto con cura. L’etichetta danneggiata o staccata su uno qualsiasi dei
componenti può causare un cattivo funzionamento del prodotto ed invalidare la garanzia.
- lasciare il drive nella confezione anti ESD fino al momento dell’utilizzo.
- Toccare i drive uno alla volta.
- Non urtare o far cadere il drive.
C_Back up dei dati
Fare una copia di back up dei propri file prima di installare il nuovo disco rigido.
Per ulteriori informazioni far riferimento al manuale dell’utente del computer e/o del sistema operativo.
B_Componenti del kit
- disco rigido
- cavo d’interfaccia ATA
- viti per il montaggio
- manuale per l’installazione

Impostazione del pin del ponticello
Impostazione del pin del ponticello
Prima di installare il disco rigido Samsung, i ponticelli devono essere impostati in modo da coincidere con la configurazione del sistema
del computer Far riferimento al seguente diagramma per le istruzioni relative all’impostazione dei pin del ponticello.
Italian 3
Master Slave Cable Select Master Slave Cable Select
32GB Clip ConfigurationGeneral Configuration
*General configuration setting as "Slave" is "Remove the jumper" *32GB Clip Configuration "Slave" is set as above

Impostazione del pin del ponticello
4 Italian
NOTA: Si verifica una situazione di system hang quando si tenta di installare un driver con una capacità superiore a 32GB in un PC in cui
sono presenti alcuni vecchi Bios. Vi sono due soluzioni a questo tipo di problema: Innanzitutto, aggiornate il BIOS contattando il
produttore del PC o della scheda madre. In secondo luogo impostate i drive jumper nella configurazione a 32GB clip ed installate il
software per la gestione del disco dal nostro sito web www.samsunghdd.com che può essere scaricato gratuitamente.
Microsoft consiglia agli utenti di Windows95 che vogliono servirsi di una capacità di 32GB o superiore, di passare a
Windows98/NT/2000 o ad un sistema superiore.

Installazione del disco rigido
Italian 5
Installazione del disco rigido
Le fasi seguenti sono tipiche dell’installazione dei sistemi operativi e dell’installazione del disco rigido.
❸
❶
❷
❹
Red
Red
❶ Key Slot
❷ DC Power Receptor
❸ ATA Interface Connector
❹ Power Supply Cable from computer power supply (3-Pin or 4-Pin)

Installazione del disco rigido
6 Italian
a_Spegnere il computer
b_Staccare i cavi esterni.
c_Aprire la calotta del computer
Il meccanismo di apertura della calotta e la posizione del disco rigido possono variare da un computer all’altro.
d_Inserire il disco rigido nello scomparto da 3,5” e fissarlo con le viti fornite.
e_Connettere i cavi.
1.Attaccare il cavo d’interfaccia ATA al connettore d’interfaccia sul disco rigido.
2.Attaccare il cavo d’alimentazione al connettore d’alimentazione sul disco rigido. Entrambi i connettori sono muniti di
chiave e potranno essere collegati solo in una direzione.
3.Controllare tutte le altre connessioni dei cavi prima di accendere il computer.
ATTENZIONE!: Non forzare né ruotare i connettori nelle spine sul disco rigido. Inserirli direttamente fino a farli arrivare in sede.

Impostazione del BIOS
Impostazione del BIOS
A_Avviare il sistema operativo. Durante la sequenza di startup avviare il programma CMOS(BIOS) per l’installazione. Solitamente i
sistemi più recenti visualizzano un messaggio simile a “premere DEL per inizializzare il SETUP” e mostrano come accedere al
programma CMOS(BIOS).
(Che cos’è il setup CMOS?)
È un programma che controlla alcuni parametri fondamentali del computer come Data e ora, capacità di memoria e lo stato dell’unità
disco rigido. Poiché le informazioni vengono registrate nel CMOS IC, questi dettagli non vanno persi quando il computer viene spento.
B_Nel BIOS scegliere una posizione del dispositivo in cui possa essere installato il disco rigido.
C_Far rilevare al computer il disco rigido. Selezionare l’opzione “rilevamento automatico” salvare ed uscire dal setup BIOS.
Se il vostro computer supporta il rilevamento automatico IDE HDD, il disco rigido verrà rilevato automaticamente. Se si seleziona il
tipo dall’adattatore IDE Sezione Master Slave primario verrà visualizzato il seguente messaggio: “Disco fisso Autotype:
[Premere Enter]”. Premendo Enter, il disco rigido verrà rilevato automaticamente.
Italian 7

Partizione e formattazione
8 Italian
Partizione e formattazione
Si deve procedere alla partizione e formattazione del disco rigido appena installato prima che sia pronto per l’uso. Se il sistema
operativo (OS) è Windows 2000, XP, o superiore, l’hard drive verrà automaticamente rilevato. Seguire le istruzioni sullo schermo durante
l’installazione del sistema operativo. Per ulteriori informazioni far riferimento al sistema operativo e/o al manuale dell’utente.
Se il vostro sistema operativo è windows ME o una versione precedente, seguire i passaggi seguenti
A_Una volta terminata l’installazione del CMOS, riavviare il sistema con un dischetto d’avvio che contenga i programmi
FDISK e FORMAT.
B_Avviare il programma FDISK per effettuare le partizioni.
Se si vuole usare una partizione soltanto, selezionare tutto lo spazio disponibile sul disco rigido. Per utilizzare 2 o più partizioni,
dividere lo spazio su disco.
C_Riavviare tramite un dischetto di riavvio.
D_Avviare il programma FORMAT e formattare il disco rigido. Se si è diviso il disco rigido in varie partizioni (D:, E:, ecc.) , si devono
formattare tutte le unità.
ATTENZIONE!: I programmi FDISK e FORMAT cancellano tutti i dati sul disco rigido. Per evitare problemi di questo tipo effettuare dei
back up dei dati prima di eseguire i programmi FDISK e FORMAT.
Installazione del sistema operativo (OS)
Far riferimento al manuale dell’utente per installare il sistema operativo.
Installazione del sistema operativo (OS)

3 Installation Guide
Thank you for selecting the Samsung hard disk drive.
This manual will guide you through the installation process.

BF68-00160B REV.00
Additional information can be obtained at
www.samsunghdd.com
SAMSUNG ELECTRONICS CO.,LTD STORAGE SYSTEM DIVISION
HEAD OFFICE : 94-1, IM SOO-DONG, GUMI-CITY KYUNG BUK, KOREA 730-350
 Loading...