

Page 1

User Guide
Page 2

MOBILE PHONE
User Manual
Please read this manual before operating your
phone and keep it for future reference.
GH68-40578A Printed in China
Page 3

Warning!
This product contains chemicals known to the State of California to cause cancer and reproductive toxicity.
Intellectual Property
All Intellectual Property, as defined below, owned by or which is otherwise the property of Samsung or its respective suppliers
relating to the SAMSUNG Phone, including but not limited to, accessories, parts, or software relating there to (the “Phone
System”), is proprietary to Samsung and protected under federal laws, state laws, and international treaty provisions. Intellectual
Property includes, but is not limited to, inventions (patentable or unpatentable), patents, trade secrets, copyrights, software,
computer programs, and related documentation and other works of authorship. You may not infringe or otherwise violate the
rights secured by the Intellectual Property. Moreover, you agree that you will not (and will not attempt to) modify, prepare
derivative works of, reverse engineer, decompile, disassemble, or otherwise attempt to create source code from the software. No
title to or ownership in the Intellectual Property is transferred to you. All applicable rights of the Intellectual Property shall remain
with SAMSUNG and its suppliers.
Open Source Software
Some software components of this product, including but not limited to 'PowerTOP' and 'e2fsprogs', incorporate source code
covered under GNU General Public License (GPL), GNU Lesser General Public License (LGPL), OpenSSL License, BSD License and
other open source licenses. To obtain the source code covered under the open source licenses, please visit:
http://opensource.samsung.com
VZW_SM-B311V_PP_UM_Eng_NB2_TN_033114_F1
.
Page 4

Disclaimer of Warranties; Exclusion of Liability
EXCEPT AS SET FORTH IN THE EXPRESS WARRANTY CONTAINED ON THE WARRANTY PAGE ENCLOSED WITH THE PRODUCT, THE
PURCHASER TAKES THE PRODUCT "AS IS", AND SAMSUNG MAKES NO EXPRESS OR IMPLIED WARRANTY OF ANY KIND
WHATSOEVER WITH RESPECT TO THE PRODUCT, INCLUDING BUT NOT LIMITED TO THE MERCHANTABILITY OF THE PRODUCT OR
ITS FITNESS FOR ANY PARTICULAR PURPOSE OR USE; THE DESIGN, CONDITION OR QUALITY OF THE PRODUCT; THE
PERFORMANCE OF THE PRODUCT; THE WORKMANSHIP OF THE PRODUCT OR THE COMPONENTS CONTAINED THEREIN; OR
COMPLIANCE OF THE PRODUCT WITH THE REQUIREMENTS OF ANY LAW, RULE, SPECIFICATION OR CONTRACT PERTAINING
THERETO. NOTHING CONTAINED IN THE INSTRUCTION MANUAL SHALL BE CONSTRUED TO CREATE AN EXPRESS OR IMPLIED
WARRANTY OF ANY KIND WHATSOEVER WITH RESPECT TO THE PRODUCT. IN ADDITION, SAMSUNG SHALL NOT BE LIABLE FOR
ANY DAMAGES OF ANY KIND RESULTING FROM THE PURCHASE OR USE OF THE PRODUCT OR ARISING FROM THE BREACH OF
THE EXPRESS WARRANTY, INCLUDING INCIDENTAL, SPECIAL OR CONSEQUENTIAL DAMAGES, OR LOSS OF ANTICIPATED PROFITS
OR BENEFITS.
Modification of Software
SAMSUNG IS NOT LIABLE FOR PERFORMANCE ISSUES OR INCOMPATIBILITIES CAUSED BY YOUR EDITING OF REGISTRY SETTINGS,
OR YOUR MODIFICATION OF OPERATING SYSTEM SOFTWARE.
USING CUSTOM OPERATING SYSTEM SOFTWARE MAY CAUSE YOUR DEVICE AND APPLICATIONS TO WORK IMPROPERLY. YOUR
CARRIER MAY NOT PERMIT USERS TO DOWNLOAD CERTAIN SOFTWARE, SUCH AS CUSTOM OS.
IF YOUR CARRIER PROHIBITS THIS, IF YOU ATTEMPT TO DOWNLOAD SOFTWARE ONTO THE DEVICE WITHOUT AUTHORIZATION,
YOU WILL BE NOTIFIED ON THE SCREEN THAT THE PHONE WILL NO LONGER OPERATE AND BE INSTRUCTED TO POWER DOWN
THE DEVICE. YOU MUST THEN CONTACT YOUR CARRIER TO RESTORE THE DEVICE TO THE CARRIER AUTHORIZED SETTINGS.
Page 5

Samsung Telecommunications America (STA), LLC
Headquarters:
1301 E. Lookout Drive
Richardson, TX 75082
Customer Care Center:
1000 Klein Rd.
Plano, TX 75074
Toll Free Tel: 1.888.987.HELP (4357)
Internet Address:
http://www.samsung.com
©
2014 Samsung Telecommunications America, LLC. Samsung is a registered trademark of Samsung Electronics Co., Ltd.
Do you have questions about your Samsung Mobile Phone?
For 24 hour information and assistance, we offer a new FAQ/ARS System (Automated Response System) at:
www.samsung.com/us/support
The actual available capacity of the internal memory is less than the specified capacity because the operating system and default
applications occupy part of the memory. The available capacity may change when you upgrade the device.
Page 6

Nuance®, VSuite™, T9® Text Input, and the Nuance logo are trademarks or registered trademarks of Nuance Communications,
Inc., or its affiliates in the United States and/or other countries.
®
and NetFront™ are trademarks or registered trademarks of ACCESS Co., Ltd. in Japan and other countries.
ACCESS
The Bluetooth
®
word mark, figure mark (stylized “B Design”), and combination mark (Bluetooth word mark and “B Design”) are
registered trademarks and are wholly owned by the Bluetooth SIG.
microSD™, microSDHC™, and the microSD logo are Trademarks of the SD Card Association.
©2012 Samsung Telecommunications America, LLC. Samsung is a registered trademark of Samsung Electronics Co., Ltd. All
product and brand names are trademarks or registered trademarks of their respective companies. Screen images simulated.
Appearance of the device may vary.
©2012 Verizon Wireless. Verizon Wireless and the Verizon wireless logos are trademarks of Verizon Trademark Services LLC.
Gusto is a trademark of Verizon Wireless. All company names, trademarks, logos and copyrights not property of Verizon Wireless
are property of their respective owners.
Page 7

Table of Contents
Section 1: Getting Started ..............................................4
Understanding This User Manual . . . . . . . . . . . . . . . . . 4
Activating Your Phone . . . . . . . . . . . . . . . . . . . . . . . . . 6
Displaying Your Phone Number . . . . . . . . . . . . . . . . . . 6
Battery . . . . . . . . . . . . . . . . . . . . . . . . . . . . . . . . . . . . 6
Turning Your Phone On and Off . . . . . . . . . . . . . . . . . . 9
Easy Setup . . . . . . . . . . . . . . . . . . . . . . . . . . . . . . . . 10
TTY Mode . . . . . . . . . . . . . . . . . . . . . . . . . . . . . . . . . 11
Roaming . . . . . . . . . . . . . . . . . . . . . . . . . . . . . . . . . . 12
Voicemail . . . . . . . . . . . . . . . . . . . . . . . . . . . . . . . . . 12
Section 2: Understanding Your Phone ......................... 13
Features of Your Phone . . . . . . . . . . . . . . . . . . . . . . . 13
Closed View of Your Phone . . . . . . . . . . . . . . . . . . . . 14
Open View of Your Phone . . . . . . . . . . . . . . . . . . . . . 15
Side Views of Your Phone . . . . . . . . . . . . . . . . . . . . . 16
Navigation Keys . . . . . . . . . . . . . . . . . . . . . . . . . . . . . 17
Understanding the Home Screen . . . . . . . . . . . . . . . . 18
Understanding the Menu . . . . . . . . . . . . . . . . . . . . . . 21
1
Section 3: Entering Text ............................................... 24
Changing the Text Entry Mode . . . . . . . . . . . . . . . . . . 24
Entering Text Using Abc/ABC Mode . . . . . . . . . . . . . . 25
Entering Numbers . . . . . . . . . . . . . . . . . . . . . . . . . . . 25
Entering Text Using T9 Word . . . . . . . . . . . . . . . . . . . 26
Entering Symbols . . . . . . . . . . . . . . . . . . . . . . . . . . . . 26
Entering Smileys . . . . . . . . . . . . . . . . . . . . . . . . . . . . 27
Entering Quick Text . . . . . . . . . . . . . . . . . . . . . . . . . . 27
Entering Text Using T9 Palabra . . . . . . . . . . . . . . . . . 28
Section 4: Call Functions ............................................. 29
Making a Call . . . . . . . . . . . . . . . . . . . . . . . . . . . . . . . 29
Answering a Call . . . . . . . . . . . . . . . . . . . . . . . . . . . . 29
Recent Calls . . . . . . . . . . . . . . . . . . . . . . . . . . . . . . . . 31
Section 5: Understanding Your Contacts ....................34
Adding a New Contact . . . . . . . . . . . . . . . . . . . . . . . . 34
Erasing Contacts . . . . . . . . . . . . . . . . . . . . . . . . . . . . 36
Editing a Contact . . . . . . . . . . . . . . . . . . . . . . . . . . . . 36
Managing Contacts . . . . . . . . . . . . . . . . . . . . . . . . . . 38
Page 8

Adding Pauses or Waits . . . . . . . . . . . . . . . . . . . . . . . 38
Finding a Contact . . . . . . . . . . . . . . . . . . . . . . . . . . . .39
Making Calls Using Contacts . . . . . . . . . . . . . . . . . . .39
Groups . . . . . . . . . . . . . . . . . . . . . . . . . . . . . . . . . . . . 40
Speed Dials . . . . . . . . . . . . . . . . . . . . . . . . . . . . . . . . 42
Emergency Contacts . . . . . . . . . . . . . . . . . . . . . . . . .43
My Name Card . . . . . . . . . . . . . . . . . . . . . . . . . . . . . .44
Backup Assistant . . . . . . . . . . . . . . . . . . . . . . . . . . . .47
Section 6: Messages ....................................................48
Types of Messages . . . . . . . . . . . . . . . . . . . . . . . . . .48
Creating and Sending Messages . . . . . . . . . . . . . . . .48
Creating and Sending Voice Messages . . . . . . . . . . . .50
Receiving Messages . . . . . . . . . . . . . . . . . . . . . . . . . .51
Message Folders . . . . . . . . . . . . . . . . . . . . . . . . . . . .54
Voicemail . . . . . . . . . . . . . . . . . . . . . . . . . . . . . . . . . .58
Mobile Email . . . . . . . . . . . . . . . . . . . . . . . . . . . . . . .59
Social Networks . . . . . . . . . . . . . . . . . . . . . . . . . . . . .59
Emergency Alerts . . . . . . . . . . . . . . . . . . . . . . . . . . . . 61
Messaging Settings . . . . . . . . . . . . . . . . . . . . . . . . . .61
Section 7: Bluetooth .....................................................64
Bluetooth Service Profiles . . . . . . . . . . . . . . . . . . . . . . 64
Turning Bluetooth On or Off . . . . . . . . . . . . . . . . . . . .65
Bluetooth Options . . . . . . . . . . . . . . . . . . . . . . . . . . . 65
Adding a New Device . . . . . . . . . . . . . . . . . . . . . . . . 66
Section 8: Media Center ............................................... 67
Search . . . . . . . . . . . . . . . . . . . . . . . . . . . . . . . . . . . 67
Tunes & Tones . . . . . . . . . . . . . . . . . . . . . . . . . . . . . 67
Pictures . . . . . . . . . . . . . . . . . . . . . . . . . . . . . . . . . . 70
My Pictures . . . . . . . . . . . . . . . . . . . . . . . . . . . . . . . . 72
Games . . . . . . . . . . . . . . . . . . . . . . . . . . . . . . . . . . . 78
Internet . . . . . . . . . . . . . . . . . . . . . . . . . . . . . . . . . . . 78
Browse and Download . . . . . . . . . . . . . . . . . . . . . . . 78
Extras . . . . . . . . . . . . . . . . . . . . . . . . . . . . . . . . . . . . 79
Section 9: Tools ............................................................ 80
Voice Commands . . . . . . . . . . . . . . . . . . . . . . . . . . . 80
Calculator . . . . . . . . . . . . . . . . . . . . . . . . . . . . . . . . . 81
Calendar . . . . . . . . . . . . . . . . . . . . . . . . . . . . . . . . . . 82
Alarm Clock . . . . . . . . . . . . . . . . . . . . . . . . . . . . . . . 83
Stop Watch . . . . . . . . . . . . . . . . . . . . . . . . . . . . . . . . 85
World Clock . . . . . . . . . . . . . . . . . . . . . . . . . . . . . . . 85
Notepad . . . . . . . . . . . . . . . . . . . . . . . . . . . . . . . . . . 86
Phone Search . . . . . . . . . . . . . . . . . . . . . . . . . . . . . . 86
Section 10: Internet ...................................................... 87
Internet . . . . . . . . . . . . . . . . . . . . . . . . . . . . . . . . . . . 87
2
Page 9

Section 11: Settings .....................................................93
My Verizon . . . . . . . . . . . . . . . . . . . . . . . . . . . . . . . . 93
Volume . . . . . . . . . . . . . . . . . . . . . . . . . . . . . . . . . . . 93
Bluetooth . . . . . . . . . . . . . . . . . . . . . . . . . . . . . . . . . 93
Accessibility . . . . . . . . . . . . . . . . . . . . . . . . . . . . . . . 94
Sounds . . . . . . . . . . . . . . . . . . . . . . . . . . . . . . . . . . . 96
Display . . . . . . . . . . . . . . . . . . . . . . . . . . . . . . . . . . 100
Phone . . . . . . . . . . . . . . . . . . . . . . . . . . . . . . . . . . . 106
Call Settings . . . . . . . . . . . . . . . . . . . . . . . . . . . . . . 115
Memory . . . . . . . . . . . . . . . . . . . . . . . . . . . . . . . . . 119
Phone Info . . . . . . . . . . . . . . . . . . . . . . . . . . . . . . . . 119
Set-Up Wizard . . . . . . . . . . . . . . . . . . . . . . . . . . . . . 120
Section 12: Health and Safety Information ...............121
Exposure to Radio Frequency (RF) Signals . . . . . . . . 121
Specific Absorption Rate (SAR) Certification
Information . . . . . . . . . . . . . . . . . . . . . . . . . . . . . 126
FCC Part 15 Information to User . . . . . . . . . . . . . . . 127
Commercial Mobile Alerting System (CMAS) . . . . . . 128
Smart Practices While Driving . . . . . . . . . . . . . . . . . 128
Battery Use and Safety . . . . . . . . . . . . . . . . . . . . . . 129
Samsung Mobile Products and Recycling . . . . . . . . 131
UL Certified Travel Charger . . . . . . . . . . . . . . . . . . . 132
3
Display / Touch-Screen . . . . . . . . . . . . . . . . . . . . . . 133
GPS . . . . . . . . . . . . . . . . . . . . . . . . . . . . . . . . . . . . .133
Emergency Calls . . . . . . . . . . . . . . . . . . . . . . . . . . . 134
Care and Maintenance . . . . . . . . . . . . . . . . . . . . . . . 135
Responsible Listening . . . . . . . . . . . . . . . . . . . . . . .136
Operating Environment . . . . . . . . . . . . . . . . . . . . . . 138
FCC Hearing Aid Compatibility (HAC) Regulations
for Wireless Devices . . . . . . . . . . . . . . . . . . . . . . . 140
Restricting Children's Access to Your Mobile Device . . 141
FCC Notice and Cautions . . . . . . . . . . . . . . . . . . . . . 141
Other Important Safety Information . . . . . . . . . . . . . 142
Section 13: Warranty Information ............................. 144
Standard Limited Warranty . . . . . . . . . . . . . . . . . . . . 144
End User License Agreement for Software . . . . . . . . 149
Index ............................................................................ 157
Page 10

Section 1: Getting Started
This section allows you to quickly start using your phone by
installing and charging the battery, activating your service,
and setting up voicemail.
Understanding This User Manual
The sections of this manual generally follow the features of
your phone. A robust index for features begins on page 157.
Also included is important safety information that you should
know before using your phone. Most of this information is
near the back of the guide, beginning on page 121.
This manual gives navigation instructions according to the
default display settings. If you select other settings,
navigation may be different.
Unless otherwise specified, all instructions in this manual
assume that the phone is open, and you are starting from the
Home screen.
Note: Instructions in this manual are based on default
settings, and may vary from your phone, depending on
the software version on your phone, and any changes to
the phone’s Settings.
Unless stated otherwise, instructions to perform tasks
in this User Manual assume that the phone is open, and
start at the Home screen.
All screen images in this manual are simulated. Actual
displays may vary, depending on the software version
of your phone and any changes to the phone’s Settings.
Getting Started 4
Page 11

Special Text
Throughout this manual, you’ll find text that is set apart from
the rest. These are intended to point out important
information, share quick methods for activating features, to
define terms, and more. The definitions for these methods
are as follows:
• Note: Presents alternative options for the current feature,
menu, or sub-menu.
• Tip: Provides quick or innovative methods, or useful
shortcuts.
• Important: Points out important information about the
current feature that could affect performance.
• Warning: Brings to your attention important information to
prevent loss of data or functionality, or even prevent
damage to your phone.
5
Text Conventions
This manual provides condensed information about how to
use your phone. To make this possible, the following text
conventions are used:
Highlight Use the Directional Key to move focus to
an item on the screen.
Select Use the Directional Key to highlight an
item on the screen, and then press the OK
Key. The OK Key function changes according to
the type of item highlighted.
➔ Arrows are used to represent the “highlight, and
then select” steps in longer, or repetitive,
procedures.
For example:
From the Home screen, press the Left Soft
Key Menu ➔ Settings ➔ Phone Info ➔
My Number.
Page 12
Activating Your Phone
If you purchased your phone at a Verizon Wireless store, it is
activated and ready to use. If you received a new phone by
mail, it may need to be activated before you can use it.
To activate your phone, choose from the following:
• Visit a Verizon Wireless store.
• Contact Verizon Wireless customer support.
• Visit
verizonwireless.com
to manage your account online.
Displaying Your Phone Number
My Number displays the ten-digit number assigned to
your phone.
From the Home screen, press the Left Soft Key
Menu ➔ Settings ➔ Phone Info ➔ My Number.
Battery
Your phone is powered by a rechargeable, standard Li-Ion
battery. A Charger is included with the phone, for charging
the battery.
Note: The battery comes partially charged. You must fully
charge the battery before using your phone for the
first time. A fully discharged battery can require up to
4 hours of charge time. After the first charge, you can
use the phone while charging.
Important! Use only Samsung-approved charging devices
and batteries. Samsung accessories are designed
to maximize battery life.
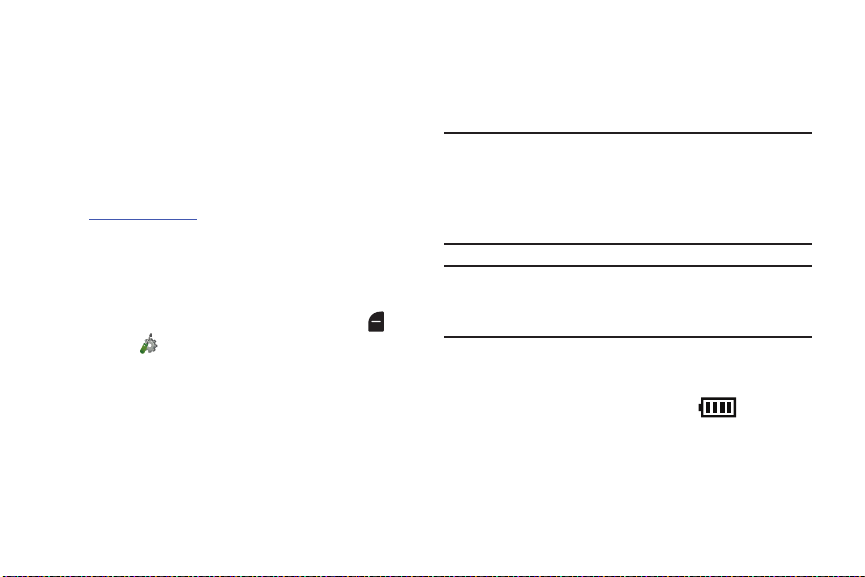
Battery Indicator
The battery icon in the upper-right corner of the display
shows battery power level, with four bars indicating a
full charge. Before the battery becomes too low to operate,
the empty battery icon will flash and a tone will sound. If you
continue to operate the phone without charging, the phone
will power off.
Getting Started 6
Page 13
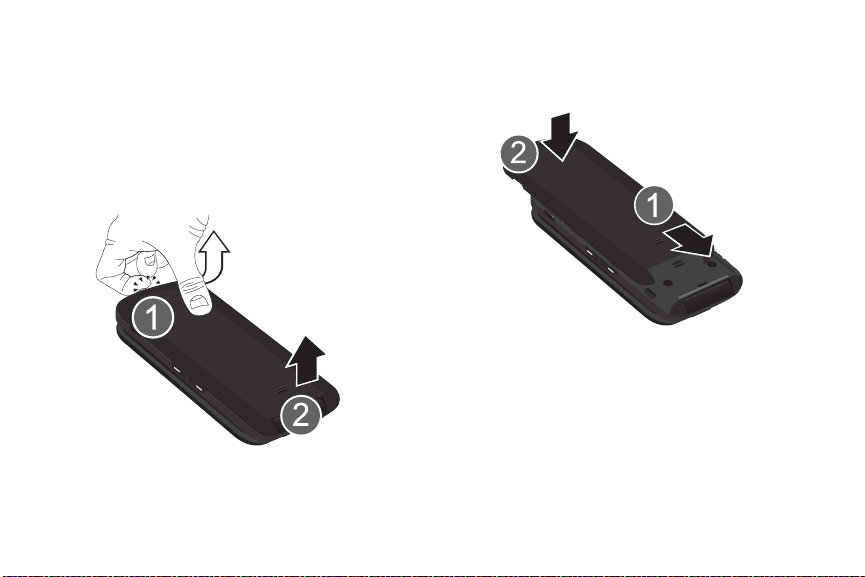
Battery Cover
The battery cover on the back of the phone protects the
battery.
Removing the battery cover
1. Hold the phone securely with both hands.
2. Use the fingertip cutout at the top of the phone to pull
the back cover off.
7
Replace the battery cover
Properly align the cover over the battery compartment,
then press it downward until it clicks into place.
Page 14

Installing the Battery
1. Remove the battery cover (see “Removing the battery
cover” on page 7).
2. Insert the battery into the phone, aligning the gold
contacts on the battery with the gold contacts in
the phone.
3. Replace the battery cover (see “Replace the battery
cover” on page 7).
Charging the Battery
Your phone comes with a charging head to charge your
phone from any 120/220 VAC outlet.
Note: The battery comes partially charged. You must fully
charge the battery before using your phone for the first
time. A fully discharged battery can require up to 4
hours of charge time. After the first charge, you can use
the phone while charging.
1. Insert the charger cable into the Charging/Accessory
port.
Getting Started 8
Page 15
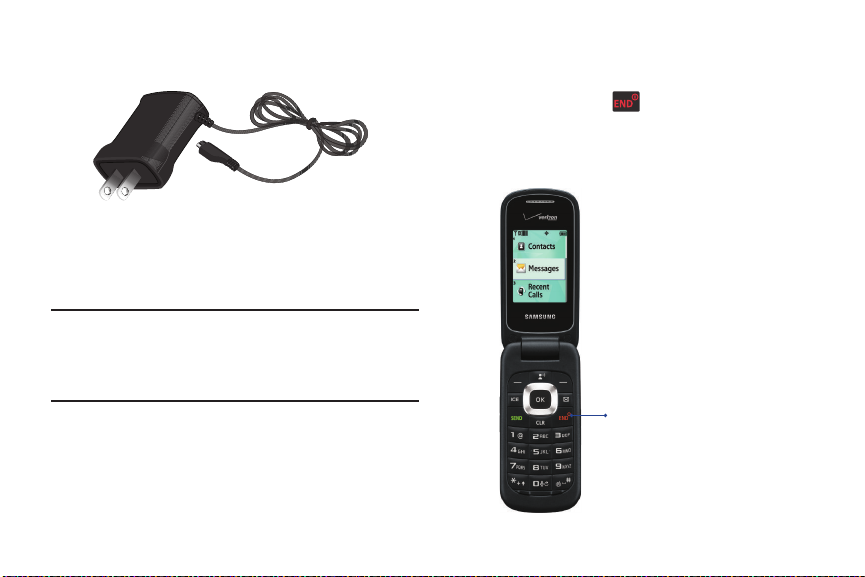
2. Plug the charging head into a standard AC power
End/Power Key
outlet.
3. When charging is complete, unplug the charging head
from the power outlet and remove the cable from the
phone.
Non-Supported Batteries
Warning! Samsung handsets do not support the use of a non-
approved battery. Using a non-approved battery may
cause damage to your phone. Use a Samsung
approved battery only.
Samsung charging accessories (such as a wall charger, and
cigarette lighter adapter) will only charge a Samsung
approved battery. When using a non-approved battery the
handset can only be used for the duration of the life of the
battery and cannot be recharged.
9
Turning Your Phone On and Off
Turning Your Phone On
Press and hold the End/Power Key to turn the
phone on or off. While powering on, the phone
connects with the home network, and then displays the
Home screen and active alerts.
Page 16

Easy Setup
Set basic preferences, to start using your phone quickly.
While setting preferences:
• Use the Directional Key to highlight an option in
a list.
• Press to make a selection and go to the next setting.
• Press the Left Soft Key Preview or Play for an
example of the highlighted selection.
• Press the Right Soft Key Skip to move to the next
setting without making a selection.
Set-Up Wizard
Use Set-up Wizard to configure your display’s fonts, call
sounds, display theme, menu layout, and clocks.
1. From the Home screen, press the Left Soft Key
Menu ➔ Settings ➔ Set-up Wizard.
2. Follow the prompts to set preferences for these
settings:
•Font Size: Select the size of fonts for your phone’s
displays (Normal or Large).
•Font Size Control: Volume Key can also be used to
control font size. Press Next and make a selection
(Yes or No).
• Call Sounds: Choose how your phone alerts you to
incoming calls (Ring only, Vibrate only, Ring and
Vibrate, or Be Silent.
• Display Themes: Select a theme for your phone’s
displays.
• Menu Layout: Choose a layout for the Menu.
•Main Clock: Select a format for the clock displayed on
the Home screen.
•Front Clock: Select a format for the clock that appears
on the external display.
Getting Started 10
Page 17

Easy Set-Up for Readout
Use Easy Set-up to configure the Readout feature. The
Readout feature reads aloud the words on the screen.
1. From the Home screen, press the Left Soft Key
Menu ➔ Settings ➔ Accessibility ➔
Easy Set-up.
2. Follow the screen prompts to choose settings for
Full Readout, Menu Readout, Digit Dial Readout,
Alert Readout, TXT Message Readout, Browser
Readout, and Flip Open & Talk.
3. Select a speech rate for reading (Fast, Medium Fast,
Normal, Medium Slow, or Slow).
Easy Set-Up for Sounds
Use Easy Set-up to set the sounds your phone makes,
including sounds to alert you to calls and messsages.
1. From the Home screen, press the Left Soft Key
Menu ➔ Settings ➔ Sounds ➔ Easy Set-up.
2. Follow the screen prompts to choose settings for Call
Sounds, Keypad Volume, Text Msg Alert,
Multimedia Msg Alert, and Voicemail Msg Alert.
11
Easy Set-Up for Displays
Use Easy-Setup to configure your phone’s displays, including
the wallpaper, menu layout, and clocks.
1. From the Home screen, press the Left Soft Key
Menu ➔ Settings ➔ Display ➔ Easy Set-up.
2. Follow the screen prompts to choose settings for
Personal Banner, Display Backlight,
Keypad Backlight, Main Wallpaper,
Front Wallpaper, Display Themes, Menu Layout,
Dial Fonts, Font Size Control, Main Clock, and
Front Clock.
TTY Mode
Your phone is fully TTY-compatible, allowing you to connect a
TTY device to the phone’s headset jack. Before you can use
your phone with a TTY device, you’ll need to enable TTY
Mode. For more information about TTY settings, see “TTY
Mode” on page 116.
Page 18
Roaming
When you travel outside your home network’s coverage area,
your phone can roam to acquire service on other compatible
digital networks. when Roaming is active, the Roaming icon
appears in the Status Bar.
During roaming, some services may not be available.
Important! Depending on your coverage area and service
plan, extra charges may apply when making or
receiving call.
You can set global roaming options. For more information,
see “Global Data Roaming Access” on page 114 and
“System Select” on page 114.
Note: Contact Verizon Wireless for more information about
your coverage area and service plan.
Voicemail
All unanswered calls to your phone are sent to voicemail,
even if your phone is turned off, so you’ll want to set up your
voicemail and personal greeting as soon as you activate your
phone.
Setting Up Voicemail
1. From the Home screen, press the Voicemail Key.
2. Follow the automated instructions to set up your new
password and record a greeting.
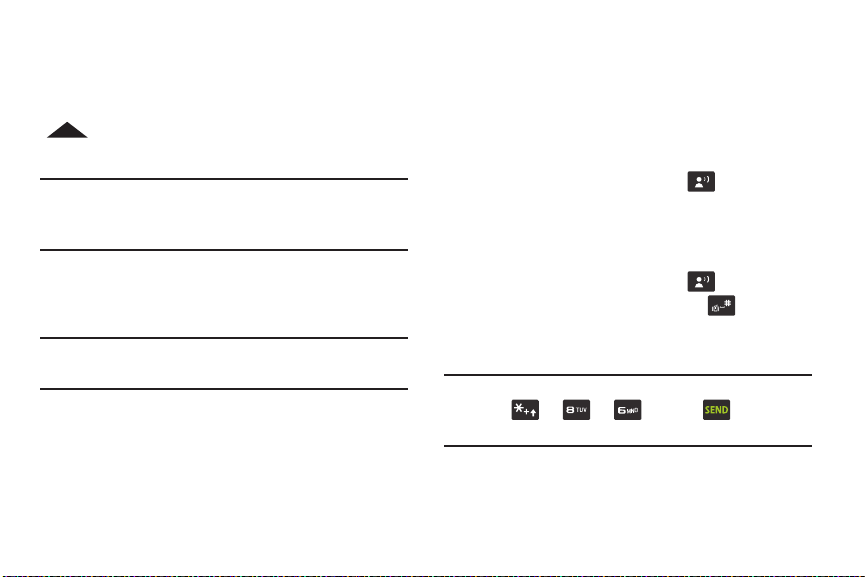
Checking Voicemail
1. From the Home screen, press the Voicemail Key.
2. Enter your password, and then press .
3. Follow the recorded prompts to listen to messages and
manage your voicemail.
Note: You can also access voicemail using the pre-set speed
dial, ➔ ➔ , and then , or by dialing
your phone number from any touch-tone phone.
Getting Started 12
Page 19

Section 2: Understanding Your Phone
This section outlines key features of your phone as well as
screens and icons that display when the phone is in use.
Features of Your Phone
• All Digital CDMA 1x Technology
• Global Positioning (GPS) Technology
• Fake Call
• Hands-Free Mode
• Personal Organization Tools
– Calculator
– Calendar
– Alarm Clock
– Stop Watch
– World Clock
– Notepad
13
• Messaging Services
– Standard Text Messaging
– Picture Messaging
– Voice Messaging
– Mobile Email
• 1.3 MP Camera
• Advanced Voice Commands, using Nuance Voice
Recognition technology
• Speakerphone
• Bluetooth
®
Wireless Technology
Page 20
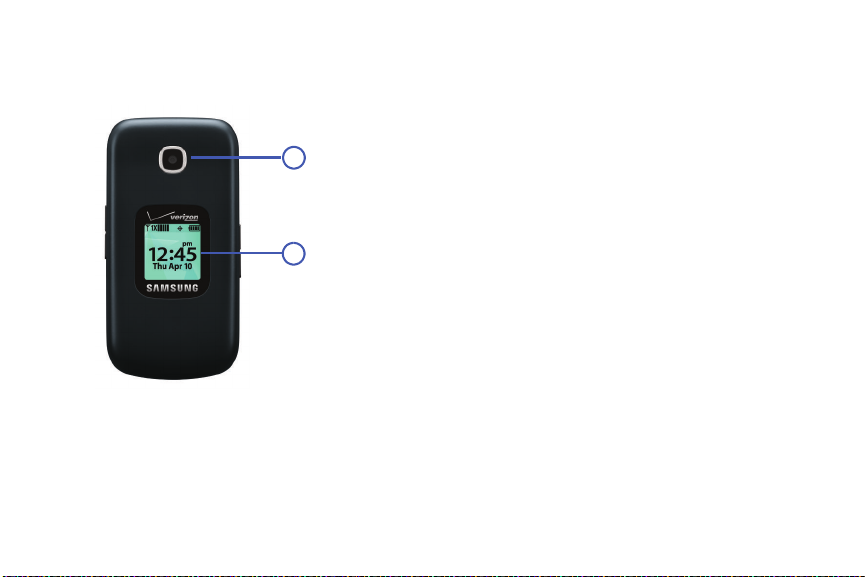
Closed View of Your Phone
1
2
Features
1. Camera Lens: The lens of the built-in camera.
2. Front Screen: Shows signal and battery strength,
time, day, and date, plus calls or message
notifications.
Understanding Your Phone 14
Page 21
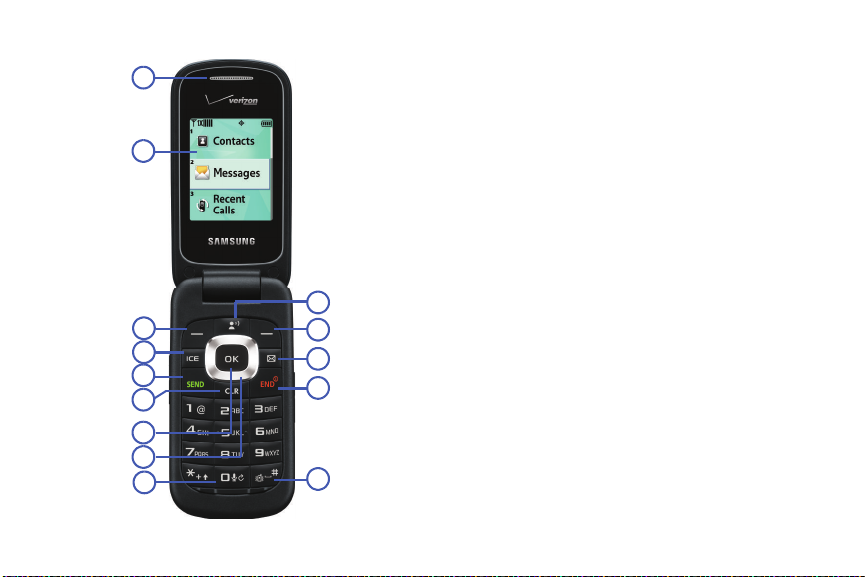
Open View of Your Phone
1
2
3
4
5
6
7
8
9
10
11
12
13
14
15
Features
1. Earpiece: Allows you to hear the caller.
2. Main Screen: Displays phone features.
3. Left Soft Key: Press to select the command at the
lower left area of the display screen.
4. In Case of Emergency (ICE) Key: Press to access
stored emergency numbers and information.
5. Send Key: Press to place or receive a call. From the
Home screen, press once to access the All Calls log.
6. Clear Key: Press to delete numbers or characters from
the display, or to return to the previous item or screen.
7. OK Key: Select a highlighted item.
8. Directional Key: Press left, right, up and down to scroll
lists or screens.
9. Voice Commands Key: Press and hold for Voice
Commands
10. Voicemail Key: Press to access voicemail.
11. Right Soft Key: Press to select the command at the
lower right area of the display screen.
12. Messaging Key: Press to access the Messaging menu.
13. End/Power Key: Press to end a call. Press and hold to
turn the phone On or Off.
14. Vibrate Mode Key:
Mode
.
Press and hold to activate Vibrate
.
Page 22

Side Views of Your Phone
1
2
3
4
5
7
6
Features
1. Strap Attachment: Attach an optional strap (not
included).
2. 3.5 mm Headset Jack: Plug in an optional headset for
music, or for safe, convenient conversations.
3. Camera Key: From the Home screen, press to activate
the Camera. When using Camera, press to take a
photo.
4. Speakerphone Key: With the flip open, press and hold
to activate the Speakerphone. With the flip closed,
press and hold to activate Voice Commands, or press 4
times to initiate a Fake Call.
5. Battery Cover Slot: Pull here with your finger to
remove the battery cover.
6. Charging/Accessory Port: Plug in charging
accessories, and connect compatible accessory
cables.
7. Volume Key: Press to adjust Volume. Press Down to
silence an incoming call ringtone. From the Home
screen, press and hold Down to switch between Sound
Off and the previous Volume level. With the phone
closed, press Down 4 times to initiate a Fake Call.
Understanding Your Phone 16
Page 23
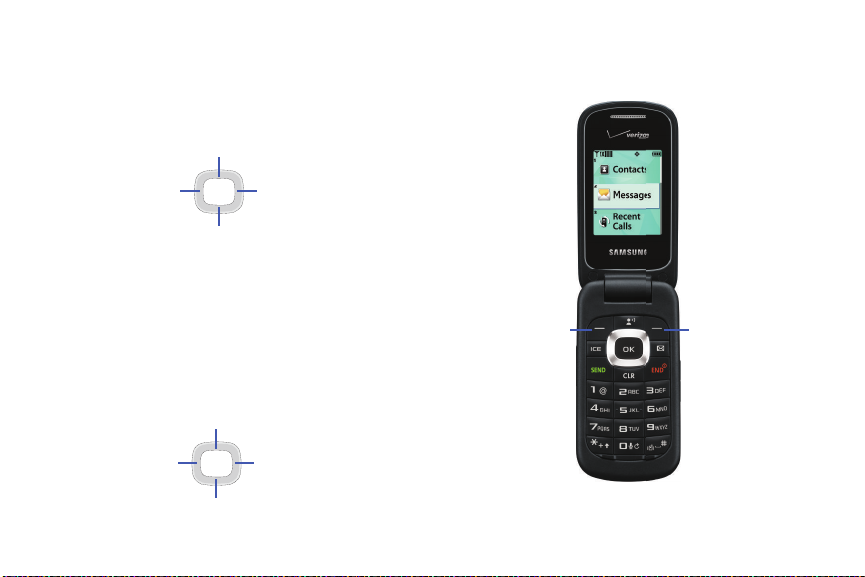
Navigation Keys
Up
Down
Left
Right
Hands-Free Mode
New Message
My Verizon
My Shortcuts
Left Soft Key Right Soft Key
Directional Key
Press the Directional Key to browse menus and lists or to
launch applications from the Home screen.
Directional Key Shortcuts
From the Home screen, press a Directional Key Up, Down,
Left or Right key to launch its corresponding application.
My Shortcuts presents a list of shortcuts that you can
customize to include your favorite features.
You can customize the Directional Key shortcuts. For more
information, see “My Shortcuts” on page 107.
17
Page 24
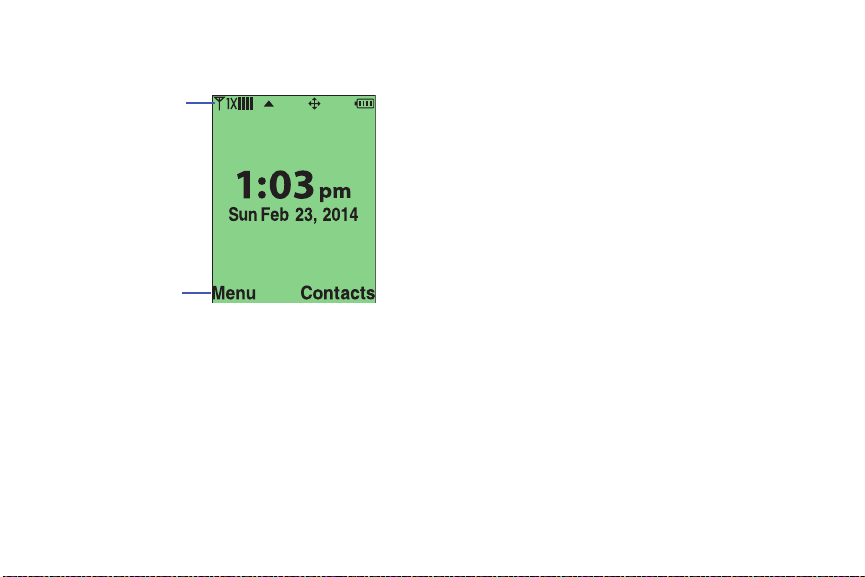
Understanding the Home Screen
Status Bar
Status and
Settings
The Home screen is the starting point for using your phone.
• Status Bar: Presents icons to show network status,
battery power, and connection details. For a list of icons,
see “Status Icons” on page 19.
• Status and Settings: Presents icons indicating active
alerts, reminders, alarms and current settings. For a list of
icons, see “Status and Settings Icons” on page 20.
Customizing the Home screen
You can customize the Home screen to suit your preferences.
• Wallpaper: Select a background image for the Lock
Screen and Home screen, from pre-loaded images, or your
own pictures. For more information, see “Wallpaper” on
page 102.
• Banners: Create a personal banner, or enable a network
status banner, to appear on the Home screen. For more
information, see “Banner” on page 100.
• Clock Format: Choose a format and color for the clock on
the Home screen. For more information, see “Clock
Format” on page 105.
• Display Theme: Display themes offer coordinated looks
for all your phone’s screens, including the Home screen.
For more information, see “Themes” on page 102.
Understanding Your Phone 18
Page 25
Home Screen Icons
Status Icons
Icons display in the top line of the Home screen to show the
status of the phone.
For a list of icons, see the Icon Glossary. From the Home
screen, press the Left Soft Key Menu ➔ Settings ➔
Phone Info ➔ Icon Glossary ➔ System Status.
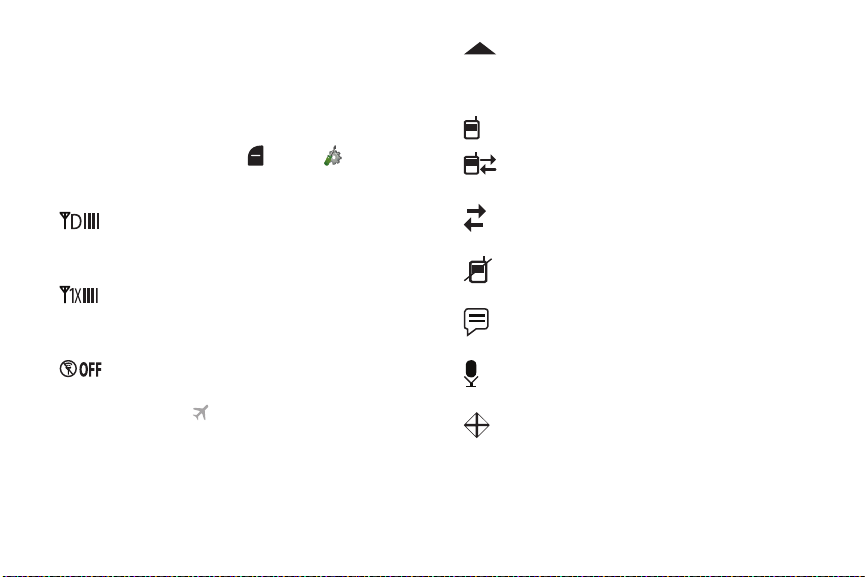
Digital Signal Strength: The number of bars
show signal strength, with more ba rs meaning a
stronger signal.
1X CDMA Signal Strength: The number of bars
show signal strength. More bars indicate stronger
signal.
Airplane Mode: When activated, you cannot send
or receive calls or messages, but other features
are available. appears on the Home screen.
For more information, see “Airplane Mode” on
page 106.
19
Roaming Status: The phone is roaming outside
the home service area. Consult Verizon Wireless
for roaming plans and rates.
Voice Call: A voice call is in progress.
Data Call: A data connection is active, and data is
being transmitted and received.
Data Dormant: A data connection is active, but no
data is being transmitted or received.
No Service: No coverage is available. You cannot
send or receive calls or messages.
Voice Listening: Device is listening for your voice
commands.
Voice Readout: Device is recording your voice
commands.
E911 Only: GPS location information is available
to network during Emergency calls only. For
details, see “Location Detection” on page 109.
Page 26
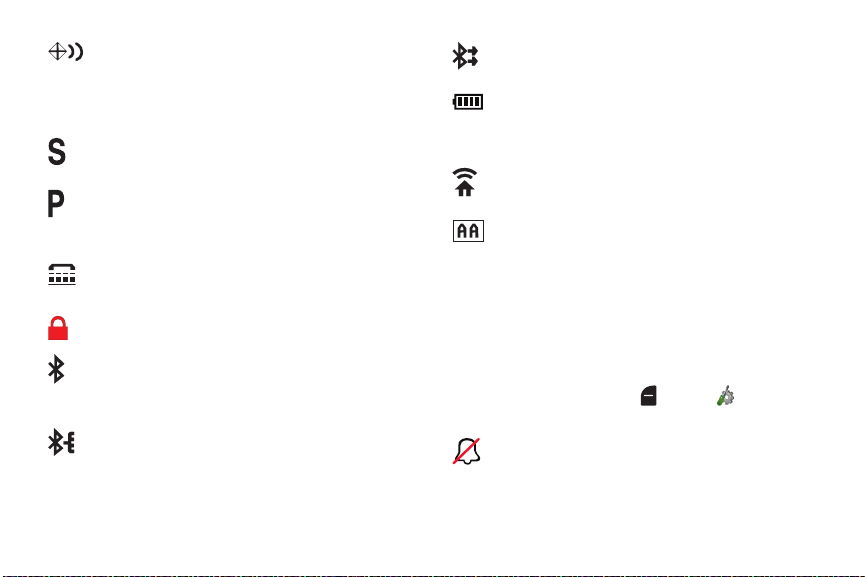
Location On: GPS location information is
available to the network. For more information
about this setting, see “Location Detection” on
page 109.
SSL: Data is encrypted by Secure Socket Layer
encryption, for increased privacy.
Voice Privacy: The Voice Privacy setting is active,
to increase privacy of voice calls. For more
information, see “Voice Privacy” on page 117.
TTY: TTY Mode is active. For more information,
see “TTY Mode” on page 116.
Keypad Lock: Keypad is currently locked.
Bluetooth On: Bluetooth service is On. For more
information, see “Turning Bluetooth On or Off” on
page 65.
Bluetooth Connected: The phone is paired with
another Bluetooth device. For more information,
about pairing with Bluetooth, see “Adding a New
Device” on page 66
Bluetooth Active: The phone is exchanging
information with another Bluetooth device.
Battery Level: Battery charge indicator. The
number of bars show available battery power,
with more bars indicating more charge.
Network Extender: Phone is connected to a
network extender device.
Auto Answer: The Auto w/ Handsfree Answer
Option is enabled. For more information, see
“Answer Options” on page 115.
Status and Settings Icons
Icons display in the Status and Settings area of the Home
screen.
For a list of icons, see the Icon Glossary. From the Home
screen, press the Left Soft Key Menu ➔ Settings ➔
Phone Info ➔ Icon Glossary ➔ Service Alert & Settings.
All Sounds Off: Volume set to All Sounds Off. No
sounds are played for calls or alerts.
Understanding Your Phone 20
Page 27
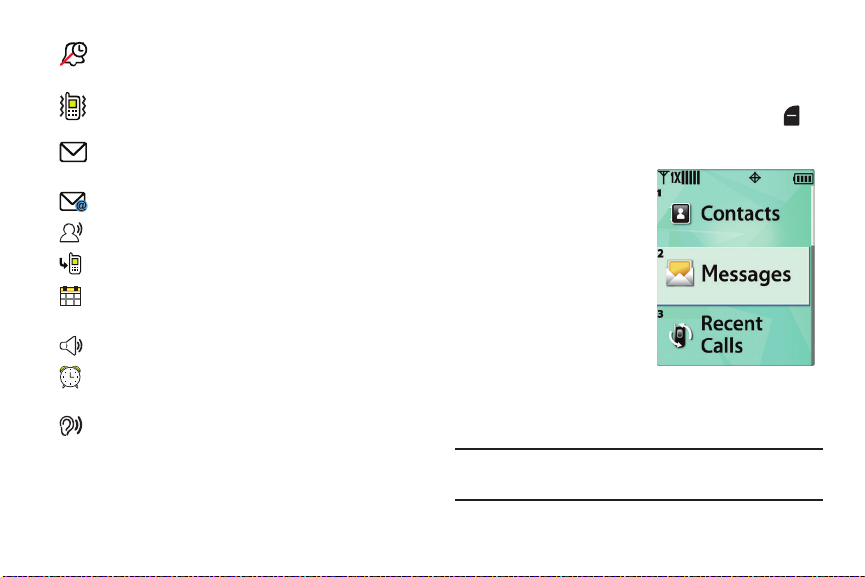
Alarm Only: Volume set to Alarm Only. The only
sounds played will be for alarms.
Vibrate Only: Volume is set to Vibrate Only. The
phone will vibrate for calls and alerts.
Unread Msg: You have new, unread text
message(s).
Email: You have new, unread email message(s).
Voicemail: You have new voicemail.
Missed Calls: You have missed calls.
Calendar Event: You have an active calendar
event.
Speakerphone: Speakerphone mode is active.
Alarm On: You have an alarm set to go off in the
next 24 hours.
Hands-free Mode: All alerts are made with sound,
and other information may be read out for alerts. For
more information, see “Hands-Free Mode” on
page 98.
21
Understanding the Menu
The Menu is the starting point for launching applications and
features.
From the Home screen, press the Left Soft Key to
select Menu.
Customizing the Menu
Setting a Display Theme
Display themes offer
coordinated looks for all your
phone’s screens, including
the Menu. For more
information, see “Themes”
on page 102.
Choosing a Menu Layout
Choose from Tab, List, or Grid
menu layouts. For more
information, see “Menu” on
page 103.
Tip: While scrolling the Menu, you can adjust the size of the
font by pressing the Volume Key Up or Down.
Page 28
Menu Items
@
These items appear on the Menu by default. You can replace
some menu items with your favorite features, and change
the order items appear in the menu. For more information
about customizing menu settings, see “Menu” on page 103.
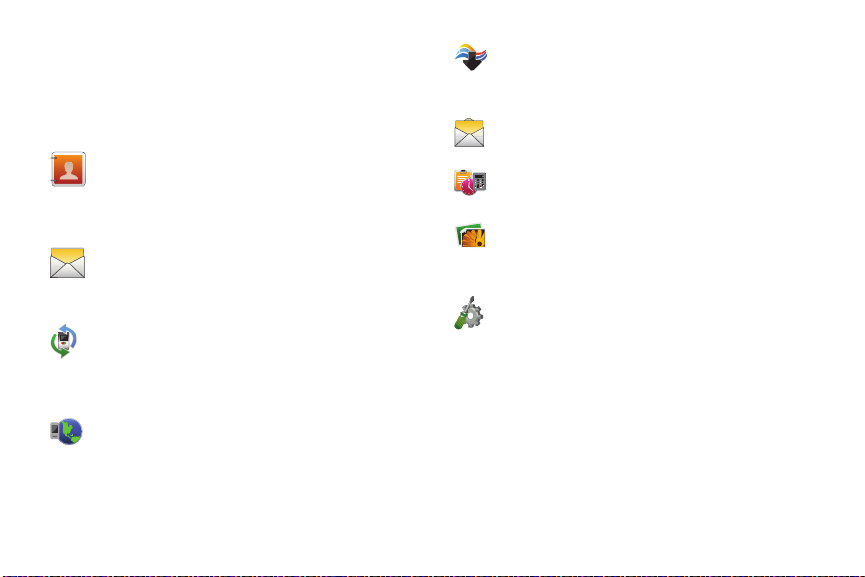
Contacts: Open the Contacts menu, to enter, view
and manage your daily contacts. For more
information, see “Understanding Your Contacts”
on page 34.
Messages: Access your phone’s messaging
features. For more information, see “Messages”
on page 48.
Recent Calls: Open the Recent Calls log, to
view recent received, missed and dialed calls.
For more information, see “Recent Calls” on
page 31.
Internet: Launch Verizon Wireless Mobile Web,
where you can manage your account and browse
the web.
Media Center: Launch Media Center, for the
multimedia features of your phone. For more
information, see “Media Center” on page 67.
Mobile Email: Send email messages from your
phone.
Tools: Access productivity tools. For more
information, see “Tools” on page 80.
My Pictures: Opens My Pictures, for access to
your photos. For more information, see “My
Pictures” on page 72.
Settings: Configure your phone to your
preferences. For more information, see
“Settings” on page 93.
Understanding Your Phone 22
Page 29

Using Menu Numbers
Each menu item has a number assigned to it, and you can
access menu items using these menu numbers.
For example, access Airplane Mode using standard
navigation:
1. From the Home screen, press the Left Soft Key
Menu.
2. Press the Directional Key Down to highlight
Settings and press OK.
3. Press the Directional Key Down to highlight
Phone and press OK.
4. Press OK to set Airplane Mode.
Example using number accelerators:
From the Home screen, press the Left Soft Key
Menu ➔ Settings ➔ Phone ➔
Airplane Mode.
23
Page 30

Section 3: Entering Text
Your phone provides convenient ways to enter words, letters,
punctuation, and numbers when you need to enter text. This
section describes text input modes and entering characters
or symbols, using the keypad.
Your phone offers these text entry modes:
• Abc/ABC: Standard text entry for phones
• 123: Numbers
• T9 Word: English predictive text
• Symbols: Common text symbols
• Smileys: Text emoticons
• Quick Text: Pre-entered phrases (text fields only)
• T9 Palabra: Spanish predictive text
• Domain extensions: Common internet phrases and
symbols
Note: Available text entry modes will depend on the type of
field.
Changing the Text Entry Mode
While entering text, you can change the text entry mode to
your preference.
Tip: You can set a default Text Entry Mode. For more
information, see “Messaging Settings” on page 61.
While entering text, press the Left Soft Key Entry
Mode, and then use the Directional Key to
highlight a mode and press to select the mode.
Note: Available text entry modes will depend on the type of
field. When you are entering text, the Left Soft Key
shows the current text entry mode.
Entering Text 24
Page 31

Entering Text Using Abc/ABC Mode
Abc mode is standard text entry mode for mobile telephones.
To switch to Abc mode, press the Left Soft Key
Entry Mode ➔
•Abc: Initial case
• ABC: Upper case
While entering text:
• Press the appropriate key once for the first letter on the
key, twice for the second letter, three times for the third
letter, and four times for the fourth letter.
• When the correct letter displays, pause briefly to advance
to the next letter, or press another key.
• Press to backspace to clear one character. Press and
hold to clear an entire word.
• Press to toggle between Abc (initial case), abc (lower
case) and ABC (upper case).
• To enter a space, press .
• Press once to enter a period, twice for “@”, three
times for a question mark “?”, and four times for an
exclamation mark “!”.
• Press and hold any key to enter the number on the key.
25
Entering Numbers
Use 123 mode to enter numbers into a text field.
To switch to 123 mode, press the Left Soft Key
Entry Mode ➔ 123.
While entering numbers:
• Press the appropriate key for each number.
• Press to backspace to clear one number. Press and
hold to clear multiple numbers in a string
.
Page 32

Entering Text Using T9 Word
T9 Word is a predictive text entry mode that recognizes
common English words matching the sequence of your key
presses and inserts the most common word into your text.
T9 Word requires only one key press per letter of the word,
and is much faster than traditional text entry.
To switch to T9 Word mode, press the Left Soft Key
Entry Mode ➔ T9 Word.
While entering text:
• Press the key for each letter only once.
• Enter the entire word before editing or deleting characters.
Press to backspace and clear one character, or press
and hold to clear an entire word.
• If T9 Word inserts the wrong word, press to toggle
between other matching words.
• Press to toggle between T9 Word (initial case), T9
word (lower case) and T9 WORD (upper case).
• To enter a space, press .
• Press once to enter a period, twice to enter :), or
three times to enter :-).
• Press and hold any key to enter the number on the key.
Entering Symbols
Use Symbols mode to enter common symbols into a text
field.
To switch to Abc mode, press the Left Soft Key
Entry Mode ➔ Symbols.
To enter symbols:
• Use the Directional Key to highlight a symbol, and
then press OK to insert it.
• There are three pages of symbols. To access more
symbols, press the Left Soft Key Prev or the Right
Soft Key
Tip: You can also press the key for the number corresponding
to a symbol.
Next to move to another page of symbols.
Entering Text 26
Page 33

Entering Smileys
Use Smileys mode to enter text emoticons.
To switch to Abc mode, press the Left Soft Key
Entry Mode ➔ Smileys.
To enter smileys:
• Use the Directional Key to highlight a smiley, and
then press OK to insert it.
Tip: You can also press the key for the number corresponding
to a smiley.
27
Entering Quick Text
Use Quick Text mode to insert pre-loaded messages into a
text message, or to create and insert your own Quick Text
phrases.
To switch to Abc mode, press the Left Soft Key
Entry Mode ➔ Quick Text.
While in Quick Text mode:
• Press the Directional Key to highlight a phrase, and
then press OK to insert the Quick Text.
• To erase a Quick Text phrase, use the Directional Key to
highlight a phrase, and then press the Left Soft Key
Erase.
• Press the Right Soft Key Options for these options:
– New: Create a new phrase.
– Edit: Modify the highlighted phrase.
– Move: Change the order of the phrases.
Page 34

Entering Text Using T9 Palabra
Palabra is a predictive text entry mode for Spanish that
recognizes common words matching the sequence of your
key presses and inserts the most common word into your
text. Palabra requires only one key press per letter of the
word, and is much faster than traditional text entry.
To switch to Palabra mode, press the Left Soft Key
Entry Mode ➔ T9 Palabra.
While entering text:
• Press the key for each letter only once.
• Enter the entire word before editing or deleting characters.
Press to backspace and clear one character, or press
and hold to clear an entire word.
• If Palabra inserts the wrong word, press to toggle
between other matching words.
• Press to toggle between Palabra (initial case), palabra
(lower case) and PALABRA (upper case).
• To enter a space, press .
• Press once to enter a period, twice to enter :), or
three times to enter :-).
• Press and hold any key to enter the number on the key.
Entering Text 28
Page 35

Section 4: Call Functions
This section describes how to make, answer, and end calls.
It also includes information about the Recent Calls log and
Voice Commands.
Making a Call
Your phone offers multiple ways to make calls:
• Enter the phone or speed dial number, and then press the
Send Key.
• Enter the speed dial number, holding the last digit until the
number dials.
• Call a contact from Contacts. For more information, see
“Making Calls Using Contacts” on page 39.
• Return a call, or call a recent caller via Recent Calls. For
more information, see “Making Calls Using Recent Calls”
on page 32.
• Voice dial using Voice Commands. For more information,
see “Voice Commands” on page 80.
29
Answering a Call
You can answer calls with either the flip open or closed.
• With the flip closed, open to answer automatically.
• With the flip open, press the Send Key.
Note: These are default Answer Options. You can choose
other options for answering calls. For more information,
see “Answer Options” on page 115.
Page 36

In-Call Options
While in a call, use the soft keys to access in-call options:
Press the Left Soft Key Mute to mute the
microphone so the other caller cannot hear your voice.
Press the Right Soft Key Options for these options:
• Messages: Display the New Message menu, to create
a new Text, Picture, or Voice Message.
• Contact List: Open Contact list to view your contacts.
• Recent Calls: Display recent incoming, missed and
outgoing calls.
• Bluetooth Menu: Choose Bluetooth options, such as
switching to a paired Bluetooth headset.
• Main Menu: Display the Main menu.
•Notepad: Opens the Notepad.
•Whisper Mode: Increase the microphone to maximum
volume level, to improve the other caller’s ability to hear
you clearly.
• Voice Privacy: Enable or disable advanced voice
encryption.
Tip: Whisper Mode can be useful when you must speak softly,
or while calling in noisy environments.
Answering Call-Waiting Calls
When you receive a call while on a call:
• Press to place the first call on hold and answer the
new call.
• To return to the original call, press again.
Sending Calls to Voicemail
Ignoring a call sends the caller directly to voicemail, and
stops the incoming call ringtone. Use one of these methods
to ignore an incoming call:
• Press the Left Soft Key Quiet to silence the ringer.
• Press TXT to send the call to voicemail, and choose a
pre-entered phrase to send as a text message, or create a
new text message to send to the caller.
• Press the Right Soft Key Ignore to send the call to
voicemail.
Call Functions 30
Page 37

Recent Calls
Recent Calls saves a record of every call that you dial, miss,
or answer.
1. From the Home screen, press the Left Soft Key
Menu ➔ Recent Calls.
– or –
From the home screen, press to view All Calls.
2. Use the Directional Key to highlight a call type,
and then press to display call records:
• Missed: Calls you did not answer.
• Received: Answered calls.
• Dialed: Outgoing calls.
•All: All, missed, received and dialed calls.
•View Timers: Statistics about calls.
3. Calls display by date, time and contact or phone
number. If the number is saved as a contact, the call
record includes icons to indicate the type of number.
31
4. Use the Directional Key to highlight a call, and then
choose from these options:
• Press the Left Soft Key
• Press OPEN to view details.
• Press the Right Soft Key Options for these
options:
– Save to Contacts
new contact, or update an existing contact.
– Erase
: Delete the highlighted call record.
– Lock/Unlock
– Erase All
– View Timers
: Locks or unlocks the entry to prevent deletion.
: Delete all call records of this type.
: Displays call statistics.
Message to send a reply.
: Save the caller’s phone number as a
Page 38

Making Calls Using Recent Calls
1. From the Home screen, press the Left Soft Key
Menu ➔ Recent Calls.
– or –
From the home screen, press to view All Calls.
2. Find a call from Missed Calls, Received Calls,
Dialed Calls, or All Calls.
3. Use the Directional Key to highlight a call record,
and then press .
Creating or Updating Contacts Using
Recent Calls
1. From the Home screen, press the Left Soft Key
Menu ➔ Recent Calls.
– or –
From the home screen, press to view All Calls.
2. Find a call from All Calls, Missed Calls, Received
Calls, or Dialed Calls.
3. Highlight a call record, and then press the
RightSoftKey Options ➔ Save to Contacts.
4. Use the Directional Key to highlight Add New
Contact or Update Existing, and then press OK.
5. Follow the prompts to save the number to a contact
record. For more information, see “Adding a New
Contact” on page 34 or see “Editing a Contact” on
page 36.
Call Functions 32
Page 39

Deleting Recent Calls Records
1. From the Home screen, press the Left Soft Key
Menu ➔ Recent Calls.
– or –
From the home screen, press to view All Calls.
2. Find a call from All Calls, Missed Calls, Received
Calls, or Dialed Calls.
3. Highlight a call record, and then press the Right Soft
Key Options ➔ Erase.
4. At the Erase entry? prompt, use the Directional
Key to highlight Yes , and then press OK.
33
Deleting All Recent Calls Records
1. From the Home screen, press the Left Soft Key
Menu ➔ Recent Calls.
– or –
From the home screen, press to view All Calls.
2. Find a call from All Calls, Missed Calls, Received
Calls, or Dialed Calls.
3. Highlight a call record, and then press the Right Soft
Key Options ➔ Erase All.
4. At the Erase all? prompt, use the Directional Key
to highlight Ye s, and then press .
Page 40

Section 5: Understanding Your Contacts
This section allows you to manage your daily contacts by
saving information in Contacts.
Contacts provides access to powerful features such as
Groups, creating and sending vCards, and viewing the phone
number assigned to your phone by Verizon Wireless.
To a ccess Contacts List for quick access to most functions:
From the Home screen, press the Right Soft Key
Contacts.
To a ccess Contacts for all contacts-related functions:
From the Home screen, press MENU ➔
Contacts.
Adding a New Contact
1. From the Home screen, press the Right Soft Key
Contacts.
2. Press the Right Soft Key Options ➔ New Contact.
3. Use the keypad to enter a name for the contact in the
Name field. For more information, see “Entering Text”
on page 24.
4. Use the Directional Key to highlight Mobile 1,
Home, Business, Mobile 2, or Fax and enter at least
one telephone number.
5. Continue using the Directional Key to move to fields to
add additional information, if desired.
6. When you’re finished entering information, press
SAVE to save the contact.
Understanding Your Contacts 34
Page 41

Adding a New Contact from the Keypad
Enter a telephone number with the external keypad, and then
save it.
1. From the Home screen, use the keypad to enter the
telephone number.
2. Press the Left Soft Key Save ➔ Add New Contact.
3. Use the Directional Key to highlight Mobile 1,
Mobile 2, Home, Business or Fax, and then press
.
4. Enter a name for the contact in the Name field.
5. Continue adding information to fields, or press
SAVE.
35
Adding a New Contact from Recent Calls
Save a telephone number from a recent call record as a
contact.
1. From the Home screen, press to display Recent
Calls.
2. Use the Directional Key to highlight a call record.
3. Press the Right Soft Key Options ➔ Save to
Contacts ➔ Add New Contact.
4. Use the Directional Key to highlight Mobile 1,
Mobile 2, Home, Business or Fax, and then press
OK.
5. Enter a name for the contact in the Name field.
6. Continue adding information to fields, or press
SAVE.
Page 42

Erasing Contacts
1. From the Home screen, press the Right Soft Key
Contacts.
2. Press the Right Soft Key Option ➔ Contacts ➔
Erase.
3. Find a contact, by pressing the Directional Key to
browse contacts, or see “Finding a Contact” on
page 39.
4. Use the Directional Key to highlight the contact, and
then press MARK to mark it for erasure, or press
the Right Soft Key Mark All to mark all contacts.
5. Press the Left Soft Key Done. At the prompt,
highlight Yes to confirm the erasure, and then press
to erase the contact(s).
6. At the prompt, enter the Lock Code. By default, the
Lock Code is the last four digits of your telephone
number.
Editing a Contact
Make changes to an existing contact.
1. From the Home screen, press the Right Soft Key
Contacts.
2. Find a contact, by pressing the Directional Key
to browse contacts, or see “Finding a Contact” on
page 39. Use the Directional Key to highlight the
contact, and then press the Left Soft Key Edit.
3. Use the Directional Key to move to fields to modify or
add information for the contact.
4. When you’re finished, press SAVE to save the
contact.
Understanding Your Contacts 36
Page 43

Editing a Contact from the Keypad
Enter a telephone number with the keypad, and then save it
to an existing contact.
1. From the Home screen, use the external keypad to
enter the telephone number.
2. Press the Left Soft Key Save ➔ Update Existing.
3. Find a contact, by pressing the Directional Key to
browse contacts, or see “Finding a Contact” on
page 39. Use the Directional Key to highlight the
contact, and then press OK.
4. Use the Directional Key to highlight Mobile 1, Mobile
2, Home, Business or Fax, and then press OK.
5. Continue editing fields, or press SAVE to save the
contact.
37
Editing a Contact from Recent Calls
Save a telephone number from a call record to a contact.
1. From the home screen, press to view All Calls.
2. Use the Directional Key to highlight a call
record, and then press to view the call record.
For more information about using Recent Calls logs,
see “Recent Calls” on page 31.
3. Press the Right Soft Key Options ➔ Save to
Contacts ➔ Update Existing.
4. Find a contact, by pressing the Directional Key to
browse contacts, or see “Finding a Contact” on
page 39. Use the Directional Key to highlight a
contact, and then press OK.
5. Use the Directional Key to highlight Mobile 1, Mobile
2, Home, Business or Fax, and then press OK.
6. Continue editing fields, or press SAVE to save the
contact.
Page 44

Managing Contacts
Use Manage Contacts to perform actions such as erasing,
locking, or unlocking, on multiple contacts at one time.
1. From the Home screen, press the Right Soft Key
Contacts.
2. Press the Right Soft Key Options ➔
Manage Contacts.
3. Choose an option:
•Erase: Mark multiple contact(s) for deletion.
•Lock: Mark multiple contact(s) to lock. Locked contacts
cannot be deleted.
•Unlock: Mark multiple contact(s) to unlock.
4. Find a contact by pressing the Directional Key to
browse contacts or see “Finding a Contact” on
page 39. Use the Directional Key to highlight
contacts, and then press to MARK each contact, or
press the Right Soft Key Mark All to mark all
contacts.
5. Press the Left Soft Key Done to perform the
selected option on all marked contacts.
Adding Pauses or Waits
Calls to automated systems can require you to press keys to
navigate menus, or to enter a password or account number.
You can store those phone numbers, with special pause or
wait characters, in a contact record to make dialing easier.
1. From the Home screen, press the Right Soft Key
Contacts.
2. Create a new contact entry, or edit an existing contact.
For more information, see “Adding a New Contact” on
page 34, or “Editing a Contact” on page 36.
3. Enter the phone number up to the pause or wait, and
then press the Right Soft Key Options to select an
option:
•Add 2-Sec Pause: Stops the dialing sequence for two
seconds, and then automatically dials the remaining
digits. A “P” appears in the field to indicate the pause.
• Add Wait: Stops the dialing sequence, to wait for
further input from you. A “W” appears in the field to
indicate the wait.
4. When you’re finished, press SAVE to save.
Understanding Your Contacts 38
Page 45

Finding a Contact
1. From the Home screen, press the Right Soft Key
Contacts. The Contacts List displays, with the
cursor in the Go To field.
2. In the Go To field, enter the first few characters of the
Contact name to see matching entries.
3. Use the Directional Key to highlight a contact,
and then use these options:
• Press to call the contact.
• Press VIEW to open the contact entry.
• Press the Left Soft Key Edit to edit the contact
entry.
• Press the Right Soft Key Options for Contacts
options.
39
Making Calls Using Contacts
You can make calls directly from your Contacts list.
1. From the Home screen, press the Right Soft Key
Contacts.
2. Find a contact, by pressing the Directional Key to
highlight a contact.
3. Press to call the contact.
Page 46

Groups
You can assign Contact entries to categories, called Groups,
to make searching your contacts faster, or to quickly send
messages to group members.
Creating a New Group
In addition to the default groups, you can create additional
groups.
1. From the Home screen, press the Left Soft Key
Menu ➔ Contacts ➔ Groups.
2. Press the Left Soft Key New.
3. At the NEW GROUP screen, enter a name of up to 32
characters for the new group in the “Enter Name”
field. For more information, see “Entering Text” on
page 24.
4. When finished, press SAVE.
Adding Contacts to Groups
1. From the Home screen, press the Left Soft Key
Menu ➔ Contacts ➔ Groups.
2. Available groups appear in the display. The Business,
Colleague, Family, and Friends groups are available
by default, or you can create a new group. For more
information about creating groups, see “Creating a
New Group” on page 40.
3. Use the Directional Key to highlight a group, and
then press VIEW to display a list of group
members.
4. Press ADD, and then find a contact by pressing the
Directional Key to browse contacts, or see “Finding a
Contact” on page 39. Use the Directional Key to
highlight contacts, and then press MARK.
5. Press the Left Soft Key Done to add the contacts to
the group.
Understanding Your Contacts 40
Page 47

Changing a Contact’s Group Assignment
Edit a contact’s Group field to change the group assignment.
1. From the Home screen, press the Left Soft Key
Menu ➔ Contacts ➔ Contact List.
2. Use the Directional Key to highlight a contact,
and then press the Left Soft Key Edit.
3. Use the Directional Key to highlight the Group field,
and then press the Left Soft Key Edit.
4. Use the Directional Key to highlight groups, and then
press MARK to mark or un-mark groups for
assignment.
5. When you finish marking groups, press the Left Soft
Done to save the changes.
Key
6. Press SAVE to save the contact entry.
41
Sending a Message to Group Members
Send a message to all members of a group at once.
1. From the Home screen, press the Left Soft Key
Menu ➔ Contacts ➔ Groups.
2. Use the Directional Key to highlight a group, and
then press VIEW to display it.
3. Press the Right Soft Key Options to choose
New Message.
4. The new message opens with the cursor positioned in
the Tex t field. Continue creating the message. For
more information, see “Messages” on page 48.
Page 48

Speed Dials
Speed Dials are 1-, 2- or 3-digit shortcuts you assign to
contacts, to allow you to quickly call the contact.
Note: Some Speed Dials are reserved by default. 211, 311,
611, and 911 cannot be assigned.
The following Speed Dials are reserved by default:
• 1 is reserved for Voicemail.
• 96 is reserved for Data Usage inquiries (#DATA).
• 97 is reserved for Balance inquiries (#BAL)
• 98 is reserved for Minute Usage (#MIN)
• 99 is reserved for Payment information (#PMT).
• 211 is reserved for health and human services.
• 311 is reserved for non-emergency services.
• 411 is reserved for directory assistance.
• 611 is reserved for customer service access.
• 911 is reserved for emergency calls.
Assigning a Speed Dial
1. From the Home screen, press the Left Soft Key
Menu ➔ Contacts ➔ Speed Dials.
2. Use the Directional Key to highlight a speed dial,
or enter the speed dial digits into the Go To field, and
then press SET.
3. At the SET SPEED DIAL screen, use the Directional
Key to highlight a contact, or enter the first few
characters into the Go To field.
4. Press OK.
5. At the Set speed dial to contact? prompt, highlight
Ye s, and then press OK.
Removing a Speed Dial
1. From the Home screen, press the Left Soft Key
Menu ➔ Contacts ➔ Speed Dials.
2. Use the Directional Key to highlight a speed dial,
or enter the speed dial digits into the Go To field, and
then press the Right Soft Key Remove.
3. At the Remove speed dial? prompt, highlight Ye s, and
then press .
Understanding Your Contacts 42
Page 49

Emergency Contacts
Set up to 3 emergency contacts, plus enter personal
information that may be helpful to others using your phone in
an emergency.
Tip: Emergency contacts display in red in the Contacts List.
Assigning Emergency Contacts
1. From the Home screen, press the Left Soft Key
Menu ➔ Contacts ➔ In Case of Emergency.
2. Use the Directional Key to highlight Contact 1,
Contact 2, or Contact 3, and then press ADD.
3. In the ADD CONTACT screen, use the Directional Key
to highlight an option and press OK:
•From Contacts: Choose an existing contact from
Contacts List, and then press OK.
•New Contact: Enter a new contact, and then
press .
43
Re-assigning or Unassigning Emergency
Contacts
1. From the Home screen, press the Left Soft Key
Menu ➔ Contacts ➔ In Case of Emergency.
2. Use the Directional Key to highlight a contact.
3. Press the Right Soft Key Options, then choose an
option:
•Re-assign: Choose another contact from Contacts
List, or create a new contact for this assignment.
•Unassign: Remove the contact from this emergency
contact.
Entering Personal Information
Enter up to 3 notes containing information that might be
helpful to others using your phone in an emergency.
1. From the Home screen, press the Left Soft Key
Menu ➔ Contacts ➔ In Case of Emergency.
2. Use the Directional Key to highlight Personal
Info, and then press VIEW.
3. Use the Directional Key to highlight Note 1, Note 2, or
Note 3, and then press ADD.
4. Enter your personal information into the note, and then
press SAVE to save the note.
Page 50

My Name Card
My Name Card is your personal contact entry in Contacts,
which you can send to recipients as a virtual business card
(vCard) attached to a message, or via Bluetooth.
Editing My Name Card
By default, My Name Card contains your mobile telephone
number. Edit My name Card to include other information.
1. From the Home screen, press the Left Soft Key
Menu ➔ Contacts ➔ My Name Card.
2. Press EDIT.
3. Press the Directional Key to highlight contact
fields to enter information. For more information, see
“Editing a Contact” on page 36.
4. Press SAVE to save My Name Card.
Sending My Name Card (vCard) in a Message
1. From the Home screen, press the Left Soft Key
Menu ➔ Contacts ➔ My Name Card.
2. Press the Right Soft Key Options, and then use the
Directional Key to highlight Send via Message
and press OK.
3. Continue with creating the new message, and then
press Send. For more information, see
“Messages” on page 48.
Understanding Your Contacts 44
Page 51

Sending My Name Card (vCard) Using Bluetooth
Send your contact information, as My Name Card, to
Bluetooth devices that support vCards.
1. From the Home screen, press the Left Soft Key
Menu ➔ Contacts ➔ My Name Card.
2. Press the Right Soft Key Options, and then use the
Directional Key to highlight Send via Bluetooth
and press OK.
3. At the CHOOSE DEVICE screen, press the
Directional Key to highlight an option, and then
press :
• Add New Device: Searches for a new Bluetooth
device for pairing, to send My Name Card.
• <Device Name>: Sends My Name Card to a
previously-paired Bluetooth device.
4. Continue with the Bluetooth transfer. For more
information about adding devices and sending via
Bluetooth, see “Bluetooth” on page 64.
45
Sending Name Cards (vCards) Using Bluetooth
Send individual contacts, or your entire contact list, to
Bluetooth devices that support vCards.
Important! Not all Bluetooth devices accept a name cards,
and not all devices support transfers of multiple
name cards. Check your target device’s
documentation.
1. From the Home screen, press the Left Soft Key
Menu ➔ Contacts ➔ Contact List.
2. Use the Directional Key to highlight a contact,
and then press the Right Soft Key Options ➔
Send Name Card.
3. At the SEND NAME CARD screen, use the Directional
Key to highlight Bluetooth, and then press .
4. Press the Directional Key to highlight contacts, and
then press MARK, or press the Right Soft Key
Mark All to mark all contacts, and then press the
Left Soft Key Done.
Page 52

5. At the CHOOSE DEVICE screen, use the Directional
Key to highlight an option, and then press :
• Add New Device: Search for a new Bluetooth device
for pairing.
• <Device Name>: Send to a previously-paired
Bluetooth device.
6. Continue with the Bluetooth transfer. For more
information about adding devices and sending via
Bluetooth, see “Bluetooth” on page 64.
Note: A vCard contains all contact information except Group,
Ringtone, and Emergency (ICE) contact status.
Sending Name Cards (vCards) by Message
You can send up to 10 contacts (as attachments to a
message) to devices that support vCards.
1. From the Home screen, press the Left Soft Key
Menu ➔ Contacts ➔ Contact List.
2. Use the Directional Key to highlight a contact,
and then press the Right Soft Key Options ➔
Send Name Card.
3. At the SEND NAME CARD screen, use the Directional
Key to highlight Message, and then press OK.
4. Press the Directional Key to highlight contacts, press
MARK to mark them for sending, and then press
the Left Soft Key Done.
5. Continue creating the message as desired. For more
information, see “Messages” on page 48.
Understanding Your Contacts 46
Page 53

Backup Assistant
Backup Assistant is a wireless service that saves a copy of
your Contacts List to a secure web site. If your phone is lost,
stolen or damaged, Backup Assistant can restore your saved
contacts to a new phone, wirelessly. Schedule daily backups
to save your information manually or automatically. Log in to
your web account for full access to your contacts for viewing,
printing adding, deleting, and editing.
verizonwireless.com/backupassistant
Visit
Wireless for more information.
Note: Standard TXT messaging rates apply. Backup Assistant
is free for My Verizon subscribers.
Tip: From the Home screen, press the Left Soft Key Menu
➔ Contacts ➔ Backup Assistant, and then follow
the onscreen directions.
47
, or contact Verizon
Page 54

Section 6: Messages
Types of Messages
Your phone can send and receive:
• Text Messages, also known as SMS (Simple Messaging
Service)
• Picture Messages, also known as MMS (Multimedia
Messaging Service)
• Voice Messages (Multimedia Messaging Service)
• Mobile Email
• Social Networks updates
Note: Some message services are only available in the
Verizon Wireless Enhanced Services Area.
Creating and Sending Messages
Text Messages are simple messages containing text, which
can be send to another mobile phone or to an Email address.
1. From the Home screen, press the
➔ New Message.
2. At the NEW MESSAGE screen, enter recipients in the
To fields:
• Use the keypad to enter a recipient’s phone number,
contact name, or Email address. As you enter
characters, matching contacts display in a list. Use the
Directional Key to highlight a contact,
then press OK.
• Press the Right Soft Key Add to select recipients:
– From Contacts: Choose contacts from the Contacts
List.
– Recent Calls: Choose numbers from Recent Calls.
– Favorites: Choose contacts you have marked as
Favorites.
– Groups: Choose a contacts Group.
Messaging Key
Messages 48
Page 55

– To Contacts : If a recipient is not saved to contacts,
you can save it as a new contact or update an
existing one.
3. Use the Directional Key to move to the Tex t field to
compose your message. For more information about
entering text, see “Entering Text” on page 24.
4. While entering text, press the Right Soft Key
Options for these options:
•Attach: Add an attachment to the message.
– Picture: Add an image file.
– Take Pictur e: Use the camera to take a picture.
– Sound: Add a sound file.
– Record Sound: Record voice and audio.
– Name Card: Add a Name Card as an attachment.
•Preview: This option is available when you attach a
picture or sound.
• Save As Draft: Save a copy of the message in the
Drafts folder.
• Insert Quick Text: Insert a pre-loaded phrase. For
more information, see “Entering Quick Text” on
page 27.
49
•Copy: Select text to copy, for pasting in another field.
Use the Directional Key to highlight the text, then press
DONE.
• Add Slide/Remove Slide: Add a second slide to the
message, or delete the current slide from the message.
This option is only available when you attach a picture
or sound.
•Paste: If you have already copied text, insert the copied
text into the message.
• Priority Level: Set the urgency of the message, to
High or Normal.
• Callback #: Choose On to add a callback phone
number to your message and enter the phone number.
• Remove Picture: Remove an attached picture.
• Remove Sound: Remove an attached recording.
• Cancel Message: Cancel the message, with the
option to save it in the Drafts folder.
5. Press SEND, or to send the message.
Page 56

Creating and Sending Voice Messages
Voice Messages combine text and voice recordings, and can
be sent to other mobile phones, or to Email addresses.
1. From the Home screen, press the
➔ New Message.
2. Press the Right Soft Key Options ➔ Attach ➔
Record Sound.
3. To record a voice message:
• Press OK to start recording.
• Press the Left Soft Key Pause to pause recording.
Press the Left Soft Key Resume to restart
recording.
• Press STOP to stop recording and attach it to a
message.
4. At the NEW MESSAGE screen, enter recipients:
• Press the Right Soft Key Add to select recipients:
– From Contacts: Choose contacts from the Contacts
List.
– Recent Calls: Choose numbers from Recent Calls.
Messaging Key
– Favorites: Choose contacts you have marked as
Favorites.
– Groups: Choose a contacts Group.
– To Contacts : If a recipient is not saved to contacts,
you can save it as a new contact or update an
existing one.
• Use the keypad to enter a phone number, contact
name, or Email address. As you enter characters,
matching contacts display. Use the Directional Key to
highlight, then press OK.
5. Use the Directional Key to move to the Voice:
field, where your voice recording appears. Press the
Left Soft Key Record to record a new voice
recording, if desired.
6. Use the Directional Key to move to the Tex t: field,
then compose your message. For more information
about entering text, see “Entering Text” on page 24.
Messages 50
Page 57

7. While entering text, press the Right Soft Key
Options to:
•Preview: Listen to the message before sending.
• Save As Draft: Save a copy in the Drafts folder.
• Insert Quick Text: Insert a pre-loaded phrase.
•Copy: Select text to copy, for pasting in another field.
Use the Directional Key to highlight the text, then
press DONE.
•Paste: If you have already copied text, insert the copied
text into the message.
• Add Slide/Remove Slide: Add a second slide to the
message, or delete the current slide from the message.
• Priority Level: Set the urgency, High or Normal.
• Cancel Message: Cancel the message, with the
option to save it in the Drafts folder.
8. Use the Directional Key to move to the Subject:
field to enter a subject for the message, if desired.
Press the Left Soft Key to switch between text
entry modes.
51
9. Use the Directional Key to move to the Name
Card: field to add a name card, if desired. Press the
Left Soft Key Add, then select My Name Card, or
Contacts to choose another contact’s name card.
10. Press SEND, or to send the message.
Receiving Messages
When you receive a message, you can choose to:
• View Now: Open the message for viewing.
• View Later: Dismiss the alert, and save the message in
the Messages folders. For more information, see
“Message Folders” on page 54.
• Reject: If you have disabled the Multimedia Auto Receive
setting, reject the message. The message is not saved to
Messages. For more information, see “Messaging
Settings” on page 61.
Tip: If you want to control when you download multimedia
content, you can disable Multimedia Auto Receive.
Page 58

Viewing Text Messages
When you receive a text message, the alert sounds (unless
turned off), and New Message appears in the display.
1. At the New TXT Message prompt, press OK to
View Now.
2. While viewing the message, you have these options:
• Press REPLY to respond to the message with a
new Text, Picture, or Voice message.
• Press the Left Soft Key Erase to delete the
message.
• Press the Right Soft Key Options:
– Forward: Send the message to another recipient.
– Reply w. Copy: Reply to the sender, plus other
recipients if desired, and include a copy of the
original message.
– Save As Quick Text: Save the message text to the
Quick Text list.
– Lock/Unlock: Lock or unlock the message to
prevent deletion.
– Add To Contacts: If the sender’s information is not
already saved to Contacts, save it as a new entry or
update to an existing entry.
– Messages Font Size: Select the font size, Normal
or Large.
– Extract Addresses: Display all Contact Numbers,
Email Addresses, and URLs extracted from the
message, to call, send an email, or open the web
page.
– Message Info: Display details about the message.
Messages 52
Page 59

Viewing Picture or Voice Messages
When you receive a Picture or Voice message, the alert
sounds (unless turned off), and New Multimedia MSG
appears in the display.
1. At the New Multimedia MSG prompt, press OK to
View Now.
2. After loading, the attachment (and text, if any), the
message appears in the display. Use the
Directional Key to scroll to see the entire
message, if necessary.
3. While viewing the message, you have these options:
• Press REPLY to respond to the message with a
new Text, Picture, or Voice message.
• Press the Left Soft Key Erase to delete the
message.
53
• Press the Right Soft Key Options (options depend
on the type of message and attachments):
– Play again: (Voice or Picture message with attached
Sound) Play the attached sound again.
– Forward: Send the message to another recipient.
– Reply w. Copy: Reply to the sender, plus other
recipients if desired, and include a copy of the
original message.
– Set As: Assign the attached picture as Wallpaper or
Picture ID.
– Save Picture: Save the attached picture to My
Pictures. (Picture messages only.)
– Erase: (Voice or Picture message with attached
Sound) Delete the message.
– Save Sound: (Voice or Picture message with
attached Sound) Save the attached sound to My
Sounds.
– Save as Ringtone: (Voice or Picture message with
attached Sound) Save the attached sound as a
ringtone.
Page 60

– View Name Card: (If Name card is attached) Display
the attached name card.
– Save Name Card: (If Name card is attached) Save
the attached name card to Contacts.
– Save As Quick Text: Save message text to the
Quick Text list.
– Lock/Unlock: Lock or unlock the message to
prevent deletion.
– Add To Contacts: Save the number of the sender to
Contacts as a new entry or additional to an existing
entry.
– Extract Addresses: Display all Contact Numbers,
Email Addresses, and URLs extracted from the
message, to call, send an email, or open the
web page.
– Message Info: Display details about the message.
Message Folders
Messages are stored in the message folders, depending on
your selections for Inbox View in Message Settings.
Tip: To scroll through all messages in the Messages, Sent, or
Drafts folder, open one message, then press the
Directional Key Left or Right.
Note: The Messages menu depends on the Inbox View
setting. For more information, see “Messaging
Settings” on page 61.
Messages 54
Page 61

Viewing Messages by Contact
When the Inbox View setting is set to Contact, all incoming
and sent messages are stored in the Messages folder,
grouped by contact (if the sender/recipient of the message is
stored as a contact) or phone number, to provide a threaded
view of the message exchange.
Note: The Messages folder only displays when the Inbox
View setting is set to Contact. For information about
the Inbox View setting, see “Messaging Settings” on
page 61.
1. From the Home screen, press the
➔ Messages.
2. The most recent message from each contact displays.
Numbers to the right of the contact/number indicate
the number of messages from this contact/number.
3. To view a message thread, use the Directional
Key to highlight a contact/number, then press
OPEN.
4. To send a message back to the sender, press the Left
Soft Key Reply.
55
Messaging Key
5. While viewing the list of contacts/messages, use the
Directional Key to highlight a contact/number,
then press the Right Soft Key Options for options
(available options depend on the type of message):
•Erase: Delete the highlighted message thread.
• Add to Contacts: (If the number is not already saved)
Save the phone number to Contacts.
•New Message: Create a new message.
• Manage Messages: Erase, Lock or Unlock, or set the
read status of messages in the Inbox.
• Sort Alphabetically: Display message threads by
contact/phone number.
• Messages Menu: Return to the Messaging menu.
• Social Networks: Update your status, or access
Facebook and Twitter to share posts, photos and links.
Viewing Messages by Time
When the Inbox View setting is set to Time, incoming
messages are stored in the Inbox, and sent messages are
stored in the Sent folder, sorted by time.
Page 62

Note: For information about the changing the Inbox View
setting, see “Messaging Settings” on page 61.
Inbox Folder
When the Inbox View setting is set to Time, incoming
messages are stored in the Inbox message folder by date
and time.
Note: The Inbox folder is only present when the Inbox View
setting is set to Time. For more information, see
“Messaging Settings” on page 61.
1. From the Home screen, press the
➔ Inbox.
2. Use the Directional Key to scroll through the list
of messages. Highlight a message, then press the Left
Soft Key Erase to delete the message, or press
OPEN to view the message. For more information,
see “Viewing Text Messages” on page 52 or “Viewing
Picture or Voice Messages” on page 53.
Messaging Key
3. While viewing the list of messages, use the
Directional Key to highlight a message, then
press the Right Soft Key Options for message
options (available options depend on the type of
message):
•Reply: Reply to the sender with a new message.
• Reply w. Copy: Reply to the sender, plus other
recipients if desired, and include a copy of the original
message.
•Forward: Send the message to another recipient.
•Add To Contacts: Save the number of the sender to
Contacts as a new entry or additional to an existing
entry.
• Extract Addresses: Display numbers, Email
Addresses, and URLs from the message, to call, send
an email, or open the web page.
• Message Info: Display details about the highlighted
message.
• Manage Inbox: Perform actions on messages,
including Erase, Lock, Unlock, Mark as Read, and Mark
as Unread.
Messages 56
Page 63

•Sort by Sender: List all messages in the Inbox by
Sender.
•Sort by Size: List all messages in the Inbox by Size.
Sent Folder
When the Inbox View setting is set to Time, outgoing
messages are stored in the Sent message folder by date and
time.
Note: The Sent folder is only present when the Inbox View
setting is set to Time. For more information, see
“Messaging Settings” on page 61.
1. From the Home screen, press the
➔ Sent.
2. Use the Directional Key to highlight a message,
then press the Left Soft Key Erase to delete the
message, or press OPEN to view the message. For
more information, see “Viewing Text Messages” on
page 52 or “Viewing Picture or Voice Messages” on
page 53.
57
Messaging Key
3. While viewing the list of messages, press the Right
Soft Key Options for message options (available
options depend on the type of message):
•Forward: Send the message to another recipient.
• Resend: Send the message again, to the original
recipient(s), plus new recipients if desired.
• Add To Contacts: Save the number of the sender to
Contacts as a new entry or additional to an existing
entry.
•Message Info: Display details about the message.
• Manage Sent: Perform actions on messages,
including Erase, Lock, or Unlock.
• Sort by Recipient: List messages by the first
addressee.
• Sort by Time/Sort by Type: List messages by type
(Text, Picture or Voice) or by time received.
Page 64

Drafts Folder
Drafts are messages that you’ve created, but have not yet
sent. You can return to the Drafts folder at any time to
review, edit or send a draft message.
1. From the Home screen, press the
➔ Drafts.
2. Use the Directional Key to scroll through the list
of messages. While viewing the list of messages, press
the Right Soft Key Options for message options
(available options depend on the type of message):
•Send: Send the message, as-is, to the listed recipients.
•Add To Contacts: Save the number of the recipient(s)
to Contacts as a new entry or additional to an existing
entry.
• Manage Drafts: Perform actions on messages,
including Erase, Lock, or Unlock.
• Sort by Recipient/Sort by Time: List all messages by
the first addressee, or by time created.
• Sort by Time/Sort by Type: List messages by type
(Text, Picture or Voice) or by time created.
Messaging Key
3. Use the Directional Key to highlight a message,
then press the Left Soft Key Erase to delete the
message, or press EDIT to edit the message.
Voicemail
From the Messaging menu, you can view the total of your
new voicemail messages, clear the voicemail counter, and
call voicemail to check messages.
1. From the Home screen, press the
➔ Voicemail.
2. On the VOICEMAIL screen, view the number of new
messages. Press CALL to dial voicemail to check
messages, or press the Left Soft Key Clear to clear
the voicemail counter.
Note: For more information about setting up and checking
voicemail, see “Voicemail” on page 12.
Messaging Key
Messages 58
Page 65

Mobile Email
Send and receive Email from popular services.
Note: Subscription, data usage or airtime charges may apply,
depending on your plan. Contact Verizon Wireless for
more information.
1. From the Home screen, press the
➔ Mobile Email.
2. Follow the prompts for signing into your account, and
subscribing to Mobile Email service.
3. Use the provider’s onscreen functions and options.
59
Messaging Key
Social Networks
Use the Social Networks feature to update Facebook or
Twitter, or access the mobile Facebook or Twitter sites.
Setting up Your Phone with Facebook or Twitter
Set up your phone to access Facebook and Twitter to share
posts, photos and links.
You can activate your phone with your Facebook or Twitter
account’s mobile account settings. Activating allows the sites
to send text messages to your phone, so you can receive
notifications and status updates, and allows you to update
your status from your phone.
From your account settings, follow the instructions in the
Mobile area to complete your phone registration. You can
also initiate registration from your phone, to receive a
confirmation code you can enter in the Mobile settings.
Initiating Registration from Your Phone
1. From the Home screen, press the Messaging Key
➔ Social Networks ➔ Update Status.
2. Enter text, then press SEND.
Page 66

3. Select sites to update. Use the Directional Key to
highlight sites, then press MARK, or press the
Right Soft Key Mark All to select Facebook and
Twitter. Once you make selections, these site(s) will be
updated automatically each time you use Update
Status. If you choose Always ask before update, your
phone will prompt you to choose site(s) each time you
use Update Status.
4. The site(s) will send a text message to your phone with
information about registration. Follow the instructions
to complete registration.
Updating Your Status
After you register your phone with Facebook or Twitter,
updating your status is easy and quick.
1. From the Home screen, press the
➔ Social Networks ➔ Update Status.
2. Enter text, then press SEND.
Messaging Key
3. Select sites to update. Use the Directional Key to
highlight sites, then press MARK, or press the
Right Soft Key Mark All to select Facebook and
Twitter. Once you make selections, these site(s) will be
updated automatically each time you use Update
Status. If you choose Always ask before update, your
phone will prompt you to choose site(s) each time you
use Update Status.
Accessing Facebook
From the Home screen, press the Messaging Key
➔ Social Networks ➔ Facebook.
Accessing Twitter
From the Home screen, press the Messaging Key
➔ Social Networks ➔ Twi tt er.
Messages 60
Page 67

Emergency Alerts
This device is designed to receive Wireless Emergency Alerts
from the Commercial Mobile Alert Service (CMAS).
Emergency Alerts are geographically-targeted, and alert
customers to imminent threats to their safety within their
area. There is no charge for receiving an Emergency Alert.
There are three types of Emergency Alerts:
• Presidential
• Imminent (Severe or Extreme)
• AMBER Alerts (missing persons)
Customers may choose not to receive Imminent Alerts and
AMBER Alerts. Presidential Alerts cannot be disabled. To
disable Imminent Threat Alerts (Extreme and Severe) and
AMBER Alerts, follow these instructions:
1. From the Home screen, press the
Key.
2. Press the Left Soft Key Settings ➔ Emergency
Alerts ➔ Receiving Alert.
3. All alerts are enabled by default (checkmark showing).
To disable alerts, highlight an alert and press MARK,
then press the Left Soft Key Done.
61
Messaging
Messaging Settings
Define settings for messages you send and receive with your
phone.
1. From the Home screen, press the
Key.
2. Press the Left Soft Key Settings for these options:
• Inbox View: Set the default message view. Choose
Time to display messages by time received, or
Contact to display messages by name or number (also
known as threaded view).
•Entry Mode: Choose a default text entry mode, from
T9 Word, T9 Palabra, Abc, ABC, or 123.
• Auto Save Sent: Choose the default save mode for
messages you send. Choose On to save all sent
messages, Off to discard sent messages, or Prompt to
have the phone prompt you each time.
• Auto Erase Inbox: Choose On to automatically replace
the oldest message of the same type when the Inbox
exceeds the maximum number of messages of that
type. Picture and video messages are replaced when
the phone’s memory is full. Choose Off to disable
automatic erasures.
Messaging
Page 68

• Messages Font Size: Set the default size for display
of message text to Normal or Large.
•TXT Auto View: Choose On to automatically display
text messages when they arrive, or Off to have the
phone prompt you.
• Multimedia Auto Receive: Choose On to
automatically accept new multimedia messages.
Choose Off to have the phone prompt you to download
new multimedia messages.
•Group Message: Choose default settings for
messages to multiple contacts. Select Group
Conversation or Individual Message.
• Domain Extensions: Create and manage a list of web
and Email extensions. Press the Left Soft Key Erase
to delete extensions. Press the Right Soft Key New to
create new extensions. To modify an extension,
highlight the extension, then press EDIT.
•Quick Text: Create and manage pre-loaded phrases to
insert into messages. Press the Left Soft Key Erase to
delete phrases. Press the Right Soft Key Options ➔
New to add new phrases. To modify a phrase, highlight
the phrase and press EDIT. To rearrange the order of
Quick Text phrases, press the Right Soft Key Options
➔ Move.
• Emergency Alerts: This device is designed to receive
Wireless Emergency Alerts from the Commercial Mobile
Alert Service (CMAS), including Presidential Alerts,
Imminent Alerts (Severe or Extreme), and AMBER
Alerts (missing persons). You may choose not to
receive Imminent and AMBER alerts, but Presidential
Alerts cannot be disabled. All alerts are enabled by
default (checkmark shown). For more information about
Emergency Alerts, press the Right Soft Key Help, or
see “Emergency Alerts” on page 61.
– Receiving alerts: All alerts are enabled by default
(checkmark showing). To disable alerts, h
MARK
alert and press
Done
to save the configuration
, then press the
.
ighlight an
Left Soft Key
Messages 62
Page 69

– Alert Reminder: Highlight an interval for reminders
that you have a CMAS message, then press SET to
save the setting.
– Alert Vibrate: Highlight On to enable vibration for
Emergency Alerts, or Off to disable, then press SET
to save the setting.
• Voicemail #: The default voicemail speed dial number
is *86. You can modify the number to add Waits or
Pauses, plus any other characters used to access
voicemail.
• Callback #: Choose On to add a callback phone
number to your messages, and set the phone number.
Choose Off to omit a callback number (you can
manually add a callback number when composing
messages).
•Signature: Choose Custom to add a signature to all
messages, then use the Directional Key to move to
the signature field to create the signature. Choose
None to disable signatures.
63
• Delivery Receipt: Choose whether you are notified
when a message you send is delivered. Choose On to
be notified for every message, or Off to disable
notification (you can set an optional delivery receipt for
individual messages).
Page 70

Section 7: Bluetooth
Bluetooth is a short-range wireless communications
technology capable of exchanging information over a
distance of about 30 feet, without a physical connection.
You don't need to line up the devices to send information
with Bluetooth. If the devices are in range, you can exchange
information between them, even if they are located in
different rooms.
Tip: When paired with a Bluetooth headset, you can press the
multi-function key on the headset to use Voice
Commands, including voice dialing.
Bluetooth Service Profiles
Bluetooth profiles are specifications for services supported
by individual devices. Profiles improve the ability of different
devices to work together.
Note: For more information about compatible Bluetooth
devices, visit the Verizon Wireless web site at
verizonwireless.com.
Your phone supports these Bluetooth profiles:
• Headset: HSP profile supports the use of a compatible
Bluetooth headset for mono voice.
• Handsfree: HFP profile supports Bluetooth headsets, and
may also support other installed compatible Bluetooth
devices with speakerphone capabilities, such as car kits or
conference room devices.
• Phonebook Access: PBAP profile allows sharing of your
name card and contact entries as vCards with compatible
Bluetooth devices.
• Object Push: OPP profile allows sending and receiving of
contact name cards (vCard), calendar events (vCalendar),
and other non-protected data between devices.
• Serial Port: SPP profile allows a remote Bluetooth device
to act as a virtual serial port.
Tip: You can find a list of supported profiles on your phone.
Press Menu ➔ Settings ➔ Bluetooth ➔ Options ➔
Supported Profiles.
Bluetooth 64
Page 71

Turning Bluetooth On or Off
Turn Bluetooth on to exchange information with a Bluetooth
device. To save battery life, or in situations where use of
wireless devices is prohibited, turn Bluetooth off.
1. From the Home screen, press the Left Soft Key
Menu ➔ Settings ➔ Bluetooth.
2. Press the Left Soft Key Set On or Set Off.
Note: When Bluetooth is turned on, the Bluetooth On icon
displays at the top of the screen.
Bluetooth Options
Use Bluetooth options to view and change your phone’s
name, display supported profiles, and set visibility and
pairing.
1. From the Home screen, press the Left Soft Key
Menu ➔ Settings ➔ Bluetooth.
2. Press the Right Soft Key Options for these options:
•My Phone Info: Enter a custom name for your phone,
visible to other Bluetooth devices during searches, and
view other information about your phone.
65
• Discovery Mode: Select On to allow other Bluetooth
devices to detect your device, or Off for no visibility.
Note: After selecting On, your phone is discoverable for one
minute, then Discover Mode automatically resets to Off.
• Supported Profiles: View a list of supported Bluetooth
profiles and their descriptions. Highlight a profile and
press VIEW to see a description.
•Searching Setting: Choose types of devices to search
during pairings, from All, Audio Device, PC, or Phone.
• Auto Pairing: Choose On to allow your phone to pair
with other Bluetooth devices without entering a
passkey, or Off to prevent automatic pairing.
Page 72

Adding a New Device
Search for a Bluetooth device and pair with it, to exchange
information between your phone and the device.
1. From the Home screen, press the Left Soft Key
Menu ➔ Settings ➔ Bluetooth ➔ Add New
Device. Bluetooth turns on, if it is not already on.
2. At the prompt, activate the target device’s Bluetooth
discoverable mode, then press OK.
3. Your phone searches for discoverable Bluetooth
devices and displays them.
4. Use the Directional Key to highlight the target
device and press PA IR. Follow the prompts:
• Auto Pairing: If you enabled Auto Pairing in Bluetooth
Options, and the selected device supports it, your
phone sends a default passkey to the device and pairs
automatically.
• Pairing with Passkey: Enter a passkey, then press
SET. Follow the prompts on the target device to confirm
the passkey and complete the pairing.
5. After pairing, you can continue on to send information
to the paired device.
6. To configure pairing options for the new paired device,
highlight the new device and press the Right Soft Key
Options:
7. Use the Directional Key to highlight the new
device and press the Right Soft Key Options to set
options for this paired device:
• Remove Device: Remove this device from your
phone’s pairing list.
• Rename Device: Change the name of this device as it
appears in the pairing list.
•Incoming Security: Choose Always Ask or Always
Connect for future pairings with this device.
• Service Discovery: View the service profiles
supported for pairing with this device.
•Device Info: View information about the paired device.
Bluetooth 66
Page 73

Section 8: Media Center
Media Center includes applications for downloading,
creating, viewing, and managing multimedia content, right
on your phone.
From the Home screen, press the Left Soft Key
Menu ➔ Media Center.
Note: Before downloading multimedia content, check
available memory. For more information, see “Memory”
on page 119.
Search
Launch the Browser to go to the Search page.
Note: If full readout or Browser readout is turned on, the first
time the Browser launches a Browser Tutorial displays
to show you how to use the Browser TTS function.
67
Tunes & Tones
Tunes & Tones offers features and applications for managing
songs, tones and sounds.
Get Ringtones
Download applications to browse and download new
ringtones.
Note: Charges apply for downloading ringtones and ringback
tones. Consult Verizon Wireless for more information.
1. From the Home screen, press the Left Soft Key
Menu ➔ Media Center ➔ Tunes & Tones ➔
Get Ringtones.
Page 74

2. Download an application for finding ringtones, or use
Verizon Tones. Use the Directional Key to
highlight an option, then press OK to proceed:
• Get New Applications: Select and download an
ringtone application, then follow the prompts to
download and install the application and find ringtones.
• Verizon Tones: Follow the prompts to download the
Verizon Tones application and subscribe to Verizon
Tones se r vice.
Get Ringback Tones
Ringback Tones play to callers while the system is
connecting their call. Use Get Ringback Tones to download
new tones.
1. From the Home screen, press the Left Soft Key
Menu ➔ Media Center ➔ Tunes & Tones ➔
Get Ringback Tones.
2. Follow the prompts to download the Verizon Tones
application and subscribe to Verizon Tones service.
My Ringtones
Download and manage ringtones for use as alerts for calls
and messages.
1. From the Home screen, press the Left Soft Key
Menu ➔ Media Center ➔ Tunes & Tones ➔
My Ringtones.
2. Use the Directional Key to highlight a ringtone,
then choose one of these actions:
• Press the Left Soft Key Set As to assign the sound
as the default Ringtone, as a ringtone for a Contact
ID, Alert Sounds for All Messages, TXT Message,
Multimedia Message, Voicemail, or Fake Call
Voice.
• Press PLAY to hear the ringtone.
• Press the Right Soft Key Info for details about the
ringtone.
3. To download new ringtones, use the Directional Key to
highlight Get New Ringtones, then press . For
more information, see “Get Ringtones” on page 67.
Media Center 68
Page 75

My Sounds
In My Sounds, record and manage sounds for use as alerts
for calls and messages.
1. From the Home screen, press the Left Soft Key
Menu ➔ Media Center ➔ Tune s & Tones ➔
My Sounds.
2. Use the Directional Key to highlight a sound, then
choose one of these actions:
• Press the Left Soft Key Set As to assign the sound
as the default Ringtone, or as a ringtone for a Contact
ID, as Alert Sounds for All Messages, TXT
Message, Multimedia Message, Voicemail, or
Fake Call Voice.
• Press PLAY to hear the sound.
69
• Press the Right Soft Key Options for options.
Available options depend on the type of sound.
– Send: Attach the sound to a new Picture Message.
– Send via Email: Attach the sound to a Mobile Email
(for sounds you recorded).
– Rename: Change the name of the sound file (for
sounds you recorded).
– Lock/Unlock: Protect the sound file from deletion,
or remove protection (for sounds you have recorded).
– Erase: Delete the highlighted sound file (or sounds
you recorded).
– Erase Files: Delete sound files you have recorded
(pre-loaded sounds cannot be erased).
– File Info: View details about the sound file.
Page 76

Recording a New Sound
1. From the Home screen, press the Left Soft Key
Menu ➔ Media Center ➔ Tunes & Tones ➔
My Sounds.
2. Use the Directional Key to highlight Record New,
then press .
3. Press the Left Soft Key RecTime to set the
recording time. Use the Directional Key to highlight an
option, then press :
• Limit for Send: Set the time limit for the new sound to
1 minute, suitable for sending in a Voice or Picture
Message.
•For Save: Remove time limit for the new sound.
4. Use these actions to record a sound file:
• Press OK to start recording.
• Press the Left Soft Key Pause to pause recording.
Press the Left Soft Key Resume to restart recording.
5. Press STOP to stop recording and save the sound.
Pictures
Pictures offers features and applications for creating,
downloading, and managing pictures on your phone.
Taking Pictures
Your phone’s built-in Camera takes pictures in JPEG format.
From the Camera, you can send pictures as attachments to
email or by Bluetooth, or upload pictures to your social
networks.
You can take pictures with the flip open or closed.
Caution! Do not take pictures of people without their
permission.
Do not take pictures in places where cameras are not
allowed.
Do not take pictures in places or in a manner where
you may interfere with another person’s privacy.
Media Center 70
Page 77

Taking Pictures with the Phone Open
1. From the Home screen, press the Camera Key on
the right side of the phone.
– or –
From the Home screen, press the Left Soft Key
Menu ➔ Media Center ➔ Pictures ➔
Tak e Pi ctu re .
2. Set Options, if desired. For more information, see
“Camera Options” on page 76.
3. Using the display screen as a viewfinder, compose your
picture by aiming the lens at your subject.
4. Press the Camera Key or TAK E to take the
picture.
5. After taking a photo, use the soft keys for these
options:
• Press the Right Soft Key Erase to delete the new
photo.
• Press Send to resize the new photo and attach it to
a new picture message.
• Press the Left Soft Key Save to save the picture to
My Pictures.
71
Taking Pictures with the Phone Closed
Take pictures, including self-portraits, without opening the
flip.
1. With the phone closed, press and hold the
Camera Key on the right side of the phone.
2. Using the front screen as a viewfinder, compose your
picture by aiming the lens at your subject.
3. Press the Camera Key to take the picture. The
picture is automatically saved to My Pictures.
Page 78

Get Pictures
Download new pictures and wallpaper from the Media
Center server.
1. From the Home screen, press the Left Soft Key
Menu ➔ Media Center ➔ Pictures ➔
Get New Pictures.
2. Use the Directional Key to highlight Get New
Applications, then press .
3. Use the Directional Key to highlight an application,
then press OK.
4. Follow the prompts to download and install the
application.
5. Follow the application’s prompts to browse and
download pictures.
Note: Charges may apply when downloading pictures.
Consult Verizon Wireless for information.
My Pictures
View and manage pictures pre-loaded on your phone, taken
with the built-in camera, or downloaded to your phone.
Note: Pictures protected by copyright, including the pictures
pre-loaded on your phone, cannot be uploaded or sent
as a message attachment.
Viewing and Managing Pictures
1. From the Home screen, press the Left Soft Key
Menu ➔ Media Center ➔ Pictures ➔
My Pictures.
– or –
From the Home screen, press the Left Soft Key
Menu ➔ My Pictures.
2. Use the Directional Key to browse the list of
photos. To view a photo, highlight the photo, then press
VIEW.
Media Center 72
Page 79

3. While browsing photos, press the Right Soft Key
Options for these options:
•Send: Send the highlighted picture as an attachment to
a Picture Message, Via Email, Via Bluetooth, To
Blogs, or To Facebook. (For pictures you have taken)
•Set As: Set the picture as the Main Wallpaper (Home
screen), as the Front Wallpaper, or as Picture ID for
a contact.
•Take Picture: Launch the Camera.
• Full View: Display the picture in full-screen mode.
• Manage Pictures:
– Erase: (For pictures you have taken.) Use the
Directional Key to highlight a picture, then press
MARK to mark the picture for deletion. To mark all
pictures, press the Right Soft Key Mark All. After
marking, press the Left Soft Key Done to erase.
– Lock: Protect the highlighted picture from changes
or deletion.
– Unlock: Remove protection from the highlighted
picture.
73
•Rename: Change the name of the highlighted picture
file (for pictures you have taken).
• Slide Show: Watch a slide show of all pictures in My
Pictures. Use the Directional Key to select a time to
display each picture, then press PLAY. While watching
the slide show, control playback with the Left Soft Key
Pause/Resume/Replay and OK Key. To close the
slide show, press the Right Soft Key Done.
• File Info: View details about the highlighted picture file.
• Get New Pictures: Launch Get Pictures to download
pictures. For more information, see “Get Pictures” on
page 72.
Page 80

Editing Pictures
1. From the Home screen, press the Left Soft Key
Menu ➔ Media Center ➔ Pictures ➔
My Pictures.
2. Use the Directional Key to browse the list of
photos. Highlight the photo, then press VIEW to
open it for editing.
3. Press the Right Soft Key Options for editing
options (other options appear in the list; for more
information see “Viewing and Managing Pictures” on
page 72):
• Zoom/Rotate: Adjust the zoom ratio of the picture by
pressing the Volume Key, or press ROTATE to change
the picture’s orientation. Press the Right Soft Key to
select Fit to Screen, or Preview On/Preview Off, to
control whether a preview of your changes appears on
the screen in a thumbnail.
•Edit: Use tools to modify the selected picture.
– Effects: Choose an effect to apply to the picture,
from Normal, Black & White, Sepia, Green, Blue,
Sketch Effect, Emboss, Soft-Glamorous, SoftElegant, Soft-Charismatic, Spring Sun, Dawn,
Fright, Cinema-Normal, Cinema-Black & White,
or Cinema-Old.
– Decorate: Press the Left Soft Key Add to add a
Frame, Clip Art, or Tex t to the picture, then press
SAVE.
– Revision: Adjust the Brightness, Saturation,
Contrast or Blur.
– Merge: Combine two pictures. Use the Directional
Key to highlight Main, then press the Left Soft Key
Set and select a picture. Repeat the process for the
second picture, then press MERGE to combine the
pictures.
– Rotate/Flip: Rotate the selected picture in
incremental steps or flip the picture horizontally or
vertically.
Media Center 74
Page 81

•Rename: Change the name of the picture.
•Lock/Unlock: Lock the picture to protect it from
deletion, or Unlock it.
• Slide Show: Watch a slide show of all pictures in My
Pictures. Use the Directional Key to select a time to
display each picture, then press PLAY. While watching
the slide show, control playback with the Left Soft Key
Pause/Resume and OK Key. To close the slide show,
press the Right Soft Key Done.
• File Info: View details about the picture.
Sharing Pictures
Send pictures you’ve taken or downloaded to your phone as
an attachment to a Picture Message or Email, via Bluetooth,
or post them to a blog or to Facebook.
Note: Pictures protected by copyright, including the pictures
pre-loaded on your phone, cannot be uploaded or sent
as a message attachment.
75
1. From the Home screen, press the Left Soft Key
Menu ➔ Media Center ➔ Pictures ➔
My Pictures.
2. Use the Directional Key to browse the list of
photos. To view a photo, highlight the photo, then press
VIEW.
3. While browsing and viewing photos, press the Right
Soft Key Options ➔ Send for sharing options.
These options will only appear for pictures that can be
sent, such as those you have taken with the Camera,
or downloaded.
Page 82

4. Choose an option:
• Picture Message: Create a new Picture Message with
the photo attached. For more information, see
“Creating and Sending Messages” on page 48.
• Via Email: Create a new Email with the photo attached.
For more information, see “Mobile Email” on page 59.
Use the
• Via Bluetooth:
pictures, then press
Right Soft Key Mark All
Soft Key Done, and follow the prompts. For more
information, see “Bluetooth” on page 64.
• To Blogs: Post pictures to a blog of your choice.
Press the Left Soft Key New to create a link to a
new blog.
• To Facebook: Post a picture to Facebook, using your
personalize upload email address. You will need to set
up your phone with your Facebook account before
posting; for more information see the Mobile account
information of your Facebook account.
Directional Key
MARK
to mark them, or press the
. After marking, press the
to highlight
Left
Camera Options
Use Camera Options to customize your photos.
1. From the Home screen, press the Camera Key on
the right side of the phone.
– or –
From the Home screen, press the Left Soft Key
Menu ➔ Media Center ➔ Pictures ➔ Ta ke
Picture.
2. Press the Right Soft Key Options for options, then
use the Directional Key to scroll Left or Right, and
to configure options:
• Shooting Mode: Select Single to take one picture at a
time, or Continuous, to take multiple pictures with
each press of the Camera Key.
•Resolution: Choose a resolution for new photos, from
1280x960, 640x480, or 320x240.
•Brightness: Choose a brightness level (1–9).
• White Balance: Choose a setting for the light source,
from Auto, Daylight, Incandescent, Fluorescent, or
Cloudy.
Media Center 76
Page 83

•Exposure: Select a setting for measuring light before
taking a picture, from Matrix, Center-weighted, or
Spot.
• Effects: Choose an effect to add to photos, from None,
Black & White, Antique, or Negative.
Night Shot
•
•Timer: Set a delay between pressing the Camera Key
• Viewfinder Mode: Choose to display icons or a
•Preview Mode: Choose a mode for viewing pictures
77
: Select On to adjust exposure for low light
Off
conditions or
and taking the picture.
guideline on the viewfinder.
after you take them, from Full Screen or Standard
Screen.
to use available light.
•Settings:
– Photo Quality: Set picture quality (Normal, Fine, or
Superfine).
– Review: Control whether the picture is displayed
after you take it, before saving.
– Shutter Sound: Play a click when pressing the
Camera Key.
–
Auto Name
automatically.
–
Shortcuts
quickly access Camera settings when taking a
picture.
: Turn On to have new pictures named
: View shortcuts for using keypad keys to
Page 84

Games
Play fun and interesting Games, right on your phone.
1. From the Home screen, press the Left Soft Key
Menu ➔ Media Center ➔ Games.
2. Use the Directional Key to highlight a game, then
press OK to launch the game.
3. To browse and download new games, use the
Directional Key to highlight Get New Applications.
Choose Subscription or Unlimited, then follow the
prompts to download and install games.
Internet
Browse the web, right from your phone. For more
information, see “Internet” on page 87.
From the Home screen, press the Left Soft Key
Menu ➔ Media Center ➔ Internet.
Note: If full readout or Browser readout is turned on, the first
time the Browser launches a Browser Tutorial displays
to show you how to use the Browser TTS function.
Browse and Download
Browse for new applications to download to your phone.
Note: Some applications may require a subscription or charge
at download.
1. From the Home screen, press the Left Soft Key
Menu ➔ Media Center ➔ Browse &
Download.
2. The list of default applications displays. Use the
Directional Key to highlight an application, or
highlight Get New Applications, then press OK.
3. Follow the prompts to download and install the
application.
Note: Default applications include Backup Assistant Plus,
Mobile E-mail, and VZ Navigator
default applications on your phone, you can launch
them from Browse & Download, or you are prompted to
download the first time you select the application in the
Menu.
®
. Since these are
Media Center 78
Page 85

Extras
Browse and download extra items to your phone.
1. From the Home screen, press the Left Soft Key
Menu ➔ Media Center ➔ Extras.
2. Use the Directional Key to highlight an
application, or highlight Get New Applications, then
press OK.
3. Follow the prompts to download and install the
application.
79
Page 86

Section 9: Tools
Voice Commands
Voice Commands is advanced speech recognition software
that recognizes your spoken commands to dial phone
numbers, create messages, and launch phone features such
as Contacts, Calendar and My Pictures. To use Voice
Commands, speak naturally into your phone, at a distance of
3-12 inches. There is no need to “train” Voice Commands, it
is designed to recognize natural speech.
At each step, Voice Commands displays a list of available
commands. If Voice Commands does not recognize your
command, it will prompt you to confirm.
For more information about configuring Voice Commands
settings, see “Voice Commands” on page 108.
There are several ways to launch Voice Commands:
• From the Home screen, press and hold the Voice
Commands Key.
• With the phone closed, press and hold the
Speakerphone Key.
• From the Home screen, press the Left Soft Key Menu
➔ Tools ➔ Voice Commands.
Using Voice Commands
1. From the Home screen, press and hold the Voice
Commands Key.
2. At the prompt “Please say a command”, speak a
command. Available commands display for reference:
• Call <Name or #>: Speak the name of a contact or a
number.
Send Message <Name or #>
•
message to a number or to someone in your Contacts List.
•Go To <Menu>: Launch a Menu item.
•Check <Item>: Speak the name of an item to check
its status.
• Contacts <Name>: Speak a contact’s name to display
the record.
•Search: Open a search web page.
•Redial: Call the last number you dialed.
• Hands-free Mode On or Hands-free Mode Off:
Enable or disable Hands-free Mode.
: Send a text, picture, or video
Tools 80
Page 87

•My Verizon: Check your account status.
•Help: Get spoken help for using Voice Commands.
Tip: For help using Voice Commands, highlight a command on
screen and press the Left Soft Key Info.
Calculator
Normal
Perform simple mathematical calculations.
1. From the Home screen, press the Left Soft Key
Menu ➔ Tools ➔ Calculator ➔ Normal.
2. Enter the first number in your equation, up to 15 digits.
3. Use the Directional Key to enter an operator:
•Up: [ + ] Addition
•Down: [ - ] Subtraction
•Right: [ x ] Multiplication
•Left: [ ÷ ] Division
While entering equations, you can use these options:
• Press the Left Soft Key Clear or the
Clear Key to delete entries.
81
• Press the Right Soft Key Oper. to enter Left [ ( ]
and Right [ ) ] parentheses or raise a number by a
power.
• Press after a number to change the sign.
• Press to enter a decimal point.
4. Press to perform the calculation.
Tip Calculator
Calculate a tip and how much each person should pay.
1. From the Home screen, press the Left Soft Key
Menu ➔ Tools ➔ Calculator ➔
Tip Calculator.
2. Use the Directional Key to move to each field:
• Bill: Enter the amount of the bill.
•Tip: Enter the tip percentage.
•# Paying: Enter the number of people paying.
Tip: Press to enter a decimal point.
3. As you enter numbers in the fields, the Calculator
automatically displays the Tip, To tal bill including the
tip, and Each person’s share of the bill.
Page 88

Converter
Convert values you enter into selected units.
1. From the Home screen, press the Left Soft Key
Menu ➔ Tools ➔ Calculator ➔ Converter.
2. Use the Directional Key to highlight a conversion
type, from Tem pe ra tu re, Length, Weight, Area,
Volume, or Currency, then press .
3. Use the Directional Key to highlight the From units
field, then press the Directional Key Left or Right to
choose the units for conversion.
4. Use the Directional Key to highlight the From quantity
field, then enter the quantity.
Tip: Press to enter a decimal point. Press after a
number to change the sign.
5. Use the Directional Key to highlight the To units field,
then press the Directional Key Left or Right to choose
the units for conversion.
Calendar
Schedule events, with reminders, so that you can track
them. Set alarms for events to be alerted of an upcoming
event.
1. From the Home screen, press the Left Soft Key
Menu ➔ Tools ➔ Calendar.
2. From the Calendar screen, find an event:
• Use the Directional Key to highlight a date on the
calendar.
• Press the Right Soft Key Options ➔ Go To Date.
• Press the Right Soft Key Options ➔ Search.
3. While viewing the event list, press the Right Soft Key
Options for event options:
• Monthly View: Return to the month view.
•Go To Date: Find a date on the calendar.
•Erase: Delete the event from the calendar.
•Erase all: Delete all events from the calendar.
• Erase All Old: Delete events that are in the past.
•Search: Enter keywords to find an event.
•Copy Event: Create a duplicate of an event.
• Send via Bluetooth: Mark event(s) to send as
vCalendar object(s) to a Bluetooth device.
Tools 82
Page 89

Adding an Event
1. From the Home screen, press the Left Soft Key
Menu ➔ Tools ➔ Calendar.
2. Press the Left Soft Key New.
3. On the NEW EVENT screen, use the Directional
Key to highlight each field, then enter the details:
• Subject: Enter the name of the event.
•Start Time and End Time: Enter the start and end
times, then press the Directional Key to set am or pm.
• Start Date and End Date: Enter the starting and
ending dates for the event.
•Recurrence: Press the Left Soft Key Set to set the
frequency of the event.
• Alert Time: Press the Directional Key to choose a
time period before the event that you want to be
alerted.
•Reminder: Press the Directional Key to set a
reminder.
•Alert Tone: Press the Left Soft Key Set to choose
a tone.
•Vibrate Press the Directional Key to choose whether
vibration accompanies the Alert Tone.
4. Press SAVE to save the event.
83
Alarm Clock
Set up to ten alarms, to go off once, or periodically at the
same time. Once set, alarms are easy to change or turn off.
Note: The Alarm icon will appear in the Event Status line on
the Home screen when the mobile phone has an
alarm event.
Setting An Alarm
1. From the Home screen, press the Left Soft Key
Menu ➔ Tools ➔ Alarm Clock.
2. For the first alarm you set, press ADD, then use the
Directional Key to highlight fields to enter alarm
details. For additional alarms, press the Left Soft Key
Add to create a new alarm.
3. Configure options for the alarm:
•Alarm: Use the Directional Key
On or Off.
•Time: Enter the time for the alarm. Use the
Directional Key
to select am or pm.
to toggle the alarm
Page 90

• Frequency: Press the Left Soft Key Set, then choose
whether the alarm repeats:
– Once: The alarm sounds only once at the specified
time.
– Daily: The alarm sounds every day.
– Weekdays: The alarm sounds Monday through
Friday.
– Weekends: The alarm sounds Saturday and Sunday.
– Custom: Choose days of the week for the alarm to
sound.
• Snooze: Press the Left Soft Key Set, then set snooze
options for delaying a ringing alarm.
•Ringer: Use the Directional Key to set a type of alert
tone, and select a ringtone.
4. When you finish entering information, press SAVE.
Disabling or Enabling an Alarm
You can turn an alarm off to control whether the alarm goes
off, without changing any other settings.
1. From the Home screen, press the Left Soft Key
Menu ➔ Tools ➔ Alarm Clock.
2. Use the Directional Key to highlight the alarm you
wish to turn off.
3. Press the Right Soft Key Options, then select Tu rn
Off or Tur n On.
Erasing Alarms
1. From the Home screen, press the Left Soft Key
Menu ➔ Tools ➔ Alarm Clock.
2. Press the Right Soft Key Options, then select Erase to
erase the highlighted alarm, or Erase All to delete all
alarms. Follow the prompts to complete the action.
Tools 84
Page 91

Stop Watch
Measure lap times and total elapsed time.
1. From the Home screen, press the Left Soft Key
Menu ➔ Tools ➔ Stop Watch.
2. Press START to start timing.
3. Press the Left Soft Key Lap to record lap times.
4. Press STOP to stop timing.
5. Press the Right Soft Key Reset to erase recorded
times.
85
World Clock
View the local time, and the time in time zones around the
world.
1. From the Home screen, press the Left Soft Key
Menu ➔ Tools ➔ World Clock.
2. Choose a time zone with one of these methods:
• Use the Directional Key to scroll through the time
zones around the world.
• Press the Left Soft Key Cities to select from a list
of supported cities. Select a city and press OK to view
your entry.
3. To select the displayed time zone, press OK.
4. To enable or disable Daylight Savings Time for the
displayed times, press the Right Soft Key to toggle
between DST On and DST Off.
Page 92

Notepad
Create, store and edit notes in Notepad.
1. From the Home screen, press the Left Soft Key
Menu ➔ Tools ➔ Notepad.
2. To add a new note, press the Left Soft Key Add,
then enter the note, up to 130 characters. For more
information, see “Entering Text” on page 24.
3. When you’re finished entering the note, press
SAVE.
Managing Notes
1. From the Home screen, press the Left Soft Key
Menu ➔ Tools ➔ Notepad.
2. Press the Directional Key to highlight a note, then
press the Right Soft Key Options to choose
options:
•Edit: Modify the highlighted note.
•Erase: Delete the highlighted note.
•Erase Notes: Mark multiple notes for deletion. Press
MARK to mark a specific note to be erased or
press the Right Soft Key Mark All. Press the
Left Soft Key Done to delete the notes.
•Lock/Unlock: Locks or unlocks the entry to prevent
deletion.
Phone Search
Search for items on your phone.
1. From the Home screen, press the Left Soft Key
Menu ➔ Tools ➔ Phone Search.
2. Enter characters to use as criteria for your search. For
more information, see “Entering Text” on page 24.
3. Use the Directional Key to highlight categories to
search, then press MARK or the Right Soft Key
Mark All to select them, then press the Left Soft
Key Done.
4. Press OK to search and display results. Highlight a
result and press VIEW to access the item.
Tools 86
Page 93

Section 10: Internet
This section outlines the web and social networking
applications available on your phone.
Internet
Browse the web from your phone.
Note: When the Data Call icon appears in the
Annunciator Line, you are connected to the Internet and
billed accordingly. Rates and prices vary according to
your service contract. For more information, contact
Verizon Wireless.
87
Launching Internet
Note: If full readout or Browser readout is turned on, the first
time the Browser launches a Browser Tutorial displays
to show you how to use the Browser TTS function.
From the Home screen, press the Directional
Key Left.
– or –
From the Home screen, press the Left Soft Key
Menu ➔ Internet.
Internet launches and displays the Verizon home page.
Exiting Internet
To exit Internet, press the End/Power Key.
Page 94

Entering a URL
Enter a URL, or web address, to go to the web page or create
a Favorite bookmark.
1. From the Home screen, press the Directional Key
Left. Internet launches and displays Verizon Services.
2. Press the Right Soft Key Menu, and then select Go
to URL.
3. Use the Directional Key to move the cursor to the
URL Address field, where the http:// prefix is entered
for you, and enter the web address.
4. Use the Directional Key to move the cursor to one of
these options, and then press :
•Go: To go to the web address.
• Add to Favorites: To save the URL to your Web
Favorites.
Navigating Internet
Use your phone’s command keys to navigate web content.
Directional Key: Press in any direction to move
the cursor, to scroll through lists and highlight
options.
OK Key: Press to select a highlighted item, or to
accept a prompt.
End/Power Key: Press to exit Internet and return
to the Home screen.
Send Key: Press to dial a highlighted number.
CLR Key: Press once to back up one page. Press
and hold to go back to Internet home page.
When entering text, press to clear the last
character. Press and hold to completely clear the
text field.
Numbers 1 - 0: Use the number keys to select
numbered list items, or enter numbers in text
fields.
Internet 88
Page 95

Left Soft Key: The Left Soft Key function depends
on the type of content that’s highlighted. For
example:
• Open: Press to go to the highlighted URL or
link. Or press to open a list of items, and then
use the Directional Key to highlight an item.
Press the Left Soft Key again, or press .
• Enter: Press to insert the cursor into a
text field.
• OK: Press to accept the text in a text field.
Right Soft Key: The Right Soft Key function
depends on the type of content that’s highlighted.
For example:
• Menu: Press to display a list of web options.
89
Using Favorites
While browsing the web, you can bookmark a page to
quickly and easily access it in the future.
Accessing Favorites
Access Favorites directly from the VZW Today home page:
1. From the Home screen, press the Left Soft Key
Menu ➔ Internet. Internet launches and displays
VZW Today home page.
2. Use the Directional Key to highlight Favorites, and
then press the Left Soft Key Open or to launch
Favorites.
Adding Favorites
1. From the Home screen, press the eft Soft Key
Internet. Internet launches and displays VZW Today
home page.
2. Use the Directional Key to highlight Favorites,
and then press the Left Soft Key Open.
3. Use the Directional Key to highlight ADD FAVORITES,
and then press the Left Soft Key Open.
Page 96

4. On the Add Link page, use the Directional Key to
move the cursor to the Name of this link: field, and
then enter a name for the Favorite.
5. Use the Directional Key to move the cursor to the
Address (URL): field, and then enter the URL for the
web page.
6. Use the Directional Key to move the cursor to the
Add to Favorites button, and then press the Left Soft
Key Open or .
Managing Favorites
1. From the Home screen, press the eft Soft Key
Internet. Internet launches and displays VZW Today
home page.
2. Use the Directional Key to highlight Favorites,
and then press the Left Soft Key Open or .
3. Use the Directional Key to highlight MANAGE
FAVORITES, and then press the Left Soft Key Open
or .
4. Under My Folders, use the Directional Key to
highlight an option, and then press the Left Soft Key
Open or :
•Create: Make a new folder on the Favorites page for
organizing your Favorites.
•Delete: Erase a folder from the Favorites page.
•Rename: Change the name of a folder on the Favorites
page.
5. Under My Links, use the Directional Key to highlight
an option, and then press the Left Soft Key Open or
:
•Add: Create a new Favorite.
•Delete: Erase a Favorite.
•Move: Change the folder location of a Favorite.
•Edit: Modify a Favorite.
•Reorder: Change the sorting order of Favorites.
Internet 90
Page 97

Internet Menu
While browsing, press the Right Soft Key Menu to
choose from a list of menu options:
1. From the Home screen, press the Directional Key
Left. Internet launches and displays My Verizon.
2. Press the Right Soft Key Menu for these options:
•VZW Home: Go to the VZW Today Internet home page.
•Add Favorite: Save the URL of the current page to
Favorites. For more information, see “Adding
Favorites” on page 89.
•Search: Enter keywords to search the web.
•Go to URL: Enter a URL address to go directly to a
page.
•Show URL: Display the URL for the current page.
•Back: Go to the previous page.
•Read again: Readout the web page content again.
(This option is only available when full readout or
browser readout is set to on.)
91
• Manage Memory: Choose Clear Cache to delete the
cache of opened pages, Clear History to delete the list
of recently-viewed pages, Clear Cookies to delete web
cookies, or Autofill to clear autofill memory.
•Settings: Choose settings to customize Internet to your
preferences. For more information, see “Internet
Settings” on page 91.
•Advanced: Choose About to view information about
Internet, Refresh to reload the current web page,
History to view recently-viewed pages, or Encryption
for encryption settings.
Internet Settings
Use Internet settings to customize Internet to your
preferences.
1. From the Home screen, press the Directional Key
Left. Internet launches and displays My Verizon.
Page 98

2. Press the Right Soft Key Menu ➔ Settings for
these options:
•Images: Check the check box to turn off browser
images.
•Restart Browser: Re-launch Internet.
• Scroll Mode: Choose Scroll Mode to select Block or
Smooth scrolling with the Directional Key. Choose
Scroll Speed to set the speed of scrolling with the
Directional Key to Fast, Medium, or Slow.
• Send Referrer: Choose ON or OFF to control sending
of referrer message.
• Key Press Timeout: The length of time Internet will
wait before a key press times out. Choose Fast,
Medium, Slow, or OFF.
• Connection Timeout: Set the length of time Internet
will wait for a page to load before timing out, from 30
seconds or 60 seconds.
Placing a Call from Internet
You can place a call directly from a phone number on a web
page, while using Internet.
1. From the Home screen, press the Directional Key
Left. Internet launches and displays Verizon Services.
2. Locate the desired telephone number on a web page,
and then use the Directional Key to highlight the
phone number.
3. Press the Left Soft Key Call or to call the phone
number.
4. To end the call, press the End/Power Key to
return to the web page in Internet.
Tip: If you make or answer a call while using Internet, the web
session is suspended during the call. When the call ends,
your Internet session resumes at the last web page.
Internet 92
Page 99

Section 11: Settings
My Verizon
My Verizon connects to the Verizon Wireless Mobile Web,
where you can manage your account and browse the web.
From the Home screen, press the Left Soft Key
Menu ➔ Settings ➔ My Verizon.
Volume
Set the default Volume for all the sounds on your phone.
1. From the Home screen, press the Left Soft Key
Menu ➔ Settings ➔ Volume.
2. Press the Volume Key or Directional Key Up or
Down to highlight a volume level, then press SET:
•High: All sounds play at High volume.
•Medium High: All sounds play at medium high
volume.
•Medium: All sounds play at medium volume.
93
• Medium Low: All sounds play at medium low volume.
•Low: All sounds play at low volume
• Vibrate Only: No sounds play, but the phone vibrates
for incoming calls and messages, alarms and other
alerts.
• Alarm Only: Sounds play for alarms, but not for calls
or alerts.
• All Sounds Off: No sounds play.
Tip: Press Play to hear a sample of a highlighted volume level.
Bluetooth
Use Bluetooth to exchange information over a distance of
about 30 feet without requiring a physical connection. For
more information, see “Bluetooth” on page 64.
From the Home screen, press the Left Soft Key
Menu ➔ Settings ➔ Bluetooth.
Page 100

Accessibility
Customize the Readout feature, which reads aloud the words
on the screen.
Easy Set-up
Quickly set Readout settings.
1. From the Home screen, press the Left Soft Key
Menu ➔ Settings ➔ Accessibility ➔
Easy Set-up.
2. Follow the screen prompts to choose settings for
Full Readout, Menu Readout, Digit Dial Readout,
Alert Readout, TXT Message Readout, Browser
Readout and Flip Open & Talk.
3. Select a speech rate for reading (Fast, Medium Fast,
Normal, Medium Slow, or Slow).
Full Readout
1. From the Home screen, press the Left Soft Key
Menu ➔ Settings ➔ Accessibility ➔
Full Readout.
2. Choose On or Off to enable or disable all Readout
options.
Menu Readout
1. From the Home screen, press the Left Soft Key
Menu ➔ Settings ➔ Accessibility ➔
Menu Readout.
2. Choose On or Off to enable or disable the Readout
option for menus.
Digit Dial Readout
1. From the Home screen, press the Left Soft Key
Menu ➔ Settings ➔ Accessibility ➔
Digit Dial Readout.
2. Choose On or Off to enable or disable the Readout
option for digit dial.
Settings 94
 Loading...