

Page 1

User Manual
GT-S6792L
www.samsung.com
Page 2

About this manual
This device provides high quality mobile communication and entertainment using Samsung’s
high standards and technological expertise. This user manual is specially designed to detail
the device’s functions and features.
•
Please read this manual before using the device to ensure safe and proper use.
•
Descriptions are based on the device’s default settings.
•
Images and screenshots may differ in appearance from the actual product.
•
Content may differ from the final product, or from software provided by service providers
or carriers, and is subject to change without prior notice. For the latest version of the
manual, refer to the Samsung website,
•
Content (high quality content) that requires high CPU and RAM usage will affect the
overall performance of the device. Applications related to the content may not work
properly depending on the device’s specifications and the environment that it is used in.
•
Available features and additional services may vary by device, software, or service
provider.
•
Applications and their functions may vary by country, region, or hardware specifications.
Samsung is not liable for performance issues caused by applications from any provider
other than Samsung.
•
Samsung is not liable for performance issues or incompatibilities caused by edited
registry settings or modified operating system software. Attempting to customise the
operating system may cause the device or applications to work improperly.
•
Software, sound sources, wallpapers, images, and other media provided with this device
are licensed for limited use. Extracting and using these materials for commercial or other
purposes is an infringement of copyright laws. Users are entirely responsible for illegal
www.samsung.com
.
use of media.
•
You may incur additional charges for data services, such as messaging, uploading and
downloading, auto-syncing, or using location services. To avoid additional charges, select
an appropriate data tariff plan. For details, contact your service provider.
2
Page 3

About this manual
•
Default applications that come with the device are subject to updates and may no longer
be supported without prior notice. If you have questions about an application provided
with the device, contact a Samsung Service Centre. For user-installed applications,
contact service providers.
•
Modifying the device’s operating system or installing softwares from unofficial sources
may result in device malfunctions and data corruption or loss. These actions are violations
of your Samsung licence agreement and will void your warranty.
Instructional icons
Warning: situations that could cause injury to yourself or others
Caution: situations that could cause damage to your device or other equipment
Note: notes, usage tips, or additional information
Copyright
Copyright © 2013 Samsung Electronics
This guide is protected under international copyright laws.
No part of this guide may be reproduced, distributed, translated, or transmitted in any form or
by any means, electronic or mechanical, including photocopying, recording, or storing in any
information storage and retrieval system, without the prior written permission of Samsung
Electronics.
3
Page 4

About this manual
Trademarks
•
SAMSUNG and the SAMSUNG logo are registered trademarks of Samsung Electronics.
•
The Android logo, Google™, Google Maps™, Google Mail™, YouTube™, Google Play™
Store, and Google Talk
•
Bluetooth® is a registered trademark of Bluetooth SIG, Inc. worldwide.
•
Wi-Fi®, Wi-Fi Protected Setup™, Wi-Fi Direct™, Wi-Fi CERTIFIED™, and the Wi-Fi logo are
registered trademarks of the Wi-Fi Alliance.
•
All other trademarks and copyrights are the property of their respective owners.
are trademarks of Google, Inc.
™
4
Page 5

Table of Contents
Getting started
7 Device layout
8 Buttons
9 Package contents
10 Installing the SIM or USIM card and
battery
13 Charging the battery
15 Inserting a memory card
17 Turning the device on and off
18 Holding the device
18 Locking and unlocking the device
18 Adjusting the volume
18 Switching to silent mode
19 Switching between networks
35 Transferring files
36 Securing the device
38 Upgrading the device
Communication
39 Phone
43 Contacts
47 Messaging
48 Email
50 Google Mail
51 Talk
52 Google+
52 Messenger
53 ChatON
Basics
20 Indicator icons
21 Using the touch screen
24 Control motions
26 Notifications
27 Home screen
29 Using applications
30 Applications screen
31 Help
32 Entering text
33 Connecting to a Wi-Fi network
34 Setting up accounts
Web & network
54 Internet
56 Bluetooth
Media
57 Music Player
59 Camera
64 Gallery
66 Video Player
5
Page 6

Table of Contents
67 YouTube
68 FM Radio
Application & media stores
69 Play Store
70 Samsung Apps
Utilities
71 Memo
72 S Planner
74 Dropbox
74 Cloud
75 Clock
77 Calculator
77 Voice Recorder
79 Google
80 Voice Search
80 My Files
81 Downloads
87 More settings
88 Home screen mode
88 Blocking mode
88 SIM card manager
88 Sound
89 Display
89 Storage
90 Power saving
90 Battery
90 Application manager
90 Location services
91 Lock screen
91 Security
93 Language and input
95 Cloud
95 Backup and reset
95 Add account
95 Motion
96 Date and time
96 Accessibility
97 Developer options
98 About device
Travel & local
82 Maps
83 Local
84 Navigation
Settings
85 About Settings
85 Wi-Fi
86 Bluetooth
86 Data usage
98 Google Settings
Troubleshooting
6
Page 7

Getting started
Device layout
Earpiece
Home button
Menu button
Power button
Touch screen
Multipurpose jack
Speaker
Rear camera
Back cover
Back button
Microphone
Headset jack
Volume button
GPS antenna
Main antenna
7
Page 8

Getting started
•
Do not cover the antenna area with your hands or other objects. This may cause
connectivity problems or drain the battery.
•
Do not use a screen protector. This causes sensor malfunctions.
•
Do not allow water to contact the touch screen. The touch screen may malfunction
in humid conditions or when exposed to water.
Buttons
Button Function
•
Press and hold to turn the device on or off.
•
Press and hold for 8-10 seconds to reset the device if it has
Power
Menu
Home
Back
Volume
fatal errors or hang-ups, or freezes.
•
Press to lock or unlock the device. The device goes into lock
mode when the touch screen turns off.
•
Tap to open a list of options available for the current screen.
•
Tap and hold on the Home screen to launch Google search.
•
Press to return to the Home screen.
•
Press and hold to open the list of recent applications.
•
Tap to return to the previous screen.
•
Press to adjust the device volume.
8
Page 9

Getting started
Package contents
Check the product box for the following items:
•
Device
•
Battery
•
Quick start guide
•
The items supplied with the device and any available accessories may vary
depending on the region or service provider.
•
The supplied items are designed only for this device and may not be compatible
with other devices.
•
Appearances and specifications are subject to change without prior notice.
•
You can purchase additional accessories from your local Samsung retailer. Make
sure they are compatible with the device before purchase.
•
Other accessories may not be compatible with your device.
•
Use only Samsung-approved accessories. Malfunctions caused by using
unapproved accessories are not covered by the warranty service.
•
Availability of all accessories is subject to change depending entirely on
manufacturing companies. For more information about available accessories, refer
to the Samsung website.
9
Page 10

Getting started
Installing the SIM or USIM card and battery
Insert the SIM or USIM card provided by the mobile telephone service provider, and the
included battery.
Only microSIM cards work with the device.
Remove the back cover.
1
Be careful not to damage your fingernails when you remove the back cover.
Do not bend or twist the back cover excessively. Doing so may damage the cover.
Insert the SIM or USIM card with the gold-coloured contacts facing downwards.
2
2
1
10
Page 11

Getting started
•
Do not insert a memory card into the SIM card slot. If a memory card happens to
be lodged in the SIM card slot, take the device to a Samsung Service Centre to
remove the memory card.
•
Use caution not to lose or let others use the SIM or USIM card. Samsung is not
responsible for any damages or inconveniences caused by lost or stolen cards.
Insert the battery.
3
2
1
Replace the back cover.
4
11
Page 12

Getting started
Removing the SIM or USIM card and battery
Remove the back cover.
1
Pull out the battery.
2
Pull out the SIM or USIM card.
3
12
Page 13

Getting started
Charging the battery
Use the charger to charge the battery before using it for the first time. A computer can be also
used to charge the device by connecting them via the USB cable.
Use only Samsung-approved chargers, batteries, and cables. Unapproved chargers or
cables can cause the battery to explode or damage the device.
•
When the battery power is low, the battery icon appears empty.
•
If the battery is completely discharged, the device cannot be turned on
immediately when the charger is connected. Allow a depleted battery to charge for
a few minutes before turning on the device.
•
If you use multiple applications at once, network applications, or applications
that need a connection to another device, the battery will drain quickly. To avoid
disconnecting from the network or losing power during a data transfer, always use
these applications after fully charging the battery.
Charging with the charger
Plug the small end of the charger into the multipurpose jack of the device, and plug the large
end of the charger into an electric socket.
Connecting the charger improperly may cause serious damage to the device. Any
damage caused by misuse is not covered by the warranty.
13
Page 14

Getting started
•
The device can be used while it is charging, but it may take longer to fully charge
the battery.
•
If the device receives an unstable power supply while charging, the touch screen
may not function. If this happens, unplug the charger from the device.
•
While charging, the device may heat up. This is normal and should not affect the
device’s lifespan or performance. If the battery gets hotter than usual, the charger
may stop charging.
•
If the device is not charging properly, take the device and the charger to a
Samsung Service Centre.
After fully charging, disconnect the device from the charger. First unplug the charger from the
device, and then unplug it from the electric socket.
Do not remove the battery before removing the charger. This may damage the
device.
To save energy, unplug the charger when not in use. The charger does not have a
power switch, so you must unplug the charger from the electric socket when not in
use to avoid wasting power. The device should remain close to the electric socket
while charging.
Checking the battery charge status
When you charge the battery while the device is off, the following icons will show the current
battery charge status:
Charging Fully charged
14
Page 15

Getting started
Reducing the battery consumption
Your device provides options that help you save battery power. By customising these options
and deactivating features in the background, you can use the device longer between charges:
•
When you are not using the device, switch to sleep mode by pressing the Power button.
•
Close unnecessary applications with the task manager.
•
Deactivate the Bluetooth feature.
•
Deactivate the Wi-Fi feature.
•
Deactivate auto-syncing of applications.
•
Decrease the backlight time.
•
Decrease the brightness of the display.
Inserting a memory card
Your device accepts memory cards with maximum capacities of 32 GB. Depending on the
memory card manufacturer and type, some memory cards may not be compatible with your
device.
•
Some memory cards may not be fully compatible with the device. Using an
incompatible card may damage the device or the memory card, or corrupt the data
stored in it.
•
Use caution to insert the memory card right-side up.
•
The device supports only the FAT file system for memory cards. When inserting a
card formatted in a different file system, the device asks to reformat the memory
card.
•
Frequent writing and erasing of data shortens the lifespan of memory cards.
•
When inserting a memory card into the device, the memory card’s file directory
appears in the
extSdCard
folder under the internal memory.
15
Page 16

Getting started
Remove the back cover.
1
Insert a memory card with the gold-coloured contacts facing downwards.
2
Push the memory card into the slot until it locks in place.
3
Replace the back cover.
4
Removing the memory card
Before removing the memory card, first unmount it for safe removal. On the Home screen,
→
tap
Remove the back cover.
1
Push the memory card until it disengages from the device, and then pull it out.
2
Replace the back cover.
3
Settings
Do not remove the memory card while the device is transferring or accessing
information. Doing so can cause data to be lost or corrupted or damage to the
memory card or device. Samsung is not responsible for losses that result from the
misuse of damaged memory cards, including the loss of data.
→
Storage
→
Unmount SD card
.
16
Page 17

Getting started
Formatting the memory card
A memory card formatted on a computer may not be compatible with the device. Format the
memory card on the device.
On the Home screen, tap
→
Delete all
.
Before formatting the memory card, remember to make backup copies of all
important data stored on the device. The manufacturer’s warranty does not cover loss
of data resulting from user actions.
→
Settings
→
Storage
→
Format SD card
→
Format SD card
Turning the device on and off
When turning on the device for the first time, follow the on-screen instructions to set up your
device.
Press and hold the Power button for a few seconds to turn on the device.
•
Follow all posted warnings and directions from authorised personnel in areas
where the use of wireless devices is restricted, such as aeroplanes and hospitals.
•
Press and hold the Power button and tap
features.
To turn off the device, press and hold the Power button, and then tap
17
Airplane mode
to disable the wireless
Power off
.
Page 18

Getting started
Holding the device
Do not cover the antenna area with your hands or other objects. This may cause connectivity
problems or drain the battery.
Locking and unlocking the device
When not in use, lock the device to prevent unwanted operation. Pressing the Power button
turns off the screen and puts the device into lock mode. The device automatically gets locked
if it is not used for a specified period.
To unlock the device, press the Power button or the Home button when the touch screen is
turned off, tap anywhere on the screen, and then flick your finger in any direction.
Adjusting the volume
Press the Volume button up or down to adjust the ringtone volume, or to adjust the sound
volume when playing music or video.
Switching to silent mode
Use one of the following methods:
•
Press and hold the Volume button down until it switches to silent mode.
•
Press and hold the Power button, and then tap
•
Open the notifications panel at the top of the screen, and then tap
Mute
or
Vibrate
.
Sound
or
Vibrate
.
18
Page 19

Getting started
Switching between networks
When you insert two SIM or USIM cards, you can use two different subscriptions on the same
network without the need to carry two devices at the same time. Activate two cards and
switch between them when making calls or sending messages.
Your device supports dual standby with two different networks. You cannot make or
answer calls on both networks at the same time.
Activating SIM or USIM cards
On the Home screen, tap →
switches for the SIM or USIM cards to the right.
Settings
→
SIM card manager
. Drag one or both of the
Changing the display name and icon of SIM or USIM cards
On the Home screen, tap →
tap the card name, and then tap
for each card.
Settings
Select icon
→
SIM card manager
or
Register name
. Select an SIM or USIM card,
. Set a display name and icon
Switching between networks
When two SIM or USIM cards are activated, network selection icons appear on the dashboard
of the notifications panel. Open the notifications panel and then select a network.
19
Page 20

Basics
Indicator icons
The icons displayed at the top of the screen provide information about the status of the
device. The icons listed in the table below are most common.
Icon Meaning
No signal
/
/
Signal strength
Currently accessing SIM or USIM card
Roaming (outside of normal service area)
GPRS network connected
EDGE network connected
UMTS network connected
HSDPA network connected
Wi-Fi connected
Bluetooth feature activated
GPS activated
Call in progress
Missed call
Synced with the web
Connected to computer
No SIM or USIM card
New text or multimedia message
Alarm activated
Silent mode activated
Vibration mode activated
20
Page 21

Basics
Icon Meaning
Flight mode activated
Error occurred or caution required
Battery power level
Using the touch screen
Use only fingers to use the touch screen.
•
Do not allow the touch screen to come into contact with other electrical devices.
Electrostatic discharges can cause the touch screen to malfunction.
•
To avoid damaging the touch screen, do not tap it with anything sharp or apply
excessive pressure to it with your fingertips.
Leaving the touch screen idle for extended periods may result in afterimages (screen
burn-in) or ghosting. Turn off the touch screen when you do not use the device.
Finger gestures
Tapping
To open an application, to select a menu item, to press an on-screen button, or to enter a
character using the on-screen keyboard, tap it with a finger.
21
Page 22

Basics
Dragging
To move an icon, thumbnail, or preview to a new location, tap and hold it and drag it to the
target position.
Double-tapping
Double-tap on a webpage, map, or image to zoom in a part. Double-tap again to return.
22
Page 23

Basics
Flicking
Flick left or right on the Home screen or the Applications screen to see another panel. Flick up
or down to scroll through a webpage or a list, such as contacts.
Pinching
Spread two fingers apart on a webpage, map, or image to zoom in a part. Pinch to zoom out.
23
Page 24

Basics
Control motions
Simple motions allow easy control of the device.
Before using motions, make sure the motion feature is activated. On the Home screen,
tap
→
Settings
Excessive shaking or impact to the device may result in unintended inputs. To learn
how to control motions properly, tap
motions
→
Motion
. (p. 97)
, and then drag the
→
Motion
Settings
switch to the right.
→
Motion
→
Learn about
Rotating the screen
Many applications allow display in either portrait or landscape orientation. Rotating the
device causes the display to automatically adjust to fit the new screen orientation.
To prevent the display from rotating automatically, open the notifications panel and deselect
Screen rotation
•
•
.
Some applications do not allow screen rotation.
Some applications display a different screen depending on the orientation. The
calculator turns into a scientific calculator when rotated to landscape.
24
Page 25

Basics
Turning over
Turn over the device to mute ringtone, pause media playback or mute the FM radio.
Shaking
Shake the device to search for Bluetooth devices.
25
Page 26

Basics
Notifications
Notification icons appear on the status bar at the top of the screen to report missed calls, new
messages, calendar events, device status, and more. Drag down from the status bar to open
the notifications panel. Scroll the list to see additional alerts. To close the notifications panel,
drag up the bar that is at the bottom of the screen.
From the notifications panel, you can view your device’s current status and use the following
options:
•
Wi-Fi
: Activate or deactivate the Wi-Fi feature.
•
GPS
: Activate or deactivate the GPS feature.
•
Sound
mode.
•
Screen rotation
: Activate or deactivate silent mode. You can vibrate or mute your device in silent
: Allow or prevent the interface from rotating when you rotate the device.
•
Bluetooth
•
Mobile data
•
Blocking mode
will block notifications. To select which notifications will be blocked, tap
Blocking mode
•
Power saving
•
Sync
The available options may vary depending on the region or service provider.
: Activate or deactivate the Bluetooth feature.
: Activate or deactivate the data connection.
: Activate or deactivate blocking mode. In blocking mode, your device
.
: Activate or deactivate power-saving mode.
: Activate or deactivate auto-syncing of applications.
Settings
→
26
Page 27

Basics
Home screen
The Home screen is the starting point to access all of the device’s features. It displays indicator
icons, widgets, shortcuts to applications, and others.
The Home screen can have multiple panels. To view other panels, scroll left or right.
Changing the Home screen mode
The Home screen has basic and easy modes. In easy mode, you can easily access your
favourite contacts, applications, and settings by adding shortcuts to the Home screen. To
→
switch to easy mode, on the Home screen, tap
→
mode
Apply
.
Settings
→
Home screen mode
→
Easy
Rearranging items
Adding an application icon
On the Home screen, tap , tap and hold an application icon, and then drag it into a panel
preview.
Adding an item
Customise the Home screen by adding widgets, folders, or panels.
Tap and hold the empty area on the Home screen, and then select one of the following
categories:
•
Apps and widgets
•
Folder
•
Page
: Create a new folder.
: Add a new panel to the Home screen.
Moving an item
: Add widgets or applications to the Home screen.
Tap and hold an item and drag it to a new location. To move it to another panel, drag it to the
side of the screen.
Removing an item
Tap and hold an item, and drag it to the rubbish bin that appears at the top of the Home
screen. When the rubbish bin turns red, release the item.
27
Page 28

Basics
Rearranging panels
Adding a new panel
Tap →
Edit page
→ .
Moving a panel
Tap →
Edit page
, tap and hold a panel preview, and then drag it to a new location.
Removing a panel
Tap →
bottom of the screen.
Edit page
, tap and hold a panel preview, and then drag it to the rubbish bin at the
Setting wallpaper
Set an image or photo stored in the device as wallpaper for the Home screen.
On the Home screen, tap
following:
•
Gallery
: See photos taken by the device’s camera or images downloaded from the
→
Set wallpaper
→
Home screen
, and then select one of the
Internet.
•
Live wallpapers
•
Wallpapers
Then, select an image and tap
frame, and then tap
: See animated images.
: See wallpaper images.
Set wallpaper
Done
.
. Or, select an image, resize it by dragging the
Using widgets
Widgets are small applications that provide convenient functions and information on your
Home screen. To use them, add widgets from the widgets panel to the Home screen.
•
Some widgets connect to web services. Using a web-based widget may result in
additional charges.
•
The widgets available may vary depending on the region or service provider.
28
Page 29

Basics
Adding widgets to the Home screen
On the Home screen, tap →
tap and hold a widget to add it to the Home screen. Put it on a location you want, resize it by
dragging the frame if necessary, and then tap anywhere on the screen to save the location of
the widget.
Widgets
. Scroll left or right on the widgets panel, and then
Using the setting shortcut widget
On the Home screen, tap →
list of setting options. Select a setting option to add it to the Home screen as a shortcut.
Widgets
, and then tap and hold
Settings Shortcut
to open a
Using applications
This device can run many different types of applications, ranging from media to Internet
applications.
Opening an application
On the Home screen or the Applications screen, select an application icon to open it.
Opening from recently-used applications
Press and hold the Home button to open the list of recently-used applications.
Select an application icon to open.
Closing an application
Close applications not in use to save battery power and maintain device performance.
Press and hold the Home button, tap
To close all running applications, tap
and then tap
.
, and then tap
End all
. Alternatively, press and hold the Home button,
End
next to an application to close it.
29
Page 30

Basics
Applications screen
The Applications screen displays icons for all applications, including any new applications
installed.
On the Home screen, tap
To view other panels, scroll left or right.
to open the Applications screen.
Rearranging applications
Tap →
another panel, drag it to the side of the screen.
Edit
, tap and hold an application, and then drag it to a new location. To move it to
Organising with folders
Put related applications together in a folder for convenience.
Tap
name and then tap
to save the arrangement.
→
Edit
, tap and hold an application, and then drag it to
OK
. Put applications into the new folder by dragging, and then tap
Rearranging panels
Create folder
. Enter a folder
Save
Pinch on the screen, tap and hold a panel preview, and then drag it to a new location.
Installing applications
Use application stores, such as
Samsung Apps
, to download and install applications.
30
Page 31

Basics
Uninstalling applications
Tap →
Uninstall
Default applications that come with the device cannot be uninstalled.
, and then select an application to uninstall it.
Sharing applications
Share downloaded applications with other users via email, Bluetooth, or other methods.
Tap
next steps vary depending on the method selected.
→
Share apps
, select applications, tap
Done
, and then select a sharing method. The
Help
Access help information to learn how to use the device and applications or configure
important settings.
Tap
Help
on the Applications screen. Select an item to view tips.
To reset help pop-ups if you have hidden them, tap
items by ticking.
Show help tip pop-ups
, and then select
31
Page 32
Basics
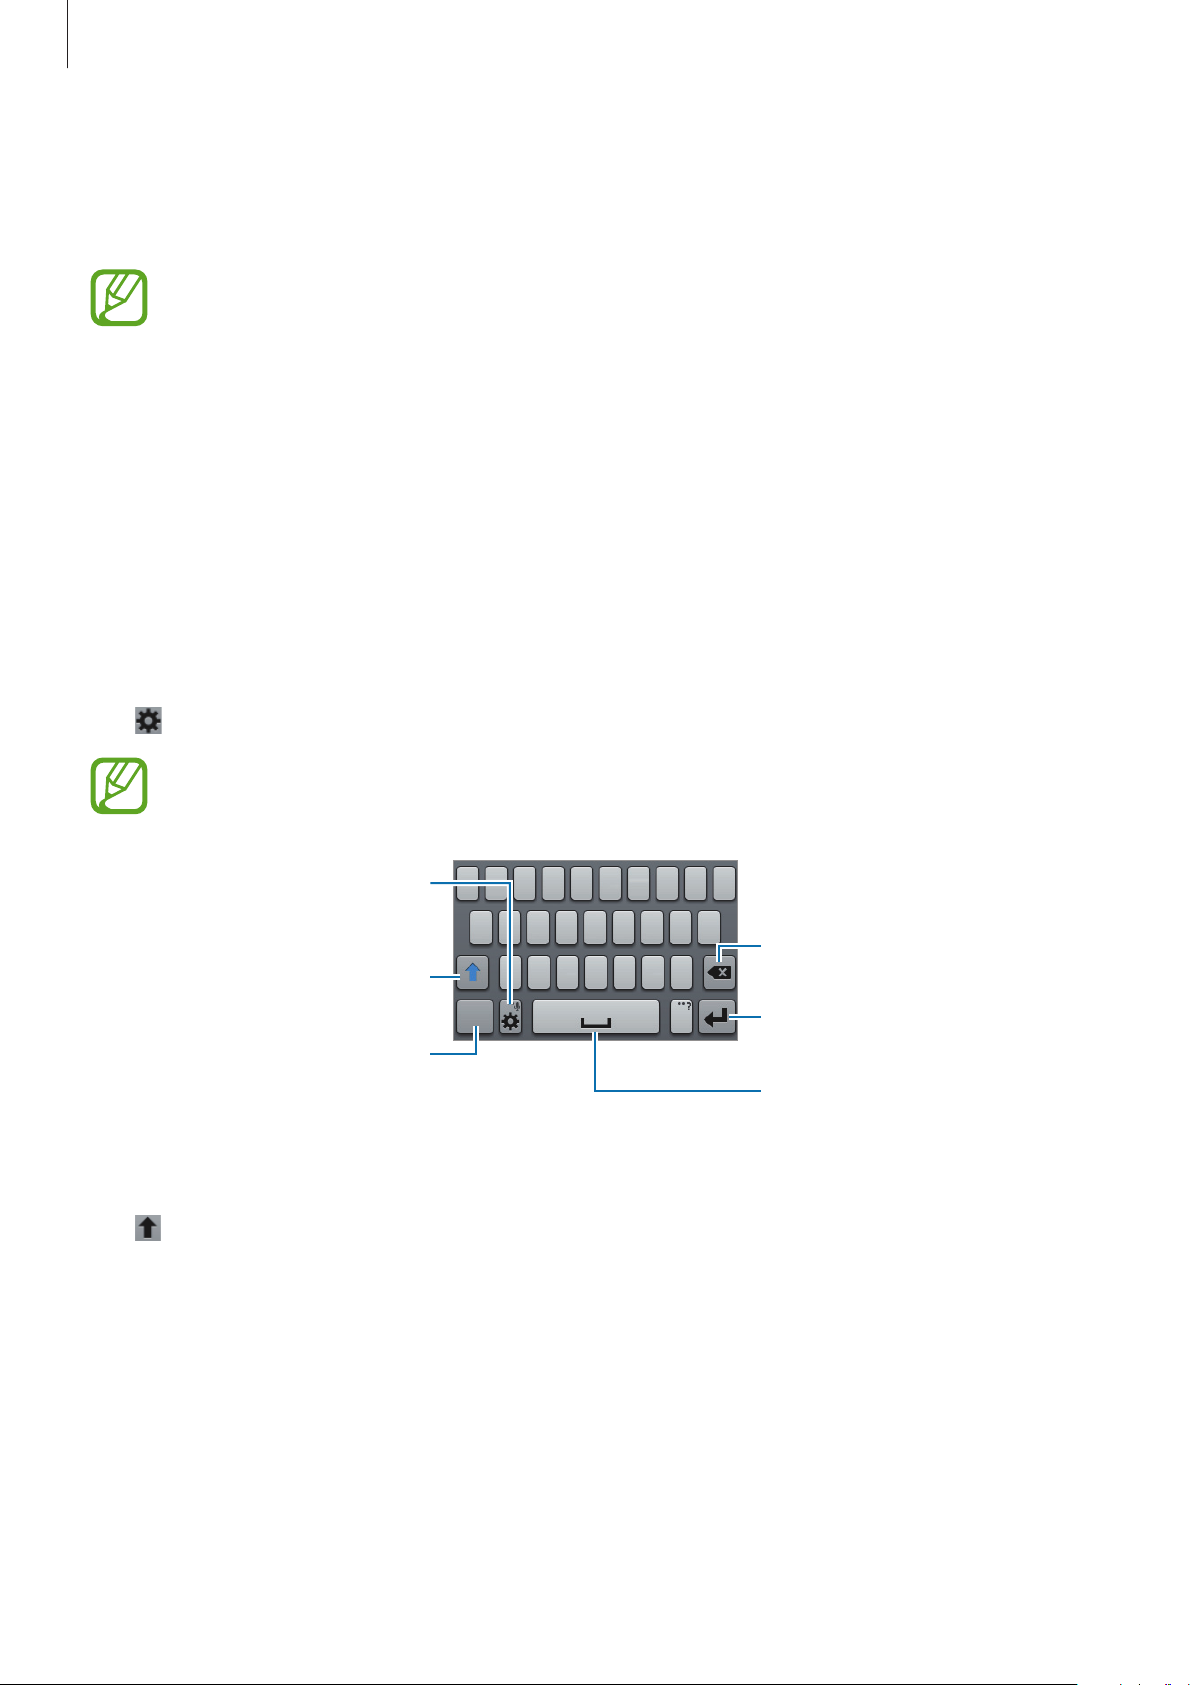
Enter a space.
Entering text
Use the Samsung keyboard or the voice input feature to enter text.
Text entry is not supported in some languages. To enter text, you must change the
input language to one of the supported languages.
Changing the keyboard type
Tap any text field, open the notifications panel, tap
the type of keyboard to use.
Using the Samsung keyboard
Changing the keyboard layout
Tap →
Portrait keyboard types
On the 3x4 keyboard, a key has three or four characters. To enter a character, tap
repeatedly the key corresponding to the character.
Set options for the Samsung
keyboard.
Enter uppercase.
, and then tap
Qwerty keyboard
Choose input method
or
3x4 keyboard
Delete a preceding character.
Break to the next line.
, and then select
.
Enter numerals and punctuation
marks.
Entering uppercase
Tap before entering a character. For all caps, tap it twice.
Changing language keyboards
Add languages to the keyboard, and then slide the space key left or right to change language
keyboards.
32
Page 33

Basics
Entering text by voice
Activate the voice input feature and then speak into the microphone. The device displays
what you speak.
If the device does not recognise your words correctly, tap the underlined text and select an
alternative word or phrase from the dropdown list.
To change the language or add languages for the voice recognition, tap the current language.
Copying and pasting
Tap and hold over text, drag or to select more or less text, and then tap to copy or to
cut. The selected text is copied to the clipboard.
To paste it into a text entry field, tap and hold at the point where it should be inserted, and
then tap
Paste
.
Connecting to a Wi-Fi network
Connect the device to a Wi-Fi network to use the Internet or share media files with other
devices. (p. 87)
Turning Wi-Fi on and off
Open the notifications panel, and then tap
Turn off Wi-Fi to save the battery when not in use.
Joining Wi-Fi networks
Wi-Fi
to turn it on or off.
On the Applications screen, tap
Select a network from the list of detected Wi-Fi networks, enter a password if necessary, and
then tap
connects to a Wi-Fi network, the device will automatically connect to it any time it is available.
Connect
. Networks that require a password appear with a lock icon. After the device
Settings
→
Wi-Fi
, and then drag the
33
Wi-Fi
switch to the right.
Page 34

Basics
Adding Wi-Fi networks
If the desired network does not appear in the networks list, tap
bottom of the networks list. Enter the network name in
type and enter the password if it is not an open network, and then tap
Network SSID
Add Wi-Fi network
, select the security
Save
.
at the
Forgetting Wi-Fi networks
Any network that has ever been used, including the current network, can be forgotten so the
device will not automatically connect to it. Select the network in the networks list, and then
tap
Forget
.
Setting up accounts
Google applications, such as
requires a Samsung account. Create Google and Samsung accounts to have the best
experience with the device.
Play Store
, require a Google account, and
Samsung Apps
Adding accounts
Follow the instructions that appear when opening a Google application without signing in to
set up a Google account.
To sign in with or sign up for a Google account, on the Applications screen, tap
Add account
screen instructions to complete the account setup. More than one Google account can be
used on the device.
Set up a Samsung account as well.
→
Google
. After that, tap
New
to sign up, or tap
Existing
, and then follow on-
Settings
→
Removing accounts
On the Applications screen, tap
account to remove, and then tap
Settings
Remove account
, select an account name under
Accounts
.
, select the
34
Page 35

Basics
Transferring files
Move audio, video, image, or other types of files from the device to the computer, or vice
versa.
The following file formats are supported by some applications. Some file formats are
not supported depending on the version of the device’s software or the computer
operating system.
•
Music: mp3, m4a, mp4, 3gp, 3ga, wma, ogg, oga, aac, and flac
•
Image: bmp, gif, jpg, and png
•
Video: 3gp, mp4, mkv, and webm
•
Document: doc, docx, dot, dotx, xls, xlsx, xltx, csv, ppt, pptx, pps, ppsx, pot, potx,
pdf, hwp, txt, asc, rtf, and zip
Connecting with Samsung Kies
Samsung Kies is a computer application that manages media contents and personal
information with Samsung devices. Download the latest Samsung Kies from the Samsung
website.
Connect the device to the computer using the USB cable.
1
Samsung Kies launches on the computer automatically. If Samsung Kies does not launch,
double-click the Samsung Kies icon on the computer.
Transfer files between your device and the computer.
2
Refer to the Samsung Kies help for more information.
Connecting with Windows Media Player
Ensure that Windows Media Player is installed on the computer.
Connect the device to the computer using the USB cable.
1
Open Windows Media Player and sync music files.
2
35
Page 36
Basics
Connecting as a media device
Connect the device to the computer using the USB cable.
1
Open the notifications panel, and then tap
2
device (MTP)
Camera (PTP)
Tap
not have any appropriate driver installed.
Transfer files between your device and the computer.
3
.
if your computer does not support Media Transfer Protocol (MTP) or
Connected as a media device
→
Media
Securing the device
Prevent others from using or accessing personal data and information stored in the device by
using the security features. The device requires an unlock code whenever unlocking it.
Setting a pattern
On the Applications screen, tap
Settings
→
Lock screen
→
Screen lock
→
Pattern
.
Draw a pattern by connecting four dots or more, and then draw the pattern again to verify it.
Set a backup unlock PIN to unlock the screen when you forget the pattern.
36
Page 37

Basics
Setting a PIN
On the Applications screen, tap
Enter at least four numbers, and then enter the password again to verify it.
Settings
→
Lock screen
→
Screen lock
→
PIN
.
Setting a password
On the Applications screen, tap
Enter at least four characters including numbers and symbols, and then enter the password
again to verify it.
Settings
→
Lock screen
→
Screen lock
→
Password
.
Unlocking the device
Turn on the screen by pressing the Power button or the Home button, and enter the unlock
code.
If the unlock code is forgotten, take the device to a Samsung Service Centre to reset it.
37
Page 38
Basics
Upgrading the device
The device can be upgraded to the latest software.
This feature may not be available depending on the region or service provider.
Upgrading with Samsung Kies
Launch Samsung Kies and connect the device to the computer. Samsung Kies automatically
recognises the device and shows available updates in a dialogue box, if any. Click the Update
button in the dialogue box to start upgrading. Refer to the Samsung Kies help for details on
how to upgrade.
•
Do not turn off the computer or disconnect the USB cable while the device is
upgrading.
•
While upgrading the device, do not connect other media devices to the computer.
Doing so may interfere with the update process.
Upgrading over the air
The device can be directly upgraded to the latest software by the firmware over-the-air
(FOTA) service.
On the Applications screen, tap
Settings
→
About device
→
Software update
→
Update
.
38
Page 39
Communication
Phone
Use this application to make or answer a call.
Tap
Phone
Making calls
Making a call
Use one of the following methods:
•
Keypad
•
Logs
on the Applications screen.
: Enter the number using the keypad, and then tap or .
: Make a call from the history of incoming and outgoing calls and messages.
•
Favorites
•
Contacts
: Make a call from the list of favourite contacts.
: Make a call from the contacts list.
Speed dial numbers
For speed dial numbers, tap and hold the corresponding digit.
Number prediction
When entering numbers on the keypad, automatic predictions appear. Select one of these to
make a call.
39
Page 40

Communication
Finding contacts
Enter a name, phone number, or email address to find a contact in the contacts list. As
characters are entered, predicted contacts appear. Select one to place a call to it.
Making an international call
Tap and hold 0 until the + sign appears. Enter the country code, area code, and phone
number, and then tap
or .
During a call
The following actions are available:
•
Hold
: Hold a call. Tap
•
Add call
•
Keypad
•
End call
•
Speaker
the speakerphone.
•
Mute
•
Headset
•
Swap
•
Merge
: Dial a second call.
: Open the keypad.
: End the current call.
: Activate the speakerphone. Keep the device away from your ears when using
: Turn off the microphone so that the other party cannot hear you.
: Switch to a Bluetooth headset if it is connected to the device.
: Switch between two calls.
: Make a multiparty call when connected to two calls. Repeat this to add more
Hold again
to retrieve the held call.
parties. This feature is available only if the multiparty call service is active.
•
•
•
•
•
→
Contacts
→
Message
→
Memo
→
Transfer
the conversation.
→
Manage conference call
multiparty call or disconnect one party form the multiparty call.
: Open the contacts list.
: Send a message.
: Create a memo.
: Connect the first party to the second party. This disconnects you from
: Have a private conversation with one party during a
40
Page 41

Communication
Adding contacts
To add a phone number to the contacts list from the keypad, enter the number and tap
Add to Contacts
.
Sending a message
Tap to send a message to the number on display.
Viewing call logs
Tap
Logs
to view the history of incoming and outgoing calls.
To filter a call log, tap
→
View by
→ a SIM or USIM card, and then select an option.
Fixed dialling number
The device can be set to restrict outgoing calls only to numbers with specified prefixes. Those
prefixes are stored in the SIM or USIM card.
Tap
Numbers
FDN list
→
Call settings
→
Enable FDN
and add numbers.
→
Additional settings
, and then enter the PIN2 supplied with the SIM or USIM card. Tap
→ a SIM or USIM card →
Fixed Dialing
Call barring
The device can be set to prevent certain calls from being made. For example, international
calling can be disabled.
Tap
a call type, select a call barring option, and then enter a password.
→
Call settings
→
Additional settings
→ a SIM or USIM card →
Call barring
, select
Receiving calls
Answering a call
When a call comes in, drag outside the large circle.
If the call waiting service is active, another call can be made. When the second call is
answered, the first call is put on hold.
41
Page 42

Communication
Rejecting a call
When a call comes in, drag outside the large circle.
To send a message when rejecting an incoming call, tap
→
the rejection message, tap
Call settings
→
Set reject messages
Reject call with message
.
. To create
Automatically rejecting calls from unwanted numbers
Tap →
then tap
Call settings
Auto reject list
→
Call rejection
. Tap
Create
, drag the
, enter a number, assign a category, and then tap
Auto reject mode
switch to the right, and
Save
.
Missed calls
If a call is missed, appears on the status bar. Open the notifications panel to view the list of
missed calls.
Call waiting
Call waiting is a service provided by the service provider. A user can use this service to
suspend a current call and switch to an incoming call.
To make use of this service, tap
→
Call settings
→
Additional settings
→ a SIM or USIM
→
card
Call waiting
.
Call forwarding
The device can be set to send incoming calls to a specified number.
Tap
and condition. Enter a number and tap
→
Call settings
→
Call forwarding
→ a SIM or USIM card, and then select a call type
Enable
.
42
Page 43

Communication
Contacts
Use this application to manage contacts, including phone numbers, email addresses, and
others.
Tap
Contacts
Managing contacts
Tap
Contacts
Creating a contact
Tap and enter contact information.
•
: Add an image.
on the Applications screen.
.
•
/ : Add or delete a contact field.
Editing a contact
Select a contact to edit, and then tap .
Deleting a contact
Tap →
Delete
.
Setting a speed dial number
Tap →
remove a speed dial number, tap and hold it, and then tap
Speed dial setting
, select a speed dial number, and then select a contact for it. To
Searching for contacts
Tap
Contacts
.
Remove
.
Use one of the following search methods:
•
Scroll up or down the contacts list.
•
Use the index at the right side of the contacts list for quick scrolling, by dragging a finger
along it.
•
Tap the search field at the top of the contacts list and enter search criteria.
43
Page 44

Communication
Once a contact is selected, take one of the following actions:
•
: Add to favourite contacts.
•
: Make a voice call.
•
•
: Compose a message.
: Compose an email.
Displaying contacts
Tap
Contacts
By default, the device shows all saved contacts.
Tap
→
.
Contacts to display
, and then select a location where contacts are saved.
Moving contacts
Tap
Contacts
Moving contacts to Google
Tap →
Contacts moved to Google Contacts appear with
.
Merge with Google
.
in the contacts list.
Moving contacts to Samsung
Tap →
Contacts moved to Samsung Contacts appear with
Merge with Samsung
.
in the contacts list.
44
Page 45

Communication
Importing and exporting contacts
Tap
Contacts
Importing contacts
.
Tap →
from SIM card
Import/Export
.
→
Exporting contacts
Tap →
.
card
Import/Export
→
Sharing contacts
Tap →
a sharing method.
Import/Export
→
Favourite contacts
Tap
Tap
Favorites
, and then take one of the following actions:
.
Import from USB storage, Import from SD card
Export to USB storage, Export to SD card
Share namecard via
, select contacts, tap
, or
Export to SIM
Done
, and then select
, or
Import
•
Search
•
Add to Favorites
•
Remove from Favorites
•
Grid view
: Search for contacts.
: Add contacts to favourites.
/
List view
: Remove contacts from favourites.
: View contacts in grid or list form.
45
Page 46

Communication
Contact groups
Tap
Groups
Adding contacts to a group
.
Select a group, and then tap . Select contacts to add, and then tap
Managing groups
Tap , and then take one of the following actions:
•
Create
•
Search
•
Change order
position, and then tap
•
Delete groups
deleted.
: Make a new group.
: Search for contacts.
: Tap and hold next to the group name, drag it up or down to another
Done
: Select user-added groups, and then tap
.
Delete
. Default groups cannot be
Sending a message or email to a group’s members
Select a group, tap →
Send message
or
Send email
, select members, and then tap
Done
.
Done
.
Business card
Tap
Contacts
Create a business card and send it to others.
Tap
Set up profile
and then tap
business card in
Tap
→
.
, enter details, such as phone number, email address, and postal address,
Save
. If user information has been saved when you set up the device, select the
ME
, and then tap to edit.
Share namecard via
, and then select a sharing method.
46
Page 47
Communication
Messaging
Use this application to send text messages (SMS) or multimedia messages (MMS).
Tap
Messaging
You may incur additional charges for sending or receiving messages while you are
outside your home service area. For details, contact your service provider.
Sending messages
Tap , add recipients, enter a message, and then tap or .
Use the following methods to add recipients:
•
Enter a phone number.
on the Applications screen.
•
Tap , select contacts, and then tap
Use the following methods to make a multimedia message:
•
Tap and attach images, videos, contacts, memos, events, and others.
•
Tap →
Add subject
to enter a subject.
Done
.
Sending scheduled messages
While composing a message, tap →
OK
tap
. The device will send the message at the specified time and date.
•
If the device is turned off at the scheduled time, is not connected to the network,
or the network is unstable, the message will not be sent.
•
This feature is based on the time and date set on the device. The time and date
may be incorrect if you move across time zones and the network does not update
the information.
Scheduled message
. Set a time and date, and then
47
Page 48

Communication
Viewing incoming messages
Incoming messages are grouped into message threads by contact.
Select a contact to view the person’s message.
Listening to a voice message
Tap and hold 1 on the keypad, and then follow the instructions from your service provider.
Use this application to send or view email messages.
Tap
Email
on the Applications screen.
Setting up email accounts
Set up an email account when opening
Enter the email address and password. Tap
Mail, or tap
instructions to complete the setup.
To set up another email account, tap
Manual setup
for a company email account. After that, follow on-screen
Email
Next
→
Settings
for the first time.
for a private email account, such as Google
→ .
Sending messages
Tap the email account to use, and then tap at the top of the screen. Enter recipients,
subject, and message, and then tap
Tap
Tap
Tap
Tap
to add a recipient from the contacts list.
→
Add Cc/Bcc
to attach images, videos, contacts, memos, events, and others.
to insert images, events, contacts, location information, and others into the message.
to add more recipients.
.
48
Page 49
Communication
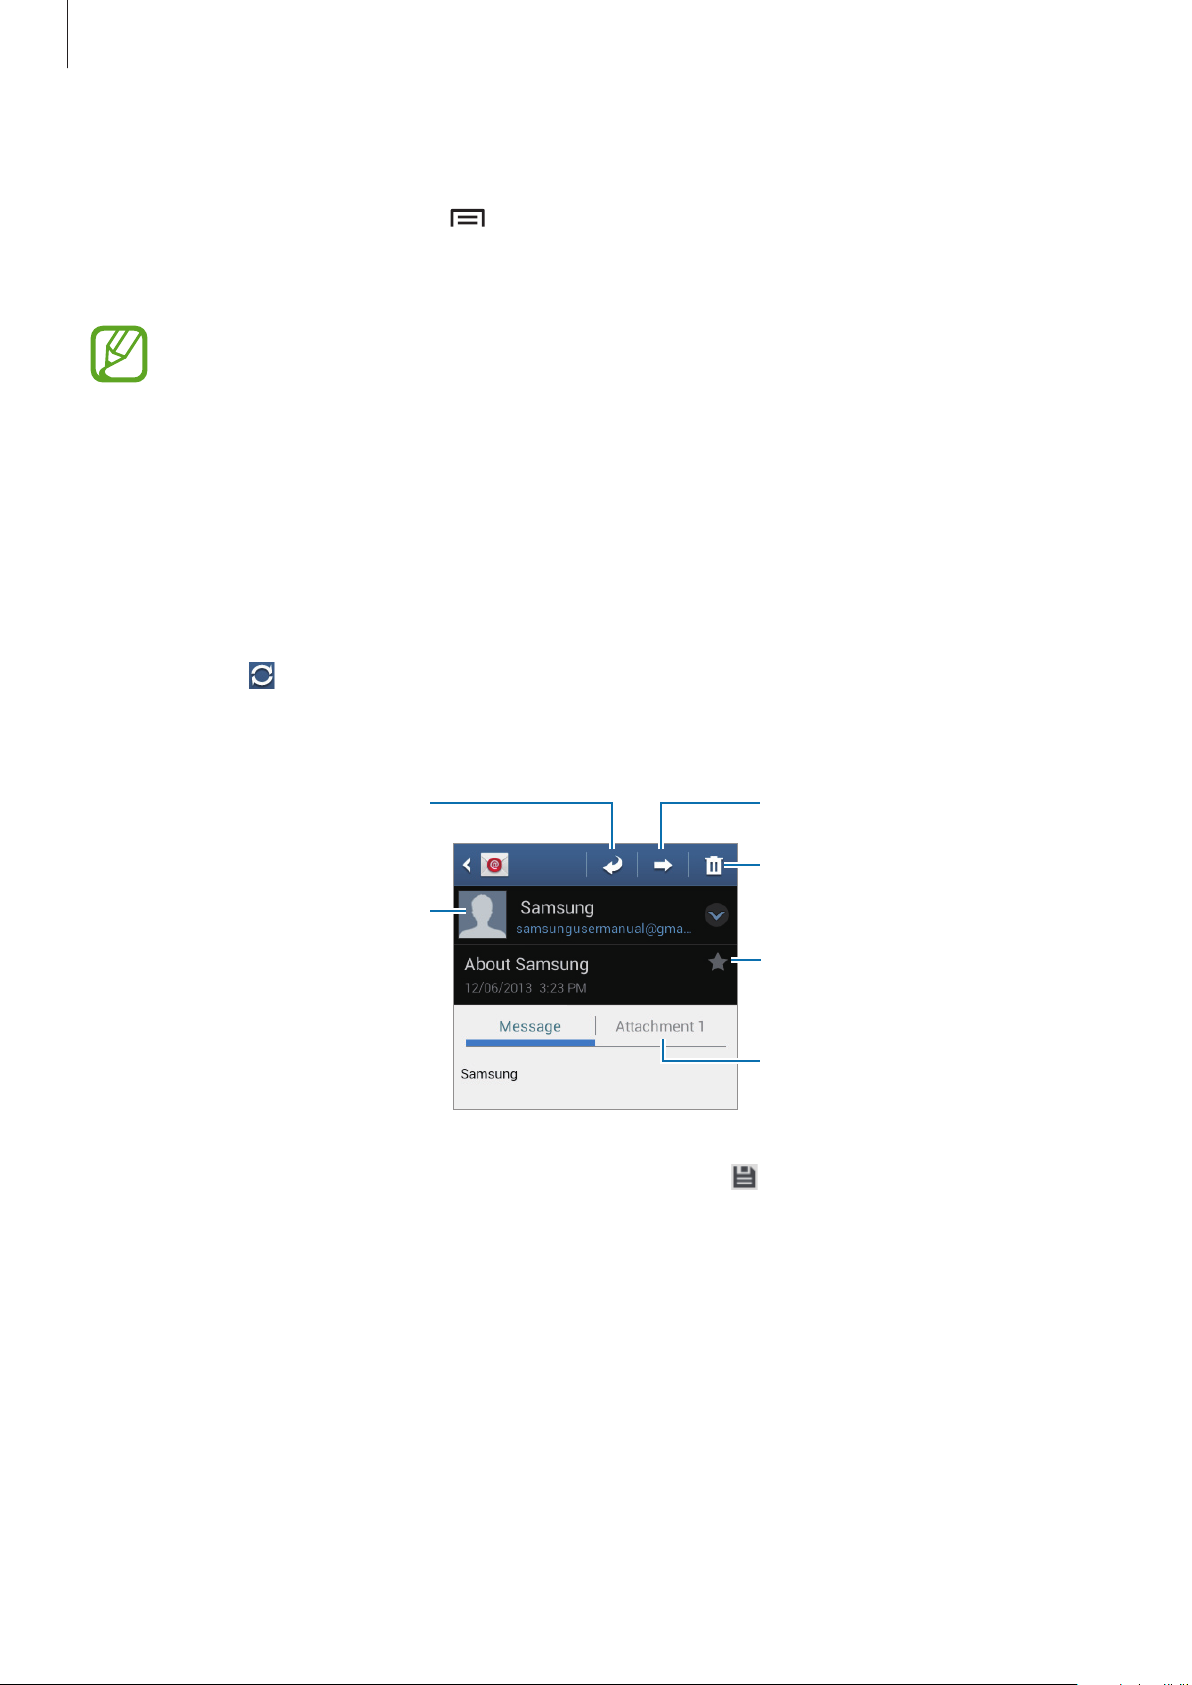
Forward the message.Reply to the message.
Sending scheduled messages
While composing a message, tap →
time and date, and then tap
date.
•
If the device is turned off at the scheduled time, is not connected to the network,
or the network is unstable, the message will not be sent.
•
This feature is based on the time and date set on the device. The time and date
may be incorrect if you move across time zones and the network does not update
the information.
Done
. The device will send the message at the specified time and
Schedule sending
. Tick
Schedule sending
, set a
Reading messages
Select an email account to use, and new messages are retrieved. To manually retrieve new
messages, tap
Tap a message to read.
.
Delete the message.
Add this email address to the
contacts list.
Mark the message as a reminder.
Open attachments.
Tap the attachment tab to open attachments, and then tap next to an attachment to save
it.
49
Page 50
Communication
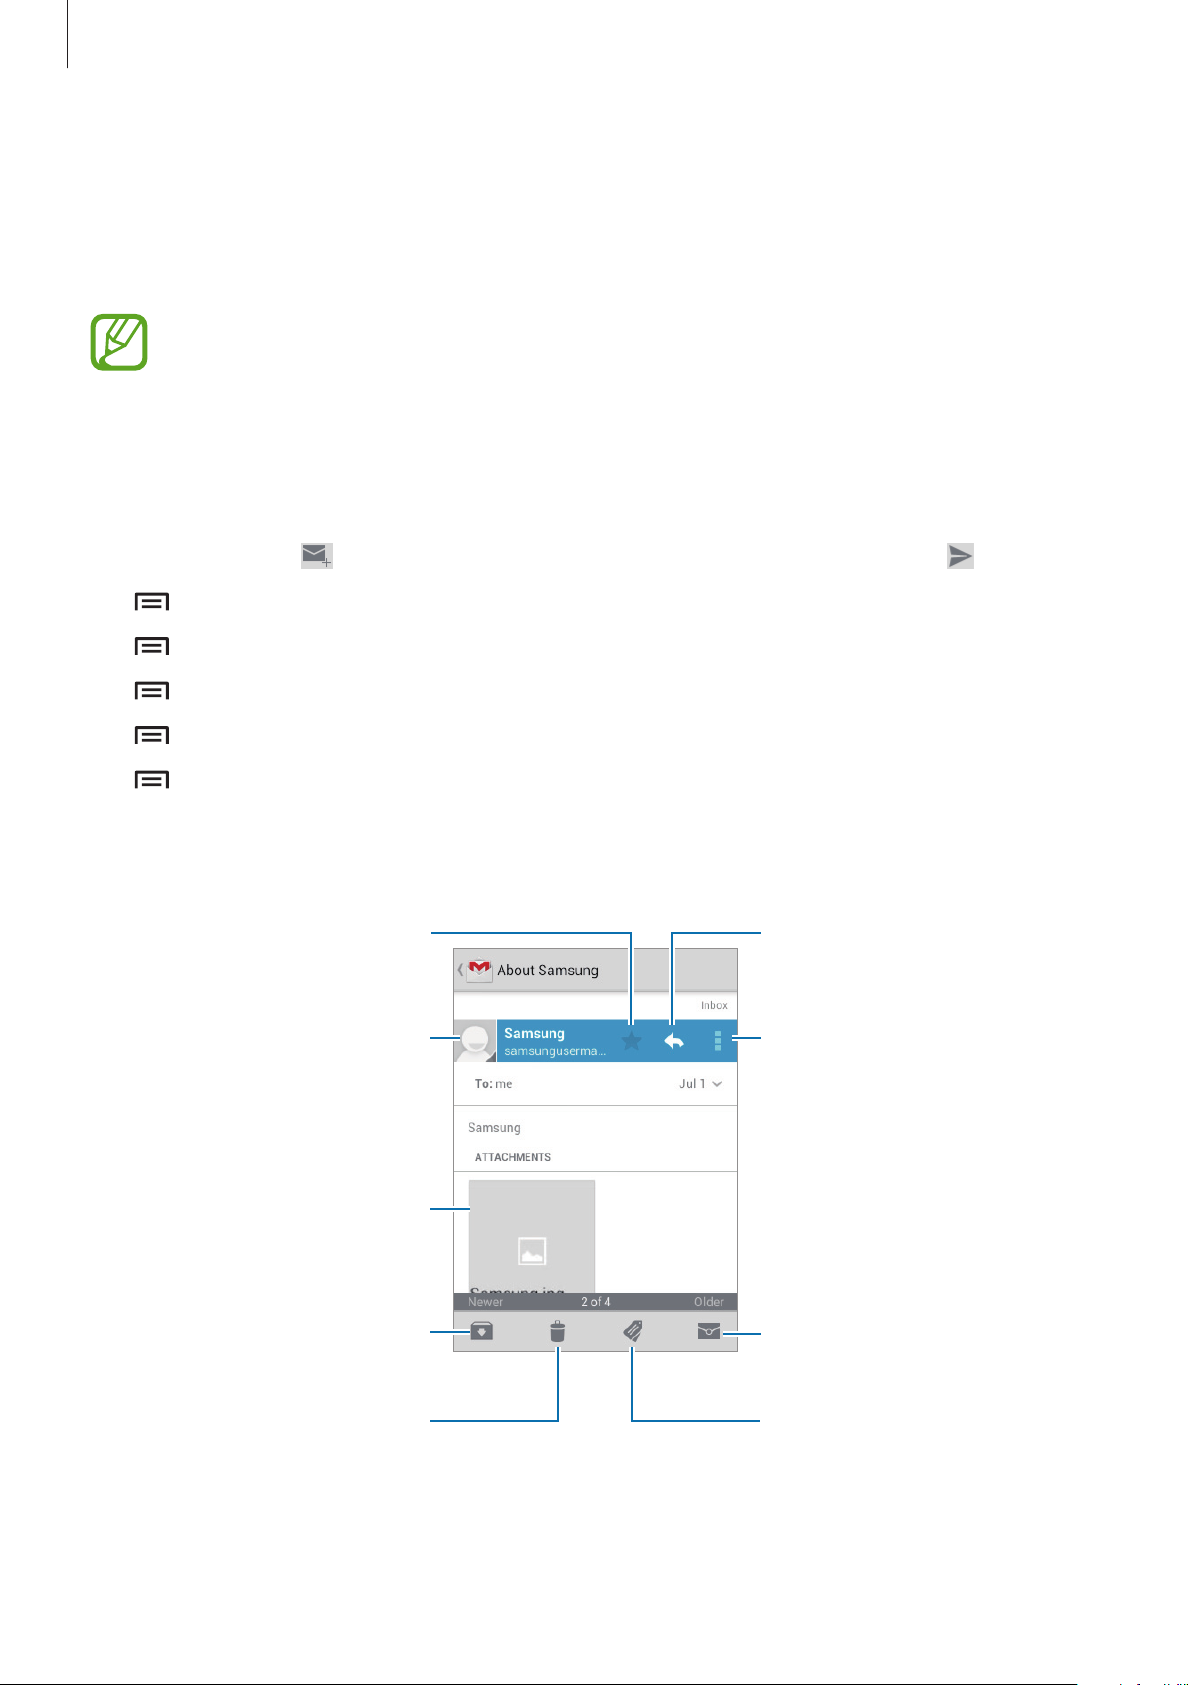
Reply to this message.
Mark the message as a reminder.
Google Mail
Use this application to quickly and directly access the Google Mail service.
Tap
Google Mail
•
This application may not be available depending on the region or service provider.
•
This application may be labelled differently depending on the region or service
provider.
Sending messages
In any mailbox, tap , enter recipients, a subject, and a message, and then tap .
on the Applications screen.
Tap
Tap
Tap
Tap
Tap
→
Attach picture
→
Attach video
→
Add Cc/Bcc
→
Save draft
→
Discard
to start over.
Reading messages
Add this email address to the
Preview attachment.
to attach images.
to attach videos.
to add more recipients.
to save the message for later delivery.
contacts list.
Reply to all recipients or forward
this message to others.
Keep this message for long-term
storage.
Delete this message.
Mark the message as unread.
Add a label to this message.
50
Page 51
Communication
Labels
Google Mail does not use actual folders, but uses labels instead. When Google Mail is
launched, it displays messages labelled Inbox.
Tap
To add a label to a message, select the message, tap
to view messages in other labels.
, and then select the label to assign.
Talk
Use this application to chat with others via Google Talk.
Tap
Talk
on the Applications screen.
This application may not be available depending on the region or service provider.
Public profile
Tap the account ID at the top of the friends list to change the availability status, image, or
status message.
Adding friends
Tap , enter the email address of the friend to add, and then tap
DONE
.
Chatting with friends
Select a friend from the friends list, enter a message in the field at the bottom of the screen,
and then tap
To add a friend to chat, tap
To end the chat, tap
.
→
→
End chat
Add to chat
.
.
51
Page 52
Communication
Switching between chats
Scroll left or right.
Deleting chat history
Chats are automatically saved. To delete the chat history, tap →
Clear chat history
Google+
Use this application to stay connected with people via Google’s social network service.
Tap
Google+
All Circles
Tap
circles.
Tap
to use other social network features.
on the Applications screen.
This application may not be available depending on the region or service provider.
to change the category, and then scroll up or down to view posts from your
Messenger
.
Use this application to chat with others via Google+ instant messaging service.
Tap
Messenger
This application may not be available depending on the region or service provider.
Select a friend from the friends list, enter a message in the field at the bottom of the screen,
and then tap
on the Applications screen.
.
52
Page 53

Communication
ChatON
Use this application to chat with any device. To use this application, you must sign in to your
Samsung account.
Tap
ChatON
Create the buddies list by entering phone numbers or email addresses of Samsung accounts,
on the Applications screen.
This application may not be available depending on the region or service provider.
or selecting buddies from the list of suggestions. Alternatively, tap
sync contacts from the device.
Tap
Chats
→
Start chat
and select a buddy to start chatting.
Contact sync
to manually
53
Page 54
Web & network
Internet
Use this application to browse the Internet.
Tap
Internet
Viewing webpages
Tap the address field, enter the web address, and then tap Go.
on the Applications screen.
Tap
to share, save, or print the current webpage while viewing a webpage.
Opening a new page
Tap →
To go to another webpage, tap
New window
.
, scroll left or right, and tap the page to select it.
Searching the web by voice
Tap the address field, tap , speak a keyword, and then select one of the suggested keywords
that appear.
This feature may not be available depending on the region or service provider.
54
Page 55

Web & network
Bookmarks
To bookmark the current webpage, tap →
To open a bookmarked webpage, tap
Add bookmark
, and then select one.
.
History
Tap →
history, tap
Tap
→
History
→
History
to open a webpage from the list of recently-visited webpages. To clear the
Clear history
→
Most visited
.
to open a webpage from the list of most visited webpages.
Saved pages
To view saved webpages, tap →
Saved pages
.
Links
Tap and hold a link on the webpage to open it in a new page, save, or copy.
To view saved links, tap
→
Downloads
.
Sharing webpages
To share a webpage address with others, tap →
To share a part of a webpage, tap and hold the desired text, and then tap
Share page
.
→
Share
.
55
Page 56

Web & network
Bluetooth
Bluetooth creates a direct wireless connection between two devices over short distances. Use
Bluetooth to exchange data or media files with other devices.
•
Samsung is not responsible for the loss, interception, or misuse of data sent or
received via the Bluetooth feature.
•
Always ensure that you share and receive data with devices that are trusted
and properly secured. If there are obstacles between the devices, the operating
distance may be reduced.
•
Some devices, especially those that are not tested or approved by the Bluetooth
SIG, may be incompatible with your device.
•
Do not use the Bluetooth feature for illegal purposes (for example, pirating copies
of files or illegally tapping communications for commercial purposes).
Samsung is not responsible for the repercussion of illegal use of the Bluetooth
feature.
To activate Bluetooth, on the Applications screen, tap
Bluetooth
the
switch to the right.
Settings
→
Bluetooth
, and then drag
Pairing with other Bluetooth devices
On the Applications screen, tap
listed. Select the device you want to pair with, and then accept the auto-generated passkey
on both devices to confirm.
Settings
→
Bluetooth
→
Scan
, and detected devices are
Sending and receiving data
Many applications support data transfer via Bluetooth. An example is
→
select an image, tap
that, accept the Bluetooth authorisation request on the other device to receive the image.
Bluetooth
, and then select one of the Bluetooth devices. After
Gallery
. Open
Gallery
,
The transferred file is saved in the
contacts list automatically.
Bluetooth
folder. If a contact is received, it is added to the
56
Page 57
Media
Music Player
Use this application to listen to music.
Tap
Music Player
•
Some file formats are not supported depending on the software installed on the
device.
•
Some files may not play properly depending on the encoding method used.
Playing music
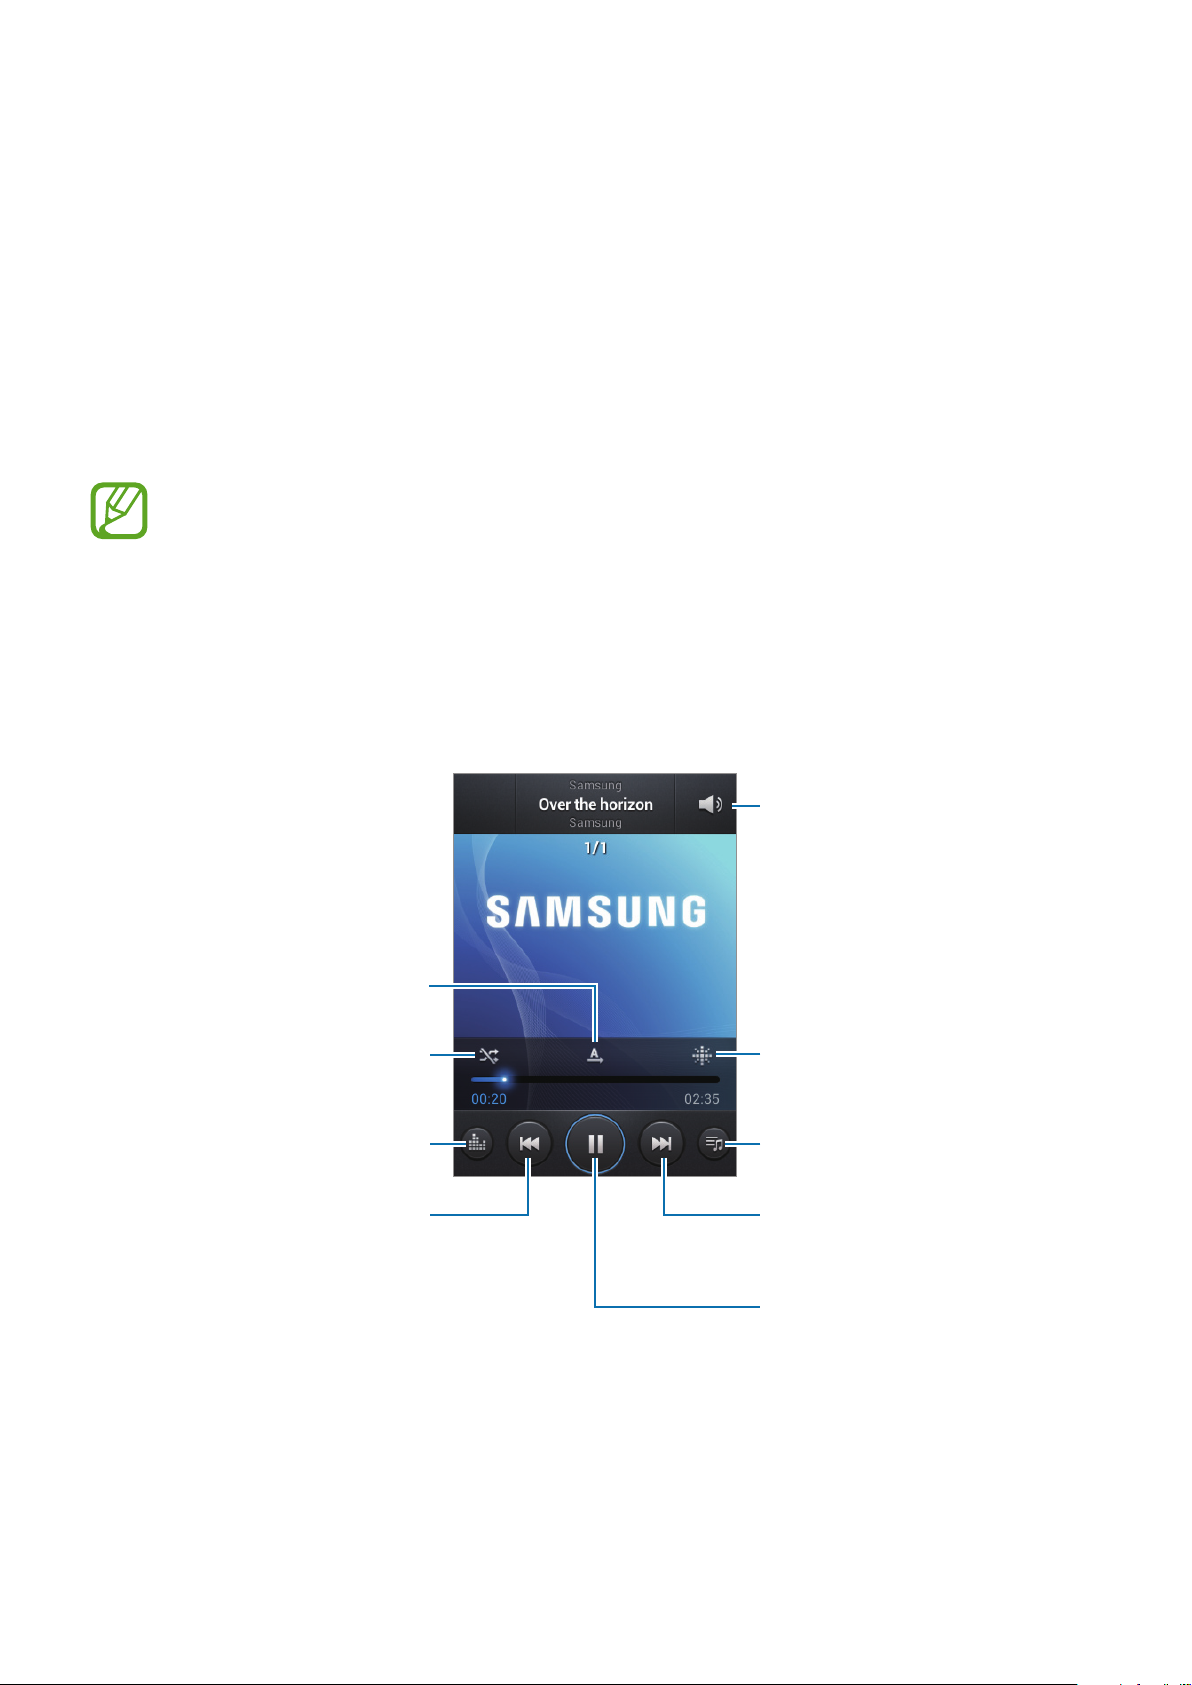
Select a music category, and then select a song to play.
on the Applications screen.
Change the repeat mode.
Turn on shuffle.
Select a sound effect.
Restart the currently-playing
song or skip to the previous
song. Tap and hold to move
backwards quickly.
Adjust the volume.
Open Music square.
Open the playlist.
Skip to the next song. Tap and
hold to move forwards quickly.
Pause and resume playback.
57
Page 58

Media
To listen to songs at equal volume levels, tap →
When
volume level. Use caution to avoid long-term exposure to loud sounds to prevent
damage to your hearing.
Smart volume
is activated, the volume may end up louder than the device
Settings
→
Smart volume
Setting a song as ringtone or alarm tone
To use the currently-playing song as ringtone or alarm tone, tap →
option.
Creating playlists
Make an own selection of songs.
Tap
Playlists
select songs to include, and then tap
To add the currently-playing song to a playlist, tap
, and then tap →
Create playlist
Done
.
. Enter a title and tap OK. Tap
→
Add to playlist
Set as
.
.
, and select an
Add music
,
Playing music by mood
Play music grouped by mood. The playlist is automatically created by the device. When a new
song is added, tap
Tap
Music square
Music square
and select a cell of mood. Or select multiple cells by dragging your finger.
→ →
Library update
.
58
Page 59
Media
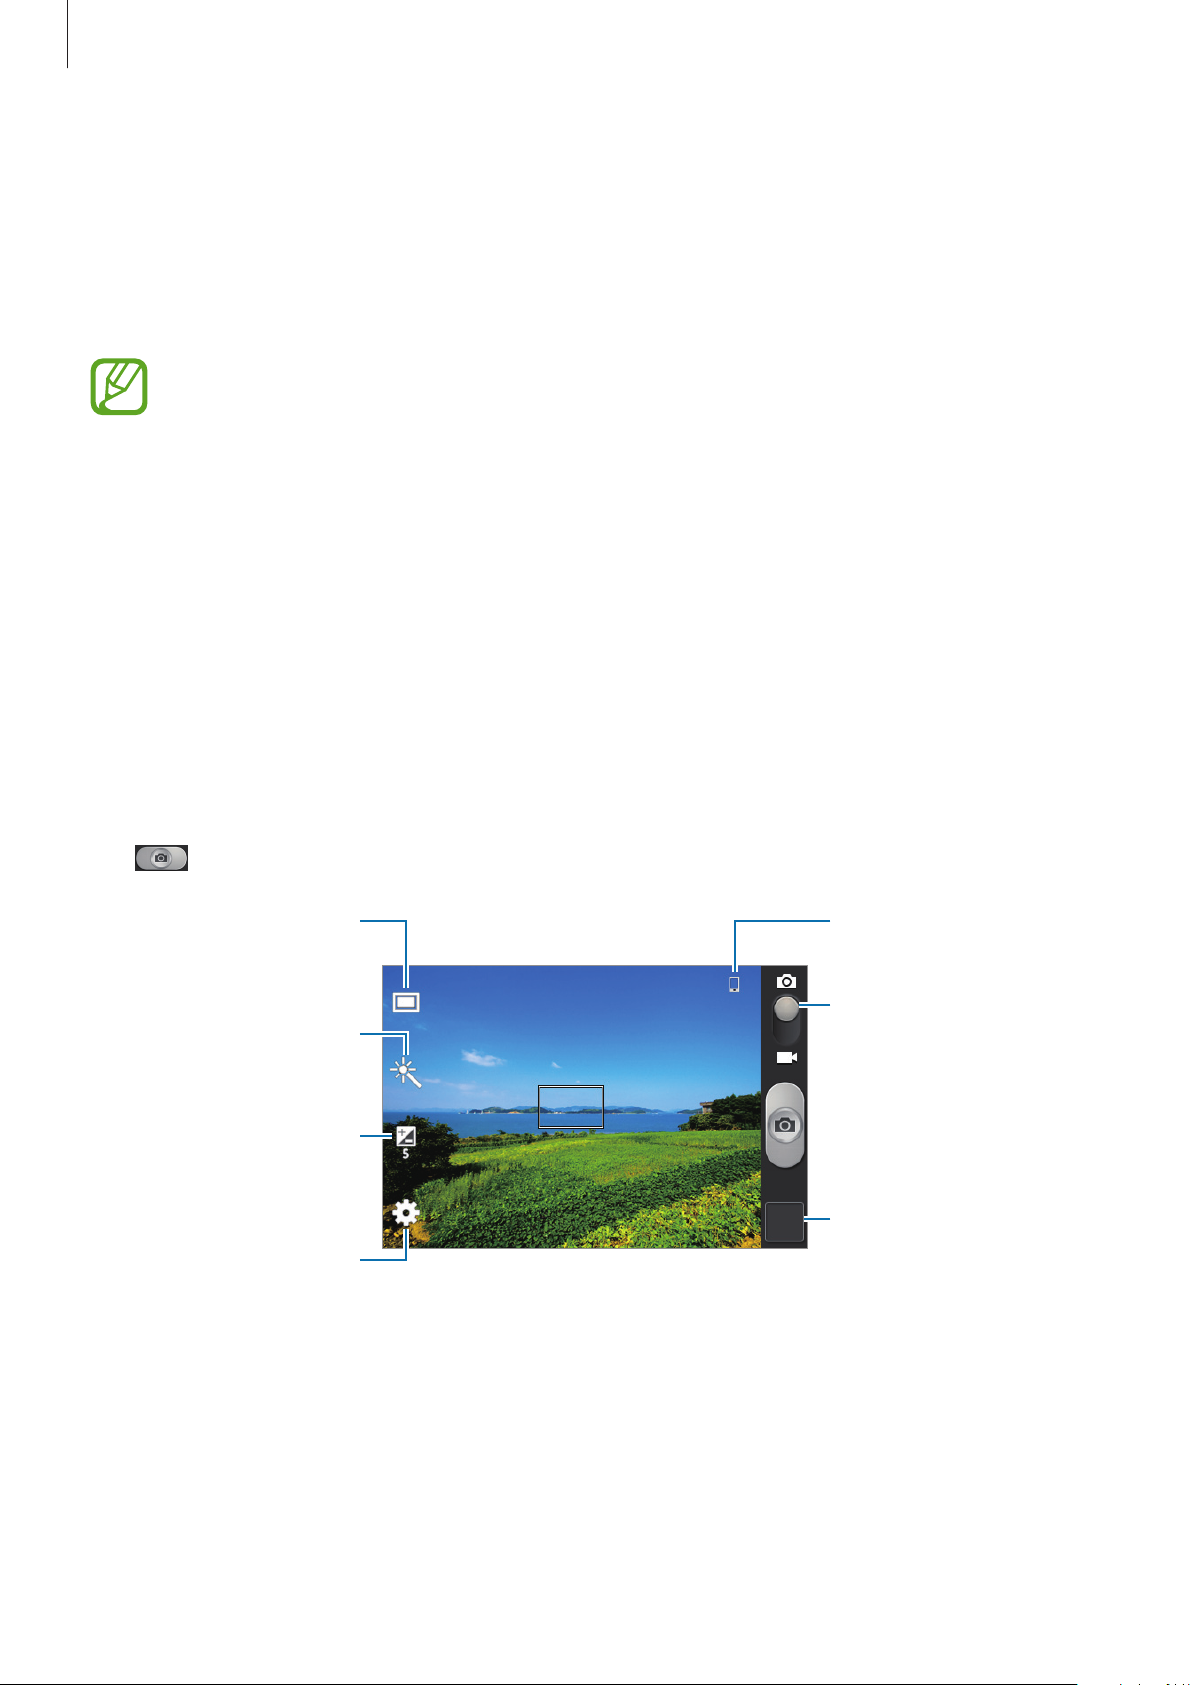
Change the shooting
Indicates which storage
Camera
Use this application to take photos or videos.
Use
Gallery
Tap
Camera
Camera etiquette
•
Do not take photos or videos of other people without their permission.
•
Do not take photos or videos where legally prohibited.
to view photos and videos taken with the device’s camera. (p. 64)
on the Applications screen.
•
The camera automatically shuts off when unused.
•
Make sure that the lens is clean. Otherwise, the device may not work properly in
some modes that require high resolutions.
•
Do not take photos or videos in places where you may violate other people’s privacy.
Taking photos
Taking a photo
Tap to take a photo.
Select among various
effects that are available.
Determine how much
light the camera’s sensor
Change the camera
mode.
receives.
settings.
is in use.
Switch between still and
video mode.
Open the image viewer
to display photos.
59
Page 60

Media
Scene mode
Predefined settings make point-and-shoot photos easier to take.
Tap
→
Scene mode
•
Landscape
•
Sports
•
Party/Indoor
•
Beach/Snow
•
Sunset
•
Dawn
•
Autumn color
•
Candlelight
•
Firework
•
Backlight
•
Night
: Use this setting for fast-moving subjects.
: Use this setting for richer colours and sharper contrasts.
: Use this setting for very subtle colours.
: Use this setting for images taken in darker conditions.
: Use this to take photos of blue skies and landscapes with richer colours.
: Use this setting for well-lit indoor scenes.
: Use this setting for well-lit or sunny outdoor scenes.
: Use this setting for red-shifted background scenery.
: Use this setting for images of bright light against a dark background.
: Use this setting for high-contrast scenes.
: Use this setting for subjects with bright lights behind them.
Shooting mode
.
Several photo effects are available.
Tap
→
Shooting mode
•
Single shot
•
Panorama
To get the best shot, follow these tips.
–
Move the camera slowly in one direction.
–
Keep the camera’s viewfinder within the guide frame.
–
Avoid taking photos of a subject in front of unrecognisable backgrounds, such as
empty skies or plain walls.
•
Share shot
•
Smile shot
: Take a single photo.
: Take a photo composed of many photos strung together.
: Send a photo directly to another device via Wi-Fi Direct.
: Take a photo when a subject smiles.
.
60
Page 61
Media
Panoramic photos
A panoramic photo is a wide landscape image consisting of multiple shots.
Tap
Tap
viewfinder, the camera automatically takes another shot in a panoramic sequence. To stop
shooting, tap
→
Shooting mode
and move the camera in one direction. When the blue frame aligns with the
.
→
Panorama
.
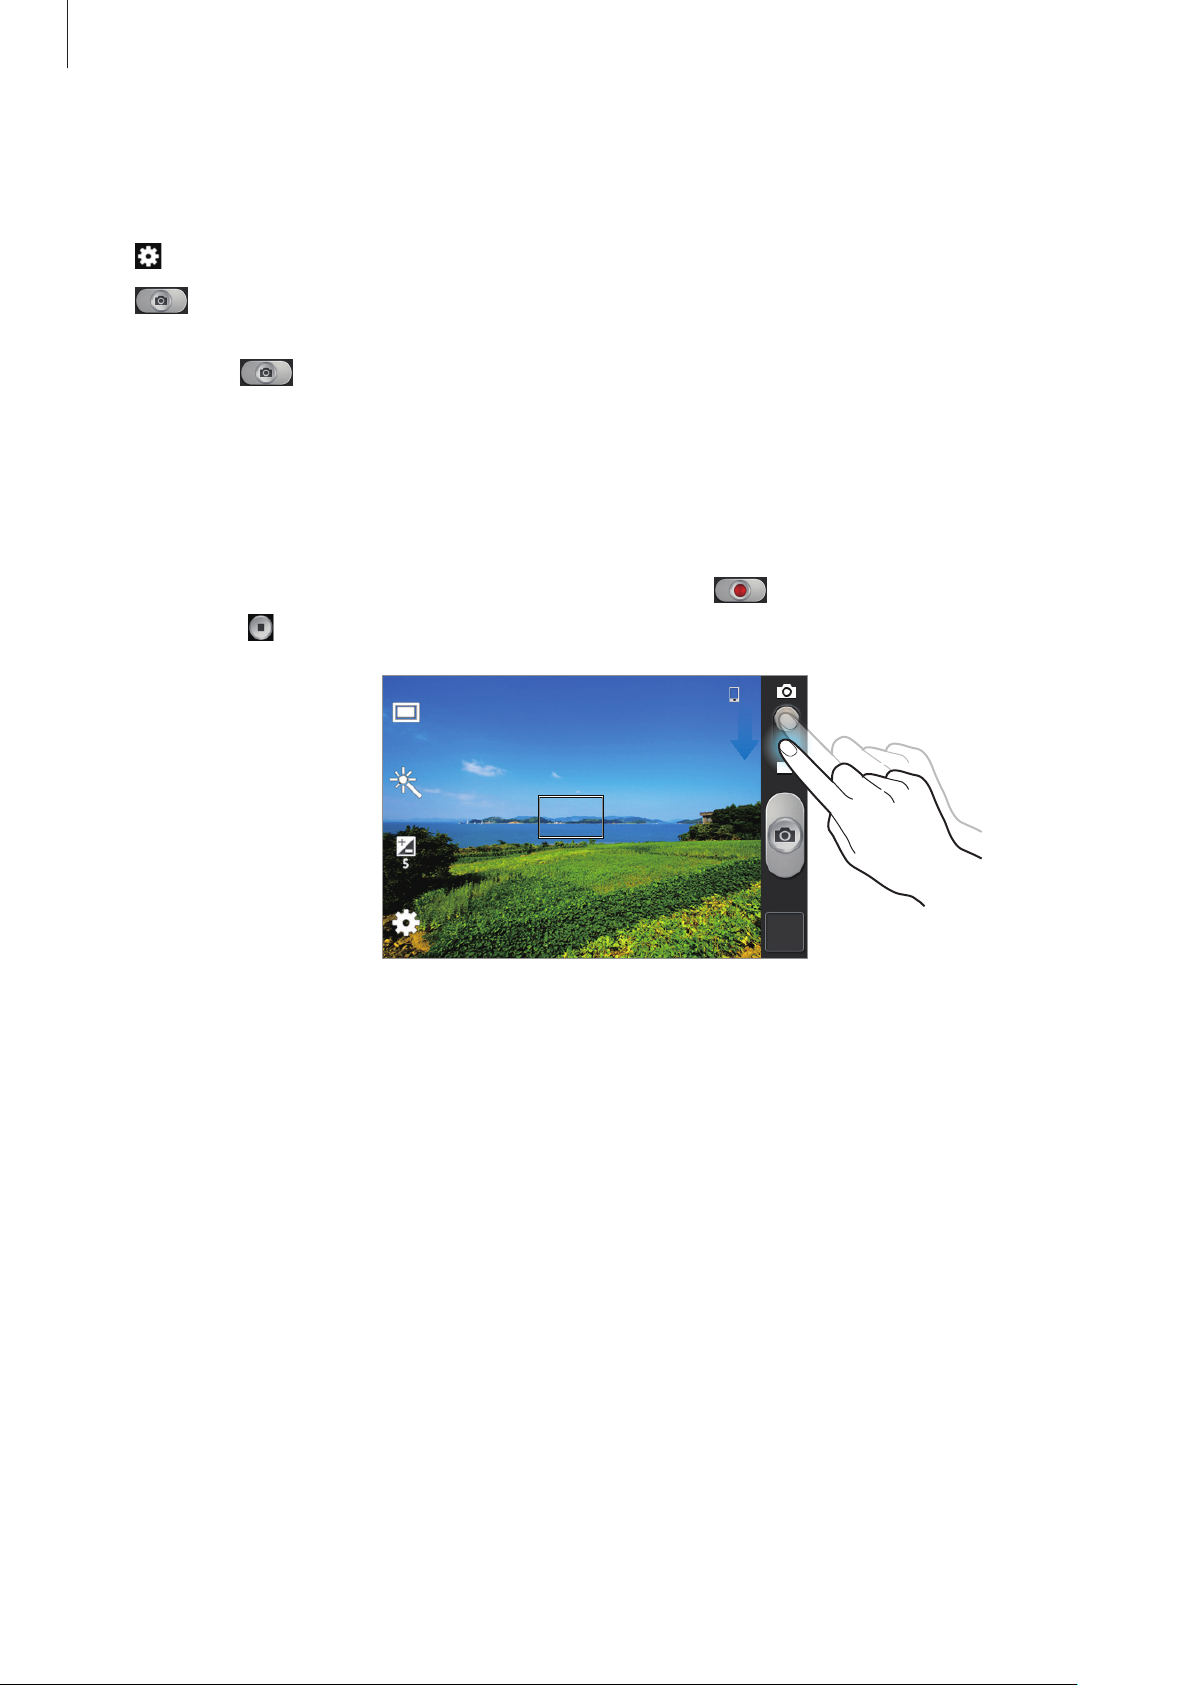
Taking videos
Taking a video
Slide the still-video switch to the video icon, and then tap to take a video. To stop
recording, tap
.
61
Page 62
Media
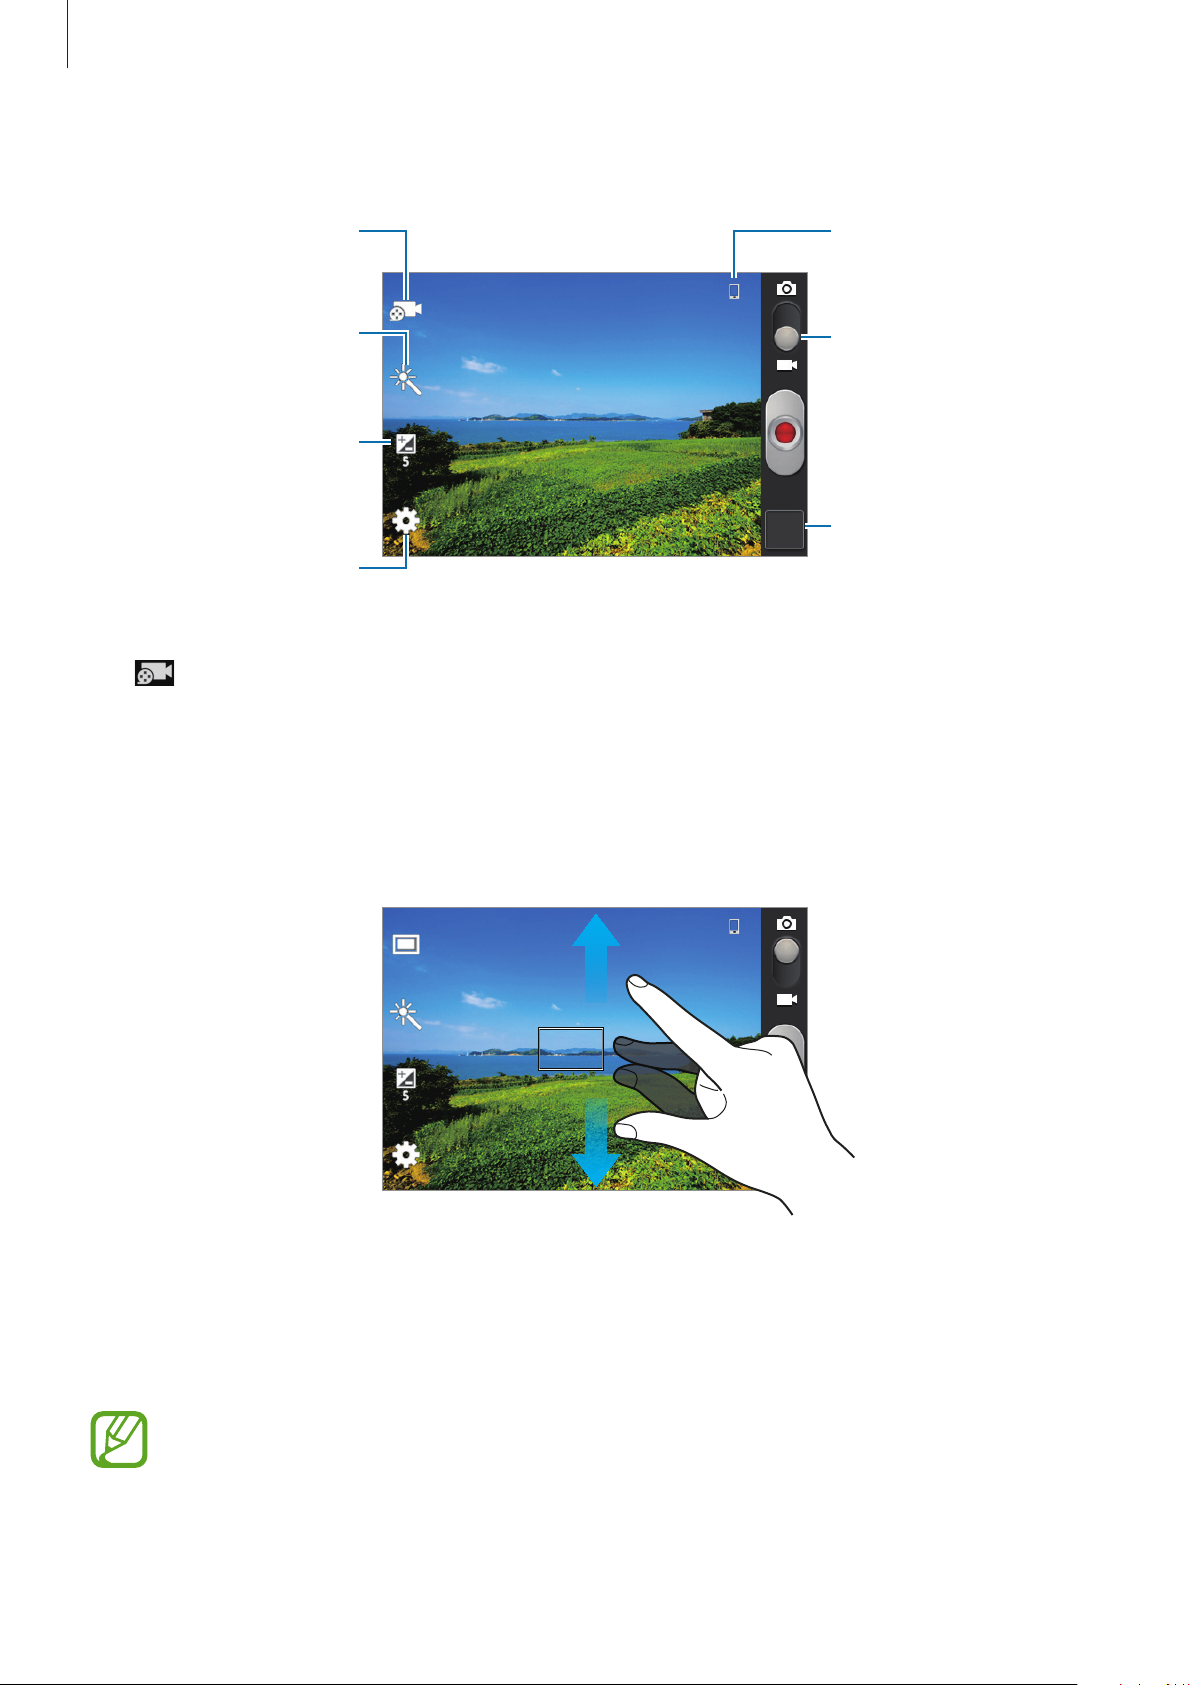
Change the recording
Indicates which storage
Recording mode
mode.
Select among various
effects that are available.
Determine how much
light the camera’s sensor
receives.
Change the camera
settings.
Tap to change the recording mode.
•
Normal
•
Limit for MMS
: Use this mode for normal quality.
: Use this mode to lower quality for sending via messaging.
is in use.
Switch between still and
video mode.
Open the video player to
play videos.
Zooming in and out
Use one of the following methods:
•
Use the Volume button to zoom in or out.
•
Spread two fingers apart on the screen to zoom in, and pinch to zoom out.
The zoom in/out effect is available when using the zoom feature while shooting
video.
62
Page 63

Media
Configuring settings for Camera
Tap to configure settings for Camera. Not all of the following options are available in both
still camera and video camera modes. The available options vary depending on the mode
used.
•
Edit shortcuts
•
GPS tag
•
Shooting mode
: Attach a GPS location tag to the photo.
•
To improve GPS signals, avoid shooting in locations where the signal may be
obstructed, such as between buildings or in low-lying areas, or in poor weather
conditions.
•
Your location may appear on your photos when you upload them to the Internet.
To avoid this, deactivate the GPS tag setting.
: Reorganise shortcuts to frequently-used options.
: Change the shooting mode.
•
Recording mode
•
Effects
•
Scene mode
•
Brightness
•
Timer
•
Resolution
more memory.
•
White balance
range. The settings are designed for specific lighting situations. These settings are similar
to the heat range for white-balance exposure in professional cameras.
•
Metering
Center-weighted
the light value at a specific location.
•
Guidelines
: Select among various effects that are available.
: Change the brightness.
: Use this for delayed-time shots.
: Select a resolution. Use higher resolution for higher quality. But it takes up
: Select a metering method. This determines how light values are calculated.
: Display viewfinder guides to help composition when selecting subjects.
: Change the recording mode.
: Change the scene mode.
: Select an appropriate white balance, so images have a true-to-life colour
measures background light in the centre of the scene.
Matrix
averages the entire scene.
Spot
measures
•
Image quality
storage space.
•
Video quality
•
Storage
•
Reset
: Reset the camera settings.
: Set the quality level for photos. Higher quality images require more
: Set the quality level for videos.
: Select the memory location for storage.
63
Page 64

Media
Shortcuts
Reorganise shortcuts for easy access to the camera’s various options.
Tap
Tap and hold an option and drag it to a slot at the left of the screen. The other icons can be
moved within the list by tapping and dragging them.
→
Edit shortcuts
.
Gallery
Use this application to view images and videos.
Tap
Gallery
Viewing images
on the Applications screen.
•
Some file formats are not supported depending on the software installed on the
device.
•
Some files may not play properly depending on the encoding method used.
Launching
an image, the
capturing a screenshot automatically creates the
it.
In a folder, images are displayed by creation date. Select an image to view it in full screen.
Scroll left or right to view the next or previous image.
Gallery
Download
displays available folders. When another application, such as
folder is automatically created to contain the image. Likewise,
Screenshots
folder. Select a folder to open
Email
, saves
Zooming in and out
Use one of the following methods to zoom in an image:
•
Double-tap anywhere to zoom in.
•
Spread two fingers apart on any place to zoom in. Pinch to zoom out, or double-tap to
return.
64
Page 65

Media
Playing videos
Video files show the icon on the preview. Select a video to watch it and tap .
Editing images
When viewing an image, tap and use the following functions:
•
Delete
•
Copy to clipboard
•
Rotate left
•
Rotate right
•
Crop
•
Set as
: Delete the image.
: Copy to clipboard.
: Rotate anticlockwise.
: Rotate clockwise.
: Resize the blue frame to crop and save the image in it.
: Set the image as wallpaper or a contact image.
•
Print
: Print the image via a USB or Wi-Fi connection. The device is only compatible with
some Samsung printers.
•
Rename
•
Details
: Rename the file.
: View image details.
Deleting images
Use one of the following methods:
•
In a folder, tap →
•
When viewing an image, tap →
Select item
, select images, and then tap →
Delete
Sharing images
Use one of the following methods:
•
In a folder, tap →
to others or share them via social network services.
Select item
, select images by ticking, and then tap to send them
Delete
.
.
•
When viewing an image, tap to send it to others or share it via social network services.
Setting as wallpaper
When viewing an image, tap →
contact.
Set as
to set the image as wallpaper or to assign it to a
65
Page 66
Media
Video Player
Use this application to play video files.
Tap
Video Player
•
Some file formats are not supported depending on the software installed on the
device.
•
Some files may not play properly depending on the encoding method used.
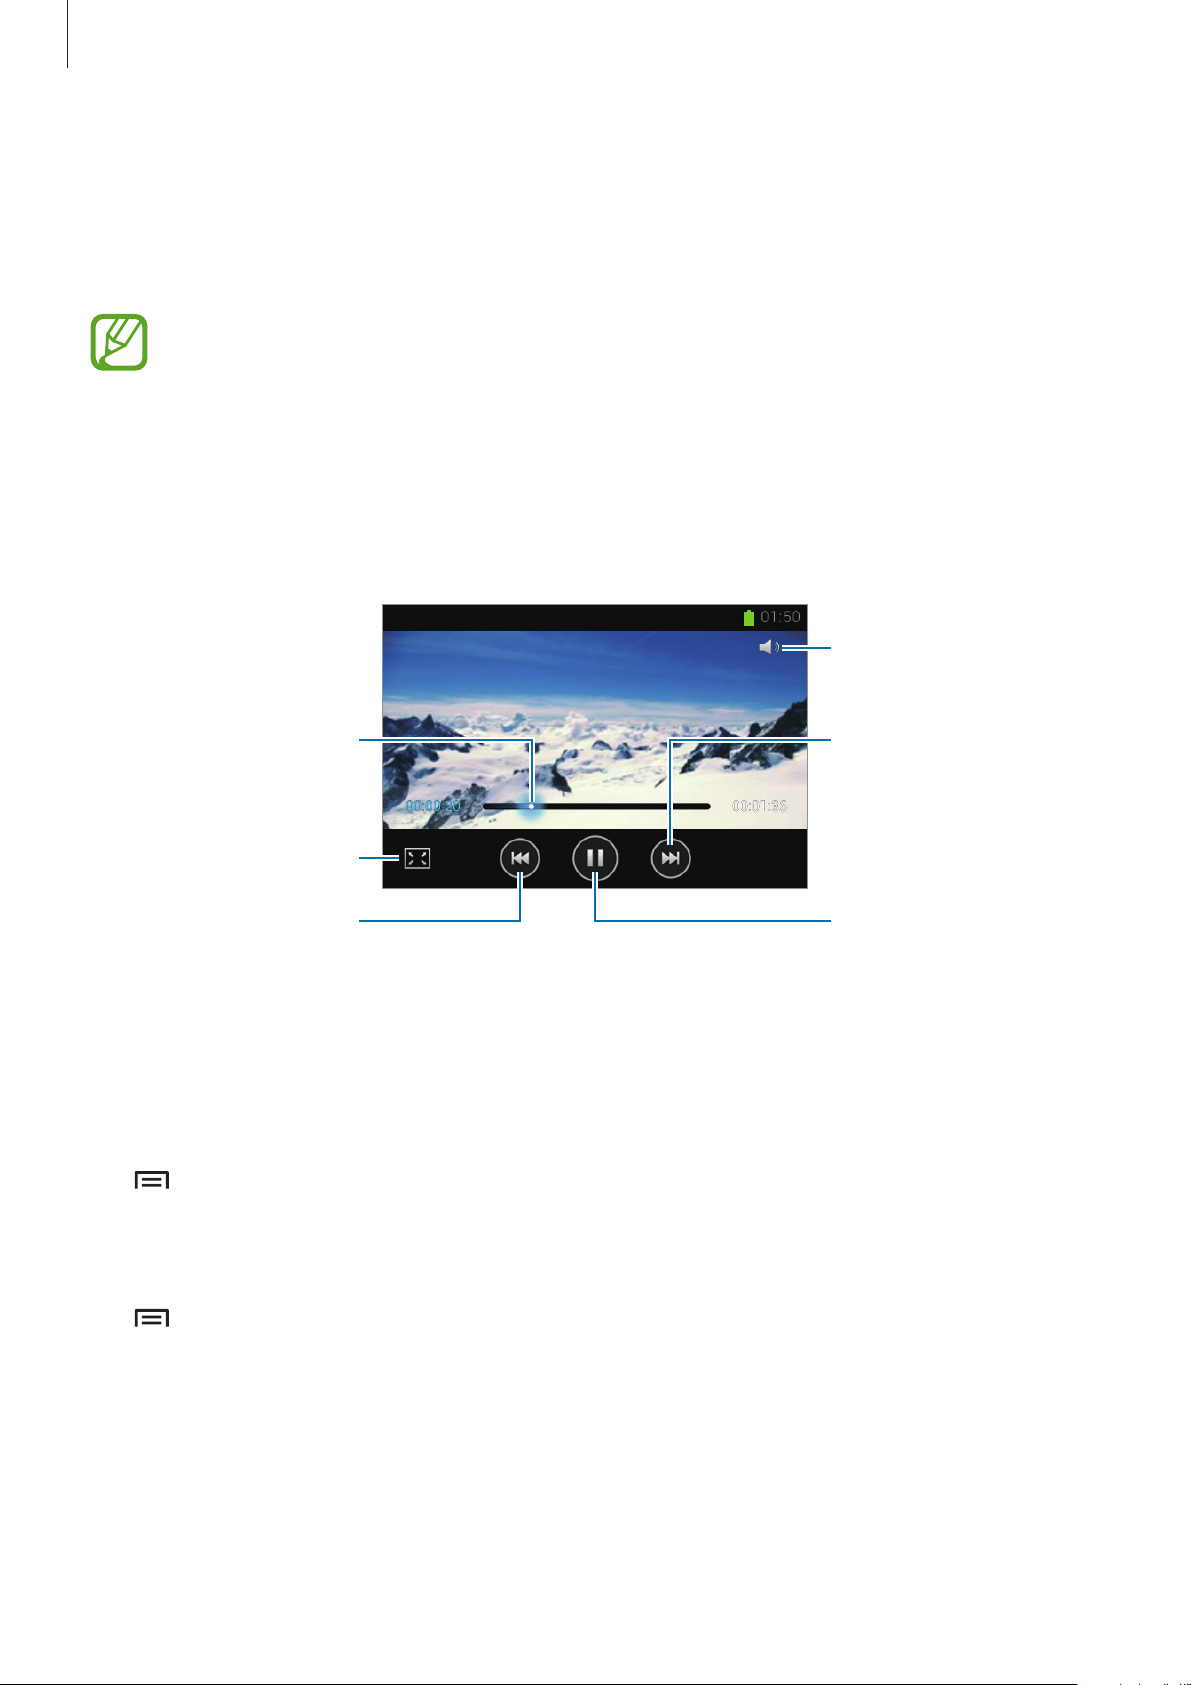
Playing videos
Select a video to play.
on the Applications screen.
Move forwards or
backwards by dragging
the bar.
Change screen ratio.
Restart the current video
or skip to the previous
video. Tap and hold to
move backwards
quickly.
Deleting videos
Tap →
Delete
, select videos by ticking, and then tap
Delete
Adjust the volume.
Skip to the next video.
Tap and hold to move
forwards quickly.
Pause and resume
playback.
.
Sharing videos
Tap →
Share via
, select videos by ticking, tap
66
Done
, and then select a sharing method.
Page 67
Media
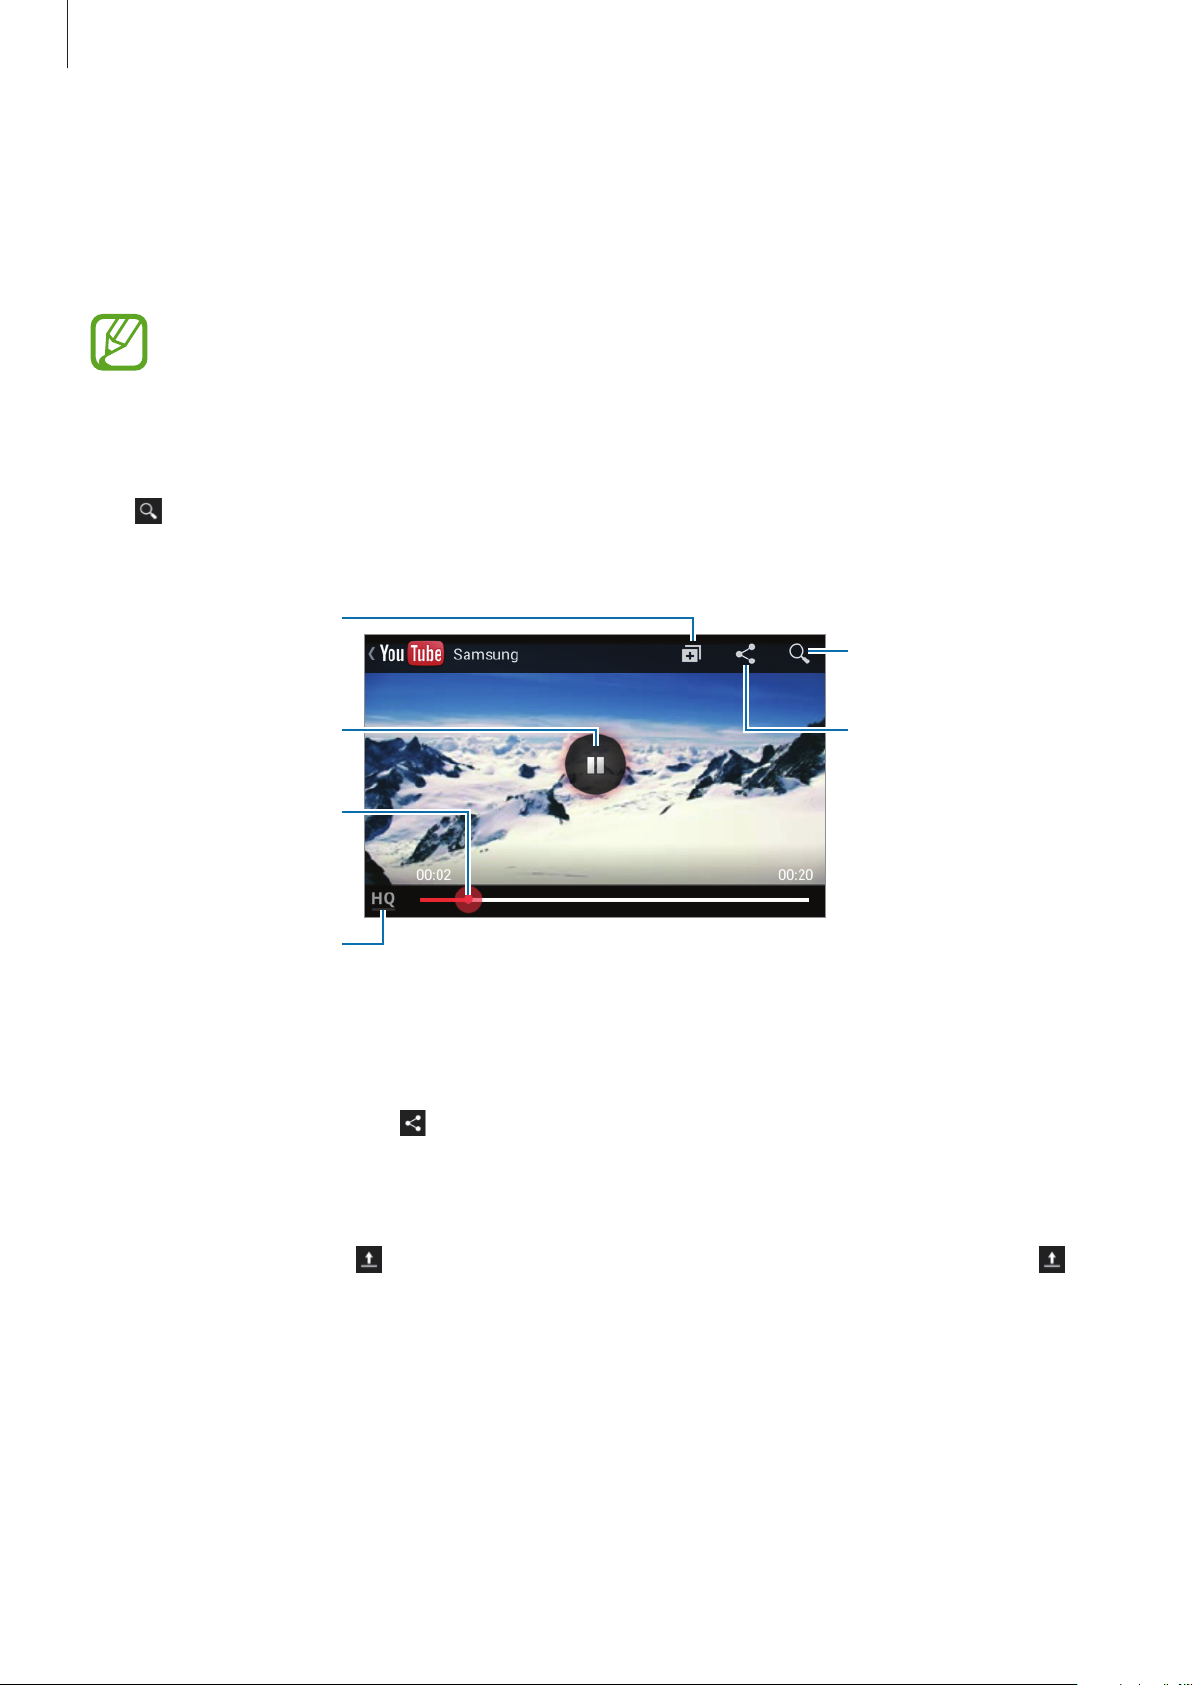
Add the video to the
YouTube
Use this application to watch videos from the YouTube website.
Tap
YouTube
Watching videos
Tap , and then enter a keyword. Select one of the returned search results to watch a video.
Rotate the device to landscape orientation to display full screen.
on the Applications screen.
This application may not be available depending on the region or service provider.
playlist.
Pause or resume
playback.
Move forwards or
backwards by
dragging the bar.
Change display
quality.
Sharing videos
Select the video to view, tap , and then select a sharing method.
Uploading videos
Search for videos.
Send the URL to
others.
Select your account, tap , select a video, enter information for the video, and then tap .
67
Page 68
Media
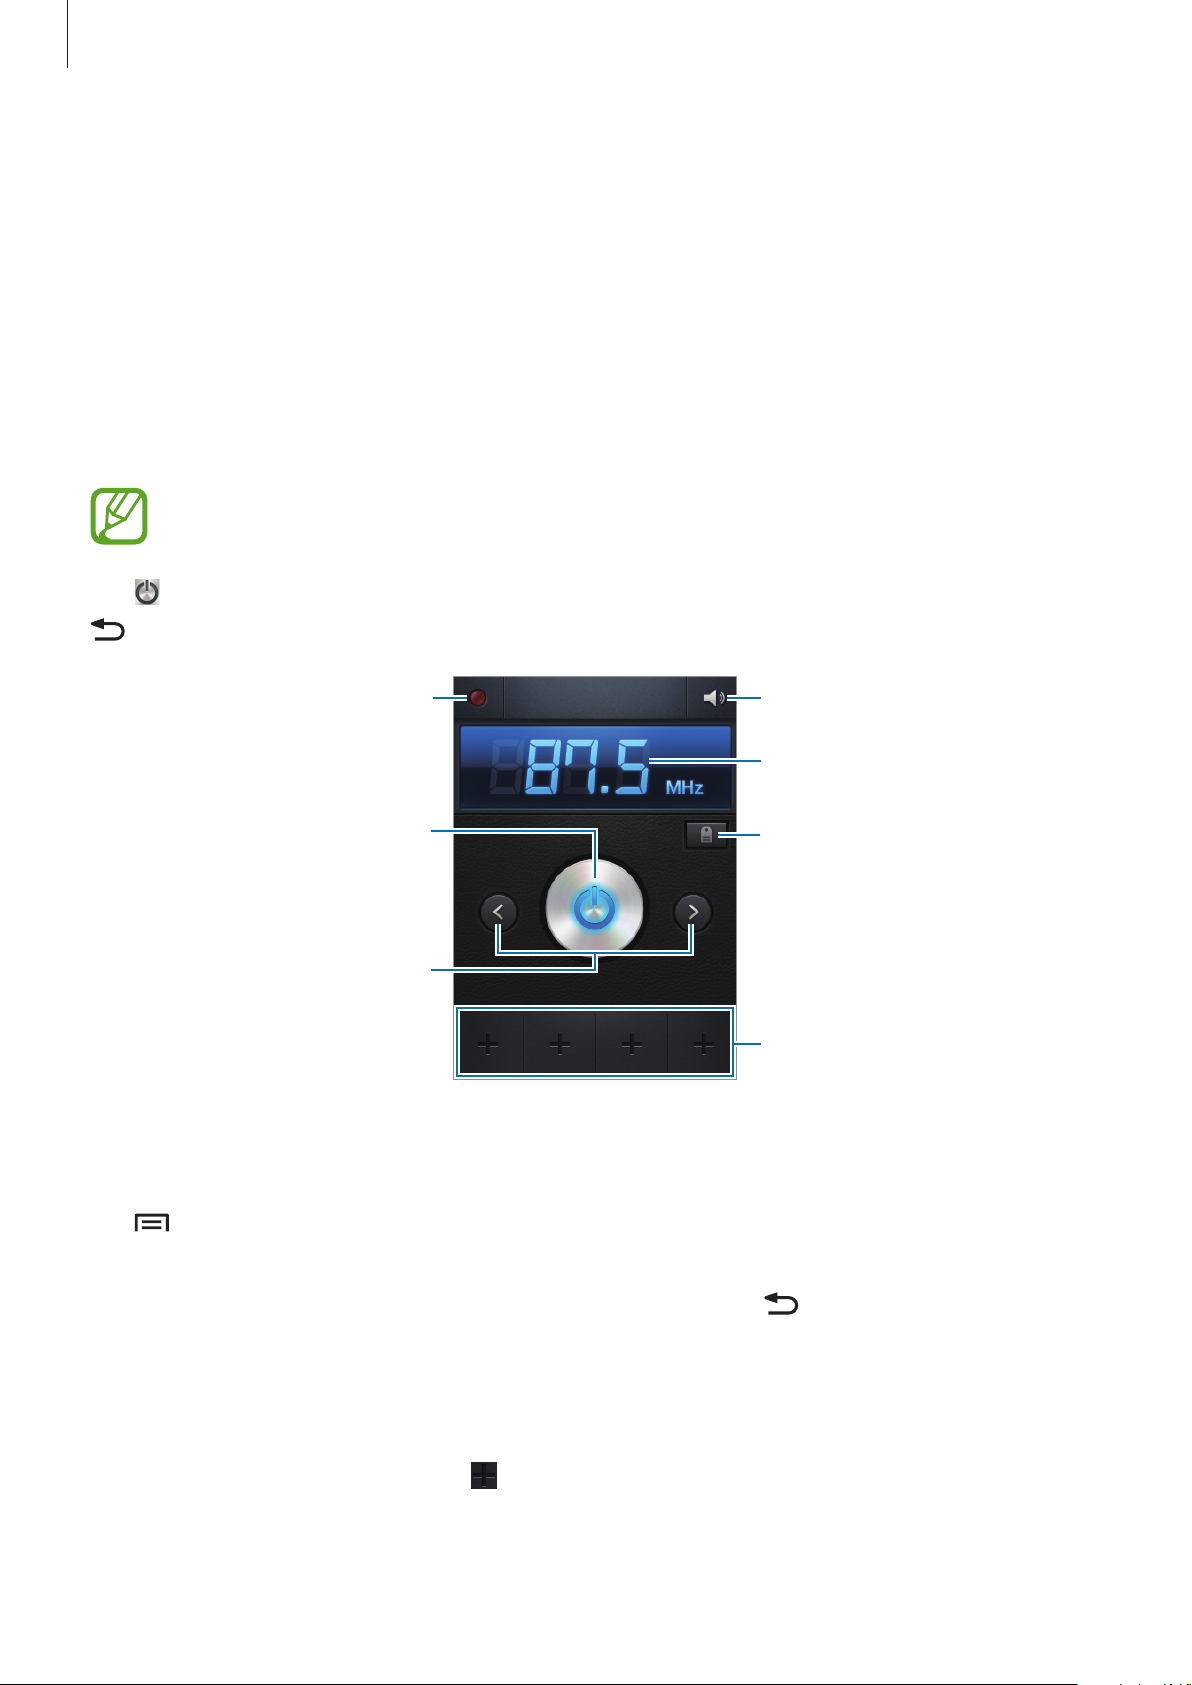
the favourites list.
FM Radio
Listen to music and news on the FM radio. To listen to the FM radio, you must connect a
headset, which serves as the radio antenna.
Tap
FM Radio
Listening to the FM radio
Plug a headset into the device before launching the FM radio.
The FM radio scans and saves available stations automatically when running for the
first time.
on the Applications screen.
Tap
to turn on the FM radio. Select the radio station you want from the stations list and tap
to return to the FM radio screen.
Record a song from the FM radio.
Turn the FM radio on or off.
Search for an available radio
station.
Scanning radio stations
Adjust the volume.
Enter radio station frequency
manually.
Access services for the current
station.
Add the current radio station to
Tap →
stations automatically.
Select the radio station you want from the stations list and tap
screen.
Scan
, and then select a scan option. The FM radio scans and saves available
to return to the FM radio
Adding stations to the favourites list
Select a radio station, and then tap to add the station to the favourites list.
68
Page 69
Application & media stores
Play Store
Use this application to purchase and download applications and games that are able to run
on the device.
Tap
Play Store
This application may not be available depending on the region or service provider.
Installing applications
Browse applications by category, or tap to search with a keyword.
on the Applications screen.
Select an application to view information. To download it, tap
for the application, tap the price, and follow on-screen instructions to complete the purchase
process.
•
When a new version is available for any installed application, an update icon
appears at the top of the screen to alert you to the update. Open the notifications
panel and tap the icon to update the application.
•
To install applications that you downloaded from other sources, on the
Applications screen, tap
Settings
→
Security
→
INSTALL
Unknown sources
. If there is a charge
.
Uninstalling applications
Uninstall the applications purchased from
Tap
then tap
→
My apps
UNINSTALL
, select an application to delete in the list of installed applications, and
.
Play Store
.
69
Page 70
Application & media stores
Samsung Apps
Use this application to purchase and download dedicated Samsung applications. For more
information, visit
Tap
Samsung Apps
This application may not be available depending on the region or service provider.
If a Samsung account is not registered, follow on-screen instructions to create a Samsung
account. To complete the subscription process, read the terms and conditions, and then tap
Accept
to agree to them.
www.samsungapps.com
on the Applications screen.
.
Installing applications
Browse applications by category. Tap to select a category.
To search for an application, tap
search field.
Select an application to view information. To download it, tap
When a new version is available for any installed application, an update icon appears
at the top of the screen, and then enter a keyword in the
Get
or
Buy
.
at the top of the screen to alert you to the update. Open the notifications panel and
tap the icon to update the application.
70
Page 71
Utilities
Memo
Use this application to record important information to save and view at a later date.
Tap
Memo
Composing memos
on the Applications screen.
Tap , enter a memo, and then tap
To change the background colour, tap
To lock the memo so that others cannot view it, tap
Save
.
→ .
Browsing memos
Browse memo thumbnails by scrolling up or down.
To edit the memo, tap
To search for a memo, tap
To delete memos, tap
To send memos to others, tap
To sort memos by date or colour, tap
To sync memos with a Google account, tap
To set a PIN to lock or unlock a memo, tap
.
→
→
Search
Delete
→
.
Send
.
.
→
Sort by
→
→
PIN lock
Sync memo
→ .
.
.
.
Viewing a memo
Tap the memo thumbnail to open it. Scroll left or right to see more memos.
Tap
and use the following:
•
: Delete the memo.
•
•
•
: Change the background colour.
: Lock the memo so that others cannot view it.
: Print the memo via a USB or Wi-Fi connection. The device is only compatible with
some Samsung printers.
71
Page 72
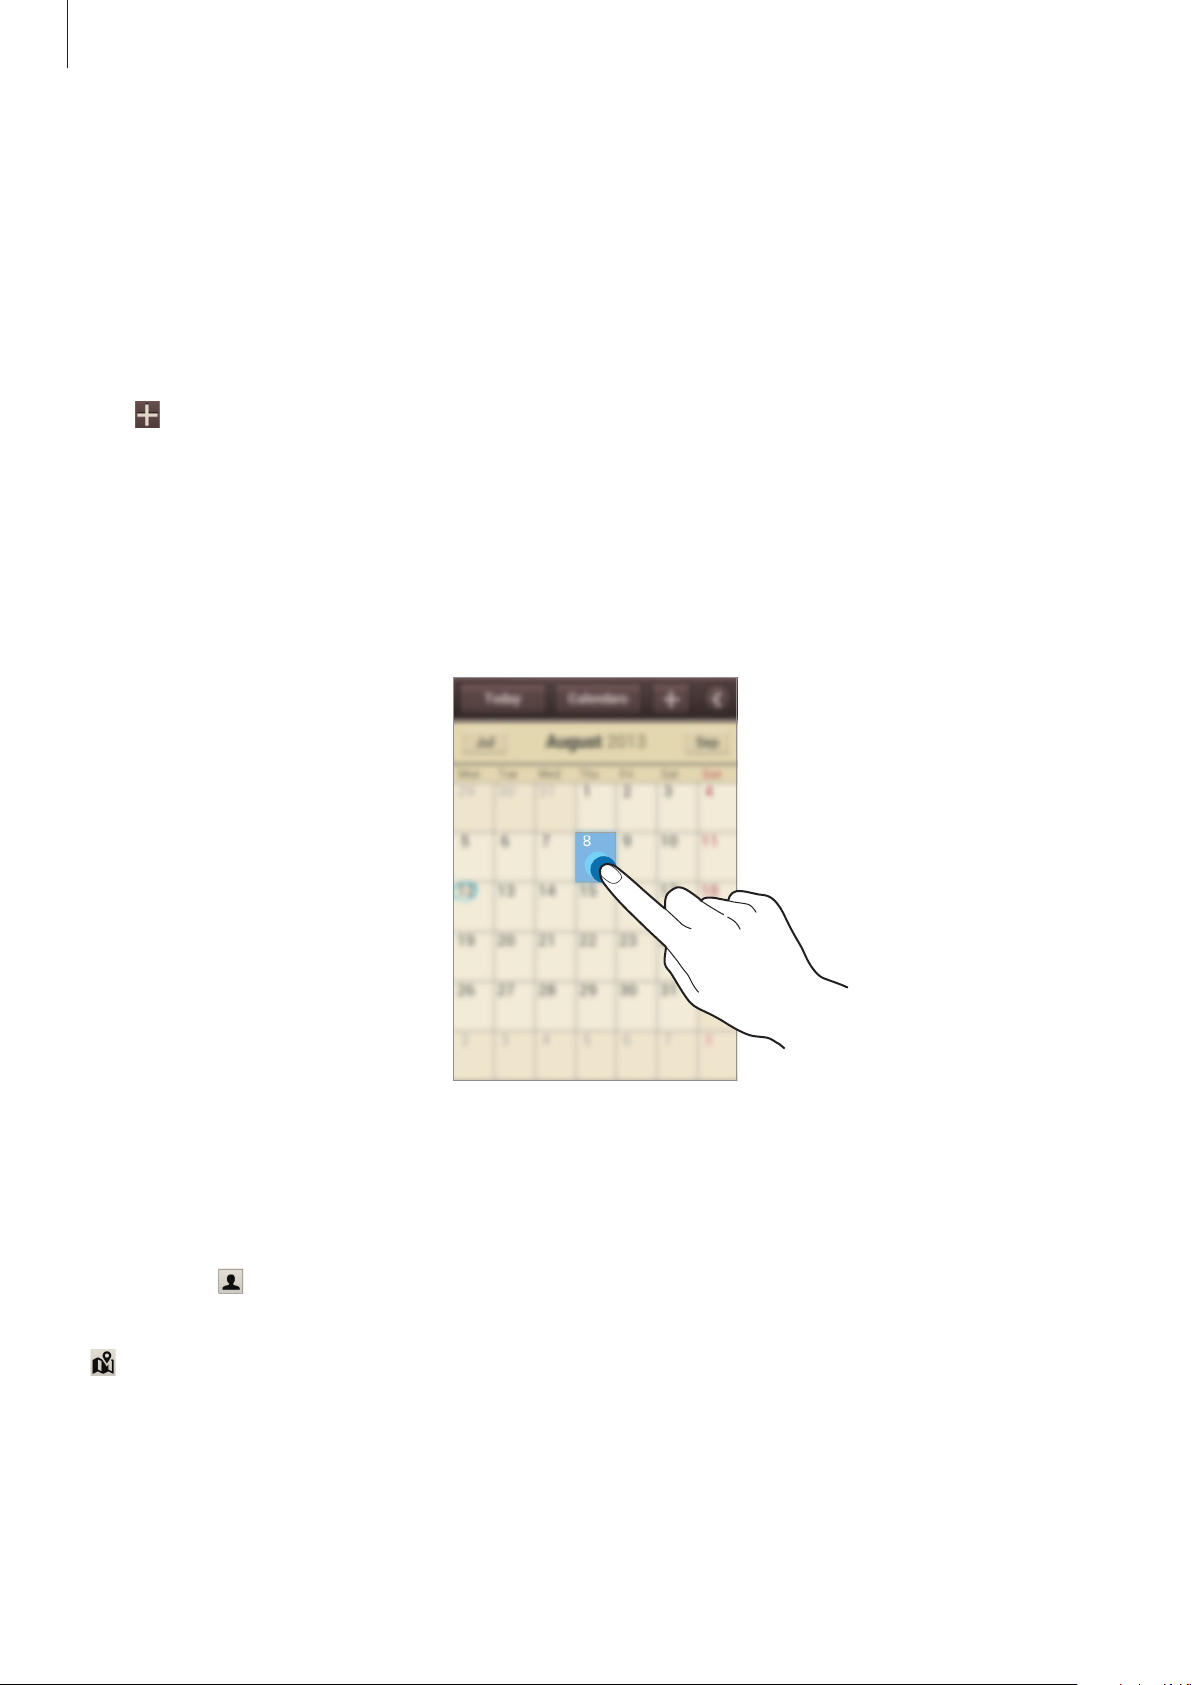
Utilities
S Planner
Use this application to manage events and tasks.
Tap
S Planner
Creating events or tasks
Tap , and then use one of the following methods:
•
Quick add
and Korean.
•
Add event
•
Add task
To add an event or task more briefly, tap a date to select it and tap it again.
on the Applications screen.
: Create an event or task from a memo. This feature is available only for English
: Enter an event with an optional repeat setting.
: Enter a task with an optional priority setting.
Enter a title and specify which calendar to use or sync with. Then tap
Edit task details
advance alert, or where it takes place.
Invite others to the event by sending an email. Enter the email address to the
field, or tap
Attach a map showing the location of the event. Enter the location in the
next to the field, and then pinpoint the precise location by tapping and holding on the
map that appears.
Attach an image. Tap
to add more details, such as how often the event repeats, when it has an
to open the contacts list.
Images
, and then take a photo or select one of the existing images.
72
Edit event details
Participants
Location
field, tap
or
Page 73

Utilities
Syncing with Google Calendar
On the Applications screen, tap
account, and then tick
screen, tap
To display synced events or tasks, tap
account, and then tap
S Planner
Sync Calendar
→ →
Done
Settings
Sync
.
→
Google
. To manually sync for updating, on the Applications
.
→
Settings
under
→
Calendars
Accounts
, select the Google
, select the Google
Changing calendar type
Tap , and then select one from among different types of calendars including year, month,
week, and others. A pinch gesture can be used to change calendar type. For example, pinch
to change from the monthly calendar to the yearly calendar, and spread apart to change
yearly calendar back to monthly calendar.
Searching for events
Tap →
Search
, and then enter a keyword to search for.
To view today’s events, tap
Deleting events
Tap →
Delete
, select events, and then tap
Sharing events
Select an event, tap →
Today
Share via
at the top of the screen.
Delete
, and then select a sharing method.
.
73
Page 74
Utilities
Dropbox
Use this application to save and share files with others via the Dropbox cloud storage. When
you save files to Dropbox, your device automatically syncs with the web server and any other
computers that have Dropbox installed.
Dropbox
Tap
This application may not be available depending on the region or service provider.
When running Dropbox for the first time, tap
instructions to complete the setup.
Once Dropbox is activated, photos and videos taken with the device’s camera are uploaded to
Dropbox automatically. To view the uploaded photos or videos, tap
To upload files to Dropbox, tap
To open files in Dropbox, select a file.
While viewing images or videos, tap
favourites list, tap
on the Applications screen.
→ →
to add it to the favourites list. To open files in the
.
Start
to activate it. Follow the on-screen
Upload here
→
Photos or videos
.
or
Other files
.
Cloud
Use this feature to sync files or back up settings and application data with your Samsung
account.
On the Applications screen, tap
This feature may not be available depending on the region or service provider.
Settings
→
Cloud
.
Syncing with the Samsung account
Tap your Samsung account or
Sync settings
to sync files.
Backing up or restoring data
Tap
Device backup
to back up or restore data with your Samsung account.
74
Page 75
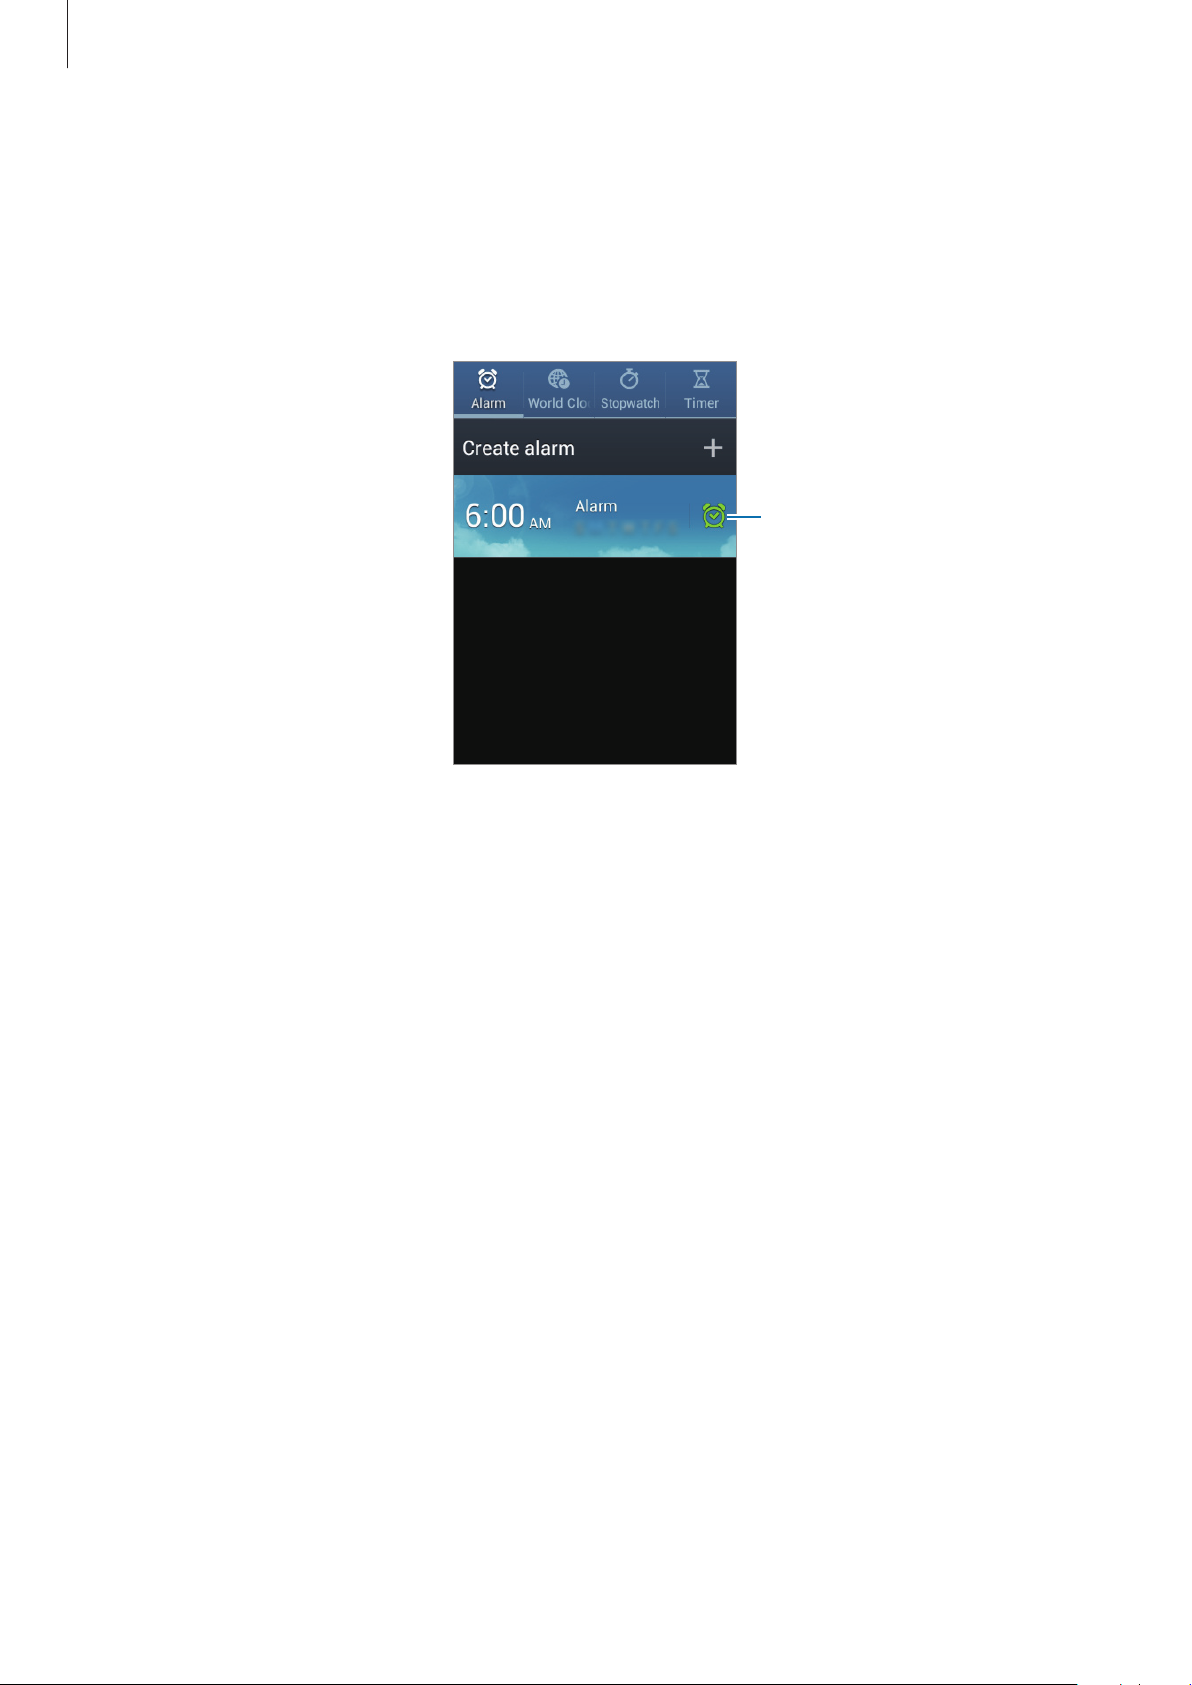
Utilities
Clock
Use this application to set alarms, check the time of many major cities in the world, measure
the duration of an event, set a timer, or use as the desk clock.
Tap
Clock
on the Applications screen.
Turn this alarm on or off.
Alarm
Setting alarms
Tap
Create alarm
then tap
•
•
•
Save
Location alarm
Snooze
time.
Smart alarm
: Set an interval and the number of times for the alarm to repeat after the preset
, set a time for the alarm to go off, select days for the alarm to repeat, and
.
: Set a time for the alarm to go off before the preset time.
: Set a location. The alarm goes off only when you are in the location.
75
Page 76

Utilities
Stopping alarms
Drag outside the large circle to stop an alarm. Drag outside the large circle to repeat
the alarm after a specified length of time.
Deleting alarms
Tap and hold the alarm, and then tap
Delete
.
World Clock
Creating clocks
Tap
Add city
To apply summer time, tap and hold a clock, and then tap
, and then enter a city name or select a city from the cities list.
Deleting clocks
Tap and hold the clock, and then tap
Delete
.
Stopwatch
Tap
Start
Tap
to time an event. Tap
Reset
to clear lap time records.
Lap
to record lap times.
DST settings
.
Timer
Set the duration, and then tap
Drag
outside the large circle when the timer goes off.
Desk clock
Tap to view in full screen.
Start
.
76
Page 77
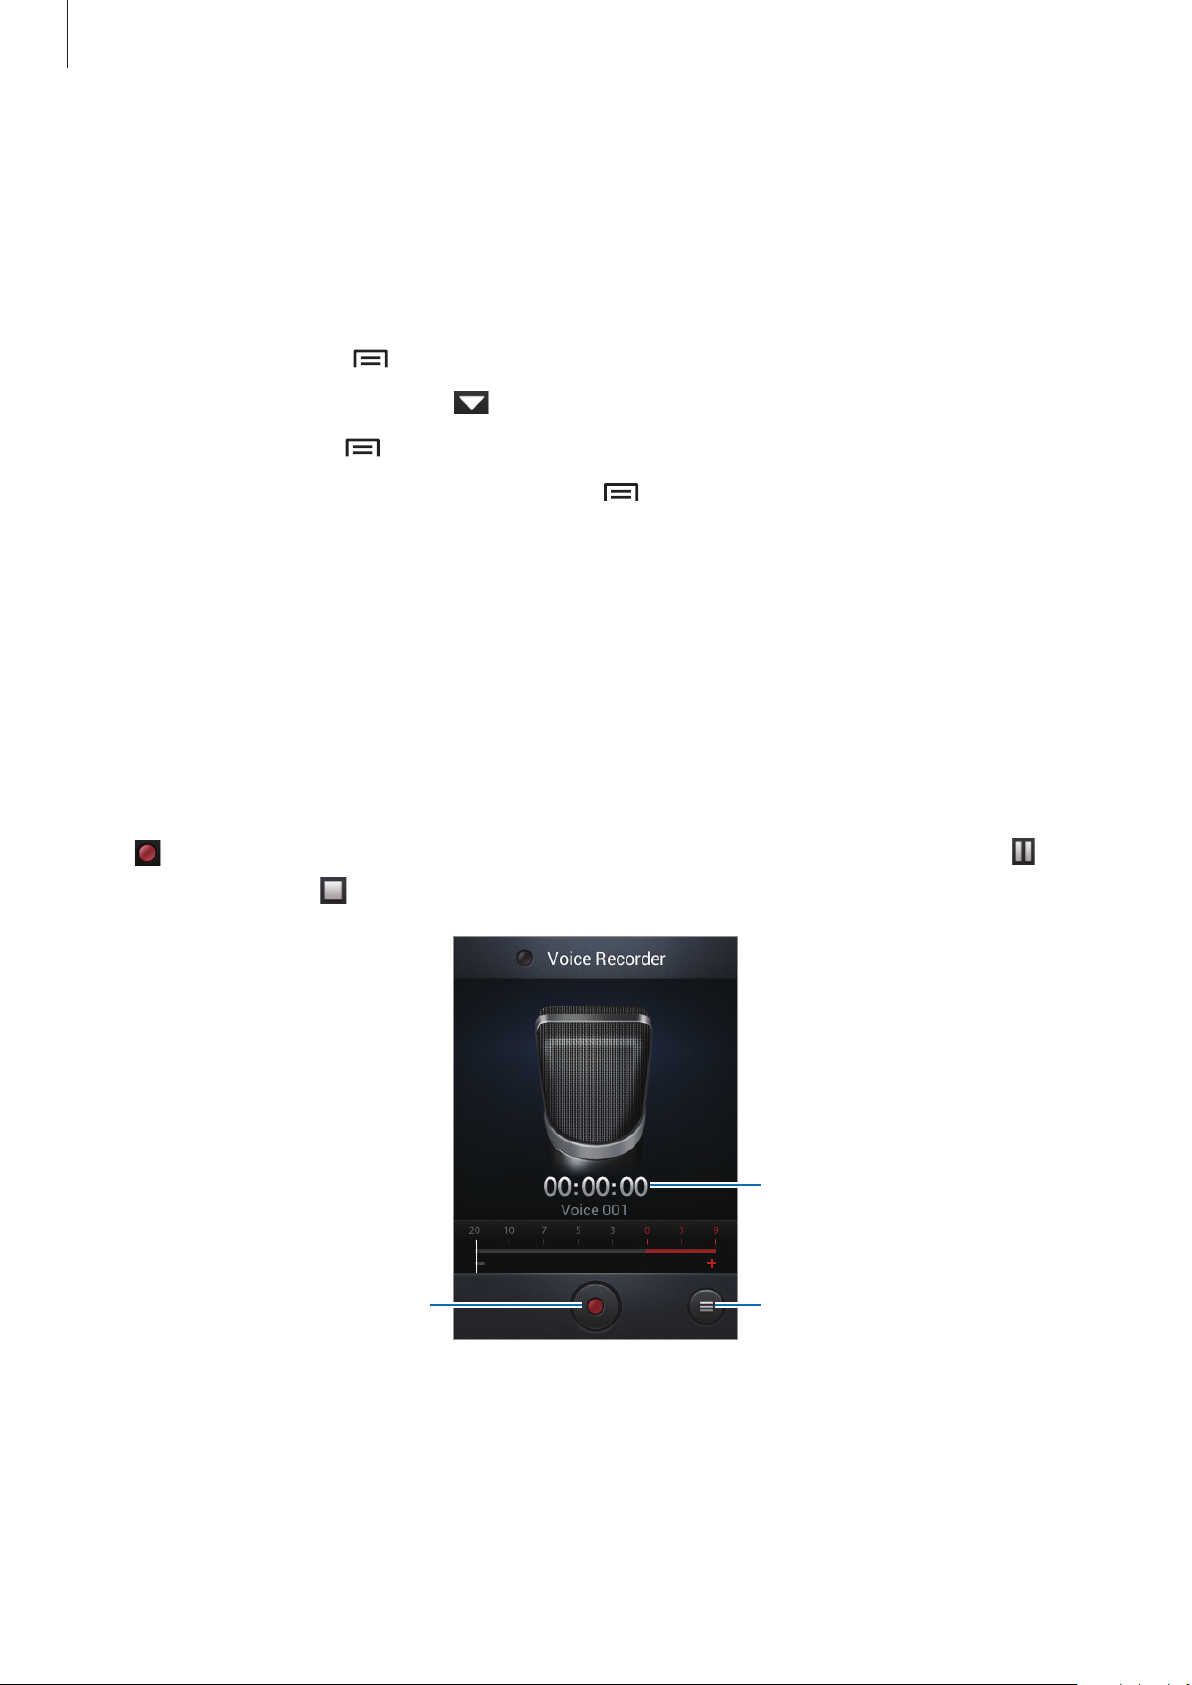
Utilities
Calculator
Use this application for simple or complex calculations.
Tap
Calculator
on the Applications screen.
Rotate the device to landscape orientation to display the scientific calculator. If
rotation
To see the calculation history, tap
To clear the history, tap
To change the character size for the history, tap
is disabled, tap →
Scientific calculator
to hide the keypad.
→
Clear history
.
.
→
Text size
.
Screen
Voice Recorder
Use this application to record or play voice memos.
Tap
Voice Recorder
Recording voice memos
Tap to start recording. Speak into the microphone at the bottom of the device. Tap to
pause recording. Tap
on the Applications screen.
to finish recording.
Start recording.
Recording elapsed time
Display the list of voice memos.
77
Page 78

Utilities
Playing voice memos
Select a voice memo to play.
•
•
•
•
•
To send a voice memo to others, tap
then select a sharing method.
: Adjust the playback speed.
: Trim the voice memo.
: Adjust the volume by dragging the volume bar.
: Stop playback.
: Pause playback.
→
Share via
, select a voice memo, tap
Managing voice memos
In the list of voice memos, tap and select one of the following:
•
Share via
•
Delete
•
Settings
•
End
: Close the voice recorder.
: Select voice memos to send, and then select a sharing method.
: Select voice memos to delete.
: Change the voice recorder settings.
Done
, and
Saving files with contextual tags
In the list of voice memos, tap →
Settings
→
Contextual filename
→ On.
78
Page 79
Utilities
Use this application to search not only the Internet, but also applications and their contents
on the device as well.
Tap
Google
Searching the device
Tap the search field, and then enter a keyword. Alternatively, tap , and then speak a
keyword.
on the Applications screen.
This application may not be available depending on the region or service provider.
Searching with images
To search with an image, tap →
and then tap
This feature is available only for English.
.
Search with camera
. Aim the rear camera at an image,
Search scope
To select what applications to search, tap →
items to search for.
Settings
→
Phone search
, and then tick the
Google Now
Launch Google search to view Google Now cards that show the current weather, public
transit info, your next appointment, and more when you are most likely to need it.
Join Google Now when opening Google search for the first time. To change Google Now
settings, tap
→
Settings
→
Google Now
.
79
Page 80

Utilities
Voice Search
Use this application to search webpages by speaking.
Tap
Voice Search
This application may not be available depending on the region or service provider.
on the Applications screen.
Speak a keyword or phrase when
Speak now
appears on the screen.
My Files
Use this application to access all kinds of files stored in the device, including images, videos,
songs, and sound clips.
Tap
My Files
Select a category, and then select a folder to open it. To go back to the parent folder, tap
To return to the root directory, tap
In a folder, tap
•
Select all
•
Create folder
•
Search
•
View by
on the Applications screen.
.
, and then use one of the following options:
: Select all files to apply the same option to them at once.
: Create a folder.
: Search for files.
: Change the view mode.
.
•
Sort by
•
Settings
Select a file or folder by ticking, and then use one of the following functions:
•
•
•
•
•
•
: Sort files or folders.
: Change the file manager settings.
: Delete files or folders.
: Send a file to others.
→
Move
→
Copy
→
Rename
→
Details
: Move files or folders to another folder.
: Copy files or folders to another folder.
: Rename a file or folder.
: View file or folder details.
80
Page 81

Utilities
Adding shortcuts to folders
Add a shortcut of frequently-used folders to the root directory. Tap →
OK
a shortcut name, tap
, select a folder, and then tap
Done
.
Add shortcut
Downloads
Use this application to see what files are downloaded through the applications.
Tap
Downloads
This application may not be available depending on the region or service provider.
To see the files downloaded from the Internet, tap
downloads
Select a file to open it with an appropriate application.
To sort the files by size, tap
To sort the files by date, tap
on the Applications screen.
Internet downloads
to see the files downloaded from other applications, such as
Sort by size
Sort by date
.
.
, otherwise, tap
Email
, enter
Other
.
81
Page 82
Travel & local
Maps
Use this application to pinpoint the location of the device, search for places, or get directions.
Tap
Maps
Searching for locations
Tap , enter an address, and then tap . Select a location to view the detailed location
on the Applications screen.
This application may not be available depending on the region or service provider.
information. To search for nearby locations, tap
Once the location is found, tap
•
Clear Map
•
Make available offline
•
Directions
•
Layers
•
Settings
•
Help
: View information about using the map.
To view current location, tap
: Clear the map.
: Save the map of a specified area to view it offline.
: Get directions for the location.
: Overlay multiple layers including satellite images, traffic information, and more.
: Change the map settings.
and use one of the following functions:
.
.
82
Page 83
Travel & local
Getting directions for a destination
Tap .
1
Tap , and then select a method to enter starting and ending locations:
2
•
My current location
•
Contacts
•
Point on map
•
My Places
: Select from the contacts list.
: Select from the list of favourite places.
: Pinpoint by tapping on the map.
: Use current location for starting location.
Select a travel method, such as driving, public transit, or walking, and then tap
3
DIRECTIONS
Select one of the routes that appear, and then tap
4
.
MAP VIEW
to view details.
Local
Use this application to search for nearby restaurants, banks, bus stops, and more.
Tap
Local
on the Applications screen.
This application may not be available depending on the region or service provider.
Select a place category, and then select a place from the list of search results.
•
Map
: Pinpoint the place on the map.
•
Directions
: Search for a route to the place.
GET
•
Call
: Call the place’s phone number.
To add a place category, tap
search into the text field.
→
Add a search
on the category list, enter a keyword to
83
Page 84

Travel & local
Navigation
Use this application to search for a route to a destination.
Tap
Navigation
•
•
Specify the destination by using various methods, such as speaking or entering the
destination address.
Once a route is found, follow the on-screen instructions to navigate to the destination.
on the Applications screen.
Navigation maps, your current location, and other navigational data may differ
from actual location information. You should always pay attention to road
conditions, traffic, and any other factors that may affect your driving. Follow all
safety warnings and regulations while driving.
This application may not be available depending on the region or service provider.
84
Page 85

Settings
About Settings
Use this application to configure the device, set application options, and add accounts.
Tap
Settings
Wi-Fi
Activate the Wi-Fi feature to connect to a Wi-Fi network and access the Internet or other
network devices.
on the Applications screen.
To use options, tap
•
Advanced
•
WPS push button
•
WPS PIN entry
: Customise Wi-Fi settings.
.
: Connect to a secured Wi-Fi network with a WPS button.
: Connect to a secured Wi-Fi network with a WPS PIN.
Setting Wi-Fi sleep policy
On the Settings screen, tap
When the screen is turned off, the device automatically turns off Wi-Fi connections.
When this happens, the device automatically accesses data networks if it is set to use
them. This may incur data transfer fees. To avoid data-usage bills, set this option to
Always
.
Wi-Fi
→ →
Advanced
→
Keep Wi-Fi on during sleep
.
Setting Network notification
The device can detect open Wi-Fi networks and display an icon on the status bar to notify
when available.
On the Settings screen, tap
activate this feature.
Wi-Fi
→ →
Advanced
85
and tick
Network notification
to
Page 86

Settings
Wi-Fi Direct
Wi-Fi Direct connects two devices directly via a Wi-Fi network without requiring an access
point.
On the Settings screen, tap
Wi-Fi
→
Wi-Fi Direct
.
Bluetooth
Activate the Bluetooth feature to exchange information over short distances.
To use more options, tap
•
Rename device
•
Visibility timeout
•
Received files
: Set a Bluetooth name for the device.
: Set duration that the device is visible.
: View received files via the Bluetooth feature.
.
Data usage
Keep track of your data usage amount, and customise the settings for the limitation.
•
Mobile data
: Set the device to use data connections on any mobile network.
•
Set mobile data limit
•
Data usage cycle
To use more options, tap
•
Restrict background data
a mobile network.
•
Auto sync data
information to sync for each account in
•
Show Wi-Fi usage
•
Mobile hotspots
background from using them.
: Activate or deactivate auto-syncing of applications. You can select what
: Set a limit for the mobile data usage.
: Enter monthly reset date to monitor your data usage.
.
: Set the device to disable sync in the background while using
: Set the device to show your data usage via Wi-Fi.
: Select Wi-Fi hotspots to prevent applications that are running in the
Settings
→
Accounts
.
86
Page 87

Settings
More settings
Customise settings to control connections with other devices or networks.
Airplane mode
This disables all wireless functions on your device. You can use only non-network services.
Mobile networks
•
Mobile data
•
Data roaming
your home network is not available.
•
Access Point Names
: Use to allow packet switching data networks for network services.
: Use the device to connect to another network when you are roaming or
: Set up access point names (APNs).
•
Network mode
•
Network operators
: Select a network type.
: Search for available networks and select a network for roaming.
Tethering and portable hotspot
•
Portable Wi-Fi hotspot
network connection with computers or other devices through the Wi-Fi network.
•
USB tethering
a computer via USB. When connected to a computer, the device is used as a wireless
modem for the computer.
•
Bluetooth tethering
connection with computers via Bluetooth.
•
Help
: Learn more about USB, Wi-Fi, and Bluetooth tethering.
: Use USB tethering to share the device’s mobile network connection with
: Use the portable Wi-Fi hotspot to share the device’s mobile
: Use Bluetooth tethering to share the device’s mobile network
VPN
Set up and connect to virtual private networks (VPNs).
87
Page 88

Settings
Home screen mode
Select a Home screen mode (basic or easy).
Blocking mode
Select which notifications will be blocked or set to allow notifications for calls from specified
contacts in blocking mode.
SIM card manager
Activate your SIM or USIM cards and customise the SIM card settings.
•
Voice call
•
Data service network
•
Receive incoming calls
network while using data services.
•
Dual SIM always on
card during a call.
When this feature is enabled, you may incur additional charges for call forwarding
depending on the region or service provider.
: Select a SIM or USIM card for voice calls.
: Select a SIM or USIM card for data service.
: Set whether or not to allow incoming calls from the GPRS
: Set the device to allow incoming calls from the other SIM or USIM
Sound
Change settings for various sounds on the device.
•
Volume
notifications.
: Adjust the volume level for call ringtones, music and videos, system sounds, and
•
Ringtone
•
Device vibration
: Select a ringtone to alert you to incoming calls and notifications.
: Select a vibration pattern.
88
Page 89

Settings
•
Vibrate when ringing
•
Dialing keypad tone
•
Touch sounds
touch screen.
•
Screen lock sound
: Set the device to sound when selecting an application or option on the
: Set the device to vibrate and play a ringtone for incoming calls.
: Set the device to sound when tapping the buttons on the keypad.
: Set the device to sound when locking or unlocking the touch screen.
Display
Change the settings for the display.
•
Wallpaper
–
Home screen
:
: Select a background image for the Home screen.
–
Lock screen
–
Home and lock screens
locked screen.
•
Brightness
•
Auto-rotate screen
•
Screen timeout
backlight.
•
Font style
•
Font size
•
Increase legibility
: Change the font size.
: Select a background image for the locked screen.
: Select a background image for the Home screen and the
: Set the brightness of the display.
: Set the content to rotate automatically when the device is turned.
: Set the length of time the device waits before turning off the display’s
: Change the font type for display text.
: Sharpen the text to make it easier to read.
Storage
View memory information for your device and memory card, or format a memory card.
Formatting a memory card permanently deletes all data from it.
The actual available capacity of the internal memory is less than the specified
capacity because the operating system and default applications occupy part of the
memory. The available capacity may change when you upgrade the device.
89
Page 90

Settings
Power saving
Activate power-saving mode and change the settings for power-saving mode.
•
CPU power saving
•
Screen power saving
•
Learn about power saving
: Set the device to limit some system resource usage.
: Set the device to decrease the brightness of the display.
: Discover how to reduce battery consumption.
Battery
View the amount of battery power consumed by your device.
Application manager
View and manage the applications on your device.
Location services
Change settings for location information permissions.
•
Use wireless networks
the location of your lost or stolen device via Wi-Fi or mobile network.
•
Use GPS satellites
•
Location and Google search
search and other Google services.
: Set the device to allow location data collection or to determine
: Set the device to use the GPS satellite for finding the current location.
: Set the device to use your current location for Google
90
Page 91
Settings
Lock screen
Change settings for the locked screen.
•
Screen lock
on the screen lock feature selected.
•
Lock screen options
applied only when you set the swipe lock option.
–
Shortcuts
This feature may not be available depending on the region or service provider.
–
Clock
–
Dual clock
: Activate the screen lock feature. The following options may vary depending
: Change the settings for the locked screen. These settings are
: Set the device to show and edit application shortcuts on the locked screen.
: Set the device to show the clock on the locked screen.
: Set the device to show the dual clock on the locked screen.
–
Help text
•
Owner information
: Set the device to show the help text on the locked screen.
: Enter your information that is shown on the locked screen.
Security
Change settings for securing the device and the SIM or USIM card.
•
Encrypt device
password each time you turn on the device.
Charge the battery before enabling this setting because it may take more than an
hour to encrypt your data.
•
Encrypt external SD card
–
Encrypt
–
Full encryption
: Set a password to encrypt data saved on the device. You must enter the
:
: Set the device to encrypt files when you save them to a memory card.
: Set the device to encrypt all files on a memory card.
–
Exclude multimedia files
for media files.
If you reset your device to the factory defaults with this setting enabled, the device
will not be able to read your encrypted files. Disable this setting before resetting the
device.
: Set the device to encrypt all files on a memory card, except
91
Page 92

Settings
•
Remote controls
via the Internet. To use this feature, you must sign in to your Samsung account.
–
Account registration
–
Use wireless networks
determine the location of your lost or stolen device via Wi-Fi or mobile network.
•
SIM change alert
the device when lost or stolen.
•
Find my mobile web page
: Set the device to allow control of your lost or stolen device remotely
: Add or view your Samsung account.
: Set the device to allow location data collection or to
: Activate or deactivate the Find my mobile feature which helps locate
: Access the Find my mobile website
findmymobile.samsung.com
(
Find my mobile website.
•
Set up SIM card lock
–
Lock SIM card
using the device.
–
Change SIM PIN
•
Make passwords visible
device to display passwords as they are entered.
•
Device administrators
device administrators to apply new policies to the device.
•
Unknown sources
download applications only from
•
Trusted credentials
applications.
•
Install from device storage
:
: Activate or deactivate the PIN lock feature to require the PIN before
: Change the PIN used to access SIM or USIM data.
: View device administrators installed on the device. You can allow
: Choose to install applications from any source. If not chosen,
: Use certificates and credentials to ensure secure use of various
). You can track and control your lost or stolen device on the
: By default, the device hides passwords for security. Set the
Play Store
: Install encrypted certificates stored on the USB storage.
.
•
Clear credentials
: Erase the credential contents from the device and reset the password.
92
Page 93
Settings
Language and input
Change the settings for text input. Some options may not be available depending on the
selected language.
Language
Select a display language for all menus and applications.
Default
Select a default keyboard type for text input.
Google voice typing
To change the voice input settings, tap .
•
Choose input languages
•
Block offensive words
words in voice inputs.
: Select input languages for text input.
: Set the device to prevent the device from recognising offensive
Samsung keyboard
To change the Samsung keyboard settings, tap .
The available options may vary depending on the region or service provider.
•
Portrait keyboard types
•
Input language
•
Predictive text
show word suggestions. You can also customise the word prediction settings.
•
Continuous input
: Select languages for text input.
: Activate predictive text mode to predict words based on your input and
: Set the device to enter text by sweeping on the keyboard.
: Change the keyboard layout.
•
Keyboard swipe
mode. Switch between input modes by scrolling left or right on the keyboard.
•
Voice input
: Enable or disable the keyboard sweeping feature for the text input
: Activate the voice input feature to enter text by voice.
93
Page 94

Settings
•
Auto capitalization
final punctuation mark, such as a full stop, question mark, or exclamation mark.
•
Auto spacing
•
Auto-punctuate
•
Character preview
•
Key-tap sound
•
Tutorial
•
Reset settings
: Learn how to enter text with the Samsung keyboard.
: Set the device to automatically insert a space between words.
: Set the device to automatically capitalise the first character after a
: Set the device to insert a full stop when you double-tap the space bar.
: Set the device to display a large image of each character tapped.
: Set the device to sound when a key is touched.
: Reset Samsung keyboard settings.
Voice search
•
Language
: Select a language for the voice recognition.
•
Speech output
action.
•
Block offensive words
•
Hotword detection
command while using the search application.
•
Personalized recognition
dashboard to improve speech recognition accuracy.
•
Google Account dashboard
•
Bluetooth headset
when it is connected to the device.
: Set the device to provide voice feedback to alert you to the current
: Hide offensive words from voice search results.
: Set the device to begin voice recognition when you say the wake up
: Set the device to use information from your Google
: Manage logs of activities with your Google account.
: Set the device to allow a voice search with a Bluetooth headset,
Text-to-speech output
•
Preferred TTS engine
speech synthesis engines, tap
: Select a speech synthesis engine. To change the settings for
.
•
Speech rate
•
Listen to an example
•
Driving mode
specify applications to use in driving mode.
: Select a speed for the text-to-speech feature.
: Listen to the spoken text for an example.
: Activate driving mode to set the device to read contents aloud and
Pointer speed
Adjust the pointer speed for the mouse or trackpad connected to your device.
94
Page 95

Settings
Cloud
Change settings for syncing data or files with your Samsung account.
Backup and reset
Change the settings for managing settings and data.
•
Back up my data
server.
•
Backup account
•
Automatic restore
applications are reinstalled on the device.
: Set the device to back up settings and application data to the Google
: Set up or edit your Google backup account.
: Set the device to restore settings and application data when the
•
Factory data reset
: Reset settings to the factory default values and delete all data.
Add account
Add email or SNS accounts.
Motion
Change the settings that control motion recognition on your device.
•
Shake to update
•
Turn over to mute/pause
FM radio by placing the device face down.
•
Learn about motions
: Set the device to search for Bluetooth devices by shaking it.
: Set the device to mute incoming calls, alarms, music, and the
: View the tutorial for controlling motions.
95
Page 96

Settings
Date and time
Access and alter the following settings to control how the device displays the time and date.
If the battery remains fully discharged or removed from the device, the time and date
is reset.
•
Automatic date and time
time zones.
•
Set date
•
Set time
•
Automatic time zone
when you move across time zones.
•
Select time zone
: Set the current date manually.
: Set the current time manually.
: Set the home time zone.
: Automatically update the time and date when moving across
: Set the device to receive time zone information from the network
•
Use 24-hour format
•
Select date format
: Display time in 24-hour format.
: Select a date format.
Accessibility
Accessibility services are special features for those with certain physical disabilities. Access
and alert the following settings to improve accessibility to the device.
•
Auto-rotate screen
•
Screen timeout
backlight.
•
Speak passwords
•
Answering/ending calls
–
The home key answers calls
pressing the Home button.
: Set the interface to rotate automatically when you rotate the device.
: Set the length of time the device waits before turning off the display’s
: Set the device to read aloud passwords you enter with Talkback.
:
: Set the device to answer an incoming call when
–
The power key ends calls
button.
•
Accessibility shortcut
when you press and hold the Power button.
•
TalkBack
: Activate Talkback, which provides voice feedback.
: Add a shortcut to
: Set the device to end a call when pressing the Power
Accessibility
96
on the quick menu that appears
Page 97

Settings
•
Font size
•
Text-to-speech output
–
Preferred TTS engine
: Change the font size.
:
: Select a speech synthesis engine. To change the settings for
speech synthesis engines, tap
–
Speech rate
–
Listen to an example
–
Driving mode
specify applications to use in driving mode.
•
Enhance web accessibility
content more accessible.
•
Mono audio
•
Turn off all sounds
•
Tap and hold delay
: Select a speed for the text-to-speech feature.
: Activate driving mode to set the device to read contents aloud and
: Enable mono sound when listening to audio with one earbud.
: Mute all device sounds.
: Set the recognition time for tapping and holding the screen.
: Listen to the spoken text for an example.
: Set applications to install web scripts to make their web
.
Developer options
Change the settings for application development.
•
Desktop backup password
•
Stay awake
•
Protect SD card
memory card.
•
USB debugging
with a USB cable.
•
Allow mock locations
Location Manager service for testing.
•
Select app to be debugged
pause debugging.
•
Wait for debugger
the debugger is ready.
•
Show touches
•
Show pointer location
when you touch the screen.
: Set the screen to remain on while you are charging the battery.
: Set the device to request a confirmation when reading data from a
: Activate USB debugging mode to connect your device to a computer
: Allow mock locations and service information to be sent to a
: Set the device to prevent the selected application from loading until
: Set the device to show the pointer when you touch the screen.
: Set a password to secure your backup data.
: Select applications to debug and prevent errors when you
: Set the device to show the coordinates and traces of the pointer
97
Page 98

Settings
•
Show layout boundaries
•
Show GPU view updates
updated with the GPU.
•
Show screen updates
•
Window animation scale
•
Transition animation scale
•
Animator duration scale
•
Disable hardware overlays
•
Force GPU rendering
performance.
•
Strict mode
operations.
: Set the device to flash the screen when applications perform long
: Set the device to show boundaries.
: Set the device to flash areas of the screen when they are
: Set the device to flash areas of the screen when they are updated.
: Select a speed for opening and closing pop-up windows.
: Select a speed for switching between screens.
: Select how long pop-up windows will be shown.
: Set the device to hide hardware overlays.
: Set the device to use 2D hardware acceleration to improve graphic
•
Show CPU usage
•
GPU rendering profile
•
Enable traces
•
Do not keep activities
new application.
•
Limit background processes
run in the background.
•
Show all ANRs
in the background.
: Set the device to list all active processes.
: Set the device to check the time of GPU rendering time.
: Set the device to capture traces of application and system performance.
: Set the device to end a running application when you launch a
: Set the device to limit the number of processes that can
: Set the device to alert you to unresponsive applications that are running
About device
Access device information and update device software.
Google Settings
Use this application to configure settings for some features provided by Google.
Tap
Google Settings
on the Applications screen.
98
Page 99

Troubleshooting
Before contacting a Samsung Service Centre, please attempt the following solutions. Some
situations may not apply to your device.
When you turn on your device or while you are using the device, it
prompts you to enter one of the following codes:
•
Password: When the device lock feature is enabled, you must enter the password you set
for the device.
•
PIN: When using the device for the first time or when the PIN requirement is enabled, you
must enter the PIN supplied with the SIM or USIM card. You can disable this feature by
using the Lock SIM card menu.
•
PUK: Your SIM or USIM card is blocked, usually as a result of entering your PIN incorrectly
several times. You must enter the PUK supplied by your service provider.
•
PIN2: When you access a menu requiring the PIN2, you must enter the PIN2 supplied with
the SIM or USIM card. For details, contact your service provider.
Your device displays network or service error messages
•
When you are in areas with weak signals or poor reception, you may lose reception. Move
to another area and try again. While moving, error messages may appear repeatedly.
•
You cannot access some options without a subscription. Contact your service provider for
more details.
Your device does not turn on
•
When the battery is completely discharged, your device will not turn on. Charge the
battery completely before turning on the device.
•
The battery may not be inserted properly. Insert the battery again.
•
Wipe both gold-coloured contacts and insert the battery again.
99
Page 100

Troubleshooting
The touch screen responds slowly or improperly
•
If you attach a protective cover or optional accessories to the touch screen, the touch
screen may not function properly.
•
If you are wearing gloves, if your hands are not clean while touching the touch screen,
or if you tap the screen with sharp objects or your fingertips, the touch screen may
malfunction.
•
The touch screen may malfunction in humid conditions or when exposed to water.
•
Restart your device to clear any temporary software bugs.
•
Ensure that your device software is upgraded to the latest version.
•
If the touch screen is scratched or damaged, visit a Samsung Service Centre.
Your device freezes or has fatal errors
If your device freezes or hangs, you may need to close applications or reinsert the battery and
turn on the device to regain functionality. If your device is frozen and unresponsive, press and
hold the Power button for 8-10 seconds to reboot.
If this does not solve the problem, perform a factory data reset. On the Applications screen,
Settings
tap
Before performing the factory data reset, remember to make back-up copies of all important
data stored on the device.
If the problem is still not resolved, contact a Samsung Service Centre.
→
Backup and reset
→
Factory data reset
→
Reset device
→
Delete all
.
Calls are not connected
•
Ensure that you have accessed the right cellular network.
•
Ensure that you have not set call barring for the phone number you are dialling.
•
Ensure that you have not set call barring for the incoming phone number.
Others cannot hear you speaking on a call
•
Ensure that you are not covering the built-in microphone.
•
Ensure that the microphone is close to your mouth.
•
If using a headset, ensure that it is properly connected.
100
 Loading...