

Samsung GTN8020 Users Manual
Communication
90
Listen to voice mail messages
›
If you have set missed calls to be diverted to the voice mail
server, callers can leave voice messages when you do not
answer incoming calls. To access your voice mail inbox and
listen to your messages,
Open the application list and select
1
and then tap and hold
Follow the instructions from the voice mail server.
2
You must save the voice mail server number before
accessing the server. Contact your service provider for
the number.
.
Phone → Keypad,
Google Mail
You can retrieve new email messages from Google Mail™
to your Inbox. When you access this application, the Inbox
screen appears. The total number of unread messages
displays in the title bar and unread messages display in bold.
●
This feature may be unavailable depending on your
region or service provider.
●
This Google Mail menu may be labelled differently
depending on your region or service provider.

Communication
91
Send an email message
›
Open the application list and select 1 Google Mail → .
Select the recipient field and enter an email address.
2
Select the subject field and enter a subject.
3
Select the text field and enter your email text.
4
To attach a photo, select ●.
●
To remove an attached photo, select
an attachment’s name.
to the right of
Select
5
View an email message
›
Open the application list and select 1 Google Mail.
Select
2
Select an email message.
3
From the message view, use the following options:
●
To create a new message, select
●
To search for an email message, select
●
To archive the message, select
●
To delete the message, select
●
To add a label to the message, select
●
To move to the next or previous message, scroll left or right.
SEND to send the message.
If you are offline or outside your service area, the
message will be held in the message thread until you
are online and inside your service area.
to update the message list.
.
.
.
.
.
Communication
92
To reply to the message, select ●.
●
To reply to the message including all recipients, select
●
To forward the message to other people, select
●
To add a star to the message, select
●
To view an attachment, select
VIEW. To save it to your
.
.
device, select SAVE.
●
To add a label to the message, select
●
To make the message as unread, select
●
To mark the message as important, select
→ Change labels.
→ Mark unread.
→ Mark as
important.
●
To hide the message, select
→ Mute. To move the
message to the inbox folder, select All Mail and drag the
message to Inbox.
●
To register the message to the spam list, select
→ Report
spam.
●
To reload the messages, select
●
To add a label to a message, select
●
To customise the email settings, select
→ Refresh.
→ Manage labels.
→ Settings.
Available options may vary depending on the account.
.

Communication
93
Email
Learn to send or view email messages via your personal or
company email account.
Set up an email account
›
Open the application list and select Email.
1
Enter your email address and password.
2
Select 3 Next (for general email accounts) or Manual setup
(for other company email accounts).
Follow the on-screen instructions.
4
To add more email accounts, select 5 → Settings → Add
account and repeat steps 2-4.
When you are finished setting up the email account, the email
messages are downloaded to your device. If you have created
more than two accounts, you can switch between email
accounts. Select an account name at the top left of the screen
and select the one you want to retrieve messages from.
Communication
94
Send an email message
›
Open the application list and select Email → .
1
Add recipients of your message.
2
●
Enter email addresses manually, separating them with a
semicolon or a comma.
●
Select email addresses from the lists by selecting
Select the subject field and enter a subject.
3
Select the text input field and enter your email text. You
4
can enter draw a sketch by selecting .
.
Select
5
Select
6
If you are offline or outside your service area, the
message will be held in the outbox until you are online
and in your service area.
View an email message
›
When you open an email account, you can view previously
retrieved email offline or connect to the email server to view
new messages. After retrieving email messages, you can view
them offline.
Open the application list and select
1
Select
2
Select an email message.
3
From the message view, use the following options:
●
To search for an email message, select
●
To create a new message, select
●
To reply to the message, select
→ files to attach.
to send the message.
Email.
to update the message list.
.
.
.

Communication
95
To reply to the message including all recipients, select ●.
●
To forward the message to other people, select
●
To delete the message, select
●
To add a star to the message, select
●
To make the message as unread, select
.
.
→ Mark as
.
unread.
●
To move the message to another folder, select
●
To save the message, select
will be saved in My Files
●
To view the messages by category, select
●
To change the view mode, select
●
To print the message using a Wi-Fi or USB connection,
→ Save email. The message
→
sdcard → Saved Email.
→ View mode.
→ Move.
→ Sort by.
select → Print. Your device is compatible only with
some Samsung printers.
●
To save the email addresses of the recipients to the
phonebook as a group of contacts, select → Save as
group.
●
To delete all messages, select
●
To customise the email settings, select
●
To save an attachment to your device, select the
→ Delete all.
→ Settings.
attachment tab → .
The options available may vary depending on the email
account or device’s orientation.
Communication
96
Talk
Learn to chat with friends and family via Google Talk™.
This feature may be unavailable depending on your
region or service provider.
Set your status
›
Open the application list and select 1 Talk.
Add your Google account (if necessary).
2
Customise your status, image, and message to display.
3
Add friends to your friend list
›
Open the application list and select 1 Talk → .
Enter an email address of the friend and select
2
When your friend accepts the invitation, the friend is
added to your friend list.
Start a chat
›
Open the application list and select 1 Talk.
Select a friend from the friends list. The chat screen opens.
2
Enter and send your message.
3
To add more friends to a chat, select ● → Add to chat.
●
To switch between active chats, select a friend from the
friends list.
●
To end the chat, select
→ End chat.
DONE.
Communication
97
ChatON
Learn to use ChatON to send and receive instant messages
from any device that has a mobile phone number.
Open the application list and select
1
If you are launching this application for the first time,
follow the on-screen instructions to complete the
account setup.
Enter and send your message.
2
ChatON.
Messenger
Learn to send and receive instant messages to friends and
family with the Google+ messenger instant messaging
service.
Open the application list and select
1
If you are launching this application for the first time,
follow the on-screen instructions to complete the
account setup.
Enter and send your message.
2
Messenger.
Google+
Learn to access the Google’s social network service. You can
create groups to share interests and thoughts or send and
receive instant messages, and upload your photos.
Open the application list and select
1
If you are launching this application for the first time,
follow the on-screen instructions to complete the
account setup.
Select a social network feature.
2
Google+.
98
Entertainment
Entertainment
Music Player
Learn to listen to your favourite music while on the go with
the music player. The music player supports the following file
formats: mp3, aac, ogg, wma, flac, m4a.
●
You can also play music files in the following formats
if you open them from My files or the web browser:
mid, xmf, rtttl, imy, rtx, ota, amr, wav, mxmf.
●
Some file formats are not supported depending on
the software of the device.
●
If the file size exceeds the available memory, an error
can occur when you open files.
●
Playback quality may vary by content type.
●
Some files may not play properly depending on how
they are encoded.
Add music files to your device
›
Start by transferring files to your device or memory card:
●
Download from the wireless web.
●
Download from a PC with Samsung Kies.
●
Receive via Bluetooth.
●
Synchronise with Windows Media Player 11.
●
Copy to your memory card.
► p. 136
► p. 64
► p. 124
► p. 125
Play music
›
After transferring music files to your device or memory card,
Open the application list and select
1
→
Select a music category
2
a music file.
Music Player.
99
Entertainment
Tap the music player field.
3
Control playback with the virtual keys.
4
During playback, select to access the following options:
●
To add music files to a playlist, select
●
To listen to music via a Bluetooth headset, select
Add to playlist.
Via
Bluetooth. You cannot use this option when you connect a
headset to your device.
●
To send the music file to others or share it, select
●
To set the music file as various tones, select
●
To search for devices that have media sharing activated
Share via.
Set as.
Scan for nearby devices.
●
To change the music player settings, select
●
You can control the music player with a headset. In
Settings.
Idle mode, press and hold the headset button to
launch the music player. Press the headset button to
start or pause playback.
●
You can experience virtual 5.1 surround sound when
listening to multichannel content, such as DVD
movies.
Create a playlist
›
Open the application list and select 1 Music Player.
Select
2
Enter a title for your new playlist and select
3
To add music files to the playlist, select
4
→ New playlist.
next to the
music files.
To delete music files from the playlist, select
music files.
5
Select
Done.
OK.
next to the
100
Entertainment
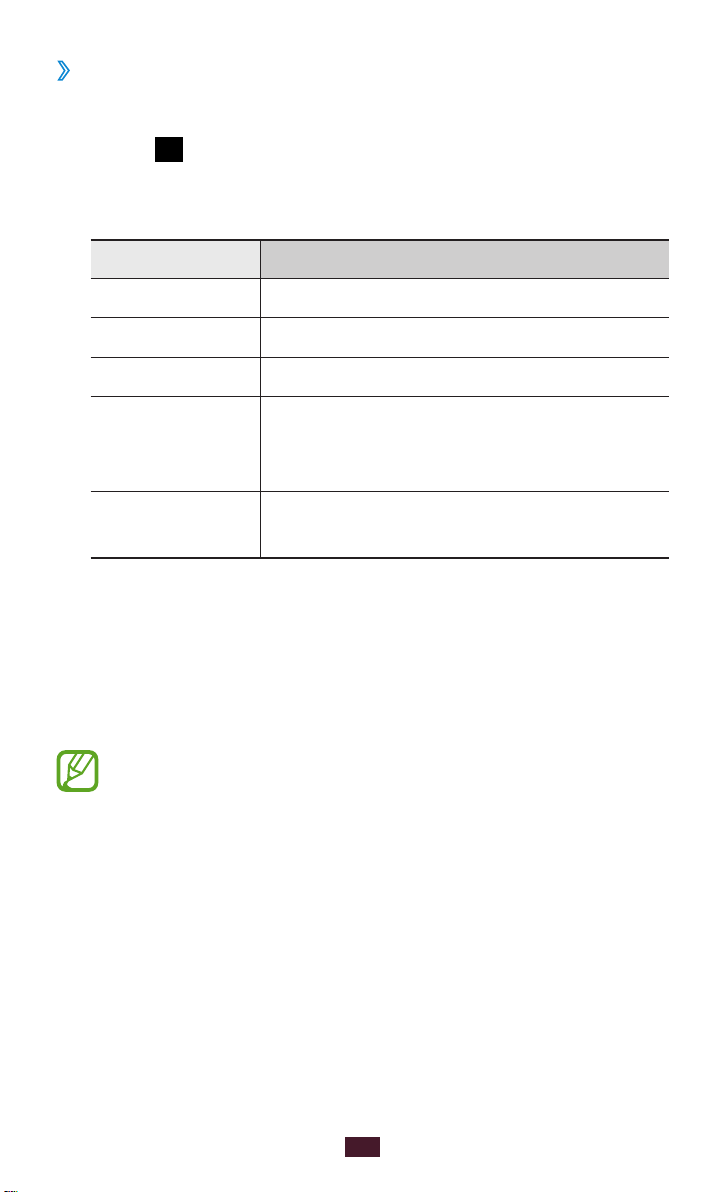
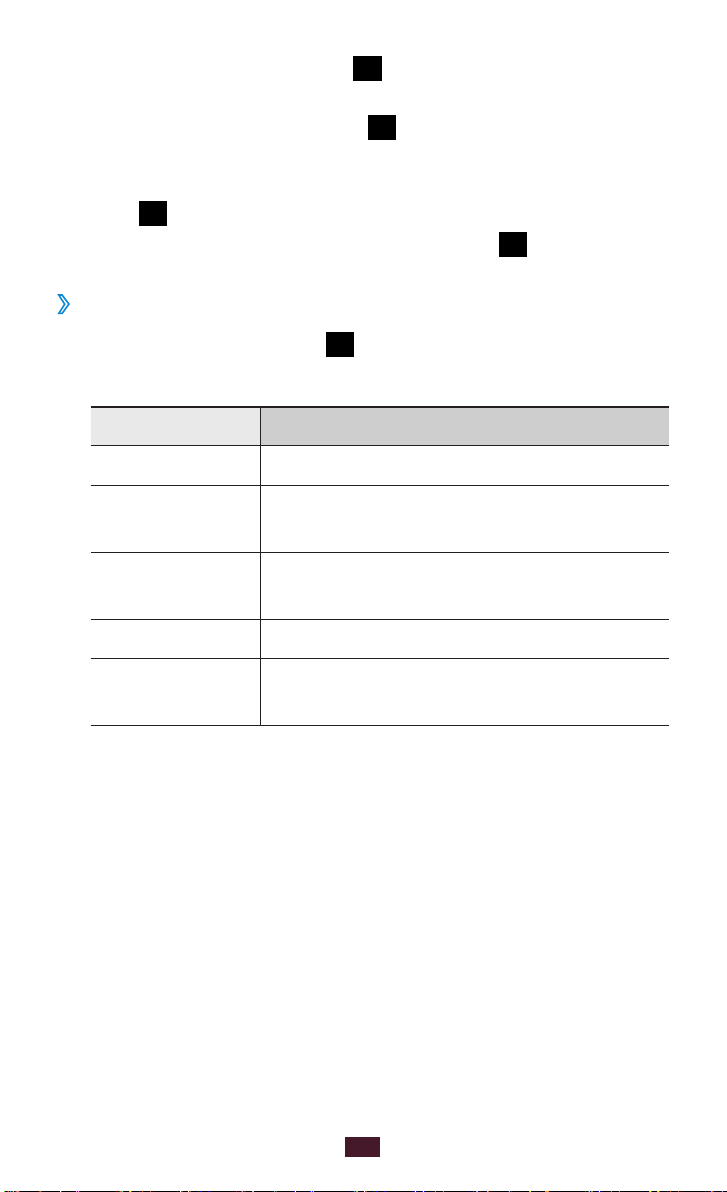
Customise music player settings
›
Open the application list and select 1 Music Player.
Select
2
Adjust the following settings to customise your music
3
player:
Option Function
SoundAlive Select a sound effect.
Play speed Change the playback speed.
Lyrics Set to display lyrics during playback.
Music auto off
Music menu
→ Settings.
Set the music player to turn off
automatically after a specific period of
time.
Select music categories to display on
the music library screen.
Music Hub
You can access the online music store, and search for and buy
your favourite songs. You can also add a music file to your
wish list and play downloaded music files.
This feature may be unavailable depending on your
region or service provider.
Open the application list and select
1
If you are launching this application for the first time,
2
check the check box next to Skip this message for 90
days, and then select Confirm.
Search for songs, and preview or buy your favourite songs.
3
Music Hub.

101
Entertainment
Camera
1
2
3
4
5
6
Learn how to capture and view photos and videos.
●
The camera automatically turns off when you do not
use it for a specified period.
●
The memory capacity may differ depending on the
shooting scene or shooting conditions.
Capture a photo
›
Open the application list and select 1 Camera.
Aim the lens at the subject and make any necessary
2
adjustments.
Number Function
Use camera shortcuts.
●
: Switch between the front and rear
camera lenses.
●
: Change the flash setting.
1
●
: Change the shooting mode.
●
: Apply a special effect.
●
: Adjust the exposure value.
You can add or remove shortcuts to
frequently used options.
2
Change the camera settings.
► p. 109
102
Entertainment
Number Function
3
4
5
6
View the storage location.
Switch to the camcorder.
Capture a photo.
View photos you have taken.
To zoom in, place two fingers on the screen and slowly
spread them apart. To zoom out, pinch them together.
You can also zoom in or out with the Volume key.
Tap where you want to focus on the preview screen.
3
The focus frame moves to the place you tapped and
changes to green when the subject is in focus.
4
Select
to take a photo.
The photo is saved automatically.
After taking photos, select the image viewer to view the
captured photos.
●
To view more photos, scroll left or right. You can also tap the
screen and scroll through the thumbnails of photos at the
bottom of the screen.
●
To zoom in or out, place two fingers on the screen and
slowly spread them apart or pinch them together. To return
to the original size, double-tap the screen.
●
To send the photo to others, select
●
To delete the photo, select
●
To start a slide show, select
→ OK.
→ Start slideshow. Tap the
→ an option.
screen to stop the slide show.
●
To register the faces in the photo as face tags, select
Face tag.
► p. 115
→
103
Entertainment
To add the photo to the clipboard, select ● → Copy to
clipboard.
●
To rotate the photo anti-clockwise, select
●
To rotate the photo clockwise, select
●
To crop a section from the photo, select
●
To edit the photo with the image editor, select
●
To set the photo as your wallpaper or a contact image,
→ Rotate left.
→ Rotate right.
→ Crop.
→ Edit.
select → Set as.
●
To send the photo to a person whose face is tagged in the
photo, select → Buddy photo share.
●
To print the photo via Wi-Fi or USB, select
→ Print. Your
device is compatible only with some Samsung printers.
●
To change the name of a file, select
●
To search for devices that have media sharing activated,
→ Rename.
select → Scan for nearby devices.
●
To view photo details, select
Change the shooting mode
›
→ Details.
You can take photos with various shooting modes. To change
the shooting mode, select
→ Shooting mode → an
option.
Option Function
Panorama Take panoramic photos.
Share shot
Buddy photo
share
Take a photo and send it to others via WiFi Direct.
Send the photo to a person whose face is
tagged in the image.
Set the device to recognise people’s faces
Smile shot
and help you take photos of them when
they smile.
Cartoon Take photos with cartoon effects.
104
Entertainment
Customise camera settings
›
Before taking a photo, select to access the following
options:
Option Function
Edit shortcuts Edit shortcuts to frequently-used options.
Self portrait
Flash
Shooting
mode
Scene mode Change the scene mode.
Exposure value
Focus mode
Timer
Effects
Resolution Change the resolution option.
Switch between the front and rear camera
lenses.
Change the flash setting; You can
manually turn the flash on or off, or set
the camera to automatically use the flash
when needed.
Change the shooting mode.
Adjust the exposure value to change the
brightness.
Take close-up photos or set the camera to
focus on the subject automatically.
Select the length of the delay before the
camera takes a photo.
Apply a special effect, such as sepia or
black and white tones.

105
Entertainment
Option Function
White balance
ISO
Adjust the colour balance according to
lighting conditions.
Adjust the sensitivity of the imaging
sensor.
Metering Select a type of exposure metre.
Outdoor
visibility
Activate Outdoor visibility to select an
appropriate lighting condition.
Guidelines Display guidelines on the preview screen.
Image quality Select a quality level for your photos.
Set the camera to include location
information for your photos.
●
To improve GPS signals, avoid shooting
in locations where the signal may be
obstructed, such as between buildings
GPS tag
or in low-lying areas, or in poor weather
conditions.
●
Your location may appear on your
photos when you upload them to the
web. To avoid this, deactivate the GPS
tag setting.
Set the camera to flip the image
Save as flipped
automatically when you take a photo with
the front camera.
Storage
Select a memory location for saving
captured photos.
Reset Reset camera settings.
106
Entertainment
Record a video
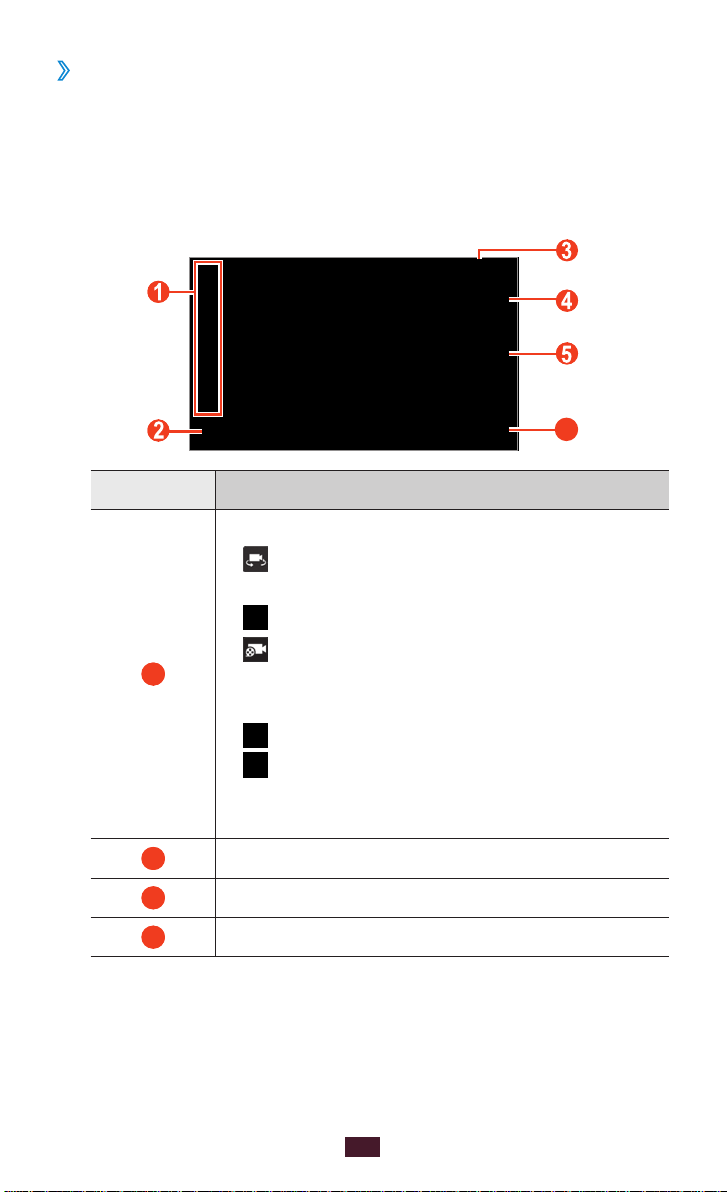
6
›
Open the application list and select 1 Camera.
Drag the slider to switch to the camcorder.
2
Aim the lens at the subject and make any necessary
3
adjustments.
Number Function
Use camcorder shortcuts.
●
: Switch to the front camera lens and
record a video of yourself.
●
: Change the flash setting.
●
: Change the recording mode (for
1
attaching to a message or for saving
normally).
●
: Apply a special effect.
●
: Adjust the exposure value.
You can add or remove shortcuts to
frequently used options.
► p. 109
2
3
4
Change the camcorder settings.
View the storage location.
Switch to the camera.
107
Entertainment
Number Function
5
6
Record a video.
View videos you have recorded.
To zoom in, place two fingers on the screen and slowly
spread them apart. To zoom out, pinch them together.
You can also zoom in or out with the Volume key.
Tap where you want to focus on the preview screen. The
4
focus frame moves to the place you tap and changes to
green when the subject is in focus.
5
6
Select
Select
to start recording.
to stop recording.
The video is saved automatically. To pause recording,
select
.
After recording videos, select the image viewer to view the
recorded videos.
●
To view more videos, scroll left or right. You can also tap the
screen and scroll through the thumbnails of videos at the
bottom of the screen.
●
To play the video, select
●
To send the video to others, select
●
To delete the video, select
●
To start a slide show, select
.
→ an option.
→ OK.
→ Start slideshow. Tap the
screen to stop the slide show.
●
To change the name of a file, select
●
To view video details, select
→ Details.
→ Rename.

108
Entertainment
Customise camcorder settings
›
Before recording a video, select to access the following
options:
Option Function
Edit shortcuts Edit shortcuts to frequently used options.
Self recording
Flash
Recording
mode
Exposure value
Timer
Effects
Resolution Change the resolution option.
White balance
Outdoor
visibility
Guidelines Display guidelines on the preview screen.
Switch between the front and rear camera
lenses.
Change the flash setting; You can
manually turn the flash on or off.
Change the recording mode.
Adjust the exposure value to change the
brightness.
Select the length of the delay before the
camera starts recording a video.
Apply a special effect, such as sepia or
black and white tones.
Adjust the colour balance according to
lighting conditions.
Activate Outdoor visibility to select an
appropriate lighting condition.
Video quality Select a quality level for your videos.
109
Entertainment
Option Function
Set the camcorder to flip the image
Save as flipped
automatically when you record a video
with the front camera.
Storage
Reset Reset camcorder settings.
Edit the shortcut icons
›
You can add or remove shortcuts to frequently-used options.
From the preview screen, select
1
Tap and hold an icon from the option list and drag it to the
2
shortcut area.
To remove shortcuts, tap and hold an icon and drag it to
the option list.
Tap the screen to return to the preview screen.
3
Select a memory location for saving
recorded videos.
→ Edit shortcuts.
Video Player
Learn to use the video player.
●
Some file formats are not supported depending on
the device’s software.
●
If a file size exceeds the memory available, an error
may occur when you try to open the file.
●
Playback quality may vary by content type.
●
Some files may not play properly depending on how
they are encoded.
110
Entertainment
Play a video
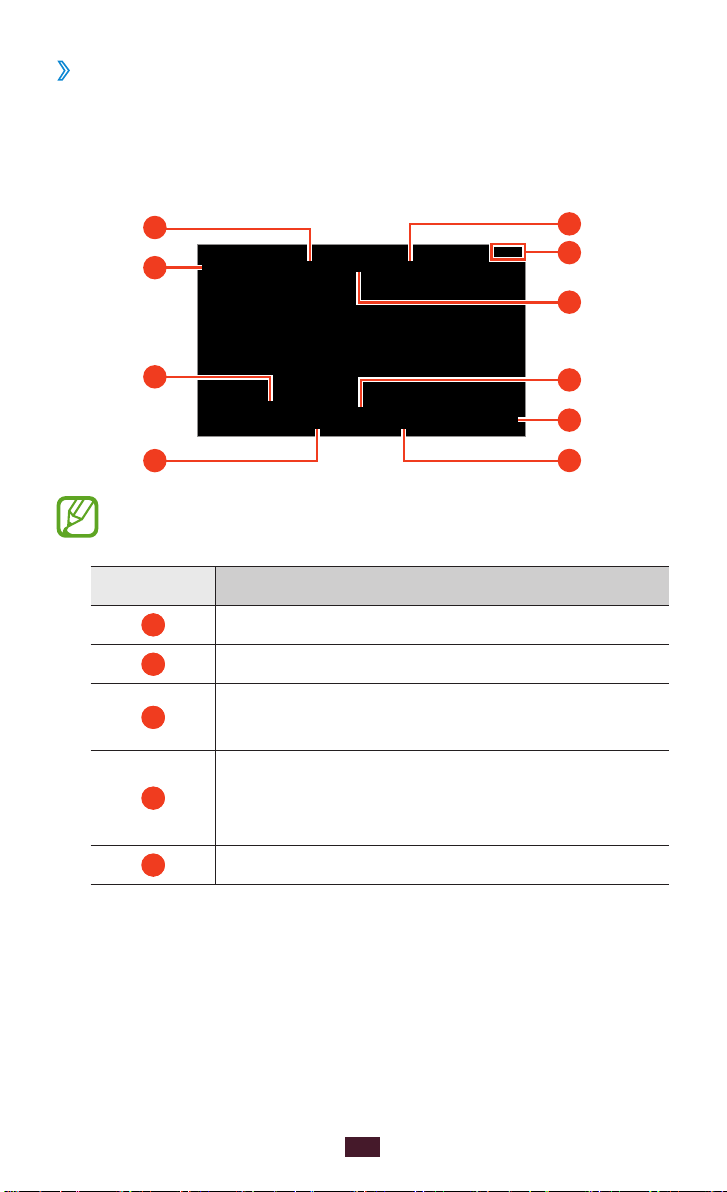
7
4
3
2
1
8
5
9
10
6
›
Open the application list and select 1 Video Player.
Select a video.
2
Control playback with the following keys.
3
The above screen may differ depending on your region
or service provider.
Number Function
1
2
3
Mute the video.
Change the ratio of the video screen.
Scan forwards or backwards in the file by
dragging or tapping the bar.
Restart playback; Skip to the previous file
4
(double-tap); Scan backwards in the file
(tap and hold).
5
Select a sound effect.
111
Entertainment
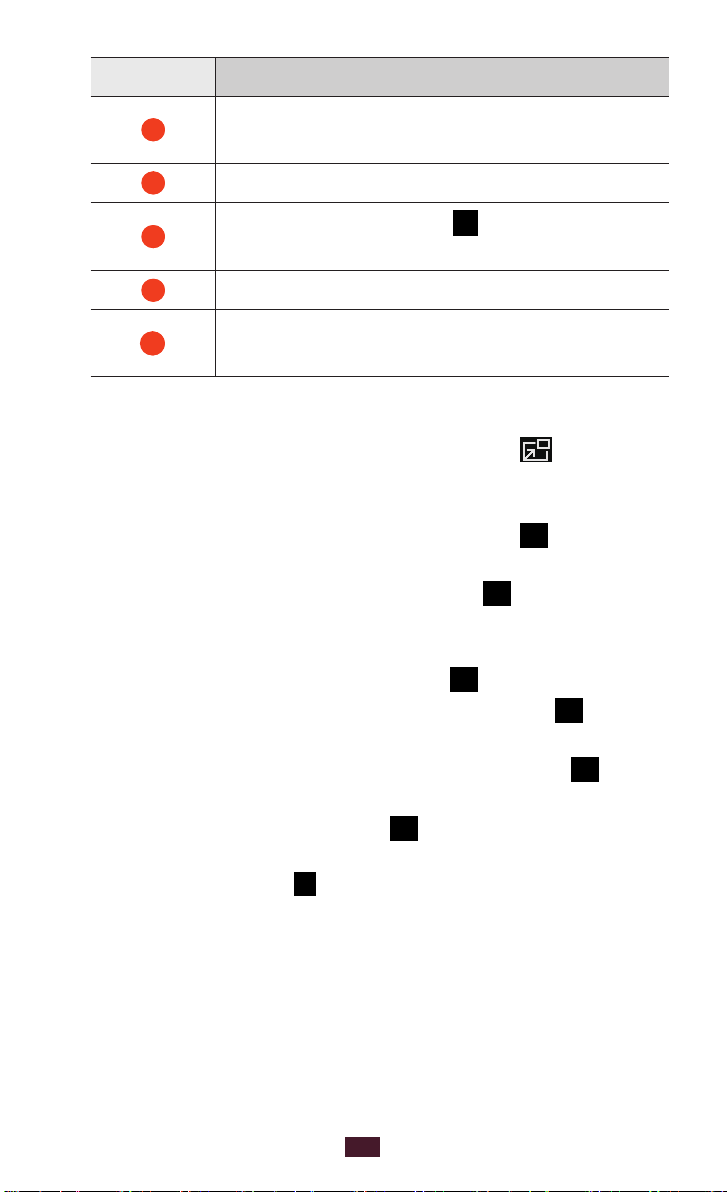
Number Function
6
7
8
9
10
Switch to the floating screen mode; Access
video player options.
Adjust the volume.
Pause playback; Select to resume
playback.
Insert a bookmark.
Skip to the next file; Scan forwards in the
file (tap and hold).
While playing a video, use the following options:
●
To switch to the floating screen mode, select
. You can
move the screen by tapping and holding it. To return to the
full screen mode, tap the screen.
●
To send the video to others or share it, select
→ Share
via.
●
To divide the video into segments, select
→ Chapter
preview. You can search for a segment and skip directly to
that point.
●
To trim a segment of the video, select
●
To listen to audio via a Bluetooth headset, select
→ Trim.
→ Via
Bluetooth.
●
To export the current video to Video maker, select
→
Video maker.
●
To view your bookmarks, select
→ Bookmarks. This
option appears only if you have bookmarked during
playback by selecting
.
112
Entertainment
To view video details, select ● → Details.
●
To set the video player to turn off automatically after a
specific period of time, select → Time set for auto
video off.
●
To search for devices that have media sharing activated,
select → Scan for nearby devices.
●
To change the video player settings, select
Customise video player settings
›
→ Settings.
During playback, select 1 → Settings.
Change the following options:
2
Option Function
Play speed Change the playback speed.
Subtitles
Auto play next
Customise the settings for a subtitle
file.
Set the video player to play the next
file automatically.
Colour tone Select a colour tone.
Outdoor
visibility
Set to improve the contrast of the
display in bright sunlight.
113
Entertainment
Gallery
Learn to view photos and play videos saved in your device’s
memory.
●
Avoid locking the device’s screen while playing a DivX
Video-On-Demand. Each time you lock the screen
while playing a DivX Video-On-Demand, one of your
available rental counts will be decremented.
●
Some file formats are not supported depending on
the software of the device.
●
If the file size exceeds the available memory, an error
can occur when you open files.
●
Playback quality may vary by content type.
●
Some files may not play properly depending on how
they are encoded.
View a photo
›
Open the application list and select 1 Gallery.
→
Select a folder
2
an image.
While viewing a photo, use the following options:
●
To view more photos, scroll left or right.
●
To zoom in or out, place two fingers on the screen and
slowly spread them apart or pinch them together. You can
also double-tap the screen. To return to the original size,
double-tap the screen.
If you activated tilting motions, you can zoom in or out
by tapping and holding two points with your fingers,
and then tilting the device back and forth.

114
Entertainment
To send the photo to others, select ● → an option.
●
To delete the photo, select
●
To start a slide show, select
→ OK.
→ Start slideshow. Tap the
screen to stop the slide show.
●
To register the faces in the photo as face tags, select
→
Face tag.
●
To add the photo to the clipboard, select
→ Copy to
clipboard.
●
To rotate the photo anti-clockwise, select
●
To rotate the photo clockwise, select
●
To crop a section from the image, select
●
To edit the photo with the image editor, select
●
To set the photo as your wallpaper or a contact image,
→ Rotate left.
→ Rotate right.
→ Crop.
→ Edit.
select → Set as.
●
To send the photo to a person whose face is tagged in the
photo, select → Buddy photo share.
●
To print the photo via Wi-Fi or USB, select
→ Print. Your
device is compatible only with some Samsung printers.
●
To change the name of a file, select
●
To search for devices that have media sharing activated,
→ Rename.
select → Scan for nearby devices.
●
To view photo details, select
→ Details.

115
Entertainment
Tag a face in an image
›
Learn to tag faces in your images to make calls, send
messages, and upload messages to social networks with the
face tag shortcuts.
Face recognition may fail depending on face angle, face
size, skin colour, facial expression, light conditions, or
accessories the subject is wearing.
Open the application list and select
1
Select an image.
2
Select 3 → Face tag → On.
Recognised faces appear in the frame.
→
Select a recognised face
4
Select the person’s name from the contact list.
5
The contact is linked to the face in the image.
When the face tag appears with a name, select the face tag
and use the available options.
Play a video
›
Open the application list and select 1 Gallery.
→
Select a folder
2
Select
3
Control playback with the keys.
4
to begin playback.
a video (indicated by the icon).
Add name.
Gallery.
► p. 109

116
Entertainment
During playback, select to access the following options:
●
To send the video to others or share it, select
●
To divide the video into segments, select
Share via.
Chapter preview.
You can search for a segment and skip directly to that point.
●
To trim a segment of the video, select
●
To listen to audio via a Bluetooth headset, select
Trim.
Via
Bluetooth.
●
To export the current video to Video maker, select
Video
maker.
●
To view your bookmarks, select
Bookmarks. This option
appears only if you have bookmarked during playback by
selecting
●
To view video details, select
●
To search for devices that have media sharing activated,
.
Details.
select Scan for nearby devices.
●
To change the video settings, select
Settings.
Paper Artist
Learn to make images look like illustrations with fun effects or
frames. Open the application list and select Paper Artist.
The edited image will be saved in ●Gallery → Paper
Picture.
●
This feature may be unavailable depending on your
region or service provider.
 Loading...