

Samsung GT-N7000L Service Manual
GSM TELEPHONE
GT-N7000/N7000L Common
GSM TELEPHONE
CONTENTS
Safety Precautions
1.
Specification
2.
Product Function
3.
Exploded View and Parts list
4.
MAIN Electrical Parts List
5.
Level1Repair
6.
Level2Repair
7.
Level3Repair
8.
Reference data
9.
Notice: All functionality, features, specifications, and
other product information provided in this document,
including but not limited to, benefits, design, pricing,
components, performance, availability, and capabiliti
es of the product are subject to change without
notice. Samsung reserves the right to alter this doc
ument or the product described herein at anytime,
without obligation to provide notification of such
changes.

This Service Manual isaproperty of Samsung Electronics Co.,Ltd.
Any unauthorized use of Manual can be punished under applicable
International and/or domestic law.
Samsung Electronics Co.,Ltd.
ⓒ
2011. 10.
Rev.1.0

Safety Precautions
1.
Repair Precaution
1-1.
Before attempting any repair or detailed tuning, shield the device from RF noise or static
electricity discharges.
Use only demagnetized tools that are specifically designed for small electronic repairs,
as most electronic parts are sensitive to electromagnetic forces.
Use only high quality screwdrivers when servicing products. Low quality screwdrivers can
easily damage the heads of screws.
Use only conductor wire of the properly gauge and insulation for low resistance, because of
the low margin of error of most testing equipment.
We recommend
Hand-soldering is not recommended, because printed circuit boards(PCBs) can be easily
gauge twisted copper wire.
22-
damaged, even with relatively low heat. Never useasoldering iron withapower rating of
more than 100 watts and use only lead-free solder with a melting point below 250°C (482°F).
Prior to disassembling the battery charger for repair, ensure that the AC power is disconnected.
Always use the replacement parts that are registered in the SEC system. Third-party replac
ement parts may not function properly.
Confidential and proprietary-the contents in this service guide subject to change without prior notice.
Distribution, transmission, or infringement of any content or data from this document without Samsung’swritten authorization is strictly prohibited.
1-1

Safety Precautions
ESD(Electrostatically Sensitive Devices) Precaution
1-2.
Many semiconductors and ESDs in electronic devices are particularly sensitive to static discha
rge and can be easily damaged by it. We recommend protecting these components with cond
uctive anti-static bags when you store or transport them.
Always use an anti-static strap or wristband and remove electrostatic buildup or dissipate
static electricity from your body before repairing ESDs.
Ensure that soldering irons have AC adapter with ground wires and that the ground wires are
properly connected.
Use only desoldering tools with plastic tips to prevent static discharge.
Properly shield the work environment from accidental electrostatic discharge before opening
packages containing ESDs.
The potential for static electricity discharge may be increased in low humidity environments,
such as air-conditioned rooms. Increase the airflow to the working area to decrease the
chance of accidental static electricity discharges.
Confidential and proprietary-the contents in this service guide subject to change without prior notice.
Distribution, transmission, or infringement of any content or data from this document without Samsung’swritten authorization is strictly prohibited.
1-2

Specification
2.
GSM General Specification
2-1.
Freq.
Band[MHz]
Uplink/
Downlink
ARFCN
range
Tx/Rx
spacing
Mod. Bit
rate/
Bit Period
Time Slot
Period/
Frame
Period
GSM850 EGSM 900 DCS1800 PCS1900
824~849
869~894
128~251
45MHz 45MHz 95MHz 80MHz 190MHz 80MHz 45MHz 45MHz
270.833kbp
s
3.692us
576.9us
4.615ms
880~915
925~960
0~124 &
975~1023
270.833kbp
s
3.692us
576.9us
4.615ms
1710~1785
1805~1880
512~885 512~810
270.833kbp
s
3.692us
576.9us
4.615ms
1850~1910
1930~1990
270.833kbp
s
3.692us
576.9us
4.615ms
WCDMA
2100
1922~1977
2112~2167
UL:
9612~9888
DL:
10562~1083
8
3.84Mcps 3.84Mcps 3.84Mcps 3.84Mcps
FrameLengt
h:
10ms
Slotlength:
0.667ms
WCDMA
1900
1852~1907
1932~1987
UL:
9262~9538
DL:
9662~9938
FrameLengt
h:
10ms
Slotlength:
0.667ms
WCDMA
900
880~915
925~960
UL:
2712~2863
DL:
2937~3088
FrameLengt
h:
10ms
Slotlength:
0.667ms
WCMDA
824~849
869~894
4132~4233
4357~4458
FrameLengt
Slotlength:
0.667ms
850
UL:
DL:
h:
10ms
Modulation 0.3GMSK 0.3GMSK 0.3GMSK 0.3GMSK
MS
P
Power
Class
Sensitivity -102dBm -102dBm -100dBm -100dBm -106.7dBm -106.7dBm -106.7dBm -106.7dBm
TDMA Mux 8 8 8 8
Cell Radius 35Km 35Km 2Km 2Km 2Km 2Km 2Km 2Km
33dBm~5dBm33dBm~5dBm30dBm~0dBm30dBm~0dBm24dBm~
ower
5pcl ~
19pcl
pcl
5
~19
pcl0pcl
~15
pcl0pcl
~15
QPSKHQPSKQPSKHQPSKQPSKHQPS
pcl
-50dBm
max+24dB
3(
m)
8
24dBm~
-50dBm
max+24dB
3(
m)
888
24dBm~
-50dBm
3(
K
max+24dB
m)
QPSKHQPS
K
24dBm~
-50dBm
max+24dB
3(
m)
Confidential and proprietary-the contents in this service guide subject to change without prior notice.
Distribution, transmission, or infringement of any content or data from this document without Samsung’swritten authorization is strictly prohibited.
2-1
Specification
GSM Tx Power Class
2-2.
TX Power
control
level
533±2
631±2
729±2
827±2
925±2
10 23±2
11 21±2
12 19±2
GSM850
dBm
dBm
dBm
dBm
dBm
dBm
dBm
dBm
TX Power
control
EGSM900
level
533±2
631±2
729±2
827±2
925±2
10 23±2
11 21±2
12 19±2
dBm
dBm
dBm
dBm
dBm
dBm
dBm
dBm
TX Power
control
DCS1800
level
030±3
128±3
226±3
324±3
422±3
520±3
618±3
716±3
dBm
dBm
dBm
dBm
dBm
dBm
dBm
dBm
TX Power
control
PCS1900
level
030±3
128±3
226±3
324±3
422±3
520±3
618±3
716±3
dBm
dBm
dBm
dBm
dBm
dBm
dBm
dBm
13 17±2
14 15±2
15 13±2
16 11±3
17 9±3
18 7±3
19 5±3
dBm
dBm
dBm
dBm
dBm
dBm
dBm
13 17±2
14 15±2
15 13±2
16 11±3
17 9±3
18 7±3
19 5±3
dBm
dBm
dBm
dBm
dBm
dBm
dBm
814±3
912±4
10 10±4
11 8±4
12 6±4
13 4±4
14 2±5
15 0±5
dBm
dBm
dBm
dBm
dBm
dBm
dBm
dBm
814±3
912±4
10 10±4
11 8±4
12 6±4
13 4±4
14 2±5
15 0±5
dBm
dBm
dBm
dBm
dBm
dBm
dBm
dBm
Confidential and proprietary-the contents in this service guide subject to change without prior notice.
Distribution, transmission, or infringement of any content or data from this document without Samsung’swritten authorization is strictly prohibited.
2-2

Operation Instruction and Installation
3.
Main Function
Android OS: Gingerbread
•
HSPA+21Mbps/HSUPA
•
MP AF with LED Flash
•8
•5.29
•
•
•
•
-1.4
-
-
WXGA Super AMOLED(C-Type)
A-GPS/BT v3.0 USB v2.0/WiFi
Recording definition:
Sensors: Accelerometer, Electromagnetic, Gyro, Light, Proximity, Barometer
Additional
GHz Dual Core CPU
Application store/Precise Motion UI
Seamless Sharing Experience.
:
1080p /
Mbps
5.76
Playback at
(802.11
a/b/g/n)/OTG
1080p
resolution
Confidential and proprietary-the contents in this service guide subject to change without prior notice.
Distribution, transmission, or infringement of any content or data from this document without Samsung’swritten authorization is strictly prohibited.
3-1
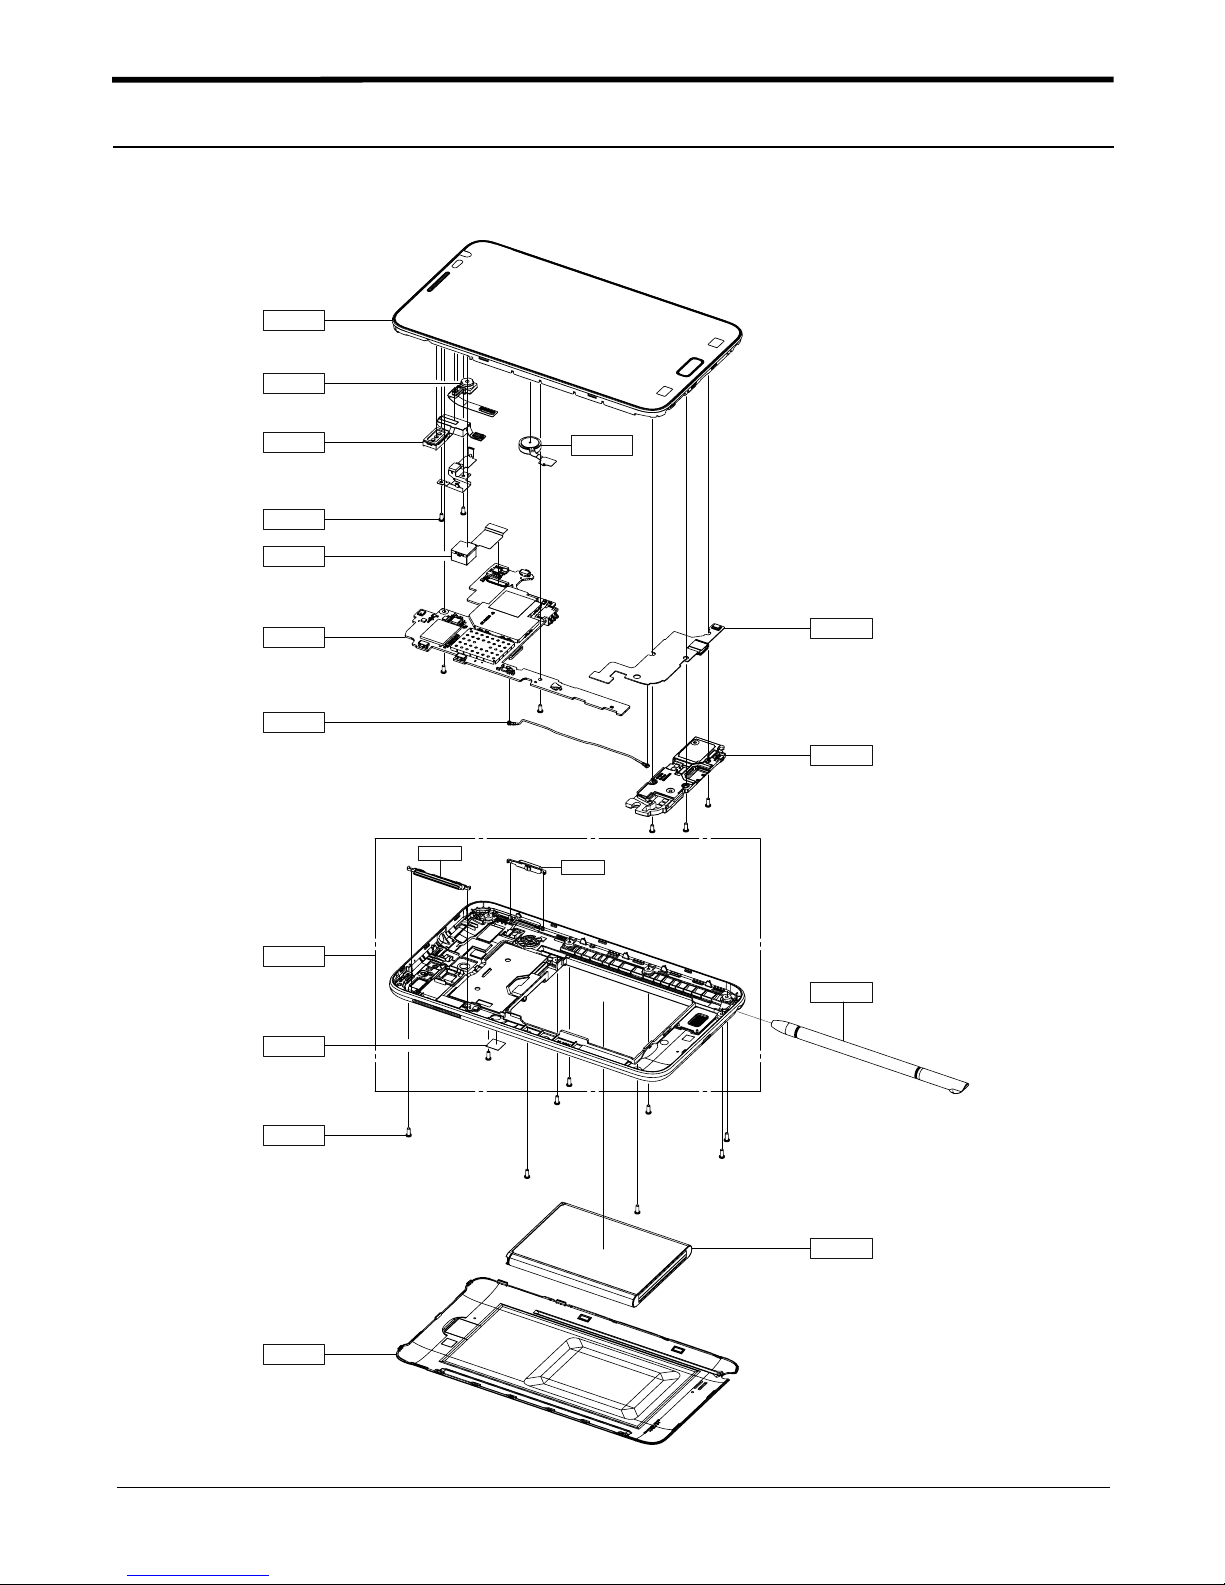
Exploded View and Parts List
4.
Cellular phone Exploded View
4-1.
QFR01
QCA02
QJK01
QCR72
QCA01
QMP01
QCB01
QRE01
QVO01
QMO01
QME02
QSP01
QCK01
QST01
QRF01
QCR05
QBC00
Confidential and proprietary-the contents in this service guide subject to change without prior notice.
Distribution, transmission, or infringement of any content or data from this document without Samsung’swritten authorization is strictly prohibited.
QBA01
4-1

Exploded View and Parts List
Cellular phone Parts list
4-2.
Design LOC Description SEC CODE
QBA01
QBC00
QCA01
QCA02
QCB01
QCR05
QCR72
QFR01
QJK01
QME02
QMO01
QMP01
QRF01
QSP01
QST01
QRE01
INNER BATTERY PACK-2500MAH,BLK,UNI,MAIN GH43-03640A
ASSY COVER-BATT GH98-21606A
ASSY CAMERA-8M
CAMERA MODULE-2M VT LSI(GT-I9220) GH59-11704A
CBF COAXIAL CABLE-GT-I9103 GH39-01489A
SCREW-MACHINE
SCREW-MACHINE
MEA FRONT-OCTA LCD ASSY(SVC) GH97-12948A
MODULE-GT_I9220 EARJACK+RCV GH59-11714A
UNIT-SUB PBA(GT-I9220) GH59-11676A
MOTOR LINEAR VIBRATION-GT-I9220 GH31-00563A
A/S ASSY-PBA MAIN(COMM) GH82-06121A
TAPE-RF SWITCH GH74-57806A
MODULE-GT_I9220L SPK+ENCLOSURE+INT GH59-11746A
ASSY ACCE-E-PEN GH98-21596A
ASSY CASE-REAR GH98-21616A
LSI MODULE(GT_I922 GH96-05397A
1/3.2"
6001-001478
6001-002051
QVO01 PMO KEY-VOL GH72-65741A
QCK01 PMO KEY-POWER GH72-65742A
Confidential and proprietary-the contents in this service guide subject to change without prior notice.
Distribution, transmission, or infringement of any content or data from this document without Samsung’swritten authorization is strictly prohibited.
4-2

MAIN Electrical Parts List
5.
SEC CODE Design LOC Description
0403-001688
0406-001322
0406-001327
0407-001002
0601-003079
0801-003031
0801-003139
0902-002847
1001-001481
1001-001699
1001-001715
1001-001733
1003-002102
1003-002391
1108-000424
1201-003308
1201-003317
1202-001068
1202-001118
1203-004819
1203-004819
1203-005485
1203-005853
1203-005907
1203-006022
1203-006494
1203-006801
1203-006807
1203-006817
1203-006851
1203-006874
1203-006985
1203-006986
1203-007142
1204-003176
1204-003328
D601 DIODE-ZENER
ZD600 DIODE-TVS
ZD300 DIODE-TVS
D600 DIODE-ARRAY
LED500 LED
U400,U600 IC
U303 IC
UCP400 IC
U604 IC
U512 IC
U1009 IC
U1004 IC
U503 IC
U500 IC
UME300 MEMORY
U1008 IC
U1005 IC
U505 IC
U200 IC
U205,U206,U208,U501 IC
U507,U510 IC
U601 IC
U508 IC
U502 IC
U506,U517 IC
U607 IC
U1000 IC
U509 IC
U301 IC
U602 IC
U511 IC
U1003 IC
U302 IC
U504 IC
U201 IC
U207 IC
Confidential and proprietary-the contents in this service guide subject to change without prior notice.
Distribution, transmission, or infringement of any content or data from this document without Samsung’swritten authorization is strictly prohibited.
5-1

Main Electrical Parts List
SEC CODE Design LOC Description
1205-004174
1205-004195
1205-004213
1205-004233
1205-004396
1205-004399
1209-001997
1209-002041
1209-002045
1209-002096
1404-001221
1405-001183
1405-001183
1405-001200
1405-001296
2007-000140
2007-000141
2007-000143
2007-000148
2007-000162
2007-000162
2007-000165
2007-000170
2007-001290
2007-001298
2007-003015
2007-007014
2007-007014
2007-007107
2007-007137
2007-007334
2007-007489
2007-007517
2007-007538
2007-007585
2007-007741
U202 IC
U1001 IC
U300 IC
U518 IC
U1011 IC
U516 IC
U608 IC
U609 IC
U605 IC
U606 IC
TH300,TH400,TH401 THERMISTOR
V203,V204,V205,V206 VARISTOR
V207 VARISTOR
ZD302 VARISTOR
V200,V201,V208 VARISTOR
R307,R308,R430,R431 R-CHIP
R506 R-CHIP
R536 R-CHIP
R500 R-CHIP
R400,R401,R402,R403 R-CHIP
R516 R-CHIP
R514 R-CHIP
R513,R517 R-CHIP
R465 R-CHIP
R1016 R-CHIP
R332,R334 R-CHIP
R314,R315,R316,R317 R-CHIP
R318,R319,R320,R321 R-CHIP
R312,R437 R-CHIP
R223,R441 R-CHIP
R609 R-CHIP
R512,R534,R535 R-CHIP
R432,R433,R462,R463 R-CHIP
R515 R-CHIP
R205 R-CHIP
U515 R-CHIP
Confidential and proprietary-the contents in this service guide subject to change without prior notice.
Distribution, transmission, or infringement of any content or data from this document without Samsung’swritten authorization is strictly prohibited.
5-2

Main Electrical Parts List
SEC CODE Design LOC Description
2007-007942
2007-008045
2007-008046
2007-008048
2007-008052
2007-008052
2007-008052
2007-008052
2007-008055
2007-008055
2007-008055
2007-008055
2007-008055
2007-008419
2007-008419
2007-008420
2007-008483
2007-008483
2007-008483
2007-008486
2007-008516
2007-008516
2007-008516
2007-008516
2007-008516
2007-008516
2007-008531
2007-008579
2007-008588
2007-008588
2007-008588
2007-008588
2007-008686
2007-008774
2007-008800
2007-009084
R201,R202,R204 R-CHIP
R621 R-CHIP
R1004 R-CHIP
R1017,R532,R533 R-CHIP
R322,R407,R408,R409 R-CHIP
R410,R421,R422,R456 R-CHIP
R457,R458,R503,R504 R-CHIP
R612 R-CHIP
R218,R220,R418,R426 R-CHIP
R428,R429,R436,R449 R-CHIP
R450,R452,R453,R454 R-CHIP
R507,R526,R528,R613 R-CHIP
R620 R-CHIP
R203,R419,R420,R447 R-CHIP
R448,R505 R-CHIP
R200,R509,R511,R615 R-CHIP
R211,R212,R213,R214 R-CHIP
R215,R301,R302,R303 R-CHIP
R304,R305 R-CHIP
R502 R-CHIP
R216,R300,R323,R324 R-CHIP
R404,R405,R406,R443 R-CHIP
R444,R445,R455,R508 R-CHIP
R531,R603,R604,R605 R-CHIP
R606,R608,R610,R611 R-CHIP
R614,R616 R-CHIP
R208,R209,R518 R-CHIP
R206 R-CHIP
R338,R339,R340,R411 R-CHIP
R412,R414,R415,R424 R-CHIP
R425,R459,R460,R617 R-CHIP
R618 R-CHIP
R1005,R1006 R-CHIP
R229,R231 R-CHIP
R434,R435,R461,R466 R-CHIP
R228,R230,R529 R-CHIP
Confidential and proprietary-the contents in this service guide subject to change without prior notice.
Distribution, transmission, or infringement of any content or data from this document without Samsung’swritten authorization is strictly prohibited.
5-3

Main Electrical Parts List
SEC CODE Design LOC Description
2007-009111
2007-009115
2007-009115
2007-009154
2007-009157
2007-009182
2007-009199
2007-009212
2007-009315
2007-009354
2007-009801
2007-009849
2007-009964
2007-010029
2007-010202
2007-010233
2007-010827
2203-000233
2203-000278
2203-000386
2203-000438
2203-000725
2203-000812
2203-000995
2203-001072
2203-002982
2203-005057
2203-005138
2203-005682
2203-005682
2203-005717
2203-005725
2203-005726
2203-005726
2203-005726
2203-005726
R234,R235,R325 R-CHIP
R464,R524,R525,R600 R-CHIP
R601 R-CHIP
R521,R522 R-CHIP
U514 R-CHIP
R523 R-CHIP
R510 R-CHIP
R222 R-CHIP
R306 R-CHIP
R1013 R-CHIP
R1002,R1003 R-CHIP
R1007,R1008 R-CHIP
R438,R439 R-CHIP
R413 R-CHIP
R520 R-CHIP
R327 R-CHIP
R619 R-CHIP
C1083,C507 C-CERAMIC,CHIP
C270 C-CERAMIC,CHIP
C214 C-CERAMIC,CHIP
C524 C-CERAMIC,CHIP
C660 C-CERAMIC,CHIP
C269 C-CERAMIC,CHIP
C274 C-CERAMIC,CHIP
C213 C-CERAMIC,CHIP
C1037,C1039 C-CERAMIC,CHIP
C208 C-CERAMIC,CHIP
C440,C445 C-CERAMIC,CHIP
C1030,C1050,C345 C-CERAMIC,CHIP
C347,C348,C349 C-CERAMIC,CHIP
C1020 C-CERAMIC,CHIP
C1100,C438,C439 C-CERAMIC,CHIP
C1042,C1065,C1066 C-CERAMIC,CHIP
C1068,C1069,C1074 C-CERAMIC,CHIP
C1079,C1081,C1084 C-CERAMIC,CHIP
C1090,C1093,C1098 C-CERAMIC,CHIP
Confidential and proprietary-the contents in this service guide subject to change without prior notice.
Distribution, transmission, or infringement of any content or data from this document without Samsung’swritten authorization is strictly prohibited.
5-4

Main Electrical Parts List
SEC CODE Design LOC Description
2203-005726
2203-005727
2203-005729
2203-005729
2203-005731
2203-005736
2203-005736
2203-005736
2203-005736
2203-005777
2203-005806
2203-006048
2203-006048
2203-006190
2203-006194
2203-006194
2203-006194
2203-006208
2203-006208
2203-006260
2203-006305
2203-006348
2203-006379
2203-006399
2203-006399
2203-006399
2203-006399
2203-006399
2203-006423
2203-006423
2203-006423
2203-006423
2203-006423
2203-006423
2203-006423
2203-006423
C238 C-CERAMIC,CHIP
C209 C-CERAMIC,CHIP
C239,C267,C353,C620 C-CERAMIC,CHIP
C634 C-CERAMIC,CHIP
C290,C352 C-CERAMIC,CHIP
C1049,C1073,C1080 C-CERAMIC,CHIP
C1101,C1102,C218 C-CERAMIC,CHIP
C219,C220,C606,C619 C-CERAMIC,CHIP
U1014 C-CERAMIC,CHIP
C1054 C-CERAMIC,CHIP
C1038,C1077 C-CERAMIC,CHIP
C204,C302,C546,C548 C-CERAMIC,CHIP
C605,C672,C677,U1013 C-CERAMIC,CHIP
C306,C342 C-CERAMIC,CHIP
C1043,C1057,C242 C-CERAMIC,CHIP
C246,C248,C309,C312 C-CERAMIC,CHIP
C665 C-CERAMIC,CHIP
C1032,C629,C631,C632 C-CERAMIC,CHIP
C633 C-CERAMIC,CHIP
C671 C-CERAMIC,CHIP
C210,C559,C562 C-CERAMIC,CHIP
U603 C-CERAMIC,CHIP
C1035 C-CERAMIC,CHIP
C1016,C1022,C1059 C-CERAMIC,CHIP
C244,C359,C517,C518 C-CERAMIC,CHIP
C641,C644,C649,C650 C-CERAMIC,CHIP
C651,C655,C656,C657 C-CERAMIC,CHIP
C658,C670 C-CERAMIC,CHIP
C1002,C1003,C1004 C-CERAMIC,CHIP
C1005,C1006,C1011 C-CERAMIC,CHIP
C1012,C1013,C1040 C-CERAMIC,CHIP
C1045,C1046,C1058 C-CERAMIC,CHIP
C1060,C1061,C1062 C-CERAMIC,CHIP
C1063,C1064,C1078 C-CERAMIC,CHIP
C207,C221,C282,C301 C-CERAMIC,CHIP
C307,C308,C313,C314 C-CERAMIC,CHIP
Confidential and proprietary-the contents in this service guide subject to change without prior notice.
Distribution, transmission, or infringement of any content or data from this document without Samsung’swritten authorization is strictly prohibited.
5-5

Main Electrical Parts List
SEC CODE Design LOC Description
2203-006423
2203-006423
2203-006423
2203-006423
2203-006423
2203-006423
2203-006423
2203-006423
2203-006423
2203-006423
2203-006423
2203-006423
2203-006423
2203-006423
2203-006426
2203-006439
2203-006562
2203-006562
2203-006642
2203-006647
2203-006647
2203-006648
2203-006648
2203-006668
2203-006824
2203-006839
2203-006872
2203-006872
2203-006872
2203-006872
2203-006872
2203-006872
2203-006872
2203-006890
2203-006896
2203-006978
C315,C316,C320,C321 C-CERAMIC,CHIP
C323,C324,C325,C326 C-CERAMIC,CHIP
C329,C330,C332,C333 C-CERAMIC,CHIP
C334,C337,C338,C339 C-CERAMIC,CHIP
C346,C355,C402,C405 C-CERAMIC,CHIP
C409,C412,C415,C420 C-CERAMIC,CHIP
C425,C437,C441,C443 C-CERAMIC,CHIP
C444,C446,C500,C501 C-CERAMIC,CHIP
C509,C510,C515,C519 C-CERAMIC,CHIP
C523,C525,C540,C549 C-CERAMIC,CHIP
C550,C551,C552,C553 C-CERAMIC,CHIP
C560,C565,C602,C603 C-CERAMIC,CHIP
C604,C616,C640,C663 C-CERAMIC,CHIP
C666 C-CERAMIC,CHIP
C555 C-CERAMIC,CHIP
C1034 C-CERAMIC,CHIP
C212,C360,C514,C542 C-CERAMIC,CHIP
C617,C618 C-CERAMIC,CHIP
C404,C407 C-CERAMIC,CHIP
C1007,C1008,C1009 C-CERAMIC,CHIP
C1014 C-CERAMIC,CHIP
C1047,C224,C226,C266 C-CERAMIC,CHIP
C276,C281 C-CERAMIC,CHIP
C286,C287,C410,C411 C-CERAMIC,CHIP
C1023,C1027,C561 C-CERAMIC,CHIP
C211,C215,C533,C539 C-CERAMIC,CHIP
C1010,C1024,C1076 C-CERAMIC,CHIP
C1085,C1088,C1089 C-CERAMIC,CHIP
C1099,C229,C310,C408 C-CERAMIC,CHIP
C414,C428,C432,C435 C-CERAMIC,CHIP
C537,C538,C544,C545 C-CERAMIC,CHIP
C547,C554,C643,C647 C-CERAMIC,CHIP
C648,C652,C653,C654 C-CERAMIC,CHIP
C628,C630,C675 C-CERAMIC,CHIP
C1095,C1096,C1097 C-CERAMIC,CHIP
C354,U1012 C-CERAMIC,CHIP
Confidential and proprietary-the contents in this service guide subject to change without prior notice.
Distribution, transmission, or infringement of any content or data from this document without Samsung’swritten authorization is strictly prohibited.
5-6

Main Electrical Parts List
SEC CODE Design LOC Description
2203-006979
2203-006979
2203-007133
2203-007147
2203-007194
2203-007210
2203-007210
2203-007210
2203-007210
2203-007270
2203-007271
2203-007279
2203-007279
2203-007317
2203-007317
2203-007317
2203-007317
2203-007317
2203-007385
2203-007391
2203-007393
2203-007393
2203-007393
2203-007393
2203-007393
2203-007449
2203-007449
2203-007449
2203-007449
2203-007449
2203-007449
2203-007449
2203-007449
2203-007449
2203-007449
2203-007449
C1015,C1026,C1091 C-CERAMIC,CHIP
C231,C234,C662 C-CERAMIC,CHIP
C528,C531,C532,C534 C-CERAMIC,CHIP
C350,C351 C-CERAMIC,CHIP
C225 C-CERAMIC,CHIP
C1017,C236,C237,C300 C-CERAMIC,CHIP
C304,C305,C319,C322 C-CERAMIC,CHIP
C327,C331,C335,C336 C-CERAMIC,CHIP
C340,C356 C-CERAMIC,CHIP
C1001,C228,C676 C-CERAMIC,CHIP
C1041,C502,C503 C-CERAMIC,CHIP
C1029,C311,C317,C318 C-CERAMIC,CHIP
C535 C-CERAMIC,CHIP
C1025,C1056,C200 C-CERAMIC,CHIP
C205,C227,C413,C416 C-CERAMIC,CHIP
C421,C423,C427,C431 C-CERAMIC,CHIP
C434,C541,C636,C642 C-CERAMIC,CHIP
C646 C-CERAMIC,CHIP
C526 C-CERAMIC,CHIP
C664,C668 C-CERAMIC,CHIP
C1000,C1044,C303 C-CERAMIC,CHIP
C513,C610,C612,C613 C-CERAMIC,CHIP
C614,C615,C621,C622 C-CERAMIC,CHIP
C623,C624,C625,C626 C-CERAMIC,CHIP
C627 C-CERAMIC,CHIP
C1021,C202,C203,C206 C-CERAMIC,CHIP
C216,C217,C230,C232 C-CERAMIC,CHIP
C233,C235,C241,C243 C-CERAMIC,CHIP
C245,C247,C249,C250 C-CERAMIC,CHIP
C253,C254,C328,C341 C-CERAMIC,CHIP
C357,C358,C400,C401 C-CERAMIC,CHIP
C403,C406,C417,C418 C-CERAMIC,CHIP
C419,C422,C424,C429 C-CERAMIC,CHIP
C433,C436,C504,C505 C-CERAMIC,CHIP
C506,C508,C511,C516 C-CERAMIC,CHIP
C520,C521,C522,C527 C-CERAMIC,CHIP
Confidential and proprietary-the contents in this service guide subject to change without prior notice.
Distribution, transmission, or infringement of any content or data from this document without Samsung’swritten authorization is strictly prohibited.
5-7

Main Electrical Parts List
SEC CODE Design LOC Description
2203-007449
2203-007449
2203-007449
2203-007449
2203-007456
2203-007474
2203-007693
2203-007701
2203-007795
2203-007796
2203-008095
2404-001496
2404-001506
2409-001186
2703-002208
2703-002649
2703-002793
2703-002858
2703-002870
2703-002901
2703-002903
2703-002907
2703-002953
2703-002955
2703-002961
2703-003125
2703-003293
2703-003545
2703-003685
2703-003686
2703-003687
2703-003755
2703-003771
2703-003869
2703-003892
2703-003896
C529,C530,C536,C543 C-CERAMIC,CHIP
C556,C557,C558,C563 C-CERAMIC,CHIP
C564,C600,C601,C608 C-CERAMIC,CHIP
C638,C645,C678 C-CERAMIC,CHIP
C607 C-CERAMIC,CHIP
C426,C430,C512,C639 C-CERAMIC,CHIP
C669 C-CERAMIC,CHIP
C609,U1017 C-CERAMIC,CHIP
C611,C659 C-CERAMIC,CHIP
C637,C661 C-CERAMIC,CHIP
C343,C344 C-CERAMIC,CHIP
TA200 C-TA,CHIP
TA600 C-TA,CHIP
BAT600 CAPACITOR
L1001 INDUCTOR-SMD
L1017 INDUCTOR-SMD
L1026,L1034 INDUCTOR-SMD
L1021 INDUCTOR-SMD
L1016,L1027,L1037 INDUCTOR-SMD
L1028 INDUCTOR-SMD
L1023 INDUCTOR-SMD
L1038 INDUCTOR-SMD
L1008 INDUCTOR-SMD
L1031 INDUCTOR-SMD
L1040,L205 INDUCTOR-SMD
L1022 INDUCTOR-SMD
L201 INDUCTOR-SMD
L204 INDUCTOR-SMD
L502 INDUCTOR-SMD
L603 INDUCTOR-SMD
L607 INDUCTOR-SMD
L1003,L1004,L1005 INDUCTOR-SMD
L1039 INDUCTOR-SMD
L302,L303 INDUCTOR-SMD
L604 INDUCTOR-SMD
L214 INDUCTOR-SMD
Confidential and proprietary-the contents in this service guide subject to change without prior notice.
Distribution, transmission, or infringement of any content or data from this document without Samsung’swritten authorization is strictly prohibited.
5-8

Main Electrical Parts List
SEC CODE Design LOC Description
2703-003897
2703-003909
2703-003911
2703-003921
2703-004001
2703-004012
2703-004013
2703-004018
2703-004034
2703-004035
2703-004037
2703-004052
2703-004132
2703-004185
2801-004339
2801-004449
2801-004458
2801-005107
2809-001369
2809-001374
2901-001625
2904-001988
2904-002020
2904-002027
2910-000125
2911-000191
3003-001136
3301-001659
3301-001729
3301-001789
3301-001851
3301-001895
3301-001912
3301-001956
3301-002037
3301-002062
L505,L508 INDUCTOR-SMD
L601,L605 INDUCTOR-SMD
L600,L602 INDUCTOR-SMD
L1030 INDUCTOR-SMD
L1024 INDUCTOR-SMD
L1012 INDUCTOR-SMD
L1020 INDUCTOR-SMD
L1033 INDUCTOR-SMD
L1006 INDUCTOR-SMD
L1011 INDUCTOR-SMD
L1010 INDUCTOR-SMD
L606 INDUCTOR-SMD
L1002,L1007 INDUCTOR-SMD
L1013 INDUCTOR-SMD
OSC300,OSC600 CRYSTAL-UNIT
OSC500 CRYSTAL-UNIT
OSC400 CRYSTAL-UNIT
OSC200 CRYSTAL-UNIT
OSC1000 OSCILLATOR-VCTCXO
OSC1001 OSCILLATOR-VCTCXO
F500,F501 FILTER-EMI
F1002 FILTER-SAW
F1003 FILTER-SAW
F1001 FILTER-SAW
F1000 FILTER
U1002 FILTER
MIC200 MIC-CONDENSOR
L1029 CORE-FERRITE
L507,L510,L511 CORE-FERRITE
L506,L509 CORE-FERRITE
L608 CORE-FERRITE
L1025 CORE-FERRITE
L200 CORE-FERRITE
L300,L301,L304 CORE-FERRITE
L503,L504 CORE-FERRITE
L1000 CORE-FERRITE
Confidential and proprietary-the contents in this service guide subject to change without prior notice.
Distribution, transmission, or infringement of any content or data from this document without Samsung’swritten authorization is strictly prohibited.
5-9

Main Electrical Parts List
SEC CODE Design LOC Description
3301-002065
3301-002066
3301-002066
3301-002078
3404-001152
3705-001448
3705-001731
3708-002162
3709-001575
3709-001645
3711-007244
3711-007313
3711-007332
3711-007478
3711-007629
3711-007746
3711-007810
3711-008011
3712-001375
3712-001375
3712-001375
4709-002048
GH62-00015A PORON1000 PAD GAP-PCB GASKET
GH70-04443A SC1000,SC1001,SC1002 ICT SHIELD-CAN CLIP
GH70-04443A SC1003,SC1004,SC1005 ICT SHIELD-CAN CLIP
GH70-07861A SC1009 ICT SHIELD-FRAME_COVER
GH80-03321A R1000,R1018,R309 Solder Bridge PAD
GH98-21812A SC1006 ICT SHIELD-FRAME_COVER
GH98-21813A SC1007 ICT SHIELD-FRAME_COVER
GH98-21814A SC1008 ICT SHIELD-FRAME_COVER
L207,L211,L213 CORE-FERRITE
L202,L203,L206,L215 CORE-FERRITE
L500,L501 CORE-FERRITE
L210,L212 CORE-FERRITE
TAC300,TAC301,TAC302 SWITCH-TACT
RFS1000 CONNECTOR-COAXIAL
RFS1001 CONNECTOR-COAXIAL
SLC500 CONNECTOR-FPC/FFC/PIC
CD300 CONNECTOR-CARD
SIM300 CONNECTOR-CARD
HDC503 CONNECTOR-HEADER
HDC301 CONNECTOR-HEADER
HDC300 CONNECTOR-HEADER
HDC200 CONNECTOR-HEADER
BTC600 CONNECTOR-HEADER
HDC501 CONNECTOR-HEADER
HDC500 CONNECTOR-HEADER
HDC504 CONNECTOR-HEADER
ANT1000,ANT1001 CONNECTOR-TERMINAL
ANT1002,ANT200 CONNECTOR-TERMINAL
MOT600,MOT601 CONNECTOR-TERMINAL
U204 RF-MODULE
Confidential and proprietary-the contents in this service guide subject to change without prior notice.
Distribution, transmission, or infringement of any content or data from this document without Samsung’swritten authorization is strictly prohibited.
5-10
Level
6.
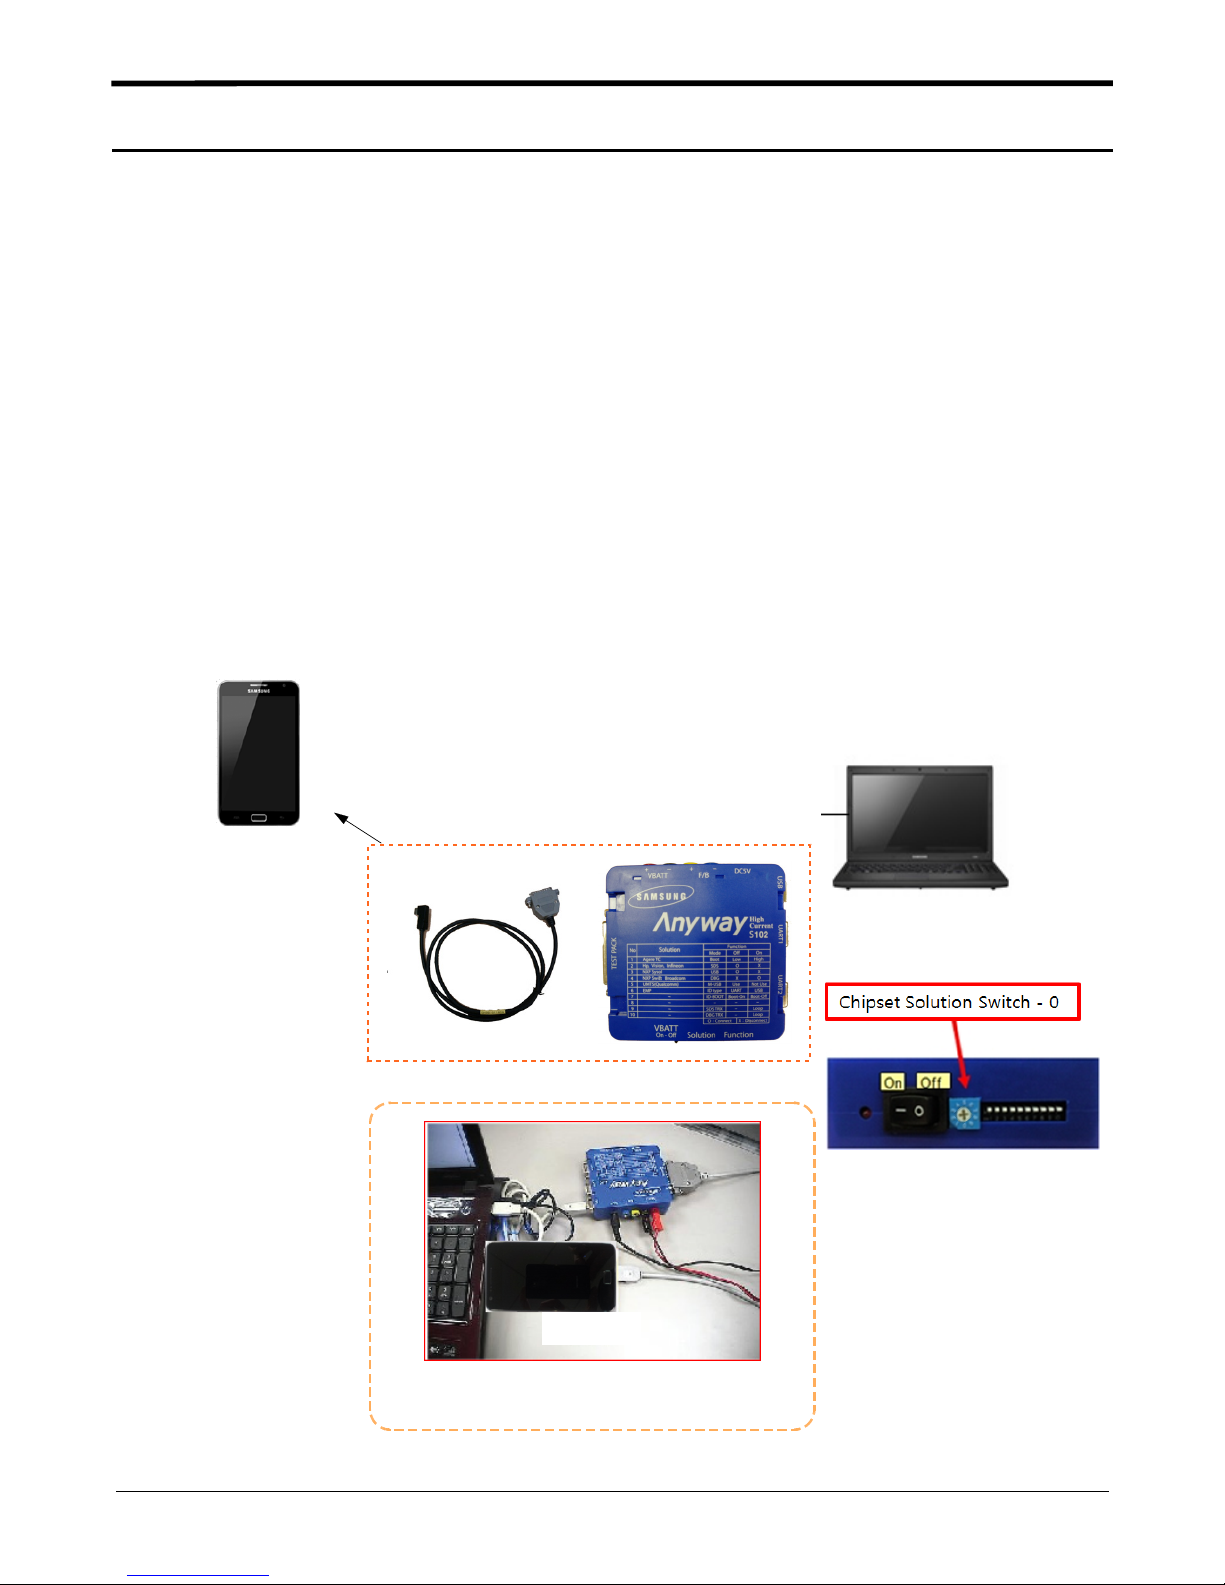
S/W installation
6-1.
Repair
6
6-1-1.
Required items in order to install S/W
Installation program: Downloader Program
y
GT-N7000 Mobile Phone
y
Data Cable
y
JIG BOX(GH99-36900B)
•
RF Test Cable(GH39-00985A)
•
JIG Cable(GH39-01290A)
•
Adapter(GH99-38251A)
•
Serial Cable
•
Mobile device specific S/W: Binary files
y
Settings
※
Connect ANYWAY JIG BOX
with JIG CABLE(Phone to JIG)
or PC to Phone Using Data Cable
(Odin3 v1.85.exe with odin3.ini)
Confidential and proprietary-the contents in this service guide subject to change without prior notice.
Distribution, transmission, or infringement of any content or data from this document without Samsung’swritten authorization is strictly prohibited.
6-1
Level6Repair
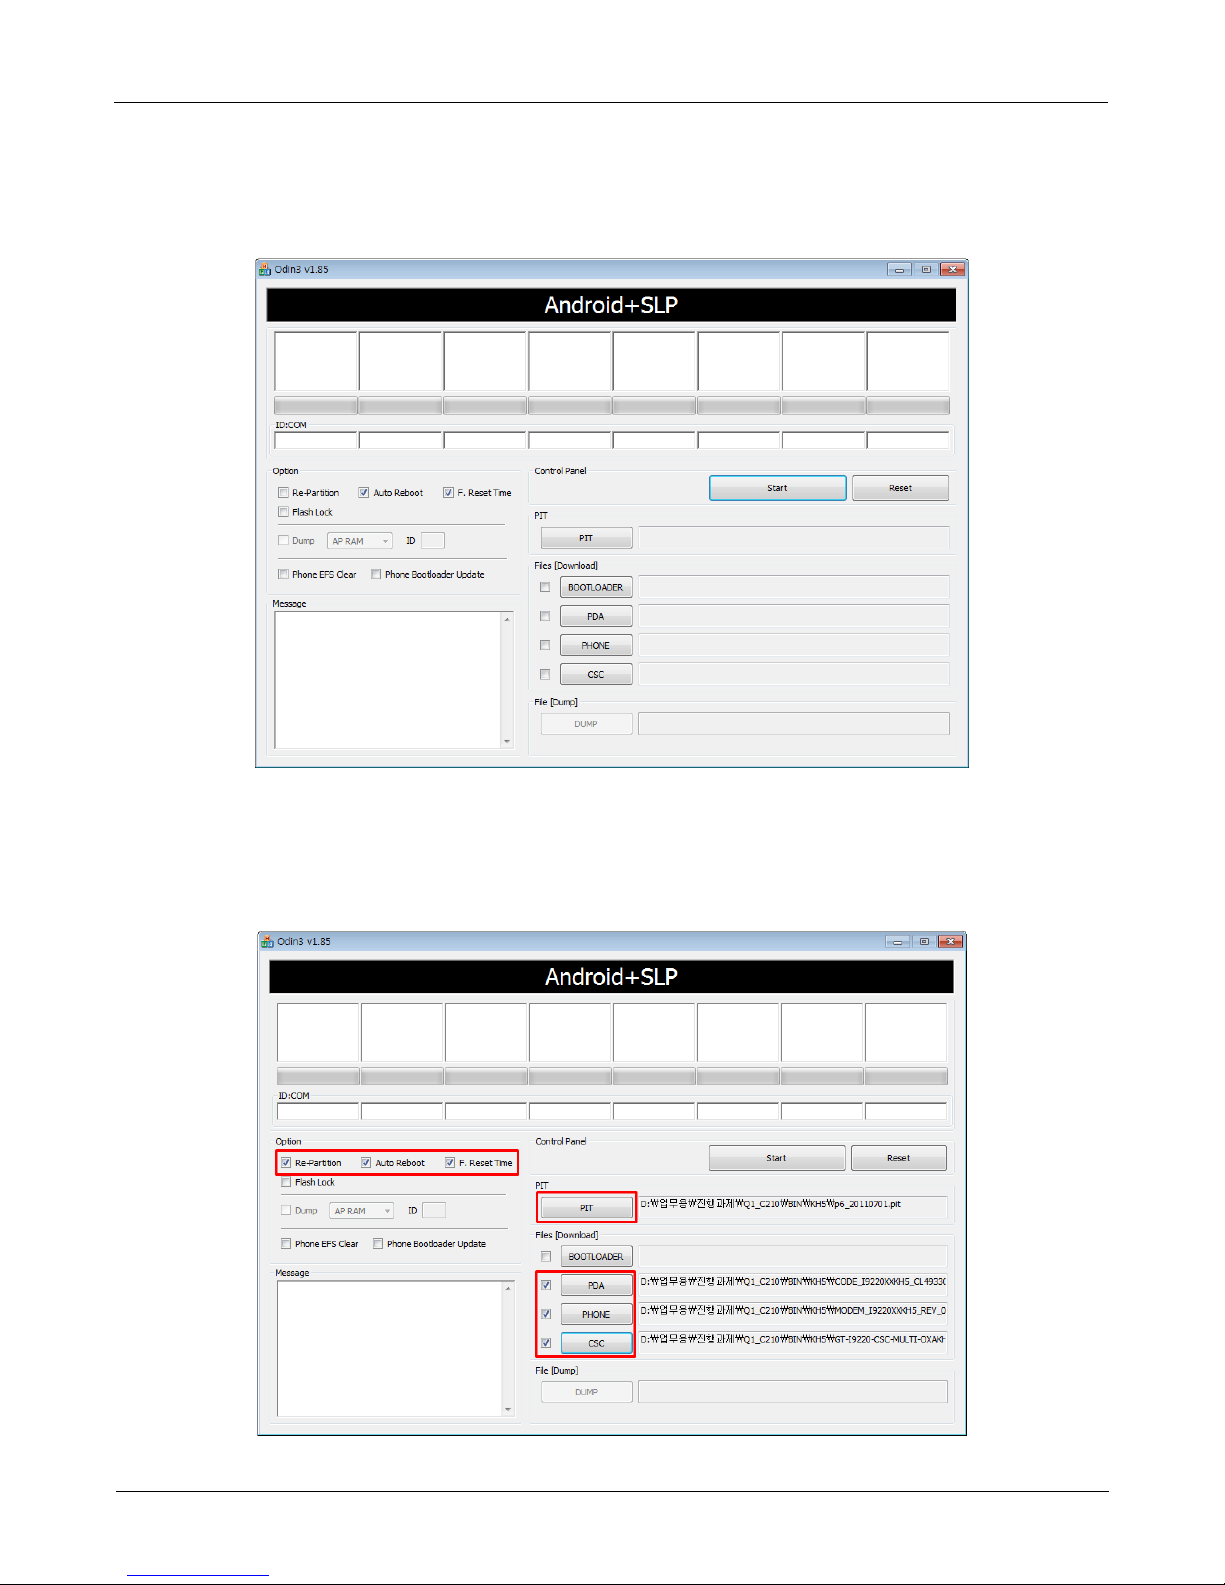
6-1-2.
S/W Installation Program(Downloader program)
Open up the S/W Installation Program by executing the
odin3.ini" file should be in the same folder with odin3 v1.85.exe)
("
Odin3 v1.85.exe"
"
Enable the check mark by click on the following options,
.
1
Check Re-Partition, Auto Reboot, and F. Reset Time
-
Check PIT
-
Check PDA, PHONE, and CSC Files
-
Confidential and proprietary-the contents in this service guide subject to change without prior notice.
Distribution, transmission, or infringement of any content or data from this document without Samsung’swritten authorization is strictly prohibited.
6-2
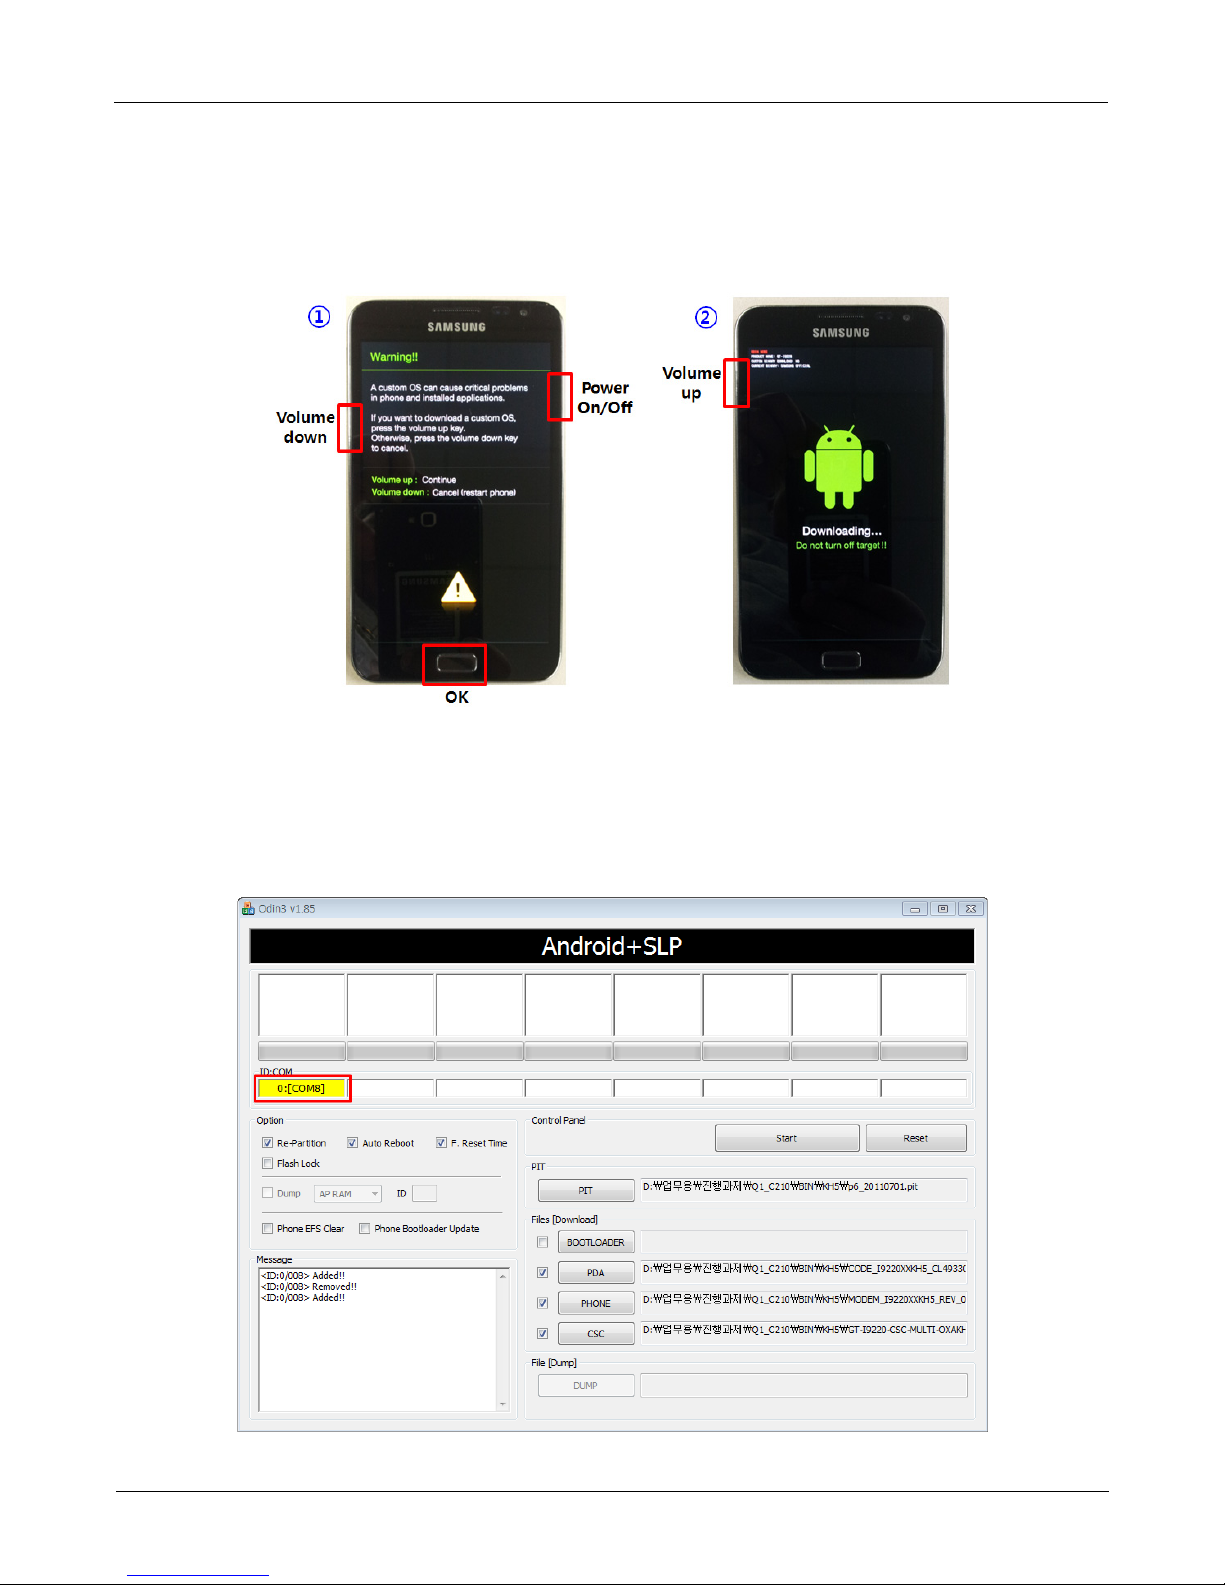
Enter into Download Mode
.
2
Enter into Download Mode by pressing Volume Down button, OK button, and
①
ON/OFF Button simultaneously.
Next, press Volume Up button.
②
Level6Repair
Connect the device to PC via Data Cable.
.
3
Make sure that the one of communication port[ID:COM] box is highlighted in
yellow. The device is now connected with the PC and ready to download the
binary file into the device.
Confidential and proprietary-the contents in this service guide subject to change without prior notice.
Distribution, transmission, or infringement of any content or data from this document without Samsung’swritten authorization is strictly prohibited.
6-3
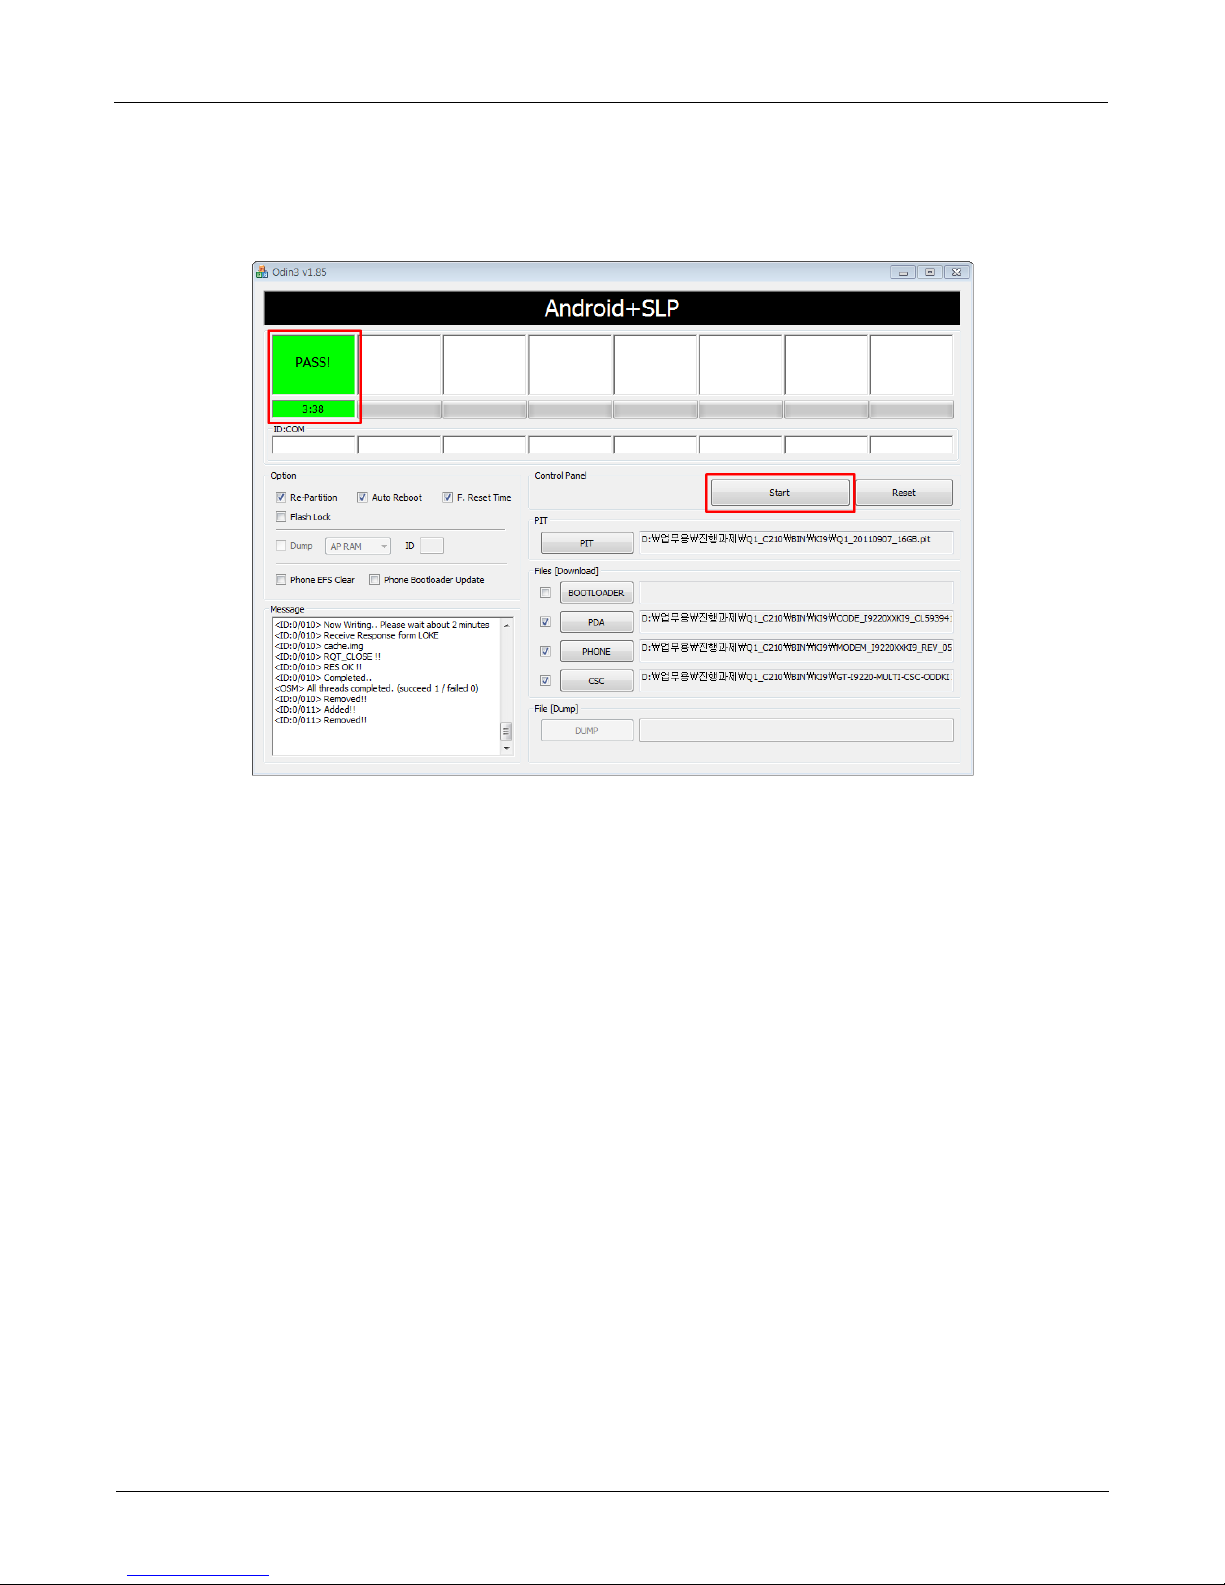
Level6Repair
Start downloading binary file into the device by clicking Start Button on the screen.
.
4
the green colored"PASS!" sign will appear on the upper-left box if the binary file
has been successfully downloaded into the device.
Disconnect the device from the Data cable.
5.
Once the device boots up, you can check the version of the binary file or name
.
6
by pressing the following code in sequence;
*#1234#
You can performfullreset by pressing the following code in sequence;
*2767*3855#
Confidential and proprietary-the contents in this service guide subject to change without prior notice.
Distribution, transmission, or infringement of any content or data from this document without Samsung’swritten authorization is strictly prohibited.
6-4
Level
7.
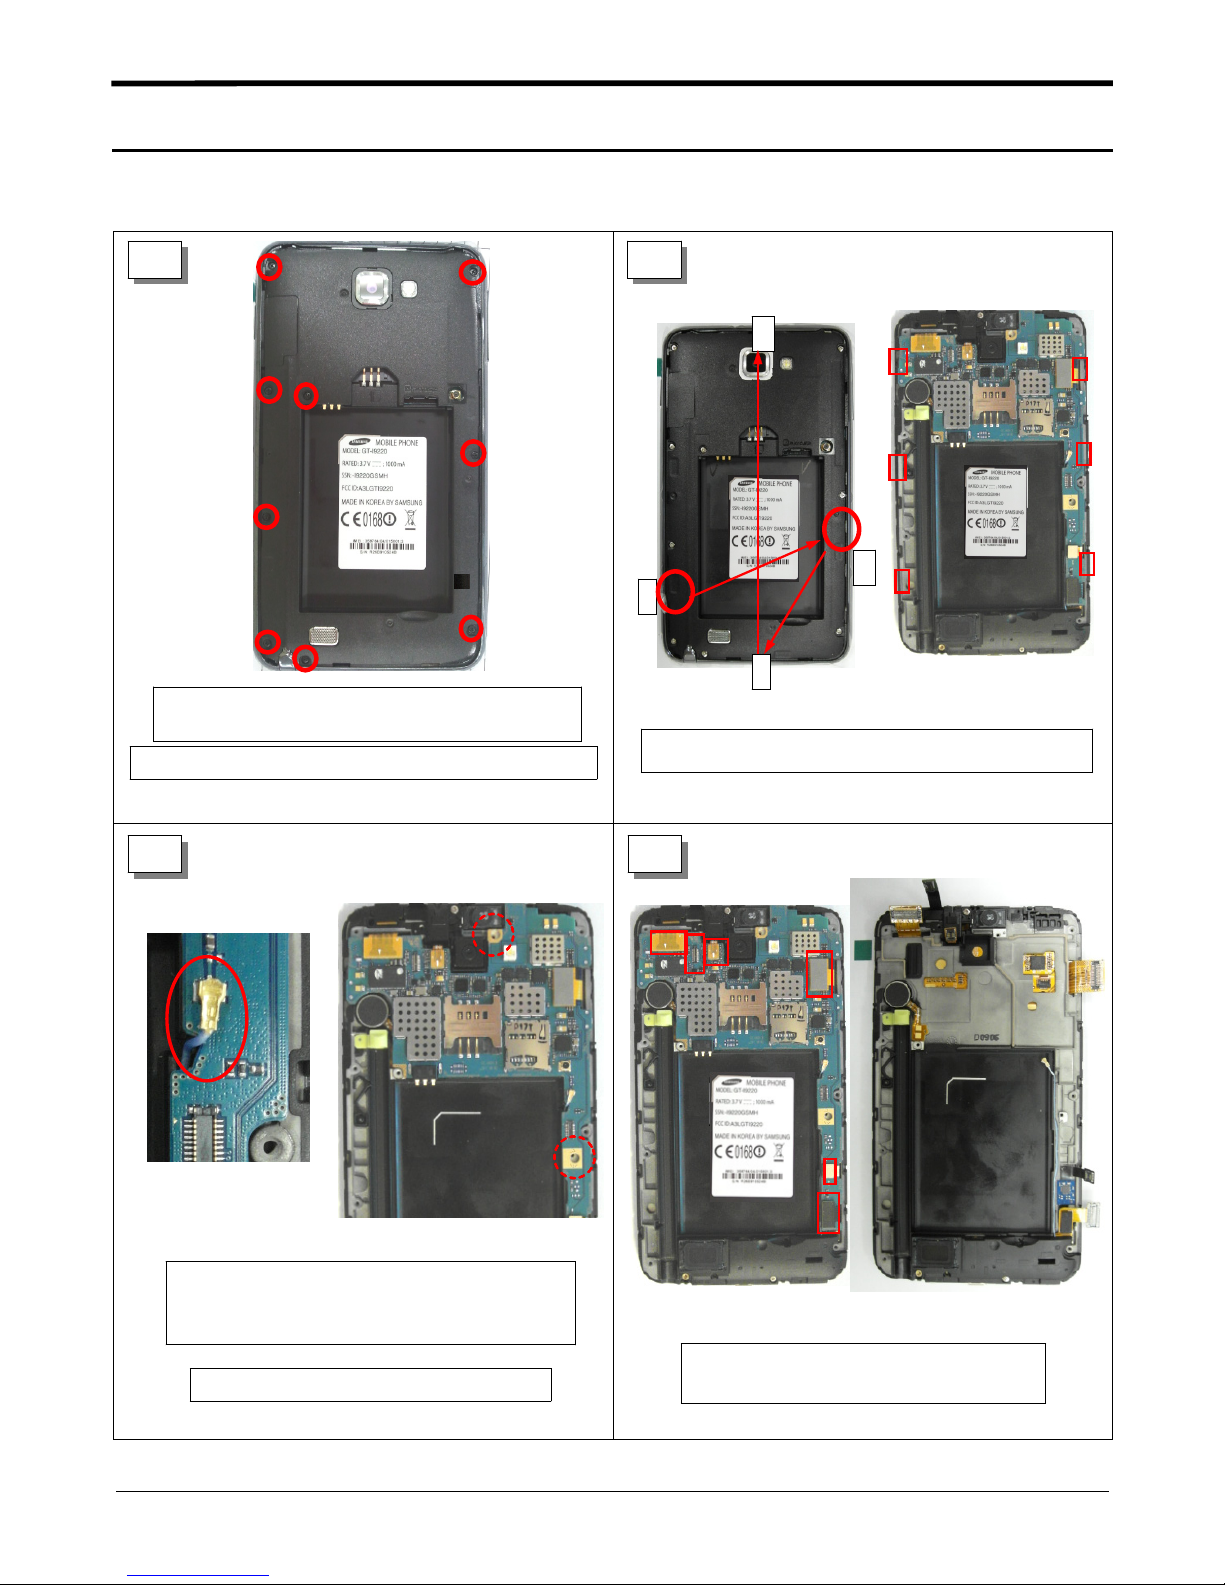
Disassembly
7-1.
Repair
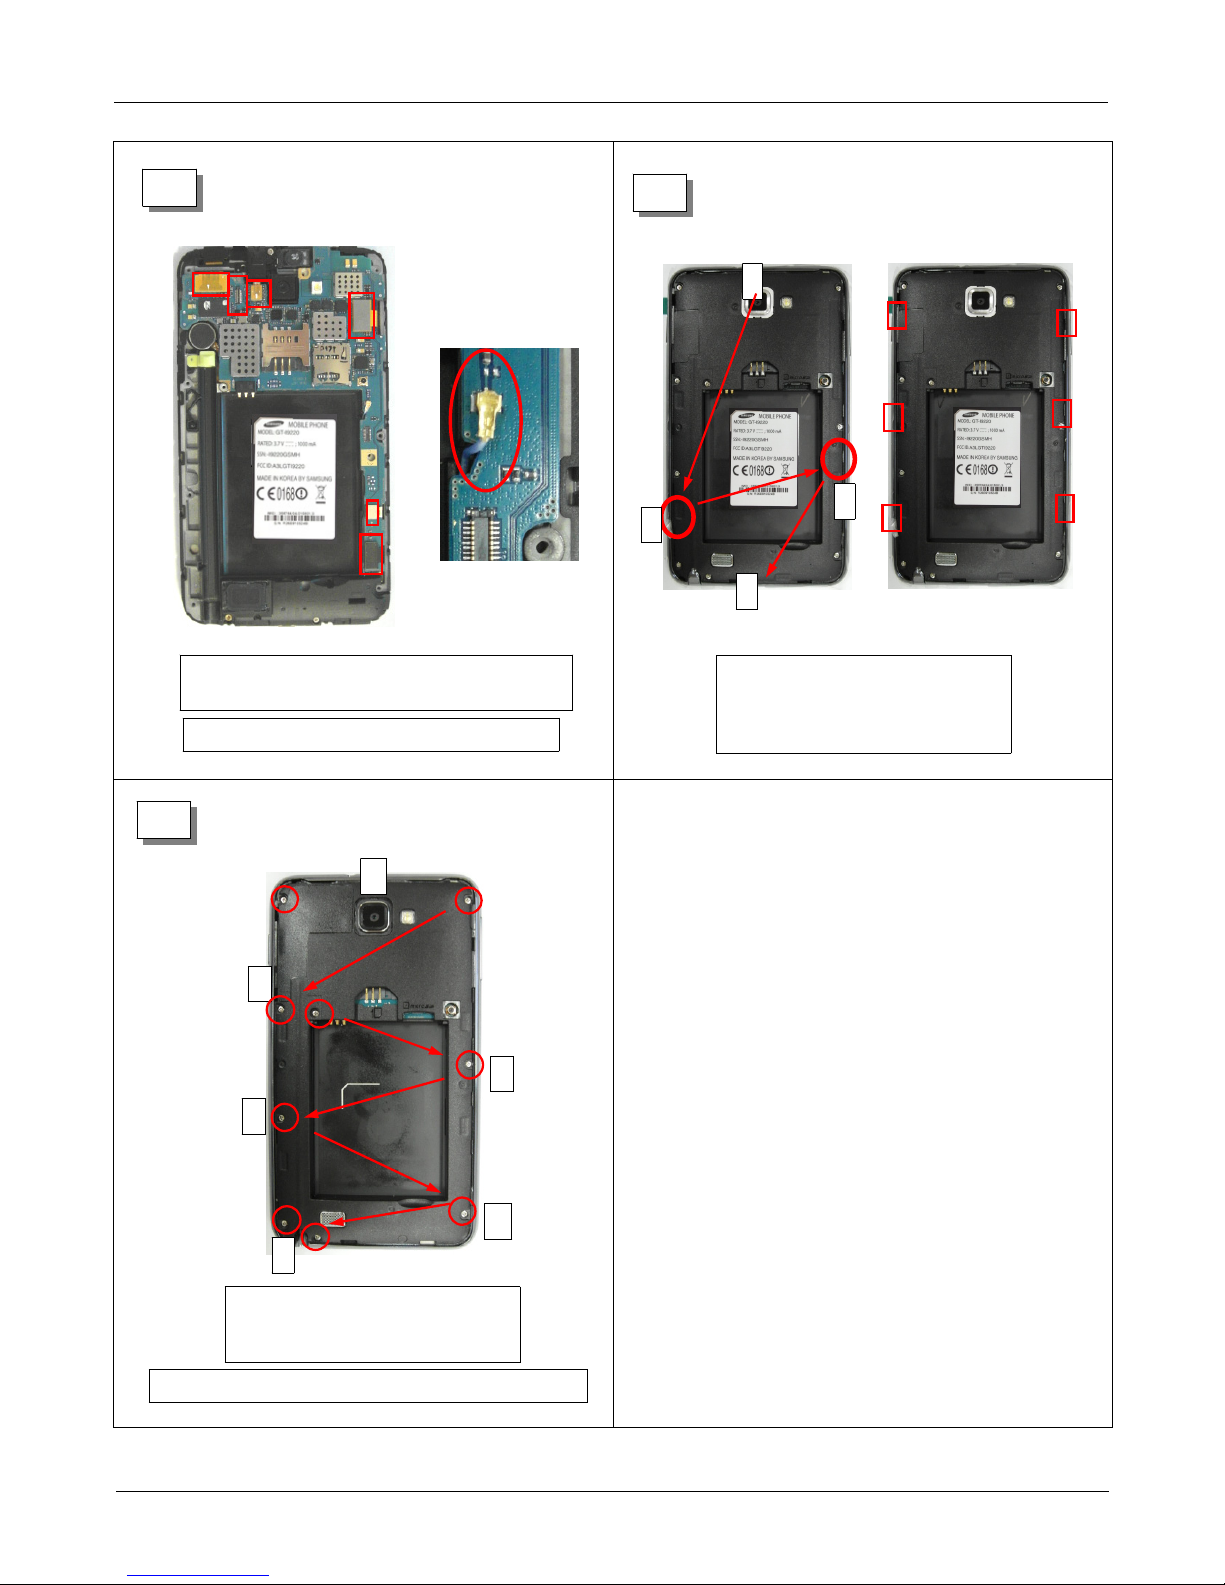
2
1
Release the screws at9points.
Torque:
(
1.0±0.1
DO NOT MAKE SCRATCH ON THE REAR.
kgf.cm)(Size: M1.4*L3)
2
4
2
1
3
Disjoint hook6points at the rear
Follow the order)
(
3 4
Separate the cable from the PBA.
Release the screw2point(Size: M1.4*L3)
Torque:
(
1.1±0.1
Be careful not to rip up the FPCBs.
kgf.cm)
Separate all connectors from the PBA.
Separate the PBA from the Front.
Confidential and proprietary-the contents in this service guide subject to change without prior notice.
Distribution, transmission, or infringement of any content or data from this document without Samsung’swritten authorization is strictly prohibited.
7-1
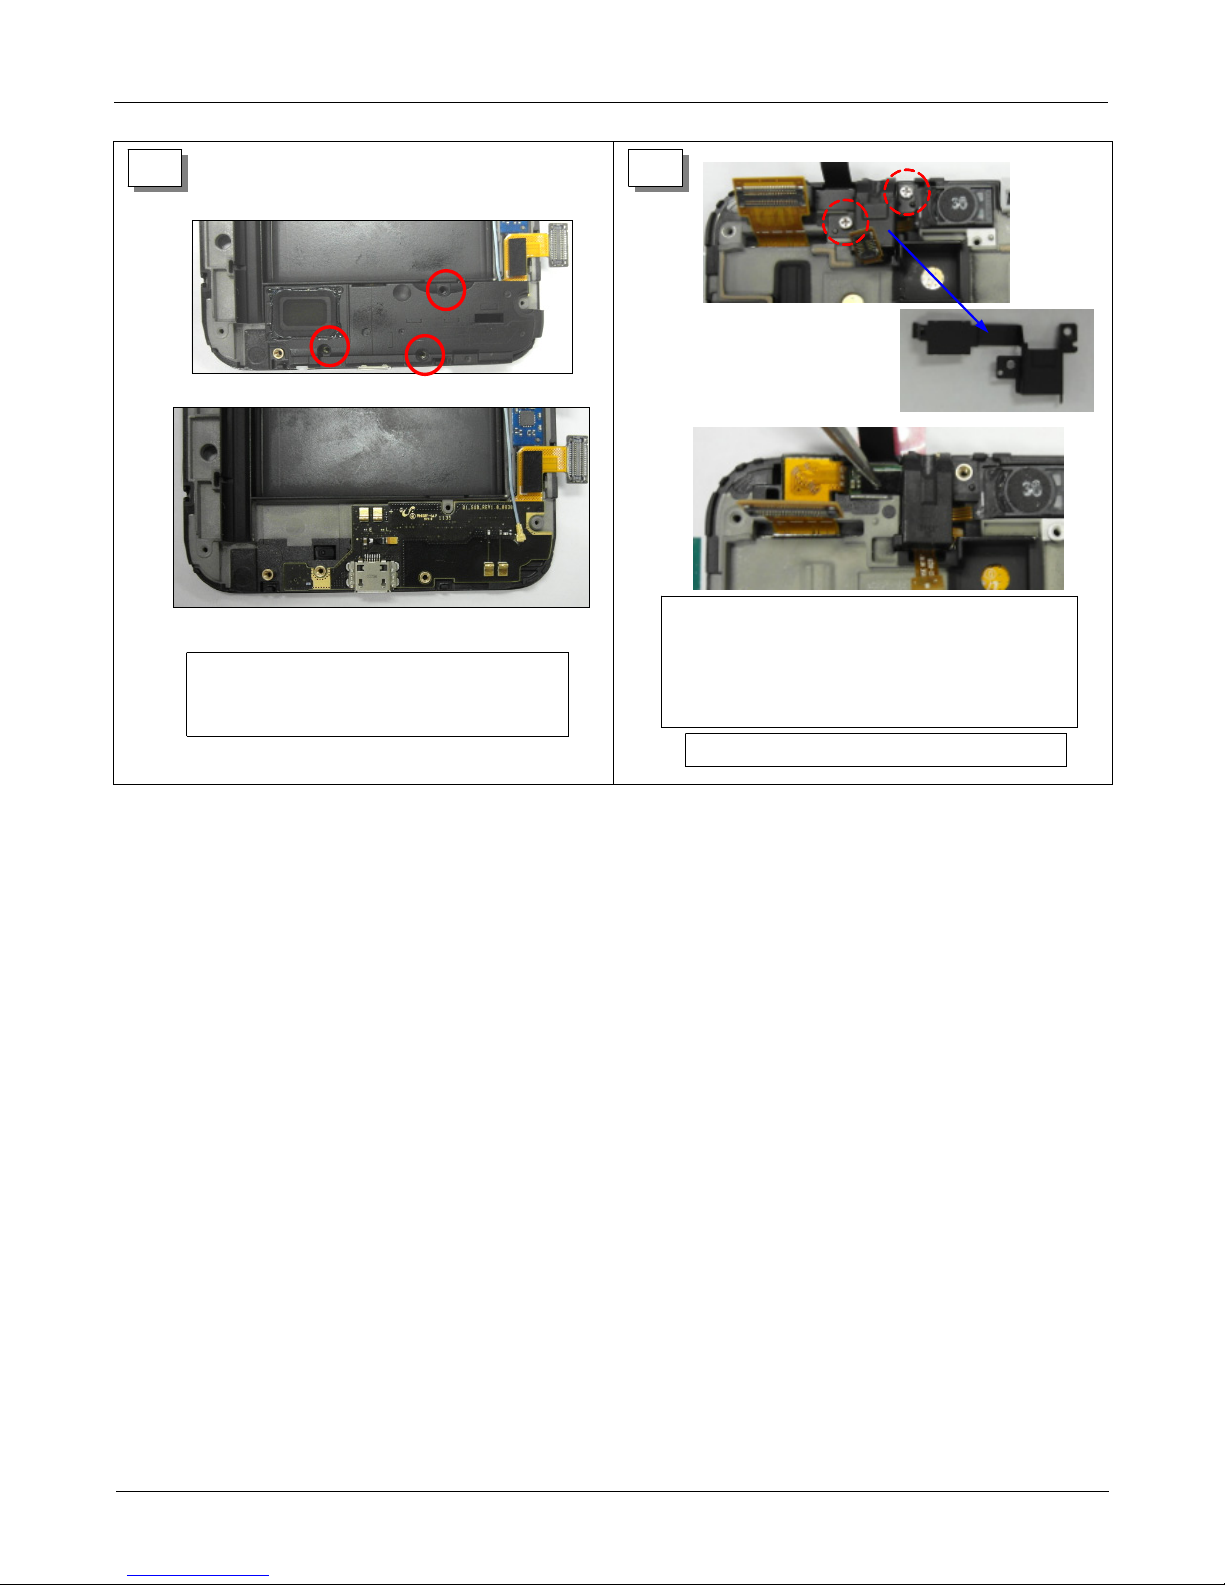
Level2Repair
7.
5 6
Release the screw3point(Size: M1.4*L2.5)
Torque:
(
1.0±0.1
kgf.cm)
Separate the sub PBA from the PBA.
Release the screw3-point(Size: M1.4*L2.5)
Torque:
(
1.0±0.1
kgf.cm)
Separate the black plate.
Separate Receiver Ass'y and CAM/Sensor
Ass'y from the Front.
Be careful not to rip up the FPCBs.
Confidential and proprietary-the contents in this service guide subject to change without prior notice.
Distribution, transmission, or infringement of any content or data from this document without Samsung’swritten authorization is strictly prohibited.
7-2
Level2Repair
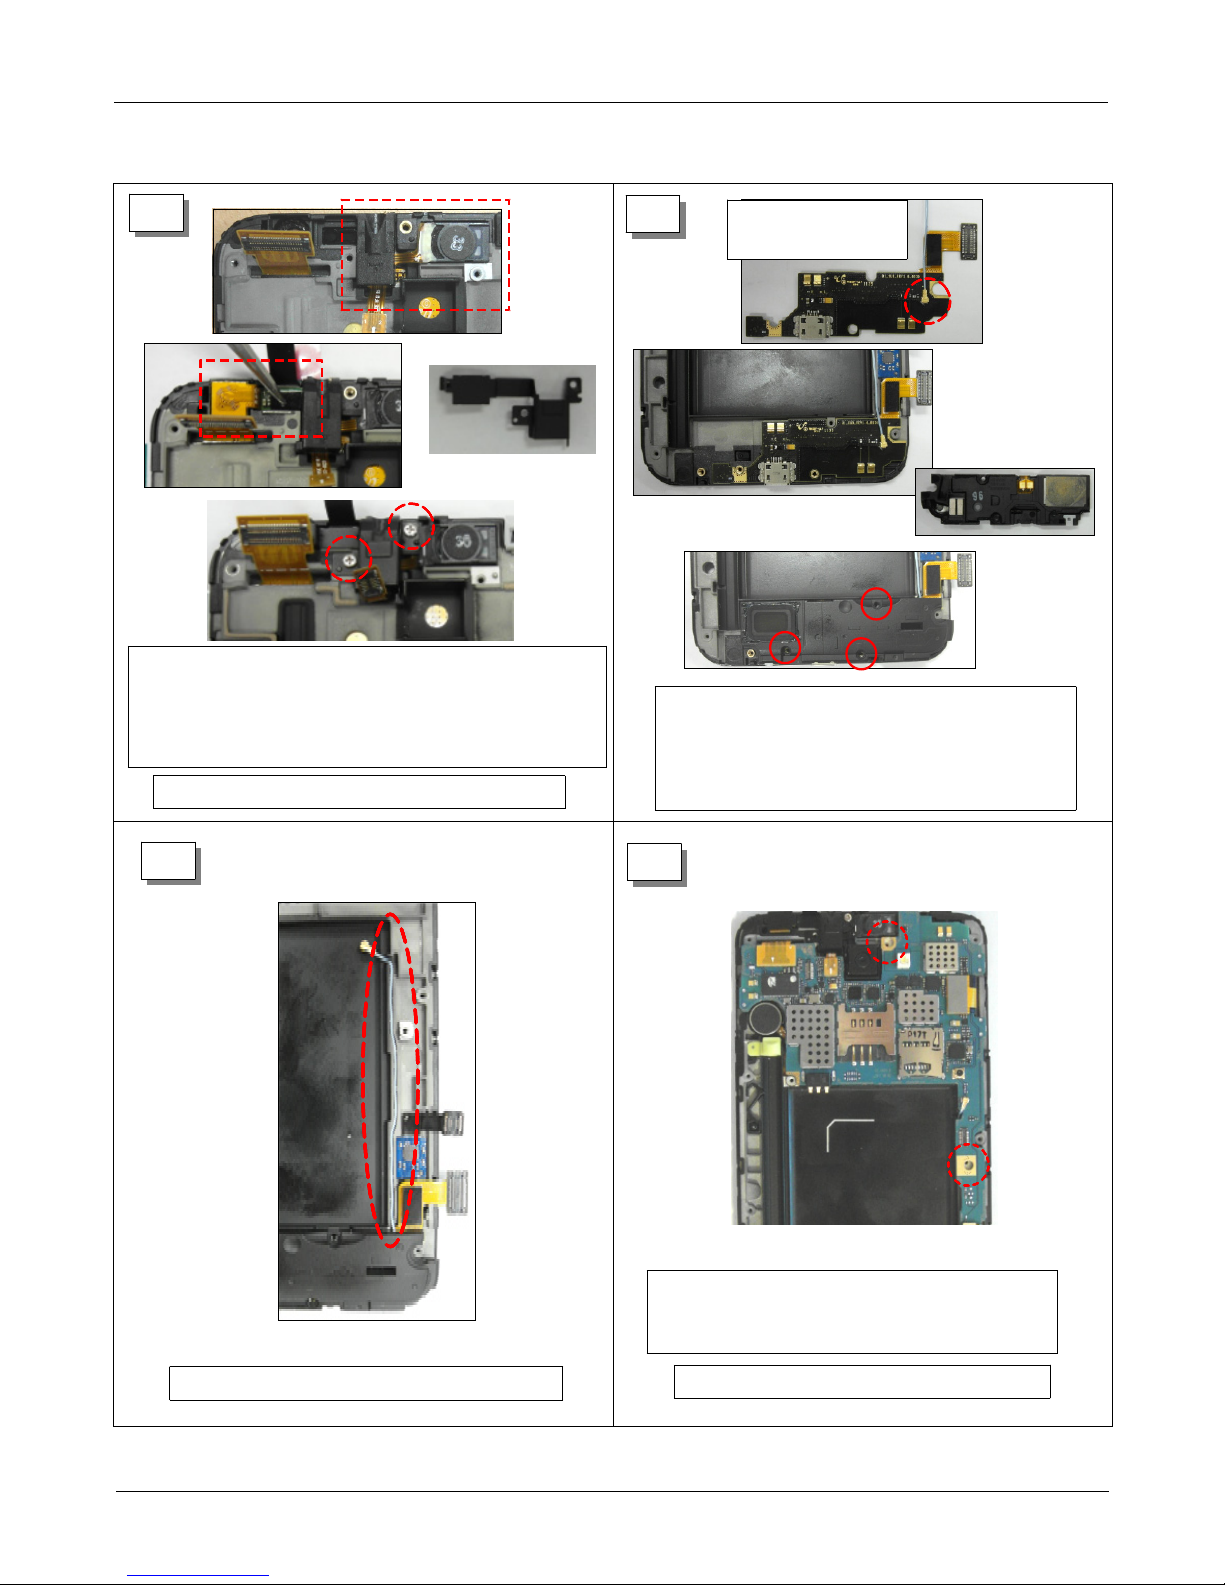
7.
Assembly
7-2.
1
Insert the receiver/earjack ass'y into the front.
Insert the
Attach black plate.
Screw2points.((Size: M1.4*L2.5)
Torque:
(
Be careful not to damage the camera FPCB.
cam/censor ass'y into the front.
2M
1.0±0.1
kgf.cm)
2
It must work
inaflat place.
Connect the cable on the sub PBA.
Attach the sub PBA on the Front.
Attach SPK/Intenna module on the sub PBA.
Screw3points.(Size: M1.4*L2.5)
Torque:
(
1.0±0.1
kgf.cm)
3
Organize the cable in the furrow.
4
Put the PBA on the Front.
Screws at2point(Size: M1.4*L3)
Torque:
(
1.1±0.1
Be careful to damage the connector FPCB.
kgf.cm)
Confidential and proprietary-the contents in this service guide subject to change without prior notice.
Distribution, transmission, or infringement of any content or data from this document without Samsung’swritten authorization is strictly prohibited.
7-3
Level2Repair
7.
5
Connect all the connector on the PBA.
Connect the cable on the PBA.
Be careful to damage the cable.
6
1
3
2
4
Assemble the Rear and the
Front.
Follow the order)
(
Hook at the6points.
7
1
2
4
6
Screws at9points.
Torque:
(
Size: M1.4*L3)
(
DO NOT MAKE SCRATCH ON THE REAR.
1.0±0.1
kgf.cm)
3
5
Confidential and proprietary-the contents in this service guide subject to change without prior notice.
Distribution, transmission, or infringement of any content or data from this document without Samsung’swritten authorization is strictly prohibited.
7-4
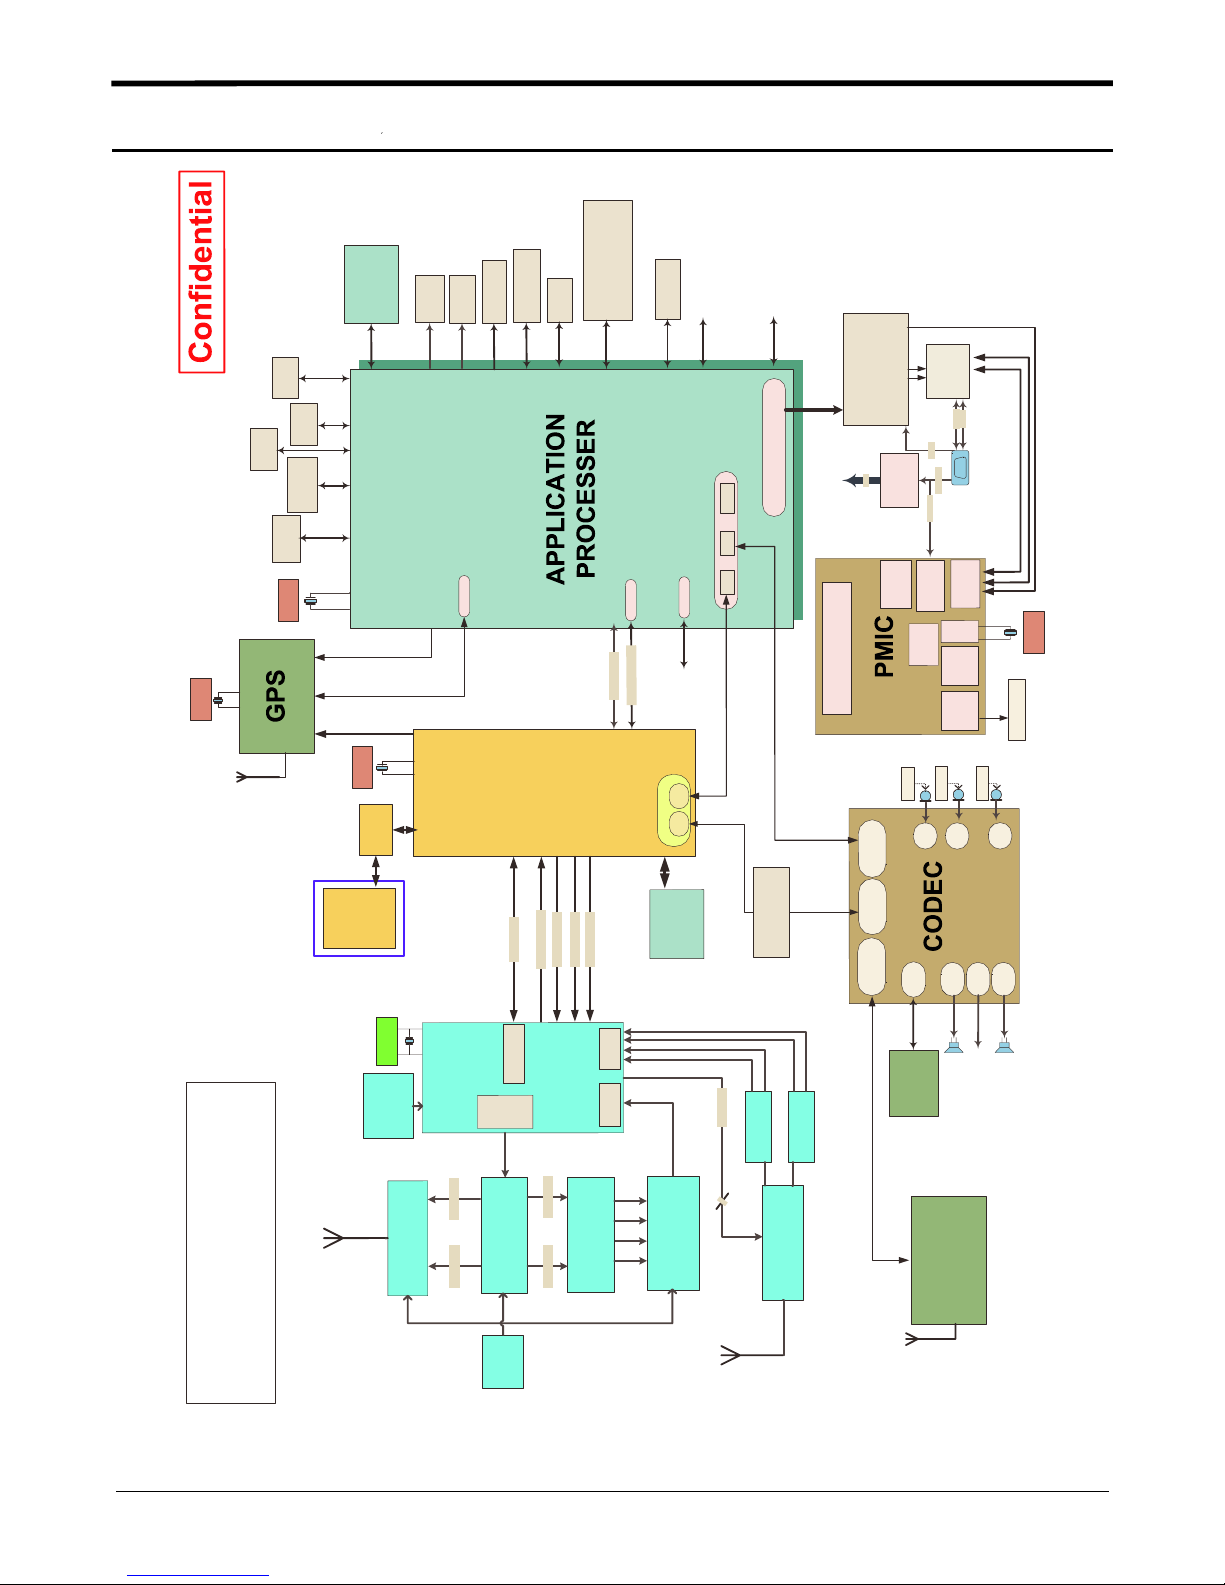
8.
Level
Repair
3
Acc
sensor
Baro
meter
Magnetic
Prox.
senso r
MEMORY
VT
MEMORY
Gyro
sensor
LCD
TSP
CAMERA
i
p
i
m
8M CAMERA
i
i
p
p
i
i
m
m
16G/32G MASS
KEYs
WIFI
sensor
AUDIO
F
I
High
switch
Mobile HD
Transmitter
HDMI
VBAT
Li Io n-
SYSTEM
Speed
USB D-
USB D+
USB ID
MICRO USB
V_BUS_5V
Charger
Switching
V_BUS_5V
D
I
_
C
I
U
M
P
D
_
C
I
M
U
D
M
_
C
I
U
M
CLOCK
CLOCK
32.768
GPS Antenna
SIM
Card
l
a
n
o
i
t
p
NFC
O
z
O
H
X
M
C
6
T
2
C
X
D
R
C
T
D
T
N
A
n
i
a
M
BLOCK DIAGRAM
GT-N7000/I9220
M
S
A
UART1
Transceiver
2G/3G
L
_
M
P
B
L
_
X
T
_
G
M
2
A
P
B
M
B
M
H
M
_
X
T
_
G
2
M
A
P
I2S1 I2S0 PCM0
UART0
UART3
E
B
O
R
T
T
S
_
C
I
S
HSIC_DATA
H
MODEM
DIG_RX/TX
REF_CLK_EN
SYS_CLK_EN
GPS_CLK_EN
SYS_CLK_26M
DigRF
Tx
H
_
M
P
B
L
_
X
T
_
H
G
C
3
T
I
W
S
D
B
N
H
A
_
B
X
T
_
G
3
G
3
A
N
/
T
G
2
X
R
C
D
C
D
AUDIO
DRx
X
2G/3G Rx
R
G
3
/
G
2
K
N
A
8
B
X
T
G
3
B
W
A
5
B
X
T
G
3
S
/
P
U
G
3
X
T
B
2
D
T
X
G
3
1
B
M
C
B
P
C
E
R
I2S2
I2S1
MEMORY
o
i
d
u
a
l
l
a
C
2-mic NS
L
R
T
C
_
D
R
3
a
n
n
e
t
n
a
y
t
i
s
r
e
v
i
D
x
x
e
e
l
l
p
p
i
i
D
D
W
W
y
y
t
t
A
A
i
i
s
s
S
S
r
r
e
e
v
v
i
i
D
D
h
c
t
i
w
S
RESET
Function
POWER Management
Mic bias
o
i
d
u
A
a
i
d
e
CM / I2S
IF Port 0
m
P
i
t
l
u
M
IF Port 1
PCM / I2S
IF Port 2
PCM / I2S
FM
BT/WIFI Antenna
Fuel
LDO
L/R
LINE2
FM RADIO R/L
Charger
RTC
Gauge
Flash
Haptic
LDO
Mic bias
Sub mic
MIC3
SPK
Radio
WIFI/BT
MIC1
AMP
LED
MUIC
driver
driver
Mic bias
Main mic
EAR
CLOCK
MOTOR
LDO
3.5phi Ear MIC
MIC2
RCV
AMP
AMP
3.5ø
EAR
Confidential and proprietary-the contents in this service guide subject to change without prior notice.
Distribution, transmission, or infringement of any content or data from this document without Samsung’swritten authorization is strictly prohibited.
8-1

Level3Repair
C
2
5
4
2
0
8
U
C
2
5
3
T
R
_
T
_
A
R
S
S
U
P
G
T
R
_
T
_
A
C
S
S
U
P
G
GPS_UART_TXD
GPS_EN
C
1
0
8
7
C1080
C1086
L1030
ANT1000
5
0
3
C
L
1
C220
0
4
0
L1039
C223
C
2
1
9
C222
C
2
1
8
A
L205
N
T
2
C225
0
0
L507
C649
C
R
5
5
H
2
1
7
8
D
H
TP202
T
P
C
3
2
0
2
9
2
T
7
P
2
0
7
T
P
2
0
8
TP206
D
C
R520
5
0
4
C526
C643
R
R
4
1
4
0
5
6
2
9
0
P
T
2
0
4
P
T
2
0
T
P
C
5
0
8
2
0
4
U
OSC200
C210
R527
R526
R528
C560
U514
C
5
4
4
C
5
4
6
C540
R523
C
5
4
1
R442
R522
R450
V
2
0
3
U
C
5
5
R229
1
0
1
2
R231
V204
C228
L
2
0
4
C250
R222
U
2
R213
0
6
R214
R215
C
R212
2
R
2
2
1
0
6
R211
TP200
TP205
C
R
R
2
4
4
0
2
2
9
5
4
C
C
5
5
5
6
OSC500
9
1
C
C
R
5
5
5
2
2
2
3
5
1
C516
6
1
5
SC1007
U
C
C
R
R
R
5
5
5
5
5
U
1
2
0
0
0
C524
9
0
8
7
5
PEN_TP_IRQ
5
R
0
5
R
0
3
5
4
0
1
5
0
0
U
R
5
C
0
5
3
0
0
C501
R502
L
R228
R230
2
1
1
1
0
5
F
V
2
H
0
2
0
D
V
0
2
5
0
C
5
F
C
2
8
2
V
2
2
0
0
L210
6
0
L212
C
2
8
7
R
2
3
5
L
2
1
C
3
2
8
6
R
C290
V207
2
3
4
C
L
C274
2
D200
2
0
7
7
0
R223
L214
TA200
C
2
C
8
2
1
4
9
L200
C208
L201
U
2
F
M
_
0
R
S
T
1
C
2
1
1
PEN_TP_AOUT
C
5
6
2
C
C425
4
2
4
C
4
2
C
4
3
3
3
C432
C431
C
5
C430
1
4
C
5
1
C429
5
C426
C427
C428
C509
R509
R510
C510
C
R
C
C
C
C
R
2
2
2
2
2
2
C
2
6
9
C236
C237
R203
C266
C201
C276
C215
C212
2
3
0
3
1
1
3
0
PCM_CLK
R
3
9
2
7
6
0
8
C200
C203
C229
C
2
3
5
U202
C
2
6
7
C
C
2
2
3
3
4
1
4
T
P
0
2
C
C
2
2
C206
2
2
4
6
C207
K
C
3
R
L
C
2
3
1
M
_
9
2
5
C
E
PCM_SYNC
0
D
O
C
4
C
2
0
5
R220
U207
C202
T
P
2
1
0
R
2
1
7
R
R
4
4
C
C
R
R
5
5
C
C
3
3
7
8
3
3
3
3
4
4
0
1
4
4
7
6
9
9
8
0
SIM300
5
0
0
C
D
H
BH1003
L
E
D
5
0
0
C
R
V
L
2
2
2
2
0
0
1
0
3
0
3
7
L202
C214
R
C675
R
3
2
3
1
3
6
R308
C672
R
R307
2
0
1
C247
R
C248
2
0
5
C241
C242
R
2
C245
0
2
R200
C246
R
2
2
3
1
T
P
1
T
P
2
2
1
8
2
T
P
1
1
R618
R617
U
6
5
0
0
6
6
U
R
2
0
4
0
L
L
C
L1002
0
2
U
1
1
1
0
0
0
0
2
C1021
0
0
3
3
C1016
C
1
C1000
0
0
C1017
1
C
C
U1000
1
1
SC1008
0
0
2
2
2
4
C
1
R
0
L
5
2
1
1
5
2
0
L1005
0
L
1
4
0
0
7
C1027
CD300
U504
R515
C
3
4
1
A
A
N
N
T
T
1
1
0
0
0
0
1
2
C1083
L1036
C
5
3
3
L509
L
5
9
C
0
0
5
5
5
2
8
U
R
5
1
9
SC1009
L
C
C
5
5
5
3
0
3
5
8
4
C
6
7
7
U
U
1
0
6
1
0
C
6
7
0
C
5
0
7
7
8
C665
C668
R614
R
5
0
0
C650
L
5
0
2
C
5
1
3
C512
Z
D
R300
3
0
R304
R301
0
R303
R302
R
3
0
5
C539
C
5
3
2
C
5
0
3
R431
R430
R506
C648
ANT202
C275
ANT201
C284 C285
C
2
6
2
5
1
2
P
T
C
2
5
1
C
2
6
3
R
2
2
1
C
2
5
8
R
2
C
3
2
2
5
5
T
P
2
1
6
4
1
2
P
T
C283
L506
C
5
3
1
C
2
5
9
H
D
C
5
0
1
C288
R225
0
9
C
R
R
2
2
2
5
3
3
2
6
3
RFS1001
R
R
R
5
5
5
1
1
1
1
3
7
U
5
0
5
R
R
C
5
5
3
1
1
5
4
6
7
U
C
3
3
5
0
8
1
C
5
0
2
C
C
C
5
5
5
3
3
3
6
7
8
U508
C272
C278
C273
C279
C
C
C
C
R
2
2
2
2
6
7
7
8
2
8
1
7
0
2
4
L
L
2
2
0
0
9
8
C265
C264
C256
1
0
2
2
U
C
S
O
C257
C261
C260
Q
2
C
R
R
0
2
2
2
8
2
2
0
9
6
7
T
H
4
0
1
C1019
L
1
0
R403
0
1
R401
C1018
1
0
0
0
S
F
R
R1018
R1019
H
D
C
3
0
2
BH1000
BH1002
C1064
R1010
Q1000
R1008
R1007
C1063
R1009
Q1001
R
1
0
1
1
C
3
C
C
4
3
3
2
4
4
4
3
H
D
C
3
0
0
ZD301
C
2
4
3
L304
U205
C354
C244
H
D
C
3
0
1
Confidential and proprietary-the contents in this service guide subject to change without prior notice.
Distribution, transmission, or infringement of any content or data from this document without Samsung’swritten authorization is strictly prohibited.
8-2

Level3Repair
0
0
2
C
I
R621
3
0
1
C
A
T
R
3
3
7
U
C
3
3
5
9
0
2
C
1
0
4
0
3
0
0
C
A
T
C
C
L
L
1
1
1
1
0
0
0
0
1
1
3
3
7
8
4
6
L1016
C1030
L
L
1
1
2
0
0
1
1
0
5
L
L
1
1
0
0
0
0
6
9
C1020
L
1
S
0
P
I
_
0
D
8
C1015
R
R336
W
L
1
0
F
2
1
6
0
0
1
C1068
L1027
R
1
L
0
1
0
0
F
0
3
4
1
0
0
L1037
3
C1084
C
1
0
9
7
9
0
0
1
U
U
TP_VICHG
6
R616
0
3
L
6
C676
0
8
6
0
7
U
R
6
1
9
C
6
6
L607
9
R613
C671
U1012
0
0
3
E
M
U
R
R
R
R
C320
R323
C313
3
3
3
3
C360
2
1
1
2
1
5
4
0
R324
C312
C310
C
C
3
3
0
0
3
2
C1057
L
L
1
1
0
0
3
1
3
9
0
0
C1026
R1001
C
1
0
9
8
C1095C1096
T
T
P
P
1
3
3
0
0
0
R
3
1
6
C1049 C1050
5
C1044
1
U
L
1
C1065
0
2
4
C1066
L
1
C1069
0
2
8
C1074
L
1
C1079
0
3
1
C1081
L
1
C1090
0
3
8
C1093
R
1
0
1
6
3
R
R
R
C
0
2
P
T
3
3
3
3
1
1
1
0
9
7
8
6
C
R1004R1005 R1006
1
0
2
8
U
1
0
0
3
1
0
0
U
C1058
U1004
C
C
C
1
1
1
0
0
0
5
4
4
C1041
2
5
6
L1023
C1042
C1031
L1012
0
0
0
L
L
1
1
0
0
1
1
1
4
SC1006
C
C
1
1
0
0
0
1
9
4
C
1
0
6
7
C
1
0
7
5
0
0
1
1
U
C
1
0
8
2
C
1
0
9
4
S
Y
S
_
C
C
C
C
C
L
1
K
C1008
1
1
1
C
0
0
0
0
0
0
1
TP308
1
3
2
2
R1003
3
0
C1007
9
5
9
C1060
C1043
M
6
0
9
U
C556
C238
C240
V
V
L
L
2
2
2
2
1
0
0
0
5
6
8
1
U511
U1013
C239
C
C
5
5
5
5
8
7
BH1001
U
T
P
3
5
0
4
T
1
P
3
C550
0
2
5
3
0
R524
3
P
T
C
R525
5
C308
4
2
C555
R532 R533
C565
C307
C309
R531
C
5
5
4
C553
R421
R422
C549
L
5
1
0
R600
C602
R601
C1032
L
1
C
0
1
1
0
2
3
9
C1055
L1022
L1021
C1054
C1051
L
1
0
2
0
C1053
1
F
C1005
C1006
C1056
C
C1062
1
0
C
3
1
8
0
C1011
0
4
C1013
C
1
0
C1010
3
7
C
1
C1061
0
3
5
C1048
0
0
0
1
C
1
C
0
4
S
7
O
R534 R535
C
5
4
5
U510
C548
R529
R530
C543
U
R
5
5
1
3
3
6
TP309
U
5
U518
1
5
3
0
3
U
C
5
6
3
R341
U
C
C551C552
5
5
1
6
4
C
7
L
5
5
1
4
1
7
TP500
N
_
N
W
D
R
W
CP_ON
P
_
T
E
0
0
6
U
C603
S
C
1
0
0
1
S
C
1
0
0
5
S
E
R
C
3
C
2
L
L
_
A
T
E
S
E
R
3
3
E
T
_
C
IV
E
A
N
O
H
P
1
C
1
3
3
R
R
1
R
3
3
E
S
1
1
E
T
_
1
3
R
E
Q
C
C
C
_
N
3
3
3
2
3
5
8
0
6
TP306
R331
R330
TP307
C334
RESET300
C333
R
R342
1
0
0
R339
2
R340
C301
R
E
S
E
T
_
N
_
R
F
C345
R322
C329
C332
C
R
6
6
6
1
6
5
C629
C
6
6
R603
1
C
6
4
7
C
6
4
6
C651
U
6
0
1
L601
C321
R329
R328
R306
C326
C324
C327
4
0
6
U
C637C638
R607
L606
C639
C617
OSC600
C634
0
0
C
R
3
0
C300
3
4
2
7
C353
OSC300
R
6
2
0
C
C660
L
6
3
6
0
R609
0
2
C
6
1
1
C610
C614
C659
C
C
6
6
0
0
0
4
C
C
6
6
1
0
6
1
C
C
6
6
1
4
9
0
C632
C620
1
0
C
0
S
0
C
C
R465
3
3
5
5
L
3
0
2
3
U
C
6
3
3
C
6
1
5
2
0
6
U
SC1002
C
3
5
2
L
6
0
5
L604
U400
5
L
L
0
C
3
R
3
3
1
4
4
6
0
0
4
1
0
C
R
C317
L303
C
3
1
8
C322
C
C
3
3
1
4
9
0
C339
TH300
C337
R312
C335
C
C
3
3
R
3
3
3
2
6
8
6
C
C
3
3
1
1
5
6
C325
R338
L504
C
C
6
6
4
4
1
2
C625
C626
C
C
6
6
2
2
1
2
C609
L600
C663
L603
C
6
1
3
1
2
0
C421
TP404
C
4
3
7
N
E
_
C
M
M
e
C
R436
3
C411
5
1
C400
C409
C410
R463
R441
C444
R462
C
C
4
4
4
0
C
3
3
5
1
8
C408
R456
C652
R
4
5
5
C644
C
C
C
6
6
6
2
2
5
3
4
6
C
C
6
6
5
2
3
R
7
C
4
C419
2
4
0
3
C
C
5
6
6
R
5
5
6
8
7
0
4
C628
R
6
C
0
6
6
C655
3
C
6
6
6
4
C
6
R610
0
5
C662
R611
C618
C
5
1
C
7
6
3
1
C612
L
5
0
3
C607
R
C
3
4
4
4
0
1
1
2
5
R
R
R
R
C
R
R
4
4
3
4
1
1
1
2
4
T
P
0
0
5
4
2
5
C
R
4
4
0
1
2
9
C413
D
6
R608
0
0
C635
C
C
R
C
4
4
4
4
4
4
4
1
0
0
0
1
0
0
0
9
8
4
5
7
5
C414
4
0
0
P
C
U
R
R
R
C
C
R
4
4
6
4
4
2
2
0
1
1
4
6
3
5
8
7
C416
3
3
R
4
R416
2
8
D601
ZD600
1
0
C
0
S
4
BTC600
C522
C
C
4
4
2
3
R413
C439
2
6
TP401TP403
O
S
C
4
0
0
C438
R439
C
R
R
4
4
4
4
5
3
3
7
8
C
C
R
R
4
4
4
4
4
4
6
6
6
1
6
0
C
C
C
4
4
4
0
0
0
1
6
7
R446
R449
4
R432
T
P
0
5
R
R
4
4
4
5
TP406
T
4
4
P
6
0
0
R
C
R
4
4
4
4
4
3
5
1
5
R
4
R434
R453
5
1
R452
R612
R
4
R
R
4
4
4
3
R405
2
2
7
9
R406
R
R
4
4
1
1
8
7
C434
T
R
R
H
4
4
4
0
0
0
R
2
0
4
0
0
T
4
A
6
0
0
U
1
0
1
MOT600
4
C678
MOT601
O
C
1
1
S
0
_
1
S
0
P
0
0
C
5
6
C
2
0
9
L501
5
1
U
U507
C
0
5
3
0
L500
0
C521
1
C504
U501
C505
C645
S
C
5
0
L
C654
6
C
5
0
0
R
R
C
4
4
4
4
4
R
4
8
7
4
4
0
2
S
C
1
0
0
3
G
C1099
0
C1085
GPS_nRST
C1073
R
T
D
R
_
X
_
A
R
S
U
P
C1101
2
0
0
1
F
U1011
C1091
L
1
0
3
5
C
1
0
7
8
P
O
R
O
N
1
0
0
0
G
R1013
C1088
C1089
TP1000
C
8
1
1
0
0
2
0
C
1
1
0
7
U
7
Z
D
3
0
2
TAC302
1
0
1
7
C1076
L1029
L
1
0
2
5
C606
C608
R602
B
A
T
6
0
0
R332
R334
8-3
Confidential and proprietary-the contents in this service guide subject to change without prior notice.
Distribution, transmission, or infringement of any content or data from this document without Samsung’swritten authorization is strictly prohibited.
 Loading...