

Samsung GT-I9100T User Manual

quick start guide
For more information, refer to the user manual at
www.samsung.com.
GT-I9100T

Thank you for purchasing this Samsung mobile
device. This device will provide you with high quality
mobile communication and entertainment based on
Samsung’s exceptional technology and high standards.
Content in this manual may differ from the product,
•
or from software provided by service providers
or carriers, and is subject to change without prior
notice.
The items supplied with your device and available
•
accessories may vary depending on your region or
service provider.
You can purchase additional accessories from your
•
local Samsung dealer.
The supplied accessories perform best for your
•
device.
Accessories other than the supplied ones may not
•
be compatible with your device.
Instructional icons
Before you start, familiarise yourself with the icons you
will see in this manual:
Warning—situations that could cause injury
to yourself or others
Caution—situations that could cause
damage to your device or other equipment
2

Note—notes, usage tips, or additional
information
[ ] Square brackets—device keys
Copyright
Copyright © 2011 Samsung Electronics
This manual is protected under international copyright
laws.
No part of this manual may be reproduced, distributed,
translated, or transmitted in any form or by any means,
electronic or mechanical, including photocopying,
recording, or storing in any information storage and
retrieval system, without the prior written permission of
Samsung Electronics.
Trademarks
SAMSUNG and the SAMSUNG logo are registered
•
trademarks of Samsung Electronics.
The Android logo, Google Search
•
Maps
, Google Mail™, YouTube™, Android
™
Market
, and Google Talk™ are trademarks of
™
Google, Inc.
Bluetooth
•
Bluetooth SIG, Inc. worldwide.
is a registered trademark of the
®
, Google
™
3

Oracle and Java are registered trademarks of
•
Oracle and/or its affiliates. Other names may be
trademarks of their respective owners.
Wi-Fi
, the Wi-Fi CERTIFIED logo, and the Wi-Fi logo
•
®
are registered trademarks of the Wi-Fi Alliance.
Your device uses non-harmonised frequency and
is intended for use in all European countries. The
WLAN can be operated in the EU without restriction
indoors, but cannot be operated outdoors in France.
All other trademarks and copyrights are the
•
property of their respective owners.
4
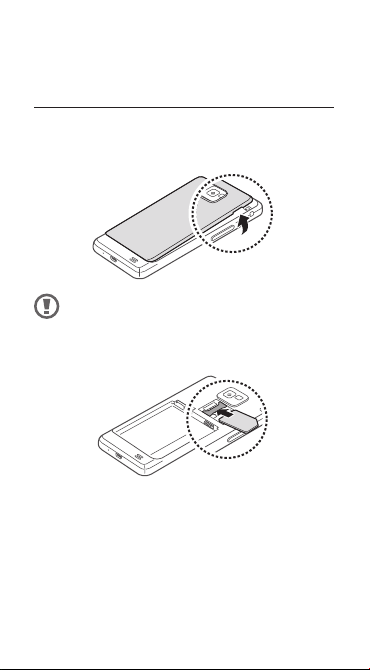
Assembling
Install the SIM or USIM card and battery
If the device is on, press and hold the Power/Lock 1.
key and select Power off
Remove the back cover.2.
Be careful not to damage your fingernails when
you remove the back cover.
Insert the SIM or USIM card with the gold-coloured 3.
contacts facing down.
→
OK to turn it off.
5
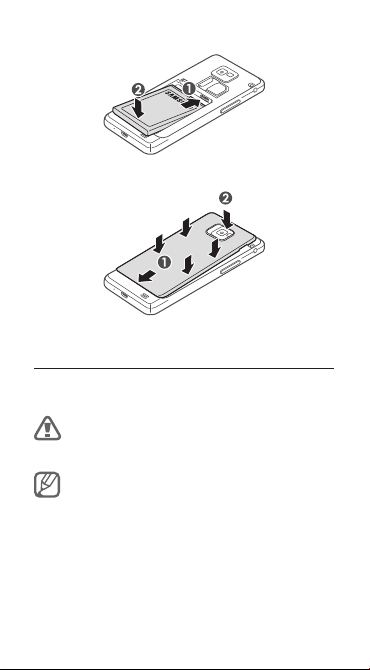
Insert the battery.4.
Replace the back cover.5.
Charge the battery
Before using the device for the first time, you must
charge the battery.
Use only Samsung-approved chargers and cables.
Unauthorised chargers or cables can cause
batteries to explode or damage your device.
If the battery is completely discharged, you cannot
turn on the device, even with the travel adapter
connected. Allow a depleted battery to charge for
a few minutes before you try to turn on the device.
6

Plug the small end of the travel adapter into the 1.
multifunction jack.
Connecting the travel adapter improperly may
cause serious damage to the device. Any damage
caused by misuse is not covered by the warranty.
Plug the large end of the travel adapter into a 2.
power outlet.
While the device is charging, the touch screen may
not function due to an unstable power supply. If
this happens, unplug the travel adapter from the
device.
When the battery is fully charged, first unplug the 3.
travel adapter from the device and then from the
power outlet.
Do not remove the battery before removing the
travel adapter. Doing so may cause damage to
the device.
To save energy, unplug the travel adapter when
not in use. The travel adapter does not have a
power switch, so you must unplug the travel
adapter from the outlet to interrupt the power
supply. The travel adapter should remain close to
the socket when in use.
7

Getting started
Turn your device on and off
To turn on your device, press and hold the Power/Lock
key. If you turn on your device for the first time, follow
the on-screen instructions to set up your device.
To turn off your device, press and hold the Power/Lock
key and select Power off
Follow all posted warnings and directions from
•
authorised personnel in areas where the use of
wireless devices is restricted, such as aeroplanes
and hospitals.
To use your device's non-network services only,
•
switch to Flight mode.
→
OK.
8
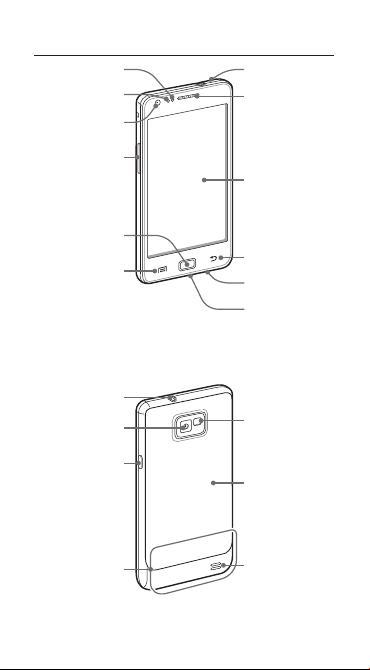
Get to know your device
Light sensor
Proximity sensor
Mouthpiece
Earpiece
Front camera lens
Volume key
Touch screen
Home key
Menu key
Back key
Mouthpiece
Multifunction jack
1. Active only when you use the speakerphone feature or record
videos.
Headset jack
Rear camera lens
Flashbulb
Power/Lock key
Back cover
1
Internal antenna
Speaker
9
 Loading...