

Page 1

Owner’s Guide
GT-i9020A
March 3, 2011
NSOG-A-1.1-100
Page 2

Legal
2
Copyright © 2011 Google Inc. All rights reserved.
Google, the stylized Google logo, Android, the stylized Android logo, Nexus, the
stylized Nexus logo, Nexus S, and the stylized Nexus S logo, are trademarks of Google
Inc. All other company and product names may be trademarks of the companies with
which they are associated.
Availability of Google applications, services, and features may vary by country, carrier,
and manufacturer.
For more information about your Nexus S phone, visit
http://www.nexusshelp.com.
NSOG-A-1.1-100 Nexus S Owner’s Guide
Page 3

Your phone and accessories 4
What’s in the box 5
Getting to know your phone 6
Installing the battery and SIM card 7
Open the phone’s back cover 7
Replace the phone’s back cover 8
Remove or insert the battery 8
Remove or insert a SIM card 10
Charging your phone 11
Charge the phone 11
Using the stereo headset 12
Turning the phone on and off 13
Turn on the phone 13
Unblock a SIM 13
Turn off the phone 14
3
Contents
Specifications 15
NSOG-A-1.1-100 Nexus S Owner’s Guide
Page 4

Your phone and accessories
Your Google™ Nexus S™ phone comes with a number of accessories,
including a headset, USB cable, and charger. For safety reasons, the
battery is not shipped inside the phone, so you need to insert it and
charge it fully before using your phone. This guide describes the parts of
your phone, how to install and charge the battery, how to turn the phone
on and off, and other useful information.
For more information about using the Android™ mobile technology
platform that runs on your phone, including the basics of using it to
place phone calls and how to use its applications to browse the web,
read email, and so on, visit your carrier’s support site and refer to the
Android User’s Guide, available from http://www.nexusshelp.com.
4
In this section
“What’s in the box” on page 5
“Getting to know your phone” on page 6
“Installing the battery and SIM card” on page 7
“Charging your phone” on page 11
“Using the stereo headset” on page 12
“Turning the phone on and off” on page 13
NSOG-A-1.1-100 Nexus S Owner’s Guide
Page 5
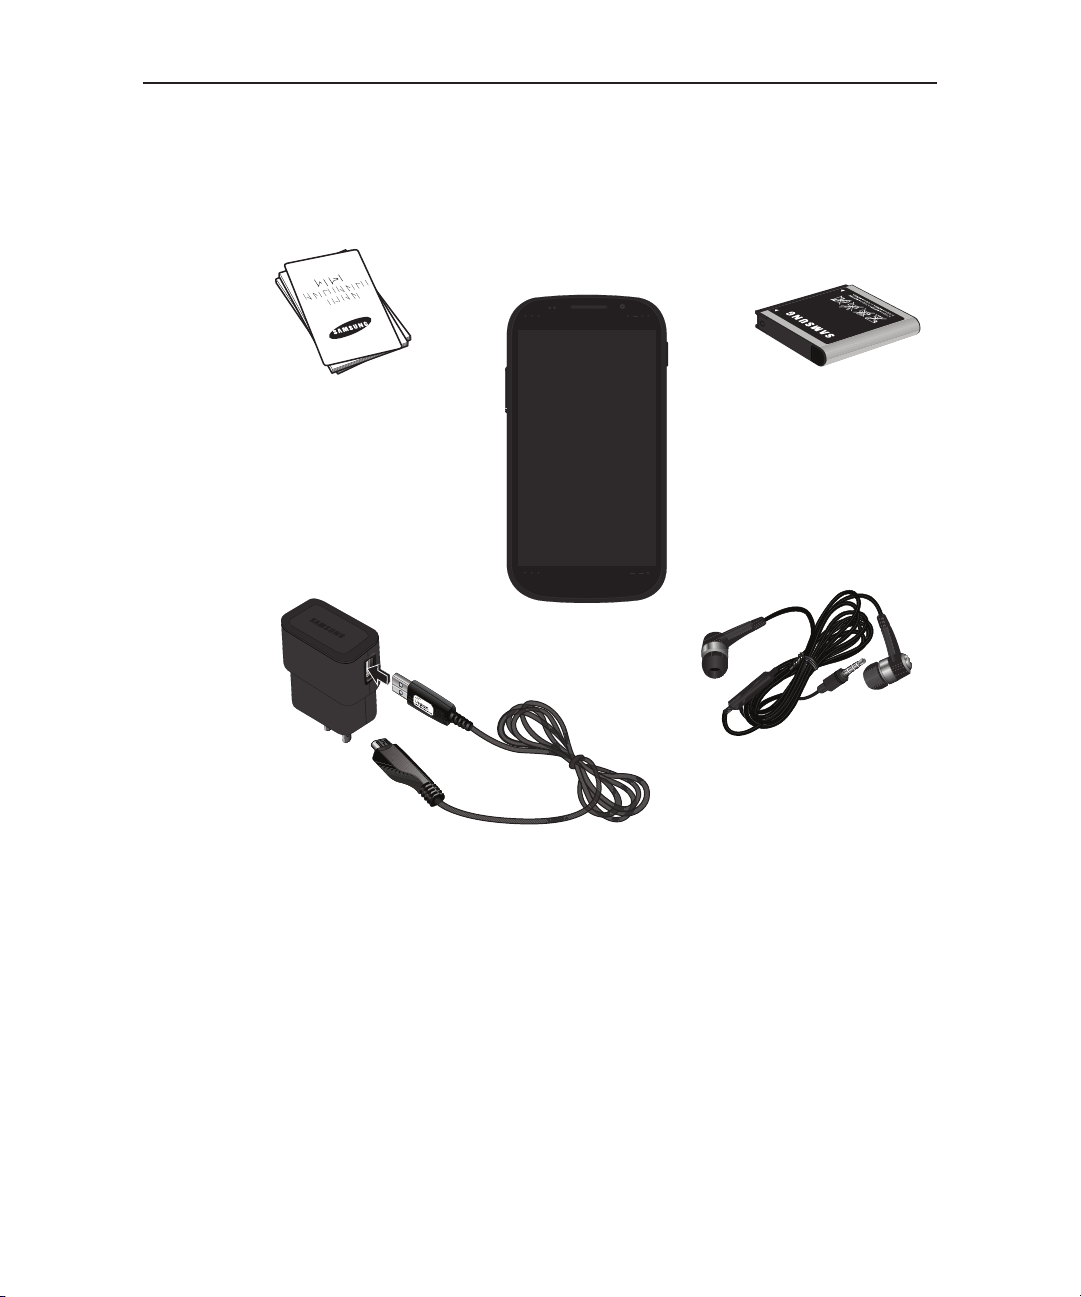
Your phone and accessories 5
Nexus S phone
Health and safety
and warranty
booklets
Headset
Battery
Charger and USB
data cable (plug
varies by country)
USB cable
What’s in the box
Your Google™ Nexus S™ phone comes with the following accessories.
NSOG-A-1.1-100 Nexus S Owner’s Guide
SIM card
If you purchased the phone with a contract with a GSM mobile carrier, a SIM card for
your carrier is included with the phone.
See “Installing the battery and SIM card” on page 7 to learn how to insert or remove
the battery and SIM.
Page 6

Your phone and accessories 6
Proximity and
light sensors
Vol um e
button
Touchscreen
Earpiece
Power
button
Vol um e
Up/Down
button
5-megapixel camera
with autofocus
Camera flash
Speaker
Back cover
USB port
Microphone
3.5mm headset jack
Fron t-faci ng
camera
Illuminated soft
buttons
Getting to know your phone
Before you use the phone, insert the battery and charge it fully. (See “Installing the
battery and SIM card” on page 7 and “Charging your phone” on page 11.)
Other sections in this chapter describe the use and function of the headset, turning
the phone on and off, and more.
Your carrier’s support site and the Android User’s Guide (available from
http://www.nexusshelp.com) describe how to place calls and other basic features of
the phone, including turning it on for the first time.
Be sure to keep the front and back camera lenses clean with a lint-free cloth.
Smudges and fingerprints can distort your pictures. The back camera’s LED flash is
next to the lens. Taking pictures and shooting videos is described in the Android User’s
Guide.
NSOG-A-1.1-100 Nexus S Owner’s Guide
Page 7

Your phone and accessories 7
Installing the battery and SIM card
To install or replace the battery or SIM, you must remove the phone’s back cover.
You must install the battery and insert a SIM before you can use the phone.
Open the phone’s back cover
S Hold the device firmly and locate the cover release latch. The release latch has a
small indentation, just large enough to insert a fingernail, and is located above the
camera lens. Place your fingernail in the opening and firmly lift the cover off the
device.
NSOG-A-1.1-100 Nexus S Owner’s Guide
Page 8

Your phone and accessories 8
Replace the phone’s back cover
S Place the cover on the back of the phone and push it down into place.
Remove or insert the battery
You must open the phone’s back cover to remove or insert the battery.
1 Turn off the phone.
See “Turning the phone on and off” on page 13.
2 Lift out the battery by slipping your finger into the small opening next to the
battery.
NSOG-A-1.1-100 Nexus S Owner’s Guide
Page 9

Your phone and accessories 9
S Insert the battery by aligning the gold contacts on the phone and the battery and
then gently pressing the battery into place.
NSOG-A-1.1-100 Nexus S Owner’s Guide
Page 10

Your phone and accessories 10
Remove or insert a SIM card
You must open the phone’s back cover and remove the battery to remove or insert the
SIM card.
S Remove the SIM card by sliding it out of its slot with the tip of your finger.
S Insert the SIM card by aligning it (notch to the lower right and gold contacts down)
and then sliding it into its slot.
NSOG-A-1.1-100 Nexus S Owner’s Guide
Page 11

Your phone and accessories 11
Incorrect
Correct
Charging your phone
Before you can use your phone, you must charge it fully.
In addition to charging from an AC outlet, the phone also charges when it is connected
to a computer’s USB port with the included USB cable. For information about
connecting the phone to a computer, see the Android User’s Guide.
Charge the phone
1 Plug the appropriate end of the supplied charger into an AC outlet. 2 Plug the appropriate end of the USB cable into the charger or into the USB port of
your computer.
3 Plug the other end of the USB cable into the micro USB port on your phone.
When charging, the screen displays a battery charging status icon.
4 When the phone is fully charged, disconnect it from the charger.
NSOG-A-1.1-100 Nexus S Owner’s Guide
Page 12

Your phone and accessories 12
Headphones
3.5mm headphone jack
Microphone
Using the stereo headset
The stereo headset plugs into the phone’s 3.5mm headset jack.
You control the headphones’ volume with the phone’s Volume Up/Down button and
with the applications on your phone (as described in the Android User’s Guide and in
the documentation for your applications).
NSOG-A-1.1-100 Nexus S Owner’s Guide
Page 13

Your phone and accessories 13
Power button
Turning the phone on and off
Use the power button to turn the phone on and off.
Turn on the phone
S Press the Power button for a few seconds, until the screen illuminates.
The first time you turn on the phone, you are welcomed to Android and prompted to
sign into your Google Account. For more information, consult your carrier and the
Android User’s Guide.
When you turn on the phone, you may be prompted to enter a personal identification
number (PIN) for your SIM card.
Unblock a SIM
If you enter the wrong SIM-unlock PIN three times, the SIM card is blocked and you
cannot use your phone except to dial an emergency number. You must obtain a PIN
Unblocking Key (PUK) from your carrier to unblock the SIM and set a new PIN.
S Dial the following, replacing “PUK” with the PUK from your carrier and replacing
both instances of “PIN” with a 4- to 8-digit PIN of your choosing:
**05*PUK*PIN*PIN#
NSOG-A-1.1-100 Nexus S Owner’s Guide
Page 14

Your phone and accessories 14
Turn off the phone
1 Press and hold the Power button until a menu opens. 2 To u c h Power off in the menu. 3 To u c h OK when asked to confirm that you want to turn off the phone.
For more about working with the touchscreen and menus, see the Android User’s
Guide.
NSOG-A-1.1-100 Nexus S Owner’s Guide
Page 15

15
Specifications
The Nexus S phone features the following specifications. For the location of many of
the features in this table, see the diagrams in “Your phone and accessories” on page 4.
The version of the Android mobile technology platform installed on your phone may
add or change some of your phone’s capabilities. For more information, consult your
carrier and the resources at http://www.nexusshelp.com, including the Android User’s
Guide.
Connectivity Quad-band GSM: 850, 900, 1800, 1900
Tri-band HSPA: 850, 1900, 2100
HSPA type: HSDPA (7.2Mbps)
Wi-Fi: 802.11 n/b/g
Bluetooth 2.1+EDR
Near Field Communication (NFC)
Assisted GPS (A-GPS)
microUSB 2.0
Display 4.0” WVGA (480x800)
Curved glass screen
Super AMOLED
235 ppi
Capacitive touch sensor
Anti-fingerprint display coating
Size and weight Height: 123.9mm
Width: 63mm
Depth: 10.88mm
Weight: 129g
NSOG-A-1.1-100 Nexus S Owner’s Guide
Page 16

Specifications 16
Hardware Physical buttons: Power and Volume Up / Down
Illuminated soft buttons: Back , Menu ,
Search , and Home
Haptic feedback (vibration)
Three-axis gyroscope
Accelerometer
Digital compass
Proximity sensor
Light sensor
Processor and
memory
1GHz Cortex A8 (Hummingbird)
16GB iNAND flash memory
Audio 3.5mm, 4-conductor headset jack (stereo audio plus
microphone)
Earpiece
Microphone
Software noise-cancellation
Cameras Back:
5 megapixels (2560x1920)
720x480 video resolution
H.264, H.263, MPEG4 video encoding
Auto focus
Flash
Fro nt:
VGA (640x480)
Battery Removable 1500mAh Li-ion battery
Digital Standby Time - Standard battery (1500mAh)
standby time up to 450 hours
Digital Talk Time - Standard battery (1500mAh) - talk time
up to 6.5 hours
NSOG-A-1.1-100 Nexus S Owner’s Guide
 Loading...