

Samsung SWG-I9020FSTMB, SPH-D720ZKASPR, SEP-D720ZKASPR, SEG-I9020PWATT, SEG-I9020FSTMB User Manual
...
Android 2.3
User’s Guide
December 13, 2010
AUG-2.3-103
Android™ mobile technology platform 2.3

Legal
2
Copyright © 2010 Google Inc. All rights reserved.
Google, the stylized Google logo, Android, the stylized Android logo, Nexus, the
stylized Nexus logo, Nexus S, the stylized Nexus S logo, Android Market, the stylized
Android Market logo, Gmail, Google Apps, Google Calendar, Google Checkout, Google
Earth, Google Latitude, Google Maps, Google Talk, Picasa, SafeSearch, and YouTube
are trademarks of Google Inc. All other company and product names may be
trademarks of the companies with which they are associated.
Availability of Google applications, services, and features may vary by country, carrier,
phone model, and manufacturer.
AUG-2.3-103 Android User’s Guide

About this guide 11
Android basics 15
Starting Android for the first time 16
If you don’t have a SIM card in your GSM phone 16
Your Google Account 16
Resetting your Google Account password 17
Additional accounts 18
Google services 18
Getting to know the Home screen 19
Using the touchscreen 22
Using the phone’s buttons 23
Using a trackball 24
Working with menus 25
Options menus 25
Context menus 26
Monitoring your phone’s status 27
Status icons 27
Notification icons 28
Managing notifications 29
Using the onscreen keyboard 31
Entering text by speaking 35
Editing text 37
Opening and switching applications 40
Locking your screen 42
Customizing the Home screen 43
Connecting quickly with your contacts 45
Optimizing battery life 46
Managing how applications use memory 48
Managing downloads 54
3
Contents
AUG-2.3-103 Android User’s Guide

Connecting to networks and devices 57
Connecting to mobile networks 58
Connecting to Wi-Fi networks 61
Connecting to Bluetooth devices 64
Connecting to a computer via USB 67
Sharing your phone’s mobile data connection 69
Connecting to virtual private networks 72
Working with secure certificates 74
Configuring Internet (SIP) calling 75
Placing and receiving calls 77
Placing and ending calls 78
Answering or rejecting calls 80
Working with the Call log 82
Calling your contacts 84
Placing an Internet (SIP) call 85
Listening to your voicemail 86
Dialing by voice 87
Options during a call 88
Managing multiple calls 90
4
Searching by text and voice 93
Searching your phone and the web 94
Using Google Search tips and tricks 100
Changing Google Search settings 101
Search settings screen 101
Google Search settings screen 101
Using Voice Actions 102
Voice Action commands 105
Contacts 109
Opening your contacts 110
Adding contacts 112
Importing, exporting, and sharing contacts 113
Adding a contact to your favorites 115
Searching for a contact 116
Editing contact details 117
Communicating with your contacts 120
AUG-2.3-103 Android User’s Guide

Changing which contacts are displayed 122
Joining contacts 124
Separating contact information 126
Accounts 127
Adding and removing accounts 128
Configuring account sync and display options 131
Gmail 135
Gmail version and availability 136
Gmail is different 137
Opening Gmail and your Inbox 138
Reading your messages 141
Composing and sending a message 145
Replying to or forwarding a message 147
Working with Priority Inbox 149
Working with conversations in batches 152
Starring a message 153
Labeling a conversation 154
Viewing conversations by label 155
Synchronizing your conversations by label 156
Reporting spam 158
Searching for messages 159
Archiving conversations 160
Appending a signature to your messages 161
Using keyboard shortcuts 162
Conversation list shortcuts 162
Message shortcuts 162
Changing Gmail settings 163
General Settings 163
Notification settings 164
5
Calendar 165
Viewing your calendar and events 166
Working in Agenda view 168
Working in Day view 169
Working in Week view 171
Working in Month view 172
AUG-2.3-103 Android User’s Guide

Viewing event details 173
Creating an event 174
Editing an event 175
Deleting an event 176
Setting an event reminder 177
Responding to an event reminder 178
Synchronizing and displaying calendars 179
Changing Calendar settings 180
Google Voice 181
Opening Google Voice and your Inbox 182
Reading or listening to your voicemail 184
Exchanging text messages 186
Starring messages 187
Viewing messages by label 188
Configuring Google Voice 189
Placing calls with Google Voice 191
Changing Google Voice settings 192
General Settings 192
Sync and notifications settings 193
6
Google Talk 195
Signing in and opening your Friends list 196
Chatting with friends 198
Changing and monitoring online status 201
Managing your Friends list 203
Changing Google Talk settings 205
Email 207
Opening Email and the Accounts screen 208
Reading your messages 210
Responding to a message 212
Starring messages 213
Working with message in batches 214
Composing and sending email 215
Working with account folders 216
Appending a signature to your messages 217
Adding and editing email accounts 218
AUG-2.3-103 Android User’s Guide

Changing email account settings 221
Account settings 221
Incoming server settings 222
Outgoing server settings 224
Messaging 227
Opening Messaging 228
Exchanging messages 229
Changing Messaging settings 234
Storage settings 234
Text message (SMS) settings 234
Multimedia message (MMS) settings 234
Notification settings 235
Browser 237
Opening Browser 238
Navigating within a webpage 241
Navigating among webpages 243
Working with multiple Browser windows 245
Downloading files 246
Working with bookmarks 248
Changing Browser settings 250
Page content settings 250
Privacy settings 251
Security settings 252
Advanced settings 252
7
Maps, Navigation, Places, and Latitude 253
Opening Maps 254
Viewing My Location and location services 255
Searching, exploring, and starring places 257
Using the Places feature in the Launcher 260
Changing map layers 261
Getting directions 263
Navigating with Google Maps Navigation (Beta) 264
Previewing and changing views of your route 265
Finding your friends with Google Latitude 268
AUG-2.3-103 Android User’s Guide

Camera 271
Opening Camera and taking pictures or videos 272
Changing Camera settings 275
Camera mode settings 276
Video mode settings 277
Gallery 279
Opening Gallery and viewing your albums 280
Working with albums 282
Working with pictures 286
Working with videos 290
YouTube 293
Opening YouTube and watching videos 294
Discovering videos 297
Rating and commenting on videos 299
Uploading and sharing videos 300
Working with playlists 302
Working with channels 303
Changing YouTube settings 304
8
Music 305
Transferring music files to your phone 306
Opening Music and working with your library 307
Playing music 309
Working with playlists 312
News & Weather 315
Checking the news and weather 316
Changing News & Weather settings 319
News & Weather settings 319
Weather settings 319
News settings 319
Refresh settings 320
Clock 321
Viewing the date, time, and other information 322
Setting alarms 324
Changing Clock alarm settings 326
AUG-2.3-103 Android User’s Guide

Car Home 327
Opening Car Home 328
Customizing Car Home 330
Starting Car Home with a Bluetooth Device 332
Changing Car Home settings 333
Calculator 335
Using the Calculator 336
Tags 337
Scanning tags 338
Working with tags 339
Market 341
Opening Android Market and finding applications 342
Downloading and installing applications 345
Managing your downloads 348
Settings 353
Opening Settings 354
Wireless & networks 355
Wireless & Network settings screen 355
Wi-Fi settings screen 355
Advanced Wi-Fi settings screen 357
Bluetooth settings screen 357
Tethering & portable hotspot settings screen 358
VPN settings screen 358
Mobile networks settings screen 358
Call settings 360
Call settings screen 360
Fixed Dialing Numbers screen 361
Additional settings 361
Internet calling (SIP) accounts screen 361
Sound settings 362
Display settings 364
Location & security settings 365
Applications settings 367
Applications settings screen 367
Development screen 367
9
AUG-2.3-103 Android User’s Guide

Accounts & sync settings 369
Accounts & sync settings screen 369
Account screen 369
Privacy settings 370
Storage settings 371
Language & keyboard settings 372
Language & Keyboard screen 372
Android Keyboard settings screen 372
Device Keyboard settings screen 373
Voice input & output settings 374
Google Voice Recognition settings screen 374
Text-to-Speech settings screen 374
Accessibility settings 376
Dock settings 377
Date & time settings 378
About phone 379
About Phone screen 379
10
AUG-2.3-103 Android User’s Guide

This guide describes how to use release 2.3 of the Android™ mobile technology
platform, including updates to Android applications that have been released on the
Android Market™ downloadable applications service.
This guide does not describe the physical features of your phone (its parts and
accessories, how to replace its battery, turn it on , and so on) or its specifications; for
that information, refer to your phone’s owner’s guide.
Chapter Describes
11
About this guide
“Android basics” on
page 15
“Connecting to networks and devices” on
page 57
“Placing and receiving
calls” on page 77
“Searching by text and
voice” on page 93
“Contacts” on page 109 Organizing and finding contact information for the people you know.
“Accounts” on page 127 Adding and synchronizing email and other accounts, including Google
“Gmail” on page 135 Sending and receiving messages using Gmail™ webmail service.
“Calendar” on page 165 Viewing and creating events on your calendar and synchronizing them
“Google Voice” on
page 181
Starting Android the first time, signing into your Google™ Accounts so
you can take full advantage of Google Apps™, and performing basic
Android tasks.
Configuring how your phone connects to mobile and Wi-Fi™ networks, to Bluetooth™ devices, and to a computer, and it describes how
to share your phone’s mobile data connection via USB or as a portable
Wi-Fi hotspot. This chapter also describes how to secure your connections to virtual private networks (VPNs) and other networks.
Using your phone to place, receive, and manage multiple calls.
Using Google Search to search your phone and the web by typing or
speaking.
Accounts and Microsoft™ Exchange ActiveSync™ accounts.
with the Google Calendar™ calendaring service on the web.
Checking your voicemail and placing calls with Google Voice.
AUG-2.3-103 Android User’s Guide
About this guide 12
Chapter Describes
“Google Talk” on
page 195
Communicating with friends by using the Google Talk™ instant messaging service.
“Email” on page 207 Configuring your phone so you can send and receive email via a con-
ventional email service.
“Messaging” on
Exchanging text and multimedia messages with other phones.
page 227
“Browser” on page 237 Browsing the web on your phone.
“Maps, Navigation,
Places, and Latitude” on
page 253
Discovering the world with street and satellite data from the Google
Earth™ mapping service, getting directions, finding your location,
sharing your location through the Google Latitude™ user location service, navigating with spoken turn-by-turn directions from Google
Maps Navigation, and the many other features available on your
phone in the Google Maps™ mapping service
“Camera” on page 271 Taking and previewing photos and videos.
“Gallery” on page 279 Viewing, sharing, and uploading your photos and videos to the
Picasa™ photo organizing software service and the YouTube™ usergenerated content website.
“YouTube” on page 293 Viewing YouTube videos.
“Music” on page 305 Listening to music by the song, album, or playlist.
“News & Weather” on
Checking the news and weather on your Home screen or in detail.
page 315
“Clock” on page 321 Checking the time and setting alarms.
“Car Home” on
Using your phone effectively in the car.
page 327
“Calculator” on
Calculating the solutions to math problems.
page 335
AUG-2.3-103 Android User’s Guide
About this guide 13
Chapter Describes
“Tags” on page 337 Scan and work with Near Field Communication (NFC) tags.
“Market” on page 341 Finding new applications on Android Market, purchasing paid applica-
tions, and installing them.
“Settings” on page 353 Opening the Settings application and its many tools for configuring
and customizing your phone.
AUG-2.3-103 Android User’s Guide

About this guide 14
AUG-2.3-103 Android User’s Guide

15
Android basics
When you first turn on your phone, you have the opportunity to sign into
your Google Account. Then it’s a good idea to become familiar with the
basics of your phone and how to use it—the Home screen, the
touchscreen, menus, applications, entering text, and so on.
In this section
“Starting Android for the first time” on page 16
“Getting to know the Home screen” on page 19
“Using the touchscreen” on page 22
“Using the phone’s buttons” on page 23
“Using a trackball” on page 24
“Working with menus” on page 25
“Monitoring your phone’s status” on page 27
“Managing notifications” on page 29
“Using the onscreen keyboard” on page 31
“Entering text by speaking” on page 35
“Editing text” on page 37
“Opening and switching applications” on page 40
“Locking your screen” on page 42
“Customizing the Home screen” on page 43
“Connecting quickly with your contacts” on page 45
“Optimizing battery life” on page 46
“Managing how applications use memory” on page 48
“Managing downloads” on page 54
AUG-2.3-103 Android User’s Guide
Android basics 16
Touch the android to begin.
Starting Android for the first time
The first time you power on your phone (after setting it up, as described in your
phone’s owner’s guide), you’re prompted to touch the Android logo to begin using your
phone.
Then you’re prompted to create or to sign into your Google Account and to make
some initial decisions about how you want to use Android and Google features.
If you don’t have a SIM card in your GSM phone
If your GSM phone doesn’t have a SIM card installed, you can’t connect to mobile
networks for voice and data services, but you can connect to a Wi-Fi network to sign
into your Google Account and to use all the features of your phone, except placing a
cell phone call. (CDMA phones don’t rely on a SIM card to connect to mobile
networks.)
If you start a GSM Android phone the first time without a SIM card, you’re asked if you
want to touch Connect to Wi-Fi to connect to a Wi-Fi network (instead of to a
mobile network) to set up your phone. To learn more, see “Connecting to Wi-Fi
networks” on page 61.
Your Google Account
You must sign into a Google Account to use Gmail, Google Talk, Google Calendar, and
other Google Apps; to download applications from Android Market; to back up your
AUG-2.3-103 Android User’s Guide
Android basics 17
When you’re finished, touch Done on
the keyboard (or press the phone’s
Back button) to close the onscreen
keyboard, so you can touch the Sign in
button at the bottom of the screen.
Touch to open the onscreen keyboard, to
enter your Google Account username.
Touch to enter your password.
settings to Google servers; and to take advantage of other Google services on your
phone.
Important If you want to restore your settings to this phone, from another phone that was run-
ning Android release 2.0 or later, you must sign into your Google Account now, during
setup. If you wait until after setup is complete, your settings are not restored. (See
“Google services” on page 18.)
If you don’t have a Google Account, you’re prompted to create one.
If you have an enterprise Gmail account through your company or other organization,
your IT department may have special instructions on how to sign into that account.
When you sign in, your contacts, Gmail messages, Calendar events, and other
information from these applications and services on the web are synchronized with
your phone.
If you don’t sign into a Google Account during setup, you are prompted to sign in or to
create a Google Account the first time you start an application that requires one, such
as Gmail or Android Market.
When you sign in, you’re prompted to enter your username and password, using the
onscreen keyboard. For information about navigating the touchscreen and entering
text, see “Using the touchscreen” on page 22 and “Using the onscreen keyboard” on
page 31.
Resetting your Google Account password
If you have a Google Account but have forgotten your password, you must reset it
before you can sign in. Go to http://www.google.com, click Sign In, click “Can’t access
AUG-2.3-103 Android User’s Guide

Android basics 18
your account?” in the sign-in box, and then follow the instructions for resetting your
password.
Additional accounts
After setup, you can add Google, Microsoft Exchange ActiveSync, conventional email,
and other kinds of accounts to your phone, and sync some or all of their data, as
described in “Accounts” on page 127. However, only the first Google Account you sign
into is backed up to Google servers. Some applications that only work with a single
account display data only from the first account that you sign into.
Google services
When you sign in, you’re asked whether you want to take advantage of the following
Google services.
Location You can choose whether to take advantage of Google’s location service,
which provides applications with your approximate location without using GPS, and
whether to use your location for Google search results and other Google services. For
information about changing these settings later, see “Location & security settings” on
page 365 and “Privacy settings” on page 370.
Backup You can choose to back up some of your data, such as your bookmarks,
your user dictionary, your Wi-Fi passwords, and many other settings, to your Google
Account, on Google servers. Some third-party applications may also take advantage
of this feature. That way, when you need to replace your phone (when you upgrade or
replace a lost phone), or if you reinstall an application, you can restore your settings
and other data. For information about changing this setting later, see “Privacy
settings” on page 370.
Date and time If you aren’t connected to a mobile network, you’re prompted to set
the date and time on your phone. See “Date & time settings” on page 378.
AUG-2.3-103 Android User’s Guide

Android basics 19
The Status bar shows the time, signal
strength, battery status, and other
information. It also displays notification
icons.
Widgets are applications that you can
use directly on the Home screen.
Touch items on the Home screen to
open them. Touch & hold an empty spot
to add a shortcut to an application, a
widget, and so on.
Touch the Launcher icon to open the
Launcher and view all your applications.
Getting to know the Home screen
When you sign in, the Home screen opens.
The Home screen is your starting point to access all the features on your phone. It
displays application icons, widgets, shortcuts, and other features. You can customize
the Home screen with different wallpaper and display the items you want. See
“Customizing the Home screen” on page 43.
At the top of the screen, the Status bar displays the time, information about the status
of your phone, and icons for notifications that you’ve received. To learn more, see
“Monitoring your phone’s status” on page 27 and “Managing notifications” on page 29.
Touch the Launcher icon at the bottom of the screen to view all installed applications.
See “Opening and switching applications” on page 40.
AUG-2.3-103 Android User’s Guide
Android basics 20
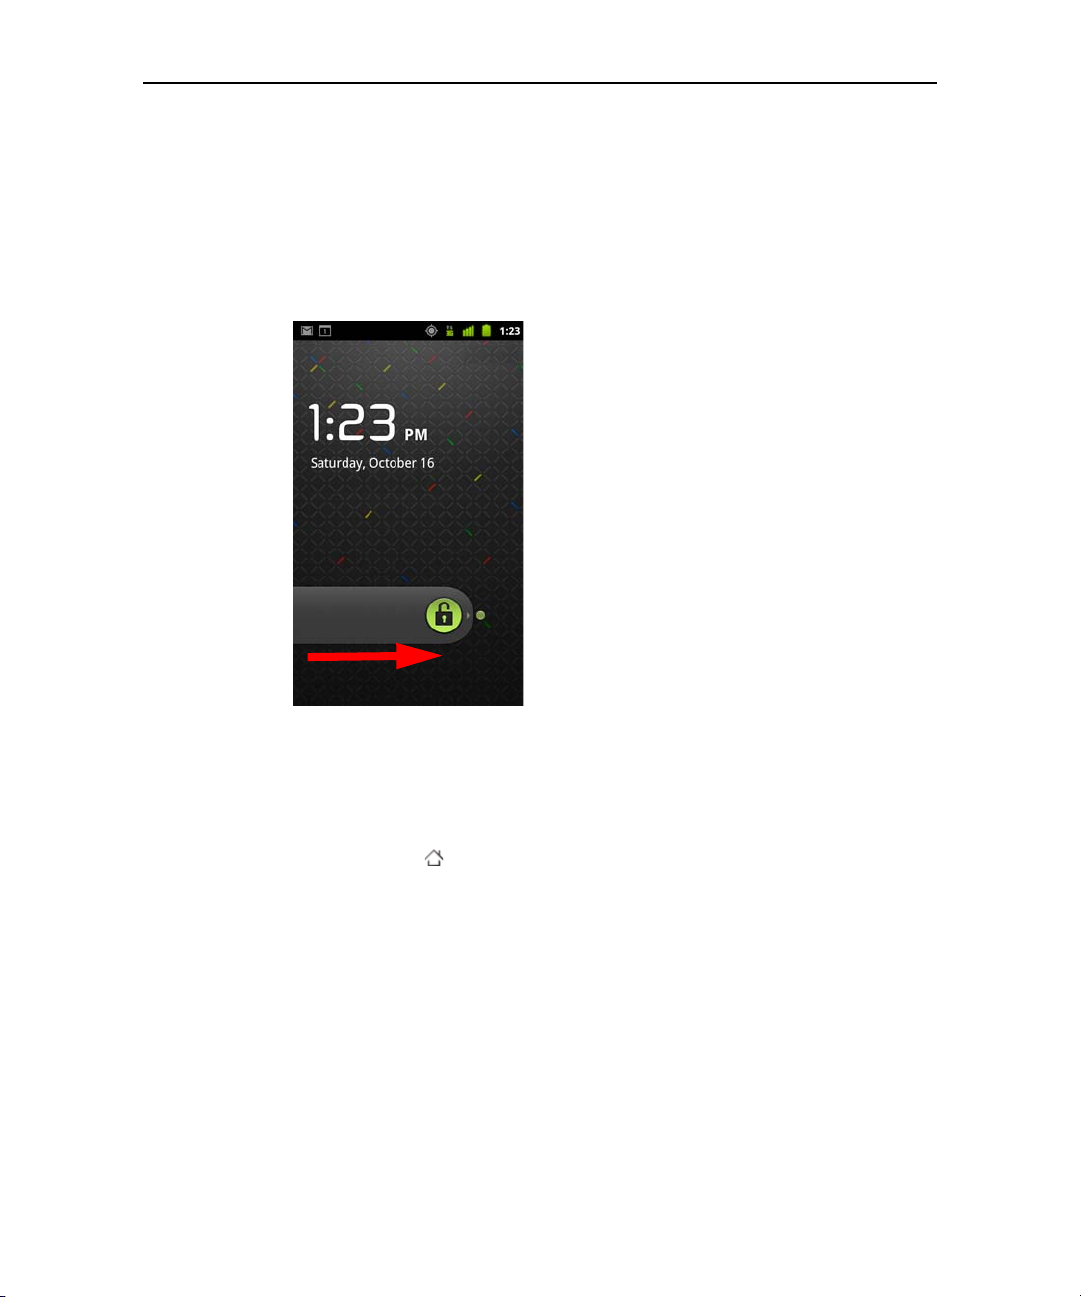
Wake up the phone
If you don’t use the phone for a while, the screen dims and then darkens, to conserve
the battery.
1 Press the Power button.
If you’ve locked your screen, you must draw an unlock pattern or enter a PIN or
password to unlock it. See “Locking your screen” on page 42.
2 Drag the lock icon to the right.
The last screen you were viewing opens.
Return to the Home screen
S Press the Home button at any time, in any application.
AUG-2.3-103 Android User’s Guide

Android basics 21
View other parts of the Home screen
S Slide your finger left or right across the Home screen.
Extensions to the Home screen provide more space for widgets, shortcuts, and
other items. For more on sliding, see “Using the touchscreen” on page 22.
Small dots at the lower left and right indicate which screen you’re viewing.
S Touch & hold the small dots on the lower left or right of the screen to view
thumbnails of the Home screen and its extensions, which you can touch to open.
AUG-2.3-103 Android User’s Guide

Android basics 22
Using the touchscreen
The main way to control Android features is by using your finger to manipulate icons,
buttons, menu items, the onscreen keyboard, and other items on the touchscreen. You
can also change the screen’s orientation.
Touch To act on items on the screen, such as application and settings icons, to type
letters and symbols using the onscreen keyboard, or to press onscreen buttons, you
simply touch them with your finger.
Touch & hold Touch & hold an item on the screen by touching it and not lifting
your finger until an action occurs. For example, to open a menu for customizing the
Home screen, you touch an empty area on the Home screen until the menu opens.
Drag Touch & hold an item for a moment and then, without lifting your finger, move
your finger on the screen until you reach the target position. You drag items on the
Home screen to reposition them, as described in “Customizing the Home screen” on
page 43, and you drag to open the Notifications panel, as described in “Managing
notifications” on page 29.
Swipe or slide To swipe or slide, you quickly move your finger across the surface
of the screen, without pausing when you first touch it (so you don’t drag an item
instead). For example, you slide the screen up or down to scroll a list, and in some
Calendar views you swipe quickly across the screen to change the range of time
visible.
Double-tap Tap quickly twice on a webpage, map, or other screen to zoom. For
example, you double-tap a section of a webpage in Browser to zoom that section to fit
the width of the screen. Double-tapping after pinching to zoom in some applications,
such as Browser, reflows a column of text to fit the width of the screen.
Pinch In some applications (such as Maps, Browser, and Gallery), you can zoom in
and out by placing two fingers on the screen at once and pinching them together (to
zoom out) or spreading them apart (to zoom in).
Rotate the screen On most screens, the orientation of the screen rotates with the
phone as you turn it from upright to its side and back again. You can turn this feature
on and off, as described in “Display settings” on page 364.
AUG-2.3-103 Android User’s Guide

Android basics 23
Using the phone’s buttons
Your phone’s physical buttons and soft buttons offer a variety of functions and
shortcuts. Refer to your phone’s owner’s guide for details about the location of the
buttons on your phone.
Button Press Press & hold
Back Opens the previous screen you were
working in. If the onscreen keyboard is
open, closes the keyboard.
Menu Opens a menu with items that affect
the current screen or application.
Home Opens the Home screen. If you’re view-
ing the left or right extended Home
screen, opens the central Home screen.
Search On the Home screen, opens Google
search for searching your phone and
the web. In many applications, opens a
search box for searching within the
application.
Power Turns off the screen. Opens a menu with options for
Volume Up /
Down
When a call is in progress, increases or
decreases the call volume. When the
phone is ringing, silences the ringer. On
the Home screen when no call is in
progress, increases or decreases the
ringtone volume, or sets the phone to
be silent or to vibrate instead of ringing.
In other applications, controls the volume of music, spoken directions, and
other audio.
Opens the most recently used
applications screen.
Opens Google search by voice.
Airplane mode, for Silent mode,
and for powering off the phone.
Quickly increases the ringtone
volume to maximum or minimum.
AUG-2.3-103 Android User’s Guide

Android basics 24
Items that you select with the
Trackball are highlighted in orange.
Using a trackball
If your phone includes a trackball (or similar navigating device you can use to select
items on screen), you may find some actions are easier using it than using your finger,
such as:
G Opening an event in a crowded calendar
G Selecting a link or form field on a web page
G Selecting text to edit
Use the Trackball
S Roll the Trackball to select items on the screen.
The selected item is highlighted in orange.
S Pressing the Trackball is equivalent to touching the selected item with your
finger.
S Pressing & holding the Trackball is equivalent to touching & holding the selected
item with your finger, for opening context menus, starting apps, and so on.
AUG-2.3-103 Android User’s Guide
Android basics 25
Touch to open more menu items.
Options menus contain items that apply
to the current screen or to the
application as a whole.
Working with menus
There are two kinds of Android menus: options menus and context menus.
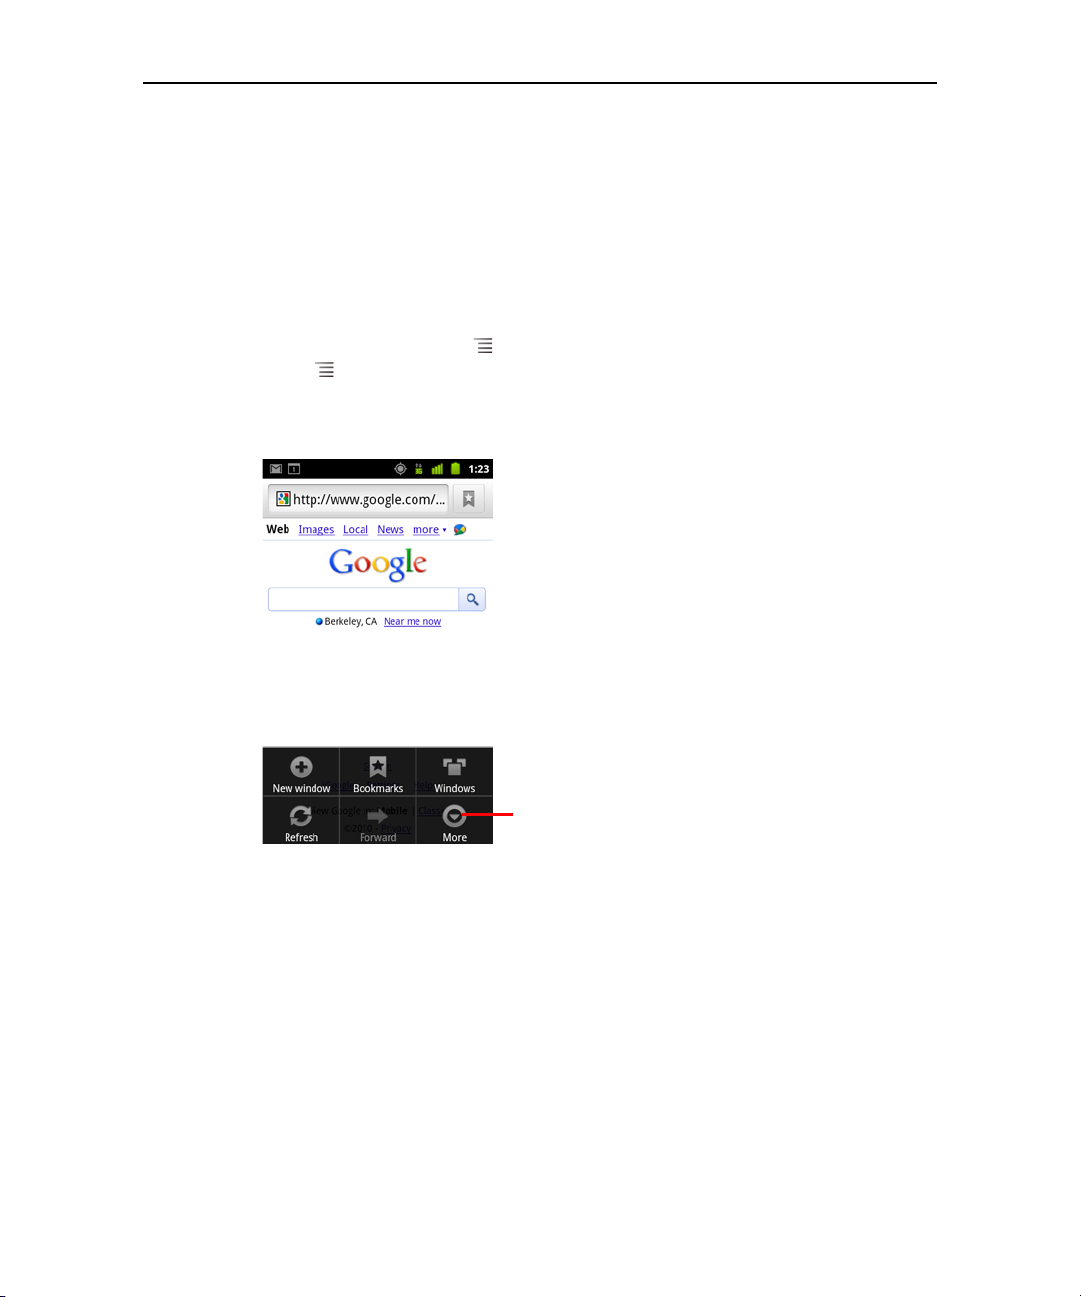
Options menus
Options menus contain tools that apply to the activities of the current screen or
application, not to any specific item on the screen. You open options menus by
pressing the Menu button . Not all screens have options menus; if you press
Menu on a screen that has no options menu, nothing happens.
Some screens have more options menu items than can fit in the main menu; you
touch More to open a menu of additional items.
AUG-2.3-103 Android User’s Guide

Android basics 26
When you touch & hold some items
on a screen...
...a context menu opens.
Context menus
Context menus contain tools that apply to a specific item on the screen. You open a
context menu by touching & holding an item on the screen. Not all items have context
menus. If you touch & hold an item that has no context menu, nothing happens.
AUG-2.3-103 Android User’s Guide
Android basics 27
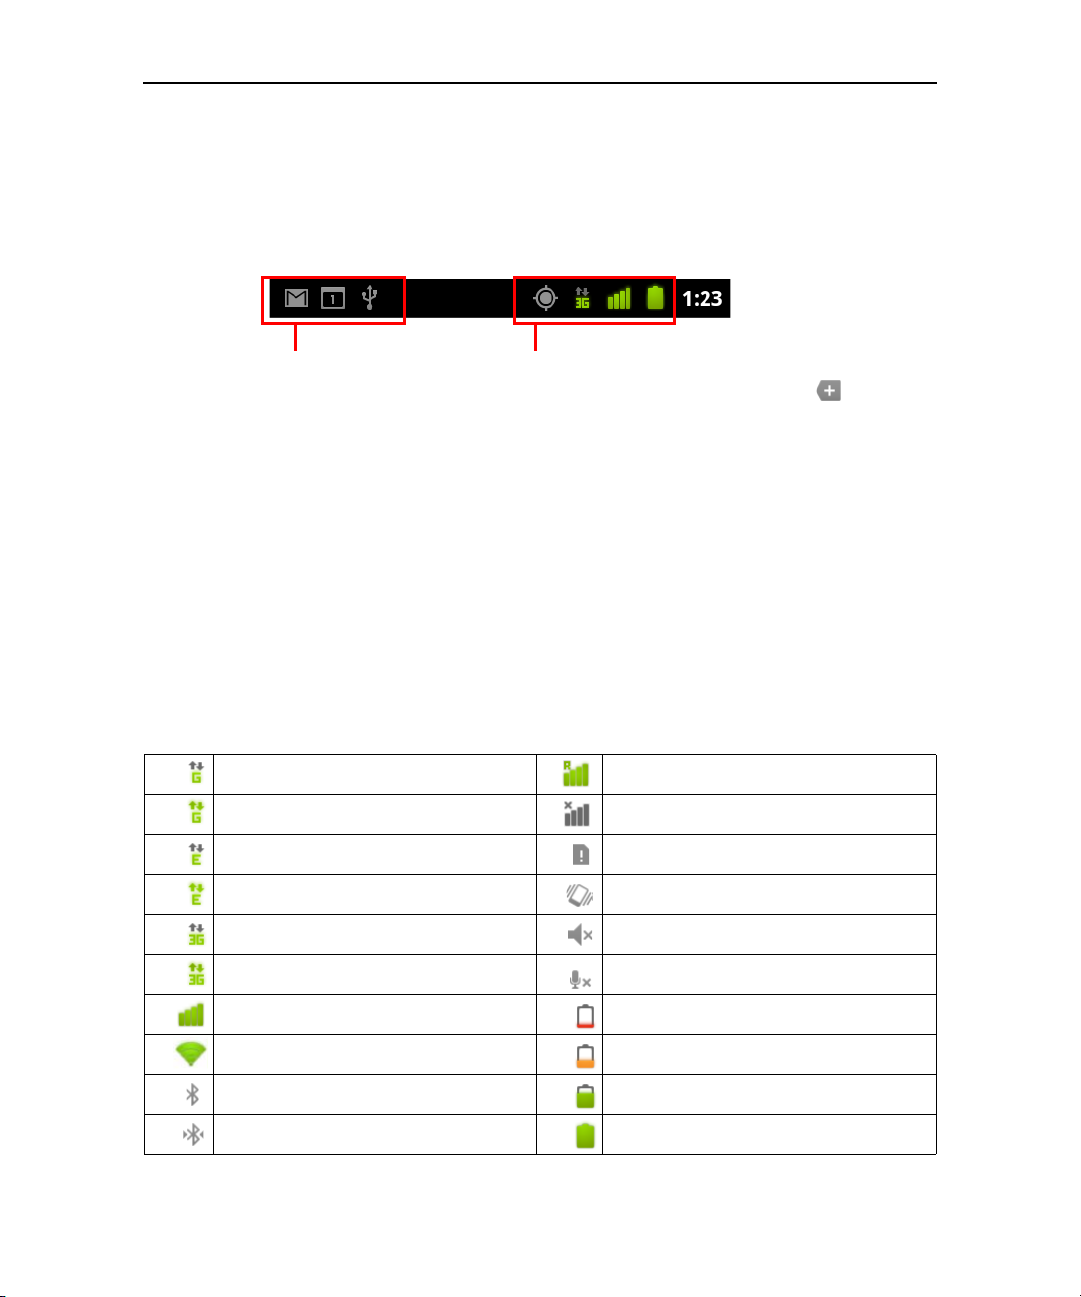
Notification icons
Status icons
Monitoring your phone’s status
The Status bar appears at the top of every screen. It displays icons indicating that
you’ve received notifications (on the left) and icons indicating the phone’s status (on
the right), along with the current time.
If you have more notifications than can fit in the status bar, a plus icon prompts
you to open the Notifications panel to view them all. See “Managing notifications” on
page 29.
Status icons
The following icons indicate the status of your phone. To learn more about the
different kinds of mobile networks, see “Connecting to networks and devices” on
page 57.
Network status icons turn green if you have a Google Account added to your phone
and the phone is connected to Google services, for syncing your Gmail, Calendar
events, contacts, for backing up your settings, and so on. If you don’t have a Google
Account or if, for example, you’re connected to a Wi-Fi network that is not connected
to the Internet, the network icons are white.
AUG-2.3-103 Android User’s Guide
Connected to GPRS mobile network Roaming
GPRS in use No signal
Connected to EDGE mobile network No SIM card installed
EDGE in use Vibrate mode
Connected to 3G mobile network Ringer is silenced
3G in use Phone microphone is mute
Mobile network signal strength Battery is very low
Connected to a Wi-Fi network Battery is low
Bluetooth is on Battery is partially drained
Connected to a Bluetooth device Battery is full
Android basics 28
Airplane mode Battery is charging
Alarm is set GPS is on
Speakerphone is on Receiving location data from GPS
Notification icons
The following icons indicate that you’ve received a notification. See “Managing
notifications” on page 29 for information about responding to these notifications. In
addition these icons, applications you install on your phone may use their own
notification icons.
New Gmail message More notifications
New text or multimedia message Call in progress
Problem with text or multimedia
message delivery
New Google Talk message Missed call
New voicemail Call on hold
Upcoming event Call forwarding is on
Data is syncing Song is playing
Problem with sign-in or sync Uploading data
SD card or USB storage is full Downloading data
An open Wi-Fi network is available Download finished
Phone is connected via USB cable Connected to or disconnected from
Phone is sharing its data connection
via USB (USB tethering)
Phone is sharing its data connection
as a Wi-Fi hotspot (Wi-Fi tethering)
Phone is tethered in multiple ways System update available
Call in progress using a Bluetooth
headset
virtual private network (VPN)
Carrier data use threshold approaching or exceeded
Application update available
AUG-2.3-103 Android User’s Guide
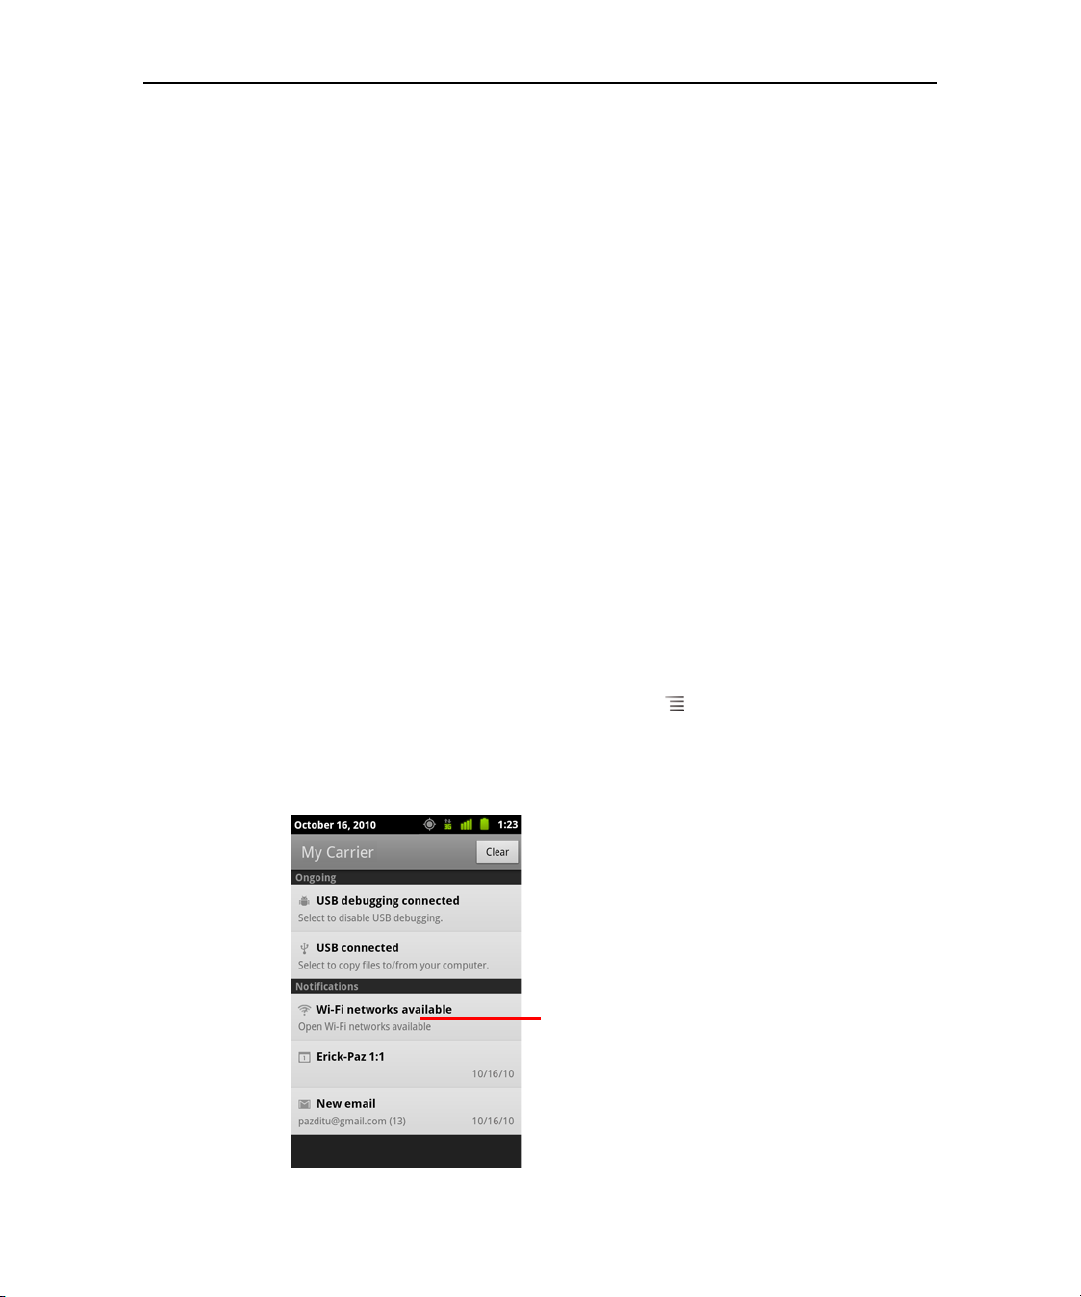
Android basics 29
Touch a notification to open it in its
application.
Managing notifications
Notification icons report the arrival of new messages, calendar events, and alarms, as
well as ongoing events, such as when call forwarding is on or the current call status.
When you receive a notification, its icon appears in the Status bar, along with a
summary that appears only briefly. For a table of notification icons, see “Notification
icons” on page 28.
If your phone uses a trackball light for notifications, the light pulses once or repeatedly
when you receive a new notification. Depending on your settings and the model of
your phone, you may also hear a notification sound, the phone may vibrate, and LEDs
may blink. These settings and adjusting sound volume and other general notification
settings is described in “Sound settings” on page 362.
You can open the Notifications panel to view a list of all your notifications.
Applications whose activities produce notifications, such as Gmail and Google Talk,
have their own settings, which you can use to configure whether and how they send
notifications, whether they sound a ringtone, vibrate, and so on. See the
documentation for those applications for details.
Open the Notifications panel
S Drag the Status bar down from the top of the screen.
On the Home screen, you can also press Menu and touch Notifications.
The Notifications panel displays your wireless provider and a list of your current
notifications. Notifications about ongoing activities are listed first, followed by
Notifications about events, such as new mail notifications or Calendar reminders.
AUG-2.3-103 Android User’s Guide

Android basics 30
Respond to a notification
1 Open the Notifications panel.
Your current notifications are listed in the panel, each with a brief description.
2 Touch a notification to respond to it.
The Notifications panel closes. What happens next depends on the notification.
For example, new voicemail notifications dial your voicemail box, and network
disconnect notifications open the list of configured networks so you can
reconnect.
Clear all notifications
1 Open the Notifications panel.
2 Touch Clear at the top right of the panel.
All event-based notifications are cleared; ongoing notifications remain in the list.
Close the Notifications panel
S Drag the tab at the bottom of the Notifications panel to the top of the screen. Or
just press the Back button.
The panel also closes when you touch a notification to respond to it.
AUG-2.3-103 Android User’s Guide
 Loading...