

Samsung GT-I8190 Service Manual
GSM TELEPHONE
GT-I8190
GSM TELEPHONE
CONTENTS
Safety Precautions
1.
Specification
2.
Product Function
3.
Exploded View and Parts list
4.
MAIN Electrical Parts List
5.
Level1Repair
6.
Level2Repair
7.
Level3Repair
8.
Reference data
9.
Notice: All functionality, features, specifications, and
other product information provided in this document,
including but not limited to, benefits, design, pricing,
components, performance, availability, and capabiliti
es of the product are subject to change without
notice. Samsung reserves the right to alter this doc
ument or the product described herein at anytime,
without obligation to provide notification of such
changes.

Safety Precautions
1.
Repair Precaution
1-1.
Before attempting any repair or detailed tuning, shield the device from RF noise or static
electricity discharges.
Use only demagnetized tools that are specifically designed for small electronic repairs,
as most electronic parts are sensitive to electromagnetic forces.
Use only high quality screwdrivers when servicing products. Low quality screwdrivers can
easily damage the heads of screws.
Use only conductor wire of the properly gauge and insulation for low resistance, because of
the low margin of error of most testing equipment.
We recommend
Hand-soldering is not recommended, because printed circuit boards(PCBs) can be easily
gauge twisted copper wire.
22-
damaged, even with relatively low heat. Never useasoldering iron withapower rating of
more than 100 watts and use only lead-free solder with a melting point below 250°C (482°F).
Prior to disassembling the battery charger for repair, ensure that the AC power is disconnected.
Always use the replacement parts that are registered in the SEC system. Third-party replac
ement parts may not function properly.
1-1
Confidential and proprietary-the contents in this service guide subject to change without prior notice.
Distribution, transmission, or infringement of any content or data from this document without Samsung’swritten authorization is strictly prohibited.

Safety Precautions
ESD(Electrostatically Sensitive Devices) Precaution
1-2.
Many semiconductors and ESDs in electronic devices are particularly sensitive to static discha
rge and can be easily damaged by it. We recommend protecting these components with cond
uctive anti-static bags when you store or transport them.
Always use an anti-static strap or wristband and remove electrostatic buildup or dissipate
static electricity from your body before repairing ESDs.
Ensure that soldering irons have AC adapter with ground wires and that the ground wires are
properly connected.
Use only desoldering tools with plastic tips to prevent static discharge.
Properly shield the work environment from accidental electrostatic discharge before opening
packages containing ESDs.
The potential for static electricity discharge may be increased in low humidity environments,
such as air-conditioned rooms. Increase the airflow to the working area to decrease the
chance of accidental static electricity discharges.
1-2
Confidential and proprietary-the contents in this service guide subject to change without prior notice.
Distribution, transmission, or infringement of any content or data from this document without Samsung’swritten authorization is strictly prohibited.

Specification
2.
GSM General Specification
2-1.
Freq.
Band[MHz]
Uplink/
Downlink
ARFCN
range
Tx/Rx
spacing
Mod. Bit
rate/
Bit Period
Time Slot
Period/
Frame
Period
GSM850 EGSM 900 DC S1800 PCS1900
824~849
869~894
128~251
45MHz 45MHz 95MHz 80MHz 190MHz 80MHz 45MHz
270.833kbps
3.692us
576.9us
4.615ms
880~915
925~960
0~124 &
975~1023
270.833kbps
3.692us
576.9us
4.615ms
1710~1785
1805~1880
512~885 512~810
270.833kbps
3.692us
576.9us
4.615ms
1850~1910
1930~1990
270.833kbps
3.692us
576.9us
4.615ms
WCDMA
2100
1922~1977
2112~2167
UL:
9612~9888
DL:
10562~10838
3.84Mcps 3.84Mcps 3.84Mcps
FrameLength:
10ms
Slotlength:
0.667ms
WCDMA
1900
1852~1907
1932~1987
UL:
9262~9538
DL:
9662~9938
FrameLength:
10ms
Slotlength:
0.667ms
WCDMA
2712~2863
2937~3088
FrameLength:
Slotlength:
900
880~915
925~960
UL:
DL:
10ms
0.667ms
Modulation 0.3GMSK 0.3GMSK 0.3GMSK 0.3GMSK QPSKHQPSK QPSKHQPSK QPSKHQPSK
MS Power 33dBm~5dBm 33dBm~5dBm 30dBm~0dBm 30dBm~0dBm
Power
Class
Sensitivity -102dBm -102dBm -100dBm -100dBm -106.7dBm -106.7dBm -106.7dBm
TDMA Mux 8 8 8 8
Cell Radius 35Km 35Km 2Km 2Km 2Km 2Km 2Km
5pcl ~ 19pcl 5
pcl
~19
pcl
pcl
0
~15
pcl
pcl
0
~15
pcl
24dBm~
-50dBm
max+24dBm)3(max+24dBm)3(max+
3(
8
24dBm~
-50dBm
88
24dBm~
-50dBm
24dB
m)
2-1
Confidential and proprietary-the contents in this service guide subject to change without prior notice.
Distribution, transmission, or infringement of any content or data from this document without Samsung’swritten authorization is strictly prohibited.

Specification
GSM Tx Power Class
2-2.
TX Power
control
GSM850
level
533±2
631±2
729±2
827±2
925±2
10 23±2
11 21±2
12 19±2
dBm
dBm
dBm
dBm
dBm
dBm
dBm
dBm
TX Power
control
EGSM900
level
533±2
631±2
729±2
827±2
925±2
10 23±2
11 21±2
12 19±2
dBm
dBm
dBm
dBm
dBm
dBm
dBm
dBm
TX Power
control
DCS1800
level
030±3
128±3
226±3
324±3
422±3
520±3
618±3
716±3
dBm
dBm
dBm
dBm
dBm
dBm
dBm
dBm
TX Power
control
PCS1900
level
030±3
128±3
226±3
324±3
422±3
520±3
618±3
716±3
dBm
dBm
dBm
dBm
dBm
dBm
dBm
dBm
13 17±2
14 15±2
15 13±2
16 11±3
17 9±3
18 7±3
19 5±3
dBm
dBm
dBm
dBm
dBm
dBm
dBm
13 17±2
14 15±2
15 13±2
16 11±3
17 9±3
18 7±3
19 5±3
dBm
dBm
dBm
dBm
dBm
dBm
dBm
814±3
912±4
10 10±4
11 8±4
12 6±4
13 4±4
14 2±5
15 0±5
dBm
dBm
dBm
dBm
dBm
dBm
dBm
dBm
814±3
912±4
10 10±4
11 8±4
12 6±4
13 4±4
14 2±5
15 0±5
dBm
dBm
dBm
dBm
dBm
dBm
dBm
dBm
2-2
Confidential and proprietary-the contents in this service guide subject to change without prior notice.
Distribution, transmission, or infringement of any content or data from this document without Samsung’swritten authorization is strictly prohibited.

Operation Instruction and Installation
3.
Main Function
Android OS: Jelly Bean
•
HSDPA
•
MP AF with LED Flash
•5
•3.97"
A-GPS/BT v4.0 USB v2.0/WiFi
•
Recording definition:
•
Sensors: Accelerometer, Electromagnetic, Gyro,Proximity
•
Additional
•
-1
-
-
S-AMOLED OCTA(C-Type)
GHz Dual Core CPU
Application store/Precise Motion UI
Seamless Sharing Experience.
Mbps/HSUPA
14.4
:
1080p /
Mbps
5.76
(802.11
Playback at
a/b/g/n)
1080p
resolution
3-1
Confidential and proprietary-the contents in this service guide subject to change without prior notice.
Distribution, transmission, or infringement of any content or data from this document without Samsung’swritten authorization is strictly prohibited.
Exploded View and Parts List
4.
Cellular phone Exploded View
4-1.
QFR01
QMO01
QCA01
QCA02
QCR72
QAR01
QSP01
QVO01
QKP01
QCK01
QVK03
QMP01
QRE01
QCR104
QBA01
QBC00
4-1
Confidential and proprietary-the contents in this service guide subject to change without prior notice.
Distribution, transmission, or infringement of any content or data from this document without Samsung’swritten authorization is strictly prohibited.

Level
6.
S/W installation
6-1.
Repair
6
6-1-1.
Required items in order to install S/W
Installation program: Downloader Program
GT-I8190 Mobile Phone
Data Cable
JIG BOX(GH99-36900B)
JIG Cable(GH39-01339A)
•
Adapter(GH99-38251A)
•
Serial Cable
•
Mobile device specific S/W: Binary files
Settings
※
(Odin3 v3.03.exe)
Connect ANYWAY JIG BOX
with JIG CABLE(Phone to JIG)
or PC to Phone Using Data Cable
6-1
Confidential and proprietary-the contents in this service guide subject to change without prior notice.
Distribution, transmission, or infringement of any content or data from this document without Samsung’swritten authorization is strictly prohibited.

Level6Repair
6-1-2.
S/W Installation Program(Downloader program)
Open up the S/W Installation Program by executing the
Odin3 v3.03.exe"
"
Enable the check mark by click on the following options,
.
1
Check Re-Partition, Auto Reboot
-
Check PIT
-
Check PDA, and CSC Files
-
6-2
Confidential and proprietary-the contents in this service guide subject to change without prior notice.
Distribution, transmission, or infringement of any content or data from this document without Samsung’swritten authorization is strictly prohibited.
Enter into Download Mode
.
2
Enter into Download Mode by pressing Volume Down button, OK button, and
ON/OFF Button simultaneously.
Level6Repair
Connect the device to PC via Data Cable.
.
3
Make sure that the one of communication port[ID:COM] box is highlighted in
yellow. The device is now connected with the PC and ready to download the
binary file into the device.
6-3
Confidential and proprietary-the contents in this service guide subject to change without prior notice.
Distribution, transmission, or infringement of any content or data from this document without Samsung’swritten authorization is strictly prohibited.
Level6Repair
Start downloading binary file into the device by clicking Start Button on the screen.
.
4
the green colored"PASS!" sign will appear on the upper-left box if the binary file
has been successfully downloaded into the device.
Disconnect the device from the Data cable.
5.
Once the device boots up, you can check the version of the binary file or name
.
6
by pressing the following code in sequence;
*#1234#
You can perform factoryreset by pressing the following code in sequence;
*#87976633#
6-4
Confidential and proprietary-the contents in this service guide subject to change without prior notice.
Distribution, transmission, or infringement of any content or data from this document without Samsung’swritten authorization is strictly prohibited.

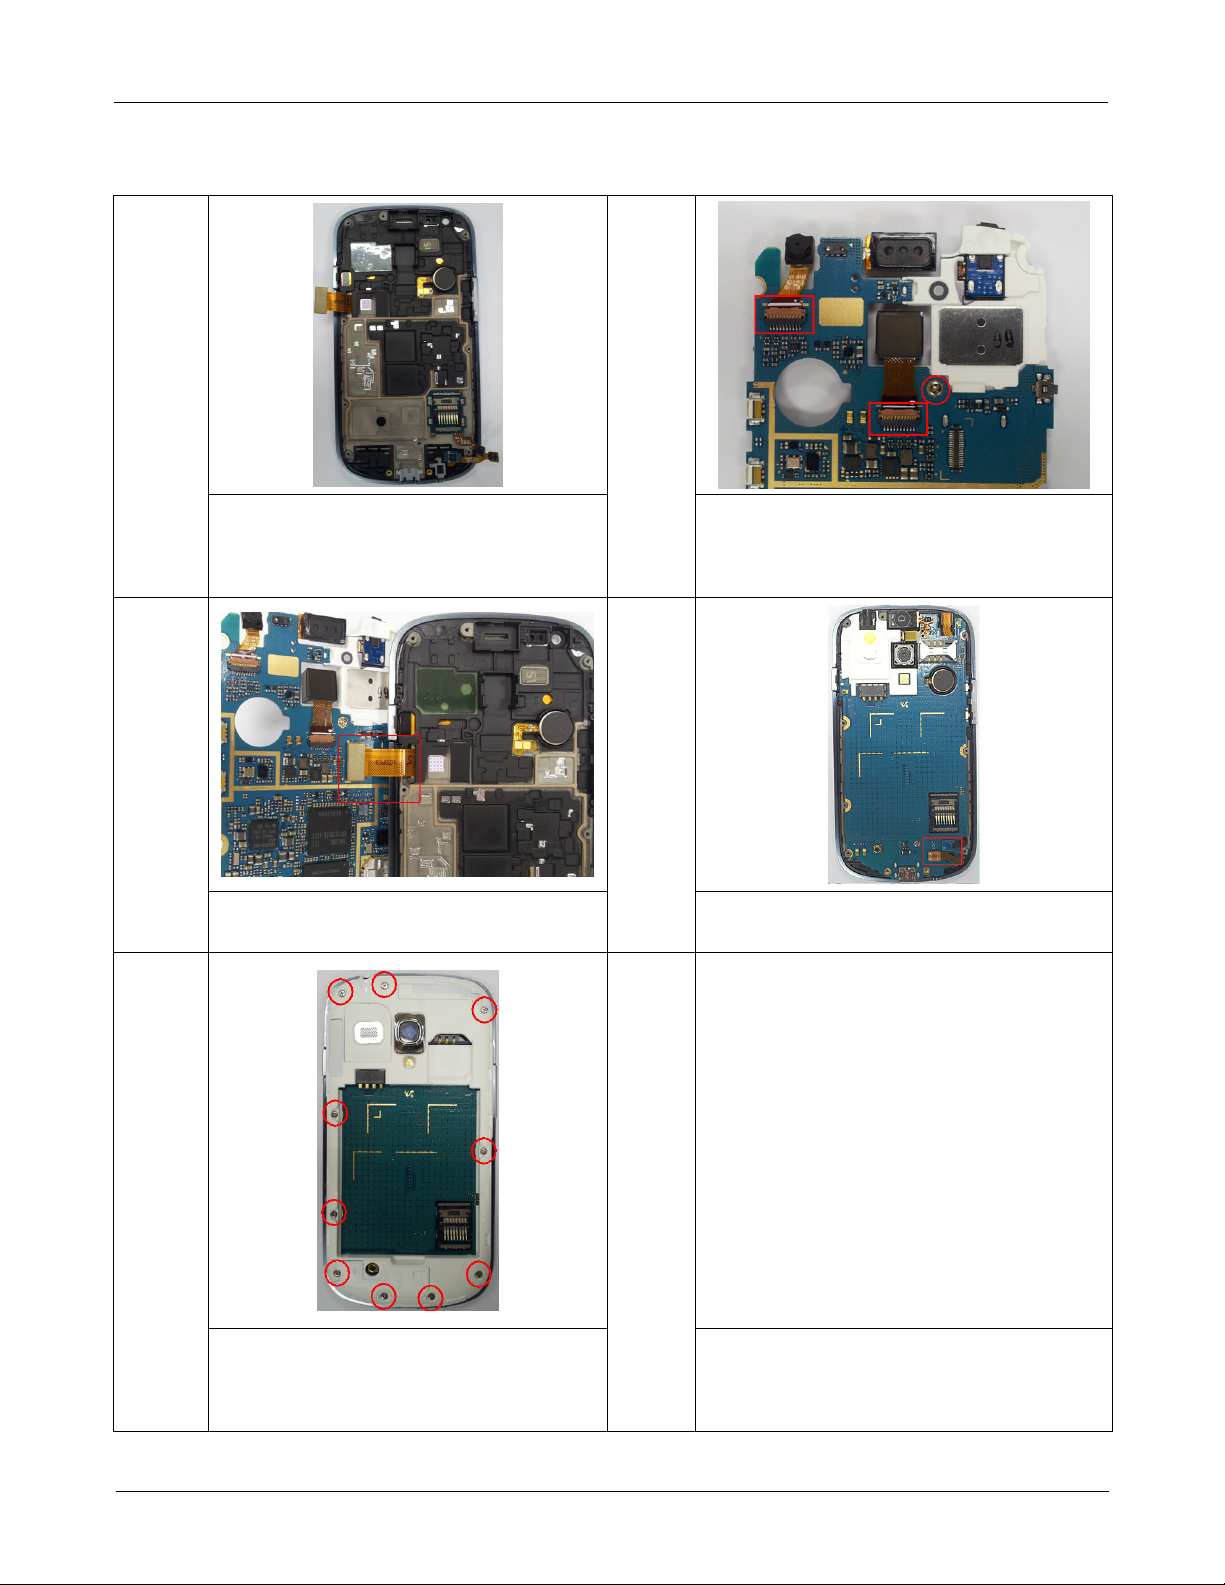
Level
7.
Disassembly
7-1.
Repair
2
1 2
Unscrew the screw in Rear(10 points)
1.
SEC CODE
-
Disassemble Rear
2.
: 6001-002667 , 1.4
X4
Separate the connectors(2Points)
1.
3 4
Disassemble PBA(Right→Left)
1.
Separate the LCD connector(1Point)
2.
5
Separate the Camera connectors(2Points)
1.
Unscrew the screw in PBA(1 point)
2.
SEC CODE
-
: 6001-002051, 1.4
X2.5
Bracket+LCD module
1.
LCD,Bracket can not be separated in normal
(
condition)
7-1
Confidential and proprietary-the contents in this service guide subject to change without prior notice.
Distribution, transmission, or infringement of any content or data from this document without Samsung’swritten authorization is strictly prohibited.
Level2Repair
7.
Assembly
7-2.
1 2
Place on Bracket+LCD Module
1.
LCD,Bracket can not be separated in normal
(
condition)
Aassemble Cameras(5Mega&VGA)
1.
Screw the speaker module screw(1POINT)
2.
SEC CODE
-
Torque
-
: 6001-002051 , 1.4
:1.1±0.1
Kgf·cm
X2.5
3 4
Aassemble LCD Connector(1POINT)
1.
Aassemble PBA(Left→Right)
2.
5
Aassemble Rear
1.
Screw10points in Rear
2.
SEC CODE
-
Torque
-
: 6001-002667 , 1.4
:1.1±0.1
Kgf·cm
X4
Aassemble the Connectors(2POINT)
1.
7-2
Confidential and proprietary-the contents in this service guide subject to change without prior notice.
Distribution, transmission, or infringement of any content or data from this document without Samsung’swritten authorization is strictly prohibited.
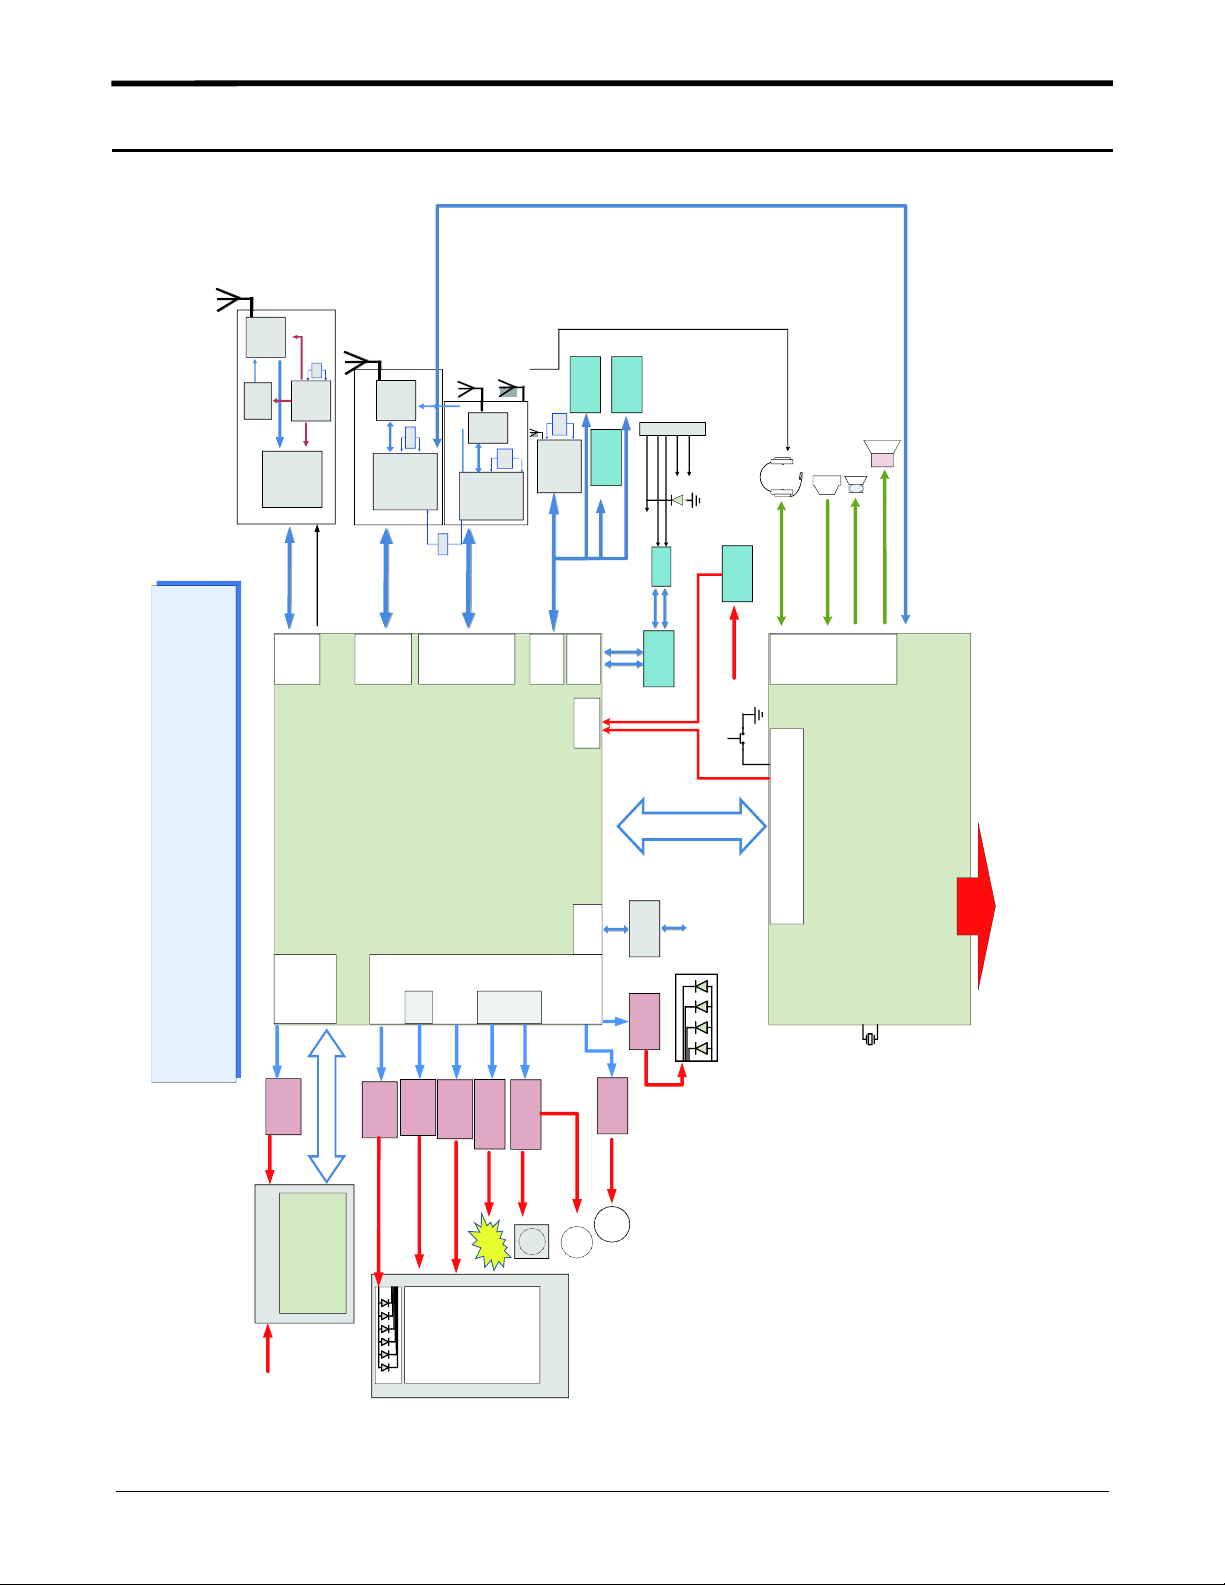
Level
8.
Block Diagram
8-1.
Repair
3
FEMid
RFMD
RF1292
DCXO
26MHz
PAM
RF6277
STE
RFMD
PM3535
PMU RF
STE
TRCV
RF3500
RF BLOCK
Updat ed Date : 2012.10.20
SYS_CLK_REQ /
RX_DA,TX_DA
RF_STOBE / SCLK / SDAT
RF BB IF
ANT
BT /WIFI
FM ANT
WIFI ANT
AWL9565
OSC
34.7MHz
STE
WIFI
CW1250
WIFI
BT_UART_TXD
BT_UART_R TS
BT_PCM_CLK
BT_PCM_SY NC
BT_PCM_DI
BT_UART_R XD
BT_UART_C TS
BT_PCM_DO
SDIO
UART
GPS ANT
TCXO
GBF_BT_RF
S/W
GPS/BT
MGF7301
CG2905
GPS/BT/FM
BT/ GPS/ FMBLOCK
26MHz
UART
27MHz
OSC
26MHz
STE
STE
NFC
PN547
I2C
STE
AP + CP
DB8520H
TAOS
ACCEL
BOSCH
BMA254
TMD2672
Proxi Sensor
ALPS
VBUS
COMPASS
HSCDTD006
I2C
DP DM
TSU6111RSVR
PORN
Micr o USB CON
USB_ID
V_BAT_FET
PTVS26V
ACRE1A2G90E
TI
u-USBSW IC
RESET IC
FT7521L6X
Phone ResetPhoneReset
Power o n KEY
EARPHONE
MIC
3PI_ADC
MIC2P / N
3PI_DETECT
Fairchild
EAR_MIC_P / N
EAR_SPK_L / R
AUDIO
FM_I2S_DO
FM_I2S_CLK
FM_I2S_SYNC
FM_I2S_DI
SPK
RECIEVER
SPK_P / SPK_N
RCV_P / RCV_N
AMP
STE
AB8500
System control IF
(BB / PMU)
MC0
((TTII))
LLeevveell SShhiifftteerr
TTXXSS00220066--2299
Main Power Supply
GGOOLLDDEENN BBlloocckk DDiiaaggrraamm HH//WW RREEVV00..77
MC2
RICOH
VVMMEEMM__33VV33
RP114K331D-TR
EELLVVDDDD__44..66VV
STOD13AMTPUR
MC2_DAT_[0: 7]
VMEM_3V3
LCD BACKLIGHT
((SSAANN DDIISSKK))
SSDDIINN77DDUU22--88GG--994444LL
ii NNAANNDD((88GG))--eeMMMMCC 44..4411
PHONE MEMORY
VSMPS2_1V8
GPIO
MIPI
DSI0
RICOH
EELLVVSSSS__--44..99VV
RP152L010B-TR
VVRREEGG__LLCCDD__33..00VV
VVRREEGG__LLCCDD__11..88VV
AMOLED LCD
MIPI
CSI0
CSI1
RICOH
SM5103
KINETIC
MIC5365-1.8YMT
TTOOUUCCHH__KKEEYY__11..88VV
OCTA TSP
LCD
MAIN LCD
4.0", AMOLED
SILICONMITUS
KTD262EJH-TR
CCAAMM DDCCDDCC//LLDDOO
FFLLAASSHH LLEEDD DDrr IICC
CAM
FLASH
VGA
CAMERA
CAMERA
5Mega AF
(OCTA)
OCTA TSP MOD ULE
MICREL
KKEEYY__LLEEDD__33..33VV
MIC5365-3.3YMT
KEY LED 3.3V
MICREL
LLDDOO__33..33VV
MIC5365-3.3YMT
32.768kHz
M
LINEAR MOTOR
8-1
Confidential and proprietary-the contents in this service guide subject to change without prior notice.
Distribution, transmission, or infringement of any content or data from this document without Samsung’swritten authorization is strictly prohibited.
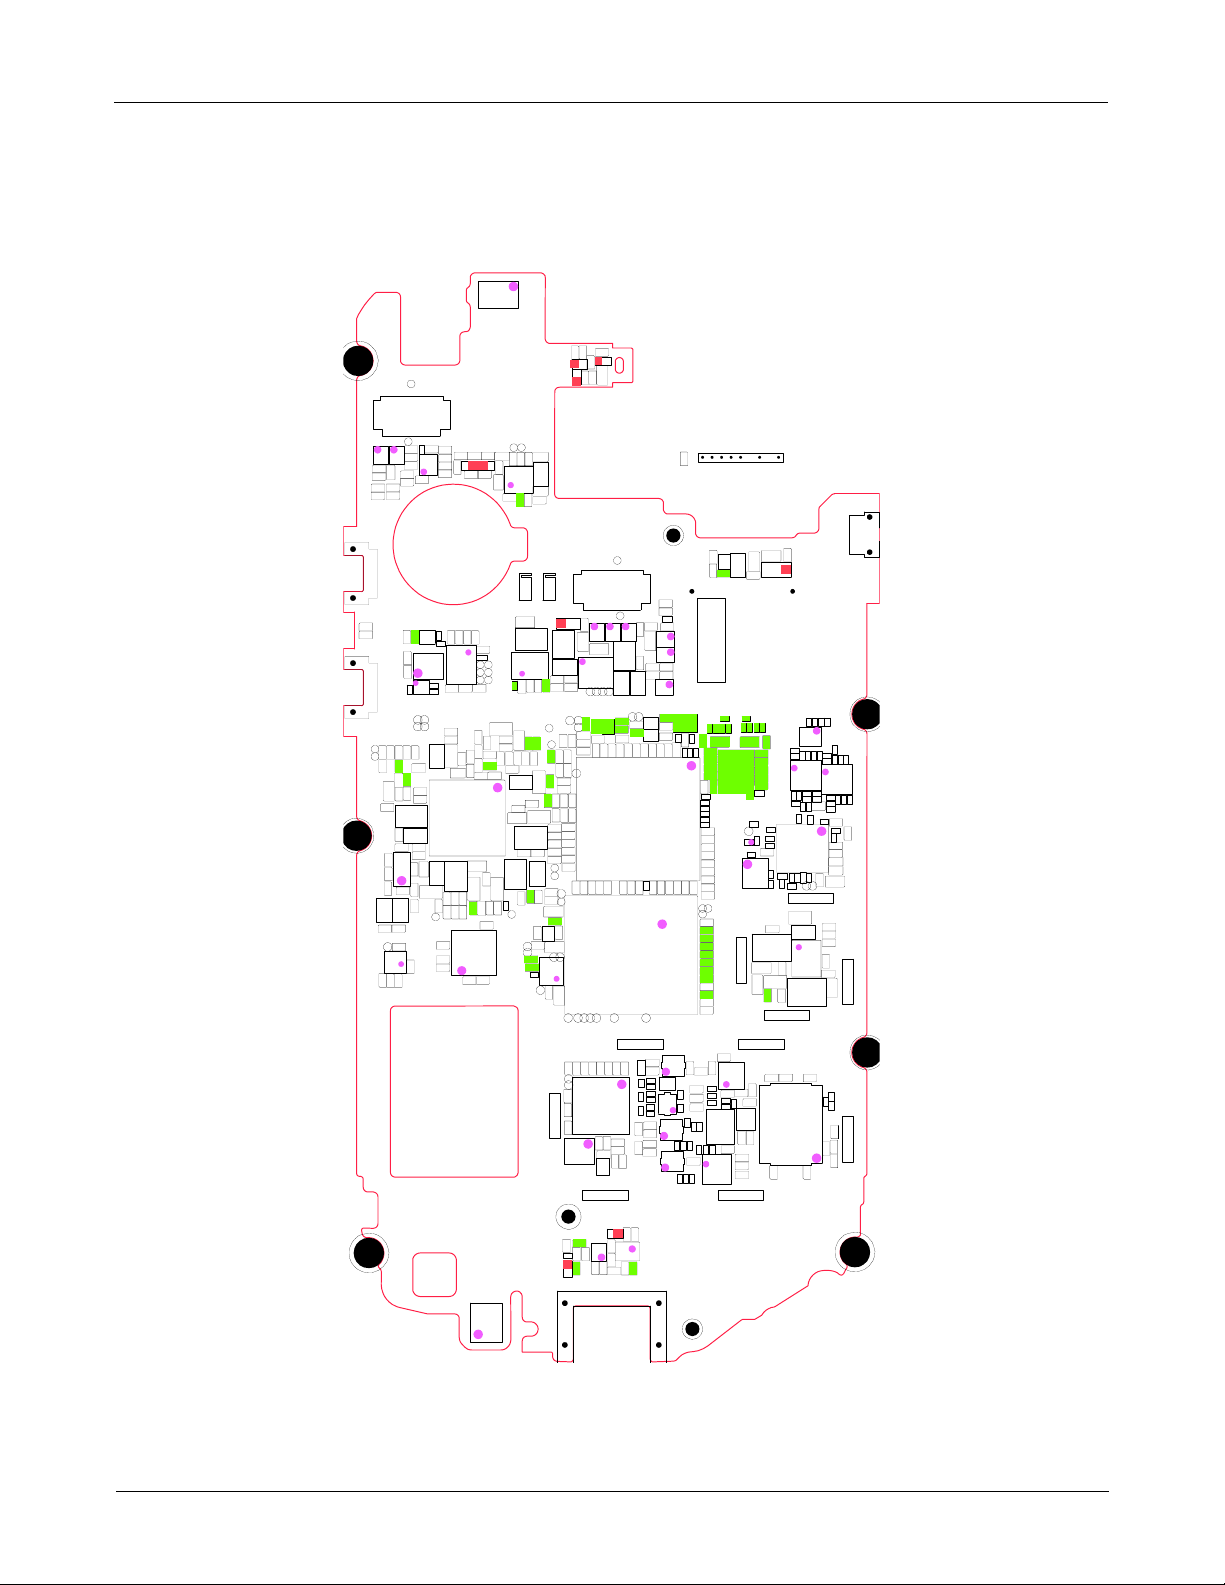
Level3Repair
B
B
8
9
PCB Diagrams
8-2.
8-2-1.
Top
OTHHOLE102
U205
L
5
7
5
7
7
C
2
4
1
5
C
L
5
1
ZD510
5
D
Z
0
2
8
Z
7
D
L
1
5
5
8
5
0
2
4
L
2
3
5
T
P
_
V
T
_
R
E
S
E
T
0
0
S
L
5
C
T
P
_
V
T
_
S
T
B
Y
R
L
5
5
1
2
L
5
1
3
1
0
C517
L
5
0
2
F501
F503
C290
2
0
8
C569
5
5
3
R
C561
C518
ZD507
L514
C
2
2
5
6
0
C
6
C559
R
L515
R
5
4
9
5
4
4
R
5
7
0
C
G
B
T
N
I
P
_
T
P
_
P
T
2
0
4
R
C
C
C
C211
R203
C231
4
4
4
3
0
1
7
0
1
5
D
Z
0
4
C
4
6
ZD505
1
1
0
5
C
5
7
8
C
C579
1
C
0
4
0
5
4
U
R
C409
3
7
1
1
2
4
R
C
C
4
0
8
0
0
4
L
0
6
C
4
3
1
1
R
3
D
1
A
0
R
3
2
4
P
OTHHOLE101
BOTHHOLE103
BOTHHOLE107
T
A
C
T
5
0
1
C566
C
5
L
C568
T
A
C
T
5
0
2
P
T
U
O
_
B
I
V
_
P
T
N
T
U
O
_
B
I
V
_
P
T
9
2
1
2
2
6
0
5
0
4
C
0
0
2
0
1
2
R
C
2
3
0
OSC200
9
2
2
C
2
1
2
C
TP_NFC_CLK_REQ
TP_FM_I203
R
C
C
R
R
5
4
4
5
5
2
2
6
1
2
1
3
5
9
0
5
1
2
7
4
4
C
C
C
C
4
4
5
4
3
4
9
4
9
4
8
3
3
4
C
4
C
R
C476
3
1
4
7
8
6
4
C
C486
C
4
7
0
0
0
L
4
4
0
9
C
C
4
4
S
0
O
C
4
6
3
C493
C
4
C
C
7
2
4
4
6
6
2
1
4
9
9
C
C482
Y
D
R
D
_
S
C
2
2
5
S
A
P
M
O
C
_
P
T
9
0
2
4
2
2
C
U
R
R
3
3
6
2
2
5
8
9
5
C
3
F200
2
2
2
L
C
C
1
0
2
L
2
1
5
C
U
R205
2
T
P
6
0
0
2
2
0
7
P
T
3
T
P
2
0
200
5
T
P
2
0
U
2
0
2
TP_FM_I202
TP_FM_I200
C426
C469
4
6
7
C
L
2
4
C
C473
C474
C
4
1
7
6
3
4
C
TP200
4
2
3
2
C
C
2
0
2
C219
L207
R206
4
6
6
C
3
6
5
C
R
C455
5
4
7
C
5
5
C
8
4
4
3
1
4
4
0
0
4
4
5
3
4
0
C
4
L
L
C
5
6
4
R542
5
8
0
3
C
4
4
C
C550
U
4
0
6
C
4
1
5
L
L
4
4
1
0
0
L
4
8
0
7
6
1
C
8
4
1
4
C
R
4
8
2
1
0
1
3
4
4
R
R
C
4
3
5
8
7
6
5
5
5
4
4
4
R
C
C
C
4
5
9
2
1
1
0
4
4
T
P
R
_
R
G
N
D
_
D
E
T
_
A
B
4
0
0
C
2
7
2
2
2
3
C
4
0
2
R
3
1
4
U
R
3
1
5
C
2
7
3
C274
1
0
0
0
4
4
T
T
O
O
M
M
C510
0
0
5
L
0
0
5
U
C530
6
9
7
1
8
0
0
0
0
1
5
5
5
5
5
R
R
R
R
R526
C
T
P
_
I
F
_
R
X
D
C562
4
0
2
C
9
5
C
C
T
4
P
4
4
_
I
6
9
F
C
_
0
5
T
X
D
4
8
1
C
C
R
3
C
C
C
C
1
4
4
4
4
4
2
2
8
9
2
2
8
4
8
9
4
C
C
4
9
4
C549
C
4
6
1
2
3
L412
0
C
C
C
3
3
1
1
8
9
C
4
3
8
L401
C
3
1
0
C
4
0
1
C400
C375
C302
L402
C450
4
7
7
C
C
4
5
2
C451
4
3
4
C
T
P
_
P
L
O
R
N
4
9
T
8
P
0
_
R
E
4
S
6
E
T
C
4
1
4
C421
C
TP_BT_VREG_ON
C
4
2
3
4
4
3
4
1
C
4
C
4
4
3
L
0
0
4
2
H
T
9
4
C
S
E
R
C370
V
I
C
E
_
A
B
8
5
0
5
3
3
5
R
C
3
6
3
U306
T
P
C
3
6
2
3
0
C369
0
TP303
TP309
R
3
4
1
R340
U308
C368
5
0
3
7
P
6
T
3
C
4
0
1
C
S
C527
R
3
1
7
C
3
1
1
2
1
3
C
0
2
C
4
5
4
T
P
_
3
0
1
2
5
3
C
P
3
0
7
6
6
3
C
BOTHHOLE110
T
P
_
5
M
_
S
T
B
Y
0
1
S
L
5
C
T
P
_
5
M
_
R
E
S
E
T
D
4
0
0
C
4
8
8
3
3
3
5
0
C
5
L
U
5
0
3
L
5
0
4
C531
TP_BT_PCM_SYNC
TP_BT_UART_CTD
TP_BT_UART_RXD
2
1
5
R
TP_BT_UART_TXD
C324
R
3
1
6
C325
C348
C
3
1
5
3
1
3
C
TP_BT_UART_RTS
5
0
R
5
0
C
3
7
3
C
C
7
3
1
7
3
4
C
3
5
6
C
C
4
8
3
C
4
7
5
C464
3
1
9
R
R
3
0
0
5
9
0
2
3
3
C
C
T
Q
N
E
_
R
T
_
S
K
R
L
_
C
TP_WLAN_SDIO_DATA2
N
_
A
S
L
Y
S
W
_
_
P
P
T
T
2
1
6
2
2
0
1
1
1
L
C
C
T
_
T
A
D
_
P
T
T
_
K
L
C
_
P
T
8
1
1
C
C
1
0
7
C
1
0
6
0
0
1
C
S
C504
9
0
5
L
1
0
1
1
5
5
C551
L
L
C
1
5
0
0
3
5
D
Z
5
0
1
5
1
5
C
F500
F502
F504
4
1
5
C
C532
5
0
5
6
L
0
5
L
C535
C536
9
8
2
2
5
5
C
C
TP_BT_PCM_CLK OD_MCP_TB_PTID_MCP_TB_PT
T
T
P
P
2
2
2
2
9
8
5
1
6
R
0
C478
0
5
R517
R
4
2
9
Q
R
3
2
7
C
3
2
3
C
C
C
C
C
C
C
C
3
3
3
3
3
3
3
3
5
4
4
2
0
2
6
0
7
3
2
0
6
6
5
7
U
C
P
3
0
0
5
2
3
8
4
0
4
3
2
R
0
4
6
6
1
3
3
3
3
3
1
3
C
C
C
C
R
C
U
M
E
3
0
1
E
K
A
W
TP_WLAN_SDIO_CMDTP_WLAN_SDIO_DATA0
TP_RF_STROBE
_
T
B
_
P
T
S
C
1
0
5
0
4
2
0
9
5
4
4
2
2
1
0
0
0
1
1
1
1
1
1
L
0
2
C
C
C
R
C
7
3
1
8
2
1
L
9
3
1
C
U
3
4
1
C
L
1
3
3
8
4
1
C
1
0
1
4
1
C
L
1
3
0
0
2
4
1
C
C100
3
0
1
L
C101
C
C
1
1
5
1
3
1
0
3
1
C134
L
C
1
O
1
0
C
1
1
7
C136
C116
L
1
4
0
1
5
1
C
Q
0
1
0
C
S
1
0
6
C
C
5
5
ZD401
2
2
5
6
R
5
5
9
2
U
0
5
8
F
5
0
R
5
5
8
C
C
2
4
5
5
3
3
4
4
5
5
0
1
R
R
R536
C
4
9
1
U404
7
8
4
C
R436
5
1
2
C
5
1
3
C
R561
H
L
C534
D
F
C
5
0
5
5
0
0
F
5
0
6
L507
L508
F
5
0
7
2
3
4
R
6
7
2
C
1
3
0
0
4
C
4
8
0
2
C
4
6
2
U
2
0
4
U
4
3
3
C
L
1
L
1
C
5
6
6
2
2
5
C
C
Q
C
4
7
9
6
4
7
3
4
5
3
C
7
4
L
2
1
2
C
2
3
2
C
R
C
C
C
3
3
3
3
5
7
2
6
0
C
C
C
C
5
0
1
3
3
3
4
4
3
1
0
7
2
6
8
C
C255
U207
R232
3
7
3
0
2
3
2
2
4
R
R
1
0
2
R
0
2
3
R
9
4
3
C
1
5
3
C
1
3
0
R
9
0
3
R
C
3
3
3
C
3
7
2
R326
C
3
2
1
C
3
3
9
C
3
5
9
3
5
8
C
2
7
8
0
1
C
3
3
6
2
2
2
3
3
3
3
3
3
3
C
C
C
C
C
3
3
8
C
8
0
0
1
3
3
P
P
T
T
0
0
3
B
D
N
T
N
I
_
P
T
C361
R332
R331
R334
R305
R304
R333
R330
R308
R303
R306
C
3
5
4
1
3
1
C
L
L
1
1
F106
2
2
5
6
L121
7
0
F
1
L
1
2
4
L120
7
4
C160
1
L
C130
1
3
5
C
C182
8
9
1
1
L
0
0
0
1
L
1
6
L123
4
1
F
L
8
0
1
1
L
L
1
2
0
0
0
7
1
C
1
F100
F
C
L
1
1
5
1
2
1
6
3
1
L
C
L
1
1
2
9
1
1
1
3
2
1
L
C
1
2
7
F102
F103
C
L
1
1
7
1
2
1
8
8
1
L
C
5
C
4
9
6
6
5
L
4
1
5
0
5
4
R
ZD400
C
4
9
7
C249
C
C
1
9
2
2
3
4
5
4
6
6
2
2
2
4
2
C
C
C
9
1
L211
2
R
0
C240
C243
C
2
6
1
C267
C269
2
4
6
C
R
C262
8
R
5
6
0
1
2
1
5
R
2
C
8
3
2
C
C210
TP_HOST_WAKE
C296
2
4
2
5
5
5
U
R
9
9
2
C
L209
C245
O
S
C
R
2
2
0
7
R
2
4
3
6
0
3
2
C
1
C
C
2
2
8
4
2
4
R230
C
1
6
5
L111
0
0
1
C
S
C
C
1
7
9
1
7
5
L
1
C176
3
1
4
3
4
7
1
1
C
C
C
S
1
0
1
0
7
S
C
1
5
0
1
5
4
C
C151
1
F
C
1
5
9
L
1
3
7
1
C172
0
1
L
4
1
0
0
0
1
F
L
1
8
0
0
9
1
C
C
1
2
C157
L
1
4
1
2
5
1
C
C146
S
C
1
0
8
4
2
R
F203
9
3
2
C
C
2
7
9
U
2
0
8
7
3
2
C
8
U101
M
TACT500
BOTHHOLE10
L
2
7
6
4
1
8
8
1
6
2
2
2
L
C
C
2
0
2
F
C
2
2
1
5
4
8
2
5
2
C
9
3
3
3
3
2
2
2
2
C
C
R
R
C
C
4
2
2
1
1
1
2
7
8
3
5
2
C
C
U201
C297
L206
7
4
2
C
C
C298
2
0
4
5
8
2
C
C
2
1
2
2
8
8
2
2
5
C
C
2
4
9
C
7
2
2
C
8
7
2
1
2
2
C
L
8
8
2
C
C
2
8
0
0
7
2
C
L
2
1
5
8
7
2
C
1
7
2
C
8
0
2
L
2
5
6
C
C
2
7
7
C275
5
0
2
C
R
8
2
C
5
3
2
6
2
C
5
L
2
1
0
7
TP_WLAN_SDIO_DATA1
TP_WLAN_SDIO_DATA3
1
0
2
S
C
C
1
7
L135
2
4
1
L
C
1
6
4
1
1
2
R
2
6
1
C
C
1
8
0
S
C
1
0
3
L
1
3
L
1
4
0
9
BOTHHOLE10
1
5
0
C
9
6
1
C
7
6
1
C
C
1
6
6
A
P
6
5
1
C
S
C
1
0
9
1
6
8
1
3
C
1
L
8
5
1
C
3
5
1
C
BOTHHOLE104
MIC500
IFC500
BOTHHOLE106
8-2
Confidential and proprietary-the contents in this service guide subject to change without prior notice.
Distribution, transmission, or infringement of any content or data from this document without Samsung’swritten authorization is strictly prohibited.
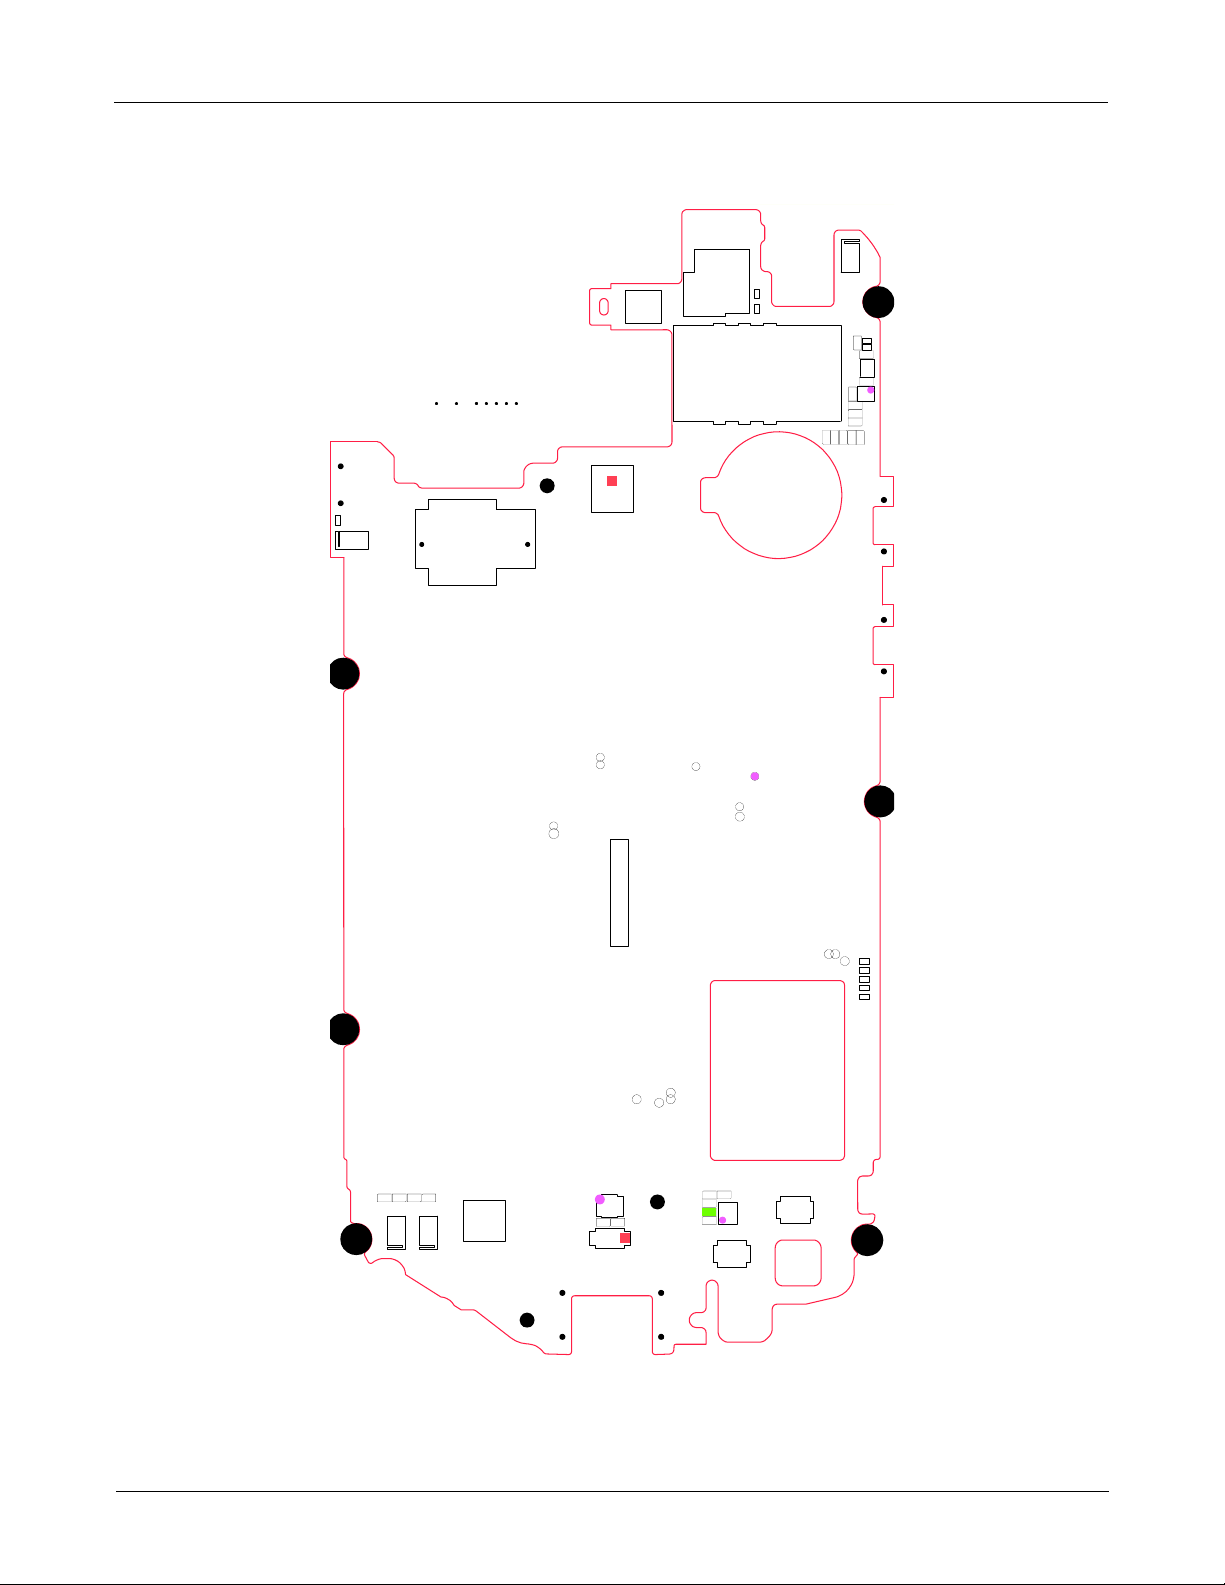
Level3Repair
8-2-2.
Bottom
A
N
T
2
0
R
C
V
5
0
L
5
2
0
HDC503
L
E
D
5
0
C
2
1
3
ANT201
0
4
T
C
0
B
T
P
3
0
2
T
P
_
S
Y
S
_
C
L
K
_
4
0
0
0
B
F
_
M
R
A
V
_
P
T
B
F
G
E
N
_
M
R
A
V
_
P
T
1
L
5
1
9
S
5
I
0
M
0
T
P
_
U
S
B
_
X
C
L
K
U
L
P
_
C
L
K
_
T
P
T
P
_
C
L
K
_
3
0
0
T
P
_
2
0
0
0
C208
C
2
0
3
C207
L204
1
0
2
F
L
2
0
2
U200
3
8
2
C
C204
L
2
0
0
C209
C
C
5
3
5
5
4
1
7
1
2
7
9
5
5
0
5
C
R
C
P
A
D
1
0
0
T
T
P
P
3
3
0
0
6
4
R336
1
0
3
P
T
R337
R338
R339
R301
T
P
_
S
C
L
K
TP_SDAT
K
L
_
C
F
E
R
_
T
X
E
_
C
F
N
_
P
T
TP_SLE
R557
R
5
5
C109
L143
C
L
1
1
8
2
1
7
F
R
S
1
0
0
0
1
0
0
1
1
T
T
N
N
A
A
5
0
4
U
C542
L
4
1
6
ZD500
6
L516
Z
D
5
0
8
C
5
7
2
HDC504
1
1
5
D
Z
HDC502
8-3
Confidential and proprietary-the contents in this service guide subject to change without prior notice.
Distribution, transmission, or infringement of any content or data from this document without Samsung’swritten authorization is strictly prohibited.

Level3Repair
Flow Chart of Troubleshooting
8-3.
Equipments
Oscilloscope
Power Supply
Digital Multi-meter
driver, ESD Safe Tweezer
+
8960 &
Confidential and proprietary-the contents in this service guide subject to change without prior notice.
Distribution, transmission, or infringement of any content or data from this document without Samsung’swritten authorization is strictly prohibited.
Spectrum Analyzer
8-4
Soldering iron
Level3Repair
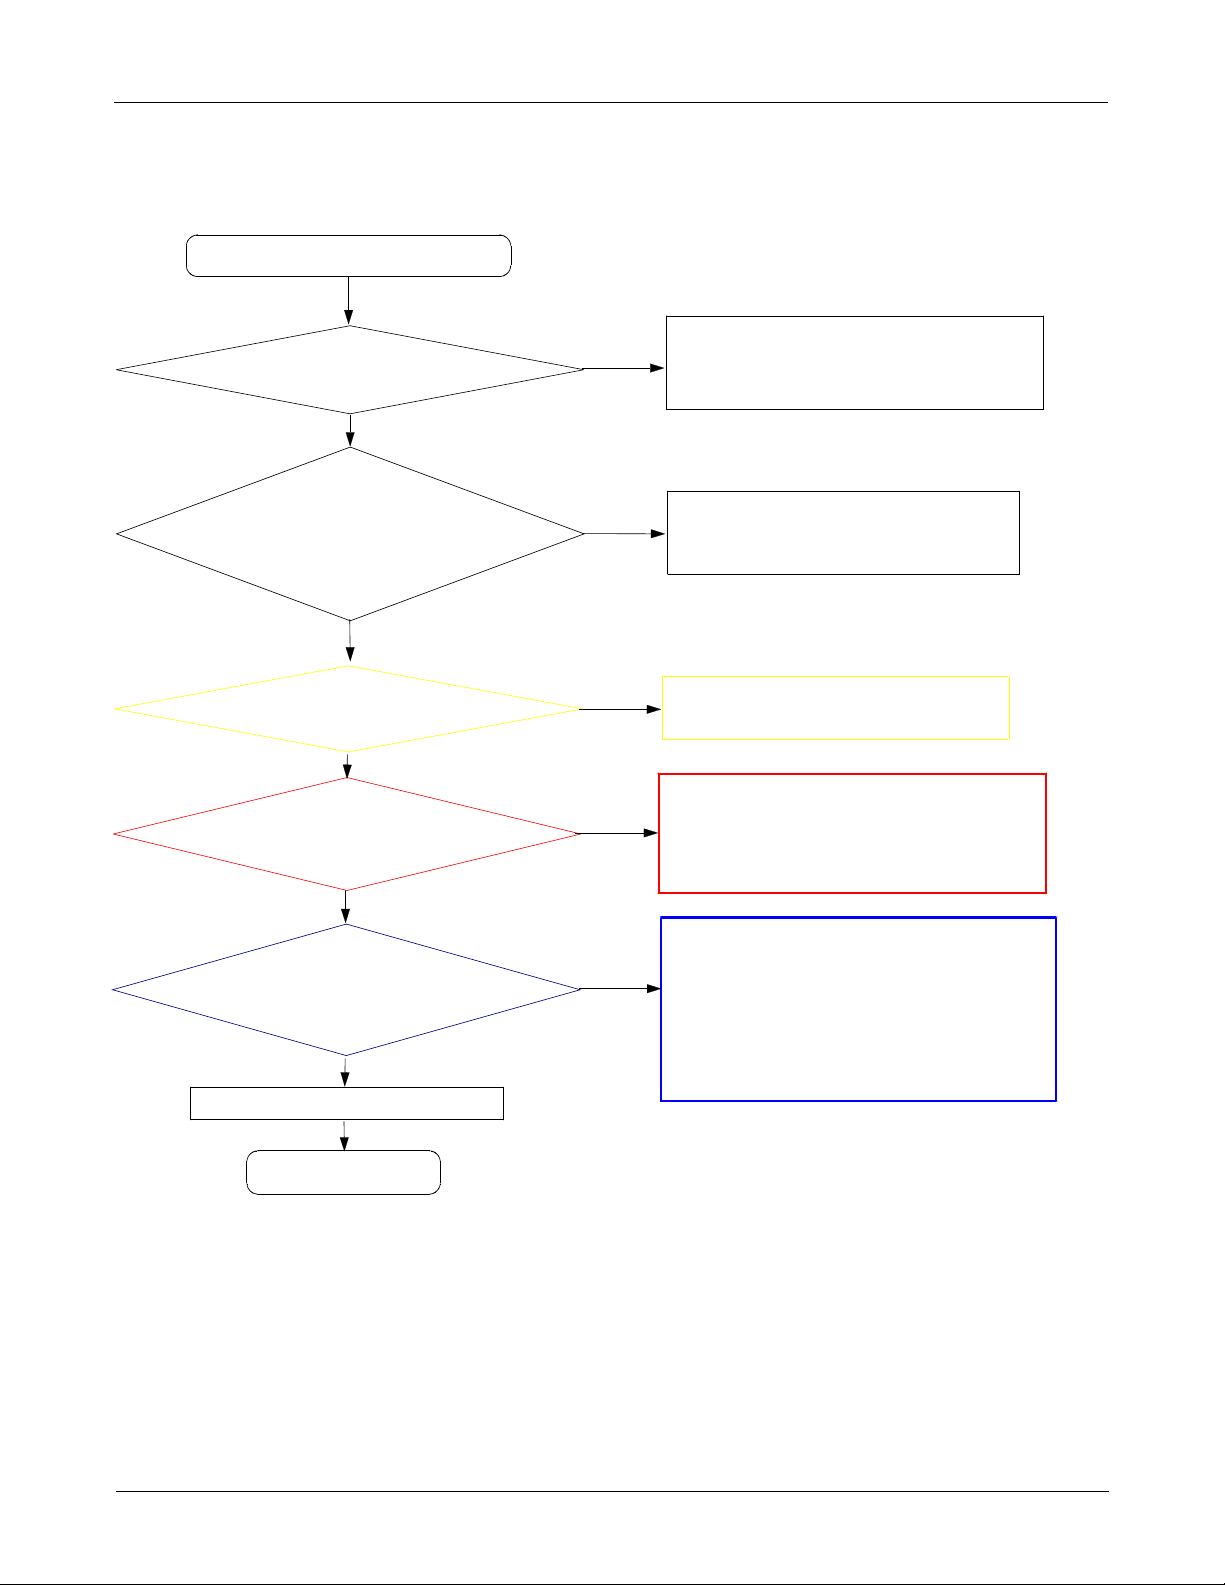
8-3-1.
Power On
Mobile phone does not power on.
Check the Battery Voltage
it more than
Is
Yes
Power-on the phone and
check the power-on sound
or motor Vibration.
No
Check the TACT500
soldering crack, open, etc)
(
3.8
V?
.
No
Yes
Abnormal
If its voltage level is extremely low(under
Change the TACT500(Power-key switch)
Charging the battery by TA.
Change the battery.
Change the FRONT-LCD ASSY
And retry to the power-on operation.
3.0
V),
Yes
Check the U403 output voltage
C416
(
Check the Clock OSC400
Is that frequency
check the initial operation
>1.8
V, C418
Yes
Yes
Yes
END
>1.2
32.768
V)
Khz?
No
No
If the output voltage is not satisfied with normal
condition, Change the U406.
Each voltage level has
※
Change the OSC400.
If OSC400 does not still work, Change the U406
This problem is internal oscillator of U406.
Test condition(Oscilloscope setting)
※
us.div(time division)
:20.0
±10%
margin.
8-5
Confidential and proprietary-the contents in this service guide subject to change without prior notice.
Distribution, transmission, or infringement of any content or data from this document without Samsung’swritten authorization is strictly prohibited.
 Loading...