

Samsung GT-B9150ZKYXAR, GT-B9150AKYATT User Manual

ANDROID DEVICE
User Manual
Please read this manual before operating your
device and keep it for future reference.

Warning!
This product contains chemicals known to the State of California to cause cancer and reproductive toxicity.
Intellectual Property
All Intellectual Property, as defined below, owned by or which is otherwise the property of Samsung or its respective suppliers
relating to the SAMSUNG Phone, including but not limited to, accessories, parts, or software relating there to (the “Phone
System”), is proprietary to Samsung and protected under federal laws, state laws, and international treaty provisions. Intellectual
Property includes, but is not limited to, inventions (patentable or unpatentable), patents, trade secrets, copyrights, software,
computer programs, and related documentation and other works of authorship. You may not infringe or otherwise violate the
rights secured by the Intellectual Property. Moreover, you agree that you will not (and will not attempt to) modify, prepare
derivative works of, reverse engineer, decompile, disassemble, or otherwise attempt to create source code from the software. No
title to or ownership in the Intellectual Property is transferred to you. All applicable rights of the Intellectual Property shall remain
with SAMSUNG and its suppliers.
Open Source Software
Some software components of this product incorporate source code covered under GNU General Public License (GPL), GNU Lesser
General Public License (LGPL), OpenSSL License, BSD License and other open source licenses. To obtain the source code covered
under the open source licenses, please visit:
http://opensource.samsung.com
GEN_GT-B9150_MR_UM_Eng_MH8_TN_121213_F3
.

Disclaimer of Warranties; Exclusion of Liability
EXCEPT AS SET FORTH IN THE EXPRESS WARRANTY CONTAINED ON THE WARRANTY PAGE ENCLOSED WITH THE PRODUCT, THE
PURCHASER TAKES THE PRODUCT "AS IS", AND SAMSUNG MAKES NO EXPRESS OR IMPLIED WARRANTY OF ANY KIND
WHATSOEVER WITH RESPECT TO THE PRODUCT, INCLUDING BUT NOT LIMITED TO THE MERCHANTABILITY OF THE PRODUCT OR
ITS FITNESS FOR ANY PARTICULAR PURPOSE OR USE; THE DESIGN, CONDITION OR QUALITY OF THE PRODUCT; THE
PERFORMANCE OF THE PRODUCT; THE WORKMANSHIP OF THE PRODUCT OR THE COMPONENTS CONTAINED THEREIN; OR
COMPLIANCE OF THE PRODUCT WITH THE REQUIREMENTS OF ANY LAW, RULE, SPECIFICATION OR CONTRACT PERTAINING
THERETO. NOTHING CONTAINED IN THE INSTRUCTION MANUAL SHALL BE CONSTRUED TO CREATE AN EXPRESS OR IMPLIED
WARRANTY OF ANY KIND WHATSOEVER WITH RESPECT TO THE PRODUCT. IN ADDITION, SAMSUNG SHALL NOT BE LIABLE FOR
ANY DAMAGES OF ANY KIND RESULTING FROM THE PURCHASE OR USE OF THE PRODUCT OR ARISING FROM THE BREACH OF
THE EXPRESS WARRANTY, INCLUDING INCIDENTAL, SPECIAL OR CONSEQUENTIAL DAMAGES, OR LOSS OF ANTICIPATED PROFITS
OR BENEFITS.
Modification of Software
SAMSUNG IS NOT LIABLE FOR PERFORMANCE ISSUES OR INCOMPATIBILITIES CAUSED BY YOUR EDITING OF REGISTRY SETTINGS,
OR YOUR MODIFICATION OF OPERATING SYSTEM SOFTWARE.
USING CUSTOM OPERATING SYSTEM SOFTWARE MAY CAUSE YOUR DEVICE AND APPLICATIONS TO WORK IMPROPERLY. YOUR
CARRIER MAY NOT PERMIT USERS TO DOWNLOAD CERTAIN SOFTWARE, SUCH AS CUSTOM OS.

Samsung Telecommunications America (STA), LLC
Headquarters:
1301 E. Lookout Drive
Richardson, TX 75082
Customer Care Center:
1000 Klein Rd.
Plano, TX 75074
Toll Free Tel: 1.888.987.HELP (4357)
Internet Address:
http://www.samsung.com
©
2013 Samsung Telecommunications America, LLC. Samsung is a registered trademark of Samsung Electronics Co., Ltd.
Do you have questions about your Samsung Mobile Phone?
For 24 hour information and assistance, we offer a new FAQ/ARS System (Automated Response System) at:
www.samsung.com/us/support
The actual available capacity of the internal memory is less than the specified capacity because the operating system and default
applications occupy part of the memory. The available capacity may change when you upgrade the device.

The Bluetooth® word mark, figure mark (stylized “B Design”), and combination mark (Bluetooth word mark and “B Design”) are
registered trademarks and are wholly owned by the Bluetooth SIG.
Google, the Google logo, Android, the Android logo, Google Play, Gmail, Google Mail, Google Maps, Google Music, Google Talk,
Hangouts, Picasa, YouTube and other marks are trademarks of Google Inc.
HDMI, the HDMI logo and the term “High Definition Multimedia Interface” are
trademarks or registered trademarks of HDMI Licensing LLC.
Wi-Fi is a registered trademark of the Wireless Fidelity Alliance, Inc.
®
Microsoft
Windows XP, Windows Vista, and Windows 7 are trademarks of Microsoft Corporation.
Other company names, product names, and marks mentioned herein are the property of their respective owners and may be
trademarks or registered trademarks.
®
, DivX Certified® and associated logos are trademarks of Rovi Corporation or its subsidiaries and are used under
, DivX
license.
DivX Certified
ABOUT DIVX VIDEO: DivX
Certified
software tools to convert your files into DivX videos.
ABOUT DIVX VIDEO-ON-DEMAND: This DivX Certified
®
to play DivX® video up to HD 720p, including premium content.
®
®
device that has passed rigorous testing to verify that it plays DivX video. Visit
is a digital video format created by DivX, LLC, a subsidiary of Rovi Corporation. This is an official DivX
®
device must be registered in order to play purchased DivX
www.divx.com
for more information and
Video-on-Demand (VOD) movies. To obtain your registration code, locate the DivX VOD section in your device setup menu (tap
Applications > Settings > About phone > Legal information > License settings > DivX® VOD > Register
). Go to
vod.divx.com
for more
information on how to complete your registration.

Table of Contents
Section 1: Getting Started ...........................4
Understanding This User Manual . . . . . . . . . . . .4
Device Layout and Function . . . . . . . . . . . . . . . . 5
Package Contents . . . . . . . . . . . . . . . . . . . . . . .6
Installation . . . . . . . . . . . . . . . . . . . . . . . . . . . .7
Restarting the Device . . . . . . . . . . . . . . . . . . . .8
Turning On the Device . . . . . . . . . . . . . . . . . . . . 9
Connecting to a Smartphone . . . . . . . . . . . . . . . 9
Turning Off the Device . . . . . . . . . . . . . . . . . . . 11
Setting Up Your Device . . . . . . . . . . . . . . . . . . 11
Connecting to Audio Equipment . . . . . . . . . . . . 15
Troubleshooting . . . . . . . . . . . . . . . . . . . . . . .16
Section 2: Basics .......................................17
Features of Your Device . . . . . . . . . . . . . . . . . .17
Controlling a Screen . . . . . . . . . . . . . . . . . . . . 18
Screen Mirroring . . . . . . . . . . . . . . . . . . . . . . .21
Using the Mirror Mouse . . . . . . . . . . . . . . . . . . 21
Entering Text . . . . . . . . . . . . . . . . . . . . . . . . . . 22
1
My Content Screen . . . . . . . . . . . . . . . . . . . . .22
Opening an Application . . . . . . . . . . . . . . . . . .23
Apps Screen . . . . . . . . . . . . . . . . . . . . . . . . . .24
Recommended Screen . . . . . . . . . . . . . . . . . . .25
Setting Up Accounts . . . . . . . . . . . . . . . . . . . .25
Notifications . . . . . . . . . . . . . . . . . . . . . . . . . .26
Transferring Files . . . . . . . . . . . . . . . . . . . . . . .27
Connecting to a Wi-Fi Network . . . . . . . . . . . .28
Section 3: Internet and Screen
Mirroring .................................................30
Internet . . . . . . . . . . . . . . . . . . . . . . . . . . . . . .30
Screen Mirroring . . . . . . . . . . . . . . . . . . . . . . .33
Section 4: Media .......................................34
Play Music App . . . . . . . . . . . . . . . . . . . . . . . .34
Music Player . . . . . . . . . . . . . . . . . . . . . . . . . .35
Gallery . . . . . . . . . . . . . . . . . . . . . . . . . . . . . . .36
Video Player . . . . . . . . . . . . . . . . . . . . . . . . . . .38
YouTube . . . . . . . . . . . . . . . . . . . . . . . . . . . . .39

Section 5: Application and
Media Stores ........................................... 40
Media Hub . . . . . . . . . . . . . . . . . . . . . . . . . . . 40
Play Store . . . . . . . . . . . . . . . . . . . . . . . . . . . 41
Samsung Apps . . . . . . . . . . . . . . . . . . . . . . . . 43
Play Movies & TV . . . . . . . . . . . . . . . . . . . . . . 44
Section 6: Utilities .................................... 45
POLARIS Office . . . . . . . . . . . . . . . . . . . . . . . 45
Google . . . . . . . . . . . . . . . . . . . . . . . . . . . . . . 46
My Files . . . . . . . . . . . . . . . . . . . . . . . . . . . . . 46
Downloads . . . . . . . . . . . . . . . . . . . . . . . . . . . 46
McAfee Virus Scan . . . . . . . . . . . . . . . . . . . . . 46
Section 7: Settings ...................................47
About Settings . . . . . . . . . . . . . . . . . . . . . . . . 47
Wi-Fi . . . . . . . . . . . . . . . . . . . . . . . . . . . . . . . 47
Bluetooth . . . . . . . . . . . . . . . . . . . . . . . . . . . . 47
Ethernet . . . . . . . . . . . . . . . . . . . . . . . . . . . . . 47
Nearby Devices . . . . . . . . . . . . . . . . . . . . . . . 48
Play Nearby Device Content . . . . . . . . . . . . . . 48
Sound . . . . . . . . . . . . . . . . . . . . . . . . . . . . . . 48
Display . . . . . . . . . . . . . . . . . . . . . . . . . . . . . . 48
Storage . . . . . . . . . . . . . . . . . . . . . . . . . . . . . 49
Application Manager . . . . . . . . . . . . . . . . . . . 49
Location Services . . . . . . . . . . . . . . . . . . . . . . 49
Lock Screen . . . . . . . . . . . . . . . . . . . . . . . . . . 49
Member Management . . . . . . . . . . . . . . . . . . 50
Security . . . . . . . . . . . . . . . . . . . . . . . . . . . . . 52
Language and Input . . . . . . . . . . . . . . . . . . . . 52
Content Backup and Restoration . . . . . . . . . . . 53
Backup and Reset . . . . . . . . . . . . . . . . . . . . . 54
Accounts . . . . . . . . . . . . . . . . . . . . . . . . . . . . 54
Mouseover . . . . . . . . . . . . . . . . . . . . . . . . . . . 55
Audio Output . . . . . . . . . . . . . . . . . . . . . . . . . 55
Date and Time . . . . . . . . . . . . . . . . . . . . . . . . 55
Accessibility . . . . . . . . . . . . . . . . . . . . . . . . . . 56
About Device . . . . . . . . . . . . . . . . . . . . . . . . . 56
Updating the Device Software . . . . . . . . . . . . 57
Section 8: Health and Safety
Information ..............................................58
Exposure to Radio Frequency (RF) Signals . . . 58
Knowing Radio Frequency Safety . . . . . . . . . . 58
FCC Radio Frequency Emission . . . . . . . . . . . 58
2

Samsung Products and Recycling . . . . . . . . . . 60
Care and Maintenance . . . . . . . . . . . . . . . . . .60
Operating Environment . . . . . . . . . . . . . . . . . .61
Restricting Children's Access to Your Device . . 63
FCC Notice and Cautions . . . . . . . . . . . . . . . . . 63
Other Important Safety Information . . . . . . . . .63
3
Section 9: Warranty Information ..............64
Standard Limited Warranty . . . . . . . . . . . . . . .64
End User License Agreement for Software . . . .69
Index ...........................................................77

Section 1: Getting Started
Use the HomeSync device to play multimedia files on large
screens that support High Definition Multimedia Interface
(HDMI). Install the HomeSync application on your smartphone
and then use it as a mouse to control the monitor or TV.
This section helps you to quickly start using your device.
Understanding This User Manual
The sections of this manual generally follow the features of
your device. A robust index for features begins on page 77.
Also included is important safety information, beginning on
page 58, that you should know before using your device.
This manual gives navigation instructions according to the
default display settings. If you select other settings,
navigation steps may be different.
Unless otherwise specified, all instructions in this manual
assume that you are starting from the
Note:
Instructions in this manual are based on default settings
and may vary from your device depending on the
software version on your device and any changes to the
device’s settings.
My content
screen.
Note:
All screen images in this manual are simulated. Actual
displays may vary depending on the software version of
your device and any changes to the device’s settings.
Special Text
In this manual, some text is set apart from the rest. This
special text is intended to point out important information,
share quick methods for activating features, define terms,
and more. The definitions for these methods are as follows:
•
Notes
: Presents alternative options for the current feature, menu,
or sub-menu.
•
Tips
: Provides quick or innovative methods or useful shortcuts.
•
Important
: Points out important information about the current
feature that could affect performance.
•
Warning
: Brings important information to your attention that
can help to prevent loss of data or functionality or damage to
your device.
Getting Started 4

Device Layout and Function
The following items can be found on the side and back of
your device as illustrated.
5
1.
Notification light
device’s status with the following colors.
•
Blue (steady)
–
Network connected
–
Ready to download or upload data
•
Green (steady)
–
Upcoming events
–
Application being updated
•
Red (blinking)
–
Failed to recognize internal hard disk drive (HDD)
•
Yellow (steady)
–
Network connection error
2.
Power button
or off.
Press and hold more than 8 seconds to restart
the device.
: The notification light alerts you to the
: Press and hold to turn the device on

3.
Functions button
your smartphone.
Press and hold for a few seconds to capture
a screenshot.
Power adaptor port
4.
supply power.
microUSB port
5.
cable with Media Transfer Protocol (MTP).
HDMI cable port
6.
using an HDMI cable.
USB port (3.0)
7.
compatible device (such as smartphones or cameras)
or a external USB storage device.
Connect a USB cable to use a keyboard or a mouse.
S/PDIF port
8.
S/PDIF cable.
LAN cable port
9.
LAN cable.
: Press to confirm secure pairing with
: Connect a power cable to
: Connect to a computer with a microUSB
: Connect to a monitor (TV or computer)
: Connect a USB cable to use a
: Connect to audio equipment using an
: Connect to a network using a
Note:
Some items, including monitors, smartphones, and
peripherals, may not be compatible with the device.
Package Contents
Check the product box for the following items. The items
supplied with the device may vary depending on the region
or service provider.
•
Device
•
Power adaptor/Power cord
•
LAN cable
• HDMI cable
Note:
You can purchase additional accessories: USB cable,
S/PDIF cable, and microUSB cable. Make sure they are
compatible with the device before purchase.
Getting Started 6

Installation
To install your device, follow these simple steps:
1. Connect the device to a monitor that supports the
High Definition Multimedia Interface (HDMI) using the
HDMI cable.
Note:
For more information, refer to the user manual for
the monitor.
7
2. Connect the device to a network by connecting the LAN
cable to the LAN cable port on the device.
•
If you connect the LAN cable after turning on the device,
access
Apps ➔ Settings ➔
Ethernet
select
•
You can let the device connect automatically to the current
Wi-Fi network your smartphone uses or you can connect to a
Wi-Fi network by accessing
However, to establish a better connection, it is recommended to
connect the LAN cable.
.
Ethernet
, and then
Apps ➔ Settings ➔
Wi-Fi
.
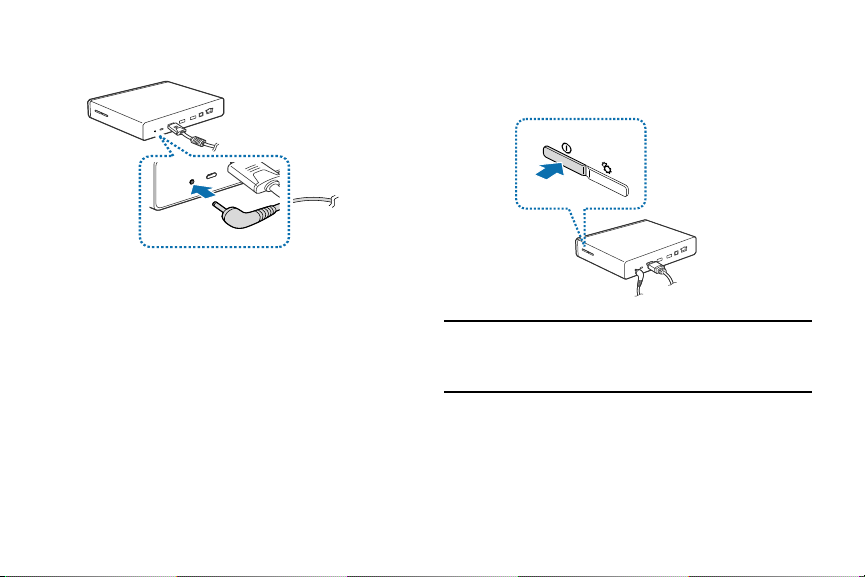
3. Connect the power adaptor to the device, and then
connect the power cord to the electrical socket.
Restarting the Device
If your device is frozen or unresponsive, press and hold the
Power button for more than 8 seconds.
Note:
Restarting may disconnect the device from your
smartphone. Connect the device to your smartphone
again with the NFC feature or the Bluetooth feature.
Getting Started 8

Turning On the Device
To turn on the device:
1. Press and hold the Power button.
2. Turn on the connected monitor.
Note:
For better picture quality, set the screen aspect ratio on
your monitor to fit its original screen or select the auto
aspect ratio setting manually. If the auto aspect ratio
setting is not available on your device, some parts of the
screen can be cut off.
9
Connecting to a Smartphone
Connect and register the device to a smartphone. You can
upload and download content, add and manage multiple user
accounts, use the smartphone as a remote control for a TV
screen or monitor (see “Controlling a Screen” on page 18),
and more.
To use this feature, you must download
Samsung Apps or the Google Play Store and install it on
your smartphone.
Note:
When your smartphone supports the Near Field
Communication (NFC) feature, touch the back of your
smartphone to the NFC antenna area near the center of
the device to download
Once the device connects to a smartphone, the device
will automatically reconnect to it whenever
is activated.
Note:
For more information about compatible smartphones,
refer to
www.samsung.com
HomeSync
HomeSync
.
.
from
HomeSync

When Your Smartphone Supports the
NFC Feature
You can connect the device to a smartphone when your
smartphone supports the NFC feature.
1. Activate the NFC feature on your smartphone.
2. To start
3. Follow the on-screen instructions.
Note:
HomeSync
to the NFC antenna area of the device.
The NFC antenna area of the smartphone may differ.
For more information, refer to the user manual for
the smartphone.
, touch the back of your smartphone
When Your Smartphone Does Not Support the
NFC Feature
You can use the Bluetooth feature to connect the device to
your smartphone, if your smartphone does not support the
NFC feature.
1. Start
HomeSync
2. Touc h
To use HomeSync, you must have a Samsung account.
If you have not set up your Samsung account, the
Samsung account screen displays. For more
information, refer to your smartphone user manual.
3. To uch
4. Select the device name from the list of
detected devices.
.
Menu
➔
Scan for devices
Add device
.
.
Getting Started 10

Note:
The device name may be different for your device. For
more information, refer to “About Device” on page 56.
5. Follow the on-screen instructions.
11
Turning Off the Device
To turn off the device:
Press and hold the Power button, and then select OK.
For more information about how to control the screen, see
“Controlling a Screen” on page 18.
Caution!
Do not disconnect the power adaptor from the device
while applications are running. Doing so may cause
malfunctions or damage to the device.
Setting Up Your Device
When you first turn on your device, you are asked to set up a
few things. To do that, the following screens display. Some
screens can be skipped (select
Previous
). Some screens display depending on the options
you choose.
Next
) or re-displayed (select

Welcome!
1. Select the
and select the language you want your device to use,
such as, English (United States), which is the default.
2. Select
Select language
Next
.
field, scroll through the list,
Wi-Fi
Make sure the Wi-Fi
choose one of the following options:
Select
not listed.
Select
Wi-Fi networks.
Select one of the Wi-Fi networks in the list, enter the
password, and select
another Wi-Fi network or select
Select
information, refer to “Wi-Fi” on page 47.
OFF / ON
icon is set to ON and
Add Wi-Fi network
Scan
to make sure you have an accurate list of
Next
to perform this task later. For more
to enter a Network SSID that is
Connect
. Select and connect to
Next
to continue.
Date and Time
This screen displays if you did not connect to a
Wi-Fi network.
1. Select
2. Select
3. Select
4. Select
Select time zone
Set date
and set the date (month, day, year),
if necessary.
Set time
and set the time (hour, minute, and AM
or PM), if necessary.
Next
.
and set the correct time zone.
End User License Agreement
1. Read the End User License Agreement for Software
and check
conditions above
2. Read the Samsung error log statement and check
or
3. Select
I understand and agree to the terms and
.
No, thanks
Next
.
.
Getting Started 12
Yes

Device Name
Your default device name is displayed on this screen
for reference.
1. Make a note of this name. It will be displayed when you
use Bluetooth, Wi-Fi Direct, and so on.
2. Select
Note:
Next
.
You may change the device name at this time.
Screen Size
This screen can be used to manually set the screen size of
the TV or monitor you will be using with HomeSync, which
will give you a better picture display.
Tip:
For better viewing, set the screen aspect ratio on your TV
to the auto aspect ratio setting.
If the auto aspect ratio setting is not available on your
device, some parts of the screen can be cut off.
1. Select the Screen Size field and then select
Scaled down 1, Scaled down 2
The screen size changes as you make your selection.
13
, or
Scaled down 3
Normal
.
Note:
You can change the screen size at any time by
accessing
Screen size
2. Select
Apps ➔ Settings
.
Finish
.
The Setting up accounts screen displays.
➔
Display ➔
Setting Up Accounts
Google applications, such as Play Store, require a Google
account. Samsung Apps requires a Samsung account. The
Setting up accounts screen can be used to set up both
accounts.
Select
Add account
The Samsung account screen displays.
– or –
Select
Later
Note:
If you skipped Wi-Fi setup, the Wi-Fi setup screen
,
displays and you must connect through a Wi-Fi network.
.
to proceed to the next screen.

Samsung Account
Sign in to your Samsung account to use Samsung services.
1. Select
2. Select
variety of services
Sign in
if you already have a Samsung account.
– or –
Select
Create new account
Samsung account.
– or –
Help
Select
For more information, refer to “Signing In to your
Samsung Account” on page 54.
The Got Google? screen displays.
to display additional information.
to learn more.
to create a
Got Google?
Your device uses your Google account to fully use its Android
features, such as Google Play.
The Got Google? screen can be used to sign in, if you already
have a Google account.
Note:
If you skipped Wi-Fi setup, the Wi-Fi setup screen
displays and you must connect through a Wi-Fi network.
Select
Yes
and then enter the email address and
password of your existing account.
Select to continue.
– or –
Select
No
to proceed to the next screen.
Getting Started 14

Make it Google
This screen displays if you did not sign in to your
Google account.
The Make it Google screen can be used to create a new
Google account.
Note:
If you skipped Wi-Fi setup, the Wi-Fi setup screen
displays and you must connect through a Wi-Fi network.
Select
Get an account
password of your existing account.
– or –
Select
Not now
information, refer to “Setting Up Accounts” on
page 25.
or enter the email address and
to perform this task later. For more
Setup Complete
Once setup is complete, the main HomeSync screen,
My content
Congratulations! Your device is set up and ready to use.
, displays.
15
Connecting to Audio Equipment
You can connect the HomeSync device to audio equipment,
such as home theaters.
To connect the device to audio equipment, use an
S/PDIF cable.
Note:
You can select a sound output format to use by
accessing
Apps ➔ Settings
➔
Audio output
.

Troubleshooting
Before you contact a Samsung Service Center, read the
following tips for a potential solution.
Nothing appears on the screen:
•
Ensure that the power adaptor and the HDMI cable are
connected properly.
Some parts of screen are cut off:
•
Set the screen aspect ratio on your monitor to fit its original
screen or select the auto aspect ratio setting manually.
Music, video, or other media content do not play:
•
Ensure that your device supports the file type.
•
Some files downloaded from the Internet cannot be played.
The device is dirty:
•
Wipe your device with a soft towel or an eraser. Using chemicals
or detergents may discolor or corrode the outside of the device.
Data stored on the device has been deleted:
•
Be sure to back up important data to another storage media (for
example, Samsung Kies) before resetting the device. Samsung is
not responsible for the loss of any data.
A connection is not established when the device is
connected to a computer with a microUSB cable:
•
You can transfer media files from a computer to the device by
connecting the device with Media Transfer Protocol (MTP).
•
If you are a Windows XP user, ensure that you have Windows XP
Service Pack 3 or higher installed on your computer.
•
Ensure that you have Samsung Kies 2.0 or Windows Media Player
10 or higher installed on your computer.
A network connection is not established when the LAN
cable is connected to the device:
•
If you connect the LAN cable after turning on the device, access
Apps ➔ Settings
•
. If you need to use a static IP, configure settings for the static
IP by accessing
Configure Ethernet device
➔
Ethernet
, and then select
Apps ➔ Settings
.
Getting Started 16
➔
Ethernet
Ethernet
➔
.

Section 2: Basics
This section outlines some key features and basic functions of
your device.
Features of Your Device
The following list outlines a few of the features included in
your device.
Component Description
CPU GAIA 1.7GHz (Cortex A15 dual)
Memory 2GB DDR3, 8GB eMMC, and 1 terabyte
Connectivity
•
Lan
•
Wi-Fi
•
Bluetooth
•
NFC Tag
17
hard drive
Gigabit Ethernet
802.11 b/g/n 2.4GHz & a/n 5GHz HT40
2x2 MIMO Channel Bonding
Version 4.0
Supports 8 accounts with 6 devices
per account
Interface
•
USB
•
MicroUSB
•
HDMI Out
•
Optical Audio
Codec
•
Video
•
Audio
DRM HDCP 1.3/2.1, Playready, Widevine,
Platform
2 external USB 3.0 connections
1 PC Connection 11pin mUSB
TV mirroring
Audio Amplifier Connection
H.264, H.263, MPEG4, VC-1, Sorenson
Spark, WMV7/8, MP43, VP8, DivX, AC3
MP3, AAC LC/AAC+/eAAC+, WMA 9std/
10pro/Lossless, FLAC, Vorbis, AMR-NB/
WB
Tru st zo ne
Android version 4.2.2, Jelly Bean

Controlling a Screen
2
1
3 4
5
Control a TV or monitor screen by using your smartphone as
a mouse or remote control.
HomeSync
1. Start
2. Select
control mode you want.
Note:
Available control modes may vary depending on the
smartphone you use.
You can also connect a mouse to the USB port on the
device to control a screen.
Using Remote Mouse
Use Remote Mode to control the screen by moving the
smartphone and touching the control pad.
1. On your smartphone, touch
Remote mouse
2. Control the pointer by moving the smartphone like
a wand up, down, left, or right.
3. Touch the control pad to select an app, feature, or field.
For more information about how to use the control pad, see
“Using the Control Pad” on page 20.
on your smartphone.
Remote control
.
, and then switch to the
Menu
➔
Remote button
1.
: Touch to toggle between the Mouse pad
and Directional keys.
2.
Control pad
: Navigate using the Mouse pad or
Directional keys.
Menu
: Touch to display additional options.
3.
Back
: Touch to return to the previous screen.
4.
Home
: Touch to display the Home screen.
5.
Basics 18

Button Mode
Use Button Mode to control the screen by using the Touch
Pad or Directional keys.
On your smartphone, touch
Button mode
Touch Pad
1. Touch
2. Slide your finger across the control pad to navigate the
device.
3. Touch the control pad to select an app or feature.
Directional Keys
1. Touch
keys.
2. Use the Directional keys to highlight your selection.
3. Touch
19
.
Touch Pad
to display the touch pad.
Directional keys
OK
to open an app or feature.
Menu
➔
to display the Directional
Using Touch Pad
Touch the control pad to move the pointer. Tap the control
pad to select a field.
For more information about how to use the control pad, see
“Using the Control Pad” on page 20.
Controlling the Pointer Speed
Adjust the pointer speed when using the remote mouse or
touch pad.
1. On your smartphone Remote Mouse or Touch Pad
screen, touch
2. Drag the slider to the left or right and select
Menu
➔
Pointer speed
.
OK
.

Using the Control Pad
Tapping
To open an application, to select an
on-screen button, or to enter a
character using the on-screen
keypad, tap it with your finger.
Double-Tapping
Double-tap on a webpage or
image to zoom into an area.
Double-tap again to return.
Dragging (Touch Pad
Mode)
Drag left or right to move to
another page when the
is changed to a after
tapping and holding the
control pad.
Drag up or down to scroll
through a list when the
is changed to a after
tapping and holding the
control pad.
Dragging (Remote
Mouse Mode)
Drag left or right to move
another page by swiping
left or right on the control
pad. Drag up or down to
scroll through a list by
swiping up or down on the
control pad.
Basics 20
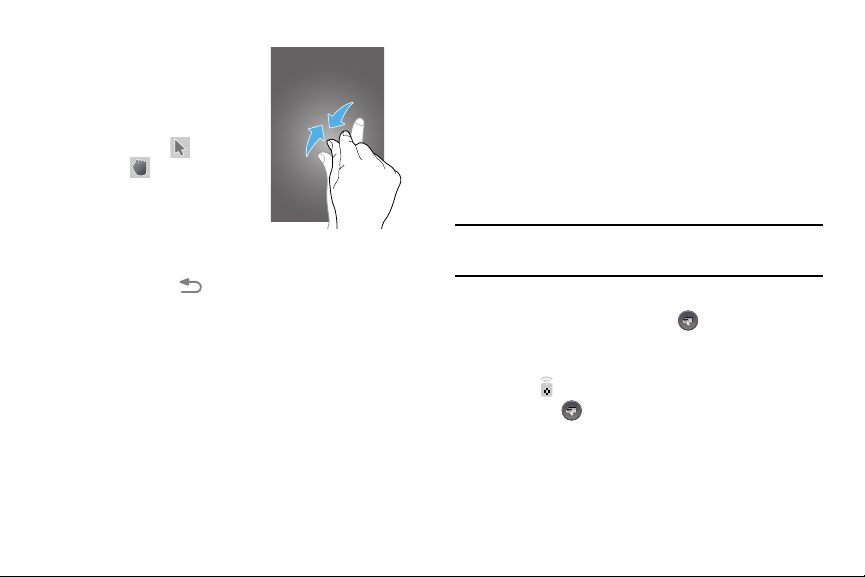
Pinching
Tap and hold the control pad
with two fingers, and then
spread them apart on a
webpage or image to zoom
into an area when is
changed to . Pinch to
zoom out.
Exiting the Remote Control
Double-tapping the
Control function and return the user to the main HomeSync
app screen.
21
Back
button will exit the Remote
Screen Mirroring
Use the Screen Mirroring application to share your
smartphone’s display on a connected monitor.
For more information, refer to “Screen Mirroring” on
page 33.
Using the Mirror Mouse
When you switch to the Mirror Mouse mode, the monitor
screen displays on your smartphone.
Note:
The Mirror Mouse feature is not available on
all smartphones.
If your smartphone supports the Mirror Mouse feature, the
Remote Control screen includes the
button.
1. Start
HomeSync
2. Select
3. Touch the
The monitor screen displays on your smartphone.
4. Use the touch screen on the smartphone to control the
monitor screen.
on your smartphone.
Remote control
Mirror Mouse
.
button.
Mirror Mouse
 Loading...