

Samsung GT-B9150 User Manual

User Manual
GT-B9150
www.samsung.com/hk

About this manual
•
Please read this manual before using the device to ensure safe and proper use.
•
Images and screenshots may differ in appearance from the actual product.
•
Content may differ from the final product, or from software provided by service providers
or carriers, and is subject to change without prior notice. For the latest version of the
manual, refer to the Samsung website,
•
Content (high quality content) that requires high CPU and RAM usage will affect the
overall performance of the device. Applications related to the content may not work
properly depending on the device’s specifications and the environment that it is used in.
•
Default applications that come with the device are subject to updates and may no longer
be supported without prior notice. If you have questions about an application provided
with the device, contact a Samsung Service Centre. For user-installed applications,
contact service providers.
•
The content may differ from the operating system of the user’s computer.
•
The device has similar functions to those on personal computers, but some features are
different and not supported.
•
Applications and their functions may vary by country, region, or hardware specifications.
Samsung is not liable for performance issues caused by applications from any provider
other than Samsung.
•
Modifying the device’s operating system or installing softwares from unofficial sources
www.samsung.com/hk
.
may result in device malfunctions and data corruption or loss. These actions are violations
of your Samsung licence agreement and will void your warranty.
•
The device can be upgraded to the latest software. For more information, refer to the
Samsung website.
•
Software, sound sources, wallpapers, images, and other media provided with this device
are licensed for limited use. Extracting and using these materials for commercial or other
purposes is an infringement of copyright laws. Users are entirely responsible for illegal
use of media.
2

About this manual
Instructional icons
Warning: situations that could cause injury to yourself or others
Caution: situations that could cause damage to your device or other equipment
Note: notes, usage tips, or additional information
Copyright
Copyright © 2013 Samsung Electronics
This guide is protected under international copyright laws. No part of this guide may be
reproduced, distributed, translated, or transmitted in any form or by any means, electronic
or mechanical, including photocopying, recording, or storing in any information storage and
retrieval system, without the prior written permission of Samsung Electronics.
Trademarks
•
SAMSUNG and the SAMSUNG logo are registered trademarks of Samsung Electronics.
•
The Android logo, Google™, YouTube™, Google Play™ Store, Google Play™ Movies, and
Google Play
•
Bluetooth® is a registered trademark of Bluetooth SIG, Inc. worldwide.
•
HDMI, the HDMI logo and the term “High Definition
Multimedia Interface” are trademarks or registered
trademarks of HDMI Licensing LLC.
Music are trademarks of Google, Inc.
™
3

About this manual
•
Wi-Fi®, Wi-Fi Protected Setup™, Wi-Fi Direct™, Wi-Fi CERTIFIED™, and the Wi-Fi logo are
registered trademarks of the Wi-Fi Alliance.
•
All other trademarks and copyrights are the property of their respective owners.
DivX
trademarks of Rovi Corporation or its subsidiaries and are
used under licence.
ABOUT DIVX VIDEO
DivX
an official DivX Certified
video. Visit
DivX videos.
ABOUT DIVX VIDEO-ON-DEMAND
This DivX Certified
Demand (VOD) movies. To obtain your registration code, locate the DivX VOD section in
your device setup menu. Go to
registration.
, DivX Certified® and associated logos are
®
is a digital video format created by DivX, LLC, a subsidiary of Rovi Corporation. This is
®
device that has passed rigorous testing to verify that it plays DivX
®
www.divx.com
device must be registered in order to play purchased DivX Video-on-
®
for more information and software tools to convert your files into
vod.divx.com
for more information on how to complete your
DivX Certified
to play DivX® video up to HD 720p, including premium content.
®
4

Table of Contents
Getting started
7 Key features
7 Device layout and function
9 Package contents
9 Installation
11 Turning on the device
12 Connecting to a smartphone
13 Connecting to audio equipment
14 Resetting the device
Basics
15 Controlling a screen
19 Entering text
19 Home screen
20 Opening an application
Web & network
27 Internet
29 Screen Mirroring
Media
30 Music Player
31 Gallery
32 Video Player
33 YouTube
Application & media stores
34 Play Store
35 Samsung Apps
21 Applications screen
22 Setting up accounts
22 Notifications
23 Transferring files
24 Setting up user profiles
25 Backing up or restoring data
26 Connecting to a Wi-Fi network
Utilities
36 POLARIS Office
37 Google
38 My Files
38 Downloads
38 McAfee VirusScan
5

Table of Contents
Settings
39 About Settings
39 Wi-Fi
40 Bluetooth
40 Ethernet
40 Nearby devices
40 Play nearby device content
41 Sound
41 Display
41 Storage
41 Application manager
42 Location services
42 Lock screen
42 Member management
43 Security
43 Language and input
46 Content backup and restoration
46 Backup and reset
46 Add account
46 Mouseover
46 Audio output
47 Date and time
47 Accessibility
47 About device
Appendix
48 Upgrading the device
50 Troubleshooting
Safety information
6
Getting started
Use this device to play multimedia files on large screens that support the High Definition
Multimedia Interface (HDMI). You can also save and share files with family members via the
Home cloud storage. Install
download content, add and manage multiple user accounts, use it as a remote control for the
screen (TV or monitor), and more.
HomeSync
application on your smartphone to upload and
Key features
The device’s key features include:
•
Home cloud service with mass storage
•
Multiple user management
•
Easy setup with the NFC feature
•
Automatic uploading
•
Media playback on large screens
•
Screen mirroring
•
Easy control with
HomeSync
application
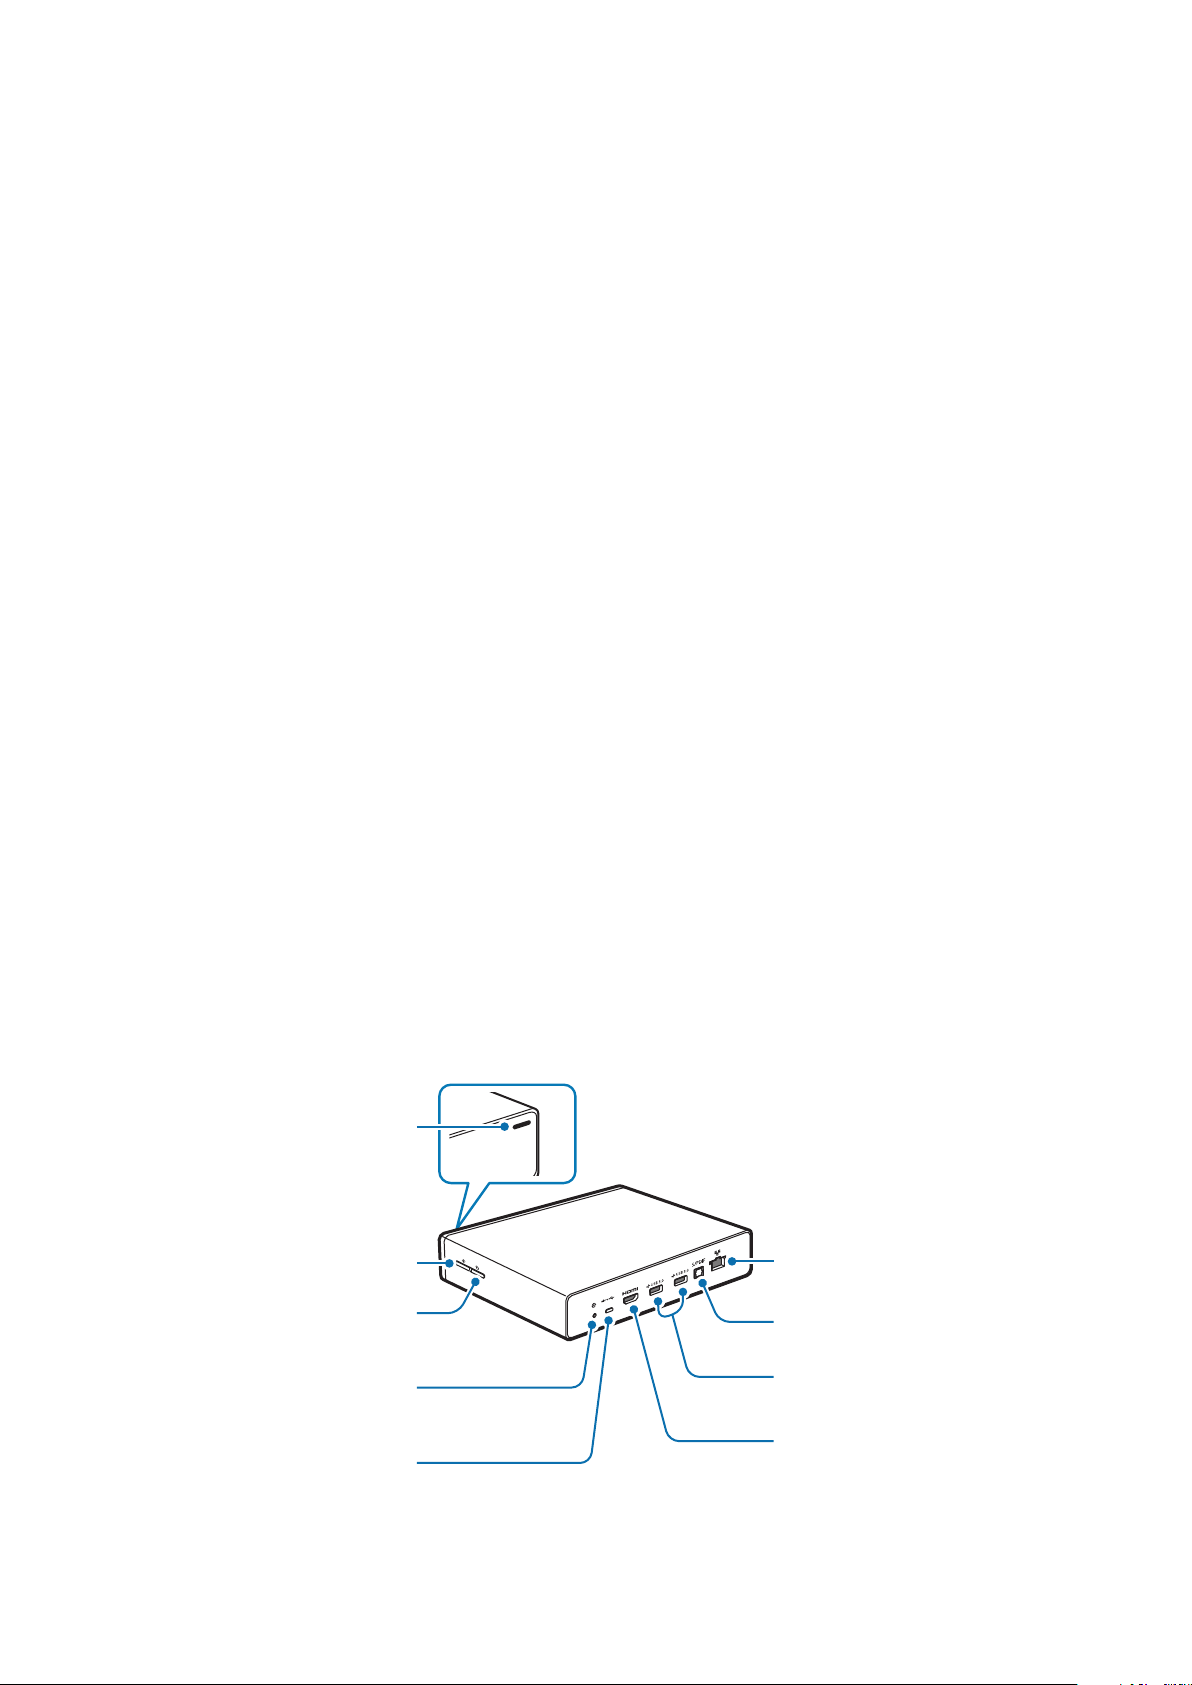
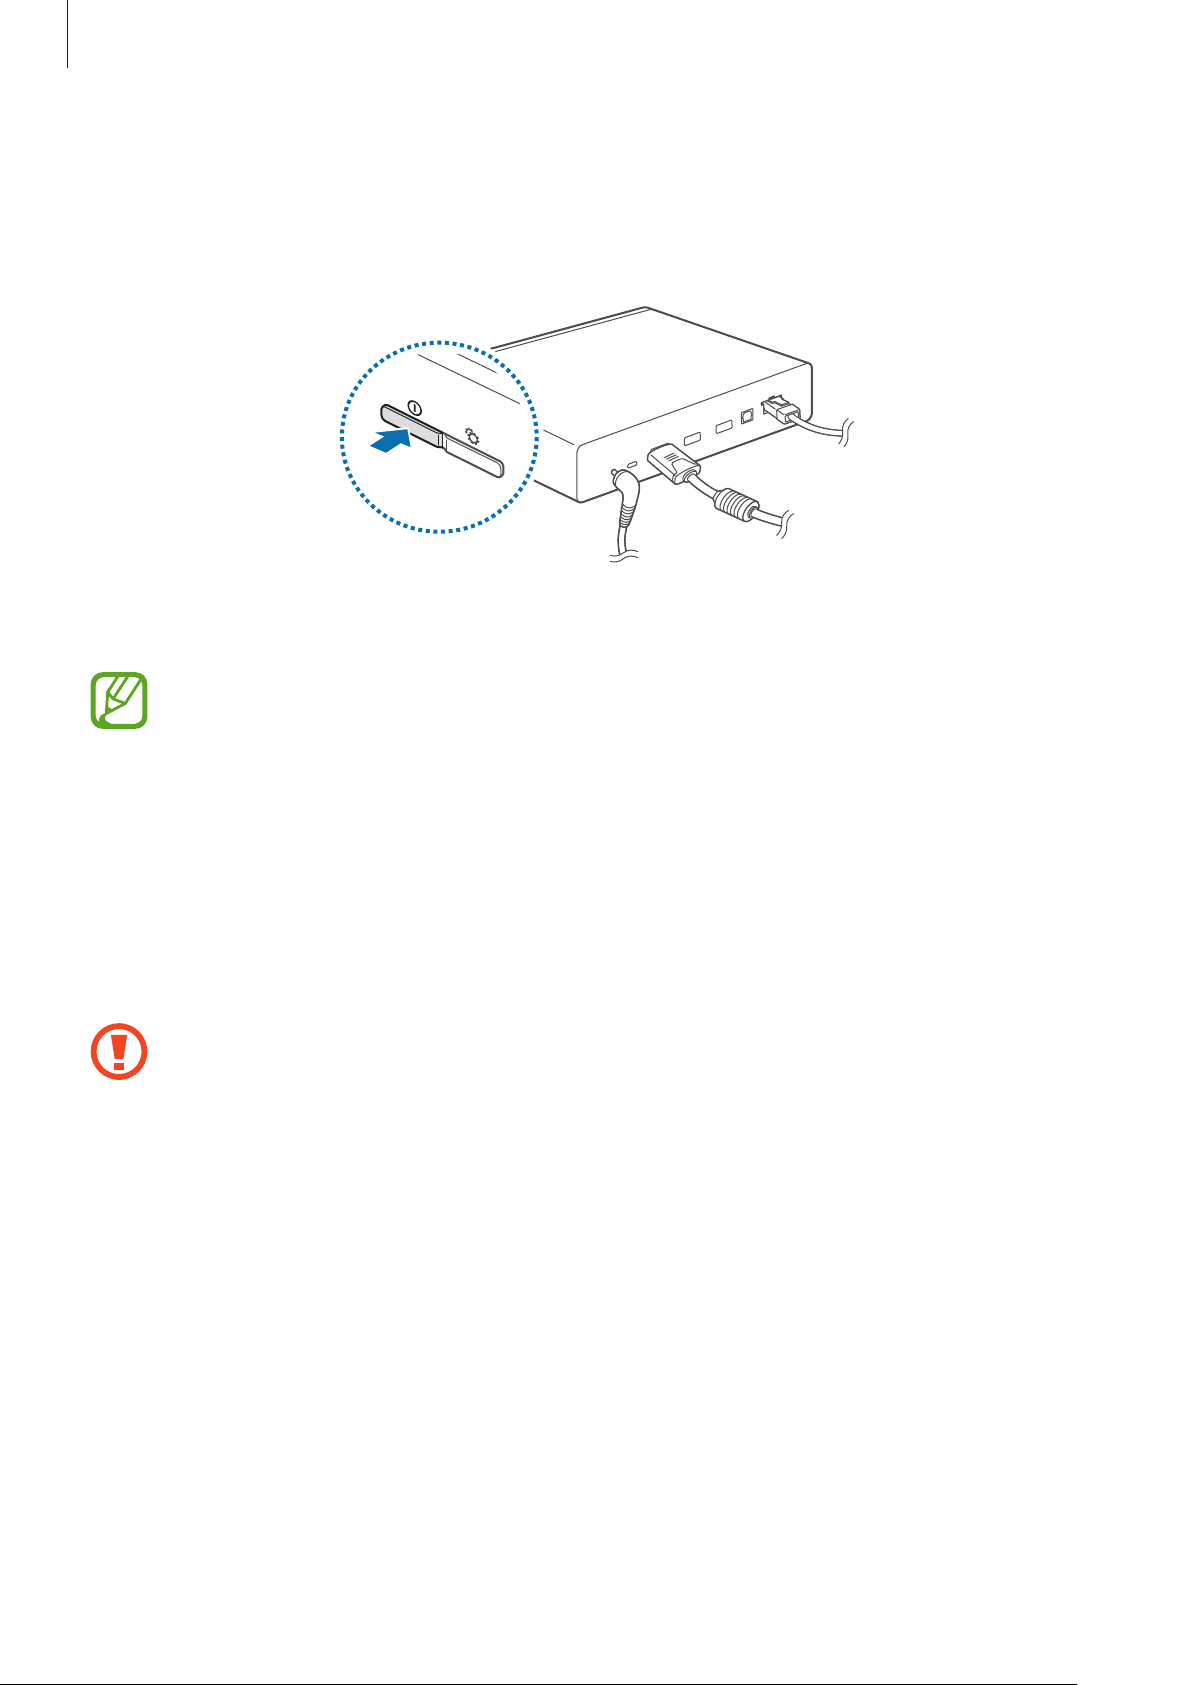
Device layout and function
Notification
light
Power button
Functions
button
Power adaptor
port
microUSB port
LAN cable port
S/PDIF port
USB port (3.0)
HDMI cable
port
7
Getting started
Name Function
•
Press and hold to turn the device on or off.
•
Power button
Functions button
Press and hold for more than 8 seconds to reset the device.
•
Press to confirm secure pairing with your smartphone.
•
Press and hold for a few seconds to capture a screenshot.
Power adaptor port
microUSB port
HDMI cable port
USB port (3.0)
S/PDIF port
LAN cable port
Some items, including monitors, smartphones, and peripherals may not be
compatible with the device.
•
Connect a power cable to supply power.
•
Connect to a computer using a microUSB cable.
•
Connect to a monitor (TV or computer) using an HDMI cable.
•
Connect to a compatible device, such as a smartphone or
camera, or an external USB storage device using a USB cable.
•
Connect to a keyboard or mouse using a USB cable.
•
Connect to audio equipment using an S/PDIF cable.
•
Connect to a network using a LAN cable.
Notification light
The notification light alerts you to the device’s status with the following colours.
Colour Status
•
Network connected
Blue (steady)
•
Ready to download or upload data
•
Upcoming events
Green (steady)
•
Application being updated
Red (blinking)
Yellow (steady)
•
Failed to recognise internal hard disk drive (HDD)
•
Network connection error
8
Getting started
Package contents
Check the product box for the following items.
•
Device
•
Power adaptor/Power cord
•
LAN cable
•
HDMI cable (A-to-A)
•
The items supplied with the device may vary depending on the region or service
provider.
•
You can purchase additional accessories: USB cable, S/PDIF cable, and microUSB
cable.
•
Make sure they are compatible with the device before purchase.
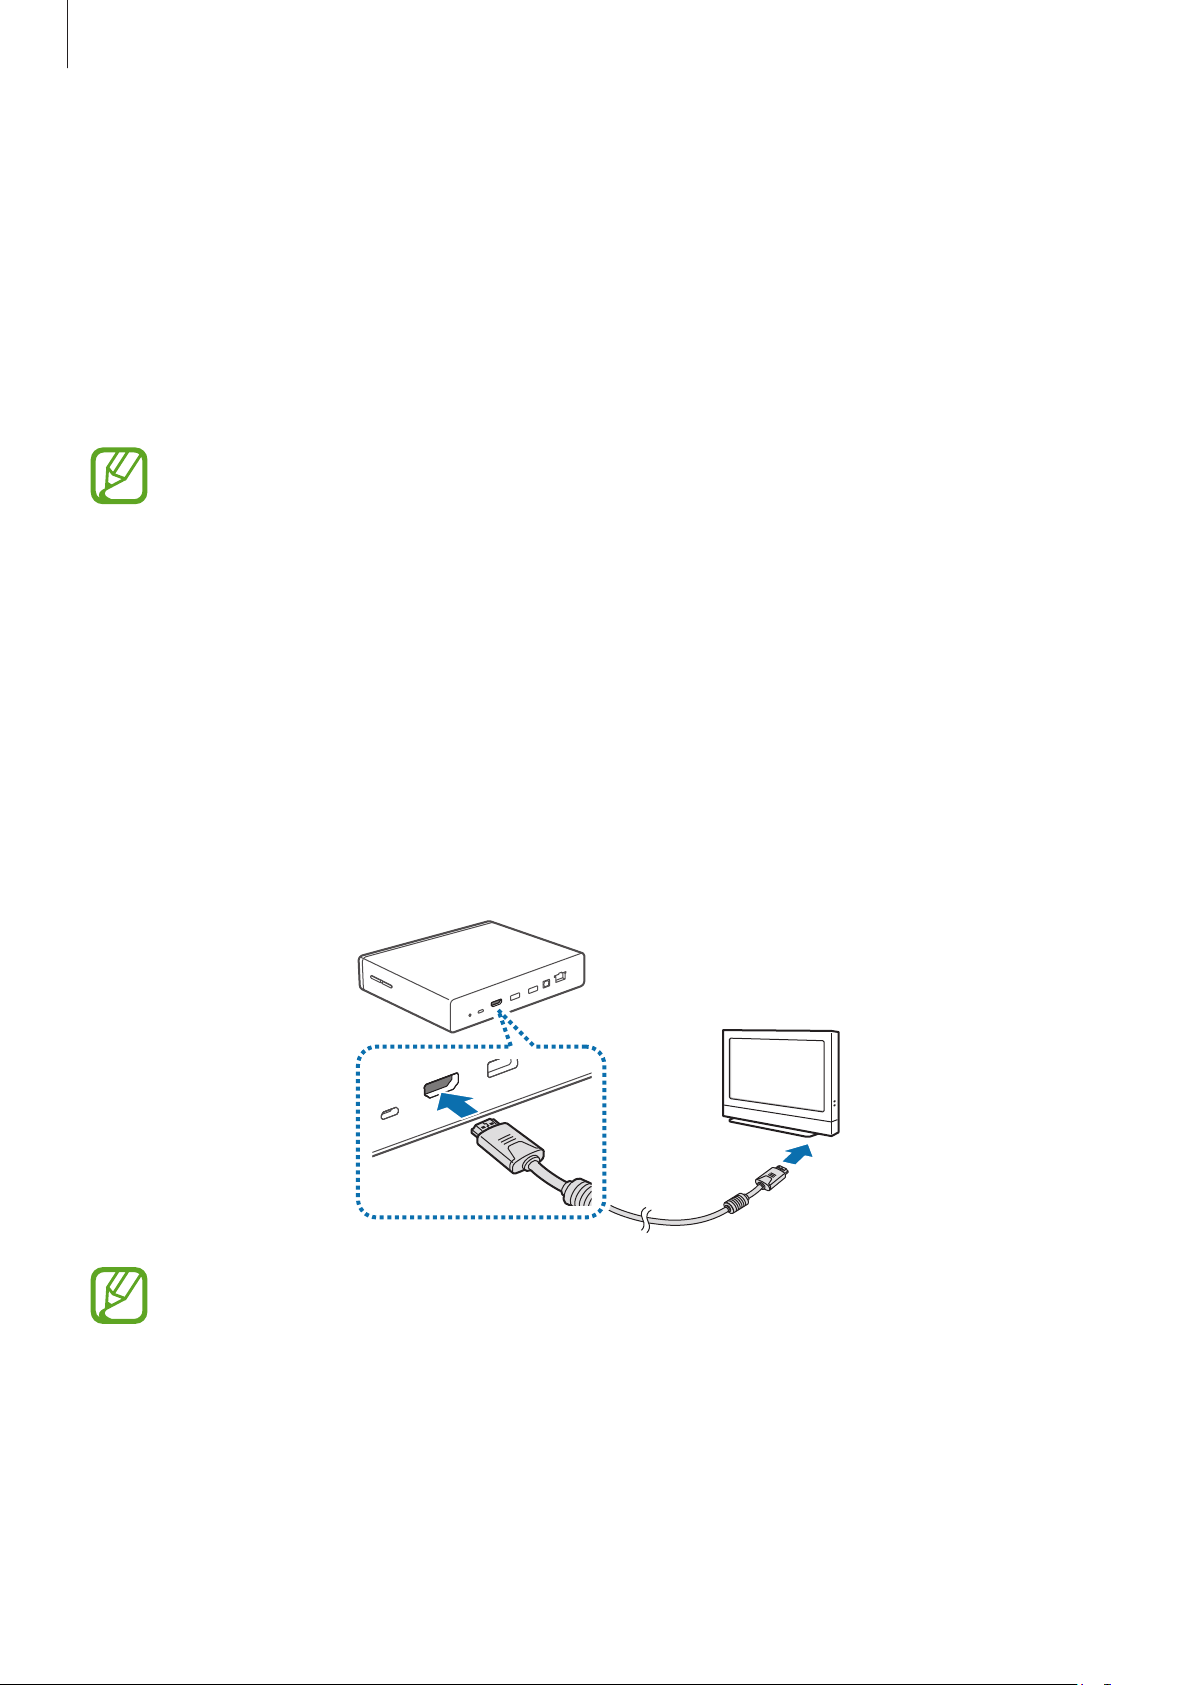
Installation
Connect the device to a monitor that supports the High Definition Multimedia Interface
1
(HDMI) using the HDMI cable.
For more information, refer to the user manual for the monitor.
9
Getting started
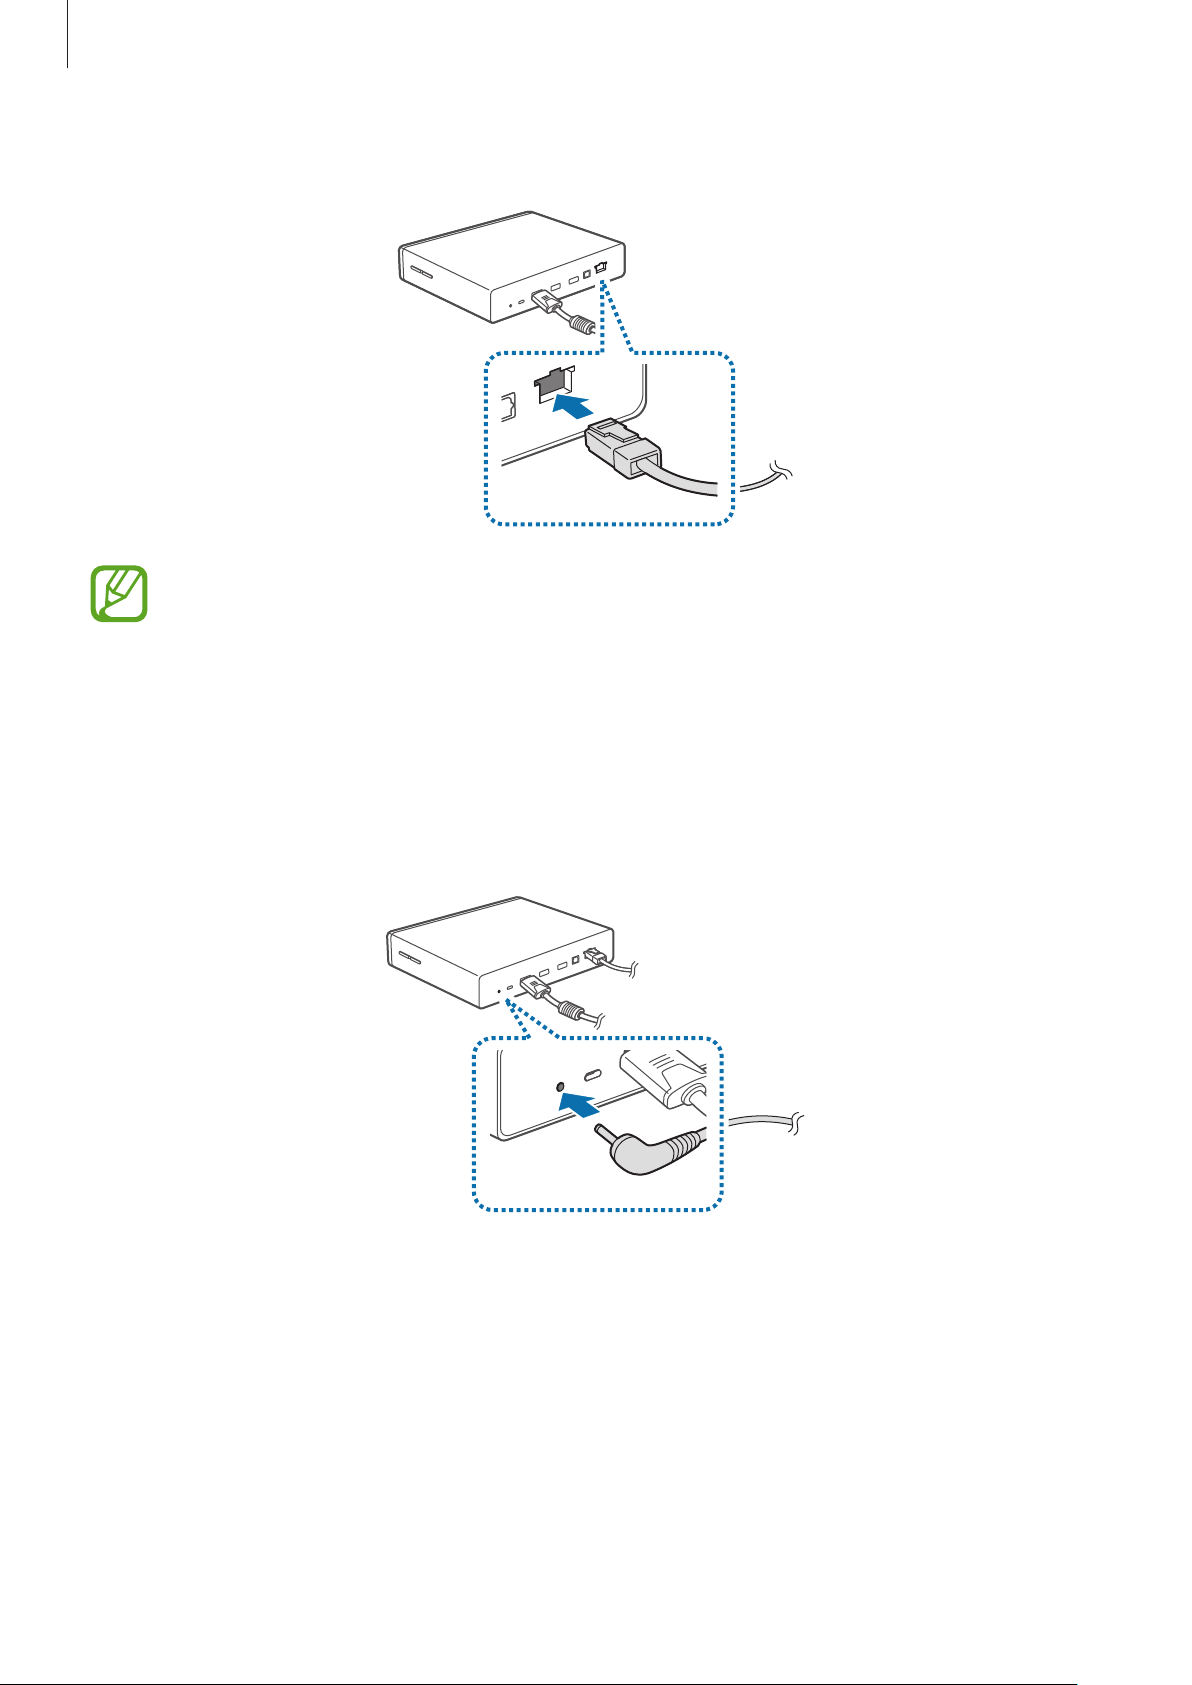
Connect a LAN cable to the LAN cable port on the device to connect to a network.
2
•
To set the static IP, access
•
You can let the device connect automatically to the Wi-Fi network your
Settings
→
Ethernet
→
Configure Ethernet device
.
smartphone uses, or you can connect to a Wi-Fi network by accessing
Wi-Fi
. However, to establish a better connection, it is recommended to use the LAN
cable.
Connect the power adaptor to the device, and then connect the power cord to the
3
electrical socket.
Settings
→
10
Getting started
Turning on the device
Press and hold the Power button to turn on the device.
1
Turn on the connected monitor.
2
For better picture quality, follow the on-screen instructions when setting up the
device for the first time and select a screen aspect ratio to fit the original screen. Or,
access
Settings
→
Display
→
Screen size
.
Turning off the device
To turn off the device, press and hold the Power button, and then press and hold the Power
OK
button again or select
For more information about how to control the screen, see page 15.
Do not disconnect the power adaptor from the device while applications are running.
Doing so may cause malfunctions or damage to the device.
.
11
Getting started
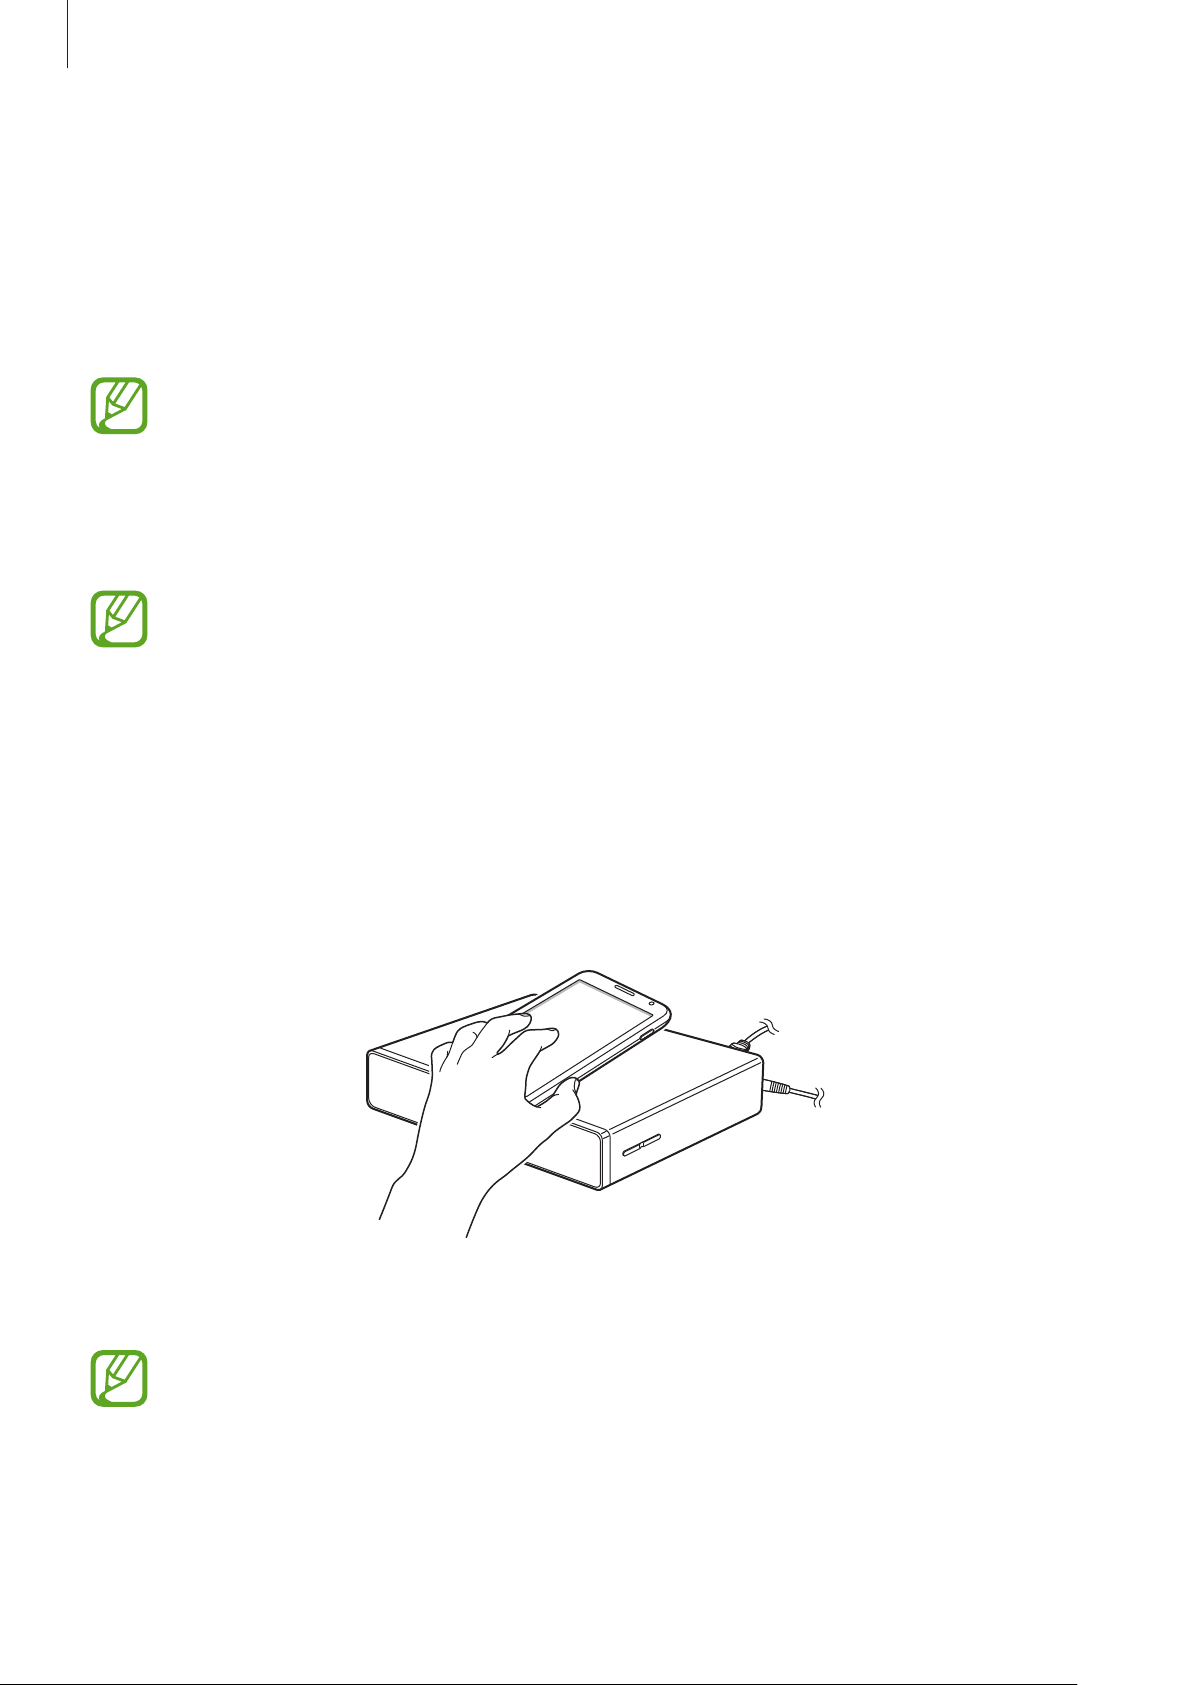
Connecting to a smartphone
Connect and register the device to a smartphone. You can upload and download content,
add and manage multiple user accounts, use it as a remote control for the screen (TV or
monitor), and more. To use this feature, you must download
Samsung Apps
When your smartphone supports the Near Field Communication (NFC) feature, touch
the back of your smartphone to the NFC antenna area near the centre of the device to
download
Once the device connects to a smartphone, the device will automatically reconnect to it
whenever
For more information about compatible smartphones, refer to
www.samsung.com/hk
or
Play Store
HomeSync
HomeSync
and install it on your smartphone.
application.
application is activated.
.
HomeSync
application from
When your smartphone supports the NFC feature
Activate the NFC feature on your smartphone.
1
To start
2
area of the device.
HomeSync
application, touch the back of your smartphone to the NFC antenna
Follow the on-screen instructions.
3
The NFC antenna area of the smartphone may differ. For more information, refer to
the user manual for the smartphone.
12
Getting started
When your smartphone does not support the NFC feature
You can connect the device to your smartphone via the Bluetooth feature when the
smartphone does not support the NFC feature.
If the Bluetooth feature on your smartphone is off, the Bluetooth feature is turned on
automatically when
Tap
1
2
3
4
HomeSync
Tap →
Select the device name from the list of detected devices.
Follow the on-screen instructions.
.
Add device
HomeSync
.
application launches.
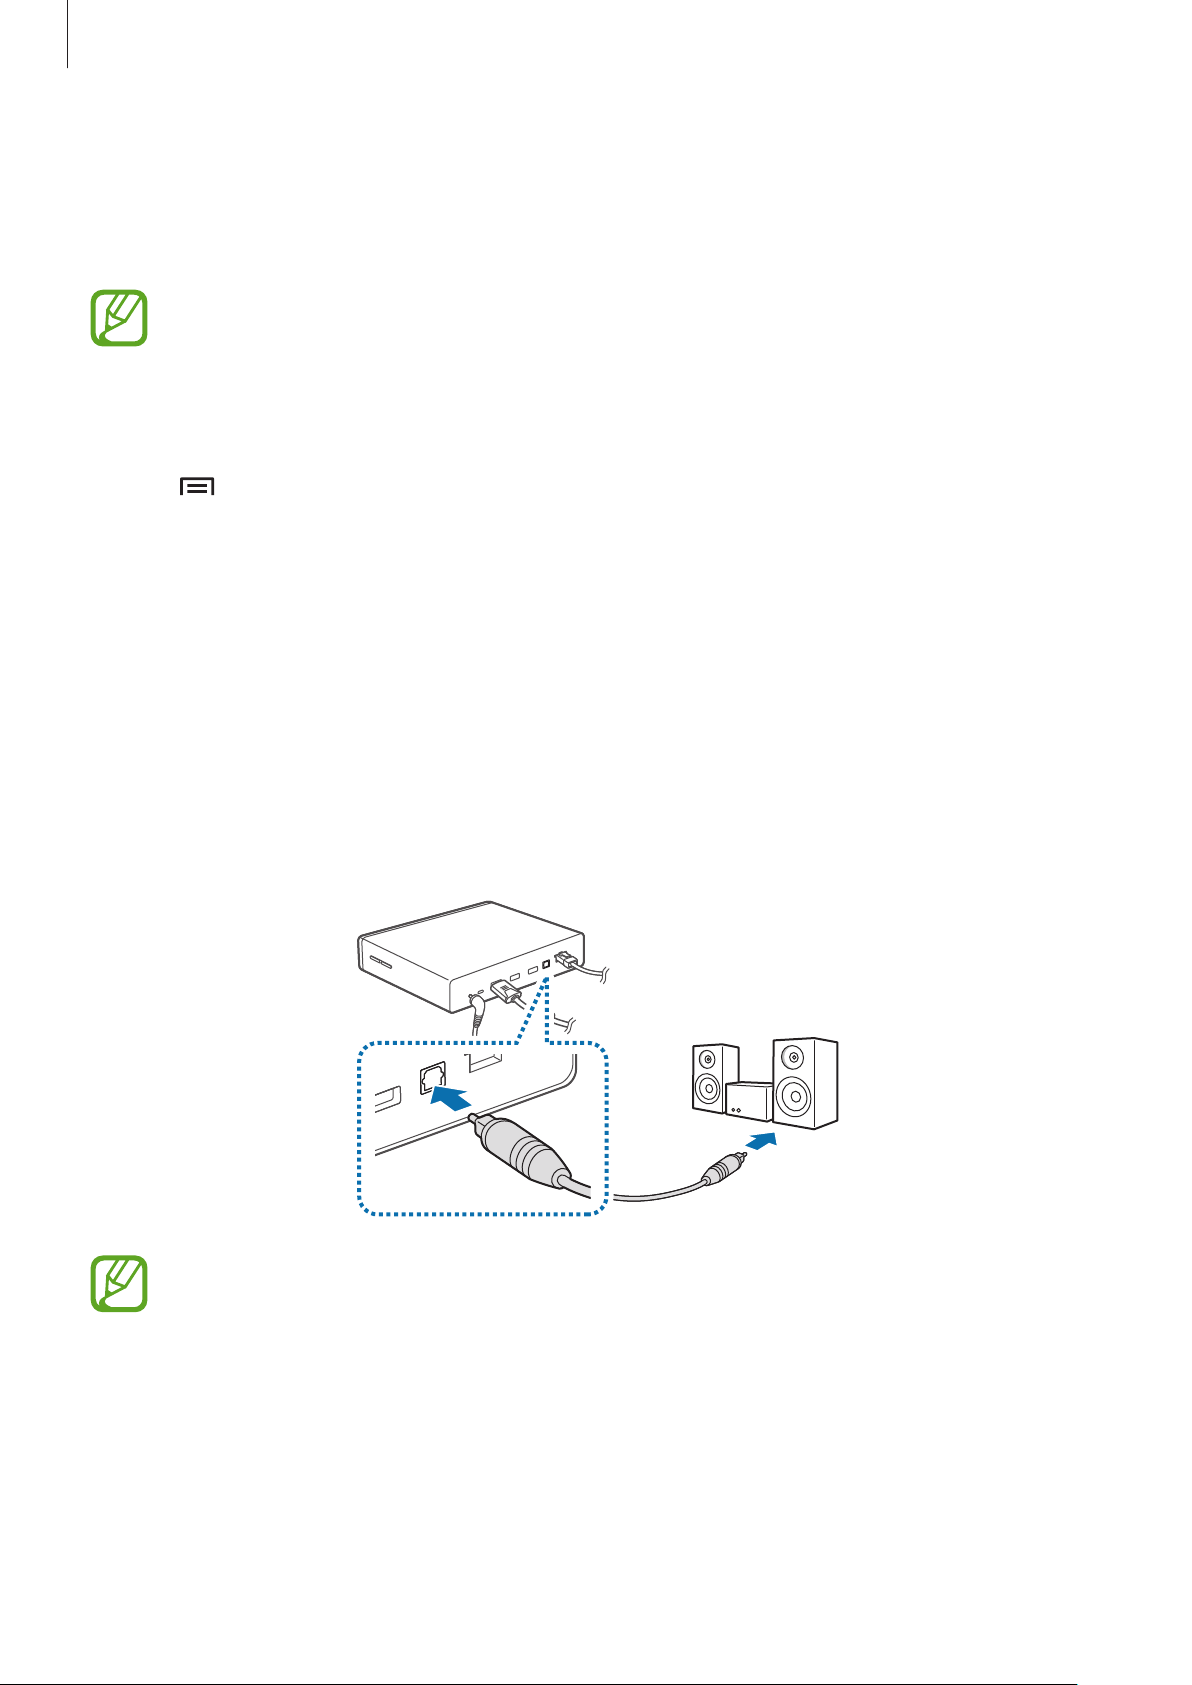
Connecting to audio equipment
You can connect the device to audio equipment, such as home theaters.
Connect the device to audio equipment using an S/PDIF cable.
You can select a sound output format to use by accessing
13
Settings
→
Audio output
.
Getting started
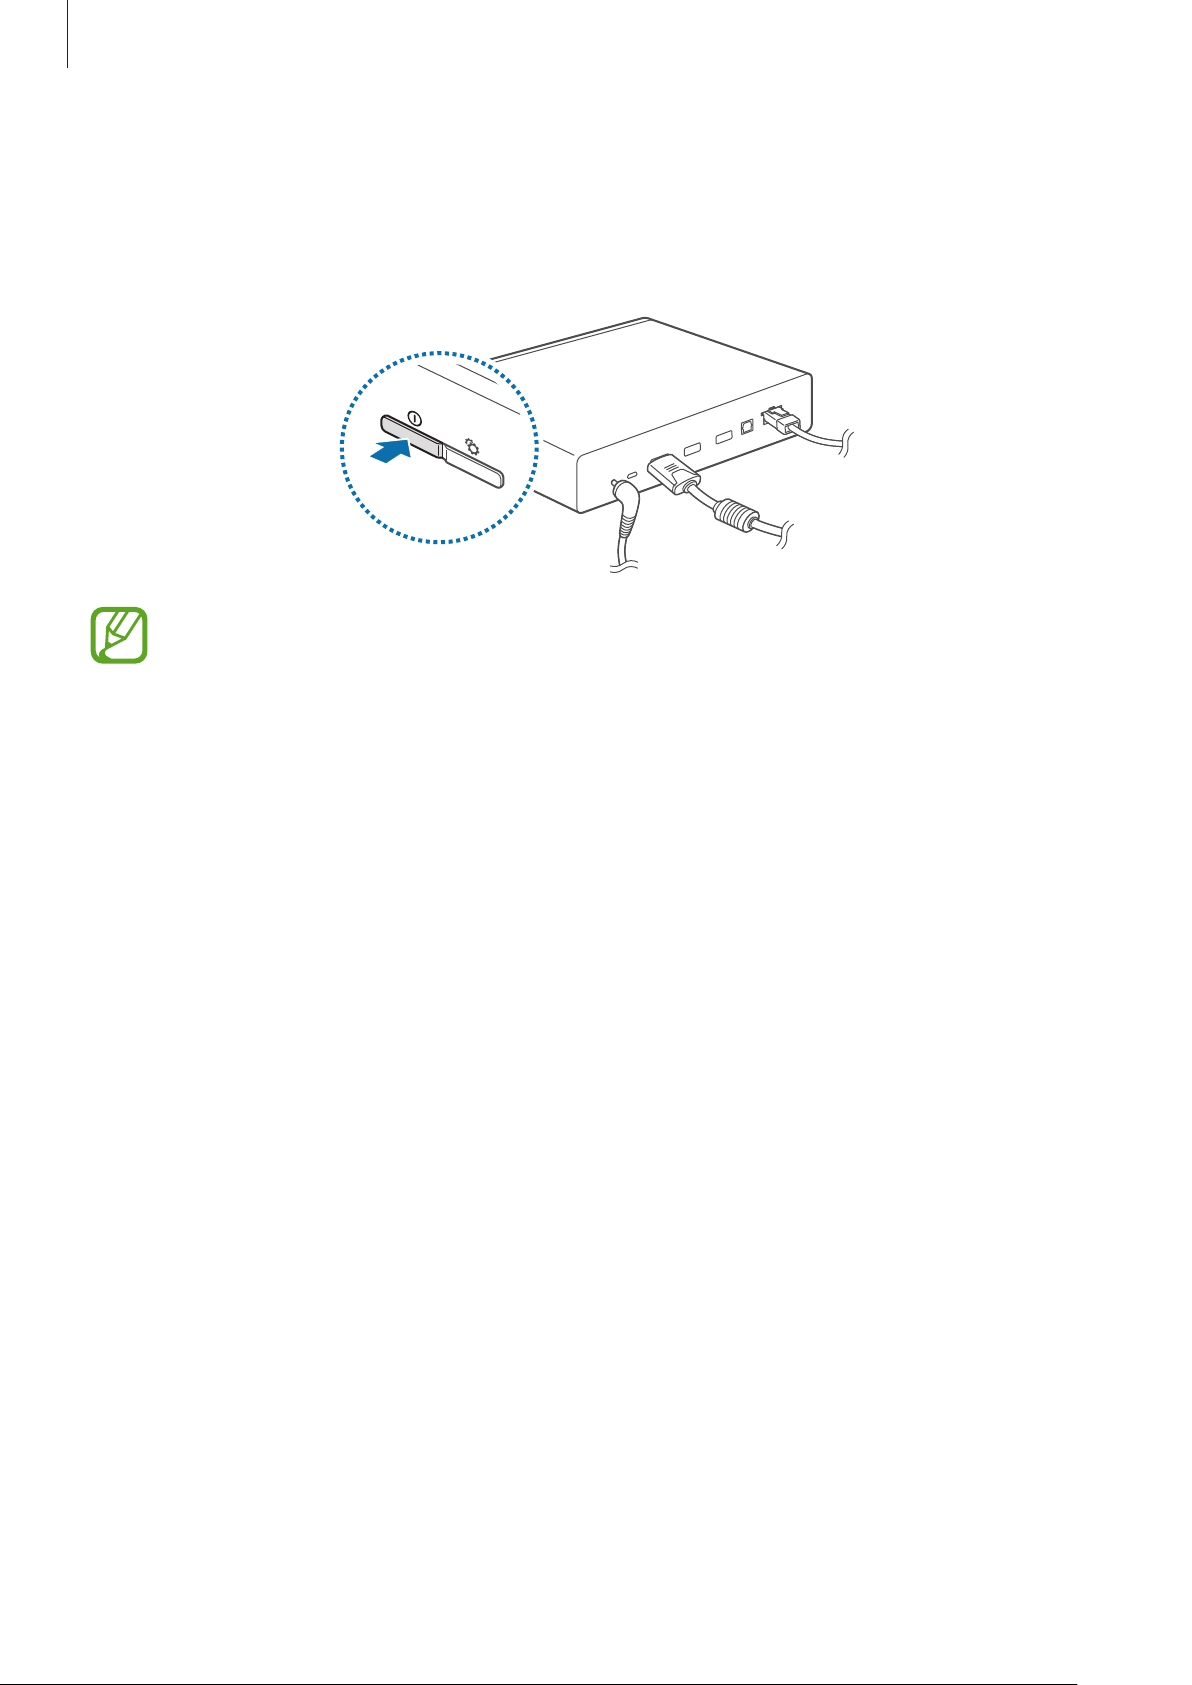
Resetting the device
If your device is frozen or unresponsive, press and hold the Power button for more than
8 seconds.
Resetting may disconnect the device from your smartphone. Connect the device to
your smartphone again via the NFC feature or the Bluetooth feature.
14
Basics
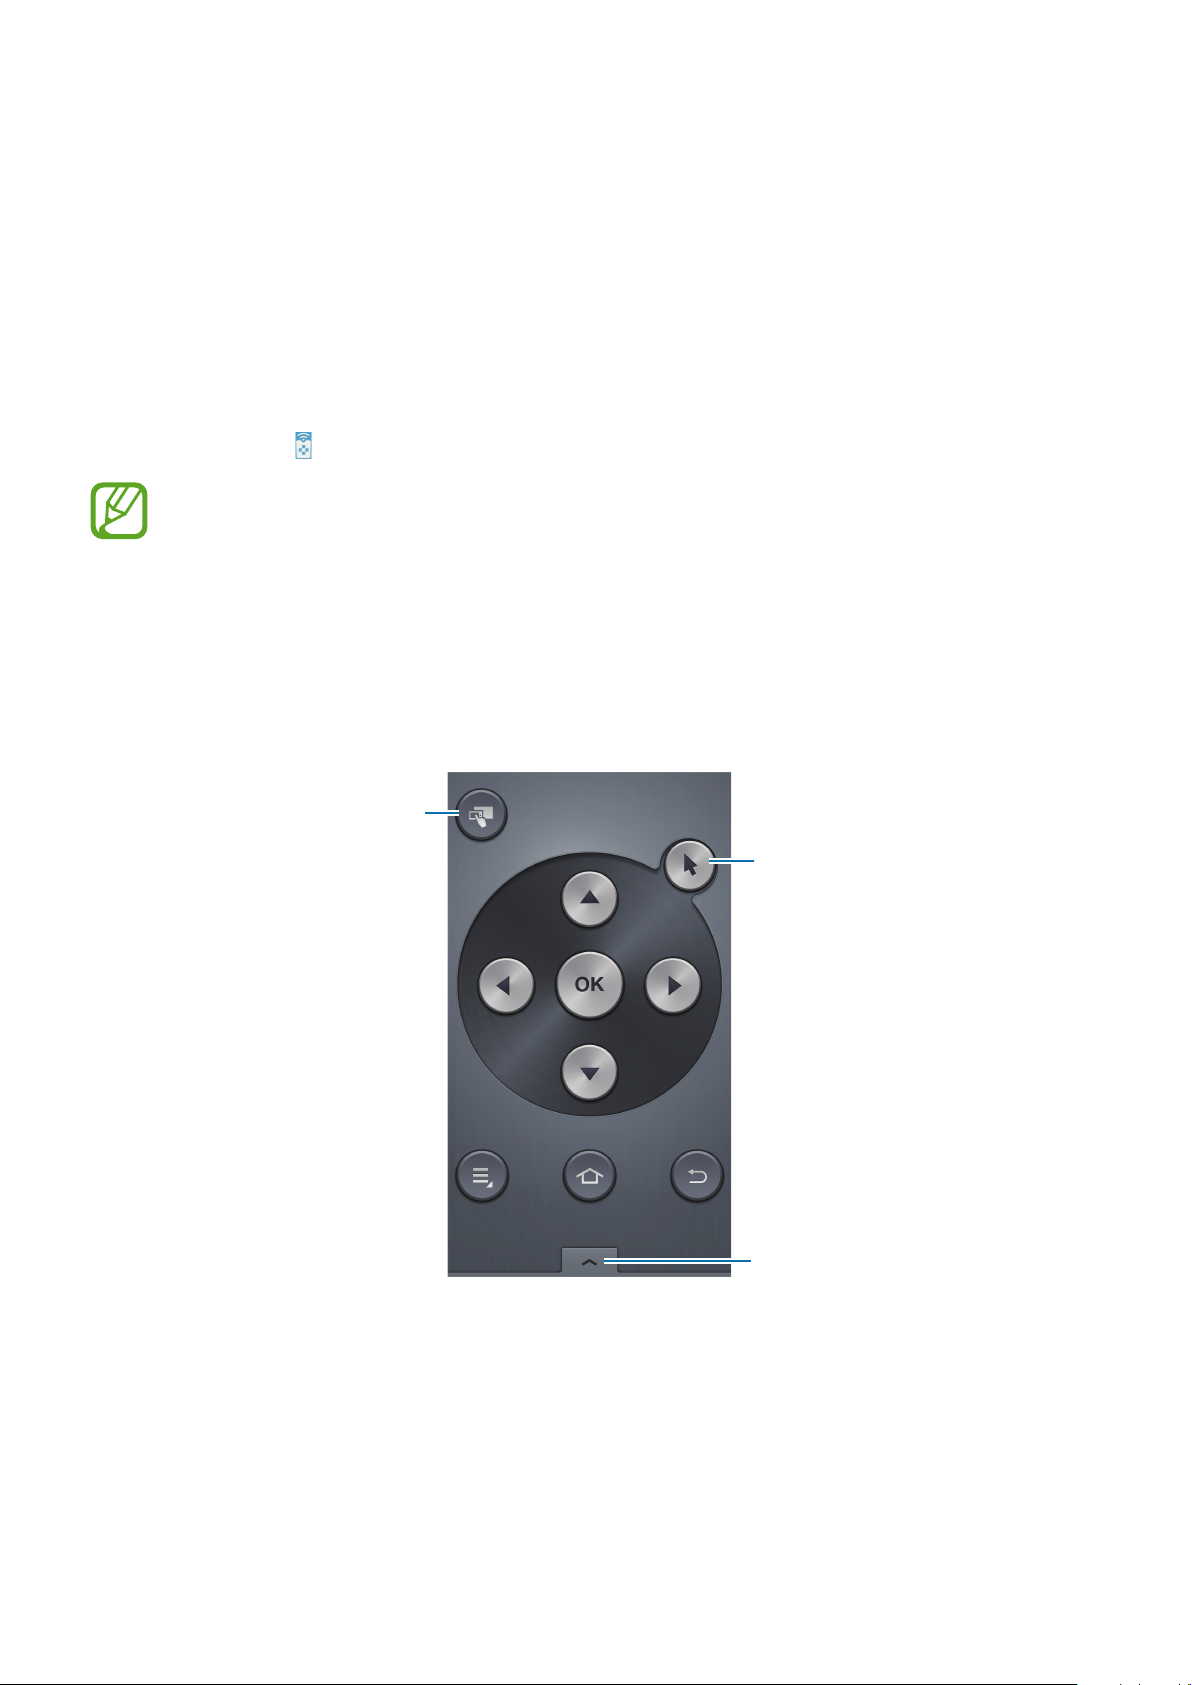
Controlling a screen
Control a screen (TV or monitor) by using your smartphone as a mouse or a remote control.
Tap
HomeSync
•
•
Using the button mode
Touch the button up, down, left, or right to move the blue frame. You can select the focused
item by touching
→ on your smartphone, and then switch to control mode you want.
Available control modes may vary depending on the smartphone you use.
You can also connect a mouse to the USB port on the device to control a screen.
OK
.
Switch to the mirror mouse
mode.
Switch to the cursor mode.
Launch the TV application.
15

Basics
Using the cursor mode
Control the screen by touching the control pad and scrolling lists with the scroll cursors.
Switch to the mirror mouse
mode.
Switch to the button mode.
Launch the TV application.
Using the mirror mouse
Tap .
The monitor screen appears on your smartphone. Use the touch screen on the smartphone to
control the monitor screen.
Using the remote mouse
Tap →
Control the screen by moving the smartphone up, down, left, or right, and then touching the
control pad.
To switch to the previous control mode, tap
Remote mouse
.
→
Button mode
or
Cursor mode
.
Controlling the pointer speed
Adjust the pointer speed when using the remote mouse or touch pad.
Tap
→
Pointer speed
. Drag the slider to the left or right and select OK.
16
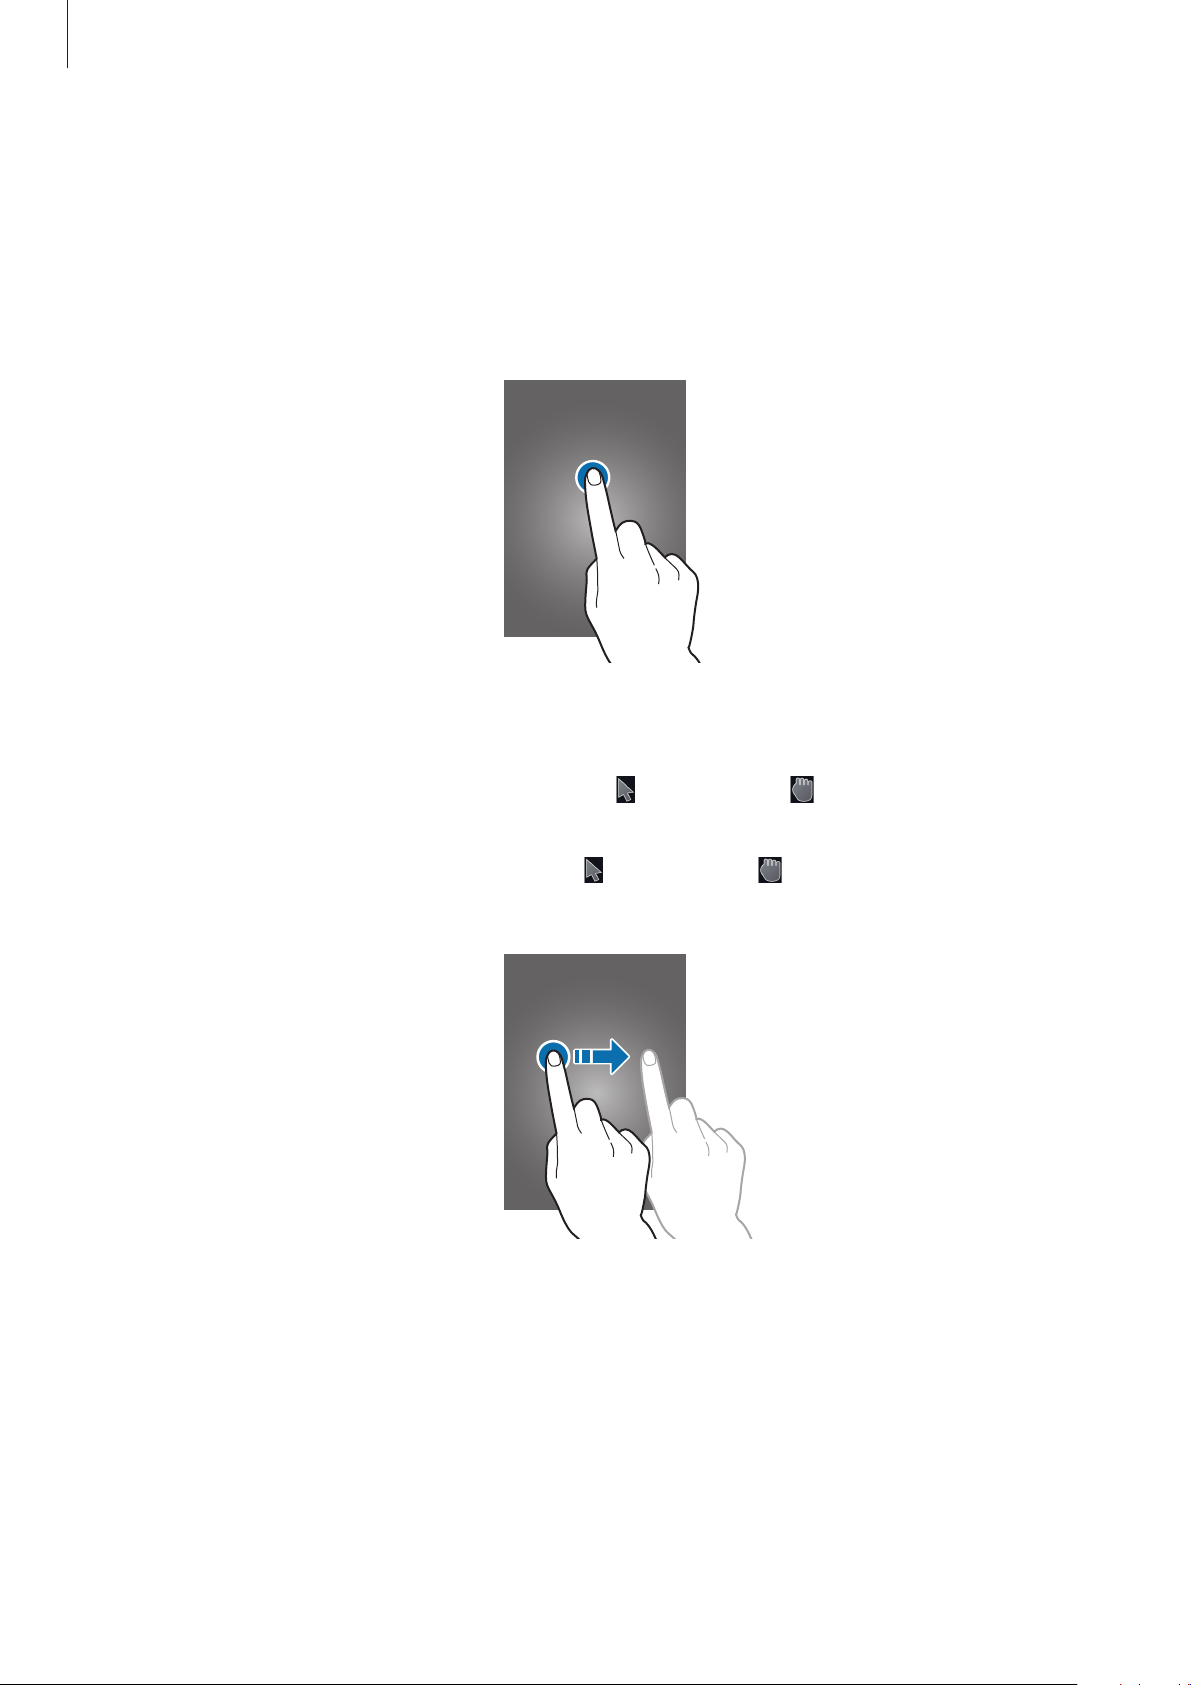
Basics
Using the control pad
Tapping
To open an application, to press an on-screen button, or to enter a character using the onscreen keypad, tap it with your finger.
Dragging
Drag left or right to move to another page when is changed to after tapping and holding
the control pad.
Drag up or down to scroll through a list when
the control pad.
is changed to after tapping and holding
17
Basics
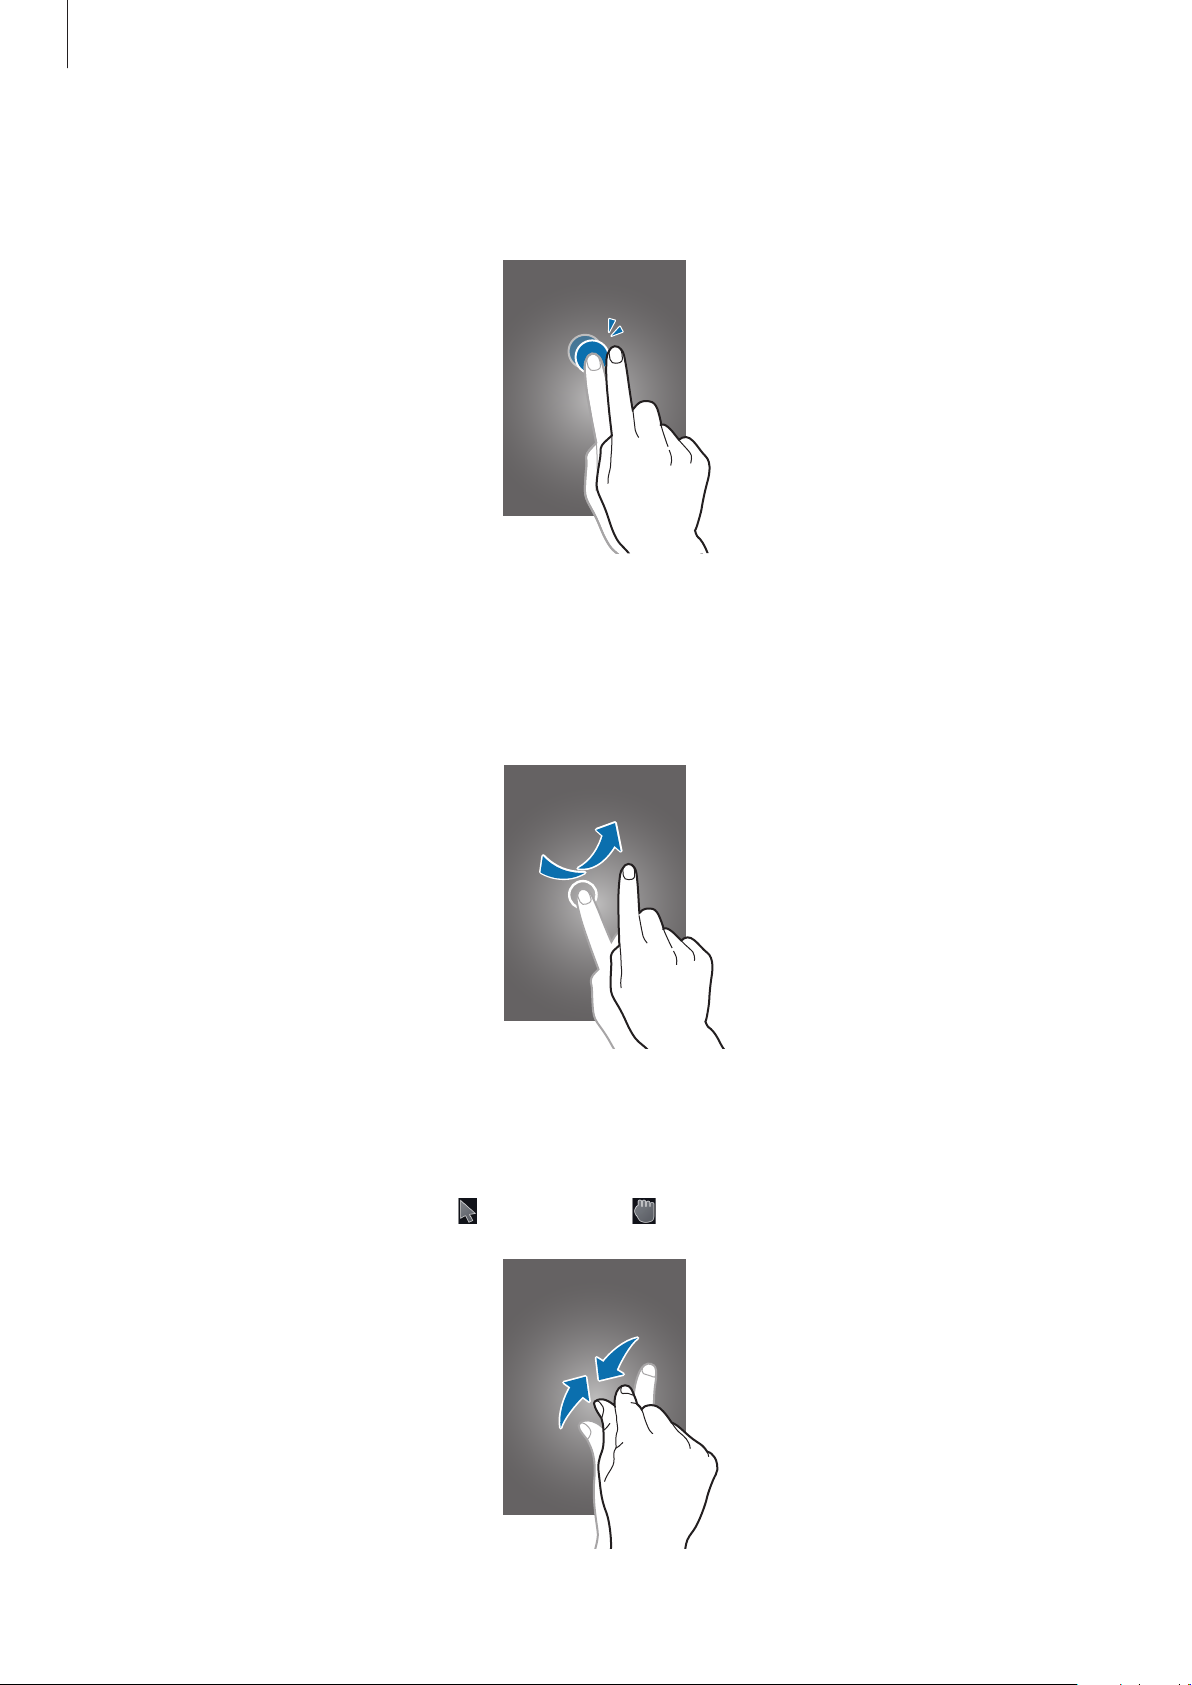
Double-tapping
Double-tap on a webpage or image to zoom into an area. Double-tap again to return.
Flicking
Flick left or right on the Home screen or the Applications screen to see another panel. Flick up
or down to scroll through a webpage or a list.
Pinching
Tap and hold the control pad with two fingers, and then spread them apart on a webpage or
image to zoom into an area when
is changed to . Pinch to zoom out.
18
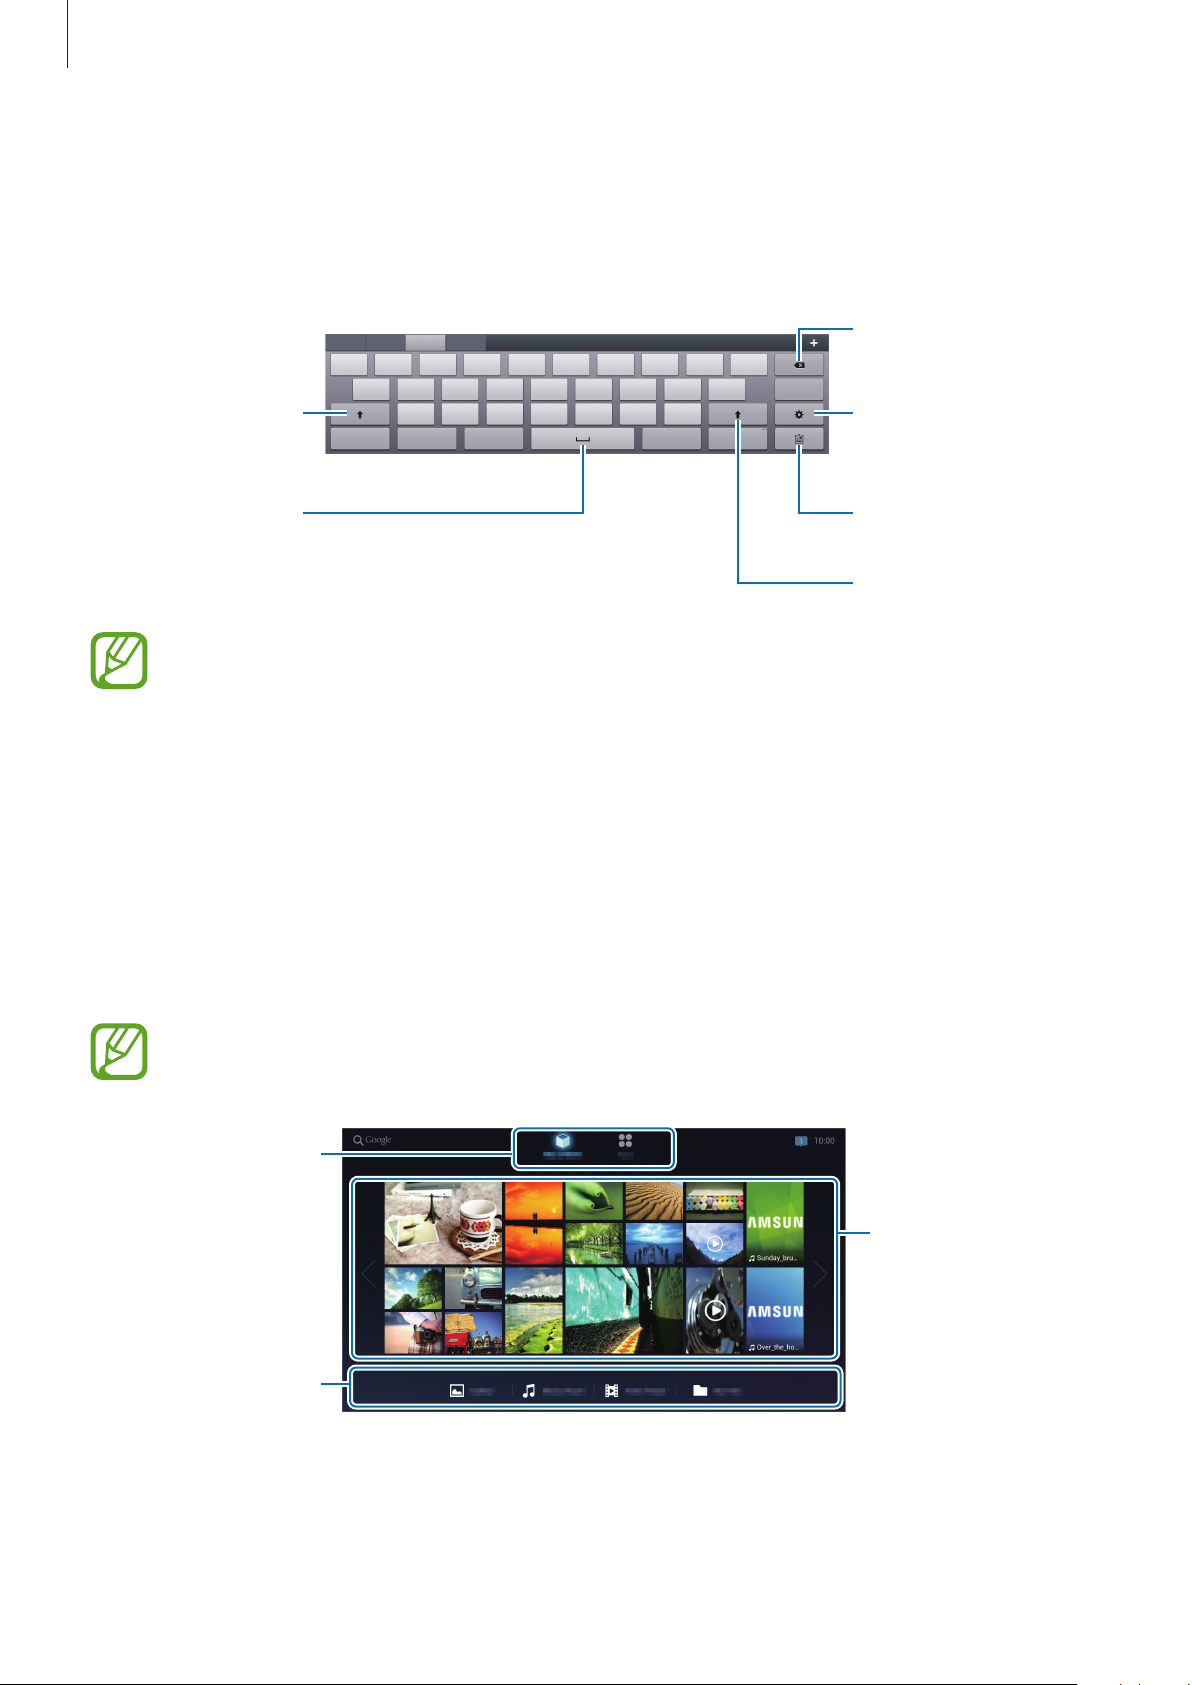
Basics
Delete a preceding
shortcut.
Entering text
To enter text, place the cursor at the text input field, and then use the keypad that appears on
the screen.
character.
Enter uppercase. Set options for the
Samsung Chinese
IME keyboard.
Enter a space.
Add an item from
the clipboard.
Enter uppercase.
You can also connect a keyboard to the USB port on the device to enter text.
Home screen
The Home screen provides thumbnails for multimedia files and icons for applications. Select
My content
icons for applications.
The Home screen have multiple panels. To view other panels, scroll left or right.
to preview photos, videos, or music in thumbnail view, or select
Apps
to view
The available options may vary depending on the region or service provider.
Select to view other
panels.
Select an application
Select a preview
thumbnail to open.
19
 Loading...