

Page 1

Table of Contents
Device Functions .............................................. 3
Setting Up Your Device
................................... 5
Turning Your Phone On and Off ............................... 9
Locking and Unlocking Screen
................................ 9
Initial Device Configuration
........................................ 9
Customize Your Phone ..................................10
Wallpaper and Widgets .............................................10
Calling Features ............................................. 12
Making a Call ..............................................................12
Ending a Call
............................................................... 13
Answering a Call
........................................................13
Rejecting a Call
..........................................................13
Voicemail .......................................................... 14
Set Up Voicemail ........................................................14
Access Voicemail
....................................................... 14
Contacts ........................................................... 15
Creating a New Contact ...........................................15
Editing an Existing Contact......................................15
Deleting an Existing Contact
...................................15
Messages ......................................................... 16
Create and Send a Message ..................................16
Page 2

Connections .................................................... 17
Connecting to Bluetooth...........................................17
Connecting to Wi-Fi
...................................................17
Near Field Communication
......................................18
S Beam
™ ............................................................................................................................. 19
Apps & More ....................................................20
Samsung Smart Switch ............................................20
Installing Apps
............................................................20
Gmail (Google Account)
........................................... 20
Setting Up Your Email Accounts
........................... 21
Internet
..........................................................................22
Multi Window
™............................................................................................................ 23
Camera .........................................................................25
Lock Screen
................................................................ 26
Page 3
3
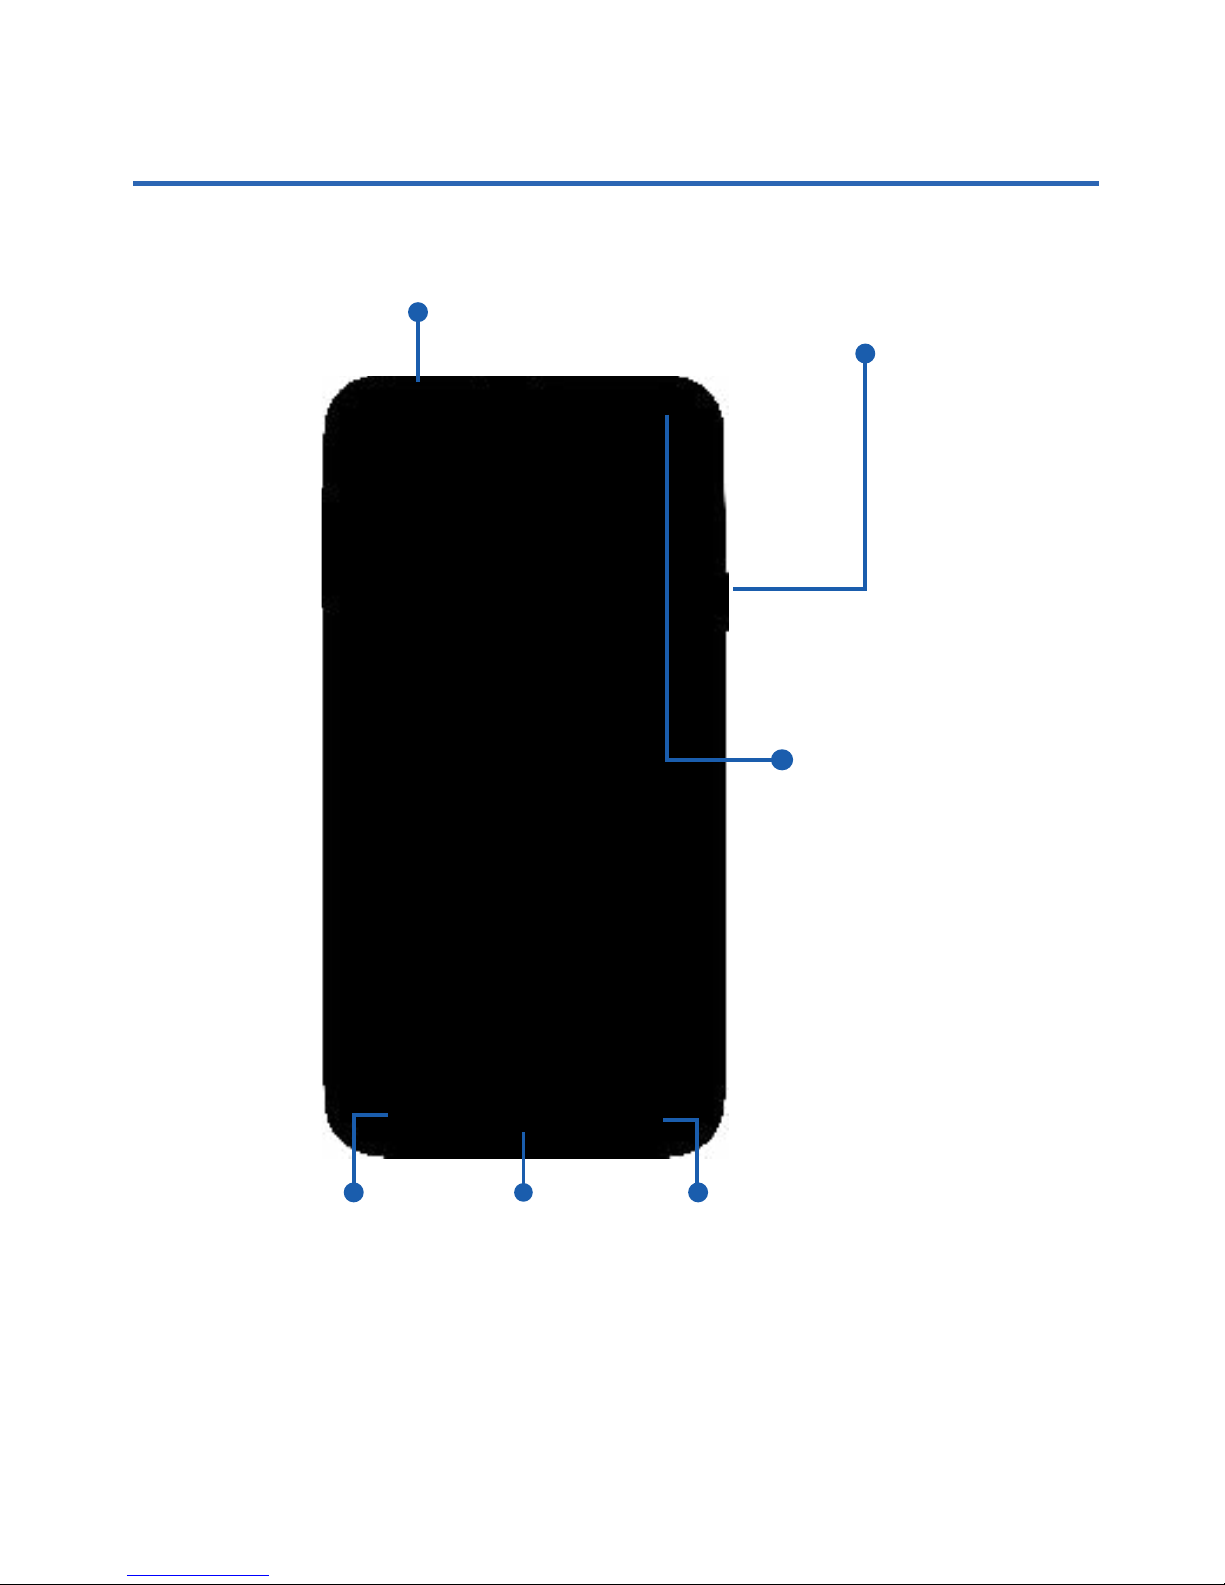
Device Functions
IR
Transmitter
Power/Lock
FrontFacing
Camera
Home/
Fingerprint
reader
Back*Recent
Apps*
*Menu and Back illuminates when using the device.
Page 4
4
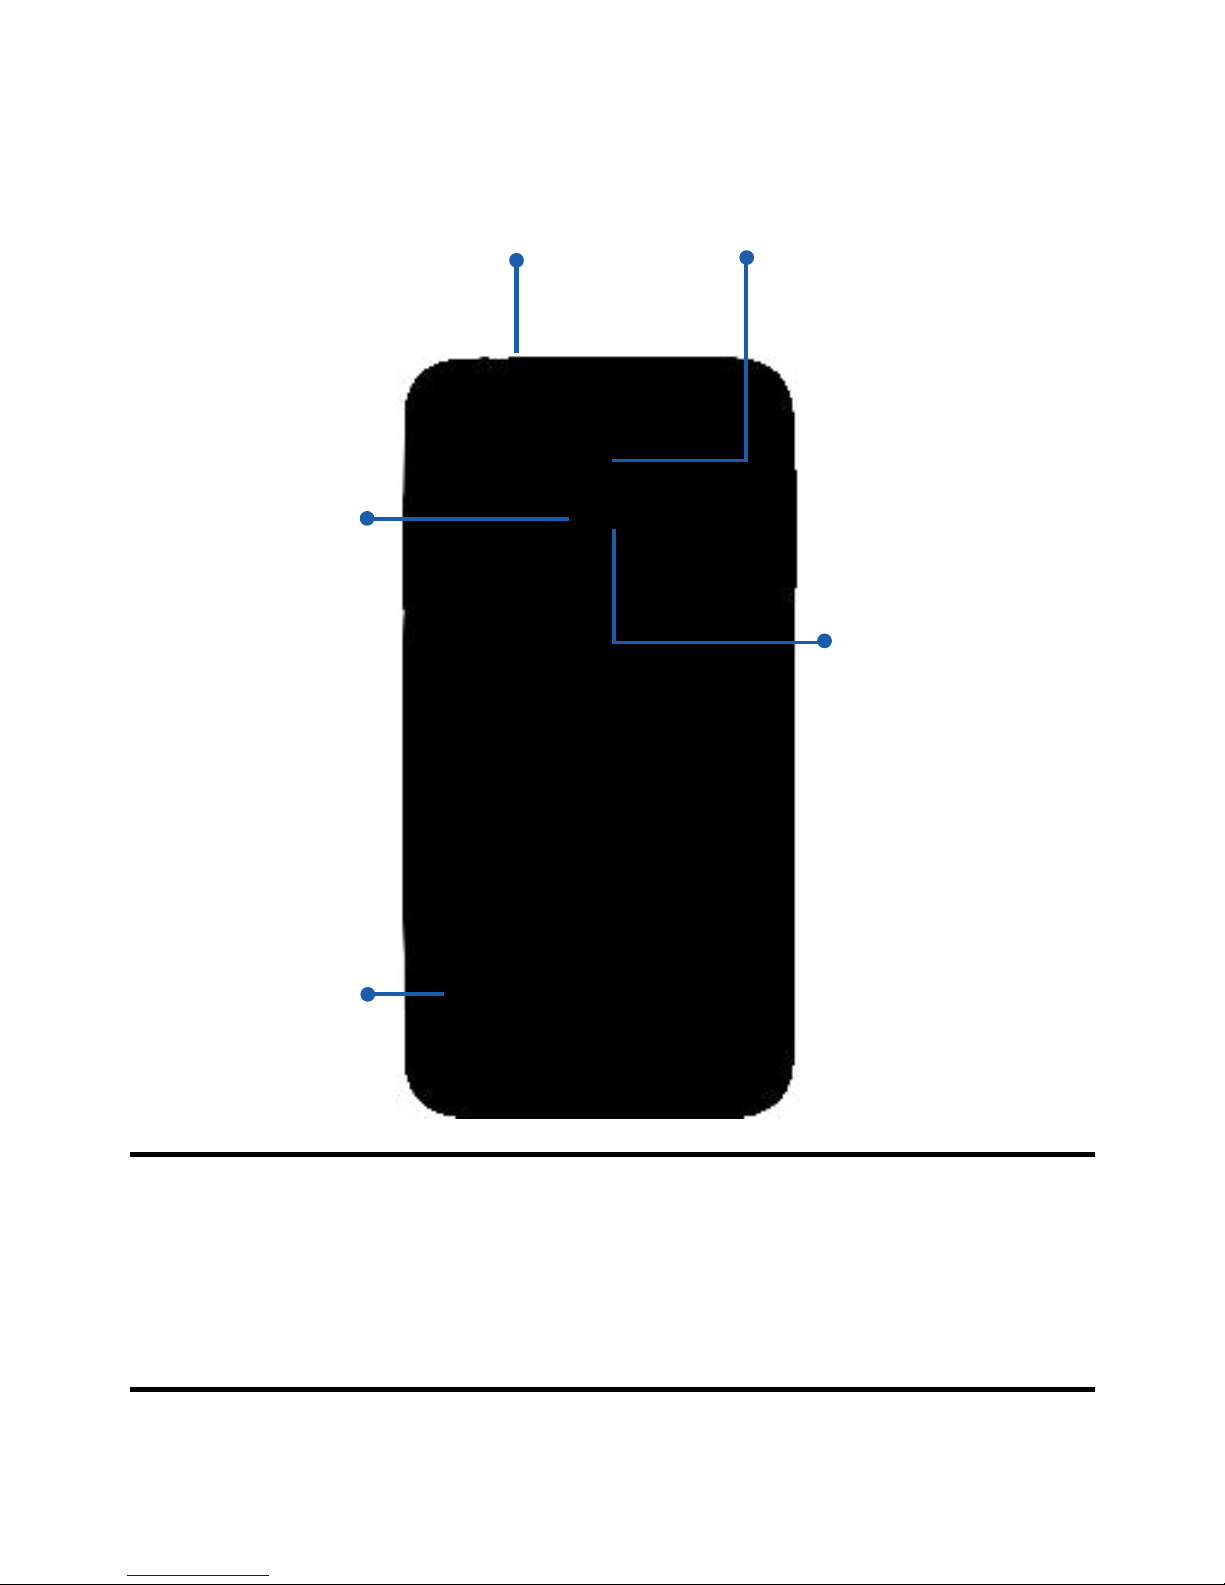
Note:
Headset
Jack
Flash
Speaker
Heart Rate
Sensor
Camera
Lens
Please use only an approved charging
accessory to charge your device. Improper
handling of the charging port, as well as the
use of an incompatible charger, may cause
damage to your device and void the warranty.
Page 5
5
Setting Up Your Device
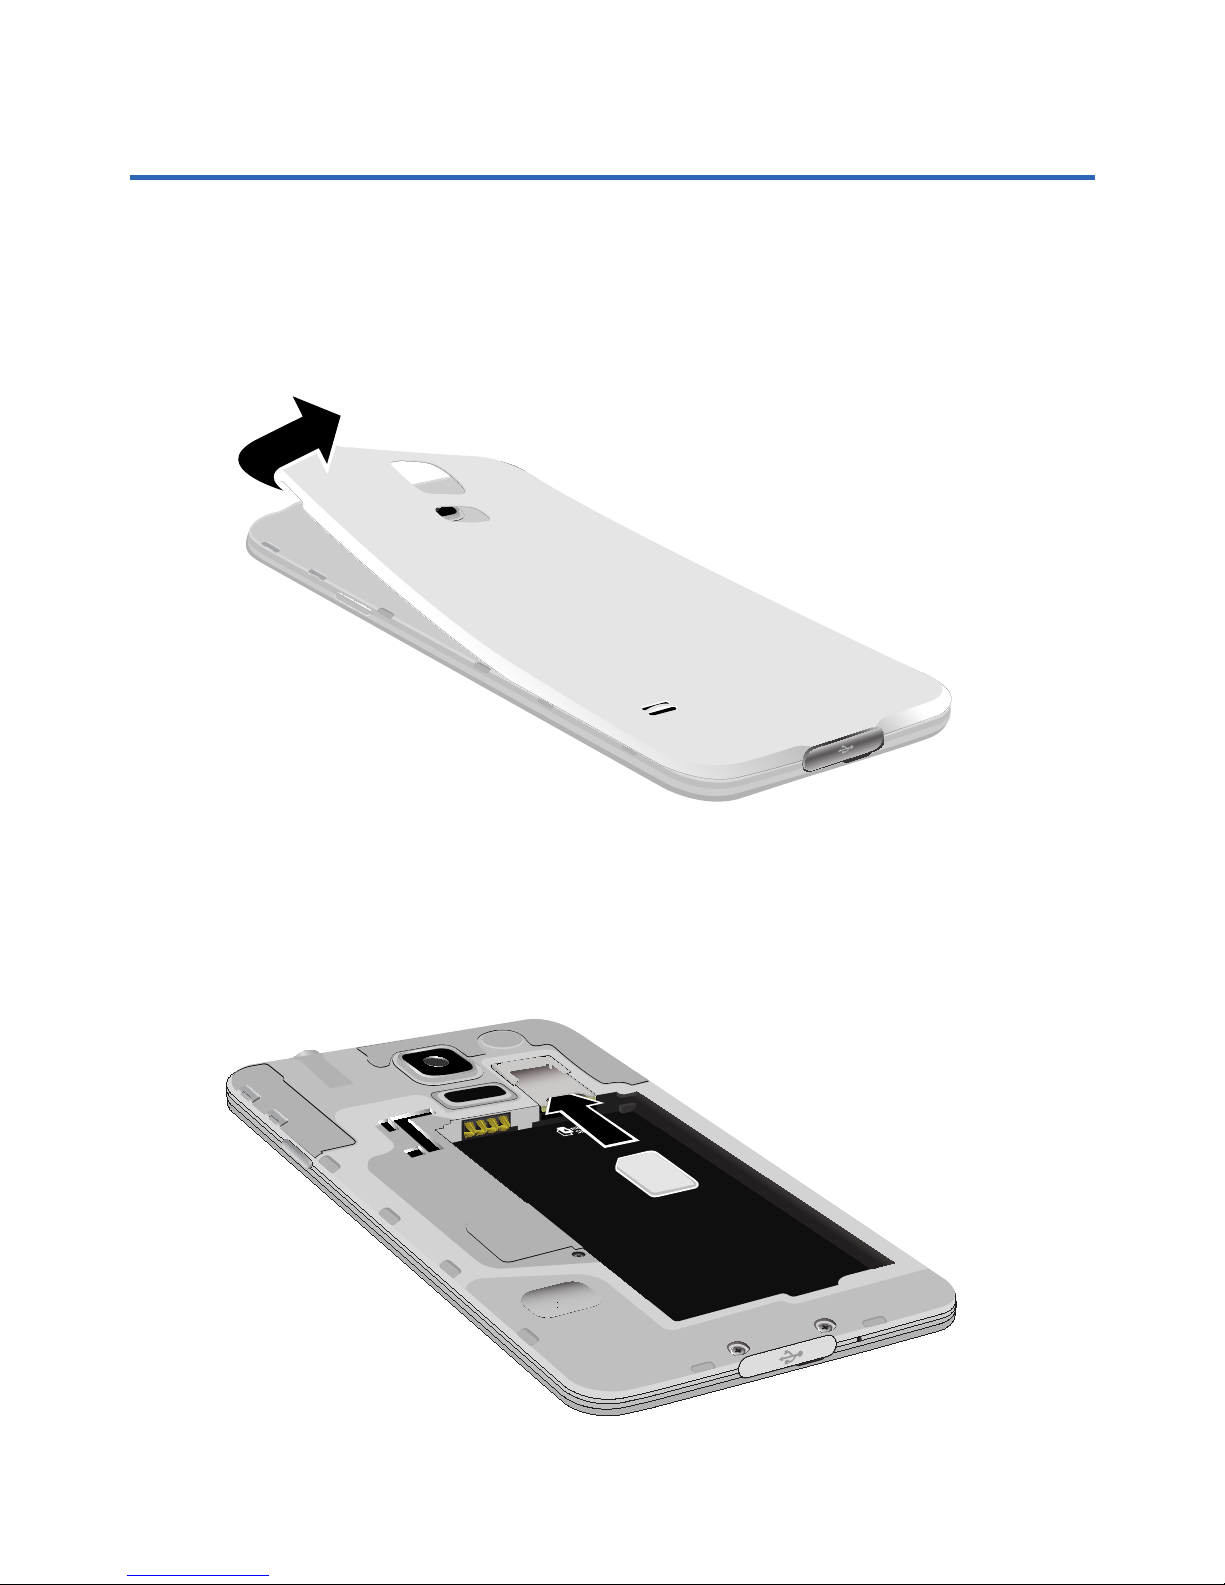
Step 1. Remove the Back Cover
● Locate the cover release latch and carefully
remove the cover off the device.
Step 2. Install the SIM Card
● Slide the SIM card into the SIM card slot until
it “clicks” into place.
Page 6
6
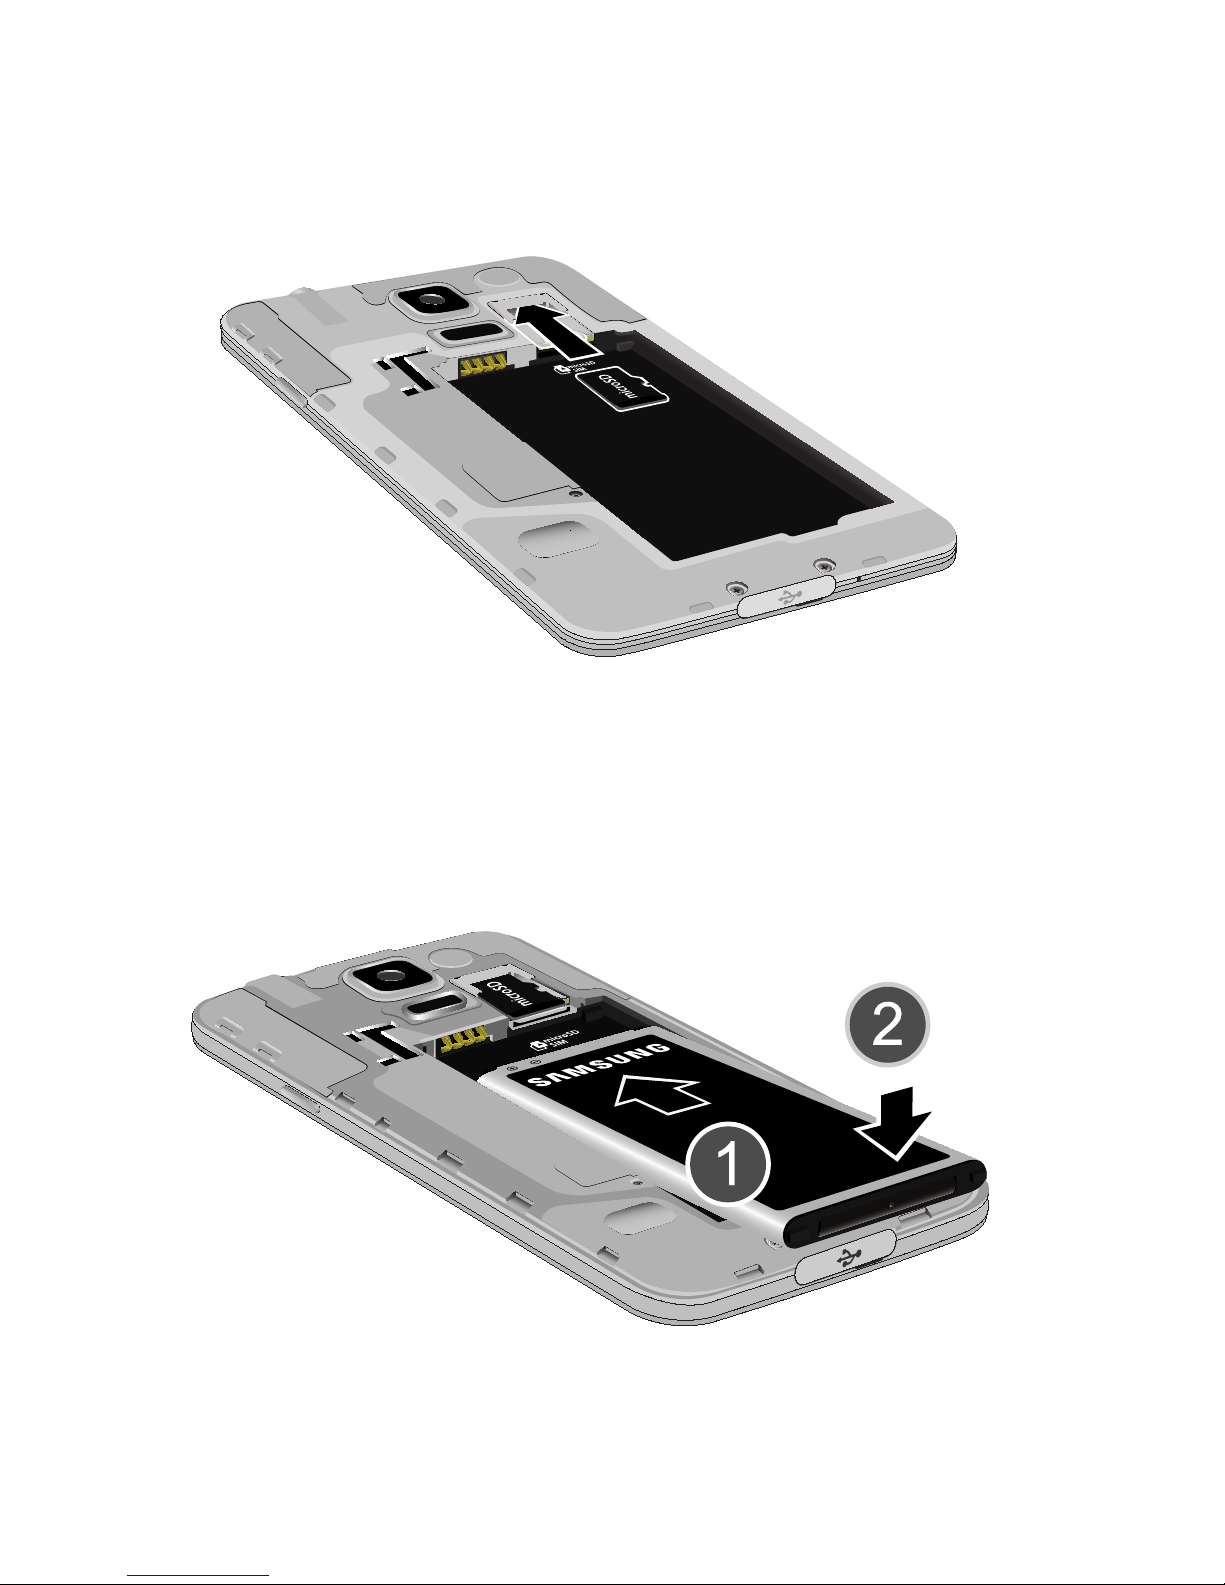
Step 3. Install the optional microSD card
● Slide the memory card into the card slot until
it is secured into place.
Step 4. Insert the Battery
● Insert the battery, making sure to align the
gold contacts (1). Press down gently to secure
the battery (2).
Page 7

7
Step 5. Replace the Back Cover
● Position the battery cover over the battery
compartment and securely press down until
you hear a click.
Note: Ensure that the back cover and the
multipurpose jack cover are closed tightly to
prevent water and dust entering the device.
Open or loose covers may allow water and
dust to enter the device and cause damage.
Step 6. Charging the Device
● Before turning on your device, charge it fully.
Be sure to use the charger that came with the
device.
Important! Verify that the battery is installed prior
to connecting the wall charger. If both
the wall charger is connected and the
battery is not installed, the handset will
power cycle continuously and prevent
proper operation. Failure to unplug
the wall charger before you remove
the battery, can cause the device to
become damaged.
Page 8
8
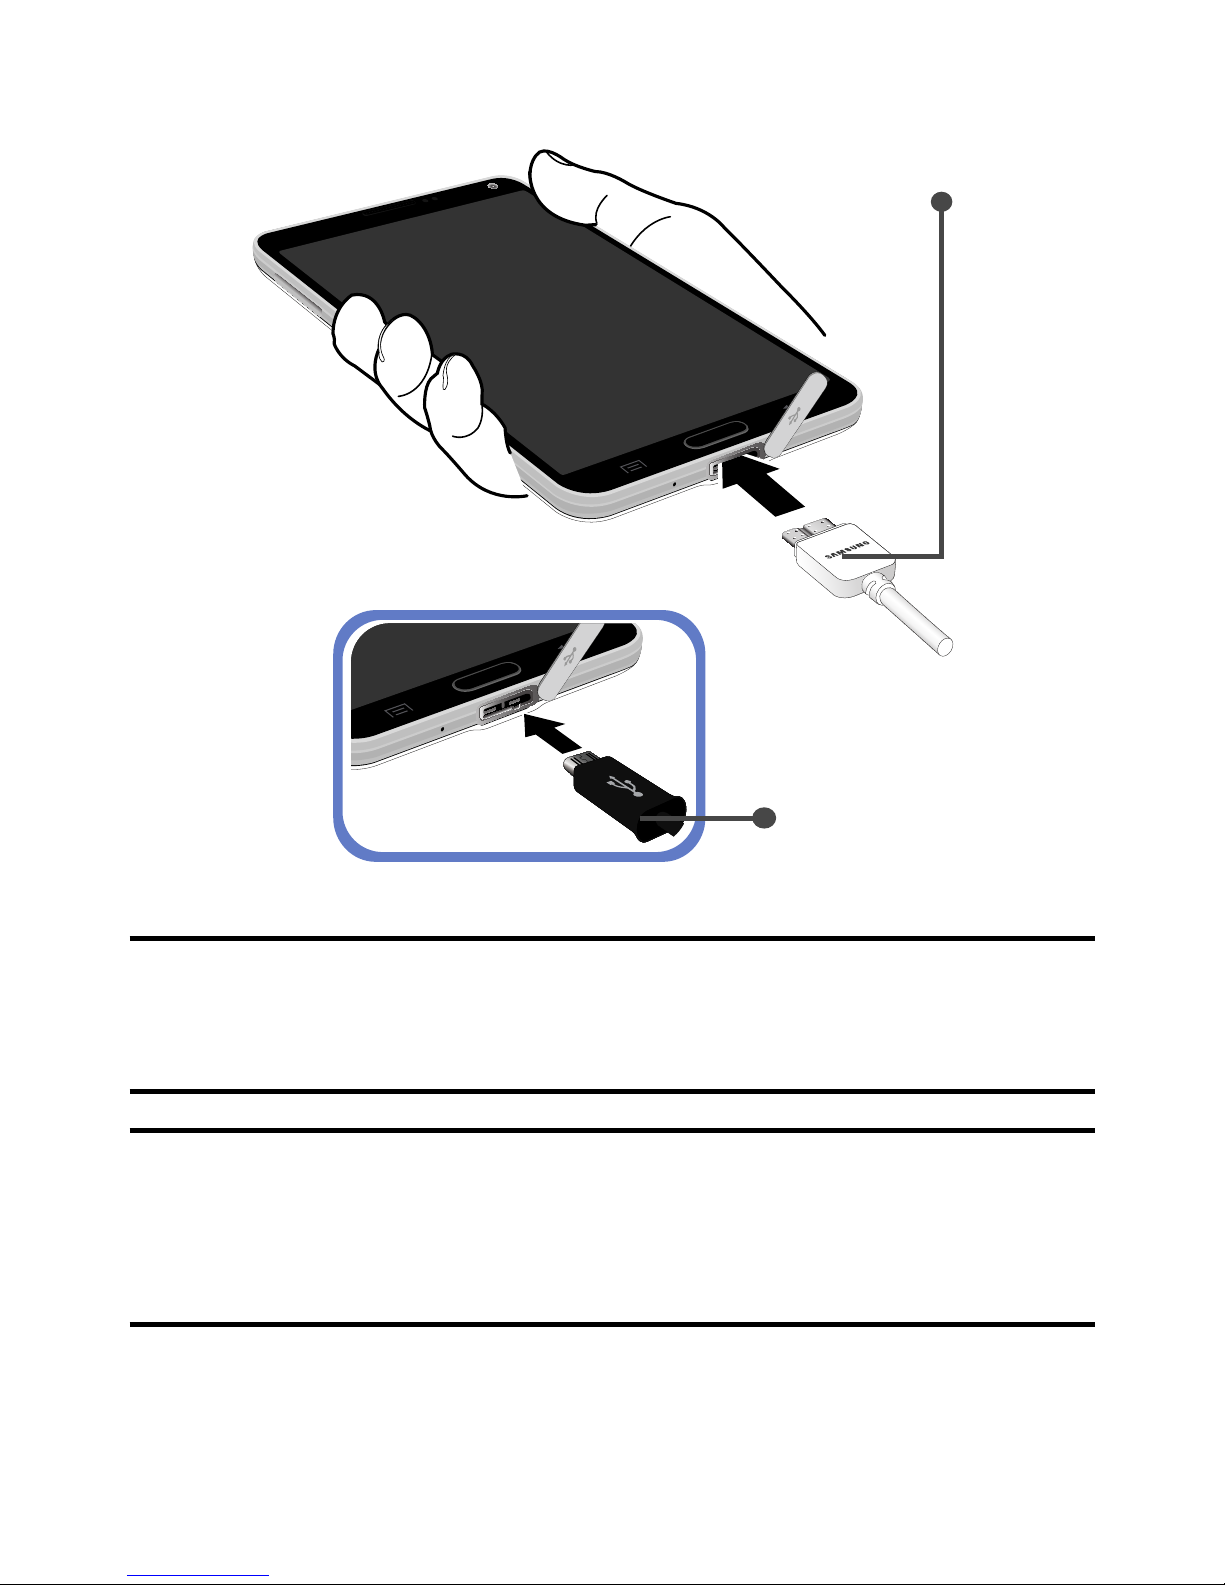
USB 3.0
connector
USB 2.0
connector
Note: Alternatively, the device can also be charged
using a USB 2.0 connector. Refer to the
image above for connection location.
Note: Connecting the charger improperly may
cause serious damage to the device. Any
damage caused by misuse is not covered by
the warranty.
Page 9

9
Turning Your Phone On and Off
1. To turn ON, press and hold the
Power/Lock key.
2. To turn OFF, press and hold Power/Lock key
and follow the prompts.
Locking and Unlocking Screen
1. To Lock, press the Power/Lock key.
2. To Unlock, press the Power/Lock key then
swipe your finger across the screen.
Initial Device Configuration
1. Select a language and tap Start or tap
Accessibility if you are visually impaired or
hard of hearing.
2. Follow the on-screen instruction to complete
the set up process.
Note: If you do not set up or log into your Gmail
account during this process, you can later
access Gmail from within the Applications
page.
Page 10

10
Customize Your Phone
Wallpaper and Widgets
► Touch and hold a blank space on one of the
home screens to access options.
Select
still or live
wallpapers.
Choose
from Home
screen, Lock
screen, or
Home and
lock screens.
Add app
and widget
shortcuts
Tap to set
home
screen
settings
Touch and
hold a
Home
screen and
drag it onto
the Trash
can icon
to remove
Page 11

11
Removing a Widget
1. Touch and hold a Widget until you can move
it around on the screen.
2. Drag the Widget up to the Remove icon and
release it.
As you place the Widget into the Trash, both
items turn red.
Note: This action does not actually delete the
Widget, it just removes it from the current
Home screen.
Page 12
12
Calling Features
Making a Call
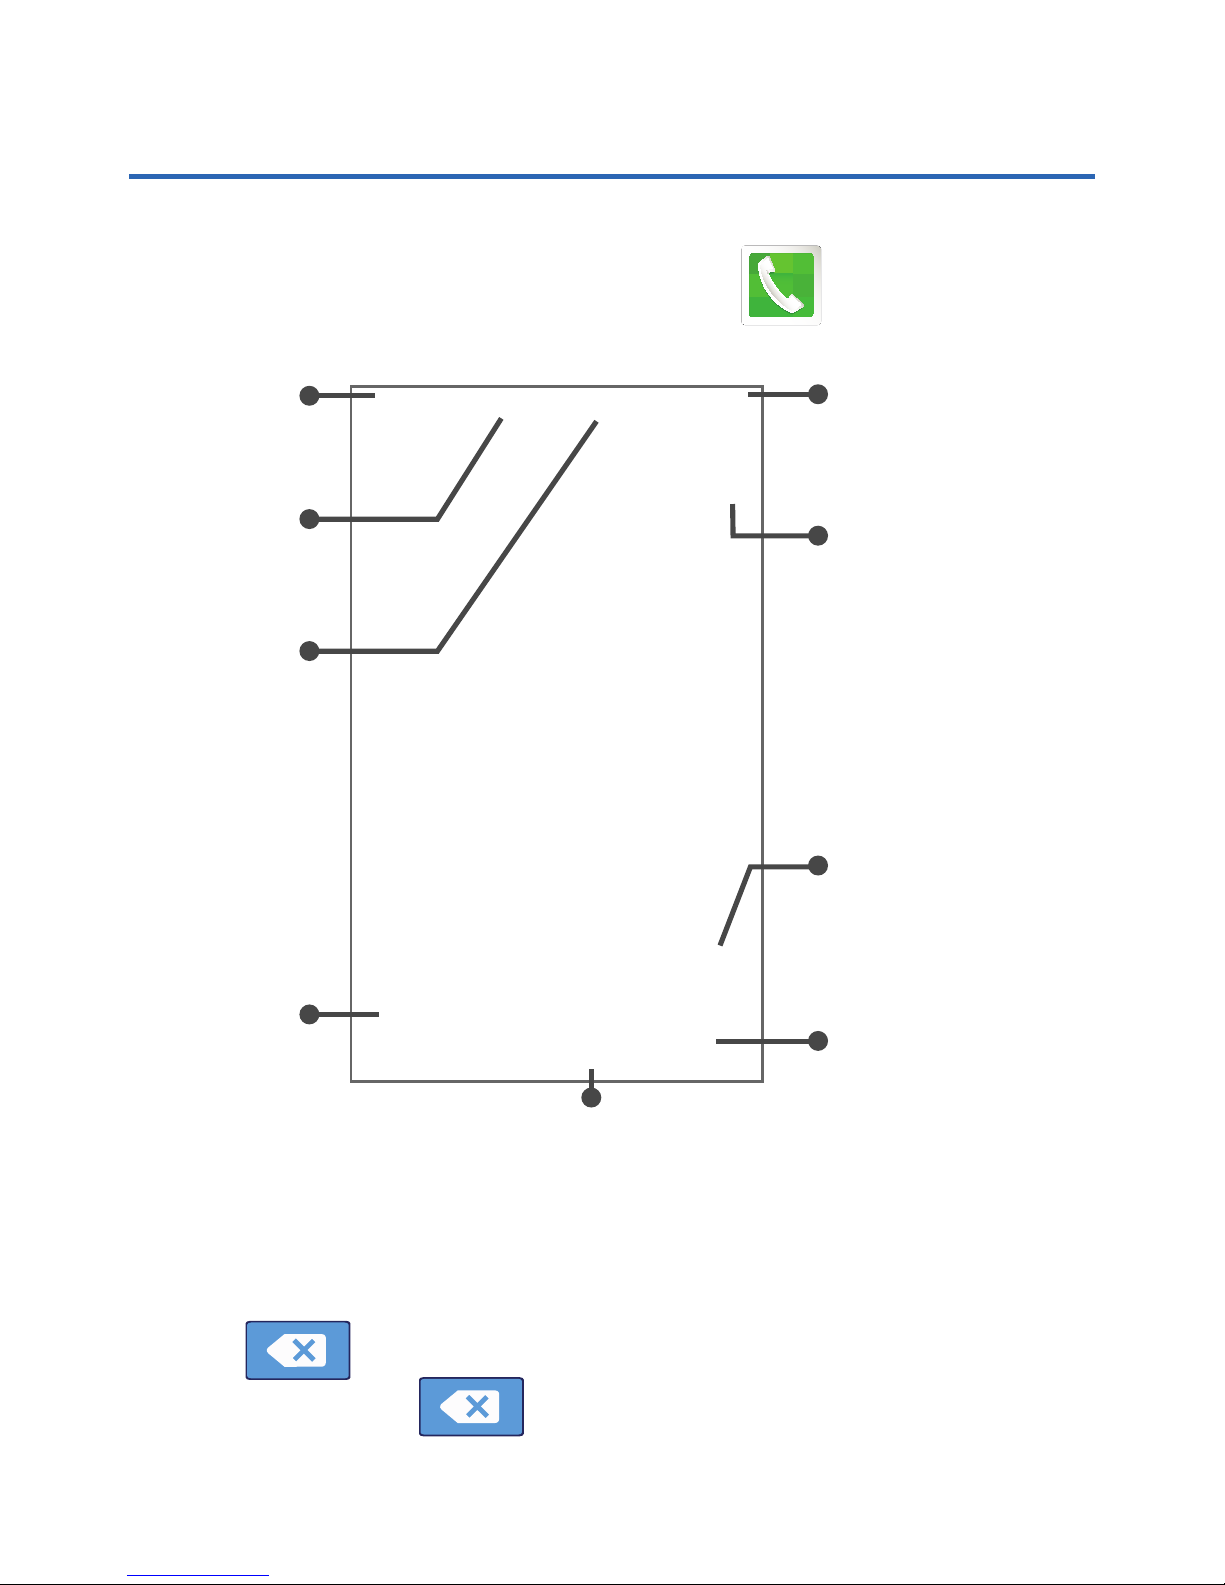
► From the Home screen, tap Phone.
Access
contacts list*
Menu
Access
frequent
contacts
Touch and
hold to
activate
vibrate
mode
Delete
Dial number
Tap for
voicemail
Call
history
Dial
number
*From the contact list, make a call by sliding your
finger across the contact name from left to right.
If you make a mistake while dialing, tap
Delete to clear the last digit. Touch
and hold
Delete to clear the entire
sequence.
Page 13
13
Ending a Call
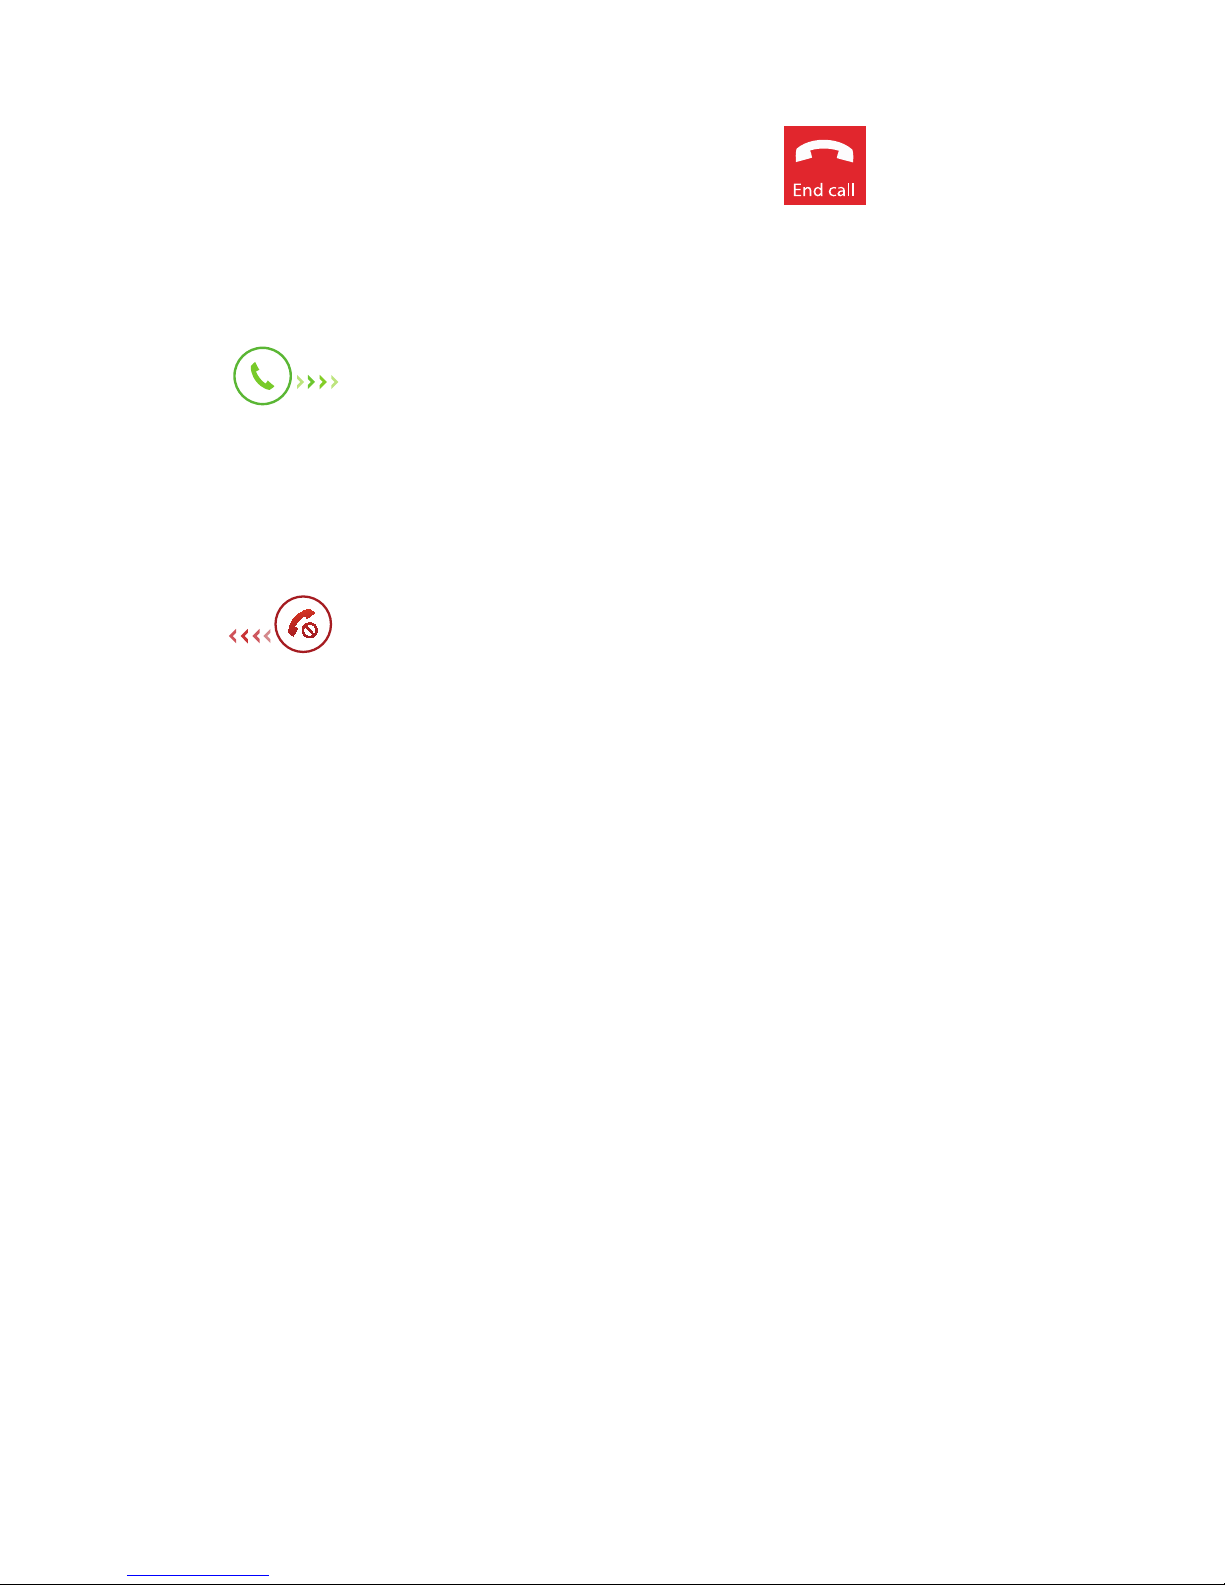
► From within an active call, tap End call.
Answering a Call
► At the incoming call screen, touch and slide
Answer in any direction to answer the
call.
Rejecting a Call
► At the incoming call screen, touch and slide
Reject in any direction to route the call
to your voicemail system.
Page 14
14
Voicemail
Set Up Voicemail
1. From the Home screen, tap Phone and
then touch and hold
until the device
dials your voicemail.
2. Follow the prompts in the new user tutorial to
set up your mail box.
Access Voicemail
1. From the Home screen, tap Phone and
then touch and hold
. After connection,
you will hear your voice greeting.
2. When connected, follow the voice prompts
from your voicemail center.
Note: Your voice mailbox is not password protected
until you create a password by following the
setup tutorial.
Page 15
15
Contacts
Creating a New Contact
1. From the Home screen, tap Phone.
2. Enter a phone number using the on-screen
dialpad.
3. Tap Add to Contacts
g
Create contact or
select the Contact entry.
4. Tap a destination type (Device, SIM, Microsoft
Exchange ActiveSync, Google, or Samsung
account) (depending on where you want to
save the new contact information).
5. Enter the desired information.
6. Tap Save to store the new entry.
Editing an Existing Contact
1. From the Home screen, tap Contacts.
2. Tap a contact to view its information, then tap
Edit.
3. Tap Save when you finish updating your
information.
Deleting an Existing Contact
1. From the Home screen, tap Contacts.
2. Touch and hold a contact name from the list
and select Delete
g
OK.
Page 16
16
Messages
Create and Send a Message
1. From the Home screen, tap Messages
g
Tap to compose message.
2. Enter either the recipient’s phone number or
e-mail address.
Note: If adding a recipient from among Logs,
Contacts, or Groups, tap the contact to
place a checkmark alongside the entry and
tap Done. The contact will be placed in the
recipient field.
3. Tap the Enter message field and enter a
message.
4. Tap Attach to insert various file types to
your message (such as images, videos, audio
files, etc..).
5. Tap Add emoticons to choose an
available emoticon and then add it into your
message (at the cursor location).
6. Select the file and complete the on-screen
instructions to insert it to the current
message.
7. Review your message and tap Send.
Page 17
17
Connections
Connecting to Bluetooth
1. From the Home screen, tap Apps
g
Settings
g
Bluetooth.
2. Touch and slide the Bluetooth slider to the
right to turn it on.
3. If necessary, tap Scan. Review the list of
discovered in-range Bluetooth
®
devices.
4. Tap a device from the list to initiate pairing.
5. Enter the passkey/PIN code, if needed, and
tap OK.
6. The external device will then have to also
accept the connection and enter your
device’s PIN code. Once successfully paired,
appears within the Status area.
Connecting to Wi-Fi
1. From the Home screen, tap Apps
g
Settings
g
Wi-Fi.
2. Touch and slide the Wi-Fi slider to the right to
turn it on.
3. Tap Menu
g
Scan to display a list of Wi-Fi
networks in-range.
4. Tap a network to connect and enter the
password if prompted. When connected you
will see
in the status bar.
Page 18
18
Near Field Communication
Allows two compatible devices to exchange data
when the back of the devices touch each other.
When used in conjunction with S Beam, your device
can be used to share images/videos/files content
when NFC-capable devices are touched.
To activate NFC:
1. From the Home screen, tap Apps
g
Settings
g
NFC.
2. Touch and slide the slider to the right to turn
it on (
ON
ON
).
Page 19

19
S Beam
™
Allows you to beam large files directly to another
compatible device that is in direct contact. These
files can be larger, such as Videos, HD pictures, and
other large files.
To activate S Beam:
1. From the Home screen, tap Apps
g
Settings
g
NFC. Verify the NFC feature
is active.
2. If not already active, tap the S Beam field and
touch and slide to the right to turn it on.
3. Complete the transfer process between the
two NFC-enabled devices by placing them
back to back. This feature can come in very
handy to quickly share pictures between
users with compatible S Beam devices.
Page 20
20
Apps & More
Samsung Smart Switch
Easily move over your photos, videos, music, apps
and more with Samsung Smart Switch™.
Get started today at www.samsungsmartswitch.com.
Installing Apps
Apps are available to download from Google Play™.
1. From the Home screen, tap Apps
g
Play Store.
2. If prompted, follow the on-screen prompts to
add an existing Google account.
Gmail (Google Account)
Before you can access Google™ applications, you
must first sign into or set up a new Gmail account.
► From the Home screen, tap Apps
g
Gmail.
● Tap New to create a new account and
follow the on-screen instructions.
● Tap Existing if you already have an
account, enter your Email and Password
and follow the on-screen instructions.
Page 21

21
Setting Up Your Email Accounts
Check email on the go with popular Internet-based
email accounts, including Yahoo!
®
Mail, etc..
1. From the Home screen, tap Apps
g
Email.
2. Enter your email address and password into
the appropriate fields and tap Next.
3. At the Account options screen, select the
frequency which the device should check for
new email on the server and tap Next.
4. At the Set up email screen, name the account
and enter a screen name to identify yourself
on this account.
5. Tap Done to store the new account.
Note: Record your email account information.
Please keep this document in a safe place.
Page 22
22
Internet
Take the Internet on the go. You can reach the latest
news, get the weather and follow your stocks.
► From the Home screen, tap Apps
g
Internet.
To enter a URL:
You can access a website quickly by entering the
URL. Websites are optimized for viewing on your
device.
► From the homepage tap the URL field at the
top of the screen, enter the URL and tap
.
To add a new window:
1. From your browser window, tap Window
g
New window. A new browser window
displays.
Note: The number of currently open windows is
displayed at the top of the Windows screen.
2. Scroll across the screen to view the currently
active windows and tap an entry to launch the
selected Internet window.
Page 23
23
Multi Window
™
Run multiple applications on the current screen at
the same time.
Note: Only applications found within the Multi
window panel can be active atop another
current application on the screen.
1. Activate the Multi Window feature:
● Using two fingers, touch and drag the
Status bar downwards and tap
g
Multi window icon to activate the feature.
2. To display the Multi window tab, press
and hold the
Back key.
3. With the Multi window tab on the left side of
the screen, tap the tab to open the application
panel.
Page 24

24
Tap to adjust
screen
size, switch
layouts,
or cloase
screen
Edit list of
available
apps
Tap to open
and close
panel
Page 25
25
Camera
This device gives you the magic of professional
digital photography. With stunning photographic
output and a range of exceptionally rich professional
shooting modes, editing features and various apps.
Going pro has never been this easy or this fun.
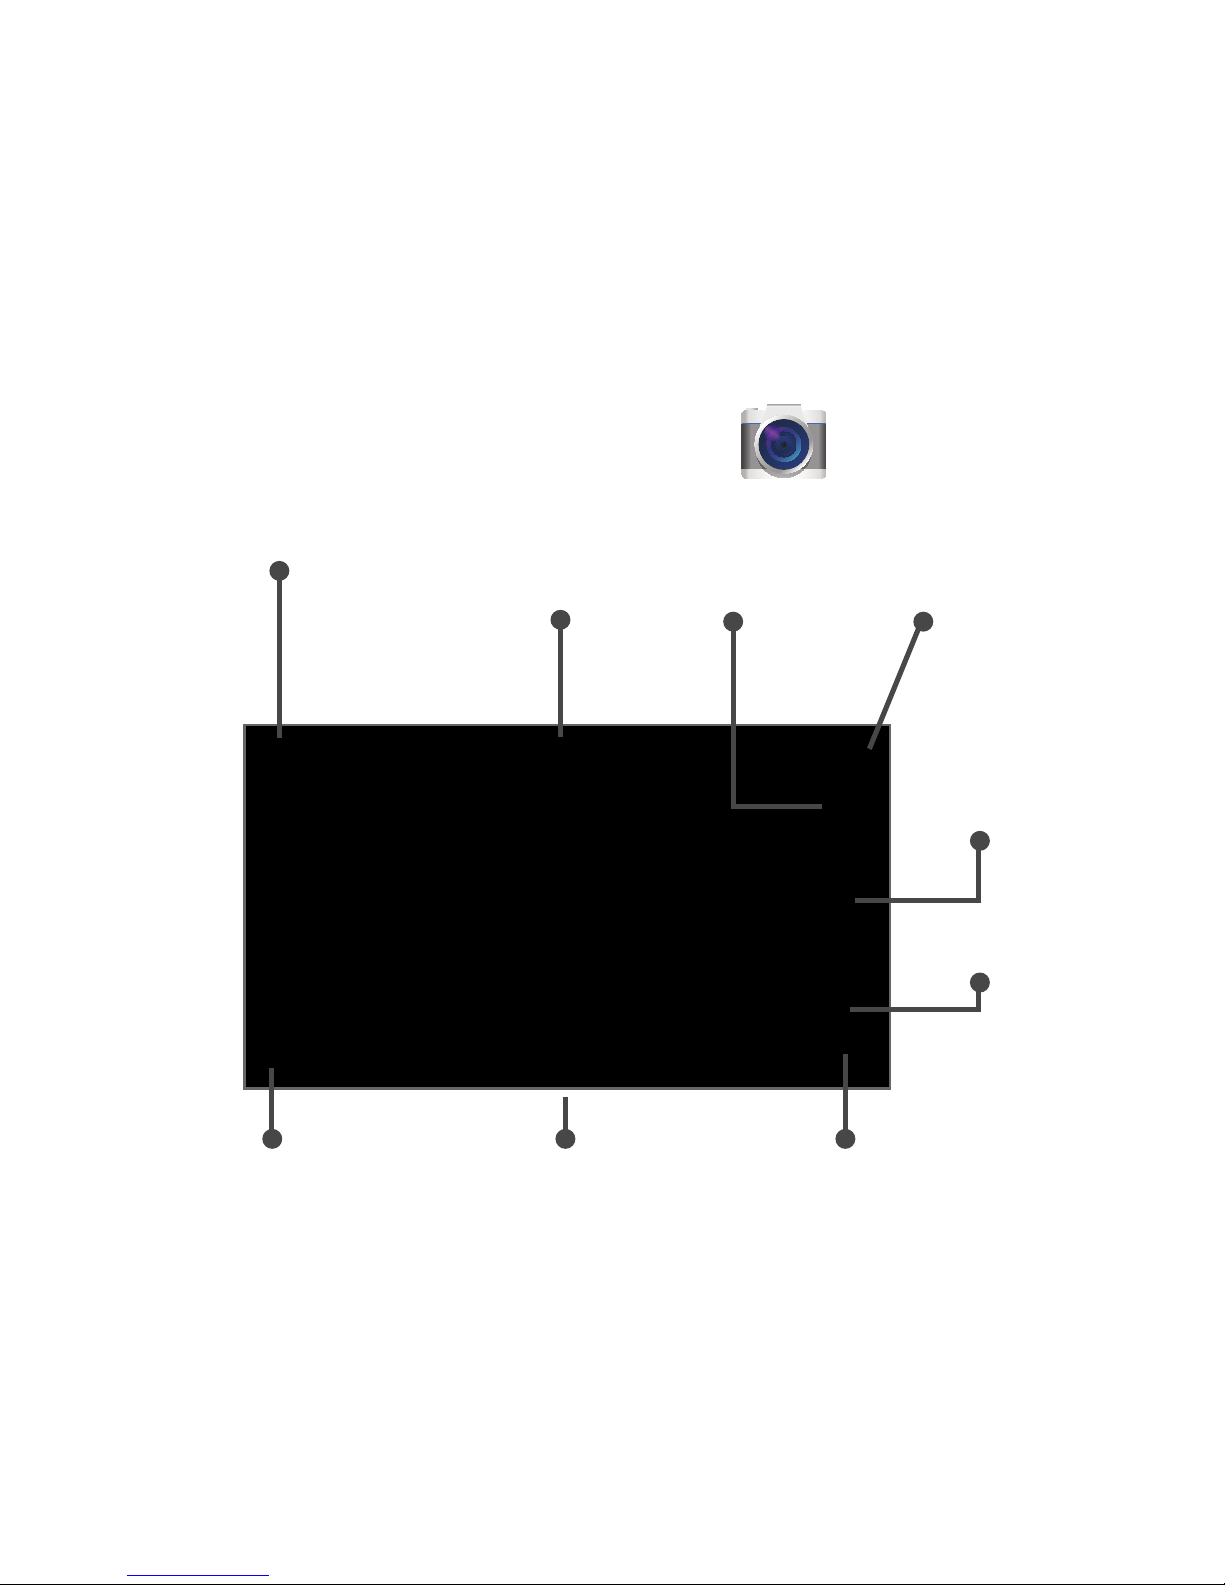
► From the Home screen, tap Camera.
Self-Portrait
Camera
mode
Record
Video
Battery
charge
Take
picture
Mode
Image
viewer
ViewfinderSettings
Page 26
26
Lock Screen
This menu contains features that allows you to
configure the device’s security parameters.
To secure data and limit phone access, set the
device to require a screen unlock pattern each time
you turn on the device, or every time the phone
wakes up from sleep mode (when the screen
automatically turns off).
► From the Home screen, tap Apps
g
Settings
g
Lock screen
g
Screen lock.
The Screen lock menu allows to choose from a
variety of locking features.
Page 27

27
Page 28

28
Page 29

Notes
___________________________________________
___________________________________________
___________________________________________
___________________________________________
___________________________________________
___________________________________________
___________________________________________
___________________________________________
___________________________________________
___________________________________________
___________________________________________
___________________________________________
___________________________________________
___________________________________________
___________________________________________
___________________________________________
___________________________________________
___________________________________________
___________________________________________
___________________________________________
___________________________________________
___________________________________________
___________________________________________
___________________________________________
 Loading...