

Page 1

User Manual
Page 2

PORTABLE ALL DIGITAL
MOBILE PHONE
User Manual
Please read this manual before operating your
phone, and keep it for future reference.
Page 3

Intellectual Property
All Intellectual Property, as defined below, owned by or which is otherwise the property of Samsung or its respective suppliers relating to
the SAMSUNG Phone, including but not limited to, accessories, parts, or software relating there to (the “Phone System”), is proprietary to
Samsung and protected under federal laws, state laws, and international treaty provisions. Intellectual Property includes, but is not limited
to, inventions (patentable or unpatentable), patents, trade secrets, copyrights, software, computer programs, and related documentation
and other works of authorship. You may not infringe or otherwise violate the rights secured by the Intellectual Property. Moreover, you
agree that you will not (and will not attempt to) modify, prepare derivative works of, reverse engineer, decompile, disassemble, or
otherwise attempt to create source code from the software. No title to or ownership in the Intellectual Property is transferred to you. All
applicable rights of the Intellectual Property shall remain with SAMSUNG and its suppliers.
Samsung Telecommunications America (STA), LLC
Headquarters: Customer Care Center:
1301 E. Lookout Drive 1000 Klein Rd.
Richardson, TX 75082 Plano, TX 75074
Toll Free Tel: 1.888.987.HELP (4357)
Internet Address:
©
2010 Samsung Telecommunications America, LLC is a registered trademark of Samsung Electronics America, Inc. and/or its related
entities.
Do you have questions about your Samsung Mobile Phone?
For 24 hour information and assistance, we offer a new FAQ/ARS System (Automated Response System) at:
www.samsungtelecom.com/support
GH68-26940A
Printed in USA
http://www.samsungusa.com
VZW_SCH-U820_Reality_English_UM_DB27_TE_030910_F7
Page 4

Reality™ is a trademark of Samsung Electronics America, Inc. and its related entities.
Nuance®, VSuite™, T9® Text Input, and the Nuance logo are trademarks or registered trademarks of Nuance Communications, Inc., or its
affiliates in the United States and/or other countries.
The Bluetooth® word mark, figure mark (stylized “B Design”), and combination mark (Bluetooth word mark and “B Design”) are registered
trademarks and are wholly owned by the Bluetooth SIG.
microSD™ and the microSD logo are Trademarks of the SD Card Association.
Open Source Software
Some software components of this product incorporate source code covered under GNU General Public License (GPL), GNU Lesser General
Public License (LGPL), OpenSSL License, BSD License and other open source licenses. To obtain the source code covered under the open
source licenses, please visit:
http://www.samsungnetwork.com/Home/opensource
.
Disclaimer of Warranties; Exclusion of Liability
EXCEPT AS SET FORTH IN THE EXPRESS WARRANTY CONTAINED ON THE WARRANTY PAGE ENCLOSED WITH THE PRODUCT, THE
PURCHASER TAKES THE PRODUCT "AS IS", AND SAMSUNG MAKES NO EXPRESS OR IMPLIED WARRANTY OF ANY KIND WHATSOEVER
WITH RESPECT TO THE PRODUCT, INCLUDING BUT NOT LIMITED TO THE MERCHANTABILITY OF THE PRODUCT OR ITS FITNESS FOR ANY
PARTICULAR PURPOSE OR USE; THE DESIGN, CONDITION OR QUALITY OF THE PRODUCT; THE PERFORMANCE OF THE PRODUCT; THE
WORKMANSHIP OF THE PRODUCT OR THE COMPONENTS CONTAINED THEREIN; OR COMPLIANCE OF THE PRODUCT WITH THE
REQUIREMENTS OF ANY LAW, RULE, SPECIFICATION OR CONTRACT PERTAINING THERETO. NOTHING CONTAINED IN THE INSTRUCTION
MANUAL SHALL BE CONSTRUED TO CREATE AN EXPRESS OR IMPLIED WARRANTY OF ANY KIND WHATSOEVER WITH RESPECT TO THE
PRODUCT. IN ADDITION, SAMSUNG SHALL NOT BE LIABLE FOR ANY DAMAGES OF ANY KIND RESULTING FROM THE PURCHASE OR USE OF
THE PRODUCT OR ARISING FROM THE BREACH OF THE EXPRESS WARRANTY, INCLUDING INCIDENTAL, SPECIAL OR CONSEQUENTIAL
DAMAGES, OR LOSS OF ANTICIPATED PROFITS OR BENEFITS.
Page 5

Table of Contents
Section 1: Getting Started .............................................. 4
Understanding this User Manual . . . . . . . . . . . . . . . . . . . . . . . .4
Activating your Phone . . . . . . . . . . . . . . . . . . . . . . . . . . . . . . . . 4
Displaying Your Telephone Number . . . . . . . . . . . . . . . . . . . . .4
Battery . . . . . . . . . . . . . . . . . . . . . . . . . . . . . . . . . . . . . . . . . . . 5
Turning Your Phone On and Off . . . . . . . . . . . . . . . . . . . . . . . . . 9
Set-Up Wizard . . . . . . . . . . . . . . . . . . . . . . . . . . . . . . . . . . . . . 9
Locking and Unlocking . . . . . . . . . . . . . . . . . . . . . . . . . . . . . . 10
Voicemail . . . . . . . . . . . . . . . . . . . . . . . . . . . . . . . . . . . . . . . . 11
Memory Card . . . . . . . . . . . . . . . . . . . . . . . . . . . . . . . . . . . . . 11
Section 2: Understanding Your Phone ......................... 13
Features of Your Phone . . . . . . . . . . . . . . . . . . . . . . . . . . . . . . 13
Front View of Your Phone . . . . . . . . . . . . . . . . . . . . . . . . . . . . 14
Back View of Your Phone . . . . . . . . . . . . . . . . . . . . . . . . . . . . 15
Side View of Your Phone . . . . . . . . . . . . . . . . . . . . . . . . . . . . . 16
Open View of Your Phone . . . . . . . . . . . . . . . . . . . . . . . . . . . . 17
Home Screen . . . . . . . . . . . . . . . . . . . . . . . . . . . . . . . . . . . . . 18
Extended Home Screens . . . . . . . . . . . . . . . . . . . . . . . . . . . . . 19
Widgets and the Widget Bar . . . . . . . . . . . . . . . . . . . . . . . . . . 20
Menu . . . . . . . . . . . . . . . . . . . . . . . . . . . . . . . . . . . . . . . . . . . 23
Event Status Bar and Event Manager . . . . . . . . . . . . . . . . . . . 25
Section 3: Navigation ...................................................27
Touch Screen Navigation . . . . . . . . . . . . . . . . . . . . . . . . . . . . 27
Keyboard Navigation . . . . . . . . . . . . . . . . . . . . . . . . . . . . . . . . 28
1
Navigation Keys . . . . . . . . . . . . . . . . . . . . . . . . . . . . . . . . . . . 28
Menu Outline . . . . . . . . . . . . . . . . . . . . . . . . . . . . . . . . . . . . . 29
Section 4: Call Functions ............................................. 33
Making a Call . . . . . . . . . . . . . . . . . . . . . . . . . . . . . . . . . . . . . 33
Ending a Call . . . . . . . . . . . . . . . . . . . . . . . . . . . . . . . . . . . . . 34
Answering a Call . . . . . . . . . . . . . . . . . . . . . . . . . . . . . . . . . . 35
Call-In-Progress Options . . . . . . . . . . . . . . . . . . . . . . . . . . . . 35
Three-way Calling . . . . . . . . . . . . . . . . . . . . . . . . . . . . . . . . . 36
Recent Calls . . . . . . . . . . . . . . . . . . . . . . . . . . . . . . . . . . . . . . 36
Voice Commands . . . . . . . . . . . . . . . . . . . . . . . . . . . . . . . . . . 38
Roaming . . . . . . . . . . . . . . . . . . . . . . . . . . . . . . . . . . . . . . . . 39
TTY Mode . . . . . . . . . . . . . . . . . . . . . . . . . . . . . . . . . . . . . . . . 39
Section 5: Contacts ...................................................... 40
Adding a New Contact . . . . . . . . . . . . . . . . . . . . . . . . . . . . . . 40
Editing a Contact . . . . . . . . . . . . . . . . . . . . . . . . . . . . . . . . . . 41
Adding Pauses or Waits . . . . . . . . . . . . . . . . . . . . . . . . . . . . . 42
Finding a Contact . . . . . . . . . . . . . . . . . . . . . . . . . . . . . . . . . . 42
Deleting a Contact . . . . . . . . . . . . . . . . . . . . . . . . . . . . . . . . . 43
Backup Assistant . . . . . . . . . . . . . . . . . . . . . . . . . . . . . . . . . . 43
Groups . . . . . . . . . . . . . . . . . . . . . . . . . . . . . . . . . . . . . . . . . . 43
Speed Dials . . . . . . . . . . . . . . . . . . . . . . . . . . . . . . . . . . . . . . 45
Favorites . . . . . . . . . . . . . . . . . . . . . . . . . . . . . . . . . . . . . . . . 45
In Case of Emergency (ICE) . . . . . . . . . . . . . . . . . . . . . . . . . . 46
My Name Card . . . . . . . . . . . . . . . . . . . . . . . . . . . . . . . . . . . . 46
Page 6

Section 6: Entering Text ............................................... 48
Entering Text Using the QWERTY Keyboard . . . . . . . . . . . . . . 48
Entering Text using the Touch Screen . . . . . . . . . . . . . . . . . . 49
Section 7: Messaging ................................................... 52
Types of Messages . . . . . . . . . . . . . . . . . . . . . . . . . . . . . . . . 52
Creating and Sending Text Messages . . . . . . . . . . . . . . . . . . . 52
Creating and Sending Picture Messages . . . . . . . . . . . . . . . . 53
Creating and Sending Video Messages . . . . . . . . . . . . . . . . . . 55
Creating and Sending Voice Messages . . . . . . . . . . . . . . . . . . 56
Receiving Messages . . . . . . . . . . . . . . . . . . . . . . . . . . . . . . . 57
Viewing Text Messages . . . . . . . . . . . . . . . . . . . . . . . . . . . . . 57
Viewing Picture, Video or Voice Messages . . . . . . . . . . . . . . . 58
Quick Reply . . . . . . . . . . . . . . . . . . . . . . . . . . . . . . . . . . . . . . 58
Message Folders . . . . . . . . . . . . . . . . . . . . . . . . . . . . . . . . . . 59
Voicemail . . . . . . . . . . . . . . . . . . . . . . . . . . . . . . . . . . . . . . . . 61
Visual Voice Mail . . . . . . . . . . . . . . . . . . . . . . . . . . . . . . . . . . 61
Mobile IM . . . . . . . . . . . . . . . . . . . . . . . . . . . . . . . . . . . . . . . . 62
Email . . . . . . . . . . . . . . . . . . . . . . . . . . . . . . . . . . . . . . . . . . . 62
Chat . . . . . . . . . . . . . . . . . . . . . . . . . . . . . . . . . . . . . . . . . . . . 63
Message Settings . . . . . . . . . . . . . . . . . . . . . . . . . . . . . . . . . 64
Erase Options . . . . . . . . . . . . . . . . . . . . . . . . . . . . . . . . . . . . . 65
Section 8: Settings & Tools .......................................... 66
My Verizon . . . . . . . . . . . . . . . . . . . . . . . . . . . . . . . . . . . . . . . 66
Tools . . . . . . . . . . . . . . . . . . . . . . . . . . . . . . . . . . . . . . . . . . . 66
Bluetooth Menu . . . . . . . . . . . . . . . . . . . . . . . . . . . . . . . . . . . 68
Sounds Settings . . . . . . . . . . . . . . . . . . . . . . . . . . . . . . . . . . . 70
Display Settings . . . . . . . . . . . . . . . . . . . . . . . . . . . . . . . . . . . 73
Touch Settings . . . . . . . . . . . . . . . . . . . . . . . . . . . . . . . . . . . 75
Phone Settings . . . . . . . . . . . . . . . . . . . . . . . . . . . . . . . . . . . 75
Call Settings . . . . . . . . . . . . . . . . . . . . . . . . . . . . . . . . . . . . . 80
Memory . . . . . . . . . . . . . . . . . . . . . . . . . . . . . . . . . . . . . . . . . 83
USB Mode . . . . . . . . . . . . . . . . . . . . . . . . . . . . . . . . . . . . . . . 84
Phone Info . . . . . . . . . . . . . . . . . . . . . . . . . . . . . . . . . . . . . . . 85
Set-Up Wizard . . . . . . . . . . . . . . . . . . . . . . . . . . . . . . . . . . . . 85
Section 9: Media Center ............................................... 86
Music & Tones . . . . . . . . . . . . . . . . . . . . . . . . . . . . . . . . . . . . 86
Picture & Video . . . . . . . . . . . . . . . . . . . . . . . . . . . . . . . . . . . 88
Games . . . . . . . . . . . . . . . . . . . . . . . . . . . . . . . . . . . . . . . . . . 89
Browser . . . . . . . . . . . . . . . . . . . . . . . . . . . . . . . . . . . . . . . . . 90
Browse & Download . . . . . . . . . . . . . . . . . . . . . . . . . . . . . . . 90
Extras . . . . . . . . . . . . . . . . . . . . . . . . . . . . . . . . . . . . . . . . . . 90
Communities . . . . . . . . . . . . . . . . . . . . . . . . . . . . . . . . . . . . . 90
Info . . . . . . . . . . . . . . . . . . . . . . . . . . . . . . . . . . . . . . . . . . . . 91
Section 10: Music ........................................................ 92
V CAST Music with Rhapsody . . . . . . . . . . . . . . . . . . . . . . . . 92
Music Player . . . . . . . . . . . . . . . . . . . . . . . . . . . . . . . . . . . . . 94
Section 11: Pictures and Video .................................... 99
Using the Camera . . . . . . . . . . . . . . . . . . . . . . . . . . . . . . . . . 99
My Pictures . . . . . . . . . . . . . . . . . . . . . . . . . . . . . . . . . . . . . 102
Using the Camcorder . . . . . . . . . . . . . . . . . . . . . . . . . . . . . . 104
My Videos . . . . . . . . . . . . . . . . . . . . . . . . . . . . . . . . . . . . . . 106
V CAST Videos . . . . . . . . . . . . . . . . . . . . . . . . . . . . . . . . . . . 107
2
Page 7

Section 12: Tools, Applications and Widgets ............109
Voice Commands . . . . . . . . . . . . . . . . . . . . . . . . . . . . . . . . . 109
Calculator . . . . . . . . . . . . . . . . . . . . . . . . . . . . . . . . . . . . . . . 109
Calendar . . . . . . . . . . . . . . . . . . . . . . . . . . . . . . . . . . . . . . . . 110
Alarm Clock . . . . . . . . . . . . . . . . . . . . . . . . . . . . . . . . . . . . . 111
Stop Watch . . . . . . . . . . . . . . . . . . . . . . . . . . . . . . . . . . . . . . 111
World Clock . . . . . . . . . . . . . . . . . . . . . . . . . . . . . . . . . . . . . 112
Notepad . . . . . . . . . . . . . . . . . . . . . . . . . . . . . . . . . . . . . . . . 112
Sketch Pad . . . . . . . . . . . . . . . . . . . . . . . . . . . . . . . . . . . . . . 113
Timer . . . . . . . . . . . . . . . . . . . . . . . . . . . . . . . . . . . . . . . . . . 113
USB Mass Storage . . . . . . . . . . . . . . . . . . . . . . . . . . . . . . . . 113
File Viewer . . . . . . . . . . . . . . . . . . . . . . . . . . . . . . . . . . . . . . 114
Device Search . . . . . . . . . . . . . . . . . . . . . . . . . . . . . . . . . . .115
Tutorial . . . . . . . . . . . . . . . . . . . . . . . . . . . . . . . . . . . . . . . . . 115
VZ Navigator
® . . . . . . . . . . . . . . . . . . . . . . . . . . . . . . . . . . . . . . . . 116
Section 13: Web and Social Networking Applications 117
Bing Search . . . . . . . . . . . . . . . . . . . . . . . . . . . . . . . . . . . . . 117
Browser . . . . . . . . . . . . . . . . . . . . . . . . . . . . . . . . . . . . . . . . 118
Communities . . . . . . . . . . . . . . . . . . . . . . . . . . . . . . . . . . . . 123
Facebook . . . . . . . . . . . . . . . . . . . . . . . . . . . . . . . . . . . . . . . 124
Twitter . . . . . . . . . . . . . . . . . . . . . . . . . . . . . . . . . . . . . . . . . 124
MySpace . . . . . . . . . . . . . . . . . . . . . . . . . . . . . . . . . . . . . . .124
Photobucket . . . . . . . . . . . . . . . . . . . . . . . . . . . . . . . . . . . . .124
WeatherBug . . . . . . . . . . . . . . . . . . . . . . . . . . . . . . . . . . . . . 124
Section 14: Health and Safety Information ...............125
Health and Safety Information . . . . . . . . . . . . . . . . . . . . . . . . 125
3
Please Note the Following Information When
Using Your Handset . . . . . . . . . . . . . . . . . . . . . . . . . . . . . 126
Samsung Mobile Products and Recycling . . . . . . . . . . . . . . . 127
UL Certified Travel Adapter . . . . . . . . . . . . . . . . . . . . . . . . . . 127
Consumer Information on Wireless Phones . . . . . . . . . . . . . . 127
Road Safety . . . . . . . . . . . . . . . . . . . . . . . . . . . . . . . . . . . . . 133
Responsible Listening . . . . . . . . . . . . . . . . . . . . . . . . . . . . . 134
Operating Environment . . . . . . . . . . . . . . . . . . . . . . . . . . . . . 136
Using Your Phone Near Other Electronic Devices . . . . . . . . . 136
FCC Hearing-Aid Compatibility (HAC) Regulations
for Wireless Devices . . . . . . . . . . . . . . . . . . . . . . . . . . . . 137
Potentially Explosive Environments . . . . . . . . . . . . . . . . . . . . 139
Emergency Calls . . . . . . . . . . . . . . . . . . . . . . . . . . . . . . . . . 139
FCC Notice and Cautions . . . . . . . . . . . . . . . . . . . . . . . . . . . 140
Other Important Safety Information . . . . . . . . . . . . . . . . . . . . 140
Product Performance . . . . . . . . . . . . . . . . . . . . . . . . . . . . . . 141
Availability of Various Features/Ring Tones . . . . . . . . . . . . . . 142
Battery Standby and Talk Time . . . . . . . . . . . . . . . . . . . . . . . 142
Battery Precautions . . . . . . . . . . . . . . . . . . . . . . . . . . . . . . . 142
Care and Maintenance . . . . . . . . . . . . . . . . . . . . . . . . . . . . . 144
Section 15: Warranty Information ............................. 145
Standard Limited Warranty . . . . . . . . . . . . . . . . . . . . . . . . . . 145
End User License Agreement for Software . . . . . . . . . . . . . . 148
Index ............................................................................ 153
Page 8
Section 1: Getting Started
This section allows you to quickly start using your phone by
installing and charging the battery, activating your service,
setting up your voicemail, contacting customer support.
Understanding this User Manual
The chapters of this manual generally follow the same order as
the menus and sub-menus in your phone. A robust index for
quick reference to features begins on page 153.
Also included is important safety information that you should
know before using your phone. Most of this information is near
the back of the guide, beginning on page 125.
Notes and Tips
Throughout this guide are icons and text that are set apart from
the rest. These are intended to point out important information,
quick methods for activating features, to define terms, and more.
The definitions for these methods are as follows:
•
Note
: Explains alternative options within the current feature, menu, or
sub-menu.
•
Tip
: Provides quick or innovative methods for performing functions
related to the subject at hand.
•
Important!
: Points out information about the current feature that could
affect performance, or even damage your phone.
Note:
All screen images in this manual are simulated. Actual displays may
vary. Instructions to perform tasks in this manual may change
depending on the software version on your phone.
Note:
Unless otherwise specified, all instructions to perform tasks in this
manual assume that you are starting from a Home screen. To get to a
Home screen, you may need to unlock the phone or display. For more
information, see “Locking and Unlocking” on page 10.
Activating your Phone
If you purchased your phone at a Verizon Wireless store, it is
activated and ready to use. If received a new phone by mail, it
may need to be activated before you can use it.
To activate your phone, choose from the following:
•
Visit a Verizon Wireless store
•
Contact Verizon Wireless customer support.
•
Visit www.verizonwireless.com to manage your account online.
Displaying Your Telephone Number
My Number
displays the ten-digit telephone number assigned to
your phone.
• From a Home screen, touch
➔
Phone Info
➔
Menu
My Number
➔
.
Getting Started 4
Settings & Tools
Page 9

Battery
Your phone is powered by a rechargeable, standard Li-Ion
battery, and comes with a wall charger for charging.
Note:
The battery comes partially charged. You must fully charge the battery
before using your phone for the first time. A fully discharged battery
requires up to 4 hours of charge time.
After the first charge, you can use the phone while charging.
Warning!:
Use only Samsung-approved charging devices and batteries.
Samsung accessories are designed to maximize battery life. Using
other accessories may invalidate your warranty and may cause
damage.
Battery Indicator
The battery icon in the upper-right corner of the display shows
battery power level, with four bars indicating a full charge.
Two to three minutes before the battery becomes too low to
operate, a blinking empty battery icon appears and a tone
sounds. If you continue to operate the phone without charging, it
will shut down.
5
Battery Cover
Your phone has a removable battery cover, covering the battery
and a tab for attaching a strap.
Removing the Cover
䊳
Grasp the phone with both hands. Pull up on the slot provided,
while lifting the cover up and off the phone.
Installing the Cover
䊳
Align the cover and press it firmly into place, being sure it
snaps into place at the corners.
Page 10

Installing the Battery
1. Remove the battery cover. For more information, see
“Battery Cover” on page 5.
2. Insert the top end of the battery into the phone housing,
aligning the gold contacts on the top of the battery with the
gold contacts on the phone. Push down on the bottom of
the battery until it snaps into place.
3. Snap the battery cover back into place.
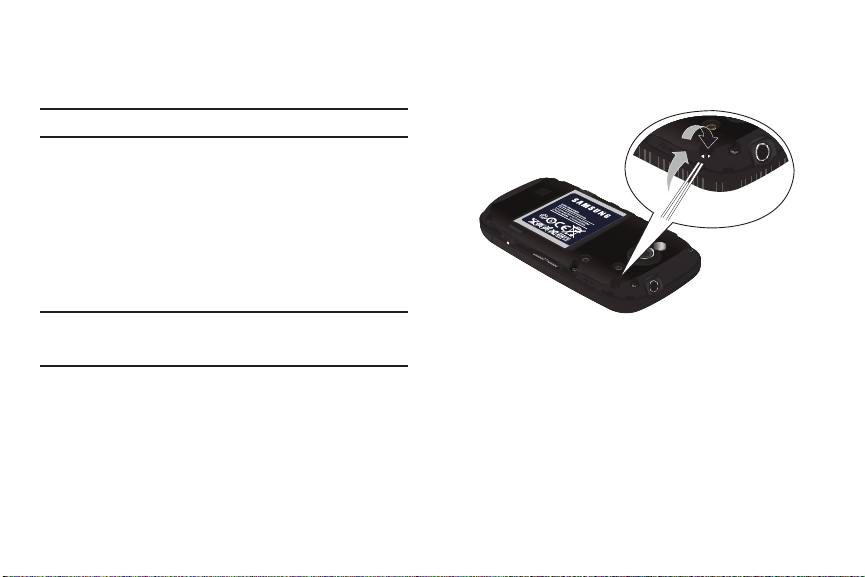
Removing the Battery
1. Remove the battery cover. For more information, refer to
“Battery Cover” on page 5.
2. Grasp the bottom of the battery using the slots provided,
then lift the battery up and out of the phone.
3. Snap the battery cover back into place.
Getting Started 6
Page 11

Charging the Battery
Charging Head
USB Cable
Correct
Incorrect
Note:
The battery comes partially charged. You must fully charge the battery
before using your phone for the first time. A fully discharged battery
requires up to 4 hours of charge time.
After the first charge, you can use the phone while charging.
1. Connect the USB cable to the charging head.
7
2. Insert the USB cable into the phone’s power/accessory
port.
3. Plug the charging head into a standard AC power outlet.
4. When the charging is complete, the indicator on the
charging head turns green. Unplug the charger from the
power outlet and remove the USB cable from the phone.
Warning!:
Use only Samsung-approved charging accessories to charge your
phone. Improper handling of the power/accesory port, as well as
the use of a non-approved charger, may cause damage to your
phone and void the warranty.
Page 12
Non-Supported Batteries
Samsung handsets do not support the use of a non-approved
battery.
Important!:
Using a non-supported battery may damage your phone.
When using a non-supported battery, you will hear a series of
beeps and you will see a warning message that indicates:
“
NON-SUPPORTED BATTERY. SEE USER GUIDE.
”
If you receive this warning, battery charging has been disabled.
Samsung charging accessories, such as the travel adapter and
cigarette lighter adapter, will only charge a Samsung-approved
battery.
Note:
When using a non-supported battery the phone can only be used for
the duration of the life of the battery. The non-supported battery
cannot be charged.
Attaching a Strap
You can attach an optional strap (not included) to your phone.
1. Remove the battery cover. See “Battery Cover” on page 5.
2. Slide the loop of the strap into the slot and over the tab to
secure it.
3. Install the battery cover.
Getting Started 8
Page 13
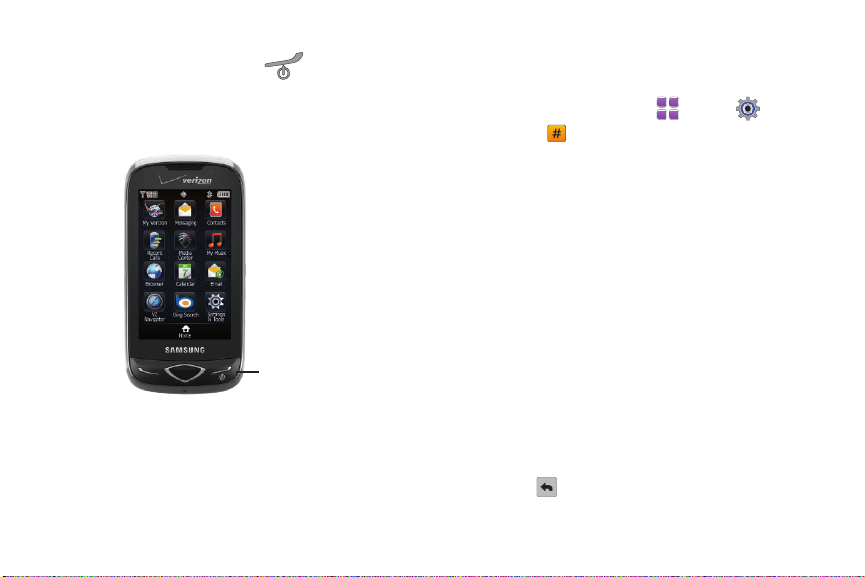
Turning Your Phone On and Off
End/Power key
䊳
Press and hold the
End/Power
key to turn the phone’s
power on or off.
While powering on, the phone connects with the home
network, then displays the Home screen and active alerts.
Set-Up Wizard
The Set-Up Wizard helps you set 9 basic parameters to get
started using your phone quickly.
1. From a Home screen, touch
Too ls
➔
Set-Up Wizard
2. Follow instructions on the screen to set preferences:
• Call Sound
• Ringtone
: Choose how incoming calls are announced.
: (Available when Ringtone Only or Ring and Vibrate are
Menu
➔
.
selected for Call Sound.) Select a ringtone for incoming calls.
• Vibrate Level
• Tone Level
• Feedback Tone
• Wallpaper
• Menu Font
• Dial Font:
•Main Clock
Touch
setting by touching
Touch
3. Touch to return to the menu.
: Set a vibration level for touch screen feedback.
: Set a level for touch screen tone feedback.
: Set a tone for touch screen feedback.
: Choose an image for the home screen.
: Set the size of menu displays.
Select the size of Dialer fonts.
: Choose a style for the main clock.
Next
to move to the next setting. You can skip any
Next.
Done
when finished.
Settings &
9
Page 14

Locking and Unlocking
Drag screen to unlock
Your phone offers two lock functions: locking the display, or
locking the phone. Because this is a touch screen phone, locking
the display prevents unintentional key presses and can minimize
unnecessary battery drainage. Locking the phone can prevent
unauthorized access to the information on your phone, while
allowing access to the Dialer for call functions.
Locking and unlocking the phone
You can lock the phone to prevent unauthorized access to
information on the phone, but allow dialing with the Dialer.
Locking and unlocking requires the Lock Code.
Locking the phone:
1. From a Home screen, touch
Tools
➔
Phone Settings ➔ Security
Menu
➔
.
Settings &
Enter the lock code when prompted. The default lock code
is the last four digits of your telephone number.
2. Touch
Lock Phone Now
. The Home screen displays.
Unlocking the phone:
䊳
Touch
Unlock
and enter the lock code at the prompt.
Note:
You may choose to lock the phone automatically when powered on.
For more information, see “Phone Lock Setting” on page 78.
Locking and unlocking the display
By default, the display locks when the backlight goes off. To
change this setting, see see “Touch Settings” on page 75.
Locking the display:
䊳
Press the
Unlocking the display
1. Press the
Note:
You can change the settings to allow you to press any key to activate
the backlight. For more information, see “Unlock Screen” on page 75.
2. Starting at the edge of the display, drag your finger across
Lock
key on the left side of the phone.
Lock
key once to wake up the display.
the display in any direction. The lock screen animates and
clears from the display.
Getting Started 10
Page 15

Voicemail
All unanswered calls to your phone are sent to voicemail, even if
your phone is turned off, so you’ll want to set up your voicemail
and personal greeting as soon as you activate your phone.
Setting up Voicemail
1. From a Home screen, touch
2. Touch and hold .
Dialer
.
– or –
Touch , then press
3. Follow the automated instructions to set up your new
Send
.
password and record a greeting.
Checking Voicemail
1. From a Home screen, touch
2. Touch and hold .
Dialer
.
– or –
Touch , then press
3. Enter your password, then touch .
4. Follow the recorded prompts to listen to messages and
Send
.
manage your voicemail.
Tip:
You can also access voice mail by dialing your phone number from any
touch-tone phone.
11
Memory Card
Your phone supports the use of an optional, removable
microSD™ memory card of up to 16GB capacity. You can store
music or pictures you download or transfer to your phone, and
other files, on the memory card.
Note:
You can only store music files that you own (from a CD or purchased
with V CAST Music with Rhapsody) on a memory card.
Installing the Memory Card
1. Pull the microSD card cover out and turn it to expose the
card slot.
2. Push the microSD card into the slot until it locks into place.
Page 16

Removing the Memory Card
1. Pull the microSD card cover out and turn to expose the
card slot.
2. Push in on the memory card to release the lock and
remove memory card from the memory card slot.
Formatting the memory card
Formatting erases any content on the memory card, and
prepares it for use with your phone.
Warning!:
Repeated formatting will shorten the life of the memory card.
Formatting a microSD Card using your Phone
1. From a Home screen, touch
Tools
➔
Memory
➔
2. Touch
At the
Format Card
Format Card?
prompt, touch
.
Menu
Card Memory
Yes
.
➔
.
Settings &
Formatting a microSD Card using your PC
For best playback of songs stored to the microSD memory card,
use the PC file system FAT32.
Consult your PC and/or memory card reader documentation for
information about formatting memory cards.
Getting Started 12
Page 17

Section 2: Understanding Your Phone
This section outlines key features of your phone. It also displays
the screen and the icons that are displayed on the phone.
Features of Your Phone
•
Full color 3-inch WQVGA Touch Screen
•
Slide-out QWERTY keyboard
•
High Speed Data (EVDO 1x - Rev 0 Capable Technology)
•
Motion Detection
•
Global Positioning (GPS) Technology with VZ Navigator
•
V CAST Music with Rhapsody® (Subscription, Wireless & PC
®
Downloads)
•
V CAST Videos
•
Social Networking through the Communities application
•
Messaging Services
–
Standard and Enhanced Text Messaging
–
Picture Messaging
–
Video Messaging
–
Threaded message display, by contact
–
Voicemail
–
Email Messaging, including mobile and corporate Email
–
Mobile Instant Messenger (IM)
•
Personal Tools, including Calculator, Calendar, Alarm Clock, Stop
Watch, World Clock, Notepad and Sketch Pad
13
•
Full HTML Browser
•
3.2 Megapixel CMOS Camera and Camcorder with Night Shot Mode
•
Advanced Nuance® Voice Recognition technology, for no-training voice
commands for dialing and other features
•
Speakerphone
•
microSD™ Memory Card Slot (up to 16GB capacity)
•
Advanced photo features and functionalities (photo river, photo editor,
dynamic canvas, panoramic photos)
•
Device Search
•
File Viewer
•
Bluetooth® 2.1 + EDR Wireless Technology. For more information, see
“Bluetooth Menu”
on page 68.
Page 18

Front View of Your Phone
1
2
3
6
5
4
Functions
1.
LCD Touch Screen
: Displays all the information needed to
operate your phone.
2.
Send key
: Press to answer an incoming call or to dial a
number. From Idle mode, press to open All Calls.
3.
Clear key
: Press to return to the previous screen. Press and
hold to return to the Home screen.
4.
Earpiece
: Allows you to hear callers.
5.
End/Power key
Off. Press to end a call or to end any application from any
: Press and hold to power the phone On or
menu, sub-menu or options menu.
6.
Microphone
: Allows the other caller to hear you clearly
when you are speaking to them.
Understanding Your Phone 14
Page 19

Back View of Your Phone
1
2
3
4
15
Features
1.
Mirror
: Use to position camera when taking self-portraits
with the Camera.
2.
Speaker
: Music, ringtones and sounds play through the
speaker.
3.
3.5 mm Headset Jack
: Plug in standard music headphones
(for listening to music only) or an optional headset for safe
and convenient conversations.
4.
Camera/Camcorder Lens
camcorder.
: The lens of the built-in camera/
Page 20

Side View of Your Phone
5
6
7
8
2
1
3
4
1.
Strap attachment
2.
USB Power/Accessory Port
charging or to sync music.
: Attach a strap (not included).
: Plug in the USB cable for
3.
Volume key
: In idle mode, press to adjust master volume,
or press and hold to activate Sound Off/Normal mode.
Press to adjust voice volume during calls, adjust audio
volume, or mute an incoming call ringer. When browsing
web with music playing, press to bring up Music Player.
4.
Lock key
: Locks/unlocks display. Press to lock display.
When backlight is off, press once to activate backlight, or
press and hold to unlock the display in one step.
5.
Memory Card Slot
: Insert an optional microSD™ memory
card to add additional memory and storage capacity.
6.
Voice Commands key
: From idle mode, press to activate
Voice Commands feature.
7.
Speakerphone/Zoom key
: Press to activate speakerphone.
In Browser, press to increase and decrease size of web
content, or in zoom mode when viewing a picture in My
Pictures.
8.
Camera/Camcorder key
: Press to activate the camera, or
press and hold to activate the camcorder.
Understanding Your Phone 16
Page 21

Open View of Your Phone
This touch screen phone also offers the convenience of a slideout QWERTY keyboard. To access the keyboard, rotate the phone
and slide the phone open.
1
2
3 4
When you slide the phone open, the display automatically rotates
from portrait mode to landscape mode.
17
QWERTY Keyboard Features
1.
Function key
: Press to toggle access to the orange symbols
on the QWERTY keyboard.
2.
Shift/Message key
: Toggles the case for alphabet
characters, between mixed case, uppercase and
lowercase. From a Home screen, press to open a new Text
Message.
3.
Space key
: Add spaces between words and characters.
Press Function + Space to choose Smileys.
4.
7
6
5
Directional keys
screens.
5.
OK key
: Navigate through phone menus and
: When navigating through a menu or screen, press
to accept the highlighted choice, or to select Go when
surfing the web.
6.
Return key
: Press to perform a highlighted function in a
menu or submenu. Press to go to the next line when
entering text.
7.
Backspace key
: Delete characters from the display when
entering text, or go back when surfing the web or viewing
pictures.
Page 22

Home Screen
3 4
5
1
2
6
7
8
The Home screen is your starting point for using the features of
your phone. You can customize home screens by placing
Widgets and changing wallpaper.
Understanding the Home Screen
1.
Widget Bar and Tab
: Touch the Widget Bar Tab to open and
close Widget Bar, for access to widgets.
2.
Dialer
3.
Contacts
4.
Message
5.
Menu
6.
Event Status Bar
button: Opens the
button: Opens
button: Opens
button: Launches the
Dialer
keypad.
Contacts
.
Messaging
.
Menu
.
: Icons light up to indicate recent events or
status changes. Touch icons to access the Event Manager
screen. See “Event Status Bar and Event Manager” on
page 25.
7.
ERI banner
: Indicates current network, if ERI Banner is
enabled. For more information, see “ERI Banner” on
page 73.
8.
Annunciator Line
: Icons indicate network status, battery
power, signal strength, connection type and more. You can
view a list of all icons used on your phone in the Icon
Glossary; for more information see “Phone Info” on
page 85.
Understanding Your Phone 18
Page 23

Extended Home Screens
The home screen extends beyond the display width to provide
more space for adding widgets.
Slide your finger horizontally across the screen to scroll to the left
or right side of the extended home screen.
The wallpaper is different on each home screen to aid you in
navigation, and you can use your own pictures as wallpaper.
The indicator at the top of the screen shows the current screen.
19
Customizing Home Screens
Home screens can be customized to fit your needs by docking
widget(s) on the home screen, and by selecting wallpaper.
Docking and Placing Widgets
For more information, see “Widgets and the Widget Bar” on
page 20.
Moving Widgets
To move a widget on the home screen, touch and hold the widget
until it responds, then drag it to a new area of the home screen.
Changing the Home Screen Wallpaper
1. From a home screen, display the Widget Bar by tapping the
Widget Bar tab, then tap the
My Pictures
widget . Use
the left or right triangle to scroll through images stored on
your phone or optional installed memory card.
2. Tap
Get New
to launch the Get New Pictures application to
download new images.
3. Tap
Set
to use the displayed image as the new wallpaper
for the current screen.
Note:
You can also set the Wallpaper in
to “Wallpaper” on page 74.
Settings
. For more information, refer
Page 24

Widgets and the Widget Bar
Widget Bar
tab
Widget Bar
Widgets are links to applications, tools or features, which can be
docked in the Widget Bar, or on a Home screen. For a list of
widgets, see “Widgets” on page 21.
The Widget Bar, located at the left of the home screen:
•
Provides quick access to widgets.
•
Keeps widgets organized and always accessible.
•
Maximizes available display space.
Tip:
You can move the Widget Bar tab: with the Widget Bar closed, touch and
hold the tab and drag up or down.
Accessing the Widget Bar
䊳
To
access the Widget Bar
䊳
To
close the Widget Bar
, tap the Widget Bar tab.
, tap the Widget Bar tab.
Widget Bar Navigation
Use your fingertip to flick up and down on the Widget Bar to scroll
through the widgets.
Docking and Placing Widgets
You can customize the Widget Bar and home screens by docking
widgets in the Widget Bar, or placing widgets on a home screen.
䊳
To
place a widget
on a Home screen, touch and hold the widget
in the Widget Bar, then drag it to the Home screen.
䊳
To
dock a widget
from a home screen to the Widget Bar, touch
and hold the widget until it responds and the Widget Bar tab
displays , then drag the widget to the Widget Bar.
䊳
To
reset widgets
on the current home screen, open the Widget
Bar, then shake the phone 3 times. You can feel the feedback
as all widgets dock in the Widget Bar automatically.
Note:
Some widgets are launched directly from the Widget Bar, while some
launch from a Home screen. For more information about Widget
properties, see “Widgets” on page 21.
Understanding Your Phone 20
Page 25

Customizing the Widget Bar
Widgets settings allow you to select widgets for display in the
Widget Bar, making the widgets available for use from the Widget
Bar, or for placing on a home screen. You can also change the
order the widgets display in the Widget Bar.
1. From a Home screen, touch
Too ls
➔
Display Settings ➔ Widgets
Menu
➔
.
Settings &
– or –
Tap t he
Widget Bar
, then tap
Widgets Settings
2. To select a widget for display in the Widget Bar, touch the
.
widget icon. When a widget is selected, it displays in color;
when the widget is available for selection its display is in
black and white.
3. To change the order of widgets in the Widget Bar, touch
and hold the widget icon and drag it to a new position in
the widget list.
Widgets
Alarm Clock
: Launches Alarm Clock. When placed
on a Home screen, shows upcoming alarms. See
“Alarm Clock” on page 111.
21
Bing Search
: Launches Bing. For more information,
see “Bing Search” on page 117.
Birthday
: Place on a home screen to display alerts
for upcoming birthdays, based on contacts’
Birthday field.
Bluetooth
: Accesses the Bluetooth features of your
phone, directly from Widget Bar or when placed on
a Home screen. For more information, For more
information, refer to “Bluetooth Menu” on
page 68.
Calculator
: Launches the calculator from the
Widget Bar, or can be placed on a Home screen. For
more information, see “Calculator” on page 109.
Calendar
: Launches the Calendar from the Widget
Bar, or place on a Home screen. For more
information, see “Calendar” on page 110.
Clock
: Displays the current day, date and time, in
the Widget Bar. Place on a Home screen to display
the current day, date and time. To change the clock
format, see “Clock Format” on page 74.
Page 26

Communities
: Upload photos or videos, or post a
status update, to your favorite social networking
sites such as Facebook, Flickr, MySpace and
Photobucket. For more information, see
“Communities” on page 123.
Date
: Displays the current day and date in the
Widget Bar, and when placed on a Home screen.
Device Search
: Search your phone for information,
applications or features. Launches from the Widget
Bar, or when placed on a Home screen. For more
information, see “Device Search” on page 115.
Dice
: Launches the Dice game directly from the
Widget Bar, or can be placed on a Home screen.
Facebook
: Launches Facebook in Browser.
Games
: Accesses Games, including Dice and any
games you’ve downloaded.
Mini Music Player
: Place on a home screen to
display current track title and control playback of
songs. Touch to launch Music Player. For more
information, see “Music Player” on page 94.
My Favorites
: Provides quick access to up to 12
favorite contacts, plus one-touch dialing or
message options. For more information, see
“Favorites” on page 45.
My Pictures
: Change the wallpaper on the current
Home screen. For more information, see
“Changing the Home Screen Wallpaper” on
page 19.
My Shortcuts
: Place on a Home screen to access up
to 12 shortcuts to favorite applications. For more
information, see “Set My Shortcuts” on page 76.
My Verizon
: Launches a Verizon Wireless mobile
web site, to check your account details and status
MySpace
: Launches MySpace in Browser.
Notepad
: Launches Notepad, directly from the
Widget Bar, or can be placed on a Home screen. For
more information, see “Notepad” on page 112.
Personal Banner
: Place on a Home screen to display
a custom banner. For more information, see
“Banner” on page 73.
Understanding Your Phone 22
Page 27

23
Photobucket
Sketch Pad
: Launches Photobucket in Browser.
: Launches Sketch Pad, directly from the
Widget Bar, or when placed on a Home screen. For
more information, see “Sketch Pad” on page 113.
Tut or ia l
: Launches a Tutorial, with instructions and
tips for using your phone. Touch to launch from
Tutorial
Widget Bar, or place on a Home screen.
Twitter
: Launches Twitter in Browser.
WeatherBug
YouTube
Widget Settings
: Launches WeatherBug in Browser.
: Launches YouTube in Browser.
: Choose widgets for display on the
Widget Bar. For more information, see
“Customizing the Widget Bar” on page 21.
Menu
The
Menu
is the starting point for launching applications and
features. To access the menu:
䊳
From a Home screen, touch
Menu
.
Touch an item to open the application, feature or menu.
Customizing the Menu
You can customize the Menu by adding or rearranging icons to
your favorite applications.
1. From a Home screen, touch
Too ls
➔
Display Settings
2. To replace an item, touch the
Menu
➔
Main Menu Settings
➔
Settings &
item, then choose another item
to replace it.
3. To rearrange items, touch and
hold an item, then drag it to a
new location.
4. Touch
Reset
to return items to
their default locations.
5. Touch
Done
to save your
changes.
.
Page 28

Menu Items
Default
These items appear on the Menu by default.
My Verizon
: Launches a Verizon Wireless mobile web
site, to check your account details and status.
Messaging
: Opens the Messaging menu. For more
information, see “Messaging” on page 52.
Contacts
: Opens the Contacts menu. For more
information, see “Contacts” on page 40.
Recent Calls
: Opens the Recent Calls menu. For more
information, see “Recent Calls” on page 36.
Calendar
: Launches the Calendar. For more
information, see “Calendar” on page 110.
Email
: Opens the Email menu. For more information,
see “Email” on page 62.
VZ Navigator
: Launches VZ Navigator®. For more
information, see “VZ Navigator®” on page 116.
Bing Search
: Launches Bing. For more information,
see “Bing Search” on page 117.
Settings & Tools
: Opens Settings & Tools. For more
information, see “Settings & Tools” on page 66.
Media Center
: Opens the Media Center menu. For
more information, see “Media Center” on page 86.
My Music
: Launches Music Player. For more
information, see “Music Player” on page 94.
Browser
: Launches the Browser. For more
information, see “Browser” on page 90.
Optional
You can customize the Menu to include these optional items:
Alarm Clock
: Launches Alarm Clock. see “Alarm
Clock” on page 111.
Bluetooth Menu
: Opens the Bluetooth Menu. For more
information, see “Bluetooth Menu” on page 68.
Understanding Your Phone 24
Page 29

Bluetooth On/Off
: Turns Bluetooth On or Off. See
“Turning Bluetooth On or Off” on page 69.
Calculator
: Launches the Calculator. For more
information, see “Calculator” on page 109.
Communities
: Launches the Communities
application. See “Communities” on page 123.
Device Search
: Launches Device Search. For more
information, see “Device Search” on page 115.
Games
: Opens the Games menu. For more
information, see “Games” on page 89.
My Pictures
: Launches My Pictures. For more
information, see “My Pictures” on page 102.
My Ringtones
: Launches My Ringtones. For more
information, see “My Ringtones” on page 87.
New Picture Msg
: Creates a new picture message.
See “Creating and Sending Picture Messages” on
page 53.
Tools
: Opens the Tools menu. See “Tools,
Applications and Widgets” on page 109.
Event Status Bar and Event Manager
The Event Status Bar appears on the Home screen to alert you to
calendar events, missed calls, new messages, or special Master
Volume modes. The Event Status Bar does not display when
there are no active alerts.
Touch an event in the Event Status bar to launch the Event
Manager.
Event Status Bar
The Event Status bar appears near the bottom of the Home
screen.
New TXT message
“Creating and Sending Text Messages” on page 52.
: Creates a new text message. See
An icon illuminated in color indicates an alert. Touching an icon
on the bar opens the Event Manager menu.
25
Page 30

Event Status Icons
Volume
: Master Volume is set to Low, Medium Low,
Medium, Medium High, or High.
Alarm Only
: Master Volume is set to Alarm Only. Your phone
will only ring when the set alarm sounds.
Vibrate Only
: Master Volume is set to Vibrate Only. Your
phone vibrates upon receiving a call, a new message or
voicemail, or when an alarm has been set.
All Sounds Off
: Master Volume is set to All Sounds Off. No
sounds will play.
New Message
: Illuminates when you receive a new
message.
New Voicemail
: Illuminates when you receive a voicemail
message. (Available on the Verizon Wireless Network.)
Missed Call
: Illuminates when you have one or more
missed calls.
Calendar Event
: Illuminates when events are scheduled in
the next 24 hours.
Speakerphone
: When illuminated in color, you can hear the
other party in a call through the speaker. When gray, you can
hear the other party through the earpiece.
Event Manager
The Event Manager offers easy access to common events and
features.
1. Touch the Event Status bar on the Home screen.
2. Touch any Event to launch
the associated feature.
3. Touch to return to the
Home screen.
Understanding Your Phone 26
Page 31

Section 3: Navigation
This section explains navigation for your phone. It also includes
an outline of all menus available on your phone.
Note:
Instructions in this User Manual apply to
except where noted.
Touch Screen Navigation
Touch Screen Navigation
Warning!:
If your handset has a touch screen display, please note that a
touch screen responds best to a light touch from the pad of your
finger or a non-metallic stylus. Using excessive force or a metallic
object when pressing on the touch screen may damage the
tempered glass surface and void the warranty. For more
information, see “Warranty Information” on page 145.
Touch
Touch icons or menu items onscreen to select or launch them.
Examples of touch actions include:
•
Entering characters with the Dialer keypad.
•
Selecting an item from a menu or list
•
Launching an application from the main Menu.
27
Touch and Hold
Activate onscreen items by a Touch and Hold action with your
,
finger. For example: touch and hold a widget on the home screen
to move the widget.
Swipe
To Swipe, drag your finger vertically or horizontally across the
screen. Use Swipe when:
•
Unlocking the screen
•
Scrolling between home screens
•
Scrolling through a menu
Flick
Flick is similar to Swipe, except that you move your finger in
quicker, lighter strokes, and Flick is always in a vertical motion.
Use Flick when:
•
Scrolling through the Contacts list.
•
Scrolling through the widgets in the Widget Bar.
•
Selecting items from a display, such as when setting an alarm.
Page 32

Keyboard Navigation
Lock key
Clear (CLR) key
To access menus and options using the slide-out QWERTY
keyboard:
Press the corresponding number key:
.
Press the Fn key, then the corresponding key, to enter special
characters: .
Press the directional keys
and
Down
to scroll in a menu or long text screen.
Left
,
To accept the highlighted option or launch the selected
applicaiton, press .
Right
, Up
Navigation Keys
Lock Key
Press the
Lock
key at any time to lock the display.
Clear/CLR Key
Press the
Clear/CLR
level.
Press and hold the
screen.
key when navigating a menu, to go back one
Clear/CLR
key at any time to go to the Home
Navigation 28
Page 33

Menu Outline
This list shows items available from
Tip:
When navigating menus with the QWERTY keyboard, you can press the
number key to select the corresponding menu item.
Menu
.
My Verizon
Messaging
➔ New Message
➔ TXT Message
➔ Picture Message
➔ Video Message
➔ Voice Message
➔ Messages
➔ Drafts
➔ Voicemail
➔ Visual Voice Mail
➔ Mobile IM
➔ Email
➔ Chat
➔ Settings
➔ Erase Options
➔ Erase Inbox
➔ Erase Sent
29
➔ Erase Draft
➔ Erase All
Contacts
➔ New Contact
➔ Contact List
➔ Backup Assistant
➔ Groups
➔ Speed Dials
➔ Favorites
➔ In Case of Emergency
➔ My Name Card
Recent Calls
➔ Missed
➔ Received
➔ Dialed
➔ All
➔ View Timers
Media Center
➔ Music & Tones
➔ VCAST Music | Rhapsody
➔ Get New Ringtones
➔ My Ringtones
Page 34

My Music
➔
➔ My Sounds
➔ Sync Music
➔ Picture & Video
➔ V CAST Videos
➔ Get New Pictures
➔ My Pictures
➔ My Videos
➔ Tak e Pi ctu re
➔ Record Video
➔ Online Album
➔ Games
➔ Browser
➔ Browse & Download
➔ Extras
➔ Communities
➔ Info
➔ App. Memory
➔ Phone Memory
➔ View Log
➔ Help
My Music
Browser
Calendar
Email
VZ Navigator
Bing Search
Settings & Tools
➔ My Verizon
➔ Too ls
➔ Voice Commands
➔ Calculator
➔ Calendar
➔ Alarm Clock
➔ Stop Watch
➔ World Clock
➔ Notepad
➔ Sketch Pad
➔ Timer
Navigation 30
Page 35

➔
➔ File Viewer
➔ Device Search
➔ Bluetooth Menu
➔ Sounds Settings
➔ Master Volume
➔ Call Sounds
➔ Alert Sounds
➔ Keypad Sounds
➔ Digit Dial Readout
➔ Service Alerts
➔ Power On/Off
➔ Display Settings
➔ Banner
➔ Backlight
➔ Widgets
➔ Wallpaper
31
USB Mass Storage
➔ TXT Message
➔ Multimedia Message
➔ Voicemail
➔ Emergency Tone
➔ Missed Call
➔ Device Connect
➔ Personal Banner
➔ ERI Banner
➔ Main Menu Settings
➔ Fonts
➔ Clock Format
➔ Unlock Screen
➔ Transition Effect
➔ Touch Settings
➔ Phone Settings
➔ Airplane Mode
➔ Set My Shortcuts
➔ Voice Commands
➔ Language
➔ QWERTY Action
➔ Location
➔ Current Country
➔ Security (requires lock code)
➔ Edit Codes
➔ Phone Only (requires lock code)
➔ Calls & Services (requires lock code)
➔ Restrictions (requires lock code)
➔ Location Setting
➔ Calls
➔ Messages
➔ Dial-Up Modem
➔ Phone Lock Setting
➔ Lock Phone Now
Page 36

Restore Phone
➔
➔ Reset Settings
➔ System Select
➔ NAM Select
➔ Motion Detection
➔ Call Settings
➔ Memory
➔ Save Options
➔ Phone Memory
➔ Memory Usage
➔ My Pictures
➔ My Videos
➔ My Ringtones
➔ My Music
➔ My Sounds
➔ My Contacts
➔ Move All to Card
➔ Card Memory (if optional card installed)
➔ Memory Usage
➔ My Pictures
➔ My Videos
➔ My Ringtones
➔ My Music
➔ My Sounds
➔ My Contacts
➔ Move All to Phone
➔ Format Card
➔ USB Mode
➔ Phone Info
➔ My Number
➔ SW/HW Version
➔ Icon Glossary
➔ Software Update
➔ Status
➔ Check New
➔ Set-Up Wizard
Navigation 32
Page 37

Section 4: Call Functions
Call
This section describes how to make, answer and end a call. It
also includes information about the Recent Calls log and voice
dialing with Voice Commands.
Making a Call
Your phone offers multiple ways to make calls:
•
Use the touchscreen Dialer to enter a telephone or speed dial number.
•
Use the QWERTY keyboard to enter a telephone or speed dial number.
•
Call a contact from Contacts, or from the Favorites widget.
•
Return a call, or call a recent caller via Recent Calls.
•
Voice dial using Voice Commands.
Touch Screen Dialer
To access the Dialer:
䊳
From a Home screen, touch
33
Dialer
.
Making a Call using the Dialer
1. From a Home screen, touch
2. Touch the digits of the
Dialer
.
telephone or speed dial
number.
•
Tou ch
Groups
to call member(s)
of a group.
•
Tou ch
Favorit es
to call a favorite
contact.
•
Tou ch
Recent Calls
to find
a recent call.
•
Tou c h
Contacts
to find a
contact.
•
Tou c h
Backspace
to
delete digits if you enter an
incorrect number.
3. Press
Tip:
As you touch numbers, matching contacts display on screen. You can
continue dialing, or touch the contact to dial their default number.
Call
or
Send
to dial the call.
Page 38

Making a Call using the QWERTY keyboard
Call
1. Slide open the phone.
2. From a Home screen, touch
3. Press the digits of the telephone or speed dial number on
Dialer
.
the QWERTY keypad.
•
Tou ch
Groups
to call member(s) of a group.
•
Tou ch
Favorit es
to call a favorite contact.
•
Tou c h
Recent Calls
•
Tou c h
•
Press Backspace to delete characters.
Tip:
As you press numbers, matching contacts display on screen, with the
number of potential matches (4, in the example above). You can
continue dialing, touch the contact to dial their number, or touch the
number to display all potential matches.
Contacts
to find a recent call.
to find a contact.
4. Touch or
Note:
When using the QWERTY keyboard, calls are automatically made in
Speakerphone mode.
Send
to dial the call.
Making a Call using Contacts
A contact is an entry that you have created to store the name,
numbers, and other information for people or groups of interest.
For more information, refer to “Contacts” on page 40.
1. From a Home screen, touch
2. Find the contact and touch
Contacts
.
Call
on the entry to dial the
default number for the Contact.
– or –
Touch the
Contact
to open the entry, then touch any
number to dial the number.
Ending a Call
䊳
Press the
End/Power
key.
Call Functions 34
Page 39

Answering a Call
AnswerAnswer
QuietQuiet
AnswerAnswer
Switch CallSwitch Call
IgnoreIgnore
Ignore Ignore 䎎 TXT TXT
DialerDialer
ContactsContacts
When you receive an incoming call, you have the option to
answer the call, or to send calls directly to voicemail. You can
also send the caller a text message response, while sending their
call to voicemail.
To answer an incoming call:
•
Touch or press
Tip:
You can quickly silence the ringer for an incoming call by touching
With
face down. For more information, see “Motion Detection“ on page 80.
or pressing the
Motion Detection
, you can silence the ringer by flipping the phone
Send
Volume
Answering Call-Waiting Calls
When you receive a call while on a call:
•
Touch
to answer the incoming call. The original call is
placed on hold.
•
Touch to return to the original call.
Sending Calls to Voicemail
•
Touch to send the call to voicemail.
•
Touch to send the call to voicemail and send a text
message to the caller.
35
to answer the call.
key.
Call-In-Progress Options
While in a call, touch an icon for the following options:
Speaker On/Of
Mute/Unmute
Bluetooth
Notepad
Whisper Mode
f: Turn the speakerphone on or off.
: Mute/unmute your voice.
: Access Bluetooth functionality.
: Open Notepad.
: Boost the volume of your voice when
the caller cannot hear you clearly.
End Call
: Disconnect the call.
Dialer
: Display the Dialer.
Contacts
: Open Contacts.
Page 40

Options
OptionsOptions
Merge CallsMerge Calls
View Timers
Sort
Erase
: Touch these options:
•
New TXT Message
•
Recent Calls
•
Bluetooth Menu
•
Main Menu
•
Voice Privacy
: Create a new text message.
: Display the Recent Calls logs.
: Display the Bluetooth menu.
: Display the Main menu.
: Encrypt the call to prevent
eavesdropping.
Three-way Calling
Using your phone, you can merge two calls to set up three-way
calling between you and two other parties.
1. Establish a call, either by dialing or answering an incoming
call.
2. While the call is in-progress with the first participant, dial
the second phone number and touch
call is placed on hold.
3. When the second party answers, touch . The
call becomes active with three parties.
Call
Call
. The first
Recent Calls
Recent Calls
saves information about all calls.
1. From a Home screen, press
2. Touch a call type in the drop-down list:
• All Calls
: All missed, received,
Send
.
and dialed calls.
• Missed Calls
: Calls you did not
answer.
• Received Calls
• Dialed Calls
• Blocked Calls
: Answered calls.
: Outgoing calls.
: All blocked
incoming calls, if blocking is
active in Phone Settings. For
more infomation, see
“Security“
on page 77.
3. Calls display by date, with the
contact name or phone number, date, and time.
Touch to display statistics.
Touch to sort the calls by Length or Name.
Touch to mark call records for deletion.
Note:
You can also access Recent Calls from a Home screen by touching
Menu
➔
Recent Calls
.
Call Functions 36
Page 41

Recent Calls Icons
Save
In Recent Calls, the icon indicates the type of call.
Received Calls
Dialed Calls
Missed Calls
: Answered calls.
: Outgoing calls you dialed.
: Calls you did not answer.
Making Calls Using Recent Calls
1. From a Home screen, press
– or –
From a Home screen, touch
Calls
.
2. Find a call from
Dialed Calls
3. Touch to dial the call.
37
All Calls, Missed Calls, Received Calls
.
Menu
Send
➔
Creating/Updating a Contact using Recent Calls
Create a contact, or update an existing contact, from a Recent
Calls log.
1. From a Home screen, press
Send
.
– or –
From a Home screen, touch
Calls
.
2. Find a call from
Dialed Calls
.
Recent
3. Touch .
4. At the
Update Existing
All Calls, Missed Calls, Received Calls
, and touch the call.
Save
Add to Contacts
prompt, choose
. Continue entering contact information.
Menu
➔
Add New Contact
Recent
, or
or
Send a Message using Recent Calls
, or
1. From a Home screen, press
– or –
From a Home screen, touch
Calls
.
2. Find a call from
Dialed Calls
All Calls, Missed Calls, Received Calls
, and touch the call.
Menu
Send
➔
.
Recent
, or
Page 42

Touch . Choose
Msg
3.
New Video Msg
Msg
, or
New TXT Msg, New Picture Msg
New Voice Msg
. For more information
about creating and sending messages, see “Messaging“
on page 52.
Voice Commands
Your phone includes
Voice Commands
, advanced speech
recognition software that allows you to use your voice to look up
contacts, make phone calls, and get calendar information.
There is no need to “train” Voice Commands, it is designed to
recognize natural speech.
䊳
Press the
Voice Commands
key.
The following is a list of functions you can perform using Voice
Commands speech recognition on your phone.
•
Call <Name or #>
: Dial a call by saying a Name in your Contacts List,
a Name and a Location (home, work, mobile) or the phone number.
•
Send <MSG Type>
: Send a text, picture, or video message to a
number or to someone in your Contacts List.
•
Go To <Menu>:
•
Check <Item>
Open any application installed on your device.
: View details of your phone status, Voicemail,
Messages, Missed Calls, Time, Signal Strength, Battery Level, Volume
Level, Balance, Minutes, Payment, and My Number.
•
Contacts <Name>:
Open a contact record from Contacts.
,
•
Redial
: Allows you to call the last number dialed.
•
Play <Playlist>
or all songs.
•
My Verizon
•
Help
: Provides a helpful tutorial on using Voice Commands.
Voice Commands Settings
1. From a Home screen, press the
key.
2. Touch
•Confirm Choices
name or number, from
Confirm
• Sensitivity
Choose from
• Adapt Voice
results. Touch
•Prompts
–
Mode
Readout + Alerts
out each screen) or
–
Audio Playback
•TXT Msg Readout
as playback.
: Opens the My Music menu, plays songs in a playlist
: Launches the My Verizon application.
Voice Commands
Settings
to configure these settings:
: Control when the sytem asks you to confirm a
Automatic, Always Confirm
, or
.
: Choose the sensitivity of the speech recognition.
More Sensitive, Automatic
, or
Less Sensitive
: Optimize speech recognition to your voice to improve
Adapt Voice
, then follow the prompts.
: Choose the type of prompts Voice Commands gives you.
: Choose the type of prompts, from
(reads out each screen and alert),
Ton es O nly
: Set playback location, Speakerphone or Earpiece.
Prompts
(voice prompts),
(plays back only tones).
Readout
: When enabled, the phone reads text me ssages
Call Functions 38
Never
.
(reads
Page 43

Tip:
• Key Setting
• About
Press
: Choose how to launch Voice Commands,
Only
(press the Voice Commands key on side of phone), or
Key/Headset
(Press the Voice commands key, or insert a headset.)
: View information about Voice Commands.
Info
for descriptions of these Voice Commands settings.
Voice Key
Voice
Roaming
What is Roaming?
When you travel outside your home network’s coverage area,
your phone can roam to acquire service on other compatible
digital networks. When roaming is active, the roaming icon
appears in the Annunciator line.
During roaming, some services may not be available. Depending
on your coverage area and service plan, extra charges may apply
when making or receiving calls.
Note:
Contact Verizon Wireless for more information about your coverage
area and service plan.
You can choose settings for system selection and roaming. For
more information, see “System Select“ on page 80.
39
TTY Mode
Your phone is TTY-compatible, allowing you to connect TTY
equipment to the phone’s headset jack. For more information
about TTY settings, see “TTY Mode“ on page 81.
Page 44

Section 5: Contacts
Done
Save
Save
This section describes how to manage your daily contacts by
saving contact information for your friends, colleagues or
business acquaintances.
To access
Contacts
:
1. From a Home screen, touch
2. The default view is
List
. Touch the pull-down list
Contact
Contacts
to choose another view, from
Backup Assistant, Groups
Speed Dials, Favorites
In Case of Emergency
My Name Card
.
,
,
, or
Adding a New Contact
1. From a Home screen, touch
Contacts
2. Touch the
a picture to the new entry from
Picture
to take a new picture with the Camera.
➔ .
Image
New
Contact
and assign
My Pictures
.
, or choose
Tak e
3. Touch fields to enter the contact information, then touch
to save each field.
4. When you’re finished, touch to save the contact.
Adding a new Contact from the Dialer
You can quickly add a new contact by entering the number into
the Dialer, then following the prompts to complete the process.
1. From a Home screen, touch
2. Enter the phone number using the touch keypad or
QWERTY keyboard, then touch ➔
Contact
.
3. Touch a field to save the number:
Business
, or
Fax
.
4. You can save the contact now, or continue entering fields.
5. When you’re finished, touch to save the contact.
Dialer
.
Save
1. Add New
Mobile 1, Mobile 2, Home
Contacts 40
,
Page 45

Adding a new Contact from Recent Calls
SaveSave
Done
Save
1. From a Home screen, touch
Calls
.
Menu
– or –
From a Home screen, press
2. Scroll through the list of calls and touch the number.
3. Touch ➔
4. Touch a field to save the number:
Business
, or
5. You can save the contact now, or continue entering fields.
6. When you’re finished, touch to save the contact.
Fax
.
Add New Contact
Mobile 1, Mobile 2, Home
Save
Editing a Contact
1. From a Home screen, touch
2. Touch an existing contact, then touch
3. Touch fields to enter the contact information, then touch
Contacts
to save each field.
4. When you’re finished, touch to save the contact.
41
Save
➔
Send
.
Edit.
Editing a Contact from the Dialer
Recent
You can add a new number to a contact by entering the number
into the Dialer, then following prompts to complete the process.
1. From a Home screen, touch
.
,
.
2. Enter the phone number, then touch ➔
Existing
.
3. Touch an existing contact, then touch a field to save the
number:
Mobile 1, Mobile 2, Home, Business
4. You can save the contact now, or continue entering fields.
5. When you’re finished, touch to save the contact.
Editing a contact from Recent Calls
1. From a Home screen, touch
Calls
.
– or –
From a Home screen, press
2. Find a call from
Dialed Calls
3. Touch ➔
All Calls, Missed Calls, Received Calls
, and touch the call.
Update Existing
Save
Save
Dialer
Menu
Send
.
.
Save
, or
➔
..
2. Update
Fax
.
Recent
, or
Page 46

Touch an existing contact, then touch a field to save the
Save
4.
number:
Mobile 1, Mobile 2, Home, Business
5. You can save the contact now, or continue entering fields.
6. When you’re finished, touch to save the contact.
Adding Pauses or Waits
Calls to automated systems can require entry of a password or
account number. You can store the numbers to a Contacts entry,
along with special pause and wait characters.
1. From a Home screen, touch
2. While entering phone number in a contact entry, enter the
Contacts
phone number up to the pause or wait, then touch .
3. Touch an option:
• 2. Add 2-Sec Pause
: Stops the dialing sequence for two
seconds, then automatically sends the remaining digits.
A “p” appears in the telephone number.
• 3. Add Wait
: Stops the dialing sequence, waiting for
further input input from you. A “w” appears in the
telephone number.
4. After your entry, touch to save the contact entry.
Save
Note:
, or
Fax
.
Entering multiple pauses extends the length of a pause. For example,
two consecutive pauses equal a total pause of four seconds.
Remember that each pause counts as a digit towards the 48-digit
maximum for telephone numbers.
Finding a Contact
Finding a contact in landscape mode
1. From a Home screen, touch
2. The cursor appears in the
.
Options
the Contact name to see matching entries.
Tip:
You can also find a Contact with
see “Device Search” on page 115.
Contacts
Search
field. Enter part or all of
Device Search
. For more information,
.
Contacts 42
Page 47

Finding a contact in portrait mode
Erase
1. From a Home screen, touch
2. Touch and hold the
Accelerator Tab
slide the tab to the
letter range
corresponding to the
first letter of the
entry’s first name.
(The list is
alphabetized by first
name.)
Deleting a Contact
1. From a Home screen, touch
2. Touch the desired contact list entry.
3. Touch .
4. At the prompt, touch
43
, then
Yes
Contacts
Contacts
to delete the entry.
Backup Assistant
.
Backup Assistant
is a wireless service that saves a copy of your
Contacts to a secure web site. If your phone is lost, stolen or
damaged, Backup Assistant can restore your saved contacts to a
new phone, wirelessly. You can schedule backups to save your
information manually or automatically. Log in to your web
account for full access to your contacts for viewing, printing,
adding, deleting and editing.
Visit
http://www.verizonwireless.com/backupassistant
, or contact
Verizon Wireless for more information.
䊳
From a Home screen, touch
Backup Assistant
from the drop-down list.
Contacts,
then choose
Groups
You can place Contact entries into
Groups
, to make searching
your Contacts faster, to quickly send messages to one or more
group members, and more.
.
Note:
By default, new entries to your Contacts are placed into the No Group
category unless a specific group category is selected.
Viewing Groups
1. From a Home screen, touch
Contacts
.
Page 48

Choose
Add
Members
Remove
Members
Done
Done
Save
New Group
Done
Groups
2.
from the pulldown list. Default groups
include:
•Business
• Colleague
•Family
• Friends
Adding Contacts to a Group
After selecting the desired group, you can add up to 10 Contacts
from your Contact List to the group.
1. From a Home screen, touch
Contacts
1. Touch a Group, then touch .
2. From the Contacts list, touch contact(s) to mark them for
addition, then touch .
Done
Removing a Contact from a Group
1. From a Home screen, touch
Contacts
2. Touch a Group, then touch .
➔
➔
Groups
Groups.
3. Touch contacts to mark them for removal, then touch
. Touch
Yes
at the prompt to confirm.
Moving a Contact to Another Group
1. From a Home screen, touch
Contacts
.
2. Touch a contact to display the contact entry.
3. Touch , then touch
Edit
Group
.
4. Touch the old group to uncheck it, then touch a new group.
Touch to return to the contact entry.
5. Touch to save the contact entry.
Creating a New Group
In addition to the default groups already in your phone, you can
create new groups, up to a total of 30 groups.
.
1. From a Home screen, touch
Contacts
➔
Groups.
2. Touch , then enter a group name, up to 32
characters.
3. Touch .
Contacts 44
Page 49

Sending a Message to Members of a Group
Done
Favorites
Use this feature to send a text, picture, video, or voice message
to some or all members of a group.
1. From a Home screen, touch
2. Touch , then choose
Message, New Video Message
3. Touch contact name(s), or touch
Contacts
New TXT Message, New Picture
, or
New Voice Message
Mark All
contacts. A check mark appears beside selected contacts.
4. Touch . The new message displays, with your
selections entered as recipients.
5. Continue creating the message, then touch to
send the message.
Speed Dials
Speed Dials
are 1- or 2-digit shortcuts you assign to contact
entries, to allow you to quickly dial a contact.
Assigning a Speed Dial Number
1. From a Home screen, touch
2. Touch the desired speed dial number.
3. Touch a contact to assign to the speed dial number. At the
prompt, touch
45
Yes
to confirm the setting.
Contacts
➔
Groups
to select all
Send
➔
Speed Dials
Favorites
Favorites
are shortcuts to contacts or groups. For each Favorite,
you can set a one-touch action for the phone to perform when
.
.
you select a favorite. After creating Favorites, access them by:
•
Touching the Favorite on the
•
Touching in the
Dialer
Favorites
.
widget on a home screen.
To create a Favorite:
1. From a Home screen, touch
2. Touch . Touch
Contacts
Contacts
➔
Favorites
.
to choose a contact , or
Groups
to choose a group.
3. Touch
Edit
to modify the
Favorite. Choose:
•Remove
: Follow the prompts to
mark Favorites for removal.
• Set One-Touch Action
from
Always Call, Always
.
Message, Always Ask
Always View Detail
4. Change the order of Favorites
: Select
, or
.
by dragging and dropping a favorite to a new location.
Page 50

In Case of Emergency (ICE)
Unassign
In Case of Emergency (ICE)
allows you to set up to 3 emergency
contacts, plus enter personal information that may be helpful to
others using your phone in an emergency.
Note:
ICE contacts are displayed in red in the Contacts list.
Assigning an emergency contact
1. From a Home screen, touch
Contacts
➔
In Case of
Emergency
.
2. Touch
3. Touch
Contact 1, Contact 2
Contact 3
.
From Contacts
choose a contact, or
Contact
to create a new
, or
to
New
contact.
4. Select or enter a contact.
Unassigning or reassigning an emergency contact
1. From a Home screen, touch
Emergency
.
Contacts
➔
In Case of
2. Touch the emergency Contact.
3. Touch to choose another ICE contact.
Re-assign
– or –
Touch to remove the contact and leave the ICE
contact empty.
Entering personal information
1. From a Home screen, touch
Emergency
.
2. Touch
3. Touch
Personal Info
Note 1, Note 2
.
or
Contacts
➔
Note 3
to enter up to three items of
In Case of
personal information.
Tip:
You can enter information such as illnesses, allergies, and other
medical details in
Personal Information
.
My Name Card
My Name Card
is your personal contact entry in Contacts, which
you can send as a virtual business card to recipients via message
attachment or by Bluetooth.
Note:
Option numbering may differ when an optional memory card is
installed.
Contacts 46
Page 51

Creating My Name Card
Save
Options
Done
Done
1. From Home screen, touch
2. In most cases, your telephone number is entered by
default. Touch to enter additional fields.
3. When finished, touch to save the Name Card.
Edit
Contacts
Sending a Name Card by Message
Send individual contact entries, including My Name Card, to
recipient(s) as an attachment to a message.
1. From a Home screen, touch
1. Send Name Card
2. Choose a message type, from
.
Message, 3. Video Message
3. Touch contact name(s) to mark them, then touch
Contacts
1. TXT Message, 2. Picture
, or
4. Voice Message
to add the contacts to the To: list of the message.
4. Continue creating the message. See “Messaging” on
page 52.
Sending a Name Card by Bluetooth
Send individual contacts, including My Name Card, to Bluetooth
devices that support vCards.
47
➔
My Name Card
➔ ➔
.
Note:
.
For more information, see “Bluetooth Menu” on page 68.
1. From a Home screen, touch
1. Send Name Card
2. Touch contact name(s) to mark them, then touch .
3. Touch the destination device.
Note:
If your phone is not already paired with the destination device, follow
the Bluetooth Search instructions on page 70.
4. If Auto Pairing is enabled, the devices pair automatically
➔
5. Bluetooth
.
and the transfer continues. If Auto Pairing is disabled,
enter a passkey when prompted, then enter the same
passkey on the destination device at its prompt.
5. Follow the prompts to complete and confirm the transfer.
Note:
All information will be transferred except for group name, ringtone,
and Emergency contact reference.
Contacts
➔ ➔
Options
Page 52

Section 6: Entering Text
Your phone provides convenient ways to enter words, letters,
punctuation, and numbers when you need to enter text.
This section describes selecting the text input mode and entering
characters, using the built-in QWERTY keyboard or the Dialer
keypad.
Entering Text Using the QWERTY Keyboard
The built-in QWERTY keyboard provides quick and easy text
input, similar to a computer keyboard.
䊳
To access the keyboard, rotate the phone and slide it open, as
shown.
Entering Characters
Enter text by pressing the appropriate keys on the QWERTY
keyboard.
Press the Backspace or Return key to position the insertion point
in the text field.
Backspace
: Deletes the previous character.
Return
: Moves the insertion point to the next line.
Entering Numbers
Press the number keys on the top row of the QWERTY keyboard.
Entering Upper and Lower Case
Enter upper and lower case alphabet letters by pressing the Shift
key to toggle the case, before pressing the character key:
• Press once to toggle from Abc to ABC.
• Press twice to toggle from ABC to abc.
• Press three times to toggle from abc to Abc.
Entering Text 48
Page 53

Entering Symbols
Text Input
Mode
Enter symbols by pressing the Function key before a key, to
access the orange special character on the key. You can also lock
the keyboard in Function mode, to enter multiple symbols.
• Press once to turn on Fn mode. When Function is
ON, appears in the annunciator line.
• Press twice to lock the keyboard in Fn mode.
When Function is LOCKED, appears in the
annunciator line.
• Press once more to return to Abc mode.
Entering Smileys
Smileys communicate feelings such as pleasure, approval or
humor.
1. Press ➔ .
2. The
Smileys
menu
displays. Touch the
number of the smiley.
49
Entering Text using the Touch Screen
The touch screen keypad provides quick and easy text input,
using standard text entry for phone keypads.
䊳
When you touch a text entry field in portrait mode, the touch
screen keypad appears for text entry.
Changing Text Input Mode
When entering text with the touch screen keypad, you can
change the text input mode to your preference.
Tip:
You can set a default Text Entry Mode. For more information, see
“Message Settings” on page 64.
1. On the onscreen keypad, touch the
Text Input Mode
Select a text input
mode:
•
T9 Word
•
Initial case
•
Upper case
•
Numeric
•
Symbols
button.
Page 54

Touch Screen Text Input Buttons
Directional key
Hide/Display keypad
Backspace
: Navigate through the text.
: Hide or display the keypad.
: Delete the previous character, or go back
to the previous field.
Shift
: Temporarily change the case for alphabet
characters, without changing text input mode. Touch
once to change case for one character, or touch twice
quickly to lock the case until you press Shift again.
Next
: In T9 Word mode, scroll through words
matching your key touches.
Space
: Add spaces between words and characters.
Using T9 Word
T9 Word is a predictive text input mode that recognizes common
words matching the sequence of your key presses and inserts
the most common word into your text. T9 Word requires only one
key press per letter of the word and is much faster than
traditional text entry.
䊳
Touch the Text Input Mode button, then select .
When entering text:
•
Press the key for each letter only once.
•
If the correct word isn’t chosen automatically, touch to
choose another word.
•
Enter the entire word before editing or deleting.
•
By default, the first letter of an entry is capitalized and consecutive
letters are lower case. Touch to change between T9 Word
(initial case), and T9 word (lower case), and T9 WORD (upper case).
•
Touch to enter a space.
Using Abc Mode
To use Abc mode, use the corresponding keys to enter your text.
䊳
Touch the Text Input Mode button , then select .
When entering text:
•
Touch each key once for the first letter, twice for the second letter,
and so on.
•
When the correct letter appears, pause briefly to advance to the
next letter, or touch another key.
•
Touch to enter a space.
•
By default, the first letter of an entry is capitalized and consecutive
letters are lower case. Touch to change between Abc (initial
case), abc (lower case), and ABC (upper case).
Entering Text 50
Page 55

Using 123 Mode
1/51/5
Use 123 mode to enter numbers into a text message.
䊳
Touch the Text Input Mode button, then select .
When entering numbers:
•
Touch a key to enter the associated number.
•
Touch to enter a space.
Using Symbols
Use Symbol mode to insert symbols and punctuation marks into
text.
䊳
Touch the Text Input Mode button, then select .
The first of 5 symbol pages displays. When entering symbols:
•
Touch a key to enter the associated symbol.
•
To display more symbols, touch to scroll through 5 pages
of symbols.
51
Page 56

Section 7: Messaging
Contacts
Recent
Calls
Favorites
This section explains how to send and receive messages, and
other features and functionality associated with messaging.
Types of Messages
Your phone can send and receive:
•
Text Messages
•
Picture Messages
•
Video Messages
•
Voice Messages
•
Mobile IM
•
Email, including Corporate Email
•
Chat
Tip:
Procedures are described using the QWERTY keyboard, unless otherwise
noted.
Creating and Sending Text Messages
Tex t Me s sage s
are simple messages containing text, which can
be sent to another mobile phone, or to an Email address. Your
phone also supports Enhanced Text Messages, which can
contain specific types of pre-loaded attachments such as
sounds, graphics and name cards.
Text messages are also known as SMS (Simple Messaging
Service) messages.
1. From a Home screen, touch
Message
➔
TXT Message
.
Message
➔
New
– or –
From a Home screen, press on the QWERTY
keyboard.
2. Enter recipients:
Contacts
•
Touch to select from the Contacts List.
Recent
•
Touch to select from Recent Calls.
Calls
Favorites
•
Touch to select from Favorites.
•
Tou ch the
Recipient
field to enter a recipient’s phone number,
contact name, or Email address manually. Touch to insert
common web or Email phrases, such as .com or @verizon.com.
Messaging 52
Page 57

Options
ContactsContacts
RecentRecent
CallsCalls
FavoritesFavorites
BlogsBlogs
Tip:
As you enter the characters of a contact’s name, matching contacts
display. Touch the desired contact to add it to the field.
3. Touch the
Tex t
field, or press to move to the
field, and compose your message.
While entering text, touch for these options:
•Paste Text
: If copied text is available, insert the copied text into the
text field.’
• Save as Draft
• Insert Quick Text
•Add
: Save a copy of the message in the Drafts folder.
: Choose from 19 pre-loaded phrases.
: Add a graphic, animation, sound, or name card (not available
if recipient is an Email address).
•Copy Text
: If text is available for copying, select text to copy.
•Edit Text Format
: Choose font size, alignment, style and color, plus
message background color (not available if recipient is an Email
address).
• Sending Options
: Set the Priority, choose whether to include a
Callback # in the message, and set the callback number.
• Cancel Message
: Cancel the message, with the option to save it in
the Drafts folder.
4. Touch or press
53
Send
Send
to send the message.
Tex t
Creating and Sending Picture Messages
Picture Messages
sent to other mobile phones, to Email addresses, your Online
Album, or a blog.
combine text, pictures, and sound, and can be
Picture messaging is also known as Multimedia Messaging
(MMS).
Note:
Picture messaging is only available in the Verizon Wireless Enhanced
Services Area.
1. From a Home screen, touch
Message
➔
Picture Message
Tip:
Sliding the QWERTY keyboard open immediately after taking a picture
opens a New Picture Message screen.
2. Enter recipients:
•
Touch to select from the Contacts List.
•
Touch to select from Recent Calls.
•
Touch to select from Favorites.
•
Touch to post the message attachment(s) to Online
Album, or to a blog.
•
Tou ch t he
Recipient
field to enter a recipient’s phone number,
contact name, or Email address manually. Touch to insert
common web or Email phrases, such as .com or @verizon.com.
Message
.
➔
New
Page 58

Send
Pictures you attach are placed on
3.
to navigate between
Slides
. Touch and
Slides
. Touch to add a new
slide for a new picture.
4. Touch the
Tex t
field, or press to move to the
field, and compose your message.
While entering text, touch for these options:
•Paste Text
: If copied text is available, insert the copied text into the
Options
text field.
•Preview
: Display the message before sending.
• Save as Draft
• Insert Quick Text
•Copy Text
: Save a copy of the message in the Drafts folder.
: Choose from 19 pre-loaded phrases.
: If text is available for copying, copy text for pasting into a
text field. To copy text, slide your finger across the text to highlight
and touch
Copy
.
• Add Slide
: Add a new slide for another picture.
• Remove Slide
• Priority Level
• Cancel Message
: If more than one slide, delete the current slide.
: Choose High or Normal priority for sending.
: Cancel the message, with the option to save it
in the Drafts folder.
5. Touch the
Picture
field, or press then , and
attach a picture:
–
To insert an image from
My Pictures
, touch an image.
Tex t
–
Tou c h
Camera
to take a new picture.
–
Tou c h
Get New Pictures
While adding a picture, touch for picture options:
•Preview
: Display the message before sending.
• Save as Draft
• Add Slide
: Add a new slide for another picture.
• Remove Slide
• Priority Level
• Cancel Message
to download a new picture.
Options
: Save a copy of the message in the Drafts folder.
: If more than one slide, delete the current slide.
: Choose High or Normal priority for sending.
: Cancel the message, with the option to save it
in the Drafts folder.
6. Touch the
Sound
field, or press then , to add a
sound:
–
To insert an image from
–
Tou c h
7. Touch the
Record New
Subject
My Sounds
, touch a sound.
to create a new recording.
field, or press then , to add a
subject, if desired.
8. Touch the
Name Card
field, or press then , to
add My Name Card or an entry from your Contacts list.
Follow the prompts and touch to insert.
9. Touch or press
Send
to send the message.
Messaging 54
Page 59

Creating and Sending Video Messages
ContactsContacts
RecentRecent
CallsCalls
FavoritesFavorites
BlogsBlogs
Options
Video Messages
combine text, videos, and sound, which can be
sent to another mobile phones, to Email addresses, your Online
Album, or a blog.
Video messaging is also known as Multimedia Messaging (MMS).
Note:
Sliding the QWERTY keyboard open immediately after taking a video
opens a New Video Message screen.
1. From a Home screen, touch
Message
➔
Video Mes sage
2. Enter recipients:
•
Touch to select from the Contacts List.
•
Touch to select from Recent Calls.
•
Touch to select from Favorites.
•
Touch to post the message attachment(s) to Online
Message
.
Album, or to a blog.
•
Tou ch t he
Recipient
field to enter a recipient’s phone number,
contact name, or Email address manually. Touch to insert
common web or Email phrases, such as .com or @verizon.com.
55
➔
New
3. Touch the
Tex t
field, or press to move to the
field, and compose your message.
While entering text, touch for these options:
•Paste Text
: If copied text is available, paste copied text into the text
field.
•Preview
: Display the message before sending.
• Save as Draft
• Insert Quick Text
•Copy Text
: Save a copy of the message in the Drafts folder.
: Choose from 19 pre-loaded phrases.
: If text is available for copying, copy text for pasting into a
text field. To copy text, slide your finger across the text to highlight
and touch
Copy
.
• Priority Level
• Cancel Message
: Choose High or Normal priority for sending.
: Cancel the message, with the option to save it in
the Drafts folder.
4. Touch the
Video
field, or or press then , and add
a video to your message.
–
To insert an image from
–
Tou ch
Camcorder
My Videos
, touch an image.
to record a new video.
Touch a video to insert it into the message, then touch
Tex t
Add.
Page 60

While adding a video, touch to choose options:
Options
Send
Contacts
Recent
Calls
Favorites
Blogs
•Preview
: Display the message before sending.
• Save as Draft
• Priority Level
• Cancel Message
: Save a copy of the message in the Drafts folder.
: Choose High or Normal priority for sending.
: Cancel the message, with the option to save it in
the Drafts folder.
5. Touch the
Subject
field, or press then , to add a
subject, if desired.
6. Touch the
Name Card
field, or press then , to
add My Name Card or an entry from your Contacts list.
Follow the prompts and touch to insert.
7. Touch or press
Send
to send the message.
Creating and Sending Voice Messages
Send voice messages to another mobile phone or to an Email
address.
1. From a Home screen, touch
Message
➔
2. Create a voice recording:
•
Tou ch to start recording.
•
To pause recording, touch . Touch to start again.
Voice Message
Message
.
➔
New
•
Touch to stop recording.
Touch
Save
to save the recording and add it to the
message.
Note:
While recording, the number to the right is an indicator of the time
remaining for your recording.
3. Enter recipients:
Contacts
•
Touch to select from the Contacts List.
Recent
•
Touch to select from Recent Calls.
Calls
Favorites
•
Touch to select from Favorites.
Blogs
•
Touch to post the message attachment(s) to Online
Album, or to a blog.
•
Tou ch the
Recipient
field to enter a recipient’s phone number,
contact name, or Email address manually. Touch to insert
common web or Email phrases, such as .com or @verizon.com.
4. Your voice recording appears in the
Touch the field to
5. Touch the
Remove
Tex t
field, or press to move to the
or
Change
Voice Recording
the recording.
field, and compose your message.
While entering text, touch for these options:
•Paste Text
: If copied text is available, paste copied text into the
Options
field.
Messaging 56
field.
Tex t
Page 61

•Preview
: Display the message before sending.
• Save as Draft
• Insert Quick Text
•Copy Text
: Save a copy of the message in the Drafts folder.
: Choose from 19 pre-loaded phrases.
: If text is available for copying, copy text for pasting into a
text field. To copy text, slide your finger across the text to highlight
and touch
Copy
.
• Priority Level
• Cancel Message
: Choose High or Normal priority for sending.
: Cancel the message, with the option to save it in
the Drafts folder.
6. Touch the
Subject
field, or press then , to add a
subject, if desired.
7. Touch the
Name Card
field, or press then , to
add My Name Card or an entry from your Contacts list.
Follow the prompts and touch to insert.
8. Touch or press
Send
Send
to send the message.
Receiving Messages
When you receive a message, you can choose to:
•
View Now
: Open the message for viewing.
•
View Later
: Dismiss the alert. The message can be viewed later in
Messages. For more information about viewing messages, see
“Message Folders”
57
on page 59.
•
Reject
: If you have disabled the Multimedia Auto Receive setting,
reject the message. The message is not saved to Messages.
Viewing Text Messages
1. Touch a message to view its details.
2. Touch to respond to the message with a new TXT,
Reply
Picture, Video or Voice Message.
3. Touch
4. While viewing a message touch to display
to delete the message.
Erase
Options
available options:
–
Forward
: Send the message to another recipient.
–
Reply w. Copy
: Reply to the sender, plus other recipients if desired,
and include a copy of the original message.
–
Save Quick Text
–
Lock/Unlock
–
Add To Contacts
: Save the message text to the Quick Text list.
: Lock or unlock the message to prevent deletion.
: Save the number of the sender to Contacts as a
new entry or addition to an existing entry.
–
Messaging Font Size
: Select the font size of the message, Normal
or Large.
–
Extract Addresses
: Display all Contact Numbers, Email Addresses
and URLs extracted from the message.
–
Message Info
: Display details, including From (also provides the date
and time the message was received), Callback #, Priority, Message
Type, Size and Attachments (if any).
Page 62

Viewing Picture, Video or Voice Messages
Reply
Mute
Options
1. Touch a message to view its details.
2. After loading, the attachment (and text if any) contained in
the message appears in the display. Scroll the screen up to
view the entire picture or message if necessary.
3. Touch to respond to the message with a new TXT,
Picture, Video or Voice Message.
4. Touch while an attached sound or video is playing
to mute the sound.
5. While viewing a message touch to choose options:
–
Play Again
: (Video, Voice, or Picture messages with attached sound)
Replay the attached sound.
–
Forward
: Send the message to another recipient.
–
Reply w. Copy
: Reply to the sender, plus other recipients if desired,
and include a copy of the original message.
–
Erase
: (Video, Voice, or Picture messages with attached Sound) Delete
the message.
–
Save Picture
: (Picture and Video messages) Save the attached
picture to My Pictures.
–
Save As Ringtone
: (Video, Voice, or Picture messages with attached
sound) Save the attached sound as a ringtone.
–
Save Sound
: (Video, Voice, or Picture messages with attached sound)
Save the attached sound to My Sounds.
–
View Name Card
: (If name card is attached) Display the attached
name card.
–
Save Quick Text
–
Set As
–
Lock/Unlock
–
Add To Contacts
: Save the message text to the Quick Text list.
: Set the attachment as a Picture ID or Ringtone.
: Lock or unlock the message to prevent deletion.
: Save the sender’s number to Contacts as a new
entry or addition to an existing entry.
–
Extract Addresses
: Display all Contact Numbers, Email Addresses
and URLs extracted from the message.
–
Message Info
: Display details, including From (plus the date and time
the message was received), Callback #, Priority, Message Type, Size
and Attachments (if any).
Quick Reply
Use Quick Reply to send a simple text message when viewing
messages in landscape mode. Just begin entering characters,
and the text field will appear.
Messaging 58
Page 63

Message Folders
Sort
Erase
Messages are stored in the message folders, depending on your
selections for Inbox View in Message Settings.
Tip:
To scroll through all messages in the Messages, Sent, or Drafts folder,
open one message and swipe your finger quickly to the left to view the
previous message, or right to view the next message.
Viewing Messages by Contact
When the Inbox View setting is set to Contact, all incoming and
sent messages are stored in the Messages folder, grouped by
contact (the sender/recipient of the message), to provide a
threaded view of the message exchange.
Note:
For more information about the Inbox View setting, see “Message
Settings” on page 64.
1. From a Home screen, touch
Messages
.
2. The most recent message from each contact displays.
Message
Touch a contact to view the message thread.
3. Tou ch
to list messages by Name or Size.
4. To mark messages for deletion, touch .
59
➔
5. While viewing a thread, touch a message to view the
message detail.
For more information about viewing Text Messages, and
available options, see “Viewing Text Messages” on
page 57.
For more information about viewing Picture, Video and
Voice Messages, and available options, see “Viewing
Picture, Video or Voice Messages” on page 58.
Viewing Messages by Time
When the Inbox View setting is set to Time, incoming messages
are stored in the Inbox, and sent messages are stored in the Sent
folder, sorted by time.
Note:
For more information about the Inbox View setting, see “Message
Settings” on page 64.
Inbox
When the Inbox View setting is set to Time, incoming messages
are stored in the Inbox message folder by date and time.
1. From a Home screen, touch
2. Tou ch
New
to create a new Text, Picture, Video or Voice
Message
➔
Inbox
message.
.
Page 64

Tou ch
Sort
New
Sort
New
Sort
Erase
Edit
3.
4. To mark messages for deletion, touch .
5. Touch the message that you wish to view. For more
to list messages by Sender or Size.
Erase
information about viewing Text Messages, and available
options, see “Viewing Text Messages” on page 57.
For more information about viewing Picture, Video and
Voice Messages, and available options, see “Viewing
Picture, Video or Voice Messages” on page 58.
Sent
When the Inbox View setting is set to Time, outgoing messages
are stored in the Sent message folder by date and time.
1. From a Home screen, touch
2. Tou ch
to create a new Text, Picture, Video or Voice
Message
message.
3. Tou ch
to list messages by Recipient or Size.
4. To mark messages for deletion, touch .
5. Touch the message that you wish to view. For more
Erase
information about viewing Text Messages, and available
options, see “Viewing Text Messages” on page 57.
➔
Sent
For more information about viewing Picture, Video and
Voice Messages, and available options, see “Viewing
Picture, Video or Voice Messages” on page 58.
Drafts
Drafts are messages that have been created, but have not yet
been sent. You can return to the Drafts folder at any time to view,
edit, or send a draft message.
1. From a Home screen, touch
2. Tou ch
message.
3. To list messages by Recipient or Size, touch
.
4. Touch to mark messages for deletion.
View and Edit Draft Messages
1. Open your device in landscape mode, from a Home screen,
touch
2. Touch the message you wish to view.
3. While viewing a message, touch to make changes
to the message, or to add attachments.
4. While viewing a message, touch to erase the
message.
Message
to create a new Text, Picture, Video or Voice
Message➔ Drafts
.
Erase
➔
Drafts
.
Messaging 60
.
Page 65

5.
Options
Call
While viewing a message, touch for these options:
•Send
: Send the message.
•Lock/Unlock
: Lock the message to prevent deletion, or unlock to
allow deletion.
• Add to Contacts
: Add address(es) from the message to Contacts.
Voicemail
Note:
Standard Text Messaging charges do not apply when checking
voicemail.
䊳
From a Home screen, touch
Message
(at the bottom of the display).
For more information about setting up and checking Voicemail,
see “Voicemail” on page 11.
Visual Voice Mail
Visual Voice Mail provides a quick and easy way to access your
voicemail. Find exactly the message you are looking for without
having to listen to every voicemail message. Visual Voice Mail
makes it quick and easy to choose the voicemails you want to
listen to first. You can also send out your own Visual Voice Mail
messages to select recipients.
1. From a Home screen, touch
Visual Voice Mail
61
.
Message
➔
Voicemail
➔
➔
2. The first time you launch Visual Voice Mail, an introduction
will play, and the application will download. Follow the
prompts to download and install the application. After the
application downloads, touch
3. The first time you access Visual Voice Mail, you will be
Yes
to run the application.
prompted “Do you want to use Visual Voicemail as the
preferred way of checking voicemail?”. If you touch OK
with “
Yes
” highlighted, the Voicemail Setting screen will
display for you to set your preference for one-touch key(s)
to access Visual Voice Mail.
• Visual Voicemail
: Touch Visual Voicemail or call Voicemail # when
you touch and hold 1.
• Call Voicemail #
: Enter the Voicemail phone number to be dialed (if
other than the default value of *86).
Tip:
Voicemail settings can also be configured in
information,see “Message Settings” on page 64.
Message Settings
. For more
Page 66

Mobile IM
Mobile IM
allows you to send and receive instant messages using
one of the following communities:
•
AOL® Instant Messenger™
•
Windows Live Messenger
•
Yah oo!®
Note:
Create the Instant Message account using a PC before accessing it on
your phone.
Using Mobile IM
1. From a Home screen, touch
Mobile IM.
2. Touch your instant message community. Use the on-
Message
➔
screen application specific functions and options to use
the instant message applications.
Send, receive and view Email using
Email
, or
Mobile Web Mail
Tip:
In
Message Settings
you touch
information, see “Message Settings” on page 64.
, you can set a default Email client to launch when
Email
or choose
.
Messaging
Mobile Email, Corporate
➔
Email
. For more
Mobile Email
1. From a Home screen, touch
Mobile Email
2. Follow the on-screen prompts for subscribing to Mobile
.
Message
➔
Email.
Note:
Subscription rates apply for Mobile Email.
3. Touch to an Email provider:
•Yahoo! Mail
• Windows Live Mail
• AOL Mail
• Verizon.net
•Other
4. Use the on-screen application specific functions and
options to use the Email applications.
Messaging 62
Email
➔
Page 67

Corporate Email
RemoSync
™ offers tools to stay more productive by doing
business directly from your phone. Using Microsoft® Exchange
ActiveSync®, RemoSync connects your phone directly to an
Microsoft Exchange server, providing real-time access to email,
contacts, calendars and tasks.
Note:
This is a paid service. The first time you launch Corporate Email, you’ll
be asked to agree to the monthly subscription fee and .
1. From a Home screen, touch
Corporate Email
2. The first time you launch Corporate Email, and introductory
.
Message
➔
Email
video will play, and the application will download. You will
be asked to confirm the monthly subscription charge.
Touch
Yes
ito continue.
3. Once the application is installed successfully,
Yes
is
highlighted. Touch to run the application.
4. After you have read the RemoSync introduction, follow the
prompts to configure your account.
63
➔
Mobile Web Mail
1. From a Home screen, touch
Mobile Web Mail
2. Follow the on-screen prompts for subscribing to Mobile
.
Message
➔
Email
Email.
3. Touch to select one of the following Email providers:
• Windows Live
• AOL Mail
•Yahoo! Mail
• Verizon.net
•Gmail
– or –
Touch the search field to find another web Email provider.
4. Use the on-screen application specific functions and
options to use the Email applications.
Chat
Join wireless chat rooms from your phone. Send text messages
and icons to many chat room participants or launch private oneon-one chat rooms. To access a chat room from the browser:
䊳
From a Home screen, touch
Message
➔
Chat
.
➔
Page 68

Message Settings
Define settings for messages sent and received on your phone.
To access your message settings, use the following steps:
䊳
From a Home screen, touch
Message
➔
Settings.
Configure these settings:
• Inbox View
: Set the default message view. Choose Time to display
messages by time of receipt, or Contact to display messages by
name or number (also known as threaded view).
• Entry Mode
: Set the default text entry mode when using the
touchscreen keypad. Choose from T9 Word, Abc, ABC or 123.
• Auto Save Sent: Choose the default save mode for sent messages.
Choose On to save all sent messages, Off to discard sent
messages, or Prompt to have the phone prompt you each time you
send a message
• Auto Erase Inbox
message of the same type when the maximum number of received
messages of that type is exceeded in the Inbox. For example,
.
: Choose On to automatically replace the oldest
the Inbox exceeds 100 text messages, the first message in the list
is replaced with the next incoming message. Picture messages are
replaced when the phone’s memory is full
• Messaging Font Size
: Set the default size for message text.
.
•TXT Auto View: Choose On to automatically display text messages
when they arrive
.
When
• Multimedia Auto Receive: Choose On to automatically accept new
multimedia messages. Choose Off to be prompted to download
new multimedia messages.
•Quick Text
• Voicemail Setting
• Callback #
• Signature
• Delivery Receipt:
: Quick Text are pre-loaded phrases you can insert i nto the
text of a message. You can create
phrases, or
Erase
quick text phrases.
New
quick text,
Move the order of
: Select voicemail defaults:
–
Speed Dial #1
either Call Voicemail #, or Visual Voice Mail.
–
Voicemail #
sequence is *86.
and set the callback number. The default callback number is your
phone number.
a signature.
: Set the default behavior when you dial Speed Dial #1,
: Enter a new Voicemail dial sequence. The default
: Select On to add a callback number to your messages,
: Choose On to add a signature to all messages, and create
Choose On to request delivery confirmation for
messages.
• Domain Extensions
and email extensions. Touch Erase to delete extensions,
create new domain extensions. Touch any extension to edit it.
• Preferred Email
: Create and manage a list of standard web
or New to
: Set your default email client, or select Let me
choose to be prompted each time you launch Email.
Messaging 64
Page 69

Erase Options
You can erase unlocked messages in your Inbox, Drafts folder, or
Sent folder. Locked messages are not erased.
To erase messages:
1. From a Home screen, touch
Options
.
2. The following options are available:
• Erase Inbox
• Erase Sent
• Erase Drafts
• Erase All
65
: Erase unlocked messages in your Inbox.
: Erase unlocked messages in your Sent folder.
: Erase unlocked messages in your Drafts folder.
: Erase unlocked messages in all message folders.
Message
➔
Erase
Page 70

Section 8: Settings & Tools
This section explains Settings for customizing your phone to your
needs, and Tools for personal productivity.
My Verizon
My Verizon connects to Verizon Wireless Mobile Web, where you
can set up Favorites, choose available applications, and other
services.
䊳
From a Home screen, touch
Tools
➔
My Verizon
Note:
You can also access My Verizon by touching
the
My Verizon
widget.
Menu
➔
Settings &
.
My Verizon
on the Menu or
Tools
The Tools menu provides personal productivity and information
applications.
Voice Commands
Use Voice Commands to operate your phone by speaking
commands. For more information about using Voice Commands,
see “Voice Commands” on page 38.
䊳
From a Home screen, touch
Tools
➔
Tools
➔
Menu
➔
Voice Commands
Settings &
.
Calculator
The Calculator menu provides a mathematical Calculator, a Tip
Calculator, and a Converter. For more information about using
Calculator, see “Calculator” on page 109.
䊳
From a Home screen, touch
Tools
➔
Tools
➔
Calculator
Menu
.
➔
Settings &
Calendar
Use the Calendar to view a calendar and schedule events. For
more information about using Calendar, see “Calendar” on
page 110.
䊳
From a Home screen, touch
Tools
➔
Tools
➔
Calendar
Menu
.
➔
Settings &
Alarm Clock
Set up to three alarms using the Alarm Clock. For more
information about using Alarm Clock, see “Alarm Clock” on
page 111.
䊳
From a Home screen, touch
Tools
➔
Tools
➔
Menu
Alarm Clock
➔
Settings &
.
Settings & Tools 66
Page 71

Stop Watch
Measure and record lap times with the Stop Watch. For more
information, refer to “Stop Watch” on page 111.
䊳
From a Home screen, touch
Too ls
➔
Tools
➔
Menu
Stop Watch
➔
.
Settings &
World Clock
View the current time in your location, plus any other time zone
in the world. For more information, see “World Clock” on
page 112.
䊳
From a Home screen, touch
Too ls
➔
Too l s
➔
Menu
World Clock
➔
.
Settings &
Notepad
Record text notes using Notepad. For more information, see
“Notepad” on page 112.
䊳
From a Home screen, touch
Too ls
➔
Too l s
➔
Notepad
Menu
.
➔
Settings &
Sketch Pad
Use Sketch Pad to draw a note using the touch screen.
䊳
From a Home screen, touch
Too ls
➔
Too l s
➔
67
Menu
Sketch Pad
➔
.
Settings &
Timer
Use Timer to set a timer.
䊳
From a Home screen, touch
Too ls
➔
Tools
➔
Timer
.
Menu
➔
Settings &
USB Mass Storage
Use an optional microSD as a mass storage device when your
phone is connected to a PC.
䊳
From a Home screen, touch
Too ls
➔
Tools
➔
Menu
➔
USB Mass Storage
Settings &
.
File Viewer
View files on an optional microSD card. For more information, see
“File Viewer” on page 114.
䊳
From a Home screen, touch
Too ls
➔
Tools
➔
File Viewer
Menu
.
➔
Settings &
Device Search
Use Device Search to find files and other items on your phone.
For more information, see “Device Search” on page 115.
䊳
From a Home screen, touch
Too ls
➔
Tools
➔
Menu
Device Search
➔
.
Settings &
Page 72

Bluetooth Menu
About Bluetooth
Bluetooth is a short-range wireless communications technology
for exchanging information over a distance of about 30 feet,
without requiring a physical connection.
You don't need to line up the devices to beam information with
Bluetooth. If the devices are in range, you can exchange
information between them, even if they are in different rooms.
Tip:
When using many Bluetooth headsets, you can press the multi-function
key on the headset to use the
Voice Commands
feature.
Bluetooth Profiles
Bluetooth profiles are specifications for services supported by
individual devices. Profiles improve the ability of different devices
to work together.
Tip:
You can find a list of supported profiles on your phone. Touch
Settings & Tools
➔
Bluetooth Menu
➔
Settings
➔
Menu
Supported Profiles
Your phone supports these Bluetooth profiles:
•
Headset
: HSP profile supports use of a compatible Bluetooth headset
for mono voice (see Note).
➔
•
Handsfree
: HFP profile supports Bluetooth headsets, and may also
support other installed compatible Bluetooth devices with
speakerphone capabilities (see Note).
•
Dial Up Networking
: DUN profile allows the phone to be used as a
data modem with a compatible Bluetooth device, such as a laptop or
PDA.
•
Stereo
: A2DP, AVRCP, GAVDP, AVDTP and AVCTP profiles support
delivery of stereo audio to a compatible Bluetooth device.
•
Phonebook Access
: PBAP profile allows sharing of your name card
and phonebook entries with a compatible Bluetooth device.
•
Basic Printing
: BPP profile allows printing of JPEG files to a Bluetooth-
enabled printer.
•
Basic Imaging
: BIP profile allows sending of non-protected images for
storing and printing.
•
Object Push
: OPP profile allows sending and receiving of contact
name cards (vCard) and calendar events (vCalendar) between devices.
•
File Transfer
.
protected data files to a compatible Bluetooth device.
•
Serial Port
: FTP profile allows the capability to send or receive non-
: SPP profile allows a remote Bluetooth device to act as a
virtual serial port.
Note:
This phone does not support all Bluetooth profiles. For vehicle/
accessory compatibility, contact Verizon Wireless.
Settings & Tools 68
Page 73

Bluetooth Settings
Settings
Bluetooth settings allow you to view and change the phone’s
name, display supported profiles, and set visibility and pairing.
1. From a Home screen, touch
Too ls
➔
Bluetooth Menu
2. Tou ch
to for these settings:
•My Phone Name
: Displays the default name, and allows you to
Menu
.
enter a new name.
• Discovery Mode
phone, or
: Select On to allow other devices to detect your
Off
for no visibility. After setting Discovery Mode to On,
your phone is visible for one minute, after which Discovery Mode
automatically turns
• Supported Profiles
Off
.
: Displays a list of supported Bluetooth
profiles. Touch a profile to view a description.
• Auto Pairing
: Select On to allow your phone to pair with other
Bluetooth devices without entering a passkey, or
automatic pairing.
69
➔
Off
Settings &
to prevent
Turning Bluetooth On or Off
When Bluetooth is turned on, you can use Bluetooth features.
When Bluetooth is turned off, you cannot send or receive.
To save battery life, or in situations where use of wireless devices
is prohibited, such as airline travel, you can turn off Bluetooth.
1. From a Home screen, touch
Too ls
➔
Bluetooth Menu
2. Touch
Turn Bluetooth On
Bluetooth Off
. When Bluetooth
or T
.
urn
Menu
➔
Settings &
is on, the Bluetooth icon
appears in the top line of the
display.
Page 74

Search
Use Search to detect, and pair with, nearby discoverable
Bluetooth devices.
1. From a Home screen, touch
Tools
➔
Bluetooth Menu
2. Touch
3. At the prompt “
Search
.
Place device you
are searching in discoverable
mode
, activate the device’s
Bluetooth discoverable mode
Menu
➔
.
Headset 1
Headset 2
and touch OK.
4. Available Bluetooth devices
appear on the Bluetooth Menu.
5. Touch a device to begin pairing.
• Automatic Pairing
: If you have
enabled Auto Pairing in Bluetooth Settings, and the selected device
supports it, your phone sends a default passkey to the device and
pairs automatically.
•Pairing with Passkey
device’s specific passkey) at the
phone, then touch
: Enter a passkey (create one, or use the
Done
ENTER PASSKEY
. You may also be prompted to enter the
prompt on your
same passkey on the other device.
Settings &
6. After connecting, the
Bluetooth Connected
icon .
appears in the upper half of the display.
Sounds Settings
Customize your phone’s sounds for incoming calls and
messages, alerts, and other phone features.
Master Volume
Set the level for all sounds made by your phone.
1. From a Home screen, touch
Tools
➔
Sound Settings
2. Touch the desired volume level. Available levels are:
• All Sounds Off
• Alarm Only
: No sounds are played.
: Sounds are played for alarms, but not for ringtones or
➔
Menu
➔
Master Volume
Settings &
other alerts.
• Vibrate Only
: No sounds are played, but the phone vibrates for
incoming calls and messages, alarms and other alerts.
•1 Low
: All sounds are played at low volume.
• 2 Medium Low
• 3 Medium
• 4 Medium High:
• 5 High:
3. Touch to save your selection and return to the menu.
: All sounds are played at medium low volume.
: All sounds are played at medium volume.
All sounds are played at medium high volume.
All sounds are played at high volume.
Settings & Tools 70
.
Page 75

Call Sounds
Set sounds for incoming calls.
1. From a Home screen, touch
Too ls
➔
Sound Settings
2. Touch the
Call Ringtone
loaded ringtones. Touch to download a
Menu
➔
Settings &
➔
Call Sounds
.
field to select from a list of pre-
Get New Ringtones
ringtone application to download new ringtones.
Note:
Charges may apply for downloads.
3. Touch
Call Vibrate
to select a vibration pattern for use along
with the Call Ringtone for incoming calls, or select
4. Touch the
5. Touch to save your selection and return to the menu.
71
Caller ID Readout
field to choose caller ID
notification on incoming calls. Choose from
Caller ID + Ring
, or
Name Repeat
.
Ring Only
Off
Alert Sounds
Choose sounds for incoming message alerts, emergency tone,
missed calls and device connection.
1. From a Home screen, touch
Too ls
➔
Sound Settings
•TXT Message
: Choose a Tone, Vibrate setting, and Reminder
➔
Menu
➔
Alert Sounds
Settings &
.
options for incoming text messages.
• Multimedia Message
: Choose a Tone, Vibrate setting, and
Reminder options for incoming picture and video messages.
• Voicemail
: Choose a Tone, Vibrate setting, and Reminder options
for new voicemail messages.
.
•Emergency Tone
–
Alert
: Set the alert for emergency dialing.
: Phone plays the Emergency Dialing tone except when the Master
Volume setting is Vibrate or All Sounds Off.
,
Note:
If Emergency Tone is set to
the handset will vibrate after emergency dialing.
If Emergency Tone is set to
Sounds Off
, the handset will not sound after emergency dialing.
–
Vibr ate
: Phone will vibrate only.
Note:
If Emergency Tone is set to
Sounds Off
, the handset will not sound after emergency dialing.
–
Off: Phone will not play the Emergency Tone or vibrate.
Alert
and Master Volume is set to
Alert
and the Master Volume is set to
Vibrat e
and Master Volume is set to
Vibrat e
All
,
All
Page 76

• Missed Call
• Device Connect
: Set a notification for missed calls.
: Choose whether a tone is played when you
connect the phone to another device.
2. Touch to save your selection and return to the menu.
Keypad Sounds
Set the volume for sounds played for keypad touches.
1. From a Home screen, touch
Tools
➔
Sound Settings
2. Touch the keypad volume level for keypad touches, from
➔
Menu
➔
Keypad Sounds
Settings &
Off, Low, Medium Low, Medium, Medium High or High.
3. Touch to save your selection and return to the menu.
Digit Dial Readout
Enable or disable readout of numbers as you dial.
1. From a Home screen, touch
Tools
➔
Sound Settings
2. Touch
3. Touch to save your selection and return to the menu.
On
to have the phone read the numbers as you dial
in the Dialer, or
Off
to
Menu
➔
Digit Dial Readout
➔
Settings &
Service Alerts
Enable or disable sounds to alert you to system or service status.
1. From a Home screen, touch
Tools
➔
Sound Settings
2. Choose
.
3. Touch to save your selection and return to the menu.
On
or
Off
for these Service Alerts:
•ERI
: Sounds an alert when you enter and exit your coverage areas.
• Minute Beep
• Call Connect
• Software Update
: While on a call, beeps after every minute of usage.
: An alert sounds when a call connects and ends.
: An alert sounds when update is complete.
➔
Menu
➔
Service Alerts
Settings &
.
Power On/Off
Enable or disable the playing of sounds when you power the
phone on and off.
1. From a Home screen, touch
Tools
➔
.
2. Set
Power Off
3. Touch to save your selection and return to the menu.
Sound Settings
On
or
Off
to control the sounds played at
.
➔
Menu
Power On/Off
➔
Settings &
.
Power On
and
Settings & Tools 72
Page 77

Display Settings
Customize the phone’s display screens.
Banner
Create a personal greeting to appear on the Home screen, or
display network status.
Personal Banner
1. From a Home screen, touch
Too ls
➔
Display Settings
Personal Banner
2. Enter up to 18 characters, then touch to save
.
➔
Menu
Banner
➔
➔
Save
Settings &
changes and return to the menu.
Note:
When you create a Personal Banner, it automatically appears on the
Home screen.
ERI Banner
Enable or disable and customize, a banner to show network
status.
1. From a Home screen, touch
Too ls
➔
Display Setting
Banner
.
73
s ➔
Menu
Banner
➔
➔
Settings &
ERI
2. Touch
On
or
Off
to control display of an ERI banner
containing network information on the Home screen.
3. Touch
4. Touch to save your selection and return to the menu.
Color
to select a font color for the ERI banner.
Backlight
Set the backlight for the display or touch keypad to remain on for
a specified period of time.
Note:
Prolonged backlight use drains the battery. The backlight setting also
determines how long the screen is illuminated before locking.
1. From a Home screen, touch
Too ls
➔
Display Settings
2. Touch the field to change the following settings:
• Screen Backlight
• Keypad Backlight
• Brightness
:
7 seconds, 15 seconds, 30 seconds, or 60 seconds.
:
7 seconds, 15 seconds, 30 seconds, or Always On.
: Auto (predefined setting) or Manual (customized
➔
Menu
Backlight
➔
Settings &
.
setting). For Manual, touch and drag the Level slider to choose a
brightness level from 0-5.
3. Touch to save your selection and return to the menu.
Page 78

Widgets
Camera
Select Widgets for display in the Widget Bar on the Home screen.
䊳
From a Home screen, touch
Tools
➔
Display Settings ➔ Widgets
Menu
➔
.
For more information, see “Widgets and the Widget Bar” on
page 20.
Wallpaper
Select a background image for the Lock Screen and Home
screens.
1. From a Home screen, touch
Tools
➔
Display Settings
2. Touch an image to select it, then:
•
To choose images from your phone, choose a source from the
drop-down menu:
microSD card),
•
To purchase additional images, touch . For more
information, refer to
•
To capture a new image, touch . For more inf ormation, see
“Using the Camera”
3. Choose a background location:
1, Home Screen 2
4. Touch to save your selection and return to the menu.
All Pictures
Phone
, or
“Get New Pictures”
on page 99.
or
Home Screen 3
Menu
➔
➔
Wallpaper
(all images stored on the phone and
Memory Card
.
Get New
Pictures
on page 88.
Lock Screen, Home Screen
.
Settings &
Settings &
.
Main Menu Settings
Customize the features and applications available on the Main
Menu. For more information about customizing the Menu, see
“Menu” on page 23.
䊳
From a Home screen, touch
Tools
➔
Display Settings
Menu
➔
Main Menu Settings
➔
Settings &
Fonts
Set the size of fonts in the Dialer, and the font style for menus.
1. From a Home screen, touch
Tools
➔
Display Settings
2. Touch the
3. Touch the
4. Touch
5. Touch to save your selection and return to the menu.
Dial Font Size
Menu Font Style
Lock Screen Font Color
Menu
➔
➔
Fonts
.
field and select
Normal or Large
field and select a font type.
and select a font color.
Settings &
Clock Format
Set the format for the Clock widget.
1. From a Home screen, touch
Tools
➔
Display Settings
2. Touch
Show Date
to display the date on the Clock.
Menu
➔
Clock Format
Settings & Tools 74
➔
Settings &
.
.
.
Page 79

3.
Touch the desired Clock Format.
4. Touch to save your selection and return to the menu.
Unlock Screen
By default, pressing the Lock key illuminates the screen for
unlocking. Use the Unlock Screen setting to allow pressing any
key to illuminate the screen.
1. From a Home screen, touch
Too ls
➔
Display Settings
2. Touch
3. Touch to save your selection and return to the menu.
Unlock Screen
and choose
Menu
➔
Unlock Screen
Lock Key Only
➔
Settings &
.
or
Any Key
Transition Effect
Activate or deactivate the default animation effect during
transitions between menu/options pages.
1. From a Home screen, touch
Too ls
➔
Display Settings
2. Touch
75
On
(activate) or
Off
Menu
➔
Transition Effect
(deactivate).
➔
Settings &
Touch Settings
Touch Settings let you set options for: Auto Lock, Vibrate Level,
Sound, Volume Level and Calibration.
1. From a Home screen, touch
Too ls
➔
Touch Settings
2. Make selections for these settings:
•Auto Lock
: Control whether the display automatically locks when
Menu
➔
Settings &
.
the backlight turns off.
.
•Vibrate Level
• Sound
• Volume Level
• Calibration
: Set the vibration level for touch screen feedback.
: Select a sound for touch screen feedback.
: Set the volume level for the touch sound.
: Align the touch screen, in case the phone does not
respond accurately to screen touches.
Phone Settings
Airplane Mode
When
.
Airplane Mode
is activated, all wireless functions of the
phone are disabled, and you cannot send or receive calls or
messages, but you can use the other features of your phone.
1. From a Home screen, touch
Too ls ➔ Phone Settings
2. Touch
On
to activate Airplane Mode, or
➔
Menu
➔
Airplane Mode
Off
to deactivate.
Settings &
.
Page 80

Touch to save your selection and return to the menu.
3.
Set My Shortcuts
Set shortcuts for up to 12 applications, to display on the My
Shortcuts widget.
䊳
From a Home screen, touch
Tools ➔ Phone Settings
Menu
➔
➔
Settings &
Set My Shortcuts
.
Voice Commands
Choose settings for the Voice Commands feature of your phone.
1. From a Home screen, touch
Tools
➔
Phone Settings ➔ Voice Commands
2. Make these selections:
•Confirm Choices
: Choose whether the phone prompts you with a list
of potential matches. Touch
Confirm
.
• Sensitivity
•Adapt Voice
•Prompts
: Set the sensitivity of speech recognition. Touch
Sensitive, Automatic
or
: Train digit dialing and name dialing to your voice.
Select the following settings for Voice Command prompts:
–
Choose a
Mode
. Touch
Ton es Only
–
Choose
Speakerphone
Audio Playback
Prompts, Readout + Alerts, Readout
.
or
Earpiece
Menu
➔
Settings &
Automatic, Always Confirm
Less Sensitive
to select audio playback through the
.
.
, or
.
Never
More
, or
•TXT Msg Readout
Tou c h On or
• Key Setting
–
Choose
–
Choose
you attach an optional headset.
• About
3. Touch to save your selection and return to the menu.
: Choose whether text messages are read.
Off
.
: Select the method for launching Voice Command.
Voice Key Only
Voice Key / Headset
to launch with the Voice key.
to launch with the voice key, OR when
: View information about the voice recognition software.
Language
Choose the language for the phone’s operation and displays.
1. From a Home screen, touch
QWERTY Action
Tools ➔ Phone Settings
2. Touch
3. Touch to save your selection and return to the menu.
QWERTY Action
English
or
Español
allows you to choose how the phone will react
➔
.
when you begin entering characters at the landscape Home
screen.
1. From a Home screen, touch
Tools
➔
Phone Settings
➔
Menu
➔
Settings &
Language
.
Menu
➔
Settings &
QWERTY Action
Settings & Tools 76
.
Page 81

2.
Choose the launch action:
•Off
: No action is taken.
•TXT Message:
•Contacts
•Notepad
3. Touch to save your selection and return to the menu.
Create a new text message.
: Open Contacts to find a contact.
: Launch Notepad to create a new note.
Location
Note:
Location service is only available on the Verizon Wireless network. It is
not available when roaming.
The Location setting determines whether your phone’s GPS
(Global Positioning System) location is availabe to the network at
all times, or only when you’ve dialed 911.
1. From a Home screen, touch
Too ls
➔
Phone Settings
2. Select a setting:
•Location On
• E911 Only
3. Touch to save your selection and return to the menu.
77
: GPS location is available to the network.
: GPS location available only when you dial 911.
➔
Menu
Location
➔
.
Settings &
Current Country
Select your current location.
1. From a Home screen, touch
Too ls
➔
Phone Settings
2. Touch the country name. If your current location is not
highlighted, touch and drag the
Menu
➔
Accelerator Tab
➔
Current Country
to the
Settings &
range corresponding to the first letter of the country’s
name.
3. Touch to save your selection and return to the menu.
Security
Lock your phone, set restrictions, and other security options.
Note:
Access to all Security settings requires the lock lode. By default, the
Lock Code is the last four digits of your phone number.
Important!:
For security reasons, your phone does not display the lock code.
If you change the lock code, be sure to record the new code for
future reference.
䊳
From a Home screen, touch
Too ls
➔
Phone Settings
➔
Menu
Security
➔
.
Settings &
.
Page 82

Edit Codes
Set a new lock code of your preference.
1. From a Home screen, touch
Tools ➔ Phone Settings
➔
Menu
Security
➔
.
Settings &
Enter the lock code when prompted. The default lock code
is the last four digits of your telephone number.
2. Touch
3. Enter the new lock code at the “
4. Enter the new lock code again at the “
5. Touch to save your selection and return to the menu.
Restrictions
Edit Codes
• Phone Only
: For unlocking the handset only.
• Calls & Services
CODE
” prompt.
to select a lock code:
: For access to Calls & Services.
ENTER NEW CODE
RE-ENTER NEW
” prompt.
You can set restrictions for receiving calls, messages and the use
of your phone as a modem.
1. From a Home screen, touch
Tools
➔
Phone Settings ➔ Security
Menu
➔
.
Settings &
Enter the lock code when prompted. The default lock code
is the last four digits of your telephone number.
2. Touch
Restrictions
.
Enter the Calls and Services Code when prompted. The
default code is the last four digits of your telephone
number.
3. Make the following selections:
• Location Setting
• Calls
Calls. Choose to
or
Block All
• Messages
Outgoing Messages. Choose to
• Dial-Up Modem: Allow
: Options are Lock Setting and Unlock Setting.
: Choose whether to restrict Incoming Calls and Outgoing
Allow All
, accept or dial calls from
Contacts Only
.
: choose whether to restrict Incoming Messages and
Allow All
, or
Block All
.
or
Block
use of the phone as a dial-up
modem.
4. Touch to save your selection and return to the menu.
Phone Lock Setting
Set the default locking behavior of your phone.
1. From a Home screen, touch
Tools
➔
Phone Settings ➔ Security
Menu
➔
.
Settings &
Enter the lock code when prompted. The default lock code
is the last four digits of your telephone number.
2. Touch
Phone Lock Setting
to select:
Settings & Tools 78
,
Page 83

• Unlocked
: The phone is unlocked by default.
•On Power Up
: The phone is automatically locked when you turn it
on. You can make phone calls, but the lock code is required to
access other features.
3. Touch to save your selection and return to the menu.
Lock Phone Now
Manually lock your phone.
1. From a Home screen, touch
Too ls
➔
Phone Settings ➔ Security
Menu
➔
.
Settings &
Enter the lock code when prompted. The default lock code
is the last four digits of your telephone number.
2. Touch
Lock Phone Now
.
The Home screen displays. To unlock, touch
Unlock
enter the lock code at the prompt.
Restore Phone
Return all settings to factory defaults and erase all user data.
Warning!:
Choosing
Restore Phone
settings and permanently erase all user data, including pictures,
videos, music, messages, contacts and downloaded applications
stored on the phone.
79
will return your phone to the default
and
Note:
After your phone powers back on, you must enter *228 and press
to re-program your phone.
1. From a Home screen, touch
Too ls
➔
Phone Settings ➔ Security
Menu
➔
.
Settings &
Enter the lock code when prompted. The default lock code
is the last four digits of your telephone number.
2. Touch
3. At the prompt, touch
Restore Phone
Yes
.
to reset and restore default
settings, or No to return to the Security menu.
Reset Settings
Return all settings to factory defaults. This setting does not erase
user data such as pictures, videos, music, messages, contacts or
downloaded applications stored on the phone.
1. From a Home screen, touch
Too ls
➔
Phone Settings ➔ Security
Menu
➔
.
Settings &
Enter the lock code when prompted. The default lock code
is the last four digits of your telephone number.
2. Touch
3. At the prompt, touch
Reset Settings
Yes
.
to reset settings, or No to return to
the Security menu.
Page 84

System Select
Set system selections for roaming. For more information about
roaming, see “Roaming” on page 39.
Note:
Contact Verizon Wireless for more information about your coverage
area and service plan.
1. From a Home screen, touch
Tools
➔
Phone Settings
2. Choose a system selection setting:
•Home Only
: Your phone is only active in your home network’s
➔
Menu
➔
System Select
Settings &
.
coverage area. When outside the coverage area, your phone will
not roam, and call functions and other features will not be available.
•Automatic
: Your phone automatically acquires service wherever
available, using on Verizon Wireless’ network and roaming
partners.
3. Touch to save your selection and return to the menu.
NAM Select
Select the primary NAM (Number Assignment Module).
1. From a Home screen, touch
Tools ➔ Phone Settings
2. Touch
3. Touch to save your selection and return to the menu.
NAM1
or
NAM2
.
➔
Menu
➔
NAM Select
Settings &
.
Motion Detection
Your phone can detect the motion of flipping the phone facedown. When set to On, the flipping the phone face-down will:
–
Temporarily mute the ringer for an incoming call.
–
Snooze a ringing alarm.
1. From a Home screen, touch
Tools ➔ Phone Settings
2. Choose a setting:
Off
or On.
➔
Menu
➔
Motion Detection
Settings &
Call Settings
Select options related to call functions.
Answer Options
Select methods for answering incoming calls.
1. From a Home screen, touch
Tools
➔
Call Settings ➔ Answer Options
2. Choose a setting:
• Slide Open
•Any Key
: Answer calls by opening the slide.
: When slide is open, answer calls by pressing any key on
Menu
➔
.
Settings &
the QWERTY keyboard.
• Auto w/ Handsfree
: When using a handsfree device, answer
calls automatically after a 5 second delay.
3. Touch to save your selection and return to the menu.
Settings & Tools 80
.
Page 85

Show Dialpad
Select settings for displaying the dialpad during phone calls.
1. From a Home screen, touch
Too ls
➔
Call Settings
2. Touch an option to activate:
•Always On
•Voicemail
• Toll Free
• Number
3. Touch to save your selection and return to the menu.
: Always displays while you’re on a call.
: Displays while you’re checking voicemail.
: Displays on calls to toll-free numbers.
: Displays when you dial the number you enter.
➔
Show Dialpad
Menu
➔
.
Settings &
Auto Retr y
Select automatic retry settings for calls.
1. From a Home screen, touch
Too ls
➔
Call Settings ➔ Auto Retry.
2. Choose a retry setting:
Menu
➔
Settings &
• 10 Seconds
• 30 Seconds
• 60 Seconds
•Off
3. Touch to save your selection and return to the menu.
81
TTY Mode
Before using your phone with a TTY device, you’ll need to enable
the TTY functions.
1. From a Home screen, touch
Too ls
➔
Call Settings
2. At the prompt “
Continue?
3. Touch a TTY mode:
Enabling TTY will disable headset audio.
”, touch
Yes
to proceed to
➔
Menu
TTY Mode
➔
.
TTY Mode
Settings &
.
•TTY Full
• TTY + Talk (VCO)
•TTY + Hear (HCO)
•TTY Off
4. Touch to save your selection and return to the menu.
One Touch Dial
Enable or disable the speed dialing feature. For more information
about using speed dials, see “Speed Dials” on page 45.
1. From a Home screen, touch
Too ls
➔
Call Settings
2. Choose
3. Touch to save your selection and return to the menu.
On
to enable one-touch dialing, or
Menu
➔
One Touch Dial
➔
.
Off
to disable.
Settings &
Page 86

Voice Privacy
Note:
This feature is only available on the Verizon Wireless network.
Enable or disable advanced voice encryption.
1. From a Home screen, touch
Tools
➔
Call Settings
2. Touch
On
to enable voice privacy, or
➔
Voice Privacy
Menu
➔
.
Off
to disable voice
Settings &
privacy.
3. Touch to save your selection and return to the menu.
Data Settings
Select a port for connections to the phone, and set connection
speed.
1. From a Home screen, touch
Tools
➔
Call Settings
• Select Port
: Choose
NULL
connections to the USB port, or
Menu
➔
➔
Data Settings
.
to allow no connections,
BLUETOOTH
to allow connections
Settings &
USB
to allow
via Bluetooth.
•Port Speed
2. Touch to save your selection and return to the menu.
230400
, or
: Select a speed, from
460800
.
19200, 57600, 115200
DTMF Tones
Set DTMF tone length.
1. From a Home screen, touch
Tools
➔
Call Settings
2. Select a tone length:
3. Touch to save your selection and return to the menu.
Normal
➔
DTMF Tones
or
Long
Menu
.
➔
.
Settings &
Assisted Dialing
Enable assisted dialing, set a reference country and enter
standard codes and prefixes to allow easier dialing of
international calls.
1. From a Home screen, touch
Tools
➔
Call Settings
2. Touch
3. Touch
4. Touch to enter codes and prefixes.
On
to enable
Assisted Dialing
Reference Country
Menu
➔
Settings &
➔
Assisted Dialing
, or
Off
to disable.
.
and select your home location.
• Country Code
,
• IDD Prefix
• NDD Prefix
•Area Code
• National Number Length
Settings & Tools 82
Page 87

5.
Save
Reset
Touch to save settings, or to reset
defaults.
6. Touch to save your selection and return to the menu.
Memory
Manage memory settings for saving pictures, videos, music,
sounds, and ringtones to your phone’s memory and optional
microSD™ memory card.
Note:
Your phone does not include a microSD™ memory card. You can
purchase a microSD card as an accessory. Consult your service
provider for more information.
䊳
From a Home screen, touch
Too ls
➔
Memory
.
Menu
Save Options
Choose the default location for pictures, videos and sounds.
1. From a Home screen, touch
Too ls
➔
Memory
➔
2. Select a save location for
3. Select a save location for
4. Select a save location for
5. Touch to save your selection and return to the menu.
83
Menu
Save Options
Pictures: Phone
Videos: Phone
Sounds: Phone
➔
➔
.
or optional
or optional
or optional
Settings &
Settings &
Card
Card
Card
Phone Memory
View memory usage on the phone’s memory.
1. From a Home screen, touch
Too ls
➔
Memory
2. Touch a setting:
• Memory Usage
current memory usage for My Pictures, My Videos, My Ringtones,
My Music, My Sounds, Applications and Multimedia Messages.
•My Pictures
downloaded via “Media Center”, or taken using Camera.
• My Videos
downloaded via “Media Center”, or taken using your phone.
• My Ringtones
Center”.
• My Music
transferred from your PC using Sync Music.
• My Sounds
your phone, or saved from a Picture message with Sound attached.
.
.
• My Contacts
•
Move All To Card
card must be inserted for this option to appear.
.
Menu
➔
Settings &
➔
Phone Memory
.
: View Available, Used and Total memory, and
: Pictures saved from a Picture message,
: Video Clips saved from a Video message,
: Ringtones you have downloaded via “Media
: Music downloaded from V CAST Music or
: Sounds you have downloaded, recorded using
: Contacts saved on your phone.
: Move all movable files to an optional card. The
Page 88

Card Memory
View the memory usage on the optional microSD™ memory
card. This menu will only appear if a card is inserted.
1. From a Home screen, touch
Tools
➔
Memory
➔
2. Touch a setting:
• Memory Usage
: View Available, Used and Total memory, and
Menu
➔
Card Memory
Settings &
.
current memory usage for My Pictures, My Videos, My Ringtones,
My Music, My Sounds and My Contacts.
• My Pictures
: Pictures saved from a Picture message,
downloaded via “Media Center”, or taken using Camera.
• My Videos
: Video Clips saved from a Video message,
downloaded via “Media Center”, or taken using Camcorder.
• My Ringtones
• My Music
: Ringtones downloaded via “Media Center”.
: Music downloaded from V CAST Music, or
transferred from your PC using Sync Music.
• My Sounds
: Sounds downloaded, recorded using your phone,
or saved from a Picture message with Sound attached.
• My Contacts
• Move All To Phone
• Format Card
Warning!:
Repeated formatting will shorten the life of the card.
: Contacts saved on your phone.
: Move all movable files to phone memory.
: Erase all files from the memory card.
USB Mode
Your phone will automatically detect connection of a Samsung
USB data cable from your computer to the phone. USB Mode
settings allow you to set the default behavior when a USB data
cable is connected.
1. From a Home screen, touch
Tools
➔
USB Mode
.
2. Touch a setting to activate it:
• Media Sync Mode
: When a USB data cable is connected, your
Menu
➔
Settings &
device is ready to sync media like music, pictures, and videos from
your PC to the microSD memory card inserted in your phone.
Note:
Media Sync Mode will not appear as an option if you do not have a
memory card inserted in your phone's microSD card slot.
•Modem Mode
: Allows the use of the Verizon Wireless Mobile Office
kit to utilize your handset as a modem for your computer. This may
require additional service activation available through Verizon
Wireless.
•Ask On Plug
: You will be asked to select the USB mode each time
the USB data cable is connect ed from your phone to the USB port of
your computer.
Settings & Tools 84
Page 89

Phone Info
View software and hardware information, your assigned
telephone number, an icon glossary, and manage software
updates.
1. From a Home screen, touch
Too ls
➔
Phone Info
2. Touch
My Number
to display the Mobile Device and the
Menu
➔
.
Mobile Identification (your telephone number) numbers.
3. Touch
SW/HW Version
to view the version of software,
PRL, ERI, Browser, Media Center, MSUI, Hardware, and
MEID of your phone.
4. Touch
Icon Glossary
to view Annunciator line icons and
descriptions.
5. Touch
Software Update
to check the status of your
phone’s software and to check for new software updates
for download to your phone.
6. Touch to return to the menu.
85
Settings &
Set-Up Wizard
Set nine basic parameters, to start using your phone quickly.
1. From a Home screen, touch
Too ls
➔
Set-Up Wizard
2. Follow instructions on the screen to set your preferences.
3. Available settings:
• Call Sound
• Ringtone
: Choose how incoming calls are announced.
: (Available if you’ve chosen Ringtone Only or Ring and
Menu
➔
Settings &
.
Vibrate for Call Sound.) Select a ringtone for incoming calls.
• Vibrate Level
• Tone Level
• Feedback Tone
• Wallpaper
• Menu Font
• Dial Font:
•Main Clock
Touch
setting by touching
Touch
4. Touch to return to the menu.
: Set a vibration level for touch screen feedback.
: Set a level for touch screen tone feedback.
: Set a tone for touch screen feedback.
: Choose an image for the home screen.
: Set the size of menu displays.
Select the size of Dialer fonts.
: Choose a style for the main clock.
Next
to move to the next setting. You can skip any
Next.
Done
when finished.
Page 90

Section 9: Media Center
Media Center includes applications for creating, viewing and
managing multimedia content, right on your phone.
You can also view memory info to see how much space you’ve
used (and have left) for stored media.
䊳
From a Home screen, touch
Note:
Before downloading any music, tones, pictures, videos, games, etc.,
check the available memory. For more information, see “Memory” on
page 83.
Menu
➔
Media Center
Music & Tones
Music & Tones
offers features and applications for managing
songs, tones and sounds.
V CAST Music with Rhapsody
(Subscription, Wireless and PC Downloads)
V CAST Music with Rhapsody® is a digital music service that lets
you listen to millions of songs from thousands of artists. Discover
new and old favorites in an extensive music catalog. For more
information, see “V CAST Music with Rhapsody” on page 92.
䊳
From a Home screen, touch
➔ Music & Tones ➔ VCAST Music | Rhapsody.
Menu
➔
Media Center
Get New Ringtones
Use
tones.
Note:
.
1. From a Home screen, touch
2. Tou ch
3. Use the onscreen buttons to locate and download tones.
4. Touch to find other ringtone applications.
Get New Ringtones
Charges apply for downloading ringtones, in addition to airtime for
downloads. Consult Verizon Wireless for more information.
Center
to download ringtones and ringback
Menu
➔
Media
➔ Music & Tones ➔ Get New Ringtones.
VZW Tones Deluxe
. The first time you launch VZW
Tones Deluxe, you’re prompted to accept the terms and
conditions and download the application. Touch
beside
VZW Tones Deluxe
• View Properties
• Lock/Unlock
to configure the application:
: Display information about the application.
: Lock the application to prevent unauthorized
downloads, or unlock.
• Remove
• Upgrade Check
: Uninstall the application.
: Check for updates to the application.
Get New Applications
Media Center 86
Page 91

My Ringtones
Get New Ringtones
1. From a Home screen, touch
Center
➔ Music & Tones ➔ My Ringtones.
2. Touch a ringtone for these options:
•Set As
: Set the tone as a
•File Info
: View
information about the tone.
Use the onscreen buttons to preview tones:
–
Touch to play the tone.
–
To stop playback, touch .
–
Touch to adjust the volume during playback.
3. Touch to browse and download new tones.
My Music
Use
My Music
to launch Music Player to play music files. For
more information, see “Music Player” on page 94.
䊳
From a Home screen, touch
➔
My Music
.
87
Menu
Ringtone, Contact ID
Menu
➔
➔
or
Alert Tone
Media Center
Media
.
My Sounds
Use
My Sounds
to record and manage sounds on your phone.
1. From a Home screen, touch
Center
➔ Music & Tones ➔ My Sounds.
2. Touch a sound for these options:
•Set As
: Set the sound as a
Menu
➔
Ringtone, Contact ID
or
•Send: Send the sound in a message.
•File Info
: View
information about the sound.
Use the onscreen buttons to preview sounds:
–
Touch to play the sound.
–
To stop playback, touch .
–
Touch to adjust the volume during playback.
Recording a Sound
1. From a Home screen, touch
Center
➔ Music & Tones ➔ My Sounds.
2. Touch Record New, then choose the type of recording:
• For Voice Message
: Record a new sound for a Voice Message
• To Save as Sound File: Save the recording to
3. Use the onscreen buttons to control recording:
–
Touch to start recording.
Menu
➔
My Sounds
Media
Alert Tone
Media
.
.
Page 92

–
Save
To pause recording, touch .
–
Touch to end the recording.
–
To review the recording, touch to play it.
–
Touch to adjust the volume during playback.
4. Touch . If you chose
For Voice Message
message opens to send the sound.
Sync Music
Use
Sync Music
1. From a Home screen, touch
2. Plug the Samsung USB cable into your phone and connect
to transfer music from your phone to your PC.
Menu
Center
➔ Music & Tones ➔ Sync Music.
it to a USB port on your PC.
3. On your phone, at the “
Media Sync Mode
Tip:
You can set a default USB Mode in Settings. For more information, see
“USB Mode” on page 84.
4. At the prompt on the PC, select a sync method:
Select USB Mode
.
• Open device to view files using Windows Explorer
drop files from the PC to your phone.
, a new Voice
➔
Media
” prompt, touch
. Drag and
• Sync digital media files using Windows Media Player
. Use
Windows Media Player on the PC to manage your phone’s music.
• Manage the device using Rhapsody.
For more information, see
“V CAST Music with Rhapsody (Subscription, Wireless
and PC Downloads)”
5. Transfer music files to your phone. When finished, you can
on page 86.
disconnect the USB cable.
Picture & Video
V CAST Videos
V CAST Videos
V CAST provides access to vibrant, full-color
video-on-demand from some of the biggest names in
entertainment.
䊳
From a Home screen, touch
➔
Picture & Video
➔
Menu
➔
V CAST Videos
Media Cente
.
For more information, see “V CAST Videos” on page 107.
Get New Pictures
1. From a Home screen, touch
Menu
➔
Media
Center ➔ Picture & Video ➔ Get New Pictures.
2. Follow the on-screen prompts to download pictures from
the Media Center server. Subscription charges may apply.
Media Center 88
r
Page 93

My Pictures
Get New Applications
Use
My Pictures
to view, edit and and manage images stored on
your phone. For more information, see “My Pictures” on
page 102.
䊳
From a Home screen, touch
➔
Picture & Video ➔ My Pictures
Menu
My Videos
Use
My Videos
to view and manage videos stored on your phone.
For more information, see “My Videos” on page 106.
䊳
From a Home screen, touch
➔
Picture & Video
➔
Menu
My Videos
Tak e Picture
Take pictures with your phone’s built-in 3.2 megapixel camera.
For more information, see “Using the Camera” on page 99.
䊳
From a Home screen, touch
➔
Picture & Video
➔
Menu
Tak e Pi ctu re
Record Video
Use the built-in Camcorder to record videos. For more
information, see “Using the Camcorder” on page 104.
䊳
89
From a Home screen, touch
➔
Picture & Video
➔
Menu
Record Video
➔
.
➔
.
➔
.
➔
.
Media Center
Media Center
Media Center
Media Center
Online Album
Store pictures and videos to your Verizon Wireless Online Album.
Note:
Before using Online Album, set up your account by visiting the Verizon
Wireless website at www.verizonwireless.com.
1. From a Home screen, touch
Center ➔ Picture & Video ➔ Online Album
Menu
➔
Media
.
The Browser launches, displaying the Online Album login
screen.
2. Enter your login credentials and touch
Sign In
.
Games
Play fun and interesting
1. From a Home screen, touch
Center
2. To play a game, touch the game in the list.
3. Touch to browse and download additional
games. Choose
➔
Games
Games
.
Subscription
, right on your phone.
Menu
➔
or
Unlimited
, then follow the
Media
prompts to download and install games.
Page 94

Browser
Get New Applications
Use your phone’s built-in
䊳
From a Home screen, touch
➔
Browser
Browser
to access the internet.
Menu
➔
.
For more information about using Browser, see “Browser” on
page 118.
Browse & Download
Use
Browse & Download
1. From a Home screen, touch
Center
➔
2. The list of default applications displays. Touch to download
to load applications on your phone
Menu
Browse & Download
.
the application and follow the onscreen prompts.
3. To download new applications, touch and
browse for new applications. Follow the online screen
prompts to download and install the applications.
4. At the
App Installed successfully?
prompt, touch
it, or No return to the list.
Note:
The
Browse & Download
with the most current download first.
menu displays all downloaded applications,
Media Center
➔
Media
Yes
to run
Extras
1. From a Home screen, touch
Center
➔
Extras
.
2. Touch to select the application you wish to download or
Menu
➔
Media
touch to browse and download additional applications.
3. At the
App Installed successfully?
prompt, touch
Yes
it, or No return to category list.
Communities
Communities
provides a single point for accessing online
communities, such as Facebook, Flickr, YouTube and MySpace.
䊳
From a Home screen, touch
➔
Communities
Tip:
You can also use the widget to launch
.
Menu
➔
Communities.
Media Center
For more information, see “Communities” on page 123.
Media Center 90
to run
Page 95

Info
Info
provides details about memory, logs, and help for using
applications.
1. From a Home screen, touch
Center
➔
Info
.
2. Touch
App. Memory
Menu
➔
to view information about memory
used and available for applications.
3. Touch
Phone Memory
to view details about the phone’s
internal memory.
4. Touch
View Log
to view logs of phone operations, if
available.
5. Touch
Help
to display Help topics about buying,
downloading, installing and using applications.
91
Media
Page 96

Section 10: Music
This section describes how to use the music features of your
phone to play, download, and manage your music files.
V CAST Music with Rhapsody
(Subscription, Wireless and PC Downloads)
V CAST Music with Rhapsody® is a digital music service that lets
you listen to millions of songs from thousands of artists. Discover
new and old favorites in an extensive music catalog.
Download V CAST Music with Rhapsody to your PC to sync
tracks, albums, and playlists to your new phone, while managing
your existing PC music library, all in one place.
V CAST Music with Rhapsody is compatible with Windows® 7,
Vista or XP Service Pack 2, with the latest Windows updates and
the latest Windows Media Player. MAC OS and Linux are not
supported.
For complete system requirements, and to download V CAST
Music with Rhapsody for free, visit
䊳
From a Home screen, touch
➔
Music & Tones
www.verizonwireless.com/music
Menu
➔
VCAST Music | Rhapsody
➔
Media Center
.
Note:
The first time you launch VCAST Music with Rhapsody, you must agree
to the Terms and Conditions. Per-song charges apply.
Downloading music to your phone
1. From a Home screen, touch
Center
➔
Rhapsody
.
2. Browse for songs using the onscreen buttons and prompts.
Touch the song you want to download, and use these
options:
•
Tou c h
Preview
•
Tou c h
Buy
to buy the song. At the
touch
Buy This Song
3. Touch
.
Tip:
Download Now
Download Later
If you choose Download Later, you can continue choosing music and
download all purchased tracks at one time by touching the Download
button on the V CAST Music with Rhapsody home screen.
Menu
➔
Music & Tones
➔
V CAST Music |
to hear a 20 second preview of the song.
CONFIRM PURCHASE
to accept the terms.
to download the song now, or
to download at a later time.
Media
prompt,
Music 92
Page 97

4.
Choose a location for the download:
Memory Card
5. Touch
(recommended), and the download starts.
Play This Song
, or touch to return to the
Phone Memory
previous screen.
Download Music to your PC
Note:
When you purchase music with your wireless device, you can also
download a copy to your PC using the V CAST with Rhapsody software.
1. From a Home screen, touch
Center
➔
Music & Tones
Rhapsody
.
2. Log in. After logging in, locate and download music files.
• Downloading a PC copy
–
Available tracks will pop up upon log-in.
–
Check the boxes of songs to download.
–
Select Download Tracks.
• Purchasing music
–
Browse the catalog and select tracks or albums to purchase.
–
Re-enter your password.
–
Confirm the purchase and the download will begin shortly.
:
• Adding subscription music
Rhapsody subscription)
93
:
Menu
➔
➔
VCAST Music |
:
(requires V CAST Music with
or
Media
–
Review subscription offerings.
–
Drag and drop tracks to My Library, or click the Add button next to the
song.
Import Songs from an Audio CD
1. On your PC, launch
2. Insert an audio CD into the CD-ROM drive.
3. The tracks on the CD display in the window. Select tracks
V CAST Music with Rhapsody
.
for import by clicking the check boxes.
4. Click on the “
Import CD
” button to import your selections.
Sync music from your PC to your phone
Use
V CAST Music with Rhapsody
on your PC to transfer music to
your phone.
1. Plug the Samsung USB cable into your phone and connect
it to a USB port on your PC.
2. On your phone, at the “
Media Sync Mode
Tip:
You can set a default USB Mode in Settings. For more information, see
“USB Mode” on page 84.
Select USB Mode
.
” prompt, touch
Page 98

At the prompt on the PC, select
Symphony No. 1 (Milton)
Shue
Repeat
Now Playing
Sound
Back
Add
To Playlist
Options
3.
Rhapsody
. For more information, see “V CAST Music with
Manage the device using
Rhapsody” on page 92.
Music Player
Use
Music Player
to play music files that you have transferred
from your PC. You can play music with the slide open or closed.
䊳
From a Home screen, touch
Menu
➔
Playing Music
1. From a Home screen, touch
Menu
Each time you open Music Player, it checks your phone
memory, and optional memory card, if installed, for music
files to update your music library.
My Music
➔
.
My Music
2. Touch to select songs to play.
My Music
.
3. During playback, use the sound and playlist controls:
• Sound
: Touch to choose Normal, Rock, Jazz, Live, Classic, Bass,
Concert, Wide or Clarity.
• Shuffle
: Touch to play songs in random order.
•Repeat
: Touch to repeat all songs, or to repeat the current song.
4. During playback, touch to access playlists. For
more information, see “Playlists” on page 97.
5. During playback, touch
•Exit Player
: Close Music Player.
for these options:
Music 94
Page 99

• Music Only Mode
: Disables all wireless communications, to allow
your phone to function only as a music player.
•Skin
: Choose a style for the Music Player interface, from Simple,
Album Artwork, Visualizer or Lyrics.
• Song Info
: Display information about the current music file.
•Memory Info
: View statistics for the phone’s memory and the
optional installed memory card.
6. Use these buttons to control playback:
•
Touch to advance to the next song in the playlist.
Touch and hold to scan forward through the current song.
•
Touch to skip to the previous song in the playlist.
Touch and hold to scan backward through the current song.
•
Touch to pause playback. Touch to resume playback.
•
Touch to adjust the volume.
95
Landscape Mode
You can rotate the phone to landscape mode to view album
covers during playback, and control playback.
When viewing covers, you can:
•
Swipe your finger across the screen to scroll through the albums.
•
Touch an album cover to display songs from the album, then touch a
song to play the song.
•
Touch to pause playback.
•
Touch to resume playback.
•
Touch to go back to Music Player.
Page 100

Copy music from your PC to your phone
My Music
Shop
Sync
Add To Playlist
Copy music from your PC to play with Music Player.
1. Plug the Samsung USB cable into your phone and connect
it to a USB port on your PC.
2. On your phone, at the “
Media Sync Mode
Tip:
You can set a default USB Mode in Settings. For more information, see
“USB Mode” on page 84.
3. At the prompt on the PC, select a sync method:
Select USB Mode
.
• Open device to view files using Windows Explorer
drop files from the PC to your phone.
• Sync digital media files using Windows Media Player
Windows Media Player on the PC to manage your phone’s music.
• Manage the device using Rhapsody.
“V CAST Music with Rhapsody”
4. Transfer music files to your phone. When finished, you can
For more information, see
on page 92.
disconnect the USB cable.
” prompt, touch
. Drag and
. Use
My Music
My Music provides access to all the songs stored on your phone,
and on an optional installed memory card.
1. From a Home screen, touch
➔ .
2. Touch the drop-down list to
Menu
➔
My Music
display:
•
All Songs
•
Playlists
•
Artists
•
Albums
•
Expired Songs
3. Touch to launch
Shop
V CAST Music with Rhapsody
to purchase new songs.
4. Touch to connect
Sync
to the PC to copy music to your phone. For more
information, see “Copy music from your PC to your phone”
on page 96.
5. Touch select songs and add them to a playlist.
Music 96
.
 Loading...