

Page 1

WiMAX/Wi-Fi
Mobile Internet Tablet
Getting Started Guide
Page 2

Page 3

Samsung Mondi™
WiMAX/Wi-Fi
Mobile Internet Tablet
Getting Started Guide
Please read this guide before operating your
device, and keep it for future reference.
Page 4

Intellectual Property
All Intellectual Property, as defined below, owned by or which is otherwise the property of Samsung or its respective suppliers relating to
the SAMSUNG Device, including but not limited to, accessories, parts, or software relating there to (the “Device System”), is proprietary to
Samsung and protected under federal laws, state laws, and international treaty provisions. Intellectual Property includes, but is not limited
to, inventions (patentable or unpatentable), patents, trade secrets, copyrights, software, computer programs, and related documentation
and other works of authorship. You may not infringe or otherwise violate the rights secured by the Intellectual Property. Moreover, you
agree that you will not (and will not attempt to) modify, prepare derivative works of, reverse engineer, decompile, disassemble, or
otherwise attempt to create source code from the software. No title to or ownership in the Intellectual Property is transferred to you. All
applicable rights of the Intellectual Property shall remain with SAMSUNG and its suppliers.
Samsung Telecommunications America (STA), LLC
Headquarters: Customer Care Center:
1301 E. Lookout Drive 1000 Klein Rd.
Richardson, TX 75082 Plano, TX 75074
Toll Free Tel: 1.888.987.HELP (4357)
Internet Address:
©
2009 Samsung Telecommunications America, LLC is a registered trademark of Samsung Electronics America, Inc. and its related
entities.
Do you have questions about your Samsung Device?
For 24 hour information and assistance, we offer a new FAQ/ARS System (Automated Response System) at:
www.samsungtelecom.com/support
http://www.samsungusa.com
SWD-M100_TWC_GSG_CF03_PS_092509_F3
Page 5

GH68-23169A
Printed in Korea
The Bluetooth® word mark, figure mark (stylized “B Design”), and combination mark (Bluetooth word mark and “B Design”) are registered
trademarks and are wholly owned by the Bluetooth SIG.
microSD™ and the microSD logo are Trademarks of the SD Card Association.
Open Source Software
Some software components of this product incorporate source code covered under GNU General Public License (GPL), GNU Lesser General
Public License (LGPL), OpenSSL License, BSD License and other open source licenses. To obtain the source code covered under the open
source licenses, please visit:
http://www.samsungnetwork.com/Home/opensource
.
Disclaimer of Warranties; Exclusion of Liability
EXCEPT AS SET FORTH IN THE EXPRESS WARRANTY CONTAINED ON THE WARRANTY PAGE ENCLOSED WITH THE PRODUCT, THE
PURCHASER TAKES THE PRODUCT "AS IS", AND SAMSUNG MAKES NO EXPRESS OR IMPLIED WARRANTY OF ANY KIND WHATSOEVER
WITH RESPECT TO THE PRODUCT, INCLUDING BUT NOT LIMITED TO THE MERCHANTABILITY OF THE PRODUCT OR ITS FITNESS FOR ANY
PARTICULAR PURPOSE OR USE; THE DESIGN, CONDITION OR QUALITY OF THE PRODUCT; THE PERFORMANCE OF THE PRODUCT; THE
WORKMANSHIP OF THE PRODUCT OR THE COMPONENTS CONTAINED THEREIN; OR COMPLIANCE OF THE PRODUCT WITH THE
REQUIREMENTS OF ANY LAW, RULE, SPECIFICATION OR CONTRACT PERTAINING THERETO. NOTHING CONTAINED IN THE INSTRUCTION
MANUAL SHALL BE CONSTRUED TO CREATE AN EXPRESS OR IMPLIED WARRANTY OF ANY KIND WHATSOEVER WITH RESPECT TO THE
PRODUCT. IN ADDITION, SAMSUNG SHALL NOT BE LIABLE FOR ANY DAMAGES OF ANY KIND RESULTING FROM THE PURCHASE OR USE OF
THE PRODUCT OR ARISING FROM THE BREACH OF THE EXPRESS WARRANTY, INCLUDING INCIDENTAL, SPECIAL OR CONSEQUENTIAL
DAMAGES, OR LOSS OF ANTICIPATED PROFITS OR BENEFITS.
Page 6

Table of Contents
Section 1: Introduction ...................................................3
Accessing the Online User Guide . . . . . . . . . . . . . . . . . . . . . . . 3
Powering the Device . . . . . . . . . . . . . . . . . . . . . . . . . . . . . . . . . 3
Initial Device Setup . . . . . . . . . . . . . . . . . . . . . . . . . . . . . . . . . . 4
Charger and Battery Replacement . . . . . . . . . . . . . . . . . . . . . . 5
Using the Kickstand . . . . . . . . . . . . . . . . . . . . . . . . . . . . . . . . . 8
microSD Card Overview . . . . . . . . . . . . . . . . . . . . . . . . . . . . . . 8
Rebooting the Device After a Lockup . . . . . . . . . . . . . . . . . . . 10
Section 2: Basics ..........................................................11
Features of Your Device . . . . . . . . . . . . . . . . . . . . . . . . . . . . . 11
Your Device . . . . . . . . . . . . . . . . . . . . . . . . . . . . . . . . . . . . . . 12
Navigating the Today Screen . . . . . . . . . . . . . . . . . . . . . . . . .16
Title Bar Icon Overview . . . . . . . . . . . . . . . . . . . . . . . . . . . . . . 19
Locking Your Device . . . . . . . . . . . . . . . . . . . . . . . . . . . . . . . . 20
Calibrating your Touchscreen . . . . . . . . . . . . . . . . . . . . . . . . . 22
Menu Navigation . . . . . . . . . . . . . . . . . . . . . . . . . . . . . . . . . . . 22
Adjusting Your Volume Levels . . . . . . . . . . . . . . . . . . . . . . . . . 25
Formatting the Device’s Memory . . . . . . . . . . . . . . . . . . . . . .26
Formatting the microSD Card . . . . . . . . . . . . . . . . . . . . . . . . . 27
Entering Text Using the QWERTY Keyboard . . . . . . . . . . . . . . . 27
Entering Text using the Onscreen Keyboard . . . . . . . . . . . . . . 31
Adjusting Text Input Settings . . . . . . . . . . . . . . . . . . . . . . . . . 31
Widgets . . . . . . . . . . . . . . . . . . . . . . . . . . . . . . . . . . . . . . . . . 32
Widget Bar Navigation . . . . . . . . . . . . . . . . . . . . . . . . . . . . . .32
1
Section 3: Communication and Connection ................ 38
Communication Setup . . . . . . . . . . . . . . . . . . . . . . . . . . . . . . 38
Airplane Mode . . . . . . . . . . . . . . . . . . . . . . . . . . . . . . . . . . . . 39
Activating Wi-Fi Communication . . . . . . . . . . . . . . . . . . . . . . . 40
Connecting to a Mobile WiMAX Network . . . . . . . . . . . . . . . . . 41
Bluetooth Communication . . . . . . . . . . . . . . . . . . . . . . . . . . . 42
Section 4: Synchronization .......................................... 46
Computer Requirements . . . . . . . . . . . . . . . . . . . . . . . . . . . . 46
Installation of ActiveSync on Your Computer . . . . . . . . . . . . . . 46
Connection of ActiveSync . . . . . . . . . . . . . . . . . . . . . . . . . . . . 47
Configuring ActiveSync . . . . . . . . . . . . . . . . . . . . . . . . . . . . . 47
Setting Up Windows Media Player Sync Options . . . . . . . . . . . 49
Synchronizing Music with Windows Media Player . . . . . . . . . . 50
Connecting to the Device via ActiveSync . . . . . . . . . . . . . . . . 51
Loading Files to Your microSD Card . . . . . . . . . . . . . . . . . . . . 52
Section 5: Email Setup ................................................. 56
Setting Up an IMAP or POP3 Account . . . . . . . . . . . . . . . . . . . 56
Editing an Email Account . . . . . . . . . . . . . . . . . . . . . . . . . . . . 60
Using ActiveSync to Configure Your Outlook
Exchange Settings . . . . . . . . . . . . . . . . . . . . . . . . . . . . . . . 62
Checking Your Outlook Email from the Today Screen . . . . . . . 64
Section 6: Calendar and Contacts ............................... 66
Calendar . . . . . . . . . . . . . . . . . . . . . . . . . . . . . . . . . . . . . . . . 66
Contacts . . . . . . . . . . . . . . . . . . . . . . . . . . . . . . . . . . . . . . . . 69
Page 7

Utilizing the Communication Bar . . . . . . . . . . . . . . . . . . . . . . 72
Section 7: Applications ................................................73
Microsoft Mobile Applications - Internet Explorer . . . . . . . . . . 73
Microsoft Mobile Applications - Office Mobile . . . . . . . . . . . . . 74
Windows Media Player . . . . . . . . . . . . . . . . . . . . . . . . . . . . . . 77
Instant Messenger . . . . . . . . . . . . . . . . . . . . . . . . . . . . . . . . . 79
Calculator . . . . . . . . . . . . . . . . . . . . . . . . . . . . . . . . . . . . . . . 79
Clocks . . . . . . . . . . . . . . . . . . . . . . . . . . . . . . . . . . . . . . . . . . 79
Using TaskSwitcher to Close Applications . . . . . . . . . . . . . . . 86
ROUTE 66 Navigation . . . . . . . . . . . . . . . . . . . . . . . . . . . . . . . 87
Section 8: Health and Safety Information ...................93
Health and Safety Information . . . . . . . . . . . . . . . . . . . . . . . . 93
Samsung Mobile Products and Recycling . . . . . . . . . . . . . . . . 93
UL Certified Travel Adapter . . . . . . . . . . . . . . . . . . . . . . . . . . . 93
Consumer Information on Wireless Devices . . . . . . . . . . . . . . 93
Road Safety . . . . . . . . . . . . . . . . . . . . . . . . . . . . . . . . . . . . . . 99
Responsible Listening . . . . . . . . . . . . . . . . . . . . . . . . . . . . . 100
Operating Environment . . . . . . . . . . . . . . . . . . . . . . . . . . . . . 102
Using Your Device Near Other Electronic Devices . . . . . . . . . 102
Potentially Explosive Environments . . . . . . . . . . . . . . . . . . . . 104
FCC Notice and Cautions . . . . . . . . . . . . . . . . . . . . . . . . . . . 104
Other Important Safety Information . . . . . . . . . . . . . . . . . . . 105
Product Performance . . . . . . . . . . . . . . . . . . . . . . . . . . . . . . 105
Availability of Various Features/Ring Tones . . . . . . . . . . . . . 106
WiMAX Language . . . . . . . . . . . . . . . . . . . . . . . . . . . . . . . . . 106
Battery Standby and Talk Time . . . . . . . . . . . . . . . . . . . . . . 106
Battery Precautions . . . . . . . . . . . . . . . . . . . . . . . . . . . . . . . 106
Window Mounted Accessory Precautions . . . . . . . . . . . . . . . 108
Care and Maintenance . . . . . . . . . . . . . . . . . . . . . . . . . . . . . 108
Section 9: Warranty Information ............................... 110
Standard Limited Warranty . . . . . . . . . . . . . . . . . . . . . . . . . 110
End User License Agreement for Software . . . . . . . . . . . . . . 113
Index ............................................................................ 118
2
Page 8

Section 1: Introduction
Power Button
The Mondi™ (WiMAX Wireless Internet Tablet) now lets you
enhance your on-the-go experience. You can now take your
computer with you and enjoy all of its functionality on a tablet
powered by Microsoft’s Windows Mobile™ 6.1 technology.
Mondi™ offers a 4.3-inch diagonal screen which easily displays
your favorite documents, data, Web sites, and expands your
online experiences with applications such as Microsoft Office
Suite, Route 66®, Widget application shortcuts,
Camera/Camcorder, and Windows Media Player®. All this access
is accomplished far easier with the availability of a full QWERTY
keyboard.
Accessing the Online User Guide
1. Launch your Internet browser.
2. Enter the following address into the Address field.
•
www.samsung.com/us/mondi/userguide
Powering the Device
Starting up on your new device is quick and easy. This section
walks you through the procedures to turn on your device, use the
charger, install an optional microSD card, and reset the device.
3
Powering On your Device
䊳
Press and hold , until it vibrates and then shows the
powering up animation.
Powering Off your Device
䊳
®
Press and hold until you see and hear the powering
down sequence (Samsung information with sound) on the
display screen.
RESET
RESET
Page 9

Initial Device Setup
Left Action key
Stylus
If your device has never been powered on before and is
initializing for the first time, you will need to follow these
procedures. These same steps are necessary if the device is ever
Hard Reset (to factory default parameters).
1. Touch the main Windows Mobile 6.1 screen to begin the
initialization process.
2. Remove the Stylus from the side compartment (adjacent to
the Left Action key) (seen below).
3. Use your stylus to calibrate the touch accuracy of the
screen by both accurately and firmly touching the center of
each onscreen crosshair. Repeat this process for every
crosshair that appears until this step has successfully
completed.
Note:
This process may need to be repeated to accurately calibrate the
device. Once successfully calibrated, you are directed onto the Time
and Date screen.
Introduction 4
Page 10

4.
Use the drop down lists to adjust the fields within the date
and time page. Options include Time zone, Date, and Time.
•
The
Date
field launches an onscreen calendar. Touch a date from
the calendar to make your update.
•
The
Time
field requires that you first touch an onscreen number,
then use your QWERTY keyboard to update the time value.
5. Touch
Next
to complete the Data and Time updates.
Charger and Battery Replacement
Note:
Use only Samsung-approved batteries and chargers with your device.
Failure to use a Samsung-approved battery and charger may increase
the risk that your device will overheat, catch fire, or explode, resulting
in serious bodily injury, death, or property damage.
Note:
Long backlight settings, searching for service, vibrate mode, browser
use, and other variables can reduce the battery’s usage times.
5
Charging the Battery
Charge the device’s battery as soon as possible so you can begin
using your device. Even though the battery has been charged
prior to packaging, it is important to keep track of your battery’s
charge.
If the battery level becomes too low, your device automatically
turns off, and you will lose any current information. For a quick
check of your battery level, glance at the battery charge indicator
located in the upper-right corner of your device’s display screen.
If the battery charge is getting too low, the battery icon ( )
blinks and the device sounds a warning tone.
Using the Travel Adapter
Your device is powered by a rechargeable Li-ion battery. The
included Travel Adapter charges your device’s internal battery.
Use only Samsung-approved batteries and chargers.
1. Locate the Power/USB Data jack (page 7).
2. Flip open the protective cover and plug the flat end of the
charger into the device’s Power/USB Data jack located on
the side of the device.
3. Plug the other end into a compatible electrical outlet.
Page 11

MIC
MIC
Correct
Incorrect
Installing the Batter y
Warning!:
Do not handle a damaged or leaking Li-Ion battery as this action
can result in being burned.
1. In a single motion, press down on the cover, slide it away
from the lens (1), and then carefully lift the battery cover
(2) away from the device.
2. Insert the battery into the opening (3), making sure to line
up the gold contacts on the inside of the battery to those
on the device. Gently press down to secure the battery (4).
Introduction 6
Page 12

Replacing the Battery
If there is a need to replace the pre-installed battery, follow these
instructions.
Warning!:
Do not handle a damaged or leaking Li-Ion battery as this action
can result in being burned.
3. Replace the cover by lining up the tabs and then firmly
sliding the cover away from the lens until it snaps into
place.
7
1. Make sure the device is powered off. For more
information, refer to “Powering Off your Device” on
page 3.
2. In a single motion, press down on the cover and slide it
away from the lens and then carefully lift the battery cover
away from the device.
3. Slide your finger into the removal grooves (1) and carefully
remove the previous battery from the battery compartment
(2).
Page 13

Using the Kickstand
The Mondi comes with a kickstand that is built into the rear
battery cover and can be pulled out to support the device when
rested upon a flat surface.
1. Turn the unit over to reveal the back battery cover.
2. Insert your finger into the groove at the end of the stand
and carefully pull outwards. When fully extended, the
stand rests at a 45-degree angle from the battery cover.
3. Lay the device on a flat surface.
Note:
Be careful not to extend the kickstand past the 45-degree angle as this
will damage the stand.
microSD Card Overview
Although your device comes with 4GB of built-in memory, you
can supplement this storage capacity by adding an optional
microSD™ (Secure Digital) memory card. This added card is
used to provide a larger capacity storage medium to your device.
It allows you to store data, documents, images, videos, and
music onto your microSD card vs within device’s internal
memory.
Introduction 8
Page 14
Note:
Incorrect
Correct
MIC
MIC
The device has been tested to support cards of up to 32GB. This
microSD card is an optional accessory, a card greater than 2GB is
recommended.
Warning!:
DO NOT remove a microSD card while files are being accessed or
transferred, as this can result in loss or damage of data.
Caution!:
Make sure your battery is fully charged before accessing/using the
microSD card. Accessed data may become damaged or unusable if
the battery runs out while using the microSD card.
Caution!:
Ejection of the card is spring-loaded. As the microSD card is being
discharged from the slot, be prepared to catch it and keep it from
falling onto the floor.
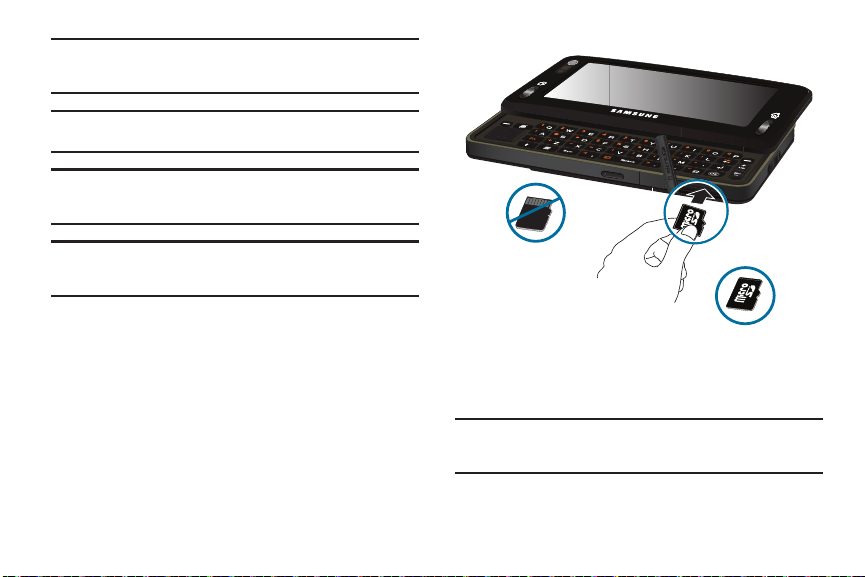
Installation of the microSD Card
1. Locate the microSD card slot.
2. Flip open the microSD card slot cover.
3. With the gold contact pins facing downward, carefully
insert the card into the opening and firmly push it in until
you hear a click (indicating the card is securely installed).
4. Once you are notified, touch
Hide
(from the bottom left of
the screen) to acknowledge the card is properly inserted
and ready to use.
Important!:
It is recommended you only use an optional microSD card of at
least 2GB (up to 16GB). Using non-recommended microSD cards
could cause data loss and damage your device.
9
Page 15

Removal of the microSD Card
RESET
RESET
RESET
RESET
Reset Slot
1. Locate the microSD card slot on the underside of the
device and flip open the microSD card slot cover.
2. Firmly press the card into the slot and release it. The card
should pop partially out of the slot.
Note:
You may need to use the tip of the included Stylus to push the card into
the slot.
3. Remove the card from the slot.
4. Place the microSD card cover back over the slot.
Rebooting the Device After a Lockup
The Reset button allows you to quickly turn off the device in the
event of a program or application error. In this case your Mondi™
would appear to “freeze” and become unresponsive.
1. Turn the device over and locate the Reset button positioned
adjacent to the Power button (seen below).
2. Firmly insert the soft plastic tip of the included Stylus into
this slot or until the device exits the current screen and
cycles power to the device (turns off then back on)
(page 4).
Note:
This reset action retains all of your device’s default parameters and
settings. This action is similar to that of a soft reset function on your
computer which only restarts the machine while maintaining all
current data intact.
Introduction 10
Page 16

Section 2: Basics
Your Mondi™ Internet Tablet is packed with features that
simplify your life and expand your ability to keep you both
connected to your office and stay in touch with the people that
are important to you. This section will guide you through the
basic functions features of your device.
Your device provides many of the features associated with a
personal computer with exceptional portability, mobile
applications, and integration of a portable device. The device is
powered by Windows Mobile 6.1®, providing the power and
familiarity of Microsoft Windows.
Features of Your Device
Your tablet is an easy-to-use and offers many significant
features. The following list outlines a few of the features included
in your device.
•
Touchscreen provides quick response to a variety of menus and
options
•
Windows Mobile 6.1 Classic
•
Windows ActiveSync® synchronization software
•
Large 4.3 inch (800 x 480 pixel) screen displaying up to 16M (million)
onscreen colors
•
4GB of internal memory
11
•
3MP (megapixel) digital camera
•
Full slide out QWERTY keyboard
•
Customizable Widget application shortcuts
•
Downloadable applications (via online purchase)
•
Built-in Bluetooth technology
•
Mobile WiMAX high-speed Internet access capable
•
Built-in Wi-Fi support
•
Full HTML Browser
•
GPS Navigation (via embedded GPS chip)
•
User friendly, menu driven access to features and options
•
Microsoft Office Mobile® Suite applications (Excel Mobile, OneNote
Mobile, PowerPoint Mobile, and Word Mobile)
•
Outlook email client
•
Internet email support (Google™ Mail, Yahoo® Mail, etc.)
•
Support for playback of both streaming audio and video via sites, as
well as local media (within microSD card).
•
Video Output (via optional mini-USB to HDMI cable)
Page 17

Your Device
7
8
9
10
12
11
5
4
3
2
1
131514
6
16
18
17
1. Display shows the information needed to operate your
device, such as the signal strength, battery level, time,
active application, etc.
2.
Webcam lens
is used to shoot a streaming video of the user
during a video conference.
3. Light sensor uses the ambient light level to adjust both
screen brightness/contrast.
•
In a bright light condition (outdoors), the sensor causes the device
to increase the brightness and contrast for better viewing.
•
In a dark light condition, the sensor adjusts the device’s brightness
and contrast for better viewing.
4.
LED
displays the current charging and network status.
•
Green LED (solid) indicates the battery has been completely
charged.
•
Red LED (solid) indicates the battery is charging.
•
Green LED (blinking) indicates the device is attempting to connect
to a Mobile WiMAX network.
•
Yellow LED (blinking) indicates a charging error.
•
Cyan LED (blinking) indicates the device is attempting a connection
to a Wi-Fi network.
•
Magenta LED (blinking) indicates an error message or an
outstanding notification the user has not yet read (accompanied by
on onscreen ).
Basics 12
Page 18

5.
Left Action key ( ) is used to launch either the
MobileWidget screen or the TaskSwitcher application.
•
Single press (quick) toggles between the MobileWidget screen
where you can use available Widgets (page 32) and the Today
screen.
•
Press and hold to activate the TaskSwitcher application that allows
to display which applications are currently running on the device
and then choose which is displayed full screen and active.
6.
Internet Explorer key
short press to launch Internet Explorer
and long press to launch the Opera mobile browser.
7. Left Softkey ( ) is used to navigate through menus and
applications by selecting the choice indicated on the lower
left area of the display screen. Softkeys are touchsensitive keys, that appear in your display, and change
function according to the current feature being used.
8.
Navigation touch pad
lets you access the device’s menus
and selects the highlighted choice when navigating
through a menu. Pressing the center button activates an
onscreen function (similar to pressing Enter) and selects
the highlighted choice when navigating through a menu.
13
9.
Fn key
(Function) key, toggle to access the numbers/
symbols shown at the top left of selected keys on the
QWERTY keyboard. This feature is activated by pressing
and holding the Fn key in conjunction with other specified
keys.
10.
Windows key
provides ready-access to the Start menu that
contains links to all the device’s applications, settings, and
other quick links.
11.
12.
Symbol key
Space key
provides access to symbol characters.
lets you add spaces between words and
characters.
Note:
Pressing both the
can only be used with the mini-USB to HDMI cable.
13.
Messaging Key
Space
and Fn key activates the TV out function, that
a short press provides access to the
Messaging menu.
•
Press briefly to access the Messaging page (to access both Outlook
and Internet mail).
•
Press and hold to launch the Notes application (to create new
notes).
14.
OK key
lets you end programs or then hide them.
Page 19

Page Up/Dn
15.
allows you to navigate up and down through
the currently active page, and also to navigate through the
different menu options.
16. Right Softkey ( ) is used to navigate through menus
and applications by selecting the choice indicated on the
lower right area of the display screen. Softkeys are touch-
sensitive keys, that appear in your display, and change
function according to the current feature being used.
17. Right Action key ( ) is used to either return to the Today
screen (without exiting the current application) or
Lock/Unlock the device (simple lock without password).
•
Single press (quick) returns you to the previous screen.
•
Pressing this key ends/closes certain applications, such as Camera,
Opera, Smart Reader, and Sudoku.
•
Press and hold to activate the screen lock/unlock functionality that
prevents accidental feature activation via inadvertent screen
touches. For more information, refer to
“Locking Your Device”
on page 20.
18.
QWERTY keyboard
provides an alphanumeric character
keyboard layout. For more information, refer to “Entering
Text Using the QWERTY Keyboard” on page 27.
19.
Speakers
left and right stereo speakers.
20.
Camera Button
lets you access the Camera mode you can
either take pictures or shoot videos (Camcorder mode).
•
Single press to access the Photo Slides feature.
•
Press and hold to access the Camera mode.
21.
Reset Button
lets you reset your device and ends all
applications currently running.
22. Power Button, located at the top rim of the device, lets
you either turn the device on/off (press hold) or help
conserve power by toggling the on/off state of the display
screen (single press).
•
This single press conserves power by temporarily turning off the
screen without shutting down the device. To turn the LCD back on,
simply slide out the QWERTY keyboard.
Note:
Adjusting the screen brightness and temporarily shutting off the screen
can greatly increase battery usage times.
23.
Power/USB Data jack
lets you connect a travel adapter
(power), USB data cable (data transfer), or HDMI cable
(video out).
CAUTION! Inserting an accessory into the
incorrect jack may damage the device.
Basics 14
Page 20

24.
RESET
RESET
25
26
27
28
24
23
21
20
19
22
Headset jack
separately).
allows you to plug in a stereo headset (sold
25.
Stylus
storage location of included stylus touch pen. It is
recommended that you use this pen when making your
onscreen selections. Using your fingers can be less
accurate, possibly scratch the screen, and leave
unnecessary residue.
26.
Microphone
sources.
27.
microSD Slot
memory of your device. For more information, refer to
“microSD Card Overview” on page 8.
28.
Volume key
allows the device to record external audio
lets you use a microSD card to expand the
allows you to adjust the device’s master
volume level that can also be done by activating the
Volume slider from the Title Bar (page 17).
29.
Kickstand
pulls out and provides support for the Mondi
when resting on a flat horizontal surface.
15
Page 21

Camera/Mirror
3029
30.
provides a 3.0 MP camera, with included
mirror, that lets you take pictures and shoot videos.
Navigating the Today Screen
Mondi™ is powered by Windows Mobile 6.1® Classic, providing
the power and familiarity of Microsoft Windows. Mobile versions
of popular Microsoft applications such as Word, Excel®,
Windows Media Player® and Outlook® eliminating the need to
learn new software.
The main screen is called the
Tod ay
screen. The items listed on
this screen provide quick access to several user selectable
applications (via Start menu or Shortcuts), Contacts, options, and
settings. The Today screen displays important information, such
as upcoming appointments, status indicators, the current date,
and time.
You can also launch a program directly by first activating the
Start
menu drop-down list and then selecting the related tab and
the program’s associated icon.
䊳
Single press the ( ) (right action key) to launch the Today
Screen (Home).
Basics 16
Page 22

7
8
9
10
11
12
6
5
4
2
1
3
Recently Used Applications
2.
Start Menu
located at the top left of the screen, opens a
drop down menu that serves as the central launching point
for Quick application links, access to device programs,
settings and Help topics.
•
The top row displays the six mostly recently used applications. As
further applications are launched, this row updates accordingly.
Today Screen Functions
1.
Title Bar
currently active program, wireless status, and allows you
to close currently active screens. Click on the status icons
to access abbreviated Connectivity, Volume, and Battery
settings menus.
17
located at the top of the screen, displays the
3.
Position Bar
currently active menu.
located alongside the shortcuts, indicates the
Page 23

Home Shortcut
4.
( ) displays the Today screen that
contains quick links to IM, Outlook email, Date/Time
information, Internet Phone, and any Upcoming
Appointments.
5.
Web Pages Shortcut
Perspective
( ) displays either a
view of currently stored Favorite Web
Bookmarks or Browsing History.
•
Tou ch
Menu
(right softkey)
> Display as > Thumbnail View
display the Bookmark (History) page images in a grid view (2 rows
by 4 columns).
•
Tou ch
Menu
(right softkey)
> Display as > Perspective View
display the Bookmarks (History) as a scrollable set of icons (one
behind another).
•
Tou ch
Menu
(right softkey)
> View >Favorite Bookmark
your favorite bookmarks. (These can be displayed in either a
Thumbnail or Perspective view.)
•
Tou ch
Menu
(right softkey)
> View > History
to display the
browsing history. (These can be displayed in either a Thumbnail or
Perspective view.)
•
Tou ch
Edit Favorite Bookmark
(left softkey) to edit your favorite
bookmarks.
Thumbnail
to display
6.
Applications (Main menu) Shortcut
( ) displays a grid
view of 12 preferred Main menu application shortcuts
(Favorites). These entries can be modified by
Edit
(ing)
which shortcuts appear onscreen.
or
to
Note:
This listing of applications are different than those
by the Windows Mobile 6.1® operating system (
7.
Favorite Contacts Shortcut
( ) displays a scrollable list
Start > Programs
of currently available Favorite Contacts. Scroll though the
Programs
provided
).
entries and tap an icon/card (image) to access the
to
information for that particular Contacts entry. For more
information, refer to “Contacts” on page 69.
8.
Multimedia Shortcut
available My Photos and Videos (
other available videos (
( ) displays a grid list of currently
Camera Album
Video Thumbnails
) and also
) stored within the
the device or within the internal microSD card.
9.
Quick Access
displays onscreen icons (on the Today page)
that provide current information regarding your Instant
Messages, Outlook emails, Time/Date, Internet Phone, and
Appointments.
Basics 18
Page 24

• Instant Messenger
• Outlook Email
•Clock
displays the current date and time information
• Internet Phone
• Appointments
displays any unread chat messages.
displays the number of unread
displays any missed Internet Phone calls.
displays the number of upcoming Calendar
appointments or events. Touch this field to open the Calendar page.
10.
WiMAX CM
(left softkey) activates the Mobile WiMAX
Connection Manager page where you can easily establish
a connection between your device and an available Mobile
WiMAX network.
11.
Magnifier
displays the information specific to the feature
located beneath it.
12.
Main menu
(right softkey) displays a grid view of your most
popular applications (Favorites). Functions the same as
touching the
Applications
Shortcut icon ( ) from the left
of the screen.
19
email messages.
.
Title Bar Icon Overview
The following table lists the onscreen icons, shown within the
Title Bar, and their descriptions.
Indicates the battery is fully charged. Tap this
icon to display the Battery power tab.
Indicates the battery is fully discharged. Tap this
icon to display the Battery power tab.
Indicates the device is connected to a power
cable and is currently being charged.
Indicates the speaker is turned on. Tap this icon
to access the onscreen Volume slider and adjust
the volume level.
Indicates the speaker is set to vibrate only. Tap
this icon to access the onscreen Volume slider
and adjust the volume level.
Indicates the speaker is turned off and vibrate
is disabled. Tap this icon to access the onscreen
Volume slider and adjust the volume level.
Indicates the device is working to establish a
wireless connection.
Page 25

Indicates the device failed to establish a
wireless connection.
Indicates an inactive Mobile WiMAX connection.
Indicates an active Mobile WiMAX connection
has been established and you are currently
using an active WiMAX broadband connection.
Indicates an active Wi-Fi connection.
Indicates an inactive Wi-Fi connection.
Indicates an error or issue with the device and
its functionality. Touch the icon to reveal the
notification.
Locking Your Device
The device can be locked either manually or automatically via the
Settings menu.
Manually Locking the Device
This manual process temporarily locks the device without the
need to utilize a password.
1. Single press the Power button ( ) to turn off the
screen but keep the device on in the background.
– or –
Press and hold the ( ) (right action key) to lock the
screen from accidental usage, but keep the screen on.
Manually Unlocking the Device
1. Single press the Power button ( ) to turn the screen
back on.
– or –
Touch
Unlock
(left softkey) and tap the onscreen grey
Unlock
button.
– or –
Press and hold the ( ) (right action key) to unlock the
screen.
Basics 20
Page 26

Setting Up an Automatic Lock State
ok
When you setup an automatic lock on your device, it requires a
password be entered prior to returning to normal operation.
When a password is set up, the device can be locked
immediately upon command, configured to lock after a specified
period of inactivity, or after the LCD blanks out.
1. From the
2. Touch the
3. Set up a timeout value by touching the
Tod ay
screen, touch
Personal
tab and tap
unused for
field then use the drop-down list to select a
Start > Settings.
Lock
value (amount of unused time required before you are
prompted for a password if the device becomes idle).
Enabling this option activates the remaining fields.
4. Touch the
Password type
field and enter the desired
information:
•Simple PIN
: must be at least four characters in length and cannot
contain a simple sequence such as 0000, 1111, or 1234.
• Strong alphanumeric
: must be at least seven characters in length
and must contain at least one character from each of the following
categories: uppercase/lowercase letters, numerals, and symbols.
Examples of strong alphanumeric passwords are
%$VH5hW
.
21
().
Prompt if device
sb?8A!3
and
5. Touch the
Password
field then use the QWERTY keyboard
to enter the desired password.
6. Touch the
Confirm password
field then use the QWERTY
keyboard to re-enter the same password.
7. Touch to save your password.
8. Touch
Yes
to confirm your selection.
Creating a Password Hint
One method of making sure you don’t accidentally forget your
new password is to use the Hint feature.
1. From the
2. Touch the
Note:
If you have previously created your password, you are prompted to
touch the onscreen password filed, use the QWERTY keyboard to enter
your password, then touch
changes.
3. Touch the onscreen
Tod ay
Personal
screen, touch
tab and tap
Start > Settings
Lock
Unlock
before you can make any updates or
Hint
tab and use your QWERTY
.
().
keyboard to enter a hint for your password into the dialog
box.
Page 27

Note:
ok
ok
X
ok
ok
This hint may be visible to others, so do not enter your password into
this field. The hint you set will only appear after five consecutive
incorrect passwords have been entered.
4. Touch to save your new password hint.
Unlocking the Device after a Timeout
1. From the
2. Use your QWERTY keyboard to enter your Lock password.
3. Touch
Password
screen, touch the password field.
Unlock
(left softkey) to unlock the device.
Calibrating your Touchscreen
It is important to calibrate your monitor properly so that your
touches are read accurately by the device.
1. From the
2. Touch the
3. Use your Stylus pen to touch the
4. Firmly and carefully touch the center of each crosshair and
Tod ay
System
screen, touch
tab and tap
Start
()
Screen
Align Screen
repeat this process until the calibration session has
completed (this could take 2 - 3 repetitions).
5. Touch to complete the process and return to the
previous screen.
> Settings
().
button.
Menu Navigation
You can tailor the device’s range of functions to fit your needs
using both menus and widgets. Menus, sub-menus, and features
can be accessed by scrolling through the available onscreen
menus.
Opening an Application
䊳
Tap the associated onscreen icon.
•
Touch or to exit from the current menu and return to
the previous screen.
•
Press (right action key) to exit from the current location or
function, and return to the Main Menu.
Note:
These actions only exit from (close) the current application while still
.
maintaining them active in the background.
Closing an Application
Applications are only closed (no longer active) when they are
exited via the application’s own Menu options. Simply touching
or will only minimize the current application and
X
keep it running actively in the background. These, still running,
applications can utilize your device resources, slow down your
device and drain your battery faster.
Basics 22
Page 28

To close your applications:
1. Touch the application’s softkey option
Menu > Exit
.
– or –
Press and hold (left action key) to launch the
TaskSwitcher
•
application.
This application visually displays any applications currently running
in the background.
•
It also provides the option to either bring a selected application
forward or End (close) it.
2. Flip through and center the desired application. The name
will appear above it.
3. Touch either
End
(to terminate the current app) or
End All
(to close all background applications). For more
information, refer to “Using TaskSwitcher to Close
Applications” on page 86.
23
Navigating Through Menus
As you navigate through a menu, options display on the screen
as scrollable lists. Menu tabs (located at the bottom of most
screens, provide access to additional screen options).
To navigate a scrollable list:
1. From the
2. Touch and gently press an onscreen option.
3. From the available list of options you can either:
Tod ay
screen, touch
•
Touch an onscreen entry to activate it.
•
Firmly press and slide your finger up or down the screen to scroll
Start
().
through lists of menu items.
•
Navigate through a long list by pressing either volume key up or
down.
Note:
Tapping or touching individual entries on the list opens the list entry.
Page 29

Touch or Tap
Scrolling Through
Options/Selections
onscreen options
4
3
2
1
Quick Navigation Among the Device Panels
Each of the available shortcuts (seen below) opens an associated
panel that can be activated by flipping across the page as seen
below.
䊳
In a single motion, touch and drag up or down along either side
(left or right) of the current panel. This actions creates a
cube-like effect as you flip among the different panels.
Note:
Scrolling requires that you press firmly on the screen then drag. When
scrolling through a list (see adjacent image) make sure not to touch or
press individual entries on the list as this will open the list entry.
Basics 24
Page 30

1.
Panel s
display the associated features, functions and
shortcuts for shortcut.
2.
Shortcuts
provide access to each of the five available
panels.
3.
Applications panel
provides a grid view of the 12 preferred
Main menu application shortcuts (Favorites). These icons
can be customized to display any 12 application shortcuts
(from those available).
4.
Favorite Contacts panel
displays a scrollable list of currently
available Favorite Contacts cards.
Adjusting Your Volume Levels
You can set the volume for the device notifications by following
these steps:
1. From the
Tod ay
screen, touch (located at the top of
your screen). A menu then displays with the onscreen
slider needed to adjust the device volume.
25
2. Using the stylus, select the desired level on the slider
located under Volume.
•
Touch either On (activate the device sounds),
vibration is felt - no sound), or
Off
Vibrat e
(only a
(mutes both onboard speakers
and turns off the vibration feature). The onscreen volume icon
changes accordingly.
3. Select again to exit.
Note:
You can also press and hold the slider, or the side volume keys to move
the selection up and down along the slider range.
Updating Sound Events
The Sounds & Notifications page allows you to select the actions
for which you hear sounds and how to notify you when those
different events occur.
1. From the
2. Touch the
3. Activate sound notifications for any of the following events
Tod ay
Personal
screen, touch
tab, then tap
Start
()
> Settings
Sounds & Notifications
.
by touching any of the following:
•
Events (warnings, system events)
•
Programs and Notifications (alarms, reminders)
•
Screen taps (Soft or Loud)
•
Hardware buttons (Soft or Loud)
.
Page 31

Touch the
ok
4.
Notifications
tab to then assign specific audio
files (or vibrate) to play for specific applications or actions.
5. Touch the
Event
drop-down list and select one of the
following events:
• ActiveSync: Begin sync
• ActiveSync: End sync
• Beam: Autoreceive
• Connection disconnected
• Connection established
• Messaging: New e-mail message
• Reminders
• Wireless network detected
6. Activate any of the following notification actions by tapping
the field adjacent to each:
• Play Sound
• Repeat
• Display message on screen
• Flash light for
•Vibrate
7. Touch to save your new settings and return to the
Personal
tab.
Formatting the Device’s Memory
Both the internal device storage location (Main Storage) and
microSD card (Storage Card) can be cleared of content via a Hard
Reset and reformat process.
The
Main Storage
(My Device) location has only ~90 MB of
storage capacity to contain your installed applications and files.
Once this capacity is reached, you can obtain an error message
indicating you need to clean up the Main Storage location (you
have reached the 90 MB limit of your storage capacity and can
no longer install additional applications).
The
My Storage
location contains up to 3.9GB of storage capacity.
If given the option for the destination of installed applications and
files, it is recommended you use either the My Storage location
or the microSD card.
1. From the
2. Touch the
•
The
•
The
Tod ay
screen, touch
System
tab and tap
Memory
tab refers to the device’s internal memory storage.
Storage Card
tab refers to the installed microSD card’s
Start
()
Hard Reset
> Settings
.
.
storage.
Note:
This can also be accessed from a similar menu by using the following
steps: tap the
3. Touch the
Applications
Memory
shortcut
tab.
> Basic Settings
.
Basics 26
Page 32

4.
Tap either an individual onscreen
Reset
the Main Storage or My Storage locations.
– or –
Tap
Clear Memory
•
If selecting the Clear Memory option, you will need to type in ‘Yes’
within the onscreen field and then tap
5. Tap
Yes
Important!:
If you clear all memory, all previously configured settings and
device data will be deleted and the unit will be reset to its factory
defaulted settings. You will then need to setup the device again
(page 4).
27
to delete both locations.
Yes
to continue with the format process.
button for either
to continue.
Formatting the microSD Card
After you have installed an optional microSD card, you can then
use the Format feature to clear any pre-existing information and
then use it for data storage.
1. From the
2. Touch the
3. Touch the
4. Tap
Tod ay
screen, touch
System
tab and tap
Storage Card
Yes
to continue with the format process.
Start
Hard Reset
tab and tap Format.
()
> Settings
.
.
For more information, refer to “Formatting the microSD Card” on
page 53.
Entering Text Using the QWERTY Keyboard
Your device provides convenient ways to enter words, letters,
punctuation, and numbers whenever you are prompted to enter
text (for example, when entering information into a field, surfing
the Web, or when using Microsoft® Outlook® and Text
Messaging).
To access the QWERTY keyboard
1. Firmly grasp the front and back of the Mondi with both
hands.
Page 33

In a single motion, use your thumbs to slide the top section
Softkey (right)
Softkey (left)
QWERTY
Keyboard
2.
of the device up to open, as shown in the following
illustration.
The built-in QWERTY keyboard supports quick and easy text
input, just as you would when using a computer’s keyboard.
Mondi also provides an onscreen virtual QWERTY keyboard that
functions in the same fashion.
When you display a screen where you can enter text, use the
keyboard to enter different character types:
Note:
When the key entering mode is changed to either
corresponding icons are shown adjacent to at the bottom of the
screen.
Shift
or Fn, their
Function
: Allows you to use characters displayed at
the top of the QWERTY keys.
Examples: 1, 5, 0, $, @, #, ?
CAPS/SHIFT
: Converts the alphabetic character into
uppercase. Changes the text input mode between
Upper/Lower case modes.
Symbol
: Launches the Symbols page from where
you choose from an onscreen list of symbols and
other character sets. Touch an onscreen item
to insert it into your text field.
Delete
: Deletes the previous character, similar to
the backspace key on a computer keyboard. This
key has two different functions: in its default mode,
it functions as a 'backspace’, within Fn mode, it
functions as a 'delete' key.
Basics 28
Page 34

Enter
Sam
SAM
: Moves the insertion point to the next line in a
message.
The keyboard provides dual-use keys labeled with alphabetic
characters on the lower half and numbers and symbols on the
upper half. Press the key combination corresponding to the
character you want to enter.
Entering Characters
Characters can be entered using either Uppercase or Lowercase.
1. Slide out the QWERTY keyboard and press to make
the next entered character uppercase. Characters then
revert back to lowercase after the next character is typed.
2. Press the desired text key.
•
For example, to enter the word “Sam”, type the keyboard sequence
below.
•
If you make a mistake and enter the wrong character, press
to erase a single character. Press and hold to erase an
entire word.
29
3. To enter all uppercase characters, press twice to
maintain all consecutive characters in uppercase.
Entering Numbers
The keyboard can be used to enter numbers, letters, and
symbols. Although these keys default to text (letters), numbers
can be input by using in conjunction with the correct
number key.
1. Press to input the character displayed on the top row
of the next QWERTY key pressed.
Page 35

Press the desired key.
11:30
Pat@
2.
– or –
To only enter all top row characters, press twice.
•
For example, to enter “11:30”, you would use the keyboard
sequence shown below.
•
If you make a mistake and enter the wrong character, press
to erase a single character. Press and hold to erase an
entire word.
Entering Symbols
Symbols can be entered from the keyboard (using the key)
or from the Symbols page (accessed using the key).
Note:
To use (Symbols page), the Text Input Mode must be set to
Samsung Keypad.
1. Position the cursor where you want the symbol to appear
within your message.
2. Press to launch the onscreen Symbols page. There
are up to eight pages of symbols (accessible by the bottom
left button. Ex:
3. Touch an onscreen entry to insert the selected symbol.
1/8
thru
8/8
).
There are multiple pages of available symbols.
– or –
1. Choose to insert a QWERTY keyboard symbol by
positioning the cursor where you want the symbol to
appear within your message.
2. Press and then press the key for the symbol you
wish to insert. This method uses the symbols etched on
the corresponding QWERT key.
Basics 30
Page 36

Entering Text using the Onscreen Keyboard
ok
In those onscreen pages where text can be entered into either
fields, strings, or messages, the device also provides access to
an onscreen virtual QWERTY keyboard.
1. From a place where you can enter text, touch the onscreen
text field.
2. Touch to pull up an onscreen keyboard.
3. Make your character selections using the same methods
discussed within the previous Entering Text, Numbers, and
Symbols sections.
4. Once complete, touch again to close the onscreen
keyboard.
Adjusting Text Input Settings
The Mondi does not, by default, use the standard Microsoft input
method but rather an XT9 input method. This method can be
configured via the Mondi Input settings page.
XT9 is a new text input software that allows you to easily enter
text faster on a Windows Mobile-based device. XT9 allows for
word prediction, word completion, and real-time spelling
corrections.
31
1. From the
2. Touch the
3. Touch the
4. With
5. Configure the desired XT9 settings:
Tod ay
Personal
Input Method
Samsung Keypad
Options..
button.
• XT9 Settings
screen, touch
tab, then touch
Start
()
> Settings
Input
.
tab.
selected, touch the onscreen
: allows you to select your input language, adjust your
word completion, spelling correction, auto-substitution, and
regional correction settings.
• XT9 Dictionaries
: provides access to the built-in dictionaries: Xt9
My Words and XT9 Auto-Substitution.
• About XT9
• XT9 Help
: describes the XT9 input software version information.
: provides end-user onscreen help for the XT9 input
software.
6. Touch
Done
(left softkey) or tap to save your new
settings and return to the previous page.
Note:
Some of these features may not be compatible with the Samsung
Keyboard Input method.
.
Page 37

Widgets
The MobileWidget page (via the Widget Bar) provides quick
access to mini-programs (widgets). This bar gives you
information at a glance and provides easy access to frequently
used tools such as (Analog Clock, Digital Clock, Calendar, Music
Player, Photo, Dual Clock/World Clock, Today’s Events, Wireless
Manger, Memo, AccuWeather, Google, Yahoo Financial and Yahoo
One Search). This bar makes great use of the available space on
your device.
The Widget Bar is a pane on the bottom of the Widget Desktop
area that houses user-selected mini-applications and keeps
them organized and always accessible.
You can easily customize the Widget area by either docking these
mini-apps to the Widget Desktop area or placing them back
within the Widget Bar for later use.
Widget Bar Navigation
You can drag the widgets to the desktop to use the application or
feature, then drag it back to the Widget Bar when you are
finished.
Accessing the Widget Bar
1. From the
Widget
.
Tod ay
screen, touch
Start
()
> Programs >
– or –
Quickly press and release the left action key ( ).
2. Tap the grey tab’s blue arrow (bottom of the screen) to
temporarily display the Widget Bar tab.
3. Tap the tab’s blue arrow again to close the Widget bar or
wait a few seconds for it to close automatically.
Adding and Deleting Widgets from the Desktop
1. From the
Widget
.
Tod ay
screen, touch
Start
()
> Programs >
– or –
Quickly press and release the left action key ( ).
• Widget Bar
- provides a horizontal list of available widgets.
Basics 32
Page 38

• Widget Desktop
Widget Bar Widget DesktopDesktop Pages
any desired widget apps. Once placed on the Widget Desktop, they
are immediately available and active. Their position on the desktop
can easily be changed by, in a single motion, touching and
dragging to a new location.
- is the available workspace where you can place
2. Touch and hold the widget (
3. In a single motion, touch and drag an available widget
from the Widget Bar (1) to the Widget Desktop area (2).
4. While still holding the icon, in a single motion, drag it over
to the new location on the Widget Desktop area and
release your finger from the screen (2).
33
1
).
5. Repeat this process for any additional widgets you wish to
add.
– or –
To remove a Widget from the Desktop area (2), touch and
drag the onscreen widget and drag it back into the Widget
Bar (1).
Page 39

Note:
Widgets are not activated by default on the device but must first be
activated via the Widgets menu.
Placing Widgets on Separate Pages
The three buttons at the top of the Widget Desktop correspond to
available pages that can contain Widgets. Since not all the
available Widgets can be displayed on a single page, these allow
you to select from one of three available pages
1. From the
Widget
.
Tod ay
screen, touch
Start
()
> Programs >
– or –
Quickly press and release the left action key ( ).
2. Touch any of the three Desktop page icons (at the top of
the page) to display one of three available Desktop pages.
You can place (anchor) a selected Widget to any of these
active pages.
3. In a single motion, touch and drag an available widget
from the Widget Bar (1) to the Widget Desktop area (2).
Rearranging Widgets within the Widget Bar
1. From the
2. In a single motion, touch and drag a widget from its
Widget
.
Tod ay
screen, touch
Start
()
> Programs >
current location on the Widget Bar and move it to a new
position either between two existing Widget icons or at the
beginning/end of the listing.
– or –
While still holding the icon, in a single motion, drag it away
from the widget bar (1) then drag it back into its new
location in the list.
Activating a Widget
1. Locate your widget (whether it is still docked in the Widget
bar or in another location).
2. Touch the Desktop Widget icon to activate the
mini-application (widget).
Basics 34
Page 40

Widget Icons
AM
10
36
The following table contains a description of each available
Widget, it’s function, and how to navigate to that particular
application. If the application is already described in another
section of this user manual, only a cross reference is then
provided.
Note:
Some of these Widgets require an active broadband connection prior to
activation and use.
Analog Clock
: displays the current time on an
analog clock.
• Touch, drag and drop the Analog clock onto
the desktop to view the time in an analog
format.
Digital Clock
: displays the current time on a
digital clock.
• Touch, drag and drop the Digital clock onto the
desktop to view the time in a digital format.
35
3
Calendar
: allows you to access the Calendar
feature and choose a specific date by tapping
from a date from an onscreen calendar.
With the Calendar feature, you can:
• Consult the calendar by day, week, month,
year, or Agenda.
• Set schedules and note anniversaries.
• Write memos to keep track of your schedule.
• Set an alarm to act as a reminder, if necessary.
• For more information, refer to “Calendar” on
page 66.
No Library
Multimedia Player
: allows you to launch the
Multimedia Player application where you can
play music and video files stored both locally
and within the microSD card to then control
their playback.
• Touch, drag and drop, then tap the Music
Player icon to launch the multimedia player.
• Touch the arrows on the widget to control the
playback of the currently active song or video.
Page 41

Pac...
Par...
Mon
03 02
Photo
: allows you to view the list of device ima ges,
received in messages, or taken by the camera.
You can then set/assign the image as the
current wallpaper for the Widget Desktop.
• For more information, refer to “Widgets” on
page 32.
Dual Clock/World Clock
: displays current time in
both the current location and within another
user-defined international location. Via the
Clocks application, you can set alarms, assign
anniversary dates, access the stopwatch
feature, and view the World Clock.
You can also view times from other parts of
the world.
• Touch, drag and drop the World Clock onto the
desktop to view the time in dual locations.
• For more information, refer to “Clocks” on
page 79.
Today’s Events
: allows you to review the
Calendar events for the current day.
With the Calendar feature, you can:
• Consult the calendar by day, week, month,
year, or Agenda.
• Set schedules and note anniversaries.
• Write memos to keep track of your schedule.
• Set an alarm to act as a reminder, if necessary.
• For more information, refer to “Calendar” on
page 66.
Wireless Manager
: Launches the Wireless
Manager application that allows you to activate
the Airplane mode, access/alter and manage
your Wi-Fi, Bluetooth, and Mobile WiMAX
connections.
• Touch, drag and drop, then tap the Wireless
Manager icon to launch the Wireless Manager
application.
• For more information, refer to “Widgets” on
page 32. For more information, refer to
“Communication and Connection” on
page 38.
Basics 36
Page 42

AccuAccu
WeatherWeather
.com.com
TM
Memo
: launches the Notes application where
you can then create, store and review
previously created notes/memos.
• For more information, refer to “Widgets” on
page 32.
AccuWeather
: uses your current data
connection to access and display an onscreen
popup containing real-time weather information
for a specified location. You must have an active
data connection to use this feature.
• For more information, refer to “Widgets” on
page 32.
Google
: launches a Google™ search field
Yahoo Finance
: uses your current data
connection to display an onscreen window
containing the latest Yahoo financial news.
• For more information, refer to “Widgets” on
page 32.
Yahoo One Search
: launches a Yahoo search
field where you can search the Web (US or
International) by entering a search string (using
your QWERTY keyboard). You must have an
active data connection to use this feature.
• For more information, refer to “Widgets” on
page 32.
where you can search the Web by entering a
search string (using your QWERTY keyboard).
You must have an active data connection to use
this feature.
• For more information, refer to “Widgets” on
page 32.
37
Page 43

Section 3: Communication and Connection
Wireless Manager
Wireless Manager
Widget
Page
Communication Setup
Your device is capable of obtaining broadband Internet Access via
either of these two available methods:
•
Wi-Fi access
•
Mobile WiMAX connection
Note:
Quick Access (activate/deactivate & configure) to the Airplane Mode,
Bluetooth, Wi-Fi and Mobile WiMAX CM features is available from the
Tod ay
screen by touching ( )
> Basic Settings
.
Wireless Manager Overview
Wireless Manager application that allows you to activate the
Airplane mode, access/alter and manage your Wi-Fi, Bluetooth,
and Mobile WiMAX connections.
Accessing the Wireless Manager Page
1. From the
2. Touch the
Tod ay
screen, touch
Connections
Start
tab and tap
()
> Settings
Wireless Manager
().
– or –
From the Title bar, touch the connection icon ( ), then
touch the blue
Wireless Manager
link.
3. Locate the desired connection method (Bluetooth, Wi-Fi or
Mobile WiMAX [see adjacent image]).
.
Communication and Connection 38
Page 44

Accessing the Wireless Manager Widget
1. From the
2. In a single motion, touch and drag the Wireless Manager
Widget
.
Tod ay
screen, touch
Start
()
> Programs >
widget ( ) from its current location on the Widget Bar
and move it to the Widget Desktop.
Communication Methods - Overview
The two available methods for connectivity are:
•
Mobile WiMAX
- is developed primarily for wireless metropolitan area
networks (WMANs).
–
provides broadband speeds without the need for cables.
–
Allows for a wider range of mobility.
Note: *
Please check with your Mobile WiMAX provider for available local
broadband speeds.
•
Wi-Fi
- has primarily been developed for wireless local area networks
(WLANs).
–
Transmission range of up to 100m.
–
Wi-Fi networks have limited range compared to Mobile WiMAX.
39
Airplane Mode
Airplane Mode allows you to use many of your device’s features,
such as Games, Office, Multimedia, etc., when you are in an
airplane or in any other area where data usage is prohibited.
When your device is in Airplane Mode ( ), it cannot send or
receive any data or access online information.
1. From the
2. In a single motion, touch and drag the Wireless Manager
Widget
.
Tod ay
screen, touch
Start
()
> Programs >
widget ( ) from the Widget Bar to the Widget Desktop
area.
3. Touch the
Airplane Mode
field to toggle its activity state
between On ( ) or Off ().
Note:
Activating Airplane mode deactivates all Bluetooth, Wi-Fi, and WiMAX
communication.
4. Press ( ) (right action key) to return to the Today screen.
Page 45

Activating Wi-Fi Communication
Wi-Fi communication requires access to an existing and
accessible Wireless Access Point (WAP). These WAPs can either
be
Open
(unsecured) as within most Hot Spots, or
Secured
(requiring knowledge of the Router name and password). The
following is a list of Wi-Fi icons displayed on the device:
Indicates an active Wi-Fi connection.
Indicates an inactive Wi-Fi connection.
1. From the
2. Touch the
Tod ay
screen, touch
Connections
Start
tab and tap
()
> Settings
Wireless Manager
().
– or –
From the Title bar, touch the connection icon ( ), then
touch the blue
3. Touch
Wireless Manager
ON
(within the Wi-Fi area) to toggle the active state.
link.
Establishing a Wi-Fi Connection
1. From the
2. Touch the
Tod ay
screen, touch
Connections
Start
tab and tap
()
> Settings
Wireless Manager
.
().
3. Touch
4. From the Wi-Fi Settings page, filter the list of available
Menu
(right softkey)
> Wi-Fi Settings
.
networks by touching an available onscreen network or
expand the search by choosing one of the following:
•
All Available
•
Only access points
•
.
Only computer-to-computer
5. Touch
Menu
(right softkey)
> Add New...
to add a new
connection, or touch an available connection to edit its
parameters.
6. From the Configure Wireless Network page, touch the
Network name
field and use the QWERTY keyboard to enter
a name for the new network connection.
Communication and Connection 40
Page 46

7.
Select from the following security connection presets from
the
Connects to
–
Select
use proxy settings).
–
Select
settings).
8. Touch any of the remaining fields to place a checkmark
drop down:
The Internet
if the network connects to the Internet (does not
Work
if the network does not connect to the Internet (uses proxy
alongside their entries (checkmarks indicate activity).
•
If the network has SSID broadcasting disabled (is “hidden”), select
This is a hidden network
•
If the connection is for an ad-hoc network, select
device-to-device (ad-hoc) connection
9. Touch
Next
(right softkey) to continue onto the
.
This device is a
.
Authentication and Data Encryption information. Use the
information provided by your Network administrator to
complete this section.
10. Use the QWERTY keyboard to complete this information
and touch
Next
(right softkey) to continue.
11. Complete the process by selecting the appropriate security
protocol parameters from the EAP type drop-down menu.
12. Touch
41
Finish
(right softkey) to complete the process.
13. Touch the
Network Adapters
card connects to:
tab to select a
My network
entry (The Internet or Work) and modify
an adapter from the list provided.
Connecting to a Mobile WiMAX Network
Mobile WiMAX provides broadband Internet access over a wider
coverage area than available with Wi-Fi or Bluetooth. Your device
comes pre-activated. Connection to a WiMAX network only
requires that you power on your device. During communication to
the Internet, the device uses any previously configured wireless
network connections (WiMAX or WLAN/ Wi-Fi).
Note:
Mobile WiMAX connectivity is only available in limited markets and
must be accompanied by an active WiMAX service plan prior to
establishing any Mobile WiMAX connectivity.
Activating the Mobile WiMAX Hardware
Since the device is pre-activated, you only have to activate the
Mobile WiMAX hardware on the device. If there are any
connection or setup issues, please contact Time Warner Cable
Customer Care at
Note:
This device is expected to achieve speeds that are twice that of 3G
wireless service. Overall internet experience will vary depending on a
number of factors including device parameters, patterns of usage,
network conditions and the characteristics of websites visited.
1-888-662-4577
.
Page 47

Initiating a Mobile WiMAX Connection
1. From the
Tod ay
screen, touch
WiMAX CM
– or –
From the
Tod ay
2. Touch
screen, touch
Connect
. Once successfully connected, you are
Start
()
returned to the Today screen. Confirm the WiMAX icon
within the Title Bar (top of screen) indicates an active
Connection ( ).
(left softkey).
> WiMAX CM
Bluetooth Communication
Bluetooth is a short-range wireless communications technology
capable of exchanging information over a distance of about
30 feet without requiring a physical connection. Unlike infrared,
you don't need to line up the devices to beam information with
Bluetooth. If the devices are within range of one another, you can
exchange information between them, even if they are located in
different rooms.
When the Bluetooth radio is turned off, you cannot communicate
(send or receive data) via Bluetooth. A Bluetooth connection with
an externally paired device allows you to transfer images,
Calendar dates, themes, and other data files.
To save battery life or in situations where radio use is prohibited,
such as airline travel, you can turn off the Bluetooth wireless
technology.
.
1. From the
2. Touch the
().
3. Touch
the active state.
Tod ay
screen, touch
Connections
ON
(within the Bluetooth area seen below) to toggle
Start
()
> Settings
tab and tap
Communication and Connection 42
Wireless Manager
.
Page 48

5. Touch the
Devices
tab and tap
Add new device...
from the
onscreen list. Your device then displays a list of discovered
Bluetooth devices that have been detected within its
communication range.
Note:
To be detectable, external Bluetooth devices must be enabled for
visibility so the Mondi can detect the device and then connect to it. If
your device does not appear in the list of available devices, make sure
this feature is active on the target device.
4. Touch
Menu
(right softkey) to access the Bluetooth
Settings.
Adding a Bluetooth Device
1. From the
2. Touch the
3. Touch
4. Prepare your external Bluetooth device for communication
().
Menu
Tod ay
screen, touch
Connections
(right softkey)
Start
()
tab and tap
Wireless Manager
> Bluetooth Settings
> Settings
.
and detection.
43
6. Touch the device you wish to pair with and touch
Next
(right softkey).
•
If your target device does not appear within the list of available
devices, touch
7. Touch the
enter the numeric passcode, and press
.
You are then notified the pairing is in progress.
Note:
If the target device does not require a passcode, touch
continue.
8. Enter the corresponding Passcode information on your
Refresh
to repeat the discovery process.
Passcode
field, use the QWERTY keyboard to
Next
(right softkey).
Next
to
target device to complete the pairing process.
Page 49

Creating a Device Name
ok
1. From the
2. Touch the
3. Touch the
Tod ay
System
Device ID
screen, touch
tab and tap
Start
()
About
().
tab and double tap the
field to highlight current name.
Note:
You can also view the Device Name via the
Bluetooth Settings page.
4. Use either the onscreen keyboard (or slide out the QWERTY
My Info
keyboard) and enter the new name for this device. For
more information, refer to “Entering Text Using the
QWERTY Keyboard” on page 27.
5. Touch the
6. Touch to store the new information and return to the
Description
field to enter additional information.
previous screen.
Note:
If this name has previously been assigned within the
Owner Information
page, this information is then updated first.
> Settings
Device name
tab within the
Start > Settings >
7. Confirm the Device name update by navigating to the
.
Bluetooth Setting - My Info tab:
•
From the
Tod ay
screen, touch
Start
()
> Settings >
Connections tab.
•
Tap
Bluetooth
( ) and touch the
8. Confirm the name was correctly updated.
My Info tab.
Device Visibility
1. From the
2. Touch the
3. Touch the
Tod ay
screen, touch
Connections
Mode
tab and then tap the
visible to other devices
Start
()
> Settings
.
tab and tap
Bluetooth
().
Make this device
box to either activate or deactivate
the visibility (discoverability) of your device by others.
•
Your device becomes visible to other devices when you transmit
your device’s name to others in your area. This allows other devices
to detect your device and request a connection. If your device is not
visible, you can still detect and connect to other devices, while still
hiding yourself from others.
Communication and Connection 44
Page 50

Making Bluetooth Secure
When the Bluetooth Visibility on your Mondi is turned on, your
device is wirelessly transmitting its device name and status to
every device within its range. This transmission can pose a
security risk and incite unauthorized connection to your device. It
is recommended that you remain hidden unless an active pairing
is necessary.
Beaming
The process of transmitting data between two paired Bluetooth
devices is known as Beaming. Data is directly transmitted/shared
to a target device. This device must be visible and must accept
either your incoming data or agree to be paired with your device.
The Samsung Mondi™ Mobile Internet Tablet supports beaming
of several different file types:
•
Windows Mobile Themes (see the User Guide for more information)
•
Microsoft Excel Workbook data (page 75)
•
Microsoft Word Document data (page 77)
•
Calendar Events (page 68)
•
Contact entries (page 72)
•
Image or Video file (page 96)
45
Page 51

Section 4: Synchronization
Your device features a built-in ActiveSync® utility that allows you
to synchronize data between your computer and your device.
This built-in application works either with a computer-installed
version of the application (that launches when a compatible
device is connected to a target computer) or as a stand-alone
feature (requiring an active broadband connection). This software
helps keep Contacts, Calendar, Tasks, or Inbox data up-to-date.
For additional help with Synchronization between your device
and your computer, you can reference the following online
information:
Windows Mobile How-Tos
.
Computer Requirements
The computer to which you install ActiveSync (v4.5 or higher)
must meet the following hardware and software requirements:
•
Operating system: Microsoft Windows XP with SP1 or later, Windows
2000 with SP4, Windows XP Tablet PC Edition, or Windows Server
2003.
•
Web browser: Microsoft Internet Explorer 6 or later (required).
•
Storage: Hard-disk drive with 12 to 65 MB of free space. (Actual
requirements will vary depending on features selected and system
configuration.)
•
I/O Port: USB port (1.0 or higher)
•
Optical drive: DVD-ROM drive
•
Video card: VGA graphics card or compatible video graphics adapter
supporting 256 colors or more.
Note:
It is recommended that you either setup a Outlook relationship
between your Mondi and computer via ActiveSync (direct connection
or wireless) and not from within Outlook.
Installation of ActiveSync on Your Computer
1. Download and install the ActiveSync application from the
Microsoft® site to your machine:
2. Launch the setup program and follow the onscreen
ActiveSync4.5.
instructions.
At the end of the installation process, you will see an ActiveSync
icon appear in your taskbar.
•
Synchronization will begin automatically the first time your device is
connected to your computer.
•
All selected synchronization items will be copied from your computer
to your device and Windows Explorer will create a shortcut to the
Mobile drive.
Once you begin the synchronization process (by connecting your
device to your computer) the Microsoft ActiveSync window will
automatically open.
Synchronization 46
Page 52

Your device will remain connected to the computer after
synchronization is complete. If any selected content is changed
on your computer (new email, photos, playlist updates, etc.)
Microsoft ActiveSync automatically re-syncs the information on
the device. You can open the device’s file directory in ActiveSync
on your computer by clicking
Tools > Explore Pocket PC
from the
ActiveSync main menu. You can then copy files quickly and easily
from the device to the computer, or vice versa.
Connection of ActiveSync
Your computer can assign a different profile to each device that is
connected to it via the ActiveSync application. Once you connect
your first Mondi device, it will show up as SWD-M100 within the
File > Mobile Devices
1. Right-click the ActiveSync icon found in your computer’s
taskbar and select the
2. Make sure the following options are checked and click OK:
• Allow USB Connections
menu.
Connection Settings...
option.
(page 8)
• Open ActiveSync when my device connects
3. Connect one end of the USB data cable (included with your
device) into the USB port on your computer.
47
4. Connect the other end into the Power/USB Data jack on the
left side of the device. (The Synchronization Setup Wizard
will launch on your computer and prompt you to set up a
sync partnership with the device.)
MIC
MIC
Correct
Incorrect
Configuring ActiveSync
1. From the initial Synchronization Setup Wizard, click
(1) to begin the setup process.
2. If you do not use Microsoft Exchange
®
(for Outlook), skip
to step 3.
Next
Page 53

To set up an Exchange Server connection, complete the
following steps.
•
Check the box in the
Microsoft Exchange field
Synchronize directly with a server running
(2) and click
Next
Note:
The information in these fields is case-sensitive. Some fields may have
already been filled in by your device upon connection to your
computer.
•
Enter an Exchange Server Address (al so known as the Outlook Web
Access server address) (3).
•
If your server requires an encrypted connection, check the box for
“
.
This server requires an encrypted (SSL) connection
•
Enter your
User name, Password
•
To enable automatic email synchronization, check the box for
password
.
•
Click
Next
to continue
3. From the Synchronization Options screen, check all
information types you would like to synchronize with your
device and your computer. (Contacts, Calendar, Email,
Tasks, Notes, Favorites, Files, and Media.)
4. Click
Next
to continue.
5. Check the box for
would like to allow this connection type (usually disabled if
your device is using an active USB connection), and click
Next.
6. Click
Finish
the partnership. ActiveSync will save the settings and
begin synchronizing your device with your computer based
on those settings.
Allow wireless data connections
to complete the setup process and establish
, and
Domain
.”
information.
Save
if you
Synchronization 48
Page 54

Note:
Media synchronization can require that you launch Windows Media
Player to finish the process of setting up the partnership.
Setting Up Windows Media Player Sync Options
If you choose to synchronize multimedia files (pictures, videos,
and music), you will need to set up a sync partnership between
your device and your computer's Windows Media Player.
Note:
The MP4 video format, although not recognized by Windows Media
Player, can be played back via the
Applications
panel.
MultiMedia Player
available from the
It is recommended that you have the latest version of Windows
Media Player installed (at the time of print it was version 11).
(You can verify you have the latest version by clicking
Check for Updates..
1. Verify
. from the Media Player menu.)
Media
was selected from within the Synchronization
Help >
Options window (described in the previous section).
2. From within the Synchronized items field (adjacent to the
Media entry) click the
49
Setup must be completed
link.
3. In the pop-up dialog box, click
Yes
to begin the setup
process.
4. Launch Windows Media Player. (Your device appears
within the left pane.)
Note:
If your device contains an internal microSD card, both the built-in
device storage location and internal microSD card (listed as
Card
) are listed as two separate device entries on the left pane.
5. Click on the
•
Sync
tab to launch the partnership process.
If the Device Setup screen (shown above) does not appear,
right-click on the device icon (left pane) and select
Setup Sync..
Storage
.
Page 55

Enter a new name for the device (as it will appear within
6.
the Windows Media Player’s left pane) and click
Finish
.
For more detailed information on creating a unique device name,
see “Creating a Device Name” on page 44.
Synchronizing Music with Windows Media Player
1. Click on any of the available library categories (such as
Artist, Album, or Songs) to display a list of all current music
files detected by Windows Media Player.
•
For the purpose of this section, Genre has been selected.
Note:
Songs that are copy-protected (DRM protection) will not be transferred
and can result in a transfer error message.
2. Select a song and drag it to the Sync List section of the
application (right pane). (The available memory indicator
will change depending on the size of the selected song.)
3. When you have finished selecting songs, click
Start Sync
to
begin the upload process from your computer to your
device’s Music folder.
•
If this list is later updated on your computer, it will be updated on
your device during the next synchronization session.
Synchronization 50
Page 56

Connecting to the Device via ActiveSync
ActiveSync allows you to synchronize data between your
computer and your device. Synchronization compares the data
on your device with your desktop computer and updates both
your device and computer with the latest data. Before you can
connect your device to your computer via USB, you will need to
install the ActiveSync application.
51
Before you continue, confirm the download and installation of the
ActiveSync application to your machine:
1. From the
2. Touch the
3. Connect one end of the USB Data cable to your computer.
4. Plug the other end of the USB cable into your Power/USB
5. Touch
6. From within the ActiveSync application, click
7. Double-click the
8. Double-click the
9. Open the
For detailed information about using ActiveSync to setup your
exchange email services, see “Using ActiveSync to Configure
Your Outlook Exchange Settings” on page 62.
Tod ay
screen, touch
ActiveSync
.
Connections
Data jack connection located on the side of the device.
Sync
(left softkey) to begin the synch process.
reveal all the device contents (both storage card and
internal device folders).
MEDIA
.
MEDIA
paste them into this folder.
tab and tap
My Windows Mobile-Based Device
Storage Card
folder, copy your selected video files and
ActiveSync4.5.
Start
()
> Programs >
External Connections
Explore
icon to
folder, then navigate to
.
.
Page 57

Loading Files to Your microSD Card
Verify your microSD card is securely installed into the device. For
more information, refer to “Installation of the microSD Card” on
page 9.
Before using your device’s mass storage capabilities, you need to
prepare your device’s data services to synchronize with your
desktop or laptop computer.
MIC
MIC
Incorrect
Correct
Once the device is connected to the computer, you can transfer
your data to or from the microSD card. One method of data
transfer involves the detection of the device as an external
storage device, method two involves using the ActiveSync®
application to synchronize file between your device and your
computer.
The device can be configured to communicate with your
computer as an extension of your computer by using the
ActiveSync utility which is used to synchronize computer
applications with your device.
Reviewing the microSD Card Information
1. From the
2. Touch the
3. Touch either the Main or Storage Card tabs to reveal
Tod ay
System
screen, touch
tab and tap
Start
Memory
()
> Settings
.
detailed memory information:
•Main
tab - reveals the
Tot al, In use
, and
Free
storage sizes for
both the general Storage and Program areas.
•Storage Card
tab - reveals the
Tot al, In use
, and
Free
storage
sizes for both the My Storage and Storage Card areas.
4. Touch to return to the previous page.
ok
Synchronization 52
.
Page 58

Formatting the microSD Card
Both the internal device storage location (Main Storage) and
microSD card (Storage Card) can be cleared of content via a Hard
Reset and reformat process.
The
Main Storage
(My Device) location has only ~90 MB of
storage capacity to contain your installed applications and files.
Once this capacity is reached, you can obtain an error message
indicating you need to clean up the Main Storage location (you
have reached the 90 MB limit of your storage capacity and can
no longer install additional applications).
The
My Storage
location contains up to 3.9 GB of storage
capacity. If given the option for the destination of installed
applications and files, it is recommended you use either the My
Storage location or the microSD card.
1. From the
2. Touch the
3. Touch the
Tod ay
screen, touch
System
tab and tap
•
The Memory tab refers to the device’s internal memory storage.
•
The Storage Card tab refers to the installed microSD card’s storage.
Storage Card
Start
()
> Settings
Hard Reset
.
tab and tap the onscreen
Format
.
button.
53
4. Tap
Yes
to continue with the format process.
Important!:
If you continue, all data will be erased from the microSD card.
5. Confirm the capacity bar is now all grey (indicating there is
nothing currently stored on the microSD card).
Using the Device as External Storage
1. From the
2. Touch the
3. Connect one end of the USB Data cable to your computer.
Tod ay
screen, touch
Connections
Start
tab and tap
()
> Settings
External Connection
.
.
Page 59

Plug the other end of the USB cable into your Power/USB
ok
4.
Data jack located on the side of the device.
– or –
From the
Tod ay
screen, touch
Settings > USB
5. Tap
storage) or
6. Touch to save your setting and initiate USB Mass
.
Mass Storage
Storage Card
and select either
Application
My Storage
(microSD card) as the destination.
Storage Mode. (Wait for the connection to be completed.
When connected, your computer will automatically detect
your device.)
7. Once your computer has detected the device and properly
installed the USB Drivers, return to your Windows desktop,
open Windows Explorer and locate the removable drive
now assigned to the detected microSD card.
Note:
After formatting the microSD card, all folders and files are deleted.
Only after taking a photograph using the Mondi is the DCIM folder
created on the card.
()
> Basic
(internal
8. Double-click this removable drive and view the available
folders. It is recommended that you create some folders to
contain your media and data content. Below is an example
of some possible folder names:
•DCIM
- default location for pictures and videos shot with the device.
Created once a picture is taken with the device.
•MEDIA
- default location for multimedia video files (user-defined).
•MUSIC
- default storage location for music files (user-defined).
•OTHERS
- used for data storage of any other file type
(user-defined).
Note:
If any of these folders is not automatically created, access the device
via ActiveSync and manually create them.
9. Open the
MEDIA
folder, copy your selected video files and
paste them into this folder.
10. Once complete, touch the onscreen
EXIT
button to
terminate the Mass Storage Mode.
Warning!:
Formatting either the “My Storage” or “microSD card” from your
computer may result in a performance decrease. This action
should be done via the Mondi Hard Reset page.
Synchronization 54
Page 60

Viewing files on microSD card via Mondi
1. From the
2. Touch the navigation drop-down menu at the top-left of the
File Explorer
Tod ay
.
screen, touch
Start
()
> Programs >
File Explorer screen (seen below).
3. Choose a storage location:
• My Device
•My Storage
•Storage Card
55
(for programs 90MB)
(Mondi Internal Storage)
(inserted microSD card)
4. Touch
Up
(left softkey) to go up a level in the folder
hierarchy structure.
– or –
Touch
Menu
(right softkey) to access the File Explorer
menu options.
5. Tap a file to then launch it within an associated application.
Page 61

Section 5: Email Setup
Setting Up an IMAP or POP3 Account
To send and receive email messages through an ISP (Internet
Service Provider) account, or to use the device to access your
corporate email through a VPN (Virtual Private Network), you will
first need to set up both an IMAP (Internet Message Access
Protocol) and/or a POP3 (Post Office Protocol) account.
Note:
You must first have an active Internet connection prior to initiating the
setup process. If you want to send and receive email messages
through an ISP account, or if you wish to use your device to access
your corporate email through a VPN, you will first need to set up/create
an IMAP (Internet Message Access Protocol) or a POP3 (Post Office
Protocol) account.
1. From the
2. Touch
3. Use the QWERTY keyboard to enter an email address and
Tod ay
screen, touch
Setup E-mail
or highlight the option and tap
Start
()
> Messaging
Select
(left softkey).
password. For more information, refer to “Entering Text
Using the QWERTY Keyboard” on page 27.
4. Verify the
.
Save password
box is checked. This function is
activated by default to allow the device to always
remember your password during later access to this email
account.
•
To prevent other users from viewing your emails, tap the
password
box to deactivate the feature.
•
The device will then attempt to determine the necessary
Save
communication settings for both incoming and outgoing email
messages.
Email Setup 56
Page 62

5.
Touch
Next
(right softkey) to continue to the next screen
where you can enable the
automatically from the Internet
Try to get e-mail settings
option. This enabling allows
the device to then attempt to retrieve these settings
automatically. This process may take several minutes.
6. Touch
Next
(right softkey), if the device was able to
automatically retrieve the necessary settings, touch
(right softkey).
– or –
If the device was unable to automatically obtain the
settings, touch
Previous
(left softkey) to return to the initial
E-mail Setup screen and proceed with the manual setup
process, see “Manual Setup of a POP3 or IMAP Account”
on page 58.
7. Tap t he
Your name:
field and then use the QWERTY
keyboard to enter the name you wish to use with this email
account. This will be the name used in the From field when
your emails go out to recipients.
•
If desired, use the keyboard to also update the
name
you wish to use for this email account.
57
Next
Account display
•
This name will appear within the device’s list of available email
accounts on your Messages screen.
Note:
Internet mail addresses carriers such as Gmail and Yahoo. The device
is able to detect the appropriate IMAP configurations for both carriers.
The Gmail fetch feature has been tested to work very well with this
device.
8. Touch
Next
(right softkey).
9. Touch the
Automatic Send/Receive
drop-down list field and
select the time interval you would like for your device to
send and check for new email.
Page 63

Touch the blue
10.
Review all download settings
link if you wish
to modify other advanced email settings and parameters.
•
For more information, refer to
“Editing an Email Account”
page 60.
11. Press
Finish
(right softkey).
Manual Setup of a POP3 or IMAP Account
If the Automatic configuration procedures were unsuccessful, or
if you need access to an email account via a VPN server
connection, contact your ISP (Internet Service Provider) or IT
Network Administrator to obtain the following information prior to
beginning the manual setup process:
•
Account type (IMAP or POP3)
•
Incoming and Outgoing Mail Server Names
•
Username and Password
•
Domain Name
•
Special Security Settings (if utilized)
You can also obtain additional email configuration tips and help
by going to:
Windows Mobile How-Tos
1. From the
2. Use the Navigation keys to highlight
Tod ay
screen, touch
already) and either touch
.
Start
Select
(left softkey) or double tap
()
> Messaging
Setup E-mail
(if not
the option.
on
.
3. Use the QWERTY keyboard to enter an email address and
password. For more information, refer to “Entering Text
Using the QWERTY Keyboard” on page 27.
4. Verify the
Save password
box is checked. This function is
activated by default to allow the device to always
remember your password during later access to this email
account.
•
To prevent other users from viewing your emails, tap the
password
box to deactivate the feature.
•
The device will then attempt to determine the necessary
Save
communication settings for both incoming and outgoing email
messages.
5. Touch
6. Remove the check mark from the
Next
(right softkey).
automatically from the Internet
Try to get e-mail settings
option by tapping the box
adjacent to the option.
7. Touch
8. Touch the field below the
9. Touch
select
Next
(right softkey).
Internet e-mail
Next
(right softkey).
Your e-mail provider
by tapping the entry.
option and
Email Setup 58
Page 64

10.
Tap t he
Your name:
field and then use the QWERTY
keyboard to enter the name you wish to use with this email
account. This will be the name used in the
From
your emails go out to recipients.
•
If desired, use the keyboard to also update the
name
you wish to use for this email account.
11. Touch
12. Use your QWERTY keyboard to enter the Incoming mail
Next
(right softkey).
Account display
server information and then tap the Account type
drop-down field to then select either
13. Touch
59
Next
(right softkey).
POP3
or IMAP4.
field when
14. Use the QWERTY keyboard to enter your account User
Name and Password information. For more information,
refer to “Entering Text Using the QWERTY Keyboard” on
page 27.
15. Touch
Next
(right softkey) and verify the
Save password
box
is checked. This function is activated by default to allow
the device to always remember your password during later
access to this email account.
•
To prevent other users from viewing your emails, tap the
password
box to deactivate the feature.
•
The device will then attempt to determine the necessary
Save
communication settings for both incoming and outgoing email
messages.
16. Touch
Next
(right softkey), then enter the Outgoing (SMTP)
mail server information.
17. Verify the appropriate fields are active by tapping them and
placing a checkmark alongside their entries.
• Outgoing server requires authentication
is used if you need to
use a password for outgoing mail in addition to incoming mail.
(Please contact your System Administrator for detailed server
requirements.)
Page 65

• Use the same name and password for sending e-mail
same user name and password for outgoing mail as for incoming
mail (can only be selected if the Outgoing server requires
authentication box is checked).
•
Touch the blue
Advanced Server Settings
link if you wish to
modify other advanced email settings and parameters. For more
information, refer to
18. Touch
within the
Next
“Editing an Email Account”
(right softkey), then select the time interval
Automatic Send/Receive
drop-down field that
you would like for your device to send and check for new
email.
•
Touch the blue
Review all download settings
link if you wish to
modify other advanced email settings and parameters. For more
information, refer to
19. Touch
Finish
“Editing an Email Account”
(right softkey) to complete the setup process.
Editing an Email Account
1. From the
2. Use the Navigation keys to highlight the email account.
3. Touch
Tod ay
Menu
screen, touch
(right softkey)
Start
> Options
()
> Messaging
and tap the
tab.
4. Tap the desired email account from the onscreen list to
then launch the Email Setup page.
to use the
on page 60.
on page 60.
Accounts
5. Touch the
6. Either confirm the email address is correct, or use the
Edit Account Setup
link.
QWERTY keyboard to change the information, and touch
Next
(right softkey).
7. Either confirm your name and account display name are
.
correct, or make changes, and touch
8. Either confirm the incoming mail server and account type
information are correct, or make changes, and touch
Next
(right softkey).
Next
(right softkey).
9. Either confirm the User name and Password information is
correct, or make changes, and touch
Next
(right softkey).
Email Setup 60
Page 66

10.
Either confirm the outgoing (SMTP) mail server information
and field selections are correct, or make changes, and
touch
Next
(right softkey).
11. From this Outgoing (SMTP) screen, confirm the correct
SMTP information and then touch the blue
Settings
link.
12. From this SMTP page, enable/disable any setting you wish
Advanced Server
by tapping the empty box adjacent to the options.
• Require SSL for Incoming e-mail
to enable SSL encryption of
incoming email (if supported by the mail server).
• Require SSL for Outgoing e-mail
to enable SSL encryption of
outgoing email (if supported by the mail server).
13. Within the
Network connection
field, tap the drop-down list
and select a firewall connection setting by tapping either
The Internet
14. When you have finished making changes, touch
(left softkey) and then touch
15. Continue onto the remaining screens to Change the
(open-no firewall) or
Next
Work
(behind a firewall).
(right softkey).
Done
Send/Receive Schedule settings (page 61) and alter the
Download Size settings (page 62).
61
Changing the Send/Receive Schedule Settings
1. From the
2. Use the Navigation keys to highlight the email account.
3. Touch
Tod ay
Menu
screen, touch
(right softkey)
Start
> Options
()
> Messaging
and tap the
.
Accounts
tab.
4. Tap the desired email account from the onscreen list to
then launch the Email Setup page.
5. Touch the
6. Select the time interval within the
Send/Receive Schedule
link.
Automatic Send/Receive
drop-down field that you would like for your device to send
and check for new email.
7. Select the time frame within the
Download messages
drop-down field to select the age of messages to
download from the server. (The longer the time period, the
more messages will be downloaded.)
8. Touch the blue
9. Activate/deactivate any settings you wish to change by
Advanced Settings
link.
tapping the boxes adjacent to each option.
• Send/receive when I click Send
to automatically check for and
download new messages whenever you Send a message.
Page 67

• Use automatic send/receive schedule when roaming
continue to check your email at predetermined intervals even if you
are in a roaming area.
10. Select a deletion action within the
When deleting messages:
drop-down field to choose whether to automatically delete
or retain messages on your email server when you delete
those messages from your device.
11. Touch
Done
(left softkey) once you have completed your
edits.
12. Continue onto the remaining screens to alter the Download
Size settings (page 62).
Changing the Download Size Settings
1. From the
2. Use the Navigation keys to highlight the email account.
3. Touch
Tod ay
Menu
screen, touch
(right softkey)
Start
> Options
()
> Messaging
and tap the
Accounts
tab.
4. Tap the desired email account from the onscreen list to
then launch the Email Setup page.
5. Touch the
Download Size Settings
link.
to
6. Select a message format within the
Message Format:
drop-down field. This selection allows you to view your
email messages as either HTML or Plain Text documents.
7. Select a message size limit within the
limit:
drop-down field. This selection allows you to limit the
Message download
size of files attached to email messages.
8. Touch
Done
(left softkey) once you have completed your
edits and finish the process of altering the email settings.
Using ActiveSync to Configure Your Outlook Exchange Settings
This method of utilizing your built-in ActiveSync application
works to not only assist in the Outlook Exchange Server®
.
configuration process by wirelessly establishing the
communication parameters with the remote server, but also help
to then synchronize emails, contacts, and more, with your
computer’s current Outlook application.
Before you can begin this process, you must:
•
Have an established data connection to the Web via either Wi-Fi or
Mobile WiMAX.
Email Setup 62
Page 68

•
Work with your System Administrator to obtain the following pieces of
information:
–
Exchange Server address and domain name.
–
Your user name and password.
1. From the
2. Touch
3. Use the QWERTY keyboard to enter an email address. For
ActiveSync
Menu
Tod ay
screen, touch
.
(right softkey)
Start
()
> Programs >
> Add Server Source..
.
more information, refer to “Entering Text Using the
QWERTY Keyboard” on page 27.
4. Uncheck the
automatically
Attempt to detect Exchange Server Settings
box by tapping the adjacent box. This
function is activated by default to allow the device to
always try and automatically detect the connection
settings of the remote exchange server.
Note:
With most secured servers, enabling this option typically returns an
error since they require a manual connection.
5. Touch
Next
(right softkey) to continue onto the Server
Address page.
63
6. Use your keyboard (QWERTY or onscreen) to enter the
server address and touch
•
If your network requires SSL encryption, activate the
requires an encrypted (SSL) connection
7. Use your keyboard (QWERTY or onscreen) to enter your
Next
(right softkey).
This server
option.
user name, password, and domain name. (The password
is case-sensitive.)
8. Leave the
Save password
box checked to avoid having to
enter the password whenever you log on to this account,
and touch
Next
(right softkey).
Page 69

Place a check adjacent to those boxes for the types of
Outlook Email Messages
9.
information you wish to synchronize with the Exchange
Server, and then touch
Finish
(left softkey).
When the setup is complete, synchronize to retrieve your email
messages. You can also set up a sync schedule to automatically
retrieve messages.
Checking Your Outlook Email from the Today Screen
1. Navigate back to the Today screen and touch the onscreen
Outlook shortcut to display the most currently received
email.
•
This shortcut indicates how many currently unread Outlook email
messages you have. Touching this shortcut will also launch the
Messaging page where you can also access and read messages
from your other email accounts.
2. Touch the entry (displayed within the Magnifier) to open
the Messaging menu.
Email Setup 64
Page 70

3.
Touch an email account to then display a list of unread
email messages.
4. Touch an onscreen email message to then read its
contents. Use your Stylus to move the slider (on the right of
the message) up or down to scroll through longer
messages.
65
Page 71

Section 6: Calendar and Contacts
Calendar
Your Calendar helps organize your time and reminds you of
important events.
Adding an Event to Your Calendar
1. From the
2. Touch the left softkey to cycle between
Note:
Use the blue arrows (upper-right of screen) to cycle through the
Calendar.
3. Touch a calendar day to which you would like to add an
4. Enter a title for the event in the
Tod ay
Yea r
, and
Agenda
event and touch
screen, touch
Start
()
> Calendar
Day, Week, Month
(full-screen table calendar view).
Menu
(right softkey)
> New Appointment
Subject
field using the
keyboard. (For more information, refer to “Entering Text
Using the QWERTY Keyboard” on page 27.)
5. Enter a locale for the event in the
Location
field using the
keyboard.
6. Select a time and date for the event by selecting the
corresponding fields, touching the onscreen calendar to
set the
Start
and
End
date and then using the drop-down
time field to select a start and end time.
.
,
7. Touch the
All Day
field and choose whether the event
should be marked as an All Day event.
.
8. Select a recurrence status for the event by touching the
Occurs
field.
•
Select
Once, Every [Day], Day [Number] of every month
, or
Every [Month Number].
Calendar and Contacts 66
Page 72

ok
9.
Select an alarm time for the event by touching the
Reminder
field.
•
Select
None
or
Remind
me to toggle the activation state of the
reminder feature.
•
Select a reminder time interval: 1, 5, 10, 15, 30, or 45.
•
Select a timeframe:
10. Assign a Category for the new event by touching the
Categories
•
Assign any of the following:
Seasonal
•
Tou ch
New
your QWERTY keyboard and touching
11. Select the number of Attendees for the event (default is
attendees...
•
Select to add either a
•
Touch either field or touch
Attendee/Add Optional Attendee
“Adding a New Contact”
12. Select a status category for the event by touching the
Status
field.
•
Select
67
minutes(s), hour(s), day(s)
, or
week(s)
field.
Business, Holiday, Pers onal
. Any combination of category types can be selected.
(left softkey) to create a new category type by using
Done
(left softkey).
).
Required Attendee
Menu
or an
(right softkey)
Optional Attendee
> Add Required
. For more information, refer to
on page 70.
Free, Ten ta ti ve, Busy
, or
Out of Office
.
, or
13. Select a sensitivity for the event by touching the
Sensitivity
field.
•
Select
Normal, Pers onal, Private
14. Touch the
.
15. Touch to save the new event and return to the
Notes
tab and use your QWERTY keyboard to
enter an optional note.
, or
Confidential
.
previous calendar page.
Reviewing Calendar Events
You can quickly access any calendar entries by either selecting a
current event from the Today screen or by accessing the
Calendar via the Start menu.
No
1. From the
2. Touch the left or right blue arrows (located in the
.
Tod ay
screen, touch
upper-right of the Calendar screen) to scroll through
Start
()
> Calendar
.
currently created events.
•
If you don't see your event, touch the left softkey to cycle between
Day, Week, Month, Yea r
, and
Agenda
(full-screen table calendar
view).
3. Touch an event from the screen to open the event.
Page 73

Editing a Calendar Event
ok
X
1. From the
2. Locate the event and tap the entry.
3. Touch
Tod ay
Menu
(right softkey)
screen, touch
> Edit
Start
to open the Calendar
Event page where you can modify any necessary fields.
4. Touch to save the new event and return to the
previous calendar page.
Deleting a Calendar Event
1. From the
2. Find the date of your calendar event and tap the event to
Tod ay
screen, touch
Start
display its details. (You can use the upper-right blue arrows
to cycle through your calendar dates and locate your
event.)
3. Touch
4. Touch
Menu
(right softkey)
Yes
to confirm the deletion or No to cancel the
> Delete Appointment....
operation.
5. Touch to return to the previous calendar page.
()
> Calendar
()
> Calendar
Beaming a Calendar Event
.
1. Verify you are actively paired to another Bluetooth device.
Make sure that device is visible and detectable. For more
information, refer to “Bluetooth Communication” on
page 42.
2. From the
3. Find the date of your calendar event and tap the event to
Tod ay
screen, touch
Start
()
> Calendar
.
display its details. (You can use the upper-right blue arrows
.
to cycle through your calendar dates and locate your
event.)
4. Touch
Menu
(right softkey)
> Beam Appointment...
. Mondi
begins to search for visible devices within its range.
5. Touch the device name from the list to begin transmission.
.
The recipient will have to accept the incoming Calendar
event file before the process is complete.
Note:
Please allow a few minutes for the device names to be completely
populated within the onscreen list.
6. Touch to return to the previous page.
ok
Calendar and Contacts 68
Page 74

Contacts
Contact cardCommunication bar
Your device’s Contacts list helps you stay in touch with
colleagues, friends and family by keeping track of all their
contact information.
Note:
If your device was synchronized to your Outlook account via
ActiveSync, your current Contacts list would contain populated entries.
For more information, refer to “Using ActiveSync to Configure Your
Outlook Exchange Settings” on page 62.
Navigating within Contacts
1. From the
Tod ay
screen, touch (Favorite Contacts
shortcut). This reveals a scrollable listing of all currently
stored contacts.
2. In a single motion, touch and drag a contact card across
the screen to scroll through the available entries.
3. To access the communication features for a selected
Contact:
•
Tap a Contact card from the onscreen list to open the
communication bar.
•
Touch a communication option to initiate that function, see
“Utilizing the Communication Bar”
69
on page 72.
•Contact card
- contains the contact information specific to a
particular contact.
• Communication bar
- provides quick access to various
communication functions. Touching any function icon launches a
communication session with the target contact using the selected
communication method:
–
Options include: IM1/IM2/IM3 (Instant Message string 1, 2 & 3),
VoIP1/VoIP2/VoIP3 (Voice Over IP - Internet Telephony), and Email
(Outlook or Internet Mail).
Page 75

Adding a New Contact
Contact cardDefault image Empty Contact
(with custom image)
1. From the
Tod ay
screen, touch (Favorite Contacts
shortcut).
2. Slide or touch an empty Contact entry to the center
position and tap the card (indicated by a Plus sign where a
picture would be). This opens the Phonebook page.
3. Touch
4. Enter a name for the entry (using either the QWERTY
Menu
(right softkey)
> New
.
keyboard). For more information, refer to “Entering Text
Using the QWERTY Keyboard” on page 27.
5. Tap the Picture icon to assign a photo to the Contact.
•
Tou ch the
My Pictures
different location such as:
Card
.
•
Touch an image from the desired location to then apply it to the
drop-down list and select images from a
My Pictures, My Storage
, or
Storage
current entry.
6. Enter phone numbers for the current contact by touching
any of the telephone fields (
Home tel
). For more information, refer to “Entering Text
Mobile tel, Work tel
, or
Using the QWERTY Keyboard” on page 27.
7. Enter an Email address for the current contact by touching
the
E-mail
field.
8. Enter Instant Messenger addresses for the current contact
by touching any of the IM,
9. Enter a VoIP ID for the current contact by touching any of
the
VoIP, VoIP2
, or
Note:
These VoIP IDs can not be saved to the contact within the Samsung
Phonebook.
VoIP3
IM2
, or
IM3
fields.
fields.
Calendar and Contacts 70
Page 76

10.
ok
Select a Category type for the current contact by touching
the
Categories
placing a checkmark alongside those categories you wish
to assign.
•
If new categories exist, touch
to begin creating your own.
•
Enter a category name and touch
11. Touch
Save
(left softkey) to save the new entry once you
have filled in all the desired fields and assigned your
categories.
12. Complete the process by touching the new entry from the
Phonebook list.
Editing an Existing Contacts Entr y
1. From the
Tod ay
shortcut).
2. In a single motion, slide a desired Contact entry card to the
center location and touch
71
field and touching the selection field and
Menu
(right softkey)
Save
> New Category
(left softkey).
screen, touch (Favorite Contacts
Open Contact
(left softkey).
3. Touch
Edit
(left softkey) to open the Contact’s information
page and begin making changes to those fields you need
updated.
– or –
Touch
Menu
(right softkey)
4. Touch an onscreen field and update the information as
> Edit
.
desired. For more information, refer to “Entering Text Using
the QWERTY Keyboard” on page 27.
5. Touch to save your changes and return to the
scrollable Contacts page.
Deleting an Existing Contacts Entry
1. From the
Tod ay
screen, touch (Favorite Contacts
shortcut).
2. Slide a desired Contact entry card to the center location.
3. Touch
Menu
4. Touch
(right softkey)
Yes
to confirm the deletion of the current entry. The
> Delete Contact
current Contact card is then reverted back to an empty
entry.
.
Page 77

Beaming a Contacts Entry
ok
1. From the
Tod ay
screen, touch (Favorite Contacts
shortcut).
2. Slide a desired Contacts entry card to the center location
and touch
3. Touch
Open Contact
Menu
(right softkey)
(left softkey).
> Send Contact > Beam
begins to search for visible devices within its range.
4. Touch the device name from the list to begin transmission.
The recipient will have to accept the incoming Contact
card file before the process is complete.
Note:
Please allow a few minutes for the device names to be completely
populated within the onscreen list.
5. Touch to return to the previous page.
. Mondi
Utilizing the Communication Bar
This bar appears once a Contact card has been tapped and
activated. These provide you with communication options
specific to the selected card.
1. From the
Tod ay
screen, touch (Favorite Contacts
shortcut).
2. Slide a desired Contact entry card to the center location
and activate it by tapping the card once.
3. Tap the card again to launch the Communication Bar to
access the various communication applications. The bar is
closed when the Contact entry card is tapped again.
Calendar and Contacts 72
Page 78

Section 7: Applications
Mondi is loaded with familiar Microsoft® Office Mobile
applications such as Pocket Outlook, Pocket Internet Explorer,
MSN® Messenger, Windows® Media™ Player, Word/PowerPoint/
Excel Mobile, and several other specialty applications. In addition
to the applications, your device is Camera/Camcorder ready.
Microsoft Mobile Applications - Internet Explorer
Use of any online feature requires that you already be connected
to the Internet by either WiMAX or Wi-Fi. (For more information,
refer to “Communication and Connection” on page 38.)
䊳
From the
Tod ay
screen, touch
Start
()
> Internet Explorer
Navigating the Web
1. Touch
Menu
(right softkey)
> Go to Web Address
. This
action highlights the Address bar at the top of the browser
page.
2. Enter a Web address by using either your QWERTY
keyboard or touch to display an onscreen keyboard.
3. Once the address is entered, press or tap the web
address from below the address bar.
73
Saving a Web Address as a Favorite Location
1. From the
2. Touch
3. Enter a Web address and press .
4. With the Web site onscreen, touch
5. Touch the
.
6. Confirm the
Tod ay
Explorer
.
Menu
(right softkey)
Add to Favorites
Name
bookmark.
Address (URL)
screen, touch
.
field and input a descriptive name for this
enter the correct information.
7. Select a Folder location to house this new Favorites
Bookmark.
8. Touch
Add
(left softkey) to store the new bookmark and
return to the previous page.
Start
()
> Internet
> Go to Web Address
Menu
.
(right softkey)
>
is correct or touch the field and
Page 79

Microsoft Mobile Applications - Office Mobile
Mondi is loaded with mobile versions of the following 2007 Office
applications: Excel Mobile, Word Mobile, PowerPoint Mobile, and
OneNote Mobile.
Excel Mobile Overview
Excel Mobile works with Microsoft Excel on your computer to
give you easy access to copies of your workbooks. You can
create new workbooks or copy workbooks from your computer to
your device. Synchronize workbooks between your computer and
your device (via ActiveSync) to ensure that you have the most upto-date content in both locations. Excel Mobile also provides
fundamental spreadsheet tools, such as formulas, functions,
sorting, and filtering.
Creating a New Excel Workbook
1. From the
Note:
If this is your first workbook, a blank workbook is displayed after
selecting Excel Mobile.
2. Touch
Tod ay
Excel Mobile
New
screen, touch
Start
()
> Office Mobile >
.
(left softkey) to begin creation of a new
Workbook.
•
If there are existing workbooks on this device, the Excel Mobile file
access screen displays any previously created workbooks. To
create a new workbook, press the
3. Create a new workbook by using your QWERTY keyboard
New
softkey.
to enter data into respective fields. For more information,
refer to “Entering Text Using the QWERTY Keyboard” on
page 27.
•
For access to additional features and functions, touch
Menu
(right softkey).
4. Once you are finished, touch
Save As..
.
5. Choose a file
and touch
6. Touch to return to the previous page.
Save
ok
Name, Folder
.
Menu
(right softkey)
location, file
Typ e
, file
Deleting a Pre-existing Workbook
1. From the
2. Touch an entry from the Excel Mobile file access screen.
3. Touch
4. Confirm the deletion by touching
Tod ay
Excel Mobile
Menu
screen, touch
.
(right softkey)
Start
()
> File > Delete
Yes
. Touch No to cancel
> Office Mobile >
.
the deletion.
Applications 74
> File >
Location
,
Page 80

Beaming a Workbook
ok
Workbook files can be beamed directly to another Bluetoothcompatible device as long as that recipient is visible and
accepting incoming data.
1. From the
2. Touch an entry from the Excel Mobile file access screen.
3. Touch
Tod ay
Excel Mobile
Menu
screen, touch
.
(right softkey)
Start
> File > Beam...
to search for visible devices within its range.
4. Touch the device from the list to begin transmission. The
recipient will have to accept the incoming data file before
the process is complete.
5. Touch to return to the previous page.
OneNote Mobile Overview
OneNote Mobile is a digital notebook that allows you to gather,
store, and manage information in a single location.
Creating a New Note
1. From the
2. Touch
75
Tod ay
screen, touch
OneNote Mobile
.
New
(left softkey) to begin creating the new note.
Start
()
> Office Mobile >
. Mondi begins
()
> Office Mobile >
3. Use the QWERTY keyboard to create your new note. For
more information, refer to “Entering Text Using the
QWERTY Keyboard” on page 27.
4. Touch
Menu
(right softkey) to select additional formatting
options.
5. Complete the process by touching
Done
(left softkey).
Word Mobile Overview
Word Mobile works with the Microsoft Word already on your
computer to give you easy access to copies of your documents
while on the go. You can create new documents or copy existing
ones from your computer to your device. Synchronize the
documents between your computer and your device (via
ActiveSync) to ensure you have the most up-to-date content in
both locations. Use Word Mobile to create documents, such as
letters, meeting minutes, and trip reports.
Creating a New Word Document
1. From the
Tod ay
screen, touch
Word Mobile
•
.
If there are no documents on this device, a new document
Start
()
> Office Mobile >
automatically displays.
Page 81

•
ok
If there are existing documents on this device, the file access
screen displays. To create a new document, press
softkey).
2. Use the QWERTY keyboard to create your new document.
For more information, refer to “Entering Text Using the
QWERTY Keyboard” on page 27.
3. Once you are finished, touch
Save As..
.
4. Choose a file
and touch
•
You can save a document in any one of the following formats: Word
Name, Folder
Save
.
Menu
(right softkey)
location, file
Document (*.docx), Word Template (*.dotx), Rich Text Format (*.rtf),
or Plain Text (*.txt).
5. Touch to return to the previous page.
Accessing Word Mobile’s Options
1. From the
Tod ay
screen, touch
Word Mobile
•
.
If there are no documents on this device, a new document
Start
()
automatically displays.
•
If there are existing documents on this device, the file access
screen displays. To create a new document, press
(left softkey).
New
(left
> File >
Typ e
, file
Location
> Office Mobile >
New
2. Touch
Menu
(right softkey)
any of the following options:
• Default template
Meeting Notes, Memo, Phone Memo, To Do, Word 97–2003
document, and Word Document (.do cx) as the default document for
any consecutive new documents.
•Save to
- Allows you to select the default storage location of new
word documents. Choose from among: Main memory, My Storage,
or Storage Card.
,
• Display in list view
Files, Plain Text Files, All Known File Types.
3. Touch to save your changes and return to the
ok
previous page.
Deleting a Pre-existing Document
1. From the
2. Touch an entry from the Word Mobile file access screen.
3. Touch
4. Confirm the deletion by touching
Tod ay
Word Mobile
Menu
.
(right softkey)
the deletion.
> Tools > Options
. Choose from
- Allows you to select a document format such as
- Allows you to display Word files, Rich Text
screen, touch
Start
()
> File > Delete
Yes
. Touch No to cancel
> Office Mobile >
.
Applications 76
Page 82

Beaming a Word Document
ok
Word Documents can be beamed directly to another Bluetoothcompatible device as long as that recipient is visible and
accepting incoming data.
1. From the
2. Touch an entry from the Word Mobile file access screen.
3. Touch
Word Mobile
Menu
Tod ay
screen, touch
.
(right softkey)
Start
()
> File > Beam...
to search for visible devices within its range.
4. Touch the device from the list to begin transmission. The
recipient will have to accept the incoming data file before
the process is complete.
5. Touch to return to the previous page.
Windows Media Player
Use Microsoft Windows Media Player® to play digital audio and
video files that are stored on your device or downloaded from the
Internet. You can play files in either an MP3 format, or in their
original Windows Media format, including files with extensions:
.wma
and
.wmv
.
77
> Office Mobile >
. Mondi begins
The device provides display of video on a 4.3 inch screen
(visible). Any imported video should be scaled to fit within that
onscreen dimension and then copied into the MEDIA folder on the
microSD card.
Launching Media Player
䊳
From the
Tod ay
Windows Media
screen, touch
.
Start
()
> Programs >
Loading a Media File into the Player
1. From the
2. Touch
Tod ay
Windows Media
Menu
(right softkey)
[folder location]
screen, touch
Start
()
> Programs >
.
> Open File > Storage Card >
. Use the File System screen to locate your
desired multimedia file.
Note:
The location of video files is not fixed but created by users. The [folder
location] description above denotes the user-created folder housing
the media files.
3. Touch the desired media file from the available list.
4. Touch
Play
(left softkey) to begin playback.
Page 83

Media Player Controls
Player Controls Volume Controls
Magnification Media Player Online
With the Media Player window open, you can change or use any
of the following application functions:
•
Magnification
- allows you to toggle between a Fullscreen and Fit to
Page view. To exit from the Fullscreen mode, tap the screen.
•
Media Player Online
- provides access to the Windows Media Player
homepage where you can access other media content.
•
Player Controls
- provides access to the Play/Pause, Next and
Previous functions.
•
Select Play to listen to a file. The Play icon turns into the Pause icon
once the file begins playing.
•
Select either Rewind or Fast Forward during playback or while
paused to skip back to the beginning of the current file and to skip
ahead to the end.
•
The playback slider control above the control icons adjusts the
playback progress of the selected file.
•
Volume Controls
䊳
Touch
- adjusts the sound level during playback.
Menu
(right softkey) to access additional application
functions.
MultiMedia Player Compatibility
The Windows Media Player recognizes wmv, and avi video
formats. The MultiMedia Player recognizes avi, wmv, and mp4
video formats, as well as DivX® encoded media files. For more
detailed information on the Multimedia Player, please refer to the
online User Guide
Devices certified to play DivX video
:
ABOUT DIVX VIDEO: DivX® is a digital video format created by
DivX, Inc. This is an official DivX Certified device that plays DivX
video.
ABOUT DIVX VIDEO-ON-DEMAND: This DivX® Certified device
must be registered with DivX in order to play DivX Video-onDemand (VOD) content. First generate the DivX VOD registration
code for your device and submit it during the registration
process.
Applications 78
Page 84

[Important: DivX VOD content is protected by a DivX DRM (Digital
Rights Management) system that restricts playback to registered
DivX Certified devices.
If you try to play DivX VOD content not authorized for your device,
the message "Authorization Error" will be displayed and your
content will not play.] Learn more at
www.divx.com/vod
.
Instant Messenger
Messenger (Windows Live Messenger®) is an instant messaging
client created by Microsoft® for peer to peer communication.
1. From the
2. Touch
3. Read the onscreen licensing agreement and touch
Messenger
Sign in
Tod ay
screen, touch
Start
()
> Programs >
.
(left softkey) to begin the login process.
Accept
(left softkey).
4. Touch the
E-mail address
and Password fields and enter
the information associated with your Messenger account.
Use the QWERTY keyboard to create your new document.
For more information, refer to “Entering Text Using the
QWERTY Keyboard” on page 27.
5. Select a email carrier (hotmail.com, live.com, msn.com, or
Other [such as yahoo.com]).
79
6. Touch
Next
(left softkey) to connect to the remote service
and complete the login process.
Calculator
Your device comes with a built-in calculator.
1. From the
2. Enter numbers using either your QWERTY or onscreen
PowerCalc
Tod ay
.
screen, touch
Start
()
keyboard.
Clocks
Allows you to manage various time events (Alarms,
Anniversaries, Stopwatch, and World Clock).
Creating a New Alar m Event
Your device comes with a built-in alarm clock feature that has the
the ability to create various alarm events.
1. From the
Tod ay
screen, touch the Date/Time shortcut.
– or –
From the
Tod ay
Clocks
2. Tap the
.
Alarm
screen, touch
tab, then touch
Start
()
New
(left softkey).
> Programs >
> Programs >
Page 85

Touch the
Alarm
3.
field and enter a unique name for this
alarm event. For more information, refer to “Entering Text
Using the QWERTY Keyboard” on page 27.
4. Select a repeating status for the alarm by touching either
On
or
Off
.
5. Select the week day assigned to the alarm by touching the
onscreen day (Sunday - Saturday).
•
If the Repeat function was activated (ON), you can select more than
one day.
6. Touch the
Time
field to open an onscreen time settings
page.
7. Touch a time field entry (Hour or Minutes) to activate the
selection.
8. Touch either the blue circle (below the grey slider) or the
slider itself, and drag it either left (to decrease the value) or
right (to increase the value).
•
Drag and hold the slider at one end to increase the incremental
value adjustment. The further you drag the slider to one end or
another, the faster the counter changes.
•
You can also touch the + or - buttons to accomplish the same
action. Touch and hold these buttons to increase the speed of the
time change.
Applications 80
Page 86

9.
Touch
Done
to complete the time assignment.
10. Select a snooze setting by touching the
Snooze
field and
then selecting one of the available options (via either a tap
or by using your Up/Down Navigation keys):
3 Min, 5 Min, 7 Min
11. Select an alarm sound (
or
10 Min
Ring
.
tone,
generated sound) for the alarm by touching the
Profile
field and selecting one of the available options (via
Vibrate
None, 1 Min
, or
System
Sound
either a tap or by using your Up/Down Navigation keys).
•
If you selected Ring or System, a sound field will appear below the
Sound Profile field.
•
Touch an available audio file to play a sample.
12. Adjust the alarm volume by either touching and dragging
the volume slider across the screen or touching either
volume icon (+/-).
Note:
If you select a Ring or System Sound Profile, the Volume slider will
appear. If you select Vibrate, no Volume adjustment is possible.
13. Touch
Done
(left softkey) once you have finished creating
the alarm.
81
Activating/Deactivating an Alarm
1. From the
,
2. Tap the
Clocks
.
– or –
From the
Tod ay
screen, touch
Tod ay
screen, touch the Date/Time shortcut.
Alarm
tab, then touch either the ON or
Start
()
> Programs >
OFF
(at the
right of the tab) to toggle the active state of the selected
alarm event.
Deleting an Alarm Event
1. From the
Clocks
.
Tod ay
screen, touch
Start
()
> Programs >
– or –
From the
Tod ay
screen, touch the Date/Time shortcut.
2. Tap the
3. Tap the
Mode
Alarm
tab, then touch
Menu
.
X
adjacent to the alarm event you wish to
(right softkey)
> Delete
delete.
•
To delete all existing Alarms, touch
4. Touch
Yes
to confirm the deletion of the selected alarm.
Delete All
(left softkey).
Page 87

Touch
Done
5.
(right softkey) to exit from the Delete Mode if
there are remaining alarm events.
Creating a New Anniversary Event
Your device comes with a built-in Anniversary feature that
provides the ability to create reminders for specific anniversary
events based on a calendar date (versus a time event).
1. From the
Clocks
.
Tod ay
screen, touch
Start
()
> Programs >
– or –
From the
Tod ay
screen, touch the Date/Time shortcut.
2. Tap the
3. Touch the
Anniversary
tab, then touch
Name
field and enter a unique name for this
New
(left softkey).
anniversary event. For more information, refer to “Entering
Text Using the QWERTY Keyboard” on page 27.
4. Touch the
Date
field to open an onscreen calendar from
where you can select a date for the event by tapping a day
from the desired month and touch
Done
(left softkey).
Touch the left and right arrows atop the calendar to move
to either the previous or next month.
5. Touch the
Time
field to open an onscreen time settings
page to adjust the time settings, see “Creating a New
Alarm Event” on page 79.
6. Touch the
7. Select an alarm sound (
Repeat
field and select a repeating status for the
anniversary event by touching either
Weekly
.
Ring
tone,
Annually, Monthly
Vibrate
generated sound) for the alarm by touching the
Profile
field and selecting one of the available options (via
either a tap or by using your Up/Down Navigation keys).
or
, or
System
Sound
Applications 82
Page 88

•
X
If you selected Ring or System, a Volume field will appear below the
Sound Profile field.
•
Touch an available audio file to play a sample.
8. Adjust the alarm volume by either touching and dragging
the volume slider across the screen or touching either
volume icon (+/-).
Note:
If you select a Ring or System Sound Profile, the Volume slider will
appear. If you select Vibrate, no Volume adjustment is possible.
9. Touch
Done
(left softkey) once you have finished creating
the anniversary event.
Activating/Deactivating an Anniversary Alert
1. From the
Clocks
.
Tod ay
screen, touch
– or –
From the
Tod ay
screen, touch the Date/Time shortcut.
2. Tap the
Anniversary
tab, then touch the drop-down field (at
the right of the tab) and make a selection:
1 day, 3 day
, or
7 day
to toggle the notification setting of the
selected anniversary alert.
83
Start
()
> Programs >
OFF, Tod ay
Deleting an Anniversary Event
1. From the
Clocks
.
Tod ay
screen, touch
Start
()
> Programs >
– or –
From the
Tod ay
screen, touch the Date/Time shortcut.
2. Tap the
3. Tap the
Anniversary
Delete Mode
tab, then touch
Menu
(right softkey)
.
adjacent to the anniversary event you wish to
>
delete.
•
To delete all existing Anniversaries, touch
4. Touch
Yes
to confirm the deletion of the selected alarm.
5. Touch
Done
(right softkey) to exit from the Delete Mode if
Delete All
(left softkey).
there are remaining anniversary events.
,
Page 89

Using the StopWatch
X
World Clock Map Favorite Locations
Your device comes with a built-in stopwatch feature.
1. From the
Clocks
.
Tod ay
screen, touch
Start
()
– or –
From the
Tod ay
screen, touch the Date/Time shortcut.
2. Tap the
3. Touch
4. Touch
Note:
StopWatch
tab.
Start
(right softkey) to turn on the timer.
Stop
(right softkey) to stop the timer.
Times can be recorded by touching
Record
(left softkey)
> Programs >
Using the World Clock
This tab lets you to view the current time at various locations in
the world, and assign up to three locations as your favorites (one
being your Home location).
5. Touch
Reset
(left softkey) to set the timer counter back to
zero.
6. Touch to exit the application and return to the
previous screen.
Viewing Time Around the World
1. From the
Clocks
.
Tod ay
screen, touch
– or –
From the
Tod ay
screen, touch the Date/Time shortcut.
2. Tap t he
World Clock
tab.
Start
()
> Programs >
Applications 84
Page 90

3.
Tap the World Clock Map on the screen.
4. Find a city on the world map by touching one of the blue
ocean areas and in a single motion touch and drag the
map across the screen.
5. Double tap a city to view the current time. The selected
time zone will turn blue.
Assigning a Favorite World Location
1. From the
Clocks
.
Tod ay
screen, touch
Start
()
> Programs >
– or –
From the
Tod ay
screen, touch the Date/Time shortcut.
2. Tap t he
3. Tap the World Clock Map on the screen.
4. Find a location and tap a city once to get the assignment
World Clock
tab.
popup. This popup displays the available cities in the
desired time zone.
85
5. Touch a city form the current time zone list to then reveal
the Favorites options:
•
Home - records/assigns the main area within which you reside or
Home, City 1
, or
City 2
.
your preferred time zone. By default, your device’s system time is
set to this region.
•
City 1/City 2 - record/assign two optional world locations for which
the device will keep track of their local times.
6. Select one the Favorite entries then touch
OK
(upper-right)
to save your choices and return to the World Clock tab.
•
Each Favorite location is referenced on the World Clock Map with a
colored square.
•
Home is blue, City 1 is green, and City 2 is red.
Editing an Existing Favorite Location
1. From the
Clocks
.
Tod ay
screen, touch
Start
()
> Programs >
– or –
From the
Tod ay
screen, touch the Date/Time shortcut.
2. Tap the
World Clock
tab and touch one of the three
onscreen Favorite locations.
Page 91

Touch the drop-down arrow adjacent to the Time Zone
ok
Active Applications Ending Options Display
Access to Multimedia Player
3.
field to then select a different city from your current time
zone.
– or –
Touch to open a list of world cities from which you
can choose a new location.
Note:
The
DST
field will reflect (activated/deactivated) if the selected area
recognizes Daylight Savings Time and can make such an adjustment
to its time tracking.
As more and more applications are left running, they can utilize
your device resources, slow down your device and drain your
battery faster.
1. Press and hold (left action key) to launch the
TaskSwitcher
•
application.
This application visually displays any applications currently running
in the background.
•
It also provides the option to either bring a selected application
forward or End (close) it.
4. Touch
Done
(left softkey) to update and store these
changes.
Using TaskSwitcher to Close Applications
Applications are only closed (no longer active) when they are
exited via the application’s own Menu options. Simply touching
or will only minimize the current application and
X
keep it running actively in the background.
Unlike most computers, wherein minimized applications appear
as blocks located along the bottom of the screen (Task Bar), on
Mondi, these, still running, applications are left to run in the
background.
Applications 86
Page 92

2.
Flip through the currently open applications and center the
desired application on the screen. Selected applications
display their name above the image.
3. Touch either
End
(to terminate the current app) or
End All
(to close all background applications).
4. Touch the Display icon (bottom-right) to change the way
the currently active applications are displayed.
•
Options are:
Horizontal List
Note:
The Multimedia Player can be launched directly from the TaskSwitcher
(bottom Left of screen).
or
Vertical Grid
.
ROUTE 66 Navigation
ROUTE 66™ is a ready-to-use navigation solution that comes
complete with built-in voice-guided 3D GPS navigation based on
your current location. Mondi utilizes its built-in GPS hardware to
work in tandem with the ROUTE 66 software and provide you
real-time and accurate map information, including access to
digital maps with POIs (points of interest). The application is
loaded onto the Mondi DVD and must be installed from your
computer, to a connected Mondi device. The included maps can
be loaded to either the device’s built-in storage space or to an
optional microSD card.
87
Note:
Once installed, the maps are associated to your Mondi. If these maps
were installed onto a microSD and then inserted into another device,
they would not function as they are registered to the specific Mondi on
which they were installed.
Installing the Application and Maps
If you have already setup an ActiveSync connection between your
Mondi and your computer, you will have to make a small
modification to your ActiveSync settings prior to disc installation
to prevent any conflicts during setup. These setup procedures
are based on the usage of the ActiveSync 4.5 application.
1. Prior to setup, make sure your Mondi has access to the
Internet as this is necessary to complete the setup and
registration process. For more information, refer to
“Communication Setup” on page 38.
Important!:
To install the maps onto your microSD card you will need a card
with at least 1GB of available space (2GB microSD card or
greater is recommended).
2. When installing the maps to the card, you will need to
establish a direct USB Mass Storage connection (vs
ActiveSync).
•
From the
Tod a y
screen, touch
Start
()
> Settings
.
Page 93

•
Tou ch t he
Connections
•
Touch the Mass Storage radio box, then choose
tab and tap
External Connections
Storage Card from
the drop-down list. The Mondi then establishes a new USB
connection with your computer and allows access to the internal
microSD card as an external storage location.
ok
•
Touch to save the new connection type and place the device
into USB Mass Storage Mode.
•
In this way, the Route 66 application can place the necessary files
directly onto the card.
3. Locate the grey ActiveSync icon within the Taskbar area of
the Desktop (bottom-right). The icon should be grey when
Mondi is not connected.
4. Right-click on the icon and select
5. Uncheck the
Allow USB connections
Connection Settings...
field and click OK. The
ROUTE 66 installation requires an open USB port to
communicate with the connected device.
Important!:
If this field is not unchecked, the necessary connection can not
be made and you will receive an error message during setup. If
you receive an ActiveSync connection error, ignore it for now.
6. Power-up the Mondi unit and connect it directly to your
computer via the USB cable. The ActiveSync icon should
remain grey after connection, if not, repeat steps 1 thru 3.
.
7. Insert your Mondi DVD disc into your available DVD drive.
The splash screen should then appear on your screen.
8. From the Splash screen click
OEM Applications > PC Utility > ROUTE66
9. From the main Route 66 application screen, click
10. Choose a language and click
11. Accept the licensing agreement and click
12. Select a language and gender for the vocal navigation
Additional Tools > Samsung
.
INSTALL
Next > Next
.
Next
.
.
instructions (when Mondi speaks the navigational
.
associated gender (
13. Place a checkmark adjacent to the desired maps you wish
uploaded for use and click
States and Canada
Note:
If you receive a connection error message, set the Mondi to Mass
Storage Mode (Step 2) and click
directions) and click
Next
. Each language has an
Male
or
Female
Next
. The default is
.
Retry
.
).
United
Applications 88
Page 94

14.
Select
Format storage medium
and click
Next
. It is
recommended that the maps be installed onto a clean and
empty microSD card. Once the maps are installed, the
microSD card is then paired for use with your specific
Mondi device.
Important!:
Formatting the microSD card will erase all information and leave
the card empty of data.
15. Read the onscreen popup describing the format process
and click
Yes
. Your microSD card is then formatted to
delete all pre-existing information and prepared for upload
of the ROUTE 66 map files and folders.
16. Click
Install
to begin the installation process of both the
maps to the microSD card as well as any other necessary
files.
Note:
This process can take several minutes. Do not disconnect your device
from the computer. These files will occupy over 1GB of storage space
on the microSD card.
17. Click
Finish
to complete the installation process and exit
the wizard.
89
18. From the main Route 66 application screen, click
EXIT
.
19. Click the onscreen
Exit
button on the Mondi device to exit
the USB Mass Storage Mode. Tap the onscreen
EXIT >
Yes
to
complete this process.
20. From the
21. Read the Mondi onscreen legal disclaimer and tap
Tod ay
ROUTE66 WM8
screen, touch
.
Start
()
> Programs >
Accept
Use the Up/Down blue arrows to scroll through the
disclaimer.
22. Tap
No
to exit from reading the disclaimer message again.
The Mondi then begins to use its internal GPS hardware to
obtain your current location.
23. Locate your ROUTE66 Voucher code from the sticker
affixed to either the DVD sleeve or the Navigation GSG and
tap
Yes
.
24. Use either the onscreen keyboard or Mondi’s own QWERTY
keyboard to enter your Voucher code.
.
Page 95

Once the Voucher code has been correctly entered, tap the
Zoom In Zoom Out
Back Target Main menu
Map Target Area
25.
onscreen green checkmark. If this is your only voucher
code, tap No.
•
If you have additional voucher codes, tap
Yes
and enter those
additional codes.
26. From the Network Connection popup, tap either
or
Allow always
Note:
If you receive a connection error during this Voucher code registration,
exit the Route66 application, establish a new Internet connection, and
restart Mondi setup process (step 20).
, and tap the onscreen green checkmark.
Ask always
1. Touch a location on the map to activate the target screen
(shown).
•
You can move around a map by touching a dragging across the
screen (in a single motion).
•
Once you have located a general area, touch a more specific
location to focus your search.
27. Mondi then utilizes the currently active Web connection to
contact the ROUTE66 server, register your device,
associate it with the entered Voucher code, then locate
your current position on the selected map group.
Navigating within Route66 Application
Once the Route66 maps and application are properly installed,
the Mondi will display your current overall location, from which
you must then select a desired area and function.
Applications 90
Page 96

2.
Touch the Target icon ( ) to reveal options specific to
your selected area. Options included in the Target menu
are:
• Navigate to
•Call
• Zoom to cursor
: begins a new navigation session.
(greyed out as Mondi can not make direct calls)
: zooms the current map to indicate more detail
about the selected target location.
• Show information
: displays additional popup information when
any onscreen map object is touched (street, locale, area). The
onscreen popup disappears once a new location is touched.
• Send cursor position
: records your current location and then
provides you the ability to send it to an external recipient via either
e-mail or Bluetooth. Some options may be greyed-out.
•Save cursor position
: Stores the current location as: a contact
entry, Favorite Location, as your home address, or as your office
address.
• Search for Points-of-interest
: displays points of interest near both
your current location and along a selected travel route.
• Add to route
: opens the Plan new route view where you select a
new route for your current trip.
3. Touch Back icon ( ) to exit from the current menu.
4. Touch the Main menu icon ( ) to reveal options that
are available during either navigation or map browsing.
Options included in the Main menu are:
91
•Search
: select from an available online database of information and
then search based on one of the following parameters: Locations,
Favorites, History, Points-of-Interest , Contacts (with their associated
locations), and a location based on a specific Latitude/Longitude.
•Navigate
: navigate based on an available online database of
information and then navigate based on one of the following
parameters: Locations, Favorites, History, Points-of-Interest,
Contacts (with their associ ated locations), and a location based on a
specific Latitude/Longitude.
•Travel mode
: create a custom navigation based on driving either
the fastest route, shortest route, or walking. Touch to green select
icon to store this new selection.
•Extras
: use one of the additional Route66 services, such as: Maps,
Traffic information, Safety cameras, Weather updates, Voices (to
change the current readout language and gender), Colour schemes
(to change the current Route66 color scheme), Travel guides,
Update (update the Route 66 software version), and Enter voucher
code (update or add a new Voucher code).
•Zoom
: alter the current map zoom magnification.
•View
: select different visualization options such as: Day/Night
colours, 2D/3D perspectives, Navigation screen layout, GPS
information, GPS stats, Volume levels, and information About Route
66.
•Send
: send one of the following to an external recipient: current
Map as image, GPS position, current selected Cursor position, or a
route description.
Page 97

•Save
: stores (within either the application itself or within the
microSD card) a current Map location as an image, GPS location, or
a selected Cursor position.
•Routes
: select a different route.
• Settings
: customize the Route66 application settings such as:
General, Map, Navigation, Speed, Alarm, Extras, Legend, Screen
orientation, Date & Time, or calibrate screen.
•Photos
: access locally stored images.
•Help
: provides onscreen help information about Route66.
•Exit
: exits the Route66 application.
For additional usage information, visit
http://www.66.com/support/
and select User Manuals.
,
Applications 92
Page 98

Section 8: Health and Safety Information
This section outlines the safety precautions associated with using
your device. These safety precautions should be followed to
safely use your device.
Health and Safety Information
Exposure to Radio Frequency (RF) Signals
Samsung Mobile Products and Recycling
Samsung cares for the environment and encourages its
customers to recycle Samsung mobile devices and genuine
Samsung accessories.
Go to:
https://fun.samsungmobileusa.com/recycling/index.jsp
information.
for more
UL Certified Travel Adapter
The Travel Adapter for this device has met applicable UL safety
requirements. Please adhere to the following safety instructions
per UL guidelines.
FAILURE TO FOLLOW THE INSTRUCTIONS OUTLINED MAY LEAD
TO SERIOUS PERSONAL INJURY AND POSSIBLE PROPERTY
DAMAGE.
IMPORTANT SAFETY INSTRUCTIONS - SAVE THESE
INSTRUCTIONS.
93
DANGER - TO REDUCE THE RISK OF FIRE OR ELECTRIC SHOCK,
CAREFULLY FOLLOW THESE INSTRUCTIONS.
FOR CONNECTION TO A SUPPLY NOT IN NORTH AMERICA, USE
AN ATTACHMENT PLUG ADAPTOR OF THE PROPER
CONFIGURATION FOR THE POWER OUTLET. THIS POWER UNIT IS
INTENDED TO BE CORRECTLY ORIENTATED IN A VERTICAL OR
HORIZONTAL OR FLOOR MOUNT POSITION.
Consumer Information on Wireless Devices
The U.S. Food and Drug Administration (FDA) has published a
series of Questions and Answers for consumers relating to radio
frequency (RF) exposure from wireless devices. The FDA
publication includes the following information:
What kinds of devices are the subject of this update?
The term wireless device refers here to hand-held wireless
devices with built-in antennas, often called "cell," "mobile," or
"PCS" devices. These types of wireless devices can expose the
user to measurable radio frequency energy (RF) because of the
short distance between the device and the user's head. These RF
exposures are limited by Federal Communications Commission
safety guidelines that were developed with the advice of FDA and
other federal health and safety agencies.
Page 99

When the device is located at greater distances from the user,
the exposure to RF is drastically lower because a person's RF
exposure decreases rapidly with increasing distance from the
source. The so-called "cordless devices," which have a base unit
connected to the telephone wiring in a house, typically operate at
far lower power levels, and thus produce RF exposures well
within the FCC's compliance limits.
Do wireless devices pose a health hazard?
The available scientific evidence does not show that any health
problems are associated with using wireless devices. There is no
proof, however, that wireless devices are absolutely safe.
Wireless devices emit low levels of radio frequency energy (RF) in
the microwave range while being used. They also emit very low
levels of RF when in the stand-by mode. Whereas high levels of
RF can produce health effects (by heating tissue), exposure to
low level RF that does not produce heating effects causes no
known adverse health effects. Many studies of low level RF
exposures have not found any biological effects. Some studies
have suggested that some biological effects may occur, but such
findings have not been confirmed by additional research.
In some cases, other researchers have had difficulty in
reproducing those studies, or in determining the reasons for
inconsistent results.
What is FDA's role concerning the safety of wireless
devices?
Under the law, FDA does not review the safety of radiationemitting consumer products such as wireless devices before they
can be sold, as it does with new drugs or medical devices.
However, the agency has authority to take action if wireless
devices are shown to emit radio frequency energy (RF) at a level
that is hazardous to the user. In such a case, FDA could require
the manufacturers of wireless devices to notify users of the
health hazard and to repair, replace or recall the devices so that
the hazard no longer exists.
Although the existing scientific data do not justify FDA regulatory
actions, FDA has urged the wireless device industry to take a
number of steps, including the following:
•
Support needed research into possible biological effects of RF of the
type emitted by wireless devices;
•
Design wireless devices in a way that minimizes any RF exposure to
the user that is not necessary for device function; and
•
Cooperate in providing users of wireless devices with the best possible
information on possible effects of wireless device use on human
health.
FDA belongs to an interagency working group of the federal
agencies that have responsibility for different aspects of RF
Health and Safety Information 94
Page 100

safety to ensure coordinated efforts at the federal level. The
following agencies belong to this working group:
•
National Institute for Occupational Safety and Health
•
Environmental Protection Agency
•
Federal Communications Commission
•
Occupational Safety and Health Administration
•
National Telecommunications and Information Administration
The National Institutes of Health participates in some interagency
working group activities, as well.
FDA shares regulatory responsibilities for wireless devices with
the Federal Communications Commission (FCC). All devices that
are sold in the United States must comply with FCC safety
guidelines that limit RF exposure. FCC relies on FDA and other
health agencies for safety questions about wireless devices.
FCC also regulates the base stations that the wireless device
networks rely upon. While these base stations operate at higher
power than do the wireless devices themselves, the RF
exposures that people get from these base stations are typically
thousands of times lower than those they can get from wireless
devices.
Base stations are thus not the primary subject of the safety
questions discussed in this document.
95
What are the results of the research done already?
The research done thus far has produced conflicting results, and
many studies have suffered from flaws in their research
methods. Animal experiments investigating the effects of radio
frequency energy (RF) exposures characteristic of wireless
devices have yielded conflicting results that often cannot be
repeated in other laboratories. A few animal studies, however,
have suggested that low levels of RF could accelerate the
development of cancer in laboratory animals.
However, many of the studies that showed increased tumor
development used animals that had been genetically engineered
or treated with cancer-causing chemicals so as to be predisposed to develop cancer in absence of RF exposure. Other
studies exposed the animals to RF for up to 22 hours per day.
These conditions are not similar to the conditions under which
people use wireless devices, so we don't know with certainty
what the results of such studies mean for human health.
Three large epidemiology studies have been published since
December 2000. Between them, the studies investigated any
possible association between the use of wireless devices and
primary brain cancer, glioma, meningioma, or acoustic neuroma,
tumors of the brain or salivary gland, leukemia, or other cancers.
None of the studies demonstrated the existence of any harmful
health effects from wireless devices RF exposures. However,
 Loading...