

Page 1
Get
Started
All you need to know to get going.
Page 2

Thanks for choosing Sprint. This booklet introduces you to the basics
of getting started with Sprint and your Samsung Galaxy Tab® 3.
ReadyNow – For more help in getting up and running with your
new tablet, take advantage of exclusive Ready Now resources at
sprint.com/readynow. You can even schedule a one-on-one
appointment at a Sprint Store near you.
For ongoing support and resources, visit sprint.com/support.
There, you’ll ind guides, tutorials, and more to help you get the
most out of your tablet.
Note: Available applications and services are subject to change at any time.
Welcome!
Page 3
Using This Guide
3
This Get Started guide is designed to help you set up and use your
new Samsung Galaxy Tab 3. It’s divided into four sections to help
you nd the information you need quickly and easily.
Using This Guide
Get Ready − page 5 − Find out what
you need to do before you use your
tablet the rst time, including activating
Sprint service on your device.
Android Basics − page 8 − Learn some
basics about how to move around on
your tablet, use the home screen, and
enter text. If you’re familiar with Android™
devices, you can probably skip these
pages (although a refresher course never
hurt anyone).
Use Your Tablet − page 15 − Take
advantage of your tablet’s features and
Sprint services, from the basics (going
online) to the more advanced (using
Google Play™, Wi-Fi®, and more).
Tools & Resources − page 27 − Find
useful tips for your tablet and discover
resources and other helpful Sprint
information. For additional information
including the full User Guide, videos,
tutorials, and community forums, visit
sprint.com/support.
Page 4
4
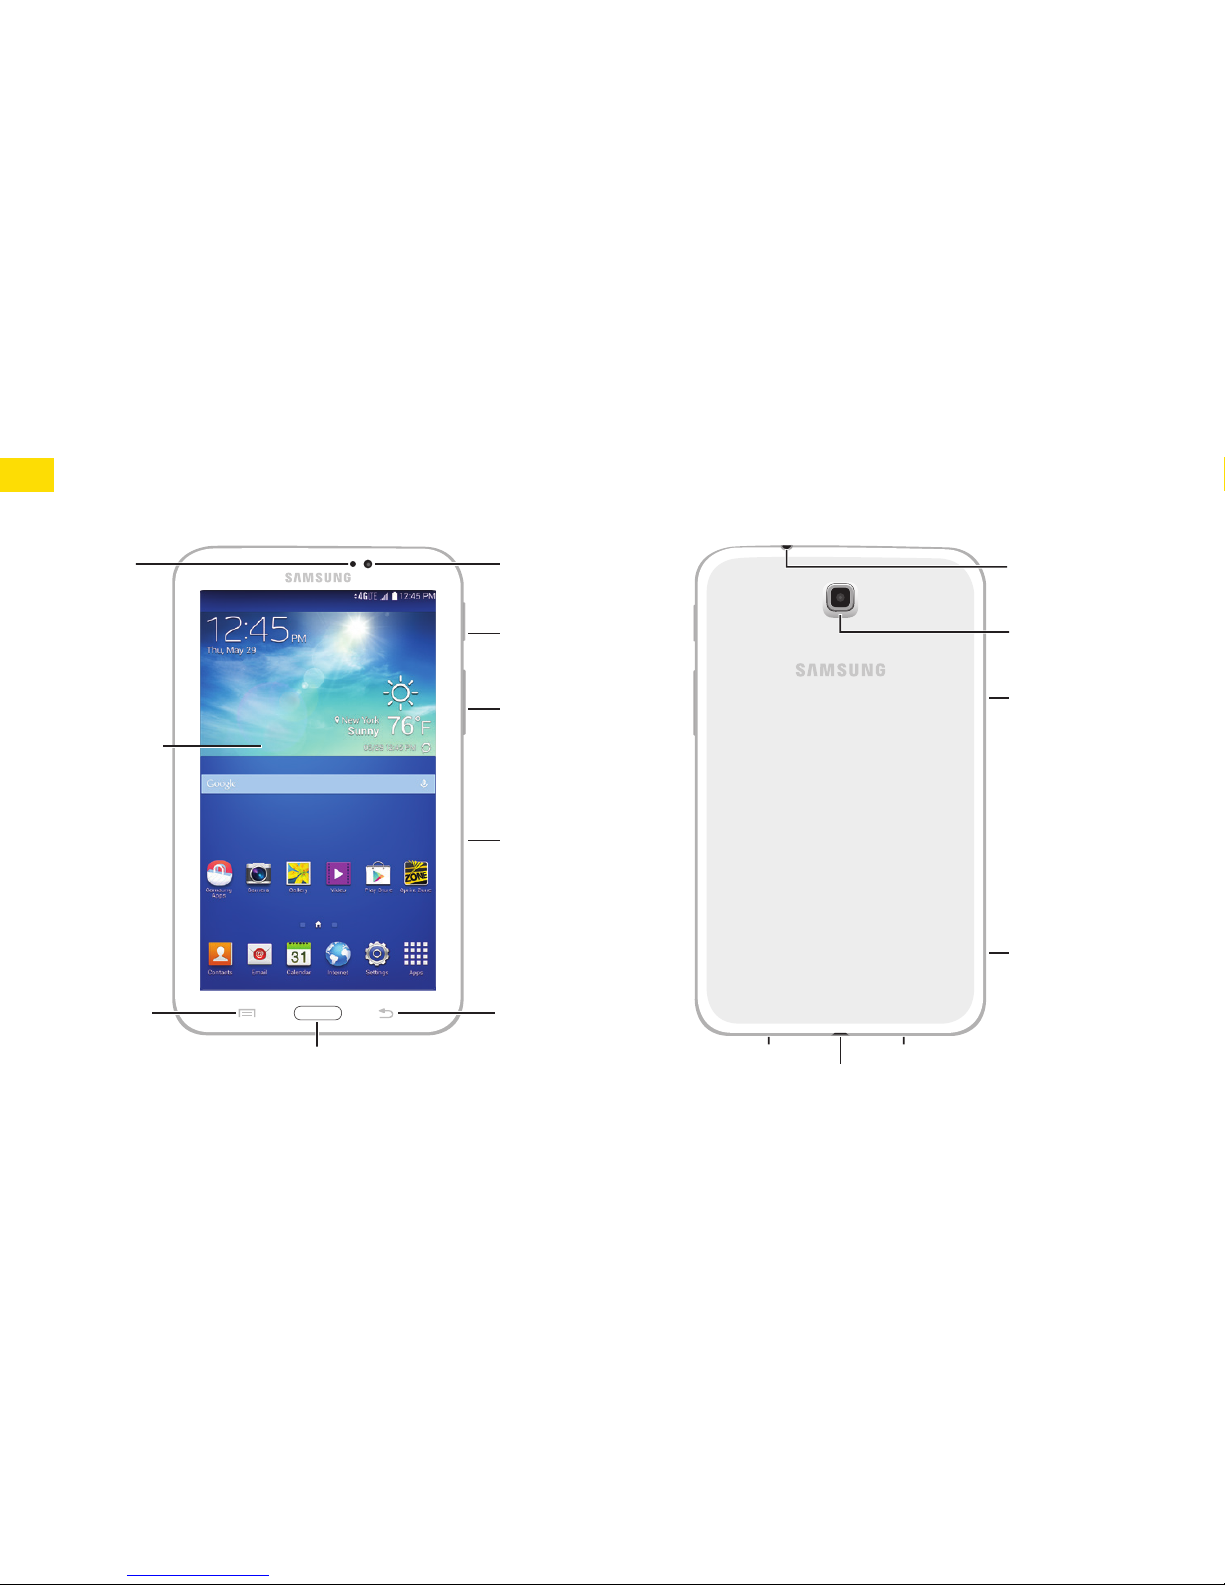
Your Samsung Galaxy Tab 3
Infrared
Blaster
Front
Camera
Display
Menu
Key
Power/Lock
Key
USB Charger/Accessory Port
Memory
Card Slot
3.5mm
Headset Jack
Camera
Light
Sensor
Volume Key
Back Key
Home Button
Speaker Speaker
SIM Card
slot
Page 5
Get Ready
visit sprint.com/readynow for more information to get your tablet up and running 5
Get Your Tablet Ready
Before you start: Visit sprint.com/readynow
to learn about transferring contacts,
calendars, and more from your old device.
Charge the Battery
1. Insert the USB cable into the
charging head.
2. Insert the small end of the USB cable into
the charger/accessory jack at the bottom
of the tablet.
3. Plug the charging head into an
electrical outlet.
Turn the Tablet On
• Press and hold the Power/Lock Key .
Unlock the Screen
• Swipe the screen with your inger to
unlock it.
Turn the Screen On and O
• To quickly turn the display screen o, press
the Power/Lock Key on the top
right side of the tablet.
• To turn the screen on and display the
unlock screen, press the Power/Lock Key
.
Turn the Tablet O
• Press and hold the Power/Lock Key
and then tap Power o > OK to turn the
tablet o.
Page 6
6
Activate Your Tablet
Activate Your Tablet
If you purchased your tablet at a
Sprint Store, it is probably
activated and ready to use.
If you received your tablet in the
mail, and it is a new Sprint account,
your tablet is designed to activate
automatically when you irst turn it
on. You will see a Sprint
Connections Optimizer notice.
Tap I agree to allow your tablet to
connect to a data network. To
conirm your activation, launch the
Web browser.
If you received your tablet in the
mail and it is going to be activated
on an existing number (you’re
swapping devices), go to
sprint.com/activate and follow
the instructions. When you have
inished, launch the Web browser
to conirm your activation.
If your tablet is still not activated, visit
sprint.com/support for assistance. If you do
not have access to the Internet, call Sprint
Customer Service at 1-888-211-4727 from
another phone.
Page 7
Get Ready
visit sprint.com/readynow for more information to get your tablet up and running 7
When you irst turn on your device, follow
the prompts to set up your Google Account
and preferences.*
Complete the Setup Screens
1. When you turn on your tablet, you’ll see the
Welcome screen. Choose a language, and
then tap Next to begin.
2. You’ll see a Wi-Fi setup screen. Follow the
prompts to set your Wi-Fi options.
3. Follow the on-screen instructions to complete
each section. Tap Skip or Next to continue.
• Got Google? - Create or sign in to a
Google Account. Select additional
Google preferences, including Google
Location options, as prompted.
• This tablet belongs to… - Enter your name
to personalize your experience.
• Samsung account - Create or sign in to
your Samsung user account.
• Dropbox™ - Create or sign in to your
Dropbox cloud storage account.
• Learn about key features - Tap a function
in the list to see more details about it.
4. Enter a name for your device and then
tap Finish.
* You do not need to sign up for a Google
Account to use your tablet; however, to
download content from the Google Play
Store app, you must link your tablet to a
Google Account.
Sprint Connections Optimizer
During or following the initial setup, you may
see a Sprint Connections Optimizer notice.
Read the notice and tap I Agree to allow
your tablet to connect automatically to the
best available data network, including Wi-Fi.
Note: You can turn o Sprint Connections
Optimizer at any time. Press and then
tap Apps >
Settings > More settings >
Mobile networks >
Connections optimizer.
Set Up Your Tablet
Page 8

8
Android Basics: Getting Around Your Tablet
Move Around Menus and Screens
Your tablet’s touchscreen lets you control
everything through various types of touches
and gestures.
Tap: When you want to type using the
onscreen keyboard, select items such as
application and settings icons, or press
onscreen buttons, simply tap them with
your inger. A light touch works best.
Touch and hold: To display the available
options for an item simply touch and hold
the item.
Flick: Move your inger in lighter, quicker
strokes than swiping. This inger gesture is
always used in a vertical motion, such as
when licking through contacts or a list.
Swipe: Quickly drag your inger vertically or
horizontally across the screen.
Drag: Press and hold your inger with some
pressure before you start to move it. Do not
release your inger until you have reached
the target position.
Rotate: Activate the Screen rotation feature
to automatically change the screen
orientation from portrait to landscape by
turning the tablet sideways.
Slide: This feature allows you to enter text
by sliding a inger from letter to letter, lifting
only between words. See page 14 for
instructions on using this continuous input
method with the various keyboard types.
Page 9
visit sprint.com/support for guides, tutorials and more 9
Android Basics
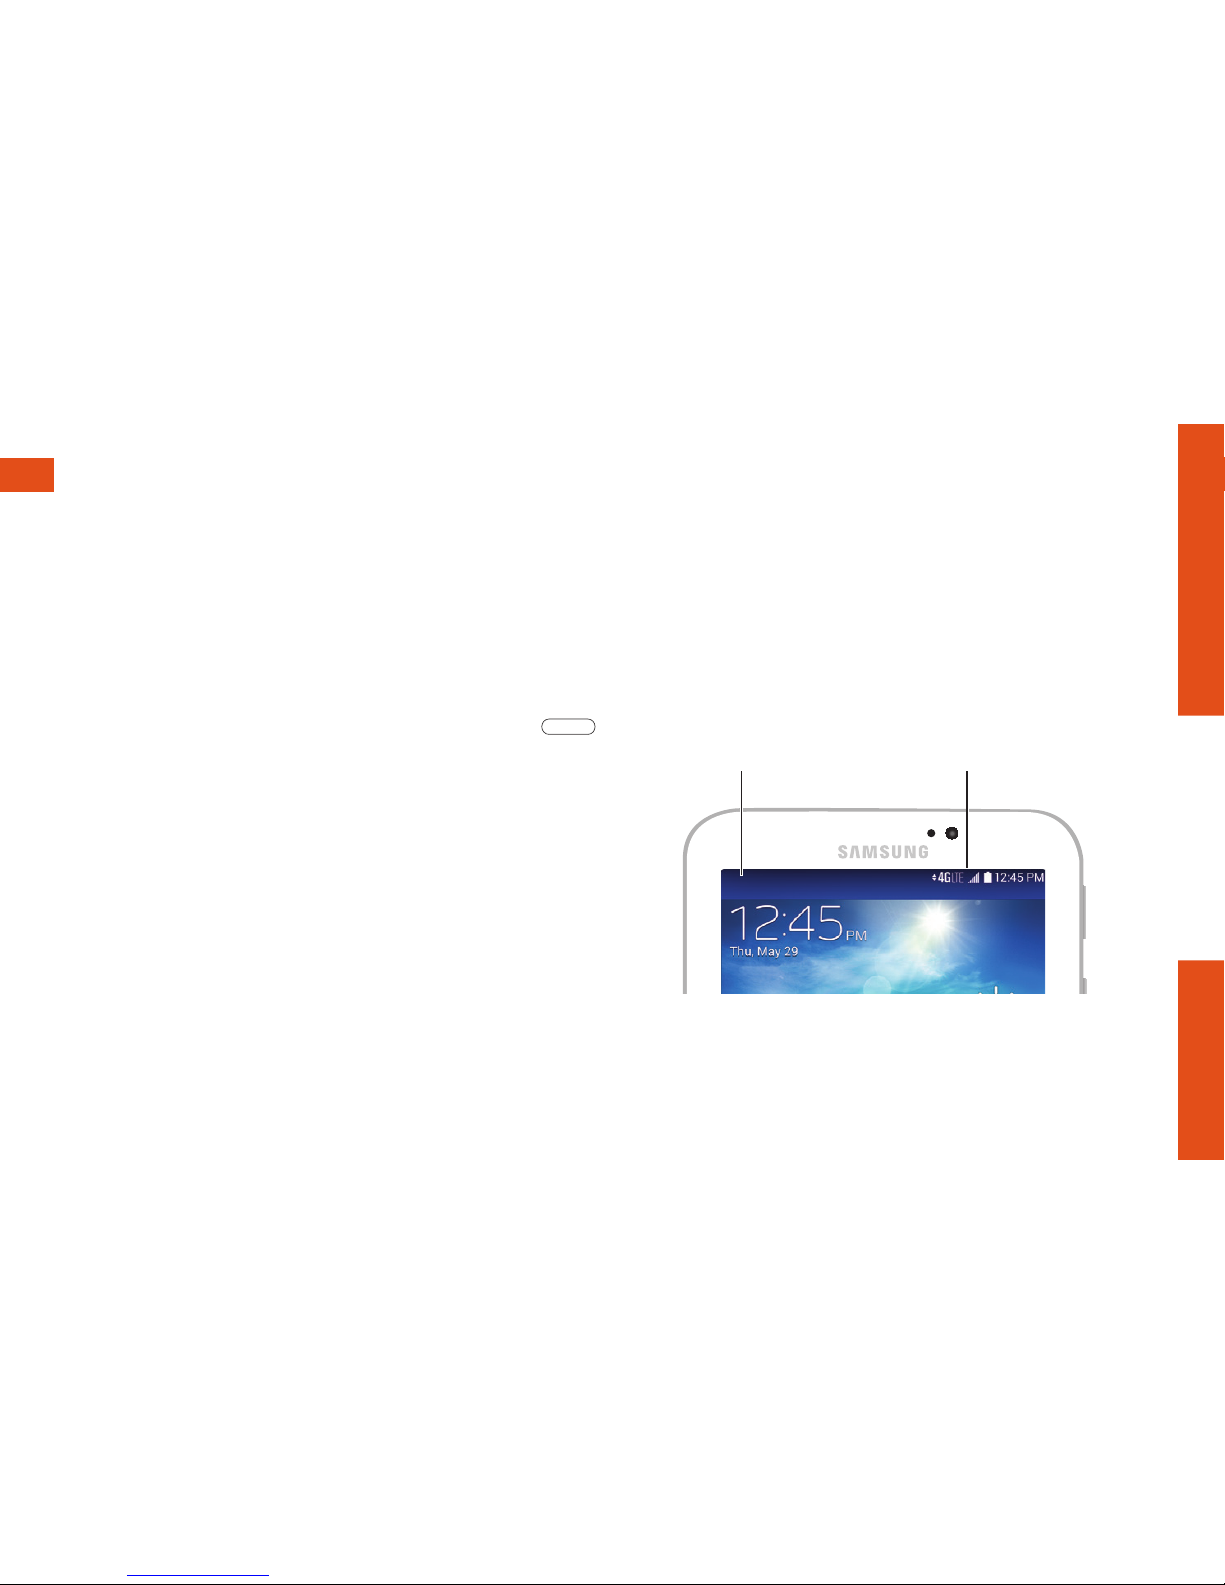
Status Bar
The status bar at the bottom of the Home
screen lets you quickly see both your tablet
status (connections, signal strength, battery,
location) and any current notiications.
Viewing Your Home Screen
Your tablet’s Home screen extends
horizontally up to seven full screens. This
gives you room to customize your tablet and
put the things you need front and center, just
a swipe away.
• To display the main Home screen, press
from any screen.
• To view extended screens, swipe the screen
left or right.
• To display thumbnails of all available screens,
pinch any home screen. Tap a thumbnail to
display any screen.
Status areaNotiication area
Your Home Screen
Page 10
10
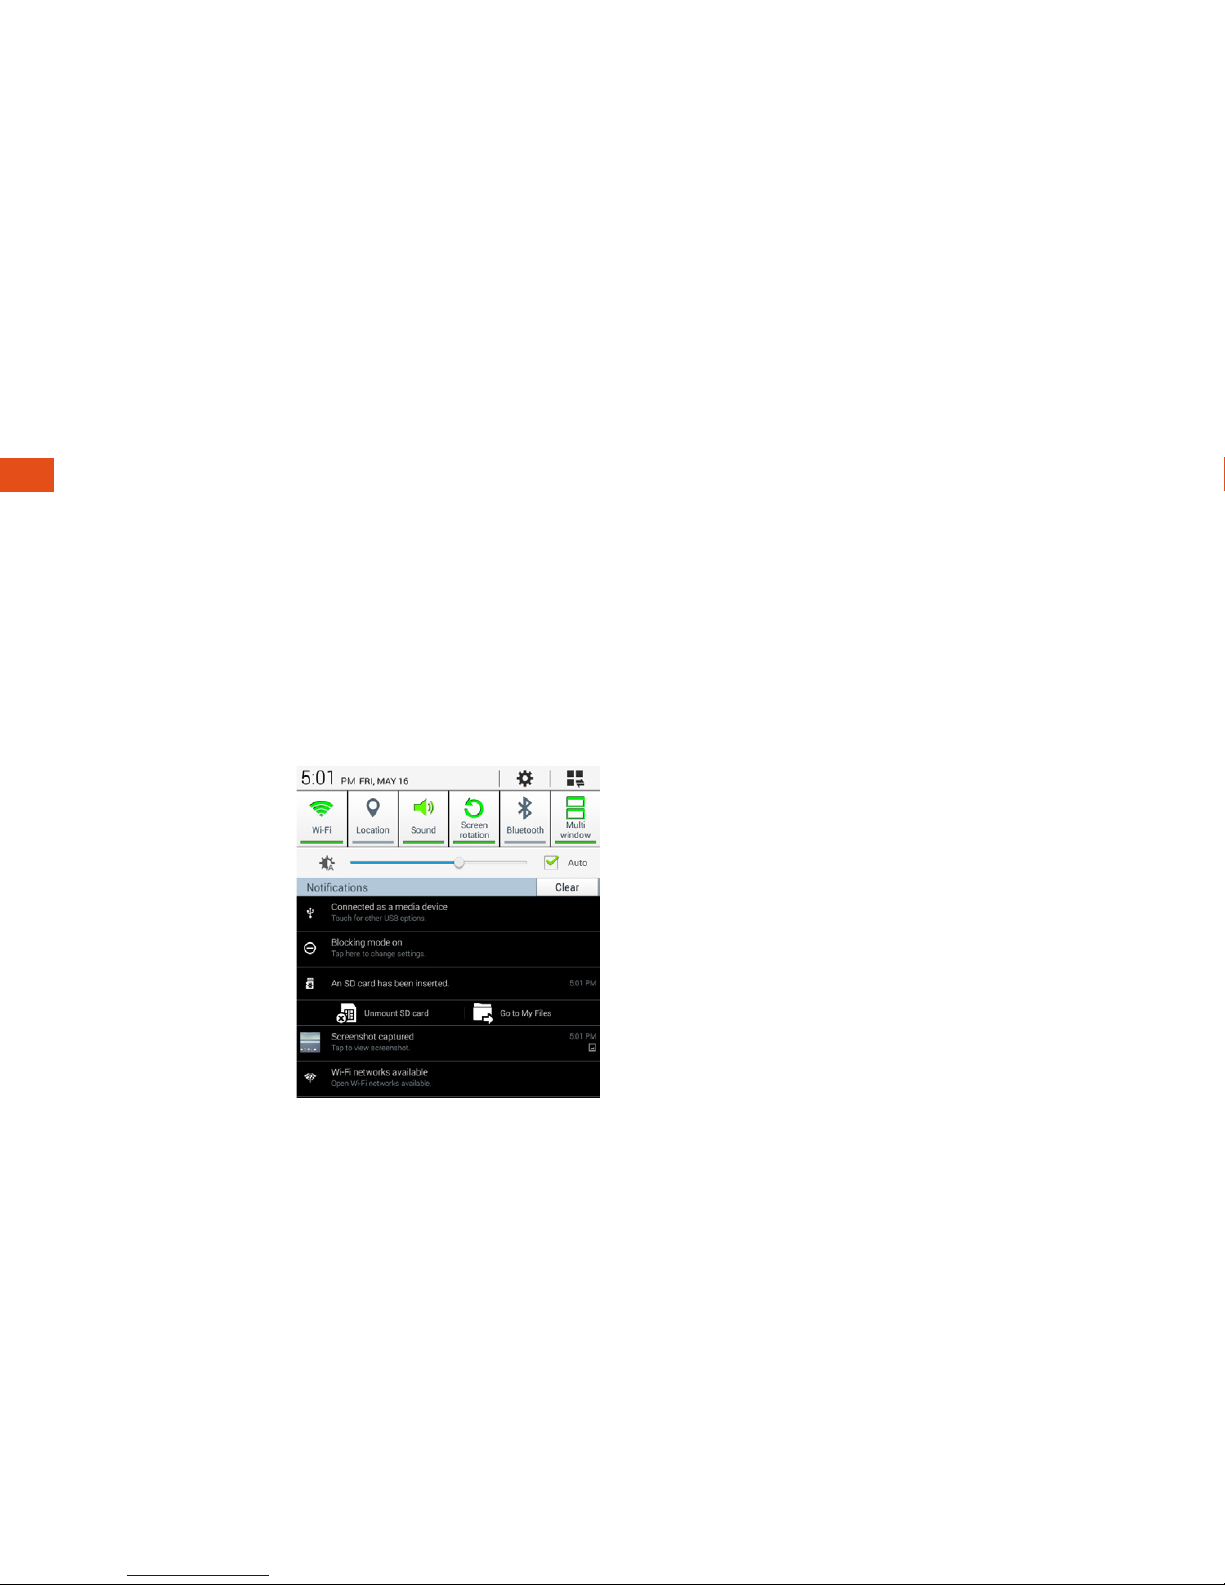
Notiications Panel
You can expand the notiication area to
provide more detailed information about
the current onscreen notiication icons.
1. Drag down from the top of the screen to
open the Notiications panel.
2. Tap a notiication entry to open
the associated
application.
Add Items to Your Home Screen
1. Touch and hold an empty area on a
home screen.
2. Tap an option under Add to home screen.
• Apps and widgets to add an app
shortcut or a widget to the home screen.
From the next screen, tap the Apps tab
and then touch and hold an app icon and
drag it to the home screen to add a
shortcut. Tap the Widgets tab and drag a
widget to the home screen to add a
widget.
• Folder to add a folder to the home
screen. Enter a folder name and tap OK
to add the folder.
• Page (if available) to add a new home
screen. Your tablet can support up to
seven home screens.
Your Home Screen
Page 11
visit sprint.com/support for guides, tutorials and more 11
Android Basics
Open Apps
• If an app is on one of your Home screens,
just tap it to open it.
• If an app is not available from your Home
screen, tap
> to display the apps
list, and then tap the app icon from the list.
You may have to scroll right or left to ind
the app you’re looking for.
Access Recently-Used Apps
Your tablet keeps a running list of your most
recently used apps.
1. Press and hold the button to open
the recently-used apps window.
2. Tap an icon to open an app.
Open Apps with Multi Window
Multi Window allows you to use two apps on
the same screen in separate, resizable
windows.
1. Drag the Notiications panel down
and touch
> Multi window to enable
the feature.
2. Touch and hold .
3. Touch and hold an app and drag it to the
Home screen, and then touch and hold
another app and drag it on top of the
irst one.
Your Home Screen
Page 12
12
Buttons and Keys
Buttons and Keys
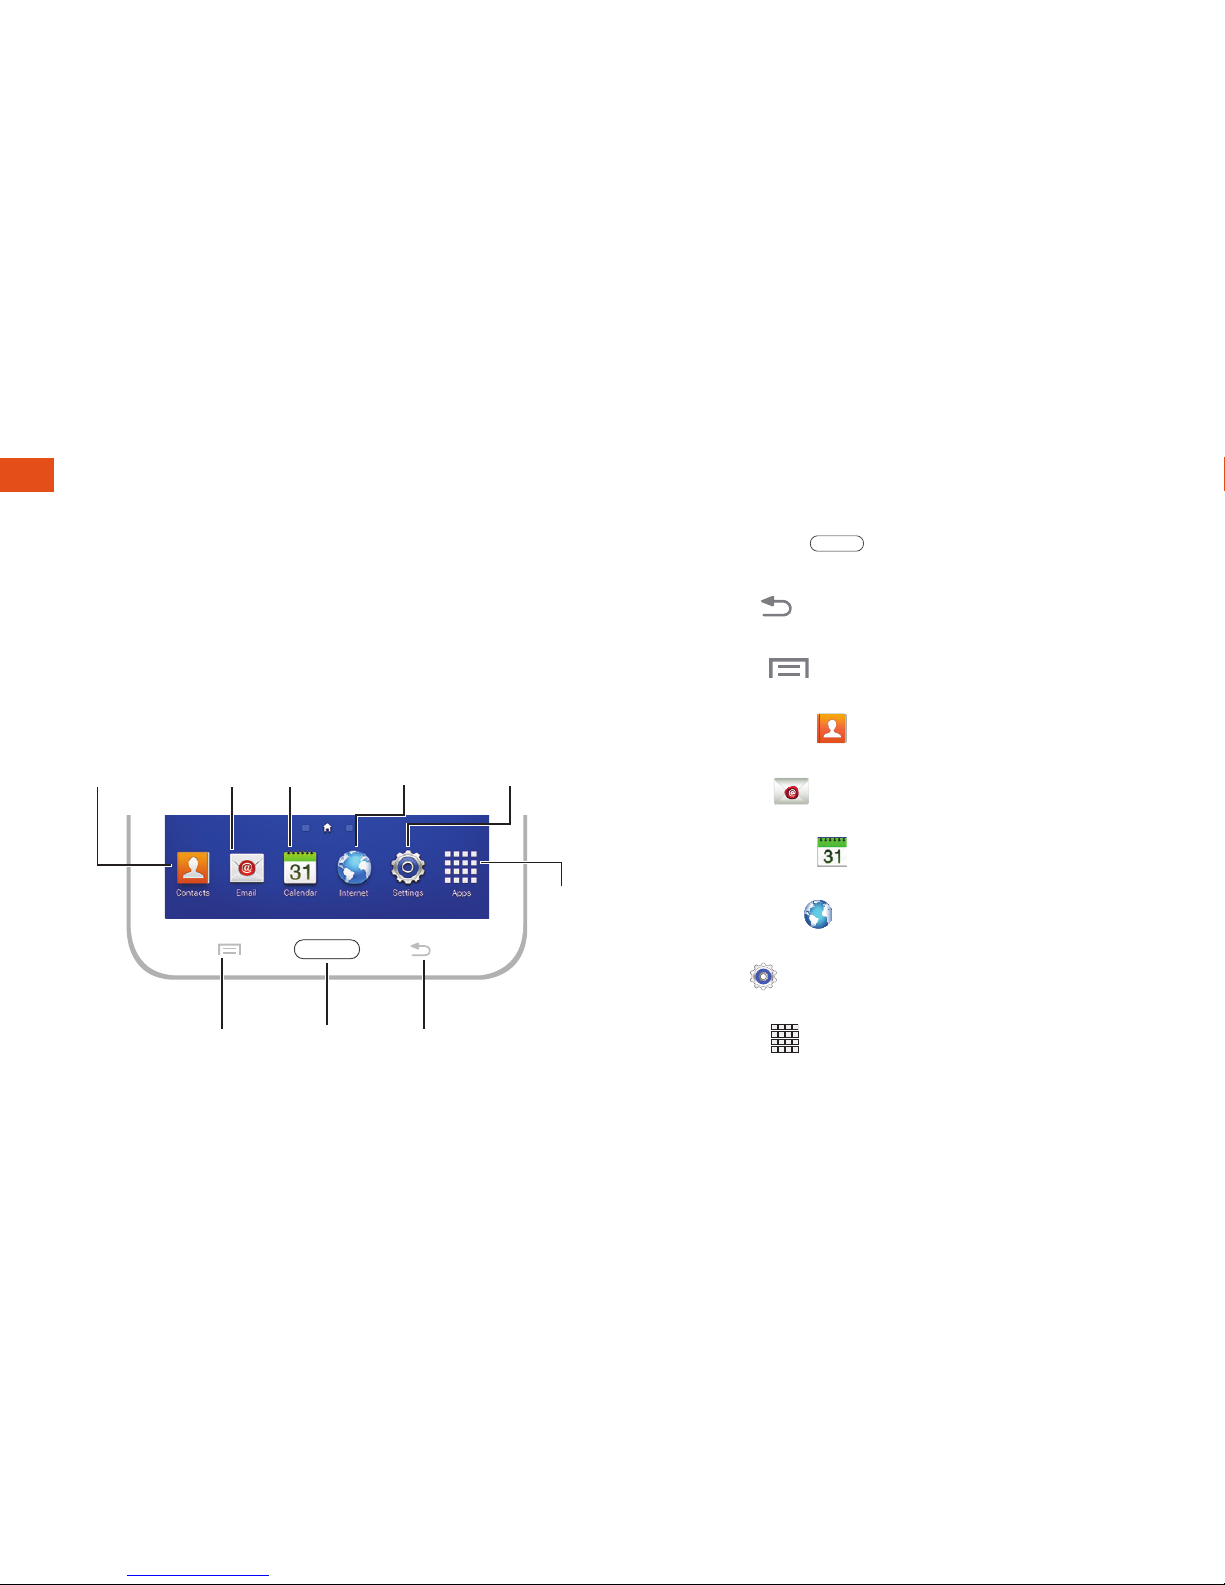
The bottom front of your tablet contains a
Home button and two static keys that let
you perform basic functions. Above this
row is a row of program icons that are
available from every Home screen.
• Home Button ( ) — Press to return to the
main Home screen.
• Back Key ( ) — Tap to return to the
previous screen view.
• Menu Key ( ) — Tap to open contextspeciic menus.
• Contacts icon ( ) — Tap to open your
Contacts list.
• Email icon ( ) — Tap to open your email
account(s).
• Calendar icon ( ) — Tap to open your
calendar.
• Internet icon ( ) — Tap to launch the
Web browser.
• Settings ( ) — Tap to access the
Settings menu.
• Apps icon ( ) — Tap to display the
applications list.
Menu
Key
Back
Key
Home
Button
Apps
Icon
Contacts
Icon
Email
Icon
Calendar
Icon
Internet
Icon
Settings
Icon
Page 13
visit sprint.com/support for guides, tutorials and more 13
Android Basics
Your QWERTY Keyboards
Your Samsung Galaxy Tab 3 comes loaded
with two QWERTY keyboards: Samsung
keyboard (default) and Swype
TM
. When you
select a ield that requires text or numbers,
an onscreen keyboard will appear. (If you
don’t see the keyboard when, for instance,
you’re entering contact information, just
tap the ield you’re working on to bring it
up.) The tablet’s onscreen QWERTY
keyboards can be used in either portrait or
landscape mode.
Note: To switch between text entry methods
while a keyboard is displayed, drag the
notiications bar down from the top of the
screen, touch Choose input method, and
then select a text entry method.
Typing with Samsung Keyboard
Entering text using the traditional Samsung
QWERTY keyboard is easy: just tap the
letters to type the words.
1. From a screen where you can enter text,
tap the input ield to reveal the onscreen
keyboard.
2. If needed, select a text mode option: ABC
to enter alphabetic characters or SYM to
enter symbols or punctuation.
3. Tap the corresponding onscreen keys to
begin typing.
• If you make a mistake, tap
to erase.
Entering Text
Page 14
14
Using Swype to Enter Text
Swype lets you enter words by tracing over
the letters in a single motion.
1. Touch an onscreen character, and then,
while maintaining your inger onscreen,
drag to the next character in the
desired word.
2. Repeat this process until the desired
characters have been drawn over. Select
from an onscreen list of possible word
matches (if prompted). This occurs if your
current action has generated more than
one possible word match.
Using Google Voice to Enter Text
Use your voice to enter text instead
of typing.
1. From any screen where you can enter text,
touch the input ield to reveal the keyboard.
2. Touch and speak clearly.
Entering Text
Page 15
visit sprint.com/support for guides, tutorials and more 15
Use Your Tablet
Use Your Tablet: Contacts
Add a New Entry to Contacts
1. Press
and then tap
Contacts >
Contacts.
2. Tap .
3. Select an account for the contact, such as
Samsung account, Google, or Microsoft
Exchange ActiveSync. Select Device to
save the contact to your tablet only.
4. Tap any ield and use the onscreen
keyboard to enter the name, phone
number, and other contact details.
5. Add more data ields or a picture if
desired, and tap Save.
Edit a Contact Entry
1. Press
and then tap Contacts >
[contact you’d like to edit].
2. Tap
.
3. Tap any ield and use the onscreen
keyboard to edit the information. You
can also add new ields or remove
existing ones.
4. Tap Save to save your updates.
Note: To add a phone number, email
address, or other ield to an existing contact,
tap Add another ield at the bottom of the
entry and select a data type.
Your tablet’s Contacts function lets you access and manage contacts from a variety of
sources, including Google and Corporate email accounts, contacts synced from your
computer, and old-fashioned contacts entered by hand.
Page 16
16
Your tablet’s Email applications let you
access and manage multiple email
accounts simultaneously in one convenient
location. Although there is a separate Gmail
application, the main email application can
manage both Internet-based email services
(Gmail™ and Yahoo™) and Corporate Work
Email (Outlook®). The tablet can also be
manually conigured to connect to other
email systems.
Set Up a Gmail Account
1. Press
and then tap
> Gmail .
2. Follow the instructions to set up or sign in
to a Gmail account.
Note: Although you need a Gmail account to
use certain features such as Google Play™,
you do not have to use Gmail as the default
account for your tablet.
Set Up a POP3/IMAP Email Account
1. Press
and then tap
> Email .
2. If another email account is already set up,
tap
> Settings > Add account.
3. Enter the Email address and Password for
the email account.
4. Tap Next and follow the onscreen
instructions.
Email
Page 17
visit sprint.com/support for guides, tutorials and more 17
Use Your Tablet
Email
Set Up a Microsoft® Exchange
ActiveSync
®
Account
1. Press and then tap > Email .
2. If another email account is already set up,
tap
> Settings > Add account.
3. Enter your Email address and Password
information and then tap Manual setup.
• Contact your Exchange Server administrator
for required sign-in information.
4. Tap Microsoft Exchange ActiveSync.
5. Enter a Domain\username, Password, and
Exchange server information, and then
tap
.
6. Follow the prompts to set additional options
and permissions. Tap
to continue.
7. Identify your new account with a unique
name and provide the outgoing name text
then tap Done.
Access Email Messages
1. Press
and then tap >
Email .
• If necessary, tap the selection arrow ( )
and tap the email account you want to use.
2. From the inbox, tap the message you want
to view.
Send an Email Message
1. Press
and then tap >
Email .
2. If necessary, tap the selection arrow ( )
and tap the email account you want to use.
3. Tap
.
4. Enter an email address in the To ield.
5. Enter a subject and a message.
• To add attachments, tap and select
an attachment.
6. Tap
.
Page 18
18
Camera & Video
Take a Picture
1. Press and then tap > Camera .
2. Using your display as a viewinder, aim the
camera lens at your subject, and tap
.
View Pictures
1. Press and then tap > Gallery to
view the Camera folders.
2. Tap a picture and then tap to explore
other options. For sharing photos, tap
at the top of the screen.
Record a Video
1. Press and then tap > Camera .
2. Using the tablet’s display screen as a
viewinder, aim the lens at your subject,
and tap
to begin recording.
3. Tap to pause or to stop recording.
View Videos
1. Press and then tap > Gallery .
2. Tap a video icon to view the video.
Share Pictures and Videos
1. Press and then tap > Gallery .
2. Tap Camera to reveal your pictures and
videos, and then press and hold a picture
or video to send.
3. Tap and select any of several methods
such as Group Play, Add to Dropbox,
Bluetooth, Email, Flipboard, Photos, Wi-Fi
Direct, and more. Follow the onscreen
instructions to send your picture or
video clip.
Page 19
visit sprint.com/support for guides, tutorials and more 19
Use Your Tablet
Web
Go Online
1. Press and then tap > Internet .
2. From the opening page, tap the address
bar and enter a website address.
• Tap a link to open it.
• For more options, tap
from any page.
Options may include New tab, New
incognito tab, Add shortcut, Share via,
Find on page, Desktop view, Save for
oline reading, Brightness, Downloads,
Print, Settings, and Help.
• To scroll, slide your inger up or down
the page.
• To zoom in or out, pinch the screen.
Note: Additional browser options, such as
Google Chrome™, may also be available on
your tablet.
Downloading Apps From the Web
You can download Apps while browsing the
Web, but you must irst set permissions in
settings to allow applications from unknown
sources. Applications downloaded from the
Google Play Store (see page 22) do not
require additional permissions.
1. Press and then tap >
Settings >
Security.
2. Tap the Unknown sources check box.
3. When the Attention dialog box opens, read
the disclaimer and tap OK.
Page 20
20
Wi-Fi
Connect to a Wi-Fi Network
When you’re in range of an available Wi-Fi
network you can use your tablet’s Wi-Fi
feature to access the Internet and other
data services.
Note: You may already have signed in to
Wi-Fi during the tablet’s setup process.
1. Press
then tap
>
Settings .
2. Tap the icon next to Wi-Fi and slide to the
ON position to turn Wi-Fi on.
3. Tap Wi-Fi and then tap Scan to display a
list of available networks.
4. Tap a Wi-Fi network to connect. If
necessary, enter the security key
(password) and tap Connect.
• When you’re connected to a Wi-Fi
network, you’ll see the Wi-Fi icon (
)
in the status bar.
Note: To quickly toggle Wi-Fi on or o,
lick the Notiications panel down from any
screen and tap Wi-Fi. You can also toggle
Bluetooth, Location, Screen rotation, and
more from the panel menu.
Page 21
visit sprint.com/support for guides, tutorials and more 21
Use Your Tablet
Mobile Hotspot
Set Up and Activate Your Mobile Hotspot
Note: Add-on to service plan required to
access hotspot functionality.
Note: Risks can be associated with
connecting to the public Internet. Your tablet
allows you to create a mobile hotspot. It is
recommended that you use a password or
other possible steps to protect against
unauthorized access.
1. Press >
>
Settings > Hotspot
and touch the ON/OFF switch to turn on
the hotspot.
2. Touch Hotspot and enter your settings.
• Network SSID – Enter a unique name for
your hotspot.
• Security – Select the type of security you
want, and then enter a unique password.
Other users can access your mobile hotspot
only if they enter the correct password.
• Broadcast channel – Select a channel
that
minimizes potential interference. You may
need to try dierent channels.
3. Touch Save to save your settings.
Connect a Device to the Mobile Hotspot
1. Enable Wi-Fi on your device (for example, a
laptop computer).
2. Select the Network SSID for your mobile
hotspot and enter the password if
prompted.
3. When “Connected” appears on your
device, launch your Web browser to
conirm you have an Internet connection.
Connect up to eight Wi-Fi-capable devices to the Internet using your Galaxy Tab 3 as a
mobile hotspot.
Page 22
22
Google Play is the place to go to ind new
apps, games, movies, and more.
Use Google Play for Downloads
1. Press and then tap > Play Store .
2. The irst time you visit the Google Play
Store app, tap Accept to accept the Terms
of Service.
3. Browse through featured apps and games,
or tap to start a search.
4. Tap an item to read a description
and reviews.
5. Tap INSTALL (for free apps) or the price
(for paid applications) and follow the
onscreen prompts.
Note: You must have a Google Account set
up on your tablet to purchase and download
applications from Google Play.
Google Mobile Services
Your Galaxy Tab 3 provides easy access to a
variety of Google services.
• Gmail – The Google mail service. Your
Gmail account lets you access many
Google-related services as well as the
Google Play.
• Google+™ Hangouts™ – Google’s versatile
IM app. Press
and then tap >
Hangouts to begin using the service.
• Google Maps™ – The Google location app.
Press
and then tap
> Maps to
begin using the service.
• YouTube™ – View and share videos.
Press
and then tap
> YouTube to
browse through and view available videos.
Sign in with your Google Account to upload
your own videos.
Google Play and Google Mobile™ Services
Page 23
visit sprint.com/support for guides, tutorials and more 23
Use Your Tablet
Pair and Connect With a Bluetooth®Capable Device
1. Verify your Bluetooth is active. (Press
and tap > Settings > Bluetooth and
then tap the ON/OFF slider to ON to turn
on Bluetooth.)
2. From the Bluetooth settings page, tap the
check box next to your tablet’s name to
make it discoverable by other devices. Your
tablet must be visible to successfully pair
with an external device.
3. Tap Scan. (Your tablet will display a list of
discovered in-range Bluetooth devices.)
4. Tap a device from the list to initiate pairing.
5. Enter the passkey or PIN code, or verify the
shared key, and tap OK.
6. The external device will then have to also
accept the connection and enter your
tablet’s PIN code.
7. Once you’re paired with a device, your
connection should launch. The Bluetooth
icon
shows your current connection status.
Share Contacts, Files, or Pictures
Using Bluetooth
1. Open the application containing the ile
you want to share (for example,
press
and then tap
>
Contacts ).
2. Locate the ile or entry you want to share.
• You can send pictures and videos directly
from the camera or from Gallery, Calendar
events, Contacts (as vCards), music tracks,
and voice recordings. Not all devices will
be able to receive all ile types.
3. Depending on the application, tap
>
Bluetooth or press and hold the ile and
select Share via (or Send) > Bluetooth.
4. Tap the name of the device to which you’re
sending the ile. (If prompted, tap OK to
turn Bluetooth on.)
Bluetooth
Page 24
24
Adding Music to Your Music Folder
Before you can listen to music with the
Music application on your tablet, you will
need to load songs into your Music folder.
1. Use the supplied USB cable to connect
your tablet to an available USB port on
your computer.
2. When you see the USB icon in the
Notiications status, lick open the
Notiications panel and make sure
Connected as a media device is
the selected mode.
3. On your computer, locate your tablet’s
internal storage, and open or create the
Music folder.
4. Copy music iles from your computer to
the music folder.
5. When you are done, follow your
computer’s procedures to safely remove
the drive, and then disconnect the tablet
from the USB cable.
Listening to Music
1. Press and then tap > Music .
2. Tap Songs, Playlists, Albums, Artists,
Genres, Folders, Composers, Years, or
Music square.
3. Tap a song to begin playing.
• Use the controls at the bottom or the
side to play, pause, or skip songs.
Note: Your tablet includes additional music
playing options, including Google Play™
Music
(Play Music) and Sprint Music Plus
(see page 26).
Music
Page 25
visit sprint.com/support for guides, tutorials and more 25
Use Your Tablet
You can set up and access all your favorite
social media apps on the go.
Set Up Social Networking Accounts
Before using your social networking
accounts, you may need to download social
media apps from the Google Play Store.
1. Press
and then tap
>
Play Store .
2. Browse or search for the app you want to
download, for example Facebook, Twitter,
or Instagram.
3. Tap the app and then tap INSTALL. Follow the
prompts to download and install the app.
Use Social Media Apps
1. Press
and then tap
>
Facebook
(or Twitter, Instagram, etc.).
2. Follow the onscreen instructions to sign
into your account, for example, by entering
a user name and password.
3. Update your status, post pictures, follow
your
favorite tweets, and more, all on your
Galaxy Tab 3.
Note: Tap the application’s menu icon to
access settings for the app, depending on
the account type.
Tip: You can add Home screen widgets for
many social networking apps. Touch and
hold an empty space on a home screen, tap
Apps and Widgets, tap Widgets, and then
drag the widget to the empty space.
Social Networking: Facebook, Twitter & More
Page 26
26
Access additional exclusive Sprint features
right from your tablet.
Sprint Music Plus
In addition to the Music application (see
page 24), your tablet oers Sprint Music
Plus, an all-in-one music store and player for
full songs, ringtones, and ringback tones.
Get Sprint Music Plus
1. Tap > Sprint Zone > Apps and
search for “Sprint Music Plus” .
2. Tap INSTALL and follow the prompts to
download and install the app.
Use Sprint Music Plus
• Press
and then tap
>
Sprint Music Plus .
• Tap to access all your music, including
items you have purchased or loaded
onto your tablet’s microSD card.
• Tap Music below Store to access the
music store.
• For more information, tap > Settings >
About or Help.
Sprint Applications
Page 27
Tools & Resources
visit sprint.com/support for guides, tutorials and more 27
Tools & Resources: Settings
Explore ways to customize your tablet, set permissions, update your tablet, and more in the
Settings menu.
Accessing Settings
1. Press and then tap >
Settings
.
2. Select the settings you
want to change.
Settings may include:
• Wi-Fi
• Hotspot
• Bluetooth
• Data usage
• More settings
• Blocking mode
• Hands-free mode
• Sound
• Display
• Storage
• Power saving mode
• Battery
• Application manager
• Default applications
• Users
• Location
• Lock screen
• Security
• Language and input
• Cloud
• Backup and reset
• Add account
• Voice control
• Accessories
• Date and time
• Accessibility
• Activate this device
• System Update
• About device
For detailed information
about settings, please see
the User Guide at
sprint.com/support.
Page 28
28
Battery-Saving Tips
Manage the Display Brightness and
Screen Timeout
• Press
and then tap
>
Settings >
Display > Brightness to modify the
backlight setting as desired.
• To turn o the screen, press the Power Key.
The tablet will continue to function.
• Turn on Power saving mode.
Press
and
then tap
>
Settings
> Power saving
mode, slide the option to ON, and select
additional power saving options.
Manage Your Tablet’s Wireless
Functions
Disable the Wi-Fi, Bluetooth, and Location
functions of the tablet when you’re not
using them.
• Use the toggle options in the Notiications
panel to turn these o when not in use.
Flick the Notiications panel down and tap
Wi-Fi, Bluetooth, or Location to toggle
these options on or o.
For more useful tips about battery care
and safety, see the User Guide at
sprint.com/support.
Page 29

Tools & Resources
visit sprint.com/support for guides, tutorials and more 29
Manage Your Account
Online: www.sprint.com
• Make a payment, see your bills, enroll in
online billing.
• Check data usage and account balance.
• See or modify the details of your Sprint
service plan.
• Get detailed instructions and download
content.
On any Phone
• Sprint Customer Service:
Dial 1-888-211-4727
• Business Customer Service:
Dial 1-888-788-4727
We are interested in your initial
impressions of this new Sprint tablet.
Within two weeks of your tablet purchase,
please go to the website
http://labs.sprint.com/sprintphonesurvey to
complete a brief survey. Your feedback will
help us provide the wireless features and
services you want most.
Thank you for choosing Sprint.
Survey
Page 30

30
Resources
Resources For Your Tablet
• This Get Started Guide to get you up
and running.
• Ready Now – Visit sprint.com/readynow for
additional help to get started on your new
tablet. You’ll ind more information on basic
setup, activation, maximizing your tablet’s
performance, and personalization. Plus, you
can even schedule a personalized
one-on-one Ready Now appointment at a
Sprint Store near you.
• Online Support – For ongoing help over the
life of your tablet, visit sprint.com/support
to ind videos, tutorials, troubleshooting
tips, and the complete User Guide for your
Samsung Galaxy Tab 3.
• Community – Visit community.sprint.com
to join the discussion about all things
Sprint. Here people help each other make
the most of their wireless services with tips,
forums, blogs, and the latest news.
Page 31
Tools & Resources
visit sprint.com/support for guides, tutorials and more 31
At Sprint, environmental responsibility is
more than talk. We’re continuously working
to reduce our carbon footprint and decrease
our use of natural resources.
So where is my User Guide?
We took the full printed User Guide out of
the box and put it, along with expanded
support resources, online for you. Less
paper, more and better information. Just visit
sprint.com/support from any computer to
access your complete User Guide and the
rest of our support materials.
What else has Sprint been doing?
Plenty. To ind out just what we’ve been up
to, use your tablet to scan the QR Code®
below or visit sprint.com/green for more
information.
To scan the code, download
and install a QR Code reader
from the Google Play Store app,
launch the reader, and aim your
tablet’s camera at the image.
This guide is printed with soy inks and
contains up to 30% post consumer paper.
Sustainability
Page 32

The services described in this guide may require a subscription to a service plan and/or may incur
additional charges. Not all services will work on all devices. See sprint.com/coverage for more details.
Portions of this guide are reproductions of work created and shared by Google and used according to
terms described in the Creative Commons 3.0 Attribution License.
Important Privacy Message. This tablet is capable of determining its/your geographical location. To set
controls for access and use of your location information by others, press
and then tap > Settings
> Location
and turn the switch to ON or OFF.
Follow any applicable prompts. These settings for the use
of location information can be turned on and o. For some applications and services you select, a device
must be turned on and set to allow collection of location information in order to function.
Please be advised that if you use a third party application, the application may collect your personal
information or require Sprint to disclose your customer information, including location information (when
applicable), to the application provider or some other third party. Sprint’s policies do not apply to these
third party applications. Please carefully review the application’s terms of use and/or the application
provider’s policies for more information about how the application will collect, access, use or disclose
your information before using a third-party application. Terms of use and other policies usually are
available on the application provider’s website.
©2014 Sprint. Sprint and the logo are trademarks of Sprint. Samsung, and Galaxy Tab are trademarks
of Samsung Electronics Co., Ltd. Gmail, Google+, Hangouts, Google Maps, YouTube, Android, Google,
Picasa, Google Mobile Services, and Google Play are trademarks of Google, Inc. Other marks are
property of their respective owners. Screen images simulated.
 Loading...