

Page 1
ANDROID TABLET
User Manual
Please read this manual before operating your
device and keep it for future reference.
Page 2

Warning!
This product contains chemicals known to the State of California to cause cancer and reproductive toxicity.
Intellectual Property
All Intellectual Property, as defined below, owned by or which is otherwise the property of Samsung or its respective suppliers
relating to the SAMSUNG Galaxy Tab, including but not limited to, accessories, parts, or software relating there to (the “Galaxy Tab
System”), is proprietary to Samsung and protected under federal laws, state laws, and international treaty provisions. Intellectual
Property includes, but is not limited to, inventions (patentable or unpatentable), patents, trade secrets, copyrights, software,
computer programs, and related documentation and other works of authorship. You may not infringe or otherwise violate the
rights secured by the Intellectual Property. Moreover, you agree that you will not (and will not attempt to) modify, prepare
derivative works of, reverse engineer, decompile, disassemble, or otherwise attempt to create source code from the software. No
title to or ownership in the Intellectual Property is transferred to you. All applicable rights of the Intellectual Property shall remain
with SAMSUNG and its suppliers.
Open Source Software
Some software components of this product incorporate source code covered under GNU General Public License (GPL), GNU Lesser
General Public License (LGPL), OpenSSL License, BSD License and other open source licenses. To obtain the source code covered
under the open source licenses, please visit:
http://opensource.samsung.com
SM-T520_UM_Eng_NAE_TN_021114_F2
.
Page 3

Disclaimer of Warranties; Exclusion of Liability
EXCEPT AS SET FORTH IN THE EXPRESS WARRANTY CONTAINED ON THE WARRANTY PAGE ENCLOSED WITH THE PRODUCT, THE
PURCHASER TAKES THE PRODUCT "AS IS", AND SAMSUNG MAKES NO EXPRESS OR IMPLIED WARRANTY OF ANY KIND
WHATSOEVER WITH RESPECT TO THE PRODUCT, INCLUDING BUT NOT LIMITED TO THE MERCHANTABILITY OF THE PRODUCT OR
ITS FITNESS FOR ANY PARTICULAR PURPOSE OR USE; THE DESIGN, CONDITION OR QUALITY OF THE PRODUCT; THE
PERFORMANCE OF THE PRODUCT; THE WORKMANSHIP OF THE PRODUCT OR THE COMPONENTS CONTAINED THEREIN; OR
COMPLIANCE OF THE PRODUCT WITH THE REQUIREMENTS OF ANY LAW, RULE, SPECIFICATION OR CONTRACT PERTAINING
THERETO. NOTHING CONTAINED IN THE INSTRUCTION MANUAL SHALL BE CONSTRUED TO CREATE AN EXPRESS OR IMPLIED
WARRANTY OF ANY KIND WHATSOEVER WITH RESPECT TO THE PRODUCT. IN ADDITION, SAMSUNG SHALL NOT BE LIABLE FOR
ANY DAMAGES OF ANY KIND RESULTING FROM THE PURCHASE OR USE OF THE PRODUCT OR ARISING FROM THE BREACH OF
THE EXPRESS WARRANTY, INCLUDING INCIDENTAL, SPECIAL OR CONSEQUENTIAL DAMAGES, OR LOSS OF ANTICIPATED PROFITS
OR BENEFITS.
Modification of Software
SAMSUNG IS NOT LIABLE FOR PERFORMANCE ISSUES OR INCOMPATIBILITIES CAUSED BY YOUR EDITING OF REGISTRY SETTINGS,
OR YOUR MODIFICATION OF OPERATING SYSTEM SOFTWARE.
USING CUSTOM OPERATING SYSTEM SOFTWARE MAY CAUSE YOUR DEVICE AND APPLICATIONS TO WORK IMPROPERLY. YOUR
CARRIER MAY NOT PERMIT USERS TO DOWNLOAD CERTAIN SOFTWARE, SUCH AS CUSTOM OS.
Page 4

Samsung Electronics America (SEA), Inc
Address:
85 Challenger Road
Ridgefield Park,
New Jersey
07660
Toll Free
1-800-SAMSUNG
Tel ep ho ne:
Internet
http://www.samsung.com
Address:
©
2014 Samsung Electronics America, Inc. All rights reserved.
Do you have questions about your Samsung Mobile Device?
For 24 hour information and assistance, we offer a new FAQ/ARS System (Automated Response System) at:
www.samsung.com/us/support
The actual available capacity of the internal memory is less than the specified capacity because the operating system and default
applications occupy part of the memory. The available capacity may change when you upgrade the device.
®
, VSuite™, T9® Text Input, and the Nuance logo are trademarks or registered trademarks of Nuance Communications,
Nuance
Inc., or its affiliates in the United States and/or other countries.
Page 5

The Bluetooth® word mark, figure mark (stylized “B Design”), and combination mark (Bluetooth word mark and “B Design”) are
registered trademarks and are wholly owned by the Bluetooth SIG.
TM
microSD
, microSDHCTM, and the microSD logo are Trademarks of the SD Card Association.
Google, the Google logo, Android, the Android logo, Google Play, Gmail, Google Mail, Google Maps, Google Music, Google Talk,
Hangouts, Picasa, YouTube and other marks are trademarks of Google Inc.
Wi-Fi is a registered trademark of the Wireless Fidelity Alliance, Inc.
Peel and the Peel logo are marks owned by Peel Technologies, Inc. and may be registered.
Page 6

Table of Contents
Section 1: Getting Started ...........................5
Understanding This User Manual . . . . . . . . . . . .5
Battery . . . . . . . . . . . . . . . . . . . . . . . . . . . . . . . 6
Turning Your Device On and Off . . . . . . . . . . . . . 8
Setting Up Your Device . . . . . . . . . . . . . . . . . . . 8
Memory Card . . . . . . . . . . . . . . . . . . . . . . . . .10
Galaxy Tab Accessories . . . . . . . . . . . . . . . . . .10
Securing Your Device . . . . . . . . . . . . . . . . . . .10
Holding the Device . . . . . . . . . . . . . . . . . . . . .11
Troubleshooting . . . . . . . . . . . . . . . . . . . . . . .11
Section 2: Understanding Your Device .....12
Features . . . . . . . . . . . . . . . . . . . . . . . . . . . . . 12
Front and Sides . . . . . . . . . . . . . . . . . . . . . . . . 13
Back, Top, and Bottom . . . . . . . . . . . . . . . . . . 13
Home Screen . . . . . . . . . . . . . . . . . . . . . . . . .14
Navigating Your Device . . . . . . . . . . . . . . . . . .17
Using the Touch Screen . . . . . . . . . . . . . . . . . .18
Multi Window . . . . . . . . . . . . . . . . . . . . . . . . .24
Notifications . . . . . . . . . . . . . . . . . . . . . . . . . . 27
Status Bar . . . . . . . . . . . . . . . . . . . . . . . . . . . . 29
Folders . . . . . . . . . . . . . . . . . . . . . . . . . . . . . . 31
1
Wallpapers . . . . . . . . . . . . . . . . . . . . . . . . . . .32
Apps Screen . . . . . . . . . . . . . . . . . . . . . . . . . .32
My Magazine . . . . . . . . . . . . . . . . . . . . . . . . . .33
Task Manager . . . . . . . . . . . . . . . . . . . . . . . . .35
Screen Capture . . . . . . . . . . . . . . . . . . . . . . . .36
Help . . . . . . . . . . . . . . . . . . . . . . . . . . . . . . . . .36
Entering Text . . . . . . . . . . . . . . . . . . . . . . . . . .36
Section 3: Accounts and Contacts ...........38
Accounts . . . . . . . . . . . . . . . . . . . . . . . . . . . . .38
Your Google Account . . . . . . . . . . . . . . . . . . . .39
Your Samsung Account . . . . . . . . . . . . . . . . . .39
Contacts . . . . . . . . . . . . . . . . . . . . . . . . . . . . .39
Groups . . . . . . . . . . . . . . . . . . . . . . . . . . . . . . .43
Favorites . . . . . . . . . . . . . . . . . . . . . . . . . . . . .45
Section 4: Messaging ...............................46
Types of Messages . . . . . . . . . . . . . . . . . . . . .46
Email . . . . . . . . . . . . . . . . . . . . . . . . . . . . . . . .46
Gmail . . . . . . . . . . . . . . . . . . . . . . . . . . . . . . . .49
Hangouts . . . . . . . . . . . . . . . . . . . . . . . . . . . . .50
Google+ . . . . . . . . . . . . . . . . . . . . . . . . . . . . .50
Page 7

Section 5: Multimedia .............................. 51
Listening to Music . . . . . . . . . . . . . . . . . . . . . 51
Play Music . . . . . . . . . . . . . . . . . . . . . . . . . . . 51
Music Player . . . . . . . . . . . . . . . . . . . . . . . . . 52
Flipboard . . . . . . . . . . . . . . . . . . . . . . . . . . . . 58
WatchON . . . . . . . . . . . . . . . . . . . . . . . . . . . . 59
Section 6: Camera and Video ................... 60
Camera . . . . . . . . . . . . . . . . . . . . . . . . . . . . . 60
Gallery . . . . . . . . . . . . . . . . . . . . . . . . . . . . . . 68
Video . . . . . . . . . . . . . . . . . . . . . . . . . . . . . . . 71
YouTube . . . . . . . . . . . . . . . . . . . . . . . . . . . . 73
Section 7: Connections ............................ 74
Wi-Fi . . . . . . . . . . . . . . . . . . . . . . . . . . . . . . . 74
Bluetooth . . . . . . . . . . . . . . . . . . . . . . . . . . . . 78
Managing Downloads . . . . . . . . . . . . . . . . . . . 84
Samsung Kies . . . . . . . . . . . . . . . . . . . . . . . . 85
Synchronizing with Windows Media Player . . . 85
Connecting as a Mass Storage Device . . . . . . 86
Section 8: Applications ............................87
Updating Applications . . . . . . . . . . . . . . . . . . 87
GPS Applications . . . . . . . . . . . . . . . . . . . . . . 87
Accessing Applications . . . . . . . . . . . . . . . . . 88
Application Folders . . . . . . . . . . . . . . . . . . . . 88
Alarm . . . . . . . . . . . . . . . . . . . . . . . . . . . . . . . 89
Calculator . . . . . . . . . . . . . . . . . . . . . . . . . . . . 90
Calendar . . . . . . . . . . . . . . . . . . . . . . . . . . . . 90
Camera . . . . . . . . . . . . . . . . . . . . . . . . . . . . . 92
Chrome . . . . . . . . . . . . . . . . . . . . . . . . . . . . . 92
Contacts . . . . . . . . . . . . . . . . . . . . . . . . . . . . . 92
Downloads . . . . . . . . . . . . . . . . . . . . . . . . . . . 92
Drive . . . . . . . . . . . . . . . . . . . . . . . . . . . . . . . 92
Dropbox . . . . . . . . . . . . . . . . . . . . . . . . . . . . . 93
e-Meeting . . . . . . . . . . . . . . . . . . . . . . . . . . . 93
Email . . . . . . . . . . . . . . . . . . . . . . . . . . . . . . . 93
Flipboard . . . . . . . . . . . . . . . . . . . . . . . . . . . . 93
Gallery . . . . . . . . . . . . . . . . . . . . . . . . . . . . . . 93
Gmail . . . . . . . . . . . . . . . . . . . . . . . . . . . . . . . 93
Google . . . . . . . . . . . . . . . . . . . . . . . . . . . . . . 94
Google Settings . . . . . . . . . . . . . . . . . . . . . . . 94
Google+ . . . . . . . . . . . . . . . . . . . . . . . . . . . . . 94
Hancom Viewer . . . . . . . . . . . . . . . . . . . . . . . 94
Hangouts . . . . . . . . . . . . . . . . . . . . . . . . . . . . 95
Help . . . . . . . . . . . . . . . . . . . . . . . . . . . . . . . . 95
Internet . . . . . . . . . . . . . . . . . . . . . . . . . . . . . 95
KNOX . . . . . . . . . . . . . . . . . . . . . . . . . . . . . . . 98
Maps . . . . . . . . . . . . . . . . . . . . . . . . . . . . . . . 98
Memo . . . . . . . . . . . . . . . . . . . . . . . . . . . . . . 98
Music . . . . . . . . . . . . . . . . . . . . . . . . . . . . . . . 99
2
Page 8

My Files . . . . . . . . . . . . . . . . . . . . . . . . . . . . .99
Netflix . . . . . . . . . . . . . . . . . . . . . . . . . . . . . .101
Photos . . . . . . . . . . . . . . . . . . . . . . . . . . . . . . 101
Play Books . . . . . . . . . . . . . . . . . . . . . . . . . .101
Play Games . . . . . . . . . . . . . . . . . . . . . . . . . . 102
Play Movies & TV . . . . . . . . . . . . . . . . . . . . . . 102
Play Music . . . . . . . . . . . . . . . . . . . . . . . . . .102
Play Newsstand . . . . . . . . . . . . . . . . . . . . . . . 102
Play Store . . . . . . . . . . . . . . . . . . . . . . . . . . . 103
Remote PC . . . . . . . . . . . . . . . . . . . . . . . . . . 104
S Voice . . . . . . . . . . . . . . . . . . . . . . . . . . . . . 105
Samsung Apps . . . . . . . . . . . . . . . . . . . . . . . 106
Screen Saver . . . . . . . . . . . . . . . . . . . . . . . . . 106
Settings . . . . . . . . . . . . . . . . . . . . . . . . . . . . .107
SideSync 3.0 . . . . . . . . . . . . . . . . . . . . . . . . .107
Video . . . . . . . . . . . . . . . . . . . . . . . . . . . . . . . 107
Voice Search . . . . . . . . . . . . . . . . . . . . . . . . . 107
WatchON . . . . . . . . . . . . . . . . . . . . . . . . . . . . 107
WebEx . . . . . . . . . . . . . . . . . . . . . . . . . . . . . . 107
World Clock . . . . . . . . . . . . . . . . . . . . . . . . . . 108
YouTube . . . . . . . . . . . . . . . . . . . . . . . . . . . . 108
Section 9: Settings ..................................109
About Settings . . . . . . . . . . . . . . . . . . . . . . . . 109
Connections . . . . . . . . . . . . . . . . . . . . . . . . .110
3
Wi-Fi . . . . . . . . . . . . . . . . . . . . . . . . . . . . . . .110
Bluetooth . . . . . . . . . . . . . . . . . . . . . . . . . . . .110
Airplane Mode . . . . . . . . . . . . . . . . . . . . . . . .111
Data Usage . . . . . . . . . . . . . . . . . . . . . . . . . .111
Location Services . . . . . . . . . . . . . . . . . . . . .112
More Networks . . . . . . . . . . . . . . . . . . . . . . .113
Nearby Devices . . . . . . . . . . . . . . . . . . . . . . .115
Screen Mirroring . . . . . . . . . . . . . . . . . . . . . .116
Device . . . . . . . . . . . . . . . . . . . . . . . . . . . . . .116
Sound . . . . . . . . . . . . . . . . . . . . . . . . . . . . . .116
Display . . . . . . . . . . . . . . . . . . . . . . . . . . . . .118
Multi Window . . . . . . . . . . . . . . . . . . . . . . . .119
Lock Screen . . . . . . . . . . . . . . . . . . . . . . . . .120
Wallpaper . . . . . . . . . . . . . . . . . . . . . . . . . . .122
Font . . . . . . . . . . . . . . . . . . . . . . . . . . . . . . . .123
Notification Panel . . . . . . . . . . . . . . . . . . . . . .123
Accessibility . . . . . . . . . . . . . . . . . . . . . . . . .124
Blocking Mode . . . . . . . . . . . . . . . . . . . . . . . .126
Controls . . . . . . . . . . . . . . . . . . . . . . . . . . . . .127
Language and Input . . . . . . . . . . . . . . . . . . . .127
Voice Control . . . . . . . . . . . . . . . . . . . . . . . . .131
Motions . . . . . . . . . . . . . . . . . . . . . . . . . . . . .131
Palm Motion . . . . . . . . . . . . . . . . . . . . . . . . .132
Smart Screen . . . . . . . . . . . . . . . . . . . . . . . .132
Page 9

General . . . . . . . . . . . . . . . . . . . . . . . . . . . . 133
Accounts . . . . . . . . . . . . . . . . . . . . . . . . . . . 133
Cloud . . . . . . . . . . . . . . . . . . . . . . . . . . . . . . 134
Backup and Reset . . . . . . . . . . . . . . . . . . . . 135
Date and Time . . . . . . . . . . . . . . . . . . . . . . . 136
Accessory . . . . . . . . . . . . . . . . . . . . . . . . . . 137
Application Manager . . . . . . . . . . . . . . . . . . 137
Default Applications . . . . . . . . . . . . . . . . . . . 139
Users . . . . . . . . . . . . . . . . . . . . . . . . . . . . . . 140
Battery . . . . . . . . . . . . . . . . . . . . . . . . . . . . . 141
Power Saving Mode . . . . . . . . . . . . . . . . . . . 142
Storage . . . . . . . . . . . . . . . . . . . . . . . . . . . . 142
Security . . . . . . . . . . . . . . . . . . . . . . . . . . . . 144
About Device . . . . . . . . . . . . . . . . . . . . . . . . 148
Section 10: Health and Safety
Information ........................................... 150
Exposure to Radio Frequency (RF) Signals . . 150
Specific Absorption Rate (SAR) Certification
Information . . . . . . . . . . . . . . . . . . . . . . . . 155
FCC Part 15 Information to User . . . . . . . . . . 157
Smart Practices While Driving . . . . . . . . . . . 157
Battery Use and Safety . . . . . . . . . . . . . . . . . 158
Samsung Mobile Products and Recycling . . . 160
UL Certified Travel Charger . . . . . . . . . . . . . 160
Display / Touch-Screen . . . . . . . . . . . . . . . . 161
GPS . . . . . . . . . . . . . . . . . . . . . . . . . . . . . . . 162
Care and Maintenance . . . . . . . . . . . . . . . . . 162
Responsible Listening . . . . . . . . . . . . . . . . . 163
Operating Environment . . . . . . . . . . . . . . . . . 165
Restricting Children's Access to Your
Mobile Device . . . . . . . . . . . . . . . . . . . . . . 167
FCC Notice and Cautions . . . . . . . . . . . . . . . 168
Other Important Safety Information . . . . . . . . 168
Section 11: Warranty Information ..........170
Standard Limited Warranty . . . . . . . . . . . . . . 170
End User License Agreement for Software . . 175
Index .........................................................183
4
Page 10

Section 1: Getting Started
This section helps you to quickly start using your device.
Understanding This User Manual
The sections of this manual generally follow the features of
your device. A robust index for features begins on page 183.
Also included is important safety information, beginning on
page 150, that you should know before using your device.
This manual gives navigation instructions according to the
default display settings. If you select other settings,
navigation steps may be different.
Unless otherwise specified, all instructions in this manual
assume that you are starting from a Home screen. To get to a
Home screen, you may need to unlock the device. For more
information, refer to “Securing Your Device” on page 10.
Note:
Instructions in this manual are based on default settings
and may vary from your device depending on the
software version on your device and any changes to the
device’s settings.
5
Note:
Unless stated otherwise, instructions in this user manual
start with the device unlocked, at the Home screen.
All screen images in this manual are simulated. Actual
displays may vary depending on the software version of
your device and any changes to the device’s settings.
Special Text
In this manual, some text is set apart from the rest. This
special text is intended to point out important information,
share quick methods for activating features, define terms,
and more. The definitions for these methods are as follows:
• Notes: Presents alternative options for the current feature,
menu, or sub-menu.
• Tips: Provides quick or innovative methods or useful
shortcuts.
• Important: Points out important information about the
current feature that could affect performance.
Page 11
•
Warning
: Brings important information to your attention
that can help to prevent loss of data or functionality or
damage to your device.
Text Conventions
This manual provides condensed information about how to
use your device. To make this possible, the following text
conventions are used to represent often-used steps:
➔ Arrows are used to represent the sequence of
selecting successive options in longer, or repetitive,
procedures.
For example:
From a Home screen, touch ➔
➔
Connections
Certain features and options use an
button.
For example:
Touch the
ON or OFF .
tab ➔
Wi-Fi
OFF / ON
button to turn Bluetooth
.
Settings
OFF / ON
Battery
Your device is powered by a rechargeable, standard Li-Ion
battery. A Wall/USB Charger (Charging Head and USB cable)
are included with the device for charging the battery.
Warning!
Use only approved charging devices. Approved
accessories are designed to maximize battery life.
Using other accessories may invalidate your
warranty and may cause damage.
Battery Indicator
The Battery icon in the Status Bar shows the battery
power level. When battery power is 15% or less, your device
prompts you to charge the battery. If you continue to operate
the device without charging, the device powers off. For
battery use information, see “About Device” on page 148.
Getting Started 6
Page 12
Charging the Battery
Your device comes with a Wall/USB Charger (Charging Head
and USB cable) to charge your device from any standard
AC power outlet.
Note:
The battery comes partially charged. You must fully
charge the battery before using your device for the first
time. After the first charge, you can use the device
while charging.
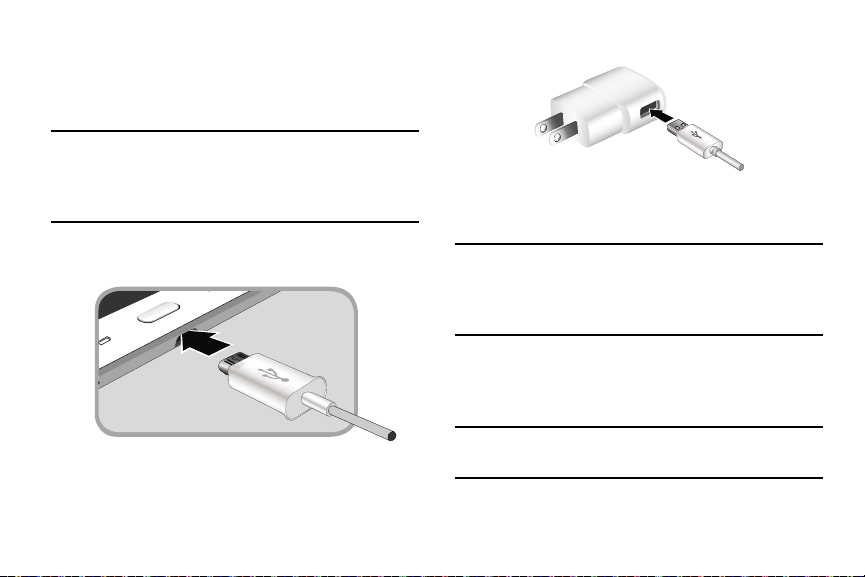
1. Insert the USB cable into the device’s Charger/
Accessory Port.
7
2. Insert the USB cable into the Charging Head.
3. Plug the Charging Head into a standard AC power
outlet.
Warning!
While the device is charging, if the touch screen
does not function due to an unstable power supply,
unplug the USB power adapter from the power outlet
or unplug the USB cable from the device.
4. When charging is complete, unplug the Charging Head
from the power outlet and remove the USB cable from
the device.
Note:
You cannot charge the battery using the USB cable and
your PC.
Page 13
Note:
If the battery is completely discharged, you cannot turn
on the device, even with the USB power adapter
connected. Allow a depleted battery to charge for a few
minutes before you try to turn on the device.
Turning Your Device On and Off
Turning Your Device On
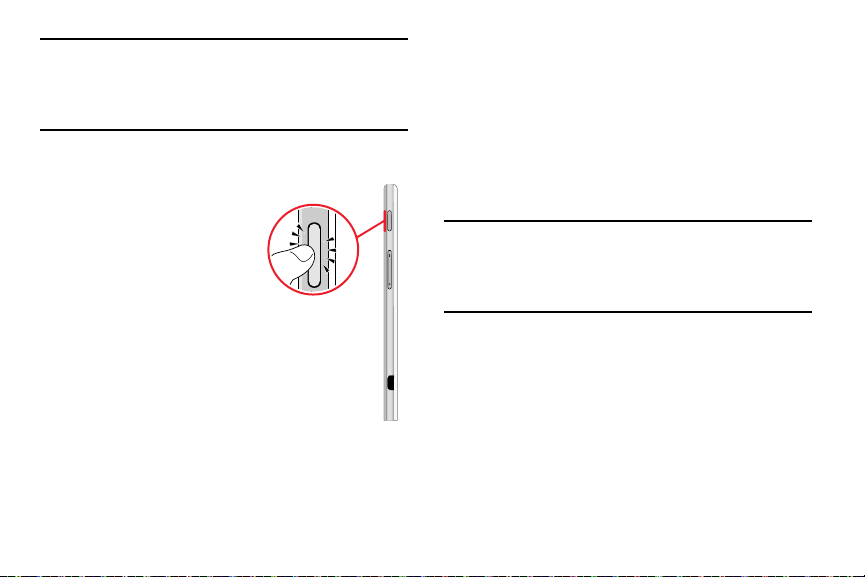
Press and hold the
Power/Lock Key
For more information, refer to
“Unlocking the Device” on
page 11.
Turning Your Device Off
1. Press and hold the
Power/Lock Key
2. On the Device options
menu, touch
➔ OK.
.
.
Power off
Setting Up Your Device
When you turn on your device for the first time, it displays a
Welcome screen. Follow the prompts to set up features and
preferences on your device.
Some screens can be skipped (touch
(touch
Back
).
1. From the Welcome screen, select a language and
touch
Next
to get started.
Note:
If you are visually impaired or hard of hearing, touch
Accessibility
Settings. For more information, refer to “Accessibility”
on page 124.
. For more information, see Accessibility
Next
) or re-displayed
Getting Started 8
Page 14

2. Follow the prompts to complete each section. For each
topic, you will have the option to skip it and continue to
the next screen.
•
Wi-Fi
: Sign in to an available Wi-Fi network. For secured Wi-Fi
networks, you will need to enter a password. For more
“Wi-Fi”
information, refer to
•
Date and time
•
End user license agreement
Agreement and touch
and conditions above
error reports during device failures, touch
•
Got Google?
Account, or touch
new Google Account.
•
Make it Google
instructions to create a new Google Account or touch
Touch to learn more about Google Accounts.
This screen only displays if you did not previously sign in to your
Google Account.
9
: Set the date, time, and select a time zone.
: Touch
: Touch
on page 74.
: Read the End User License
I understand and agree to the terms
. If you would like to send Samsung
Yes
.
Yes
to sign in to your current Google
No
and follow the instructions to set up a
Get an account
and follow the
Not now
•
Google and your Location
location services. Touch each location service to enable.
•
This tablet belongs to…
information is used by the tablet to personalize certain apps.
•
Samsung account
Samsung account or touch
instructions to sign in or set up a new Samsung account.
Touch
here
•
•
.
to learn more using your Samsung account.
Dropbox
: Touch
set up a new Dropbox account or touch
your existing Dropbox account.
Thank you
: This screen displays the Device name and an
option to learn more.
–
Device name
identify the tablet when using Bluetooth, Wi-Fi Direct, and so on.
The default is the model name, SM-T520.
–
Finish
: Your setup is now complete. Touch
main Home screen.
: Read the information about
: Enter your first and last name. This
: Touch
Sign in
to sign in to your current
Create new account
Create account
: Enter a name for the tablet. This name is used to
and follow the instructions to
Sign in
Finish
. Follow the
to sign in to
to display the
Page 15
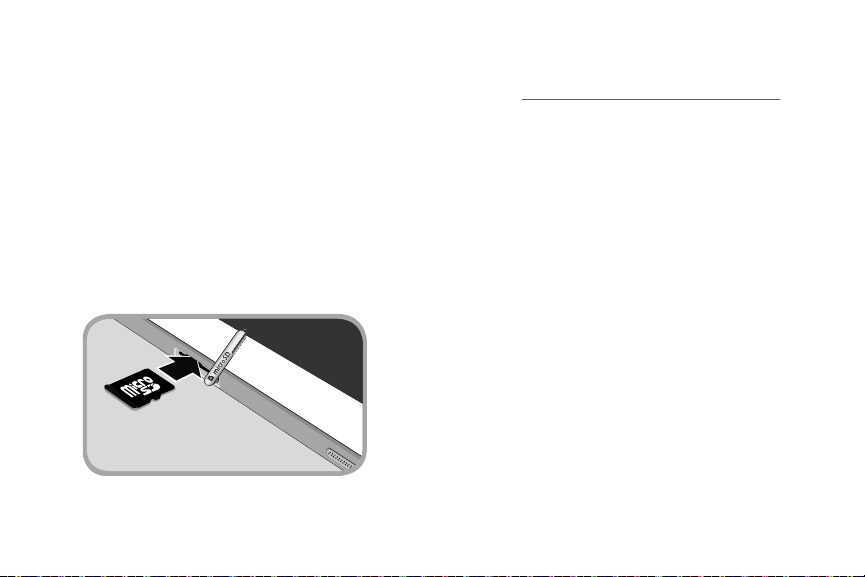
Memory Card
Your device supports removable microSD or microSDHC
memory cards with maximum capacities of 64 GB
(depending on the memory card manufacturer and type).
Memory cards are used to store music, photos, videos, and
other files.
Installing a Memory Card
1. Open the memory card slot cover and turn to expose
the slot.
2. With the gold contacts facing down, carefully slide the
memory card into the slot, pushing gently until it clicks
into place.
3. Close the Memory Card Slot cover.
Galaxy Tab Accessories
To find accessories for your Galaxy Tab:
samsung.com/us/mobile/galaxy-tab-accessories
1. Go to
2. Use your model number to find compatible
accessories.
Securing Your Device
By default, the device locks automatically when the screen
times out or you can lock it manually.
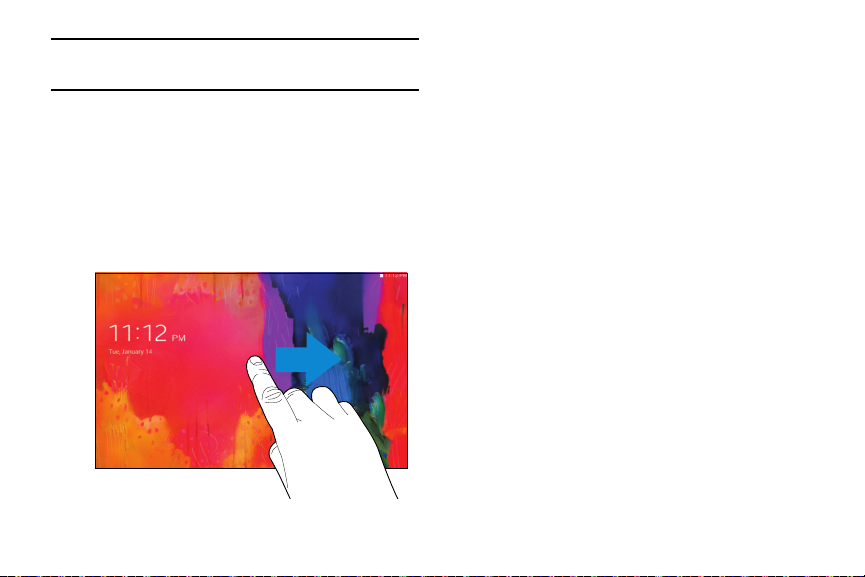
Unlock the tablet by swiping your finger across the screen.
This is the default Screen lock (Swipe), and offers no
security.
Prevent others from using or accessing personal data
and information stored in the device by using a secure
Screen Lock.
For more information about creating and enabling a secure
Screen Lock, see “Lock Screen” on page 120.
For other settings related to securing your device, see
“Security” on page 144.
Getting Started 10
.
Page 16
Note:
Unless stated otherwise, instructions in this User Manual
start with the device unlocked, at the Home screen.
Locking the Device Manually
Press the
Power/Lock Key
.
Unlocking the Device
1. Press the
2. Swipe across the screen as shown. This is the default
11
Power/Lock Key
Swipe screen lock and offers no security.
. The Lock screen displays.
Holding the Device
Your device’s internal antenna is located along the top back
of the device. Do not block the antenna; doing so may affect
signal quality and may cause the device to operate at a
higher power level than is necessary.
Troubleshooting
If your device has fatal errors, hangs up, or freezes, you may
need to reset the device to regain functionality.
• If your device is frozen and unresponsive, press and hold
the
Power/Lock Key
for 8 to 10 seconds.
Page 17

Section 2: Understanding Your Device
This section outlines key features of your device and
describes the screen and the icons that appear when the
device is in use. It also shows how to navigate through
the device.
Features
• 10.1-inch WQXGA (2560x1600) TFT (PLS) LCD touch
screen
• Android Version: KitKat 4.4.2
• 1.9 GHz and 1.3GHz quad-core processors
• Full HTML Web Browser
• Bluetooth 4.0 Wireless technology. For more information,
refer to “Bluetooth” on page 78.
• Built-in Wi-Fi technology (802.11 a/b/g/n/ac)
• 8 megapixel camera and camcorder, plus 2 megapixel full
HD forward-facing camera for video chat
• Full integration of Google applications (Gmail, YouTube,
Google Maps, and Voice Search)
• Photo gallery that supports GIF, AGIF, JPEG, PNG, BMP,
WBMP, and WEBP formats
• Messaging Features:
– Gmail
– Email (corporate and personal)
– Google Hangouts (Instant Messaging and Video Chat)
• HD Video Player (1080p)
– Codec: MPEG4, H.264, H.263, VC-1, VP8, WMV7/8,
Sorenson Spark, MP43
– Format: AVI, MP4, 3GP, MKV, WMV, ASF, FLV
• Music player that supports MP3, AAC/AAC+/EAAC+, WMA,
Vorbis, FLAC, AC-3, AMR-NB/WB, WAV
• Support for microSD and microSDHC
memory cards
• Preloaded applications such as Google Play Books, Google
Play Store, and more. For more information, refer to “More
Application Information” on page 33.
Warning!
This device does not support some USB storage
media devices. For more information, refer to
“Galaxy Tab Accessories” on page 10.
Understanding Your Device 12
Page 18
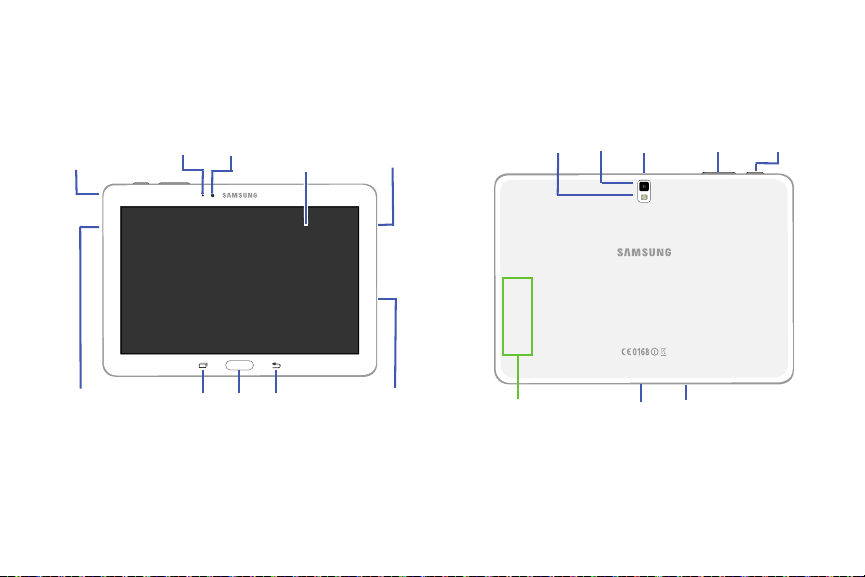
Front and Sides
Light
Sensor
Front-fa cing
Camera
Lens
Display
Screen
Memory
Card Slot
Recent
Apps
BackHome
3.5 mm
Headset
Jack
External
Speaker
External
Speaker
Microphone
Flash
Camera
Lens
Infrared
Blaster
Power/
Lock Key
Volu me
Key
GPS
Antenna
Charger/
Accessory Port
The following items can be found on the front and sides of
your device.
Back, Top, and Bottom
The following items can be found on the back, top, and
bottom of your device.
13
Page 19
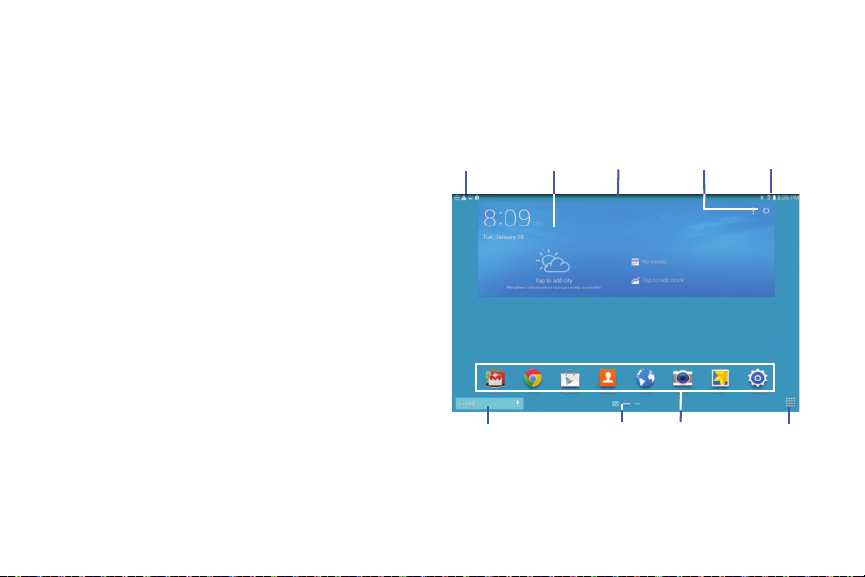
Home Screen
Status
Indicators
Notifications
Status Bar
Refresh
Conten tWidge ts
Apps
Screen
App
Shortcuts
Current
Screen
Google
Search
The Home screen is the starting point for using your device. It
consists of:
•
Status Bar
side and status indicators on the right side.
Note
and drag the top of the screen down. It will disappear after a view
seconds.
•
Notifications
at the top of the screen to report calendar events, device
status, and more. Drag down from the Status Bar to open
the Notification Panel.
•
Widgets
widgets are found on the Home screen by default.
•
Refresh Content
Screen App.
•
Status indicators
battery charge, and time.
•
Google Search
information, refer to
: The Status Bar displays notifications on the left
: The Status Bar is sometimes hidden. To display it, touch
: Notification icons appear on the Status Bar
: Applications that run on the Home screen. Some
: Touch to refresh the content of the Home
: Display your current network status,
: Search the web by typing or speaking. For more
“Google”
on page 94.
•
Current Screen
displayed.
•
App Shortcuts
•
App Screen
: Shows which Home screen is presently
: Touch to launch your favorite apps.
: Access to all your apps and widgets.
Understanding Your Device 14
Page 20
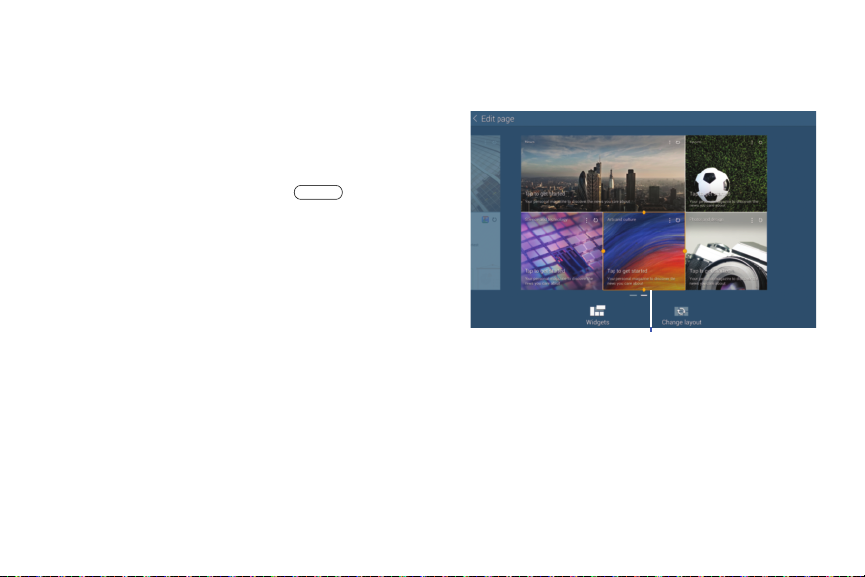
Additional Home Screens
Drag to resize
The Home screen has two different kinds of panels. The
Standard panels display shortcuts to applications and
widgets and the Magazine panels can host Home Screen
Apps, which are built-in apps that run on the Home screen.
The Home screen can have multiple panels.
One Home screen is designated as the main Home screen,
and it displays whenever you press the Home key.
To scroll through the Home screens:
Slide your finger horizontally across the screen.
Customize Home Screen Apps
Home Screen Apps are built-in apps that run in multiple
windows on the Home screens. You can modify the layout of
each Home screen by adding or removing Home Screen Apps
and resizing them.
15
To modify a Home screen:
1. From a Home screen, touch and hold on a Home
Screen App until the Edit page displays.
2. Tou ch
Change layout
Screen Apps.
to randomly rearrange the Home
Page 21

To resize a Home Screen App:
Active Pag e
Main Home Screen
Home Screen
Apps
Add Page
1. Touch and hold a Home Screen App until a gold box
appears around it.
2. Drag a side of the box to resize it. The other Home
Screen Apps automatically adjust to accommodate the
resized window.
Note:
Not all Home Screen Apps can be resized.
To relocate a Home Screen App:
1. Touch and hold a Home Screen App until it “releases”
from the page.
2. Drag the Home Screen App to a new location and
release. The other Home Screen Apps automatically
adjust to accommodate it.
Customizing Home Screens
Your device comes with two default Home screens that
contain Home Screen Apps and two Homes screens that hold
apps and widgets.You can add an additional page of Home
Screen Apps and up to two additional pages to hold apps and
widgets.
To customize the Home screens:
1. From a Home screen, pinch the screen from diagonal
corners to the center to display the editing screen.
2. Touch a Home screen to activate it.
Understanding Your Device 16
Page 22
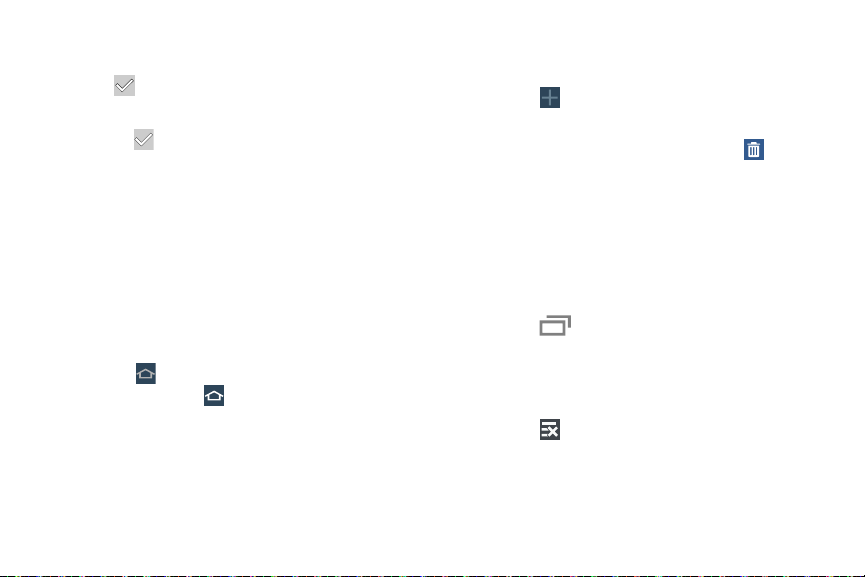
Add or remove Home Screen Apps:
Home Screen Apps currently in use on the active page
display a check mark.
Touc h a
Home Screen App
To uch
to remove the Home Screen App from the
active page.
Change the layout of Home Screen Apps:
To uch
Change layout
Screen Apps on the active page.
To rearrange the order of pages:
Touch and hold, and then drag a page to a new
location.
To set a new main Home screen:
To uch
main Home screen ( )
17
on a Home screen to set it as the new
to add it to the active page.
to randomly rearrange the Home
.
Add or remove Home screens:
To add a new Home screen:
Touch .
To remove an existing Home screen:
Touch and hold, and then drag a page to
Navigating Your Device
Use command keys and the touch screen to navigate.
Command Keys
Recent Apps
To display a list of recently used apps:
Tou ch
To close an app:
Drag the app preview up or down.
To end all running apps:
Touch
Recent apps
Close all
.
. Touch an app to open it.
Remove
.
Page 23

To manage running apps, downloads, device memory, and
storage:
Tou ch
For more information, refer to “Task Manager” on page 35.
Home
To display the main Home screen:
Tou ch Home.
To launch Google Now:
Touch and hold
Back
To return to the previous screen, option, or step:
Tou ch Back
Recent apps
.
➔
Home.
Task Manager
.
Using the Touch Screen
Use only your fingers or a stylus with the touch screen.
Caution!
Do not allow the touch screen to come into contact
with other electrical devices. Electrostatic discharges
can cause the touch screen to malfunction.
To avoid damaging the touch screen, do not touch it
with anything sharp or apply excessive pressure to it
with your fingertips.
Leaving the touch screen idle for extended periods may
result in afterimages (screen burn-in) or ghosting. Turn off
the touch screen when you do not use the device.
Understanding Your Device 18
Page 24
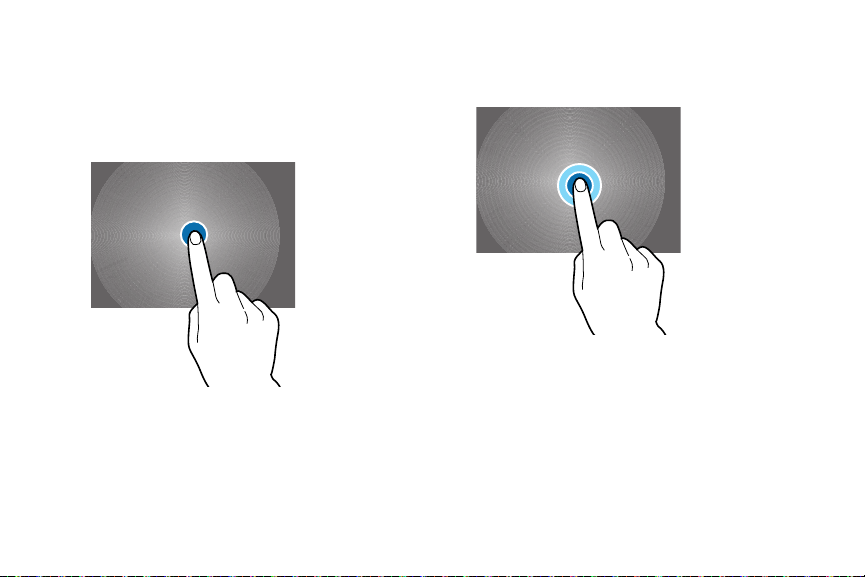
Finger Gestures
Touching
To open an application, to select a menu item, to press an
onscreen button, or to enter a character using the onscreen
keyboard, touch it with a finger.
19
Touching and Holding
Touch and hold an item for more than 2 seconds to access
available options.
Page 25
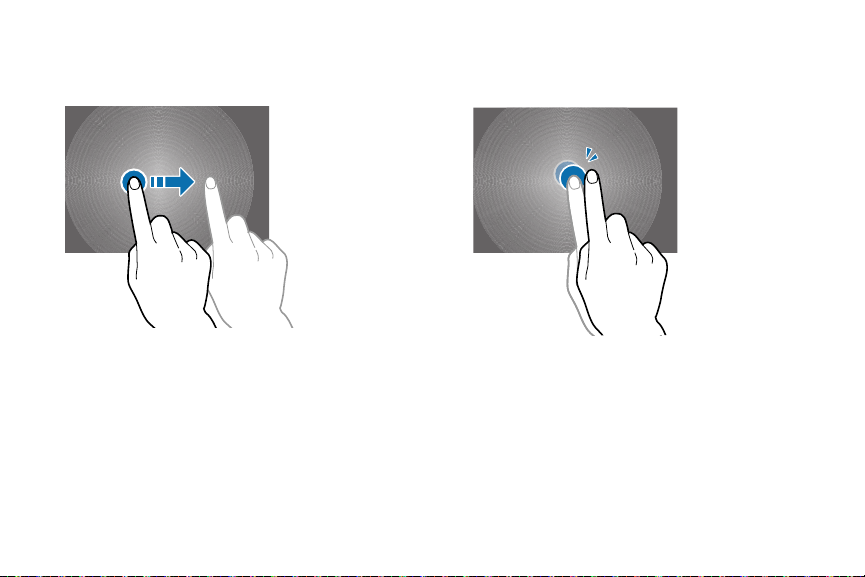
Dragging
To move an icon, thumbnail, or preview to a new location,
touch and hold it and drag it to the target position.
Double-Tapping
Double-tap on a web page, map, or image to zoom in a part.
Double-tap again to zoom out again.
Understanding Your Device 20
Page 26
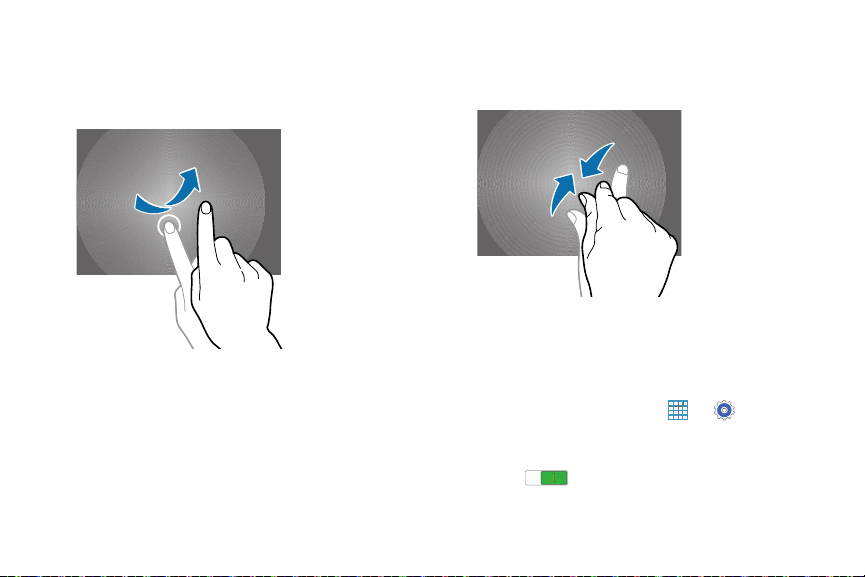
Swipe
Swipe left or right on the Home screen or the Applications
screen to see another panel. Swipe up or down to scroll
through a web page or a list, such as contacts.
21
Pinching and Spreading
Spread two fingers apart on a web page, map, or image to
zoom in. Pinch to zoom out.
Control Motions
Simple motions allow easy control of the device.
Before using motions, make sure the motion feature is
activated.
1. From a Home screen, touch ➔
Controls
tab ➔
Motions
.
OFF / ON
2. Touch the
ON .
button to turn the feature
Settings
➔
Page 27
Note:
Excessive shaking or impact to the device may result in
unintended inputs. Control motions properly.
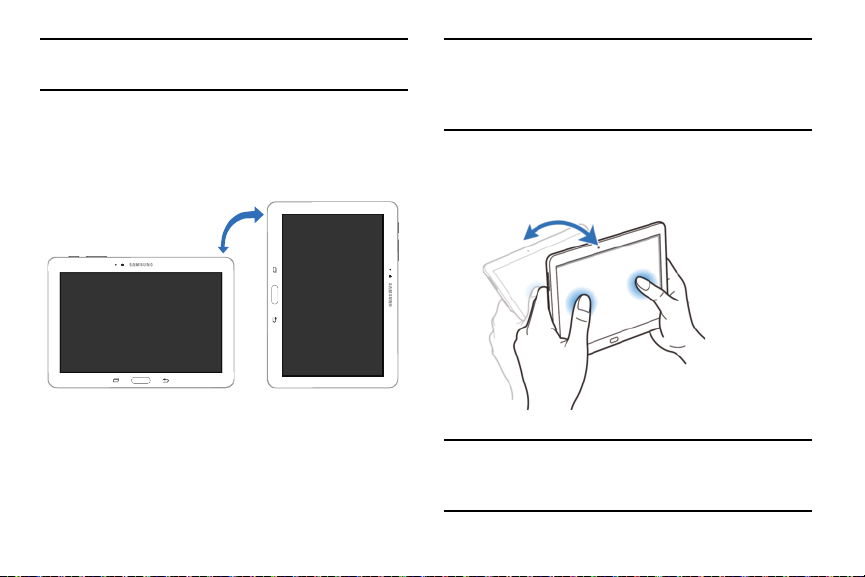
Rotating the Screen
Many applications allow display in either portrait or
landscape orientation. Rotating the device causes the display
to automatically adjust to fit the new screen orientation.
To prevent the display from rotating automatically, open the
Notification Panel and deselect
Screen rotation
.
Note:
Some applications do not allow screen rotation. Some
applications display a different screen depending on the
orientation. For example, the calculator turns into a
scientific calculator when rotated to landscape.
Tilting
Touch and hold two points on the screen, and then tilt the
device back and forth to zoom in or out.
Note:
To move an icon to a new location, touch and hold it and
drag it to the target position. For more information, refer
to “Dragging” on page 20.
Understanding Your Device 22
Page 28
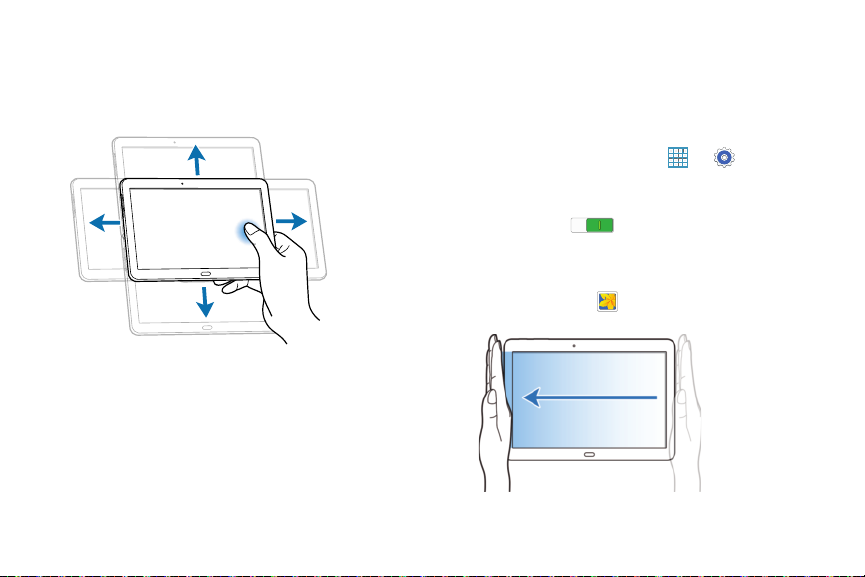
Panning to Browse
When an image is zoomed in, touch and hold a point on the
screen, and then move the device in any direction to browse
the image.
23
Palm Motions
Use palm motions to control the device by touching the
screen.
Before using motions, make sure the palm motion feature is
activated.
1. From a Home screen, touch ➔
Controls
tab ➔
Palm motion
2. If necessary, touch the
feature ON .
Sweeping
Sweep your hand across the screen to capture a screenshot.
The image is saved in
OFF / ON
Gallery
.
➔
Settings
button to turn the
Screenshots
album.
➔
Page 29
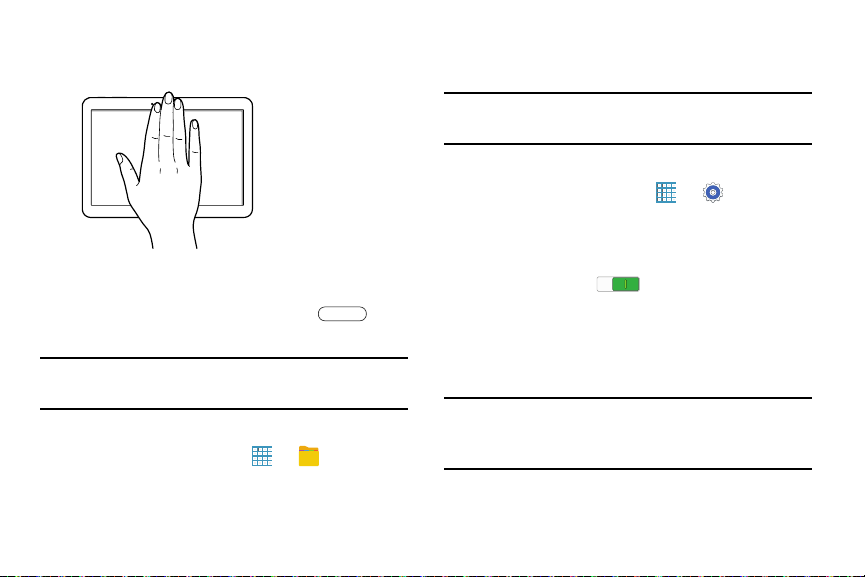
Covering
Cover the screen with a palm to pause media playback.
Capturing Screenshots
Press and hold the
to capture and save an image of the current screen.
Note:
A copy of the screenshot is automatically saved to the
clipboard.
To view the screen shots:
1. From a Home screen, touch ➔
2. Touch
3. Touch a screen capture file to display it.
Categories
Power/Lock Key
➔
Images
.
and
My Files
Home
.
Multi Window
Multi task by using two applications at the same time.
Note:
Only applications displayed on the Multi window panel
can be used with the Multi window feature.
Activate Multi Window
1. From a Home screen, touch ➔
Device
tab.
2. To uch
3. If necessary, touch the
Multi window ON .
4. If desired, touch
automatically view content in Multi window when you
open files from My Files or Video player, or attachments
from email.
Note:
You can also activate Multi window from the Notification
Panel. For more information, refer to “Notification Panel”
on page 27.
Multi window
.
OFF / ON
Open in multi window view
Understanding Your Device 24
Settings
button to turn
to
➔
Page 30
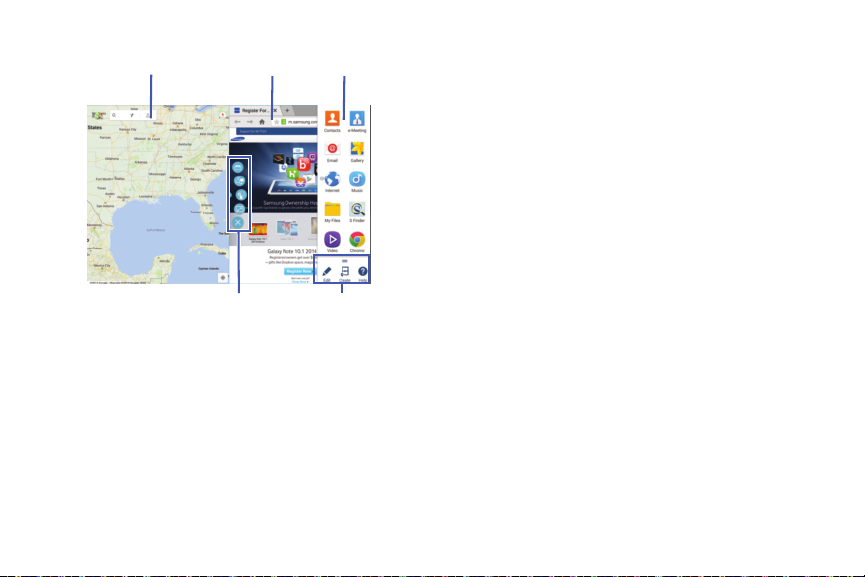
Multi Window
Controls
Panel
Controls
Multi Window
Panel
App 1
App 2
Multi Window Panel
Multi window apps are displayed on the Multi window panel.
Display the Multi window panel:
1. Activate Multi window (see “Activate Multi Window” on
page 24).
2. Swipe the right edge of the screen toward the center to
display the Multi window panel. After a few seconds,
the panel will be hidden again.
Using Multi Window Applications
You can use Multi window to run two applications at the
same time.
1. With Multi window activated, swipe the right edge of
the screen toward the center to display the Multi
window panel.
2. Drag an app off the panel and release. Drag another
app off of the panel and release it into one of the
highlighted windows.
25
Page 31

Window Controls
Select an application window and touch in the middle of
the windows. Window controls appear:
Switch app to compact screen.
Switch locations between Multi window
applications.
Share items between the application windows. Drag
an item to share from one window to another. Some
applications may not support this feature.
Maximize the application.
Close the application.
Creating a Paired Window
Use this feature to save the combination of current running
Multi window applications.
On the Multi window panel:
1. Touch to access the panel controls.
Create
2. Touc h
3. Enter a title and then touch
Panel Configuration
You can rearrange the apps on the Multi window panel, add
new apps, or remove apps.
On the Multi window panel:
1. Touch to access the panel controls.
2. Touc h
.
OK
.
Edit
.
Understanding Your Device 26
Page 32
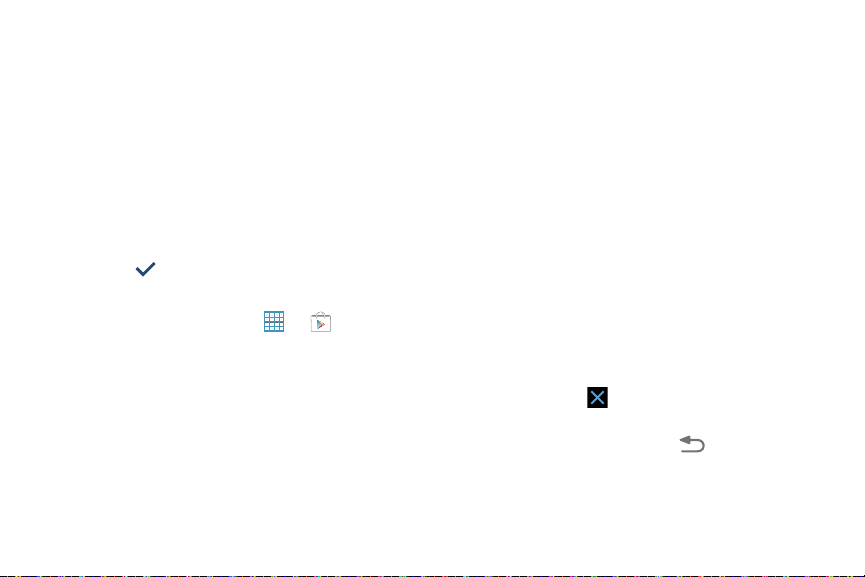
Configuring Apps
To remove an app from the panel:
Touch and drag it off of the panel and place it in the
storage area.
To add an app to the panel:
Touch and drag it from the storage area to the panel.
To relocate an app:
Touch and drag it to a new location.
To save your changes:
Touc h
To download new Multi window apps:
From a Home screen, touch ➔
27
Done
.
Play Store
Notifications
Notification icons appear on the Status Bar at the top of the
screen to report calendar events, device status, and more.
For details about these notifications, open the Notification
Panel.
Notification Panel
To view the Notification Panel:
1. Swipe downward from the top of the screen to display
the Status Bar.
2. Swipe downward again on the Status Bar to display the
Notification Panel.
.
3. Scroll down the list to see additional notification
details.
4. Touch an item to open it.
5. To clear a single notification, drag the notification left
or right. Touch to clear all notifications.
6. To close the Notification Panel, swipe upward from the
Back
bottom of the screen or touch
.
Page 33
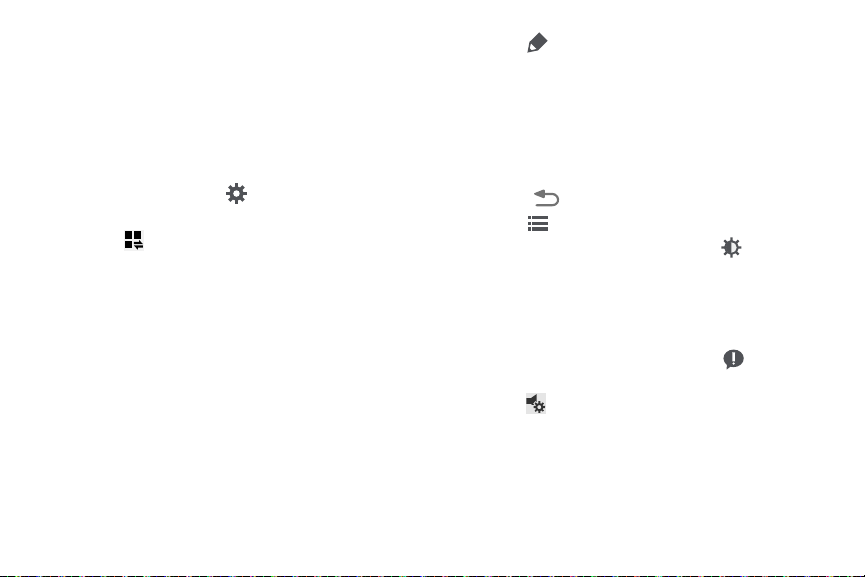
Accessing Additional Panel Functions
In addition to notifications, the Notification Panel also
provides quick and ready access to separate device
functions. These can be quickly activated or deactivated by
toggling them on or off. You can choose the functions that
display.
From the Notification Panel:
1. To go to Settings, touch
information, refer to “Settings” on page 109.
2. Touch to display additional options.
The following functions can either be activated (green)
or deactivated (gray): Wi-Fi, GPS, Sound/Vibrate/Mute,
Screen rotation, Bluetooth, Reading mode,
Blocking mode, Power saving, Multi window,
Screen Mirroring, Smart stay, Smart pause, Sync, and
Airplane mode.
Settings
. For more
3. Touch and locate the Notification Panel area at the
bottom of the Notification Panel screen.
•
In a single motion, touch and hold a desired function, such as
Airplane mode, then drag it to the top two rows.
•
Touch
Brightness and volume
want to be able to adjust the screen brightness and volume
from the Notification Panel.
•
Touch
4. Touch to display only your primary functions.
5. To set the display brightness, touch the
slider and drag it to set the brightness or touch
allow the device to set brightness automatically based
on available light and battery charge status. For more
information, refer to “Display” on page 118.
6. To adjust the system volume, touch the
slider and drag it to set the Notification sound level or
touch to set the level for Notifications, Media, and
System sounds. For more information, refer to “Sound”
on page 116.
Back
to exit the Notification Panel.
Understanding Your Device 28
to create a check mark if you
Brightness
Auto
to
Sound
Page 34
Notifications
To close the Notification Panel:
displays system notifications.
Touch a notification entry to display the details. Touch
to remove Notification Icons from the Status Bar.
For more information, refer to “Notification Panel” on
page 27.
To uch Back
, or swipe up.
Status Bar Icons
Some common status and notification icons are shown
below.
Connectivity Icons
Wi-Fi connected
Bluetooth enabled
Status Bar
The Status Bar at the top of the home screen provides device
information (such as network status, battery charge, and
time) on the right side and notification alerts on the left.
To display the Status Bar:
From a Home screen, swipe downward from the top of
the screen. The grey Status Bar will appear. It will
disappear after a few seconds.
29
Bluetooth paired
Connected to computer
Wi-Fi Direct is active and your tablet is
connected to another device.
The Nearby devices setting is enabled.
Page 35
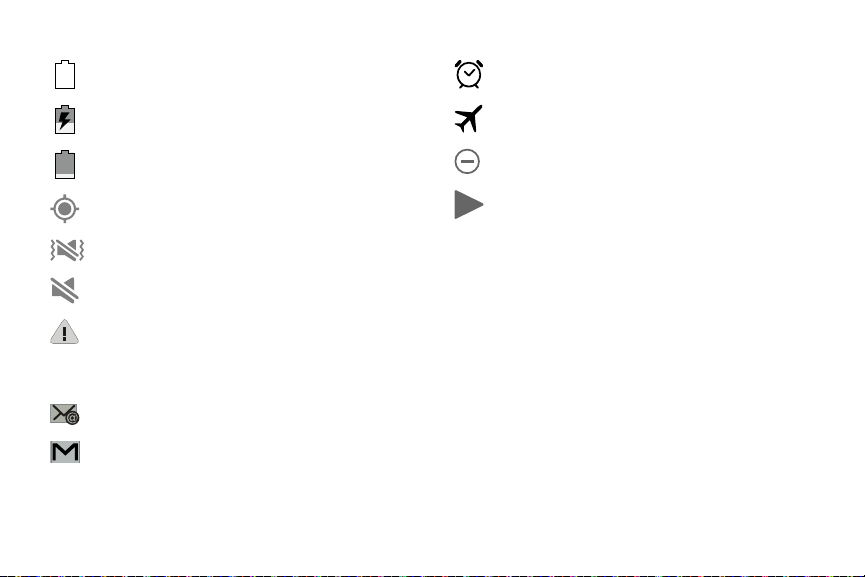
Device Status Icons
Battery full
Other Icons
Alarm activated
Battery charging
Battery low
GPS enabled
Vibrate mode enabled
Mute mode enabled
Error occurred or caution required
Messaging Icons
New email
New Gmail
Airplane mode activated
Blocking mode activated
Music is playing.
Apps and Widgets
You can add, reposition, or remove shortcuts and widgets
from the Home screen.
•
Shortcuts
applications.
•
Widgets
onscreen applications.
: Icons on the Home screen that launch
: Self-contained applications. They appear as
Understanding Your Device 30
Page 36
Adding a Shortcut or Widget
You can customize the Home screen by adding shortcuts
and widgets.
1. From a Home screen, touch and hold on an empty area
of the screen until the Home screen pop-up displays.
Touch Apps and Widgets.
– or –
Touch to display the Apps screen.
2. For shortcuts, touch the
the
Widgets
tab.
3. Touch and hold the shortcut or widget, and then drag it
to the Home screen and release.
Removing a Shortcut or Widget
Shortcuts and widgets can be removed from the
Home screen.
Touch and hold the shortcut or widget until it detaches,
and then drag it to
Note:
Removing a shortcut does not delete the application;
it simply removes the shortcut from the Home screen.
31
Apps
tab. For widgets, touch
Remove
and release.
Folder s
Place folders on the Home screen to organize items.
Adding Folders
1. From a Home screen, touch and hold on an empty area
of the screen until the Home screen pop-up appears.
Folder
2. Tou ch
3. Enter a name for the folder and touch
Using Folders
Touch the folder to open it and access the shortcuts
inside.
To add shortcuts to the folder, touch and hold the
shortcut, and then drag it to the folder and release.
To delete a folder, touch and hold the folder until it
detaches, and then drag it to
Note:
All shortcuts contained in the folder will also be deleted.
.
OK
.
Remove
and release.
Page 37
Wallpapers
You can choose a picture to display on the Home Screen,
Lock screen, or on both the Home and Lock screens. Choose
from preloaded wallpapers, or select a photo you have
downloaded or taken with the Camera.
1. From a Home screen, touch and hold on an empty area
of the screen until the Home screen pop-up displays.
2. Touch
Note:
Home Screen, Lock screen
lock screens
•
Gallery
•
Live wallpapers
wallpapers (Home screen only).
•
Photos
only).
•
Wallpapers
You can also set the wallpaper in Settings. From a
Home screen, touch ➔
➔
Wallpaper
for options:
: Access the Gallery to select a photo.
: Choose from pre-loaded interactive animated
: Access Google Photos to select a photo (Home screen
: Choose from pre-loaded wallpaper images.
.
, or
Home and
Settings
➔
Device
tab
Apps Screen
The
Apps
screen displays all applications installed on your
tablet. Applications that you download and install from
Google Play or from the web are also added to a Home
screen.
The Apps icons can be arranged in various ways. To change
the arrangement of the Apps icons:
1. From a Home screen, touch .
2. Touc h
3. To uch
To manually change the order of the icons on the Apps
screen:
1. From a Home screen, touch .
2. Touc h
3. Touch and hold an icon and drag it to a new position.
4. To uch
You can place shortcuts to applications on the Home screen
for quick access to the application. For more information,
refer to “Adding a Shortcut or Widget” on page 31.
Menu
➔
Sort by
Customizable grid
Menu
➔
Edit
Save
to save the changes.
Understanding Your Device 32
.
or
Alphabetical grid
.
.
Page 38

To view your downloaded applications:
1. From a Home screen, touch .
Download
2. Touch
3. Touch an icon on the
to launch the application.
– or –
Add an App Shortcut to a Home screen by dragging the
App icon onto the Home screen. For more information,
refer to “Adding a Shortcut or Widget” on page 31.
to view downloaded apps.
Downloaded applications
screen
Application Information
To view information about an App, such as the amount of
storage it uses, force the App to stop, uninstall updates, and
clear data:
1. From a Home screen, touch ➔
General
tab ➔
Application manager
All
2. Touch the
touch the app to open a screen with details about
the App.
33
tab, scroll through the apps list, and
Settings
➔
.
More Application Information
For more information, refer to “Applications” on page 87.
In that section, each application that is available on the
Applications screen is listed and described. If the application
is also described in another section of this user manual, then
a cross reference to that particular section is provided.
Various widgets are also described.
My Magazine
Make your own social magazine with My Magazine.
My Magazine brings you personalized news and information,
social media, and more together in a magazine-style layout.
Rearranging Widgets on the Magazine Panels
Adding a Magazine Widget
To add a Magazine widget to a Magazine panel:
1. Pinch on the Magazine panel (see “Customizing Home
Screens” on page 16).
2. Touch to select a panel preview at the top of the
screen.
3. Select a Magazine widget to add to the panel.
You can add up to 6 Magazine widgets to a panel.
Page 39
Moving a Magazine Widget
To move a Magazine widget:
1. Touch and hold a Magazine widget.
2. Drag it to a new location.
3. Resize it by dragging the frame, if necessary.
4. Tap to save the location of the Magazine widget.
Removing a Magazine Widget
To remove a Magazine widget:
1. Touch and hold a Magazine widget until it detaches.
Remove
2. Drag it to
and release.
Access My Magazine
My Magazine is comprised of various Home screen
applications, news feeds from a variety of sources, and
social content, such as Google+.
To access My Magazine:
From a Home screen, touch the
Applications
To customize which My Magazine Home Screen Apps appear
on your Home screens, see “Customize Home Screen Apps”
on page 15.
Home Screen Apps.
News, Social
, or
Viewing My Magazine
Use these actions while viewing My Magazine.
Viewing Topics
Swipe left or right to scroll between topics.
Touch any preview to view the entire article.
Tou ch
Tou ch
Viewing Articles
Swipe left or right to move between pages.
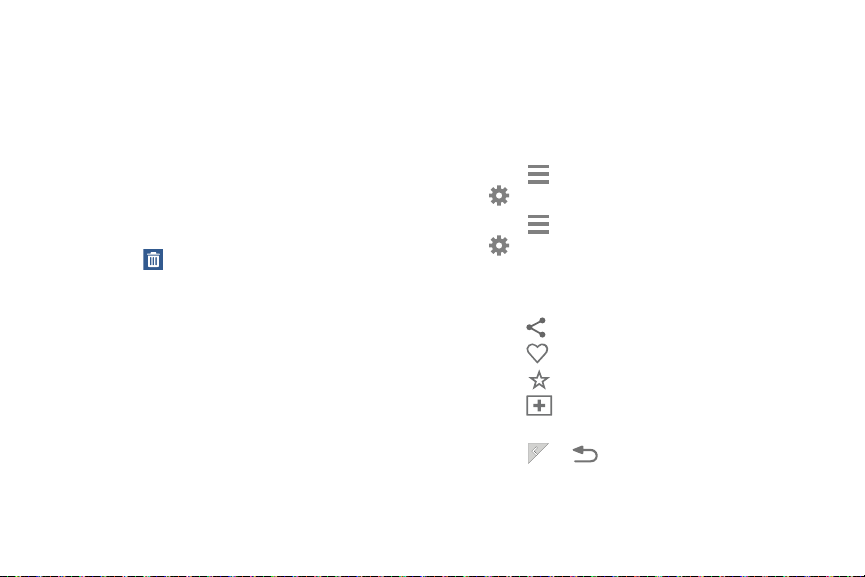
Touch to share the article.
Touch to “Like” this article.
Touch to set the article as a favorite.
Touch to sign in to your Flipboard account or
create a Flipboard account.
Tou ch or to return to the topic page.
Content Guide
Settings ➔ Help
Content Guide ➔ My Flipboard
Settings ➔ About
➔
to get assistance using Flipboard.
to read the Terms of Use.
Understanding Your Device 34
My Flipboard
➔
➔
Page 40

Touc h
Menu
for options:
•
Save Image to Device
current page to Gallery.
•
Read Later
•
View on Web
•
Report
: Flag this article as inappropriate for review by
Flipboard.
Subscribing to Magazines
1. From any Home screen, touch a My Magazine app to
get started.
2. Touch
3. Touch a topic, such as News or Business, and touch a
magazine to subscribe.
35
: Save a copy of all images on the
: Save this article to your article list for later.
: View the Internet source of the article.
Content Guide
.
Task Manager
Your device can run applications simultaneously and some
applications run in the background.
Use Task Manager to see which applications are running on
your device and to end running applications to extend battery
life. You can also uninstall applications from your device and
see how much memory is used by applications.
To access the Task Manager:
1. Tou ch
2. Touch each tab for options:
Active applications
3.
device. Touch
to terminate all running applications.
Downloaded
4.
Play. Touch
your device.
RAM manager
5.
Memory (RAM) currently in use. Touch
clear inactive and background processes.
Storage
6.
(SD card) storage memory statistics.
Recent apps
End
: View applications installed from Google
Uninstall
: Display the amount of Random Access
: View internal (System storage) and external
➔
Task manager
: View applications running on your
to terminate an application or
to remove an application from
.
End all
Clear memory
to
Page 41
Screen Capture
Press and hold the
to capture and save an image of the current screen.
Note:
A copy of the screenshot is automatically saved to the
clipboard.
To view the screen shots:
1. From a Home screen, touch ➔
2. Touch to open the
3. Touch a screen capture to view it.
Power/Lock Key
Screenshots
and
album.
Gallery
.
Help
Access help information to learn how to use the device and
applications or configure important settings.
1. From a Home screen, touch ➔
Samsung
folder ➔
2. Select a category to view tips.
Help
.
Home
Entering Text
Use the Samsung keyboard or the voice input feature to
enter text.
Note:
Text entry is not supported in some languages. To enter
text, you must change the input language to one of the
supported languages.
Using the Keyboard
To choose a text input method while entering text:
1. Touch any text field.
2. Touch the top of the screen and swipe downward.
The Notification Panel screen displays.
3. Touc h
type of keyboard to use.
Entering Uppercase
Touch before entering a character. For all caps, touch
it twice.
Changing the Keyboard Type
Touch and hold
the keyboard type. Options are: Normal, Floating, and Split.
Select input method
Options
, and then touch to change
Understanding Your Device 36
, and then select the
Page 42
Changing Language Keyboards
Add languages to the keyboard, and then slide the space key
left or right to change language keyboards.
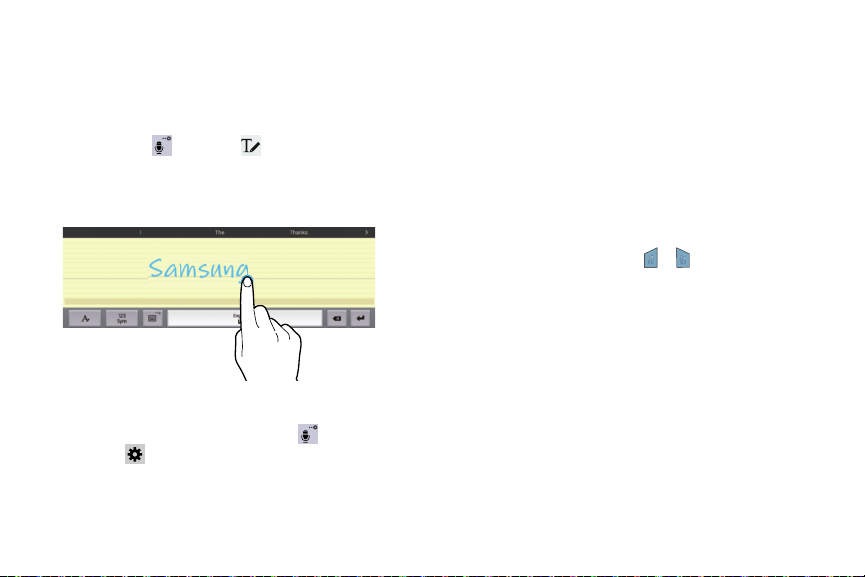
Handwriting
Touch and hold
write a word with a finger. As you write, suggestions are
offered in the word options area in case the correct letters
were not recognized. Select a suggested word.
Use handwriting gestures to perform actions, such as
editing or deleting characters and inserting spaces. To
view the gesture guides, touch and hold
then touch
Using handwriting gestures
37
Options
Settings
➔
Help
.
➔
Handwriting
➔
Keyboard
, and then
Options
➔
, and
Entering Text By Voice
Activate the voice input feature and then speak into the
microphone. The device displays what you speak.
If the device does not recognize your words, touch the
underlined text and select an alternative word or phrase from
the drop-down list.
To change the language or add languages for voice
recognition, touch the current language.
Copying and Pasting
Touch and hold over text, drag or to select more or less
text, and then touch
text is copied to the clipboard.
To paste it into a text entry field, touch and hold at the point
where it should be inserted, and then touch
Copy
to copy or
Cut
to cut. The selected
Paste
.
Page 43

Section 3: Accounts and Contacts
This section explains how to manage accounts and contacts.
Accounts
Your device can synchronize with a variety of accounts. With
synchronization, information on your device is updated with
any information that changes in your accounts.
•
Samsung Account
•
Dropbox
•
Email
: Add an Email Account to sync Contacts.
•
Google
: Add your Google Account to sync your Contacts,
Calendar, and Gmail.
•
LDAP
: Add an LDAP Account to find entries in an LDAP directory.
•
Microsoft Exchange ActiveSync
sync Contacts, Calendar, and Email.
•
Facebook
•
Twi tt er
: Add a Twitter Account.
•
WebEx
: Add a Cisco WebEx Meetings account.
: Add your Samsung Account.
: Add your Dropbox Account.
: Add your Exchange Account to
: Add a Facebook Account to sync apps.
Setting Up Accounts
Set up and manage your synchronized accounts with the
Accounts
setting.
1. From a Home screen, touch ➔
tab ➔
Accounts
➔
General
2. Touch the account type.
3. Follow the prompts to enter your account credentials to
complete the set up process.
Your tablet communicates with the appropriate account
servers to set up your account. When complete, your
account displays in the
screen.
Add account
Accounts
Accounts and Contacts 38
Settings ➔
.
area of the Settings
Page 44
Your Google Account
In order to utilize your device to the fullest extent, you will
need to create a Google Account when you first use your
device. With a Google Account, Google applications will
always be in sync between your tablet and computer.
1. From a Home screen, touch ➔
General
tab ➔
Accounts ➔ Add account ➔ Google
2. Follow the prompts to sign into your existing account or
create a new account.
Settings ➔
Your Samsung Account
Create a Samsung Account for access to Samsung apps
and services, and much more.
1. From a Home screen, touch ➔
General
tab ➔
Accounts ➔ Add account ➔
Samsung account
2. Follow the prompts to sign into your existing account or
create a new account.
39
.
Settings ➔
Contacts
Use this application to manage contact information for your
friends, family, and colleagues, including phone numbers,
email addresses, and others.
To access Contacts:
.
From a Home screen, touch ➔
Add a Contact
1. Touch
pop-up displays.
2. To choose where the contact is stored, touch
an account.
– or –
Tou ch
more information, refer to “Setting Up Accounts” on
page 38.
Contacts
➔
Add new account
Create
to add a different account. For
Contacts
.
. The Save contact to
Device
or
Page 45
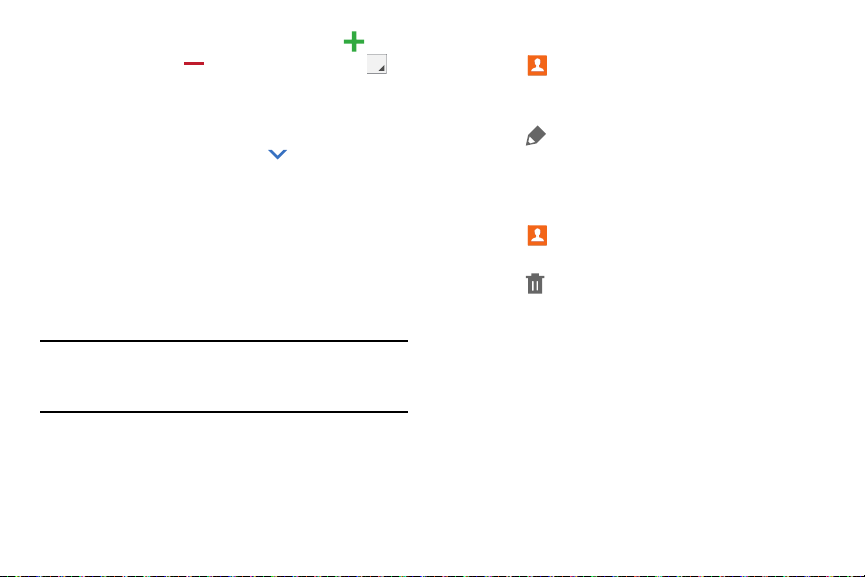
3. Touch each field to enter information. Touch to add
another entry, or to remove an entry. Touch to
choose a label.
•
Picture
: Touch the picture icon to assign a picture to the
new contact.
•
Name
: Enter the name. Touch to display additional
name fields.
•
Phone
: Enter a phone number.
•
Email
: Enter an email address.
•
Groups
: Assign the contact to a group. For more
information, refer to “Groups” on page 43.
•
Add another field
4. Touch
Note:
Save
Your personal Contact entry is always listed at the top of
the Contacts list under ME. Touch
your contact information.
: Add additional fields for the contact.
.
Set up profile
to add
Updating Contacts
1. Touc h
2. Touch a contact in the Contacts list to view its
information.
3. Touc h
4. Touch any field to edit. For more information, refer to
“Add a Contact” on page 39.
Contacts
Edit
.
.
Deleting Contacts
1. Touc h
2. Touch a contact in the Contacts list to display it.
3. To uch
4. At the prompt, touch
Contacts
Delete
.
.
OK
.
Accounts and Contacts 40
Page 46

Contacts Display Options
There are various ways to display your contacts.
1. Touch
2. Touch the
view contacts in various ways:
•Groups
•Favorites
•Contacts
3. While viewing
4. While viewing the
Settings
41
Contacts
.
Groups
tab,
Favorites
tab, or
: Display contacts sorted into groups—such as
Not assigned, Co-workers, Family, Friends, etc. The number of
contacts in each group is displayed next to the group name.
Touch a group name to show only contacts in that group. For
more information, refer to “Create a New Group” on page 43.
: Show only your favorite (or starred), contacts. For
more information, refer to “Favorites” on page 45.
: Show all your contacts. Touch the
enter a keyword to list contacts that contain that keyword.
Groups, Favorites
Menu
for options.
for Contact settings.
Contacts
, or
Contacts
tab, touch
Contacts
Search
, touch
Menu
tab to
field and
➔
Linked Contacts
Your device can synchronize with multiple accounts,
including Google, Corporate Exchange, and other email
providers. When you synchronize contacts from these
accounts with your device, you may have multiple contacts
for the same person.
Linking, or joining, imported contact records allows you to
see all of a contact’s numbers and addresses together in a
single contact entry. Linking also helps you keep your
contacts updated, because any changes that your contacts
make to their information in the respective accounts are
automatically updated the next time you synchronize with
that account.
Page 47
Linking Contacts
1. Touch
2. Touch a contact in the Contacts list to display it.
3. Touch
4. Touch the contact you want to link. The linked contact’s
information is displayed with the original contact’s
information.
5. Repeat Steps 3 and 4 to link other contacts.
Separating Contacts
1. Touch
2. Touch a contact in the Contacts list to display it.
3. Touch
contacts is displayed.
4. Touch
Contacts
.
Menu
➔
Link contact.
Contacts
.
Menu
➔
Separate contact.
to separate a linked contact.
A list of linked
Sharing Contact Information
You can send a contact’s information using Bluetooth to other
Bluetooth devices, or in an Email or Gmail as an attachment.
Note:
Not all Bluetooth devices accept contacts and not all
devices support transfers of multiple contacts. Check
the target device’s documentation.
Contacts
1. Touc h
2. To uch
3. To uch
4. Touch a sending method, such as Bluetooth or email.
5. Follow the prompts to send the contact information.
Menu
Selected contact
contact, or touch
.
➔
Share namecard via
to share only the displayed
Multiple contacts
Accounts and Contacts 42
.
.
Page 48
Importing and Exporting Contacts
To back up and restore your contacts, you can export your
contacts list to a storage device (such as a PC), or import
your contacts list from a storage device.
1. Use the USB cable to connect your device to the
storage device.
2. Touch
3. Touch
4. Touch an option and then follow the prompts.
Contacts
Menu
➔
.
Settings
➔
Import/Export
.
Groups
Assign contacts to Groups, such as co-workers, family, or
friends, to make searching for contacts faster or to quickly
send an email to group members.
43
Create a New Group
Create a new group when you add or edit a contact.
1. Touch
2. Touch
3. Touch the
4. Tou ch
Select all
contacts to the group.
5. Tou ch
Tip:
Contacts can belong to more than one group. While
editing a contact, touch the
groups.
Once you create a new group, the Contacts list can be set to
display only the contacts in that group. For more information,
refer to “Contacts Display Options” on page 41.
Contacts
Create
.
Group name
Add member
, and then touch
Save
.
➔
Groups
tab.
field and enter a name.
, touch individual contacts or touch
Done
to add the selected
Groups
field to add additional
Page 49
Adding Group Members
To add a contact to a group, just edit a contact’s Group field.
For more information, refer to “Updating Contacts” on
page 40.
To add multiple contacts to a group:
Contacts
➔
Groups
1. Touch
2. Touch the group to which you want to add members.
Menu
➔
3. Touch
The contacts that can be added display.
4. Touch
5. Touch Done to add the contacts to the group.
Select all
Add member
or the name of each contact to add.
tab.
.
Removing Group Members
1. Touch
2. Touch the group from which you want to remove
members.
3. Touch
4. Touch
5. Touch Done to remove the contacts.
Contacts are removed from the group and the group
name is removed from each contact’s
Contacts
➔
Groups
tab.
Menu
➔
Remove member
Select all
or the name of each contact to remove.
.
Group
field.
Renaming a Group
1. Touc h
2. Touch the group you want to rename.
3. To uch
4. Touc h th e
5. To uch
Contacts
Menu
Group name
Save
.
➔
Groups
tab.
➔
Edit
.
field and enter a new name.
Deleting Groups
1. Touc h
Delete groups
2. Touch individual groups or touch
touch
3. To uch Group only to delete only the group or Group
and group members to delete both the group and the
group’s members.
Done
Contacts
.
.
➔
Groups
tab ➔
Menu
Select all
, then
Accounts and Contacts 44
➔
Page 50
Favorites
Mark contact records with a gold star to identify them as
favorites.
Mark a Contact as a Favorite
1. Touch
2. Touch a contact in the Contacts list to display it.
3. Touch the
Tip:
You do not have to edit the contact to mark it as a favorite.
View Favorites
1. Touch
2. Touch the
displayed.
– or –
Touch the
list only your starred contacts that are being saved to
your Google Account.
45
Contacts
.
Star
so that it turns gold .
Contacts
.
Favorites
tab. Only your starred contacts are
Groups
tab, then touch
Starred in Android
Remove Favorites
Note:
to
1. Touch
2. Tou ch
3. Touch individual contacts or touch
Done
To remove the currently displayed contact from your
favorites list, touch the
name so that it is no longer gold .
Contacts
Menu
to remove.
➔
Favorites
➔
Remove from Favorites
Star
next to the contact’s
tab.
Select all
.
, then touch
Page 51
Section 4: Messaging
This section describes how to send and receive messages
and other features associated with messaging.
Types of Messages
Your device supports these types of messages:
• Email
• Gmail
• Hangouts
• Google+
Note:
Your Wi-Fi-only device does NOT support voice calling
and messaging services. Please disregard any “dial”
and “message” related menus because some Gmail
options are identically set in all Android devices.
Use Email to view and manage all your email accounts in one
application.
From a Home screen, touch ➔
Configuring Email Accounts
You can configure Email for most accounts in just a
few steps.
Email
1. Touc h
2. The first time you set up an email account, at the Set
up email screen, enter an
then touch
– or –
For additional accounts, touch
Add account
3. Follow the onscreen instructions to set up your email
account.
4. To uch
Next
go to the Apps screen.
.
Email address
Next
.
.
to go to the next screen or touch
Email
.
and
Password
Menu ➔ Settings
Previous
Messaging 46
,
➔
to
Page 52
Note:
For Exchange ActiveSync accounts, the Activate device
administrator? screen may appear. Read the information
and touch
5. Enter an account name and your name, if required.
6. Touch
Note:
To configure email account settings at any time, use
Account settings.
47
Activate
to continue.
Done
.
The device communicates with the appropriate server
to set up your account and synchronize your email.
When complete, your email appears in the Inbox for
the account.
Menu ➔ Settings
. Touch the account to display
Managing Your Email Accounts
If you add more than one email account, you can view email
you receive for all accounts in the
you can view email accounts individually.
Email
1. Touch
2. Touch the
screen to select:
• Combined view
•<Account Name
3. Touch
Touch to return to a two column view.
.
drop-down menu at the top left of the
: View all email in a combined inbox.
>: View email for the account.
Split view
Combined view
to display email in three columns.
screen or
Refreshing Your Email Account
Refresh your account to update your device from your email
servers.
1. Touch
2. In the Application Bar, touch
Email
.
Refresh
.
Deleting Email Accounts
To delete an Email account:
Email
1. Touch
2. Touch
.
Menu ➔ Settings
➔
Delete account
.
Page 53
Email Settings
Use the Email Settings to configure your Email preferences.
Note:
Available settings depend on the email provider.
1. Touch
2. Touch
General settings
•Display
• Composing and sending
•Auto advance
• Confirm deletions
•Priority senders
• Spam addresses
• Rules for filtering
3. Touch an account to configure specific settings.
Available options depend on the account.
Email
.
Menu
➔
Settings
, then touch
. The following options display:
: Set how email is shown in the email list and when you
open them.
while composing and sending email.
message. Choices are: Next email, Previous email, or Email list.
as a priority.
names, address, or subject.
: Set what functions are available
: Set the screen to show after deleting a
: Ask for confirmation before deleting email.
: Enter email addresses that you want treated
: Manage your spam address list.
: Create rules for filtering email based on
Composing and Sending Email
1. Touc h
2. If you have multiple accounts set up, choose an
account from the menu at the top of the screen.
3. Touc h
recipients and the email text.
4. While composing a message:
•
Touch Menu
Tracking options, and Security options.
•
Touch
Available options depend on the type of email account.
5. Touch the body of the email to enter the text of your
email. Touch the text option buttons to edit and format
your message text.
6. Touc h
– or –
Touc h
– or –
Touc h
Email
.
Compose
, then touch fields to enter
to display options: Schedule sending, Priority,
Attach
to add a file to the message.
Send
to send the message.
Save
to save the email to the Drafts folder.
Discard
to discard the email.
Messaging 48
Page 54
Replying to an Email
1. Touch
2. Open an email that you have received.
3. Touch
Email
.
Reply
to reply to the sender of the email.
Forwarding an Email
1. Touch
2. Open an email that you have received.
3. Touch
contact.
Email
.
Forward
to forward the email to another
Gmail
Send and receive email with Gmail, Google’s web-based
email service.
From a Home screen, touch ➔
Gmail
➔
49
.
Google
folder
Setting Up Your Gmail Account
If you did not set up a Google Account during the initial
configuration, the first time you launch Gmail, your device
prompts you to set up your Google Account.
1. Touch
2. Follow the prompts to sign in or create a new account.
The device communicates with the Google server to set
up your account and synchronize your email. When
complete, your Gmail displays in the Inbox.
Note:
You can use more than one Google Account on your
device. From a Home screen, touch ➔
➔
additional Google Account.
General
Gmail
tab ➔
.
Accounts
➔
Add account
Settings
to add an
Page 55
Composing and Sending Gmail
1. Touch
2. Touch
the message. While composing a message, touch
3. Touch
– or –
Touch
message.
Gmail
Compose
Menu
for options.
SEND
Menu ➔ Save draft
.
, then touch fields to compose
to send this message.
to save a draft of this
Refreshing Your Gmail Account
Refresh your account to update your device from the Gmail
servers.
1. Touch
2. While viewing your Inbox, drag your finger downward
across your messages.
Gmail
.
Gmail Settings
Use the Gmail Settings to configure your Gmail preferences.
1. Touch
2. Touch
Gmail
.
Menu ➔ Settings
for settings.
Hangouts
Previously known as Google Talk, Hangouts is an online place
to meet friends and family, share photos, and host video
calls. Conversation logs are automatically saved to a Chats
area in your Gmail account.
From a Home screen, touch ➔
Hangouts
➔
.
Google
folder
Google+
Google+ makes messaging and sharing with your friends a
lot easier. You can set up Circles of friends, visit the Stream
to get updates from your Circles, use Messenger for fast
messaging with everyone in your Circles, or use Instant
Upload to automatically upload videos and photos to your
own private album on Google+.
From a Home screen, touch ➔
Google+
➔
.
Google
folder
Messaging 50
Page 56
Section 5: Multimedia
This section explains how to use the music features of your
device including the Music app and the Music Player.
Flipboard and WatchON are also described.
Listening to Music
You can listen to music using your device’s built-in speakers,
through a wired headset, or through a Bluetooth headset.
For more information, refer to “Bluetooth” on page 78.
Volume Key
Press the
onscreen volume control, then touch and drag on the scale to
set the volume. You can also press the
playback volume.
51
on the top of the device to activate
Volume Key
to adjust
Play Music
Note:
Some options require a Google Account.
Google Play Music is a Google service that gives you instant
access to your personal music collection stored on the
Internet and your device. Google Play Music lets you browse,
shop, and play back songs purchased from the Google Play
Store app, as well as songs you have loaded from your own
music library
For more information, visit
From a Home screen, touch ➔
Google
music.google.com
folder➔
Play Music
.
.
Page 57
Music Player
Use the Music application to listen to music.
To access Music Player:
1. From a Home screen, touch ➔
Note:
Some file formats are not supported depending on the
software installed on the device. Some files may not
play properly depending on the encoding method used.
The Music Player application searches your device’s
internal storage or on an installed memory card for
music and playlists. This can take from a few seconds
to several minutes, depending on the amount of new
music added since you last opened the application. It
then displays your music in several ways.
2. Touch a tab, such as
on, to change the way you view the contents of your
library.
Playlists, Tra ck s, Albums
Music
.
, and so
Searching for Music
To find music in your library:
1. To uch
2. Touc h
name of an artist, album, or song.
Music
.
Search
and use the keyboard to type the
Music Player Options and Settings
To use Music Player options and configure settings:
1. To uch
2. Touc h
• Create playlist / Add to playlist
• Via Bluetooth
• Delete
•Music square
• Scan for nearby devices
Music
.
Menu
to display the following options:
or add to a playlist.
: Share music via Bluetooth.
: Delete selected or all items.
: Create a playlist based on mood.
nearby.
: Create a new playlist
: Share music with devices
Multimedia 52
Page 58
• Settings
53
: The following settings display:
Player
–
SoundAlive
–
Adapt Sound
–
Play speed
–
Music auto off
to turn off automatically by touching one of the time
values.
–
Lyrics
–
Smart volume
surroundings.
–
Voice control
playback.
My music
–
Tab s
Music screen. Playlists and Tracks are not optional.
–
Playlists
Favorites is not optional.
To rearrange Tabs or Playlists, touch the grid for an entry and
drag the entry to a new position in the list.
: Configure SoundAlive.
: Enhance sound quality.
: Decrease or increase play speed.
: Set the option Off or set your music
: Display the lyrics of the song, if available.
: Automatically adjust volume to
: Use voice commands to control
: Customize the tabs that display on the main
: Customize the types of playlists that display.
Managing Playlists
Create, manage, or delete a playlist:
Tou ch
Creating a Playlist
1. Touch the
2. Touch
– or –
Under
3. Use the keyboard to enter a name for the playlist and
touch
Adding Songs to a Playlist
1. Touch the
playlist. Touch
– or –
Tou ch the
Add to playlist
2. Touch each song you want to add or touch
and then touch
3. If the ADD TO PLAYLIST screen displays, touch a
playlist,
Music
.
Playlists
tab.
Menu ➔ Create playlist
My playlists
OK
, touch
.
Playlists
tab and, under
Tra ck s
tab and touch
.
Done
Create playlist
Add tracks
.
, or
.
Create playlist
My playlists
.
Menu
Now playing list
.
➔
Select all
.
, touch a
,
Page 59

Renaming a Playlist
1. Touch the
playlist.
2. Touch
3. Use the keyboard to enter a new name for the playlist
and touch
Changing the Order of a Playlist
1. Touch the
playlist.
2. Touch
3. Touch the grid for an entry and drag the entry to a
new position in the list.
4. Touch
Playing a Playlist
1. Touch the
2. Touch
Recently added
created.
3. Touch a song to start playing the playlist at that song.
Playlists
tab and, under
Menu ➔ Edit title
OK
.
Playlists
tab and, under
Menu ➔ Change order
Done
to change the order and save the playlist.
Playlists
tab.
Favorites, Most played, Recently played
, or touch a playlist title that you
My playlists
.
My playlists
.
, touch a
, touch a
, or
Removing Songs from Playlists
1. Touc h th e
2. Touc h
3. Touch each song you want to remove or touch
Select all
4. To uch
Deleting a Playlist
1. Touc h th e
2. Touc h
3. Touch each playlist you want to remove or touch
Select all
4. To uch
Playlists
tab and touch a playlist.
Menu ➔ Remove
.
Done
to save the playlist.
Playlists
tab.
Menu ➔ Delete
.
Done
.
.
.
Multimedia 54
Page 60
Playing Music
1. Tou ch
2. Touch a song or touch an album or genre and then
touch a song in the list of songs on the album.
The song you touch starts to play. Unless you choose a
repeat option, the tracks in the current list play in order
until the end of the list is reached. Otherwise, playback
stops only if you stop it, even when you switch
applications.
Music
.
Accessing the Music Player
If you navigate away from the Music Player application and
music is playing, the Music notification icon is displayed
in the System Bar.
You can change songs or easily return to the Music Player:
1. Touch the top of the screen and swipe downward.
The Notification Panel displays.
2. Touch the song thumbnail to display the Music player.
You can also pause and resume playback and skip to
the next or previous song in the panel. For more
information, refer to “Notifications” on page 27.
55
Music Player Controls
When a song is playing, the Music Player screen displays
various controls are available.
1. Tou ch
2. Touch a song or playlist to begin playback.
The music player displays below the music listing.
3. Touch the song thumbnail to enlarge the music player.
Music
.
and
Page 61
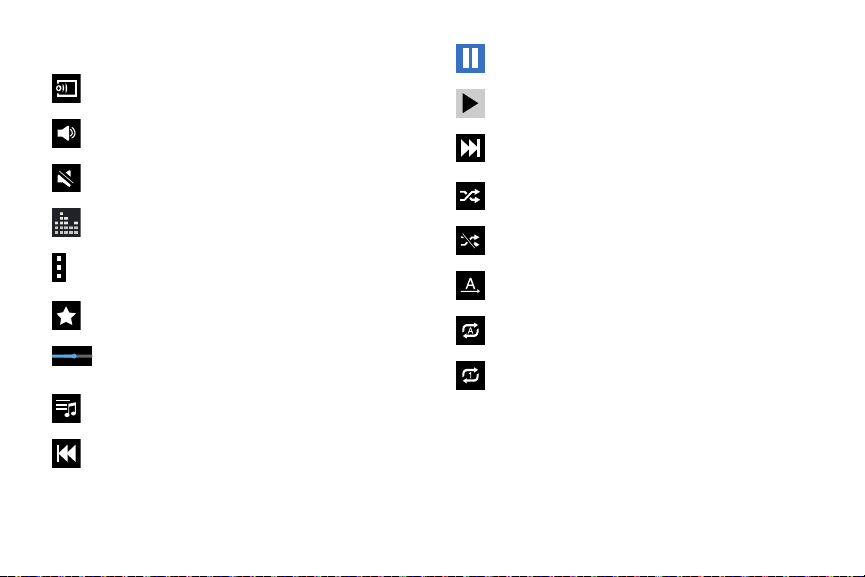
During playback, the following controls are available:
Scan for DLNA-enabled devices
Volume control and SoundAlive.
Volume control showing volume muted.
Touch to view and set SoundAlive options.
Access settings. For more information, refer to “Options
While Playing a Song” on page 57.
Assign the current song as a Favorite.
Touch and drag the end of the progress bar to scan
forward or backward through the current song.
Lists the current playlist songs.
Touch and hold to rewind the song. Touch to go to
previous song.
.
Pause the song.
Start the song after pausing.
Touch and hold to fast-forward the song. Touch to go to
next song.
Shuffles the current list of songs randomly.
Songs play in order and are not shuffled.
Plays the entire song list once.
Replays the current list when the list ends.
Repeats the currently playing song.
Multimedia 56
Page 62

Options While Playing a Song
There are various options and controls available while a song
is playing:
Music
1. Tou ch
then a song.
2. Touch the music player to enlarge it.
3. Touch
• Via Bluetooth
Bluetooth device.
• Add to playlist
existing playlist.
•Set as
• Scan for nearby devices
directly to nearby devices.
• Settings
information, refer to “Music Player Options and Settings”
on page 52.
• Details
•
End
: This option returns you to the Home Screen.
57
, touch a playlist or an album, and
Menu
to display the following options:
: Play the current song by using a
: Add the song to a new playlist or an
: Use the current song as an alarm tone.
: Discover and connect
: Displays Music Player settings. For more
: View song details.
Playing Music by Mood
Play music grouped by mood. The playlist is automatically
created by the device.
Touch
select a cell of mood.
– or –
Select multiple cells by dragging your finger across
multiple cells.
Music
➔
Menu ➔ Music square
and
Page 63
Use this application to access your personalized magazines.
Important!
Before you use Flipboard, verify that you have an
active Internet connection available. For more
information, refer to “Wi-Fi” on page 74.
1. From a Home screen, touch ➔
Next
2. Touch
then touch
3. To start your Flipboard, touch
and swipe to the left.
4. Touch
account information or your Flipboard account to view
your content and social networks.
5. Select a cover story or a topic, swipe through the
Flipboard pages, and then select an article to read.
on the Welcome to Flipboard pop-up and
Done
to get started.
FLIP
Flipboard Account
to sign in with your Facebook
Flipboard
on the greeting page
6. While reading an article, use the following icons:
Go to the previous page.
Share the article with others.
Touch to set the article as a favorite.
.
Set the article as your likes in Flipboard.
Create an account for Flipboard to make your
own magazine.
Multimedia 58
Page 64
WatchON
Enjoy all of your favorite movies and TV shows with
WatchON.
Important!
Before you use WatchON, verify that you have an
active Internet connection available. For more
information, refer to “Wi-Fi” on page 74.
Notes
1. Before beginning your initial WatchON application
setup, make sure that your TV is turned off.
2. To improve your recommendations, turn on seamless
viewing across multiple screens, and simplify the
purchase of content from Samsung WatchON, sign into
your Samsung account before using WatchON. For
more information, refer to “Your Samsung Account” on
page 39.
59
Initial Configuration
1. From a Home screen, touch ➔
The Set up WatchON screen displays.
2. Tou ch
3. Read the Privacy policy, check the
4. Follow the onscreen instructions.
Set up WatchON
The Privacy policy displays.
accept the terms of the above privacy policy
Next
touch
.
.
WatchON Menu
1. From a Home screen, touch ➔
Menu
2. Touch
•
Sign in
WatchON experience.
•
Settings
onscreen instructions.
•
Help
Contact us telephone number.
for the following options.
: Sign in to your Samsung account to improve your
: Configure Samsung WatchON settings. Follow the
: Displays Samsung WatchON help information and a
WatchON
I have read and
box, and
WatchON
.
.
Page 65
Section 6: Camera and Video
Camera
Use this application to take photos or videos.
Gallery
Use
camera.
Note:
Note:
to view photos and videos taken with the device’s
From a Home screen, touch ➔
The camera automatically shuts off when unused.
Make sure that the lens is clean. Otherwise, the device
may not work properly in some modes that require high
resolutions.
Camera
Camera Etiquette
• Do not take photos or videos of other people without their
permission.
• Do not take photos or videos where legally prohibited.
.
• Do not take photos or videos in places where you may
violate other people’s privacy.
Taking Photos
1. Touch the image on the preview screen where the
camera should focus.
When the subject is in focus, the focus frame turns
green.
2. Touch to take the photo.
Camera and Video 60
Page 66
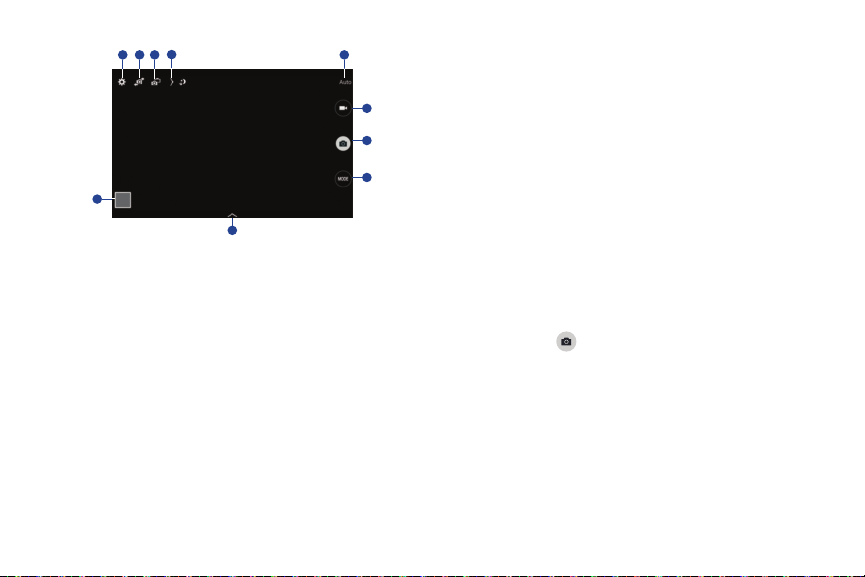
1. Change camera settings.
1
7
8
6
3
5
2
9
10
4
2. Switch between the front and rear camera.
3. Switch to dual camera mode.
4. View more options.
5. Display current mode.
6. Record video button.
7. Camera button.
8. Shooting mode.
9. Open Gallery to view photos and videos.
10. Select an available effect.
Shooting Mode
Several photo effects are available. Some modes are not
available when taking self-portraits.
Tou ch
MODE
, and then scroll up or down the screen at
the right side of the screen.
•
Auto
: Allow the camera to evaluate the surroundings and
determine the ideal mode for the photo.
•
Beauty face
images.
•
Best photo
best one.
•
Best face
combine them to create the best possible image.
–
: Take a photo with lightened faces for gentler
: Take a series of photos, and then save the
: Take multiple group shots at the same time and
Touch to take multiple photos. To get the best shot, hold
the camera steady and remain still while taking photos. When
Gallery
opens, touch the yellow frame on each face, and
choose the best individual pose for the subject. After choosing a
Save
pose for each individual, touch
to merge the images into a
single photo, and save it.
61
Page 67

•
Sound & shot
–
Note:
While taking photos in this mode, sound is recorded by
the internal microphone.
•
Drama
image that shows trails of the movement.
To get the best shot, follow these tips. The device may not take
photos properly in other shooting conditions.
–
–
–
–
–
: Take a photo with sound.
Touch to take a photo. The device records a few seconds
of audio after taking a photo.
: Take a series of photos and combine them to create an
Hold the camera steady and remain still while taking photos.
Take photos of a subject that is moving in one direction.
Take photos with backgrounds that are free of moving objects.
Avoid taking photos of a subject and background with similar
colors.
Avoid taking photos of a subject that is too close or too far
away to fit within the viewfinder or that is too long such as a bus
or a train.
•
Rich tone (HDR)
and dark areas.
•
Eraser
background.
–
Touch to take a series of photos. The device erases
traces of movement from a moving subject. To restore the
original photo, touch Show moving objects, and then touch the
highlighted area.
To get the best shot, follow these tips:
–
Hold the camera steady and remain still while taking photos.
–
Avoid taking photos of a subject and background with
similar colors.
–
When taking photos of a subject that is moving very little or
moving a great deal, the camera may not recognize all of the
movements.
–
If there are multiple subjects moving in the background, the
camera may not recognize all of the movement.
: Take photos without losing details in bright
: Erase the movements of moving subjects in the
Camera and Video 62
Page 68
•
Panorama
: Take a photo composed of many photos strung
together.
To get the best shot, follow these tips:
–
Move the camera slowly in one direction.
–
Keep the camera’s viewfinder within the guide frame.
–
Avoid taking photos of a subject in front of unrecognizable
backgrounds, such as empty skies or plain walls.
•
Sports
: Use this setting for fast-moving subjects.
Panoramic Photos
A panoramic photo is a wide landscape image consisting of
multiple shots.
MODE
➔
Panorama
1. Touch
2. Touch and move the camera in one direction.
When the blue frame aligns with the viewfinder, the
camera automatically takes another shot in a
panoramic sequence. To stop shooting, touch . If
the viewfinder is out of the direction, the device
stops shooting.
63
.
Applying Filter Effects
Use the filter effects to take unique photos or videos.
Touch and select a filter effect. The available
options vary by mode.
Recording Videos
To record a video, touch to record a video.
To pause recording, touch .
To continue recording, touch .
To stop recording, touch .
While recording, use the following actions:
To change the focus, touch where you want to focus.
To focus on the centre of the screen, touch .
To capture an image from the video while recording,
touch .
Page 69
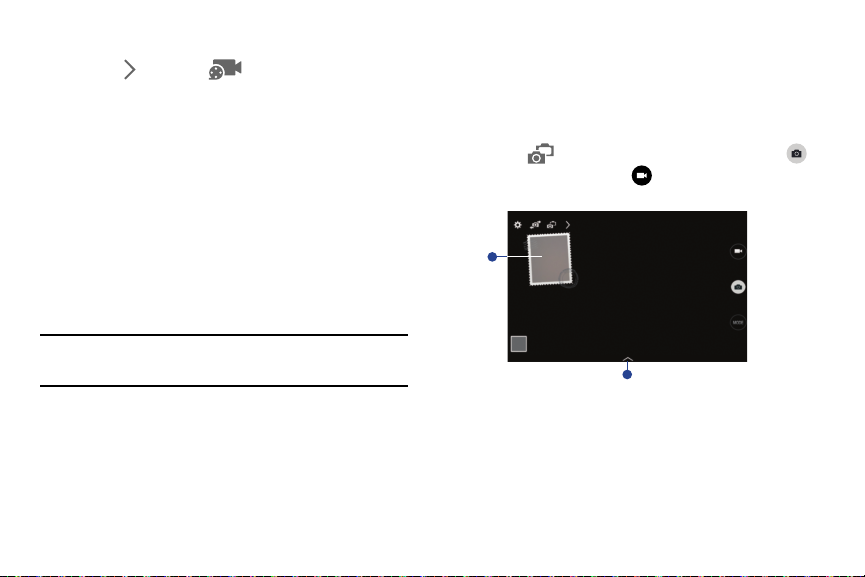
Recording Mode
1
2
Tou ch
Options
the recording mode.
•
Normal
: Use this mode for normal quality.
•
Limit for email
messages.
•
Fast motion
Zooming In and Out
Use one of the following methods:
Use the
Volume
Spread two fingers apart on the screen to zoom in, and
pinch to zoom out.
Note:
The zoom in and out effect is available when using the
zoom feature while shooting video.
➔
Recording mode
to change
: Use this mode to lower quality for sending via
: Use this mode when recording action scenes.
button to zoom in or out.
Dual Camera Mode
When you take a landscape photo with the rear camera, the
photo or video captured by the front camera appears in an
inset window, or vice versa. Use this feature to take a
beautiful landscape photo and a self-portrait simultaneously.
Touch to switch to dual camera mode. Touch
to take a photo or touch to record a video.
1. Touch the window to resize it or move it to a new
location.
2. Select various styles that are available.
Camera and Video 64
Page 70
Note:
You can record videos in dual camera mode for up to
5 minutes in Full HD and up to 10 minutes in HD. While
taking videos in this mode, sound is recorded by the
internal microphone.
Share Shot
Touc h
Options
➔ and select one of the
following:
•
Share shot
: Send a photo directly to another device via
Wi-Fi Direct.
•
Buddy photo share
face that you have tagged in a photo and send it to that person.
•
Remote viewfinder
remotely.
: Set the device to recognize a person’s
: Set a device to control the camera
Controlling the Camera Remotely
Set a device as a viewfinder to control the camera remotely.
1. Touch
2. Touch to take a photo remotely using the device as a
65
Options
➔ ➔
then connect the device and the camera using
Wi-Fi Direct.
viewfinder.
Remote viewfinder
, and
Configuring Settings for Camera
Touch to configure settings for Camera. Not all of
the following options are available in both still camera
and video camera modes. The available options vary
depending on the mode used.
Camera
:
•
Photo size
: Select a resolution. Use higher resolution for higher
quality. Higher resolution photos take up more memory.
•
Burst shot
: Take a series of photos of moving subjects.
•
Tap to take pics
take photos.
•
Face detection
help you take photos of them.
•
Metering modes
how light values are calculated. Centre-weighted measures
background light in the centre of the scene. Spot measures
the light value at a specific location. Matrix averages the
entire scene.
: Touch the image on the preview screen to
: Set the device to recognize people’s faces and
: Select a metering method. This determines
Page 71

•
ISO
: Select an ISO value. This controls camera light sensitivity.
It is measured in film-camera equivalents. Low values are for
stationary or brightly-lit objects. Higher values are for fastmoving or poorly-lit objects.
•
Smart stabilization
Anti-shake helps focus when the camera is moving.
•
Save as
taking photos with rich tone mode.
Video recorder
•
Video size
quality. Higher resolution videos take up more memory.
•
Video stabilization
Anti-shake helps focus when the camera is moving.
Settings
:
•
Location tag
Note:
To improve GPS signals, avoid shooting in locations
where the signal may be obstructed, such as between
buildings or in low-lying areas, or in poor weather
conditions.
: Activate or deactivate anti-shake.
: Set the device to delete the original photo when
:
: Select a resolution. Use higher resolution for higher
: Activate or deactivate anti-shake.
: Attach a GPS location tag to the photo.
Tip:
Your location may appear on your photos when you upload
them to the Internet. To avoid this, deactivate the GPS
tag setting.
•
Review pics/videos
them.
•
Volu me key
the shutter or zoom function.
•
Timer
: Use this for delayed-time shots.
•
White balance
images have a true-to-life color range. The settings are
designed for specific lighting situations. These settings are
similar to the heat range for white-balance exposure in
professional cameras.
•
Exposure value
how much light the camera’s sensor receives. For low light
situations, use a higher exposure.
•
Guidelines
when selecting subjects.
: Set to show photos or videos after taking
: Set the device to use the Volume button to control
: Select an appropriate white balance, so
: Change the exposure value. This determines
: Display viewfinder guides to help composition
Camera and Video 66
Page 72
•
Flash
: Activate or deactivate the flash.
•
Voice control
commands.
•
Contextual filename
tags. Activate this to use Tag Buddy in Gallery.
•
Save as flipped
the original scene.
•
Storage
•
Reset
•
Help
67
: Set the camera to take photos with voice
: Set the camera to display contextual
: Invert the image to create a mirror-image of
: Select the memory location for storage.
: Reset the camera settings.
: Access help information for using the camera.
Shortcuts
Reorganize shortcuts for easy access to the camera’s various
options.
1. Touch
2. Touch and hold a shortcut icon to display all shortcuts.
3. Touch and hold an option and drag it to a slot at the top
Note:
The other icons can be moved within the list by touching
and dragging them.
Tip:
Tou ch
default settings.
Options
.
of the screen.
Reset
to reset the quick settings layout to the
Page 73
Gallery
Use this application to view images and videos.
From a Home screen, touch ➔
Note:
Some file formats are not supported depending on the
software installed on the device. Some files may not
play properly depending on the encoding method used.
Viewing Images
Launching Gallery displays available folders. When another
application, such as Email, saves an image, the Download
folder is automatically created to contain the image.
Likewise, capturing a screenshot automatically creates the
Screenshots folder.
Select a folder to open it.
In a folder, images are displayed by creation date.
Select an image to view it in full screen.
Scroll left or right to view the next or previous image.
Gallery
.
Zooming In and Out
Use one of the following methods to zoom in or out on
an image:
Double-tap anywhere on the screen to zoom in or
zoom out.
Spread two fingers apart on any place to zoom in.
Pinch the screen to zoom out.
Viewing Images Using the Motion Feature
Use the motion feature to execute a function with particular
motion. For more information, refer to “Motions” on
page 131.
1. From a Home screen, touch ➔
Controls
tab.
OFF / ON
2. Touc h th e
Motions ON .
3. Touc h th e
ON .
button next to
OFF / ON
buttons to turn each feature
Camera and Video 68
Motions
Settings
to turn
➔
Page 74

Playing Videos
Video files show the icon on their thumbnails.
Select a video to watch it and touch .
Trimming Segments of a Video
1. Select a video, and then touch
2. Move the start bracket to the desired starting point,
move the end bracket to the desired ending point, and
then save the video.
Tri m
.
Editing Images
While viewing an image, touch
following functions:
•
Edit
: Use Photo Editor to edit your photo.
•Favorite
• Slideshow
•Photo frame
69
: Add to the favorites list.
: Start a slideshow with the images in the
current folder.
: Use this to add a frame and a note to an
image. The edited image is saved in the Photo frame
folder.
Menu
and use the
• Photo note
image. Touch to edit the note.
• Copy to clipboard
•Print
Some printers may not be compatible with the device.
•Rename
• Buddy photo share
face is tagged in the image.
•Rotate left
• Rotate right
•Crop
in it.
•Set as
• Details
• Settings
: Use this to write a note on the back of the
: Copy to clipboard.
: Print the image via a USB or Wi-Fi connection.
: Rename the file.
: Send the image to a person whose
: Rotate counter-clockwise.
: Rotate clockwise.
: Resize the blue frame to crop and save the image
: Set the image as wallpaper or a contact image.
: View image details.
: Change the Gallery settings.
Page 75

Modifying Images
While viewing an image, touch
use the following functions:
•Rotate
: Rotate the image.
•Crop
: Crop the image.
•Color
: Adjust the saturation or brightness of the image.
•Effect
: Apply effects to the image.
•Sticker
: Attach stickers.
•Drawing
•Frame
: Draw on the image.
: Apply frames to the image.
Favorite Images
While viewing an image, touch
add the image to the favorites list.
Menu
Menu
➔
➔
Edit
and
Favorite
Deleting Images
Use one of the following methods:
Sharing Images
Use one of the following methods:
to
Setting as Wallpaper
In a folder, touch
by ticking, and then touch
When viewing an image, touch
In a folder, touch
by ticking, and then touch to send them to others
or share them via social network services.
When viewing an image, touch to send it to others
or share it via social network services.
When viewing an image, touch
set the image as wallpaper or to assign it to a contact.
Menu
➔
Select item
Delete
Delete
Menu
➔
Select item
Menu
Camera and Video 70
, select images
.
.
, select images
➔
Set as
to
Page 76
Tagging Faces
1. Touch
2. Touch the face, touch
3. When the face tag appears on an image, touch the face
Note:
Face recognition may fail depending on the face angle,
face size, skin color, facial expression, light conditions,
or accessories the subject is wearing.
71
Menu
➔
Settings ➔ Tags ➔ Face tag
A yellow frame appears around the recognized face.
Add name
, and then select or add
a contact.
tag and use available options, such as sending
messages.
Using Tag Buddy
.
To display a contextual tag (weather, location, date, and
person’s name) when opening an image:
1. Touch
2. Touch the
Menu
ON .
➔
Settings ➔ Tags ➔ Tag buddy
OFF / ON
button to turn Tag buddy
.
Video
Use this application to play video files.
From a Home screen, touch ➔
Note:
Some file formats are not supported depending on the
device's software. Some files may not play properly
depending on the encoding method used.
Video
.
Page 77
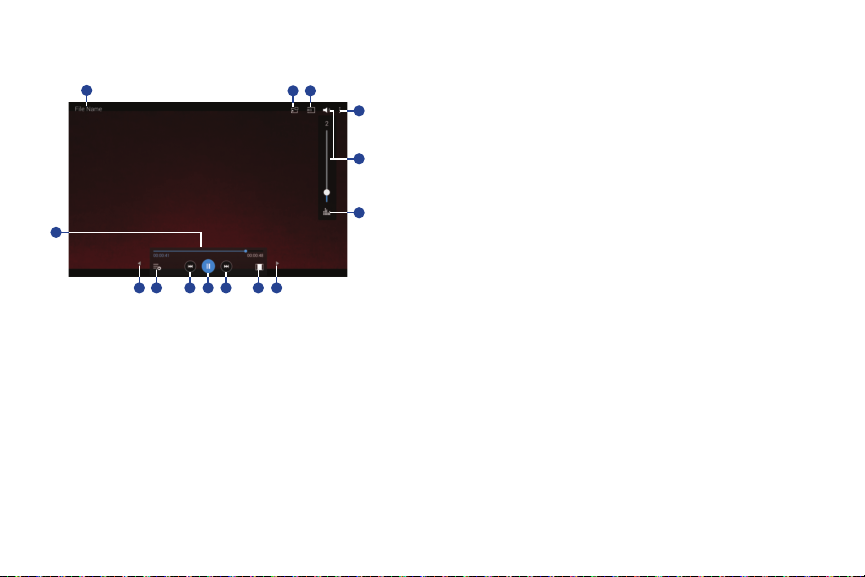
Playing Videos
2
5
11 121098 13 8
4
6
3
7
1
Select a video to play.
1. Video file name.
2. Use the pop-up player.
3. Scan DLNA-enabled devices.
4. Access additional options.
5. Touch to display the volume control, and then touch
and drag on the scale to set volume. You can also press
the Volume Key on the side of the device to adjust
playback volume.
6. Display the volume control (5) and touch this icon to
access SoundAlive settings.
7. Move forwards or backwards by dragging the bar.
8. Touch either side of the controls to reposition to the left
or right.
9. Switch to split screen mode and show video
thumbnails on the left side of the screen.
10. Restart the current video or skip to the previous video.
Touch and hold to move backwards quickly.
11. Pause and resume playback.
12. Skip to the next video. Touch and hold to move
forwards quickly.
13. Change screen ratio.
Camera and Video 72
Page 78
Deleting Videos
Touc h
Menu
➔
Delete
, select videos by ticking, and
then touch
Delete
.
Sharing Videos
Touch
Menu
➔
Share via
, select videos by ticking, touch
Done
, and then select a sharing method.
Using Popup Video Player
Use this feature to use other applications without closing the
video player.
While watching videos, touch to use the pop-up
player.
Spread two fingers apart on the screen to enlarge the
player or pinch to reduce it.
To move the player, drag the player to another location.
73
YouTube
Use this application to watch videos from the YouTube
website.
From a Home screen, touch ➔
Note:
This application may not be available depending on the
region or service provider.
Watching Videos
1. Touch , and then enter a keyword.
2. Select one of the returned search results to watch a
video.
3. Rotate the device to landscape orientation to display
full screen.
Settings and Help
Touch
Menu
to configure YouTube settings or to view
YouTube help information.
YouTube
.
Page 79
Section 7: Connections
Your device includes features to connect to the internet and
to other devices by using Wi-Fi, Bluetooth, or a USB cable.
Wi-Fi
Wi-Fi is a wireless networking technology that provides
access to local area networks. Use your device’s Wi-Fi
feature to:
•
Access the internet for browsing or to send and receive email.
•
Access your corporate network.
•
Use hotspots provided by hotels or airports while traveling.
Wi-Fi communication requires access to an existing Wireless
Access Point (WAP). WAPs can be Open (unsecured, as with
most hotspots) or Secured (requiring you to provide login
credentials).
Your device supports Wi-Fi 802.11 a/b/g/n/ac.
Turn Wi-Fi On or Off
Turn your device’s Wi-Fi service on or off. When you turn
Wi-Fi service on, your device automatically searches for
available, in-range WAPs (Wireless Access Points).
From the Notification Panel
1. From any screen, touch the top of the screen and
swipe downward. The Notification Panel displays.
Wi-Fi
2. To uch
From Settings
1. From a Home screen, touch ➔
Connections
2. Touc h th e
OFF .
to turn Wi-Fi ON (green) or
tab ➔
Wi-Fi
.
OFF / ON
button to turn Wi-Fi ON or
OFF
(grey).
Settings
Connections 74
➔
Page 80

Scan and Connect to a Wi-Fi Network
When you turn on Wi-Fi, your device searches for and
displays available Wi-Fi connections.
1. From any screen, touch the top of the screen and
swipe downward. The Notification Panel displays.
2. Touch
Note:
3. When the scan is complete, touch a Wi-Fi network to
Tip:
Note:
75
Wi-Fi
to turn Wi-Fi ON (green). Your device
begins scanning for available Wireless Access Points.
To begin a new scan for available WAPs, touch
connect. If the Wi-Fi network is open (unsecured), your
device automatically connects. If the Wi-Fi network is
secured, enter the password at the prompt to connect.
You can have your device automatically notify you of
available networks. See
Settings” on page 76.
When Wi-Fi is on, is displayed on the Status Bar.
Network notification
under “Wi-Fi
Scan
Add a Wi-Fi Network Manually
1. From a Home screen, touch ➔
Connections
2. To uch the
3. To uc h
•
.
•
Note:
Depending on the security protocol used by the WAP,
additional network information may be required, such as
a password.
•
4. To uc h
tab ➔
Wi-Fi
.
OFF / ON
button to turn Wi-Fi ON .
Add Wi-Fi network
Network SSID
Point (WAP).
Security
: Select the type of security used by the WAP.
Password
: If the WAP is secured, enter the password or
hex key.
Connect
and enter the following:
: Enter the name of the Wi-Fi Wireless Access
.
Settings
➔
Page 81
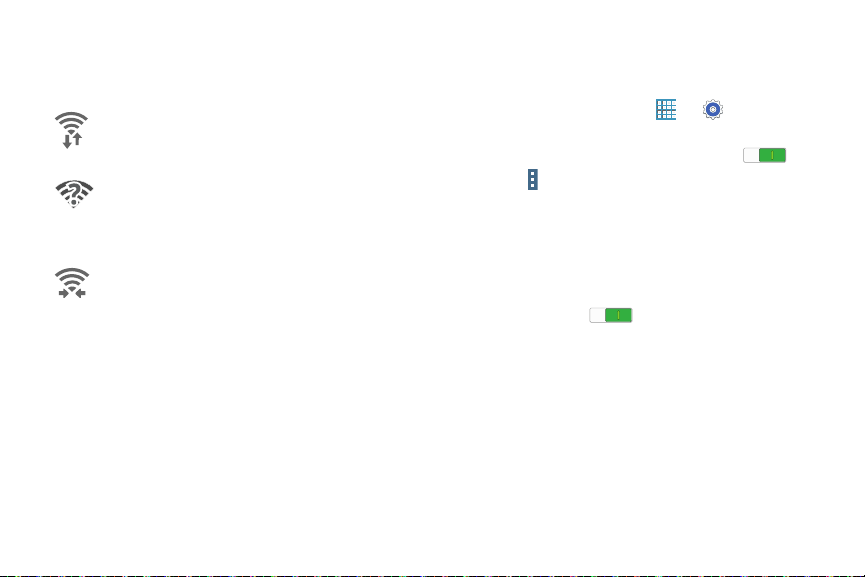
Wi-Fi Status Indicators
The following icons show your current Wi-Fi connection
status at a glance:
Displays when Wi-Fi is connected, active, and
communicating with a Wireless Access Point
(WAP).
Displays when there is a Wi-Fi access point
available but you are not connected to it. May
also display if there is a communication issue
with the target Wireless Access Point (WAP).
Displays when connected to another device
using Wi-Fi Direct. For more information, refer to
“Wi-Fi Direct” on page 77.
Wi-Fi Settings
The Wi-Fi settings menu allows you to set up many of your
device’s advanced Wi-Fi services.
1. From a Home screen, touch ➔
Connections
2. Touc h th e
3. Touc h
•Advanced
tab ➔
Wi-Fi
.
OFF / ON
button to turn Wi-Fi ON .
Menu
for options:
:
–
Network notification
Wireless Access Points (WAPs) are available.
–
Passpoint
: Connect to passpoint-enabled Wi-Fi Access
Points automatically. Touch the
Passpoint ON . Touch
available Passpoint-enabled Wi-Fi APs.
–
Sort by
: Sort Wi-Fi networks by Alphabet or
Signal strength.
–
Keep Wi-Fi on during sleep
disconnect from Wi-Fi.
–
Always allow scanning
and other apps to scan for networks, even when Wi-Fi is
turned off.
: Receive a notification when new
: Allow Google location service
Settings
OFF / ON
button to turn
Passpoint
to see other
: Specify when to
Connections 76
➔
Page 82

–
Wi-Fi timer
: Specify the
for Wi-Fi to be automatically connected.
time
–
Install certificates
–
MAC address
is required when connecting to some secured networks
(not configurable).
–
IP address
configurable).
• WPS push button
Protected Setup) router or other equipment.
• WPS PIN entry
up a PIN-secured connection to a Wi-Fi router or other
equipment (not configurable).
•
Help
: Learn about setting up and using Wi-Fi networks, and
other settings.
77
Starting time
: Install authentication certificates.
: View your device’s MAC address, which
: View your device’s IP address (not
: Set up a connection to a WPS (Wi-Fi
: View the PIN used by your tablet to set
and the
Ending
Wi-Fi Direct
Wi-Fi Direct allows device-to-device connections so you
can transfer large amounts of data over a Wi-Fi connection.
These devices must be enabled for Wi-Fi Direct
communication. This connection is direct and not via a
hot spot or Wireless Access Point (WAP).
1. From a Home screen, touch ➔
Connections
2. To uch the
3. To uc h
Your device begins scanning for other devices enabled
with Wi-Fi Direct.
4. Enable Wi-Fi Direct on the target device.
5. In the list of available devices, touch the target device.
– or –
If you want to connect to more than one device, touch
Multi connect
to connect that supports Multi-connect. Touch
tab ➔
Wi-Fi
.
OFF / ON
button to turn Wi-Fi ON .
Wi-Fi Direct
.
and touch each device to which you want
Settings
Done
➔
.
Page 83

6. On the target device, touch
seconds to touch
Once connected, the target device will show as
Connected
in your list of Wi-Fi Direct devices and the
icon will display on the Status Bar.
Share Information with Wi-Fi Direct
To share videos, photos, or other information with the
connected device, follow these steps:
1. View the information that you want to share. For
example, if you want to share a photo, find the photo in
your camera viewer or touch
Share, Share via,
touch the
2. Touch the
The Wi-Fi Direct settings screen displays, Wi-Fi Direct
is turned on, and your device scans for other devices.
3. Touch a connected device name.
The other device displays a pop-up that indicates it is
receiving the file.
Wi-Fi Direct
Accept
option.
Accept
(you have 30
).
My Files folder, then
or
Send via
option.
Bluetooth
Bluetooth is a short-range wireless communications
technology for exchanging information over a distance of
about 30 feet. You do not need to line up the devices to send
information with Bluetooth. If the devices are in range, you
can exchange information between them— even if they are
in different rooms.
Your device can use Bluetooth to share photos, contacts and
other content with other Bluetooth-enabled devices. Many of
the apps on your tablet provide options for sharing via
Bluetooth under
Menu
.
Connections 78
Page 84
Turning Bluetooth On or Off
From the Notification Panel
1. From any screen, touch the top of the screen and
swipe downward. The Notification Panel displays.
Bluetooth
2. Touch
off (grey).
From Settings
1. From a Home screen, touch ➔
Connections
2. Touch the
or OFF .
Note:
When Bluetooth is on, is displayed on the Status Bar.
79
to turn Bluetooth on (green) or
tab ➔
Bluetooth
.
OFF / ON
button to turn Bluetooth ON
Settings
➔
Pairing with a Bluetooth Device
To exchange information between your device and another
bluetooth-enabled device, you first must pair them.
Tip:
After pairing, your device and the target device recognize
each other and exchange information without having to
enter a passcode or PIN.
1. From a Home screen, touch ➔
Connections
2. To uch the
ON .
3. Make sure that the target device is discoverable so that
your device can find it. Refer to the instructions that
came with the target device to find out how to set it to
discoverable mode.
4. To uc h
devices within range.
tab ➔
Bluetooth
.
OFF / ON
button to turn Bluetooth
Scan
. Your device will start to scan for Bluetooth
Settings
➔
Page 85
5. When you see the name of the target device displayed
Available devices
in the
tablet will attempt to pair with the target device.
•
If requested, enter the passcode displayed on the target device.
6. The pairing and connection status is displayed below
the target device in the Available devices section.
When you are connected to the target device,
(Bluetooth connected) displays in the Status Bar.
Note:
Due to different specifications and features of other
Bluetooth-compatible devices, display and operations
may be different, and functions such as transfer or
exchange may not be possible with all Bluetoothcompatible devices.
section, touch the name. Your
Bluetooth Status Indicators
The following icons show your Bluetooth connection status
at a glance:
Displays when Bluetooth is active.
Displays when Bluetooth is connected (paired)
and communicating.
Reconnect to a Bluetooth Device
When you have paired your tablet with another device, you
should be able to reconnect it automatically by turning on
Bluetooth on your tablet.
1. From a Home screen, touch ➔
Connections
2. Touc h th e
ON .
3. Make sure that the target device is discoverable so that
your device can find it. Refer to the instructions that
came with the target device to find out how to set it to
discoverable mode.
4. To uch
devices within range.
5. When you see the name of the target device displayed
in the Available devices section, touch the name. Your
tablet will attempt to pair with the target device.
•
If you still cannot reconnect, try to disconnect or unpair from
the target device, and then follow the instructions for
“Pairing with a Bluetooth Device” on page 79.
tab ➔
Bluetooth
.
OFF / ON
button to turn Bluetooth
Scan
. Your device will start to scan for Bluetooth
If requested, enter the passcode displayed on the target device.
Settings
➔
Connections 80
Page 86
Disconnect or Unpair from a Bluetooth Device
Follow these instructions to disconnect or unpair your tablet
from a Bluetooth device.
Disconnect from a Bluetooth Device
1. From a Home screen, touch ➔
Connections
2. Touch the
ON .
3. Touch the connected device, and then touch
disconnect.
Unpair from a Bluetooth Device
You can make your tablet forget its pairing connection with
another Bluetooth device. To connect to the other device
again, you may need to enter or confirm a passcode again.
1. From a Home screen, touch ➔
Connections
2. Touch the
ON .
3. Touch the connected device, and then touch
81
tab ➔
Bluetooth
OFF / ON
button to turn Bluetooth
tab ➔
Bluetooth
OFF / ON
button to turn Bluetooth
.
.
Settings
OK
Settings
Unpair
➔
to
➔
.
Send Information Using Bluetooth
You can use Bluetooth to transfer information between your
tablet and another Bluetooth-enabled device such as a tablet
or notebook computer. The first time you transfer information
between your table and another device, you need to enter or
confirm a security passcode. After that, your tablet and the
other device are paired, and you will not need to exchange
pass codes to transfer information in the future.
Send Information from Your Tablet to Another Device
You can send the following types of information, depending
on the device you are sending to:
•
Images and videos
•
Calendar events
•
Contacts
•
Audio files
Note:
Your tablet must already be paired to the target device in
order to share files. For more information, refer to
“Pairing with a Bluetooth Device” on page 79.
Page 87
1. From a Home screen, touch ➔
Connections
2. Touch the
ON .
3. Set the target device to discoverable mode. Refer to
the target device's documentation for instructions on
receiving information over Bluetooth.
4. On your tablet, open the application that contains the
information or file you want to send. Some common
ways of sharing files via Bluetooth include:
•
•
•
5. Touch the name of the target device.
6. On the target device, follow the prompts to accept
the file.
tab ➔
Bluetooth
.
OFF / ON
button to turn Bluetooth
While viewing photos or videos in the Gallery, touch
➔
Bluetooth
.
While playing music using the Music app, touch Menu
Via Bluetooth
While viewing a Contact, touch Menu
Share namecard ➔ Bluetooth
.
Settings
➔
➔
.
Receive Data Using Bluetooth
Your tablet is capable of receiving a wide variety of file types
with Bluetooth, including photos, audio files, and documents
such as PDFs.
Note:
Your tablet must already be paired to the target device in
order to share files. For more information, refer to
“Pairing with a Bluetooth Device” on page 79.
1. From a Home screen, touch ➔
➔
Connections
2. Touc h th e
ON .
3. When your tablet receives a file transfer request
notification, touch
4. When the file is transferred, a notification displays. To
open the file immediately, slide down the Notification
Panel, and then touch the relevant notification.
tab ➔
OFF / ON
Bluetooth
.
button to turn Bluetooth
Accept
.
Connections 82
Settings
➔
Page 88
Accessing Files Received via Bluetooth
1. From a Home screen, touch ➔
Connections
2. Touch
3. Touch a file to open it. When you open a received file,
what happens next depends on the file type:
•
•
•
4. Received data is normally saved to the Bluetooth folder
on your tablet. If you receive a contact, it is saved to
your contacts automatically.
83
tab ➔
Bluetooth
.
Menu
➔
Received files
Media files and documents are usually opened directly in a
compatible application. For example, if you open a music track,
it starts playing in the Music Player application.
For a vCalendar file, select the calendar where you want to
save the event, and then touch
to your Calendar events.
For a vCard contact file, if there are multiple vCard files on your
storage card, you can choose to import one, several, or all of
those contacts to your Contacts list.
Import
Settings
.
. The vCalendar is added
➔
Bluetooth Settings
1. From a Home screen, touch ➔
Connections
2. To uch the
ON .
3. To uch
•
•
•
Change Your Bluetooth Name
You can change the name that is used to identify your tablet
when using Bluetooth.
1. From a Home screen, touch ➔
General
2. Edit the device name and touch OK.
tab ➔
Bluetooth
.
OFF / ON
button to turn Bluetooth
Menu
for options:
Visibility timeout
other devices when you turn on visibility.
Received files
Help
: Display additional Bluetooth information.
: Set the length of time your tablet is visible to
: Show the list of files received using Bluetooth.
tab ➔ About device ➔ Device name
Settings
Settings
.
➔
➔
Page 89

Managing Downloads
Files, apps, and other items you download in Internet, Gmail,
Email, or in other ways, are stored on your tablet’s internal
storage. You can use the Downloads app to view, reopen, or
delete what you have downloaded.
To manage the demands on their networks or to help you
avoid unexpected charges, some mobile networks place
restrictions on the size of the files you can download. When
you are connected to such networks, and you try to
download an oversized-file, you are asked or required to
delay downloading the file until the next time you are
connected to a Wi-Fi network. At that time, the download
resumes automatically. The Downloads app can also be used
to view and manage these queued files.
Downloaded files are stored in the Download directory in
your tablet’s internal storage. You can view and copy files
from this directory when connected to a computer with a
USB cable.
Uninstalling an App
Apps come pre-installed on your device and you can
download additional apps from Google Play. If you decide to,
you can uninstall apps you downloaded from Google Play and
other sources.
There are several ways to uninstall an app:
1. From a Home screen, touch ➔
General
tab ➔ Application manager
2. Touc h th e
3. Touch the app you want to uninstall.
4. Touc h th e
A pop-up displays the message
uninstalled.
5. To uch OK to confirm you want to uninstall the app.
You can also use Google Play to uninstall apps you
downloaded from there (see “Play Store” on page 103).
Tip:
To uninstall updates to pre-installed apps, touch the app
and touch
message
uninstalled
DOWNLOADED
Uninstall
Uninstall updates
All updates to this Android system app will be
. Touch OK to uninstall the updates.
tab.
button.
. A pop-up displays the
Settings
.
Application will be
Connections 84
➔
Page 90
To uninstall an app from the Apps screen:
1. From a Home screen, touch .
Menu
➔
2. Touch
Uninstall screen.
– or –
Touch
➔
Uninstall
A appears on Apps that can be uninstalled or
disabled.
3. Touch an app’s icon and then touch
remove the app from your tablet.
Note:
You cannot uninstall pre-loaded apps. You can only
uninstall the apps you have downloaded.
85
Uninstall/disable apps
Download
and then touch
.
OK
to display the
Menu
to uninstall and
Samsung Kies
Samsung Kies is a software that enables you to update your
device firmware, synchronize files, and transfer data to and
from your device directly by connecting to your computer.
To learn more about Samsung Kies and to download the
software (PC and Mac), visit
samsung.com/kies
.
Synchronizing with Windows Media Player
Ensure that Windows Media Player is installed on your PC.
1. Attach your device to the computer with the USB cable.
Your computer recognizes the connection and displays
the Auto Play screen. (If the Auto Play screen does not
appear, manually launch the program.)
2. Click the option to
to synchronize music files.
3. Select and drag the music files you want to the sync
list and begin synchronizing.
4. When finished, exit Windows Media Player and
disconnect the USB cable.
Sync digital media files to this device
Page 91

Connecting as a Mass Storage Device
You can connect your device to a PC as a removable disk and
access the file directory. If you insert a memory card in the
device, you can also access the files directory from the
memory card by using the device as a memory card reader.
Note:
The file directory of the memory card displays as
separate from the internal memory, which is
1. Insert a memory card into the device to transfer files
from or to the memory card.
2. Attach your device to the computer with the USB cable.
Your computer recognizes the connection and displays
the AutoPlay screen.
Tab le t
Card
.
,
3. Click the option to
You should see a Card and a Tablet folder.
4. Copy files from the PC to the memory card
(Card folder).
5. When finished, close the PC folder and disconnect the
USB cable.
Open device to view files
.
Connections 86
Page 92

Section 8: Applications
This section contains a description of each application that is
available on the Apps screen, its function, and how to
navigate through that particular application. If the application
is described in another section of this user manual, then a
cross reference to that description is provided.
Updating Applications
Once you have registered your device (see “Software
Update” on page 149) and signed into your Google Account
(see “Your Google Account” on page 39), you may see the
Updates Available
a new version of one or more apps available or, when you
open an application that is preloaded on your device, an
Update Available
To update the applications:
1. Touch the top of the screen and swipe downward.
The Status Details screen displays.
2. Touch
For more information, refer to “Updates to Downloaded
Apps” on page 104.
87
notification in the Status Bar if there is
message may be displayed.
Updates available
.
GPS Applications
GPS applications allow you to achieve real-time,
GPS-enabled, turn-by-turn navigation and to access local
searches based on a variety of category parameters.
To receive better GPS signals, avoid using your device in the
following conditions:
• Inside a building or between buildings
• In a tunnel or underground passage
• In poor weather
• Around high-voltage or electromagnetic fields
• In a vehicle with tinted windows
Global GPS turn-by-turn navigation, mapping, and
Point of Interest content is available for three areas,
including North America, Western Europe, and China,
where wireless coverage is available.
Page 93
Important!
If you touch or cover the internal GPS antenna
while using GPS services, it may impede the GPS
signal resulting in the GPS services not working in
an optimal manner. To locate the approximate
location of the internal GPS antenna, see “Back,
Top, and Bo ttom” on page 13.
Accessing Applications
The
Apps
screen displays all applications installed on your
wireless device. Applications that you download and install
from Google Play or from the web are also added to a
Home screen.
To access applications:
1. From a Home screen, touch .
The Apps screen displays.
2. Locate the application’s icon and touch it to launch the
application.
Tip:
To open applications quickly, add the icons of frequentlyused applications to one of the Home screens, if it is not
there by default. For more information, refer to “Adding a
Shortcut or Widget” on page 31.
Application Folders
There are several applications that are grouped into different
folders. The applications in this section are described
alphabetically. The following folders contain the applications
listed below:
Samsung: Alarm, Calculator, Downloads, Help, KNOX,
S Voice, SideSync 3.0, and World Clock.
Google
: Drive, Gmail, Google, Google Settings, Google+,
Hangouts, Photos, Play Books, Play Games,
Play Movies & TV, Play Music, Play Newsstand, and
Voice Search.
Applications 88
Page 94
Alarm
Set alarms for reminders or for wake-up times.
1. Touch
2. Touch
alarm means the alarm is deactivated.
3. Touch an alarm to change any of its settings and then
touch
Note:
When an alarm is set, displays in the Status Bar.
Setting Alarms
Touc h
select days for the alarm to repeat, and then touch
Save
•
89
Samsung
Turn alarm on
Save
to save the updates.
Create
, set a time for the alarm to go off,
.
Location alarm
you are in the location.
: Set a location. The alarm goes off only when
folder ➔ Alarm.
to activate the alarm. A gray
•
Snooze
: Set an interval and the number of times for the alarm
to repeat after the preset time.
•
Smart alarm
preset time.
•Name
: Set a time for the alarm to go off before the
: Give the alarm a name.
Stopping Alarms
Drag outside the large circle to stop an alarm.
Drag outside the large circle to repeat the alarm
after a specified length of time.
Deleting Alarms
Touch and hold the alarm, and then touch
Delete
.
Page 95
Calculator
The Calculator provides basic and advanced arithmetic
functions.
1. Touch
2. Enter the first number using the numeric keys.
3. Enter the operation for your calculation by touching the
corresponding onscreen arithmetic function key.
4. Enter the next number.
5. To view the result, touch the
6. Repeat Steps 3 through 5 as many times as required.
7. Touch to clear the result.
8. To clear the calculator history, touch
9. For more advanced problems, use the advanced
operators
would on a pocket calculator.
10. Touch and hold entries in the Calculator's display field
to copy or cut the contents of the display.
Copied to clipboard
another app.
Samsung
folder ➔
=
(equals) key.
sin, ln, cos, log, tan
displays. Paste the copied value in
, and so on, just as you
Calculator
Clear history
.
Calendar
Use this application to manage events and tasks.
Tou ch
Creating Events or Tasks
1. Touch and use one of the following methods:
•Add event
•Add task
– or –
Touch a date on the calendar to select it and touch it
.
again.
Enter a title and specify which calendar to use or sync
with. Then touch
add more details, such as how often the event repeats,
when it has an advance alert, or where it takes place.
2. Attach a map showing the location of the event. Enter
the location in the
field, and then pinpoint the precise location by touching
and holding on the map that appears.
Calendar
.
: Enter an event with an optional repeat
setting.
: Enter a task with an optional priority setting.
Edit event details
Location
or
Edit task details
field, touch next to the
Applications 90
to
Page 96
Syncing with Google Calendar
1. From a Home screen, touch ➔
tab ➔
General
2. Touch a Google Account ➔
To manually sync for updating:
Touc h
To display synced events or tasks:
Touc h
then check mark the Google Account.
Accounts ➔ Google
Calendar
➔
Calendar
➔
Sync Calendar
Menu
Menu
Changing Calendar Type
At the top of the screen:
1. Touch a calendar type:
List
2. Touch
91
to list all events or
Yea r, Month, Week
Tas k
Settings ➔
.
➔
➔
Sync
.
➔
Calendars
, or
to list all tasks.
Sync now
, and
Day
.
Searching for Events
Touch
the search.
.
To view today’s events, touch Today at the top of the
screen.
Deleting Events
Touch an event or task. On the pop-up, touch
➔ Delete.
– or –
Tou ch
touch Delete.
Sharing Events
Touch an event. On the pop-up, touch
Share via, and then select a sharing method.
Search
, and then enter a keyword to use for
Menu
➔ Delete, select events, and then
Menu
➔
Menu
Page 97
Camera
Use this application to take photos or videos.
Tou ch
For more information, refer to “Camera” on page 60.
Camera
.
Chrome
Use Chrome to browse the internet and bring your open tabs,
bookmarks and omnibox data from your computer to your
tablet.
Tou ch
Chrome
.
Contacts
Store contact information for your friends, family, and
colleagues, to quickly access information or to send a
message.
Tou ch
For more information, refer to “Contacts” on page 39.
Contacts
.
Downloads
Use this application to see what files are downloaded
through the applications.
1. Touc h
2. Select a file to open it with an appropriate application.
Samsung
folder ➔
Downloads
.
Drive
Use the Google Drive app to open, view, rename, and share
your Google Docs and files.
Google
1. Touc h
2. Sign in to your Google account. For more information,
refer to “Setting Up Your Gmail Account” on page 49.
A product tour displays the first time you access Drive.
to get started.
Touc h
at any time.
Next
Menu
3. To uch
Tip:
folder ➔
to view the product tour or touch
➔
Product Tour
Drive
.
Go to Drive
to repeat the product tour
Applications 92
Page 98
4. Follow the onscreen instructions to use Drive.
Menu
➔
Settings
5. Touch
preferences.
6. Touch
information.
Menu
➔
to configure your Drive
Help
to display additional help
Dropbox
Use this application to save and share files with others via
the Dropbox cloud storage. When you save files to Dropbox,
your device automatically syncs with the web server and any
other computers that have Dropbox installed.
1. Touch
2. Follow the onscreen instructions to complete the setup
and begin using Dropbox.
Dropbox
.
e-Meeting
Samsung e-Meeting is an integrated, secure, and server-free
system that allows paperless communication and sharing of
documents in real-time.
Touc h
93
e-Meeting
.
Send and receive email using popular email services.
Touch
For more information, refer to “Email” on page 46.
Email
.
Use this application to access your personalized magazines.
Touch
For more information, refer to “Flipboard” on page 58.
Flipboard
.
Gallery
Use Gallery to view, capture, and manage photos and videos.
For more information, refer to “Gallery” on page 68.
Touch
Gallery
.
Gmail
Send and receive email with Gmail, Google’s web-based
email.
Touch
For more information, refer to “Gmail” on page 49.
Google
folder ➔
Gmail
.
Page 99
Use this application to search not only the Internet, but also
applications and their contents on the device as well.
Tou ch
Google Now
Google Now recognizes repeated actions performed on the
device (including accessing locations, repeated calendar
appointments, search queries, and more). Google Now uses
these actions to automatically send updates for user-specific
information in the form of “cards.”
For more information, visit
1. Press and hold
2. Follow the prompts to set up and use Google Now.
Note:
When Google Now is enabled, you can also access it by
touching
Google
folder ➔
google.com/landing/now
Google
folder ➔
Home
Google
.
Google
.
.
.
Google Settings
Use this application to configure settings for some features
provided by Google.
Tou ch
Google
folder ➔
Google Settings
.
Google+
Share updates and see what is going on around you with
Google+ for mobile.
Tou ch
For more information, refer to “Google+” on page 50.
Google
folder ➔
Google+
.
Hancom Viewer
Hancom Office Viewer opens and manages Hancom Office
Hanword (*.hwp) and Hanshow (*.show) documents.
1. To uch
The app is installed.
2. For more information, touch
Online Support
Hancom Viewer
.
.
About Hancom Viewer
Applications 94
➔
Page 100
Hangouts
Hangouts is an online place to meet friends and family, share
photos, and host video calls.
Touc h
For more information, refer to “Hangouts” on page 50.
Google
folder ➔
Hangouts
.
Help
Access help information to learn how to use the device and
applications or configure important settings.
Touc h
For more information, refer to “Help” on page 36.
Samsung
folder ➔
Help
.
Internet
Your device is equipped with a full HTML browser that gives
you access to the Internet.
Touc h
95
Internet
.
Command Keys
Touch
Touch
Touch
Touch
Zoom
•
Touch the screen twice to zoom in or out.
•
Use two fingers, such as your index finger and
thumb, to zoom out by making an inward pinch
motion on the screen. To zoom in, make an
outward motion by sweeping your fingers out.
Tip:
For convenient browsing, you can rotate the device to
landscape mode.
Back
or to return to the previous page.
Forward
to go forward to a recent page.
Home
to display your Internet Home screen.
Refresh
to reload the current page.
 Loading...