

Page 1

ANDROID TABLET
User Manual
Please read this manual before operating your
device and keep it for future reference.
Page 2

Intellectual Property
All Intellectual Property, as defined below, owned by or which is otherwise the property of Samsung or its respective suppliers relating to
the SAMSUNG Galaxy Tab, including but not limited to, accessories, parts, or software relating there to (the “Galaxy Tab System”), is
proprietary to Samsung and protected under federal laws, state laws, and international treaty provisions. Intellectual Property includes, but
is not limited to, inventions (patentable or unpatentable), patents, trade secrets, copyrights, software, computer programs, and related
documentation and other works of authorship. You may not infringe or otherwise violate the rights secured by the Intellectual Property.
Moreover, you agree that you will not (and will not attempt to) modify, prepare derivative works of, reverse engineer, decompile,
disassemble, or otherwise attempt to create source code from the software. No title to or ownership in the Intellectual Property is
transferred to you. All applicable rights of the Intellectual Property shall remain with SAMSUNG and its suppliers.
Samsung Electronics America (SEA), Inc.
Address:
85 Challenger Road
Ridgefield Park, New Jersey 07660
Toll Free Telephone:
Internet Address
©
2011 Samsung Electronics America, Inc. All rights reserved.
Do you have questions about your Samsung Mobile Device?
For 24 hour information and assistance, we offer a new FAQ/ARS System (Automated Response System) at:
http://www.samsung.com/us/support
1-800-SAMSUNG
:
http://www.samsungusa.com
GT-P1010_WI-FI Tab_English_UM_UEKC6_BH_033111_F6
Page 3

Nuance®, VSuite™, T9® Text Input, XT9® Smart Input, and the Nuance logo are trademarks or registered trademarks of Nuance
Communications, Inc., or its affiliates in the United States and/or other countries.
The Bluetooth® word mark, figure mark (stylized “B Design”), and combination mark (Bluetooth word mark and “B Design”) are registered
trademarks and are wholly owned by the Bluetooth SIG.
microSDTM, microSDHCTM, and the microSD logo are Trademarks of the SD Card Association.
Openwave® is a registered Trademark of Openwave, Inc.
and are trademarks of SRS Labs, Inc. CS Headphone and WOW HD technologies are incorporated under license from
SRS Labs, Inc.
Google, the Google logo, Android, the Android logo, Android Market, Gmail, Google Mail, Google Apps, Google Calendar, Google Checkout,
Google Earth, Google Latitude, Google Maps, Google Talk, Picasa, and YouTube are trademarks of Google Inc.
Wi-Fi is a registered trademark of the Wireless Fidelity Alliance, Inc.
Swype is a trademark of Swype, Inc.
Open Source Software
Some software components of this product incorporate source code covered under GNU General Public License (GPL), GNU Lesser General
Public License (LGPL), OpenSSL License, BSD License and other open source licenses. To obtain the source code covered under the open
source licenses, please visit:
http://opensource.samsung.com
.
Page 4

Disclaimer of Warranties; Exclusion of Liability
EXCEPT AS SET FORTH IN THE EXPRESS WARRANTY CONTAINED ON THE WARRANTY PAGE ENCLOSED WITH THE PRODUCT, THE
PURCHASER TAKES THE PRODUCT “AS IS”, AND SAMSUNG MAKES NO EXPRESS OR IMPLIED WARRANTY OF ANY KIND WHATSOEVER
WITH RESPECT TO THE PRODUCT, INCLUDING BUT NOT LIMITED TO THE MERCHANTABILITY OF THE PRODUCT OR ITS FITNESS FOR ANY
PARTICULAR PURPOSE OR USE; THE DESIGN, CONDITION OR QUALITY OF THE PRODUCT; THE PERFORMANCE OF THE PRODUCT; THE
WORKMANSHIP OF THE PRODUCT OR THE COMPONENTS CONTAINED THEREIN; OR COMPLIANCE OF THE PRODUCT WITH THE
REQUIREMENTS OF ANY LAW, RULE, SPECIFICATION OR CONTRACT PERTAINING THERETO. NOTHING CONTAINED IN THE INSTRUCTION
MANUAL SHALL BE CONSTRUED TO CREATE AN EXPRESS OR IMPLIED WARRANTY OF ANY KIND WHATSOEVER WITH RESPECT TO THE
PRODUCT. IN ADDITION, SAMSUNG SHALL NOT BE LIABLE FOR ANY DAMAGES OF ANY KIND RESULTING FROM THE PURCHASE OR USE OF
THE PRODUCT OR ARISING FROM THE BREACH OF THE EXPRESS WARRANTY, INCLUDING INCIDENTAL, SPECIAL OR CONSEQUENTIAL
DAMAGES, OR LOSS OF ANTICIPATED PROFITS OR BENEFITS.
Page 5

Table of Contents
Section 1: Getting Started ..............................................4
Understanding This User Manual . . . . . . . . . . . . . . . . . . . . . . . 4
Battery . . . . . . . . . . . . . . . . . . . . . . . . . . . . . . . . . . . . . . . . . . . 5
Turning Your Device On and Off . . . . . . . . . . . . . . . . . . . . . . . . 6
Your Google Account . . . . . . . . . . . . . . . . . . . . . . . . . . . . . . . . 7
Using Google Maps . . . . . . . . . . . . . . . . . . . . . . . . . . . . . . . . . 7
System Tutorial . . . . . . . . . . . . . . . . . . . . . . . . . . . . . . . . . . . . 7
Task Manager . . . . . . . . . . . . . . . . . . . . . . . . . . . . . . . . . . . . . 7
Memory Card . . . . . . . . . . . . . . . . . . . . . . . . . . . . . . . . . . . . . . 8
Galaxy Tab Accessories . . . . . . . . . . . . . . . . . . . . . . . . . . . . . . 9
Securing Your Device . . . . . . . . . . . . . . . . . . . . . . . . . . . . . . . . 9
Troubleshooting . . . . . . . . . . . . . . . . . . . . . . . . . . . . . . . . . . . 10
Android System Recovery . . . . . . . . . . . . . . . . . . . . . . . . . . . 11
Section 2: Understanding Your Device ........................12
Features . . . . . . . . . . . . . . . . . . . . . . . . . . . . . . . . . . . . . . . . 12
Front and Top Views . . . . . . . . . . . . . . . . . . . . . . . . . . . . . . . 13
Side Views . . . . . . . . . . . . . . . . . . . . . . . . . . . . . . . . . . . . . . . 14
Back and Bottom Views . . . . . . . . . . . . . . . . . . . . . . . . . . . . . 14
Home Screen . . . . . . . . . . . . . . . . . . . . . . . . . . . . . . . . . . . . . 15
Navigating Your Device . . . . . . . . . . . . . . . . . . . . . . . . . . . . . 17
Notification Panel . . . . . . . . . . . . . . . . . . . . . . . . . . . . . . . . . . 18
Primary Shortcuts . . . . . . . . . . . . . . . . . . . . . . . . . . . . . . . . . 20
Widgets . . . . . . . . . . . . . . . . . . . . . . . . . . . . . . . . . . . . . . . . . 20
Shortcuts . . . . . . . . . . . . . . . . . . . . . . . . . . . . . . . . . . . . . . . . 22
Folders . . . . . . . . . . . . . . . . . . . . . . . . . . . . . . . . . . . . . . . . . 23
Wallpapers . . . . . . . . . . . . . . . . . . . . . . . . . . . . . . . . . . . . . . 24
Applications . . . . . . . . . . . . . . . . . . . . . . . . . . . . . . . . . . . . . . 24
Section 3: Contacts and Accounts ..............................29
Accounts . . . . . . . . . . . . . . . . . . . . . . . . . . . . . . . . . . . . . . . . 29
Contacts . . . . . . . . . . . . . . . . . . . . . . . . . . . . . . . . . . . . . . . . 30
My Profile . . . . . . . . . . . . . . . . . . . . . . . . . . . . . . . . . . . . . . . 34
Groups . . . . . . . . . . . . . . . . . . . . . . . . . . . . . . . . . . . . . . . . . 34
Favorites . . . . . . . . . . . . . . . . . . . . . . . . . . . . . . . . . . . . . . . . 36
Section 4: Entering Text ............................................... 37
Virtual QWERTY Keyboard . . . . . . . . . . . . . . . . . . . . . . . . . . . 37
Text Input Methods . . . . . . . . . . . . . . . . . . . . . . . . . . . . . . . . 37
Changing the Input Method . . . . . . . . . . . . . . . . . . . . . . . . . . 37
Entering Text Using Swype . . . . . . . . . . . . . . . . . . . . . . . . . . 38
Entering Text Using the Samsung Keypad . . . . . . . . . . . . . . . 40
Section 5: Messaging ................................................... 41
Types of Messages . . . . . . . . . . . . . . . . . . . . . . . . . . . . . . . . 41
Gmail . . . . . . . . . . . . . . . . . . . . . . . . . . . . . . . . . . . . . . . . . . 41
Email . . . . . . . . . . . . . . . . . . . . . . . . . . . . . . . . . . . . . . . . . . . 43
Google Talk . . . . . . . . . . . . . . . . . . . . . . . . . . . . . . . . . . . . . . 47
Section 6: Web and Social Networking ....................... 48
Browser . . . . . . . . . . . . . . . . . . . . . . . . . . . . . . . . . . . . . . . . . 48
Maps . . . . . . . . . . . . . . . . . . . . . . . . . . . . . . . . . . . . . . . . . . . 52
Latitude . . . . . . . . . . . . . . . . . . . . . . . . . . . . . . . . . . . . . . . . . 53
1
Page 6

Navigation . . . . . . . . . . . . . . . . . . . . . . . . . . . . . . . . . . . . . . . 53
News & Weather . . . . . . . . . . . . . . . . . . . . . . . . . . . . . . . . . . . 54
Places . . . . . . . . . . . . . . . . . . . . . . . . . . . . . . . . . . . . . . . . . .54
Google Search . . . . . . . . . . . . . . . . . . . . . . . . . . . . . . . . . . . . 54
Voice Search . . . . . . . . . . . . . . . . . . . . . . . . . . . . . . . . . . . . .55
Feeds and Updates . . . . . . . . . . . . . . . . . . . . . . . . . . . . . . . . . 55
YouTube . . . . . . . . . . . . . . . . . . . . . . . . . . . . . . . . . . . . . . . . . 56
Section 7: Music ...........................................................57
Music Player . . . . . . . . . . . . . . . . . . . . . . . . . . . . . . . . . . . . . . 57
Music Hub . . . . . . . . . . . . . . . . . . . . . . . . . . . . . . . . . . . . . . . 59
Section 8: Photos and Video ........................................60
Camera . . . . . . . . . . . . . . . . . . . . . . . . . . . . . . . . . . . . . . . . .60
Video . . . . . . . . . . . . . . . . . . . . . . . . . . . . . . . . . . . . . . . . . . . 64
Gallery . . . . . . . . . . . . . . . . . . . . . . . . . . . . . . . . . . . . . . . . . . 64
Digital Frame . . . . . . . . . . . . . . . . . . . . . . . . . . . . . . . . . . . . . 67
Media Hub . . . . . . . . . . . . . . . . . . . . . . . . . . . . . . . . . . . . . . . 68
Section 9: Connections ................................................69
Wi-Fi . . . . . . . . . . . . . . . . . . . . . . . . . . . . . . . . . . . . . . . . . . .69
Bluetooth . . . . . . . . . . . . . . . . . . . . . . . . . . . . . . . . . . . . . . . . 70
USB Settings . . . . . . . . . . . . . . . . . . . . . . . . . . . . . . . . . . . . . 71
Memory Card . . . . . . . . . . . . . . . . . . . . . . . . . . . . . . . . . . . . . 72
Section 10: Applications and Widgets ........................ 74
GPS Applications . . . . . . . . . . . . . . . . . . . . . . . . . . . . . . . . . .74
Alarm Clock . . . . . . . . . . . . . . . . . . . . . . . . . . . . . . . . . . . . . . 75
AllShare . . . . . . . . . . . . . . . . . . . . . . . . . . . . . . . . . . . . . . . . . 76
Amazon Kindle . . . . . . . . . . . . . . . . . . . . . . . . . . . . . . . . . . . . 77
2
Browser . . . . . . . . . . . . . . . . . . . . . . . . . . . . . . . . . . . . . . . . . 77
Calculator . . . . . . . . . . . . . . . . . . . . . . . . . . . . . . . . . . . . . . . 78
Calendar . . . . . . . . . . . . . . . . . . . . . . . . . . . . . . . . . . . . . . . . 78
Camera . . . . . . . . . . . . . . . . . . . . . . . . . . . . . . . . . . . . . . . . . 80
Contacts . . . . . . . . . . . . . . . . . . . . . . . . . . . . . . . . . . . . . . . . 80
Daily Briefing . . . . . . . . . . . . . . . . . . . . . . . . . . . . . . . . . . . . . 80
Date, Time, and Weather . . . . . . . . . . . . . . . . . . . . . . . . . . . . 81
Date, Time, or Weather . . . . . . . . . . . . . . . . . . . . . . . . . . . . . 82
Digital Frame . . . . . . . . . . . . . . . . . . . . . . . . . . . . . . . . . . . . . 82
Dual Clock . . . . . . . . . . . . . . . . . . . . . . . . . . . . . . . . . . . . . . . 82
Email . . . . . . . . . . . . . . . . . . . . . . . . . . . . . . . . . . . . . . . . . . . 82
FT Mobile . . . . . . . . . . . . . . . . . . . . . . . . . . . . . . . . . . . . . . . . 83
Gallery . . . . . . . . . . . . . . . . . . . . . . . . . . . . . . . . . . . . . . . . . . 83
Gmail . . . . . . . . . . . . . . . . . . . . . . . . . . . . . . . . . . . . . . . . . . . 83
Google Search . . . . . . . . . . . . . . . . . . . . . . . . . . . . . . . . . . . . 83
Latitude . . . . . . . . . . . . . . . . . . . . . . . . . . . . . . . . . . . . . . . . . 83
Maps . . . . . . . . . . . . . . . . . . . . . . . . . . . . . . . . . . . . . . . . . . . 84
Market . . . . . . . . . . . . . . . . . . . . . . . . . . . . . . . . . . . . . . . . . . 84
Media Hub . . . . . . . . . . . . . . . . . . . . . . . . . . . . . . . . . . . . . . . 84
Memo . . . . . . . . . . . . . . . . . . . . . . . . . . . . . . . . . . . . . . . . . . 85
Moviefone . . . . . . . . . . . . . . . . . . . . . . . . . . . . . . . . . . . . . . . 85
Music . . . . . . . . . . . . . . . . . . . . . . . . . . . . . . . . . . . . . . . . . . . 86
Music Hub . . . . . . . . . . . . . . . . . . . . . . . . . . . . . . . . . . . . . . . 86
My Files . . . . . . . . . . . . . . . . . . . . . . . . . . . . . . . . . . . . . . . . . 86
Navigation . . . . . . . . . . . . . . . . . . . . . . . . . . . . . . . . . . . . . . . 87
News & Weather . . . . . . . . . . . . . . . . . . . . . . . . . . . . . . . . . . 87
NYTimes . . . . . . . . . . . . . . . . . . . . . . . . . . . . . . . . . . . . . . . . 87
Page 7

Places . . . . . . . . . . . . . . . . . . . . . . . . . . . . . . . . . . . . . . . . . . 88
Power Control . . . . . . . . . . . . . . . . . . . . . . . . . . . . . . . . . . . . 88
Qik Manual . . . . . . . . . . . . . . . . . . . . . . . . . . . . . . . . . . . . . . 89
Qik Video . . . . . . . . . . . . . . . . . . . . . . . . . . . . . . . . . . . . . . . . 89
Samsung Apps . . . . . . . . . . . . . . . . . . . . . . . . . . . . . . . . . . . . 89
Settings . . . . . . . . . . . . . . . . . . . . . . . . . . . . . . . . . . . . . . . . . 90
Social Hub . . . . . . . . . . . . . . . . . . . . . . . . . . . . . . . . . . . . . . . 90
Talk . . . . . . . . . . . . . . . . . . . . . . . . . . . . . . . . . . . . . . . . . . . . 90
Task Manager . . . . . . . . . . . . . . . . . . . . . . . . . . . . . . . . . . . . 90
ThinkFree Office . . . . . . . . . . . . . . . . . . . . . . . . . . . . . . . . . . . 91
Video . . . . . . . . . . . . . . . . . . . . . . . . . . . . . . . . . . . . . . . . . . . 91
Voice Search . . . . . . . . . . . . . . . . . . . . . . . . . . . . . . . . . . . . . 91
World Clock . . . . . . . . . . . . . . . . . . . . . . . . . . . . . . . . . . . . . . 92
WSJ . . . . . . . . . . . . . . . . . . . . . . . . . . . . . . . . . . . . . . . . . . . . 92
YouTube . . . . . . . . . . . . . . . . . . . . . . . . . . . . . . . . . . . . . . . . 93
Section 11: Settings .....................................................94
Accessing Settings . . . . . . . . . . . . . . . . . . . . . . . . . . . . . . . . . 94
Wireless and Network . . . . . . . . . . . . . . . . . . . . . . . . . . . . . . 94
Sound Settings . . . . . . . . . . . . . . . . . . . . . . . . . . . . . . . . . . . 100
Display Settings . . . . . . . . . . . . . . . . . . . . . . . . . . . . . . . . . . 102
Location and Security . . . . . . . . . . . . . . . . . . . . . . . . . . . . . . 103
Applications . . . . . . . . . . . . . . . . . . . . . . . . . . . . . . . . . . . . . 106
Accounts and Sync . . . . . . . . . . . . . . . . . . . . . . . . . . . . . . . 108
Privacy . . . . . . . . . . . . . . . . . . . . . . . . . . . . . . . . . . . . . . . . . 109
SD Card and Device Storage . . . . . . . . . . . . . . . . . . . . . . . . 110
Search . . . . . . . . . . . . . . . . . . . . . . . . . . . . . . . . . . . . . . . . . 110
Locale and Text . . . . . . . . . . . . . . . . . . . . . . . . . . . . . . . . . . 111
Voice Input and Output . . . . . . . . . . . . . . . . . . . . . . . . . . . . 114
Accessibility . . . . . . . . . . . . . . . . . . . . . . . . . . . . . . . . . . . . 115
Date and Time . . . . . . . . . . . . . . . . . . . . . . . . . . . . . . . . . . . 115
About Device . . . . . . . . . . . . . . . . . . . . . . . . . . . . . . . . . . . . 116
Section 12: Health and Safety Information ............... 117
Exposure to Radio Frequency (RF) Signals . . . . . . . . . . . . . . 117
Specific Absorption Rate (SAR) Certification Information . . . 121
Smart Practices While Driving . . . . . . . . . . . . . . . . . . . . . . . 123
Battery Use and Safety . . . . . . . . . . . . . . . . . . . . . . . . . . . . 123
Display / Touch-Screen . . . . . . . . . . . . . . . . . . . . . . . . . . . . 125
Section 13: Warranty Information ............................. 132
Standard Limited Warranty . . . . . . . . . . . . . . . . . . . . . . . . . 132
End User License Agreement for Software . . . . . . . . . . . . . . 135
Index ............................................................................ 140
3
Page 8

Section 1: Getting Started
This section helps you to quickly start using your device.
Understanding This User Manual
The sections of this manual generally follow the features of your
device. A robust index for features begins on page 140.
Also included is important safety information, beginning on
page 117, that you should know before using your device.
This manual gives navigation instructions according to the
default display settings. If you select other settings, navigation
steps may be different.
Unless otherwise specified, all instructions in this manual
assume that you are starting from a Home screen. To get to a
Home screen, you may need to unlock the device. For more
information, refer to “Securing Your Device” on page 9.
Note:
Instructions in this manual are based on default settings and may vary
from your device depending on the software version on your device
and any changes to the device’s settings.
Unless stated otherwise, instructions in this user manual start with the
device unlocked, at the Home screen.
All screen images in this manual are simulated. Actual displays may
vary depending on the software version of your device and any
changes to the device’s settings.
4
Special Text
In this manual, some text is set apart from the rest. This special
text is intended to point out important information, share quick
methods for activating features, define terms, and more. The
definitions for these methods are as follows:
•
Notes
: Presents alternative options for the current feature, menu, or
sub-menu.
•
Tips
: Provides quick or innovative methods or useful shortcuts.
•
Important
: Points out important information about the current feature
that could affect performance.
•
Warning
: Brings important information to your attention that can help
to prevent loss of data or functionality or damage to your device.
Text Conventions
This manual provides condensed information about how to use
your device. To make this possible, the following text conventions
are used to represent often-used steps:
➔
Arrows are used to represent the sequence of selecting
successive options in longer, or repetitive, procedures. For
example:
From a Home screen, press the
➔
Wireless and network
➔
Wi-Fi settings
Menu Key
➔Settings
.
Page 9
Battery
Your device is powered by a rechargeable, standard Li-Ion
battery. A Wall/USB Charger (Charging Head and USB cable) are
included with the device for charging the battery.
Note:
The battery comes partially charged. You must fully charge the battery
before using your device for the first time.
After the first charge, you can use the device while charging.
Charging the Battery
Your device comes with a Wall/USB Charger (Outlet Connector,
Charging Head, and USB cable) to charge your device from any
standard AC power outlet.
Note:
The battery comes partially charged. You must fully charge the battery
before using your device for the first time.
After the first charge, you can use the device while charging.
Warning!:
Use only approved charging devices. Approved accessories are
designed to maximize battery life. Using other accessories may
invalidate your warranty and may cause damage.
Battery Indicator
The Battery icon in the Status Bar shows the battery power
level. When battery power is 15% or less, your device prompts
you to charge the battery. If you continue to operate the device
without charging, the device powers off.
Tip:
Task Manager provides helpful information about extending battery life.
For more information, refer to “Task Manager” on page 7.
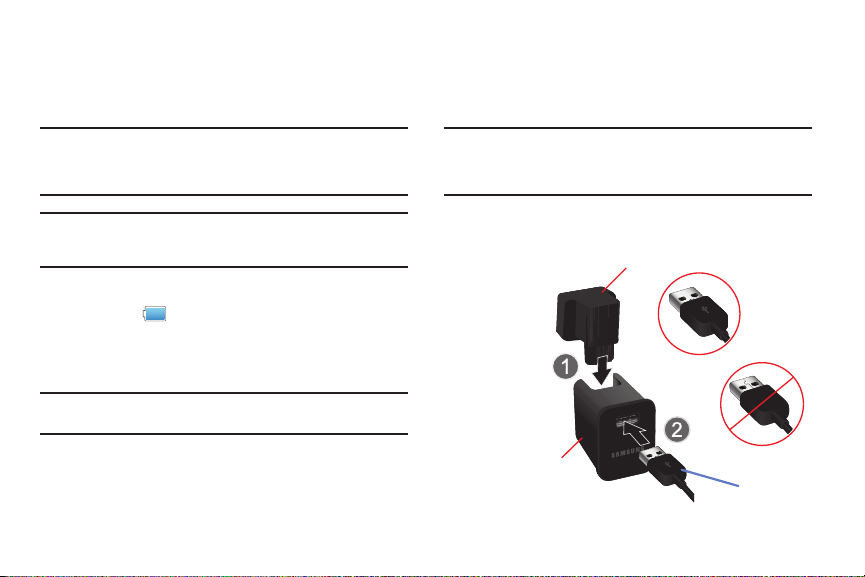
1. Carefully slide the Outlet Connector into the Charging Head
(1), making sure the connection is secure.
Outlet Connector
Correct
Charging
Head
Incorrect
USB Cable
Getting Started 5
Page 10

Insert the USB cable into the Charging Head (2).
Correct
Incorrect
Charger/Accessory Port
2.
3. Insert the USB cable into the device’s Charger/Accessory
Port (3).
4. Plug the Charging Head into a standard AC power outlet.
5. When charging is complete, unplug the Charging Head
from the power outlet and remove the USB cable from the
device.
Turning Your Device On and Off
Turning Your Device On
䊳
Press and hold the
Power/Lock Key
.
Note:
Your device’s internal antenna is located along the top back of the
device. Do not block the antenna; doing so may affect signal quality
and may cause the device to operate at a higher power level than is
necessary.
Turning Your Device Off
1. Press and hold the
2. At the prompt, touch
Power/Lock Key
Power off
.
.
6
Page 11

Your Google Account
Your new device uses your Google account to fully utilize its
Android features, including Gmail, Maps, Navigation, Google Talk
and the Android Market. When you turn on your device for the
first time, set up a connection with your existing Google account
or create a new Google account.
To create a Google account or set up your Google account on
your device use
Accounts and sync
settings. For more
information, refer to “Accounts and Sync” on page 108.
Using Google Maps
In order to use some applications related to Google Maps, you
must first connect Wi-fi. For more information, refer to “Wi-Fi
Settings” on page 94.
You must also enable location services to use Google Maps.
Some features require Standalone or Google location services.
For more information, refer to “Location and Security” on
page 103.
System Tutorial
To get the most out of your device, use the system tutorial to
learn about important concepts:
䊳
From a Home screen, press the
➔
About device ➔ System tutorial
Menu Key ➔ Settings
.
Task Manager
Your device can run applications simultaneously and some
applications run in the background.
Use Task Manager to see which applications are running on your
device and to end running applications to extend battery life. You
can also uninstall applications from your device and see how
much memory is used by applications.
Task Manager provides information about applications, including
Active applications, Package, RAM manager, Summary
, and
Help
To access the Task Manager:
1. From a Home screen, touch
➔
Task Manager
2. Touch the
.
Active applications
running on your device. Touch
End all
to stop all running applications.
3. Touch the
Packa ge
Android Market. Touch
Applications
tab to view applications
End
to end an application or
tab to view applications installed from
Uninstall
to remove an application
from your device.
Getting Started 7
.
Page 12

Touch the
4.
RAM manager
(Random Access Memory) currently in use. Touch
to clear inactive processes or
background processes, then touch
5. Touch the
Summary
tab to display the amount of RAM
Level 1
Level 2
to clear inactive and
Clear Memory
.
tab to view RAM and Storage memory
statistics.
6. Touch the
Help
tab to view useful tips for extending battery
life.
Tip:
To launch Task Manager from any screen, touch and hold the
Home Key
You can also access Task Manager from the
more information, refer to “Widgets” on page 20.
, then touch
Task Manager
.
Program Monitor
widget. For
Memory Card
Your device supports removable microSD™ or microSDHC™
memory cards, for storage of music, photos, videos, and other
files.
Note:
You can only store music files that you own (from a CD or purchased
with the device) on a memory card.
8
Correct
Memory
Card Slot
Incorrect
Installing a Memory Card
1. Open the Memory Card Slot cover and turn to expose the
slot.
2. With the gold contacts facing down, carefully slide the
memory card into the slot, pushing gently until it clicks into
place.
3. Replace the Memory Card Slot cover.
Page 13

Removing a Memory Card
Important!:
To prevent damage to information stored on the memory card,
unmount the card before removing it from the device.
1. From a Home screen, press the
➔
SD card and device storage ➔ Unmount SD card
2. Open the Memory Card Slot cover and turn to expose the
Menu Key ➔ Settings
.
slot.
3. Gently press down on the memory card, so that it pops out
from the slot, and carefully pull the card out.
4. Replace the Memory Slot cover.
Galaxy Tab Accessories
To find accessories for your Gaxaxy Tab:
1. Go to
http://www.samsung.com/us/mobile/galaxy-tab-
accessories
.
Galaxy Tab accessories display.
2. Use your model number to find compatible accessories.
Securing Your Device
By default, the device locks automatically when the screen times
out or you can lock it manually. You can unlock the device using
one of the default Unlock screens or, for increased security, use a
personal screen unlock pattern.
For more information about creating and enabling a Screen
unlock pattern, see “Set Screen Lock” on page 104.
For other settings related to securing your device, see “Location
and Security” on page 103.
Note:
Unless stated otherwise, instructions in this User Manual start with the
device unlocked, at the Home screen.
Locking the device manually
䊳
Press the
Power/Lock Key
.
Getting Started 9
Page 14
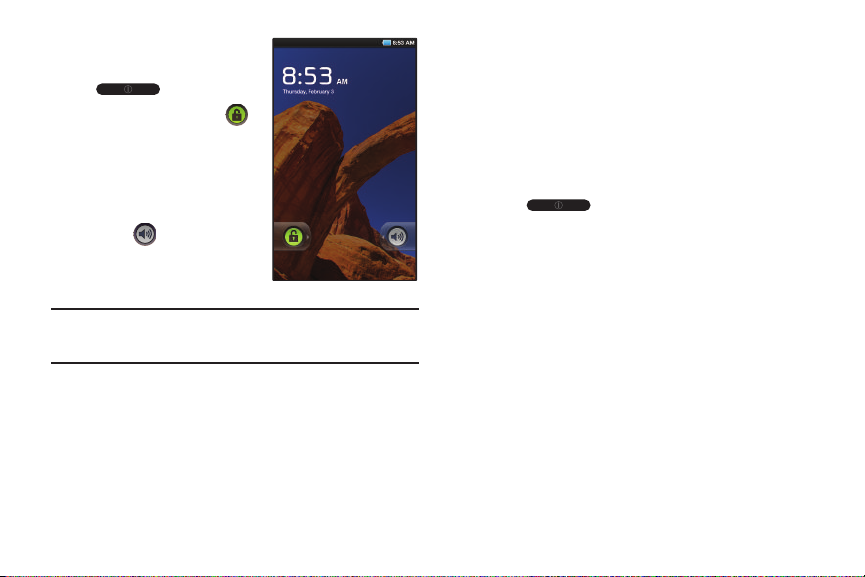
Unlocking the device
1. Press the
Power/Lock Key
.
2. Touch and drag
Unlock
from left to right.
You can also set the master
Volume level from the lock
screen. Touch and drag
Sound
from right to left
to toggle Sound between ON
and OFF modes.
Note:
You can choose the type of Screen Unlock you want to use, from
Pattern, PIN or Password. For more information, refer to “Location and
Security” on page 103.
10
Troubleshooting
If your device has fatal errors, hangs up, or freezes, you may
need to close all programs or reset the device to regain
functionality.
•
If your device is still responsive, but a program is frozen, close the
program using the Task Manager. For more information, refer to
Manager”
on page 7.
•
If your device is frozen and unresponsive, press and hold the
Lock Key
for 8 to 10 seconds.
“Task
Power/
Page 15

Android System Recovery
Android System Recovery is used for Google updates. The
average user should never need to perform a system recovery.
Note:
If you entered this menu by mistake, use the Volume Up/Down key to
select
reboot system now
then continues to boot up.
, then press the
Home Key
. Your device
To enter the Android System Recovery mode, follow these steps:
1. With the device turned off, press the
and
Volume Up Key
Power/Lock Key
at the
same time until the device switches on.
2. Once the Galaxy Tab logo appears, release the Power/Lock
key while continuing to press the Volume Up key.
3. Continue to press the Volume Up key for at least 8
seconds, until Recovery mode is launched and the Android
System Recovery screen is displayed.
4. Release the Volume Up key.
5. The following options are available:
• reboot system now
• apply sdcard:update.zip
: turns on your device.
: allows you to apply updates to your
device.
•wipe data/factory reset
: deletes all data from the device except
captured pictures and videos. For more information, refer to
“Factory Data Reset”
• wipe cache partition
on page 110.
: allows you to delete all cache data such as
log files.
• format internal sd-card
: allows you to reformat the internal
microSD card.
6. Use the Volume Up/Down key to scroll up or down, then
use the
Home Key
to make a selection.
Getting Started 11
Page 16

Section 2: Understanding Your Device
This section outlines key features of your device and describes
the screen and the icons that appear when the device is in use. It
also shows how to navigate through the device.
Features
•
7-inch 1024x600 WSVGA TFT LCD touch screen
•
Android OS
•
Android Market, plus pre-loaded applications
•
Messaging Features:
–
Gmail
–
Email (corporate and personal)
•
Connections:
–
Wi-Fi 802.11 b/g/n
–
Bluetooth 2.1
•
Compatible with Adobe® Flash® 10.1
•
Social Hub to integrate your e-mail, calendar and favorite social
networking sites
12
•
3 Megapixel Camera/Camcorder with Flash, plus 1.3 Megapixel
forward-facing Camera
•
Photo Gallery that supports JPEG, PNG, GIF, A-GIF, WBMP, and BMP
formats
•
HD Video Player (720p) that supports H.263, H.264, MPEG4, 3GP,
WMV (v9), Xvid, and DivX® formats
•
DivX Certified® to play DivX® video up to 640x480, including premium
content
•
Music Player that supports WAV, MP3, AAC, AAC+, eAAC+, AMR-NB,
AMR-WB, WMA (v9/10), MIDI, and SP-MIDI formats
•
Support for microSD™ and microSDHC™ Memory Cards.
•
Bluetooth® Wireless Technology. For more information about
supported profiles, see
“Bluetooth Profiles”
on page 96.
Page 17

Front and Top Views
3
2
7654
1
The following items can be found on the front and top of your
device as illustrated on the next page.
1.
3.5mm Headset Jack
2.
Light Sensor
: Plug in an optional headset.
: Used to control screen brightness
automatically and when taking photos with the
Front-facing Camera.
3.
Front-facing Camera Lens
4.
Menu Key
: Press to display options for the current screen.
5.
Home Key
: Press to display the Home screen. Press and
: Used when taking photos.
hold to display recent applications or to launch Task
Manager.
6.
Back Key
: Press to return to the previous screen or option.
7.
Search Key
: Press to launch Google Search, to search your
device or the web.
Understanding Your Device 13
Page 18

Side Views
1
2
3
4
3 4
2
1
The following items can be found on the sides of your device.
1.
Power/Lock Key
:
Press and hold to
turn the device on or
off. Press to lock the
device or to wake
the screen for
2.
unlocking.
Microphone
: Used to
pick up your voice or
audio during
recording.
3.
Volume Key
Home screen, press
to adjust Master Volume. During calls or music playback,
: From a
press to adjust volume. Press to mute the ringtone of an
incoming call.
4.
Memory Card Slot
: Install a memory card for storage of
files.
14
Back and Bottom Views
The following items can be found on the back and bottom of your
device.
1.
Camera Flash
: Used
when taking photos.
2.
Camera Lens
: Used
when taking photos or
recording videos.
3.
Charger/Accessory Port
:
Plug in a USB cable for
charging or to sync
music and files.
4.
External Speakers
: Used
in music or video
playback, notification
tones, and for other
sounds.
Page 19

Home Screen
5
4
3
2
1
The Home screen is the starting point for using your device.
Note:
Unless stated otherwise, instructions in this User Manual start with the
device unlocked, at the Home screen.
1.
Status Bar
: Presents icons to show notifications, battery
power, and connection details. For a list of icons, see
“Status Bar” on page 19.
2.
Widgets
: Applications that run on the Home screen. These
widgets are found on the Home screen by default. For
more information, refer to “Widgets” on page 20.
3.
Home screen
: The starting point for using your device.
Place shortcuts, widgets and other items to customize your
device to your needs.
4.
Shortcuts
: Shortcuts to common applications.These
shortcuts are found on the Home screen by default. For
more information, refer to “Shortcuts” on page 22.
5.
Primary Shortcuts
more information, refer to “Primary Shortcuts” on
: Shortcuts to common features. For
page 20.
Warning!:
If your device has a touch screen display, note that a touch screen
responds best to a light touch from the pad of your finger. Using
excessive force or a metallic object when pressing on the touch
screen may damage the tempered glass surface and void the
warranty. For more information, refer to “Warranty Information”
on page 132.
Understanding Your Device 15
Page 20

Extended Home Screen
The Home screen consists of the Home panel, plus four panels
that extend beyond the display width to provide more space for
adding shortcuts, widgets, and folders. You can also add four
more panels, up to a total of nine.
Slide your finger horizontally across the screen to scroll to the left
or right side panels. As you scroll, the indicator at the top of the
display shows your current position.
Customizing the Home Screen
To customize the Home screen to suit your preferences just
navigate to the desired Home screen, then touch and hold on the
screen to display the
Add to Home screen
menu. Then touch one
of the options:
•
Widgets
: For more information, refer to
•
Shortcuts
: For more information, refer to
•
Folders
: For more information, refer to
•
Wallpapers
: For more information, refer to
“Widgets”
“Shortcuts”
“Folders”
“Wallpapers”
on page 20.
on page 22.
on page 23.
on
page 24.
Display settings
You can customize display settings to your preferences. For more
information, refer to “Display Settings” on page 102.
16
Adding and removing Home screen panels
Your device comes with five Home screen panels. You can
customize the Home screen to include additional panels.
Note:
The panel in the first position displays when you press the
Home Key
1. From a Home screen, press the
2. Use these controls to configure panels:
.
Menu Key ➔
Remove
: Touch and drag a panel to the Trash Can
to remove the panel from the Home screen.
Add
: Touch to add a new panel, up to a total of 9.
3. To rearrange the order of panels, touch and drag a panel to
a new location.
Tip:
You can also display
Edit
options by pinching the Home screen.
Edit
.
Page 21

Navigating Your Device
Use command keys and the touch screen to navigate.
Command Keys
Menu Key
Press the
Menu Key to display options for the current screen
or feature.
Home Key
Press the
Home Key to display
the first Home screen.
Press and hold the
Home Key
to launch a menu of recent
applications or to launch Task
Manager.
Back Key
Press the
Back Key to return to the previous screen, option,
or step.
Search Key
Press the
Search Key
to search the web and your device.
Context-sensitive Menus
Context-sensitive menus offer options for features or screens. To
access context-sensitive menus:
•
Press the
Menu Key
•
Press and hold on an item.
.
Finger Gestures
Tou ch
Touch items to select or launch them. For example:
•
Touch the on-screen keyboard to enter characters or text.
•
Touch a menu item to select it.
•
Touch an application’s icon to launch the application.
Touch and Hold
Activate on-screen items. For example:
•
Touch and hold a widget on the home screen to move it.
•
Touch and hold on a field to display a pop-up menu of options.
Swipe, Flick, or Slide
Swipe, flick, or slide your finger vertically or horizontally across
the screen. For example:
•
Unlocking the screen
•
Scrolling the Home screens or a menu
Understanding Your Device 17
Page 22

Pinch
1
2
3
4
Use two fingers, such as your index finger and
thumb, to make an inward pinch motion on the
screen, as if you are picking something up, or
an outward motion by sweeping your fingers
out. For example:
•
Pinch the Home screen to show customization options.
•
Pinch a photo in Gallery to zoom in.
Notification Panel
The Notification Panel shows information about connections,
messages, and other items.
To display the Notification Panel:
䊳
Sweep your finger downward from the top of the screen.
From the Notification Panel, the following options are available:
1. Touch an icon to activate the feature.
2. Tap to clear all notifications.
3. Tap a notification to open the application.
4. Touch and hold, then slide your finger up to close the
Notification Panel or touch the Back Key .
Icons
Icons at the top of the Notification Panel show status for:
•
Wi-Fi
: Touch to enable or disable Wi-Fi. For more information, refer to
“Wi-Fi”
on page 69.
•
Bluetooth
: Touch to enable or disable Bluetooth. For more information,
refer to
“Bluetooth”
•
GPS
: Touch to enable Standalone GPS services. For more information,
refer to
“Use GPS Satellites”
•
Silent
: Touch to toggle Silent mode On or Off.
on page 70.
on page 104.
18
Page 23
Orientation lock
•
: Touch to enable or disable Orientation Lock. When
enabled, the screen orientation locks in the current orientation
(horizontal or vertical) and the orientation does not change when you
rotate the device.
Brightness
Touch and drag the slider to set the brightness or touch
Auto
allow the device to set brightness automatically based on
available light and battery charge status.
Clearing Notifications
1. Sweep your finger downward from the top of the screen to
display the Notifications Panel.
2. Touch a notification to clear it.
– or –
Touch
Clear
to clear all notifications.
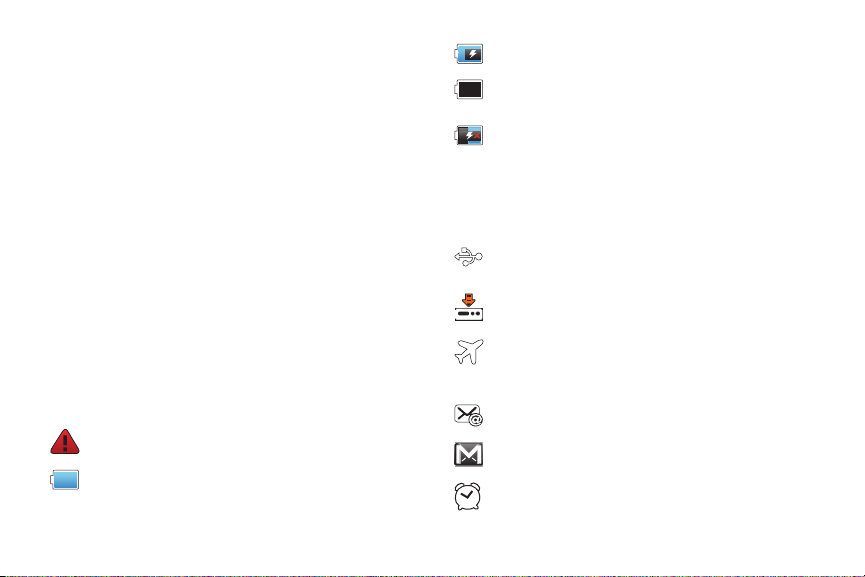
Status Bar
The Status Bar displays icons to show network status, battery
power, and other details.
System Alert
Battery Level
: Check Notifications Panel for alerts.
: Shown fully charged.
to
Charging Indicator
Device Power Critical
: Battery is charging.
: Battery has only three percent
power remaining. Charge immediately.
USB Charging Indicator
: The device is connected to a
computer using a USB cable, but it is not charging.
The battery is only charged while connected to a
computer, if the device is turned off. When the device
is off, press the Power/Lock key to see the battery
charging indicator.
USB Connected
: Device is connected to a computer
using a USB cable.
Download in progress
: An application is being
downloaded to the device.
Indicates that the Flight Mode is active, which allows you
to use many of your tablet’s features, but it cannot access
online information or applications..
New Email Message
New Gmail Message
Alarm Set
: You have new email.
: You have new Gmail.
: An alarm is active. For more information,
refer to “Alarm Clock” on page 75.
Understanding Your Device 19
Page 24
Silent mode
: All sounds except media and alarms are
silenced and vibrate mode is active. See “Silent
Mode” on page 100.
Preparing SD Card
Bluetooth Active
Wi-Fi Active
: A memory card is installed.
: Bluetooth is turned on.
: Wi-Fi is connected, active, and
communicating with a Wireless Access Point (WAP).
Wi-Fi Action Needed
: Action needed to connect to
Wireless Access Point (WAP).
Acquiring GPS Signal
: Displays when GPS is acquiring a
signal.
GPS Active
: Displays when GPS is active.
Primary Shortcuts
Primary Shortcuts appear at the bottom of the display.
Browser
: Access the Internet. Appears on the Home
screen by default. For more information, refer to
“Browser” on page 48.
20
Applications
: Access your device’s applications. For
more information, refer to “Applications” on page 24.
Email
: Send and receive email from your device.
Appears on the Home screen by default. For more
information, refer to “Email” on page 43.
Widgets
Widgets are self-contained applications that you can place on the
Home screen to access your favorite features.
Adding Widgets to the Home screen
1. Navigate to the desired Home screen, then touch and hold
on the screen to display the
2. Touch
Widgets
, then touch a widget to add it to the Home
Add to Home screen
menu.
screen.
Removing Widgets
䊳
Touch and hold the Widget until
Remove
appears at
the bottom of the screen, then drag the Widget to the
Remove
icon to remove it.
Page 25

Widgets
AccuWeather Clock
: Display the forecast from
AccuWeather. Touch the widget to choose locations.
Analog Clock
Calendar
: Display an analog clock.
: Display a calendar. For more information,
refer to “Calendar” on page 78.
Calendar clock
: Display an analog clock with the current
date.
Daily Briefing
: Monitor the weather, financial
information, news, and your schedule from one
convenient location. Appears on a Home screen by
default. For more information, refer to “Daily Briefing”
on page 80.
Date, time, and weather
: Display the date, the time, and
the weather for your current location or any other
location. For more information, refer to “Date, Time,
and Weather” on page 81.
Date, time, or weather
: Display either the date, the time,
or the weather for your current location or choose
another location. For more information, refer to “Date,
Time, or Weather” on page 82.
Dual clock
: Display the date and time for two different
locations. For more information, refer to “Dual Clock”
on page 82.
Feeds and Updates
: This application allows you to have
feeds and updates from Facebook, MySpace, and
Twitter displayed on your tablet. For more information,
refer to “Feeds and Updates” on page 55.
Google Search
: Display a Google Search bar. For more
information, refer to “Google Search” on page 54.
Home screen tips
Latitude
: Display tips about the Home screen.
: Locate your friends on a map, and share or
hide your location. For more information, refer to
“Latitude” on page 53.
Market
: Download applications from the Android
Market. For more information, refer to “Market” on
page 84.
Understanding Your Device 21
Page 26

aksdj akljlad pekajr didlfajj jd djfnfn
jeuifhe jle liekz ldak eaji alpald fhak a
aksdj akljlad pekajr didlfajj jd djfnfn
jeuifhe jle liekz ldak eaji alpald fhak a
aksdj akljlad pekajr
aksdj akljlad pekajr didlfajj jd djfnfn
jeuifhe jle liekz ldak eaji alpald fhak a
aksdj akljlad pekajr didlfajj jd djfnfn
jeuifhe jle liekz ldak eaji alpald fhak a
aksdj akljlad pekajr didlfajj jd djfnfn
jeuifhe jle liekz ldak eaji alpald fhak a
aksdj akljlad pekajr didlfajj jd djfnfn
jeuifhe jle liekz ldak eaji alpald fhak a
Android
News & Weather
: Display current news and weather for
your location. For more information, refer to “News &
Weather” on page 54.
NYTimes
: Allows you to read the latest edition of The
New York Times newspaper. For more information, refer
to “NYTimes” on page 87.
Picture frame
Power control
: Display a picture on a Home screen.
: Control Wi Fi, Bluetooth, and GPS
connections, and set automatic synchronization and
brightness settings. For more information, refer to
“Power Control” on page 88.
Program Monitor
: Display the number of active
applications. Touch to launch Task Manager. For more
information, refer to “Task Manager” on page 7.
Y! Finance Clock
: Display a clock with financial
information from Yahoo!® Finance.
YouTube
: Search YouTube and watch videos. For more
information, refer to “YouTube” on page 56.
22
Shortcuts
Use Shortcuts for quick access to applications or features, such
as Email or other applications.
Adding Shortcuts from a Home screen
1. Navigate to a Home screen panel, then touch and hold on
the screen to display the
2. Touch
Shortcuts
Add to Home screen
menu.
, then touch a selection, then follow the
prompts to add it to the Home screen.
Applications
: Launch an application. For a list,
see “Applications” on page 24.
Bookmark
: Launch a bookmarked web page
Contact
: View a contact you specify.
Directions & Navigation
: Get directions and
navigation from Google Maps.
Email
: Access an Email account. For more
information, refer to “Email” on page 43.
Gmail label
: Access a Gmail label.
.
Page 27

Latitude
: Locate your friends on a map and share
or hide your location.
Settings
: Go to a specific setting.
Adding Shortcuts from Applications
1. Navigate to a Home screen panel.
2. Touch
3. Touch and hold on an application icon. The Shortcut icon is
Applications
.
automatically placed on the selected Home screen.
Removing Shortcuts
䊳
Touch and hold the Shortcut until
then drag the Shortcut to the
Remove
Remove
appears,
icon.
Folders
Place Folders on the Home screen to organize items together on
the Home screen.
1. Navigate to the desired Home screen, then touch and hold
on the screen to display the
2. Touch
Folders
, then touch a selection:
New folder
All contacts
Add to Home screen
: Create a new empty folder.
: Create a folder containing all
menu.
contacts.
Contacts with phone numbers
: Create a folder
containing contacts with stored phone numbers.
Received list from Bluetooth
: Create a folder
containing a list of items received from
Bluetooth.
Recent documents
: Display the ThinkFree Office
Recent Docs list. Tap an entry to open the
associated document. For more information,
refer to “ThinkFree Office” on page 91.
Starred contacts
: Create a folder containing
contacts marked as Favorites.
Understanding Your Device 23
Page 28

Removing Fol ders
䊳
Touch and hold the Folder until
drag the Folder to the
Remove
Remove
icon.
appears, then
Wallpapers
You can choose a picture to display in the background of the
Home screen. Choose from preloaded wallpaper images or select
a photo you have downloaded or taken with the Camera.
1. From a Home screen, touch and hold on the screen to
display the
Wallpapers
Add to Home screen
.
menu, then touch
– or –
From a Home screen, press the
➔
Wallpaper
.
2. Choose a source for images:
• Home screen Wallpaper
Menu Key
: Access the Gallery to choose a picture
from an installed memory card. Touch a picture to select it, then
use the crop tool to resize the picture, if desired. Touch
Save
to
save the picture as wallpaper.
24
• Live wallpapers
wallpapers. Touch a wallpaper to see an example. Touch
to view options for the selection. Touch
: Choose from pre-loaded interactive animated
Settings
Set wallpaper
to save your
choice.
• Wallpaper gallery
Touch a wallpaper, then touch
: Choose from pre-loaded wallpaper images.
Set wallpaper
.
Applications
The Applications screen holds all applications on your wireless
device. Applications that you download and install from the
Android Market or from the web are also added to the
Applications screen.
You can place shortcuts to applications on the Home screen, for
quick access to the application. For more information, refer to
“Adding Shortcuts from Applications” on page 23.
1. From a Home screen, touch
2. Slide your finger across the screen left or right to scroll
Applications
.
through the Applications screens.
3. Touch an icon to launch the application.
Page 29

Customizing the Applications Screens
1. From a Home screen, touch
2. Press the
3. Touch and hold an application icon, then drag it to a new
Menu Key
Applications
➔ Edit
.
.
location.
4. When you are finished, press the
Note:
To discard changes to the Applications screens before you save them,
press the
Menu Key
➔ Cancel
Menu Key ➔ Save
, then touch OK to confirm.
Applications
Alarm Clock
: Schedule alarms to remind you of
appointments or events, or as a wake-up. For more
information, refer to “Alarm Clock” on page 75.
AllShare
: Synchronize your device with your TV. A
shortcut to AllShare appears on a Home screen by
default. For more information, refer to “AllShare” on
page 76.
Amazon KindleTM: Download Amazon books to read on
your device. A shortcut to Amazon Kindle appears on a
Home screen by default. For more information, refer to
“Amazon Kindle” on page 77.
Browser
: Access the Internet. By default, a shortcut to
Browser appears on the Home screen as a Primary
Shortcut. For more information, refer to “Browser” on
page 48.
Calculator
: The calculator provides the basic
arithmetic functions; addition, subtraction,
.
multiplication, and division. The calculator can also be
used as a scientific calculator. For more information,
refer to “Calculator” on page 78.
Calendar
: Record events and appointments to manage
your schedule. A shortcut to Calendar appears on a
Home screen by default. For more information, refer to
“Calendar” on page 78.
Camera
: Take photos or record videos. A shortcut to
Camera appears on a Home screen by default. A
shortcut to Camera appears on a Home screen by
default. For more information, refer to “Camera” on
page 60.
Contacts
: Save and manage contact information for
your friends and colleagues. For more information,
refer to “Contacts” on page 30.
Understanding Your Device 25
Page 30

Daily Briefing
news, and your schedule, from one application. A
shortcut to Daily Briefing appears on a Home screen
by default. For more information, refer to “Daily
Briefing” on page 80.
Digital Frame
or play music. For more information, refer to “Digital
Frame” on page 67.
Email
default, a shortcut to Email appears as a Primary
Shortcut on the Home screen. For more information,
refer to “Email” on page 43.
FT Mobile
world’s leading business newspaper. This application
lets you download the daily FT for offline reading and
access the FT’s award-winning content and video. It
also allows you to view your personal investment
portfolios. For more information, refer to “FT Mobile”
on page 83.
Gallery
device or on an installed memory card. For more
information, refer to “Gallery” on page 64.
: Monitor weather, financial information,
: Display a slideshow of photos, a clock,
: Send and receive email from your device. By
: Read a fully optimized version of the
: View and manage photos stored on your
Gmail
: Send and receive emails with Gmail, Google’s
web-based email. For more information, refer to
“Gmail” on page 41.
Google Search
: Use the Google search engine to
search the internet and your device. A shortcut to
Google Search appears on a Home screen by default.
For more information, refer to “Google Search” on
page 54.
Latitude
: Use Google Latitude to locate your friends on
a map and share or hide your location. For more
information, refer to “Latitude” on page 53.
Maps
: Find locations and get directions with Google
maps. A shortcut to Maps appears on a Home screen
by default. For more information, refer to “Maps” on
page 52.
Market
: Browse, download, and install Android
applications. A shortcut to Market appears on a Home
screen by default. For more information, refer to
“Market” on page 84.
Media Hub
: Browse the latest movies and TV shows,
then rent or purchase the media for viewing on your
device. For more information, refer to “Media Hub” on
page 68.
26
Page 31

Memo
: Create text memos and use Bluetooth to send
memos. For more information, refer to “Memo” on
page 85.
Moviefone
: Browse a directory of movies, check the
latest theater showtimes, find theater locations
nearest to you, buying tickets in advance, view
original movie content and news, and read movie
reviews. For more information, refer to “Moviefone”
on page 85.
Music
: Play music stored on an optional installed
memory card. For more information, refer to “Music
Player” on page 57.
Music Hub
: The Music Hub lets you purchase and
download songs and albums. For more information,
refer to “Music Hub” on page 59.
My files
: Find, view and manage files stored on an
optional installed memory card. For more information,
refer to “My Files” on page 86.
Navigation
: Use Google Maps Navigation to search for
locations, with turn-by-turn directions. For more
information, refer to “Navigation” on page 53.
News & Weather
aksdj akljlad pekajr didlfajj jd djfnfn
jeuifhe jle liekz ldak eaji alpald fhak a
aksdj akljlad pekajr didlfajj jd djfnfn
jeuifhe jle liekz ldak eaji alpald fhak a
aksdj akljlad pekajr
aksdj akljlad pekajr didlfajj jd djfnfn
jeuifhe jle liekz ldak eaji alpald fhak a
aksdj akljlad pekajr didlfajj jd djfnfn
jeuifhe jle liekz ldak eaji alpald fhak a
aksdj akljlad pekajr didlfajj jd djfnfn
jeuifhe jle liekz ldak eaji alpald fhak a
aksdj akljlad pekajr didlfajj jd djfnfn
jeuifhe jle liekz ldak eaji alpald fhak a
more information, refer to “News & Weather” on
: View Google news and weather. For
page 54.
NYTimes
: Display the award-winning journalism of The
New York Times on your device. A shortcut to NYTimes
appears on a Home screen by default. For more
information, refer to “NYTimes” on page 87.
Places
: Use Google Maps to find places of interest,
plus add your own favorite places. For more
information, refer to “Places” on page 54.
Qik manual
: Read through the Qik manual right on
your Galaxy tablet. It contains the instructions you
need to use the Qik Video application. For more
information, refer to “Qik Manual” on page 89.
Qik Video
: Qik lets you record and share videos with
your friends, family, and favorite social networks like
Facebook, YouTube, and Twitter. For more information,
refer to “Qik Video” on page 89.
Understanding Your Device 27
Page 32

Samsung Apps
your smart device even smarter. Simply and easily
download an abundance of applications to your phone
such as games, news, reference, social networking,
navigation, and more. A shortcut to Samsung Apps
appears on a Home screen by default. For more
information, refer to “Samsung Apps” on page 89.
Settings
For more information, refer to “Settings” on page 94.
Social Hub
Facebook, YouTube, and Twitter, all in one place. For
more information, refer to “Social Hub” on page 90.
Tal k
information, refer to “Google Talk” on page 47.
Task Manager
For more information, refer to “Task Manager” on
page 7.
ThinkFree Office
: Connect to Samsung Apps and make
: Configure your device to your preferences.
: Access your social networks, like
: Chat with other Google Talk users. For more
: View and manage active applications.
: Provides access to a Microsoft®
Video
: Play and manage videos stored on an installed
memory card. For more information, refer to “Video”
on page 64.
Voice Search
: Perform a Google search by speaking
your search terms. For more information, refer to
“Voice Search” on page 55.
World clock
: View the date and time in any time zone.
For more information, refer to “World Clock” on
page 92.
WSJ
: Allows you to read the latest edition of The Wall
Street Journal newspaper. A shortcut to WSJ appears
on a Home screen by default. For more information,
refer to “WSJ” on page 92.
YouTube
: View and upload YouTube videos, right from
your device. A shortcut to YouTube appears on the
Main Home screen by default. For more information,
refer to “YouTube” on page 56.
Office-compatible applications suite. It also provides a
centralized location for the management of your
online and offline files. For more information, refer to
“ThinkFree Office” on page 91.
28
Page 33

Section 3: Contacts and Accounts
This section explains how to manage contacts and accounts.
Accounts
Your device can synchronize with a variety of accounts. With
synchronization, information on your device is updated with any
information that changes in your accounts.
•
Microsoft Exchange
: Add your Exchange account to sync Contacts,
Calendar and Email.
•
Google
: Add your Google account to sync your Contacts, Calendar and
Gmail.
•
Facebook
: Add your Facebook account to sync Contacts.
•
Twitter
: Add your Twitter SNS Service to sync Contacts.
•
MySpace
: Sync with MySpace SNS Service for Contacts.
Note:
You must register your device with your social networking site before
using the device to access the network.
Setting Up Your Accounts
Set up and manage your synchronized accounts with the
Accounts and sync
1. From a Home screen, press the
➔
2. Touch
3. Follow the prompts to enter your account credentials to
setting.
Accounts and sync
Add account
Menu Key
.
, then touch the account type.
➔
complete the set-up process.
4. The device communicates with account servers to set up
your account. When complete, your account appears in the
Manage accounts
area of the
Accounts and sync
Contacts and Accounts 29
screen.
Settings
Page 34

Setting Up a Facebook account
Note:
You must register your device with your social networking site before
using the device to access the network.
1. From a Home screen, press the
➔
Accounts and sync ➔ Add account ➔ Facebook
Menu Key
The Welcome to Facebook Sync. screen displays.
2. Touch
3. Enter your
4. Follow the prompts to complete the set-up.
Setting Up a Twitter account
Note:
1. From a Home screen, press the
Next
.
Email
address and
You must register your device with your social networking site before
using the device to access the network.
Password
, then touch
Menu Key
➔
Accounts and sync ➔ Add account ➔ Twitter
The Welcome to Twitter Sync. screen displays.
2. Touch
30
Next
.
➔
➔
.
Settings
.
Log in
Settings
3. Enter your
touch
4. Follow the prompts to complete the set-up.
Setting Up a MySpace account
Note:
You must register your device with your social networking site before
using the device to access the network.
1. From a Home screen, press the
.
➔
Username or email
Log in
.
address and
Menu Key
Accounts and sync ➔ Add account ➔ MySpace
The Welcome to MySpace Sync. screen displays.
2. Touch
3. Enter your
4. Follow the prompts to complete the set-up.
Next
.
Email
and
Password
, then touch
Contacts
Store contact information for your friends, family and colleagues,
to quickly access information or to send a message.
To access Contacts:
䊳
From a Home screen, touch
➔
Contacts
.
Applications
Password
➔
Log in
, then
Settings
.
.
Page 35

Creating Contacts
1. From a Home screen, touch
➔
Contacts
2. At the
➔
Save contact to
Applications
.
prompt, touch an account for
synchronizing the contact (available options depend on the
accounts you have set up for synchronization).
3. Touch contact fields to enter information:
•
Tou ch t he Photo ID to
•
Tou ch
First name
•
Tou ch
Last name
Touch to enter a
Select photo
to identify the contact.
, then enter a first name for the contact.
, then enter a last name for the contact.
Name prefix, Middle name, Name suffix
Phonetic given name, Phonetic middle name
family name
.
•
Tou ch
Phone number
Label button to choose a label, from
fax, Home Fax, Pager, Other, Custom
to enter a phone number, then touch the
Mobile, Home, Work, Work
, or
Callback
custom label. To add another number, touch .
•
Tou ch
Email address
Label button to choose a label, from
or
Custom
to enter an email address, then touch the
Work, Home, Mobile, Other
to create a custom label. To add another address,
touch .
•
Tou ch
Instant msg
to enter an instant message address, then
touch the Label button to choose a label, from
, or
Phonetic
to create a
Google Talk, AIM
Windows Live, Yah o o!, Skype, QQ, ICQ, Jabber
create a custom label. To add another IM, touch .
•
Tou c h
Groups
to assign the contact to a group. For more
information about Groups, see
•
Tou c h
Postal address
•
Tou c h
Organization
•
To add more fields, touch
address, Birthday
4. When you finish entering information, touch
Updating Contacts
Make changes to update an existing contact.
,
1. From a Home screen, touch
➔
Contacts
2. Touch a contact to view its information, then touch
3. Continue entering contact information. For more
information, refer to “Creating Contacts” on page 31.
4. To delete a contact, touch
,
,
, or
Custom
“Groups”
on page 34.
fields to enter a physical address.
fields to enter a company name or association.
More
to choose
, and
Anniversary
Note, Nickname, Web
.
Applications
Done
.
.
Delete
. At the prompt, touch OK.
Contacts and Accounts 31
Edit
to
.
Page 36

Linked Contacts
Your device can synchronize with multiple accounts, including
Google, Corporate Exchange, and other email providers, plus
social networking sites like Facebook, Twitter, and MySpace.
When you synchronize contacts from these accounts with your
device, you may have multiple contacts for one person.
Linking, or joining, imported contact records allows you to see all
the contact’s numbers and addresses together in one Contact
entry. Linking also helps you keep your contacts updated,
because any changes that your contacts make to their
information in the respective accounts is automatically updated
the next time you synchronize with the account.
Linking contacts
1. From a Home screen, touch
➔
Contacts
2. Touch a contact to display its information.
3. Press the
.
Menu Key
Applications
➔
More
➔
Join contact
and then
touch another contact to link.
32
Unlinking contacts
1. From a Home screen, touch
➔
Contacts
2. Touch a contact to display its information.
3. Touch the Joined contacts field to display linked contacts.
4. Touch next to the contact to unlink it from the
.
Applications
displayed contact.
Get Friends
Use the Get Friends feature to sync with your accounts. You can
choose an account you have already added or add a new
account.
For more information about setting up accounts on your device,
see “Setting Up Your Accounts” on page 29.
1. From a Home screen, touch
➔
Contacts
2. Press the
3. Touch
.
Menu Key ➔ Get friends
Add my account
Applications
.
, then touch an account. For more
information, refer to “Setting Up Your Accounts” on
page 29.
4. Press the
Menu Key
➔ Sync now
.
Page 37

Contacts Display Options
1. From a Home screen, touch
➔
Contacts
2. Press the
•
Tou ch
.
Menu Key
Only contacts with phones
Applications
➔
Display options
to restrict display to contacts
to set options:
with phone numbers.
•
Tou ch
Sort by
•
Tou ch
Display contacts by
Last name first
•
Tou ch
Device
to list contacts by
.
to choose groups to display or touch an account to
First name
to list contacts by
or
Last name
First name first
.
choose display categories.
3. Touch
Done
to save options.
Sending Namecards
Sending a Namecard (vCard)
You can send contact namecards as vCards by way of Bluetooth
to other Bluetooth devices or in an Email or Gmail as an
attachment.
Note:
Not all Bluetooth devices accept contacts and not all devices support
transfers of multiple contacts. Check the target device’s
documentation.
1. From a Home screen, touch
➔
Contacts
.
Applications
2. Press the
3. Touch contact(s) to mark them for sending, then touch
Send
. A check mark indicates marked contacts.
4. At the prompt, choose a sending method, then follow the
prompts to send the namecard:
• Bluetooth
page 70.
•Email
or
: For more information, refer to
•Gmail
: For more information, refer to
Gmail”
Note:
Touch
Use by default for this action
every time you send a namecard.
Exporting and Importing Contacts
You can export your contact list to an installed memory card or
import contacts (previously exported) from a memory card.
1. From a Home screen, touch
➔
Contacts
2. Press the
3. Touch
Import from SD card
the prompts to complete the operation.
Menu Key
➔
Send namecard via
: For more information, refer to
on page 42.
to use the selected sending method
Applications
.
Menu Key
➔
Import/Export
or
Export to SD card
Contacts and Accounts 33
.
“Bluetooth”
“Email”
on
on page 43.
“Composing and Sending
.
, then follow
Page 38

My Profile
My profile is your own contact record. You can send My profile as
a vCard by way of Bluetooth or as an attachment by way of Email
or Gmail.
1. From a Home screen, touch
➔
Contacts
2. Press the
.
Menu Key
Applications
➔
More
➔
My profile
to display
your contact information.
3. To add information, press the
Menu Key
➔
Edit
. For
more information, refer to “Creating Contacts” on
page 31.
Sending My Profile
You can send My Profile as a vCard by way of Bluetooth to other
Bluetooth devices or as an attachment to a Gmail or other email.
1. From a Home screen, touch
➔
Contacts
2. Press the
.
Menu Key
Applications
➔
More
➔
My profile
to display
your contact information.
3. Press the
34
Menu Key
➔
Send via
.
4. At the prompt, choose a sending method, then follow the
prompts to send the profile:
•Bluetooth
: For more information, refer to
“Bluetooth”
on
page 70.
•Email
: For more information, refer to
•Gmail
: For more information, refer to
Gmail”
on page 42.
Note:
Touch
Use by default for this action
every time you send My Profile.
“Email”
on page 43.
“Composing and Sending
to use the selected sending method
Groups
Assign contacts to Groups to make searching for contacts faster
or to quickly call or send messages to group members. You can
also assign a ringtone to a group, which lets you easily recognize
incoming calls from group members.
Creating a New Group
1. From a Home screen, touch
➔
Contacts
2. Touch .
3. Touch the
4. Touch
, then touch the
Enter group name
Done
to save the new group.
Applications
Groups
tab.
field to enter a group name.
Page 39

Deleting a Group
1. From a Home screen, touch
➔
Contacts
2. Press the
3. Touch a group to mark it or touch
➔
Menu Key
Groups
Applications
.
➔
Delete groups
Select all
groups. A check mark indicates marked groups.
4. Touch
Delete
to delete the group(s).
Editing a Group
1. From a Home screen, touch
➔
Contacts
2. Touch a Group to display it.
3. Press the
4. Touch
, then touch the
Menu Key
Done
to save the changes.
Applications
➔
Edit group
Groups
Adding and Removing Group Members
1. From a Home screen, touchtouch
➔
Contacts
2. Touch a Group to display it.
3. Press the
, then touch the
Menu Key
Applications
Groups
➔
Edit group members.
.
tab.
.
tab.
to mark all
4. To add a contact, touch the contact name on the left side of
the screen.
5. To remove a contact from the group, touch next to the
contact name.
Tip:
You can also change a contact’s group associations by editing the
contact. For more information, refer to “Creating Contacts” on page 31.
Sending a Message to Group Members
1. From a Home screen, touch
➔
Contacts
2. Touch a
3. Touch
4. Touch contacts to mark them as recipients for the new
Group
Send
, then touch
, then touch the
to display it.
message, then touch
5. The new message displays with marked contacts as
Send email
Send
.
Applications
Groups
tab.
to create a new email.
recipients. For more information, refer to “Composing and
Sending Email” on page 44.
Contacts and Accounts 35
Page 40

Favorites
Mark contacts with a star to identify them as Favorites.
Favorites display on the Favorites tab in Contacts for fast viewing
or messaging and are indicated by in the contact record.
Creating and Removing Favorites
1. From a Home screen, touch
➔
Contacts
2. Touch a contact to display it, then touch the
.
Applications
Star
next
to the contact name.
3. Touch the
Star
again to remove the contact from the
Favorites list.
36
Accessing and Editing Favorites
1. From a Home screen, touch
➔
Contacts
2. Touch
3. Touch a contact to add it to the Favorites list.
4. Touch next to a contact to remove it from the Favorites
, then touch the
Edit Favorites
Applications
Favorites
to display all Favorites.
tab.
list.
Page 41

Section 4: Entering Text
Swype Keyboard
This section describes how to enter words, letters, punctuation
and numbers when you need to enter text.
Virtual QWERTY Keyboard
Your device uses a virtual QWERTY keyboard for text entry. Use
the keyboard to enter letters, punctuation, numbers, and other
characters into text entry fields or applications. Access the
keyboard by touching any text entry field.
The virtual QWERTY keyboard displays at the bottom of the
screen. By default, when you rotate the device, the screen
orientation updates to display the keyboard at the bottom of the
screen.
Text Input Methods
Your device offers two text input methods:
•
Swype
: Swype is a new text input method that allows you to enter
words by gliding your finger over the virtual QWERTY keyboard, lifting
your finger between words. You can also enable Word prediction,
which matches your key touches to common words.
•
Samsung Keypad
keyboard that allows you to enter text by touching keys on the screen.
The Samsung Keypad includes predictive text, which matches your
key touches to common words so that you can select the word to enter
it into your text.
: The Samsung Keyboard is a virtual QWERTY
Changing the Input Method
When entering text, you can select the text input method.
1. Touch and hold on a text input field
The Select Input Method popup displays.
2. Touch an input method:
•Swype
• Samsung keypad
Entering Text 37
Page 42

Entering Text Using Swype
Swype is a new way to enter text on touch screens. Instead of
touching each key, use your finger to trace over each letter of a
word. For each word, place your finger on the first letter and glide
to the subsequent letters, lifting on the last letter.
This example shows how to enter the word “this”. Put your finger
down on the “t” and, without lifting, glide it to the “h”, then to the
“i”, then over to the “s”.
38
Here are a few tips to get you started:
•
Spacing is automatic
: When you finish a word, just lift your finger and
start the next word.
•
Double letters
•
Capitalization
: Just “scribble” on the key.
: Swype recognizes and capitalizes the first word of
sentences. If you want to capitalize a word that is not at the beginning
of a sentence, just glide above the keyboard before gliding over the
next letter.
•
Contractions
: Swype recognizes most words that include an
apostrophe; just swype the letters of the word, including the
apostrophe.
•
Punctuation
: Tap and hold a key to view a punctuation menu and
make a selection.
•
Accented characters
: Just glide through the letters of the word.
Swype usually recognizes the word and correctly accents the letters.
•
Error correction
: If you make a mistake, double-tap on the word you
want to change.
Configuring Swype
Configure Swype to your preferences.
•
For more information, refer to
•
While entering text, touch the
“Swype”
on page 112.
Swype Key ➔ Options
.
Page 43

Swype Help
While entering text, you can get tips and help about using Swype.
•
Touch the
Swype Key
to show
Tips
. Tap
More Tips
to see
more.
•
Touch the
Swype Key ➔ Tut or i al
for an interactive tutorial.
Entering Symbols and Numbers
Using the Swype Keyboard:
•
Touch and hold on a key to enter the symbol or number at the top of
the key.
•
Touch and hold on a key until a menu of all characters available on that
key appears, then touch a character to enter it.
•
Touch to switch to Symbols mode, then touch a key.
•
For more symbols, touch
Shift
, then touch the corresponding
key.
Using the Numeric Keyboard
Switch to a Numeric Keyboard, to quickly enter numbers and
mathematical operators:
䊳
Touch and hold .
Using Swype Speech Recognition
Enter text by speaking. Swype recognizes your speech and
enters text for you.
䊳
Touch . At the
Speak now
prompt, speak the text
you want to enter.
Editing Keyboard
The Editing Keyboard provides a quick way to move the cursor
and highlight text. If the application in which you are working
supports editing, you can cut, copy, or paste highlighted text.
䊳
Swype from the
SYM Key
Swype Key
.
to the
Entering Text 39
Page 44

Entering Text Using the Samsung Keypad
The Samsung Keypad is a custom virtual QWERTY keyboard,
featuring predictive text. Input characters by tapping the
on-screen keys with your finger or use speech recognition.
As you enter characters, predictive text matches your key
touches to common words and displays them. Select a word
from the display to insert it into your text.
Configuring Samsung Keypad
Configure the Samsung Keypad to your preferences.
•
For more information, refer to
•
While entering text, touch
40
“Samsung Keypad”
Settings
.
on page 113.
Entering Upper and Lower Case Letters
The default case is lower case (abc). Enter upper and lower case
alphabet letters by touching the Shift key to toggle the
case, before touching the letter key(s).
•
Touch once to switch from abc to Abc mode
•
Touch and hold to switch to ABC mode
Entering Symbols and Numbers
To enter a number, touch , then touch the
corresponding key.
To enter common symbols, touch to switch to
Symbols mode, then touch the corresponding key.
There are three pages of symbols. Touch to switch to
the next page.
Using Speech Recognition
Enter text by speaking. Samsung Keypad recognizes your speech
and enters text for you.
Note:
Enable Voice Input in Samsung keypad settings. For more information,
refer to “Samsung Keypad” on page 113.
䊳
Touch
Speech Recognition
.
Page 45

Section 5: Messaging
This section describes how to send and receive messages and
other features associated with messaging.
Types of Messages
Your device supports these types of messages:
•
Gmail
: Send and receive Gmail from your Google account.
•
Email
: Send and receive email from your email accounts, including
Corporate Exchange mail.
•
Google Talk
: Chat with other Google Talk users.
Note:
Your Wi-Fi-only device does NOT support voice calling and messaging
services. Please disregard any “dial” and “message” related menus
because some Gmail options are identically set in all Android devices.
Gmail
Send and receive emails with Gmail, Google’s web-based email.
Tip:
To set up your Google account on your device use
settings. For more information, refer to “Accounts and Sync” on
page 108.
䊳
From a Home screen, touch
➔
Gmail
.
Applications
Accounts and sync
Setting Up Your Gmail Account
The first time you launch Gmail, your device prompts you to set
up your Google account.
Note:
You can use more than one Google account on your device. To add
another account, use the
1. From a Home screen, touch
➔
Gmail
2. At the Adding an Account screen, touch
touch an option:
•Create
• Sign in
Sign In.
3. The device communicates with the Google server to set up
your account and synchronize your email. When complete,
your Gmail appears in the Inbox.
Menu Key
➔
Accounts
option.
Applications
.
Next
to begin, then
: Follow the prompts to create a new account.
: Enter your Google Username and Password, then touch
Messaging 41
Page 46

Refreshing Your Gmail Account
Refresh your account to update your device from the Gmail
servers.
1. From a Home screen, touch
➔
Gmail
2. Press the
.
Menu Key
Applications
➔
Refresh
.
Managing Your Gmail Account
Use menu options to manage your Gmail.
1. From a Home screen, touch
➔
Gmail
2. Press the
•Refresh
•Compose
• Accounts
• Go to labels
•Search
•More
–
–
–
42
.
Menu Key
: Update your device from the Gmail servers.
: Create and send new Gmail.
: Choose a Gmail account or add a Google account.
: View Gmail by label.
: Enter keywords to search mail.
:
Settings
: Configure settings. For more information, refer to
account settings”
Help
: Learn about using Gmail.
About
: View information about Gmail.
Applications
for these options:
on page 43.
“Gmail
Composing and Sending Gmail
1. From a Home screen, touch
➔
Gmail
2. Press the
3. Touch the
.
Menu Key
To
field to enter recipients. As you enter names
Applications
➔
Compose
.
or email addresses, matching contacts display. Touch a
contact to add it to the field.
4. Touch the
5. Touch
6. While composing a message, press the
Subject
Compose Mail
field to enter a subject.
to enter the text of your email.
these options:
•Send
: Send the message.
• Save draft
• Add Cc/Bcc
: Save the message as a draft for sending later.
: Create Cc (copy) and Bcc (blind copy) fields in the
message. After creating the fields, touch to enter recipients.
• Attach
: Launch Gallery to select a photo to add to the message.
•Discard
: Close the message without saving.
•Help
: Learn about using Gmail.
7. Touch
Send
to send the message.
Menu Key
for
Page 47

Gmail account settings
1. From a Home screen, touch
➔
Gmail
.
2. Press the
Menu Key
• General settings
–
Signature
–
Confirm actions
Delete, and Send actions.
–
Reply all
responding to messages.
–
Auto-advance
conversation.
–
Message text size
–
Batch operations
conversation.
–
Clear search history
–
Labels
:
: Create a text signature to add to outgoing messages.
: Enable or disable Reply All as the default action when
: Choose a screen to show after you delete or archive a
: Choose which labels are synchronized.
: Have your device prompt you to confirm Archive,
: Allow changes to labels on more than one
• Notification settings
–
Email notifications
in the Status Bar.
–
Select ringtone
–
Vibrat e
–
Notify once
new email, not for every new message.
: Choose a ringtone for new email notifications.
: Choose vibration settings for email notifications.
: When enabled, a notification appears in the Status Bar for
Applications
➔ More
: Set the size of text in message displays.
: Remove previous searches you performed.
➔
Settings
for settings:
:
: When enabled, notifications for new email appear
Use Email to view and manage all your email accounts in one
application.
Configuring Email Accounts
1. From a Home screen, touch
➔
Email
2. At the Set up email screen, enter an
Password
3. Enter an account name for the email account just added,
.
and touch
Applications
Next
.
Email address
which is displayed on the inbox for the email account.
4. Enter your name, which is displayed on outgoing
messages.
5. Touch
Done
.
The device communicates with the appropriate server to
set up your account and synchronize your email. When
complete, your email appears in the Inbox for the account.
6. Enter account credentials, then complete set-up by
following the prompts to configure account options.
Available options vary, depending on the provider.
Messaging 43
and
Page 48

If the account includes synchronization of contacts and
calendars, you can choose whether to synchronize these
features with your device.
7. To add additional email accounts, press the
➔
Account manager
Email address, Password
Note:
To configure email account settings at any time, use the
➔
Account manager
Account settings.
➔
Add Account
, and so on.
option. Touch the account to display
Menu Key
, then enter the
Menu Key
Composing and Sending Email
1. From a Home screen, touch
➔
Email
2. Touch an account, if you have more than one account set
up, then touch
3. Touch the
.
New message
To
field to enter recipients. As you enter names
Applications
.
or email addresses, matching contacts display. Touch a
contact to add it to the field.
4. Touch
5. Touch the
44
Cc/Bcc
to enter recipients in the Cc or
Subject
field to enter a subject.
Bcc
fields.
6. Touch the text field to enter the email text.
7. Touch
8. While composing a message, press the
Attach
to add an attachment:
• My files
: Choose a file to attach.
•Contacts
: Attach contact name card(s).
•Location
: Attach your current location or find a location on a map.
Menu Key
these options:
• Save as draft
•Discard
9. Touch
: Save the message in Drafts.
: Delete the message without sending.
Send
to send the message.
Managing Emails
Combined Inbox
You can view emails you receive to all accounts in the All inboxes
screen or you can view email accounts individually.
1. From a Home screen, touch
➔
Email
2. Touch the pop-up menu at the top left of the screen to
.
Applications
select:
• All inboxes
•<Account Name
: View all emails in a combined inbox.
> View emails for the account.
for
Page 49

Printing Emails
You can print emails by way of Wi-Fi on a supported,
Wi-Fi-enabled printer.
1. From a Home screen, touch
➔
Email
.
2. Open an email to view it.
3. While viewing the email, press the
4. If you are already connected to Wi-Fi, your device displays
Applications
Menu Key
➔
available printers. Touch a printer to proceed.
– or –
At the prompt, touch OK, then connect to a Wi-Fi network.
After connecting, your device displays available printers.
Touch a printer to proceed.
5. Follow the prompts to print the email.
Print.
Note:
These Samsung printers are supported: CLP-310 Series,
CLP-320 Series, CLP-610 Series, CLP-620 Series,
CLP-660 Series, CLP-670 Series, CLP-770 Series,
CLX-3170 Series, CLX-3180 Series, CLX-3240 Series,
CLX-6200 Series, CLX-6222 Series, CLX-6250 Series,
CLX-8385 Series, CLX-8540 Series, CLX-9250_9350 Series,
ML-1630W Series, ML-1865W Series, ML-2525W Series,
ML-2580 Series, ML-2850 Series, ML-2853 Series,
ML-2855 Series, ML-3470 Series, ML-3475 Series,
ML-4050 Series, ML-4055 Series, ML-451x 501x Series,
ML-4550 Series, ML-4555 Series, ML-5510 6210 Series,
ML-8x00 Series, SCX-3200 Series, SCX-4623 Series,
SCX-4323FW Series, SCX-4x24 Series, SCX-4x25 Series,
SCX-4x26 Series, SCX-4x28 Series, SCX-4500W Series,
SCX-5635 Series, SCX-5835_5935 Series, SCX-6545 Series,
SCX-8030_8040 Series.
Account Manager
Account Manager lets you use settings to configure handling of
email on your device.
Note:
Available settings may depend on the email account and include
setting how much email to synchronize, creating signatures for emails
you send, and other handling options.
1. From a Home screen, touch
➔
Email
2. Press the
.
Menu Key
➔
an account for options:
Applications
Account manager
, then touch
Messaging 45
Page 50

• General settings
–
Account name
–
Your name
–
Signature
–
Email check frequency
queries the remote server for new email changes. Options are:
Every 5 minutes, Every 10 minutes, Every 15 minutes, Every 30
,
minutes
–
Default account
automatically sent from this account.
–
Always Cc/Bcc myself
on all emails you send.
• Exchange ActiveSync settings
–
Period to sync Email
your device.
–
Empty Server Trash
folder on the Email server.
–
Sync schedule
server.
–
Out-of-office Settings
–
Size to retrieve emails
–
Period to sync Calendar
Options are:
.
calendar
46
:
: Enter a name to identify this account.
: Enter your name, to appear on emails from this account.
: Enter a signature to add to emails from this account.
: Lets you configure how often the device
Every hour, Every 4 hours
, or
Once a day
.
: When enabled, email from your device is
: When enabled, your email address is copied
(Exchange accounts only):
: Choose how much email you want to see on
: Touch to delete emails from the Trash or Deleted
: Set the schedule for synchronizing email from the
: (not supported).
: Set a maximum size for retrieving emails.
: Touch to choose a Calendar sync period.
2 weeks, 1month, 3 months, 6 months
, or
All
Never
• Notification settings
–
Email notifications
:
: When enabled, the New Email icon appears in
the Status Bar when a new email arrives.
–
Select ringtone
: Choose a ringtone for email notifications for this
account.
–
Vibra te
,
: When enabled, email notifications for this accounts are
accompanied by vibration.
• Server settings
–
Incoming settings
–
Outgoing settings
–
Sync contacts
:
: Configure server settings.
: Configure outgoing settings.
: When enabled, contacts from your account are
synchronized with your device’s Contacts.
–
Sync calendar
: When enabled, events from your account are
synchronized with your device’s Calendar.
• Common Settings
–
Forward with files
:
: Enable or disable forwarding of file attachments.
Page 51

Google Talk
Chat with other Google Talk users.
Tip:
Talk requires that you have a Google account. To set up your Google
account on your device use
information, refer to “Accounts and Sync” on page 108.
䊳
From a Home screen, touch
Note:
If you have already set up your Google account, you are automatically
logged in. If you do not have a Google account, you can touch
create a new Google account.
Accounts and sync
Applications ➔ Tal k
settings. For more
Create
.
to
Messaging 47
Page 52

Section 6: Web and Social Networking
Browser
Your device is equipped with a full HTML Browser that allows you
to access the internet.
䊳
From a Home screen, touch
Tip:
Browser appears by default as a Primary shortcut on the Home screen.
Browser
.
Navigating the Web
Command Keys
•
Press the
Back Key
or to
return to the previous page.
•
Press and hold the
Back Key
to display a list of bookmarks.
•
Touch and hold to display a list
of recent pages.
•
Touch to go forward to a recent
page.
Touching and dragging
•
Touch and drag your finger on the
screen to navigate pages and to
reposition pages within the screen.
48
Entering text in a field
•
While browsing, touch a text field to display the virtual QWERTY
keyboard to enter text.
Zoom
•
Tap the screen twice to zoom in or out.
Tip:
For convenient browsing, you can rotate the device to landscape mode.
Selecting items on a page
While browsing, use gestures and menus to navigate:
•
Touch an item to select it.
•
Touch a hyperlink to follow the link.
•
Touch and hold on a hyperlink for these options:
–
Open in new window
–
Copy link URL
–
Add link to Bookmarks
loading it).
–
Save link
–
Share link
: Open a new window to display the linked page.
: Save the link’s URL to the clipboard.
: Create a bookmark to the page (without
: Save the linked page to Download history.
: Send the link by way of Bluetooth, Email, or Gmail.
Page 53

Using Browser Windows
You can have multiple windows open at one time to easily switch
between windows.
1. From a Home screen, touch
2. To open a new window, touch
3. To switch to another open window, touch , then touch
Browser
Windows
.
1
➔ .
1
another open window to display it.
Entering a URL
Access a website quickly by entering the URL.
1. From a Home screen, touch
2. Touch the
URL
field at the top of the screen, then enter the
Browser
.
URL using the virtual QWERTY keyboard.
3. As you enter characters, potential matches display.
Continue entering characters or touch a match to complete
the URL.
4. Touch
Go
to load the page.
Copying Fields or Text
Copy information from a web page to the clipboard for pasting.
Copying text
1. From a Home screen, touch
2. Browse to a web page.
3. On the web page, touch and hold on the text, then touch
Copy
on the pop-up menu.
4. To paste the copied text, navigate to the desired field (or to
Browser
.
another application), then touch and hold in a text field and
touch
Paste
on the pop-up menu.
Copying a hyperlink or URL
1. From a Home screen, touch
2. Browse to a web page.
3. Touch and hold on the link or URL, then touch
URL
on the pop-up menu.
4. To paste the copied link or URL, navigate to the desired
Browser
.
Copy link
field (or to another application), then touch and hold in a
text field and touch
Paste
.
Web and Social Networking 49
Page 54

Using Bookmarks
While browsing, bookmark a site to quickly access it later.
Creating a bookmark
1. From a Home screen, touch
2. Browse to a website, then touch
3. Touch
4. At the
Add bookmark
Add bookmark
Browser
Bookmarks
.
.
.
prompt, confirm the Name and URL
for the bookmark, then touch OK to save the bookmark.
Accessing bookmarks and history
Launch a bookmarked page or reload recent pages.
1. From a Home screen, touch
2. Touch
3. On the
50
Bookmarks
Bookmarks
•
Touch a bookmark to load the page.
•
Touch and hold on a bookmark for these options:
–
Open
: Launch the bookmarked page.
–
Open in new window
–
Add shortcut to Home
–
Share link
: Use Bluetooth, Email, or Gmail to send the link.
–
Copy link URL
–
Set as homepage
–
Delete bookmark
: Save the link’s URL to the clipboard.
Browser
.
.
tab, use these options:
: Open the linked page in a new window.
: Create a bookmark on the Home screen.
: Assign the bookmarked link as the home page.
: Remove the bookmark.
4. On the
5. On the
Most visited
•
Touch a page to reload it.
•
Touch the star next to a page to bookmark it.
•
Touch and hold on a page for these options:
–
Open
–
Open in new window
–
Add bookmark/Remove from bookmarks
remove the bookmark for this page.
–
Remove from history
History
•
Touch a page to load it.
•
Tou ch
•
Touch the star next to a page to bookmark it.
•
To clear the history, touch
•
Touch and hold on a page for these options:
–
Open
–
Open in new window
–
Add bookmark/Remove from bookmarks
remove the bookmark for this page.
–
Remove from history
tab, use these options:
: Launch the web page.
tab, use these options:
Tod a y, Yes t e rd a y
: Launch the web page.
: Launch the web page in a new window.
: Remove the record of this page.
, or
: Launch the web page in a new window.
: Remove the record of this page.
Last 7 days
Clear
.
: Bookmark the page or
for lists of recent pages.
: Bookmark the page or
Page 55

Browser Menu
While viewing a web page, press the
•
Add bookmark
•
Find on page
•
Download manager
•
Brightness
•
Settings
•
More
–
Print
: Create a bookmark for the current page.
: Search for content on the current page.
: View and manage recent downloads.
: Set the display’s brightness.
: Customize the Browser (see Browser Settings).
:
: Print the webpage by way of Wi-Fi on a supported, Wi-Fi-enabled
Menu Key
printer.
–
Share page
–
: Use Bluetooth, Email, or Gmail to send the page’s URL.
Page info
: View information about the current page, including the URL.
Browser Settings
1. From a Home screen, touch
2. Press the
Menu Key
➔
Browser
Settings
:
• Page content settings
–
Default zoom
–
Open pages in overview
: Choose a default zoom level for web pages.
: When enabled, displays an overview of
newly-opened pages.
–
Text encoding
–
Block pop-up windows
: Choose a default character set for web pages.
: When enabled, blocks pop-up windows.
.
for options:
–
Load images
: When enabled, images are automatically loaded when
you visit a page. When disabled, images are indicated by a link, which
you can touch to download the picture.
–
Auto-fit pages
: When enabled, the Browser automatically sizes web
pages to fit your device’s display.
–
Landscape view only
: When enabled, all pages display in the wider
landscape orientation (rotate your device to view pages in landscape
mode).
–
Enable JavaScript
: When enabled, the Browser automatically runs
JavaScript scripts on pages you visit.
–
Enable plug-ins
: When enabled, the Browser automatically loads and
runs plug-ins on pages you visit.
–
Open in background
: When enabled, new windows open behind the
current window.
–
Set home page
: View and set the default first page that displays when
you launch the Browser.
–
Default storage
: The default location for downloads (not configurable).
• Privacy settings
–
Clear cache
: Delete content and databases stored on the device.
–
Clear histor y
: Delete the list of previously-visited pages.
–
Accept cookies
: When enabled, allows Browser to save and read
cookie information used by web pages.
–
Clear all cookie data
–
Remember form data
: Delete cookie information saved to the device.
: When enabled, stores information you enter
into forms to make future forms easier.
–
Clear form data
: Deletes saved form information.
Web and Social Networking 51
Page 56

–
Enable location
: When enabled, sites you visit can request access to
your location.
–
Clear location access
: Clear location access for all web sites.
• Security settings
–
Remember passwords
: When enabled, saves usernames and
passwords for sites you visit, to make future visits easier.
–
Clear passwords
–
Show security warnings
: Clear all saved usernames and passwords.
: When enabled, the Browser warns you if
there is a problem with a site’s security.
• Advanced settings
–
Website settings
–
Reset to default:
: View and manage settings for individual web sites.
Clear all browser data and reset all settings to the
factory defaults.
Maps
Use Google Maps to find your current location, get directions, and
other location-based information. The Google Maps shortcut
appears by default on the Home screen.
Note:
You must enable location services to use Maps. Some features require
Standalone or Google location services. For more information, refer to
“Location and Security” on page 103.
52
䊳
From a Home screen, touch
➔
Maps
.
Applications
– or –
From a Home screen, touch
Tip:
A shortcut to Maps appears on the Main Home screen by default.
Maps
.
Navigating the Map
Zooming
•
Double-tap on the screen to zoom in.
•
Touch Zoom in or Zoom out .
Scrolling
•
Touch and drag on the screen to reposition the map in the display.
Touch
•
Touch an icon on the map to display information about the location.
Page 57

Maps Menu
1. From a Home screen, touch
2. While viewing a map, press the
options:
•Search
: Find a location.
•Directions
• Starred Places
•Clear Map
• Join Latitude
: Get driving, public transport, or walking directions.
: Display starred locations.
: Remove search results from the map.
: Join Latitude, to share your location with friends you
choose and Google.
•More
:
–
Labs
: Access experimental features.
–
Sign In
:
Enter your Google Username and Password, then touch
Sign In
.
–
Help
: Learn about Google maps.
–
Terms, Privacy & Notices
including the Terms and Conditions, Privacy Policy, Legal Notices, and
Web History.
–
About
: View information about Maps.
Maps
: View information about Google Maps,
.
Menu Key
for these
Latitude
Use Google Latitude to locate your friends on a map and share or
hide your location.
䊳
From a Home screen, touch
➔
Latitude
.
Applications
Navigation
Use Google Navigation to find a destination and to get walking or
driving directions.
Note:
You must first create a wi-fi connection to use Navigation.
1. From a Home screen, touch
➔
Navigation
2. To find a destination, touch an option:
.
• Speak Destination
• Type Destination
•Contacts
• Starred Places
: Enter the destination.
: Choose a destination from a contact record.
: Choose destinations you have marked as favorites.
• Recent Destinations
3. While navigating, press the
•Search
: Find a location.
• Route info
: View information about the current route.
Applications
: Say the name or address of your destination.
: Choose from recent destinations.
Menu Key
Web and Social Networking 53
for options:
Page 58

•Layers
: Choose map layers to display.
•Mute/Unmute
•Exit Navigation
•More
–
–
–
–
: Mute to silence voice-guided prompts.
: Close Navigation and discard route information.
:
Directions list
Set destination
Help
: View directions in a step-by-step list.
: Choose or enter a destination.
: Learn about Google maps.
Terms, Privacy & Note
including the Service Agreement and Privacy Policy, and give Feedback.
News & Weather
View Google news and weather.
1. From a Home screen, touch
➔
News & Weather
2. Press the
•Refresh
• Settings
–
Weather settings
.
Menu Key
: Update the application from the Google servers.
:
: Choose location(s) and set the metric for
temperature displays.
–
News settings
: Choose topics, configure settings for fetching articles
and images, and view the terms of service for news service.
–
Refresh settings
–
Application version
: Choose options for updating content.
number.
54
: View information about Google Maps,
Applications
aksdj akljlad pekajr didlfajj jd djfnfn
jeuifhe jle liekz ldak eaji alpald fhak a
aksdj akljlad pekajr didlfajj jd djfnfn
jeuifhe jle liekz ldak eaji alpald fhak a
aksdj akljlad pekajr
aksdj akljlad pekajr didlfajj jd djfnfn
jeuifhe jle liekz ldak eaji alpald fhak a
aksdj akljlad pekajr didlfajj jd djfnfn
jeuifhe jle liekz ldak eaji alpald fhak a
aksdj akljlad pekajr didlfajj jd djfnfn
jeuifhe jle liekz ldak eaji alpald fhak a
aksdj akljlad pekajr didlfajj jd djfnfn
jeuifhe jle liekz ldak eaji alpald fhak a
for these options:
: Touch and hold to see the application version
Places
Google Places uses your location to help you find nearby
destinations, such as restaurants, bars, hotels, attractions, ATMs,
and gas stations, or you can enter a location.
1. From a Home screen, touch
➔
Places
.
2. Touch a category or touch
Applications
Find places
to enter criteria.
3. Touch a destination to view details and for map and
navigation options.
Google Search
Search the internet, and your device, using the Google search
engine.
Tip:
The Google Search widget appears on a Home screen by default. For
information about displaying widgets on the Home screen, see “Adding
Widgets to the Home screen” on page 20.
1. From a Home screen, touch the
Google Search
widget
.
– or –
From a Home screen, touch
➔
Google Search
.
Applications
Page 59

Enter search criteria to display matching searches.
2.
3. Touch
Voice Search
to search using spoken
commands.
Voice Search
Voice Search offers voice-activated Google searches.
Tip:
Voice Search is also available on the Google Search widget, which
appears on a Home screen by default.
1. From a Home screen, touch
➔
Voice Search
2. Voice Search uses your location to improve search results
.
and offer other services. Touch
based searches or
3. Touch
Speak now
, then speak your search criteria slowly
Applications
Disagree
to disallow.
Agree
to allow location-
and clearly. Google searches for the information and
displays results.
Feeds and Updates
This application allows you to have feeds and updates from
Facebook, MySpace, and Twitter displayed on your tablet.
1. Press to activate the Home screen.
2. Navigate to a desired empty Home screen.
3. Touch and hold on an empty area of the screen.
4. From the
5. Ta p
Add to Home screen
Feeds and Updates
.
window tap
Widgets
The Feeds and Updates screen
displays on the selected Home
screen.
6. Tap on the
7. Select the Social networks that
account
Tap here to add
field.
you would like to have added to
your Feeds and Updates. The options are:
Facebook,MySpace
, and
Twitter
.
Web and Social Networking 55
.
Page 60

You must first sign in to the social networks for which you
would like to have feeds and updates displayed on your
tablet.
8. Enter
Email
and
Password
and tap
Log in
.
9. The Feeds and Updates screen
is updated with the latest feeds
and updates from your social
networks.
10. Tap in the top right corner
of the screen to automatically
refresh your social networking
feeds and content.
11. Tap to display the following settings:
•Auto refresh
: this option allows you to set how often your social
networks are updated. Choose None, Every 1 hour, Every 4 hours,
Every 8 hours, or Once a day.
12.
Select service
: this option allows you to turn the Feeds and Updates
to your different social networks on or off. Tap the social networks to
toggle the green arrows on and off. The green arrow indicates that the
Feeds and Updates are on.
56
YouTube
View and upload YouTube videos right from your device.
1. From a Home screen, touch
YouTube
.
– or –
From a Home screen, touch
➔
YouTube
2. Browse and select videos for viewing.
3. While browsing, press the
.
Applications
Menu Key
for these
options:
•Home
: Display the main YouTube screen.
•Browse
: View videos by category such as Comedy, Music, or
Education.
•Search
: Enter criteria to find videos.
• My Channel
•Upload
• Settings
: Add an account and configure account settings.
: Transfer a video from your device to YouTube.
: Configure display and search settings and view
information about the application.
Page 61

Section 7: Music
Song Title
Artist Name / Album Title
Volume
Shuffle
5.1 Channel Mode
Repeat
Playback Controls
Favorites
List mode
Info
Music Player
The Music Player plays songs from an installed memory card.
1. From a Home screen, touch
➔
Music
2. Music Player scans your memory card and displays songs
on the
3. Touch a song or playlist to begin playback.
.
Songs, Playlists, Albums, Artists
Applications
, or
Genres
tabs.
4. During playback, use the sound and playlist controls:
•Info
: Touch to view information about the current song.
•Favorites
: Touch to mark the current song as a Favorite (starred).
•Volume
: Touch to activate on-screen volume control, then touch
and drag on the scale to set volume. You can also press the Volume
Key on the side of the device to adjust playback volume.
•List mode
: Touch to switch to the list of songs.
• 5.1 Channel Mode
• Shuffle
: Touch to enable stereo sound.
: When enabled, songs play in random order. When
disabled, songs play in the order they appear in List view.
•Repeat
: Touch to repeat the current song, repeat all songs, or
disable repeat mode.
• Playback controls
–
Touch to advance to the next song. Touch and hold to scan
forward through the current song.
–
Touch to go back to the previous song. Touch and hold to
scan backward through the current song.
–
Touch to pause playback. Touch to resume playback.
:
Music 57
Page 62

Creating a Playlist
1. From a Home screen, touch
➔
Music
2. Press the
, then touch the
Menu Key
➔ New playlist
name field to enter a name for the playlist.
3. Touch
Done
to save the new playlist.
Adding Songs to Playlists
1. From a Home screen, touch
➔
Music
2. Touch the playlist, then press the
➔
Add music
3. Touch songs to select them or touch
, then touch the
.
A checkmark indicates selected songs.
4. Touch
58
Add
to add the selected songs to the playlist.
Applications
Playlists
tab.
, then touch the
Applications
Playlists
tab.
Menu Key
Select all
.
Adding a song to a playlist during playback
1. From a Home screen, touch
➔
Music
2. Touch a song to play it.
3. Press the
4. Choose one of these options:
•
Touch a playlist to add the selected song to the playlist.
•
Tou ch
.
Menu Key ➔ Add to playlist
Create playlist
Applications
to create a new playlist for the song.
Music Player Settings
1. From a Home screen, touch
➔
Music
2. Press the
• Equalizer
• Effect
• Music menu
.
Menu Key
: Touch to enable a visual effect, then select an effect.
: Touch to choose a sound effect.
: Choose the types of menus to display as tabs in
Applications
➔ Settings
for these options:
Music Player.
.
Page 63

Music Hub
Samsung Music Hub makes your device a personal music
manager and lets you access, buy, and download millions of
music tracks. Access top albums, top tracks, featured albums,
and new releases. Music Hub allows you to search for tracks,
albums, and artists. Enjoy music samples before you download
them directly to your Wi-Fi Galaxy Tab.
Note:
You must sign up for an account before accessing some of the Music
Hub options.
1. From a Home screen, touch
➔
Music Hub
.
2. Read the Disclaimer and tap
Applications
OK
to continue or
Exit
to exit.
The Music Hub Home screen displays.
3. Tap one of the following options:
•Home
: Displays a top album, top tracks, a featured album, and new
releases. Tap an item to display more information and prices.
•Search
: Lets you search for tracks, albums, and artists.
–
Tou ch
Tra ck s, Albums & Singles
keyword
and use the keyboard to type your search request.
–
Tou ch
Search
. A list of items is displayed.
–
Touch an entry in the list to display more information.
, or
Artists
and then touch
Enter
•My Music
: Displays the following options:
–
My Playlist
: Tap
Recently played
My list
tracks,
library
–
Basket
OUT
–
Purchase List
• Settings
–
Account
not have an account.
–
Payme nt
to view tracks you have added to your list, and
to view songs you have bought and downloaded.
: Displays songs that you have selected to buy. Touch
to start the purchase process.
: Displays a list of your purchases.
: Displays the following options:
: Tap
SIGN IN
, if you have an account, or
: Allows you to set up your payment method.
to display a list of recently played
SIGN UP
Music 59
My
CHECK
, if you do
Page 64

Section 8: Photos and Video
Options
Image
Mode
Camera
Viewer
Camera
Use your device’s built-in camera to take photos and record
video.
䊳
From a Home screen, touch
Camera
– or –
From a Home screen, touch
➔
Camera
Important!:
Do not take photos of people without their permission.
Do not take photos in places where cameras are not allowed.
Do not take photos in places where you may interfere with
another person’s privacy.
60
.
Applications
.
Taking Photos
1. From a Home screen, touch
Camera
.
– or –
From a Home screen, touch
➔
Camera
2. Using the display as a viewfinder, compose your photo by
.
Applications
aiming the lens at the subject. To configure settings, see
“Camera Options” on page 61.
3. To take the photo, touch the
4. After taking a photo, touch
Camera
button.
Image Viewer
to view the photo.
While viewing the photo, use these options:
•
Touch the screen with two fingers or double-tap on the screen to
zoom all the way in or out. For more information, refer to
on page 18.
•
Press the
Menu Key
–
Share
: Send the photo by using
Picasa
.
or
–
Set as
: Assign the photo as
Lock screen Wallpaper
or
–
Delete
: Erase the photo.
for options:
AllShare, Bluetooth, Email, Gmail
Contact icon
,
.
Home screen Wallpaper
“Pinch”
,
,
Page 65

•
A
Press the
Back Key to return to the Camera to take more
photos.
Tip:
Touch the photo to show or hide Image Viewer options.
Camera Options
Camera options are represented by icons across both sides of the
screen. While in Camera mode, touch the following icons to
configure the camera:
Shooting mode
: Choose an automatic shooting mode,
from:
•
Single shot
: Take a single photo.
•
Panorama
: Touch the Camera button to take a photo,
then use the on-screen guideline to move the
viewfinder and take the next 7 shots automatically.
•
Smile shot
: Touch the Camera button to
automatically focus on the subject’s face and take
the photo.
•
Self-shot
: Take photos with the front camera.
Scene mode
: Choose an automatic scene mode from
Portrait, Landscape, Night, or Sports, or choose None.
Flash
: Choose a flash mode from Auto, On, or Off.
Exposure value
Settings ➔ Image
•
Resolutions
: Set the brightness of the photo.
:
: Set a size for the image. Options
are: 3.2M (2048x1536), w2.4M (2048x1232),
2M (1600x1200), w1.5M (1600x960),
w0.6M (1024x600), or 0.4M (800x600).
•
White balance
: Set the light source. Options are:
Auto, Daylight, Cloudy, Incandescent, or Fluorescent.
•
Effects
: Apply an effect to photos. Options are:
Normal, Negative, Black and white, or Sepia.
•
ISO
: Set the imaging sensitivity. Options are: Auto,
ISO100, ISO200, or ISO400.
•
Image quality
: Choose a quality setting for photos.
Options are: Superfine, Fine, or Normal.
Photos and Video 61
Page 66

Settings ➔ Setup
Record
Options
Image
Mode
Viewer
•
Review
:
: Enable or disable the instant review feature,
which displays images immediately after capture.
•
GPS
: Enable or disable tagging of photos with the
GPS location.
•
Shutter sound
: Enable or disable the camera’s
shutter sound.
•
Storage
: Set the storage location. Options are:
Device or Memory card.
•
Reset
: Set all Camera settings to the defaults.
Camcorder
Use your device’s built-in Camcorder to record high-definition
video in 720p resolution.
Tip:
A shortcut to Camera appears on a Home screen by default.
䊳
From a Home screen, touch
Mode
icon to the Camcorder setting .
62
Camera
, then slide the
Capturing Video
Important!:
Do not take videos of people without their permission.
Do not take videos in places where cameras are not allowed.
Do not take videos in places where you may interfere with
another person’s privacy.
1. From a Home screen, touch
Mode
icon to the Camcorder setting .
2. Using the display as a viewfinder, compose your shot by
Camera
, then slide the
aiming the lens at the subject. To configure settings, see
“Camcorder Options” on page 63.
Page 67

To start recording, touch the
3.
recording, the button changes to
Record
Pause
button. During
. Touch
to temporarily stop recording. To resume recording, touch
Record
again.
4. To stop recording, touch the
5. After recording, touch
Stop
button.
Image Viewer
to view the video.
While viewing the video, use these options:
•
Double-tap on the video to zoom all the way in or out.
•
Press the
Menu Key for the following options:
–
Tou ch
Share
to send the video via AllShare, YouTube, Bluetooth, Gmail,
or Email.
–
Tou ch
Play
to review the video.
–
Tou ch
Delete
to erase the video.
•
Press the
Back Key
Tip:
Touch the video to show or hide Image Viewer options.
to return to the Camcorder.
Pause
Camcorder Options
Configure the camcorder.
Camcorder options are represented by icons across both sides of
the screen. While in Camcorder mode, touch the following icons
to configure the camcorder:
Recording mode
Scene
Flash
Exposure value
Settings
•
White balance
: Indicates recording mode.
: Not available for videos.
: Touch Off or On.
: Set the brightness of the video.
➔ Video
:
: Set the light source. Options are:
Auto, Daylight, Cloudy, Incandescent, or Fluorescent.
•
Effects
: Apply an effect to videos. Options are:
Normal, Negative, Black and white, or Sepia.
•
Video quality
: Choose a quality setting for videos.
Options are: Fine or Normal.
Photos and Video 63
Page 68

Settings ➔ Setup
•
Audio recording
:
: Enable to record sound along with
video.
•
Review
: Enable or disable the instant review feature,
which displays videos immediately after capture.
•
Shutter sound
: Enable or disable the camera's
shutter sound.
•
Storage
: Set the storage location. Options are:
Device or Memory card.
•
Reset
: Set all Camcorder settings to the defaults
Video
Your device’s 7-inch 1024x600 WSVGA LCD screen provides
playback of videos. Use Video to view and manage videos stored
on an installed memory card.
1. From a Home screen, touch
➔
Video
.
2. Touch the
3. While viewing the list, press the
Downloaded, Recorded
•List by
: Display videos by Name (default), Date, Size, or Type.
•Share via
: Send the video with AllShare, YouTube, Bluetooth,
Applications
, or
Folders
tab.
Menu Key
for options:
Gmail, or Email.
64
• Delete
: Touch videos to select them for deletion or touch
to delete all videos.
• Auto play next
: Touch to enable or disable automatic playing of
videos in the order they appear.
4. Touch a video to play it. While playing a video, touch the
screen to display or hide on-screen playback controls.
5. During playback, press the
• Mosaic search
: allows you to see thumbnails of the video in
Menu Key for options:
various stages so you can go directly to the desired location.
•Share via
: Send the video by AllShare, YouTube, Bluetooth, Gmail,
or Email.
• Bookmarks
• Subtitles
• Details
: allows you to bookmark your videos.
: allows you to see subtitles for a video, if available.
: provides details about the photo such as Name, Size,
Resolution, Duration, Format, and Date modified.
Gallery
You r de vice’s
high-resolution
7-inch 1024x600 WSVGA LCD screen provides
display of photos and videos.
Use Gallery to view, capture, and manage photos and videos.
Note:
Your device comes with a 16GB memory card pre-installed.
Tip:
A shortcut to Gallery appears by default on the Main Home screen.
Select all
Page 69

Viewing Videos
1. From a Home screen, touch
➔
Gallery
2. Touch a category, then touch a video to play it.
Note:
Videos are marked with a Play button.
3. While viewing a video, press the
.
Applications
Menu Key
options:
• Mosaic search
: allows you to see thumbnails of the video in
various stages so you can go directly to the desired location.
•Share via
: Send the video by AllShare, YouTube, Bluetooth, Gmail,
or Email.
• Bookmarks
•Subtitles
• Details
: allows you to bookmark your videos.
: allows you to see subtitles for a video, if available.
: provides details about the photo such as Name, Size,
Resolution, Duration, Format, and Date modified.
for these
Viewing Photos
1. From a Home screen, touch
➔
Gallery
2. Touch a category, then touch a photo to view it.
3. While viewing a photo, touch the screen for these options:
•Slideshow
•Menu
–
–
–
.
: Touch to view a slideshow of photos.
: Touch to display the following options:
Share
: Share the selected photo via AllShare, Picasa, Bluetooth, Gmail,
or Email.
Delete
: Erase the photo.
More
: Touch for more options:
- Details
: Display details about the photo.
- Set as
: Use the picture as Home screen Wallpaper, Lock screen
Applications
Wallpaper, or a Contact icon.
- Crop
: Alllows you to crop the image. Touch and drag the sides of
the crop box to create the crop area, then touch
Discard
to stop without cropping the picture.
- Print
: Connect to Wi-Fi, then send the photo to a printer.
- Rotate left
: Allows you to rotate the picture counterclockwise 90
Save
degrees.
- Rotate right
: Allows you to rotate the picture clockwise 90
degrees.
Photos and Video 65
. Touch
Page 70

Setting a Photo as a Contact Icon
1. From a Home screen, touch
➔
Gallery
2. Touch a category, then touch a photo to select it.
3. Touch
4. Tap a contact entry and tap
.
Menu ➔ More ➔ Set as ➔ Contact icon
Applications
.
Save
to save the selected
photo as the contact’s icon.
Setting a Photo as Wallpaper
1. From a Home screen, touch
➔
Gallery
2. Touch a category, then touch a photo to select it.
3. Touch
4. Tap and drag the edges of the crop box inward or outward
.
Menu ➔ More ➔ Set as ➔ Home screen Wallpaper
to edit the photo, then touch
Applications
Save
to set the edited photo
as the Home screen wallpaper.
66
Sharing Photos and Videos
Share photos and videos with your friends.
1. From a Home screen, touch
➔
2. Touch a category to display thumbnails, then select items
for sharing:
•
•
3. Touch
Bluetooth, Email
.
Applications
Gallery
To select an entire category, press the
viewing categories, then touch
To select multiple photos or videos from a category, press the
.
Menu Key
Select all ➔ Share
while
.
Menu
Key while viewing the thumbnails. Touch thumbnails to mark
them for sharing, then touch
AllShare, YouTube (videos only),
, or
Share
.
Gmail
, then follow the prompts.
Picasa
(photos only),
Page 71

Digital Frame
Display a slideshow of photos, or a clock, along with music from
your installed memory card.
1. From a Home screen, touch
➔
Digital Frame
2. By default, Digital Frame displays a Clock. Tap the screen
.
Applications
to choose from:
•Clock
: Displays a clock on the screen. While displaying a clock,
press the
Menu Key
–
Clock style
: Tap the type of clock and touch OK.
–
Go to music
accompany the clock.
–
Timeout
: Set the period of time the clock displays before closing.
–
Brightness
: Set the brightness of the display.
–
Time format
for these options:
: Launches Music Player so you can choose music to
: Choose from a 12-hour or 24-hour clock.
•Slideshow
: Displays a slideshow of photos from an installed
memory card. While displaying slideshow, press the
Menu Key
–
Add to slideshow
slideshow.
–
Slideshow effects
the slideshow.
–
Duration
–
Go to music
slideshow.
–
Timeo ut
–
Brightness
•Music
for these options:
: Browse and select photos to display in the
: Choose the type of transition between photos in
: Set the length of time each photo displays.
: Launch Music Player, to choose music to accompany the
: Set the period of time the slideshow displays before ending.
: Set the brightness of the display.
: Launches Music Player so you can select music to play with
the Clock or Slideshow. For more information, refer to
Player”
on page 57.
Photos and Video 67
“Music
Page 72

Media Hub
Samsung Media Hub is your one stop for the hottest movie and
TV content. With hundreds of titles available at your fingertips,
entertaining on the go has never been easier. You can rent or
purchase your favorite content and conveniently watch
anywhere. Featuring the stunning viewing quality Samsung is
known for, Samsung Media Hub is your gateway to mobile video
like you have never experienced it before.
Note:
Media Hub service requires a Media Hub account and depends on
service availability.
1. From a Home screen, touch
➔
Media Hub
.
2. Read the End-User License Agreement (EULA) and tap
Accept
to continue or
Decline
Applications
to exit.
The Media Hub screen displays.
3. To rent or buy media, you must have a Media Hub account.
Press the
Menu Key
➔
My Account
to log in to your
account or to create an account. Follow the prompts to
complete log-in.
68
4. Browse content using these options:
• What’s new
•My Media
• Movie Store
• TV Store
5. When you find media you want to view, use these options:
• Watch Preview
•Own
: Recently-added titles for rent or purchase.
: Content you have previously purchased or rented.
: Movies you can rent or purchase.
: TV shows you can rent or purchase.
: View a short clip from the movie or show.
: Purchase the media for unlimited viewing on your device.
Follow the prompts to enter payment details.
•Rent
: Purchase a time-limited download of the media. Follow the
prompts to enter payment details
Page 73

Section 9: Connections
Your device includes features to connect to the internet and to
other devices by using Wi-Fi, Bluetooth, or a USB cable. Your
device also supports removable microSD™ or microSDHC™
memory cards for storing music, photos, videos, and files.
Wi-Fi
Wi-Fi is a wireless networking technology that provides access to
local area networks. Use your device’s Wi-Fi feature to:
•
Access the internet for browsing or to send and receive email.
•
Access your corporate network.
•
Use hotspots provided by hotels or airports while traveling.
Wi-Fi communication requires access to an existing Wireless
Access Point (WAP). WAPs can be Open (unsecured, as with most
hotspots) or Secured (requiring you to provide login credentials).
Your device supports the 802.11 b/g/n Wi-Fi protocol.
Configuring Wi-Fi Settings
For more information about configuring your device’s Wi-Fi
settings, see “Wi-Fi Settings” on page 94.
Finding Wi-Fi Networks
You can have your device automatically notify you of available
networks. For more information, refer to “Network Notification”
on page 95.
Turning Wi-Fi On or Off
Turn your device’s Wi-Fi service on or off. When you turn Wi-Fi
service on, your device automatically searches for available,
in-range WAPs (Wireless Access Points).
Turning Wi-Fi On
1. From any screen, sweep your finger downward from the
top to display the Notification Panel.
2. Touch
Turning Wi-Fi Off
1. From any screen, sweep your finger downward from the
Wi-Fi
to turn Wi-Fi On.
top to display the Notification Panel.
2. Touch
Wi-Fi
to turn Wi-Fi Off.
Connections 69
Page 74

Scanning and Connecting to a Wi-Fi Network
When you turn on Wi-Fi, your device searches for available Wi-Fi
connections, then displays them on screen.
1. From any screen, sweep your finger downward from the
top to display the Notification Panel.
2. Touch
Wi-Fi
to turn Wi-Fi On. Your device automatically
scans for available Wireless Access Points.
3. When the scan is complete, touch a Wi-Fi network to
connect. If the Wi-Fi network is open, your device
automatically connects. If the Wi-Fi network is secured,
enter the password at the prompt to connect.
Adding a Wi-Fi Network Manually
1. From a Home screen, press the
➔
Wireless and network ➔ Wi-Fi settings
2. Touch
3. Touch
Wi-Fi
to turn Wi-Fi On.
Add Wi-Fi network
Menu Key
➔ Settings
.
, then enter information about the
network:
• Network SSID
• Security
• Password
70
: Enter the name of the Wi-Fi Wireless Access Point.
: Select the type of security used by the WAP.
: If the WAP is secured, enter the password or hex key.
Note:
Depending on the Security protocol used by the WAP, additional
network information may be required.
4. Touch
Save
to save the settings.
Bluetooth
Bluetooth is a short-range wireless communications technology
for exchanging information over a distance of about 30 feet.
You do not need to line up the devices to send information with
Bluetooth. If the devices are in range, you can exchange
information between them, even if they are in different rooms.
Configuring Bluetooth Settings
Configure your device’s Bluetooth settings. For more information,
refer to “Bluetooth Settings” on page 96.
Turning Bluetooth On or Off
Turning Bluetooth On
1. From any screen, sweep your finger downward from the
top to display the Notification Panel.
2. Touch
Note:
Bluetooth
to turn Bluetooth on.
When Bluetooth is on, the
Bluetooth
icon displays in the Status Bar.
Page 75

Turning Bluetooth Off
1. From any screen, sweep your finger downward from the
top to display the Notification Panel.
2. Touch
Bluetooth
to turn Bluetooth off.
Pairing with a Bluetooth Device
Search for a Bluetooth device and pair with it, to exchange
information between your device and the target device.
Tip:
After pairing, your device and the target device recognize each other and
exchange information without having to enter a passcode or PIN.
1. From a Home screen, press the
➔
Wireless and network ➔ Bluetooth settings
2. Touch
3. Enable the target device’s discoverable or visible mode.
4. Touch
5. From the list of scanned devices, touch the target device,
Bluetooth
to turn on Bluetooth.
Scan devices
.
Menu Key ➔ Settings
.
then follow the prompts to complete the pairing:
•
If the target device requires a PIN, enter a PIN for the target device
and touch OK. When prompted, enter the PIN on the target device.
•
If the device allows automatic or smart pairing, your device
attempts to pair with the device automatically. Follow the prompts
on your device and the target device to complete the pairing.
USB Settings
Configure USB Settings to automatically identify your device
when you attach it to a computer with a USB cable.
For more information, refer to “USB Settings” on page 98.
Samsung Kies
Samsung Kies is a software that enables you to update your
device firmware by connecting to the PC.
To learn more about Samsung Kies and Samsung applications,
browse featured applications and download Kies at:
www.samsungapps.com
.
Connections 71
Page 76

Connecting With Samsung Kies
1. Install Samsung Kies software on your PC.
2. From a Home screen, press the
➔
Wireless and network
3. Using an optional PC data cable, connect the multifunction
Menu Key ➔ Settings
➔
USB settings ➔ Samsung Kies
jack on your device to a PC.
4. Run Samsung Kies and follow the prompts to update your
device firmware.
5. Refer to Samsung Kies Help for more information.
Memory Card
Your device supports removable microSD™ or microSDHC™
memory cards for storing music, photos, videos, and files.
Note:
Your device comes with a USB cable and includes a 16GB memory card
pre-installed.
Installing and Removing a Memory Card
For more information about installing and removing a memory
card, see “Memory Card” on page 8.
Important!:
To prevent damage to information stored on the memory card,
always unmount the card before removing it from the device.
72
Formatting a Memor y Card
Formatting erases all content from the memory card and
prepares it for use with your device.
Formatting a memory card using your device
.
1. From a Home screen, press the
➔
SD card and device storage
2. Tou ch
Unmount SD card
. At the prompt, touch OK to
Menu Key ➔ Settings
continue.
3. After unmounting the SD card, touch
4. Follow the prompts to confirm the formatting of the card.
Formatting a memory card using your computer
Consult your computer and/or memory card reader
documentation for information about formatting memory cards.
Format SD card
.
Page 77

Transferring Files to a Memory Card
Using the Media Player USB Setting
1. From a Home screen, press the
➔
Wireless and network ➔ USB Settings
Media player
2. Attach your device to the computer with the USB cable.
.
Menu Key ➔ Settings
, then select
Your computer recognizes the connection and launches the
default media player.
3. Use the media player software to transfer files to the
memory card.
4. When finished, touch the
Home Key
to quit Media
player mode. Disconnect the USB cable.
Using the Mass Storage USB Setting
Note:
Your device comes with a USB cable.
2. Attach your device to the computer with a USB cable. Your
device recognizes the connection and displays
connected
in the Status Bar and Notifications Panel.
3. At the USB Mass Storage prompt, touch
Mount
USB
to enable
file copying between your computer and the memory card.
4. At the prompt on the computer, select a transfer method:
•
Open folder to view files using Windows Explorer. Drag and drop
files from the PC to the memory card installed in your device.
•
Manage the device using Windows Media Player. For more
information, refer to “Music menu
to display as tabs in Music Player.”
5. Transfer files to the memory card. When finished, touch
Tur n Off
on the USB Mass Storage prompt and disconnect
: Choose the types of menus
on page 58.
the USB cable.
1. From a Home screen, press the
➔
Wireless and network ➔ USB Settings
Mass storage
.
Menu Key ➔ Settings
, then select
Connections 73
Page 78

Section 10: Applications and Widgets
Location of Internal
(
Back view of device
)
GPS Antenna
Antennas
Bluetooth/Wi-Fi
Antenna
This section contains a description of each application that is
available in the Applications Menu, its function, and how to
navigate through that particular application. If the application is
already described in another section of this user manual, then a
cross reference to that particular section is provided. Various
widgets are also described.
Tip:
To open applications quickly, add the icons of frequently-used
applications to one of the Home screens. For details, see “Adding
Shortcuts from Applications” on page 23.
GPS Applications
GPS applications allow you to achieve real-time, GPS-enabled,
turn-by-turn navigation and to access local searches based on a
variety of category parameters.
To receive better GPS signals, avoid using your device in the
following conditions:
•
inside a building or between buildings
•
in a tunnel or underground passage
•
in poor weather
•
around high-voltage or electromagnetic fields
•
in a vehicle with tinted windows
74
Global GPS turn-by-turn navigation, mapping, and Point of
Interest content is available for three continents, including North
America (U.S., Canada, and Mexico), Western Europe, and China,
where wireless coverage is available.
Important!:
If you touch or cover the internal GPS antenna while using GPS
services, it may impede the GPS signal resulting in the GPS
services not working in an optimal manner. Refer to the following
diagram to locate the approximate location of the internal GPS
antenna.
Page 79

Alarm Clock
Set alarms for reminders or for wake-up times.
Setting Alarms
1. From a Home screen, touch
➔
Alarm Clock
2. Press the
3. Touch fields to configure the alarm:
•(Time)
• Repeat
•Ringtone
•Vibrate
•Snooze
•Label
4. Touch
.
Menu Key
: Set a time for the alarm to sound.
: Choose One-time event or days for the alarm to repeat.
: Choose a tone for alarms.
: Enable or disable vibration for alarms.
: Enable or disable the snooze feature.
: Enter a name for the alarm.
Done
to save the alarm.
Applications
➔
Add alarm
Deleting Alar ms
1. From a Home screen, touch
➔
Alarm Clock
2. Press the
.
Menu Key
Applications
➔
Delete alarm
3. Touch alarms to mark them for removal or touch
4. Touch
Delete
to remove the selected alarms.
Select All
.
Alarm Settings
1. From a Home screen, touch
➔
Alarm Clock
.
2. Press the
3. Configure these settings:
.
Menu Key
• Alarm in silent mode
Applications
➔
Settings
.
: When enabled, alarm tones play, even when
Silent mode is active.
• Alarm volume
• Snooze duration
: Set the volume for alarm tones.
: Choose a snooze period. When an alarm
sounds, you can touch Snooze to repeat the alarm after the
specified period of time.
• Side button settings
: Configure the side buttons to use when
responding to alarms.
.
Applications and Widgets 75
Page 80

AllShare
Use AllShare to share multimedia content from your device via
Wi-Fi with DLNA (Digital Living Network Alliance) certified
devices. With AllShare, you can:
•
Play multimedia content from your device on another player, such as a
Wi-Fi-capable TV or other playback device.
•
Play multimedia content from another source, such as a wireless
media server, on your device.
•
Play multimedia content from another source, such as a wireless
media server, on another device. Your device retrieves content from
the source and uses Wi-Fi to deliver it to another device and acts as a
remote to control playback.
Note:
AllShare uses your device’s Wi-Fi services. For more information about
Wi-Fi, see “Wi-Fi” on page 69.
Configuring AllShare
Configure AllShare settings to identify your device as a server,
connect to Wi-Fi, and set treatment of copied files.
1. From a Home screen, touch
AllShare
.
– or –
From a Home screen, touch
➔
AllShare
76
.
Applications
2. Press the
Menu Key
➔
Settings
to configure these
settings:
• Media server name
(the default is your device’s default name), then touch
• Share media
videos, Share pictures
• Access point network
: Enter a name for the media server, if desired
: Choose types of media for sharing, from
, or
Share audio
, then touch OK.
: Turn on your Wi-Fi service and connect to
Save
Share
.
an available Wi-Fi Access Point.
• Upload from other devices
copied from other devices. Choose from
ask
, or
Always reject
• Default memory
downloaded files, from
: Set your device’s treatment of files
Always accept, Always
, then touch OK.
: Choose the default location for saving
Device
or
Memory card
.
Playing Media from your Device to Another Device
Play multimedia content from your device on another player, such
as a Wi-Fi-capable TV or other playback device, and use your
device as a remote to control playback.
1. From a Home screen, touch
2. In the
Server
column, touch
3. In the
Display device
touch
Next
.
AllShare
My device
.
.
column, touch the target device, then
Page 81

Choose media from an installed memory card, then touch
4.
files to mark them for sharing. A checkmark indicates
selected files.
Playing Media From Another Source on Your Device
Play multimedia content from another source, such as a wireless
media server, on your device.
1. From a Home screen, touch
2. In the
Server
column, touch the media server.
3. In the
Display device
Next
.
4. Choose media
to play, then follow the prompts to start
AllShare
column, touch
.
My Device
, then touch
playback.
Playing Media From a Ser ver on a Player via Your Device
Play multimedia content from another source, such as a wireless
media server, on another device, using your device’s Wi-Fi
service. Your device retrieves content from the source and uses
Wi-Fi to deliver it to the device and acts as a remote control.
1. From a Home screen, touch
2. In the
Server
column, touch the media server.
3. In the
Display device
touch
Next
.
AllShare
.
column, touch the target device, then
4. Choose media
to play, then follow the prompts to start
playback.
Amazon Kindle
Use the Amazon KindleTM application to download books for
reading, right on your device.
Note:
You must be registered with Amazon to use the Kindle application.
䊳
From a Home screen, touch
Amazon Kindle
.
– or –
From a Home screen, touch
➔
Amazon Kindle
Applications
.
Browser
Your device includes a full HTML Browser, to access the internet.
For more information, refer to “Browser” on page 48.
Tip:
By default, Browser appears as a Primary Shortcut on a Home screen.
䊳
From a Home screen, touch
Browser
.
– or –
From a Home screen, touch
➔
Browser
.
Applications
Applications and Widgets 77
Page 82

Calculator
The calculator provides the basic arithmetic functions; addition,
subtraction, multiplication, and division. You can also use this as
a scientific calculator.
1. From the Home screen, touch
➔
Calculator
.
2. Enter the first number using the numeric keys.
3. Enter the operation for your calculation by touching the
Plus, Minus, Multiplication
4. Enter the next number.
5. To view the result, touch the = key.
6. Repeat steps 1 to 4 as many times as required.
Applications
, or
Division
sign.
Rotate your device to display the scientific calculator in
landscape mode.
78
Calendar
Record events and appointments to manage your schedule.
1. From a Home screen, touch
Calendar
.
– or –
From a Home screen, touch
➔
Calendar
2. Touch a tab to choose a calendar view:
•Day
: Display today’s schedule and scroll to other days.
• Week
•Month
•List
: Display events in a chronological list.
3. Press the
•Go to
• Delete
• Settings
.
: Display the current week and scroll to other weeks.
: Display the current month and scroll to other months.
Menu Key
: Display a specific date.
: Delete an event.
: Customize the calendar.
Applications
for these options:
Page 83

Creating a Calendar Event
To create a calendar event:
1. From a Home screen, touch
Calendar
.
– or –
From a Home screen, touch
➔
Calendar
2. Double-tap the date for which you want to enter an event.
.
Applications
– or –
Touch the date for which you want to enter an event, then
touch .
3. Enter the event information in the New event screen, then
touch
Done
.
Customizing the Calendar
1. From a Home screen, touch
2. Press the
Menu Key ➔ Settings
• View settings
–
Calendars
: View all your calendars.
–
Calendar sync
–
First day of week
–
Hide declined events
:
: Synchronize calendars from multiple accounts.
Calendar
.
to configure settings:
: Choose a day to begin each week.
: Enable or disable display of events.
–
Lock time zone
your selected time zone, which is defined by the following field.
–
Select time zone
select a time zone to lock event times and dates.
• Notification settings
–
Vibra te
–
Select ringtone
: Allows you to lock event times and dates based on
: If
Lock time zone
is enabled, used this option to
:
: Set vibration behavior for calendar notifications.
: Choose a tone for calendar notifications.
Sending Calendar Events
Send events as vCalendar files by using Bluetooth or as
attachments to Email.
Note:
Depending on the type of event, the
available.
1. From a Home screen, touch
2. Touch an event, then touch
3. Choose a sending method:
• Bluetooth
: For more information about Bluetooth pairing and
sending, see
•Email
“Pairing with a Bluetooth Device”
: For more information, refer to
Send via
option may not be
Calendar
Send via
Applications and Widgets 79
.
“Email”
.
on page 43.
on page 71.
Page 84

Camera
Take photos and record video with your device’s built in Camera.
For more information, refer to “Camera” on page 60.
Tip:
A shortcut to Camera appears on a Home screen by default.
䊳
From a Home screen, touch
Camera
.
– or –
䊳
From a Home screen, touch
➔
Camera
.
Applications
Contacts
Store contact information for your friends, family and colleagues,
to quickly access information or to send a message. For more
information, refer to “Contacts” on page 30.
Tip:
A shortcut to Contacts appears on a Home screen by default.
䊳
From a Home screen, touch
➔
Contacts
80
.
Applications
Daily Briefing
With Daily Briefing, you can monitor the weather, financial
information, news, and your schedule in one convenient
application.
Tip:
The Daily Briefing widget appears on a Home screen by default.
1. From a Home screen, touch
➔
Daily Briefing
2. Touch
3. Touch
.
Tap to add city
Current location
Applications
.
or touch the Search bar, enter the
first letters of the city you want to add, then scroll through
the list of cities to find the city.
4. Touch the city you want to add and touch
Save
.
The Edit city list screen displays.
5. Touch
Add
to add another city or touch .
The AccuWeather.com screen displays.
6. Sweep the screen to the left and touch
Tap to add stock
.
Page 85

Touch the Search bar, type a company name or stock
7.
symbol, and touch .
Stocks display.
8. Touch the check mark next to the stocks you want to track
and touch
Save
.
The Select stock index screen displays.
9. Touch
Add
to add another stock or touch .
The Y! Finance screen displays.
10. Sweep the screen to the left and touch
Tap to get news
The AP Mobile news for the city displays.
11. Sweep the screen to the left.
The Schedule screen displays a list of events, if any have
been created. For more information, refer to “Creating a
Calendar Event” on page 79..
12. Sweep the screen to the left to view weather conditions.
Tip:
After Daily Briefing is setup, touch on any field to display the
information. Sweep the screen left or right to scroll through the Daily
Briefing pages.
Customizing Daily Briefing
To customize Daily Briefing:
䊳
From any Daily Briefing main screen, press the
Menu Key
➔ Settings
and touch one of the following
options:
•
AccuWeather.com
•
Y! Finance
•
AP Mobile news.
Date, Time, and Weather
.
Display the date, the time, and the weather for your current
location or any other location.
1. Navigate to the desired Home screen, then touch and hold
on the screen to display the
2. Touch
Widgets ➔ Date, time, and weather
Add to Home screen
.
menu.
The Date, time, and weather widget displays. The widget
may be moved to the next available Home screen and you
have to
Tap on widget to confirm
3. Touch the widget to add it to the Home screen.
4. Tap t he
time
(center) widget to choose a city for the time
.
display.
Applications and Widgets 81
Page 86

Tap to add city
5.
(bottom widget) to choose a city for the
weather display.
Date, Time, or Weather
Display either the date, the time, or the weather for your current
location or choose another location.
1. Navigate to the desired Home screen, then touch and hold
on the screen to display the
2. Touch
Widgets ➔ Date, time, or weather
Add to Home screen
.
menu.
The Configure Widget menu displays.
3. Touch either
Date, Time
, or
Weather
.
The selected widget appears.
4. Customize the Time or Weather widget as explained
in“Date, Time, and Weather” on page 81.
Digital Frame
Display a slideshow of photos, or a clock, along with music from
your installed memory card. For more information, refer to
“Digital Frame” on page 67.
䊳
From a Home screen, touch
➔
Digital Frame
82
.
Applications
Dual Clock
Display the date and time for two different locations.
1. Navigate to the desired Home screen, then touch and hold
on the screen to display the
2. Touch
Widgets ➔ Dual clock
Add to Home screen
.
menu.
The Dual clock widget displays, which is actually two
widgets. Each widget displays a clock, a city name, the
digital time, and the date.
3. Tap either widget to choose a different city than the one
currently displayed.
Send and receive email using popular email services. For more
information, refer to “Email” on page 43.
Tip:
Email appears as a Primary Shortcut on a Home screen by default.
䊳
From a Home screen, touch
Email
.
– or –
From a Home screen, touch
➔
Email
.
Applications
Page 87

FT Mobile
Read a fully optimized version of the world’s leading business
newspaper. This application lets you download the daily FT for
offline reading and access the FT’s award-winning content and
video. It also allows you to view your personal investment
portfolios.
䊳
From a Home screen, touch
➔
FT Mobile
Applications
.
Gallery
Use Gallery to view, capture, and manage photos and videos. For
more information, refer to “Gallery” on page 64.
Tip:
A shortcut to Gallery appears on the Main Home screen by default.
䊳
From a Home screen, touch
➔
Gallery
.
Applications
Gmail
Send and receive emails with Gmail, Google’s web-based email.
For more information, refer to “Gmail” on page 41.
䊳
From a Home screen, touch
➔
Gmail
.
Applications
Google Search
Search the internet, and your device, using the GoogleTM search
engine. For more information, refer to “Google Search” on
page 54.
Tip:
The Google Search widget appears by default on a Home screen. For
information about displaying widgets on the Home screen, see “Adding
Widgets to the Home screen” on page 20.
䊳
From a Home screen, touch
➔
Google Search
Applications
.
Latitude
With Google Latitude, you can see the location of all of your
friends on a map or on a list. You can also share or hide your
location.
You must first set up your tablet to use wireless networks to help
pinpoint your location. Also, Latitude works best when Wi-Fi is
enabled.
䊳
From a Home screen, touch
➔
Latitude
.
Applications
Applications and Widgets 83
Page 88

Maps
Use Google Maps to find your current location, get directions, and
other location-based information. For more information, refer to
“Maps” on page 52.
Tip:
A shortcut to Google Maps appears on the Main Home screen by default.
䊳
From a Home screen, touch
Maps
.
– or –
From a Home screen, touch
➔
Maps
.
Note:
You must enable location services to use Maps. Some features require
Standalone or Google location services. For more information, refer to
“Location and Security” on page 103.
Applications
Market
Browse for new Android applications, games or downloads for
your device. You must have a Google account set up on your
device to download a new application.
1. From a Home screen, touch
Market
.
– or –
From a Home screen, touch
➔
Market
84
.
Applications
2. The first time you open Market, read the Terms of Service,
then touch
3. Browse for items to install:
• Apps
•Games
• Downloads
Accept
to continue.
: New applications.
: New games.
: New downloads and updates to applications installed
on your device.
4. While browsing, press the
Menu Key for the following
options:
•Search
: Enter criteria to find applications.
• Downloads
: Display requested downloads, plus available updates
to applications installed on your device.
•Help
: Get help for using Android Market.
Media Hub
Samsung Media Hub is your one stop for the hottest movie and
TV content.
For more information, refer to “Media Hub” on page 68.
Note:
Media Hub service requires a Media Hub account and depends on
service availability.
䊳
From a Home screen, touch
➔
Media Hub
.
Applications
Page 89

Memo
Create and manage text memos and use Bluetooth to send
memos to paired Bluetooth devices.
Composing a Memo
1. From a Home screen, touch
➔
Memo
2. Touch , compose the memo, then touch
.
Applications
Done
to save.
For more information, refer to “Text Input Methods” on page 37.
Memo List Options
While viewing the list of Memos:
1. Press the
Menu Key for the following options:
•Sort by
: Sort the memo list by
• Delete
: Select one or all memos and touch
• Send via
: Touch
Bluetooth
memos, and touch
•Maximize
/
Minimize
or
Done
to send by the selected method.
: Show a maximum or minimum number of
Date
or
Title
.
Delete
Email
and then select one or all
.
lines for each memo.
2. Touch and hold a memo in the list to display the following
options:
• Send via
: Touch
Bluetooth
or
Email
selected method. For more information, refer to
to send the memo by the
“Bluetooth”
page 70.
• Delete
: Touch
Delete
to delete the selected memo.
Memo Options
While viewing a Memo:
1. Press the
Menu Key for the following options:
•Print
: Send this Memo to a printer.
• Send via
: Touch
Bluetooth
or
Email
to send the memo by the
selected method. For more information, refer to
“Bluetooth”
page 70.
Moviefone
Movie lovers can experience the fun and convenience of
Moviefone on their Galaxy Tab. With Moviefone mobile apps and
a custom mobile web experience, you are mere taps away from
on-the-go movie planning. Browse a directory of movies, check
the latest theater showtimes, find theater locations nearest to
you, buy tickets in advance, view original movie content and
news, and read movie reviews. With Moviefone and your Galaxy
Tab, you have movies at your fingertips.
1. From a Home screen, touch
➔
Moviefone
Applications
.
Applications and Widgets 85
on
on
Page 90

Tap one of the following options:
2.
•Movies
: Displays a list of movies playing in your area. Touch an
entry to get more information about the movie.
•Upcoming
: Displays a list of movies that will be coming soon, their
release dates, and rating. Touch an entry to get more information
about the movie.
•Theaters
: Displays a list of theaters located near to your present
location. Touch an entry to get more information about the theater
including a list of movies offered there and showtimes for today.
• Trailers
: Displays a list of video clips that show selected scenes
from current and upcoming movies. Touch an entry to play the
trailer.
•News
: Displays a list of articles abou t movies, actors, and actresses
from the past and present.
3. While viewing one of the above options, press the
for these options:
•Sort Movie
: Sort the list of movies By Release Date, By MPAA
Rating, or Alphabetically.
•Search
: Enter a movie you want to find.
• Edit Location
: Use your current location or use another location
based on a ZIP code.
• Settings
: Allows you to set the video quality and to log in to
Facebook.
• About
: Lists information about Moviefone including the license
agreement.
86
Menu Key
Music
Play music files from an installed memory card. For more
information, refer to “Music Player” on page 57.
Tip:
A shortcut to Music Player appears on a Home screen by default.
䊳
From a Home screen, touch
➔
Music
.
Applications
Music Hub
The Music Hub lets you purchase and download songs and
albums.
For more information, refer to “Music Hub” on page 59.
䊳
From a Home screen, touch
➔
Music Hub
Applications
.
My Files
Find, view and manage files stored on an installed memory card.
If the file is associated with an application on your device, you
can launch the file in the application.
1. From a Home screen, touch
➔
My Files
2. Tap a folder and scroll down or up until you locate a file.
.
Applications
Page 91

Touch a file to launch it in the associated application (if the
aksdj akljlad pekajr didlfajj jd djfnfn
jeuifhe jle liekz ldak eaji alpald fhak a
aksdj akljlad pekajr didlfajj jd djfnfn
jeuifhe jle liekz ldak eaji alpald fhak a
aksdj akljlad pekajr
aksdj akljlad pekajr didlfajj jd djfnfn
jeuifhe jle liekz ldak eaji alpald fhak a
aksdj akljlad pekajr didlfajj jd djfnfn
jeuifhe jle liekz ldak eaji alpald fhak a
aksdj akljlad pekajr didlfajj jd djfnfn
jeuifhe jle liekz ldak eaji alpald fhak a
aksdj akljlad pekajr didlfajj jd djfnfn
jeuifhe jle liekz ldak eaji alpald fhak a
3.
file is associated with an application).
4. While browsing files, use these controls:
•
Tou ch
Up
to go to a higher directory.
•
Tou ch
Select
for these options:
–
Touch files, then touch
Bluetooth, Gmail
–
Touch files, then touch
new location, then touch
–
Touch files, then touch
can touch a new location, then touch
–
Touch files, then touch
•
Press the
Menu Key
–
New folder
–
Rename
–
Details
: Select an item to view information about the item.
Send via
, or
to send the selected files by
Email
.
Copy
to copy the file(s) to the clipboard. Touch a
Paste
.
Cut
to remove the file(s) to the clipboard. You
Paste
Delete
to erase the files.
for these options:
: Create a new folder for storing files.
: Change the name of the folder.
to move the files.
Navigation
Use Google Navigation to find a destination and get walking or
driving directions. For more information, refer to “Navigation” on
page 53.
䊳
From a Home screen, touch
➔
Navigation
.
Applications
News & Weather
View Google news and weather. For more information, refer to
“News & Weather” on page 54.
䊳
From a Home screen, touch
➔
News & Weather
Applications
.
NYTimes
NYTimes allows you to read the latest web edition of The New
York Times newspaper.
1. From the Home screen, touch
NYTimes
.
– or –
From a Home screen, touch
➔
NYTimes
.
Applications
The Latest News screen is displayed.
2. Tap on an article title to read it.
3. Press the
Menu Key
before selecting an article for the
following options:
•Sections
: allows you to select a section that you are interested in
reading about. Examples include Latest News, World, U.S., Politics,
Business, and so on.
• About
: provides information about The New York Times application
such as Privacy Policy, Copyright Notice, and Feedback.
Applications and Widgets 87
Page 92

Press the
Menu Key
4.
after selecting an article for the
following options:
•Share
: allow you to share an article by Email or Gmail.
•Font Size
: allows you to choose the size of the font. Options are:
Small, Medium, Large
, and
Huge
.
Places
Google Places uses your location to help you find nearby
destinations, such as restaurants, bars, hotels, attractions, ATMs
and gas stations, or you can enter a location. For more
information, refer to “Places” on page 54.
䊳
From a Home screen, touch
➔
Places
.
Applications
Power Control
Active applications, Wi-Fi, Bluetooth, GPS, Synchronization, or
the LCD Brightness functionality all act to drain your battery.
The Power Control widget is designed to quickly activate (turn on)
or deactivate (turn off) those functions or applications that use
the most battery power.
The following is a list of helpful tips that can help conserve your
battery power:
•
Reduce your backlight time.
•
Turn off Bluetooth, Wi-Fi, and Synchronization when not in use.
88
•
Deactivate the GPS when it is not needed. Most applications that use
this function periodically query the GPS satellites for the current
location. Each query drains your battery.
•
Turn off Automatic application synchronization.
•
Close any applications that may be running in the background (such as
Music Player).
To use the Power Control shortcut bar:
1. From the Home screen, touch and hold an empty area until
the
Add to Home screen
2. Touch
Widgets
➔
Power control
menu displays.
.
The Power Control shortcut is added to the Home screen.
3. Touch one of the icons on the Power Control widget to
activate the application (Wi-Fi, Bluetooth, GPS,
Synchronization, or LCD Brightness).
A green bar displayed beneath the icon means the
application is activated (turned on).
Page 93

Touch one of the icons a second time to deactivate the
4.
application.
The green bar is removed from beneath the icon, which
means the application is deactivated (turned off).
Qik Manual
Before you begin using the Qik Video application, read through
the Qik manual right on your Galaxy tablet. It contains the
instructions you need to use the Qik Video application.
1. From the Home screen, touch
➔
Qik_manual
Applications
.
The Qik App Manual main menu displays.
2. Touch the entry that best describes what you need to do.
Options are:
•
Create a Qik account
•
Make a video call
•
Record and share a video
•
Send and receive video messages
•
Manage Video Gallery
Qik Video
Qik Video is a mobile video sharing service that lets you record
and share videos with your friends, family, and your favorite
social networks like Facebook, YouTube, and Twitter. Your video
is automatically saved as you record. No more time-consuming
manual uploads.
䊳
From the Home screen, touch
➔
Qik_Video
Note:
You cannot make a call when a Bluetooth headset is connected.
.
Applications
Samsung Apps
Connect to Samsung Apps and make your smart device even
smarter. Simply and easily download an abundance of
applications to your phone such as games, news, reference,
social networking, navigation, and more.
䊳
From a Home screen, touch
Samsung Apps
.
– or –
From a Home screen, touch
➔
Samsung Apps
Applications
.
Applications and Widgets 89
Page 94

Settings
Configure your device to your preferences. For more information,
refer to “Settings” on page 94.
䊳
From a Home screen, press the
Menu Key ➔ Settings
– or –
From a Home screen, touch
➔
Settings
.
Applications
Social Hub
Access your social networks, like Facebook, YouTube, and
Twitter, all in one place.
䊳
From a Home screen, touch
➔
Social Hub
.
Applications
To add an account:
1. Touch
Add account
.
The Accounts and sync screen displays.
2. Touch
Add account
at the bottom of the screen.
The Add an account screen displays.
90
3. Touch the account you want to add and then enter the
required information, such as email address and
password.
.
The added account now appears on the Social Hub screen
with any other accounts.
4. Touch an account entry to start the application.
Talk
Use Google Talk to chat with other Google Talk users. For more
information, refer to “Google Talk” on page 47.
䊳
From a Home screen, touch
Applications ➔ Tal k
Task Manager
View and manage active applications on your device. For more
information, refer to “Task Manager” on page 7.
Tip:
To quickly launch Task Manager, touch and hold the
then touch
Task Manager.
䊳
From a Home screen, touch
➔
Task Manager
.
Applications
Home Key
.
,
Page 95

ThinkFree Office
ThinkFree Office Mobile for Android is a Microsoft Office
compatible office suite. This application provides a central place
for managing your documents online or offline.
1. From the Home screen, touch
➔
ThinkFree Office
2. Read the End User License Agreement, then touch
.
Applications
Accept
if you agree with the terms of use.
Four tabs display:
•Home
: displays the introduction to ThinkFree Offi ce and lists a short
description of each of the tabs and what type of information they
provide.
• Recent Docs
•My Docs
: displays recently viewed or downloaded documents.
: This is where you keep your documents on this device.
You can manage documents, or send them to others, and upload
the documents to ThinkFree Online.
•Online
: This provides your online storage information. You can also
share your documents to others without using email attachments.
Video
View and manage videos stored on an optional installed memory
card.
For more information, refer to “Video” on page 64.
Tip:
A shortcut to Video appears on the Main Home screen by default.
䊳
From a Home screen, touch
➔
Video
.
Applications
Voice Search
Perform Google searches by speaking your search terms. For
more information, refer to “Voice Search” on page 55.
䊳
From a Home screen, touch
➔
Voice Search
Tip:
Voice Search is available on the Google Search bar widget, which
appears on a Home screen by default.
.
Applications
Applications and Widgets 91
Page 96

World Clock
View the date and time in any time zone.
1. From a Home screen, touch
➔
World clock
2. Press the
• Add city
• Change order
.
Menu Key
: Choose a city to display.
: Touch the bars on an entry and drag the entry
to a new position in the list. Touch
•Remove
: Select cities to remove from the display.
• DST settings
: Enable or disable Daylight Savings Time
Applications
for these options:
Done
to change the order.
adjustments.
WSJ
WSJ allows you to read the latest web edition of The Wall Street
Journal newspaper.
1. From a Home screen, touch
WSJ
.
– or –
From a Home screen, touch
➔
WSJ
.
Applications
The Wall Street Journal screen displays.
92
2. Tap
Subscribe Now
limited access, or
for full access,
Log In
Register For Free
, if you are already a subscriber.
Follow the on-screen instructions.
When you log in, today’s The Wall Street Journal displays.
3. Press the
Menu Key
• Subscribe
: Touch
Street Journal
• Sections
: Touch a section, such as Front Page, What’s News,
Subscribe Now
tablet edition.
for these options:
to subscribe to
Opinion, and so on, to view that section. Touch
The Wall
Start Screen
to the WSJ start screen.
•Quotes
: Touch the Search field and use the keypad to enter a
company name or stock ID. Touch an entry in the resulting list for
more information.
•Info
: Touch
Tips, FAQs, Customer Service
, or
Legal
information.
4. Press the
5. Press the
Back Key
to return to the start screen.
Menu Key
➔
Logout
➔ Yes
to log out of the
WSJ app.
for
to go
for WSJ help
Page 97

YouTube
View and upload YouTube videos, right from your device. For
more information, refer to “YouTube” on page 56.
Tip:
A shortcut to YouTube appears on the Main Home screen by default.
䊳
From a Home screen, touch
You Tu be
.
– or –
From a Home screen, touch
➔
YouTube
.
Applications
Applications and Widgets 93
Page 98

Section 11: Settings
This section explains Settings for customizing your device.
Accessing Settings
䊳
From a Home screen, press the
Menu Key
➔ Settings
– or –
From a Home screen, touch
➔
Settings
.
Applications
Wireless and Network
Control your device’s wireless connections.
Flight Mode
Flight mode allows you to use many of your tablet’s features,
such as Camera, Games, and more, when you are in an airplane
or in any other area where accessing data is prohibited.
Important!:
When your tablet is in Flight Mode, it cannot access online
information or applications.
94
1. From a Home screen, press the
➔
Wireless and network
.
– or –
From the Home screen, touch
➔
Settings
2. Touch the
➔
Wireless and network
Flight mode
Menu Key
.
Applications
check box to enable Flight mode. A
check mark displayed next to the feature indicates Flight
mode is active.
Wi-Fi Settings
Your device supports Wi-Fi b/g/n. Use Wi-Fi settings to manage
your device’s Wi-Fi connections.
For more information about using your device’s Wi-Fi features,
see “Wi-Fi” on page 69.
➔ Settings
.
Page 99

Turning Wi-Fi On or Off
Turn your device’s Wi-Fi service on or off. When you turn Wi-Fi
service on, your device automatically searches for available, inrange Wireless Access Points (WAPs).
1. From a Home screen, press the
➔
Wireless and network
2. Touch
Wi-Fi settings
, then touch
Menu Key
➔ Settings
.
Wi-Fi
to turn Wi-Fi On or
Off. When on, a check appears in the checkbox.
Network Notification
Have your device alert you to new Wireless Access Points (WAPs).
1. From a Home screen, press the
➔
Wireless and network
2. Touch
Wi-Fi settings
, then touch
Menu Key
.
Network notification
➔ Settings
to
turn notifications On or Off. When on, a check appears in
the checkbox.
Advanced Settings
Set up and manage wireless access points.
1. From a Home screen, press the
➔
Wireless and network
Menu Key
➔ Wi-Fi settings
➔
Settings
.
2. Press the
Menu Key
• Advanced
:
–
Wi-Fi sleep policy
out and data connections switch to mobile data. Use Wi-Fi sleep policy
settings to specify when to switch from Wi-Fi to mobile data for data
communications. Touch to choose from
Never when plugged in
–
MAC address
connecting to some secured networks (not configurable).
–
Proxy
: Touch to enter a proxy number.
–
Port
: Touch to enter a port number.
• IP Settings
: Enter IP settings for configuring a connection to a
➔ Advanced
: By default, Wi-Fi turns off when the screen times
, or
: View your device’s MAC address, required when
When screen turns off
Never
.
for these settings:
network using a static IP, including:
–
Use static IP
: Touch to turn static IP On or Off.
–
IP address
: Enter the IP address.
–
Gateway
: Enter the gateway.
–
Netmask
: Enter the netmask.
–
DNS 1
: Enter the DNS1.
–
DNS 2
: Enter the DNS2.
,
Settings 95
Page 100

Bluetooth Settings
Use Bluetooth settings to manage Bluetooth connections, set
your device’s name, and control your device’s visibility.
Bluetooth Profiles
Profiles are specifications for services supported by individual
devices to improve the ability of different devices to work
together. Your device supports these Bluetooth® profiles:
•
Serial Port
: SPP 1.1 supports a remote Bluetooth device to act as a
virtual serial port.
•
Stereo
: A2DP 1.2, AVRCP 1.0, GAVDP 1.2, AVDTP 1.2 and AVCTP 1.0
support delivery of stereo audio to a compatible Bluetooth device.
•
Object Exchange
–
OPP 1.1 allows exchange of contact name cards (vCard 2.1), calendar
events (vCalendar), and other non-protected files.
–
BPP allows printing to compatible Bluetooth-enabled printers.
Note:
This device does not support all Bluetooth profiles.
96
:
Turning Bluetooth On or Off
Turn your device’s Bluetooth service On or Off. For more
information about using Bluetooth to exchange information with
other Bluetooth devices, see see “Bluetooth” on page 70.
1. From a Home screen, press the
➔
Wireless and network ➔ Bluetooth settings
2. Touch
Bluetooth
to turn Bluetooth On or Off. When On, a
Menu Key
➔ Settings
.
check appears in the checkbox.
Additional Bluetooth Settings
When Bluetooth is on, additional settings are available.
1. From a Home screen, press the
➔
Wireless and network ➔ Bluetooth settings
2. Touch a setting to configure Bluetooth:
• Device Name
: Your device’s default name appears on screen.
Menu Key
➔ Settings
.
Touch to change the device name. Available when Bluetooth is
turned On.
• Visible
: Control your device’s visibility to other devices’ Bluetooth
searches. Touch to turn On or Off. Available when Bluetooth is
turned On.
• Scan devices
: Touch to scan for nearby discoverable devices. After
searching, touch a device to pair with it . For more inf ormation, refer
to
“Pairing with a Bluetooth Device”
on page 71.
 Loading...