

Samsung Galaxy S II (Boost Mobile) User Manual

©2012 Samsung. All rights reserved. BOOST and BOOSTMOBILE and Logo are
trademarks of Boost. Other marks are the property of their respective owners.
9/9/12
Online User Guide
Boost Galaxy S II
www.boostmobile.com
Consejo: Para encontrar esta guía para usuarios en Español,
por favor visita a
haz clic en
To find this user guide in English, please visit
www.boostmobile.com/user_guides
Important Privacy Message – Boost Mobile’s policies often do
not apply to third-party applications. Third-party applications
may access your personal information or require Boost to
disclose your customer information to the third-party
application provider. To find out how a third-party application
will collect, access, use, or disclose your personal information,
check the application provider’s policies, which can usually be
found on their website. If you aren’t comfortable with the thirdparty application’s policies, don’t use the application.
Open Source Software – Some software components of this
product incorporate source code covered under GNU General
Public License (GPL), GNU Lesser General Public License
(LGPL), OpenSSL License, BSD License and other open
source licenses. To obtain the source code covered under the
open source licenses, please visit
Bo ost_ SPH -D710 _UG _FH21 _WB _09 0912_ F1
www.boostmobile.com/espanol y
ASISTENCIA.
: opensource.samsung.com
Disclaimer of Warranties; Exclusion of Liability
EXCEPT AS SET FORTH IN THE EXPRESS WARRANTY
CONTAINED ON THE WARRANTY PAGE ENCLOSED WITH
THE PRODUCT, THE PURCHASER TAKES THE PRODUCT "AS
IS", AND SAMSUNG MAKES NO EXPRESS OR IMPLIED
WARRANTY OF ANY KIND WHATSOEVER WITH RESPECT TO
THE PRODUCT, INCLUDING BUT NOT LIMITED TO THE
MERCHANTABILITY OF THE PRODUCT OR ITS FITNESS FOR
ANY PARTICULAR PURPOSE OR USE; THE DESIGN,
CONDITION OR QUALITY OF THE PRODUCT; THE
PERFORMANCE OF THE PRODUCT; THE WORKMANSHIP OF
THE PRODUCT OR THE COMPONENTS CONTAINED
THEREIN; OR COMPLIANCE OF THE PRODUCT WITH THE
REQUIREMENTS OF ANY LAW, RULE, SPECIFICATION OR
CONTRACT PERTAINING THERETO. NOTHING CONTAINED IN
THE INSTRUCTION MANUAL SHALL BE CONSTRUED TO
CREATE AN EXPRESS OR IMPLIED WARRANTY OF ANY KIND
WHATSOEVER WITH RESPECT TO THE PRODUCT. IN
ADDITION, SAMSUNG SHALL NOT BE LIABLE FOR ANY
DAMAGES OF ANY KIND RESULTING FROM THE PURCHASE
OR USE OF THE PRODUCT OR ARISING FROM THE BREACH
OF THE EXPRESS WARRANTY, INCLUDING INCIDENTAL,
SPECIAL OR CONSEQUENTIAL DAMAGES, OR LOSS OF
ANTICIPATED PROFITS OR BENEFITS.
SAMSUNG IS NOT LIABLE FOR PERFORMANCE ISSUES OR
INCOMPATIBILITIES CAUSED BY YOUR EDITING OF
REGISTRY SETTINGS, OR YOUR MODIFICATION OF
OPERATING SYSTEM SOFTWARE.
USING CUSTOM OPERATING SYSTEM SOFTWARE MAY
CAUSE YOUR DEVICE AND APPLICATIONS TO WORK
IMPROPERLY.
Table of Contents
Tip: Looking for something? If you don’t see it in the headings
listed here, try the Index on page 163.
Introduction . . . . . . . . . . . . . . . . . . . . . . . . . . . . . . . . . i
Your Phone’s Menu . . . . . . . . . . . . . . . . . . . . . . . . . . i
1A. Setting Up Service . . . . . . . . . . . . . . . . . . . 2
Setting Up Your Device . . . . . . . . . . . . . . . . . . . . . . 2
Activating Your Device . . . . . . . . . . . . . . . . . . . . . . 3
Making Calls . . . . . . . . . . . . . . . . . . . . . . . . . . . . . . . 4
Setting Up Your Voicemail . . . . . . . . . . . . . . . . . . . 4
Account Passwords . . . . . . . . . . . . . . . . . . . . . . . . . 5
Getting Help . . . . . . . . . . . . . . . . . . . . . . . . . . . . . . . 5
2A. Device Basics . . . . . . . . . . . . . . . . . . . . . . . 8
Your Device . . . . . . . . . . . . . . . . . . . . . . . . . . . . . . . . 8
Turning Your Phone On and Off . . . . . . . . . . . . . 11
Viewing the Display Screen . . . . . . . . . . . . . . . . . 11
Battery and Charger . . . . . . . . . . . . . . . . . . . . . . . 13
Navigation and Customization . . . . . . . . . . . . . . 14
Displaying Your Phone Number . . . . . . . . . . . . . 23
Entering Text Using the Samsung Keyboard . . 23
Creating a Google Account . . . . . . . . . . . . . . . . 25
2B. Making and Answering Calls . . . . . . . . . 26
Making Calls . . . . . . . . . . . . . . . . . . . . . . . . . . . . . 26
Receive Phone Calls . . . . . . . . . . . . . . . . . . . . . . 28
Phone Call Options . . . . . . . . . . . . . . . . . . . . . . . . 29
Voicemail . . . . . . . . . . . . . . . . . . . . . . . . . . . . . . . . 32
2C. Settings . . . . . . . . . . . . . . . . . . . . . . . . . . . . 38
Wireless and Network Settings . . . . . . . . . . . . . . 38
Call Settings . . . . . . . . . . . . . . . . . . . . . . . . . . . . . . 41
Device Settings . . . . . . . . . . . . . . . . . . . . . . . . . . . 43
Personal Settings . . . . . . . . . . . . . . . . . . . . . . . . . 49
System Settings . . . . . . . . . . . . . . . . . . . . . . . . . . . 56
2D. Call Log . . . . . . . . . . . . . . . . . . . . . . . . . . . . 64
Logs . . . . . . . . . . . . . . . . . . . . . . . . . . . . . . . . . . . . . 64
2E. Contacts . . . . . . . . . . . . . . . . . . . . . . . . . . . . 67
Get Started with Contacts . . . . . . . . . . . . . . . . . . 67
2F. Calendar & Tools . . . . . . . . . . . . . . . . . . . . 78
Before You Begin . . . . . . . . . . . . . . . . . . . . . . . . . 78
Calendar . . . . . . . . . . . . . . . . . . . . . . . . . . . . . . . . . 78
Alarm & Timer . . . . . . . . . . . . . . . . . . . . . . . . . . . . 81
Calculator . . . . . . . . . . . . . . . . . . . . . . . . . . . . . . . . 82
1

My Files . . . . . . . . . . . . . . . . . . . . . . . . . . . . . . . . . 82
Bluetooth . . . . . . . . . . . . . . . . . . . . . . . . . . . . . . . . 83
microSD Card . . . . . . . . . . . . . . . . . . . . . . . . . . . . 83
Update Your Phone . . . . . . . . . . . . . . . . . . . . . . . 85
2G. Voice Services . . . . . . . . . . . . . . . . . . . . . . 88
Voice Services . . . . . . . . . . . . . . . . . . . . . . . . . . . 88
2H. Camera . . . . . . . . . . . . . . . . . . . . . . . . . . . . 92
Take Pictures . . . . . . . . . . . . . . . . . . . . . . . . . . . . . 92
Camera Settings . . . . . . . . . . . . . . . . . . . . . . . . . . 95
Record Videos . . . . . . . . . . . . . . . . . . . . . . . . . . . . 97
View Pictures and Videos using Gallery . . . . . 98
Working with Photos . . . . . . . . . . . . . . . . . . . . . 100
Photo Editor . . . . . . . . . . . . . . . . . . . . . . . . . . . . . . 101
Share Photos and Videos . . . . . . . . . . . . . . . . . 102
2I. Bluetooth . . . . . . . . . . . . . . . . . . . . . . . . . . 105
Turning Bluetooth On and Off . . . . . . . . . . . . . 105
3A. Service: The Basics . . . . . . . . . . . . . . . . 112
Service: The Basics . . . . . . . . . . . . . . . . . . . . . . . 112
3B. Web & Data Services . . . . . . . . . . . . . . . 118
Getting Started with Data Services . . . . . . . . . . 118
Wi-Fi . . . . . . . . . . . . . . . . . . . . . . . . . . . . . . . . . . . 123
2
Wi-Fi Direct . . . . . . . . . . . . . . . . . . . . . . . . . . . . . . 125
Kies Via Wi-Fi . . . . . . . . . . . . . . . . . . . . . . . . . . . . 126
AllShare . . . . . . . . . . . . . . . . . . . . . . . . . . . . . . . . . 127
Email . . . . . . . . . . . . . . . . . . . . . . . . . . . . . . . . . . . 128
Play Books . . . . . . . . . . . . . . . . . . . . . . . . . . . . . . 137
Play Movies . . . . . . . . . . . . . . . . . . . . . . . . . . . . . . 137
Music . . . . . . . . . . . . . . . . . . . . . . . . . . . . . . . . . . . 137
Using Play Store . . . . . . . . . . . . . . . . . . . . . . . . . . 141
Google Navigation . . . . . . . . . . . . . . . . . . . . . . . . 142
Applications . . . . . . . . . . . . . . . . . . . . . . . . . . . . . 144
4A. Important Safety Information . . . . . . . 146
General Precautions . . . . . . . . . . . . . . . . . . . . . . 146
Maintaining Safe Use of and
Access to Your Phone . . . . . . . . . . . . . . . . . . . . 147
Using Your Phone With a
Hearing Aid Device . . . . . . . . . . . . . . . . . . . . . . . 149
Caring for the Battery . . . . . . . . . . . . . . . . . . . . . 150
Radio Frequency (RF) Energy . . . . . . . . . . . . . . 151
Owner’s Record . . . . . . . . . . . . . . . . . . . . . . . . . . 153
User Guide Proprietary Notice . . . . . . . . . . . . . . 153

4B. Manufacturer’s Warranty . . . . . . . . . . . 154
Standard Limited Warranty . . . . . . . . . . . . . . . . . 154
Index . . . . . . . . . . . . . . . . . . . . . . . . . . . . . . . . . . 163
3

Introduction
This User Guide introduces you to Boost Mobile service
and all the features of your new phone. It’s divided into
four sections:
⽧ Section 1: Getting Started
⽧ Section 2: Your Phone
⽧ Section 3: Service Features
⽧ Section 4: Safety and Warranty Information
WARNING: Please refer to the Important Safety Information
section on page 146 to learn about information
that will help you safely use your phone. Failure to
read and follow the Important Safety Information
in this phone guide may result in serious bodily
injury, death or property damage.
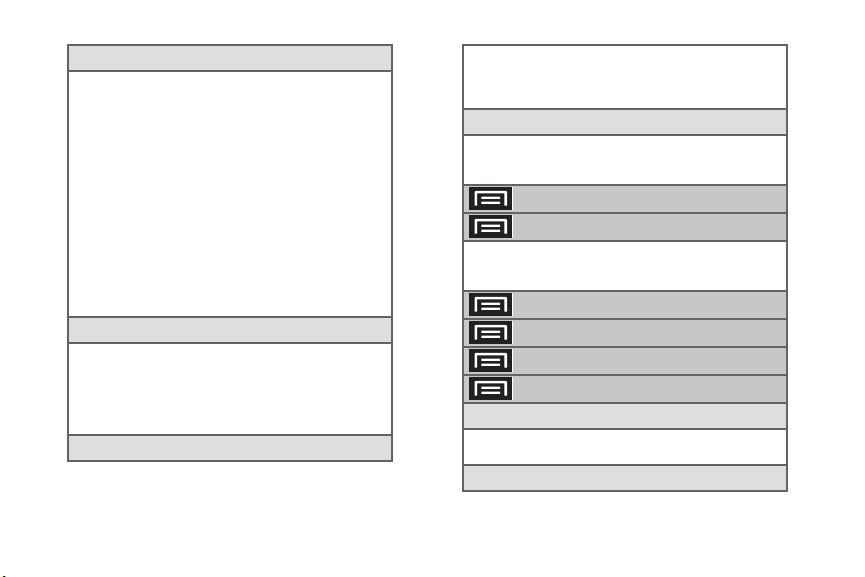
Your Phone’s Menu
The following table outlines your phone’s main menu
structure. For more information about using your
phone’s menus, see “Navigation and Customization”
on page 14.
Tap this onscreen button to reveal these additional
options and features.
Home screen
Home screen
1: Apps
1: AllShare 2: Boost Hotspot
3: Boost Zone 4: Calculator
5: Calendar 6: Camera
7: Clock 8: Downloads
9: Email 10: Gallery
11: Gmail 12. Google+
13:Instagram 14: Internet
15: Kies air 16: Latitude
17: Local 18: Maps
19: Messenger 20: Mobile ID
21: Music Player 22: My Files
23: Navigation 24: Photo editor
25: Play Books 26: Play Magazines
27: Play Movies & TV 28: Play Music
29: Play Store 30: Polaris Office
31: Search 32: Settings
33: Social Hub 34: Talk
35: Task 36: Task manager
37: Video maker 38: Video player
39: Voice command 40: Voice recorder
41: Voice talk 42: Voicemail
43: YouTube
i
ii
2: Widgets
1: AP mobile news 2: AccuWeather.com
3: Application monitor 4: Bookmarks
5: Buddies now 6: Month
7: Agenda 8: Today
9: Classic clock 10: Simple clock
11: Funky clock 12: Modern clock
13: Contact 14: Digital clock
15: Analog dual clock 16: Digital dual clock
17: Email 18: Gmail
19: Google Play Books 20: Google Play Music
21: Google Search 22: Google+ posts
23: Latitude 24: Picture frame
25: Play Store 26: Power Saving
27: S Bookmark 28: Social Hub
29: Today Agenda 30: Traffic
31: Voice 32: Voicemail
33: Yahoo! Finance 34: YouTube
3: Shortcuts
1: Applications 2: Book
3: Bookmark 4: Contact
5: Direct dial 6: Direct message
7: Directions & Navigation 8: Gmail label
9: Kies via Wi-Fi 10: Music playlist
11: Settings shortcut
4: Folders
1: New Folder 2: All contacts
3: Contacts with 4: Received list fromBluetooth
phone numbers 4: Contact
5: Recent documents 6: Starred contracts
5: Walpapers
1: Gallery 2: ID wallpapers
3: Live wallpapers 4: Wallpaper gallery
5: Wallpapers
> Add
> Wallpaper
1: Gallery 2: ID wallpapers
3: Live wallpapers 4: Wallpaper gallery
5: Wallpapers
> Search
> Notifications
> Edit
> Settings
1: Wi- Fi (On/Off )
1: Wi-Fi networks 2: Scan
3: Add network
2: 4G settings (On/Off)
3: Bluetooth (On/Off)
4: Bluetooth settings
1: Bluetooth (On/Off) 2: Device name
3: Available devices 4: Scan for devices
5: Data usage
1: Mobile data 2: Set mobile data limit (On/Off)
3: Data usage cycle
More settings
1: Airplane mode (On/Off)
2: Kies via Wi-Fi
3: VPN
1: Add VPN network
4: Wi-Fi Direct (On/Off)
5: Mobile networks
1: 3G data
Call Settings
1: Set reject messages 2: Turn on proximity sensor
3: North American dialing 4: International dialing
5: DDTM 6: TTY mode
7: Voicemail settings
Sound
1: Volum e
1: Music, video, games, and other media
2: Ringtone
3: Notifications 4: System
2: Vibration intensity
1: Ringtone 2: Notification
3: Vibrate on screen tap
3: Silent mode
1: Off 2: Vibrate
3: Mute
4: Phone ringtone
5: Default notifications
6: Vibrate and ring (On/Off)
7: Keytones (On/Off)
8: Touch sounds (On/Off)
9: Screen lock sound (On/Off)
10: Vibration on screen tap (On/Off)
Display
1: Home screen wallpaper
iii

1: Gallery 2: ID wallpapers
3: Live wallpapers 4: Wallpaper gallery
5: Wallpapers
2: Lock screen wallpaper
1: Gallery 2: Wallpaper gallery
3: Clock (On/Off)
4: Weather (On/Off)
5: Weather settings
1: Unit 2: Auto refresh
6: Clock and weather position
1: Top 2: Middle
3: Bottom
7: Brightness
8: Screen mode
1: Dynamic 2: Standard
3: Movie
9: Auto-rotate screen (On/Off)
10: Screen timeout
1: 15 seconds 2: 30 seconds
3: 1 minute 4: 2 minutes
5: 5 minutes 6: 10 minutes
iv
11: Font style
1: Get fonts online 2: Cancel
12: Pulsenotification light (On/Off)
13: Display battery percentage (On/Off)
14: Touch key light duration
1: 1.5 seconds 2: 6 seconds
3: Always off 4: Always on
15: Auto adjust screen power(On/Off)
16: Gyroscope calibration
Power saving mode
1: Power sa ving
1: Use power saving mode
2. Customer power saving setting
3: Learn about power saving
Storage
1: Device memory
2: USB storage
2: SD card
Battery
1: S creen
2: Android System
3: Cell standby
4: Android OS
Applications
1: Downloaded
2: On SD card
3: Running
4: All
Accounts and sync (On/Off)
1: S ync all
2: Add account
Location services
1: Google location service (On/Off)
2: GPS satellites (On/Off)
3: Location and Google search (On/Off)
Security
1: Screen lock
1: None 2: Slide
3: Face unlock 4: Pattern
5: Pin 6: Password
2: Owner information
3: Encrypt device
4: Encrypt SD card
5: Make passwords visible (On/Off)
4: Device administrators
5: Unknown sources (On/Off)
6: Trusted credentials
1: System 2: User
7: Install from device storage
8: Clear credentials
Language and input
1: Language
1: English 2: Español
2: Default
1: Samsung keypad 2: Swype
v
3: Google voice typing
1: Samsung keypad 2: Swype
3: Voice recognition
1: Google 2: Samsung powered by
Vlingo
4: Voice search
1: Language
2: SafeSearch
3: Block offensive words (On/Off)
4: Personalized recognition (On/Off)
5: Google Account dashboard
5: Text-to-speech output
1: Google Text-to-speech 2: Samsung TTS
3: Speech rate 4: Listen to an example
5: Driving mode (ON/Off) 6: Driving mode settings
6: Pointer speed
Privacy
1: Factory data reset
Dock
1: Audio output mode (On/Off)
Date and time
vi
1: Automatic date and time (On/Off)
2: Automatic time zone (On/Off)
3: Set date
4: Set time
5: Select time zone
6: Use 24-hour format (On/Off)
7: Select date format
Accessibility
1: TalkBack (On/Off)
2: The power key ends calls (On/Off)
3: Auto-rotate screen (On/Off)
4: Speak passwords (On/Off)
5: Tap and hold delay
1: Short 2: Medium
3: Long
6: Install Web scripts
1: Allow 2: Do not allow
Motion
1: Motion activation (On/Off)
2: Tilt to zoom
3: Pan to edit
4: Double tap
5: Turn over to mute
Developer options
1: USB debugging (On/Off)
2: Development device ID
3: Allow mock locations
4: Desktop backup password
5: Strict mode enabled (On/Off)
6: Show pointer location (On/Off)
7: Show touches (On/Off)
8: Show screen updates (On/Off)
9: Show CPU usage (On/Off)
10: Force GPU rendering (On/Off)
11: Window animation scale
12: Transitiion animation scale
1: Animation is off 2: Animation scale 0.5x
3: Animation scale 1x 4: Animation scale 1.5x
5: Animation scale 2x 6: Animation scale 5x
7: Animation scale 10x
13: Do not keep activities (On/Off)
14: Limit background processes
1: Standard limit 2: No background processes
3: 1 process at most 4: 2 processes at most
5: 3 processes at most 6: 4 processes at most
15: Show all ANRs (On/Off)
System Update
1: Update PRL
2: Update Profile
3: Update Samsung Software
4: Update Firmware
About phone
1: S tat us
2: Legal information
vii
1: Open source licenses 2: Google Legal
3: License settings 4: Privacy Alert from Boost
3: Model number
4: Android version
5: Baseband version
6: Kernel version
7: Build number
8: Hardware version
In Use Menu
1: Add call/Merge 2: Kaypad
3: End call 4: Speaker
5: Mute (On/Off) 6: Bluetooth
WARNING: If your Samsung Galaxy S II phone has a
touchscreen display, please note that a
touchscreen responds best to a light touch from
the pad of your finger. Using excessive force
when pressing on the touchscreen may damage
the tempered glass surface and void the
warranty. “4B. Manufacturer’s Warranty” on
page 154
viii

Section 1
Getting Started
1A. Setting Up Service
⽧ Setting Up Your Device (page 2)
⽧ Activating Your Device (page 3)
⽧ Making Calls (page 4)
⽧ Setting Up Your Voicemail (page 4)
⽧ Account Passwords (page 5)
⽧ Getting Help (page 5)
Setting Up Your Device
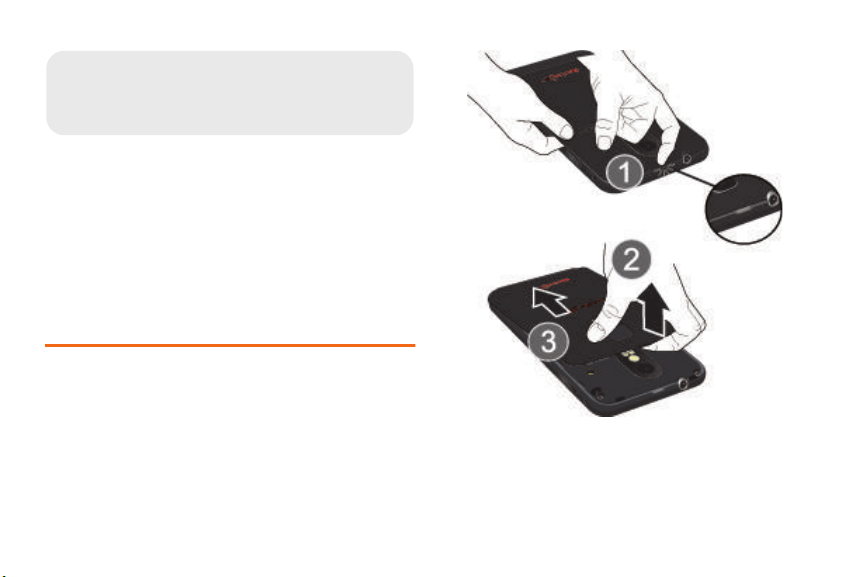
Install the battery by:
1. Grasping the device firmly and locating the cover
release latch.
2 1A. Setting Up Service
2. Placing your finger nail in the opening and firmly
“pop” the cover off the device (similar to a soda
can).
Caution!: Do not bend or twist the back cover excessively.
Doing so may damage the cover.
3. Insert the battery into the opening in the back of
the device, making sure the connectors align and
gently press down to secure the battery.
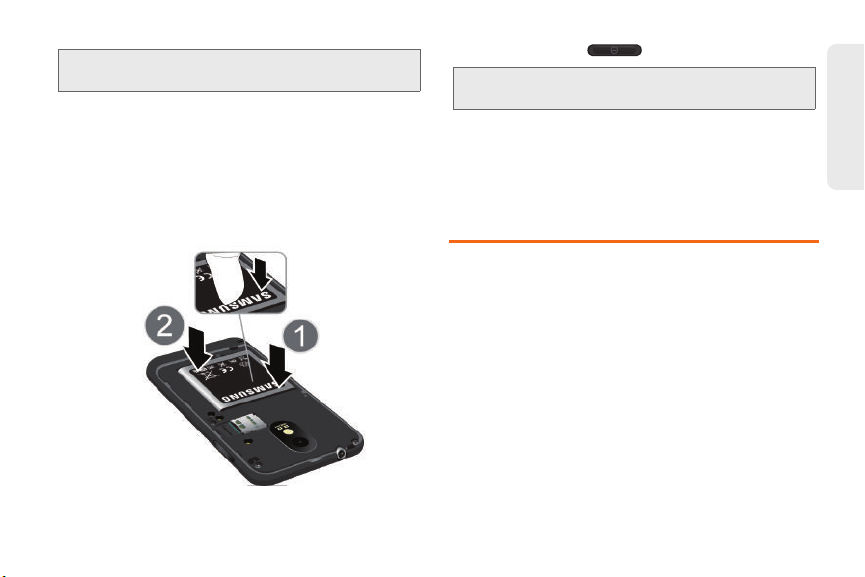
4. Position the battery cover over the battery
compartment and press down until you hear a
click.
5. Press and Hold to turn on the device.
Note: If your device is activated, it turns on, searches for Boost
Mobile service, and enters standby mode.
Unlocking Your Device Screen
䊳 To unlock your phone from this screen, swipe
upward with your finger on the screen.
Activating Your Device
To activate your new phone, please refer to the
Activation Instructions included within the Getting
Started Guide.
For additional support information visit us at:
www.boostmobile.com
– or –
Call Boost Customer Care at
(
1-888-266-7848).
1-888-BOOST-4U
1A. Setting Up Service 3
Setting Up Service
Mobile ID
An exclusive service from Boost Mobile, Mobile ID is
loaded with a variety of “ID packs” for Android powered
phones. Each pack is a customized experience of the
best applications, widgets, shortcuts, wallpapers and
ringers.
You can install as many as many as six ID packs
including MyID at any one time, and you can easily
switch from one ID Pack to another without losing any
applications already installed.
Installing Your First ID Pack
1. Press and tap > Mobile ID.
Note: Your device must be activated, your battery should be
fully charged, and you should be in a network coverage
area before you install an ID Pack.
2. On the Choose Your ID screen, tap Get New ID
Packs.
3. Touch an ID Pack on the Mobile ID > Get New ID
Packs screen. Read the information screen for a
description of the ID Pack and touch
4. Touch Agree to accept the Terms & Conditions.
4 1A. Setting Up Service
Install.
5. If prompted, touch Continue on any following
screens until you see the progress icon in the
upper-left corner of your screen.
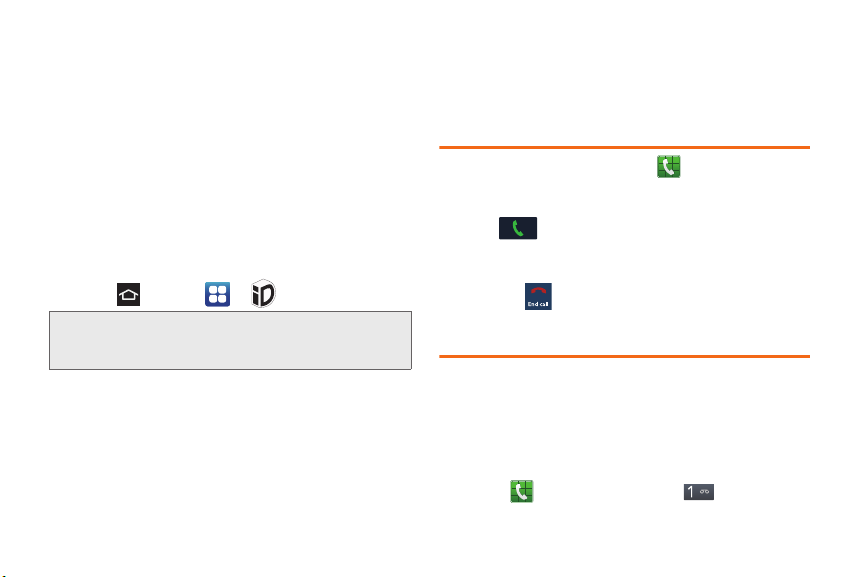
Making Calls
1. From the Home screen, tap and use the
on-screen keypad to enter the number you wish to
dial.
2. Tap to make the call.
Ending a Call
䊳 Tap the key.
Setting Up Your Voicemail
Your device automatically transfers all unanswered
calls to your voicemail, even if your device is in use or
turned off. You should set up your Voicemail and
personal greeting as soon as your device is activated.
Always use a password to protect against unauthorized
access.
1. Press then press and hold .

2. Follow the system prompts to:
䡲 Create your password.
䡲 Record your name announcement.
䡲 Record your greeting.
Note: Voicemail Password
Boost Mobile strongly recommends that you create a
password when setting up your voicemail to protect
against unauthorized access. Without a password,
anyone who has access to your device is able to
access your voicemail messages.
Account Passwords
As a Boost Mobile customer, you enjoy unlimited
access to your personal account information, your
voicemail account, and your data services account. To
ensure that no one else has access to your information,
you will need to create passwords to protect your
privacy.
Voicemail Password
You will create your voicemail password (or passcode)
when you set up your voicemail. See “Setting Up Your
Voicemail” on page 4.
Getting Help
Managing Your Account
Online: www.boostmobile.com
䢇 Access your account information.
䢇 Check your minutes used (depending on your Boost
Mobile service plan).
䢇 View and add money to your account.
䢇 Enroll in Auto Re-Boost to make automatic
payments.
䢇 Purchase accessories.
䢇 Shop for the latest Boost Mobile phones.
䢇 View available Boost Mobile service plans and
options.
䢇 Learn more about data services and other products
like games, ringtones, wallpapers, and more.
From Any Other Phone
䢇 1-888-BOOST-4U (1-888-266-7848).
1A. Setting Up Service 5
Setting Up Service

411
411 gives you access to a variety of services and
information, including residential, business and
government listings, movie listings or showtimes,
driving directions, restaurant reservations and major
local event information. You can get up to three pieces
of information per call, and the operator can
automatically connect your call at no additional charge.
A per call charge and standard airtime fee may apply
depending on your plan.
䊳 Tap .
6 1A. Setting Up Service

Section 2
Your Phone
⽧ Your Device (page 8)
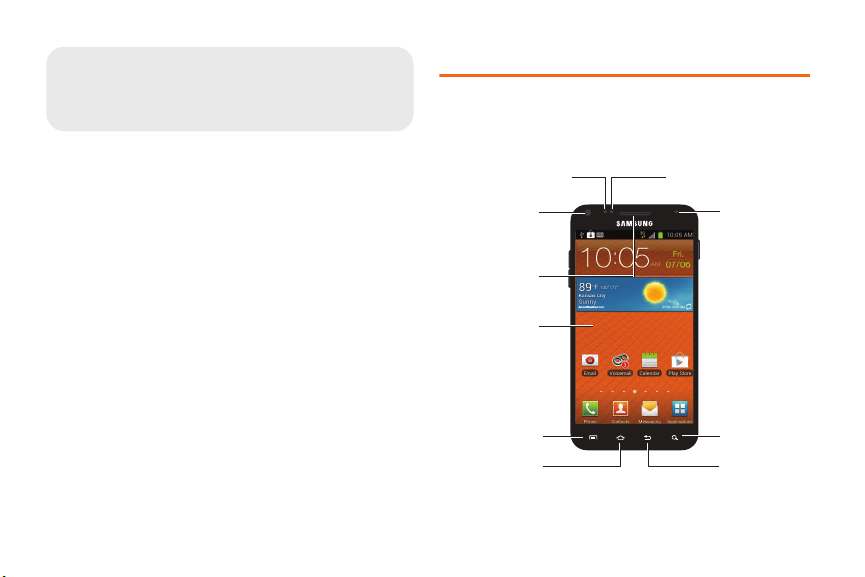
2A. Device Basics
Proximity
Sensor
Menu Key
Back Key
Search Key
LED
Home Key
Ambient Light and
Proximity Sensor
Earpiece
Touchscreen
Self Camera
Lens
⽧ Turning Your Phone On and Off (page 11)
⽧ Viewing the Display Screen (page 11)
⽧ Battery and Charger (page 13)
⽧ Navigation and Customization (page 14)
⽧ Displaying Your Phone Number (page 23)
⽧ Entering Text Using the Samsung Keyboard (page 23)
⽧ Creating a Google Account (page 25)
Your Device
Phone Front View
8 2A. Device Basics

Key Functions
䢇 Ambient Light and Proximity Sensor uses the ambient
light level to adjust keypad access. If the light path is
blocked, for example, when holding the phone close
to your ear, the touch screen will turn off.
䢇 Self Camera Lens allows you to take pictures and
videos of yourself when you set the camera shooting
mode to Front portrait.
䢇 Earpiece lets you hear the caller and automated
prompts.
䢇 Touchscreen displays all the information needed to
operate your device, such as the call status, the
Contacts list, and the date and time. Also provides
one-touch access to all of your features and
applications.
䢇 Menu Key allows you to access your device’s main
functions menu: Add, Manage apps, Wallpaper,
Search, Notifications, and Settings. While in a menu,
press to open a list of actions available from the
current screen or onscreen option.
䢇 Home Key returns you to the Home Screen. Press and
hold to open the recently-used applications window.
䢇 Back Key When in a menu, pressing the Back key
returns you to the previous menu, closes a dialog
box, or exits an onscreen menu/option.
䢇 Search Key launches the Google search option.
䢇 Status Bar Icons provide information about your
device’s status and options, such as signal strength,
wireless technology, ringer setting, messaging, and
battery charge.
䢇 LED Indicator lights when charging, you have missed
events, or incoming notifications. The light turns on
by default unless you turn it off.
䢇 Proximity Sensor uses the ambient light level to
adjust keypad access. If the light path is blocked, for
example, when holding the phone close to your ear,
the touch screen will turn off.
2A. Device Basics 9
Device Basics

Phone Camera and External Views
3.5mm
Headset Jack
Power/Lock
Button
Speaker
Mic
Charger/
Accessory Jack
10 2A. Device Basics
Camera
Volume
Buttons
Flash
䢇 3.5 mm Headset Jack allows you to plug in an
optional headset for convenient, hands-free
conversations.
CAUTION! Inserting an accessory into
the incorrect jack may damage the device.
䢇 Power Button lets you turn the device on or off,
or turn off the touchscreen display.
䡲 When the screen is turned off, press once to
return to Screen lock mode.
䡲 While the device is unlocked and not on an active
call, press and hold to display the Phone options
menu (Silent mode, Airplane mode, Power off).
䢇 External Speaker lets you hear the different ringers
and sounds. You can mute the ringer when receiving
incoming calls by pressing the volume button. The
speaker also lets you hear the caller’s voice in
speakerphone mode.
䢇 Charger/Accessory Jack allows you to connect the
phone charger or a USB cable (included).
CAUTION!
Inserting an accessory into the incorrect jack may
damage the device.
䢇 Microphone allows other callers to hear you clearly
when you are speaking to them.
䢇 Camera flash helps illuminate subjects in low-light
environments when the camera is focusing and
capturing a photo or video.
䢇 Volume Buttons allows you to adjust the ringer
volume in standby mode, the voice volume during a
call, and media playback volume.
䢇 Camera Lens as part of the built-in 3.0 megapixel
camera, this lens lets you take pictures and videos
䢇 microSD Card* Slot lets you use a microSD card to
expand the memory of your phone.
Note: *microSD Card not included. Must be purchased
separately.
䢇 Camera Button lets you activate the camera and
camcorder and take pictures and videos.
Turning Your Phone On and Off
1. Press and hold until the phone
switches on.
2. Sweep your finger across the screen to unlock
the phone.
Turning Your Phone Off
1. To switch off the phone, press and hold ,
until the
2. Tap Power
Device options
off
to switch off the phone.
screen displays.
3. At the Power off prompt, tap OK.
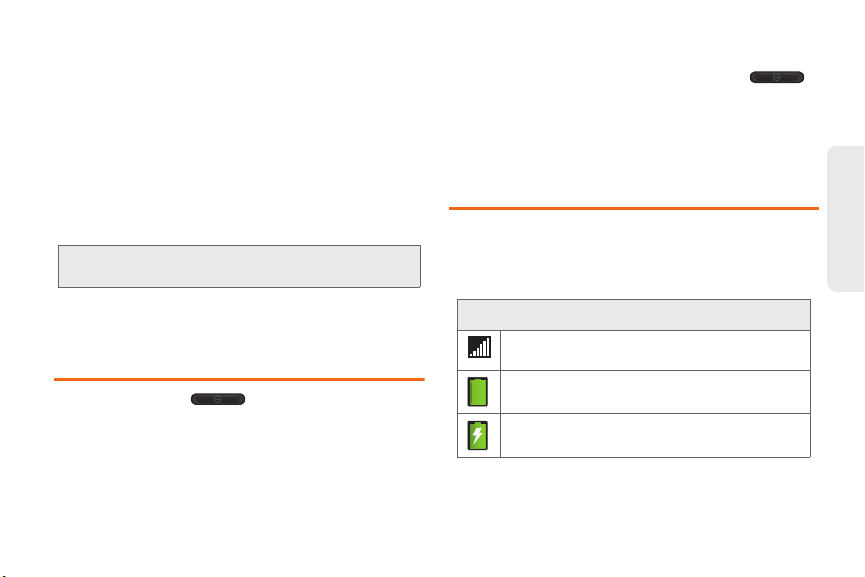
Viewing the Display Screen
Your device’s display screen provides information
about your device’s status and options. This list
identifies the symbols you’ll see on your device’s
display screen:
Status Bar – Status Icons
Signal Strength – Shows your current signal
strength. (More bars = stronger signal.)
Battery Strength – Shows your current battery
charge level. (Icon shown is fully charged.)
Battery Charging – Shows your current battery
charge level and indicates it is charging.
2A. Device Basics 11
Device Basics
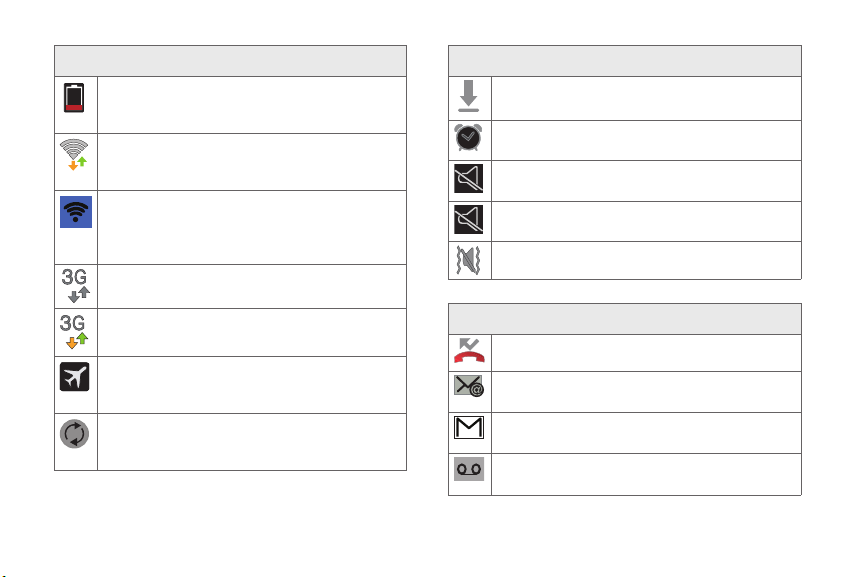
Status Bar – Status Icons
Battery Critical – Shows your current battery
charge level requires attention and your device
will soon shut off.
Wi-Fi Connected – Wi-Fi is connected, active
and communicating with a Wireless Access
Point (WAP).
Wi-Fi Direct Connected – Displays when Wi-Fi
Direct is active and configured for a direct
connection to another compatible device in the
same direct communication mode.
3G Available – Boost 3G data service is
available.
3G Communicating – Boost 3G data service is
active and communicating.
Airplane Mode On – Your device will not make
or receive calls or provide data access. Local
applications are still available.
Data Synchronization – Application sync is
active and synchronization is in progress for
Gmail, Calendar and Contacts.
12 2A. Device Basics
Status Bar – Status Icons
Mobile ID – Mobile ID is available for installation.
Alarm Event – Shows you have an upcoming
alarm event.
Silence – All incoming sounds are turned off.
Mute – All sound are turned off.
Vibrate – The ringer is set to vibrate only.
Status Bar – Notification Icons
Missed Call – You missed an incoming call.
New Email – You received a new email or text
message.
New Gmail – You received a new Gmail
message.
New Voicemail – You received a voicemail
message.
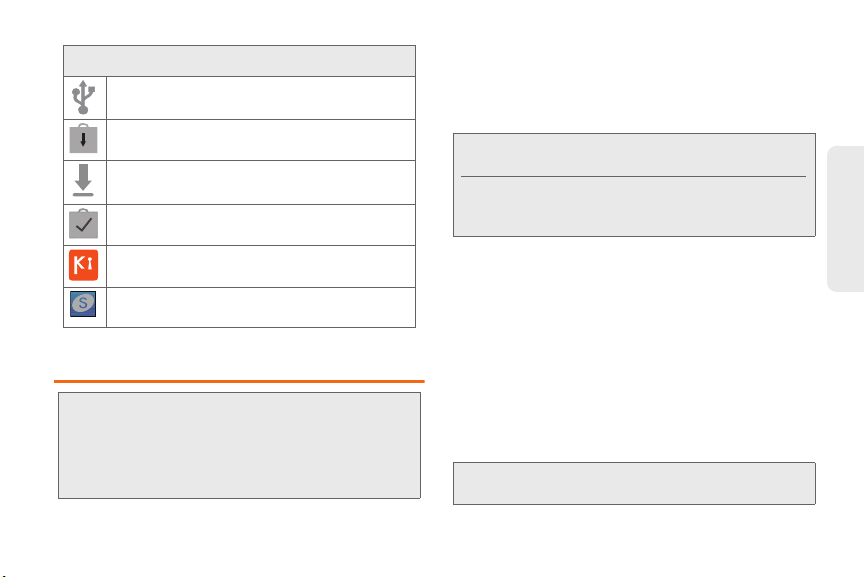
Status Bar – Notification Icons
USB Connection – The device has detected an
active USB connection.
System Updates Available – A new system
update is available for download.
Downloading – The phone is currently
downloading an application.
Download Successful – A recent software
download was successfully downloaded.
Kies Air Connection – Phone is connected to a
PC using Kies air.
Samsung Notification – Samsung Account
requires activation.
Battery and Charger
WARNING: Use only Samsung-approved batteries and
chargers with your device. The failure to use a
Samsung-approved battery and charger may
increase the risk that your device will overheat,
catch fire or explode, resulting in serious bodily
injury, death or property damage.
Battery Capacity
Your device is equipped with a Lithium Ion (Li-Ion)
battery. It allows you to recharge your battery before it is
fully drained.
Note: Watch your device’s battery level indicator and charge
the battery before it runs out of power.
Long backlight settings, searching for service, vibrate
mode, browser use and other variables may reduce the
battery’s talk and standby times.
Installing the Battery
䊳 See “Setting Up Your Device” on page 2.
Removing the Battery
1. Make sure the power is off so that you don’t lose
any stored numbers or messages.
2. Grasp the device firmly, locate the cover release
latch, and then place your fingernail in the opening
and firmly “pop” the cover off the device.
3. Carefully remove the battery from the device.
WARNING: Do not handle a damaged or leaking Li-Ion
battery as you can be burned.
2A. Device Basics 13
Device Basics
Charging the Battery
Keeping track of your battery’s charge is important. If
your battery level becomes too low, your device
automatically turns off and you will lose any information
you were just working on.
Always use a Samsung-approved desktop charger,
travel charger, or vehicle power adapter to charge your
battery.
䊳 Plug the first end of the charger into the phone’s
charger jack and the other end into an electrical
outlet.
With the Samsung-approved Li-Ion battery, you can
recharge the battery before it completely runs down.
Navigation and Customization
The Samsung Galaxy S II is a touch-sensitive device
which allows you to select onscreen options with a
single tap, and also scroll through long menu lists.
Simply slide up and down through the display with
your fingertip.
14 2A. Device Basics
Tip: Some menu options are also accessed by pressing and
holding an onscreen item, such as a Contact entry from
the Contacts tab.
Home Screen Overview
The Home Screen is the starting point for many
applications and functions, and it allows you to add
items like application icons, shortcuts, folders, or
widgets to give you instant access to information and
applications.
Press from any menu to access the default page.
䢇 Status bar, located at the top of the screen, displays
both Notification and Status icons.
Status
Notification
Main
Display
Shortcuts
Widgets
App tab
䢇 Status area displays icons associated with the status
of the device such as communication, coverage,
Bluetooth and Wi-Fi communication, battery levels,
GPS, etc.
䢇 Notification area displays icons associated with end-
user notifications such as: email messages, calls
(missed, call in progress), new voicemail, upcoming
events, a USB connection, and text/MMS.
䢇 Main Display a customizable screen that provides
information about notifications and device status,
allows access to application widgets.
䢇 Shortcuts are icons that launch available device
applications such as Camera, Samsung App, and
Play Store.
䢇 Widgets are self-contained onscreen applications
(not shortcuts). These can be placed onto any of the
available screens (Home or Extended).
䢇 Extended Home Screens are screens that extend
beyond the current visible screen width to provide
more space for adding icons, widgets, and more.
䡲 There are seven available screens. Three of those
screens are populated with default shortcuts or
widgets, and four empty screens to customize.
There are seven white dots in the middle, lower
portion of the screen. The boldest, white dot
indicates the current page.
Device Basics
2A. Device Basics 15
Note: The Status bar is visible across all Home screens.
Screen #3 is the Home screen.
䢇 Applications tab accesses all of your available
applications. Some of these applications also exist as
Widgets to place onto an available screen.
Using the Applications Tab
All of the application icons are accessed through this
tab.
1. Press and tap to open the tab.
2. Scroll through the list and tap an icon to launch the
associated application.
Applications
The following is a listing of some sample applications
available using the Applications tab.
16 2A. Device Basics
Application Icons
AllShare - allows your phone to stream photos,
music and videos from its memory to other
Digital
Living Network Alliance (DLNA) certified phones.
Your phone can also play digital content
streamed from other DLNA certified phones.
Boost Hotspot Mobile Hotspot allows you to turn
your phone into a Wi-Fi hotspot. The feature
works best
when used in conjunction with 4G data services
(although 3G service can also be used).
Boost Zone - Lets you stay connected to all the
latest news and information from Boost Mobile.
Included here are, news, feedback, featured
applications and trips/tricks for your device
(page 112).
Calculator – Launches the onscreen calculator
application (page 82).
Calendar – Launches the Calendar applications
that syncs itself to either your Google or
®
calendar (page 78). Events can only be
Outlook
synced to a managed account (page 50).
 Loading...