

Page 1
MOBILE PLAYER
User Manual
Please read this manual before operating your
phone and keep it for future reference.
Page 2

YP-GS1_UM_English_UELB5_BH_120312_F5
Intellectual Property
All Intellectual Property, as defined below, owned by or which is otherwise the property of Samsung or its respective suppliers
relating to the SAMSUNG Galaxy Player, including but not limited to, accessories, parts, or software relating there to (the “Galaxy
System”), is proprietary to Samsung and protected under federal laws, state laws, and international treaty provisions. Intellectual
Property includes, but is not limited to, inventions (patentable or unpatentable), patents, trade secrets, copyrights, software,
computer programs, and related documentation and other works of authorship. You may not infringe or otherwise violate the
rights secured by the Intellectual Property. Moreover, you agree that you will not (and will not attempt to) modify, prepare
derivative works of, reverse engineer, decompile, disassemble, or otherwise attempt to create source code from the software. No
title to or ownership in the Intellectual Property is transferred to you. All applicable rights of the Intellectual Property shall remain
with SAMSUNG and its suppliers.
Open Source Software
Some software components of this product incorporate source code covered under GNU General Public License (GPL), GNU Lesser
General Public License (LGPL), OpenSSL License, BSD License and other open source licenses. To obtain the source code covered
under the open source licenses, please visit:
http://opensource.samsung.com
.
Disclaimer of Warranties; Exclusion of Liability
EXCEPT AS SET FORTH IN THE EXPRESS WARRANTY CONTAINED ON THE WARRANTY PAGE ENCLOSED WITH THE PRODUCT, THE
PURCHASER TAKES THE PRODUCT "AS IS", AND SAMSUNG MAKES NO EXPRESS OR IMPLIED WARRANTY OF ANY KIND
WHATSOEVER WITH RESPECT TO THE PRODUCT, INCLUDING BUT NOT LIMITED TO THE MERCHANTABILITY OF THE PRODUCT OR
ITS FITNESS FOR ANY PARTICULAR PURPOSE OR USE; THE DESIGN, CONDITION OR QUALITY OF THE PRODUCT; THE
PERFORMANCE OF THE PRODUCT; THE WORKMANSHIP OF THE PRODUCT OR THE COMPONENTS CONTAINED THEREIN; OR
COMPLIANCE OF THE PRODUCT WITH THE REQUIREMENTS OF ANY LAW, RULE, SPECIFICATION OR CONTRACT PERTAINING
Page 3

THERETO. NOTHING CONTAINED IN THE INSTRUCTION MANUAL SHALL BE CONSTRUED TO CREATE AN EXPRESS OR IMPLIED
WARRANTY OF ANY KIND WHATSOEVER WITH RESPECT TO THE PRODUCT. IN ADDITION, SAMSUNG SHALL NOT BE LIABLE FOR
ANY DAMAGES OF ANY KIND RESULTING FROM THE PURCHASE OR USE OF THE PRODUCT OR ARISING FROM THE BREACH OF
THE EXPRESS WARRANTY, INCLUDING INCIDENTAL, SPECIAL OR CONSEQUENTIAL DAMAGES, OR LOSS OF ANTICIPATED PROFITS
OR BENEFITS.
SAMSUNG IS NOT LIABLE FOR PERFORMANCE ISSUES OR INCOMPATIBILITIES CAUSED BY YOUR EDITING OF REGISTRY SETTINGS,
OR YOUR MODIFICATION OF OPERATING SYSTEM SOFTWARE.
USING CUSTOM OPERATING SYSTEM SOFTWARE MAY CAUSE YOUR DEVICE AND APPLICATIONS TO WORK IMPROPERLY.
Samsung Electronics America (SEA), Inc
©
2012 Samsung Electronics America, Inc. All rights reserved.
Address:
85 Challenger Road
Ridgefield Park,
New Jersey
07660
Toll Free
Telephone:
1-800-SAMSUNG
Internet
Address:
http://www.samsung.com
Page 4

Do you have questions about your Samsung Mobile Device?
For 24 hour information and assistance, we offer a new FAQ/ARS System (Automated Response System) at:
www.samsung.com/us/support
Nuance®, VSuite™, T9® Text Input, XT9® Smart Input, and the Nuance logo are trademarks or registered trademarks of Nuance
Communications, Inc., or its affiliates in the United States and/or other countries.
The Bluetooth
®
word mark, figure mark (stylized “B Design”), and combination mark (Bluetooth word mark and “B Design”) are
registered trademarks and are wholly owned by the Bluetooth SIG.
microSD
TM
, microSDHCTM, and the microSD logo are Trademarks of the SD Card Association.
Google, the Google logo, Android, the Android logo, Android Market, Gmail, Google Calendar, Google Latitude, Google Maps,
Google Music, Google Talk, Picasa, and YouTube and other marks are trademarks of Google Inc.
Wi-Fi is a registered trademark of the Wireless Fidelity Alliance, Inc.
, DivX
®
, DivX Certified® and associated logos are trademarks of Rovi Corporation or its subsidiaries and are used under
license.
DivX Certified
®
to play DivX® video up to HD 720p, including premium content.
ABOUT DIVX VIDEO: DivX
®
is a digital video format created by DivX, LLC, a subsidiary of Rovi Corporation. This is an official DivX
Certified
®
device that plays DivX video. Visit
www.divx.com
for more information and software tools to convert your files into DivX
videos.
ABOUT DIVX VIDEO-ON-DEMAND: This DivX Certified
®
device must be registered in order to play purchased DivX Video-on-
Demand (VOD) movies. To obtain your registration code, locate the DivX VOD section in your device setup menu (
(Menu) >
Settings > About device > Legal information > Licence settings > DivX® VOD > Register
). Go to
vod.divx.com
for more information on
how to complete your registration.
TM
Page 5

1
Table of Contents
Section 1: Getting Started .......................... 6
Understanding This User Manual . . . . . . . . . . . 6
Setting Up Your Device . . . . . . . . . . . . . . . . . . . 7
Charging the Battery . . . . . . . . . . . . . . . . . . . 10
Turning Your Device On and Off . . . . . . . . . . . 11
Setting Up Your Device . . . . . . . . . . . . . . . . . . 12
Using Google Maps . . . . . . . . . . . . . . . . . . . . 13
Task Manager . . . . . . . . . . . . . . . . . . . . . . . . 14
Accessories . . . . . . . . . . . . . . . . . . . . . . . . . . 14
Securing Your Device . . . . . . . . . . . . . . . . . . . 15
Troubleshooting . . . . . . . . . . . . . . . . . . . . . . . 16
Android System Recovery . . . . . . . . . . . . . . . 16
Safe Mode . . . . . . . . . . . . . . . . . . . . . . . . . . . 17
Section 2: Understanding Your Device .... 18
Features . . . . . . . . . . . . . . . . . . . . . . . . . . . . 18
Front View . . . . . . . . . . . . . . . . . . . . . . . . . . . 19
Side View . . . . . . . . . . . . . . . . . . . . . . . . . . . . 20
Back and Bottom Views . . . . . . . . . . . . . . . . . 20
Home Screen . . . . . . . . . . . . . . . . . . . . . . . . . 21
Navigating Your Device . . . . . . . . . . . . . . . . . 23
Notification Panel . . . . . . . . . . . . . . . . . . . . . . 24
Status Bar . . . . . . . . . . . . . . . . . . . . . . . . . . . 25
Primary Shortcuts . . . . . . . . . . . . . . . . . . . . . 27
Widgets . . . . . . . . . . . . . . . . . . . . . . . . . . . . . 28
Shortcuts . . . . . . . . . . . . . . . . . . . . . . . . . . . . 29
Folders . . . . . . . . . . . . . . . . . . . . . . . . . . . . . . 30
Wallpapers . . . . . . . . . . . . . . . . . . . . . . . . . . . 31
Applications . . . . . . . . . . . . . . . . . . . . . . . . . . 32
Section 3: Entering Text ............................37
Virtual QWERTY Keyboard . . . . . . . . . . . . . . . . 37
Using the Samsung Keypad . . . . . . . . . . . . . . 37
Configuring the Keypad . . . . . . . . . . . . . . . . . 37
Entering Upper and Lower Case Letters . . . . . 38
Entering Symbols and Numbers . . . . . . . . . . . 38
Using XT9 Predictive Text . . . . . . . . . . . . . . . . 38
Editing Text . . . . . . . . . . . . . . . . . . . . . . . . . . 39
Using the Handwriting Feature . . . . . . . . . . . . 40
Using Speech Recognition . . . . . . . . . . . . . . . 43
Page 6

2
Section 4: Contacts and Accounts ...........44
Accounts . . . . . . . . . . . . . . . . . . . . . . . . . . . . . 44
Contacts . . . . . . . . . . . . . . . . . . . . . . . . . . . . . 46
My Profile . . . . . . . . . . . . . . . . . . . . . . . . . . . .50
Groups . . . . . . . . . . . . . . . . . . . . . . . . . . . . . . 51
Activities . . . . . . . . . . . . . . . . . . . . . . . . . . . . .53
Section 5: Messaging ................................54
Types of Messages . . . . . . . . . . . . . . . . . . . . .54
Gmail . . . . . . . . . . . . . . . . . . . . . . . . . . . . . . .54
Email . . . . . . . . . . . . . . . . . . . . . . . . . . . . . . . . 57
Google Talk . . . . . . . . . . . . . . . . . . . . . . . . . . .62
Google Messenger . . . . . . . . . . . . . . . . . . . . . .63
Section 6: Web and Social Networking ....64
Books . . . . . . . . . . . . . . . . . . . . . . . . . . . . . . . 64
Internet . . . . . . . . . . . . . . . . . . . . . . . . . . . . . .66
Maps . . . . . . . . . . . . . . . . . . . . . . . . . . . . . . . . 72
Latitude . . . . . . . . . . . . . . . . . . . . . . . . . . . . . . 74
Navigation . . . . . . . . . . . . . . . . . . . . . . . . . . . . 76
Places . . . . . . . . . . . . . . . . . . . . . . . . . . . . . . .78
Google+ . . . . . . . . . . . . . . . . . . . . . . . . . . . . .78
Google Search . . . . . . . . . . . . . . . . . . . . . . . . .79
Voice Search . . . . . . . . . . . . . . . . . . . . . . . . . .79
YouTube . . . . . . . . . . . . . . . . . . . . . . . . . . . . .80
Section 7: Music .......................................82
Music Player . . . . . . . . . . . . . . . . . . . . . . . . . .82
FM Radio . . . . . . . . . . . . . . . . . . . . . . . . . . . . .85
Section 8: Photos and Videos ...................87
Camera . . . . . . . . . . . . . . . . . . . . . . . . . . . . . .87
Videos . . . . . . . . . . . . . . . . . . . . . . . . . . . . . . .93
Gallery . . . . . . . . . . . . . . . . . . . . . . . . . . . . . . .94
Section 9: Connections .............................99
Wi-Fi . . . . . . . . . . . . . . . . . . . . . . . . . . . . . . . .99
Bluetooth . . . . . . . . . . . . . . . . . . . . . . . . . . . .101
Samsung Kies . . . . . . . . . . . . . . . . . . . . . . . .102
Memory Card . . . . . . . . . . . . . . . . . . . . . . . . .103
Kies Air . . . . . . . . . . . . . . . . . . . . . . . . . . . . .105
Section 10: Applications and Widgets ...106
GPS Applications . . . . . . . . . . . . . . . . . . . . . .106
AllShare . . . . . . . . . . . . . . . . . . . . . . . . . . . . .107
Angry Birds . . . . . . . . . . . . . . . . . . . . . . . . . .108
Page 7

3
Books . . . . . . . . . . . . . . . . . . . . . . . . . . . . . 108
Calculator . . . . . . . . . . . . . . . . . . . . . . . . . . 109
Calendar . . . . . . . . . . . . . . . . . . . . . . . . . . . 109
Camera . . . . . . . . . . . . . . . . . . . . . . . . . . . . 111
Clock . . . . . . . . . . . . . . . . . . . . . . . . . . . . . . 111
Contacts . . . . . . . . . . . . . . . . . . . . . . . . . . . 114
Downloads . . . . . . . . . . . . . . . . . . . . . . . . . . 114
Dual Clock . . . . . . . . . . . . . . . . . . . . . . . . . . 115
Email . . . . . . . . . . . . . . . . . . . . . . . . . . . . . . 115
FM Radio . . . . . . . . . . . . . . . . . . . . . . . . . . . 115
Gallery . . . . . . . . . . . . . . . . . . . . . . . . . . . . . 116
Gmail . . . . . . . . . . . . . . . . . . . . . . . . . . . . . . 116
Google+ for Mobile . . . . . . . . . . . . . . . . . . . 116
Google Messenger . . . . . . . . . . . . . . . . . . . . 116
Google Search . . . . . . . . . . . . . . . . . . . . . . . 117
Internet . . . . . . . . . . . . . . . . . . . . . . . . . . . . 117
Keys Air . . . . . . . . . . . . . . . . . . . . . . . . . . . . 117
Latitude . . . . . . . . . . . . . . . . . . . . . . . . . . . . 117
Maps . . . . . . . . . . . . . . . . . . . . . . . . . . . . . . 118
Market . . . . . . . . . . . . . . . . . . . . . . . . . . . . . 118
Memo . . . . . . . . . . . . . . . . . . . . . . . . . . . . . 119
Music . . . . . . . . . . . . . . . . . . . . . . . . . . . . . . 120
My Files . . . . . . . . . . . . . . . . . . . . . . . . . . . . 120
Navigation . . . . . . . . . . . . . . . . . . . . . . . . . . 121
News & Weather . . . . . . . . . . . . . . . . . . . . . 121
Places . . . . . . . . . . . . . . . . . . . . . . . . . . . . . 122
Power Control . . . . . . . . . . . . . . . . . . . . . . . 122
Quickoffice . . . . . . . . . . . . . . . . . . . . . . . . . . 123
Samsung Apps . . . . . . . . . . . . . . . . . . . . . . . 123
Samsung Smart View . . . . . . . . . . . . . . . . . . 124
Settings . . . . . . . . . . . . . . . . . . . . . . . . . . . . 125
Social Hub . . . . . . . . . . . . . . . . . . . . . . . . . . 125
Talk . . . . . . . . . . . . . . . . . . . . . . . . . . . . . . . 125
Task Manager . . . . . . . . . . . . . . . . . . . . . . . 126
textPlus . . . . . . . . . . . . . . . . . . . . . . . . . . . . 126
Videos . . . . . . . . . . . . . . . . . . . . . . . . . . . . . 126
Voice Recorder . . . . . . . . . . . . . . . . . . . . . . . 127
Voice Search . . . . . . . . . . . . . . . . . . . . . . . . 128
YouTube . . . . . . . . . . . . . . . . . . . . . . . . . . . . 128
Section 11: Settings ................................129
Accessing Settings . . . . . . . . . . . . . . . . . . . . 129
Wireless and Networks . . . . . . . . . . . . . . . . . 129
Page 8

4
Sound . . . . . . . . . . . . . . . . . . . . . . . . . . . . . .134
Display . . . . . . . . . . . . . . . . . . . . . . . . . . . . . 136
Location and Security . . . . . . . . . . . . . . . . . . 138
Applications . . . . . . . . . . . . . . . . . . . . . . . . .140
Accounts and Sync . . . . . . . . . . . . . . . . . . . .143
Privacy . . . . . . . . . . . . . . . . . . . . . . . . . . . . . 144
SD Card and Device Storage . . . . . . . . . . . . . 145
Locale and Text . . . . . . . . . . . . . . . . . . . . . . .146
Voice Input and Output . . . . . . . . . . . . . . . . . 148
Accessibility . . . . . . . . . . . . . . . . . . . . . . . . . 149
Dock Settings . . . . . . . . . . . . . . . . . . . . . . . .149
Date and Time . . . . . . . . . . . . . . . . . . . . . . . . 150
About Device . . . . . . . . . . . . . . . . . . . . . . . . . 150
Section 12: Health and Safety
Information ............................................152
Exposure to Radio Frequency (RF) Signals . . .152
Specific Absorption Rate (SAR) Certification
Information . . . . . . . . . . . . . . . . . . . . . . . .157
FCC Part 15 Information to User . . . . . . . . . .159
Smart Practices While Driving . . . . . . . . . . . .159
Battery Use and Safety . . . . . . . . . . . . . . . . .160
Samsung Mobile Products and Recycling . . . .162
UL Certified Travel Charger . . . . . . . . . . . . . .162
Display / Touch-Screen . . . . . . . . . . . . . . . . .163
GPS . . . . . . . . . . . . . . . . . . . . . . . . . . . . . . . .164
Care and Maintenance . . . . . . . . . . . . . . . . . .164
Responsible Listening . . . . . . . . . . . . . . . . . .165
Operating Environment . . . . . . . . . . . . . . . . .167
Restricting Children's Access to Your
Mobile Device . . . . . . . . . . . . . . . . . . . . . .169
FCC Notice and Cautions . . . . . . . . . . . . . . . .169
Other Important Safety Information . . . . . . . .170
Section 13: Warranty Information ..........172
Standard Limited Warranty . . . . . . . . . . . . . .172
End User License Agreement for Software . . .177
Social Hub . . . . . . . . . . . . . . . . . . . . . . . . . . .184
LIMITATION OF LIABILITY . . . . . . . . . . . . . . . .189
Social Hub Privacy Policy . . . . . . . . . . . . . . . .192
INFORMATION THAT WE COLLECT . . . . . . . . .192
USE OF INFORMATION WE COLLECT . . . . . . .193
DISCLOSURE OF INFORMATION TO
THIRD PARTIES . . . . . . . . . . . . . . . . . . . . . .194
Page 9

5
CHILDREN . . . . . . . . . . . . . . . . . . . . . . . . . . 195
SECURITY OF THE INFORMATION
WE COLLECT . . . . . . . . . . . . . . . . . . . . . . 195
CHAT ROOMS AND OTHER PUBLIC AREAS . . 195
CONTESTS AND SWEEPSTAKES . . . . . . . . . . 196
ACCURACY OF THE INFORMATION
WE COLLECT . . . . . . . . . . . . . . . . . . . . . . 196
CHANGES TO PRIVACY POLICY . . . . . . . . . . . 197
Social Hub End User License Agreement . . . 197
Section 14: Samsung Product
Registration ...........................................202
Index .........................................................203
Page 10

6
Section 1: Getting Started
This section helps you to quickly start using your device.
Understanding This User Manual
The sections of this manual generally follow the features of
your device. A robust index for features begins on page 203.
Also included is important safety information, beginning on
page 152, that you should know before using your device.
This manual gives navigation instructions according to the
default display settings. If you select other settings,
navigation steps may be different.
Unless otherwise specified, all instructions in this manual
assume that you are starting from a Home screen. To get to a
Home screen, you may need to unlock the device. For more
information, refer to “Securing Your Device” on page 15.
Note:
Instructions in this manual are based on default settings
and may vary from your device depending on the
software version on your device and any changes to the
device’s settings.
Note:
Unless stated otherwise, instructions in this user manual
start with the device unlocked, at the Home screen.
Note:
All screen images in this manual are simulated. Actual
displays may vary depending on the software version of
your device and any changes to the device’s settings.
Special Text
In this manual, some text is set apart from the rest. This
special text is intended to point out important information,
share quick methods for activating features, define terms,
and more. The definitions for these methods are as follows:
•
Notes
: Presents alternative options for the current feature, menu,
or sub-menu.
•
Tips
: Provides quick or innovative methods or useful shortcuts.
•
Important
: Points out important information about the current
feature that could affect performance.
Page 11
Getting Started 7
•
Warning
: Brings important information to your attention that can
help to prevent loss of data or functionality or damage to your
device.
Text Conventions
This manual provides condensed information about how to
use your device. To make this possible, the following text
conventions are used to represent often-used steps:
Setting Up Your Device
Prior to use, it is necessary to install the battery into its
corresponding internal compartment. The microSD card slot
is also located in this same internal area.
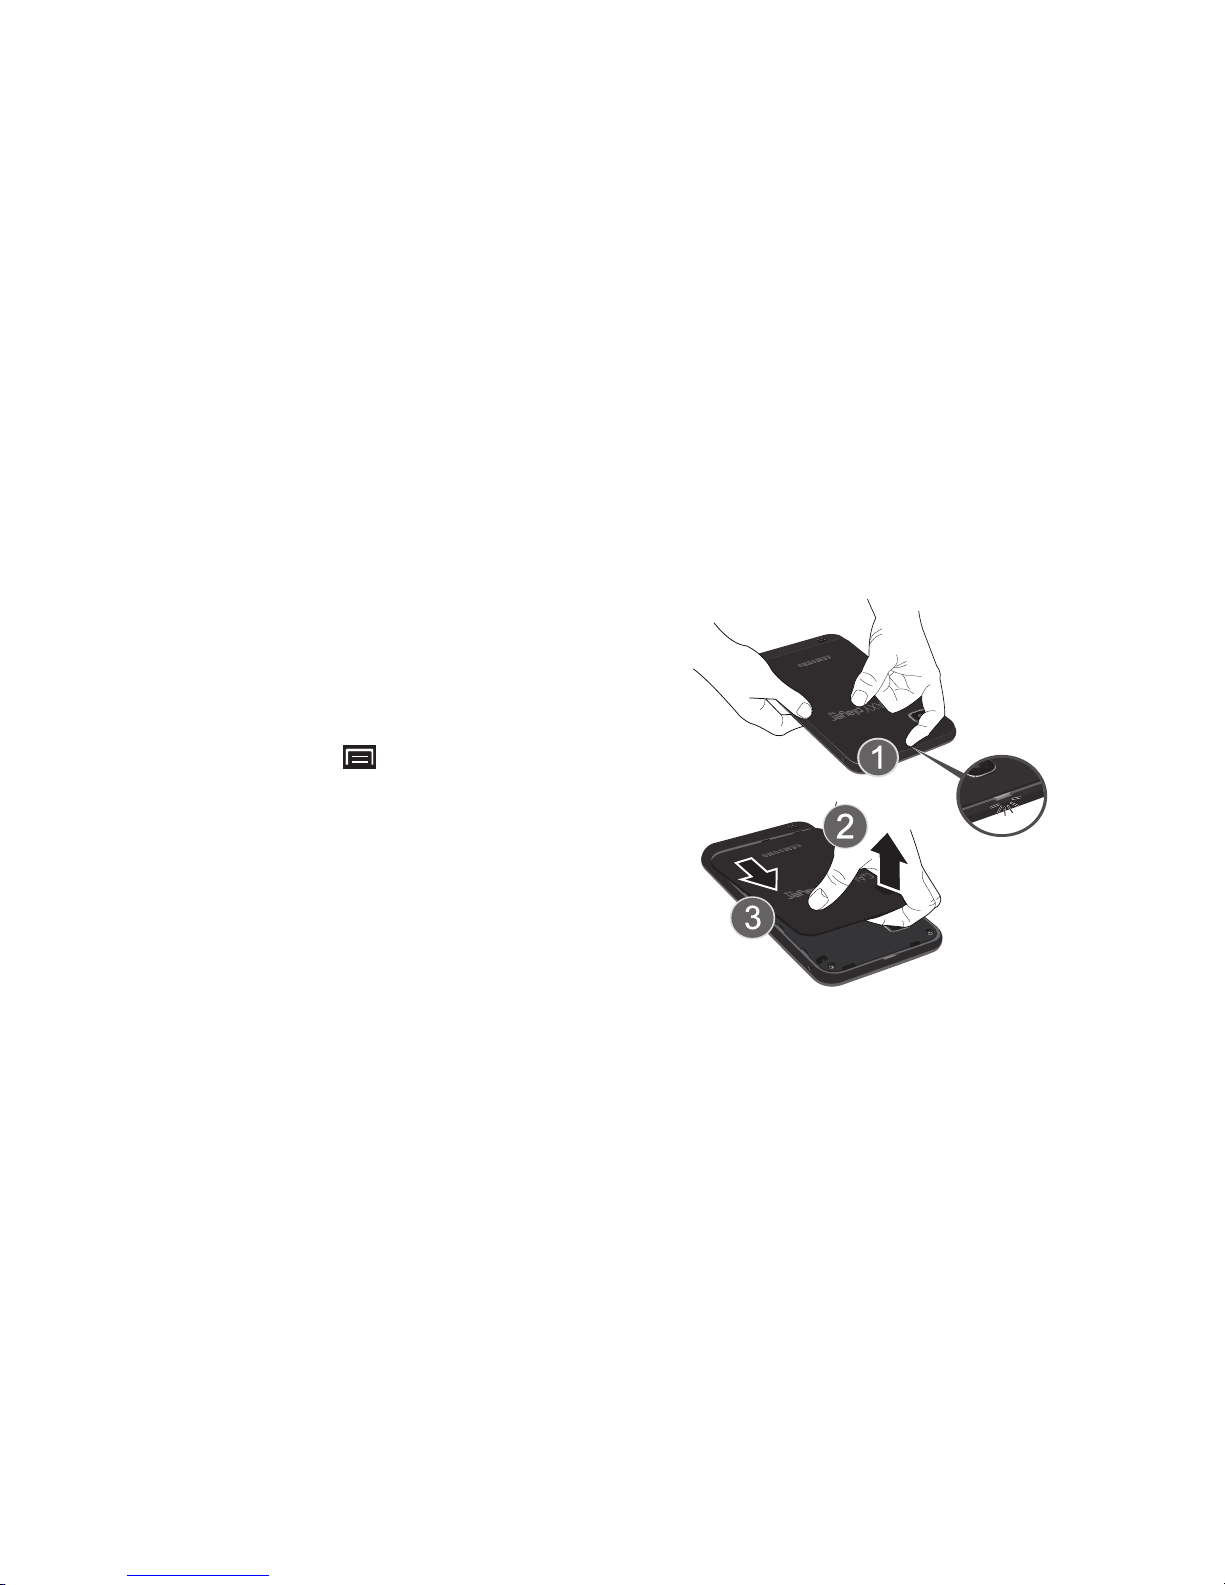
Removing the Battery Cover
To remove the battery cover:
1. Place your thumbnail into the slot (1) at the top of the
device. If you have fragile nails, use a pointed object.
2. Lift the cover up (2) and off (3) the device.
➔
Arrows are used to represent the sequence of selecting
successive options in longer, or repetitive, procedures. For
example:
From a Home screen, touch
(Menu) ➔Settings
➔
Wireless and networks
➔
Wi-Fi settings
.
Page 12
8
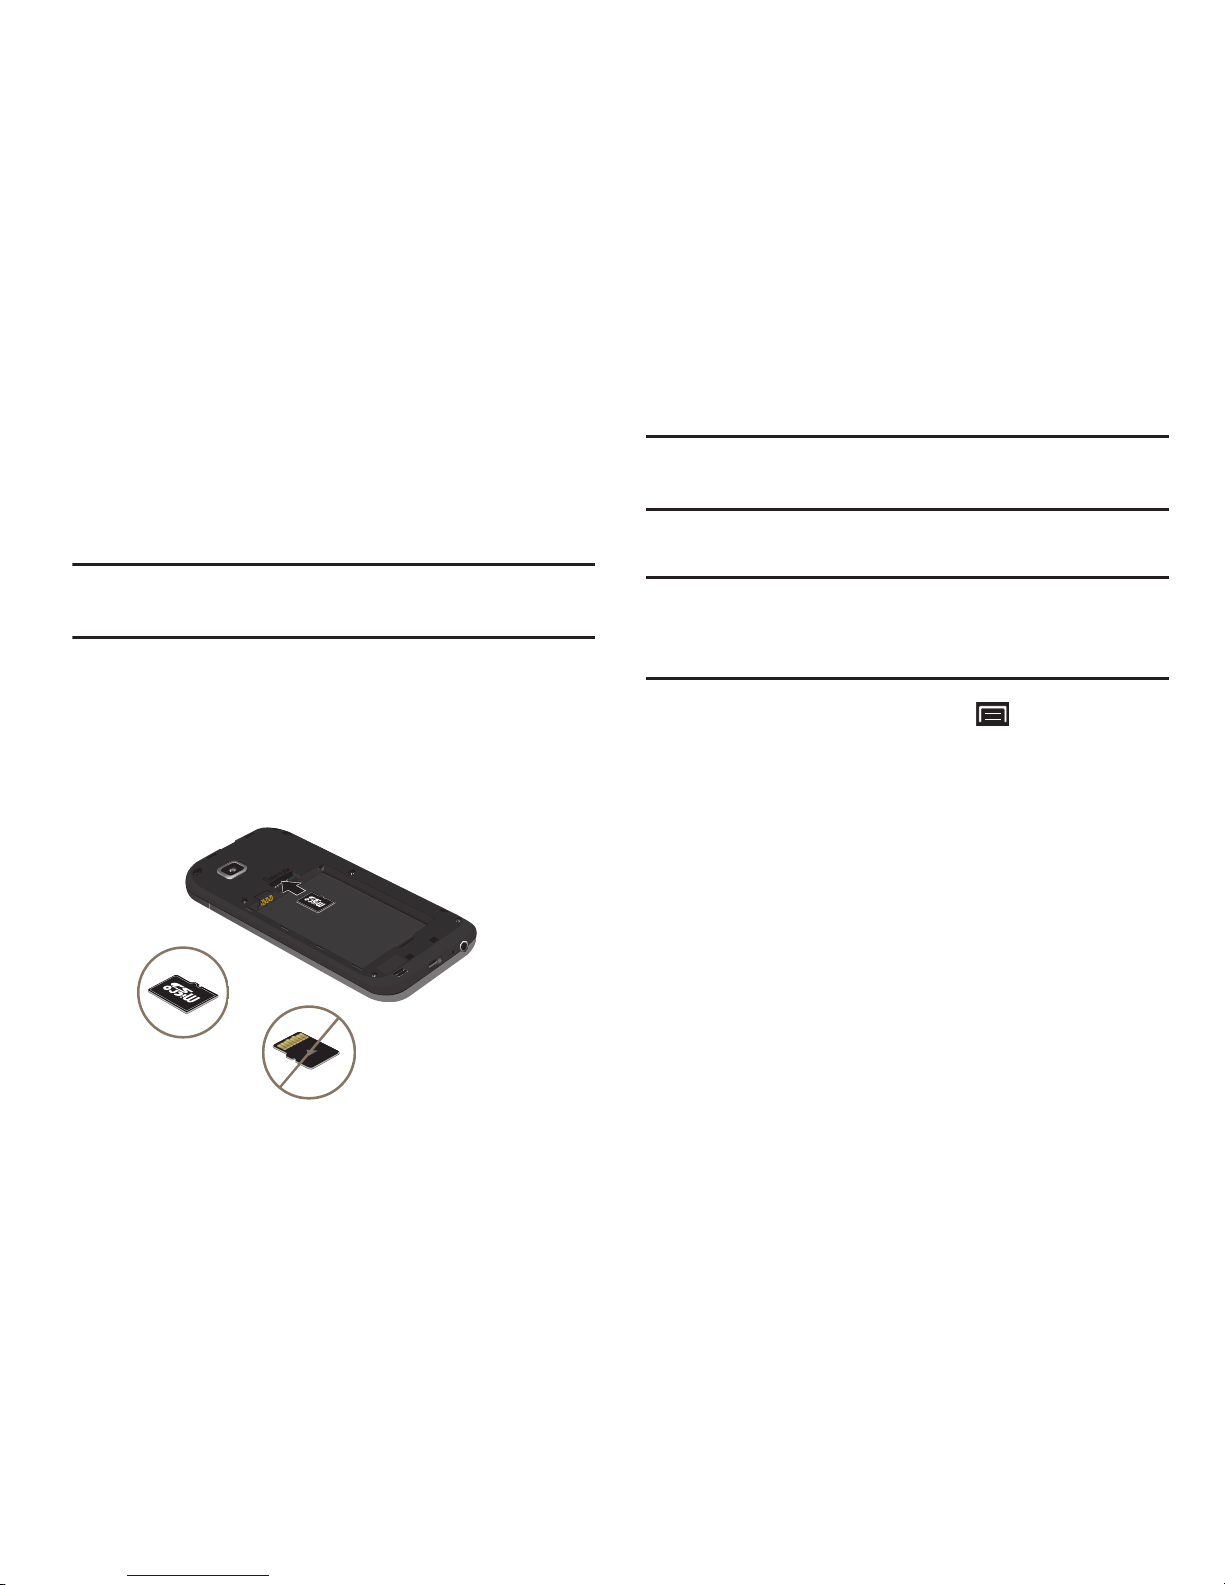
Installing a Memory Card
Your device supports removable microSD™ or microSDHC™
memory cards, for storage of music, photos, videos, and
other files.
Note:
You can only store music files that you own (from a CD
or purchased with the device) on a memory card.
To install a memory card:
With the battery cover removed, push the microSD
card into the slot (as shown) until it clicks. Make sure
the microSD’s gold contact pins face downward and
the card is securely inserted.
Note:
Your device has been tested to support up to a 32GB
memory card.
Removing a Memory Card
Important!
To prevent damage to information stored on the
memory card, unmount the card before removing it
from the device.
1. From a Home screen, touch the
(Menu) ➔ Settings
➔
SD card and device storage ➔ Unmount SD card
.
2. With the battery cover removed, locate the Memory
Card Slot on the upper right side of the back of the
device.
3. Gently press down on the memory card, so that it pops
out from the slot, and carefully pull the card out.
Correct
Incorrect
Page 13
Getting Started 9
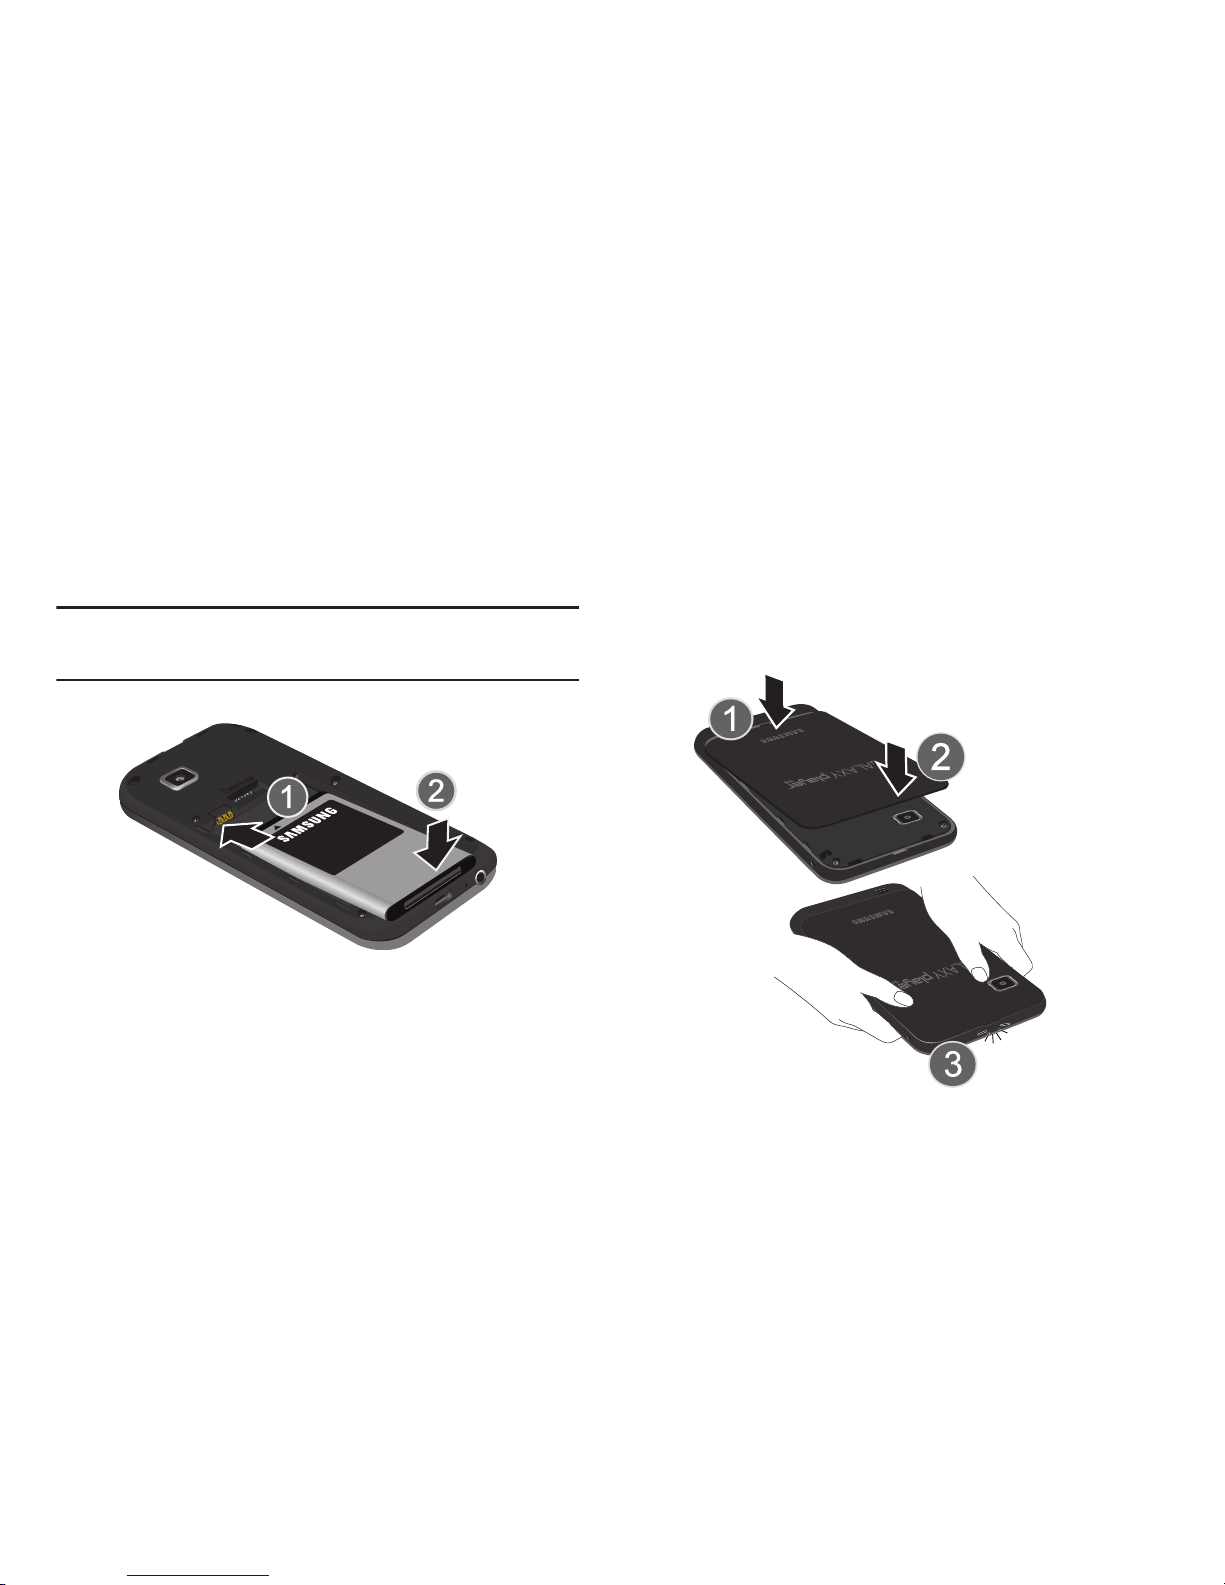
Installing the Battery
To install the battery:
1. Insert the battery into the opening on the back of the
device, making sure the connectors align (1).
2. Gently press down to secure the battery (2).
Note:
Make sure the battery is properly installed before
switching on the device.
Replacing the Battery Cover
To replace the battery cover:
1. Place the battery cover onto the back of the device (1)
and press down (2).
2. Press down firmly along the edges of the cover to
ensure that the cover is flush with the phone. You
should hear a light click as the cover locks in place.
Page 14
10
Charging the Battery
Your device is powered by a rechargeable, standard Li-Ion
battery. The Travel Charger that is used to charge the battery
is included with your device. Use only Samsung-approved
batteries and chargers.
Note:
The battery comes partially charged. You must fully
charge the battery before using your device for the first
time.
After the first charge, you can use the device while
charging.
Warning!
Use only approved charging devices. Approved
accessories are designed to maximize battery life.
Using other accessories may invalidate your
warranty and may cause damage.
Battery Indicator
The Battery icon in the Status Bar shows the battery
power level. When battery power is 15% or less, your device
prompts you to charge the battery. If you continue to operate
the device without charging, the device powers off. For
battery use information, see “About Device” on page 150.
Using the Travel Charger
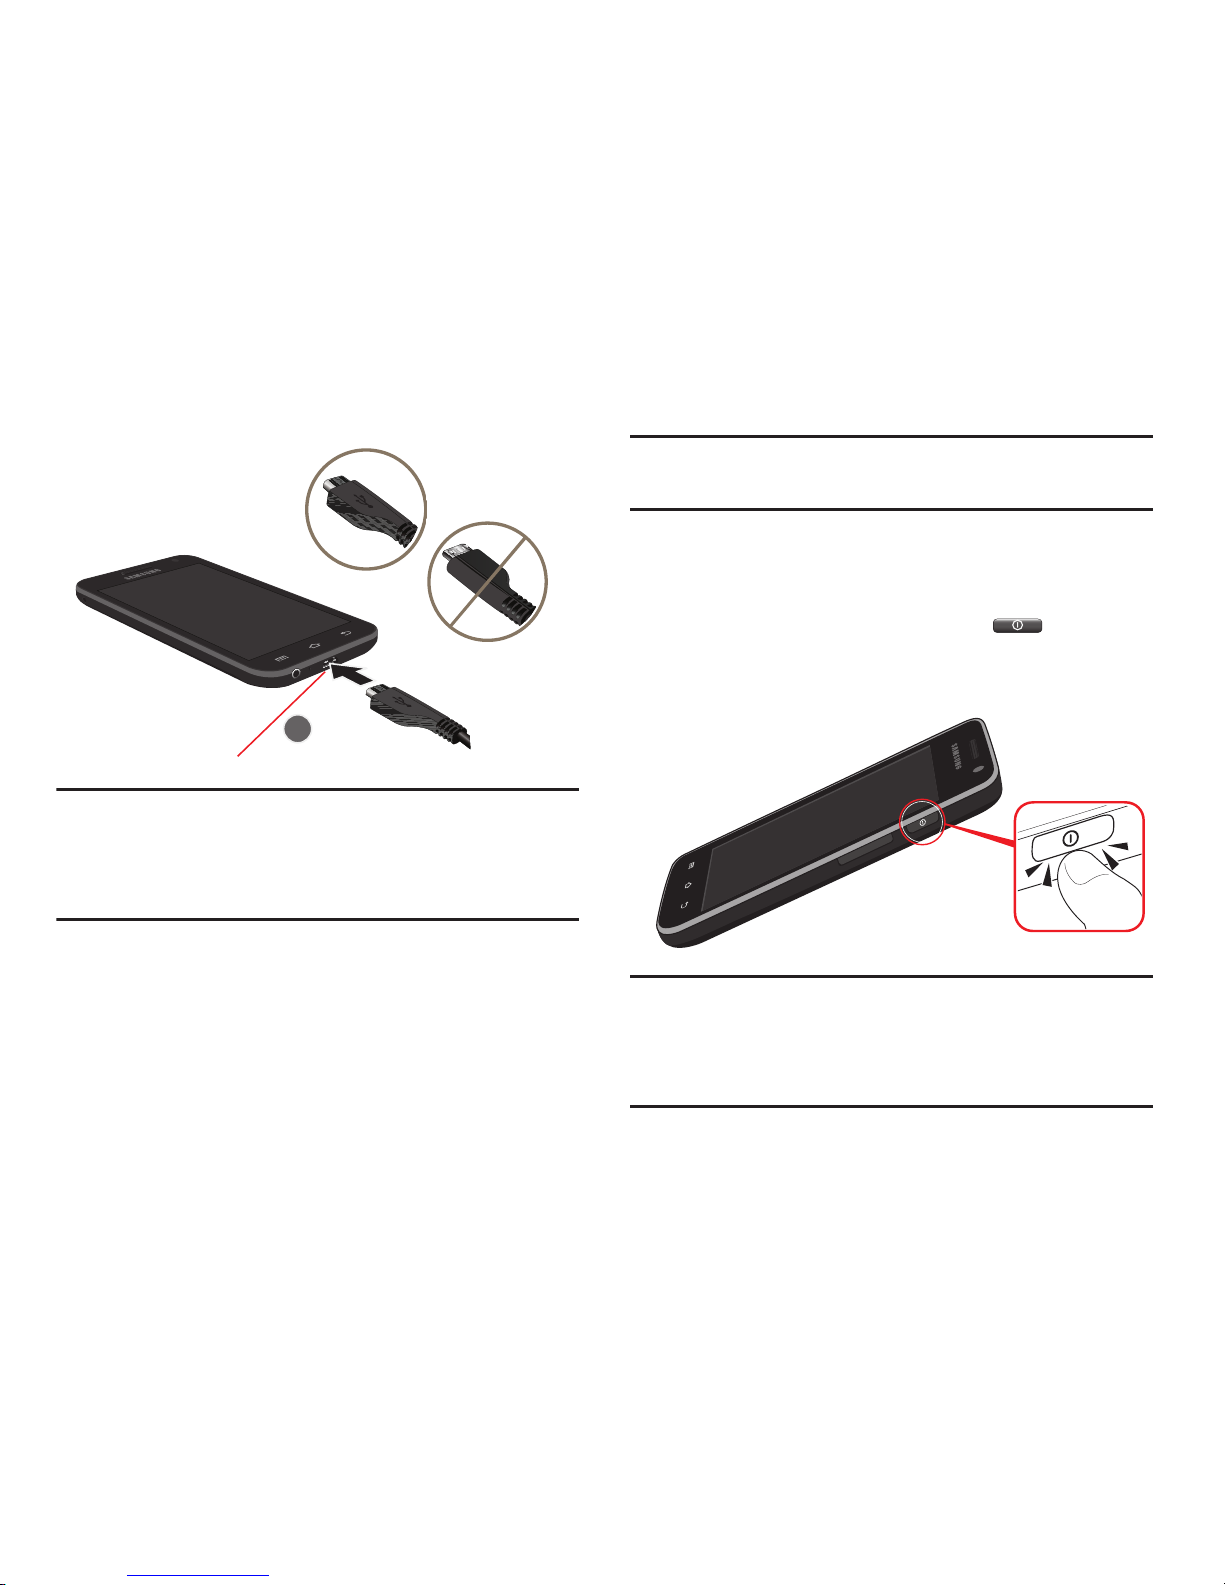
1. With the battery installed, locate the Charger/
Accessory Port on the bottom of the device.
Important!
Verify that the device battery is installed prior to
connection. If the battery is not properly installed
and the wall charger is connected, the device may
power off and on continuously, preventing proper
operation.
2. Plug the flat end of the Travel Charger into the Charger/
Accessory Interface connector on the device (1) and
the other end into a standard AC wall outlet.
Page 15
Getting Started 11
Warning!
While the device is charging, if the touch screen
does not function due to an unstable power supply,
unplug the USB power adapter from the power outlet
or unplug the USB cable from the device.
3. When charging is finished, remove the flat end from
the Charger/Accessory Interface connector on the
device.
Note:
Failure to unplug the wall charger before you remove the
battery, can cause damage to the device.
Turning Your Device On and Off
Turning Your Device On
Press and hold the
Power/Lock Key
.
For more information, refer to “Unlocking the Device”
on page 15.
Note:
Your device’s internal antenna is located along the top
back of the device. Do not block the antenna; doing so
may affect signal quality and may cause the device to
operate at a higher power level than is necessary.
Charger/Accessory Port
Correct
Incorrect
Page 16

12
Turning Your Device Off
1. Press and hold the
Power/Lock Key
.
2. At the prompt, touch
Power off
.
Setting Up Your Device
When you first turn on your device, a Location consent popup displays. If you want to allow Google’s location service to
collect anonymous location data:
Touc h
Agree
. Otherwise, touch
Disagree
.
The main Home screen displays
.
Select Language
Your device defaults to English. To change to another
language:
1. From a Home screen, touch
(Menu) ➔Settings
➔
Locale and text
➔
Select language
. Scroll through the
list and touch the language you want your device to
use, such as, English (United States).
2. Touch
(Home)
to return to the main Home screen.
Enable Wi-Fi
To enable Wi-Fi:
1. From a Home screen, touch
(Menu) ➔Settings
➔
Wireless and networks
➔
Wi-Fi settings
.
2. Touch
Wi-Fi
to turn Wi-Fi On. When on, a check mark
appears in the check box.
3. Touch
Add Wi-Fi network
to enter a Network SSID that is
not listed.
– or –
Touch one of the Wi-Fi networks in the list, enter the
password, and touch
Connect
.
For more information, refer to “Wi-Fi Settings” on
page 129.
4. Touch
Home
to return to the main Home screen.
Page 17

Getting Started 13
Set Date and Time
To set the date and time:
1. From a Home screen, touch
(Menu) ➔Settings
➔
Date and time
The Date and time screen displays.
2. Touch
Set date
to set the day, month, and year, then
touch
Set time
to set the hour and minute.
For more information, refer to “Date and Time” on
page 150.
Your Google Account
Your new device uses your Google account to fully utilize its
Android features, including Gmail, Maps, Navigation, Google
Talk and the Android Market. When you turn on your device
for the first time, set up a connection with your existing
Google account or create a new Google account.
To create a Google account or set up your Google account on
your device use
Accounts and sync
settings. For more
information, refer to “Accounts and Sync” on page 143.
Note:
You have to enable Wi-Fi before setting up your Google
account.
Backup and Restore
To manage your device’s use of personal information:
1. From a Home screen, touch
(Menu)
➔ Settings
➔
Privacy
.
2. Touc h
Back up my data
to enable or disable backup of
settings to the Google server.
For more information, refer to “Privacy” on
page 144.For more information, refer to “Backup and
Restore” on page 144.
Using Google Maps
In order to use some applications related to Google Maps,
you must first connect Wi-Fi. For more information, refer to
“Wi-Fi Settings” on page 129.
You must also enable location services to use Google Maps.
Some features require Standalone or Google location
services. For more information, refer to “Location and
Security” on page 138.
Page 18
14
Task Manager
Your device can run applications simultaneously and some
applications run in the background.
Use Task Manager to see which applications are running on
your device and to end running applications to extend battery
life. You can also uninstall applications from your device and
see how much memory is used by applications.
Task Manager provides information about applications,
including
Active applications, Downloaded, RAM, Storage
, and
Help
.
To access the Task Manager:
1. From a Home screen, touch
(Applications)
➔
Task manager
.
– or –
From any screen, touch and hold
(Home)
, then
touch
Task Manager
.
Task Manager displays.
2. Touch the
Active applications
tab to view applications
running on your device. Touch
End
to end an
application or
End all
to stop all running applications.
3. Touch the
Downloaded
tab to view applications
installed from Android Market. Touch
Uninstall
to
remove an application from your device.
4. Touch the
RAM
tab to display the amount of Random
Access Memory (RAM) currently in use. Touch
Clear
memory
to clear inactive and background processes.
5. Touch the
Storage
tab to view internal and external
storage memory statistics.
6. Sweep the tabs to the left and touch the
Help
tab to
view useful tips for extending battery life.
Accessories
The items supplied with your device may vary depending on
the software and accessories available in your region.
•
You can obtain additional accessories from your local Samsung
dealer.
•
The supplied accessories perform best for your device.
•
Accessories other than the supplied ones may not be compatible
with your device.
Page 19
Getting Started 15
Securing Your Device
By default, the device locks automatically when the screen
times out or you can lock it manually. You can unlock the
device using one of the default Unlock screens or, for
increased security, use a personal screen unlock pattern.
For more information about creating and enabling a Screen
unlock pattern, see “Set Screen Lock” on page 138.
For other settings related to securing your device, see
“Location and Security” on page 138.
Note:
Unless stated otherwise, instructions in this User Manual
start with the device unlocked, at the Home screen.
Locking the Device Manually
Press the
Power/Lock Key
.
Unlocking the Device
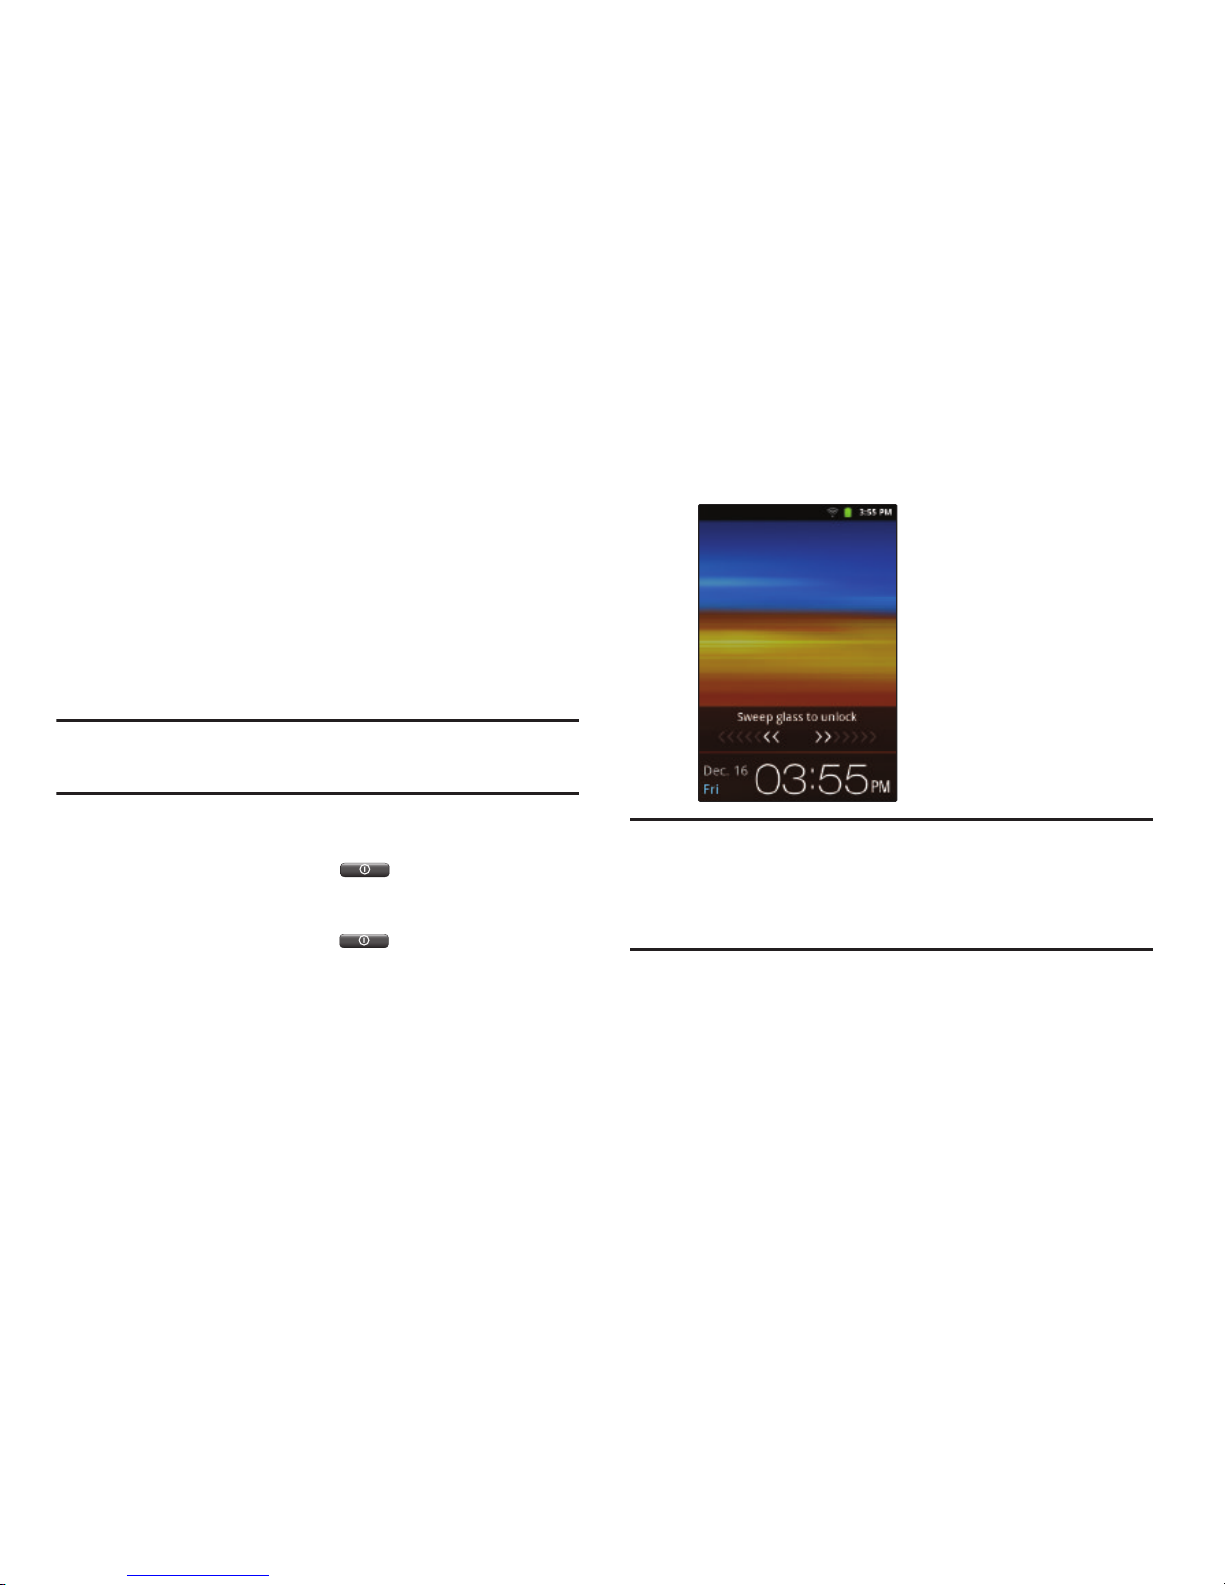
1. Press the
Power/Lock Key
.
The locked screen displays
Sweep glass to unlock
. The
day, date, and time also display.
2. Touch and sweep across the screen, either to the left
or right, as indicated on the screen.
Note:
You can choose the type of Screen Unlock you want to
use, from Pattern, PIN, or Password. For more
information, refer to “Location and Security” on
page 138.
Page 20

16
Troubleshooting
If your device has fatal errors, hangs up, or freezes, you may
need to close all programs or reset the device to regain
functionality.
•
If your device is still responsive, but a program is frozen, close the
program using the Task Manager. For more information, refer to
“Task Manager”
on page 14.
•
If your device is frozen and unresponsive, press and hold the
Power/Lock Key
for 8 to 10 seconds.
Android System Recovery
Android System Recovery is used for Google updates. The
average user should never need to perform a system
recovery.
Note:
If you entered this menu by mistake, use the Volume Up/
Down key to select
reboot system now
, then touch
(Home)
. Your device then continues to boot up.
To enter the Android System Recovery mode, follow these
steps:
1. Turn the device off.
2. Press the
Volume Up Key
and then press
the
Power/Lock Key
at the same time until the
device switches on.
Tip:
Volume Up is the end closest to the Power/Lock Key.
3. Once the SAMSUNG logo appears, release the Power/
Lock key while continuing to press the Volume Up key.
4. Continue to press the Volume Up key until the Android
System Recovery screen displays.
5. Release the Volume Up key.
The following options are available:
• reboot system now
: Turns on your device.
• apply update from sdcard
: Used to apply an update file from
your microSD card.
•wipe data/factory reset
: Deletes all data from the device
except captured pictures and videos. For more information,
refer to
“Factory Data Reset”
on page 145.
• wipe cache partition
: Deletes all cache data, such as log files.
6. Press the Volume Up/down key to scroll up or down,
then touch
(Home)
to make a selection.
Page 21

Getting Started 17
Safe Mode
You can boot your device into Safe Mode if you want to
troubleshoot whether added applications are causing
problems with the device. Safe mode only loads basic
system software.
1. Make sure your phone is turned off.
2. Press and hold the
Power/Lock Key
( ) to boot up
your device.
3. After the animation starts to display, repeatedly touch
(Menu)
.
When the Home screen is displayed,
Safe mode
is
displayed in the lower left corner of the screen.
Page 22

18
Section 2: Understanding Your Device
This section outlines key features of your device and
describes the screen and the icons that appear when the
device is in use. It also shows how to navigate through the
device.
Features
Your device is lightweight, easy-to-use, and offers many
useful features. The following list outlines a few of the
features included in your device.
•
Touch screen provides quick response to a variety of menus and
options including applications and seven home screens
•
AndroidTM 2.3.6, Gingerbread
•
Android MarketTM for access to over 250,000 Apps
•
Ready access to the Internet
•
Built-in Bluetooth® 3.0 Wireless technology. For more
information, refer to
“Bluetooth Settings”
on page 131.
•
Built-in Wi-Fi technology (802.11 b/g/n)
•
3.65-inch 480x320 HVGA TFT LCD touch screen
•
2 Megapixel camera and camcorder plus .3 Megapixel
forward-facing VGA camera
•
Messaging Features:
–
Gmail
–
Email (corporate and personal)
–
Google Talk
•
Support for microSD™ and microSDHC™ Memory Cards, which
are used for data storage and access
•
Photo Gallery that supports JPEG, PNG, GIF, and BMP formats
•
HD Video Player (720p) that supports H.263, H.264, MPEG4, 3GP,
WMV (v9), and DivX formats
•
DivX Certified® to play DivX® video up to HD 720p, including
premium content
•
Music Player that supports WAV, MP3, AAC, AAC+, eAAC+, WMA
(v9), and Ogg formats
•
FM Radio that lets you listen to your local FM radio stations
•
Kies Air
•
Social Hub to integrate your e-mail, calendar, and favorite social
networking sites
Page 23
Understanding Your Device 19
Front View
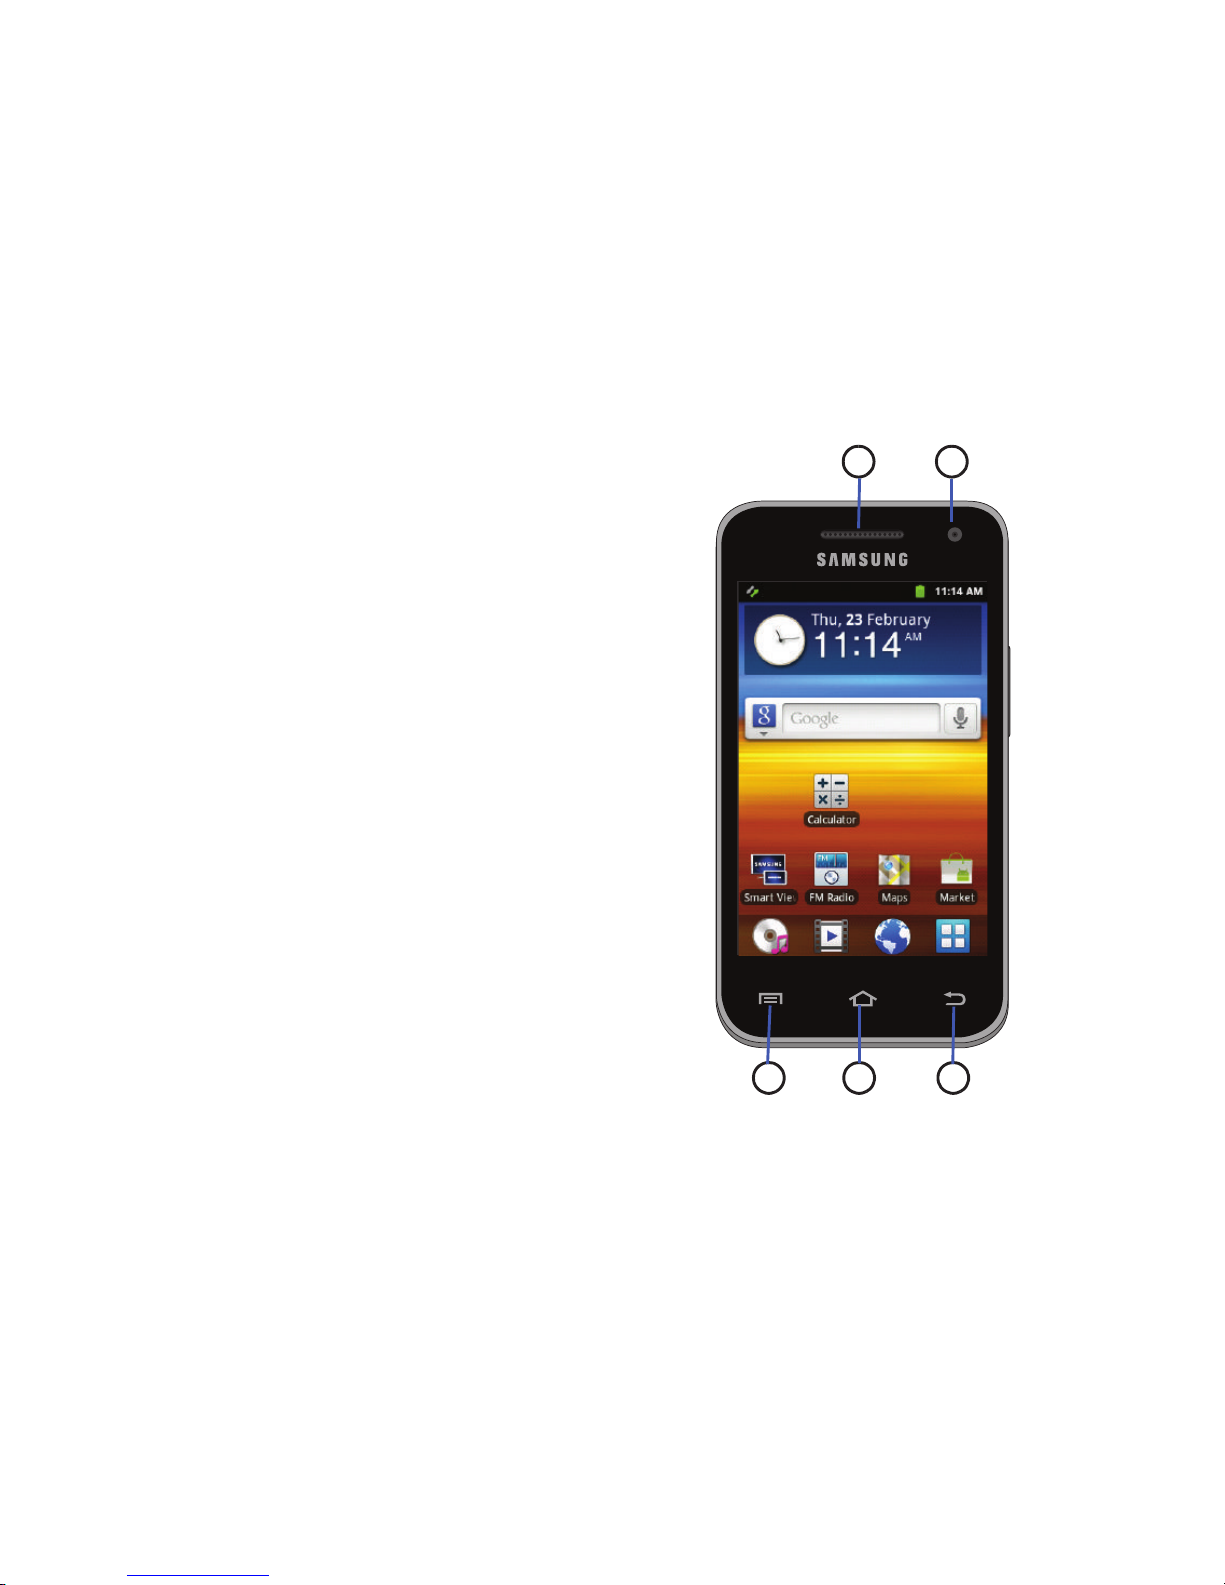
The following items can be found on the front of your device
as illustrated.
1.
External Speaker
: Used for music or video playback,
notification tones, and for other sounds.
2.
Front-facing Camera Lens
: Used when taking photos.
3.
Menu
: Touch to display options for the current screen.
Touch and hold to access Google Search.
4.
Home
: Touch to display the Home screen. Touch and
hold to display recent applications or to launch Task
Manager. Touch to wake the screen for unlocking.
5.
Back
: Touch to return to the previous screen or option.
1
543
2
Page 24
20
Side View
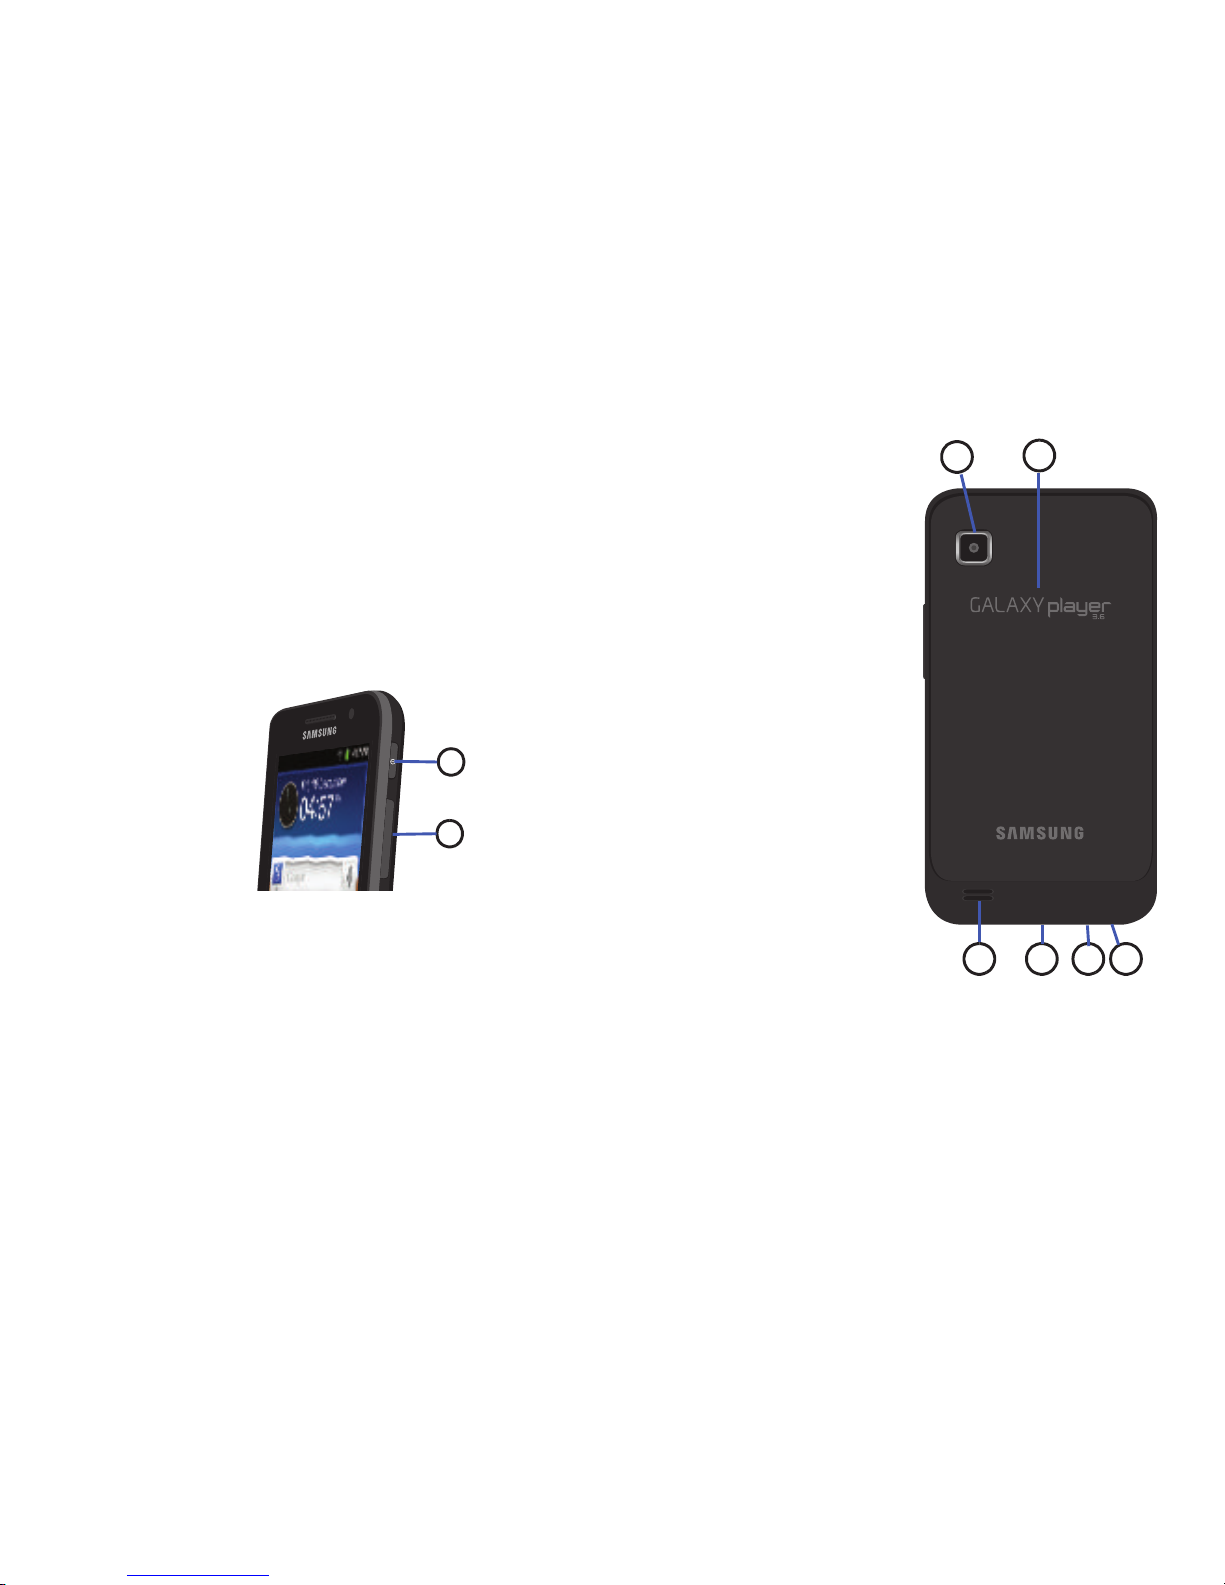
The following items can be found on the side of your device.
1.
Power/Lock Key
: Press and hold to turn the device on or
off. Press to lock the device or to wake the screen for
unlocking.
2.
Volume Key
: From a Home screen, press to adjust
Master Volume. During music playback, press to adjust
volume.
Back and Bottom Views
The following items can be found on the back and bottom of
your device.
1.
Camera Lens
: Used to take photos or record videos.
2.
Memory Card Slot
: Remove the cover to install a
memory card for storage of files. For more information,
refer to “Installing a Memory Card” on page 8.
3.
External Speakers
:
Used for music or
video playback,
notification tones,
and for other sounds.
4.
Charger/Accessory
Port
: Allows you to
connect a Travel
Charger or other
optional accessories
such as a USB/data
cable to sync music
and files.
5.
Microphone
: Used for
voice recording or
video chat.
6.
3.5mm Headset Jack
:
Plug in for
headphones, which
also serve as an antenna. For more information, refer
to “FM Radio” on page 85.
1
2
5
1
3
2
4 6
Page 25
Understanding Your Device 21
Home Screen
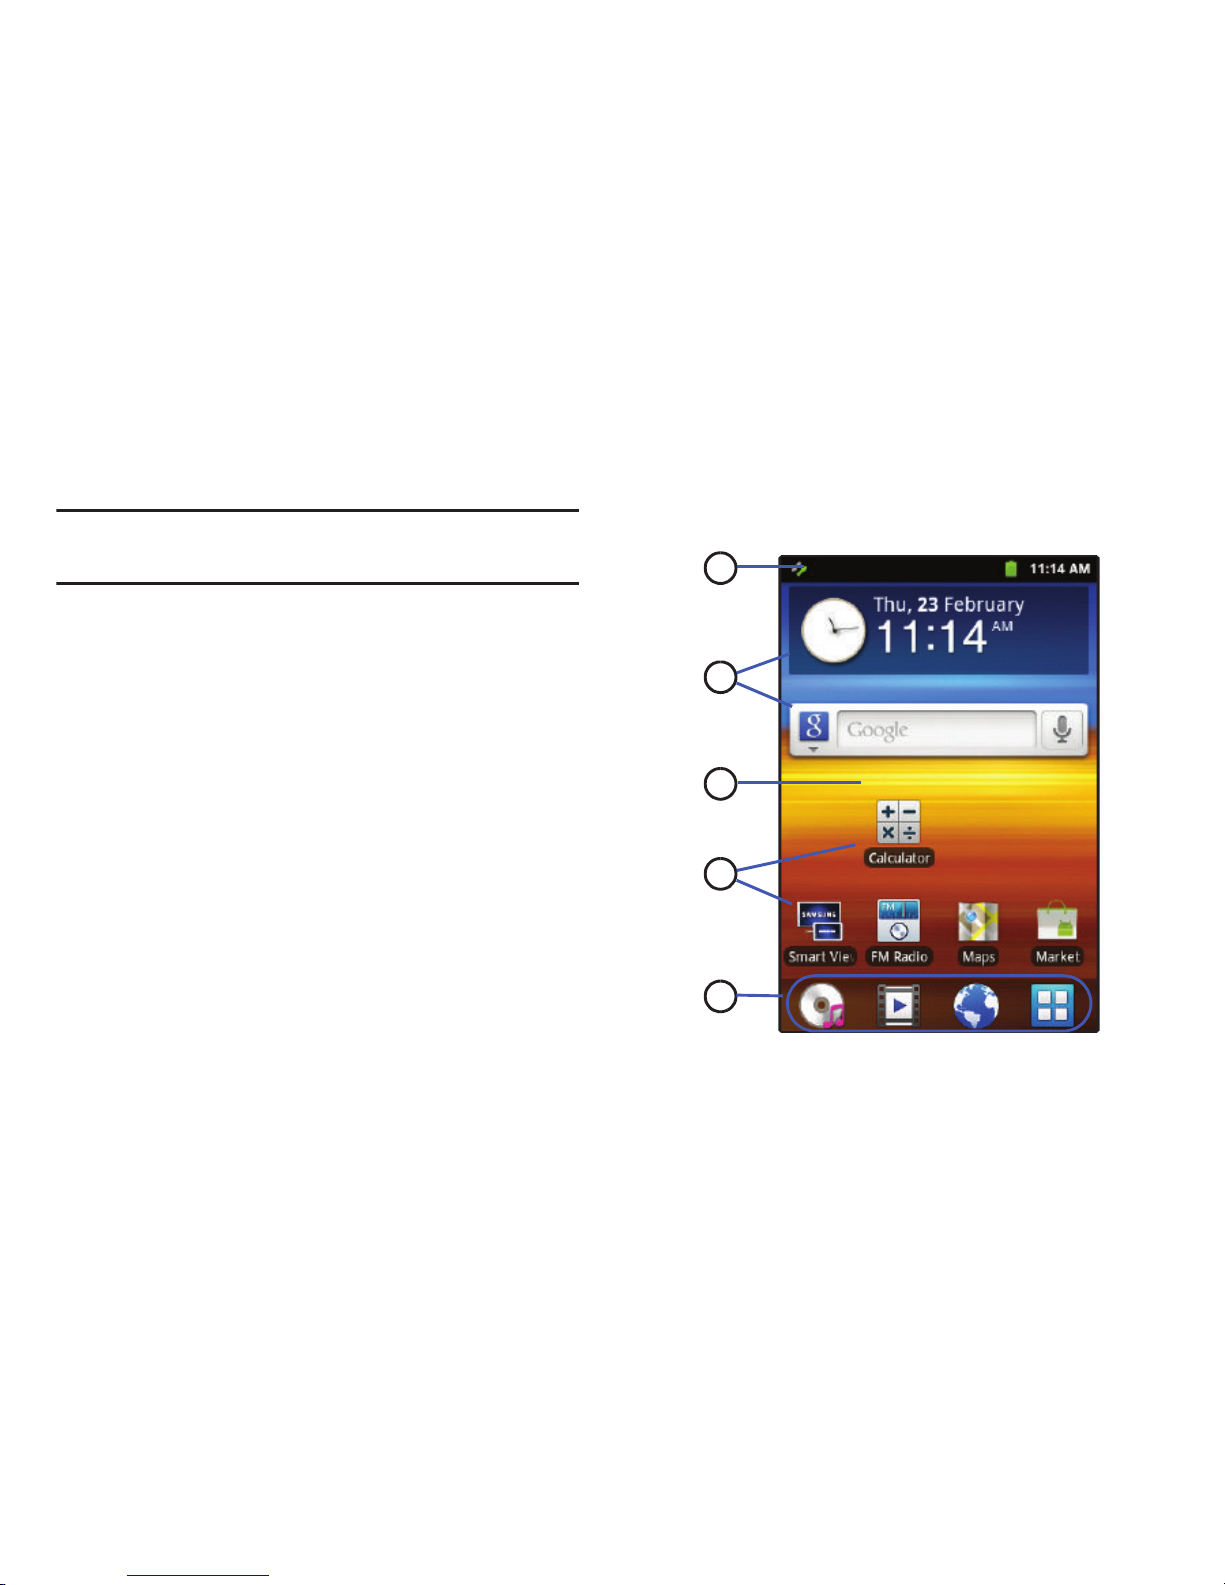
The Home screen is the starting point for using your device.
Note:
Unless stated otherwise, instructions in this User Manual
start with the device unlocked, at the Home screen.
1.
Status Bar
: Presents icons to show notifications,
battery power, and connection details. For a list of
icons, see “Status Bar” on page 25.
2.
Widgets
: Applications that run on the Home screen.
These widgets are found on the Home screen by
default. For more information, refer to “Widgets” on
page 28.
3.
Home screen
: The starting point for using your device.
Place shortcuts, widgets, and other items to customize
your device to your needs.
4.
Shortcuts
: Shortcuts to common applications.These
shortcuts are found on the Home screen by default. For
more information, refer to “Shortcuts” on page 29.
5.
Primary Shortcuts
: Shortcuts to common features. For
more information, refer to “Primary Shortcuts” on
page 27.
5
3
4
2
1
Page 26
22
Extended Home Screen
The Home screen consists of the Home panel, plus six panels
that extend beyond the display width to provide more space
for adding shortcuts, widgets, and folders.
Slide your finger horizontally across the screen to scroll to
the left or right side panels. As you scroll, the indicator at the
top of the display shows your current position.
Customizing the Home Screen
To customize the Home screen to suit your preferences just
navigate to the desired Home screen, then touch and hold on
the screen to display the
Add to Home screen
menu. Then
touch one of the options:
•
Widgets
: For more information, refer to
“Widgets”
on page 28.
•
Shortcuts
: For more information, refer to
“Shortcuts”
on
page 29.
•
Folders
: For more information, refer to
“Folders”
on page 30.
•
Wallpapers
: For more information, refer to
“Wallpapers”
on
page 31.
Display Settings
You can customize display settings to your preferences. For
more information, refer to “Display” on page 136.
Adding and Removing Home Screen Panels
Your device comes with seven Home screen panels. You can
customize the Home screen by removing or adding panels.
Note:
The panel in the first position displays when you touch
(Home)
.
1. From a Home screen, touch
(Menu) ➔
Edit
.
2. Use these controls to configure panels:
3. To rearrange the order of panels, touch and drag a
panel to a new location.
Tip:
You can also display
Edit
options by pinching the Home
screen.
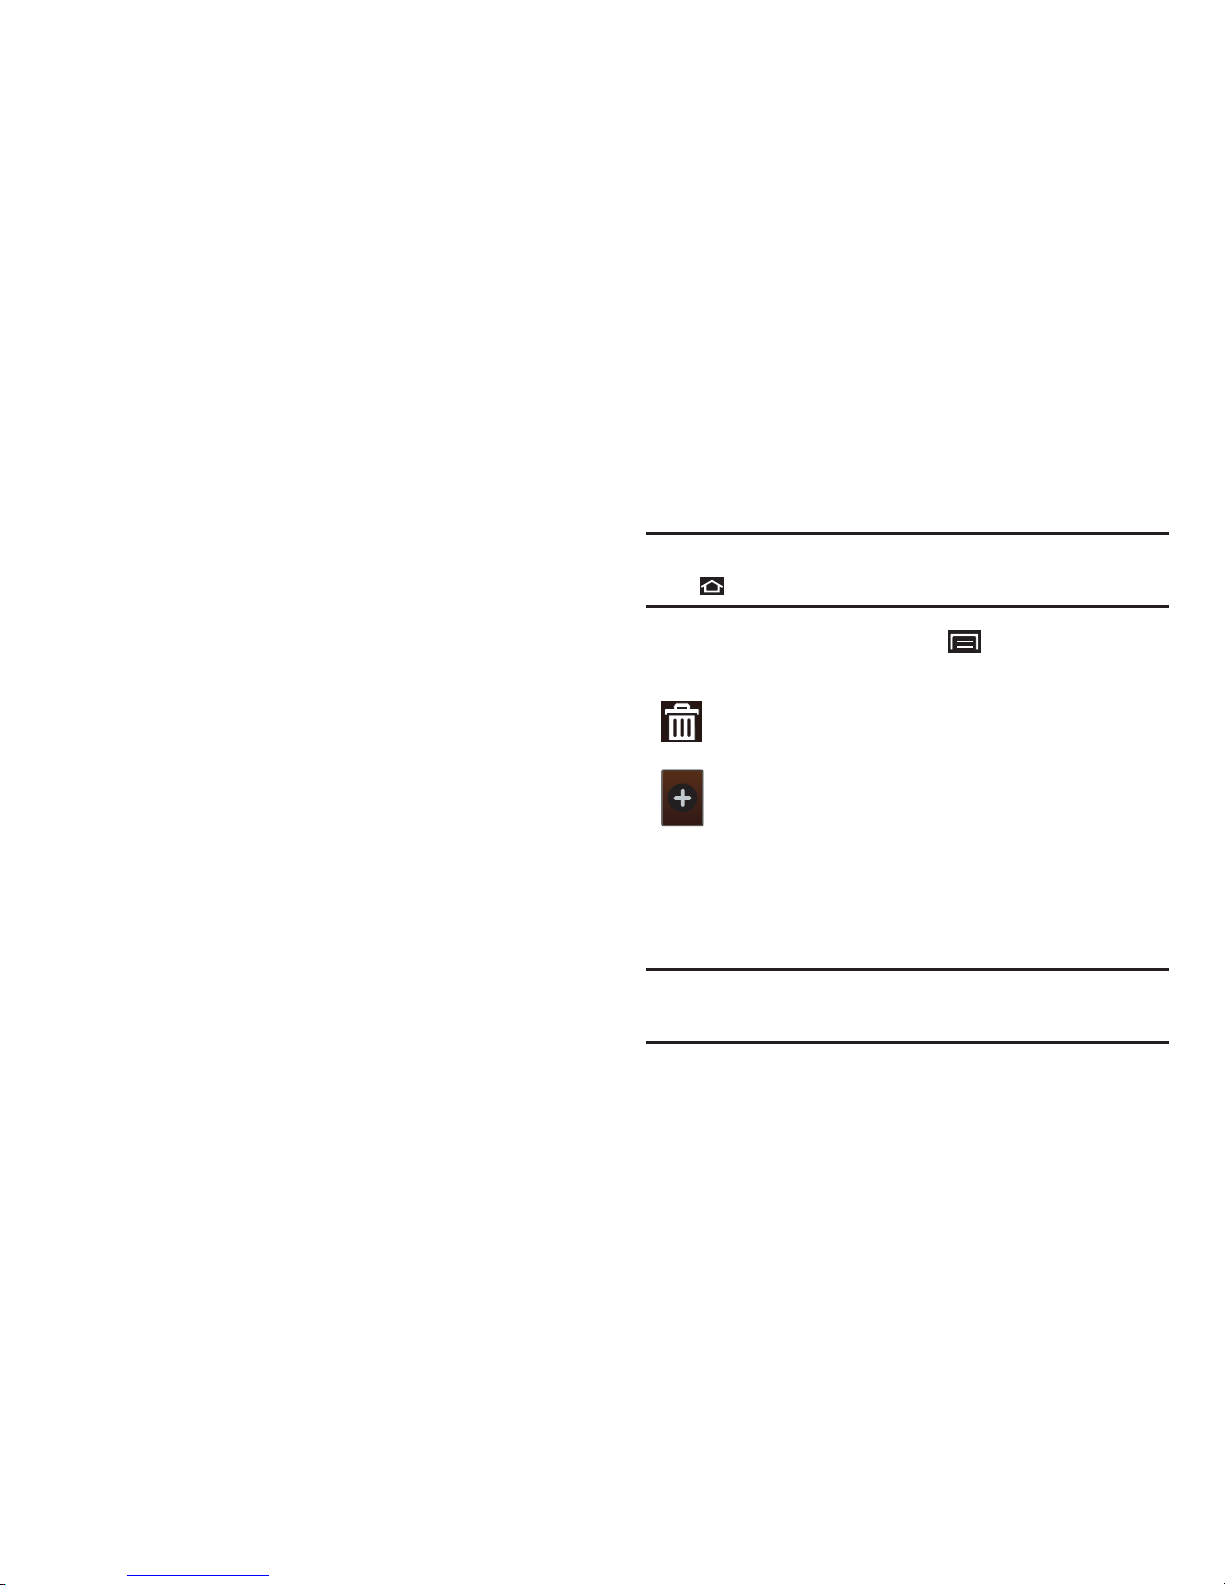
Remove
: Touch and drag a panel to the Trash
Can to remove the panel from the Home screen.
Add
: Touch to add a new panel, up to a total of
seven. This option is available when less than
seven panels have been added.
Page 27
Understanding Your Device 23
Navigating Your Device
Use command keys and the touch screen to navigate.
Command Keys
Menu
Touch
(Menu)
to display options for the current screen
or feature. Touch and hold to activate Google Search.
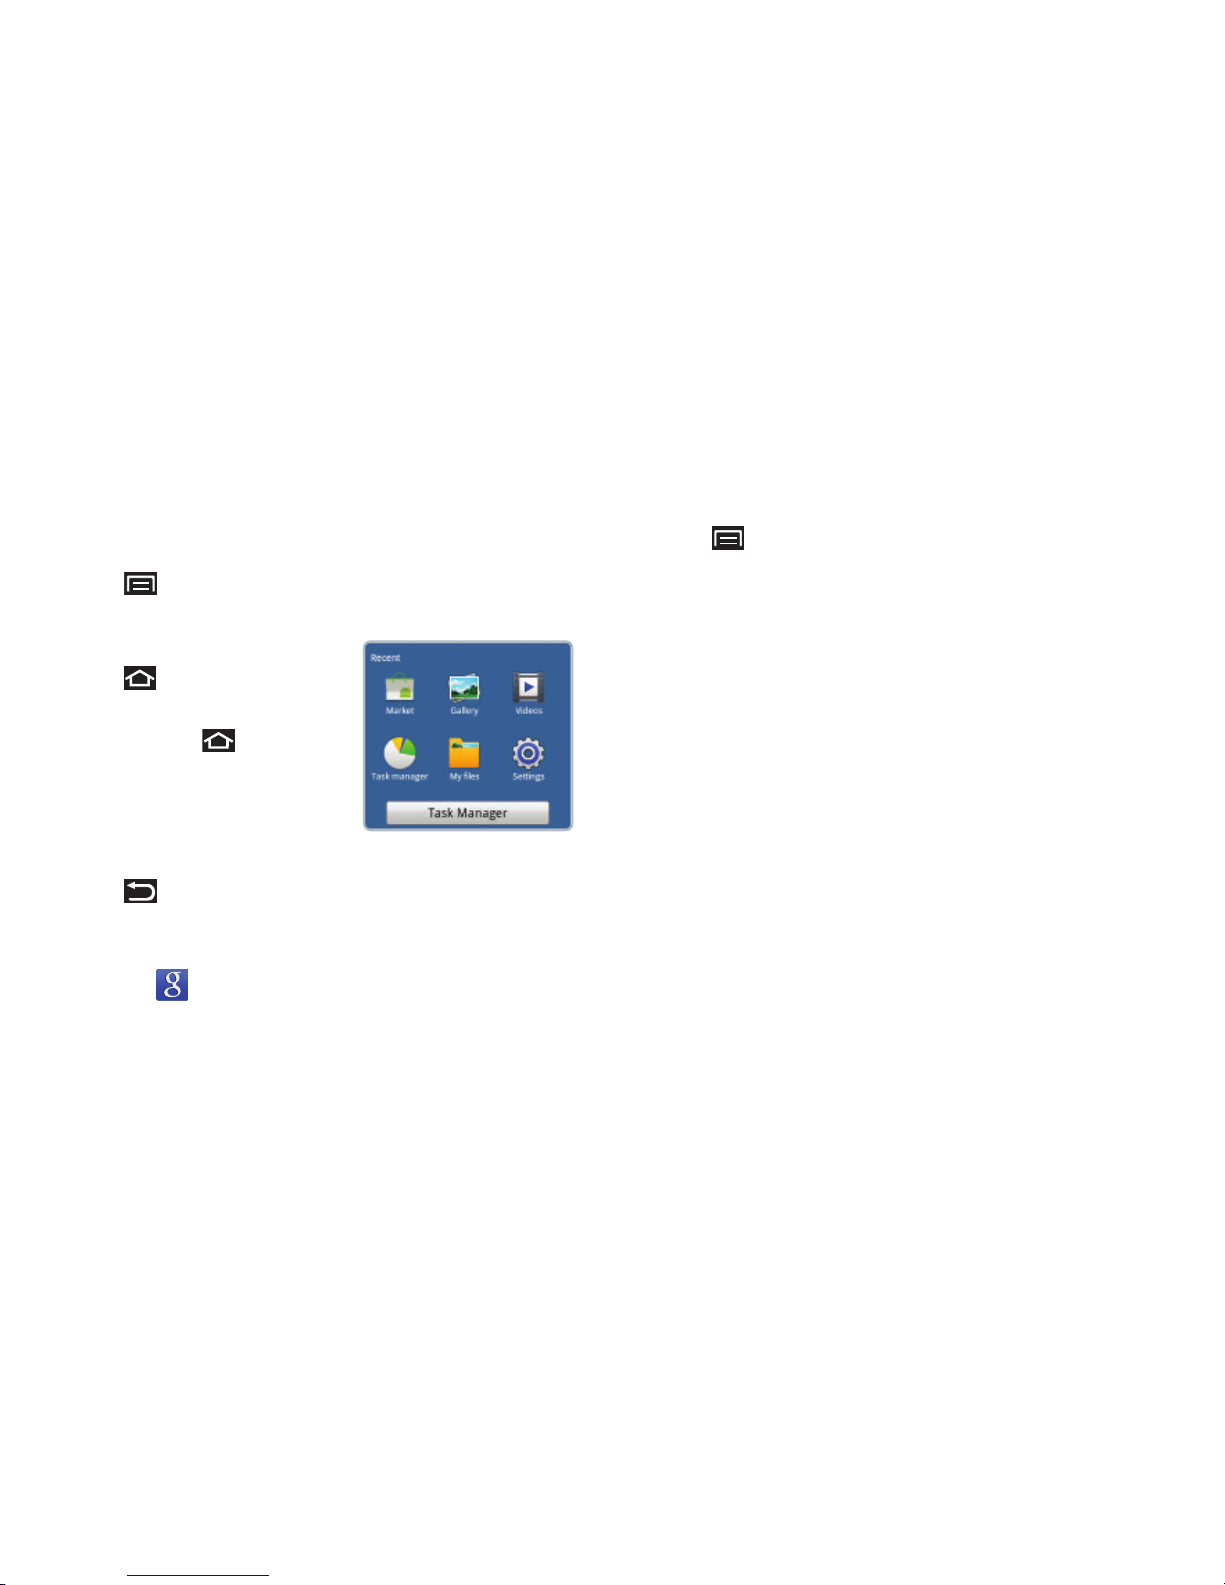
Home
Touch
(Home) to display the
first Home screen.
Touch and hold
(Home) to
launch a menu of recent
applications or to launch Task
Manager.
Back
Touch
(Back)
to return to the previous screen, option, or
step.
Google Search
Touch the
Google Search
widget to search the web and
your device. The Google Search widget is found on the Home
panel by default. For more information, refer to “Google
Search” on page 79.
Context-Sensitive Menus
Context-sensitive menus offer options for features or
screens. To access context-sensitive menus:
•
Touch
(Menu)
.
•
Touch and hold on an item.
Finger Gestures
Touch
Touch items to select or launch them. For example:
•
Touch the on-screen keyboard to enter characters or text.
•
Touch a menu item to select it.
•
Touch an application’s icon to launch the application.
Touch and Hold
Activate on-screen items. For example:
•
Touch and hold a widget on the home screen to move it.
•
Touch and hold on a field to display a pop-up menu of options.
Swipe, Flick, or Slide
Swipe, flick, or slide your finger vertically or horizontally
across the screen. For example:
•
Unlocking the screen
•
Scrolling the Home screens or a menu.
Page 28
24
Pinch
Use two fingers, such as your index finger
and thumb, to make an inward pinch
motion on the screen, as if you are picking
something up, or an outward motion by
sweeping your fingers out. For example:
•
Pinch the Home screen to show customization options.
•
Pinch a photo in Gallery to zoom in.
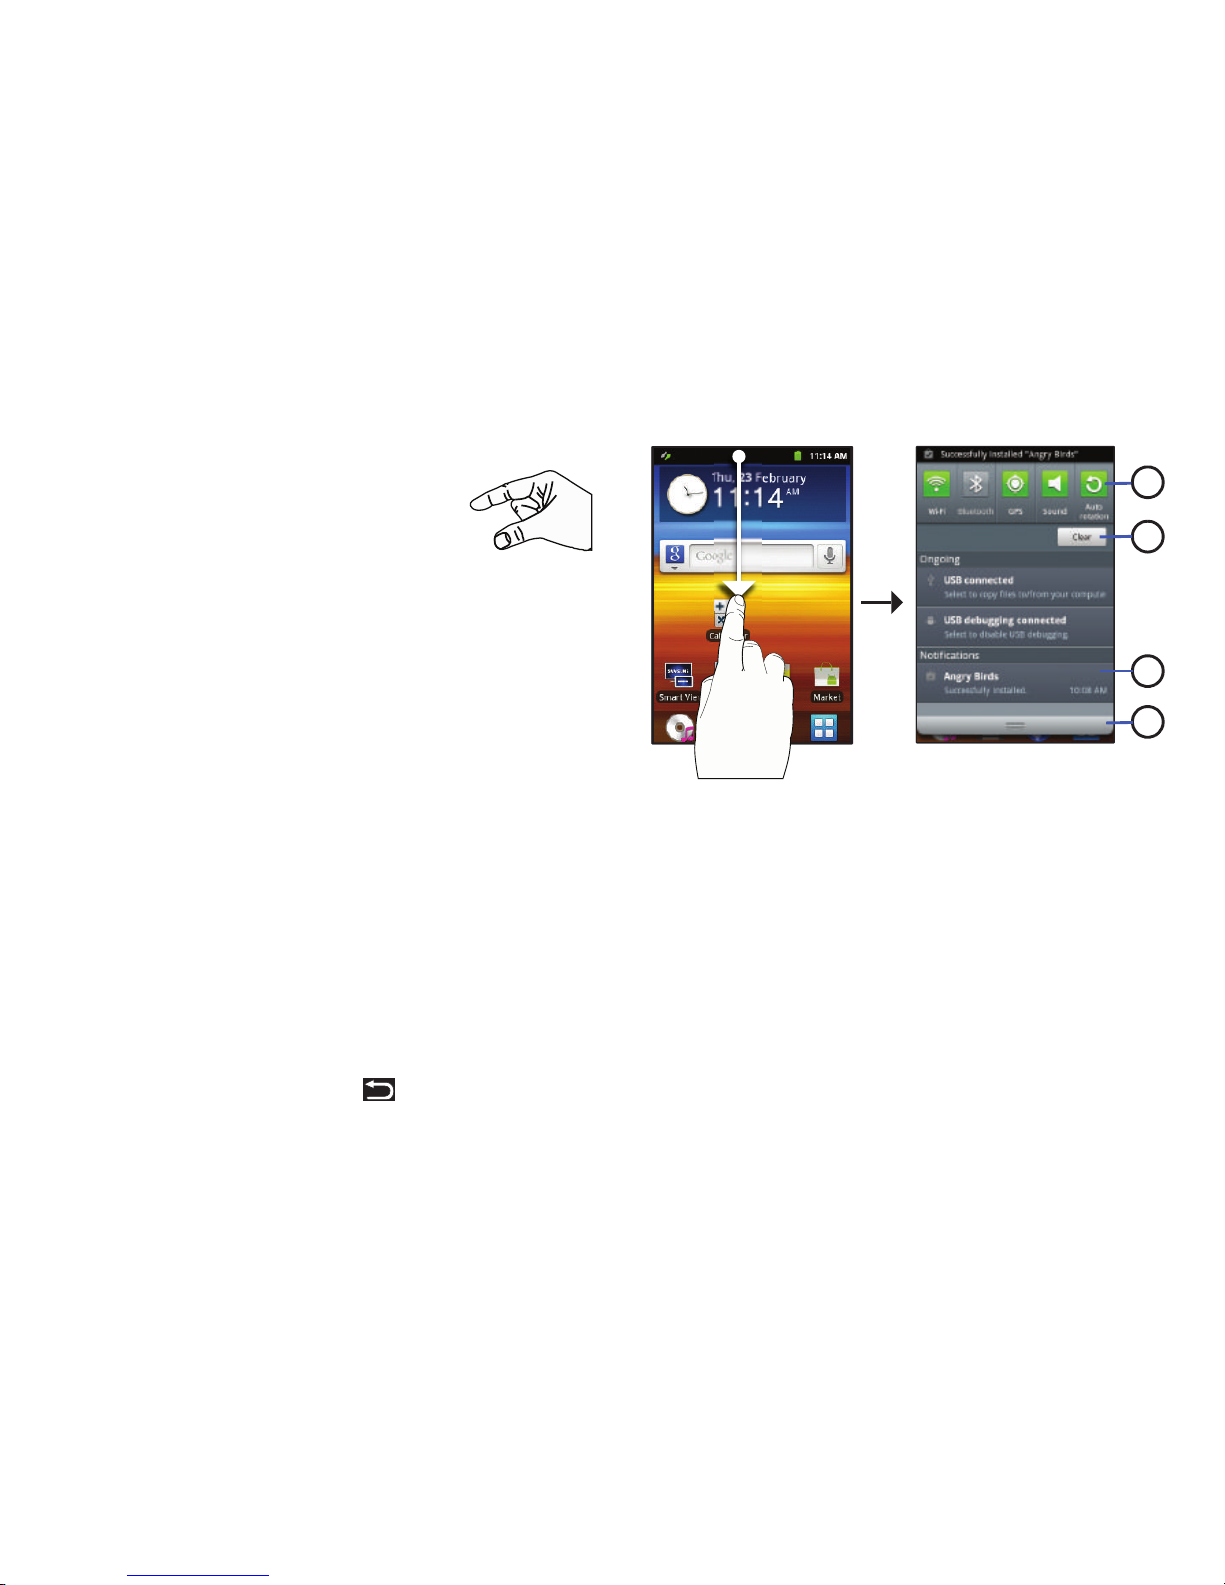
Notification Panel
The Notification Panel shows information about connections,
messages, and other items.
To display the Notification Panel:
Sweep your finger downward from the top of the
screen.
From the Notification Panel, the following options are
available:
1. Touch an icon to activate the feature.
2. Touch to clear all notifications.
3. Touch a notification to open the application.
4. Touch and hold, then slide your finger up to close the
Notification Panel or touch
(Back)
.
Icons
Icons at the top of the Notification Panel show status for:
•
Wi-Fi
: Touch to enable or disable Wi-Fi. For more information,
refer to
“Wi-Fi”
on page 99.
•
Bluetooth
: Touch to enable or disable Bluetooth. For more
information, refer to
“Bluetooth”
on page 101.
•
GPS
: Touch to enable Standalone GPS services. For more
information, refer to
“Use GPS Satellites”
on page 138.
1
2
3
4
Page 29
Understanding Your Device 25
•
Sound / Silent / Vibration
: Touch to toggle between sound and
silent or vibration. For more information, refer to
“Sound”
on
page 134.
•
Auto rotation
: Touch to enable or disable auto rotation. When
enabled, the screen orientation changes when you rotate the
device. When disabled, the screen locks in the current orientation
(horizontal or vertical) and the orientation does not change when
you rotate the device.
Clearing Notifications
1. Sweep your finger downward from the top of the
screen to display the Notifications Panel.
2. Touch a notification to clear it.
– or –
Touch
Clear
to clear all notifications.
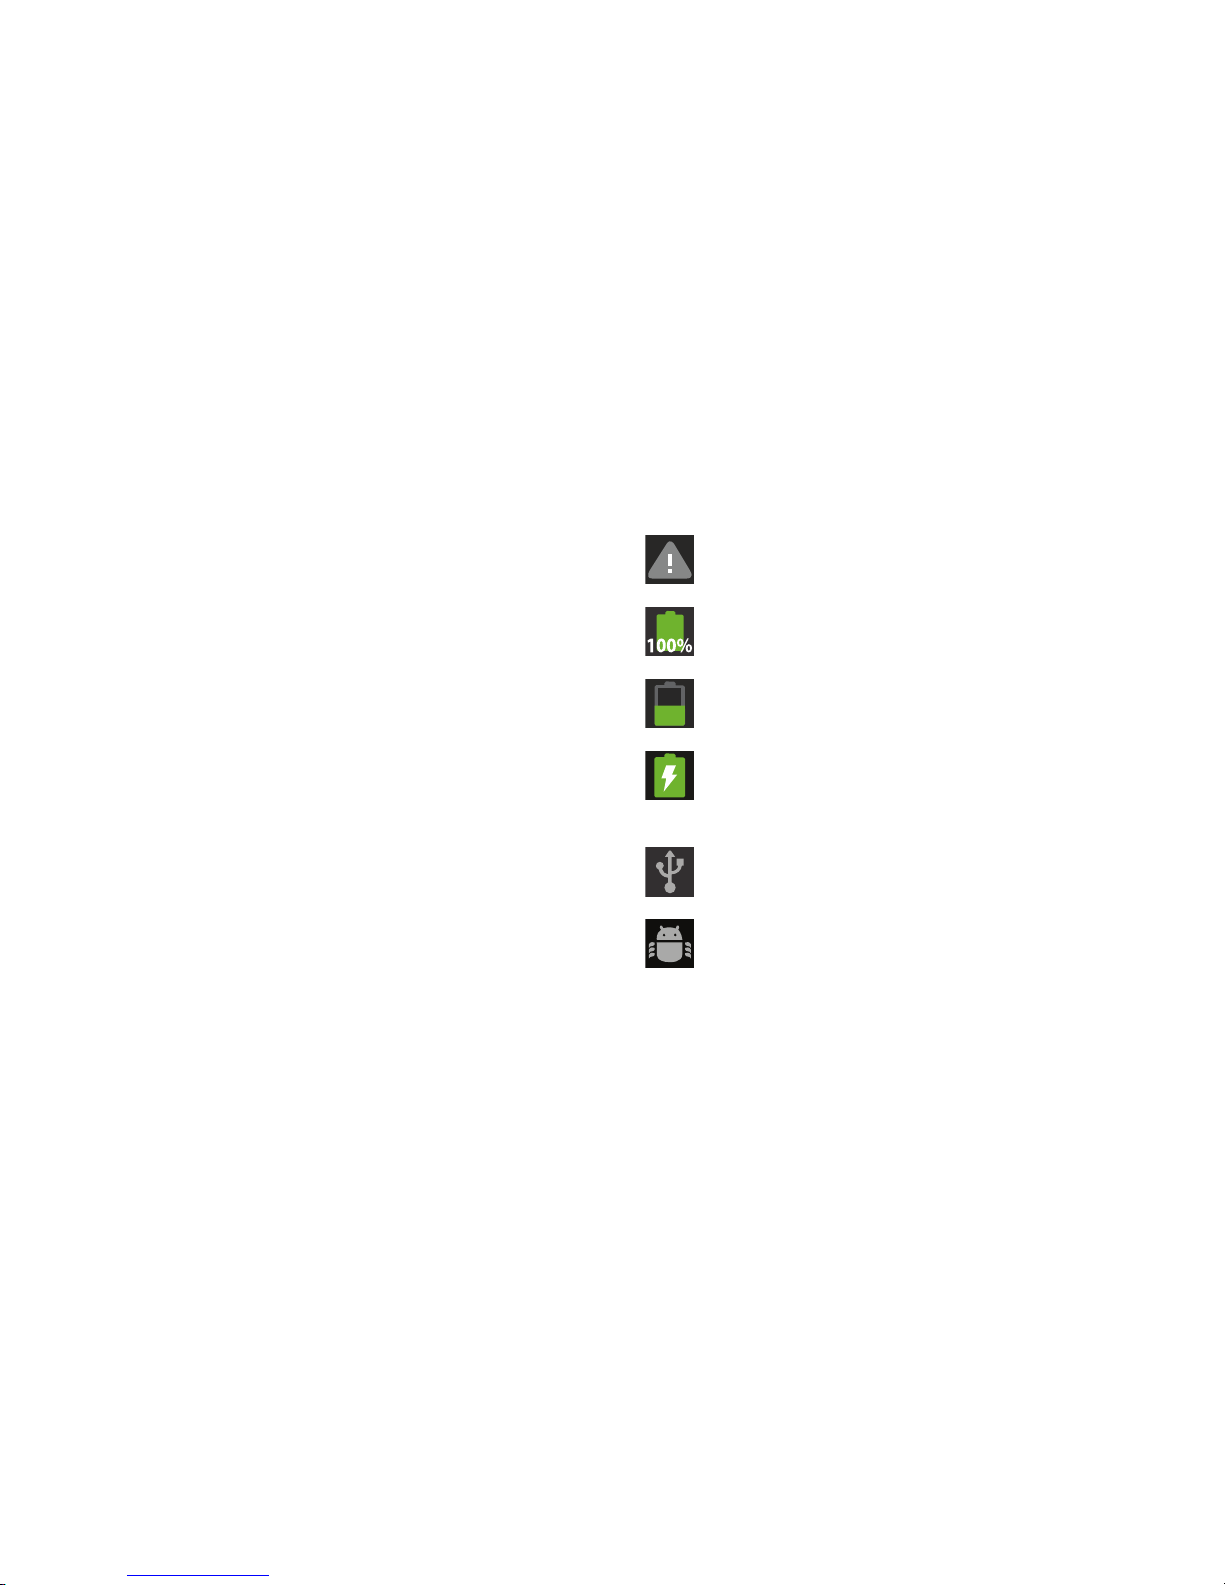
Status Bar
The Status Bar displays icons to show connection status,
battery power, and other details.
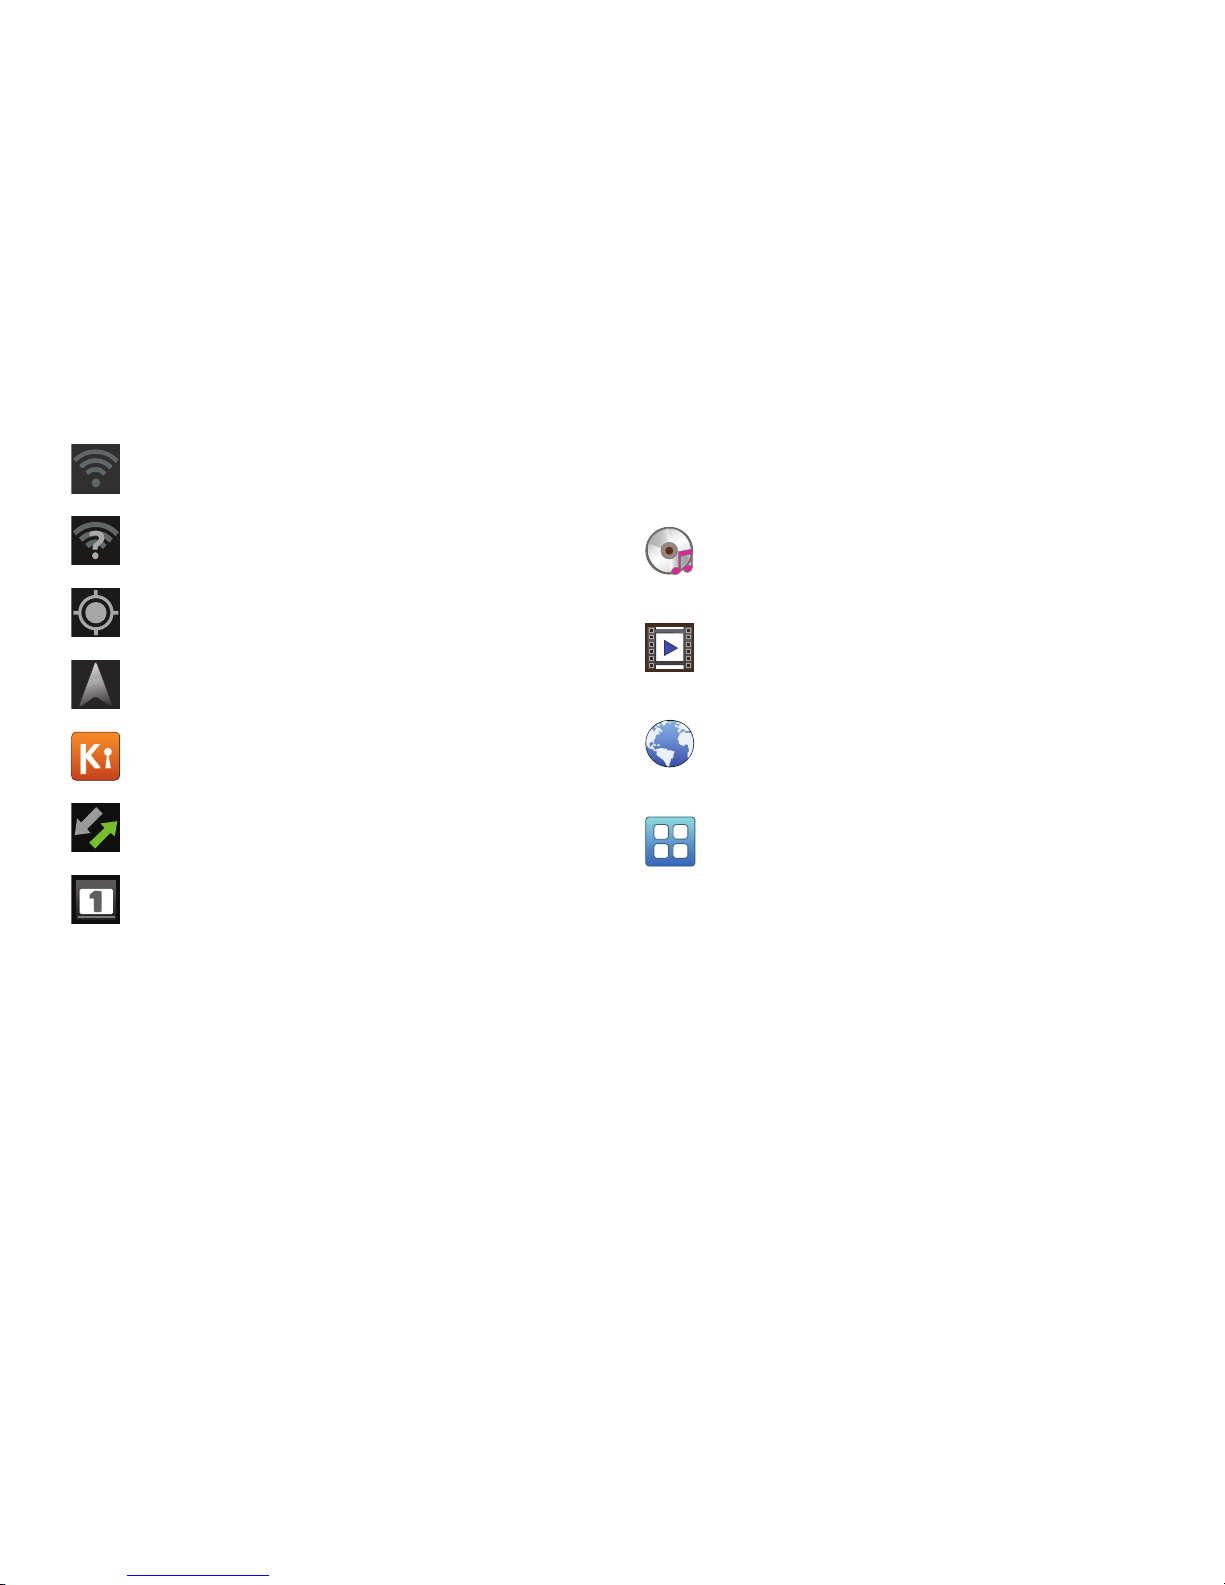
System Alert
: Check Notifications Panel for alerts.
Battery Full
: Battery is fully charged. Disconnect
device from power source.
Battery Level
: Shown partially charged.
Charging Indicator
: Battery is charging. Displays
when connected to a standard AC wall outlet or to a
computer by way of a USB cable.
USB Connected
: Device is connected to a computer
using a USB cable.
USB Debugging
: Device is connected to a computer in
debugging mode. For more information, refer to
“USB Debugging” on page 141.
Page 30
26
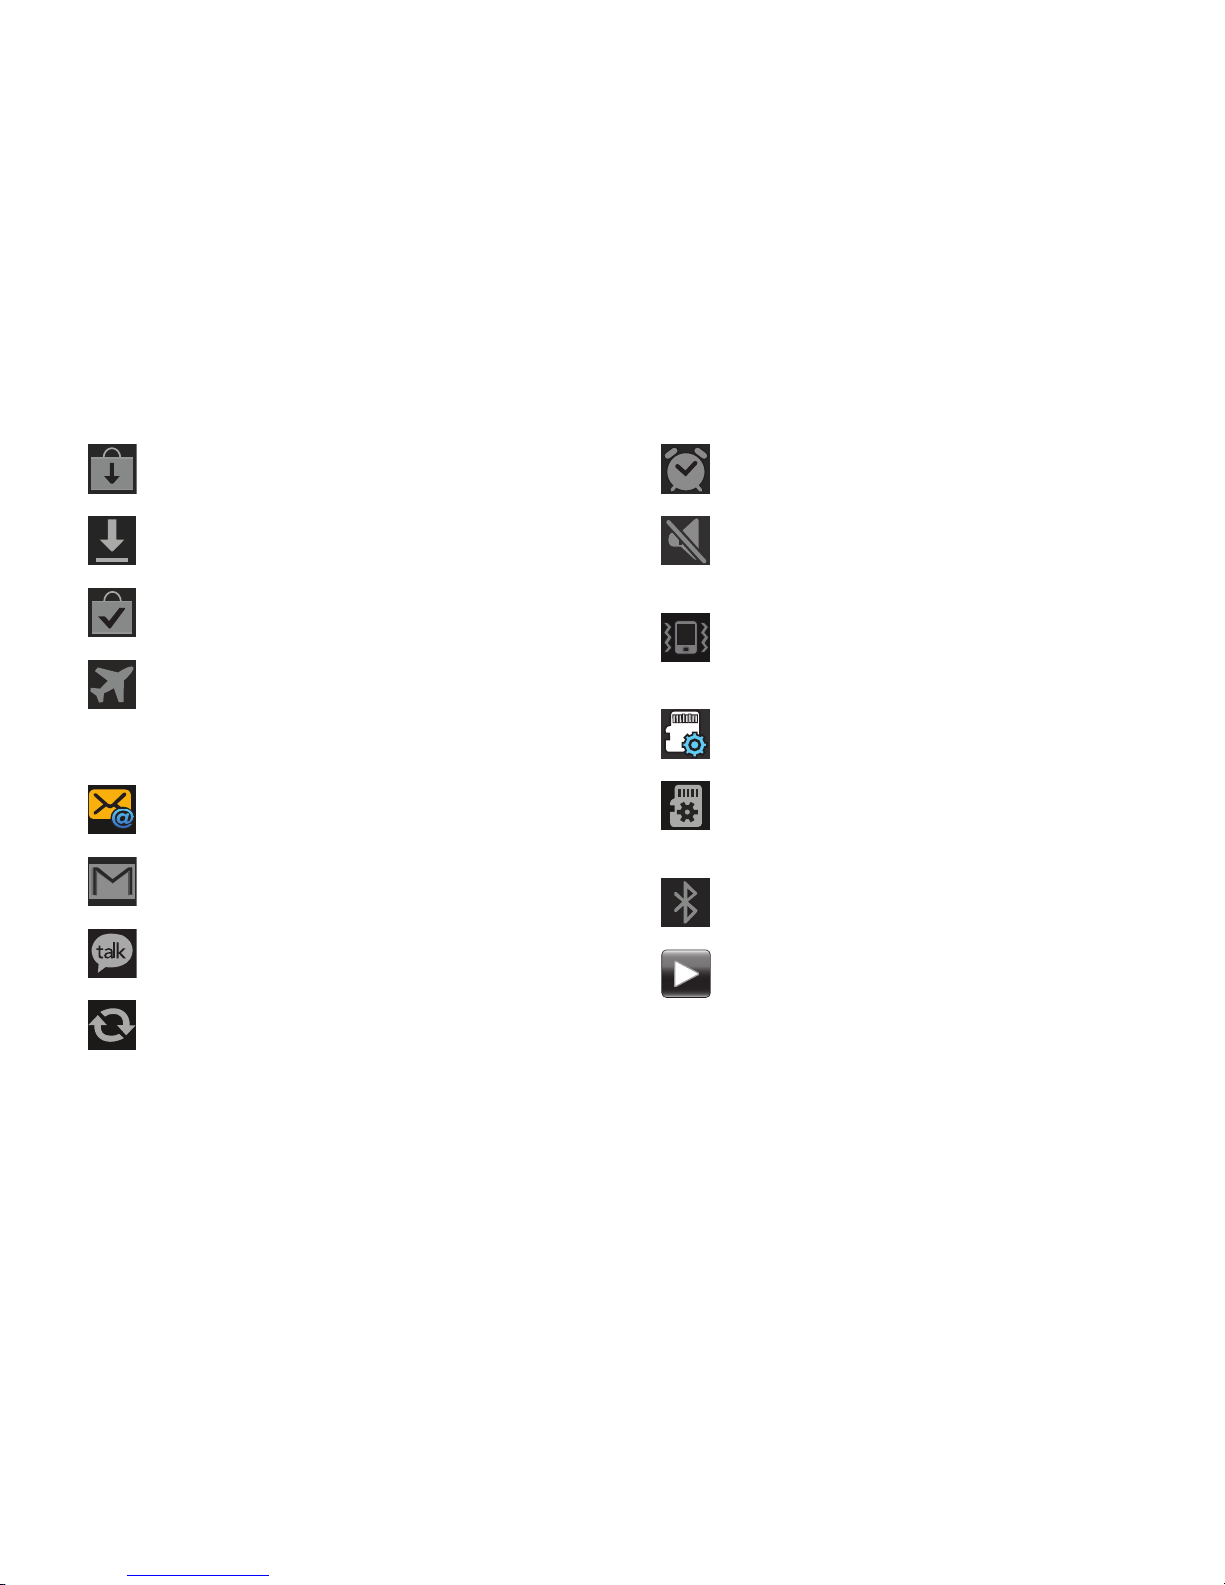
Updates Available
: Updates to the applications you
have downloaded are available.
Download in Progress
: An application is being
downloaded to the device.
Download Successful
: A recent software download
was successfully downloaded.
Flight Mode
: Indicates that the Flight Mode is active,
which allows you to use many of your device’s
features, but it cannot access online information or
applications.
New Email Message
: You have new email.
New Gmail Message
: You have new Gmail.
Google Talk Invitation
: Someone has invited you to
chat using Google Talk.
Refresh
: An account is being refreshed.
Alarm Set
: An alarm is active. For more information,
refer to “Clock” on page 111.
Silent Mode
: All sounds except media and alarms are
silenced, and Vibrate mode is not active. For more
information, refer to “Silent Mode” on page 134.
Vibrate Mode
: All sounds are silenced, and Vibrate is
set to Always or Only in Silent mode. For more
information, refer to “Vibrate” on page 134.
Media Scanner
: The media scanner is active.
Preparing SD Card
: A memory card has been mounted
and is being prepared for use. For more information,
refer to “SD Card and Device Storage” on page 145.
Bluetooth Active
: Bluetooth is turned on.
Music Player
: A song is playing. Touch the Music icon
or display the Notification Panel to see the song title
and music player controls. For more information,
refer to “Music Player” on page 82.
Page 31
Understanding Your Device 27
Primary Shortcuts
Primary Shortcuts appear at the bottom of the display.
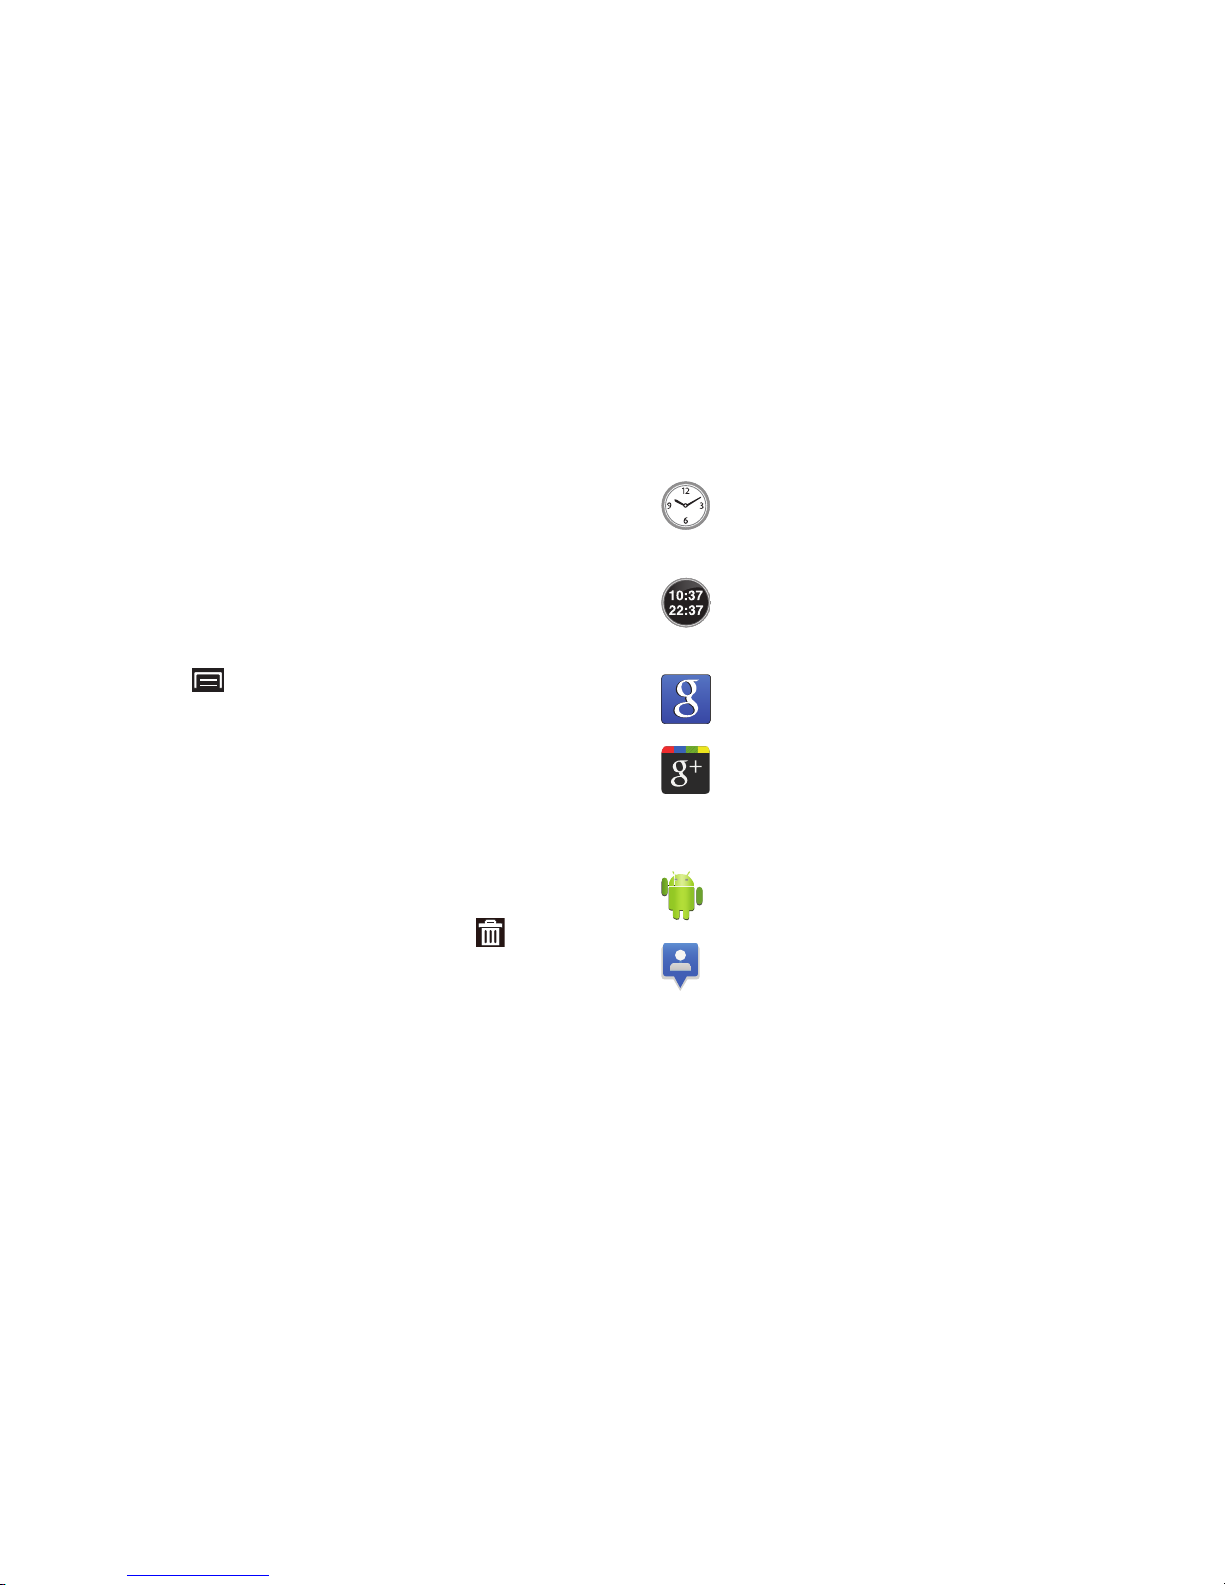
Wi-Fi Active
: Wi-Fi is connected, active, and
communicating with a Wireless Access Point (WAP).
Wi-Fi Action Needed
: Action needed to connect to
Wireless Access Point (WAP).
GPS Active
: Displays when GPS is active.
Navigation Active
: The Navigation app is active. For
more information, refer to “Navigation” on page 76.
Kies air
: Displays when Kies air is active.
Software update
: This is a notification for Software
update. Follow the on-screen instructions.
Event
: This is a notification for one or more events.
Music
: Play music stored on an optional installed
memory card. For more information, refer to “Music
Player” on page 82.
Videos
: Play and manage videos stored on an
installed memory card. For more information, refer
to “Videos” on page 93.
Internet
: Access the Internet. Appears on the Home
screen by default. For more information, refer to
“Internet” on page 66.
Applications
: Access your device’s applications. For
more information, refer to “Applications” on
page 32.
Page 32
28
Widgets
Widgets are self-contained applications that you can place
on Home screens to access your favorite features.
Adding Widgets to a Home Screen
1. Navigate to the desired Home screen.
2. Touch and hold on the screen.
– or –
Touch
(Menu)
➔
Add
.
The
Add to Home screen
menu displays.
3. Touch
Widgets
.
4. Scroll through the list of Widgets and touch a Widget.
The Home screen displays and the Widget appears on
it.
Removing Widgets
1. Touch and hold the Widget until
Remove
appears
at the bottom of the screen.
2. Drag the Widget to the
Remove
icon and remove your
finger to delete the Widget.
List of Widgets
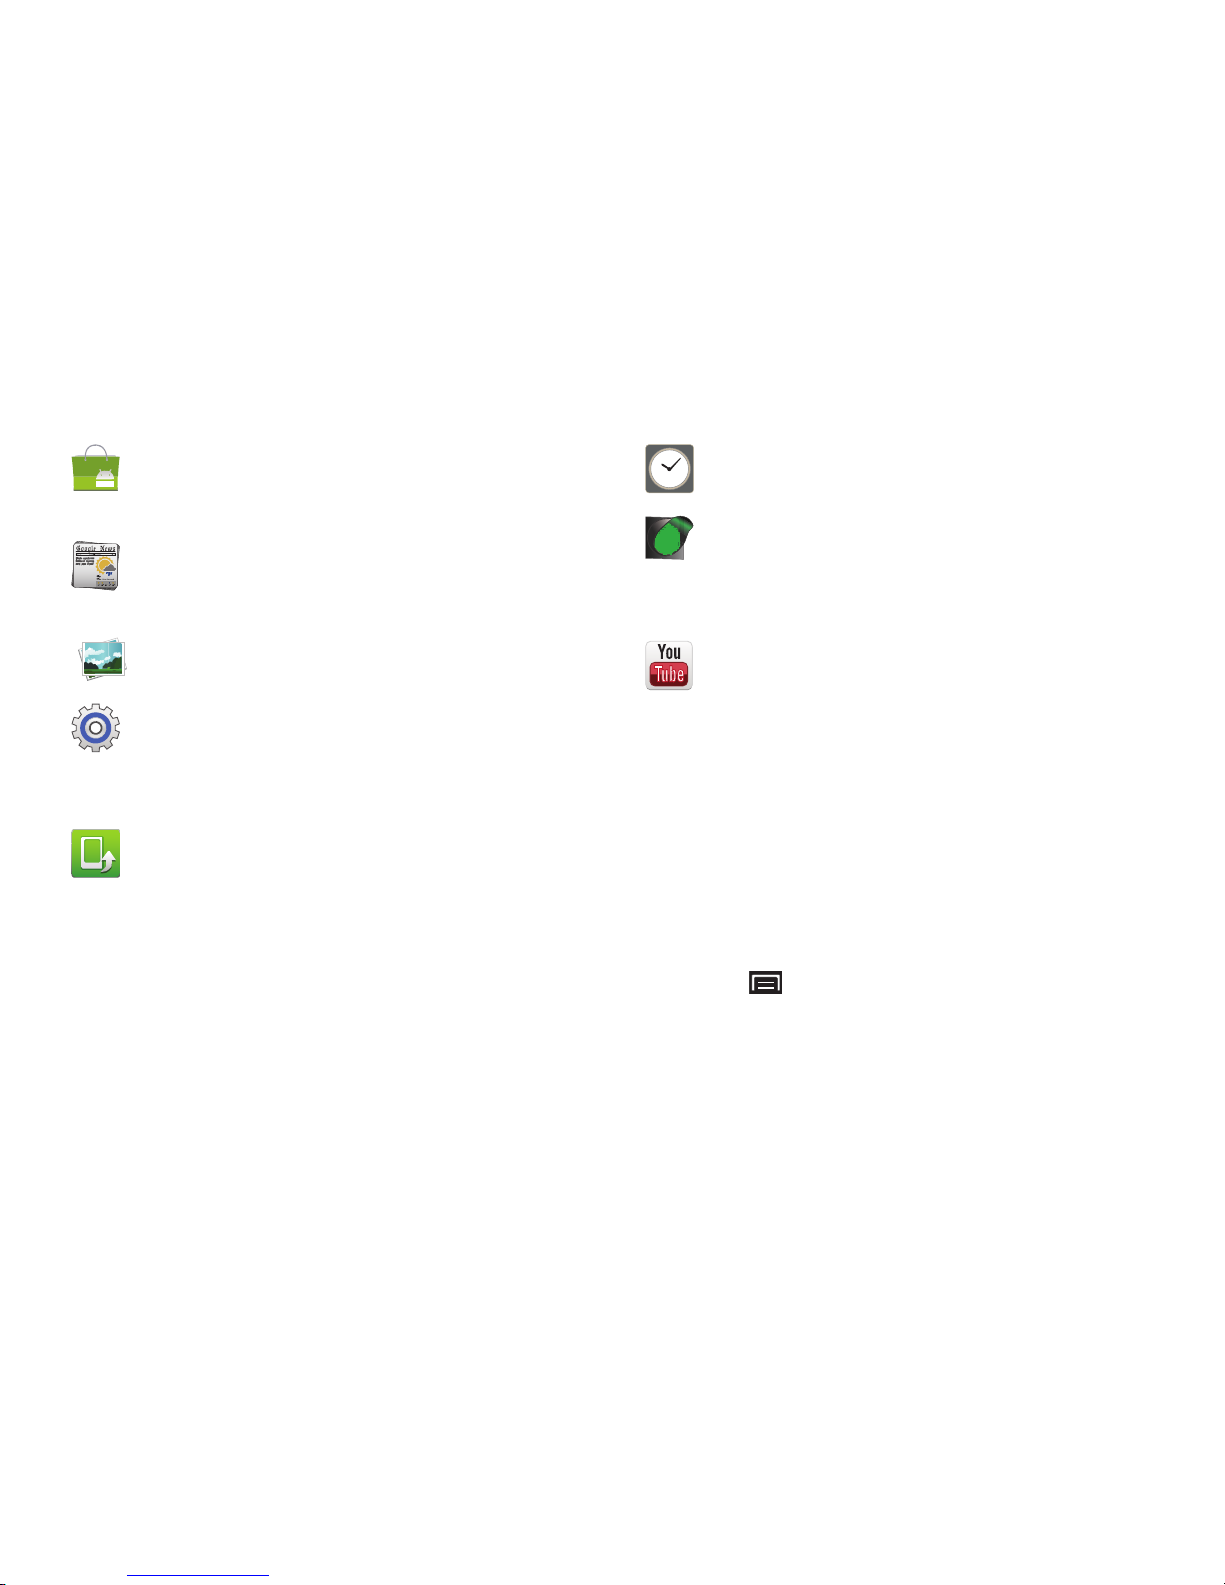
Analog clock
: Display the time on a Home screen, add
alarms, and access the Clock app. For more
information, refer to “Clock” on page 111.
Dual clock
: Display the date and time for two different
locations. For more information, refer to “Dual Clock”
on page 115.
Google Search
: Display a Google Search bar. For more
information, refer to “Google Search” on page 79.
Google+
: Share updates and see what is going on
around you with Google+ for mobile. For more
information, refer to “Google+ for Mobile” on
page 116.
Home screen tips
: Display tips about the Home screen.
Latitude
: Locate your friends on a map, and share or
hide your location. For more information, refer to
“Latitude” on page 74.
Page 33
Understanding Your Device 29
Shortcuts
Use Shortcuts for quick access to applications or features,
such as Email or other applications.
Adding Shortcuts from a Home screen
1. Navigate to the desired Home screen.
2. Touch and hold on the screen.
– or –
Touc h
(Menu)
➔
Add
.
The
Add to Home screen
menu displays.
Market
: Download applications from the Android
Market. For more information, refer to “Market” on
page 118.
News & Weather
: Display current news and weathe r for
your location. For more information, refer to “News &
Weather” on page 121.
Picture frame
: Display a picture on a Home screen.
Power control
: Control Wi-Fi, Bluetooth, and GPS
connections, and set automatic synchronization and
brightness settings. For more information, refer to
“Power Control” on page 122.
Software update
: May include bug fixes,
enhancements to services (or parts thereof), products
or devices, and updates and enhancements to any
software previously installed (including entirely new
versions). These updates are sent over the air without
USB connection. Touch the Widget and follow the onscreen instructions.
aksdj akljlad pekajr didlfajj jd djfnfn
jeuifhe jle liekz ldak eaji alpald fhak a
aksdj akljlad pekajr didlfajj jd djfnfn
jeuifhe jle liekz ldak eaji alpald fhak a
aksdj akljlad pekajr
aksdj akljlad pekajr didlfajj jd djfnfn
jeuifhe jle liekz ldak eaji alpald fhak a
aksdj akljlad pekajr didlfajj jd djfnfn
jeuifhe jle liekz ldak eaji alpald fhak a
aksdj akljlad pekajr didlfajj jd djfnfn
jeuifhe jle liekz ldak eaji alpald fhak a
aksdj akljlad pekajr didlfajj jd djfnfn
jeuifhe jle liekz ldak eaji alpald fhak a
Time
: Displays a clock, digital time, day, and date.
Traffic
: Define a destination, name it, and use Google
Maps to view the traffic from your location to the
defined location. For more information, refer to
“Maps” on page 72.
YouTube
: Search YouTube and watch videos. For more
information, refer to “YouTube” on page 80.
Page 34
30
3. Touch
Shortcuts
.
4. Touch a selection and follow the prompts to add it to
the Home screen.
Adding Shortcuts from Applications
1. Navigate to a Home screen.
2. Touch
(Applications)
.
3. Touch and hold on an application icon. The Shortcut
icon is automatically placed on the selected Home
screen.
Removing Shortcuts
1. Touch and hold the Shortcut until
Remove
appears
at the bottom of the screen.
2. Drag the Shortcut to the
Remove
icon and remove your
finger to delete the Shortcut.
Folders
Place Folders on the Home screen to organize items together
on the Home screen.
1. Navigate to the desired Home screen.
2. Touch and hold on the screen.
– or –
Touch
(Menu)
➔
Add
.
The
Add to Home screen
menu displays.
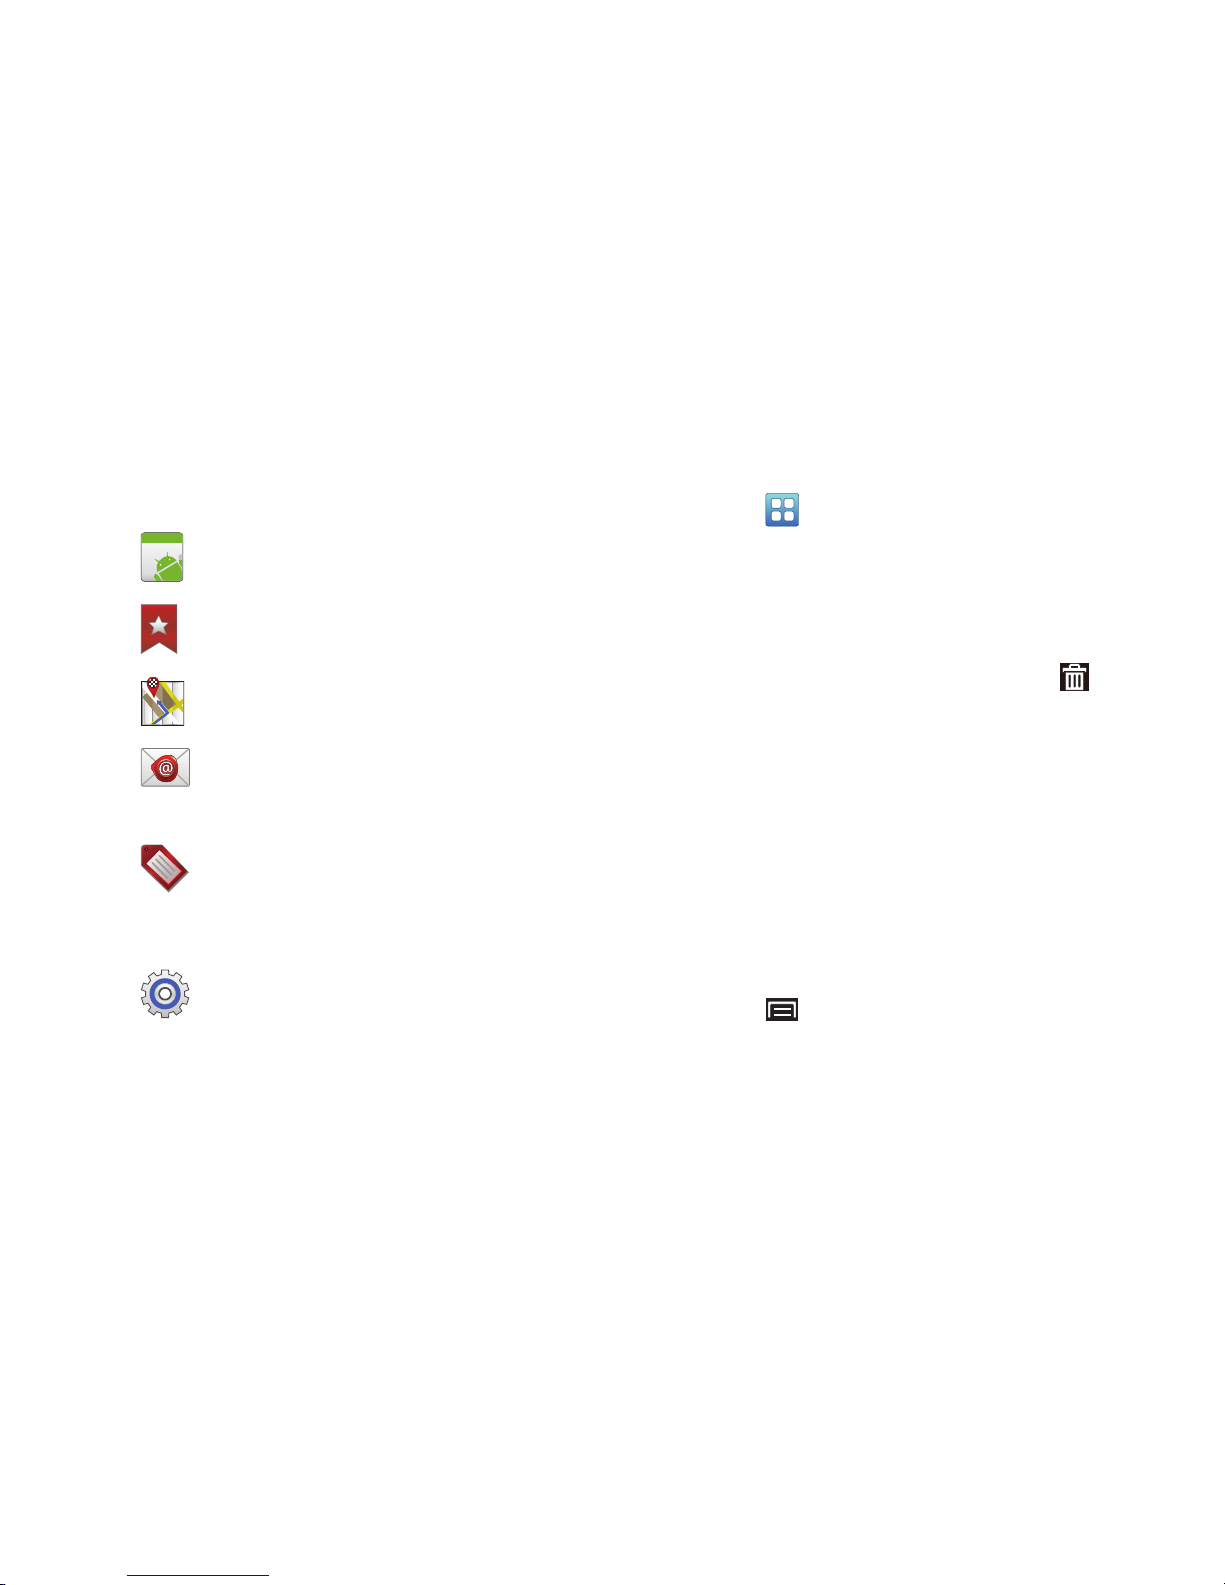
Applications
: Launch an application. For a list,
see “Applications List” on page 32.
Bookmark
: Launch a bookmarked web page
.
Directions & Navigation
: Get directions and
navigation from Google Maps.
Email
: Access an Email account. Appears once
an Email account is set up. For more
information, refer to “Email” on page 57.
Gmail label
: Access a Gmail label. Appears
once a Gmail account is set up. For more
information, refer to “Setting Up Your Gmail
Account” on page 55.
Settings
: Go to a specific setting.
Android
Page 35
Understanding Your Device 31
3. Touch
Folders
and then touch a selection:
Removing Folders
1. Touch and hold the Folder until
Remove
appears at
the bottom of the screen.
2. Drag the Folder to the
Remove
icon and remove your
finger to delete the Folder.
Wallpapers
You can choose a picture to display in the background of the
Home screen. Choose from preloaded wallpaper images or
select a photo you have downloaded or taken with the
Camera.
1. Navigate to a Home screen.
2. Touch and hold on the screen to display the
Add to
Home
screen
menu, then touch
Wallpapers
.
– or –
Touc h
(Menu) ➔ Wallpaper
.
The
Select wallpaper from
menu displays.
3. Choose a source for images:
•Gallery
: Access the Gallery to choose a picture from an
installed memory card. Touch a picture to select it, then use the
crop tool to resize the picture, if desired. Touch
Save
to save
the picture as wallpaper.
•Live wallpaper
: Choose from pre-loaded interactive animated
wallpapers. Touch a wallpaper to see an example. Touch
Set
wallpaper
to save your choice.
• Wallpaper gallery
: Choose from pre-loaded wallpaper
images. Touch a wallpaper, then touch
Set wallpaper
.
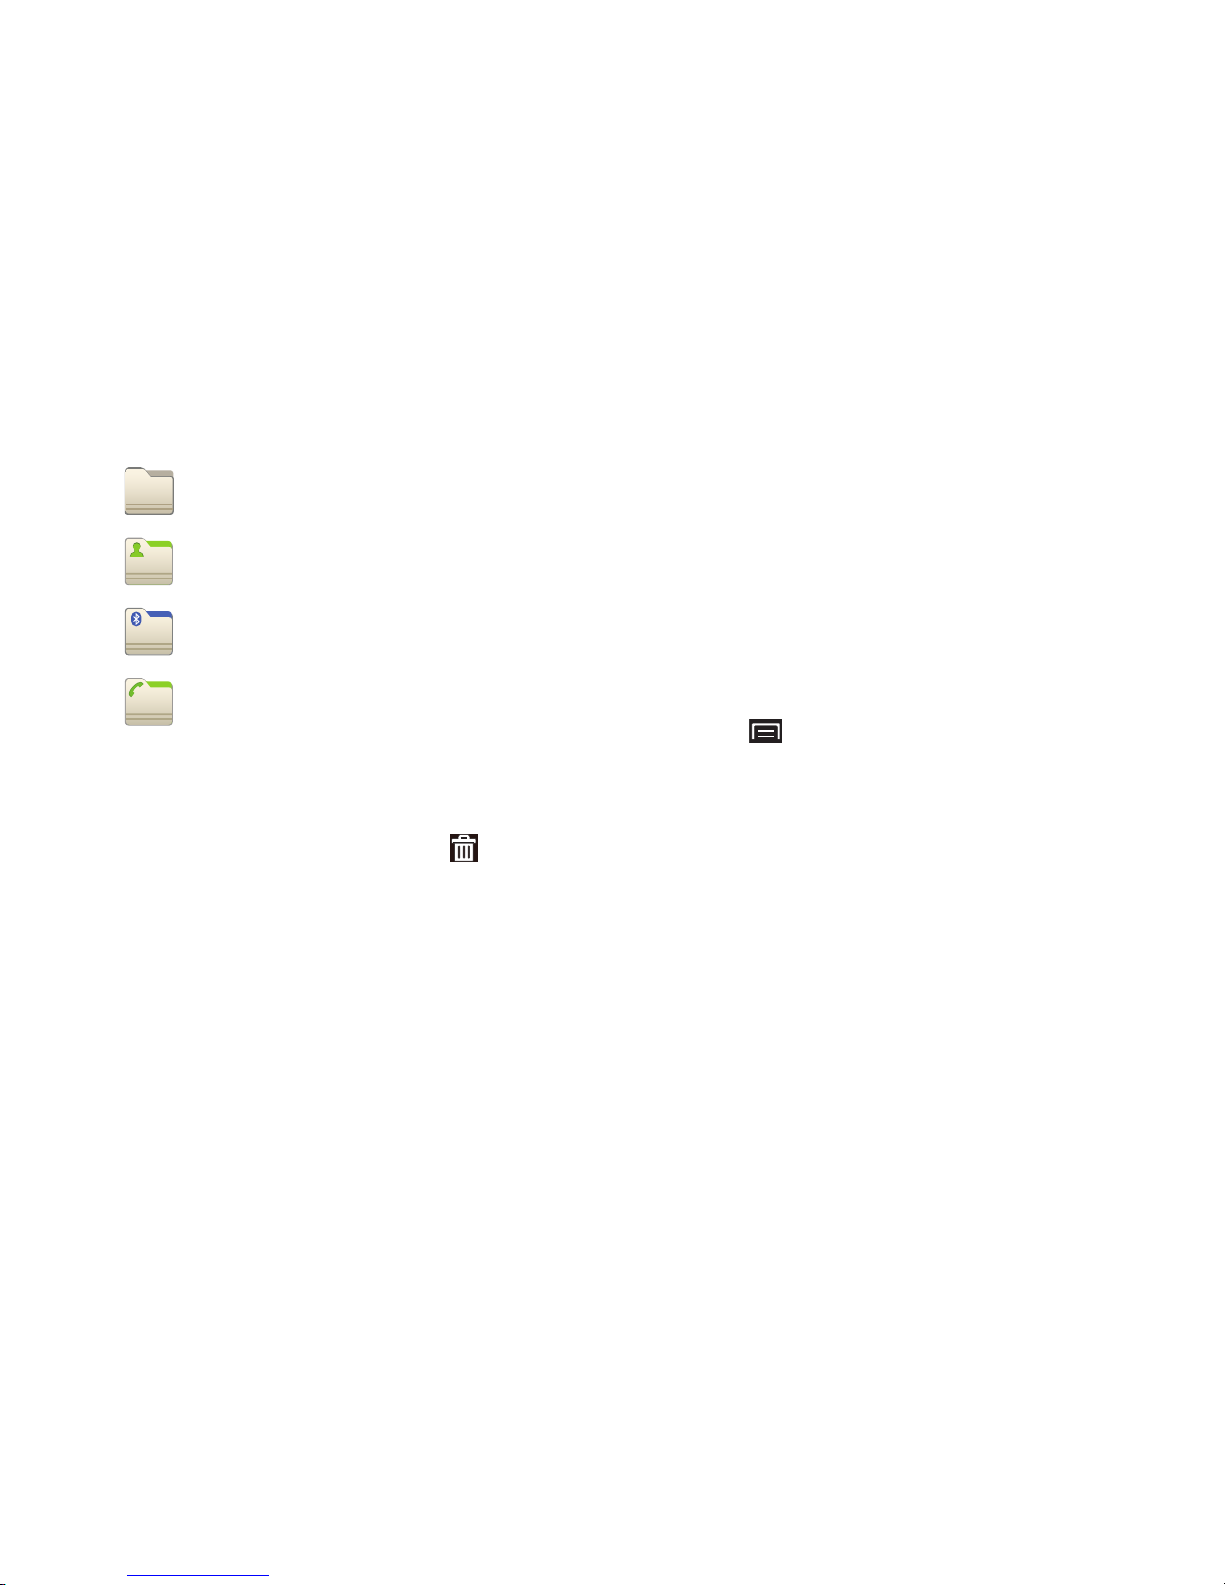
New folder
: Create a new empty folder.
All contacts
: Create a folder containing all
contacts.
Bluetooth received
: Create a folder containing
a list of items received from Bluetooth.
Contacts with phone numbers
: Create a folder
containing contacts with stored phone
numbers.
Page 36
32
Applications
The Applications screen holds all applications on your device.
Applications that you download and install from the Android
Market or from the web are also added to the Applications
screen.
You can place shortcuts to applications on the Home screen
for quick access to the application. For more information,
refer to “Adding Shortcuts from Applications” on page 30.
1. From a Home screen, touch
(Applications)
.
2. Slide your finger across the screen left or right to scroll
through the Applications screens.
3. Touch an icon to launch the application.
Customizing the Applications Screens
1. From a Home screen, touch
(Applications)
.
2. Touch
(Menu) ➔
Edit
.
3. Touch and hold an application icon, then drag it to a
new location.
4. When you are finished, touch
(Menu) ➔ Save
.
Note:
To discard changes to the Application screens before
you save them, touch
(Menu)
➔
Cancel
, then touch
OK
to confirm.
Applications List
The following is an alphabetical list of the applications that
come preloaded on your device:
AllShare
: Synchronize your device with your TV. For
more information, refer to “AllShare” on page 107.
Angry Birds
: Angry Birds is a fun and addictive puzzle
game. For more information, refer to “Angry Birds”
on page 108.
Books
: Read eBooks from the web-based Google
Books service. For more information, refer to
“Books” on page 64.
Page 37
Understanding Your Device 33
Calculator
: The calculator provides the basic
arithmetic functions; addition, subtraction,
multiplication, and division. The calculator can also
be used as a scientific calculator. A shortcut to
Calculator appears on the Main Home screen by
default. For more information, refer to “Calculator”
on page 109.
Calendar
: Record events and appointments to
manage your schedule. For more information, refer
to “Calendar” on page 109.
Camera
: Take photos or record videos. For more
information, refer to “Camera” on page 87.
Clock
: Schedule alarms to remind you of
appointments or events, or as a wake-up. For more
information, refer to “Clock” on page 111.
Contacts
: Save and manage contact information for
your friends and colleagues. For more information,
refer to “Contacts” on page 46.
Downloads
: Files, apps, and other items you
download in Browser, Gmail, Email, or in other ways,
are stored on your tablet’s internal storage. Use the
Downloads app to view, reopen, or delete what you
have downloaded. For more information, refer to
“Downloads” on page 114.
Email
: Send and receive email from your device. For
more information, refer to “Email” on page 57.
FM Radio
: The built-in FM radio in your device
provides free music from your local FM radio stations.
A shortcut to FM Radio appears on the Main Home
screen by default. For more information, refer to “FM
Radio” on page 85.
Gallery
: View and manage photos stored on your
device or on an installed memory card. For more
information, refer to “Gallery” on page 94.
FM
Page 38
34
Gmail
: Send and receive email with Gmail, Google’s
web-based email. A shortcut to Gmail appears on a
Home screen by default. For more information, refer
to “Gmail” on page 54.
Google+ for Mobile
: Share updates and see what is
going on around you with Google+ for mobile. For
more information, refer to “Google+” on page 78.
Google Messenger
: With Google Messenger, you can
bring groups of friends together into a simple group
conversation. For more information, refer to “Google
Messenger” on page 63.
Google Search
: Use the Google search engine to
search the internet and your device. A shortcut to
Google Search appears on the Main Home screen by
default. For more information, refer to “Google
Search” on page 79.
Kies air
: This mobile application enables Wi-Fi
device-to-device connections and browser-based
management. For more information, refer to “Kies
Air” on page 105.
Latitude
: Use Google Latitude to locate your friends
on a map and share or hide your location. For more
information, refer to “Latitude” on page 74.
Maps
: Find locations and get directions with Google
maps. A shortcut to Maps appears on the Main Home
screen by default. For more information, refer to
“Maps” on page 72.
Market
: Browse, download, and install Android
applications. A shortcut to Market appears on the
Main Home screen by default. For more information,
refer to “Market” on page 118.
Memo
: Create text memos and use Bluetooth to send
memos. For more information, refer to “Memo” on
page 119.
My files
: Find, view and manage files stored on an
optional installed memory card. For more
information, refer to “My Files” on page 120.
Navigation
: Use Google Maps Naviga tion to search for
locations, with turn-by-turn directions. For more
information, refer to “Navigation” on page 76.
Page 39
Understanding Your Device 35
News & Weather
: Display current news and weather
for your location. For more information, refer to
“News & Weather” on page 121.
Places
: Use Google Maps to find places of interest,
plus add your own favorite places. For more
information, refer to “Places” on page 78.
Quickoffice
: The Quickoffice application allows you
to create and save Microsoft Word, Excel, and
Powerpoint documents. You can also view existing
PDFs. For more information, refer to “Quickoffice” on
page 123.
Samsung Apps
: Connect to Samsung Apps and make
your smart device even smarter. Simply and easily
download an abundance of applications to your
device such as games, news, reference, social
networking, navigation, and more. For more
information, refer to “Samsung Apps” on page 123.
Smart View
: Use your device as a remote control for
your TV or enjoy TV and other multimedia right from
your device. A shortcut to Smart View appears on the
Main Home screen by default. For more information,
refer to “Samsung Smart View” on page 124.
aksdj akljlad pekajr didlfajj jd djfnfn
jeuifhe jle liekz ldak eaji alpald fhak a
aksdj akljlad pekajr didlfajj jd djfnfn
jeuifhe jle liekz ldak eaji alpald fhak a
aksdj akljlad pekajr
aksdj akljlad pekajr didlfajj jd djfnfn
jeuifhe jle liekz ldak eaji alpald fhak a
aksdj akljlad pekajr didlfajj jd djfnfn
jeuifhe jle liekz ldak eaji alpald fhak a
aksdj akljlad pekajr didlfajj jd djfnfn
jeuifhe jle liekz ldak eaji alpald fhak a
aksdj akljlad pekajr didlfajj jd djfnfn
jeuifhe jle liekz ldak eaji alpald fhak a
Settings
: Configure your device to your preferences.
For more information, refer to “Settings” on
page 129.
Social Hub
: Access your social networks, like
Facebook, YouTube, and Twitter, all in one place. For
more information, refer to “Social Hub” on page 125.
Talk
: Chat with other Google Talk users. A shortcut to
Talk appears on a Home screen by default. For more
information, refer to “Google Talk” on page 62.
Ta sk m an a ge r
: View and manage active applications.
For more information, refer to “Task Manager” on
page 14.
textPlus
: textPlus is a software application for mobile
devices that allows its users to send and receive text
messages, both on a one-to-one basis and in groups,
all for free. For more information, refer to “textPlus”
on page 126.
Voice recorder
: Record your voice or other sounds,
and share via Bluetooth or Gmail. For more
information, refer to “Voice Recorder” on page 127.
Page 40
36
Voice Search
: Perform a Google search by speaking
your search terms. For more information, refer to
“Voice Search” on page 79.
YouTube
: View and upload YouTube videos, right from
your device. For more information, refer to “YouTube”
on page 80.
Page 41
Entering Text 37
Section 3: Entering Text
This section describes how to enter words, letters,
punctuation and numbers when you need to enter text.
Virtual QWERTY Keyboard
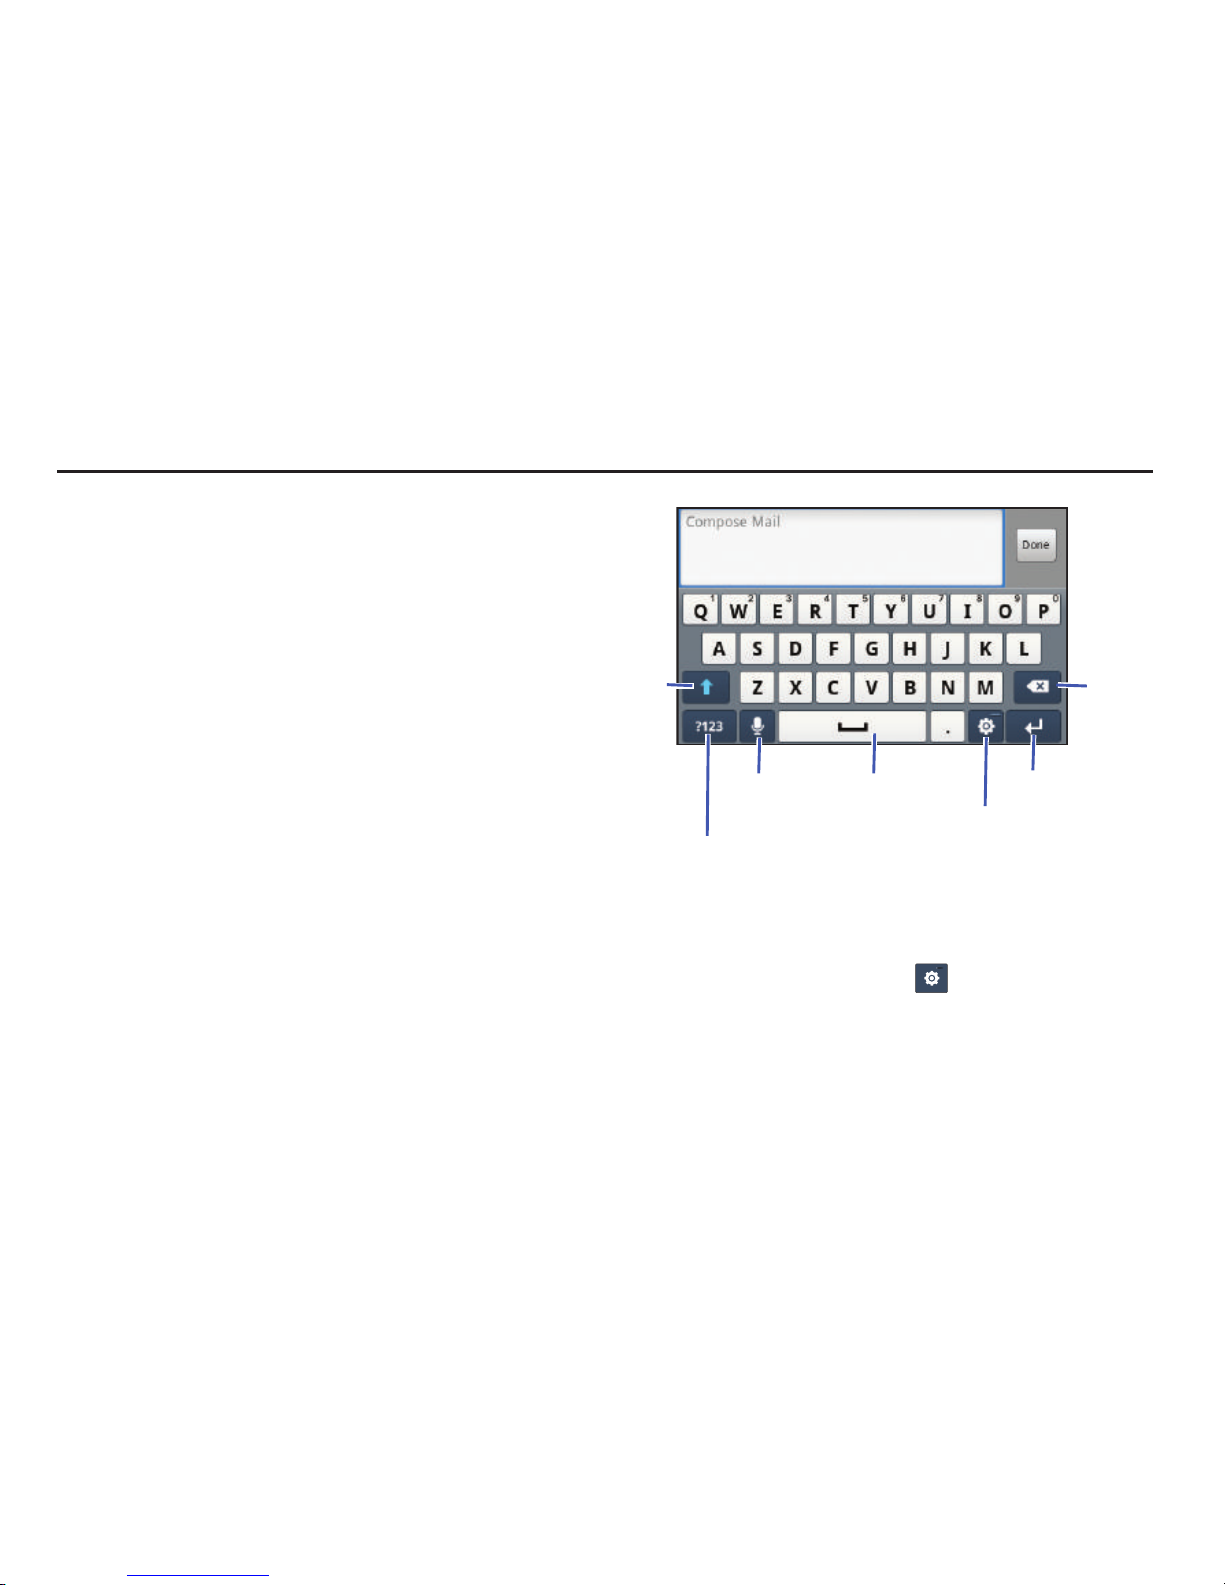
Your device uses a virtual QWERTY keyboard for text entry.
Use the keyboard to enter letters, punctuation, numbers, and
other characters into text entry fields or applications. Access
the keyboard by touching any text entry field.
The virtual QWERTY keyboard displays at the bottom of the
screen. By default, when you rotate the device, the screen
orientation updates to display the keyboard at the bottom of
the screen.
Using the Samsung Keypad
The Samsung Keypad is a custom virtual QWERTY keyboard,
featuring predictive text. Input characters by touching the
on-screen keys with your finger or use speech recognition.
As you enter characters, predictive text matches your key
touches to common words and displays them. Select a word
from the display to insert it into your text.
Configuring the Keypad
To configure the Samsung Keypad to your preferences:
While entering text, touch
(Settings)
.
The Samsung keypad settings screen is displayed. For
more information, refer to “Samsung Keypad” on
page 146.
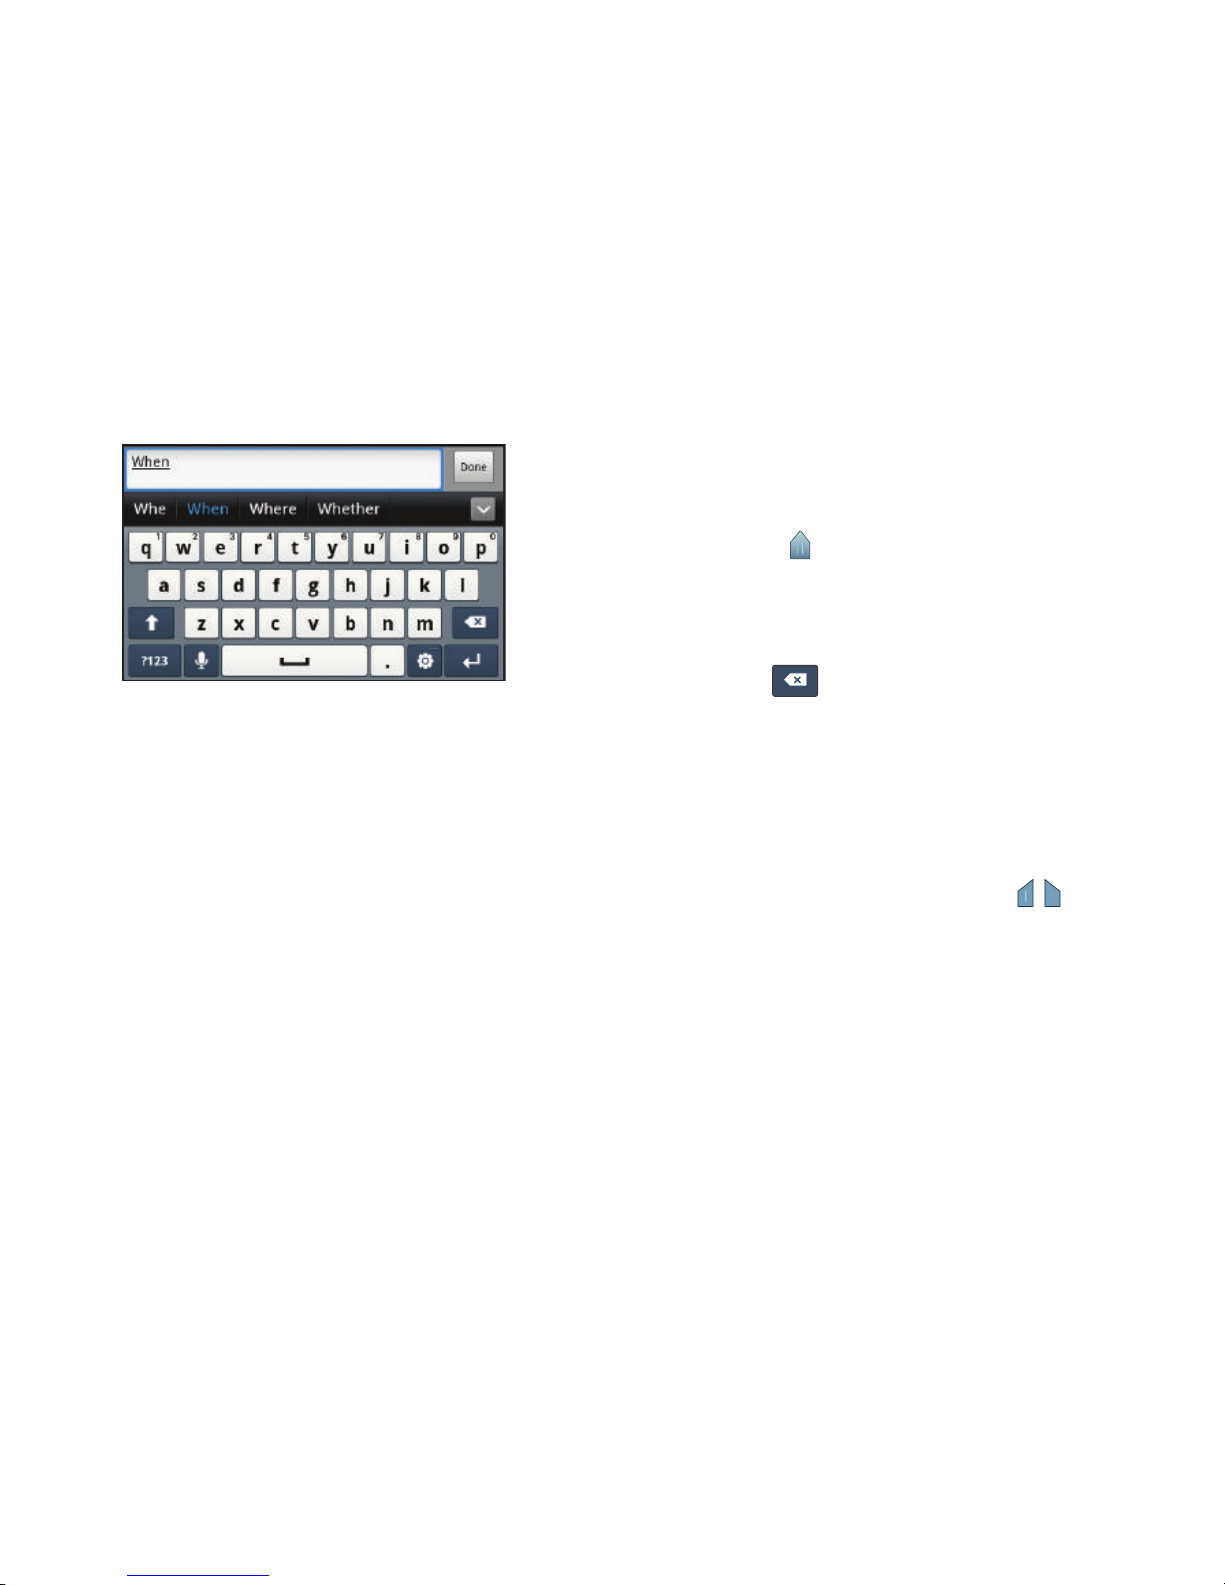
New
Paragraph
Text Input Mode
Keypad
Shift
Key
Delete
Space Bar
Speech
Recognition
Settings
Key
Page 42
38
Entering Upper and Lower Case
Letters
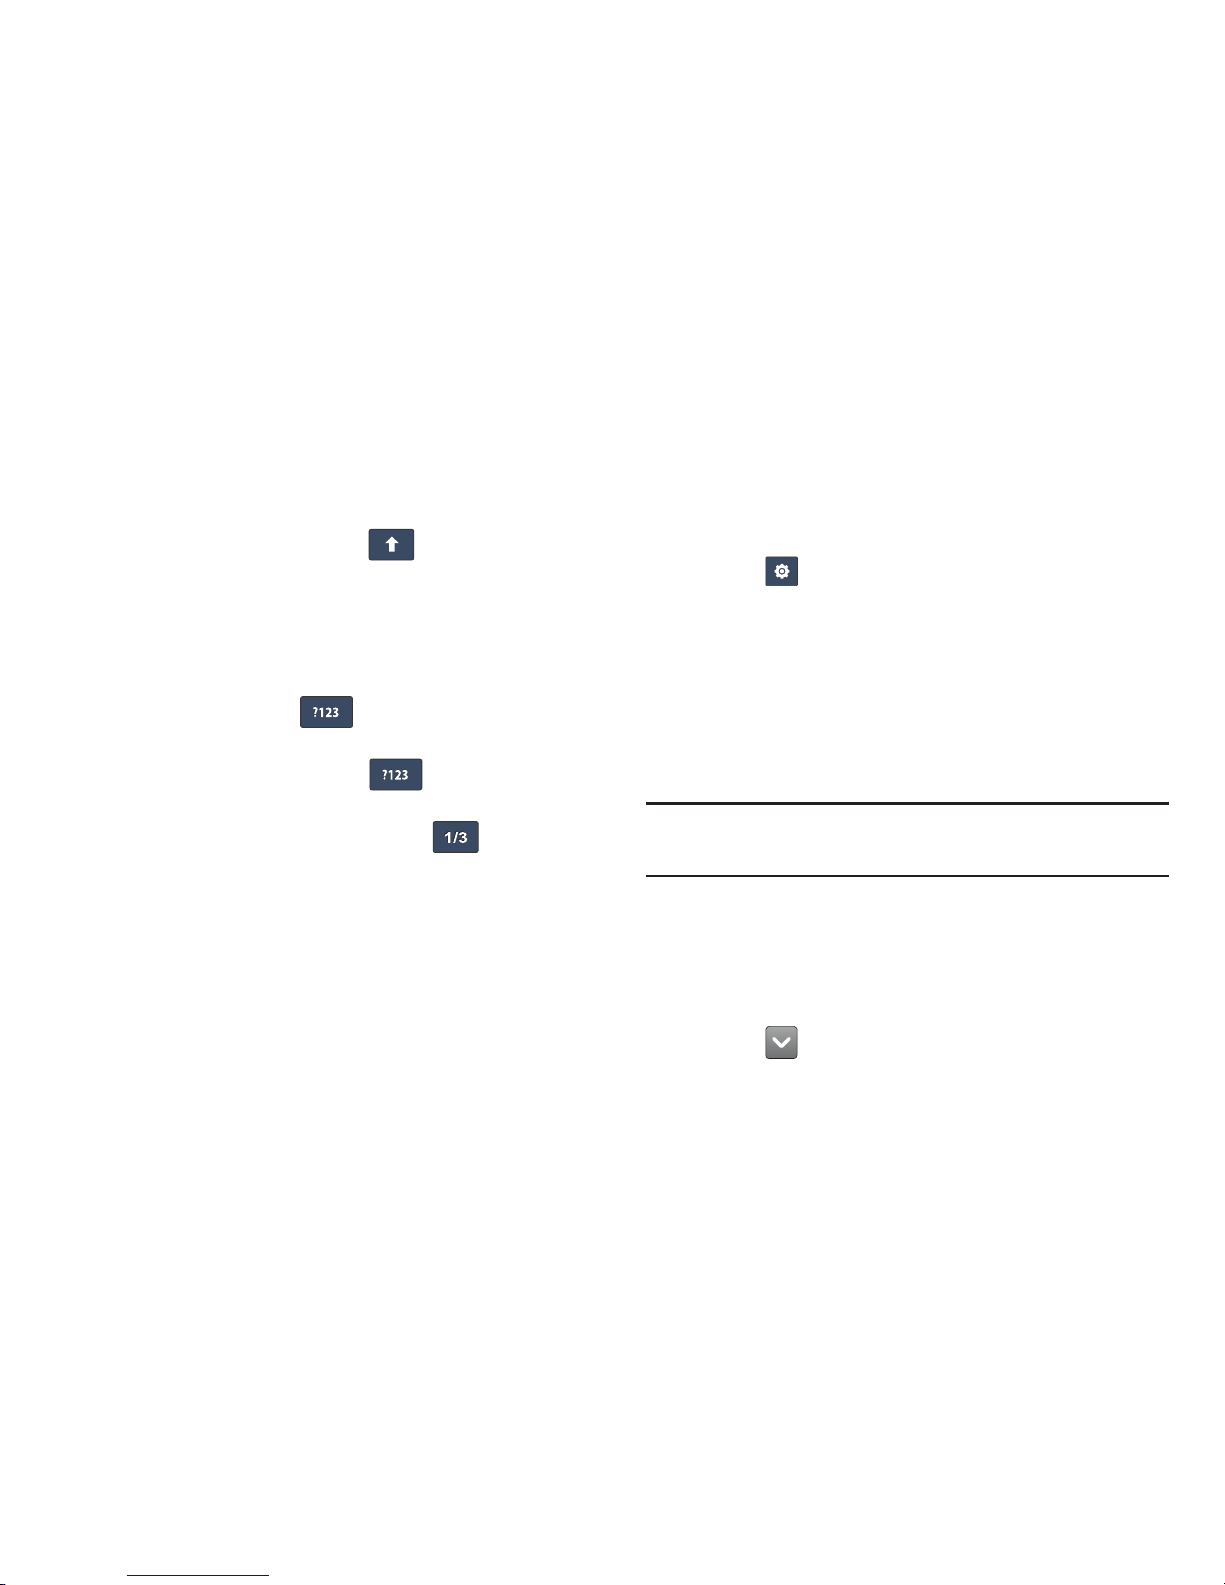
The default case is lower case (abc). Enter upper and lower
case alphabet letters by touching
(Shift)
to toggle the
case, before touching the letter key(s).
•
Touch once to switch from abc to Abc mode.
•
Touch and hold to switch to ABC mode.
Entering Symbols and Numbers
To enter a number, touch , then touch the
corresponding key.
To enter common symbols, touch to switch to
Symbols mode, then touch the corresponding key.
There are three pages of symbols. Touch to switch to
the next page.
Touch and hold a vowel key (A, E, I, O, U, or Y) or the C, N, or
S key to open a small window where you can touch an
accented vowel or other alternate letter.
Touch and hold the Period key ( . ) to open a small window
with a set of common symbols and Emoticons.
Using XT9 Predictive Text
XT9 is a predictive text system that has next-letter prediction
and regional error correction, which compensates for users
touching the wrong keys on QWERTY keyboards.
1. Touch
(Settings)
at the bottom of the keypad.
The Samsung keypad settings screen displays.
2. Touch the
XT9
field so a green check mark appears
next to the field.
3. Touch the
XT9 advanced settings
field to modify XT9
associated settings. For more information, refer to
“Samsung Keypad” on page 146.
Note:
The XT9 option is available only when Abc mode has
been selected.
4. Begin typing a word. A list of word options displays.
Touch one of the words to replace the word that has
already been typed.
– or –
Touch and then touch
Add word
to register a new
word to XT9.
Page 43
Entering Text 39
5. Continue typing your message. XT9 mode can be used
in portrait or landscape mode.
Editing Text
You can edit the text you enter in text fields by cutting,
copying, or pasting text. These operations can be performed
within and across apps. However, some apps do not support
editing some or all of the text displayed while others may
offer their own way to select text.
Editing Existing Text
To edit text that you have entered:
1. Touch the text at the point you want to edit.
The
Cursor
displays at the point you touched.
2. Touch and drag the
Cursor
to a better position, if
necessary.
3. Enter additional text or delete text by repeatedly
touching
(Delete)
.
Copying, Deleting, or Replacing Text
To select and copy, delete, or replace text:
1. Touch and hold the text or word you want to select.
The Edit text pop-up displays.
2. Touc h
Select word
or
Select all
.
The selected text is highlighted with a tab at
each end of the selection.
3. Drag a selection tab to expand or reduce the range of
selected text.
Page 44
40
4. Depending on the action you want to take for the
selected text, in the pop-up touch:
– or –
Enter text by typing or speaking to replace the
selection with what you type.
– or –
Touch
(Delete)
to delete the selected text.
Tip:
Touch on another area of the screen to unselect the text.
Pasting Text
To paste previously copied text:
1. Touch the text at the point you want to paste the copied
text.
The
Cursor
displays at the point you touched.
2. Touch and hold the
Cursor
and touch
(Paste)
in the
pop-up.
Closing the Keyboard
To close the keyboard:
Touch
(Back)
.
Using the Handwriting Feature
You can enter text simply by using your finger to handwrite
letters on your screen.
1. From a screen where you can enter text, activate the
keypad by touching a text input field on the screen.
2. If necessary, touch
(Settings)
➔
Portrait keypad
types
, then
Handwriting box 1
or
Handwriting box 2
.
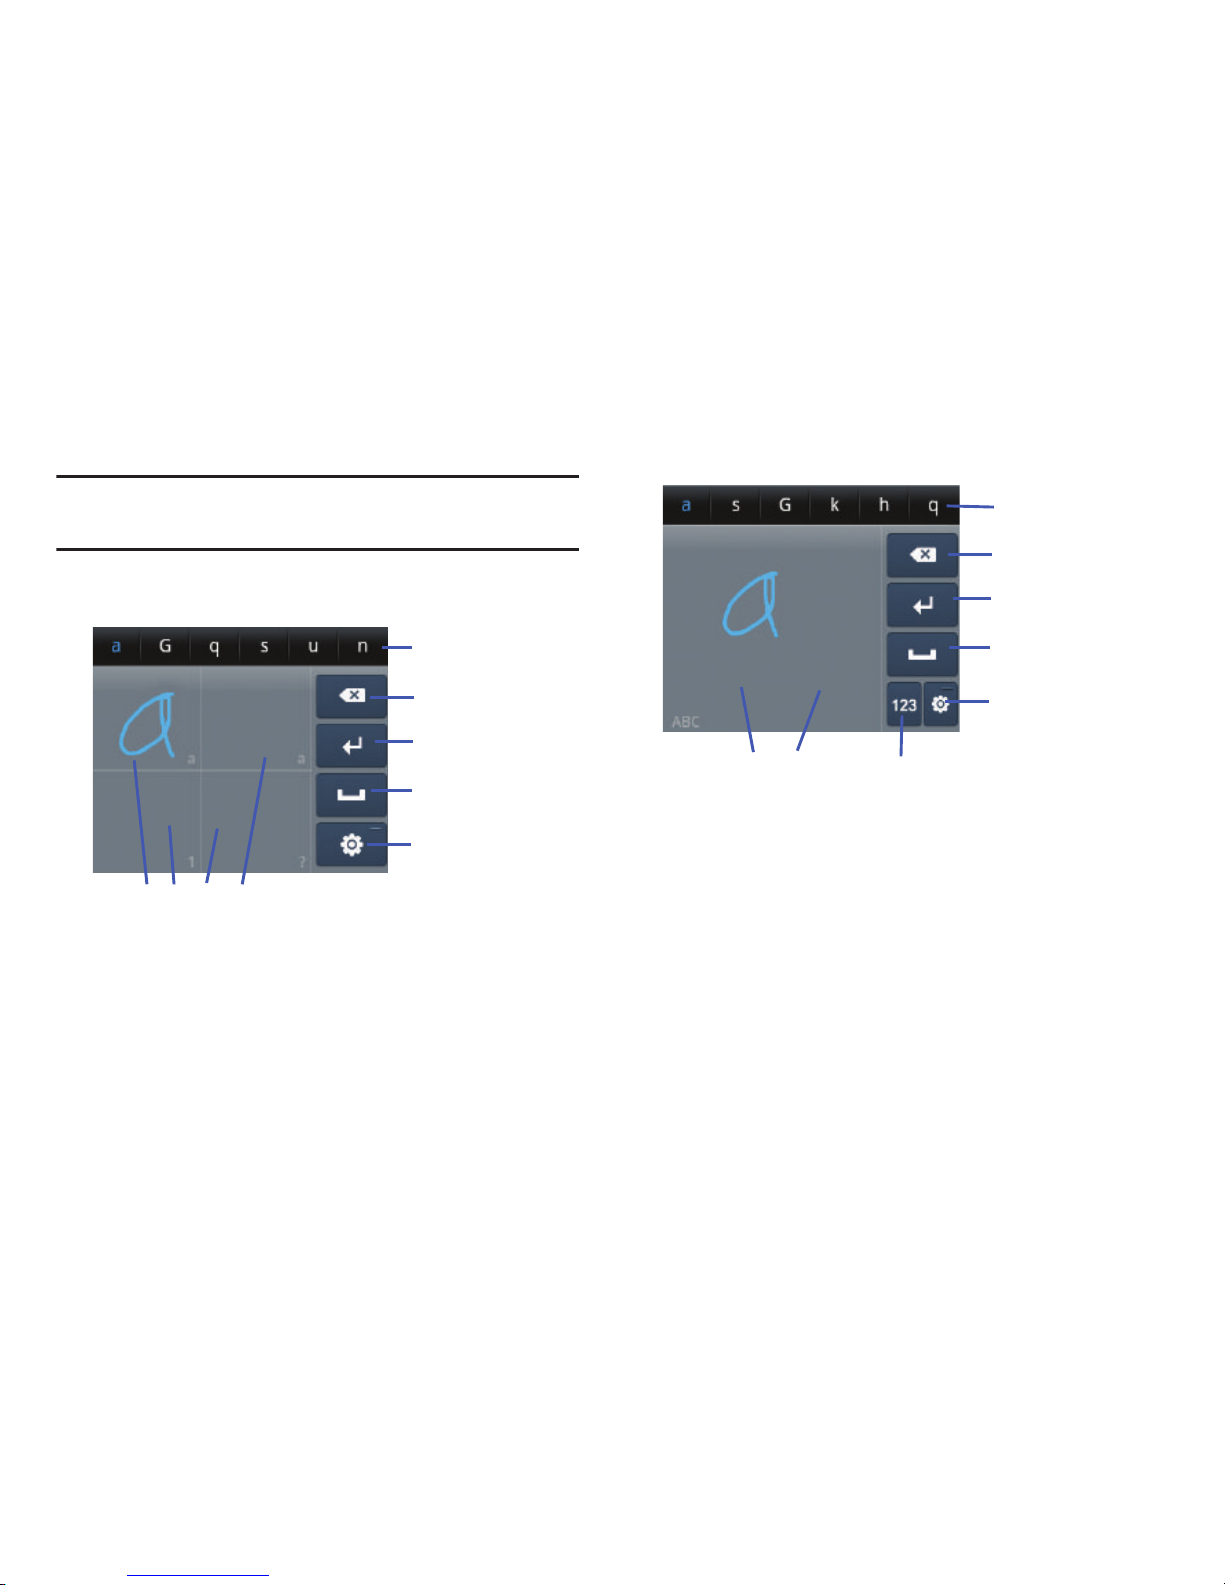
Handwriting box 1 has four handwriting areas, two for
characters (
a
), one for numbers (1), and one for
symbols and special characters (
?
).
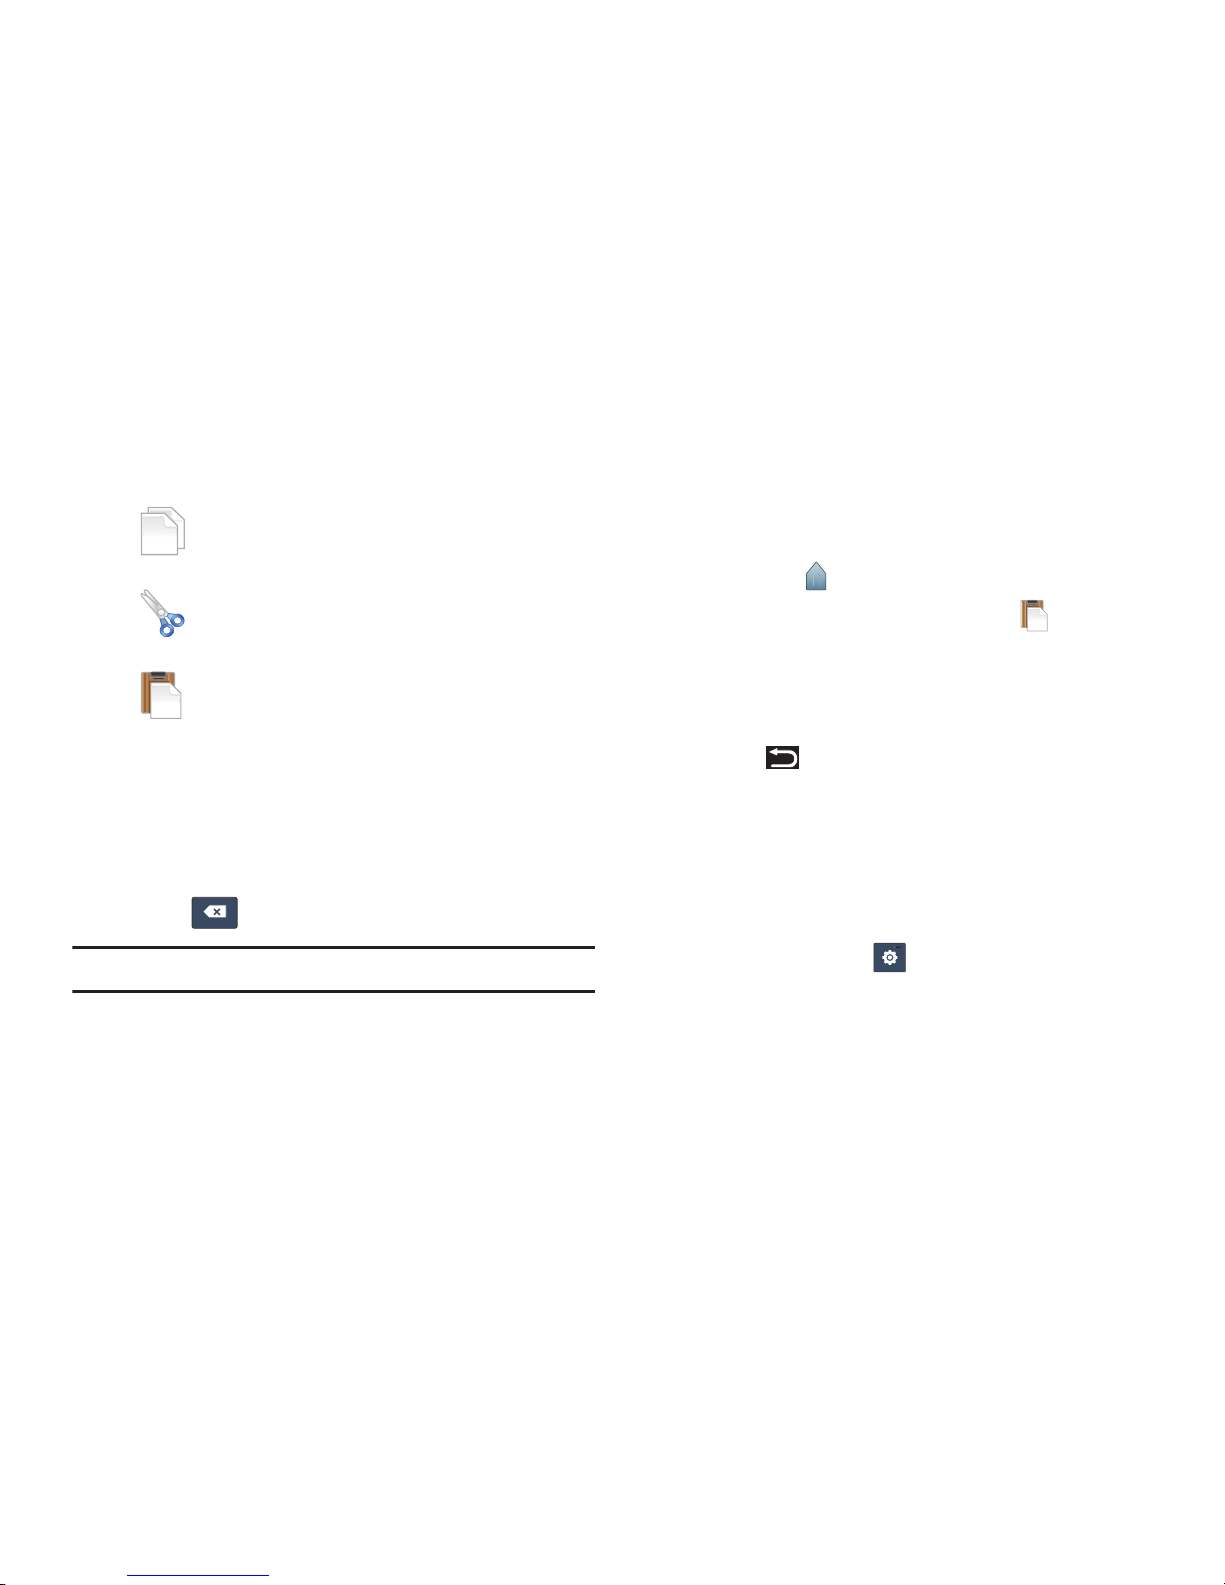
Copy
to save the selected text to the clipboard.
Cut
to remove the selected text.
Paste
to replace the previously saved text in
the clipboard.
Page 45
Entering Text 41
Handwriting box 2 has one handwriting area.
Note:
Handwriting box 1 and Handwriting box 2 only display in
portrait mode.
3. Use your finger tip to write out each character.
4. When you write single letters, suggestions are offered
in the
Letter Options
area. The suggested letter appears
in blue. If that suggestion is incorrect, touch one of the
other letters.
Handwriting areas
Delete Key
Line Return
Language / Space
Keypad Settings
Letter Options
Handwriting box 1
Handwriting box 2
Letter Options
Handwriting area
Delete Key
Line Return
Language / Space
Keypad Settings
Text Input Mode
Page 46

42
Handwriting Tips
•
For uppercase letters, write the letter larger than the lowercase
letters.
•
Write a dash (horizontal line) to add a space.
•
To write numbers and symbols with Handwriting box 1, write
numbers in the lower left area and symbols in the lower right
area. For Handwriting box 2, touch the Text Input Mode key.
Handwriting Box Key
The keys are similar for both handwriting pads.
•
Delete
: Touch to delete letters or touch and hold to delete
multiple letters.
•
Line Return
: Start a new line of text.
•
Language
/
Space
: Touch to add a space. If you have more than
one language defined, touch and hold this key, then drag across
the pop-up to change the language.
•
Keypad Settings
: Display the keypad settings. For more
information, refer to
“Handwriting Settings”
on page 42.
•
Text Input Mode
: For Handwriting box 2, the current mode is
displayed in the lower left corner of the handwriting area. Touch
the Text Input Mode key to activate alphabetic (
ABC
), numeric
(
123
), or symbols (
?#+
) mode.
Handwriting Settings
To change the Handwriting settings:
1. Touch
(Settings)
, then touch
Handwriting settings
.
The following settings can be changed:
• Recognition time
: Set the time it takes for your tablet to
recognize what you write. Choose from 0.1, 0.3, 0.5, 1, or 2
seconds.
• About
: View information on the handwriting tool manufacturer
and view Gesture Methods for Space, Enter, and Back Space.
2. Touch
(Back)
repeatedly to return to your
message.
Page 47
Entering Text 43
Using Speech Recognition
You can use your voice to enter text using the Voice input
feature, which lets you enter text by speaking. Samsung
Keypad recognizes your speech and enters text for you.
Note:
Enable
Voice Input
in Samsung keypad settings. For
more information, refer to “Samsung Keypad” on
page 146.
1. Touch
(Speech Recognition)
on the Samsung
Keypad.
2. At the
Speak now
prompt, speak clearly and distinctly
into the microphone.
3.
Working...
is displayed while the software is converting
your voice to text.
The text is displayed in the message.
4. Touch
(Speech Recognition)
again to speak and
add more text.
Note:
The feature works best when you break your message
down into smaller segments.
Page 48

44
Section 4: Contacts and Accounts
This section explains how to manage contacts and accounts.
Accounts
Your device can synchronize with a variety of accounts. With
synchronization, information on your device is updated with
any information that changes in your accounts.
•
Facebook
: Add your Facebook account to sync Contacts.
•
Twitter
: Add your Twitter SNS Service to sync Contacts.
•
MySpace
: Add your MySpace SNS Service to sync Contacts.
•
Microsoft Exchange
: Add your Exchange account to sync
Contacts, Calendar and Email.
•
Google
: Add your Google account to sync your Contacts, Calendar,
and Gmail.
Note:
You must register your device with your social
networking site before using the device to access the
network.
Setting Up Your Accounts
Set up and manage your synchronized accounts with the
Accounts and sync
setting.
1. From a Home screen, touch
(Menu)
➔
Settings
➔
Accounts and sync
.
2. Touch
Add account
, then touch the account type.
3. Follow the prompts to enter your account credentials to
complete the set-up process.
4. The device communicates with account servers to set
up your account. When complete, your account
appears in the
Manage accounts
area of the
Accounts
and sync
screen.
Note:
Before you can set up an account, Wi-Fi must be
enabled. For more information, refer to “Turning Wi-Fi
On or Off” on page 129.
Page 49
Contacts and Accounts 45
Setting Up a Facebook Account
Note:
You must register your device with your social
networking site before using the device to access the
network.
1. From a Home screen, touch
(Menu)
➔
Settings
➔
Accounts and sync ➔ Add account ➔ Facebook
.
The Set up your Facebook account screen displays.
2. Touch
Next
.
3. Enter the
Email
address and
Password
you use for
Facebook, then touch
Login
.
4. Follow the prompts to complete the set-up.
Setting Up a Twitter Account
Note:
You must register your device with your social
networking site before using the device to access the
network.
1. From a Home screen, touch
(Menu)
➔
Settings
➔
Accounts and sync ➔ Add account ➔ Twitter
.
The Set up your Twitter account screen displays.
2. Touc h
Next
.
3. Enter the
Username or email
address and
Password
you
use for Twitter, then touch
Login
.
4. Follow the prompts to complete the set-up.
Setting Up a MySpace Account
Note:
You must register your device with your social
networking site before using the device to access the
network.
1. From a Home screen, touch
(Menu)
➔
Settings
➔
Accounts and sync ➔ Add account ➔ MySpace
.
The Set up your MySpace account screen displays.
2. Touc h
Next
.
3. Enter your
Email
and
Password
you use for MySpace,
then touch
Login
.
4. Follow the prompts to complete the set-up.
Page 50
46
Contacts
Store contact information for your friends, family and
colleagues, to quickly access information or to send a
message.
To access Contacts:
From a Home screen, touch
(Applications)
➔
Contacts
.
Creating Contacts
To add a new contact:
1. From a Home screen, touch
(Applications)
➔
Contacts
➔
.
2. At the
Save new contacts to
prompt:
•
Touch
Device
to save the contact information in your device’s
memory.
– or –
•
Touch an account for synchronizing the contact (available
options depend on the accounts you have set up for
synchronization).
3. Touch contact fields to enter information:
•
Touch the Photo ID to
Select photo
to identify the contact.
•
To uc h
First name
, then enter a first name for the contact.
•
Touch
Last name
, then enter a last name for the contact.
Touch to enter a
Name prefix, Middle name, Name
suffix
,
Phonetic given name, Phonetic middle name
, or
Phonetic family name
.
•
Touch
Phone number
to enter a phone number, then touch the
Label button to choose a label, from
Mobile, Home, Work
,
Work Fax, Home Fax, Pager, Callback, Other
, or
Custom
to
create a custom label. To add another number, touch .
•
Touch
Email address
to enter an email address, then touch the
Label button to choose a label, from
Work, Home, Mobile
,
Other
, or
Custom
to create a custom label. To add another
address, touch .
•
Touch
Instant msg
to enter an instant message address, then
touch the Label button to choose a label, from
Google Talk
,
AIM, Windows Live, Yah oo, Skype, QQ, ICQ, Jabber
, or
Custom
to create a custom label. To add another IM, touch
.
Page 51
Contacts and Accounts 47
•
Touch
Groups
to assign the contact to a group. For more
information about Groups, see
“Groups”
on page 51.
•
Touch
Postal address
fields to enter a physical address.
•
Touch
Organization
fields to enter a company name or job title.
•
To add more fields, touch
More
to choose
Notes, Nickname
,
Website, Internet call, Birthday
, and
Anniversary
.
4. When you finish entering information, touch
Save
.
Updating Contacts
To make changes to an existing contact:
1. From a Home screen, touch
(Applications)
➔
Contacts
.
2. Touch and hold a contact, then touch
Edit
.
– or –
Touch a contact to view its information, then touch
(Menu)
➔
Edit
.
3. Continue entering contact information. For more
information, refer to “Creating Contacts” on page 46.
4. To delete a contact, touch
(Menu)
➔
Delete
. At the
prompt, touch
OK
.
Linked Contacts
Your device can synchronize with multiple accounts,
including Google, Corporate Exchange, and other email
providers, plus social networking sites like Facebook, Twitter,
and MySpace. When you synchronize contacts from these
accounts with your device, you may have multiple contacts
for one person.
Linking, or joining, imported contact records allows you to
see all the contact’s numbers and addresses together in one
Contact entry.
Linking also helps you keep your contacts updated because
any changes that your contacts make to their information in
the respective accounts is automatically updated the next
time you synchronize with the account.
Linking contacts
1. From a Home screen, touch
(Applications)
➔
Contacts
.
2. Touch a contact to display its information.
3. Touc h
(Menu)
➔
Join contact
and then touch
another contact to link.
The Contacts joined message displays.
Page 52
48
Unlinking contacts
1. From a Home screen, touch
(Applications)
➔
Contacts
.
2. Touch a contact to display its information.
3. Touch the
Joined contacts
field to display linked
contacts.
4. Touch next to the contact to unlink it from the
displayed contact.
The Contacts separated message displays.
Tip:
Touch
Join another contact
to join additional contacts to
this contact.
Get Friends
Use the Get Friends feature to sync with your accounts. You
can choose an account you have already added or add a new
account.
For more information about setting up accounts on your
device, see “Setting Up Your Accounts” on page 44.
1. From a Home screen, touch
(Applications)
➔
Contacts
.
2. Touch
(Menu) ➔ Get friends
.
3. Touch
Add account
, then touch an account. For more
information, refer to “Setting Up Your Accounts” on
page 44.
4. Touch
(Menu)
➔ Sync now
.
Contacts Display Options
1. From a Home screen, touch
(Applications)
➔
Contacts
.
2. Touch
(Menu)
➔
More ➔ Display options
to set
the following options:
• Only contacts with phone numbers
: Restrict display to
contacts with phone numbers.
•Sort by
: List contacts by
First name
or
Last name
.
• Display contacts by
: List contacts by
First name first
or
Last
name first
.
•Device
: Choose groups to display or touch an account to
choose display categories.
3. Touch
Done
to save options.
Page 53
Contacts and Accounts 49
Sending Email
You can send an email to a contact from the Contacts
application.
1. From a Home screen, touch
(Applications)
➔
Contacts
.
2. Touch
(Menu)
➔
More ➔ Send email
.
3. Touch one or more contacts to mark them for sending,
then touch
Add
. A check mark indicates marked
contacts.
4. At the prompt, choose a sending method, then follow
the prompts to send the email:
•Email
: For more information, refer to
“Email”
on page 57.
•Gmail
: For more information, refer to
“Composing and
Sending Gmail”
on page 56.
Note:
Touch
Use by default for this action
to use the selected
sending method every time you send an email.
Sending a Namecard (vCard)
You can send contact namecards as vCards by way of
Bluetooth to other Bluetooth devices or in an Email or Gmail
as an attachment.
Note:
Not all Bluetooth devices accept contacts and not all
devices support transfers of multiple contacts. Check
the target device’s documentation.
1. From a Home screen, touch
(Applications)
➔
Contacts
.
2. Touc h
(Menu)
➔
Import/Export
➔
Send namecard
via
.
Touch contact(s) to mark them for sending, then touch
Send
. A check mark indicates marked contacts.
– or –
Touch a contact to display its information, then touch
(Menu)
➔
Send via
.
Page 54
50
3. At the prompt, choose a sending method, then follow
the prompts to send the namecard:
• + textPlus Better than text
: For more information, refer to
“textPlus”
on page 126.
•Bluetooth
: For more information, refer to
“Bluetooth”
on
page 101.
•Email
: For more information, refer to
“Email”
on page 57.
•Gmail
: For more information, refer to
“Composing and
Sending Gmail”
on page 56.
Note:
Touc h
Use by default for this action
to use the selected
sending method every time you send a namecard.
Exporting and Importing Contacts
You can export your contact list to an installed memory card
or import contacts (previously exported) from a memory card.
1. From a Home screen, touch
(Applications)
➔
Contacts
.
2. Touch
(Menu)
➔
Import/Export
.
3. Touch
Import from SD card
or
Export to SD card
, then
follow the prompts to complete the operation.
My Profile
My profile is your own contact record. You can send My
profile as a vCard by way of Bluetooth or as an attachment by
way of Email or Gmail.
1. From a Home screen, touch
(Applications)
➔
Contacts
.
2. Touch
(Menu)
➔
My profile
.
3. Add your profile information and touch
Save
.
– or –
Touch
(Menu)
➔
Edit
to update your profile
information
For more information, refer to “Creating Contacts” on
page 46.
Page 55
Contacts and Accounts 51
Sending My Profile
You can send My Profile as a vCard by way of Bluetooth to
other Bluetooth devices or as an attachment to a Gmail or
other email.
1. From a Home screen, touch
(Applications)
➔
Contacts
.
2. Touch
(Menu)
➔
My profile
to display your contact
information.
3. Touch
(Menu)
➔
Send namecard via
.
4. At the prompt, choose a sending method, then follow
the prompts to send the profile:
• + textPlus Better than text
: For more information, refer to
“textPlus”
on page 126.
• Bluetooth
: For more information, refer to
“Bluetooth”
on
page 101.
•Email
: For more information, refer to
“Email”
on page 57.
•Gmail
: For more information, refer to
“Composing and
Sending Gmail”
on page 56.
Note:
Touch
Use by default for this action
to use the selected
sending method every time you send My Profile.
Groups
Assign contacts to Groups to make searching for contacts
faster or to quickly send messages to group members.
Creating a New Group
1. From a Home screen, touch
(Applications)
➔
Contacts
, then touch the
Groups
tab.
2. Touc h
(Menu)
➔
Create
.
3. Touch the
Group name
field to enter a group name.
4. Touc h
Save
to save the new group.
Deleting a Group
1. From a Home screen, touch
(Applications)
➔
Contacts
, then touch the
Groups
tab.
2. Touc h
(Menu)
➔
Delete
.
3. Touch one or more groups to mark them or touch
Select all
to mark all groups. A check mark indicates
marked groups.
4. Touc h
Delete
, then touch
Group only
, to only delete the
group, or
Group and group members
, to delete the
group and the members of that group.
Page 56
52
Editing a Group
1. From a Home screen, touch
(Applications)
➔
Contacts
, then touch the
Groups
tab.
2. Touch a Group to display it.
3. Touch
(Menu)
➔
Edit group
.
4. Use the keyboard to change the group name.
5. Touch
Save
to save the changes.
Adding and Removing Group Members
1. From a Home screen, touch
(Applications)
➔
Contacts
, then touch the
Groups
tab.
2. Touch a Group to display it.
3. Touch
(Menu)
➔
Add member.
– or –
Touch
(Menu)
➔
Remove member.
4. To add a contact, touch the contact name on the left
side of the screen or touch
Select all
to add all contacts
listed. Touch
Add
.
– or –
5. To remove a contact from the group, touch the contact
name on the left side of the screen or touch
Select all
to
remove all contacts listed. Touch
Remove
.
Tip:
You can also change a contact’s group associations by
editing the contact. For more information, refer to
“Creating Contacts” on page 46.
Sending a Message to Group Members
1. From a Home screen, touch
(Applications)
➔
Contacts
, then touch the
Groups
tab.
2. Touch a
Group
to display it.
3. Touch
(Menu)
➔
Send email
to create a new email.
Group members that have an email address are
displayed.
4. Touch contacts to mark them as recipients for the new
message, then touch
Add
.
Page 57
Contacts and Accounts 53
5. At the prompt, choose a sending method, then follow
the prompts to send the message:
•Email
: For more information, refer to
“Email”
on page 57.
•Gmail
: For more information, refer to
“Composing and
Sending Gmail”
on page 56.
Note:
Touch
Use by default for this action
to use the selected
sending method every time you send an email to a
group.
6. The new message displays with marked contacts as
recipients. For more information, refer to “Composing
and Sending Email” on page 59.
Activities
The Activities option allows you to view updated contact
information that has been synchronized with Facebook,
Twitter, or MySpace.
1. From a Home screen, touch
(Applications)
➔
Contacts
➔
Activities
.
Note:
You must log in to an SNS account (Facebook, Twitter, or
MySpace) before you can view the Updates.
2. The updates are displayed.
Note:
Activity updates will not appear unless you have
synchronized your device with your accounts. For more
information, refer to “Accounts and Sync” on page 143.
Page 58
54
Section 5: Messaging
This section describes how to send and receive messages
and other features associated with messaging.
Types of Messages
Your device supports these types of messages:
•
Gmail
: Send and receive Gmail from your Google account.
•
Email
: Send and receive email from your email accounts,
including Corporate Exchange mail.
•
Google Talk
: Chat with other Google Talk users.
•
Google Messenger
: Brings groups of friends together into a
simple group conversation.
Note:
Your Wi-Fi-only device does NOT support voice calling
and messaging services. Please disregard any “dial”
and “message” related menus because some Gmail
options are identically set in all Android devices.
Gmail
Send and receive email with Gmail, Google’s web-based
email.
Tip:
To set up your Google account on your device, use
Accounts and sync
settings. For more information, refer to
“Accounts and Sync” on page 143.
From a Home screen, touch
Gmail
.
– or –
From a Home screen, touch
(Applications)
➔
Gmail
.
Page 59
Messaging 55
Setting Up Your Gmail Account
The first time you launch Gmail, your device prompts you to
set up your Google account.
Note:
You can use more than one Google account on your
device. To add another account, touch
(Menu)
➔
Accounts
➔Add accounts
.
1. From a Home screen, touch
Gmail
.
2. At the Add a Google Account screen, touch
Next
to
begin, then touch an option:
•Create
: Follow the prompts to create a new account.
• Sign in
: Enter your Google Username and Password, then
touch Sign In.
3. The device communicates with the Google server to set
up your account and synchronize your email. When
complete, your Gmail appears in the Inbox.
Refreshing Your Gmail Account
Refresh your account to update your device from the Gmail
servers.
1. From a Home screen, touch
Gmail
.
2. Touch
(Menu)
➔
Refresh
.
Managing Your Gmail Account
Use menu options to manage your Gmail.
1. From the Home screen, touch
Gmail
.
2. Touc h
(Menu)
for these options:
•Refresh
: Update your device from the Gmail servers.
•Compose
: Create and send new Gmail.
• Accounts
: Choose a Gmail account or add a Google account.
• Go to labels
: View Gmail by label.
•Search
: Enter keywords to search mail.
•More
:
–
Settings
: Configure settings. For more information, refer to
“Gmail account settings”
on page 56.
–
Help
: Learn about using Gmail.
–
About
: View information about Gmail.
Page 60

56
Composing and Sending Gmail
1. From the Home screen, touch
Gmail
.
2. Touch
(Menu)
➔
Compose
.
3. Touch the
To
field to enter recipients. As you enter
names or email addresses, matching contacts display.
Touch a contact to add it to the field.
4. Touch the
Subject
field to enter a subject.
5. Touch the
Compose Mail
field to enter the text of your
email.
6. While composing a message, touch
(Menu) for
these options:
•Send
: Send the message.
• Save draft
: Save the message as a draft for sending later.
•Add Cc/Bcc
: Create Cc (copy) and Bcc (blind copy) fields in the
message. After creating the fields, touch to enter recipients.
• Attach
: Launch Gallery to select a photo to add to the
message.
•Discard
: Close the message without saving.
•Help
: Learn about using Gmail.
7. Touch to send the message or to save the
message as a draft.
Gmail account settings
1. From the Home screen, touch
Gmail
.
2. Touch
(Menu)
➔ More
➔
Settings
for settings:
General preferences
• Message Actions
: Set how you want message actions to show
at the top of the screen. Options are: Always show, Only show
in portrait, and Don’t show.
• Clear search history
: Remove previous searches you
performed.
• Clear “Show pictures”
: Restores the default setting (do not
show pictures automatically) for all the people who send you
email, including those whose Show pictures setting you may
have changed when reading messages from them.
Page 61

Messaging 57
Account settings
• General settings
–
Priority Inbox
: This setting is only available if you have
configured Gmail on the web to show Priority Inbox. If available,
you can set Priority Inbox as the conversation list to open when
you have new mail, rather than Inbox.
–
Signature
: Create a text signature to add to outgoing
messages.
–
Confirm actions
: Have your device prompt you to confirm
Archive, Delete, and Send actions.
–
Reply all
: Enable or disable Reply All as the default action when
responding to messages.
–
Auto-advance
: Choose a screen to show after you delete or
archive a conversation.
–
Message text size
: Set the size of text in message displays.
–
Batch operations
: Allow changes to labels on more than one
conversation.
–
Sync inboxes and labels
: Choose which labels are
synchronized.
• Notification settings
:
–
Email notifications
: When enabled, notifications for new email
appear in the Status Bar.
–
Labels to notify
: Set notification preferences for synced labels.
Touc h
Inbox
or
Priority Inbox
to set your preferences.
Add account
•
Add a new Google account. For more information, refer to
“Setting Up Your Gmail Account”
on page 55.
Email
Use Email to view and manage all your email accounts in one
application.
Setting Up Email Accounts
1. From a Home screen, touch
(Applications)
➔
Email
.
2. At the Set up email account screen, enter an
Email
address
and
Password
and touch
Next
.
3. Enter an account name for the email account just
added, which is displayed on the inbox for the email
account.
Page 62
58
4. Enter your name, which is displayed on outgoing
messages.
5. Touch
Done
.
The device communicates with the appropriate server
to set up your account and synchronize your email.
When complete, your email appears in the Inbox for the
account.
6. Enter account credentials, then complete set-up by
following the prompts to configure account options.
Available options vary, depending on the provider.
If the account includes synchronization of contacts and
calendars, you can choose whether to synchronize
these features with your device.
Adding Additional Email Accounts
To add additional email accounts:
1. From a Home screen, touch
(Applications)
➔
Email
.
The list of email accounts displays.
Note:
If you only have one email account set up, touch
(Menu)
➔Accounts
to display the list of email accounts.
2. Touch
(Menu)
➔ Add account
.
3. Enter the
Email address, Password
, and so on.
Managing Email
You can view email you receive for all accounts on the
Combined inbox screen or you can view email accounts
individually.
1. From a Home screen, touch
(Applications)
➔
Email
.
Note:
If you only have one email account set up, touch
(Menu)
➔Accounts
to display the list of email accounts.
2. Touch one of the following:
• Combined inbox
: View all email in a combined inbox.
•<account name
>: Only view email for one email account.
3. While viewing the Combined inbox, touch
(Menu)
for these options:
•Compose
: Create and send new email.
•Accounts
: Displays all email accounts. Touch an account or
Combined inbox
.
Page 63
Messaging 59
4. While viewing email for one email account, touch
(Menu)
for these options:
•Compose
: Create and send new email. For more information,
refer to
“Composing and Sending Email”
on page 59.
•Refresh
: Update your device from the email server.
•Search
: Enter keywords to search email.
• Accounts
: Displays all email accounts. Touch an account or
Combined inbox
.
•List by
: View email for this account by Date, Sender, or Read/
Unread.
•More
:
–
Account settings
: Configure settings. For more information,
refer to
“Configuring Email Account Settings”
on
page 60.
–
Text size
: Choose the text size for email in this account. Options
are: Small, Medium, and Large.
–
View mode
: Set the view mode to Standard view or
Conversation view.
Composing and Sending Email
1. From a Home screen, touch
(Applications)
➔
Email
.
2. Touch an account, if you have set up more than one
account.
3. Touc h
(Menu)
➔
Compose
.
4. Touch the
To
field to enter recipients. As you enter
names or email addresses, matching contacts display.
Touch a contact to add it to the field.
– or –
Touc h
Recent, Contacts
, or
Group
and select contacts,
then touch
Add
when all contacts have been selected.
5. Touc h
Cc/Bcc
to enter recipients in the Cc or
Bcc
fields.
6. Touch the
Subject
field to enter a subject.
7. Touch the text field to enter the email text.
Page 64

60
8. Touch
Attach
to add an attachment. Choices are:
•File
: Select a file from My files.
•Pictures
: Select a picture from Gallery.
•Videos
: Select a video from Gallery.
•Audio
: Select an audio file from My files.
• Capture picture
: Open the camera and take a picture.
•Capture video
: Open the video recorder and shoot a video.
• Record audio
: Open the voice recorder and make a recording.
•Contacts
: Open your contact list so contacts can be selected to
attach a contact namecard file.
•Calendar
: Open your calendar so calendar events, like
birthdays and anniversaries, can be selected to attach an invite
file.
•Memo
: Open the Memo app and attach a memo.
The selected or created file is attached. Touch to
remove the attachment.
9. While composing a message, touch
(Menu)
for
these options:
• Save as draft
: Save the message in Drafts.
• Add text
: Lets you add text to your email from:
–
Contacts
: Touch contact information to select it, then touch
Add
.
–
Calendar
: Touch a calendar event to add the event details to
you email.
–
Memo
: Touch one or more memos, then touch OK.
10. Touc h
Send
to send the message or
Discard
to cancel
the email.
Configuring Email Account Settings
Account Settings lets you use settings to configure handling
of email on your device.
Note:
Available settings may depend on the email account and
include setting how much email to synchronize, creating
signatures for email you send, and other handling
options.
Page 65

Messaging 61
To configure email account settings at any time:
1. From a Home screen, touch
(Applications)
➔
Email
.
2. Touch an account, if you have set up more than one
account.
3. Touch
(Menu)
➔
More ➔ Account settings
.
The following options display depending on the type of
account:
General settings
• Account name
: Enter a name to identify this account.
•Your name
: Enter your name, to appear on email from this
account.
• Email check frequency
: Lets you configure how often the
device queries the remote server for new email changes.
Options are:
Never, Every 5 minutes, Every 10 minutes
,
Every 15 minutes, Every 30 minutes
, or
Every hour
.
• Default account
: When enabled, email from your device is
automatically sent from this account.
Notification settings
• Email notifications
: When enabled, the New Email icon
appears in the Status Bar when a new email arrives.
• Select ringtone
: Choose a ringtone for email notifications for
this account.
•Vibrate
: When enabled, email notifications for this accounts
are accompanied by vibration.
Server settings
• Incoming settings
: Configure server settings.
• Outgoing settings
: Configure outgoing settings.
• Sync contacts
: When enabled, contacts from your account are
synchronized with your device’s Contacts.
• Sync calendar
: When enabled, events from your account are
synchronized with your device’s Calendar.
Common Settings
• Recent messages
: Set the number of recent messages.
Options are:
25, 50, 75, 100, 200
, or
To ta l
.
Page 66
62
• Forward with files
: Enable or disable forwarding of file
attachments.
• Add signature
: Enable or disable adding a signature.
•Signature
: Enter a signature to add to email from this account.
Google Talk
Google Talk is a free Windows and web-based application for
instant messaging offered by Google. Conversation logs are
automatically saved to a Chats area in your Gmail account.
This allows you to search a chat log and store them in your
Gmail accounts.
Tip:
Talk requires that you have a Google account. To set up
your Google account on your device use
Accounts and
sync
settings. For more information, refer to “Accounts
and Sync” on page 143.
1. From a Home screen, touch
Talk
.
– or –
From a Home screen, touch
(Applications)
➔
Talk
.
2. Touch
Next
to set up a Google account or to Sign in.
3. Touch
Create
to create a new Google account.
– or –
Touch
Sign in
, if you have an existing Google account.
Note:
If you have already set up your Google account, you are
automatically logged in.
4. After entering your user name and password, touch
Done
.
5. Touch
Sign in
.
Once sign in is complete, the Talk screen displays.
6. Touch
(Menu)
to display the following options:
• All friends
/
Most popular
: List all friends or the most popular
friends.
• Add friend
: Use the keypad to enter an invitation to a friend,
then touch
Send invitation
.
•Search
: Enter a search term and search Google Talk.
•Sign out
: Close Google Talk and display the Home screen.
• Settings
: Offers various settings for Google talk.
Page 67
Messaging 63
•More
: Displays the following options:
–
End all chats
: Terminates any chats that you have open.
–
Invites
: Lists any pending invitations that you have sent.
–
Blocked
: Lists any friends that you have blocked.
–
Help
: View a list of help items.
7. Touch and hold a Friend entry to display the following
options:
Start chat, Friend info, Block friend, Remove
friend
,
View contact, Auto show friend
/
Always show friend
,
and
Hide friend
.
Note:
If you touch the
Hide friend
option, touch
(Menu)
➔
Add friend ➔Send invitation
to make the Friend visible
again.
8. Touch a Friend’s entry to display the Chat entries for
that Friend.
Google Messenger
With Google Messenger, you can bring groups of friends
together into a simple group conversation, putting everyone
on the same page. When you get a new conversation in
Messenger, Google+ sends an update to your device.
To get started, touch the Messenger icon on the home screen
of the Google+ app or use the Messenger icon on your
Applications screen.
1. From a Home screen, touch
(Applications)
➔
Messenger
.
The Messenger screen displays.
2. Touc h
Learn more
in the center of the screen and then
touch a topic to learn more about using Google
Messenger.
Page 68
64
Section 6: Web and Social Networking
This section describes the various web and social networking
applications available on your device such as Books,
Internet, Maps, Latitude, Navigation, Places, Google and
Voice Search, YouTube, and Google+.
Books
Use the Books app to read eBooks from the web-based
Google Books service. Google eBooks is a new way to
discover, buy, and enjoy your favorite books online and
offline.
You can read books online or mark them for availability
offline, so you can read them when you have no Internet
connection (such as on an airplane). You can also use Books
as your starting point for browsing or searching for books on
line.
1. From a Home screen, touch
(Applications)
➔
Books
.
The Google Books main screen displays.
Note:
You may be asked to create or sign on to your Google
account. For more information, refer to “Setting Up Your
Gmail Account” on page 55.
2. To add more books to your library, touch
Shop
in the
Application bar.
A pop-up displays links to the Android Market Terms of
Service, the Google Music Terms of Service, the Google
Books Terms of Service, and the YouTube Rentals
Terms of Service. Read each document and touch
Accept
.
Browse the selection of Google eBooks, which are
arranged in categories like Featured, New Arrivals, Top
Selling, Top Rated, Top Free, and many more.
3. To find a book by title or author name, touch
Search
on the Books main screen or touch
Shop
➔
Search
.
Page 69

Web and Social Networking 65
4. On the Books main screen, touch
(Menu)
for these
options:
• Sort order
: Set how books are displayed. Options are: Recently
read, Title, or Author.
• Manage library
: Touch to delete the book for your library.
Touch a pin to mark books to make them available offline.
Touch a pin again to remove books from your device.
•Refresh
: If a book in your library does not appear on your
device, use this option to update the display.
• Accounts
: Set the account to use.
•Settings
–
Storage location
: Set where to store books on your device.
–
About
:
The Books version number is displayed.
–
Terms of Service, Privacy Policy, Open-source licenses
:
Touch to read the documents.
•Help
: Displays various Book help information. Touch
Help
Centre
to get additional Google Book information.
5. Touch the cover of a book to start reading.
Reading a Book
Once the book displays:
1. Sweep across the screen to turn the page.
2. Touc h
(Menu)
for these options:
•Contents
: Display the book’s table of contents.
•Settings
: Set the Text size, Line space, Typeface, Justification,
Themes, and Brightness.
• Original pages
/
Flowing text
: Display the pages of the book
in their original format or use your format settings.
•Search
: Use the keyboard to enter a search term and touch the
search key
to search the book for the term.
•Share
: Share the book by using + textPlus Better than text,
Bluetooth, Email, Gmail, or Google+.
•More
–
My library
: Displays your library of books.
–
About
: Displays the Market description of the book.
–
Help
: Touch
Quick tips, Help center, Contact us
, or
Report
a problem
to link the appropriate website.
Page 70
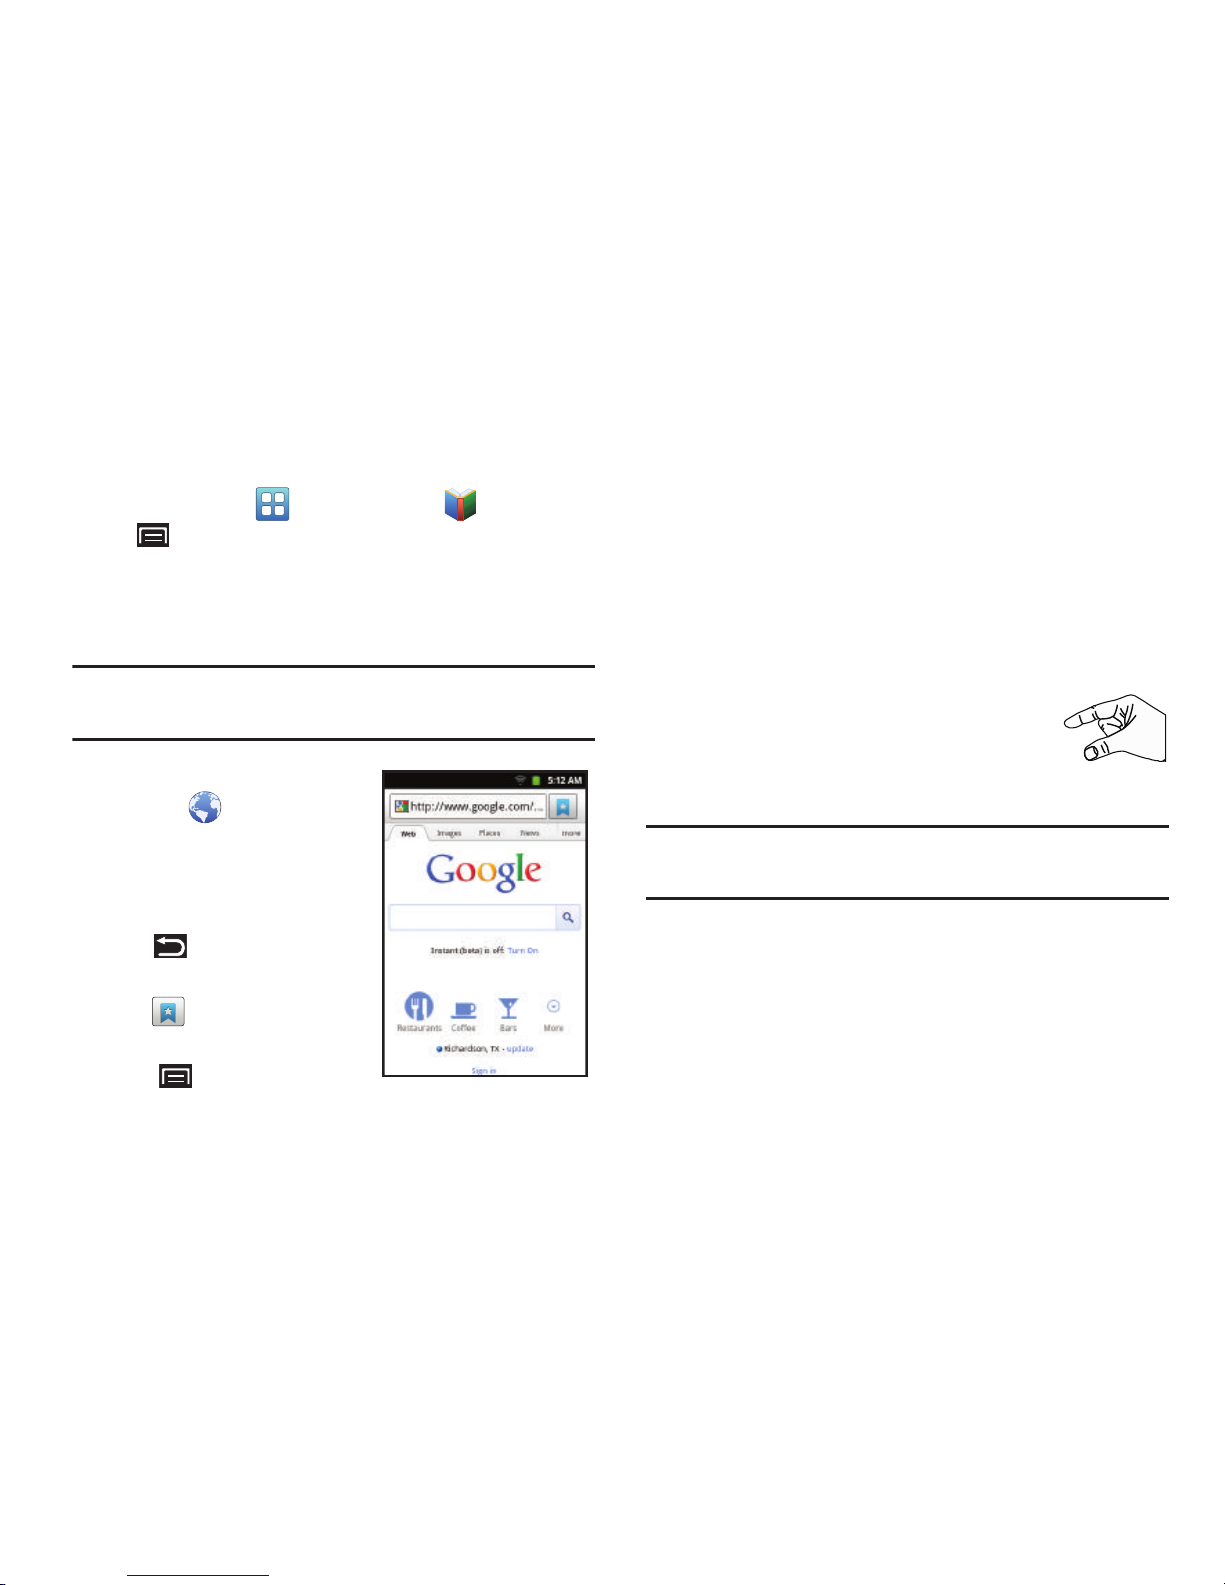
66
3. To contact customer support, report an issue, and
display more Google eBooks information, from a Home
screen, touch
(Applications)
➔
Books ➔
(Menu) ➔Help
.
Internet
Your device is equipped with a full HTML Browser that allows
you to access the internet.
Tip:
By default, Internet appears as a Primary Shortcut on
Home screens.
From a Home screen,
touch
(Internet)
.
Your home page displays.
Navigating the Web
Command Keys
•
Touch
(Back)
to return to
the previous page.
•
Touch to display Bookmarks,
Most visited, and History.
• Touch
(Menu) ➔
Forward
to go forward to a recent page.
Touching and dragging
•
Touch and drag your finger on the screen to navigate pages and
to reposition pages within the screen.
Entering text in a field
•
While browsing, touch a text field to display the virtual QWERTY
keyboard to enter text.
Zoom
•
Tap the screen twice to zoom in or out.
• Use two fingers, such as your index finger
and thumb, to zoom out by making an
inward pinch motion on the screen. To zoom
in, make an outward motion by sweeping your fingers out.
Tip:
For convenient browsing, you can rotate the device to
landscape mode.
Page 71

Web and Social Networking 67
Selecting items on a page
While browsing, use gestures and menus to navigate:
•
Touch an item to select it.
•
Touch a hyperlink to follow the link.
•
Touch and hold on a hyperlink for these options:
–
Open
: Open the linked page.
–
Open in new window
: Open a new window to display the linked
page.
–
Bookmark link
: Create a bookmark to the page (without loading
it).
–
Save link
: Save the linked page to Download history.
–
Share link
: Send the link by way of + textPlus Better than text,
Bluetooth, Email, Gmail, or Google+.
–
Copy link URL
: Save the link’s URL to the clipboard.
Using Internet Windows
You can have multiple windows open at one time and easily
switch between windows.
1. From a Home screen, touch
(Internet)
.
2. Touch
(Menu)
.
3. To open a new window, touch
New window
.
– or –
Touc h
Windows ➔
New window
.
4. To switch to another open window, touch
Windows
,
then touch another open window to display it.
5. To close an open window, touch
Windows
, then touch
in the upper right corner of the window you want
to close.
Entering a URL
Access a web site quickly by entering the URL.
1. From a Home screen, touch
(Internet)
.
2. Touch the
URL
field at the top of the screen, then enter
the URL using the virtual QWERTY keyboard.
As you enter characters, potential matches display.
3. Touch a match to complete the URL.
– or –
Continue entering characters and touch to load
the page.
Page 72

68
Copying Fields or Text
Copy information from a web page to the clipboard for
pasting, searching, or sharing.
Selecting Text
1. From a Home screen, touch
(Internet)
.
2. Browse to a web page.
3. On the web page, touch and hold on the text until the
text viewer displays. When you see the text you want
highlighted, stop touching the screen.
The text is highlighted.
4. Touch and drag the left or right text selector to
select more or less text.
5. To copy the highlighted text, touch .
To search for the highlighted text, touch , then
touch
Google, Google translate, Wikipedia
, or
Dictionary
.
To share the highlighted text, touch , then touch
Share as text
or
Share as image
. Then touch
+ textPlus
Better than text
,
Bluetooth, Email, Gmail, Google+
, or
Picasa
.
Copying a Hyperlink or URL
1. From a Home screen, touch
(Internet)
and browse
to a web page.
2. Touch and hold on the link or URL, then touch
Copy link
URL
on the pop-up menu.
Pasting Text, Hyperlinks, or URLs
To paste copied text, hyperlinks, or URLs:
1. Navigate to the desired field or to another application.
2. Touch and hold in a text field.
3. Touch
Paste
on the pop-up menu.
Using Bookmarks
While browsing, bookmark a site to quickly access it later.
Creating a Bookmark
1. From a Home screen, touch
(Internet)
and browse
to a web page.
2. Touch
➔
Bookmarks
.
3. Touch
Add
.
The
Add bookmark
prompt displays.
4. Confirm the Name and URL for the bookmark, then
touch
OK
to save the bookmark.
Page 73

Web and Social Networking 69
Accessing Bookmarks, Most Visited, and History
Launch a bookmarked page or most visited page, or reload
recent pages.
1. From a Home screen, touch
(Internet)
.
2. Touch .
3. On the
Bookmarks
tab, use these options:
•
Touch a bookmark to load the page.
•
Touch and hold on a bookmark for these options:
–
Open
: Launch the bookmarked page.
–
Open in new window
: Open the linked page in a new window.
–
Edit bookmark
: Change the bookmark name or URL.
–
Add shortcut to Home
: Create a bookmark on the Home
screen.
–
Share link
: Use + textPlus Better than text, Bluetooth, Email,
Gmail, or Google+ to send the link.
–
Copy link URL
: Save the link’s URL to the clipboard.
–
Delete bookmark
: Remove the bookmark.
–
Set as homepage
: Assign the bookmarked link as the home
page.
4. On the
Most visited
tab, use these options:
•
Touch a link to reload it.
•
Touch the star next to a link to bookmark or unbookmark it.
•
Touch and hold on a link for these options:
–
Open
: Launch the web page.
–
Open in new window
: Launch the web page in a new
window.
–
Add bookmark/Remove from Bookmarks
: Bookmark the
page or remove the bookmark for this page.
–
Share link
: Use + textPlus Better than text, Bluetooth, Email,
Gmail, or Google+ to send the link.
–
Copy link URL
: Save the link’s URL to the clipboard.
–
Remove from history
: Remove the record of this page.
–
Set as homepage
: Assign the bookmarked link as the home
page.
Page 74

70
5. On the
History
tab, use these options:
•
Touch a link to load it.
•
Touch
To da y, Ye st e rd a y, Last 7 days, Last month
, or
Older
for lists of recent pages.
•
Touch the star next to a link to bookmark or unbookmark it.
•
To clear the history, touch
(Menu)
➔
Clear history
.
•
Touch and hold on a link for these options:
–
Open
: Launch the web page.
–
Open in new window
: Launch the web page in a new
window.
–
Add bookmark/Remove from Bookmarks
: Bookmark the
page or remove the bookmark for this page.
–
Share link
: Use + textPlus Better than text, Bluetooth, Email,
Gmail, or Google+ to send the link.
–
Copy link URL
: Save the link’s URL to the clipboard.
–
Remove from history
: Remove the record of this page.
–
Set as homepage
: Assign the bookmarked link as the home
page.
Internet Menu
While viewing a web page, touch
(Menu)
for the
following options:
•
New window
: Open a window.
•
Windows
: View the windows you have open.
•
Refresh
: Redisplay the current web page.
•
Forward
: Go forward to a recent page.
•
Add bookmark
: Create a bookmark for the current page.
•
More
:
–
Add shortcut to Home
: Create a bookmark on the Home
screen.
–
Find on page
: Search for content on the current page.
–
Page info
: View information about the current page, including
the URL.
–
Share page
: Use + textPlus Better than text, Bluetooth, Email,
Gmail, or Google+ to send the page’s URL.
–
Downloads
: View and manage recent downloads.
–
Settings
: Customize the Internet settings (see
“Internet
Settings”
on page 71).
Page 75

Web and Social Networking 71
Internet Settings
1. From a Home screen, touch
(Internet)
.
2. Touch
(Menu)
➔
More
➔
Settings
for the following
options:
Page content settings
•Default zoom
: Choose a default zoom level for web pages.
• Open pages in overview
: When enabled, displays an overview
of newly-opened pages.
• Text encoding
: Choose a default character set for web pages.
• Block pop-up windows
: When enabled, blocks pop-up
windows.
•Load images
: When enabled, images are automatically loaded
when you visit a page. When disabled, images are indicated by
a link, which you can touch to download the picture.
• Auto-fit pages
: When enabled, the Browser automatically
sizes web pages to fit your device’s display.
• Landscape view only
: When enabled, all pages display in the
wider landscape orientation (rotate your device to view pages in
landscape mode).
• Enable JavaScript
: When enabled, the Browser automatically
runs JavaScript scripts on pages you visit.
• Enable plug-ins
: When enabled, the Browser automatically
loads and runs plug-ins on pages you visit.
• Open in background
: When enabled, new windows open
behind the current window.
• Set home page
: View and set the default first page that
displays when you launch the Browser.
•Default storage
: The default location for downloads.
Privacy settings
• Clear cache
: Delete content and databases stored on the
device.
• Clear history
: Delete the list of previously-visited pages.
• Accept cookies
: When enabled, allows Browser to save and
read cookie information used by web pages.
• Clear all cookie data
: Delete cookie information saved to the
device.
• Remember form data
: When enabled, stores information you
enter into forms to make future forms easier.
Page 76
72
• Clear form data
: Deletes saved form information.
• Enable location
: When enabled, sites you visit can request
access to your location.
• Clear location access
: Clear location access for all web sites.
Security settings
• Remember passwords
: When enabled, saves usernames and
passwords for sites you visit, to make future visits easier.
•Clear passwords
: Clear all saved usernames and passwords.
• Show security warnings
: When enabled, the Browser warns
you if there is a problem with a site’s security.
Advanced settings
• Select search engine
: Select the search engine you want to
use. Choices are: Google, Yahoo!, and Bing.
• Website settings
: View and manage settings for individual
web sites.
• Reset to default:
Clear all browser data and reset all settings to
the factory defaults.
Maps
Use Google Maps to find your current location, get directions,
and other location-based information.
Tip:
The Google Maps shortcut appears on the main Home
screen by default. For information about adding shortcuts
to a Home screen, see “Adding Shortcuts from a Home
screen” on page 29.
Note:
You must enable location services to use Maps. Some
features require Standalone or Google location services.
For more information, refer to “Location and Security”
on page 138.
From the Home screen, touch
Maps
.
– or –
From a Home screen, touch
(Applications)
➔
Maps
.
Page 77

Web and Social Networking 73
Navigating the Map
Zooming
•
Double-tap on the screen to zoom in.
•
Touch Zoom in or Zoom out .
Scrolling
•
Touch and drag on the screen to reposition the map in the display.
Touch
•
Touch an icon on the map to display the name of the location.
•
Touch to display more information about the location.
•
Touch the star to mark the location as a favorite (starred) location.
Maps Menu
1. From a Home screen, touch
Maps
.
2. While viewing a map, touch
(Menu)
for these
options:
•Search
: Find a location.
• Directions
: Get driving, public transport, or walking directions.
•Clear Map
: Remove search results from the map.
•More
:
–
Map
: Display the main Maps screen.
–
Places
: Open the Places application. For more information,
refer to
“Places”
on page 78.
–
Navigation
: Open the Navigation application. For more
information, refer to
“Navigation”
on page 76.
–
Join Latitude / Latitude
: Join or display Latitude, to share
your location with friends you choose and Google. For more
information, refer to
“Latitude”
on page 74.
–
Location history
: Enable location history.
–
My Places
: Display starred locations. For more information,
refer to
“Touch”
on page 73.
•Settings
:
–
Cache Settings
: Set your
Automatic caching
preference and
Clear map tile cache
, if necessary.
–
Location reporting
: Used to set various Latitude options. For
more information, refer to
“Latitude Menu”
on page 75.
This option only displays if you are signed in to Latitude.
–
Labs
: Access experimental features.
–
Terms, Privacy & Notices
: View information about Google
Maps, including the Terms and Conditions, Privacy Policy, Legal
Notices, and Web History.
–
About
: View information about Maps.
•Help
: Learn about Google maps.
Page 78
74
Other Map Options
Touch the indicated icon to use these additional Map options:
Latitude
With Google Latitude, you can see the location of all of your
friends on a map or on a list. You can also share or hide your
location.
You must first set up your tablet to use wireless networks to
help pinpoint your location. Also, Latitude works best when
Wi-Fi is enabled.
To enable Wi-Fi:
1. From a Home screen, touch
(Menu)
➔ Settings
.
2. Touch
Location and security
➔
Use wireless networks
.
A green check mark indicates the feature is
enabled.
3. Touch
Wireless and networks ➔ Wi-Fi settings
➔
Wi-Fi
to turn Wi-Fi on. For more information, refer to “Wi-Fi”
on page 99.
4. Log on to your Google account.
Note:
To create a Google account or set up your Google
account on your device use
Accounts and sync
settings.
For more information, refer to “Accounts and Sync” on
page 143.
Search Maps
: Use the keypad to enter your request to
Search the map for a city, location, and so on.
Suggestions are displayed as you type. Touch to
speak a city, location, and so on, to display.
Layers
: Enable or disable a map layer to display.
Choose from Traffic, Satellite, Terrain, Transit Lines,
Latitude, My Maps, Bicycling, or Wikipedia. Touch
Clear Map
to remove previous layers.
Compass
: Set the map to always display north at the
top of the screen or to automatically rotate like a
compass, keeping north on the map facing north,
and so on. Your device may have to be calibrated the
first time you use this feature. Follow the on-screen
instructions.
Page 79
Web and Social Networking 75
5. Touch
Home
➔
(Applications)
➔
Latitude
.
Your location is displayed on the map, accurate to 30
meters.
Sharing Your Location with Friends
1. From the Latitude map screen, touch or
(Menu) ➔More
➔Latitude
to display your Latitude list
of friends. At first, only your name is displayed.
2. Touch
(Menu)
➔ Add friends
.
3. Touch
Select from Contacts
or
Add via email address
.
4. Touch a contact.
– or –
Enter an email address and touch
Add friends
.
5. At the
Send sharing requests
prompt, touch
Yes
.
Your friend will receive an email or text message with your
location marked on a map. They will also receive instructions
on how to view your location from the web or use Latitude on
their device, if it is available. Once they acknowledge your
request, their location will display on your device. They can
share their location from their computer, phone, or device.
For more information, go to
http://www.google.com/latitude
.
Latitude Menu
1. From a Home screen, touch
(Applications)
➔
Latitude
.
2. Touc h
(Menu)
for these options:
•Map view
: Display the map screen.
• Show stale friends/Hide stale friends
: Show or hide friends
depending on the accuracy of their Latitude information.
•Location reporting
: Used to set various Latitude options.
Background location reporting
–
Location reporting
: Set the following options:
Detect your location
: Enable or disable whether your location
is updated automatically.
Set your location
: Set your location manually.
Do not update your location
: Your friends cannot see your
automatic location.
Location history
–
Enable location history
: This history is only seen by you.
Latitude location sharing
–
Manage your friends
: Add or remove friends who can see
your location. For more information, refer to
“Sharing Your
Location with Friends”
on page 75.
Page 80
76
–
Sign out of Latitude
: Sign out of Latitude and launch the Maps
application.
Check-ins
–
Automatic check-ins
: Checks you in to places that you have
designated.
–
Check-in notifications
: Enables notifications that suggest
places to check in.
–
Manage your places
: View and modify your automatic check-
ins and muted places.
• Add friends
: Share your location with friends. For more
information, refer to
“Sharing Your Location with
Friends”
on page 75.
• Check in
: Automatically check in at specific places you
designate, and you will be checked in when you are there.
• Refresh friends
: Update your Latitude list of friends.
Navigation
Use Google Navigation to find a destination and to get
walking or driving directions.
Note:
You must first create a Wi-Fi connection to use
Navigation. For more information, refer to “Wi-Fi” on
page 99.
1. From a Home screen, touch
(Applications)
➔
Navigation
.
The
Set Destination
screen displays.
2. Touch either
Driving
or
Walking
at the top of the screen
to describe the type of directions you want.
3. Touch
Map
at the top of the screen to see a map
(Driving) or a satellite image (Walking) of your area.
4. If Driving, touch
(Route options)
to set whether
directions should
Avoid highways
and
Avoid tolls
.
Page 81

Web and Social Networking 77
5. To find a destination, touch an option:
• Speak Destination
: Say the name or address of your
destination.
• Type Destination
: Enter the destination.
•Contacts
: Choose a destination from a contact record.
• Starred Places
: Choose destinations you have marked as
favorites.
• Recent Destinations
: Choose from recent destinations. This
option is not available until a destination has been requested.
6. While navigating, touch
(Menu)
for options:
•Search
: Find a location.
•Route Info
: View information about the current route.
•Layers
: Choose map layers to display.
•Mute/Unmute
: Mute to silence voice-guided prompts.
• Exit Navigation
: Close Navigation and discard route
information.
•More
:
–
Directions List
: View directions in a step-by-step list.
–
Set Destination
: Choose or enter a destination.
–
Settings
: Touch
Screen Dimming
to turn the option On or Off.
When on, a check mark appears in the check box. Use
this option to conserve power.
–
Help
: Learn about Google maps.
–
Terms, Privacy & Notices
: View information about Google
Maps, including the Terms and Conditions, the Privacy Policy,
and Legal Notices.
Page 82
78
Places
Places is an application that uses Google Maps and your
location to help you find Restaurants, Cafes, Bars,
Attractions, and other businesses. You can also add your own
locations.
The Places application allows you to find the best sources for
business information across the web, including business
listing details, reviews, photos, nearby public transit, and
other related information. Business owners can provide
additional details, such as photos, hours of operation, and
coupons.
1. From a Home screen, touch
(Applications)
➔
Places
.
2. Touch one of the business categories to search for a
particular business.
All of the businesses in that category that are close to
you display.
3. Touch a business in the list to see more details about it.
The business details such as address, phone, website,
and location are displayed. You can also see reviews
from around the web and from Google users.
Google+
Share updates and see what is going on around you with
Google+ for mobile.
•
Share your thoughts and location.
•
Instantly upload your photos and videos as you take them.
•
Get updates from your circles in the stream.
•
Check in to a place.
•
Make plans on-the-go with group messaging.
•
View posts from people around you.
To get started:
1. From a Home screen, touch
(Applications)
➔
Google+
.
The Google+ home screen displays.
2. Touch
(Menu)
➔ Help
and then touch a topic to
learn more about using Google+.
Page 83
Web and Social Networking 79
Google Search
Search the internet, and your device, using the Google
search engine.
Tip:
The Google Search widget appears on the main Home
screen by default. For information about displaying
widgets on the Home screen, see “Adding Widgets to a
Home Screen” on page 28.
1. From the Home screen, touch the
Google Search
widget
.
– or –
From a Home screen, touch
(Applications)
➔
Google Search
.
2. Use the keypad to enter search criteria to display
matching searches.
Suggestions display below the text entry area.
3. Touch a suggestion to search for that term.
– or –
Touch to start the search.
A browser window displays the search results.
4. Touc h
Voice Search
, on the
Google Search
widget,
to search using spoken commands.
Voice Search
Voice Search offers voice-activated Google searches. Voice
Search uses your location to improve search results and offer
other services.
Tip:
Voice Search is also available on the Google Search
widget, which appears on a Home screen by default.
1. From a Home screen, touch
(Applications)
➔
Voice Search
.
2. Touc h
Agree
to allow location-based searches or
Disagree
to disallow.
3. Touc h
Speak now
, then speak your search criteria
slowly and clearly. Google searches for the information
and displays results.
Page 84
80
YouTube
View and upload YouTube videos right from your device.
1. From a Home screen, touch
(Applications)
➔
YouTube
.
2. The first time you open YouTube, read the Terms of
Service, then touch
Accept
to continue.
3. Browse and select videos for viewing.
YouTube Menu
While browsing or viewing a YouTube page, touch
(Menu)
for the following options:
•
Home
: Display the main YouTube screen.
•
Browse
: View videos by category such as Comedy, Education, or
Music.
•
Search
: Enter criteria to find videos.
•
My Channel
: Add an account and configure account settings.
•
Upload
: Transfer a video from your device to YouTube.
•
Settings
: Configure display and search settings and view
information about the application.
YouTube Settings
1. From the Home screen, touch
YouTube
.
2. Touch
(Menu)
➔
Settings
for the following options:
General settings
• High quality on mobile
: Enable or disable high quality video
mode.
•Caption font size
: Set the caption font size to
Small, Medium
,
Large
, or
Extra Large
.
•Uploads
: Specify network preferences for uploads. Choose
from
Only when on WiFi
or
On any network
.
Search settings
• Clear search history
: Clear previous YouTube searches from
displaying in the Search box.
• SafeSearch filtering
: Set the video search filter to
Don’t filter
,
Moderate
, or
Strict
.
Page 85

Web and Social Networking 81
About
–
Help
: Displays the YouTube Help web site.
–
Feedback
: Displays the YouTube feedback form. You must be
at least 18 years old to fill out the form.
–
Google Mobile Terms of Service
/
YouTube Terms of
Service
/
Google Mobile Privacy Policy
/
YouTube Privacy
Policy
: Tap one of the items to read the selected terms of
service or privacy policy information.
–
Open source licenses
: Displays the license details for open
source software.
–
Application version
: Displays the YouTube version number.
Page 86
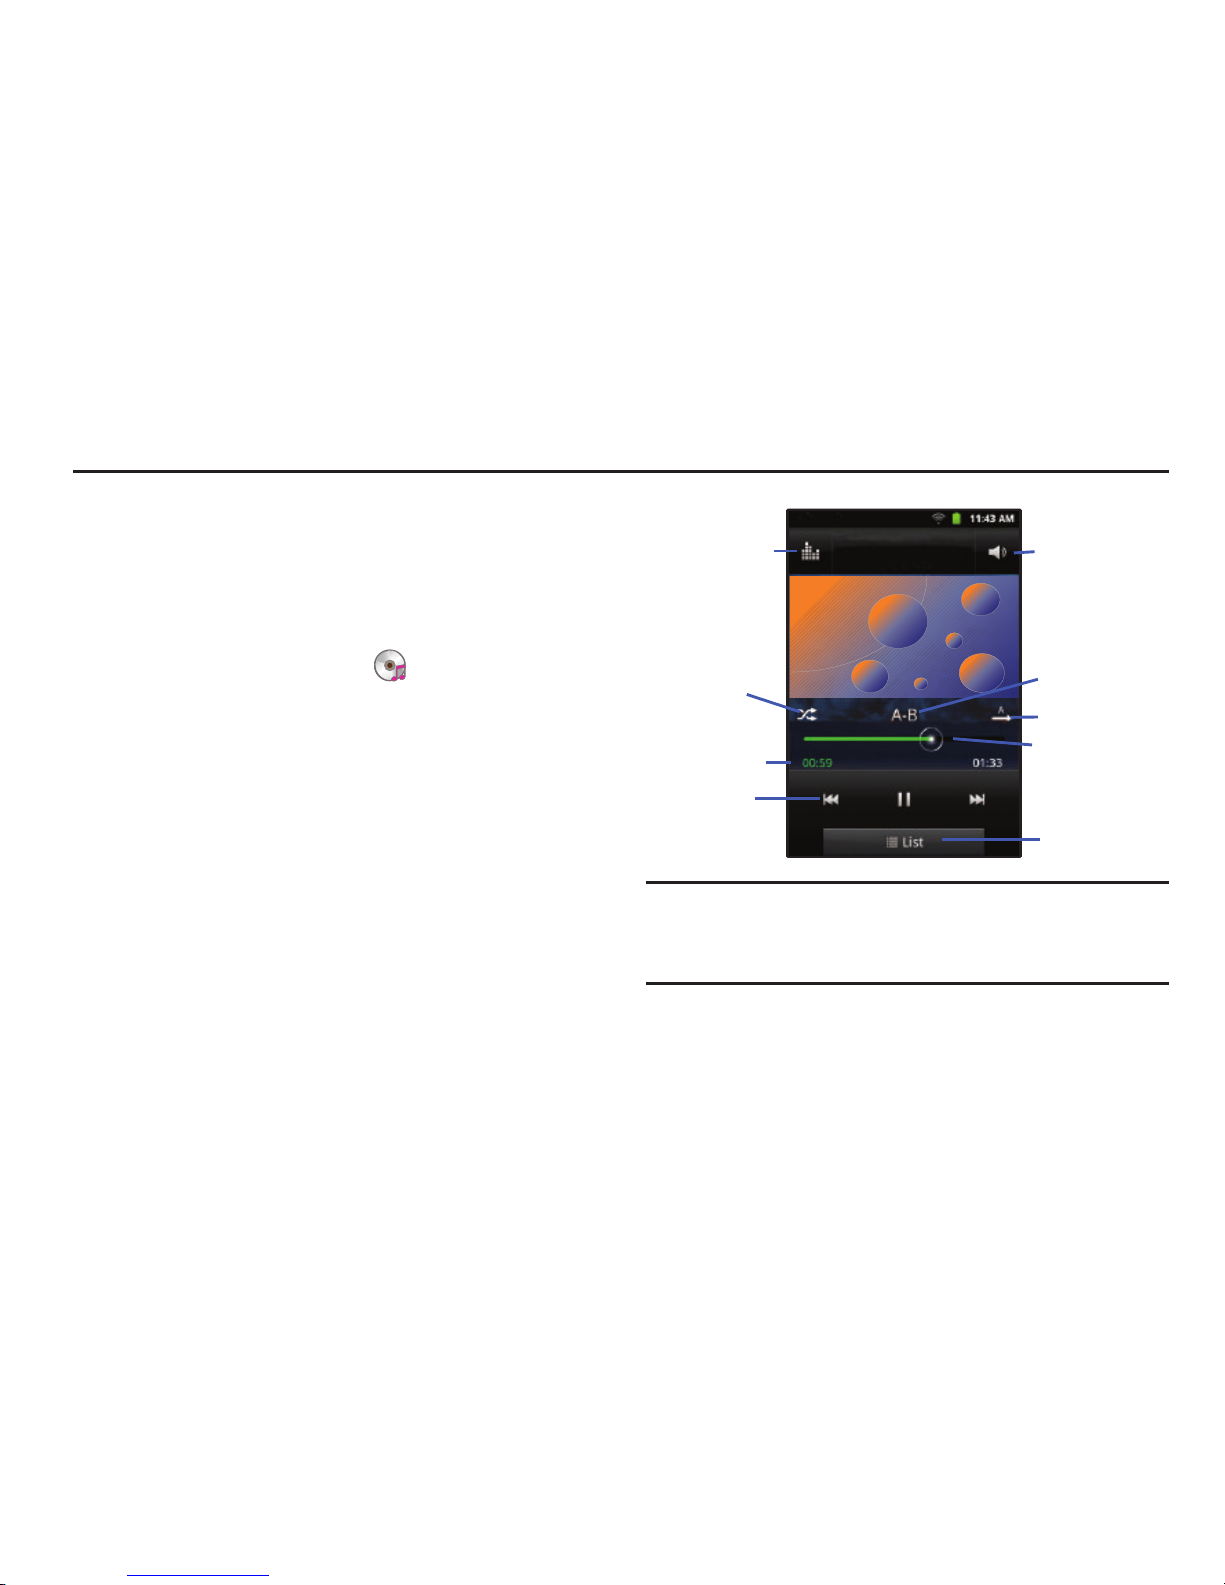
82
Section 7: Music
This section explains how to use the music features of your
device including the Music Player and the FM Radio.
Music Player
The Music Player plays songs from an installed memory
card.
1. From a Home screen, touch
(Music)
.
2. Music Player scans your memory card and displays
songs on the
All, Playlists, Albums, Artists
, or
Folders
tabs.
3. Touch a song or playlist to begin playback.
4. During playback, use the sound and playlist controls:
•SoundAlive
: Touch to set SoundAlive options. For more
information, refer to
“Music Player Settings”
on page 84.
•Volume
: Touch to activate on-screen volume control, then
touch and drag on the scale to set volume. You can also press
the Volume Key on the side of the device to adjust playback
volume.
Note:
Tap the screen to hide or display the Shuffle, Repeat
Section, and Repeat icons, the Progress Bar, and time
indicators.
•Shuffle
: When enabled, songs play in random order. When
disabled, songs play in the order they appear in List view.
“Song Title”
Album Title
Artist Name
Volume
Shuffle
Repeat
Playback
SoundAlive
List mode
Controls
Repeat Section
Progress Bar
Time
Indicators
Page 87
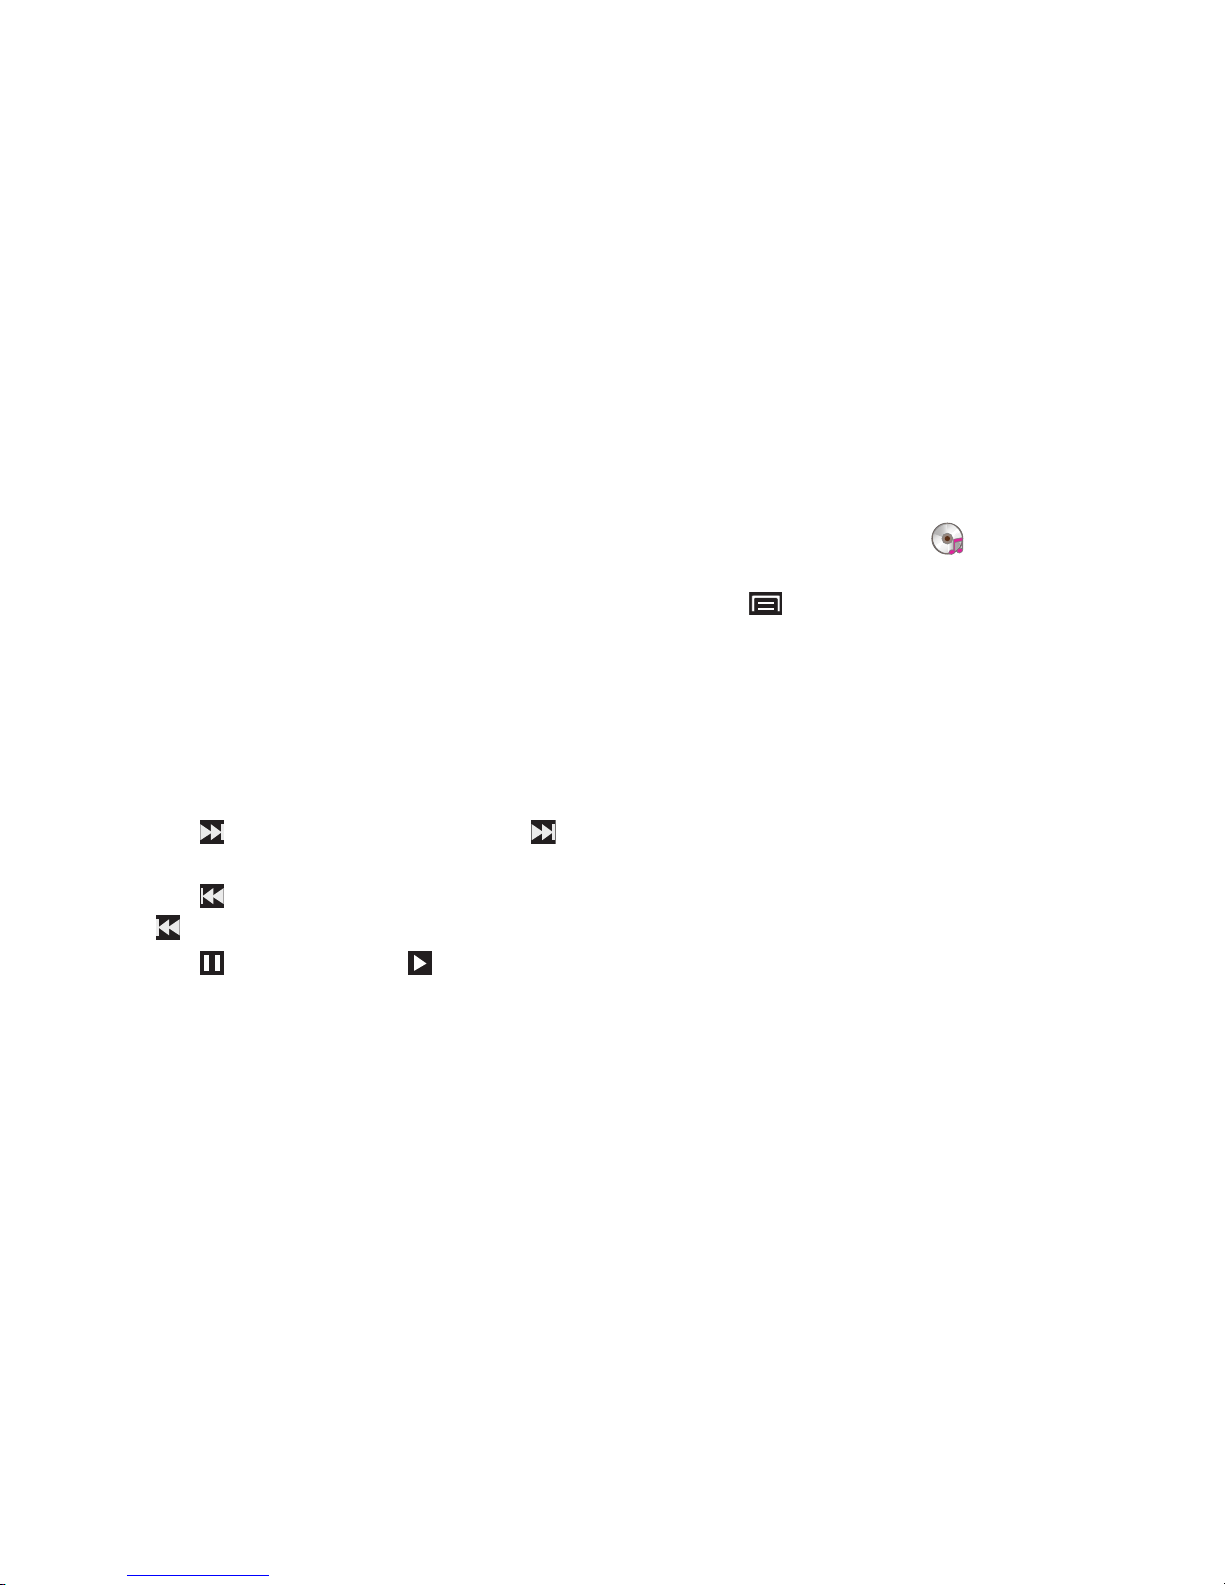
Music 83
• Repeat Section
: Touch to select a section you want to repeat.
Touch once to set the start of the section (A). Touch again to set
the end of the section (B) and start the repeating section. Touch
Clear A-B
to clear and stop the repeating section.
•Repeat
: Touch to repeat the current song, repeat all songs, or
disable repeat mode.
• Progress Bar
: Touch and drag the end of the progress bar to
scan forward or backward through the current song.
•Time indicators
: The time indicators show, in minutes and
seconds, how much of the song has played (left) and the length
of the song (right).
•Playback controls
:
–
Touch to advance to the next song. Touch and hold to
scan forward through the current song.
–
Touch to go back to the previous song. Touch and hold
to scan backward through the current song.
–
Touch to pause playback. Touch to resume playback.
•List mode
: Touch to switch to the All tab, which lists all songs.
Music Player Options
To access additional options while playing a song, follow
these steps:
1. From a Home screen, touch
(Music)
, then touch a
song or playlist to begin playback.
2. Touc h
(Menu)
.
The follow options are available:
• Add to quick list
/
Go to quick list
: Adds the current music file
to the Quick list or displays the Quick list.
• Via Bluetooth
: Scan for devices and pair with a Bluetooth
headset.
• Share music via
: Share your music by using AllShare,
Bluetooth, Email, or Gmail.
• Set as alarm tone
: Use the current music file as an alarm tone.
• Go to disc view
: Displays your music files as discs. Sweep the
discs left or right to choose a song and then touch the disc to
play it.
Page 88

84
•More
:
–
Add to playlist:
Add the current music file to a selected playlist.
–
Details
: View media information such as artist name, song title,
album title, track length, genre, recording date, and so on.
–
Settings
: Change your music player settings. For more
information, refer to
“Music Player Settings”
on page 84.
Creating a Playlist
1. From a Home screen, touch
(Music)
, then touch
the
Playlists
tab.
2. Touch
(Menu)
➔ Create
, then touch the name field
to enter a name for the playlist.
3. Touch
Save
to save the new playlist.
Adding Songs to Playlists
1. From a Home screen, touch
(Music)
, then touch
the
Playlists
tab.
2. Touch a playlist
3. Touch
Add music
.
– or –
Touch
(Menu)
➔
Add
.
4. Touch songs to select them or touch
Select all
.
A check mark indicates selected songs.
5. Touch
Add
to add the selected songs to the playlist.
Adding a song to a playlist during playback
1. From a Home screen, touch
(Music)
.
2. Touch a song to play it.
3. Touch
(Menu) ➔ More ➔ Add to playlist
.
4. Choose one of these options:
•
Touch a playlist to add the selected song to the playlist.
•
Touch
Create playlist
to create a new playlist for the song.
Music Player Settings
1. From a Home screen, touch
(Music)
.
2. Touch
(Menu)
➔ Settings
for these options:
•SoundAlive
: Touch to select a sound effect. Touch
User1
or
User2
to define your own sound settings.
•Play speed
: Touch and drag the speed indicator from 0.7 to
1.3. The default speed is 1.0.
Page 89
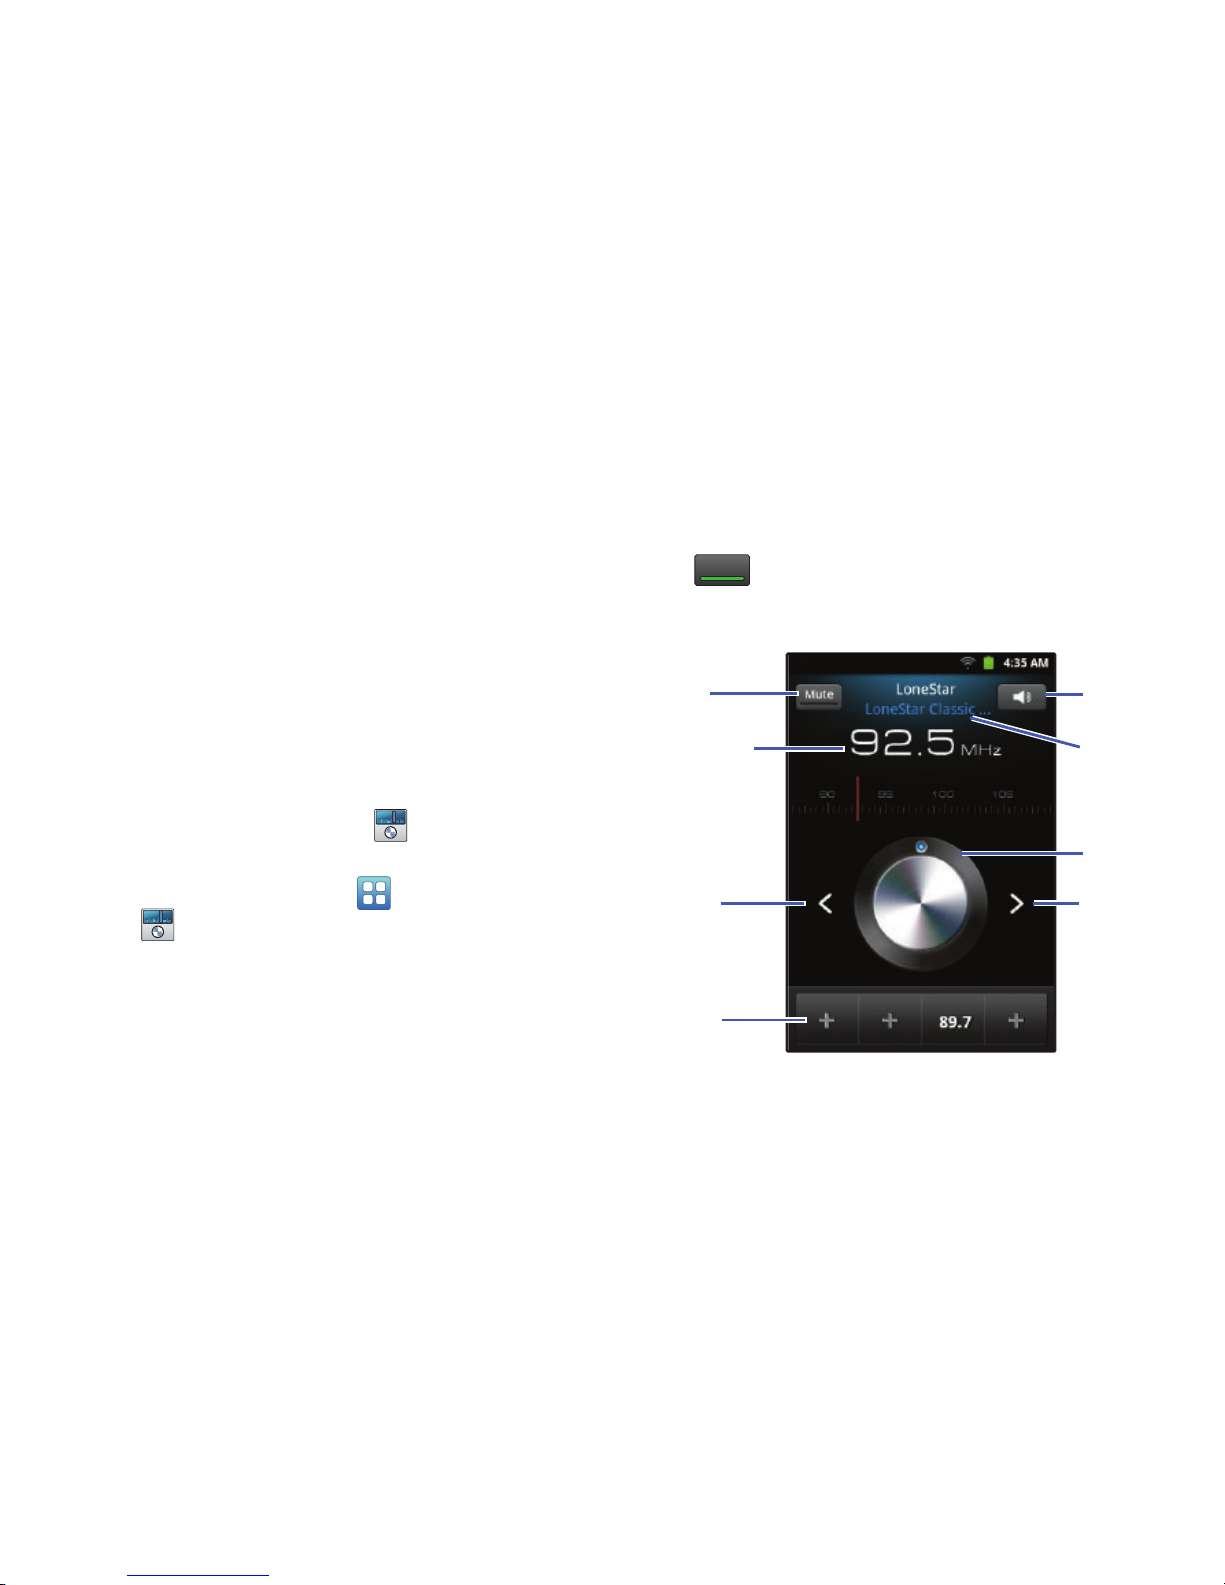
Music 85
• Music menu
: Choose the types of menus to display as tabs in
Music Player. A check mark indicates selected types.
• Music play screen
: Choose a background graphic for the
music play screen. Touch Albumart, Lyrics, or Graphic 01, 02,
03, or 04. A green checkmark displays on the graphic you
choose. Touch
Done
to start using the graphic.
FM Radio
The built-in FM radio in your device provides free music from
your local FM radio stations. You can manually or
automatically scan for stations and create a Station List of
your favorite stations.
To use the radio:
1. From the Home screen, touch
FM Radio
.
– or –
From a Home screen, touch
(Applications)
➔
FM Radio
.
The FM Radio screen displays.
If you have not plugged in your headphones, an
Earphone not connected
message displays. Your
headphones also serve as an antenna for your FM
radio.
2. Turn the Station Dial clockwise or counter-clockwise to
find FM stations as indicated by the Current Radio
Station indicator at the top of the display.
3. Touch the
Mute
button to turn on or turn off the sound.
indicates that the sound is muted.
4. Touc h
Media Volume
to adjust the volume.
FM
FM
Mute
Previous
Station
Favorites
Current Radio
Mute /
Station
Unmute
Dial
Media
Volume
Station
Next
Station
Station
ID
Page 90

86
5. Touch the
Previous Station
button or the
Next
Station
button to step through the available
stations.
6. Touch a
Favorites
button to set the current station
as a favorite. Once a Favorites button is set, touch the
button to go to that station.
7. Touch
(Menu)
to display the following options:
• Via speaker
/
Via earphones
: Toggle between the headset
and the device speakers.
•Normal frequency
/
Alternative frequency
: Toggle between
normal frequencies and alternative frequencies.
•All channels
: Display the list of stations found after a scan and
your favorites. This list may be empty, if no scan has been
performed and no favorites have been set.
Touch (Menu)
for the following options:
–
Remove
: Touch
Select all
or touch individual stations to
remove them from the Station List. Touch
Remove
once you
have made your selection.
–
Rename
: Touch the station you want to rename, enter the new
name, and touch
Save
.
•Scan
: Removes the existing Station List, if one exists, scans for
FM stations, and adds them to the Station List. Touch
All
channels
to remove your Favorites or
Retaining favourites
to
keep your favorites.
• Settings
: Displays the following options:
–
Region
: Touch the region that best describes where you are
using FM Radio. Choices are:
Europe
and
USA
.
–
Background playing
: Enable the FM radio to play in the
background after closing the application. Remove the check
mark to disable this feature.
–
Show Station ID
: Display station information.
–
Alternative frequency
: Turn alternative frequency on or off.
–
FM auto off
: Enable the Fm radio to play and then
automatically turn off after 30 minutes, 1 hour, or 2 hours.
Touch
Off
to disable this feature.
Page 91
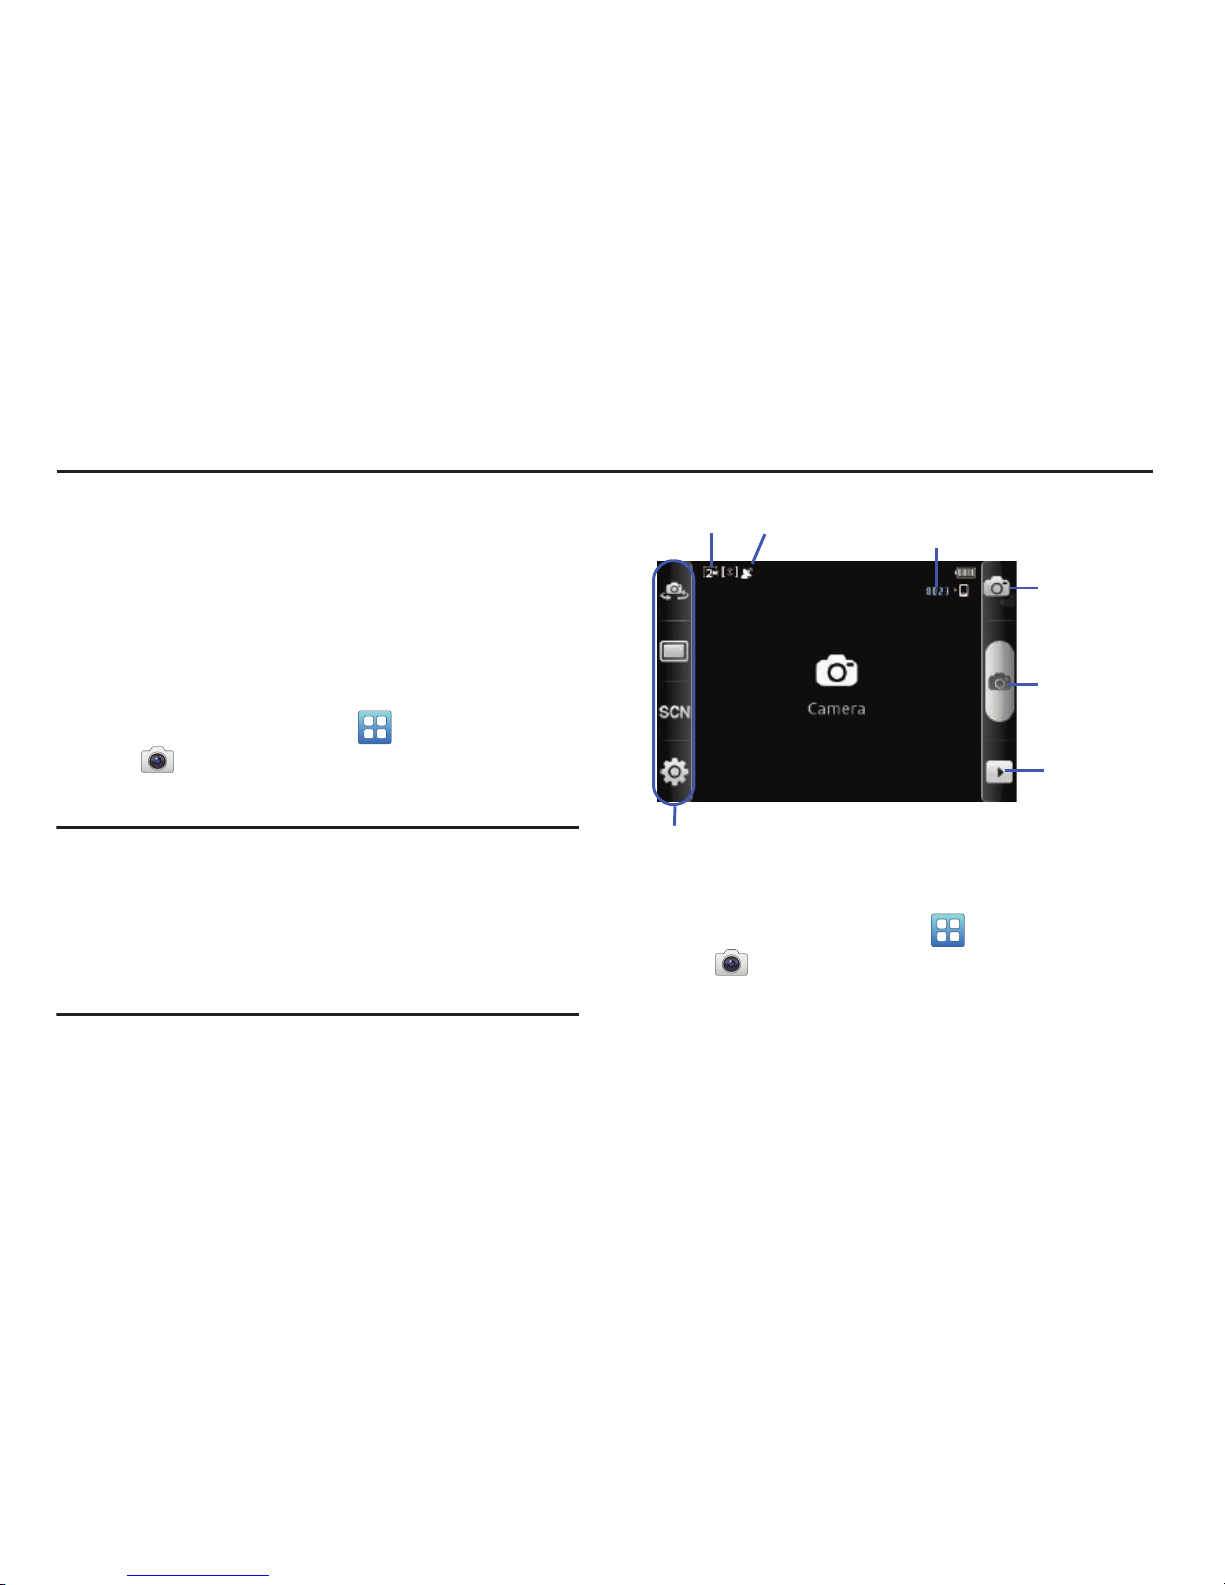
Photos and Videos 87
Section 8: Photos and Videos
This section explains how to use your device’s built-in
camera and camcorder, how to use the Videos app to view
and manage videos, and how to use the Gallery app to view,
capture, and manage photos and videos.
Camera
Use your device’s built-in camera and camcorder to take
photos and record videos.
From a Home screen, touch
(Applications)
➔
Camera
.
The Camera screen displays.
Important!
Do not take photos of people without their
permission.
Do not take photos in places where cameras are
not allowed.
Do not take photos in places where you may
interfere with another person’s privacy.
Taking Photos
1. From a Home screen, touch
(Applications)
➔
Camera
.
2. Using the display as a viewfinder, compose your photo
by aiming the lens at the subject. To configure settings,
see “Camera Options and Settings” on page 88.
3. To take the photo, touch the
Camera Key
.
Options and
Image
Mode
Camera
Viewer
Key
Resolution
GPS Active
Photos
Remaining
Settings
Page 92
88
Camera Options and Settings
Camera options and settings are represented by icons on the
left side of the screen. While in Camera mode, touch the
following icons to configure the camera:
Self shot
: Touch to switch to the front-facing camera
lens and take a photo of yourself.
Shooting mode
: Choose an automatic shooting mode,
from:
•
Single shot
: Take a single photo.
•
Continuous
: Take consecutive photos by pressing
and holding the Camera key.
•
Panorama
: Touch the Camera button to take a
photo, then use the on-screen guideline to move
the viewfinder and take the next 7 shots
automatically.
•
Smile shot
: Touch the Camera button to
automatically focus on the subject’s face and
take the photo.
Scene mode
: Choose an automatic scene mode from
None, Landscape, Night, Sports, Party/Indoor, Beach/
Snow, Sunset, Dawn, Fall colour, Firework,
Candlelight, or Backlight.
SCNSCN
Settings
: Touch for the following options:
•
Timer
: Set a 2, 5, or 10 second timer.
•
Resolution
: Set a size for the image. Options
are: 2M (1600x1200), 1.3M (1280x960),
0.3M (640x480), or 0.1M (320x240).
•
White balance
: Set the light source. Options are:
Auto, Daylight, Cloudy, Incandescent, or
Fluorescent.
•
Effects
: Apply an effect to photos. Options are:
Normal, Negative, Black and white, or Sepia.
•
Metering
: Set how the camera measures or
meters the light source: Centre-weighted, Spot,
or Matrix.
•
Image quality
: Choose a quality setting for photos.
Options are: Superfine, Fine, or Normal.
•
Brightness
: Set the brightness of the photo.
Page 93
Photos and Videos 89
Viewing Photos with the Image Viewer
After taking a photo, use the Image Viewer to view, share, or
delete photos.
1. Touc h
Image Viewer
to view the photo.
2. Touch the screen to show or hide Image Viewer
options.
3. Touch the screen with two fingers or double-tap on the
screen to zoom all the way in or out. For more
information, refer to “Pinch” on page 24.
4. Sweep across the screen to display the next or
previous photo.
5. Touc h
Share
to use + textPlus Better than text,
AllShare, Bluetooth, Email, Gmail, Google+, or Picasa
to share the photo.
6. Touc h
Set as
to assign the photo as a Contact icon,
Home screen wallpaper, or Lock screen wallpaper.
7. Touc h
Delete
to delete the photo being displayed. Touch
OK
to delete the photo or
Cancel
to exit.
Settings
: Touch
for the following options:
•
Guidelines
: Used to enable or disable the
guidelines.
•
GPS
: Enable or disable tagging of photos with
your GPS location. displays on the screen
when this option is active.
Caution!
Be aware that your location may be
present on a photo when posting your
photos on the internet.
•
Review
: Activate the instant review feature,
which displays images immediately after
capture.
•
Shutter sound
: Enable or disable one of the
camera’s three shutter sounds.
•
Storage
: Set the storage location. Options are:
Internal memory or memory card.
•
Reset
: Set all Camera settings back to the
defaults.
Page 94
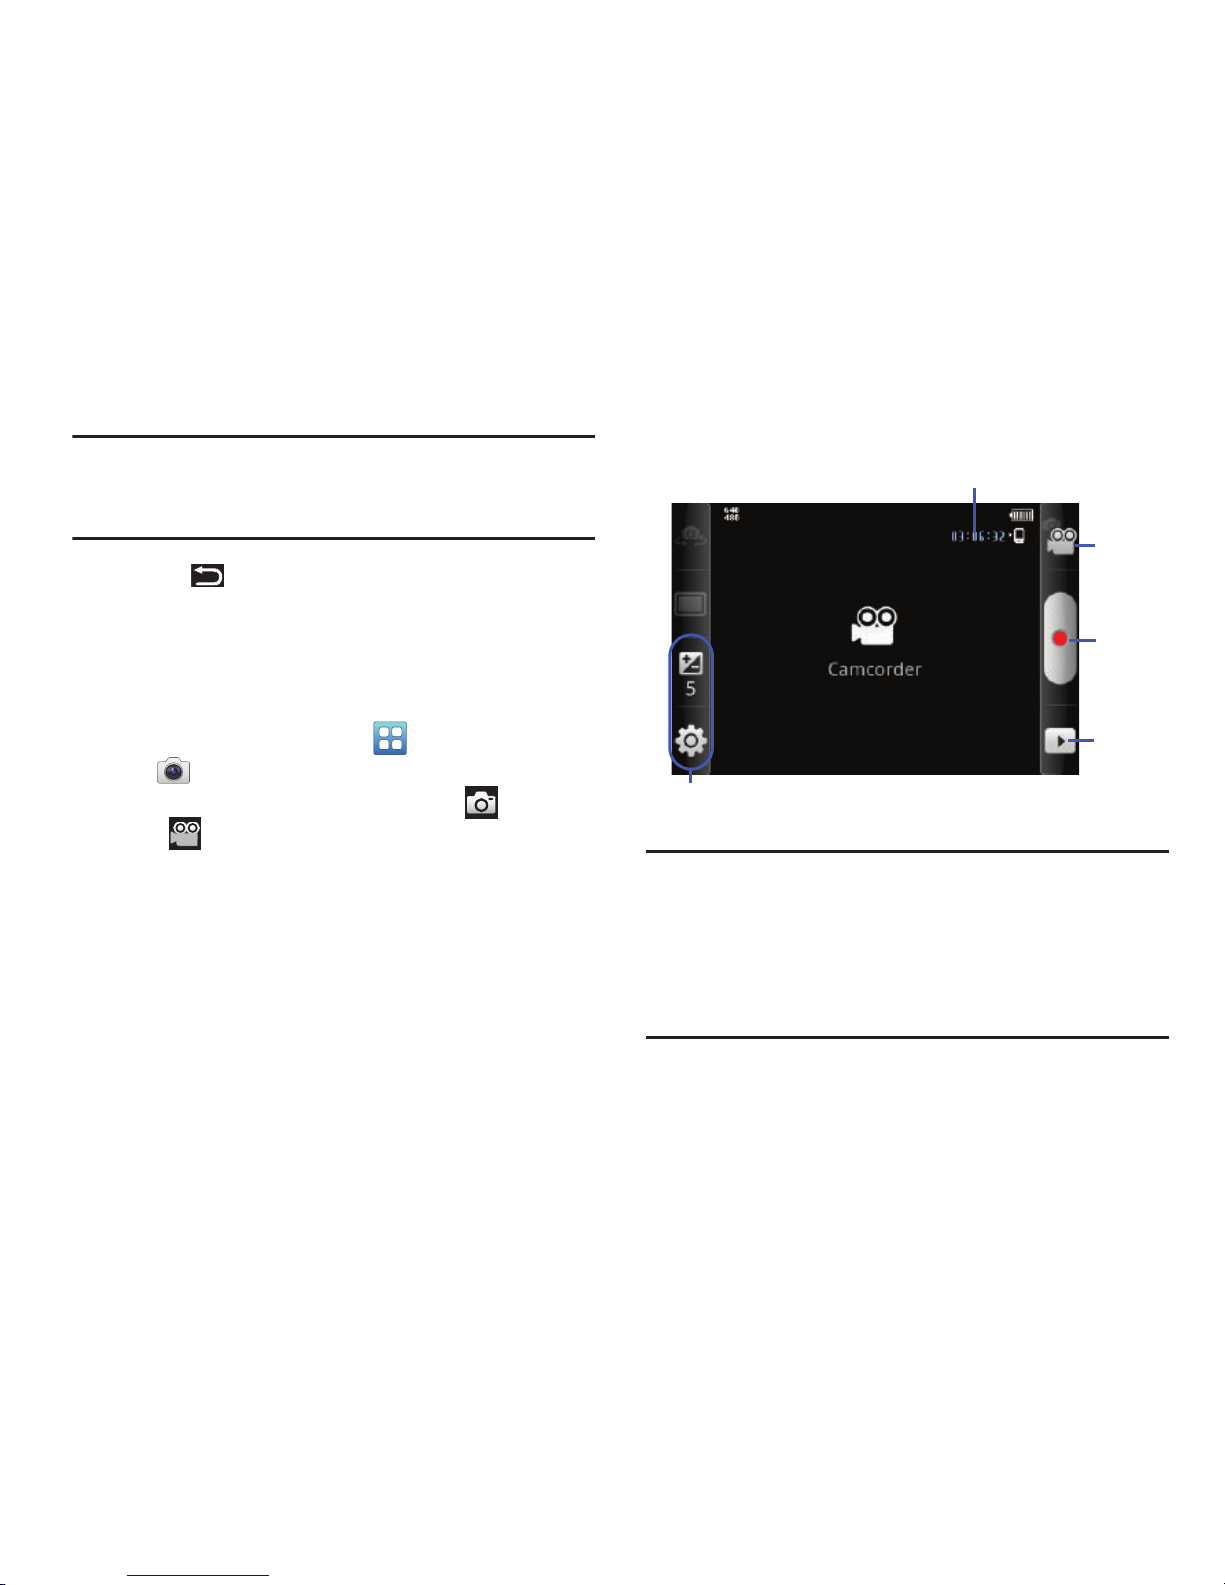
90
Note:
Photos are stored in the /sdcard/DCIM/Camera folder as
jpg files. For more information, refer to “My Files” on
page 120.
8. Touch
(Back)
to return to the Camera to take more
photos.
Camcorder
Use your device’s built-in Camcorder to record highdefinition video in 720p resolution.
1. From a Home screen, touch
(Applications)
➔
Camera
.
2. Touch the
Mode
icon to switch from the Camera to
the Camcorder.
Important!
Do not take videos of people without their
permission.
Do not take videos in places where cameras are
not allowed.
Do not take videos in places where you may
interfere with another person’s privacy.
Record
Options and
Image
Mode
Viewer
Recording Time
Remaining
Settings
Page 95
Photos and Videos 91
Recording Videos
1. From a Home screen, touch
(Applications)
➔
Camera
.
2. Touch the
Mode
icon to switch from the Camera to
the Camcorder.
3. Using the display as a viewfinder, compose your shot
by aiming the lens at the subject. To configure settings,
see “Camcorder Options and Settings” on page 91.
4. To start recording, touch
(Record)
. During
recording, the button changes to
(Pause)
. Touch
Pause
to temporarily stop recording. To resume
recording, touch
(Record)
again.
5. To stop recording, touch the
(Stop)
button.
Camcorder Options and Settings
Before you start recording videos, use the camcorder options
and settings to configure the camcorder for best results.
Camcorder options are represented by icons on the left side
of the screen.
While in Camcorder mode, touch the following icons to
configure the camcorder:
Exposure value
: Set the brightness of the video.
Settings:
Touch for the following options:
•
Timer
: Set a timer for how long to wait before
recording a video. Options are: Off, 2 sec, 5 sec,
and 10 sec.
•
Resolution
: Set the video size to either: 640x480
or 320x240.
•
White balance
: Set the light source. Options are:
Auto, Daylight, Cloudy, Incandescent, or
Fluorescent.
•
Effects
: Apply an effect to videos. Options are:
Normal, Negative, Black and white, or Sepia.
•
Video quality
: Choose a quality setting for videos.
Options are: Superfine, Fine, or Normal.
Page 96
92
Viewing Videos with the Image Viewer
After recording a video, use the Image Viewer to play, share,
or delete your video.
1. Touch
Image Viewer
to view the video.
2. Touch the screen to show or hide Image Viewer
options.
3. Sweep across the screen to display the next or
previous video.
4. Touch
Share
to use AllShare,
Bluetooth
, Email,
Gmail
, or
YouTube
to
share the video.
5. Touch
Play
to play the video being displayed.
6. Touch
Delete
to delete the video being displayed. Touch
OK
to delete the photo or
Cancel
to exit.
Note:
Videos are stored in the /sdcard/DCIM/Camera folder as
mp4 files. For more information, refer to “My Files” on
page 120.
7. To play a video, touch
(Play)
. Touch
(Pause)
to
pause the video and touch
(Resume)
to resume
playing the video.
8. Touch and drag the white dot on the progress
bar to fast forward or rewind the video. Touch the left
end of the progress bar to restart the video. Touch the
right end of the progress bar to end the video playback.
– or –
Touch
(Rewind)
to restart the video or
(Fast
Forward)
to end the video.
Settings
: Touch
for the following options:
•
Guidelines
: Used to enable or disable the
guidelines.
•
Audio recording
: Enable to record sound along
with video.
•
Review
: Enable or disable the instant review
feature, which displays videos immediately after
capture.
•
Storage
: Set the storage location. Options are:
Internal memory or Memory card.
•
Reset
: Set all Camcorder settings back to the
defaults.
Page 97

Photos and Videos 93
9. Touch
(Brightness)
to adjust the video brightness.
10. Touch
(Back)
to return to the Camcorder.
Videos
Your device’s 3.65-inch 480x320 HVGA TFT LCD touch
screen provides playback of videos. Use the Videos app to
view and manage videos stored on an installed memory
card.
1. From a Home screen, touch
(Videos)
.
2. While viewing the Videos list, touch
(Menu) for
options:
• Remove from list
: Touch videos to select them or touch
Select
all
to remove all videos. Touch
Remove from list
to delete the
video files.
•List by
: Display videos by Size, Name (default), Date, or Type.
3. Touch a video to play it. While playing a video, touch
the screen to display or hide on-screen playback
controls.
4. During playback, touch
(Menu)
for options:
•Share video
: Send the video by AllShare, YouTube, Bluetooth,
Gmail, or Email.
•SoundAlive
: Set the sound quality to Normal, Voice, Movie, or
5.1 ch.
•Details
: Provides details about the photo such as File name,
Format, Resolution, File size, Date & Time, and Forwarding.
• Via Bluetooth
: Scans for a Bluetooth device on which to play
the video.
•Subtitles
: View subtitles for the video, if available.
•More
: Touch for more options.
–
Settings
: Set the video to repeat.
–
Add bookmark
: Add a bookmark at the current spot in the
video.
–
Bookmarks
: Display all bookmarks for this video. Touch a
bookmark to start playing the video at the bookmarked spot.
Touc h
Delete
, touch bookmarks, and then touch
Done
to delete
bookmarks.
Page 98
94
Adjusting Screen View
While viewing a video, you can also adjust the screen view.
Screen view allows you to select Original Size, Full-Screen,
or Full-Screen in Ratio to view your video.
Note:
The screen view icons are a three-way toggle. The icon
that is displayed, is the mode that appears after the icon
is touched.
•
Original Size
( ): Play the video in its original size.
•
Full-Screen in Ratio View
( ): Enlarge the video as much as
possible without becoming distorted.
•
Full-Screen View
(
):
Use the entire screen, which may
cause some minor distortion.
Other Video Controls
The following controls are also available while viewing a
video:
•
Brightness
: Touch to adjust the video brightness.
•
Volume
: Touch and use the slider to adjust the video
volume.
•
Pause / Resume
: Touch to pause the video being played.
Touch
to
resume playing.
•
Previous / Rewind
: Touch to jump to the previously played
video or touch and hold to restart the video.
•
Next / Fast Forward
: Touch to jump to the previously played
video or touch and hold to fast forward to the end of the video.
•
Touch and drag the white dot on the progress bar to fast
forward or rewind the video. Touch the left end of the progress
bar to restart the video. Touch the right end of the progress bar to
end the video playback.
•
Exit
: To return to the videos list, touch in the top right corner
of the screen.
Gallery
Your device’s 3.65-inch 480x320 HVGA TFT LCD touch
screen provides
high-resolution
display of photos and videos.
Use the Gallery app to view, capture, and manage photos and
videos.
Page 99
Photos and Videos 95
Gallery Options
When you open the Gallery, various photo and video folders
are displayed. The folders can be on your device or on your
external memory card.
To Manage Folders
1. From a Home screen, touch
(Applications)
➔
Gallery
.
2. Touch
(Menu)
.
Select all
and
Unselect all
appears at the top of the
screen. Check marks also display on each folder of
pictures or videos.
3. Touch
Select all
or touch the folders you want to select
(the check mark turns white when a folder is
selected), then touch one of these options:
•Share
: Send each selected folder and its contents by +
textPlus Better than text (photos), AllShare, Bluetooth, Email,
Gmail, Google+ (photos), Picasa (photos), or YouTube (videos).
•Delete
: Touch
Confirm deletions
to delete the selected
folders.
•More
:
–
Details
: Displays details about the folders selected.
To Manage Folder Contents
1. From a Home screen, touch
(Applications)
➔
Gallery
.
2. Touch a folder to display the folder’s contents.
3. Touc h
(Menu)
.
Select all
and
Unselect all
appears at the top of the
screen. Check marks also display on each picture or
video.
4. Touc h
Select all
or touch the pictures or videos you
want to select (the check mark turns white when
an item is selected), then touch one of these options:
•Share
: Send each selected item by + textPlus Better than text
(photos), AllShare, Bluetooth, Email, Gmail, Google+ (photos),
Picasa (photos), or YouTube (videos).
• Delete
: Touch
Confirm deletions
to delete the selected items.
•More
:
–
Details
: Displays details about the items selected.
For additional photo options see
“Viewing Photos”
on page 96.
Page 100
96
Access the Camera from Gallery
To access the Camera from the Gallery:
1. From a Home screen, touch
(Applications)
➔
Gallery
.
2. Touch at the top of the screen. For more
information, refer to “Camera” on page 87.
Viewing Photos
1. From a Home screen, touch
(Applications)
➔
Gallery
.
2. Touch a category, then touch a photo to view it.
3. While viewing a photo, touch the screen for these
options:
•Slideshow
: Touch to view a slideshow of photos.
•Menu
: Touch to display the following options:
–
Share
: Share the selected photo by + textPlus Better than text,
AllShare, Bluetooth, Email, Gmail, Google+, or Picasa.
–
Delete
: Touch
Confirm deletions
to delete the selected
folders.
–
More
: Touch for more options:
• Details
: Display details about the photo.
•Show on map
: Show on a map where the picture was taken, if
available.
•Set as
: Use the picture as a Contact icon, Home screen wallpaper, or
Lock screen Wallpaper.
•Crop
: Allows you to crop the image. Touch and drag the sides of the
crop box to create the crop area, then touch
Save
. Touch
Cancel
to
stop without cropping the picture.
•Rotate left
: Allows you to rotate the picture counterclockwise 90
degrees.
• Rotate right
: Allows you to rotate the picture clockwise 90 degrees.
Viewing Videos
1. From a Home screen, touch
(Applications)
➔
Gallery
.
2. Touch a category, then touch a video to play it.
Note:
Videos are marked with a Play button.
 Loading...