

Page 1
4G LTE SMARTPHONE
User Manual
Please read this manual before operating your device,
and keep it for future reference.
Page 2

Legal Notices
Warning: This product contains chemicals known
to the State of California to cause cancer and
reproductive toxicity.
Intellectual Property
All Intellectual Property, as defined below, owned
by or which is otherwise the property of Samsung
or its respective suppliers relating to the SAMSUNG
Phone, including but not limited to, accessories,
parts, or software relating there to (the “Phone
System”), is proprietary to Samsung and protected
under federal laws, state laws, and international
treaty provisions. Intellectual Property includes,
but is not limited to, inventions (patentable or
unpatentable), patents, trade secrets, copyrights,
software, computer programs, and related
documentation and other works of authorship. You
may not infringe or otherwise violate the rights
secured by the Intellectual Property. Moreover,
you agree that you will not (and will not attempt
to) modify, prepare derivative works of, reverse
engineer, decompile, disassemble, or otherwise
attempt to create source code from the software.
No title to or ownership in the Intellectual Property
is transferred to you. All applicable rights of the
Intellectual Property shall remain with SAMSUNG
and its suppliers.
Open Source Software
Disclaimer of Warranties;
Exclusion of Liability
EXCEPT AS SET FORTH IN THE EXPRESS
WARRANTY CONTAINED ON THE WARRANTY
PAGE ENCLOSED WITH THE PRODUCT, THE
PURCHASER TAKES THE PRODUCT “AS IS”, AND
SAMSUNG MAKES NO EXPRESS OR IMPLIED
WARRANTY OF ANY KIND WHATSOEVER WITH
RESPECT TO THE PRODUCT, INCLUDING BUT
NOT LIMITED TO THE MERCHANTABILITY OF THE
PRODUCT OR ITS FITNESS FOR ANY PARTICULAR
PURPOSE OR USE; THE DESIGN, CONDITION OR
QUALITY OF THE PRODUCT; THE PERFORMANCE
OF THE PRODUCT; THE WORKMANSHIP OF THE
PRODUCT OR THE COMPONENTS CONTAINED
THEREIN; OR COMPLIANCE OF THE PRODUCT
WITH THE REQUIREMENTS OF ANY LAW, RULE,
SPECIFICATION OR CONTRACT PERTAINING
THERETO. NOTHING CONTAINED IN THE
INSTRUCTION MANUAL SHALL BE CONSTRUED
TO CREATE AN EXPRESS OR IMPLIED WARRANTY
OF ANY KIND WHATSOEVER WITH RESPECT TO
THE PRODUCT. IN ADDITION, SAMSUNG SHALL
NOT BE LIABLE FOR ANY DAMAGES OF ANY KIND
RESULTING FROM THE PURCHASE OR USE OF
THE PRODUCT OR ARISING FROM THE BREACH
OF THE EXPRESS WARRANTY, INCLUDING
INCIDENTAL, SPECIAL OR CONSEQUENTIAL
DAMAGES, OR LOSS OF ANTICIPATED PROFITS
OR BENEFITS.
Some software components of this product
incorporate source code covered under GNU
General Public License (GPL), GNU Lesser General
Public License (LGPL), OpenSSL License, BSD
License and other open source licenses. To obtain
the source code covered under the open source
licenses, please visit:
http://opensource.samsung.com.
Modification of Software
SAMSUNG IS NOT LIABLE FOR PERFORMANCE
ISSUES OR INCOMPATIBILITIES CAUSED BY
YOUR EDITING OF REGISTRY SETTINGS, OR
YOUR MODIFICATION OF OPERATING SYSTEM
SOFTWARE.
USING CUSTOM OPERATING SYSTEM SOFTWARE
MAY CAUSE YOUR DEVICE AND APPLICATIONS
TO WORK IMPROPERLY. YOUR CARRIER MAY
NOT PERMIT USERS TO DOWNLOAD CERTAIN
SOFTWARE, SUCH AS CUSTOM OS.
i
Legal Notices ATT_SM-G800A_Eng_UM_NK4_TN_121614_F2_rev3
Page 3

IF YOUR CARRIER PROHIBITS THIS, IF YOU
ATTEMPT TO DOWNLOAD SOFTWARE ONTO THE
DEVICE WITHOUT AUTHORIZATION, YOU WILL BE
NOTIFIED ON THE SCREEN THAT UNAUTHORIZED
SOFTWARE HAS BEEN DETECTED. YOU SHOULD
THEN POWER DOWN THE DEVICE AND CONTACT
YOUR CARRIER TO RESTORE THE DEVICE TO THE
CARRIER AUTHORIZED SETTINGS.
Diagnostic Software
This device is equipped with diagnostic software
reporting usage and performance information used
solely to deliver improved network quality and
overall device experience to AT&T customers. Please
refer to your AT&T Wireless Customer Agreement
and/or the AT&T Privacy Policy (www.att.com/
privacy) for more information.
SAFE™ (Samsung Approved For Enterprise)
SAFE™: “SAFE™” (Samsung for Enterprise) is
a mark for a Samsung device which has been
tested against Samsung’s own internal criteria for
interoperability with certain third party securityrelated solutions for MDM and VPN. The testing
includes field testing with local network connection
and menu tree testing which tests functionality of the
solutions in conjunction with the Samsung device.
During the testing, the device is tested with the
security solutions to see if the solutions work with
the device as described by the third party security
solution providers. The testing, for example, includes
field testing with local network connection and menu
tree testing which tests functionality of the solutions
in conjunction with the Samsung device. For more
information about Samsung’s SAFE™ program,
please refer to www.samsung.com/us/safe.
DEVICES AND APPLICATIONS TESTED WITH
SAFE™ DEVICES. IN NO EVENT SHALL THE
SAMSUNG ENTITIES BE LIABLE FOR ANY
DIRECT, INDIRECT, INCIDENTAL, PUNITIVE, OR
CONSEQUENTIAL DAMAGES OF ANY KIND
WHATSOEVER WITH RESPECT TO INFORMATION
TECHNOLOGY SECURITY PROTECTION, SAFE™
DEVICES OR APPLICATIONS TESTED WITH SAFE™
DEVICES. In addition, information technology
security protection will be affected by features or
functionality associated with, among other things
the e-mail platform, master data management, and
virtual private network solutions selected by the
software provider, solution provider or user. Choice
of an e-mail, master data management, and virtual
private network solution is at the sole discretion of
the software provider, solution provider or user and
any associated effect on information technology
security protection is solely the responsibility of
the software provider, solution provider or user.
For complete statement of limited warranty, please
refer to www.samsung.com/us/safe, available on the
web and where Samsung smartphones and mobile
devices are sold. [051214]
Samsung Telecommunications
America (STA), LLC
Headquarters:
1301 E. Lookout Drive
Richardson, TX 75082
Phone:
1-800-SAMSUNG (726-7864)
Disclaimer of Warranties: EXCEPT AS OTHERWISE
PROVIDED IN THEIR STANDARD END USER
LICENSE AND WARRANTY, TO THE FULL EXTENT
PERMITTED BY LAW SAMSUNG ELECTRONICS
CO., LTD., SAMSUNG TELECOMMUNICATIONS
AMERICA, LLC, AND THEIR AFFILIATES
(COLLECTIVELY REFERRED TO HEREIN AS THE
“SAMSUNG ENTITIES”) EXPRESSLY DISCLAIM
ANY AND ALL WARRANTIES, EXPRESS OR
IMPLIED, INCLUDING ANY WARRANTY OF
MERCHANTABILITY, FITNESS FOR A PARTICULAR
PURPOSE, INTEROPERABILITY OR NONINFRINGEMENT, WITH RESPECT TO INFORMATION
TECHNOLOGY SECURITY PROTECTION, SAFE™
1-888-987-HELP (4357)
Internet Address:
www.samsung.com
©2014 Samsung Telecommunications America, LLC.
Samsung is a registered trademark of Samsung
Electronics Co., Ltd.
ii
Legal Notices
Page 4

Do you have questions about your
Samsung Mobile Phone?
For 24 hour information and assistance, we offer
a new FAQ/ARS System (Automated Response
System) at: www.samsung.com/us/support
The actual available capacity of the internal memory
is less than the specified capacity because the
operating system and default applications occupy
part of the memory. The available capacity may
change when you upgrade the device.
Online Legal Information
The online version of the Health/Safety and
Warranty guide for your device can be found at:
English: www.samsung.com/us/Legal/Phone-
HSGuide
Spanish: www.samsung.com/us/Legal/Phone-
HSGuide_SP
The online version of the End User Licensing
Agreement for your device can be found:
Nuance®, VSuite™, T9® Text Input, and the Nuance
logo are trademarks or registered trademarks of
Nuance Communications, Inc., or its affiliates in the
United States and/or other countries.
ACCESS® and NetFront™ are trademarks or
registered trademarks of ACCESS Co., Ltd. in Japan
and other countries.
The Bluetooth® word mark, figure mark (stylized “B
Design”) , and combination mark (Bluetooth word
mark and “B Design”) are registered trademarks and
are wholly owned by the Bluetooth SIG.
microSD™ and the microSD logo are Trademarks of
the SD Card Association.
Openwave® is a registered Trademark of Openwave,
Inc.
Google, the Google logo, Android, the Android
logo, Google Play, Gmail, Google Mail, Google
Maps, Google Music, Google Hangouts, Picasa,
Play Newsstand, YouTube and other marks are
trademarks of Google Inc.
Online at: www.samsung.com/us/Legal/
SamsungLegal-EULA1.
Wi-Fi is a registered trademark of the Wireless
Fidelity Alliance, Inc.
Swype and the Swype logos are trademarks of
Swype, Inc. © 2010 Swype, Inc. All rights reserved.
iii
Legal Notices
Page 5

Table of Contents
Getting Started ............................................................. 1
Front View ........................................................................... 2
Back View ........................................................................... 3
Assemble Your Device ............................................... 4
Set Up Your Device ...................................................... 7
Set Up Accounts on Your Device ........................ 8
Know Your Device ..................................................... 9
Home Screen..................................................................10
Status Bar .........................................................................13
Navigation, Motions, and Gestures ..................14
Notification Panel .........................................................15
Entering Text ...................................................................16
Calling ..................................................................................18
Calling .................................................................................19
Applications ...................................................................22
Apps Screen ...................................................................23
Google Applications ..................................................25
AT&T Applications .......................................................27
Other Applications ......................................................29
AT&T Address Book ...................................................31
Camera and Video ......................................................32
Contacts .............................................................................34
Calculator ..........................................................................38
Calendar ............................................................................39
Clock ....................................................................................40
Email ....................................................................................41
Gallery ................................................................................. 42
Internet ................................................................................44
Messages .........................................................................46
Music Player ....................................................................48
MyFiles ..............................................................................49
S Health .............................................................................51
S Voice ...............................................................................52
Video Player ....................................................................53
Settings ..............................................................................54
How to Use Settings ..................................................55
Wi-Fi and Wi-Fi Direct ................................................56
Bluetooth ...........................................................................58
Tethering and Wi-Fi Hotspot ..................................60
Airplane Mode ...............................................................62
Data Usage ......................................................................63
Location Services ........................................................64
More Networks ..............................................................65
Sharing Files with NFC .............................................66
Nearby Devices .............................................................67
Printing ................................................................................68
Screen Mirroring ........................................................... 69
Sound ..................................................................................70
Display ................................................................................73
Wallpaper ..........................................................................75
Lock Screen ....................................................................76
Notification Panel .........................................................77
Toolbox ...............................................................................78
Easy Mode .......................................................................79
Accessibility .....................................................................80
Blocking Mode ..............................................................82
Private Mode ...................................................................83
Finger Scanner ..............................................................84
Motions and Gestures...............................................85
Air View ..............................................................................86
Accounts ............................................................................87
Backup and Reset.......................................................88
Language and Input Settings ...............................89
iv
TOC
Page 6

Date and Time ...............................................................91
Safety Assistance ........................................................92
Battery ................................................................................. 93
Power Saving ..................................................................94
Storage ...............................................................................95
Security...............................................................................97
Help ......................................................................................99
About Your Device ................................................... 100
Application Manager ............................................... 101
Default Applications ................................................ 103
v
TOC
Page 7

Getting Started
Learn about your mobile
device hardware, assembly
procedures, and how to
get started using your new
device.
Page 8
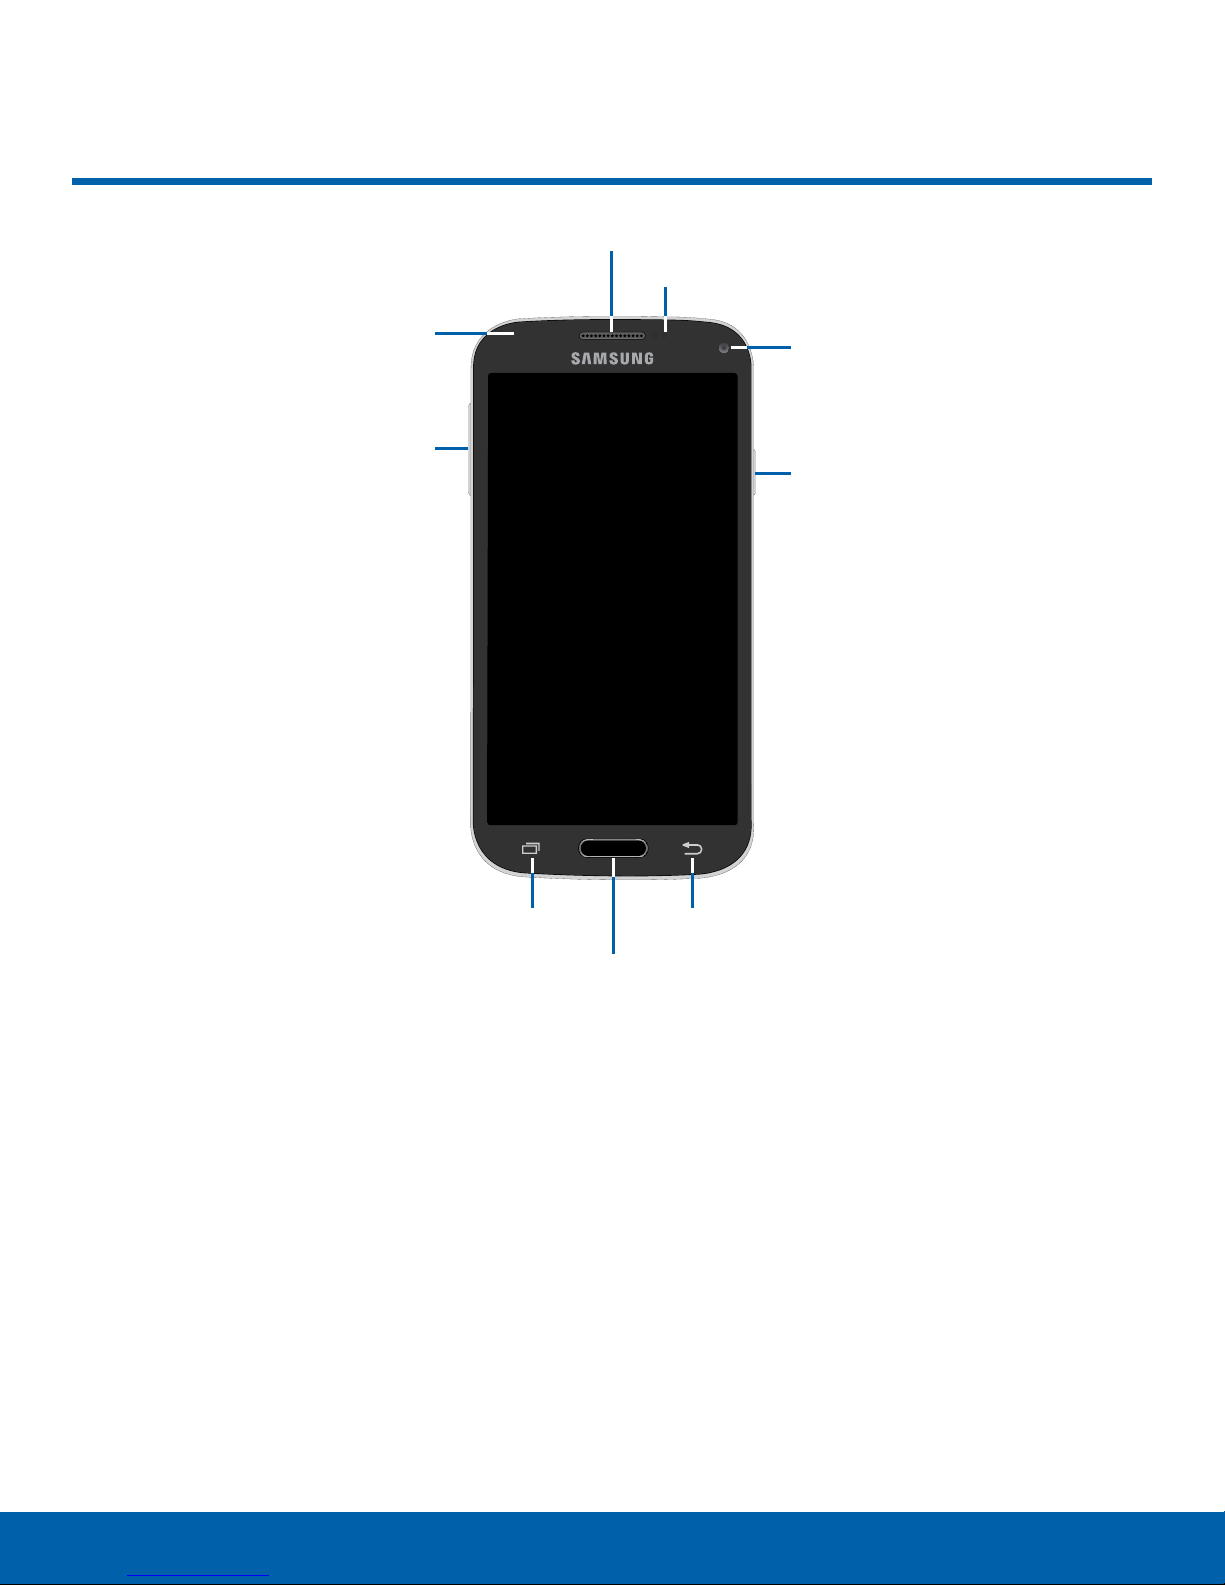
Front View
Status Light
Volume key
Earpiece
Proximity and
gesture sensors
Front camera
Power/Lock key
Recent apps
Home/Finger Scanner key
Back key: Tap to return to the previous screen, or
•
to close a dialog box, menu, or keyboard.
Earpiece: Listen to a call.
•
Front camera: Take self-portraits and record
•
videos of yourself.
Home/Finger Scanner key: Tap to return to the
•
Home screen. Activate the Fingerprint security
feature.
Proximity and gesture sensors: Detects the
•
presence of objects near the device.
Recent apps: Tap to display recent apps, or touch
•
and hold for home screen options.
Back key
Power/Lock key: Press and hold to turn the
•
device on or off. Press to lock or wake up the
screen. Press and hold to turn the device off or
restart it, or for quick access to Airplane Mode,
Emergency Mode, and to Mute, Vibrate, and
Sound modes.
Status Light: Displays red when charging or the
•
battery is low, blue when a notification has arrived
or you are voice recording, and green when fully
charged.
Volume key: Press to adjust the volume of your
•
device’s sounds and audio.
2
Front ViewGetting Started
Page 9
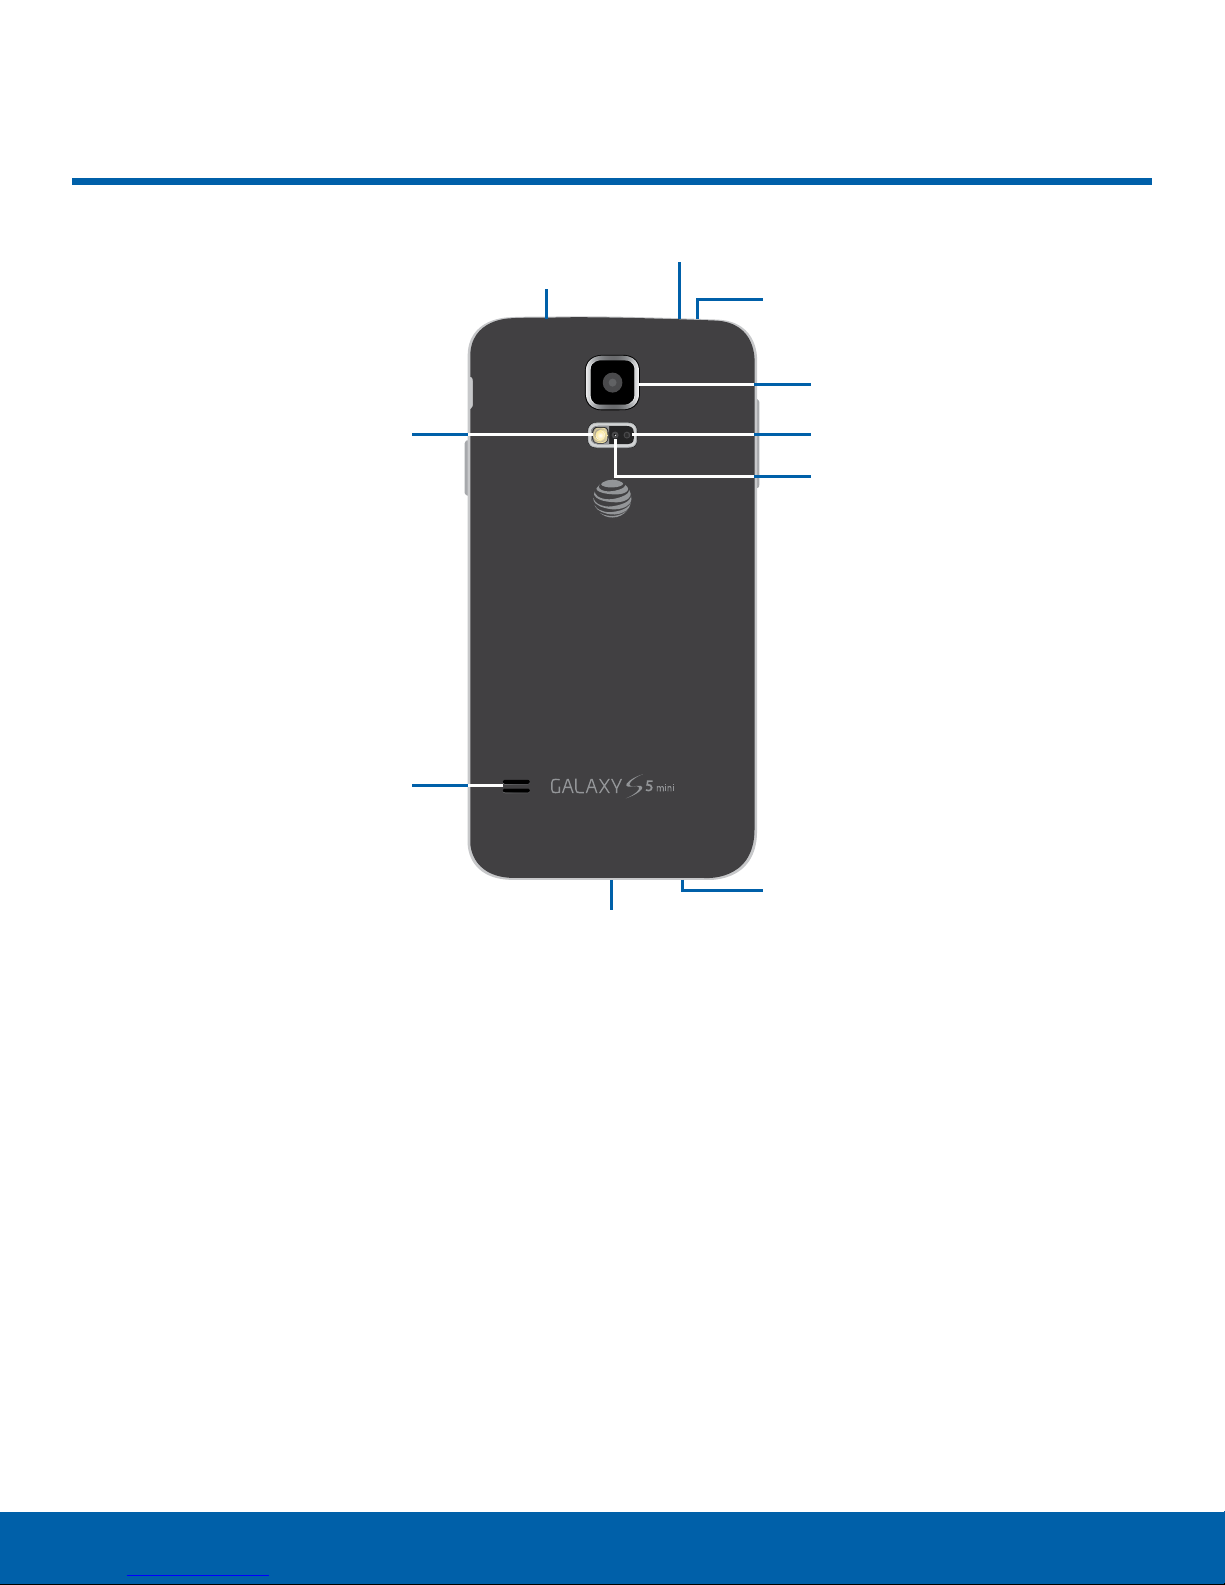
Back View
Microphone
Headset jack
Infrared transmitter
Camera
Flash
Speaker
USB charger/Accessory port
Back camera: Take pictures and record videos.
•
Flash: Illuminate subjects in low-light
•
environments when taking a photo or recording
video.
Headset jack: Connect an optional headset
•
(notincluded).
Heart rate sensor
Temperature and humidity
sensor
Microphone
Microphone: Records audio and detects voice
•
commands.
Speaker: Plays music, and other sounds.
•
Temperature and humidity sensor: Monitors both
•
temperature and humidity conditions. This is used
to calculate calories burned within S Health.
Heart Rate Sensor: When using the S Health
•
app, this sensor measures your heart rate via your
fingertip.
Infrared transmitter: Controls external devices
•
using infrared light.
USB charger/Accessory port: Connect the
•
Charger/USB cable (included), and other optional
accessories (not included) .
3
Back ViewGetting Started
Page 10
Assemble Your Device
Prior to use, it is necessary to
install the SIM card, optional
memory card (not included), and
the battery.
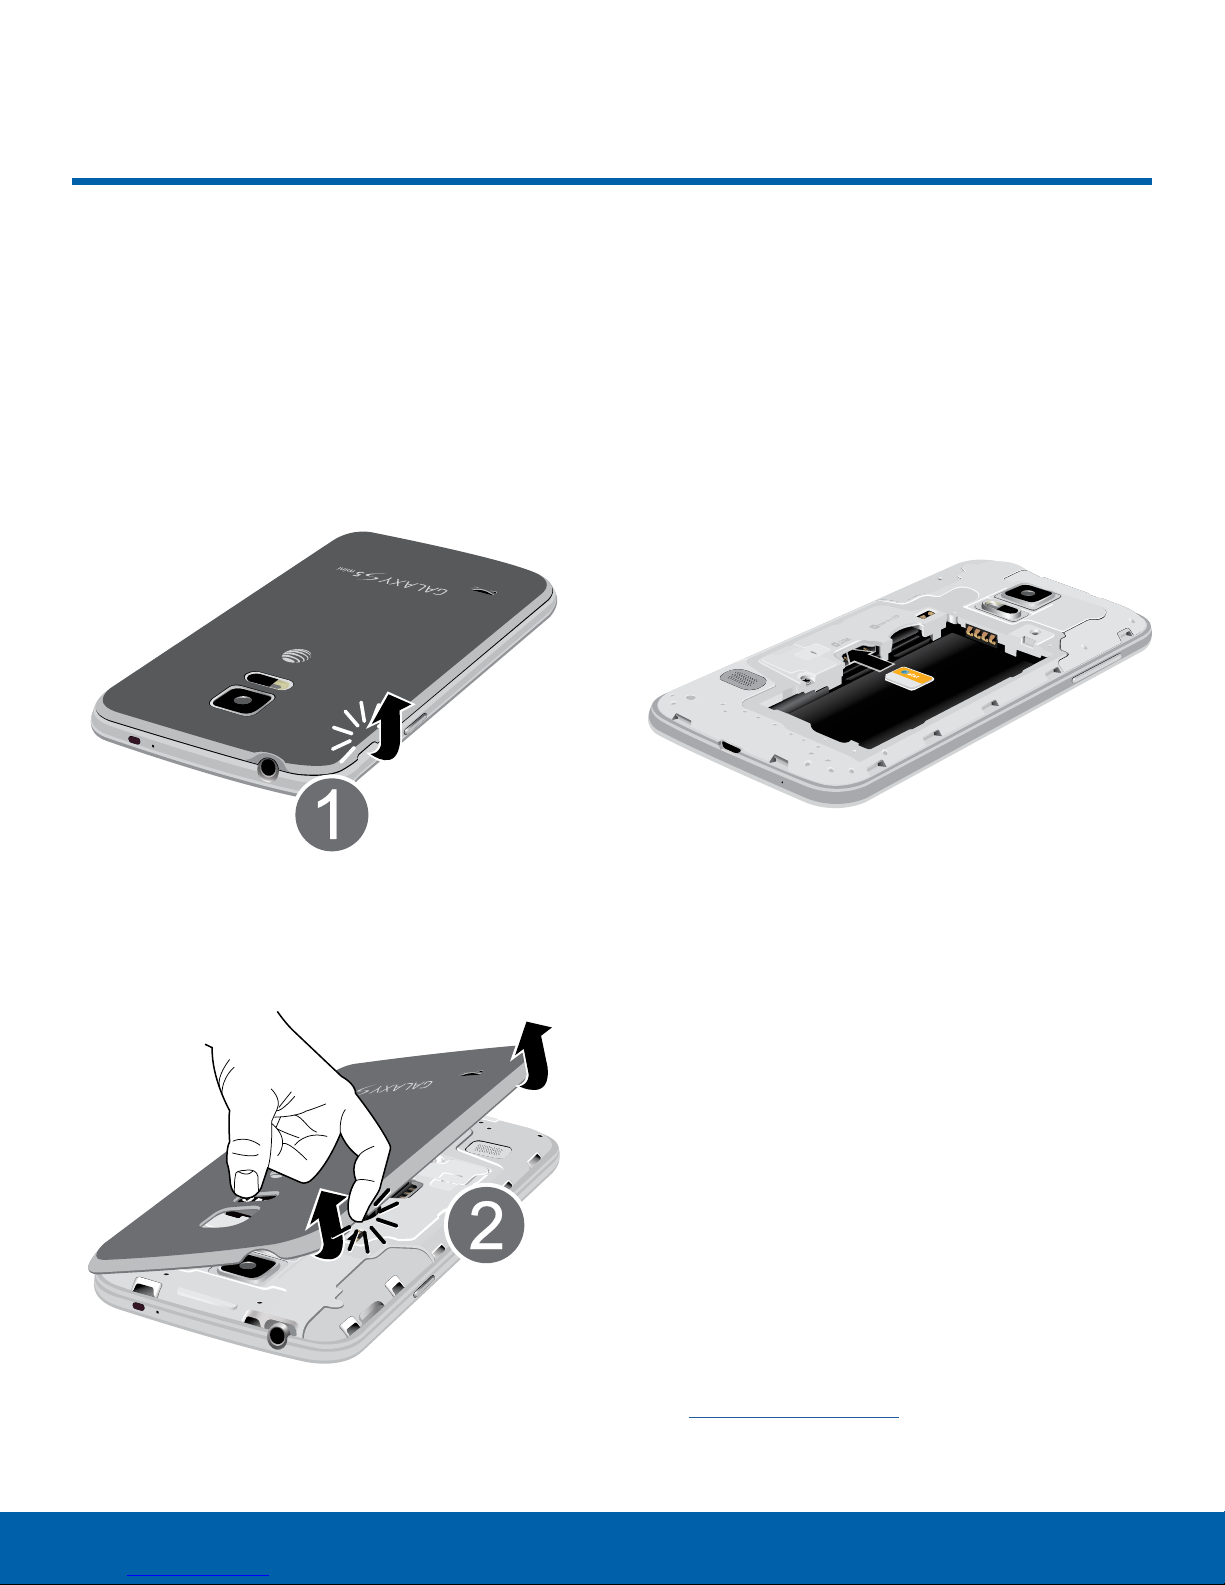
Remove the Back Cover
Install the SIM Card
When you subscribe to a cellular network, you are
provided with a plug-in SIM card. During activation,
your SIM card will be loaded with your subscription
details, such as your PIN, available optional
services, and many others features.
Warning: Please be careful when handling the SIM
card to avoid damaging it. Keep all SIM cards out of
reach of small children.
1. Remove the back cover using the slot on the top
of your phone.
2. Lift the cover upward from the phone.
Warning: Do not bend or twist the back cover
excessively. Doing so may damage the cover.
► Carefully slide the SIM card into the SIM card
socket (as shown) until the card locks into place.
Make sure that the card’s gold contacts face into
the phone and that the angled corner of the card
is positioned as shown.
Caution: If the card is not inserted correctly, the
phone will not detect the SIM card. Re-orient the card
back into the slot if the SIM is not detected.
Install an Optional Memory Card
You can install an optional microSD or microSDHC
memory card (not included) to expand available
memory space.
Note: A memory card can be installed at any time; it
is not necessary to install it prior to using the device.
For more information on installing a memory card,
see Install a Memory Card.
4
Assemble Your DeviceGetting Started
Page 11
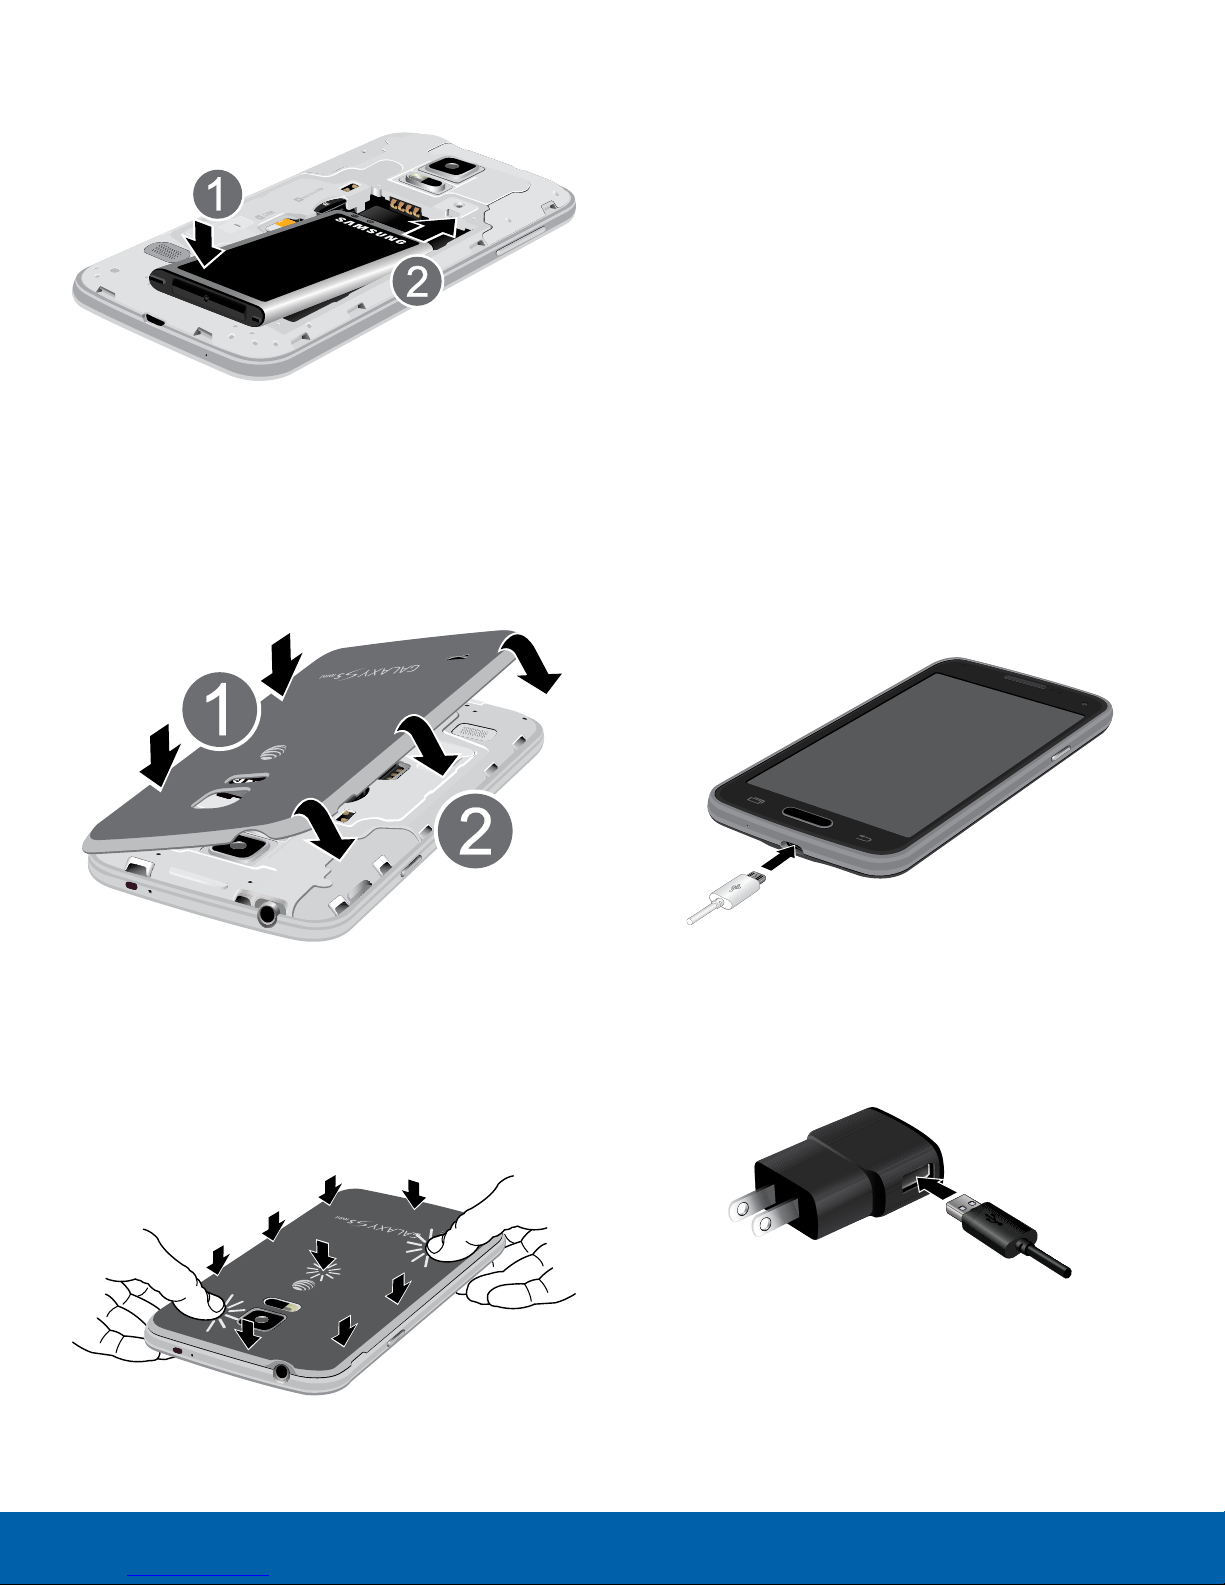
Install the Battery
Charge the Battery
Your device is powered by a rechargeable, standard
Li-Ion battery. A Wall/USB Charger (Charging Head
and USB cable) is included with the device, for
charging the battery.
The battery comes partially charged. You must fully
charge the battery before using your device for the
first time. A fully discharged battery requires up to 4
hours of charge time. After the first charge, you can
use the device while charging.
1. Insert the battery into the opening on the back of
the phone, making sure the connectors align.
2. Gently press down to secure the battery.
Replace the Back Cover
1. Place the back cover onto the back of the phone
and press down.
2. Press along the edge of the back cover until you
have a secure seal.
Caution: Use only Samsung-approved charging
devices and batteries. Samsung accessories are
designed to maximize battery life. Using other
accessories may invalidate your warranty and may
cause damage.
Your device comes with a charger (charging head
and USB cable) to charge your device from any
110/220 VAC outlet.
1. Insert the USB cable into the port.
2. Connect the USB cable to the charging head,
then plug the charging head into a standard
ACpower outlet.
3. When charging is complete, unplug the charging
head from the power outlet and remove the USB
cable from the device.
Caution: Failure to unplug the wall charger before you
remove the battery, can cause damage to the device.
5
Assemble Your DeviceGetting Started
Page 12

When to Charge the Battery
When the battery is weak and only a few minutes of
talk time remain, the device sounds a warning tone
at regular intervals.
In this condition, your device conserves its
remaining battery power, not by turning off the back
light, but by entering the dimming mode.
When the battery level becomes too low, the device
automatically turns off.
► For a quick check of your battery level, locate
the battery charge indicator located in the upperright corner of your device’s display. Solid color
(
) indicates a full charge.
You can also choose to display a percentage
value. Having a percentage value onscreen can
provide a better idea of the remaining charge on
the battery. For more information, see Battery.
6
Assemble Your DeviceGetting Started
Page 13

Set Up Your Device
Turn Your Device On and Off
Turning the Device On
► Press and hold the Power/Lock key until the
device vibrates and starts up.
Turning the Device Off
1. Press and hold the Power/Lock key until the
Device Options menu displays.
2. At the prompt, tap Power off.
AT&T Ready2Go
The first time you turn your device on, the AT&T
Ready2Go screen displays. It will guide you through
the basics of setting up your device.
Follow the prompts to choose a default language,
connect to a Wi-Fi network, set up accounts, choose
location services, learn about your device’s features,
and more.
If you touch not now > Exit, you can set up your
device later. You can access Ready2Go by tapping
Apps > AT&T Ready2Go.
Secure Your Device
Use your device’s screen lock features to secure
your device.
Lock the Device
By default, the device locks automatically when the
screen times out.
► To lock the device, press the Power/Lock key.
Unlock the Device
The default Screen lock on your device is Swipe.
► To unlock your device, press the Power/Lock
key or Home key, and then touch and drag your
finger across the screen.
Set Up a Secure Screen Lock
The default Screen lock is Swipe, which offers no
security. To choose a more secure screen lock, see
Set a Screen Lock.
7
Set Up Your DeviceGetting Started
Page 14

Set Up Accounts on Your Device
Google Account
Your new device uses your Google Account to
fully utilize its Android features, including Gmail,
GoogleHangouts, and the Google Play Store.
When you turn on your device for the first time, set
up your existing Google Account, or create a new
GoogleAccount.
– or –
To create a new Google Account or set up your
Google Account on your device at any time, use
Accounts settings. Formore information, see
Accounts.
► From a Home screen, tap
Settings> Accounts > Add account >
Google.
Apps >
Samsung Account
Create a Samsung account, for access to Samsung
content and apps on your device.
When you turn on your device for the first time, set
up your existing Samsung account, or create a new
Samsung account.
– or –
To create a new Samsung account or set up your
Samsung account on your device at any time,
use Accounts settings. Formore information, see
Accounts.
► From a Home screen, tap
Settings> Accounts > Add account >
Samsungaccount.
Apps >
8
Set Up Accounts on Your DeviceGetting Started
Page 15

Know Your Device
Learn some of the key
features of your mobile
device, including the screens
and icons, as well as how to
navigate the device and enter
text using the keyboard.
Warning: Please note that a touch screen
responds best to a light touch from the pad of your
finger or a non-metallic stylus. Using excessive
force or a metallic object when pressing on the
touch screen may damage the tempered glass
surface and void the warranty.
Page 16
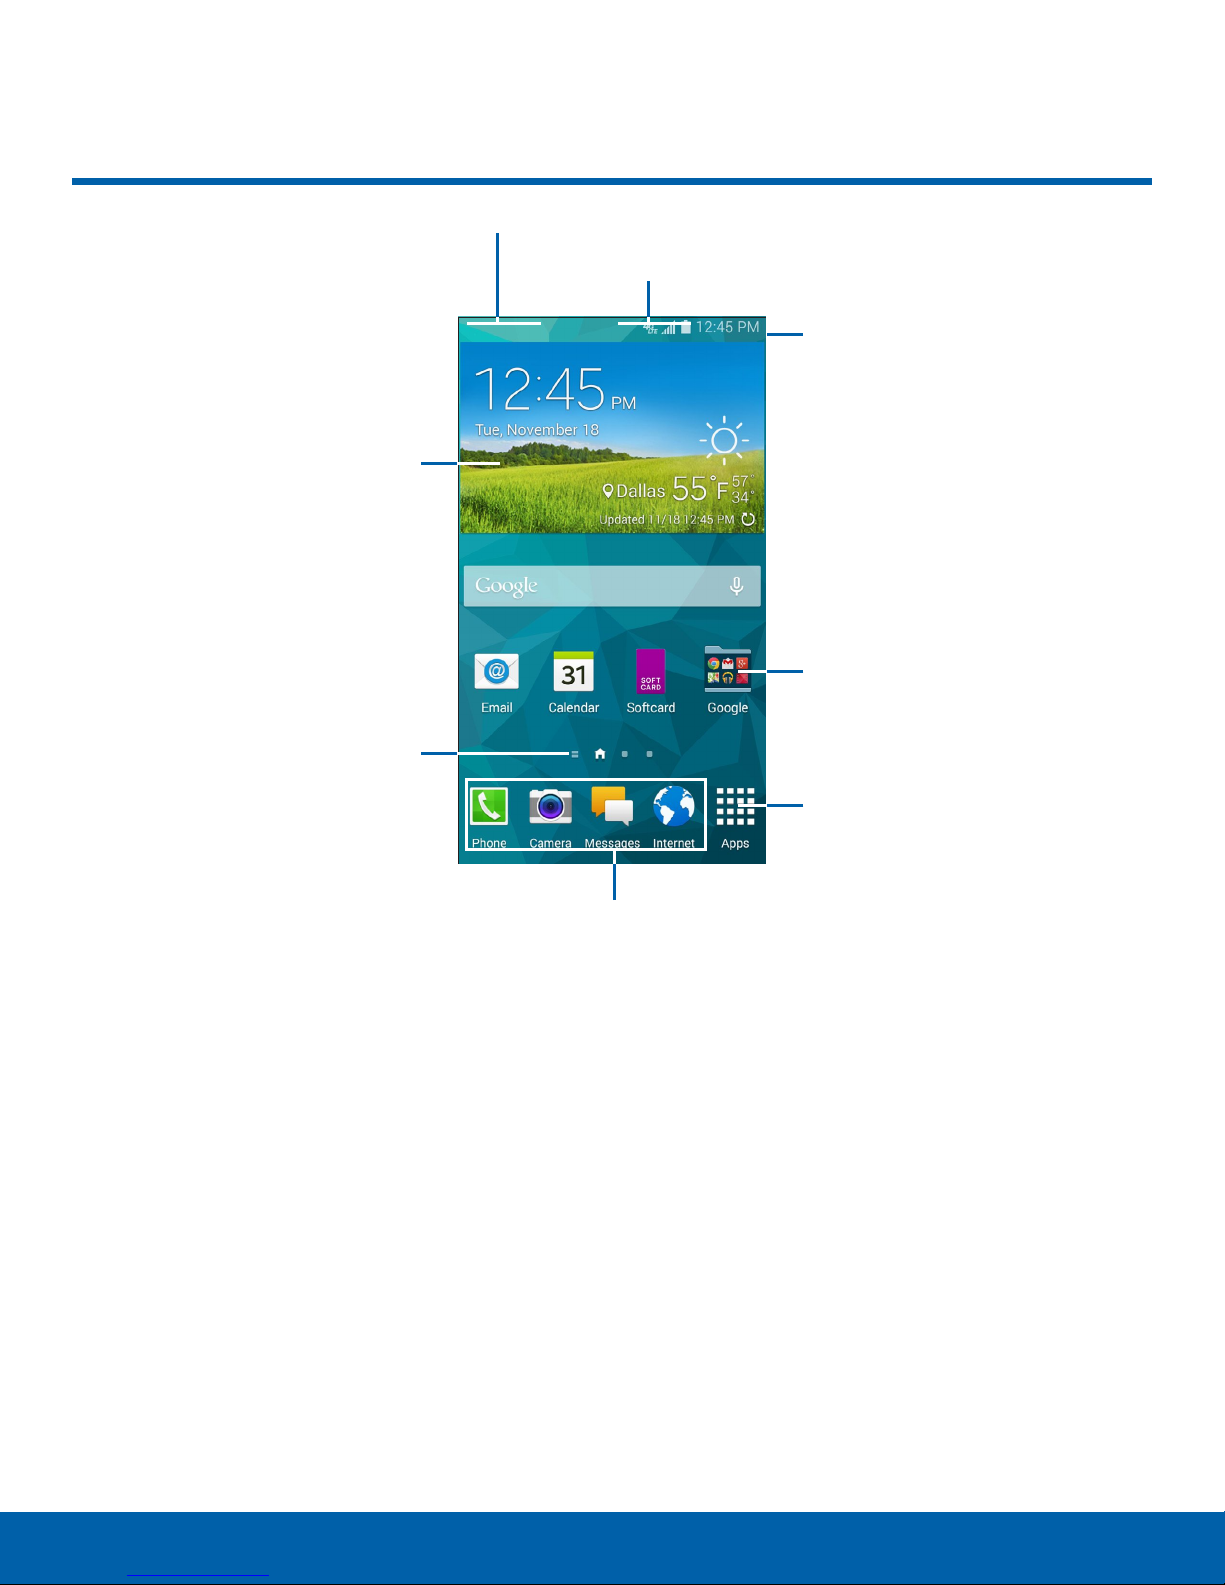
Home Screen
Widget
Notification Icons
Status Icons
Status Bar
App Folder
Home Screen Indicator
App Folder: For your convenience, related
•
applications that are grouped into folders on the
Home screens.
Apps Screen: Allows quick access to all of your
•
applications.
App Shortcuts: Shortcuts to your favorite
•
applications.
Home Screen Indicator: Indicates which
•
Homescreen is presently displayed.
App
Shortcuts
•
•
•
•
Apps Screen
Notification Icons: Display new messages and
emails, notifications, available software updates,
and so on.
Status Bar: Displays device status icons (right)
and notification icons (left).
Status Icons: Display information about the
device, such as the network signal strength,
battery level, the time, and so on.
Widgets: Self-contained applications that run on
the Home screen (not shortcuts) .
10
Home ScreenKnow Your Device
Page 17

The Home screen is the starting
App Shortcuts
point for using your device.
Customize your home screen
by adding application shortcuts,
widgets, folders, andusing
wallpapers.
Manage Home Screens
Your device comes with multiple home screens by
default, and you can add more screens. You can
also change the order of the home screens.
1. From a Home screen, pinch the screen.
– or –
Touch and hold an empty space on the screen.
2. Use these options to manage screens:
Add a screen: Scroll to the end of the
•
screens, and then tap Add.
Remove a screen: Touch and hold on a
•
screen, and then drag it to the
Remove.
You can use app shortcuts to launch an app from
any home screen.
Add a Shortcut to a Home Screen
1. From a Home screen, tap Apps.
2. Touch and hold an app shortcut, and then drag it
to a Home screen and release it.
Remove a Shortcut
1. Touch and hold a shortcut to releaseit.
2. Drag the icon to the Remove icon and then
release it.
Note: Removing a shortcut does not delete the app, it
just removes the shortcut from the home screen.
Widgets
Widgets are self-contained apps that display on a
home screen. Unlike a shortcut, a widget operates
right on the home screen. There are all kinds
of widgets, including links to a specific contact,
Internet bookmarks, Gmail and email accounts, and
many others.
Set a screen as the main home screen:
•
Tap Main Home Screen at the top of a
screen. This screen display when you press
the Home Key.
Change the order of screens: Touch and hold
•
on a screen, and then drag to a new position.
Add a Widget to the Home Screen
1. Touch and hold an empty space on the screen,
and then tap Widgets.
2. Touch and hold a widget, and then drag it to a
home screen and release.
Remove a Widget
1. From a Home screen, touch and hold a widget to
releaseit.
2. Drag the widget to the Remove icon and
releaseit.
Note: Removing a widget does not delete the widget,
it just removes the widget from the home screen.
11
Home ScreenKnow Your Device
Page 18

Folders
Change the Wallpaper
Place folders on the Home screen to organize items.
Adding Folders
1. From a Home screen, touch and hold on an app
shortcut.
2. Drag the shortcut onto
release.
Enter a folder name.
•
Tap Add to place additional apps in the
•
folder.
Tap Done on the keyboard.
•
A folder will be created with the shortcut(s)
inside.
Create folder and
Using Folders
Tap the folder to open it and access the shortcuts
•
inside.
Change the look of the home and lock screens with
wallpaper. You can display a favorite picture, or
choose from preloaded wallpapers.
1. From a Home screen, pinch the screen.
– or –
Touch and hold an empty space on the screen.
2. Tap Wallpapers, and then choose Home screen,
Lock screen, or Home and lock screens.
3. Tap a wallpaper to see a sample, and then tap
Set wallpaper.
To add shortcuts to the folder, touch and hold
•
the shortcut, and then drag it onto the folder and
release.
To delete a folder, touch and hold the folder until
•
it detaches, and then drag it to Remove and
release.
Tap More options to change the folder’s color
•
scheme.
12
Home ScreenKnow Your Device
Page 19
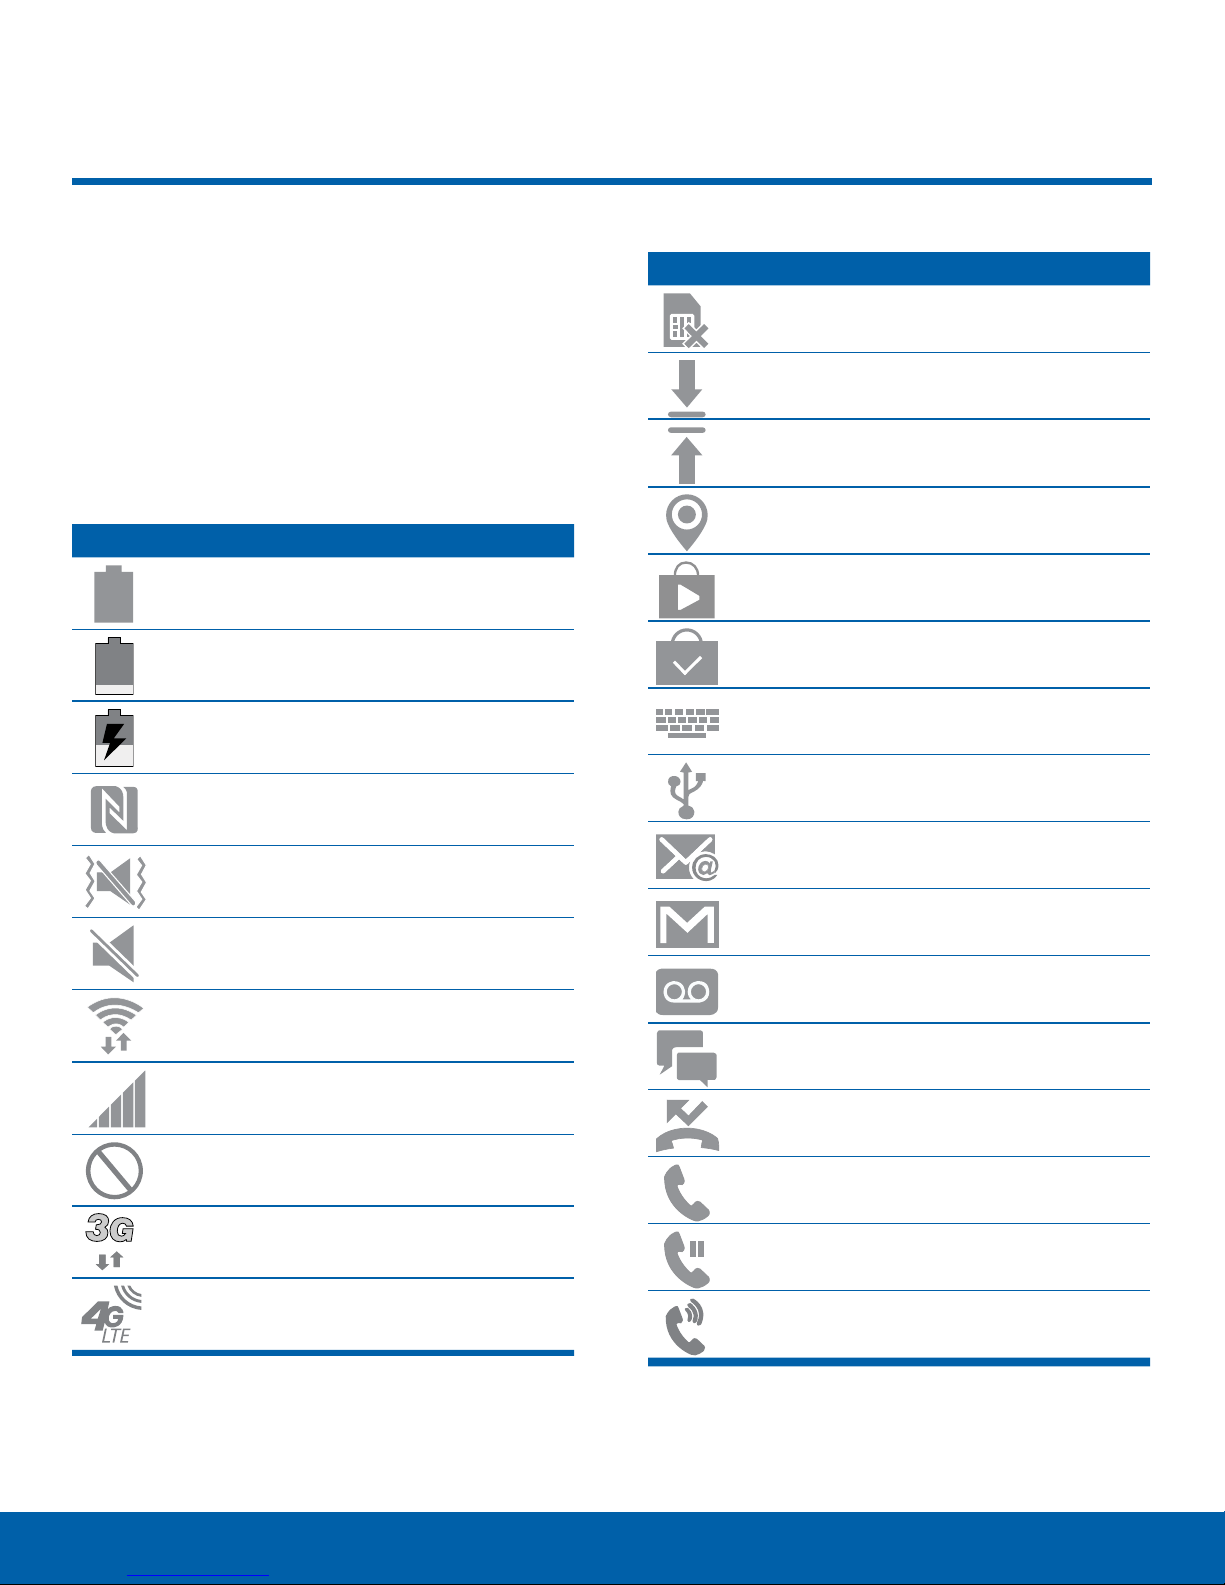
Status Bar
The Status Bar at the top of the
Home screen provides device
information (such as network
status, battery charge, and time)
on the right side and notification
alerts on the left.
Status Icons
Battery is fully charged.
Battery is low.
Battery is charging.
NFC (Near-Field Communication) is
enabled.
Vibrate mode is enabled.
Notication Icons
No SIM card is installed, or the installed
SIM card is not working.
Download of a file or app is in progress.
File is being uploaded or sent.
Location service (GPS) is active.
App updates are available from the
Google Play Store.
App updates are complete.
Keyboard is in use.
Connected to a computer using a
USBcable.
New email has arrived
Mute mode is enabled.
Wi-Fi is active.
Signal strength.
No wireless network is available.
The device is connected to a 3G wireless
network.
The device is connected to a 4G LTE
wireless network.
New Gmail has arrived.
New voicemail message has been
received.
New text or multimedia message has
arrived.
Missed call.
Call in progress.
Call is on hold.
Call is using speakerphone.
13
Status BarKnow Your Device
Page 20

Navigation, Motions, and Gestures
Touchscreen Navigation
Tap
Lightly tap items to select or launch them.
Tap the on screen keyboard to enter characters
•
ortext.
Tap an item to select it.
•
Tap an app icon to launch the application.
•
Touch and Hold
Activate onscreen items by a touch and hold
gesture. For example:
Touch and hold a widget on the Home screen to
•
move it.
Touch and hold a field to display a pop-up menu
•
of options.
Swipe or Slide
To swipe, lightly drag your finger vertically or
horizontally across the screen.
Unlock the screen.
•
Scroll through the Home screen or a menu.
•
Drag
To drag, touch and hold on an item, and then move
it to a new location.
Add a shortcut to the Home screen.
•
Move a widget on the Home screen.
•
Pinch and Spread
Pinch the screen using your thumb and forefinger, or
spread by moving your fingers apart.
Zoom in or out while viewing a picture or a
•
webpage.
Zoom in or out while taking a picture.
•
Motions and Gestures
Control your device by making specific gestures
with your hand above the device’s screen.
Enable Motions and Gestures
► From a Home screen, tap Apps > Settings
> Motions and gestures.
Direct call: Call the contact whose call log,
•
message, or contact details are currently on
the screen by bringing the device close to your
ear.
Smart alert: Your device will vibrate when you
•
pick it up to notify you about missed calls and
messages.
Mute/pause: Mute incoming calls and pause
•
playback by turning the device screen-side
down, or by covering the screen with your
hand. You can also use Smart pause, which
pauses video playback when you look away
from the screen.
Palm swipe to capture screen: Create a copy
•
of the current screen by swiping the side of
your hand across the screen, from left to right
or right to left. The screenshot is saved to the
clipboard and to the Screenshots folder in
theGallery app.
14
Navigation, Motions, and GesturesKnow Your Device
Page 21
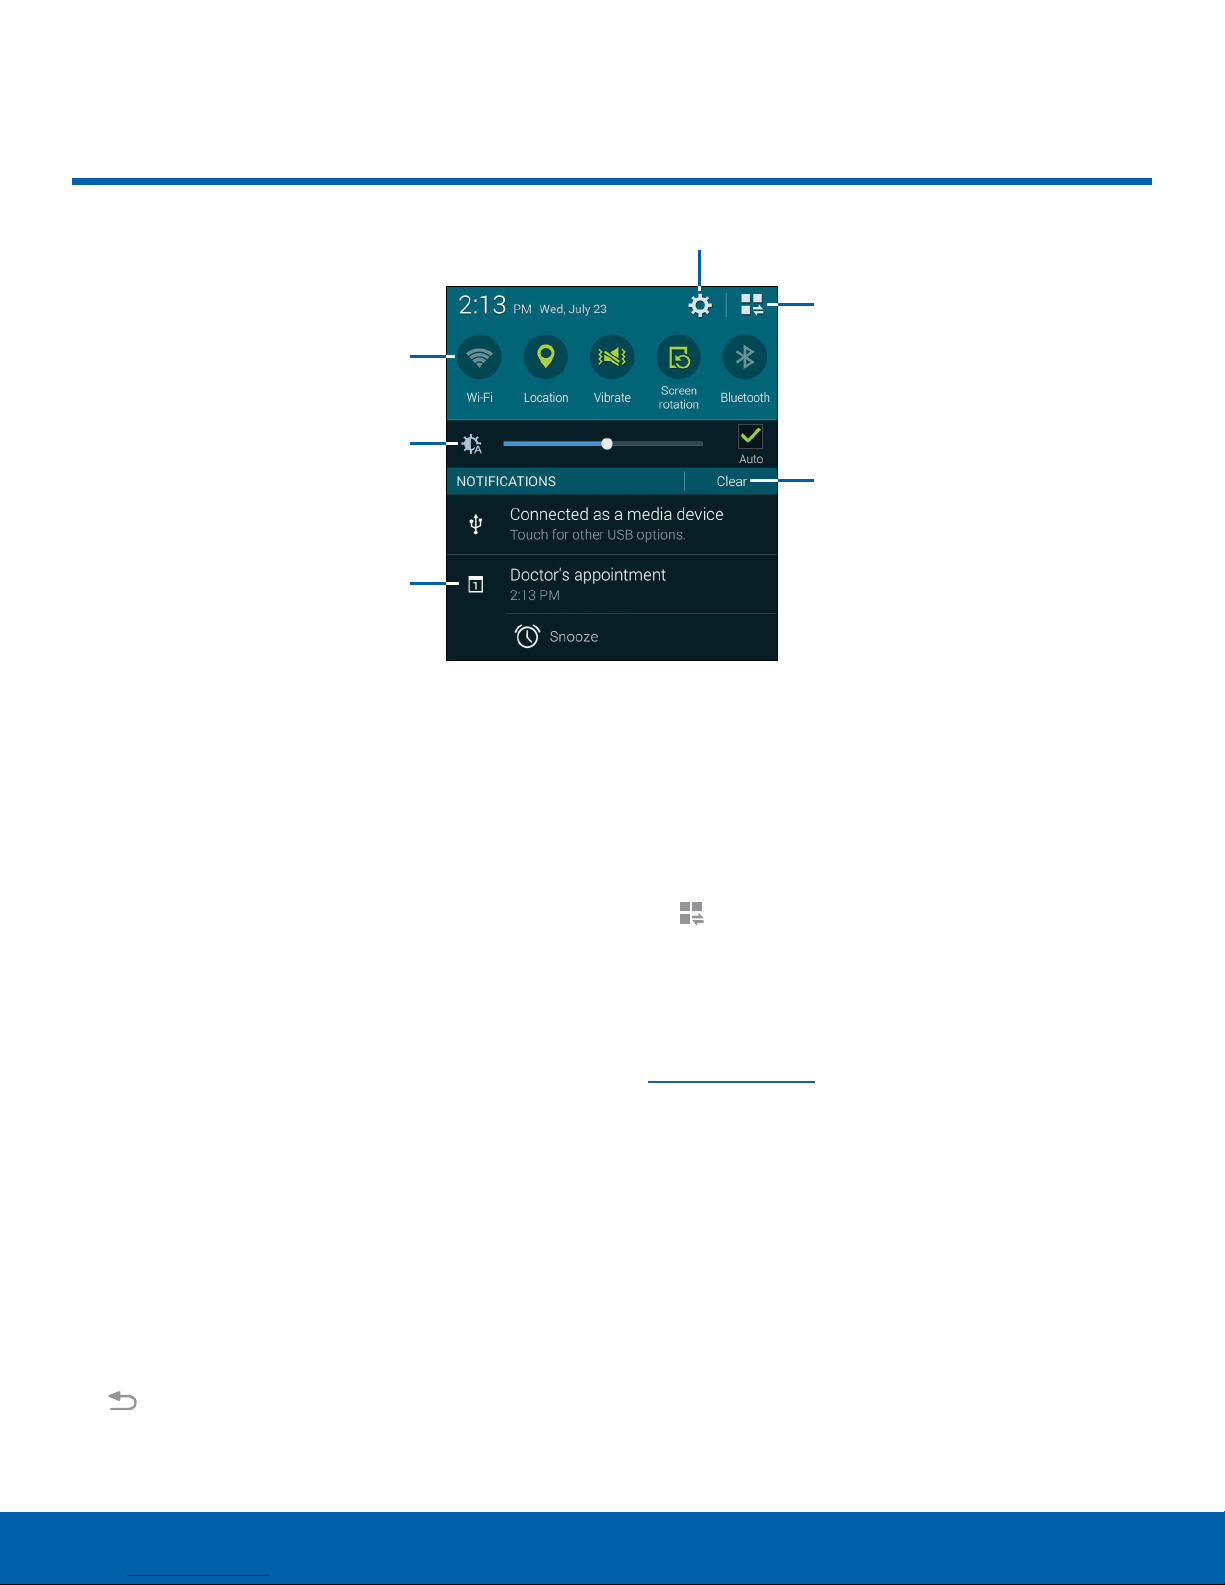
Notification Panel
Quick settings
Adjust screen
brightness
Tap notification
to launch app or
view detail
Settings
View additional
Quick settings
Clear all
notifications
Notification icons display
on the Status Bar displaying
calendar events, device status,
and more. For details about
these notifications, open the
Notification Panel.
View the Notification Panel
1. Swipe down on the Status Bar to display the
Notification Panel.
2. Scroll down the list to see notification details.
Tap an item to open it.
•
To clear a single notification, drag the
•
notification left or right. Tap Clear to clear all
notifications.
Quick Settings
In addition to notifications, the Notification Panel
also provides quick access to device functions such
as Wi-Fi, allowing you to quickly turn them on or off.
► To view additional Quick settings, tap
Viewall.
Notification Panel Settings
To customize the Notification Panel, see
Notification Panel.
3. To close the Notification Panel, swipe upward
from the bottom of the screen or press the
Backkey.
15
Notification PanelKnow Your Device
Page 22
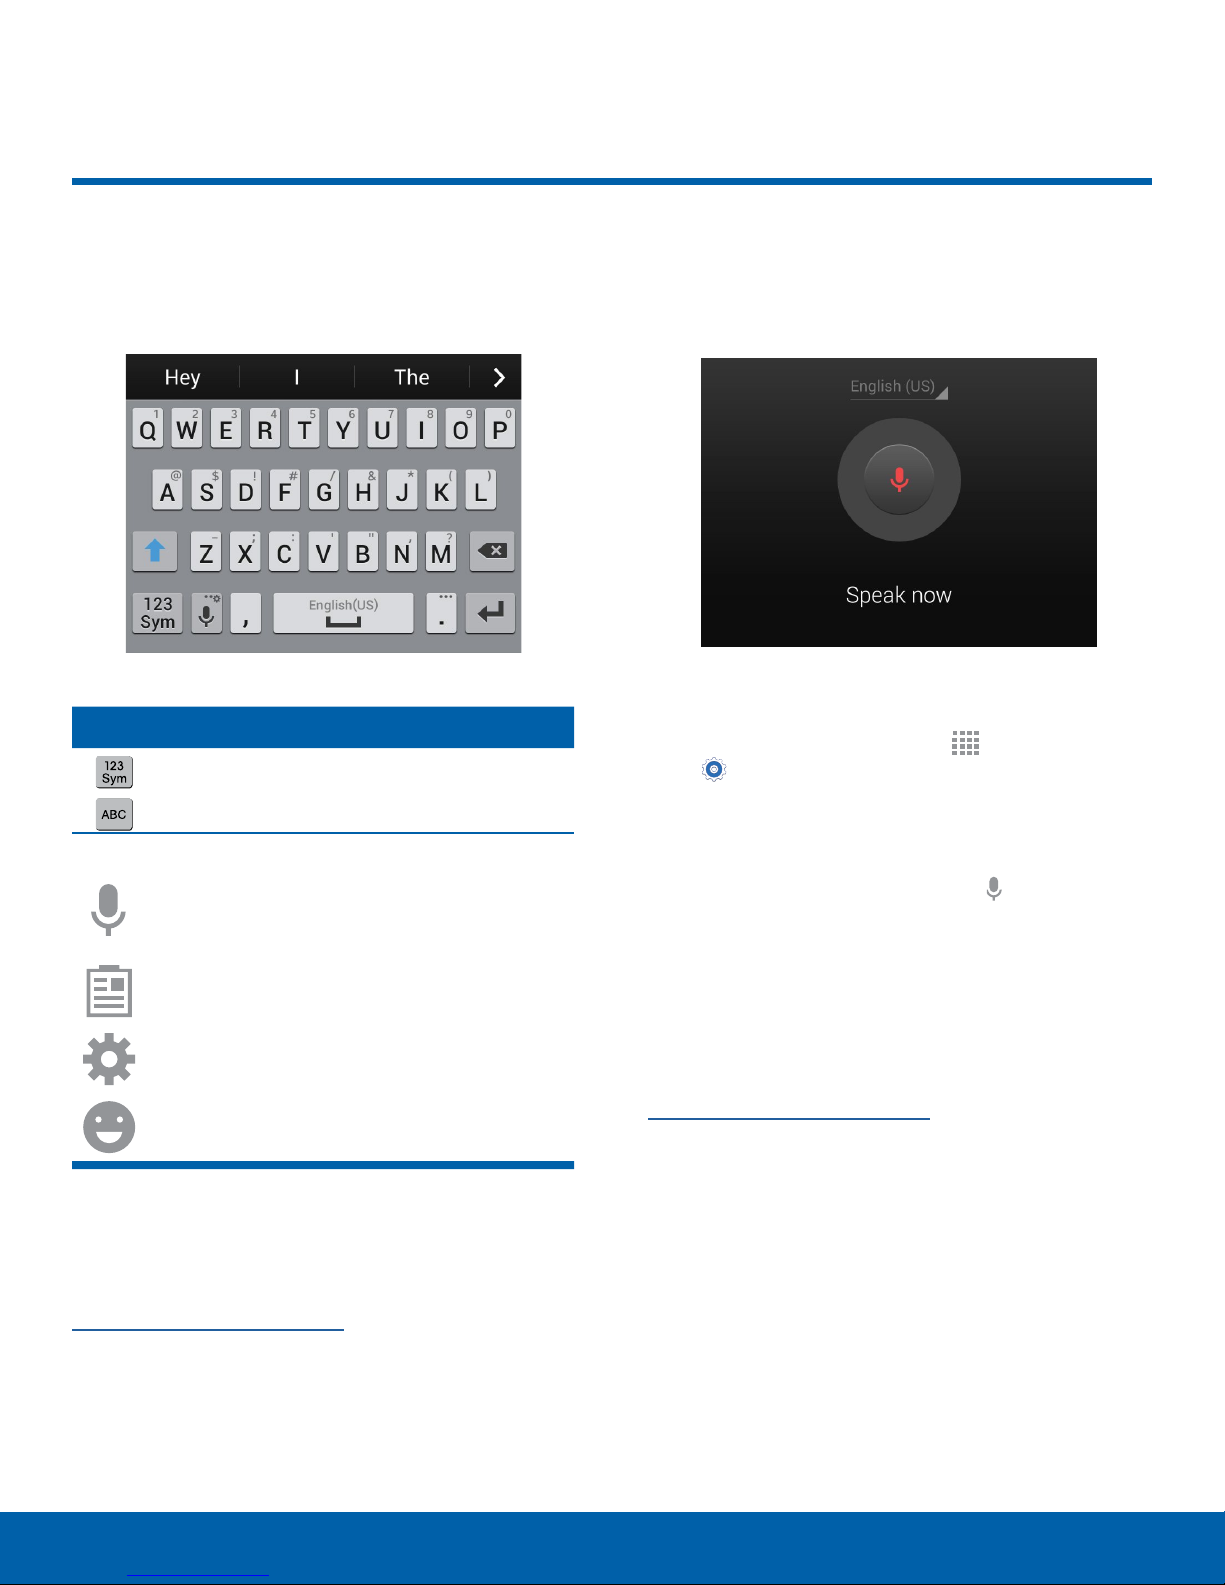
Entering Text
Using the SamsungKeyboard
Type your text input using a QWERTY keyboard.
Special Keys
Tap to switch to numbers and symbols.
Tap to switch to letters.
Touch and hold the Options key to:
Use Google Voice Typing.
Using Google Voice Typing
Instead of typing, speak your text input.
1. To enable Google Voice Typing:
From a Home screen, tap Apps >
•
Settings.
Tap the check box next to Google voice
•
typing to enable this feature.
2. On the Samsung Keyboard, tap
Type. You may need to touch and hold the
Options key (left of the Space key) to find it.
Google Voice
Access the clipboard.
Access keyboard settings.
Insert emoticons.
Configure the Samsung Keyboard
To customize the Samsung Keyboard, see
Samsung Keyboard Settings.
3. Speak your text.
Configure Google Voice Typing
To customize Google Voice Typing, see
Google Voice Typing Settings.
16
Entering TextKnow Your Device
Page 23
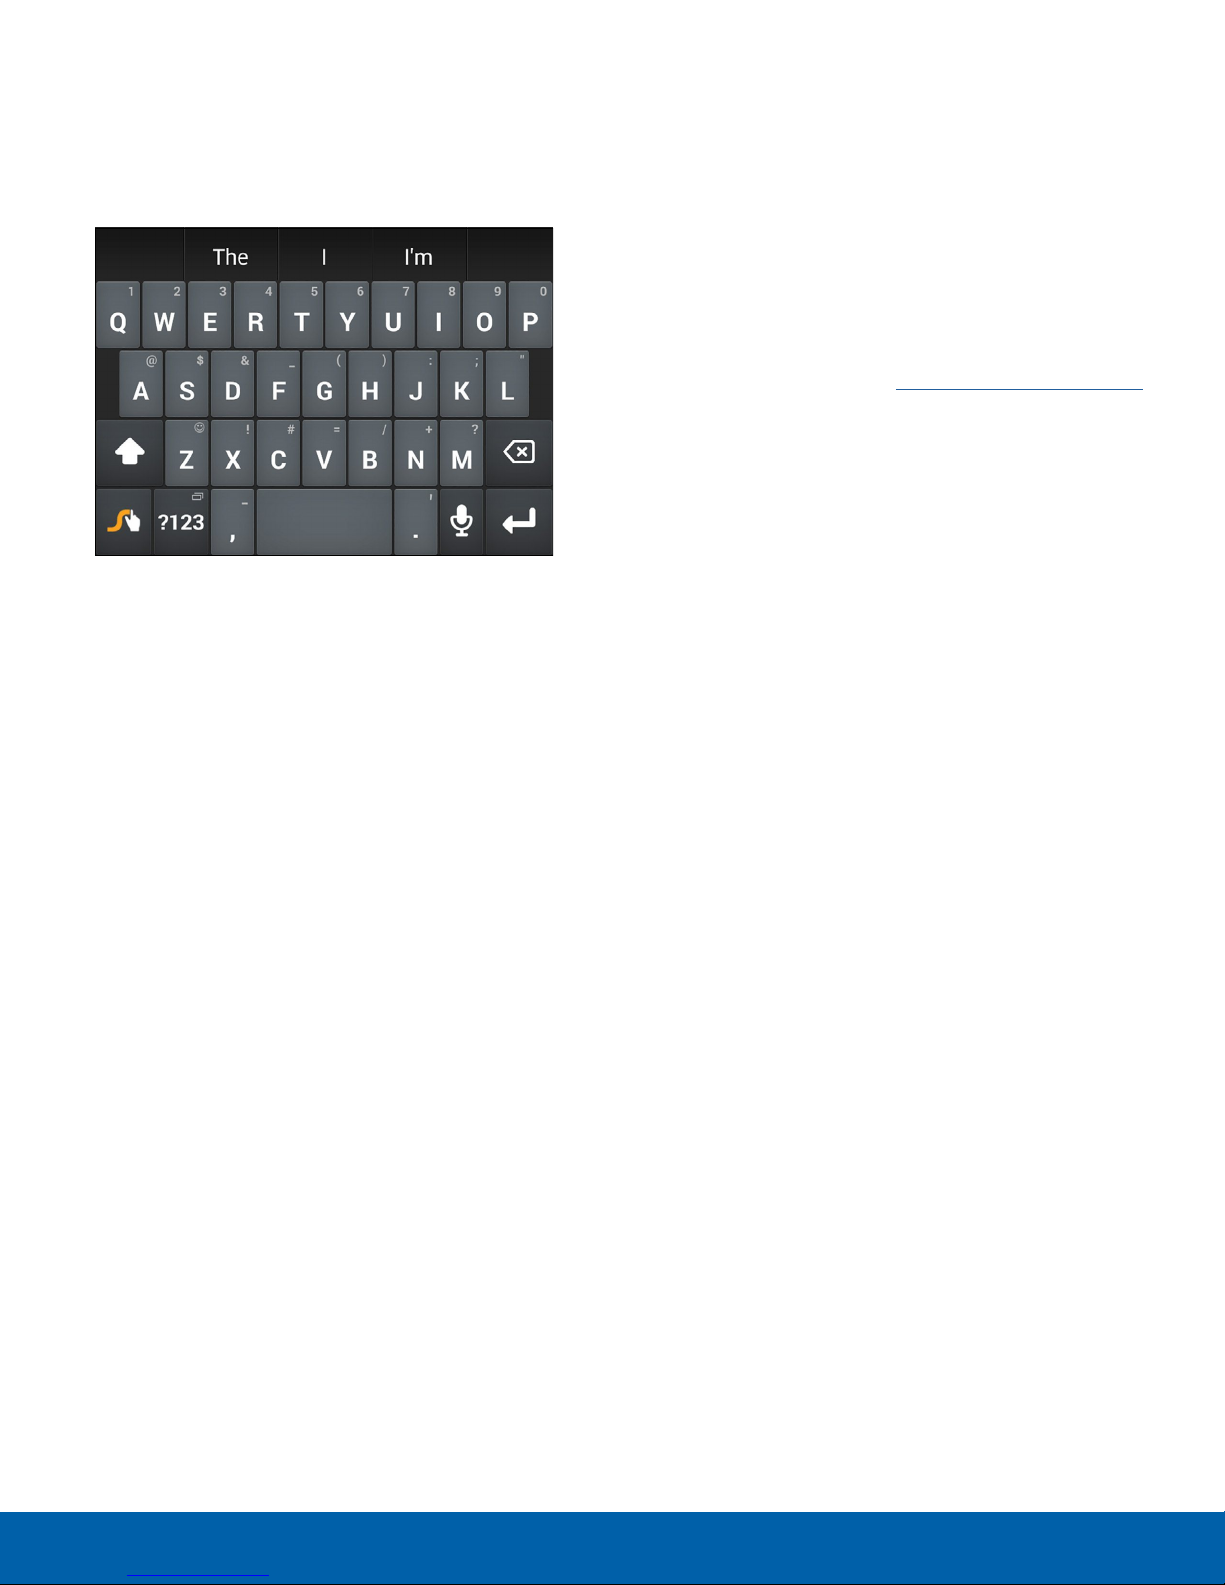
Using Swype
Swype is a text input method that makes it possible
to enter a word by sliding your finger or stylus from
letter to letter, lifting your finger between words.
Enabling and Configuring Swype
To enable the Swype keyboard while entering text:
1. Touch the top of the screen and swipe downward
to display the Notification Panel.
2. Touch Choose input method.
3. Touch Swype.
Configure Swype
To customize Swype, see Swype Keyboard Settings.
17
Entering TextKnow Your Device
Page 24

Calling
Make telephone calls using a
variety of calling features and
services.
Page 25
Calling
Learn how to make or answer
a call. Explore features and
functionality associated with
making or answering a call.
Make a Call
1. From a Home screen, tap Phone.
2. Enter a number and tap
Quickly Dial a Number from
YourContactList
1. From a Home screen, tap Apps >
Contacts.
2. While viewing your contact list, swipe your finger
across a contact to the right to call the contact.
Dial a Recent Number
All incoming, outgoing and missed calls are
recorded in the Call log. If the number or caller is
listed in your contacts list, the associated name is
also displayed.
1. From a Home screen, tap
2. Tap the Logs tab. A list of recent calls is
displayed.
Dial.
Phone.
Answer a Call
When a call is received the phone rings and
displays the caller’s phone number, or name if
stored in the contacts list.
1. At the incoming call screen:
Touch and drag Answer in any direction to
-
answer the call.
Touch and drag Reject in any direction to
-
reject the call and send it to your voicemail.
2. Tap
Multitasking While on a Call
If you exit the call screen and return to a Home
screen, your active call is indicated by an icon on
the Status bar.
This lets you continue with your current call and do
something else, such as access the contacts list,
view a recent email, locate a picture, and so on.
► Tap the reactivate button to return to the
callscreen.
– or –
To end a call from any application, swipe the
Status bar downward to reveal the Notifications
panel, and then tap
Endcall.
End call.
3. Tap a contact, and then tap
Dial.
End a Call
► When you are ready to end your call, tap
Endcall.
19
CallingCalling
Page 26

Options During a Call
Your phone provides a number of functions that you
can use during a call.
Adjusting the Call Volume
► Press the Volume key to increase or decrease
the volume.
– or –
Quickly add more volume to the incoming audio
by tapping
Listen with the Speaker or
BluetoothHeadset
Listen to the call using the speaker or through a
Bluetoothheadset (not included).
► Press Speaker to hear the caller using the
speaker.
– or –
More options > Extra volume.
Call Waiting
If your service plan supports this feature, you can
answer an incoming call while you have a call in
progress. You are notified of an incoming call by a
call waiting tone.
To answer a new call while you have a call in
progress:
1. Slide
new call. Tap an option:
-
-
2. Tap the previous On hold number entry and
select Swap to switch between the two calls.
This places the new caller on hold and activates
the previous call.
Answer in any direction to answer the
Putting [Caller] on hold to place the previous
caller on hold while you answer the new
incoming call.
Ending call with [Caller] to end the previous
call and answer the new call.
Press Bluetooth to use a Bluetooth headset
(notincluded).
Personalize the Call Sound Setting
Adjust the sound by using an audio equalizer.
► From the currently active call, tap
Moreoptions > Personalize call sound.
Place a New Call While in a Call
If your service plan supports this feature, you can
make another call while a call is in progress.
1. From the active call, tap Add call to dial the
second call. The first call is displayed as a
thumbnail.
2. Dial the new number and tap
Tap Swap to switch between the two calls.
-
Tap Merge to hear both callers at once
-
(multiconferencing).
Dial.
Call Log
The numbers of the calls you have dialed, received,
or missed are stored in the Call log.
1. From a Home screen, tap
2. Tap the Logs tab. A list of recent calls is
displayed. If the caller is in your contacts list,
their name is displayed.
Save a Recent Call to Your Contacts List
1. From a Home screen, tap Phone > Logs tab.
2. Tap the call you want to save add to your
contacts list.
3. Tap Create contact.
– or –
If you want to replace the number for an existing
contact, tap Update existing.
Phone.
20
CallingCalling
Page 27
Delete a Call from the Call Log
1. From a Home screen, tap Phone > Logs tab.
2. Touch and hold the call you want to delete from
the Call log.
3. Tap
Delete.
Add a Call to the Reject List
By adding a caller to your Reject list, future calls
from this number will be sent directly to your
voicemail.
1. From a Home screen, tap
2. Touch and hold the caller you want to add to the
Reject list.
Phone > Logs.
Make an Emergency Call without a
SIMCard
Without a SIM card, you can make an emergency
call with the phone. However, normal cell phone
service is not available.
Note: Access to the call function depends on the
level of security configured for the Lock screen. The
possible situations are explained below. For more
information, see Lock Screen.
1. If the phone has a secure Lock screen
configured (like Pattern, PIN, Password, or
Fingerprint), then touch and drag the
Emergency Call icon across the Lock screen.
– or –
3. Tap
More options > Add to Auto reject list.
Make a Call Using Speed Dial
You can assign a shortcut number to a contact for
speed dialing their default number.
► To make a call using Speed Dial, tap
> Keypad and enter the speed dial number, hold
down on the last digit.
Create a Speed Dial
1. From a Home screen, tap Apps >
Contacts.
2. Tap
More options > Speed dial. The Speed
dial screen displays showing the numbers
1 through 100 (Number 1 is reserved for
voicemail).
Tap an unused number to assign it to a
-
contact’s default phone number.
To remove a speed dial number assignment,
-
tap Remove.
Phone
If the phone does not have a secure Lock screen
configured (like Swipe or None), then navigate to
the Home screen and tap
2. Enter 911 and tap
3. Complete your call. During this type of call, you
will have access to the Speaker mode, Keypad,
and End Call features.
4. Tap
Endcall.
Dial.
Phone.
Make an Emergency Call with a SIM Card
1. From a Home screen, tap Phone.
2. Enter 911 and tap
3. Complete your call. During this type of call, you
will have access to the Speaker mode, Keypad,
and End Call features.
4. Tap
Endcall.
Dial.
Call Settings
To access the Call settings menu:
Make an Emergency Call
The Emergency calling mode makes redialing an
emergency number a 1-tap process.
Note: This mode can drain your battery power more
rapidly than normal calling mode.
21
► From a Home screen, tap
Moreoptions > Settings > Call.
– or –
From a Home screen, tap
Call.
Phone >
Apps > Settings >
CallingCalling
Page 28

Applications
The Apps screen displays all
applications installed on your
device, both preloaded apps
and apps you download and
install yourself.
Learn how to change the way
apps appear, organize apps
into folders, and uninstall or
disable apps.
Page 29

Apps Screen
The Apps screen shows all
preloaded apps and apps that
you downloaded. You can
uninstall, disable, or hide apps
from view.
Shortcuts to app can be placed on any of the Home
screens. For more information, see Add a Shortcut
to a Home Screen.
Accessing Applications
1. From a Home screen, tap Apps.
2. Tap an application’s icon to launch it.
3. To return to the main Home screen, press the
Home key.
Uninstall or Disable Apps
You can uninstall or disable apps you download and
install.
Preloaded apps cannot be uninstalled.
•
Apps that are disabled are turned off and hidden
•
from view.
1. From a Home screen, tap
2. Tap
3. Tap
More options > Uninstall/disable apps.
Apps that can be uninstalled or disabled have a
Delete symbol appear on their icon.
Delete and follow the prompts to either
uninstall or disable the app.
Apps.
Organize Your Apps
The Apps icons can be organized in folders and
listed alphabetically or in your own custom order.
Download and Install NewApps
Find new apps to download and install on your
device:
Google Play Store: Download new apps from
•
the Google Play Store.
Visit play.google.com/store/apps to learn more.
Samsung Apps: Download apps specifically
•
designed for your Samsung device.
Visit apps.samsung.com to learn more.
Change the Order Apps Are Listed
1. From a Home screen, tap Apps.
2. Tap
3. Tap an option:
More options > View type.
Customizable grid: The default view, which
-
allows you to touch and hold on apps to move
them from screen to screen.
Alphabetical grid: Icons are arranged in a
-
grid, in A-Z order.
23
Apps ScreenApplications
Page 30

Use Folders to Organize Apps
1. From a Home screen, tap Apps.
2. Tap
3. Enter a folder name.
4. Tap
More options > Create folder.
Add, select apps to include in the folder,
and then tap Done.
Touch a folder to view its apps. Touch an app
-
to launch it.
Touch More options to select a background
-
color for the folder.
Apps Screen Options
1. From a Home screen, tap Apps.
2. Tap
More options for these options:
Edit: Touch and hold an app icon, and then
-
drag it to one of the following icons:
Create folder: Create a new folder.
-
Create page: Create a new apps screen
-
and place the icon on it. This only appears
in Customizable grid view.
App info: View information about this app.
-
Hide Apps from View
You can hide (rather than uninstall or disable) any
apps you do not wish to see on the App screen.
1. From a Home screen, tap
2. Tap
3. Tap apps to hide, and then tap Done.
More options > Hide apps.
Apps.
Show Hidden Apps
You can unhide apps you have hidden and put them
back on the App screen.
1. From a Home screen, tap
2. Tap
3. Tap apps to unhide, and then tap Done.
More options > Hidden apps.
Apps.
Disable or Delete: Remove the app.
-
Preloaded apps are disabled. Downloaded
apps are uninstalled.
Create folder: Create a new folder to hold the
-
app icon.
View type: Configure the apps screen.
-
Uninstall/disable apps: Uninstall an app that
-
you downloaded to your device, or disable
a preloaded app (preloaded apps cannot be
uninstalled). Touch
disable the selected app.
Hide apps: Hide apps from the Apps screen.
-
Show disabled apps: Display disabled apps.
-
Show hidden apps: Display hidden apps.
-
GALAXY Essentials: View and download
-
Samsung apps that are optimized for use with
GALAXY devices.
Delete to remove or
24
Help: View information about your device.
-
Apps ScreenApplications
Page 31
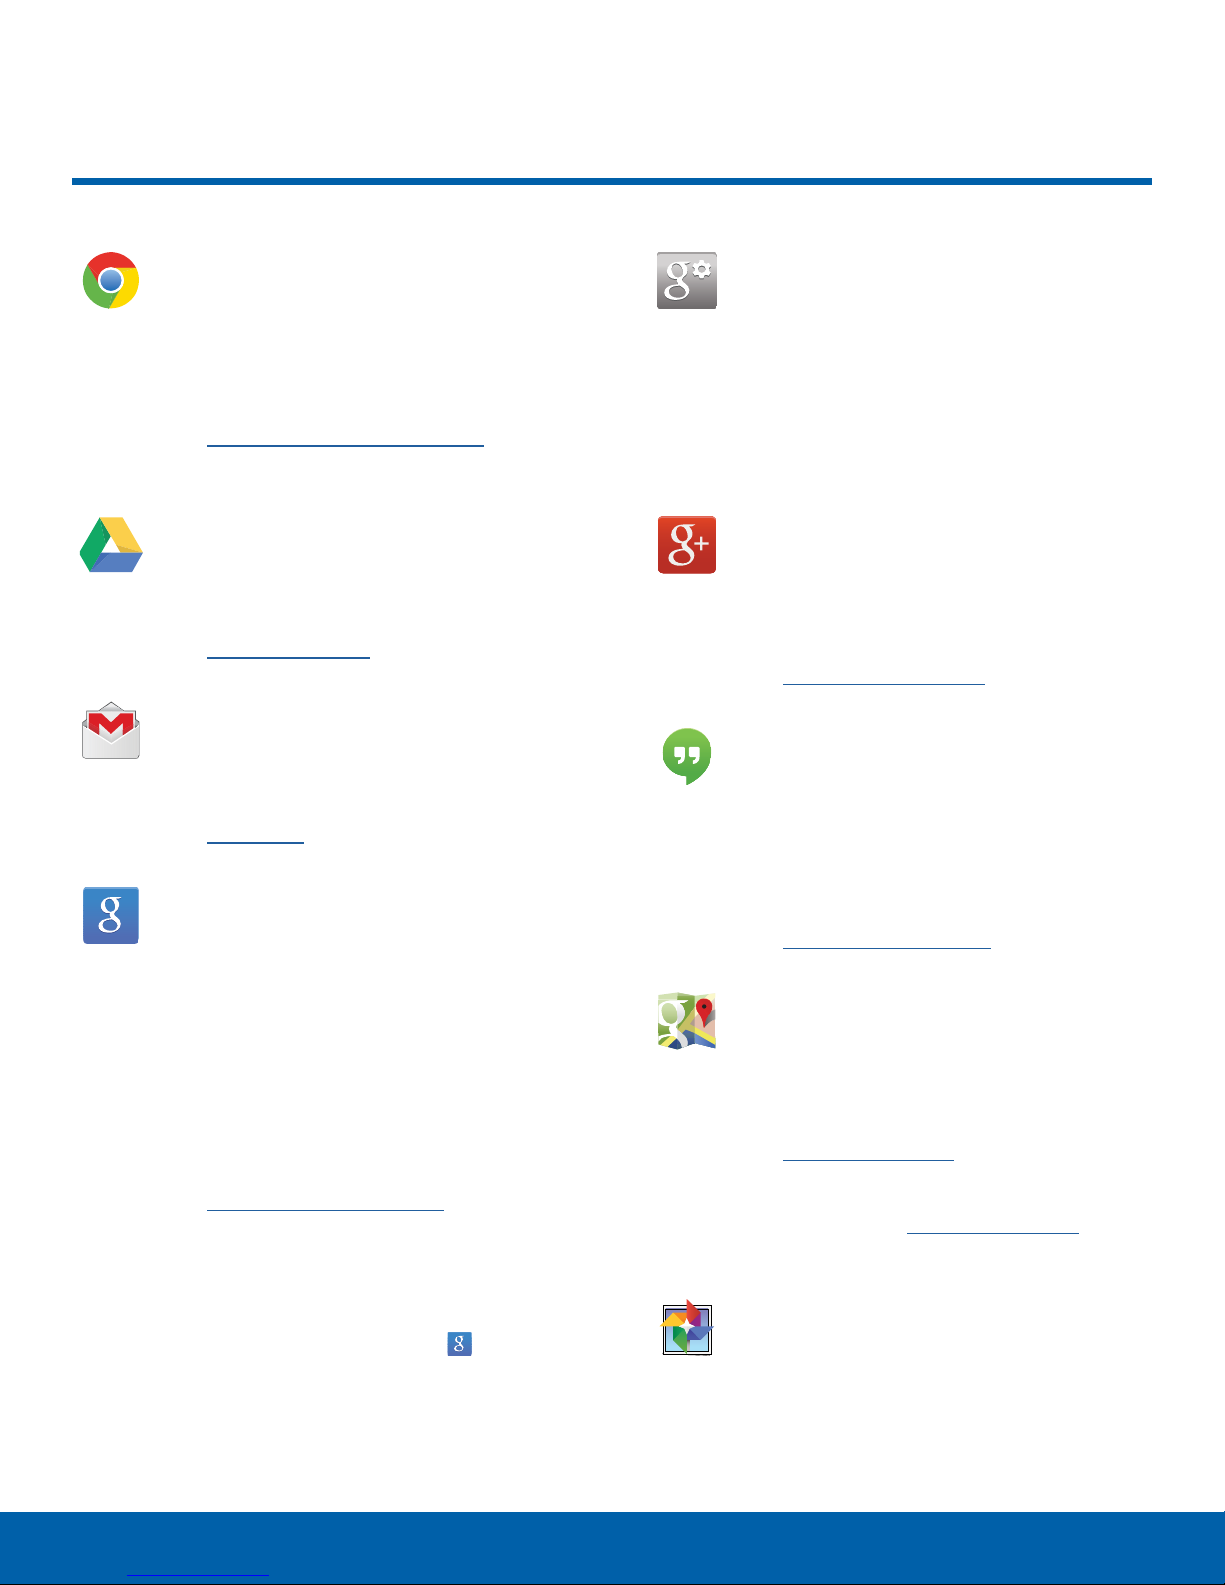
Google Applications
Chrome
Use Google Chrome to browse the
Internet and bring your open tabs,
bookmarks and address bar data from
your computer to your mobile device.
Visit google.com/chrome/browser to learn
more.
Drive
Open, view, rename, and share your
Google Docs and files.
Visit drive.google.com to learn more.
Gmail
Send and receive email with Gmail,
Google’s web-based email service.
Visit gmail.com to learn more.
Google
Google Settings
Quickly and easily change Google app
settings to suit your preferences.
Note: You must be signed in to the
application you want to configure. For
example, sign in to Google+ to configure
Google+ settings.
Google+
Stay connected and share with Google+.
Chat with friends and family, post photos,
and see what others are sharing.
Visit google.com/mobile/+ to learn more.
Hangouts
Hangouts is an online place to meet
friends and family, share photos, and
host video calls. Conversation logs are
automatically saved to a Chats area in
your Gmail account.
Search not only the Internet, but also the
apps and contents of your device.
Google Now
Google Now works in the background to
collect information you regularly look up
and organize it into convenient cards that
appear when you need them.
Visit google.com/landing/now to learn
more.
► Press and hold the Home key.
Note: When Google Now is enabled, you
can also access it by touching
.
Visit google.com/hangouts to learn more.
Maps
Use Google Maps to find your current
location, get directions, and other
location-based information.
Visit google.com/maps to learn more.
You must enable location services to use
Maps. Please see Location Services.
Photos
This application automatically backs
up your photos and videos to a secure
Google cloud location.
25
Google ApplicationsApplications
Page 32
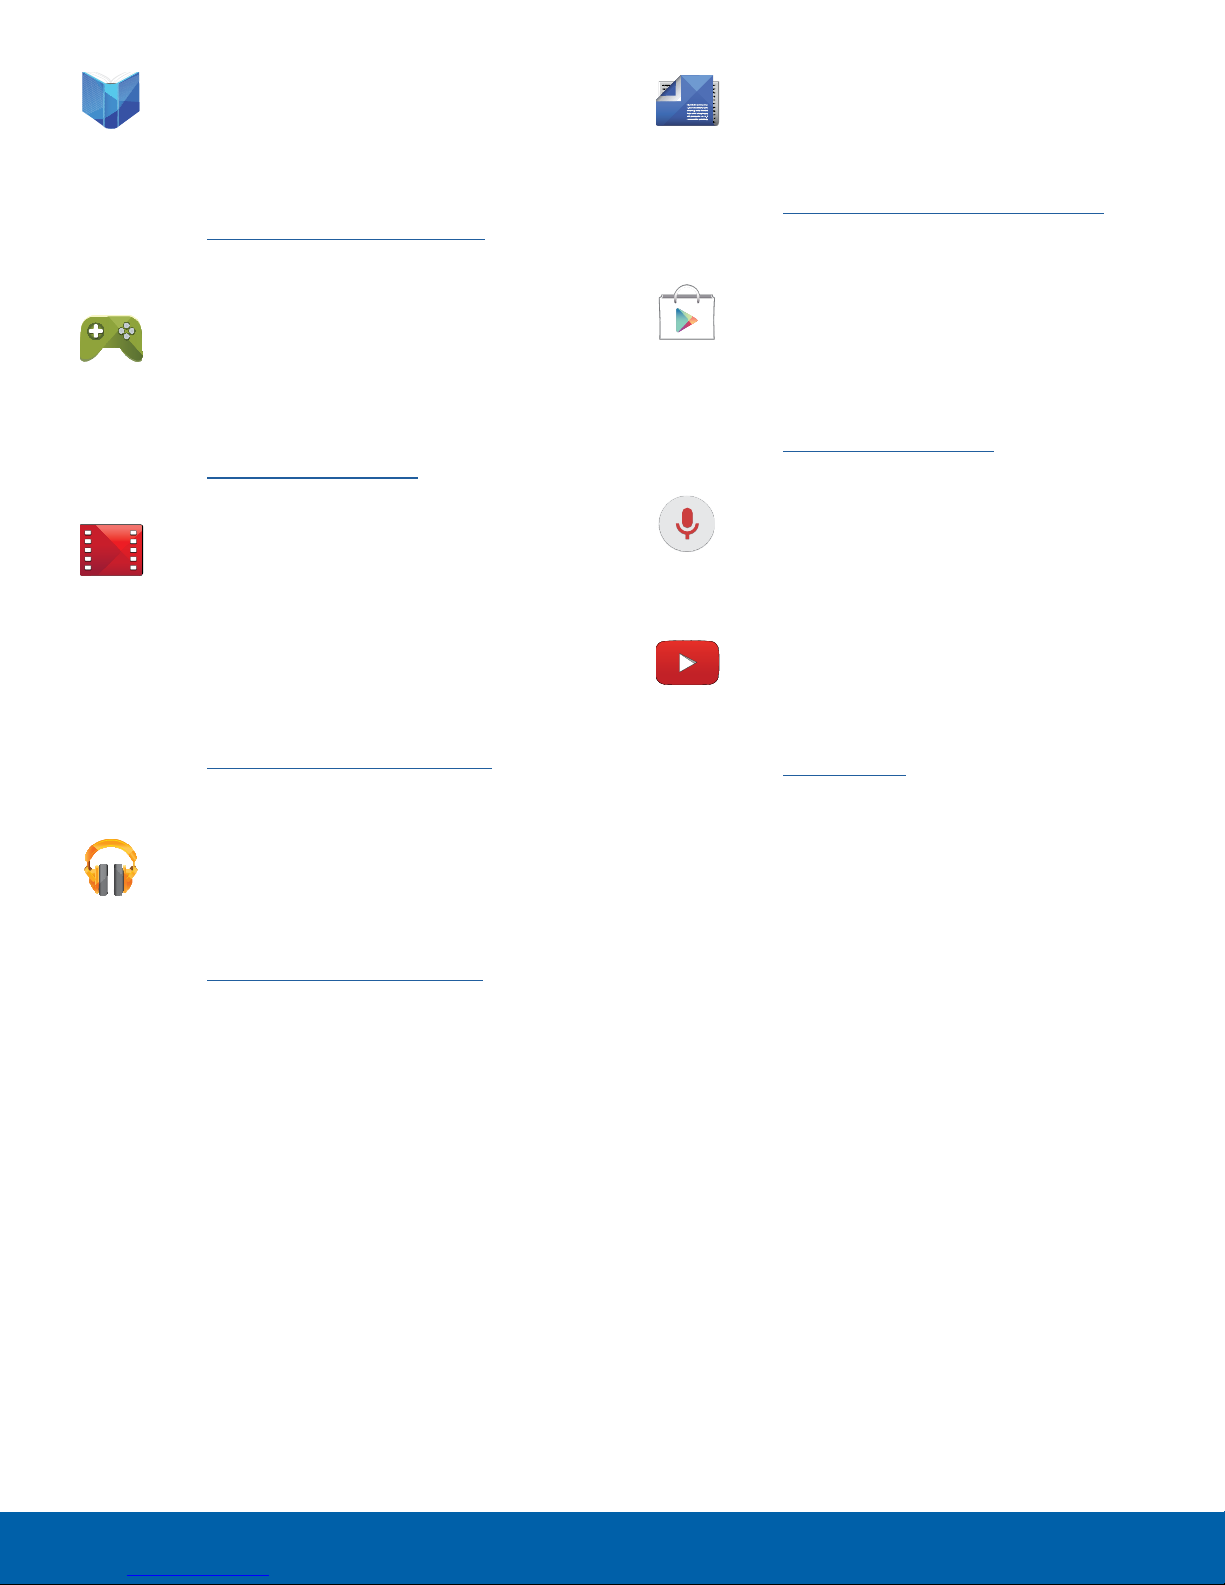
Play Books
Play Newsstand
With Google Play Books, you can find
millions of free e-books and hundreds of
thousands more to buy in the eBookstore.
Visit play.google.com/store/books to learn
more.
Play Games
Discover hundreds of games for download
and purchase through the Google Play
Store.
Visit play.google.com/store to learn more.
Play Movies & TV
Watch movies and TV shows purchased
from Google Play. You can stream them
instantly, or download them for viewing
when you are not connected to the
Internet. You can also view videos saved
on your device.
Subscribe to your favorite magazines to
read on your device at your leisure.
Visit play.google.com/store/newsstand to
learn more.
PlayStore
Find new apps, movies and TV shows,
books, magazines, and games in Google
Play Store.
Visit play.google.com/store to learn more.
Voice Search
Use voice commands to search the web
with Google.
YouTube
View and upload YouTube videos right
from your device.
Visit play.google.com/store/movies to
learn more.
Play Music
With Google Play Music, you can play
music and audio files on your device.
Visit play.google.com/store/music to learn
more.
Visit youtube.com to learn more.
26
Google ApplicationsApplications
Page 33
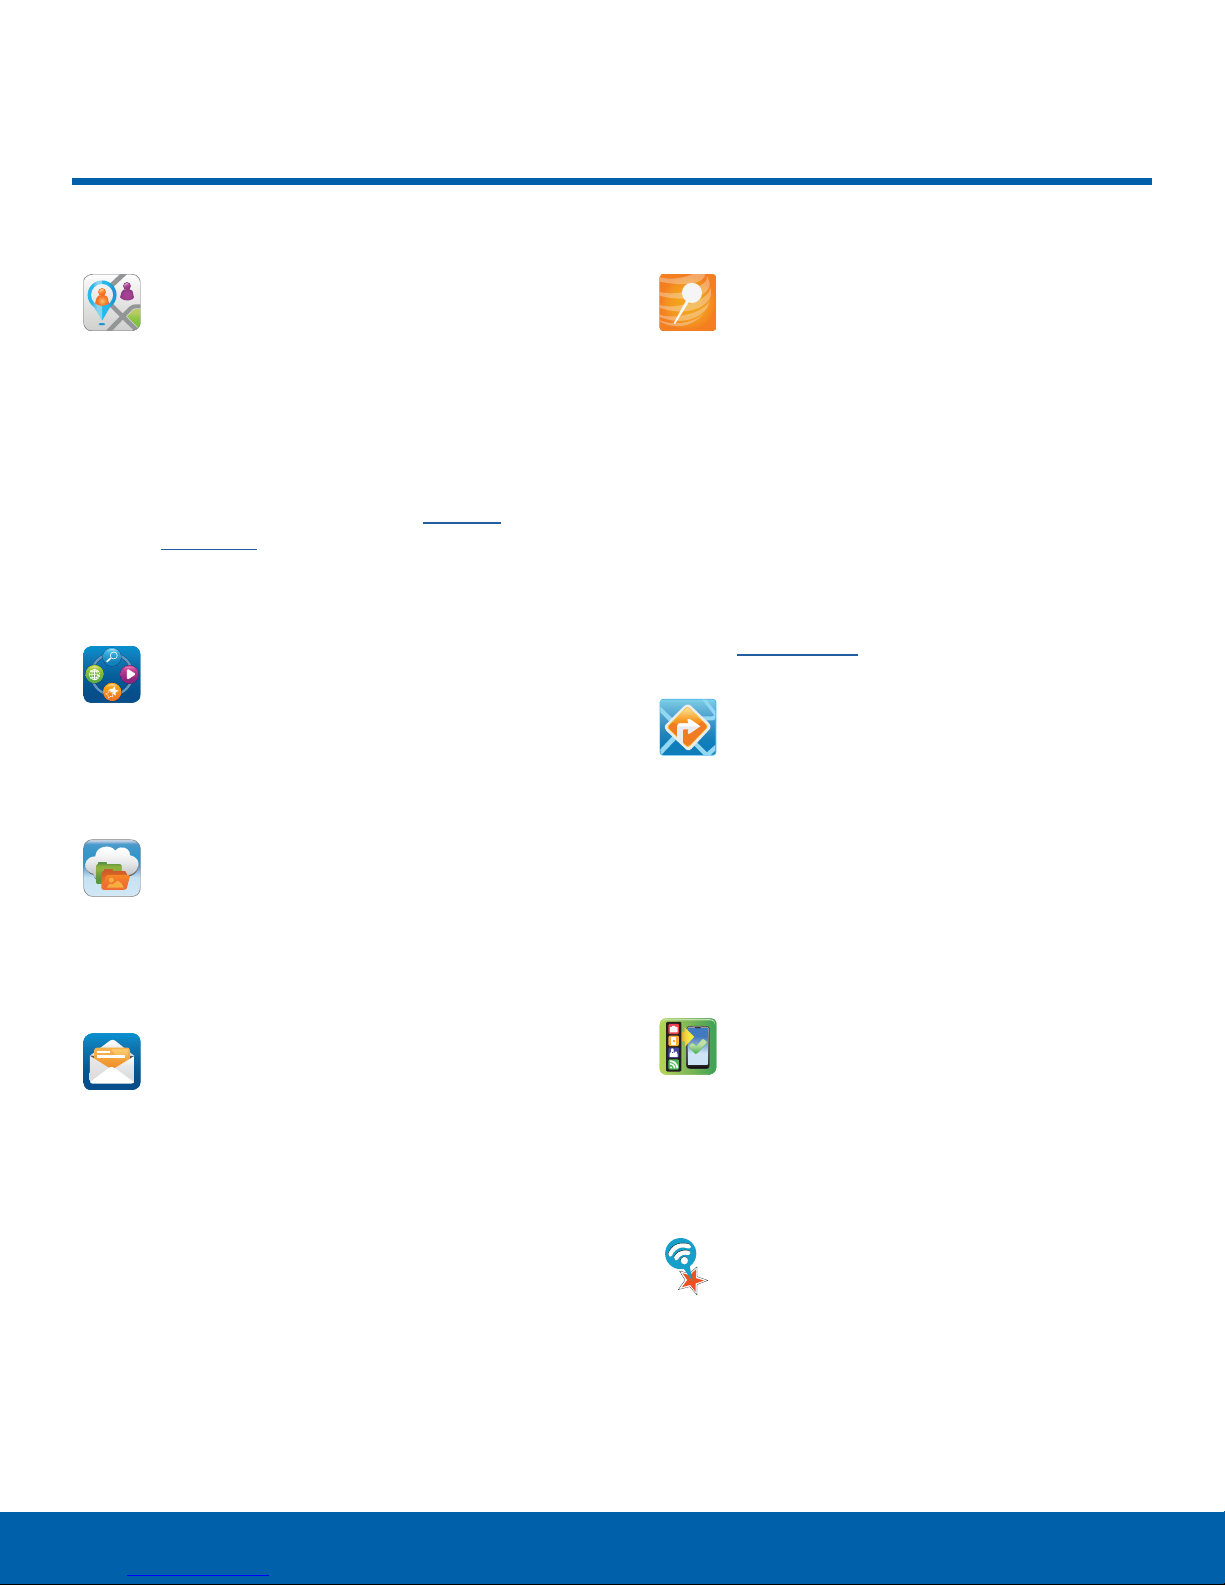
AT&T Applications
AT&T FamilyMap
AT&T FamilyMap provides peace of mind
by being able to conveniently locate a
family member from your wireless phone
or PC and know that your family’s location
information is secure and private.
FamilyMap requires a paid subscription.
To sign up for service, visit att.com/
familymap for more information or
contact your AT&T Customer Service
Representative.
AT&T Live
The AT&T Live application is your
personalized news source. Just start
reading and your news stream will be
tailored to focus on the articles you love.
AT&T Locker
AT&T Mobile Locate
With the AT&T Mobile Locate app you can
access the Mobile Protection Pack and
with a paid subscription, replace your
phone if it is lost or damaged, locate your
phone if it is lost, and receive backup and
phone support.
In order to take advantage of the AT&T
Mobile Locate application, you must
purchase the Mobile Protection Pack
within 30 days of purchase/activation of a
new device. For more information, visit
att.com/mpp.
AT&T Navigator
AT&T Navigator provides you with access
to real-time GPS-driven applications.
These programs not only allow you to
achieve turn-by-turn navigation, but also
access local searches.
AT&T Locker allows you to store, share,
and sync all of your photos, videos, and
documents in one safe, convenient place:
the AT&T cloud.
AT&T Mail
Instantly get your mail anytime, anywhere.
Read, respond to, and organize your
messages quickly, whether you are at
home or on the go.
Note: You must have a data plan to use
this feature. These services require the
purchase of a subscription.
AT&T Ready2Go
AT&T Ready2Go allows you to quickly and
easily setup your phone by using the web
browser on your PC. You can set-up email
accounts, import contacts, set wallpaper,
configure Wi-Fi and many more features.
AT&T Smart Wi-Fi
With AT&T Smart Wi-Fi, you can maximize
your battery performance, maximize your
data, simplify access to AT&T Hot Spots
and Wi-Fi networks, automate your Wi-Fi
connections, and track your data use.
27
AT&T ApplicationsApplications
Page 34
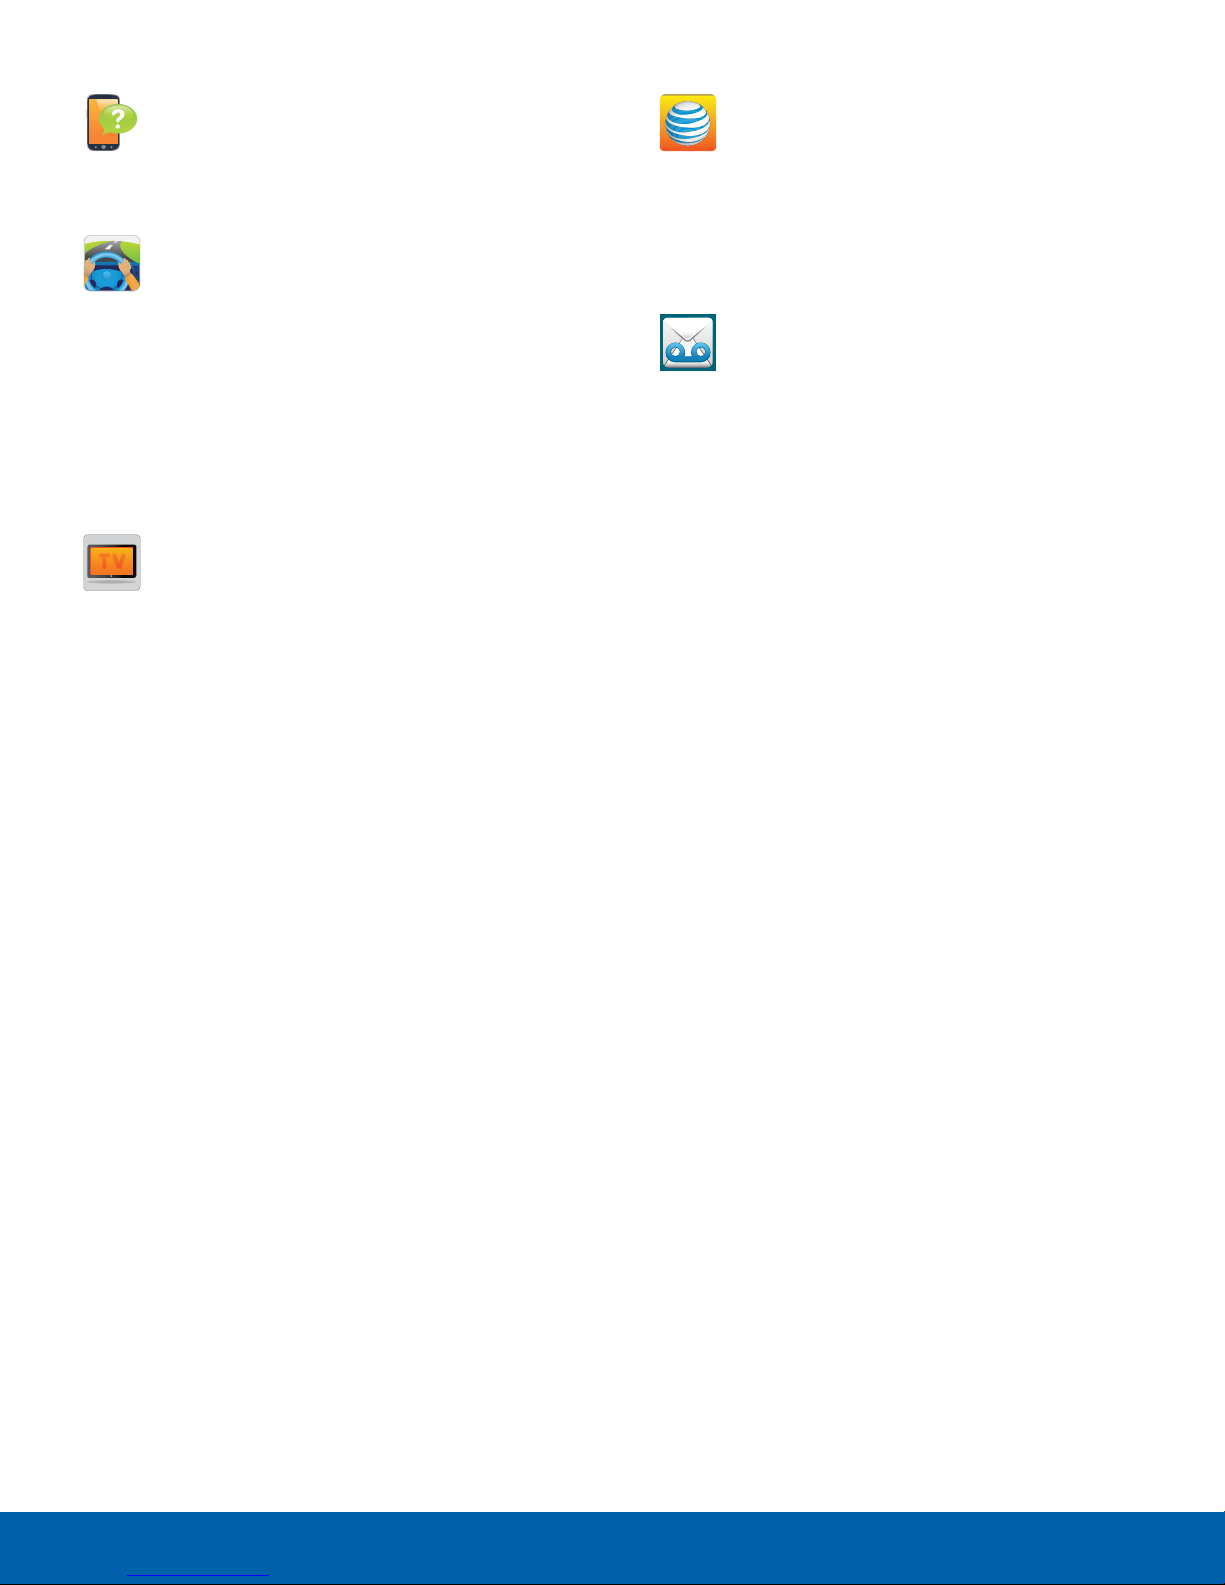
Device Help
myAT&T
Device Help provides online information to
help with your device questions.
DriveMode
With the AT&T DriveMode application, you
can set your phone to auto reply when
you are driving and do not want to answer
the phone. You can set auto reply to
Messages, Emails, and Phone Calls. You
can also allow up to five of your contacts
to contact you while you are in Drive
mode.
Mobile TV
Mobile TV is a subscription service that
allows you to watch your favorite TV
shows using your handset.
Note: This feature requires a paid
subscription. See your AT&T Customer
Service Representative for more
information.
The myAT&T application allows you to
manage your own AT&T account. You can
review and pay your bill, check minutes
and data usage, upgrade to a new device,
or change your rate plan.
Visual Voicemail
Use Visual Voicemail to review and
manage your voicemail messages directly
from your phone without dialing into
voicemail. You can also see a list of your
messages on your phone and select
which ones you want to play, call back,
share, delete, or save.
28
AT&T ApplicationsApplications
Page 35
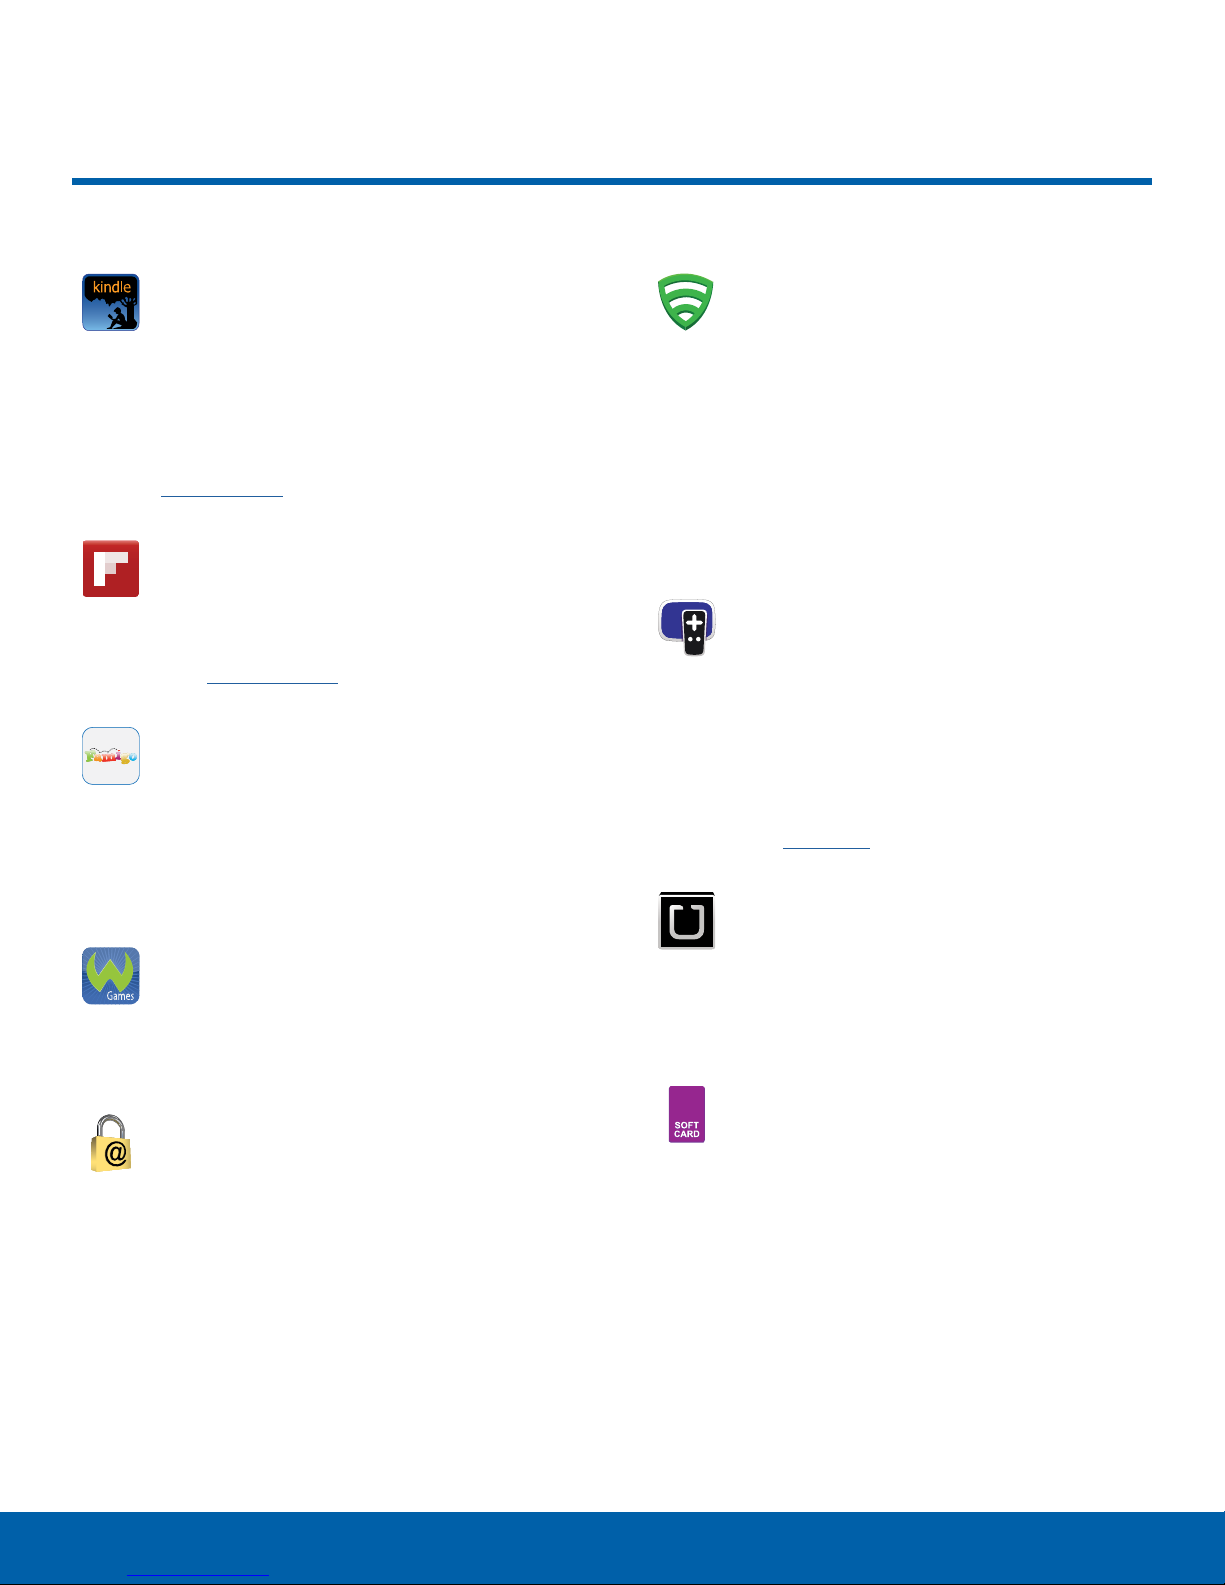
Other Applications
Amazon Kindle
Use the Amazon Kindle application to
download books for reading, right on your
device.
You must be registered with Amazon to
use the Kindle application. Visit
Amazon.com to learn more.
Flipboard
Use this application to access your
personalized magazines.
Visit flipboard.com to learn more.
For Kids!
Famigo creates a safe and fun mobile
environment for your kids by blocking
ads, social networking, and unsafe apps.
Famigo also provides recommendations
for kid-safe apps and content.
Lookout
Lookout Security provides mobile devicespecific security features that are coupled
with a minimal performance hit. Lookout
Mobile Security provides key security
options that are unique to the mobile
market. Along with the antivirus and antimalware tech, there’s a lost and stolen
phone locater service, an application
privacy adviser, and a backup service.
Smart Remote
Discover and control your TV’s
programming right from your device. You
can control your entertainment system
with gestures from your device. Peel
Smart Remote also suggests TV shows for
you based on what you watch and like.
Visit peel.com to learn more.
Uber
Games
Access social and premium games. Join
Game Hub to enjoy free games with your
friends.
Keeper
Keeper is an secure password manager
for your phone and works seamlessly
across your mobile phones, tablets,
computers, and web browsers.
An entirely new and modern way to travel
is at your fingertips. Uber is your private
driver in more than 130 cities and 30
countries.
Softcard
Softcard uses NFC technology to let you
pay for purchases with just a touch of
your phone. It holds credit, debit, and
loyalty cards while organizing offers,
deals, and promotions. Isis helps you
manage your spending by showing you
card balances and recent purchases for
most of the cards in your virtual wallet.
Note: Softcard requires a special SIM
card. See your AT&T Customer Service
representative for more information.
29
Other ApplicationsApplications
Page 36

YP
The Yellowpages Mobile application
provides quick and ready access to
businesses, map locations, and storage
of your favorite searches. Use YP to
touch into local businesses, locations,
and events, and connect to your search
in real-time.
30
Other ApplicationsApplications
Page 37

AT&T Address Book
Keep your contacts safe by
synchronizing them with your
AT&T Address Book, your
personal online address book.
When you access the AT&T Address Book, a
network backup service, contacts are automatically
synchronized between your phone and online
address book. The changes you make are
automatically saved and, if you ever upgrade,
damage, or lose your phone, you can easily restore
your contacts onto your new phone.
Activating Your AT&T Address
Book
To activate the AT&T Address Book:
► From a Home screen, tap
Contacts.
Apps >
Synchronizing Your AT&T
Address Book
If you ever upgrade, damage, or lose your phone,
you can easily synchronize your contacts onto your
new phone.
Note: You must first copy any contacts that exist on
your SIM card to your phone.
To synchronize your AT&T Address book:
1. Tap
2. Tap
AT&TAddressBook.
3. At the AT&T Address Book screen, tap Sync to
synchronize your contact list with your online
Address Book. Your contact list is synchronized.
4. At the confirmation prompt, tap OK. Your contact
list is displayed.
You can also manage your Address Book online at
att.com/addressbook.
Contacts.
More options > Settings > Contacts >
Your Address Book is displayed. If you have not
synchronized your phone with your online AT&T
Address Book, the AT&T Address Book screen is
displayed. To synchronize your Address Book now:
► Tap Sync. Follow the onscreen instructions.
Your AT&T Address Book is Ready to Use. You can
now make a call or send a message through your
Address Book.
31
AT&T Address BookApplications
Page 38
Camera and Video
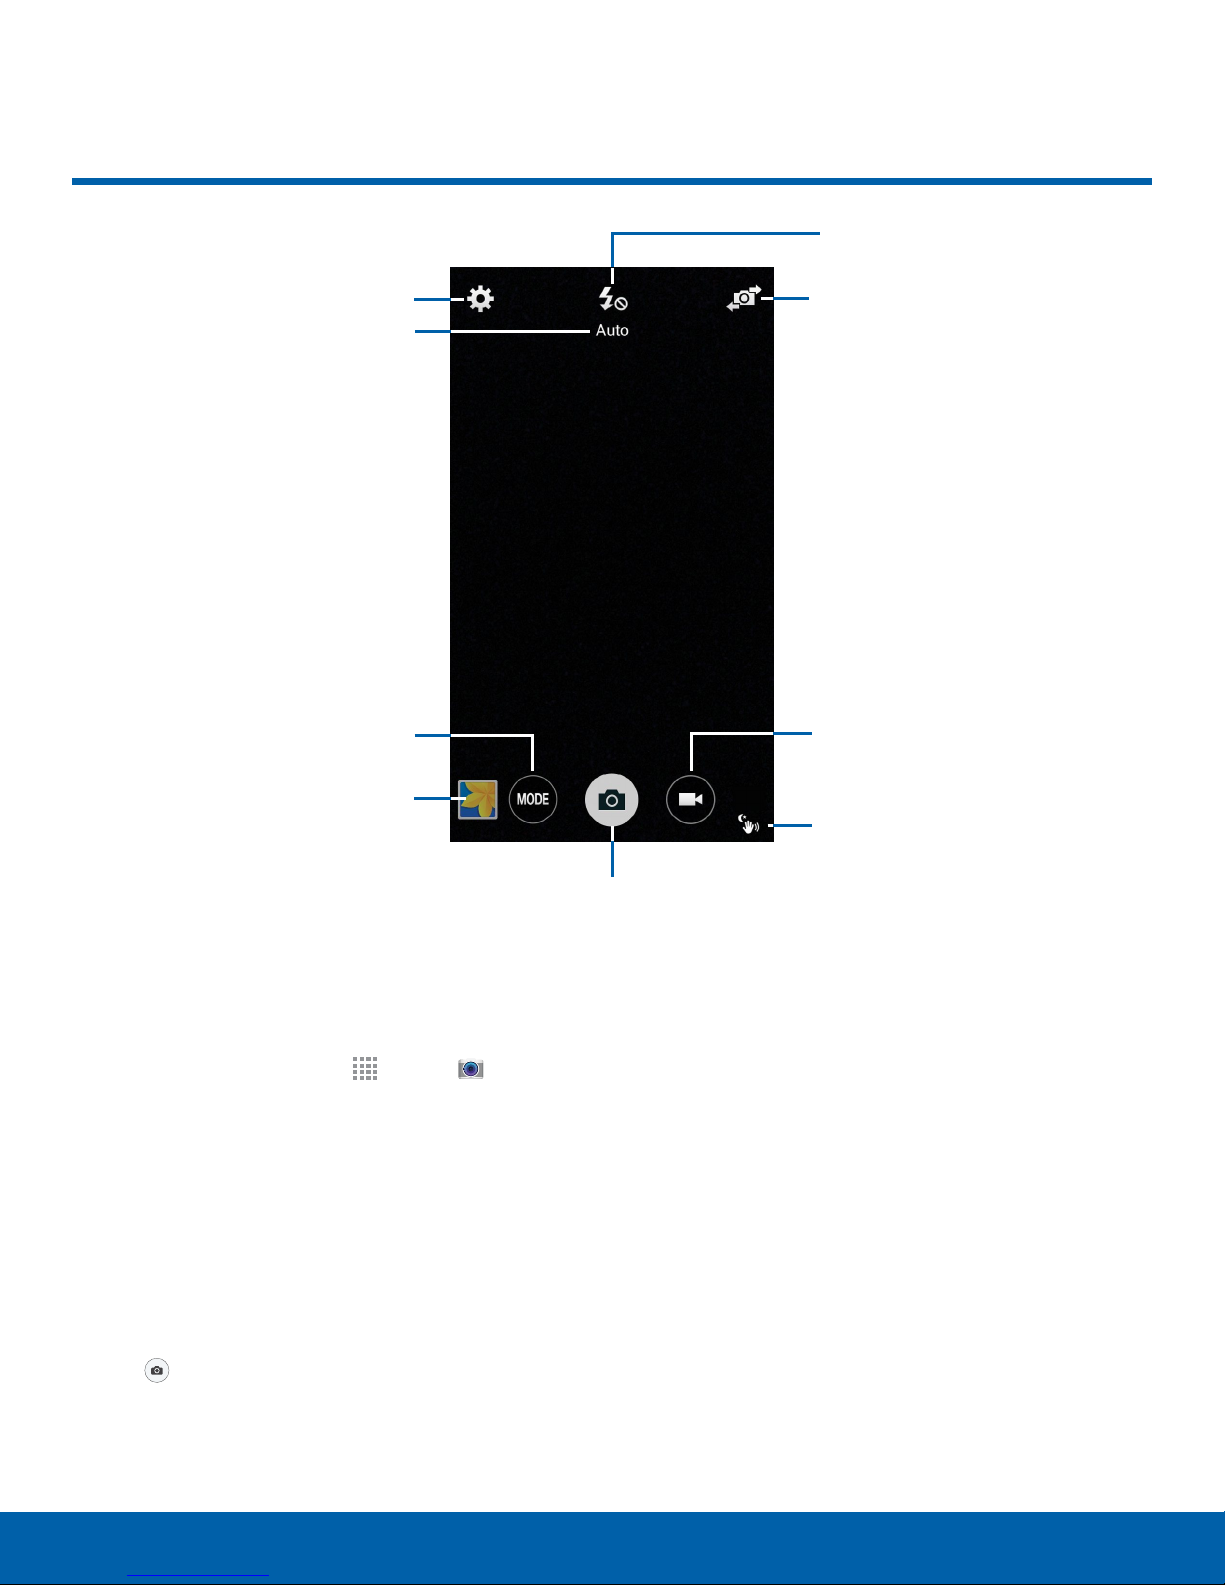
Current flashmode
Camera settings
Current shooting mode
Change shooting mode
View pictures and
videosintheGallery
Switch between the front
and back cameras
Record video
Anti-shake active
Take a picture
Taking Pictures
Take pictures with your device’s front or back
camera, or combine shots with Dual mode.
1. From a Home screen, tap
2. Using the display screen as a viewfinder,
compose your shot by aiming the camera at the
subject. While composing your picture, use the
onscreen options, or these gestures:
3. Press the Volume key up or down to zoom in or
out, or tap the screen with two fingers and pinch
or spread them on the screen to zoom.
4. Tap the screen to focus on the area you touched.
5. Tap
to take the picture.
Apps > Camera.
Shooting Mode
Several photo effects are available. Some modes are
not available when taking self-portraits.
► Tap MODE, and then scroll up or down the
screen at the side of the screen.
Auto: Allow the camera to evaluate the
-
surroundings and determine the ideal mode
for the photo.
Beauty face: Take a photo with lightened
-
faces for gentler images.
Shot & more: Take a quick burst of photos
-
and apply effects to them.
Panorama: Take a photo composed of many
-
photos strung together.
32
Camera and VideoApplications
Page 39

Virtual tour: Create interactive virtual tours of
-
your surroundings.
Recording mode: Select Normal, Limit for
-
email, or Fast motion mode.
Continuous shot: Take pictures continuously
-
by pressing and holding the Camera button.
HDR (Rich tone): Take photos without losing
-
details in bright and dark areas.
Dual camera: Take pictures and record videos
-
using the front and rear cameras at the same
time. A variety of picture-in-picture styles are
available.
Manage modes: Select which shooting modes
-
to display when you tap MODE.
Download: Download additional shooting
-
modes from the Samsung Apps store.
Camera Settings
► Tap Settings to configure settings for
Camera. Not all of the following options are
available in both still camera and video camera
modes. The available options vary depending on
the mode used.
Picture size: Select a resolution. Use higher
-
resolution for higher quality. Higher resolution
photos take up more memory.
ISO: Select an ISO value. This controls
-
camera light sensitivity. It is measured in
film-camera equivalents. Low values are for
stationary or brightly-lit objects. Higher values
are for fast-moving or poorly-lit objects.
Effects: Add special graphical effects.
-
Flash: Activate or deactivate the flash.
-
Timer: Take time-delayed pictures or videos.
-
Location tags: Attach a GPS location tag to
-
each photo.
Storage location: Select the memory location
-
for storage.
Review pics/videos: Set to show photos or
-
videos after taking them.
White balance: Select an appropriate white
-
balance, so images have a true-to-life color
range. The settings are designed for specific
lighting situations. These settings are similar to
the heat range for white-balance exposure in
professional cameras.
Exposure value: Change the exposure value.
-
This determines how much light the camera’s
sensor receives. For low light situations, use a
higher exposure.
Grid lines: Display viewfinder grid lines to help
-
composition when selecting subjects.
Shutter sound: Have the camera make a
-
shutter sound each time a picture is taken.
The Volume key: Use the Volume key as the
-
camera key, the record key, or as a zoom key.
Voice control: Set the camera to take photos
-
with voice commands.
Metering modes: Select a metering
-
method. This determines how light values
are calculated. Center-weighted measures
background light in the center of the scene.
Spot measures the light value at a specific
location. Matrix averages the entire scene.
Tap to take pics: Tap the image on the
-
preview screen to take photos.
Save as: Save the picture in HDR (rich tone)
-
only.
Video size: Select a resolution. Use higher
-
resolution for higher quality. Higher resolution
videos take up more memory.
33
Help: View help on using the camera.
-
Reset settings: Reset the camera settings..
-
Camera and VideoApplications
Page 40
Contacts
Store and manage your contacts
with the Contacts app, which
can be synchronized with a
variety of your existing personal
accounts, including Google,
Email, Facebook, and your
Samsung account.
For more information on connecting with and
managing your accounts through your device, see
Accounts.
Contacts
Access your list of contacts by using the Contacts
app, which is a shortcut to the Contacts tab. To
access your Contacts list:
► From a Home screen, tap
Contacts.
Apps >
Adding a Contact
Use the following procedure to add a new contact.
1. From a Home screen, tap
Contacts.
2. Tap
information.
Add, and then tap contact fields to enter
Choose a storage account for the contact. You
-
can choose Device to store the contact on the
device, or choose an account.
Tap Photo to assign a picture to the new
-
contact.
Enter a name, phone number, email address,
-
and assign the contact to a group. Tap
Addanother field to add additional contact
information.
Tap Add to enter additional entries.
-
Tap Delete to remove an entry.
-
Tap Expand for additional fields.
-
Apps >
Finding a Contact
You can search for a contact, or scroll the list to find
one by name.
1. From a Home screen, tap
Contacts.
2. Tap the Search field, and then enter characters
to find contacts that match.
– or –
Tap a letter on the side of the list to jump directly
to that letter in the alphabetical list. You can also
press and slide across the alphabetical list to
select a letter with better precision.
Apps >
Tap to choose a label for the field.
-
3. Tap Save.
Edit a Contact
When editing a contact, you can tap a field and
change or delete the information, or you can add
additional fields to the contact’s list of information.
1. From a Home screen, tap
Contacts.
2. Tap the contact to display it, and then tap
Edit.
3. Tap any of the fields to add, change, or delete
information.
4. Tap Save.
Apps >
34
ContactsApplications
Page 41
Share a Name Card
Unlink Contacts
When you share a name card, the contact’s
information is sent as a vCard file (.vcf). You can
share a vCard via Bluetooth or Wi-Fi Direct, attach it
to a message, or save it to a storage location.
1. From a Home screen, tap
Contacts.
2. Tap a contact to display it, and then tap
Moreoptions > Share name card.
3. Choose a sharing method and follow the
prompts.
Apps >
Save a Business Card as a Contact
1. From a Home screen, tap Apps >
Contacts.
2. Tap
3. When the camera opens, center the business
4. Your device analyzes the picture of the business
Moreoptions > Business cards > Add.
card in the guidelines on the screen. If the
Camera can recognize the business card, it will
take the picture automatically, or you can take
the picture manually.
card to create a new contact. You can also add
more information to the contact.
1. From a Home screen, tap Apps >
Contacts.
2. Tap the contact to display it, and then tap
Link.
3. Tap
from the main contact.
Remove beside contacts to unlink them
Delete Contacts
You can delete a single contact, or choose multiple
contacts to delete.
1. From a Home screen, tap
Contacts.
2. Touch and hold on a contact to select it. You
can also tap other contacts, or choose Select all
to select all contacts.
3. Tap
Delete, and then tap Delete to confirm.
Apps >
Favorites
When you mark contacts as favorites, they are
easily accessible from other apps. Favorites display
together on the Favorites tab in Contacts.
5. Tap Save. The business card is displayed as the
picture for the contact.
Note: You can view all your business cards by tapping
Moreoptions > Businesscards.
Link Contacts
When you have contacts from various sources
(Gmail, Facebook, etc.) , you may have multiple
similar entries for a single contact. Contacts lets you
link multiple entries into a single contact.
1. From a Home screen, tap
Contacts.
2. Tap the contact to display it, and then tap
Link.
3. Tap Link another contact, and then select
contact(s) to link to the original contact.
4. Tap Done to save the linked contact.
Apps >
Mark Contacts as Favorites
1. From a Home screen, tap Apps >
Contacts.
2. Tap a contact to display it, and then tap
Favorite (turns bright ).
Remove Contacts from Favorites
1. From a Home screen, tap Apps >
Contacts.
2. Tap the Favorites tab, and then touch and
hold on a contact to select it. You can also tap
other contacts, or choose Select all to select all
contacts.
3. Tap
Delete.
35
ContactsApplications
Page 42
Create a Shortcut to a Favorite
Rename a Group
You can create a shortcut to a favorite on the home
screen, to access their information directly from the
home screen.
1. From a Home screen, tap
Contacts.
2. Tap the Favorites tab, and then touch and hold
on a contact to select it.
3. Tap
Moreoptions > Add shortcut to home
screen. The new shortcut displays in an empty
area of the home screen.
Apps >
Groups
You can use groups to organize your contacts. Your
device comes with preloaded groups, and you can
create your own. You might create a group for your
family, for coworkers, or a team. Groups make it
easy to find contacts, and you can send messages
to the members of a group.
1. From a Home screen, tap Apps >
Contacts.
2. Tap the
3. Tap
new name.
4. Tap Save.
Groups tab, and then tap a group.
Moreoptions > Edit group and enter a
Add Contacts to a Group
1. From a Home screen, tap Apps >
Contacts.
2. Tap the
3. Tap
want to add.
4. Tap Done.
Groups tab, and then tap a group.
Add, and then tap the contact(s) you
Send an Email to a Group
You can send an email to members of a group.
Create a Group
1. From a Home screen, tap Apps >
Contacts.
2. Tap the
3. Tap fields to enter information about the group:
Tap Create group in All Accounts in to
-
choose where to save the group. You can save
it to a specific account, to the device memory,
or to all accounts.
Tap Group name to enter a name for the new
-
group.
4. Tap Add member and select contact(s) to add to
the new group, and then tap Done.
5. Tap Save.
Groups tab, and then tap Add.
1. From a Home screen, tap
Contacts.
2. Tap the
3. Tap
4. Tap contacts to select them, or tap Select all,
and then tap Done. (You will only see group
members that have email addresses in their
contact records.)
5. Choose an account and follow the prompts.
Groups tab, and then tap a group.
Moreoptions > Send message email.
Apps >
Delete a Group
Preset groups, such as Family, cannot be deleted.
1. From a Home screen, tap
Contacts.
2. Tap the
3. Tap
4. Select groups to delete and tap Done.
Groups tab.
Moreoptions > Delete groups.
Apps >
36
ContactsApplications
Page 43

Contact Settings
These settings allow you to modify settings
associated with using the Contacts app.
1. From a Home screen, tap
Contacts.
2. Tap
3. Tap an option and follow the onscreen
Moreoptions > Settings.
instructions.
Apps >
37
ContactsApplications
Page 44
Calculator
The Calculator provides basic
and advanced arithmetic
functions.
Basic Operation
1. From a Home screen, tap Apps >
Calculator.
2. Enter the first number using the numeric keys.
3. Tap the appropriate arithmetic function key.
4. Enter the next number.
5. To view the result, tap the
Equals key.
Additional Functions
To clear the results:
► Tap
To copy all or part of the calculation to the
clipboard:
► Touch and hold an entry in the displayfield, then
tap Copy.
Clear.
Scientific Calculator
Turn the device landscape to use advanced
arithmetic functions, such as sin, cos, and tan.
38
CalculatorApplications
Page 45

Calendar
Manage your events and tasks.
Create an Event or Task
1. From a Home screen, tap Apps >
Calendar.
2. Tap
methods:
3. Enter details for the event or task, and then
tapSave.
Add and use one of the following
Event: Enter an event with an optional repeat
-
setting.
Task: Enter a task with an optional priority
-
setting.
Delete an Event or Tasks
Sharing Events
1. From a Home screen, tap Apps >
Calendar.
2. Tap to view an event or task. Tap
> Share via, select a sharing method, and follow
the prompts.
Moreoptions
Calendar Settings
These settings allow you to modify settings
associated with using the Calendar.
1. From a Home screen, tap
Calendar.
2. Tap
3. Tap an option and follow the prompts.
More options > Settings.
Apps >
1. From a Home screen, tap Apps >
Calendar.
2. Tap a day and an event or task on that day. Tap
Delete to delete it.
– or –
To delete multiple events or tasks, tap
Moreoptions > Delete, select events or tasks,
and then tap Done.
39
CalendarApplications
Page 46

Clock
The Clock app offers features for
keeping track of time and setting
alarms.
1. From a Home screen, tap Apps > Clock.
2. Tap a tab to use a feature:
Alarm: Set an alarm to ring at a specific time.
-
Repeat weekly: When enabled, the alarm
-
repeats every week.
Alarm type: Choose whether the alarm will
-
use sound, vibration, or vibration and sound to
alert you.
Alarm tone: If you have chosen an alarm type
-
that includes sound, choose a sound to play
for the alarm.
World clock: View the time of day or night in
-
other parts of the world. World Clock displays
time in hundreds of different cities, within all
24 time zones around the world.
Stopwatch: Measure intervals of time.
-
Timer: Set a countdown timer. Use a timer
-
to count down to an event based on a preset
time length (hours, minutes, and seconds).
Create an Alarm
Create an alarm event. You can set one-time or
recurring alarms, and choose options for how to be
notified.
1. From a Home screen, tap
Alarm tab.
2. Tap
Create alarm:
Time: Choose a time for the alarm.
-
Days: Choose the days to use this alarm.
-
Apps > Clock >
Volume: If you have chosen an alarm type
-
that includes sound, drag the slider to set the
volume of the alarm.
Snooze: Allow snoozing, and set Interval and
-
Repeat values for the alarm while snoozing.
Smart alarm: When on, the alarm will start
-
playing a tone at a low volume at an interval
before the alarm time, and slowly increase in
volume. Choose a time interval and a tone to
use with smart alarm. Available when you have
chosen an alarm type that includes sound.
Name: Enter a name for the alarm.
-
3. Tap Save.
Delete an Alarm
1. From a Home screen, tap Apps > Clock.
2. Touch and hold an alarm, and then tap
Delete.
40
ClockApplications
Page 47

Email
Use the Email app to view and
manage all your email accounts
in one application.
To access Email:
► From a Home screen, tap
Apps > Email.
Configuring Email Accounts
You can configure Email for most accounts in just a
few steps.
1. From a Home screen, tap
2. Follow the onscreen instructions to set up your
email account.
– or –
For additional accounts, tap
Settings > Manage accounts > Add.
The device communicates with the appropriate
server to set up your account and synchronize your
email. When complete, your email appears in the
Inbox for the account.
Apps > Email.
More options >
Managing Your Email Accounts
You can view email you receive for all accounts on
the Combined view screen or you can view email
accounts individually.
1. From a Home screen, tap
2. Tap the
screen to select:
Combined view: View all email in a combined
•
inbox.
<Account Name>: View email for only this
•
account.
drop-down menu at the top left of the
Apps > Email.
Refreshing Your Email Account
Refresh your account to update your email
accounts.
1. From a Home screen, tap
2. In the Application Bar, tap
Apps > Email.
Refresh.
Remove Email Accounts
Note: To configure email account settings at any time,
tap
More options > Settings. Tap the account to
display Account settings.
To remove an Email account from your device:
1. From a Home screen, tap
2. Tap
3. Tap the account you want to remove.
4. Tap
5. Tap Remove to confirm.
41
More options > Settings.
Delete, tap the accounts you want to
remove, and tap Done.
Apps > Email.
EmailApplications
Page 48

Gallery
View, edit, and manage pictures
and videos.
View Images and Videos
Launching Gallery displays available folders. When
another application, such as Email, saves an image,
a Download folder is automatically created to
contain the image. Likewise, capturing a screenshot
automatically creates a Screenshots folder.
1. From a Home screen, tap
2. Tap
choose the way items display.
3. Tap
newalbum.
4. Tap a folder to open it.
•
Menu, and then tap Time or Album to
Menu > Albums, and then tap
Moreoptions > Create album to create a
Tap an image or video to view it in fullscreen.
Scroll left or right to view the next or previous
image or video.
Apps > Gallery.
Trimming Segments of a Video
1. Select a video, and then tap Tri m.
2. Using the sliders at the bottom of the screen
to trim the video. Move the start bracket to the
desired starting point, move the end bracket to
the desired ending point, and then tap Done to
save the video.
Editing Images
► While viewing an image, tap Moreoptions:
Edit: Use basic tools to edit your photo.
-
More info: View image details.
-
Copy to clipboard: Place a copy on the
-
clipboard.
Studio: Edit your photo with advanced tools.
-
Rotate left: Rotate the photo counter-
-
clockwise.
Rotate right: Rotate the photo clockwise.
-
Zoom In and Out
Use one of the following methods to zoom in or out
on an image:
Double-tap anywhere on the screen to zoom in or
•
zoom out.
Spread two fingers apart on any place to zoom in.
•
Pinch the screen to zoom out.
Playing Videos
► From a Home screen, tap Apps > Gallery.
Tap a folder to open it.
-
Tap a video to view it.
-
Crop: Resize the frame to crop the image.
-
Rename: Rename the file.
-
Slideshow: Start a slideshow with the images
-
and videos in the current folder.
Set as: Set the image as wallpaper or as a
-
contact’s photo.
Print: Print the image via a USB or Wi-Fi
-
connection. Some printers may not be
compatible with the device.
Settings: Change the Gallery settings.
-
42
GalleryApplications
Page 49

Deleting Images
Gallery Settings
1. From a Home screen, tap Apps > Gallery.
2. Tap a folder to open it.
3. In a folder, tap
images, and then tap Done.
– or –
When viewing an single image, tap
More Options > Delete, select
Delete.
Sharing Images
Use one of the following methods:
1. From a Home screen, tap
2. Tap a folder to open it.
3. In a folder, tap
images, and then tap
others or share them via social network services.
– or –
Moreoptions > Select, select
Apps > Gallery.
Share to send them to
These settings allow you to modify settings
associated with using your Gallery.
1. From a Home screen, tap
2. Tap
3. Tap an option and follow the onscreen
4. Tap
More options > Settings.
instructions.
More options > Add account to add a
Samsung, Google, or Facebook account.
Apps > Gallery.
When viewing an image full screen, tap
to send it to others or share it via social network
services.
Share
43
GalleryApplications
Page 50

Internet
Access the Internet with a fully
featured web browser.
Access the Internet
► From a Home screen, tap Apps > Internet.
Command Keys
Tap Back or Back key to return to the
•
previous page.
Tap Forward to go forward to a recent page.
•
Tap Home to display your Internet Home
•
screen.
Tap Refresh to reload the current page.
•
Viewing Web Site
► To view a web site, tap the address field, enter
the web address, and then tap Go.
Browser Windows
Use windows to view multiple web pages at the
same time.
To open a new browser window, tap
•
Moreoptions > Newwindow.
To view all open windows, tap Tab Manager to
•
view all open windows.
To close a tab, tap Tab Manager and tap the
•
Close icon on a window to close it.
Bookmarks
To bookmark the current web page, tap
•
Bookmark > Add.
To open a bookmarked web page, tap
•
Bookmark and tap an entry.
Note: The
along the bottom of the screen. If the bar is not visible,
swipe the screen downward to make the browser bars
appear.
Bookmark icon is on the menu bar
To share, save, or print the current web page,
-
tap
More options.
Tap the screen twice to zoom in or out. Or
-
pinch the screen to zoom out and stretch the
screen to zoom in.
To see the address and menu bars, swipe the
-
screen downward with your finger.
To hide the address and menu bars, swipe the
-
screen upward with your finger.
History
► Tap Bookmark > History tab to view a list of
recently visited web pages.
Saved Pages
To save a web page, tap More options >
•
Savepage.
Tap Saved pages to view a list of saved web
•
pages.
Note: The
along the bottom of the screen. If the bar is not visible,
swipe the screen downward to make the browser bars
appear.
44
Saved pages icon is on the menu bar
InternetApplications
Page 51

Sharing Pages
► To share a web page address with others, tap
More options > Share via and follow the
prompts.
Incognito Mode
Pages viewed in Incognito mode do not appear in
your browser history or search history, and leave no
traces (such as cookies) on your device.
Note: Any downloaded files will remain on your device
after you close the Incognito window.
Incognito windows display
and have a darker shade of gray.
To start Incognito mode while in a normal browser
•
window, tap
To open a new incognito tab while in Incognito
•
mode, tap Moreoptions > Newincognito tab.
Moreoptions > Incognito mode.
Incognito on their tab
45
InternetApplications
Page 52

Messages
Learn how to send and receive
different messages using the
default Messages app on your
phone.
Types of Messages
Your default Messages app provides the following
message types:
Text Messages (SMS)
•
Multimedia Messages (MMS)
•
The Short Message Service (SMS) lets you send
and receive text messages to and from other mobile
phones or email addresses. To use this feature, you
may need to subscribe to your service provider’s
message service.
The Multimedia Messaging Service (MMS) lets you
send and receive multimedia messages (such as
picture, video, and audio messages) to and from
other mobile phones or email addresses. To use this
feature, you may need to subscribe to your service
provider’s multimedia message service.
Messaging icons are displayed at the top of the
screen and indicate when messages are received
and their type.
Creating and Sending Messages
This section describes how to create and send a
message using the Messages app.
1. From a Home screen, tap
Compose.
2. Tap the Enter recipient field to manually enter
a recipient or tap
recipient from your Contacts. You can also select
the recipient based on Groups, Favorites, or
Logs.
3. If adding a recipient from your Contacts, tap the
contact to place a check mark then tap Done.
The contact will be placed in the recipient field.
4. Enter additional recipients by separating each
entry with a semicolon (;) and then using the
previous procedure. More recipients can be
added at any time before the message is sent.
Note: For the Group option, if the number of
recipients is less than 10, all members in the
group will be added. You will need to delete any
unnecessary members in the list by selecting the trash
can icon and deleting unwanted entries.
5. Tap the Enter message field and use the
onscreen keypad to enter a message. For more
information, please see Entering Text.
6. Tap
emoticon from an onscreen list and then add
it into your message (at the cursor location) if
desired.
Add emoticons to choose an available
Add Recipient to select a
Messages >
7. Review your message and tap
Note: If you exit a message before you send it, the
message is automatically saved as a draft.
46
Send.
MessagesApplications
Page 53

Viewing New Messages
Messages Settings
When you receive a new message, a new message
icon appears on the Status Bar.
To view the message:
1. Open the Notification Panel and select the
message. For more information, please see
Notification Panel.
– or –
From a Home screen, tap
then tap the new message to view it.
2. To play a multimedia message (audio or video),
tap
3. To scroll through the list of messages, tap the
screen and scroll up or down the page.
Play.
Messages, and
Deleting Messages
To delete messages, follow these steps:
1. From a Home screen, tap
Messages.
Configure the settings for text messages, multimedia
messages, voicemail, and push messages.
► From a Home screen, tap
Messages > More options > Settings.
Apps >
Emergency Alerts
This device is designed to receive wireless
emergency alerts from the Commercial Mobile
Alerting System (CMAS) which may also be known
as the Personal Localized Alerting Network (PLAN) .
For more information, please contact your wireless
provider.
Emergency Alerts allows customers to receive
geographically-targeted messages. Alert messages
are provided by the US Department of Homeland
Security and will alert customers of imminent threats
to their safety within their area. There is no charge
for receiving an Emergency Alert message.
There are three types of Emergency Alerts:
2. Tap
3. Tap each message you want to delete or tap
4. Tap Done.
5. At the Delete conversations prompt, tap OK to
More options > Delete.
Select all.
delete or Cancel to cancel.
Message Search
1. You can search through your messages by using
the Message Search feature.
2. From a Home screen, tap
3. Tap
4. Enter a word or phrase to search for, and then
tap
Search.
Search on the keyboard.
Messages.
Alerts issued by the President
•
Alerts involving imminent threats to safety of life
•
(Extreme and Severe)
AMBER Alerts (missing child alert)
•
Users may choose not to receive Imminent Threats
(Extreme and Severe) and AMBER Alerts. Alerts
issued by the President cannot be disabled.
To disable Imminent Threats and AMBER Alerts,
follow the instructions below:
1. From a Home screen, tap
2. Tap
3. Tap Emergency alerts.
4. All alerts are enabled by default (check mark
More options > Settings >
Emergencyalerts.
showing). Tap on an alert option to disable it.
Messages.
47
MessagesApplications
Page 54
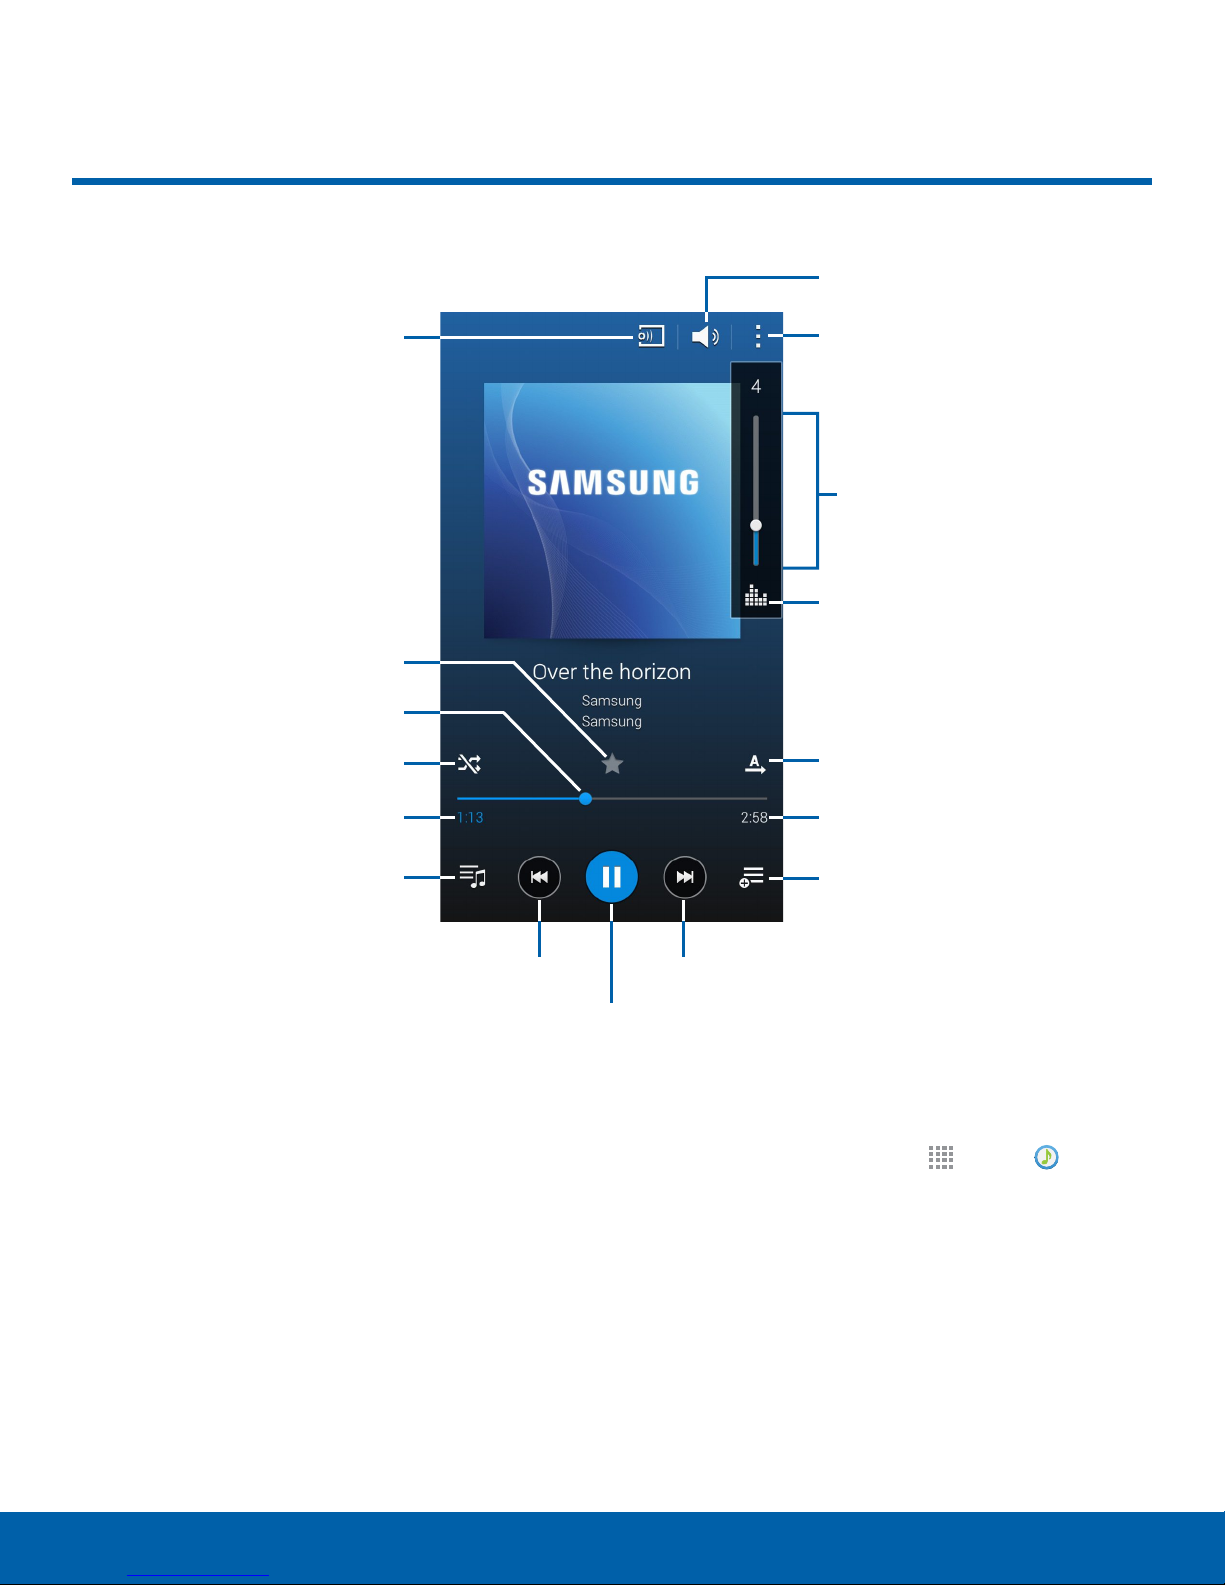
Music Player
Sound (opens Volume)
Stream the song to
another device
Mark as favorite
Playback position
Shuffle songs
Elapsed playing time
View playlist
More options
Volume
Adjust the sound quality
with SoundAlive
Repeat mode for the song
orplaylist
Length of song
Add to playlist
Rewind song or go toprevious song
Listen to your favorite songs
with the Music player. Navigate
through your music library, play
songs, and create customized
playlists.
Scan forward or gotonext song
Pause/Play
Listen to Music
1. From a Home screen, tap Apps > Music.
2. Tap a library category at the top of the screen to
3. Scroll through the list of songs and tap an entry
48
view your music files.
to begin playback.
Music PlayerApplications
Page 55
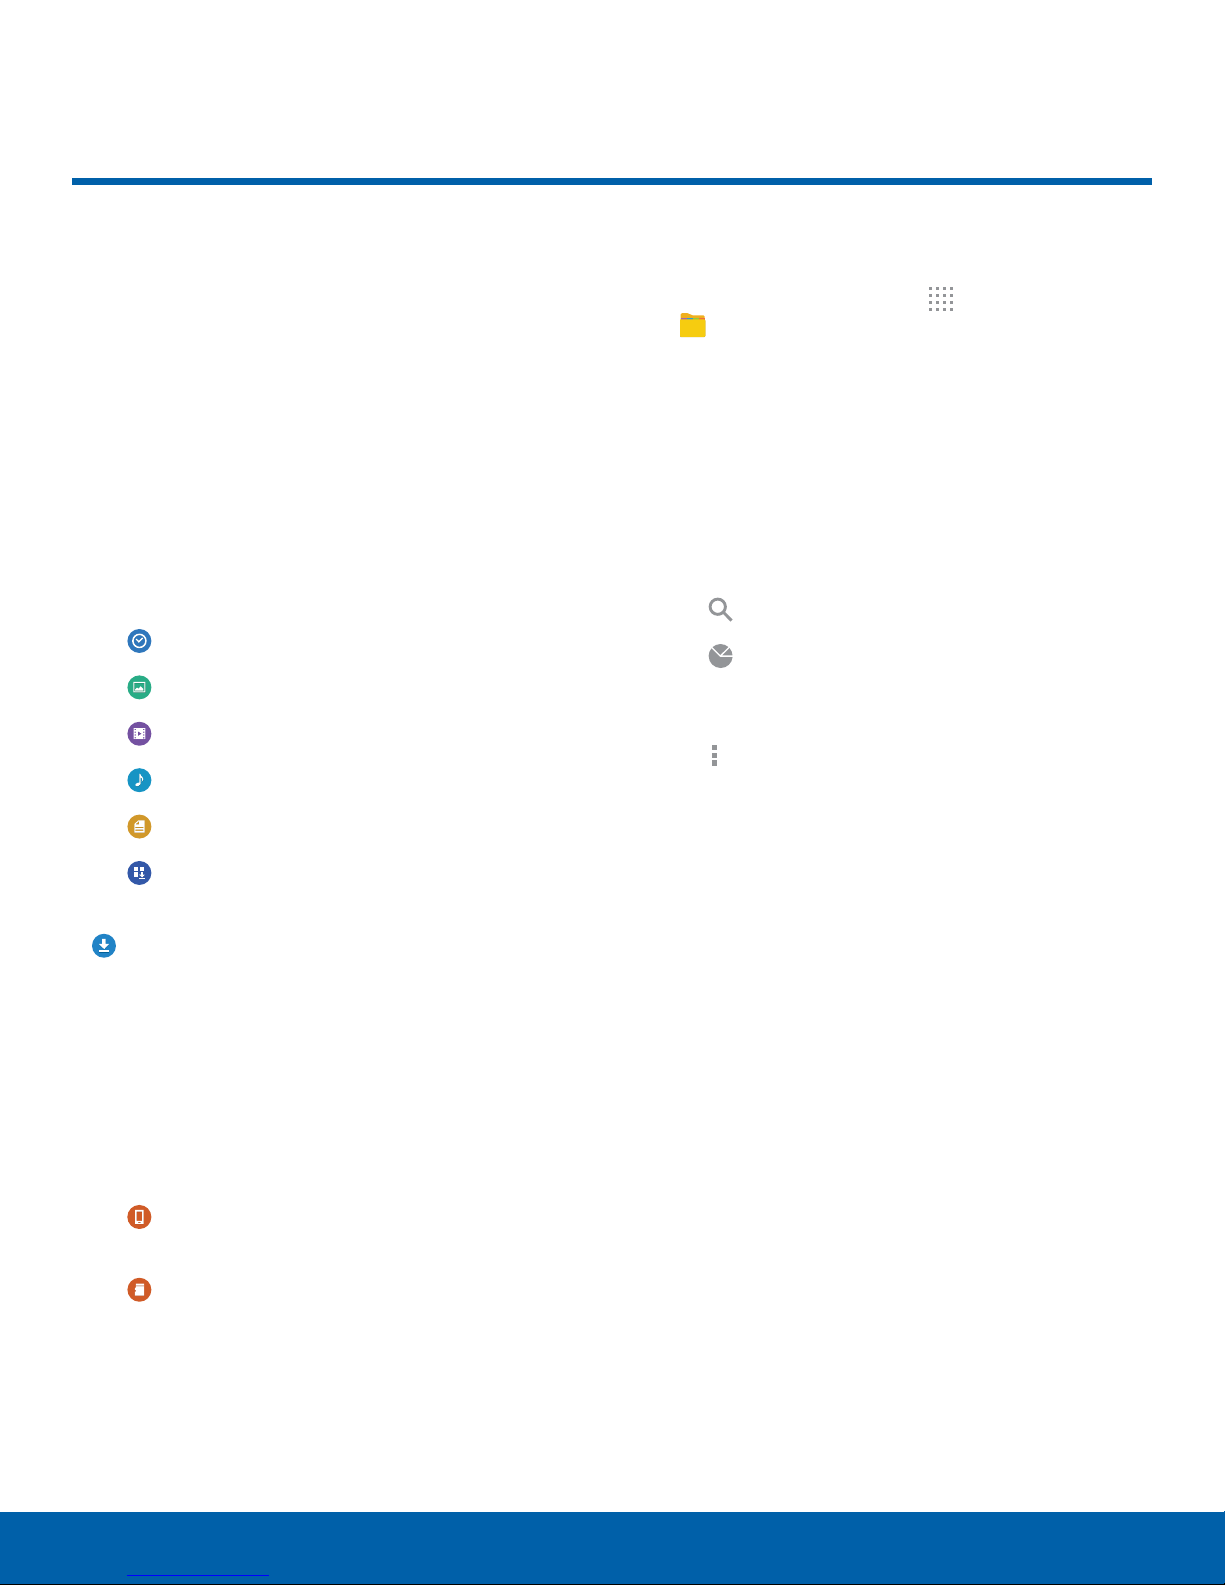
MyFiles
Access files stored on your
device, including images, videos,
songs, and sound clips.
View Files
Files stored in the device are organized into the
following groups:
Quick Search: Files are grouped into the
•
following categories:
Recent files: View recently saved files.
-
Images: View image files.
-
Videos: View video files.
-
Audio: View audio files.
-
Documents: View document files.
-
Downloaded apps: View downloaded
-
apps.
Download History: View all apps and files that
•
have been downloaded to the device.
Shortcuts: Contains shortcuts to files or folders
•
that you have added. This option only appears if
you have added shortcuts to the MyFiles main
screen.
To view files in My Files:
1. From a Home screen, tap
MyFiles.
2. Tap a category to view the relevant files or
folders.
3. Tap a file or folder to open it.
Apps >
My Files Options
On the main screen of My Files, the following
options are available:
Tap Search, and then enter search criteria.
•
Tap Storage usage to view memory
•
information for your device and memory card
(ifinstalled) .
Tap More options for these options:
•
Select: Select shortcuts. This option only
-
appears if you have added shortcuts to the
MyFiles mains screen.
Delete: Select and delete files or folders.
-
This option only appears if you have added
shortcuts to the MyFiles main screen.
Add shortcut: Add a shortcut on the My Files
-
main screen to any folder.
Add FTP server: Add an FTP server shortcut
-
on the My Files main screen.
Local Storage: View folders and files in their
•
storage locations.
Device storage: View folders and files
-
located on the device.
SD card: View folders and files located on
-
the memory card (if installed).
Cloud Storage: Contains shortcuts to FTP
•
servers or other cloud storage locations that you
have added. This option only appears if you have
added shortcuts to the MyFiles main screen.
49
Scan for nearby devices: Search for devices
-
that have media sharing activated.
Settings: Change the settings for viewing files.
-
MyFilesApplications
Page 56

Category Options
Options for Selected Files and Folders
After tapping on a category, the following options
are available:
Tap Home to return to the main screen of the
•
My Files app.
Tap Search, and then enter search criteria.
•
Tap More options to find the following options:
•
Select: Select files or folders.
-
Delete: Select and delete files or folders.
-
Create folder: Add a folder to the current list.
-
This option only appears in Local Storage
categories.
View as: Change the appearance of the files
-
or folders.
Sort by: Change the sort order of the files.
-
Add shortcut: Add a shortcut to the current
-
location on either a Home screen or the
MyFiles main screen. This option only
appears in Local Storage categories.
Tap More options > Select, select a file or
•
folder, and then use one of these functions:
Share via: Send files to others or share
them.
Delete: Delete files or folders.
Tap More options for additional options:
•
Move: Move files or folders to another folder.
-
Copy: Copy files or folders to another folder
-
Rename: Rename a file or folder. This option
-
only appears when just one file or folder is
selected.
Zip: Create a zip folder containing the selected
-
files. This option only appears in Local
Storage categories. A selected zip folder has
the additional options of Extract and Extract
to current folder.
Details: View details of the selected file(s) or
-
folder(s).
Settings: Change the settings for viewing files.
-
50
MyFilesApplications
Page 57

S Health
Use SHealth to plan, track, and
Ankle swelling, especially at night;
•
manage your health goals and
activities, including exercise,
sleep, and meals.
1. From a Home screen, tap Apps >
SHealth.
2. Read and accept the terms and conditions.
3. Set up your health profile and goals.
Before You Start Exercising
This app can be used to monitor your exercise.
While moderate physical activity, such as brisk
walking, is safe for most people, health experts
suggest that you talk with your doctor before you
start an exercise program, particularly if you have
any of the following conditions:
Heart disease;
•
Asthma or lung disease;
•
Diabetes, or liver or kidney disease;
•
A heart murmur or a rapid or pronounced
•
heartbeat;
Muscle pain when walking upstairs or up a hill that
•
goes away when you rest.
Finally, the American College of Sports Medicine
recommends that you see your doctor before
engaging in vigorous exercise if two or more of the
following apply:
You are a man older than age 45 or a woman
•
older than age 55;
You have a family history of heart disease before
•
age 55;
You smoke or quit smoking in the past six months;
•
You have not exercised for three months or more;
•
You are overweight or obese;
•
You have high blood pressure or high cholesterol.
•
You have impaired glucose tolerance, also called
•
prediabetes.
Arthritis.
•
You should also check with your doctor if you have
symptoms suggestive of heart, lung, or other serious
disease, such as:
Pain or discomfort in your chest, neck, jaw, or
•
arms during physical activity;
Dizziness or loss of consciousness;
•
Shortness of breath with mild exertion or at rest,
•
or when lying down or going to bed;
When in Doubt — Check It Out
If you are unsure of your health status, have several
health problems, or are pregnant, you should speak
with your doctor before starting a new exercise
program. Working with your doctor ahead of time is
a good way to plan an exercise program that is right
and safe for you. Consider it the first step on your
path to physical fitness.
51
S HealthApplications
Page 58

S Voice
Speak commands to perform
operations on your device, and
to speak criteria for searches
and other operations.
Use SVoice to find everything
from directions to trivia answers
to the current weather forecast.
1. From a Home screen, tap Apps > SVoice.
2. Speak a command.
3. Tap the microphone icon if the device does not
hear you, or to give it another command.
Tip: Tap
to view a tutorial.
More options for example commands and
52
S VoiceApplications
Page 59
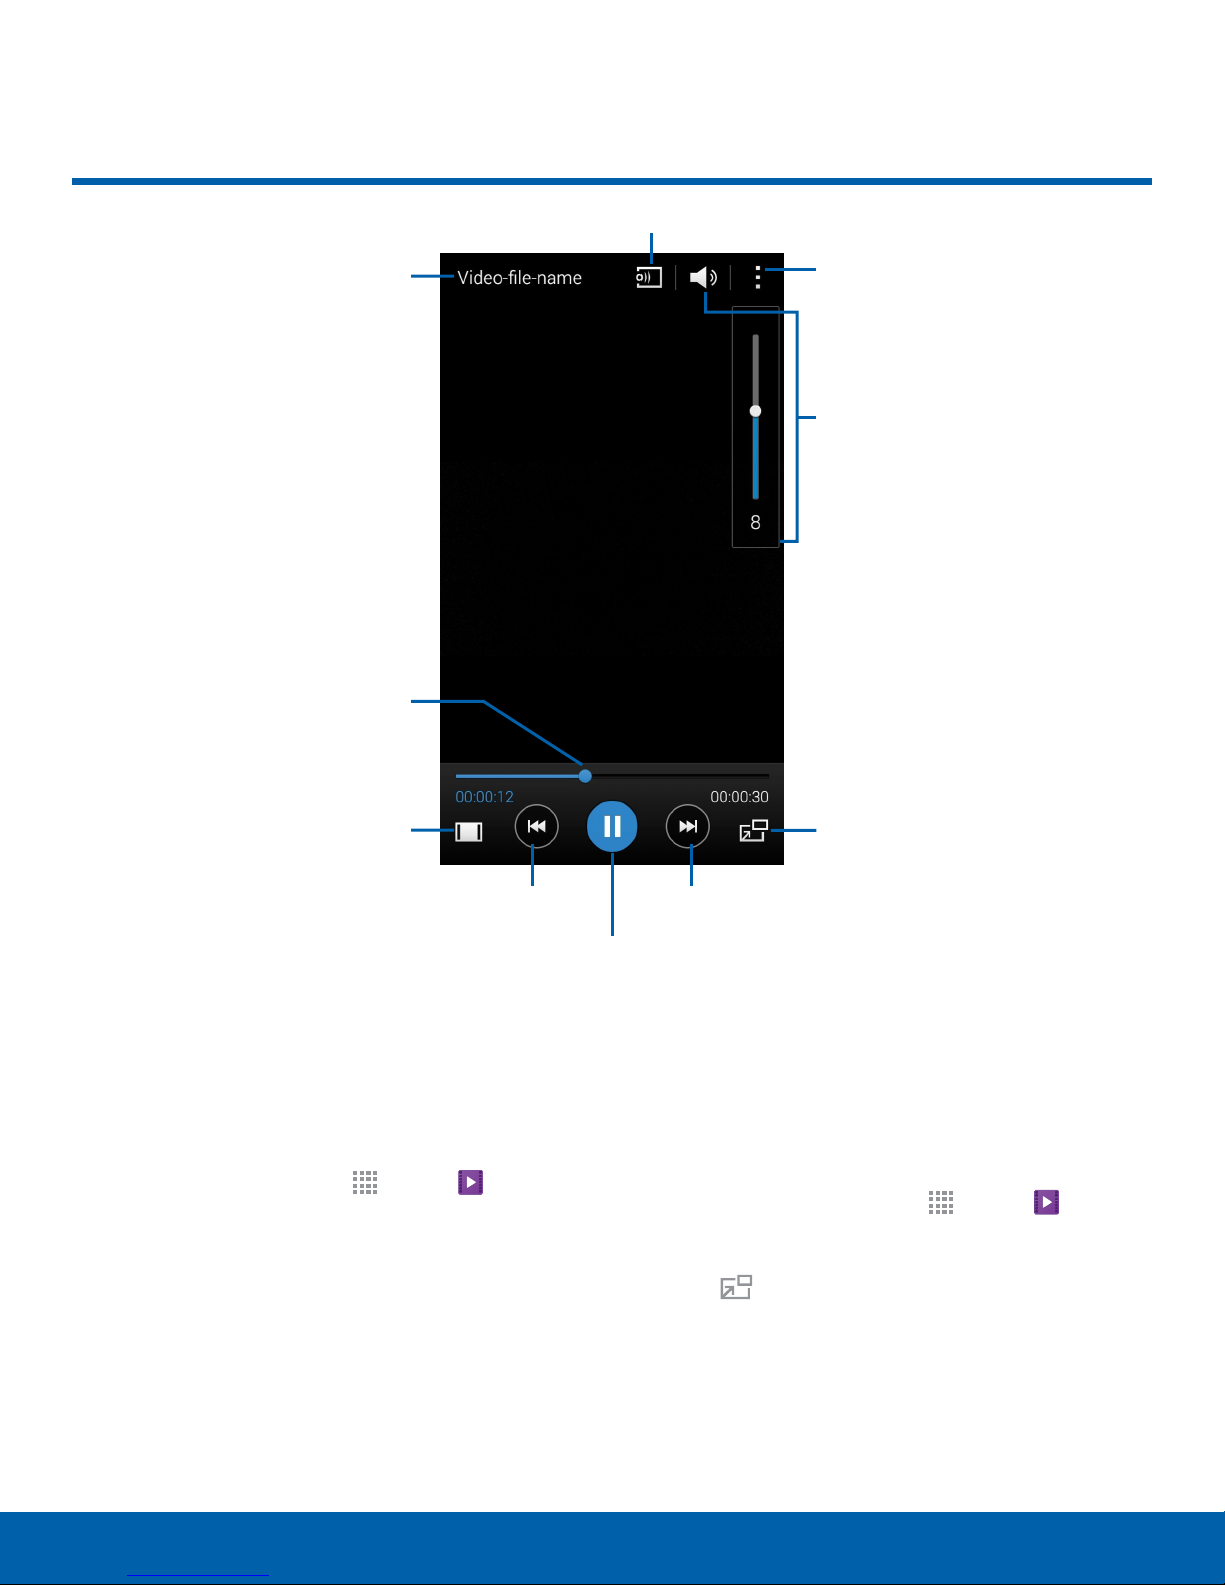
Video Player
Change player
Video file name
Playback position
Change screen ratio
More options
Volume
Pop up play
Rewind video or go toprevious video Scan forward or gotonext video
Pause/Play
Play and manage videos stored
on your device.
To access video:
1. From a Home screen, tap
2. Scroll through the videos stored on your device.
After a few seconds, each video thumbnail
begins playing a preview of the clip.
3. Tap a video to view it.
Apps > Video.
Use Pop-Up Play
Multi task with Pop-Up Play — transform your video
player into a pop-up window. The video will continue
to play, and the pop-up window can be resized or
moved anywhere on the screen.
1. From a Home screen, tap
2. Tap a video to view it.
3. Tap
video in a floating window.
•
•
Pop-up play to continue playing the
Drag the window to any location on the screen.
Use two fingers to pinch or spread to resize
the floating window.
Apps > Video.
53
Video PlayerApplications
Page 60

Settings
Configure your device’s
connections and settings,
add accounts, and customize
the home screen, apps, and
features.
Page 61

How to Use Settings
OFF
Some options use an ON/OFF button to turn the
•
option on (
For some options, you must tap a field, such as
•
Email address, to display and set options.
Some options are enabled or disabled by tapping
•
a check box. When enabled, a check mark
displays. Tap the check mark to remove it and
disable the option.
Accessing Settings
► From a Home screen, tap Apps >
Settings.
– or –
From a Home screen, drag down from the Status
bar to display the Notification panel, and then tap
Settings.
ON
) or off (
).
Customize the Quick Settings
Menu
Quick settings are the settings that you are most
likely to frequently use. When you first access the
Settings menu, the Quick settings are set to a
default list of settings.
Changing the Quick Settings
You can change the Quick settings list to include
your most frequently used settings.
1. From a Home screen, tap
Settings.
2. Tap
More options > Edit quick settings.
Select additional settings to appear in your
-
Quicksettings menu. Settings that are already
in the Quick settings menu are checked.
Apps >
Search for Settings
If you are not sure exactly where to find a certain
setting, you can use the Setting search feature.
1. From a Home screen, tap
Settings.
2. Tap
Search.
Enter a word or words in the Search box. As
-
you type, settings that match will appear on
the screen.
Tap an entry to go to that setting.
-
Apps >
Uncheck a highlighted item to remove it.
-
3. Tap Done to save your new Quick settings menu.
Change How Settings Are Listed
Settings can be listed in grid view (default), a list
view, or a tab view.
1. From a Home screen, tap
Settings.
2. Tap
3. Select a new view.
More options > View by.
Apps >
55
How to Use SettingsSetting s
Page 62

Wi-Fi and Wi-Fi Direct
Wi-Fi is a term used for certain
types of Wireless Local Area
Networks (WLAN). Wi-Fi
communication requires access
to a Wireless Access Point
(WAP) .
Wi-Fi Direct creates a direct
connection between two or
more devices using Wi-Fi.
Turn Wi-Fi On or Off
Turning Wi-Fi on makes your device able to discover
and connect to compatible in-range WAPs.
1. From a Home screen, tap
Settings.
Apps >
Scan and Connect to a Wi-Fi
Network
1. From a Home screen, tap Apps >
Settings.
2. Tap Wi-Fi, and then tap ON/OFF to turn Wi-Fi on.
3. When Wi-Fi is first turned on, your device will
automatically scan for available networks and
display them.
4. Tap the network you want to connect to.
When you select an open network, you are
-
automatically connected to the network.
Otherwise, enter a password to connect.
To manually scan for networks, tap
-
Moreoptions > Scan.
Manually Connect to a
Wi-FiNetwork
2. Tap Wi-Fi, and then tap ON/OFF to turn Wi-Fi on
or off.
Smart Network Switching
► Tap the check box next to Smartnetworkswitch
to enable automatically switching between Wi-Fi
and mobile networks to maintain a stable Internet
connection.
1. From a Home screen, tap Apps >
Settings.
2. Tap Wi-Fi, and then tap ON/OFF to turn Wi-Fi on.
3. Tap Add Wi-Fi network.
4. Enter information about the Wi-Fi network:
Tap Network SSID to enter the name of the
-
Wi-Fi network.
Tap the Security field and select a security
-
option and enter your password.
Tap Show advanced options, if you need to
-
add advanced options such as Proxy settings,
IPsettings, or Key management.
5. Tap Connect to store the new information and
connect to your target WAP.
56
Wi-Fi and Wi-Fi DirectSettings
Page 63

Wi-Fi Status Indicators
These Status bar icons show your current Wi-Fi
connection status:
MAC address: View your device’s
-
MAC address, which is required when
connecting to some secured networks (not
configurable).
Displays when Wi-Fi is connected, active,
and communicating with a Wireless Access
Point (WAP).
An Wi-Fi access point is available, but you
are not connected to it. It may also display
if there is a communication issue with the
target Wireless Access Point (WAP).
Wi-Fi Settings
The Wi-Fi settings menu allows you to set up many
of your device’s advanced Wi-Fi services.
1. From a Home screen, tap
Settings.
2. Tap Wi-Fi, and then tap ON/OFF to turn Wi-Fi on.
3. Tap
More options for options:
Scan: Start another scan for nearby Wi–Fi
-
networks.
Wi–Fi Direct: Configure a Wi–Fi Direct
-
connection with a nearby device.
Advanced:
-
Network notification: Receive a notification
-
when new Wireless Access Points (WAPs)
are available.
Passpoint: Connect to passpoint-enabled
-
Wi-Fi Access Points automatically.
Sort by: Sort Wi-Fi networks by Alphabet
-
or Signal strength.
Keep Wi-Fi on during sleep: Specify when
-
to disconnect from Wi-Fi.
Always allow scanning: Allow Google
-
location service and other apps to scan for
networks, even when Wi-Fi is turned off.
Install certificates: Install authentication
-
certificates.
Apps >
IP address: View your device’s IP address
-
(not configurable).
WPS push button: Set up a connection to a
-
WPS (Wi-Fi Protected Setup) router or other
equipment.
WPS PIN entry: View the PIN used by your
-
device to set up a PIN-secured connection
to a Wi-Fi router or other equipment (not
configurable).
Help: Learn about setting up and using Wi-Fi
-
networks, and other settings.
Wi-Fi Direct
Wi-Fi Direct allows direct device-to-device
connections via Wi-Fi, without having to connect to a
Wi-Fi network.
1. From a Home screen, tap
Settings.
2. Tap Wi-Fi, and then tap ON/OFF to turn Wi-Fi on.
Wi-Fi must be on to configure settings.
3. Tap
4. After scanning for devices, select a device,
More options > Wi-Fi Direct. Your device
automatically scans for nearby Wi-Fi Direct
devices, or you can tap Scan to start scanning.
and then follow the prompts to complete the
connection.
Tap More options > Multi connect to
-
scan for devices that support multi connect.
Select the devices and follow the prompts to
establish the connections.
To rename your device (as seen by
-
other devices), tap More options >
Renamedevice.
Wi-Fi Direct Status Indicator
Displays when connected to another device
using Wi-Fi Direct.
Apps >
57
Wi-Fi and Wi-Fi DirectSettings
Page 64

Bluetooth
Bluetooth is a short-range
communications technology that
allows you to connect wirelessly
to a number of Bluetooth
devices, such as headsets
and hands-free car Bluetooth
systems, and Bluetooth-enabled
computers, printers, and wireless
devices.
Note: The Bluetooth communication range is
approximately 30 feet.
Turn Bluetooth On and Off
1. From a Home screen, tap Apps >
Settings.
2. Tap Bluetooth, and then tap ON/OFF to turn
Bluetooth on or off.
Making Your Device Visible to
Other BluetoothDevices
When you make your device visible, other Bluetooth
can find it in a scan and initiate pairing. You can
choose the length of time your device remains
visible.
1. From a Home screen, tap
Settings.
2. Tap Bluetooth, and then tap ON/OFF to turn
Bluetooth on.
3. Tap Bluetooth >
Visibilitytimeout.
4. Select a time period for your device to remain
visible after you turn on visibility.
More options >
Apps >
Scan for Bluetooth Devices
When you want to pair with another Bluetooth
device, you can scan for nearby devices that are
visible.
Change Your Device’s Name
Change the name others will use when pairing with
your device via Bluetooth.
1. From a Home screen, tap
Settings.
2. Tap Bluetooth >
Renamedevice.
3. Tap Device name and edit your device name.
More options >
Apps >
1. From a Home screen, tap
Settings.
2. Tap Bluetooth, and then tap ON/OFF to turn on
Bluetooth.
3. When Bluetooth is first turned on, it scans for
nearby Bluetooth devices and displays them.
To manually perform a new scan, tap Scan.
-
Apps >
58
BluetoothSettings
Page 65

Pair Bluetooth Devices
The Bluetooth pairing process allows you to
establish trusted connections between your device
and another Bluetooth device.
Delete a Paired Device (Unpairing)
When you unpair from a Bluetooth device, the two
devices will no longer recognize each other. To
connect again, you’d need to pair the devices.
Pairing between two Bluetooth devices is a onetime process. Once a pairing is created, the devices
will continue to recognize their partnership and
exchange information without having to re-enter a
passcode again.
1. From a Home screen, tap
Settings.
2. Tap Bluetooth, and then tap ON/OFF to turn on
Bluetooth.
3. Make sure that the target device is discoverable,
so that your device can find it. Refer to the
instructions that came with the device to find out
how to set it to discoverable mode.
4. Tap Scan. Your device will start to scan for
Bluetooth devices within range.
5. When you see the name of the target device
displayed in the Bluetooth devices section, tap
the name. Your phone then automatically tries to
pair with the target device. If automatic pairing
fails, enter the passcode supplied with the target
device.
Note: Due to different specifications and features
of other Bluetooth-compatible devices, display and
operations may be different, and functions such as
transfer or exchange may not be possible with all
Bluetooth compatible devices.
Apps >
1. Verify your Bluetooth is active.
2. From the Bluetooth settings page, tap
Settings next to the previously paired device.
3. Tap Unpair to delete the paired device.
Review Files Received via
Bluetooth
When you receive files from another device via
Bluetooth, you can access them from Bluetooth
settings.
1. From a Home screen, tap
Settings.
2. Tap Bluetooth >
Receivedfiles.
More options >
Apps >
Bluetooth Status Indicators
This Status bar icon show your current Bluetooth
connection status:
Bluetooth is active.
Disconnect a Paired Device
Disconnecting a paired device breaks the
connection between the device and your device, but
retains the knowledge of the pairing. At a later point
when you wish to reconnect the device, there is no
need to setup the connection information again.
1. From a Home screen, tap
Settings.
2. Locate the paired device and tap the
Settings icon next to it.
3. Tap Unpair.
Apps >
59
BluetoothSettings
Page 66

Tethering and Wi-Fi Hotspot
Share your device’s Internet
connection with a computer that
connects to your device using a
USB cable or via Bluetooth.
Use Portable Wi-Fi hotspot to
share your device’s Internet
connection with other devices
using your device as a Portable
Wi-Fi hotspot.
Connect Your Device to a
Computer Using Tethering
1. From a Home screen, tap Apps > Settings
> Tethering and Wi-Fi hotspot.
2. Choose a tethering method:
USB tethering: Connect the computer to the
-
device using the USB cable, and then touch
USB tethering to turn tethering on.
Turn Portable Wi-Fi Hotspot Onor Off
Activate your device’s Portable Wi-Fi hotspot
application to allow other devices to use your
device’s Internet connection.
1. From a Home screen, tap
Settings > Tethering and Wi-Fi hotspot >
Mobile Hotspot.
2. Touch ON/OFF to turn Portable Wi-Fi hotspot on
or off.
Warning! By default, your device’s Portable
Wi-Fi hotspot has no security applied, and any
device can connect. For more information, see
Configure Portable Wi-Fi Hotspot Settings.
Apps >
Connect a Device to
YourMobileHotspot
Use the other device’s Wi-Fi control to connect to
your device’s Portable Wi-Fi hotspot.
1. From a Home screen, tap
Settings > Tethering and Wi-Fi hotspot >
Mobile Hotspot.
2. Touch ON/OFF to turn on Portable Wi-Fi hotspot.
Apps >
Use Your Device as a
PortableWi-Fi Hotspot
Note: You must have a tethering plan on your service
account in order to use the Portable Wi-Fi hotspot.
Warning! Portable Wi-Fi hotspot consumes battery
power and uses data service.
3. Activate Wi-Fi on the target device.
4. Scan for Wi-Fi hotspots, and select the target
device from the list.
5. On the target device, enter your device’s
Portable Wi-Fi hotspot password.
60
Tethering and Wi-Fi HotspotSettings
Page 67

Allowed Device List
Configure Portable Wi-Fi Hotspot
Control whether devices connect to your Portable
Wi-Fi hotspot with the Allowed device list. After
you add devices to the list, they can scan for your
device and connect using your device’s Portable
Wi-Fi hotspot name and password.
Note: Using your device as a Portable Wi-Fi hotspot
consumes battery power and uses data service.
While Portable Wi-Fi hotspot is active, your device’s
applications will use the Portable Wi-Fi hotspot
data service. Roaming while using your device as a
Portable Wi-Fi hotspot will incur extra datacharges.
1. From a Home screen, tap
> Tethering and Wi-Fi hotspot> Mobile Hotspot.
2. Tap
3. Tap OK to add the device.
More options > Allowed devices, and
then tap
Device name and MACaddress.
Add to enter the other device’s
Apps > Settings
Change the Portable Hotspot
Password
1. From a Home screen, tap Apps >
Settings > Tethering and Wi-Fi hotspot >
Mobile Hotspot.
2. Tap
More options > Configure hotspot.
Settings
Manage your Portable Wi-Fi hotspot security and
connecting settings.
1. From a Home screen, tap
Settings > Tethering and Wi-Fi hotspot >
Mobile Hotspot.
2. Tap
More options > Configure hotspot for
options:
Network SSID: View and change the name of
-
your Portable Wi-Fi hotspot.
Hide my device: Make your Portable Wi-Fi
-
hotspot invisible to other Wi-Fi devices during
a scan. Other devices can still connect to your
Portable Wi-Fi hotspot, but will have to set up
the connection manually with your Network
SSID and Password.
Security: Choose the security level for your
-
Portable Wi-Fi hotspot.
Password: If you choose a security level that
-
uses a password, enter the password. By
default, the password is your device’s phone
number.
Show password: Display your password
-
instead of masking it.
Apps >
3. Tap the Security field and select WPA2 PSK and
enter a new password.
Turn Off Portable Wi-Fi Hotspot
Automatically
Set your device to automatically turn off Portable
Wi-Fi hotspot if there are no connected device.
1. From a Home screen, tap
Settings > Tethering and Wi-Fi hotspot >
Mobile Hotspot.
2. Tap
3. Select an amount of time to pass before
More options > Timeout settings.
disabling Mobile Hotspot.
Apps >
Show advanced options: Access advanced
-
options, including Broadcast channel, and
to specify the channel your device uses for
Portable Wi-Fi hotspot.
61
Tethering and Wi-Fi HotspotSettings
Page 68

Airplane Mode
Airplane mode disconnects your
device from all networks and
turns off connectivity features,
such as phone calls, Wi-Fi, and
Bluetooth.
While in airplane mode, you
can use other features, such as
playing music, watching videos,
and other online applications.
1. From a Home screen, tap Apps >
Settings.
2. Tap Airplane mode, and then tap ON/OFF to
enable or disable the option.
Note: You can also control Airplane mode from
the Device options menu. Press and hold the
Power/Lock key, and then tap Airplane mode.
62
Airplane ModeSettings
Page 69

Data Usage
Monitor your mobile data usage.
Note: Your service provider may account for data
usage differently.
1. From a Home screen, tap
> Datausage for options:
Mobile data: Enable mobile data. You can also
-
control Mobile Data at the Notification panel.
Set mobile data usage: Disable your mobile
-
data connection when the specified limit is
reached. Drag the red limit line to set the data
usage limit.
Data usage cycle: Tap the menu, and then
-
choose a time period for data usage. Data
usage for the period displays on the graph,
along with usage by application below.
Apps > Settings
2. Tap
More options for options:
Data roaming: Enable data roaming on your
-
device.
Restrict background data: Restrict some
-
apps and services from working unless you
are connected to a Wi-Fi network.
Auto sync data: Set your accounts to
-
automatically sync.
Show Wi-Fi usage: Display a Wi-Fi tab that
-
shows Wi-Fi usage.
Mobile hotspots: Select Wi-Fi networks that
-
are mobile hotspots. You can restrict apps
from using these networks, and you can
configure apps to warn you before using these
networks for large downloads.
63
Data UsageSettings
Page 70

Location Services
Some apps, such as Google
maps, may require one or more
location services be turned on
for full functionality.
Locating Method
1. From a Home screen, tap Apps > Settings
> Location.
2. Tap ON/OFF to turn on Location services.
3. Tap Mode to select how your location is
determined:
High accuracy: Use GPS, Wi-Fi, and mobile
-
networks.
Power saving: Use Wi-Fi and mobile networks
-
(no GPS) .
Location Reporting
Google uses Location Reporting to store and use
your device’s most recent location data. Google
apps, such as Google Maps, can use this data to
improve your search results based on places that
you have visited.
1. From a Home screen, tap
> Location.
2. Tap ON/OFF to turn on Location services.
3. Tap Google Location Reporting for options:
Location Reporting: Allow Google apps to
-
use your device’s most recent location data.
Location History: Allow Google to store a
-
history of your location data. Tap DELETE
LOCATION HISTORY to permanently delete
your location history.
Apps > Settings
GPS only: Use GPS only.
-
Recent Location Requests
Apps that have requested your location are listed
under Recent location requests.
1. From a Home screen, tap
> Location.
2. Tap ON/OFF to turn on Location services.
3. Tap an entry to view the app’s settings.
Apps > Settings
My Places
You can save your favorite locations for use with
services that require location information. This
information can improve your search results and
other location-related activities.
1. From a Home screen, tap
> Location.
2. Tap ON/OFF to turn on Location services.
3. Tap My places.
4. Tap a category (Home, Work, or Car) to add a
location:
Tap Add to add additional categories.
-
Tap More options > Delete to delete a
-
custom category.
Home, Work, and Car cannot be deleted.
-
Apps > Settings
64
Location ServicesSettings
Page 71

More Networks
The More Networks settings
allow you to configure a variety
Access point names: Add or remove mobile
-
access point names for mobile connection to
the Internet.
of communication settings for
your device.
Set the Default Messaging App
Your mobile device can be equipped with more than
one application for text and multimedia messaging.
To select a default messaging app:
1. From a Home screen, tap
Settings.
2. Tap More networks > Default messaging app
to select the app to use for text and multimedia
messages.
Apps >
Configure Mobile Networks
You can control your device’s access to networks
and mobile data services as follows:
1. From a Home screen, tap
Settings.
2. Tap More networks > Mobile networks for
options:
Mobile data: Allow your device to connect to a
-
mobile data network.
Data roaming: Allow your device to connect
-
to data services while roaming. Significantly
higher charges may result.
Enhanced 4G LTE mode: Enable or disable
-
enhanced features available with 4G LTE.
Apps >
Available networks: View and search for
-
available mobile networks.
VirtualPrivate Networks (VPNs)
You can set up and configure Virtual Private
Networks on your device.
Note: You must set a screen lock PIN or password
before setting up a VPN. For more information, see
Lock Screen.
Adding a VPN
1. From a Home screen, tap Apps > Settings
> Morenetworks > VPN.
2. Tap Basic VPN or Advanced IPSec and follow
the prompts to set up yourVPN.
Connect to a VPN
1. From a Home screen, tap Apps > Settings
> VPN.
2. Tap either Basic VPN or Advanced IPSec.
3. Tap the VPN you want to connect to, enter your
log in information, and tap Connect.
Edit or Delete a VPN
1. From a Home screen, tap Apps > Settings
> VPN.
2. Tap either Basic VPN or Advanced IPSec.
3. Touch and hold the VPN that you want to edit or
delete.
4. Tap either Edit network or Delete network.
65
More NetworksSettings
Page 72

Sharing Files with NFC
NFC (Near Field Communication)
allows data exchange when you
touch your device with another
compatible device. This is used
for applications such as Android
Beam and S Beam.
To activate NFC:
1. From a Home screen, tap
> NFC.
2. Tap ON/OFF to turn NFC on.
Apps > Settings
Android Beam
When Android Beam is activated, you can beam app
content to another NFC-capable device by holding
the devices close together. You can beam browser
pages, YouTube videos, contacts, and more.
1. From a Home screen, tap
> NFC.
Apps > Settings
S Beam
When S Beam is activated, you can beam files to
another NFC-capable device by holding the devices
close together.
You can beam images and videos from your Gallery,
music files from your Music app, and more.
1. From a Home screen, tap
> NFC.
2. Tap ON/OFF to turn NFC on.
3. Tap ON/OFF to turn S Beam on.
4. Touch the back of your device with another NFCenabled device.
5. Select content to transfer and select Touch to
beam to transfer it.
Apps > Settings
Tap and Pay
Tap and pay allows you to select the default
payment application you want to use for making onphone purchases.
2. Tap ON/OFF to turn NFC on.
3. Tap ON/OFF to turn Android Beam on.
4. Touch the back of your device with another NFCenabled device.
5. Select content to transfer and select Touch to
beam to transfer it.
1. From a Home screen, tap
> NFC.
2. Tap ON/OFF to turn NFC on.
3. Tap Tap and pay.
4. Select the app that you want as your default.
Apps > Settings
66
Sharing Files with NFCSettings
Page 73

Nearby Devices
Share your media files with
nearby devices via Wi-Fi, Wi-Fi
Direct, or Mobile Hotspot.
Warning! If file sharing is enabled, other devices can
access your data. Use this option with care.
1. From a Home screen, tap
> Nearby devices.
2. Tap ON/OFF to enable Nearby devices.
3. Set the following options:
Shared contents: Select the content to share.
-
Choices are: Videos, Photos, and Music.
Allowed devices: Indicate the devices
-
accessible to your device.
Denied devices: Indicate devices not allowed
-
access to your device.
Download to: Allow downloading of data to
-
your device or optional memory card (not
included).
Receive files from other phones: Warn if a
-
device attempts to upload data to your device.
Apps > Settings
67
Nearby DevicesSettings
Page 74

Printing
Print images and documents
to Samsung printers and
other compatible printers
(notincluded).
1. From a Home screen, tap Apps > Settings
> Printing.
2. Tap a print service and follow the prompts.
Note: Tap
print service drivers.
Download plug-in to install additional
68
PrintingSettings
Page 75

Screen Mirroring
Share Your Device’s Screen with
Another Device.
1. From a Home screen, tap Apps> Settings
> ScreenMirroring.
2. Tap ON/OFF to enable Screen Mirroring.
Available devices are listed.
Tap Scan to find more devices.
-
3. Tap a device and follow the prompts to connect.
69
Screen MirroringSettings
Page 76

Sound
Configure the sounds and
vibrations used to indicate
notifications, screen touches,
and other activities.
Change the Sound Mode
You can switch between sound modes, while
preserving the individual sound settings you’ve
made.
Tip: Sound modes are also available from the Device
options menu. Press and hold the Power/Lock key,
and then choose Mute, Vibrate, or Sound from the
Device options.
1. From a Home screen, tap
Settings.
2. Tap Sound > Sound mode, and then choose a
mode:
Sound: Your device uses the sounds,
-
vibrations, and volume levels you’ve chosen in
Sound settings for notifications and alerts.
Apps >
Adjust the Volume
Set the system volume level, and set default volume
for call ringtones, notifications, and other media.
Tip: You can also set System volume from the home
screen by pressing the Volume key.
1. From a Home screen, tap
Settings.
2. Tap Sound > Volume, and then drag the sliders
to set the default volume for:
Ringtone
-
Music, video, games, and other media
-
Notifications
-
System
-
Apps >
Select a Default Ringtone
Choose from preset ringtones or add your own.
1. From a Home screen, tap
Settings.
Apps >
Vibrate: Your device vibrates for notifications
-
and alerts. This uses the Vibration intensity
you choose in Sound settings.
Mute: Your device plays no sounds or
-
vibrations. On-screen reminders will still occur.
2. Tap Sound > Ringtones.
3. Tap a ringtone to hear a preview, and then tap
OK to set it as your default ringtone.
– or –
Tap Add to use an audio file as a ringtone.
70
SoundSettings
Page 77

Select a Default Vibration Pattern
Play Tones When Entering a
Choose from preset vibration patterns or create your
own pattern.
1. From a Home screen, tap
Settings.
2. Tap Sound > Vibrations.
3. Tap a pattern to preview it, and then tap OK to
set it as your default vibration pattern.
– or –
Tap Create and follow the prompts instructions
to create a new vibration pattern.
Apps >
Change the Notification Sound
Choose a sound for notifications, such as for new
messages and event reminders.
1. From a Home screen, tap
Settings.
Apps >
Phone Number
Play tone when the dialing keypad is tapped.
1. From a Home screen, tap
Settings.
2. Tap Sound > Dialing keypad tone to turn the
feature on.
Apps >
Play Tones When Touching or
Tapping theScreen
Play tones when you touch or tap the screen to
make selections.
1. From a Home screen, tap
Settings.
2. Tap Sound > Touch sounds to turn the
feature on.
Apps >
2. Tap Sound > Notifications.
3. Tap a sound to preview it, and then tap OK to set
it as your default notification sound.
Vibrate When Ringing
Your device can vibrate in addition to ringing when
you receive a call.
1. From a Home screen, tap
Settings.
2. Tap Sound > Vibrate when ringing to turn the
feature on.
Apps >
Set the Screen Lock Sound
Play a sound when you unlock the screen.
1. From a Home screen, tap
Settings.
2. Tap Sound > Screen lock sound to turn the
feature on.
Apps >
Play a Sound When Using the
Samsung Keyboard
1. From a Home screen, tap Apps >
Settings.
2. Tap Sound > Sound when tapped to turn the
feature on.
71
SoundSettings
Page 78

Set Notification Sounds for
Music Effects
Samsung Applications
Choose notification alerts for calls, messages, email,
and calendar events.
1. From a Home screen, tap
Settings.
2. Tap Sounds for options:
Call: Customize notification and alerts for
-
phone calls.
Messaging: Customize messaging
-
notifications and alerts.
Email: Configure your email account
-
notifications.
Calendar: Configure your event notifications.
-
Apps >
Select a default music effects control panel to use
when playing music on your device.
1. From a Home screen, tap
Settings.
2. Tap Sounds > Music effects and select a music
effects control panel.
Apps >
72
SoundSettings
Page 79

Display
Adjust the Screen Brightness
Adjust the screen brightness to suit your
surroundings or personal preference. You may also
want to adjust screen brightness to conserve battery
power.
1. From a Home screen, tap
Settings.
2. Tap Display > Brightness for options:
Tap Automatic brightness to allow the device
-
to adjust brightness automatically.
To set a custom brightness level, clear the
-
Automatic brightness check mark and then tap
and drag the Brightness level.
Note: You can also control Brightness from the
Notification panel. Drag down the Status bar at the top
of the screen to find the Brightness options.
Apps >
Automatically Rotate the Screen
Use the front camera to rotate the screen based on
the orientation of your face.
1. From a Home screen, tap
Settings.
2. Tap Display > Screen rotation
3. Ta p ON/OFF, and then tap Smart rotation to
turn the feature on.
Apps >
Smart Stay
Using the front camera to detect your face, the
screen will not time out as long as you are facing
the screen.
1. From a Home screen, tap
Settings.
2. Tap Display > Smart stay to turn the feature on.
Apps >
Change the Font Style and Size
You can set the font style and size for all text that
displays on the screen.
1. From a Home screen, tap
Settings.
2. Tap Display > Font to choose a Font style and
Font size.
Tap Download to find new fonts from
-
Samsung GALAXY Apps.
Apps >
Set the Screen Timeout Delay
Choose how long the display screen remains lit after
you tap the screen or press any key.
1. From a Home screen, tap
Settings.
2. Tap Display > Screen timeout, and then choose
a time period.
Apps >
73
DisplaySettings
Page 80

Select a Screen Mode
Choose a screen mode to match your type of
viewing. You can choose to have the device
automatically adapt the display depending on the
type of image being displayed, and other criteria
such as battery level.
1. From a Home screen, tap
Settings.
2. Tap Display > Screen mode, and then choose a
screen mode.
To have your device automatically optimize
-
the display to match the type of image being
displayed and other criteria, such as battery
level, tap Adaptive display.
– or –
Choose a specify type of screen mode based
on what your are viewing.
Apps >
Flipboard: Display pictures from Flipboard.
-
Tap Settings for options.
Google Photos: Display pictures from your
-
Google Photos account. Tap Settings for
options.
Photo frame: Display pictures in a photo
-
frame. Tap Settings for options.
Photo table: Display pictures in a photo table.
-
Tap Settings for options.
3. Tap Preview to see a demonstration of
Daydream.
Configure the LED Indicator
Select which functions (such as charging or low
battery) the LED indicator on the front of the device
will display.
Auto Adjust the Screen Tone
Your device will analyze the images displayed on the
screen and automatically adjusts the brightness to
conserve battery power.
1. From a Home screen, tap
Settings.
2. Tap Display > Auto adjust screen tone to turn
the feature on.
Apps >
Daydream (Screen Saver)
The Daydream setting controls what the screen
displays when the device is docked (dock not
included), or while charging. You can choose to
display colors, or display photos stored on your
device.
1. From a Home screen, tap
Settings.
2. Tap Display > Daydream. Tap ON/OFF to turn
Daydream on. Configure options:
Colors: Tap the selector to display a changing
-
screen of colors.
Apps >
1. From a Home screen, tap
Settings.
2. Tap Display > LED indicator for options.
Apps >
Set the Touch Key Light Duration
Set the length of time the Recent apps key and
Back key remain lit after you touch them.
1. From a Home screen, tap
Settings.
2. Tap Display > Touch key light duration to
choose a timeout period.
Apps >
Increase the Touch Sensitivity of
the Screen
Increase the sensitivity of the touch screen to
improve results when wearing gloves.
1. From a Home screen, tap
Settings.
2. Tap Display > Increase tap sensitivity to turn
the feature on.
Apps >
74
DisplaySettings
Page 81

Wallpaper
Change the look of the home
and lock screens with wallpaper.
You can display a favorite
picture, or choose from
preloaded wallpapers.
1. From a Home screen, pinch the screen.
– or –
Touch and hold an empty space on the screen.
2. Tap Wallpapers, and then choose Home screen,
Lock screen, or Home and lock screens.
3. Tap a wallpaper to see a sample, and then tap
Set wallpaper.
Tap More images to select an image from the
-
Gallery, Google Photos, or other location (if
available).
Tap Bubbles or Phase beam for animated
-
wallpaper. (Animated wallpaper consumes
additional battery power).
Tap Travel wallpaper to see recommended
-
travel destinations (Lock screen only).
75
WallpaperSettings
Page 82

Lock Screen
Choose a method for unlocking
your screen. Different Screen
Locks have different levels of
security and options.
Set a Screen Lock
1. From a Home screen, tap Apps >
Settings.
2. Tap Lock Screen
3. Tap Screen lock to select a screen lock and
level of security:
Swipe: Swipe the screen to unlock it. This
-
option provides no security.
Pattern: A screen unlock pattern is a tap
-
gesture you create and use to unlock your
device. This option provides medium security.
PIN: Select a PIN to use for unlocking the
-
screen. This option provides medium to high
security.
Password: Create a password for unlocking
-
the screen. This option provides high security.
Fingerprint: Use fingerprint recognition
-
to unlock the screen. This option provides
medium to high security.
Screen Lock Options
Swipe Only
Unlock effect: Set the visual effect used when
-
unlocking the screen.
Help text: Show help information on unlocking
-
the screen on the Lock screen.
Pattern Only
Pattern type: Select a pattern type.
-
Make pattern visible: Display the pattern as
-
your draw it.
Vibration feedback: Vibrate when the unlock
-
pattern is entered incorrectly.
Lock automatically: Set the amount of time
-
to pass after the screen is turned off before
locking the screen.
Lock instantly with power key: Check this
-
box to lock the screen once the Power key is
pressed.
All Screen Locks
Dual clock: Display a dual clock on your
-
Lock screen when roaming.
Clock size: Select the size of the clock that
-
will appear on your Lock screen.
Show date: Display the date on the
-
Lockscreen.
None: Never use a Lock screen.
-
76
Camera shortcut: Display a camera shortcut
-
on your Lock screen.
Owner Information: Show owner information
-
on the Lock screen.
Additional information: Display Weather
-
information or the step count when Pedometer
in SHealth is turned on.
Lock ScreenSettings
Page 83

Notification Panel
Customize which Quicksetting
buttons appear on the
Notification Panel.
You can also customize
which apps appear on the
Recommended applications
menu on the Notification pane
when you perform certain
actions, such as plugging in
earphones.
► From a Home screen, tap Apps >
Settings>Notification panel.
– or –
From the Notification panel, tap
Edit.
View all >
Recommended Applications
When you perform certain actions, such as plugging
in earphones, the Notification panel can display
shortcut to your favorite related apps, such as Music
Player or Google Play Music.
1. From a Home screen, tap
Settings>Notification panel.
2. Tap Recommended applications.
3. Tap ON/OFF to turn the feature on.
To customize which shortcuts appear on the
-
Recommended apps menu, tap Edit.
Apps >
Tap Brightness adjustment to be able
-
to adjust the screen brightness from the
Notification Panel.
Tap Recommended applications to show
-
selected apps on the Notification Panel
after certain actions, such as connecting
earphones. Tap ON/OFF to turn the
feature on.
To customize which quick setting buttons
-
appear at the top of the Notification Panel, tap
and drag buttons to reorder them. Tap Reset
to use the default layout.
77
Notification PanelSettings
Page 84

Toolbox
The Toolbox is a floating
shortcut menu that displays on
every screen, giving you quick
access to your favorite apps.
1. From the Home screen, tap Apps >
Settings.
2. Tap Toolbox. Tap ON/OFF to enable.
3. Tap Edit to choose up to five apps to display in
Toolbox.
78
ToolboxSettings
Page 85

Easy Mode
View your Home screen using
the default layout or provide
an easier user experience for
the first-time smartphone users
using Easy mode.
1. From the Home screen, tap Apps >
Settings.
2. Tap Easy mode.
Tap the Easy mode radio button to activate it.
-
Scroll down to see the applications that have
-
an Easy mode version. Tap any application to
uncheck if you want the standard display for
that application.
79
Easy ModeSettings
Page 86

Accessibility
Accessibility services are special
features to make using the
device easier for those with
Negative colors: Reverse the display
-
of onscreen colors from White text on a
Black background to Black text on a White
background.
certain physical disabilities.
Note: You can download additional accessibility
applications from the Google Play Store.
1. From a Home screen, tap
Settings.
2. Tap Accessibility for options:
Vision
TalkBack: Speak feedback aloud to help blind
-
and low-vision users.
TalkBack can collect all of the text you
-
enter, except passwords, including personal
data and credit card numbers. It may also
log your user interface interactions with the
device.
Dark screen: Keep the screen turned off at all
-
times for privacy.
Rapid key input: Release your finger to enter
-
selection instead of double tapping.
Speak passwords: Read the characters aloud
-
as you enter your passwords.
Font size: Set the font size.
-
Apps >
Color adjustment: Adjust the color of the
-
screen if you are color blind or have difficulty
reading the display because of the screen
color. Tap Color adjustment for options.
Accessibility shortcut: Quickly enable
-
accessibility features in two quick steps. Tap
ON/OFF to turn the feature on.
Text-to-speech options: Set your preferred
-
TTS engine and options. For more information,
see Text-To-Speech Options.
Hearing
Flash notification: Set your camera light to
-
blink whenever you receive a notification.
Turn off all sounds: Turn off all sounds
-
including receiver voice.
Hearing aids: Improve the sound quality of
-
your device for use with hearing aids.
Samsung subtitles (CC): Use Samsung
-
subtitles with multimedia files when available
Tap Samsung subtitles (CC) for options.
Google subtitles (CC): Use Google subtitles
-
with multimedia files when available. Tap
Google subtitles (CC) for options.
Magnification gestures: Use exaggerated
-
gestures such as triple-tapping, double
pinching, and dragging two fingers across the
screen.
Notification reminder: Play a beep when a
-
notification for a call, message, and so on, has
been missed.
80
Sound balance: Use the slider to set the Left
-
and Right balance when using a stereo device.
Mono audio: Switch audio from stereo to
-
mono for use with one earphone.
AccessibilitySettings
Page 87

Dexterity and Interaction
Assistant menu: Improve the device
-
accessibility for users with reduced dexterity.
Press and hold delay: Select a time interval
-
for this tap gesture.
Interaction control: Enable motions and
-
screen timeout. You can also block areas of
the screen from tap interaction.
More Settings
Direct Access: Open your accessibility
-
settings by pressing the Home Key three times
in quick succession.
Answering/ending calls: Select options for
-
answering and ending calls by pressing keys
and/or using voice control.
Single tap mode: Tap to stop/snooze alarms
-
and calendar events.
Manage accessibility: Export your
-
accessibility settings and share them with
another device.
Services
Additional accessibility apps may be downloaded
from the Google Play Store. Certain accessibility
services you install may be configured here.
81
AccessibilitySettings
Page 88

Blocking Mode
Turn off notifications for
selectedfeatures.
1. From a Home screen, tap Apps >
Settings.
Tap Allowed contacts to configure the
-
contacts for whom call and message
notifications still appear even when Blocking
Mode is enabled. You can select:
None: Block notifications from all contacts.
-
2. Tap Blocking mode. Tap ON/OFF to turn the
feature on.
3. Configure options:
Tap Block incoming calls to block incoming
-
phones calls.
Tap Turn off notifications to block all
-
notifications.
Tap Turn off alarm and timer to block all
-
alarms.
Tap the Always field to enable or disable
-
Blocking Mode at all times. When Always is
disabled, you can configure the From and To
time fields to define a range of hours each day
to turn on Blocking Mode.
All contacts: Allow notifications from all
-
contacts.
Favorites: Allow notifications only from
-
contacts that are marked as Favorites.
Group: Allow notifications only from
-
contacts in specific groups.
Custom: Create a custom list of contacts
-
for whom notifications will appear when
Blocking Mode is enabled.
Note: When Blocking Mode is enabled,
the Status Bar.
displays in
82
Blocking ModeSettings
Page 89

Private Mode
Hide personal content from
being accessed by anyone else
using your device.
Private mode is only available for
certain applications.
Note: A secure screen lock (Pattern, PIN, Fingerprint,
or Password) is required to use Private Mode.
Set Up Private Mode
1. From a Home screen, tap Apps >
Settings.
2. Tap Private mode.
3. Follow the prompts to learn about and set up
Private mode.
83
Private ModeSettings
Page 90

Finger Scanner
Use fingerprint recognition as an
alternative to entering passwords
in certain apps.
You can also use your fingerprint
to verify your identity when
logging in to your Samsung
account.
Register a Fingerprint
You can register up to 3 fingerprints. A password
will also set up as an alternative to your fingerprint.
1. From a Home screen, tap
Settings.
2. Tap Finger Scanner > Fingerprint manager.
Apps >
Set a Backup Password
1. From a Home screen, tap Apps >
Settings.
2. Tap Finger Scanner > Set backup password.
3. Enter your fingerprint or password.
Additional Settings
1. From a Home screen, tap Apps >
Settings.
2. Tap Finger Scanner for options.
Screen lock: Change your Screen lock
-
and access Screen lock settings. For more
information, see Lock Screen.
Verify Samsung account: Verify your identity
-
using your fingerprint when logging in to your
Samsung account.
To add a fingerprint, tap Add and follow
-
the instructions to register a fingerprint and
password.
To rename a fingerprint, touch and hold the
-
fingerprint, and then touch Edit.
To delete a fingerprint, touch and hold the
-
fingerprint, and then touch
Remove.
Pay with PayPal: Link your PayPal account
-
to your device to make payments with your
registered fingerprints.
84
Finger ScannerSettings
Page 91

Motions and Gestures
Control certain device actions
by touching the screen with the
palm of your hand.
1. From a Home screen, tap Apps >
Settings.
2. Tap Motions and gestures.
3. Tap ON/OFF to enable each of the following:
Direct call: Call the contact whose call log,
-
message, or contact details are currently on
the screen by bringing the device close to
yourear.
Smart alert: Set the device to vibrate when
-
you pick it up to notify you about missed calls
and messages.
Mute/pause: Mute or pause sounds and video
-
by covering the screen or turning over the
device.
Palm swipe to capture: Capture an image of
-
the screen when you sweep your hand left or
right across the screen.
85
Motions and GesturesSettings
Page 92

Air View
Preview information, extend text,
or enlarge pictures by hovering
your finger over the screen.
1. From a Home screen, tap Apps >
Settings.
2. Tap Air view.
3. Tap ON/OFF to turn the feature on.
86
Air ViewSettings
Page 93

Accounts
Set up and manage accounts,
including your Google Account,
Samsung account, email, and
social networking accounts.
Depending on the account, you
can choose to synchronize your
calendar, contacts, and other
types of content.
Add an Account
1. From a Home screen, tap Apps >
Settings.
2. Tap Accounts > Add account.
3. Tap one of the account types.
4. Follow the prompts to enter your credentials and
set up the account.
Account Settings
Each account has its own set of settings. In addition,
you can configure common settings for all accounts
of the same type.
Note: Account settings and available features vary
between account types and service providers. Contact
your service provider for more information on your
account’s settings.
1. From a Home screen, tap Apps >
Settings.
2. Tap Accounts > (
Tap an account to configure that account’s
-
settings.
Tap Settings or other available options to
-
configure common settings for all accounts of
this type.
account type) .
Delete an Account
1. From a Home screen, tap Apps >
Settings.
Synchronize Accounts
1. From a Home screen, tap Apps >
Settings.
2. Tap Accounts > (account type).
3. Tap an account to view the sync settings for that
account.
Check individual data items to sync.
-
Tap Sync to synchronize the account.
-
2. Tap Accounts > (
3. Tap the account, and then tap More options >
Removeaccount.
87
account type) .
AccountsSettings
Page 94

Backup and Reset
Back up your data to Google
servers. You can also reset your
device to its factory defaults.
Backup and Restore
Enable backup of your information to Google
servers.
1. From a Home screen, tap
Settings.
2. Tap Backup and reset for options:
Back up my data: Enable back up of
-
application data, Wi-Fi passwords, and other
settings to Google servers.
Backup account: Select a Google account to
-
be used as your backup account.
Apps >
Factory Data Reset
Return your device to its factory defaults.
Warning! This action permanently erases ALL data
from the device, including Google or other account
settings, system and application data and settings,
downloaded applications, as well as your music,
photos, videos, and other files.
1. From a Home screen, tap
Settings.
2. Tap Backup and reset > Factory data reset.
3. Tap Reset device and follow the prompts to
perform the reset.
Apps >
Automatic restore: Enable automatic
-
restoration of settings from Google servers.
When enabled, backed-up settings are
restored when you reinstall an application.
88
Backup and ResetSettings
Page 95

Language and Input Settings
Configure your device’s
language and input settings.
Set Your Default Language
1. From a Home screen, tap Apps >
Settings.
2. Tap Language and input > Language.
3. Select a language from the list.
Select Your Default Keyboard
orInput Method
1. From a Home screen, tap Apps >
Settings.
2. Tap Language and input > Default.
3. Select a keyboard.
Note: Additional keyboards can be downloaded from
the Google Play Store.
3. Tap
options:
Settings next to Samsung keyboard for
Select input languages: Choose which
-
languages are available on the keyboard. To
switch between languages, slide the space bar
sideways.
Predictive text: Allow Predictive text to
-
suggest words matching your text entries,
and, optionally, complete common words
automatically. Predictive text can learn your
personal writing style from your Contacts,
Messages, Gmail, and social networking
sites — improving its accuracy of predicting
your text entries.
Additional keyboard settings provide
-
assistance with capitalization, punctuation,
and much more.
Swype Keyboard Settings
Configure options for using the Swype keyboard.
1. From a Home screen, tap
Settings.
Apps >
Samsung Keyboard Settings
Configure options for using the Samsung keyboard.
1. From a Home screen, tap
Settings.
2. Tap Language and input.
Apps >
2. Tap Language and input.
3. Tap
89
Settings next to Swype for options:
Settings: Configure basic options.
-
Themes: Change the keyboard layout.
-
My Words: Manage your personal dictionary,
-
new word updates, as well as how Swype can
learn from your writing style in various apps.
Languages: Set the current language.
-
Additional languages can be downloaded.
Gestures: Learn about using Swype gestures.
-
Help: View information on using Swype.
-
Language and Input SettingsSettings
Page 96

Google Voice Typing Settings
Text-To-Speech Options
Speak rather than type your text entries using
Google Voice Typing.
1. From a Home screen, tap
Settings.
2. Tap Language and input.
3. Tap
options:
Settings next to Google voice typing for
Choose input languages: Select languages
-
for Google voice typing.
Block offensive words: Hide words many
-
people find offensive are in results of Google
voice searches. Offensive words are replaced
in results with a placeholder (####).
Offline speech recognition: Download and
-
install speech recognition engines, allowing
you to use voice input while not connected to
the network.
Apps >
Configure your Text-To-Speech (TTS) options. TTS
is used for various accessibility features, such as
TalkBack. For more information, see Accessibility.
1. From a Home screen, tap
Settings.
2. Tap Language and input > Text-to-speech for
options:
Choose either the Samsung or Goggle text-to-
-
speech engine. Tap Settings next to each
TTS engine for options.
Speech rate: Set the speed at which the text
-
is spoken.
Listen to an example: Play a sample of
-
speech synthesis (available if voice data is
installed).
Default language status: Display the default
-
language in use.
Apps >
Voice Search
Use Google voice recognition to perform Google
searches using spoken commands.
To perform a voice search, tap
search bar or widget. Or say “Ok Google” to launch
a Google search (if the hotword detection option is
enabled).
1. From a Home screen, tap
Settings.
2. Tap Language and input > Voice search for
options.
Tap “Ok Google” hotword detection to
-
launch a Google search whenever you say
“OkGoogle.”
Additional options include selecting a default
-
language, blocking offensive words, and more.
in the Google
Apps >
Read New Notifications Aloud
Set the device to read new notifications aloud for
incoming calls, messages, and emails, as well as
caller or sender information.
1. From a Home screen, tap
Settings.
2. Tap Language and input > Read notifications
aloud.
3. Tap each option to either enable or disable it.
Apps >
Mouse/Trackpad Settings
Configure settings for using an optional mouse or
trackpad (not included) .
1. From a Home screen, tap
Settings.
2. Tap Pointer speed to set the speed of the
pointer.
Apps >
90
Language and Input SettingsSettings
Page 97

Date and Time
By default, your device receives
date and time information from
Set date: Tap to manually set the date. This
-
option is locked if Automatic date and time is
enabled.
the wireless network.
When you are outside network
coverage, you may want to
set date and time information
manually using the date and time
settings.
1. From a Home screen, tap Apps >
Settings.
2. Tap Date and time. The following options
appear:
Automatic date and time: Tap the check box
-
to use the time on the mobile and/or Wi-Fi
network. If this option is checked, you cannot
manually set the date and time.
Set time: Tap to manually set the time. This
-
option is locked if Automatic date and time is
enabled.
Automatic time zone: Tap the check box to
-
use the time zone detected on the mobile and/
or Wi-Fi network. If this option is checked, you
cannot manually set the time zone.
Select time zone: Tap to manually set the time
-
zone. This option is locked if Automatic time
zone is enabled.
Use 24-hour format: Tap to use 24-hour
-
format (as opposed to 12-hour with AM and
PM).
Select date format: Tap to choose your
-
preferred date format.
3. Set the date, time, time zone, time format, and
date format.
91
Date and TimeSettings
Page 98

Safety Assistance
Receive real-time information
about emergencies and severe
weather conditions.
You can also enable Emergency
mode (a power-conserving mode
which restricts certain apps and
functions while allowing access
to Messages, Contacts, and
emergency calls).
Emergency Mode
Use Emergency mode to conserve batter power
during emergencies. Power-hungry apps and
functions are disable, but you are still able
to sendmessages, use Contacts, and make
emergencycalls.
1. From a Home screen, tap
Settings>SafetyAssistance.
2. Tap Emergency mode.
Apps >
Send Help Messages
Send a quick alert to your primary contacts when
you are in an emergency situation.
To enable this feature:
1. From a Home screen, tap
Settings>SafetyAssistance.
2. Tap Send help messages.
3. Tap OFF/ON to turn the feature on.
Tap Send pictures to send photos taken with
-
the front and back cameras to your emergency
contacts.
Tap Send sound recording to send a short
-
audio message to your emergency contacts.
To send a help messages:
► Press the Power/Lock key quickly three times.
Apps >
Manage Primary Contacts
Select contacts or create new ones to be your
emergency contacts. These contacts automatically
receive your help message.
3. Tap ON/OFF to turn the feature on.
Geo News
Receive information about weather, environmental
situations, and geological information for your
location during emergencies.
1. From a Home screen, tap
Settings>SafetyAssistance.
2. Tap Geo News.
3. Tap ON/OFF to turn the feature on.
Tap Geo News notification pop-ups to
-
receive pop-up alerts.
Apps >
1. From a Home screen, tap
Settings>SafetyAssistance.
2. Tap Manage primary contacts.
Tap Create primary contacts:
-
Tap Create new contacts to enter a name
-
and phone number for a new emergency
contact.
Tap Select from contacts to designate a
-
contact to be an emergency contact.
92
Apps >
Safety AssistanceSettings
Page 99

Battery
View how battery power is used
for device activities.
1. From a Home screen, tap Apps >
Settings.
2. Tap Battery for options:
Show battery percentage: Display the battery
-
charge percentage next to the battery icon on
the Status bar.
Battery Chart: The battery level displays as
-
a percentage. The amount of time the battery
has been used also displays.
Apps and OS Usage: Battery usage displays
-
in percentages per application.
Tap Screen, Android System, Android OS,
-
or an app to view they are affecting battery
use.
Tap Refresh to update the listing.
-
Note: Other applications may be running that affect
battery use.
93
BatterySettings
Page 100

Power Saving
Conserve battery power by
automatically adjusting the
screen brightness, limiting the
performance of the CPU, and
other power reduction activities.
Ultra power saving mode saves
even more battery power by
using a gray scale theme on the
Home screen and limiting the
number of usable apps.
1. From a Home screen, tap Apps >
Settings.
2. Tap Power saving for options:
Power saving mode: Tap Power saving mode
-
to select options. Tap ON/OFF to turn the
feature on.
Ultra power saving mode: Tap Ultra power
-
saving mode for options. Tap ON/OFF to turn
the feature on.
Tip: Tap
information about conserving power.
More options > Help to display more
94
Power SavingSettings
 Loading...