

Page 1
Inst_Manu_US.book Page 2 Tuesday, August 12, 2003 6:22 PM
Page 2
Inst_Manu_US.book Page 3 Tuesday, August 12, 2003 6:22 PM
Contens (CD-ROM)
Before You Start . . . . . . . . . . . . . . . . . . . . . . . . . 5
Charging with the Cradle . . . . . . . . . . . . . . . . . . . . . . . . 5
Charging without the Cradle . . . . . . . . . . . . . . . . . . . . . . 6
Connecting to External Equipment Using the Cradle . . . 7
Connecting GADGET and External Equipment . . . . . . . 9
Time Display . . . . . . . . . . . . . . . . . . . . . . . . . . . . . . . . . 10
Identifying the Parts (the main unit) . . . . . . . . . . . . . . . 12
Inserting Memory Stick/
Operating Delete-Protection switch . . . . . . . . . . . . 14
Identifying the Parts (Cradle and Remote Control) . . . . 16
Selecting a Mode [Play] . . . . . . . . . . . . . . . . . . . . . . . . 18
Setting Menu Items . . . . . . . . . . . . . . . . . . . . . . . . . . . . 19
Quick Access . . . . . . . . . . . . . . . . . . . . . . . . . . . . . . . . 20
LCD Screen . . . . . . . . . . . . . . . . . . . . . . . . . . . . . . . . . . 23
Basic Usage . . . . . . . . . . . . . . . . . . . . . . . . . . . 25
Reference Recordable Hours and Photo Count . . . . . . 25
Recording Movies (MPEG4 Video Recording) . . . . . . . 27
Playing Back Movies (MPEG4 Video Playback) . . . . . . 28
Recording Still Images . . . . . . . . . . . . . . . . . . . . . . . . . 29
Playing Back Still Images . . . . . . . . . . . . . . . . . . . . . . . 29
Recording from a TV or VCR . . . . . . . . . . . . . . . . . . . . . 30
Viewing on TV . . . . . . . . . . . . . . . . . . . . . . . . . . . . . . . . 31
Recording Sounds . . . . . . . . . . . . . . . . . . . . . . . . . . . . 32
Listening to Sounds in an Audio File . . . . . . . . . . . . . . . 33
Listening to MP3 Music . . . . . . . . . . . . . . . . . . . . . . . . . 34
Connecting to a PC . . . . . . . . . . . . . . . . . . . . .36
USB's Functions . . . . . . . . . . . . . . . . . . . . . . . . . . . . . . 36
PC Camera Function . . . . . . . . . . . . . . . . . . . . . . . . . . 36
Removable Disk Function . . . . . . . . . . . . . . . . . . . . . . . 43
Connecting to a Printer . . . . . . . . . . . . . . . . . . . . . . . . . 44
Enjoy Variety of Usages . . . . . . . . . . . . . . . . . . 45
Different Menu Settings . . . . . . . . . . . . . . . . . . . . . . . . 45
Precautions for Use . . . . . . . . . . . . . . . . . . . . .51
Precautions for Handling the Internal Hard Disk . . . . . 51
Precautions on Handling the Camera . . . . . . . . . . . . . 51
Precautions for Use - Concerning the Operating
Environment of the Supplied Software . . . . . . . . . . 52
Precautions for Cleaning the Unit and Handling
the Internal Lithium Cell . . . . . . . . . . . . . . . . . . . . . 53
Precaution for Using “Memory Stick”/
“Memory Stick Pro” . . . . . . . . . . . . . . . . . . . . . . . . 54
Precautions for Handling the Lens and
the LCD Screen . . . . . . . . . . . . . . . . . . . . . . . . . . . 56
Precautions for Charging and Handling
the Battery . . . . . . . . . . . . . . . . . . . . . . . . . . . . . . . 57
Using GADGET Overseas . . . . . . . . . . . . . . . . . . . . . . 59
3
Page 3
Inst_Manu_US.book Page 4 Tuesday, August 12, 2003 6:22 PM
Troubleshooting . . . . . . . . . . . . . . . . . . . . . . . . 62
Troubleshooting . . . . . . . . . . . . . . . . . . . . . . . . . . . . . . 62
Additional Information . . . . . . . . . . . . . . . . . . . . 69
Major Specifications . . . . . . . . . . . . . . . . . . . . . . . . . . . 69
Guarantee and Services . . . . . . . . . . . . . . . . . . . . . . . . 72
4
Page 4
Not
Inst_Manu_US.book Page 5 Tuesday, August 12, 2003 6:22 PM
Before You Start
■
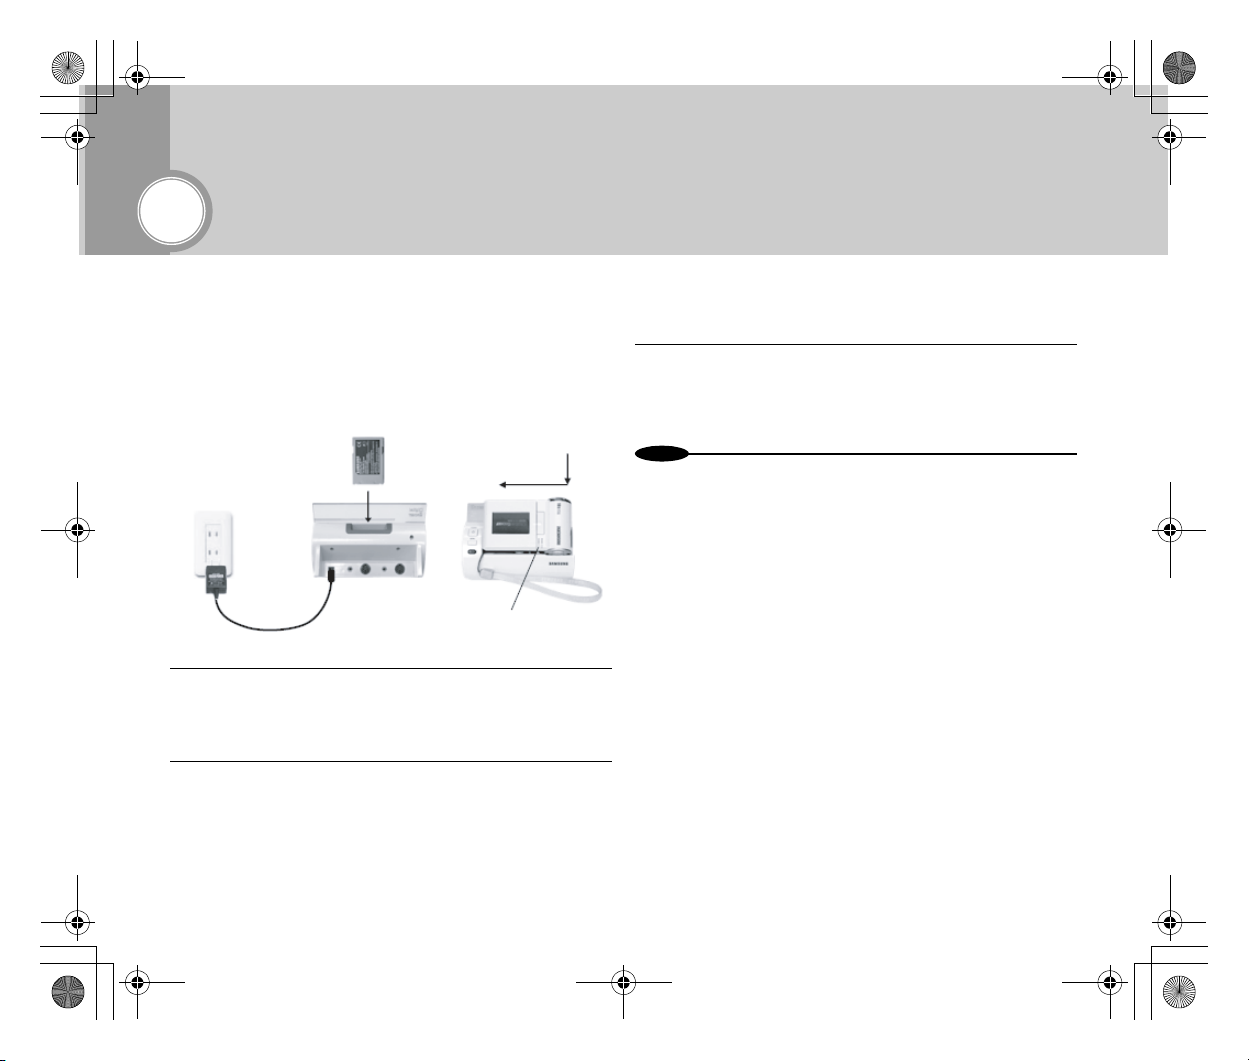
Charging with the Cradle
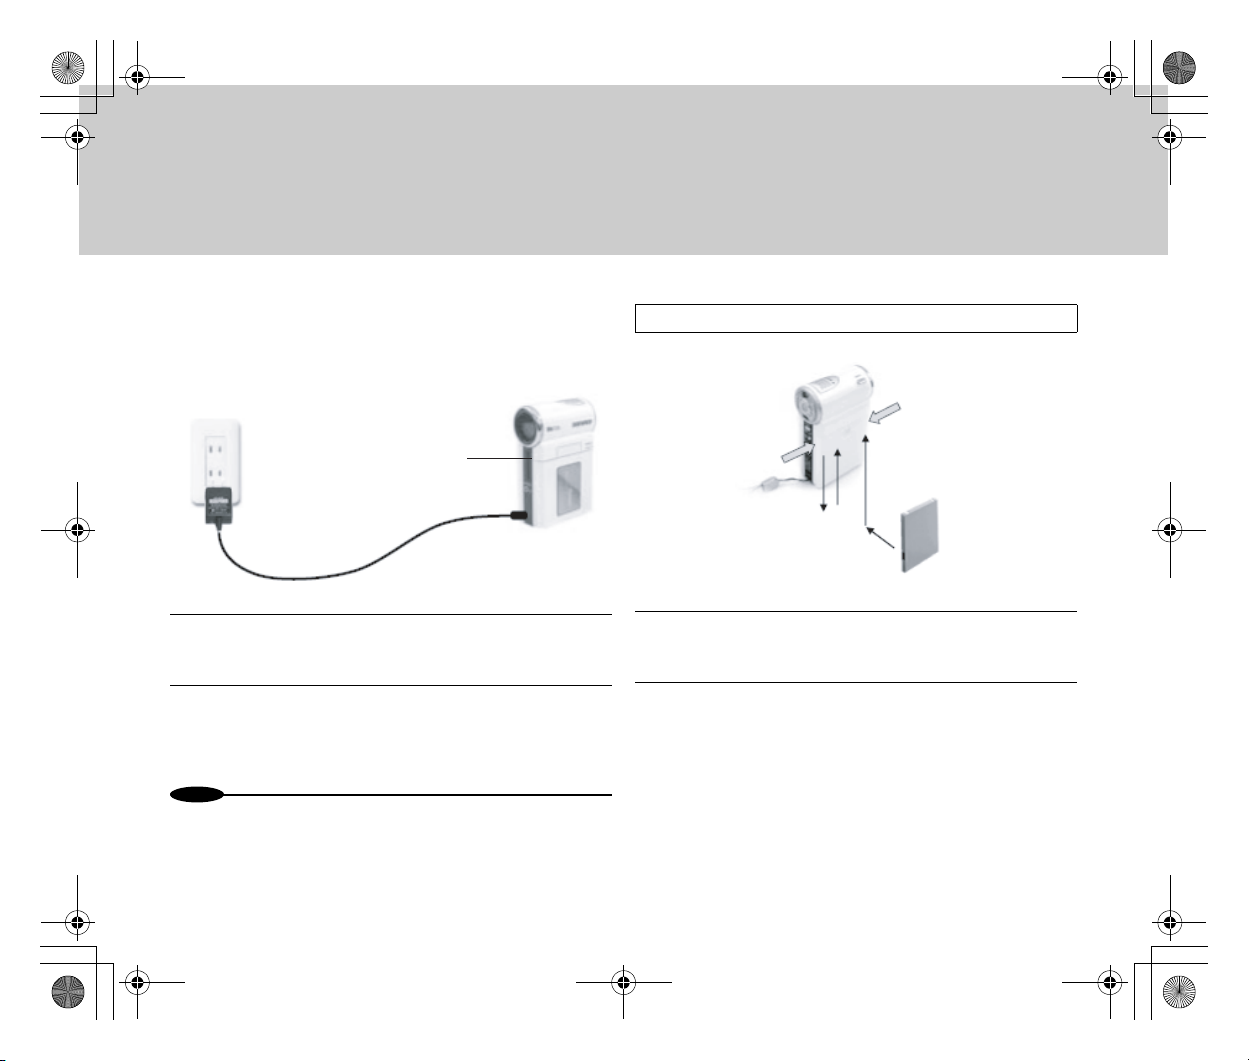
Using the cradle, you can charge GADGET's main and additional
battery packs at the same time.
● Charging GADGET's Main Battery Pack
Wall outlet
AC Adaptor
DC IN jack
Charge lamp (orange)
1 Connect the AC Adaptor to the cradle and then
connect it to a wall outlet.
•The cradle's panel lights up blue.
2 Connect the GADGET unit to the cradle and power
off the cradle.
•Charging starts.
•When completed, the charge lamp goes off.
● Charging the Additional Battery Pack
1 Insert the additional battery pack into the battery
charging slot located on the cradle's rear panel.
•Charging of the additional battery pack starts.
es
•At the time of purchase, the battery packs are not charged. Charge
them before you start using this device.
• Charge time: about 90 minutes (for either the main or additional battery
pack)
• You can charge the main battery pack only, the additional battery pack
only or both battery packs at the same time.
5
Page 5
Not
Inst_Manu_US.book Page 6 Tuesday, August 12, 2003 6:22 PM
■Charging without the Cradle
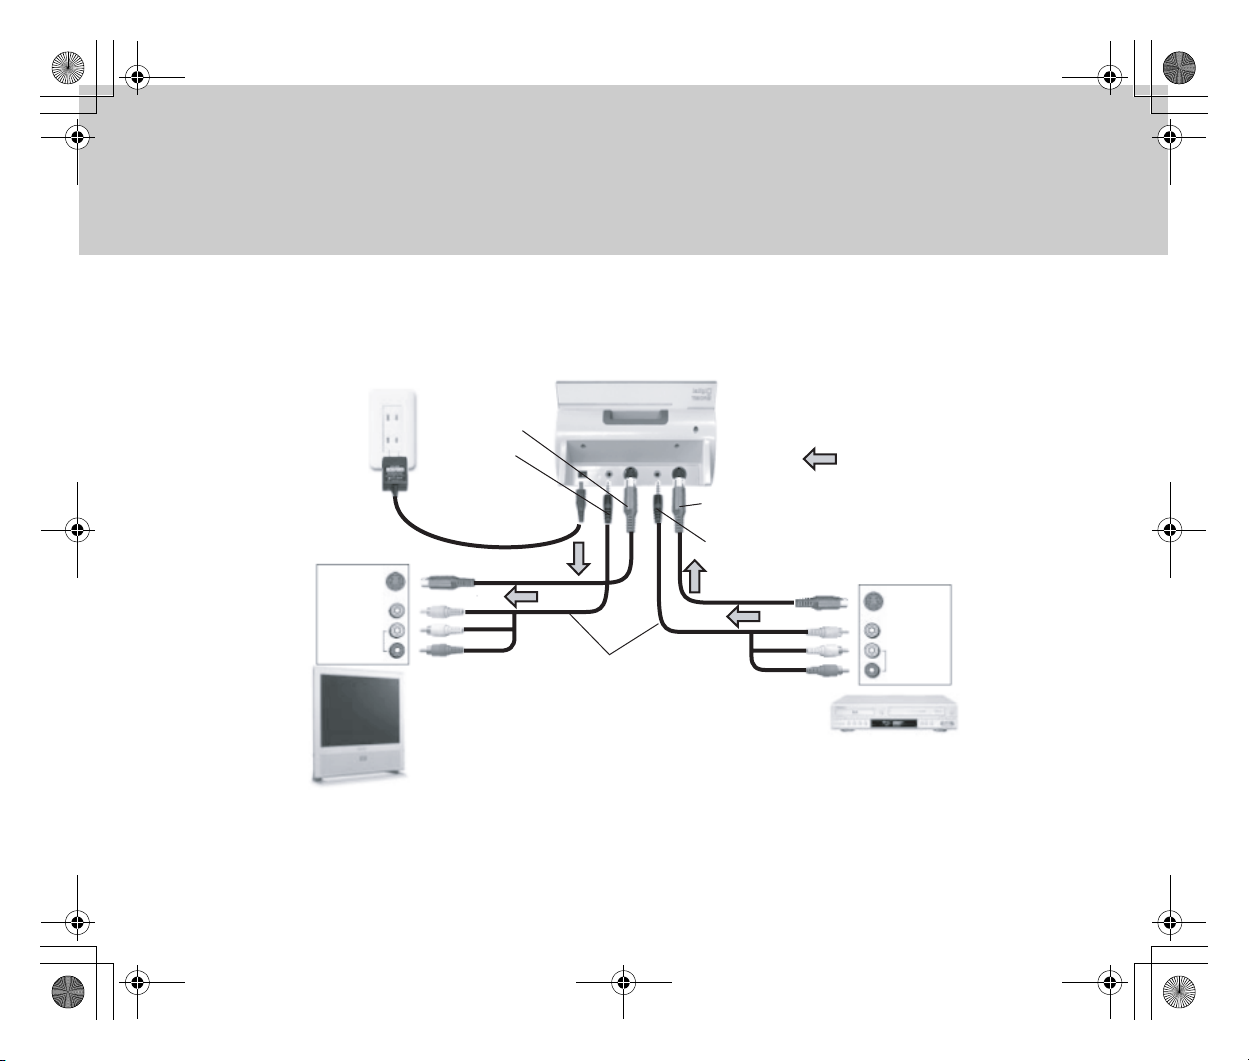
You can charge the battery pack installed in the GADGET unit as
it is.
Wall outlet
Charge lamp (orange)
AC Adaptor
DC IN jack
1 Connect the AC Adaptor to the GADGET unit and
then connect it to a wall outlet.
2 Turn off the power.
•Charging starts.
•When completed, the charge lamp goes off.
es
•At the time of purchase, the battery packs are not charged. Charge
them before you start using this device.
•Batteries cannot be charged when the GADGET unit is powered on.
When charging, turn the Power switch to [OFF].
Installing a Battery Pack
Push
Push
1 Push the upper section of both sides of the battery
cover and slide the cover down to remove it.
2 Install a battery pack and reattach the cover in
place.
6
Page 6
Inst_Manu_US.book Page 7 Tuesday, August 12, 2003 6:22 PM
■Connecting to External Equipment Using the Cradle
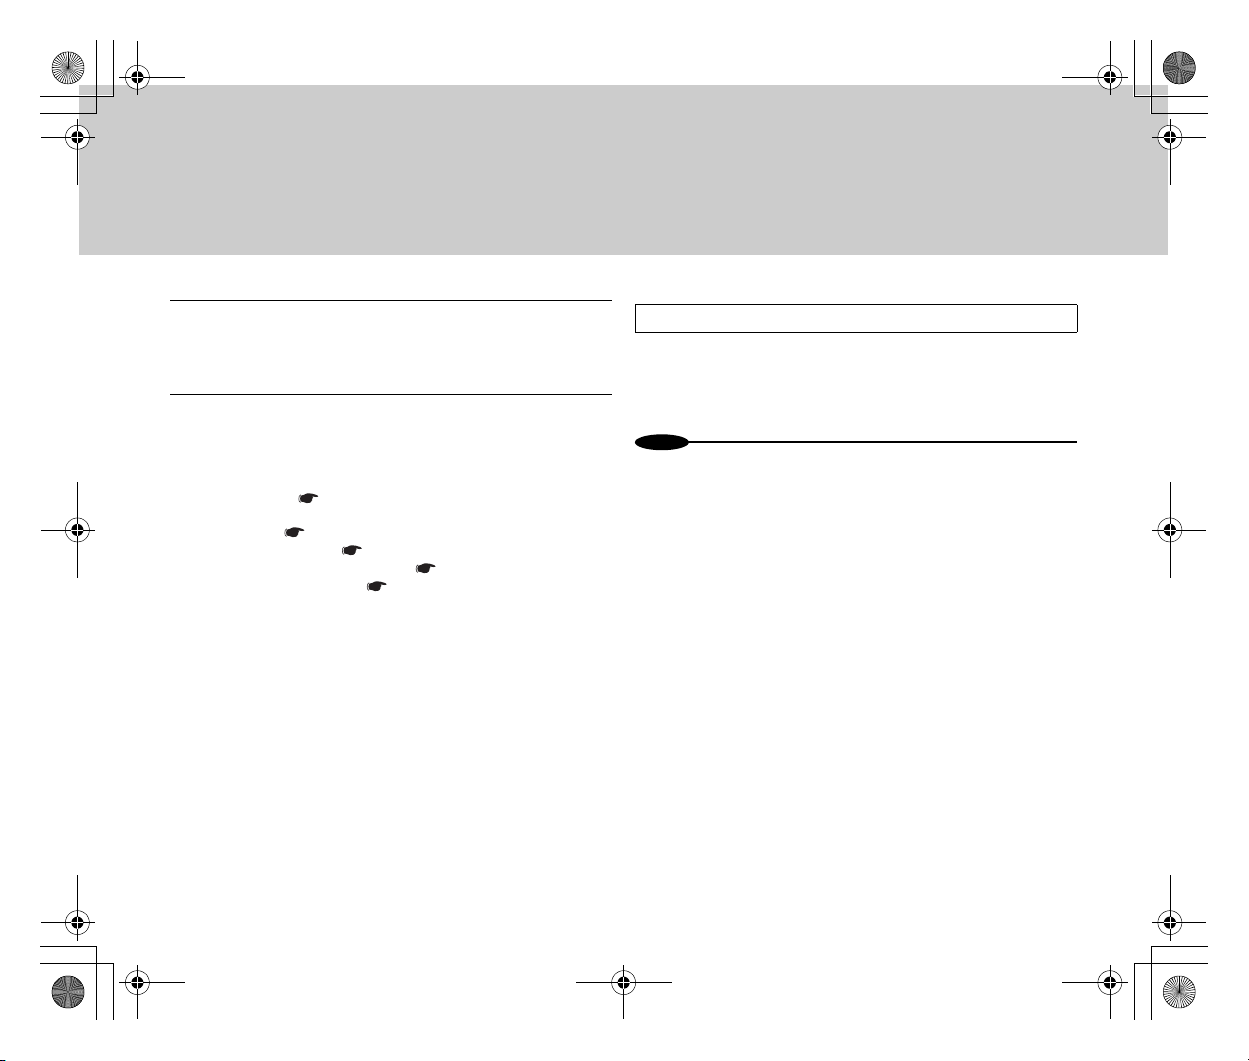
The cradle can be useful for charging or connecting the device to external equipment (such as a TV set or a VCR).
S-video output
AV input
S-Video
Video
Sound
AV output
AC Adaptor
TV set
DC IN jack
AV cable
Flow of signals
S-video input
AV input
AV output
S-Video
Video
Sound
VCR
7
Page 7
Not
Inst_Manu_US.book Page 8 Tuesday, August 12, 2003 6:22 PM
1 As shown in the diagram on the previous page,
connect the GADGET unit to external equipment
with the cable shipped with the device.
2 Connect the AC Adaptor to the GADGET unit and
then connect it to a wall outlet.
•After that, go to the pages on the respective
operations.
• Charging Page xx
• Basic operations (power on and selection of operating
mode) Page xx
• Menu operation Page xx
• Recording from TV or video Page xx
• Viewing on a TV set Page xx
Using the Connected External Equipment
You can use the connected external equipment as usual even when the GADGET unit is removed from the cradle or when it is powered off.
es
•To record movies and/or still images recorded by GADGET on a video,
output images from the GADGET unit to a VCR.
8
Page 8
Inst_Manu_US.book Page 9 Tuesday, August 12, 2003 6:22 PM
■Connecting GADGET and External Equipment
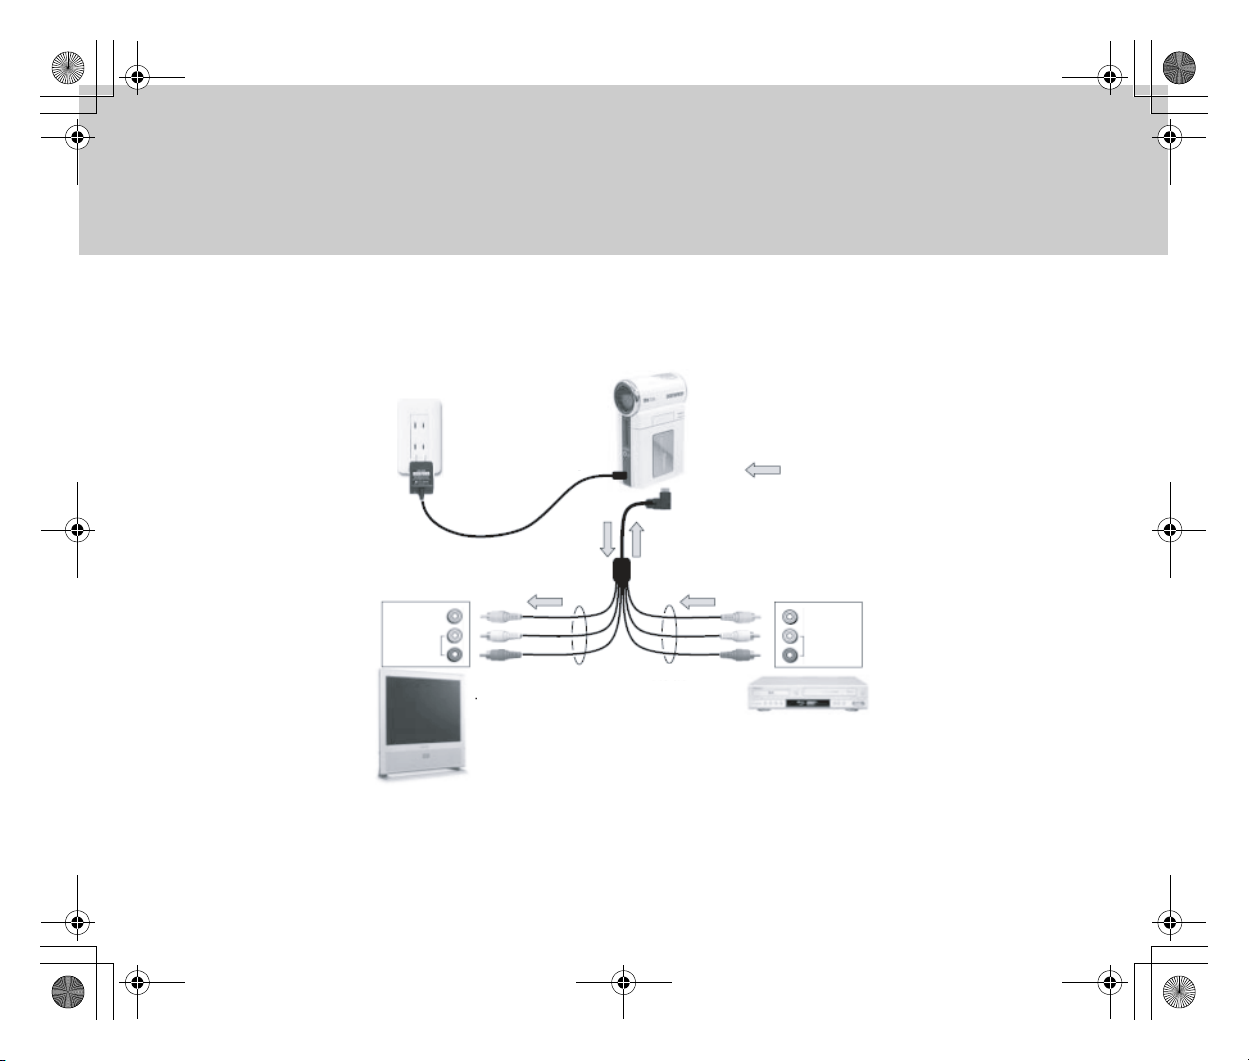
Connect the GADGET unit and external equipment (such as a TV set or a VCR) using the multi-AV cable shipped with the device.
Wall socket
AV input
Video
Sound
AC Adaptor
TV set
DC IN jack
AV output
Flow of signals
Multi-AV cable
AV output
Video
Sound
AV input
VCR
9
Page 9
Not
Inst_Manu_US.book Page 10 Tuesday, August 12, 2003 6:22 PM
1 As shown in the diagram on the previous page,
connect the GADGET unit and external equipment
with the multi-AV cable shipped with the device.
2 Connect the AC Adaptor to the GADGET unit and
then connect it to a wall outlet.
•After that, go to the pages on the respective
operations.
• Charging Page xx
• Basic Operations (power on and selection of operating
mode) Page xx
• Menu Operation Page xx
• Recording from TV or VCR Page xx
• Viewing on TV Page xx
es
•To copy movies and/or still images recorded by GADGET to a video,
output images from the GADGET unit to a VCR.
■Time Display
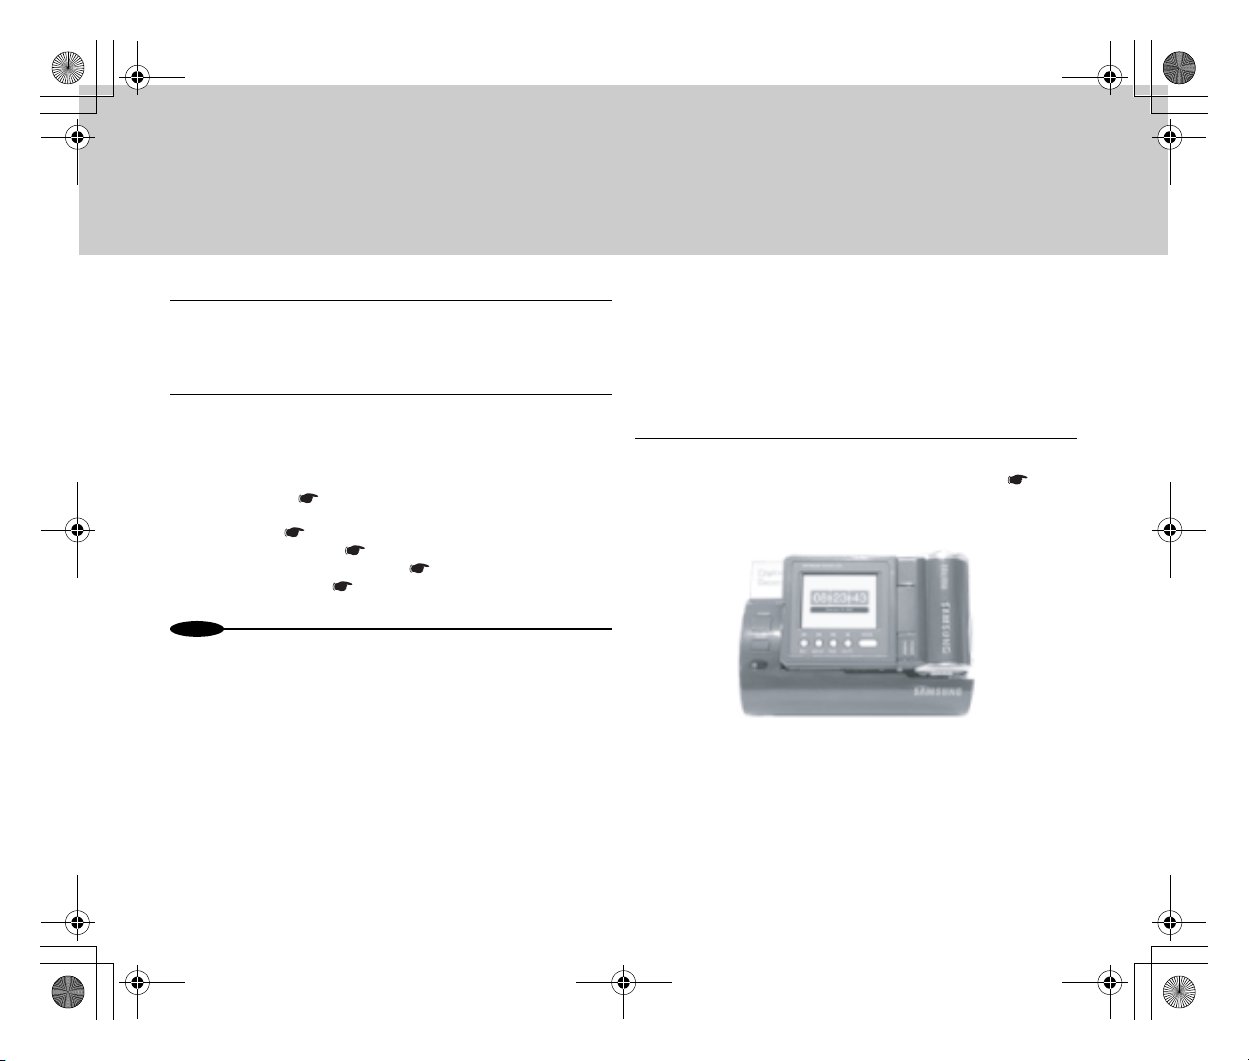
You can check the current time any time except during image/
video recording.
● When Connected to the Cradle
1 Turn off GADGET's power and connect it to the
cradle with its LCD screen faced outward. ( Page
xx)
•Powering on terminates the time display.
10
Page 10
Not
Inst_Manu_US.book Page 11 Tuesday, August 12, 2003 6:22 PM
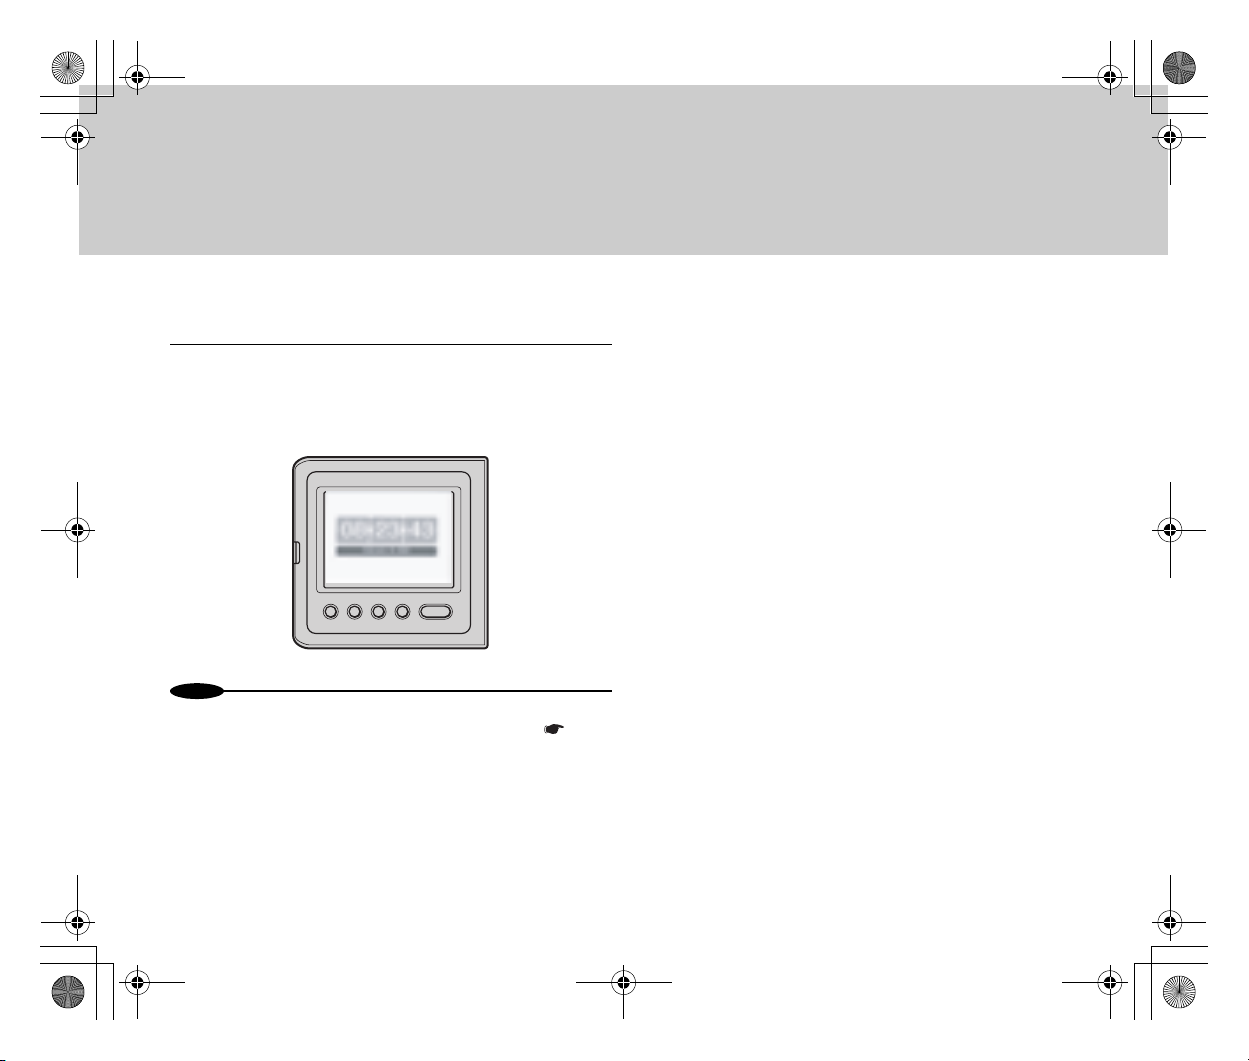
● When Using GADGET Alone
1 Hold down the Mode button for one second or
longer.
•The current time appears on the LCD screen.
•Pressing a button restores the initial state.
es
•Time display is disabled at the time of purchase. To use the time
display function, set Time Display to [On] from the menu. ( Page
xx)
•Two types of time display are available: analog and digital. You can
choose the type you prefer from the menu.
11
Page 11
Inst_Manu_US.book Page 12 Tuesday, August 12, 2003 6:22 PM
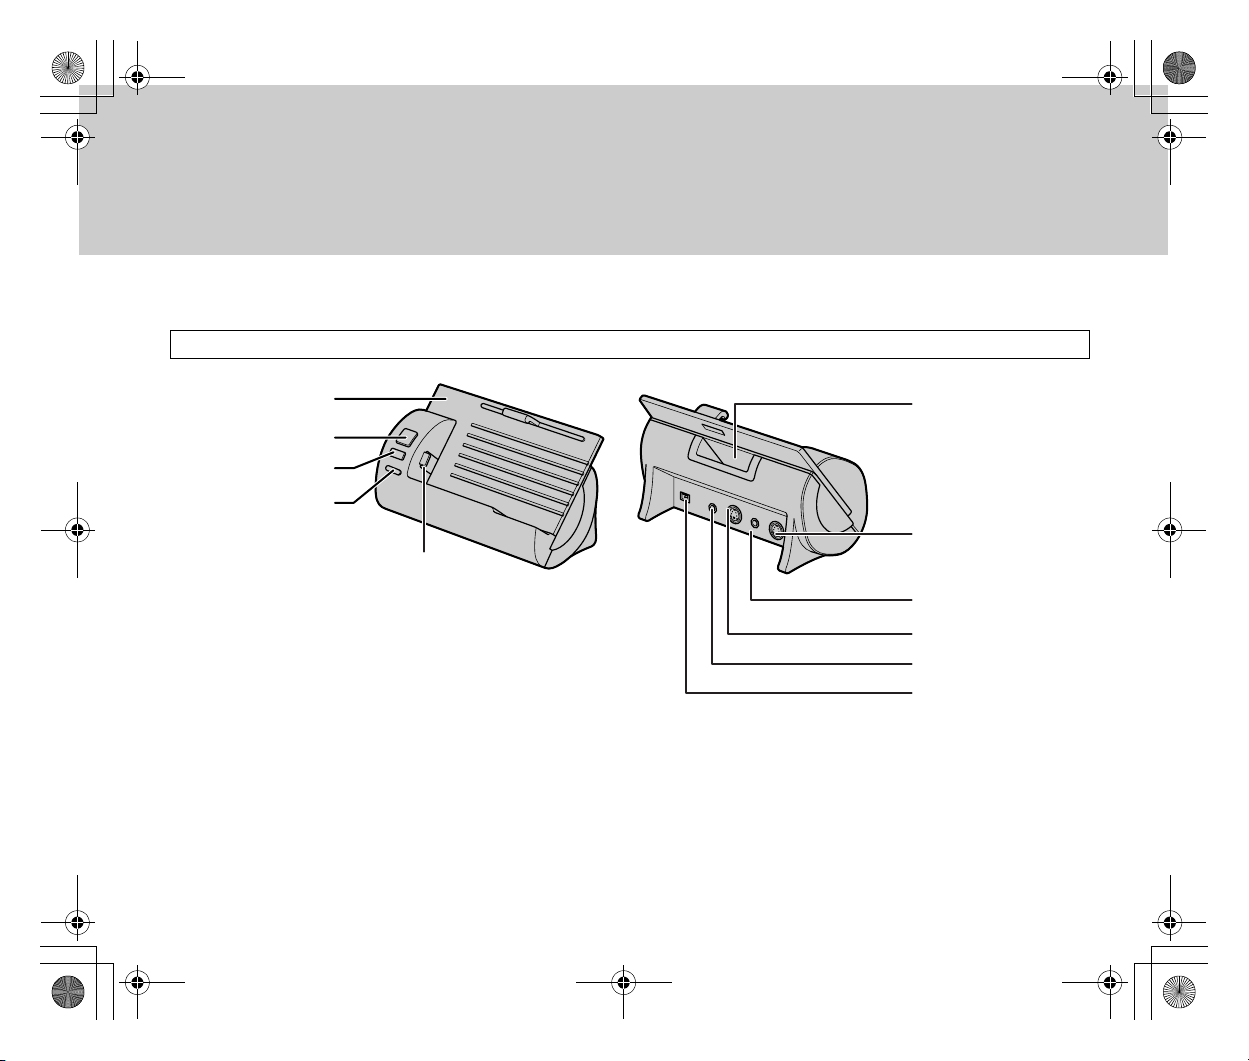
■Identifying the Parts (the main unit)
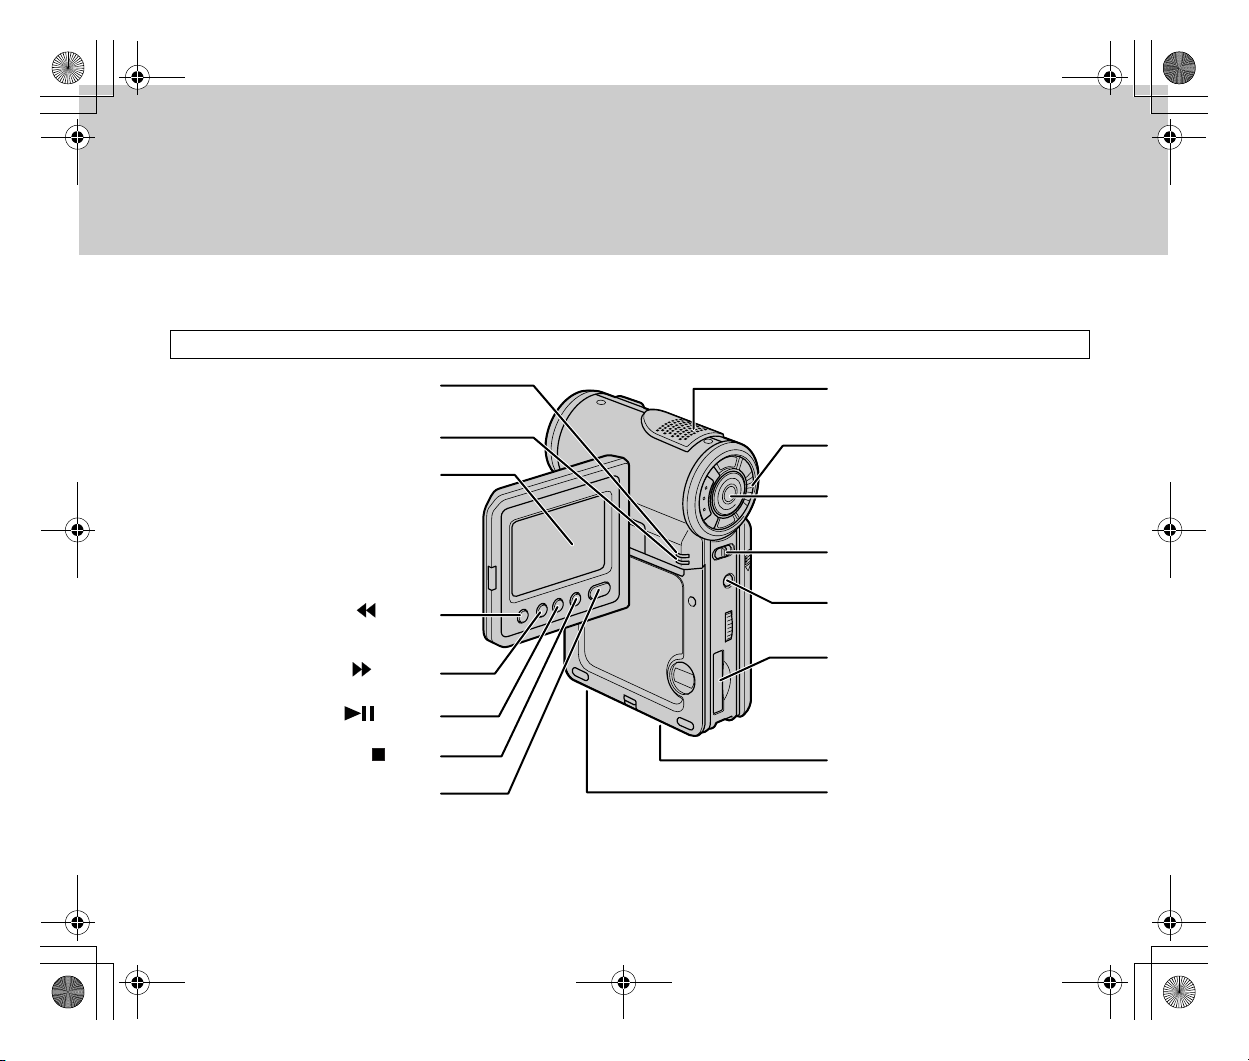
Identifying the Parts - Main Unit
Power lamp (red)
Charge lamp
While charging: orange
When charging is completed: blue
LCD screen
Rew button ( / LOCK)
FF button ( / MF/AF)
Play button ( / FADE)
Stop button ( / BLC)
Mode button
Microphone
Zoom button
Start/Stop button
Power switch
(From left to right: [CAM][PLAY][OFF])
Menu button
Memory Stick slot
Connecter for Cradle
Tripod Adaptor receptacle
12
Page 12
Inst_Manu_US.book Page 13 Tuesday, August 12, 2003 6:22 PM
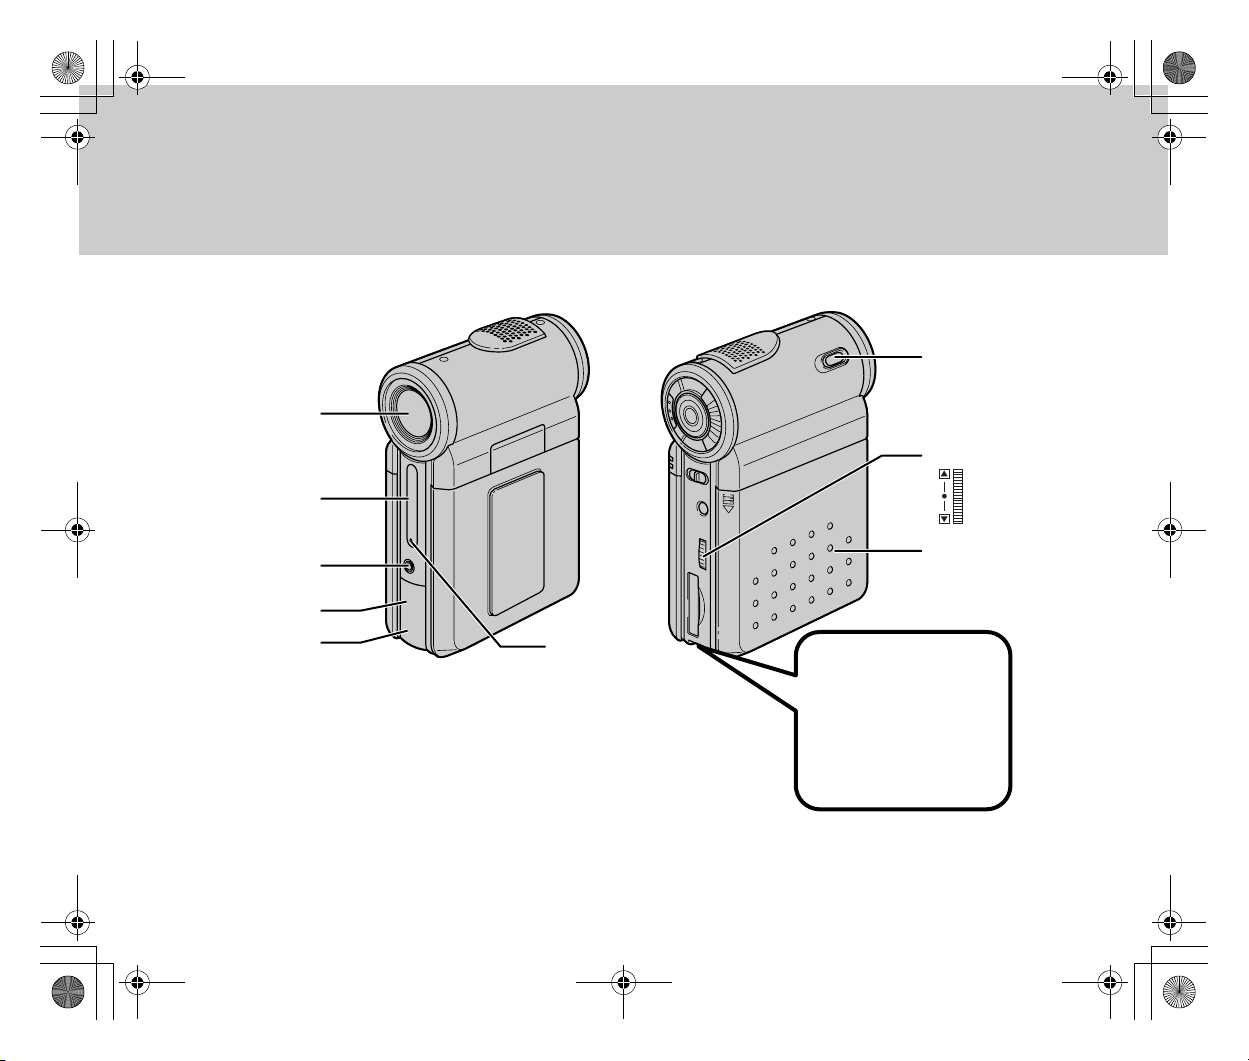
Lens
Remote sensor
Photo button
Menu selector
Earphone jack
USB jack
DC IN jack
Picture recording
lamp
Battery cover
Fix the strap to it, as
shown in the figure.
13
Page 13

Not
Inst_Manu_US.book Page 14 Tuesday, August 12, 2003 6:22 PM
■Inserting Memory Stick/Operating
Delete-Protection switch
When handling the “Memory Stick”/“Memory Stick Pro”, be sure
to turn the Power switch to [OFF].
● Inserting
[014-i1]
(The lower section of the main unit's rear panel. Near
the slot for the Memory Stick.
The Memory Stick is being inserted. The arrow
indicates the inserting direction.)
1 Check the inserting direction indicated by the
mark, and insert the Memory Stick as far as
possible.
es
•Check the direction carefully. An attempt to insert the stick up-sidedown or by placing it in the opposite orientation may damage the
“Memory Stick”/“Memory Stick Pro” or the unit body.
● Removing
[014-i2]
(The same figure as the above. However, the arrow
points to the opposite direction.)
1 Press down the “Memory Stick”/“Memory Stick Pro”
softly and release it.
•The “Memory Stick”/“Memory Stick Pro” is pushed
out.
•Do not attempt to pull it out without pressing it
down.
2 Hold the “Memory Stick”/“Memory Stick Pro” by its
tip and pull it out.
14
Page 14
Not
Inst_Manu_US.book Page 15 Tuesday, August 12, 2003 6:22 PM
● Using the Delete-Protection switch
[014-i3]
(Memory Stick. The upper half of the rear section.
With a right arrow, pointing to the LOCK side.)
- Delete-Protection switch
1 Turn the Delete-Protection switch to “LOCK”.
•Only playback is enabled with all other functions
(recording, deleting, and formatting) disabled.
•Resetting the switch enables the other functions,
such as recording, again.
es
•Depending on the model, the location and/or appearance of the DeleProtection switch may differ from those shown here.
15
Page 15
Inst_Manu_US.book Page 16 Tuesday, August 12, 2003 6:22 PM
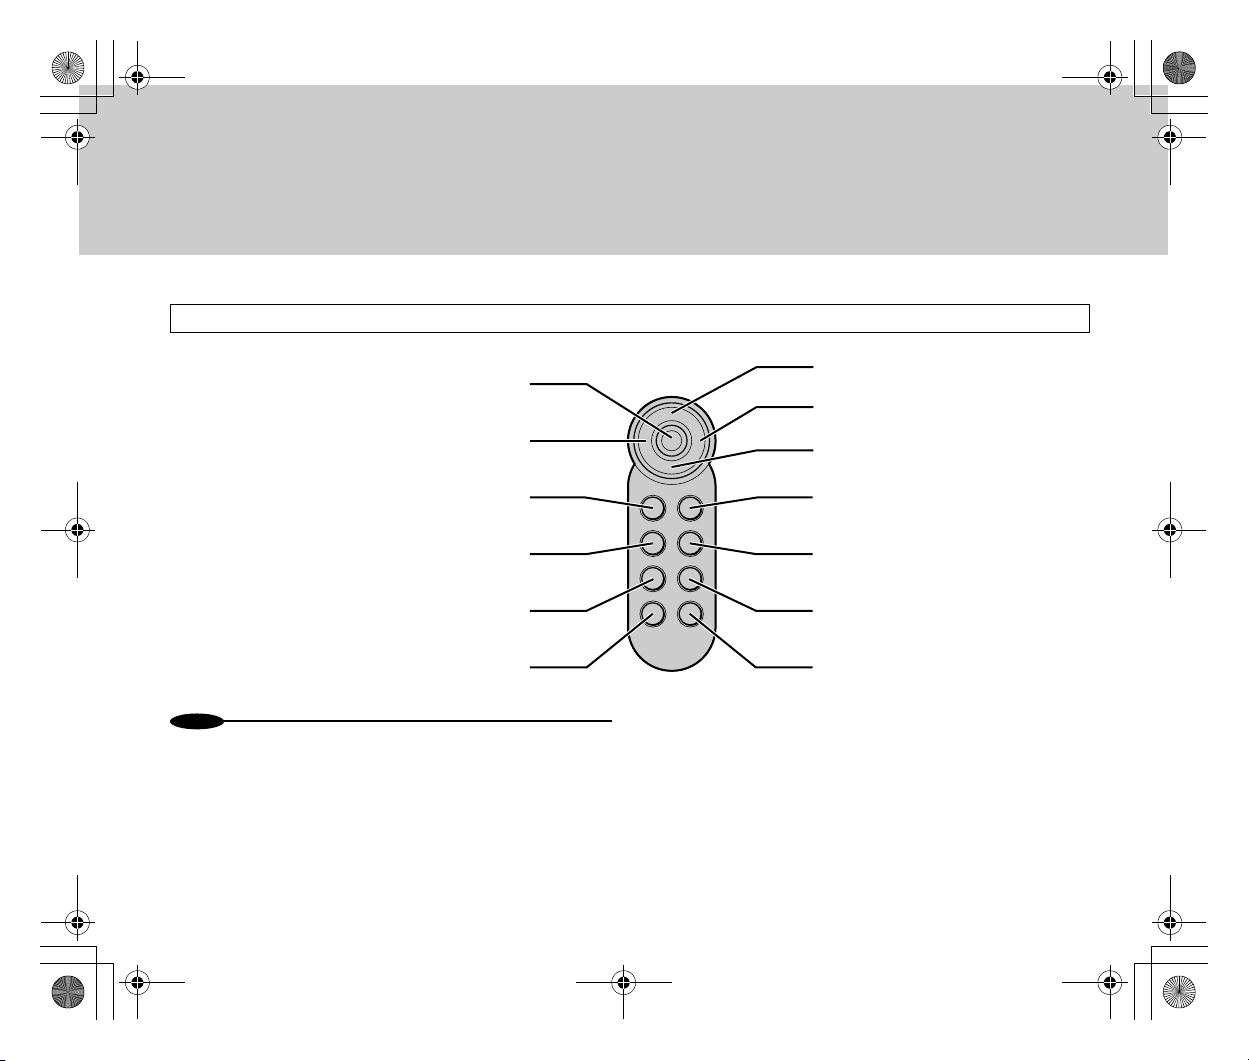
■Identifying the Parts (Cradle and Remote Control)
Cradle
Power (blue)/
Battery Charge
(orange) lamp
Power button
Menu button
Remote sensor
Docking Connector for IT CAM-7/9
Battery
charging slot
S-video input jack
AV input jack
S-video output jack
AV output
DC IN jack
16
Page 16
Not
Inst_Manu_US.book Page 17 Tuesday, August 12, 2003 6:22 PM
Remote Control
Start/Stop button
Rew button
Photo button
Menu button
Mode button
Slow button
es
•When using the Remote Control, check that the supplied lithium cell is
installed in it.
Play button
FF button
Stop button
Cursor Up/Zoom Wide
Cursor Down/Zoom Tele
Enter button
Frame Advanced
17
Page 17
Inst_Manu_US.book Page 18 Tuesday, August 12, 2003 6:22 PM
■Selecting a Mode [Play]
● When Connected to the Cradle (only for the
Play Mode):
Select an operating mode with the GADGET unit connected to the
cradle.
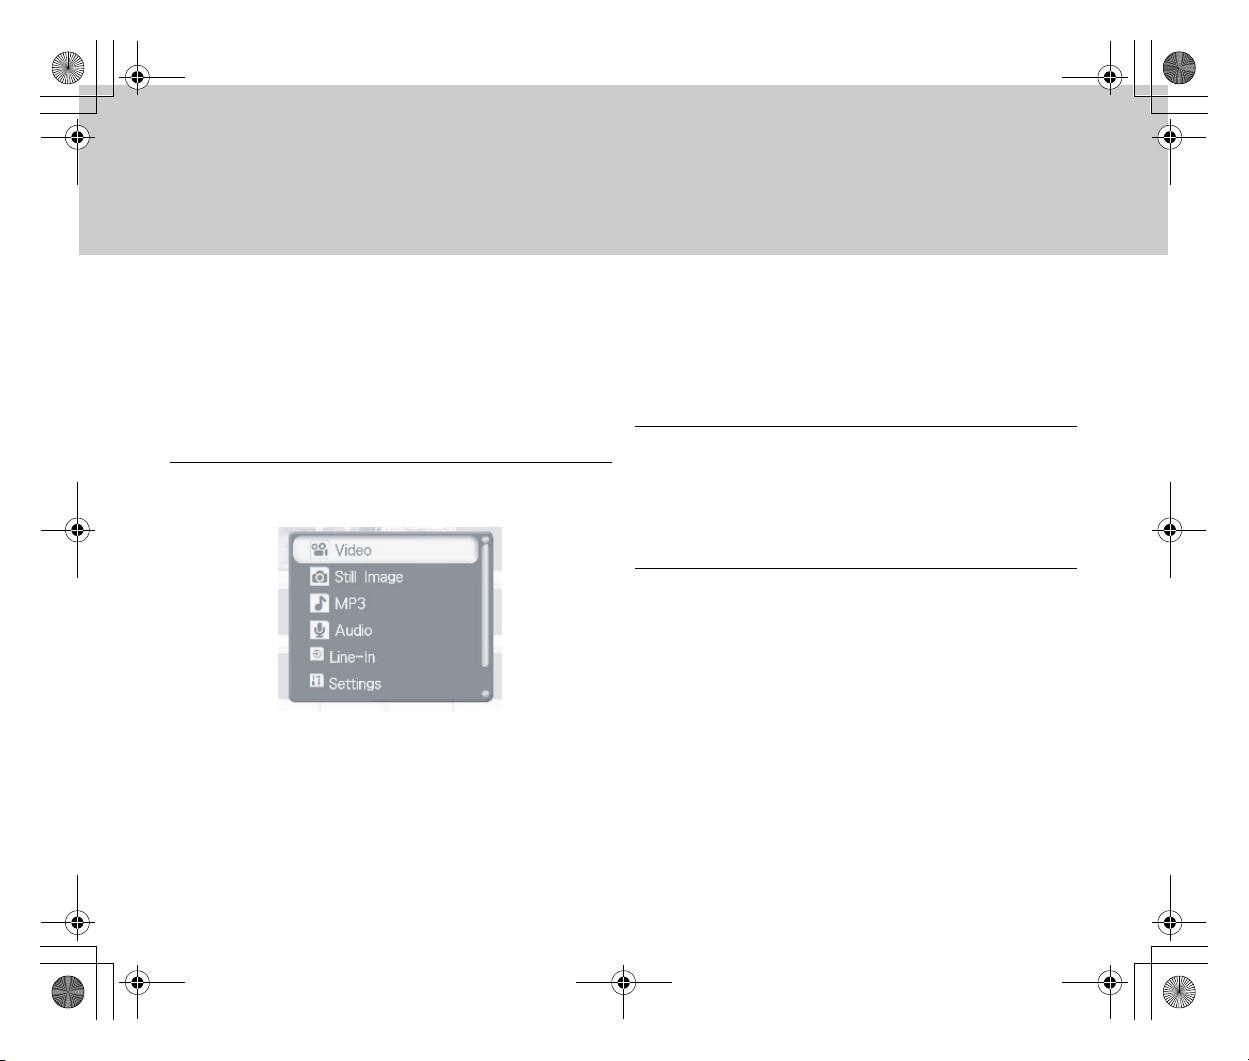
1 Turn on the power and press the Mode button.
•The operating mode selection screen appears.
[Video]: Plays back movie files.
[Still Image]: Plays back still images.
[MP3]: Plays back music (in the MP3 format).
[Audio]: Plays back sounds recorded (in the WAV
format) via the internal microphone.
[Line-In]: Records images from connected external
equipment.
[Settings]: Sets the functions common to all modes.
[File Browser]: Checks the contents of the internal
hard disk drive/“Memory Stick”/“Memory Stick Pro”.
2 Select an operating mode with the Rew button or
the FF button on the LCD screen and finalize the
selection with the Play button.
● When Using GADGET Alone
1 Set the Power switch to [CAM] or [PLAY], and press
the Mode button.
•The operation selection screen appears.
◆In recording mode:
[Camera]: Records movies or still images.
[Line-In]: Records images from connected external
equipment.
[Audio]: Records sounds via the via the internal
microphone (in the WAV format).
[Settings]: Sets the functions common to all modes.
[File Browser]: Checks the contents of the internal
hard disk drive/“Memory Stick”/“Memory Stick Pro”.
18
Page 18
Inst_Manu_US.book Page 19 Tuesday, August 12, 2003 6:22 PM
◆In playback mode:
[Video]: Plays back movie files.
[Still Image]: Plays back still images.
[MP3]: Plays back music (in the MP3 format).
[Audio]: Plays back sounds recorded (in the WAV
format) via the internal microphone.
[Settings]: Sets the functions common to all modes.
[File Browser]: Checks the contents of the internal
hard disk drive/“Memory Stick”/“Memory Stick Pro”.
2 Finalize the selection with the Menu selector.
■Setting Menu Items
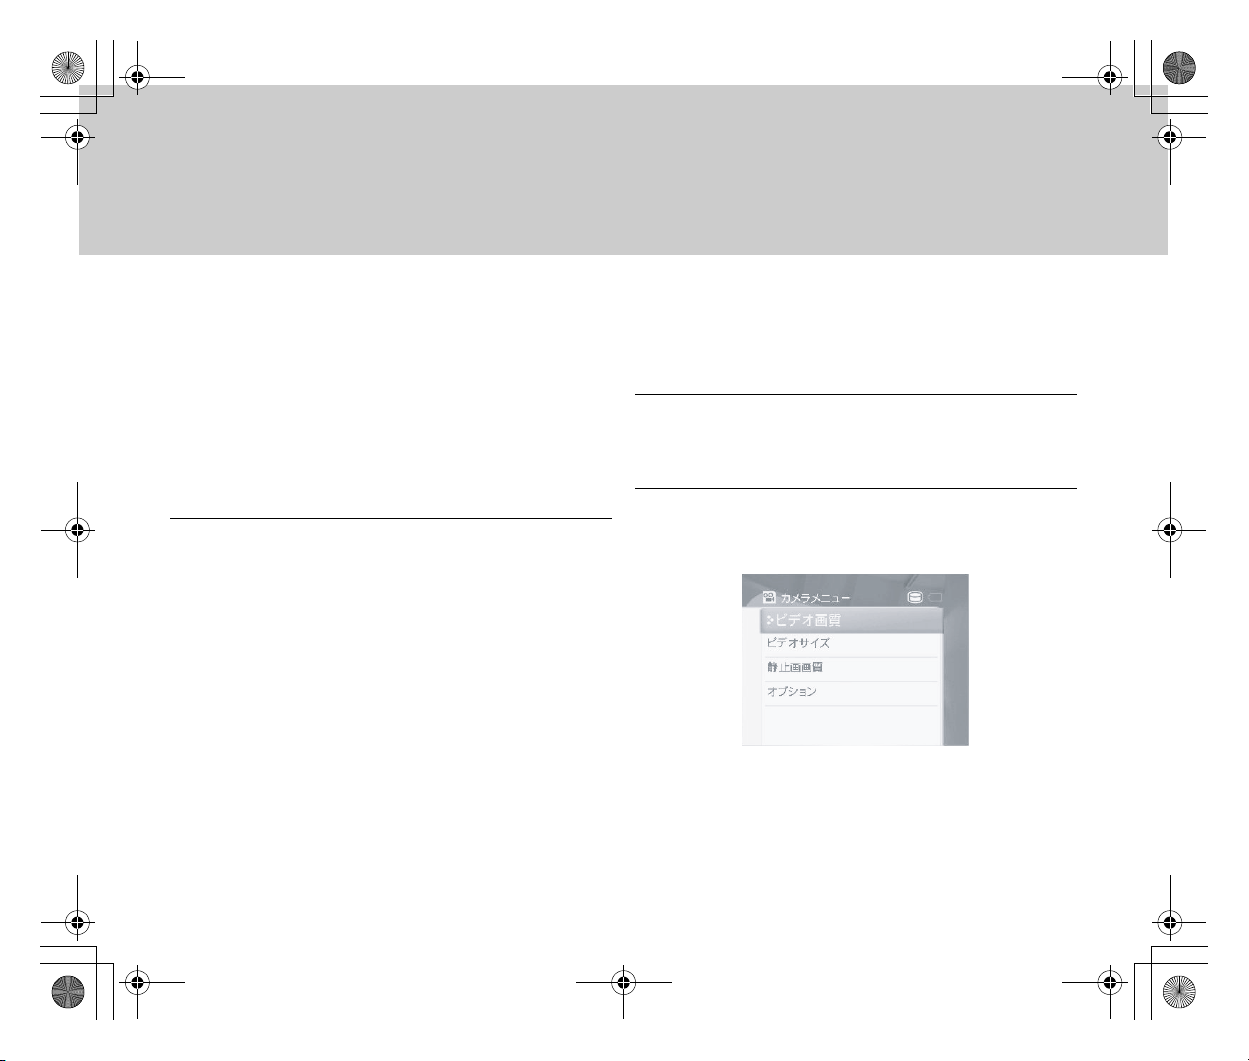
Set menu items as follows:First, switch the operating mode and
then display the Menu screen.
1 Set the Power switch to [CAM] or [PLAY].
•When the unit is connected to the cradle, press
the Power button.
2 Using the Mode button, switch the operating mode
and then press the Menu button.
•Menus that can be set up appear.
- Setting example for the [CAM] - [Camera] mode:
19
Page 19
Inst_Manu_US.book Page 20 Tuesday, August 12, 2003 6:22 PM
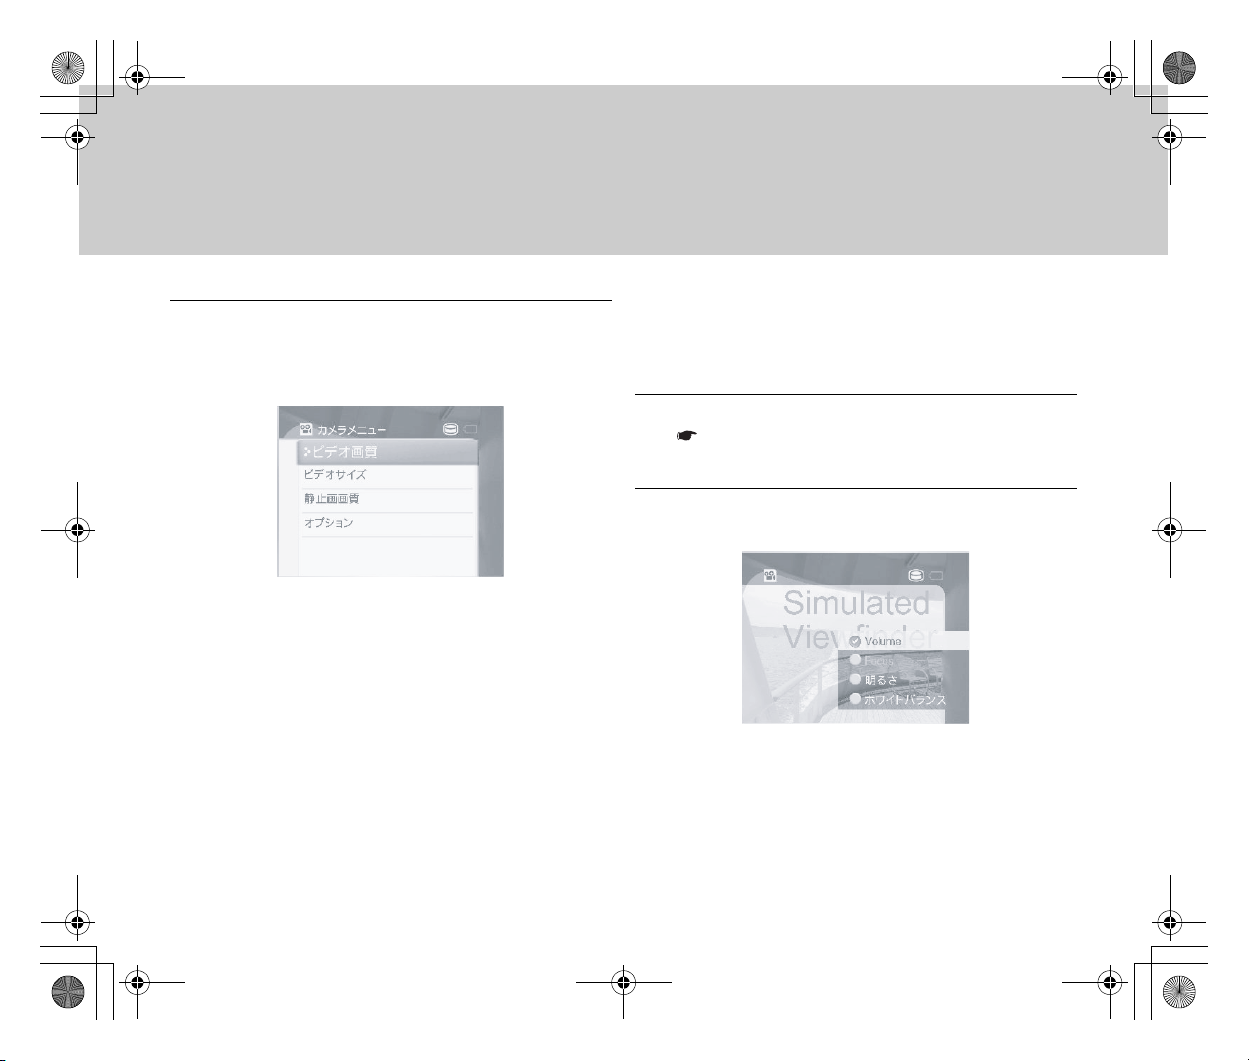
3 On the LCD screen, using the Rew button, FF
button or Play button, finalize the selection (with the
Menu selector when using GADGET's main unit
alone). ([Example] [Still Photo Quality])
■Quick Access
You can change the white balance or exposure through onetouch operation during image/video recording.
1 Set up for recording movies or still images.
( Page xx)
•Camera images appear on the LCD screen.
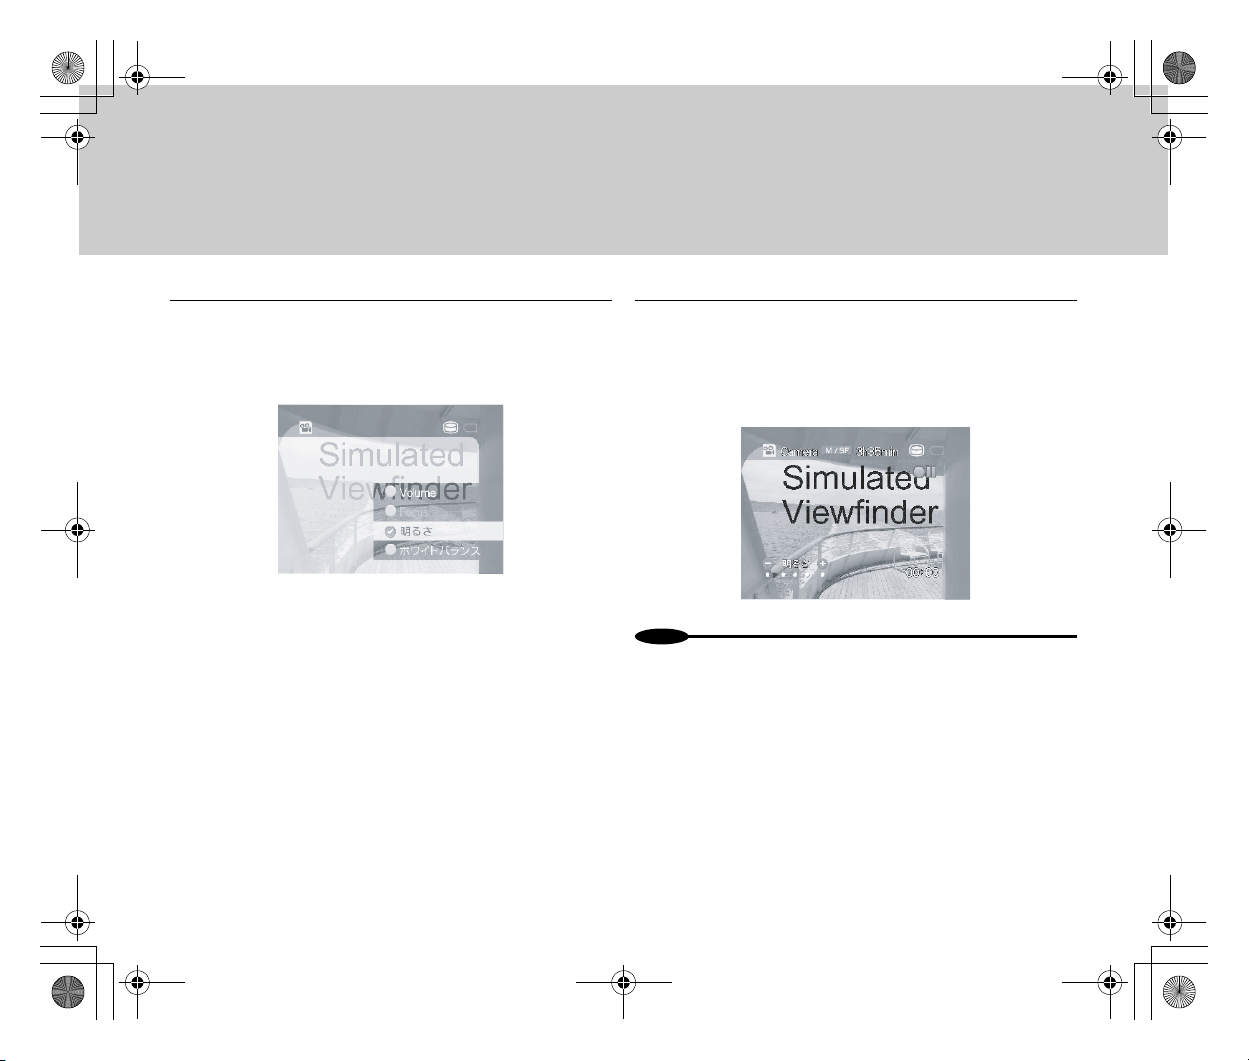
2 Press the Menu selector.
•The quick access menu items appear.
20
Page 20
Not
Inst_Manu_US.book Page 21 Tuesday, August 12, 2003 6:22 PM
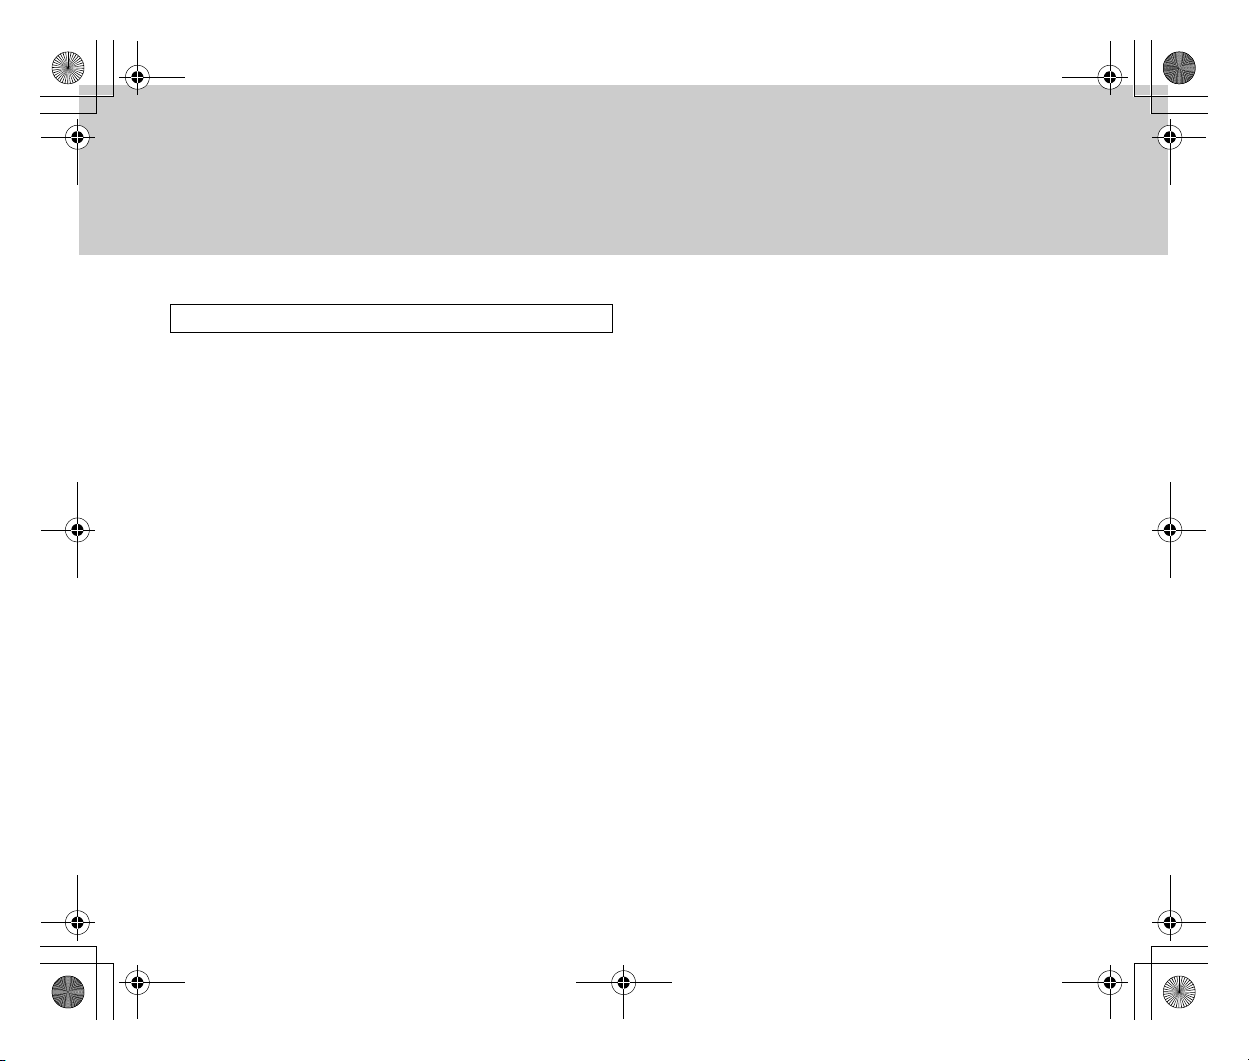
3 By moving the Menu selector up/down, select the
item that you want to change. ([Example] Exposure)
• The settings for the selected item are displayed on
the screen for several seconds.
4 Move the Menu selector up/down again to select a
new setting item.
•Even if nothing is displayed on the screen,
operating the Menu selector displays menu items.
•The display goes off several seconds after setting.
es
•[Focus] can be selected after switching to manual focusing using the
FF button (MF/AF) on the LCD screen. Auto focusing cannot be used
for selecting it.
21
Page 21
Inst_Manu_US.book Page 22 Tuesday, August 12, 2003 6:22 PM
Items Available for Quick Access
• [Volume]: Adjusts the earphone volume during
recording.
• [Focus]: Enables focus to be adjusted manually.
(You need to switch to manual focusing.)
• [Exposure]: Adjusts exposure.
• [White Balance]: Adjusts the color shade. Selecting
[HOLD] for the set value displays a [ ] mark in the
middle of the screen, enabling the color shade to be
fixed to the current value. In this state, move the
Menu selector downward to fix the color shade to
whatever is displayed in the [ ] at that moment.
22
Page 22
Not
Inst_Manu_US.book Page 23 Tuesday, August 12, 2003 6:22 PM
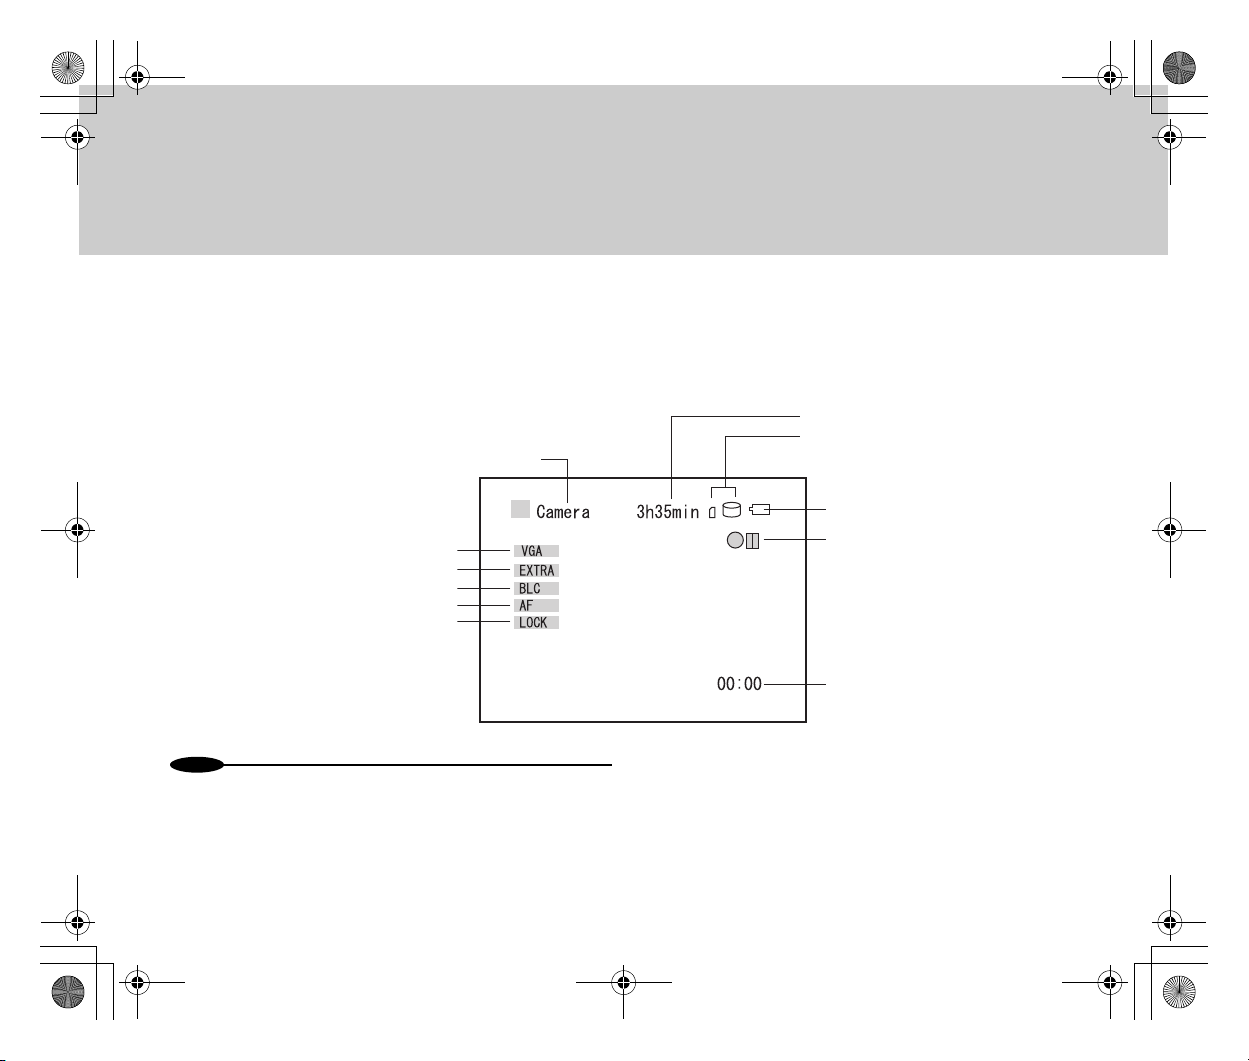
■LCD Screen
● Identifying the Parts
[REC] mode
Mode
Video/Still photo quality
Video size
Backlight correction
Focus
Focus lock
Remaining time
Recording media
Remaining battery capacity
Recording/Stand-by
es
•The remaining time, remaining battery capacity, mode (record/standby) and lapsed time are displayed even after [Display] is set to [OFF].
•Recording media: hard disk/Memory StickThe one you have selected
is displayed on the right in a larger size, while the one that is not
selected is shown on the left in a smaller size. (If you have selected the
hard disk and the Memory Stick has been inserted, the Memory Stick
Lapsed time
icon appears on the left in a smaller size. If it has not been inserted, the
icon does not appear.)
•Video size: Indicates the size of the video to be displayed. VGA (640 x
480)/QVGA (320 x 240). You can switch over the size from the menu.
•Video/Still Photo Quality: Indicates the photo quality at the time of
recording. [EXTRA]: Extra (for video)/Super Fine (for still images), [SFINE]: Super Fine (for video)/Fine (for still images), [FINE]: Fine (for
23
Page 23
Not
Inst_Manu_US.book Page 24 Tuesday, August 12, 2003 6:22 PM
video)/- (not applicable to still images). Use the menu to switch over
the setting.
•Backlight Correction: BLC (enabled)/blank (disabled). You can switch
over the setting with the Stop button on the LCD screen.
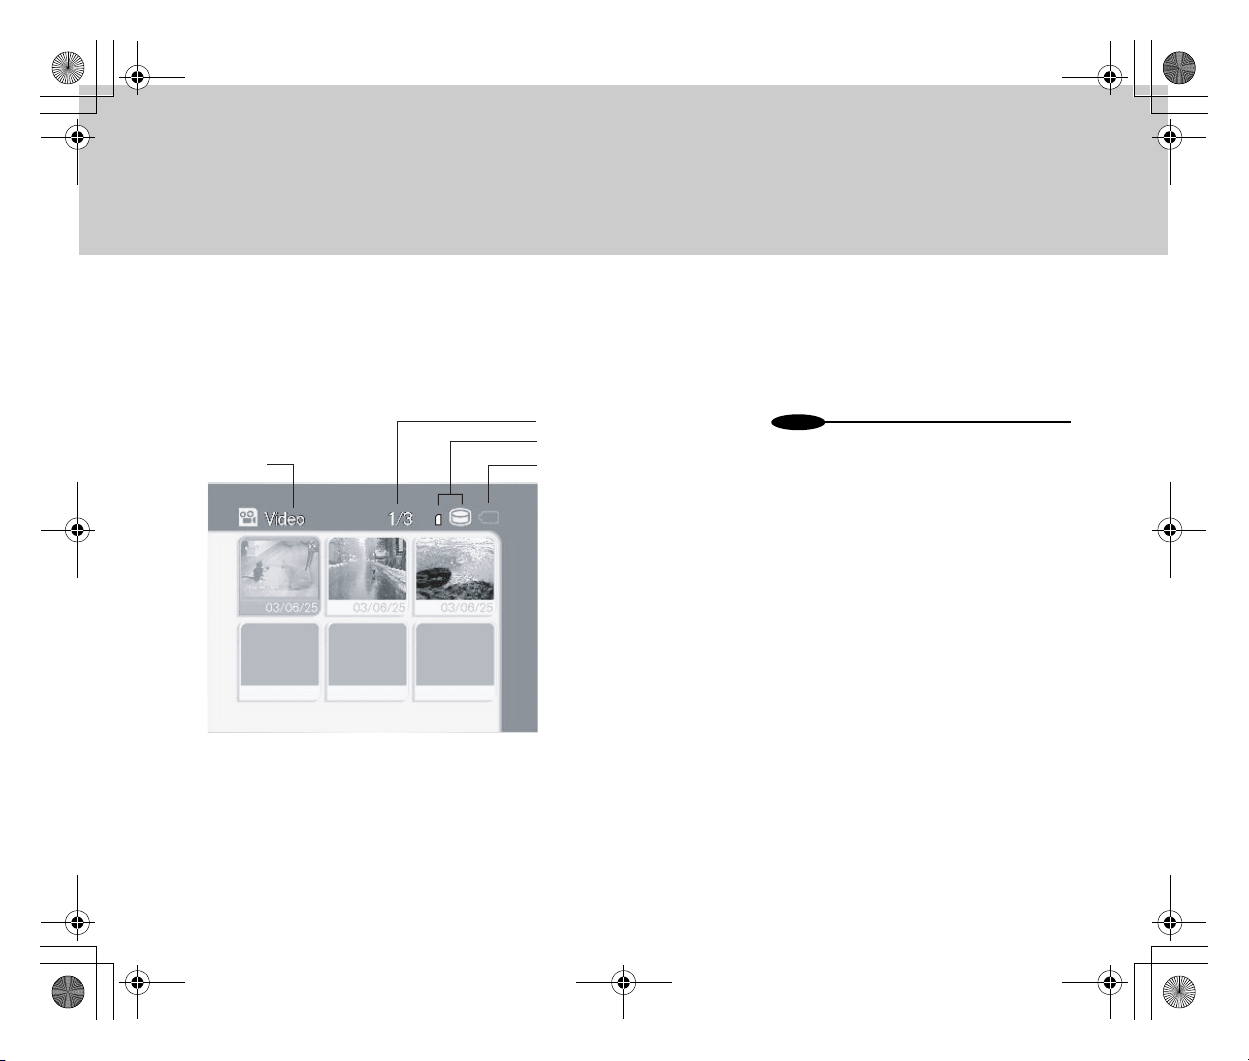
[PLAY] mode
File No.
Recording media
Mode
Remaining battery capacity
•Focus: AF (auto focus)/MF (manual focus). You can switch the setting
with the FF button on the LCD screen.
•Focus Lock: LOCK (enabled)/blank (disabled). You can switch over
the setting with the Rew button on the LCD screen.
es
•These are displayed even after [Display] is set
to [OFF].
24
Page 24
Not
Not
Inst_Manu_US.book Page 25 Tuesday, August 12, 2003 6:22 PM
Basic Usage
■
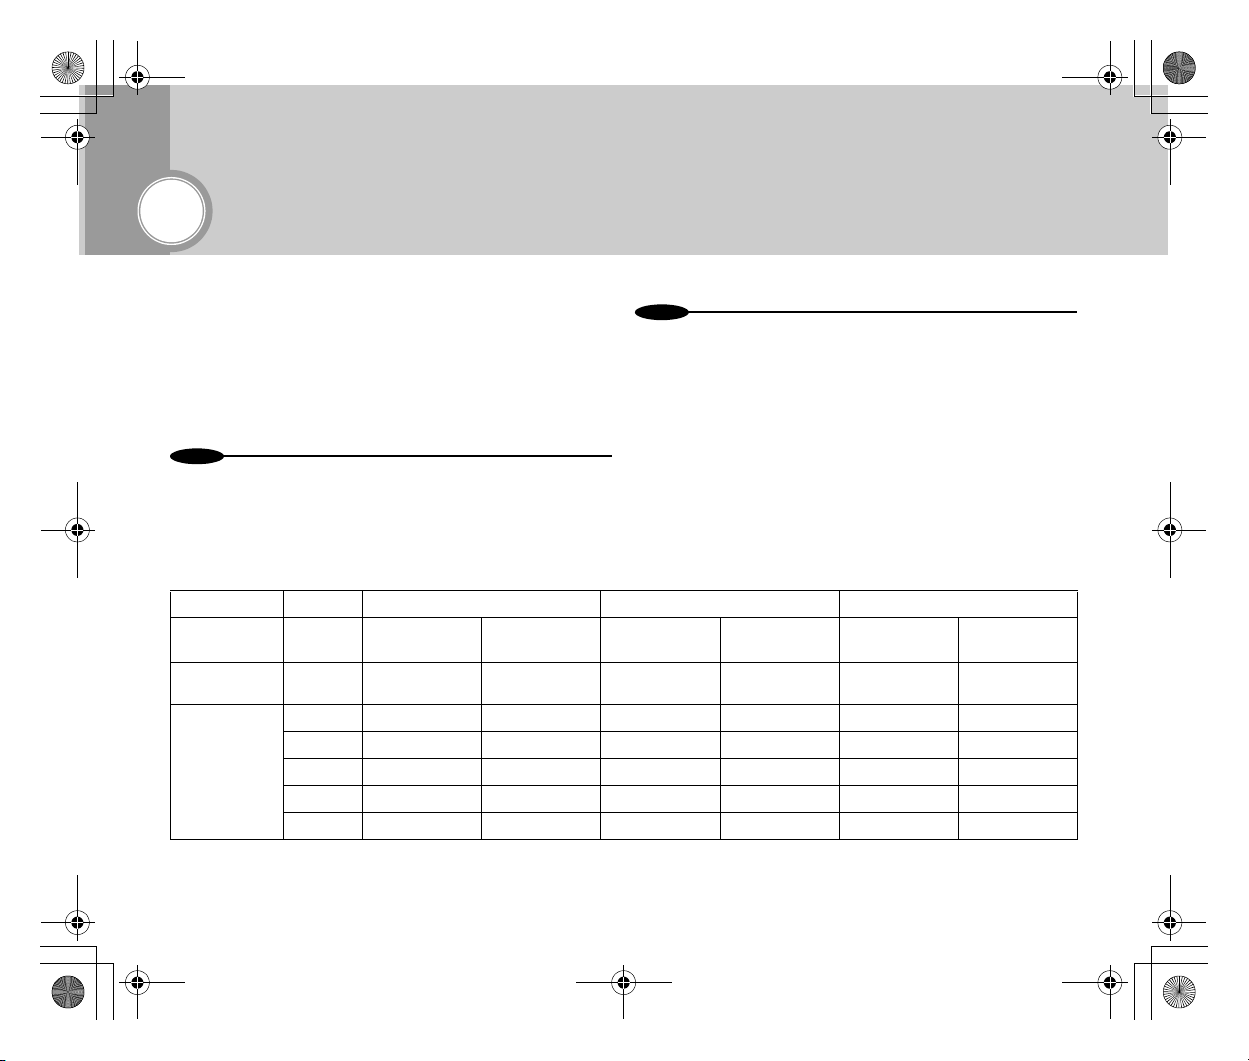
Reference Recordable Hours and Photo
Count
These values provide references for the time and the number of
photos that the internal hard disk drive (1.5 GB) and the
“Memory Stick”/“Memory Stick Pro” can record.
es
•“Memory Stick”/“Memory Stick Pro” may not be useable if it has been
formatted on a device other than GADGET. Similarly, “Memory Stick”/
“Memory Stick Pro” that has been formatted in Explorer on a PC cannot
be used. Re-format it on GADGET.
● Movies
Extra Super Fine Fine
VGA
(640×480)
Hard Disk 1.5 GB About 20 - 120 minutes About 150 - 250
8 MB × About xx minutes × About xx minutes × About xx minutes
16 MB × About xx minutes × About xx minutes × About xx minutes
Memory Stick
32 MB × About xx minutes × About xx minutes × About xx minutes
64 MB × About xx minutes × About xx minutes × About xx minutes
128 MB × About xx minutes × About xx minutes × About xx minutes
QVGA
(320×240)
minutes
es
•When shooting movies in EXTRA mode, the compression ratio is
automatically adjusted from scene to scene in order to achieve high
photo quality. This in turn affects the recordable time, resulting in
different recording times for different scenes.
•When using Memory Stick, recording cannot be guaranteed for VGAsized movies. This is because the data transfer rate would fail to satisfy
the minimum value specified for Memory Stick.
VGA
(640×480)
About 60 minutes About 150 minutes About 90 minutes About 200 minutes
QVGA
(320×240)
VGA
(640×480)
QVGA
(320×240)
25
Page 25
Inst_Manu_US.book Page 26 Tuesday, August 12, 2003 6:22 PM
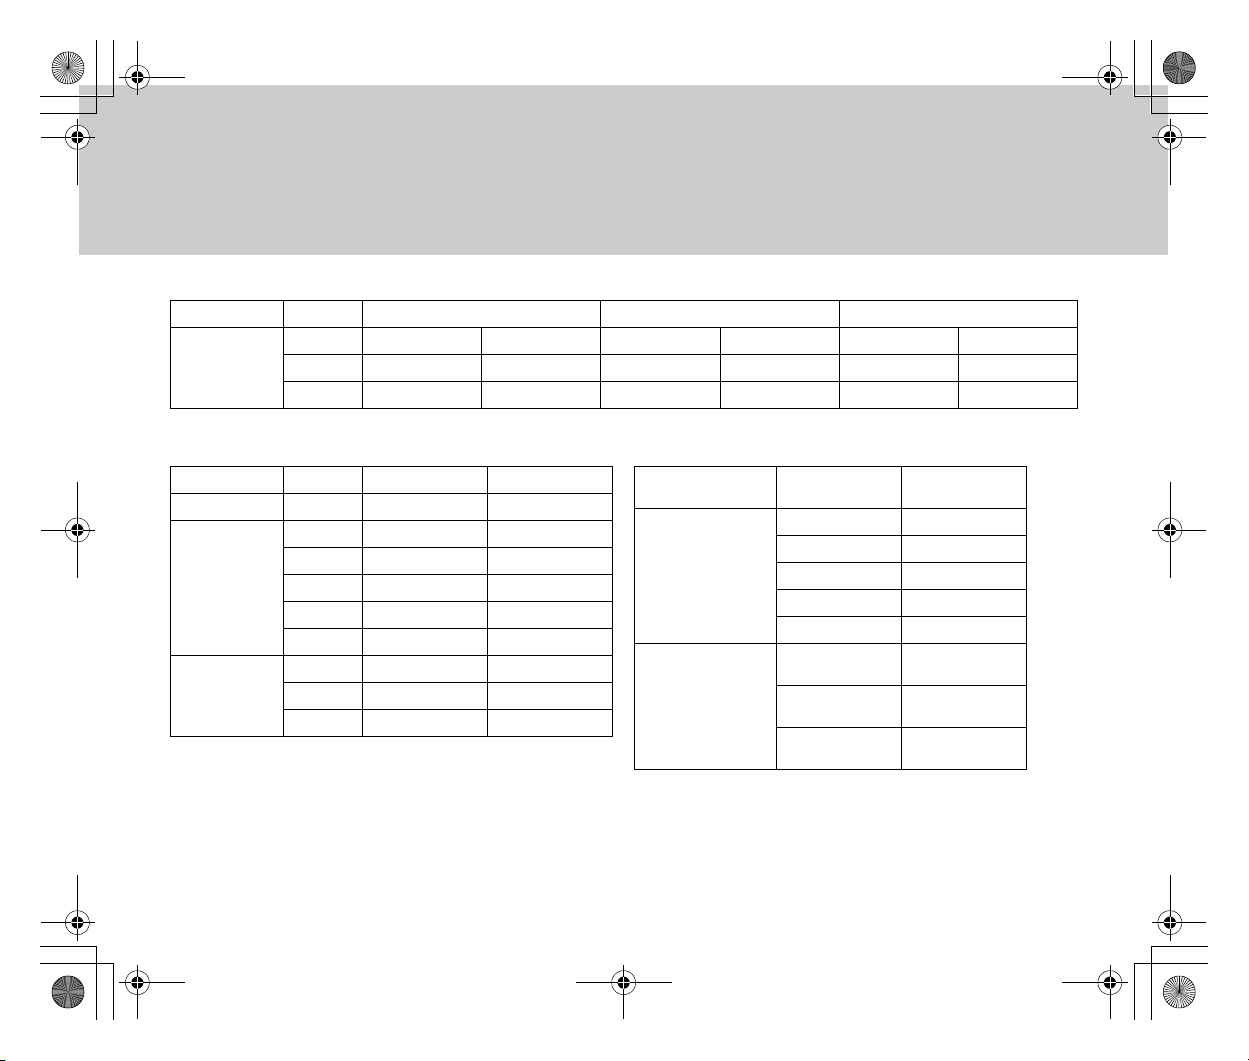
Extra Super Fine Fine
256 MB About xx minutes About xx minutes About xx minutes About xx minutes About xx minutes About xx minutes
Memory Stick F
512 MB About xx minutes About xx minutes About xx minutes About xx minutes About xx minutes About xx minutes
1 GB About xx minutes About xx minutes About xx minutes About xx minutes About xx minutes About xx minutes
● Still Images ● Sound
Super Fine Fine
Hard Disk 1.5 GB About 8,738 photos About 17,476 photos
8 MB About 45 photos About 91 photos
16 MB About 91 photos About 182 photos
Memory Stick
Memory Stick F
32 MB About 182 photos About 364 photos
64 MB About 364 photos About 728 photos
128 MB About 728 photos About 1,456 photos
256 MB About 1,456 photos About 2,912 photos
512 MB About 2,912 photos About 5,825 photos
1 GB About 5,825 photos About 11,650 photos
Hard Disk 1.5 GB About 8 hours and 44
8 MB About 2 minutes
16 MB About 5 minutes
Memory Stick
Memory Stick PF
32 MB About 10 minutes
64 MB About 21 minutes
128 MB About 43 minutes
256 MB About 1 hour and 27
512 MB About 2 hours and 54
1 GB About 5 hours and 49
minutes
minutes
minutes
minutes
26
Page 26
Not
Inst_Manu_US.book Page 27 Tuesday, August 12, 2003 6:22 PM
■Recording Movies (MPEG4 Video
Recording)
You can record movies in the MPEG4 format.
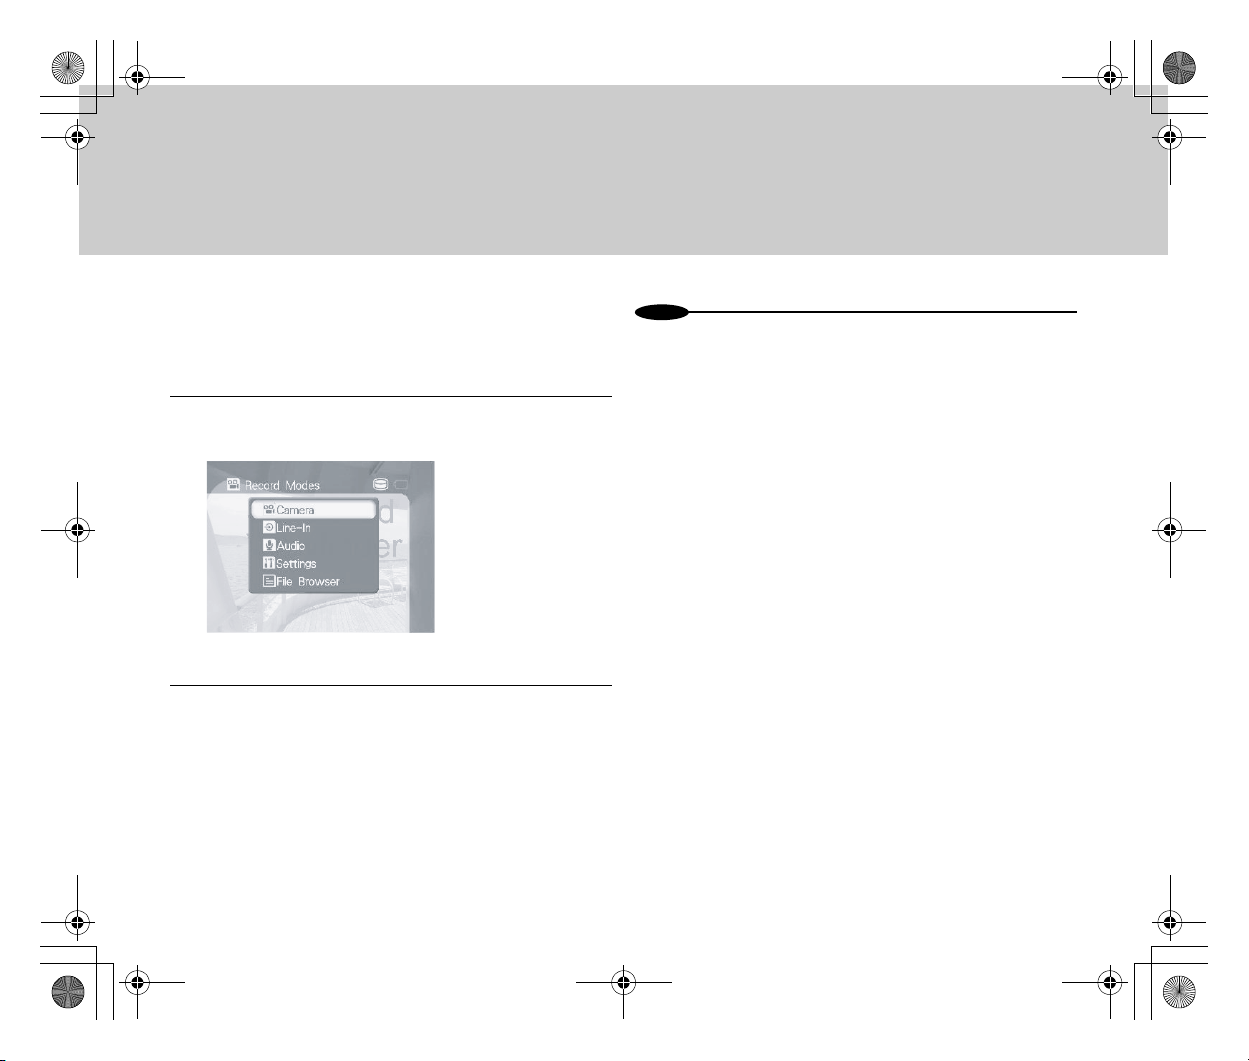
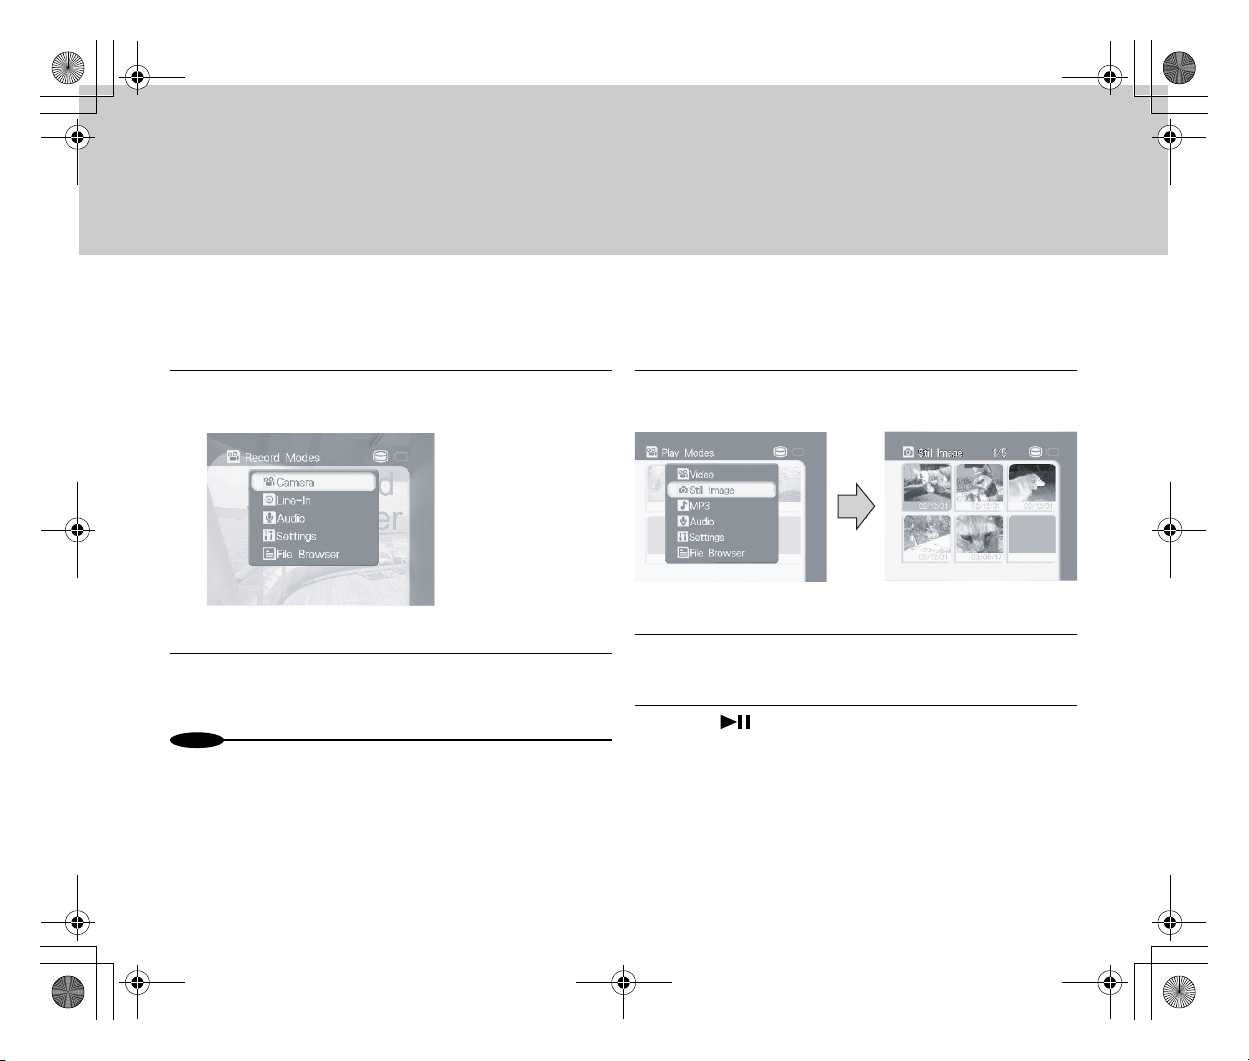
1 Turn the Power switch to [CAM] and press the
Mode button to select [Camera].
•Camera images appear on the LCD screen.
2 Press the Start/Stop button.
•Video recording starts.
•To stop recording, press the Start/Stop button
again.
es
•Image recording is disabled when GADGET is set in the cradle.
Remove the main unit from the cradle before image recording.
•Recording movies again after you stop recording them once causes
them to be saved in a new file.
•Press the Menu button to set the picture quality and other items.
•You can set the volume, focus, exposure, and white balance via the
Quick Access function.
27
Page 27
Not
Inst_Manu_US.book Page 28 Tuesday, August 12, 2003 6:22 PM
■Playing Back Movies (MPEG4 Video
Playback)
Play back MPEG4 video files in which you have recorded
movies.
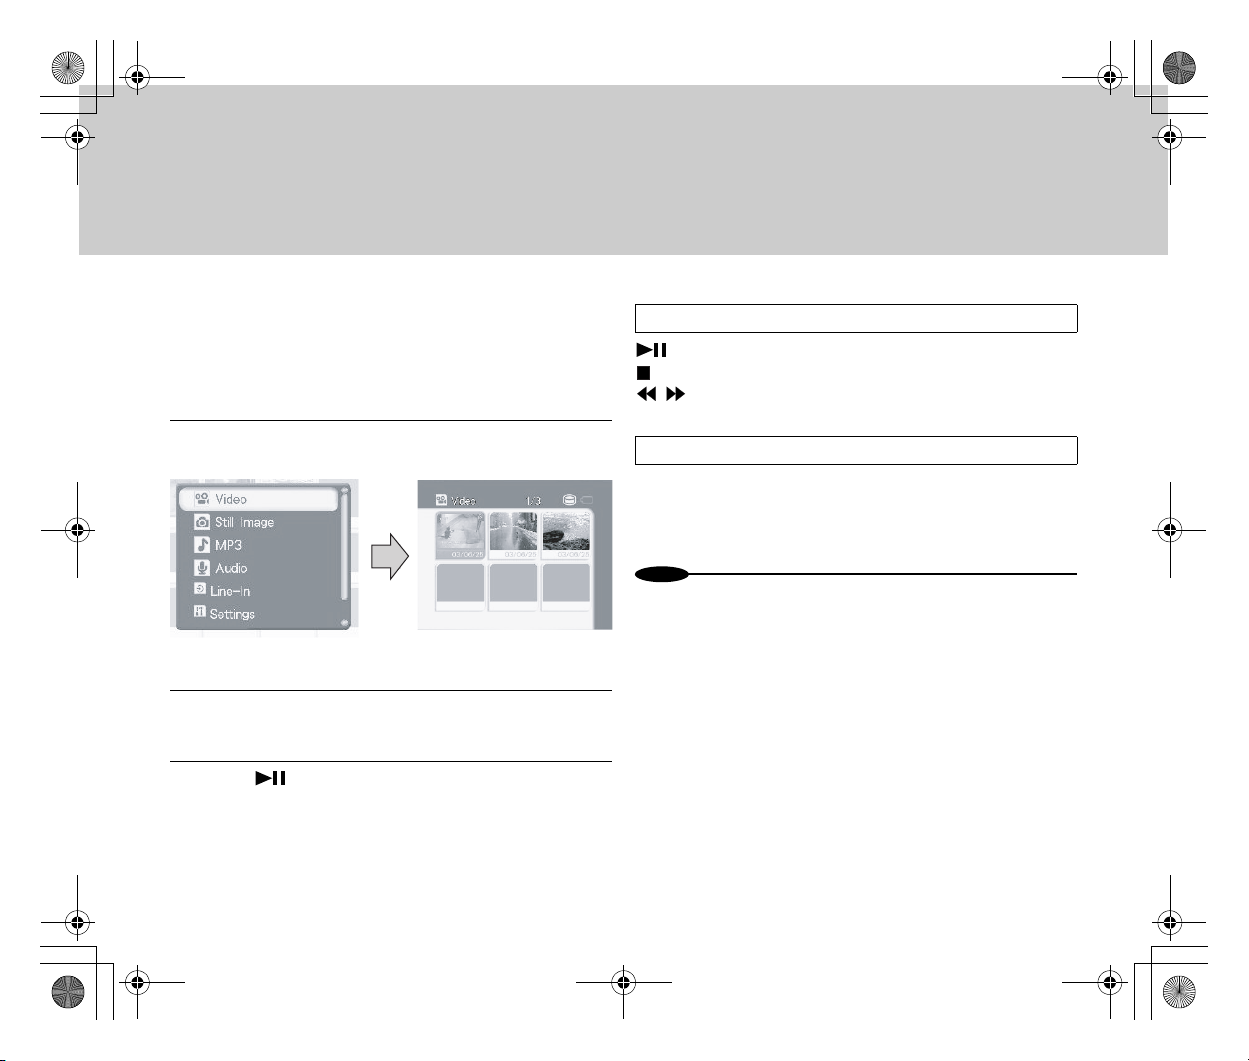
1 Turn the Power switch to [PLAY] and press the
Mode button to select [Video].
•A file list screen appears.
2 Move the Menu selector up or down to select the file
you want to play back.
3 Press .
Operations
: Playback/pause
: Stop (returns to the file list)
/ : Fast-rewind/fast-forward
To Play to End/Repeat:
While stopping, press the Menu button and set [Play
Mode] under [Options] to either [Single Video], [Play to
End], [Repeat] or [Repeat All].
es
•To play back audio files, connect earphones.
•You can adjust the volume with the Menu selector.
28
Page 28
Not
Inst_Manu_US.book Page 29 Tuesday, August 12, 2003 6:22 PM
■Recording Still Images
You can record still images.
1 Turn the Power switch to [CAM] and press the
Mode button to select [Camera].
•A camera image appears on the LCD screen.
2 Press the Photo button.
•This records a still image.
es
•Image recording is disabled when GADGET is set in the cradle.
Remove the main unit from the cradle before image recording.
•Press the Menu button to set picture quality and other items.
•You can set the focus, exposure and white balance via the Quick
Access function.
•Sounds are not recorded.
■Playing Back Still Images
Play back still images you have recorded.
1 Turn the Power switch to [PLAY] and press the
Mode button to select [Still Image].
•A file list screen appears.
2 Move the Menu selector up or down to select the file
you want to play back.
3 Press .
•The selected still image is displayed.
29
Page 29
Inst_Manu_US.book Page 30 Tuesday, August 12, 2003 6:22 PM
Playing Back All Still Images in Sequence
(Slide Show)
While stopping, press the Menu button to select [Slide
Show] under [Options]. You can change the switching
time ( Page xx).
Operations
: Play/pause
: Stop (Return to the file list)
/ : Previous/next image
■Recording from a TV or VCR
Record images from external equipment in GADGET.
1 Connect the GADGET unit to the cradle.
Alternatively, connect the GADGET unit to external
equipment with Multi-AV cables.
•When connecting to the cradle, turn the Power
switch of the GADGET unit to [OFF].
2 Turn on the power and press the Mode button to
select [Line-In].
•The external equipment's image appears on the
LCD screen.
30
Page 30
Not
Not
Inst_Manu_US.book Page 31 Tuesday, August 12, 2003 6:22 PM
3 Press the Start/Stop button on the Remote Control.
•Recording starts.
•To stop recording, press the Start/Stop button
again.
es
•Videos that contain a copyright signal (copy guard) cannot be
recorded.
Automatic Recording
This function enables automatic video recording when
timer recording is set.
In the state 3, if the external equipment is deactivated,
the GADGET unit enters Recording Standby state. At
the time set with the timer function, recording starts automatically as a video signal is received. When the video signal is lost, recording ends automatically.
es
•Do not turn off the power in Standby state.
•Since recording starts on GADGET after receiving a video signal from
external equipment, the first part of the video cannot be recorded for
several seconds.
■Viewing on TV
You can enjoy videos and still images on TV.
1 Connect the GADGET unit to the cradle.
Alternatively, connect the GADGET unit to external
equipment with Multi-AV cables.
•When connecting to the cradle, turn the Power
switch of the GADGET unit to [OFF].
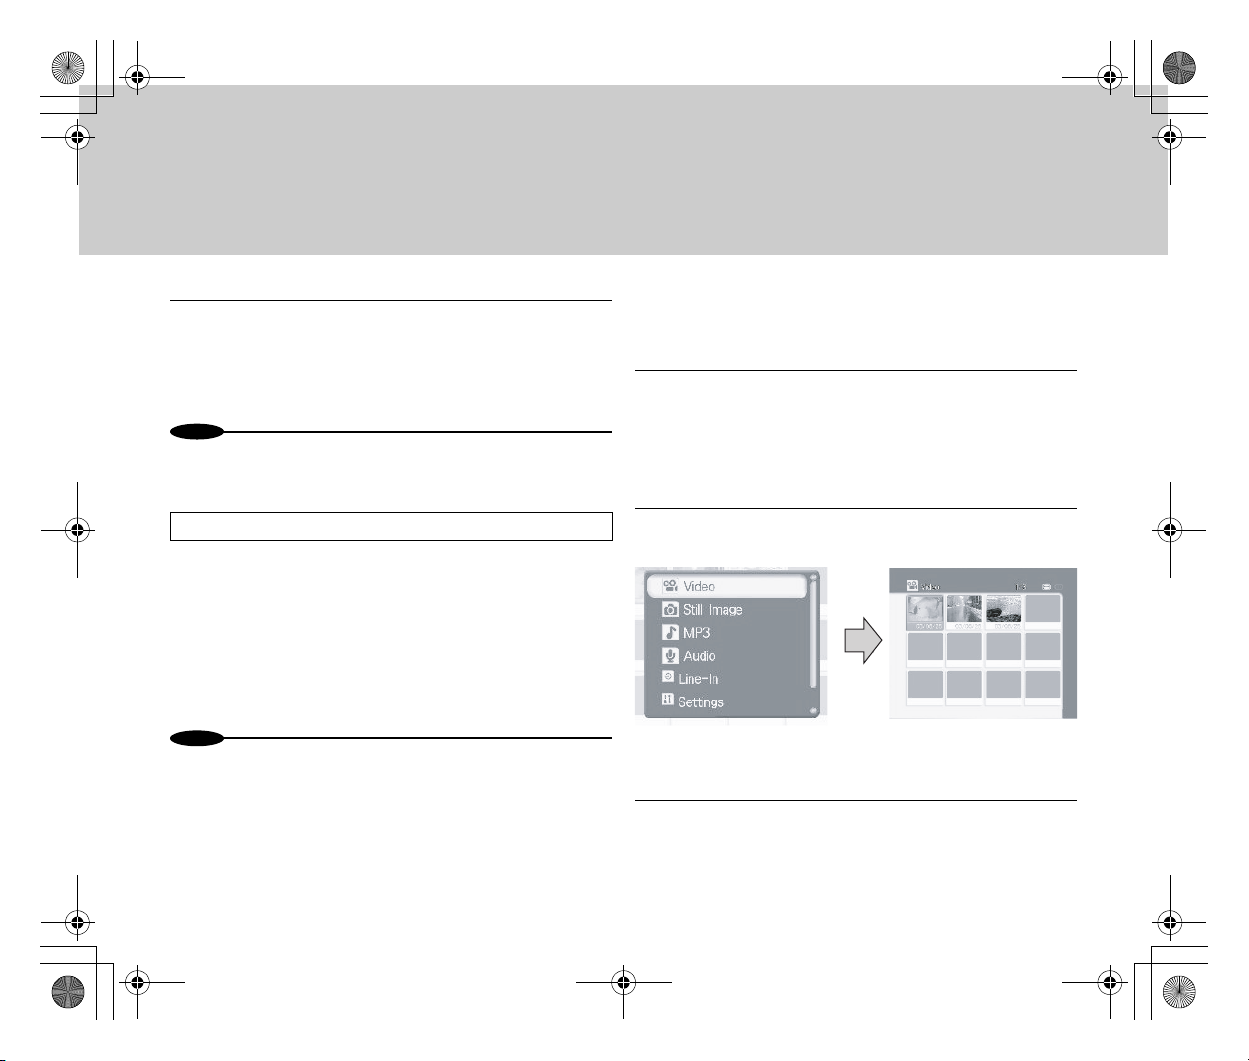
2 Turn on the power and press the Mode button to
select a desired playback mode.
- When Selecting Video Mode:
•A file list screen appears.
3 Press [Cursor Up]/[Cursor Down] on the Remote
Control to select the file you want to play back.
31
Page 31
Inst_Manu_US.book Page 32 Tuesday, August 12, 2003 6:22 PM
4 Press .
•Video playback starts.
■Recording Sounds
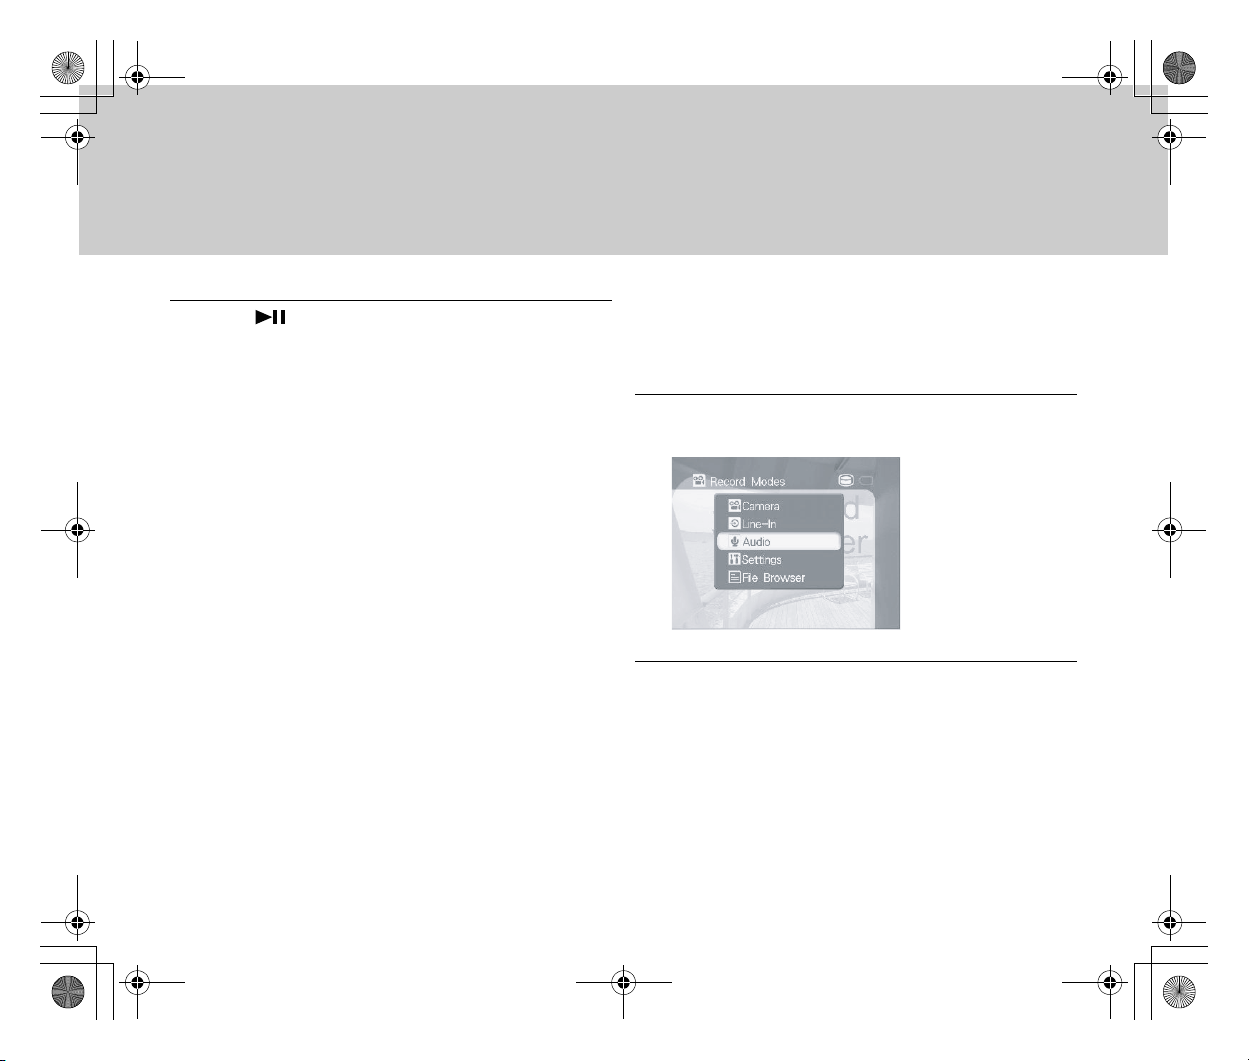
Use the internal microphone to record sounds. You can also
record still images while recording sounds.
1 Turn the Power switch to [CAM] and press the
Mode button to select [Audio].
2 Press the Start/Stop button.
•Audio recording starts.
•To stop recording, press the Start/Stop button
again.
•If still image recording is enabled, pressing the
Photo button enables you to record still images.
32
Page 32
Not
Inst_Manu_US.book Page 33 Tuesday, August 12, 2003 6:22 PM
es
•Audio recording is disabled when GADGET is set in the cradle.
Remove the main unit from the cradle before audio recording.
•Recording sounds again after you stop recording them once causes
them to be saved in a new file.
•By setting the menu, you can record still images while recording
sounds ( Page xx).
•Audio input from external equipment is disabled.
■Listening to Sounds in an Audio File
You can play back audio files in which you have recorded sounds
using GADGET.
1 Connect the earphones.
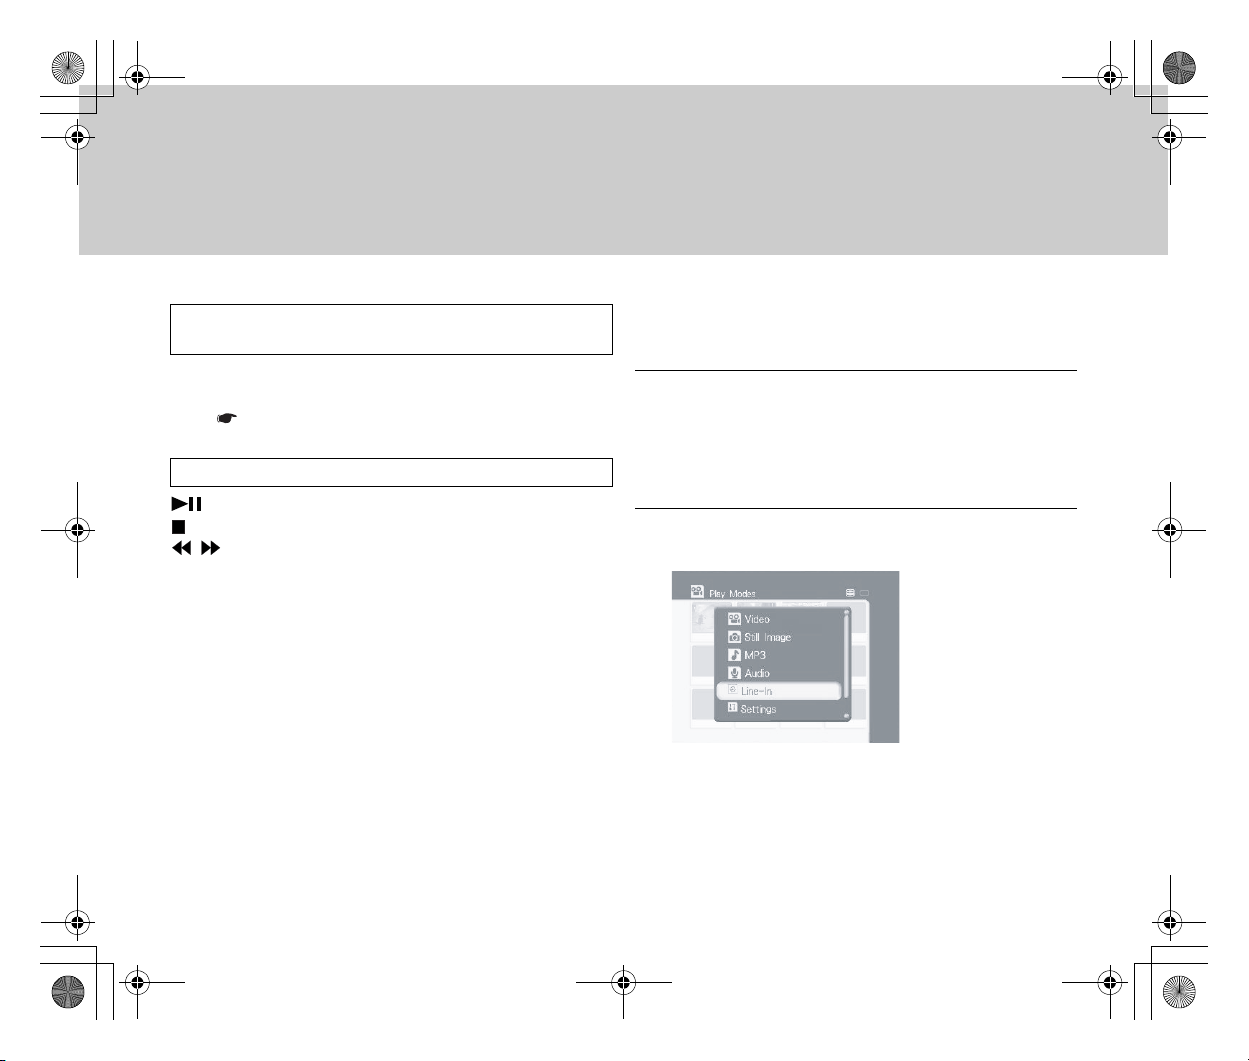
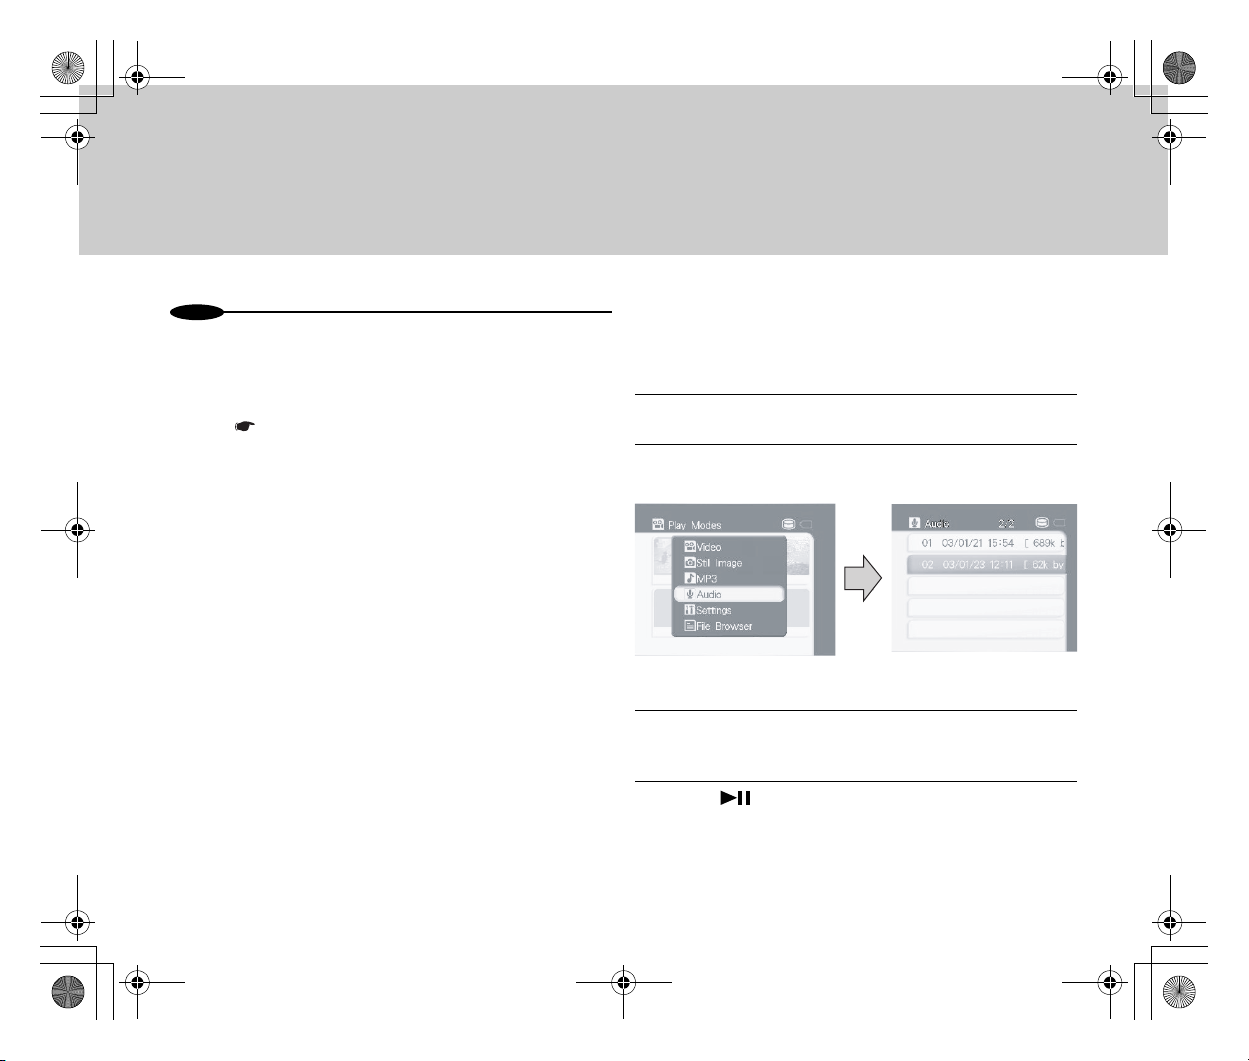
2 Turn the Power switch to [PLAY] and press the
Mode button to select [Audio].
•An audio file list appears.
3 Move the Menu selector up or down to select the file
you want to play back.
4 Press .
•Audio playback starts.
33
Page 33
Not
Inst_Manu_US.book Page 34 Tuesday, August 12, 2003 6:22 PM
es
•You can adjust the volume with the Menu selector.
Operations
: Playback/pause
: Stop (returns to the file list)
/ : Fast-rewind/fast-forward
To Play to End/Repeat:
While stopping, press the Menu button and set [Repeat]
under [Options] to either [Single Audio File], or [Repeat
All].
■Listening to MP3 Music
You can listen to music by copying MP3 music files from a PC
to GADGET.
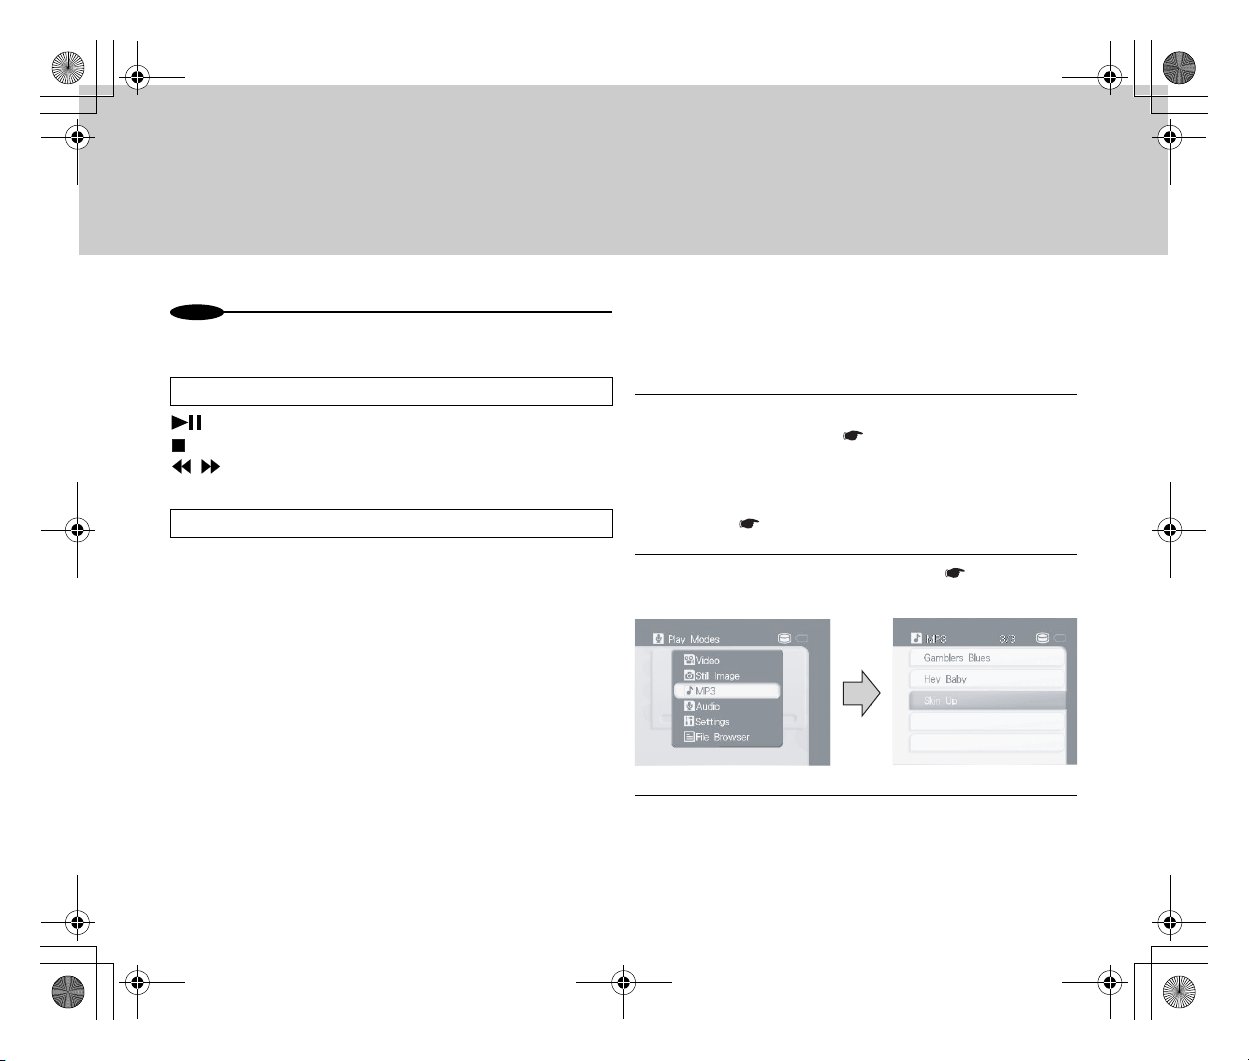
1 Turn the GADGET unit's Power switch to [PLAY]
and connect to a PC ( Page xx). Then copy MP3format files to GADGET's hard disk or to “Memory
Stick”/“Memory Stick PRO”.
•Copy MP3 files to the [free] folder under the [MP3]
folder ( Page xx).
2 Disconnect GADGET from the PC ( Page xx) and
press the Mode button to select [MP3].
3 Move the Menu selector up or down to select the file
you want to play back.
34
Page 34
Not
Inst_Manu_US.book Page 35 Tuesday, August 12, 2003 6:22 PM
4 Press .
•Music playback starts.
•GADGET supports MP3 ID3 tags. During
playback, the song title, album title, and artist
name listed in the ID3 tag appear on the screen.
Operations
: Playback/pause
: Stop (returns to the file list)
/ : Previous/next file
Changing Display
You can change the display to still image display
(Slide Show).
After selecting [MP3] with the Mode button, set display
from the [Options] menu.
es
•Song title information may be incorrectly displayed in part.
•You can create up to three folders under the MP3 folder.
•Example: Naming a folder
[MP3] - [Genre] - [Artist] - [Album] - 01 - Song title .mp3
[MP3] - [Artist] - [Album] - 01 - Song title .mp3
35
Page 35
Not
Inst_Manu_US.book Page 36 Tuesday, August 12, 2003 6:22 PM
Connecting to a PC
GADGET can be connected to a PC or a printer that has direct
printing capability via the USB interface.
■USB's Functions
The USB interface provides the following three functions:
● PC camera function
When connected to a PC with its Power switch set to [CAM],
GADGET functions as a PC camera. This function enables
transmission of current videos to a communications
application such as Windows Messenger (which requires a
specified USB driver, Image Mixer and DviX to be installed).
● Removable disk function
When connected to a PC with its Power switch set to [PLAY],
GADGET can function as an external hard disk for a PC,
reading and writing data.
● USB direct printing function
When connected to a to a printer that has a USB direct print
function with its Power switch set to [PLAY], GADGET can
print still images selected on it without a PC.
■PC Camera Function
When connected to a PC, GADGET can function as external
storage or a PC camera. This function requires the specified USB
driver and software to be installed.
es
•For the power supply, be sure to use the AC adaptor.
● Installing the USB driver [Windows]
Install the USB driver onto a PC to prepare for connecting the
GADGET unit to the PC.
1 Terminate other applications and insert the
supplied CD-ROM.
• Do not connect the USB cable before installing the
USB driver.
2 Select [Install USB driver] from [Software
Installation].
3 Complete the installation, following the instructions
on the screen.
•Restart the machine to enable the USB driver.
36
Page 36
Not
Not
Inst_Manu_US.book Page 37 Tuesday, August 12, 2003 6:22 PM
es
•In the following cases, uninstall ( Page xx) the USB driver, and then
reinstall it.
– You have connected the USB cable before completing the
installation.
– You have canceled the installation before its completion.
● Installing the USB driver [Macintosh]
Install the USB driver onto Macintosh to prepare for
connecting the GADGET unit to the Macintosh.
1 Terminate other applications and insert the
supplied CD-ROM into the CD slot.
• Do not connect the USB cable before installing the
USB driver.
2 From [Software Installation], click on [Installing USB
Driver ] and install the USB driver to the Macintosh
[System Folder] by the drag-and-drop technique.
•Restart the machine to enable the USB driver.
es
•In the following cases, uninstall ( Page xx) the USB driver, and then
reinstall it.
– You have connected the USB cable before completing the
installation.
– You have canceled the installation before its completion.
● Uninstalling the USB Driver
When the USB driver cannot be installed normally, uninstall
the driver, and then reinstall it.
● Windows
1 Power on the PC and start Windows.
2 Connect the AC adaptor to GADGET and turn the
Power switch to [CAM] or [PLAY].
3 Connect GADGET's USB jack to the PC's USB jack
with the supplied USB cable.
4 Open the PC's [Device Manager].
◆For Windows 2000 Professional:
Open [My Computer] → [Control Panel] →
[System] → [Hardware], in this order, and click on
[Device Manager].
◆For other Windows OS's
Open [My Computer] → [Control Panel] →
[System], in this order, and click on [Device
Manager].
37
Page 37
Inst_Manu_US.book Page 38 Tuesday, August 12, 2003 6:22 PM
5 Delete devices marked “?” from the entries under
[Other Devices].
6 Power off GADGET and remove the USB cable.
7 Restart the PC.
8 Reinstall the USB driver ( Page xx).
● Macintosh
1 From the Extensions folder inside the System folder,
select the two files installed on Page xx and put
them into the Trash.
2 Restart your Macintosh.
3 Reinstall the USB driver ( Page xx).
● Installing DivX [Windows]
The DivX software enables GADGET to function as a PC
camera, displaying images on the screen of the PC.
1 Terminate other applications.
2 Insert the supplied CD-ROM into the PC's CD slot.
•The installation screen appears. If the installation
screen does not appear, open the CD-ROM drive
icon under [My Computer], and double-click on
[DivX Installation].
38
Page 38
Not
Inst_Manu_US.book Page 39 Tuesday, August 12, 2003 6:22 PM
3 Click on [DivX Installation].
[037-s1]
4 Follow the instructions on the screen to proceed
with the installation procedure.
5 Click on [Finish].
6 Restart the PC.
•DivX is enabled after restarting the PC.
es
•To uninstall DivX, use [Adding/Removing Programs (Applications)]
from the [Control Panel].
•For details on how to use DivX, see the online help.
● Installing DivX [Macintosh]
1 Terminate other applications.
2 Insert the supplied CD-ROM into the Macintosh CD
slot.
•The installation screen appears. If it does not
appear, open the CD-ROM icon and double-click
on the installation menu icon to go to the
installation screen.
3 Click on [DivX Installation].
[038-s1]
4 Double-click the installer icon.
39
Page 39
Not
Not
Inst_Manu_US.book Page 40 Tuesday, August 12, 2003 6:22 PM
5 Follow the instructions on the screen to proceed
with the installation procedure.
6 Restart your Macintosh after completing the
installation.
•DivX is enabled after restarting the Macintosh.
es
•To uninstall DivX, put the folder containing the installed DivX into the
Trash.
•For details on how to use DivX, see the online help.
● Installing PIXELA ImageMixer [Windows]
The PIXELA ImageMixer software is used to edit video or
audio files.
1 Terminate other applications.
2 Insert the supplied CD-ROM into the PC's CD slot.
•The installation screen appears. If the installation
screen does not appear, open the CD-ROM drive
icon under [My Computer], and double-click on
[PIXELA ImageMixer Installation].
3 Click on [PIXELA ImageMixer Installation].
[040-s1]
4 Select the language to be used from the list.
5 Follow the instructions on the screen to proceed
with the installation procedure.
6 Click on [Finish].
es
•To uninstall PIXELA ImageMixer, use [Adding/Removing Programs
(Applications)] from the [Control Panel].
•For details on how to use PIXELA ImageMixer, see the online help.
40
Page 40
Not
Inst_Manu_US.book Page 41 Tuesday, August 12, 2003 6:22 PM
● Installing PIXELA ImageMixer [Macintosh]
1 Terminate other applications.
2 Insert the supplied CD-ROM into the Macintosh CD
slot.
•The installation screen appears. If it does not
appear, open the CD-ROM icon and double-click
on the installation menu icon to go to the
installation screen.
3 Click on [PIXELA ImageMixer Installation].
[038-s1]
4 Double-click the installer icon for the language to
be used.
5 Follow the instructions on the screen to proceed
with the installation procedure.
6 Restart your Macintosh after completing the
installation.
•PIXELA ImageMixer is enabled after restarting the
Macintosh.
es
•To uninstall PIXELA ImageMixer, put the folder containing the installed
PIXELA ImageMixer into the Trash.
•For details on how to use PIXELA ImageMixer, see the online help.
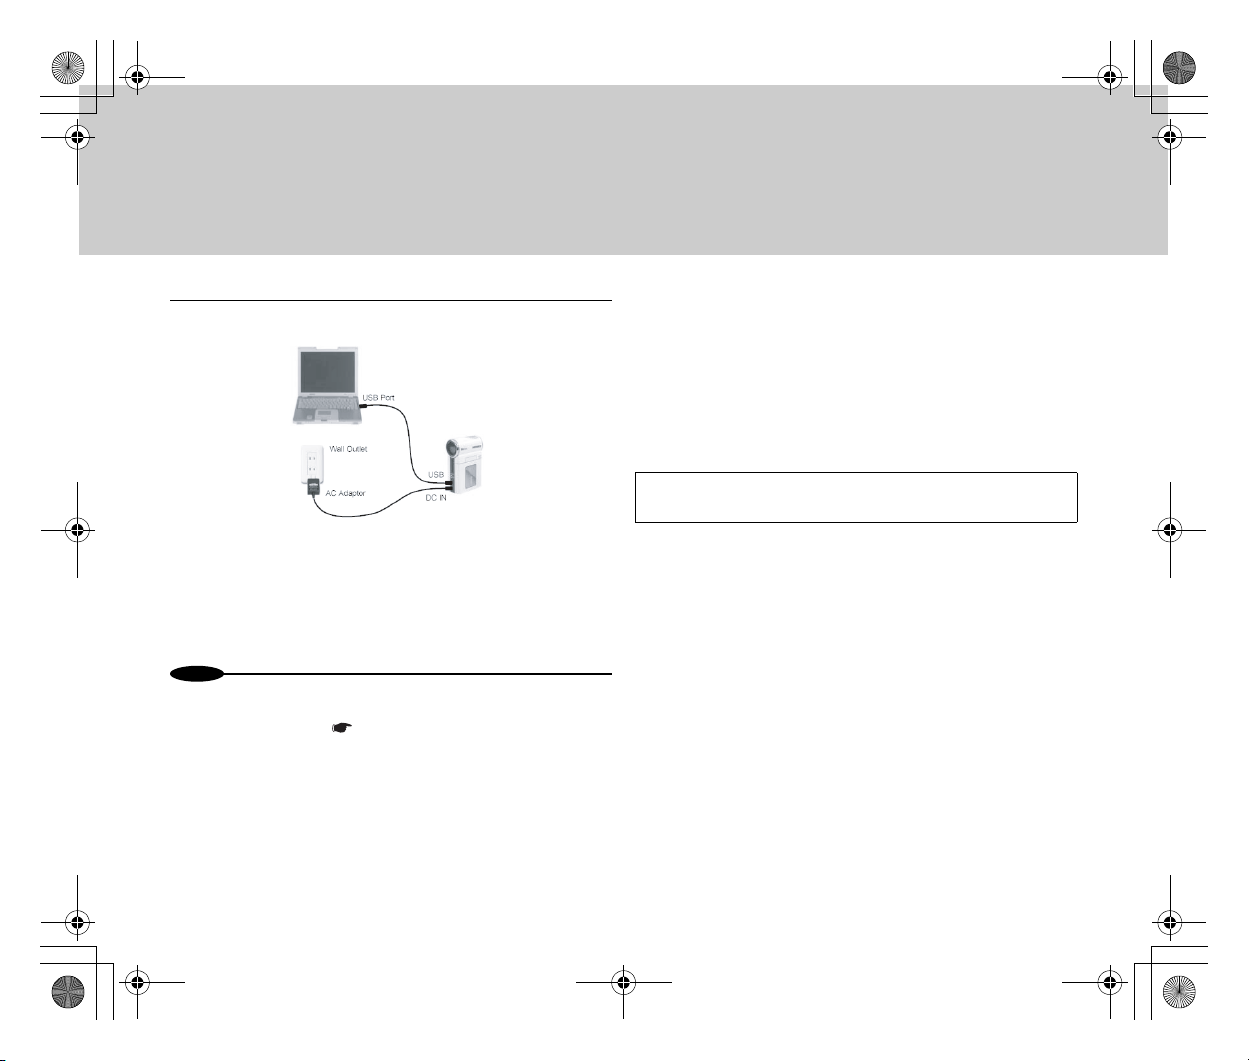
● Using as a PC Camera
1 Start the PC.
2 Turn the Power switch to [CAM].
41
Page 41
Not
Inst_Manu_US.book Page 42 Tuesday, August 12, 2003 6:22 PM
3 Connect the GADGET unit to the PC.
•GADGET can be used as a PC camera for
programs such as Windows Messenger. Its usage
may vary depending on the software. See the
documentation of the respective software
products.
es
•Complete installation of the USB driver on the PC beforehand.
Connecting the USB cable before driver installation causes the USB
driver installation to fail ( Page xx).
•The PC camera function cannot be used while the device is connected
to the cradle. Remove the device from the cradle and connect it to the
PC.
•Using a USB hub or connecting two or more USB devices at a time
may hinder GADGET's normal operation. In that case, disconnect all
USB devices from the PC, and then reconnect GADGET to the PC.
•After installing the USB driver, follow the message displayed to
complete installation of the USB driver when connecting the GADGET
unit to a PC with the USB cable for the first time.
•A PC that supports USB 2.0 enables fast data transfer.
•When cables, other than the supplied ones, that do not support the
USB specifications are used, no guarantee of proper operation is
provided.
•When connected to a PC, the GADGET operates in PC-only mode. To
operate the GADGET unit, disconnect it from the PC.
Disconnecting the USB Cable without Powering
Off
● For Windows
Click the “Removing hardware” icon in the task tray and
check that the “USB high-volume storage device can be
removed safely” message is displayed before disconnecting
the cable. (No icon is displayed on Windows 98 Second
Edition. Check that data transfer has been completed before
disconnecting the cable.)
● For Macintosh
Put the icon for GADGET into the Trash before disconnecting
the cable.
42
Page 42
Not
Inst_Manu_US.book Page 43 Tuesday, August 12, 2003 6:22 PM
■Removable Disk Function
You can use GADGET's internal hard disk and “Memory Stick”/
“Memory Stick Pro” as a PC's external storage.
● Using as External Storage
1 Connect the GADGET unit to a PC ( Page xx).
2 Set the Power switch to [PLAY].
•The PC recognizes GADGET's internal hard disk
or “Memory Stick”/“Memory Stick Pro” as external
storage (that is a removable disk), and the drive
icon appears in [My Computer] (for Windows). Or,
the desk top displays the drive icon (for
Macintosh).
3 Execute operations such as moving/copying/
deleting a file.
4 Power off the PC, and then turn GADGET's Power
switch to [OFF].
es
•Do not disconnect the USB cable during data transmission.
•When using the device as external storage, you do not need to install
any specified USB driver or software.
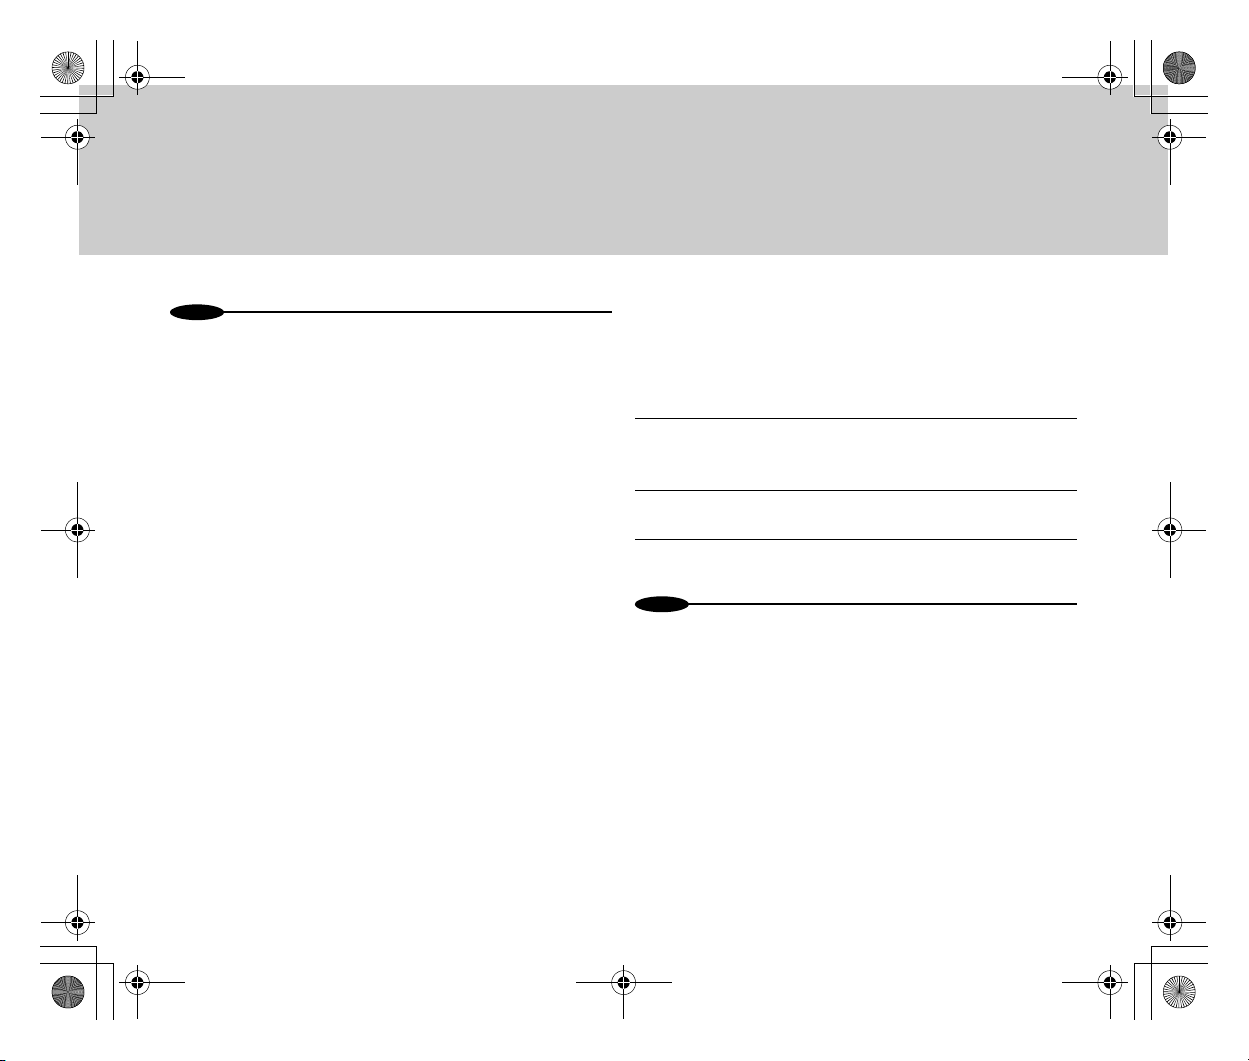
● Folder Structure
Recorded data are stored in the internal hard disk drive or
“Memory Stick”/“Memory Stick Pro”, as illustrated below.
● Folder structure at a glance
43
Page 43
Not
Not
Inst_Manu_US.book Page 44 Tuesday, August 12, 2003 6:22 PM
es
•DCAMxxxx. JPG: still images, DCAMxxxx. AVI: movies, DCAMxxxx.
THM: thumbnails, DCAMxxxx. ASF: video files created on Samsung or
other models, DCAMxxxx. WAV: audio files.
•The xxxx portion represents an assigned number.
•Except for the [free] folder, do not rename or delete any folders.
GADGET's normal operation might fail if you do.
•You can assign any desired name to [free].
•One folder can contain up to 100 files or folders.
■Connecting to a Printer
Connecting to a printer that has a USB direct printing function
enables printing of still images selected on your GADGET unit to
be printed without a PC.
1 Connect GADGET to a printer with a USB cable and
turn GADGET's Power switch to [PLAY].
2 Press the Mode button and select a still image.
3 Using the Menu button, select [Print].
es
•To use the device while it is being connected to the cradle, power on
the cradle in step 1.
44
Page 44
Inst_Manu_US.book Page 45 Tuesday, August 12, 2003 6:22 PM
Enjoy Variety of Usages
■
Different Menu Settings
You can change menu settings from their states at the time of
purchase.
● Power switch: [CAM]
FInitial settings.
Camera
Video Quality Extra
---------------------------------------- -------------------------------------------------------------------
Video Size
---------------------------------------- -------------------------------------------------------------------
Still Photo Quality
---------------------------------------- -------------------------------------------------------------------
Options Self Timer Time:
------------------------------------------ -------------------------------------------
Video Effects
------------------------------------------ -------------------------------------------
Program AE
Super Fine
Fine
VGA (640×480)
QVGA (320×240)
Super Fine
Fine
Off
5 Seconds
10 Seconds
Off
Art (Rough)
Black & White
Negative (Inverted)
Sepia
Auto
Sports (Blurring-proof)
Spotlight
(Overexposure-proof)
------------------------------------------ -------------------------------------------
Exposure
------------------------------------------ -------------------------------------------
Shutter
------------------------------------------ -------------------------------------------
White Balance
Line-In
Video Quality Extra
Auto
–7 - +7
Auto
1/60 - 1/10000
Auto
Indoor
Outdoor
Hold (Fixed at the current white
balance)
Super Fine
---------------------------------------- -------------------------------------------------------------------
Video Size
Audio Recording
Enable Photo
---------------------------------------- -------------------------------------------------------------------
Still Photo Quality
------------------------------------------------------------------------------------
White Balance
Fine
VGA (640 x 480)
QVGA (320 x 240)
Off
On
Super Fine
Fine
Auto
Indoor
Outdoor
Hold (Fixed at the current white
balance)
45
Page 45
Inst_Manu_US.book Page 46 Tuesday, August 12, 2003 6:22 PM
Settings (Menu items are common to [CAM] and [PLAY].)
Select Storage
Hard Disk
Memory Stick
---------------------------------------- -------------------------------------------------------------------
Display Display Off
On
------------------------------------------ -------------------------------------------
Back Light
Auto Off
Off
On
------------------------------------------ -------------------------------------------
LCD Brightness –(0)+
------------------------------------------ -------------------------------------------
LCD Color –(0)+
------------------------------------------ -------------------------------------------
Display Mode
------------------------------------------ -------------------------------------------
Color Scheme
------------------------------------------ -------------------------------------------
Time Display
Auto Off
Auto
LCD (Large-size characters)
TV (Small-size characters)
Orange
Blue
Green
Pink
Off
On
------------------------------------------ -------------------------------------------
Boot Screen
Off
Default
---------------------------------------- -------------------------------------------------------------------
Setup Set Date/Time Internal clock settings
Select Photo
------------------------------------------ -------------------------------------------
Date Format
YY/MM/DD
DD/MM/YY
MM/DD/YY
------------------------------------------ -------------------------------------------
Auto Shutoff
Off (Auto Shutoff disabled)
30 Seconds
1 Minute
5 Minutes
* Auto Shutoff is enabled when running on the internal battery. When
running on an external battery, the power cannot be turned off
automatically.
------------------------------------------ -------------------------------------------
Remote Control
------------------------------------------ -------------------------------------------
Language
------------------------------------------ -------------------------------------------
Video System
------------------------------------------ -------------------------------------------
Version Info GADGET version
Off (Disabled)
On (Enabled)
English
Korean
Japanese
NTSC (Japan, Korea, USA, etc.)
PAL (Europe, China, Africa,
etc.)
46
Page 46
Inst_Manu_US.book Page 47 Tuesday, August 12, 2003 6:22 PM
---------------------------------------- -------------------------------------------------------------------
Format
* Formatting deletes all files including protected ones, and they can never be restored.
Consider carefully before formatting.
* While formatting, do not change the Power switch position, operate GADGET, or remove
the Memory Stick.
* “Memory Stick”/“Memory Stick Pro” can not be used if it has been formatted on a PC.
Reformat it on GADGET.
* Formatting cannot be performed when the Delete-Protection switch on the Memory
Stick is set to [LOCK].
---------------------------------------- -------------------------------------------------------------------
Demo Mode Off
Hard Disk
Memory Stick
On
Start Now
File Browser (Check the data stored on the hard disk or Memory Stick.)
Audio
DCIM
Movie
MP3
● Power switch: [PLAY]
FInitial settings.
Video
Options Play Mode
------------------------------------------ -------------------------------------------
Play Multiple Display Multiple Movie Files
------------------------------------------ -------------------------------------------
Display Screen Size
---------------------------------------- -------------------------------------------------------------------
Delete
---------------------------------------- -------------------------------------------------------------------
Protect
Single Video
Play to End
Repeat
Repeat All
Actual Size
Full Screen
Delete This Video
Delete All Video Files
File Number Reset
(Reassigns by starting with
0001.)
No
Yes
Select Multiple
Protect This Video (Cancels
protection if it is protected.)
Protect All Video Files
Cancel Protection of All Video
Files
Select Multiple
47
Page 47
Inst_Manu_US.book Page 48 Tuesday, August 12, 2003 6:22 PM
* When listed in a table, protected files appear with a key icon. When checked in File
Browser, they are marked “Protected.”
* Setting the Delete-Protection switch on Memory Stick to [LOCK] causes all files on the
Memory Stick to be protected.
* When the Delete-Protection switch on the Memory Stick is set to [LOCK], no key icon
appears.
---------------------------------------- -------------------------------------------------------------------
Copy to Memory Stick
(Or Copy to Hard Disk)
Still Images
Select Storage
---------------------------------------- ----------------------------------------------------------------------
Options Slide Show
Copy This Video
Copy All Video Files
Select Multiple
Copy All Files
Hard Disk
Memory Stick
On
Off
------------------------------------------ -------------------------------------------
Play Multiple Display Still Image
------------------------------------------ -------------------------------------------
Repeat
On
Off
------------------------------------------ -------------------------------------------
Slide Show
Switching Time
* It takes longer than the set time for large-size still images recorded on other digital
cameras to be displayed. (Reference: It takes about 10 seconds to display an image of
about 3 mega (million) pixels.)
* The still image display function supports images ranging from QQVGA (162 x 120 dots)
up to 5 mega pixels.
3 Seconds
5 Seconds
10 Seconds
---------------------------------------- ----------------------------------------------------------------------
Delete Still image files to be deleted:
Delete This Image
Delete All Images
File Number Reset
(Reassigns by starting with
0001.)
No
---------------------------------------- ----------------------------------------------------------------------
Protect
* Setting the Delete-Protection switch on Memory Stick to [LOCK] causes all files on the
Memory Stick to be protected.
---------------------------------------- ----------------------------------------------------------------------
Print
Select Multiple
Protect This Still Photo
Yes
Protect All Still Photos
Cancel Protection of All Still
Photos
Select Multiple
Print This Still Photo
Enter the number of copies to print out.
↓
When the unit is connected to a USB direct printing-enabled printer:
When the unit is not connected to a USB direct printing-enabled printer:
Select “Save to DPOF file” or
“Start Print.”
The number of copies to be
printed out is saved in the
DPOF file.
48
Page 48
Inst_Manu_US.book Page 49 Tuesday, August 12, 2003 6:22 PM
---------------------------------------- ---------------------------------------------------------------
Print All Still Photos
Enter the number of copies to print out.
↓
When the unit is connected to a USB direct printing-enabled printer:
When the unit is not connected to a USB direct printing-enabled printer:
---------------------------------------- ---------------------------------------------------------------
Select “Save to DPOF file” or
“Start Print.”
The number of copies to be
printed out is saved in the
DPOF file.
Select Photo
Save Number of Copies to DPOF File
Or
Start Print (This setting cannot be selected when not connected to a printer that
supports USB direct printing.)
Or
Cancel
---------------------------------------- ---------------------------------------------------------------
DPOF Print (Cannot be selected if no DPOF file exists.)
---------------------------------------- ---------------------------------------------------------------
Clear DPOF File (Cannot be selected if no DPOF file exists.)
GADGET is compliant with the DPOF (Digital Print Order Format) standards. A DPOFcompliant printer can be used to automatically print out photos specified on GADGET. You
can select the still photo you want to print and specify the number of copies needed. Or you
can choose to print all still photos in the number you specify.
What you have specified is saved in the DPOF file.
Additionally, GADGET supports USB direct printing. You can connect the device to a printer
that supports USB direct printing to directly print from the printer without using a PC.
---------------------------------------- ----------------------------------------------------------------------
Copy to Memory Stick
(Or Copy to Hard Disk)
Copy This Still Image
Copy All Images
Select Multiple
Copy All Files
MP3
Song Selection
Select Title
Select Artist
Select Album
Select Genre
Select Folder
* Tag information in the MP3 file is used for Select Artist, Select Album, and Select Genre.
For Select Folder, folder information is used.
---------------------------------------- ----------------------------------------------------------------------
Options Random
------------------------------------------ -------------------------------------------
Play Multiple
------------------------------------------ -------------------------------------------
Repeat
Off
On
Play Song
Off
Song
All (All songs associated with
the current folder, artist, album,
genre or all)
------------------------------------------ -------------------------------------------
Display
Song Information
Slide Show: All still images
Slide Show: Selected still
images
Slide Show switching time
3 Seconds
5 Seconds
---------------------------------------- ----------------------------------------------------------------------
Delete
10 Seconds
Delete This MP3 File
Delete All MP3 Files
Select Multiple
49
Page 49
Inst_Manu_US.book Page 50 Tuesday, August 12, 2003 6:22 PM
---------------------------------------- ----------------------------------------------------------------------
Protect
* Setting the Delete-Protection switch on Memory Stick to [LOCK] causes all files on the
Memory Stick to be protected.
---------------------------------------- ----------------------------------------------------------------------
Copy to Memory Stick
(Or Copy to Hard Disk)
Audio
Options Play Multiple Play Multiple Audio Files
---------------------------------------- ----------------------------------------------------------------------
Delete
------------------------------------------ -------------------------------------------
Repeat
Protect This MP3 File
Protect All MP3 Files
Cancel Protection of All MP3
Files
Select Multiple
Copy This MP3 File
Copy All MP3 Files
Select Multiple
Copy All Files
Off
Audio File
Repeat All Audio Files
Delete This Audio File
Delete All Audio Files
File Number Reset
(Reassigns by starting with
0001.)
No
Yes
---------------------------------------- ----------------------------------------------------------------------
Protect
* Setting the Delete-Protection switch on Memory Stick to [LOCK] causes all files on the
Memory Stick to be protected.
---------------------------------------- ----------------------------------------------------------------------
Copy to Memory Stick
(Or Copy to Hard Disk)
Settings
The menu items are the same as those when the Power switch is set to [CAM].
File Browser (Check the data stored in the hard disk or Memory Stick.)
Protect This Audio File
Protect All Audio Files
Cancel Protection of All Audio
Files
Select Multiple
Copy This Audio File
Copy All Audio Files
Select Multiple
Copy All Files
Audio
DCIM
Movie
MP3
50
Page 50
Inst_Manu_US.book Page 51 Tuesday, August 12, 2003 6:22 PM
Precautions for Use
■
Precautions for Handling the Internal
Hard Disk
• Using hard disk management tools (such as a
partition management tool) for a PC may disable the
hard disk.
• High-precision manufacturing technology is applied
to fabrication of the hard disk. Therefore it is highly
sensitive to impact, temperature, and humidity, and
it can become faulty due to such factors.
• Do not cause impact to the device while it is
operating. That may damage the hard disk head or
the magnetic disk that records and plays data to and
from the hard disk. If damaged, the hard disk needs
to be replaced.
• Any hard disk failure disables the reading of any data
recorded on it.
• Even when the hard disk has been used correctly, we
cannot recover data loss due to hard disk failure nor
can we compensate for it.
Be sure to copy any valuable data to your Memory Stick or
make a backup copy of such data.
■Precautions on Handling the Camera
• Use GADGET away from other equipment. Strong
magnetism from a speaker or a large-sized motor
may distort images on the display. Also, radio
interference between a TV set/game machine and
GADGET may lead to poor image reception on either
or both of these devices.
• In case GADGET does not operate normally because
of magnetism or radio waves, remove the battery and
the AC adaptor. Then reconnect them and turn on the
power again.
• If a radio tower or high-voltage cable exists in the
surrounding area, the quality of recorded images
and sounds may be affected by the radio waves and/
or high voltages involved.
• When using insecticide or any volatile substances
around the GADGET unit, take care to prevent the
substance form being sprayed on the GADGET unit.
Such substances may deteriorate its outer jacket or
cause paint to peel off.
• Do not allow rubber or vinyl products to be in contact
with the GADGET unit for a long time.
• When using GADGET on a beach or any other places
exposed to sand or dust, take care not to allow sand/
dust to enter inside the device or the jack sections.
Intrusion of sand/dust may cause failure.
51
Page 51
Inst_Manu_US.book Page 52 Tuesday, August 12, 2003 6:22 PM
• Do not allow the device to come in contact with
seawater or any water. If that ever happens, wipe the
device body with a wet cloth after fully wringing it out.
Then wipe it with a dry cloth.
• When carrying the GADGET unit, take care not to
drop or hit it against any object. High impact may
damage the outer jacket, leading to failure.
• Do not use the device for business purposes such as
monitoring. GADGET is not designed to serve such
business purposes. Using it at length may cause
heat to accumulate inside the device, resulting in
failure.
● When GADGET is not used for long periods:
When GADGET is not used for a long time, follow the instructions below for storing it.
• Set the Power switch to [OFF].
• Remove the power source such as the battery or the
AC adaptor.
• Avoid storing it in such places as follows:
– Places that are exposed to dust or sand
– Places that are affected by magnetism, radio waves or
static electricity
– Places that are exposed to high temperature, high humidity
or direct sunlight
■Precautions for Use - Concerning the
Operating Environment of the Supplied
Software
● Windows environment
•CPU: Pentium xx, xx MHz or above.
•OS: Windows 98SE/ME/2000/XP. (PC/AT
compatible computer with the Japanese version
preinstalled.)
• Memory: xx MB or more
• Free space on the hard disk: xx MB or more (Space
of xx MB or more is recommended.)
• Display resolution: 800 x 600 dots or higher
• Provided with a USB port.
• With Windows Media Player xx or later installed
• With DirectX xx or later installed
● Macintosh environment
• OS: MacOS 9.1 - 9.22 (Macintosh with one of these
versions preinstalled)
• Memory: xx MB or more
• Free space on the hard disk: xx MB or more (Space
of xx MB or more is recommended.)
• Display resolution: 800 x 600 dots or higher
• Provided with a USB port
52
Page 52
Not
Inst_Manu_US.book Page 53 Tuesday, August 12, 2003 6:22 PM
es
•Not all PCs configured with the above environment are subject to
guarantee of proper operation.
•PCs used via a USB hub or with a USB card are out of the scope of
guarantee.
•If your OS is Windows 2000/XP, log in as the [Administrator
(administrator of the PC)] (or a user with the equivalent privileges) to
install the OS.
■Precautions for Cleaning the Unit and
Handling the Internal Lithium Cell
● Cleaning
• Wipe dust off the main unit using a soft, dry cloth.
Do not use a solvent such as benzine or thinner.
Such solvents may deteriorate the outer jacket or
cause paint to peel off. If the jacket is heavily soiled,
soak a wipe in thinned kitchen detergent, wring it
out well, and wipe the jacket with it. Then, finish with
a dry cloth.
• When using a chemically treated wipe, follow the
accompanying instructions.
• If fingerprints are left on the lens or if you used
GADGET in a highly humid place or in a place that
may be affected by salt, such as a seashore, be
sure to wipe the lens surface with a soft wipe.
• If the LCD screen is soiled with fingerprints or dirt,
wipe it with the supplied wiper (for ITCAM-9 only) or
with a dry, soft wipe.
53
Page 53
Not
Inst_Manu_US.book Page 54 Tuesday, August 12, 2003 6:22 PM
● Internal Rechargeable Lithium Cell
GADGET incorporates a rechargeable lithium cell that stores
the date and other settings even when the AC adaptor and the
battery are removed.
The rechargeable lithium cell is automatically recharged
when GADGET is used. If the device is not used at all, the cell
runs down in a week, and the time is displayed like this: .“- -
-.” In this case, connect the AC adaptor to GADGET or install
a battery into it, then turn the Power switch to [PLAY] or
[CAM]. Then leave it for xx hours or longer. After that, set the
date again ( Page xx).
Note, however, that GADGET operates normally even when
the lithium cell has drained if you do not need date recording.
es
•If date setting fails even after the internal rechargeable lithium cell is
fully charged, contact our service agent available to you ( Page
xx).
•Recycling of lithium cells is encouraged since they contain precious
resources of which only small deposits have been identified. As for
disposal of GADGET after you have finished using it, bring it to our
recycling agent.
■Precaution for Using “Memory Stick”/
“Memory Stick Pro”
● Using and Storing
• Do not make contact with the jacks or allow any
metal to make contact with them.
• Do not affix any item other than the prepared labels.
• Do not cause high impact to it, bend it, or drop it.
• Do not disassemble or alter it.
• Keep it off water.
• Avoid using or storing it in places as described
below:
– In a heated car, under the blazing sun, or in any place
exposed to high temperature
– Under direct sunlight
– In a place exposed to high humidity or corrosive effect
– When carrying or storing GADGET, keep it in the case
supplied with your “Memory Stick”/“Memory Stick Pro”.
• Data may be destroyed if GADGET is used in any of
the following ways:
– If the “Memory Stick” or “Memory Stick Pro” is removed
or the unit's power is shut off while writing or reading
data.
– If the unit is used under the influence of static electricity
or electrical noise.
54
Page 54
Not
Inst_Manu_US.book Page 55 Tuesday, August 12, 2003 6:22 PM
• If data in your “Memory Stick” or “Memory Stick Pro”
has been destroyed or lost due to inappropriate
usage, Samsung shall not be liable for any loss
whatsoever.
• We recommend that you back up important data by
copying them to your PC'S hard disk.
● Image Compatibility
• GADGET is compliant with the “Design rules for
Camera File systems” standard, a unified standard
established by the Japan Electronics and
Information Technology Industries Association.
Static images recorded on devices not compliant
with the unified standard cannot be displayed on
GADGET.
• If a “Memory Stick”/“Memory Stick Pro” used on
another device will not operate, format the “Memory
Stick”/“Memory Stick Pro” on your GADGET
( Page xx). Note that formatting erases all data
recorded on the “Memory Stick”/“Memory Stick
Pro”.
● Formatting “Memory Stick”/“Memory Stick Pro”
“Memory Stick”/“Memory Stick Pro” formatted on a PC is not
guaranteed to operate on GADGET. Formatting must be
performed on GADGET ( Page xx).
es
•“Memory Stick”/“Memory Stick Pro” is a trademark of Sony
Corporation.
•Other system names and product names used in this document may
be trademarks or registered trademarks of the respective owners.
Note that the symbols for trademarks/registered trademarks, such as
“TM” or “(R),” may not be explicitly used in this document.
55
Page 55
Inst_Manu_US.book Page 56 Tuesday, August 12, 2003 6:22 PM
■Precautions for Handling the Lens and
the LCD Screen
● Handling the Lens
• When the lens is cloudy, turn off the Power switch
and let the device stand for about an hour. The
cloudiness will disappear when the unit has caught
up with the ambient temperature.
• In order to prevent fungi, keep the device in a clean
place with adequate ventilation. We recommend
that you operate GADGET with the power on about
once a month, which helps your GADGET to
operate in good condition for an extended period.
● Handling the LCD Screen
• Dark dots may appear on the LCD screen or they
may stay on (in red, blue or green). This
phenomenon is not an LCD malfunction. Even
though our LCD screens are manufactured using
high-precision technology, at a ratio of 0.01% or
less, some may be subject to pixel loss or
persisting dots on the screen. You can be
reassured, however, that these dots will not be
recorded in your data.
• In a cold district, or when the main unit is
excessively cold, the LCD screen may become
slightly darker than usual immediately after
powering on. As the temperature rises, the normal
brightness comes back.
• Under accute changes in temperature,
condensation may occur on the LCD screen. In that
case, only use the supplied wiper (only for ITCAM-
9) or a soft sloth to wipe it off.
56
Page 56
Inst_Manu_US.book Page 57 Tuesday, August 12, 2003 6:22 PM
■Precautions for Charging and Handling
the Battery
● Charging
• Before starting, be sure to charge the battery
( Page xx).
• Keep charging until the CHARGE lamp goes off at
an ambient temperature between 0 and 40 degrees
centigrade. Outside this temperature range,
charging may be more time-consuming.
• After charging is finished, remove the AC adaptor
from the unit's DC IN jack or disconnect the battery
from the GADGET unit.
● Using the Battery Efficiently
• Use the battery at an ambient temperature between
0 and 40 degrees centigrade. Under 0 degrees
centigrade, the operating hours may be reduced.
Under such conditions, you can extend the
operating hours by warming the battery beforehand
in your pocket.
• The battery keeps going down even in the standby
state or when playing is paused. Turning off the
power whenever possible helps extend the
operating hours.
• The battery is not waterproof. Take care to keep it
away from water.
● Storing Battery
• Leaving the battery installed in your GADGET
slowly leads to battery drain even when the Power
switch is set to [OFF]. Be sure to disconnect the
battery from the main unit after charging or when
you will not use the device for hours. This
procedure enables you to prevent battery drain and
reduction in battery life.
• Store the battery in a cool place with low humidity,
at a fixed temperature if possible. An excessively
low or high ambient temperature may reduce the
battery life.
• When you are storing the battery at length, we
recommend that you charge the battery at least
once a year and put it back in storage after
completely letting it discharge.
57
Page 57
Inst_Manu_US.book Page 58 Tuesday, August 12, 2003 6:22 PM
● Checking Remaining Battery Capacity
When the display indicates that the remaining battery
capacity is adequate but the power shuts off shortly, charge
the battery to its full capacity.again. The remaining battery
capacity should now be displayed correctly. Note, however,
that correct indication may not be recovered after the unit has
been used at a high temperature at length, after the unit has
stood with the battery fully charged, or after the battery has
been heavily used. Use the information above to plan your
shooting hours.
● Battery Life
• A battery has a life. The battery capacity slowly
goes down as it is repeatedly used or used over
time. When the operating time has become
significantly short, the battery has reached the end
of its life, requiring you to replace it with a new one.
• When disposing of a battery pack that you no
longer need, do not burn or disassemble it. Cover
the jack section with tape or the like and bring it to
a recycle shop available to you.
● Short-circuiting of the Battery Jack Section
Do not allow any metal items (such as a necklace or a hair
pin) to make contact with the battery's jacks (plus and minus
pins). Doing so may cause short-circuiting, which may result
in an electric shock, liquid leakage, overheating, ignition, or
blow-out.
58
Page 58
Inst_Manu_US.book Page 59 Tuesday, August 12, 2003 6:22 PM
■Using GADGET Overseas
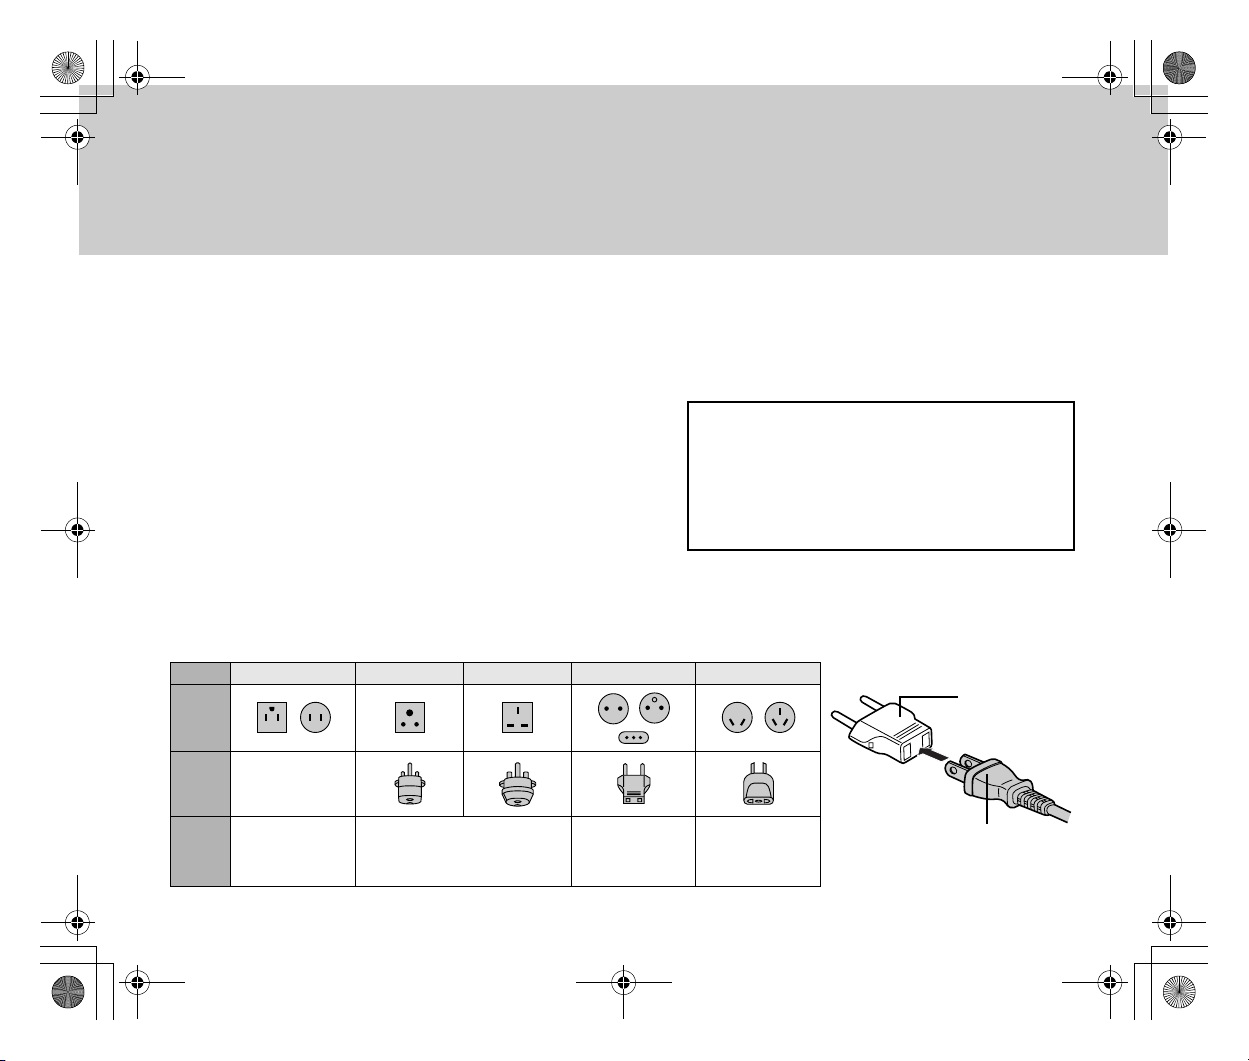
With GADGET, you can record and play back data anywhere around the world. Keep the following notes in mind when you do so.
● Power Supply
The AC adaptor shipped with the GADGET unit is designed to
automatically switch to the appropriate supply voltage among those
used around the world (100 V, 120 V, 220 V or 240 V) and to an
appropriate frequency (50 Hz or 60 Hz). However, the shape of the
power receptacle may differ , depending on your destination country,
region, or district. When using your GADGET overseas, check the
shape of the power receptacle of your destination and prepare a
suitable plug. For purchase of an outlet adaptor plug, contact our
service agent or your travel agency. The same charging procedure
applies as that for domestic use.
Types of Power Receptacles in Major Countries and Regions
Ty pe
Shape
Outlet
Adaptor
Plug
Major
Countries
and
Regions
A B BF C S
Not needed
Japan, North America Europe, Asia, Africa Europe Oceania, China
The supplied AC adaptor is designed to
support all supply voltages (100 V, 120 V, 220
V and 240 V) and frequencies (50 Hz and 60
Hz) used in the world.
Do not use a commercially available transformer; it may cause failure.
An example
of an outlet
adaptor plug
Insert in the
direction as
shown.
Power cord
59
Page 59
Inst_Manu_US.book Page 60 Tuesday, August 12, 2003 6:22 PM
● Watching TV
Ground wave analog color TV broadcasting is performed in three systems: NTSC, PAL (PAL/PAL-M/PALN), and SECAM. These systems are related to devices
such as TVs, VCRs, and video cameras. To play recorded videos, the color systems of the recording and playing devices must match. The GADGET unit can be
connected to an NTSC or PAL-system TV set, you need
to prepare either an NTSC- or PAL-system TV.
Major countries and regions using the NTSC system
· USA
· American Samoa
· Antigua and Babuda
· Yemen (some districts)
· British Bermuda
· Ecuador
· El Salvador
· Guyana
· Canada
· Cuba
· Guatemala
· Guam
· Grenada
· Costa Rica
· Columbia
· Jamaica
· Surinam
· Saint Christopher and Nevis
· Saint Vincent and the Grenadines
· Saint Lucia
· Taiwan
· Korea
· Chile
· Trinidad and Tobago
· Commonwealth of Dominica
· Dominican Republic
· Nicaragua
· Venezuela
· Haiti
· Panama
· Bahamas and Marshall
· Barbados
· Fiji
· Philippines
· Puerto Rico
· Vietnam (some districts)
· Belize
· Peru
· Bolivia
· Honduras
· Mariana Islands
· Federated States of Micronesia
60
Page 60
Not
Inst_Manu_US.book Page 61 Tuesday, August 12, 2003 6:22 PM
· Myanmar
· Mexico
Major countries and regions using the PAL system
[PAL]
· UK
· Italy
· Australia
· Austria
· The Netherlands
· Kuwait
· Singapore
· Switzerland
· Sweden
· Spain
· Slovakia
· Thailand
· Czech
· China
· Denmark
· Germany
· New Zealand
· Norway
· Hungary
· Finland
· Belgium
· Hong Kong
· Poland
· Portugal
· Malaysia
[PAL-M]
· Brazil
[PAL-N]
· Argentina
· Uruguay
· Paraguay
Major countries and regions using the SECAM system
· Iraq
· Iran
· Ukraine
· Guyana
· France
· Bulgaria
· Monaco
· Russia
es
•Prepare a TV set that has video/audio jacks.
61
Page 61
Inst_Manu_US.book Page 62 Tuesday, August 12, 2003 6:22 PM
Troubleshooting
■
Troubleshooting
While Recording
[Symptom]
Recording is disabled.
[Cause]
The hard disk, or “Memory Stick”/“Memory Stick Pro”
does not have enough free space.
[Action]
Delete unnecessary data.
[Symptom]
The recordable time/photo count for movies or still images significantly differs from the value stated in this
document.
[Cause]
The recordable time/photo count varies depending on
the subject images. This is not a failure.
[Action]
-
[Cause]
The recordable time and photo count become less than
the stated values when movies, still images, and audio/
music files are used in a single “Memory Stick”/“Memory Stick Pro”.
[Action]
-
While Playing
[Symptom]
Movies and/or sounds are not played normally.
[Cause]
Data may have been destroyed because of static electricity or radio waves.
[Action]
Create backup copies of important data on a PC or other media.
[Symptom]
Sounds are not heard through earphones while displaying still images.
[Cause]
While displaying still images, it is normal that sounds
are not heard.
[Action]
-
[Symptom]
The LCD screen displays movies in a small size.
62
Page 62
Inst_Manu_US.book Page 63 Tuesday, August 12, 2003 6:22 PM
[Cause]
The movies were recorded in QVGA (320 x 240) mode
and played with [Display Screen Size] set to [Actual
Size].
[Action]
From the menu, set [Display Screen Size] to [Full
Screen].
[Symptom]
While recording fast motions, sometimes mosaic type
noise occurs.
[Cause]
The phenomenon occurs from the inherent nature of
MPEG4 movies. This is not an abnormality.
[Action]
Record in [Extra] mode.
[Symptom]
Files recorded on other devices or using third-party
software cannot be played.
[Cause]
GADGET cannot always play files recorded on other devices or using third-party software. This is not an abnormality.
[Action]
-
[Symptom]
Files recorded on GADGET cannot be played on another device or images in the files cannot be displayed in
the correct size.
[Cause]
Other devices cannot always play files recorded on
GADGET or cannot always play images in such files in
the correct size. This is not an abnormality.
[Action]
-
[Symptom]
Data recorded on a PC cannot be read on GADGET.
[Cause]
GADGET cannot read data that are incompatible with
GADGET.
[Action]
-
[Symptom]
MPEG4 movies recorded on GADGET cannot be
played on a PC.
[Cause]
A PC without movie-playing software installed cannot
play movies recorded on GADGET.
63
Page 63
Inst_Manu_US.book Page 64 Tuesday, August 12, 2003 6:22 PM
[Action]
Install the supplied software.
[Symptom]
Black boarders appear at the top and bottom of the
screen while playing movies on a PC.
[Cause]
If top and bottom black boarders were included in the
original video/broadcasting screen, they are naturally
included in movies, recorded or played on GADGET.
When playing such movies on a PC, those black boarders appear as well. This is not an abnormality.
[Action]
-
[Symptom]
MP3 files cannot be played on GADGET.
[Cause]
1. An MP3 file cannot be played if its folder/file name includes
characters other than Japanese or English characters. (When
Japanese has been selected from the “Display Language” menu
item)
2. An MP3 file cannot be played if its encoding format is not
compatible.
3. An MP3 folder cannot be played if it has more than 100 folders and
files in all.
4. An MP3 folder cannot be played if it has a hierarchical structure with
more than three or more sub-folder layers.
[Action]
1. Use Japanese or English characters for the name.
2. An incompatible file cannot be played by design.
3. Delete unnecessary folders and files to reduce the total number to
100 or less.
4. Restructure the sub-folders under the MP3 folder into a hierarchy
with three layers or fewer.
[Symptom]
The title/artist name does not appear for the MP3 file being played.
[Cause]
Although GADGET supports the MP3 ID tags, they may
not always be displayed in the following cases:
• The folder/file name includes characters other than
Japanese or English characters. (When Japanese
has been selected from the [Display Language]
menu item)
• The ID tag includes characters other than
Japanese or English characters.
(When Japanese has been selected from the
“Display Language” menu item)
[Action]
-
64
Page 64
Inst_Manu_US.book Page 65 Tuesday, August 12, 2003 6:22 PM
While Operating “Memory Stick”
[Symptom]
Data cannot be written, deleted, or formatted to/from/on
the “Memory Stick”/“Memory Stick Pro”.
[Cause]
The Delete-Protection switch has been locked.
[Action]
Unlock the Delete-Protection switch.
[Symptom]
“Memory Stick”/“Memory Stick Pro” formatted on a device other than GADGET is not useable.
[Cause]
“Memory Stick”/“Memory Stick Pro” formatted on a device other than GADGET cannot be used.
[Action]
Reformat it on GADGET.
[Symptom]
“Memory Stick”/“Memory Stick Pro” formatted on GADGET is not useable on other devices.
[Cause]
[Action]
Format it on the device it will be used with.
[Symptom]
“Memory Stick”/“Memory Stick Pro” cannot be read on
GADGET.
[Cause]
A certain folder has been deleted from the “Memory
Stick”/“Memory Stick Pro” on the PC that is running it.
[Action]
Do not delete any folder from “Memory Stick”/“Memory
Stick Pro”.
[Symptom]
“Memory Stick”/“Memory Stick Pro” formatted in the
NTFS format cannot be detected on GADGET.
[Cause]
GADGET does not support NTFS-formatted “Memory
Stick”/“Memory Stick Pro”.
[Action]
Use GADGET to format any “Memory Stick”/“Memory
Stick Pro” to be used on GADGET.
[Symptom]
GADGET-formatted “Memory Stick”/“Memory Stick Pro”
is not useable.
[Cause]
GADGET or the “Memory Stick”/“Memory Stick Pro”
may be faulty.
65
Page 65
Inst_Manu_US.book Page 66 Tuesday, August 12, 2003 6:22 PM
[Action]
Contact our service center ( Page xx).
Connecting to a TV Set or VCR
[Symptom]
No images or sounds are generated after connecting to
a TV set.
[Cause]
Connection may be faulty.
[Action]
Re-connect using the supplied cable.
[Cause]
The Power switch may not be set to [PLAY], disabling
image and sound playback.
[Action]
Set the Power switch to [PLAY].
[Symptom]
Connecting to external equipment using the cradle disturbs the display.
[Cause]
Connecting GADGET to both video/audio input and output jacks of a single external device may disturb the display.
[Action]
Connect GADGET to either the video/audio input or output jack, not to both.
[Symptom]
Part of the display characters do not appear.
[Cause]
Part of the display characters may be suppressed depending on the TV type. This is not a failure.
[Action]
-
[Symptom]
Panoramic images (16.9) cannot be recorded normally.
[Cause]
GADGET does not support panoramic images.
[Action]
-
[Symptom]
Automatic recording fails to record the top portion.
[Cause]
GADGET's automatic recording function starts after detecting video signal input. Thus , it may not record the
portion immediately after the start of automatic recording.
66
Page 66
Inst_Manu_US.book Page 67 Tuesday, August 12, 2003 6:22 PM
[Action]
Give a one-minute allowance or so for timer setting on
the external equipment.
Connecting to a PC
[Symptom]
After connecting the USB cable, a green [?] mark appears for [USB High-Volume Storage Device] in [Device
Manager] on Windows.
[Cause]
Depending on the OS, [?] may appear if the cable was
connected without installing the supplied USB driver.
[Action]
Disconnect the USB cable from GADGET and install the
USB driver.
[Symptom]
While using Windows Me, [Warning on device removal]
appeared after the USB cable was disconnected.
[Cause]
This warning appears if the cable was connected without installing the supplied USB driver.
[Action]
Install the USB driver.
[Symptom]
The PC that has been recovered from suspension does
not detect GADGET.
[Cause]
[Action]
Restart the PC.
Other Trouble
[Symptom]
GADGET cannot be powered on.
[Cause]
GADGET cannot be powered on unless the battery and/
or AC adaptor is/are connected correctly.
[Action]
Check the connections.
[Cause]
The battery is run down.
[Action]
Charge the battery, or replace the battery with a fully
charged one.
67
Page 67
Inst_Manu_US.book Page 68 Tuesday, August 12, 2003 6:22 PM
[Symptom]
The power is suspended immediately after it is turned
on.
[Cause]
The remaining battery capacity is not sufficient.
[Action]
Charge the battery, or replace the battery with a fully
charged one.
[Symptom]
Recording/playing failed, followed by screen freeze.
[Cause]
[Action]
Press the reset switch inside the battery case. After
pressing the reset switch, check any desired settings.
[Symptom]
Red, blue, green, or white dots appeared on the screen.
[Cause]
At a ratio of less than 0.01%, LCD screens are subject
to pixel loss or dots that are permanently lit, which is not
a failure.
[Action]
-
[Symptom]
GADGET does not detect DPOF information that has
been set on another device.
[Cause]
GADGET may not detect DPOF information that has
been set on another device. This is not a failure.
[Action]
Re-enter the information on GADGET.
[Symptom]
DPOF setting/resetting is time-consuming.
[Cause]
Setting/resetting is naturally time-consuming if there are
numerous files to be set or reset. This is not an abnormality.
[Action]
-
[Symptom]
DPOF information that has been set on another device
is deleted.
[Cause]
Deleting a file on GADGET may delete DPOF information set on an another device. This is not a failure.
[Action]
-
68
Page 68
Inst_Manu_US.book Page 69 Tuesday, August 12, 2003 6:22 PM
Additional Information
■
Major Specifications
● ITCAM-7/9
System
Recording method Hard disk drive/Memory Stick recording system (with MPEG4 video compression and ADPCM audio compression)
Video signal NTSC/PAL color, CCIR-compliant method
Audio recording method ADPCM method, 44.1 kHz/16 bits (stereo)
Recording media Internal 1-inch hard disk drive: 1.5 GB
Memory Stick: 16 - 128 MB
Memory Stick Pro: 256 MB - 32 GB
Recording/playing time (for the internal hard disk)
20 - 120 minutes: VGA, Extra (VBR)
60 minutes: Super Fine (CBR, 3.0 Mbps)
150 minutes: QVGA, Super Fine (CBR, 1.2 Mbps)
Video file format AVI format, MPEG4 video compression and ADPCM audio compression
Bit rate Video: 0.5 Mbps (QVGA)- 2.5 Mbps (VGA), supporting CBR and VBR
Audio: 352.8 Kbps
Image pickup device 1/6 type CCD, about 350,000 pixels (total), progressive scanning
Zoom lens Optical magnification: 10
Focal length f = 3.15 - 31.5 mm, F = 1.8 - 2.0
Filter diameter 30 mm
Minimum object intensity0.5 lux
LCD screen Model 2 semi-transmissive color LCD, about 211,000 pixels
69
Page 69
Inst_Manu_US.book Page 70 Tuesday, August 12, 2003 6:22 PM
General Specifications
Input/output jacks Input/output jacks for USB 2.0 (5-pin, mini-B type) (shared for S-video, composite video, and audio)
Earphone jack
Input/output jacks
USB jack USB 2.0-compliant
Special connector for connecting the cradle (for video, audio, power supply, etc.)
Headphone jack 3.5 ∅, 3-pin mini jack
Allowable operating
temperature
Allowable relative
temperature
Supply voltage 7.2 V (when operating on a battery)
Power consumption About 5.0 W
External dimensions 33×103×63 mm (width x height x depth)
Mass About 220 g (including the battery)
0°C - 40° C
10% - 80%
8.4 V (when operating via the AC adaptor)
● Cradle Specifications (only for ITCAM-9)
Input/output jacks
S-video input jack Mini Din 4-pin
Y input: 1 Vp-p, 75Ω unbalanced, negative sync
C input: 0.286 mV, 75Ω unbalanced
70
Page 70
Inst_Manu_US.book Page 71 Tuesday, August 12, 2003 6:22 PM
S-video output jack Mini Din 4-pin
Y output: 1 Vp-p, 75Ω unbalanced, negative sync
C output: 0.286 mV, 75Ω unbalanced
AV input 3.5 ∅, 4-pin mini jack
Video input: 1 Vp-p, 75Ω unbalanced, negative sync
Audio input: 327 mV, 10 kΩ, stereo
AV output 3.5 ∅, 4-pin mini jack
Video output: 1 Vp-p, 75Ω unbalanced, negative sync
Audio output: 327 mV, 2.2 kΩ, stereo
Special connector for connecting ITCAM-7/9 (for video, audio, power supply, etc.)
DC input DC 8.4 V
Dimensions
(width x height x depth)
Weight About 170 g
127 mm x 80 mm x 68 mm
● AC Adaptor Specifications
Input voltage AC 100 - 240 V, 50/60 Hz
Output voltage DC 8.4 V, 1.6 A
Allowable operating
temperature
Dimensions
(width x height x depth)
Weight 110 g
0°C - 40° C
60 mm x 44 mm x 26 mm
71
Page 71
Inst_Manu_US.book Page 72 Tuesday, August 12, 2003 6:22 PM
■Guarantee and Services
1. Guarantee (attached as a separate document)
When receiving the guarantee from your dealer, be sure to check the entries for
“Dealer Name and Guarantee Period,” and keep the gurantee in a safe place.
2. Guarantee period: For one year after the date of purchase
If the unit is used for business or special purposes, it is subject to pay repair
services even during the guarantee period.
3. Requesting repair services during the guarantee period
First, refer to the “Troubleshooting” section in this manual and check the device
again. If the problem still persists, then present the guarantee certificate to your
dealer and make a request for repair. For this product, repair services are only
supported for items that can be brought in.
4. Requesting repair services after the guarantee period has expired
First, contact your dealer. If it is possible to maintain the product's functionality
by repairing it, we provide pay repair services upon request.
5. Minimum retaining period for replacement performance components
The repair performance components (parts needed for maintaining the defined
functionality) for this digital video camera will be retained in stock for eight years
after the production is discontinued.
6. Feel free to make inquiries to your dealer about our after-the-sale
services, including repair services during the guarantee period. You can
also contact the following:
Information we need:
• Your name, address, and phone number
• The product name (ITCAM-7/9), Item No., and date of purchase
• Description of the trouble or abnormality
72
Page 72
Inst_Manu_US.book Page 73 Tuesday, August 12, 2003 6:22 PM
List of Service Agents
The agents listed below can also provide repair services. Please contact our service agent nearest you.
* Request: Please be sure to contact our service center for advisory or handling-related information concerning this
product.
* Note that the information on service agents, including their phone numbers and addresses, are subject to
change.
District Shop Name Prefecture Address Phone Number Fax Number
Hokkaido ›››› Hokkaido ››››, Sapporo-shi 011-xxx-xxx 011-xxx-xxx
›››› Hokkaido ››››, Sapporo-shi 011-xxx-xxx 011-xxx-xxx
›››› Hokkaido ››››, Sapporo-shi 011-xxx-xxx 011-xxx-xxx
›››› Hokkaido ››››, Sapporo-shi 011-xxx-xxx 011-xxx-xxx
Tohoku ›››› Aomori ››››, Hachinohe-shi 0178-xxx-xxx 0178-xxx-xxx
›››› Aomori ››››, Hachinohe-shi 0178-xxx-xxx 0178-xxx-xxx
›››› Aomori ››››, Hachinohe-shi 0178-xxx-xxx 0178-xxx-xxx
›››› Aomori ››››, Hachinohe-shi 0178-xxx-xxx 0178-xxx-xxx
73
 Loading...