

Page 1
Electric Range
user manual
FE710DRS
This manual is made with 100 % recycled paper.
ENGLISH
imagine the possibilities
Thank you for purchasing this Samsung product.
To receive more complete service, please register
your product at
www.samsung.com/register
1-800-SAMSUNG (726-7864)
FE710DRS_XAC_DG68-00334A-07_EN.indd 1 05/11/2012 20:31:12
Page 2
features of your new range
Enhanced convenience. Better cooking. Easy maintenance. Your new electric range has been designed to
bring you these benefits and more.
• The latest in heat-distribution technology
Other ranges with just one fan tend to make a swirl of heat that fails to cover the whole inside of
the oven. This means uneven heat distribution and uneven cooking. Your new range has Surround
Airvection™, which Samsung enhanced by adding a third heating element and a multi-fan system
that circulates the heat evenly in all directions. You get more ecient energy consumption and
more even cooking.
• Steam Quick cleaning
Thanks to Steam Quick™, Samsung’s unique technology for light-duty cleaning jobs, keeping
your oven spick-and-span is a snap — no hassle, no odor, no chemicals. Steam Quick™ cleans
the inside of your range with high-temperature steam in just 20 minutes.
• Bigger is better
With a capacity of 5.9 cubic feet, your new range is equipped with more space than any of its
competitors in the U.S. market. This means greater convenience for you when cooking for the
holidays or when entertaining.
• A cooktop with 5 burners
Four main burners with two that dial heat up to dierent pot sizes.
A smaller warming burner in the center of the range top.
• Twin Cooking
This oven features the unique twin cooking system. It allows you to prepare two dierent meals at
the same time using two dierent temperatures in the upper and lower compartment. Or you can
cook either in the upper or lower compartment, which saves time and energy.
2_ features of your new range
FE710DRS_XAC_DG68-00334A-07_EN.indd 2 05/11/2012 20:31:12
Page 3
important safety instructions
Read and follow all instructions before using your oven to prevent the
risk of fire, electric shock, personal injury, or damage when using the
range. This guide does not cover all possible conditions that may occur. Always
contact your service agent or manufacturer about problems that you do not
understand.
WHAT YOU NEED TO KNOW ABOUT SAFETY
INSTRUCTIONS
Warnings and Important Safety Instructions in this manual do not cover all
possible conditions and situations that may occur. It is your responsibility to use
common sense, caution, and care when installing, maintaining, and operating
your oven.
IMPORTANT SAFETY SYMBOLS AND PRECAUTIONS
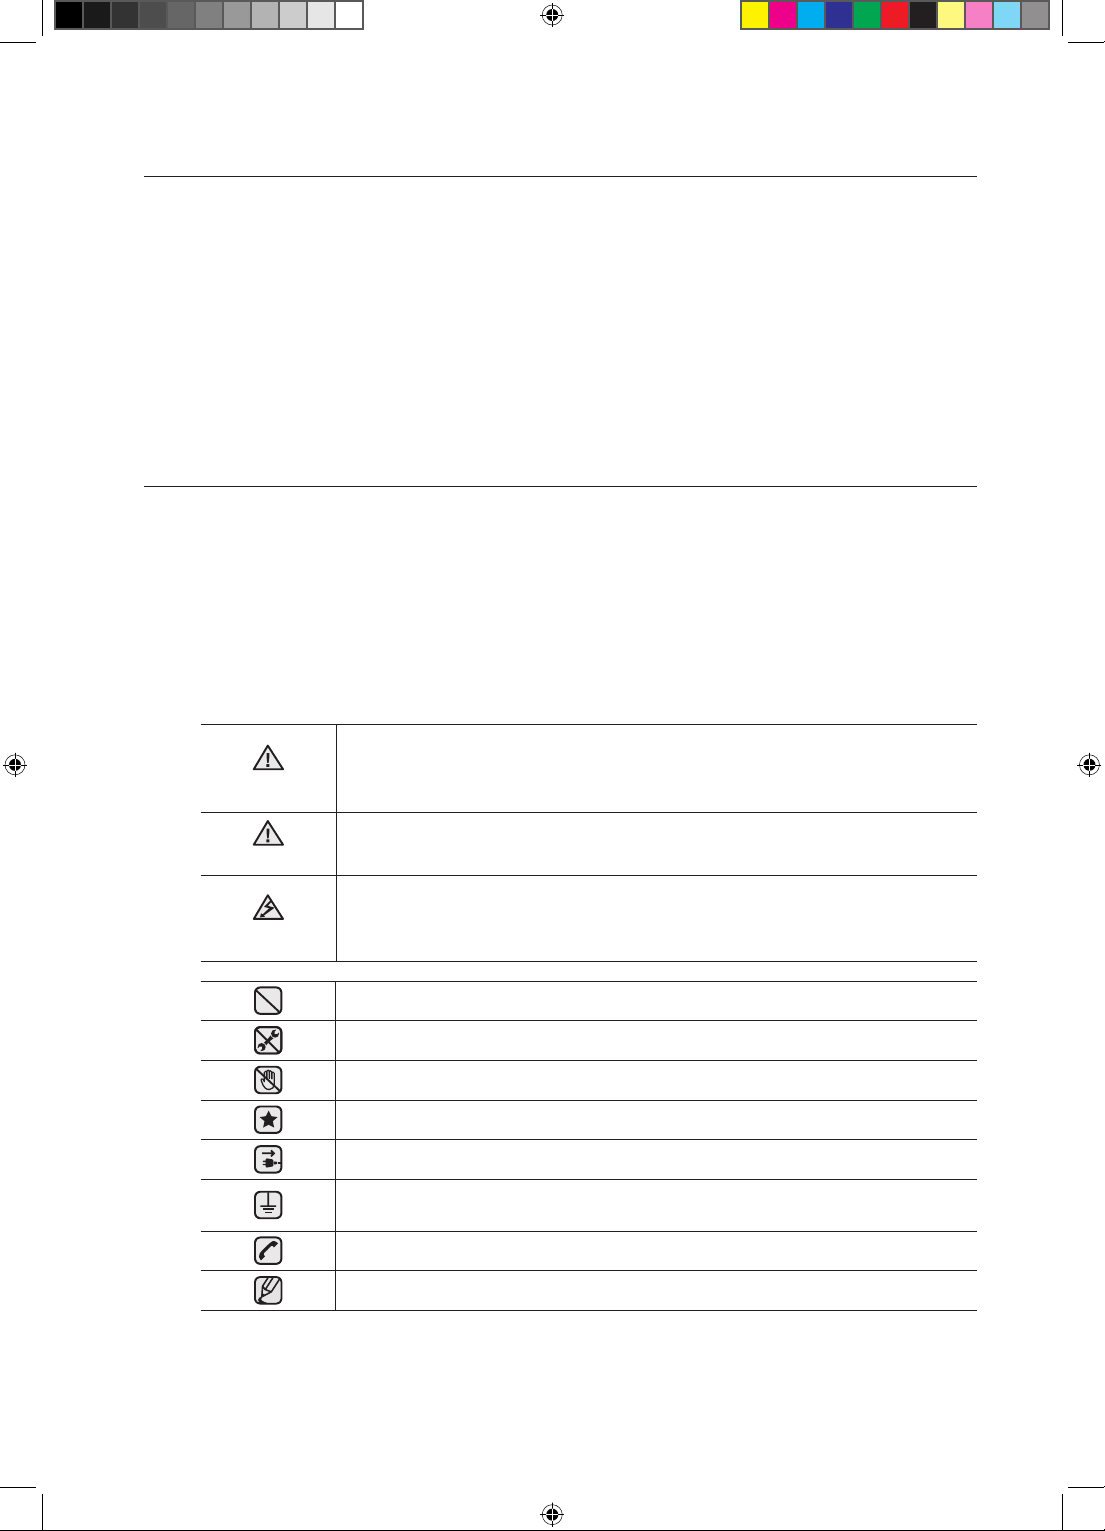
What the icons and signs in this user manual mean:
Hazards or unsafe practices that may result in severe
WARNING
CAUTION
CAUTION
These warning signs are here to prevent injury to you and others.
Please follow them explicitly.
personal injury or death.
Hazards or unsafe practices that may result in minor
personal injury or property damage.
To reduce the risk of fire, explosion, electric shock, or
personal injury when using your oven, follow these basic
safety precautions.
Do NOT attempt.
Do NOT disassemble.
Do NOT touch.
Follow directions explicitly.
Unplug the power plug from the wall socket.
Make sure the machine is grounded to prevent electric
shock.
Call the service center for help.
Note
After reading this section, keep it in a safe place for future reference.
Important safety instructions _3
FE710DRS_XAC_DG68-00334A-07_EN.indd 3 05/11/2012 20:31:13
Page 4
ANTI-TIP DEVICE
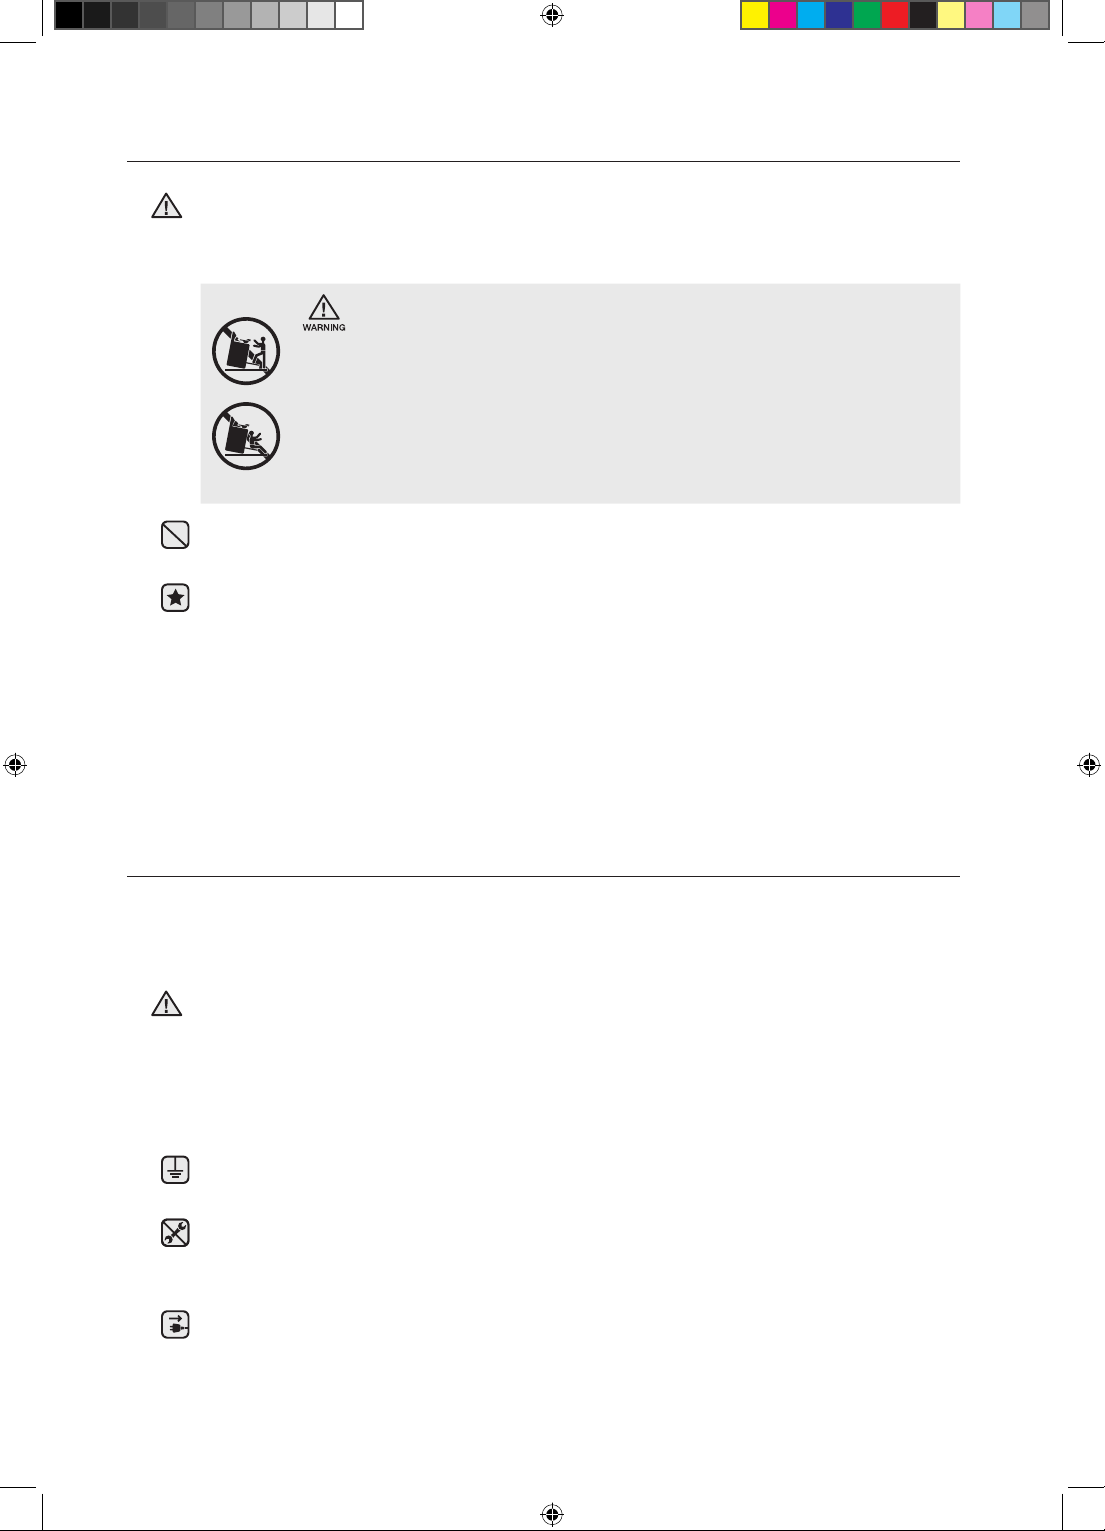
WARNING-To reduce the risk of tipping the range, the range must be
WARNING
secured by a properly installed Anti-Tip device. Refer to the installation
manual for instructions.
WARNING
ALL RANGES CAN TIP AND CAUSE INJURIES TO
PERSONS
INSTALL THE ANTI-TIP DEVICE PACKED WITH RANGE
FOLLOW ALL INSTALLATION INSTRUCTIONS
Do not step, lean, or sit on the doors of the range. You can cause
the range to tip, resulting in burns or serious injuries.
Check to see that the Anti-Tip device is installed properly. Then grasp the
top rear edge of the range and carefully attempt to tilt it forward. Verify
that the Anti-Tip device is engaged.
If you pull the range out from the wall for any reason, make sure the
device is properly engaged when you push the range back against the
wall. If it is not, there is a possible risk of the range tipping over and
causing injury if you or a child stand, sit or lean on an open door.
FOR YOUR SAFETY
When using electrical appliances, you should follow basic safety
precautions, including the following:
Use this appliance only for its intended purpose as described in this
CAUTION
Owner’s Manual.
Potentially hot surfaces include the cooktop, areas facing the cooktop,
oven vent opening, surfaces near the opening, crevices around the oven
door.
Be sure your appliance is properly installed and grounded by a qualified
technician.
User servicing - Do not repair or replace any part of the appliance
unless specifically recommended in the manual. All other servicing should
be referred to a qualified technician.
Always disconnect power to appliance before servicing by removing the
fuse or switching o the circuit breaker.
4_ features of your new range
FE710DRS_XAC_DG68-00334A-07_EN.indd 4 05/11/2012 20:31:13
Page 5
Do not enter inside the oven.
Do not store items of interest to children in cabinets above a
range or on the back guard of a range. Children climbing on the range
to reach items could be seriously injured.
Do not leave children alone. Never leave children alone or unattended
in an area where this appliance is in use. They should never be allowed to
sit or stand on any part of the appliance.
Never use your appliance for warming or heating the room.
Do not use water on grease fires. Turn o the oven to avoid spreading
the flame. Smother the fire or flame by closing the door or use a dry
chemical, baking soda, or foam-type extinguisher.
Storage in or on appliance. Do not store flammable materials in the
oven or near the surface units. Be sure all packing materials are removed
from the appliance before operating it. Keep plastics, clothes, and paper
away from parts of the appliance that may become hot.
Wear proper apparel. Never wear loose-fitting or hanging garments
while using the appliance.
Use only dry potholders. Placing moist or damp potholders on hot
surfaces may result in burns from steam. Do not let the potholder touch
hot heating elements. Do not use a towel or other bulky cloth.
Teach children not to play with the controls or any other part of the range.
Keep children away from the door when opening or closing it as they may
bump themselves on the door or catch their fingers in the door.
SURFACE COOKING UNITS
Never leave surface units unattended at high heat settings.
Boilovers cause smoking and greasy spillovers that may ignite.
Do not lift the cooktop. Lifting the cooktop can damage the range and
cause the range to malfunction.
Do not operate the cooktop without cookware. If the cooktop
operates without cookware, the control knobs will become hot.
Never use the glass cooktop surface as a cutting board.
Important safety instructions _5
FE710DRS_XAC_DG68-00334A-07_EN.indd 5 05/11/2012 20:31:13
Page 6
Use care when touching the cooktop. The glass surface of the
cooktop will retain heat after the controls have been turned o.
Be careful when placing spoons or other stirring utensils on the
glass cooktop surface when it is in use. They may become hot and
could cause burns.
Use proper pan sizes. This appliance is equipped with surface units of
dierent size. Select pots and pans that have flat bottoms large enough
to cover the surface area of the heating element. Using undersized
cookware will expose a portion of the heating element to direct contact
and may result in the ignition of clothing. Matching the size of the pot or
pan to the burner will also improve eciency.
Glazed cooking utensils. Only certain types of glass, glass/ceramic,
ceramic,earthenware, or other glazed cookware are suitable for range-top
service without breaking due to the sudden change in temperature.
Cookware handles should be turned outward and not extend
over adjacent surface units. To reduce the risk of burns, ignition
of flammable materials, and spillage due to unintentional contact with
cookware, cookware handles should be positioned so that they are
turned outward, and do not extend over adjacent surface units.
Read and follow all instructions and warnings on the cleaning cream
labels.
Be sure you know which control knob operates each surface unit. Make
sure you turned on the correct surface unit.
Always turn the surface units o before removing cookware.
When preparing flaming foods under the hood, turn the fan on.
Keep an eye on foods being fried at high or medium high heat settings.
6_ features of your new range
FE710DRS_XAC_DG68-00334A-07_EN.indd 6 05/11/2012 20:31:13
Page 7
OVEN
DO NOT TOUCH THE HEATING ELEMENTS OR INTERIOR
SURFACES OF THE OVEN. Heating elements may be hot even though
they are dark in color. Interior surfaces of an oven become hot enough to
cause burns. During and after use, do not touch or let clothing or other
flammable materials contact the heating elements or interior surfaces
of the oven until they have had sucient time to cool. Other surfaces of
the appliance may become hot enough to cause burns. Among these
surfaces are oven vent openings and surfaces near these openings, oven
doors, and windows of oven doors.
Do not heat unopened food containers. Build-up of pressure may
cause the container to burst and result in injury.
Do not use the oven to dry newspapers. If overheated, they can
catch on fire.
Do not use the oven for a storage area. Items stored in an oven can
ignite.
Use care when opening door. Let hot air or steam escape before you
remove or replace food in the oven.
Protective liners. Do not use aluminum foil to line the oven bottoms,
except as suggested in the manual. Improper installation of these liners
may result in a risk of electric shock or fire.
Keep oven vent ducts unobstructed. The oven vent is located above
the right rear surface unit. This area could become hot during oven use.
Never block this vent or place plastic or heat-sensitive items on it.
Placement of oven racks. Always place oven racks in the desired
location while the oven is cool. If the rack must be moved while the oven
is hot, use potholders. Do not let the potholders come in contact with the
hot heating element in the oven.
Do not allow aluminum foil or a meat probe to contact the heating
elements.
Important safety instructions _7
FE710DRS_XAC_DG68-00334A-07_EN.indd 7 05/11/2012 20:31:13
Page 8
WARMING DRAWER
DO NOT TOUCH THE HEATING ELEMENT OR THE INTERIOR
SURFACE OF THE DRAWER. These surfaces may be hot enough to
burn.
REMEMBER: The inside surface of the drawer may be hot when the
drawer is opened.
The purpose of the warming drawer is to hold hot cooked foods
at serving temperature. Always start with hot food. You cannot heat or
cook cold food in the warming drawer.
Use care when opening the drawer. Open the drawer a crack and
let hot air or steam escape before removing or replacing food. Hot air or
steam which escapes can cause burns to hands, face and/or eyes.
Do not use the drawer to dry newspapers. If overheated, they can
catch on fire.
Do not use aluminum foil to line the drawer. Foil is an excellent heat
insulator and will trap heat beneath it. This will upset the performance of
the drawer and it could damage the interior finish.
Do not leave paper products, plastics, canned food or combustible
materials in the drawer.
Never leave jars or cans of fat drippings in or near the drawer.
Do not warm food in the drawer for more than three hours.
SELF-CLEANING OVENS
Do not clean the door gasket. The door gasket is essential for a good
seal. Care should be taken not to rub, damage, or move the gasket.
Never keep pet birds in the kitchen. Birds are extremely sensitive
to the fumes released during an oven self-clean cycle. Fumes may be
harmful or fatal to birds. Move birds to a well-ventilated room.
Clean only the parts listed in this manual in the self-clean cycle.
Before self-cleaning the oven, remove the partition, rack, utensils, and
food.
Do not use any commercial oven cleaner or oven liner protective coating
of any kind in or on the outside of the oven. Use only a ceramic cooktop
cleaner or the cleaner supplied with this appliance to clean the glass
cooktop.
8_ features of your new range
FE710DRS_XAC_DG68-00334A-07_EN.indd 8 05/11/2012 20:31:13
Page 9
Remove the nickel oven shelves from the oven before you begin the selfcleaning cycle, or they may discolor.
If the self-clean mode malfunctions, turn the oven o and disconnect the
power supply. Have it serviced by a qualified technician.
VENTILATING HOOD
Clean ventilating hoods frequently. Do not let grease accumulate on
the hood or filter.
When flaming foods under the hood, turn the fan on.
GLASS/CERAMIC COOKING SURFACES
DO NOT TOUCH SURFACE UNITS OR AREAS NEAR UNITS.
Surface units may be hot even though they are dark in color. Areas near
surface units may become hot enough to cause burns. During and after
use, do not touch, or let clothing or other flammable materials contact the
surface units or areas near the units until they have had sucient time to
cool. Among these areas are the cook-top and the facing of the cooktop.
Do not cook on a broken cooktop. If the cooktop should break,
cleaning solutions and spillovers may penetrate the broken cook-top and
create a risk of electric shock. Contact a qualified technician immediately.
Clean the cooktop with caution. If a wet sponge or cloth is used to
wipe spills on a hot cooking area, be careful to avoid steam burn. Some
cleaners can produce noxious fumes if applied to a hot surface.
BEFORE YOU BEGIN
Clean the oven thoroughly before using for the first time. Remove
the accessories and operate the oven at the bake setting of 400 °F for 1
hour before using. There will be a distinctive odor. This is normal. Ensure
your kitchen is well ventilated during this conditioning period.
Important safety instructions _9
FE710DRS_XAC_DG68-00334A-07_EN.indd 9 05/11/2012 20:31:13
Page 10
CRITICAL INSTALLATION WARNINGS
WARNING
The installation of this appliance must be performed by a qualified technician or
service company.
- Failing to have a qualified technician install the range may result in electric
shock, fire, an explosion, problems with the product, or injury.
Unpack oven, remove all packaging material and examine the oven for any
damage such as dents on the interior or exterior of the oven, broken door
latches, cracks in the door, or a door that is not lined up correctly. If there is any
damage, do not operate the oven and notify your dealer immediately.
Plug the power cord into a properly grounded outlet with the proper
configuration. Your oven should be the only item connected to this circuit.
Keep all packaging materials out of the reach of children. Children may use them
for play.
Install your appliance on a level and hard floor that can support its weight.
- Failing to do so may result in abnormal vibrations, noise, or problems with the
product.
This appliance must be properly grounded.
Do not ground the appliance to a gas pipe, plastic water pipe, or telephone line.
- This may result in electric shock, fire, an explosion, or problems with the
product
Do not cut or remove the ground prong from the power cord under any
circumstances.
Connect the oven to a circuit that provides the correct amperage.
Do not install this appliance in a humid, oily or dusty location, or in a location
exposed to direct sunlight or water (rain drops).
- This may result in electric shock or fire.
Do not use a damaged power cord or loose wall socket.
- This may result in electric shock or fire.
Do not pull or excessively bend the power cord.
Do not twist or tie the power cord.
Do not hook the power cord over a metal object, place a heavy object on the
power cord, or insert the power cord between objects.
- This may result in electric shock or fire.
If the power cord is damaged, contact your nearest service center.
10_ features of your new range
FE710DRS_XAC_DG68-00334A-07_EN.indd 10 05/11/2012 20:31:13
Page 11
CRITICAL USAGE WARNING
CAUTION
If the appliance is flooded by any liquid, please contact your nearest service
center. Failing to do so may result in electric shock or fire.
If the appliance produces a strange noise, a burning smell, or smoke, unplug the
power plug immediately and contact your nearest service center.
- Failing to do so may result in electric shock or fire
In the event of a gas leak (such as propane gas, LP gas, etc.), ventilate the area
immediately. Do not touch the power cord. Do not touch the appliance.
- A spark may result in an explosion or fire.
Take care not to contact the oven door, heating elements, or any of the other
hot parts with your body while cooking or just after cooking.
- Failing to do so may result in burns.
If materials inside the oven should ignite, keep the oven door closed, turn the
oven o and disconnect the power cord, or shut o power at the fuse or circuit
breaker panel. If the door is opened, the fire may spread.
Always observe safety precautions when using your oven. Never try to repair the
oven on your own - there is dangerous voltage inside. If the oven needs to be
repaired, contact an authorized service center near you.
If you use the appliance when it is contaminated by foreign substances such as
food waste, it may result in a problem with the appliance.
Take care when removing the wrapping from food taken out of the appliance.
- If the food is hot, hot steam may be emitted abruptly when you remove the
wrapping and this may result in burns.
Do not attempt to repair, disassemble, or modify the appliance yourself.
- Since a high voltage current enters the product chassis, it may result in
electric shock or fire.
- When a repair is needed, contact your nearest service center.
If any foreign substance such as water has entered the appliance, contact your
nearest service center.
- Failing to do so may result in electric shock or fire.
Do not touch the power cord with wet hands.
- This may result in electric shock.
Do not turn the appliance o while an operation is in progress.
- This may cause a spark and result in electric shock or fire.
Keep all packaging materials well out of the reach of children, as packaging
materials can be dangerous to children.
- If a child places a plastic bag over its head, the child can suocate.
Important safety instructions _11
FE710DRS_XAC_DG68-00334A-07_EN.indd 11 05/11/2012 20:31:13
Page 12
Do not let children or any person with reduced physical, sensory or mental
capabilities use this appliance unsupervised.
Make sure that the appliance’s controls and cooking areas are out of the reach
of children.
- Failing to do so may result in electric shock, burns or injury.
Do not touch the inside of the appliance immediately after cooking. The inside of
the appliance will be hot.
- Failing to do so may result in burns.
Do not use or place flammable sprays or objects near the oven.
- Flammable items or sprays can cause fires or an explosion.
Do not insert fingers, foreign substances, or metal objects such as pins or
needles into inlets, outlets, or holes. If foreign substances are inserted into any
of these holes, contact your product provider or nearest service center.
Do not tamper with or make any adjustments or repairs to the door. Under no
circumstances should you remove the door or outer shell of the oven.
Do not store or use the oven outdoors.
Never use this appliance for purposes other than cooking.
- Using the appliance for any purpose other than cooking may result in fire.
Open the cap or stopper of a sealed container (herb tonic tea bottle, baby
bottle, milk bottle and so on) and make a hole in food items such as shells or
nuts (eggs, chestnuts, etc) with a knife, before cooking them.
- Failing to do so may result in burns or injury.
Never heat plastic or paper containers and do not use them.
- Failing to do so may result in fire.
Do not heat food wrapped in paper such as magazines and newspaper.
- This may result in fire.
Do not open the door when the food in the oven is burning.
- If you open the door, it causes an inflow of oxygen and may cause a fire.
Do not apply excessive pressure to the door or the inside of the appliance. Do
not strike the door or the inside or the appliance.
- Hanging on to the door may result in the product falling and cause serious
injury.
- If the door is damaged, do not use the appliance. Contact a service center.
Do not hold food in your bare hands during or immediately after cooking.
- Use cooking gloves. The food may be very hot and you could burn yourself.
12_ features of your new range
FE710DRS_XAC_DG68-00334A-07_EN.indd 12 05/11/2012 20:31:13
Page 13
USAGE CAUTIONS
CAUTION
If the surface is cracked, turn the appliance o.
- Failing to do so may result in electric shock.
Dishes and containers can become hot. Handle with care.
Hot foods and steam can cause burns. Carefully remove container coverings,
directing the steam away from hands and face.
Remove lids from baby food before heating. After heating baby food, stir well to
distribute the heat evenly. Always test the temperature by tasting before feeding
the baby. The glass jar or the surface of the food may appear to be cooler than
the interior, which can be hot enough to burn an infant’s mouth.
Take care as beverages or food may be very hot after heating.
- Especially when feeding a child. Check that it has cooled suciently.
Take care when heating liquids such as water or other beverages.
- Make sure to stir during or after cooking.
- Avoid using a slippery container with a narrow neck.
- Remove the container at least 30 seconds after heating.
- Failing to do so may result in an abrupt overflow of the contents and cause
burns.
Important safety instructions _13
FE710DRS_XAC_DG68-00334A-07_EN.indd 13 05/11/2012 20:31:13
Page 14
Do not stand on top of the appliance or place objects (such as laundry, oven
cover, lighted candles, lighted cigarettes, dishes, chemicals, metal objects, etc.)
on the appliance.
- Items, such as a cloth, may be caught in the door.
- This may result in electric shock, fire, problems with the product, or injury.
Do not operate the appliance with wet hands.
- This may result in electric shock.
Do not spray volatile substances such as insecticide onto the surface of the
appliance.
- As well as being harmful to humans, it may also result in electric shock, fire or
problems with the product.
Do not put your face or body close to the appliance while cooking or when
opening the door just after cooking.
- Take care that children do not come too close to the appliance.
- Failing to do so may result in children burning themselves.
Do not place food or heavy objects over the edge of the oven door.
- If you open the door, the food or object may fall and this may result in burns
or injury.
Do not abruptly cool the door, the inside of the appliance, or a dish by pouring
water over it during or just after cooking.
- This may result in damage to the appliance. The steam or water spray may
result in burns or injury.
Do not operate while empty except for self-cleaning.
Do not defrost frozen beverages in narrow-necked bottles. The containers can
break.
Do not scratch the glass of the oven door with a sharp object.
- This may result in the glass being damaged or broken.
Do not store anything directly on top of the appliance when it is in operation.
Do not use sealed containers. Remove seals and lids before cooking. Sealed
containers can explode due to buildup of pressure even after oven has been
turned o.
Take care that food you are cooking in the oven does not come into contact
with the heating element.
- This may result in fire.
Do not over-heat food.
- Overheating food may result in fire.
14_ features of your new range
FE710DRS_XAC_DG68-00334A-07_EN.indd 14 05/11/2012 20:31:13
Page 15
CRITICAL CLEANING WARNINGS
CAUTION
Do not clean the appliance by spraying water directly on to it.
Do not use benzene, thinner or alcohol to clean the appliance.
- This may result in discoloration, deformation, damage, electric shock or fire.
Take care not to hurt yourself when cleaning the appliance (external/internal).
- You may hurt yourself on the sharp edges of the appliance.
Do not clean the appliance with a steam cleaner.
- This may result in corrosion.
Keep the inside of the oven clean. Food particles or spattered oils stuck to the
oven walls or floor can cause paint damage and reduce the eciency of the
oven.
Important safety instructions _15
FE710DRS_XAC_DG68-00334A-07_EN.indd 15 05/11/2012 20:31:13
Page 16
contents
INTRODUCING YOUR NEW RANGE
17
SURFACE COOKING
18
USING THE WARMING DRAWER
25
OPERATING THE OVEN
27
17 Overview
17 What’s included with your range
18 About surface cooking
20 How to set the appliance for surface cooking
23 Using the proper cookware
23 Choosing the proper cookware
24 Protecting the cooktop surface
25 About the warming drawer
26 Turning the warming drawer on or o
27 The oven control panel
28 The twin oven control
29 Using oven racks
29 Using the partition
30 Twin cooking mode temperature setting ranges
31 Setting the clock
32 Minimum and maximum settings
32 Setting the timer On/O
33 Oven rack positions
35 Baking
37 Convection baking
40 Convection roasting
42 Timed cooking
44 Delay timed cooking
46 Broiling
48 Using the custom cook feature
51 Using the warm function
51 Using the defrost function
52 Extra features
54 Turning the oven light on and o
MAINTAINING YOUR APPLIANCE
56
TROUBLESHOOTING
56 Self-cleaning
58 Steam-cleaning
59 Care and cleaning of the oven
61 Care and cleaning of the glass cooktop
63 Removing and replacing the oven door
64 Removing and replacing the warming drawer
65 Changing the oven light
66 Troubleshooting
66
WARRANTY
70 Warranty
70
16_ Contents
FE710DRS_XAC_DG68-00334A-07_EN.indd 16 05/11/2012 20:31:13
Page 17
introducing your new range
OVERVIEW
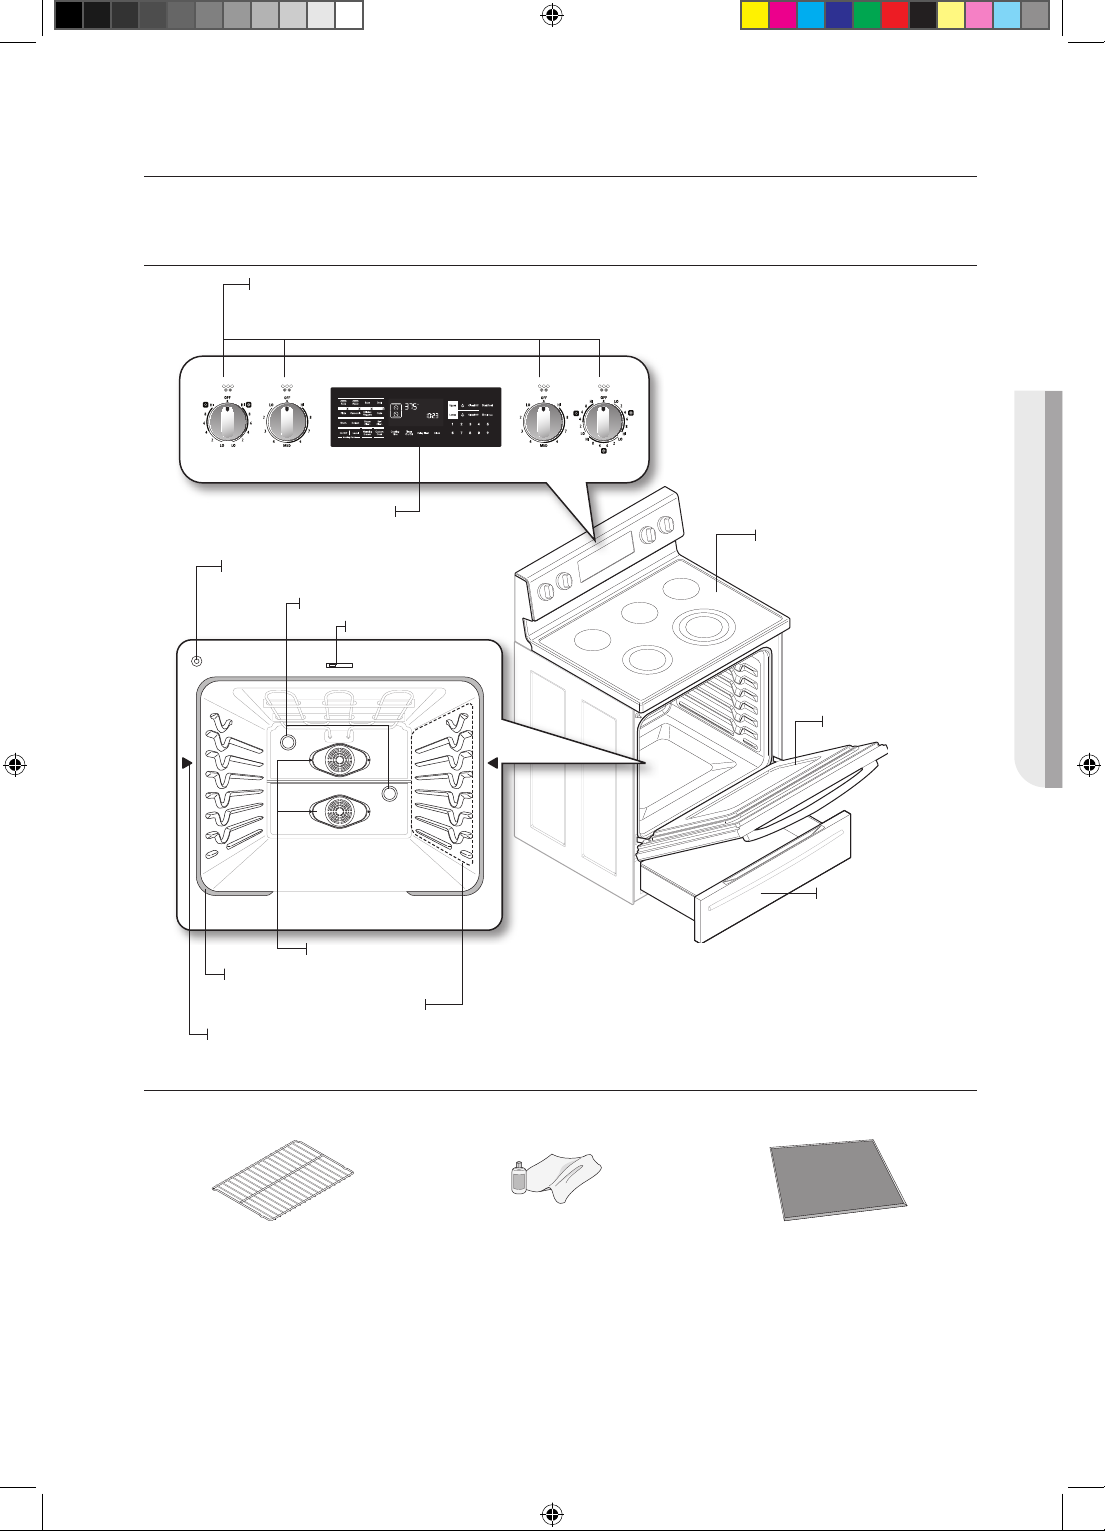
* Surface control knobs
See page 19 for more information
INTRODUCING
See page 27 for more information
Oven control panel
Automatic oven light switch
* Oven light
Self/steam clean latch
Convection fan
Gasket
Shelf position
Partition insert position
WHAT’S INCLUDED WITH YOUR RANGE
Glass surface
Oven door
Warming drawer
* Wire racks Cleaner & Cleaning pad * Partition
If you need an accessory marked with a *, you can buy it from the Samsung
Contact Center (1-800-726-7864).
Introducing your new range _17
FE710DRS_XAC_DG68-00334A-07_EN.indd 17 05/11/2012 20:31:14
Page 18
surface cooking
ABOUT SURFACE COOKING
BEFORE COOKING
CAUTION
• Do not use the glass cooktop surface as a cutting board.
• Do not place or store items that can melt or catch fire on the glass cooktop, even
when it is not being used.
• Turn the surface units on only after placing the cookware on them.
• Do not store heavy items above the cooktop surface. They could fall and damage it.
DURING COOKING
CAUTION
• Do not place aluminum foil or plastic items such as salt and pepper shakers, spoon
holders, or plastic wrappings on the range when it is in use. The hot air from the vent
could melt plastics or ignite flammable items.
• Make sure the correct surface unit is turned on.
• Never cook food directly on the glass. Always use cookware.
• Always place the pan in the center of the surface unit you are cooking on.
• Never leave surface units unattended while using a high heat setting. Boilovers cause
smoking and greasy spillovers that may catch on fire.
• Turn the surface units o before removing cookware.
• Do not use plastic wrap to cover food. Plastic may melt onto the surface and be very
dicult to remove.
AFTER COOKING
CAUTION
• Do not touch the surface units until they have cooled down.
• The surface may be still be hot and burns may occur if the glass surface is touched
before it has cooled down suciently.
• Immediately clean spills on the cooking area to prevent a tough cleaning chore later.
• If you have a cabinet directly above the cooking surface, make sure that the items
in it are infrequently used and can be safely stored in an area subjected to heat.
Temperatures in the cabinet may be unsafe for items such as volatile liquids, cleaners.
and aerosol sprays.
About the radiant surface elements
The temperature of radiant surface elements rises gradually and evenly. As the temperature rises,
the radiant element will glow red. To maintain the selected setting, the element will cycle on and
o. The heating element retains enough heat to provide a uniform and consistent heat during the
o cycle. For ecient cooking, turn o the element several minutes before cooking is complete.
This will allow residual heat to complete the cooking process.
Radiant elements have a limiter that allows the element to cycle ON and OFF, even at the HI
setting. This helps to prevent damage to the ceramic cooktop. Cycling at the HI setting is
normal and can occur if the cookware is too small for the radiant element or if the cookware
bottom is not flat.
18_ Surface cooking
FE710DRS_XAC_DG68-00334A-07_EN.indd 18 05/11/2012 20:31:14
Page 19
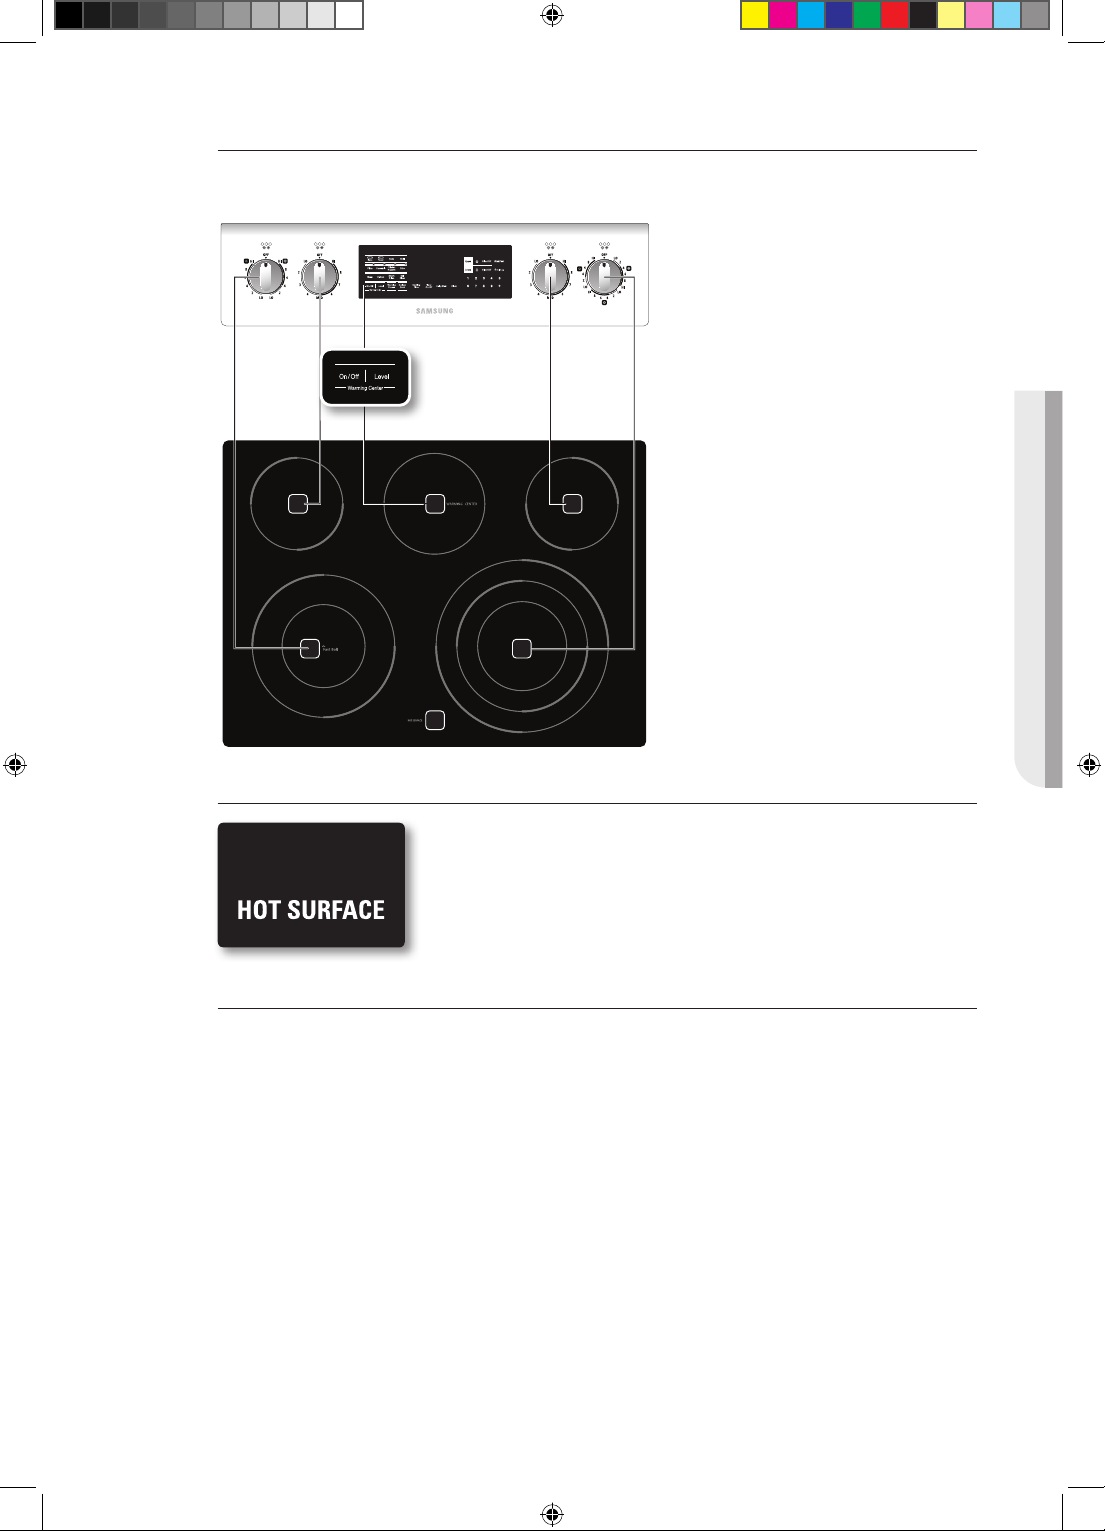
Location of the radiant surface elements and controls
The radiant control knobs operate the radiant surface elements on the cooktop as shown below.
SURFACE COOKING
1
3 4
5 2
6
1. Single element: Left rear
2. Single element: Right rear
3. Dual element: Left front (3,000 W)
4. Triple element: Right front (3,000 W)
5. Warming center: Center rear
6. Hot surface indicator
Hot surface indicator
• Comes on when the unit is turned on or hot to the touch.
• Stays on even after the unit is turned o.
• Glows until the unit is cooled to approximately 150 °F.
Cooking areas
• The cooking areas on your range are identified by permanent circles on the glass cooking
surface. For the most ecient cooking, fit the pan size to the element size.
• Pans should not extend more than ½˝ to 1˝ beyond the cooking area.
• When a control is turned on, you can see a glow through the glass cooking surface. The
element will cycle on and o to maintain the preset heat setting, even at high settings.
• For more information on selecting proper types of cookware, refer to the section “Using the
proper cookware” on page 23.
Surface cooking _19
FE710DRS_XAC_DG68-00334A-07_EN.indd 19 05/11/2012 20:31:15
Page 20
HOW TO SET THE APPLIANCE FOR SURFACE COOKING
• The surface elements may be hot even when o and burns can occur. Do not touch
CAUTION
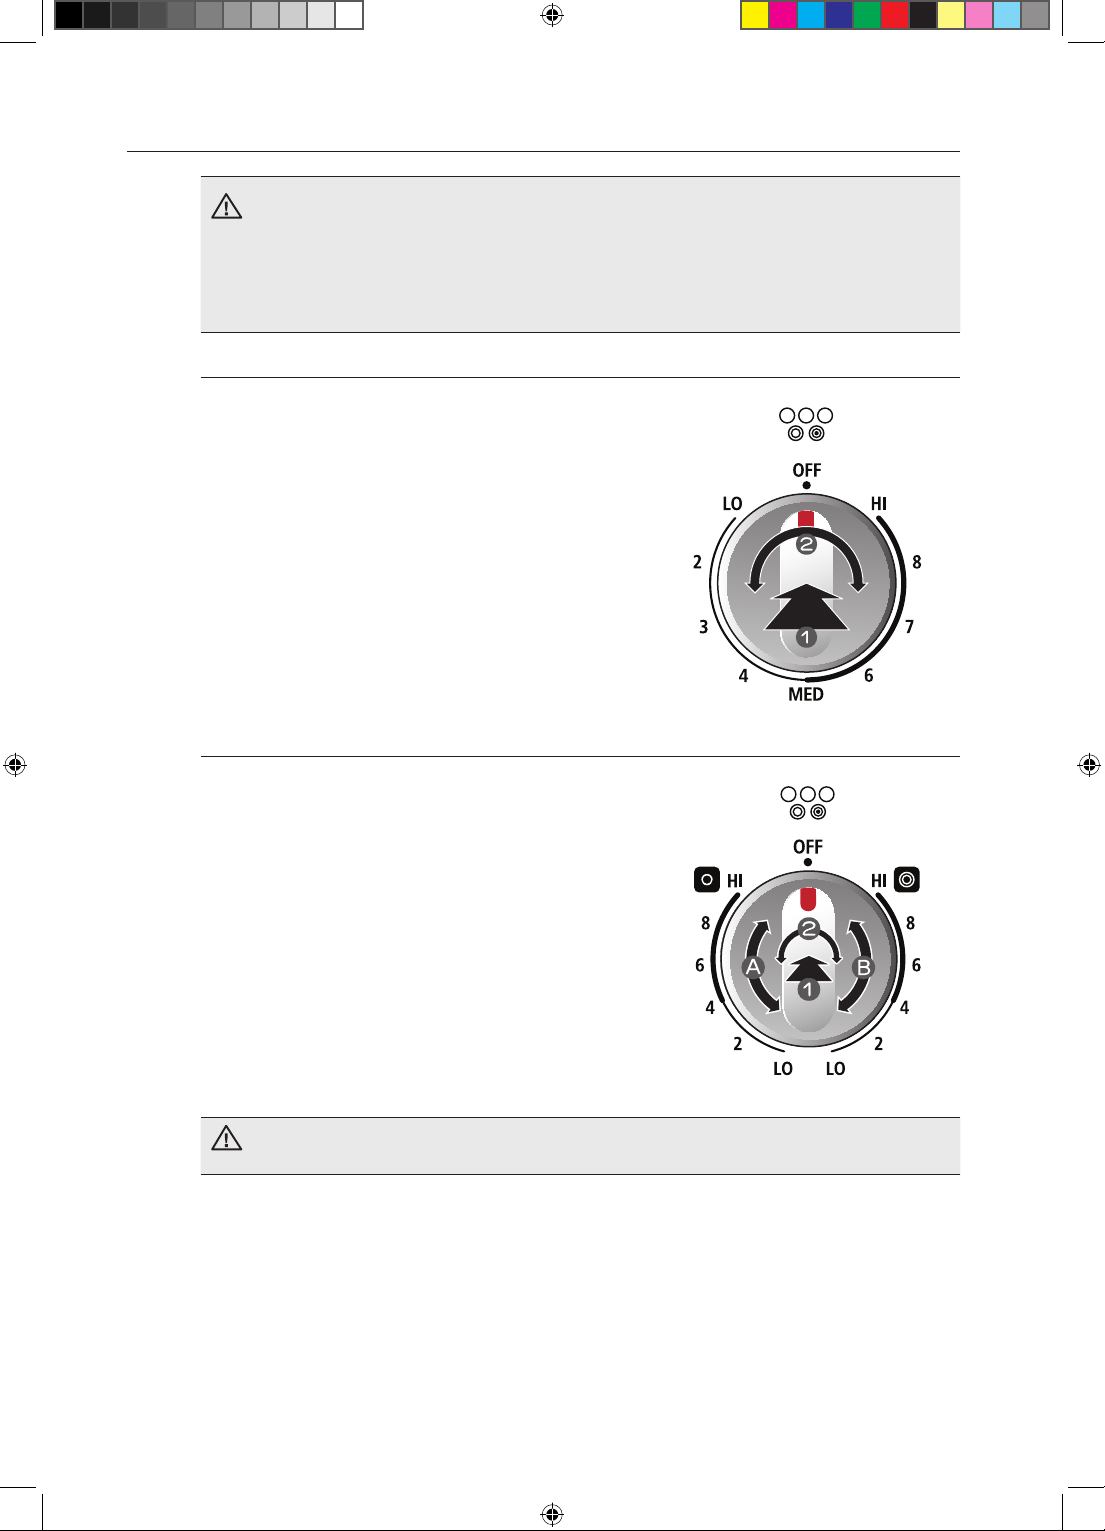
Single surface unit control knob (left rear, right rear)
1. Push the knob in.
2. Turn in either direction to the setting you want.
• At both the o and high settings, the knob clicks into
position.
the surface elements until they have cooled down suciently.
• At high or medium-high settings, never leave food unattended. Boilovers cause
smoking and greasy spillovers may catch on fire.
• Be sure you turn the control knob to OFF when you finish cooking.
Dual surface unit control knob (left front)
The dual surface unit has 2 cooking sizes to select from so
you can match the size of the cooking area to the size of
the cookware you are using.
1. Push the knob in.
2. Turn in either direction to the setting you want.
• To use the small surface unit, turn the control knob to
the small burner (A) settings.
• To use the large surface unit, turn the control knob to
the large burner (B) settings.
The area on the knob between the high and o settings is not appropriate for cooking.
CAUTION
20_ Surface cooking
FE710DRS_XAC_DG68-00334A-07_EN.indd 20 05/11/2012 20:31:15
Page 21
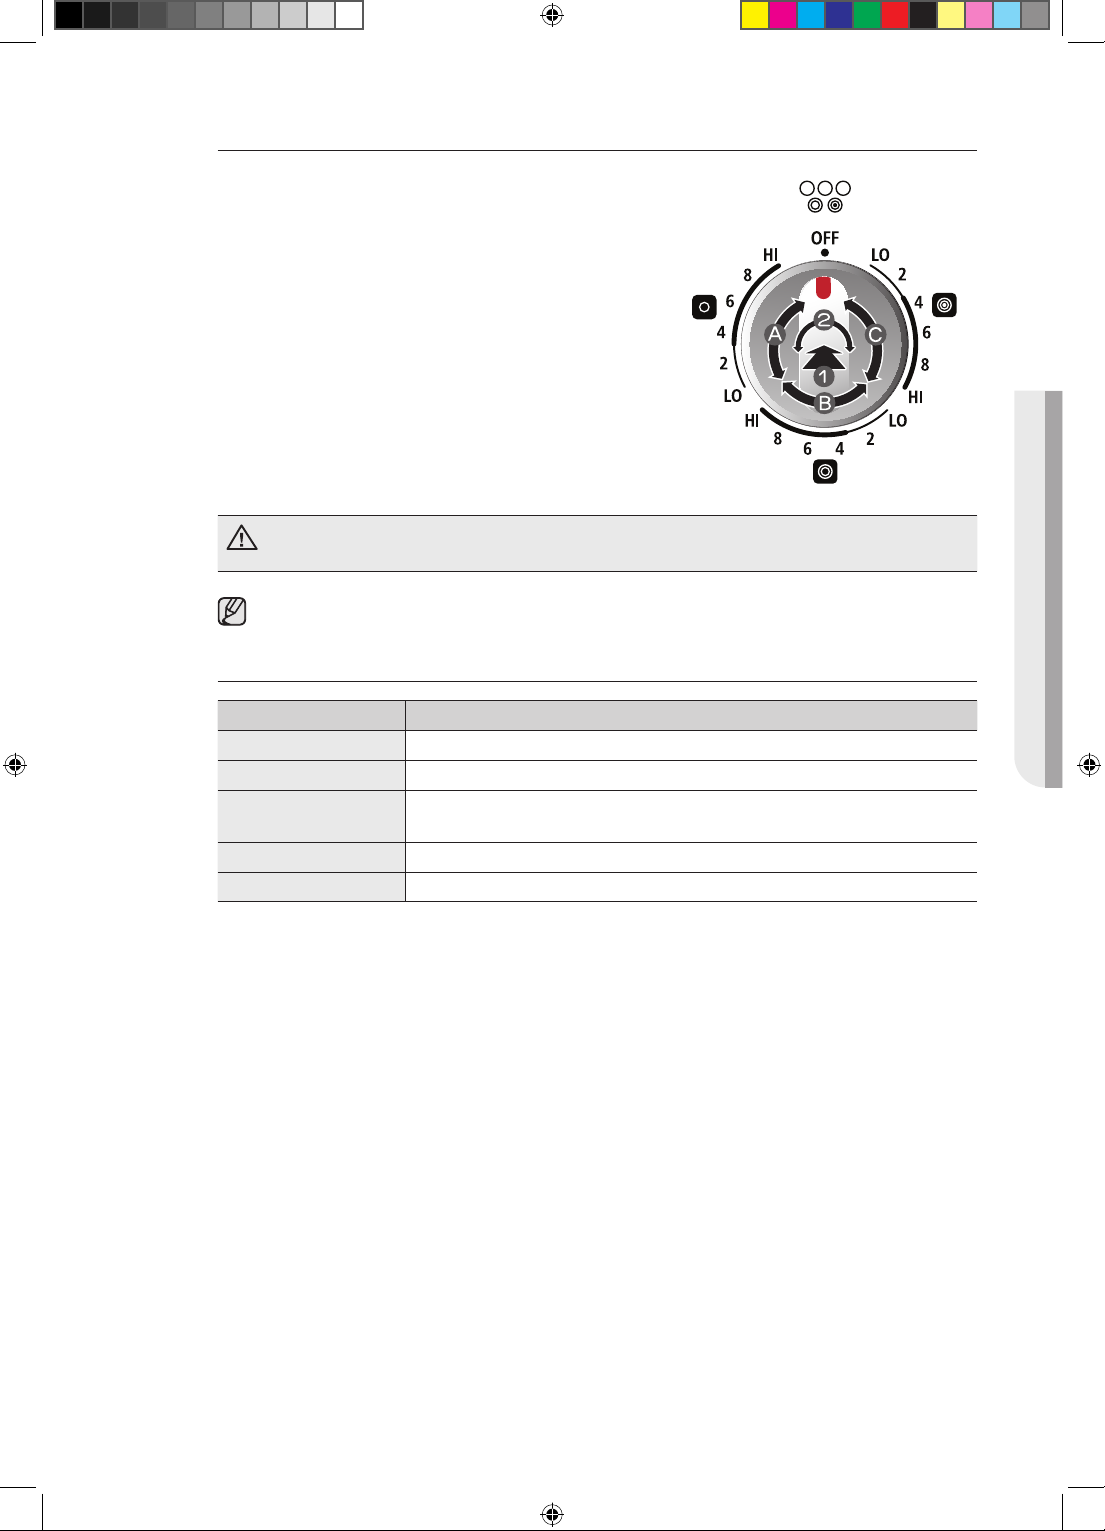
Triple surface unit control knob (right front)
The dual surface unit has 3 cooking sizes to select from so
you can match the size of cooking area to the size of the
cookware you are using.
1. Push the knob in.
2. Turn in either direction to the setting you want.
• To use the small surface unit, turn the control knob to
the small burner (A) settings.
• To use the middle surface unit, turn the control knob to
the middle burner (B) settings.
• To use the large surface unit, turn the control knob to
the large burner (C) settings.
The area on the knob between the high and o settings is not appropriate for cooking.
CAUTION
When changing from a high heat setting to a lower heat setting, the surface unit may stop
glowing. This is normal.
Recommended settings
SETTING TYPE OF COOKING
HIGH Starting most foods, bringing water to a boil, pan broiling
MEDIUM HIGH Continuing a rapid boil, frying, deep fat frying
MEDIUM Maintaining a slow boil, thickening sauces and gravies, steaming
vegetables
MEDIUM LOW Keeping foods cooking, poaching, stewing
LOW Keeping warm, melting, simmering
SURFACE COOKING
Surface cooking _21
FE710DRS_XAC_DG68-00334A-07_EN.indd 21 05/11/2012 20:31:15
Page 22
Using the warming center
The warming center, located in the back center of the glass surface, will keep hot, cooked food
at serving temperature.
• The surface warmer will not glow red like the cooking elements.
• Do not warm food on the warming center for more than two hours.
CAUTION
• Use only cookware and dishes recommended as safe for oven and cooktop use.
• Always use potholders or oven mitts when removing food from the warming center as
cookware and plates will be hot.
• When warming pastries and breads, use covers that have an opening to allow
moisture to escape.
• Do not use plastic wrap to cover foods. Plastic may melt onto the surface and be very
dicult to clean o.
• Food should be kept in its container and covered with a lid or aluminum foil to
maintain food quality.
• Always start with hot food. Eating uncooked or cold food placed on the warming
center could result in illness.
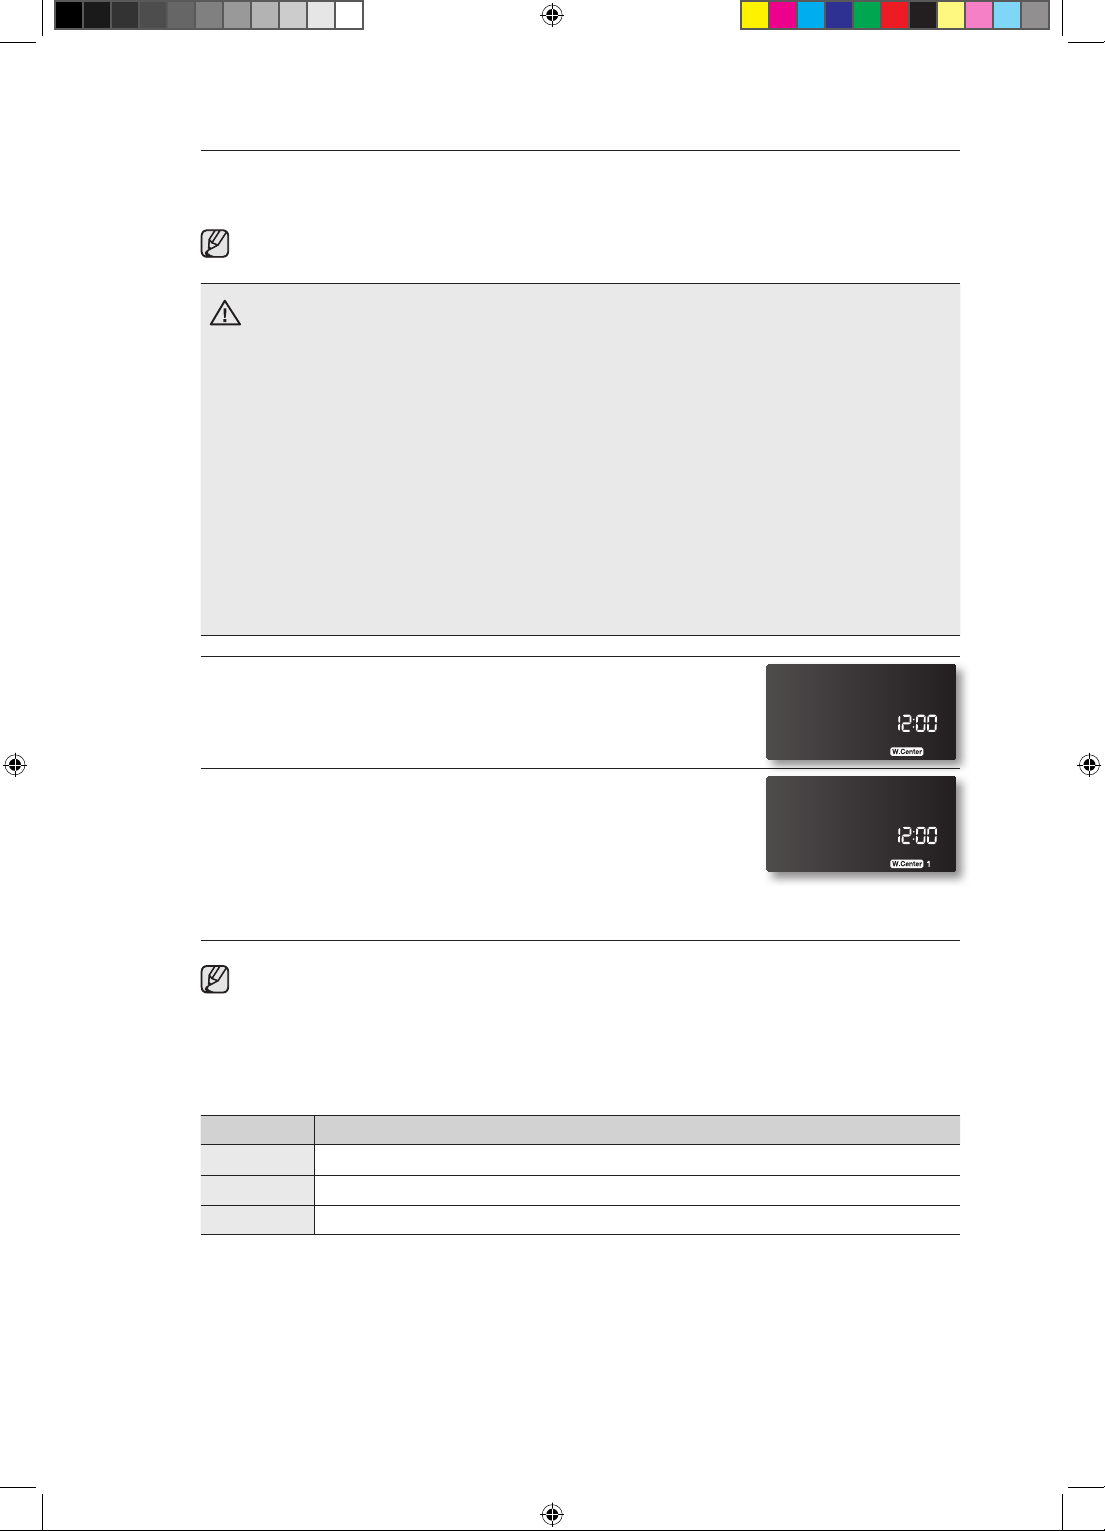
1. Turn the warming center on.
Press the WARMING CENTER ON/OFF pad.
2. Select the power setting you want.
Pressing the WARMING CENTER LEVEL pad once will set it to
the level 1 setting. Press the pad twice for the level 2 setting, 3
times for level 3.
3. Turn the warming center o.
Press the WARMING CENTER ON/OFF pad.
• Pressing the CLEAR/OFF pad does not turn the warming center o.
• For best results, all foods on the warming center should be covered with a lid or
aluminum foil. When warming pastries or breads, the lid or foil should be vented to allow
moisture to escape.
Recommended settings
LEVEL TYPE OF FOOD
1 Breads/pastries, casseroles, gravies, eggs
2 Dinner plate with food, soups (cream), vegetables, sauces, stews, meats
3 Fried foods, soups (liquid), hot beverages
22_ Surface cooking
FE710DRS_XAC_DG68-00334A-07_EN.indd 22 05/11/2012 20:31:15
Page 23
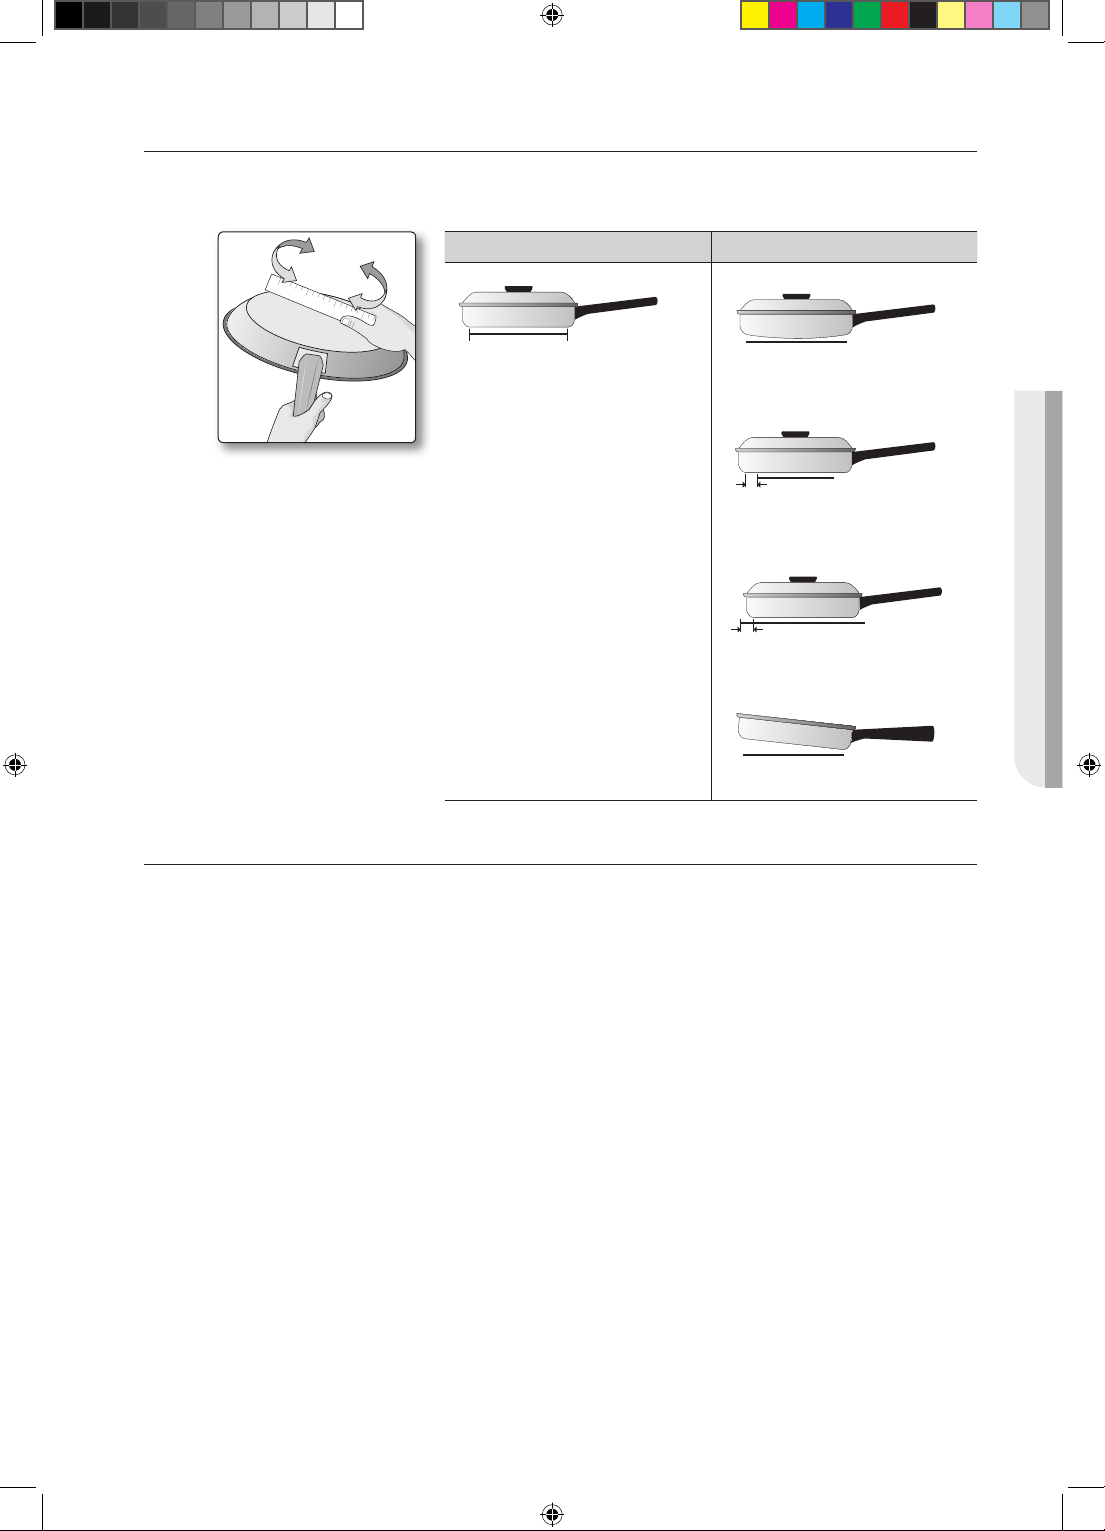
USING THE PROPER COOKWARE
Using the right cookware can prevent many problems, such as uneven cooking or extended
cooking times. Using the proper pans will reduce cooking times and cook food more evenly.
CORRECT INCORRECT
Flat bottom and straight sides.
• Tight fitting lids.
• Weight of handle does not tilt
Check for flatness by
rotating a ruler across the
bottom of the cookware.
pan.
• Pan is well balanced.
• Pan size matches the amount
of food to be prepared
and the size of the surface
element.
• Made of a material that
conducts heat well.
• Always match pot diameter to
element surface diameter.
CHOOSING THE PROPER COOKWARE
What your cookware is made of determines how evenly and quickly heat is transferred from the
surface element to the pan bottom.
• ALUMINUM - Excellent heat conductor. Some types of food will cause the aluminum to
darken. (Anodized aluminum cookware resists staining and pitting.). If aluminum pans are slid
across the ceramic cooktop, they may leave metal marks that resemble scratches. Remove
these marks as soon as the cooktop cools down.
• COPPER - Excellent heat conductor but discolors easily. May leave metal marks on ceramic
glass (see above).
• STAINLESS STEEL - Slow heat conductor with uneven cooking results. Is durable, easy to
clean and resists staining.
• CAST IRON - A poor conductor, but retains heat very well. Cooks evenly once cooking
temperature is reached. Not recommended for use on ceramic cooktops.
• ENAMELWARE - Heating characteristics will vary depending on base material. Porcelain-
enamel coating must be smooth to avoid scratching ceramic cooktops.
• GLASS - Slow heat conductor. Not recommended for ceramic cooktop surfaces because it
may scratch the glass.
Curved and warped pan
bottoms.
Pan overhangs element by more
than one-half inch.
Pan is smaller than element.
Heavy handle tilts pan.
SURFACE COOKING
Surface cooking _23
FE710DRS_XAC_DG68-00334A-07_EN.indd 23 05/11/2012 20:31:16
Page 24

PROTECTING THE COOKTOP SURFACE
Cleaning
• Clean the cooktop before using it for the first time.
• Clean your cooktop daily or after each use. This will keep your cooktop looking good and can
prevent damage.
• If a spillover occurs while you are cooking, immediately clean the spill from the cooking area
while it is hot to prevent a tough cleaning chore later. Using extreme care, wipe the spill with a
clean dry towel.
• Do not allow spills to remain on the cooking area or the cooktop trim for a long period of time.
• Do not use abrasive cleansing powders or scouring pads, which will scratch the cooktop.
• Do not use chlorine bleach, ammonia, or other cleansers not specifically recommended for use
on a glass-ceramic surface.
Preventing marks and scratches
• Do not use glass cookware. It may scratch the cooktop.
• Do not place a trivet or wok ring between the cooktop and the pan. These items can mark or
scratch the cooktop.
• Make sure the cooktop and the pan bottom are clean.
• Do not slide metal pans across the cooktop.
Preventing stains
• Do not use a soiled dish cloth or sponge to clean the cooktop surface. A film will remain, which
may cause stains on the cooking surface after the area is heated.
• Continuously cooking on a soiled surface may/will result in a permanent stain.
Preventing other damage
• Do not allow plastic, sugar, or foods with high sugar content to melt onto the hot cooktop.
Should this happen, clean immediately.
• Do not let a pan boil dry. This will damage the cooktop and the pan.
• Do not use the cooktop as a work surface or cutting board.
• Do not cook food directly on the cooktop. Use the proper cookware.
24_ Surface cooking
FE710DRS_XAC_DG68-00334A-07_EN.indd 24 05/11/2012 20:31:16
Page 25
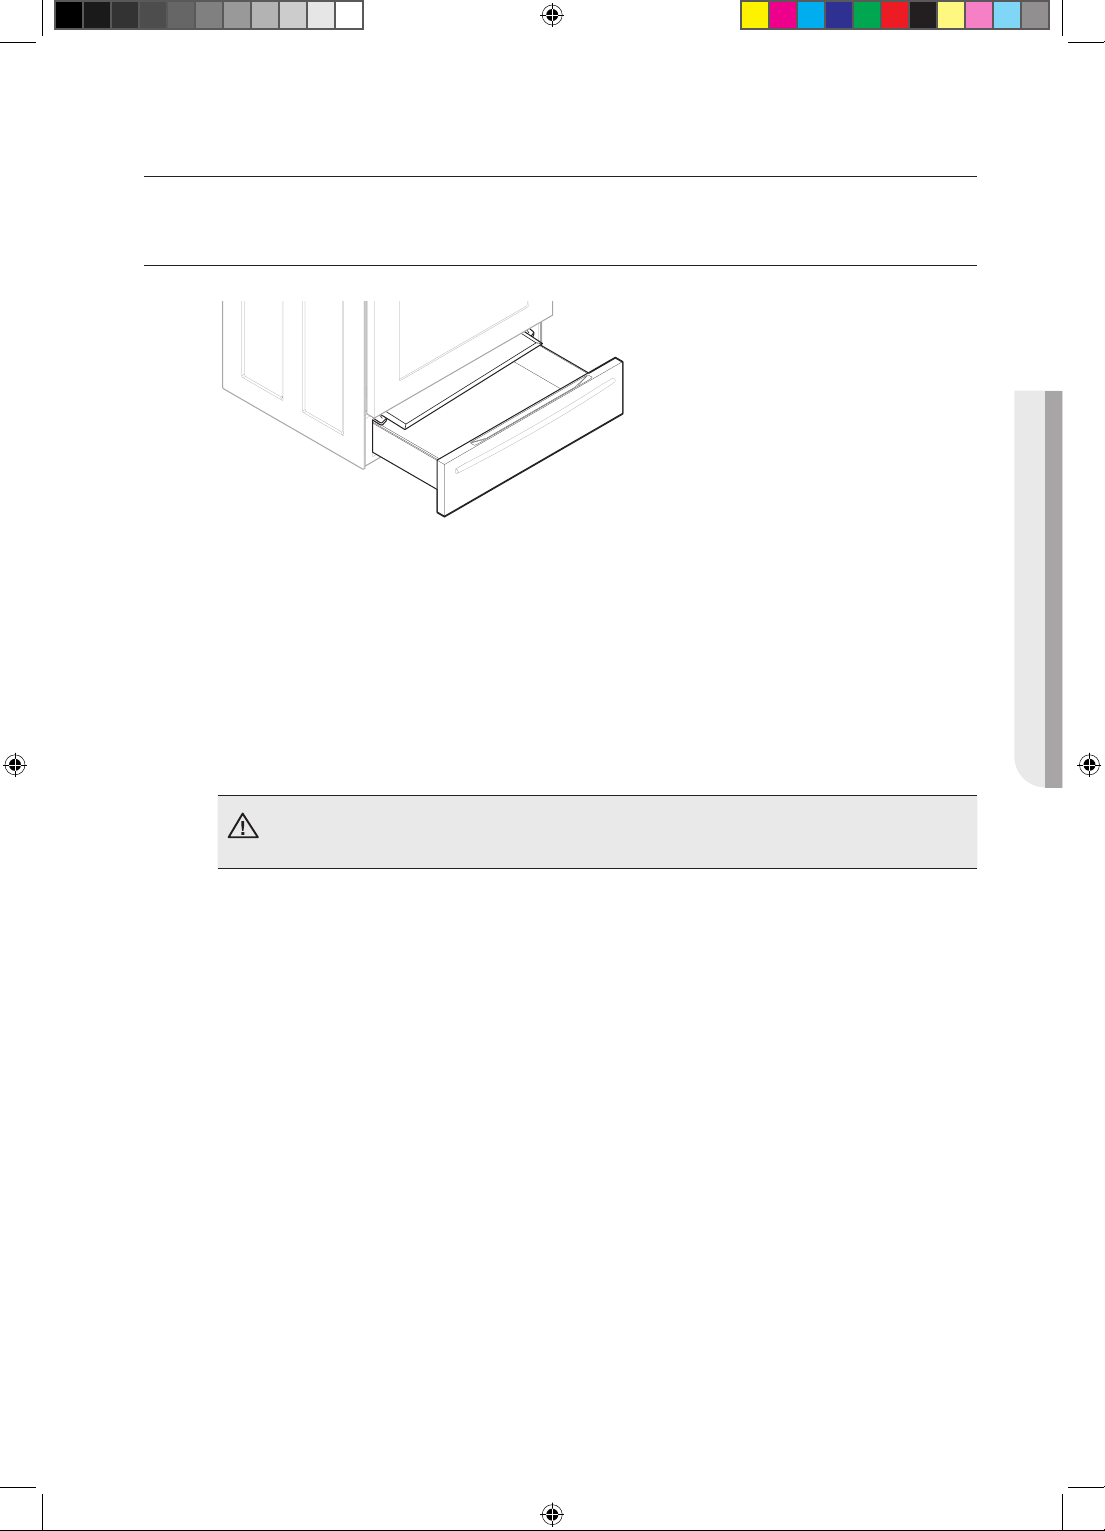
using the warming drawer
ABOUT THE WARMING DRAWER
The warming drawer will keep hot,
cooked foods warm. Always start with hot
food. Do not use to warm cold food other
than bread, crisping crackers, chips or dry
cereal.
Allow approximately 25 minutes for the
warming drawer to preheat.
• Do not line the warming drawer or pan with aluminum foil. Foil is an excellent heat
insulator and will trap heat beneath it. This will impede the performance of the drawer
and could damage the interior finish.
• Do not put liquid or water in the warming drawer.
• All foods placed in the warming drawer should be covered with a lid or aluminum foil. When
warming pastries or breads, use a vented lid or vented aluminum foil to allow moisture to
escape.
• Remove serving spoons, etc., before placing containers in the warming drawer.
• Food should be kept hot in its cooking container or transferred to a heat-safe serving dish.
WARMING DRAWER
Plastic containers or plastic wrap will melt if in direct contact with the drawer, pan or a
hot utensil. Melted plastic may not be removable and is not covered under your warranty.
CAUTION
Using the warming drawer _25
FE710DRS_XAC_DG68-00334A-07_EN.indd 25 05/11/2012 20:31:16
Page 26
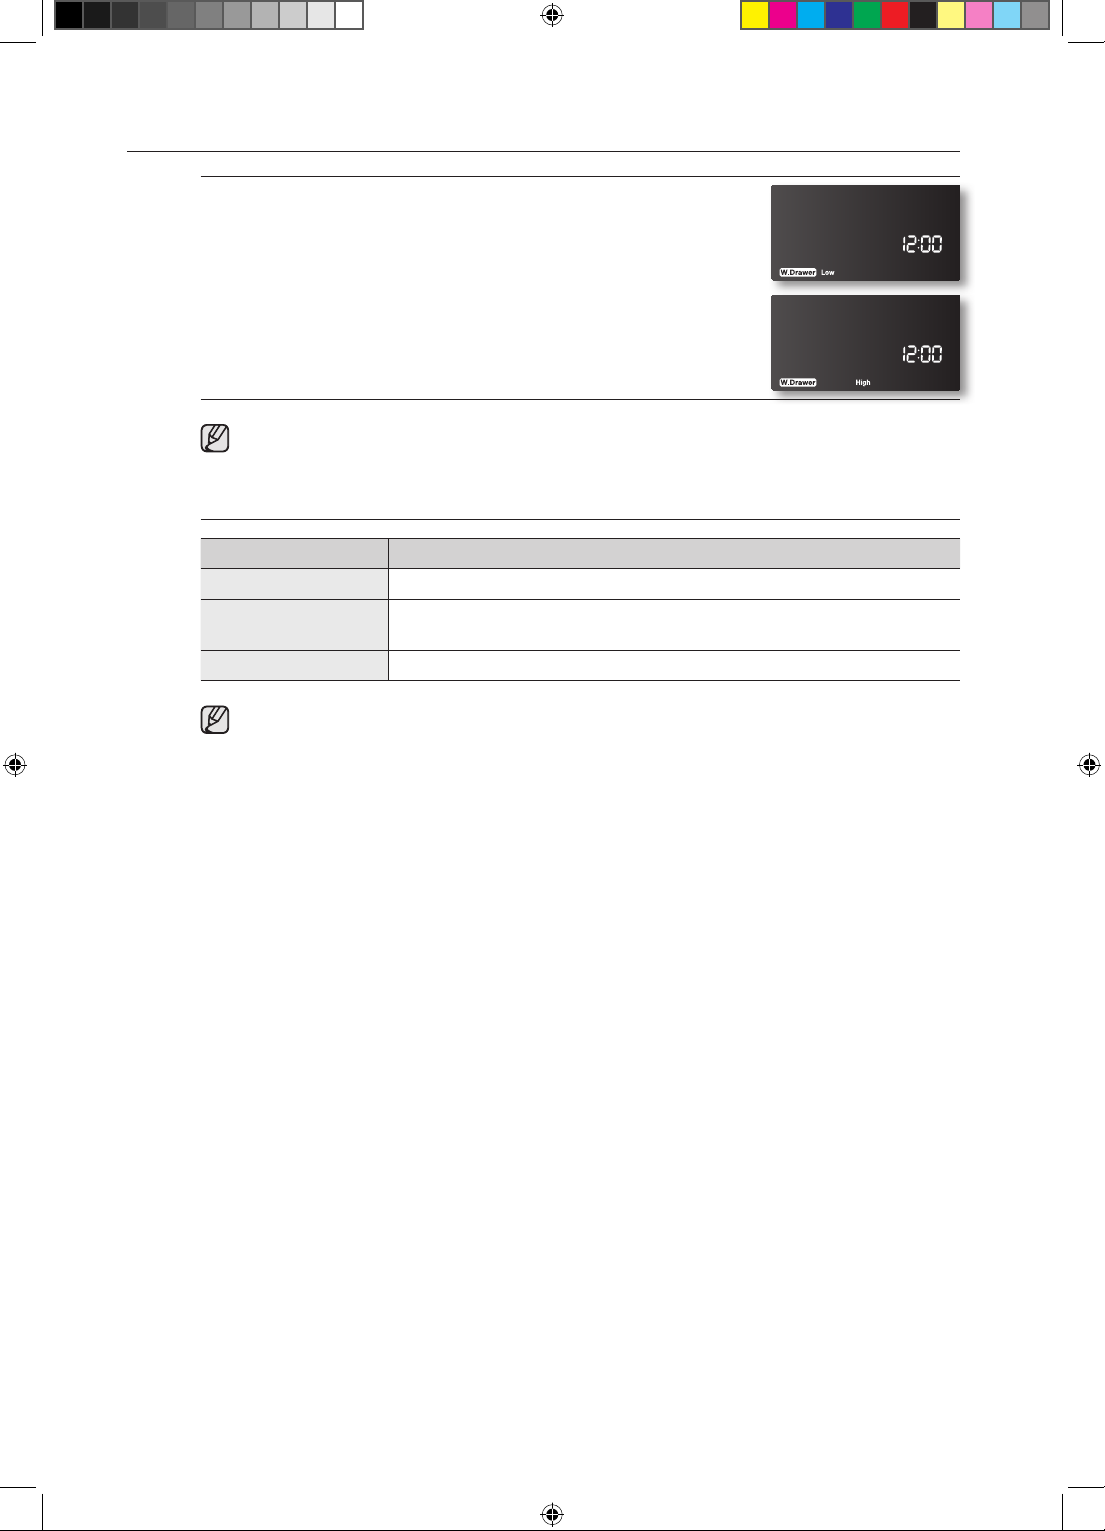
TURNING THE WARMING DRAWER ON OR OFF
1. Set the warming drawer to the heat level you want.
Press the WARMING DRAWER pad once for low, twice for
medium, or 3 times for high or 4 times for o.
The warming drawer starts automatically once you have finished
selecting the level you want.
2. To turn the warming drawer o, press the WARMING DRAWER
pad until the warming drawer turns o.
• Pressing the CLEAR/OFF pad does not turn the warming drawer o.
• The warming drawer cannot be used during a self-cleaning cycle.
Recommended settings
LEVELS TYPE OF FOOD
Low Rolls (soft), empty dinner plates
Med
High Bacon, poultry, pizza, hamburger patties, pork chops, fried foods
• Dierent types of food may be placed in the warming drawer at the same time. For best
results, do not leave foods in the warming drawer for longer than 1 hour. Do not leave
smaller quantities or heat-sensitive foods, such as eggs, for longer than 30 minutes.
• The warming drawer will shut o automatically after 3 hours.
Gravies, eggs, biscuits, pastries, casseroles, vegetables, rolls (hard),
roasts (beef, pork, lamb)
26_ Using the warming drawer
FE710DRS_XAC_DG68-00334A-07_EN.indd 26 05/11/2012 20:31:16
Page 27
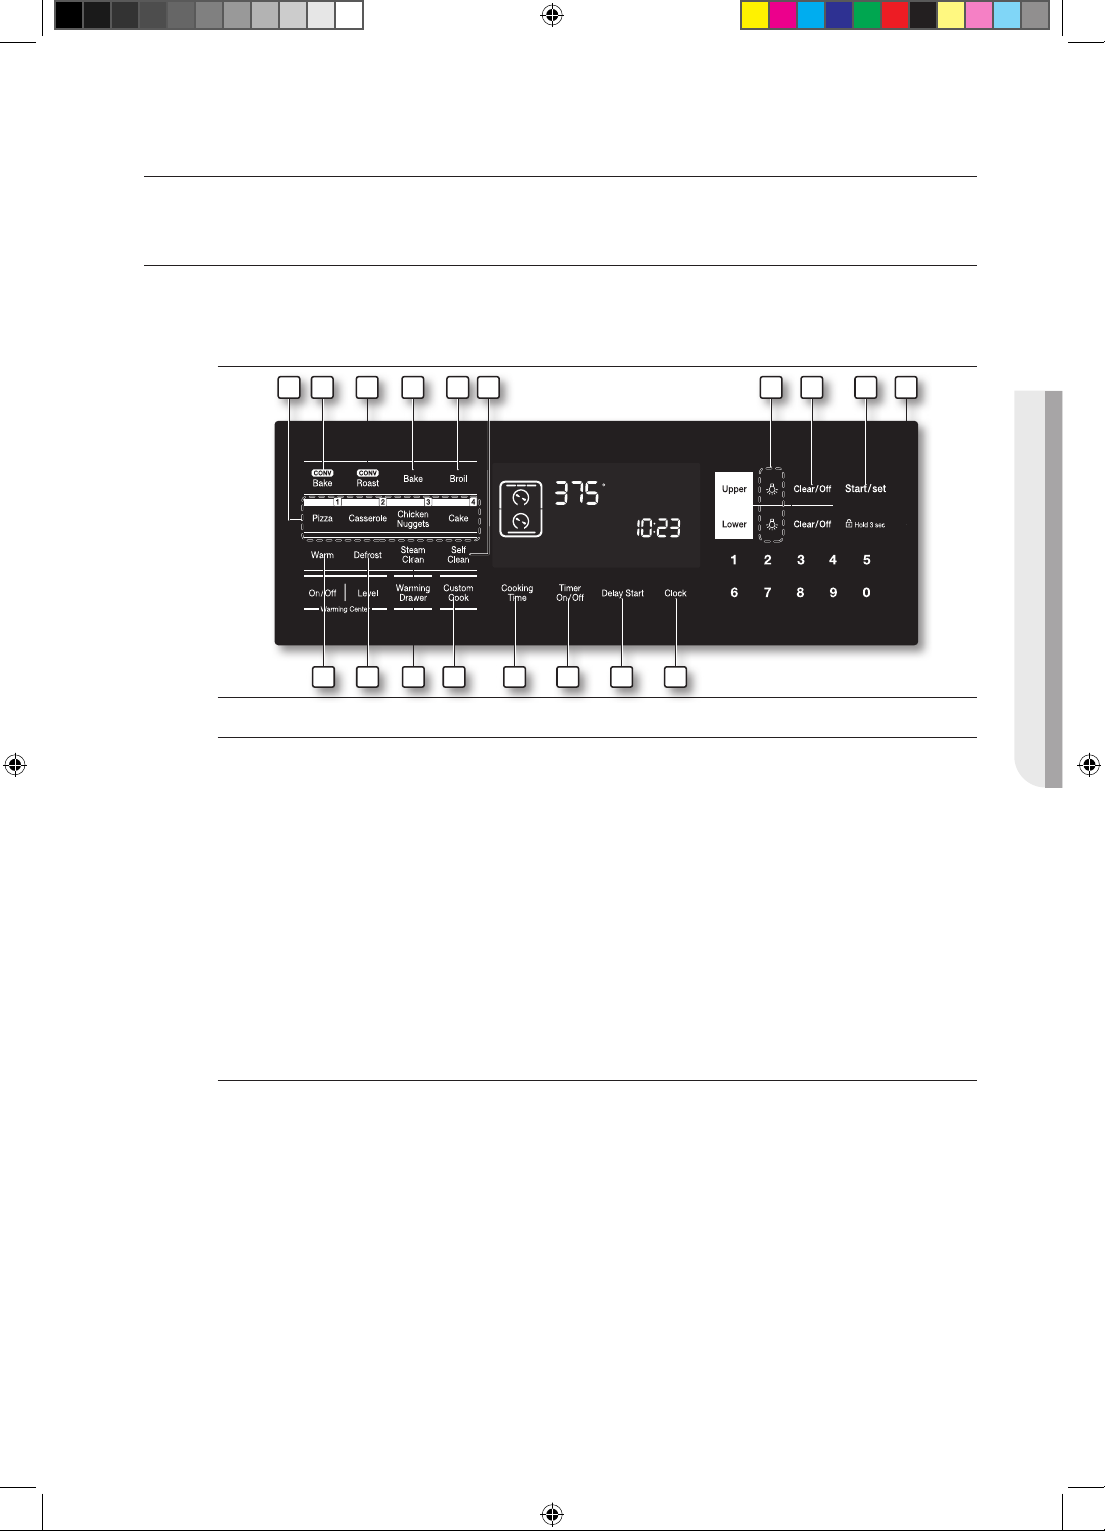
operating the oven
THE OVEN CONTROL PANEL
READ THE INSTRUCTIONS CAREFULLY BEFORE USING THE OVEN. For satisfactory use
of your oven, become familiar with the various features and functions of the oven as described
below. Detailed instructions for each feature and function follow later in this user manual.
710 11 8 9 6 2 312 13
1715 16 14 4 18 5 1
Common functions
1. CLOCK : Use to set the time of day.
2. START/SET : Use to start any cooking or cleaning fuctions in the oven.
3. CONTROL LOCKOUT : Press to lock the buttons on the touch pad so they cannot be
activated accidentally.
4. COOKING TIME : Press and then use the number pads to set the amount of time you want
your food to cook. The oven will shut o when the cookting time has run out.
(Bake, Conv.bake/Roast only)
5. DELAY START : Press to set the oven to start and stop automatically at a time you set.
(Bake, Conv.bake/Roast, Cooking Time, and self clean only.)
6. CLEAR/OFF : Press to cancel all oven operations except the clock and timer, warming center,
and warming drawer.
7. OVEN LIGHT : Press to turn the oven light on or o.
OPERATING THE OVEN
Single oven
8. BAKE : Use to select the Bake function of the single oven.
9. BROIL : Use to select the broil function of the single oven.
10. CONVECTION BAKE : Use to select the Convection bake function of the single oven.
11. CONVECTION ROAST : Use to select the Convection roast function of the single oven.
12. EASY COOK : Press to recall the Easy cook recipe setting of the single oven.
13. SELF CLEAN : Use to select the Self-cleaning function of the single oven.
14. STEAM CLEAN : Use to select the Steam-cleaning function of the single oven.
15. WARM : Use to select the Warm function of the single oven to keep cooked foods warm.
16. DEFROST : Use to select the Defrost function of the single oven.
17. CUSTOM COOK : Press to record and recall your favorite recipe setting.
18. TIMER ON/OFF : Press to select the timer feature of the single oven.
Operating the oven _27
FE710DRS_XAC_DG68-00334A-07_EN.indd 27 05/11/2012 20:31:17
Page 28
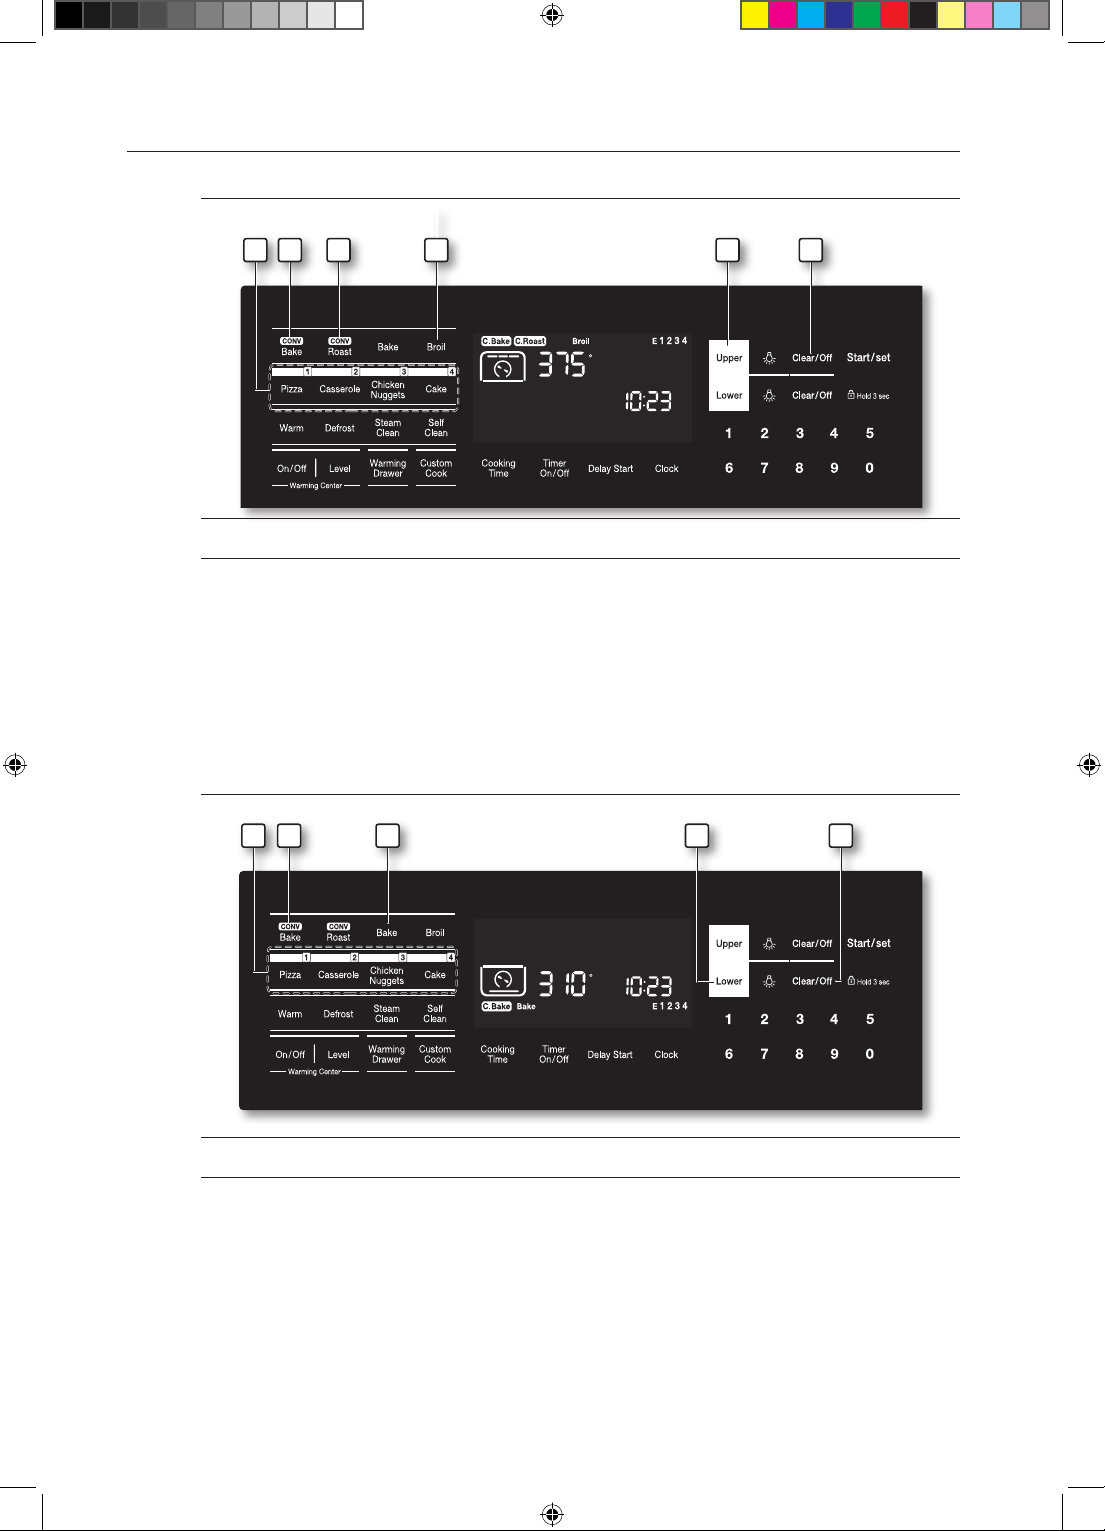
THE TWIN OVEN CONTROL
You can to select the upper and lower touch pads after inserting the partition into the oven.
Twin oven upper
1. UPPER : Press to select the upper oven for twin mode cooking before using the cooking
function.
2. BROIL : Use to select the broil function of the upper oven.
3. CONVECTION BAKE : Use to select the Convection bake function of the upper oven.
4. CONVECTION ROAST : Use to select the Convection roast function of the upper oven.
5. EASY COOK : Press to recall the Easy cook recipe setting of the upper oven.
6. CLEAR/OFF : Press to cancel upper oven operations except the clock and timer, warming
center, and warming drawer.
125 43 6
123 54
Twin oven lower
1. LOWER : Press to select the Lower oven for twin mode cooking before using the cooking
function.
2. BAKE : Use to select the bake function of the lower oven.
3. CONVECTION BAKE : Use to select the Convection bake function of the lower oven.
4. EASY COOK : Press to recall the Easy cook recipe setting of the lower oven.
5. CLEAR/OFF : Press to cancel lower oven operations except the clock and timer, warming
center, and warming drawer.
28_ Operating the oven
FE710DRS_XAC_DG68-00334A-07_EN.indd 28 05/11/2012 20:31:17
Page 29
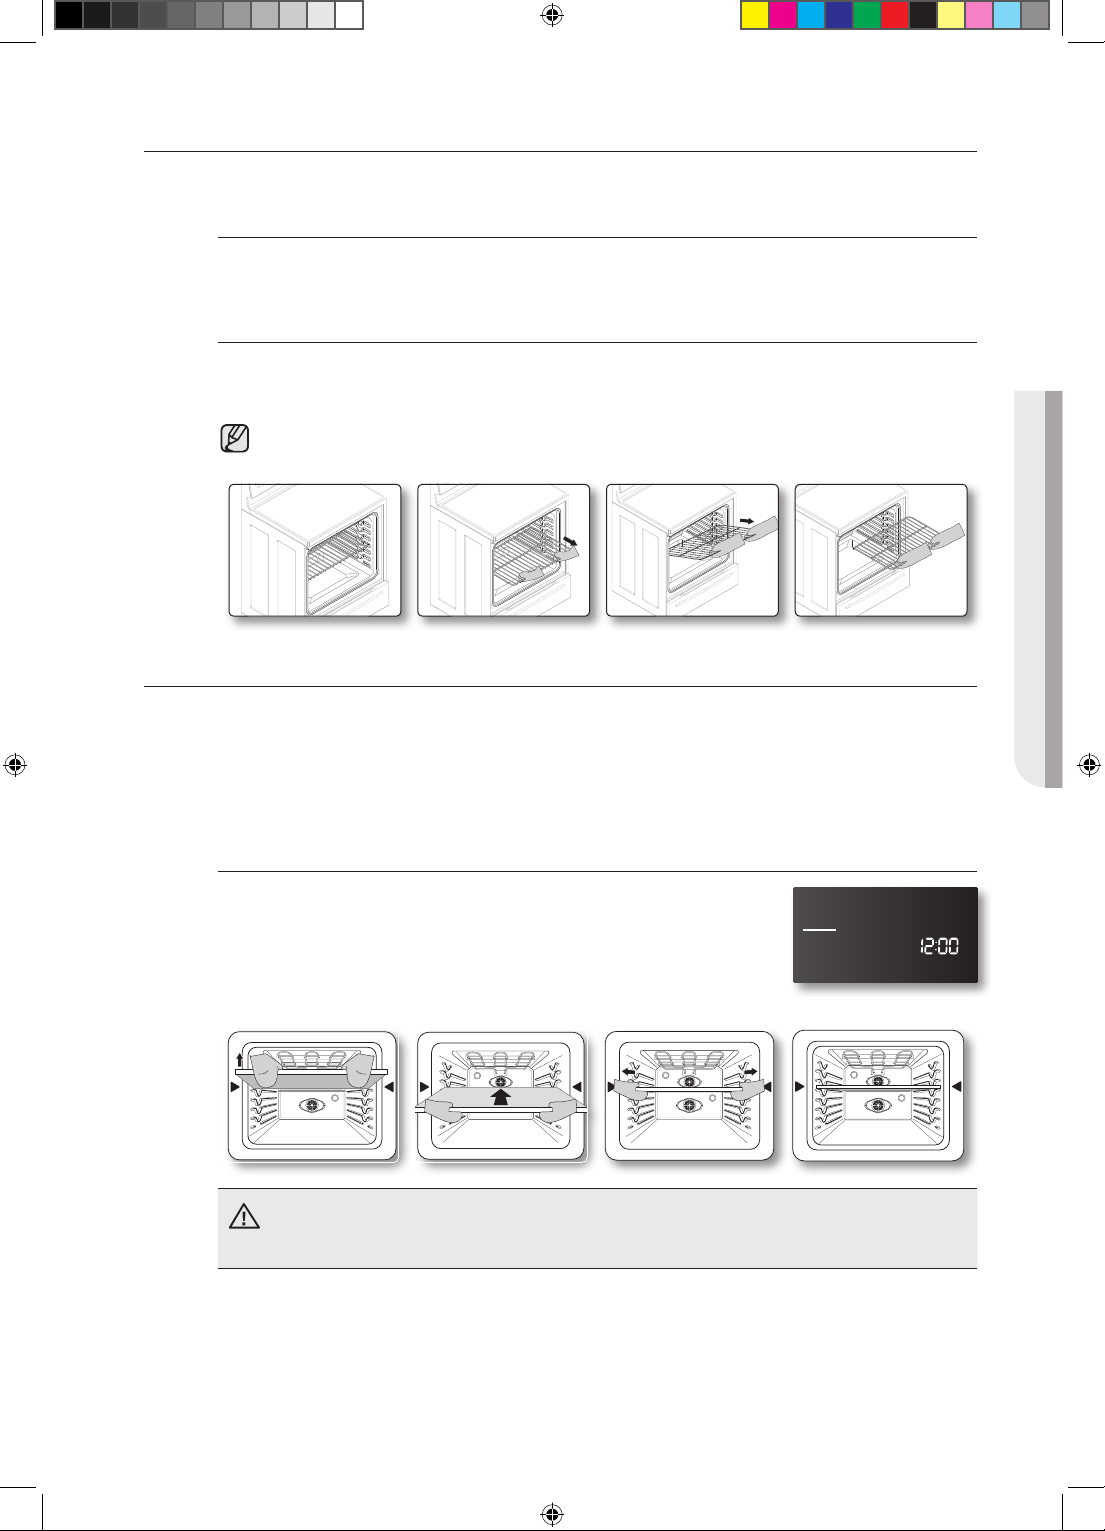
USING OVEN RACKS
The racks have a turned-up back edge that prevents the racks from pulling out of the oven cavity.
To remove racks
1. Pull the rack straight out until it stops.
2. Lift up the front of the rack and pull it out.
To replace racks.
1. Place the end of the rack on the support.
2. Tilt the front end up and push the rack in.
In order to remove or replace racks properly, follow the orders recommended in below.
USING THE PARTITION
• To use twin mode operation inserting partition.
• Can`t use self clean and steam clean mode when partition located in the cavity.
• Use the glove when you maintain the partition.
• You have to handle the partition on both hand.
OPERATING THE OVEN
To Enter the partition at cavity.
1. Insert partition at 5 level in cavity.
2. Push the partition to end of cavity.
3. You can see the “-” icon on the display.
Range displays “E-0C”
CAUTION
• Check the partition to see if it is installed correctly.
Operating the oven _29
FE710DRS_XAC_DG68-00334A-07_EN.indd 29 05/11/2012 20:31:18
Page 30
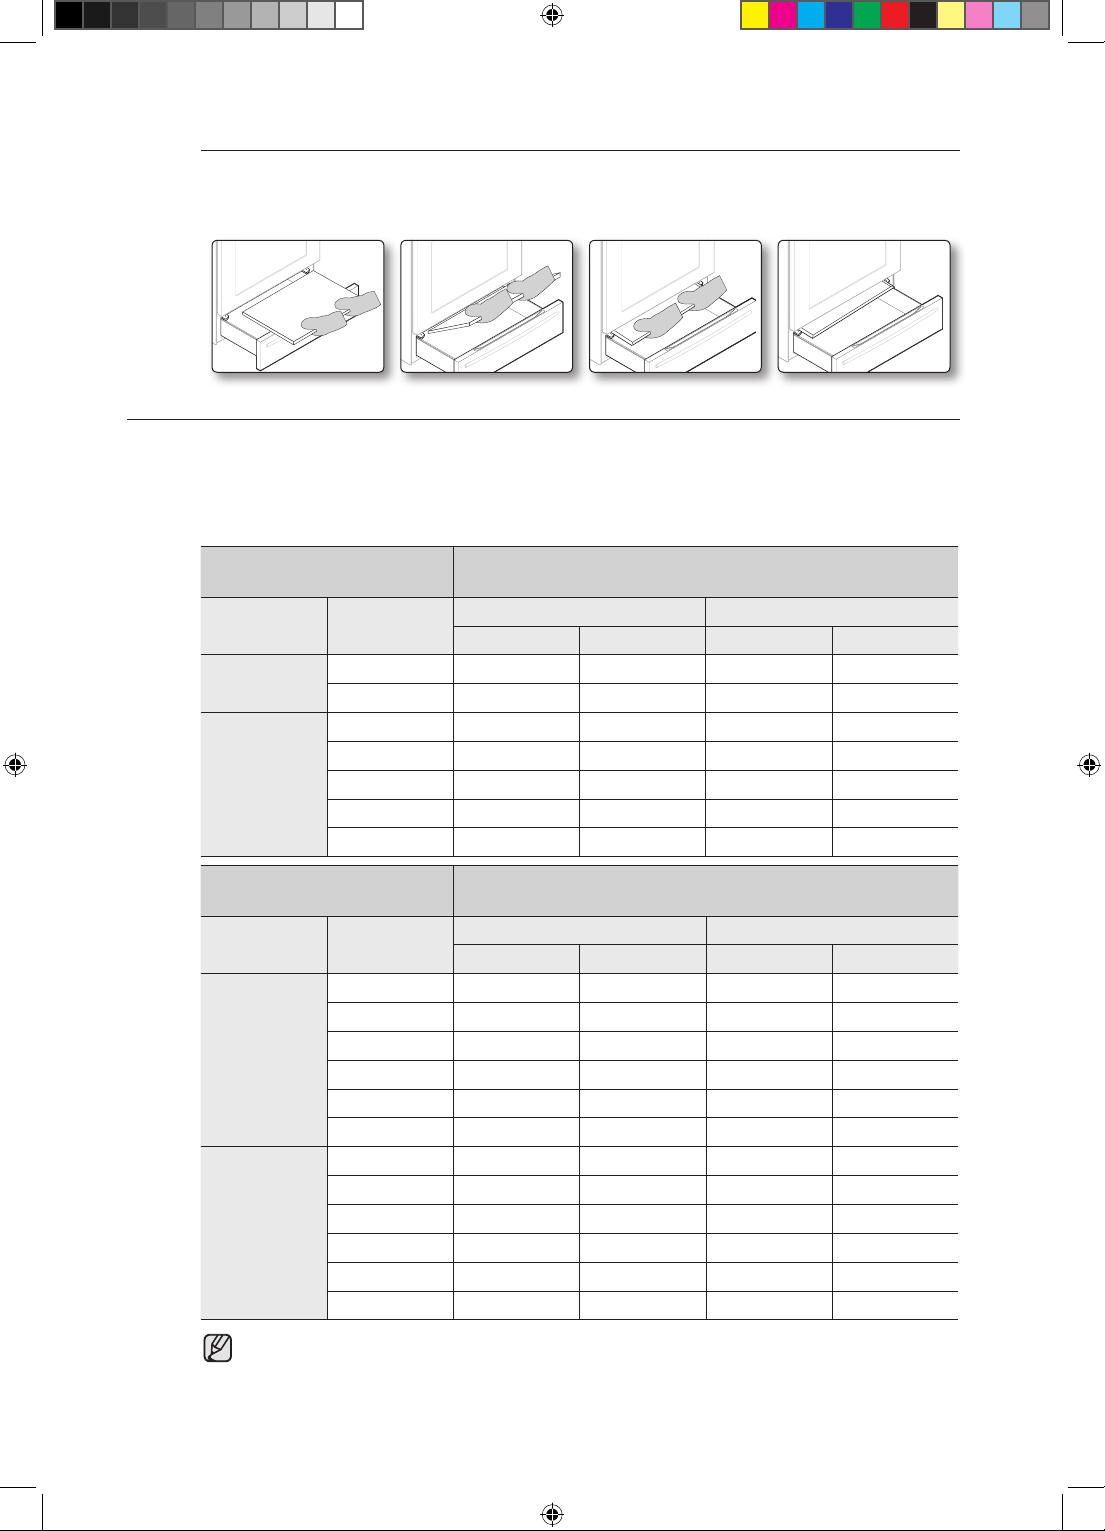
To Enter the partition at partition storage.
1. Open the drawer fully.
2. Put on the partition at slide.
3. Push the partition in.
TWIN COOKING MODE TEMPERATURE SETTING RANGES
When you use the upper and lower ovens at the same time, each oven has a minimum and
maximum amount of power available and consequently a minimum and maximum temperature
setting. Oven temperatures in the lower oven also limit broil settings in the upper oven. The
temperature and broil setting limitations are shown in the table below.
(O - Available, X - Not available)
UPPER OVEN
Mode Set Temp
Broil
480 °F 350 °F 480 °F 375 °F 480 °F
Convection
Bake &
Convection
Roast
450 °F 350 °F 480 °F 375 °F 480 °F
275 °F 225 °F 300 °F 250 °F 325 °F
250 °F 200 °F 250 °F 225 °F 275 °F
175 °F 150 °F 175 °F 175 °F 200 °F
Available setting function and temp.
BAKE Convection BAKE
MIN MAX MIN MAX
Hi 350 °F 480 °F 375 °F 480 °F
Low 300 °F 450 °F 325 °F 480 °F
LOWER OVEN
LOWER OVEN
Mode Set Temp
Bake
Convection
Bake
The twin cooking mode lets you use dierent settings for the upper and lower
compartments, such as dierent switch o times, cooking times and temperatures settings.
To apply or modify settings in either compartment, press the respective touch pad.
30_ Operating the oven
UPPER OVEN
Available setting function and temp.
BROIL Convection BAKE & ROAST
LOW HI MIN MAX
480 °F X O 425 °F 480 °F
450 °F O O 375 °F 480 °F
350 °F O O 300 °F 475 °F
325 °F O X 300 °F 425 °F
250 °F X X 250 °F 325 °F
150 °F X X 175 °F 200 °F
480 °F O O 375 °F 480 °F
450 °F O O 375 °F 480 °F
350 °F O X 300 °F 425 °F
325 °F O X 275 °F 400 °F
250 °F X X 225 °F 275 °F
175 °F X X 175 °F 200 °F
FE710DRS_XAC_DG68-00334A-07_EN.indd 30 05/11/2012 20:31:19
Page 31
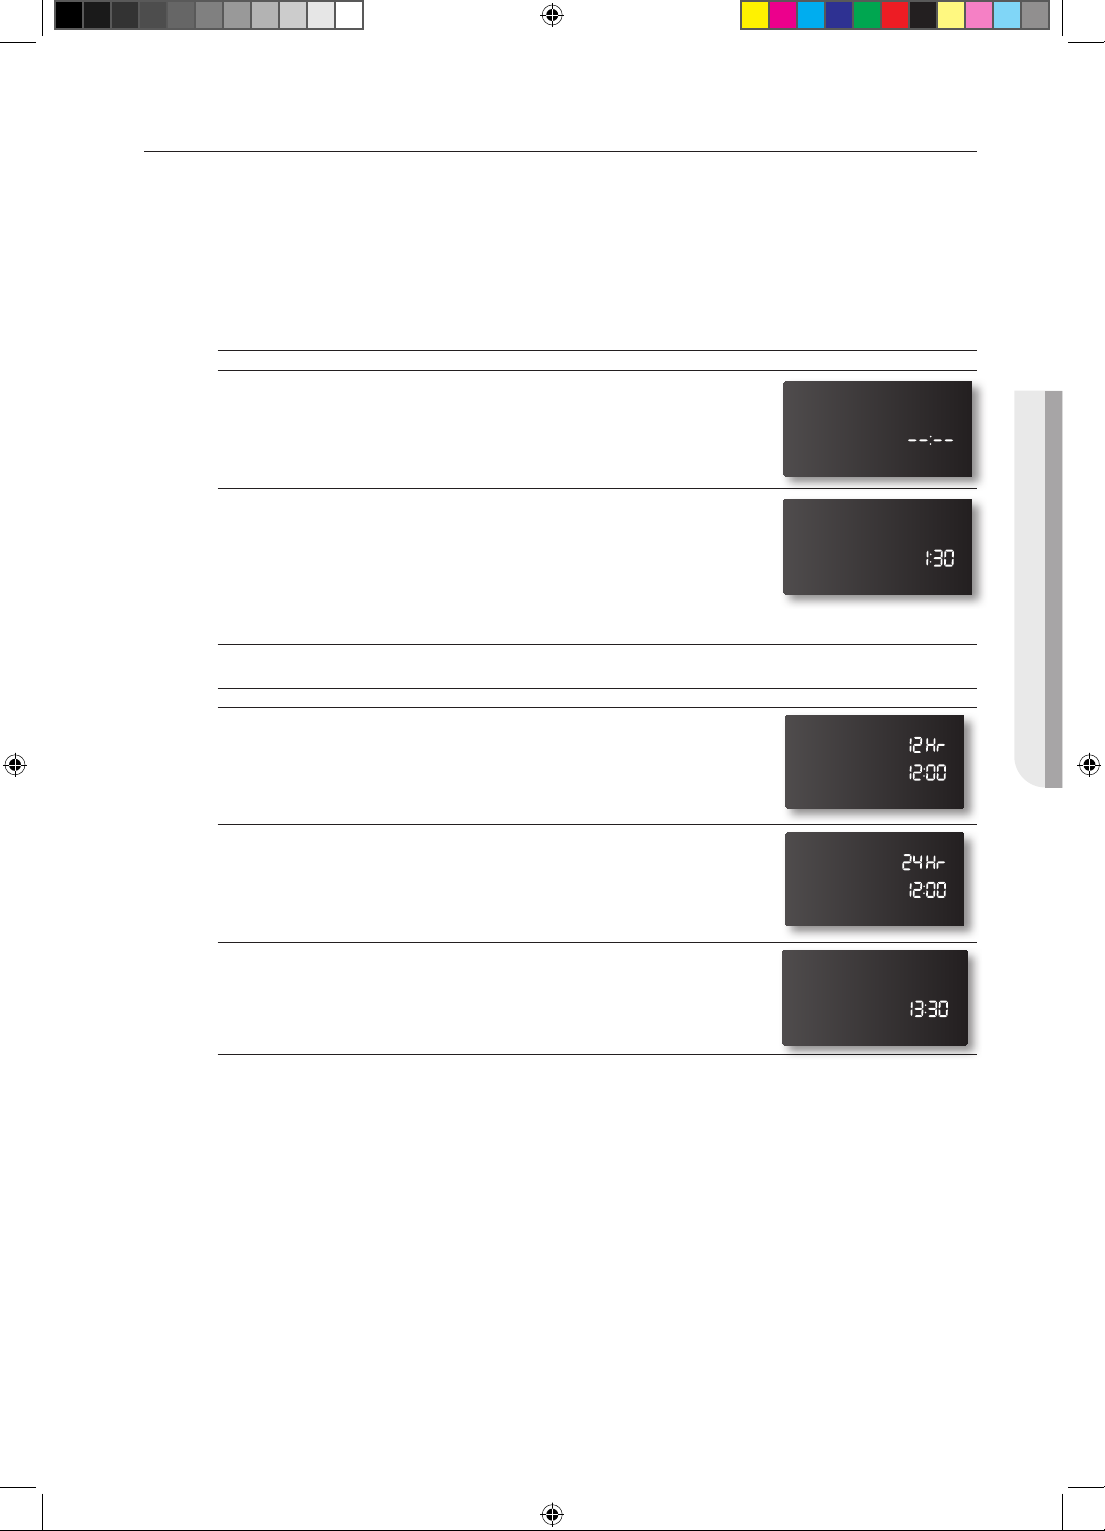
SETTING THE CLOCK
The clock must be set to the correct time of day for the automatic oven timing functions to work
properly.
• The time of day cannot be changed during a timed cooking, a delay-timed cooking or a selfcleaning cycle.
• You can choose between a 12-hour or 24-hour display. The default is 12-hour.
How to set the clock
1. Start the setup.
Press the CLOCK pad.
2. Enter the present time.
Enter the current time in hours and minutes on the number pad,
eg. 1,3,0 for 1:30
3. Exit the set up.
Press the START/SET or CLOCK pad.
How to change between a 12-hour and 24-hour display
1. Start the setup.
Press CLOCK and 0 on the number pad at the same time for 3
seconds.
The display will show the present mode (eg. 12 hour).
2. Select the display mode you want.
Press 0 on the number pad to select 12 hour or 24 hour.
Pressing 0 on the number pad changes the display between 12
hour and 24 hour.
3. Exit the set up.
Press the SET/START pad.
OPERATING THE OVEN
Operating the oven _31
FE710DRS_XAC_DG68-00334A-07_EN.indd 31 05/11/2012 20:31:19
Page 32
MINIMUM AND MAXIMUM SETTINGS
All of the features listed have minimum and maximum time or temperature settings.
A beep will sound each time you press a pad on the control panel and the entry is accepted. An
error tone will sound in the form of a long beep if the temperature or time you entered is below the
minimum or above the maximum setting for the feature.
FEATURE MINIMUM MAXIMUM
Single Oven
Bake 150 °F (65 °C) 550 °F (287 °C)
Broil LO HI
Convection Bake 175 °F (80 °C) 550 °F (287 °C)
Convection Roast 175 °F (80 °C) 550 °F (287 °C)
Self Clean 2 Hr. 4 Hr.
Steam Clean 20 Min. 20 Min.
Warming center - 3 Hr.
Warming Drawer - 3 Hr.
Warm - 3 Hr.
Twin Oven ( With partition)
Bake 150 °F (65 °C) 480 °F (250 °C)
Broil LO HI
Convection Bake 175 °F (80 °C) 480 °F (250 °C)
Convection Roast 175 °F (80 °C) 480 °F (250 °C)
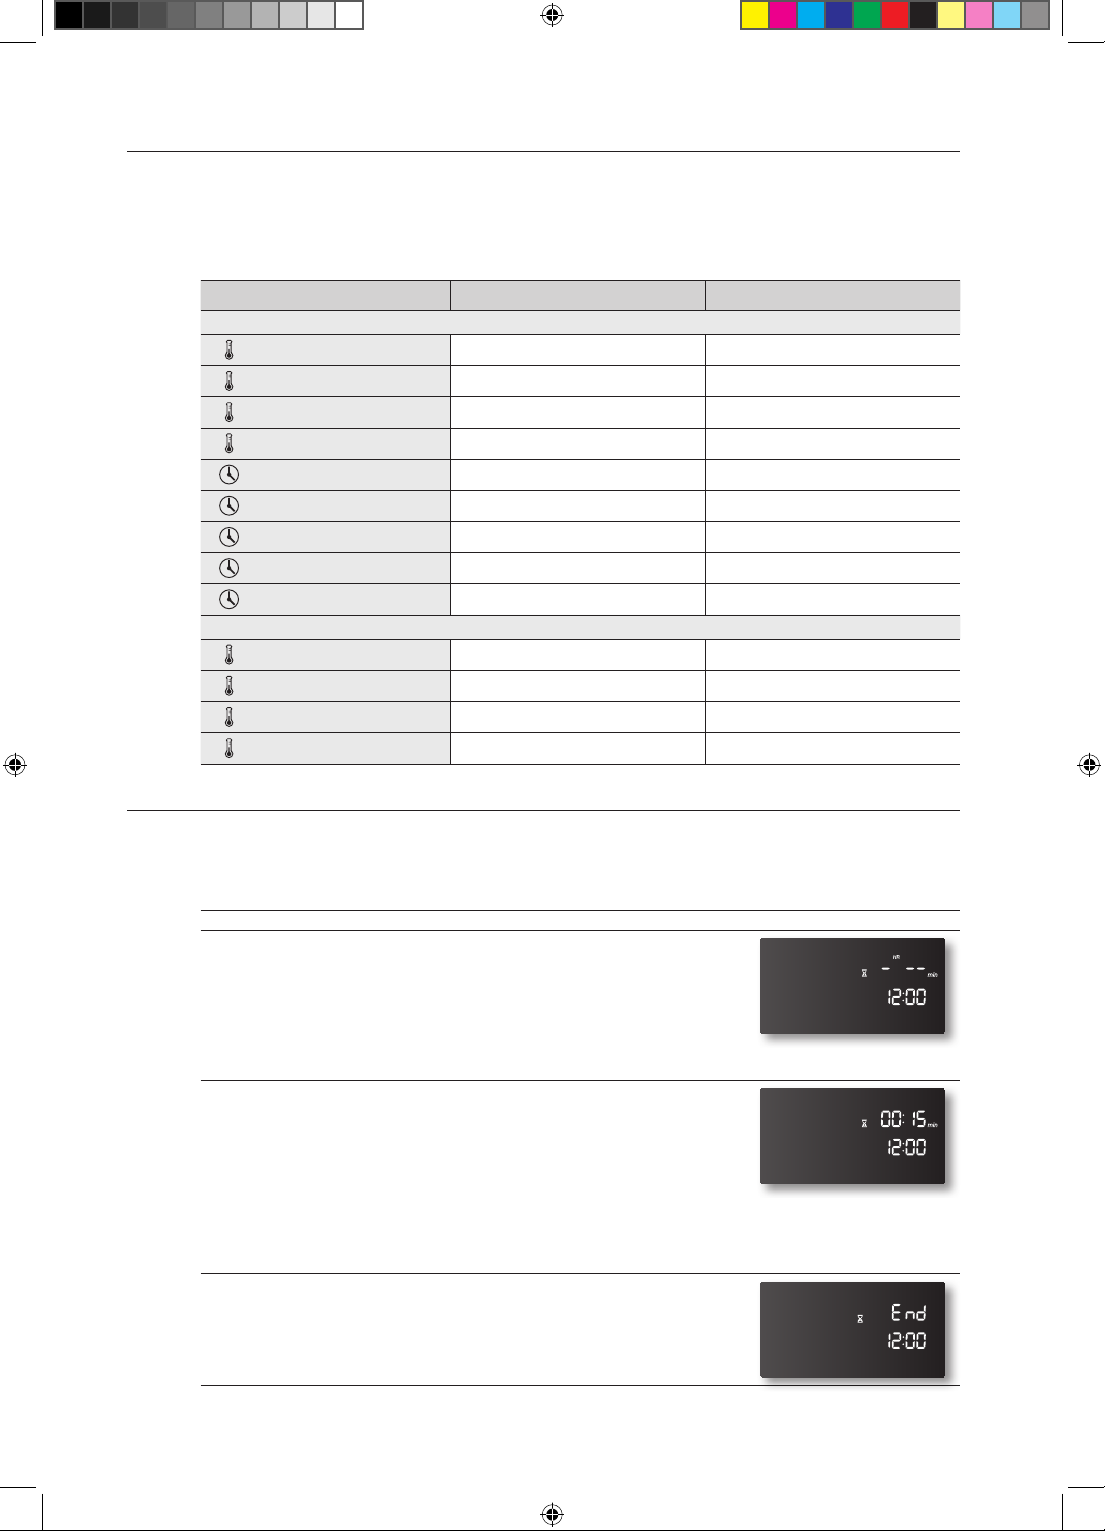
SETTING THE TIMER ON/OFF
The timer counts down elapsed time and will beep when the time you set has elapsed. It does not
start or stop cooking functions. You can use the timer with any of the other oven functions.
How to set the timer
1. Turn the timer on.
Press the TIMER ON/OFF pad.
2. Select the unit of time you want.
Press the pad once to select hours/minutes, twice to select
seconds or three times to turn the timer o.
3. Enter the amount of time you want.
Enter the amount of time you want using the number pad, eg. 1,
5. The timer can be set for any amount of time from 1 minute to 9
hours and 99 minutes or 1 second to 99 minutes and 99 seconds.
If you make a mistake, press and start again.
4. Start the timer.
Press the TIMER ON/OFF pad.
5. When the set time has elapsed, the oven will beep and the display
will show End until you press the pad. You can cancel the timer at
any time by pressing the pad.
32_ Operating the oven
FE710DRS_XAC_DG68-00334A-07_EN.indd 32 05/11/2012 20:31:20
Page 33
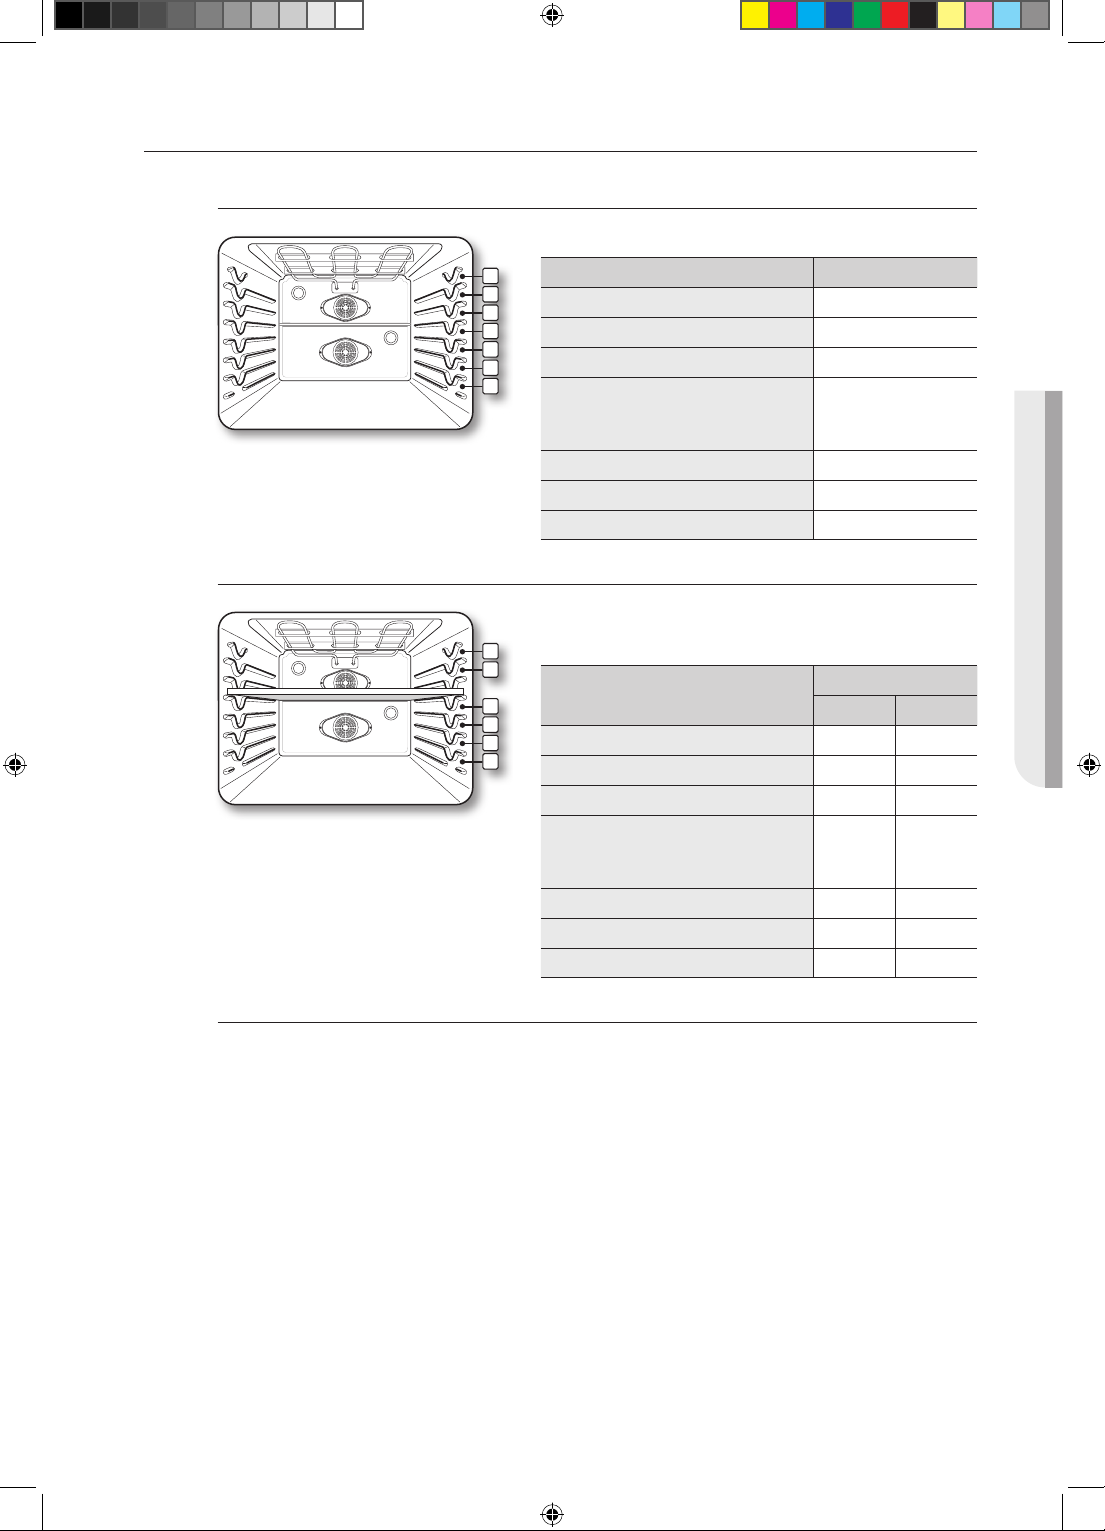
OVEN RACK POSITIONS
Oven rack positions (single mode)
Oven rack positions with partition (twin mode)
The single oven has 7 rack positions (1~7).
7
6
5
4
3
2
1
Frozen pies 4
Angel food cake 2
Bundt or pound cakes 3
Biscuits, muns, brownies,
TYPE OF FOOD RACK POSITION
cookies, cupcakes, layer cakes,
pies
Casseroles 4
Small roast, ham 2
Turkey, large roast 1
The upper oven has 2 rack positions (A, B).
B
The lower oven has 4 rack positions (1~4).
A
4
3
2
1
Frozen pies A 2
Angel food cake - 2
TYPE OF FOOD
Bundt or pound cakes - 2
Biscuits, muns, brownies,
cookies, cupcakes, layer cakes,
pies
Casseroles A 2
Small roast, ham A 2
Turkey, large roast - 1
4
RACK POSITION
Upper Lower
A 2
OPERATING THE OVEN
Baking layer cakes
Centering the baking pans in the oven as much as possible will produce better results. If baking
with more than one pan, place the pans so each has at least 1˝ to 1½˝ of air space around it.
If baking four cake layers at the same time, place the oven racks in positions 2 and 5.
Place two pans in the rear of the top rack and the other two pans in the front of the bottom rack.
Operating the oven _33
FE710DRS_XAC_DG68-00334A-07_EN.indd 33 05/11/2012 20:31:20
Page 34
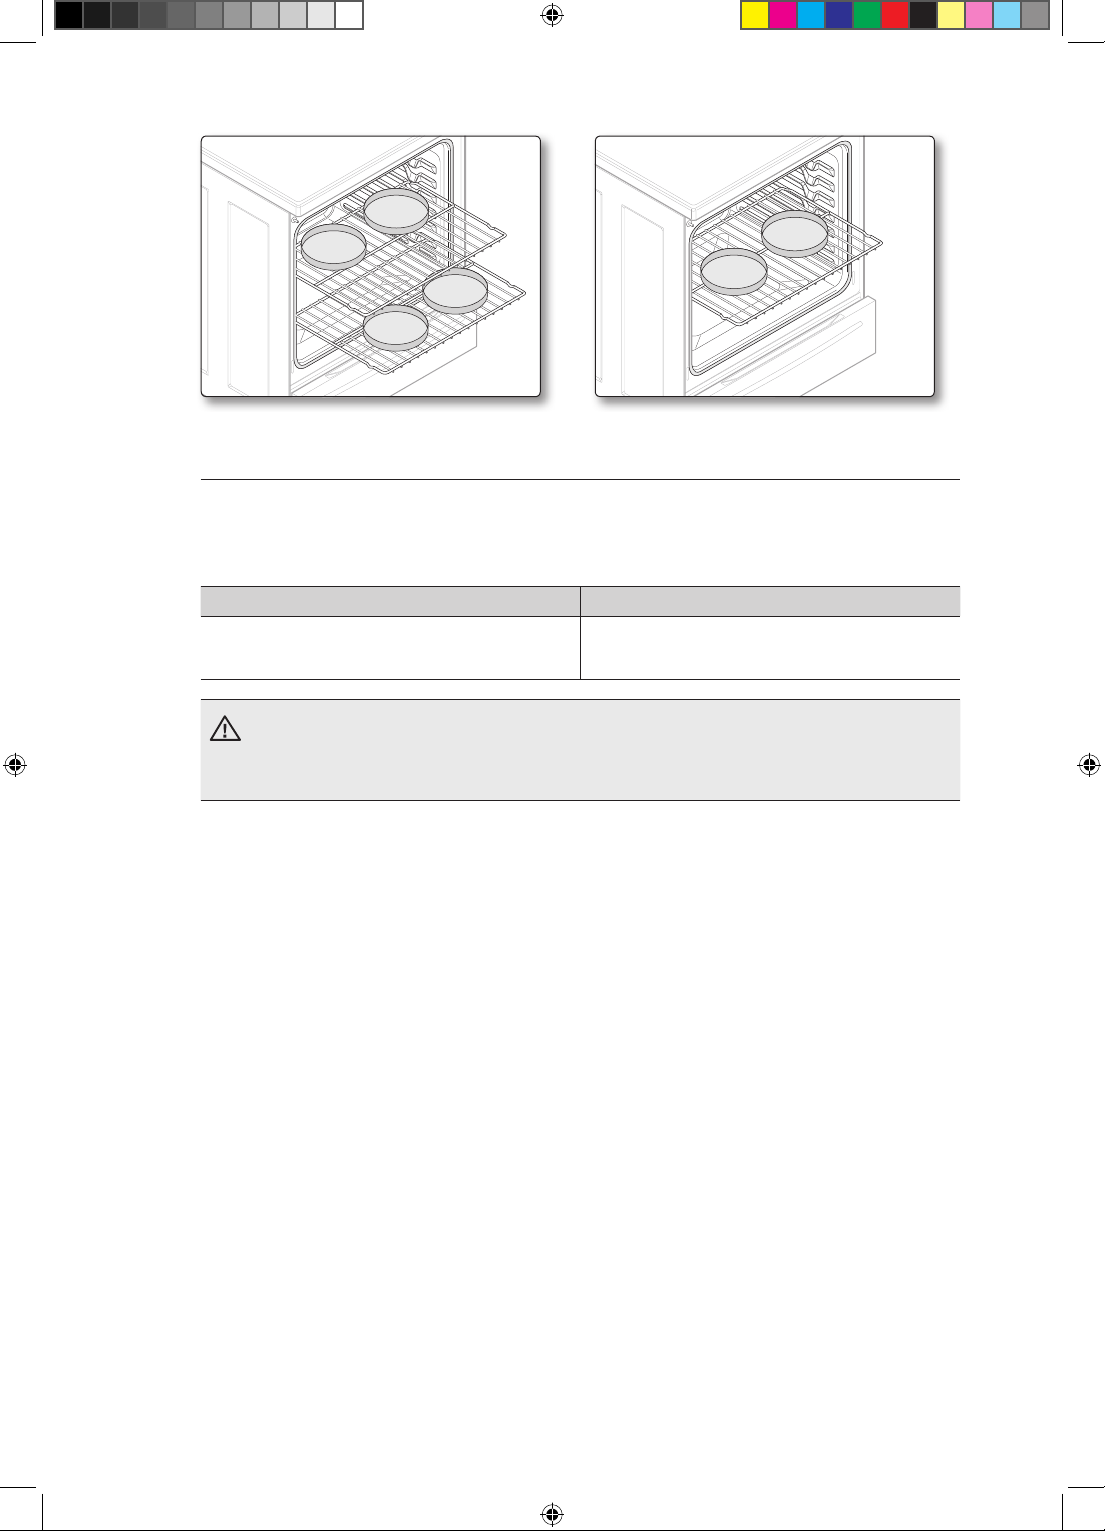
Fig. 1 Fig. 2
Before using the racks
The oven has three racks.
Each rack has stops that need to be placed correctly on the supports. These stops will keep the
rack from coming completely out.
REMOVING THE RACKS REPLACING THE RACKS
1. Pull the rack straight out until it stops.
2. Lift up the front of the rack and pull it out.
• Do not cover a rack with aluminum foil or place on the oven bottom. This will hamper
CAUTION
the heat circulation, resulting in poor baking, and may damage the oven bottom.
• Arrange the oven racks only when the oven is cool.
1. Place the end of the rack on the support.
2. Tilt the front end up and push the rack in.
34_ Operating the oven
FE710DRS_XAC_DG68-00334A-07_EN.indd 34 05/11/2012 20:31:21
Page 35
BAKING
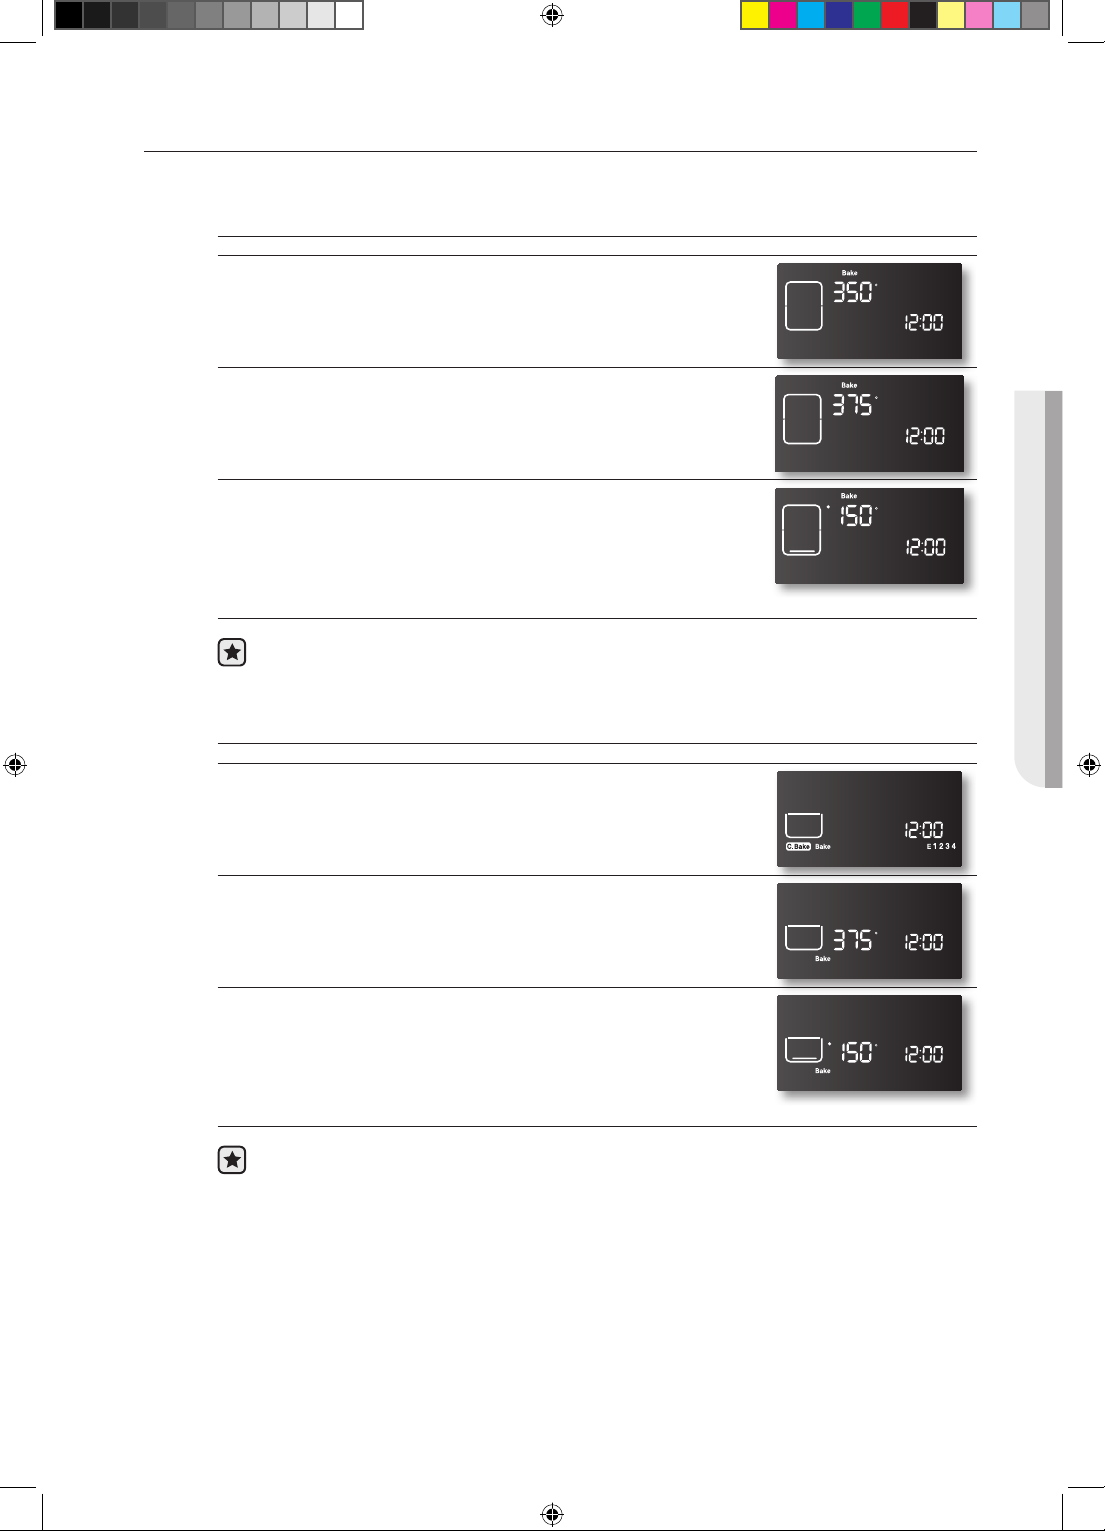
The oven can be programmed to bake at any temperature from 150 °F to 550 °F.
How to set the thermostat (Single mode)
1. Start the set up.
Press the BAKE pad. The default temperature is 350 °F.
2. Enter the temperature you want on the number pad, eg. 3, 7, 5.
3. Start the bake function.
Press the START/SET pad. The temperature display will start to
4. If you want to cancel baking or if you have finished, press the
OPERATING THE OVEN
change once the oven temperature reaches 150 °F.
CLEAR/OFF pad.
Place food in the oven after preheating if the recipe calls for it. Preheating is very important
for good results when baking cakes, cookies, pastry, and breads. After the oven has
reached the desired temperature, a long beep will sound 6 times.
How to set the thermostat (Twin mode)
1. Insert the Partition.
2. Start the set up.
Press the LOWER pad.
3. Press the BAKE pad. The default temperature is 350 °F.
4. Enter the temperature you want to on the number pad eg. 3, 7, 5.
5. Start the bake function
Press the START/SET pad. The temperature display will start to
change once the oven temperature reaches 150 °F.
6. If you want to cancel baking or if you have finished, press the
CLEAR/OFF pad.
Place food in the oven after preheating if the recipe calls for it. Preheating is very important
for good results when baking cakes, cookies, pastry, and breads. After the oven has
reached the desired temperature, a long beep will sound 6 times.
Operating the oven _35
FE710DRS_XAC_DG68-00334A-07_EN.indd 35 05/11/2012 20:31:21
Page 36
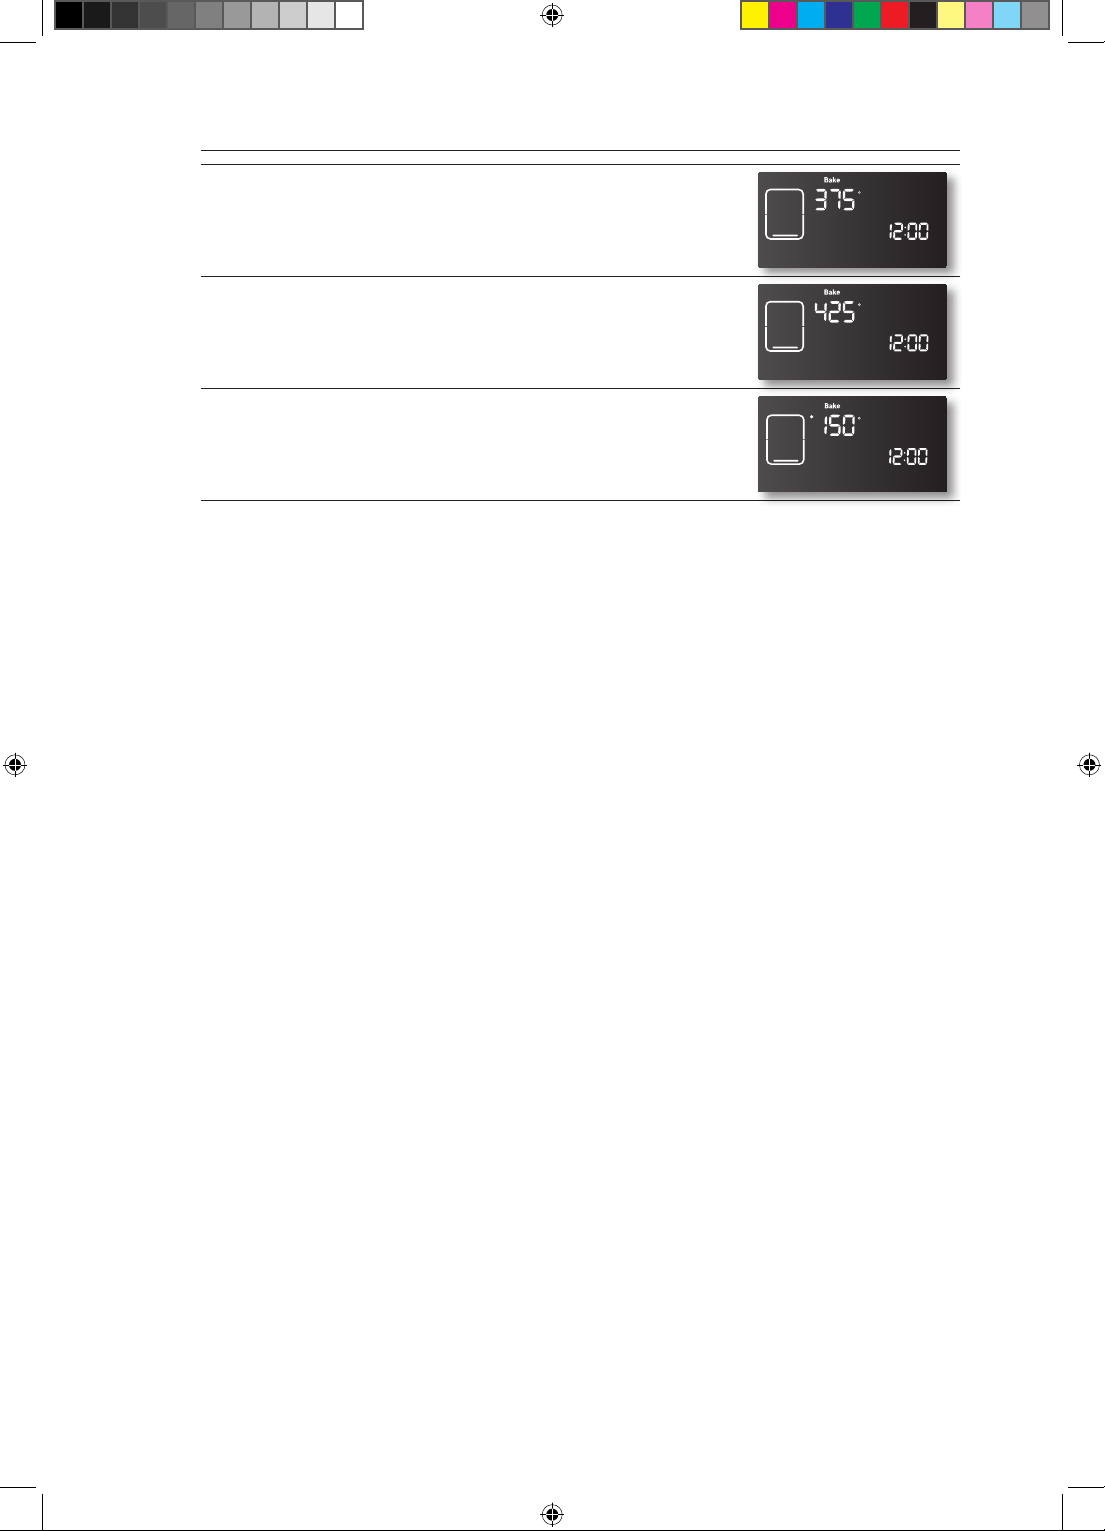
How to adjust the thermostat while cooking
1. Start the setup.
Press the BAKE pad. The display will show the present
temperature, eg. 375 °F.
2. Enter the temperature you want, eg. 425 °F, by using the number
pad.
3. Complete the entry by pressing the START/SET pad.
The process is the same in twin mode.
36_ Operating the oven
FE710DRS_XAC_DG68-00334A-07_EN.indd 36 05/11/2012 20:31:22
Page 37
CONVECTION BAKING
7
6
5
4
3
2
1
7
6
5
4
3
2
1
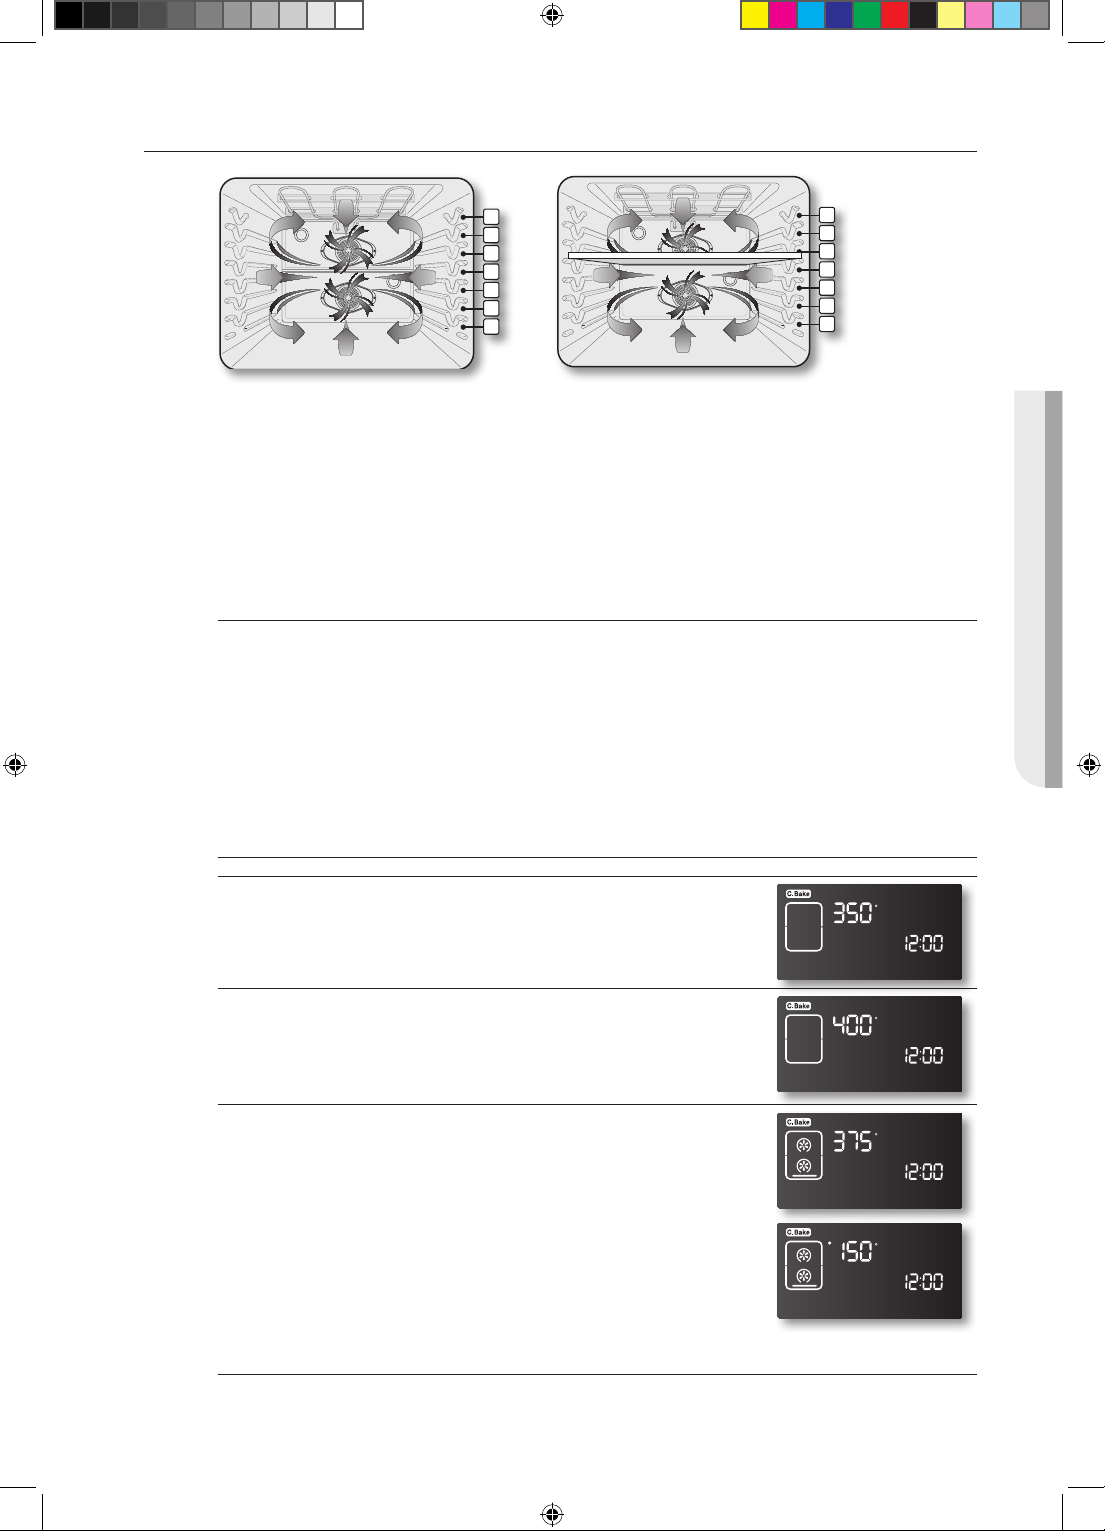
By using the convection bake feature, you will be able to cook faster. You can program the oven
for convection baking at any temperature between 175 °F and 550 °F.
When operating in twin mode, you can program the oven for convection baking at any
temperature between 175 °F and 480 °F. This improved heat distribution allows for even cooking
and excellent results using multiple racks at the same time. Foods cooked on a single oven rack
will generally cook faster and more evenly with convection baking. Multiple oven rack cooking
may slightly increase cook times for some foods, but the overall result is time saved. Breads and
pastries brown more evenly.
Tip for convection baking (single mode)
The amount of time you save will vary depending on the amount and type of food you are
cooking. When baking cookies or biscuits, you should use pans with no sides or very low sides
to allow the heated air to circulate around the food. Using a pan with a dark finish will allow faster
cooking times.
When using convection baking with a single rack, place the oven rack in position 4. If cooking on
multiple racks, place the oven racks in positions 2 and 5 or positions 2, 4 and 6.
When baking a cake, using the bake mode will produce better results.
OPERATING THE OVEN
How to set the oven for convection baking (single mode)
1. Start the convection baking mode.
Press the CONV. BAKE pad. The default temperature is 350 °F.
2. Enter the temperature you want, eg. 400 °F, by using the number
pads. Set the temperature that is called for in the recipe.
Important: In convection baking, the oven automatically sets the
temperature 25 °F lower than your setting because convection
baking cooks food more eectively.
3. Press the START/SET pad to begin convection baking.
Conv. Bake and the adjusted oven temperature, eg. 375 °F, will
appear in the display for 2 seconds.
The temperature display will start to change once the oven
temperature reaches 150 °F.
A beep will sound 6 times when the adjusted oven temperature,
eg. 375 °F, is reached and the display will show the autoconverted oven temperature.
4. Turn o or cancel convection baking by pressing the CLEAR/OFF
pad.
Operating the oven _37
FE710DRS_XAC_DG68-00334A-07_EN.indd 37 05/11/2012 20:31:23
Page 38
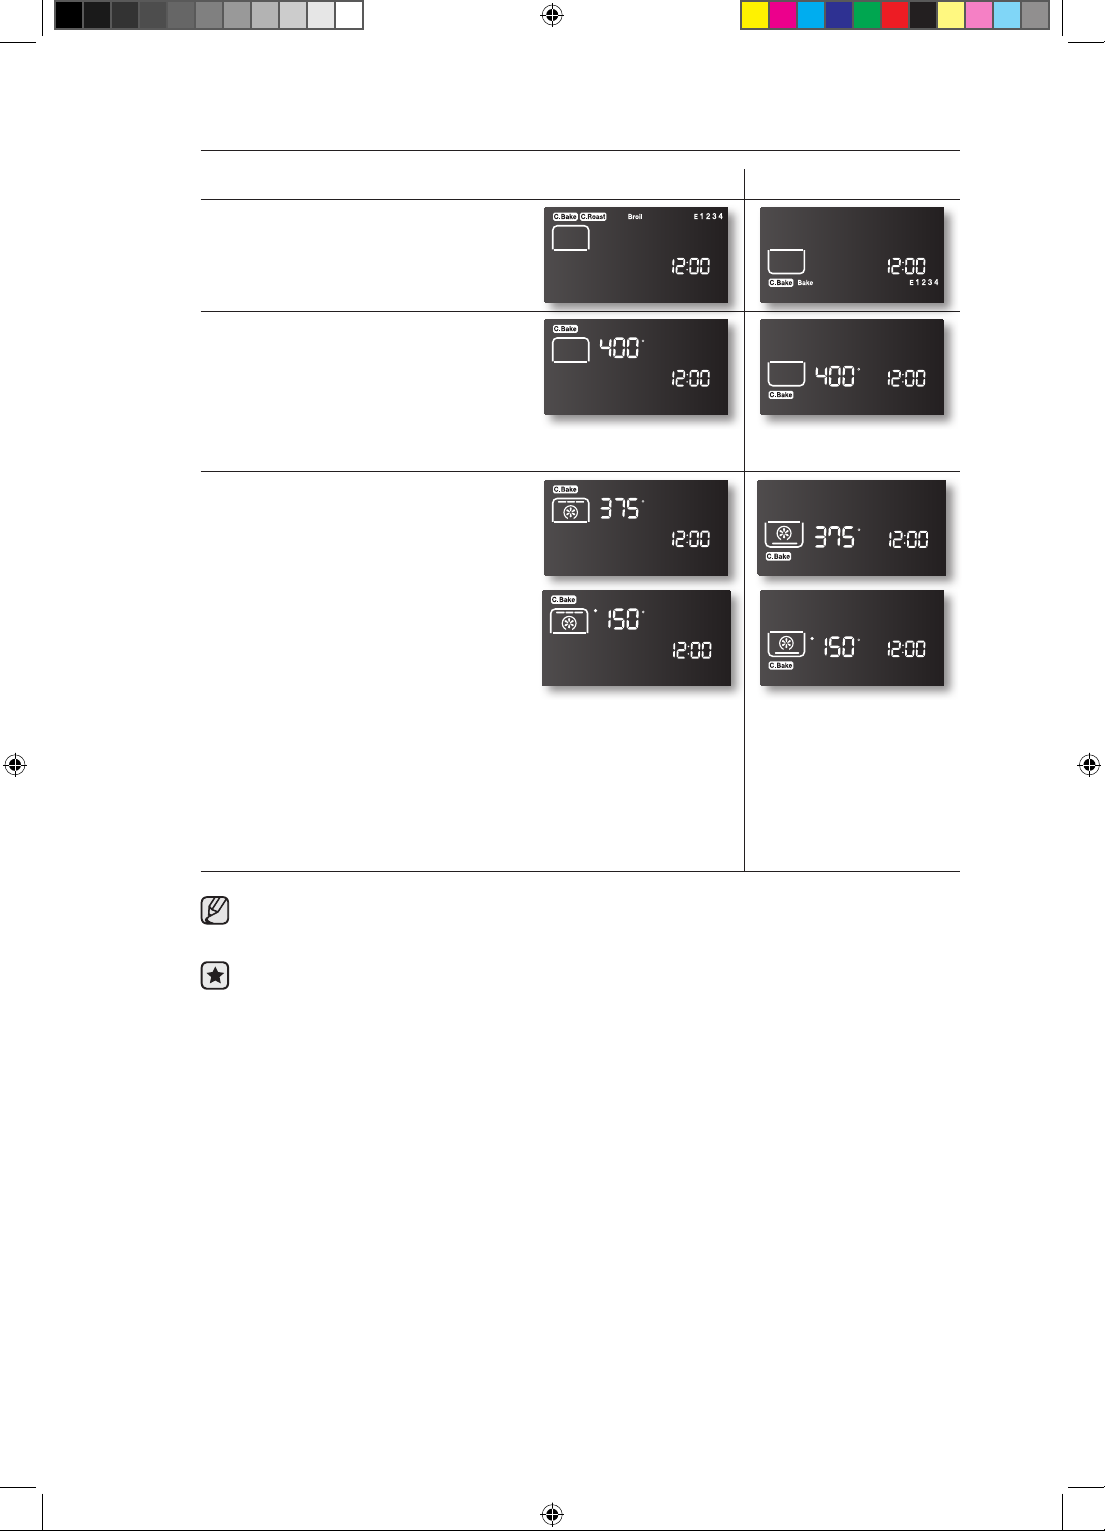
How to set the oven for convection baking (twin mode)
Insert the partition into the cavity. UPPER LOWER
1. Start the Convection baking mode
Press the UPPER or LOWER pad.
Select the partition in which you intend
to cook.
2. Press the CONV.BAKE pad. The
default temperature is 350 °F
3. Enter the temperature you want,. eg.
400 °F, by using number pads.
You can select a temperature from
175 °F to 480 °F.
4. Press the START/SET pad to begin
convection baking.
Conv. Bake and the adjusted oven
temperature, eg. 375 °F, will appear in
the display for 2 seconds.
The temperature display will start to
change once the oven temperature
reaches 150 °F.
A beep will sound 6 times when
the adjusted oven temperature, eg.
375 °F, is reached and the display
will show the auto-converted oven
temperature.
5. Turn o or cancel convection baking
by pressing the CLEAR/OFF pad
each oven you want to OFF.
In convection baking mode, the oven automatically reduces the set regular baking
temperature by 25 °F to the appropriate conversion temperature.
The convection oven fan shuts o when the oven door is opened.
DO NOT leave the door open for long periods of time while using convection cooking or you
may shorten the life of the convection heating element.
38_ Operating the oven
FE710DRS_XAC_DG68-00334A-07_EN.indd 38 05/11/2012 20:31:23
Page 39
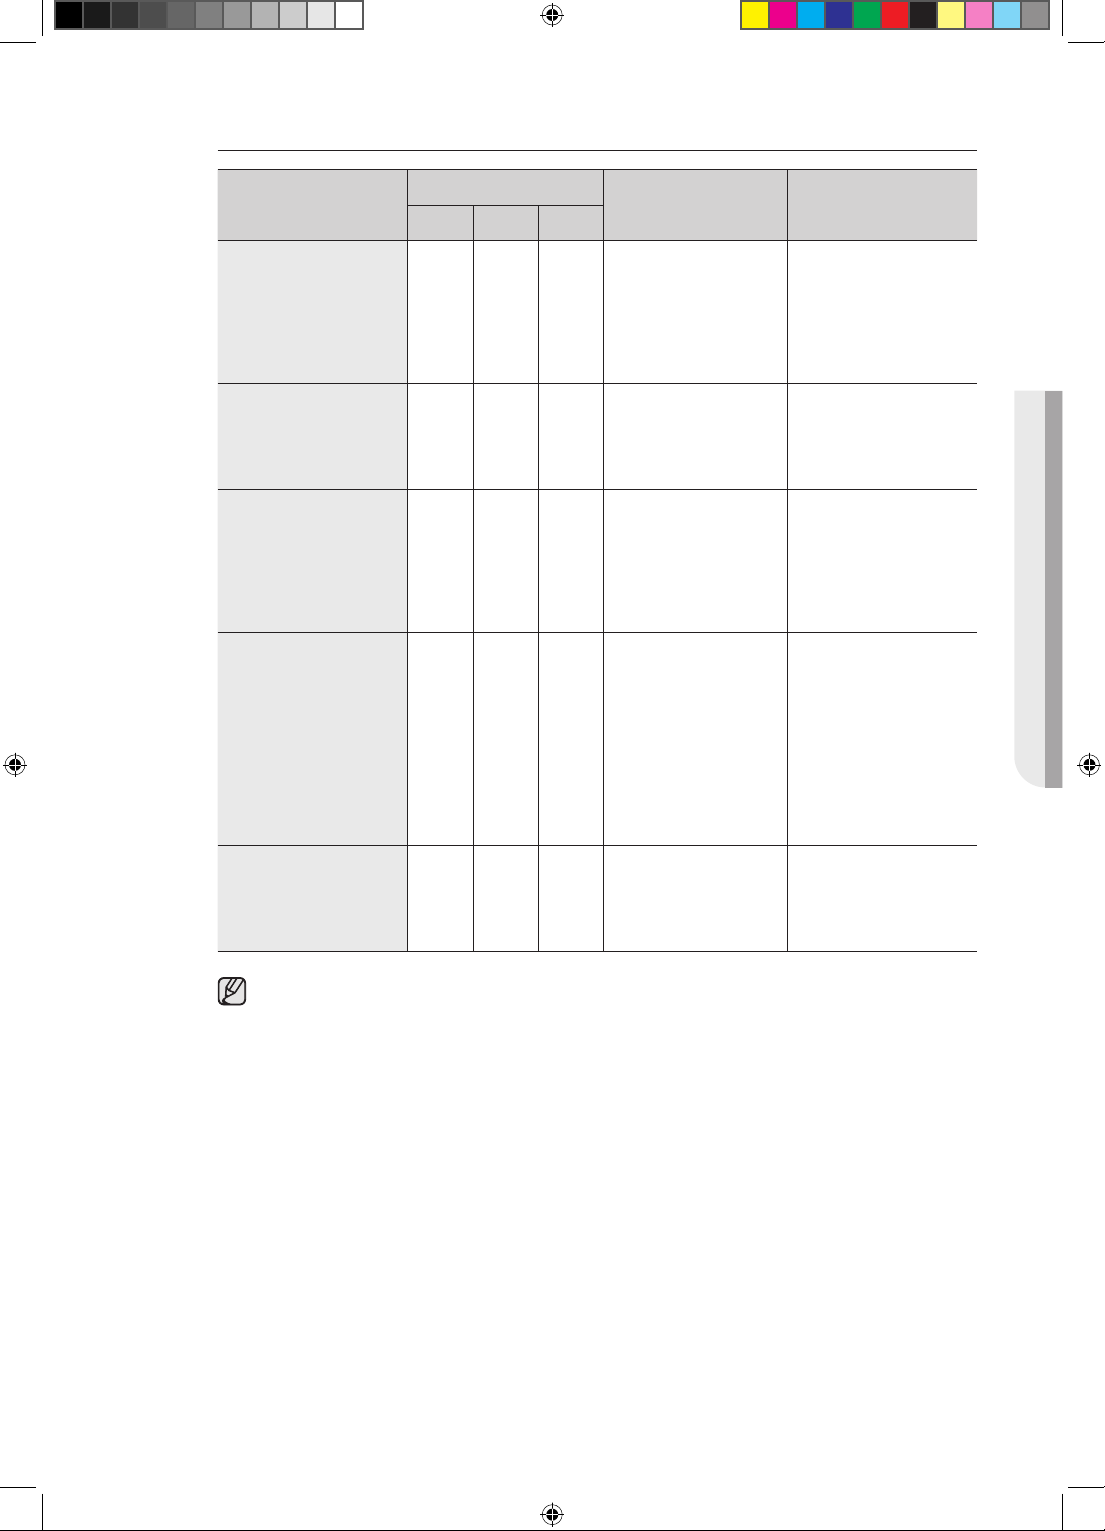
Recommended convection baking guide
Food Item
Rack Position
Single Upper Lower
Cake
Cupcakes 4 A 2 325 17-19
Bundt Cake 3 - 1 325 35-43
Angel Food 2 - 1 325 35-39
Pie
2 crust, fresh, 9˝ 3 A 1 350-400 45-55
2 crust, frozen fruit, 9˝ 3 A 1 350 68-78
Cookies
Sugar 3 A 2 325-350 12-17
Chocolate Chip 3 A 2 325-350 14-18
Brownies 3 A 2 325 29-36
Breads
Yeast bread, loaf, 9x5 3 A 1 350 18-22
Yeast rolls 3 A 2 350-375 13-18
Quick Bread, loaf, 8x4 3 A 1 325-350 45-55
Temp.* (preheated
oven) (°F )
Convection bake
time ** (min)
OPERATING THE OVEN
Biscuits 3 A 2 350-375 9-14
Muns 3 A 2 400 15-19
Pizza
Frozen 3 A 2 375-425 23-26
Fresh 3 A 2 400-425 12-15
* The convection bake temperature is 25 °F less than recommended on packages or
recipes. The temperature in this chart has been reduced 25 °F.
** Actual times depend on the mixes or recipes baked. Follow recipe or package
directions and reduce temperature appropriately.
*** Set the temperature to the temperature called for in the recipe. The oven will
automatically decrease the temperature by 25 °F for convection baking.
Operating the oven _39
FE710DRS_XAC_DG68-00334A-07_EN.indd 39 05/11/2012 20:31:24
Page 40
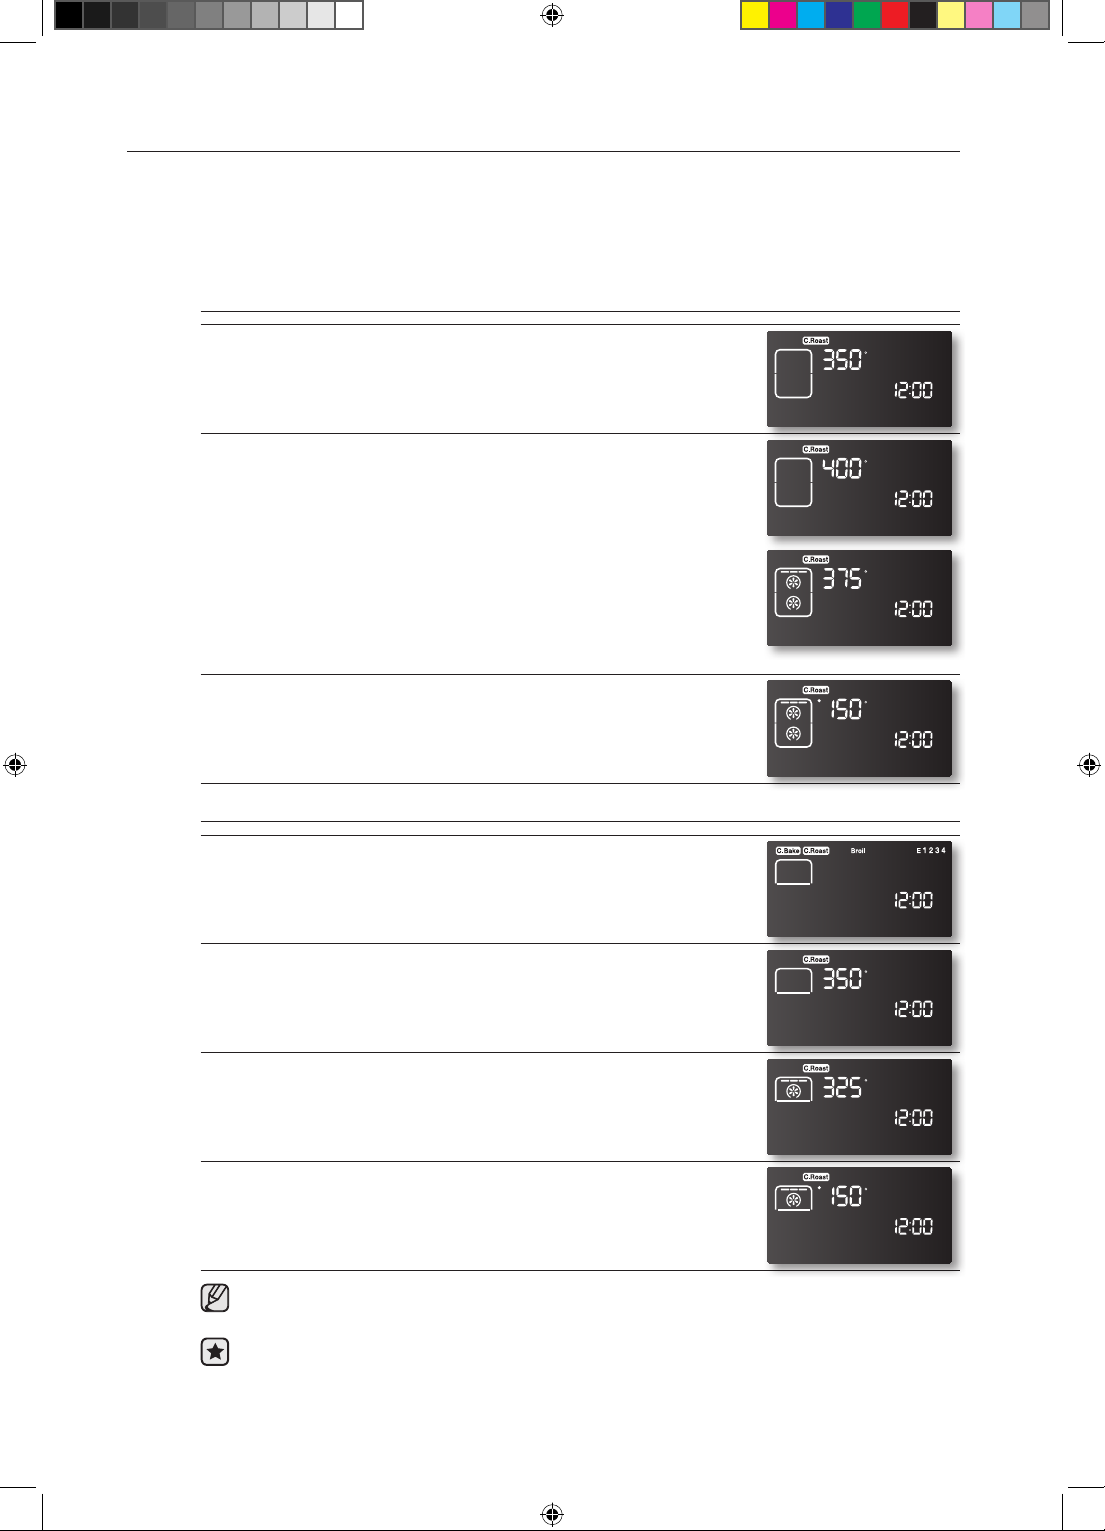
CONVECTION ROASTING
Convection roasting is good for cooking large tender cuts of meat, uncovered.
Heat comes from the top heating element. The convection fan circulates the heated air evenly
over and around the food. Meat and poultry are browned on all sides as if they were cooked on a
rotisserie. The heated air seals in juices quickly for a moist and tender product while, at the same
time, creating a rich golden brown exterior.
How to set the oven for convection roasting (single mode)
1. Start the convection roasting mode.
Press the CONV. ROAST pad. The default temperature is 350 °F.
2. Enter the temperature you want, eg. 400 °F, by using the number
pads.
3. Press the START/SET pad to begin convection roasting.
Conv. Roast and the adjusted oven temperature, eg. 375 °F, will
appear in the display for 2 seconds.
The temperature display will start to change once the oven
temperature reaches 150 °F.
A beep will sound 6 times when the adjusted oven temperature,
eg. 375 °F, is reached and the display will show the auto-converted
oven temperature.
4. Turn o or cancel convection roasting by pressing the CLEAR/OFF
pad.
How to set the oven for convection roasting (twin mode)
1. Insert the partition in the cavity.
2. Start the convection roasting mode.
Press the UPPER pad.
2. Press the CONV. ROAST pad.
Press the conv.roast pad. The default temperature is 350 °F.
4. Press the START/SET pad to begin convection roasting.
5. Turn o or cancel convection roasting by pressing the CLEAR/OFF
pad.
In the convection roasting mode, the oven will automatically reduce the set regular baking
temperature by 25 °F to the appropriate conversion temperature.
The convection oven fan shuts o when the oven door is opened.
DO NOT leave the door open for long periods of time while using convection cooking or you
may shorten the life of the convection heating element.
40_ Operating the oven
FE710DRS_XAC_DG68-00334A-07_EN.indd 40 05/11/2012 20:31:24
Page 41
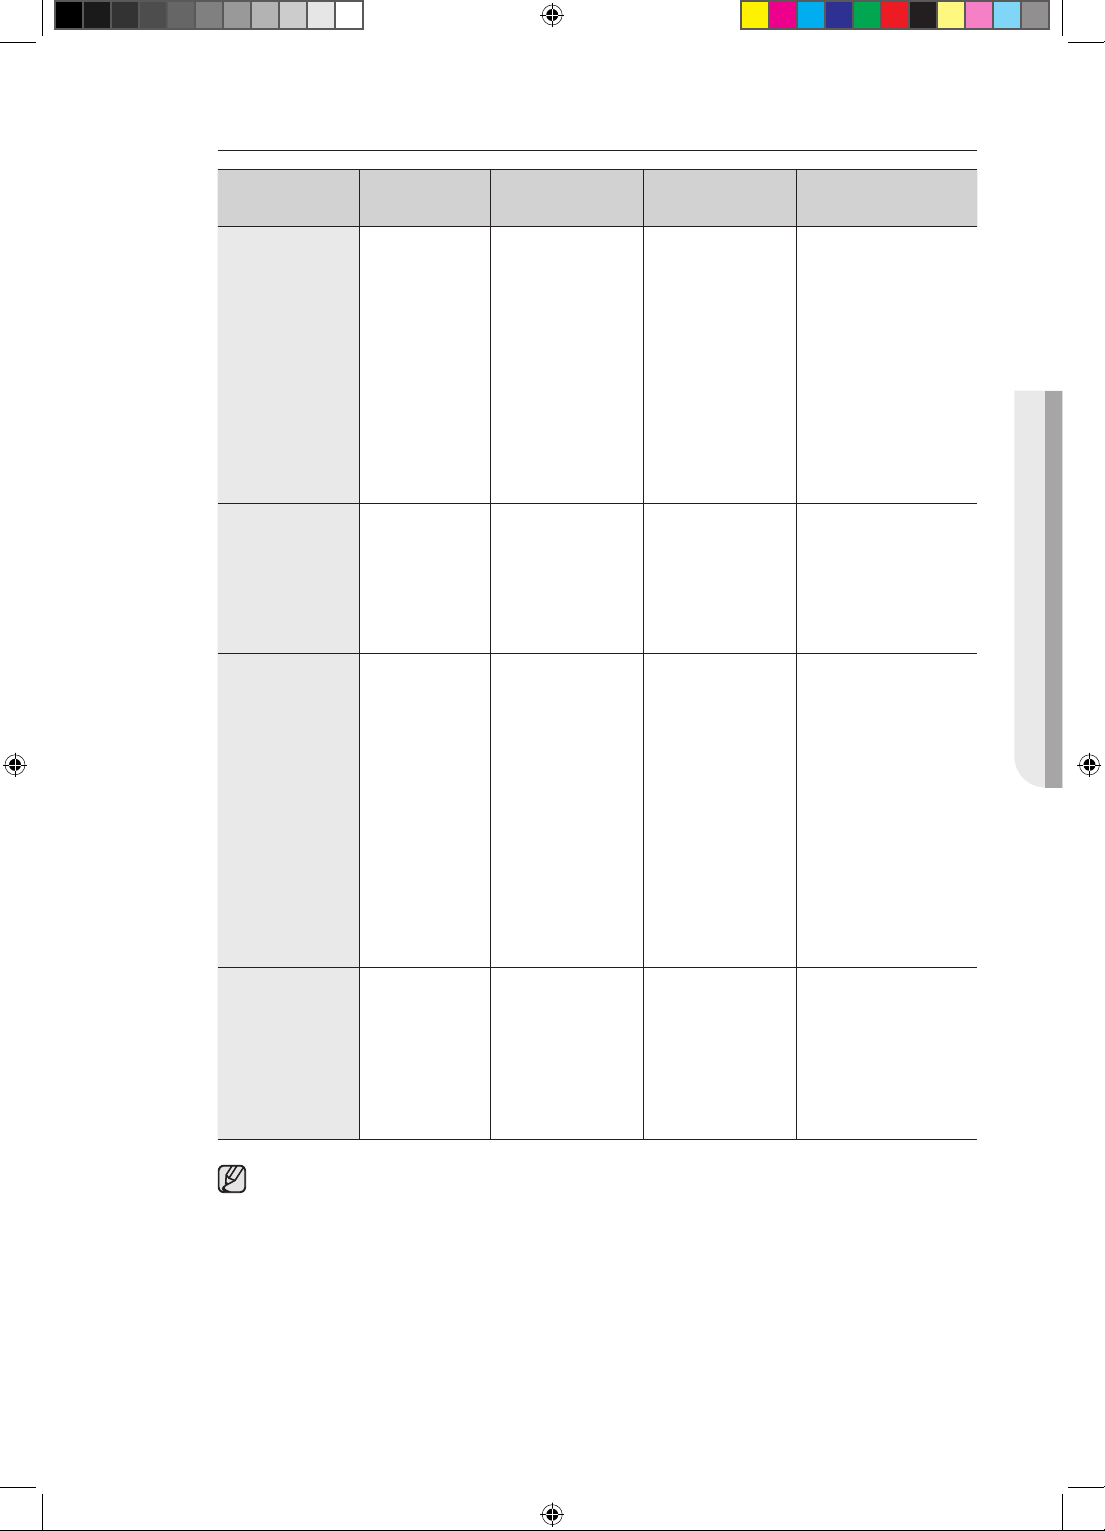
Recommended convection roasting guide
Meat Weight (lb) Oven temp. (°F )
Beef
Rib roast 4-6 325
Rib eye roast,
(boneless)
Rump, eye, tip
sirloin (boneless)
Tenderloin roast 2-3 325 28-38 145 (med/rare)
Pork
Loin roast
(boneless or
bone-in)
Shoulder 3-6 350 20-30 160
Poultry
Chicken - whole 3-4 375 17-23 180
Turkey,
unstued**
4-6 325
3-6 325
5-8 350 15-25 170
12-15 325 12-16 180
Roasting time*
(min per lb)
25-28
28-32
24-29
29-34
25-30
28-35
Internal temp. (°F )
145 (med/rare)
160 (medium)
145 (med/rare)
160 (medium)
145 (med/rare)
160 (medium)
OPERATING THE OVEN
Turkey,
unstued**
Turkey,
unstued**
Turkey breast 3-8 325 20-25 170
Cornish hen 1-1½ 350 45-75 (total time) 180
Lamb
Half leg 3-4 325
Whole leg 6-8 325
* Roasting times are approximate and may vary depending on the shape of the meat.
The convection roast temperature is 25 °F less than recommended on packages or
recipes. The temperature in this chart has been reduced 25 °F.
** A stued turkey requires additional roasting time. The minimum safe temperature for
stung in poultry is 165 °F.
*** Set the temperature to the temperature called for in the recipe. The oven will
automatically decrease the temperature by 25 °F for convection roasting.
16-20 325 11-15 180
21-25 325 8-12 180
25-30
30-35
25-30
30-35
160 (medium)
170 (well)
160 (medium)
170 (well)
Operating the oven _41
FE710DRS_XAC_DG68-00334A-07_EN.indd 41 05/11/2012 20:31:25
Page 42
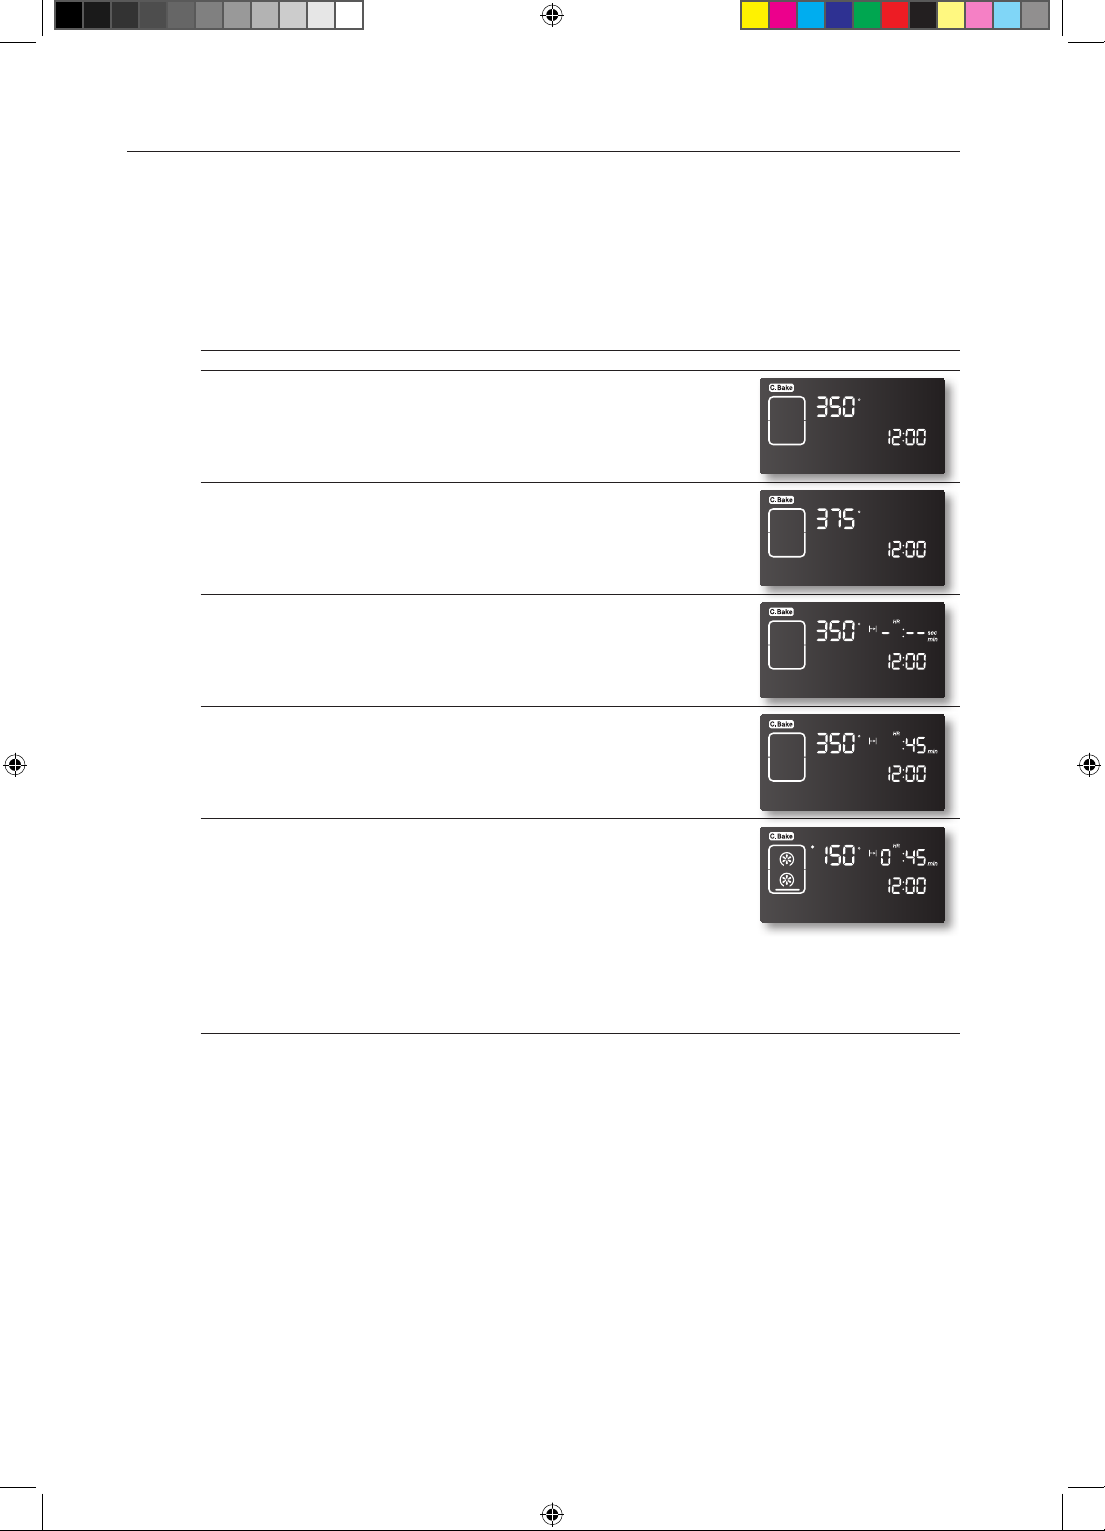
TIMED COOKING
In timed cooking, the oven turns on immediately and cooks for the length of time you select. At
the end of the cooking time, the oven turns o automatically.
• You can use the timed cooking feature only with another cooking operation (bake, convection
bake, or convection roast).
• The clock must be set to the current time.
How to set the oven for timed cooking (single mode)
1. Enter the setup.
Press the pad for the cooking operation you want, eg. CONV.
BAKE. The default temperature is 350 °F.
2. Enter the temperature you want, eg. 375 °F, by using the number
pads.
3. Press the COOKING TIME pad.
4. Enter the cooking time you want, eg. 45 min, by using the number
pads.
You can set the cooking time for any amount from 1 minute to 9
hours and 99 minutes.
5. Press the START/SET pad to begin cooking.
The temperature display will start to change once the oven
temperature reaches 150 °F.
The oven will continue to cook until the set amount of time has
elapsed, then turn o automatically unless the warm feature was
set. (Refer to the section on the warm feature on page 51.)
6. You can cancel a timed cooking at any time by pressing the
CLEAR/OFF pad.
42_ Operating the oven
FE710DRS_XAC_DG68-00334A-07_EN.indd 42 05/11/2012 20:31:25
Page 43
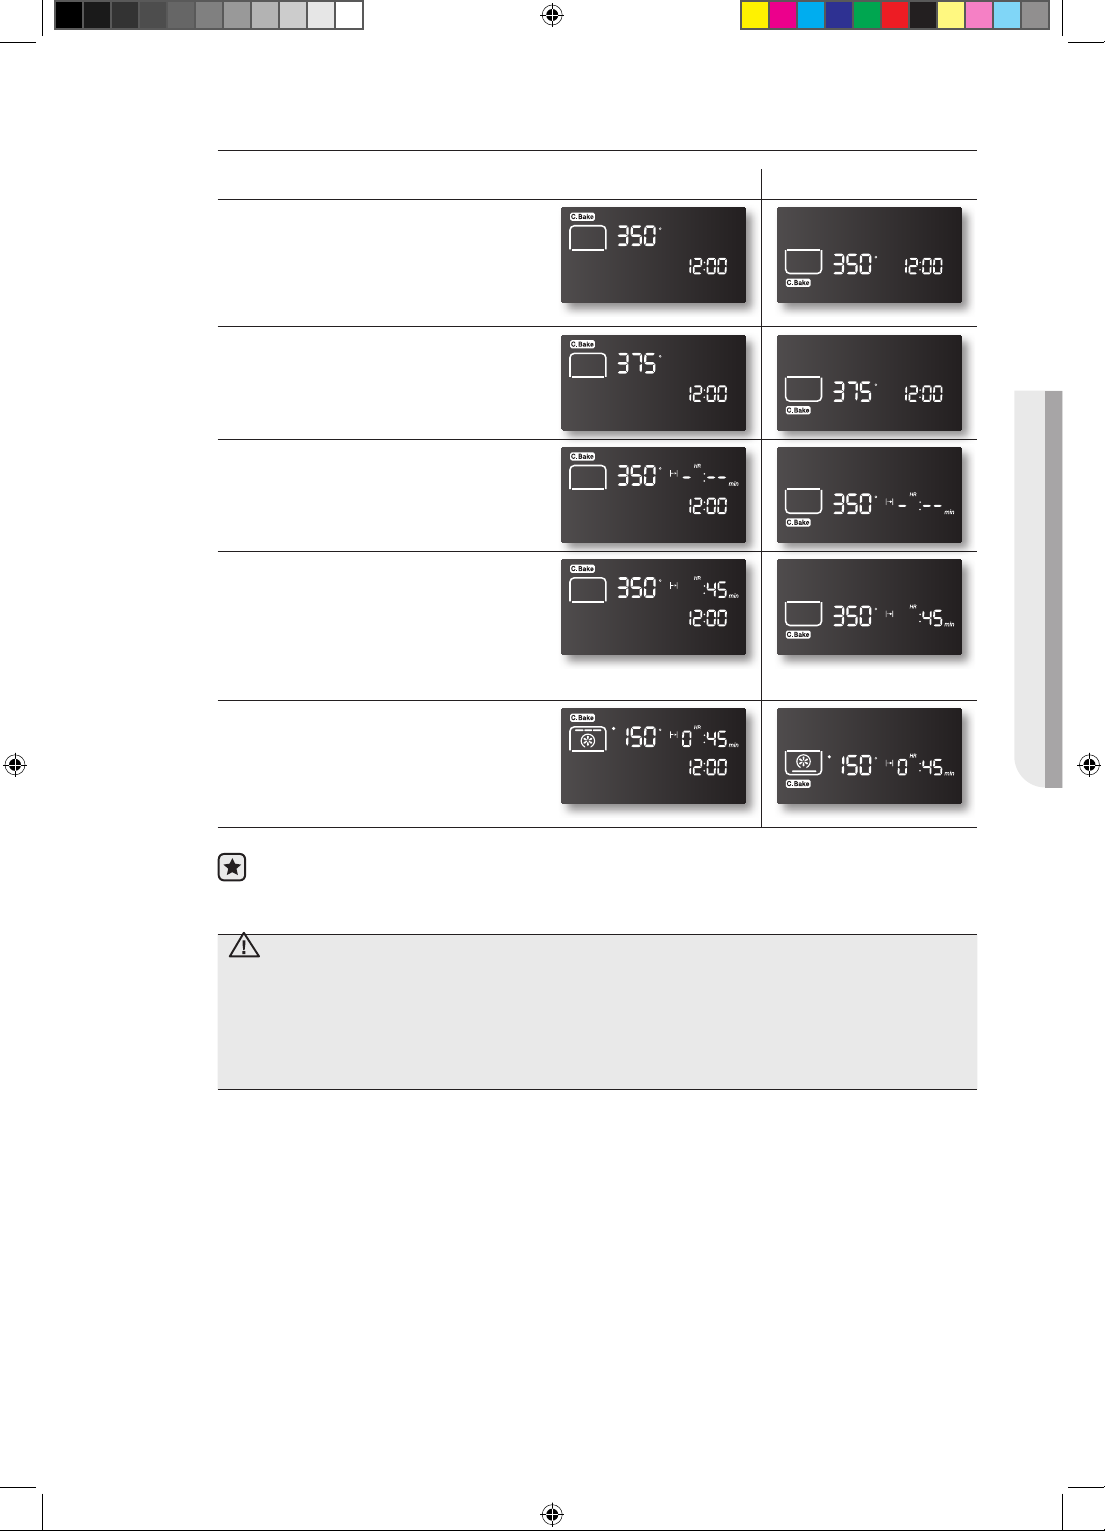
How to set the oven for timed cooking (twin mode)
Insert the partition into the cavity. UPPER LOWER
1. Enter the setup.
Press the UPPER or LOWER pad for
the cooking operation you want, eg.
CONV.BAKE. The default temperature
is 350 °F.
2. Enter the temperature you want, eg.
375 °F, by using the number pads.
3. Press the COOKING TIME pad.
4. Enter the cooking time you want,
eg. 45 minutes, by using the number
pads.
You can set the cooking time for any
amount from 1 minute to 9 hours and
99 minutes.
5. Press the START/SET pad to begin
cooking operation.
6. You can cancel a timed cooking at
any time by pressing the CLEAR/OFF
pad.
OPERATING THE OVEN
Place food in the oven after preheating if the recipe calls for it. Preheating is important for
good results when baking cakes, cookies, pastry, and breads. After the oven has reached
the desired temperature, a long beep will sound 6 times.
Use caution with the timed cooking or delay timed cooking features. Use these
CAUTION
features when cooking cured or frozen meats and most fruits and vegetables. Foods
that can easily spoil, such as milk, eggs, fish, meat or poultry, should be chilled in the
refrigerator first. Even when chilled, they should not stand in the oven for more than
1 hour before cooking begins, and should be removed promptly when cooking is
completed. Eating spoiled food can result in sickness from food poisoning.
Operating the oven _43
FE710DRS_XAC_DG68-00334A-07_EN.indd 43 05/11/2012 20:31:27
Page 44
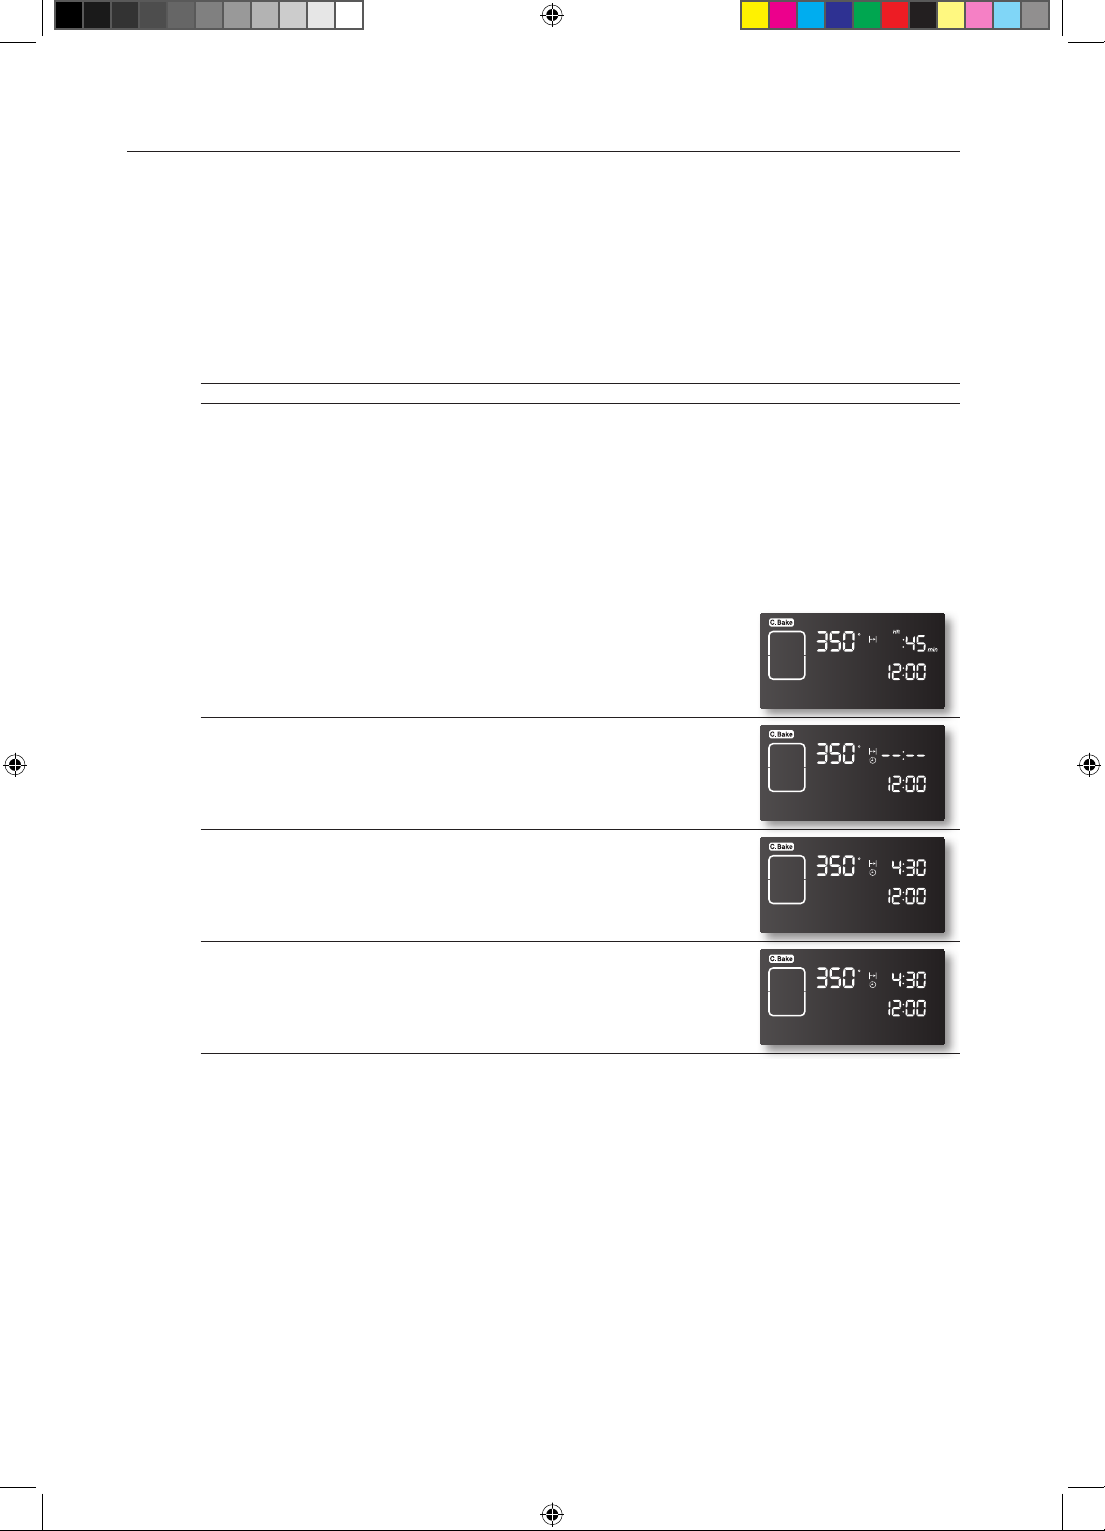
DELAY TIMED COOKING
In a delay timed cooking, the oven’s timer turns the oven on and o at times you select in
advance.
• You can use the delay timed cooking feature only with another cooking operation (bake,
convection bake, or convection roast).
• You can set the oven for a delay timed cooking before setting other cooking operations.
• The clock must be set to the current time.
How to set the oven for delay timed cooking (single mode)
1. Position the oven rack(s) and place the food in the oven.
2. Enter the setup.
Press the pad for the cooking operation you want, eg. CONV.
BAKE. The default temperature is 350 °F.
3. Use the number pads to enter the temperature you want, eg. 375
°F.
4. Press the COOKING TIME pad.
5. Enter the cooking time you want, eg. 45 minutes, by using the
number pad.
You can set the cooking time for any amount of time from 1 minute
to 9 hours and 99 minutes.
6. Press the DELAY START pad.
7. Enter the time you want the oven to turn on, eg. 4:30, by using the
number pads.
8. Press the START/SET pad.
At the set time, a short beep will sound. The oven will begin to
bake. When the oven has reached the desired temperature, a long
beep will sound 6 times.
44_ Operating the oven
FE710DRS_XAC_DG68-00334A-07_EN.indd 44 05/11/2012 20:31:27
Page 45
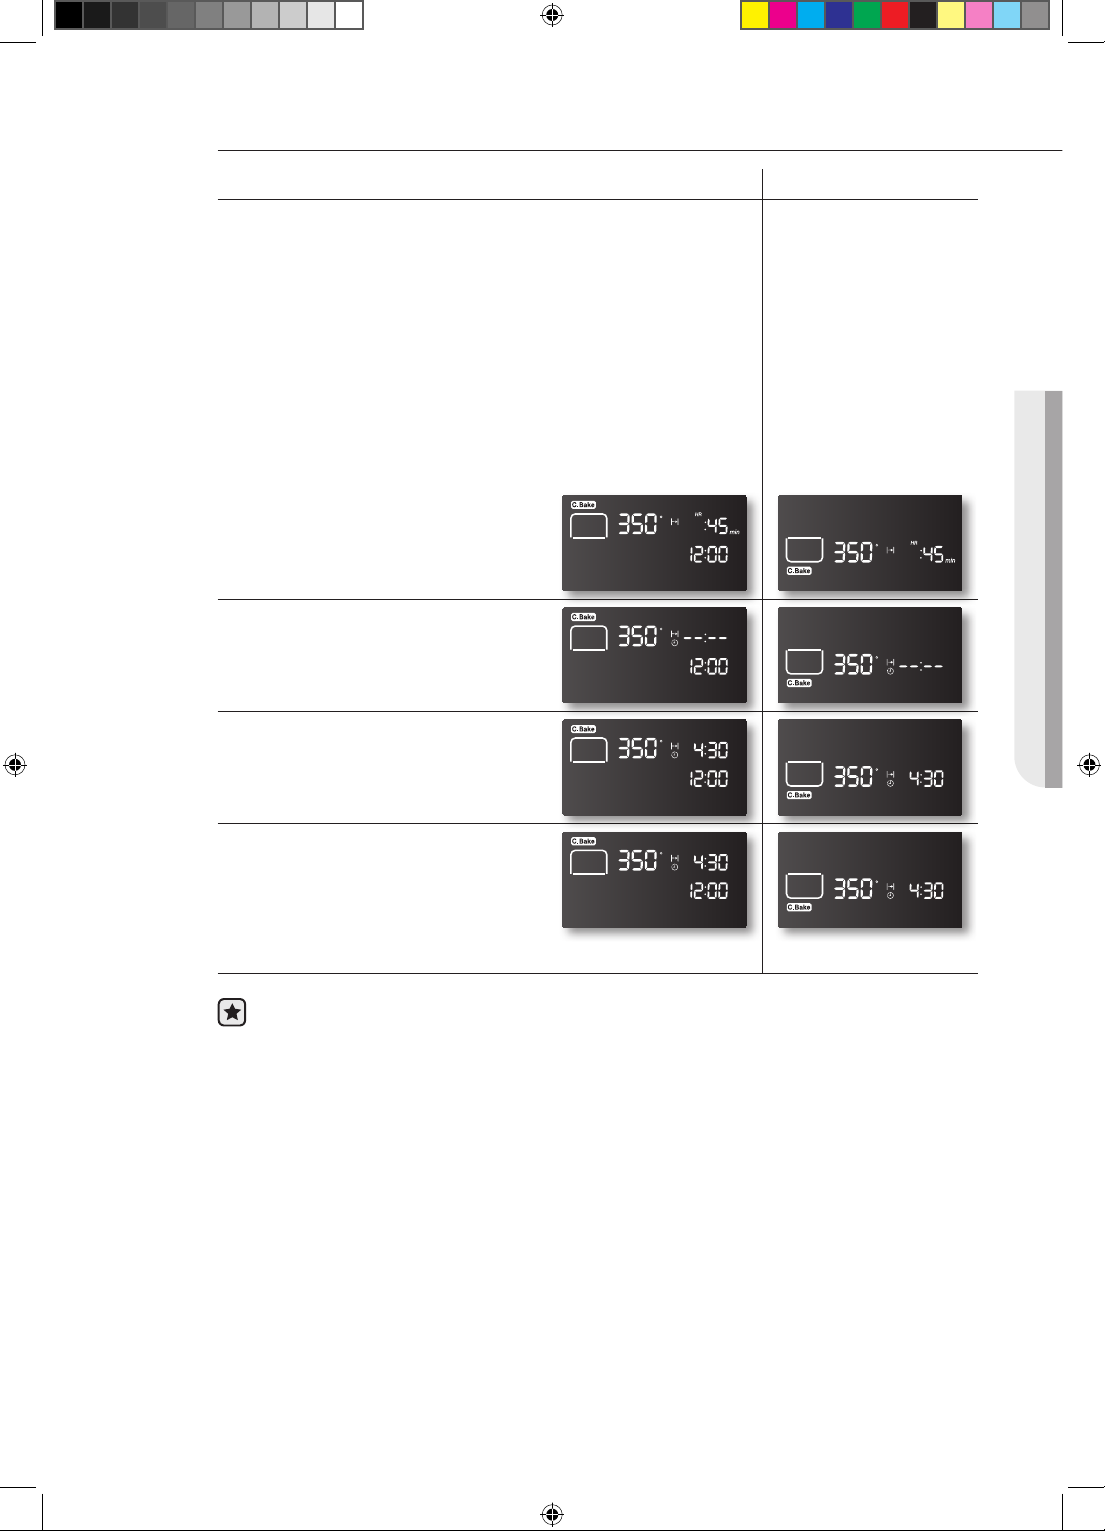
How to set the oven for delay timed cooking (twin mode)
Insert the partition into the cavity. UPPER LOWER
1. Position the oven rack(s) and place the
food in the oven.
2. Enter the setup.
Press the UPPER or LOWER pad for
the cooking operation you want, eg.
CONV.BAKE. The default temperature
is 350 °F.
3. Use the number pads to enter the
temperature you want, eg. 375 °F.
4. Press the COOKING TIME pad.
5. Enter the cooking time you want, eg.
45 minutes, by using the number pad.
You can set the cooking time for any
amount of time from 1 minute to 9
hours and 99 minutes.
6. Press the DELAY START pad.
OPERATING THE OVEN
7. Enter the time you want the oven to
turn on, eg. 4:30, by using the number
pads.
8. Press the START/SET pad.
At the set time, a short beep will
sound. The oven will begin to bake.
When the oven has reached the
desired temperature, a long beep will
sound 6 times.
Place food in the oven after preheating if the recipe calls for it. Preheating is important for
good results when baking cakes, cookies, pastry, and breads. After the oven has reached
the desired temperature, a long beep will sound 6 times.
Operating the oven _45
FE710DRS_XAC_DG68-00334A-07_EN.indd 45 05/11/2012 20:31:28
Page 46
BROILING
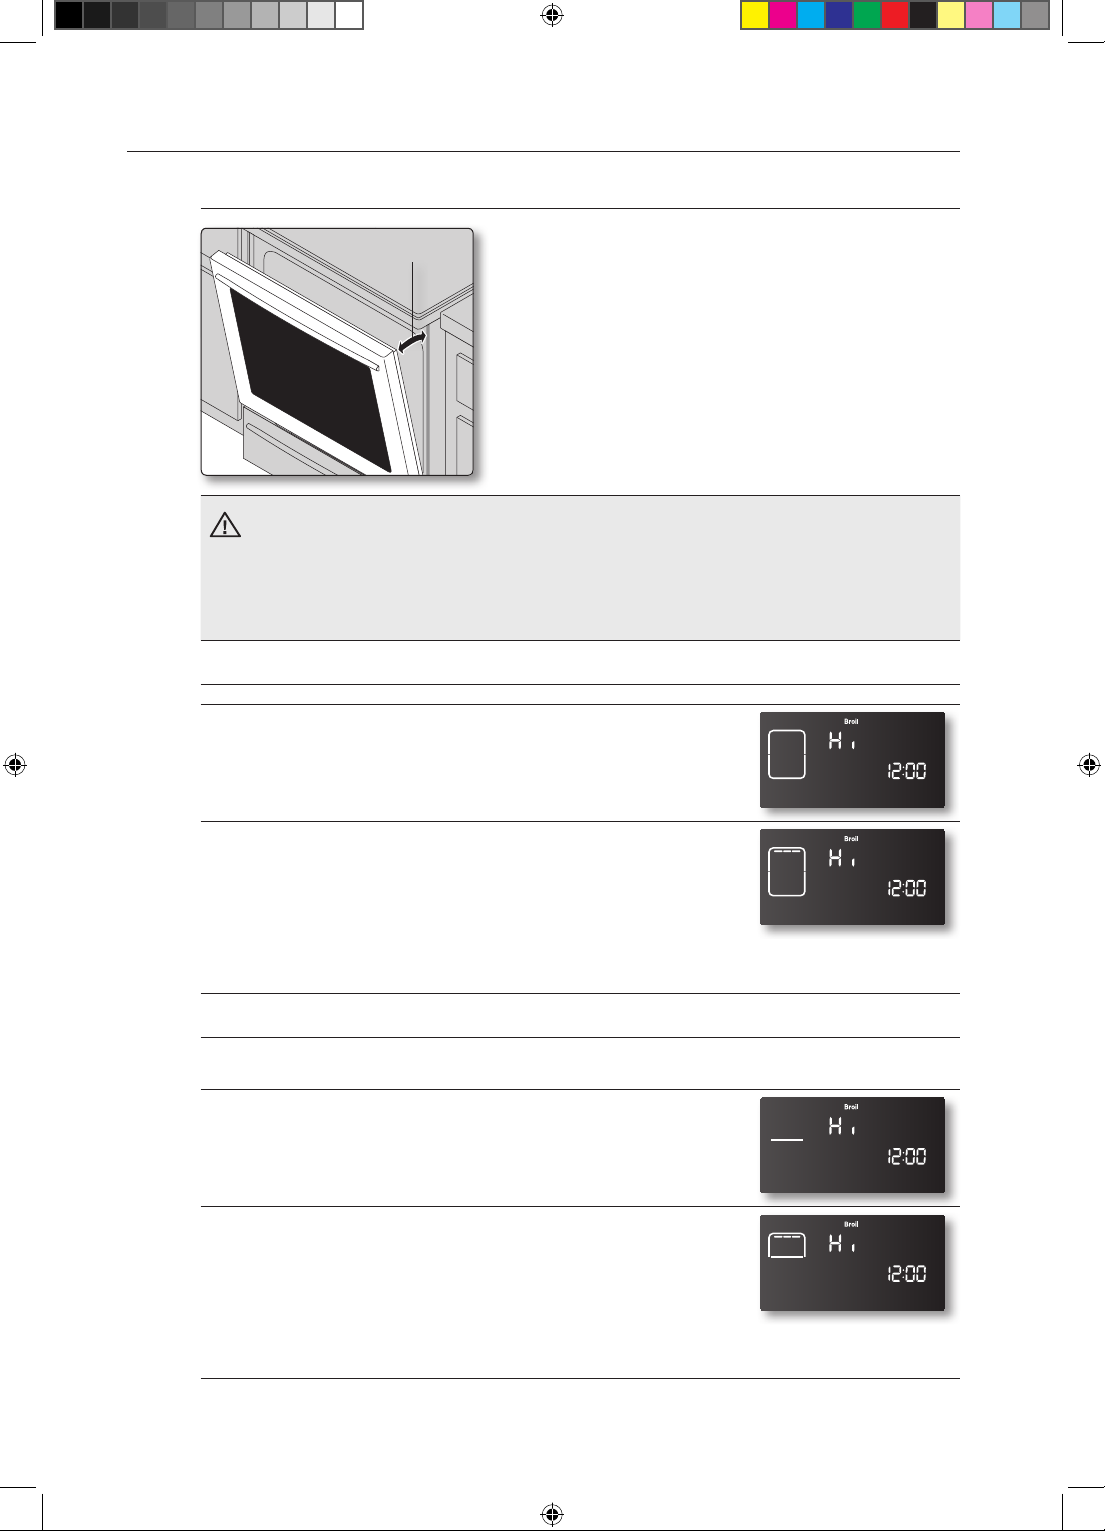
Broil stop position
Broil stop position
Should an oven fire occur, close the oven door and turn the oven o. If the fire continues,
throw baking soda on the fire or use a foam-type fire extinguisher. Do not put water or
CAUTION
flour on the fire. Flour may explode and water can cause a grease fire to spread and
cause personal injury.
Do not open the door when you cook in the twin mode.
Leave the door open to the broil stop position. The door
will stay open by itself and the proper temperature will be
maintained in the oven.
How to set the oven for broiling (single mode)
1. Select the broil setting you want.
Press the BROIL pad once for HI or twice for LO.
Use LO to cook foods such as poultry or thick cuts of meat
thoroughly without over-browning them.
2. Start the broiling function.
Press the START/SET pad.
Broil one side until the food is browned. Turn over and cook on the
other side.
3. Press the CLEAR/OFF pad once you have finished cooking or if
you want to cancel broiling.
How to set the oven for broiling (twin mode)
Insert the partition into the cavity.
1. Press the UPPER pad.
Press the BROIL pad once HI or twice for LO.
Use LO to cook foods such as poultry or thick cuts of meat
thoroughly without over-browning them.
2. Start the broiling function.
Press the START/SET pad.
Broil one side until the food is browned. Turn over and cook on the
other side.
3. Press the CLEAR/OFF pad once you have finished cooking or if
you want to cancel broiling.
46_ Operating the oven
FE710DRS_XAC_DG68-00334A-07_EN.indd 46 05/11/2012 20:31:29
Page 47
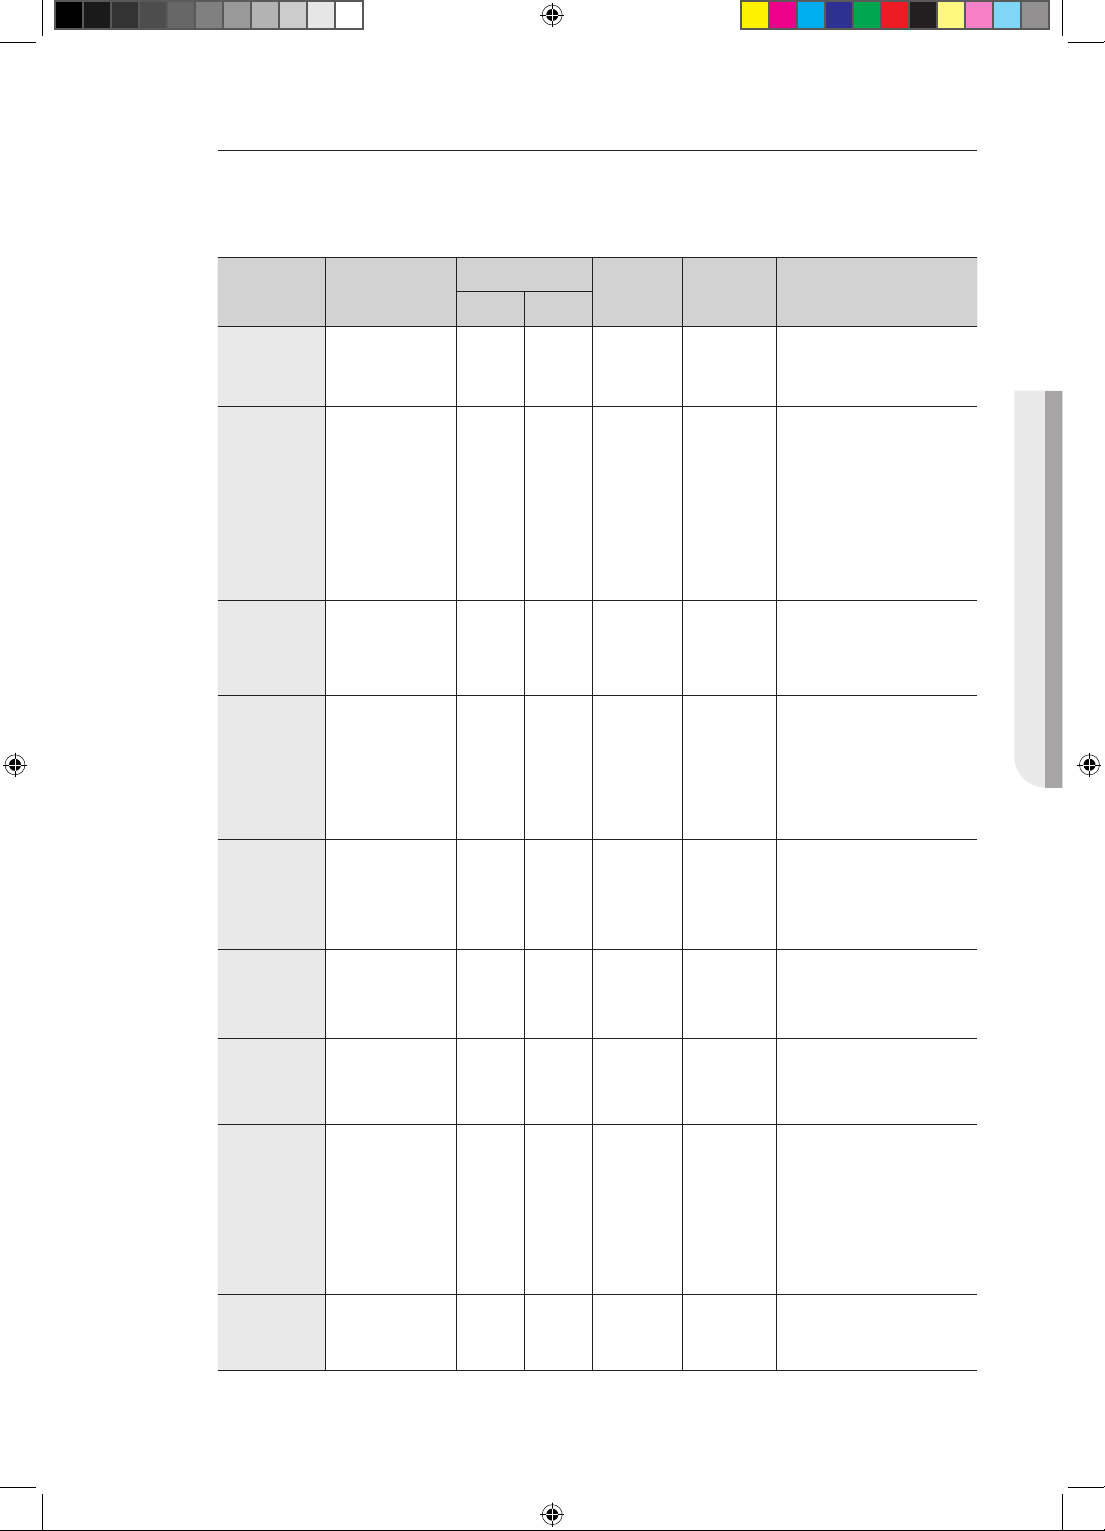
Recommended broiling guide
The size, weight, thickness, starting temperature, and your preference of doneness will aect
broiling times.
This guide is based on meats at refrigerator temperature.
Food
Ground
beef
Well done
Beef steaks
Rare
Medium 7 B 10 4-6
Well done 7 B 12 5-7
Rare
Medium 6 A 16 8-11
Well done 6 A 19 11-13
Chicken
Lobster
tails
Quantity and/
or thickness
1 lb. (4 patties)
½ to ¾˝ thick
1˝ thick
1 to 1½ lbs.
1½˝ thick
2 to 2½ lbs.
1 whole cut up
2 to 2½ lbs.,
split lengthwise
2 Breasts 5 A 13-18 5-10
2–4
10 to 12 oz.
each
Shelf position
Single Upper
7 or 6 B 8-10 4-6
7 B 8 3-5
6 A 14 7-9
4 A 23-28 13-18
4 A 14-18
First
side time
(min.)
Second
side time
(min.)
Do not
turn over.
Comments
Space evenly. Up to 8
patties may be broiled at
once.
OPERATING THE OVEN
Steaks less than 1˝ thick.
Cook through before
browning.
Pan frying is
recommended.
Slash fat.
Broil skin-side-down first.
Cut through back of shell.
Spread open.
Brush with melted butter
before broiling and
halfway through broiling
time.
Fish fillets ¼ to ½˝ thick 6 A 5-9 3-4
Ham slices
(Precooked)
Pork chops
Well done
Lamb
chops
Medium
Well done 6 A 8 7-9
Medium
Well done 6 A 13 9-11
Salmon
Steaks
½˝ thick 6 A 5-7 3-5
2 (½˝ thick) 6 A 7 6-8
2 (1˝ thick)
about 1 lb.
2 (1˝ thick)
about 10 to 12
oz.
2 (1½˝ thick)
about 1 lb.
2 (1˝ thick) 7 B 8 3-4
4 (1˝ thick)
about 1 lb.
5 A 9-10 7-9
6 A 6 4-6
6 A 11 9
7 B 9 4-6
Handle and turn very
carefully. Brush with
lemon butter before and
during cooking, if desired.
Increase time 5 to 10
minutes per side for 1½˝
thick or home-cured ham.
Slash fat.
Slash fat.
Grease pan. Brush steaks
with melted butter.
Operating the oven _47
FE710DRS_XAC_DG68-00334A-07_EN.indd 47 05/11/2012 20:31:29
Page 48
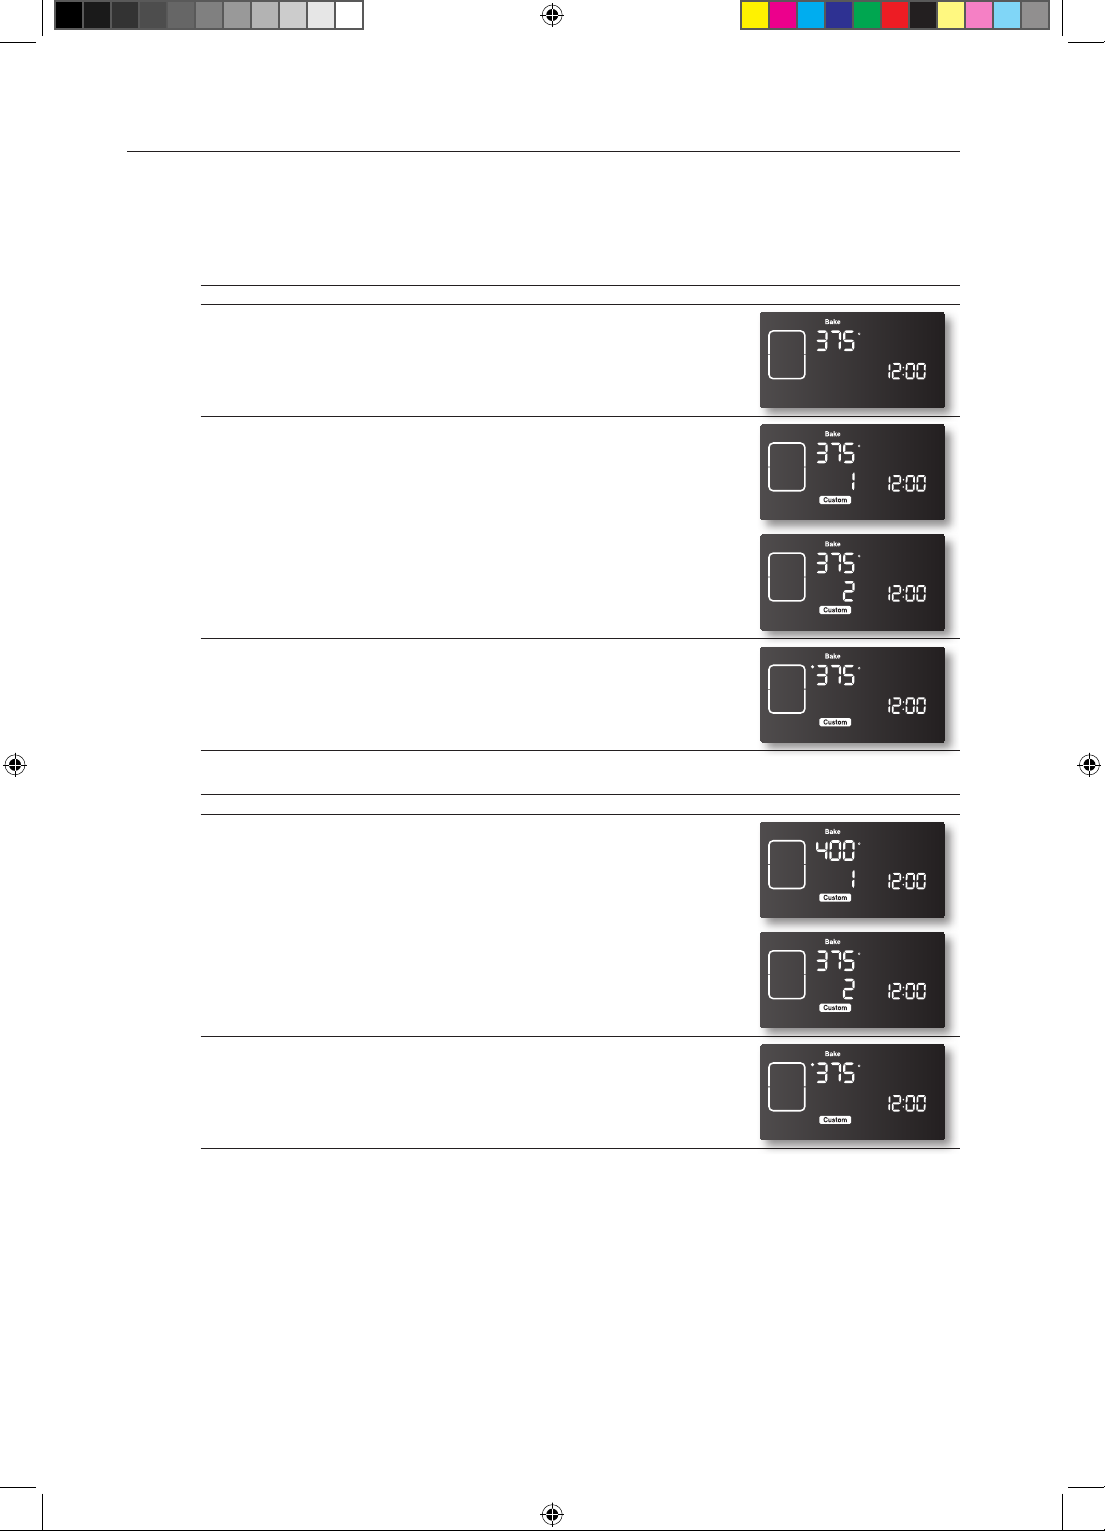
USING THE CUSTOM COOK FEATURE
The custom cook feature lets you record up to 3 dierent recipe settings. You can use the custom
cook feature for baking, convection baking, or convection roasting. It will not work with any other
function, including the delay start feature.
How to record a recipe setting
1. Press the pad for the cooking operation you want to store, eg.
BAKE. The default temperature is 350 °F.
2. Use the number pad to enter the temperature you want, eg. 375
°F.
3. Press the CUSTOM COOK pad the number of times
corresponding to where you want to store the setting, eg. for
recipe setting 2, press the CUSTOM COOK pad twice.
Recipe settings can be stored at 1, 2, or 3.
4. Press the START/SET pad.
How to recall a setting
1. Press the CUSTOM COOK pad the number of times
corresponding to where the recipe setting is stored, eg. for recipe
setting 2, press the CUSTOM COOK pad twice.
2. Start the stored cooking operation.
Press the START/SET pad.
48_ Operating the oven
FE710DRS_XAC_DG68-00334A-07_EN.indd 48 05/11/2012 20:31:30
Page 49
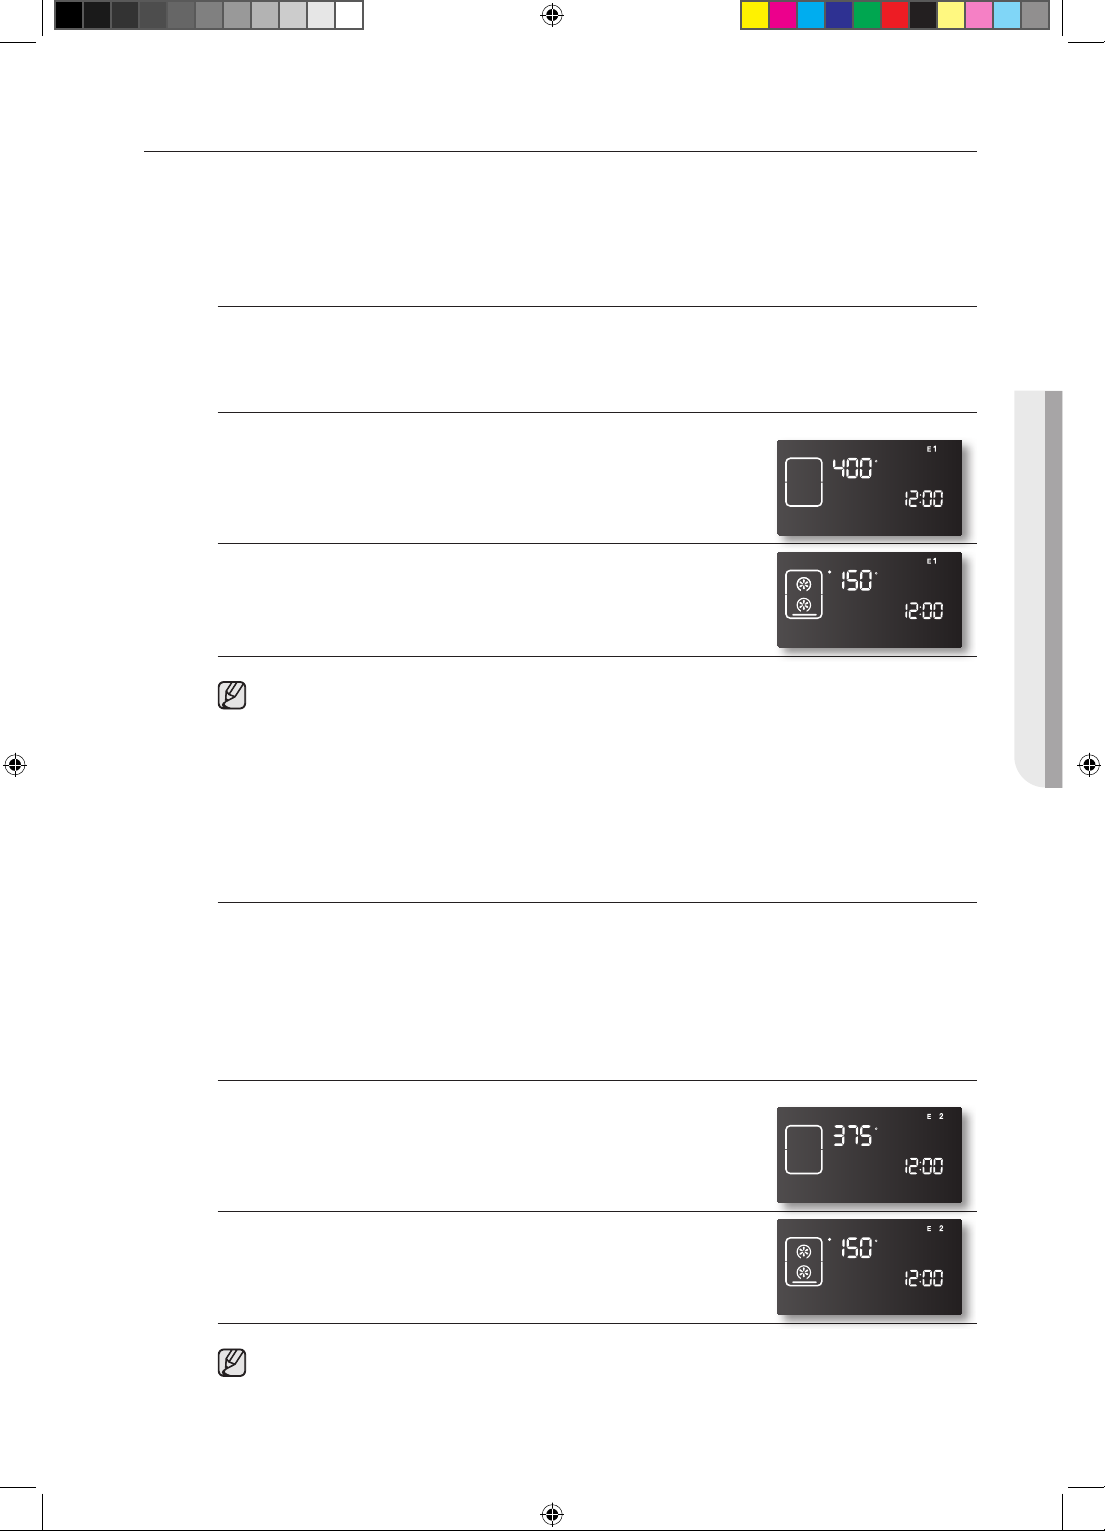
USING THE EASY COOK FEATURE
You can use the Easy Cook feature in both the single and twin cooking modes. To use the Easy
Cook feature in the single cooking mode, follow the directions below. To use the Easy Cook
feature in the twin cooking mode, insert the partition, select the cavity you want to use by pressing
the upper or lower pad, and then follow the directions below.
Pizza
The Pizza function bakes pizza bottoms until they are crisp and browned while keeping the
topping moist.
How to set the Pizza function.
1. Press the PIZZA pad.
2. Press the START/SET pad to begin pizza cooking.
• Use only 1 rack and place the rack in position 2 or 3 for the best results when using the
Pizza function in the single cooking mode.
• When using this function In the twin cooking mode, place the rack in position A if you are
using the upper cavity or in position 1 or 2 if your are using the lower cavity.
• The default temperature is 400 °F. You can adjust the oven temperature to fit your needs.
• Follow the package instructions for preheating and baking times.
Casserole
The Casserole function provides the ideal cooking method for lasagna, stew, and popular
casseroles with toppings.
The Casserole pad provides a heat cycling that bakes all around the cooking vessel, providing an
evenly browned top and evenly heated food.
OPERATING THE OVEN
How to set the Casserole function
1. Press the Casserole pad. The default temperature is 375 °F.
2. Enter the temperature you want on the number pad.
3. Press the START/SET pad.
For the best results, cook casseroles with toppings uncovered, and stews and braised
meats covered to prevent evaporation.
Operating the oven _49
FE710DRS_XAC_DG68-00334A-07_EN.indd 49 05/11/2012 20:31:30
Page 50
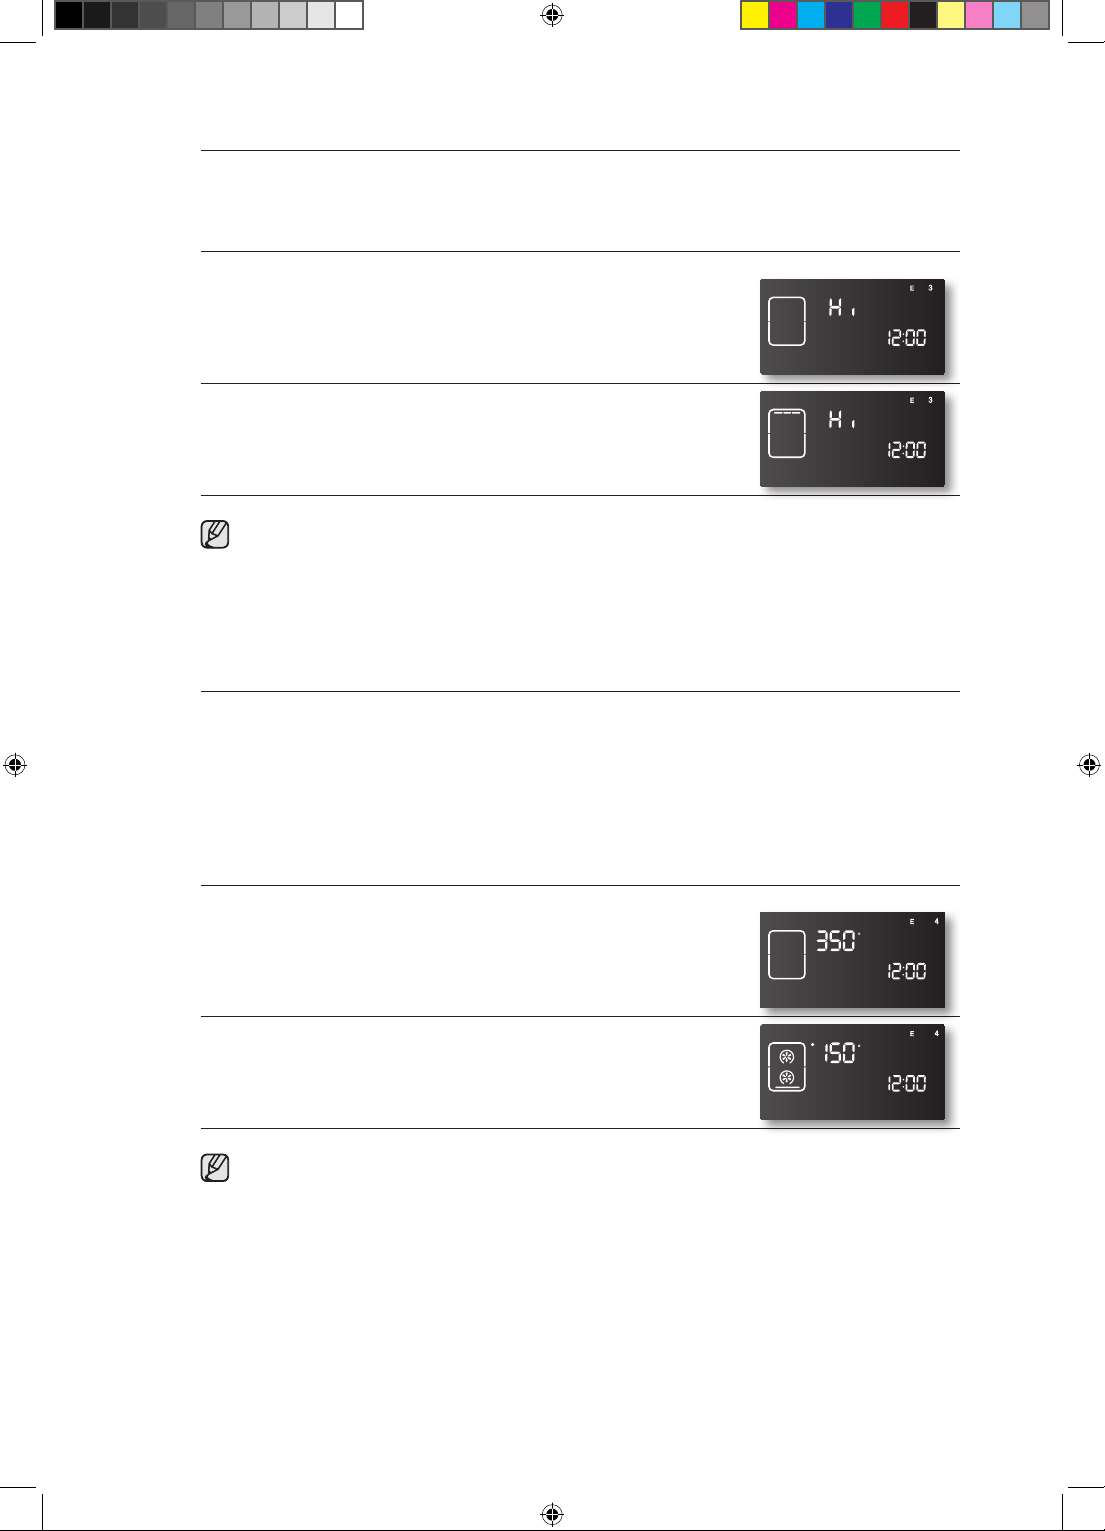
Chicken Nuggets
Use the Chicken Nuggets function to cook convenience style frozen chicken nuggets.
How to set the Chicken Nuggets function
1. Press the CHICKEN NUGGETS pad once for HI or twice for LO.
Use LO to cook thick style foods.
2. Press the START/SET pad to begin chicken nuggets cooking.
• When using this function in the single cooking mode, place the oven rack in position 6 or
7 for best results.
• In the twin cooking mode, place the oven rack in position B if you are using the upper
cavity or position 2 or 3 if you are using the lower cavity.
• Preheating the oven is not necessary.
Cake
The Cake function provides preheat and then a gentle cycling of heat, giving cakes more volume
and allowing delicate foods to cook more evenly.
The Cake function is the ideal cooking method for cakes, brownies, pies, baked custards, and
Cheesecake.
The temperature and cooking time depend on the quantity and composition of the dough.
How to set the Cake function
1. Press the CAKE pad. The default temperature is 350 °F.
2. Enter the temperature you want on the number pad.
3. Press the START/SET pad.
• If the cake has a good appearance but it is soggy inside, next time, bake at a lower
temperature for a little longer.
• If the cake and pie is unevenly browned, next time, set the temperature a little lower.
• When using this function in the twin cooking mode and using the lower cavity, place the
oven rack in position 2 or 3 for the best results.
50_ Operating the oven
FE710DRS_XAC_DG68-00334A-07_EN.indd 50 05/11/2012 20:31:31
Page 51
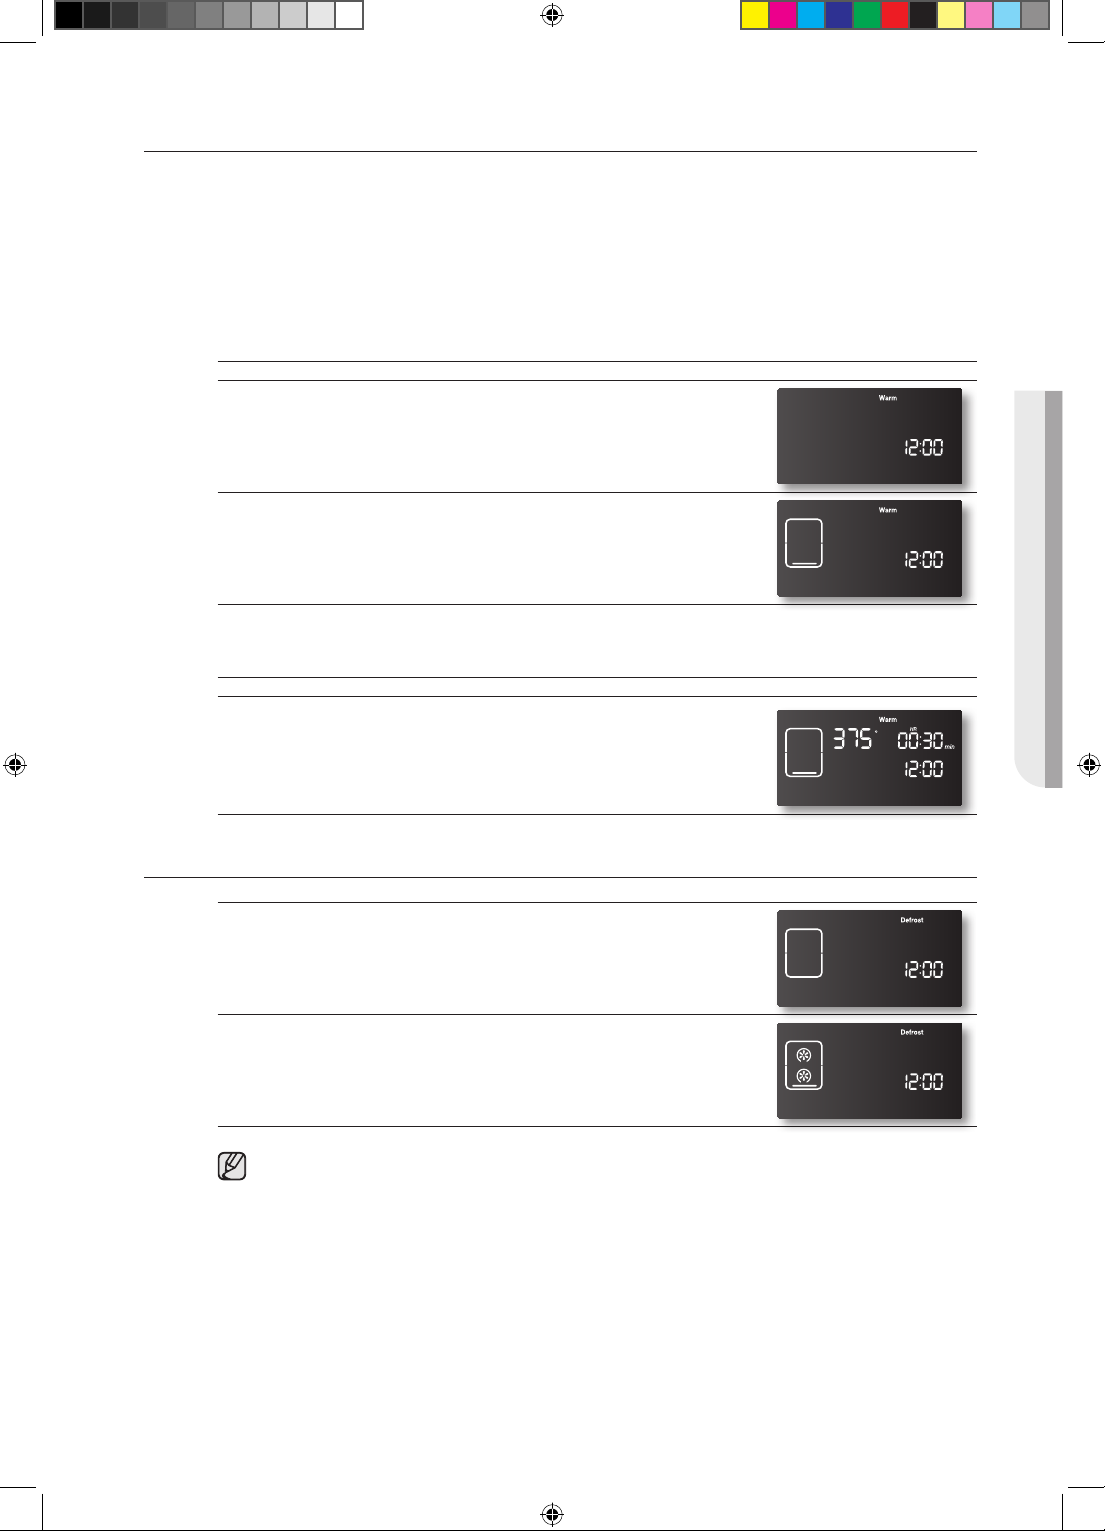
USING THE WARM FUNCTION
The Warm function will maintain an oven temperature of 170 °F. You should not use this feature to
reheat cold foods. The Warm function will keep cooked food warm for serving up to 3 hours after
cooking has finished.
After 3 hours, the feature will shut the oven o automatically. You can use the Warm function
without any other cooking operations or you can set it to activate after a timed or delay timed
cooking operation.
How to use the Warm function
1. Press the Warm pad.
2. Press the START/SET pad.
3. Press the CLEAR/OFF pad at any time to turn the feature o.
How to set the oven to activate the Warm function after a timed
cooking
1. Press the Warm pad during a cooking operation, eg. baking.
The oven is now programmed to activate the Warm function
automatically after completing the cooking operation.
2. Press the CLEAR/OFF pad at any time to turn the feature o.
USING THE DEFROST FUNCTION
1. Press the DEFROST pad.
The Defrost function automatically provides the optimum
temperature for the defrost process, and therefore does not have
a temperature adjustment.
OPERATING THE OVEN
2. Press the START/SET pad.
3. Press the CLEAR/OFF pad at any time to turn o the defrost
feature.
• If you press the DEFROST pad when the oven temperature is above 100 °F, Hot will
appear in the display. Because these functions produce the best results when started
while the oven is cool, we recommend that you wait until the oven has cooled down and
Hot disappears from the display.
• Remove all packaging from the frozen food before defrosting for the best results. This way, food
will not be lying in defrosted liquid and the cooking compartment remains cleaner.
• When defrosting food which has frozen together, e.g. berries, chops, fish fillets etc. separate the
food about half-way through the defrosting process.
Operating the oven _51
FE710DRS_XAC_DG68-00334A-07_EN.indd 51 05/11/2012 20:31:31
Page 52
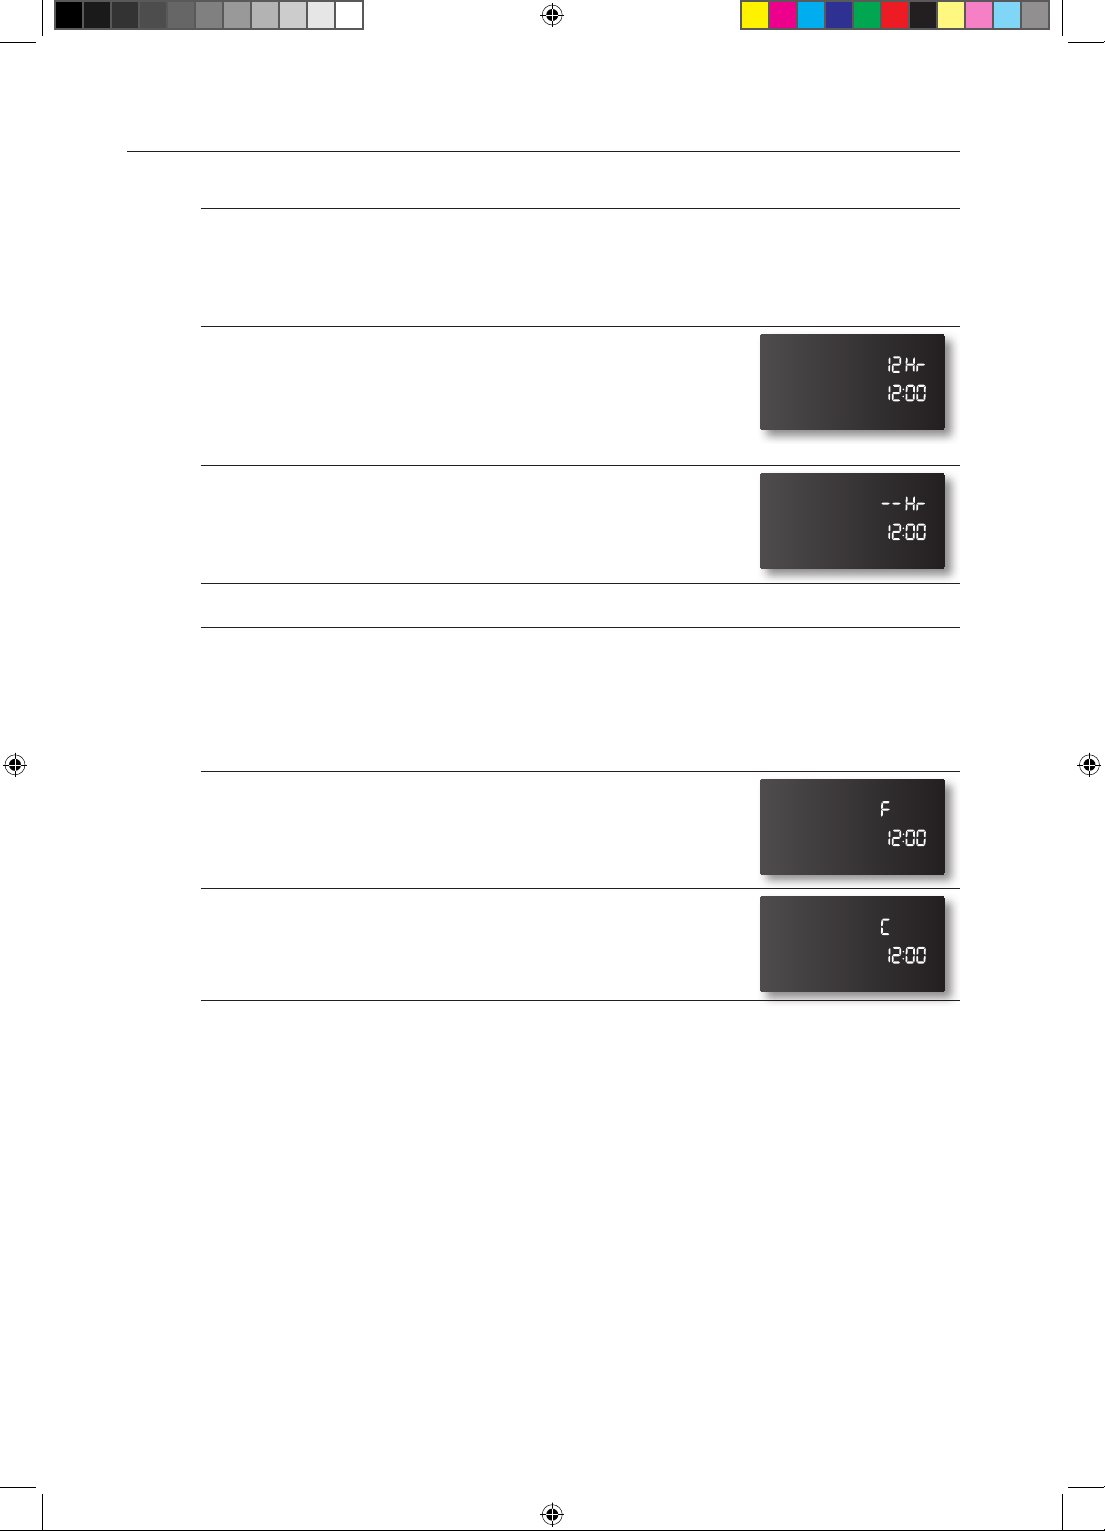
EXTRA FEATURES
12 hour energy saving
If you accidently leave the oven on, this feature will automatically turn o the oven after 12 hours
during baking functions or after 3 hours during a broil function.
How to turn 12 hour energy saving feature on or o
1. Press COOKING TIME and the 0 number pad at the same time
for 3 seconds.
The display will show 12 Hr (12 hour shut-o) or -- Hr (no shut-
o).
The default is 12 Hr.
2. Press the 0 number pad to select OFF or ON.
Pressing the 0 number pad changes the mode between 12 Hr and
-- Hr.
3. Press the START/SET pad.
Fahrenheit or Celsius temperature selection
You can program the oven control to display temperatures in Fahrenheit or Centigrade. The oven
has been preset at the factory to display in Fahrenheit.
How to change the display from Fahrenheit to Centigrade or from Centigrade
to Fahrenheit
1. Press BROIL and the 0 number pad at the same time for 3
seconds.
The display shows F (Fahrenheit) or C (Centigrade).
The default is F.
2. Press the 0 number pad to select F or C.
Pressing the 0 number pad changes the display between F and C.
3. Press the START/SET pad.
52_ Operating the oven
FE710DRS_XAC_DG68-00334A-07_EN.indd 52 05/11/2012 20:31:32
Page 53
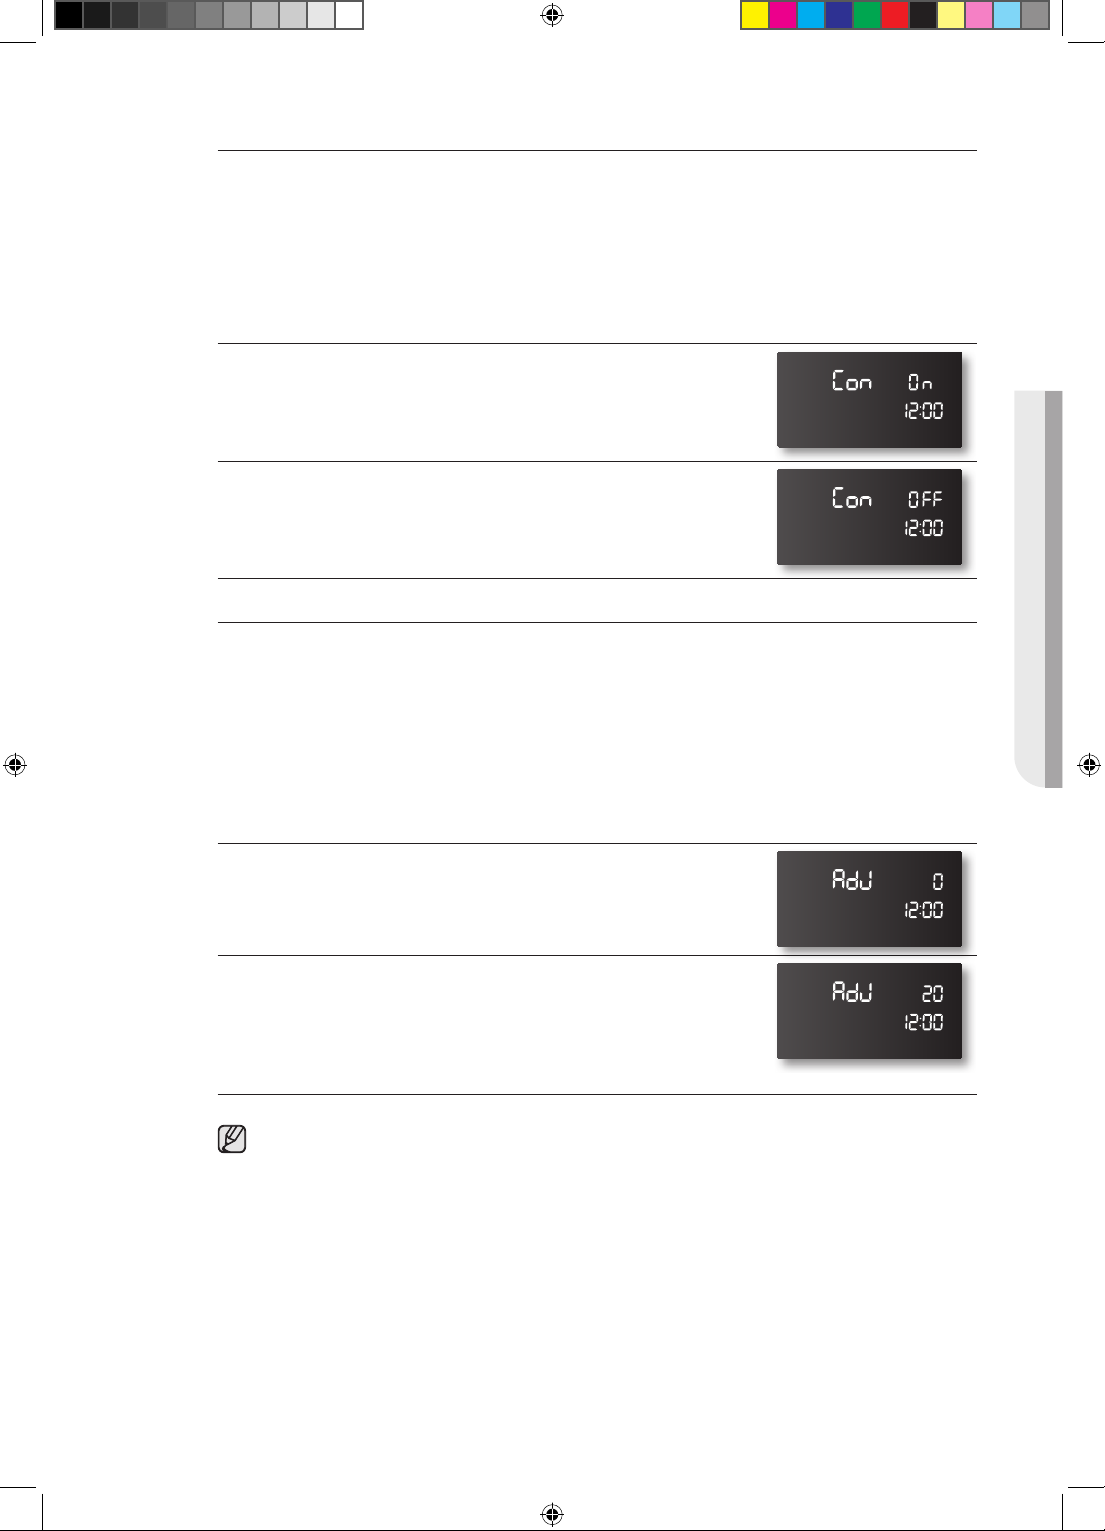
Convection auto conversion feature
When you use convection bake, the convection auto conversion feature will automatically convert
entered regular baking temperatures to convection baking temperatures.
This feature is activated so that the display will show the actual converted (reduced) temperature.
For example, if you enter a regular recipe temperature of 350 °F and press the START/SET pad,
the display will show the converted temperature of 325 °F.
How to disable or enable the auto conversion feature
1. Press CONV. BAKE and the 0 number pad at the same time for 3
seconds.
The display will show Con On (enabled) or Con OFF (disabled).
The default setting is Con On.
2. Press the 0 number pad to select Con On or Con OFF.
Pressing the 0 number pad changes the mode between Con On
and Con OFF.
3. Press the START/SET pad.
Thermostat adjustment
The temperature in the oven has been preset at the factory. When first using the oven, be sure to
follow recipe times and temperatures. If you think the oven is too hot or too cool, you can adjust
the temperature in the oven. Before adjusting, test a recipe by using a temperature setting that is
higher or lower than the recommended temperature. The baking results should help you to decide
how much of an adjustment is needed.
The oven temperature can be adjusted ±35 °F (±19 °C ).
OPERATING THE OVEN
How to adjust the oven temperature
1. Press BAKE and the 0 number pad at the same time for 3
seconds.
The display will show AdJ 0.
2. Enter the adjustment you want, eg. 20 °F, by using the number
pads.
You can adjust the temperature to lower than the factory setting by
pressing the BAKE pad.
3. Press the START/SET pad.
This adjustment will not aect the broiling or the self-cleaning temperatures. The adjustment
will be retained in memory after a power failure.
Operating the oven _53
FE710DRS_XAC_DG68-00334A-07_EN.indd 53 05/11/2012 20:31:32
Page 54
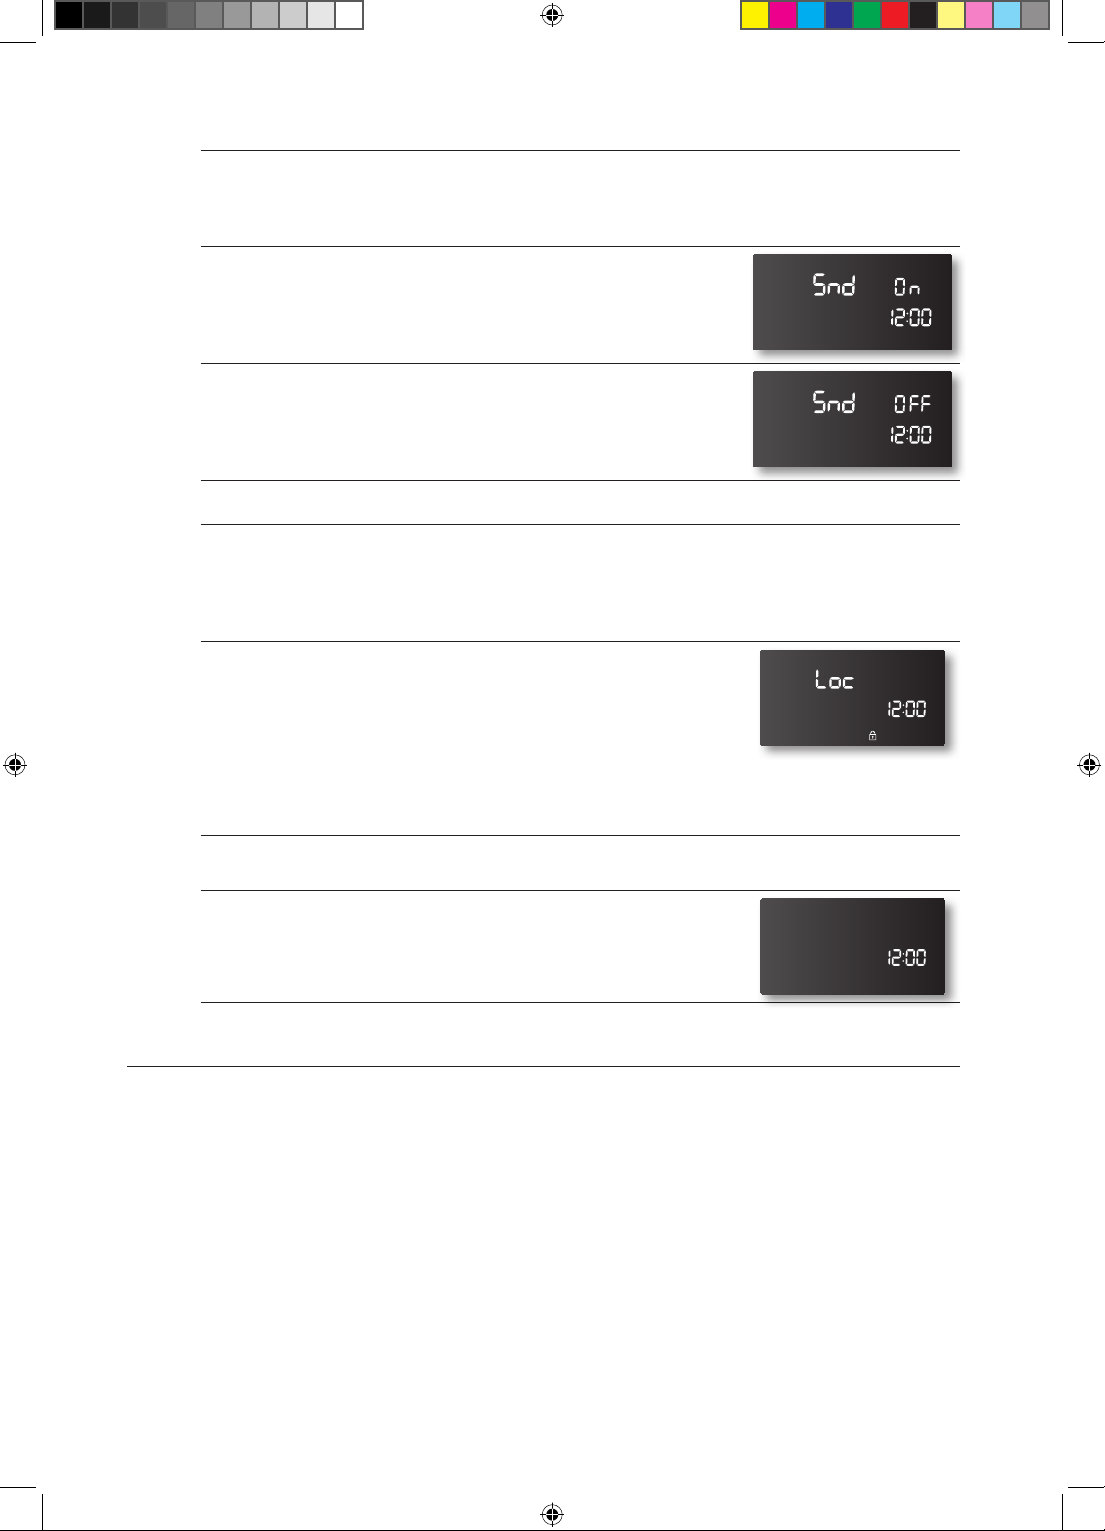
Sound on/o
Using Sound on/o, you can set the oven controls to operate silently.
How to turn the sound on or o
1. Press Oven Light and the 0 number pad at the same time for 3
seconds.
The display will show Snd On (sound on) or Snd OFF (sound o).
The default setting is Snd On.
2. Press the 0 number pad to select OFF or ON.
Pressing the 0 number pad changes the mode between Snd On
and Snd OFF.
3. Press the START/SET pad.
Control lockout
Control Lockout lets you lock the buttons on the touch pad so they cannot be activated
accidentally.
How to activate the control lockout feature
1. Press the CONTROL LOCKOUT pad for 3 seconds.
The display will show Loc and a Lock icon continuously, as well as
the current time.
All functions must be cancelled before Control Lockout is
activated.
This function is available only when the oven temperature is under
400 °F.
How to unlock the controls
1. Press the CONTROL LOCKOUT pad for 3 seconds.
Loc and the lock icon will disappear from the display.
TURNING THE OVEN LIGHT ON AND OFF
• The oven light turns on automatically when the door is opened.
• The oven light turns o automatically when the door is closed.
• You can turn the oven light on and o manually by pressing the OVEN LIGHT pad.
54_ Operating the oven
FE710DRS_XAC_DG68-00334A-07_EN.indd 54 05/11/2012 20:31:33
Page 55
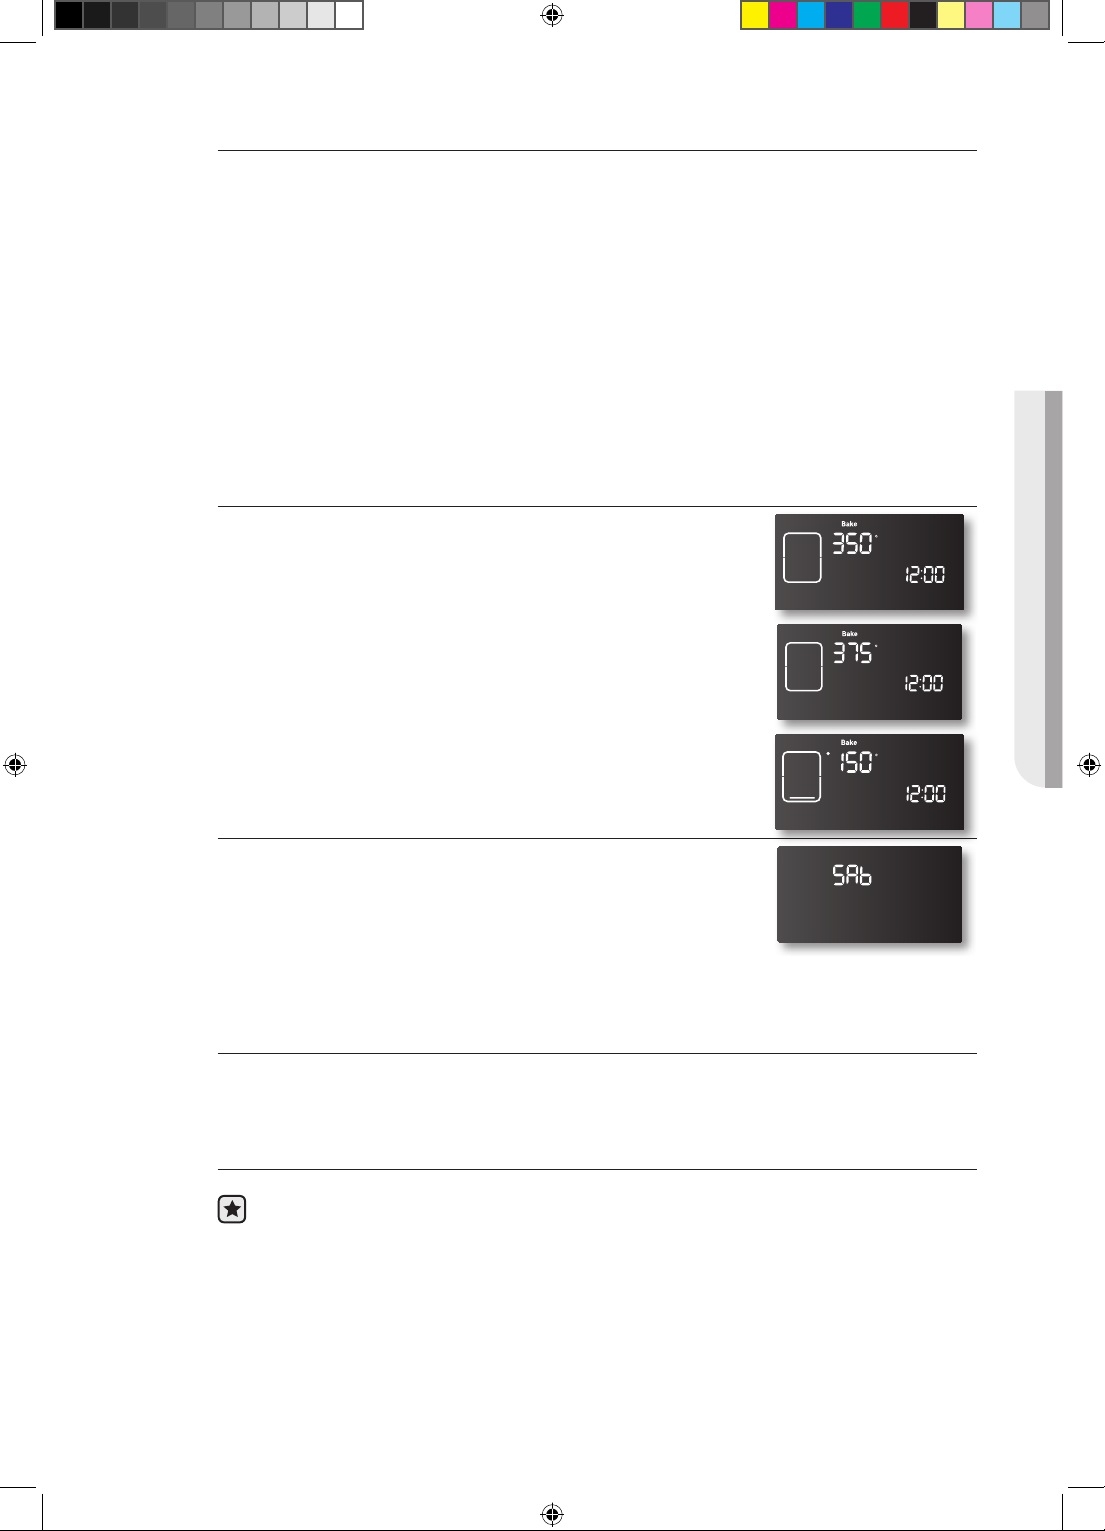
Setting the Sabbath feature
(For use on the Jewish Sabbath & Holidays)
The Sabbath feature, which can only be used with baking, sets the oven so that it remains on
continuously. You can change the oven temperature, (the oven temperature adjustment feature
should be used only during Jewish holidays), but the display will not change and tones will not
sound when a change occurs.
Once the oven is properly set for baking with the Sabbath feature active, the oven will remain on
continuously until the Sabbath feature is cancelled. This will override the factory preset 12 hour
energy saving feature. If you need the oven light on during the Sabbath, press the OVEN LIGHT
pad before activating the Sabbath feature. Once the oven light is turned on and the Sabbath
feature is active, the oven light will remain on until the Sabbath feature is turned o. If you want the
oven light o during the Sabbath, be sure to turn the oven light o before activating the Sabbath
feature.
How to use the Sabbath feature
1. Press the BAKE pad.
The default temperature is 350 °F.
2. Enter the temperature you want, eg. 375 °F, by using the number
pad.
3. Press the START/SET pad.
The temperature display will start to change once the oven
temperature reaches 150 °F.
OPERATING THE OVEN
4. Press the CLOCK and the TIMER ON/OFF pads at the same
time for 3 seconds.
The display will show SAb.
Once SAb appears in the display, the oven control will no longer
beep or display any further changes.
You may change the oven temperature once baking has started.
Remember that the oven control will no longer beep or display any
further changes once you turn on the Sabbath feature.
5. You can turn the oven o at any time by pressing the CLEAR/OFF
pad. This will turn only the oven o. If you want to deactivate the
Sabbath feature, hold down the CLOCK and TIMER ON/OFF
pads at the same time for 3 seconds. Sab will disappear from the
display.
Do not attempt to activate any other programmable features except BAKE while the
Sabbath feature is active. ONLY the following key pads will function correctly with the
Sabbath feature: NUMBER, BAKE, START/SET and CLEAR/OFF. ALL OTHER
KEYPADS should not be used once the Sabbath feature is activated.
Operating the oven _55
FE710DRS_XAC_DG68-00334A-07_EN.indd 55 05/11/2012 20:31:33
Page 56
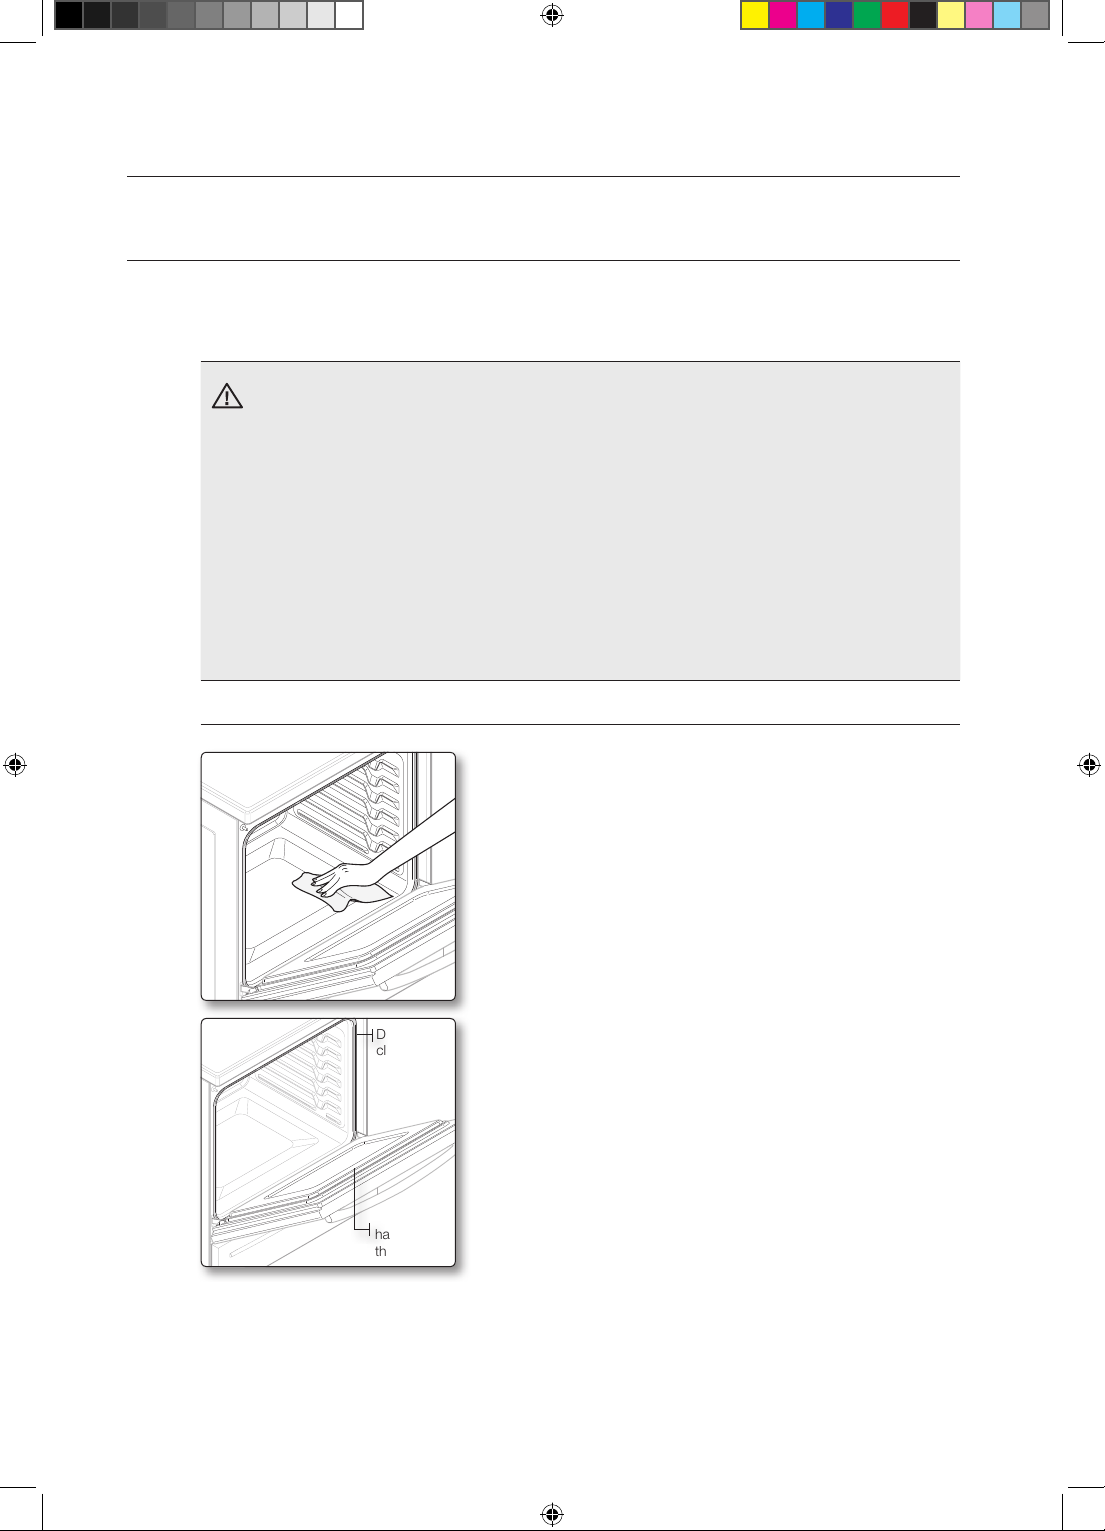
maintaining your appliance
SELF-CLEANING
This self-cleaning oven uses high temperatures (well above cooking temperatures) to burn o
leftover grease and residue completely or reduce them to a finely powdered ash that you can wipe
away with a damp cloth.
• During the self-cleaning cycle, the outside of the range will become very hot to the
CAUTION
Before a self-cleaning cycle
touch. Do not leave small children unattended near the appliance.
• Some birds is extremely sensitive to the fumes given o during the self-cleaning cycle
of any range. Move birds to another well-ventilated room.
• Do not line the oven walls, racks, bottom or any other part of the range with
aluminum foil. Doing so will result in poor heat distribution, produce poor baking
results and cause permanent damage to the oven interior (aluminum foil will melt and
stick to the interior surface of the oven).
• Do not force the oven door open while self-cleaning is in progress. This can damage
the automatic door locking system. Use care when opening the oven door after the
self-cleaning cycle is complete. Stand to the side of the oven when opening the door
to allow hot air or steam to escape. The oven may still be VERY HOT.
Fig. 1
Fig. 2
Don’t hand
clean the
oven door
gasket.
You may
hand clean
the door.
• We recommend venting your kitchen with an open window
or using a ventilation fan or hood during the self-cleaning
cycle.
• Remove the wire rack, broil pan, broil pan insert, all
cookware and any aluminum foil from the oven.
• Wipe up debris from the oven bottom. (Fig. 1)
• The silver-colored oven racks can be self-cleaned, but they
will darken, lose their luster and become hard to slide.
• Residue on the front frame of the range and outside the
gasket on the door will need to be cleaned by hand. Clean
these areas with hot water, soap-filled steel-wool pads or
cleansers such as Soft Scrub. Rinse well with clean water
and dry.
• Do not clean the gasket. The fiberglass material of the oven
door gasket cannot withstand abrasion. It is essential for
the gasket to remain intact. If you notice it becoming worn
or frayed, replace it. (Fig. 2)
• Make sure the oven light bulb cover is in place and the
oven light is o.
56_ Maintaining your appliance
FE710DRS_XAC_DG68-00334A-07_EN.indd 56 05/11/2012 20:31:34
Page 57
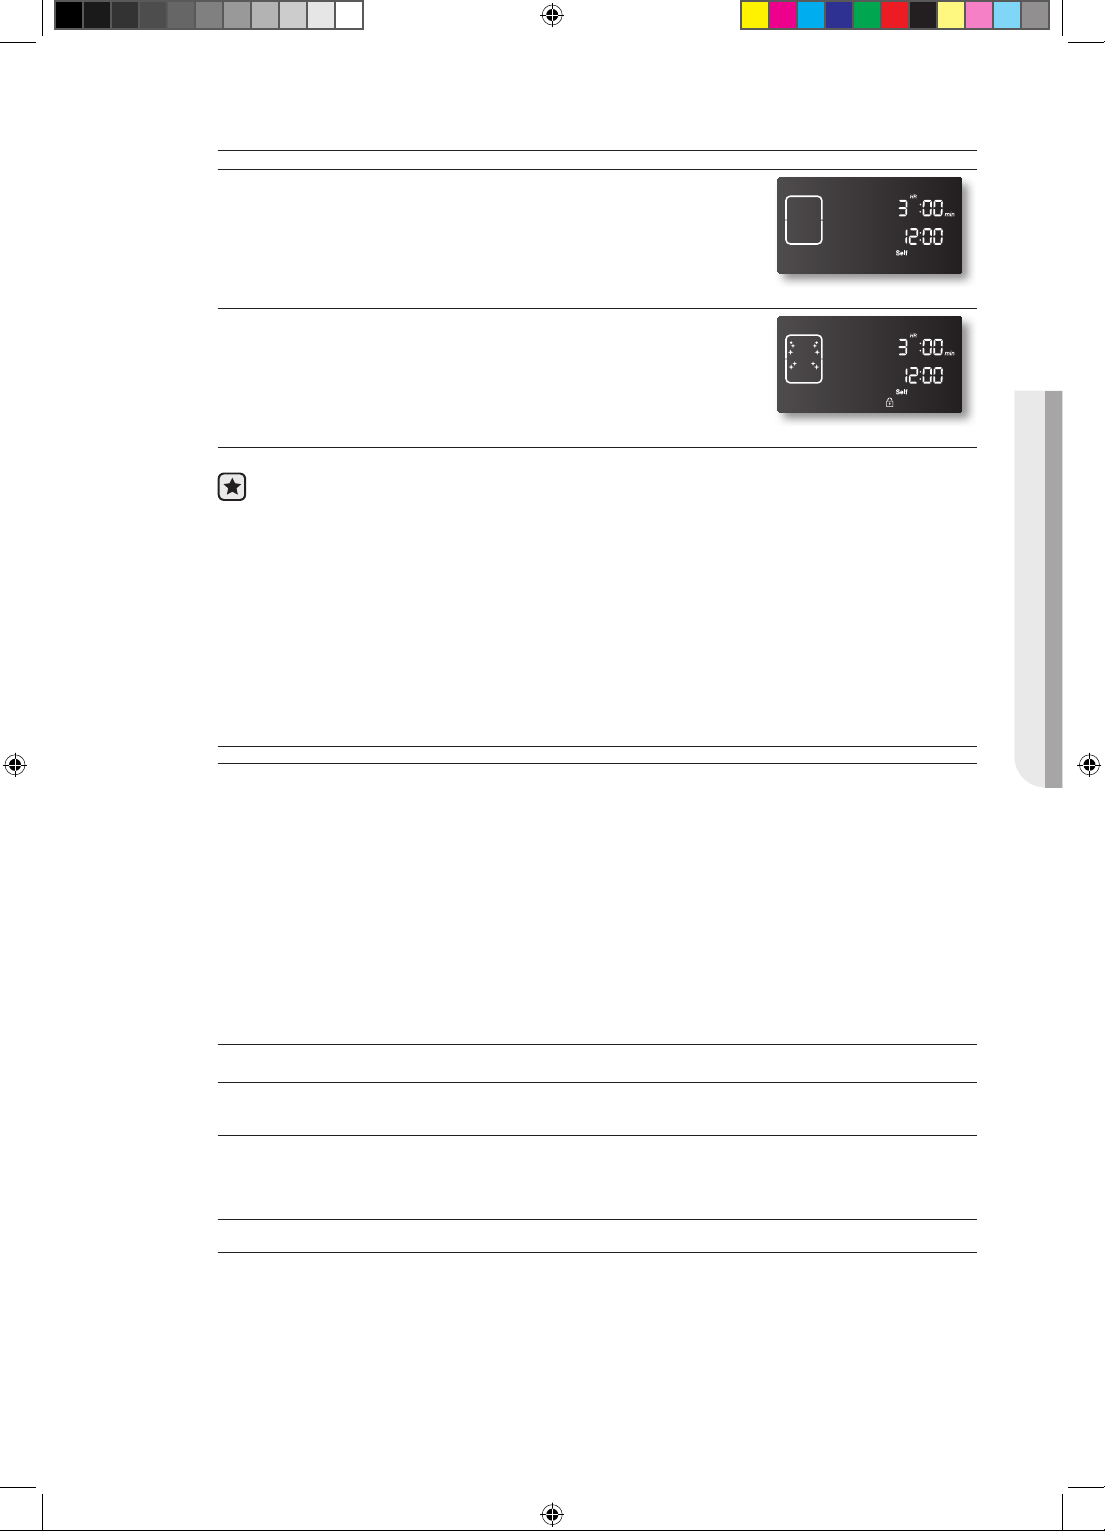
How to set the oven for self-cleaning
1. Select the length of time for the self-cleaning operation, eg. 3
hours.
Press the SELF CLEAN pad once for a 3 hour clean time, twice
for a 4 hour clean time, or 3 times for a 2 hour clean time.
The default setting is 3 hours.
2. Start the self-cleaning cycle.
Press the START/SET pad. The motor-driven door lock will
engage automatically.
When the self-cleaning cycle is done, End will show in the display
and a beep will sound 6 times.
• You will not be able to start a self-cleaning cycle if the control lockout feature is activated
or if the oven’s temperature is too hot.
• The oven door locks automatically. The display will show the clean time remaining. You
cannot open the oven door until the temperature drops to a safe/cool temperature and
the door unlocks automatically.
• The self-cleaning feature will not operate when the warming center or warming drawer is
on.
• The self-clean feature will not operate when the partition is in the oven.
• The self-clean feature will not operate when a surface cooktop element is on. if a surface
element gets turned on during a self-cleaning cycle, the cycle will turn o automatically.
MAINTAINING YOUR APPLIANCE
How to delay the start of self-cleaning
1. Press the SELF CLEAN pad.
Select the desired self-clean time by pressing the SELF CLEAN pad.
2. Press the DELAY START pad.
3. Using the CLOCK and number pads, enter the time you want the clean cycle to start.
4. Press the START/SET pad.
The display will show Delay, Self clean and Lock icon. The motor-driven door lock will
engage automatically.
5. Self-Cleaning cycle will turn on automatically at the set time.
6. When the self-cleaning cycle is done, End will show in the display and a beep will sound 6
times.
How to turn o the self-cleaning feature
You may find it necessary to stop or interrupt a self-cleaning cycle due to smoke in the oven.
1. Press the CLEAR/OFF pad.
2. You will be able to open the oven door once the oven has cooled down for approximately 1
hour.
After a self-cleaning cycle
• You may notice some white ash in the oven. Wipe it up with a damp cloth after the oven cools.
If white spots remain, remove them with a soap-filled steel wool pad and rinse thoroughly with a
vinegar and water mixture.
• If the oven is not clean after one cycle, repeat the cycle.
• You cannot set the oven for cooking until the oven is cool enough for the door to unlock.
Maintaining your appliance _57
FE710DRS_XAC_DG68-00334A-07_EN.indd 57 05/11/2012 20:31:34
Page 58
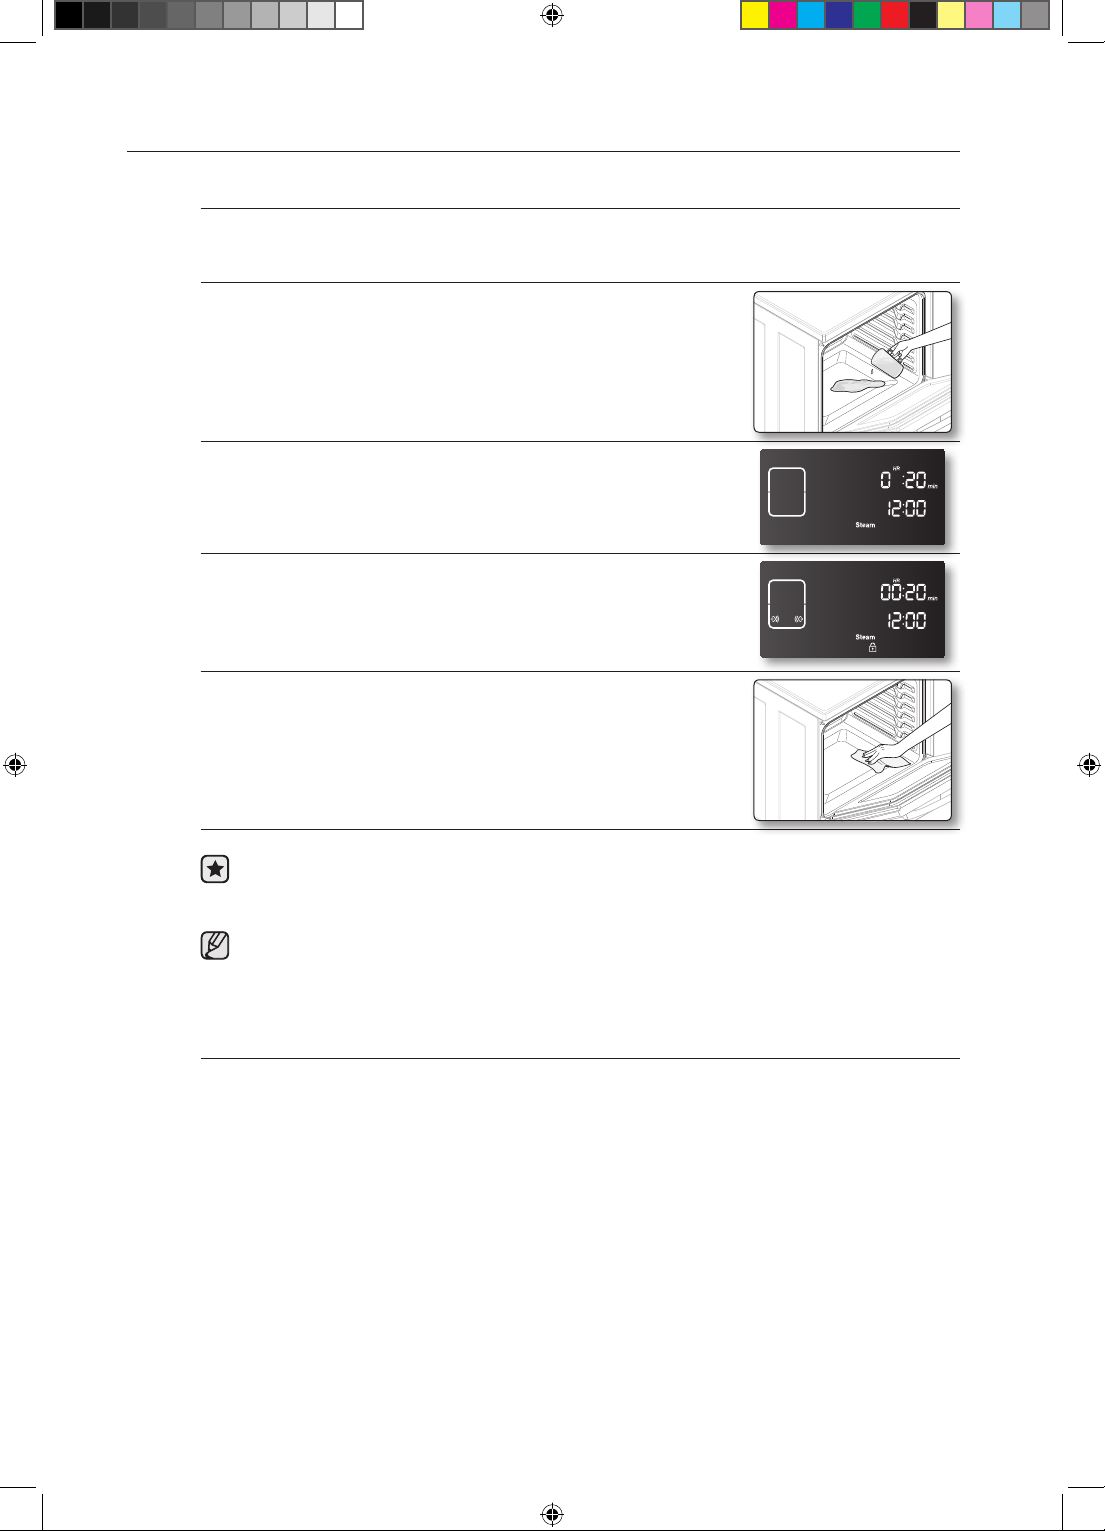
STEAM-CLEANING
How to set the oven for steam-cleaning
Steam-cleaning saves time and energy when the oven needs light cleaning. For heavier-duty
cleaning of debris and grease, use the self-cleaning function.
1. Remove all accessories from the oven.
2. Pour approximately 10 oz. (300 ml) of water onto the bottom of the
empty oven and close the oven door.
Use normal water only, not distilled water.
3. Press the STEAM CLEAN pad.
4. Press the START/SET pad.
The motor-driven door lock will engage automatically.
When the operation is complete, the display will blink and a beep
will sound.
5. Press the CLEAR/OFF pad.
6. Clean the oven’s interior.
There will be a significant amount of water remaining on the
bottom of the oven after a steam-cleaning cycle. Remove the
residual water with a sponge or soft dry cloth.
The steam-clean feature will not operate when the partition is in the oven.
When steam-cleaning, use exactly 10 oz. of water since this produces the best results.
If you press the STEAM CLEAN pad when the oven temperature is above 100 °F, Hot will
appear in the display. Because these functions produce the best results when started while
the oven is cool, we recommend that you wait until the oven has cooled down and Hot
disappears from the display.
After a steam-cleaning cycle
• Take care when opening the door before a steam-cleaning procedure has ended. The water on
the bottom is hot.
• Open the oven door and remove the remaining water with a sponge. Do not leave the residual
water in the oven for any length of time. Wipe the oven clean and dry with a soft cloth. Do not
forget to wipe under the oven door seal.
• Use a detergent-soaked sponge, a soft brush, or a nylon scrubber to wipe the oven interior.
Remove stubborn residue with a nylon scourer. You can remove lime deposits with a cloth
soaked in vinegar.
• If the oven remains dirty, you can repeat the procedure once the oven has cooled.
• For heavy residue, such as grease left over from roasting, we recommend that you rub
detergent into the residue before activating the steam-cleaning function.
• After cleaning, leave the oven door ajar at a 15 ° angle to allow the interior enamel surface to
dry thoroughly.
58_ Maintaining your appliance
FE710DRS_XAC_DG68-00334A-07_EN.indd 58 05/11/2012 20:31:34
Page 59
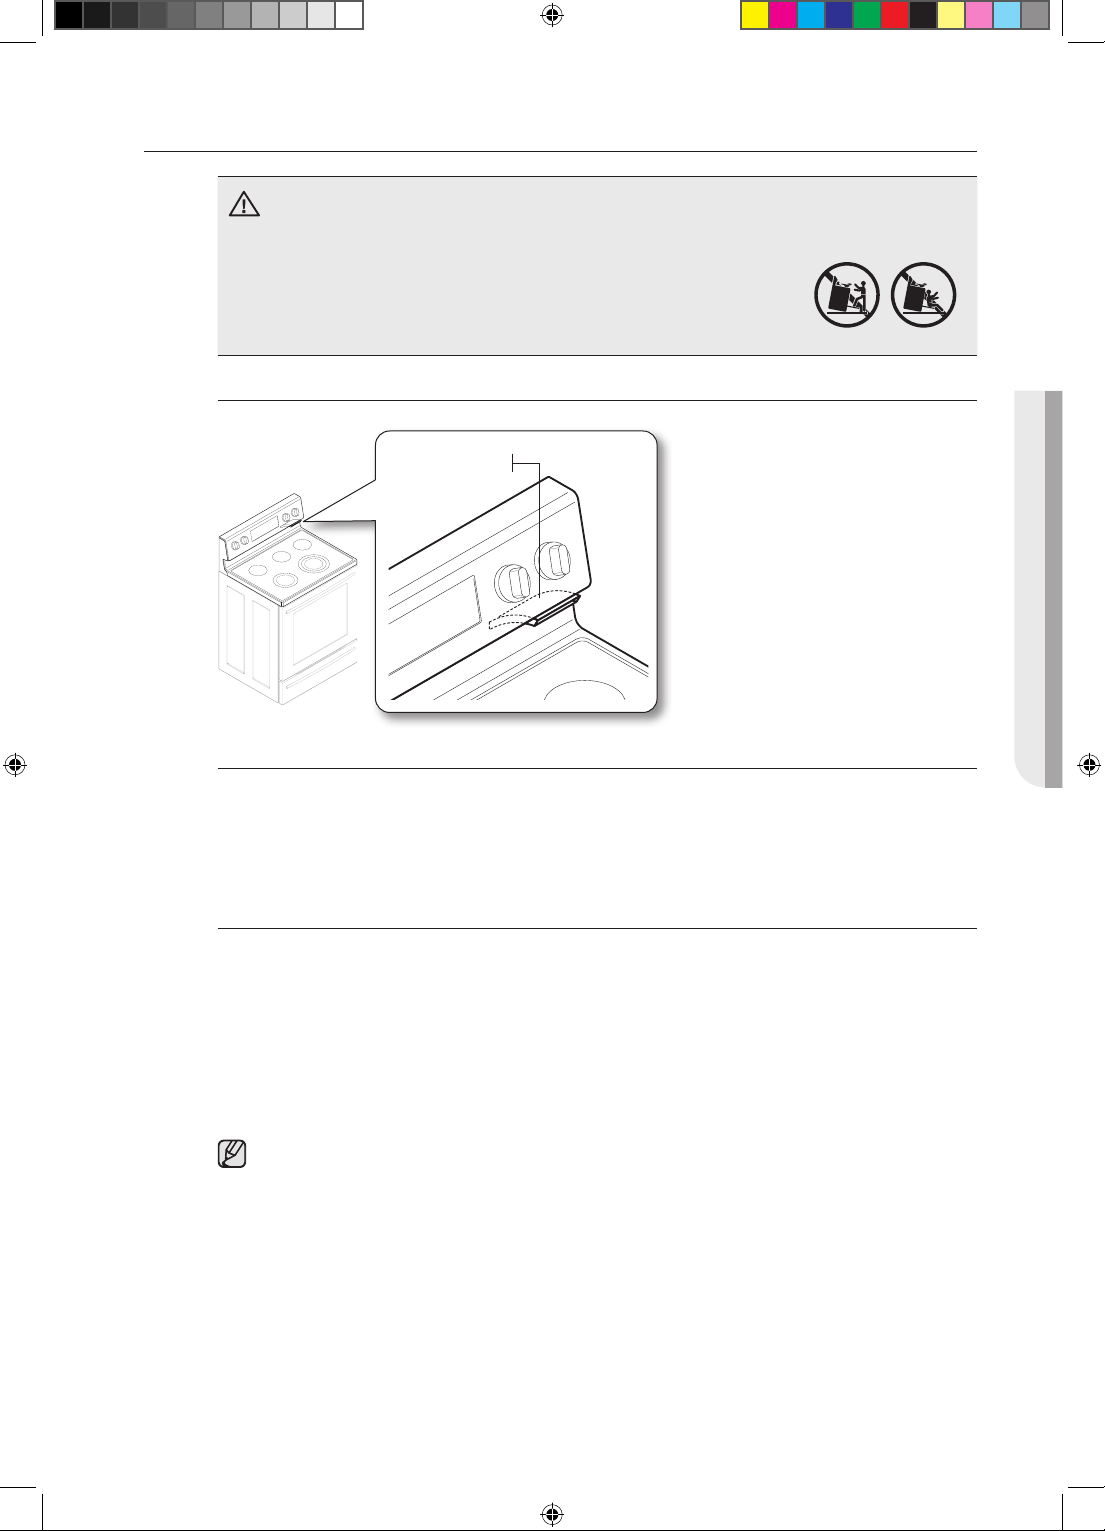
CARE AND CLEANING OF THE OVEN
• Be sure all controls are OFF and all surfaces are COOL before cleaning any
WARNING
part of the range.
• If your range is removed for cleaning, servicing or
any reason, be sure the Anti-Tip device is re-engaged
properly when the range is replaced. Failure to take
this precaution could result in tipping of the range and
cause injury.
Oven vent
Oven vent
• The oven vent is located above the
right rear surface unit.
• This area can become hot when the
oven is on.
• It is normal for steam to come out of
the vent.
• The vent is important for proper air
circulation. Never block this vent.
Cleaning painted parts and decorative trim
• For general cleaning, use a cloth with hot and soapy water.
• For more dicult residue and built-up grease, apply a liquid detergent directly onto the area and
leave for 30 to 60 minutes. Wipe with a damp cloth and dry. Do not use abrasive cleaners on
any of these surfaces. They can scratch.
Cleaning stainless steel surfaces
1. Shake the bottle of Stainless Steel Appliance Cleaner or polish well.
2. Place a small amount of stainless steel appliance cleaner or polish on a damp cloth or damp
paper towel.
3. Clean a small area, rubbing with the grain of the stainless steel if applicable.
4. Dry and bu with a clean, dry paper towel or soft cloth.
5. Repeat as necessary.
MAINTAINING YOUR APPLIANCE
• Do not use a steel-wool pad. It will scratch the surface.
• If you have used a mineral oil-based stainless steel appliance cleaner before to clean
the appliance, wash the surface with dishwashing liquid and water prior to using the
Stainless Steel Appliance Cleaner or polish.
Maintaining your appliance _59
FE710DRS_XAC_DG68-00334A-07_EN.indd 59 05/11/2012 20:31:35
Page 60
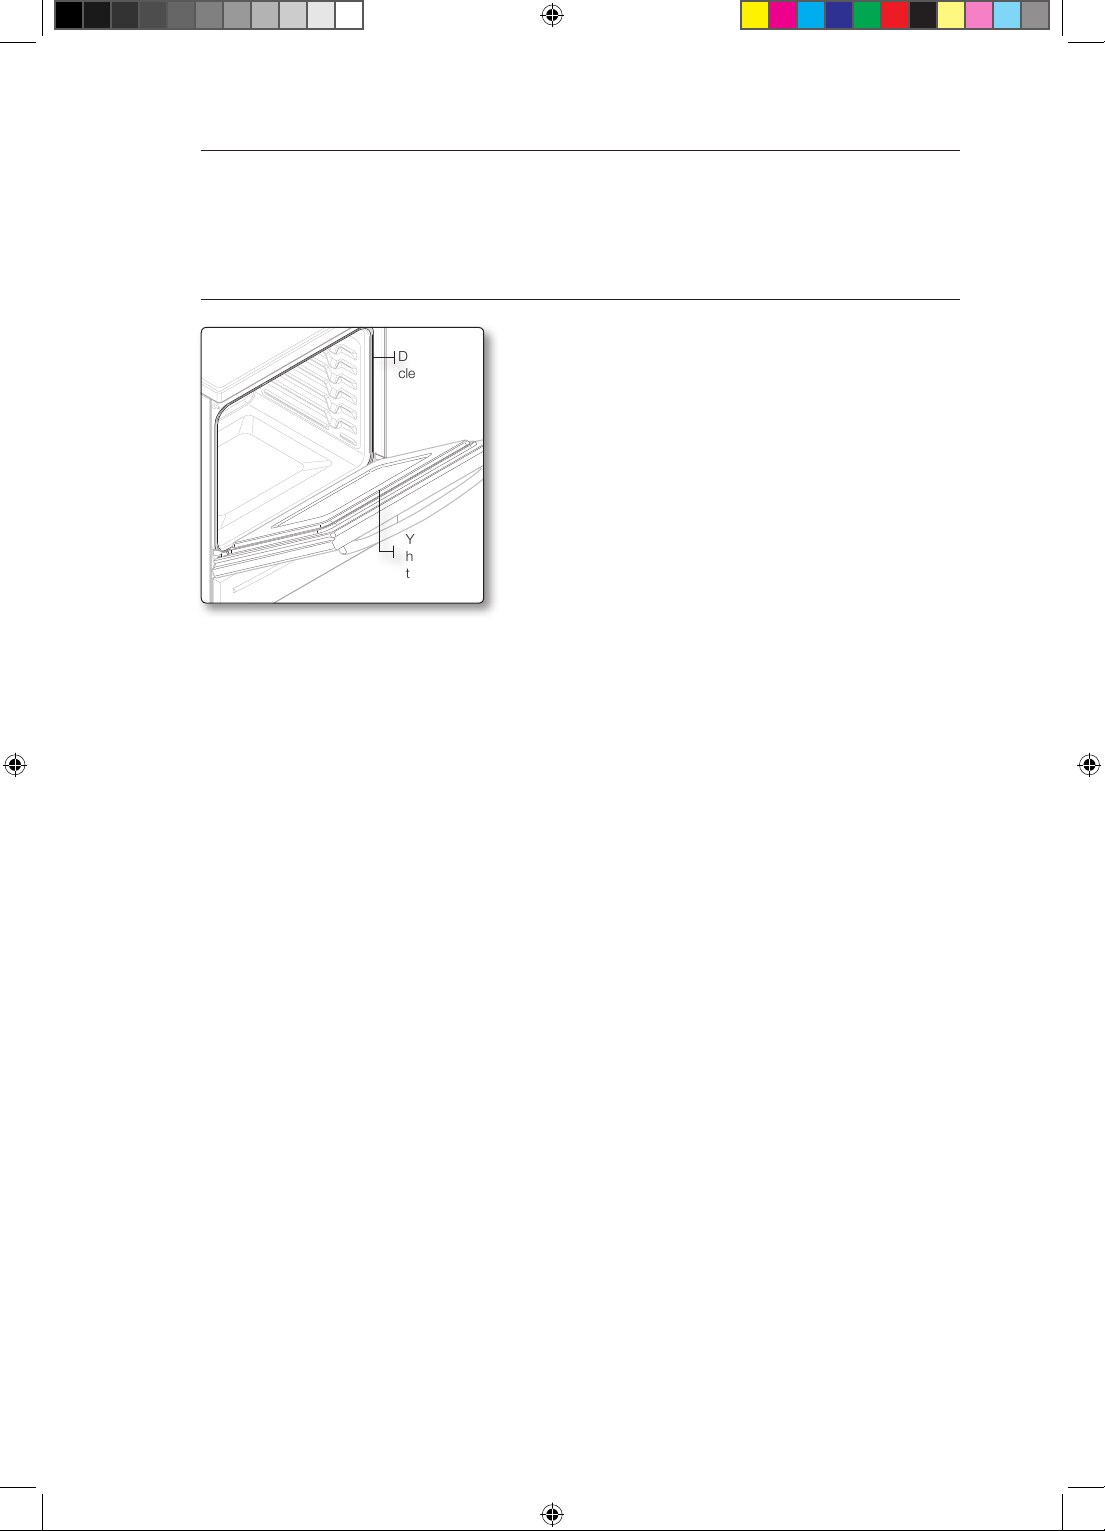
Oven racks
• If the racks are left in the oven during a self-cleaning cycle, their color will turn slightly blue and
the finish will become dull. After the self-cleaning cycle is complete and the oven has cooled,
rub the sides of the racks with wax paper or a cloth containing a small amount of oil. This will
help the racks glide more easily into their tracks.
Oven door
• Use soap and water to thoroughly clean the top, sides,
Don’t hand
clean the
oven door
gasket.
You may
hand clean
the oven
door.
and front of the oven door. Rinse well. You may use a
glass cleaner on the outside glass of the oven door.
DO NOT immerse the door in water. DO NOT spray or
allow water or the glass cleaner to enter the door
vents. DO NOT use oven cleaners, cleaning powders,
or any harsh abrasive cleaning materials on the outside
of the oven door.
• DO NOT clean the oven door gasket. The oven
door gasket is made of a woven material which is
essential for a good seal. Care should be taken not to
rub, damage or remove this gasket.
60_ Maintaining your appliance
FE710DRS_XAC_DG68-00334A-07_EN.indd 60 05/11/2012 20:31:35
Page 61
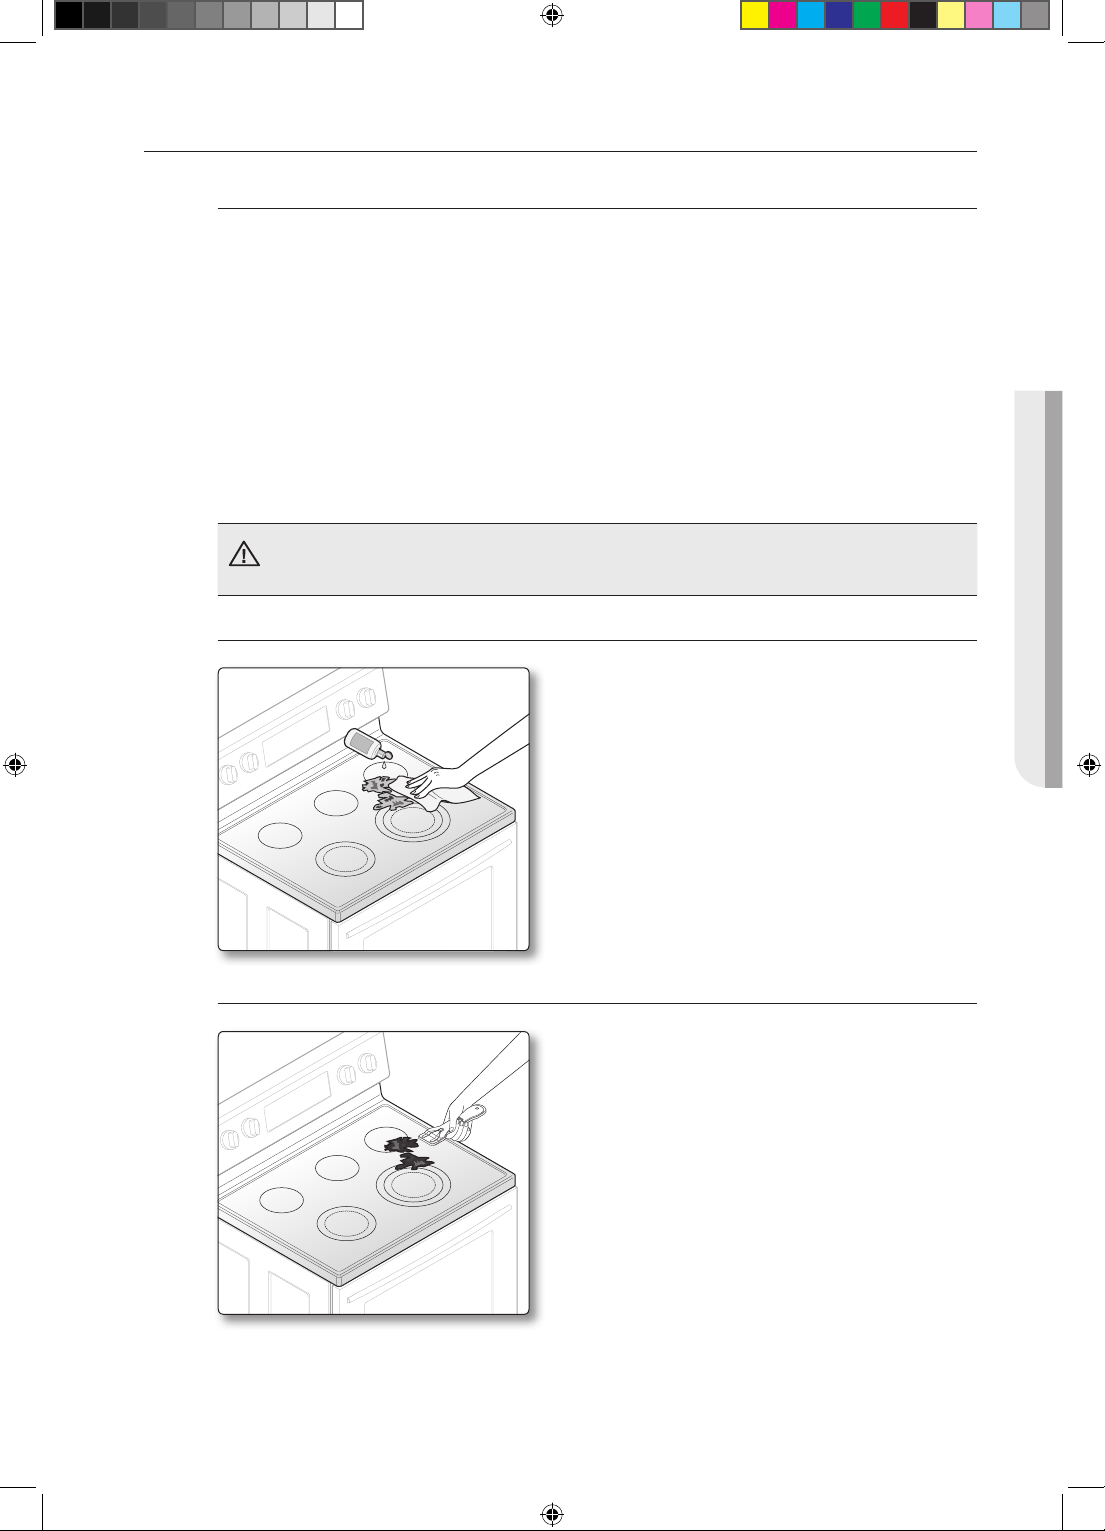
CARE AND CLEANING OF THE GLASS COOKTOP
Normal daily use cleaning
Use only a ceramic cooktop cleaner or the cleaner supplied with this appliance on the glass
cooktop. Other creams may not be as eective.
By following these directions, you can maintain and protect the surface of your glass cooktop.
• Before using the cooktop for the first time, clean it with a ceramic cooktop cleaner or the
included cleaner. This helps protect the top and makes cleanup easier.
• Use the ceramic cooktop cleaner or the included cleaner daily. This will help keep the cooktop
looking new.
• Shake the cleaning cream well. Apply a few drops of cleaner directly to the cooktop.
• Use a paper towel or a cleaning pad for ceramic cooktops to clean the entire cooktop surface.
• Use a dry cloth or paper towel to remove all cleaning residue. No need to rinse.
DAMAGE to your glass surface may occur if you use scrub pads other than those
recommended.
WARNING
Removing burned-on residue
1. Allow the cooktop to cool.
2. Spread a few drops of ceramic cooktop cleaner
on the entire burned residue area.
3. Using the included cleaning pad for ceramic
cooktops, rub the residue area, applying pressure
as needed.
4. If any residue remains, repeat the steps listed
above as needed.
5. For additional protection, after all residue has been
removed, polish the entire surface with ceramic
cooktop cleaner and a paper towel.
MAINTAINING YOUR APPLIANCE
Removing heavy, burned-on residue
1. Allow the cooktop to cool.
2. Use a single-edge razor-blade scraper at
approximately a 45 ° angle against the glass
surface and scrape the soil. It will be necessary to
apply pressure in order to remove the residue.
3. After scraping with the razor scraper, spread a few
drops of ceramic cooktop cleaner on the entire
burned residue area. Use the included cleaning
pad to remove any remaining residue. (Do not
scrape the seal.)
4. For additional protection, after all residue has
been removed, polish the entire surface with the
included cooktop cleaner and a paper towel.
Maintaining your appliance _61
FE710DRS_XAC_DG68-00334A-07_EN.indd 61 05/11/2012 20:31:35
Page 62
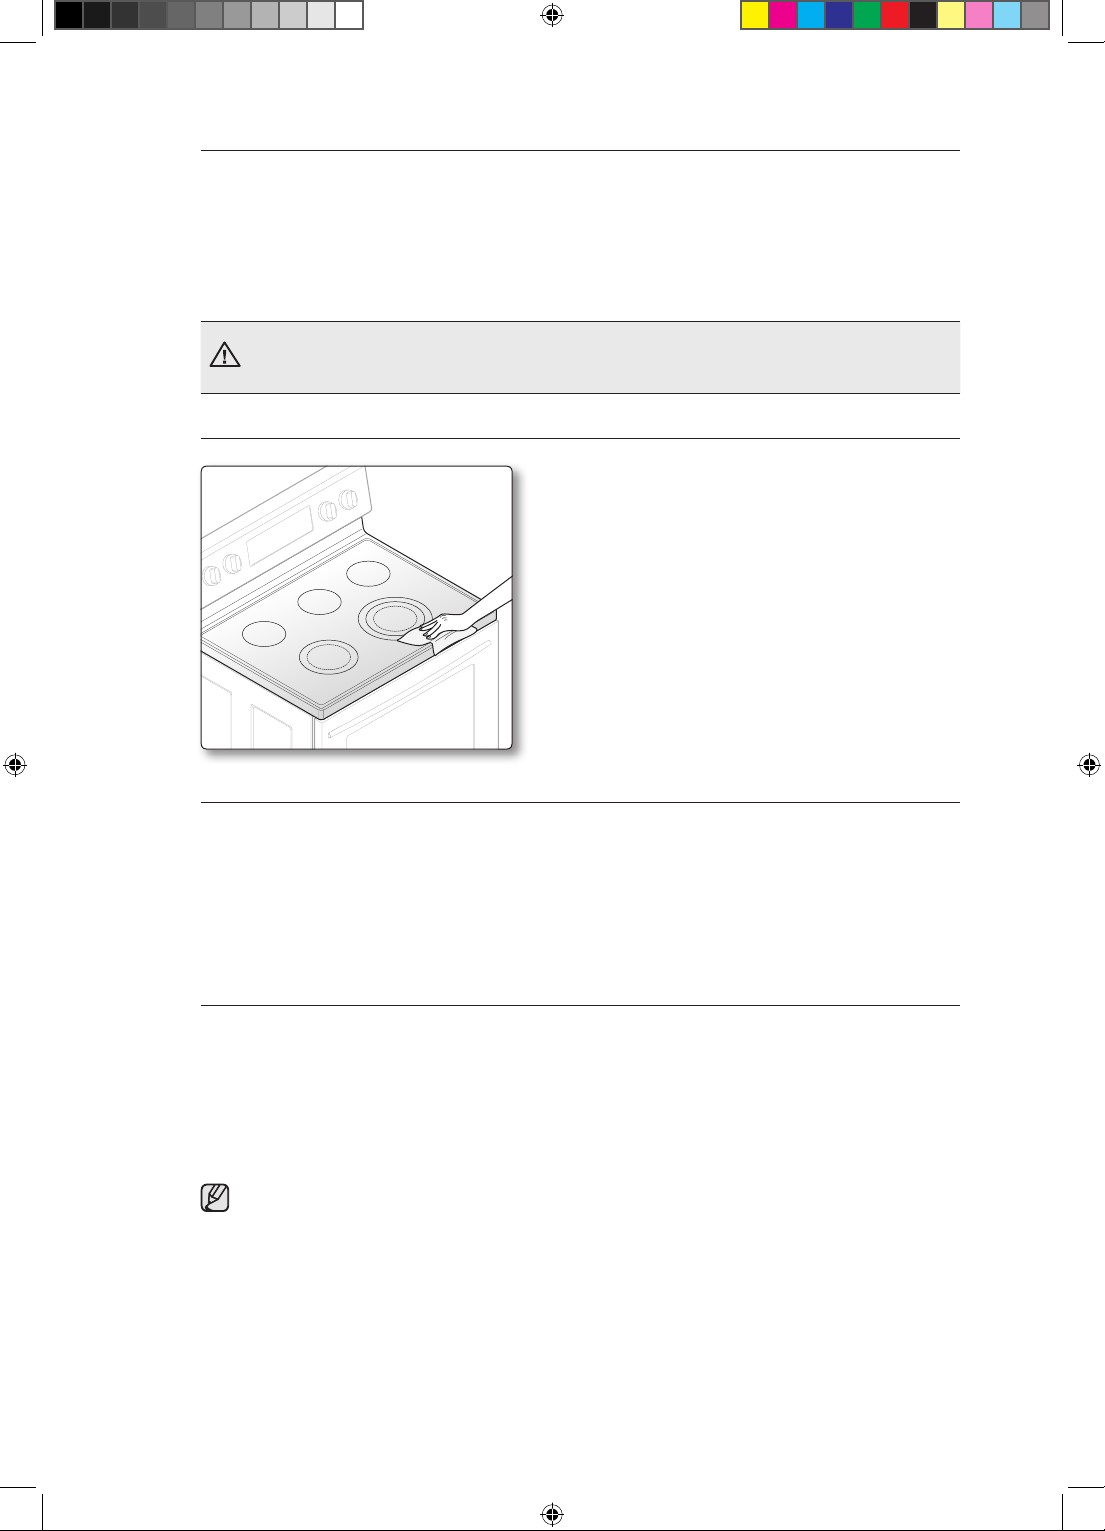
Removing metal marks and scratches
1. Be careful not to slide pots and pans across your cooktop. It will leave marks on the cooktop
surface. You can remove these marks by applying ceramic cooktop cleaner or the included
cleaner with a cleaning pad for ceramic cooktops.
2. If pots with a thin overlay of aluminum or copper are allowed to boil dry, the overlay may leave
black discoloration on the cooktop. You should remove this discoloration immediately or it may
become permanent.
Carefully check the bottoms of pans for roughness that may scratch the cooktop.
WARNING
Cleaning the cooktop seal
To clean the seal around the edges of the glass, lay a
wet cloth on it for a few minutes, then wipe clean with
a nonabrasive cleaner.
Potential for permanent damage to the glass surface
• Sugary spillovers (such as jellies, fudge, candy, syrups) or melted plastics can cause pitting
of the surface of your cooktop. This is not covered under the warranty. You should clean the
spill while it is still hot. Take special care when removing hot substances. Refer to the following
section.
• When using a scraper, be sure it is new and the razor blade is still sharp. Do not use a dull or
nicked blade.
Cleaning sugary spills and melted plastic
1. Turn o all surface units. Remove hot pans.
2. Wearing an oven mitt, use a single-edge razor-blade scraper to move the spill to a cool area of
the cooktop. Remove the spill with paper towels.
3. Any remaining spillover should be left until the surface of the cooktop has cooled.
4. Don’t use the surface units again until all of the residue has been completely removed.
If pitting or indentation in the glass surface has already occurred, the cooktop glass will
have to be replaced. In this case, service will be necessary.
62_ Maintaining your appliance
FE710DRS_XAC_DG68-00334A-07_EN.indd 62 05/11/2012 20:31:35
Page 63
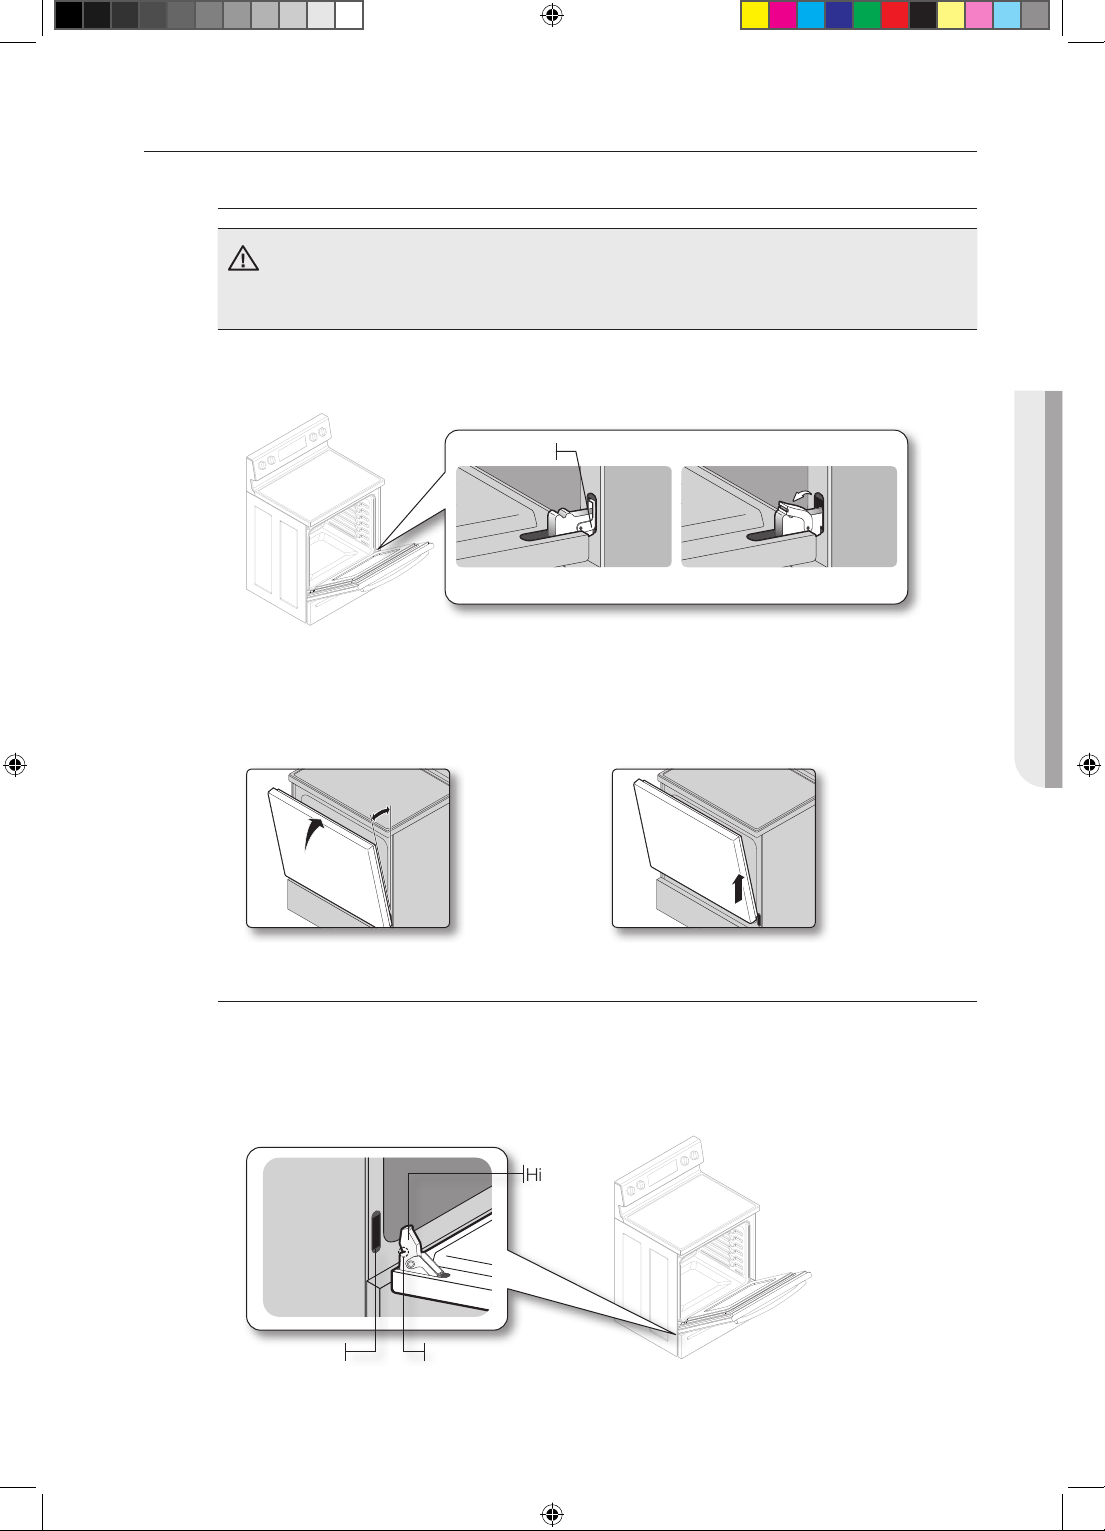
REMOVING AND REPLACING THE OVEN DOOR
How to remove the door
• The door is very heavy. Be careful when removing and lifting the door. Do not lift the
CAUTION
1. Open the door completely.
2. Pull the hinge locks down toward the door frame to the unlocked position.
3. Firmly grasp both sides of the door at the top.
4. Close the door to the door removal position, which is approximately 5 degrees from vertical
5. Lift door up and out until the hinge arm is clear of the slot (Fig. 2).
door by the handle.
• Turn the power OFF before removing the door.
Hinge lock
Locked position Unlocked position
(Fig. 1).
MAINTAINING YOUR APPLIANCE
about 5 °
Fig. 1 Fig. 2
How to replace the door
1. Firmly grasp both sides of the door at the top.
2. With the door at the same angle as the removal position, slide the indentation of the hinge arm
into the bottom edge of the hinge slot. The notch in the hinge arm must be fully inserted into
the bottom of the slot.
Hinge arm
Bottom
edge of slot
Indentation
Maintaining your appliance _63
FE710DRS_XAC_DG68-00334A-07_EN.indd 63 05/11/2012 20:31:36
Page 64
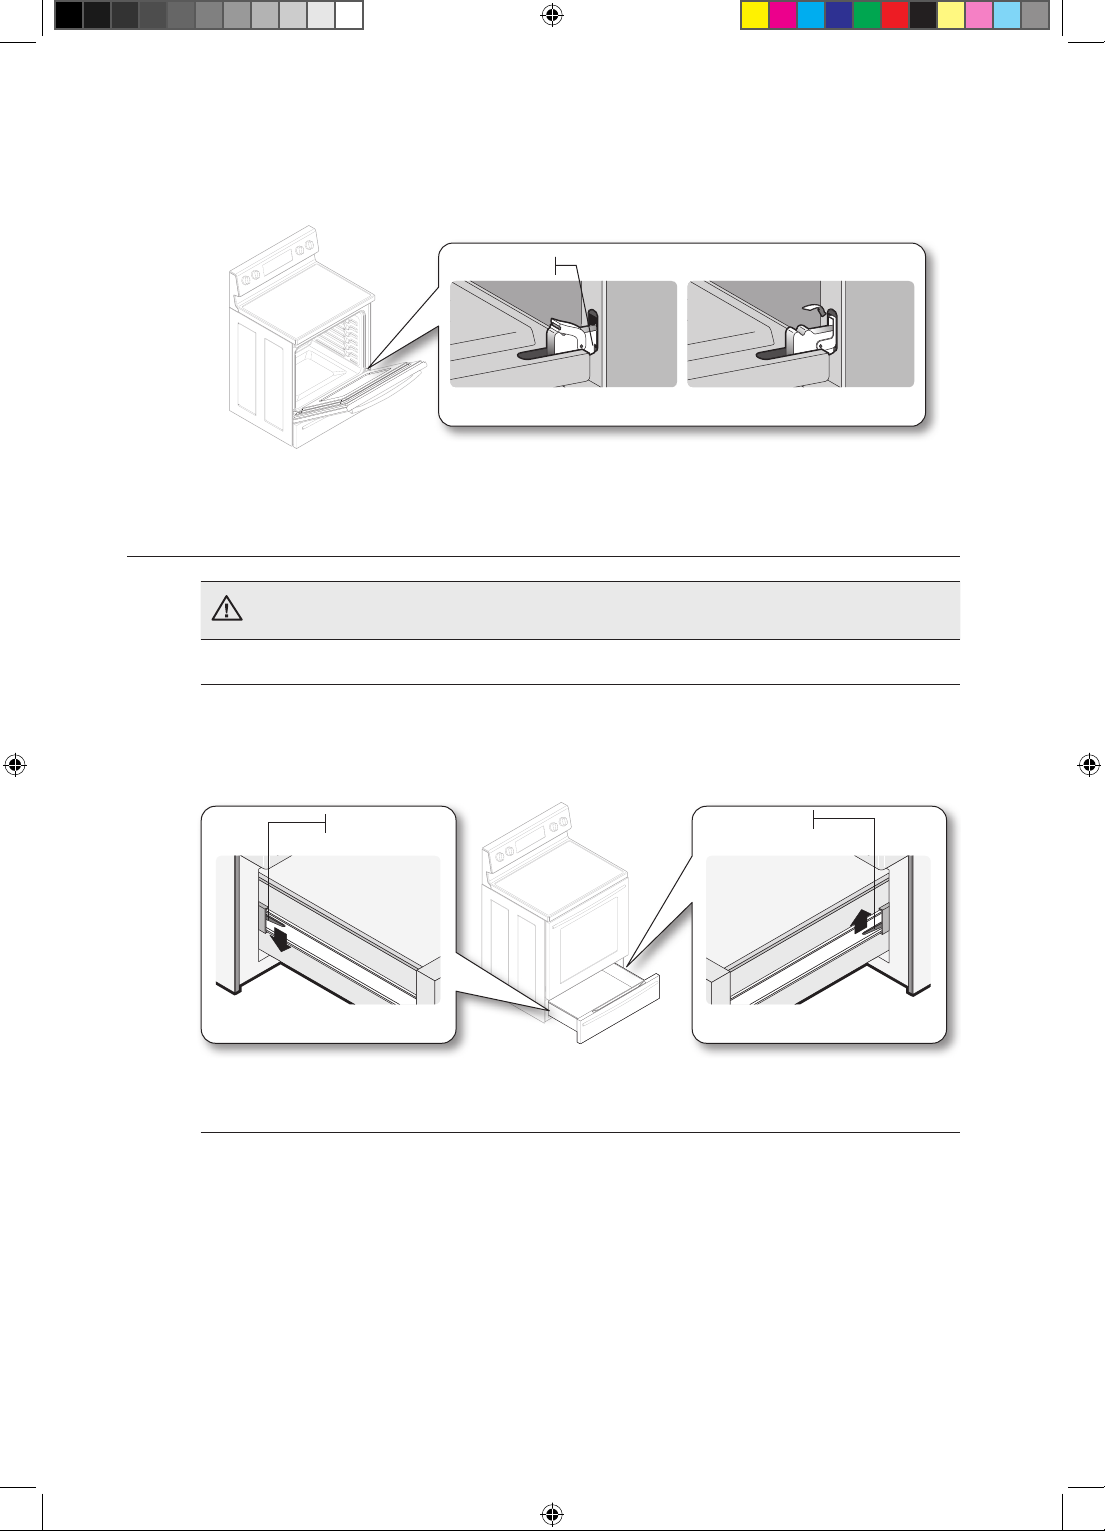
3. Open the door fully. If the door will not open fully, the indentation is not inserted correctly in the
bottom edge of the slot.
4. Push the hinge locks up against the front frame of the oven cavity to the locked position.
Hinge lock
Unlocked position Locked position
5. Close the oven door.
REMOVING AND REPLACING THE WARMING DRAWER
Turn the power OFF before removing the warming drawer.
CAUTION
How to remove the warming drawer
1. Open the drawer to the fully opened position.
2. Locate the glide lever on each side of the drawer; push down on the left glide lever and pull up
on the right glide lever.
Lever
Push down on the left glide
Lever
Pull up on the right guide
3. Pull the warming drawer away from the range.
How to replace the warming drawer
1. Replace the shield on the right glide of the drawer body.
2. Pull the bearing glides to the front of the chassis glide.
3. Align the glide on each side of the drawer with the glide slots on the range.
4. Push the drawer into the range until levers click (approximately 2 inches). Pull the drawer open
again to seat bearing glides into position. If you do not hear the levers click or the bearing
glides do not feel seated, remove the drawer and repeat step 1. This will minimize possible
damage to the bearing glides.
64_ Maintaining your appliance
FE710DRS_XAC_DG68-00334A-07_EN.indd 64 05/11/2012 20:31:38
Page 65
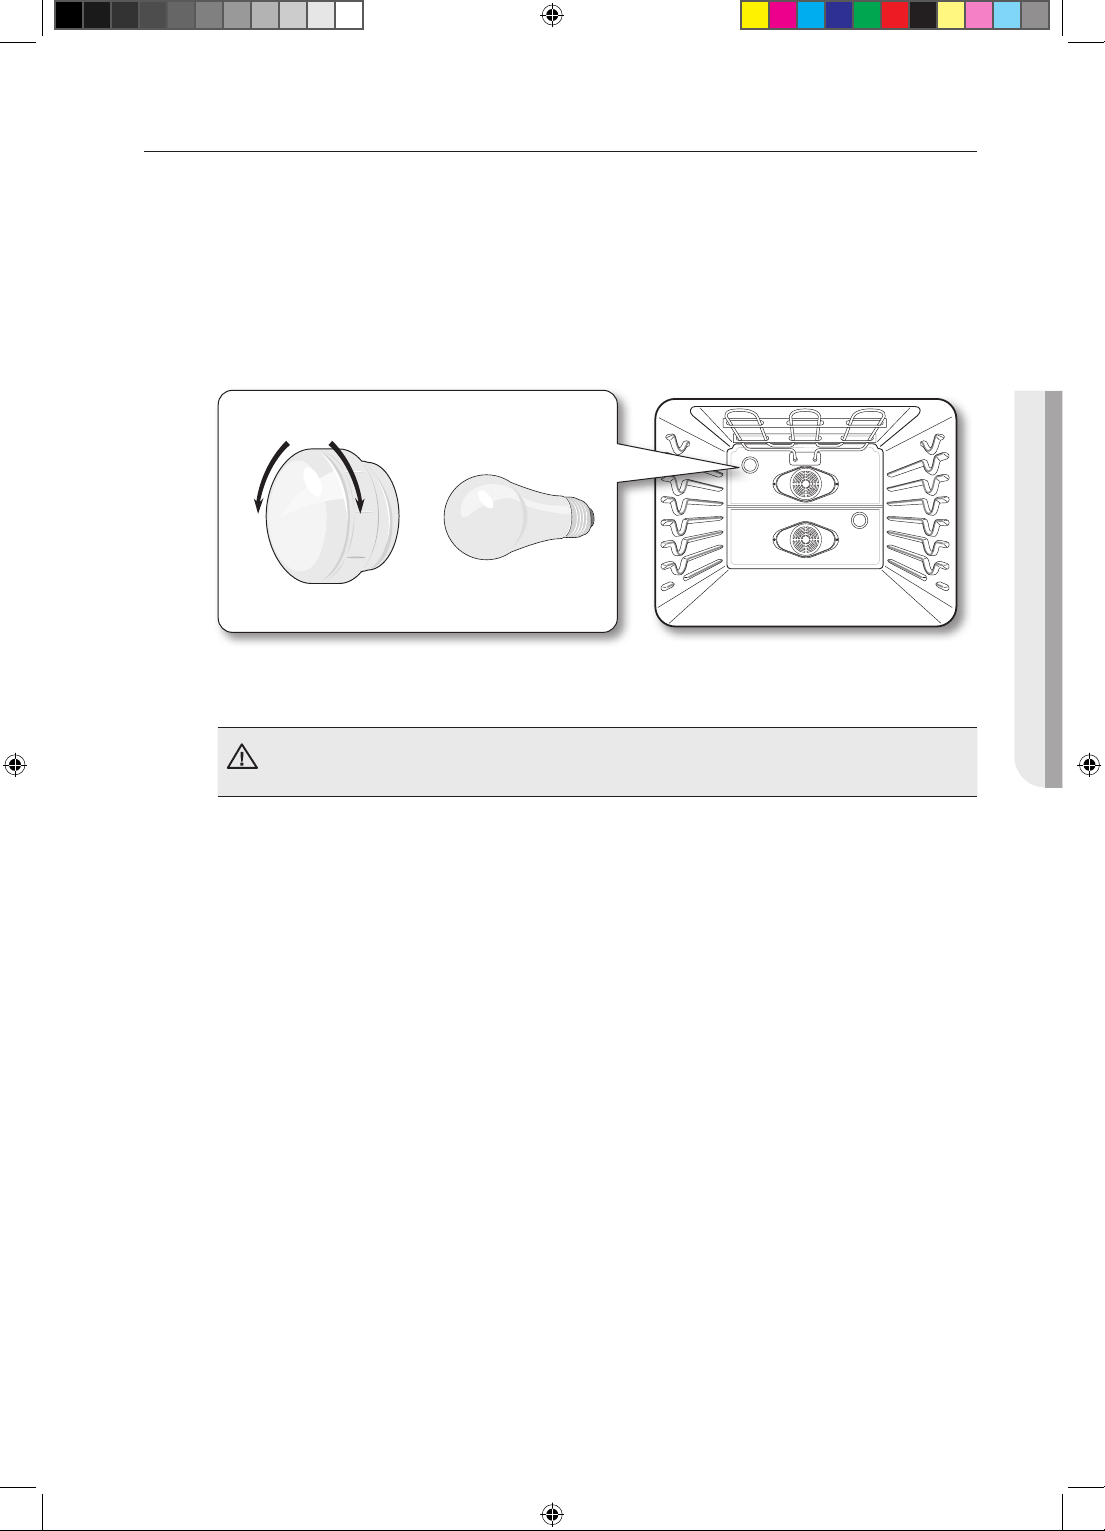
CHANGING THE OVEN LIGHT
The oven light is a standard 40-watt appliance bulb. It will come on when the oven door is open.
When the oven door is closed, press the OVEN LIGHT pad to turn it on or o. It will not work
during a self-cleaning cycle.
1. Make sure the oven and the bulb are cool.
2. Unplug the range or disconnect power.
3. Turn the glass bulb cover in the back of the oven counterclockwise to remove.
4. Turn the bulb counterclockwise to remove it from its socket.
Remove
5. Replace the light bulb and glass bulb cover by turning them clockwise.
6. Plug in the range or reconnect power.
Replace
Glass bulb cover Bulb
MAINTAINING YOUR APPLIANCE
Before changing your oven light bulb, disconnect the electrical power to the range at the
main fuse or circuit breaker panel. Make sure the oven and the bulb are cool.
CAUTION
Maintaining your appliance _65
FE710DRS_XAC_DG68-00334A-07_EN.indd 65 05/11/2012 20:31:38
Page 66
troubleshooting
TROUBLESHOOTING
Samsung works hard to ensure that you don’t have problems with your new electric range. If you run into
unexpected trouble, look first for a solution in the table below. If, after trying the suggested solution, you’re
still having trouble, call Samsung at 1-800-SAMSUNG (1-800-726-7864).
PROBLEM POSSIBLE CAUSE SOLUTION
The range is not
level.
The appliance
must be accessed
for servicing and
cannot be moved
easily.
The oven control
beeps and displays
and F error code.
The surface units
will not maintain
a rolling boil or
will not cook fast
enough.
The surface units
will not turn on.
The surface unit
stops glowing when
changed to a lower
setting.
The appliance has been installed
improperly.
The floor is sagging or sloping. • Contact a carpenter to correct the
The kitchen cabinets are not
properly aligned and make the
range appear lopsided.
The kitchen cabinets are not
square and are too close to
the range. There isn’t enough
clearance.
The carpet is interfering with
movement of the range.
You have a function error code.
CODE CAUSE
-SE- Shorted key
E-27 Oven sensor opened
E-28 Oven sensor shorted
E-08 Oven heating error
E-0A Oven heating over
E-0E Door locking error
You may be using inappropriate
cookware.
In some areas, the power (voltage)
may be low.
A fuse in your home may be blown
or the circuit breaker tripped.
The cooktop controls are set
improperly.
This is normal. The unit is still on and hot.
• Place the oven rack in the center of the
oven. Place a level on the oven rack.
Adjust the leveling legs at the base of the
range until the oven rack is level.
• Insure the floor is level and strong and
stable enough to adequately support the
range.
situation.
• Ensure the cabinets are square and
provide sucient room for installation.
• Contact a builder or installer to make the
appliance accessible.
• Provide sucient space so the range can
be lifted over the carpet.
• Press the CLEAR/OFF pad and restart
the oven. If the problem persists,
disconnect all power to the range for at
least 30 seconds and then reconnect the
power. If this does not solve the problem,
call for service.
• Use pans which are flat and match the
diameter of the surface unit selected.
• Cover the pan with a lid until the desired
heat is obtained.
• Replace the fuse or reset the circuit
breaker.
• Check to see the correct control is set for
the surface unit you are using.
66_ Troubleshooting
FE710DRS_XAC_DG68-00334A-07_EN.indd 66 05/11/2012 20:31:39
Page 67
PROBLEM POSSIBLE CAUSE SOLUTION
Areas of
discoloration on the
cooktop.
Food spillover was not cleaned. • Refer to the section on care and cleaning
of the glass cooktop on page 61.
The surface is hot and the model
features a light-colored cooktop.
• This is normal. The surface may appear
discolored when it is hot. This is temporary
and will disappear as the glass cools.
The surface unit
frequently cycles on
This is normal. • The element will cycle on and o to
maintain the heat setting.
and o.
The oven will not
turn on.
The range is not completely
plugged into the electrical outlet.
A fuse in your home may be blown
or the circuit breaker tripped.
The oven controls have been set
• Make sure the electrical plug is inserted
into a live, properly grounded outlet.
• Replace the fuse or reset the circuit
breaker.
• See the chapter on operating the oven.
improperly.
The oven is too hot. • Allow the oven to cool.
The appliance will
not turn on.
The appliance is not completely
plugged into the electrical outlet or
a fuse in your home may be blown
• Make sure the power cord is plugged into
a live, properly grounded outlet. Check the
fuse and circuit breakers.
or the circuit breaker tripped.
Incomplete service wiring. • Call for service.
Power outage. • Check to see if the house lights will turn
on. If required, call your local electric
company for service.
The oven light will
not turn on.
The light bulb is loose or defective. • Tighten or replace the bulb.
The switch operating the light is
• Call for service.
broken.
Oven smokes
excessively during
broiling.
The control has not been set
properly.
• Refer to the section on setting oven
controls.
• Make sure the oven door is opened to the
broil stop position.
The meat has been placed too
close to the element.
• Reposition the rack to provide proper
clearance between the meat and the
element. Preheat the broil element for
searing.
The meat has not been properly
prepared.
• Remove the excess fat from the meat. Cut
away fatty edges that may curl, leaving the
lean intact.
Food does not bake
or roast properly.
Grease has built up on oven
surfaces.
The oven controls have not been
set correctly.
The oven rack has been positioned
incorrectly or is not level.
• Regular cleaning is necessary when
broiling frequently.
• See the chapter on operating the oven.
• See the section on using the oven racks
on page 23 or 29.
Incorrect cookware or cookware of
improper size being used.
The oven sensor needs to be
adjusted.
• See the section on adjusting the
thermostat on page 53.
TROUBLESHOOTING
Troubleshooting _67
FE710DRS_XAC_DG68-00334A-07_EN.indd 67 05/11/2012 20:31:39
Page 68
PROBLEM POSSIBLE CAUSE SOLUTION
Food does not broil
properly.
The oven controls have been set
incorrectly.
The rack has not been properly
• Press the BROIL pad.
• See the broiling guide on page 46.
positioned.
Cookware not suited for broiling. • Use suitable cookware.
The oven
temperature is too
In some areas the power (voltage)
may be low.
The oven sensor needs to be
adjusted.
• Preheat the broil element for 10 minutes.
• See the broiling guide on page 46.
• See the section on adjusting the
thermostat on page 53.
hot or too cold.
Scratches or
abrasions on
cooktop surface.
The cooktop is being cleaned
improperly.
Cookware with rough bottoms was
used on the cooktop or there were
coarse particles (eg. salt or sand)
present between the cookware
• Scratches are not removable. Tiny
scratches will become less visible in time
as a result of cleaning.
• To avoid scratches, use the recommended
cleaning procedures. Make sure cookware
bottoms are clean before use and use
cookware with smooth bottoms.
and the surface of the cooktop.
Cookware has been slid across the
cooktop surface.
Brown streaks or
specks.
Boilovers have been cooked onto
the surface.
• Use the blade scraper to remove soil.
• See the section on the care and cleaning
of the glass cooktop on page 61.
Areas of
discoloration with
metallic sheen.
The oven will not
self-clean.
Mineral deposits from water and
food have been left on the surface
of the cooktop.
The oven temperature is too high
to start a self-clean operation.
The oven controls have been set
incorrectly.
• Remove using a ceramic-glass cooktop
cleaning cream.
• Use cookware with clean, dry bottoms.
• Allow the range to cool and reset the
controls.
• See the section on self-cleaning on page
56.
You cannot start a self-cleaning cycle if you have activated the oven lockout
feature or if a radiant surface element is on.
“Crackling” or
“popping” sound.
This is the sound of the metal
heating and cooling during
• This is normal.
both the cooking and cleaning
functions.
Excessive smoke
during a selfcleaning cycle.
There is excessive soiling in the
oven.
• Press the CLEAR/OFF pad. Open the
windows to rid the room of smoke. Wait
until the self-cleaning cycle is cancelled.
Wipe up the excessive soil and reset the
oven for self-cleaning.
The oven door will
The oven is too hot. • Allow the oven to cool.
not open after a
self-cleaning cycle.
Oven not clean
after a self-cleaning
cycle.
The oven controls were not set
correctly.
• See the section on self-cleaning on page
56.
The oven was heavily soiled. • Wipe up heavy spillovers before starting
the self-cleaning cycle. Heavily soiled
ovens may need to self-clean again or for
a longer period of time.
68_ Troubleshooting
FE710DRS_XAC_DG68-00334A-07_EN.indd 68 05/11/2012 20:31:39
Page 69
PROBLEM POSSIBLE CAUSE SOLUTION
Steam from the
vent.
When using the convection
feature, it is normal to see steam
• This is normal.
coming out of the oven vent.
As the number of racks or the
amount of food being cooked
increases, the amount of visible
steam will increase.
Burning or oily odor
coming from the
vent.
This is normal in a new oven and
will disappear in time.
• To speed the process, set a self-cleaning
cycle for a minimum of 3 hours.
• See the section on self-cleaning on page
56.
Strong odor. An odor from the insulation around
• This is temporary.
the inside of the oven is normal
for the first few times the oven is
used.
Fan noise. A convection fan may automatically
• This is normal.
turn on and o.
Oven racks are
dicult to slide.
Display goes blank. A fuse in your home may be blown
The shiny, silver-colored racks
were cleaned in a self-cleaning
cycle.
or the circuit breaker tripped.
• Apply a small amount of vegetable oil to
a paper towel and wipe the edges of the
oven racks with the paper towel.
• Replace the fuse or reset the circuit
breaker.
Display flashes. There was a power failure. • Reset the clock.
Drawer does not
slide smoothly or
drags.
Warming drawer will
not work.
The drawer is out of alignment. • Fully extend the drawer and push it all the
way in. See page 64.
The drawer is over-loaded or the
load is unbalanced.
A fuse in your home may be blown
or the circuit breaker tripped.
• Reduce weight. Redistribute drawer
contents.
• Replace the fuse or reset the circuit
breaker.
The controls are not set correctly. • See the chapter on using the warming
drawer starting on page 26.
Excessive
condensation in the
drawer.
There is liquid present in the
• Remove the liquid.
drawer.
Uncovered foods. • Cover food with a lid or aluminum foil.
The temperature is set too high. • Adjust the temperature to a lower setting.
Food dries out in
the warming drawer.
Moisture is escaping. • Cover food with a lid or aluminum foil.
The drawer is not fully closed. • Push the drawer in until the latch engages.
TROUBLESHOOTING
Troubleshooting _69
FE710DRS_XAC_DG68-00334A-07_EN.indd 69 05/11/2012 20:31:39
Page 70

warranty
PLEASE DO NOT DISCARD THIS REPLACES THE WARRANTY PAGE IN THE USE & CARE GUIDE
SAMSUNG ELECTRIC RANGE
LIMITED WARRANTY TO ORIGINAL PURCHASER
This SAMSUNG brand product, as supplied and distributed by SAMSUNG ELECTRONICS CANADA, INC. (SAMSUNG) and delivered
new, in the original carton to the original consumer purchaser, is warranted by SAMSUNG against manufacturing defects in materials
and workmanship for a limited warranty period of:
One (1) Year Parts and Labor, Five (5) Years Parts Warranty
For Glass Cooktop and Heater Radiant
During this limited additional four-year warranty, you will responsible for any labor or in-home service.
This limited warranty begins on the original date of purchase, and is valid only on products purchased and used in the Canada. To
receive warranty service, the purchaser must contact SAMSUNG for problem determination and service procedures. Warranty service
can only be performed by a SAMSUNG authorized service center. The original dated bill of sale must be presented upon request as
proof of purchase to SAMSUNG or SAMSUNG’s authorized service center. Samsung will provide in-home service during the warranty
period at no charge subject to availability within the contiguous Canada.. In home service is not available in all areas. To receive in home
service product must be unobstructed and accessible to the service agent. If service is not available Samsung may elect to provide
transportation of the product to and from an authorized service center.
SAMSUNG will repair or replace this product, at our option and at no charge as stipulated herein, with new or reconditioned parts or
products if found to be defective during the limited warranty period specified above. All replaced parts and products become the property
of SAMSUNG and must be returned to SAMSUNG. Replacement parts and products assume the remaining original warranty, or ninety
(90) days, whichever is longer.
This limited warranty covers manufacturing defects in materials and workmanship encountered in normal, noncommercial use of this
product and shall not apply to the following: damage which occurs in shipment; delivery and installation; applications and uses for which
this product was not intended; altered product or serial numbers; cosmetic damage or exterior finish; accidents, abuse, neglect, fire,
water, lightning or other acts of nature; use of products, equipment, systems, utilities, services, parts, supplies, accessories, applications,
installations, repairs, external wiring or connectors not supplied or authorized by SAMSUNG which damage this product or result
in service problems; incorrect electrical line voltage, fluctuations and surges; customer adjustments and failure to follow operating
instructions, maintenance and environmental instructions that are covered and prescribed in the instruction book; product removal and
reinstallation; problems caused by pest infestations, and overheating or overcooking by user. This limited warranty shall not cover cases
of incorrect electric current, voltage or supply, light bulbs, house fuses, house wiring, cost of a service call for instructions, or fixing
installation errors. Furthermore, damage to the glass cooktop caused by the use of cleaners other than the recommended cleaners and
pads, damage to the glass cook top caused by hardened spills of sugary materials or melted plastic that are not cleaned according to the
directions in the use and care guide are not covered. SAMSUNG does not warrant uninterrupted or error-free operation of the product.
EXCEPT AS SET FORTH HEREIN THERE ARE NO WARRANTIES ON THIS PRODUCT EITHER EXPRESS OR IMPLIED AND
SAMSUNG DISCLAIMS ALL WARRANTIES INCLUDING, BUT NOT LIMITED TO, ANY IMPLIED WARRANTIES OF MERCHANTABILITY,
INFRINGEMENT OR FITNESS FOR A PARTICULAR PURPOSE. NO WARRANTY OR GUARANTY GIVEN BY ANY PERSON, FIRM OR
CORPORATION WITH RESPECT TO THIS PRODUCT SHALL BE BINDING ON SAMSUNG. SAMSUNG SHALL NOT BE LIABLE FOR
LOSS OF REVENUE OR PROFITS, FAILURE TO REALIZE SAVINGS OR OTHER BENEFITS, OR ANY OTHER SPECIAL, INCIDENTAL
OR CONSEQUENTIAL DAMAGES CAUSED BY THE USE, MISUSE OR INABILITY TO USE THIS PRODUCT, REGARDLESS OF
THE LEGAL THEORY ON WHICH THE CLAIM IS BASED, AND EVEN IF SAMSUNG HAS BEEN ADVISED OF THE POSSIBILITY OF
SUCH DAMAGES. NOR SHALL RECOVERY OF ANY KIND AGAINST SAMSUNG BE GREATER IN AMOUNT THAN THE PURCHASE
PRICE OF THE PRODUCT SOLD BY SAMSUNG AND CAUSING THE ALLEGED DAMAGE. WITHOUT LIMITING THE FOREGOING,
PURCHASER ASSUMES ALL RISK AND LIABILITY FOR LOSS, DAMAGE OR INJURY TO PURCHASER AND PURCHASER’S
PROPERTY AND TO OTHERS AND THEIR PROPERTY ARISING OUT OF THE USE, MISUSE OR INABILITY TO USE THIS PRODUCT.
THIS LIMITED WARRANTY SHALL NOT EXTEND TO ANYONE OTHER THAN THE ORIGINAL PURCHASER OF THIS PRODUCT, IS
NONTRANSFERABLE AND STATES YOUR EXCLUSIVE REMEDY.
Some provinces or territories may or may not allow limitations on how long an implied warranty lasts, or the exclusion or limitation of
incidental or consequential damages, so the above limitations or exclusions may not apply to you. This warranty gives you specific legal
rights, and you may also have other rights which vary from state to state. User Replaceable Parts may be sent to the customer for unit
repair. If necessary, a Service Engineer can be dispatched to perform service.
To obtain warranty service, please contact SAMSUNG at:
Customer Service 55 Standish Court Mississauga, Ontario L5R 4B2 Canada
1-800-SAMSUNG (726-7864) and www.samsung.com
Samsung Electronics Canada Inc.,
70_ Warranty
FE710DRS_XAC_DG68-00334A-07_EN.indd 70 05/11/2012 20:31:39
Page 71
memo
FE710DRS_XAC_DG68-00334A-07_EN.indd 71 05/11/2012 20:31:39
Page 72
CANADA 1-800-SAMSUNG (726-7864)
MEXICO 01-800-SAMSUNG (726-7864)
U.S.A
1-800-SAMSUNG (726-7864)
Consumer Electronics
www.samsung.com/ca (English)
www.samsung.com/ca_fr (French)
www.samsung.com
Please be advised that the Samsung warranty does NOT cover service calls to explain
product operation, correct improper installation, or perform normal cleaning or maintenance.
FE710DRS_XAC_DG68-00334A-07_EN.indd 72 05/11/2012 20:31:40
DG68-00334A-07
Page 73
Manuel d'utilisation
de la cuisinière électrique
FE710DRS
Ce manuel est en papier recyclé à 100 %.
FRANÇAIS CANADIEN
un monde de possibilités
Nous vous remercions d'avoir choisi ce produit
Samsung. Afin de bénéficier du meilleur du service
après-vente, enregistrez votre appareil sur le site suivant:
www.samsung.com/register
1-800-SAMSUNG (726-7864)
FE710DRS_XAC_DG68-00334A-07_CFR.indd 1 05/11/2012 20:28:41
Page 74
caractéristiques de votre
nouvelle cuisinière
Plus de commodité. Cuisson de meilleure qualité. Entretien facile. Votre nouvelle cuisinière électrique a été
conçue pour vous orir tous ces avantages et plus encore.
• Toute nouvelle technologie en matière de distribution de chaleur
Les cuisinières équipées d'un seul ventilateur ont tendance à former un tourbillon de chaleur
qui ne se répartit pas dans l'ensemble du four. Ainsi, la chaleur n'est pas distribuée de façon
uniforme et la cuisson n'est pas homogène. Votre nouvelle cuisinière est équipée de la technologie
Surround Airvection™ de Samsung: un troisième élément chauant et un système à plusieurs
ventilateurs permettent de faire circuler uniformément la chaleur dans toutes les directions. Vous
parvenez ainsi à une consommation d'énergie plus ecace et obtenez une cuisson plus uniforme.
• Nettoyage vapeur rapide
Grâce à Steam Quick™, technologie Samsung unique en son genre destinée aux travaux de
nettoyage légers, conserver votre four dans un état de propreté impeccable est un jeu d'enfant.
Le tout sans dicultés, sans odeurs et sans produits chimiques. Steam Quick™ nettoie l'intérieur
de votre cuisinière à l'aide de vapeur haute température en l'espace de 20minutes.
• Plus d'espace
Dotée d'une capacité de 167 litres (5,9 pieds cubes), votre nouvelle cuisinière dispose d'un
espace bien plus important que toutes les marques concurrentes présentes sur le marché
américain. Il vous est désormais plus facile de cuisiner pendant les fêtes ou pour le plaisir.
• Table de cuisson à 5 foyers
Quatre foyers principaux, dont deux avec réglage de la chaleur selon diérentes tailles de plats.
Un foyer plus petit au centre de la table de cuisson pour maintenir les plats chauds.
• Cuisson double
Ce four est équipé de la fonction de cuisson double. Cette fonction permet de préparer deux plats
diérents en même temps en utilisant deux températures diérentes dans la partie supérieure
et la partie inférieure du four. Vous pouvez également choisir de cuire les aliments dans la partie
supérieure ou la partie inférieure du four, ce qui constitue une économie de temps et d'énergie.
2_ caractéristiques de votre nouvelle cuisinière
FE710DRS_XAC_DG68-00334A-07_CFR.indd 2 05/11/2012 20:28:41
Page 75
consignes de sécurité importantes
Lisez et suivez toutes les consignes avant d'utiliser votre four afin
d'éviter tout risque d'incendie, d'électrocution, de blessure ou de
dommage lors de l'utilisation de la cuisinière. Le présent guide ne couvre
pas toutes les situations susceptibles de se produire. Contactez toujours votre
réparateur ou le fabricant en cas de fonctionnement anormal de l'appareil.
CE QUE VOUS DEVEZ SAVOIR SUR LES CONSIGNES DE SÉCURITÉ
Les avertissements et les consignes de sécurité importantes contenus dans ce manuel ne sont
pas exhaustifs. Il est de votre responsabilité de faire appel à votre bon sens et de faire preuve
de prudence et de minutie lors de l'installation, de l'entretien et de l'utilisation de votre four.
SYMBOLES DE SÉCURITÉ IMPORTANTS ET PRÉCAUTIONS
Signification des icônes et des symboles utilisés dans ce manuel:
Risques ou manipulations dangereuses susceptibles d'entraîner des
AVERTISSEMENT
blessures graves, voire mortelles.
Risques ou manipulations dangereuses susceptibles d'entraîner des
ATTENTION
ATTENTION
Les symboles d'avertissement sont là pour éviter que vous ou d'autres personnes
ne se blessent. Veillez à bien en respecter les consignes.
Après lecture de cette rubrique, conservez le manuel dans un endroit sûr afin de
pouvoir le consulter ultérieurement.
blessures légères ou des dégâts matériels.
Afin de réduire les risques d'incendie, d'explosion, d'électrocution ou de
blessures lors de l'utilisation du four, vous devez respecter ces règles de
sécurité de base.
Interdit.
NE PAS démonter.
NE PAS toucher.
Suivez scrupuleusement les consignes.
Débranchez la prise murale.
Assurez-vous que l'appareil est relié à la terre afin d'éviter
tout risque d'électrocution.
Contactez le service d'assistance technique.
Remarque
Consignes de sécurité importantes _3
FE710DRS_XAC_DG68-00334A-07_CFR.indd 3 05/11/2012 20:28:43
Page 76
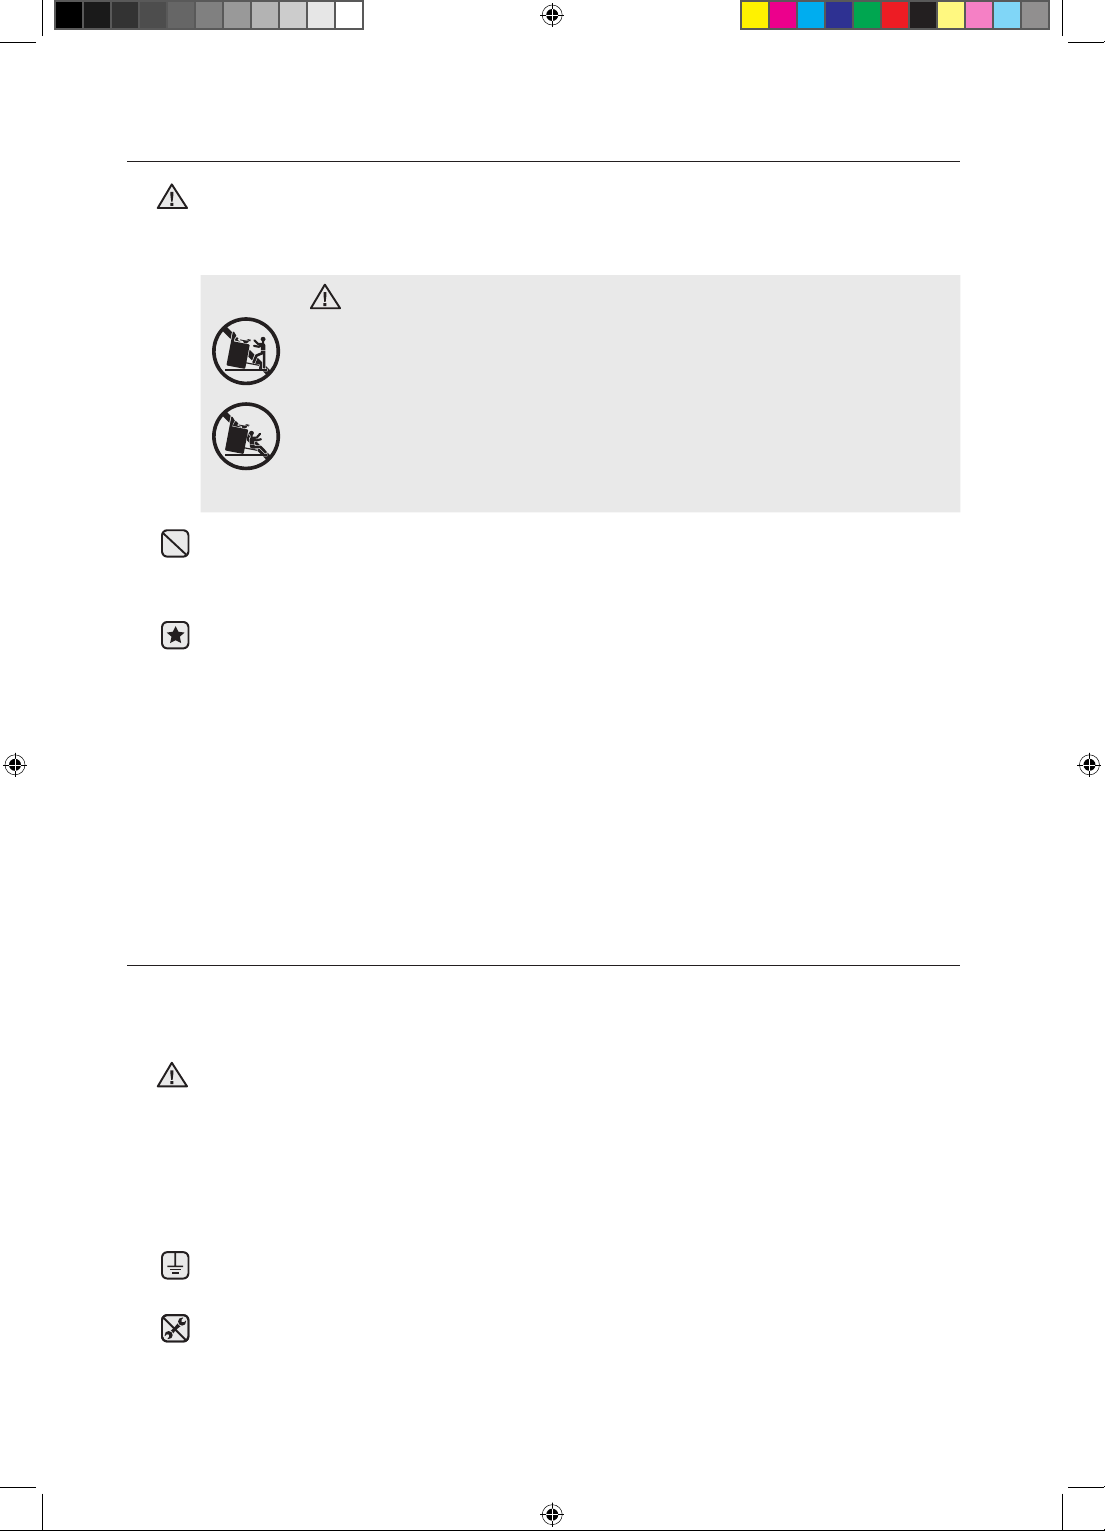
DISPOSITIF ANTI-BASCULEMENT
AVERTISSEMENT Afin d'éviter tout risque de basculement de la
AVERTISSEMENT
cuisinière, fixez-la correctement à l'aide d'un dispositif anti-basculement.
Reportez-vous au manuel d'installation pour plus d'instructions.
AVERTISSEMENT
AVERTISSEMENT
TOUTES LES CUISINIÈRES SONT SUSCEPTIBLES DE
BASCULER ET DE PROVOQUER DES BLESSURES
INSTALLEZ LE DISPOSITIF ANTI-BASCULEMENT LIVRÉ
AVEC LA CUISINIÈRE
SUIVEZ TOUTES LES INSTRUCTIONS D'INSTALLATION
Ne marchez pas, ne vous appuyez pas et ne vous asseyez pas
sur les portes de la cuisinière. L'appareil risquerait de basculer et
provoquer de graves blessures.
Vérifiez que le dispositif anti-basculement est correctement installé.
Puis, saisissez le bord supérieur à l'arrière de la cuisinière et essayez
prudemment de l'incliner vers l'avant. Vérifiez que le dispositif antibasculement est emboîté.
Si vous devez, pour une quelconque raison, retirer la cuisinière du mur,
assurez-vous de bien emboîter le dispositif lorsque vous remettez la
cuisinière en place contre le mur. Si le dispositif n'a pas été correctement
installé, la cuisinière risque de basculer et de provoquer des blessures si une
personne ou un enfant marche, s'assoit ou s'appuie sur la porte ouverte.
POUR VOTRE SÉCURITÉ
Lorsque vous utilisez des appareils électriques, respectez les consignes
de sécurité de base suivantes:
Utilisez ce four uniquement pour l'usage auquel il est destiné (tel que
ATTENTION
décrit dans ce manuel d'utilisation).
Les surfaces potentiellement chaudes comprennent la table de cuisson,
les zones faisant face à la table de cuisson, l'orifice de ventilation du four,
les surfaces situées à proximité de cette ouverture, les rainures situées
autour de la porte du four.
Assurez-vous que votre appareil est correctement installé et mis à la terre
par un technicien qualifié.
Dépannage utilisateur Ne réparez ni ne remplacez jamais les pièces de
l'appareil vous-même, sauf si le présent manuel vous y autorise. Toute
autre réparation devra être eectuée par un technicien qualifié.
4_ caractéristiques de votre nouvelle cuisinière
FE710DRS_XAC_DG68-00334A-07_CFR.indd 4 05/11/2012 20:28:43
Page 77
Eteignez toujours l'appareil avant de procéder à une réparation, en
retirant le fusible ou en coupant le disjoncteur.
Ne pénétrez pas à l'intérieur du four.
Ne rangez pas d'objets susceptibles d'éveiller l'intérêt des enfants
dans les placards situés au-dessus de la cuisinière ou sur le
dosseret de la cuisinière (risque de chute et de blessures graves).
Ne laissez pas les enfants seuls. Ne laissez jamais un enfant sans
surveillance dans la pièce où est installé l'appareil. Ne les autorisez jamais
à monter sur une quelconque partie de l'appareil.
N'utilisez jamais l'appareil pour chauer une pièce.
N'utilisez pas d'eau pour éteindre les flammes de friture. Éteignez
le four pour éviter leur propagation. Étouez le feu en fermant la porte ou
en utilisant un extincteur à poudre, à mousse ou à dioxyde de carbone.
Stockage à l'intérieur ou sur le dessus de l'appareil. N'entreposez aucun
matériau inflammable dans ou à proximité du four. Retirez tous les éléments
d'emballage de l'appareil avant de l'utiliser. Maintenez tout objet en plastique,
vêtement et papier à distance des pièces susceptibles d'être chaudes.
Portez les vêtements appropriés. Ne portez jamais de vêtements
amples lorsque vous utilisez cet appareil.
Utilisez uniquement des maniques sèches. L'utilisation de maniques
humides ou mouillées sur les surfaces chaudes peut entraîner des
brûlures en raison de la vapeur qui se dégage à ce moment-là. Les
maniques ne doivent pas entrer en contact avec les éléments chauants.
N'utilisez pas de serviette ou de chion de grande taille.
Apprenez aux enfants à ne pas jouer avec les commandes ou les autres
éléments de la cuisinière.
Veillez à ce que les enfants soient éloignés de la porte lors de son
ouverture ou de sa fermeture car ils pourraient se cogner contre la porte
ou se prendre les doigts dedans.
TABLE DE CUISSON
Ne laissez jamais la table de cuisson sans surveillance lorsqu'un
foyer fonctionne à puissance élevée. En cas de débordement, les
particules graisseuses provenant des aliments risquent de s'enflammer.
Ne soulevez pas la table de cuisson. Vous risqueriez de
l'endommager et de provoquer des dysfonctionnements.
Ne faites jamais fonctionner la table de cuisson sans récipient. Les
boutons de commande deviendraient brûlants.
N'utilisez jamais la table de cuisson vitrée comme planche à découper.
Consignes de sécurité importantes _5
FE710DRS_XAC_DG68-00334A-07_CFR.indd 5 05/11/2012 20:28:43
Page 78
Soyez prudent lorsque vous touchez la table de cuisson. La surface
vitrée restera chaude quelques minutes même après l'arrêt de la cuisson.
Posez les ustensiles de cuisine sur la table de cuisson avec
précaution, surtout lorsque celle-ci fonctionne. Ils pourraient devenir
chauds et provoquer des brûlures.
Utilisez des plats de taille appropriée. La cuisinière est dotée de
foyers de diérentes tailles. Utilisez des casseroles et des poêles à fond
plat, susamment larges pour recouvrir toute la surface de chaue.
L'utilisation d'ustensiles de taille trop petite exposerait une partie de
l'élément chauant à un risque de contact et d'inflammation (ex.: tissu).
Des casseroles et des poêles de taille adéquate augmenteront en outre
l'ecacité de la cuisson.
Ustensiles de cuisson en faïence. Afin d'éviter tout risque de fêlure
lié au brusque changement de température, seuls certains récipients
en verre, vitrocéramique, céramique, terre cuite ou faïence peuvent être
utilisés sur cette table de cuisson.
Orientez toujours le manche des ustensiles vers l'extérieur et non
au-dessus des foyers voisins. Afin de réduire tout risque de brûlure,
d'inflammation et de projections, dirigez toujours le manche du récipient
vers l'extérieur et non au-dessus des foyers voisins.
Suivez les consignes et avertissements figurant sur les étiquettes des
produits nettoyants.
Assurez-vous que vous savez quel bouton de commande correspond à
chaque foyer. Assurez-vous d'avoir allumé le bon foyer.
Éteignez toujours le foyer avant de retirer la casserole.
Si vous préparez des aliments qui s'enflamment sous la hotte, activez la
ventilation.
Surveillez les aliments frits à température élevée ou moyenne.
6_ caractéristiques de votre nouvelle cuisinière
FE710DRS_XAC_DG68-00334A-07_CFR.indd 6 05/11/2012 20:28:43
Page 79
FOUR
NE TOUCHEZ PAS LES ÉLÉMENTS CHAUFFANTS OU LES
SURFACES INTERNES DU FOUR. Les éléments chauants peuvent être
chauds même s'ils sont noirs. Les surfaces internes d'un four deviennent
susamment chaudes pour provoquer des brûlures. Pendant et après le
fonctionnement, ne touchez pas les éléments chauants et les surfaces
internes du four et ne laissez aucun vêtement ou produit inflammable
entrer en contact avec ces derniers tant qu'ils n'ont pas refroidis. Certaines
autres surfaces du four peuvent devenir chaudes au point de provoquer
des brûlures. Il s'agit des orifices de ventilation du four et surfaces situées
à proximité de ces orifices, portes du four et vitres des portes.
Ne faites pas chauer des aliments contenus dans des contenants
fermés. L'accumulation de pression pourrait faire exploser le contenant
et provoquer des blessures.
N'utilisez pas le four pour faire sécher des journaux. S'ils sont
surchaués, ils risquent de s'enflammer.
N'utilisez pas le four comme espace de rangement. Les éléments
rangés dans le four peuvent s'enflammer.
Soyez prudent lorsque vous ouvrez la porte. Laissez l'air chaud
ou la vapeur s'échapper avant de retirer les aliments du four ou de les
remettre.
Couches protectrices. N'utilisez pas de papier d'aluminium pour
recouvrir la sole du four, sauf si les instructions le suggèrent. Une
installation inappropriée de ces couches protectrices est susceptible de
provoquer une décharge électrique ou un incendie.
N'obstruez pas les conduits de ventilation du four. L'orifice de
ventilation est situé au-dessus de l'élément de surface arrière droit.
Pendant le fonctionnement du four, cette zone peut devenir extrêmement
chaude. N'obstruez jamais cette ouverture et n'y placez pas de matière
plastique ou d'éléments sensibles à la chaleur.
Insertion des grilles du four. Placez toujours les grilles du four à
la hauteur appropriée tant que le four est encore froid. Si vous devez
déplacer une grille alors que le four est chaud, utilisez des maniques.
Les poignées des récipients ne doivent jamais toucher les éléments
chauants du four.
L'aluminium ou la sonde thermique ne doit pas toucher les éléments
chauants.
Consignes de sécurité importantes _7
FE710DRS_XAC_DG68-00334A-07_CFR.indd 7 05/11/2012 20:28:43
Page 80
TIROIR CHAUFFE-PLAT
NE TOUCHEZ PAS L'ELEMENT CHAUFFANT OU LA SURFACE
INTERNE DU TIROIR. Ces surfaces peuvent être chaudes au point de
provoquer des brûlures.
ATTENTION: il est possible que la surface interne du tiroir soit chaude à
son ouverture.
Le tiroir chaue-plat permet de maintenir des aliments cuits à
température de service. Les aliments doivent être déjà chauds. Le tiroir
chaue-plat ne permet pas de faire réchauer ou cuire des aliments.
Soyez prudent à l'ouverture du tiroir. Entrouvrez le tiroir et laissez l'air
chaud ou la vapeur s'échapper avant de retirer ou replacer les aliments.
L'air chaud ou la vapeur qui s'échappe peut provoquer des brûlures aux
mains, au visage et/ou aux yeux.
N'utilisez pas le tiroir pour faire sécher des journaux. S'ils sont
surchaués, ils risquent de s'enflammer.
N'utilisez pas de papier d'aluminium pour tapisser le tiroir. Le papier
d'aluminium est un excellent isolant thermique et aurait pour conséquence
d'emprisonner la chaleur. Son utilisation est susceptible de perturber le
fonctionnement du tiroir et d'endommager la finition intérieure.
Ne placez pas de papier, plastique, conserves ou matériaux combustibles
dans le tiroir.
Ne laissez jamais de pot ou de boîte contenant de la graisse dans le tiroir
ou à proximité de celui-ci.
Ne faites pas réchauer les aliments dans le tiroir plus de trois heures.
FOURS AUTO-NETTOYANTS
Ne nettoyez jamais le joint de la porte. Le joint de la porte est
indispensable pour assurer une bonne étanchéité. Veillez à ne pas frotter,
endommager ni déplacer le joint.
Ne laissez jamais vos oiseaux de compagnie dans la cuisine. Les
oiseaux sont extrêmement sensibles à la fumée émise durant les cycles
d'auto-nettoyage du four. La fumée peut être dangereuse, voire mortelle
pour les oiseaux. Déplacez les oiseaux dans une pièce bien aérée.
Procédez uniquement au cycle d'auto-nettoyage des éléments
mentionnés dans le manuel. Avant de procéder à l'auto-nettoyage du
four, retirez la plaque de séparation, la grille, les ustensiles et les aliments.
Aucun nettoyant ou revêtement de protection pour four disponible dans le
commerce ne doit être utilisé pour l'intérieur ou l'extérieur du four. Utilisez
uniquement un nettoyant pour surface de cuisson en céramique ou le
nettoyant fourni avec l'appareil pour le nettoyage de la table de cuisson vitrée.
8_ caractéristiques de votre nouvelle cuisinière
FE710DRS_XAC_DG68-00334A-07_CFR.indd 8 05/11/2012 20:28:43
Page 81
Retirez les grilles en nickel avant de démarrer le cycle d'auto-nettoyage
du four afin d'éviter qu'elles ne se décolorent.
Si le mode d'auto-nettoyage ne fonctionne pas, éteignez le four et débranchezle de la prise d'alimentation. Faites-le réparer par un technicien qualifié.
HOTTE D'ASPIRATION
Nettoyez fréquemment la hotte d'aspiration. Ne laissez pas la
graisse s'accumuler sur la hotte ou le filtre.
Si les aliments situés sur la cuisinière s'enflamment, activez la
ventilation.
TABLE DE CUISSON EN VITROCÉRAMIQUE
NE TOUCHEZ PAS LES FOYERS OU LES ZONES SITUÉES À
PROXIMITÉ. Les éléments de la table de cuisson peuvent être chauds
même s'ils sont noirs. Les zones situées à proximité de ces éléments
peuvent devenir chaudes au point de provoquer des brûlures. Pendant
et après le fonctionnement de la cuisinière, ne touchez pas les foyers ou
les zones situées à proximité des foyers et évitez que des vêtements ou
produits inflammables n'entrent en contact avec ces derniers tant qu'ils
n'ont pas entièrement refroidi. Ces zones incluent notamment la table de
cuisson et les zones situées face à la table de cuisson.
Ne faites rien cuire sur une table de cuisson brisée. Si la table de
cuisson est cassée, vous risquez de vous électrocuter en la nettoyant ou
en cuisinant dessus. Contactez immédiatement un technicien qualifié.
Nettoyez la table de cuisson avec précaution. Si vous utilisez une
éponge ou un chion humide pour essuyer les salissures sur une table
de cuisson chaude, veillez à ne pas vous brûler avec la vapeur. Certains
nettoyants peuvent former des fumées toxiques s'ils sont appliqués sur
une surface chaude.
AVANT DE COMMENCER
Nettoyez soigneusement le four avant de l'utiliser pour la première
fois. Retirez les accessoires et faites fonctionner le four en mode Bake
(Cuisson traditionnelle) sur 400°F pendant 1heure avant de l'utiliser. Il est
normal qu'une odeur caractéristique se dégage lors de cette opération. Ceci
est tout à fait normal. Aérez convenablement la pièce pendant cette période.
Consignes de sécurité importantes _9
FE710DRS_XAC_DG68-00334A-07_CFR.indd 9 05/11/2012 20:28:43
Page 82
AVERTISSEMENTS IMPORTANTS
AVERTISSEMENT
RELATIFS À L'INSTALLATION
L'installation de cet appareil doit être eectuée par un technicien qualifié ou
l'employé d'une société de dépannage.
- Le non-respect de cette consigne peut provoquer une électrocution, un
incendie, une explosion, un dysfonctionnement de l'appareil ou des blessures.
Déballez le four, retirez tous les éléments d'emballage et vérifiez que le four n'est
pas endommagé (traces de choc à l'intérieur ou à l'extérieur du four, loquets de
la porte brisés, fêlures au niveau de la porte ou porte mal alignée). En cas de
dommages, n'utilisez pas le four et contactez immédiatement votre revendeur.
Branchez le cordon d'alimentation sur une prise adaptée correctement reliée à la
terre. Ne branchez aucun autre appareil électrique sur ce même circuit.
Gardez tous les éléments d'emballage hors de la portée des enfants. Ceux-ci
risqueraient de les utiliser pour jouer.
Installez votre appareil sur un revêtement plat et dur, capable de supporter son
poids.
- Le non-respect de cette consigne risque d'entraîner des vibrations anormales,
des bruits ou d'autres problèmes avec l'appareil.
Cet appareil doit être correctement relié à la terre.
Ne reliez jamais cet appareil à une conduite de gaz, à un tuyau d'eau en
plastique ou à une ligne téléphonique.
- Cela pourrait entraîner un risque d'électrocution, d'incendie, d'explosion ou de
défaillance de l'appareil.
Ne coupez ni ne retirez JAMAIS la broche de mise à la terre de la fiche du cordon
d'alimentation.
Assurez-vous que l'ampérage de la prise sur laquelle est branché l'appareil est
adapté.
N'installez pas cet appareil dans un endroit humide, graisseux ou poussiéreux et
veillez à ce qu'il ne soit pas exposé directement à la lumière du soleil ou à une
source d'eau (eau de pluie).
- Cela pourrait entraîner un risque d'électrocution ou d'incendie.
N'utilisez jamais un cordon d'alimentation endommagé ou une prise murale mal
fixée.
- Cela pourrait entraîner un risque d'électrocution ou d'incendie.
Ne tirez pas sur le cordon d'alimentation et faites en sorte qu'il ne soit jamais plié
de façon excessive.
Ne vrillez et ne serrez pas le cordon d'alimentation.
N'accrochez pas le cordon d'alimentation sur un objet métallique; ne placez pas
d'objet lourd sur le cordon d'alimentation; n'insérez pas le cordon d'alimentation
entre des objets.
- Cela pourrait entraîner un risque d'électrocution ou d'incendie.
Si le cordon d'alimentation est endommagé, contactez le centre de dépannage
le plus proche.
10_ caractéristiques de votre nouvelle cuisinière
FE710DRS_XAC_DG68-00334A-07_CFR.indd 10 05/11/2012 20:28:43
Page 83
AVERTISSEMENTS IMPORTANTS RELATIFS À
ATTENTION
L'UTILISATION
En cas d'inondation, si votre appareil a été en contact avec l'eau, veuillez contacter le
centre de dépannage le plus proche. Le non-respect de cette consigne peut entraîner un
risque d'électrocution ou d'incendie.
Si l'appareil génère un bruit anormal, une odeur de brûlé ou de la fumée, débranchez
immédiatement la prise et contactez le service de dépannage le plus proche.
- Le non-respect de cette consigne peut entraîner un risque d'électrocution ou
d'incendie.
En cas de fuite de gaz (propane, GPL, etc.), aérez immédiatement la pièce. Ne touchez
pas non plus l'appareil. Ne touchez pas non plus l'appareil.
- La moindre étincelle risquerait de provoquer une explosion ou un incendie.
Prenez garde à ne pas toucher la porte du four, les éléments chauants ou toute autre
partie de l'appareil susceptible d'avoir chaué.
- Le non-respect de cette consigne risque d'entraîner des brûlures.
En cas de départ de feu à l'intérieur du four, laissez sa porte fermée, éteignez l'appareil
et débranchez la prise ou coupez l'alimentation au niveau du tableau de fusibles ou du
disjoncteur. Si vous ouvrez la porte du four, l'incendie risque de se propager.
Respectez systématiquement les consignes de sécurité lorsque vous utilisez votre four. Ne
tentez jamais de réparer vous-même l'appareil; le courant électrique circulant à l'intérieur
est très élevé. Si le four nécessite des réparations, contactez un centre de dépannage
agréé proche de chez vous.
Si vous utilisez l'appareil alors qu'il est contaminé par des substances étrangères (ex.:
résidus d'aliments), vous risquez de l'endommager.
Retirez l'emballage des aliments avec précaution lorsque vous sortez ces derniers du four.
- Si les aliments sont chauds, de la vapeur chaude peut s'échapper soudainement
lorsque vous en retirez l'emballage, et vous risquez de vous brûler.
Ne tentez pas de réparer, démonter ou modifier vous-même l'appareil.
- Le châssis de l'appareil étant traversé par un courant à haute tension, il existe un
risque d'électrocution ou d'incendie.
- Si le four nécessite des réparations, contactez le centre de dépannage le plus proche
de chez vous.
Si une substance étrangère telle que de l'eau pénètre dans l'appareil, contactez le centre
de dépannage le plus proche.
- Le non-respect de cette consigne peut entraîner un risque d'électrocution ou
d'incendie.
Ne manipulez pas le cordon d'alimentation avec les mains mouillées.
- Cela pourrait entraîner un risque d'électrocution.
N'éteignez pas l'appareil s'il est en cours de fonctionnement.
- Cela pourrait provoquer une étincelle et entraîner un risque d'électrocution ou
d'incendie.
Conservez tous les matériaux d'emballage hors de portée des enfants: les matériaux
d'emballage présentent un danger pour les enfants.
- Risque d'asphyxie avec les sacs plastique notamment.
Consignes de sécurité importantes _11
FE710DRS_XAC_DG68-00334A-07_CFR.indd 11 05/11/2012 20:28:43
Page 84
Ne laissez pas les enfants ou toute personne à capacités physiques, sensorielles ou mentales réduites
utiliser cet appareil sans surveillance.
Veillez à ce que les commandes et les zones de cuisson du four soient hors de portée des enfants.
- Le non-respect de cette consigne peut entraîner un risque d'électrocution, d'incendie ou de
blessures.
Ne touchez pas l'intérieur du four juste après son fonctionnement; les éléments sont encore brûlants.
- Le non-respect de cette consigne risque d'entraîner des brûlures.
N'utilisez et n'entreposez pas d'aérosols ou d'objets inflammables à proximité du four.
- Les matériaux inflammables et les aérosols peuvent créer un incendie ou une explosion.
N'insérez pas vos doigts, de substances étrangères ou d'objets métalliques tels que des épingles
ou des aiguilles dans l'entrée, la sortie et les orifices de l'appareil. En cas d'insertion de substances
étrangères dans l'une de ces ouvertures, contactez votre fournisseur ou le centre de dépannage le plus
proche.
N'essayez pas de modifier, d'ajuster ou de réparer la porte. NE retirez JAMAIS la porte ou l'habillage
du four.
N'entreposez et n'utilisez jamais le four en extérieur.
Cet appareil ne doit jamais être utilisé à d'autres fins que la cuisson.
- Si vous vous servez de l'appareil pour un autre usage que celui auquel il est destiné, vous risquez
de provoquer un incendie.
Ôtez le couvercle ou le bouchon des récipients fermés (bouteille de thé aux herbes, biberon, bouteille
de lait, etc.) et percez un trou dans les aliments protégés d'une coquille (œufs, noisettes, etc.) à l'aide
d'un couteau avant de les faire cuire.
- Le non-respect de cette consigne risque d'entraîner des brûlures ou des blessures.
Ne faites jamais chauer des récipients en plastique ou en papier et ne les utilisez pas.
- Le non-respect de cette consigne risque d'entraîner un incendie.
Ne faites pas chauer d'aliments emballés dans du papier tel que des pages de magazine ou du
journal.
- Cela pourrait provoquer un incendie.
N'ouvrez pas la porte si les aliments à l'intérieur du compartiment de cuisson sont en flammes.
- Vous risqueriez d'aggraver l'incendie.
N'exercez pas de pression excessive sur la porte ou à l'intérieur de l'appareil. Évitez tout choc sur la
porte ou à l'intérieur de l'appareil.
- S'accrocher à la porte de l'appareil risque de le faire basculer et de provoquer de graves blessures.
- Si la porte du four est endommagée, ne vous servez pas de l'appareil. Contactez le centre
d’assistance technique.
Ne touchez pas les aliments pendant ou immédiatement après la cuisson.
- Utilisez des maniques afin d'éviter toute brûlure.
12_ caractéristiques de votre nouvelle cuisinière
FE710DRS_XAC_DG68-00334A-07_CFR.indd 12 05/11/2012 20:28:43
Page 85
AVERTISSEMENTS RELATIFS À L'UTILISATION
ATTENTION
Si la surface du four est fissurée, n'utilisez pas l'appareil.
- Le non-respect de cette consigne risque d'entraîner une électrocution.
Les plats et récipients peuvent devenir extrêmement chauds. Manipulez-les
avec précaution.
Les plats chauds et la vapeur peuvent provoquer des brûlures. Retirez le
couvercle des récipients avec précaution en veillant à éloigner ces derniers de
votre visage et de vos mains afin d'éviter que le dégagement de vapeur ne vous
brûle.
Retirez les couvercles des petits pots pour bébé avant de les faire chauer.
Lorsque vous réchauez des aliments pour bébé, remuez-les bien pour répartir
la chaleur uniformément. Testez toujours la température des aliments avant de
les donner à un bébé Contrairement à ce qu'il paraît, le récipient en verre ou la
surface des aliments peuvent être chauds au point de brûler la bouche du bébé.
Soyez prudent car les boissons ou aliments peuvent être très chaud(e)s après
avoir été réchaué(e)s.
- Vérifiez que les aliments ont susamment refroidi avant de les donner aux
jeunes enfants.
Montrez-vous particulièrement vigilant lorsque vous faites chauer des liquides
(ex.: eau ou autres boissons).
- Veillez à remuer pendant ou après la cuisson.
- Évitez d'utiliser des récipients glissants à goulot étroit.
- Attendez au moins 30secondes avant de retirer le récipient du four.
- Le non-respect de cette consigne risque de provoquer un soudain
débordement de son contenu et d'entraîner des brûlures.
Consignes de sécurité importantes _13
FE710DRS_XAC_DG68-00334A-07_CFR.indd 13 05/11/2012 20:28:43
Page 86
Ne montez pas sur l'appareil et ne placez pas d'objets (ex.: linge, couvercle de
four, bougies allumées, cigarettes allumées, plats, produits chimiques, objets
métalliques, etc.) dessus.
- Des articles peuvent rester coincés dans la porte.
- Cela pourrait entraîner un risque d'électrocution, d'incendie, de défaillance de
l'appareil ou des blessures.
N'utilisez pas l'appareil avec les mains mouillées.
- Cela pourrait entraîner un risque d'électrocution.
Ne vaporisez pas de substances volatiles (ex.: insecticide) sur la surface de
l'appareil.
- Ces substances sont non seulement nocives pour la santé, mais elle peuvent
également entraîner une électrocution, un incendie ou une défaillance de
l'appareil.
N'approchez pas votre visage ou votre corps de l'appareil pendant la cuisson
ou lors de l'ouverture de la porte juste après la cuisson.
- Veillez à ce que les enfants ne s'approchent pas trop près de l'appareil.
- Le non-respect de cette consigne risque d'entraîner des brûlures pour les
enfants.
Ne posez pas d'aliments ou d'objets lourds sur la porte lorsque celle-ci est
ouverte.
- Vous risqueriez de vous brûler ou de vous blesser si les objets chutaient.
Ne créez pas de choc thermique brutal au niveau de la porte, de l'intérieur de
l'appareil ou du plat (ex.: en versant de l'eau dessus pendant ou juste après la
cuisson).
- Cela risque d'endommager l'appareil. La vapeur ou les projections d'eau
pourraient entraîner des brûlures ou des blessures.
Ne faites jamais fonctionner l'appareil à vide, sauf en mode d'auto-nettoyage.
Ne faites jamais décongeler de boissons surgelées contenues dans des
bouteilles à col étroit. Celles-ci risqueraient d'éclater.
Ne rayez pas la surface vitrée de la porte du four à l'aide d'un objet tranchant.
- Cela pourrait endommager, voire briser la vitre.
Ne posez rien sur l'appareil lorsque celui-ci fonctionne.
N'utilisez pas de récipients fermés hermétiquement. Retirez les opercules et
les couvercles avant la cuisson. Les récipients fermés hermétiquement peuvent
exploser en raison de l'accumulation de pression, même après l'arrêt du four.
Veillez à ce que les aliments ne touchent pas les éléments chauants du four.
- Cela pourrait provoquer un incendie.
Ne faites pas surchauer les aliments.
- Cela pourrait provoquer un incendie.
14_ caractéristiques de votre nouvelle cuisinière
FE710DRS_XAC_DG68-00334A-07_CFR.indd 14 05/11/2012 20:28:43
Page 87
AVERTISSEMENTS IMPORTANTS RELATIFS
ATTENTION
AU NETTOYAGE
Ne nettoyez pas l'appareil en pulvérisant directement de l'eau dessus.
N'utilisez pas de benzène, de diluant ou d'alcool pour nettoyer l'appareil.
- Cela pourrait entraîner une décoloration, une déformation, des dommages
sur l'appareil ainsi qu'un risque d'électrocution ou d'incendie.
Prenez garde à ne pas vous blesser en nettoyant l'appareil (extérieur/intérieur).
- Les arêtes de celui-ci peuvent se révéler très tranchantes.
Ne nettoyez pas l'appareil à l'aide d'un nettoyeur vapeur.
- Cela pourrait entraîner un phénomène de corrosion.
Veillez à maintenir l'intérieur du four toujours propre. Les particules d'aliments
ou les projections d'huile adhérant aux parois risquent d'abîmer le four ou d'en
réduire son ecacité.
Consignes de sécurité importantes _15
FE710DRS_XAC_DG68-00334A-07_CFR.indd 15 05/11/2012 20:28:43
Page 88
sommaire
PRÉSENTATION DE VOTRE NOUVELLE
CUISINIÈRE
17
TABLE DE CUISSON
18
UTILISATION DU TIROIR CHAUFFE-PLAT
25
UTILISATION DU FOUR
27
ENTRETIEN DE VOTRE APPAREIL
56
DÉPANNAGE
17 Présentation
17 Accessoires fournis
18 A propos de la table de cuisson
20 Comment régler la cuisinière pour utiliser la table
de cuisson?
23 Utilisation des ustensiles de cuisine appropriés
23 Choix des ustensiles de cuisine appropriés
24 Protection de la surface lisse
25 À propos du tiroir chaue-plat
26 Activation ou désactivation du tiroir chaue-plat
27 Tableau de commande du four
28 Système de cuisson en mode double
29 Utilisation des grilles de cuisson
29 Utilisation de la plaque de séparation
30 Plages de réglage de la température en mode de
cuisson double
31 Réglage de l'horloge
32 Réglages minimum et maximum
32 Activation/Désactivation de la minuterie
33 Hauteurs de grille
35 Faire cuire de la pâte crue
37 Cuisson par convection
40 Rôtissage par convection
42 Cuisson minutée
44 Cuisson minutée diérée
46 Cuisson au gril
48 Utilisation de la fonction cuisson personnalisée
51 Utilisation de la fonction maintien au chaud
51 Utilisation de la fonction de décongélation
52 Fonctions complémentaires
54 Activation et désactivation de l'éclairage du four
56 Auto-nettoyage
58 Nettoyage vapeur
59 Entretien et nettoyage du four
61 Entretien et nettoyage de la table de cuisson
vitrée
63 Retrait et remise en place de la porte du four
64 Retrait et remise en place du tiroir chaue-plat
65 Remplacement de l'ampoule du four
66 Dépannage
66
GARANTIE
70 Garantie
70
16_ Sommaire
FE710DRS_XAC_DG68-00334A-07_CFR.indd 16 05/11/2012 20:28:43
Page 89
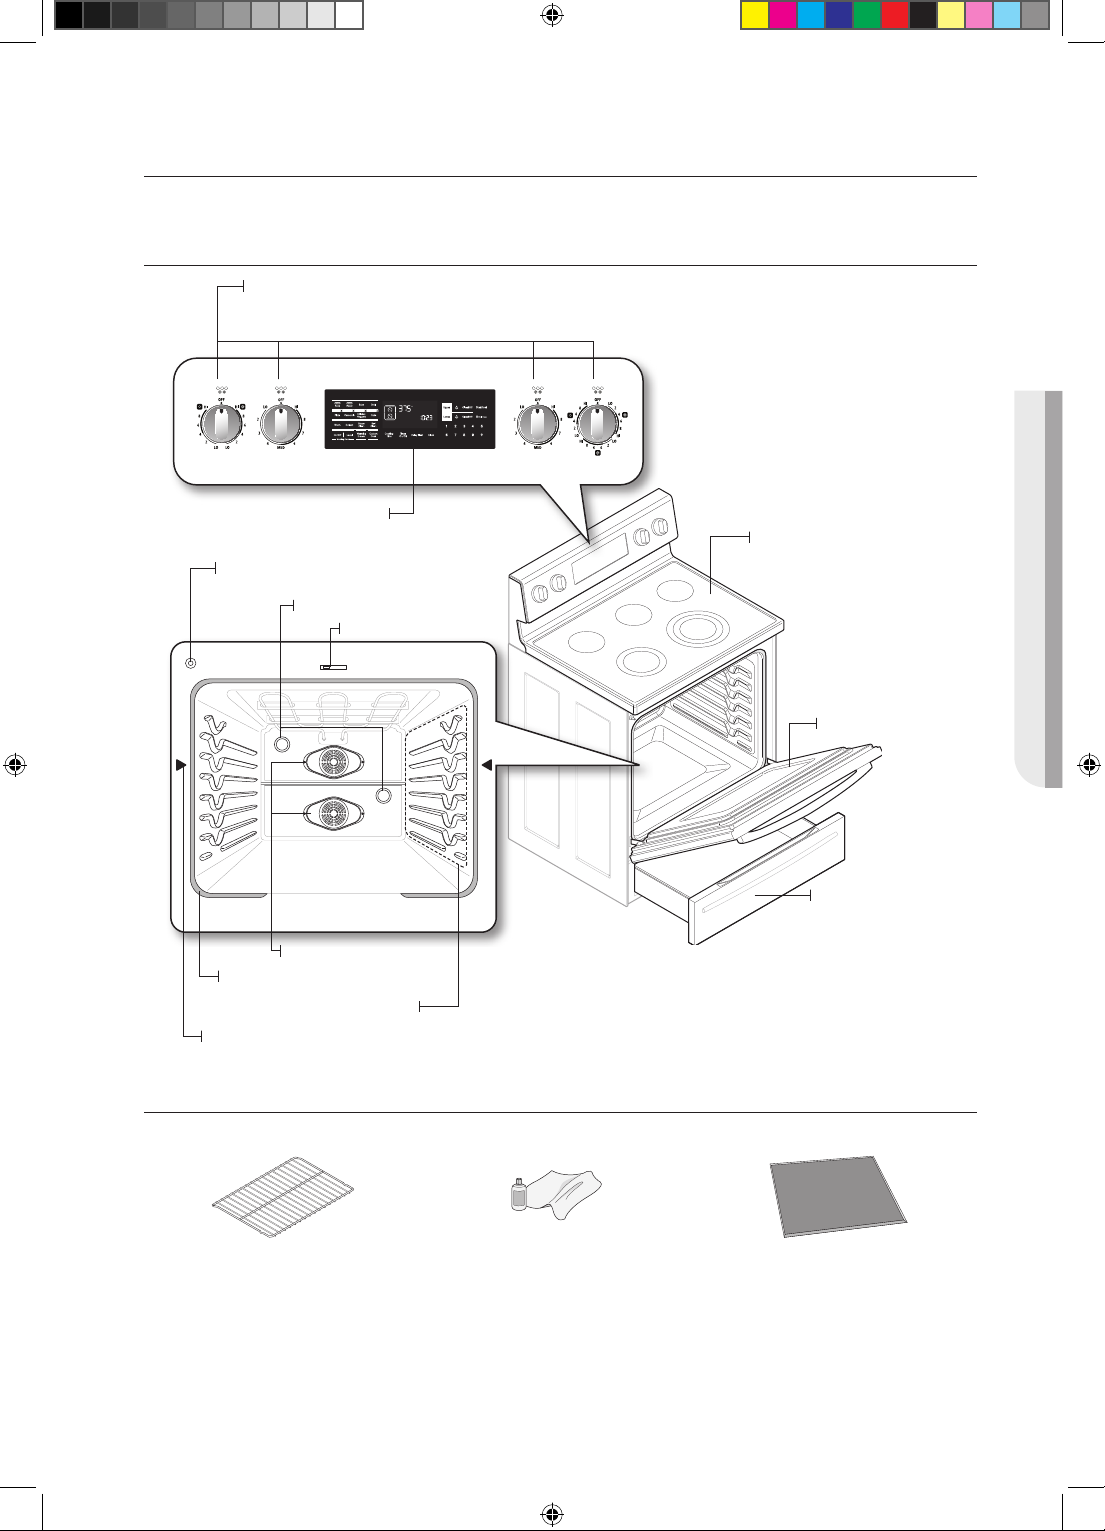
présentation de votre nouvelle cuisinière
PRÉSENTATION
* Boutons de commande de la table
Reportez-vous à la page 19 pour plus d'informations.
Tableau de commande du four
Reportez-vous à la page 27 pour
plus d'informations.
Commutateur d'éclairage automatique
du four
Eclairage du four
Loquet de nettoyage
automatique/vapeur
Surface vitrée
Porte du four
INTRODUCTION
Tiroir chaue-plat
Ventilateur de convection
Joint
Hauteur
Position d'insertion de la plaque de séparation
ACCESSOIRES FOURNIS
* Grilles métalliques Nettoyant et chion de nettoyage * Plaque de séparation
Si vous souhaitez acheter un accessoire repere par un asterisque (*), vous pouvez
le commander aupres du Centre d’assistance Samsung (1-800-726-7864).
Présentation de votre nouvelle cuisinière _17
FE710DRS_XAC_DG68-00334A-07_CFR.indd 17 05/11/2012 20:28:44
Page 90
table de cuisson
A PROPOS DE LA TABLE DE CUISSON
AVANT LA CUISSON
ATTENTION
• N'utilisez pas la table de cuisson vitrée comme planche à découper.
• Ne placez et ne rangez rien qui soit susceptible de fondre ou de s'enflammer sur la
surface vitrée, même si elle n'est pas utilisée.
• Allumez les foyers uniquement après avoir placé un récipient sur le foyer.
• Ne stockez pas d'objets lourds au-dessus de la table de cuisson. Ils pourraient
tomber et l'endommager.
PENDANT LA CUISSON
ATTENTION
• Ne placez pas de papier d'aluminium ou d'objet en plastique tel que salières et
poivrières, porte-cuillères ou emballages en plastique sur la cuisinière lorsque vous
l'utilisez. L'air chaud provenant de l'orifice de ventilation risque de faire fondre le
plastique ou d'enflammer les objets.
• Assurez-vous que le foyer correct est allumé.
• Ne faites jamais cuire d'aliments directement sur la surface vitrée. Utilisez toujours un
récipient.
• Veillez à toujours centrer la casserole sur le foyer que vous utilisez.
• Ne laissez jamais les foyers sans surveillance lorsque vous utilisez une température
élevée. En cas de débordement, les particules graisseuses provenant des aliments
risquent de s'enflammer.
• Eteignez les foyers avant de retirer la casserole.
• Ne couvrez pas les aliments de film plastique. Le plastique risque de fondre sur la
surface et de s'avérer très dicile à nettoyer.
APRÈS LA CUISSON
ATTENTION
• Ne touchez pas les foyers avant qu'ils n'aient refroidi.
• Le foyer peut encore être chaud et vous risquez de vous brûler si vous touchez la
surface vitrée avant qu'elle n'ait susamment refroidi.
• Nettoyez immédiatement les éclaboussures de la table de cuisson afin d'éviter
qu'elles ne s'incrustent et soient diciles à nettoyer.
• Si un placard de rangement est installé directement au-dessus de la table de cuisson,
assurez-vous que les éléments qu'il contient sont rarement utilisés et qu'ils ne sont
pas sensibles à la chaleur. La chaleur peut s'avérer dangereuse dans le cas de
liquides volatils, de nettoyants ou de produits en aérosol.
À propos des foyers radiants
La température des éléments radiants augmente progressivement et uniformément. À mesure
que la température augmente, le foyer radiant devient rouge. Afin que soit conservé le réglage
sélectionné, l'élément se met en marche et s'arrête alternativement. L'élément chauant
conserve assez de chaleur pour fournir une température uniforme et constante durant le cycle de
désactivation. Pour une cuisson ecace, éteignez l'élément chauant quelques minutes avant la
fin de la cuisson. Ainsi, la chaleur résiduelle permet de terminer le processus de cuisson.
Les foyers radiants sont équipés d'un limiteur leur permettant de s'allumer et de s'éteindre, même avec
le réglage HI (Elevé). Cela permet d'éviter toute détérioration de la surface de cuisson en céramique.
L'activation et la désactivation pendant le réglage HI (Elevé) sont normales et se produisent si la
casserole est trop petite pour le foyer radiant utilisé ou si le fond de la casserole n'est pas plat.
18_ Table de cuisson
FE710DRS_XAC_DG68-00334A-07_CFR.indd 18 05/11/2012 20:28:45
Page 91
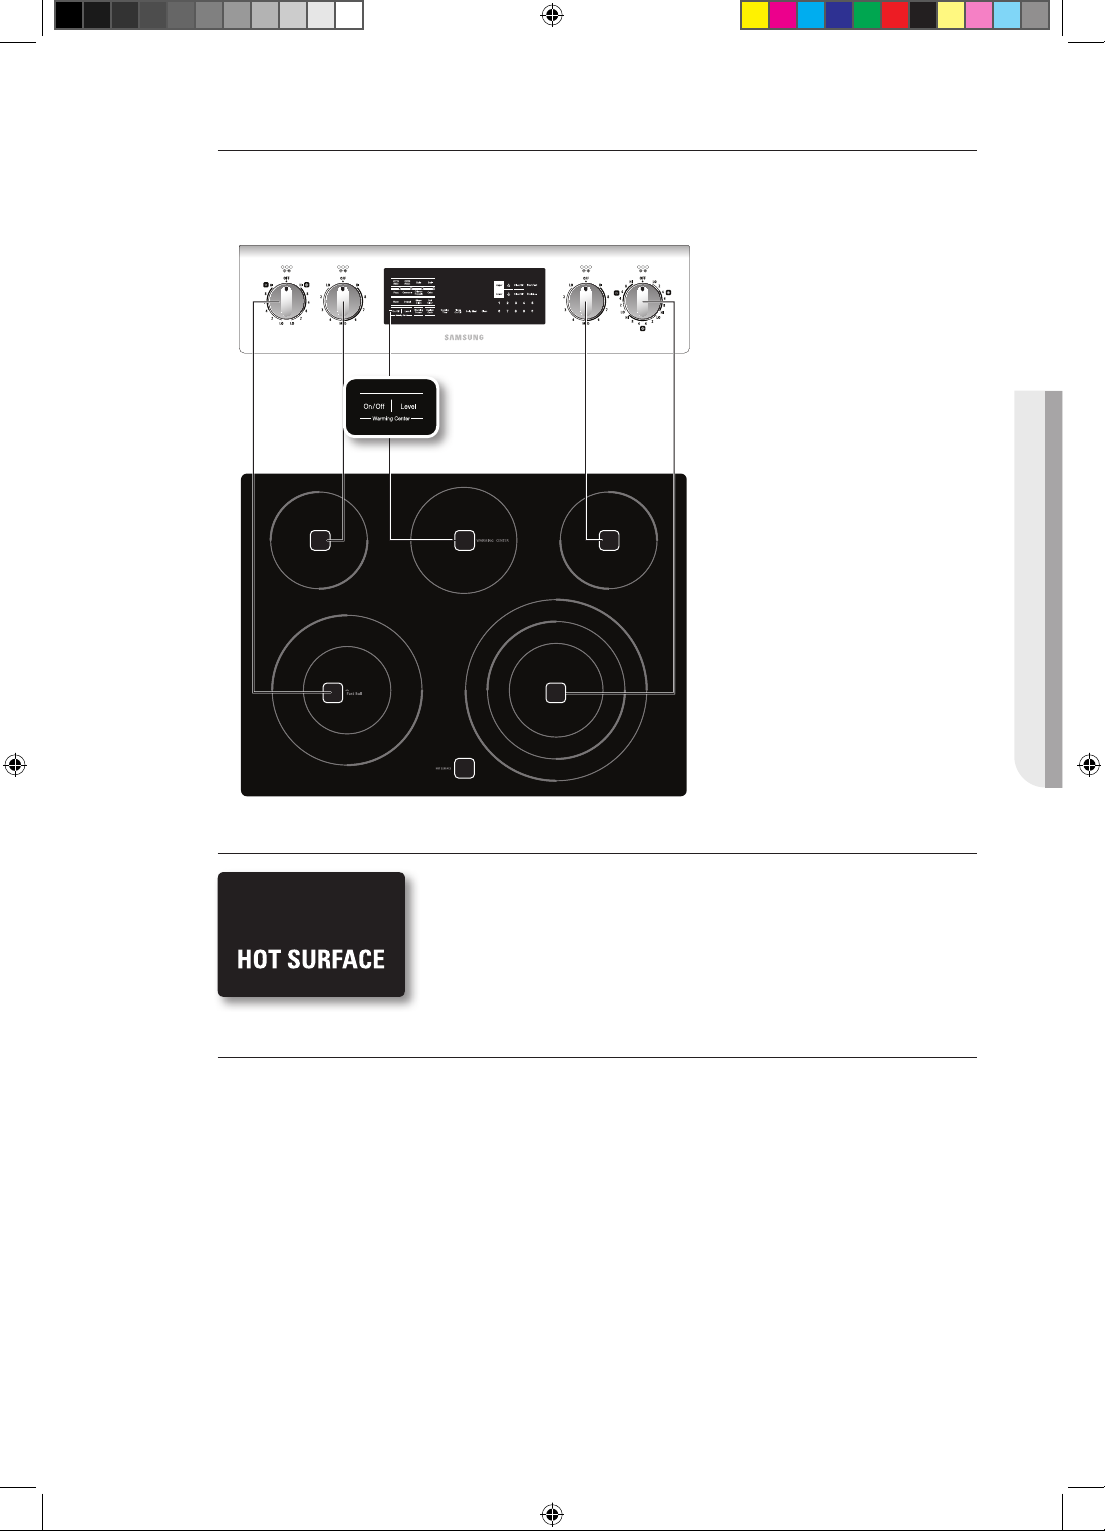
Emplacement des foyers radiants et des commandes
Les boutons de commande permettent d'activer les foyers radiants de la table de cuisson comme
indiqué ci-dessous.
1. Élément unique : arrière
1
3 4
5 2
6
gauche
2. Élément unique : arrière droit
3. Élément double : avant
gauche (3,000 W)
4. Élément triple: avant droit
(3,000 W)
5. Zone chaue-plat : arrière
centre
6. Témoin de surface chaude
TABLE DE CUISSON
Témoin de surface chaude
• S'allume lorsque la surface est allumée ou est chaude au toucher.
• Reste allumé même après la mise hors tension du foyer.
• Reste allumé jusqu'à ce que la surface descende à environ 150 °F.
Zones de cuisson
• Les zones de cuisson de votre cuisinière sont matérialisées par des cercles permanents sur la
table de cuisson vitrée. Pour une cuisson plus ecace, utilisez des récipients de même taille
que les foyers.
• Les récipients ne doivent pas dépasser de plus de ½” à 1” la zone de cuisson.
• Lorsqu'un bouton est activé, une lueur est visible à travers la table de cuisson vitrée. L'élément
s'allume et s'éteint alternativement afin de maintenir la chaleur préréglée, même
lorsque le réglage de température est élevé.
• Pour obtenir plus d'informations sur la sélection des ustensiles de cuisine appropriés, reportezvous au chapitre «Utilisation des ustensiles de cuisine appropriés», en page23.
Table de cuisson _19
FE710DRS_XAC_DG68-00334A-07_CFR.indd 19 05/11/2012 20:28:45
Page 92
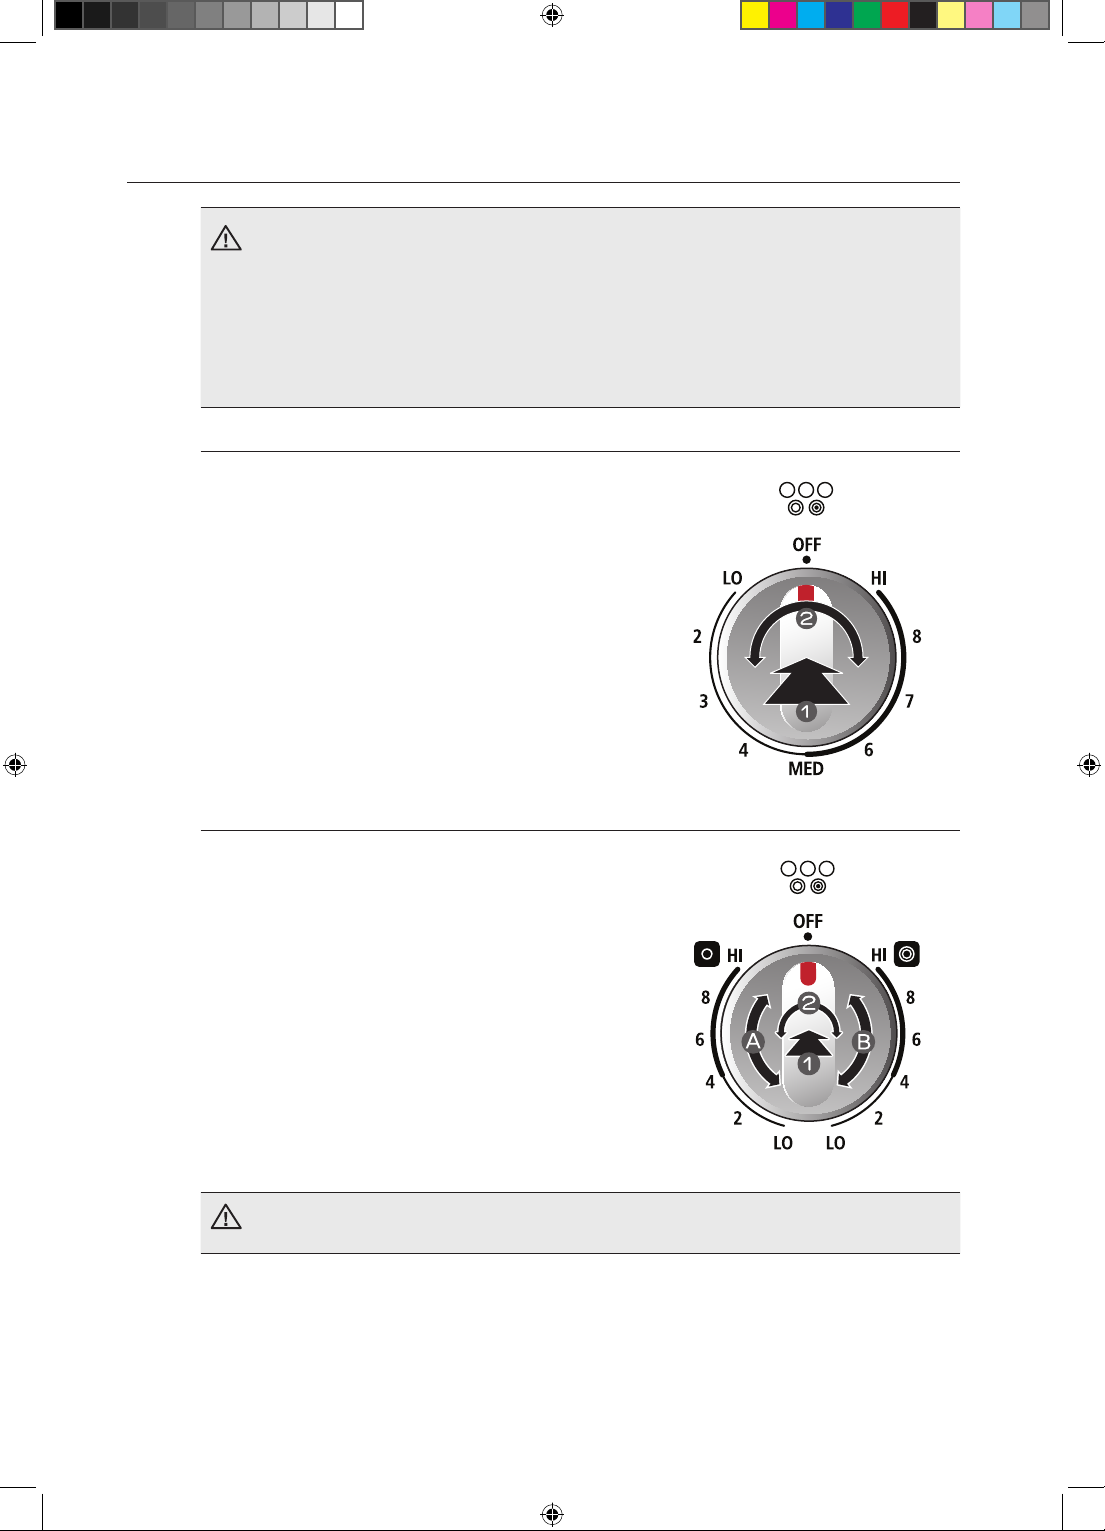
COMMENT RÉGLER LA CUISINIÈRE POUR UTILISER LA TABLE DE
CUISSON?
• Les foyers de la table de cuisson peuvent être chauds, même éteints, et provoquer
ATTENTION
Bouton de commande de l'élément unique (arrière gauche, arrière droit)
1. Enfoncez le bouton.
2. Tournez dans l'une ou l'autre direction selon le réglage
• Sur les positions o (désactivé) et high (élevé), un déclic
est émis.
des brûlures. Ne touchez pas les foyers avant qu'ils n'aient susamment refroidi.
• Ne laissez jamais la cuisson sans surveillance à température élevée ou moyennement
élevée. En cas de débordement, les particules de graisse provenant des aliments
risquent de s'enflammer.
• Veillez à tourner le bouton de commande sur OFF (DESACTIVE) à la fin de la
cuisson.
souhaité.
Bouton de commande de l'élément double (avant gauche)
Le foyer double est doté de deux tailles de cuisson de
manière à pouvoir accueillir plusieurs types de récipients.
1. Enfoncez le bouton.
2. Tournez dans l'une ou l'autre direction selon le réglage
souhaité.
• Pour utiliser le petit élément, tournez le bouton de
commande sur le réglage correspondant au petit foyer
(A).
• Pour utiliser le grand élément, tournez le bouton de
commande sur le réglage correspondant au grand
foyer (B).
La zone située entre le réglage élevé et désactivé n'est pas adaptée à la cuisson.
ATTENTION
20_ Table de cuisson
FE710DRS_XAC_DG68-00334A-07_CFR.indd 20 05/11/2012 20:28:45
Page 93
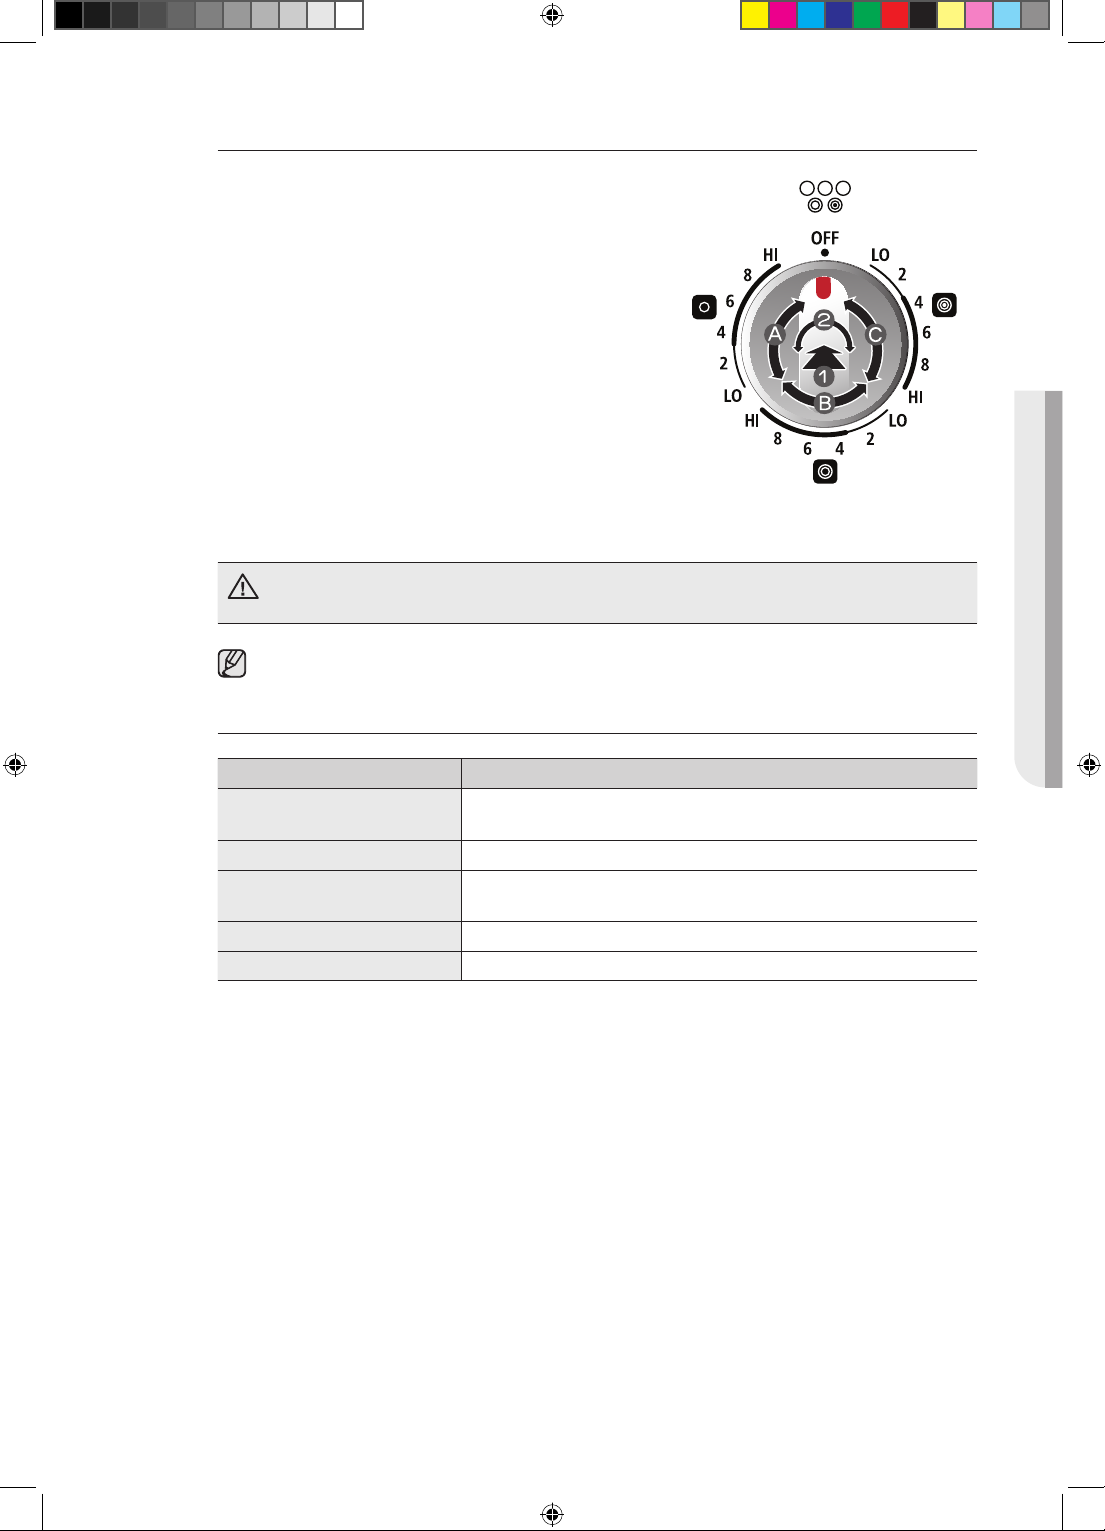
Bouton de commande de l'élément triple (avant droit)
Le foyer double est doté de 3 tailles de cuisson de
manière à pouvoir accueillir plusieurs types de récipients.
1. Enfoncez le bouton.
2. Tournez dans l'une ou l'autre direction selon le réglage
souhaité.
• Pour utiliser le petit élément, tournez le bouton de
commande sur le réglage correspondant au petit foyer
(A).
• Pour utiliser l'élément moyen, tournez le bouton de
commande sur le réglage correspondant au foyer
moyen (B).
• Pour utiliser le grand élément, tournez le bouton de
commande sur le réglage correspondant au grand
foyer (C).
La zone située entre le réglage élevé et désactivé n'est pas adaptée à la cuisson.
ATTENTION
Lorsque vous passez du réglage d'une température élevée à celui d'une température faible,
l'élément de surface redevient noir. Ceci est tout à fait normal.
TABLE DE CUISSON
Réglages recommandés
REGLAGE TYPE DE CUISSON
ÉLEVÉE Démarrer la cuisson de la plupart des aliments, amener l'eau à
ébullition, griller dans une poêle
MOYENNEMENT ÉLEVÉE Griller rapidement à la poêle, frire, frire dans un bain d'huile
MOYENNE Maintenir à faible ébullition, épaissir des sauces, cuire des
légumes à la vapeur
MOYENNEMENT FAIBLE Poursuivre la cuisson, pocher, faire mijoter
FAIBLE Maintenir au chaud, faire fondre, cuire doucement
Table de cuisson _21
FE710DRS_XAC_DG68-00334A-07_CFR.indd 21 05/11/2012 20:28:46
Page 94
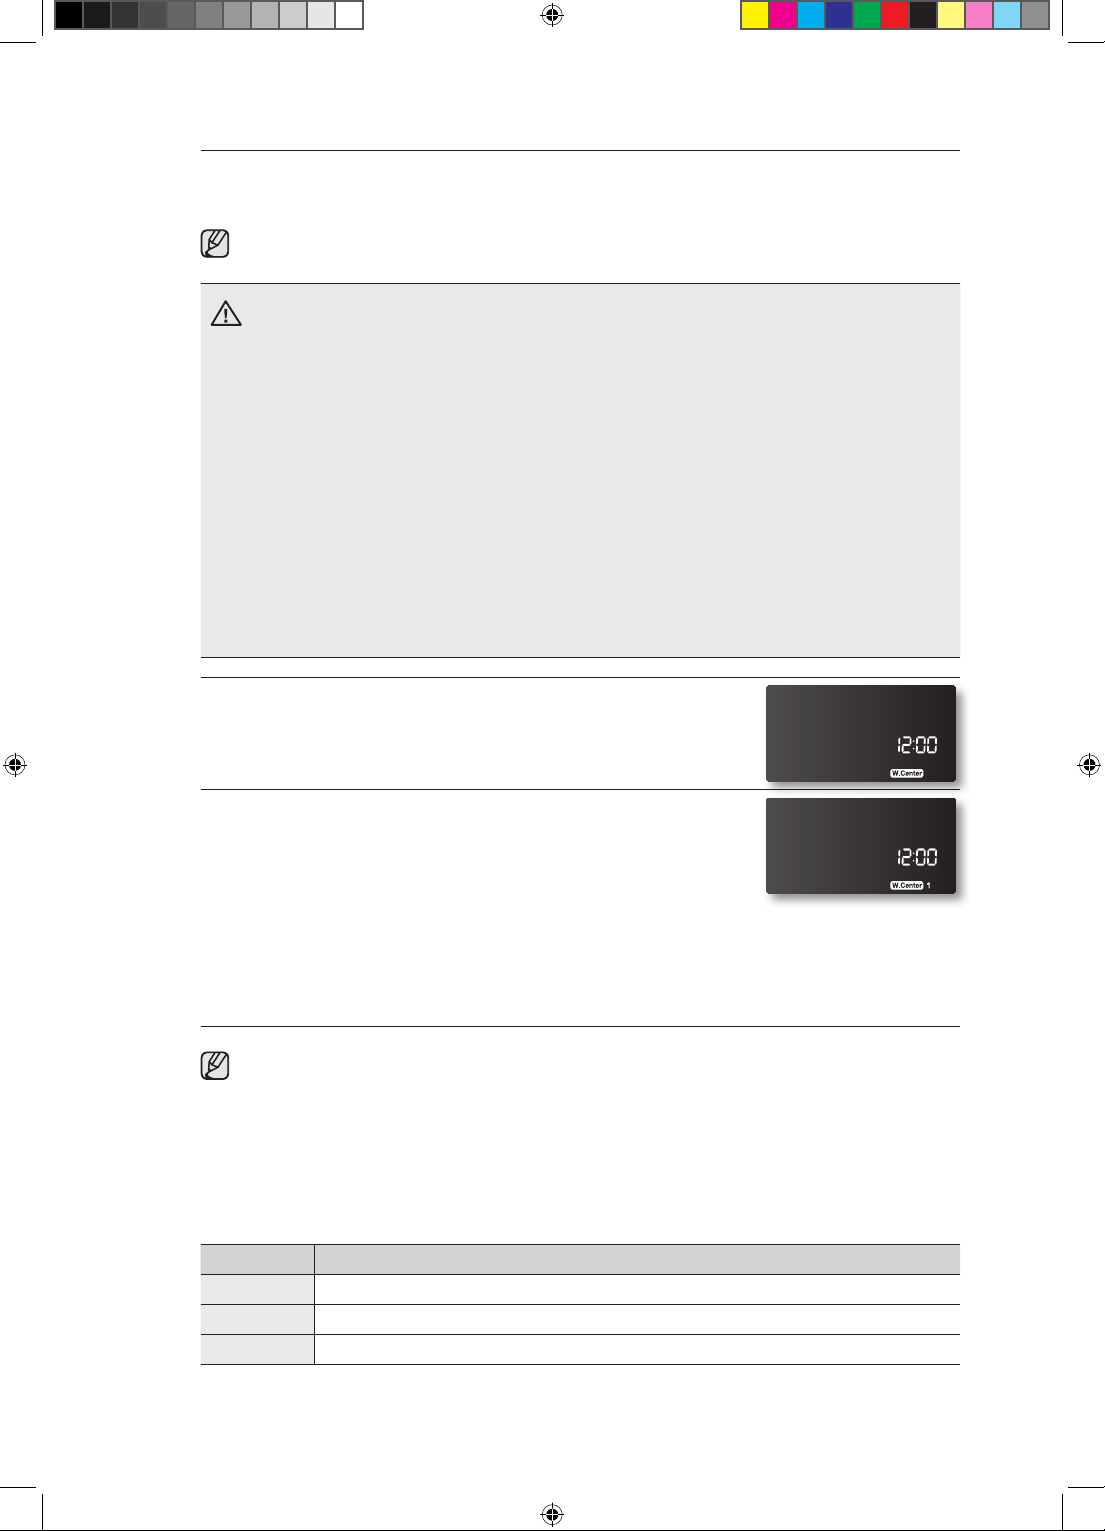
Utilisation de la zone chaue-plat
La zone chaue-plat, située dans la partie centrale arrière de la surface vitrée, conserve les
aliments cuits à température de consommation.
• La zone chaue-plat ne devient pas rouge comme les autres foyers.
• Ne réchauez pas les aliments pendant plus de deux heures sur la zone chaue-plat.
ATTENTION
• Utilisez uniquement des ustensiles et plats recommandés pour une utilisation sûre
dans le four et sur la table de cuisson.
• Utilisez toujours des maniques ou des gants lorsque vous retirez les aliments de la
zone chaue-plat, car les ustensiles et les plats restent chauds.
• Lorsque vous faites chauer des pâtisseries et du pain, ménagez une ouverture dans
le couvercle afin de permettre à la vapeur de s'échapper.
• Ne couvrez pas les aliments de film plastique. Le plastique risque de fondre sur la
surface et de s'avérer très dicile à nettoyer.
• Il est recommandé de conserver les aliments dans leurs récipients et recouverts d'un
couvercle ou d'un papier d'aluminium afin d'en conserver tout le goût.
• Les aliments doivent être déjà chauds. La consommation d'aliments crus ou froids
placés sur la zone chaue-plat risque de vous rendre malade.
1. Allumez la zone chaue-plat.
Appuyez sur la touche WARMING CENTER ON/OFF
(ACTIVATION/DESACTIVATION DE LA ZONE CHAUFFEPLAT).
2. Sélectionnez la puissance de votre choix.
Appuyer une fois sur la touche WARMING CENTER LEVEL
(NIVEAU DE LA ZONE CHAUFFE-PLAT) permet de régler le
niveau sur 1. Appuyez deux fois sur la touche pour régler le niveau
2 et trois fois pour régler le niveau 3.
3. Eteignez la zone chaue-plat.
Appuyez sur la touche WARMING CENTER ON/OFF
(ACTIVATION/DESACTIVATION DE LA ZONE CHAUFFEPLAT).
• Appuyer sur la touche CLEAR/OFF (EFFACER/ARRET) ne permet pas d'éteindre la
zone chaue-plat.
• Pour de meilleurs résultats, recouvrez les aliments placés sur la zone chaue-plat d'un
couvercle ou d'un film d'aluminium. Lorsque vous faites chauer des pâtisseries ou du
pain, ménagez une ouverture dans le couvercle à l'aide d'aluminium afin de permettre à
la vapeur de s'échapper.
Réglages recommandés
NIVEAU TYPE D'ALIMENTS
1 Pains/pâtisseries, plats mijotés, sauces, œufs
2 Assiettes-repas, soupes (veloutés), légumes, sauces, ragoûts, viandes
3 Aliments frits, soupes (bouillons), boissons chaudes
22_ Table de cuisson
FE710DRS_XAC_DG68-00334A-07_CFR.indd 22 05/11/2012 20:28:46
Page 95
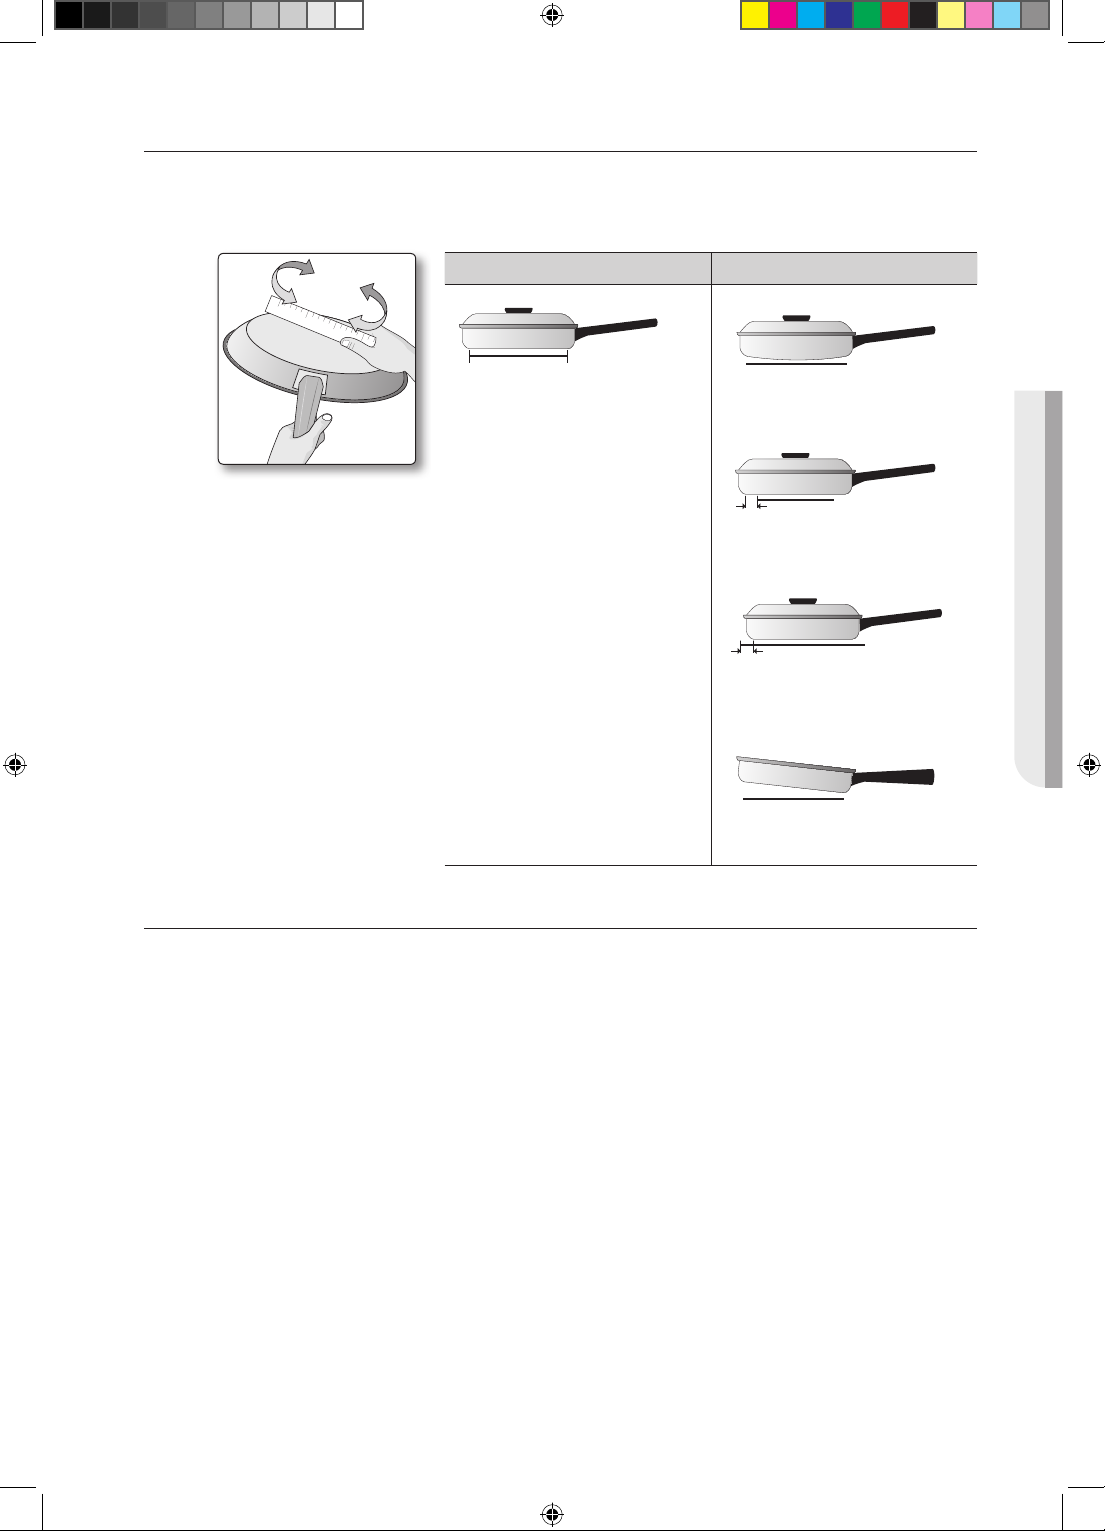
UTILISATION DES USTENSILES DE CUISINE APPROPRIÉS
L'utilisation de l'ustensile de cuisine approprié permet d'éviter de nombreux problèmes tels qu'une
cuisson inégale ou un temps de cuisson trop long. Utiliser une casserole adaptée permet de
réduire les temps de cuisson et de cuire uniformément les aliments.
APPROPRIÉ NON APPROPRIÉ
Vérifiez que le fond du
récipient est plat en
faisant tourner une règle
dessus.
Fond plat et bords droits.
• Couvercles hermétiques.
• Le poids du manche ne fait
pas incliner la casserole.
• Casserole bien équilibrée.
• La taille de la casserole
est adaptée à la quantité
d'aliments à préparer et à la
taille du foyer.
• Matériau permettant une
bonne conduction de la
chaleur.
• Le diamètre du récipient doit
toujours correspondre à celui
du foyer.
Fond de casserole bombé et
déformé.
La casserole dépasse du foyer
de plus d'un pouce et demi.
La casserole est plus petite que
le foyer.
Le manche fait incliner le
récipient.
CHOIX DES USTENSILES DE CUISINE APPROPRIÉS
Le matériau de l'ustensile de cuisine assure que la chaleur émise par le foyer se propage
uniformément et rapidement au fond de la casserole.
• ALUMINIUM - Excellent conducteur thermique. Certains types d'aliments font noircir
l'aluminium (Les ustensiles en aluminium anodisé résistent aux taches et aux piqûres). Si
vous faites glisser des casseroles en aluminium sur la table de cuisson en céramique, des
traces métalliques semblables à des rayures peuvent apparaître. Retirez ces traces dès le
refroidissement de la surface de cuisson.
• CUIVRE - Excellent conducteur thermique mais se décolore facilement. Peut laisser des traces
métalliques sur la vitrocéramique (voir ci-dessus).
• ACIER INOXYDABLE - Conducteur thermique lent entraînant une cuisson inégale. Durable,
facile à nettoyer et résistant aux taches.
• FONTE - Mauvais conducteur, mais conserve bien la chaleur. La cuisson n'est uniforme
qu'une fois la température de cuisson atteinte. Son utilisation n'est pas recommandée pour les
surfaces de cuisson en céramique.
• CASSEROLE ÉMAILLÉE - Les caractéristiques de chauage varient en fonction du matériau
de base. Les revêtements en émail vitrifié doivent être lisses afin d'éviter de rayer les surfaces
de cuisson en céramique.
• VERRE - Conducteur thermique lent. Son utilisation n'est pas recommandée sur les surfaces
de cuisson en céramique car il peut rayer la surface.
TABLE DE CUISSON
Table de cuisson _23
FE710DRS_XAC_DG68-00334A-07_CFR.indd 23 05/11/2012 20:28:46
Page 96
PROTECTION DE LA SURFACE LISSE
Nettoyage
• Nettoyez la table de cuisson avant de l'utiliser pour la première fois.
• Nettoyez votre table de cuisson quotidiennement ou après chaque utilisation. Ainsi, vous
conserverez votre table de cuisson en bon état et éviterez les dommages.
• Si la casserole déborde durant la cuisson, nettoyez immédiatement la zone de cuisson tant
qu'elle est chaude; un nettoyage ultérieur s'avèrerait plus dicile. Nettoyez prudemment les
éclaboussures à l'aide d'un chion sec.
• Evitez qu'elles ne restent trop longtemps sur la zone de cuisson ou la garniture de la surface de
cuisson.
• N'utilisez pas de poudre à récurer ou de tampon abrasif qui risquerait de rayer la table de
cuisson.
• N'utilisez pas d'agent de blanchiment chloré, d'ammoniac ou de nettoyant non recommandé
pour une utilisation sur une surface en vitrocéramique.
Prévention des traces et des rayures
• N'utilisez pas d'ustensiles en verre. Ils pourraient rayer la table de cuisson.
• Ne placez pas de grille ou d'anneau wok entre la table de cuisson et la casserole. Ces
accessoires sont susceptibles de marquer ou de rayer la table de cuisson.
• Assurez-vous que la table de cuisson et le fond de la casserole sont propres.
• Ne faites pas glisser de casseroles en métal sur la table de cuisson.
Prévention des taches
• N'utilisez pas de torchon ou d'éponge sale pour nettoyer la table de cuisson. Un film
subsisterait, provoquant des taches sur la table de cuisson après son chauage.
• Si vous continuez d'utiliser la table de cuisson alors que celle-ci est sale, les taches deviennent
définitives.
Prévention d'autres dommages
• Evitez de laisser du plastique, du sucre ou des aliments à forte teneur en sucre fondre sur la
table de cuisson chaude. Si cela se produit, nettoyez-la immédiatement.
• Ne laissez jamais chauer un récipient jusqu'à évaporation complète de son contenu. Vous
risqueriez de l'endommager.
• N'utilisez pas la table de cuisson comme plan de travail ou planche à découper.
• Ne faites jamais cuire d'aliments directement sur la table de cuisson. Utilisez des ustensiles
de cuisine appropriés.
24_ Table de cuisson
FE710DRS_XAC_DG68-00334A-07_CFR.indd 24 05/11/2012 20:28:46
Page 97
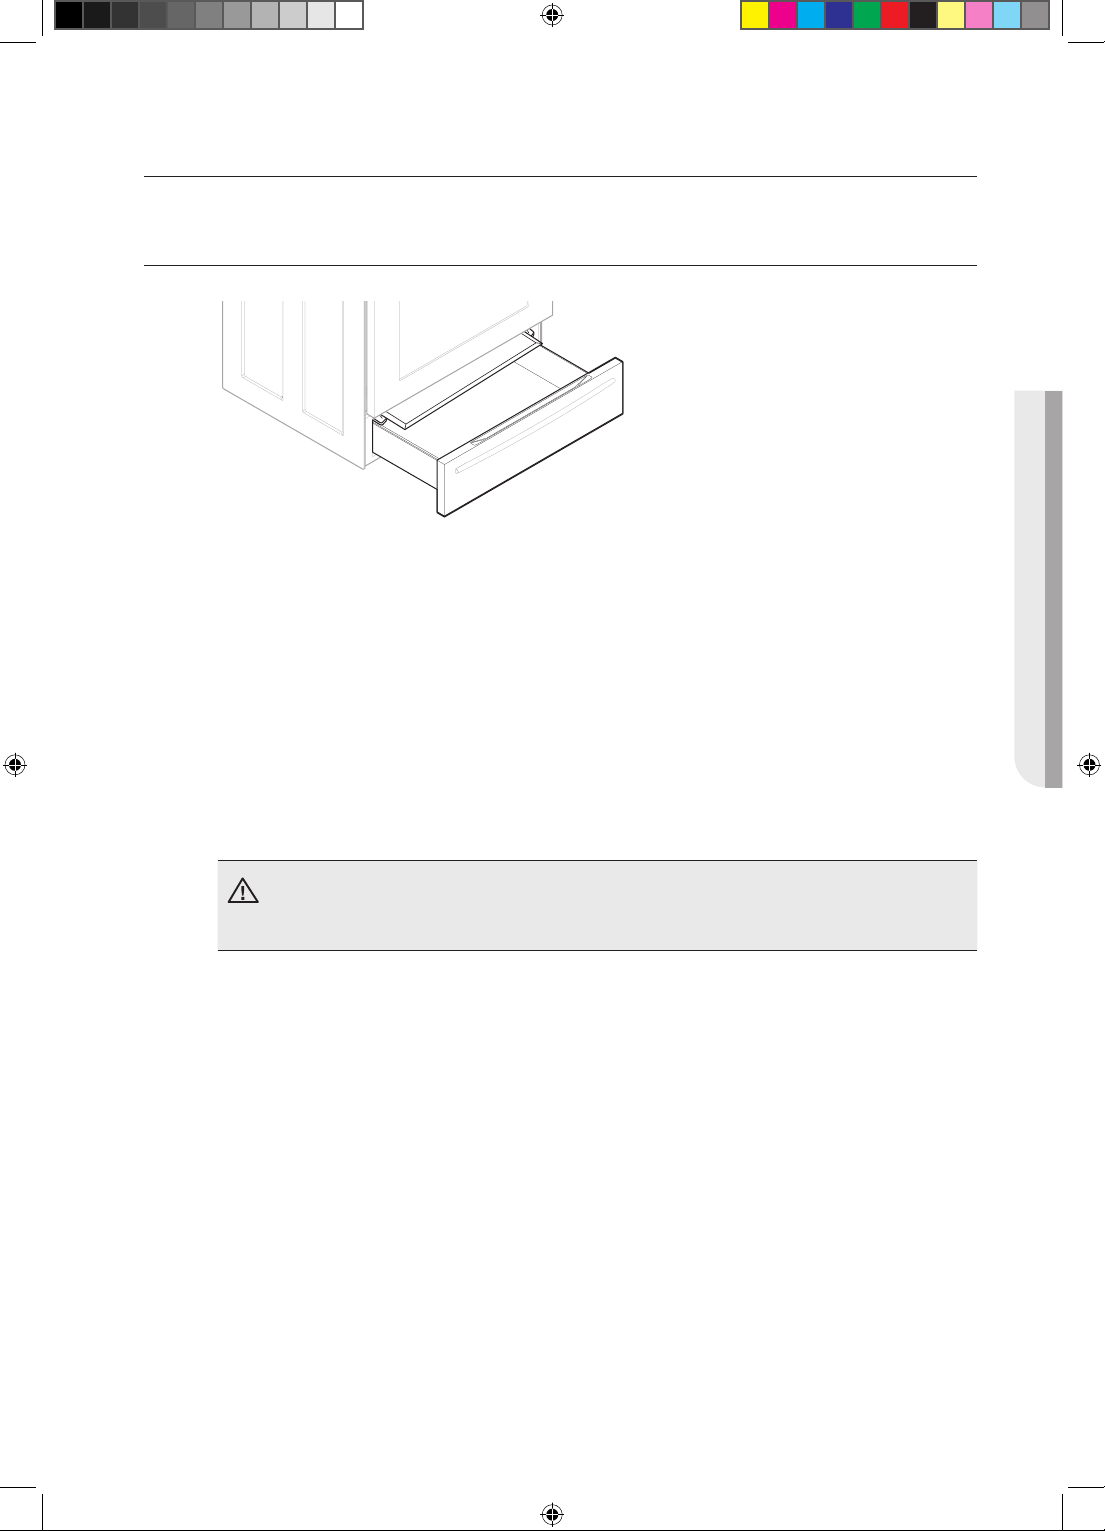
utilisation du tiroir chaue-plat
À PROPOS DU TIROIR CHAUFFE-PLAT
Le tiroir chaue-plat conserve les
aliments cuits chauds. Les aliments
doivent être déjà chauds. Ne l'utilisez pas
pour faire chauer des aliments froids,
à l'exception du pain, des crackers, des
chips ou des céréales déshydratées.
Environ 25minutes sont nécessaires pour
préchauer le tiroir chaue-plat.
• Ne tapissez pas le tiroir chaue-plat ou la casserole de papier d'aluminium. Le
papier d'aluminium est un excellent isolant thermique et aurait pour conséquence
d'emprisonner la chaleur. Son utilisation est susceptible de perturber le
fonctionnement du tiroir et d'endommager la finition intérieure.
• Ne placez pas de liquide ou d'eau dans le tiroir chaue-plat.
• Tous les aliments placés dans le tiroir chaue-plat doivent être recouverts d'un couvercle ou
de papier d'aluminium. Lorsque vous faites chauer des pâtisseries ou du pain, ménagez une
ouverture à l'aide d'aluminium ou utilisez un couvercle perforé afin de permettre à la vapeur de
s'échapper.
• Retirez les couverts de service, etc., avant de placer le récipient dans le tiroir chaue-plat.
• Conservez les aliments dans le récipient de cuisson ou transférez-les dans un plat de service
résistant à la chaleur.
TIROIR CHAUFFE-PLAT
Les récipients ou emballages en plastique fondent s'ils sont en contact direct avec le
tiroir, la casserole ou un ustensile chaud. Il est possible le plastique fondu ne s'enlève
ATTENTION
plus. Ces dégâts ne sont pas couverts par la garantie.
Utilisation du tiroir chaue-plat _25
FE710DRS_XAC_DG68-00334A-07_CFR.indd 25 05/11/2012 20:28:47
Page 98
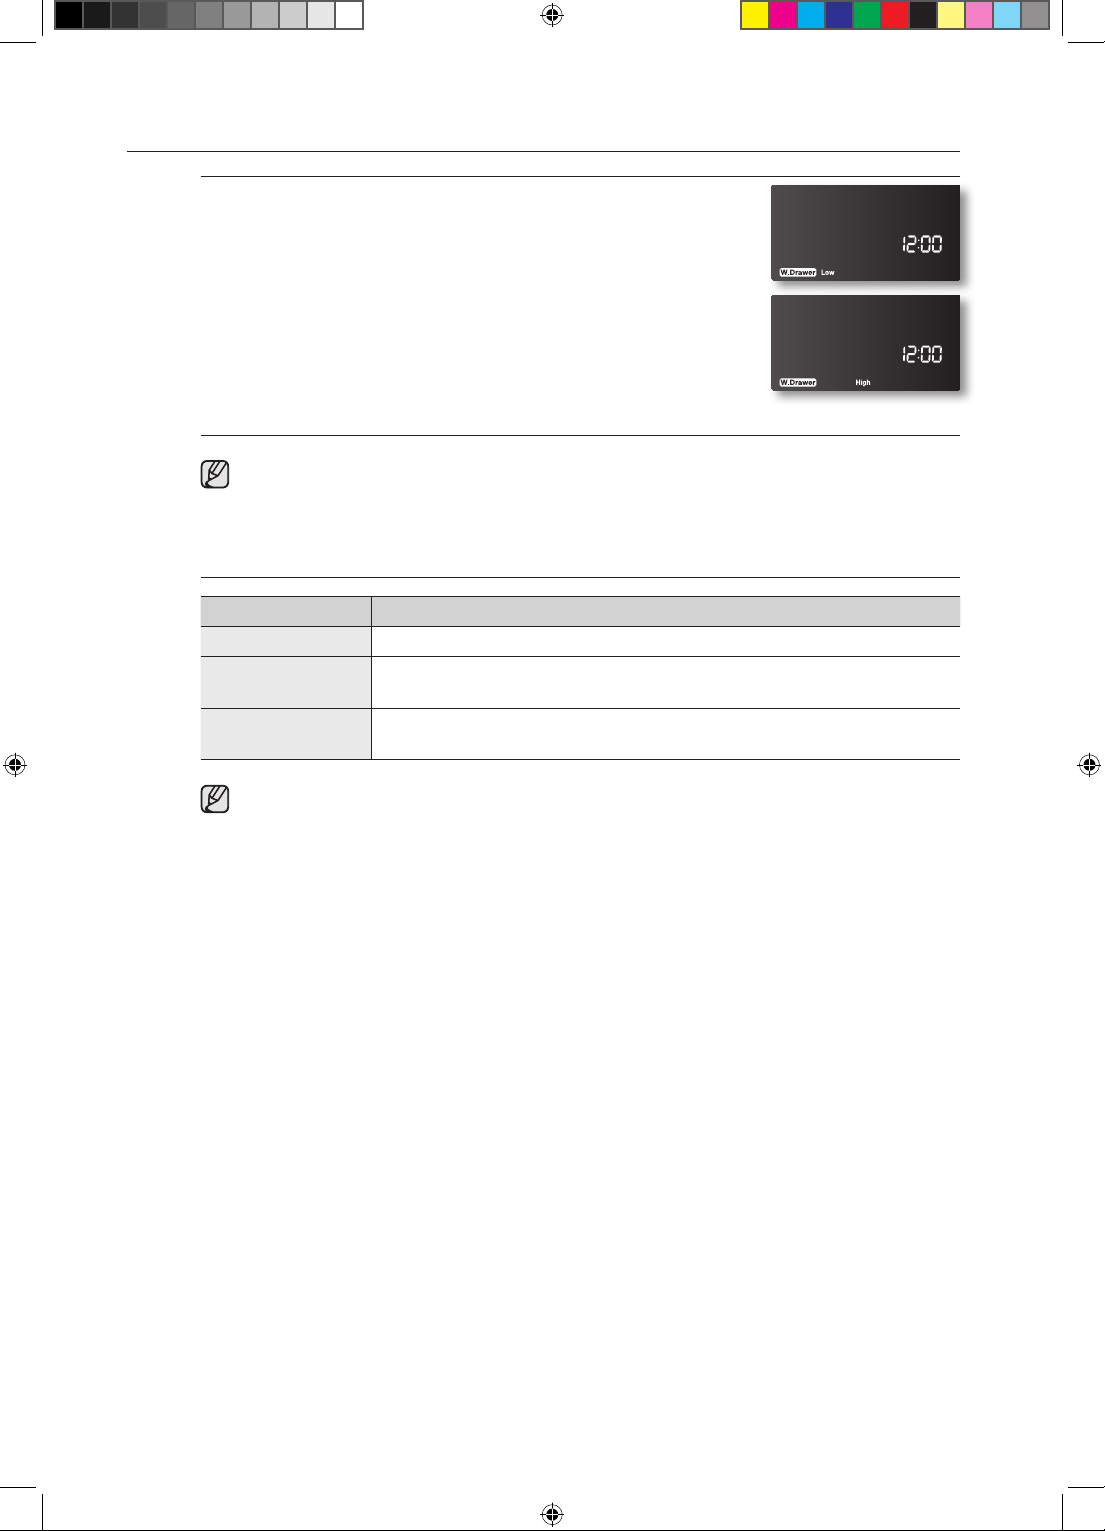
ACTIVATION OU DÉSACTIVATION DU TIROIR CHAUFFE-PLAT
1. Réglez le tiroir chaue-plat sur la puissance souhaitée.
Appuyez une fois sur la touche WARMING DRAWER (TIROIR
CHAUFFE-PLAT) pour obtenir une puissance faible, deux fois
pour obtenir une puissance moyenne, trois fois pour obtenir une
puissance élevée et quatre fois pour l'éteindre.
Le tiroir chaue-plat démarre automatiquement une fois le réglage
sélectionné.
2. Pour éteindre le tiroir chaue-plat, appuyez sur la touche
WARMING DRAWER (TIROIR CHAUFFE-PLAT) jusqu'à
extinction de celui-ci.
• Appuyer sur la touche CLEAR/OFF (EFFACER/ARRÊT) ne permet pas d'éteindre le
tiroir chaue-plat.
• Le tiroir chaue-plat ne peut pas être utilisé durant le cycle d'auto-nettoyage.
Réglages recommandés
NIVEAUX TYPE D'ALIMENTS
Low (Faible) Petits pains (mous), assiettes vides
Med (Centre)
High (Élevé)
Sauces, œufs, biscuits, pâtisseries, plats mijotés, légumes, petits pains
(durs), rôtis (bœuf, porc, agneau)
Bacon, volaille, pizza, boulettes de viande, côtelettes de porc, aliments
frits
• Vous pouvez placer simultanément diérents types d'aliments dans le tiroir chaue-plat.
Pour de meilleurs résultats, ne laissez pas les aliments pendant plus d'une heure dans
le tiroir chaue-plat. Ne laissez pas d'aliments en petites quantités ou sensibles à la
chaleur, comme des œufs, pendant plus de 30minutes.
• Le tiroir chaue-plat s'éteint automatiquement après 3heures.
26_ Utilisation du tiroir chaue-plat
FE710DRS_XAC_DG68-00334A-07_CFR.indd 26 05/11/2012 20:28:47
Page 99
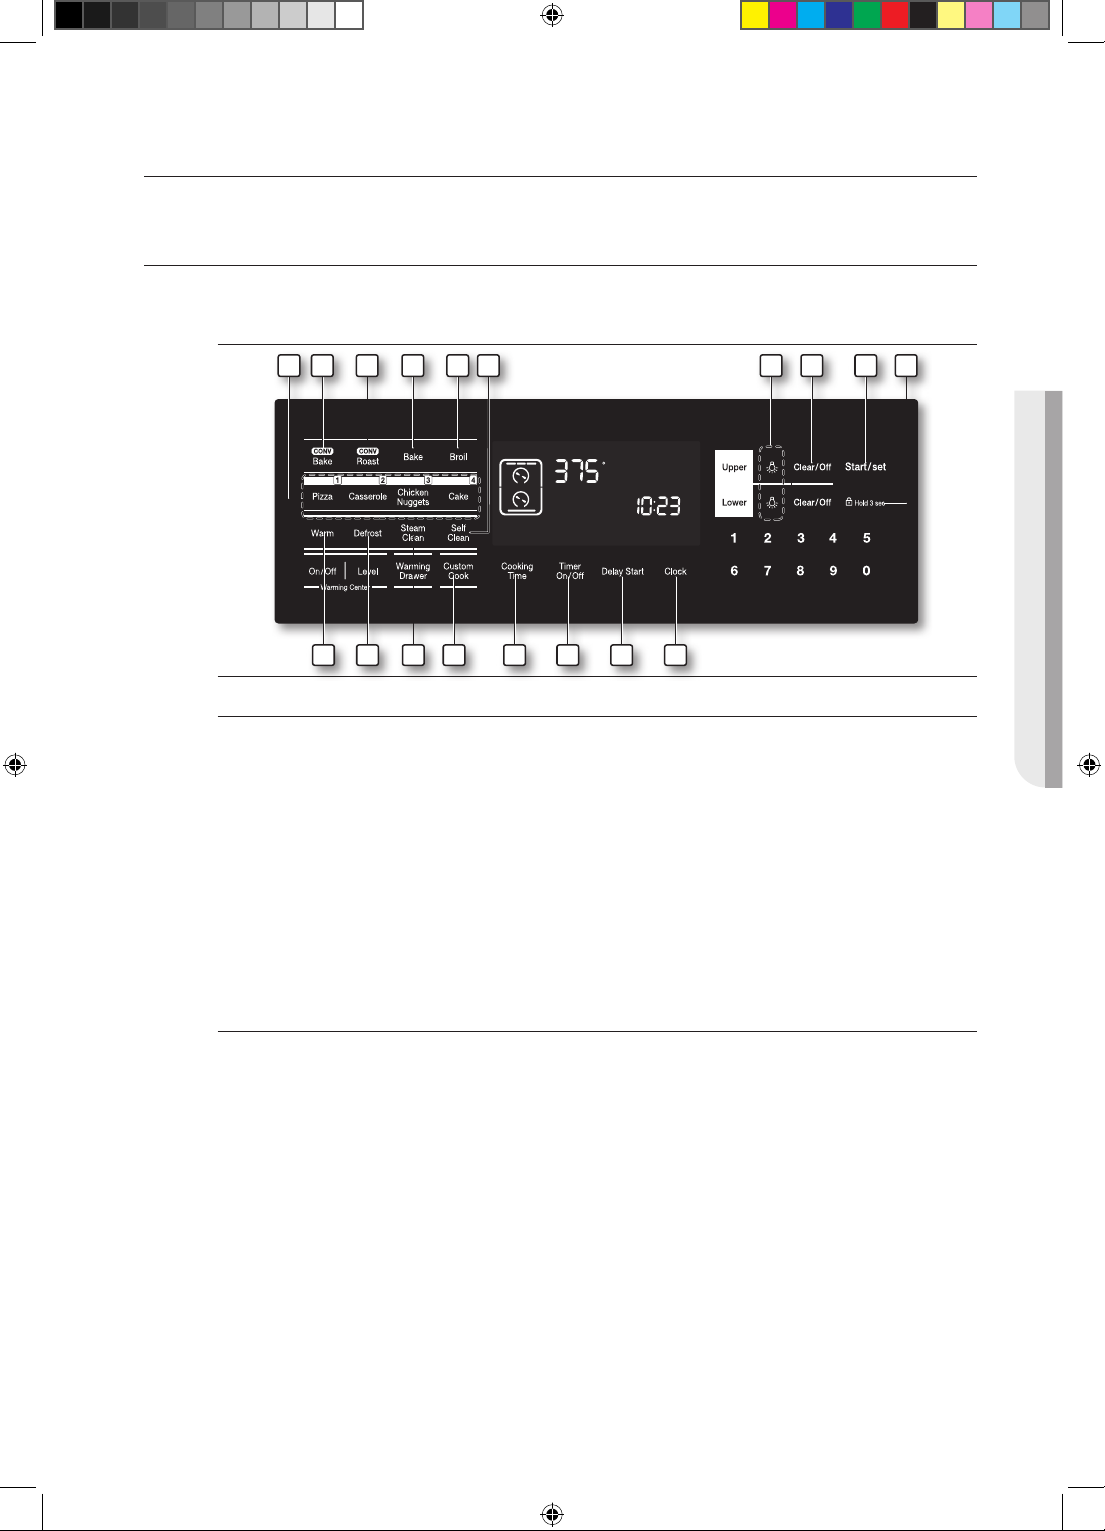
utilisation du four
TABLEAU DE COMMANDE DU FOUR
LISEZ ATTENTIVEMENT LES CONSIGNES D'UTILISATION AVANT DE VOUS SERVIR DU FOUR. Afin de
profiter au mieux de votre four, familiarisez-vous avec les fonctionnalités décrites ci-dessous. Vous trouverez
un descriptif détaillé de chaque fonction et de chaque caractéristique plus loin dans ce manuel.
1715 16 14 4 18 5 1
Fonctions traditionnelles
1. CLOCK (HORLOGE): permet de régler l'heure.
2. START/SET (DÉPART/RÉGLAGE): permet de démarrer le programme de cuisson ou de nettoyage sélectionné.
3. CONTROL LOCKOUT (VERROUILLAGE DES COMMANDES): permet de verrouiller les boutons afin qu'ils ne
puissent pas être activés par accident.
4. COOKING TIME (TEMPS DE CUISSON): appuyez sur ce bouton puis utilisez le pavé numérique pour définir le
temps de cuisson des aliments. Le four s'éteint une fois le temps de cuisson écoulé. (Bake (Cuisson traditionnelle),
Conv. Bake (Cuisson par conv.) et Conv. Roast (Rôtissage par conv.) uniquement)
5. DELAY START (DÉPART DIFFÉRÉ): permet de régler le départ et l'arrêt automatique du four selon l'heure définie.
(Bake (Cuisson traditionnelle), Conv. Bake (Cuisson par conv.), Conv. Roast (Rôtissage par conv.) et
Self Clean (Auto-nettoyage) uniquement.)
6. CLEAR/OFF (EFFACER/ARRÊT): permet d'annuler tous les fonctionnements du four, à l'exception de l'horloge, de la
minuterie, de la zone chaue-plat et du tiroir chaue-plat.
7. OVEN LIGHT (ÉCLAIRAGE DU FOUR): permet d'allumer ou d'éteindre l'éclairage du four.
Mode unique
8. BAKE (CUISSON TRADITIONNELLE): permet d'activer la fonction de cuisson traditionnelle dans le four en mode
unique.
9. BROIL (GRIL): permet d'activer la fonction de gril dans le four en mode unique.
10. CONVECTION BAKE (CUISSON PAR CONVECTION): permet d'activer la fonction de cuisson par convection dans
le four en mode unique.
11. CONVECTION ROAST (RÔTISSAGE PAR CONVECTION): permet d'activer la fonction de rôtissage par convection
dans le four en mode unique.
12. EASY COOK (CUISSON FACILE): permet de rappeler le réglage de la recette facile dans le four en mode unique.
13. SELF CLEAN (AUTO-NETTOYAGE): permet d'activer la fonction d'auto-nettoyage dans le four en mode unique.
14. STEAM CLEAN (NETTOYAGE VAPEUR): permet d'activer la fonction d'auto-nettoyage dans le four en mode unique.
15. WARM (MAINTIEN AU CHAUD): permet d'activer la fonction de maintien au chaud dans le four en mode unique
pour que les aliments restent chauds.
16. DEFROST (DÉCONGÉLATION): permet d'activer la fonction de décongélation dans le four en mode unique.
17. CUSTOM COOK (CUISSON PERSONNALISÉE): permet d'enregistrer et de rappeler le réglage de votre recette
préférée.
18. TIMER ON/OFF (ACTIVATION/DÉSACTIVATION DE LA MINUTERIE): permet d'activer la fonction de minuterie
dans le four en mode unique.
710 11 8 9 6 2 312 13
UTILISATION DU FOUR
Utilisation du four _27
FE710DRS_XAC_DG68-00334A-07_CFR.indd 27 05/11/2012 20:28:47
Page 100
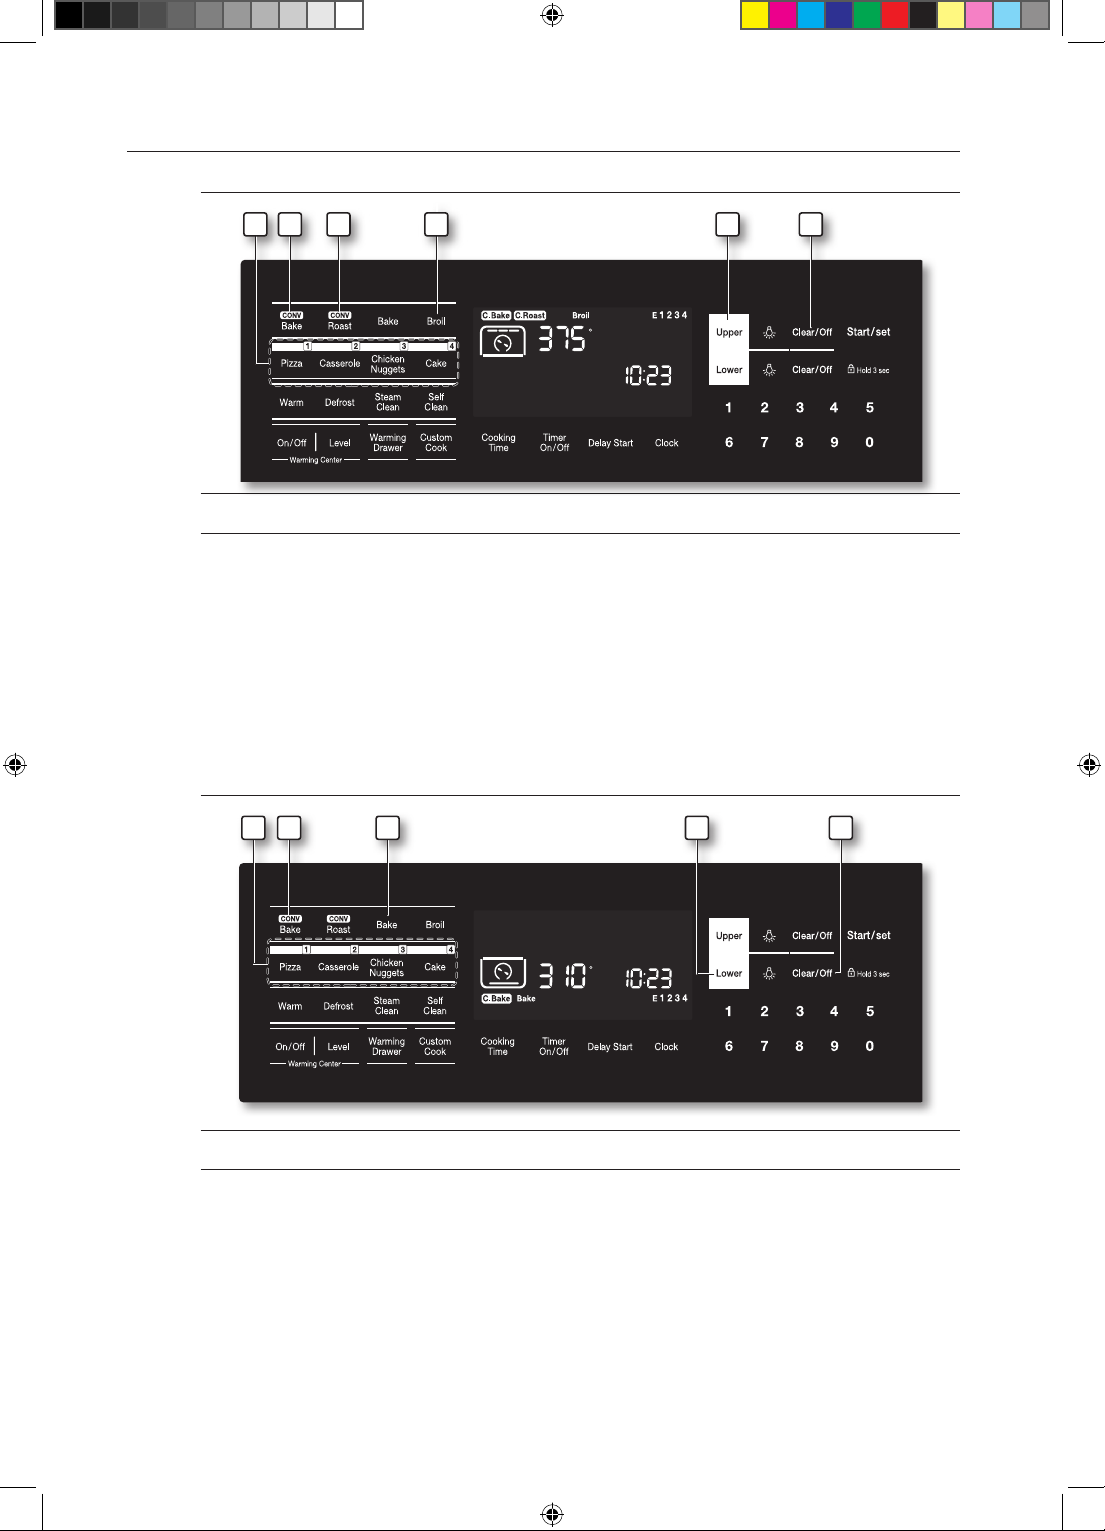
SYSTÈME DE CUISSON EN MODE DOUBLE
Ce système vous permet de régler chaque compartiment de cuisson de votre four.
Compartiment supérieur de la cuisson en mode double
1. UPPER (SUPÉRIEUR): permet de sélectionner le compartiment supérieur du mode double avant
d'activer les fonctions de cuisson.
2. BROIL (GRIL): permet d'activer la fonction de gril dans la partie supérieure du four.
3. CONVECTION BAKE (CUISSON PAR CONVECTION): permet d'activer la fonction de cuisson par
convection dans la partie supérieure du four.
4. CONVECTION ROAST (RÔTISSAGE PAR CONVECTION): permet d'activer la fonction de cuisson
par rôtissage dans la partie supérieure du four.
5. EASY COOK (CUISSON FACILE): permet de rappeler le réglage de la recette facile dans la partie
supérieure du four.
6. CLEAR/OFF (EFFACER/ARRÊT): permet d'annuler toutes les fonctions en cours dans la partie
supérieure four, à l'exception de l'horloge, de la minuterie, de la zone chaue-plat et du tiroir chaue-plat.
125 43 6
123 54
Compartiment inférieur de la cuisson en mode double
1. LOWER (INFÉRIEUR): permet de sélectionner le compartiment inférieur du mode double avant
d'activer les fonctions de cuisson.
2. BAKE (CUISSON TRADITIONNELLE): permet d'activer la fonction de cuisson traditionnelle dans la
partie inférieure du four.
3. CONVECTION BAKE (CUISSON PAR CONVECTION): permet d'activer la fonction de cuisson par
convection dans la partie inférieure du four.
4. EASY COOK (CUISSON FACILE): permet de rappeler le réglage de la recette facile dans la partie
inférieure du four.
5. CLEAR/OFF (EFFACER/ARRÊT): permet d'annuler toutes les fonctions en cours dans la partie
inférieure four, à l'exception de l'horloge, de la minuterie, de la zone chaue-plat et du tiroir chaue-plat.
28_ Utilisation du four
FE710DRS_XAC_DG68-00334A-07_CFR.indd 28 05/11/2012 20:28:48
 Loading...