

Page 1
1
Key features of your new Extender
• View movies, photos, recorded TV or sports and listen to music using Windows Media Center.
• Anynet+ (HDMI-CEC) is supported.
• Wireless network connection is supported.
• Extender is installable on the rear of your Samsung TV using the bracket rack.
• Record TV programs received through the TV tuner card installed on the PC.
• Enjoy viewing media contents of your Vista Home Premium or Vista Ultimate PC on your Samsung TV.
The menu items, contents, and services in this product are subject to change without prior notice.
For further information, please refer to Help and Support of your Vista PC.
Continuous viewing of 4:3 aspect ratio programs can result in screen burn-in (or "image retention" as it is known) and may damage
your display especially if you have a plasma type of display. We do not recommend watching 4:3 aspect ratio programs (with black
rectangle bars on its side) for an extended period of time. Beware this kind of image retention damage is not covered by most TV
manufacturers' warranty.
Grandprix_new.indd 1 2008-07-08 오후 1:32:25
Page 2
2
What's included with your new Extender
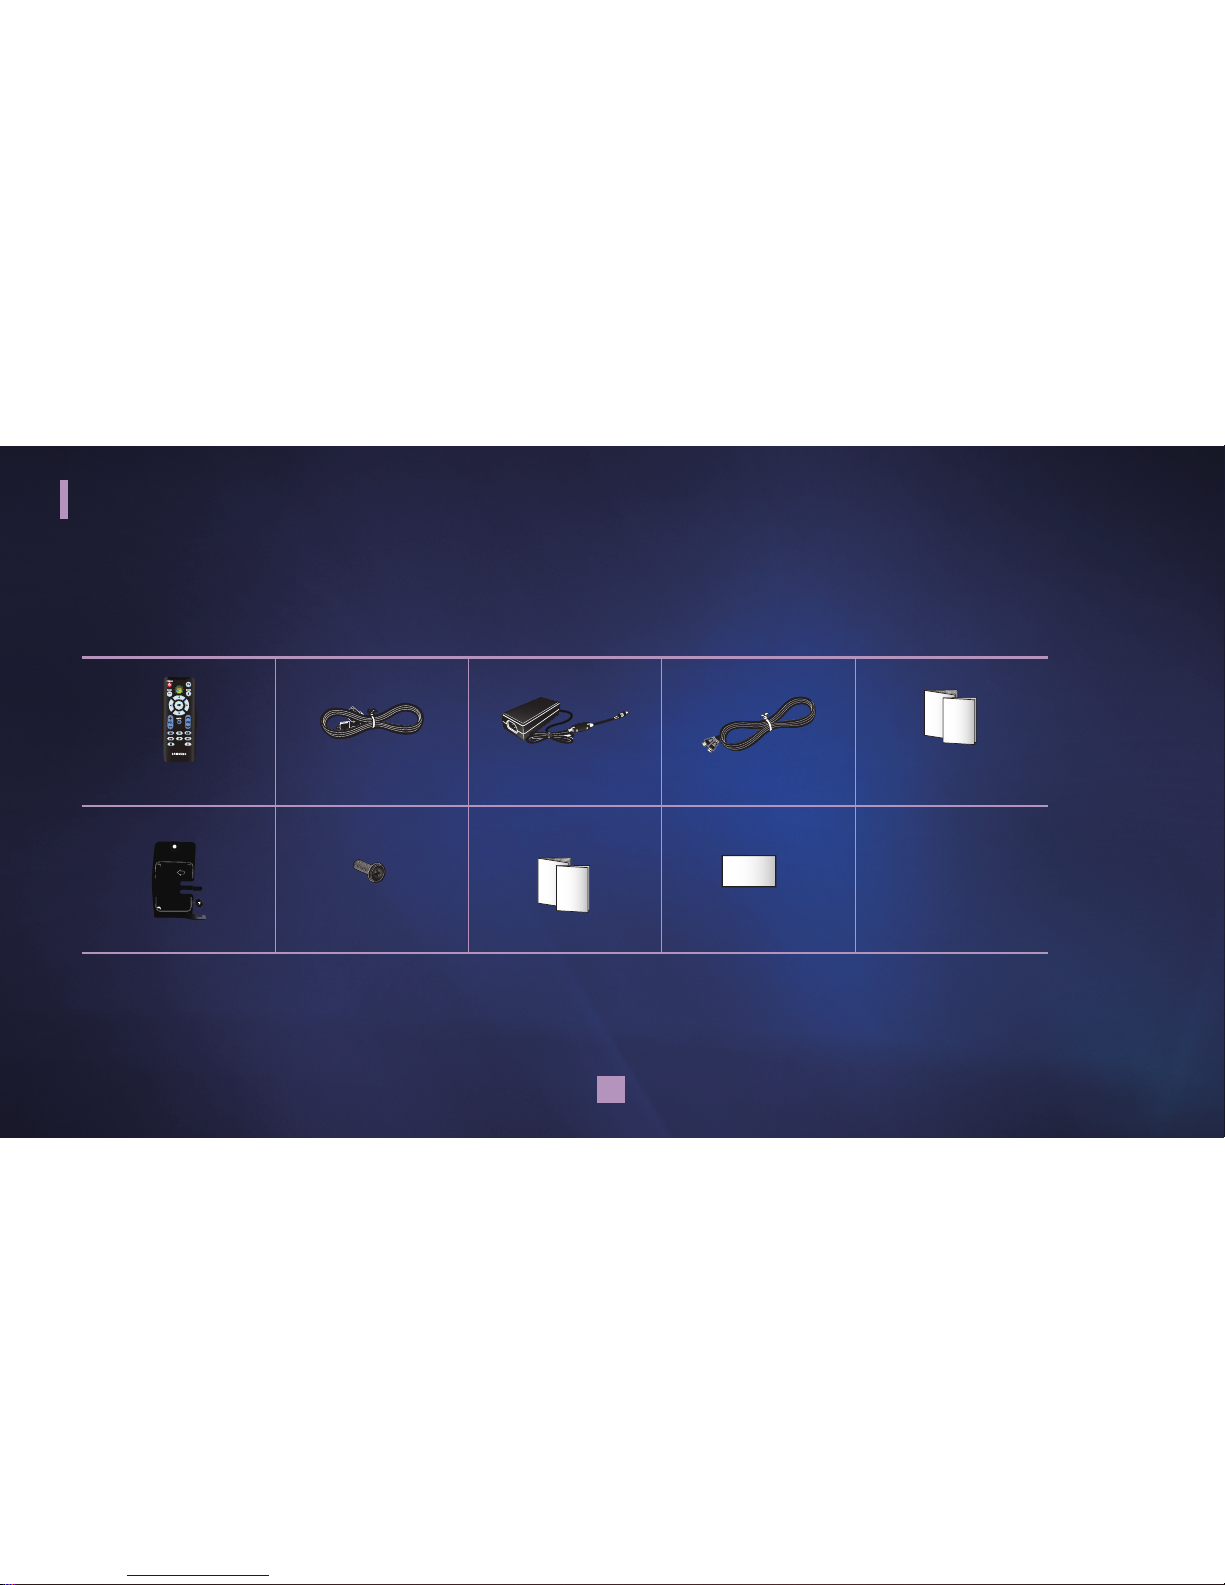
Your new Extender device comes with following accessories. If any of these items is missing from your box, call Samsung’s Customer
Care Center. Contact information is displayed on page 44.
▶ The exact shape of each item may vary by model.
Remote Control Power Cord Adapter HDMI Cable Safety Guide
Bracket Rack Screw Quick Guide Warranty Card
Use a screw which fits your Samsung TV.
Grandprix_new.indd 2 2008-07-08 오후 1:32:26
Page 3

3
Contents
KEY FEATURES OF YOUR NEW EXTENDER 1
WHAT'S INCLUDED WITH YOUR NEW EXTENDER 2
CONTENTS
3
INTRODUCING YOUR NEW EXTENDER
4
Connection panels 4
Front 4
Rear panel jacks
5
Remote control 6
Replacing remote control battery 7
CONNECTIONS 8
Connecting to a TV 8
Connecting to a router and PC
9
Connecting to Anynet + 1
0
Scanning and switching between Anynet+ devices 11
CONNECTING TO VISTA PC FOR THE FIRST TIME 12
Setting up Media Center Extender for the first time 12
SETTINGS MENU 16
Setting up Extender 16
Setting TV resolution 26
Setting screen saver 27
Updating software
28
Viewing product support
30
Resetting system
31
Operating manual 32
USING WINDOWS MEDIA CENTER EXTENDER 33
Viewing pictures or videos 33
Listening to music
34
Viewing tv or movies
35
Watching sports
36
Using online media
37
Setting tasks 38
MOUNTING YOUR EXTENDER 39
Installing the bracket rack 39
Uninstalling the bracket rack
40
TROUBLESHOOTING 41
Troubleshooting 41
SPECIFICATIONS 43
Specifications 43
CONTACT INFORMATION 44
Contact Information 44
Grandprix_new.indd 3 2008-07-08 오후 1:32:26
Page 4

4
FRONT
1 POWER LAMP
When Extender is powered on, the POWER LAMP lights up.
1
Introducing your new Extender
Grandprix_new.indd 4 2008-07-08 오후 1:32:27
Page 5
5
Introducing your new Extender
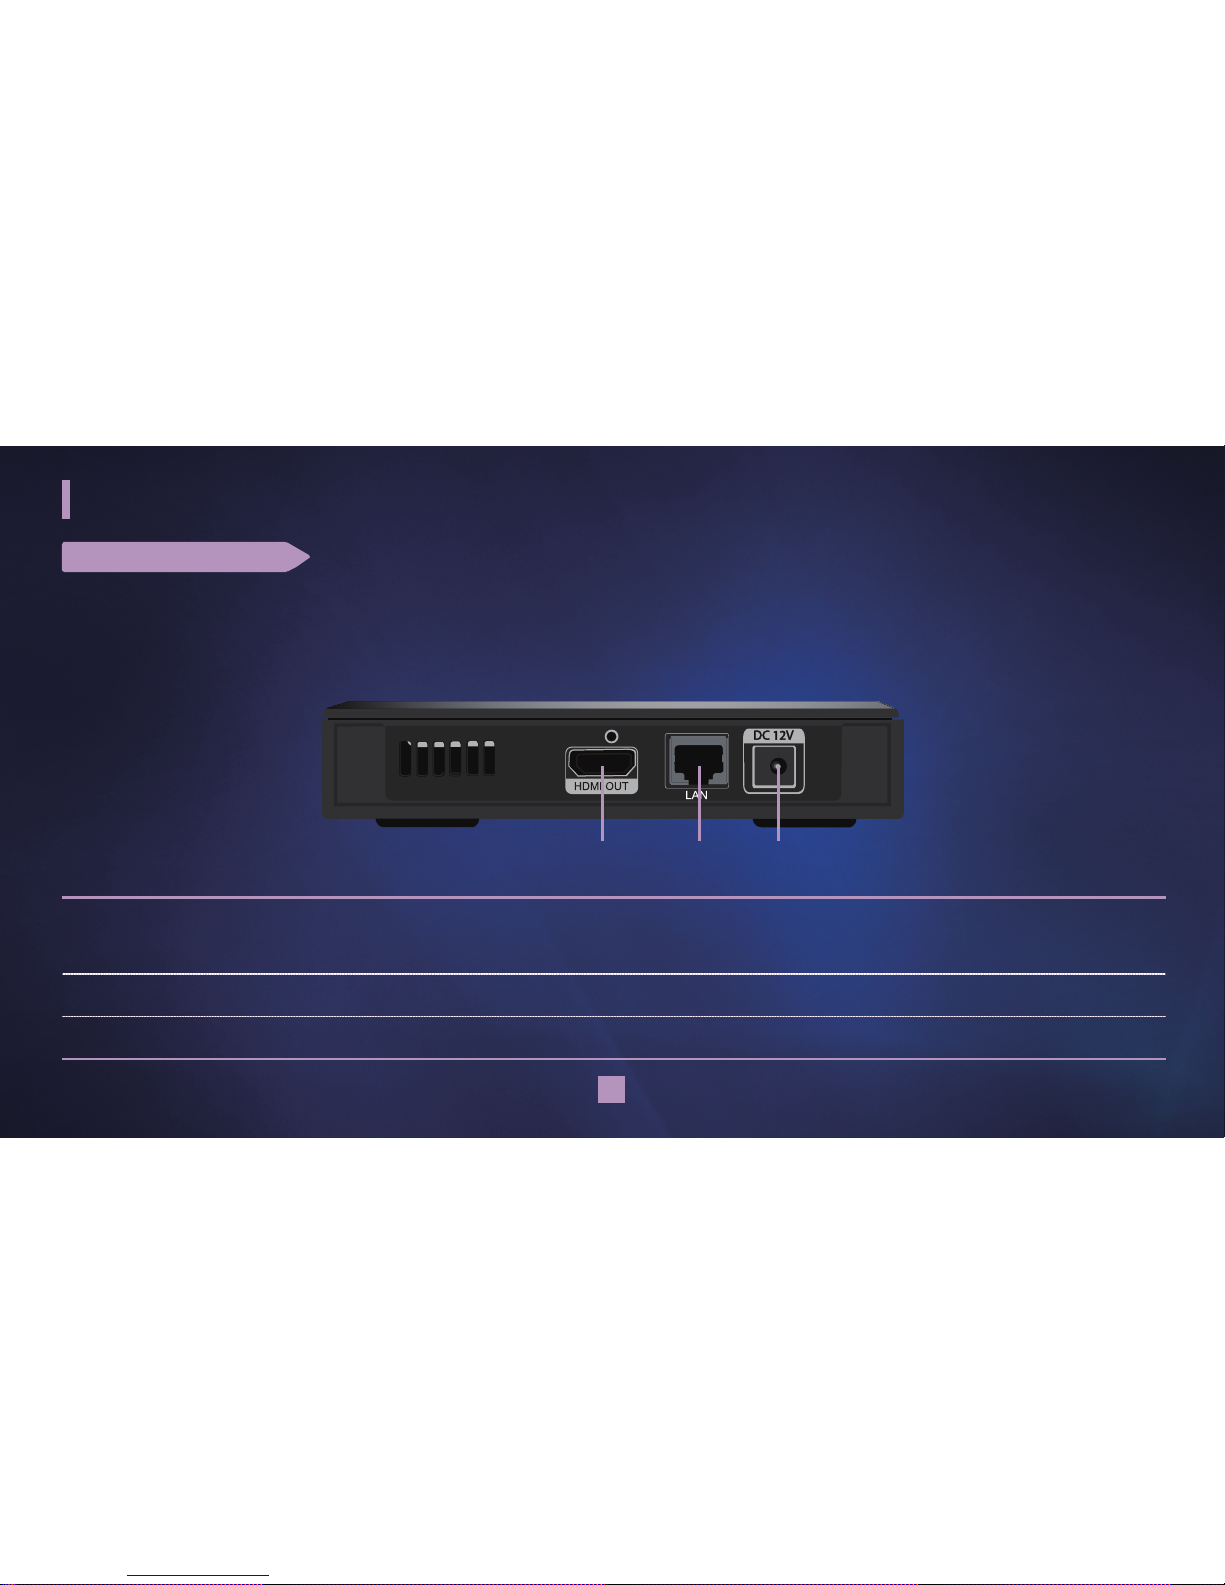
REAR PANEL JACKS
1 HDMI OUT
HDMI, which stands for High Definition Multimedia Interface, is the latest audio video technology that allows you to
connect digital audio video equipment with a digital TV with a single cable.
2 LAN
Connect an Ethernet/LAN cable (not included) for a wired network connection.
3 DC 12V
Connect the supplied power adaptor.
1 2 3
Grandprix_new.indd 5 2008-07-08 오후 1:32:28
Page 6
6
REMOTE CONTROL
Introducing your new Extender
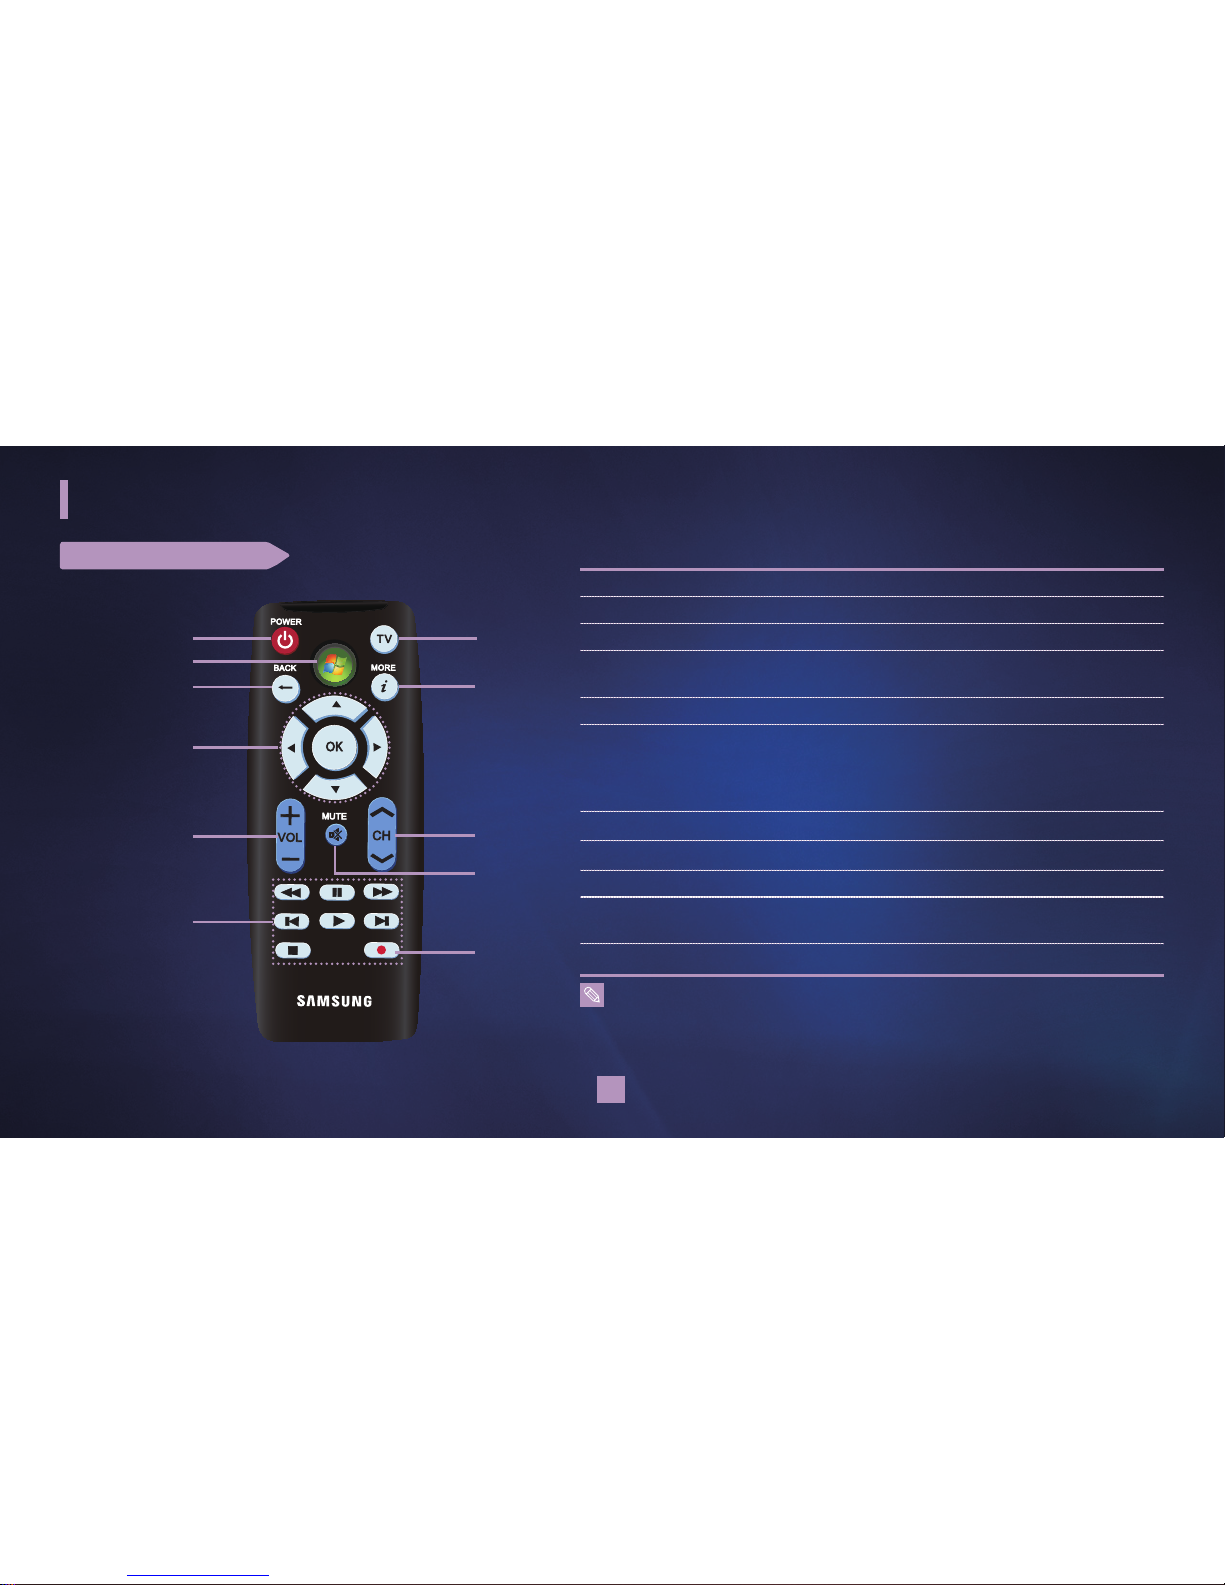
1 POWER
Turns the TV on or off.
2 GREEN BUTTON
Launches Windows Media Center.
3 BACK
Returns to the previous menu.
4 UP/DOWN/
LEFT/RIGHT/OK
Navigates through on-screen menus.
5 VOL
Controls the volume.
6 PLAY-RELATED
FUNCTIONS
Controls playback (rewind/pause/fast forward/
skip back/play/skip forward/stop)
The operation of each button can vary
depending on the contents being played.
7 RECORD
Records TV on your PC (if equipped with a TV tuner).
8 MUTE
Turns audio output on and off.
9 CH
Changes the channel.
0 MORE
Displays more information and options for the
current media content.
! TV
Exits Windows Media Center and enters TV mode.
■
This simple remote control is for Samsung TVs with Anynet+ released since 2008.
■
You should point it at the TV.
■
You can also use your Samsung TV's remote control to operate Extender.
Press the DMA button on the Samsung TV's remote control. Windows Media Center will be
launched.
1
3
9
5
2
4
6
!
0
8
7
Grandprix_new.indd 6 2008-07-08 오후 1:32:28
Page 7
7
Introducing your new Extender
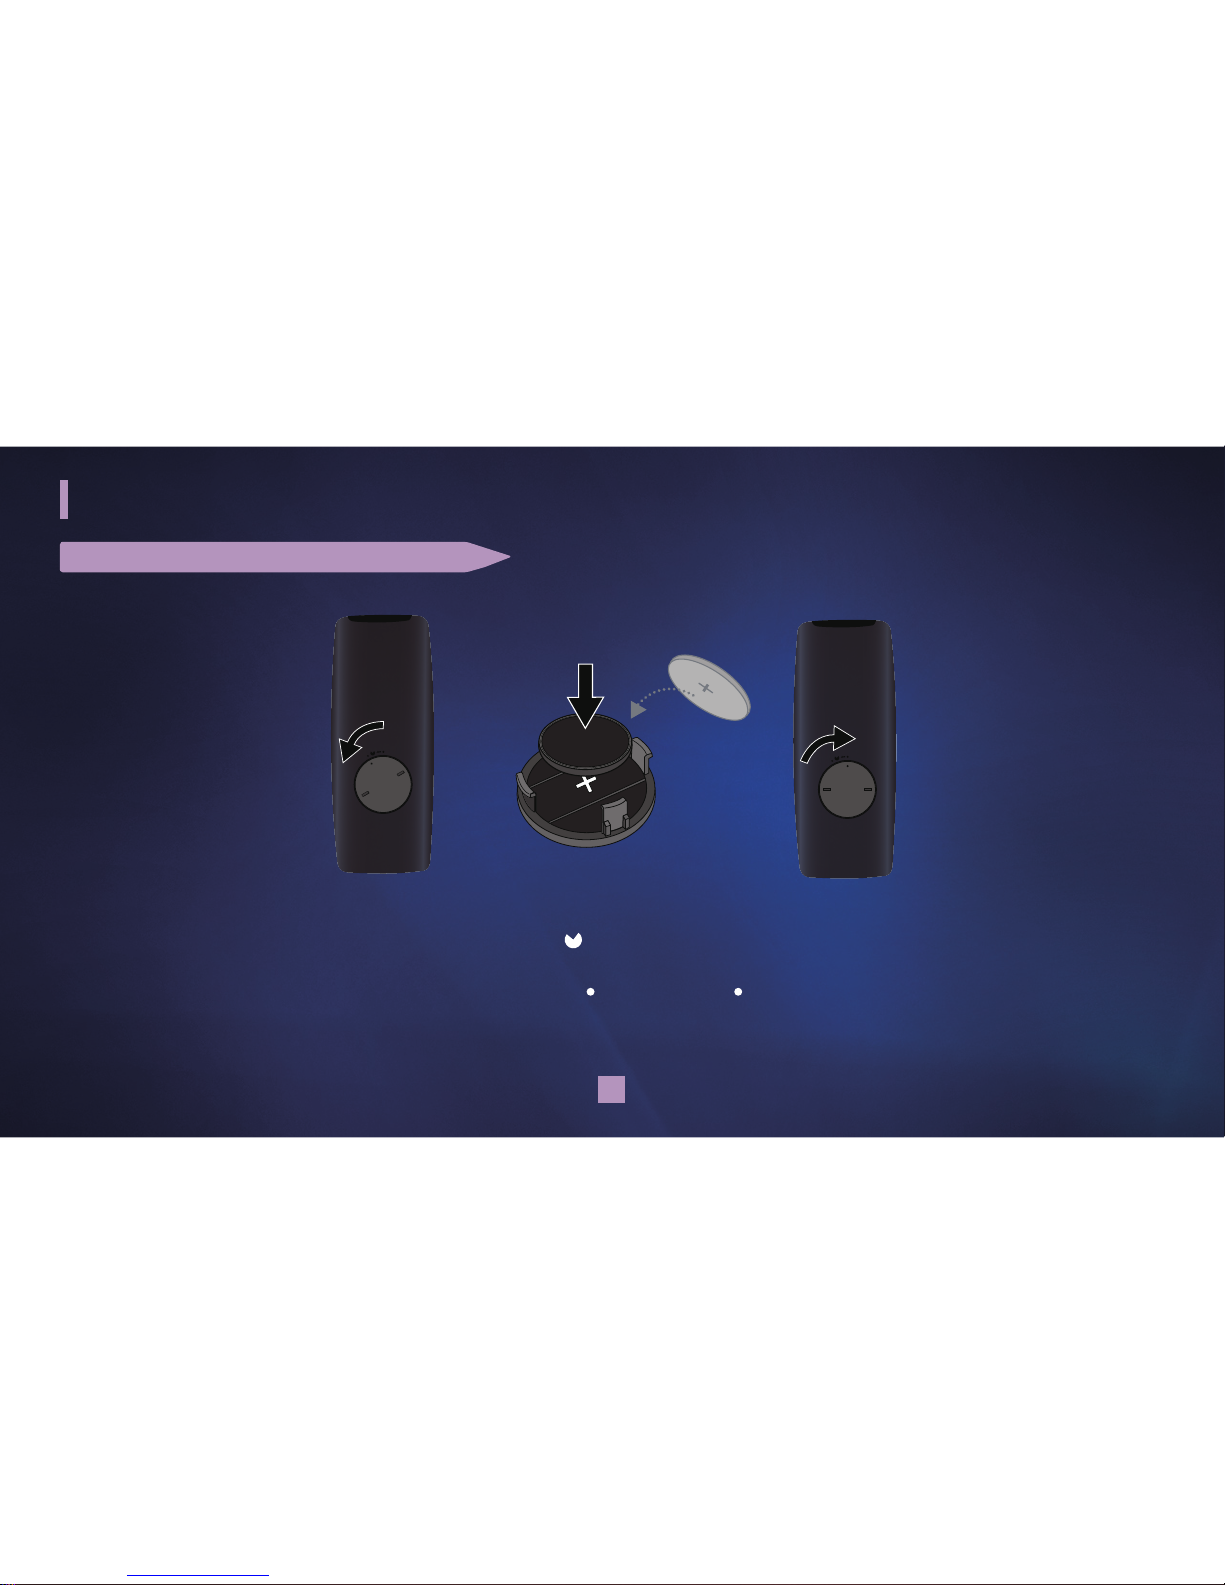
REPLACING REMOTE CONTROL BATTERY
1 Turn the battery holder counterclockwise (as indicated with ( ) mark) using your fingernail. The battery holder opens.
2 Insert the battery into the battery holder with the positive (+) terminal facing down and press it firmly until a locking sound is heard.
3 Place the battery holder back in the remote control. Match its ( ) mark with the ( ) mark on the remote control and turn the battery
holder clockwise to lock it.
Grandprix_new.indd 7 2008-07-08 오후 1:32:29
Page 8
8
Connections
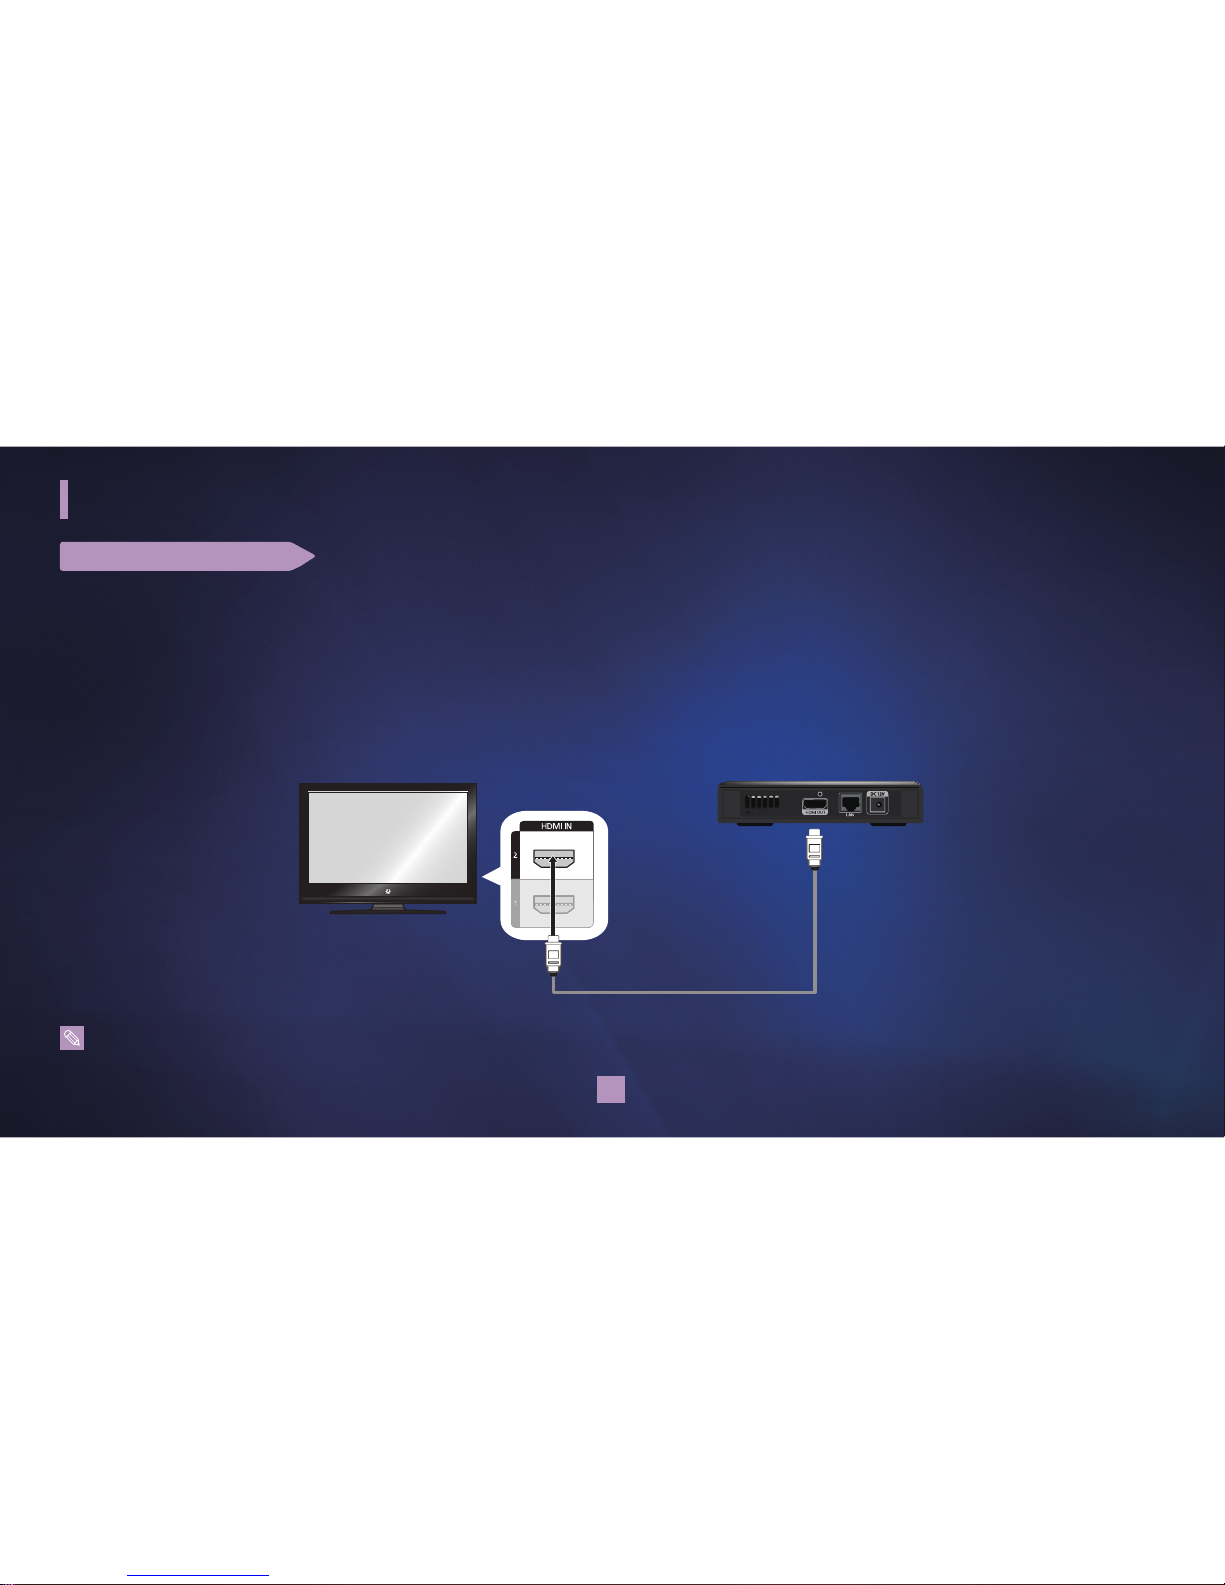
CONNECTING TO A TV
HDMI
HDMI (High-Definition Multimedia Interface) is the new, uncompressed, all-digital audio and video interface. The single cable carries both
audio and video.
■
Connect an HDMI cable between the HDMI jack on the TV and the HDMI jack on the Extender device.
HDMI Cable
<Samsung TV with Anynet+>
<Extender>
<Rear of TV>
■
Each TV must be connected to only one Extender. If connected to 2 or more Extenders, malfunction may occur.
■
The Extender supports only Samsung TVs with Anynet+ released since 2008.
Grandprix_new.indd 8 2008-07-08 오후 1:32:30
Page 9

9
CONNECTING TO A ROUTER AND PC
■
Connect Ethernet/LAN cables between the LAN jack on the Extender device and a LAN jack of the router and between the router and a PC.
HDMI Cable
Ethernet/LAN Cable
Ethernet/LAN Cable
<Samsung TV with Anynet+>
<Extender>
<Router>
<Vista PC>
<LAN Jack on the Wall>
■
For using your Extender on a wireless network, Windows certified routers are recommended.
■
The Extender device does not support direct connection to the PC using a cross cable.
■
To use your Extender on a wireless network, unplug the Ethernet/LAN cable from the Extender and run the Network Setup Wizard by selecting Settings followed by
Network.
Grandprix_new.indd 9 2008-07-08 오후 1:32:31
Page 10

10
TV : CONNECTING TO Anynet +
The Extender supports only Samsung TVs with Anynet+ released since 2008.
To use the Anynet+, Anynet+(HDMI-CEC) must be set to ‘On’ on the TV menu.
1 Press the MENU button to display the menu. Press the or button to select Application (or Input), then press the ENTER ( )
button.
2 Press the or button to select Anynet+ (HDMI-CEC), then press the ENTER ( ) button.
3 Press the or button to select On, then press the ENTER ( ) button.
• The Anynet+ (HDMI-CEC) function is enabled.
• If you select Off, Anynet+ (HDMI-CEC) is disabled.
■
TV menu operation.
Grandprix_new.indd 10 2008-07-08 오후 1:32:31
Page 11

11
TV : SCANNING AND SWITCHING BETWEEN ANYNET+ DEVICES
1 Press the TOOLS button.
• Press the or button to select “Device List”, then press the ENTER ( ) button.
• Anynet+ devices connected to the TV are listed.
• If you cannot nd a device you want, press the red button to scan for devices.
2 Press the or button to select "Media Center" and press the ENTER ( ) button. TV displays Windows Media Center.
Only when you set “Anynet+ (HDMI-CEC)” to On in the “Application” menu, the “Device List” menu appears.
• Switching to the selected devices may take up to 2 minutes. Once selected, the operation cannot be cancelled.
• The time required to scan for devices is determined by the number of connected devices.
• When the device scan is completed, the number of devices found is not displayed.
• The TV automatically scans devices when it is turned on. If you connect your Extender after the TV is on, select the Searching
Connections menu on the TV to search for devices.
• Connect the TV to the Extender and then turn on the TV. Press the GREEN BUTTON on the device's remote or the DMA button on the
TV’s remote control. Windows Media Center will be launched.
• If you switch to an input mode other than Anynet+, the Extender will be turned off after 5 minutes. Press the TOOLS button on the
TV’s remote control to start the Anynet+ device.
• If you turn off the TV, the Extender will be turned off.
■
TV menu operation.
Grandprix_new.indd 11 2008-07-08 오후 1:32:32
Page 12

12
Connecting to Vista PC for the first time
SETTING UP MEDIA CENTER EXTENDER FOR THE FIRST TIME
You can connect your Media Center Extender to your Vista PC following the steps below.
1 Press / to select “Next,” then press
the OK button.
To set up this Extender for use with your
PC, an 8 digit setup key is displayed.
■
If you want to use a static IP for your Extender, select Cancel then press OK. Refer to "To set IP address manually" at page 23.
■
To use dynamic IP, or already set up the static IP, select Next then press OK.
Extender Setup
Welcome to Windows Media Center
If you have a PC with Windows VIsta™ Home Premium or Ultimate (or later) and a home
network, you can set up this device as a Media Center Extender.
For more information on Extender before setup, select Learn More.
To proceed with setup now, select Next.
Next CancelLearn More
Grandprix_new.indd 12 2008-07-08 오후 1:32:32
Page 13
13
Connecting to Vista PC for the first time
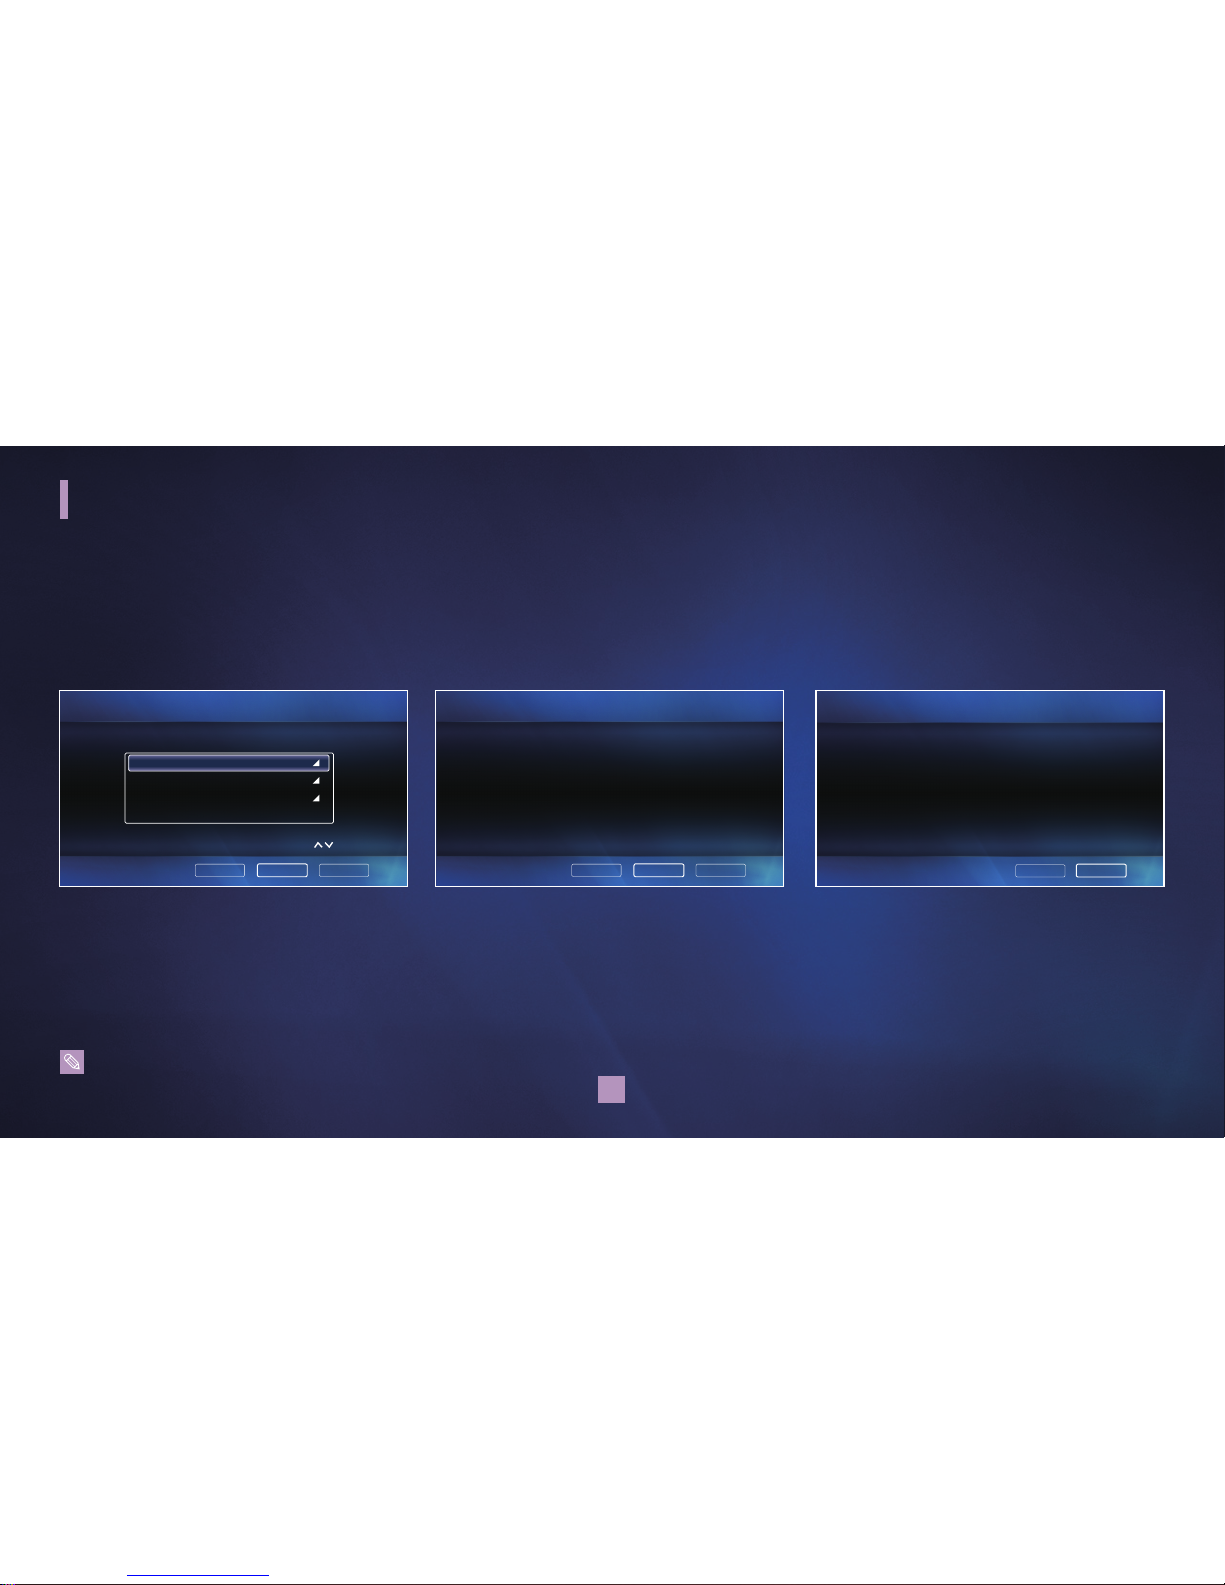
Steps 1-1 ~ 1-3 are only for WIRELESS networking.
1-1 Press / to select Wireless
Network and press the OK button.
Press
/ to select “Next”, then
press the OK button.
1-2 Press / to select “Next,” then
press the OK button.
1-3 Press the / to select "Finish,”
then press the OK button.
If the network setup failure occurs,
the setup screen moves to the
setup procedure, “To set IP address
manually,” shown in the page 23.
When connecting by wireless network, make sure that Ethernet/LAN cable is not connected.
■
When using wireless network, the video quality may be poor depending on the network condition.
Network Setup
Acquiring IP Address
Please wait...
This process can take up to 2 minutes.
Next CancelBack
Finish
Back
Network Setup
Successfully Connected
Your device is now connected to your home network.
Select Finish to exit.
Network Setup
Choose Your Wireless Network
Next CancelBack
wirelessAP : unsecure
11b/g/n
aiportthru : unsecure
11b
comp : unsecure
11b/g
Not Listed
Grandprix_new.indd 13 2008-07-08 오후 1:32:33
Page 14

14
Connecting to Vista PC for the first time
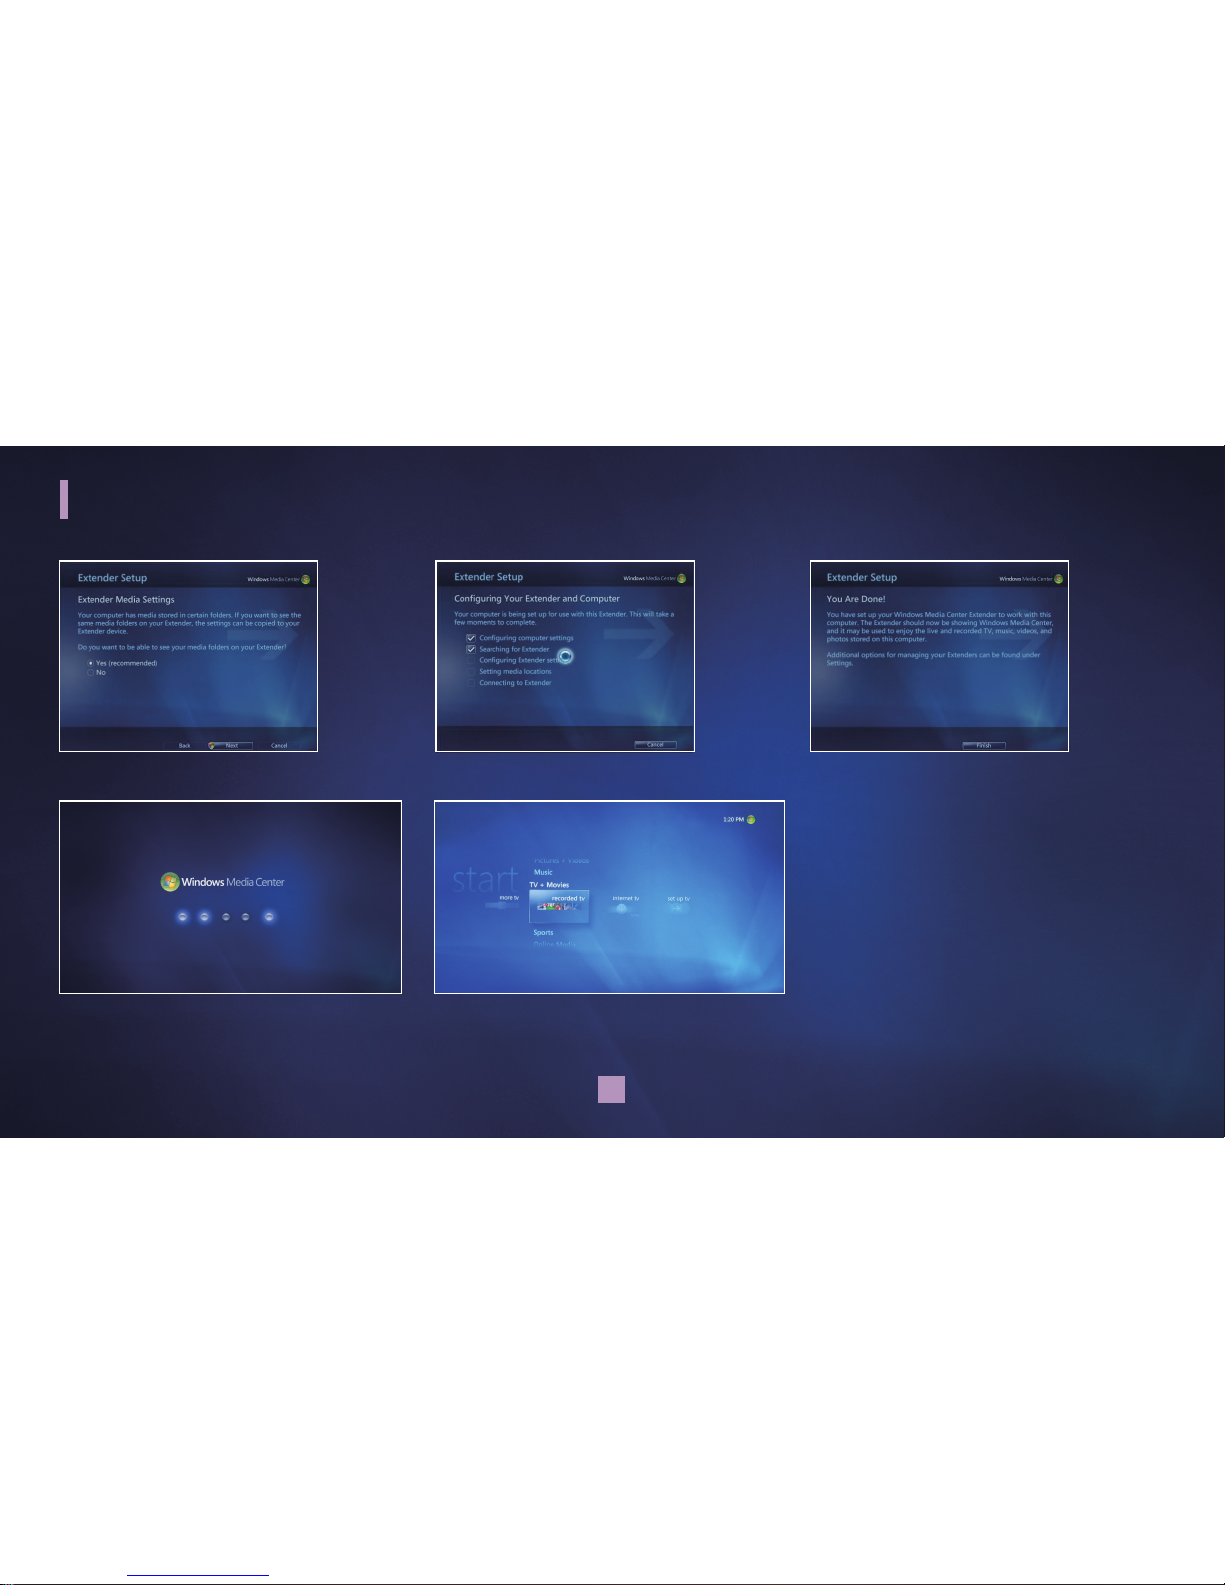
To complete setting up Extender in the PC, run Windows Media Center from the start menu of the PC.
3 Click / to select “Task”
and
/to select “add
extender.”
4 Click “Next.” 5 Enter the 8 digit setup key
that is displayed on the TV
then click “Next.”
6 Click “Next.”
■
The menu items are subject to change without notice.
Grandprix_new.indd 14 2008-07-08 오후 1:32:34
Page 15
15
Connecting to Vista PC for the first time
10 Your Media Center Extender is
connecting to your PC.
11 When the connection is complete, the
menu screen of the Windows Media
Center appears on TV.
7 Select the desired item then click “Next.” 8 Configuration is in progress. 9 Click “Finish.”
Grandprix_new.indd 15 2008-07-08 오후 1:32:37
Page 16
16
Settings Menu
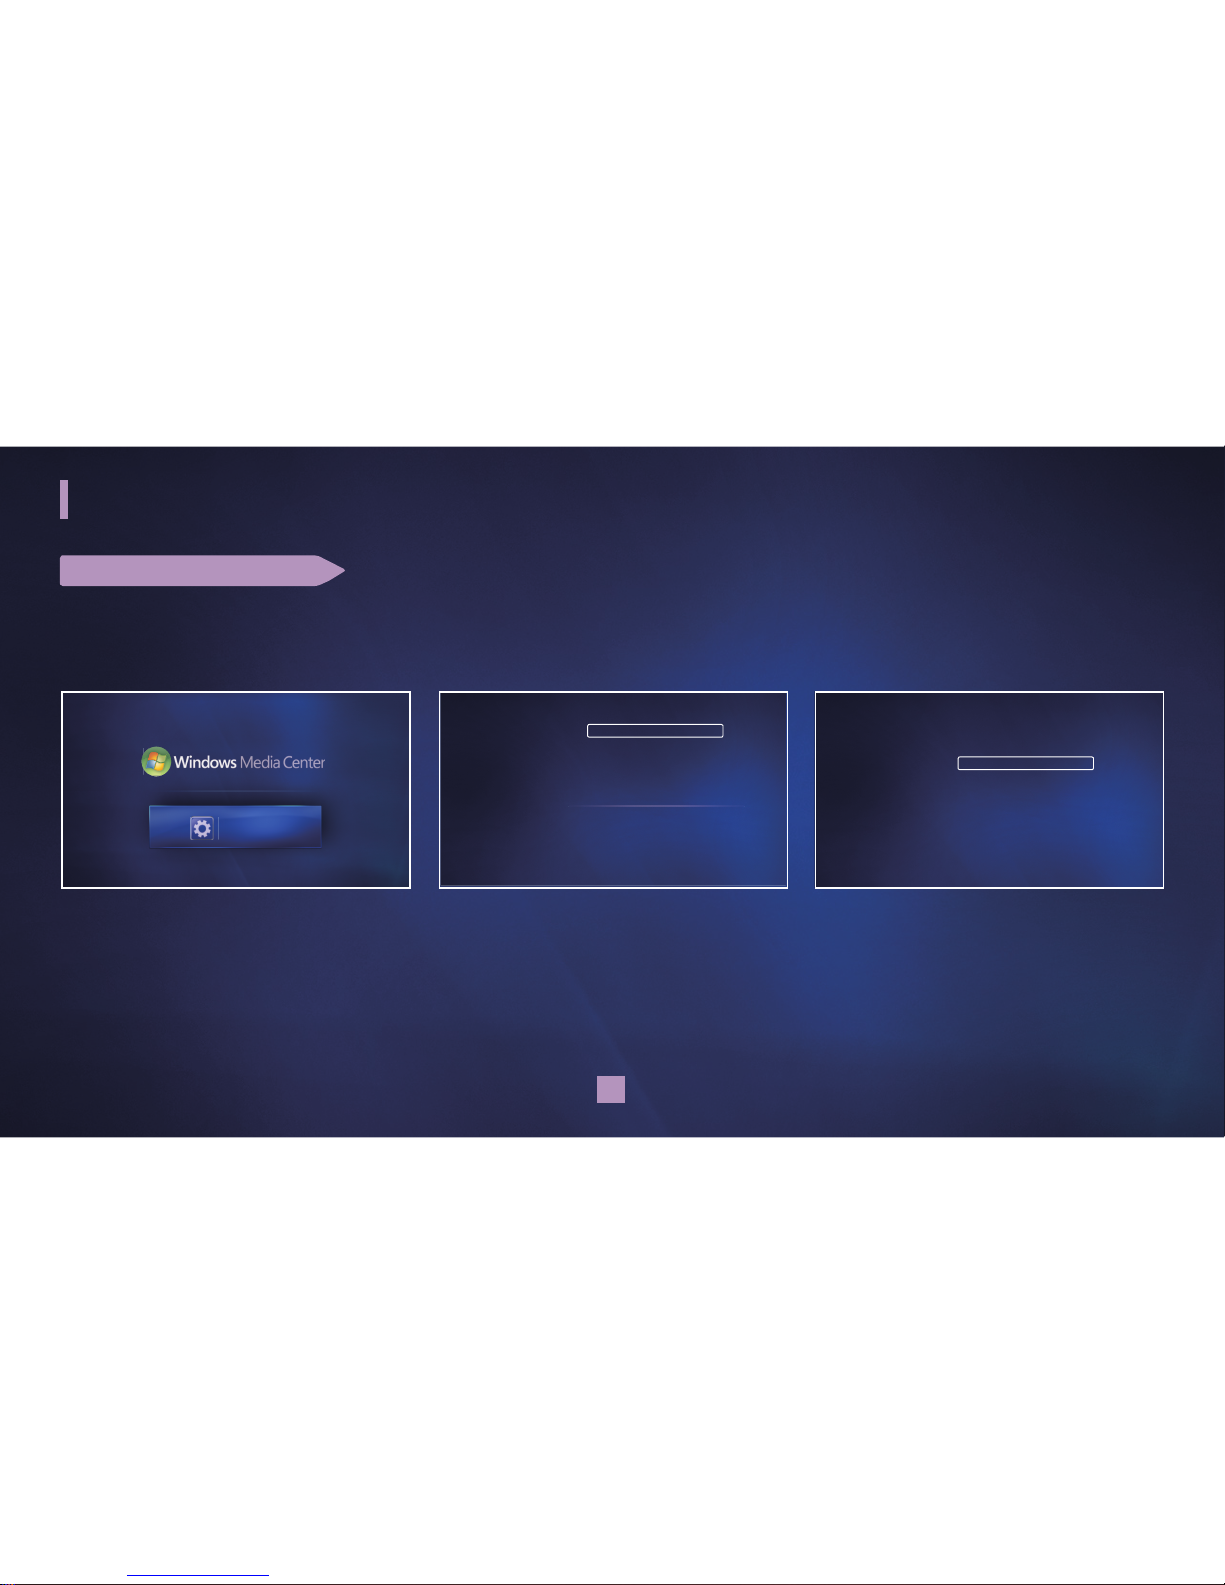
SETTING UP EXTENDER
Set Up Extender
Set up your Extender to enjoy Windows Media Center.
1 Press / to select “Settings,” then
press the OK button.
2 Press / to select “Extender
Settings…,” then press the OK button.
3 Press / to select “Set Up Extender,”
then press the OK button.
Learn More
Set Up Extender
Launch Extender
Remove Extender Information
EXTENDER SETTINGS
settings
Extender Settings…
Network
TV Resolution
Screen Saver
Software Update
Product Support
Reset System
Operating Manual
settings
Settings
Grandprix_new.indd 16 2008-07-08 오후 1:32:39
Page 17

17
Settings Menu
4 Press / to select “Next,” then press
the OK button.
To set up this Extender for use with your
PC, an 8 digit setup key is displayed.
Extender Setup
Welcome to Windows Media Center
If you have a PC with Windows VIsta™ Home Premium or Ultimate (or later) and a home
network, you can set up this device as a Media Center Extender.
For more information on Extender before setup, select Learn More.
To proceed with setup now, select Next.
Next CancelLearn More
Grandprix_new.indd 17 2008-07-08 오후 1:32:39
Page 18
18
Settings Menu
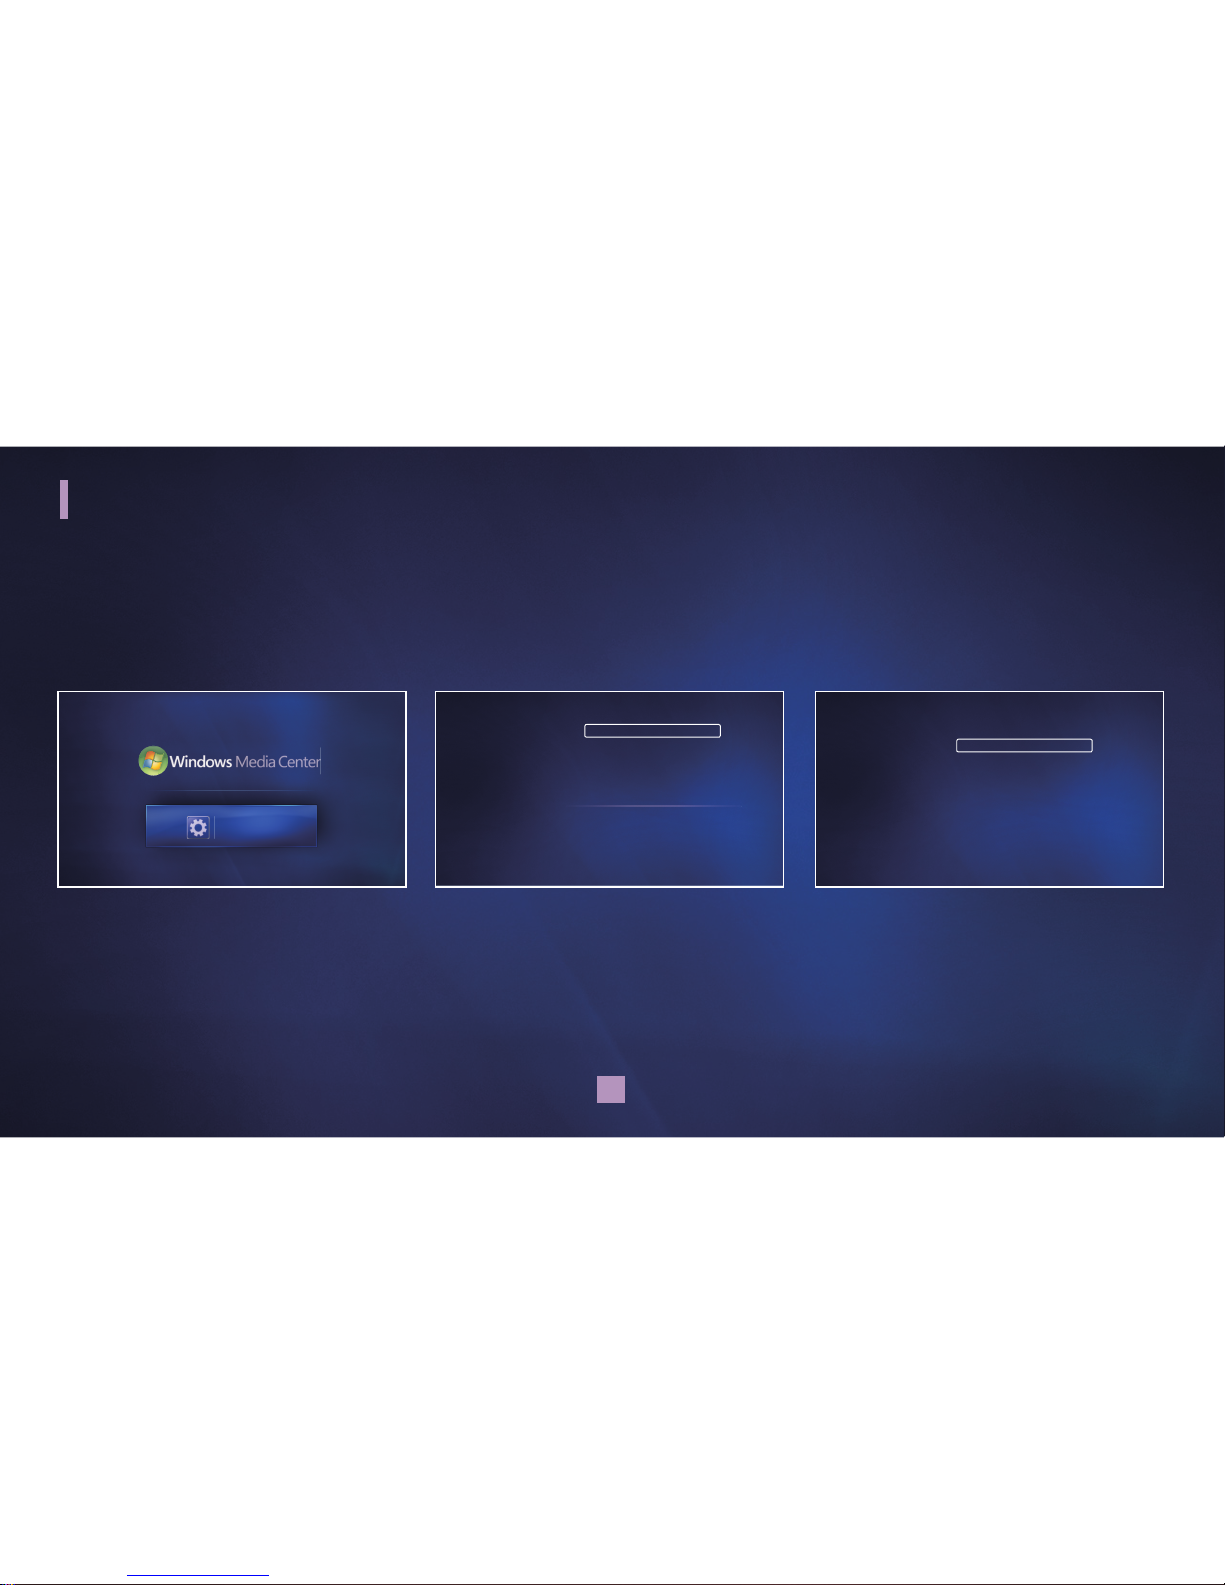
Learn More
You can get more information on Windows Media Center.
1 Press / to select “Settings,” then
press the OK button.
2 Press / to select “Extender
Settings…,” then press the OK button.
3 Press / to select “Learn More,” then
press the OK button.
Settings
Extender Settings…
Network
TV Resolution
Screen Saver
Software Update
Product Support
Reset System
Operating Manual
settings
Learn More
Set Up Extender
Launch Extender
Remove Extender Information
EXTENDER SETTINGS
settings
Grandprix_new.indd 18 2008-07-08 오후 1:32:40
Page 19
19
Settings Menu
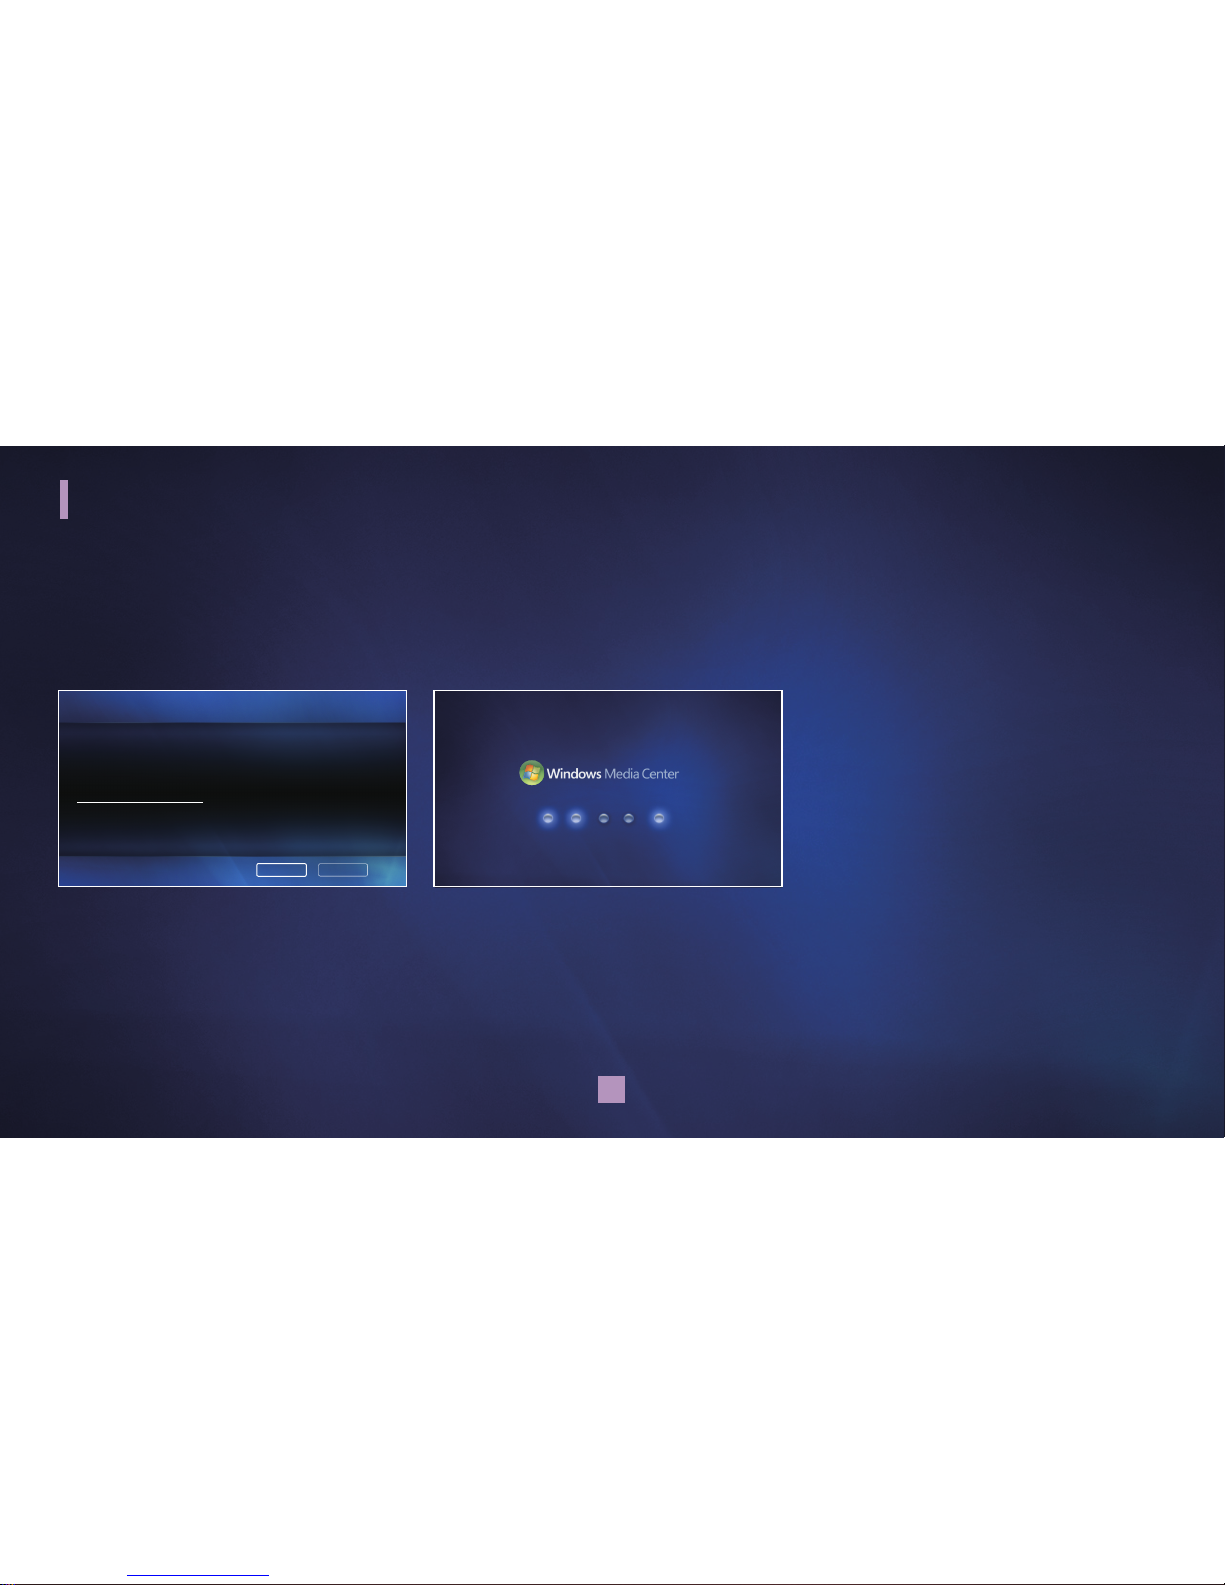
4 Press / to select “Next,” then press
the OK button.
5 The Extender connects to the PC.
About Media Center Extenders
Media Center Extenders bring the richest digital entertainment experience to your TV.
Watch and record TV shows, view your digital photos, listen to your music collection, and
share your home videos - then press the remove to let friends and family join in the fun!
Learn more at:
www.WindowsVista.com/extender
Select Next to begin.
Windows Vista Home Premium or Ultimate (or later) and a network are required.
Next Cancel
Grandprix_new.indd 19 2008-07-08 오후 1:32:41
Page 20
20
Settings Menu
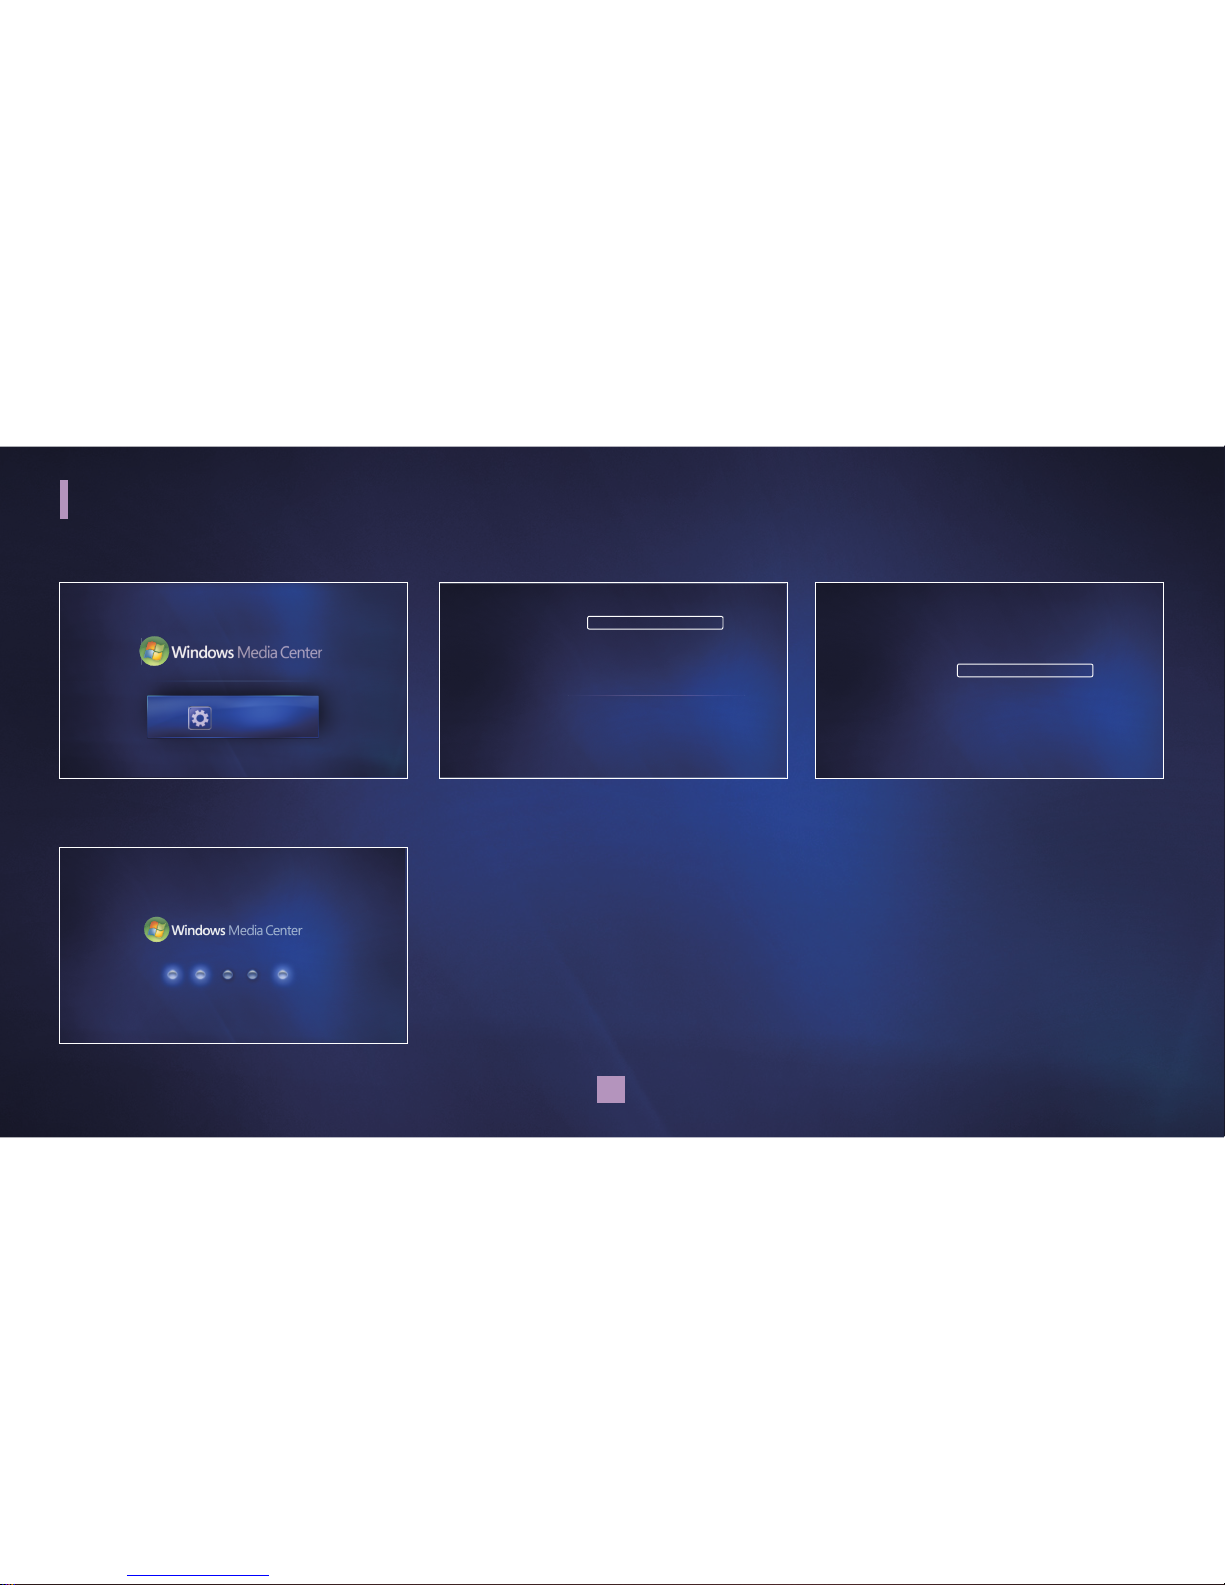
Launch Extender
You can start Windows Media Center.
1 Press / to select “Settings,” then
press the OK button.
2 Press / to select “Extender
Settings…,” then press the OK button.
3 Press / to select “Launch Extender,”
then press the OK button.
4 The Extender connects to the PC.
Learn More
Set Up Extender
Launch Extender
Remove Extender Information
EXTENDER SETTINGS
settings
Extender Settings…
Network
TV Resolution
Screen Saver
Software Update
Product Support
Reset System
Operating Manual
settings
Settings
Grandprix_new.indd 20 2008-07-08 오후 1:32:43
Page 21
21
Settings Menu
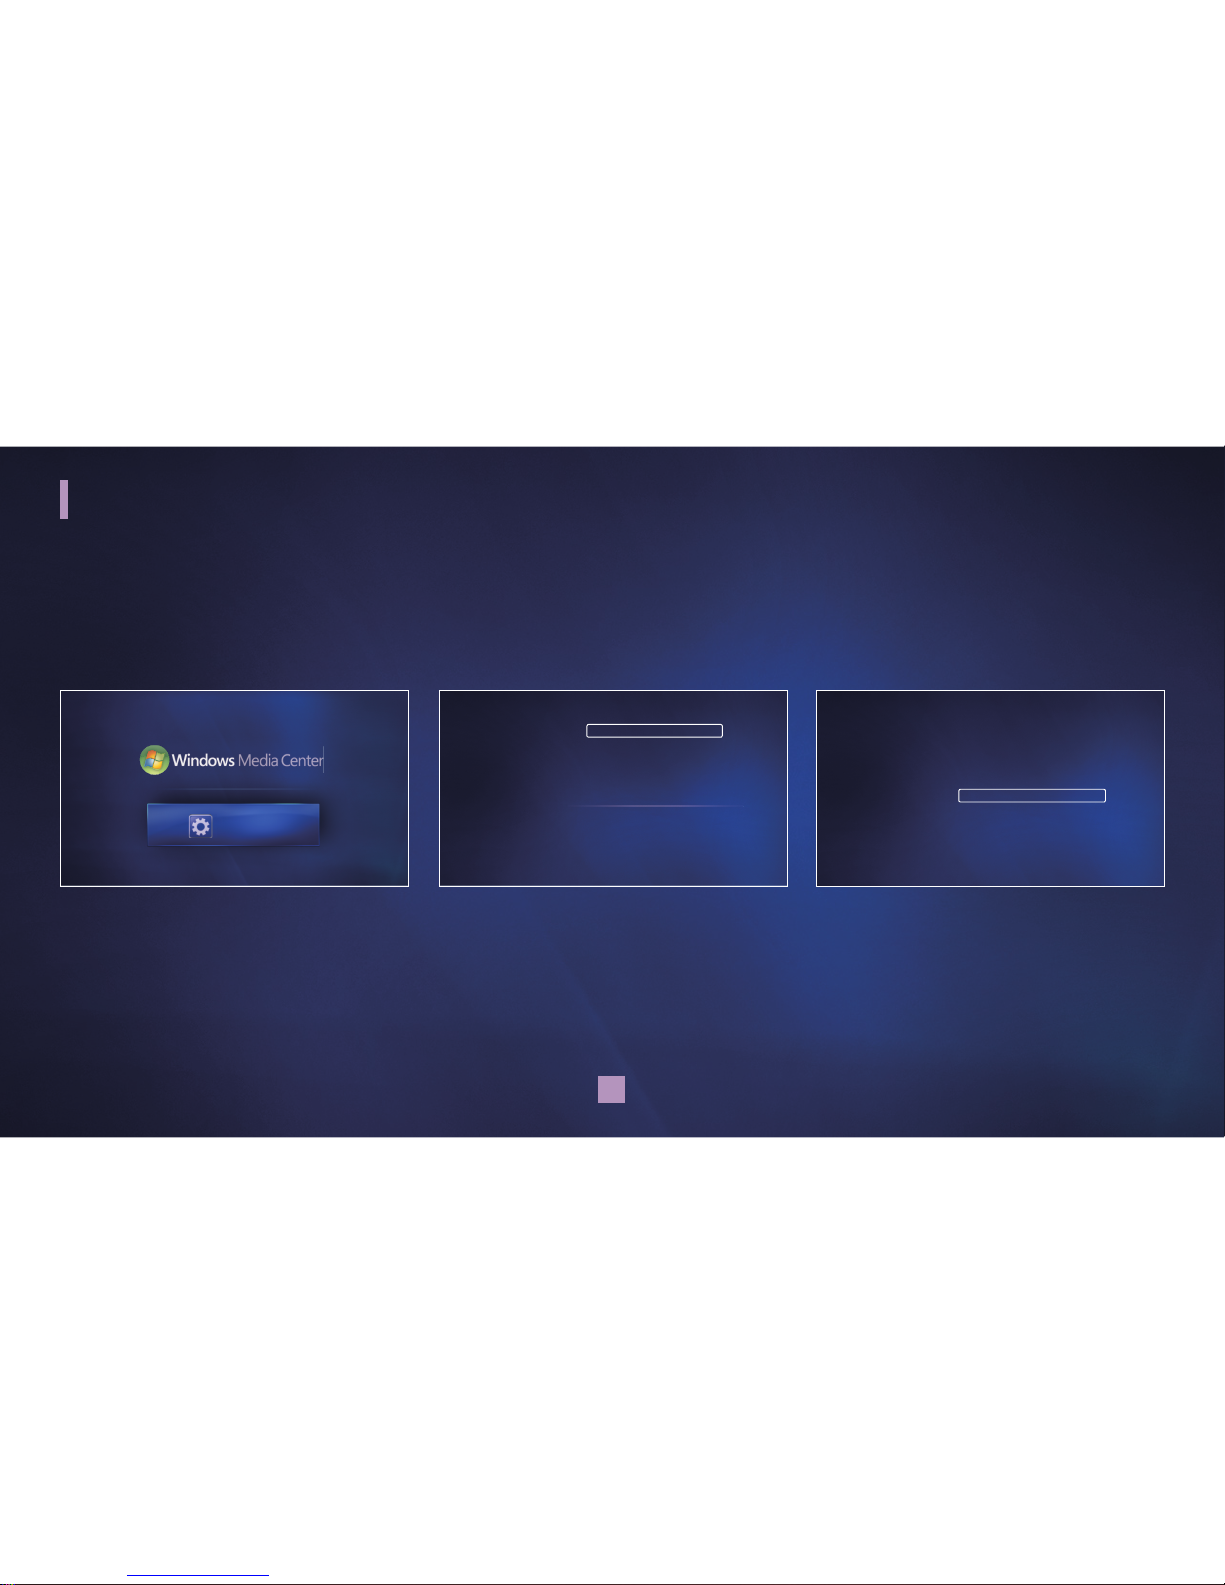
Remove Extender Information
You can remove the Extender’s connection to the PC. This option allows you to set up the Extender for use with a different PC.
1 Press / to select “Settings,” then
press the OK button.
2 Press / to select “Extender
Settings…,” then press the OK button.
3 Press / to select “Remove Extender
Information,” then press the OK button.
Learn More
Set Up Extender
Launch Extender
Remove Extender Information
EXTENDER SETTINGS
settings
Extender Settings…
Network
TV Resolution
Screen Saver
Software Update
Product Support
Reset System
Operating Manual
settings
Settings
Grandprix_new.indd 21 2008-07-08 오후 1:32:44
Page 22
22
Settings Menu
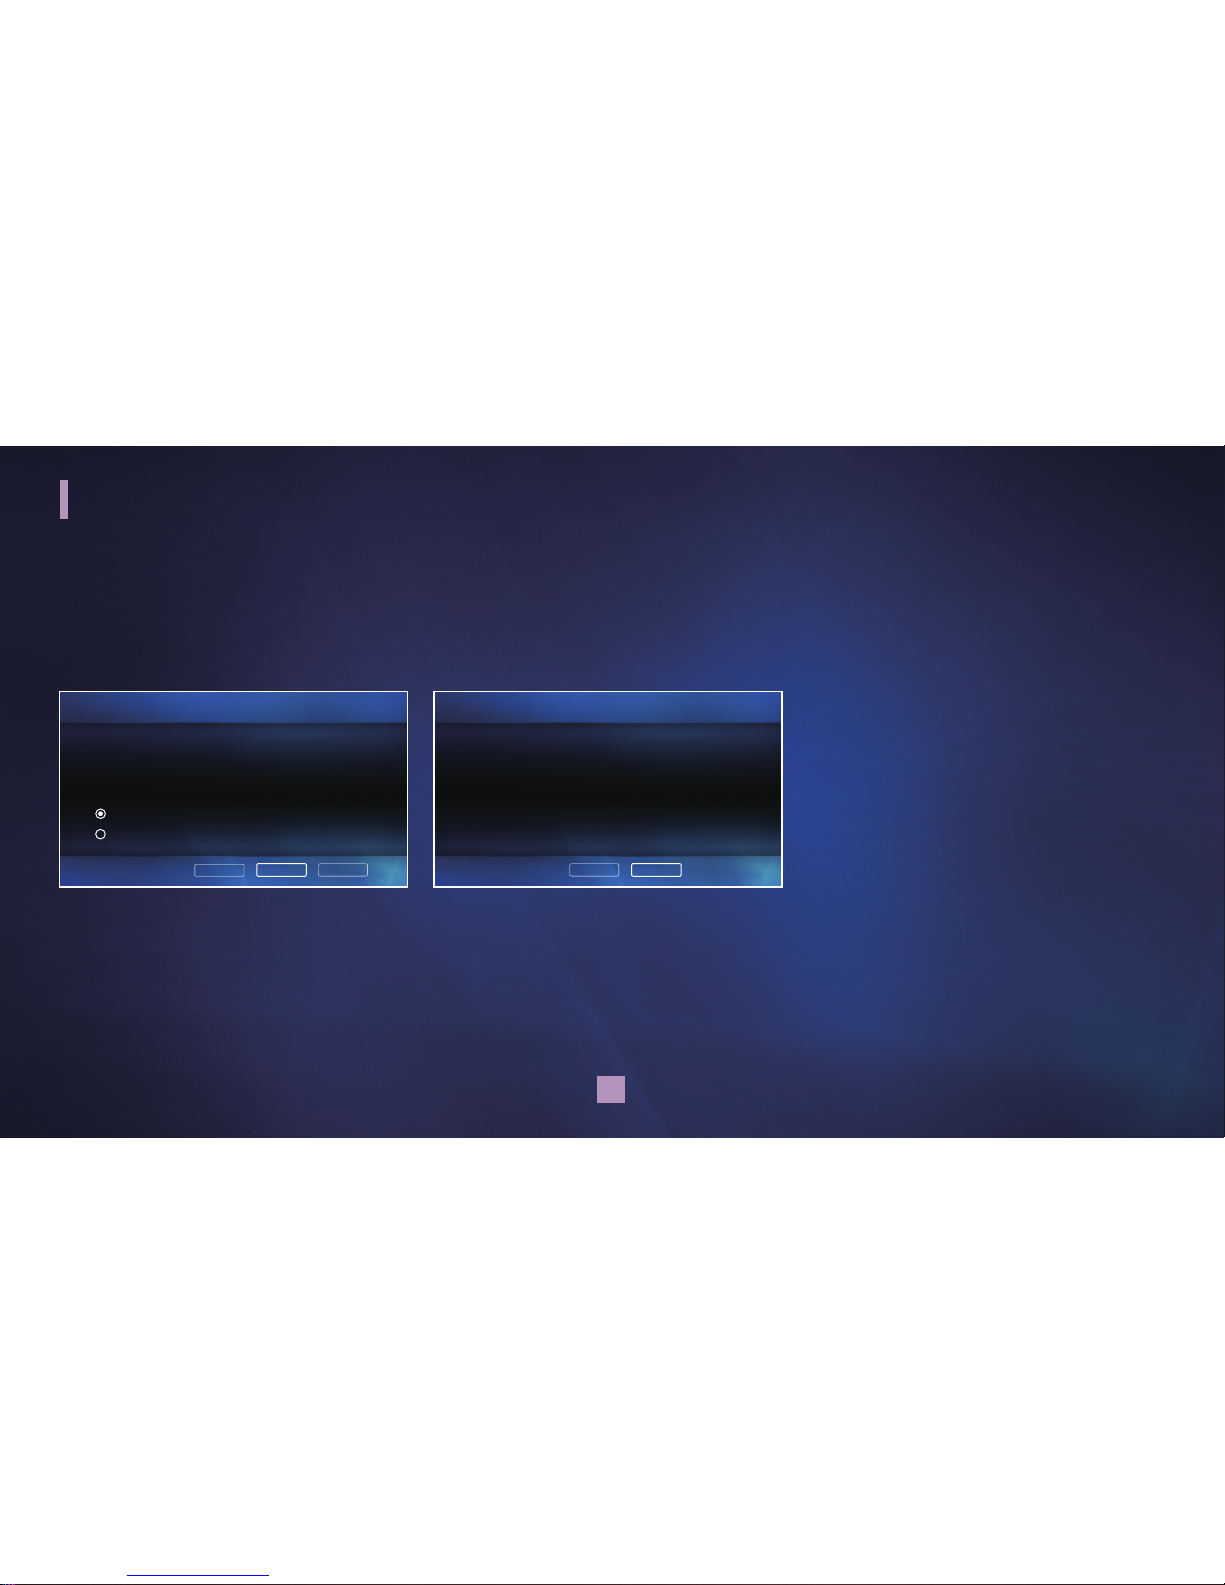
4 Press / to select the desired item
then press the OK button. Select “Next,"
then press the OK button.
5 Press / to select “Finish," then press
the OK button.
Extender Setup
Remove Extender Information
Removing Extender information will prevent this Extender from connecting to your
Windows Media Center PC. If you continue, you may set up this Extender at a later
time by pressing the green button on the remote control or by selecting the Set Up
Extender option in the Extender device menu.
Do you want to remove the current Extender information?
Yes
No (Default)
Cancel
NextBack
Network Setup
Extender Information Not Removed
You have chosen not to remove the Extender information. No changes have been made
and your Extender will continue to work properly as a Media Center Extender.
FinishBack
Grandprix_new.indd 22 2008-07-08 오후 1:32:45
Page 23
23
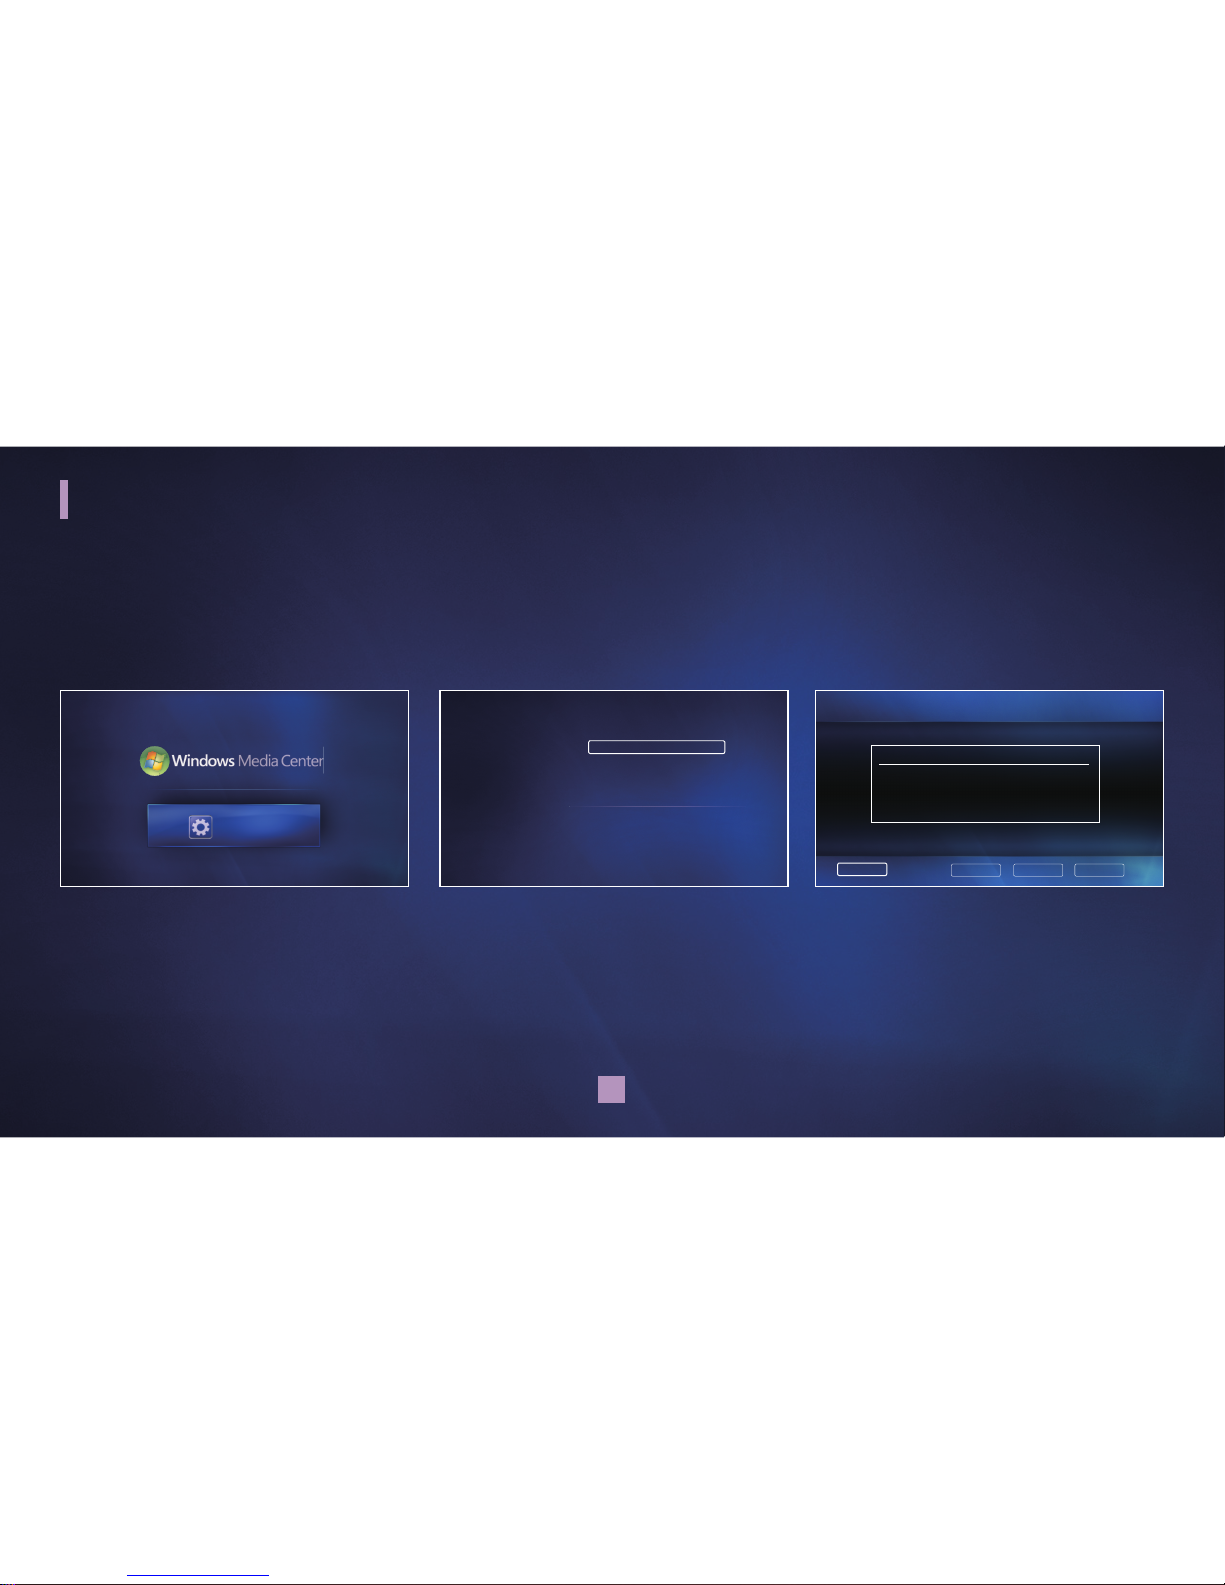
To set IP address manually
1 Press / to select “Settings,” then
press the OK button.
2 Press / to select “Network,” then
press the OK button.
3 Press / / / to select “Manual,”
then press the OK button.
Settings Menu
You can manually set network settings.
This option allows you to use static IP address.
Extender Settings…
Network
TV Resolution
Screen Saver
Software Update
Product Support
Reset System
Operating Manual
settings
Settings
Next CancelBack
Network Setup
Current Settings
Wired Network
IP Address(DHCP) 192.168.130.57
Subnet Mask 255.255.255.0
DNS 164.124.101.1
Gateway 192.168.130.1
Internet Connected
To change how this device connects to your network, select Next(recommended).
If you have a custom network that needs static settings, select Manual.
Manual
Grandprix_new.indd 23 2008-07-08 오후 1:32:46
Page 24
24
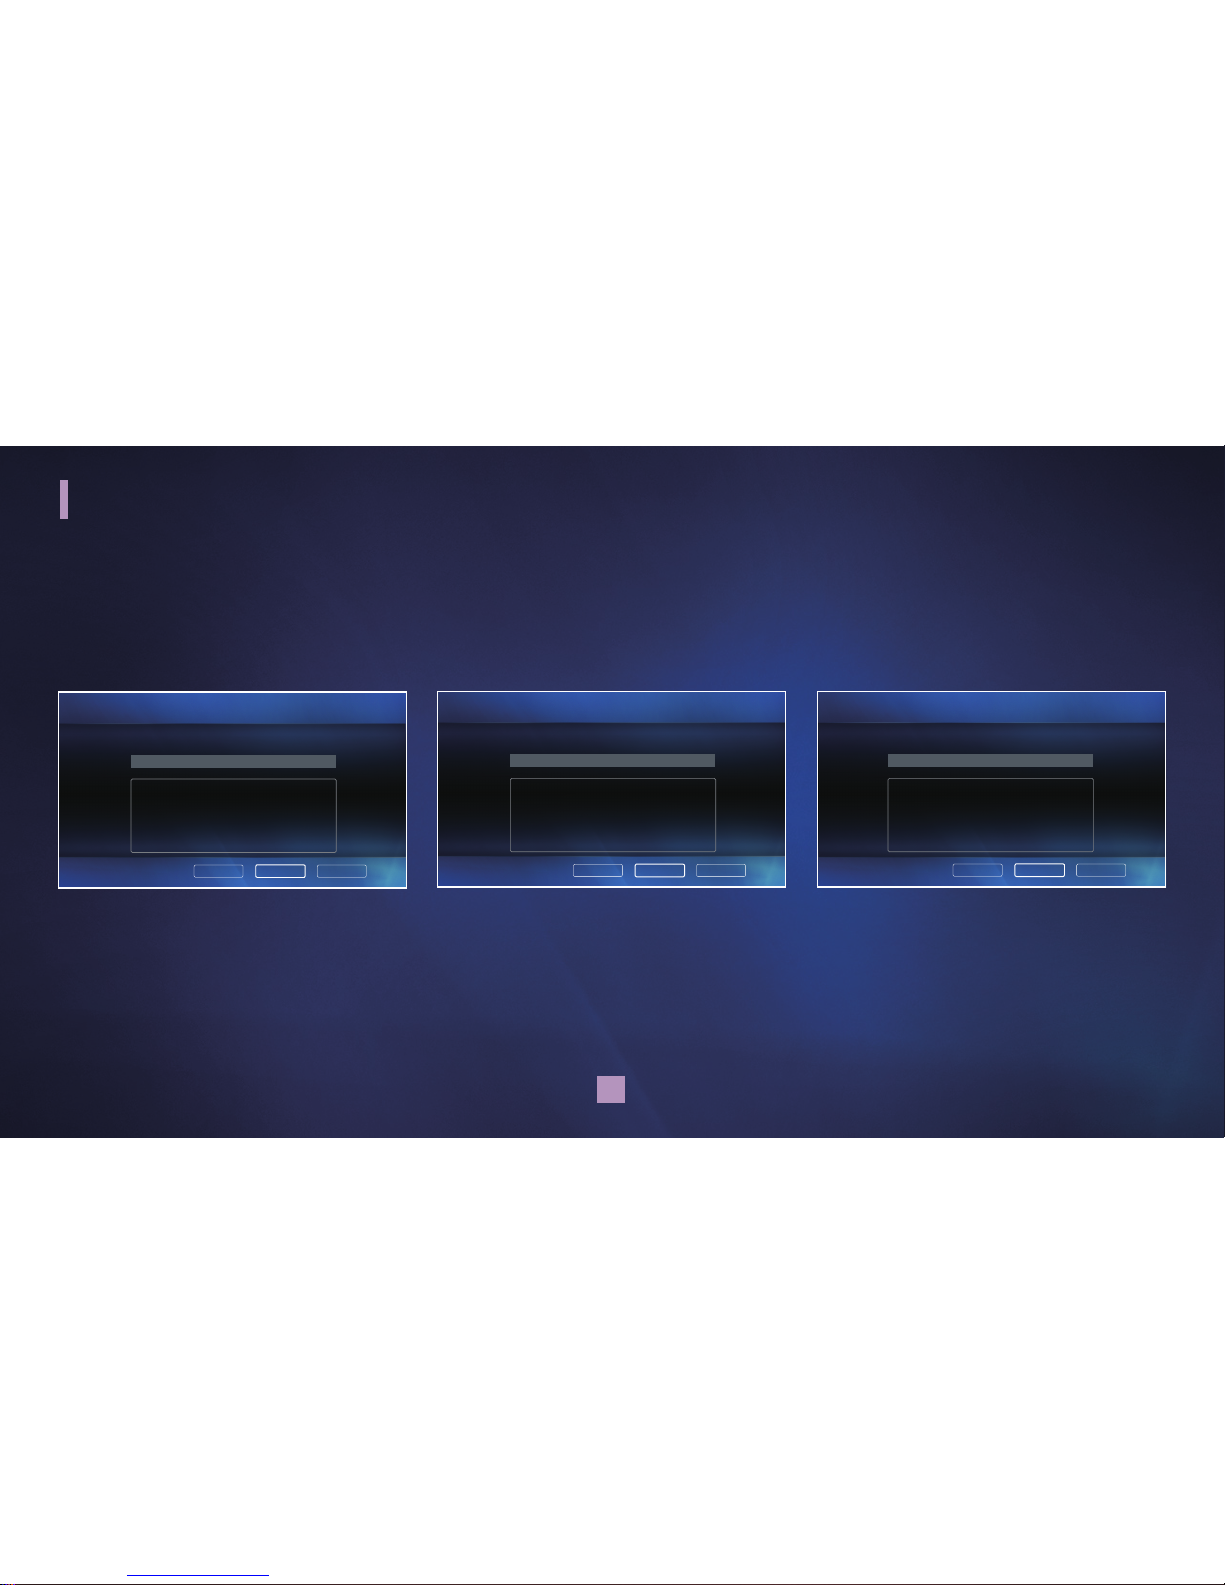
4 Press the number buttons and / /
/ to enter the IP address. Press /
to select “Next,” then press the OK
button.
5 Press the number buttons and / /
/ to enter the subnet mask. Press the
/ to select "Next,” then press the
OK button.
6 Press the number buttons and / /
/ to enter the internet gateway. Press
the
/ to select "Next,” then press
the OK button.
Settings Menu
Network Setup
Enter Your IP Address
Next CancelBack
EN ` 1 2 3 4 5 6 7 8 9 0 - =
CAPS a b c d e f g h i j [ ] \
SHIFT k l m n o p q r s ; ' CLEAR
BKSP t u v w x y z . , /
SPACE
192.168.0.3
Network Setup
Enter Your Subnet Mask
Next CancelBack
EN ` 1 2 3 4 5 6 7 8 9 0 - =
CAPS a b c d e f g h i j [ ] \
SHIFT k l m n o p q r s ; ' CLEAR
BKSP t u v w x y z . , /
SPACE
255.255.255.0
Network Setup
Enter Your Internet gateway
Next CancelBack
EN ` 1 2 3 4 5 6 7 8 9 0 - =
CAPS a b c d e f g h i j [ ] \
SHIFT k l m n o p q r s ; ' CLEAR
BKSP t u v w x y z . , /
SPACE
192.168.0.1
Grandprix_new.indd 24 2008-07-08 오후 1:32:47
Page 25
25
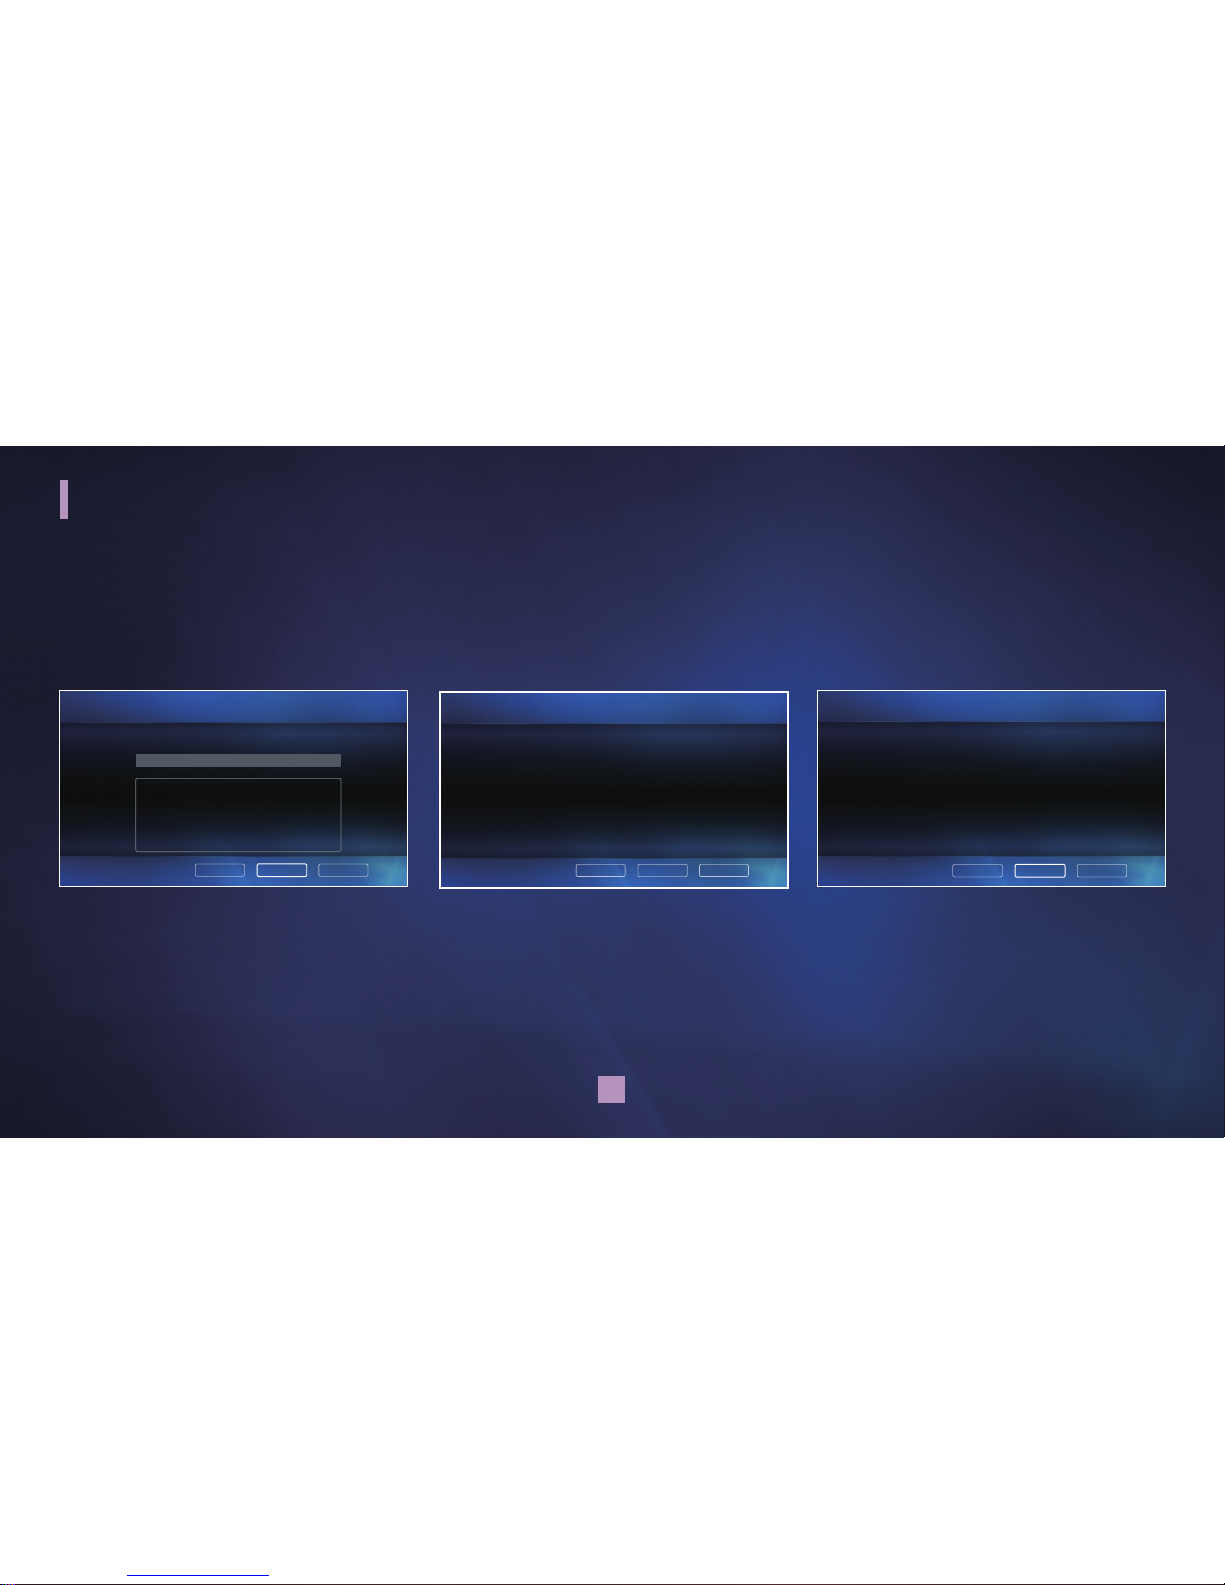
7 Press the number buttons and / /
/ to enter the DNS server. Press the /
to select "Next,” then press the OK
button.
8 Press / to select “Next,” then press
the OK button.
9 Press the / to select " Next,” then
press the OK button.
Settings Menu
Restart Now?
For these changes to take effect, your Extender needs to restart.
Select Next to restart now.
Next
CancelBack
Network Setup
Review Settings
You have entered these settings:
IP address: 192.168.0.3
Subnet Mask: 255.255.255.0
Gateway: 192.168.0.1
DNS: 10.33.13.11
Select Next to continue with these settings.
Next CancelBack
Network Setup
Enter Your DNS Server
Next CancelBack
EN ` 1 2 3 4 5 6 7 8 9 0 - =
CAPS a b c d e f g h i j [ ] \
SHIFT k l m n o p q r s ; ' CLEAR
BKSP t u v w x y z . , /
SPACE
10.33.13.11
Grandprix_new.indd 25 2008-07-08 오후 1:32:48
Page 26
26
Settings Menu
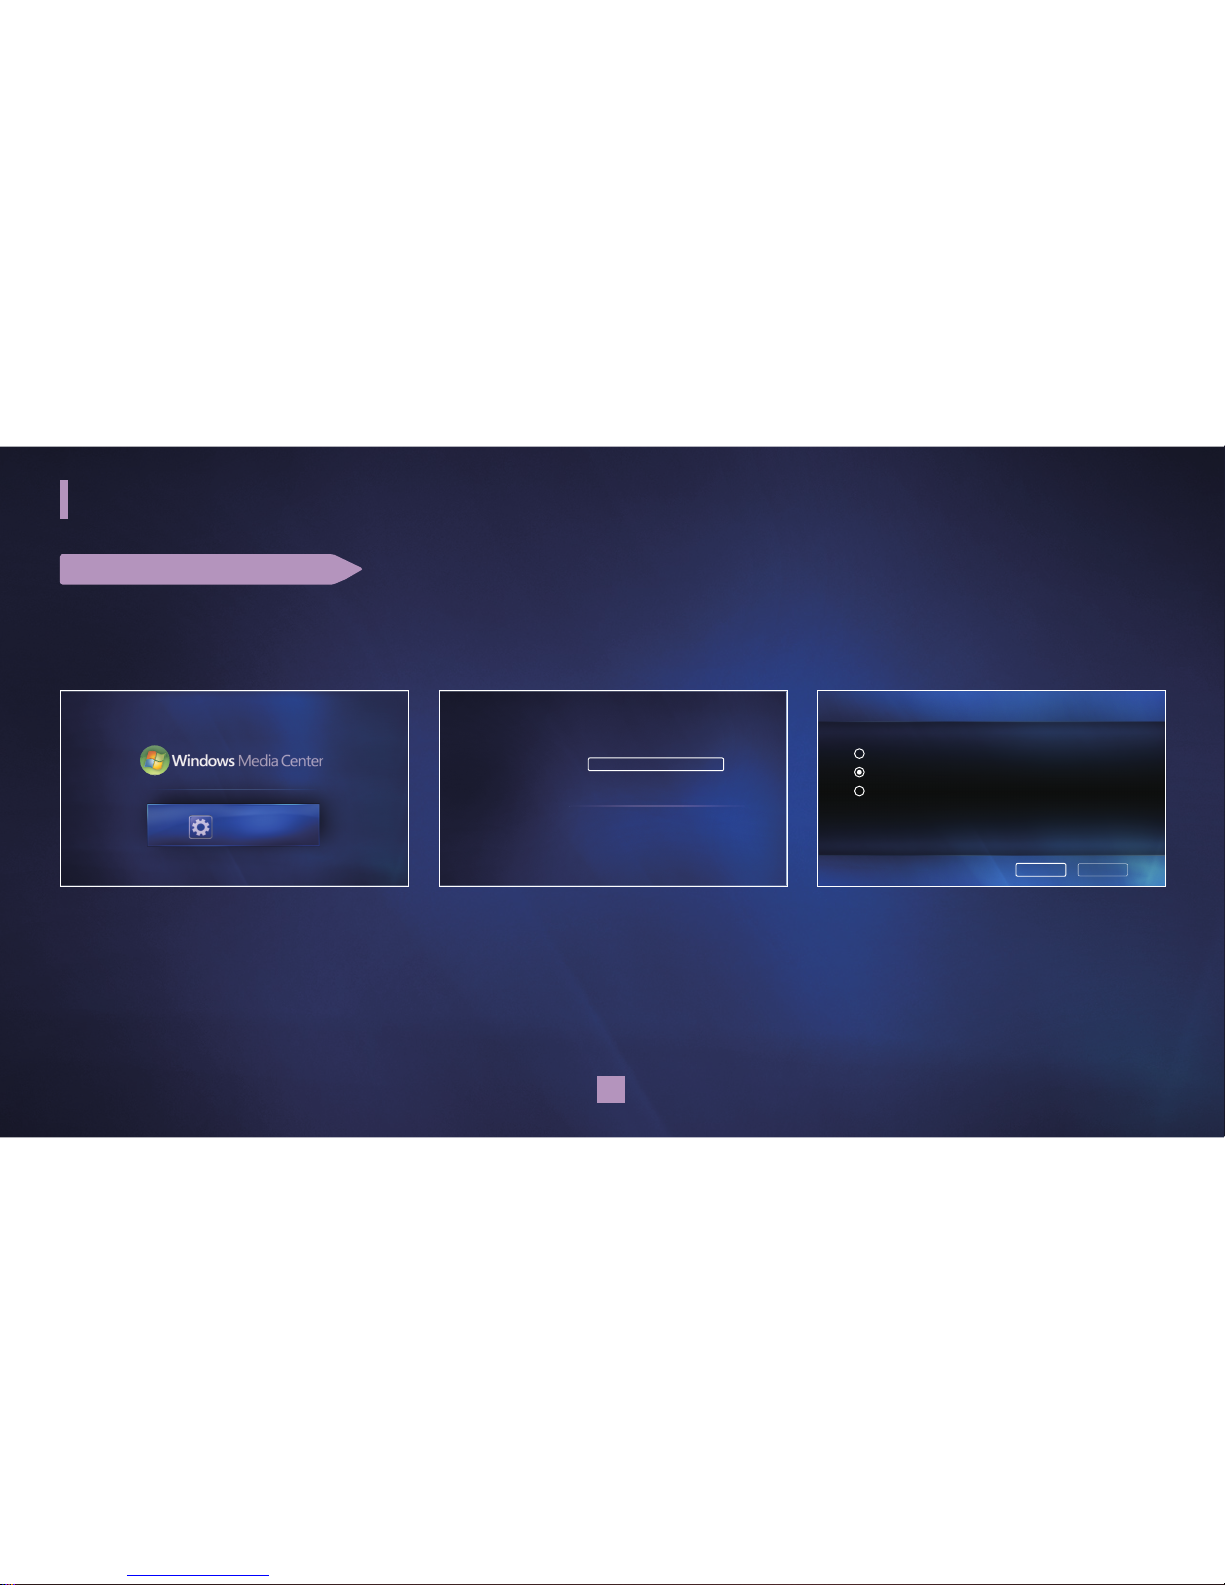
SETTING TV RESOLUTION
You can set your Samsung TV’s resolution. For better display quality, 720p or 1080i is recommended.
1 Press / to select “Settings,” then
press the OK button.
2 Press / to select “TV Resolution,”
then press the OK button.
3 Press / to select the desired item
then press the OK button. Select “Finish,"
then press the OK button.
Settings
Extender Settings…
Network
TV Resolution
Screen Saver
Software Update
Product Support
Reset System
Operating Manual
settings
TV Resolution
Set TV Resolution
480p
720p
1080i
Cancel
Finish
Grandprix_new.indd 26 2008-07-08 오후 1:32:49
Page 27
27
Settings Menu
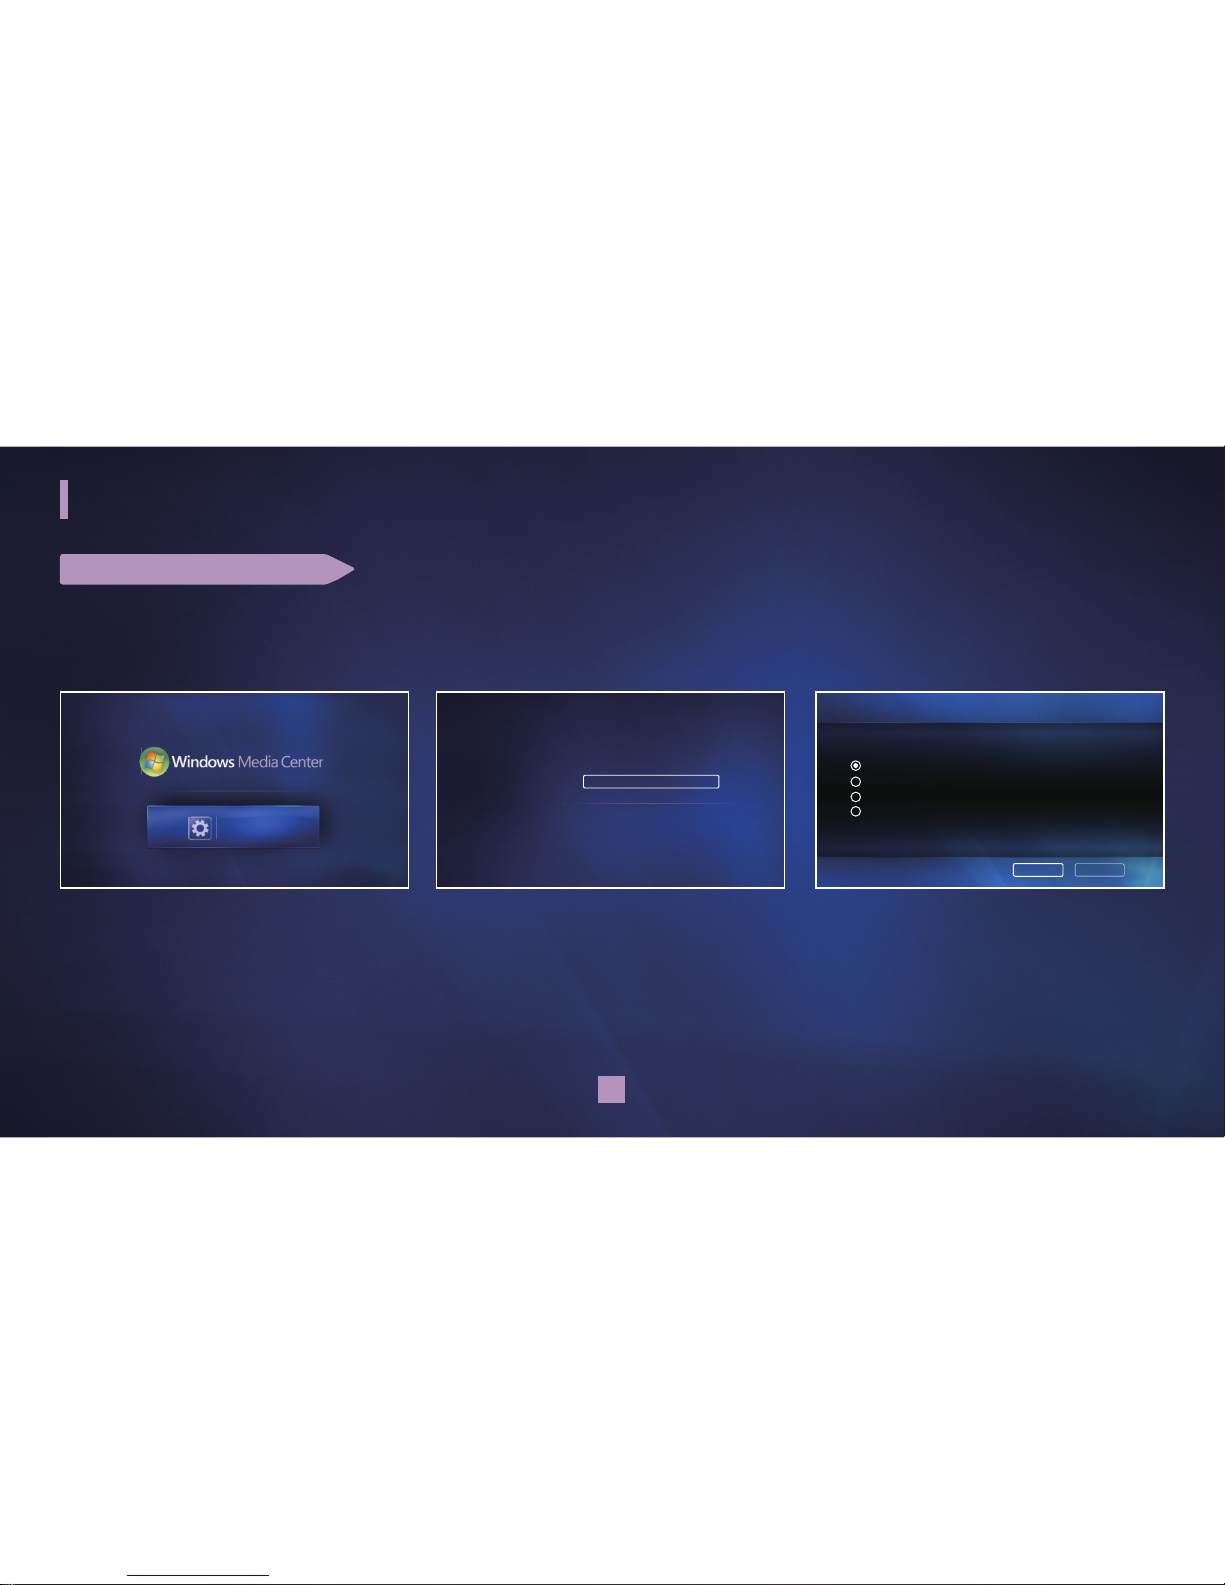
SETTING SCREEN SAVER
You can choose the length of time after which this screen saver turns on.
1 Press / to select “Settings,” then
press the OK button.
2 Press / to select “Screen Saver,”
then press the OK button.
3 Press / to select the desired item
then press the OK button. Select “Finish,"
then press the OK button.
Settings
Extender Settings…
Network
TV Resolution
Screen Saver
Software Update
Product Support
Reset System
Operating Manual
settings
Screen Saver
Set Timing
Set the screen saver to turn on after :
5 minutes
10 minutes
15 minutes
30 minutes
Cancel
Finish
Grandprix_new.indd 27 2008-07-08 오후 1:32:51
Page 28
28
Settings Menu
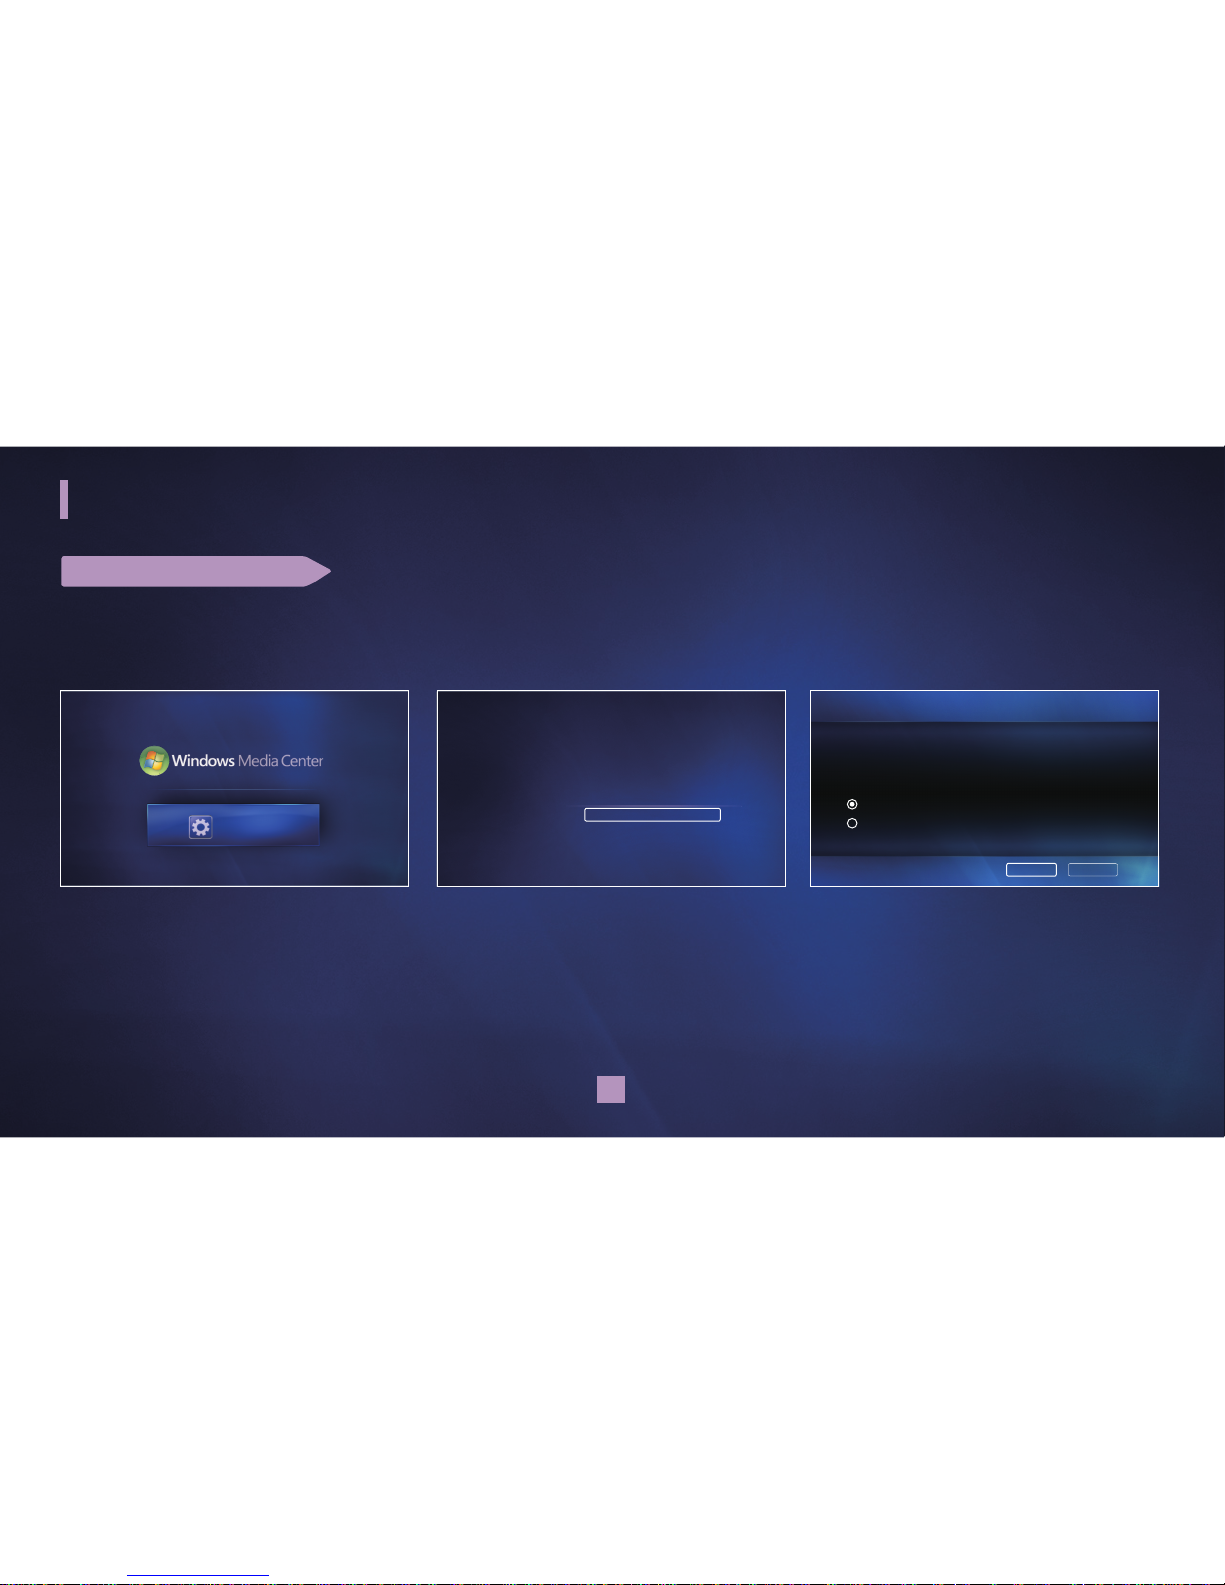
UPDATING SOFTWARE
You can update to a newer version of the Extender software (requires a network connection).
1 Press / to select “Settings,” then
press the OK button.
2 Press / to select “Software Update,”
then press the OK button.
3 Press / to select the desired item
then press the OK button. Select
“Next,” then press the OK button.
Software Update
New Update Available
A new update is available for your Extender. After the update, your Extender will
restart.
Would you like to update your Extender?
Yes, install and restart
Not now
Cancel
Next
Extender Settings…
Network
TV Resolution
Screen Saver
Software Update
Product Support
Reset System
Operating Manual
settings
Settings
Grandprix_new.indd 28 2008-07-08 오후 1:32:52
Page 29
29
Settings Menu
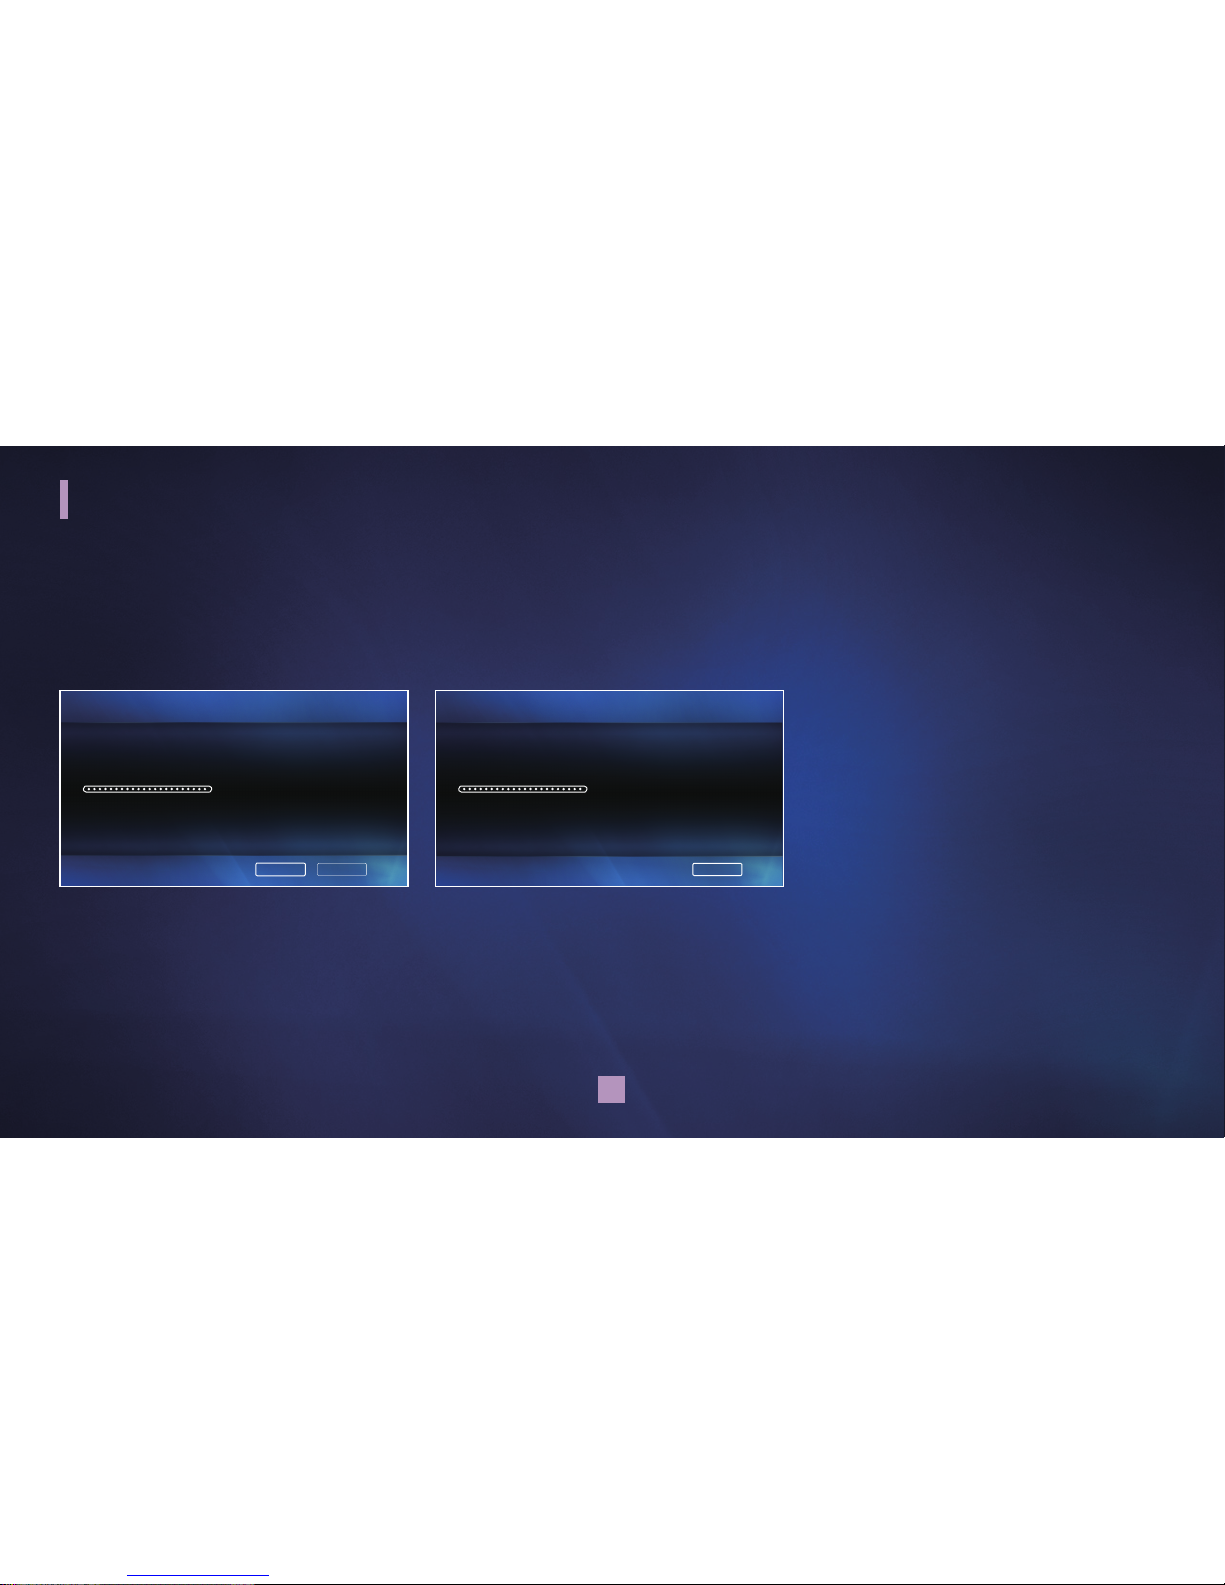
4 Select "Next" when the downloading is
complete.
5 Select "Next" when the downloading is
complete.
The Extender will restart automatically,
then the main screen of the Extender
appears.
Software Update
Installig Update
Please wait while the Extender installs the update.
100% Complete
Do not power off your TV or Extender. The Extenderwill restart automatically when
Next is selected.
Next
Software Update
Downloading Update
Please wait while the Extender downloads the update.
100% Complete
Cancel
Next
Grandprix_new.indd 29 2008-07-08 오후 1:32:53
Page 30
30
Settings Menu
VIEWING PRODUCT SUPPORT
You can view support information for the Extender device.
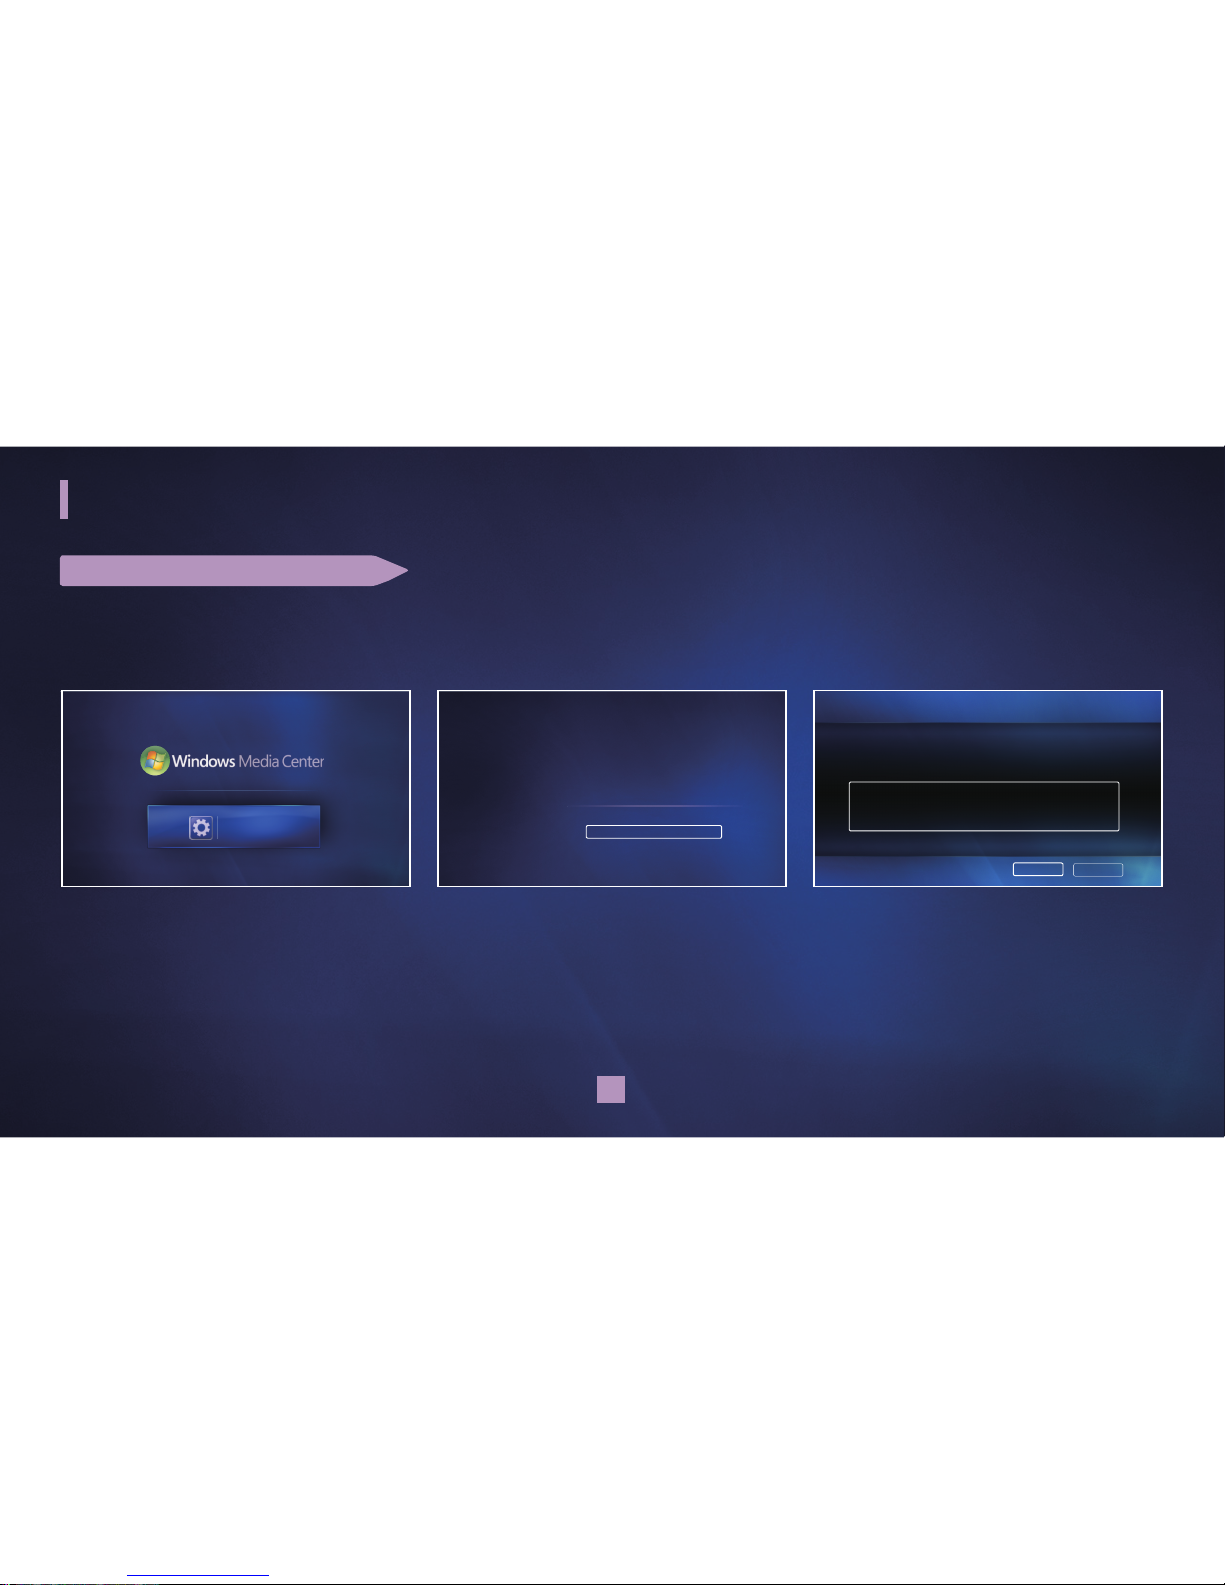
1 Press / to select “Settings,” then
press the OK button.
2 Press / to select “Product Support,”
then press the OK button.
3 Press the OK button to exit.
Settings
Extender Settings…
Network
TV Resolution
Screen Saver
Software Update
Product Support
Reset System
Operating Manual
settings
Product Support
Support Information
If you are experiencing problems, please visit
<http://www.samsung.com>
Windows Media Center 100.200.096.008
Firmware Version 1.0
UPnP device information Samsung MediaLive
MAC hardware address for wired adapter 00:16:E8:AF:70:03
MAC hardware address for wireless adapter 00:16:E8:AF:70:04
Cancel
Finish
Grandprix_new.indd 30 2008-07-08 오후 1:32:54
Page 31
31
Settings Menu
RESETTING SYSTEM
You can reset your Extender to its factory default settings.
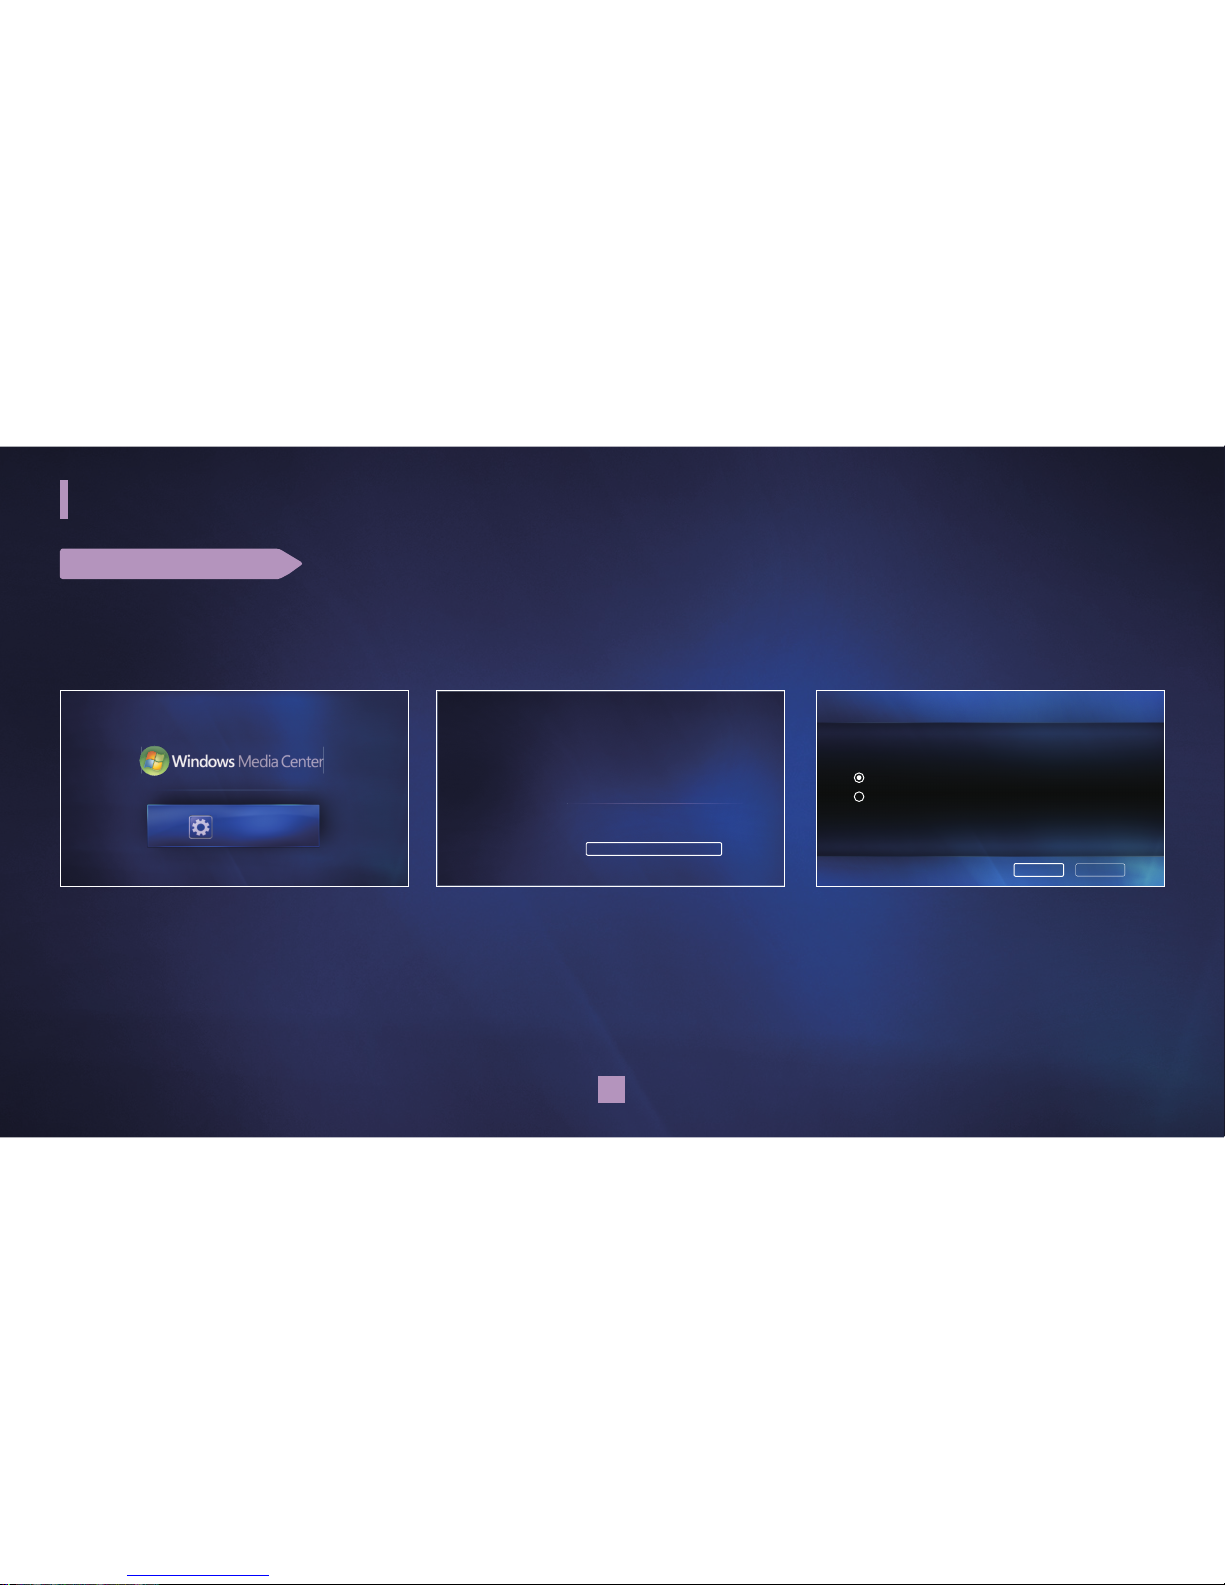
1 Press / to select “Settings,” then
press the OK button.
2 Press / to select “Reset System,”
then press the OK button.
3 Press / to select the desired item,
then press the OK button. Select “Next,”
then press the OK button. When the
system reset is complete, the main screen
of the Extender appears.
Settings
Extender Settings…
Network
TV Resolution
Screen Saver
Software Update
Product Support
Reset System
Operating Manual
settings
Reset System
Restore to Factory Settings?
Are you sure want to restore this Extendr to its factory settings? All of your current
settings will be removed and the Extender will restart.
Yes
No
Cancel
Next
Grandprix_new.indd 31 2008-07-08 오후 1:32:55
Page 32
32
Settings Menu
OPERATING MANUAL
You can view the operating manual of product.
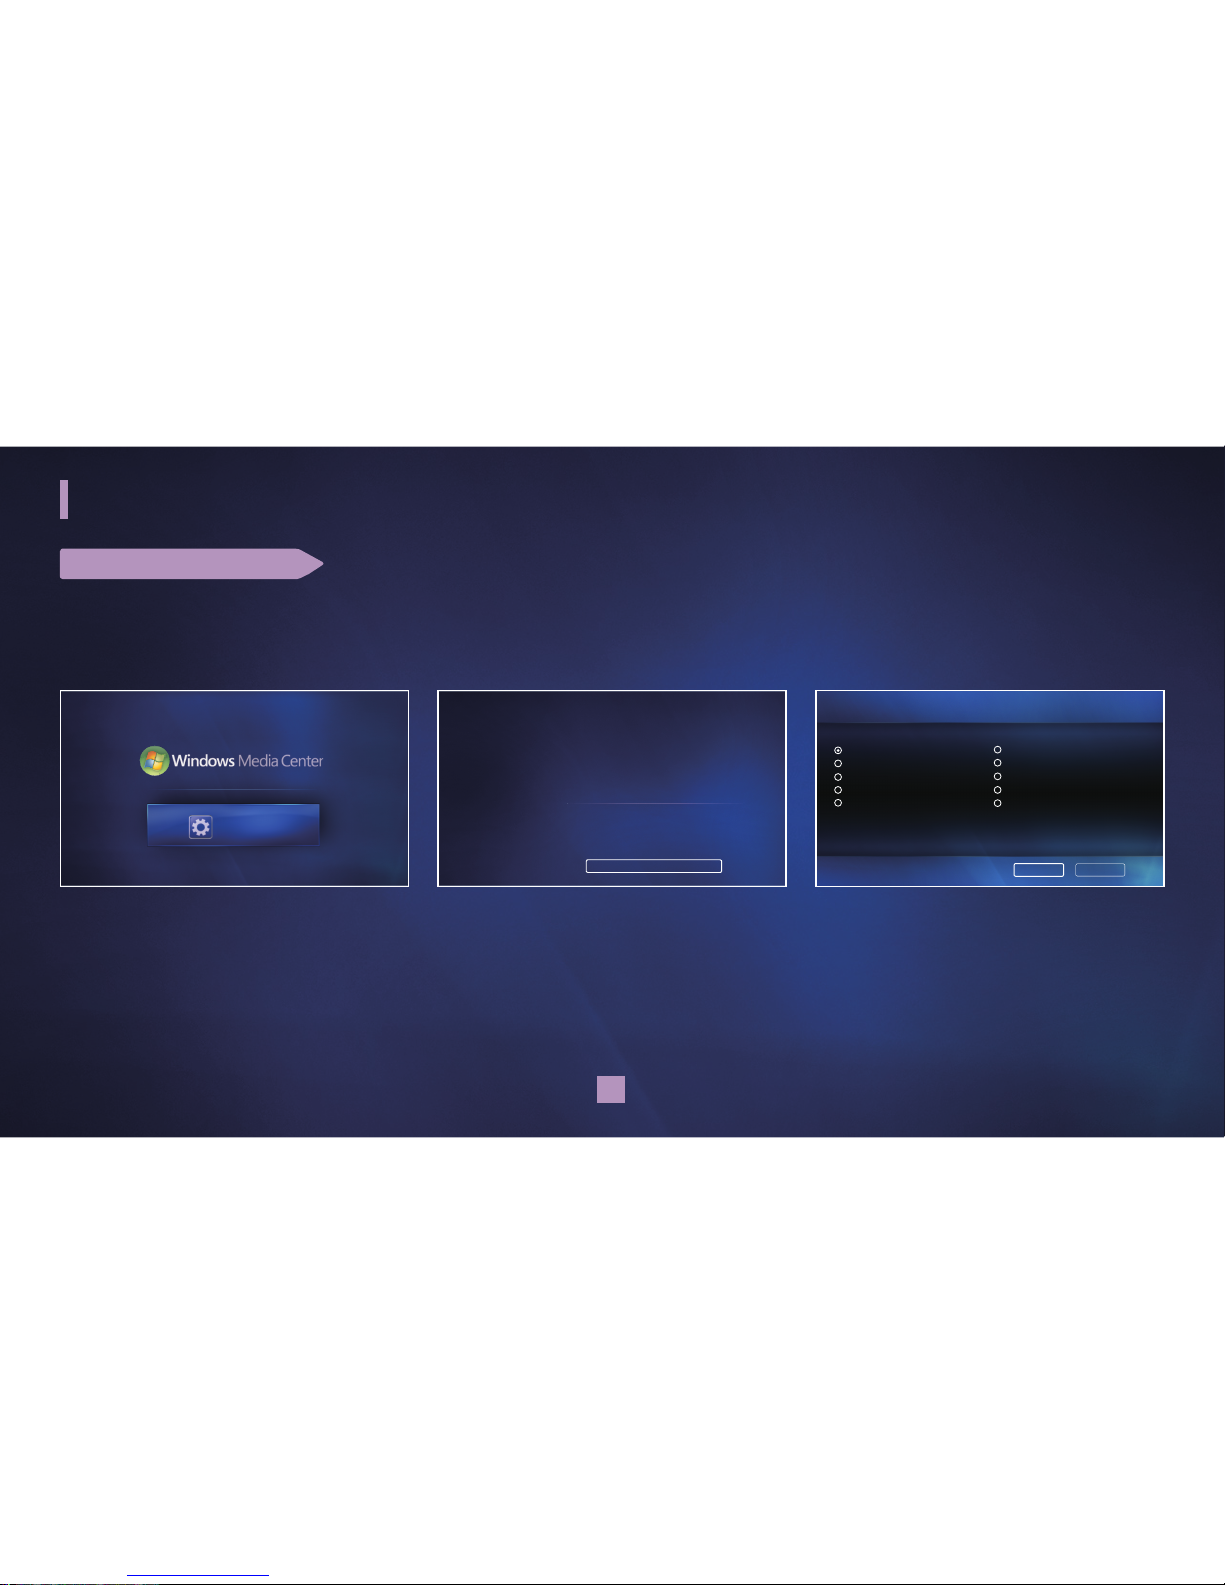
1 Press / to select “Settings,” then
press the OK button.
2 Press / to select “Operating
Manual,” then press the OK button.
3 Press / / / to select the desired
chapter, then press the OK button.Select
"NEXT" then press the OK button. The
screen of the desired chapter manual
appears.
Cancel
Next
Operating Manual
Select Chapter
Key Features Of Your New Extender Settings Menu
What's Included With Your New Extender Mounting Your Extender
Contents Troubleshooting
Introducing Your New Extender Specifications
Connections Contact Information
Page Navigation Information
Press Back (or Return) button for chapter selection page.
Press Left button for previous page. Press Right button for next page.
Extender Settings…
Network
TV Resolution
Screen Saver
Software Update
Product Support
Reset System
Operating Manual
settings
Settings
Grandprix_new.indd 32 2008-07-08 오후 1:32:56
Page 33
33
Using Windows Media Center Extender
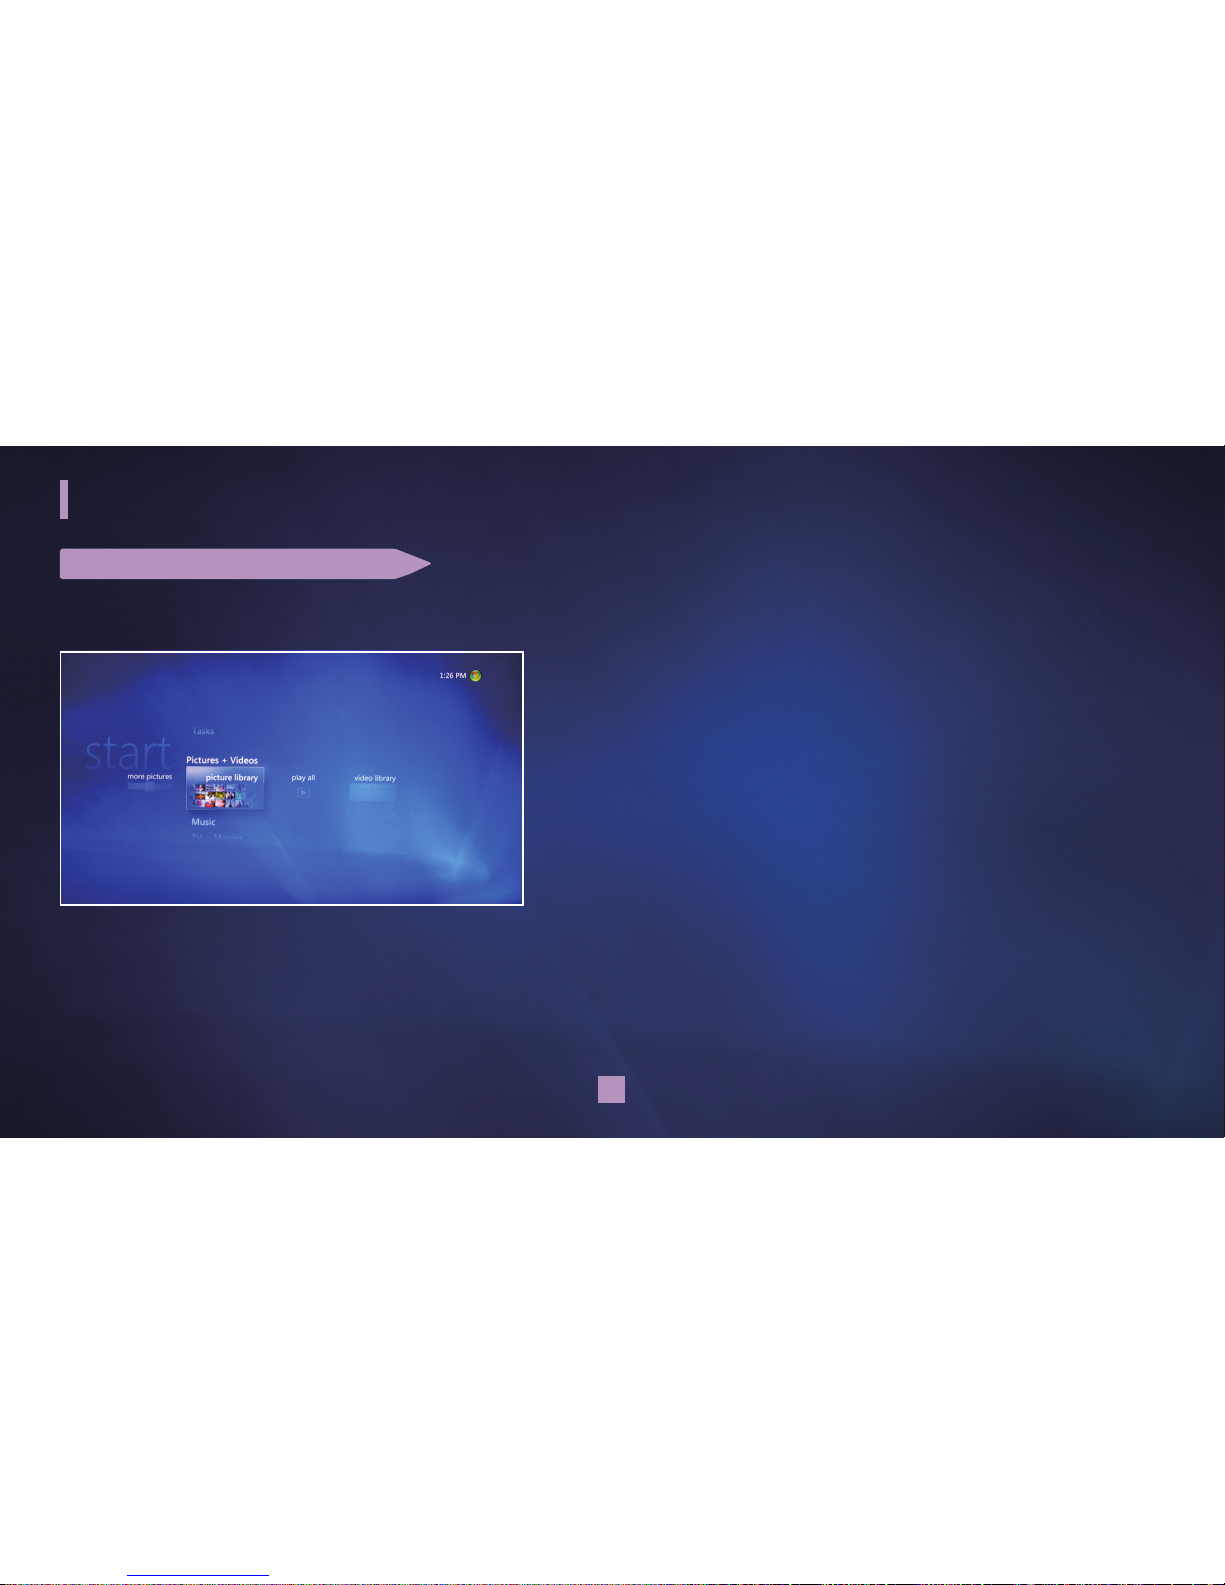
VIEWING PICTURES OR VIDEOS
1 Press / to select “Pictures + Videos.”
2 Press / to select the desired items then press the OK button.
• more pictures : You can view online streamed pictures.
• pictures library : You can view all the pictures in your library.
• play all: You can play slide show of all the pictures in your library.
• video library: You can view information about all the videos in your library.
• You can add folders on your PC as your library by selecting Tasks > settings > Library Setup > Add Folders.
Grandprix_new.indd 33 2008-07-08 오후 1:32:59
Page 34
34
Using Windows Media Center Extender
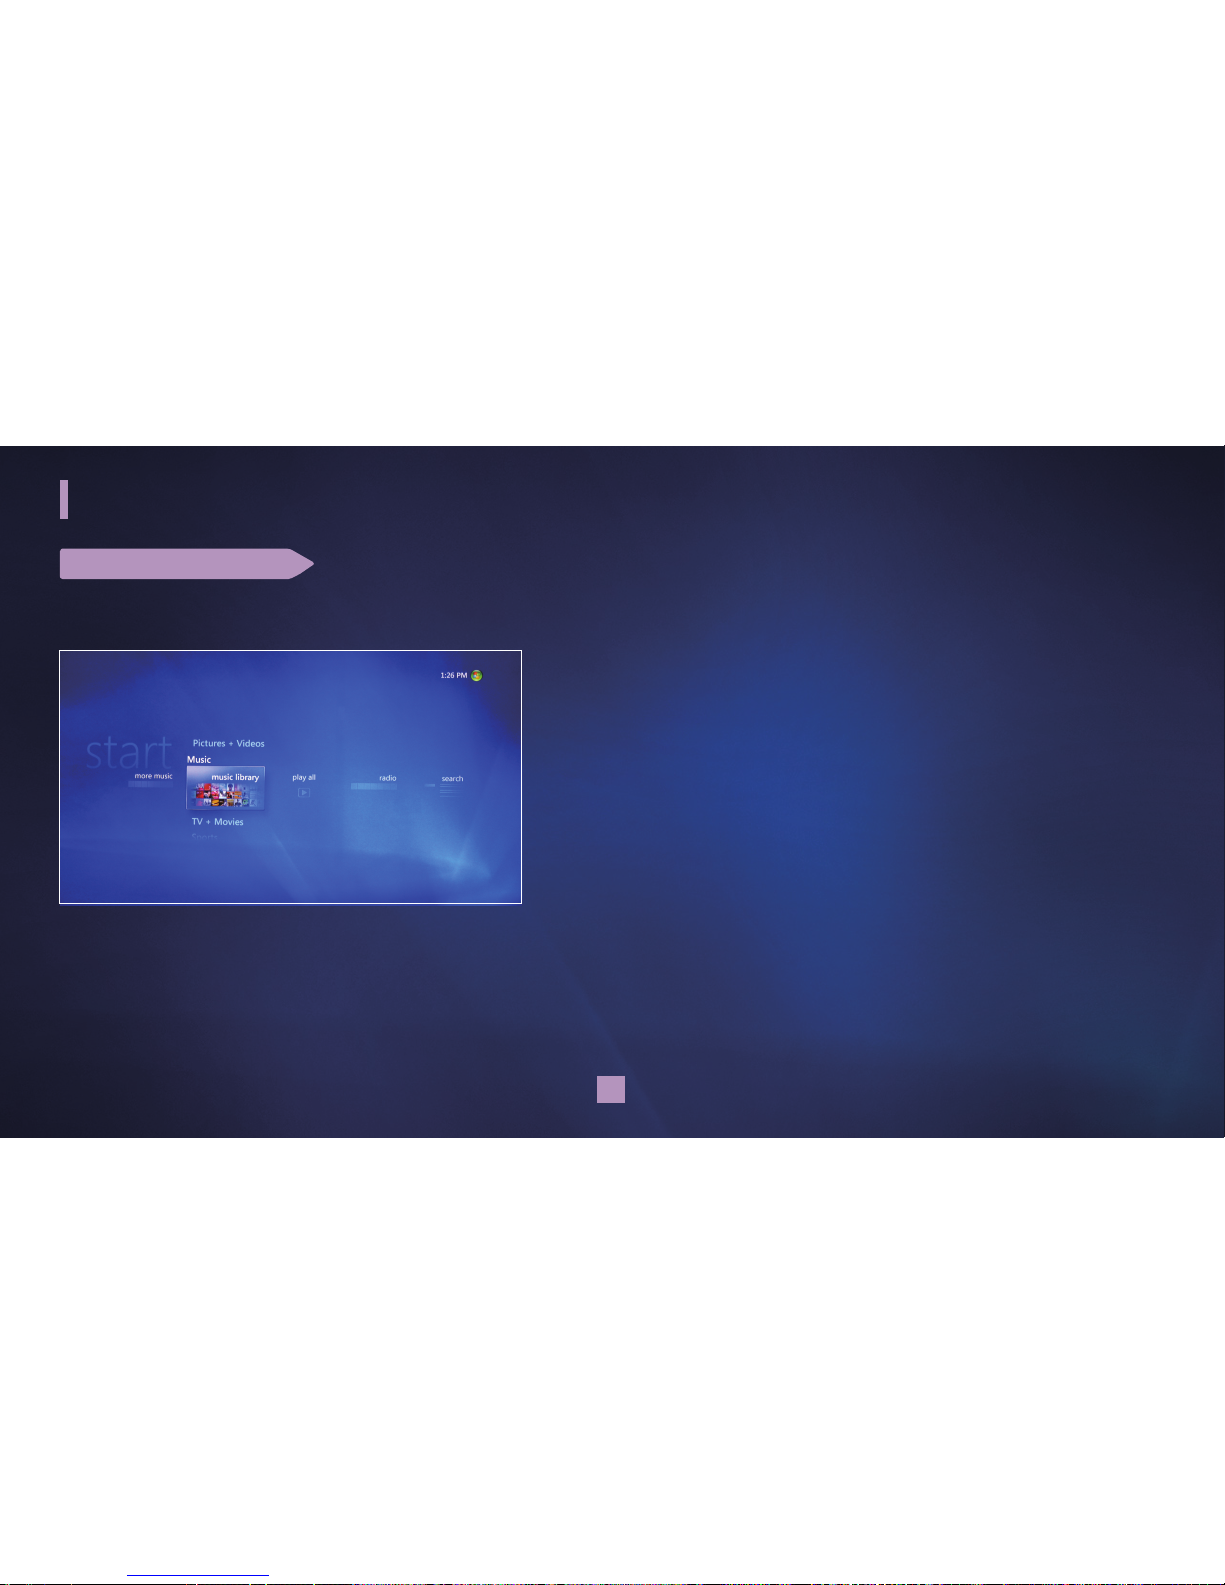
LISTENING TO MUSIC
You can listen to music which is saved in your PC or in the internet.
1 Press / to select “Music.”
2 Press / to select the desired items then press the OK button.
• more music : You can play online streamed music.
• music library : You can view all the music in your library.
• play all: You can play all the music in your library.
• radio: You can play online stations that you have subscribed to.
• search: You can look for available music by artist, song or genre.
• Streaming CD/DVD from your PC to a Media Center Extender is not provided.
• You can add folders on your PC as your library by selecting Tasks > settings > Library Setup > Add Folders.
Grandprix_new.indd 34 2008-07-08 오후 1:33:01
Page 35
35
Using Windows Media Center Extender
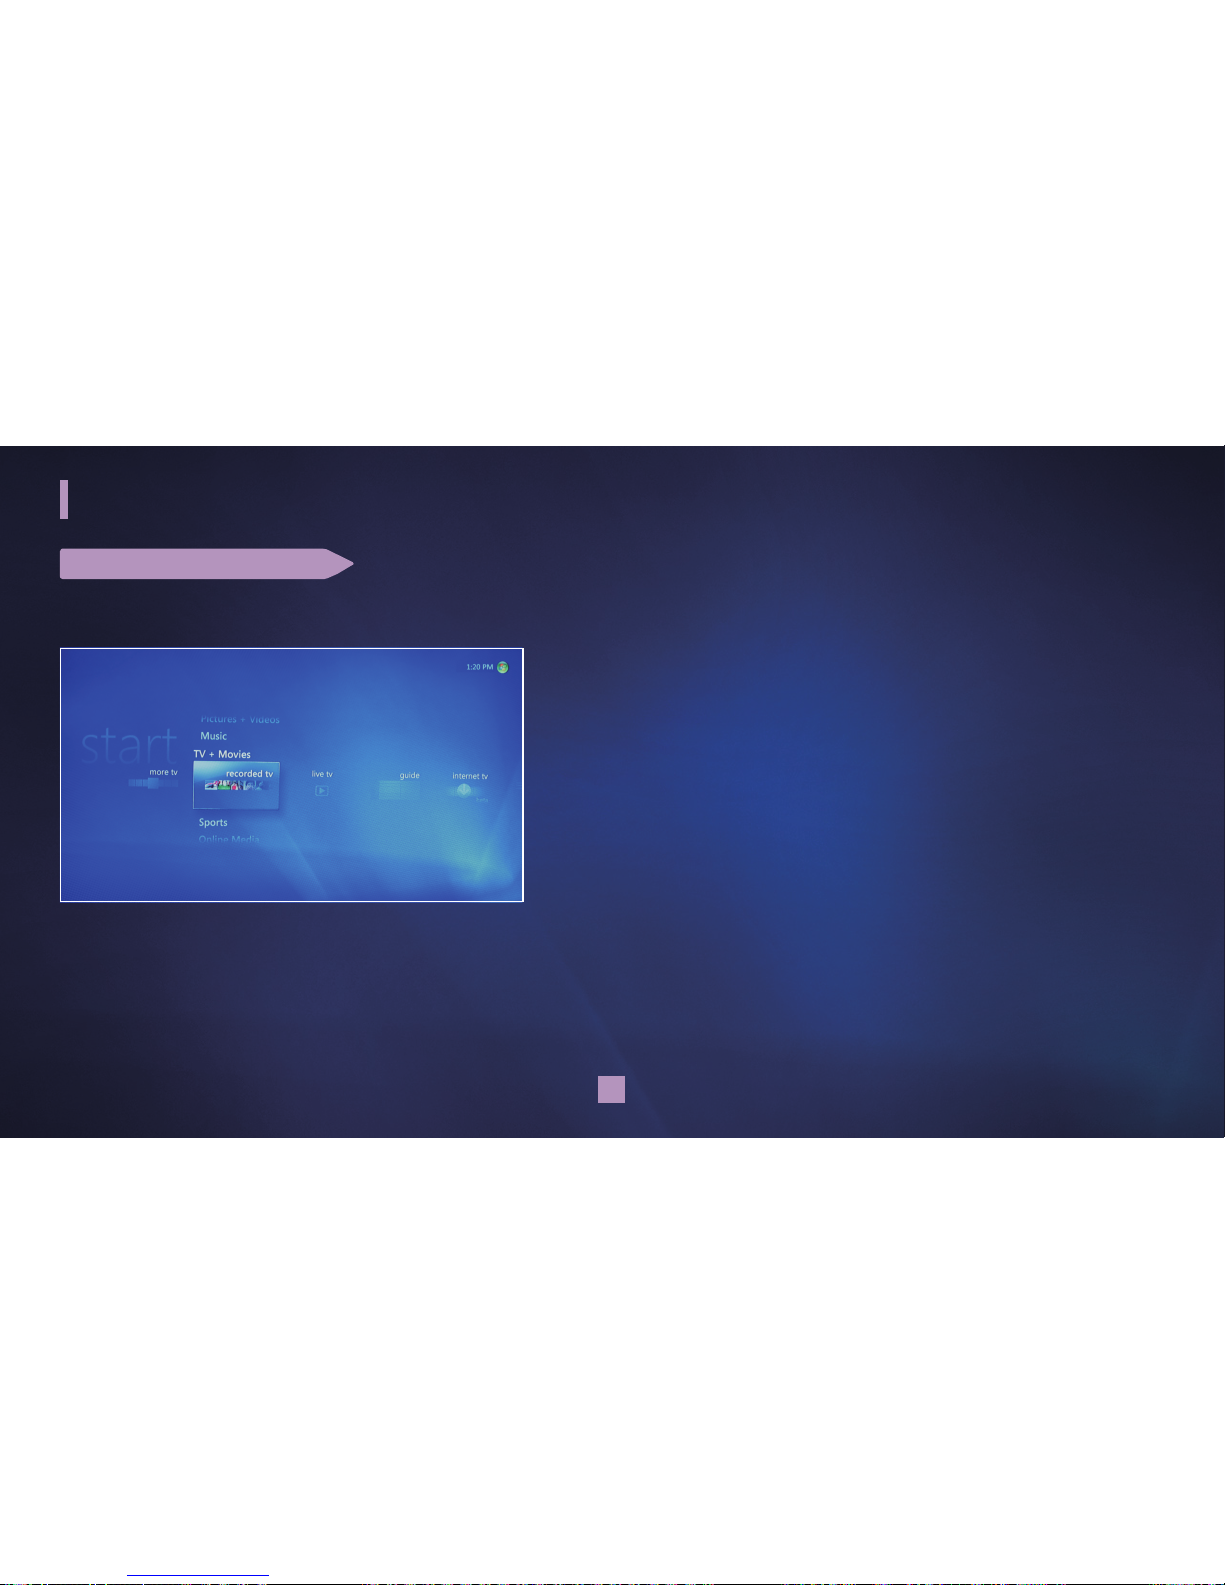
VIEWING TV OR MOVIES
You can watch or record TV programs when the Vista Certified TV tuner card is installed in your PC.
1 Press / to select “TV + Movie.”
2 Press / to select the desired items then press the OK button.
• more tv : You can view online streamed show.
• recorded tv: You can play a recorded tv program.
• live tv : You can watch a live tv program.
• guide : You can use your internet connection to download the Electronic
Programming Guide.
• internet tv : You can watch a tv program broadcasted through internet.
(available in U.S.A. only)
• search : You can search for available tv program.
• Streaming CD/DVD from your PC to a Media Center Extender is not provided.
Grandprix_new.indd 35 2008-07-08 오후 1:33:03
Page 36
36
Using Windows Media Center Extender
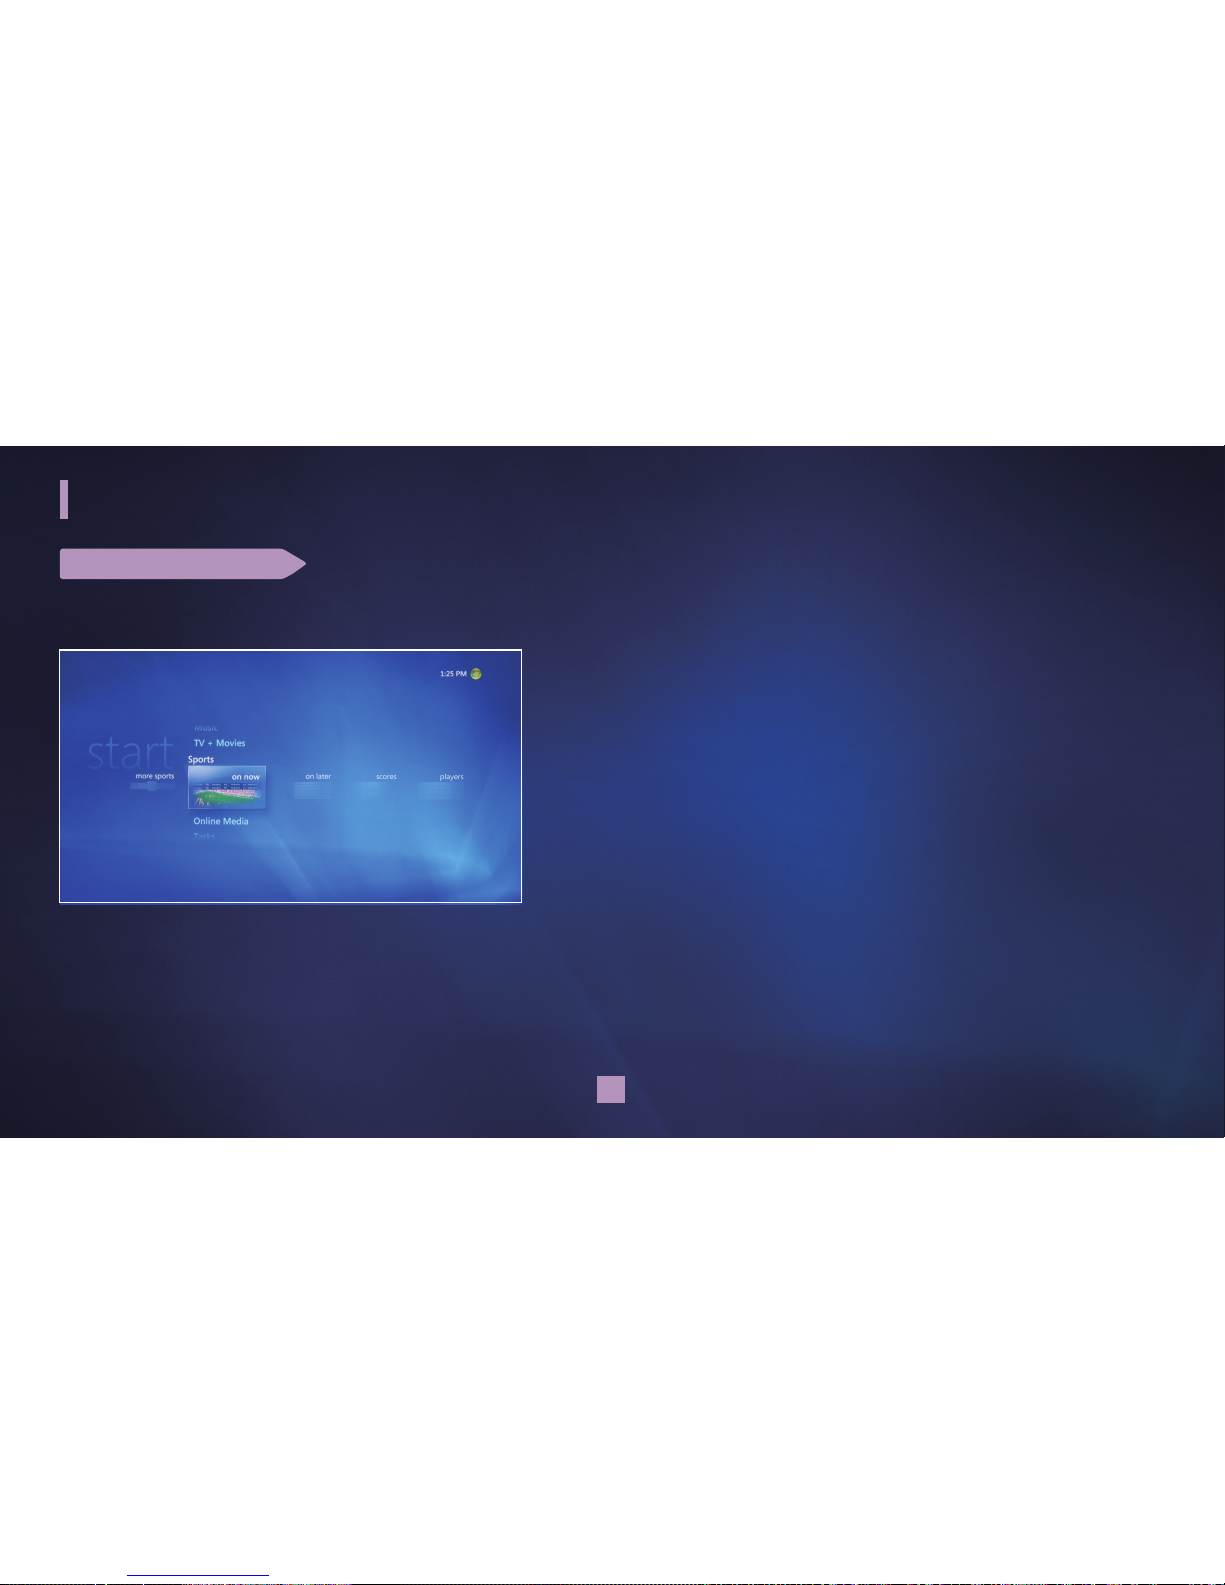
WATCHING SPORTS
You can watch sports when the TV tuner card is installed in your PC.
1 Press / to select “Sports.”
2 Press / to select the desired items then press the OK button.
• more sports: You can view online streamed sports programs.
• on now: You can view sports programs currently playing.
• on later: You can view a guide of upcoming sports programs.
(only for U.S.A. and Canada)
• scores: You can view scores and details of major league sports.
(only for U.S.A. and Canada's major league sports)
• players: You can add players to track fantasy and favorite players.
(only for U.S.A. and Canada's major league sports)
Grandprix_new.indd 36 2008-07-08 오후 1:33:06
Page 37
37
Using Windows Media Center Extender
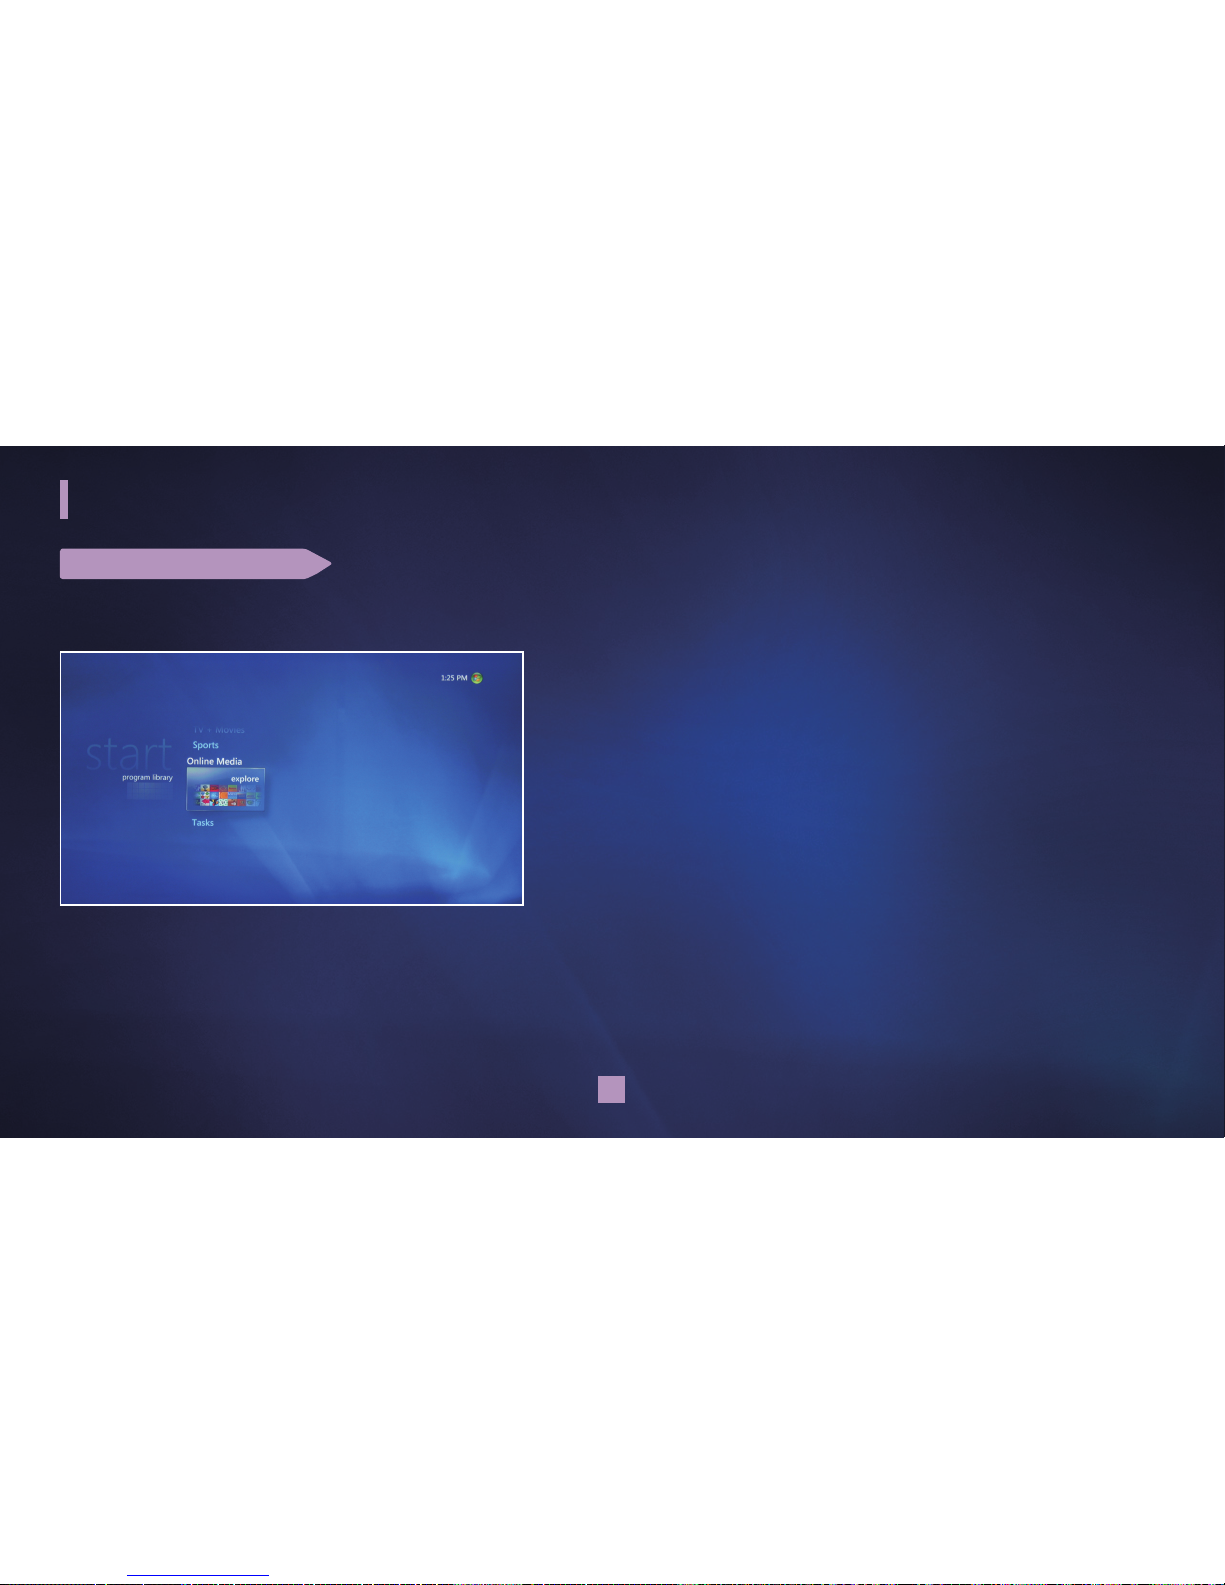
USING ONLINE MEDIA
1 Press / to select “Online Media.”
2 Press / to select the desired items then press the OK button.
• program library: You can find the desired program.
• explore: You can explore various contents in the internet.
Grandprix_new.indd 37 2008-07-08 오후 1:33:08
Page 38
38
Using Windows Media Center Extender
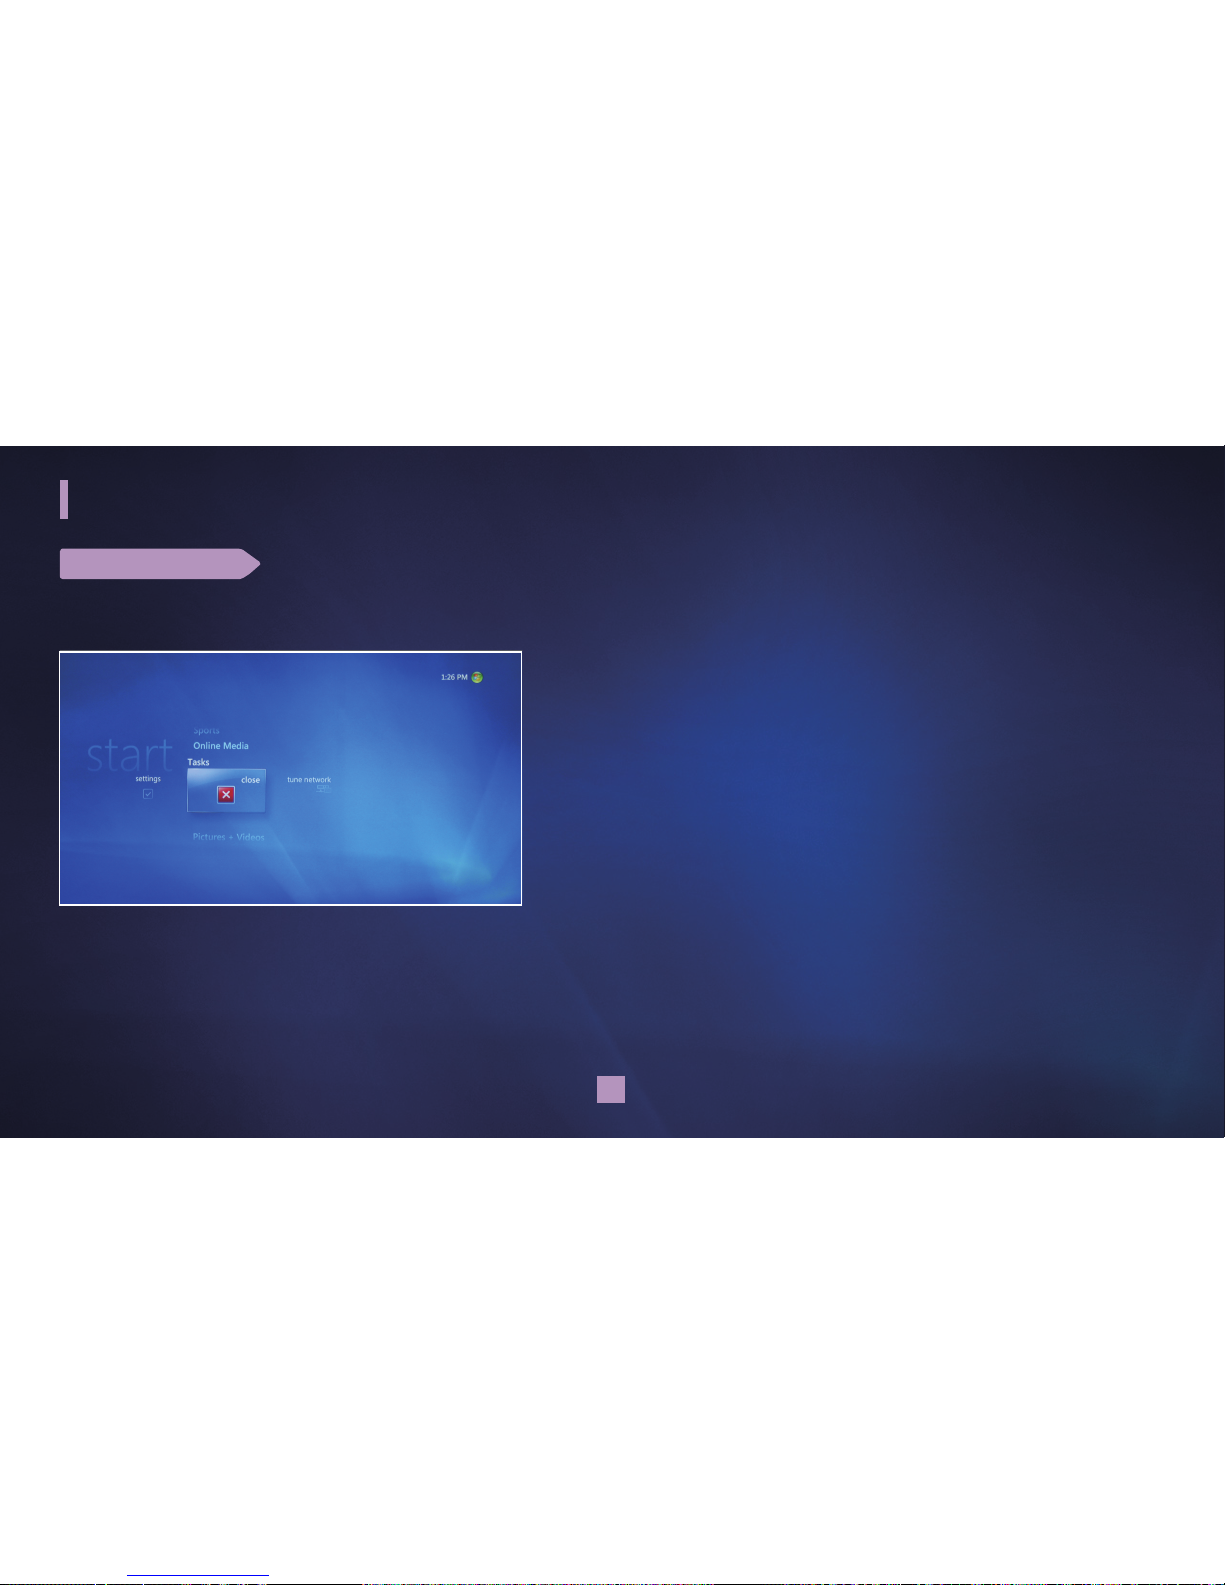
SETTING TASKS
1 Press / to select “Tasks.”
2 Press / to select the desired items then press the OK button.
• settings: You can set basic functions of Windows Media Center.
• close: You can exit the Windows Media Center.
• tune network: You can tune network performance.
Grandprix_new.indd 38 2008-07-08 오후 1:33:11
Page 39
39
Mounting your Extender
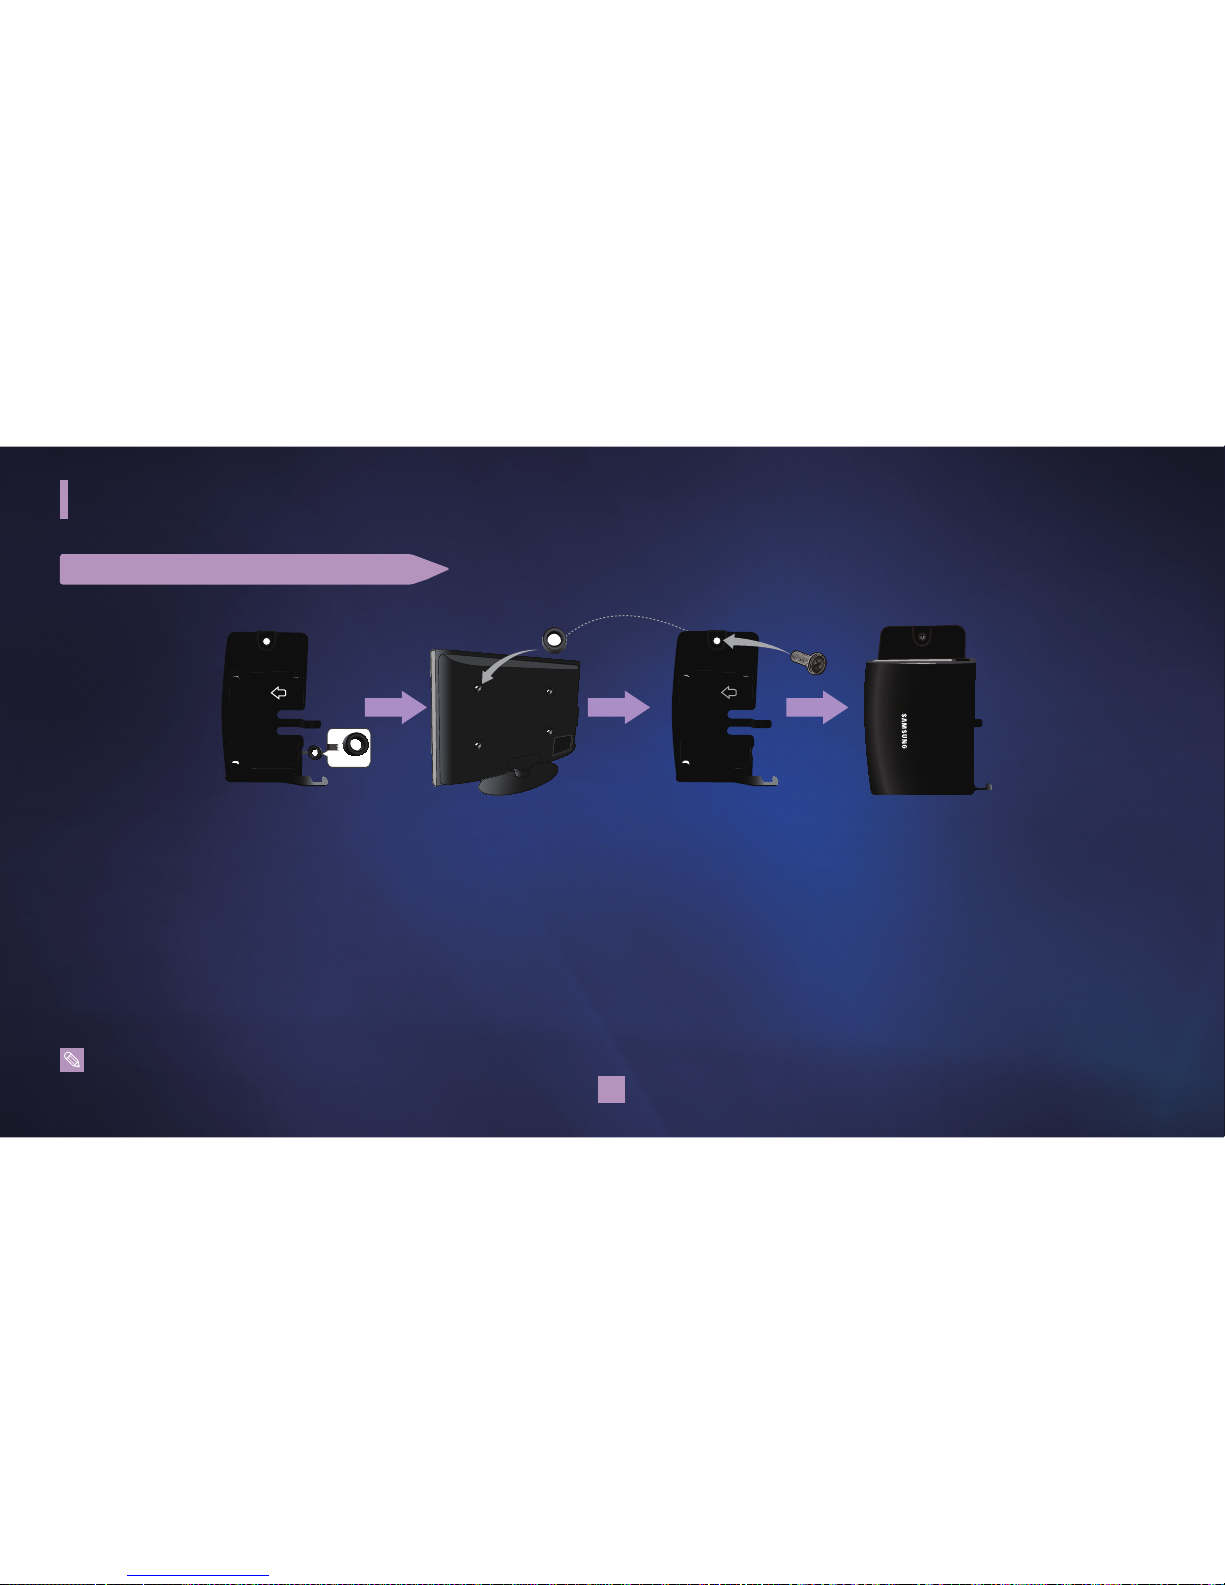
INSTALLING THE BRACKET RACK
1 Separate the supporting ring from the lower right part of the provided bracket rack.
2 Insert the supporting ring into one of the VESA mounting holes on the rear of your Samsung TV.
3 Place the bracket rack upright then align its mounting hole with the VESA mounting hole on the rear of the TV.
4 Insert one of the screws provided (use one that fits into the hole) through the bracket hole and into the TV hole then tighten it with a
screwdriver.
5 Align the four holes on the rear of the Extender device with the four hooks on the bracket rack.
6 Slide the device in the direction of the arrow on the bracket rack.
7 Arrange the cables connecting to your Extender device using the hook located on the lower right of the bracket rack.
■
If you mount the Extender device on the rear of the TV, Wireless network performance may decrease.
<Rear of TV>
Grandprix_new.indd 39 2008-07-08 오후 1:33:11
Page 40
40
Mounting your Extender
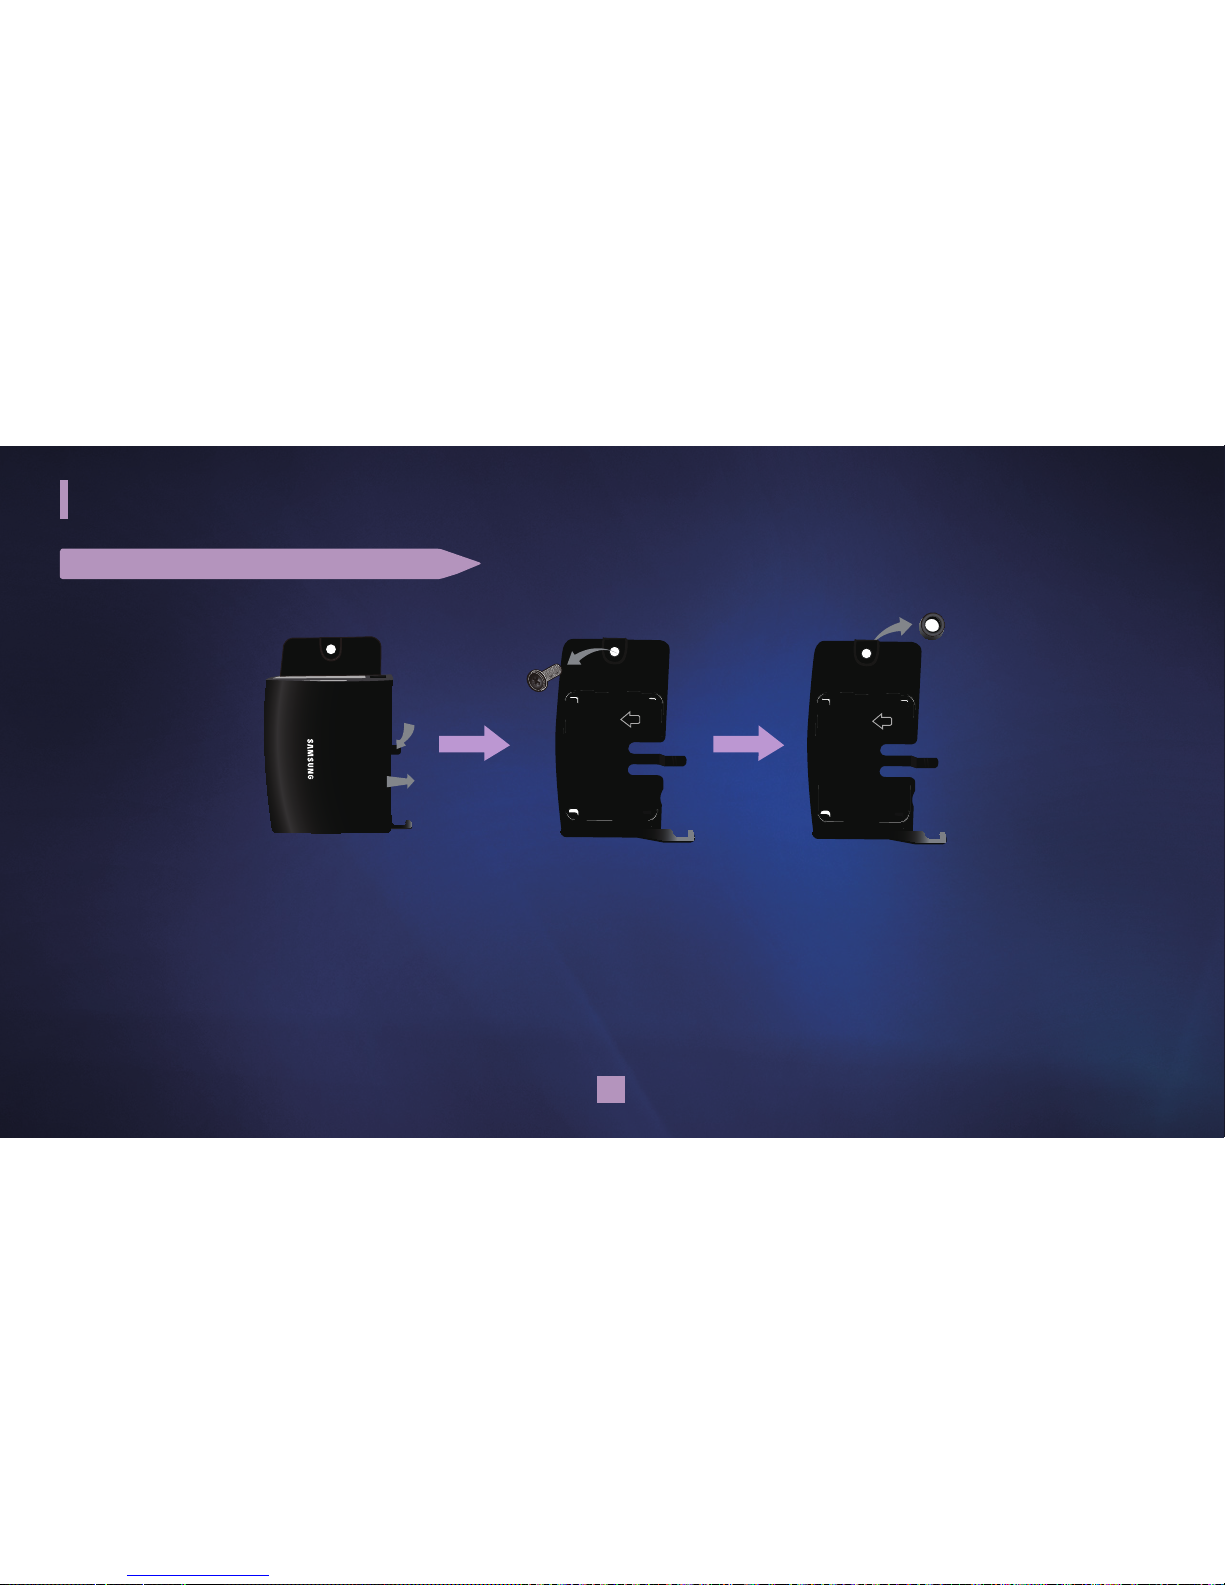
UNINSTALLING THE BRACKET RACK
1 Push the Extender device to the right as you press down on the lever extending from the bracket to separate the Extender device from
the bracket rack.
2 Loosen the screw holding the bracket in place with a screwdriver.
3 Remove the bracket rack and the supporting ring.
Grandprix_new.indd 40 2008-07-08 오후 1:33:12
Page 41

41
Troubleshooting
TROUBLESHOOTING
Problem Solution
No video
• Check that the HDMI cable is firmly in place.
• Check that the TV is set to the correct input.
• Turn the TV off and then back on.
No audio
• Check that the HDMI cable is firmly in place.
• Make sure the volume on your TV is turned up to an audible level.
Wired network
connection failure
• Check that the Ethernet/LAN cable is connected to the correct ports (on both ends) and firmly in place.
• Check that the router is powered on and operating correctly.
• Make sure that DHCP was selected in the network section of the Media Center Extender setup or that the
correct static IP setting has been configured, if DHCP is not used on the network.
Wireless network
connection failure
• Check that you have set the Extender device to use a wireless connection.
• Make sure you have set wireless security settings to match exactly what you have set up your router to use.
• Check that the distance from the Media Center Extender to the router is within the router's wireless range.
Samsung is working hard to ensure that you don't have many problems with your new Extender. If you are experiencing problems getting
your Extender to work, first try the troubleshooting tips below. Additional troubleshooting tips are on page 42.
For questions about Windows Media Center and Extender, please see Windows Help and Support. On your PC, go to the Start menu and
select Help and Support.
Always make sure you have downloaded the latest updates on your PC.
Grandprix_new.indd 41 2008-07-08 오후 1:33:12
Page 42

42
Problem Solution
You can't find the
Extender device on
your computer.
• Check that networking (wired or wireless) has been setup on the Extender device.
• If you are using a wireless connection, ensure that you have connected to the proper access point.
• If your home has multiple networks (multiple routers) ensure that your Media Center computer and the
Extender are on the same network (router).
• If you are using a non-Microsoft firewall, please disable the firewall program while your Extender is in use.
You can find the
Extender device on
your computer, but it
fails to setup in Vista.
• You can only have the Extender associated to one computer at a time; ensure that it has been removed from
any previous computers that are in the home.
• You can try to reset the Extender device using the reset menu of the Extender setup.
• Try restarting both devices. Shut off the Extender device. Restart the computer and wait for it to fully start;
make sure Media Center has started as well. Then turn back on the Extender device and try association again.
You can't find
your files on the
Vista Media Center
or Media Center
Extender.
• Check that the files are in a watched folder in Vista Media Center. If they are not, add the folder containing
the files by selecting Tasks > settings > Library Setup > Add Folders.
Remote control
does not work.
• Check the batteries (the TV should indicate activity if it is receiving a signal).
• Check that you are pointing the remote control directly at the TV.
• Check that the Samsung TV supports Anynet+ (2008 and later models).
• Anynet+ (HDMI-CEC) must be set to On in the TV's menu.
• If you connect your Extender after the TV is on, select the Searching Connections menu on the TV to search
for attached devices. (see page 11)
Grandprix_new.indd 42 2008-07-08 오후 1:33:13
Page 43

43
Specifications
SPECIFICATIONS
Specifications
Following Samsung 2008 TV supports the
Media Center Extender
CPU
300MHz Multimedia CPU
LCD TV 9 series : 46" 55"
8 series : 46" 52"
7 series : 40" 46" 52"
6 series : 32" 40" 46" 52"
5 series : 32" 37" 40" 46" 52"
4 series : 32" 37" 40"
PDP TV 7 series : 50" 58" 63"
6 series : 50" 58" 63"
5 series : 50" 58"
4 series : 42" 50"
DLP TV 7 series : 61" 67"
6 series : 50" 56" 61" 72"
5 series : 67"
OS Linux 2.6
Power AC 100~240V (DC 12V Adaptor)
Power Consumption 10W
Video Out HDMI(480p/720p/1080i)
Audio Out HDMI
Network Wired / Wireless(802.11n/a/b/g)
PC System Requirement Microsoft Windows Vista™ Home Premium or Ultimate
Video Format MPEG-1/2/4, H.264, WMV (VC-1)
Audio Format PCM, MP3, AC3, WMA, WMApro
Picture Format JPEG
Dimension (W*D*H) 154 x 125.4 x 31 (mm)
Weight 0.4 kg
■
Some files may not be played.
Grandprix_new.indd 43 2008-07-08 오후 1:33:13
Page 44

44
ContactSamsungWORLD-WIDE
IfyouhaveanyquestionsorcommentsregardingSamsungproducts,pleasecontactSamsungcustomercarecenter.
Country
CustomerCareCenter
WebSite
Address
U.S.A. 1-800-SAMSUNG (7267864) www.samsung.com
Samsung Electronics America Inc., 105 Challenger
Road, Ridgefield Park, NJ 07660-0511.
Contact Information
CONTACT INFORMATION
Grandprix_new.indd 44 2008-07-08 오후 1:33:14
 Loading...