

Page 1

User manual
DRAFT, not Final
ET-WV521
Draft Manual: The Manual is preliminary and some features discussed may not be applicable or complete and are
not final. (i.e. Network/Computer/Software/System Requirements and features, Packet Contents, Installation Description,
User Interface and .etc.)
Page 2

DRAFT, not Final
S
AFETY INFORMATION
S
AFETY
To reduce the risk of electric shock, do not remove the cover (or back).
No user serviceable parts are inside. Refer to qualified service personnel.
W
ARNINGS
This symbol indicates “dangerous voltage” inside the product that presents a
risk of electric shock or personal injury.
Warning
•
To reduce the risk of fire or electric shock, do not expose this appliance to rain or moisture.
Caution: To prevent electric shock,
match wide blade of plug to the wide
slot, fully insert.
This symbol indicates important instructions accompanying the product.
Caution
•
Apparatus shall not be exposed to dripping or splashing and no objects filled with liquids, such as vases, shall be placed
on the apparatus.
•
The Mains plug is used as a disconnect device and shall stay readily operable at any time.
•
This apparatus shall always be connected to an AC outlet with a protective grounding connection.
•
To disconnect the apparatus from the mains, the plug must be pulled out from the mains socket, therefore the mains plug
shall be readily operable.
•
Ensure that the AC power supply in your house complies with the identification sticker located on the back of your product.
•
Install your product horizontally or vertically, on a suitable base (furniture), with enough space around it for ventilation
(7.5~10cm).
•
Do not place the product on amplifiers or other equipment which may become hot.
•
Do not stack anything on top of the product.
•
In order to disconnect the product completely from the power supply, remove the main plug from the wall outlet, especially when left unused for a long period of time.
•
During thunderstorms, disconnect the AC main plug from the wall outlet. Voltage peaks due to lightning could damage
the product.
•
Do not expose the product to direct sunlight or other heat sources. This could lead to overheating and malfunction of the
product.
•
Protect the product from moisture, and excess heat or equipment creating strong magnetic or electric fields (i.e. speakers.).
•
Disconnect the power cable from the AC supply if the product malfunctions.
•
Your product is not intended for industrial use. Use of this product is for personal use only.
•
Condensation may occur if your product has been stored in cold temperatures. If transporting the product during the
winter, wait approximately 2 hours until the product has reached room temperature before using.
P
RECAUTIONS
S
AMSUNG WIRELESS ROUTER USER MANUAL
P
AGE
2
Page 3

DRAFT, not Final
T
ABLE OF
Safety Information ................................................ 2
Safety Warnings ................................................................. 2
Precautions ...................................................................... 2
Getting Started ...................................................... 4
Package Contents ............................................................... 4
System Requirements .......................................................... 4
About this Product .............................................................. 5
Features .......................................................................... 5
Description ....................................................................... 6
Front View .................................................................... 6
Back View .................................................................... 6
Installation ....................................................................... 7
Before you Begin ............................................................ 7
Wireless Installation Considerations ..................................... 7
Connect to Cable/DSL/Satellite Modem. ................................ 7
Connect to Another Router ................................................ 8
Connecting to the Web UI ..................................................... 9
Router’s Defaults ............................................................ 9
Connecting using the Browser ............................................ 9
C
ONTENTS
Knowledge Base .............................................................90
One Foot Connection (OFC) Method ...................................................... 90
Connect my Samsung TV to the router using OFC. ......................... 90
Plug & Access Connection Method .................................................. 91
Connect my Samsung TV to the router using Plug & Access. ......... 91
Priority Quality of Service ................................................................. 91
Wireless Basics ...................................................................................... 92
Wireless Modes ............................................................................... 94
Wireless Security ............................................................................. 94
What is WPA? ................................................................................... 94
Networking Basics ........................................................................... 95
Connect to a Wireless Network .............................................................. 96
Using Windows® 7 ....................................................................... 96
Configuration WPS ............................................................................ 97
Using Windows Vista
Using Windows® XP .................................................................. 101
Troubleshooting ..................................................... 102
Technical Specifications ........................................ 104
® .................................................................................................................... 100
Web User Interface ............................................. 10
Setup Category ................................................................ 11
Internet - Wizard ........................................................... 12
Internet - Manual Internet Connection ................................. 18
Wireless Settings .......................................................... 27
Network Settings .......................................................... 35
Advanced Category ........................................................... 37
Virtual Server .............................................................. 38
Port Forwarding ........................................................... 39
Application Rules ......................................................... 40
Quality of Service (QoS) ................................................. 41
Network Filter .............................................................. 43
Access Control ............................................................ 44
Website Filter .............................................................. 47
Inbound Filter .............................................................. 48
Firewall Settings ........................................................... 49
Routing ..................................................................... 50
Advanced Wireless ........................................................ 51
Wi-Fi Protected Setup .................................................... 53
Advanced Network Settings. ............................................. 55
Guest Zone ................................................................. 57
IPv6 ......................................................................... 59
IPv6 Firewall ............................................................... 72
Tools Category ................................................................. 73
Admin ....................................................................... 74
Time ......................................................................... 75
Syslog ...................................................................... 76
Email Settings ............................................................. 77
System ...................................................................... 78
Firmware ................................................................... 79
Dynamic DNS .............................................................. 80
System Check .............................................................. 81
Schedules .................................................................. 82
Status Category ................................................................ 83
Device Info ................................................................. 84
Logs ......................................................................... 86
Statistics ................................................................... 87
Internet Sessions .......................................................... 87
Wireless .................................................................... 88
IPv6 ......................................................................... 88
Support Category ............................................................. 89
S
AMSUNG WIRELESS ROUTER USER MANUAL
P
AGE
3
Page 4

DRAFT, not Final
G
ETTING STARTED
P
ACKAGE CONTENTS
Check for the supplied accessories below:
•
Wireless 802.11ac Dual Band Router
•
Power Adapter with extra Power Cable
•
Ethernet Cable
•
CD-ROM (with installation software and manuals)
•
Quick Installation Guide
•
Stand
•
Mounting Kit
Network Requirements:
•
10/100Mbps Ethernet LAN adapter
•
802.11a/g/n/ac Wireless Adapter
•
Ethernet-based Cable or DSL Modem
S
YSTEM REQUIREMENTS
Computer Requirements:
•
Window 7/Vista/XP (with SP3)
•
10/100 Ethernet LAN adapter
•
CD-ROM drive
Software Requirements:
•
Operating System like Microsoft Windows, Macintosh, or Linux
•
Browser like Internet Explorer (6 or higher), Mozilla Firefox (3.0 or higher), Safari (3.0 or higher), or Chrome (2.0 or
higher)
S
AMSUNG WIRELESS ROUTER USER MANUAL
P
AGE
4
Page 5

A
DRAFT, not Final
BOUT THIS PRODUCT
This user’s guide provides a wonderful insight into the functionality of the product called the Samsung ET-WV521. This guide
is based on the current running firmware/software version available for this product and might touch on some new and
exciting topics never seen on this product line before providing a rewarding reading experience and in the end acts as a guide
when installing and maintaining this product.
The Samsung wireless router is packed with a load of features. Most of these features are what is expected from an Internet
Wireless router, and then there are the features that are unique to Samsung products.
•
Internet Connectivity
Cable
Modem, this device can act as the Internet Gateway
local network. Connections like, PPPoE, Static
to your
and Dynamic
tion can be made.
•
Wireless LAN functionality
full package of what the 802.11n protocol has to offer.
Other remarkable features are WMM, Automatic Fallback, RF Output Level Control, Latest Wireless Security
requirements, WPS and much more.
•
Networking
10/100Mbps LAN port and 1 10/100Mbps Internet port.
This device can handle a network of up to 1000 MAC
addresses.
•
Multicasting
•
DHCP
functionality.
•
Quality of Service
traffic based on weight or priority. IP Pools can be managed based on application port numbers.
•
Advanced Security
a list of security features like Network Filtering, Access
Control, Website Filtering, Inbound Filtering and SPI.
•
IPv6
. One of the most attractive features of this router is
the fact that not only does it support local IPv6 support,
but also IPv6 Internet Connection support. This is truly
an Internet Gateway ahead of it’s time.
•
More
. Other features like DDNS, System Checking,
Firmware Updates, Email Settings (for notification), and
Schedules are also available on this device.
IP Connections, PPTP, and L2TP connec-
. This router is equipped with 4
. Supports IGMPv2.
. This device supports both Server and Client
. In conjunction with a DSL or
. This router supports the
. QoS rules can be created to shape
. The Samsung router supports also
F
EATURES
•
One Foot Connection
unique, feature allows you to connect your Samsung TV
automatically to this router, using the OFC connection
method.
•
Plug & Access
feature allows you to connect this router to any Samsung
wireless device easily by using USB memory stick.
•
Samsung Priority QoS
unique, feature will identify any Samsung networking
device in your network and give it the higher wireless
network traffic priority. The is perfect for video steaming
to your Samsung TV.
. This powerful, Samsung
. This powerful, Samsung unique,
. This powerful, Samsung
S
AMSUNG WIRELESS ROUTER USER MANUAL
P
AGE
5
Page 6

D
DRAFT, not Final
ESCRIPTION
F
ONT VIEW
1
POWER LED
2
INTERNET LED
3
2.4Ghz LED
4
5Ghz LED
5
WPS BUTTON
A solid blue light indicates a proper connection to the power supply.
A solid blue light indicates the PPP negotiation has successfully completed.
A solid light indicates that the 2.4GHz wireless segment is ready. This LED
blinks during wireless data transmission.
A solid light indicates that the 5.0GHz wireless segment is ready. This LED
blinks during wireless data transmission.
Press the WPS button for 1 second to initiate the WPS process. The button will
flash blue while a WPS connection is being established. The button will light
solid blue for 5 seconds when the device has successfully been added to the
network.
B
ACK VIEW
1
USB PORT
2
LAN PORTS
3
INTERNET PORT
4
RESET BUTTON
5
POWER SWITCH
6
POWER RECEPTOR
The USB port can be used for WPS enabled Wireless USB adapters. One other
feature this port is used for is called the
The 4 x RJ-45 LAN ports can be used for 10/100Mbps LAN connections like
computers.
The RJ-45 Internet (WAN) port can be used for connections like a DSL/Cable
modem.
Pressing the Reset button restores the router to its original factory default settings.
Use this switch to power on/power off the device.
Receptor for the supplied power adapter.
Plug & Access
feature.
S
AMSUNG WIRELESS ROUTER USER MANUAL
P
AGE
6
Page 7

DRAFT, not Final
I
NSTALLATION
This section will walk you through the installation process. Placement of the router is very important. Do not place the router
in an enclosed area such as a closet, cabinet, attic or garage.
B
EFORE YOU BEGIN
•
Please configure the router with the computer that was last connected directly to your modem.
•
You can only use the Ethernet port on your modem. If you were using the USB connection before using the router, then
you must turn off your modem, disconnect the USB cable and connect an Ethernet cable to the Internet port on the router,
and then turn the modem back on. In some cases, you may need to call your ISP to change connection types (USB to
Ethernet).
•
If you have DSL and are connecting via PPPoE, make sure you disable or uninstall any PPPoE software such as WinPoet,
Broadjump, or Enternet 300 from your computer or you will not be able to connect to the Internet.
•
When running the Setup Wizard from the CD, make sure the computer you are running the CD from is connected to the
Internet and online or the wizard will not work. If you have disconnected any hardware, reconnect your computer back to
the modem and make sure you are online.
The wireless router lets you access your network using a wireless connection from virtually anywhere within the operating
range of your wireless network. Keep in mind, however, that the number, thickness and location of walls, ceilings, or other objects that the wireless signals must pass through, may limit the range. Typical ranges vary depending on the types of materials and background RF (radio frequency) noise in your home or business. The key to maximizing wireless range is to follow
these basic guidelines:
W
IRELESS INSTALLATION CONSIDERATIONS
1.
Keep the number of walls and ceilings between the router and other network devices to a minimum - each wall or ceiling
can reduce your adapter’s range from 3-90 feet (1-30 meters.) Position your devices so that the number of walls or ceilings is minimized.
2.
Be aware of the direct line between network devices. A wall that is 1.5 feet thick (.5 meters), at a 45-degree angle appears
to be almost 3 feet (1 meter) thick. At a 2-degree angle it looks over 42 feet (14 meters) thick! Position devices so that the
signal will travel straight through a wall or ceiling (instead of at an angle) for better reception.
3.
Building Materials make a difference. A solid metal door or aluminum studs may have a negative effect on range. Try to
position access points, wireless routers, and computers so that the signal passes through drywall or open doorways.
Materials and objects such as glass, steel, metal, walls with insulation, water (fish tanks), mirrors, file cabinets, brick,
and concrete will degrade your wireless signal.
4.
Keep your product away (at least 3-6 feet or 1-2 meters) from electrical devices or appliances that generate RF noise.
5.
If you are using 2.4GHz cordless phones or X-10 (wireless products such as ceiling fans, lights, and home security
systems), your wireless connection may degrade dramatically or drop completely. Make sure your 2.4GHz phone base is
as far away from your wireless devices as possible. The base transmits a signal even if the phone in not in use.
C
ONNECT TO CABLE
If you are connecting the router to a cable/DSL/satellite modem, please follow the steps below:
1.
Place the router in an open and central location. Do not plug the power adapter into the router.
2.
Unplug the modem’s power adapter. Shut down your computer.
3.
Unplug the Ethernet cable (that connects your computer to your modem) from your computer and place it into the Internet
port on the router.
4.
Plug an Ethernet cable into one of the four LAN ports on the router. Plug the other end into the Ethernet port on your
computer.
5.
Plug in your modem. Wait for the modem to boot (about 30 seconds).
6.
Plug the power adapter to the router and connect to an outlet or power strip.
7.
Use the power switch to power on the router. Wait about 30 seconds for the router to boot.
8.
Turn on your computer.
S
AMSUNG WIRELESS ROUTER USER MANUAL
/DSL/S
ATELLITE MODEM
P
AGE
7
Page 8

DRAFT, not Final
C
If you are connecting the router to another router to use as a wireless access point and/or switch, you will have to do the following before connecting the router to your network:
•
Disable UPnP™
•
Disable DHCP
•
Change the LAN IP address to an available address on your network. The LAN ports on the router cannot accept a DHCP
address from your other router.
ONNECT TO ANOTHER ROUTER
To connect to another router, please follow the steps below:
1.
Plug the power into the router and use the power switch to power up the router. Connect one of your computers to the
router (LAN port) using an Ethernet cable. Make sure your IP address on the computer is 192.168.0.xxx (where xxx is
between 2 and 254). If you need to change the settings, write down your existing settings before making any changes. In
most cases, your computer should be set to receive an IP address automatically in which case you will not have to do
anything to your computer.
2.
Open a web browser and enter http://192.168.0.1 and press Enter. When the login window appears, set the user name to
‘
admin
’ and leave the password box empty. Click
3.
Click on Advanced and then click Advanced Network. Uncheck the Enable UPnP checkbox. Click Save Settings to continue.
4.
Click Setup and then click Network Settings. Uncheck the Enable DHCP Server checkbox. Click Save Settings to continue.
5.
Under Router Settings, enter an available IP address and the subnet mask of your network. Click Save Settings to save
your settings. Use this new IP address to access the configuration utility of the router in the future. Close the browser and
change your computer’s IP settings back to the original values as in Step 1.
6.
Disconnect the Ethernet cable from the router and reconnect your computer to your network.
7.
Connect an Ethernet cable in one of the LAN ports of the router and connect it to your other router. Do not plug anything
into the Internet (WAN) port of the router.
8.
You may now use the other 3 LAN ports to connect other Ethernet devices and computers. To configure your wireless
network, open a web browser and enter the IP address you assigned to the router. Refer to the Configuration and Wireless
Security sections for more information on setting up your wireless network.
Login
to continue.
S
AMSUNG WIRELESS ROUTER USER MANUAL
P
AGE
8
Page 9

DRAFT, not Final
C
ONNECTING TO THE
This section will help you to connect to your router’s Web User Interface (Web UI) for the first time.
R
The router’s default values are as follows:
IP Address:
Username:
Password:
To connect the router’s Web UI, you’ll need to use your Internet Browser. Open you Internet browser, like Internet Explorer, and
enter the router’s default IP address in the address bar as follows.
192.168.0.1
admin
(blank)
C
ONNECTING USING THE BROWSER
OUTER’S DEFAULTS
W
EB
UI
After entering the IP address (default is 192.168.0.1), press <enter> or click on the ‘Go’ option. This will open a page called
the login page, which will look like this:
Enter the username and password in the spaces provided and click on the
Login
button.
S
AMSUNG WIRELESS ROUTER USER MANUAL
P
AGE
9
Page 10

DRAFT, not Final
W
EB
U
SER INTERFACE
This Web User Interface is divided into categories, found in the top menu, and pages, found in the left menu.
The Samsung Wireless router Web UI provides five categories to edit.
Setup:
Advanced:
Tools:
Status:
Support:
In this category the user will be able to configure the basic features for this router to function properly on a network. Features like Internet Connectivity, Local Area Network Connectivity and Wireless
Connectivity.
In this category the user will be able to configure the more advanced features that can be done by this
router. Features like Port Forwarding, Firewall settings, Quality of Service settings and more.
In this category the user will be able to configure features that are related to the router itself. Features
like the time settings, login accounts, firmware update and more.
In this category the user will be able to view information regarding the configuration and functionality of this device. Displays like WAN, LAN and Wireless configurations, System, Firewall and Router
logs, and more.
In this category the user will have access to a portal of information regarding each and every page
that exists on this device. This information gives the basic description of parameter and uses for the
pages.
S
AMSUNG WIRELESS ROUTER USER MANUAL
P
AGE
10
Page 11

DRAFT, not Final
S
ETUP CATEGORY
In this category the user will be able to configure the basic features for this router to function properly on a network. Features
like Internet Connectivity, Local Area Network Connectivity and Wireless Connectivity.
Pages that can be configured in the
Internet:
Wireless Settings:
Network Settings:
On this page the user can configure the Internet settings for this router.
On this page the user can configure the Wireless settings for this router.
On this page the user can configure the Network settings for this router.
Setup
category are as follows:
S
AMSUNG WIRELESS ROUTER USER MANUAL
P
AGE
11
Page 12
DRAFT, not Final
I
When configuring the device for the first time, we recommend that you click use the
Wizard
, and follow the instructions on the screen. This wizard is designed to assist user with a quick and easy method to
configure the Internet Connectivity of this router.
NTERNET
- W
IZARD
Internet Connection Setup
To initiate the quick and easy Internet connection wizard, click on the
start a 4 step configuration process.
This wizard will guide you through a step-by-step process to configure your new Samsung router and connect to the Internet.
Step 1:
Step 2:
Step 3:
Step 4:
Click on the
Click on the
Step 1:
based configuration pages. To secure the new networking device, please set and verify a password here.
The following parameters can be configured:
Click on the
Click on the
In this step the user will be able to re-configure the
In this step the user will be able to configure the
In this step the user will be able to configure the
In this step the user will be able to save the settings and initiate the connection process.
Prev
button to return to the previous window. Click on the
Cancel
By default, the new Samsung Router does not have a password configured for administrator access to the Web-
Password:
Verify Password:
Prev
Cancel
button to discard the changes made and return to the Internet home page.
Enter the new login password used here.
Re-enter the new login password used here.
button to return to the previous window. Click on the
button to discard the changes made and return to the Internet home page.
Login Password
Time Zone
Internet Connectivity
Internet Connection Setup Wizard
for this device.
used by this device.
Next
button to continue to the next step.
Next
button to continue to the next step.
of this device.
button. This will
S
AMSUNG WIRELESS ROUTER USER MANUAL
P
AGE
12
Page 13
DRAFT, not Final
Step 2:
for the router.
Select the appropriate time zone for your location. This information is required to configure the time-based options
The following parameters can be configured:
Time Zone:
Click on the
Click on the
Step 3:
The following parameters can be configured:
Prev
Cancel
On this page the user will be able to configure the Internet Connectivity used by this device.
Dynamic IP Address:
PPPoE
PPTP
L2TP
Static IP Address:
Click on the
Click on the
Configure your Internet Connection: Dynamic IP Address Connection
Prev
Cancel
Select the appropriate Time Zone used. This information will be used by the time-based options on
this router.
button to return to the previous window. Click on the
button to discard the changes made and return to the Internet home page.
Next
button to continue to the next step.
Choose this if your Internet connection automatically provides you with an IP Address. Most
Cable Modems use this type of connection.
Choose this option if your Internet connection requires a PPPoE username and password to get
online. Most DSL modems use this type of connection.
Choose this option if your Internet connection requires a PPTP username and password to get
online.
Choose this option if your Internet connection requires an L2TP username and password to get
online.
Choose this option if your Internet Setup Provider provided you with IP Address information
that has to be manually configured.
button to return to the previous window. Click on the
button to discard the changes made and return to the Internet home page.
Next
button to continue to the next step.
S
AMSUNG WIRELESS ROUTER USER MANUAL
P
AGE
13
Page 14

DRAFT, not Final
After selecting the
Dynamic IP Address
Internet connection method, the following page will appear:
The following parameters can be configured:
MAC Address:
Clone Button:
Host Name:
Click on the
Click on the
Prev
Cancel
Configure your Internet Connection: PPPoE Connection
After selecting the
Enter the MAC address of the Internet gateway (plugged into the Internet port of this device) here.
If the configuration PC also acts as the Internet gateway, then click on the
Address
MAC Address field blank.
button to copy the PC’s MAC address into the space provided. If you’re not sure, leave the
Clone Your PC’s MAC
Enter the host name used here. You may also need to provide a Host Name. If you do not have or
know this information, please contact your ISP.
button to return to the previous window. Click on the
button to discard the changes made and return to the Internet home page.
Next
button to continue to the next step.
PPPoE
Internet connection method, the following page will appear:
The following parameters can be configured:
Address Mode:
IP Address:
User Name:
Password:
Verify Password:
Service Name:
Click on the
Click on the
Prev
Cancel
Here the user can specify whether this Internet connection requires the use of a Dynamic or Static IP
address. PPPoE usually requires a Dynamic IP configuration.
Enter the PPPoE IP address used here. This option is only available if Static IP is selected.
Enter the PPPoE account user name used here. This information is given by the ISP.
Enter the PPPoE account password used here. This information is given by the ISP.
Re-enter the PPPoE account password used here.
This optional field enables the user to enter a service name to identify this Internet connection here.
button to return to the previous window. Click on the
button to discard the changes made and return to the Internet home page.
Next
button to continue to the next step.
S
AMSUNG WIRELESS ROUTER USER MANUAL
P
AGE
14
Page 15

DRAFT, not Final
Configure your Internet Connection: PPTP Connection
After selecting the
The following parameters can be configured:
Address Mode:
PPTP IP Address:
PPTP Subnet Mask:
PPTP Gateway IP Address:
PPTP Server IP Address:
User Name:
Password:
Verify Password:
Click on the
Click on the
Configure your Internet Connection: L2TP Connection
PPTP
Internet connection method, the following page will appear:
Prev
button to return to the previous window. Click on the
Cancel
button to discard the changes made and return to the Internet home page.
Here the user can specify whether this Internet connection requires the use of a Dynamic
or Static IP address. PPTP usual requires a Dynamic IP configuration.
Enter the PPTP IP address used here. This option is only available if Static IP is selected.
Enter the PPTP Subnet Mask used here.
Enter the PPTP Gateway IP address used here.
Enter the PPTP Server IP address used here. This is normally the same a the PPTP Gateway IP address.
Enter the PPTP username used here.
Enter the PPTP password used here.
Re-enter the PPTP password used here.
Next
button to continue to the next step.
S
AMSUNG WIRELESS ROUTER USER MANUAL
P
AGE
15
Page 16
DRAFT, not Final
After selecting the
The following parameters can be configured:
Address Mode:
L2TP IP Address:
L2TP Subnet Mask:
L2TP Gateway IP Address:
L2TP Server IP Address:
User Name:
Password:
Verify Password:
Click on the
Click on the
Configure your Internet Connection: Static IP Address Connection
L2TP
Internet connection method, the following page will appear:
Prev
button to return to the previous window. Click on the
Cancel
button to discard the changes made and return to the Internet home page.
Here the user can specify whether this Internet connection requires the use of a Dynamic
or Static IP address. L2TP usual requires a Dynamic IP configuration.
Enter the L2TP IP address used here. This option is only available if Static IP is selected.
Enter the L2TP Subnet Mask used here.
Enter the L2TP Gateway IP address used here.
Enter the L2TP Server IP address used here. This is normally the same a the L2TP Gateway IP address.
Enter the L2TP username used here.
Enter the L2TP password used here.
Re-enter the L2TP password used here.
Next
button to continue to the next step.
S
AMSUNG WIRELESS ROUTER USER MANUAL
P
AGE
16
Page 17
DRAFT, not Final
After selecting the
The following parameters can be configured:
IP Address:
Subnet Mask:
Gateway Address:
Primary DNS Address:
Secondary DNS Address:
Click on the
Click on the
Step 4:
The Internet Connection Setup Wizard has completed. Click the
Static IP Address
Prev
button to return to the previous window. Click on the
Cancel
button to discard the changes made and return to the Internet home page.
Internet connection method, the following page will appear:
Enter the Static IP address provided by the ISP here.
Enter the Subnet Mask provided by the ISP here.
Enter the Gateway IP address provided by the ISP here.
Enter the Primary DNS IP address used here.
Enter the Secondary DNS IP address used here. This field is normally optional. Only one
DNS address is required for a functional Internet connection, but using a second DNS
address provides more stability.
Next
button to continue to the next step.
Connect
button to save your settings.
Click on the
Click on the
After clicking the
Internet page.
Prev
button to return to the previous window. Click on the
Cancel
button to discard the changes made and return to the Internet home page.
Connect
button to following window will appear. The device will save the settings and return to the main
Next
button to continue to the next step.
S
AMSUNG WIRELESS ROUTER USER MANUAL
P
AGE
17
Page 18

DRAFT, not Final
I
On this page the user can configure the Internet Connection settings manually. To access the Manual Internet Connection
page, click on the
Manual Internet Connection Setup
NTERNET
- M
ANUAL INTERNET CONNECTION
button.
On this page there a multiple parameter that can be configured regarding the Internet Connection setup. We’ll discuss them
from top to bottom.
At any given point the user can save the configurations done, on this page, by clicking on the
choose to discard the changes made, them click on the
Don’t Save Settings
button.
Save Settings
button. If you
S
AMSUNG WIRELESS ROUTER USER MANUAL
P
AGE
18
Page 19

DRAFT, not Final
Internet Connection Type: Static IP
Select Static IP from the drop-down menu if all the Internet port’s IP information is provided to you by your ISP. You will need
to enter in the IP address, subnet mask, gateway address, and DNS address(es) provided to you by your ISP. Each IP address
entered in the fields must be in the appropriate IP form, which are four octets separated by a dot (x.x.x.x). The Router will not
accept the IP address if it is not in this format.
The following parameters can be configured:
IP Address:
Subnet Mask:
Gateway Address:
Primary DNS Address:
Secondary DNS Address:
MTU:
MAC Address:
Click on the
Click on the
Save Settings
Don’t Save Settings
Enter the Static IP address provided by the ISP here.
Enter the Subnet Mask provided by the ISP here.
Enter the Gateway IP address provided by the ISP here.
Enter the Primary DNS IP address used here.
Enter the Secondary DNS IP address used here. This field is normally optional. Only one
DNS address is required for a functional Internet connection, but using a second DNS
address provides more stability.
Maximum Transmission Unit - you may need to change the MTU for optimal performance
with your specific ISP. 1500 is the default MTU.
The default MAC Address is set to the Internet port’s physical interface MAC address on
the Broadband Router. It is not recommended that you change the default MAC address
unless required by your ISP. You can use the
replace the Internet port’s MAC address with the MAC address of your Ethernet card.
button to accept the changes made.
button to discard the changes made.
Clone Your PC’s MAC Address
button to
S
AMSUNG WIRELESS ROUTER USER MANUAL
P
AGE
19
Page 20

DRAFT, not Final
Internet Connection Type: Dynamic IP (DHCP)
Select Dynamic IP (DHCP) from the drop-down menu to obtain IP Address information automatically from your ISP. Select
this option if your ISP does not give you any IP numbers to use. This option is commonly used for cable modem services.
The following parameters can be configured:
Host Name:
Primary DNS Server:
Secondary DNS Server:
MTU:
MAC Address:
Click on the
Click on the
Save Settings
Don’t Save Settings
The Host Name is optional but may be required by some ISPs. Leave blank if you are not
sure.
Enter the Primary DNS IP address used here.
Enter the Secondary DNS IP address used here. This field is normally optional. Only one
DNS address is required for a functional Internet connection, but using a second DNS
address provides more stability.
Maximum Transmission Unit - you may need to change the MTU for optimal performance
with your specific ISP. 1500 is the default MTU.
The default MAC Address is set to the Internet port’s physical interface MAC address on
the Broadband Router. It is not recommended that you change the default MAC address
unless required by your ISP. You can use the
replace the Internet port’s MAC address with the MAC address of your Ethernet card.
button to accept the changes made.
button to discard the changes made.
Clone Your PC’s MAC Address
button to
S
AMSUNG WIRELESS ROUTER USER MANUAL
P
AGE
20
Page 21

DRAFT, not Final
Internet Connection Type: PPPoE (Username / Password)
Select PPPoE (Username/Password) from the drop-down menu if your ISP uses a PPPoE connection. Your ISP will provide
you with a username and password. This option is typically used for DSL services. Make sure to remove your PPPoE software
from your computer. The software is no longer needed and will not work through a router.
The following parameters can be configured:
Address Mode:
IP Address:
Username:
Password:
Verify Password:
Service Name:
Reconnect Mode:
Maximum Idle Time:
DNS Mode:
Primary DNS Server:
Here the user can specify whether this Internet connection requires the use of a Dynamic
or Static IP address. PPPoE usually requires a Dynamic IP configuration.
Enter the PPPoE IP address used here. This option is only available if Static IP is selected.
Enter the PPPoE account user name used here. This information is given by the ISP.
Enter the PPPoE account password used here. This information is given by the ISP.
Re-enter the PPPoE account password used here.
This optional field enables the user to enter a service name to identify this Internet connection here.
Use the radio buttons to specify the reconnect mode. The user can specify a custom
schedule or specify the
ule, use the drop-down menu to select one of the schedules that has been defined in the
Schedules page. To create a new schedule, click the
Schedules page. Schedules will be discussed later.
Enter a maximum idle time during which the Internet connection is maintained during
inactivity. To disable this feature, enable Auto-reconnect.
This option allow the router to obtain the DNS IP addresses from the ISP, when
DNS from ISP
Enter DNS Manually
Enter the Primary DNS IP address used here.
On Demand
is selected, or allows the user to enter DNS IP address manually, when
is selected.
, or
Manual
option. To specify a custom sched-
New Schedule
button to open the
Receive
S
AMSUNG WIRELESS ROUTER USER MANUAL
P
AGE
21
Page 22

DRAFT, not Final
This page is a continue from the PPPoE Internet Connection Type:
Secondary DNS Server:
MTU:
MAC Address:
Click on the
Click on the
Save Settings
Don’t Save Settings
Enter the Secondary DNS IP address used here. This field is normally optional. Only one
DNS address is required for a functional Internet connection, but using a second DNS
address provides more stability.
Maximum Transmission Unit - you may need to change the MTU for optimal performance
with your specific ISP. 1492 is the default MTU.
The default MAC Address is set to the Internet port’s physical interface MAC address on
the Broadband Router. It is not recommended that you change the default MAC address
unless required by your ISP. You can use the
replace the Internet port’s MAC address with the MAC address of your Ethernet card.
button to accept the changes made.
button to discard the changes made.
Clone Your PC’s MAC Address
button to
S
AMSUNG WIRELESS ROUTER USER MANUAL
P
AGE
22
Page 23

DRAFT, not Final
Internet Connection Type: PPTP (Username / Password)
Select PPTP (Point-to-Point Tunneling Protocol) from the drop-down menu if your ISP uses a PPTP connection. Your ISP
will provide you with a username and password. This option is typically used for DSL services.
The following parameters can be configured:
Address Mode:
PPTP IP Address:
PPTP Subnet Mask:
PPTP Gateway IP Address:
PPTP Server IP Address:
Username:
Password:
Verify Password:
Reconnect Mode:
Maximum Idle Time:
Primary DNS Server:
Secondary DNS Server:
Here the user can specify whether this Internet connection requires the use of a Dynamic
or Static IP address. PPTP usual requires a Dynamic IP configuration.
Enter the PPTP IP address used here. This option is only available if Static IP is selected.
Enter the PPTP Subnet Mask used here.
Enter the PPTP Gateway IP address used here.
Enter the PPTP Server IP address used here. This is normally the same a the PPTP Gateway IP address.
Enter the PPTP username used here.
Enter the PPTP password used here.
Re-enter the PPTP password used here.
Use the radio buttons to specify the reconnect mode. The user can specify a custom
schedule or specify the
ule, use the drop-down menu to select one of the schedules that has been defined in the
Schedules page. To create a new schedule, click the
Schedules page. Schedules will be discussed later.
Enter a maximum idle time during which the Internet connection is maintained during
inactivity. To disable this feature, enable Auto-reconnect.
Enter the Primary DNS IP address used here.
Enter the Secondary DNS IP address used here. This field is normally optional. Only one
DNS address is required for a functional Internet connection, but using a second DNS
address provides more stability.
On Demand
, or
Manual
option. To specify a custom sched-
New Schedule
button to open the
S
AMSUNG WIRELESS ROUTER USER MANUAL
P
AGE
23
Page 24

DRAFT, not Final
This page is a continue from the PPTP Internet Connection Type:
MTU:
MAC Address:
Click on the
Click on the
Save Settings
Don’t Save Settings
Maximum Transmission Unit - you may need to change the MTU for optimal performance
with your specific ISP. 1400 is the default MTU.
The default MAC Address is set to the Internet port’s physical interface MAC address on
the Broadband Router. It is not recommended that you change the default MAC address
unless required by your ISP. You can use the
replace the Internet port’s MAC address with the MAC address of your Ethernet card.
button to accept the changes made.
button to discard the changes made.
Clone Your PC’s MAC Address
button to
S
AMSUNG WIRELESS ROUTER USER MANUAL
P
AGE
24
Page 25

DRAFT, not Final
Internet Connection Type: L2TP (Username / Password)
Choose L2TP (Layer 2 Tunneling Protocol) if your ISP uses a L2TP connection. Your ISP will provide you with a username
and password. This option is typically used for DSL services.
The following parameters can be configured:
Address Mode:
L2TP IP Address:
L2TP Subnet Mask:
L2TP Gateway IP Address:
L2TP Server IP Address:
Username:
Password:
Verify Password:
Reconnect Mode:
Maximum Idle Time:
Primary DNS Server:
Secondary DNS Server:
Here the user can specify whether this Internet connection requires the use of a Dynamic
or Static IP address. L2TP usual requires a Dynamic IP configuration.
Enter the L2TP IP address used here. This option is only available if Static IP is selected.
Enter the L2TP Subnet Mask used here.
Enter the L2TP Gateway IP address used here.
Enter the L2TP Server IP address used here. This is normally the same a the PPTP Gateway IP address.
Enter the L2TP username used here.
Enter the L2TP password used here.
Re-enter the L2TP password used here.
Use the radio buttons to specify the reconnect mode. The user can specify a custom
schedule or specify the
ule, use the drop-down menu to select one of the schedules that has been defined in the
Schedules page. To create a new schedule, click the
Schedules page. Schedules will be discussed later.
Enter a maximum idle time during which the Internet connection is maintained during
inactivity. To disable this feature, enable Auto-reconnect.
Enter the Primary DNS IP address used here.
Enter the Secondary DNS IP address used here. This field is normally optional. Only one
DNS address is required for a functional Internet connection, but using a second DNS
address provides more stability.
On Demand
, or
Manual
option. To specify a custom sched-
New Schedule
button to open the
S
AMSUNG WIRELESS ROUTER USER MANUAL
P
AGE
25
Page 26

DRAFT, not Final
This page is a continue from the L2TP Internet Connection Type:
MTU:
MAC Address:
Click on the
Click on the
Save Settings
Don’t Save Settings
Maximum Transmission Unit - you may need to change the MTU for optimal performance
with your specific ISP. 1400 is the default MTU.
The default MAC Address is set to the Internet port’s physical interface MAC address on
the Broadband Router. It is not recommended that you change the default MAC address
unless required by your ISP. You can use the
replace the Internet port’s MAC address with the MAC address of your Ethernet card.
button to accept the changes made.
button to discard the changes made.
Clone Your PC’s MAC Address
button to
S
AMSUNG WIRELESS ROUTER USER MANUAL
P
AGE
26
Page 27

DRAFT, not Final
W
On this page the user can configure the Wireless settings for this device. There are 3 ways to configure Wireless using this
router. Firstly, the user can choose to make use for the quick and easy Wireless Connection Wizard. Secondly, the user can
choose to make use Wi-Fi Protected Setup. Lastly, the user can configure the Wireless settings manually.
IRELESS SETTINGS
Wireless Settings: Wireless Network Setup Wizard
The Wireless Network Setup Wizard is specially designed to assist basic network users with a simple, step-by-step set of
instructions to configure the wireless settings of this router. It is highly recommended to customized the wireless network
settings to fit into your environment and to add higher security.
To initiate the Wireless Network Setup Wizard click on the
Step 1:
Enter the new SSID names in the appropriate spaces provided. Secondly the user can choose between two wireless security
wizard configurations. The user can select ‘
generate a WPA/WPA2 pre-shared key using the TKIP and AES encryption methods; or the user can select ‘
sign a network key
AES encryption methods.
In this step, the user must enter a custom Wireless Network Name or SSID for the frequency band 2.4GHz and 5Ghz.
Wireless Connection Setup Wizard
Automatically assign a network key
’, by which the user will be prompt to manually enter a WPA/WPA2 pre-shared key using the TKIP and
’, by which the router will automatically
button.
Manually as-
Click on the
Click on the
Prev
button to return to the previous page. Click on the
Cancel
button to discard the changes made and return to the main wireless page.
Next
button to continue to the next page.
Step 2:
the user can manually enter the WPA/WPA2 pre-shared key in the
user chooses to use the same key for both frequency bands, then select the ‘
S
This step will only be available if the user selected ‘
AMSUNG WIRELESS ROUTER USER MANUAL
Manually assign a network key
Wireless Security Password
Use the same Wireless Security Password
’ in the previous step. Here
space provided. If the
P
AGE
27
Page 28

DRAFT, not Final
on both 2.4GHz and 5GHz band
for both individual frequency bands. The key entered must be between 8 and 63 characters long.
Remember
prevent future troubleshooting.
, this key will be used when wireless clients wants to connect to this device. So please remember this key to
’ option. Un-selecting this option will allow the user to manually enter a pre-shared key
Click on the
Click on the
Prev
button to return to the previous page. Click on the
Cancel
button to discard the changes made and return to the main wireless page.
Next
button to continue to the next page.
Setup Complete:
Click on the
Click on the
Click on the
On this page the user can view the configuration made and verify whether they are correct.
Prev
button to return to the previous page.
Cancel
Save
button to discard the changes made and return to the main wireless page.
button to accept the changes made.
After click the
Save
button the device will save the settings made and return to the main wireless page.
S
AMSUNG WIRELESS ROUTER USER MANUAL
P
AGE
28
Page 29

DRAFT, not Final
Wireless Settings: Wi-Fi Protected Setup Wizard
If your Wireless Clients support the WPS connection method, this Wi-Fi Protected Setup Wizard can be used to initiate a
wireless connection between this device and Wireless clients with a simple click of the WPS button. The Wi-Fi Protected
Setup Wizard is specially designed to assist basic network users with a simple, step-by-step set of instructions to connect
wireless clients to this router using the WPS method.
To initiate the Wi-Fi Protected Setup Wizard click on the
Step 1:
Manual
In this step the user have two options to choose from. You can choose
if the wireless client does not support WPS.
Add Wireless Device with WPS
Auto
if the wireless client supports WPS, or
button.
Click on the
Click on the
Step 2:
Firstly, there is the
code. This PIN code should be identical on the wireless client.
Secondly, there is the
nect to this device by similarly pressing the PBC button on it.
Click on the
Click on the
Prev
button to return to the previous page. Click on the
Cancel
After selecting
Prev
Cancel
button to discard the changes made and return to the main wireless page.
Personal Identification Number (PIN)
button to return to the previous page. Click on the
button to discard the changes made and return to the main wireless page.
Next
button to continue to the next page.
Auto
, the following page will appear. There are two ways to add a wireless device, that supports WPS.
method. Using this method will prompt the user to enter a
Push Button Configuration (PBC)
method. Using this method will allow the wireless client to con-
Next
button to continue to the next page.
PIN
S
AMSUNG WIRELESS ROUTER USER MANUAL
P
AGE
29
Page 30

DRAFT, not Final
Step 2:
this router. The wireless clients should configure their wireless settings to be identical to the settings displayed on this page
for a successful connection. This option is for wireless clients that can’t use the WPS method to connect to this device.
After selecting
Click on the
Click on the
Click on the
this device.
Prev
Cancel
Wireless Status
Manual
button to return to the previous page. Click on the
button to discard the changes made and return to the main wireless page.
, the following page will appear. On this page to user can view the wireless configuration of
Next
button to continue to the next page.
button to navigate to the Status > Wireless page to view what wireless client are connected to
S
AMSUNG WIRELESS ROUTER USER MANUAL
P
AGE
30
Page 31
DRAFT, not Final
Wireless Settings: Manual Wireless Network Setup
The manual wireless network setup option allows user to configure the wireless settings of this device manually. This option
is for the more advanced user and includes all parameter that can be configured for wireless connectivity.
To initiate the Manual Wireless Network Setup page, click on the
On this page the user can configure all the parameters related to the wireless connectivity of this router.
Manual Wireless Connection Setup
button.
The following parameters can be configured:
Wireless Band:
Enable Wireless:
Wireless Network Name:
Enable Auto Channel
Selection:
Wireless Channel:
Transmission Rate:
Wireless Mode:
Band Width:
Displays the wireless band being configured. In this option we find that the following
parameters will be regarding the 2.4GHz band.
Check the box to enable the wireless function. If you do not want to use wireless, uncheck
the box to disable all the wireless functions. Select the time frame that you would like your
wireless network enabled. The schedule may be set to
will be available in the drop-down menu. Click
The Service Set Identifier (SSID) is the name of your wireless network. Create a name using up to 32 characters. The SSID is case-sensitive.
The auto channel selection setting can be selected to allow this device to choose the
channel with the least amount of interference.
By default the channel is set to 1. The Channel can be changed to fit the channel setting
for an existing wireless network or to customize the wireless network. If you enable Auto
Channel Selection, this option will be greyed out.
Select the transmit rate. It is strongly suggested to select Best (Automatic) for best performance.
Here the user can manually select the preferred frequency band to use for this wireless
network.
When using the 802.11n frequency band, the user have an option to choose between a
20MHz or 20/40MHz bandwidth.
Always
. Any schedule you create
New Schedule
to create a new schedule.
S
AMSUNG WIRELESS ROUTER USER MANUAL
P
AGE
31
Page 32
DRAFT, not Final
WMM Enable:
Enabled Hidden Wireless:
By default the wireless security of this router will be disabled. In this next option the user can enabled or disable wireless
security for the frequency band 2.4GHz. There are two types of encryption that can be used. WEP or WPA/WPA2.
Wireless Security Mode: WEP Wireless Security (basic)
Wired Equivalent Privacy (WEP) is the most basic form of encryption that can be used for wireless networks. Even though it
is known as a ‘weak’ security method, it is better than no security at all. Older wireless adapter sometimes only supports WEP
encryption and thus we still find this encryption method used today.
WMM (Wi-Fi Multimedia) is QoS for your wireless network. Check this box to improve
the quality of video and voice applications for your wireless clients. This feature is not
available in 802.11n configurations.
Check this box if you do not want the SSID of your wireless network to be broadcasted.
If the SSID is hidden, the SSID will not be seen by Site Survey utilities, so your wireless
clients will have to know the SSID of your router in order to connect to it.
The following parameters can be configured:
Authentication:
WEP Encryption:
Default WEP Key:
WEP Key:
Displays that the authentication method
Here the user can specify to either use a 64Bit or a 128Bit encrypted key.
Here the WEP key number used will be displayed. The Key number used by WEP on this
device can only be set to 1.
Enter the WEP key used here. For 64-bit keys you must enter 10 hex digits into each key
box. For 128-bit keys you must enter 26 hex digits into each key box. A hex digit is either
a number from 0 to 9 or a letter from A to F. You may also enter any text string into a WEP
key box, in which case it will be converted into a hexadecimal key using the ASCII values
of the characters. A maximum of 5 text characters can be entered for 64-bit keys, and a
maximum of 13 characters for 128-bit keys.
Open System
is used.
S
AMSUNG WIRELESS ROUTER USER MANUAL
P
AGE
32
Page 33
DRAFT, not Final
Wireless Security Mode: WPA/WPA2 Wireless Security (enhanced)
Wi-Fi Protected Access (WPA) is the most advanced and up to date wireless encryption method used today.
This is the recommended wireless security option.
The following parameters can be configured:
Cipher Type:
PSK/EAP:
RADIUS Server IP Address:
Port:
Shared Secret:
Select the appropriate cipher type to use here. Options to choose from are Temporal Key
Integrity Protocol (
WPA supports two authentication frameworks. Pre-Shared Key (PSK) and Extensible Authentication Protocol (EAP). PSK requires only the use of a pass-phrase (Shared Secret)
for security. EAP on the other hand requires the installation of a RADIUS Server on the
local network.
When the user chooses to use the EAP authentication framework, the RADIUS server’s IP
address can be entered here.
When the user chooses to use the EAP authentication framework, the RADIUS server’s port
number can be entered here.
Enter the shared secret used here. This secret phrase needs to be the same on all of the
wireless client for them to be able to connect to the wireless network successfully.
TKIP
), Advanced Encryption Standard (
AES
), and
Auto (TKIP/AES).
S
AMSUNG WIRELESS ROUTER USER MANUAL
P
AGE
33
Page 34

DRAFT, not Final
The next section will allow the user to configure all the parameters regarding the
The following parameters can be configured:
Wireless Band:
Enable Wireless:
Wireless Network Name:
Enable Auto Channel
Selection:
Wireless Channel:
Transmission Rate:
Wireless Mode:
Band Width:
WMM Enable:
Enabled Hidden Wireless:
By default the wireless security of this router will be disabled. In this next option the user can enabled or disable wireless
security for the frequency band 5GHz. These settings are identical to what we’ve discussed for the 2.4GHz security earlier.
Displays the wireless band being configured. In this option we find that the following
parameters will be regarding the 5GHz band.
Check the box to enable the wireless function. If you do not want to use wireless, uncheck
the box to disable all the wireless functions. Select the time frame that you would like your
wireless network enabled. The schedule may be set to
will be available in the drop-down menu. Click
The Service Set Identifier (SSID) is the name of your wireless network. Create a name using up to 32 characters. The SSID is case-sensitive.
The auto channel selection setting can be selected to allow this device to choose the
channel with the least amount of interference.
By default the channel is set to 36. The Channel can be changed to fit the channel setting
for an existing wireless network or to customize the wireless network. If you enable Auto
Channel Selection, this option will be greyed out.
Select the transmit rate. It is strongly suggested to select Best (Automatic) for best performance.
Here the user can manually select the preferred frequency band to use for this wireless
network.
When using the 802.11n frequency band, the user have an option to choose between a
20MHz or 20/40MHz bandwidth.
WMM (Wi-Fi Multimedia) is QoS for your wireless network. Check this box to improve
the quality of video and voice applications for your wireless clients. This feature is not
available in 802.11n configurations.
Check this box if you do not want the SSID of your wireless network to be broadcasted.
If the SSID is hidden, the SSID will not be seen by Site Survey utilities, so your wireless
clients will have to know the SSID of your router in order to connect to it.
5GHz
frequency band.
Always
New Schedule
. Any schedule you create
to create a new schedule.
Click on the
Click on the
S
AMSUNG WIRELESS ROUTER USER MANUAL
Save Settings
Don’t Save Settings
button to accept the changes made.
button to discard the changes made.
P
AGE
34
Page 35

DRAFT, not Final
N
ETWORK SETTINGS
On this page the user can configure the internal network settings of the router and also able to configure the built-in DHCP
server to assign IP addresses to computers on the network. The IP address that is configured here is the IP address that is
used to access the Web-based management interface. If you change the IP address in this section, you may need to adjust
your PC’s network settings to access the network again.
In this next section the user can configure the router settings of this device.
The following parameters can be configured:
Router IP Address:
Default Subnet Mask:
Host Name:
Local Domain Name:
Enable DNS Relay:
DHCP Server Settings
DHCP stands for Dynamic Host Control Protocol. This device has a built-in DHCP server. The DHCP Server will automatically assign an IP address to the computers on the LAN/private network. Be sure to set your computers to be DHCP clients
by setting their TCP/IP settings to “Obtain an IP Address Automatically.” When you turn your computers on, they will automatically load the proper TCP/IP settings provided by the router. The DHCP Server will automatically allocate an unused
IP address from the IP address pool to the requesting computer. You must specify the starting and ending address of the IP
address pool.
At the bottom of the page, click on the
Click on the
Don’t Save Settings
Enter the IP address of the router. The default IP address is 192.168.0.1. If you change
the IP address, once you click Apply, you will need to enter the new IP address in your
browser to get back into the configuration utility.
Enter the Subnet Mask. The default subnet mask is 255.255.255.0.
Enter a Host Name to identify this device.
Enter the Domain name (Optional).
Uncheck the box to transfer the DNS server information from your ISP to your computers.
If checked, your computers will use the router for a DNS server.
Save Settings
button to discard the changes made.
button to accept the changes made.
S
AMSUNG WIRELESS ROUTER USER MANUAL
P
AGE
35
Page 36
DRAFT, not Final
The following parameters can be configured:
Enable DHCP Server:
DHCP IP Address Range:
DHCP Lease Time:
Note:
are outside of this range or you may have an IP conflict.
In the
DHCP Reservation List
the DHCP pool, will be displayed.
Check this box to enable the DHCP server on your router. Uncheck to disable this function.
Enter the starting and ending IP addresses for the DHCP server’s IP assignment.
The length of time for the IP address lease. Enter the Lease time in minutes.
If you statically (manually) assign IP addresses to your computers or devices, make sure the IP addresses
a list of DHCP clients, which MAC address that have been locked to specific IP addresses in
In the ‘
Number of Dynamic DHCP Clients
In the
DHCP Reservation
MAC addresses in the list along with the appropriate IP address.
The following parameters can be configured:
Checkbox:
Computer Name:
IP Address:
MAC Address:
’ section, all the active DHCP clients will be displayed.
section, the user can configure reserved IP address to selective DHCP clients, by entering their
Check this box to enable the reservation.
Enter the computer name. Alternatively, select a computer that currently has a DHCP lease
from the drop down menu and click << to automatically populate the Computer Name, IP
Address, and MAC Address fields.
Enter the IP address you want to assign to the computer or device. This IP Address must
be within the DHCP IP Address Range.
Enter the MAC address of the computer or device.
S
AMSUNG WIRELESS ROUTER USER MANUAL
P
AGE
36
Page 37

DRAFT, not Final
A
DVANCED CATEGORY
In this category the user will be able to configure the more advanced features that can be done by this router. Features like
Port Forwarding, Firewall settings, Quality of Service settings and more.
Pages that can be configured in the
Virtual Server:
Port Forwarding:
Application Rules:
QoS:
The QoS Engine option helps improve your network gaming performance by prioritizing applications. By default the
QoS Engine settings are disabled and application priority is not classified automatically.
Network Filter:
Access Control:
Website Filter:
Inbound Filter:
Firewall Settings:
Routing:
Advanced Wireless:
Guest Zone:
IPv6:
On this page the user can configure the IPv6 connectivity of this device.
IPv6 Firewall:
On this page that user can configure Virtual Server policies related to this router.
On this page the user will be able to forward a list of ports to an internal IP address.
On this page, the user can create a set of application rules.
On this page the user can configure network filtering rules.
On this page the user can configure access control rules.
On this page the user can configure website and domain filtering rules.
On this page the user can configure Inbound Firewall Filtering rules.
On this page the user can configure some basic Firewall settings.
On this page the your can setup multiple routing profiles and rules.
On this page the user can configure more advanced wireless properties.
On this page the user can create and maintain guest zone for wireless access.
On this page the user can configure the IPv6 Firewall properties for this device.
Advanced
category are as follows:
S
AMSUNG WIRELESS ROUTER USER MANUAL
P
AGE
37
Page 38
DRAFT, not Final
V
IRTUAL SERVER
This router can be configured as a virtual server so that remote users accessing Web or FTP services via the public IP address can be automatically redirected to local servers in the LAN (Local Area Network). The router’s firewall feature filters
out unrecognized packets to protect the LAN network so all computers networked with the router are invisible to the outside
world. The user can make some of the LAN computers accessible from the Internet by enabling Virtual Server. Depending on
the requested service, the router redirects the external service request to the appropriate server within the LAN network.
The router is also capable of port-redirection, meaning that incoming traffic to a particular port may be redirected to a differ-
ent port on the server computer.
On this page, the user can open external access to single ports.
The following parameters can be configured:
Checkbox:
Name:
IP Address:
Port (Public/Private):
Traffic Type:
Schedule:
Click on the
Click on the
Save Settings
Don’t Save Settings
Check the box on the left side to enable the Virtual Server rule.
Enter a name for the rule or select an application from the drop-down menu. Select an
application and click << to populate the fields.
Enter the IP address of the computer on your local network that you want to allow the
incoming service to. If your computer is receiving an IP address automatically from the
router (DHCP), you computer will be listed in the Computer Name drop-down menu.
Select your computer and click <<.
Enter the port that you want to open next to Public Port and Private Port. The public and
private ports are usually the same. The public port is the port seen from the Internet side,
and the private port is the port being used by the application on the computer within your
local network.
Select TCP, UDP, or All from the Protocol drop-down menu.
Use the drop-down menu to schedule the time that the Virtual Server Rule will be enabled.
The schedule may be set to Always, which will allow the particular service to always be
enabled. You can create your own times in the Schedules page.
button to accept the changes made.
button to discard the changes made.
S
AMSUNG WIRELESS ROUTER USER MANUAL
P
AGE
38
Page 39
DRAFT, not Final
P
ORT FORWARDING
On this page the user will be able to forward a list of ports to an internal IP address.
The following section allows the user to configure the port forwarding rules.
The following parameters can be configured:
Checkbox:
Name:
IP Address:
Ports to Open (TCP/UDP):
Schedule:
Inbound Filter:
Click on the
Click on the
Save Settings
Don’t Save Settings
Tick the checkbox on the left side to enable the Port Forwarding rule.
Enter a name for the rule or select an application from the drop-down menu. Select an
application and click << to populate the fields.
Enter the IP address of the computer on your local network that you want to allow the
incoming service to. If your computer is receiving an IP address automatically from the
router (DHCP), you computer will be listed in the Computer Name drop-down menu.
Select your computer and click <<.
Enter the external port number in the appropriate space provided. If the port number is
TCP then enter the number in the TCP space, and if the port number is UDP than enter it
in the UDP space.
Use the drop-down menu to schedule the time that the Port Forwarding rule will be enabled. The schedule may be set to Always, which will allow the particular service to always
be enabled. You can create your own times in the Schedules page.
Select the inbound filter rule here. Options to choose from are
any other custom rule created.
button to accept the changes made.
button to discard the changes made.
Allow All, Deny All
, and
S
AMSUNG WIRELESS ROUTER USER MANUAL
P
AGE
39
Page 40
DRAFT, not Final
A
PPLICATION RULES
Some applications require multiple connections, such as Internet gaming, video conferencing, Internet telephony and others.
These applications have difficulties working through NAT (Network Address Translation). Special Applications makes some of
these applications work with the router. If you need to run applications that require multiple connections, specify the port normally associated with an application in the “Trigger Port” field, select the protocol type as TCP or UDP, then enter the firewall
(public) ports associated with the trigger port to open them for inbound traffic.
On this page, the user can create a set of application rules.
The following parameters can be configured:
Checkbox:
Name:
Application:
Port (Trigger):
Port (Firewall):
Protocol:
Schedule:
Click on the
Click on the
Save Settings
Don’t Save Settings
Check the box on the left side to enable the Application Rule.
Enter a name for the rule. You may select a predefined application from the Application
drop-down menu and click <<.
Displays a list of predefined application to use in the rules.
This is the port used to trigger the application. It can be either a single port or a range of
ports.
This is the port number on the Internet side that will be used to access the application.
You may define a single port or a range of ports. You can use a comma to add multiple
ports or port ranges.
Select the protocol of the firewall port (TCP, UDP, or All).
The schedule of time when the Application Rule will be enabled. The schedule may be set
to Always, which will allow the particular service to always be enabled. You can create
your own times in the Schedules page.
button to accept the changes made.
button to discard the changes made.
S
AMSUNG WIRELESS ROUTER USER MANUAL
P
AGE
40
Page 41
DRAFT, not Final
Q
UALITY OF SERVICE (QO
The QoS Engine option helps improve your network gaming performance by prioritizing applications. By default the QoS
Engine settings are disabled and application priority is not classified automatically.
S)
Smart QoS improves VoIP voice quality or streaming by ensuring your VoIP or streaming traffic is prioritized over other
network traffic, such as FTP or Web.
The following parameters can be configured:
Enable QoS:
Uplink Speed:
Downlink Speed:
Queue Type:
Queue ID:
Queue Priority:
Queue Weight:
Click on the
Click on the
Save Settings
Don’t Save Settings
This option is disabled by default. Enable this option for better performance and experience with online games and other interactive applications, such as VoIP.
The speed at which data can be transferred from the router to your ISP. This is determined by your ISP. ISP’s often define speed as a download/upload pair. For example,
1.5Mbits/284Kbits. Using this example, you would enter 284. Alternatively you can test
your uplink speed with a service such as www.dslreports.com.
The speed at which data can be transferred from the ISP to the router. This is determined by your ISP. ISP’s often define speed as a download/upload pair. For example,
1.5Mbits/284Kbits. Using this example, you would enter 1500. Alternatively you can test
your downlink speed with a service such as www.dslreports.com.
Here the user can specify the queue type used. When choosing the option
Queue
, the router will apply QoS based on the internal specification for the queue ID’s
listed. When choosing the option
on the user defined percentage in the Queue Weight column.
In this column the Queue ID used will be displayed.
In this column the Queue Priority used will be displayed.
After choosing to use the Weight Fair Queue option, under Queue Type, the user will be
able to manual enter the Queue Weight for each individual Queue ID.
button to accept the changes made.
button to discard the changes made.
Weight Fair Queue
, the router will apply QoS based
Strict Priority
S
AMSUNG WIRELESS ROUTER USER MANUAL
P
AGE
41
Page 42
DRAFT, not Final
After specifying the QoS framework used, in the QoS setup section, the user can now create individual rules for scenarios that
require the use of traffic control and data priority manipulation.
The following parameters can be configured:
Checkbox:
Name:
Priority:
Protocol:
Local IP Range:
Remote IP Range:
Application Port:
Click on the
Click on the
Save Settings
Don’t Save Settings
Tick this option to enable the rule specified.
Enter a custom name for the rule being created here. This name is used for identification.
Select the appropriate priority requirement from the drop-down menu that will be applied
to this rule. Option to choose from are
Select the protocol used for the application for in the drop-down menu and it will automatically place it in the Protocol field.
Enter the local IP range used here. This is the IP range of you Local Area Network. The
Router’s IP cannot be included in this range.
Enter the remote IP range used here. This is the IP range of the public network from the
Internet Port side. To apply this rule to any IP addresses from the public side, enter the
range 0.0.0.1 to 255.255.255.254.
Enter the application port number used here.
button to accept the changes made.
button to discard the changes made.
Highest, Higher, Normal
, and
Best Effort.
S
AMSUNG WIRELESS ROUTER USER MANUAL
P
AGE
42
Page 43
DRAFT, not Final
N
ETWORK FILTER
The MAC (Media Access Controller) Address filter option is used to control network access based on the MAC Address of
the network adapter. A MAC address is a unique ID assigned by the manufacturer of the network adapter. This feature can be
configured to ALLOW or DENY network/Internet access.
In the
MAC Filtering Rules
can be created are 24 rules.
The following parameters can be configured:
Configure MAC Filtering:
Checkbox:
MAC Address:
DHCP Client List:
Schedule:
Click on the
Click on the
Save Settings
Don’t Save Settings
section, the user can create and edit Network filter rules. This maximum amount of rules that
Select
button to accept the changes made.
Turn MAC Filtering OFF, Turn MAC Filtering ON and ALLOW computers
, or
listed to access the network
listed to access the network
Check the box on the left side to enable the Network Filter.
Enter the MAC address you would like to use in this filtering rule.
Select a DHCP client from the Computer Name drop-down menu and click << to copy that
MAC Address.
The schedule of time when the Network Filter will be enabled. The schedule may be set to
Always, which will allow the particular service to always be enabled. Click the New Schedule button to create your own times in the Schedules page.
button to discard the changes made.
Turn MAC Filtering ON and DENY computers
from the drop-down menu.
S
AMSUNG WIRELESS ROUTER USER MANUAL
P
AGE
43
Page 44
DRAFT, not Final
A
CCESS CONTROL
The Access Control option allows you to control access in and out of your network. Use this feature as Access Controls to
only grant access to approved sites, limit web access based on time or dates, and/or block internet access for applications
like P2P utilities or games.
In
Access Control
section the user can enable the access control feature and add new access control policies.
The following parameters can be configured:
Enable Access Control:
Add Policy:
After clicking on the
new policy. The first window explains the process.
Click on the
Click on the
Step 1:
Next
Cancel
In the first step, the user can enter the policy name used.
Tick this option to enable the Access Control feature.
Click on this button to add a new Access Control Policy.
Add Policy
button to continue to the next window.
button to discard the changes made and return to the main Access Control window.
button, the add policy wizard will guide you through the step-by-step process in adding a
The following parameters can be configured:
Policy Name:
Enter the new policy name used for this rule here.
Click on the
Click on the
Click on the
S
AMSUNG WIRELESS ROUTER USER MANUAL
Prev
button to return to the previous window.
Next
button to continue to the next window.
Cancel
button to discard the changes made and return to the main Access Control window.
P
AGE
44
Page 45
DRAFT, not Final
Step 2:
In the second step, the user can configure the schedule settings for this rule.
The following parameters can be configured:
Details:
Click on the
Click on the
Click on the
Step 3:
Prev
Next
Cancel
In the third step, the user can configure the address type and IP address of the machines used in this rule.
Select the appropriate predefined schedule rule to apply to this rule from the drop-down
menu.
button to return to the previous window.
button to continue to the next window.
button to discard the changes made and return to the main Access Control window.
The following parameters can be configured:
Address Type:
IP Address:
Machine Address:
Add:
Update:
Delete:
Click on the
Click on the
Click on the
Prev
Next
Cancel
button to return to the previous window.
button to continue to the next window.
button to discard the changes made and return to the main Access Control window.
Specify a machine with its IP or MAC address, or select ‘Other Machines’ for machines
that do not have a policy.
After selecting the IP address type, the user can enter the IP address of the machines used
in this rule here. Alternatively, the user can select a Computer from the
list.
After selecting the MAC address type, the user can enter the MAC address of the machine
used in this rule here. Alternatively, the used can select a Computer from the
Name
Click on this button to add the machine to the list.
After clicking the option, the user will be able to update the machine information.
If the user chooses to remove a machine from the list, click on the icon.
list.
Computer Name
Computer
S
AMSUNG WIRELESS ROUTER USER MANUAL
P
AGE
45
Page 46
DRAFT, not Final
Step 4:
he following parameters can be configured:
Click on the
Click on the
Click on the
Click on the
In the fourth step, the user can select the filtering method used for this rule.
Method:
Apply Web Filter:
Apply Advance Port Filters:
Prev
button to return to the previous window.
Next
button to continue to the next window.
Cancel
Save
button to discard the changes made and return to the main Access Control window.
button to accept the changes made and return to the main Access Control window.
Here the user can select the filtering method used. Options to choose from are ‘
Access Only
After selecting the ‘
tion. Selecting this option will allow the web filter access control feature to be applied to
this rule.
After selecting the ‘
tion. Selecting this option will allow the advanced port filters access control feature to be
applied to this rule.
’, ‘
Block All Access
Block Some Access
Block Some Access
’, and ‘
Block Some Access’.
’ option, the user will be able to select this op-
’ option, the user will be able to select this op-
Log Web
In the Policy Table section a list on access control rules will be displayed. To edit a specific rule, click on the icon. To
remove a specific rule, click on the icon.
Click on the
Click on the
Save Settings
Don’t Save Settings
button to accept the changes made.
button to discard the changes made.
S
AMSUNG WIRELESS ROUTER USER MANUAL
P
AGE
46
Page 47
DRAFT, not Final
W
Website Filters are used to allow you to set up a list of Web sites that can be viewed by multiple users through the network.
Website Filter is used to allow or deny computers on your network from accessing specific web sites by keywords or specific
Domain Names. Select ‘
to access the specified URLs and Domain Names. ‘
puters on your network to access the specified URLs and Domain Names.
The following parameters can be configured:
Website URL/Domain:
ALLOW computers access to ONLY these sites
Enter the URL or Domain name that you want to allow or block here.
An example of an URL is: http://www.facebook.com/
An example of a domain name is: facebook.com
EBSITE FILTER
DENY computers access to ONLY these sites
’ in order only allow computers on your network
’ in order deny com-
Click on the
Click on the
Click on the
Clear the list below...
Save Settings
Don’t Save Settings
button to accept the changes made.
button to remove all the entries from the spaces in the list.
button to discard the changes made.
S
AMSUNG WIRELESS ROUTER USER MANUAL
P
AGE
47
Page 48
DRAFT, not Final
I
NBOUND FILTER
The Inbound Filter option is an advanced method of controlling data received from the Internet. With this feature you can
configure inbound data filtering rules that control data based on an IP address range.
Inbound Filters can be used for limiting access to a server on your network to a system or group of systems. Filter rules can
be used with Virtual Server, Port Forwarding, or Remote Administration features. The user can add new Inbound filter rule in
the next section.
The following parameters can be configured:
Name:
Action:
Enable:
Remote IP Start:
Remote IP End:
Add:
Cancel:
In the
Inbound Filter List
The user can enter a custom name for the inbound filter rule here.
Select an action that will take place when this rule is initiated. Options to choose from are
Allow
and
Deny.
Tick this option to enable the specified IP range for this rule.
Enter the remote starting IP address here in the range.
Enter the remote ending IP address here in the range.
Click this button to add the new inbound filter rule.
Click this button to discard the new inbound filter rule.
section, the user can view a list of the inbound filter rules already created. To edit a specific rule,
click on the appropriate icon. The delete a specific rule, click on the icon.
S
AMSUNG WIRELESS ROUTER USER MANUAL
P
AGE
48
Page 49
DRAFT, not Final
F
IREWALL SETTINGS
A firewall protects your network from the outside world. The router offers a firewall type functionality. The SPI feature helps
prevent cyber attacks. Sometimes you may want a computer exposed to the outside world for certain types of applications.
If you choose to expose a computer, you can enable DMZ. DMZ is short for Demilitarized Zone. This option will expose the
chosen computer completely to the outside world.
Firewall rules can be used to allow or deny traffic passing through the router. You can specify a single port by utilizing the
input box at the top or a range of ports by utilizing both input boxes. DMZ means “Demilitarized Zone”. DMZ allows computers behind the router firewall to be accessible to Internet traffic. Typically, your DMZ would contain Web servers, FTP servers
and others.
The following parameters can be configured:
Enable SPI:
Check the Enable SPI box to enable the SPI (Stateful Packet Inspection, also known as
dynamic packet filtering) feature. Enabling SPI helps to prevent cyber attacks by tracking
more state per session. It validates that the traffic passing through the session conforms
to the protocol.
In the
DMZ Host
section, the user will be able to configure the DMZ settings for this router.
The following parameters can be configured:
Enable DMZ:
DMZ IP Address:
Click on the
Click on the
S
AMSUNG WIRELESS ROUTER USER MANUAL
Save Settings
Don’t Save Settings
Tick this option to enable the DMZ feature.
Enter the IP address of the computer on the LAN that you want to have unrestricted
Internet communication in the DMZ IP address field. To specify an existing DHCP client,
use the Computer Name drop-down to select the computer that you want to make a DMZ
host. If selecting a computer that is a DHCP client, be sure to make a static reservation in
the Setup > Network Settings page so that the IP address of the DMZ machine does not
change.
button to accept the changes made.
button to discard the changes made.
P
AGE
49
Page 50
DRAFT, not Final
R
OUTING
The Routing option is an advanced method of customizing specific routes of data through your network.
In the
Static Routing
can be configured is 32.
The following parameters can be configured:
Checkbox:
Interface:
Destination:
Subnet Mask:
Gateway:
Click on the
Click on the
Save Settings
Don’t Save Settings
section, the user can configure routing rules used by this router. The maximum amount of rules that
To enable a route, check the box that is on the left side of the route.
Use the drop-down menu to specify if the IP packet must use the WAN or LAN interface to
transit out of the Router.
Enter the IP address of the packets that will take this route.
Enter the subnet mask to specify the subnet of the IP packets that will take this route.
Enter the next hop that will be taken if this route is used.
button to accept the changes made.
button to discard the changes made.
S
AMSUNG WIRELESS ROUTER USER MANUAL
P
AGE
50
Page 51
DRAFT, not Final
A
DVANCED WIRELESS
These options are for users that wish to change the behavior of their 802.11n wireless radio from the standard settings. We
do not recommend changing these settings from the factory defaults. Incorrect settings may impact the performance of your
wireless radio. The default settings should provide the best wireless radio performance in most environments.
In the next section, the user can configure the more advanced wireless settings for the
The following parameters can be configured:
Wireless Band:
Transmit Power:
Beacon Interval:
RTS Threshold:
Fragmentation:
DTIM Interval:
Preamble Type:
Short Guard Interval:
2.4GHz frequency
Here the user can view the wireless frequency band being configured. In the case
This option sets the transmit power of the antennas.
Beacons are packets sent by an Access Point to synchronize a wireless network. Specify a
value. 100 is the default setting and is recommended.
Here the user can enter the RTS threshold value used. This value should remain at its
default setting of 2346. If inconsistent data flow is a problem, only a minor modification
should be made.
The fragmentation threshold, which is specified in bytes, determines whether packets will
be fragmented. Packets exceeding the 2346 byte setting will be fragmented before transmission. 2346 is the default setting.
Here the user can enter the DTIM Interval value. Delivery Traffic Indication Message
(DTIM) is a countdown informing clients of the next window for listening to broadcast and
multicast messages. The default settings is 1.
Use the radio buttons to specify whether the Router should use the
Long Preamble
dancy Check) block for communication between the Router and roaming wireless adapters.
Check this box to reduce the guard interval time therefore increasing the data capacity.
However, it’s less reliable and may create higher data loss.
type. The preamble type defines the length of the CRC (Cyclic Redun-
band.
2.4GHz
Short Preamble or
.
S
AMSUNG WIRELESS ROUTER USER MANUAL
P
AGE
51
Page 52

DRAFT, not Final
In the next section, the user can configure the more advanced wireless settings for the
The following parameters can be configured:
Wireless Band:
Transmit Power:
Beacon Interval:
RTS Threshold:
Fragmentation:
DTIM Interval:
Preamble Type:
Short Guard Interval:
Click on the
Click on the
Save Settings
Don’t Save Settings
Here the user can view the wireless frequency band being configured. In the case
This option sets the transmit power of the antennas.
Beacons are packets sent by an Access Point to synchronize a wireless network. Specify a
value. 100 is the default setting and is recommended.
Here the user can enter the RTS threshold value used. This value should remain at its
default setting of 2346. If inconsistent data flow is a problem, only a minor modification
should be made.
The fragmentation threshold, which is specified in bytes, determines whether packets will
be fragmented. Packets exceeding the 2346 byte setting will be fragmented before transmission. 2346 is the default setting.
Here the user can enter the DTIM Interval value. Delivery Traffic Indication Message
(DTIM) is a countdown informing clients of the next window for listening to broadcast and
multicast messages. The default settings is 1.
Use the radio buttons to specify whether the Router should use the
Long Preamble
dancy Check) block for communication between the Router and roaming wireless adapters.
Check this box to reduce the guard interval time therefore increasing the data capacity.
However, it’s less reliable and may create higher data loss.
button to accept the changes made.
button to discard the changes made.
type. The preamble type defines the length of the CRC (Cyclic Redun-
5GHz frequency
band.
5GHz.
Short Preamble or
S
AMSUNG WIRELESS ROUTER USER MANUAL
P
AGE
52
Page 53
DRAFT, not Final
WI-FI P
Wi-Fi Protected Setup (WPS) System is a simplified method for securing your wireless network during the “Initial setup” as
well as the “Add New Device” processes. The Wi-Fi Alliance (WFA) has certified it across different products as well as manufactures. The process is just as easy, as depressing a button for the Push-Button Method or correctly entering the 8-digit
code for the Pin-Code Method. The time reduction in setup and ease of use are quite beneficial, while the highest wireless
Security setting of WPA2 is automatically used.
In the Wi-Fi Protected Setup section, the user can enable the WPS feature of this router.
The following parameters can be configured:
Enable:
Wi-Fi Protected Setup:
Reset to Unconfigured:
In the
default or to generate a new PIN code. A PIN is a unique number that can be used to add the router to an existing network or
to create a new network. The default PIN may be printed on the bottom of the router. For extra security, a new PIN can be
generated. You can restore the default PIN at any time. Only the Administrator (“admin” account) can change or reset the PIN.
PIN Settings
section, the user not only will be able to view the PIN code, but will also be able to reset the PIN to
Tick this option to enable the Wi-Fi Protected Setup feature.
This parameter displays the WPS setup status.
Click this button disable the WPS feature used on this router.
ROTECTED SETUP
The following parameters can be configured:
PIN:
Reset PIN to Default:
Generate New PIN:
S
AMSUNG WIRELESS ROUTER USER MANUAL
Shows the current value of the router’s PIN.
Click this button to restore the default PIN of the router.
Click this button to create a random number that is a valid PIN. This becomes the router’s
PIN. You can then copy this PIN to the user interface of the registrar.
P
AGE
53
Page 54

Click the
DRAFT, not Final
wireless devices to the wireless network.
Connect your Wireless Device
button to start Wireless Connection Setup Wizard. This wizard helps you add
The wizard will either display the wireless network settings to guide you through manual configuration, prompt you to enter
the PIN for the device, or ask you to press the configuration button on the device. If the device supports Wi-Fi Protected
Setup and has a configuration button, you can add it to the network by pressing the configuration button on the device and
then the on the router within 60 seconds. The status LED on the router will flash three times if the device has been successfully added to the network.
There are several ways to add a wireless device to your network. A “registrar” controls access to the wireless network. A registrar only allows devices onto the wireless network if you have entered the PIN, or pressed a special Wi-Fi Protected Setup
button on the device. The router acts as a registrar for the network, although other devices may act as a registrar as well.
Click on the
Click on the
Save Settings
Don’t Save Settings
button to accept the changes made.
button to discard the changes made.
S
AMSUNG WIRELESS ROUTER USER MANUAL
P
AGE
54
Page 55
DRAFT, not Final
A
DVANCED NETWORK SETTINGS
This section contains settings which can change the way the router handles certain types of traffic. We recommend that you
not change any of these settings unless you are already familiar with them or have been instructed to change them by one of
our support personnel.
UPnP:
UPnP is short for Universal Plug and Play which is a networking architecture that provides compatibility among networking
equipment, software, and peripherals. The device is a UPnP enabled router, meaning it will work with other UPnP devices/
software. If you do not want to use the UPnP functionality, it can be disabled by selecting “Disabled”.
The following parameters can be configured:
Enable UPnP:
WAN Ping:
When you Enable WAN Ping response, you are causing the public WAN (Wide Area Network) IP address on the device to
respond to ping commands sent by Internet users. Pinging public WAN IP addresses is a common method used by hackers
to test whether your WAN IP address is valid.
Tick this option to enable the UPnP feature of the router.
The following parameters can be configured:
Enable WAN Ping:
WAN Port Speed:
This allows you to select the speed of the WAN interface of the router: Choose 100Mbps, 10Mbps, or 10/100Mbps Auto.
The following parameters can be configured:
WAN Port Speed:
Tick this option to enable the WAN Ping Response option of the router.
You may set the port speed of the Internet port to 10Mbps, 100Mbps, or auto. Some older
cable or DSL modems may require you to set the port speed to 10Mbps.
S
AMSUNG WIRELESS ROUTER USER MANUAL
P
AGE
55
Page 56

DRAFT, not Final
Multicast Streams:
This section enables the user to allow Multicast traffic to pass from the Internet to your network more efficiently.
The following parameters can be configured:
Enable Multicast Streams:
Wireless Enhance Mode:
Click on the
Click on the
Save Settings
Don’t Save Settings
Enable this option if you are receiving video on demand type of service from the Internet.
The router uses the IGMP protocol to support efficient multicasting transmission of identical content, such as multimedia, from a source to a number of recipients. This option
must be enabled if any applications on the LAN participate in a multicast group. If you
have a multimedia LAN application that is not receiving content as expected, try enabling
this option.
Check the Wireless Enhance Mode box to enable the router to forward all multicast
streams from the Internet to the wireless station using a unicast stream. This feature helps
improve the quality of multimedia applications for wireless users.
button to accept the changes made.
button to discard the changes made.
S
AMSUNG WIRELESS ROUTER USER MANUAL
P
AGE
56
Page 57
DRAFT, not Final
G
UEST ZONE
On this page, the user will be able to configure the Guest Zone, settings. The guest zone provide a separate network zone for
guest to access Internet.
In the Guest Zone section below, the user will be able to enable the routing function between guest zones.
The following parameters can be configured:
Enable Routing:
Tick this option to enable routing between guest zones.
In the following section, the user will be able to configure the Guest Zone Wireless Network settings used by the
frequency band.
The following parameters can be configured:
Enable Guest Zone:
Wireless Band:
Wireless Network Name:
Security Mode:
Tick this option to enable the Guest Zone feature for the frequency band 2.4GHz. Use the
drop-down menu to schedule the time that the Firewall rule will be enabled. The schedule
may be set to Always, which will allow the particular service to always be enabled. Click
the New Schedule button to create your own times in the Schedules page.
Displays the frequency band used.
The Service Set Identifier (SSID) is the name of your wireless network. Create a name using up to 32 characters. The SSID is case-sensitive.
The security mode enables the user to configure wireless security for this wireless guest
zone. For more information about wireless security, refer to the Wireless Settings page.
2.4GHz
S
AMSUNG WIRELESS ROUTER USER MANUAL
P
AGE
57
Page 58

DRAFT, not Final
In the following section, the user will be able to configure the Guest Zone Wireless Network settings used by the
frequency band.
5GHz
The following parameters can be configured:
Enable Guest Zone:
Wireless Band:
Wireless Network Name:
Security Mode:
Click on the
Click on the
Save Settings
Don’t Save Settings
Tick this option to enable the Guest Zone feature for the frequency band 5GHz. Use the
drop-down menu to schedule the time that the Firewall rule will be enabled. The schedule
may be set to Always, which will allow the particular service to always be enabled. Click
the New Schedule button to create your own times in the Schedules page.
Displays the frequency band used.
The Service Set Identifier (SSID) is the name of your wireless network. Create a name using up to 32 characters. The SSID is case-sensitive.
The security mode enables the user to configure wireless security for this wireless guest
zone. For more information about wireless security, refer to the Wireless Settings page.
button to accept the changes made.
button to discard the changes made.
S
AMSUNG WIRELESS ROUTER USER MANUAL
P
AGE
58
Page 59
DRAFT, not Final
IPV6
On this page the user can configure the mode that the Router will use to access an IPv6 Internet connection.
There are several connection types to choose from: Link-local, Static IPv6, DHCPv6, Stateless Auto-Configuration, PPPoE,
IPv6 over IPv4 Tunnel and 6to4. If you are unsure of your connection method, please contact your IPv6 ISP.
Note:
been removed or disabled.
IPv6 Connection Type: Static IPv6
In the following section we’ll discuss the parameters that can be configured when setting up an Static IPv6 connection. This
mode is used when your ISP provides you with a set IPv6 addresses that does not change. The IPv6 information is manually
entered in your IPv6 configuration settings. You must enter the IPv6 address, Subnet Prefix Length, Default Gateway, Primary
DNS Server, and Secondary DNS Server. Your ISP provides you with all this information.
The following parameters can be configured:
My IPv6 Connection is:
If using the PPPoE option, you will need to ensure that any PPPoE client software on your computers has
Select the appropriate IPv6 Connection Type used for this configuration here.
The following parameters can be configured:
IPv6 Address:
Subnet Prefix Length:
Default Gateway:
Primary DNS Server:
Secondary DNS Server:
Enter the WAN IPv6 address for the router here.
Enter the WAN subnet prefix length value used here.
Enter the WAN default gateway IPv6 address used here.
Enter the WAN primary DNS Server address used here.
Enter the WAN secondary DNS Server address used here.
The following parameters can be configured:
LAN IPv6 Address:
Link-Local Address:
Enter the LAN (local) IPv6 address for the router here.
Displays the Router’s LAN Link-Local Address here.
S
AMSUNG WIRELESS ROUTER USER MANUAL
P
AGE
59
Page 60
DRAFT, not Final
The following parameters can be configured:
Enable Auto-Configuration:
Auto-Configuration Type:
Router Advertisement
Lifetime:
IPv6 Address Range
(Start):
IPv6 Address Range
(End):
IPv6 Address Lifetime:
Click on the
Click on the
Save Settings
Don’t Save Settings
The user can tick this option to enable the auto-configuration feature.
The user can select the auto-configuration type used here. Options to choose from are
Stateless
This option is only available when the auto-configuration type is set to
the router advertisement lifetime value used here.
This option is only available when the auto-configuration type is set to
start IPv6 Address for the DHCPv6 range for your local computers.
This option is only available when the auto-configuration type is set to
end IPv6 Address for the DHCPv6 range for your local computers.
This option is only available when the auto-configuration type is set to
IPv6 Address Lifetime (in minutes).
button to accept the changes made.
button to discard the changes made.
or
Stateful (DHCPv6).
Stateless
Stateful
Stateful
Stateful
. Enter
. Enter the
. Enter the
. Enter the
S
AMSUNG WIRELESS ROUTER USER MANUAL
P
AGE
60
Page 61
DRAFT, not Final
IPv6 Connection Type: Auto-Configuration (Stateless/DHCPv6)
In the following section we’ll discuss the parameters that can be configured when setting up an Auto-Configuration (Stateless/DHCPv6) connection. This is a method of connection where the ISP assigns your IPv6 address when your router requests one from the ISP’s server. Some ISP’s require you to make some settings on your side before your router can connect
to the IPv6 Internet.
The following parameters can be configured:
My IPv6 Connection is:
The following parameters can be configured:
Obtain IPv6:
Use the following IPv6:
Primary DNS Server:
Secondary DNS Server:
Use the section to configure the internal network settings of your router. The LAN IPv6 Link-Local Address is the IPv6 Address that you use to access the Web-based management interface. If you change the LAN IPv6 Address here, you may need
to adjust your PC’s network settings to access the network again. DHCP-PD can be used to acquire a IPv6 prefix for the LAN
interface.
Select the appropriate IPv6 Connection Type used for this configuration here.
Select this option to obtain the DNS Server addresses automatically.
Select this option to manually enter the DNS Server addresses used.
Enter the primary DNS Server address used here.
Enter the secondary DNS Server address used here.
The following parameters can be configured:
Enable DHCP PD:
LAN IPv6 Address:
LAN IPv6 Link-Local Address:
S
AMSUNG WIRELESS ROUTER USER MANUAL
Select this option to enable DHCP PD.
Enter the LAN IPv6 address used here. This address must be in the ‘/64’ subnet.
Displays the LAN IPv6 Link-Local address used here.
P
AGE
61
Page 62

DRAFT, not Final
The following parameters can be configured:
Enable Auto-Configuration:
Auto-Configuration Type:
Router Advertisement
Lifetime:
IPv6 Address Range
(Start):
IPv6 Address Range
(End):
IPv6 Address Lifetime:
Click on the
Click on the
Save Settings
Don’t Save Settings
The user can tick this option to enable the auto-configuration feature.
The user can select the auto-configuration type used here. Options to choose from are
Stateless
This option is only available when the auto-configuration type is set to
the router advertisement lifetime value used here.
This option is only available when the auto-configuration type is set to
start IPv6 Address for the DHCPv6 range for your local computers.
This option is only available when the auto-configuration type is set to
end IPv6 Address for the DHCPv6 range for your local computers.
This option is only available when the auto-configuration type is set to
IPv6 Address Lifetime (in minutes).
button to accept the changes made.
button to discard the changes made.
or
Stateful (DHCPv6).
Stateless
Stateful
Stateful
Stateful
. Enter
. Enter the
. Enter the
. Enter the
S
AMSUNG WIRELESS ROUTER USER MANUAL
P
AGE
62
Page 63
DRAFT, not Final
IPv6 Connection Type: PPPoE
Select this option if your ISP requires you to use a PPPoE (Point to Point Protocol over Ethernet) connection to IPv6 Internet.
DSL providers typically use this option. This method of connection requires you to enter a Username and Password (provided
by your Internet Service Provider) to gain access to the IPv6 Internet. The supported authentication protocols are PAP and
CHAP.
The following parameters can be configured:
My IPv6 Connection is:
Select the appropriate IPv6 Connection Type used for this configuration here.
The following parameters can be configured:
PPPoE Session:
Username:
Password:
Verify Password:
Service Name:
MTU:
Select the PPPoE Session value used here. This option will state that this connection
shares it’s information with the already configured IPv6 PPPoE connection, or the user can
create a new PPPoE connection here.
Enter the PPPoE username used here. This information is obtainable from the ISP.
Enter the PPPoE password used here. This information is obtainable from the ISP.
Re-enter the PPPoE password used here.
Enter the service name for this connection here. This option is optional.
Enter the MTU value used here. The default value is 1492.
The following parameters can be configured:
Obtain IPv6:
Use the following IPv6:
Primary DNS Server:
Secondary DNS Server:
S
AMSUNG WIRELESS ROUTER USER MANUAL
Select this option to obtain the DNS Server addresses automatically.
Select this option to manually enter the DNS Server addresses used.
Enter the primary DNS Server address used here.
Enter the secondary DNS Server address used here.
P
AGE
63
Page 64
DRAFT, not Final
Use the section to configure the internal network settings of your router. The LAN IPv6 Link-Local Address is the IPv6 Address that you use to access the Web-based management interface. If you change the LAN IPv6 Address here, you may need
to adjust your PC’s network settings to access the network again. DHCP-PD can be used to acquire a IPv6 prefix for the LAN
interface.
The following parameters can be configured:
Enable DHCP PD:
LAN IPv6 Address:
LAN IPv6 Link-Local Address:
Select this option to enable DHCP PD.
Enter the LAN IPv6 address used here. This address must be in the ‘/64’ subnet.
Displays the LAN IPv6 Link-Local address used here.
The following parameters can be configured:
Auto-Configuration:
Auto-Configuration Type:
Router Advertisement
Lifetime:
IPv6 Address Range
(Start):
IPv6 Address Range
(End):
IPv6 Address Lifetime:
Click on the
Click on the
Save Settings
Don’t Save Settings
The user can tick this option to enable the auto-configuration feature.
The user can select the auto-configuration type used here. Options to choose from are
Stateless
This option is only available when the auto-configuration type is set to
the router advertisement lifetime value used here.
This option is only available when the auto-configuration type is set to
start IPv6 Address for the DHCPv6 range for your local computers.
This option is only available when the auto-configuration type is set to
end IPv6 Address for the DHCPv6 range for your local computers.
This option is only available when the auto-configuration type is set to
IPv6 Address Lifetime (in minutes).
button to accept the changes made.
button to discard the changes made.
or
Stateful (DHCPv6).
Stateless
Stateful
Stateful
Stateful
. Enter
. Enter the
. Enter the
. Enter the
S
AMSUNG WIRELESS ROUTER USER MANUAL
P
AGE
64
Page 65
DRAFT, not Final
IPv6 Connection Type: IPv6 in IPv4 Tunnel
In section to the user can configure the IPv6 connection to run in IPv4 Tunnel mode. IPv6 over IPv4 tunneling encapsulates
IPv6 packets in IPv4 packets so that IPv6 packets can be sent over an IPv4 infrastructure.
The following parameters can be configured:
My IPv6 Connection is:
Select the appropriate IPv6 Connection Type used for this configuration here.
The following parameters can be configured:
Remote IPv4 Address:
Remote IPv6 Address:
Local IPv4 Address:
Local IPv6 Address:
Subnet Prefix Length:
Enter the remote IPv4 address used here.
Enter the remote IPv6 address used here.
Enter the local IPv4 address used here.
Enter the local IPv6 address used here.
Enter the Subnet prefix length value used here.
The following parameters can be configured:
Obtain IPv6:
Use the following IPv6:
Primary DNS Server:
Secondary DNS Server:
Select this option to obtain the DNS Server addresses automatically.
Select this option to manually enter the DNS Server addresses used.
Enter the primary DNS Server address used here.
Enter the secondary DNS Server address used here.
The following parameters can be configured:
LAN IPv6 Address:
LAN IPv6 Link-Local:
S
AMSUNG WIRELESS ROUTER USER MANUAL
Enter the LAN IPv6 address used here. This address must be in the ‘/64’ subnet.
Displays the LAN IPv6 Link-Local address used here.
P
AGE
65
Page 66
DRAFT, not Final
The following parameters can be configured:
Auto-Configuration:
Auto-Configuration Type:
Router Advertisement
Lifetime:
IPv6 Address Range
(Start):
IPv6 Address Range
(End):
IPv6 Address Lifetime:
Click on the
Click on the
Save Settings
Don’t Save Settings
The user can tick this option to enable the auto-configuration feature.
The user can select the auto-configuration type used here. Options to choose from are
Stateless
This option is only available when the auto-configuration type is set to
the router advertisement lifetime value used here.
This option is only available when the auto-configuration type is set to
start IPv6 Address for the DHCPv6 range for your local computers.
This option is only available when the auto-configuration type is set to
end IPv6 Address for the DHCPv6 range for your local computers.
This option is only available when the auto-configuration type is set to
IPv6 Address Lifetime (in minutes).
button to accept the changes made.
button to discard the changes made.
or
Stateful (DHCPv6).
Stateless
Stateful
Stateful
Stateful
. Enter
. Enter the
. Enter the
. Enter the
S
AMSUNG WIRELESS ROUTER USER MANUAL
P
AGE
66
Page 67
DRAFT, not Final
IPv6 Connection Type: 6to4
In this section the user can configure the IPv6 6to4 connection settings. 6to4 is an IPv6 address assignment and automatic
tunneling technology that used to provide unicast IPv6 connectivity between IPv6 sites and hosts across the IPv4 Internet.
The following parameters can be configured:
My IPv6 Connection is:
Select the appropriate IPv6 Connection Type used for this configuration here.
The following parameters can be configured:
6to4 Address:
6to4 Relay:
Primary DNS Server:
Secondary DNS Server:
Here the 6to4 configured address will be displayed.
Enter the 6to4 relay address used here.
Enter the primary DNS Server address used here.
Enter the secondary DNS Server address used here.
The following parameters can be configured:
LAN IPv6 Address:
LAN IPv6 Link-Local Address:
Enter the LAN IPv6 address used here. This address must be in the ‘/64’ subnet.
Displays the LAN IPv6 Link-Local address used here.
S
AMSUNG WIRELESS ROUTER USER MANUAL
P
AGE
67
Page 68
DRAFT, not Final
The following parameters can be configured:
Auto-Configuration:
Auto-Configuration Type:
Router Advertisement
Lifetime:
IPv6 Address Range
(Start):
IPv6 Address Range
(End):
IPv6 Address Lifetime:
Click on the
Click on the
Save Settings
Don’t Save Settings
The user can tick this option to enable the auto-configuration feature.
The user can select the auto-configuration type used here. Options to choose from are
Stateless
This option is only available when the auto-configuration type is set to
the router advertisement lifetime value used here.
This option is only available when the auto-configuration type is set to
start IPv6 Address for the DHCPv6 range for your local computers.
This option is only available when the auto-configuration type is set to
end IPv6 Address for the DHCPv6 range for your local computers.
This option is only available when the auto-configuration type is set to
IPv6 Address Lifetime (in minutes).
button to accept the changes made.
button to discard the changes made.
or
Stateful (DHCPv6).
Stateless
Stateful
Stateful
Stateful
. Enter
. Enter the
. Enter the
. Enter the
S
AMSUNG WIRELESS ROUTER USER MANUAL
P
AGE
68
Page 69
DRAFT, not Final
IPv6 Connection Type: 6rd
In this section the user can configure the IPv6 6rd connection settings.
The following parameters can be configured:
My IPv6 Connection is:
Select the appropriate IPv6 Connection Type used for this configuration here.
The following parameters can be configured:
6rd IPv6 Prefix:
IPv4 Address:
Mask Length:
Assigned IPv6 Prefix:
6rd Border Relay IPv4 Address:
Primary DNS Server:
Secondary DNS Server:
Enter the 6rd IPv6 address and prefix value used here.
Enter the IPv4 address used here.
Enter the IPv4 mask length used here.
Displays the IPv6 assigned prefix value here.
Enter the 6rd border relay IPv4 address used here.
Enter the primary DNS Server address used here.
Enter the secondary DNS Server address uses here.
The following parameters can be configured:
LAN IPv6 Address:
LAN IPv6 Link-Local Address:
S
AMSUNG WIRELESS ROUTER USER MANUAL
Enter the LAN IPv6 address used here. This address must be in the ‘/64’ subnet.
Displays the LAN IPv6 Link-Local address used here.
P
AGE
69
Page 70
DRAFT, not Final
The following parameters can be configured:
Auto-Configuration:
Auto-Configuration Type:
Router Advertisement
Lifetime:
IPv6 Address Range
(Start):
IPv6 Address Range
(End):
IPv6 Address Lifetime:
Click on the
Click on the
Save Settings
Don’t Save Settings
The user can tick this option to enable the auto-configuration feature.
The user can select the auto-configuration type used here. Options to choose from are
Stateless
This option is only available when the auto-configuration type is set to
the router advertisement lifetime value used here.
This option is only available when the auto-configuration type is set to
start IPv6 Address for the DHCPv6 range for your local computers.
This option is only available when the auto-configuration type is set to
end IPv6 Address for the DHCPv6 range for your local computers.
This option is only available when the auto-configuration type is set to
IPv6 Address Lifetime (in minutes).
button to accept the changes made.
button to discard the changes made.
or
Stateful (DHCPv6).
Stateless
Stateful
Stateful
Stateful
. Enter
. Enter the
. Enter the
. Enter the
S
AMSUNG WIRELESS ROUTER USER MANUAL
P
AGE
70
Page 71
DRAFT, not Final
IPv6 Connection Type: Link-Local Only
The Link-local address is used by nodes and routers when communicating with neighboring nodes on the same link. This
mode enables IPv6-capable devices to communicate with each other on the LAN side.
The following parameters can be configured:
My IPv6 Connection is:
The following parameters can be configured:
LAN IPv6 Link-Local Address:
Click on the
Click on the
Save Settings
Don’t Save Settings
Select the appropriate IPv6 Connection Type used for this configuration here.
Displays the LAN IPv6 Link-Local address used here.
button to accept the changes made.
button to discard the changes made.
S
AMSUNG WIRELESS ROUTER USER MANUAL
P
AGE
71
Page 72

DRAFT, not Final
IPV6 F
On this page the user can configure the IPv6 firewall settings. The firewall settings section is an advance feature that is used
to allow or deny traffic from passing through the device. It works in the same way as IP Filters with additional settings. You
can create more detailed rules for the device.
In the IPv6 Firewall rules section the user can create, enable and disable IPv6 firewall rules used by this device.
IREWALL
The following parameters can be configured:
Configure IPv6 Filtering:
Checkbox:
Name:
Source Interface:
Destination Interface:
Schedule:
IP Address Range:
Protocol:
Port Range:
Click on the
Click on the
Save Settings
Don’t Save Settings
This option defines the behaviour of all the IPv6 firewall rules created. Option to choose
from are ‘
listed
option used here.
Tick this option to used the firewall rules created.
Enter a custom firewall rule name here. This name is used for identification.
Select the appropriate source interface used here.
Select the appropriate destination interface used here.
Select a time schedule that will be applied to this rules here.
Enter the IPv6 address range used here.
Select the protocol used for this rule here. Options to choose from are
and
Enter the port range used for this rule here.
button to accept the changes made.
button to discard the changes made.
Turn IPv6 Filtering OFF
’, and ‘
Turn IPv6 Filtering ON and DENY rules listed
ICMP.
’, ‘
Turn IPv6 Filtering ON and ALLOW rules
’. Select the appropriate
ALL, TCP, UDP,
S
AMSUNG WIRELESS ROUTER USER MANUAL
P
AGE
72
Page 73

DRAFT, not Final
T
OOLS CATEGORY
In this category the user will be able to configure features that are related to the router itself. Features like the time settings,
login accounts, firmware update and more.
Pages that can be configured in the
Administration:
device.
Time:
On this page the user can configure the time and date settings for this router.
System Log:
EMail Settings:
System:
Firmware:
language packs.
Dynamic DNS:
System Check:
Schedules:
On this page the user can reboot, reset, backup and restore this router.
On this page the user can configure a new password as well as remote administration settings for this
On this page the user can view and configure the system log.
On this page the user can configure the email settings for this router.
On this page the user can perform a firmware upgrade on this router. Also uploadable from this page is the
On this page the user can configure the DDNS settings for this router.
On this page the user can perform and system check (using Ping) for this router.
On this page the user can create and maintain time schedules for this router.
Tools
category are as follows:
S
AMSUNG WIRELESS ROUTER USER MANUAL
P
AGE
73
Page 74
DRAFT, not Final
A
DMIN
This page will allow you to change the Administrator password and configure the authentication settings. This window also
allows you to enable Remote Management, via the Internet.
In the
Admin Password
section, the user can change the login password used for this device.
The following parameters can be configured:
Password:
Verify Password:
Enter the new login password used here.
Re-enter the new login password here.
The following parameters can be configured:
Enable Graphical Authentication:
Enable Remote Management:
Remote Admin Port:
Remote Admin Inbound
Filter:
Details:
Click on the
Click on the
Save Settings
Don’t Save Settings
Tick this option to enable the graphical image confirmation when the user login to the web
configuration. Example:
Tick this option to enable remote management. This option will enable the router to be
accessible from the Internet port.
Enter the remote administration port number used here. Sometimes services like an
internal webserver will occupy the port number 80. In this option the user can change the
remote administration port to 8080 for example.
Select the appropriate remote admin inbound filter behaviour here. Options to choose
from are
Enter the remote admin inbound filter detail description used here.
button to accept the changes made.
button to discard the changes made.
Allow All
and
Deny All.
S
AMSUNG WIRELESS ROUTER USER MANUAL
P
AGE
74
Page 75
DRAFT, not Final
T
IME
The Time window allows you to configure, update, and maintain the correct time on the internal system clock. From this section you can set the time zone that you are in and set the Time Server. Daylight Saving can also be configured to automatically
adjust the time when needed.
The following parameters can be configured:
Time:
Time Zone:
Enable Daylight Saving:
Sync. your computer’s
time settings:
Here will be displayed the current time configuration running on this device.
Select the appropriate time zone used on this device here.
Check this box if the country your are located in uses Daylight Saving time. Enter a start
date and an end date for daylight saving time.
Click this button to synchronize the router’s system clock to the management computer’s
time settings.
The following parameters can be configured:
Automatically synchronize:
NTP Server Used:
Update Now:
The following parameters can be configured:
Set Manually:
Click on the
Click on the
Save Settings
Don’t Save Settings
NTP is short for Network Time Protocol. NTP synchronizes computer clock times in a
network of computers. Tick this option to enable automatic time and date synchronizing.
Select the appropriate time server used here. The interval at which the router will communicate with the NTP server is set to 7 days.
After selecting the appropriate time server and enabling the automatic synchronization
option, click on this button to update the current time and date of the router.
Here the user can manually configure the date and time used by this device. Options to
configure are
button to accept the changes made.
button to discard the changes made.
Year, Month, Day, Hour, Minute
, and
Second.
S
AMSUNG WIRELESS ROUTER USER MANUAL
P
AGE
75
Page 76

DRAFT, not Final
S
YSLOG
The Syslog options allow you to send log information to a System Log Server.
The following parameters can be configured:
Enable Logging:
Syslog Server IP Address:
Click on the
Click on the
Save Settings
Don’t Save Settings
Tick this option to enable the Syslog feature.
Enter the Syslog Server IP address used here.
button to accept the changes made.
button to discard the changes made.
S
AMSUNG WIRELESS ROUTER USER MANUAL
P
AGE
76
Page 77

DRAFT, not Final
E
MAIL SETTINGS
The Email feature can be used to send the system log files and router alert messages to your email address.
The following parameters can be configured:
From Email Address:
To Email Address:
Email Subject:
SMTP Server Address:
Account Name:
Password:
Verify Password:
Send Mail Now:
Click on the
Click on the
Save Settings
Don’t Save Settings
This email address will appear as the sender when you receive a log file or firmware
upgrade notification via email.
Enter the email address where you want the email sent.
Enter the text that you want to appear in the subject line of the e-mail that is sent.
Enter the SMTP server address for sending email. If your SMTP server requires authentication, select this option.
Enter your account for sending email.
Enter the password associated with the account.
Re-enter the password associated with the account here.
Click this button to send a test email from the Router to verify that the email settings have
been configured correctly.
button to accept the changes made.
button to discard the changes made.
S
AMSUNG WIRELESS ROUTER USER MANUAL
P
AGE
77
Page 78

DRAFT, not Final
S
YSTEM
This section allows you to manage the router’s configuration settings, reboot the router, and restore the router to the factory
default settings. Restoring the unit to the factory default settings will erase all settings, including any rules that you’ve created.
The following parameters can be configured:
Save Settings To Local
Hard Drive:
Load Settings From Local
Hard Drive:
Restore To Factory Default
Settings:
Reboot The Device:
Clear Language Pack:
Click on the
Click on the
Save Settings
Don’t Save Settings
Use this option to save the current router configuration settings to a file on the hard disk
of the computer you are using. First, click the
lowing you to select a location and file name for the settings.
Use this option to load previously saved router configuration settings. First, use the
Browse
Upload Settings
This option will restore all configuration settings back to the settings that were in effect
at the time the router was shipped from the factory. Any settings that have not been saved
will be lost, including any rules that you have created. If you want to save the current
router configuration settings, use the Save button above.
Click to reboot the router.
If you previously installed a language pack and want to revert all the menus on the Router
interface back to the default language settings, click the
button to accept the changes made.
button to discard the changes made.
option to find a previously saved file of configuration settings. Then, click the
button below to transfer those settings to the router.
Save
button. A file dialog will appear, al-
Clear
button.
S
AMSUNG WIRELESS ROUTER USER MANUAL
P
AGE
78
Page 79
DRAFT, not Final
F
IRMWARE
Use the Firmware window to upgrade the firmware of the Router and install language packs. If you plan to install new
firmware, make sure the firmware you want to use is on the local hard drive of the computer. If you want to install a new
language pack, make sure that you have the language pack available. Please check the support site for firmware updates. You
can download firmware upgrades to your hard drive from the support site.
In the
Firmware Information
the
Current Firmware Date
Online Now for Latest Firmware Version.
In the
Firmware Upgrade
button and navigating to the firmware file, saved on the local hard drive. After locating the file, click on the
initiate the firmware upgrade.
Note:
current configuration first before any firmware update.
Note:
wireless connection.
section the user can view the
of this same firmware version running on this device, and a button to click that will
section the user can physically upgrade the firmware of this device clicking on the
Some firmware upgrades will reset the configuration, of the device, to factory defaults. Be sure to save the
Always update the firmware of this device using the
Current Firmware Version
wired
connection. Never upgrade the firmware using a
number running on this device,
Check
Browse
Upload
button to
In the
Language Pack Upgrade
and navigating to the language pack, downloaded to the computer. After navigating to the language pack file, click on the
Upload
Always keep a close lookout on the local vendor’s website for new firmware upgrades and language packs.
Click on the
Click on the
S
button to initiate the language pack upload and configuration.
Save Settings
Don’t Save Settings
AMSUNG WIRELESS ROUTER USER MANUAL
section, the user can change the router’s language pack by clicking on the
button to accept the changes made.
button to discard the changes made.
Browse
button
P
AGE
79
Page 80
DRAFT, not Final
D
The DDNS feature allows you to host a server (Web, FTP, Game Server, etc…) using a domain name that you have purchased
(www.whateveryournameis.com) with your dynamically assigned IP address. Most broadband Internet Service Providers
assign dynamic (changing) IP addresses. Using a DDNS service provider, your friends can enter in your domain name to
connect to your server no matter what your IP address is.
The following parameters can be configured:
Enable DDNS:
Server Address:
Host Name:
User Account:
Password:
DDNS Account Testing:
Click on the
Click on the
Save Settings
Don’t Save Settings
Dynamic Domain Name System is a method of keeping a domain name linked to a changing IP Address. Check the box to enable DDNS.
Choose your DDNS provider from the drop down menu.
Enter the Host Name that you registered with your DDNS service provider.
Enter the Username for your DDNS account.
Enter the Password for your DDNS account.
Click this button to verify that the DDNS account user name and password have been
entered correctly.
button to accept the changes made.
button to discard the changes made.
YNAMIC
DNS
S
AMSUNG WIRELESS ROUTER USER MANUAL
P
AGE
80
Page 81

DRAFT, not Final
S
YSTEM CHECK
This useful diagnostic utility can be used to check if a computer is on the Internet. It sends ping packets and listens for
replies from the specific host.
In the
Ping Test
want to ping (Packet Internet Groper) and click on the
Ping Result
section the user can test the Internet connectivity by entering in a
box.
Ping
button. The status of your Ping attempt will be displayed in the
host name
or the
IP address
that you
In the
IPv6 Ping Test
that you want to ping (Packet Internet Groper) and click on the
in the
Ping Result
In the
Ping Result
section the user can test the Internet connectivity by entering in a
Ping
button. The status of your Ping attempt will be displayed
box.
section the results of the attempted ping will be displayed.
host name
or the
IPv6 address
S
AMSUNG WIRELESS ROUTER USER MANUAL
P
AGE
81
Page 82
DRAFT, not Final
S
CHEDULES
Schedules can be created for use with enforcing rules. For example, if you want to restrict web access to Mon-Fri from 3pm
to 8pm, you could create a schedule selecting Mon, Tue, Wed, Thu, and Fri and enter a Start Time of 3pm and End Time of
8pm.
The following parameters can be configured:
Name:
Day(s):
All Day - 24 hrs:
Start Time:
End Time:
Click on the
Click on the
Add
Cancel
Enter the custom name for the new schedule rule here. This name is used for identification.
To use every day in the week for this rule, select the
selected days for this rule, select the
used for this rule.
button to add this new rule to the schedule rules list.
button to discard the information and cancel the rule addition.
To enable this rule to run 24 hours instead of only a certain part of the day, tick this option.
If the
All Day
If the
All Day
option is not selected, the user can enter the starting time here.
option is not selected, the user can enter the ending time here.
Select Day(s)
All Week
option and tick the appropriate days
option. To use only
In the
Schedule Rules List
the icon of the specific entry, To remove an existing rule, click on the icon of the specific entry.
section, the user can view the available schedule rules created. To edit an existing rule, click on
S
AMSUNG WIRELESS ROUTER USER MANUAL
P
AGE
82
Page 83

DRAFT, not Final
S
TATUS CATEGORY
In this category the user will be able to view information regarding the configuration and functionality of this device. Displays
like WAN, LAN and Wireless configurations, System, Firewall and Router logs, and more.
Pages that can be configured in the
Device Information:
Wireless information.
Logs:
The Logs option allows you to view the router logs. You can define what types of events you want to view and the level
of the events to view. This router also has external Syslog Server support so you can send the log files to a computer on your
network that is running a Syslog utility.
Statistics:
802.11n/g (2.4GHz) and 802.11n/a (5GHz) wireless bands. The traffic counter will reset if the device is rebooted.
Internet Sessions:
Internet session is a conversation between a program or application on a LAN-side computer and a program or application on
a WAN-side computer.
Wireless:
tion time and MAC address of the connected wireless clients.
IPv6:
clients.
Here you can view the amount of packets that pass through the router on both the WAN, LAN ports and both the
The wireless client table displays a list of current connected wireless clients. This table also displays the connec-
The IPv6 page displays a summary of the Router’s IPv6 settings and lists the IPv6 address and host name of any IPv6
This page displays the current information for the router. It will display the LAN, WAN (Internet), and
The Internet Sessions page displays full details of active Internet sessions through your router. An
Status
category are as follows:
S
AMSUNG WIRELESS ROUTER USER MANUAL
P
AGE
83
Page 84

DRAFT, not Final
D
EVICE INFO
This page displays the current information for the router. It will display the LAN, WAN (Internet), and Wireless information. If
your Internet connection is set up for a Dynamic IP address then a Release button and a Renew button will be displayed. Use
Release to disconnect from your ISP and use Renew to connect to your ISP.
In the
In the
General
WAN
section, information about the time and firmware is being displayed.
section, information about the Internet connection is being displayed.
In the
LAN
In the
section, information about the Local Area Network configuration is being displayed.
Wireless LAN
section, information about the
2.4GHz
Wireless Local Area Network configuration is being displayed.
S
AMSUNG WIRELESS ROUTER USER MANUAL
P
AGE
84
Page 85

DRAFT, not Final
In the
Wireless LAN2
section, information about the
5GHz
Wireless Local Area Network configuration is being displayed.
S
AMSUNG WIRELESS ROUTER USER MANUAL
P
AGE
85
Page 86
DRAFT, not Final
L
OGS
The router automatically logs (records) events of possible interest in it’s internal memory. If there isn’t enough internal memory for all events, logs of older events are deleted but logs of the latest events are retained. The Logs option allows you to view
the router logs. You can define what types of events you want to view and the level of the events to view. This router also has
external Syslog Server support so you can send the log files to a computer on your network that is running a Syslog utility.
The following parameters can be configured:
Save Log File:
The following parameters can be configured:
Log Type:
Log Level:
The following parameters can be configured:
First - Last Page:
Previous - Next:
Clear:
Link to Email Log Settings:
Click the
Use the radio buttons to select the types of messages that you want to display from the
log. System, Firewall & Security, and Router Status messages can be selected.
There are three levels of message importance: Critical, Warning, and Information. Select
the levels that you want displayed in the log.
Use these buttons to navigate to the first or last page of the router logs.
Use these buttons to navigate to the next or previous page of the router logs.
Click on this button to clear all the contents from the log.
Click this button to open the Email Settings screen so that you can change the Email
configuration for sending logs.
Save
button save the Router’s log entries to a log file on your computer.
S
AMSUNG WIRELESS ROUTER USER MANUAL
P
AGE
86
Page 87

DRAFT, not Final
S
The screen below displays the Traffic Statistics. Here you can view the amount of packets that pass through the router on both
the WAN, LAN ports and both the 802.11n/g (2.4GHz) and 802.11n/a (5GHz) wireless bands. The traffic counter will reset if
the device is rebooted.
Click on the
Click on the
The Internet Sessions page displays full details of active Internet sessions through your router. An Internet session is a conversation between a program or application on a LAN-side computer and a program or application on a WAN-side computer.
Refresh
Reset
button to refresh the display page.
button to clear all the statistic information for all the fields displayed.
I
NTERNET SESSIONS
TATIST I CS
S
AMSUNG WIRELESS ROUTER USER MANUAL
P
AGE
87
Page 88

DRAFT, not Final
W
The wireless client table displays a list of current connected wireless clients. This table also displays the connection time and
MAC address of the connected wireless clients.
In the
Number of Wireless Clients - 2.4GHz Band
In the
Number of Wireless Clients - 5GHz Band
IRELESS
section a list of 2.4GHz active wireless clients will be displayed.
section a list of 5GHz active wireless clients will be displayed.
IPV6
The IPv6 page displays a summary of the Router’s IPv6 settings and lists the IPv6 address and host name of any IPv6 clients.
S
AMSUNG WIRELESS ROUTER USER MANUAL
P
AGE
88
Page 89

DRAFT, not Final
S
UPPORT CATEGO RY
In this category the user will have access to a portal of information regarding each and every page that exists on this device.
This information gives the basic description of parameter and uses for the pages.
S
AMSUNG WIRELESS ROUTER USER MANUAL
P
AGE
89
Page 90
DRAFT, not Final
K
NOWLEDGE
O
NE FOOT CONNECTION
The device supports a unique feature called the One Foot Connection method. This feature allows a user to configure their
Samsung TV to connect to this router in a very unique and easy way. For this feature to work, the Samsung TV must also
support the OFC feature.
B
ASE
(OFC) M
ETHOD
Step 1
: Turn on the power for both devices, the TV and the Router.
C
ONNECT MY SAMSUNG
TV
TO THE ROUTER USING
OFC.
Step 2
: Navigate to the
Network Settings
, of the TV, using the remote and select the
One Foot Connection
option.
Step 3
: Place the device approximately 1 foot away from the Wireless Adapter of the TV, while both units are powered ON.
Wait until the connection has been established automatically.
Step 4
: When a successful connection is done, a message will appear on the TV, stating that the Network Settings is done.
Place the router back to the desired location in your home.
If the OFC connection failed, a fail message will appear on the TV screen. When this happens restart the Router and the TV
and try the connection again by moving the router a little closer to the TV.
Note:
When you want to change your wireless network settings on the router and then want to re-configure the
wireless connection between the router and the TV, this procedure can be done again from
Step 1.
S
AMSUNG WIRELESS ROUTER USER MANUAL
P
AGE
90
Page 91
P
DRAFT, not Final
LUG
The device supports another unique feature called the Plug & Access Connection method. This feature allows a user to
configure their Samsung TV to connect to this router, wirelessly, using a Flash Memory Stick to transfer the wireless settings, used on the router, to the Samsung TV. This feature will only work between Samsung devices that support the Plug &
Access connection method.
C
ONNECT MY SAMSUNG
Step 1
: Turn on the power for both devices, the TV and the Router.
Step 2
: Insert a Flash Memory Stick into the USB port, found on the back panel of the ET-WV521.
Step 3
: The router will identify that Flash Memory Stick and start the wireless configuration settings transfer automatically.
The WPS light will start to flicker when data is being written.
After the transfer has been completed, the WPS light will shine solid.
& A
CCESS CONNECTION METHOD
TV
TO THE ROUTER USING PLUG
& A
CCESS
.
Step 4
: Remove the Flash Memory Stick from the router and insert it into the USB port of the Samsung TV.
Step 5
: When a successful wireless connection configuration is done, a message will appear on the TV, stating that the
Network Settings is done.
Note:
If the Plug & Access wireless connection configuration failed, a fail message will appear on the TV screen.
When this happens restart the Router and the TV and try the connection again from Step 1.
Note:
When you want to change your wireless network settings on the router and then want to re-configure the
wireless connection between the router and the TV, this procedure can be done again from Step 1.
The device supports another unique feature called the Priority Quality of Service (QoS) feature. This feature will recognize
any Samsung wireless networking device, connected to the router, and automatically initiate the built-in priority QoS
After initiation the router will give higher wireless network priority to this device.
This is a remarkable feature, especially when a Samsung TV needs to stream High Definition (HD) video and audio content
from the Internet for display. This feature is one of the most important aspects of this router and is only used between Samsung devices.
P
RIORITY QUALITY OF SERVICE
feature.
S
AMSUNG WIRELESS ROUTER USER MANUAL
P
AGE
91
Page 92

DRAFT, not Final
W
IRELESS BASICS
Wireless products are based on industry standards to provide easy-to-use and compatible high-speed wireless connectivity
within your home, business or public access wireless networks. Strictly adhering to the IEEE standard, the wireless family
of products will allow you to securely access the data you want, when and where you want it. You will be able to enjoy the
freedom that wireless networking delivers.
A wireless local area network (WLAN) is a cellular computer network that transmits and receives data with radio signals instead of wires. Wireless LANs are used increasingly in both home and office environments, and public areas such as airports,
coffee shops and universities. Innovative ways to utilize WLAN technology are helping people to work and communicate more
efficiently. Increased mobility and the absence of cabling and other fixed infrastructure have proven to be beneficial for many
users.
Wireless users can use the same applications they use on a wired network. Wireless adapter cards used on laptop and desktop systems support the same protocols as Ethernet adapter cards.
Under many circumstances, it may be desirable for mobile network devices to link to a conventional Ethernet LAN in order to
use servers, printers or an Internet connection supplied through the wired LAN. A Wireless Router is a device used to provide
this link.
What is Wireless?
Wireless or Wi-Fi technology is another way of connecting your computer to the network without using wires. Wi-Fi uses radio frequency to connect wirelessly, so you have the freedom to connect computers anywhere in your home or office network.
How does Wireless work?
Wireless works similar to how cordless phone work, through radio signals to transmit data from one point A to point B. But
wireless technology has restrictions as to how you can access the network. You must be within the wireless network range
area to be able to connect your computer. There are two different types of wireless networks Wireless Local Area Network
(WLAN), and Wireless Personal Area Network (WPAN).
Wireless Local Area Network (WLAN)
In a wireless local area network, a device called an Access Point (AP) connects computers to the network. The access point
has a small antenna attached to it, which allows it to transmit data back and forth over radio signals. With an indoor access
point as seen in the picture, the signal can travel up to 300 feet. With an outdoor access point the signal can reach out up
to 30 miles to serve places like manufacturing plants, industrial locations, college and high school campuses, airports, golf
courses, and many other outdoor venues.
Wireless Personal Area Network (WPAN)
Bluetooth is the industry standard wireless technology used for WPAN. Bluetooth devices in WPAN operate in a range up to
30 feet away. Compared to WLAN the speed and wireless operation range are both less than WLAN, but in return it doesn’t
use nearly as much power which makes it ideal for personal devices, such as mobile phones, PDAs, headphones, laptops,
speakers, and other devices that operate on batteries.
Who uses wireless?
Wireless technology has become so popular in recent years that almost everyone is using it, whether it’s for home, office, business, we have a wireless solution for it.
Home
•
Gives everyone at home broadband access
•
Surf the web, check email, instant message, etc.
•
Gets rid of the cables around the house
•
Simple and easy to use
S
AMSUNG WIRELESS ROUTER USER MANUAL
P
AGE
92
Page 93

DRAFT, not Final
Small Office and Home Office
•
Stay on top of everything at home as you would at office
•
Remotely access your office network from home
•
Share Internet connection and printer with multiple computers
•
No need to dedicate office space
Where is wireless used?
Wireless technology is expanding everywhere not just at home or office. People like the freedom of mobility and it’s becoming
so popular that more and more public facilities now provide wireless access to attract people. The wireless connection in
public places is usually called “hotspots”.
Using a Wireless Card bus Adapter with your laptop, you can access the hotspot to connect to Internet from remote locations
like: Airports, Hotels, Coffee Shops, Libraries, Restaurants, and Convention Centers.
Wireless network is easy to setup, but if you’re installing it for the first time it could be quite a task not knowing where to start.
That’s why we’ve put together a few setup steps and tips to help you through the process of setting up a wireless network.
Tips
Here are a few things to keep in mind, when you install a wireless network.
Centralize your router or Access Point
Make sure you place the router/access point in a centralized location within your network for the best performance. Try to
place the router/access point as high as possible in the room, so the signal gets dispersed throughout your home. If you have
a two-story home, you may need a repeater to boost the signal to extend the range.
Eliminate Interference
Place home appliances such as cordless telephones, microwaves, and televisions as far away as possible from the router/
access point. This would significantly reduce any interference that the appliances might cause since they operate on same
frequency.
Security
Don’t let you next-door neighbors or intruders connect to your wireless network. Secure your wireless network by turning on
the WPA or WEP security feature on the router. Refer to product manual for detail information on how to set it up.
S
AMSUNG WIRELESS ROUTER USER MANUAL
P
AGE
93
Page 94

DRAFT, not Final
W
IRELESS MODES
There are basically two modes of networking:
•
Infrastructure – All wireless clients will connect to an access point or wireless router.
•
Ad-Hoc – Directly connecting to another computer, for peer-to-peer communication, using wireless network adapters on
each computer, such as two or more wireless network Cardbus adapters.
An Infrastructure network contains an Access Point or wireless router. All the wireless devices, or clients, will connect to the
wireless router or access point.
An Ad-Hoc network contains only clients, such as laptops with wireless cardbus adapters. All the adapters must be in Ad-Hoc
mode to communicate.
This section will show you the different levels of security you can use to protect your data from intruders. The router offers
wireless security options like WPA/WPA2 PSK/EAP.
WPA (Wi-Fi Protected Access), is a Wi-Fi standard that was designed to improve the security features of WEP (Wired Equivalent Privacy).
W
IRELESS SECURITY
W
HAT IS
WPA?
The 2 major improvements over WEP:
•
Improved data encryption through the Temporal Key Integrity Protocol (TKIP). TKIP scrambles the keys using a hashing
algorithm and, by adding an integrity-checking feature, ensures that the keys haven’t been tampered with. WPA2 is based
on 802.11i and uses Advanced Encryption Standard (AES) instead of TKIP.
•
User authentication, which is generally missing in WEP, through the extensible authentication protocol (EAP). WEP
regulates access to a wireless network based on a computer’s hardware-specific MAC address, which is relatively simple
to be sniffed out and stolen. EAP is built on a more secure public-key encryption system to ensure that only authorized
network users can access the network.
WPA-PSK/WPA2-PSK uses a passphrase or key to authenticate your wireless connection. The key is an alpha-numeric password between 8 and 63 characters long. The password can include symbols (!?*&_) and spaces. This key must be the exact
same key entered on your wireless router or access point.
WPA/WPA2 incorporates user authentication through the Extensible Authentication Protocol (EAP). EAP is built on a more
secure public key encryption system to ensure that only authorized network users can access the network.
S
AMSUNG WIRELESS ROUTER USER MANUAL
P
AGE
94
Page 95
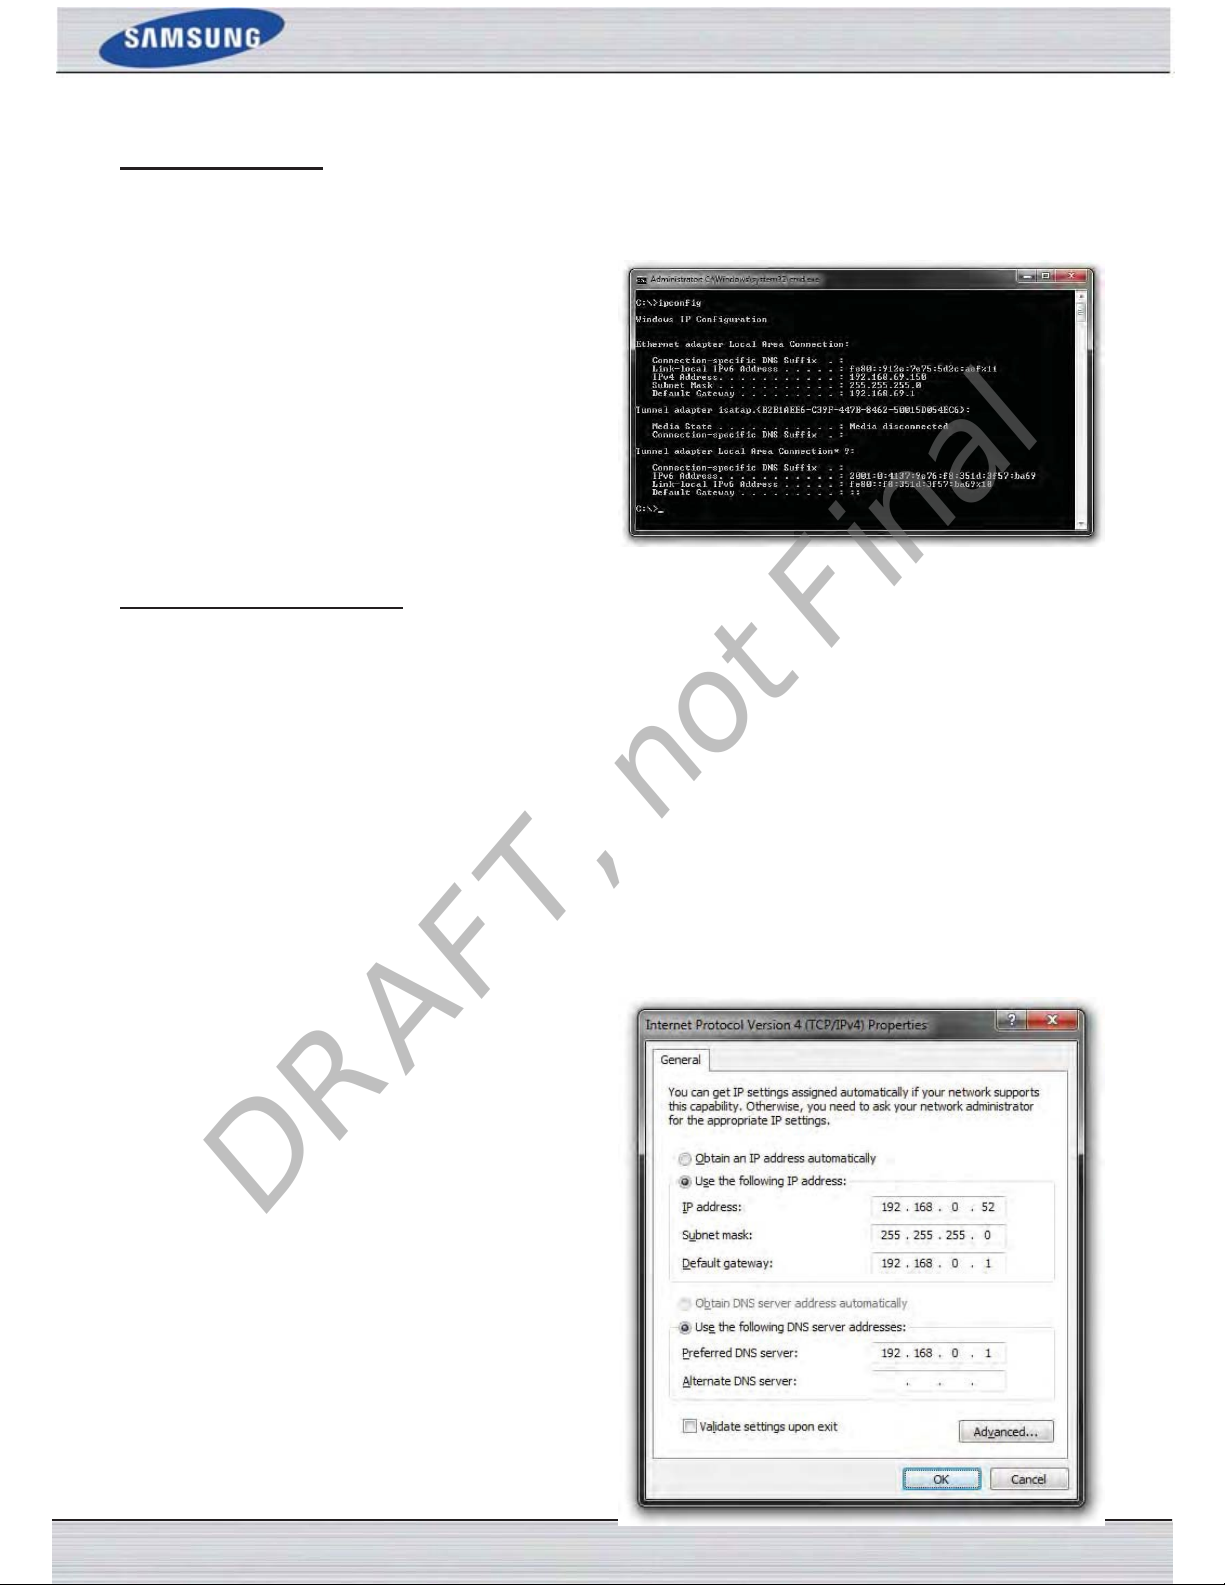
DRAFT, not Final
N
ETWORKING BASICS
Check your IP address
After you install your new network or wireless adapter, by default, the TCP/IP settings should be set to obtain an IP address
from a DHCP server (i.e. wireless router) automatically. To verify your IP address, please follow the steps below.
Click on Start > Run. In the run box type cmd and click OK.
(Windows® 7/Vista® users type cmd in the Start Search box.)
At the prompt, type ipconfig and press Enter.
This will display the IP address, subnet mask, and the default
gateway of your adapter.
If the address is 0.0.0.0, check your adapter installation,
security settings, and the settings on your router. Some firewall software programs may block a DHCP request on newly
installed adapters.
Statically Assign an IP address
If you are not using a DHCP capable gateway/router, or you need to assign a static IP address, please follow the steps below:
Step 1
•
Windows® 7 - Click on Start > Control Panel > Network and Internet > Network and Sharing Center > Change Adapter
Setting.
•
Windows Vista® - Click on Start > Control Panel > Network and Internet > Network and Sharing Center > Manage Network Connections.
•
Windows® XP - Click on Start > Control Panel > Network Connections.
•
Windows® 2000 - From the desktop, right-click My Network Places > Properties.
Step 2
Right-click on the Local Area Connection which represents your network adapter and select Properties.
Step 3
Highlight Internet Protocol (TCP/IP) and click Properties.
Step 4
Click Use the following IP address and enter an IP address
that is on the same subnet as your network or the LAN IP address on your router.
Example:
your IP address 192.168.0.X where X is a number between 2
and 99. Make sure that the number you choose is not in use
on the network. Set Default Gateway the same as the LAN IP
address of your router (192.168.0.1).
If the router’s LAN IP address is 192.168.0.1, make
Set Primary DNS the same as the LAN IP address of your
router (192.168.0.1). The Secondary DNS is not needed or
you may enter a DNS server from your ISP.
Step 5
Click OK twice to save your settings.
S
AMSUNG WIRELESS ROUTER USER MANUAL
P
AGE
95
Page 96
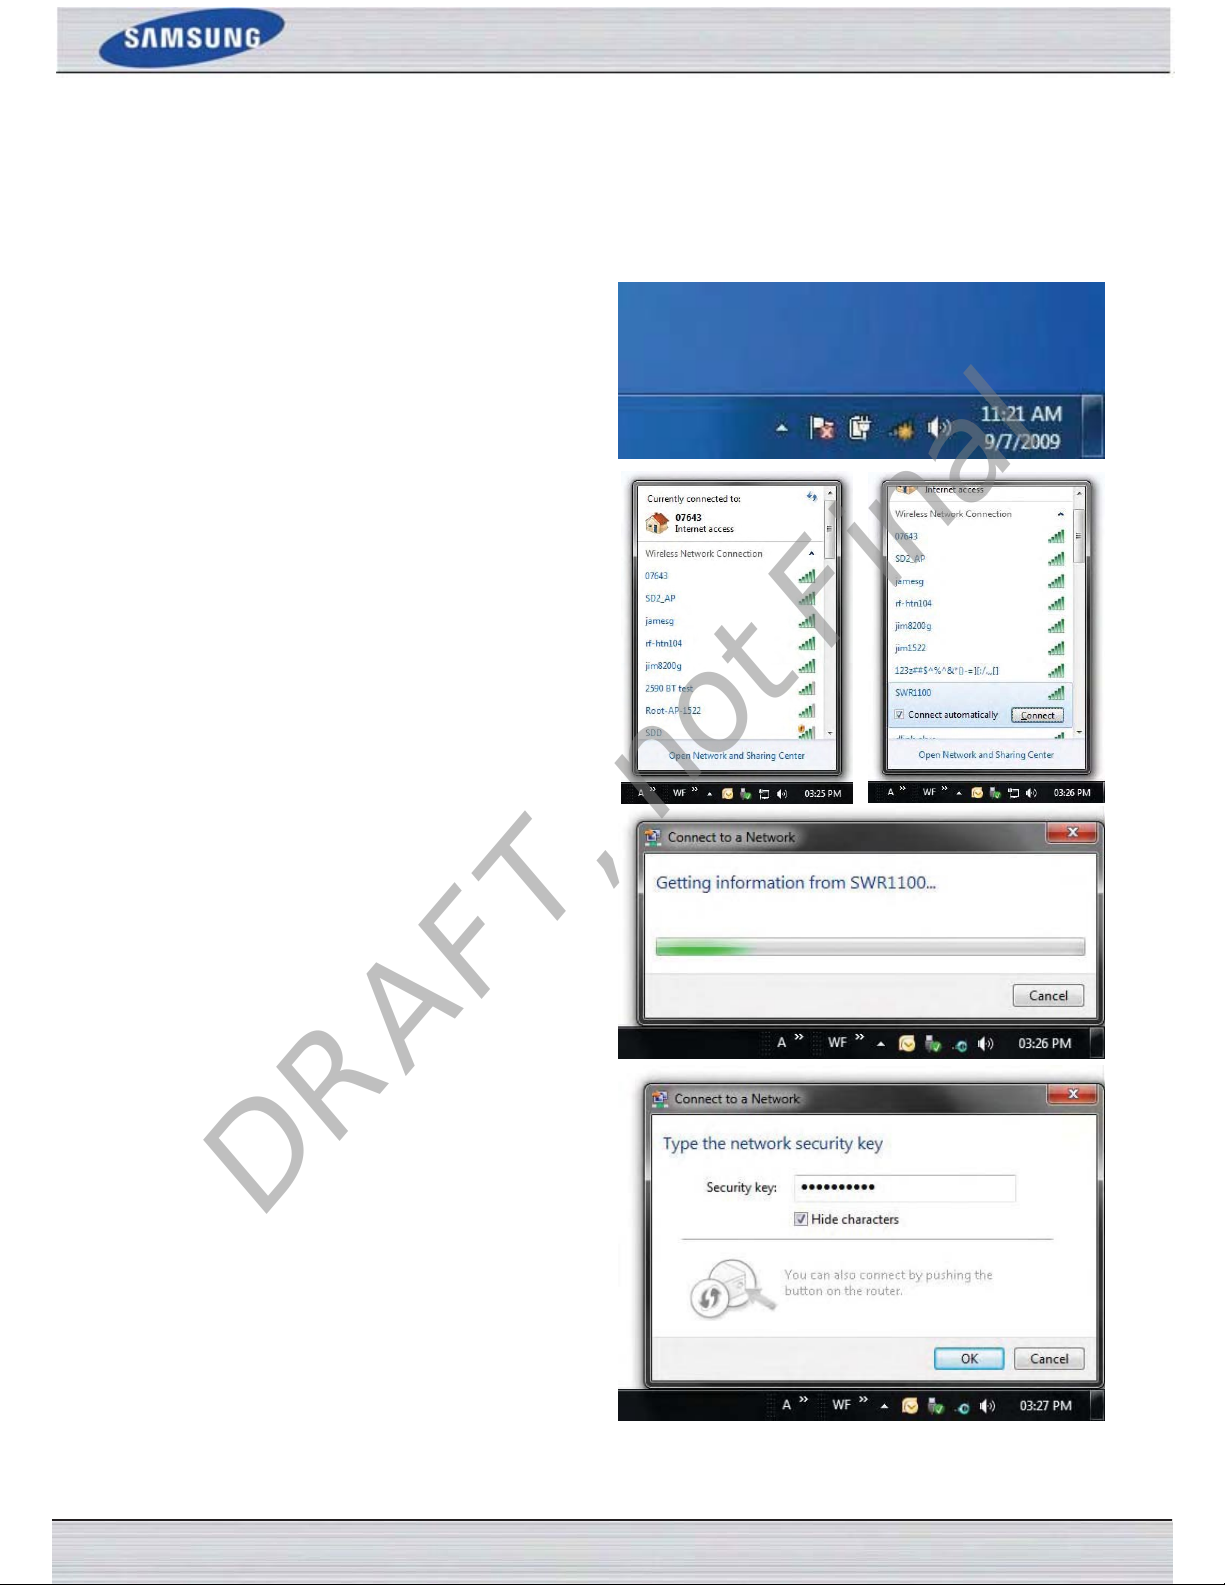
DRAFT, not Final
C
ONNECT TO A
U
It is recommended to enable wireless security (WPA/WPA2) on your wireless router or access point before configuring your
wireless adapter. If you are joining an existing network, you will need to know the security key or passphrase being used.
1.
Click on the wireless icon in your system tray (lower-right
corner).
2.
your area.
The utility will display any available wireless networks in
SING WINDOWS
W
IRELESS NETWORK
®
7
3.
Highlight the wireless network (SSID) you would like to
connect to and click the Connect button.
If you get a good signal but cannot access the Internet, check
your TCP/IP settings for your wireless adapter. Refer to the
Networking Basics section in this manual for more information.
4.
The following window appears while your computer tries to
connect to the router.
5.
Enter the same security key or passphrase that is on your
router and click Connect. You can also connect by pushing
the WPS button on the router.
It may take 20-30 seconds to connect to the wireless network.
If the connection fails, please verify that the security settings
are correct. The key or passphrase must be exactly the same
as on the wireless router.
S
AMSUNG WIRELESS ROUTER USER MANUAL
P
AGE
96
Page 97
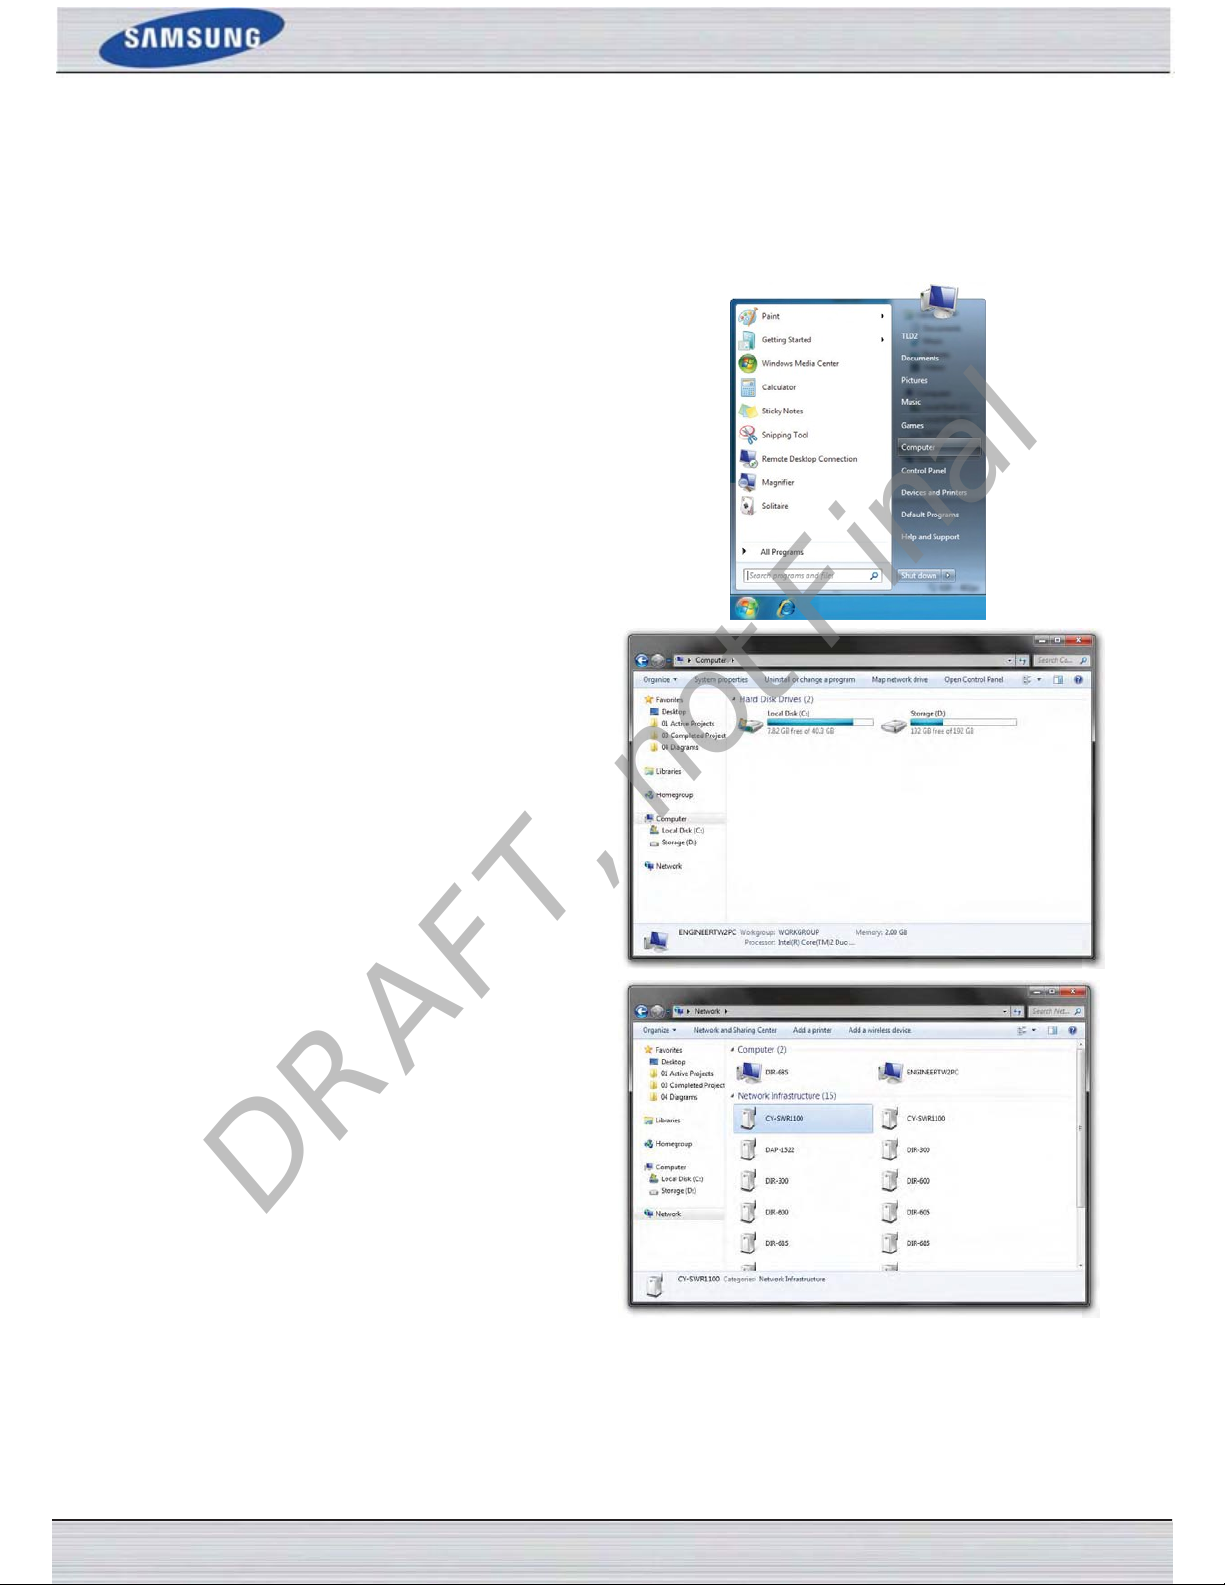
DRAFT, not Final
C
The WPS feature of the router can be configured using Windows® 7. Carry out the following steps to use Windows® 7 to
configure the WPS feature of the router:
1.
Click the Start button and select Computer from the Start
menu.
ONFIGURATION
WPS
2.
Click the Network option.
3.
Double-click the Router.
S
AMSUNG WIRELESS ROUTER USER MANUAL
P
AGE
97
Page 98
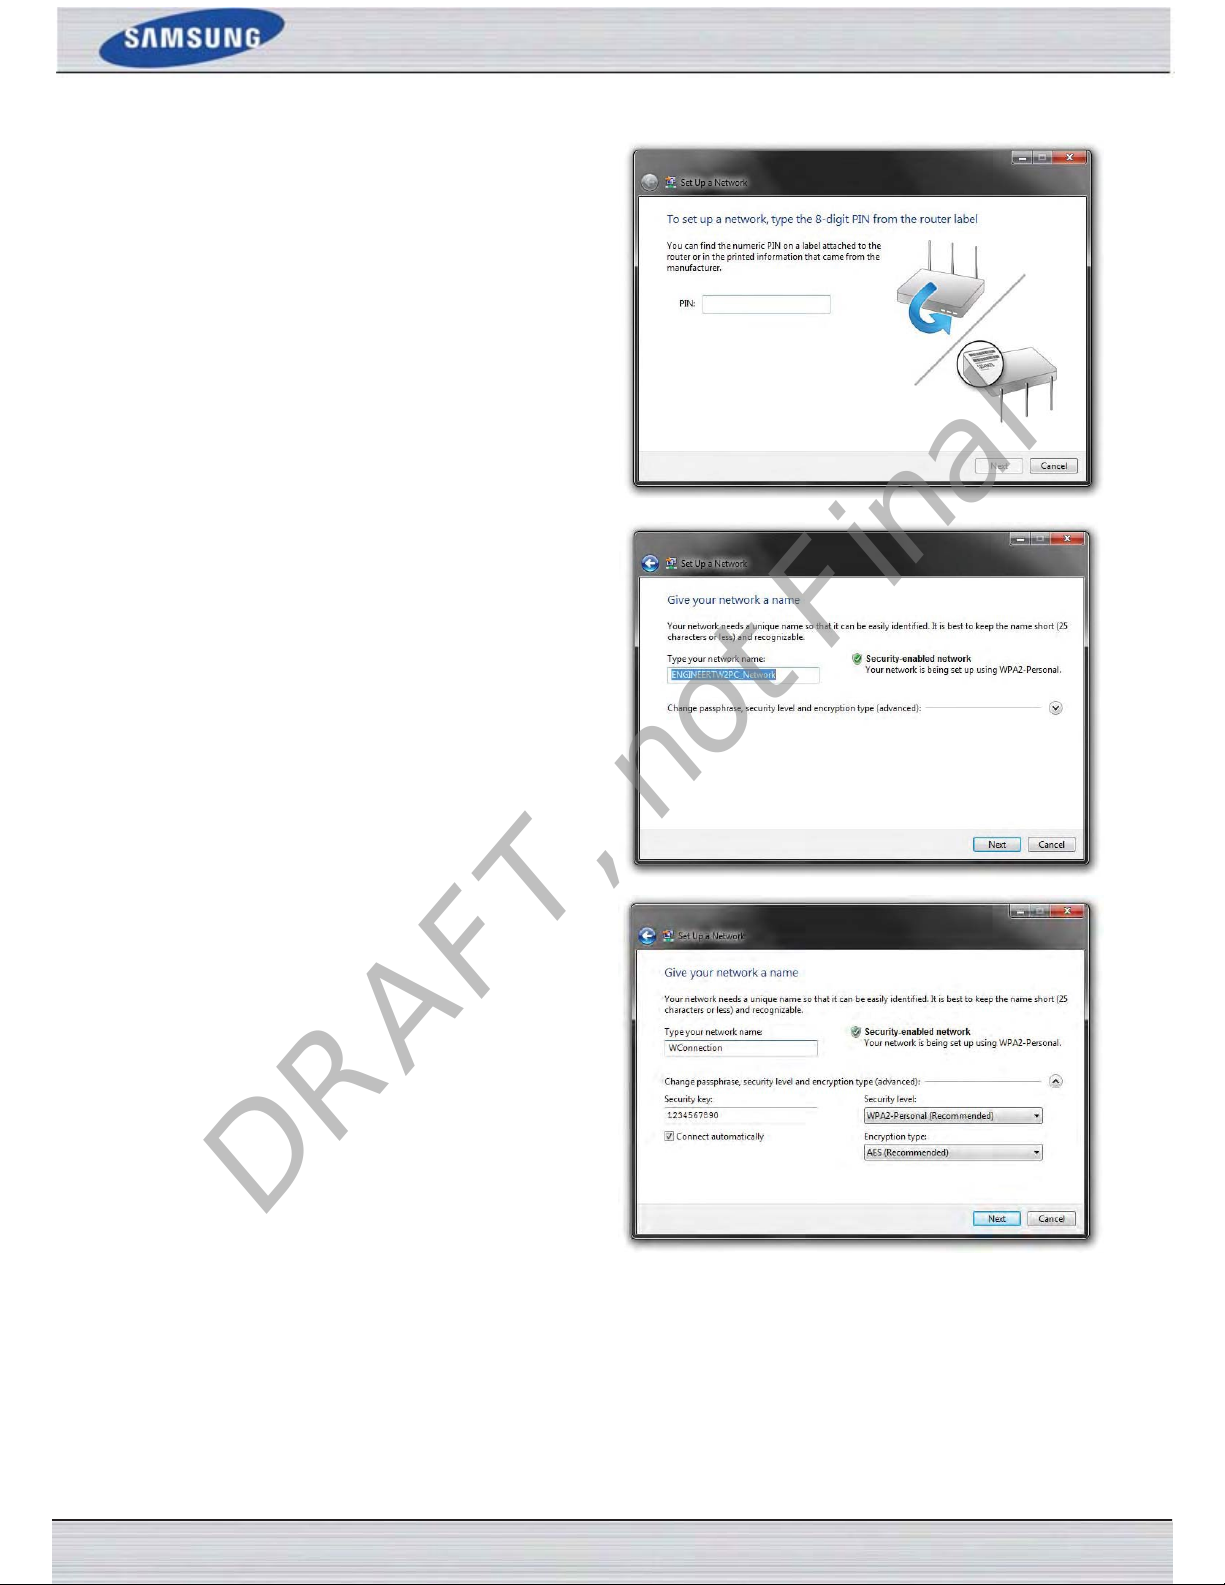
DRAFT, not Final
4.
Input the WPS PIN number and click Next.
5.
Type a name to identify the network.
6.
To configure advanced settings, click on the drop-down
icon.
Click Next to continue.
S
AMSUNG WIRELESS ROUTER USER MANUAL
P
AGE
98
Page 99
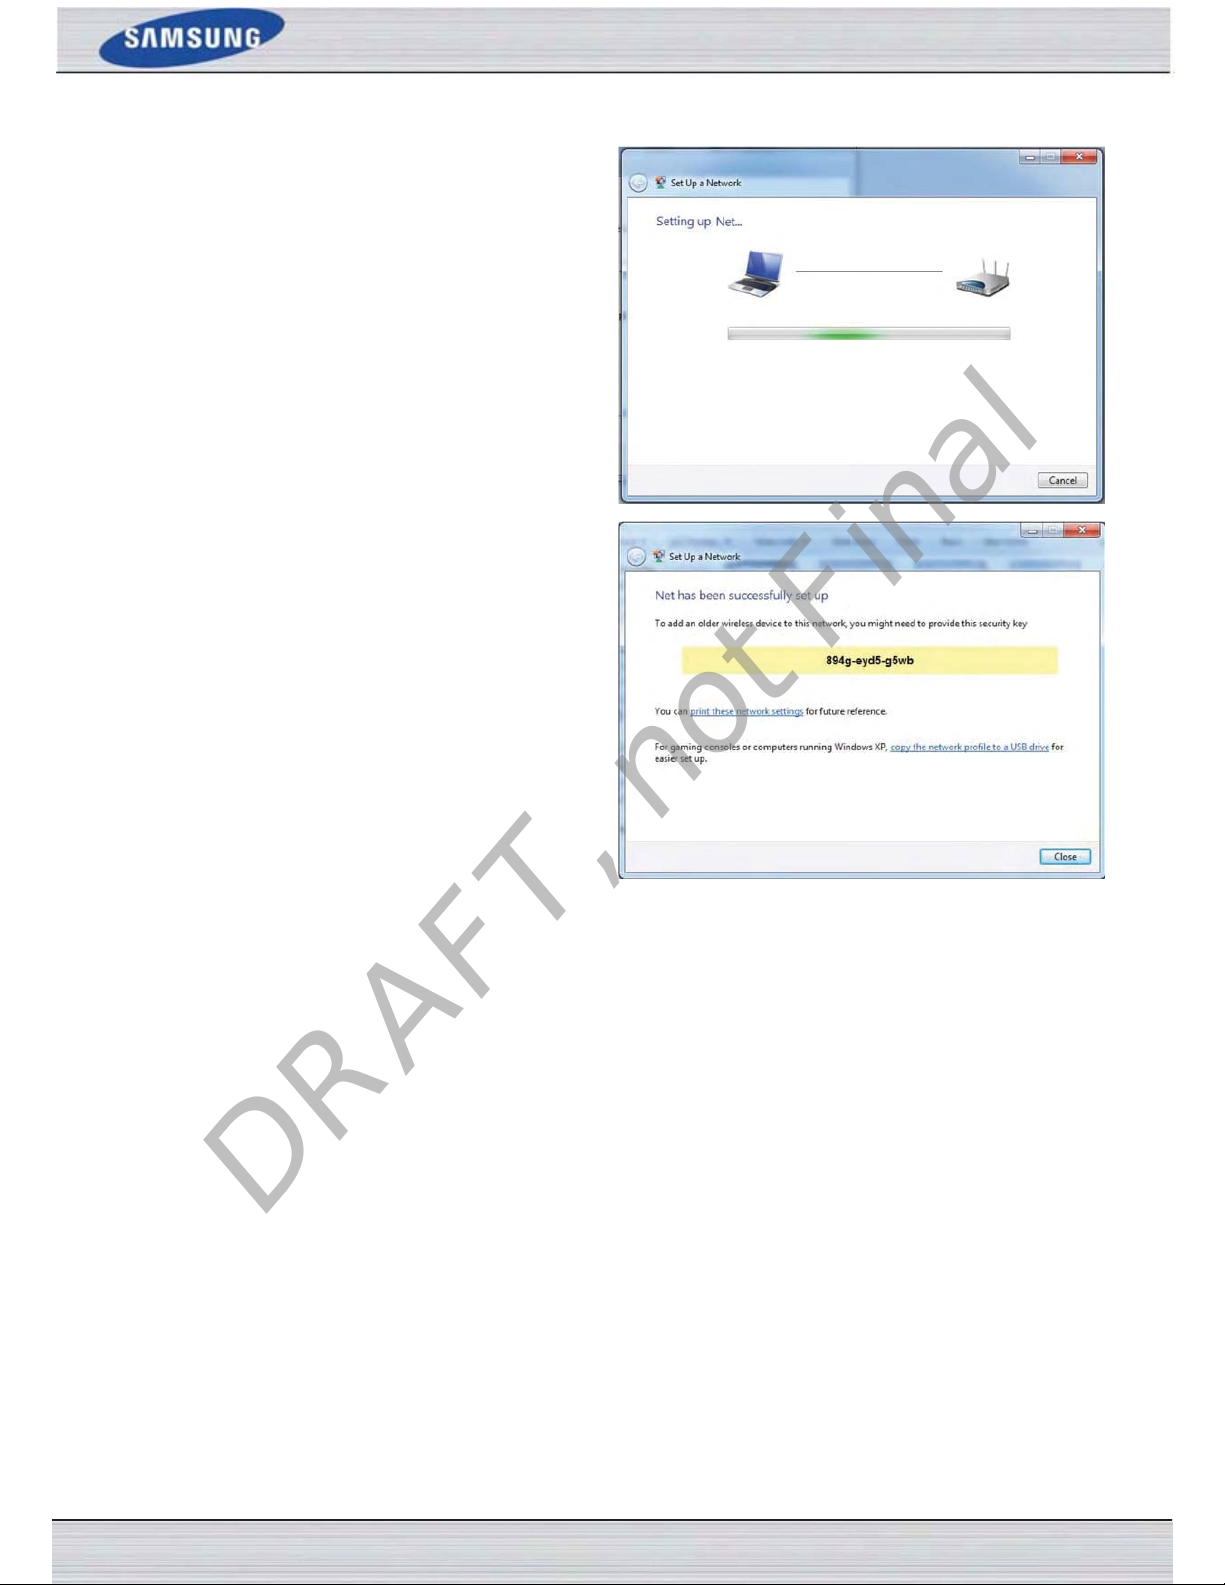
DRAFT, not Final
7.
The following window appears while the Router is being
configured.
Wait for the configuration to complete.
8.
The following window informs you that WPS on the
device has been setup successfully.
Make a note of the security key as you may need to provide
this security key if adding an older wireless device to the
network in the future.
9.
Click Close to complete WPS setup.
S
AMSUNG WIRELESS ROUTER USER MANUAL
P
AGE
99
Page 100
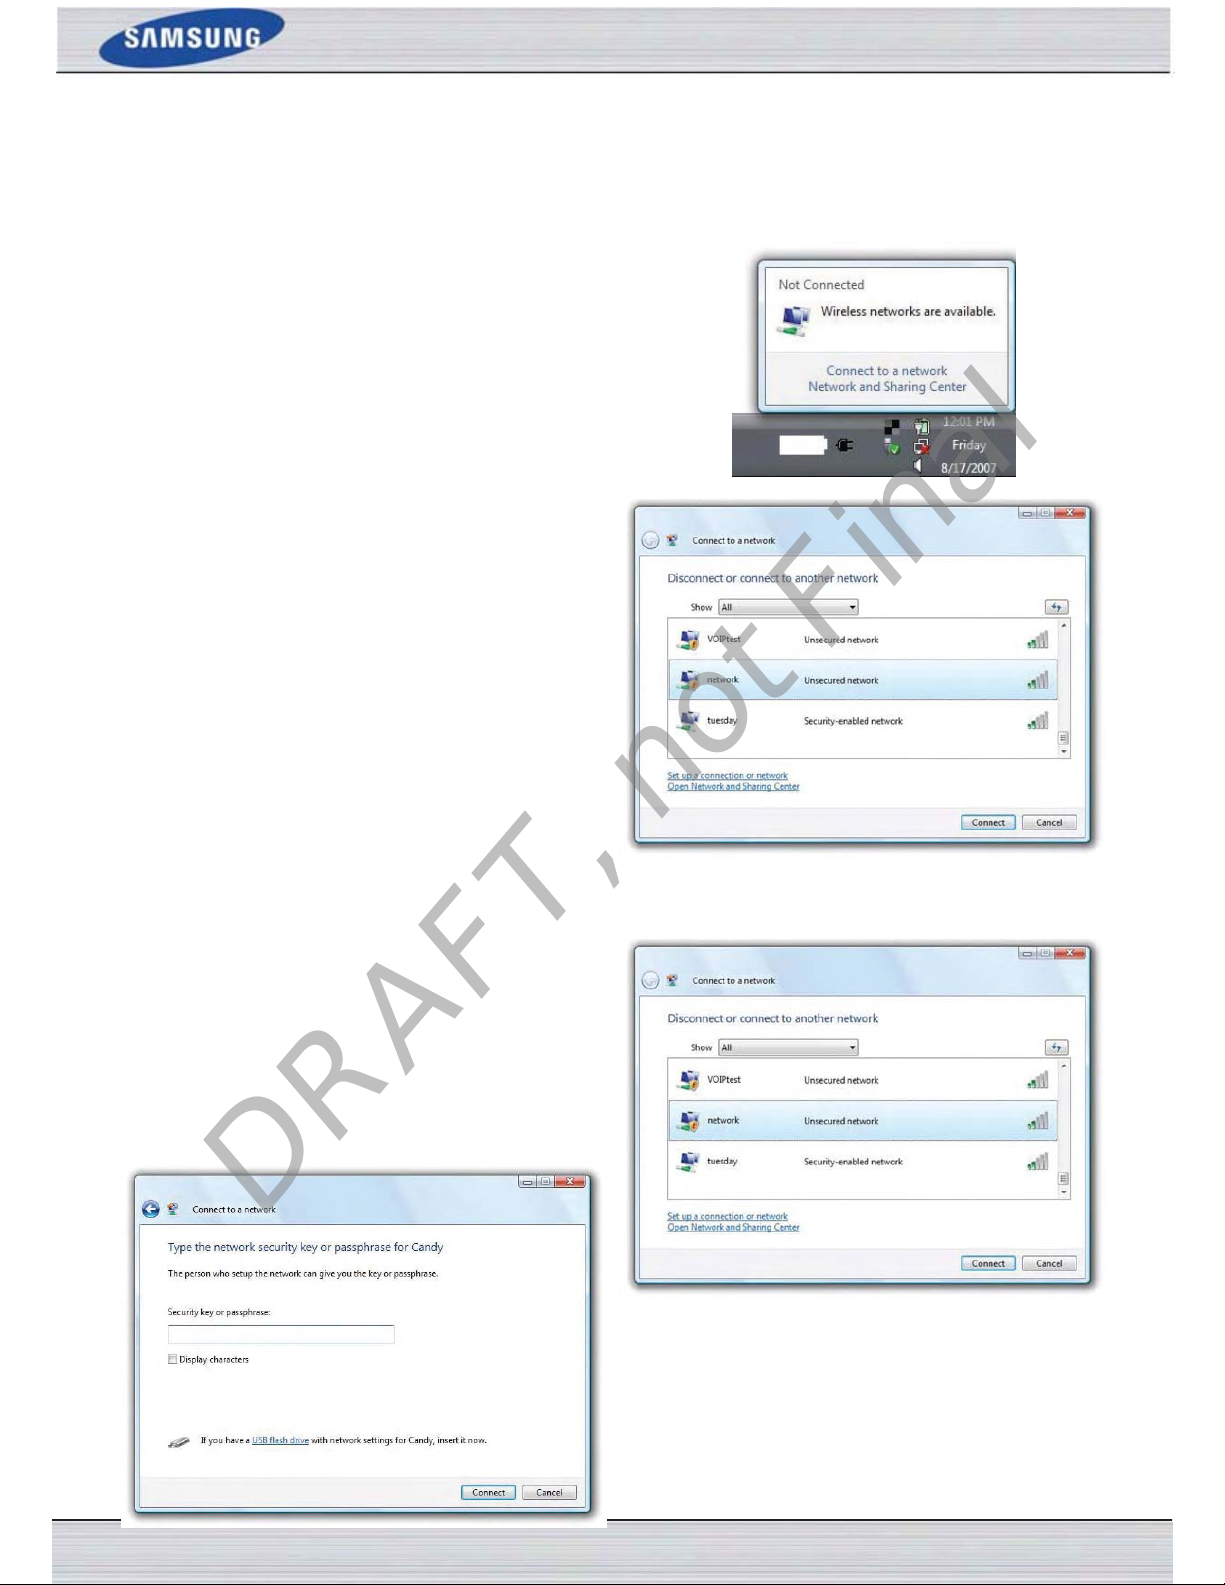
DRAFT, not Final
U
Windows Vista
please refer to the user manual of your wireless adapter for help with connecting to a wireless network. Most utilities will have
a “site survey” option similar to the Windows Vista
If you receive the Wireless Networks Detected bubble, click on
the center of the bubble to access the utility or right-click on
the wireless computer icon in your system tray (lower-right
corner next to the time).
®
users may use the built-in wireless utility. If you are using another company’s utility or Windows
SING WINDOWS VISTA
®
utility as seen below.
®
®
2000,
Select Connect to a network.
The utility will display any available wireless networks in your
area.
Click on a network (displayed using the SSID) and click the
Connect button.
If you get a good signal but cannot access the Internet, check
you TCP/IP settings for your wireless adapter. Refer to the
Networking Basics section in this manual for more information.
It is recommended to enable wireless security (WPA/WPA2) on your wireless router or access point before configuring your
wireless adapter. If you are joining an existing network, you will need to know the security key or passphrase being used.
1.
Open the Windows Vista® Wireless Utility by right-clicking
on the wireless computer icon in your system tray (lower right
corner of screen). Select Connect to a network.
2.
Highlight the wireless network (SSID) you would like to
connect to and click Connect.
3.
Enter the same security key or passphrase that is on your
router and click Connect.
It may take 20-30 seconds to connect to the wireless network.
If the connection fails, please verify that the security settings
are correct. The key or passphrase must be exactly the same
as on the wireless router.
S
AMSUNG WIRELESS ROUTER USER MANUAL
P
AGE
100
 Loading...